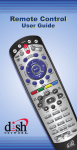
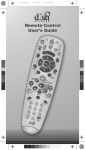
1
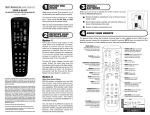
Remote Control Setup
Personalizing Your Remote Controls
What you’ll find in this chapter:
• IMPROVING RECEIVER CONTROL
• CONTROLLING OTHER COMPONENTS
• THE RECOVER BUTTON
• SENDING DISCRETE POWER ON AND OFF
71
Chapter 10
Improving Receiver Control
Improving Receiver Control
These instructions help you improve your remote control settings to best operate your satellite
receiver.
Changing the Address for Remote Control 2
Because UHF signals travel long distances and go through walls, a neighbor’s remote may control
your receiver by mistake. To keep this from happening, you can change the remote address. You
can also use these instructions to change the address on Remote Control 1.
3
2
1
4
SAT
SYSTEM INFO
Press SYSTEM INFO
on the receiver and note the
Remote Address number
5
6
SELECT
#
Press and hold
the SAT Mode Enter a number
Press
Press SELECT
button until all
other than the
POUND
Press
Mode buttons
one found in
(SAT Mode
RECORD
light up
step one
button will flash)
1. Press SYSTEM INFO on the receiver's front panel. The System Information screen displays
on the nearby TV and shows the Remote Address.
Write down the Secondary Remote Address:
If changing the address for Remote Control 1, write down
the Primary Remote Address:
2. Press and hold SAT on your remote control for about three seconds, until all of the mode
buttons light up, and then release SAT.
3. Use the NUMBER PAD to enter any number between 1 and 16, but not the one you wrote in
step 1.
4. Press POUND (#). If you entered the address correctly, SAT will flash three times.
Write down the number you entered:
5. Press RECORD. Make sure the Remote Address you see on the System Information screen is
the same as the one you entered in step 3. If it isn't, the remote cannot control the receiver.
6. Press SELECT to close the System Information screen.
Checking the Remote Control Address
1
SAT
Press & hold the SAT
Mode button until all Mode
buttons light up
2
#
#
Press POUND
twice
SAT
Watch the SAT Mode
button and count the flashes
1. Press and hold the SAT mode button until all of the mode buttons light up, then release it.
2. Press POUND (#) twice. The SAT mode button will flash the same number of times as the
address number (for example, three flashes means address 3).
72
Remote Controls
Improving Receiver Control
Confirming Remote Control Operation
2
SYSTEM INFO
1
Battery AAA
3
4
Press
RECORD
Press
POWER
SAT
Check batteries
and press
SAT Mode
If no operation,
press SYSTEM INFO on the
receiver to display the
System Information screen
1. Make sure the remote has fresh batteries and is in SAT mode.
2. Press SYSTEM INFO on the receiver front panel to display the system information screen on
the nearby TV.
3. Press RECORD on the remote control:
•
Remote Control 1 - The Primary Remote Address in the system information screen changes to
match the address preset in your remote control.
•
Remote Control 2 - The Secondary Remote Address in the system information screen
changes to match the address preset in your remote control.
4. Press POWER on the remote controls to turn the receiver on or off.
Adjusting the Remote Control Antenna
Be sure to set the remote control antenna (back of the receiver) straight up so you can use the
remote control from as far away as possible. Don't let the antenna touch anything.
If your UHF Pro Remote Control 2 isn't working well from far away, you may be
experiencing interference from objects near your receiver. To improve your remote
control's range, try the following:
–
Place the receiver higher than all of the other equipment in your
entertainment center.
–
Provide room above the receiver so that the remote control antenna can
be installed straight up. If you cannot install the antenna straight up, tilt
the antenna at about a 30° angle.
–
Place the remote control antenna outside the entertainment center by
using a coaxial cable to connect the antenna to the receiver.
–
Try moving the receiver to other locations.
–
Move any nearby over-the-air antennas away from the remote control
antenna. Do not place an over-the-air antenna on top of your receiver.
–
Install a UHF attenuator. See Installing a UHF Attenuator for details.
73
Chapter 10
Improving Receiver Control
Changing the UHF Frequency Using the A/B Switch
Battery
Your remote control has a switch to change the UHF frequency that your remote control uses. The
switch comes preset to the A position, but you can change the setting to the B position to lessen
the likelihood of another UHF remote interfering with yours.
1. Remove the battery cover from the remote control.
2. Use a small screw driver or a paper clip to carefully change the setting.
3. Put the battery cover back on the remote control.
A
4. Use the SYS INFO button on the front panel to open the System Information
screen.
B
5. Press RECORD on the remote control.
6. Make sure the System Information screen shows the correct band information:
• Switch position A - IR/UHF Pro Band A
• Switch Position B - IR/UHF Pro Band B
Installing a UHF Attenuator
Unwanted UHF signals may interfere with signals from the remote control to the receiver. To
prevent such interference, you can install a 10 dB attenuator (available from many consumer
electronics parts stores). Adding this attenuator will help keep out stray UHF signals, but it also cut
down how far away you can use the remote control.
1. Remove the remote control antenna from the REMOTE
ANTENNA input on the receiver back panel.
2. Attach a 10 dB attenuator to the REMOTE ANTENNA
input.
3. Attach the remote control antenna to the attenuator.
74
Remote Controls
Controlling Other Components
Controlling Other Components
To use the remote to control other devices (such as a TV, VCR, DVD player, tuner, amplifier, or
DISH Network satellite receiver), you must first program it to control these other devices. You can
do this by either following the instructions in Setting Up Using Device Code Tables on page 76, or
the Setting Up Using Device Codes Scan procedure described on page 77.
Remote Control Modes
Use the remote control’s mode buttons, SAT (satellite receiver), TV (for a TV), VCR (for a VCR or
a DVD player), and AUX (“auxiliary,” for a second TV, a VCR, a tuner, an audio amplifier, or a
second DISH Network satellite receiver) to set the remote control to the right mode for the device.
To change the mode, press the button for the device you want the remote to control. The mode
button lights for two seconds to show you’ve set the remote to that mode.
Limited Mode
You can program your remote control in Limited Mode to keep from accidentally changing the
channel on your TV or VCR. When you use the remote to control your TV in Limited Mode, you will
only be able to use POWER, MUTE, and VOLUME. Also, when you use the remote to control your
VCR in Limited Mode, you will only be able to use POWER and the VCR function buttons.
Turning Limited Mode On and Off
1. Press and hold the mode button (for example, TV) until all of the mode buttons light. Release
the mode button.
2. Press:
•
PAGE UP to turn Limited Mode on.
•
PAGE DOWN to turn Limited Mode off.
3. Press POUND.
Note: Limited Mode is not used with amplifiers.
Combination Devices
If you are programming the remote to control a combination device, such as a TV/VCR or a TV/
DVD, program the remote control in one mode, and then repeat the procedure in the other mode.
For example, to program the remote to control a TV/VCR using code 748, follow the instructions to
program the remote to control the TV using code 748, and then repeat the instructions for the VCR
using the same code.
75
Chapter 10
Controlling Other Components
Setting Up Using Device Code Tables
Set up the remote to control other devices using the device codes listed on page 132. In the
instructions below, the column on the left contains the instructions and the column on the right
provides additional information.
2
1
VCR
Turn
device on
3-4
Press & hold
Mode button
until all Mode
Find code in buttons light up
tables
7
#
Enter code
from table
Press
POUND
8
9-11
VCR
Test to make
Press POWER sure code
to see if device
works
turns off
Instructions
Additional Information
1. Turn the device on.
Use the device’s front panel buttons or its remote control.
2. Find the brand name of the device in the
tables starting on page 132.
If the brand isn’t listed, see Setting Up Using Device Codes
Scan on page 77.
3. Press and hold the mode button until all the
other mode buttons light up, then release
the button. The mode button flashes.
For example, for a TV, hold the TV mode button until all of
the other mode buttons light. When you let go, TV will flash.
4. For AUX mode only. Press 0 for a TV, 1 for
a VCR, or 2 for a tuner or amplifier.
If you’re not programming in AUX mode, skip to step 5.
5. Enter one of the three-digit device codes
from the table using the number buttons.
The three-digit device code is for the brand name of your
device that you found in step 2.
6. If you want to program Limited Mode, press
1. If not, skip to step 7.
See Limited Mode for more information.
7. Press POUND (#).
If you entered the code correctly, the mode button flashes
three times.
8. Press POWER to turn off the device. If the
device does not turn off, go to step 10.
If the code works, the device should turn off.
9. Turn the device back on and try some other
buttons to make sure they work. If the code
works for other buttons, stop here.
Sometimes POWER works when other buttons don’t. If in
Limited Mode, try VOLUME or MUTE.
10. If the code doesn’t work, repeat steps 3
through 9 with another device code from
the tables.
Try every code listed for your brand until one works for your
device.
11. If you can’t find a code that works try,
Setting Up Using Device Codes Scan that
follows.
76
5-6
VCR
Remote Controls
Controlling Other Components
Setting Up Using Device Codes Scan
If the code for your device is not listed in the tables starting on page 132 or if you could not find a
code that worked for your device, use this procedure to scan the remote control’s memory for the
device code. In the instructions below, the column on the left contains the instructions and the
column on the right provides additional information.
2-3
1
VCR
Turn
device on
4
5
VCR
Press & hold
Mode button
until all Mode
buttons light up
Press
POWER
6
#
Press UP or
DOWN ARROW
until device
turns off
Press
POUND
7-8
VCR
Turn device back on
and test to make
sure code works
Instructions
Additional Information
1. Turn the device on.
Use the device’s front panel buttons or its remote control.
2. Press and hold the mode button until all the
other mode buttons light up, and then
release the button. The mode button
flashes.
For example, hold the TV mode button until all of the other
mode buttons light. When you let go, TV will flash.
3. For AUX mode only. Press 0 for TV, 1 for
VCR, or 2 for a tuner, or amplifier. Then
press the STAR (*) button.
This step is for programming the type of device that will be
programmed in AUX mode. If you’re not programming in
AUX mode, skip to step 4.
4. Press POWER.
This puts your remote in the scan mode.
Instructions
Additional Information
5. Press the UP or DOWN ARROW
repeatedly until the device turns off.
As you press the UP or DOWN ARROW, the remote
tries each code in the memory to see if it can turn off your
device. When the device turns off, you have found a code
that might work.
Note: The mode button for the device will flash rapidly eight
times when you’ve scanned all the codes for that device.
6. Press POUND (#).
The mode button flashes three times if you have entered
the code correctly, and stores the code you found.
7. Turn the device back on and try some other
buttons to make sure they work.
Sometimes POWER works when other buttons don’t. If
using Limited Mode, try VOLUME or MUTE.
8. If necessary, repeat this procedure until
you’ve tried all the codes.
You may need to repeat the scan to find the best code for
your device.
77
Chapter 10
Controlling Other Components
Checking the Device Codes
Use these steps to find the device code you’ve set for each remote control mode (TV, VCR, and
AUX).
2
1
VCR
#
Press POUND
twice
Press & hold the Mode
button until all Mode
buttons light up
78
#
VCR
Watch the Mode button
and count the flashes
Instructions
Additional Information
1. Press and hold the mode button until all the
other mode buttons light up, and then
release the button. The mode button
flashes.
For example, hold TV until all of the other mode buttons
light. When you let go, TV will flash.
2. Press the Pound (#) button twice.
Watch the mode light to determine your
code. The mode button flashes the number
for each digit of the device code, with a
pause between the groups of flashes. A
quick flash is for zero.
For example, if the code is 570, the mode button flashes
five times, pauses, flashes seven times, pauses, and
flashes once quickly.
Instructions
Additional Information
For AUX mode: The first group of flashes tells
you what the AUX mode controls. A quick flash
(zero) before the three-digit code is for a TV,
one regular flash is for a VCR, and two flashes
is for a tuner, or amplifier.
For example, if the TV code is 570, the AUX mode button
flashes once quickly (indicating 0 for TV), pauses, flashes
five times, pauses, flashes seven times, pauses, and
flashes once quickly.
For a satellite receiver programmed in AUX
mode: The AUX mode button will flash the
same number of times as the address number.
For example, if the receiver address is 3, the AUX mode
button flashes three times.
For Limited Mode: If you have programmed a
TV or VCR in Limited Mode, the mode button
flashes once at the end of the flash sequence.
For example, if the TV code is 570, the AUX mode button
flashes once quickly (indicating 0 for TV), pauses, flashes
five times, pauses, flashes seven times, pauses, flashes
once quickly, and then flashes once (indicating Limited
Mode).
Remote Controls
Controlling Other Components
Controlling a Tuner or Amplifier
Use the following remote control buttons to control a tuner or amplifier. When the remote control is
set up as described on pages 75 and 79, press the AUX mode button to set the remote to AUX
mode. The AUX mode button will stay lit for two seconds to show you’ve set the remote to AUX
mode. Make sure to keep the remote in AUX mode to use the following buttons.
AUX Mode
To use the features described in this section, make sure
youi are in AUX mode by pressing the AUX Mode button.
AUX
Press this
button for
AUX Mode
Power
Turns the
tuner/amplifier
on and off
Arrows/Select
Buttons
Volume & Mute Buttons
Control tuner/amplifier
volume
Channel up/down
with the Arrow buttons.
Change tuner/amplifier
inputs with the Select
button
Switching Between TV and Tuner/Amplifier Volume Adjustment
When the remote control is setup to operate your TV, the VOLUME and MUTE buttons
will adjust your TV volume. If you prefer the volume and mute functions of the remote control to
adjust the volume of a remote-controllable audio tuner or amplifier instead of the TV, this capability
can be set up using the AUX mode of the remote control.
To set the remote to adjust the tuner/amplifier volume (steps 1-5 set up the remote and steps 6-7
make sure the remote is set up correctly):
3
1
AUX
Press and hold the
AUX Mode buttton for
four seconds
(button will flash)
2
VOLUME
Press the plus
Press side of VOLUME
POUND
4
5
Press
ZERO
6
Press
SAT
POUND
Press
(AUX button
will flash 3 times) SAT Mode
7
Test to make
sure volume
works on device
79
Chapter 10
Controlling Other Components
To set the remote back to adjust the TV volume (steps 1-5 set up the remote and steps 6-7 make
sure the remote is set up correctly):
3
1
TV
Press and hold the
TV Mode buttton for
four seconds
(button will flash)
80
2
VOLUME
Press the plus
Press side of VOLUME
POUND
4
5
Press
ZERO
6
Press
SAT
POUND
Press
(AUX button
will flash 3 times) SAT Mode
7
Test to make
sure volume
works on device
Remote Controls
The Recover Button
Programming to Control a Second Satellite Receiver
If you have another DISH Network satellite receiver installed, you can use this remote in AUX
mode to control it along with your new receiver. When you program the remote to control this other
receiver, the remote will send out IR and UHF (not UHF Pro) signals to the receiver. You can
program the remote to control any other DISH Network satellite receiver, except for following:
•
TV2 on DISH 322, ViP222, ViP622 DVR, ViP722 DVR, DISH Player-DVR 522, 625, and 942
•
DishPlayer 7100/7200
2
1
Mon, October 18
0
0
c
e R00 0000 0000-01
f
b
d
DISH Player-DVR 522
Software: L236
g
Satellite: 110
Signal:
h
Device: DP34, Feed(1), Feed(2), Feed(3)
i
1
UHF
Remote Addrs.
TV Out
Details
S00 0000 0000-01
119
148
5
3
j
Done
2
UHF
4
AUX
System Info
a Status: Good
3
Press the
3 button
Remote Addrs.
TV Out
Next
Copyright 2005, EchoStar Technologies Corp. All Rights Reserved.
5
3
5
2
Press and hold the
AUX Mode buttton until all
Mode butttons light up
(Button will Flash)
Display System Information
screen and note the
Remote Control Address
6
Press
Press POUND
Enter remote
RECORD
address from step (AUX button
will flash 3 times)
one
1. Turn on the other receiver and display the System Info screen.
Write down the receiver’s address:
2. Using the new remote control, press and hold AUX until all the other mode buttons light up,
and then release the button. AUX flashes.
3. Press the 3 button.
4. Use the NUMBER PAD to enter the address you wrote in step 1.
5. Press POUND (#). AUX blinks three times.
6. Press RECORD to make sure the address in the remote matches the address on the other
receiver.
The Recover Button
Use RECOVER if you have a snowy, blue, or black screen on your TV and cannot get the picture
back from your satellite receiver. When you press RECOVER as described, the remote control
sends commands to your TV to change channels or video inputs to get back to watching satellite
programming. This procedure works only if you have accidentally changed the TV channel or
video input. It does not recover lost satellite signal (See Troubleshooting on page 120 for more
information).
Note: The remote must be programmed to control the TV (and VCR, if applicable) for RECOVER
to work as described.
Note: RECOVER will first try to tune your TV to channel 3, then channel 4, and then other video
inputs with each press of RECOVER. You may need to press RECOVER up to 30 times to recover
81
Chapter 10
The Recover Button
your satellite TV video. If RECOVER is programmed to a specific channel, RECOVER will tune the
TV to the specific channel first (for example, channel 60).
Programming the Recover Button for Remote Control 2
When your Remote Control 2 is shipped from the factory, RECOVER is set up to restore satellite
TV viewing by tuning your TV (or VCR) to channel 3, 4, and other inputs. To use RECOVER with
your remote TV (or VCR), you need to program RECOVER with the specific three-digit number
channel that you use to watch TV2 programming. (For two-digit number channels, use zero first.
For example, enter channel 60 as 060.) The following instructions describe how to program
RECOVER to tune your remote TV (or VCR) back to a selected channel.
3
2
POWER
TV
VCR
AUX
SAT
I
N
T
TV/VIDEO
MENU
PU
PAGE
TV
Press and hold the
TV Mode button until all
Mode buttons light up
(button will flash)
VOLUME
MUTE
GUIDE
T
H
E
M
E
S
B
R
O
W
S
E
SELECT
RECALL
CANCEL
INFO
VIEW TV
DVR
SKIP
BACK
SKIP
FWD
BACK
R
FWD
PAUSE
STOP
PLAY
RECORD
1
ghi
2
jkl
4
5
pqrs
tuv
7
8
/format
TI
S
abc
AP
ON
PIP
W
def P O S I
3
mno
6
wxyz
9
search
0
4
TV
1
#
5
Press
STAR
Enter the
digits of your
channel number
1
Program Remote 2 to
control your remote
TV
Press POUND
(TV Mode button
will flash 3 times)
Using the Recover Button
The following setup is required to use RECOVER:
• The remote control must be set up to control the TV and, if installed, the VCR.
• If a VCR is installed, it must be connected as shown on page 109.
• On a remote TV, RECOVER must be programmed to tune your remote TV to the specific
channel to receive TV2 programming (for example, channel 60), using the instructions on
page 82.
4
3
1
2
Press
and hold
Make sure RECOVER
your TV is
until all
on
Mode buttons
light up
System Info
Mon, October 18
0
0
c
e R00 0000 0000-01
S00 0000 0000-01
f
a Status: Good
b
DISH Player-DVR 522
d
Software: L236
Press RECOVER
again and wait for the
TV or VCR Mode
buttons to flash once
then all four Mode
buttons to flash once
g
Satellite: 110
Signal:
h
Device: DP34, Feed(1), Feed(2), Feed(3)
i
1
UHF
119
Remote Addrs.
TV Out
Details
2
5
148
5
3
j
Done
2
UHF
Remote Addrs.
TV Out
5
3
Next
Copyright 2005, EchoStar Technologies Corp. All Rights Reserved.
Don’t see the System
When the System
Information Screen?
Information screen
Repeat steps 2 & 3
displays, you have until the System Information
recovered your satellite
screen appears
programming
(press SELECT to exit)
SELECT
Note: Press any remote control button other than RECOVER to end this procedure.
Note: If RECOVER is not programmed to a specific channel, RECOVER will first try to tune your
TV to channel 3, then channel 4, and then other video inputs with each press of RECOVER. You
may need to press RECOVER up to 30 times to recover your satellite TV video. If RECOVER is
programmed to a specific channel (see page 82), RECOVER will tune the TV to the specific
channel (for example, channel 60).
82
Remote Controls
Sending Discrete Power On and Off
Removing the Recover Button Channel Programming
The following instructions describe how to reset RECOVER to restore satellite TV viewing by
tuning your TV (or VCR) to channel 3, 4, and other inputs.
1
TV
2
3
Press STAR
Press the
Zero button
3 times
Press and hold the
TV Mode button until all
Mode buttons light up
(button will flash)
4
Press POUND
(TV Mode button
will flash 3 times)
Sending Discrete Power On and Off
Installers use remote control discrete power On and power Off IR commands when programming
macro commands into universal remotes. Using an On-only or Off-only command is more effective
than a toggle On/Off command when trying to make sure the satellite receiver is reliably in one
state or the other. To use discrete power commands, complete the following:
2
1
SA
T
ME
NU
MU
VC
TV
TE
VO
LU
PA
SE
LE
CT
LL
GU
O
W
O
R
AU
ME
CK
ST
OP
SWA
1
IDE
B
R
gh
2
8
0
US
mn
wx
9
R
CA
NC
EL
SK
FW IP
D
E
RD
PL
AY
FW
D
abc
jkl
tuv
6
3
o
def
O
P
5
CO
PIP
i
rs
N
4
PA
RE
P
pq
7
/FO
RM
AT
VOLUME
X
GE
E
BA
R
DV
4
VOLUME
or
SAT
PO
WE
R
O
S
BASKIP
CK
E
DE
H
CA
INF
M
E
TV
/VI
T
S
RE
TV
3
SI T I O
yz
#
1
Program the
remote control
Press
SAT Mode
until all mode
buttons light up
Press
POWER
Press VOLUME UP
for discrete power on
or press VOLUME DOWN
for discrete power off
5
Press any
button
to end this
procedure
Tips
•
If using a specific channel for TV2 (for example, channel 60), TV2’s remote control must be
programmed with a TV2 channel before you can use RECOVER.
•
Place the channel sticker on the remote TV and write down the channel you use to watch
DISH Network programming. The stickers are inside the front cover of this guide.
•
If you don’t want to accidentally change channels on your TV or VCR, the remote control in
Limited Mode as described on page 75.
•
Make sure you have a remote control antenna connected so you can use Remote Control 2.
See page 17 for instructions.
83
Chapter 10
Questions
Questions
•
•
84
My remote doesn’t control my receiver or other components. What should I do?
–
Ensure the remote control is in the correct mode (page 75).
–
Check the batteries (page 17).
–
Check the remote control address (pages 72 and 78).
–
Check the remote control antenna (page 17).
–
Adjust the remote control antenna (page 73).
Why does my receiver change channels or display menus at random? Your neighbor
may have their remote control set on the same address. Change the address on your remote
control and receiver as described on page 72. If that doesn’t help, you may have to install a
UHF attenuator as described on page 74.
Remote Controls
Notes
Notes
85
Chapter 10
Notes
Notes
86