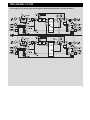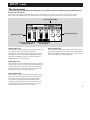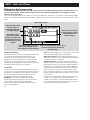
1
USERS MANUAL
Gold Channel
DIGITALLY ENHANCED MIC-PREAMP
TABLE OF CONTENTS
By Bruce Botnick
FOREWORD
About this Manual
WELCOME
Features
INTRODUCTION
Buttons, Knobs, Controllers and other functions
THE FRONT PANEL
Inputs, Outputs
THE REAR PANEL
THE SIGNAL FLOW
CONNECTING THE GOLD CHANNEL
General description to get started
QUICK REFERENCE
SIGNAL
Selecting the primary Inputs, Outputs ,Clock, Dither and Insert
Setting the Analog Input Gain
GAIN
LEVEL
RECALL AND LIST
STORE
Digital In, Master Out and Analog Out levels
Recalling a Factory, User or Memory Card preset
Storing and Naming a new User preset, using the Letterbox
Constructing your own preset
ROUTING AND LAYOUT
EDIT
Editing the blocks, M/S-matrix, Delay, Insert, Meter page
Parameters in the digital processing
THE BLOCKS
UTILITY
System parameters, Memory Card handling
MIDI
THE RESET MENU
SELF TEST
TECHNICAL SPECIFICATIONS
MIDI IMPLEMENTATION CHART
TROUBLE SHOOTING
CERTIFICATIONS
FACTORY PRESET LIST
WHERE GREAT RECORDINGS BEGIN
TC Electronic, Sindalsvej 34, DK-8240 Risskov - [email protected]
By Loren Alldrin
Rev 1.3 - SW - V 1.03
Prod No: 606058511
4
6
7
8
10
11
12
13
14
16
17
18
20
22
24
30
31
32
34
35
36
37
38
39
40
42
3
FOREWORD
Microphones as Ears
by Bruce Botnick
I've always felt that microphones were colors on a sound painter's palette. Colors that can be used to bring out
the many sounds that we record and help us to create different textures used in the mix.
Many recording engineers have their favorite microphones and don't necessarily use the same favorite on the
same instrument in all applications. In creating the sound field, the mixer will look at the instrumentation, the
microphones available, and make his choice based upon what he knows will work and what he hears in his
imagination.
Equating Imagination when it comes to recording music is like comparing the improvisational work of a fine
musician. You have to know your tools by heart in order to be free enough to dream in full three dimensional
stereo and color.
Back in the early days of hi-fi, monaural long playing records, when I was really, really young; I can remember
hearing people breathing on recordings. Hearing the rosin of the bow on the strings of a violin. The fingernails
of a pianist on the ivories. I could never hear that on old 78's as a majority of the microphones used up till the
1950's were ribbons. Radio Recorders had basically only ribbons, RCA 44's and 77's, with a couple of
Telefunken U47's mixed in. Their consoles were like most of that day in that the mic preamps had built-in pre
eq to compensate for the lack of high frequencies that are inherent in ribbon microphones. As the industry
started moving forward with condensers, those consoles with their pre eq provided the seminal sounds that we
grew up on. The mixers now had the revolutionary Telefunken/Neuman U47, Km 53,54's and U67's. The Sony
C37 which was a less expensive and somewhat sweeter version of the U47 and the now famous Telefunken
ELM-251 and AKG C-12's. Sound became hi-fi. Then came dynamic microphones, or did they precede? I have
seen dynamic microphones used in the strangest ways for reasons that never made sense and they worked great.
The most common usage has been on live vocals, loud amplified instruments, drums and percussion. Not hi-fi
in comparison to a condenser, but able to do things that you can't do with a condenser. Such as; using a Shure
56, 57 or 58 as a hammer to drive nails into a stage and still be useable by a singer later in performance.
Swinging the mic in a ever increasing arc, hitting concert promoters in the head as well as guitar amps. The
speed and impact should destroy those hardy mics, but they keep on doing their thing, day in and day out. Try
that with a $5,000 condenser and see how far your money will go.
Since hi-fi was such a new thing, everything about it was of interest and this information was on the back of hifi albums. This was an unyielding source of inspiration. If the sound of a U47 close mic'd on Miles Davis'
trumpet sounded great and romanced me, that was what I would use when and if I got the chance to record a
jazz trumpeter. The amazing thing is the human memory. When I did get the opportunity and used the U47 it
4
FOREWORD
sounded just like what I remembered, minus Miles Davis of course. As time has advanced forward I am always
on the lookout for this printed information as well as photographs and film documentaries of recording
sessions. Seeing the masters at work and their use of the pallet is the best way to learn. Not only can you see
and hear what they used, but also how high and far away the microphone was placed from the instrument. The
only thing we can't see is the nature of the console and what eq and dynamics were used if any. Also, the good
fortune that these masters enjoyed, was the privilege of recording master musicians capable of making great
sounds.
The future is now upon us. Digital microphones with built in A/D's capable of 96 khz, 24 bit output. Custom
tailoring of the eq curves via computer programming for the mixer who needs the microphone to do it his way.
Digital processing of these new signals by digital microphone preamplifiers with eq and dynamics. It's amazing
what it used to be, as it now happens, almost as soon as we can think it up, the future is now.
Microphones have a great history and have been a part of almost all of the 20th century's most important music
and political events. My gratitude to those dreamers who dreamt of reproducing human hearing in full three
dimensional stereo and color. I am at their feet.
Bruce Botnick - June 1998
Bruce Botnick is a recording engineer and producer whose work spans the last three decades. Although he is
primarily known as engineer and producer for the legendary 60's rock group, The Doors, Bruce has recorded
and produced literally hundreds of other legendary classic rock hits throughout the 60's and 70's. His clients
have included a "who's who" of Rock & Roll: The Beach Boys, Buffalo Springfield, The Turtles, The
Supremes, Marvin Gaye, Stevie Wonder, The 5th Dimension, Bread, MC5, Delaney and Bonnie, Judy Collins,
Dave Mason, The Rolling Stones, Joe Cocker, Eddie Money, Kenny Loggins, Steve Perry and many others.
Considered by many to be one of the "pioneers" of digital recording, Bruce was the first to engineer the first all
digital recording of a motion picture soundtrack, "Star Trek The Motion Picture". Since then, Bruce has
recorded and produced countless music scores for films such as "E.T.", "Poltergeist I & II", "Indiana Jones And
The Temple Of Doom", "Rambo", "Gremlins", "The Color Purple", "Caddyshack", "Startrek V", "Blaze",
'Total Recall", "The Doors Movie", "Sleeping With The Enemy", "Father Of The Bride", "Beauty And The
Beast", "Basic Instinct", "Aladdin", "The Lion King", "Pocahontas", "Waterworld", First Knight", "City Hall",
"L.A. Confidential", "Ghost & The Darkness", "Executive Decision", "Airforce One", "Deep Rising". Bruce
recently completed producing The Doors 4-CD Box Set, and engineered the music score for latest Disney
animated feature film, Mulan.
5
WELCOME
Congratulations
Congratulations on the purchase of your new Gold
Channel. We hope that you have as much pleasure
using it as we had making it.
The Gold Channel is carefully designed to make perfect
recordings of your precious music directly to your digital storage
media. There are three essential steps in the recording process:
Microphone amplification, Analog to Digital conversion and a
powerful package of signal processing. These are all brought
together in the Gold Channel. These plus the routing possibilities
in the processing section and the versatile Input and Output
connectors, set a whole new standard for what you can expect
from a stand-alone mic-preamp.
The Gold Channel is equipped with 24 bit AD/DA converters,
AES/EBU, S/PDIF and ADAT/Toslink Optical Inputs and
Outputs.
About this Manual
Many people in the music business (and elsewhere) have an
aversion to reading manuals. We understand that. So if you feel
like starting without reading the whole manual, check out the
Quick Reference at page 11. You can always use the manual if
you want to check out areas that you have questions about.
On the other hand, you might want to know a little more about
the Gold Channel before you start pressing keys. The manual
will take you step by step through all of the Gold Channel’s
functions. If you want to read about a specific function, please
refer to the Table of Contents.
6
INTRODUCTION
General Introduction
The Gold Channel is designed so that all its main functions are available directly on the front panel: Input select, +48V phantom, gain
setting with PAD, Lo-Cut, Phase Invert, Mute, Soft Clipper and Meter select. These combined with separate bypass buttons for each
processing block and a user friendly display, gives you an intuitive box that is very easy to use, despite the many features.
The Gold Channel is a true dual mono machine with four processing blocks on each channel that can be selected, routed and changed
individually, or if placed in the same routing position, can be linked for stereo operation.
The Gold Channel has three basic modes: 1) Four blocks of processing available on each channel (44.1 or 48 kHz)
2) With one processing block on each channel that runs at double sample rate (88.2 or 96 kHz)
3) Three processing blocks on channel 1 which run at double sample rate (88.2 or 96 kHz)
Gold Channel features:
- Two channels of high-end mic-preamplification.
- A Dynamic EQ which is a De-esser with additional
frequency range and control, enabling you to use it as
- Two types of Expander/Gate algorithms that enable
a De-popper.
you to use either an over-easy Noise-Gate or a more
comprehensive Expander with additional parameters.
- Two types of Compressor algorithms where TC has
- A Digital Radiance Generator (DRGTM) which adds a
tube-like sound to your material.
emulated the warm analog sound of vintage
compressors.
- R.I.A.A. equalization allows you to connect your
turntable to the mic-inputs.
- Two types of EQ algorithms that incorporate TC
Electronic’s proprietary SoftSat technology. Easy EQ
- M/S encoding and decoding both before and after the
is an emulation of vintage EQ’s, plus an Advanced EQ
processing blocks, gives you the opportunity to take
with additional parameters.
advantage of this recording technique, that has been
used for years in the film and broadcast industries.
- A De-Esser, which can help remove the sibilant
sounds from vocal recordings.
7
THE FRONT PANEL
POWER
Press and hold the Power
switch until the Gold Channel
logo shows, then release.
CARD SLOT
The PCMCIA slot can be used
for storing and loading presets.
Use Type 1 PC Cards with a
minimum 64 KBytes of SRAM,
or up to 2MB.
8
CHANNEL 1 AND 2
The Gold Channel has direct access to all primary functions on the micpreamp for each channel:
Input gain encoder: Sets the analog input gain along with the PAD button.
Everytime you change the input level, the Gain page will pop up, so you can
read the exact input gain.
Input: Selects between Microphone, Line-level and Digital input. Every time
you change the input, the Signal page will pop up to help you view the
Input/Output status of the machine. If you select Digital input, you must
select what digital format to use on the Signal page.
PAD: Attenuates the input signal by 0, 20, 40 or 60 dB before the analog
input gain encoder. (60 dB is shown when 20 + 40 dB LED’s is ON)
Note: Set PAD range in the Utility display to get access to 60 dB PAD
+48V on/off: Supplying +48V Phantom power to condenser microphones
Phase: Inverts the phase of the input signal by 180 o
Locut: Digital Locut filter can be set to off, 60, 80 or 120Hz at -12 dB/octave.
If you want Locut at other frequencies, use the Easy Equalizer.
Softclip: The digital soft clipper is placed right after the Input select and just
before the Locut filter. When the Active led is blinking, the soft clipper is
working on your input signal.
Mute: Is placed right before the main output panner on each channel.
Meter: Switches the 14 segment LED meter between showing Input before
the Softclip and output right after the digital Master Output.
Clip: Indicates if overload is detected somewhere in the signal chain
DYN meters: The 2 X 4 LED meters show you the gain reduction for the
Expander and Compressor in the Routing.
Bypass: The Expander, Compressor, EQ and Tools keys, work as bypass
for each block. With a double click you get access to the parameters of the
respective processing block.
THE FRONT PANEL
FUNCTIONS
The four Function buttons
give access to the primary
display groups.
Programs: Here you can
store, recall or delete a
preset.
Edit: Here you can decide
the layout and setup the
processing blocks you
want, control all
parameters in the
processing and view input
meters for the blocks.
Setup: Here you can
select inputs and outputs,
insert send/return, dither,
and all main input and
output levels.
Utility: Here general
system parameters are
controlled, Display viewing
angle, plus all features
regarding MIDI and Preset
cards.
< > MENU KEYS
In many of the displays you can select
different menus by pressing the arrow
keys, for instance, in the Edit display you
can select between Meter, Edit, Routing
and Layout.
THE PARAMETER WHEEL
Use the Parameter wheel to change the
position of the cursor in the display
THE VALUE WHEEL
Use the Value wheel to change the
values of a parameter.
ENTER, EXIT
The Enter key is used to confirm actions,
or for accessing a block. The Enter key
will blink when the Gold Channel needs
you to confirm. The Exit key is normally
used to exit a menu, or to cancel an
action.
9
THE REAR PANEL
Main
Power
Switch
Balanced
Mic/Line
XLR
Inputs
Balanced
Analog
XLR
Outputs
Serial no. ADAT and
Tos-link
In/Out
Word
Clock
Input
RCA
Digital
AES/EBU
S/PDIF
In/Outs
MIDI
External
In,Thru,Out Control
Input
Notes
Pin 2 is “Hot” on all XLR’s (IEC and AES standards).
You must use balanced XLR-XLR cables to get the +48V phantom power to your condenser microphones.
External control jack works with the optional TC Master Fader to control the Master Output Level.
The Gold Channel power supply is capable of operating at any line voltage between 100 volts and 240 Volts
(50-60 Hz).
Balanced XLR-XLR cables:
XLR - XLR
Pin 1 - Pin 1 (Ground)
Pin 2 - Pin 2 (Hot)
Pin 3 - Pin 3 (Cold)
10
THE SIGNAL FLOW
On this page you can see the signal flow through the Gold Channel presented in a technical drawing.
11
CONNECTING THE GOLD CHANNEL
The Gold Channel can be used in different kinds of setups and applications due to the extensive input and output
possibilities. Here are a couple of suggestions on how to connect the Gold Channel.
Recording setup
The normal recording or tracking setup, where you connect one
or two microphones directly into the Gold Channel and have
all outputs available simultaneously.
For example: Use the analog outputs for monitoring the artist,
and the digital outputs for recording directly to your digital
storage media.
Post recording setup
When you are done recording and want to do some additional
processing on your tracks, you can connect the output from
your digital recording device to the digital input of the Gold
Channel, enabling you to keep your tracks in the digital
domain. Set the digital input format on the Signal page.
The analog inputs and outputs, which are not in use when
working in the digital domain, can be used for inserting an
analog device, like a tube compressor. Select Line as Insert
send/return on the Signal page, and set the Insert block
position to either Pre or Post processing (on the Layout page).
Make sure that the Direct Ch. 1 and Ch. 2 signal parameters in
the Insert block are turned all the way down.
Mixer setup
The Insert option can also be used to turn the Gold Channel
into a four input mixer with two analog inputs and two
channels of digital input. Connect one or two microphones
and a digital device like another Gold Channel, and set the
digital input format at Insert return on the Signal page. Select
the Insert block position as Pre or Post processing (on the
Layout page) and use the Gain, Pan and Delay parameters in
the Insert block for fine tuning the mix. All outputs will be
12
QUICK REFERENCE
General Control
General control of the Gold Channel display is accomplished by dialing the Parameter wheel to
change position of the cursor, and the Value wheel to change values. In many of the displays you can
select different menus by pressing the < > Menu keys, as in the Edit display where you can select
between Meter, Edit, Routing and Layout. Press Enter to carry out an action (for example, when
recalling a preset).
Recall
Press Programs (if you are not already there) and select Recall with the < > Menu keys. Use the
Value wheel to select a preset (Factory, User or Card preset) and press Enter to load the preset.
Quick Store
If you want to store a modified factory preset with the same name, press Programs and use the < >
Menu keys to access the Store menu, then press Enter to confirm. The Gold Channel will now
automatically store your preset in the first empty User space, using the current name. If you have
modified a User preset, the Gold Channel will default to the same User preset number when you try
to store it. If you don’t want to overwrite the preset, choose another User or Card bank number with
the Value wheel.
Editing
Press the Edit key and select the Edit display using the < > Arrow keys. There are two ways of
entering the parameter display of a processing block. Double-click the bypass key of the block you
want to edit or dial the Parameter wheel to place the cursor on the block you want to Edit and press
Enter. Press the Exit key when you want to return to the Edit display, or double-click on the bypass
key.
Routing
Changing the order of the processing blocks is done in the Routing display. Press the Edit key and
select the Routing display using the < > Menu keys. Place the cursor where you want to insert a
processing block, and dial the Value wheel to select the sub-algorithm (sub-algorithm is shown in the
lower text line). Now press Enter to insert the current processing block. Pressing Enter while
pointing to a processing block will give you a short-cut to the parameter display of the processing
block, and pressing Exit will return you to the Routing display.
Input/Output Levels
When using Analog input, turn the Input encoders at the upper left corner of each channel to adjust
the input levels. When adjusting the input level, the Gain display will automatically appear and then
disappear again after a few seconds. You must make sure that the Input encoder indication on the
display has grabbed the indication on the outer circle which shows the actual input gain. Otherwise,
nothing will happen to the input gain.
To access the Digital Input/Output levels and the analog output levels, press the Setup key and select
the Level page using the < > Menu keys.
NOTE: The Digital Master Out levels are placed before the Analog output levels, and will therefore
have influence on the Analog output levels.
13
SETUP - Signal
The Signal Display
On the Signal display you can select the main inputs, Insert send and return, Sample Rate source, ADAT or TOS Link
output, and view what outputs are available.
To get to the Signal page press the SETUP button, if you are not already there, and use the < > Menu keys to select SIGNAL.
Basic operation is accomplished by using the Parameter wheel to change cursor position and the value wheel to change values.
Select Insert Send and
Return sources
“Signal” page selected
Input Source
on Channel 1
and 2
Signal is present on all
shown outputs.
Select Channel Status
Bits output
External Clock
indicator
Sample rate source
Select Dither for
the digital outputs
Select between
ADAT, TOS or
THRU for the
optical output
The Signal Display
Whenever you touch one of the Input selectors on the front, the
Signal display will pop up, and disappear after a few seconds. If
you don’t want the display to go back automatically, you can set
the Auto Pages parameter in the Utility/Config display to OFF.
NOTE: This will also affect the Gain display.
AES/EBU - Digital AES/EBU can use up to 24 bits. Use the
balanced XLR Digital In/Out for this connection. AES/EBU
should use balanced 110 Ohm cables. The incoming sample rate
will be displayed in the Digital box at the Signal page. The
“Digital” LED’s will be blinking if no clock is present or if the
Gold Channel cannot lock to the incoming clock.
Input
The Input box is controlled from the Input selector for each
channel on the front. It can be Mic, Line or Digital input. If it’s
set to Digital, the Value wheel is used to select between the
different digital formats: AES/EBU, S/PDIF, TOS Link and
ADAT. You cannot select different digital formats for channels 1
and 2.
S/PDIF - Digital S/PDIF can use up to 20 bits. Use the RCA
jacks In/Out for this connection. S/PDIF should use unbalanced
75 Ohm cables. The incoming sample rate will be displayed in
the Digital box in the Signal page. The “Digital” LED’s will be
blinking if no clock is present or if the Gold Channel cannot lock
to the incoming clock.
NOTE: The Input select overrides the Insert send/return, meaning
that the setting selected at the Input cannot be chosen at the
Insert return. Also note that the Insert option is only available
when both channels are either analog or digital. You will get the
message: INSERT OFF, if the insert is no longer possible, and
INSERT ON when it’s possible again.
14
TOS link - Optical TOS link uses the S/PDIF digital format. Use
the Optical In/Out for this connection. TOS link uses fiberoptic
cables. The incoming sample rate will be displayed in the Digital
box at the Signal page. The “Digital” LED’s will be blinking if
no clock is present or if the Gold Channel cannot lock to the
incoming clock.
SETUP - Signal
ADAT - When using an ADAT, use the Parameter wheel to move
the cursor to the channel 1 or 2 input boxes, and the Value wheel
to select channel number. It is possible to select two ADAT
channels, process them and send them out on two different - or
the same - ADAT channels. The incoming sample rate will be
displayed in the Digital box at the Signal page. The “Digital”
LED’s will be blinking if no clock is present or if the Gold
Channel can not lock to the incoming clock.
NOTE: The four or six unprocessed ADAT channels are not
passed through the Gold Channel.
Insert Send and Return
The Insert Send and Return in the Gold Channel is not a normal
send/return as on other mixers, but a more comprehensive way of
using the inputs and outputs. This means that depending on what
you select as your primary input, most other inputs and outputs
are free for use as insert sends or returns. The only limitation is
that both input channels must be either analog (Mic or Line) or
Digital, to enable the send/return feature.
Example: If the Gold Channel is set up with mics on both inputs,
it is then possible to use the AES/EBU in/outs to connect another
processing machine or effect in the signal chain.
For further details and options see “Connecting the Gold
Channel” (page 11-12) and “Edit” (Page 23).
NOTE: The Input select overrides the Insert send/return, meaning
that the setting selected at the Input cannot be chosen at the
Insert return. Also note that the Insert option will automatically
be turned off when both channels are not either analog or digital.
Clock
The Clock parameter determines what source the Gold Channel
is using as digital clock. The Gold Channel can use internal 44.1
kHz, internal 48 kHz, incoming Digital sample rate (from the
selected Digital input) or external sync (word clock).
The Gold Channel is capable of using its own internal clock
while using audio from the Digital input. This means that you
can use the Gold Channel as master clock when working in a
digital setup. The Gold Channel will automatically switch to the
appropriate clock when you select Input source. For instance,
you select AES/EBU as your input source, the Gold Channel now
automatically switches the Clock parameter to Digital.
NOTE: The external sync input will only recognize standard
word clock from 32 kHz to 48 kHz.
Digital External Clock
When the Gold Channel is locked to any external clock, this box
will display the incoming sample rate.
Dither
The Gold Channel can output Dither from 8 to 22 bit resolution.
The dither type is HP-TDF or High Pass Triangular probability
Density Function.
Gold Channel uses internal 24 bit resolution and 24 bit AD/DA
converters. Dither should therefore only be used in case the
digital outputs are used (e.g. to a 16 bit DAT machine). It is
recommended not to use dither until the final stage of a
production, so if there is a chance that the source material is
going to be dithered later in a production, do not use Dither.
Output
The Gold Channel will output signal on all available outputs
simultaneously.
Example: If the Gold Channel is set to Mic input on both
channels and off at Insert send/return, you will have both analog,
AES/EBU, S/PDIF and TOS link (or ADAT) outputs available.
The TOS link can be switched to any two ADAT channels
between 1 and 8. When using ADAT, use the Parameter wheel to
move the cursor to the “Optical” box, and the value wheel to
select ADAT and channel number for each channel.
The output box will automatically show you what outputs are
available according to your choices of Input and Insert.
Use the Value wheel to change the Channel Status Bits of the
digital output between professional and consumer format. When
AES/EBU is above S/PDIF in the list, the Gold Channel will
output the professional AES/EBU standard, and when S/PDIF is
on top of AES/EBU, the Gold Channel will output the S/PDIF
consumer standard.
The Gold Channel defaults to AES/EBU but some digital
consumer products refuses to accept the professional standard.
In that case change to S/PDIF consumer standard.
Example: If you are using a non-professional DAT machine as a
receiver of the Gold Channel digital output, and you cannot make
it accept the digital input, change the output format from
AES/EBU to S/PDIF.
NOTE: The different Status Bit standards do not affect the
quality of the audio output from the Gold Channel.
15
SETUP - Gain
The Gain Display
On this page you can set and adjust the gain of the analog inputs, and use the Auto Gain Setting option, which helps
you get the best results when you are doing recordings.
To view the Gain page press the SETUP button, if you are not already there, and use the < > Menu keys to select GAIN.
Basic operation is accomplished by using the Parameter wheel to change cursor position and the value wheel to change values.
“Gain” page selected
Use the Auto Gain Set
option to get the
optimal input level
through the analog
inputs to the
A-D converters
Current input level Setting
Position of the front
encoders
Actual current input
level, shown in dB
When grayed out, Digital
input is selected
Generally about the Gain Display
Whenever you touch one of the Input gain encoders on the front,
the Gain display will appear, and disappear after a few seconds.
If you don’t want the display to go back automatically, you can
set the Auto Pages parameter on the Utility display to OFF.
Gain
At the left of the display, there are two “knobs” showing the
analog input gain. The inner circle indicates the position of the
Input encoders on the front panel, and the indications on the
outer circle along with the dB value below, shows you the
amplification of the input. If the input gain is set to +18dB, you
must have an input signal at -18dBu to get 0dB output.
After a Total Recall or an Auto Gain Set, the two indicators may
not be linked, in which case, it’s the outer indication along with
the dB value that is actual. Turn the input encoders on the front
until the indicators link, so that manual adjustment of the gain
becomes possible again.
Auto Gain Set
The Auto Gain Set option enables you to automatically set the
optimal mic or line input levels.
16
Note: The 60 dB PAD is not used at Auto Gain Set, this may
cause the message Too Much Level to show up even though it’s
possible to set optimal gain with the 60 dB PAD. If possible
switch to Line inputs and run the Auto Gain Set again.
Select
Selects what channel(s) you are working with: Ch.1, Ch.2, Ch.1
and Ch.2 or Stereo. The difference between Ch. 1 + Ch. 2 and
Stereo is that in the former you’ll get two independent
measurements at the same time, and in the latter, you will get the
lowest gain on both inputs.
Headroom
Here you select what headroom the Auto Gain Set should give
the input signal or how far should maximum peak be from 0dB.
Auto Gain ENTER
Press ENTER and the measuring will begin. Whenever you want
you can press Enter again. The measuring will stop and the
optimal input gain will be set automatically.
NOTE: If maximum gain isn’t enough to reach the headroom
level, the message: “Insufficient level” will show up.
SETUP - Level
The Level display
On the Level page you can adjust the Digital Input level, the Master Level for all outputs and the Analog Output level
for channels one and two.
To view the Level display, press the SETUP key if you are not already there, and use the < > Menu keys to select the Level page.
Basic operation is accomplished by using the Parameter wheel to change cursor position and the value wheel to change values.
“Level” page selected
Analog output levels
Digital input levels
When grayed out, analog
input is selected
Master output levels
for all outputs
Adjusting the levels
Use the parameter wheel to move the cursor and select what level
you will adjust, either one channel at a time or both
simultaneously. Use the Value wheel to adjust the levels. If you
have different levels on each channel, adjusting both channels
will preserve the difference until you reach the maximum or
minimum level on one of the channels.
Analog output levels
These “knobs” control the analog output level for each channel,
and are placed right after the DA converters. This means that the
Master level will affect the Analog output level controls (Except
if the analog outputs are used for Insert Send)
Digital input levels
These parameters control the digital input if you have selected it
on one or both channels. If you are not using a Digital input, the
bars will be grayed out, and you have no access to adjust them.
The digital input level is parallel to the analog input gain, and
therefore has no effect on the analog input level.
Master output levels
These parameters control the output level for all outputs except
Insert Send if chosen. In the signal chain they are placed right
after the panners in the output section (see the Edit display).
It is possible to remote control the Master output level by
connecting an optional TC Master Fader via the External 1/4”
jack input at the back panel. In Utility/Config menu you can
choose whether it shall control Ch.1, Ch.2 or both.
17
PROGRAMS - Recall
The Recall and List Displays
Here you can Recall a Factory, User or Card preset, and you can load a separate channel of processing or even a
single processing block from one preset to another.
To get to the Recall page press the PROGRAMS button, if you are not already there, and use the < > arrow keys to select Recall.
Basic operation is accomplished by using the Parameter wheel to change the Recall mode and the value wheel to change preset number.
When the preset number is blinking pressing Enter will Recall the selected preset.
Recall page selected
Select between
Total recall,
Recall or Partial
recall mode
User, Factory or Card bank
Preset number
Preset name
Recalling presets
There are three levels of recalling presets in the Gold Channel:
Total Recall: You can make a Total Recall that recalls absolutely
every setting in the machine (Except +48V), including input gain
and input/output/insert setup.
Recall: Where you Recall all processing settings that can be
modified in the Edit, Routing and Layout displays. This includes
M/S matrix, Delay and Panner settings, plus all processing blocks
placed in the two channels.
Partial Recall: Here you can recall selected processing blocks
from one preset into the preset you are currently working on (See
below).
NOTE: When you scroll through the presets with the Value
wheel, you will automatically jump between the Factory, User
and Card banks. Factory presets is marked “F”, User presets is
marked “U” and Card presets is marked “C”.
Partial Recall
The grid at the left of the display is used to make what we call
partial recall. This enables you to load parts of the settings from
one preset, into the preset you are currently working on.
18
It can either be all processing blocks from one or both channels,
or just a single processing block. Turn the Parameter wheel to
select what you want to partial recall.
The small icons in the grid represents different things:
A box that is not filled out indicates that the block is present in
the Routing.
A diamond indicates that the block is present in the Routing, and
that a partial recall will overwrite the current settings.
A box that is filled out (black) indicates that the block is not
present in the Routing, but will be placed in the Routing when
partial recall is confirmed.
Example: Recall factory preset 100 Empty Routing. Now turn the
Parameter wheel until the display reads: Ch.1+2 COM, then turn
the Value wheel to factory preset 79 (F079 Stereo Keyboards)
and press Enter. The Compressor settings from factory preset 79
are now loaded into the preset. Continue in this way to construct
exactly the preset you want, and store it in a separate space in the
User bank.
PROGRAMS - Recall
The List Display
This is another way of recalling and displaying the preset lists
(Factory, User and Card), and is very useful when you are
looking for a specific preset name but cannot remember the
preset number.
You can Recall a preset directly from the List by scrolling with
the Parameter wheel. The preset name/number that is blinking
will be instantly recalled when you press Enter.
The Value wheel is used for jumping between Factory preset 001,
User preset 001, Card preset 001 and the last preset in the list.
Note: When recalling from the List display you will always get a
normal Recall of the preset, not a Total or Partial Recall.
Exercise 1:
How to Recall a preset
In this Exercise we are going to recall a couple of presets. Press
the Programs key (if you’re not already there) and select the
“Recall” page using the < > Arrow keys.
Now dial the Value wheel to scroll through the factory presets.
While scrolling you will see both the preset number, preset name
and the LED of the Enter key blinking, indicating that the current
preset has not been recalled yet.
Select preset #10 and press Enter to confirm. Preset #10 is now
recalled.
Exercise 1: How to Recall a preset
Press the Programs key
PROGRAMS
Dial Value
wheel to scroll
through
presets
Press the Enter key
to Recall the Preset
ENTER
19
PROGRAMS - Store
The Store Display
When you have made a preset, you can go to this page, give it a name and store settings in a space in the User bank.
To get to the Store page press the PROGRAMS button, if you are not already there, and use the < > Menu keys to select STORE
Basic operation is accomplished by using the Parameter wheel to change cursor position, and the value wheel to change values.
“Store” page selected
User or Card bank number
and name if not empty
New preset name
Select CAP for capital letters
and punctuation
Insert a blank space
Deletes the present cursor position
The Store function
The Gold Channel can hold a maximum of 100 User presets, and
up to 999 additional presets can be stored on a PC-card
(depending on the size of the card). Use Type 1 PC Cards with a
minimum 64 KBytes of SRAM., up to 2MBytes.
How to Store
When you have made a preset you can store it quickly under the
same name, or you can give it a new name and storage position.
If you have made the preset by modifying one of the 100 factory
presets, entering the Store display will give you a default to the
first empty User space and preserve the original Factory preset
name. You can then just press Enter and the preset will be stored,
or you can change the name with the letterbox, and select another
User bank space or a Card bank space.
If the preset you want to store is made out of a User preset,
entering the Store display will take you to the original User
preset space. You can then press ENTER to overwrite the old
User preset, or you can select another User or Card bank position
- maybe give it a new name - and store it.
20
The Letterbox:
Scroll through the
letters and press Enter
to confirm
When the typing is finished, go to
Done and press Enter to Store
The Letterbox
With this box you can give your presets exactly the name you
want. Use the Parameter wheel to select letter position and the
Value wheel to select letter/symbol. Press ENTER to place the
letter, and continue until you have written the full preset name.
Then move the cursor to DONE in the lower right corner and
press ENTER to store the preset with the new name.
In the Letterbox there are also some tools: CAP, INS and DEL,
that you can place cursor at and press ENTER.
CAP changes between small/capitalized letters and
numbers/symbols. Instead of scrolling to the CAP function all
the time, you can press EXIT to change CAP, indicated by the
black dot next to CAP.
INS, inserts a space in the line (if you want to write some more,
or have misspelled something).
DEL, deletes the letter/symbol that the cursor is placed at.
PROGRAMS - Store
Exercise 2: How to Store a preset with the existing
name
When you want to store a Factory preset, the Gold Channel
automatically selects the first free storage space in the User bank.
If you try to re-store a User preset, the Gold Channel will
automatically select the same storage space.
- Press the Programs key and use the < > menu keys to access the
Store display.
- Dial the Value wheel to select a storage space.
- Press Enter to confirm.
Exercise 3: How to name a preset
In this exercise we will try to name or rename a preset.
If the preset is not named before the storage, it will be stored
with the name of the preset it was built from.
- Press the Programs key and use the < > menu keys to access the
Store display.
- Dial the Value wheel to select a storage space.
- Dial the Parameter wheel to go to the Name line
- Dial the Value wheel to scroll through the Letterbox
- Press Enter every time you have selected both cursor position
and letter
- When finished go to the DONE box in the letterbox and press
Enter, now the preset is stored with the new name.
Exercise 2: How to Store a preset with the
existing name.
Exercise 3: How to name and store a preset
Press the Programs
key
PROGRAMS
PROGRAMS
Use the <> menu keys
to select Store display
Use the <> menu
keys to select Store
display
Dial Value
wheel to select
storage space
Dial Value
wheel to select
storage space
Press the Enter key
to Store the Preset
Press the Programs
key
Dial Parameter
wheel to go to
the name line
and select
cursor position
ENTER
Dial the Value wheel to
select letter or symbol and
press Enter
When finished
move the cursor to
DONE and press
Enter to Store
21
EDIT - Routing and Layout
Setting up the processing blocks
In the Routing display you can freely select the order of the processing blocks in the Gold Channel. With the Layout
page you can select if you want to run two channels or one channel at 96 kHz and where to place the Insert block.
To get access to the Routing display, press the EDIT key if you are not already there, and use the < > Menu keys to select the Routing page.
“Routing” page selected
Dial the Parameter
wheel to select block
position, and Value
wheel to select between
the ten Sub-algorithms.
Then press Enter to
confirm setting
Shows you Sub-algorithm type
at cursor position
About the Routing display
The Routing display has a grid with positions where you can put
in processing blocks. The grid size depends on what Mode you
have selected in the Layout display . The lines from IN to OUT
through the grid positions indicate that there will always be
access from inputs to outputs, with or without processing blocks.
All processing blocks are running in mono and are set up in
series, meaning that the first block will be fed through the second
and so on.
Setting up processing blocks
For each channel it is possible to place one Expander, one
Compressor, one EQ and one of the Tools algorithms (Only
limited by available Grid positions).
Basic operation is accomplished by using the Parameter wheel to
change cursor position between the various block positions, and
the Value wheel to change between the sub-algorithms, the Enter
key is used to confirm a sub-algorithm setting.
NOTE: If you select a block that is already in the channel
routing, the block that is already set will start blinking and the
cursor will get rounded corners. If you press Enter to confirm the
setting, the block that was already there will be deleted.
22
Empty block positions
The Sub-algorithms
Below is a list of the sub-algorithms for the four blocks
EXPANDER:
Easy Gate
Advanced Expander
COMPRESSOR:
Soft Compressor
Vintage Compressor
EQUALIZER:
Easy Equalizer
Advanced Equalizer
TOOLS:
De-Esser
Dynamic Equalizer
DRGTM
R.I.A.A.
The Layout page
The Layout page features a number of functions that all refer to
the Routing. In the Layout display, there is a miniature version of
the current Routing, showing the grid size and the position of the
blocks.
EDIT - Routing and Layout
Mode
Rate Mode - This is where you decide what basic layout of the
grid you want to work with. There are three different setups:
1) Two channels with four processing positions on
each channel (44.1/48kHz)
2) One processing position on both channels.
(88.2/96kHz)
3) Three processing positions on Ch.1 and none at
Ch.2 (88.2/96kHz)
The difference between the three modes is, that the processing
sample rate in the first mode is 44.1 or 48 kHz, where it is 88.2
or 96 kHz in the other two modes. The arrow boxes on each side
of the processing blocks indicates the up and down sampling of
the signal.
NOTE: In mode three there will still be signal through channel
two, and you still have the M/S matrix, Delay, Insert and the
processing on the front available (Locut/Softclip).
Ch.1 to Ch.2 Ch.1 input
to Ch.2,
post
processing
This is a built in Y-split that enables you to get channel one’s
input signal on both processing lines. You can select whether the
signal should be taken before (Pre) or after (Post) the processing
blocks of channel one. The post setting actually enables you to
use all eight processing blocks at 44.1/48 kHz Mode in a serial
way for channel one’s input.
NOTE: The signal for Ch.2 will be taken right after Locut and
Softclip, but before Phase Invert. Therefore Locut and Softclip
will be set to Off on Ch.2, but Phase Invert will be available on
both channels.
The M/S Matrix will not be available because M/S recording
needs two separate inputs.
In the Post mode Links will not be available.
Insert -
Insert
placed
post
processing
With this parameter you select if you want to have the Insert
block present in the Routing grid, and if it should be placed
before (Pre) or after (Post) the processing blocks.
NOTE: You have to select the send/return source on the Signal
page.
Columns and Blocks
The functions here are somewhat similar to the functions of a
spreadsheet. Use them when you want to move, insert or delete a
whole Column or a single Block.
Column Move Left - Will move the current Column to the left.
Move Right - Will move the current Column to the right.
Insert Col - Will insert a new Column.
Delete Col - Will delete the current Column.
Block Move Left - Will move the current Block left.
Move Right - Will move the current Block right.
Insert Block- Will Insert a new Block.
Delete Block- Will delete the current Block.
Press Enter to carry out the selected function.
23
EDIT - Edit and Meter
Editing the digital processing
The Edit display is the place where you have a general overview of what processing blocks, Insert and Links are set
up in the current preset, and it is where you get access to edit the different parameters in the digital processing
section of the Gold Channel.
To get access to the Edit display, press the EDIT key if you are not already there, and use the < > Menu keys to select the Edit page.Basic
operation is accomplished by using the Parameter wheel to change cursor position and the Enter button to access the parameter lists of the
blocks.
“Edit” page selected
Place the cursor on IN
and press Enter to
access input M/S matrix
and Delay settings
Press Enter to Edit
processing at cursor
position, or double-click
on the bypass button for
the processing you want
to Edit.
Place the cursor on OUT
and press Enter to access
output M/S matrix and
Panner settings
Link button available when you Shows you Sub-algorithm type at cursor
have same sub-algo at same
position. Press Enter to access the
block position on both channels
parameter page
About the Edit Display
The Edit display shows you the processing blocks and Insert that
are set up in the Routing display, and automatically views
available Links. The lines from the IN to the OUT blocks
through the processing blocks, indicate the signal flow. When
you bypass a block, the graphics change to indicate that the
signal doesn’t go through the block. At the lower line you can see
the name of the block that the cursor is placed on.
The IN Block
If you place the cursor on the block named IN and press Enter,
you get access to a range of parameters that relate to the input on
both channels. In the signal chain these parameters are placed
after the processing on the front (Locut, Phase invert and
Softlim), and before the processing and Insert blocks.
M/S Matrix - Select between Encoding and Decoding,
depending on what your input signal is. Also see the separate
section on M/S recording technique in this manual.
NOTE: This M/S matrix runs simultaneously with the M/S
matrix in the output block.
24
Unit - With this parameter you can change the unit that the delay
time is measured in: Milliseconds, Feet and Meters.
Delay Ch.1 and Ch.2 - Controls 340 ms adjustable delay on
each channel. The first 10 ms are adjustable in 0.1 ms steps, and
from 10 ms to 340 ms, in 1 ms steps.
Output Correlation - The graphics running with the delay
settings is a Phase Correlation meter. This shows you the output
phase correlation between Ch.1 and Ch.2. When the black dot is
at maximum (+), you have the same phase on both outputs and
when it goes down to minimum (-), the outputs are completely
phase reversed. The “tail” after the black dot shows you the
history of the phase correlation. You can then, with the Time/Div.
parameter, adjust how much history it displays: From 0.1 second
to 0.9 seconds.
Example: Set up the Gold Channel with the same input on both
channels (e.g., a 1 kHz test tone), and see that the phase
correlation is at maximum. Then press the Phase Invert button
on one of the channels, and see how it shifts. Also try to adjust
the phase correlation with the delay parameters.
EDIT - Edit and Meter
NOTE: The Panner settings of the output also have influence on
the output phase, therefore this Phase Correlation meter is also
shown at the Output page along with the Panner controls.
The OUT Block
The Output block contains M/S matrix, Panners for each channel,
Phase Correlation meter and indication of total processing delay.
M/S Matrix - Select between Encoding and Decoding,
depending on what you want your output signal to be. Also see
the separate part on M/S recording technique in this manual.
NOTE: This M/S matrix runs simultaneously with the M/S
matrix in the Input block.
Pan Ch.1 and Ch.2 - These are separate panners for channel
one and channel two, and pan the signal between left and right
outputs.
Output Correlation - This is a phase correlation meter that
shows you the phase correlation between Ch.1 and Ch.2 outputs.
When the black dot is at maximum (+), you have the same phase
on both outputs and when it goes down to minimum (-), the
outputs are completely phase reversed. The “tail” after the black
dot shows you the history of the phase correlation. You can then,
with the Time/Div. parameter, adjust how much history it
displays: From 0.1 seconds to 0.9 seconds per division.
NOTE: The Delay settings on the input also have influence on
the output phase, therefore this Phase Correlation meter is also
shown at the Input page along with the Delay parameters.
Processing Delay - Shows you the total amount of delay that
the Gold Channel contributes to the signal due to A-D conversion
and digital processing (1.1 ms minimum). Included is also the
delay settings from the Input block. The figures are read-only
parameters.
If you use the analog outputs, you must add 0.57 ms to the
number shown, because of the time it takes to make the D-A
conversion.
Return Ch.1 and Ch.2 - For the Return channel selected on
the Signal page, you can control the input Gain for each channel
as well as the Panning between Left and Right outputs, and you
also have 340 ms delay available, adjusted in 0.1 ms steps the
first 10 ms and 1 ms steps from 10 to 340 ms.
Direct Ch.1 and Ch.2 - For the direct signal (main input
source) you have Gain and Panner parameters here for both
channel one and two. These parameters are primarily meant for
the mixer situation. Remember that the Gain must be set to off if
you use it as a normal send/return insert.
NOTE: These two parameters are additional in the signal path,
and do not substitute any of the other gains and panners in the
machine.
Link
The Link option is available whenever you have placed the same
sub-algorithm for example, an advanced EQ - at the same grid
position on each channel. If a Link is possible, a little box will
show up under the blocks. With the cursor you can scroll to the
little box, and with the Value wheel you can activate the Link.
When you activate the Link, the Gold Channel will copy the
settings from channel one to channel two, and any changes you
make will be made on both channels. When you unlink, the
settings will stay as they are, but now you can control each
channel separately again.
NOTE: Link will not be available when you select Ch.2 input
from Ch.1 Post processing.
When a Link is ON, the Sidechain input from Ch.2 to Ch.1 will
not be possible.
Meter Page
The meter page shows you the input of each block in the
Routing. Press Enter or double click on the Bypass buttons, this
will take you to the parameter pages.
The INSERT block
The Insert block is placed in the routing either pre or post the
processing blocks, and contains parameters to handle send/return
signals and direct channel one and two signals. The idea of the
extended Insert block is to enable a normal send/return insert, but
also to turn the Gold Channel into a four channel mixer, with a
pair of analog inputs, a pair of digital inputs and several output
opportunities.
Send Gain Ch.1 and Ch.2 - Controls the output gain for the
selected Send output on the Signal page.
25
THE BLOCKS
The Blocks
SIDECHAIN
Expander
The Sidechain is the reference signal that the Gate is listening
to internally for making the processing. You will never hear
this signal on the output.
On the following pages you will find a description of
the ten processing algorithms, and the parameters
you can control in them.
There are two different expander/gate sub types in
the Gold Channel. They are running from the same
sub-algorithm, but with different parameters
available, fitted for different applications.
Both the Gate and Expander perform Downward Expansion.
Downward Expansion in general, means that below a certain
threshold the input signal’s gain is reduced on the output
according to a specific ratio. For instance, if a Gate or
Expander has a ratio 1:2, for every dB the input decreases the
output will be decreased with 2 dB. Expanders/Gates are often
used to remove background noise from, for instance, old
keyboards, or for separating the inputs of different drum mics.
Expander/Gate
Input
When placed on Channel 1, you can select the Sidechain Input
to be either the Same (Ch.1) or Channel 2.
Example: If you select to have Sidechain input from Ch.2, you
can go to the Layout page and select Ch. 1 Pre, as input to
Ch.2. Now you have all the blocks on Ch. 2 for processing the
Sidechain signal on Ch. 1. You can also have a completely
different input on Ch. 2.
NOTE: When two blocks are linked, you cannot select Ch. 2 as
input for Ch. 1 Sidechain.
Advanced Expander
Easy Gate
Mode
The Mode parameter changes between fast and slow gating,
and covers a change in both the Ratio, Attack, Release, hold
and knee mode parameters.
Threshold
When the input signal falls below this threshold, the Gate starts
working. This means that the higher threshold the more gating
you will get.
Max. Damping
With this parameter you can decide the maximum number of
dB the gate shall attenuate (See the graphics to get a better
understanding).
26
Threshold
When the input signal falls below this threshold, the
Expander/Gate starts working. This means that the higher
threshold the more expansion you will get.
Ratio
The Ratio of the gain reduction. If the Ratio is set to 4:1 it
means that for every 1 dB the input signal decreases, the output
will decrease by 4 dB.
When the Ratio is set Infinite:1, it means that when the input
signal falls below the threshold, the output is turned all the way
down. This is also known as gating.
Attack
The Attack is the time that the Expander/Gate uses for bringing
the reduced signal to 1:1, when the signal exceeds the
threshold.
THE BLOCKS
Hold
Is the time that the Expander/Gate will keep the Ratio at 1:1
below the threshold, before the Release time sets in.
Release
The Release time is the fallback time that the Expander/Gate
uses to reach the gain reduction specified by the Ratio
parameter.
Example: If the input signal suddenly drops 4 dB below
threshold in no time with the Ratio set to 1:4 and the Release
set to 20 ms, the Gold Channel will use 20 ms to reach a gain
reduction of 12 dB.
Knee Mode
The Knee Mode parameter sets the bending point of the
Expander to soft knee or hard knee. When soft knee is
selected, the Expander will gradually reach the ratio, while
hard knee will cause the Expander to go directly from no
expansion to the current ratio.
Max. Damping
With this parameter you can decide the maximum numbers of
dB the expansion shall attenuate (See the graphics to get a
better understanding).
SIDECHAIN
The Sidechain is the reference signal that the Expander is
listening to internally to carry out the processing. You will
never hear this signal on the output. The Advanced Expander
has a separate bandpass filter for tweaking the sidechain
signal, and you can give it another input signal.
Filter
Turns the Sidechain bandpass filter on/off. The bandpass filter
attenuates low and high frequencies, from the Freq and
Bandwidth parameter settings by -12 dB/octave.
Bandwidth
Sets the Bandwidth of the Sidechain bandpass filter.
Monitor
Here you can monitor the Sidechain signal, which is very
useful for getting the right settings of the Sidechain filter.
Input
When placed on Channel 1, you can select the Sidechain Input
to be either the Same (Ch.1) or Channel 2.
Example: If you select to have Sidechain input from Ch.2, you
can go to the Layout page and select Ch. 1 Pre, as input to
Ch.2. Now you have all the blocks on Ch. 2 for processing the
Sidechain signal on Ch. 1. You can also have a completely
different input on Ch. 2.
NOTE: When two blocks are linked, you cannot select Ch. 2
as input for Ch. 1 Sidechain.
Compressor
There are two types of compressors in the Gold
Channel. They use two different algorithms that
make them perform in two very different ways. When
we made these compressors, we listened to the
characteristics in some of the old compressors that
are very popular in recording studios today, and tried
to put some of their characteristics into our
compressors.
A Compressor is meant to reduce the dynamic content of the
input signal, and thereby keep a more constant level. When the
input signal exceeds the threshold, the Compressor starts to
reduce the signal according to the Ratio. The Ratio describes
how much the signal is reduced, e.g. a Ratio at 2:1 means that
for every 2 dB the signal exceeds the threshold, only 1dB
comes out.
Compressor
Freq
Sets the center frequency of the Sidechain bandpass filter.
27
THE BLOCKS
Soft Compressor
This is a feed forward compressor.. It sounds very smooth
and works well on acoustic and electronic instruments.
Threshold
When the input level exceeds the Threshold, the Compressor
will be activated. This means that the lower the Threshold, the
more compression you will get.
Ratio
The Ratio of the gain reduction. E.g.: When the Ratio is set to
4:1 it means that for every 4dB the input level rises, the output
level increases by only 1 dB.
Attack
The Attack time is the response time that the Compressor uses
to reach the gain reduction specified by the Ratio parameter.
Example: If the input signal suddenly increases to 4dB above
threshold in no time with the Ratio set to 4:1 and the Attack
set to 20 ms, the Compressor will use 20 ms to reach the gain
reduction of 1 dB.
Release
Release sets the fall back time of the Compressor, after the
signal drops below the Threshold.
Knee Mode
The Knee Mode parameter sets the bending point of the
compressor to soft knee or hard knee. When soft knee is
selected, the Compressor will gradually reach the ratio, while
hard knee will cause the Compressor to go directly from no
compression to the set ratio.
Output
Output adjusts the output gain after compression, to
compensate the loss of level caused by the compression.
SIDECHAIN
The Sidechain is the reference signal that the Compressor is
listening to internally for processing. You will never hear this
signal on the output.
28
Input
When placed on Channel 1, you can select the Sidechain Input
to be either the Same (Ch.1) or Channel 2.
Example: If you select to have Sidechain input from Ch.2, you
can go to the Layout page and select Ch. 1 Pre, as input to
Ch.2. Now you have all the blocks on Ch. 2 for processing the
Sidechain signal on Ch. 1. You can also have a completely
different input on Ch. 2.
NOTE: When two blocks are linked, you cannot select Ch. 2
as input for Ch. 1 Sidechain.
Vintage Compressor
This compressor is a bit more specialized and “vintage”- like.
It is a very musical compressor that sounds especially good on
vocals.
It’s a feedback type compressor which means that it gets its
Sidechain input from its output, and therefore it is not possible
to have another separate input to the Sidechain.
Input Drive
The Compressor works with a fixed threshold at -24 dB, so the
Input Drive is meant for adjusting the input level to fit this
threshold.
Example: The more you boost the Input Drive, the more you
will exceed the fixed threshold, and you will get more
compression.
Output Gain
Output Gain adjusts the level after the compression, enabling
you to compensate for level jumps through the Compressor.
Ratio
Adjusts the Ratio of the gain reduction.
Example: When the Ratio is set to 4:1 it means that for every 4
dB the input level rises, the output level increases by only
1 dB.
THE BLOCKS
Attack
The Attack time is the response time that the Compressor uses
to reach the gain reduction specified by the Ratio parameter.
Example: If the input signal suddenly increases to 4 dB above
threshold in no time with the Ratio set to 4:1 and the Attack set
to 20 ms, the Compressor will use 20ms to reach the gain
reduction of 1 dB.
Release
Release sets the fall back time of the Compressor, after the
signal drops below the Threshold.
Equalizer
Equalizers are some of the most common signal
processing devices, and are made in many different
variations and with different colorations. The
Equalizer types in the Gold Channel are made with
parametric and shelving filters. We have put great
efforts in making the EQ algorithms sound as
musical and “analog” as possible.
Easy Equalizer
This EQ type is based on old style EQ’s and incorporates just a
few parameters, making it fast and easy to work with. Built-in
soft limiters on each band in the algorithm gives you a warm
and analog sound when you tweak the filters.
The EQ has five bands:
Lo Cut - Cut filter with fixed -12 dB/oct. attenuation
Lo - Shelving filter with +/-18 dB gain and four fixed
frequencies
Mid - Bell filter with +/-18 dB gain and five fixed
frequencies
Hi - Shelving filter with +/-18 dB gain and fixed frequency at
2.5 KHz.
Hi Cut - Cut filter with fixed -12 dB/oct. gain reduction
Advanced Equalizer
This five band parametric EQ has a lot more parameters than
the Easy EQ, enabling you to make any adjustment you would
like.
The algorithm is made with built in soft limiters on each band,
which gives you a warm, analog-like sound with the EQ.
Bands 1 and 5 are shelving filters and bands 2, 3 and 4 are
fully parametric peaking filters.
Band 1
Type - Selects Bell or Shelf type of filter
Gain - +/-18 dB range
Freq - adjusts the frequency from 20 Hz - 5 kHz
Slope or Width - depending on type of filter
Band - On/Off function for the band
Band 2, 3 and 4
Gain - +/-18 dB range
Freq - adjusts the frequency from 20 Hz - 20 kHz
Width - adjusts the bandwidth of the filter (0.1 - 4 octaves)
Band - On/Off function for the band
Band 5
Type - Selects Bell or Shelf type of filter
Gain - +/-18 dB range
Freq - adjusts the frequency from 501Hz - 20 kHz
Slope or Width - depending on type of filter
Band - On/Off function for the band
Out Level
Here you can adjust the level after the EQ filtering.
Soft Clip
The built in soft clippers/limiters on each band can here be
switched On/Off.
29
THE BLOCKS
Tools
Input
In the Tools section you’ll find some useful
algorithms for different purposes.
De-Esser
This De-Esser takes advantage of a technique where
the Threshold is always relative to the average level
of the material. This means that if the average level
of your material increases, so will the Threshold,
and the De-Esser removes relatively the same. This
gives you a more musical and useful De-Esser.
A De-Esser is used for removing the sibilant sounds from
instruments and especially voices. It does this dynamically,
which means that it’s not a static EQ filter but a dynamic filter
that only cuts into the sound when the high frequencies are
loud in the material.
Dynamic Equalizer
Threshold
When the input level exceeds the Threshold, the De-Esser will
be activated. The Threshold setting is relative to the average
level.
NOTE: This means that the de-esser will also work for soft
signals.
The Dynamic Equalizer is somewhat like an
extended De-esser with more parameters and
enlarged frequency range, enabling better control.
You can also look at the Dynamic Equalizer (and DeEsser) as a compressor that works in a defined and
limited part of the frequency range.
Freq
Sets the cut-off frequency.
Threshold
When the input level exceeds the Threshold, the Dynamic
Equalizer will be activated.
SIDECHAIN
Mode
Decides how the Threshold shall react. When set to Relative,
the Threshold will be relative to the average level of the
signal. This means that also soft signals are processed. For
signals where the average level is determined by signals
outside the frequency range set, for example, a vocal with
sibilance, the Relative setting is useful and very musical.
When Mode is set to Absolute, the Threshold set refers to full
scale, 0 dB, and is therefore well suited for limiting the
maximum level in a specified frequency range, e.g. the bass.
The Sidechain is the reference signal that the De-Esser is
listening to internally for processing. You will never hear this
signal on the output.
Monitor
Here you can monitor the Sidechain signal, which is very
useful for hearing what the De-Esser actually removes from
the main signal.
30
When placed on Channel 1, you can select the Sidechain Input
to be either the Same (Ch. 1) or Channel 2.
Example: If you select to have Sidechain input from Ch. 2,
you can go to the Layout page and select Ch. 1 Pre, as input to
Ch. 2. Now you have all the blocks on Ch. 2 for processing
the sidechain signal on Ch. 1. You can also have a completely
different input on Ch. 2.
NOTE: When two blocks are linked, you cannot select Ch. 2
as input for Ch. 1 Sidechain.
Ratio
The Ratio of the gain reduction.When the Ratio is set to 4:1 it
means that for every 4 dB the defined frequency range rises,
the output level increases by only 1 dB.
THE BLOCKS
Attack
The Attack time is the response time that the Compressor uses
to reach the gain reduction specified by the Ratio parameter.
Example: If the input signal suddenly increases to 4 dB above
threshold in no time with the Ratio set to 4:1 and the Attack
set to 20ms, the Dynamic EQ will use 20ms to reach the gain
reduction of 3 dB.
Release
Release sets the fall-back time of the Dynamic EQ, after the
signal drops below the Threshold.
Freq
Sets the center frequency of the range the Dynamic EQ should
work in.
Curve
Sets the bandwidth or Lo/Hi shelf setting of the range the
Dynamic EQ should work in.
Monitor
Here you can monitor the Sidechain signal, which is very
useful to hear what the Dynamic Equalizer actually removes
from the main signal
Digital Radiance Generator
The DRGTM (Digital Radiance Generator) adds low
order (especially second) harmonic distortion to the
signal. This kind of distortion is very analog-like, and
will add a certain warmth to your material. This is
what is sometimes called “tube saturation”.
Drive
The DRG drive is adjustable from 0 (minimum) to 10
(maximum) distortion.
Curve
If your material is asymmetric (percussive/speech, etc.), the
plus/minus parameter will change the sound of the DRG.
R.I.A.A. Equalization
The R.I.A.A. equalization algorithm is a standard
frequency curve that, when added to the signal,
enables you to plug your turntable into the mic
inputs and listen to your records. Note that you
must still adjust the input gain.
You can choose between the IEC standard from 1964 or 1987.
The 1987 curve includes a subsonic filter.
Make balanced connections as shown in drawing below.
Warning: Do not switch +48V phantom power On when
connected to your turntable to avoid potential damage to your
pick-up.
Input
When placed on Ch. 1, you can select the Sidechain Input to
be either the Same (Ch. 1) or Ch. 2.
Example: If you select to have Sidechain input from Ch. 2,
you can go to the Layout page and select Ch. 1 Pre, as input to
Ch. 2. Now you have all the blocks on Ch. 2 for processing
the sidechain signal on Ch. 1. You can also have a completely
different input on Ch. 2.
NOTE: When two blocks are linked, you cannot select Ch. 2
as input for Ch. 1 Sidechain.
31
UTILITY
The Utility Display
In Utility you can choose between CONFIG, CARD and
MIDI. Use the < > Menu keys to select between the
three displays.
The Config. Page
In the Config. page you can set up a number of global parameters
for the Gold Channel such as memory protect, MIDI bulk dump
etc.
Display Viewing Angle
Adjust for best contrast of the LCD display.
Clip Hold
Here you can set the time you want the Clip indicator to stay lit
after a clip is detected (Off, 5sec, 30sec or 60sec).
PAD range
Selects how many of the PAD values you want to have access to.
If set to 20 you are only able to scroll between 0 and 20 dB,
when set to 40 you have 0, 20 and 40 dB available and if set to
60 you have 0, 20, 40 and 60 dB PAD choices. This is done to
make it easier for you to control the PAD, because if you only
use 0 and 20 dB PAD in your daily work, it’s irritating to scroll
through 40 and 60 every time you press the PAD key.
Param. dial direction
This parameter enables you to change the cursor direction when
dialing the Parameter wheel in parameter lists. Choose whether
the cursor should move up or down when dialing the parameter
wheel clockwise.
Auto Pages
Selects how the Gain and Signal pages shall react when
parameters are changed. Enter And Exit cause the pages to pop
up and disappear automatically. Enter At Touch, causes the pages
to pop up automatically but not to change back automatically.
Off means that nothing will happen automatically
Double Click
Turns the bypass buttons double click function on/off.
Fader Control
Selects what channels the TC Master Fader should control on the
Master output level. When set to Stereo the two outputs will
always be identical.
Fader Calibration
Press Enter to enable calibration of the optional TC Master Fader
connected to the External Control input. Follow the instructions
in the display.
Protect
Sets the Preset Protect function On/Off.
32
Protect Low limit
Sets the lower limit of the preset protect. The current number is
included in the protection.
Protect High limit
Sets the higher limit of the preset protect. The current number is
included in the protection.
The Card Page
The Card page features a number of tools for handling cards,
including preset copying to and from a Card.
Use the Parameter wheel to scroll, and the Value wheel to change
values.
Card type: SRAM PCMCIA, type 1, min. 64 KBytes to 2 MB.
Show card status
This function makes it possible to check the status of your PCcard. The Gold Channel will be able to display the size of the
card, the write protection status, the number of presets on the
card and the amount of free space.
NOTE: This information will only be available when the card is
Gold Channel formatted or contains Gold Channel presets. The
Gold Channel will read “New Card” when the card is inserted, if
the card is not formatted.
Format/Erase Card
This function will Format and Erase the PC-card. Press Enter
twice to confirm this action.
WARNING: This action will overwrite ALL existing presets on
the current Card.
USER/CARD BANK COPY
This section makes it possible to copy a specified group of
presets to or from a specific space on a card. For example: You
want to copy User preset 10-15 from the Gold Channel to preset
5-10 on your card. Now set the “User bank preset start” at 10
(because you to start the group of presets at #10), the “Card bank
preset start” at 5 (because you want the first copied preset to start
at #5), the “Number of presets” to 5 (because that is the number
of presets you want to copy). Now select Copy “From User bank
to Card” scroll to “Execute copy” and press Enter twice to
confirm the copy operation.
User bank preset start
This parameter determines where the copy action should start in
the internal User bank.
Card bank preset start
This parameter determines where the copy action should start in
the Card bank.
Number of presets
This parameter sets the number of presets to be copied.
UTILITY
Copy
Select whether you want to copy from User bank to card or from
card to User bank.
Custom Map
In the Custom Map you can decide what every incoming
Program change should map to, using the “Map Program Change
No.” and the “Into Preset” parameters
Execute Copy
Select this parameter and press Enter twice to carry out the copy
action.
Map Program Change No.
Use this parameter to select the Program change number you
want to remap.
The MIDI page
Into Preset
Use this parameter to set the new destination of the selected
program change number.
Basic Channel
The basic MIDI channel of the Gold Channel. This is the channel
that you should transmit Program changes on to change Presets in
the Gold Channel.
NOTE:The Gold Channel outputs the on/off status of the blocks
at Preset change.
Program change
This parameter enables or disables MIDI program changes on the
Gold Channel. When set to Enabled the Gold Channel will
respond to program changes incoming on the “Basic Channel”.
Bank Selection
This function is a new MIDI standard, making it possible to
Recall Presets above #128. This parameter determines whether
the Gold Channel should respond to this message or not. If your
MIDI device is capable of using this function, you should select
Fine or Coarse.
(Please refer to your MIDI device’s owners manual to make sure
which type the current product is using).
Sysex Device ID
The System exclusive ID of the Gold Channel. This is used when
performing bulk dumps to and from the Gold Channel.
Program Change Offset
With this parameter you are able to add to or subtract from the
incoming Program change: e.g. the incoming Program change is
Preset 79, and the offset is set to +1, the Program change will
now be 80.
Mapping Mode
Sets which bank incoming program changes should be sent to:
ROM (Factory), USER, CARD or Custom. This means that you
can guide all incoming Program changes to any of the three
banks, or you can design your own Custom MIDI map.
Reset Custom Map
Place the cursor on this parameter and press Enter to Reset the
Custom map.
MIDI Bulk Dump
You can back up the User presets of the Gold Channel to another
Gold Channel or to MIDI recording device using these functions.
NOTE: Transmitter and receiver must have same Sysex ID.
User Bank to MIDI
Connect your Gold Channel’s MIDI Out to another Gold
Channel, a sequencer or any other MIDI recordable device. Press
Enter twice and the Gold Channel will perform a MIDI bulk
dump of all User presets.
MIDI to User Bank
Connect the storage device to the Gold Channel’s MIDI In and
press Enter. The Gold Channel is now ready to receive a MIDI
bulk dump containing User presets.
WARNING: This action will overwrite ALL existing User presets
in the Gold Channel.
MIDI Controller map for Software 1.07 or higher.
cc10 Input Channel 1 Mute , 0..63 Unmute, 64..127 Mute
cc11 Input Channel 2 Mute , 0..63 Unmute, 64..127 Mute
cc12 Input Channel 1 OutLevel, 0..127 Maps to -31dB to +6dB
cc13 Input Channel 2 OutLevel, 0..127 Maps to -31dB to +6dB
Above controllers are receive only, they are not send to MIDI out
on the Gold Channel.
33
RESET MENU
The Reset page
Enter User Data page
Store and load your setup to
or from card
Reset system parameters
Clear all user presets
Test Programs
The User data page
Type your name here
and your phone number
How to enter the Reset Menu
Hold the Programs key pressed during power-up.
Move the cursor using the Parameter wheel and press
Enter to select the option you want. Power off/on to
leave the Reset Menu.
Set User Info
This function makes it possible to store your name and phone
number into the Gold Channel. Press Enter to access the User
data menu. Use the Value wheel and the Parameter wheel to write
your name and phone number into the Gold Channel. Press Enter
to accept. Your name and phone number will be displayed during
power-up.
Store Setup
Press Enter twice to confirm that you want to save the setup of the
Gold Channel. All system parameters are saved meaning all
parameter settings on the Level and Signal pages.
34
Recall Setup
Press Enter twice to confirm that you want to recall the setup
saved by “Store Setup”.
All system parameters will be reset according to the saved setup,
meaning all parameter settings on the Level and Signal pages.
Reset Setup
This will reset all system parameters back to the factory default.
This reset will NOT delete the User presets of the Gold Channel.
Clear all Presets
This will delete all User presets.
WARNING: This action will destroy ALL existing User presets in
the Gold Channel.
Run Test Program
See description on next page.
SELF TEST
PRESS AND HOLD THE PROGRAMS KEY WHILE
POWERING UP, TO ACCESS THE RESET MENU AND
SELECT »RUN TEST PROGRAM«
Turn the Value Wheel to scroll through Self tests
Key test
Select Key test by pressing Enter.
The keys must be pressed in the order they are requested by the
Gold Channel to pass the test.
Press Exit to leave Key test.
In knobs test
Select In knobs test by pressing Enter.
Turn the In knobs to 30 and back to 0 to pass test.
Press Exit to leave In test.
Parameter + Value Wheel test
Select test by pressing Enter.
Turn the Parameter wheel and the Value wheel to 30 and back to
0 to pass test.
Press Exit to leave Wheel test.
LED test
Select LED's test by pressing Enter.
Turn a Wheel to test the LED's. The test is “ok” when “none”
LED's are lit.
Press Exit to leave LED test.
Display test
Select Display test by pressing Enter.
Press Enter to check that all pixels are lit. Press any key to leave
the pixel test.
Press Exit to leave Display test.
Analog I/O test
Select Analog I/O test by pressing Enter.
Connect an Analog Output to the Analog Input, which has to be
tested and press Enter.
PPM must show -12 DB to pass test.
Press Exit to leave Analog I/O test.
Digital I/O test
Select Digital I/O test by pressing Enter.
Connect AES/EBU output to AES/EBU input.
Connect S/PDIF output to S/PDIF input.
Connect ADAT output to ADAT input.
PPM must show 0 DB to pass test.
Press Exit to leave Digital I/O test.
Midi I/O test
Select Midi I/O test by pressing Enter.
Connect Midi Out to Midi In.
Prg. change 1-128 is send out on Midi Thru. Connect this socket
to a Midi compatible device and confirm the Prg.. changes.
Press Exit to leave Midi I/O test.
External Control Input
Select Pedal test by pressing Enter.
Connect a momentary switch to the External Control Input.
When pressing the Switch, the Result should be OK.
When released, the Result should be Not OK.
Press Exit to leave Pedal test.
NOTE: Result of test must be not OK if no jack is inserted.
PCMCIA test
Select PCMCIA test by pressing Enter.
Insert PCMCIA card.
NOTE: All Data on PCMCIA card will be destroyed.
Press Enter to test.
Result reads:
Low battery - Time to change battery in your PCMCIA card.
Not OK - Try the test using another PCMCIA card.
Press Exit to leave PCMCIA test.
Battery test
Select Battery test by pressing Enter.
Confirm that Result is OK.
Press Exit to leave Battery test.
System test
Select System test by pressing Enter.
Confirm that Result is OK.
Result reads:
Eeprom Not OK - The unit will most likely work OK, the
message is for service matters only.
DSP Not OK - Contact your local dealer.
Press Exit to leave System test.
Power Off - On to start standard software.
Build in test v.3.06
Service note
In case of the unlikely event that the unit needs to be sent in for
service, please pack it in the original box and an outer box
before sending it.
35
TECHNICAL SPECIFICATIONS
ANALOG LINE INPUTS
Connectors:
Impedance (balanced):
Phantom supply:
Max. Input Level (balanced):
Sensitivity,
@ 12 dB headroom (balanced):
Dynamic Range (unweighted):
THD+N:
Frequency Response:
Crosstalk
(Line to Mic. Pad 0), worstcase:
(Line to Line or Mic. Pad
20/40/60), worstcase:
Common Mode Rejection,
RS = 40 Ohm:
A to D Conversion:
A to D Delay:
Analog MiC Inputs
Connectors:
Impedance (balanced):
Phantom supply:
Max. Input Level (balanced)
Pad 0/20/40/60:
Sensitivity @
12 dB headroom (balanced):
Dynamic Range, RS = 40 Ohm
(unweighted):
Noise Figure, Pad 0,
RS = 200 Ohm:
THD+N:
Frequency Response:
Crosstalk:
(Mic., all Pad to Mic.,
Pad 0), worstcase:
(Mic., all Pad to Mic.,
Pad 20/40/60), worstcase:
Common Mode Rejection,
RS = 200 Ohm:
A to D Conversion:
A to D Delay:
Analog Outputs
Connectors:
Impedance:
Max. Output Level:
Full Scale Output Range:
Dynamic Range:
THD+N:
Frequency Response:
Crosstalk:
D to A Conversion:
D to A Delay:
XLR balanced (pin 2 hot)
6.8 kOhm
--22 dBu
- 11 dBu to 10 dBu
> 103 dB
< -90 dB (0.003 %) @ 1kHz, -3 dBFS
20 Hz to 20 kHz: +0/-0.3 dB
< -65 dB, 20 Hz to 20 kHz
< -85 dB, 20 Hz to 20 kHz
> 60 dB @ 50/60 Hz & > 70 dB @ 1 kHz
24 bit (1 bit, 128 times oversampling)
0.8 ms @ 48 kHz
XLR balanced (pin 2 hot)
6.8 kOhm
48V +/- 10%, pin 2 & 3 through 6.81 kOhm
0: -40 dBu, 20: -18 dBu, 40: 2 dBu, 60: 22dBu
0: -82 dBu to -52 dBu, 20: -52 dBu to -30 dBu,
40: -30 dBu to -10 dBu, 60: -10 dBu to 10 dBu
Digital Inputs and Outputs
Connectors:
XLR (AES/EBU), RCA Phono (S/PDIF), Optical
(Toslink, ADAT)
Formats:
AES/EBU (24 bit), S/PDIF (20 bit), EIAJ CP-340,
IEC 958, EIAJ Optical (Toslink), ADAT Lite pipe
Output Dither:
HPF TPDF dither 8-24 bit
Word Clock Input:
RCA Phono, 75 ohm, 0.6 to 10 Vpp, 30 - 50 Khz
Sample Rates:
44.1 kHz, 48 kHz
Processing Delay:
0.2 ms @ 48 kHz
Frequency Response DIO:
20 Hz to 23.9 kHz +0.01/-0.1 dB @ 48 kHz
PCMCIA Interface
Connector:
Standards:
Card Format:
PC Card, 68 pin type l cards
PCMCIA 2.0, JEIDA 4.0
Supports up to 2 MB SRAM
Control Interface
MIDI:
GPI, Pedal, Fader:
In/Out/Thru : 5 Pin DIN
1/4" phone jack
General
EMC Complies with:
Safety Certified to:
Operating Temperature:
Storage Temperature:
Humidity:
Finish:
EN 55103-1, EN 55103-2 and Class B limits of FCC
rules, part 15
IEC65, EN 60065, UL 1419, CSA E65
32° F to 122° F (0° C to 50° C)
-22° F to 167° F (-30° C to 70° C)
Max. 90 % non-condensing
Anodized aluminum front, Plated and painted steel
chassis
0: >56 dB, 20: >88 dB, 40: >98 dB, 60: >100 dB
< 1.8 dB
0: <-80 dB, 20/40/60: <-92 dB, -3dBFS
0: 20 Hz to 20 kHz, +0/-0.9 dB,
20/40/60: 20 Hz to 20 kHz, +0/-0.3 dBFS
LCD:
Dimensions:
Weight:
Mains Voltage:
Power Consumption:
Backup Battery Life:
56 x 128 dot graphic LCD-display
19" x 1.75" x 8.2" (483 x 44 x 208 mm)
5.5 lbs. (2.5 kg)
100 to 240 VAC, 50 to 60 Hz (auto-select)
<20 W
>10 years
<-66 dB, 20 Hz to 20 kHz
<-82 db, 20 Hz to 20 kHz
> 60 dB @ 50/60 Hz & > 70 dB @ 1 kHz
24 bit (1 bit, 128 times oversampling)
0.8 ms @ 48 kHz
XLR balanced (pin 2 hot)
50 Ohm (active transformer)
22 dBu (balanced)
-10 dBu to 22 dBu
>100 dB (unweighted)
-86 dB (0.005%) @ 1 kHz, -6 dBFS
10 Hz to 20 kHz: +0/-0.5 dB
<-60 dB, 10 Hz to 20 kHz, typical < -90 dB @1 kHz
24 bit (1 bit, 128 times oversampling)
0.57 ms @ 48 kHz
Technical Specifications are subject
to change without notice !
36
MIDI IMPLEMENTATION CHART
Digitally Enhanced Mic-preamp, Gold Channel - May 1998 Version 1.0
Function
Basic Channel
Mode
Default
Changed
Default
Messages
Altered
Note Number
Velocity
After Touch
True Voice
Note ON
Note OFF
Key’s
Ch’s
Pitch Bend
Control Change
Prog Change
True#
System Exclusive
Common
System real time
Aux Messages
:Song Pos
:Song Sel
:Tune
:Clock
:Commands
:Local ON/OFF
:All Notes OFF
:Active Sense
:Reset
Transmitted
1(-16)
1-16
Recognized
1(-16)
1-16
X
X
X
X
X
X
X
X
X
X
X
X
X
X
X
X
X
X
O
0-127
O Bulkdump
X
X
X
X
X
X
X
X
X
O
0-127
O Bulkdump
X
X
X
X
X
X
X
X
X
Remarks
Notes
O:YES
X:NO
37
TROUBLE SHOOTING
You press Power switch, but there is no reaction.
- The power switch on the rear panel is switched off.
You cannot turn the power off.
- Press and hold the Power switch for 3 seconds, then release to power off
No sound through the Gold Channel
- You are using Analog input, but the input selected is Digital, or some send/return has been selected on the Signal page, without anything
connected.
You do not hear what you expect as Ch.2 input
- Ch.2 gets it input from Ch.1. Go to the Layout page and set the parameter: “Ch.1 to Ch.2” to OFF.
You cannot change the PAD value more than between 0 and 20
- The PAD range is limited. Go to the Utility, Config page and change the range of the PAD button.
38
CERTIFICATIONS
This equipment has been tested and found to comply with the
limits for a Class B digital device, pursuant to part 15 of the
FCC rules.
These limits are designed to provide reasonable protection
against harmful interference in residential installations.
This equipment generates, uses and can radiate radio frequency
energy and, if not installed and used in accordance with the
instructions, may cause harmful interference to radio
communications. However, there is no guarantee that
interference will not occur in a particular installation.
If this equipment does cause harmful interference to radio or
television reception, which can be determined by turning the
equipment off and on, the user is encouraged to try to correct the
interference by one or more of the following measures:
• Reorient or relocate the receiving antenna.
• Increase the separation between the equipment and receiver.
• Connect the equipment into an outlet on a circuit different
from that to which the receiver is connected.
• Consult the dealer or an experienced radio/TV technician for
help.
The user may find the following booklet, prepared by the
Federal Communications Commission, helpful:
"How to identify and Resolve Radio/TV interference Problems."
This booklet is available from the US. Government Printing
Office, Washington, DC 20402, Stock No. 004-000-0034-4.
Caution:
You are cautioned that any change or modifications not
expressly approved in this manual could void your authority to
operate this equipment.
Certificate Of Conformity
TC Electronic A/S, Sindalsvej 34, 8240 Risskov, Denmark,
hereby declares on own responsibility that the following product:
Gold Channel, Digitally Enhanced Mic-preamp
Is covered by this certificate and marked with CE-label conforms
with following standards:
EN 60065
Safety requirements for mains
operated Electronic and related
apparatus for household and similar
general use.
EN 55103-1
Product family standard for audio,
video, audio-visual and entertainment
lighting control apparatus for
professional use.
Part 1: Emission.
EN 55103-2
Product family standard for audio,
video, audio-visual and entertainment
lighting control apparatus for
professional use.
Part 2: Immunity.
With reference to regulations in following directives:
73/23/EEC, 89/336/EEC
Issued in Risskov, May14th 1998
Anders Fauerskov
Managing Director
For the customers in Canada:
This Class B digital apparatus meets all requirements of the
Canadian Interference-Causing Equipment Regulations.
Cet appareil numérique de la classe B respecte toutes les
exigences du Réglement sur le matériel brouilleur du Canada.
39
FACTORY PRESET LIST
Preset
1
2
3
4
5
6
7
8
9
10
11
12
13
14
15
16
17
18
19
20
21
22
23
24
25
26
27
28
29
30
31
32
33
34
35
36
37
38
39
40
41
42
43
44
45
46
47
48
49
50
40
Description
Female Vocal
Lead Vocal
Male Vocal
El Gtr Clean
Rthm Gtr D/I
Acoustic Gtr Helper
Kick L BassDI R Rock
909 BD/SD Insert
Drum Room MS-Rec
String Quartet MS
Vox Eq/Comp
Male Vocal 2
Easy Vocals
Gold Vocal
Male Vox Eq/Comp
Back Voc Composite
Vintage Vox
Comp. Vocal
2 Live Rappers
Bust A Dope Rap
Lead Vocal Chain
Vocal Easy Gate-Fast
Vocal Easy Gate-Slow
De-Es/Comp Vocal
Vocal Processor
Voice Tweezer
2 El Gtr/Rock
Stereo Rhythm Guitar
Natural Guitar
L:El Gtr R:Clean Gtr
Marshall 900
Clean Gtr. Fendamp
LPgtr. Fendamp
Marsh Mayquen Gtr
El Gtr Clean Tight
El Gtr Clean Loose
Nice Acc Gtr
Rock Acc Gtr
Heavy Acc Gtr
Neck Acc Gtr
Sndhole Acc Gtr.
Bigrythm Acc Gtr.
Sndhl Full Acc Gtr
Dynamic Acc Gtr
Latly Tekno Bass
Dbl Bass U47FET
Basses
Bass Amp 4x10FL
Slap Bass 4x10FL
Lively Steel Strings
Compressor, De-esser and EQ optimized for female vocals (96kHz processing on ch.1)
All processing blocks on channel one, and output on channel two
Compressor, De-esser and EQ optimized for male vocals (Same settings on both ch.)
EQ, Compressor and Expander for clean guitars (Same settings on both channels)
Compressor, EQ and Expander line in guitar (96kHz processing on ch.1)
Compressor and EQ for acoustic guitars (Same settings on both channels)
Expander, EQ and Comp for kickdrum (Ch.1) and bass guitar (Ch.2)
Processing for drum samples: Kickdrum on ch.1 and Snaredrum on ch.2
Mid/Side recording technique for recordings in a drum room
Mid/Side recording technique for recordings of classical setups
Vocal preset with EQ and compressor (Same settings on both channels)
Compressor and Dynamic EQ for male vocals (Same settings on both channels)
Compressor and EQ for different vocals (same settings on both channels)
Comprehensive processing on channel one - output on channel two
Another vocal preset (Same settings on both channels)
Two different backing vocal settings
EQ, Compressor and De-Esser for vocals (Same settings on both channels)
Vocal compressor in 96 kHz mode (Same settings on both channels)
Expander, EQ, Compressor and De-esser for high volume rap vocals
Input on channel one, processing on both channels and output on channel two
Vocal setting with processing on both channels - output on channel two
Noise gate for vocals fast (96 kHz processing)
Noise gate for vocals slow (96 kHz processing)
De-Esser, Compressor and EQ for vocals (96 kHz processing mode)
Post recording preset for vocals (Same settings on both channels)
Tweaks the life out of your vocal
Two settings for electric guitars miked with dynamic microphones
Guitar stereo recording
EQ and Compressor for guitar (96 kHz processing mode)
Two electric guitar settings
Dynamic mic on a Marshall stack
EV RE-20 on Fender '65 Super Reverb, clean Les Paul gtr. (Same settings on both ch.)
Neumann TLM-103 on Fender '69 Twin Reverb, clean Les Paul gtr.
TLM-103 on Marshall stack, Brian May "Queen" Les Paul gtr.
Two different guitar settings with EQ, compressor and expander
Two different guitar settings with EQ, compressor and expander
EQ, Compressor and De-esser for acoustic guitar
Rock acoustic guitar settings (two different)
Heavy acoustic guitar settings (two different)
AKG C451 on neck of acoustic guitar
AKG C414 at soundhole of acoustic guitar
AKG C460 condenser mic on acoustic guitar
Neumann U87 at soundhole of acoustic guitar
Sennheiser 421 at acoustic guitar
Line in and full processing for bass
Neumann U47 on bass
Two different bass presets
Hartke cabinet with Neumann TLM-103
Hartke cabinet with Sennheiser 421
DRG, compressor and EQ (Same settings on both channels)
FACTORY PRESET LIST
Preset
51
52
53
54
55
56
57
58
59
60
61
62
63
64
65
66
67
68
69
70
71
72
73
74
75
76
77
78
79
80
81
82
83
84
85
86
87
88
89
90
91
92
93
94
95
96
97
98
99
100
Description
Flamenco Gtr
Viola Da Gamba
Irish Mandolin
Wire Harp
El Cajon Hi/Lo
Piezo Guitar Wide
Piezo Guitar Pickups
Dynamic Piezo Pickup
Kick L Snare R Rock
Kick L Snare R Dark
Kick L Snare R Sqush
Kick L Hat R Rock
Tom
Floortom
Overhead Comp
Ducking Drums
Wind Chime
Snaredrum
No Attack
Gate Channel 1
Kicks
Snares
Crazy Kick Sucker
Djembe Hi/Lo Dyn
Bodhran
Piano
Hohner D6 Clavinet
Keyboard Radiance
Stereo Keyboards
Heavy Keyboards
Wurlitzer D/I
Transformer Sound
Post Deessing
LA-3A Compressor
De-Ess Channel 1
Comb Filter Effect
Slap Delay Effect
FM Radio News
Stereo Mastering
Vinyl Mastering
M-490 B
U-87 Vintage Comp
U-87 Soft Comp
U-89
M-149
AKG 414
Sennheiser 416
SM-7
UMT-70si
Empty Routing
EQ and compressor for acoustic flamenco guitar (Same settings on both channels)
EQ and DRG for Viola (Same settings on both channels)
EQ and compressor (Same settings on both channels)
EQ, compressor and DRG (Same settings on both channels)
EQ and compressor for Electric Cajon (Hi/Lo settings)
Input on channel one and output on both channels - delay on channel two
Expander, EQ and Compressor (Same settings on both channels)
Input on ch.1 output on both channels. Delay on channel 2
Expander, EQ and compressor settings for kick and snare drum
Expander, EQ and compressor settings for kick and snare drum
Expander, EQ and compressor settings for kick and snare drum
Expander, EQ and comp. for kick drum, EQ for the Hi-hat
Compressor, EQ and expander for side-tom (Same settings on both channels)
Compressor, EQ and expander for floor-tom (Same settings on both channels)
Compressor for cymbals
Two compressors on channel one (output on channel two) for heavy comp. of drums
EQ and comp for chimes
Comp and EQ for snaredrum (Same settings on both channels)
Removes the attack from your drums
Gate on channel one with Sidechain EQ on channel two (only use ch.1 output)
EQ, expander and compressor for kick-drum (Same settings on both channels)
EQ, expander and compressor for snare-drum (Same settings on both channels)
Far out kick-drum setting with input on channel one and output on channel two
Preset for Djembe with two dynamic microphones
EQ and compressor (Same settings on both channels)
EQ and compressor for piano
For a noisy synth or el-piano
Adds on some warmth to your keyboard sound
Processing for your keyboard
Processing for your keyboard
Line in and then compression and DRG for keyboard/el-piano
A little effect thing that makes some harmonic transformer sound (Tip: Look into the EQ)
Compressor, Dynamic EQ and EQ for post processing (96 kHz mode on channel one)
Emulation of famous compressor setting
De-esser with EQ as Sidechain processing (only output channel one)
A little delay on channel two makes this effect
Long delay on channel two makes this effect
If you want to improve the received sound from your local radio station
Not a Finalizer but you can come a long way with this
When you want to convert you old vinyl records into the digital world
Compressor and EQ for this microphone
Vintage compressor and EQ on a Neumann U-87
Soft compressor and EQ on a Neumann U-87
Compressor and EQ on a Neumann U-89
Compressor and EQ on a Neumann M-149
Compressor and EQ on an AKG 414
Compressor and EQ on a Sennheiser 416 mk2
Expander and EQ on a Shure SM-7
Compressor and EQ on a Geffel Microtech UMT - 70si
Build up your preset from here
41
WHERE GREAT RECORDINGS BEGIN
by Loren Alldrin
Have you ever thought about where recordings really begin? If this question brings to mind a
tape deck, mixer or analog-to-digital converter, you're a bit too far down the signal path. While
these components are crucial parts of many recording chains, they're not where the process
actually beings. Instead, it's the microphone that's the real starting point for most recordings.
The microphone is responsible for the crucial first conversion that turns minute changes in air pressure (sound)
into an electrical signal. How well the mic performs this task has a profound effect on the quality of the
recording. Capture a brilliant performance with a bad mic (or poor mic placement), and the result is a bad
recording. Place the right mic in front of a talented instrumentalist or vocalist, and you'll consistently capture
excellent recordings.
Choosing and using microphones well involves a unique mix of artistry and technical savvy, making it one of
the more enjoyable - and challenging - aspects of recording. In the next few pages, we'll help you achieve great
recordings by covering some key principles of microphone technology, selection and placement.
Microphones: The Inside Story
Microphones use three main methods to convert sound to electricity, a distinction that divides mics into the
dynamic, ribbon and condenser classes. The dynamic mic is simplest of the three, and works much like a
loudspeaker in reverse. As sound vibrates a thin, round diaphragm, a coil of wire moves back and forth through
a magnetic field to generate a changing voltage. This voltage is the microphone signal. In a ribbon mic (which
is closely related to the dynamic mic), the ultra-thin wisp of metal that makes up the ribbon sits directly in a
magnetic field. When it moves in response to sound, the ribbon generates a corresponding voltage that is the
mic's output signal.
Condenser mics suspend an ultra-thin membrane above a stationary, electrically charged backplate. Thanks to
the electrical principle of capacitance, any movement of the diaphragm causes a small change in voltage. This
tiny signal is then amplified inside the mic body to become the mic signal. Because condenser mics have onboard amplifiers, they require a source of power. The most common way to power condenser mics is with
phantom power, a voltage sent down a standard mic cable by a preamplifier or mixer. It's important to note that
applying phantom power to a ribbon mic will often destroy the ribbon, and likewise may harm some dynamic
mics.
The condenser mic class splits further, based on the size of the diaphragm used to pick up sound. Smalldiaphragm condenser mics use diaphragms less than 1/2-inch in diameter. Large-diaphragm condensers
frequently boast diaphragms an inch or more in diameter. Diaphragm size affects many aspects of mic
performance, including frequency response, directivity, sensitivity and overall sonic character.
Finally, mics differ in their pickup patterns--this describes how a microphone responds to sound coming from
all sides (see figure 1). If a mic picks up all sounds equally, it's a non-directional or "omnidirectional" design.
More common are mics most sensitive to sounds coming from a heart-shaped area directly in front of them,
which describes the "cardioid" pattern. Other patterns include bi-directional (most sensitive to sounds coming
from directly in front and behind), supercardioid and hypercardioid. The latter two are more-directional
versions of the standard cardioid.
42
WHERE GREAT RECORDINGS BEGIN
A bi-directional pattern is impractical to create in a dynamic design, which explains why most dynamic mics are either omni or some form
of cardioid. Ribbon mics are bi-directional by default, though some ribbon mics are available in a cardioid pattern. Condenser mics cover
the whole gamut of directional patterns, and many large-diaphragm condenser mics offer a selection of pickup patterns from omni to
cardioid to bi-directional.
Choosing the Right Mic
With all these mic types to choose from, it can seem like an overwhelming task to pick the right one for a given instrument or voice. To
make matters even trickier, a given type of mic won't always excel in certain applications. Thankfully, there are many time-proven
guidelines that can help narrow down your choices. Experimentation is also an important part of the process - the only rule of mic
selection is that there are no rules. You should try everything.
One of the first steps in choosing a mic is to listen to the sound itself. Listen for characteristics of the instrument or voice that you wish to
accentuate, as well as those that are better subdued. The right mic will capture the most flattering recording, making the sound seem "better
than life." Even if your goal is capturing a sound with complete accuracy and no enhancement, you'll need to have a good picture in your
mind of what the voice or instrument really sounds like.
Choosing the microphone type is a good next step. Dynamic, condenser and ribbon mics often have specific performance characteristics
unique to their mic type. Dynamic mics tend to be the most rugged, making them a good choice when a mic must stand in harm's way.
Most dynamics also handle extremely loud sounds without distortion. Ribbon mics are the most fragile, and tend to distort easily as sounds
get louder and lower in frequency. A wayward puff of air or wind can tear a ribbon from its mount, requiring an expensive repair to fix.
Modern condenser designs are generally much sturdier than ribbon mics, but still aren't as tough as most dynamics.
Sonically, condenser mics tend to have the most open, accurate sound with the most extended high-frequency response. This is because
most condenser diaphragms are extremely light and thin, making them capable of responding accurately to subtle, delicate changes in air
pressure. Dynamic mics have a much heavier diaphragm assembly, which limits the speed at which they can respond to sound. This makes
dynamic mics tend toward a more "compressed" sound, with reduced transients and less high-frequency detail. Ribbon mics generally fall
somewhere between condensers and dynamics, and are often considered to have a smoother, mellower sound than the other mic types. As
with all aspects of mic performance, however, certain mics will fall well outside these gross generalizations. The only way to know how a
mic will perform is to listen to it.
Pickup pattern is another key element of mic performance. Directional mics are used to reduce the amount of ambient sound and room
reverb that ends up in a recording, as well as stray sound from other instruments. Omnidirectional mics pick up a higher ratio of ambient
sound, which may be appropriate in good-sounding rooms. Bi-directional mics are useful when recording two instruments or vocalists-placed on opposite sides of the microphone, both performers can enjoy the sonic benefits of being "on-mic." You'll want to choose a mic's
pickup pattern based on the environment the instrument or voice is being recorded in.
Finally, the individual sonic character of the mic comes into play. The goal is to choose a mic whose unique sound complements the
instrument or voice you're recording. Whether dark or bright, fat or thin, up-front or mellow, there's a mic out there that's a perfect match
for every sound source. It's up to you to find it.
Microphone Placement
Where you place a mic (or mics) is nearly as important to the quality of a recording as the mic itself. Finding the right distance and
location depends on the specific sound of the voice or instrument, as well as the characteristics of the recording space. Again,
experimentation is key.
43
WHERE GREAT RECORDINGS BEGIN
Miking distance works in concert with directional pattern to affect the amount of ambient sound recorded.
Moving a mic closer to a sound source makes it louder in relation to competing sounds. To the listener,
this reduction of ambient sound makes the instrument or voice appear to be closer. Pulling the mic back
and allowing it to record more ambient sound will appear to push the sound back from the plane of the
speakers. In other words, mic placement has a direct effect on the perceived location of the sound on
playback. Though you can simulate this effect with artificial ambience, the results are rarely as convincing
as those achieved by varied microphone placement.
When it comes to mic distance, there are potential problems at both extremes. Place a mic too close, and it
may pick up only one aspect of a sound's character. Most directional mics also experience proximity
effect, which causes a buildup in bass frequencies when placed within about 18 inches of the sound
source. A low-cut filter or low-frequency equalization (both of which are found in the Gold Channel) can
help compensate for excessive proximity effect. Up-close mic placement can also accentuate dynamics
and transient peaks, making the sound a challenge to properly record and mix. When close mic placement
is a must, the Gold Channel's compression circuit can help tame excessive peaks.
Placing a mic too far from the instrument or voice can make for a distant, unexciting sound. Rooms with
poor acoustics will show up loud and clear on a distant mic, as will unwanted sounds and noises. High
frequencies and subtle details tend to decrease quickly with distance, giving distant miking a somewhat
duller sound than up-close miking. For most popular music recording of a single instrument, miking
distances of eight inches to three feet are most common.
Apart from miking distance, the orientation of mic to instrument or voice can have a significant impact on
the sound. Since high and low frequencies spread out from a sound source differently, various locations
around an instrument will deliver dramatically different sound. Likewise, various spots in a room will
have a different mix of frequencies due to the way sound careens around between walls, ceiling and floor.
Sometimes, moving a microphone just a few inches can alter the character of the sound considerably. The
closer the mic is, the more dramatic the resulting change. Finding a voice or instrument's "sweet spot"
takes some time, but is well worth the effort.
Stereo Recording
Stereo recording uses two microphones to record a more pronounced sense of spaciousness and ambience
than is possible with a single mic. Stereo recording can make a single instrument seem to spread from one
speaker to the other, or it can capture the sound of an ensemble with a great degree of realism.
Though variations abound, there are three common miking arrangements used to capture stereo sound (see
figure 2). The simplest is the spaced pair, which places two directional or omnidirectional mics anywhere
from 12 inches to several feet apart in front of the sound source. Spaced pair recordings capture a rich, full
ambient sound.
A related approach is coincident pair or "X-Y" recording. This approach places two directional mics at
roughly a 90-degree angle to one another, with their heads nearly touching. Though not quite as lush as
spaced pair stereo, this method offers good sound localization and better compatibility for mono playback.
A matched pair of mics is important for both spaced pair and X-Y miking setups, as is identical signal
processing of the two channels. The Gold Channel's stereo link mode makes it well-suited to X-Y and
spaced pair stereo recording, as changes in one channel will be performed identically on the other.
44
WHERE GREAT RECORDINGS BEGIN
The third common stereo miking approach is mid-side or "M/S." M/S miking uses a forward-facing directional mic and a side-facing bidirectional mic. M/S recording offers very good stereo imaging with the added benefit of excellent mono compatibility. Through some
electronic processing: M/S-encoding and decoding, the two mic signals can be combined to create a stereo signal either before recording or
on playback. The Gold Channel offers M/S encoding and decoding at its input and output.
The Gold Channel
The TC Electronic Gold Channel offers a wealth of power to amplify and process microphone signals. This power can be used to further
enhance a great-sounding mic signal, or it can be used to correct a not-so-great sound. Your job is to give the Gold Channel the bestpossible sound to work with, which is where good mic technique comes into play. Remember - mic selection and placement isn't just
another step in the recording process.
It's where great recordings begin.
For more information about microphone techniques and technology, check out "The Home Studio Guide to Microphones" by Loren
Alldrin. Written in a non-technical, easy-to-read style, this book has one simple goal: to help you make great recordings with any
microphone. Call Mix Bookshelf at 800-543-7771 for ordering information.
45