1
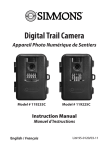
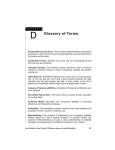
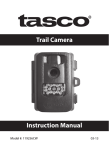
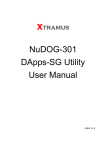
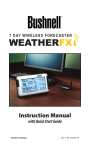
Digital Trail Camera
Instruction Manual
Model#: 119223C
Lit# 93-0580/04-10
IMPORTANT NOTE
Congratulations on your purchase of one of the best trail cameras on the
market! Tasco is very proud of this little unit and we are sure you will be
pleased with it as well. We appreciate your business and want to earn
your trust. Please refer to the notes below and the instructions in this
manual to ensure that you are completely satisfied with this product.
If your Tasco Trail Cam does not seem to be functioning properly
or if you are having photo/video quality issues, please check the
Troubleshooting/FAQ section on pages 15-17.
Problems are often due to something simple that was overlooked, or
require only changing one setting to solve.
If your problem continues after trying the solutions in the
Troubleshooting/FAQ section, please call Tasco Customer Service at
(800) 423-3537. In Canada, call (800) 361-5702.
Tasco recommends using 4 Energizer® Alkaline “C” Cell batteries in
this Trail Cam to obtain maximum battery life.
Tasco recommends using SanDisk® SD and SDHC Cards
(up to 8GB capacity) in this Trail Cam.
Page Index
Introduction
Parts and Controls
Camera Setup
Setting the Year, Date & Time
Setting Camera/Video Mode and Resolution
Formatting SD Cards
Exiting the Setup Menu
Camera Operation
Mount the Camera
Test the Coverage Area
Secure the Camera
Viewing the Photos and Videos
Glossary
Specifications Troubleshooting/FAQ 4
5
7
7
8
8
9
10
10
10
11
12
13
14
15
3
INTRODUCTION
Congratulations on your purchase of the Tasco 119223C digital trail
camera. This trail camera is designed to record the activity of wildlife in
the outdoors with its still image and movie modes and weatherproof,
rugged construction.
Main Features:
•
1.3MP digital sensor
•
Compact Size (177mm*137mm*52mm)
•
Long Battery Life (Up to 90 Days)
•
Trigger Time=1.6 second
•
LCD Display
•
Xenon Flash
•
640*480 at 15 FPS Videos
•
Supports up to 8 GB SD Card
•
Date, Time & Moon Phase Imprint
•
Auto Exposure
•
Auto White Balance
•
Power Supply: 4 “C” Cell batteries
•
Weatherproof
4
Parts and Controls Guide
PIR Motion
Sensor
Camera
Lens
Padlock
Hole
PIR
Indicator
Xenon
Flash
Front of Camera
5
Parts and Controls Guide
LCD
Display
SD Card
Slot
Power
Button
Battery
Compartment
USB Port
Control Panel
(Front Opened)
Control Panel Detail
6
CAMERA SETUP
Open the Cam by pulling out on the two latches on the right side. Install
4 “C” cell batteries (flat base of all batteries contacting springs), and insert
an SD card (not included, use any capacity from 16MB to 8GB. Do not
substitute MMC cards.) in the slot to the right of the 5 buttons as indicated
on the slot cover (upside down, with the notched corner of the card on
the left and metal contacts of the card facing the back of the slot). Press
the card down until you hear it click into place. If the Cam is turned on
without a card in place, it may not turn off-reset it by pulling one of the
batteries out partway, insert a new or empty SD card, and put the battery
back in place. Only remove or insert cards with power off.
1. Date
2. Time
3. 4 Digit Display
4. Still Photo Mode /
Resolution
5. Video Mode
6. SD Card
6
Setup Icons- Display Guide
1. Setting the Date, Year and Time
If you are using the camera for the first time, you should set the date and
time so your photos will be “stamped” correctly.
Set Date and Year
•
Briefly press the MENU button-the first two digits of the year will
flash, prompting you to enter the year.
•
Use the UP/DOWN buttons to set the current year (2010-2030), then
press OK. Set the month the same way, and press OK again.
•
Set the month the same way, and press OK again. The display will
then change to let you set the day, with only the last two digits
blinking.
7
Camera Setup (continued)
•
•
Again use the UP/DOWN buttons to change the day if necessary
and press OK.
To set the time, use UP/DOWN to set the hour and minute. The time
display uses the 24 hr standard, so 2:00 PM is indicated as “1400”,
etc.
Note: The Date & Time setting will normally be retained for a few minutes
when the batteries are removed from the camera. However, you may need
to reset the Date & Time after replacing the batteries, if they have been
removed for a longer period of time.
2. Setting Camera/Video Mode and Resolution
This item allows you to select whether the camera takes still photos
(and select high or low resolution), or shoots video clips when the PIR is
triggered (Photo or Video Mode).
•
•
•
•
After the date and time have been set, press OK. You will see the
camera icon and the word “Lo” will blink.
By pressing UP/DOWN, the camera will cycle between Lo resolution
still photo, Hi resolution still photo, and movie (video) modes. Choose the mode that you want and press OK.
The “Lo” setting will allow you to take lower resolution (1.3MP)
images and therefore accumulate more images on your card while
the “HI” setting will give you high resolution (3.0MP via software
interpolation) images of better quality but fewer images can be
stored to the card. In Movie mode a 14 second AVI file will be recorded to the SD Card
each time the camera is triggered. The movie length is preset and
cannot be changed. There are no additional settings or options for
Video Mode.
3. Formatting SD Cards
•
8
Pressing OK again after the resolution options will go to the Format
screen next. Formatting is recommended before you re-use an old
SD card, and is a quick way to erase all of the photos/videos after
Camera Setup (continued)
•
•
•
•
you’ve saved any you wish to keep.
The display will read “FoNo”, with “No” and the SD card icon
blinking. Press OK when “No” is flashing if you don’t want to format
the card.
To format the card, press either UP/DOWN button and the “Fo”
portion will blink. Press OK and the display will change to “Y N” with
the SD card icon blinking. “N” (NO) is the default, so pressing OK will cancel the formatting,
then pressing and holding MENU will exit menu mode. If you are certain that you want to format the card and DELETE all
data and images on the card, then press either UP/DOWN button to
select “Y” (YES). With “Y” flashing, press OK- the display will briefly
change to “SdFr”. Exiting the Setup Menu
Press and hold MENU to exit Menu mode at any time once you have
finished changing any of the menu item settings or using one of the
menu options.
In normal operating mode, the display will only show the still photo or
movie clip icon in the lower left corner, an SD card icon on the lower right,
and one or more digits that indicate how many photo or movie files have
been stored on the card.
9
CAMERA OPERATION
Once your camera has been setup, you are ready to begin using it to
capture photos of wildlife activity in the area you choose to locate it. Just
follow these steps:
1. Mount the Camera
It is recommended that you mount the camera about 4 or 5 feet (1.2~1.5
meters) off the ground, with the camera pointed at a slight downward
angle. It’s best to avoid mounting the camera facing east or west as the
rising and setting of the sun could produce false triggers and overexposed
images. Clear branches and other debris away from the front of the
camera so as not to block the camera lens or PIR sensor.
To mount the camera in place, insert the strap through the strap slots on
the rear housing. Wrap the strap around the mounting surface. Aim the
camera at the area you wish to observe. Secure the strap and tighten the
buckle in order to secure the camera.
Make sure that both door latches are securely locked in place, to ensure
proper weather resistance.
2. Test the Camera
To test the camera operation, power on the camera and wave your hand
in front of the lens and PIR (passive infrared/motion) detector, while
looking at the LCD display. As long as events are being detected, a new
still photo or movie clip (as set in the menu) will be recorded every 30
seconds, indicated on the display by “SnAP”, then “SLP” (Sleep).
Note: in Video Mode, the display will stay on “SnAP” for the duration of each
video clip.
The red LED lamp (PIR Indicator) on the front of the camera can help you
determine how large an area is covered, as it will flash anytime an “event”
is detected while the camera is in MENU mode. To check the coverage
10
Camera OPERATION (continued)
area, press the MENU button, then step away from the camera. Move
straight back from the camera to find the length (depth) of the sensor
detection zone, and move left or right to check the width (edges) of the
detection zone (note that it becomes wider as you move farther back-see
below). When you no longer see the red PIR indicator flash as you move
around, you are past the limits of the coverage area. Reposition the
camera if necessary. When you finish testing the camera, press and hold
MENU to exit Menu mode.
3. Set the Camera
Make sure the camera’s power is turned on, and make sure a new or
empty SD card has been inserted, then leave the area-there is a 30 second
delay after power on before the first photo is taken. Batteries typically last
90 days or more, depending on how often the Cam is activated by events,
how often the flash fires, ambient temperature, etc.
4. Secure the Camera
A standard padlock may be used in the camera’s lock hole to secure it and
prevent theft.
11
VIEWING THE PHOTOS and VIDEOS
After your camera has been operating for awhile, you will of course want
to review the photos and/or videos it has been capturing. This can be
done by either of two methods, according to your preference or the
availability of accessory equipment:
Using an SD Card Reader
Make sure the power is off, and remove the SD card by pushing down
lightly on the top edge of the card-it will pop up for removal.
Insert it into an SD card reader (available at most computer, photo, or
electronics dealers) connected via USB to your PC or Mac to view, copy,
or delete the photos (standard JPG files) and movies (AVI files) inside the
“DCIM/100MEDIA” folder on the card. Double click on an individual file to
see it, or open the files using the photo software of your choice.
Connect the Camera to PC directly
Press POWER to turn on the camera, then press the MENU button.
Connect your camera to your PC with a compatible USB cable. The PC will
recognize the camera as an external storage device, using the “USB Mass
Storage” standard (no driver installation necessary-not compatible with
Windows 98 or earlier). The PC will display a new disk symbol under “My
Computer” or in Windows Explorer, and you will see a dialog window on
your desktop with several options to view, move, or copy the photo and
video files that are stored on the SD card.
12
GLOSSARY
PIR (Passive Infrared Sensor): Senses motion like a typical security motion
detector. Requires infrared energy (heat) in addition to motion to trigger
the sensor to help limit detection to live animals (rather than leaves, etc).
Xenon Flash: This is a standard electronic flash tube, which fires
automatically in low light conditions to provide adequate illumination.
Battery Life: Time that camera will function in the field. Dependent on
ambient temperature, number of images taken and number of times the
flash fires. When the battery voltage drops below 4.5v, the flash stops
firing. When battery voltage is below 3.5v, the camera stops working.
FULL: When memory capacity (SD Card) is full, the LCD display indicates
“FULL”
Mass Storage: Connect the USB cable to a computer, press the “MENU”
button, and the computer can access the contents of the SD card. The
camera is automatically recognized as an “external drive”, without the
need to install special drivers. (Win 98 and older operating systems are
not supported. Mac OS9 and OSX are also compatible-the camera will
appear on your desktop as an external storage device or “disk”).
13
Technical Specifications
Model Number
119223C
Image Sensor Type
1/3 Inch CMOS
Effective Resolution
1.3 Megapixels
Effective Focal Length
4.4 mm
Lens Aperture
Display
f/2.0
Monochrome LCD
PIR Sensor
Yes
Trigger Speed
1.6 second
Max Flash Distance
16 feet (5 meters)
Storage
SD Card up to 8 GB Capacity
PIR Indicator
Yes (Setup mode only)
Selectable Image Resolution
1.3MP, 3.0MP
Video Resolution
Movie: AVI 640 x 480 pixels @ 15 fps (15
seconds).
File Format (Image/Video)
JPEG/AVI
Date Time Imprint
Yes
Moon Phase Imprint
Yes
Exposure
Auto
White Balance Mode
Auto
Power Supply
4 “C” Cell batteries (alkaline or NiMh)
Water Resistant
Yes
14
Troubleshooting / FAQ
Battery life is shorter than expected
1. Battery life will vary with operating temperature and the number
of images taken over time. Typically, the Trail Cam will be able to
capture several images before the batteries die.
2. Check to make sure you have used new alkaline batteries. Tasco
recommends using 4 Energizer® Alkaline “C” Cell batteries in
this Trail Cam to obtain maximum battery life.
3. Make sure that the Power Button was switched to the “On”
position, and that the camera was not left in setup mode.
4. Make sure that you are using a good quality name brand SD card
in your camera. Tasco recommends SanDisk® brand SD Cards
up to 8GB. Our experience indicates that poor quality SD cards
can sometimes reduce your Trail Cam battery life.
Camera stops taking images or won’t take images
1. Please make sure that the SD card is not full. If the card is full, the
camera will stop taking images.
2. Check the batteries to make sure that they are new alkaline “C”
Cell batteries. See note above about short battery life.
3. Make sure that the camera Power Button is switched “On” .
4. Make sure that you are using a good quality SD card in your
camera. Tasco recommends SanDisk® SD Cards up to 8GB. 5. If the SD card has its write protect switch in the lock position, the
camera will not take images.
6.
In some cases, other devices may change the formatting of the
SD card so that it will not work properly with the Trail Cam.
Camera won’t power up
1. Make sure that you have installed all 4 batteries in the battery
compartment. Tasco recommends using 4 Energizer® Alkaline
“C” Cell batteries in this Trail Cam.
2. Make sure that the batteries are installed correctly, observing
proper polarity. Always place the negative (flat) end of each
battery in contact with the spring side of its slot inside the
camera.
15
Troubleshooting / FAQ
Still Photo and/or Video Quality Problems
1. Night photos appear too dark
a. Try using a set of new batteries. The flash will stop operating
near the end of the battery life.
b. You will get the best results when the subject is within the
ideal flash range, no farther than about 16’ (5m) from the camera.
Subjects may appear too dark at greater distances.
2. Daytime photos or videos appear too dark
a. Make sure that the camera is not aimed at the sun or other
light sources during the day, as this may cause the auto exposure
to produce darker results.
3. Night photos appear too bright
a. You will get the best results when the subject is within the ideal
flash range, no closer than 10’ (3m) from the camera. Subjects
may appear too light at closer distances.
4. Daytime photos or videos appear too bright
a. Make sure that the camera is not aimed at the sun or other
light sources during the day.
5. Photos with streaked subject
a. In some cases with low lighting conditions and fast moving
subjects, the HI resolution setting may not perform as well as the
LO setting.
b. If you have multiple images where fast moving subjects
produce streaks on the photo, try the LO setting instead.
6. Red , green or blue color cast
a. Under certain lighting conditions, the sensor can become
confused resulting in poor color images.
b. If this is seen on a consistent basis, then the sensor may need
servicing. Please contact Tasco customer service.
7. Short video clips—not recording to the length set
a. Check to make sure that the SD card is not full.
b. Make sure that the camera has good batteries in it. Near the
end of the battery life, the camera may choose to record shorter
video clips to conserve power.
16
Troubleshooting / FAQ
Photos Do Not Capture Subject of Interest
1. Try to set your camera up in an area where there is not a heat
source in the camera’s line of sight.
2. In some cases, setting the camera near water will make the
camera take images with no subject in them. Try aiming the
camera over ground.
3. Try to avoid setting the camera up on small trees that are prone
to being moved by strong winds.
4. Remove any limbs which are right in front of the camera lens.
PIR Sensor LED Flashes/Doesn’t Flash
1. When the camera is in the “Setup” mode, the PIR Indicator LED on
the front of the camera will flash when it senses motion. This is
for setup purposes only and will help the user aim the camera. 2. During use, the LED will not flash when the camera takes an
image. This is to help keep the camera hidden from game.
Camera won’t retain settings
1. Make sure that you have been saving the changes to any parameter
settings that you made while in Setup mode, by pressing “OK”
after changing the setting. If you don’t save your new setting after
changing it, the camera will continue to use the original default
setting for that parameter.
17
TWO-YEAR LIMITED WARRANTY
Your Tasco® product is warranted to be free of defects in materials and workmanship for
two years after the date of purchase. In the event of a defect under this warranty, we will,
at our option, repair or replace the product, provided that you return the product postage
prepaid. This warranty does not cover damages caused by misuse, improper handling,
installation, or maintenance provided by someone other than a Tasco Authorized Service
Department.
Any return made under this warranty must be accompanied by the items listed below:
1) A check/money order in the amount of $10.00 to cover the cost of postage and handling
2) Name and address for product return
3) An explanation of the defect
4) Proof of Date Purchased
5) Product should be well packed in a sturdy outside shipping carton, to prevent damage in transit,
with return postage prepaid to the address listed below:
IN U.S.A. Send To:
Tasco
Attn.: Repairs
8500 Marshall Drive
Lenexa, Kansas 66214
IN CANADA Send To: Tasco
Attn.: Repairs
25A East Pearce Street, Unit 1
Richmond Hill, Ontario L4B 2M9
For products purchased outside the United States or Canada please contact your local
dealer for applicable warranty information. In Europe you may also contact Tasco at:
Tasco Germany GmbH
European Service Centre
Mathias-Brüggen-Str. 80
D-50827 Köln
GERMANY
Tel: +49 221 995568-0
Fax: +49 221 995568-20
This warranty gives you specific legal rights.
You may have other rights which vary from country to country.
©2010 B.O.P..
Specifications and designs are subject to change without any notice
or obligation on the part of the manufacturer.
18
FCC Compliance Statement:
This equipment has been tested and found to comply with the limits for a
Class B digital device, pursuant to part 15 of the FCC Rules. These limits are
designed to provide reasonable protection against harmful interference
in a residential installation.
Operation is subject to the following two conditions: (1) This device
may not cause harmful interference, and (2) this device must accept any
interference received, including interference that may cause undesired
operation.
This equipment generates, uses and can radiate radio frequency energy
and, if not installed and used in accordance with the instructions, may
cause harmful interference to radio communications. However, there is
no guarantee that interference will not occur in a particular installation.
If this equipment does cause harmful interference to radio or television
reception, which can be determined by turning the equipment off and
on, the user is encouraged to try to correct the interference by one or
more of the following measures:
· Reorient or relocate the receiving antenna.
· Increase the separation between the equipment and receiver.
· Connect the equipment into an outlet on a circuit different from
that to which the receiver is connected.
· Consult the dealer or an experienced radio/TV technician for help.
The device does not contain any user-serviceable parts. Repairs should
only be made by an Authorized Tasco repair center. Unauthorized repairs
or modifications could result in permanent damage to the equipment,
and will void your warranty and your authority to operate this device
under Part 15 regulations.
The shielded interface cable which is provided must be used with the
equipment in order to comply with the limits for a digital device pursuant
to Subpart B of Part 15 of FCC Rules.
19
For further questions or additional information please contact:
Tasco
9200 Cody, Overland Park, Kansas 66214
(800) 423-3537 • www.Tasco.com
©2010 B.O.P.