1
Portable Stereo CD System
!"#CD !
‰UI½ u¹d²Ý≈ W−b U½«uDÝ≈ ÂUE½
Operating Instructions
!"
This Manual is an overseas version and some details may differ
from Instructions enclosed with products sold in Australia
qOGA²« «œUý—≈
Model No.
RX-ES27
RX-ES22
Before connecting, operating or adjusting this
product, please read these instructions
completely. Please keep this manual for future
reference.
!"#$%&'()*+,-./012
!"#$%&'()*+,-.
Ë√ q??O?,u?ð q?³?& ÎU??O?K? «œU?ý—ù« Ác?¼ …¡«d?& v?łd?¹
Æ“UN'« «c¼ j³{ Ë√ qOGAð
ÆVO²J« «cNÐ ÿUH²Šô« vłd¹
GC GS
RQT6279_2G (Cv_3)
RQT6279-2G
1
29/1/04, 2:12 PM
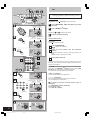
DearDear
Customer
Customer
Thank you for purchasing this product.
For optimum performance and safety, please read these instructions
carefully.
Table of Contents
Inside of product
!
Z²M*« qš«œ
N o te o n A C p o w e r s u p p ly c o r d ( F o r S a u d i A r a b ia a n d K u w a it o n ly )
!"#$%&'()*+,-./0123456789
WOÐdF« WJKLLK® œœd²*« —UO²« eON& qÐU" ’uBÐ WCŠö©jI5 X¹uJ«Ë W¹œuFF«
Before use
!
«b²Ýô« q³
Remove the connector cover.
!"#$%
ÆqÝu*« ¡UDž ‰“√
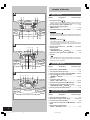
How to replace the fuse
!"#$%
…d³NB« ‰«b³²Ý« WOIO"
The location of the fuse differ according to the type of AC mains
plug (figures A and B). Confirm the AC mains plug fitted and
follow the instructions below.
Illustrations may differ from actual AC mains plug.
!"#$%=AC= !"#$%&'()*=A B !"=AC !"#$%&'()*+,-./012
!"#$%=AC !"#$%&'
A qJý® œœd²*« —UO²« fÐU ·ö²šSÐ …dONB« lu- nK²¹
wFOzd« œœd²*« —UO²« fÐU WLzö- s- oI% Æ©B qJýË
ÆÁU½œ√ «œUý—ù« l³ð≈Ë
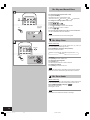
1. Open the fuse cover with a screwdriver.
!"#$%&'()*+
ÆWO³uK« dO-UF*« pH- WDÝ«u¹…dONB« ¡UDž `²5≈
Figure A
=^
A qJý
Supplied Accessories .......................................................... 4
Precautions ......................................................................... 4
Use of Batteries .................................................................. 4
Power Sources .................................................................... 6
Memory Batteries ................................................................ 6
Location of Controls ............................................................ 8
The Remote Control .......................................................... 10
Setting the Clock ............................................................... 12
Using Headphones ........................................................... 12
Maintenance ..................................................................... 12
The Radio .......................................................................... 14
CDs ................................................................................... 18
Cassettes .......................................................................... 24
Tips on Recording ............................................................. 24
Recording CDs .................................................................. 26
Recording the Radio ......................................................... 30
Sound Quality ................................................................... 32
3-D sound with the Sound Virtualizer ................................ 32
The Play and Record Timer .............................................. 34
The Sleep Timer ................................................................ 36
The Timer Fader ................................................................ 36
Troubleshooting ................................................................ 38
Technical Specifications .................................................... 38
CAUTION!
THIS PRODUCT UTILIZES A LASER.
USE OF CONTROLS OR ADJUSTMENTS OR
PERFORMANCE OF PROCEDURES OTHER THAN THOSE
SPECIFIED HEREIN MAY RESULT IN HAZARDOUS
RADIATION EXPOSURE.
DO NOT OPEN COVERS AND DO NOT REPAIR
YOURSELF. REFER SERVICING TO QUALIFIED
PERSONNEL.
WARNING:
Figure B
=_
B qJý
Fuse cover
!"
…dONB« ¡UDž
TO REDUCE THE RISK OF FIRE, ELECTRIC SHOCK OR
PRODUCT DAMAGE, DO NOT EXPOSE THIS APPARATUS
TO RAIN, MOISTURE, DRIPPING OR SPLASHING AND
THAT NO OBJECTS FILLED WITH LIQUIDS, SUCH AS
VASES, SHALL BE PLACED ON THE APPARATUS.
This product may receive radio interference caused by mobile
telephones during use. If such interference is apparent, please
increase separation between the product and the mobile
telephone.
2. Replace the fuse and close or attach the fuse cover.
!"#$%&'()* !"+,ÆUNzUDž Xý Ë√ ‚Už≈Ë …dONB« ‰b³²Ý≈
Figure A
=^
A qJý
Figure B
=_
Fuse (5 ampere) B qJý
!5 …dONB«
©dO³-« µ®
Fuse (5 ampere)
!5 …dONB«
©dO³-« µ®
CAUTION:
Change the voltage setting to suit the AC voltage in your
area. See page 6. Note that the unit will be seriously
damaged or fail to operate correctly if this setting is not
made correctly.
THIS UNIT IS INTENDED FOR USE IN TROPICAL
CLIMATES.
2
RQT6279
RQT6279_2G (Cv_3)
2
30/1/04, 9:30 AM
!"
Dear Customer
!"#$%&
!"#$%&'()*+,-./012
e¹eF« UM½uГ
ÆZ²M*« «c¼ pz«dA ö¹eł
Î
Î
«dJý
«œU?ý—ù« Ác?¼ …¡«d vłd¹ ¨q¦$_« ¡«œ_« vKŽ ‰uB(«Ë ÊU$_« qł√ s$
ÆW¹UMFÐ
U¹u²;« ‰Ëbł
! .......................................................................................... 5
! .......................................................................................... 5
!" ...................................................................................... 5
................................................................................................. 7
!" ...................................................................................... 7
! .......................................................................................... 9
........................................................................................... 11
! ........................................................................................ 13
!"# ................................................................................ 13
............................................................................................... 13
........................................................................................... 15
CD ................................................................................................. 19
........................................................................................... 25
!" .................................................................................... 25
CD
.................................................................................. 27
!"#
............................................................................. 31
............................................................................................... 33
!"#$%&'()!* .................................................... 33
µ ÆÆÆÆÆÆÆÆÆÆÆÆÆÆÆÆÆÆÆÆÆÆÆÆÆÆÆÆÆÆÆÆÆÆÆÆÆÆÆÆÆÆÆÆÆÆÆÆÆÆÆÆÆÆÆÆÆÆÆÆÆÆÆÆÆÆÆÆÆÆÆÆÆ WI6d*« UI×K*«
µ ÆÆÆÆÆÆÆÆÆÆÆÆÆÆÆÆÆÆÆÆÆÆÆÆÆÆÆÆÆÆÆÆÆÆÆÆÆÆÆÆÆÆÆÆÆÆÆÆÆÆÆÆÆÆÆÆÆÆÆÆÆÆÆÆÆÆÆÆÆÆÆÆÆÆÆÆÆÆÆÆÆ UÞUO²Š≈
µ ÆÆÆÆÆÆÆÆÆÆÆÆÆÆÆÆÆÆÆÆÆÆÆÆÆÆÆÆÆÆÆÆÆÆÆÆÆÆÆÆÆÆÆÆÆÆÆÆÆÆÆÆÆÆÆÆÆÆÆÆÆÆÆÆÆÆÆ U¹—UD³« «b@²Ý≈
∑ ÆÆÆÆÆÆÆÆÆÆÆÆÆÆÆÆÆÆÆÆÆÆÆÆÆÆÆÆÆÆÆÆÆÆÆÆÆÆÆÆÆÆÆÆÆÆÆÆÆÆÆÆÆÆÆÆÆÆÆÆÆÆÆÆÆÆÆÆÆÆÆÆÆÆÆÆ …—bI« —œUB$
∑ ÆÆÆÆÆÆÆÆÆÆÆÆÆÆÆÆÆÆÆÆÆÆÆÆÆÆÆÆÆÆÆÆÆÆÆÆÆÆÆÆÆÆÆÆÆÆÆÆÆÆÆÆÆÆÆÆÆÆÆÆÆÆÆÆÆÆÆÆÆÆÆ …dC«c« U¹—UDÐ
π ÆÆÆÆÆÆÆÆÆÆÆÆÆÆÆÆÆÆÆÆÆÆÆÆÆÆÆÆÆÆÆÆÆÆÆÆÆÆÆÆÆÆÆÆÆÆÆÆÆÆÆÆÆÆÆÆÆÆÆÆÆÆÆÆÆÆ rJײ« `OðUH$ lu$
±± ÆÆÆÆÆÆÆÆÆÆÆÆÆÆÆÆÆÆÆÆÆÆÆÆÆÆÆÆÆÆÆÆÆÆÆÆÆÆÆÆÆÆÆÆÆÆÆÆÆÆÆÆÆÆÆÆÆÆÆÆÆÆÆÆ bFÐ sŽ rJײ« tłu$
±≥ ÆÆÆÆÆÆÆÆÆÆÆÆÆÆÆÆÆÆÆÆÆÆÆÆÆÆÆÆÆÆÆÆÆÆÆÆÆÆÆÆÆÆÆÆÆÆÆÆÆÆÆÆÆÆÆÆÆÆÆÆÆÆÆÆÆÆÆÆÆÆÆÆÆÆÆ WŽUL« j³{
±≥ ÆÆÆÆÆÆÆÆÆÆÆÆÆÆÆÆÆÆÆÆÆÆÆÆÆÆÆÆÆÆÆÆÆÆÆÆÆÆÆÆÆÆÆÆÆÆÆÆÆÆÆÆÆÆÆÆÆÆ ”√d« UŽULÝ Â«b@²Ý≈
±≥ ÆÆÆÆÆÆÆÆÆÆÆÆÆÆÆÆÆÆÆÆÆÆÆÆÆÆÆÆÆÆÆÆÆÆÆÆÆÆÆÆÆÆÆÆÆÆÆÆÆÆÆÆÆÆÆÆÆÆÆÆÆÆÆÆÆÆÆÆÆÆÆÆÆÆÆÆÆÆÆÆÆÆ W½UOB«
±µ ÆÆÆÆÆÆÆÆÆÆÆÆÆÆÆÆÆÆÆÆÆÆÆÆÆÆÆÆÆÆÆÆÆÆÆÆÆÆÆÆÆÆÆÆÆÆÆÆÆÆÆÆÆÆÆÆÆÆÆÆÆÆÆÆÆÆÆÆÆÆÆÆÆÆÆÆÆÆÆÆÆÆÆ u¹œ«d«
±π ÆÆÆÆÆÆÆÆÆÆÆÆÆÆÆÆÆÆÆÆÆÆÆÆÆÆÆÆÆÆÆÆÆÆÆÆÆÆÆÆÆÆÆÆÆÆÆÆÆÆÆÆÆÆÆÆÆÆÆÆÆÆÆÆÆ W−$b*« U½«uDÝù«
≤µ ÆÆÆÆÆÆÆÆÆÆÆÆÆÆÆÆÆÆÆÆÆÆÆÆÆÆÆÆÆÆÆÆÆÆÆÆÆÆÆÆÆÆÆÆÆÆÆÆÆÆÆÆÆÆÆÆÆÆÆÆÆÆÆÆÆÆÆÆÆÆÆÆÆÆÆÆÆÆ U²OÝUJ«
≤µ ÆÆÆÆÆÆÆÆÆÆÆÆÆÆÆÆÆÆÆÆÆÆÆÆÆÆÆÆÆÆÆÆÆÆÆÆÆÆÆÆÆÆÆÆÆÆÆÆÆÆÆÆÆÆÆÆÆÆÆÆ qO−L²« vKŽ UEŠö$
≤∑ ÆÆÆÆÆÆÆÆÆÆÆÆÆÆÆÆÆÆÆÆÆÆÆÆÆÆÆÆÆÆÆÆÆÆÆÆÆÆÆÆÆÆÆÆÆÆÆÆÆÆÆÆÆ W−$b*« U½«uDÝù« qO−Lð
≥± ÆÆÆÆÆÆÆÆÆÆÆÆÆÆÆÆÆÆÆÆÆÆÆÆÆÆÆÆÆÆÆÆÆÆÆÆÆÆÆÆÆÆÆÆÆÆÆÆÆÆÆÆÆÆÆÆÆÆÆÆÆÆÆÆÆÆÆÆÆÆÆÆ u¹œ«d« qO−Lð
≥≥ ÆÆÆÆÆÆÆÆÆÆÆÆÆÆÆÆÆÆÆÆÆÆÆÆÆÆÆÆÆÆÆÆÆÆÆÆÆÆÆÆÆÆÆÆÆÆÆÆÆÆÆÆÆÆÆÆÆÆÆÆÆÆÆÆÆÆÆÆÆÆÆÆÆ uB« WOŽu½
≥≥ ÆÆÆÆÆÆÆÆÆÆÆÆÆÆÆÆÆÆÆÆÆÆÆÆÆÆÆ wF«u« uB« l{uÐ 3D œUFÐ_« wŁöŁ uX
≥µ ÆÆÆÆÆÆÆÆÆÆÆÆÆÆÆÆÆÆÆÆÆÆÆÆÆÆÆÆÆÆÆÆÆÆÆÆÆÆÆÆÆÆÆÆÆÆÆÆÆÆÆÆÆÆ qO−L²«Ë ŸUL²Ýô« XR$
≥∑ ÆÆÆÆÆÆÆÆÆÆÆÆÆÆÆÆÆÆÆÆÆÆÆÆÆÆÆÆÆÆÆÆÆÆÆÆÆÆÆÆÆÆÆÆÆÆÆÆÆÆÆÆÆÆÆÆÆÆÆÆÆÆÆÆÆÆÆÆÆÆÆÆÆÆÆÆ ÂuM« XR$
≥∑ ÆÆÆÆÆÆÆÆÆÆÆÆÆÆÆÆÆÆÆÆÆÆÆÆÆÆÆÆÆÆÆÆÆÆ XR*UÐ uBK w−¹—b²« UHšù«Ë uKF«
wHK)« ·öG« Æ ÆÆÆÆÆÆÆÆÆÆÆÆÆÆÆÆÆÆÆÆÆÆÆÆÆÆÆÆÆÆÆÆÆÆÆÆ UNŠöX«Ë ‰UDŽ_« Íd% qOœ
wHK)« ·öG« Æ ÆÆÆÆÆÆÆÆÆÆÆÆÆÆÆÆÆÆÆÆÆÆÆÆÆÆÆÆÆÆÆÆÆÆÆÆÆÆÆÆÆÆÆÆÆÆÆÆÆÆÆÆ WOMH« UHX«u*«
!"#$ ......................................................................... 35
!" .................................................................................... 37
!"#$
!"# ................................................................................ 39
° tO³Mð
! ........................................................................................ 39
Æ—eOK« WFý√ “UN'« «c¼ Âb@²L¹
Ác?¼ w?6 œb?×?$ u?¼ U?$ d?Ož ¡«œ_« Ë√ j³C«Ë√ rJײ« «Ëœ√ «b@²Ý≈
ÆWFý_« v≈ dOD)« ÷dF²« v≈ ÍœR¹ b WIOŁu«
5K¼R*« 5OMH« lł«— ÆpLHMÐ qK)« ÕöX≈ ‰ËU% ôË WODž_« `²Hð ô
ÆW½UOB« ‰ULŽ√ ¡«œ_
......................................................................... 37
!"#$%&'
!"#$%&'()*+,-./0!12345
!"#$%&'()*+
!"#$%&'()*+,-./0%12'
!"#$%&'()*+,-./0123456
!" #$%&$'()*+,-./012'3
!"#$
∫d¹c%
¨“UN'« ‰ö²š« Ë√ WOzUÐdNJ« UIFB« Ë√ Ê«dOM« Ÿôb½« dÞU@$ qOKI²
w?G³?M¹Ë ‚U?Að—ô« Ë√ d?DI?« Ë√ WÐu?Þd« Ë√ d?DL?K “U?N'« «c?¼ ÷dF?ð ô
Æ“UN'« ‚u6 U¹d¼e« q¦$ ¨qz«uLUÐ …¡uKŽ ¡UOý√ l{Ë ÂbŽ
¡UMŁ√ ‰uL;« nðUN« sŽ U&U½
Î
Î
UOJKÝô
Îöš«bð Z²M*« «c¼ q³I²L¹ b
qBH« …œU¹“ ¡Ułd« ¨ÎU×{«Ë qš«b²« «c¼ q¦$ ÊUC «–≈ Æ«b@²Ýô«
ƉuL;« nðUN«Ë Z²M*« 5Ð
!"#$%&'()*+,-./0123/45678
!"#$%&'()*+,-./01&234
!"#$%&'()*+,-.#AC !"
!7
!"#$%&'()*+!,-./012&3
!"#$%&'
∫tO³Mð
w6 œœd²*« —UO²« WODu6 rzöð wJ WODuH« W¾ONð dOOG²Ð r
Æ∑ W×HX dE½√ p²IDM$
ÀËbŠ v« «c¼ ÍœR¹ ÆW×O×X dOž W¾ON²« X½UC «–« tO³²½√
…—uBÐ “UN'« «c¼ qOGAð w6 ‚UHš« Ë« …bŠuUÐ rOLł nKð
ÆW×O×X
ÆÍ—«b*« ŒUM*« «– oÞUM*« w6 «b@²Ýô« qł√ s$ …bF$ …bŠu« Ác¼
!"#$%&'()*
3
RQT6279
Ar3_new1
3
1/29/04, 11:22 AM
A
7
A
Supplied Accessories
a Remote control transmitter (EUR648251) ............................ 1 pc.
b AC power supply cord .......................................................... 1 pc.
c AC plug adaptor .................................................................. 1 pc.
d Batteries for remote control ............................................... 2 pcs.
Please check and identify the supplied accessories.
a
Note
b
The included AC power supply cord is for use with this unit only. Do
not use it with other equipment.
(i) (For Saudi Arabia and Kuwait)
!"#$%&'()*+,
Precautions
©X¹uJ«Ë W¹œuF« WOÐdF« WJKLLK®
•
•
(ii) (For others)
!"#$%&
©p?½u p½uN®
•
•
•
c
Avoid using or placing this unit near sources of heat. Do not leave
it in an automobile exposed to direct sunlight for a long time with
the doors and windows closed as this may deform the cabinet.
Avoid cuts, scratches, or poor connections in the AC power supply
cord, as they may result in possible fire or electric shock hazard.
Also, excessive bending, pulling or splicing of the cord should be
avoided.
Do not unplug the AC power supply cord by pulling on the cord. To
do so may cause premature failure or shock hazard.
Do not operate this unit on AC outlet in a bathroom, as a potential
shock hazard may result.
When not in use, disconnect the AC power supply cord from the
household AC outlet.
CAUTION!
(For areas except Saudi Arabia and Kuwait)
!"#$%&'()*+,#-./
©X¹uJ«Ë W¹œuF« WOÐdF« WJKL*« «bŽ U oÞUMLK®
• DO
•
d
•
•
NOT INSTALL OR PLACE THIS UNIT IN A
BOOKCASE, BUILT-IN CABINET OR IN ANOTHER
CONFINED SPACE. ENSURE THE UNIT IS WELL
VENTILATED. TO PREVENT RISK OF ELECTRIC SHOCK
OR FIRE HAZARD DUE TO OVERHEATING, ENSURE
THAT CURTAINS AND ANY OTHER MATERIALS DO NOT
OBSTRUCT THE VENTILATION VENTS.
DO NOT OBSTRUCT THE UNIT'S VENTILATION
OPENINGS WITH NEWSPAPERS, TABLECLOTHS,
CURTAINS, AND SIMILAR ITEMS.
DO NOT PLACE SOURCES OF NAKED FLAMES, SUCH
AS LIGHTED CANDLES, ON THE UNIT.
DISPOSE OF BATTERIES IN AN ENVIRONMENTALLY
FRIENDLY MANNER.
The socket outlet shall be installed near the equipment and easily
accessible or the mains plug or an appliance coupler shall remain
readily operable.
Use of Batteries
• If this unit is not used for a long period of time or is used
only from an AC power source, remove all the batteries to
prevent potential damage due to possible battery leakage.
• Align the poles (+ and –) properly when inserting the batteries.
• Do not mix old and new batteries or different types of batteries.
• Do not recharge ordinary dry cell batteries.
• Do not heat or disassemble the batteries. Do not allow them to
contact flame or water.
• Do not keep together with metallic objects such as necklaces.
• Do not use rechargeable type batteries.
• Do not use batteries if the covering has been peeled off.
Mishandling of batteries can damage other items, cause damage to
the unit, and may cause a fire through short-circuiting or electrolyte
leakage.
If electrolyte leaks from the batteries, consult your dealer.
Wash thoroughly with water if electrolyte comes in contact with any
part of your body.
4
RQT6279
RQT6279_2G (4_5)
4
29/1/04, 11:04 AM
A !
WId*« UI×K*«
A
!"#$%&'()*+
(EUR648251) ............................................................ 1
WFD# ± .................................. (EUR648251) bFÐ sŽ rJײ« tłu!
!" ............................................................................ 1
!"#$ .................................................................... 1
!" ............................................................................ 2
WFD# ± ÆÆÆÆÆÆÆÆÆÆÆÆÆÆÆÆÆÆÆÆÆÆÆÆÆÆÆÆÆÆÆÆÆÆÆÆÆÆÆÆÆÆÆÆÆÆÆÆ œœd²*« —UO²« …—b# pKÝ
WFD# ± ÆÆÆÆÆÆÆÆÆÆÆÆÆÆÆÆÆÆÆÆÆÆÆÆÆÆÆÆÆÆÆÆÆÆÆÆ œœd²*« —UO²« …—b# fÐU# T¹UN!
ÊU²FD# ÆÆÆÆÆÆÆÆÆÆÆÆÆÆÆÆÆÆÆÆÆÆÆÆÆÆÆÆÆÆÆÆÆÆÆÆÆÆÆ bFÐ sŽ rJײ« tłu* U¹—UDÐ
a b c d !"#$%&'()*+,-.'/0,102345
a
b
c
d
ÆWId*« UI×K*« eOO9Ë oIײ« vłd¹Ô
ÅÅW?E?Šö?!ÅÅ
ÆjI …bŠu« Ác¼ l! «b9²Ýù« qł√ s! od*« œœd²*« —UO²« œ«b!≈ qÐU>
Ædš¬ “UNł l! t!b9²Bð ô
!
UÞUO²Š≈
•
!"#$%&'()*+,-.*+&/01234567
•
!"#$%&'()*+,-.
!"#$%&'()*+,-./01234567%8,
!"#$%&'()*+,-./0123
•
!"#$%&'!"#()*+,-./01234567
!"#$
!"#$%&'()*+,-./0123#4&567
•
!"#$%&'()*+%&,-./
•
•
•
!"#$%&'()*+,-./0123
!"#$%&'()*+,-./012
!"#$%&'()*+,-./0123
!"#$
!"#$%#&'()*+,-./012
•
!"#$%&'()**+,-./01
•
!"#$%&'()*+,-./012
!"#$%&'()*+,-%&). !"(/0123
!"#$%
!"
• • • !"#$%&'()*++,&-./0#)12345/
!"#$%&'()*+
!"#$%&'()*+,-./0
!"#$%&'("#)*+,-
• !"#$%&'()$*
• !"#$%&'()*+,-./0%12
• !"#$%&'()*+,-./012
• !"#$#%&
• !"#$%&'()*+,-. !/
!"#$%&'()*+,-./01&'2345678
!"#$%&'
!"#$%&'()*+,$-./012
!"#$%&'()*+,-./01234'567
w?? t??>d??²? ð ô Æ…—«d??(« —œU??B?! »d?# “U?N?'« l?{Ë Ë√ «b?9?²?Ý« V?M?& •
YOŠ c«uM«Ë »«uÐ_« WIKG*«Ë …dýU³*« fLA« WFý_ W{dF*« …—UOB«
ÆWMOÐUJ« ÁuAð v≈ ÍœR¹ b# p– Ê√
œœd²*« —UO²« …—b# ·«dÞ_ ∆œd« qO[u²«Ë ‘Ëb)«Ë “Ëe(« VM& •
U?I?F?B?« d?D?š Ë√ Ê«d?O?M?« Ÿôb?½≈ p?– s?Ž r?−?M?¹ b?# Y?O?Š w?BOzd«
q?¹b?−?²?« Ë√ V?×?B?« Ë√ Íu?K?« w? ◊«d?ù« V?M?& ¨p?c?> ÆW?O?zUÐdNJ«
ÆqÐUJK
b?# Æt?B?H?½ q?ÐU?J?« V×BÐ wBOzd« œœd²*« —UO²« …—b# qÐU> qBHð ô •
ÆW?OzUÐdN> WIFB ÷dF²« Ë√ t½«Ë_ oÐUÝ qA v≈ p– ÍœR¹
Ê_ ÂU?L?(« w? w?B?O?zd?« œœd?²?*« —U?O²« …—b# vKŽ “UN'« «c¼ qGAð ô •
Æ…dDš WOzUÐdN> UIF[ v≈ ÷dF²K Íu# ‰UL²Š≈ qJA¹ p–
—UO²« l³M! s! wBOzd« œœd²*« —UO²« qB≈ ¨‰ULF²Ýô« ÂbŽ WUŠ w •
ÆweM*« œœd²*«
°tO³Mð
Ë√ V²J« U½«eš w “UN'« «c¼ lCð ôË VBMð ô •
WNÐUA*« WIKG*« “uO(« w Ë√ W²O³*« UMOÐUJ«
ÂbŽ s! b>Qð Æ…bOł W¹uNð ·Ëdþ ÊULC p–Ë
W¹uN²« ·ËdC Èdš√ œ«u! Í√ Ë√ dzU²B« WK#dŽ
oz«d(« Ë√ WOzUÐdNJ« UIFB« dÞU9! VM−²Ë
Æ¡ULŠù« ◊d W−O²½
WODž√Ë n×BUÐ …bŠu« W¹uNð Uײ qHIð ô •
ÆWKŁUL*« œuM³«Ë dzU²B«Ë …bzU*«
¨…¡UC*« ŸuLAU> ¨·uAJ*« VNK« —œUB! lCð ô •
Æ…bŠu« vKŽ
ÆW¾O³K WI¹b[ WI¹dDÐ U¹—UD³« s! hK9ð •
—UO²K wBOzd« —bB*« cšQ! s! »dIUÐ “UN'« l{u¹ Ê√ wG³M¹
sJ1 YO×Ð —UO²K wBOzd« —bB*« fÐU# l{u¹ Ê√ wG³M¹Ë ¨œœd²*«
ÆU! WKJA! œułË WUŠ w WuNBÐ tO≈ ‰u[u«
U¹—UD³« «b9²Ý≈
w? d?B?Ô²?#≈ Ë√ W?K?¹u?Þ …b?* “U?N?'« «b?9?²?Ý≈ Âb?Ž v?K?Ž W?O?M« bIŽ «–≈
‰“√ ¨c?zb?M?Ž ¨j?I? œœd?²?*« w?B?O?zd?« —U?O?²« …—b# —bB! vKŽ tKOGAð
Æ U¹—UD³« `ýdð W−O²½ qL²;« nK²« ÍœUH² U¹—UD³« WU>
Æ U¹—UD³« ‰Ušœ≈ bMŽ WLOKÝ …—uBÐ ©-Ë ´® 5³DI« WH[«d0 r#
Æ U¹—UD³K WHK²<« Ÿ«u½_« Ë√ …b¹b'«Ë W1bI« U¹—UD³« jK9ð ô
Æ…œU²F*« WU'« U¹—UD³« s×ý …œUŽSÐ rIð ô
Æ¡U*« Ë√ VNK« f!öð UNKF& ô Æ U¹—UD³« pJHð ôË s9Bð ô
ÆbzöI« q¦! WO½bF*« ¡UOý_« l! UNEH% ô
Æs×A« …œUŽù qÐUI« ŸuM« s! U¹—UDÐ Âb9²Bð ô
ÆtFKš - b# ¡UDG« ÊU> «–≈ U¹—UD³« Âb9²Bð ô
•
•
•
•
•
•
•
•
V³B¹ ¨Èdš_« œuM³« nK²¹ Ê√ sJ1 U¹—UD³« ‰Ë«bð …¡UÝ≈
dB# …dz«œ ÀËbŠ ‰öš s! o¹d(« V³B¹ b#Ë ¨“UN−K nK²«
Æw²OËd²JOù« W¹—UD³« qzUB »dBð Ë√
V¹dI« qO>u« dA²Ý≈ Æ U¹—UD³« s! w²OËd²JOù« qzUB« »dBð «–≈
ÆpM!
Ϋb?O?ł t?K?B?ž≈ p?L?B?ł ¡«e?ł√ s?! ¡e?ł Í√ w?²?O?Ëd?²?J?O?ù« q?zUB« f* «–≈
Æ¡U*UÐ
5
RQT6279
Ar/Ch5_new1
5
1/29/04, 2:36 PM
7
7
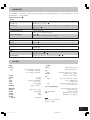
Power Sources
A
1
A
VOLT ADJ
110 – 127V
OFF
2
7
○
○
○
VOLT ADJ
110 – 127V
OFF
220–
240V
OFF
○
○
○
○
OFF
110-127 V
○
○
○
○
○
○
a flat head screwdriver to turn [VOLT ADJ] to
1 Use
■
the voltage setting for your area.
2 Connect the AC power supply cord.
■
VOLT ADJ
110 – 127V
220–
240V
○
a).
For areas except Saudi Arabia and Kuwait:
Use the plug adaptor (included) if necessary (
220–
240V
220-240 V
○
○
○
○
○
○
○
○
○
○
○
○
○
○
○
○
B
C
Household AC outlet
!"#
wOzd« weM*« l³M*« Ãdš
○
○
○
○
B
7
○
a
○
○
○
○
○
○
○
○
○
○
○
○
○
○
○
○
○
○
○
○
○
○
○
○
“
” flashes on the display when the batteries are running down.
Then, the unit turns itself off and displays “U01”.
Replace all the batteries with new ones.
1
2
7
8
4
3
6
5
C
7
○
○
○
○
○
○
○
○
○
○
○
○
○
○
○
○
○
○
○
○
○
○
○
Memory Batteries
(not included)
Memory batteries retain memory (clock/timer/CD/radio settings)
during power supply interruption.
These batteries do not power the unit.
Inner row
wKš«b« nB«
Replacing the batteries
Outer row
wł—U)« nB«
○
Removing the batteries
Battery life
(R20/LR20, D, UM-1)
○
(not included)
Open the battery cover, insert a finger into the hole in the bottom of
the unit and push out.
D
○
Using batteries
Disconnect the AC power supply cord from the unit to operate on
battery power.
The remote control cannot turn the unit on when batteries are used.
AC power supply cord (included)
!"#$
©od® …—b qÐU
AC IN
○
Operating the unit on AC power
○
○
○
○
• The memory batteries last about one year.
• Connect the unit to AC power before replacing the batteries.
• Extend the memory battery life by always pressing [ /I ] to turn
the unit off before disconnecting the unit from the household AC
outlet or replacing the power batteries.
E
Removing the batteries
Lift the negative end of the number 4 battery to remove batteries.
D
7
(R6/LR6, AA, UM-3)
2
1
3
E
7
○
○
○
○
○
○
○
○
○
○
○
○
○
○
4
○
○
○
○
○
○
○
○
○
○
○
○
○
○
○
○
2
1
3
4
6
RQT6279
RQT6279_2G (6-7)5
6
5/2/04, 12:02 PM
A
1 ■
2 ■
…—bI« —œUB
!"#$%&'!"
œœd²*« —UO²« …—b vKŽ “UN'« qOGAð
!"#$%&' [VOLT ADJ] (
!"#$%&'()*+,-.
!) W?¾?O?Nð v?≈ [VOLT ADJ] …—«œù ”√d?« `?D?#? p?H? Âb?<²Ý≈
Æp²IDM w' WO²uH«
!"#$%&
!"#$%&'()*+",-.
!"#$%&'()*() ( ).
a
Æœœd²*« —UO²« …—b pKÝ qO>u²Ð r
!"#$%&'()*+
!"#$%&'()*+,-./
!"#!$%&' ()*+,-
C
!"
a) ÎU¹—Ëd{ ÊUE «–≈ ©o'd® fÐUI« T¹UN Âb<²Ý≈
∫X¹uJ«Ë W¹œuF« WOÐdF« WJKL*« «bŽ U oÞUMLK
.(
B
A
©WI'd dOž® U¹—UD³« «b<²Ý≈
B
W?D?Ý«u?Ð q?O?G?A?²?K? “U?N?'« s? w?#?O?zd?« WOzUÐdNJ« WUD« pKÝ qB'«
Æ U¹—UD³« WUÞ
b?M?Ž q?O?G?A?²?« l?{Ë v?≈ “U?N?'« d?¹b?¹ Ê√ b?F?Ð s?Ž r?J?×?²?« t?łu?* s?J1 ô
Æ U¹—UD³« «b<²Ý≈
!"#$%&'()*+,-./0% !123
U¹—UD³« Ÿe½
!"#$
!"#$%“
” !"#$%U01
!"#$%&'(#$)
!"#$%&'()*+,-
D !" !"
!"#$%&'()*+,-.(')!/%0/ /
CD/ !"#$
!"#$%&'()*+ ,-.
“U?N?'« q?H?Ý√ w?' …œułu*« WײH« w' UF³>« qšœ√ ¨W¹—UD³« ¡UDž `²'≈
Æ×U<K l'œ«Ë
U¹—UD³« b√
rŁ Æ U¹—UD³« WUÞ –UH½ bMŽ ÷dF« WýUý vKŽ“
”5³*« ¡wC¹
Æ“U01” …—Uýô« ÷dF¹Ë UOzUIKð qOGA²« sŽ “UN'« nu²¹
Æ…b¹bł U¹—UD³Ð U¹—UD³« lOLł ‰b³²Ý«
©WI'd dOž® …dE«c« U¹—UDÐ
•
•
•
!"
!"#$%&'()*+,-.
!"#$%&'( )*
!"#$%&'()*+,-./0$1&2345)67
!"#$%& [ /I ] !"#$
E
!"
4 !"#$%& '()
C
D
W½«uDÝô«ØXR*«ØWŽU#« UÞu³C® …dE«cUÐ …dE«c« U¹—UDÐ kH²%
ÆWOzUÐdNJ« WUD« b¹Ëeð ŸUDI½« ¡UMŁ« ©u¹œ«d«ØW−b*«
Æ…—bIUÐ “UN'« b9 ô U¹—UD³« Ác¼
U¹—UD³« ‰«b³²Ý«
ÆbŠ«Ë ÂUŽ w«uŠ …dE«c« U¹—UDÐ Wbš dLŽ
Æ U¹—UD³« ‰«b³²Ý≈ q³ œœd²*« —UO²« …—b v≈ “UN'« qO>u²Ð r
—e??« j??G? { U??L? z«œ W??D? Ý«u?Ð …d?E«c?« U?¹—U?D?Ð W?b?š …b? v?K?Ž k?'U?Š
W??U??D?« f?³?I? s? “U?N?'« q?B?' q?³? “U?N?'« q?O?G?A?ð ·U?I?¹ô [ /I ]
ÆWUD« U¹—UDÐ ‰«b³²Ý« Ë« w#Ozd« weM*« WOzUÐdNJ«
U¹—UD³« Ÿe½
•
•
•
E
Æ U¹—UD³« W«“ù ¥ r— W¹—UD³K W³U#« W¹UNM« l'—≈
7
RQT6279
Ar/Ch7_new
7
2/5/04, 10:28 AM
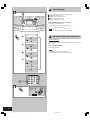
Location of Controls
A
7
A
1 2
3 4
Basic controls
Number
Designation
1 Standby/on switch (
Reference Page
/I )
Press to switch the unit from on to standby mode or vice versa. In
standby mode, the unit is still consuming a small amount of power.
2 Preset equalizer button (PRESET EQ) ..................... 32
3 Play timer/record timer button
(˚ PLAY/REC) ............................................................ 34
4 Clock/timer button (CLOCK/TIMER) .................. 12, 34
5 RX-ES27
Standby indicator ( )
When the unit is connected to the AC mains supply, this indicator
lights up in standby mode and goes out when the unit is turned on.
5
6
7
8
9
RX-ES22
0
Standby/on indicator ( /I)
The indicator lights green when the unit is turned on.
When the AC power supply is used, it functions as an AC
connection indicator. (The indicator colour changes to red when
the unit is turned off.)
B
7
! @ #
$
6 Volume control buttons (+, – VOLUME) ...... 14, 18, 24
7 Display panel
8 Time adjust dial
(TIME/PRESET TUNE CD SKIP ) ................. 12, 34
9 Remote control signal sensor (SENSOR) ............... 10
0 Speaker
Note
These speakers do not have magnetic shielding. Do not place
them near televisions, personal computers or other devices
easily influenced by magnetism.
B
^ &
%
C
7
) ¡ ™ £
* (
:
;
Tuner/CD controls
Number
Designation
Reference Page
umber
Designation
Reference Page
! Band button (TUNER BAND) .............................. 14, 16
@ CD play/pause button (6 CD) ................................ 18
# CD recording mode button (CD REC MODE) .... 28, 30
$ CD program/clear, tuner preset button
(•MEMORY *CLEAR) ........................................... 16, 22
% CD tray
^ Tuning/CD search buttons
(REW / – / Q , R / + / FF) .............................. 14, 18
& CD mode select/stop button (L TAPE/CD) ........ 18, 20
* Preset channel select/CD track select dial
(TIME/PRESET TUNE CD SKIP ) ................. 16, 18
( CD tray open/close button (0 CD) ........................... 18
C
Cassette deck controls
Number
Designation
)
¡
™
£
Deck eject button (0 DECK) ..................................... 24
Record/record pause button (a/ J) .............. 26, 28, 30
Cassette play button (: TAPE) ................................. 24
Tape mode select/stop button (L TAPE/CD) ..... 24, 26
: Deck
; Rewind/fast-forward buttons
(REW / – / Q , R / + / FF) ..................................... 24
8
RQT6279
RQT6279-G (8-11)2
Reference Page
8
7/12/01, 4:42 PM
!
A
rJײ« `OðUH lu
!
1 / E
!
/I F
!"#$%&' &()*+&,-"./012+&, !"#$%&'()*
2 !"# (PRESET EQ) ................................................... 33
3 !"#$% (˚ PLAY/REC) ...................................... 35
4 !"# (CLOCK/TIMER) ..................................... 13, 35
5 RX-ES27
!" ( )
! AC !"#$%&'()*+,-.#/012
!"#
RX-ES22
!"#$ ( /I)
!"#$%&'()*+, AC !"#$% AC !"#$%&'()*+
!"#$%&'
6 !" (+, – VOLUME) ........................................ 15, 19, 25
7 8 !"#$%
CD SKIP
(TIME/PRESET TUNE
) ............................ 13, 35
9 !"#$ (SENSOR) ...................................................... 11
0 !"#$%&'()*+,-./0123456378
!"#$%&'()*+
B
!
@
#
$
%
^
&
*
!CD
CD !"#$%&'() (•MEMORY *CLEAR) .... 17, 23
CD CD (REW / – / Q , R / + / FF) ............. 15, 19
CD !"#$% (L TAPE/CD) ................................. 19, 21
!"#$CD !"#$%
CD SKIP ) ............................ 17, 19
(TIME/PRESET TUNE
( CD !"#$% (0 CD) ................................................. 19
)
¡
™
£
!"#$
!
!" (0 DECK) ............................................................. 25
!"# (a/ J) ............................................. 27, 29, 31
!" (: TAPE) .............................................................. 25
!"#$%&' (L TAPE/CD) ................................ 25, 27
: ; !"# (REW / – / Q , R / + / FF) .......................... 25
A
■
WHOþu«
rd«
( /I ) qOGA²«Ø—UE²½ù« ÕU²H
fJF«Ë —UE²½ù« WUŠ v≈ qOu²« WUŠ s “UN'« qOŠd² f³≈
WUŠ w …—bI« s UHOHÞ
Î
ÎUD „öN²Ý≈ w “UN'« q«u¹ ÆfJFUÐ
Æ—UE²½ù«
≥≥ .......................... (PRESET EQ) j³C« o³*« ‰œUF*« —“
qO−²« W²RØŸUL²Ýù« W²R —“
˚ PLAY/REC)
≥µ ............................................................. (˚
≥µ \±≥ ........................ (CLOCK/TIMER) W²R*«ØWŽU« —“
1
2
3
4
RX-ES27 5
( ) —UE²½ù« dýR
¨œœd²*« —UO²« œ«bù wOzd« —bB*« v≈ WKu …bŠu« ÊuJð UbMŽ
v?≈ …b?Šu?« …—«œ≈ b?MŽ THDM¹Ë —UE²½ù« l{Ë w dýR*« «c¼ TC¹
ÆqOGA²« l{Ë
RX-ES22
( /I) qOGA²«Ø—UE²½ù« 5³
Æ“UN'« w≈ …—bI« qOuð bMŽ dCš_« ÊuKUÐ dýR*« Z¼u²¹
—UO²« qOu² dýRL qLFO ¨œœd²*« —UO²K —bB «b²Ý≈ bMŽ
©Æ…—bI« qOuð lD bMŽ dLŠ_« v≈ dýR*« Êu dOG²OÝ® Æœœd²*«
uB« …—UNł w rJײ« —«—“√
≤µ \±π \±µ .............................................. (+, – VOLUME)
÷dF« WŠu
Xu« j³{ ’d
≥µ \±≥ ................ (TIME/PRESET TUNE
CD SKIP )
±± ............... (SENSOR) bFÐ sŽ rJײ« tłu …—Uý≈ dFA²
WŽULÝ
6
7
8
9
0
ÅWEŠöÅ
s? »d?I?U?Ð U?N?F?C?ð ô Æw??O?D?M?G? V?−?Š U?N? f?O? U?ŽUL« Ác¼
w?²?« Èd?š_« …e?N?ł_« Ë√ w?B??A« dðuO³LJ« …eNł√ ¨ U½u¹eHK²«
ÆjMGL²« WDÝ«uÐ WuNÐ dðQ²ð
W½«uDÝù«Øn«u*« w rJײ« «Ëœ√
!
(TUNER BAND) .................................................... 15, 17
CD !"# (6 CD) ..................................................... 19
CD !" (CD REC MODE) ..................................... 29, 31
C
lłd*« W×H
WOÝUÝ_« rJײ« «Ëœ√
lłd*« W×H
WHOþu«
B
■
rd«
±∑ \±µ ....................................... (TUNER BAND) Włu*« —“
W−b*« W½« uDÝû XR*« ·UI¹ù«ØŸUL²Ýù« —“
±π ..................................................................... (6 CD)
≥± \≤π .... (CD REC MODE) W−b W½«uDÝ≈ qO−ð l{Ë —“
n??«u??L? ?K? ? o??³? ?? ?*« j??³? ?C? ?« ¨W?−?b?*« W?½«u?D?Ýù« W?«“≈ØZ?U?½d?Ð —“
≤≥ \±∑ ................................................ (•MEMORY *CLEAR)
!
@
#
$
W−b*« W½«uDÝù« WOMO %
W−b*« W½«uDÝù« Y×ÐØnOu²« —«—“√ ^
±π \±µ .............................. (REW / – / Q , R / + / FF)
·UI¹ù«ØW−b*« W½«uDÝù« l{Ë —UO²š≈ —“ &
≤± \±π ................................................................ (L TAPE/CD)
W??½«u?D?Ýô« —U?? —U?O?²?š«ØU?I?³?? W?Þu?³?C?*« …U?M?I?« —U?O?²?š« ’d? *
CD W−b*«
±π \±∑ ................. (TIME/PRESET TUNE
CD SKIP )
±π ................... (0 CD) W−b*« W½«uDÝù« WOMO oKžØ`² —“ (
XOÝUJ« „œ w rJײ« «Ëœ√
lłd*« W×H
WHOþu«
C
■
rd«
≤µ ........................................... (0 DECK) „b« ëdš≈ —“
qO−²K XR*« ·UI¹ù«ØqO−²« —“
≥± \≤π \≤∑ ............................................................ (a/ J)
≤µ .................................... (: TAPE) XOÝUJ« ŸUL²Ý≈ —“
≤∑ \≤µ .... (L TAPE/CD) ·UI¹ù«Øj¹dA« l{Ë —UO²š≈ —“
„œ
l¹d« .bI²«ØlOłd²« —«—“√
≤µ ..................................... (REW / – / Q , R / + / FF)
)
¡
™
£
≤
∞
9
RQT6279
Ar/Ch9
9
12/7/01, 4:19 PM
The Remote Control
A
7
A
¤
§
SLEEP TIMER FADER DISPLAY
1
2
3
4
5
6
≥10
7
8
9
0
FM MODE/BP C RESET
RANDOM
REPEAT
PRESET EQ
TUNER
CD
Number
‹
1
PGM/-CLEAR
14
≥
ª
•
TAPE
›
12
2
22
17 , 23
º
⁄
S.VIRTUALIZER REW
fi
11
FF
fl
AUTO SCAN
PRESET TUNE
CD SKIP
–
VOLUME
‡
+
Buttons
6
Designation
Reference Page
§ Sleep timer button (SLEEP) ....................................... 36
≥ Numbered buttons .......................................... 16, 20, 22
• FM mode/BP button (FM MODE/BP) ................... 14, 30
ª Tape counter reset button (C-RESET) ...................... 24
º Sound virtualizer button (S.VIRTUALIZER) .............. 32
⁄ Auto scan button (AUTO SCAN) ............................... 14
¤ Timer fader button (TIMER FADER) .......................... 36
‹ Display select button (DISPLAY) ......................... 12, 24
› Repeat button (REPEAT) ............................................ 20
fi Random play button (RANDOM) ............................... 20
fl Tuning/rewind/fast-forward buttons
(REW/– , +/FF) ........................................................ 14, 24
‡ Preset tuning/preset scan/CD skip/search buttons
( S / 4, 3 / T) ................................................. 16, 18
When the unit is supplied with AC power, buttons 1 , 2 , 6 , 11 ,
12 , 14 , 17 , 22 and 23 function in the same way as the controls on the
main unit. To save power, the unit cannot be turned on from the remote control when batteries are used.
B
B
7
Batteries
Insert so the poles (+ and –) match those in the remote control.
R6, AA, UM-3
1
2
Remove if the remote control is not going to be used for a long period
of time. Store in a cool, dark place.
Replace if the unit does not respond to the remote control even when
held close to the front panel.
C
Use
Aim at the sensor, avoiding obstacles, at a maximum range of 7 meters
directly in front of the unit.
• Keep the transmission window and the unit’s sensor free from dust.
• Operation can be affected by strong light sources, such as direct
sunlight, and the glass doors on cabinets.
C
7
Do not
Remote control signal sensor (SENSOR)
!"#$%SENSOR
(SENSOR) bFÐ sŽ rJײ« tłu …—Uý≈ dFA²
30°
• put heavy objects on the remote control.
• take the remote control apart.
• spill liquids onto the remote control.
30°
Transmission
window
‰UÝ—ù« …cU½
10
RQT6279
RQT6279-G (8-11)2
10
7/12/01, 4:42 PM
A
§
≥
•
ª
º
⁄
¤
‹
›
fi
fl
‡
bFÐ sŽ rJײ« tłu
—«—“_«
!
!"# (SLEEP) ........................................................... PT
......................................................................... 17, 21, 23
FM !"#$% (FM MODE/BP) ............................ 15, 31
!"#$% (C-RESET) ................................................ 25
!"# (S.VIRTUALIZER) ........................................... 33
!" (AUTO SCAN) ..................................................... 15
!"#$% (TIMER FADER) ....................................... 37
!" (DISPLAY) ..................................................... 13, 25
(REPEAT) ................................................................... 21
!" (RANDOM) .......................................................... 21
!" #$% (REW/– , +/FF) ................................ 15, 25
!"#$%&$ CD !"#
( S / 4, 3 / T ) ..................................................... 17, 19
!"#$%&'()#$*+,- 1 2 6 1112 1417
22 23 !"#$%&'()*+,-."/0123456
!"#$%&'(")$ *+,-./012"34
B
lłd*« W×H
WHOþu«
A
■
rd«
≥∑ ................................................ (SLEEP) ÂuM« W²R —“
≤≥ \≤± \±∑ ........................................................ WOLd« —«—“_«
≥± \±µ ............................. (FM MODE/BP) BP/FM l{Ë —“
≤µ ........................... (C-RESET) j¹dA« œ«bŽ j³{ …œUŽ≈ —“
≥≥ ........................... (S.VIRTUALIZER) wF«u« uB« —“
±µ ............................. (AUTO SCAN) wJOðUuðË_« `*« —“
uBK w−¹—b²« UHšù«Ë uKF« W²R —“
≥∑ .......................................................... (TIMER FADER)
≤µ \±≥ ................................... (DISPLAY) ÷dF« —UO²š≈ —“
≤± .................................................... (REPEAT) —«dJ²« —“
≤± .................................. (RANDOM) wz«uAF« ŸUL²Ýù« —“
l¹d« .bI²«ØlOłd²«ØnOu²« —«—“√
≤µ \±µ .................................................... (REW/ – , + / FF)
W½«uDÝô« wDðØo³*« j³C« `Øo³*« j³C« nOuð —«—“«
±π \±∑ ............... ( S / 4
4, 3 / T)Y׳«ØCD W−b*«
§
≥
•
ª
º
⁄
¤
‹
›
fi
fl
‡
¨ 2 ¨ 1 s —«—“_« qLF𠨜œd²*« —UO²« …—bIРΫœËe “UN'« ÊuJ¹ UbMŽ
…b?Šu?U?Ð r?J?ײ« `OðUHL WI¹dD« fHMÐ 23 Ë 22 ¨ 17 ¨ 14 ¨ 12 ¨ 11 ¨ Æ6
....
s? q?O?G?A?²?« l?{Ë v?≈ “U?N?(« …—«œ≈ s?J1 ô ¨…—bI« dOu² ÆWOOzd«
Æ U¹—UD³« «b²Ý≈ bMŽ bFÐ sŽ rJײ« tłu
!"#$%&'()*+,-!"./012
!"#$%&'()*#+,-./0()*12345678
!"#$%&'()*'+,!"#-./0120345
C
!"#$%7 !"#$%&'()*+,-./012
• !"#$%&'()*+,-./012
• !"#$%&'()*+,-*./012345678+
!"#$%&'()*+,-./
• • • !"#$%&'
!"#
!"#$%&'(
U¹—UD³«
B
■
ÆbFÐ sŽ rJײ« tłu w UN²KO¦ ©- Ë ´® UNÐUD√ oÐUDð YO×Ð UNKšœ√
Æse« s WK¹uÞ …d²H bFÐ sŽ rJײ« tłu «b²Ý≈ ÂbŽ bMŽ UNŽe½≈
ÆrKEË ¨œ—UÐ ÊUJ w UN½eš
t?K?L?Š b?M?Ž v?²?Š b?F?Ð s?Ž r?J?×?²?« t?łu?* “U?N?'« V−²¹ r «–≈ UNb³²Ý≈
ÆWOU_« WNł«u« s »dIUÐ
«b²Ýù«
C
■
w? —U?²?√ ∑ ÁU?B?√ ‚U?D?½ bMŽ ¨oz«uF« ÎU?¹œU?H?²? ¨d?F?A?²*« WOŠU½ tłË
Æ…dýU³ “UN'« WbI
Æ—U³G« s WOUš “UN'« dFA²Ë ‰UÝ—ù« …cU½ kHŠ≈ •
f?L?A?« ¡u?{ q?¦? ¨b?¹b?A?« ¡u?C?« —œU?B?0 q?O?G?A²« dŁQ²¹ Ê√ sJ1 •
Æ U½«e)« vKŽ w²« WOłUłe« »«uÐ_«Ë ¨dýU³*«
ªsŽ lM²≈
ÆbFÐ sŽ rJײ« tłu vKŽ WKOIŁ ¡UOý√ l{Ë •
ÆbFÐ sŽ rJײ« tłu pOJHð •
ÆbFÐ sŽ rJײ« tłu ‚u qz«u« VJÝ •
11
RQT6279
Ar/Ch11
11
12/7/01, 4:21 PM
3
7
1
7
Setting the Clock
4
2 •7
7
This is a twenty-four hour clock.
The example shows how to set the clock to 13:30.
1 Press [ /I ] to turn the unit on.
■
2 Press [CLOCK/TIMER] to select “CLOCK”.
■
Each time you press the button:
CLOCK
ON ˚PLAY
Original display
˚PLAY OFF
˚REC OFF
3 Turn [TIME/PRESET TUNE
■
ON ˚REC
Within 10 seconds
1
7
2
7
○
○
○
3
7
○
○
○
CD SKIP
] to set
the time.
4 Press [CLOCK/TIMER] to start the clock.
■
The original display is restored shortly after.
○
○
○
○
○
○
○
○
○
○
○
○
○
○
○
○
○
○
○
○
○
○
○
○
○
○
○
When batteries are used
The unit cannot be turned on with the remote control.
Note
○
○
○
○
○
○
○
○
○
○
○
○
○
○
○
○
○
○
○
○
○
○
○
○
○
○
○
The clock may lose or gain some time over a period.
Readjust if necessary.
A
Displaying the clock
Remote control only
4
7
○
○
○
○
○
○
○
○
○
○
○
○
○
○
○
○
○
○
○
○
○
○
○
○
○
○
○
○
○
○
Press [DISPLAY].
B
7
Using Headphones (not included)
Reduce volume before connection.
A
Plug type: 3.5 mm stereo
Note
SLEEP TIMER FADER DISPLAY
1
2
3
4
5
6
DISPLAY
Avoid listening for prolonged periods of time to prevent hearing
damage.
PGM/-CLEAR
≥10
Maintenance
If the surfaces are dirty
B
7
To clean this unit, wipe with a soft, dry cloth.
• Never use alcohol, paint thinner or benzine to clean this unit.
• Before using chemically treated cloth, read the instructions that
came with the cloth carefully.
For a cleaner crisper sound
PHONES
Clean the heads after every 10 hours of use to assure good quality
playback and recording.
Use a cleaning tape (not included).
12
RQT6279
RQT6279-G (12-15)4
12
7/12/01, 4:43 PM
!
24
WŽU« j³{
!"
ÆWŽUÝ ≤¥ XOuð ÂUEMÐ WŽUÝ Ác¼
Ʊ≥∫≥∞ v≈ WŽU« W¾ONð WOHO ‰U¦*« `{u¹
!"#$%&'()"1330
1 [ /I ] !"#$
■
[ C L O C K / T I M E R 2 ■
“CLOCK” ÆqOGA²« l{Ë v≈ “UN'« …—«œù [
!"#$] !
Æ“CLOCK” —UO²šô [CLOCK/TIMER] jG{≈
∫—e« UNO jGC¹Ô …d q w
!"#$%&'()*+,
˚PLAY OFF
CLOCK
ON ˚PLAY
˚PLAY OFF
˚REC OFF
ON ˚REC
ON ˚PLAY
˚REC OFF
ON ˚REC
3 [TIME/PRESET TUNE
■
wK_« ÷dF«
CD SKIP
] —Ëœ
Ò
!
CD SKIP
] !
ÆW?ŽU« ¡b³ [CLOCK/TIMER] jG{≈
Æ…eOłË …d²HÐ p– bFÐ wK_« ÷dF« œUF²¹Ô
4 [CLOCK/TIMER ■
CLOCK
w½«uŁ ±∞ ‰öš w
ÆXu« j³C [TIME/PRESET TUNE
10
/I ] jG{≈
!"#$] !"#$
!"#$%&'()*+
U¹—UD³« «b²Ý≈ bMŽ
ÆbFÐ sŽ rJײ« tłu0 qOGA²« l{Ë v≈ “UN'« …—«œ≈ sJ1 ô
!"#
!"#$%&'
ÅWEŠöÅ
Æ`O×B« Xu« sŽ WŽU« XË w dOšQð Ë« .bIð qB×¹ Ê« sJ1
Æ…—Ëd{ „UM¼ ÊU «–« WŽU« j³{ bŽ«
!"#$%"&'()*'+,-./0%12345,
WŽU« ÷dŽ
A
!"
A
jI bFÐ sŽ rJײ« tłu
!"#$%
[DISPLAY
.[DISPLAY] jG{≈
!] ©WId dOž®
”√d« UŽULÝ Â«b²Ý≈
B
!"#$%&'(
B
ÆqOu²« q³ uB« …—UNł Èu² iHš≈
u¹d²Ý 3 ≥[µ ∫fÐUI« Ÿu½
!"#$%&
!"3.5
ÅWEŠöÅ
!"
!"#$%&'()*+,-.
nK²« VM−² WK¹uÞ WOM“ «d²H uB« v≈ ŸUL²Ýù« VM&
ÆwFL«
W½UOB«
W² `DÝ_« X½U «–≈
!"#
ÆWUł WLŽU½ Wdš Âb²Ý≈ “UN'« «c¼ nOEM²
!"#$%&'()*
• • !"#$%&'()*%+,*-./012
!"#$%&'()*+,-$./0123
nOEM² ‚öÞù« vKŽ s¹eM³« Ë√ ÊU¼b« od Ë√ ‰u×J« Âb²ð ô
Æ“UN'« «c¼
ÆW¹UMFÐ UNF WId*« «œUý—ù« √d≈ ¨U¹ËULO
Î
WKUF ‚dš «b²Ý« q³
!"#$%&'(
!"#$%&'$()*+,-./0110 !"#$%
!" #$%&'()*+
•
•
wI½Ë `{«Ë u qł√ s
ŸU?L?²?Ý« …œu?ł ÊU?L?C? ‰U?LF²Ýô« s UŽUÝ ±∞ q bFÐ ”˃d« `«
Æ©od dOž® nOEMð j¹dý Âb²Ý« Æ…bOł qO−ðË
13
RQT6279
Ar/Ch13
13
12/7/01, 7:20 PM
3
7
A
2
7
1
7
The Radio
Preparation: (when using batteries) Press [
A
/I ].
Normal tuning
1 Press [TUNER BAND] to select “FM” or “AM”.
■
(Unit comes on when using AC power.)
Each time you press the button:
AM ↔ FM
7
Q ] or [ R /+/FF ] to select a
[ REW/–/Q
2 Press
■
station.
1
2
7
○
○
○
3
7
○
○
B
7
○
○
○
○
○
○
○
○
○
○
○
○
○
○
○
○
○
○
○
○
○
○
○
○
○
○
○
○
○
B
Using auto scan
REW
Remote control only
You can search for a station by listening to all tuned-in stations for 8
seconds each.
○
○
○
○
○
○
○
○
○
○
○
○
○
○
○
○
○
○
○
○
○
○
○
○
○
○
○
VOLUME
1 Press [TUNER] to select “FM” or “AM”.
■
2 Press [AUTO SCAN].
■
[AUTO SCAN] when you find the desired
3 Press
■
station.
Auto scan starts.
TAPE
TUNER
FF
AUTO SCAN
Auto scan ends when it reaches the original frequency again.
To stop during the process, press [AUTO SCAN].
1
7
CD
S.VIRTUALIZER REW
2 •7
3
7
○
” is displayed during FM stereo broadcasts.
3 Press [+, – VOLUME] to adjust the volume.
■
PRESET EQ
1
7
2
7
○
“
C
Remote control only
PRESET TUNE
CD SKIP
–
Press [FM MODE/BP] to display “ MONO ”.
” goes off) and noise reduces when
Monaural sound is selected (“
reception is weak.
+
VOLUME
If noise is excessive in FM
TUNER
Press [FM MODE/BP] again to cancel the mode.
Auto-tuning
○
○
○
○
○
○
○
○
○
○
○
○
○
○
○
○
○
○
○
○
○
○
○
○
○
○
○
Indicates auto scan
!"#
wJOðUuðË_« `*« 5³¹
AUTO SCAN
Press and hold [REW / – / Q] or [R / + / FF] until the frequency
starts changing rapidly.
The frequency stops when it finds a station. (Interference may also
cause it to stop. Start auto-tuning again if this occurs.)
To stop auto-tuning
Press [REW / – / Q] or [R / + / FF].
D To improve reception
■
7
C
7
○
○
○
3
FM: Change the length and direction of the antenna.
AM: Change the facing of the unit.
○
○
○
○
○
○
○
○
○
○
○
○
○
○
○
○
○
AUTO SCAN
FM MODE/BP
○
○
○
○
○
○
○
○
○
Note
• AM reception is briefly interrupted if [0 DECK] is pressed.
• To improve reception when using the unit in a building or vehicle,
use it near a window.
AM allocation setting
FM MODE/BP C RESET
RANDOM
REPEAT
PRESET EQ
TUNER
CD
TAPE
S.VIRTUALIZER REW
AUTO SCAN
Only from the main unit
Before receiving AM broadcasts, be sure to select the correct allocation setting (either 9 kHz or 10 kHz) for your area.
1
[TUNER BAND] to select FM.
2 Press
Press and hold [TUNER BAND] for approximately 5
seconds.
FF
PRESET TUNE
CD SKIP
VOLUME
D
7
○
The frequency display will be returned to the minimum frequency
of the AM band and the display will begin to flash. Keep holding
for approximately 5 more seconds.
FM
AM
3 When
the display stops flashing and indicates a
different frequency number, release [TUNER BAND].
To return to the original frequency, repeat steps 1 to 3 above.
Note
After changing the “allocation” setting, the frequencies you
previously preset into the memory will be cleared.
14
RQT6279
RQT6279-G (12-15)4
14
7/12/01, 4:43 PM
!"#$%& [
A
u¹œ«d«
/I ] .[
/I ]—e« jG{« © U¹—UDÐ ‰ULF²Ý« bMŽ® ∫dOCײ«
!
[TUNER BAND
1 ■
AM
!"#$] !"FM
2
■
3 [+, – VOLUME
■
FM ↔ AM ∫—e« UNO jGCð …d q w
Q ] [ R/+/FF ] !"#$%&
[ REW/–/Q
B
FM !"#$%&'“
Æ“AM” Ë« “FM” —UO²šô [TUNER BAND] jG{≈
©AC œœd² —UOð ‰ULF²Ý« bMŽ “UN'« qG²A¹®
!"#$%&'()*+,-./
!"#$%&'()*+,
AM ↔ FM
Q ] jG{≈
ÆU WD× —UO²šô [ R/+/FF ] Ë√ [ REW/–/Q
.FM Włu* u¹d²« WOŽ«–ù« Z«d³« ¡UMŁ√ “
” ÷dŽ r²¹
”
Æ uB« …—UNł Èu² j³C [+, – VOLUME] jG{«
!"#] !"#$
!"#$
jI bFÐ sŽ rJײ« tłu
qJ w½«uŁ ∏ …b*« WH« u*« UD;« lOLł v≈ ŸUL²ÝùUÐ WD× sŽ Y׳« pMJ1
ÆUNM
!"#$%&'() 8 !"#$%&
1 [TUNER !"#$] ! “FM” “AM”
■
2 [AUTO SCAN !"#] ■
!"#$%&'()*+, [AUTO SCAN
3 ■
] Æ“AM” Ë« “FM” —UO²šô [TUNER] —“ jG{«
Æ[AUTO SCAN] jG{≈
!"#$
!"#$%&'()*+,-./012
!"#$%&'()*+ [AUTO SCAN !"#] ÆwJOðUuðË_« `*« √b³¹
ÆWÐužd*« WD;« b& UbMŽ [AUTO SCAN] jG{≈
ÆÈd?š√ …d? w?K?_« œœd?²?« v?≈ q?B?¹ U?b?MŽ wJOðUuðË_« `*« wN²M¹
Æ[AUTO SCAN] jG{≈ ¨WOKLF« ¡UMŁ√ ·UI¹û
FM !"#$
C
FM Włu*« w Ϋbz«“ g¹uA²« ÊU «–≈
!"#$%
jI bFÐ sŽ rJײ« tłu
[FM MODE/BP FM “ MONO ” !
] !
!"#$%&'()*+,-./01234,56&78
!"#$%“
” !
FM
BP
] !"#$%
[FM MODE/BP
!
[REW / – / Q] [R / + / FF] !"#$%&'()
!"
!"#$%&'()*+,-./'01234567)* !"#$%&'()*+,-./012
!"#$%
[REW / – / Q] [R / + / FF] D ■
B
wJOðUuðË_« `*« «b²Ý≈
!"#$%
C
A
W¹œUF« WH«u*«
i?? H? ?? ?M? ¹Ë (“
Æ“ MONO ” ÷dF [FM MODE/BP] jG{≈
” …—U?? ýô« w?? H? ?²? ?? ?ð® ÍœU?? Š« u?? —U?? O? ²? š« r??²? ¹
ÆUHOF{ ‰U³I²Ýô« ÊuJ¹ UbMŽ g¹uA²«
Æl?{u« ¡UGù Èdš√ …d [FM MODE/BP] jG{≈
wJOðUuðË_« nOu²«
w? œœd?²?« √b³¹ v²ŠÆ [R / + / FF] Ë√ [REW / – / Q] j?G?CÐ kH²Š«
ÆWŽdÐ dOOG²«
ÆtUI¹≈ v≈ ÎUC¹√ qš«b²« ÍœR¹ b® ÆWD× œU−¹« bMŽ œœd²« nu²¹
©Æ«c¼ ÀbŠ «–≈ Èdš√ …d wJOðUuðË_« nOu²« √bÐ≈
wJOðUuðË_« nOu²« ·UI¹ù
.[R / + / FF] Ë√ [REW / – / Q] jG{≈
‰U³I²Ýù« 5ײ ■
D
Æwz«uN« l{uË ‰uÞ dOž
Ò :FM
Æ“UN'« WNłË dOž
Ò :AM
!"#$%
FM: !"#$%&'(
AM: !"#$%
WEŠö
• [0 DECK !] AM !"#$%&'(
• !"#$%&'()*+,-./0123,45678'(9
.[0 DECK] —e« jG{ - «–« …dOB …d²H AM Włu ‰U³I²Ý« nu²¹
tb²Ý≈ …—UOÝ Ë√ vM³ w “UN'« «b²Ý≈ bMŽ ‰U³I²Ýù« 5ײ
Æ…cUM« s »dIUÐ
•
•
AM Â≈ t¹ù« hOBð j³{
AM WOOz d« …bŠu« s jI
!"#$
AM !"#$%&'()*+,-./01*2342
(9 kHz 10 kHz)
1 [TUNER BAND !"] ! FM 2 [TUNER BAND !"] 5 !"#$% AM !"# 5 3 !"#$%&'()*+,-./
!"#$%&' ()*+,-./0%12
[TUNER BAND !"] !"#$%&'() *+,-
13
UD× ‰U³I²Ý≈ w ŸËdA« q³ `O×B« hOB²« —UO²š≈ s bQð
Æp²IDM vKŽ ΫœUL²Ž≈ p–Ë ©eðd¼ uKO ±∞ Ë√ eðd¼ uKO π® Â≈ t¹ù«
ÆFM Â≈ ·≈ —UO²šù “[TUNER BAND] Włu*«” —“ jG{≈ 1
µ …b?* “[TUNER BAND] W?łu?*«” —“ j??G?{ w? d?L?²?Ý≈Ë j?G?{≈ 2
ÆU³¹dIð
Î
w½«uŁ
r?Ł AM Â≈ t?¹ù« W?ł u?*« œœd?²? v?½œ_« b?(« v?≈ œœd?²« ÷dŽ lłdOÝ
Èd?š√ w?½«u?Ł µ …b?* j?G?C?« w? d?L?²?Ý≈ Æi?O?u?« w? ÷d?F« √b³¹
ÆU³¹dIð
Î
s?Ž ÷d?F?« n?u?²?¹ U?b?M?Ž “[TUNER BAND] W?łu?*«” —“ —d?Š 3
ÆnK² œœdð r— ÷dF¹Ë iOu«
ÆWIÐU« 3 v≈ 1 «uD)« —d ¨wK_« œœd²« v≈ …œuFK
!"#$!%&'()*+,-./ !"#$
WEŠö
w ÎU?I?³?? W?Þu?³?C*« «œœd²« wGK²Ý åhOB²«ò j³{ dOOGð bFÐ
Æ…d«c«
Ar/Ch15_1-aw
15
12/7/01, 6:05 PM
15
RQT6279
2
1 •7
2 7
7
A
The Radio
Preparation: (when using batteries) Press [
/I ].
Preset tuning
Tuning is simpler if you preset stations.
You can preset 12 FM and 12 AM stations.
A
SLEEP TIMER FADER DISPLAY
1
7
2
7
○
○
○
2
7
1
2
3
4
5
6
≥10
7
8
9
0
Preparation: Tune to the station you want to preset. (\ page 14)
1
7
PGM/-CLEAR
Presetting radio stations
1 Press [•MEMORY CLEAR].
■
2 Turn [TIME/PRESET TUNE
■
*
While “
” is flashing
CD SKIP ] to select
a channel and press [•MEMORY *CLEAR].
○
○
○
○
○
○
○
○
○
○
○
○
○
○
○
○
○
○
○
○
○
○
○
○
○
○
On the remote control
Press the numbered button(s) to enter the station into a
channel (1 to 12).
To enter channel 10, 11 or 12
≥10], then the two digits.
Press [≥
○
If “
” goes off during presetting, return to step ■
1.
Selecting channels
Preparation: Press [TUNER BAND] to select “FM” or “AM”.
B Turn [TIME/PRESET TUNE
■
the channel.
B
7
CD SKIP
] to select
On the remote control
Press the numbered button(s) to select the channel (1 to 12).
≥10], then the two digits.
To select channel 10, 11 or 12, press [≥
C
Using preset scan
You can search for a station by listening to all preset channels for 8
seconds each.
Preset channel
!
o³*« j³C« …UM
Remote control only
Preparation: Press [TUNER] to select “FM” or “AM”.
Press and hold [ S / 4 ] or [ 3 / T ] until “PS”
1 appears
■
on the display.
Preset scan starts.
7
C
PRESET EQ
TAPE
FF
1
7
2
7
○
○
+
VOLUME
○
○
○
○
○
○
Cancelling a preset channel
1
2
3
4
e.g. If channel 3 is not needed
Select channel 3.
Press [•MEMORY *CLEAR].
While “
” is flashing
CD SKIP ] to display “– –”.
Turn [TIME/PRESET TUNE
Press [•MEMORY *CLEAR].
Now, when you perform preset scan or turn [TIME/PRESET TUNE
CD SKIP ] to select a preset channel, channel 3 is skipped.
Indicates preset scan
!"#$%
o³*« j³C« ` 5³¹
PRESET TUNE
CD SKIP
○
Preset scan ends after searching through each preset channel once.
3 / T].
To stop during the process, press [ S / 4] or [3
1 •7
2
7
PRESET TUNE
CD SKIP
–
[ S / 4 ] or [ 3 / T ] when you find the
2 Press
■
desired channel.
TUNER
CD
S.VIRTUALIZER REW
AUTO SCAN
○
TUNER
○
PRESET TUNE
CD SKIP
○
○
○
○
○
○
○
○
○
○
○
○
○
○
○
○
○
○
○
Hints
• To select the cancelled channel, press the remote control’s numbered buttons.
3 / T] on the remote control for
• You can press [ S / 4] or [3
turning of [TIME/PRESET TUNE
CD SKIP ] described
above.
16
RQT6279
RQT6279-G (16-19)3
16
7/12/01, 4:45 PM
u¹œ«d«
!"#$%& [
.[
/I ] !
j³C« WI³*« WH«u*«
!"#$%&'()*+
!"12FM12AM
A
Æ UD×LK o³*« j³CUÐ XL «–≈ jÐ√ nOu²« ÊuJ¹
ÆAM WD× ±≤ Ë FM W?D?×? ±≤ œbF o³*« j³CUÐ ÂuIð Ê√ pMJ1
!"#$
u¹œ«d« UD; o³*« j³C«
!"#$%&'(\ 15
1 [•MEMORY CLEAR
■
2 [TIME/PRESET TUNE
■
*
“
/I ] —e« jG{« © U¹—UDÐ ‰ULF²Ý« bMŽ® ∫dOCײ«
” !"# [•MEMORY
*
U?? I? ?³? ?? ? U?? N? ?D? ?³? ?{ b?? ¹d?? ð w?? ²? ?« W?? D? ?×? L? K? n??O? u??²? U??Ð r?? ∫d?? ?O? ? C? ? ×? ?²? ?«
©±µ W×H ®
!"#$] .[•MEMORY *CLEAR] jG{≈
CD SKIP ] !
CLEAR !"#$]
!"#$%
!"#$%&'()*+, 112
10, 1112
≥10] !"#$%&'()"*
[≥
!"#$ “
ÎUCu “
” Êu?J¹ ULMOÐ
…U?M? —U?O?²šô [TIME/PRESET TUNE
CD SKIP ] —Ëœ
Ò
.[•MEMORY *CLEAR] jG{«Ë
jI bFÐ sŽ rJײ« tłu
Æ©±≤ v≈ ±® …UM w WD;« ‰Ušœù WLd*« —«—“_« jG{≈
±≤ Ë« \±± \±∞ «uMI« qUšœù
Æ5L— rŁ ¨[≥10] jG{≈
” !"#$%& ■
1 !"
…uD)« v« lł—« ¨o³*« j³C« ¡UMŁ« “
!"
” …—Uýô« XH²š« «–«
Æ
«uMI« —UO²š≈
[TUNER BAND
“AM”
!"#$] [TIME/PRESET TUNE
B
■
CD SKIP
“FM” ] !"
.AM Ë« FM —U?O²šô [TUNER BAND] j?G{« ∫d?O?C?ײ«
Æ…UMI« —UO²šô [TIME/PRESET TUNE
CD SKIP ]—Ëœ
Ò
B
■
jI bFÐ sŽ rJײ« tłu
jI bFÐ sŽ rJײ« tłu
!"#$%
!"#$%&'()*+, (1 12
≥10] !"#$%&'(
!"# 10 11 12 [≥
C
A
!"#
Æ©±≤ ≠ ±® …UMI« —UO²šô WLd*« ©—«—“ô«® —e« jG{«
Æ5Ld« —«—“« rŁ ¨[≥10] —e« jG{« ¨±≤ Ë« ±± Ë« ±∞ r— …UMI« —UO²šô
o³*« j³C« ` «b²Ý≈
C
∏ …b?* W?H?« u?*« U?D?;« l?O?L?ł v?≈ ŸU?L?²?ÝùU?Ð WD× sŽ Y׳« pMJ1
ÆUNM qJ w½«uŁ
!"#$%& 8 !"#$%&
jI bFÐ sŽ rJײ« tłu
!
.“AM ”Ë« “ FM ”—U?O²šô [TUNER] j?G{« ∫d?O?Cײ«
[TUNER !"] “FM” “AM”
1
■
! [ S / 4 ] [ 3 / T ] !"#$%&
PS !"#
“PS” d?N?E?¹ v?²?Š [ 3 / T ] Ë√ [ S / 4 ] j?G?C?Ð k?H?²Š≈
!"#$%&'(
2 ■
!"#$%&'()* [ S / 4 ] [ 3 / T ]
Æ÷dF« WŠu vKŽ
Æo³*« j³C« ` √b³¹
…U??? ?? M?? ?? ?I?? ?? ?« b??? ??& U??? ??b??? ??M?? ?? Ž [ 3 / T ] Ë√ [ S / 4 ] j??? ?? G?? ?? {≈
ÆWÐužd*«
…d o³ j³{ …UM q ‰öš Y׳« bFÐ o³*« j³C« ` wN²M¹
3 / T ] Ë√ [ S / 4] jG{≈ ¨WOKLF« ¡UMŁ√ ·UI¹û Æ…bŠ«Ë
.[3
!"#$%&'()*+$%&',-./0
3 / T] !"#$%&'()*+, [S / 4] [3
o³*« j³C« …UM ¡UG≈
1
2
3
4
!"#$%&
!"#$%&3
1 !3
2 [•MEMORY CLEAR !"#$] 3 “ ” [TIME/PRESET TUNE
CD SKIP ] “– –”
4 [•MEMORY
CLEAR !"#$] *
!"
*
!"#$%&'( [TIME/PRESET TUNE
!"#$%&#$3 !"#$
CD SKIP
]
ÆWÐuKD dOž ≥ …UMI« X½U «–≈ ∫‰U¦
Æ≥ …UMI« d²š≈
Æ[•MEMORY *CLEAR] j?G{«
ÎU?Cu “
” ÊuJ¹ ULMOÐ
Æå≠≠å …—Uýô« ÷dF [TIME/PRESET TUNE CD SKIP ] —Ëœ
Ò
Æ[•MEMORY *CLEAR] j?G{«
—Ëbð
Ë« o³*« j³C« ` ¡«dł« bMŽ ÆÊü«
Ò
WÞu³C …UM —UO²šô [TIME/PRESET TUNE
CD SKIP ]
Æ≥ r— …UMI« sŽ wD²« r²¹ ¨UI³
ÅWEŠöÅ
• !"#$%&'()*+,#-.(/0
3 / T] • !"#$% [ S / 4 ] [3
[TIME/PRESET TUNE CD SKIP ] !"#$%
ÆWLd*« bFÐ sŽ rJײ« tłu —«—“« jG{« ¨WOGK*« …UMI« —UO²šô •
3 / T ] Ë« [S / 4] j?G{ pMJ1 •
s?Ž r?J?×?²« tłu vKŽ …œułu*« [3
w?? W??u??u??*« [TIME/PRESET TUNE CD SKIP ] ·U?? I? ¹ô b??F? Ð
ÆvKŽô«
17
RQT6279
Ar/Ch17
17
12/7/01, 6:09 PM
CDs
2
7
TAPE ⁄ CD
1 Press [0 CD] to open the tray.
■
(The unit comes on.)
Load a CD and press [0 CD] to close the tray.
2 Press [6 CD] to start play.
■
3 Press [ +, – VOLUME] to adjust the volume.
■
Plays to the end of the CD and stops.
To stop play
3
7
Press [L TAPE/CD].
1
7
One touch play (When using AC power)
When a CD is loaded, press [6 CD].
The unit comes on and play starts.
To pause play
1
7
Press [6 CD] during play.
Press again to resume play.
To skip tracks
Turn [TIME/PRESET TUNE
CD SKIP ] clockwise (forward) or
counter-clockwise (backward).
On the remote control
3 / T] (forward).
Press [S / 4] (backward) or [3
Label must face upward
!"#$
vKŽô« ÁU&UÐ oBK*« ÊuJ¹ Ë« V−¹
2
7
○
○
○
○
○
○
○
○
○
○
○
○
○
○
○
○
○
○
○
○
○
○
○
○
○
○
○
○
○
○
Searching through tracks
Press and hold [REW / – / Q] (backward) or [R / + / FF] (forward)
during play.
On the remote control
3 / T] (forward) during
Press and hold [ S / 4] (backward) or [3
play.
CD
Elapsed time of track in play
!"#$%&'
ŸUL²Ýù« bO —ULK wCIM*« Xu«
Track number in play
!"#!"$%
ŸUL²Ýù« bO —U*« r—
Note
Separate this unit from radios and televisions if it causes interference.
A
3
7
○
○
○
○
○
○
○
○
○
○
○
○
○
○
○
○
○
○
○
○
○
○
○
○
○
○
○
○
○
○
VOLUME
CD selection
b
Do not
A
7
○
○
• use irregularly shaped CDs ( ).
• use CDs with labels and stickers that are coming off or with
adhesive exuding from under labels and stickers. ( )
• attach scratch-proof covers or any other kind of accessory.
• write anything on the CD.
• clean CDs with liquids. (Wipe with a soft, dry cloth.)
• use CDs printed with label printers available on the market.
a
○
○
○
○
○
○
○
○
○
○
○
○
○
○
○
○
○
○
○
○
○
○
○
○
○
○
○
○
○
○
○
○
○
○
○
○
○
○
○
○
○
○
○
○
○
○
○
○
○
○
○
○
○
b
○
○
○
○
○
c
18
RQT6279
RQT6279-G (16-19)3
a
Choose CDs with this mark: ( ).
This unit can play CD-DA (digital audio) format audio CD-R and CDRW that have been finalized (a process that enables CD-R/CD-RW
players to play audio CD-R and CD-RW) upon completion of
recording.
It may not be able to play some CD-R or CD-RW due to the condition
of the recording.
18
7/12/01, 4:45 PM
c
CD
W−b*« U½«uDÝù«
1 [0 CD CD
■
!"#] !"#$%&
CD [0 CD CD
2 [6 CD] ■
!CD
ÆWOMOB« `²H [0 CD] jG{≈
©“UN'« qG²A¹®
!"#] !"#
ÆWOMOB« ‚öžô [0 CD] jG{«Ë CD W−b W½«uDÝ« l{
!"#$
!"
ÆŸUL²Ýù« ¡b³ [6 CD] jG{≈
#$%
3 [ +, – VOLUME
■
!"#$
!"#] Ænu²¹Ë W−b*« W½«uDÝ≈ W¹UN½ v≈ ŸUL²Ýù« r²¹
!"#$
Æ uB« …—UNł Èu² j³C [ +, – VOLUME] jG{≈
!"#
ŸUL²Ýù« ·UI¹ù
[L TAPE/CD !"CD] .[L TAPE/CD] j?G{≈
!"#$ !"#$%&'
CD [6 CD] !"!#$%&
©œœd²*« —UO²« …—b «b²Ý≈ bMŽ® …bŠ«Ë WLKÐ ŸUL²Ýù«
.[6 CD] j?G{≈ ¨W−b W½«uDÝ≈ qOL% bMŽ
ÆŸUL²Ýù« √b³¹Ë qOGA²« l{Ë v≈ “UN'« ‰uײ¹
!"#
U²R
ŸUL²Ýù« ·UI¹ù
Î
ÆŸU?L²Ýù« ¡UMŁ√ [6 CD] jG{≈
ÆŸUL²Ýù« ·UM¾²Ýô Èdš√ …d jG{≈
!"#
WŽU« »—UIŽ ÁU&UÐ [TIME/PRESET TUNE
CD SKIP ] —Ëœ
Ò
©nKK® WŽU« »—UIŽ fJŽ Ë« ©ÂUö®
!"#$ [6 CD] !"#$%&'(
«—U*« wD²
!"#"$%&' !"#"(% [TIME/PRESET
CD SKIP ] TUNE
!
3 / T] !"#
[ S / 4] !"# [3
jI bFÐ sŽ rJײ« tłu
3 / T ] Ë« ©nKK® [ S / 4] jG{«
Æ©ÂUö® [3
«—U*« ‰öš Y׳«
!"#
!"#$%& [REW / – / Q] !"# [R / + / FF] !"
!
3 / T] !"#
!"#$%& [ S / 4] !"# [3
Ë« ©n?? ? K? ? ?? ? ?K? ? ® [REW / – / Q] —e?? ? « v?? ? K? ? ?Ž j?? ? G? ? ?C? ? ?« l?? ? ÐU?? ? ðË j?? ? G? ? {«
ÆŸUL²Ýô« ¡UMŁ« ©ÂUö® [R / + / FF]
jI bFÐ sŽ rJײ« tłu
Ë« ©n?? ? ? ?K? ? ? ? ? ? ? ? K? ? ? ?® [ S / 4] —e?? ? ? ?« v?? ? ? ?K? ? ? ? Ž j?? ? ? ?G? ? ? ? C? ? ? ? « l?? ? ? ÐU?? ? ? ðË j?? ? ? G? ? ? ?{«
3 /T]
ÆŸUL²Ýô« ¡UMŁ« ©ÂUö® [3
A
ÅWEŠöÅ
!"#$%&'(
CD
!)*+,-.!/012!3
a
!"#$%&CD !"#CD-DA !"#$%&CD-RCD-RW
!"#$%&'()*+,-./01CD-R/CD-RW
!"CD-RCD-RW
!"#$%&'()*+,-CD-RCD-RW
b
c
Æg¹uAð V³¹ ÊU «–« Êu¹eHK²«Ë u¹œ«d« …eNł« sŽ “UN'« «c¼ qB«
W−b*« U½«uDÝù« —UO²š≈
!
!
• !"#$%CD • !"#$%&'()*CD !"#$%&'()*+,
!"#$%&'( • !"#$%&'()*+,-.
• CD !"#$%
• !"#CD !"#$%&$'
• !"#$%&"#'()'*+CD
a
A
( ) ∫WöF« Ác¼ qL% w²« U½«uDÝù« d²š≈
©wL— u® CD-DA W½«uDÝ« u U—u qGA¹ Ê« “UN'« «cN sJ1
…œU?Žô W?K?ÐU?I?« W?½«u?D?Ýô«Ë CD-R q?O?−??²?« …œU?Žô W?K?ÐU?I?« W?½«u?DÝô«Ë
öGA sJ9 WOKLŽ® …bŠ«Ë …d UNOKŽ qO−²« - w²« CD-RW WÐU²J«
…œU?? Žô W?? K? ÐU??I? « U??½«u??D? Ýô« q??O? G? A? ð s?? CD-R/CD-RW U??½«u??D? Ýô«
©W?OðuB« CD-RW W?ÐU²J« …œUŽô WKÐUI« U½«uDÝô«Ë CD-R q?O−²«
ÆqO−²« ¡UN²½« bFÐ
Ë« CD-R q?O?−??²?« …œU?Žô W?K?ÐU?I?« U?½«u?D?Ýô« i?FÐ qGA¹ ô Ê« sJ1
ÆqO−²« ·Ëd{ V³Ð CD-RW WÐU²J« …œUŽô WKÐUI« U½«uDÝô«
b
sŽ lM²≈
.( ) qJA« WLE²M dOž U½«uDÝ≈ «b²Ý≈
UIBK Ë« q³O UNOKŽ błu¹ w²« CDs W−b*« U½«uDÝô« ‰ULF²Ý«
c
( ) ÆUN²% s WIô œ«u Ãdð
Æ UI×K*« s Ÿu½ Í√ Ë√ ‘bK …bU WODž√ oB
ÆW−b*« W½«uDÝù« vKŽ Tý Í√ WÐU²
Æqz«uUÐ W−b*« U½«uDÝù« nOEMð
©ÆWUłË ¨tMO WýULIÐ UN×≈®
q³OK« UFÐUDÐ WŽu³DË« Wu² CDs W−b U½«uDÝ« ‰ULF²Ý«
Æ‚«uÝô« w …œułu*«
•
•
•
•
•
•
19
RQT6279
Ar/Ch19_1
19
12/7/01, 7:03 PM
CDs
Other modes of play
SLEEP TIMER FADER DISPLAY
!
Numbered buttons
WOLd« —«—“_«
1
7
1
2
3
4
5
6
≥10
7
8
9
0
RANDOM
REPEAT
FM MODE/BP C RESET
PRESET EQ
TAPE
TUNER
Remote control only
A
REPEAT
FF
Direct access play
Starts play from a selected track
Select the track with the numbered buttons.
≥10], then the two digits.
For two-digit tracks, press [≥
2
7
CD
S.VIRTUALIZER REW
A
7
Preparation: Press [L] to switch to CD mode.
PGM/-CLEAR
B
Repeat play
Plays a track or all tracks repeatedly
Press [REPEAT] before or during play to select a mode.
Each time you press the button:
: One-track repeat
1
1
2
3
4
5
6
≥10
7
8
9
0
: All-tracks repeat
(No display) : Cancel
Press [CD] to start play if in the stop mode.
B
7
To repeat selected tracks
1 Start program play (\ page 22).
REPEAT
2 Press [REPEAT] to select “
1
7
”.
To cancel
Press [REPEAT] until “ 1
” and “
” are cleared.
The mode is also cancelled if the CD tray is opened.
RANDOM
Random play
Plays the tracks once each in random order
2
7
○
○
○
○
○
○
○
○
○
○
○
CD
○
○
○
○
○
○
○
○
○
○
○
○
○
○
○
○
○
○
○
1 Press [RANDOM] during CD stop mode.
■
2 Press [CD] to start play.
■
To cancel
Press [RANDOM] to clear “
”.
If cancelled during play, play continues to the end of the CD.
The mode is also cancelled if the CD tray is opened.
Note
• Random play cannot be used together with one-track repeat and
program play.
• You cannot select tracks with the numbered buttons.
• You cannot skip to tracks already played.
• Search can be done within the track in play only.
20
RQT6279
RQT6279-G (20-23)5
20
7/12/01, 4:47 PM
CD
W−b*« U½«uDÝù«
!"#
[ ] ŸUL²Ýû Èdš_« ŸU{Ë_«
!"CD
∫dOCײ«
ÆW?−?b?*« U½«uDÝù« l{Ë v≈ ‰uײK [L] jG{≈
!"#$%
jI bFÐ sŽ rJײ« tłu
A
!"#
!"#$%&'()*
A
dýU³*« ‰uuUÐ ŸUL²Ýù«
Æ—U²<« —U*« s ŸUL²Ýô« √b³¹
!"#$%&'(
!"#$%10
≥10] !"#$% [≥
!"#$%&'
ÆWLd*« —«—“_UÐ —U*« d²š≈
Æ5Ld« rŁ ¨[≥10] jG{« ¨5L— s ÊuJ²ð w²« «—ULK
B
!
!"#$%&'()
B
—dJ²*« ŸUL²Ýù«
Æ…—dJ² …—uBÐ ŸUL²Ýû «—U*« q Ë√ bŠ«Ë —U qGA¹Ô
!"#$% [REPEAT ] !"#$
Æl{u« —UO²šù ŸUL²Ýù« ¡UMŁ√ Ë√ q³ [REPEAT] jG{≈
!"#$%&'()*+,
∫—e« UNO jGCÔ¹ …d q w
1
bŠ«Ë —U —«dJð ∫ 1
«—U*« q —«dJð ∫
¡UG≈ ©÷dŽ ÊËbЮ
!"#$%&[CD]
!"#
Æ·UI¹ô« l{uÐ “UN'« ÊU «–« ŸUL²Ýô« ¡b³ [CD] jG{≈
!"#$%&'
1 !"#$
2 [REPEAT
…—U² «—U —«dJ²
23
!] !"
[REPEAT] !" 1
!CD !"#$%&'(
!
.“
!
® Z?d³*« ŸUL²Ýù« √bÐ≈
” —UO²šô [REPEAT] j?G{≈
1
2
¡UGû
.“
” Ë“1
” W?«“≈ r?²?¹ v²Š [REPEAT] j?G{≈
ÆW−b*« U½«uDÝù« WOMO `² - «–≈ ÎUC¹√ l{u« vGK¹Ô
!
wz«uAF« ŸUL²Ýù«
!"#$%&'()*+,%
1 CD !"# [RANDOM ■
2 [CD] !"#$
■
Æ©≤≥ W×H
wz«uAŽ VOðdð w UNM q …bŠ«Ë …d «—U*« qGA¹
!] ÆCD W−b*« W½«uDÝô« nuð l{Ë ¡UMŁ« [RANDOM] jG{«
ÆŸUL²Ýù« ¡b³ [CD] jG{≈
!
¡UGû
[RANDOM !] !"
!"#$%&'()*+!"&,-./01CD !
!CD !"#$%&'(
.“
” W?«“ù [RANDOM] j??G?{≈
W½«uDÝô« W¹UN½ W¹UG ŸUL²Ýô« dL²¹ ¨ŸUL²Ýô« ¡UMŁ« ¡UGô« - «–«
ÆCD W−b*«
ÆW−b*« U½«uDÝù« WOMO `² - «–≈ ÎUC¹√ l{u« wGKÔ¹
•
•
•
•
!"#$#%&'()* !+,-.
!"#$%&'()
!"#$%&'()*+
! "#$%&'()*+,
!/0123
ÅÅW??E?Šö? Å
ŸU?L?²?Ýô« —«d?J?ð l?{Ë l? wz«uAF« ŸUL²Ýô« l{Ë ‰ULF²Ý« sJ1 ô
ÆZd³*« ŸUL²Ýô«Ë bŠ«Ë ≠ —U*
ÆWLd*« —«—“ô« WDÝ«uÐ «—U*« —UO²š« pMJ1 ô
Æq³ s UNŽULÝ - w²« «—U*« v≈ wD²« pMJ1 ô
ÆŸUL²Ýô« ¡UMŁ« jI —U*« sL{ Y׳« ¡«dł« sJ1
•
•
•
•
21
RQT6279
Ar/Ch21
21
12/7/01, 4:27 PM
TAPE ⁄ CD
CDs
3
1 7
2
7
7
Program play
Select up to 36 tracks to play in the order you choose.
On the main unit
Preparation: Press [
1
7
[TIME/PRESET TUNE
1 Turn
■
the track.
2 Press [•MEMORY CLEAR].
■
Play time
!
ŸUL²Ýù« XË
Track number
!
—U*« r—
TAPE/CD] to switch to CD mode.
CD SKIP
] to select
*
Repeat step ■
1 and ■
2 to program other tracks.
2
7
○
○
○
○
○
○
○
○
○
○
○
○
○
○
○
○
○
○
○
○
○
○
○
○
○
○
○
○
○
○
Programmed track
Play sequence
!
!
Zd³*« —U*« ŸUL²Ýù« VUFð
3 Press [ 6 CD] to start play.
■
On the remote control
Preparation:
Press [ ] to switch to CD mode.
3
7
○
○
○
○
○
○
○
○
○
○
○
○
○
○
○
○
○
○
○
○
○
○
○
○
○
○
○
○
Press [PGM/*CLEAR].
2
Enter the track number with the numbered
buttons.
“
” appears on the display.
○
CD
For tracks numbered 10 and over, press [≥10] then the two
digits.
Repeat this step to program other tracks.
1
2
3
4
5
6
≥10
7
8
9
0
FM MODE/BP C RESET
RANDOM
REPEAT
PRESET EQ
TUNER
CD
2
TAPE
1
PGM/-CLEAR
S.VIRTUALIZER REW
3
Press [CD] to start play.
The program remains intact even if play is stopped or the unit is
turned off. “Cd-P” appears when play is stopped to indicate the contents are in the memory.
3
To cancel
FF
AUTO SCAN
Press and hold [• MEMORY *CLEAR] (remote control: [PGM/
CLEAR]) in the stop mode until “CLEAR” is displayed.
The mode is also cancelled if the CD tray is opened.
PRESET TUNE
CD SKIP
*
VOLUME
1
1
PGM/-CLEAR
“FULL” is displayed
If 36 tracks have already been programmed.
“– –:– –” is displayed
○
○
○
○
2
○
○
○
3
○
○
○
○
○
○
○
○
○
○
2
3
4
5
6
≥10
7
8
9
0
○
○
○
○
○
○
○
○
○
○
○
○
○
○
○
○
○
○
○
○
Programmed track
Play sequence
!
!
Zd³*« —U*« ŸUL²Ýù« VUFð
1
○
○
○
○
○
If the total play time of the program exceeds 100 minutes.
You can still program and play tracks.
A To check the program contents (while “Cd-P” is
■
displayed)
Turn [TIME/PRESET TUNE
On the remote control
3 / T].
Press [S / 4] or [3
○
○
○
○
○
○
○
○
○
○
○
○
○
○
○
○
○
CD
A
7
22
RQT6279
RQT6279-G (20-23)5
22
7/12/01, 4:47 PM
CD SKIP
].
CD
W−b*« U½«uDÝù«
!"
∫Zd³*« ŸUL²Ýù«
!"36
!"#$%&'()*
ÆÁb¹dð Íc« VOðd²« w UNŽUL Ϋ—U ≥∂ v²Š d²š≈
!"
[
1
■
2
■
wOzd« “UN'« vKŽ
TAPE/CD
!"CD] =xqfjbLmobpbq=qrkb=
=xqfjbLmobpbq=qrkb=
`a=phfm
[•MEMORY *CLEAR
■
1 ■
2 !"CD
z=
z= !"
!"#$] ∫dOCײ«
ÆW−b*« U½«uDÝù« l{Ë v≈ ‰uײK [L TAPE/CD] jG{≈
Æ—U*« —UO²šô [TIME/PRESET TUNE
CD SKIP
.[•MEMORY *CLEAR] jG{≈
!"#$%&'()*+,
ÆÈdš« «—U W−d³
3
■
[ 6 CD] !"#$%
[ ] ] —Ëœ
Ò
!"#$
Ë
…uD)« bŽ«
ÆŸUL²Ýù« ¡b³ [6 CD] jG{≈
!"CD
jI bFÐ sŽ rJײ« tłu
1
[PGM/*CLEAR
“
” !"#$%&.
2
!"#$%&'(
3
[CD] ∫dOCײ«
!"#$] ÆW−b*« U½«uDÝù« l{Ë v≈ ‰uײK [L] jG{≈
.[PGM/ *CLEAR] jG{≈
!"#10 !"#$% [ 10] !"#$%&'
!"#$%&'()*
ÆWýUA« vKŽ“
ÆWLd*« —«—“_UÐ —U*« r— qšœ√
!"#$
!
!"#$%&'( [•MEMORY *CLEAR
!" [PGM/*CLEAR !"#$] !
!CD !"#$%&'(
!"#$] “CLEAR” “FULL” !"36
ÆŸUL²Ýù« ¡b³ [CD] jG{≈
¡UGû
sŽ rJײ« tłu® [•MEMORY *CLEAR] vKŽ jGC« lÐUðË jG{«
…—Uýô« ÷dŽ r²¹ v²Š ·UI¹ô« l{Ë w ©[PGM/*CLEAR] ∫bFÐ
Æ“CLEAR”
ÆCD W−b*« W½«uDÝô« WOMO `² - «–« UC¹« l{u« wG²K¹
!
“FULL” ÷dŽ r²¹
“– –:– –” Æ—U ≥∂ W−dÐ WUŠ w
!"#$%&' “Cd-P” [TIME/PRESET TUNE
!"#$%
[S / 4] [3
3 / T]
3
q?OGAð ·UI¹« - Ë« ŸUL²Ýù« ·UI¹≈ - «–≈ v²Š tUŠ vKŽ ZU½d³« qE¹
w U¹u²;« Ê√ ÊUO³ ŸUL²Ýù« ·UI¹≈ r²¹ UbMŽ “Cd-P” dNE¹ Æ“UN'«
Æ…d«c«
!"#$%&'()*+,100
!"#$%&'()*
A ■
2
Æ5L— rŁ [≥10] jG{≈ ¨vKŽ√Ë ±∞ WLd*« «—ULK W³MUÐ
ÆÈdš« «—U W−d³ …uD)« Ác¼ ¡«dł« bŽ«
!"#$%&'()*+,-./012345 !"#67
Cd-P !"#$%&'()*+)*,%-
1
” …—Uýô« dNEð
CD SKIP
!"#$%&'
]
“– – : – –” ÷dŽ r²¹
p?½U?J?S?Ð ‰«e?¹ ô ÆW?I?O?œ ±∞∞ Z?U?½d?³?K? w?K?J?« ŸUL²Ýù« XË “ËU& «–≈
Æ «—U*« ŸULÝË W−dÐ
A
©“Cd-P” …—Uýô« ÷dŽ ¡UMŁ« ® ZU½d³« Èu²× h×H ■
.[TIME/PRESET TUNE
CD SKIP
]—Ëœ
Ò
jI bFÐ sŽ rJײ« tłu
.[3
3 / T ] Ë« [ S / 4] jG{≈
23
RQT6279
Ar/Ch23
23
12/7/01, 4:28 PM
Cassettes
TAPE ⁄ CD
1 7
2
7
3
7
REW
1 Press [0 DECK] to open the deck.
■
(The unit comes on.)
Load a cassette and close the deck by hand.
2 Press [ : TAPE] to start play.
■
3 Press [+, – VOLUME] to adjust the volume.
■
To stop play
Press [L TAPE/CD].
1
7
One touch play (When using AC power)
When a cassette is loaded, press [: TAPE].
The unit comes on and play starts.
Side to be played back facing up
!"#$%&
vKŽ√ v≈ tO≈ ŸUL²Ýù« …œUŽ≈ œ«d*« V½U'«
DECK
Fast-forward and rewind
Press [REW / – / Q ] (rewind) or [R / + / FF] (fast-forward).
On the remote control
Press [REW / –] (rewind) or [+ / FF] (fast-forward).
Selection of tapes
2
7
○
○
○
3
7
○
○
○
Insert the cassette with the exposed tape facing you.
!"#$%&'()
Æp tł«u ·uAJ*« j¹dA« V½Uł ÊuJ¹ YO×Ð XOÝUJ« qšœ√
○
○
○
○
○
○
○
○
○
○
○
○
○
○
○
○
○
○
○
○
○
○
○
○
○
○
○
○
Cassette tape care
○
○
○
○
○
○
○
○
○
○
○
○
○
○
○
○
○
○
○
○
○
○
○
○
○
○
○
• Tapes exceeding 100 minutes are thin and can break or get caught
in the mechanism.
• Tape slack can get caught up in the mechanism and should be
taken up before the tape is played.
• Endless tapes can get caught up in the deck’s moving parts if used
incorrectly.
VOLUME
Tips on Recording
Use household AC power or new batteries when recording to avoid
poor recordings caused by the batteries running down.
Televisions can cause interference to recordings made on this unit if
the two are too close to each other.
A
7
○
○
Use normal position tapes to play correctly.
High position and metal position tapes can be played, but the unit will
not be able to do full justice to the characteristics of these tapes.
DISPLAY
SLEEP TIMER FADER DISPLAY
○
○
○
○
○
Selection of tapes for recording
1
2
3
4
5
6
≥10
7
8
9
0
FM MODE/BP C RESET
RANDOM
REPEAT
PRESET EQ
TUNER
CD
TAPE
REW
S VIRTUALIZER
○
○
○
○
a
○
○
PGM/-CLEAR
○
○
FF○
Use normal position tapes.
High position and metal position tapes can be used, but the unit will
not be able to record or erase them correctly.
Volume and sound quality in recording
C RESET
○
○
○
○
○
○
• Recording level is set automatically.
• Recording are unaffected by changes to sound quality.
○
○
○
○
○
○
○
A
To display the tape counter while recording
Remote control only
Press [DISPLAY].
Each time you press the button in the CD or radio mode:
a Present state
b
b Present time
To reset the tape counter
Press [C-RESET].
The counter resets to “000”.
24
c
RQT6279
RQT6279-G (24-29)3
24
7/12/01, 4:48 PM
c Tape counter
U²OÝUJ«
1 [0 DECK
■
!] !"
Æ„b« `²H [0 DECK] jG{≈
!"#$%&
!"#$%&'()*
©“UN'« qG²A¹®
ÆbO« WDÝ«uÐ „b« oKž«Ë XOÝU j¹dý l{
2 [ : TAPE !"] !"#$
■
!
] !"#$
3 [+, – VOLUME
■
ÆŸUL²Ýù« ¡b³ [ : TAPE] jG{≈
Æ uB« …—UNł Èu² j³C [+, – VOLUME] jG{≈
ŸUL²Ýù« ·UI¹ù
!"#
Æ[7 TAPE/CD] jG{≈
[L TAPE/CD !"CD] ©œœd²*« —UO²« …—b «b²Ý≈ bMŽ® …bŠ«Ë WLKÐ ŸUL²Ýù«
Æ[3 TAPE] jG{≈ ¨XOÝU qOL% bMŽ
ÆŸUL²Ýù« √b³¹Ë qOGA²« l{Ë v≈ “UN'« ‰uײ¹
!"#$ !"#$%&'
!"#$%& [: TAPE
!"#$%&'()
!"] lOłd²«Ë l¹d« ‡ .bI²«
Æ©l¹dÝ ‡ .bIð® [R / + / FF] Ë« ©lOłdð® [REW / – / Q ] jG{«
!"
[REW / – / Q ] !"# [R / + / FF] !"#$%
[REW / –] !"# [+ / FF] !"
!"
jI bFÐ sŽ rJײ« tłu
Æ©l¹dÝ ‡ .bIð® [+ / FF] Ë« ©lOłdð® [REW / –] jG{«
WÞdýô« —UO²š«
!"#
!"#$%&'()*+,-.
!"#$%&'()*+,-./01 !23456789,
!"#$%&'()
ÆÍœUF« l{u« WÞdý« qLF²Ý« `O× qJAÐ ŸUL²Ýö
“UN'« sJ ¨w½bF*« l{u«Ë wUF« l{u« WÞdý« v« ŸUL²Ýô« sJ1
ÆWÞdýô« Ác¼ hzUBš qU qOGAð vKŽ Ϋ—œU ÊuJ¹ s
XOÝUJ« j¹dAÐ W¹UMF«
!"#
• 100 !"#$%&'()*+,-./012
• !"#$%&'()*+,-./01234567
• !"#$%&'()*+,-./0123456&'7'8
!"#$%&'()
!"
!"#$!"%&'(#$!)* !+,-./012
!"#$
• !"#$%&'
• !"#$% &'()*
qO−²« qł√ s WÞdý_« —UO²š≈
ÆÍœUF« l{u« WÞdý« qLF²Ý«
s? “U?N?'« s?J? ¨w?½b?F?*« l?{u?«Ë w?U?F?« l?{u?« W?Þd?ý« ‰U?LF²Ý« sJ1
ÆW×O× …—uBÐ UN× Ë« UNKO−ð vKŽ Ϋ—œU ÊuJ¹
qO−²« w uB« WOŽu½Ë …—UNł
qO−²« ¡UMŁ√ j¹dA« œ«bŽ ÷dF
!"#$%
[DISPLAY
a
q?O?−??²?« b?MŽ …b¹bł U¹—UDÐ Ë√ weM*« œœd²*« —UO²« …—b Âb²Ý≈
ÆWJKN²*« U¹—UD³« sŽ W&UM« W¾¹œd« öO−²« ÍœUH²
«c¼ vKŽ r²ð w²« öO−²K Îöš«bð Êu¹eHOK²« …eNł√ V³ð Ê√ sJ1
ÆULNCFÐ s …b¹bý WÐdI vKŽ s¹“UN'« ÊU «œ≈ “UN'«
ÆÎUOJOðUuðË√ qO−²« Èu² W¾ONð r²¹
Æ uB« WOŽu½ w «dOG²UÐ öO−²« dŁQ²ð ô
!"#$%&
CD
•
•
A
jI bFÐ sŽ rJײ« tłu
!] .[DISPLAY] jG{≈
!"#$%&'()*+*,-
b
c
Æu¹œ«d« ¨W−b*« W½«uDÝù« l{Ë w —e« UNO jGCÔ¹ …d q w
j¹dA« œ«bŽ c
•
•
!"#
!"#$%&
!"#$%&'()*+,-./012345678,-9:
!"#$%&'
A
•
qO−²« vKŽ UEŠö
!"#$#%&'()*'+,-./'+0123450
w d?A×Mð Ë√ lD?IMð Ê√ UN?MJ1Ë WIO?— WIOœ ±∞∞ “ËU?−²ð w²?« WÞdý_«
ÆWOü«
Æj¹dA« ŸULÝ q³ t³×Ý wG³M¹Ë WOü« j¹dA« ¡Uð—≈ dA×M¹ Ê√ sJ1
Xb²Ý≈ «–≈ Wdײ*« „b« ¡«eł√ w WOzUN½ö« WÞdý_« dA×Mð Ê√ sJ1
ÆW¾ÞUš …—uBÐ
wU(« Xu« b
WOU(« WU(« a
!"#$%&'()*
[C-RESET !"#$%&'()] !"#$%&'()*000
j¹dA« œ«bŽ j³{ …œUŽù
Æ[C-RESET] jG{≈
Æ“000” v≈ œ«bF« j³{ …œUŽ≈ r²¹
25
RQT6279
Ar/Ch25
25
12/7/01, 4:29 PM
A
7
Tips on Recording
To protect tapes against further recording
!"#$%&
j¹dA« vKŽ Èdš√ öO−ð lM*
Side A
A A V½Uł
A
Erasure prevention
The illustration shows how to remove the tabs to prevent recording.
To record on the tape again, cover as shown.
Tab for side “B”
B !
B V½U'« ÊU
Tab for side “A”
A !
A V½U'« ÊU
B
To re-record
!"#
1 Press [0 DECK] to open the deck and insert the cassette with
A
qO−²« …œUŽù
Adhesive tape
Normal position tape
!
ÍœUŽ l{Ë j¹dý
B
7
the side to be erased facing up.
2 Press [L TAPE/CD] to switch to TAPE mode.
3 Press [a/ J].
oô j¹dý
3
1
2
Recording CDs
C
C
7
Erasing recordings
17
3
7
Normal recording
Preparation:
• Insert a CD (\ page 18).
• Wind on the leader tape.
2
7
1 Press [0 DECK] to open the deck.
■
Load a cassette with the side for recording facing up and close
the deck by hand.
2 Press [L TAPE/CD] to switch to CD mode.
■
Each time you press the button:
TAPE ↔ Cd
3 Press [a/ J] to start recording.
■
CD play and recording start at the same time.
The cassette stops when the CD finishes.
To stop recording
Press [L TAPE/CD].
D To pause recording
■
1
7
Press [a/ J].
Press again to resume recording.
Side to be recorded facing up
!"#$%
vKŽô« ÁU&UÐ tKO−𠜫d*« V½U'«
DECK
To continue recording from another CD on the same cassette
1 Press [0 CD] and replace the CD.
2 Press [a/ J].
7
3
7
○
○
○
○
○
○
2
○
○
○
To record selected tracks
Insert the cassette with the exposed tape facing you.
!"#$%&'()
Æp tł«u ·uAJ*« j¹dA« V½Uł ÊuJ¹ YO×Ð XOÝUJ« qšœ√
○
○
○
○
○
○
○
○
○
○
○
○
○
○
○
○
○
○
○
○
○
○
○
○
TAPE ⁄ CD
1 Do step ■
1., then program the tracks (\
2 Press [a/ J].
To skip unwanted tracks
○
○
○
○
○
○
○
○
○
○
○
○
○
○
○
○
○
○
○
○
○
○
○
○
○
○
○
1 Press [a/ J] to pause recording (the CD also pauses).
2 Turn [TIME/PRESET TUNE CD SKIP ] so the next track
you want to record is displayed.
3 Press [a/ J] to resume recording.
D
7
26
RQT6279
RQT6279-G (24-29)3
page 22).
26
7/12/01, 4:48 PM
!"
A
qO−²« vKŽ UEŠö
!"#$
`*« lM
!"#$%&'()*+,-./0,-1234,-56/
!"#$%&'
B
q?O?−??²?K? Æq?O?−?²« lM* WM_« Ÿe½ WOHO w×O{u²« rÝd« `{u¹
Æ`{u*U UײH« jž ¨Èdš√ …d j¹dA« vKŽ
!"
1 [0 DECK
!"
öO−²« `
!] 2 [L TAPE/CD
3 [a/ J] !
!"#$%&"'
!"CD] !"#$%&'(
ÊuJ¹ YO×Ð XOÝUJ« j¹dý qšœ« rŁ „b« `²H [0 DECK] jG{≈
ÆvKŽô« ÁU&UÐ t× œ«d*« V½U'«
1
.TAPE j¹dA« l{Ë v≈ ‰uײK [L TAPE/CD] jG{≈
2
3
W−b*« U½«uDÝù« qO−ð
!
ÍœUF« qO−²«
• CD\ 19
• !"#
©±π W×H
1 [0 DECK !] !
■
2 [L TAPE/CD !"`a]=
■
!"#$%&'()*+,
TAPE !" ↔ Cd
[a/ J] !"`a
C
∫dOCײ«
® W−b W½«uDÝ≈ qšœ√ •
Æj¹dA« ∆œUÐ n •
Æ„b« `²H [0 DECK] jG{≈
!"#$% !&'()*#+,-./
3
■
B
.[a/ J] jG{≈
CD
C
A
tOKŽ qO−²« œ«d*« V½U'« ÊuJ¹ YO×Ð XOÝUJ« j¹dý l{
ÆbO« WDÝ«uÐ „b« oKž«Ë vKŽô« ÁU&UÐ
ÆW−b*« W½«uDÝù« l{Ë v≈ ‰uײK [L TAPE/CD] jG{≈
∫—e« UNO jGCÔ¹ …d q w
!"#$
Cd ↔ TAPE
!"CD !"!#
CD !"#$%&'()*+
ÆqO−²« ¡b³ [a/ J] jG{≈
ÆXu« fH½ w qO−²«Ë W−b*« W½«uDÝû ŸUL²Ýù« √b³¹
ÆW−b*« W½«uDÝù« wN²Mð UbMŽ XOÝUJ« nu²¹
!"#
[L TAPE/CD !"CD] D ■
qO−²« ·UI¹ù
!"#
.[L TAPE/CD] j?G{≈
[a/ J] !"#$%&'(
.[a/ J] jG{≈
ÆqO−²« ·UM¾²Ýô Èdš√ …d tDG{≈
!"#$%&'!`a
1 [0 CDCD
2 [a/ J] ÎU²R qO−²« ·UI¹ù ■
D
!"#] CD.
j¹dA« fH½ vKŽ Èdš√ W−b W½«uDÝ≈ s qO−²« WK«u*
ÆCD W−b*« W½«uDÝô« ‰b³²Ý«Ë [0 CD] jG{≈
!"#$%&'
1 ! ■
1. 2 [a/ J] Æ[a/ J] jG{≈
!"#$%&'( \23
1
2
…—U² «—U qO−²
!"#$%&'()
Æ©≤≥ W×H
1 [a/ J] !"CD !"#
2 [TIME/PRESET TUNE CD SKIP
!"#$
3 [a/ J] !"#
] ® «—U?*« ZdÐ rŁ ¨
!"#$%
1
Æ[a/ J] jG{≈ 2
…uD)« qLŽ«
WÐuKD*« dOž «—U*« wD²
W?−?b*« W½«uDÝù« nu²ð® ÆÎU?²?R? qO−²« ·UI¹ù [a/ J] j?G{≈ 1
©ÆUC¹√
Î
Î
U²R
—U*« ÷dŽ r²¹ v²Š [TIME/PRESET TUNE CD SKIP ] —Ëœ
Ò 2
ÆtKO−ð b¹dð Íc« wU²«
ÆqO−²« ·UM¾²Ýô [a/ J] jG{≈ 3
27
RQT6279
Ar/Ch27
27
12/7/01, 4:31 PM
Recording CDs
3 7 7
7
4
ALL-REC
2
7
1
Records the whole CD or selected tracks. When the tape finishes
before CD, recording and CD pauses for you to resume recording on
the opposite side.
Preparation: Insert a CD (\ page 18).
1 Press [L TAPE/CD] to switch to CD mode.
■
2 Press [CD REC MODE] to display “ALL-REC”.
■
Each time you press the button:
ALL-REC
2
7
○
○
OFF
The display shows the tape length needed.
“C – – – –” indicates the tape needed exceeds 100 minutes.
You can still record, but some tracks may not be recorded if the
tape isn’t long enough.
1
7
○
1-REC
[0 DECK] to open the deck and load a cas3 Press
■
sette with the side for recording facing up.
4 Press [a/ J] to start recording.
■
TAPE ⁄ CD
The unit rewinds the tape, records 10 seconds of silence, and
then starts recording.
○
○
○
○
○
○
○
○
○
○
○
○
○
○
○
○
○
○
○
○
○
○
○
○
○
○
○
To stop recording
Press [L TAPE/CD]. The CD also stops.
If a track is interrupted at the end of the side facing up
3
7
○
○
○
4
7
○
○
○
○
○
○
○
○
○
○
○
○
○
○
○
○
○
○
○
○
○
○
○
○
○
○
○
○
○
○
DECK
Recording and CD pauses.
To record the track again on the opposite side
1. Press [0 DECK], flip the cassette, and insert it.
2. Press [a/ J].
The unit records 10-second of silence, and resumes recording
from the beginning of the cut-off track.
To record selected tracks
1 Program tracks (\ page 22).
○
○
○
○
○
○
○
○
○
○
○
○
○
○
○
○
○
○
○
○
○
○
○
○
○
○
○
2 Do steps ■
2. to ■
4..
Note
You cannot use ALL-REC with random play and repeat play (\ page
20).
28
RQT6279
RQT6279-G (24-29)3
28
7/12/01, 4:48 PM
CD
W−b*« U½«uDÝù« qO−ð
ALL-REC !"#
!CD !"#$%&'()*+CD !"#$CD
!"#$%&'()*+,-./'(0
CD\ 19
1 [L TAPE/CD !"CD] !"CD
■
[ CD REC MODE CD !"] !"
2 ■
ALL-REC !"#$%
!"#$%&'()*+,
!"#$%&'()*+,“C – – – –” !"#$%&'()100 !"#$%
!"#$%&'"#()*+,$-./01"2+
[0 DECK !] 3 ■
!"#$
4 [a/ J] !"#$
■
!"#$%&'"()%
!"#$%&'10 !"#$%&'()*
«—U? lOLł ‡ qO−ð® ALL-REC
©CD W−b*« W½«uDÝô«
w?N?²?M¹ UbMŽ Æ…—U²<« «—U*« Ë« CD W?−?b*« W½«uDÝô« qU q−¹
W½«uDÝô«Ë qO−²« nu²¹ ¨ CD W−b*« W½«uDÝô« ¡UN²½« q³ j¹dA«
ÆfUF*« V½U'« vKŽ qO−²« WFÐU² qł« s U²R CD W−b*«
©±π W×H
® W−b W½«uDÝ≈ qšœ√ ∫dOCײ«
ÆW−b*« W?½«uDÝù« l{Ë v≈ ‰uײK [
TAPE/CD] jG{≈
Æ“ALL-REC” ÷d?Ž r²¹ YO×?Ð [CD REC MODE] jG{≈
∫—e« UNO jGC¹ …d q w
OFF
1-REC
ALL-REC
Æ»uKD*« j¹dA« ‰uÞ WýUA« ÷dFð
p?M?J?1 ÆW?I?O?œ ±∞∞ “ËU?−?²?¹ »u?K?D*« j¹dA« Ê√ “C– – – –” 5?³¹
«–≈ «—U*« iFÐ qO−ð r²¹ ô b sJ ¨qO−²« w —«dL²Ýù«
ÆWOU …—uBÐ Îö¹uÞ j¹dA« sJ¹ r
Y?O?×?Ð X?OÝUJ« j¹dý l{ rŁ „b« `²H [0 DECK] j?G{≈
ÆvKŽô« ÁU&UÐ tOKŽ qO−²« œ«d*« V½U'« ÊuJ¹
ÆqO−²« ¡b³ [a/ J] jG{≈
!"#
[L TAPE/CD !"CD] CD !"
¨w½«uŁ ±∞ tðb XU ¡eł q−¹ ¨j¹dA« lOłd²Ð “UN'« ÂuI¹
ÆqO−²« √b³¹ rŁ
!"#$%&'()*+ ,-./012
CD !
!"#$%&'()*
1. [0 DECK !] ! !"#$%&'(
2. [a/ J] !"# 10 !"#$%&'()*+,- -./01
!
!"#$%&'
1 !"\ 23
2 !"# ■
2. ■
4. !
qO−²« ·UI¹ù
ÆÎUC¹√ W−b*« W½«uDÝù« nu²ð Æ[ 7 TAPE/CD] jG{≈
∫vKŽú« t−²*« XOÝUJ« tłË W¹UN½ w —U*« nuð «–≈
ÆQ²R W−b*« W½«uDÝù«Ë qO−²« nu²¹
fUF*« tłu« vKŽ Èdš√ …d —U*« qO−²
Æt?K?šœ√Ë ¨XOÝUJ« VK≈ [0 DECK] j?G{≈ Ʊ
Æ[a/ J] jG{≈ Æ≤
n½Q²¹Ë ¨w½«uŁ 10 tðb XU ¡eł qO−²Ð “UN'« ÂuI¹
Ænu²*« —U*« W¹«bÐ s qO−²«
! ALL-REC !"#$%&!"'()*+\21
…—U² X—U qO−²
Æ©≤≥ W×H
Æ
v≈
® «—U*« ZdÐ
«u?D)« cOHM²Ð r
1
2
ÅWEŠöÅ
ŸUL²Ýô«Ë —dJ²*« ŸUL²Ýô« l{Ë l ALL-REC l{Ë Â«b²Ý« pMJ1 ô
Æ©≤± W×H
® wz«uAF«
29
RQT6279
Ar/Ch29
29
12/7/01, 4:32 PM
A
Recording CDs
2
3
4 7
1 7
7
7
A
1-REC
Records a selected track from the CD and stops.
Preparation:
Insert a CD (\ page 18) and a cassette (\ page 24).
Wind the tape on to where you want to start recording.
1
7
2
7
○
○
○
3
7
○
○
○
1 Press [L TAPE/CD] to switch to CD mode.
■
2 Press [CD REC MODE] to display “1-REC”.
■
TAPE ⁄ CD
Each time you press the button:
○
○
○
○
○
○
○
○
○
○
○
○
○
○
○
○
○
○
○
○
○
○
○
○
○
○
ALL-REC
○
1-REC
OFF
[TIME/PRESET TUNE
CD SKIP
3 Turn
■
the track you want to record.
4 Press [a/ J] to start recording.
■
] to select
CD play and recording start at the same time.
○
○
○
○
○
○
○
○
○
○
○
○
○
○
○
○
○
○
○
○
○
○
○
○
○
○
○
To stop recording
Press [L TAPE/CD]. The CD also stops.
To continue recording from another CD
4
7
○
○
○
1. Press [0 CD] and replace the CD.
2. Do steps ■
3. to ■
4..
○
○
○
○
○
○
○
○
○
○
○
○
○
○
○
○
○
○
○
○
○
○
○
○
○
○
○
To record a track in play
1 Press [CD REC MODE] to display “1-REC”.
2 Press [a/ J ].
Recording starts from the beginning of the track and stops when the
track finishes.
B
17
3
7
7
Note
Recording and CD will stop when the tape reaches its end, even if the
track has not finished.
TAPE ⁄ CD
B
1
7
3
7
○
○
○
Recording the Radio
Preparation:
• To record from the beginning of the tape:
Wind on the leader tape.
• To record from part way through the tape:
Wind the tape on to where you want to start recording.
DECK
○
○
○
○
○
○
○
○
○
○
○
○
○
○
○
○
○
○
○
○
○
○
○
○
○
○
○
a cassette with the side for recording facing
1 Load
■
up.
2 Tune to the station \
■
3 Press [a/ J] to start recording.
■
(
page 14).
To stop recording
Press [L TAPE/CD].
C
7
FM MODE/BP
To pause recording
1
2
3
4
5
6
≥10
7
8
9
0
FM MODE/BP C RESET
RANDOM
REPEAT
PRESET EQ
TUNER
CD
30
TAPE
PGM/-CLEAR
Press [a/ J ].
Press again to resume recording.
C
■
Reducing noise when recording AM (Beat Proof
function)
Remote control only
Press [FM MODE/BP] while recording.
Each time you press the button:
bP1 ↔ bP2
Choose the setting with the least noise.
RQT6279
RQT6279-G (30-35)2
30
7/12/01, 4:49 PM
CD
A
W−b*« U½«uDÝù« qO−ð
!"#
1-REC
CD
©…—U² «—U qO−ð® 1-REC
!"#$%&'()*+,-.
Ænu²¹Ë CD W−b*« W½«uDÝô« s —U²<« —U*« q−¹
CD\ 19 !"#$% \ 25
!"#$%&' ()*
Æ©≤µ W×H
1 [L TAPE/CD !"CD] !"CD
■
[ CD REC MODE CD !"] !"
2 ■
“1-REC !"#”
∫dOCײ«
® XOÝUË ©±π W×H ® W−b W½«uDÝ≈ qšœ√
ÆqO−²« √b³ð Ê√ b¹dð YOŠ v≈ j¹dA« n
ÆW−b*« W½«uDÝù« l{Ë v≈ ‰uײK [
∫—e« UNO jGC¹Ô …d q w
OFF
—U*« —UO²šô [TIME/PRESET TUNE
3
■
4 [a/ J] ■
CD SKIP
] !"CD
CD SKIP ] —Ëœ
Ò
ÆtKO−ð b¹dð Íc«
ÆXu« fH½ w qO−²«Ë W−b*« W½«uDÝû ŸUL²Ýù« √b³¹
qO−²« ·UI¹ù
!"#$CD
!"#$%&'()
[L TAPE/CD
!"CD] CD
!"
ÆÎU?C¹√ W−b*« W½«uDÝù« nu²ð .[L TAPE/CD] jG{≈
Èdš« CD W−b W½«uDÝ« s qO−²« WFÐU²*
ÆCD W−b*« W½«uDÝô« ‰b³²Ý«Ë [0 CD] jG{« Ʊ
Æ v« s «uD)« qLŽ« Æ≤
1. [0 CD] CD
2. ! ■
3. ■
4. !
tO≈ ŸUL²Ýù« ¡UMŁ√ U —U qO−²
1 [CD REC MODECD
!"] !"# 1-REC
!"#
Æ“1-REC” ÷dŽ r²¹ YO×Ð [CD REC MODE] jG{≈
Æ[a/ J] jG{≈
!"#$#%&'()
!"#$%&'()*
!"#$%&'CD
ÅWEŠöÅ
qB¹ UbMŽ CD W−b*« W½«uDÝô« qOGAðË qO−²« nu²¹ ·uÝ
Æ—U*« wN²M¹ r «–« v²Š ¨t²¹UN½ v« j¹dA«
!"#$%&'()*+
u¹œ«d« qO−ð
!"#
B
• • t?O?K?Ž q?O?−??²« œ«d*« V½U'« ÊuJ¹ YO×Ð XOÝU j¹dý l{
ÆvKŽô« ÁU&UÐ
1 !"#$% !&'()*+
■
2 ! \
■
3 [a/ J] !"#$
■
B
∫dOCײ«
∫j¹dA« W¹«bÐ s qO−²K •
Æj¹dA« ∆œUÐ n
∫j¹dA« jÝË ¡eł s qO−²K •
ÆqO−²« ¡bÐ b¹dð YOŠ v≈ j¹dA« n
!"#"$ %
!"#
!"#$%& '
!"#$%& '()
1
2
Æ—U*« wN²M¹ UbMŽ nu²¹Ë —U*« W¹«bÐ s qO−²« √b³¹
2 [a/ J ] ALL-REC
!"!#
!"#
1-REC
ÆqO−²« ¡b³ [a/ J] jG{≈
!"#$
TAPE/CD] jG{≈
.“1-REC” ÷dŽ r²¹ YO×Ð [CD REC MODE] jG{≈
!"#$%&'()*+,
1-REC
[TIME/PRESET TUNE
!"#$%
A
Æ©±µ W×H
15
® WD;« nOu²Ð r
ÆqO−²« ¡b³ [a/ J ] jG{≈
qO−²« ·UI¹ù
.[L TAPE/CD] j?G{≈
!"#
[L TAPE/CD !"CD] U²R
qO−²« ·UI¹ù
Î
Æ[a/ J] jG{≈
ÆqO−²« ·UM¾²Ýô Èdš√ …d jG{≈
!"#
[a/ J ] !"#$%&'(
C AM
■
!"#$%&'()"*+,
!"#$%
! [FM MODE/BPFM
!"#$%&'()*+,
bP1 ↔ bP2
!"#$%&'()*
!"#$%] b{ œuLB« WHOþË® AM tłu*« qO−ð bMŽ g¹uA²« qOKIð ■
C
©wA¹uA²« ‚b«
jI bFÐ sŽ rJײ« tłu
ÆqO−²« ¡UMŁ√ [FM MODE/BP] jG{≈
∫—e« UNO jGCÔ¹ …d q w
bP1
bP2
Æq_« g¹uA²« «– W¾ON²« d²š≈
31
RQT6279
Ar/Ch31
31
12/7/01, 5:53 PM
A
7
A
Sound Quality
PRESET EQ
a XBS: Adds punch to rock
b Clear: Clarifies higher sounds
c Soft: For background music
d Vocal: Adds gloss to vocals
You can choose one of four types of sound quality.
Press [PRESET EQ] to select a setting.
Each time you press the button:
a XBS
b Clear c Soft
d Vocal
EQ-OFF (cancelled)
Note
Changes to sound quality do not affect recordings.
○
○
○
○
○
○
○
○
○
PRESET EQ
○
○
○
○
○
○
○
○
○
○
○
○
○
○
a
○
○
○
○
○
○
○
B
3-D sound with the Sound Virtualizer
Remote control only
You can create a three-dimensional sound field when listening to
stereo sound.
b
Press [S.VIRTUALIZER].
Press again to cancel.
Note
• This feature does not affect recordings.
• The actual effect depends on the source played.
c
d
FM MODE/BP C RESET
RANDOM
REPEAT
PRESET EQ
TUNER
CD
S.VIRTUALIZER REW
S.VIRTUALIZER
AUTO SCAN
B
7
TAPE
FF
PRESET TUNE
CD SKIP
S.VIRTUALIZER
32
RQT6279
RQT6279-G (30-35)2
32
7/12/01, 4:49 PM
A
A
uB« WOŽu½
!"#$%&'()
a XBS: !"#$%&'(
b !"#$
c !"#$%&'()
d !"#$%&
[PRESET EQ !"#$] !"#$%&
„Ëd« vIOÝu* …u nOC¹ ∫XBS
WOUF« «u_« `{u¹ ∫ÒvKł
WOHK)« vIOÝu qł√ s W¾ON²« Ác¼ Âb²Ý≈ ∫ÊuMŠ
5ÐdD*« uB qIB« s Ϋb¹e nOC¹ ∫¡UMž
!"#$%&'()*+,
ÆU W¾ONð —UO²šô [PRESET EQ] jG{≈
¡UMž
a
b
c
d
Æ uB« WOŽuM Ÿ«u½√ WFЗ√ 5Ð s bŠ«Ë Ÿu½ —U²ð Ê√ pMJ1
d
ÊuMŠ
c
—e« UNO jGCÔ¹ …d q w
wKł
Ò
b
XBS
a
©¡UG≈® EQ-OFF
!"#$%&'(
ÅWEŠöÅ
Æ öO−²« vKŽ uB« …œuł dOOGð dŁR¹ ô
B
!"#$%&'()!*
!"#$%
uB« l{uÐ 3D œUFÐ_« wŁöŁ u
wF«u«
!"#$%&'(!)*#+,-
[S.VIRTUALIZER !"#$%] B
jI bFÐ sŽ rJײ« tłu
Æu¹d²« u v« ŸUL²Ýô« bMŽ œUFÐô« ‡ wŁöŁ wðu ‰U− oKš pMJ1
!"#$%&'()*
Æ[S.VIRTUALIZER] jG{≈
Æ¡UGû Èdš√ …d tDG{≈
• !"#$%&'(
• !"#$%&'()*+
ÅWEŠöÅ
Æ öO−²« vKŽ dŁRð ô …eO*« Ác¼ •
ÆŸuL*« —bB*« vKŽ wKFH« dOŁQ²« bL²F¹ •
33
RQT6279
Ar/Ch33
33
12/7/01, 4:35 PM
5
7
3
1 •7
2 •7
7
2 •7
3 7
4
7
2
1
The Play and Record Timer
2
You can set the timer to come on at a certain time to wake you up
(play timer) or to record a radio station (record timer).
1
Preparations:
Turn the unit on and set the clock. (\ page 12)
• For play timer, prepare the music source (tape/CD/radio) for
listening, and set the volume.
• For record timer, check the cassette’s erasure prevention tab (\
page 26: ■
A ) and load the cassette with the side for recording facing
up. Tune to the radio station (\ page 14 or 16), and set the volume.
1
7
Setting the start and finish times
[CLOCK/TIMER] to select the desired timer
1 Press
■
function.
FOR PLAY TIMER
Each time you press the button:
CLOCK
ON œPLAY
œPLAY OFF
FOR RECORD TIMER
œREC OFF
Original display
2
7
○
○
Finish
¡UN²½≈
Start
¡bÐ
○
○
○
○
○
○
○
○
○
○
○
○
○
○
○
○
○
○
ON ˚ PLAY: to set the play timer
ON ˚ REC: to set the record timer
Proceed to step ■
2 before these indicators stop flashing
(about 10 seconds).
Finish
¡UN²½≈
Start
¡bÐ
○
○
○
○
○
○
○
ON œREC
○
○
[TIME/PRESET TUNE
2 1 Turn
■
the start time.
2 Press [CLOCK/TIMER].
[TIME/PRESET TUNE
3 1 Turn
■
the finish time.
2 Press [CLOCK/TIMER].
○
1
CD SKIP
] to set
CD SKIP
] to set
The start and finish times are now set.
Turning the timer on
4 Press [˚ PLAY/REC] to display the timer indicator.
■
2
Each time you press the button:
PLAY
3
7
○
○
○
REC
no display (off)
˚ PLAY: to turn the play timer on
˚ REC: to turn the record timer on
(The indicator doesn’t appear if the start and finish times
haven’t been set.)
“E” appears if the clock hasn’t been set.
○
○
○
○
○
○
○
○
○
○
○
○
○
○
○
○
○
○
○
○
○
○
○
○
○
○
○
5 Press [
■
1
/I ] to turn the unit off.
The unit must be off for timer to operate.
The record timer comes on about 30 seconds earlier than the
set time.
To cancel the timer
˚ PLAY/REC] when the unit is on to clear the timer indicaPress [˚
tors from the display.
(The timer comes on at the set time everyday if the timer is on.)
2
4
7
○
○
5
7
○
34
○
○
○
○
○
○
○
○
○
○
○
○
○
○
○
○
○
○
○
○
○
○
○
○
○
○
○
○
○
○
○
○
○
○
○
○
○
○
○
○
○
○
○
○
○
○
○
○
○
○
○
○
○
○
○
○
○
RQT6279
RQT6279-G (30-35)2
34
7/12/01, 4:49 PM
!"#$
qO−²«Ë ŸUL²Ýô« XR
!""#$%&'()"*#+,-./"#0123456
!"#$%&'(
!"#$%&'\ 13
• !" !"#$%&'&()*&+LCDL
!"
!"#
A !"
• !" !"#$%&'()\27 ■
!"#$ %&'()*+,-./%012\ 1517
!"#$%&'
Âu?M?« s pþUI¹ô sÒO?F? X?Ë v?K?Ž “U?N'« qOGA² XR*« j³{ pMJ1
Æ©qO−²« XR® u¹œ«— WD× qO−² Ë« ©ŸUL²Ýô« XR®
∫ «dOCײ«
Æ©±≥ W×H ® WŽU« j³{«Ë qOGA²« l{Ë v≈ “UN'« —œ√
W?½«u?D?Ý«Øj?¹d?ý® v?I?O?Ýu*« —bB eNł ¨ŸUL²Ýô« XR0 ŸUL²Ýö •
Æ uB« …—UNł Èu² j³{« rŁ ¨ŸUL²Ýö ©u¹œ«—ØW−b
v?K?Ž …u?łu?*« `??*« l?M? W?M??« h?×?« ¨q?O?−??²?« X?R?0 qO−²K •
tłu« ÊuJ¹ YO×Ð XOÝUJ« qšœ« p– bFÐ ■
A ∫≤∑ W×H ® j¹dA«
W×H ® u¹œ«d« WD× vKŽ n«Ë ÆvKŽô« ÁU&UÐ tOKŽ qO−²« œ«d*«
Æ uB« …—UNł Èu² j³{« rŁ ¨©±∑ Ë ±µ
!"#$%&
[CLOCK/TIMER
1 ■
¡UN²½ù«Ë ¡b³« UË√ W¾ONð
!"#$] !"#$
ÆWÐuKD*« XR*« WHOþË —UO²šô [CLOCK/TIMER] jG{«
!"#$%&'()*+,
CLOCK
ON
PLAY
∫—e« UNO jGCÔ¹ …d q w
PLAY OFF
PLAY OFF
ON
REC OFF
ON
REC
ON ˚ PLAY !"#$% !"#
ON ˚ REC !"#$% !"#
2 ( !"#$!
!"#$%&'()*+ ■
10)
1 [TIME/PRESET TUNE CD SKIP ] !"#
2 [CLOCK/TIMER !"#$] [TIME/PRESET TUNE CD SKIP ] 3 1 ■
!"#
2 [CLOCK/TIMER !"#$] 2
■
!"#$%&'()
!"#$"%] !"#$
REC
˚ PLAY !"#$ !"#$
˚ REC !"#$ !"#$
!"#$%&'()*+*,-./0123456
!"#"$%&'(E !
5 [
■
CLOCK
PLAY
wKô« ÷dF«
ŸUL²Ýù« XR j³C :ON ˚ PLAY
qO−²« XR j³C :ON ˚ REC
i?u?« s?Ž «d?ýR?*« Ác¼ nu²ð Ê« q³ …u?D?)« ¡«d?ł« lÐUð
Æ©Ê«uŁ ±∞ w«uŠ®
j³C [TIME/PRESET TUNE
CD SKIP
] —Ëœ
Ò
1
Æ¡b³« XË
.[CLOCK/TIMER] j?G{≈ 2
j³C [TIME/PRESET TUNE
CD SKIP
] —Ëœ
Ò
1
Æ¡UN²½ô« XË
.[CLOCK/TIMER] j?G{≈ 2
Æ¡UN²½ù«Ë ¡b³« w²Ë j³{ Êü« -
qOGA²« l{Ë v≈ 5²R*« …—«œ≈
∫—e« UNÐ jGCð …d q w
!"#$%&'()*+,
PLAY
ON
REC OFF
˚ PLAY/REC] jG{«
ÆXR*« dýR ÷dF [˚
!"#
[˚ PLAY/REC
4 ■
REC
/I ] !"
÷dŽ ÊËbÐ
©·UI¹«®
REC
PLAY
˚ PLAY
qOGA²« l{Ë v≈ ŸUL²Ýù« XR …—«œù :˚
˚ REC
qOGA²« l{Ë v≈ qO−²« XR …—«œù :˚
©Æ¡UN²½ù«Ë ¡b³« UË√ j³{ r²¹ r «–≈ dýR*« dNE¹ ô®
ÆWŽU« j³{ r²¹ r «–≈ “E”dNE¹
Æ·UI¹« l{Ë v≈ “UN'« …—«œù [ /I ] jG{≈
Æ5²R*« qLF¹ v²Š ·UI¹« l{Ë w “UN'« ÊuJ¹ Ê√ V−¹
◊u³C*« Xu« q³ qOGA²« l{Ë v≈ qO−²« XR ‰uײ¹
ÆWO½UŁ ≥∞ w«u×Ð
XR*« ¡UGô
!"#$%&'%()*+, !"#$% !&'()30 !"
˚ PLAY/REC] j??G? {«
W?? «“ô q?? O? G? A? ð l??{Ë w?? “U??N? '« Êu??J? ¹ U??b??M? Ž [˚
Æ÷dF« WýUý s XR*« «dýR
XR*« ÊU «–« ◊u³C*« Xu« vKŽ UOu¹ XR*« WDÝ«uÐ “UN'« qG²A¹®
Æ©qOGAð l{Ë w
!"
˚ PLAY/REC !"#$"%] !"
!"#$%& [˚
!"#$%&' ($)*+,
!"#$%&'()*+!,"-&./0%123
35
RQT6279
Ar/Ch35
35
12/7/01, 6:44 PM
The Play and Record Timer
A
7
To check the settings (when unit is off)
SLEEP TIMER FADER DISPLAY
SLEEP
○
○
○
○
○
○
○
Press [CLOCK/TIMER].
The settings are shown in the following order:
Start time, Finish time
Music source Volume
○
○
○
○
1
2
3
4
5
6
○
○
○
○
○
○
PGM/-CLEAR
To change the settings (when unit is on)
≥10
○
○
○
Original display
○
○
○
○
○
○
○
○
○
○
Time setting
!
Xu« j³{
SLEEP
To change the times
Do steps ■
1,■
2 ,■
3 , and ■
5.
To change the source or volume
˚ PLAY/REC] to clear the timer indicator.
1. Press [˚
2. Make changes to the source or volume.
3. Do steps ■
4 to ■
5.
You can enjoy your desired source after you have set the timer.
Turn the unit off before the timer’s start time.
Note
The play and record timers cannot be used together.
A
B
7
Remote control only
You can set the unit to turn off after certain time. (e.g. when you
want to fall asleep while listening to music.)
SLEEP TIMER FADER DISPLAY
○
○
○
The Sleep Timer
○
○
○
○
1
2
3
4
5
6
○
○
○
○
○
○
TIMER FADER
Press [SLEEP] to select the time (minutes).
PGM/-CLEAR
Each time you press the button:
≥10
○
○
○
SLEEP 30
○
○
○
○
○
○
○
○
○
○
○
○
○
SLEEP 60
SLEEP 90
SLEEP 120
SLEEP OFF
○
TIMER FADER
To cancel
Press [SLEEP] to select “SLEEP OFF”.
To check the remaining time
Press [SLEEP] once.
The remaining time is shown for about 5 seconds.
To change the setting
Press [SLEEP] to select the new time.
Note
You can use sleep timer in combination with play and record timer.
Make sure the unit is off before the play/record timer’s start time.
B
The Timer Fader
Remote control only
Volume increases slowly to the set level when a timer turns the unit
on and decreases slowly when the sleep timer turns the unit off.
Press [TIMER FADER] to display “
”.
(All timers will be affected.)
Press again to cancel.
Note
This feature does not affect record timer’s recordings.
36
RQT6279
RQT6279-G (36-40)5
36
7/12/01, 4:51 PM
!"#$
qO−²«Ë ŸUL²Ýô« XR
!"#$%&'()*
[CLOCK/TIMER !"#$] !"#$%&'(
!"#$ !
Æ[CLOCK/TIMER] jG{«
∫wU²« VOðd²« w W¾ON²« ŸU{Ë√ `{uð
wK_« ÷dF« ← uB« …—UNł ← —bB*« ← ¡UN²½ù« XË ¨¡b³« XË
!"
!"#$%&'()*
©qOGA²« l{uÐ “UN'« ÊuJ¹ UbMŽ® UÞu³C« dOOG²
!"#$!
!■
1 ■
2 ■
3 ■
5 !"#$!%
˚ PLAY/REC] 1. [˚
2. !"# $%
3. ! ■
4 ■
5.
©·UI¹ô« l{uÐ “UN'« ÊuJ¹ UbMŽ® UÞu³C« h×H
UË_« dOOG²
Æ Ë ¨ ¨ «uD)« cOHM²Ð r
uB« …—UNł Èu² Ë« —bB*« dOOG²
˚ PLAY/REC] jG{« Ʊ
ÆXR*« 5³ `* [˚
Æ uB« …—UNł Èu² Ë« —bB*« dOOG²Ð r Æ≤
Æ v« «uD)« cOHM²Ð r Æ≥
!
!"#$%&'
!"#$%&'()*&+,-./01
!"#$%&"'(#)*+,-./0
ÆXR*« j³{ s wN²Mð Ê« bFÐ »užd*« —bB*UÐ ŸU²L²Ýô« pMJ1
ÆqOGA²« XË √b³¹ Ê« q³ “UN'« qOGAð nË«
A
ÅWEŠöÅ
!"#$
!"%&'!()*
ÆiFÐ l qO−²«Ë ŸUL²Ýô« U²R qOGAð sJ1 ô
!"
A
ÂuM« XR
!"#$%
jI bFÐ sŽ rJײ« tłu
UbMŽ ¨ö¦® Æœb× XË bFÐ qOGA²« sŽ nu²O “UN'« j³{ pMJ1
!"#$%&'()*+,-./#01234'567*8
[SLEEP
!"#$] ©ÆvIOÝuLK ŸUL²Ýô« ¡UMŁ« ÂUMð Ê« b¹dð
!"#$%&'()
Æ©ozUbUЮ Xu« —UO²šô [SLEEP] jG{≈
∫—e« UNO jGC¹Ô …d q w
!"#$%&'()*+
SLEEP 120
SLEEP 90
SLEEP 60
SLEEP 30
SLEEP OFF
¡UGû
Æ“SLEEP OFF” —UO²šô [SLEEP] jG{≈
!
[SLEEP
!
!"#$] !" SLEEP OFF
!"#
wI³²*« Xu« WFł«d*
Æ…bŠ«Ë …d [SLEEP] jG{≈
Æw½«uŁ µ w«u( wI³²*« Xu« dNE¹
!"#$#
[SLEEP !"#$] !"#$%5
!"#$!
[SLEEP
!"#$] Xu« dOOG²
Æb¹b'« Xu« —UO²šô [SLEEP] jG{≈
ÅWEŠöÅ
!"#$%
ÆqO−²«Ë ŸUL²Ýô« XR l o«u²UÐ ÂuM« XR ‰ULF²Ý« pMJ1
ØŸUL²Ýô« XR ¡bÐ XË q³ qOGA²« sŽ “UN'« nuð s bQð
ÆqO−²«
!"#$%&'(& !")*+
!"#$%&"'(#)*+,-./0
B
uBK w−¹—b²« UHšù«Ë uKF«
XR*UÐ
!"#$
B
jI bFÐ sŽ rJײ« tłu
!"#$%
!"#$!%&'()*+,-.'/0 !"1$!%&'
!"#$
[TIMER FADER “
”
!"#$%!&] !"
◊u³C*« Èu²*« vKŽ UO−¹—bð …œU¹eUÐ uB« …—UNł Èu² √b³¹
hUM²UÐ uB« …—UNł Èu² √b³¹Ë “UN'« XR*« qGA¹ UbMŽ
ÆqOGA²« sŽ “UN'« ÂuM« XR nu¹ UbMŽ UO−¹—bð
”÷dF ›TIMER FADER¤ jG{«
©Æ U²R*« lOLł dŁQ²ð ·uÝ®
Æ¡UGö Èdš« …d jG{«
Æ“
!"#$%&'()*+,!"#$%&'()*
ÅWEŠöÅ
!"#$%&'()*%&+
ÆXR*« öO−ð qO−ð vKŽ …eO*« Ác¼ dŁRð ô
37
RQT6279
Ar/Ch37
37
12/7/01, 4:37 PM
Troubleshooting
Before requesting service, make the below checks. If you can’t fix the unit as described below, or if something not listed here occurs, refer to the
enclosed directory to locate an Authorized Service Center convenient to you or contact your dealer.
Reference pages are shown as black circled numbers (e.g.
)
6
Common problems
6
6
Indicates incorrect operation. Read the instructions.
Replace the batteries or use household AC power.
Power batteries haven’t been inserted. Insert them or use household AC power. (“U02” appears only if you have inserted memory batteries.)
“E” is displayed.
“U01” is displayed.
“U02” is displayed.
CD
CD won’t play or CD display is incorrect.
Certain sections are not played properly.
à
Place the CD label facing up.
Wait for an hour for condensation to dry and try again.
Clean the CD.
Replace the CD if it is scratched, warped, or nonstandard.
à
Cassette deck
Ç
Recording is not possible.
Poor sound quality.
If the cassette’s tabs have removed, cover the holes with adhesive tape.
Clean the heads.
Radio
A lot of noise or difficult to tune.
ê
Interference may be caused by other equipment or the use of its remote control. Turn the
other equipment off or separate this unit from them.
Remote control
Ä
The remote control doesn’t work.
Ä
Check the batteries are inserted correctly.
Replace the batteries if they are worn.
Turn the unit on from the main unit if you are using batteries to power the unit.
The unit can’t be turned on from the
remote control.
6,Ä
Technical Specifications
Radio
General
Frequency range
FM
AM
87.50 –108.00 MHz (50 kHz steps)
522 –1629 kHz (9 kHz steps)
520–1630 kHz (10 kHz steps)
CD player
Sampling frequency
Decoding
Beam source
No. of channels
Wow and flutter
D/A converter
44.1 kHz
16 bit linear
Semiconductor laser (wavelength 780 nm)
2 channel, stereo
Below measurable limit
MASH (1 bit DAC)
Tape recorder
Track system
Monitor system
Recording system
Erasing system
Frequency range
Normal position
4 track, 2 channel, stereo
Variable sound monitor
AC bias
Multi Pole magnet
(RX-ES27) 8 cm 5.4 Ω x 2
(RX-ES22) 8 cm 2.7 Ω x 2
Speakers
Jacks
Output
Power output
PHONES: 3.5 mm stereo (16 –32 Ω)
(RX-ES27) 140W (PMPO)
(RX-ES22) 70W (PMPO)
Power requirement
AC
110V-127V / 220V-240V, 50/60 Hz
Power consumption: (RX-ES27) 33W
(RX-ES22) 20W
Battery
12 V [Eight R20/LR20 (D, UM-1) batteries]
•Do not use rechargeable type batteries.
Memory back-up for computer/clock
6 V [Four R6/LR6 (AA, UM-3) batteries]
•Do not use rechargeable type batteries.
Dimensions (WxHxD)
529 x 144 x 276 mm
Mass
(RX-ES27) 4.5 kg without batteries
(RX-ES22) 4.0 kg without batteries
50 –14000 Hz
Note
Specifications are subject to change without notice.
Mass and dimensions are approximate.
38
RQT6279
RQT6279-G (36-40)5
38
29/1/04, 2:25 PM
!"#
!"#$%&'()*+,-./012345*6789:;<=&>?@A7<=BCDEF+@&')G HI7JK&LMEN
!"#$%&'()*+,-./0
!"#$%&'()
7
!
b
!"#$%&'()*"
U01
!"#$%$&'
U02
!"#"$%&'(
UO2
!"CD
2345"$6789:;<
â
!
CD !"#$%
!"#$%&'()*+,-./0
!"#$%&'(
CD
â
CD
)*+,+-."#/01
7
CD
CD
7
()
!"
!"#$%&'CD
!
ë
!"#
!"#$%&'()*+,-."/0123
!
!"
!"#$%&
!"#$%&'()"*+,-./012345"#$%6&'789:%;<=
!"#!$
!"#$%&'(
!"#$%&'
!"#$%&'()*+",#-./01()2
É
!"#$
!"#$%&
Å
Å
()
7Å
!
!
cj
^j
87.50108.00 MHz50 kHz
5221629 kHz9 kHz
5201630 kHz10 kHz
!
(RX-ES27) 85.4 x 2
(RX-ES22) 82.7 x 2
!
PHONES3.5 !"#16-32
(RX-ES27)140PMPO
(RX-ES22)70PMPO
`a
!
44.1 kHz
16 !
!"#$%780
!"#
!"#$
MASH1DAC
!"
(RX-ES22) 20
12 [8R20/LR20D, UM-1 ]
!"#$%$&'
110-127/ 220-24050/60 Hz
! (RX-ES27) 33
!"#$%&'(
!"
!
!
!
4
!
!
!
!"# $%"
!"#$
AC
6 [4R6/LR6AA, UM-3 ]
!"#$%$&'
!=ñ==ñ=
50 -14000 Hz
529 x 144 x 276 (RX-ES27) 4.5 !"#$
(RX-ES22) 4.0 !"#$
!"#$%&'()*+
!"#$%&'
39
RQT6279
RQT6279-G (36-40)5
39
29/1/04, 2:25 PM
UNŠö«Ë ‰UDŽ_« Íd% qOœ
w —uc dOž qDŽ qBŠ «–« Ë« ¨qHÝô« w WŠËdA*« «¡«dłôUÐ “UN'« `OKBð s sJL²ð r «–« ÆqHÝô« w …—uc*« Uu×H« ¡«dłSÐ r7 ¨`OKB²« Ubš VKÞ q³7
ÆqOuUÐ qBð« Ë« p VÝUM hšd `OKBð Ubš ed œU−¹ô “UN'« l od*« `OKB²« Ubš e«d qOœ v« lł—« ¨‰Ëb'« «c¼
7
¡«œuÝ …dz«œ qš«œ ÂU7—U WMO³ lłd*« U×H
WUŽ qUA
“E” ÷dŽ r²¹
7 Æœœd²*« —UO²« …—b7 Âb\²Ý≈ Ë√ U¹—UD³« ‰b³²Ý≈
Æ «œUý—ù« √d7≈ Æ`O× dOž qOGAð v≈ dOA¹
7
“U01” ÷dŽ r²¹
“U02” ÷dŽ r²¹
ÆweM*« AC œœd²*« —UO²« W7UÞ qLF²Ý« Ë« U¹—UD³« qšœ« ¨W7UD« U¹—UDÐ ‰Ušœ« r²¹ r
©¨…d«c« U¹—UDÐ ‰Ušœ« - «–« jI òUO2å …—Uýô« dNEð®
â ÆvKŽô« ÁU&UÐ oBK*« tOKŽ œułu*« V½U'« ÊuJ¹ YO×Ð W−b*« W½«uDÝô« l{
W−b*« W½«uDÝù«
W−b*« W½«uDÝù« qOGAð r²¹ ô
W−b*« W½«uDÝù« ÷dŽ Ë√ ŸUL²Ýû
`O× dOž
ÆÈdš« …d ‰ËUŠ rŁ WÐuÞd« nŁUJð n−O WŽUÝ …b* dE²½«
â
`O× qJAÐ lLPð ô WMOF ÂUP7«
ÆW−b*« W½«uDÝù« nE½
ÆWOÝUO7 dOž Ë« W¹u²K Ë« WýËb\ X½U «–« CD W−b*« W½«uDÝô« ‰b³²Ý«
ë Æoô j¹dAÐ »uI¦« wDž ¨W¹U7u« WMP« W«“« - «–«
É Æ”Ëƒd« nE½
XOÝUJ« „œ
ÆqO−P²« sJ1 ô
W¾¹œ— u WOŽu½
u¹œ«d«
qOGAð n7Ë« ÆtÐ ’U)« bFÐ sŽ rJײ« tłu ‰ULF²Ý« Ë« dš« “UNł qš«b²« V³Ý ÊuJ¹ Ê« sJ1
Æ…eNłô« w7UÐ sŽ “UN'« «c¼ qB« Ë« dšô« “UN'«
nOu²« WÐuF Ë√ g¹uA²« s dO³ —b7
Å ÆW×O× …—uBÐ UNUšœ≈ - b7 U¹—UD³« Ê√ s oI%
Å ÆWJKN²P X½U «–≈ U¹—UD³« ‰b³²Ý≈
Ũ7 ÆW7UDUÐ “UN'« b¹Ëe² U¹—UDÐ Âb\²Pð XM «–« wPOzd« “UN'« s “UN'« qGý
bFÐ sŽ rJײ« tłu
qLF¹ ô bFÐ sŽ rJײ« tłu
qOGA²« l{Ë v≈ “UN'« …—«œ≈ sJ1 ô
bFÐ sŽ rJײ« tłu s
WOMH« UH«u*«
WUŽ —u√
UŽULP«
≤ ™ ÂË√ µ[¥ rÝ ∏ (RX-ES27)
≤ ™ ÂË√ ≤[∑ rÝ ∏ (RX-ES22)
©ÂË√ ≥≤ ≠ ±∂® u¹d²Ý 3 ≥[µ ªPHONES
(PMPO) ◊«Ë ±¥∞ (RX-ES27)
(PMPO) ◊«Ë ∑∞ (RX-ES22)
fÐUI*«
Ãdš
…—bI« Ãdš
…—bI« U³KD²
œœd² —UOð
eðd¼ ∂∞ص∞ ¨Xu ≤¥∞ ≠ ≤≤∞ØXu ±≤∑ ≠ ±±∞
◊«Ë ≥≥ (RX-ES27) ∫…—bI« „öN²Ý≈
◊«Ë ≤∞ (RX-ES22)
W¹—UDÐ
©D ¨R20/LR20 r−Š ¨UM1 U¹—UDÐ ∏® Xu ±≤
Æs×A« …œUŽù qÐUI« ŸuM« s U¹—UDÐ Âb\²Pð ô •
WŽUP«Ø»uÝU×K …d«c« rŽœ
©AA ¨R6/LR6 r−Š ¨UM3 U¹—UDÐ ¥® Xu ∂
Æs×A« …œUŽù qÐUI« ŸuM« s U¹—UDÐ Âb\²Pð ô •
©oLŽ ™ ŸUHð—≈ ™ ÷dŽ® œUFÐ_«
3 ≤∑∂ ™ ±¥¥ ™ µ≤π
Ê“u«
U¹—UD³« ÊËbÐ ¥[µ (RX-ES27)
U¹—UD³« ÊËbÐ ¥[∞ (RX-ES22)
u¹œ«d«
œœd²« Èb
Â≈ ·ù«
Â≈ t¹ù«
©eðd¼uKO µ∞ «uD\Ю eðd¼UGO ±∞∏[∞∞ ≠ ∏∑[µ∞
©eðd¼uKO π «uD\Ю eðd¼uKO ±∂≤π ≠ µ≤≤
©eðd¼uKO ±∞ «uD\Ю eðd¼uKO ±∂≥∞ ≠ µ≤∞
eðd¼uKO ¥¥[±
wDš XÐ ±∂
©+ ∑∏∞ Włu*« ‰uÞ® —eO qu t³ý
u¹d²Ý ¨ÊUðUM7
tÝUO7 sJL*« b(« s q7√
©XÐ ± włu wL7— ‰u×® MASH
u¹d²Ý ¨ÊUðUM7 ¨ ≤—UP ¥
dOG² wðu V7«d
œœd²*« —UO²K “UO×½≈
»UD7ô« œbF² fODMG
eðd¼ ±¥∞∞∞ ≠ µ∞
W−b W½«uDÝ≈ qGA
œœd²« WMOŽ
eOd²« qŠ
We(« —bB
«uMI« œbŽ
ËUH²«Ë XU\²«
ÍdþUMðØwL7— ‰u×
j¹dA« q−P
lÐU²²« ÂUE½
W³7«d*« ÂUE½
qO−P²« ÂUE½
`P*« ÂUE½
œœd²« Èb
ÍœUO²Ž≈ l{u
ÅÅWEŠöÅÅ
Æo³P —UFý≈ ÊËœ s dOOG²K W{dŽ WOÝbMN« UH«u*«
ÆWO³¹dIð rOIÐ œUFÐ_«Ë Ê«“Ë_«
En
Matsushita Electric Industrial Co., Ltd.
Web Site: http://www.panasonic.co.jp/global/
Cn
Ar
RQT6279-2G
L1201TC2024
Ar/ChBack_1
1
1/29/04, 1:52 PM