1
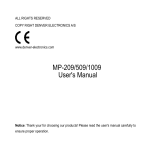
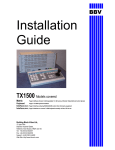
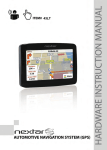
MA566 | Digital MP3 Player Instruction Manual Thank You For Choosing A Nextar Product. Please Read This Manual Carefully To Get The Most Out Of Your Player CONTENTS Precautions System requirement 1. Installation instruction 1.1 Installing the driver 1.2 Installing the battery 2. Connecting/ downloading/ disconnecting 2.1 Connecting a PC 2.2 Downloading 2.3 Removing USB device 3. Basic operation 3.1 Buttons and functions 3.2 Power on/off 3.3 Main menu setup 4. MP3 Player Operation CONTENTS continued 4.1Playing music 4.2 Voice mode 4.2.1 Playing voice 4.2.2 Record function 4.3 FM Tuner 4.3.1 Playing FM 4.3.2 Recording FM 1 CONTENTS continued 4.3.3 Setting FM 4.4 Function Setting 4.4.1 Setting EQ mode 4.4.2 Setting Play mode 4.4.3 Setting Contrast 4.4.4 Setting Backlight 4.4.5 Setting Power set 4.4.6 Setting Recording 4.4.7 Setting Language 4.4.8 Exit 4.5 Preview function 4.6 About 4.7 Folder function 4.8 Exit 5. AB play mode 6. Lock function 7. Lyric sync 8. USB mode 9. FAQ 10. Technical specifications 2 Precautions 1) Never use the player while driving or operating other vehicles. Distractions can cause traffic accidents, and the use of some portable devices is restricted in some locations by law.. Wherever potential risks exist, please stop using the player for safety purposes. 2) Please insert the earphone before powering on the player. This will prevent potential damage to the earphones. 3) Keep the player clean and away from heat sources or direct sunlight, dirt, humidity or rain. 4) If the unit becomes dirty, please clean with soft, damp cloth. Never clean with alcohol or other cleaners. 5) Never use the player in very dry environment to avoid damage from static. 6) Never disconnect the player from a PC abruptly during downloading, uploading and formatting to avoid application failure. 7) When the player is used as a removable disk, please follow the proper file download and upload procedures. Nextar cannot assume any responsibility for any file lost due to improper operation. 8) Attention: Because of the way that memory is calculated by your PC operating system, and because some space on your player is used for formatting purposes, the amount of space indicated as available on your unit may be less than the advertised capacity of the player. This is normal. See the chart on the next page for examples. Attention: 1.We have made every attempt to insure the accuracy of this manual, but we cannot be responsible for any errors or omissions. 2. We guarantee the function of this player out of the box when purchased. We cannot guarantee against data loss or damage to the player due to misuse or incorrect application. 3. The software, hardware and instruction manual are subject to change and improvement without notice. 3 System Requirements Microsoft Windows® 98se/2000/Me/XP Pentium 200MHZ or above. USB port 120MB hard disk space Mouse installed CDROM drive 1. Installation instruction 1.1 Installing driver for Windows® 98SE (not required for Windows® ME or above) a. Connect the MP3 Player to the USB port of a PC, "Find new hardware" appears on the screen, then click "Search latest driver for this device" and insert the driver CD into CDROM, and then click "Next". b. Select "Look in" to direct the installation directory to the "Drivers" files in the driver CD, then click Yes. c. PC will install the driver for Windows® 98SE automatically. 1. 2 Installing battery Ø Install one LR03 AAA size 1.5V alkaline or 1.2V NiMH battery properly per indicator on the player. Ø Press the 4; button to power the player on and enter the MP3 standby mode. 2. Connecting / downloading/removing 2.1 Connecting a PC as USB Before operation, please verify the player is powered on with one end of the USB cable came with the system inserted into PC and another end into the MP3 player. 2.2 Downloading mp3 songs You can drag and drop the files and folders onto this removable device. The transfer icon will appears as below. 4 2.3 Removing the USB device a. Double click the Safely Remove Hardware icon in taskbar: b. From Safely Remove Hardware screen, highlight "USB Mass Storage Device" item, and then click "Stop" button. "Stop to Hardware Device" window appears on the screen as shown in the picture below. 5 c. Click “OK”. After the "Safe to Remove Hardware" window appears, the player can be disconnected from PC safely. Notice: Never unplug the USB cable when transmitting data with PC to avoid damaging the Player; after data transmitting, please do not disconnect the player from PC until "Device now be safely removed" appears; while using USB function, all other buttons will be nonfunctional. Any application lost or I/O error and power on issues caused by improper operations, please refer to FAQ. 3. Basic operation 3. 1 Buttons and functions 1) Hold 2) Menu 3) Previous ׀7 4) AB/REC 5) VOL 6) Next8 7) Earphone jack 8) VOL+ 9) 4;Play/Pause/Stop5 10) Microphone 3.2 Power on/off From power off mode, press the 4; button to power the player on and enter into the MP3 standby mode; press the 4;button 3 seconds under any mode, the player will save the data and enter power off mode. 6 MP3 standby mode Notice: DO NOT remove the battery from the battery compartment to power the player off, as all the data on the player may be lost! 3.3 Main menu setup From standby or playing mode, you can press the MENU button to enter the main menu. Push the ׀7or8 ׀button to select: Play music, Voice mode, FM Tuner, Setting, Preview, About, Folder and Exit; you can press the MENU button to enter the desired setting. 4. How to use the MP3 player 4.1 Playing music a) From MP3 standby mode, you can press the 4;button to play MP3 music and press the 4; button again to pause. To resume playing, please press the 4;button the third time. Play b) Pause From play or pause mode, press and hold the 4;button 2 seconds, the player will return to the MP3 standby mode, press and hold the 4;button again, it will repeat step "a)". c) From MP3 standby or play mode, you can push the ׀7 or 8׀ button to select previous or next track. d) From STOP status, you can push the ׀7or8׀ button to find your desired track quickly. e) From play mode, you can keep pressing the ׀7or 8 ׀button to fast backward or forward in this track. f) From play mode, press the V + or Vbutton to adjust volume. 7 g) From MP3 standby, play and pause mode, press and hold the 4; button 3 seconds, the player will save the data and enter the power off mode. 4.2 Setting the voice mode 4.2.1 Playing voice files a) From MP3 mode or voice standby mode, you can press the MENU button to enter the main menu. To enter the playing voice mode, please push the ׀7 or 8׀ button to select Voice and press the MENU button. You can press the 4; button to play, and press this button again to pause. To resume playing, please press this button a third time. Play pause b) From voice standby or play mode, you can press the ׀7 or 8׀ button to select previous or next track. c) From STOP status, you can push and hold the ׀7 or 8 ׀button to find your desired music quickly. d) From Play mode, you can push and hold ׀7 or 8 ׀button to fast backward or forward in this track. e) From play mode, press the V + or Vbutton to adjust volume. f) From voice standby mode, keep pressing the 4; button over 3 seconds, the player will enter the power off mode. Note: The EQ selection will be unavailable when playing voice files. 4.2.2 Recording From MP3 mode or voice standby mode, press the AB/REC button 2 seconds, the player will enter the recording mode, and press the AB/REC button again to stop. You can press the 4; button to play voice, and press this button again to pause. To resume playing, please press this button a third time. Recording Stop recording 8 4.3 FM Tuner 4.3.1 Playing FM a) From MP3 playing, voice playing or standby mode, you can press the MENU button to enter the main menu, and then push the ׀7 or 8׀ button to select FM mode and press the MENU button to enter. The player will play FM under the preset station. b) From FM playing mode, you can switch between saved channels by pressing the ׀7 or 8 ׀button when the Preset appears after pressing the 4;button. c) From FM playing mode, you can push the ׀7 or 8 ׀button to adjust the frequency manually, the frequency will increase or decrease by 0.1MHZ; When reach the desired channel, you can press the MENU button to enter the FM main menu, and push the ׀7 or 8׀ button to select saving radio station, and then press the MENU button enter and the 4; button to save. d) From FM playing mode, you can press the VOL+ or VOL button to adjust the volume. e) From FM playing mode, press the 4; button 3 seconds, the player will enter the power off mode. 4.3.2 Recording FM From FM playing mode, press the REC /AB button 2 seconds to enter the FM recording mode, the FM music will be recorded in WAV format. You can press the 4; button to pause recording. You can press the REC /AB button to finish recording and save the file and listen under the Voice mode. The player will return to the FM Tuner screen. FM recording pause 9 4.3.3 Setting FM stations From FM playing mode, you can press the MENU to enter the function setting mode. You can push the ׀ 7or 8 ׀button to select: Play music, Play voice, Save station, Delete station, Auto Scan, Exit and then press the MENU button to enter the desired mode. A. Pay music: Press the MENU button to enter the FM main menu, and push the ׀7 or 8 ׀button to select return to music playing, and then press the MENU button to exit the FM mode and enter the music playing standby mode. B. Play voice: Press the MENU button to enter the FM main menu, and push the ׀7or8 ׀button to select return to voice playing, and then press the MENU button to exit the FM mode and enter the voice playing standby mode. C. Save station: Press the MENU button to enter the FM main menu, and then push the ׀7 or 8׀ button to select Save. Press the 4; button to confirm saving. D. Delete station: Press the MENU button to enter FM main menu, and push the ׀7 or 8 ׀button to select Delete, and then press the 4; button to confirm delete. E. Auto Scan: After entering this mode, the player will scan the radio station automatically and save F. Exit: Return to FM playing mode. 10 4. 4 Function settings From MP3 mode or voice standby mode, you can press the MENU button to enter the main menu, and push the ׀7 or 8׀ button to select setting and press the MENU button to enter. The function setting includes: Equalizer, play mode, contrast, backlight, power set, record set, language and exit. You can press the MENU button to save the selected setting mode. 4.4.1 Setting equalizer mode Push the ׀7or 8 ׀button to select the equalizer mode: Normal, pop rock classical, jazz and bass. Press MENU button to save the selected equalizer set. 4.4.2 Setting play mode Push the ׀7 or 8׀ button to select the playing mode, including: Normal, repeat one, repeat all and shuffle repeat. You can press the MENU button to save the selected play mode. 4.4.3 Setting contrast Push the ׀7 or 8׀ button to adjust the contrast of LCD. Press MENU button to save the selected setting. 11 4.4.4 Adjusting backlight Push the ׀7 or 8׀ button to select the backlight setting, including: Always off, 5sec, 10sec, always on. Press MENU button to save the selected setting. 4.4.5 Setting power set Push ׀7 or 8 ׀ button to select the Power set, including: Disable, 2min, 10min, 30min. Press the MENU button to save the selected shutdown time. 4.4.6 Setting rRecording Push ׀7 or 8׀ button to select the record set, including: 8000Hz, 11000Hz, 16000Hz, 22000Hz. Press the MENU button to save the select the recording setting. 4.4.7 Setting language Push the ׀7 or 8׀ button to select language: German, English, French, Spanish, Italian, Press the MENU button to save the selected language. 4.4.8 Exit Return to the previous mode. 4.5 Music preview From MP3 mode or voice standby mode, you can press the MENU button to enter the main menu, and push the ׀7 or 8׀ button to select the music preview function setting, and then press the MENU button to enter. During preview, it will play the initial 10 seconds of each music file and then skip to next. You can press the MENU button to exit. 12 4.6 About From MP3 mode or voice standby mode, you can press the MENU button to enter the main menu, and push the ׀7 or 8 ׀button to select about function, and then press the MENU button to enter. You can view the total memory and available memory. 4.7 Folder function From mp3 or voice standby mode, you can press the MENU button to enter the main menu, and push the ׀7 or 8 ׀button to select folder function, and then press the MENU button to enter. You can push and hold the MENU button to browse the file, and push the ׀7 or 8 ׀to select the desired one. In the folder mode, press MENU to enter the PLAY OR DELETE mode, press the ׀7or8 ׀button to select. Press MENU to confirm .If you select the play, it will play the current song. If you select the delete, it will come into the delete mode. Repress the ׀7or8 ׀ button to select the YES OR NO. Press MENU to confirm and press4; to exit. Note: You can not view the record folder and file under play music mode, which will only be available in play voice mode. ) 4.8 Exit Return to MP3 mode. Note: From setting mode, you can press the 4; button to exit the setting mode quickly. 13 5. AB Play Mode From MP3 or voice mode: 1) Press the AB /REC button to select starting point A. 2) Press the AB /REC button to select end point B, then it will repeat between AB. 3) Press the AB /REC button again to cancel setting and resume playing MP3 or voice. 6. HOLD function From MP3 and voice standby/ play/ pause/ record mode, you can push the HOLD switch opposite the arrow to lock all the other buttons with a Lock icon on the LCD accordingly. If you want to use other buttons, please push the HOLD switch to the opposite direction of arrow. 7. Lyric sync: This player supports lyric sync function. Notice: The lyric file name shall be the same as music file, but with the suffix of *. LRC and saved in the same directory, and only the lyrics with time indication can be displayed properly. For information on this feature, please see our website at www.nextar.com 8. USB mode Plug the Player into the USB port of a PC, The player display will indicate a USB connection. Additional icons will display when files are moving between the PC and the player For more information on how to update the software or format the removable disk, please refer to our website. 14 9. FAQ Problem No display after pressing the power button No sound when playing music. Causes No batteries installed, or batteries are very low 1. Volume is too low or no music are on your player. 2. Battery low. 3. MP3 or WMA file is corrupt. Cannot download music files after connecting to your PC 1. HOLD is on so the disk is write protected 2. The unit is not connected to PC properly. 3. Storage directory is wrong Can not play MP3 files created by the user The MP3 files currently are compressed at a bitrate no supported by this player. Consult the Nextar website for mor info No response after pressing a button. HOLD switch is on so buttons are locked Can not open the disk or prompt I/O error after connecting PC. Caused by some improper operation. Turn off the unit, disconnect if from your PC and begin the process again. 15 Technical specifications Bit rate: SNR: Dynamic range: Condition of storage: Distortion: Display USB port: Memory: Net weight: Dimension: Working condition: Output: Battery life: Record time: Operatin current: Standby current: 8~320Kbps >85db >80(1KHZ) Humidity<90%, normal temperature <0.05% (REFERENCE LEVEL:0dB(MP3) 1 mW,4mW 52dB/62dB(VOICE, REFERENCE FREQUENCY:1KHZ) ID3 information display, blue backlight USB2.0 high speed 128MB/256MB /512MB/1GB/2GB <30g 83.5*29.5*24mm Humidity <85%,10~40 5mW*2 <12h, low power waste 0.8hour(320KBPS,128MB);30HOURS (8KBPS,128MB) 60mA 50mA 16 No part of this manual may be copied, republished, reproduced, transmitted or distributed in any way without prior written consent of Nextar, Inc. Any unauthorized distribution of this manual is expressly forbidden. Nextar is a registered trademark of Tofasco, Inc. Nextar may find it necessary to modify, amend or otherwise change or update this manual. We reserve the right to do this at any time, without any prior notice. All specifications and features are subject to change without notice. All screen shots shown are simulated and may not represent the actual screen on production units sold to consumers. For instruction manuals, updated drivers or other information, be sure to visit our website at: www.Nextar.com Or write us at: Nextar 1661 Fairplex Dr. LaVerne, CA USA 91750 Copyright © 2006