1
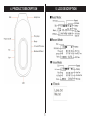
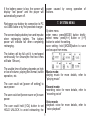
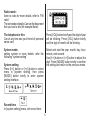
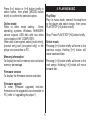
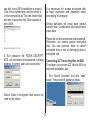
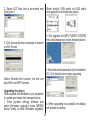
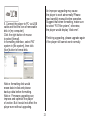
MA201 | Digital MP3 Player
Instruction Manual
Table of Contents
1. Introduction...........................................................................................................1
2. Safety instructions.................................................................................................1
3. Function overview.................................................................................................2
4. Product description...............................................................................................3
5. LCD description....................................................................................................3
6. Basic operation.....................................................................................................4
7. System menu........................................................................................................5
8. Playing music........................................................................................................8
9. Telephone book...................................................................................................14
10. Recording voice................................................................................................15
11. Voice playback..................................................................................................16
12. USB disk function.............................................................................................17
13. Troubleshooting................................................................................................22
14. Specifications...................................................................................................23
1. Introduction
Choose the suitable volume. Do not turn up
the volume of the earphones too high while
using it. If you get ringing in your ears stop
using the device or turn the volume down.
Thank you for purchasing our MP3 player.
Before using the unit please read this
manual carefully to obtain the best possible
performance from your player. Keep this
manual for future reference
Do not disassemble the device yourself
and do not wipe the surface of device with
alcohol and benzene and thinners.
2. Safety Instructions
Do not using the device in areas with
prohibiting electronic devices, such as in
plane.
The manual contains the important safety
instructions and information of the device’s
proper usage. Make sure to read carefully
and understand all the instructions to avoid
accident.
Do not use the device while driving
an automobile or walking in the street,
otherwise, an accident may result.
Do not expose the device to extreme
temperature (above 40°), especially in cars
with shutting windows in summer.
Do not expose to moisture. Do not store in
humid or dirty areas.
Our company take partly responsibility
that memory is lost because of defective
products and repair and other reasons.
Please users comply with the manual to
operate it properly.
Avoid the device falling and bumping
strongly. Do not make OLED suffer from
violent shake; otherwise, OLED could be
damaged or displayed abnormally.
Our company reserves the right to improve
the product so product’s specification and
design are subject to change without further
notice.
3. Function overview
Multiple EQ modes
Switch EQ in seven types: normal, rock,
pop, classic, soft, jazz, bass
Portable USB storage device with huge
memory
You can upload/download files in shortcut
way in WINDOWS EXPLORER without
other programs (WINDOUWS 98 above).
Multiple play modes
Switch play modes in seven types: normal
play, repeat one, single folder play, repeat
folder play, repeat all, random, intro
OLED display, multi-screen saver
pictures
Supports various audio formats
Supports MP1.2.3, WMA, ASF, WAV musical
files
Managing disk function
Sets two partitions for USB disk by
accessorial tool. One is normal disk, the
other is security disk in which files could not
be accessed freely
Digital recording/repeating
Records and saves the audio files as the
WAV or ACT format; contrast and following
reading function make users experience the
real digital repeating function.
Support multi-languages
Display three languages and track
information with lyric in simplified Chinese,
English, traditional Chinese, Japanese,
Korean, French, German, Italian, Dutch,
Portuguese and Spanish
4. Product Description
5. LCD description
6. Basic operation
Adjusting the volume
In music mode, voice playback mode and
FM mode, pressing [VOL] button briefly will
enter volume adjustment interface.
Power on/off
The player supports auto and manual power
on function
Pressing [>>I] button or [I<<] button will
increase/decrease the volume one step.
Manual power on:
press and hold [>II] button for 3 seconds,
the player will go to working mode when the
player is turned on. Auto power off: in the
power off status, the player will automatically
go to USB mode via USB cable to connect
to PC.
Holding [>>I] button or [I<<] button will
increase/decrease continuously.
Notice: Do not turn up the volume of the
earphones too high, otherwise your hearing
will be impaired.
Power off
a. Playing status: to press [>II] button, the
song will pause; to hold [>II] button for
three second, the player will be turned off.
Reset power
You can press [Reset] button to reboot the
player if it crashes.
Battery
The player adopts a built-in polymer
battery
with
a
large
capacity.
b. In music mode: to hold [>II] button for two
seconds, the music will stop, then to hold
[>II] button for three seconds, the player will
be turned off.
c. In other modes: to press [>II] button for
three seconds, the player will be turned off.
d. When batter power is low, system will
automatically power the player off.
If the battery power is low, the screen will
display “low power” and the player will
automatically power off.
power caused by wrong operation of
buttons.
Recharge your battery by connection to PC
via USBA cable or by the provided charger.
7. System menu
System menu
enter menu: press[MODE] button briefly.
select menu: press[I<<] button or [>>I]
button to select the setting.
save setting: hold [MODE]button to save
and escape from menu.
The screen displays battery icon and impulse
when recharging battery. The battery
power will indicate full when completing
recharging.
The battery will be full until it is recharged
continuously for 4hours(the first two times
will take 10hours).
The usable time of battery depends on high
or low of volume, playing files format, button
operation, etc.
Music mode:
playing music for more details, refer to
“playing music”
The user could set [power off setting] to
save power.
Record mode:
recording voice for more details, refer to
“recording voice”
The user could set [screen saver on] to save
power.
The user could hold [VOL] button to set
HOLD UNLOCK to avoid exhausting the
Voice mode:
playback voice for more details, refer to
“voice playback”
Radio mode:
listen to radio for more details, refer to “FM
radio”
The text reads originally:Can see the document
that you love to see (for example:Novel)
The telephone is thin:
Can at any time see your friend of personal
name card
Press [VOL] button briefly and the digit of year
will be blinking; Press [VOL] button briefly
and the digit of month will be blinking.
System mode:
setting system or more details, refer the
following “system setting”
Select and start the year, month, day, hour,
minute, and second.
Use [I<<] button or [>>I] button to adjust the
digit. Press [MODE] button briefly to confirm
the setting and return to the previous menu.
System setting
Press [I<<] button or [>>I] button to select
menu in [system setting], then press
[MODE] button briefly to enter system
setting interface.
Record time
In [system setting] menu, set record time.
Language
In [language] interface, use [I<<] button or
[>>I] button to select language, then press
[MODE] button confirm.
If 0 is selected, the high lightness is set to
off.
Adjust backlight and use [MODE] button to
confirm.
Notice: without pressing any button, OLED
screen displays low lightness when setting
time is up (the time unit is second).
Power off setting
Operation refers to “backlight” setting.
Backlight
The user could set OLED lightness duration
to save OLED and power. Using OLED
screen with high lightness duration will short
OLED screen life.
Off time mode: To set the self-power off time
when the player playback is stopped and no
button is pressed.
If “0” is selected, this function will be
disabled. The time unit is seconds.
Sleep time mode
To set self-power off time after last key
pressed, regardless of whether the player is
active or stopped. The time unit is minutes.
Use [I<<] button or [>>I] button to adjust
time time from 0 to 30seconds.
Screen saver setting
Setting screen saver to save OLED screen
and to spare battery power.
8. Playing music
Press [I<<] button or [>>I] button briefly to
select option, then press [MODE] button
briefly to confirm the selected option.
Play/Stop
Play: In music mode, connect the earphone
to the player and select songs, then press
PLAY/STOP [>II] button briefly.
Online mode
Refer to other mode setting.
Some
operating systems Windows 98/98SEP4
cannot support USB disk with two disks
icons display in MY COMPUTER.
When disk is encrypted, select [multi driver],
[normal only] and [encrypted only] in the
player via connection to PC.
Stop: Press PLAY/STOP [>II] button briefly.
Select music
Pressing [I<<] button briefly will move to the
previous songs. Holding [I<<] button will
move backward fast.
Memory information
To display the built-in memory size and used
memory percentage.
Pressing [>>I] button briefly will move to the
next songs. Holding [>>I] button will move
forward fast.
Firmware version
To display the firmware version and date.
Firmware upgrade
To enter [firmware upgrade] function,
firmware can be upgraded via connection to
PC (refer to “upgrading the player”).
How to add DRM music
3). Run "WMP10"(Windows Media Player
10), the "MTP" device will be discover
Select "Sync",and then open the local
folder where your music files saved.
1). Connect player to PC, after 10 seconds
a dialog will be appear, select "Take no
action" or click "Cancel" button to continue.
2). Open "My Computer", clean up
the device as the following steps:
4). Select all music you want tosync to
player, and drag them to the"SyncList"
on the left side of WMP 10, click"Start
Sync" to began download:
a). Click the MTP device icon use
the right button of the mouse,
and then select "Format";
b). Waiting for the format
processing until finish.
5). When finish downloading, you can see
the music files on the right side of WMP 10.
How to play
Browser "My Computer", you can see
the files already downloaded to player.
At first, you must enter into System
setup and setup the "DRM Time",
set it to current time, otherwise the
DRM music can't play accurately.
After setup "DRM Time", you can go back to
music mode to play and listen to music.
6). Disconnect the player, it will
make ID3 Playlist automatic, this
will cost about 8 seconds.
Music play menu
In music play mode, pressing [MODE] button
will enter music play menu. Using [I<<]
button or [>>] button to select the mode,
then press [MODE] button to confirm.
•
•
•
•
•
•
7). Then the player will process DRM
licence, it will cost 5~10 seconds.
10
Repeat
Equalizer
Tempo
Rate
Replay
Replay times
•
•
Replay gap
Exit
Folder
Play the selected folder once
Equalizer mode
In music play menu, the user could enter
[equalizer] interface. Use [I<<] button and
[>>I] button to select EQ.
Repeat Folder
Repeat all songs
Repeat All
Repeat all songs
Repeat mode
In music play menu, the user could enter
[repeat] interface. Use [I<<] button and [>>I]
button to select repeat mode.
Random
Randomly select song to play
Normal
Play all the songs once
Intro
Play the first part of all saved tracks for 10
seconds
Repeat One
Repeat play one
11
Tempo rate
In music play menu, the user could enter
[tempo rate] interface. Use [I<<] button and
[>>I] button to select tempo rate.
When “A” in the icon
blinks, press [>>I]
button briefly to confirm beginning.
Then “B” in the icon
blinks, press [>>I]
button briefly to confirm ending. Replay icon
will not blink at this time. The player will
replay from A to B. exist from replay mode
after finishing the set replay time.
Moving to positive direction will fast tempo
rate and moving to negative direction will
slow tempo rate. The digit “0” means normal
tempo rate.
In replay mode, re-set “A” in the icon by
pressing [I<<] button briefly.
2.following read function this function is
disabled in voice mode
Replay mode
1 A—B replay
In music play menu, pressing [MODE] button
briefly will enter repeat mode. The icon
of song number in the screen will change
into the icon of repeat mode. The picture
appears as below:
a.In A—B replay, enter following read mode
by pressing [>>I] button briefly.
b.When replay icon
is turned to following
icon
, voice record begins and time gap
is from A to B.
12
c. Time is up and the player resumes playing.
When icon is turned to
, press [>>I]
button briefly to enter contrast function.
In the above three modes, press [MODE]
button briefly to exit from replay mode.
Replay time
In music play menu, enter [replay time] by
using [I<<] button or [>>I] button to select
replay time. Then press [MODE] button to
confirm. User sets number of replay time
from A to B by this way.
Notice: In this mode, press button to return
to A—B replay.
3.contrast function this function is disabled
in voice mode
a.Enter this function and icon
displays ,
the player will playback the following voice.
b.Finish following voice and icon displays
Replay gap
Enter [replay gap] interface. Refer to “replay
time” setting and set replay time gap between
every replay (time unit is second).
, at this time, the player plays back the
former music.
c.After finishing former music the player
resumes playing recording. It won’t stop
until pressing [MODE] button to exit.
Lyric display
User can download lyrics from website and
save them in the player with the same name
to music.
Notice: in this mode, press button briefly to
return to following read mode.
Notice: The player displays lyric whose
name is the same to MP3 file’s. For example,
13
music format’s name is “song.mp3” and LRC
file’s name must be “song.lrc”, they are also
in the same folder.
9. telephone book
First time, the user can find the file
‘Setup_enu_v1.1.exe’ in drive disc CD.
Then install this software on
the PC as following steps
Connect the mp3 with the PC,
pressing the start menu to find
the Flary Address software:
Select the file menu to choose the
new, and then you will find the file
‘C:\Program Files\Flary\TelAddbk.
dat’, then copy the file in your mp3
14
Select the file menu to choose the Input
Data to find the file (TelAddbk.dat) in your
mp3, and then press the open button.
Fill in team name in the blank and
press the Append Grouping button:
Enter the main menu to select
Telephone mode and you will find
you added Tel information.
10. Recording voice
Recording voice
Enter record mode in system menu
Press [>II] button briefly to begin to record
Press [>II] button briefly again to pause to
record
Select the team you added, and then key
in the Name and the TEL you want to add.
Press the New Card button and you can
see the name and Tel No. in the right blank.
Hold [>II] button to stop recording
Hold [MODE] again button to exit record
mode and save record files
1.Press [REC] shortcut button briefly to
enter record mode( stop playing files before
enter record mode).
Add the whole information
as the above steps:
Press the Save button and Quit.
Disconnect the mp3 to PC.
2.Make sure battery power and disk memory
are sufficient.
15
3.The player support 99 record files in one
folder.
Fine recoding, WAV format, good voice
quality, Long recording, ACT format, fair
quality and longer recording time
4.Record files are saved in the current folder
in “record stop submenu/local folder”
5.When the memory is used up, the screen
will show “over flow”. Please delete some
files to release memory.
Fine VOR, WAV format, good voice quality,
will pause recording automatically when
there is no sound detected
6.The screen will show “over flow” if the
folder contains over 99 files; please open a
new folder to store further recording.
Long VOR, ACT format, quality, will pause
recording automatically when there is no
sound detected
7.During recording, only [>II] button &
[MODE] button will function.
1.VOR is that voice controls recording on/
off. Recording will stop without voice in order
to save memory.
2.For fine recording, please record in little
noise background.
3.Please do not talk before recording and
start recording in 5~ 6 seconds.
Voice recording type
In stop recording status, press [MODE]
button briefly to enter record setting menu.
11. Voice playback
Select [RECORING TYPE] and press
[MODE] button briefly to enter.
16
Play record files
Enter voice mode in system menu
for more details, please refer to “playing
music” in music mode. But this mode has no
following reading and contrast functions.
Press [>II] button briefly to begin playback
12. USB disk function
Press [>II] button briefly to pause playback
USB display mode
The player can be a large mobile storage
device. For Windows 2000, Mac OS 10.3 or
Linux Redhat 8.0 pro, no driver is required.
For Windows 98, driver is required.
Hold [>II] button to stop playback
Press [I<<] button or [>>I] button briefly to
select play record files
The player supports USB bus-powered and
began to charge up when connecting to PC.
In suspending mode, press [MODE] button
briefly to escape from USB mode, then reselect the mode you want to go.
Hold [MODE] button to exist from voice mode
Press [VOL] button to enter
adjustment of volume
mode for
Voice play menu
In voice mode, press [MODE] button briefly
to enter [voice play] while playing record
files.
•
•
•
•
The player supports Suspend mode and
user can create 99 files in one folder.
When connected to a computer, the
OLED will indicate three different modes:
suspending mode, data downloading , data
uploading
Repeat
Tempo Rate
Replay
Exit
17
1. Connect the player to PC and run attached
procedure: MP3 PLAYER DISK TOOL.
2. Choose [partition and encrypt] option
and decide available size of each disk. Set
username and password, put username
in [new user] and new password in [new
password], then confirm them. After clicking
[start] button, dividing disk begins. Click
[OK] to reboot computer.
Encrypt disk function
User can use the attached tool to set
partitions for USB disk. One is normal disk,
other is encrypted disk. (User can see two
disk icons in computer. WINDOWS 2K
need install SP4, otherwise, user only see
one disk icon and selecting [normal only] or
[encrypt only]of[online mode]of [system set]
[will see other icon]. Encrypted disk would
hide all private data, other cannot access
data without password.
Disk partition steps:
3. After rebooting computer, users will see
18
two disk icons (SP4 installation is a must).
Click the encrypted disk and three files is
in the encrypted disk. Two are hidden files
and one is executive file. Disk capacity is
only 300K.
It is necessary for access encrypted disk
to input username and password when
connecting to computer.
Setting partitions will erase data, please
backup data. Combination disks would also
erase data.
Please do not lose username and password.
Otherwise, you cannot access encrypted
disk. You can combine disks to cancel
encrypted disk at risk of damaging data in
encrypted one.
4. Run executive file: RDISK DECRYPT.
EXE, put username and password in dialog
window. If correct, user can access disk.
Converting ACT recording files to WAV
The player can convert ACT files to WAV by
attached installation tool.
1. Run “Sound Converter” and click “open”
button. The picture will appear as below:
Notice: Data in encrypted disk cannot be
read by the player.
19
2. Select ACT files that is converted and
click [open]
(Enter directly USB mode via USB cable
and upgrade as the following steps)
2. Run upgrade tool [MP3 PLAYER UPDATE]
then click [choose new version firmware] button.
3. Click [convert] button and begin to convert
to WAV format
3. Select the new firmware driver (in the installation
CD). Click [start] button to begin upgrading.
Notice: Besides this function, the tool can
play WAV and MP3 formats.
Upgrading the player
Utilize update tool installed in your computer
to update and repair the damaged driver.
1. Enter [system setting] interface and
select [firmware upgrade]; press [MODE]
button briefly to enter [firmware upgrade].
4. When upgrading is successful, the display
will indicate as below:
20
An improper upgrading may cause
the player to work abnormally! Please
read carefully manual before operation.
Suggest that when formatting, make sure
to select “FAT file system”, otherwise,
the player would display “disk error”.
5. Connect the player to PC via USB
cable and find the icon of removable
disk in [my computer].
Click the right button of mouse
to select [format].
In formatting interface, select FAT
system in [file system], then click
[star] button to format disk.
Finishing upgrading, please upgrade again
if the player still cannot work normally.
Notice: formatting disk would
erase data in disk and please
backup data before formatting.
Notice : Firmware upgrading can
improve and optimize the player’
s function. But it would not affect the
player even without upgrading.
21
13. Troubleshooting
If the player couldn’t play normally, please use trouble shooting guide to help you.
Symptom
The player cannot be turned on
Please check the battery capacity.
Please check if the device’s procedure is damaged.
The player crashes
Press RESET button to start the player.
The player cannot work
Please check the battery capacity.
Please check if HOLD mode is set.
Please check volume is set to “0” and make sure that earphones are
connected properly and clean.
Corrupted music data will make noise in some extent even be played
abnormally; make sure the files are full.
Please choose FAT file system in dialogue box when formatting disk.
The player cannot upload /download
files; no disk icon in computer
Please check USB cable is correctly connected.
Please re-install properly driver.
The player cannot record
Please check if memory is sufficient.
Please check the battery capacity.
Strange characters are displayed on
screen
Please check if the correct language is selected.
If you encounter other difficulties in warranty, please contact our company.
22
14. Specifications
Item
Specification
Product number
MA201
Dimension
30 X 65 X 20mm(W*H*D)
Weight
33g
Dual color OLED screen
two color OLED display
Operating language
Simplified Chinese, English, traditional Chinese, Japanese, French, German,
Italian, Dutch, Portuguese, and Spanish
Transferring data rate
USB2.0 FS (reading 1000K Byte/s, writing 750K Byte/s)
File formats supported
Music: MP1, MP2, MP3, WMA, WMV, ASF, WAV; Record: ACT, WAV
S/N rate
85dB
The max output power
(L) 10mW+(R) 10mW (320hm)
Built-in memory
64MB/128MB/256MB/512MB/1GB/2GB
Power
3.7 V polymer battery
Power usable time
Play time: 7hs; record time: 8hs;
Operating temperature
-5°C - +40°C
Operating System
WIN98SE/ME/2K/XP, Mac OS 10, Linux2.4.2 (Only WIN98 needs the driver)
Accessories
User’s Manual, Earphone,USB cable, Installation CD
Specification and appearance are subject to change and improvement without further notice.
23
No part of this manual may be copied, republished, reproduced, transmitted
or distributed in any way without prior written consent of Nextar, Inc. Any
unauthorized distribution of this manual is expressly forbidden.
Nextar is a registered tradernark of Tofasco,Inc.
Nextar may find it necessary to modify, amend or otherwise or update this manual.
We reserve the right to do this at any time, without any prior notice. All specifications
and features are subject to change without notice. All specifications and features
are subject to change without notice. All screen shots shown are sinulated and
may not represent the actual screen on production units sold to consumers.
For instruction manuals, updated drivers or other
information, be sure to visit our website at:
WWW.Nextar.com
or write us at:
Nextar
1661 Fairplex Dn
LaVerne, CA USA 91750
copyright © 2006
24