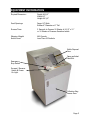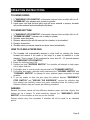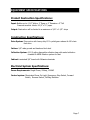
1
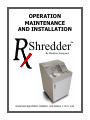
OPERATION
MAINTENANCE
AND INSTALLATION
TM
Shredder
By Marathon Equipment
MARATHON EQUIPMENT COMPANY OMI MANUAL # 0071, 3/05
Page 1
Table of
Contents
Page
Introduction························································· 3
Pre-Operating Instructions ······································· 4
Equipment Information ··········································· 5
Operating Instructions ············································ 6
Equipment Specifications········································· 7
Electric Safety Switch ············································· 8
Maintenance ······················································· 9
Maintenance Pictures ············································· 10
Trouble Shooting Guide··········································· 11
Installation Instructions ·········································· 12
Parts Ordering Information ······································ 13
Notes Page ·························································· 14
© Copyright 2005 Marathon Equipment Company
Page 2
INTRODUCTION
Dear Customer,
Thank you for purchasing a Marathon Rx Shredder.
This product is designed to give you reliable service and superior performance for
years to come. To guarantee top performance from your shredder and safest
operation, every person involved in operation, maintenance, and installation should
read and thoroughly understand all instructions in this manual and follow all warnings.
If you need assistance with your shredder, please contact your equipment distributor.
When you contact your distributor, you will need to provide serial number, installation
date, and electrical schematic number.
If you have any safety concerns with equipment, or need further
information, please contact us at:
Marathon Equipment Company
P.O. Box 1798
Vernon, Al 35592-1798
Attn: Field Service Department
1-800-633-8974
Page 3
PRE-OPERATING SAFETY INSTRUCTIONS
•
Employers should allow only authorized and trained personnel to operate this
equipment.
•
Do not remove access covers except for servicing.
•
This shredder utilizes a safety interlock switch and stops power to the motor when
the collection bag access door is open.
•
The electronic circuitry in this shredder performs several functions:
Senses the presence of paper in the shredder inlet and automatically starts
shredding and then stops the shredder after the paper has passed through.
Controls the safety functions of the shredder.
Operates the indicator lights.
•
The automatic start function of this shredder uses a diffuse type photo eye in the
paper feed slot to detect the presence of paper.
•
Depress the stop switch when shredder is not in use.
!
CAUTION: Do not insert any objects other than what it was designed for.
Never insert hand, fingers or any foreign objects into the feed opening.
Serious injury may result.
Keep all loose articles of clothing, ties, jewelry, long hair or other loose
objects away from feed opening.
Serious injury may result.
Always turn off and unplug the machine before moving, servicing,
cleaning or any other conduct other than normal operation.
Serious injury may result.
Page 4
EQUIPMENT INFORMATION
Physical Dimension:
Depth:26 1/4”
Width:24”
Height:44 1/4”
Feed Openings:
Paper:10” Wide
Bottles:4” Diameter x 6” Tall
Process Time:
5 Seconds to Process 20 Sheets of 8 1/2” x 11”
or 10 Sheets of Pressure Sensitive Labels
Shipping Weight:
Sound Level:
480 Pounds
Less Than 65 Decibels
Bottle Disposal
Door
Paper and Label
Feed Slot
Emergency
Stop Switch
Forward / Reverse
Switch & Power
On Light
Collection Bag
Access Door
Page 5
OPERATING INSTRUCTIONS
TO SHRED PAPER:
1. If “EMERGENCY STOP SWITCH” is illuminated, depress button and light will turn off.
2. “POWER ON” light indicates unit is ready to operate.
3. Insert paper into feed slot and photo eye will sense material is present, shredder
will process material and automatically shut down.
TO SHRED BOTTLES:
1.
2.
3.
4.
5.
6.
If “EMERGENCY STOP SWITCH” is illuminated, depress button and light will turn off.
“POWER ON LIGHT” indicates unit is ready to operate.
Operator raises feed door.
Operator places bottle with lid removed into chamber to be shredded.
Operator closes door.
Shredder starts, processes material and shuts down automatically.
HOW TO CLEAR A PAPER JAM:
1. The shredder will automatically attempt to clear itself by rotating the knives
forward and reverse if too much or too large of a piece of material is in the
chamber. This is normal. If this continues for more than 20 – 30 seconds depress
the “EMERGENCY STOP SWITCH”.
2. Empty the collection bag if full.
3. Depress and hold “REVERSE SWITCH” the shredder will attempt to back paper
out of paper feed slot.
4. If shredder jams in reverse mode, depress and hold “FORWARD SWITCH”.
5. If shredder jams again, alternate slowly depressing the “REVERSE SWITCH” and
“FORWARD SWITCH” to attempt to move jammed paper completely through
shredder.
6. If you are unable to clear the jam using this method, depress “EMERGENCY
STOP SWITCH” and “UNPLUG THE SHREDDER”, remove the collection bag
from cabinet and carefully remove any paper extending below the cutting head.
Reinsert collection bag and repeat jam clearing procedure.
DANGER:
Because the sensor cannot tell the difference between paper and other objects, this
feature can be a hazard. To avoid accidents, depress the “EMERGENCY STOP
SWITCH” on the shredder as soon as you are finished.
Remove electric plug from receptacle if shredder will not be used for an extended
period.
Page 6
EQUIPMENT SPECIFICATIONS
Product Destruction Specifications:
Input: Bottles up to 4 1/4” Wide x 3” Deep or 3” Diameter x 5” Tall
Pressure sensitive labels: 8-1/2” x 11” paper
Output: Destruction will be limited to a maximum of 1/8” x 1-1/2” strips
Construction Specifications:
Drive System: Drive motor with heavy duty 87:1 cycloid gear reducer & #50 chain
final drive
Cutters: 1/8” wide ground and hardened tool steel
Collection System: 12 1/2 gallon disposable collection bag with sealed collection
chamber & HEPA filtration system for dust
Cabinet: Laminated 3/4” board with Melamine laminate
Electrical System Specifications:
Power Requirements: Single Phase, 20Amp, 120VAC
Control system: Illuminated Power On Light, Emergency Stop Switch, Forward
Switch, Reverse Switch, Full Bag Indicator
Page 7
ELECTRIC SAFETY SWITCH
CIRCUIT BREAKER:
Located on rear panel, near
the bottom.
POWER CORD
Page 8
MAINTENANCE DIRECTIONS
WARNING: Only authorized personnel should perform these functions.
DANGER: Unplug the shredder before doing any maintenance.
•
Inspect door switch, power cord, and electrical controls and make sure they are
functioning properly and in good condition.
•
Inspect HEPA filter. Replace after 6 to 12 months depending on usage or when it
appears full of debris.
•
Keep the disposal area clean and free of paper scraps.
•
Use the disposal bags specially designed for this unit.
KNIFE CARE:
Your shredder knives should be oiled weekly under normal use and circumstances.
OIL YOUR RX SHREDDER CUTTING HEAD:
1. Unplug the shredder power cord from power outlet, before doing any maintenance.
2. Apply a thin layer of shredder lubricant through the paper feeding slot, moving
from one side to the other.
3. Reconnect electric power cord of shredder, to power outlet.
4. Press and hold the “REVERSE Switch” for 10-15 seconds to allow the oil to spread
over the cutting head.
5. Shred a few sheets of paper to remove any excess oil.
OIL YOUR RX SHREDDER GEARS AND CHAIN:
1. Unplug the shredder power cord from power outlet, before doing any maintenance.
2. Open the clean-out access door and inspect the cutting mechanism for any residue
buildup. Clean any debris that may cause clogging.
3. Spray Marathon Shredder Lubricant on the chain drive and gear once a month.
4. Reconnect electric power cord of shredder in power outlet.
FULL COLLECTION BAG REMOVAL:
1. Press and hold “Forward Switch” to finish shredding any paper left in the feed slot.
2. Press “Emergency Stop Switch” it should illuminate and display “STOP” inside
button.
3. Open “Collection Bag Access Door” and slide out the collection bag.
4. Fold bag along crease on bag.
5. Peel off paper covering adhesive strips and fold top flaps together to seal bag.
6. Insert new bag into chamber and continue shredding.
Page 9
MAINTENANCE PICTURES
CHAIN AND
SPROCKET
GEAR
DRIVE
ACCESS DOOR
SAFETY SWTICH
MAGNET LATCH
FOR ACCESS DOOR
HEPA
FILTER
COLLECTION BAG
Page 10
TROUBLE SHOOTING GUIDE
MALFUNCTION
Shredder won’t operate
PROBLEM
SOLUTION
No electrical power to unit
Plug shredder cord into
electric receptacle
Thermal overload could
be tripped
Check thermal overload on
rear of cabinet
Emergency Stop Switch is
in wrong position or
illuminated
Depress “Emergency Stop
Switch” light should turn off
and shredder should
operate
Collection bag is full
Remove and replace bag
“Emergency Stop Switch”
is flashing
Collection bag is full
Shredder will not operate
in automatic mode
Shredder operates only
with manual switches
Photo eye needs cleaned,
adjusted or replaced
Shredder reverses
continuously
Shredder jam proximity
switch is faulty or out of
adjustment
Adjust or replace proximity
switch
Shredder will not reverse
Shredder jam proximity
switch is faulty or out of
adjustment
Adjust or replace proximity
switch
Page 11
INSTALLATION INSTRUCTIONS
1. Shredder is shipped on a metal skid and wrapped with continuous sheets and
stretch film. Remove all strapping and protective covering.
2. The shredder is also shipped with a set of casters bolted to the bottom of the
shredder. However the unit must be lifted out of the skid so that the rollers can
make contact and allow the shredder to be rolled into place.
3. The power cord and replacement bags are shipped inside the bag access door.
4. Roll the shredder into it’s desired location. It should be placed within 5’ of a 20
amp 120 volt electrical receptacle. NOTE! It is recommend that it be placed on a
separate circuit for optimum performance. Do not plug into an electrical circuit that
also powers sensitive electrical equipment such as computer, printer, cash register.
5. Plug the power cord into shredder and then to the desired receptacle.
6. Turn the electrical switch at the rear of the shredder to the on position.
7. Refer to the operator instructions in the operation section of the manual.
Page 12
PARTS ORDERING INFORMATION
To purchase supplies, please call our parts department at 1-800-633-8974.
Please have your SERIAL NUMBER on hand when you call.
ITEM
QUANITY
PART NUMBER
Bag for Rx Shredder
1
05-4643
Bags for Rx Shredder
5
577399
Lubricant
PARTS LIST
PART #
DESCRIPTION
03-4738
Interlock Switch
06-2812
Interlocking Door Handle
06-2832
Cover Plate 2 x 4 x 42 3/16 16 GA
06-2833
Door Chute Plate 1 7/16 x 26 9/16 16 GA
06-2834
1 3/32 x 7 1/8 16 GA Door Chute
06-2835
Paper Chute 3 9/16 x 11 7/8
06-2836
3 x 9 7/8 16 GA
06-2980
Decal Kit
06-2991
Collection Bag Access Door
Page 13
NOTES
Page 14