1
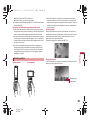
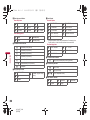
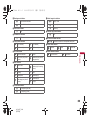
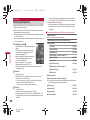
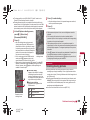
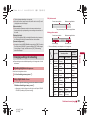
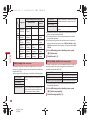
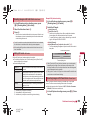
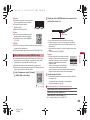
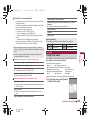
dv67_E.book
199 ページ
2009年5月25日 月曜日 午前9時1分
Camera
Before using camera. . . . . . . . . . . . . . . . . . . . . . . . . . . . . . . . . . . . . . . .200
Shooting still pictures . . . . . . . . . . . . . . . . . . . . . . . . . . <Shoot still pic>206
Shooting moving pictures . . . . . . . . . . . . . . . . . . . . . . . .<Shoot movie>209
Changing settings for shooting . . . . . . . . . . . . . . . . . . . . . . . . . . . . . . . .211
Changing camera settings . . . . . . . . . . . . . . . . . . . . . . . . . . . . . . . . . . .217
Sending still pictures or moving pictures after shooting
. . . . . . . . . . . . . . . . . . . . . . . . . . . . . . . . . . . . . . .<Mail/blog function>218
Using Bar code reader . . . . . . . . . . . . . . . . . . . . . . .<Bar code reader>218
Scanning text . . . . . . . . . . . . . . . . . . . . . . .<Character Reader (OCR)>220
Using Card reader. . . . . . . . . . . . . . . . . . . . . . . . . . . . . . <Card reader>221
Using Information reader . . . . . . . . . . . . . . . . . . . <Information reader>222
Using the FOMA terminal as loupe . . . . . . . . . . . . . . . . <Cameraloupe>223
Creating original Deco-mail picture. . . . . . . . . . . . . . . . . . . <Shotdeco>224
Copyrights and rights of portrait
Images and audio recorded with the FOMA terminal are for personal use and may not be used without the consent of the rightful person in accordance
with copyright laws. Please note that the use of the likeness or name of other individuals without their consent, defacement or a similar act may infringe
on an individual’s rights of portrait. Please be aware of copyrights and rights of portrait when making public images and audio recorded with the handset
on the Internet or similar media. The recording of images or audio may be restricted at concerts, performances and exhibits even when recorded for
personal use. Do not use this handset to send copyrighted images for uses other than those permitted under copyright laws.
t
Please respect the privacy of others when using a camera-enabled mobile phone to shoot and send images.
199
e10_dv67_7e.fm
[199/224]
dv67_E.book
200 ページ
2009年5月25日 月曜日 午前9時1分
Before using camera
Precautions for using camera
Camera
Fingerprints or oil on the lens may cause the image to be out of focus. In
addition, images may blur and rays of light may appear in images when
shot near a strong light source. Wipe the lens with a soft cloth before
shooting images.
Shoot when battery level is sufficient. Images may appear dark and
distorted when shot with insufficient battery power even while the
handset is charging. Do not shoot images while charging.
Although the cameras are made with high-precision technology, some pixels
or lines look constantly dark or bright. Further, white lines and other noise may
appear in images especially when shooting images in dimly lit surroundings.
The quality of images may deteriorate when shot or saved after the
FOMA terminal has been left in a warm location for a long time.
If the camera lens is exposed to direct sunlight for a long time, the
internal color filter may discolor, creating a discoloration of shot images.
Images shot in shooting conditions which include the sun, a light or other
strong light source may appear dark and distorted.
Direct images shot of the sun may damage the performance of the CCD.
The FOMA terminal may become warm after shooting still pictures
continuously, shooting long moving pictures, or activating the camera for
a long time. This is not a malfunction.
When the AF mode is switched, sounds may be heard from the camera
lens. This is not a malfunction.
The camera lens has built-in the mechanical shutter and ND filter on its
front side.
The FOMA terminal may sound when using the camera. This is not a
malfunction.
The front side of camera lens may be closed when the camera is not
used. This is not a malfunction.
Images are blurred when the FOMA terminal moves while shooting
images. Hold securely to prevent blurring. Use the ISO sensitivity (High
sensitivity) function/Fix camera shake function when shooting still
pictures and the Fix camera shake function to prevent camera shake
when shooting moving pictures.
200
e10_dv67_7e.fm
[200/224]
The color and brightness of the subject in images shot with the camera
may differ from the actual color and brightness.
Make sure that your fingers, hair and handset strap do not obscure the
camera lens when shooting images.
Because a larger image size requires more data, movement in the image
on the FOMA terminal display may appear slow.
Indoor fluorescent lighting may create flickering or streaky shading on the
screen. This flickering or shading may be reduced by changing the
lighting conditions, brightness or adjusting the camera brightness and
White balance.
Picture Light does not illuminate or flash for shooting when the battery
level is low.
Performance while using camera
Shot still pictures are saved to the [Camera] folder in My picture of Data
box, and shot moving pictures are saved to the [Camera] folder in
i-motion/Movie of Data box. Data can also be saved to the microSD Card
(nP. 340).
When activating still pictures shooting, Card reader, Information reader,
Shotdeco or Cameraloupe, Picture Light illuminates. Picture Light flashes
when activating moving pictures shooting.
To end the camera mode, close the FOMA terminal or press H or c
with the viewfinder display shown in each camera mode.
In each camera mode, if no operations are performed for approximately 2
minutes with the viewfinder display shown, the camera mode
automatically ends and the stand-by display reappears. The camera
mode does not end if there are unsaved data, or when the Submenu,
Shooting settings screen or scan results screen is shown.
Shutter sound, shooting start/end sound, completion sound,
Focus lock sound, and auto timer sound
For still pictures shooting, moving pictures shooting, Card reader,
Information reader, Shotdeco or Cameraloupe, sounds are enabled
regardless of the FOMA terminal settings.
For the Character reader and Bar code reader, sound volume follows the
Phone ring volume. Also, sounds are disabled in the following cases.
While the Manner mode is set
dv67_E.book
201 ページ
2009年5月25日 月曜日 午前9時1分
While the Public mode (Drive mode) is set
While the Phone ring volume is set to [Silent]
The shutter sound can be changed (nP. 89). The shutter sound volume
cannot be changed.
Receiving a call while shooting and performance of alarm
Shooting position
Normal position
Still picture mode
When the FOMA terminal is set to the Cycloid position, the image size is
switched to the size for the Cycloid position, and still pictures can be shot in
the horizontal screen. When returning to the normal position, the size
returns to the size for the normal position.
For details on image sizes in each position nP. 204
Moving picture mode
Cycloid position
In the Cycloid position, moving pictures can be shot in the horizontal screen.
However, the image size does not switch.
Camera
If the alarm is activated while viewing the still picture preview screen or
moving picture shooting screen, the shooting is canceled. After the alarm
ends, the camera screen reappears and the shot data can be saved.
If a call is received while viewing the still picture preview screen or saving
the still picture, the Received call screen appears. Then, the call can be
received. After the call ends, the camera screen reappears and the shot
still picture can be saved.
If a call is received while shooting moving pictures or displaying the
moving picture shooting confirmation menu screen, the Received call
screen appears. Then, the call can be received. After the call ends, the
moving picture shooting confirmation menu screen appears. Operate
according to the screen.
In the Cycloid position, shooting with the sub camera is not available.
When the sub camera is set in the normal position, it is switched to the
main camera if the position is changed to the Cycloid position. When the
position is returned to the normal position, the camera is switched back
to the sub camera.
Remaining time
Status display
201
e10_dv67_7e.fm
[201/224]
dv67_E.book
202 ページ
2009年5月25日 月曜日 午前9時1分
Titles
The shot (saved) still pictures, moving pictures, and business card
images, images of Information reader and Deco-mail picture of Shotdeco
are automatically titled based on the date and time when they were shot.
Example: Shoot at 1:05:07 P.M. on August 24, 2009 b [090824_130507]
Still pictures that were continuously shot are labeled in series
([ _01], [ _02] …) at the end of the title.
For business card images, [ _meishi] is added at the end of the title.
For images of Information reader, [ _info] is added at the end of the title.
For details on how to edit the titles nP. 353
Camera
r
q
Still picture/
Cameraloupe
Zoom
Moving
picture
in*1
Zoom out*1
–
Shooting settings
i
a
m
Card
reader/
Bar code Character
Shotdeco
reader
reader Information
reader
–
Change
shooting
mode*3
Shoot by
scene
Switch
Chase
focus ON/
OFF*5
Common
replay
mode/
Normal
shooting
o
Brightness▲*1
p
Brightness▼*1
202
e10_dv67_7e.fm
[202/224]
–
–
Switch Picture Light
ON/OFF
Switch to
Shoot
still
picture
–
–
–
Still picture/
Cameraloupe
Moving
picture
Card
Bar code Character
reader/
Shotdeco
reader
reader Information
reader
*
Switch phone#SD
–
–
–
–
#
Picture Light
–
–
–
–
s
Chase
focus*6
1
Switch camera-mode
2
Key operations for shooting screen
Key
Key
3
Folder list
screen of
My picture
Focus lock
Folder list Saved
screen of data
i-motion/
Movie
AF mode
Auto timer
4
Select
subject
Switch AF mode
Switch
image/
voice
–
Inverse
mode
Resize
–
AF mode
–
–
–
Zoom
in*1, 2
Zoom
in*1
5
Select size
–
–
–
–
Zoom
out*1, 2
Zoom
out*1
6
Select image quality
–
–
–
–
7
Shoot by scene
–
–
–
–
8
ISO
sensitivity
–
–
–
–
9
White balance
–
–
–
–
0
Activate Operation
guide
–
–
–
–
–
Switch
still/
anime
Switch to
Shoot
still
picture*4
–
–
–
Fix
camera
shake
*1 Keep pressing a key to adjust the zoom or the brightness continuously.
*2 Available only for Information reader.
*3 Operate only when the AF mode is set to [Face first AF] for the still
picture shooting.
*4 Available only for Card reader.
*5 Available only for shooting still pictures.
*6 Available only when Chase focus is set to [ON] for the still picture
shooting. The Focus lock can be used when Chase focus is set to
[OFF].
dv67_E.book
203 ページ
2009年5月25日 月曜日 午前9時1分
Shooting screen layout
The following icons appear on the display in the camera mode.
When switched to the Full-screen mode (nP. 206), icons do not
appear.
Still picture shooting screen
1 3 5 7 9 b d f
2 4 6 8 a c e
g
Card reader/Information reader
screen
The screen shown below is for
Card reader.
1
3
g
Shotdeco screen
1
g
3 6
n
h
Moving picture shooting screen
1 3 5 7 i b
2 4 h 8 9
j
g
k
1 Focus lock indicator
Camera
L (green)
L (red)
Appears when focus is locked
Appears when focusing
2 Picture Light indicator
Bar code reader screen
1 g
3 l
Character reader screen
1 g
3 m
M
N
Auto
ON
3 Image brightness indicator
S
Q
R
S
T
U
Dark c Normal b Bright
4 Auto timer indicator
0
2 seconds
9
5 seconds
:
10 seconds
Continued on next page
e10_dv67_7e.fm
[203/224]
203
dv67_E.book
204 ページ
2009年5月25日 月曜日 午前9時1分
5 Shoot by scene indicator
Shoot still picture
W
5
8
Normal
People
Night scene
1
H
I
8 Size indicator
Shoot still picture
2
!
*
Landscape
Exercise
Character
Into the sun
Food
Night + People
Shoot moving picture
&
.
%
_
Normal
People
Landscape (soft)
Landscape (sharp)
6 Continuous mode indicator
Camera
q
h
i
)
=
k to q
|
ON, Manual (for 25 pictures)
ON, Manual (for 9 pictures)
ON, Manual (for 6 pictures)
ON, Manual (for 4 pictures)
m
l
*
]
j
[
c
4
204
e10_dv67_7e.fm
[204/224]
QCIF: 176×144
Panorama: 2560×640
Stand-by: 480×854*
2
1
FWVGA: 864×480
VGA: 640×480
QCIF: 176×144
sQCIF: 128×96
QVGA: 320×240
o
p
a
QVGA: 240×320
ECONOMY (only for moving
pictures)
Auto (for still pictures)/ON (for moving pictures)
a ISO sensitivity indicator
Strobophoto
NORMAL
FullHD: 1080×1920*
j
Shared Multishot (2 to 25 pictures)
FINE
3M: 1536×2048*
VGA: 480×640
9 Fix camera shake indicator
Shotdeco (for 5 pictures)
HIGH QUALITY
5M: 1944×2592*
* Still pictures can be shot in the Cycloid position. For shooting in the
Cycloid position, vertical size and horizontal size are switched.
Shoot moving picture
7 Image quality indicator
d
c
b
v
s
t
g
10M: 2736×3648
a to Z
Auto(~3200)
High (up to 12800)
100 to 12800(underFullHD)
b White balance indicator
/
:
Auto
Tungsten
,
;
Fluorescent
Sunlight
*
Cloud/Shade
dv67_E.book
205 ページ
2009年5月25日 月曜日 午前9時1分
j Switch image/voice indicator
c Shooting mode indicator
w
<
AB
A
B
Egao focus shutter mode
Furimuki shutter mode
d Chase focus indicator
&
ON (1 seconds)
ON (2 seconds)
^
\ to e
@
?
ON (4 seconds)
ON (8 seconds)
X
Face first AF (only for still
pictures)
P
Closeup
T
Manual focus (only for still/
moving pictures)
$
Spectrum (only for moving
pictures)
M
N
O
P
Ripple
h Effect indicator
4
J
K
7
Black & white
L
Faded edges (only for still
pictures)
Sepia
Sparkling
Colored pencil
Indicates the number of linked split data being read
m Inverse mode indicator
i
Automatic
j
Normal
k
Reverse text
[
Still picture mode
\
Anime mode
Camera
Center AF/Standard
ON
n Switch still/anime indicator
g AF mode indicator
C
Voice only
l QR code link number indicator
ON
f Long exposure indicator
_
.
Image only
k Common replay mode indicator
ON
e Continuous AF indicator
\
Image + voice
Kaleidoscope (L)
Kaleidoscope (S)
Fish-eye
i File size limit indicator
C
D
For mail (short) (500 KB)
For mail (long) (2 MB)
205
e10_dv67_7e.fm
[205/224]
dv67_E.book
206 ページ
2009年5月25日 月曜日 午前9時1分
Shoot still pic
Shooting still pictures
When a still picture is shot, the shutter sounds. After that, a still picture
appears on the preview screen.
If the AF mode is set to [Face first AF], the following shutter modes are
available besides the normal shooting.
Egao focus shutter mode: Automatically detect the people’s smile and
shoot a still picture.
Furimuki shutter mode: Automatically detect other people’s face and
shoot a still picture.
1
Camera
2
In stand-by, press C.
: In the Custom menu: Select [Camera]/[Shoot
still pic].
: The camera can be activated just by setting
the handset to the Cycloid position in the
stand-by display (nP. 96).
: Bar code reader/Card reader is automatically
activated after detecting a bar code or a
business card (nP. 206).
: Use the zoom (nP. 211) or show the
Shooting settings screen (nP. 216).
: To shoot a still picture of yourself: Switch the camera to the sub
camera (nP. 206).
Press t.
: Shoot a still picture.
: Press a to switch from Egao focus shutter mode b Furimuki
shutter mode b Normal shooting.
• Shoot a still picture by pressing t even while the Egao focus
shutter mode/Furimuki shutter mode is set.
• To return to normal shooting, shoot a still picture.
t.
3 Press
: Save a still picture.
: To delete a still picture and shoot again: Press c.
: To send a still picture with mail or post it on blog/SNS (nP. 218):
Press m/select the sending method, compose and send a mail/
Deco-mail.
206
e10_dv67_7e.fm
[206/224]
: To send still pictures using high-speed Ir communication (IrSS™
function) (nP. 320): Press a/select the sending method/t.
When shot with the sub camera
: Still pictures appear on the display inverted (left-right orientation
backwards) but are saved as a normal image (correct left-right
orientation).
■ Submenu operations for still picture shooting screen
[Main/sub camera]
Switch between main and sub camera.
[Switch camera-mode]/select the camera mode/t
[Shooting menu]
/[AF mode]
nP. 213
/[ISO sensitivity]
nP. 215
/[White balance]
nP. 216
/[Picture light]/select the setting/t
/[Shoot by scene]
nP. 216
/[Auto timer]
nP. 213
/[Continuous mode]
nP. 208
/[Brightness]/select the setting/t
/[Shoot with frame]
nP. 214
/[Effect shot]
nP. 214
[Display Data box]
[Auto switch mode]/select the setting/t
Set whether to automatically activate Bar code reader/Card reader
after detecting a bar code or a business card.
[Chase focus]
nP. 213
[Continuous AF]
nP. 214
[Long exposure]
nP. 214
[Fix camera shake]
nP. 215
dv67_E.book
207 ページ
2009年5月25日 月曜日 午前9時1分
[Auto save mode]
[Camera settings]
/[Egao level]
nP. 217
/[Auto save mode]/select the setting/t
Set whether to save a shot still picture automatically.
/[Save camera set]
nP. 218
[Full-screen mode]
[Select size]
nP. 212
[Select image quality]
nP. 212
[Switch phone#SD]
nP. 217
[Operation guide]
[Main/sub camera]
In the Cycloid position, switching to the sub camera cannot be
performed.
[Picture light]
Shot still pictures are automatically saved in the save destination set
with Switch phone#SD.
[Full-screen mode]
When the image size is QCIF: 176×144 or Panorama: 2560×640,
Full-screen mode is not available.
■ Submenu operations for still picture preview screen
[Switch phone#SD]
nP. 217
[Edit image]
nP. 321
[Facial treatment]
nP. 323
[Set screen]
/[Stand-by display]/select the setting/t/[Yes]
/[Phonebook]/add to the phonebook
/[Schedule]/save a schedule
When Picture light is set to [Auto], Picture Light automatically
illuminates depending on the surrounding light.
[Paste loc. Info]/t/[Yes]
For details on position location nP. 301
Picture Light is a supplementary light source for surroundings with low
light. The amount of light is less than that of an ordinary camera flash.
[Normal image]
Even if Picture light is set to [OFF], Picture Light illuminates (dims) for
the still picture mode and flashes (dims) for moving picture mode.
When performing close-up shots of printed materials that are mostly
white under fluorescent light, the color or shadow of the FOMA terminal
may appear in the picture, depending on the angle and whether Picture
Light is on or off. This is not a malfunction.
[Auto switch mode]
When the image size is QCIF: 176×144 or Panorama: 2560×640, or
Effect shot is set to other than [OFF], Auto switch mode is not available.
The camera mode is automatically switched at the distance of
approximately 10 cm. However, the camera mode may not be
automatically switched if a bar code or a business card is displayed
small or not displayed in the center of the screen.
[Save inverted]
[Full-screen mode]
For details on the Full-screen mode nP. 207
[Set screen]
Set screen is not available if save destination is set to microSD Card.
[Stand-by display]
Depending on the image size, the display size selection screen may
appear. Select a display size.
[Phonebook]
When the image size is 10M: 2736×3648 or 5M: 1944×2592,
Phonebook is not available.
Continued on next page
e10_dv67_7e.fm
[207/224]
Camera
After switching from the main camera to the sub camera, it may take
time for the brightness and tone to appear correctly.
If the Auto save mode is set to [ON], Edit image, Set screen and other
operations are not available immediately after shooting.
207
dv67_E.book
208 ページ
2009年5月25日 月曜日 午前9時1分
[Schedule]
In the displayed schedule save screen, the following contents are
pre-installed.
Date: Shoot date and time of still picture
Image: Still picture
[Save inverted]
It is not possible to save inverted images when shooting still pictures
with a frame (nP. 214).
Continuous shooting <Continuous mode>
Camera
Shoot multiple still pictures continuously.
When Continuous mode is set to [ON], automatically shoot still pictures
at approximately 0.06 second intervals. When it is set to [Manual], shoot
multiple still pictures continuously with shutter operations.
QVGA: 240×320 and QCIF: 176×144 can be shot combining the
Continuous mode and Shoot with frame.
Available image sizes and maximum number of shots in Continuous
mode are as follows.
1
2
Stand-by: 480×854
4 shots
QVGA: 240×320
9 shots
VGA: 480×640
6 shots
QCIF: 176×144
25 shots
When Continuous mode is set to [Strobophoto], shoot five still pictures at
approximately 0.13 seconds intervals regardless of the image size and
create sixth picture by combining those. Some of the five pictures may
not be used for combining.
In the still picture shooting screen, press C/
[Shooting menu]/[Continuous mode]/select the
setting/t.
Press t.
: The first still picture is shot and the following still pictures are shot
automatically.
: In the Manual shooting mode, press t until the maximum number of
shots for the Continuous mode.
: When continuous shooting is complete, or shooting was canceled by
pressing C, the continuous shooting preview screen appears.
: The combined image appears for Strobophoto. Press C to display
the continuous shooting preview screen.
208
e10_dv67_7e.fm
[208/224]
an image/t/t.
3 Select
: Save an image.
: For Strobophoto: Press t.
: To send a still picture with mail or post it on blog/SNS (nP. 218):
Press m/select the sending method, compose and send a mail/
Deco-mail.
When the Auto save mode (nP. 206) is set to [ON], all still pictures
are saved automatically.
Changing the image size, setting Effect shot or switching cameras
cancels the Continuous mode.
If an incoming call is received or the alarm is activated in the Continuous
mode, the still pictures being shot are retained and the Continuous mode
is canceled. However, depending on the timing when an incoming call is
received or the alarm is activated, the still pictures being shot are
discarded, and the still picture shooting screen reappears.
Closing the FOMA terminal or pressing H while shooting in the
Continuous mode causes shooting to be interrupted and the camera
mode to be ended. In addition, changing the position causes shooting
to be interrupted, and returning to the still picture shooting screen.
If the FOMA terminal is moved when shooting with Strobophoto set, [Failed
to shoot still picture] may appear and the shooting may not be available.
■ Submenu operations for continuous shooting preview
screen
[Save all]
[Delete all]
[Save one]
[Delete one]
[Paste loc. Info]/t/[Yes]
For details on position location nP. 301
Shooting panoramic pictures <Panorama>
By importing images continuously while moving the FOMA terminal
horizontally, a panoramic picture can be created automatically.
Panoramic pictures are saved in the size of 2560 (W) × 640 (H).
dv67_E.book
1
2
209 ページ
2009年5月25日 月曜日 午前9時1分
The image quality is set to [HIGH QUALITY], the AF mode is set to
[Center AF], these settings cannot be changed.
Shooting panoramic pictures is not available when shooting with the sub
camera or when in the Cycloid position. If the sub camera is set or the FOMA
terminal is switched to the Cycloid position while displaying the panoramic
picture shooting screen, the normal still picture shooting screen appears.
In the still picture shooting screen,
press C/[Select size]/
[Panorama(2560×640)].
Press t.
1
2
Panoramic picture
shooting screen
1 Cross mark display
Appears in the center of the display
considering the position where the
shooting is started as an origin. Use
this display to check the gap from the
origin when moving the camera.
2 Moving speed display
Indicates the moving speed of the
FOMA terminal.
r
q
s
Too slow
4
and the preview screen appears.
Press t.
: Save an image.
While a panoramic picture is shot, zoom and brightness cannot be
adjusted.
If an incoming call is received or the alarm is activated while a
panoramic picture is shot, importing is canceled, and the images being
imported up to that point are discarded.
While a panoramic picture is shot, if no operations are made for
approximately 2 minutes, the camera mode automatically ends and the
stand-by display reappears. The images imported up to that point are
discarded.
When [s] appears, the image quality may deteriorate. Especially when
shooting close subjects, be careful not to display the icon.
When shooting is continued even after [t] appears, the parts shot at
the beginning and ending may be discarded.
Shoot movie
Shooting moving pictures
Shooting starts after the shooting start sound is heard. However,
recording may not begin immediately. Picture Light illuminates while a
moving picture is shot (Picture Light flashes when Switch image/voice is
set to [Voice only]).
Shooting stops automatically when the remaining time indicator reads
00:00:00 (The moving picture file size reaches limit during shooting or
microSD Card has no available space). Shot moving pictures can be
saved/composed mail/played/canceled.
Use Focus lock when there is a focus error (nP. 216).
Appropriate speed
Too fast
Continued on next page
e10_dv67_7e.fm
[209/224]
Camera
: After the shooting start sound, panoramic
shooting starts. Move the FOMA terminal to
either direction of left or right within the range
for shooting a panoramic picture (do not move
back once moved to one direction). Steady the
position of the cross mark which appears in
the center at the start of shooting.
Panoramic picture
: For the moving speed of the FOMA terminal,
shooting screen
make sure that [q] appears as the moving
speed indicator on the lower left of the screen.
: When shooting is almost completed, [t] appears. Even after [t]
appears, the combined image is updated by moving the FOMA
terminal. However, when [u] appears, further updating is not
available. Proceed to step 3.
t to end shooting.
3 Press
: After the shooting end sound, the imported images are combined,
209
dv67_E.book
1
210 ページ
2009年5月25日 月曜日 午前9時1分
In the Custom menu, select
[Camera]/[Shoot movie].
: Use the zoom (nP. 211) or show Shooting
settings screen (nP. 216).
: To shoot a moving picture of yourself: Switch
the camera to the sub camera (nP. 210).
Make sure not to press keys while shooting a moving picture as keypad
sounds may be recorded.
■ Submenu operations for moving picture shooting screen
Refer to submenu operations for still picture shooting screen (nP. 206)
for the following functions.
Main/sub camera
Switch camera-mode
Shooting menu (AF mode, White balance, Picture light, Shoot by
scene, Auto timer, Brightness, Effect shot)
Display Data box
Fix camera shake
Camera settings (Save camera set)
Select size
Select image quality
Switch phone#SD
Operation guide
Camera
2
Press t.
3
Press t to end shooting.
[Switch img/voice]/select the setting/t
Set the image and voice combination.
4
: After the shooting end sound, the moving picture shooting
confirmation menu screen appears.
Select [Save].
[File size limit]/select the file size/t
: Save a moving picture.
: To send with message (nP. 218): Select [Compose message]/
compose and send a message.
: To play a moving picture: Select [Play].
: To cancel a moving picture: Select [Cancel]/[Yes].
[Camera settings]
: The subject at the center is automatically focused and shot.
The remaining time indicator is an approximation. Shooting may
continue longer than the remaining time indicated before the start of
shooting or may automatically stop before the indicator reads 00:00:00.
The following actions are taken when the FOMA terminal is closed or
the position is changed during the shooting.
When the shooting time is approximately 1 second or more:
Shooting ends and moving picture shooting confirmation menu
screen appears
When the shooting time is less than approximately 1 second and the
FOMA terminal is closed: Shooting ends and the camera mode ends
When the shooting time is less than approximately 1 second and the
position is changed: Shooting ends and the moving picture shooting
screen appears
However, recording is continued when Switch image/voice is set to
[Voice only]. If the FOMA terminal is closed, [Voice recording] appears
on the sub display.
210
e10_dv67_7e.fm
[210/224]
/[Noise reduction]/select the setting/t
Set whether to minimize audio noise.
/[Display light time]/select the setting/t
Set backlight illumination time while shooting.
[Common replay mode]/select the setting/t
Set whether to replay moving pictures on other FOMA terminals.
[File size limit]
When sending with i-motion mail, select [For mail (short)] or [For mail
(long)]. Record based on the allowable size of mail attachment. Select
[For mail (short)] to limit the file size to up to approximately 500 KB.
Select [For mail (long)] to limit the file size to up to approximately 2 MB.
If File size limit is set to [Unrestricted], the maximum recorded size is
approximately 5 MB when the save destination is set to the FOMA
terminal handset, and the maximum recorded size is unrestricted when
the save destination is set to the microSD Card. The maximum
recording time is approximately 1 hour (except when Switch image/
voice is set to [Voice only]). When mail is sent from the preview screen
before saving, the first 2 MB or less are cut and sent.
dv67_E.book
211 ページ
2009年5月25日 月曜日 午前9時1分
File size changes depending on image size.
When the Common replay mode is set, the file size is set to [For mail
(short)] and cannot be changed.
Still picture mode
Current zoom position
Maximum magnification
[Noise reduction]
Noise reduction processes sound to make conversations clearer.
Sound quality may vary depending on surrounding noise and tone of
the voice.
[Display light time]
The previous step to maximum magnification
Moving picture mode
Current zoom position
Maximum magnification
Status display
Remaining time
Even if set to [Always ON], the backlight illumination time is same as
the Display light time for all screens other than the viewfinder.
[Common replay mode]
Image size is set to QCIF: 176×144, image quality to [FINE], file size to
[For mail (short)] (500 KB), Fix camera shake to [OFF], Switch image/
voice to [Image + voice], and Effect shot to [OFF]. These settings
cannot be changed.
: The area affected by zoom depends on the image size.
Maximum magnification (zoom step)
Image size
Cycloid
position
Main camera Sub camera Main camera
Shoot 10M:
2736×3648
still
picture 5M:
1944×2592
Approx. 2.0×
(10 steps)
–
–
Approx. 1.3×
(5 steps)
–
Approx. 1.1×
(3 steps)
Select from five brightness levels.
3M:
1536×2048
Approx. 1.7×
(7 steps)
–
Approx. 1.3×
(5 steps)
1
FullHD:
1080×1920
Approx. 1.7×
(7 steps)
–
Approx. 1.3×
(5 steps)
Stand-by:
480×854
Approx. 7.3×
(13 steps)
VGA:
480×640
Approx. 11.4× Actual size
(15 steps)
(–)
–
QVGA:
240×320
Approx. 22.8× Approx. 4.0×
(18 steps)
(9 steps)
–
QCIF:
176×144
Approx. 14.2× Approx. 5.4×
(16 steps)
(12 steps)
–
Some settings are not available depending on the image size or for the
sub camera.
Adjusting brightness <Brightness>
In the shooting screen, press u.
Using digital zoom <Zoom>
1
In the still picture/moving picture/Information reader/
Shotdeco shooting screen, press v.
: Alternatively, slide the finger to the left/right on the Optical TOUCH
CRUISER (excluding still picture shooting).
Actual size
(–)
Approx. 5.3×
(11 steps)
Continued on next page
e10_dv67_7e.fm
[211/224]
Camera
Changing settings for shooting
Normal position
211
dv67_E.book
212 ページ
2009年5月25日 月曜日 午前9時1分
Maximum magnification (zoom step)
Image size
Normal position
VGA: 480×640
Cycloid
position
QVGA: 240×320
QCIF: 176×144
Main camera Sub camera Main camera
Shoot Panorama:
2560×640
still
picture
Approx. 3.6×
(12 steps)
Shoot FWVGA:
moving 864×480
picture VGA:
640×480
Camera
–
–
Approx. 2.6×
(10 steps)
–
Approx. 2.6×
(10 steps)
Approx. 3.6×
(12 steps)
–
Approx. 3.6×
(12 steps)
QVGA:
320×240
Approx. 7.1×
(15 steps)*
Approx. 1.5×
(5 steps)
Approx. 7.1×
(15 steps)*
QCIF:
176×144
Approx. 7.1×
(15 steps)
Approx. 2.7×
(11 steps)
Approx. 7.1×
(15 steps)
sQCIF:
128×96
Approx. 7.1×
(15 steps)
Approx. 3.7×
(14 steps)
Approx. 7.1×
(15 steps)
* When Fix camera shake is set to [OFF]
Setting image size <Select size>
The larger the image size, the higher the image resolution. As the size
increases, the number of images to shoot and amount of recordable time
decrease (nP. 502).
Each image size of the still pictures is available in the following cases.
10M: 2736×3648
5M: 1944×2592
These are ideal sizes for viewing on a PC or
printing.
3M: 1536×2048
Panorama: 2560×640
212
e10_dv67_7e.fm
[212/224]
This is the same size as the display on the
FOMA terminal. Useful for shooting a still
picture to set as the stand-by display.
This is the size for shooting panoramic
pictures.
Available image sizes differ depending on the camera mode, shooting
position, and main camera/sub camera.
For shooting still pictures, set the main/sub camera and the normal/
Cycloid position separately.
For shooting moving pictures, both cameras are set in the same size.
However, when the main camera is set to FWVGA: 864×480 or VGA:
640×480 and switched to the sub camera, the image size will be QCIF:
176×144.
1
In the still/moving picture shooting screen, press
C/[Select size].
2
Select the size/t.
Setting image quality <Select image quality>
The better the image quality, the more detailed and clearer the image. As
the quality increases, the number of images to shoot and amount of
recordable time decrease (nP. 502).
HIGH QUALITY
Shoot with high image quality.
FINE
Shoot with fairly high image quality.
NORMAL
Shoot with standard image quality.
ECONOMY (only for moving pictures) Increase shooting time and shoot.
For shooting still pictures, set the main/sub camera and the normal/
Cycloid position separately.
FullHD: 1080×1920
Stand-by: 480×854
These are ideal sizes for attaching to i-mode
mail and sending to the i-mode terminal or PC,
etc.
1
In the still/moving picture shooting screen, press
C/[Select image quality].
2
Select the image quality/t.
dv67_E.book
213 ページ
2009年5月25日 月曜日 午前9時1分
Shooting images with Auto timer <Auto timer>
1
In the still/moving picture shooting screen, press
C/[Shooting menu]/[Auto timer].
2 Select the Auto timer time/t.
t.
3 Press
: The Auto timer is activated after the Auto timer sound. After the set
Example: Still picture shooting
1
In the still picture shooting screen, press C/
[Shooting menu]/[AF mode].
2
Select the AF mode.
time elapses, a picture is automatically shot after the shutter sound
or the shooting start sound.
If a call is received or an alarm is activated while Auto timer is activated,
the Auto timer is canceled and the shooting screen reappears.
When setting the Egao focus shutter mode with Auto timer set, Auto
timer is disabled.
; Select [Center AF].
; Select [Face first AF].
• Detect up to five people’s faces. When multiple face detection
frames appear, the red face detection frame is focused.
• To specify the face to adjust the focus, slide the finger to the left/
right on the Optical TOUCH CRUISER.
; Select [Closeup].
; Select [Manual focus]/adjust the focus with v/t.
• The focus adjusting bar appears. Adjust the center line to make it
deep blue.
Current focus position
Set the AF (auto focus) mode according to the subject.
For shooting still pictures, the AF mode setting turns to [Face first AF]
when the image size is changed.
Set the following AF mode.
Center AF*1
Standard*2
Face first AF*1
Focus adjusting bar
When [Face first AF] is set, the face detection may not work properly
depending on the angle of face, the distance to the subject or the
shooting conditions. Also, the subject other than face and background
may be detected as face by mistake.
Focus is activated and the subject at the center is
focused.
Detect people’s faces and adjust the focus. When
people’s faces are detected, the face detection
frame focuses on the subject searching for the face
even if the subject moves. When multiple faces are
detected, specify the face to adjust the focus.
Closeup
Recommended mode for shooting close subjects
(approx. 10 cm).
Manual focus*3
Adjust the focus manually.
*1 Available only for still picture shooting.
*2 Not available for still picture shooting.
*3 Available only for still picture and moving picture shooting.
Change the AF mode in the Egao focus shutter mode/Furimuki shutter
mode to return to the Normal shooting.
Shooting images with Chase focus <Chase focus>
Once the subject is selected, shooting is available even if the subject
moves. The focus moves according to the motion of the subject.
When the image size for still pictures is QCIF: 176×144 or Panorama:
2560×640, Chase focus cannot be set.
1
In the still picture shooting screen, press C/[Chase
focus].
Continued on next page
e10_dv67_7e.fm
[213/224]
Camera
Setting AF mode <AF mode>
213
dv67_E.book
2
214 ページ
2009年5月25日 月曜日 午前9時1分
Select the setting/t.
: When Chase focus is set to [ON], press s in the still picture
shooting screen. Chase focus starts after the subject inside the focus
frame is focused (A blue frame appears on the selected subject).
Press s again to cancel Chase focus.
Shooting images with Continuous AF
<Continuous AF>
The inside of the focus frame is continuously focused. Press a shooting key
to shoot without focusing. Even if the subject is moving, in-focus picture is
shot.
When the image size for still pictures is Panorama: 2560×640,
Continuous AF cannot be set.
1
Camera
2
In the still picture shooting screen, press C/
[Continuous AF].
Select the setting/t.
If Continuous AF is not set, a still picture is shot after ending the focus
operation.
Shooting images with Long exposure
<Long exposure>
Keep the shutter open for a long time to shoot images. Use Long exposure
to shoot the active subject such as fireworks, or to shoot in dimly lit place
such as night scene.
When the image size for still pictures is Panorama: 2560×640, Long
exposure cannot be set.
1
2
In the still picture shooting screen, press C/[Long
exposure].
Select the time/t.
Be careful not to cause camera shake while Long exposure is set.
214
e10_dv67_7e.fm
[214/224]
Shooting still pictures with a frame
<Shoot with frame>
Set and shoot still pictures with frames.
Image sizes available for the shooting still pictures with frames are
Stand-by: 480×854, VGA: 480×640, QVGA: 240×320, or QCIF:
176×144.
When the Continuous mode is set in Stand-by: 480×854 or VGA:
480×640, shooting still pictures with a frame is not available.
If the image size differs from the frame size, the frame is rotated 90°.
Use frames downloaded from sites to shoot with frames.
1
In the still picture shooting screen, press C/
[Shooting menu]/[Shoot with frame]/[ON].
2
Select a frame/i.
3
Press t.
: To preview: Select a frame/t.
Adding various effects <Effect shot>
Set effects for still pictures and moving pictures to change the color tone
and touch.
When the image size for still pictures is other than QVGA: 240×320 or
QCIF: 176×144, Effect shot is not available. Also, when the image size
for moving pictures is FWVGA: 864×480 or VGA: 640×480, Effect shot is
not available.
Effect type
OFF
To remove effects
Black & white
Image contrast is expressed in monotone
Sepia
Image contrast is expressed in sepia color
Sparkling
Bright areas light up
Colored pencil
A colored line is drawn
Faded edges*1
Image edges have a soft, blurred effect
Spectrum*2
Spectrum of motions
dv67_E.book
215 ページ
2009年5月25日 月曜日 午前9時1分
Ripple
Adds ripple effect
Kaleidoscope (L)
Adds a kaleidoscope effect with a large pattern
Kaleidoscope (S)
Adds a kaleidoscope effect with a small pattern
Fish-eye
Image is expressed as seen through a fish-eye lens
*1 Available only for still picture shooting.
*2 Available only for moving picture shooting.
1
In the still/moving picture shooting screen, press
C/[Shooting menu]/[Effect shot]/select the type
of effect/t.
2
Press t.
If set to [Auto(~800)], [Auto(~3200)] or [High (up to 12800)], sensitivity
is automatically set according to the conditions of the subject. The value
of ISO sensitivity is automatically increased within the following range
when there is insufficient light.
Auto(~800): ISO sensitivity 100 to 800
Auto(~3200): ISO sensitivity 100 to 3200
High (up to 12800): ISO sensitivity 100 to 12800
1
In the still picture shooting screen, press C/
[Shooting menu]/[ISO sensitivity].
2
Select the setting/t.
ISO sensitivity which can be set differs depending on the image size.
Switching to Continuous mode, changing the image size, or switching
image and voice cancels Effect shot when Effect shot is set.
Shooting while fixing camera shake
<Fix camera shake>
For moving picture shooting, when Effect shot is set, Fix camera shake
is automatically set to [OFF]. Afterward, when Effect shot is canceled,
the Fix camera shake setting before Effect shot is retrieved.
Shooting in High sensitivity <ISO sensitivity>
In the low-light situation, take clear pictures with less camera shake.
The lower value of ISO sensitivity is suitable for shooting in the well-lit
place, while higher ISO is more suitable for shooting in the dark place
(The higher ISO value increases the image noise).
Shooting conditions
ISO
100
sensitivity Outside on a
sunny day
3200
Cloudy and rainy/
indoors
12800
Dark place
When the image size for still pictures is QVGA: 240×320, QCIF:
176×144 or Panorama: 2560×640, or the image size for moving pictures
is FWVGA: 864×480 or VGA: 640×480, Fix camera shake is not
available.
1
In the still/moving picture shooting screen, press
C/[Fix camera shake].
2
Select the setting/t.
Camera
For moving picture shooting, Image quality is automatically set as
follows and cannot be changed when Effect shot is set.
QVGA: 320×240, QCIF: 176×144: [HIGH QUALITY]
sQCIF: 128×96: [FINE]
When shooting a still picture, Fix camera shake is activated in a
location where a camera shake often occurs, such as dark place.
When shooting with Fix camera shake ON, shot images may contain
noise or become darker depending on the subjects or surrounding light.
This is not a malfunction. In such cases, shoot images after setting Fix
camera shake to [OFF].
For shooting still pictures, Fix camera shake is disabled if Continuous
mode is set.
215
e10_dv67_7e.fm
[215/224]
dv67_E.book
216 ページ
2009年5月25日 月曜日 午前9時1分
If White balance is set to a setting other than [Auto] while shooting
moving pictures, Shoot by scene is automatically set to [Normal].
Shooting environment/subject-specific images
<Shoot by scene>
Set the camera to shoot with natural colors and focus based on the
surroundings and subject.
1
In the still/moving picture shooting screen, press
C/[Shooting menu]/[Shoot by scene].
2
Select the mode/t.
: To display the description of mode, select the mode and press i.
For shooting still pictures, if Shoot by scene is set, White balance is
automatically set to [Auto].
For shooting moving pictures, if Shoot by scene is set to other than
[Normal], White balance is automatically set to [Auto].
Shooting with Focus lock <Focus lock>
Use the Focus lock to keep the focus on the subject and change the
composition.
Use Focus lock when there is a focus error.
The Focus lock sound notifies that focus is locked (excluding shooting
moving picture).
The Focus lock cannot be used in the Egao focus shutter mode/Furimuki
shutter mode or while Continuous AF is set.
1
In the shooting screen, adjust focus and press s (for
1+ seconds).
Camera
For shooting still pictures, if Shoot by scene is set to [Auto recognition],
a mode is automatically switched to [Normal]/[People]/[Night scene]/
[Landscape]/[Character]/[Food]/[Night + People]. The mode may not be
selected properly depending on the shooting condition and the subject.
Adjusting color tone <White balance>
2
According to the light condition when shooting, adjust the color and shoot.
Auto
Suitable for shooting under incandescent lamp.
Fluorescent
Suitable for shooting under fluorescent light.
Sunlight
Suitable for shooting outside on sunny days.
Cloud/Shade
Suitable for shooting outside on cloudy days or in the
shade.
1
In the still/moving picture shooting screen, press
C/[Shooting menu]/[White balance].
2
Select the type of White balance/t.
If White balance is set while shooting still pictures, Shoot by scene is
automatically set to [Normal].
216
e10_dv67_7e.fm
[216/224]
Change the composition and press t.
: Do not change the distance to the subject.
Focus lock is available while a moving picture is shot. Use when the
distance to a subject changes while shooting. However, the audio noise
may affect shooting when the Focus lock is used.
Automatically adjust the color tone.
Tungsten
: The focus lock indicator color changes depending on the situation
(nP. 203).
: To disable the Focus lock: Press s (for 1+ seconds).
: Press s to lock/disable when Chase focus is set to [OFF] for the
still picture shooting and the shooting other than the still picture.
Changing settings for shooting collectively
<Shooting settings>
Show settings for functions frequently used when shooting and change
them collectively.
1
In the still/moving picture shooting screen, press i.
dv67_E.book
217 ページ
2009年5月25日 月曜日 午前9時1分
1
2
3
4
5
6
1
d
3
e
5
6
The length of moving pictures that can be saved depends on the size of
the microSD Card. The maximum length is approximately 1 hour for
moving pictures with video.
For details on checking still/moving pictures saved on a microSD Card
nP. 350
When save destination is the microSD Card, still pictures are saved in
the [Camerafolder xxx] (“xxx” is the largest number when multiple
folders exist), and moving pictures are saved in the [Camerafolder].
8
9
7
b
c
a
For still pictures
When the number of still pictures or moving pictures saved in the folder
exceeds 1,000, a new folder is automatically created, and still pictures
or moving pictures are saved in the new folder. The microSD Card used
on a PC or other devices cannot be used for saving unless the manager
information is updated (nP. 350).
b
9
7
f
c
a
For moving pictures
When saving to a microSD Card, images are saved in DCF1.0
(ExifVer.2.2, JPEG) format.
• “DCF” (Design rule for Camera File system) is a standard created
mainly by JEITA (Japan Electronics and Information Technology
Industries Association) for images from digital cameras and other
devices to be shared with related devices. However, DCF standard
does not guarantee the entire compatibility of all devices.
• “Exif” is a file format established by JEITA (Japan Electronics and
Information Technology Industries Association) for adding
supplementary information to the still picture.
Setting level to detect smile <Egao level>
Detect the following smiles.
Changing camera settings
For details on changing the shutter sound nP. 89
Saving to microSD Card <Switch phone#SD>
Save shot images to a microSD Card.
1
In the still/moving picture shooting screen, press
C/[Switch phone#SD].
2
Select the save destination/t.
Camera
1 Effect shot
9 White balance
2 Continuous mode
a Switch phone#SD
3 AF mode
b Fix camera shake
4 Auto timer
c Picture light
5 Select size
d Common replay mode
6 Select image quality
e Switch img/voice
7 Shoot by scene
f File size limit
8 ISO sensitivity
: To change settings: Select an item with w/t.
: Also, use the Optical TOUCH CRUISER.
: To return to the shooting screen: Press i.
Level 1 (grin)
Grin
Level 2
Smile with showing tooth
Level 3
Smile in a widemouthed
1
In the still picture shooting screen, press C/
[Camera settings]/[Egao level].
2
Select the setting/t.
217
e10_dv67_7e.fm
[217/224]
dv67_E.book
218 ページ
2009年5月25日 月曜日 午前9時1分
Preventing still/moving picture shooting
settings from being retained to return to default
settings <Save camera set>
Save the following settings after the camera mode ends and use those
same settings later. Prevent the settings from being retained to return to the
default settings after the camera mode ends.
Shooting Select size, Select image quality, Switch phone#SD, Fix
camera shake, Shoot by scene, Auto save mode, ISO
still
sensitivity, Egao level, Auto switch mode, Picture light, Chase
picture
focus, Continuous AF
[Select size] and [Select image quality] are retained for both
main/sub cameras and normal/Cycloid positions.
Shooting Select size, Select image quality, File size limit, Display light
moving
time, Switch phone#SD, Fix camera shake, Noise reduction,
picture
Picture light
Camera
1
In the still/moving picture shooting screen, press
C/[Camera settings]/[Save camera set]/[OFF].
Mail/blog function
Sending still pictures or moving
pictures after shooting
After shooting still pictures or moving pictures, attach images to
i-mode mail and send from the preview screen. In addition, send
still pictures as Deco-mail or post them on blog/SNS.
Moving pictures are sent as i-motion mail.
When posting still pictures on blog/SNS, register posting sites in advance
(nP. 150).
1
In the still picture preview screen/continuous
shooting preview screen, press m.
: In the moving picture shooting confirmation menu screen: Select
[Compose message]/proceed to step 3.
218
e10_dv67_7e.fm
[218/224]
2
Select the sending method.
; Select [Attach to mail].
• The shot still picture is attached.
; Select [Insert mail].
• The shot still picture is inserted in a mail to compose Deco-mail.
; Select [Post]/select a posting site/i.
• The shot still picture is attached.
: The shot still pictures are automatically saved.
3 Compose and send a mail/Deco-mail.
When a shot still picture exceeds 2 MB, a confirmation screen asking
whether to compress an image for attaching to mail appears. Select
[Yes] to compress an image to 2 MB or less and attach.
When a shot moving picture exceeds 2 MB, a confirmation screen
asking whether to cut the file for attaching to mail appears. Select [Yes]
to cut and attach the first 2 MB or less.
Insert mail is not available for the following shot still pictures.
The image size is 10M: 2736×3648, 5M: 1944×2592, 3M:
1536×2048, FullHD: 1080×1920, Panorama: 2560×640
The image size is Stand-by: 480×854 and the image quality is
[HIGH QUALITY], [FINE]
The image size is VGA: 480×640, QVGA: 240×320 and the image
quality is [HIGH QUALITY]
Bar code reader
Using Bar code reader
Use the camera to scan bar codes
(JAN/QR codes) for Phone To (AV
Phone To), Mail To, Web To, register
bookmark, add to phonebook,
display text and i-appli To. Copy
and paste text, play and save
melodies, and view and save
images or ToruCa.
Scan results cannot be saved on microSD Cards.
dv67_E.book
219 ページ
2009年5月25日 月曜日 午前9時1分
JAN code
JAN code is a type of bar code using vertical
bars of varying width to express numbers.
The code on the right is read as
[4942857119022].
JAN8 and JAN13 can be read.
2
Display bar code (JAN/QR code) to be scanned in the
center of the screen/t.
QR code
QR code is a type of two-dimensional code
expressing data vertically and horizontally.
The code on the right is read as [株式会社
NTTドコモ].
CODE128
CODE128 is a type of bar code using vertical bars of varying width to
express numbers, alphabets, etc.
Download compatible i-appli software to scan CODE128 (nP. 284).
Use scanned text from bar codes (JAN/QR codes) for functions such as
connecting to i-mode or Full Browser, composing mail, making voice/
Videophone calls, composing SMS and running i-appli.
Some bar codes cannot be scanned depending on types or sizes.
Bar codes may not be scanned due to scratches, dirt, damage, poor print
quality, lighting conditions or QR code version.
1
In the Custom menu, select [Camera]/
[LifeKit]/[Bar code reader].
: Scan the bar code directly without shooting it on the screen.
: Position the camera 10 cm or more from the bar code (JAN/QR
code). Keep aligned and do not move the FOMA terminal or code
while scanning.
: When scanning is complete, an end tone is heard and scan results
appear.
: To interrupt scanning: Press i/c.
Split data
: QR code may be split into a multiple set of codes
(maximum 16) which can be compiled into one
set of data. If split data is scanned, a message
appears. The parentheses show remaining
codes/total codes.
Select [Yes] to proceed to the next QR code
scanning screen. When the next QR code is
shown in the center of the screen, scanning starts automatically.
Repeat until all split data is scanned. Scan results appear.
Camera
Using text from bar codes (JAN/QR codes)
10 cm or more
the scanned results.
3 Use
: When scanned characters and numbers are underlined: Select the
scanned text/t.
• Based on the type of scanned text, a screen appears.
: To copy all scanned text: Press i.
■ Submenu operations for bar code reader screen
[Switch camera-mode]/select the camera mode/t
[Saved data]/select the saved data/t
[Switch AF mode]/select the setting/t
For details on switching AF mode nP. 213
219
e10_dv67_7e.fm
[219/224]
dv67_E.book
220 ページ
2009年5月25日 月曜日 午前9時1分
■ Submenu operations for scan results screen
Phone number Single-byte numbers, single-byte symbols [- + P # *]
[Add to phonebook]/add to the phonebook
English word
[Add bookmark]/add to a bookmark
Text may not be scanned correctly due to scratches, dirt, damage, poor
print quality, lighting conditions or text size.
[Copy]/select the start position/t/select the end position/t
[Save]/select the save destination/t
Scanning and using images/ToruCa/melodies
from QR codes
1
Scan QR code.
2
Press t/select a usage/t.
: In the scan results screen, [Image]/[Melody]/[ToruCa] appears
depending on the scanned data.
Camera
: If [Display] is selected when multiple ToruCa are included, only the
first ToruCa is acquired.
: When [Save] is selected, images are saved in the [Acquired data]
folder in My picture of Data box, melodies are saved in the [Acquired
data] folder in Melody of Data box, and ToruCa is saved in [ToruCa]
of ToruCa in the Osaifu-Keitai menu.
Character Reader (OCR)
Scanning text
Shoot printed data such as URLs, mail addresses, phone
numbers and English words, and convert into text to be used by
the FOMA terminal.
Text which can be scanned is shown below. Such as URLs, mail
addresses, phone numbers, English words, etc. are automatically
distinguished based on the text. Double-byte characters such as kanji
and hiragana cannot be scanned.
URL
Single-byte alphabet, single-byte numbers, single-byte
symbols [. - _ : / E]
Mail address
Single-byte alphabet, single-byte numbers, single-byte
symbols [. @ - _ :]
220
e10_dv67_7e.fm
[220/224]
Single-byte alphabet, single-byte numbers, single-byte
symbols [- / ? ! @ + * ’ ( ) , . &]
Using scanned text
Data type (URL, mail address, phone number, English word) is
automatically distinguished. Use functions such as scanning text,
connecting to i-mode or Full Browser, composing mail, making voice/
Videophone calls, composing SMS, searching in dictionaries, adding to the
phonebook, and saving bookmarks.
1
In the Custom menu, select
[Camera]/[Character reader].
2
Display the text to be scanned in the center of the
frame〔 〕on the screen/t.
: Text near the sides of the frame〔 〕may be difficult to scan.
: Adjust the distance so that the bar on the bottom of the screen turns
a deep blue.
: Scan up to approximately 60 characters at one time.
: When multiple lines were scanned: Specify the lines to scan with u.
• Text is scanned one line at a time.
t.
3 Press
: To edit the scanned result: Press t.
: To change the data type of scanned result: Press v.
• When the scanned result is phone number, the data type cannot be
changed.
: To scan again: Press a/[Yes].
dv67_E.book
4
221 ページ
2009年5月25日 月曜日 午前9時1分
Press i/use scanned results.
: To connect to the site with a URL (Category: URL): Select [Connect
i-mode]/[Connect FB].
: To compose a message with a mail address (Category: Mail): Select
[Yes]/compose and send a message.
: To use a phone number (Category: Tel).
• To make a voice call: Press s/t/[Yes].
• To make a Videophone call: Press i/[Yes].
• To compose an SMS: Press a/[Yes]/compose and send an
SMS.
• To add Chaku-moji: Press m/select the message.
: To search for scanned text in dictionary (Category: Word): Select
[Yes]/select a dictionary/t/search in dictionary.
When scanned data is a phone number, parentheses (()) become a
hyphen (-). Hyphen (-) is erased for adding to the phonebook or making
a call.
■ Submenu operations for character reader screen
[Switch camera-mode]/select the camera mode/t
[Search dictionary]/[Yes]/select a dictionary/t/search in
dictionary
For details on searching for dictionary nP. 369
[Edit]/edit text/t
[Copy all]
[Delete]/[Yes]
[Add to phonebook]
Scanned data is added to various following items by data type.
[Mail]
Mail address
Phone number
[Word]
Name/Reading
Using Card reader
Scan a business card (Japanese/English) with the camera to save
to the FOMA terminal handset phonebook.
The following items can be saved.
Name
Reading (surname only)
Phone/mobile phone/fax number (up to three in total)
Mail address (up to three)
Company/school
Reading of company/school name
Department
Title
Postal code
Address
Memo (saved date, URL and other items) Picture call setting
[Switch AF mode]/select the setting/t
For details on switching AF mode nP. 213
[Inverse mode]/select the setting/t
Switch the character type to be scanned.
[Continue]/scan text
Connect to previously scanned data to make complete text. Scan up
to 256 characters.
Memo
[Tel]
Card reader
[Select subject]/select a category/t
■ Submenu operations for scan results screen
[URL]
1
Camera
When the category of scanned data is URL, http:// is added to the
scanned results even if it is missing.
[Add bookmark]/add to a bookmark
In the Custom menu, select [Camera]/
[LifeKit]/[Card reader].
[Add]/scan text
Scan text in up to three sessions and link scanned text into one
group.
[Add to phonebook]/add to the phonebook
Continued on next page
e10_dv67_7e.fm
[221/224]
221
dv67_E.book
2
222 ページ
2009年5月25日 月曜日 午前9時1分
Display a business card in the center of the screen/
t.
: The shutter sounds.
: Hold the FOMA terminal securely to fit the entire business card with
the frame shown on the display. Make sure that no other objects,
especially text-written objects, are displayed on the screen.
: For scanning, the direction of the business card can be either vertical
or horizontal on the screen. Keep it vertical or horizontal when
scanning.
: The larger the displayed image of the business card is, the clearer
the scan result is. However, bringing the camera too close to the
business card makes it difficult to adjust the focus. Keep the camera
approximately 10 cm away from the business card.
t/add to the phonebook.
3 Press
: The shot card images are automatically saved and the phonebook
Camera
entry screen appears. Scanned items are entered in the phonebook
entry screen.
: When the total number of saved phone numbers, mobile phone
number and fax numbers is four or more or there are four or more
saved mail addresses, the three numbers or addresses from the top
are saved. [T]/[u]/[Z] are the icons for phone number type and [B]
is for mail address type.
: The shot card images are set to Picture call. However, the images do
not appear when making/receiving a call or in the Redial/Received
calls details screen.
Some business cards cannot be scanned or be recognized properly.
The following business cards cannot be scanned.
Business cards with letters written in a language other than
Japanese and English
Business cards with background images
Handwritten business cards and business cards with
handwritten-style fonts
Business cards with letters written in both vertical and horizontal
directions
Business cards shown on a display, etc.
222
e10_dv67_7e.fm
[222/224]
The following business cards cannot be scanned fine.
Business cards with light colored text and low contrast
Business cards with extremely small characters
Business cards with italic fonts
Shiny, coated business cards
Business cards with a logo or logo-style characters
Business cards in which there is no space between characters since
they are placed too close to each other
The reading (pronunciation in kana) may not be saved correctly or
added automatically.
Category of item may not be recognized properly.
The shot card images are saved to the [Camera] folder in My picture of
Data box.
■ Submenu operations for card reader screen
[Switch camera-mode]/select the camera mode/t
[AF mode]
nP. 213
Information reader
Using Information reader
Information reader allows to scan information such as store
name, phone number, etc. from a magazine, etc. by using the
camera, and newly save it to the FOMA terminal handset
phonebook.
The following items can be saved.
Store name
Phone number (up to three)
Mail address (up to three)
Address
Memo (store hours, closed, URL, directions, and other items)
Picture call setting
dv67_E.book
1
223 ページ
2009年5月25日 月曜日 午前9時1分
In the Custom menu, select [Camera]/
[LifeKit]/[Information reader].
Scanning does not work well for the following texts.
Printed on scabrous paper, etc.
Have reading printed beside store name, etc.
Include some highlighted texts
Refer to Card reader for cases other than listed above.
The shot images are saved to the [Camera] folder in My picture of Data
box.
■ Submenu operations for information reader screen
2
Refer to submenu operations for card reader screen (nP. 222) for
those for information reader screen.
Display information in the center of the screen/t.
t/add to the phonebook.
3 Press
: The shot images are automatically saved and the phonebook entry
screen appears. Scanned items are entered in the phonebook entry
screen.
: When there are four or more saved phone numbers or mail
addresses, the three numbers or addresses from the top are saved.
: The shot images are set to Picture call. However, the images do not
appear when making/receiving a call or in the Redial/Received calls
details screen.
Cameraloupe
Using the FOMA terminal as loupe
Use the camera to magnify a small text, such a text in a
newspaper and others, and view it in the display. Shooting the
magnified image as a still picture is also available.
Display at a magnification of approximately 3.6 times in the normal
position, and at approximately 2.6 times in the Cycloid position.
1
In the Custom menu, select
[Camera]/[Cameraloupe].
Camera
: The shutter sounds.
: Hold the FOMA terminal securely to fit necessary information in the
screen. If the displayed text gets small, display a phone number or
address and make its size bigger to scan.
: Display necessary information near the center of the screen.
: Display necessary information in bigger size to scan easily. If the
camera gets too close, it causes difficulty in focusing. Move the
camera away at least 10 cm from information.
: To shoot still pictures: Proceed to step 2 of
“Shooting still pictures” on P. 206.
: Change the settings in the same way as in
shooting still pictures (nP. 211, P. 217).
Some information cannot be scanned or recognized properly
depending on the description of magazine, etc.
The following cannot be scanned.
Phone number in Chinese numeral
223
e10_dv67_7e.fm
[223/224]
dv67_E.book
224 ページ
2009年5月25日 月曜日 午前9時1分
Creating animated GIFs
Shotdeco
Creating original Deco-mail picture
Scan hand written pictures or text as a GIF image to create
original Deco-mail pictures or Deco-mail pictograms. The
animated GIFs can be created by combining the scanned images.
1
2
In the Custom menu, select
[Camera]/[Shotdeco].
Display an image or a character to be scanned in the
red frame of the screen/t.
: The shutter sounds.
Camera
t.
3 Press
: To change the color of images: Press 1 to 6.
: To change the highlighted status of images: Press 7.
: To undo the images: Press 8.
: To send Deco-mail (nP. 128): Press m/compose and send a
Deco-mail.
■ Submenu operations for Shotdeco shooting screen
[Switch camera-mode]/select the camera mode/t
[Resize]/select the size/t
[Switch still/anime]/select the mode/t
224
e10_dv67_7e.fm
[224/224]
The animated GIFs can be created by combining maximum five images.
1
2
In the Shotdeco shooting screen, press C/[Switch
still/anime]/[Anime].
: Alternatively, press i.
• Each time i is pressed, modes are switched between the Still
picture mode and the Anime mode.
Display an image or a character to be scanned in the
red frame of the screen/t.
: The shutter sounds.
: Shoot up to five images.
: When continuous shooting is complete, or shooting was canceled by
pressing C, the preview screen appears.
t.
3 Press
: To check the image after combining: Press i.
: To send Deco-mail (nP. 128): Press m/compose and send
Deco-mail.
Even if a ruled notepad, etc. is used, pictures and text are scanned
excluding the ruled lines and the white background color (Sometimes
the ruled lines are scanned).
The scanned images are saved to the [Decome-picture] folder in My
picture of Data box (Images are saved to the [Decome-pict] folder when
the image size is Emoji: 20×20).
When considerable noise is caused by the subjects or shooting place,
adjust the brightness to shoot clearly.