1
Instant Broadband™ Series
EtherFast
Cable/DSL Routers
®
Use this User Guide to install the following Linksys product(s):
BEFSRU31
BEFSR41 v2
BEFSR11
EtherFast Cable/DSL Router with USB Port and 10/100 3-Port Switch
EtherFast Cable/DSL Router with 10/100 4-Port Switch
EtherFast 1-Port Cable/DSL Router
User Guide
COPYRIGHT & TRADEMARKS
Copyright © 2000 Linksys, All Rights Reserved. Instant Broadband is a registered
trademark of Linksys. Microsoft, Windows, and the Windows logo are registered trademarks of Microsoft Corporation. All other trademarks and brand names are the property of their respective proprietors.
LIMITED WARRANTY
Linksys guarantees that every Instant Broadband EtherFast Cable/DSL Router is free
from physical defects in material and workmanship under normal use for one (1) year
from the date of purchase. If the product proves defective during this warranty period,
call Linksys Customer Support in order to obtain a Return Authorization number. BE
SURE TO HAVE YOUR PROOF OF PURCHASE ON HAND WHEN CALLING. When
returning a product, mark the Return Authorization number clearly on the outside of the
package and include your original proof of purchase. RETURN REQUESTS CANNOT
BE PROCESSED WITHOUT PROOF OF PURCHASE. All customers located outside of
the United States of America and Canada shall be held responsible for shipping and
handling charges.
IN NO EVENT SHALL LINKSYS’ LIABILITY EXCEED THE PRICE PAID FOR THE PRODUCT FROM DIRECT, INDIRECT, SPECIAL, INCIDENTAL, OR CONSEQUENTIAL DAMAGES RESULTING FROM THE USE OF THE PRODUCT, ITS ACCOMPANYING SOFTWARE, OR ITS DOCUMENTATION. LINKSYS OFFERS NO REFUNDS FOR ITS PRODUCTS. Linksys makes no warranty or representation, expressed, implied, or statutory,
with respect to its products or the contents or use of this documentation and all accompanying software, and specifically disclaims its quality, performance, merchantability,
or fitness for any particular purpose. Linksys reserves the right to revise or update its
products, software, or documentation without obligation to notify any individual or entity.
Please direct all inquiries to:
Linksys P.O. Box 18558, Irvine, CA 92623.
FCC STATEMENT
The Instant Broadband EtherFast Cable/DSL Router has been tested and found to
comply with the limits for a Class B digital device, pursuant to Part 15 of the FCC
Rules. These limits are designed to provide reasonable protection against harmful
interference in a residential installation. This equipment generates, uses, and can radiate radio frequency energy and, if not installed and used according to the instructions,
may cause harmful interference to radio communications. However, there is no guarantee that interference will not occur in a particular installation. If this equipment does
cause harmful interference to radio or television reception, which is found by turning
the equipment off and on, the user is encouraged to try to correct the interference by
one or more of the following measures:
•
•
•
•
Reorient or relocate the receiving antenna
Increase the separation between the equipment or device
Connect the equipment to an outlet other than the receiver’s
Consult a dealer or an experienced radio/TV technician for assistance
009
Instant Broadband Series
EtherFast Cable/DSL Routers
Table of Contents
Introduction
The Linksys EtherFast Cable/DSL Router
Features
Package Contents for the 4-Port Router
Network Requirements
Package Contents for the 1-Port Router
Network Requirements
Package Contents for the 3-Port Router
Network Requirements
1
1
1
2
2
3
3
4
4
Getting to Know the 4-Port
EtherFast Cable/DSL Router
The 4-Port Router’s Rear Panel
The 4-Port Router’s Front Panel LEDs
5
5
6
Getting to Know the 1-Port
EtherFast Cable/DSL Router
The 1-Port Router’s Rear Panel
The 1-Port Router’s Front Panel LEDs
8
8
9
Getting to Know the 3-Port
EtherFast Cable/DSL Router
The 3-Port Router’s Rear Panel
The USB Icon
The 3-Port Router’s Front Panel LEDs
11
11
12
13
Connecting Your Cable/DSL Router
to Your Network
Overview
LANs and WANs
IP Addresses: A Quick Lesson
Connecting Your Hardware Together & Booting Up
Uplinking: Connecting More Devices to Your Router
15
15
15
16
18
20
Configuring Your Router’s USB Port
Windows 98 Configuration
Windows 2000 Configuration
Windows Millennium Configuration
21
21
25
29
Configuring Your Network with the
Cable/DSL Router
Configuring Your Cable/DSL Router
Configuring Your PCs to Connect to the Cable/DSL Router
33
34
36
The Cable/DSL Router’s Web-based Utility
Quick and Easy Router Administration
Setup
Password
Status
DHCP
Help
IP Filtering
IP Forwarding
Dynamic Routing
Static Routing
DMZ Hosting
Logging
38
38
39
41
43
44
45
47
49
50
51
53
54
Troubleshooting
Common Problems
Frequently Asked Questions
55
55
57
Appendix
How to Ping Your ISP’s E-mail & Web Addresses
Installing the TCP/IP Protocol
Twisted-Pair Cabling
Crimping Your Own Network Cables
4-Port Router Specifications
Environmental Specifications
1-Port Router Specifications
Environmental Specifications
3-Port Router Specifications
Environmental Specifications
Customer Support
61
61
64
66
67
68
68
69
69
70
70
71
Instant Broadband Series
Introduction
EtherFast Cable/DSL Routers
Package Contents for the 4-Port Router
The Linksys EtherFast Cable/DSL Router
Congratulations on the purchase of your EtherFast Cable/DSL Router from
Linksys! The EtherFast Cable/DSL Router is the perfect solution for connecting a network of PCs to a high-speed broadband Internet connection and to
an Ethernet network backbone. Configurable as a DHCP server, the EtherFast
Cable/DSL Router is the only visible network device on the Internet. The
Router also serves as your Internet firewall, protecting your network’s PCs
from being accessed by external users. All incoming data packets are monitored and filtered. Your Router can also be configured to block internal users'
access to the Internet with IP Filtering, as well as play Internet games, videoconference, and much more.
Now all of your PCs can enjoy lightning-fast broadband Internet connections
and share internal network data. Link it all together and your network will
blaze along faster than you ever thought possible.
Features
• Connects to a Broadband Modem and to an Ethernet Network Backbone
• Equipped With a 3 or 4-Port 10/100 Switch (BEFSRU31 & BEFSR41 v2
only)
• Connects All of Your PCs to the Internet with Just One IP Address
• Firewall Protects Your PCs From Outside Intruders on the Internet
• Configurable Through a PC’s Web Browser Using Netscape Navigator 4.0
or Internet Explorer 4.0
• Supports IPSec Pass-Through for Virtual Private Networking (VPNs)
• Administer Your Router Remotely Over the Internet
• 10/100 Switch Speeds Up Your Gaming and Multimedia Connections
(BEFSRU31 & BEFSR41 v2 only)
• Configurable as a DHCP Server on Your Network
• Compatible with Virtually All Standard Internet Applications
• Administrators Can Block Specific Internal Users' Internet Access
• DMZ Hosting Feature Enables Internet Multimedia Applications
Such as Video-Conferencing and Internet Gaming
1
• One EtherFast Cable/DSL Router with 10/100 4-Port Switch
• One Power Adapter
• One Power Cord
• One User Guide and Registration Card
Network Requirements
• One RJ-45 broadband Internet connection, with a cable or DSL modem
• One PC with a 10Mbps or 10/100 Mbps Ethernet card or adapter installed
• TCP/IP network protocol installed on each PC
• UTP CAT 5 network cables with RJ-45 connectors
• Internet Explorer 4.0 and higher, or Netscape Navigator 4.0 and higher
Version 5.5 for Internet Explorer and Version 4.7 for Netscape
Navigator are highly recommended for optimal results.
2
Instant Broadband Series
Package Contents for the 1-Port Router
Package Contents for the 3-Port Router
• One EtherFast 10/100 1-Port Cable/DSL Router
• One Power Adapter
• One User Guide and Registration Card
• One EtherFast Cable/DSL Router with USB Port & 10/100 3-Port Switch
• One USB Cable
• One 3.5” Floppy Disk for USB Setup
• One Power Adapter
• One User Guide and Registration Card
Network Requirements
Network Requirements
• One RJ-45 broadband Internet connection, with a cable or DSL modem
• One PC with a 10/100 Mbps Ethernet card or adapter installed
• TCP/IP network protocol installed on each PC
• UTP CAT 5 network cables with RJ-45 connectors
• Internet Explorer 4.0 and higher, or Netscape Navigator 4.0 and higher
• One RJ-45 broadband Internet connection, with a cable or DSL modem
• One PC with a 10/100 Mbps Ethernet card or adapter installed,
or a PC with a USB port
• TCP/IP network protocol installed on each PC
• UTP CAT 5 network cables with RJ-45 connectors
• Internet Explorer 4.0 and higher, or Netscape Navigator 4.0 and higher
Version 5.5 for Internet Explorer and Version 4.7 for Netscape
Navigator are highly recommended for optimal results.
3
EtherFast Cable/DSL Routers
Version 5.5 for Internet Explorer and Version 4.7 for Netscape
Navigator are highly recommended for optimal results.
4
Instant Broadband Series
Getting to Know the 4-Port
EtherFast Cable/DSL Router
EtherFast Cable/DSL Routers
4-Port Router’s Front Panel LEDs
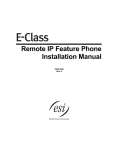
The 4-Port Router’s Rear Panel
Your Router’s ports, where network cables are connected, are located on the
rear panel of your Router.
The 4-Port Router’s Ports
The WAN (Wide Area Network) port is where you
connect your cable or DSL modem.
Ports 1-4
These four LAN (Local Area Network) ports connect to network devices, such as PCs, print servers,
and remote hard drives. If port 1 is being used, the
Uplink port will not work- these two shared ports
have internally shared wiring.
The Uplink port is used to expand your network
by connecting to another switch or hub. Uplinking
to another Router, switch or a hub is done by simply running a cable from the Uplink port to the
other device. See page 10 for more on uplinking.
If the Uplink port is being used, Port 1 will not
work.
Power
5
BEFSR41 v2 shown above
Power
Green. The Power LED lights up when the Router is powered on.
Link/Act
Green. The Link/Act LED serves two purposes. If the LED
is continuously lit up, the Router is successfully connected
to a device through the corresponding port (1, 2, 3 or 4). If
the LED is flickering, the Router is actively sending or
receiving data over that port.
Full/Col
Green. The Full/Col LED also serves two purposes. If this
LED is lit up continuously, the connection made through
the corresponding port is running in Full Duplex mode. If
the LED flickers, the connection is experiencing collisions.
Infrequent collisions are normal.
BEFSR41 v2 shown above
WAN
Uplink
The LAN Indicators
If this LED flickers too often, there may be a problem with
your connection. See the Troubleshooting section if you
have problems.
100
Orange. The 100 LED lights up when a successful
100Mbps connection is made through the corresponding
port.
If this LED is not lighting up, then your connection speed is
10 Mbps.
The Power port is where you will connect the
power adapter. Be sure to connect the power cord
to the power adapter before plugging it in.
6
Instant Broadband Series
The WAN Indicators
Link
Green. The Link LED lights up when a successful connection is made between the Router and your broadband device
or network.
Act
Green. The Act LED flickers when the Router is sending or
receiving data over the broadband WAN port (to the
Internet).
Diag
EtherFast Cable/DSL Routers
Getting to Know the 1-Port
EtherFast Cable/DSL Router
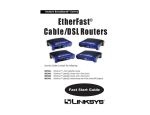
The One-Port Router’s Rear Panel
The rear panel of the Router is where all of the Router’s cabling connections
are made, and where you can reset or configure the Router’s LAN port.
Orange. The Diag LED lights up when the Router goes
through its self-diagnosis mode during every boot-up, and
also when you click Apply to update any changes made in
the Router’s Utility. It will turn off upon successful completion of the diagnosis.
If this LED stays on for an abnormally long period of time,
see the Troubleshooting section.
The Reset Button* The Reset button can be used in one of two ways.
1. If your Router is having problems connecting to the Internet, press the
Reset button in for just a moment with a paper clip or a pencil tip. This
clears up any jammed connections, and is similar to pressing the Reset button on your PC to reboot it.
2. If you are experiencing extreme problems with your Router and have tried
all other troubleshooting measures, press the Reset Button in and hold it
down until the orange Diag LED on the front panel turns on and off
completely.
This will restore factory defaults and clear all of the Router’s settings,
including the IP addresses you entered.
BEFSR11 shown above
The One-Port Router’s Ports
WAN
The WAN (Wide Area Network) port is where you
connect your cable or DSL modem.
LAN
The LAN (Local Area Network) port is where you
connect your Router to a PC, hub, or switch. If
you have more than one PC, connect an Ethernet
hub or switch to your Router, then connect your
PCs to that hub or switch.
Power
The Power port connects to the power adapter.
Leaving the power off for too long could result in the loss of network connections.
See also restoring factory defaults through the Web-based Utility in the
Cable/DSL Router’s Web-based Utility section.
* The Reset Button is located on the front panel of the 4-Port Router, and the rear panel of the
3-Port Router and the 1-Port Router.
7
8
Instant Broadband Series
Buttons & Switches
The Reset Button
Details on the Reset button are found on page 7.
The Crossover Switch
The Crossover Switch (X II) toggles the LAN port
between crossover mode (X) and straight-through
mode (II).
EtherFast Cable/DSL Routers
Link/Act
Green. The Link/Act LED serves two purposes. If the LED
is continuously lit up, the Router is successfully connected
to a device through the LAN port. If the LED is flickering,
the Router is actively sending or receiving data through the
LAN port.
Full/Col
Green. The Full/Col LED also serves two purposes. If this
LED remains lit, a LAN port connection is being successfully maintained. If the LED flickers, the connection is
experiencing collisions. Infrequent collisions are normal.
If you are connecting the Router’s LAN Port
directly to a PC or an uplink port on a hub or
switch, choose the crossover (X) mode.
If this LED flickers too often, there may be a problem with
your connection. See Troubleshooting on page 56 if you
encounter problems.
If you are connecting the Router’s LAN port to a
standard port on a hub or switch, choose the
straight-through (II) mode.
10/100
Note: If you’re not sure which mode to use on the Crossover Switch, check the
LAN port’s Link LED on the front panel of the Router.
Orange. The 10/100 LED lights up when a successful
100Mbps connection is made through the corresponding
port.
If the Link LED does not light up after the Router is fully installed and configured, try switching the Crossover Switch to the other side. If the Link LED lights
up, you know that your mode setting is correct.
If a connection is running at 10Mbps, the 10/100 LED will
not light up.
uplinking,” or connecting two pieces of network hardware together, such
When“u
as a router and a switch, a general rule of thumb is to plug one end of a network
cable into a straight-through port, and the other end into a crossover port.
The WAN Indicators
Link
Green. The Link LED lights up when a successful connection is made between the Router and your Broadband
device or network.
Act
Green. The Act LED flickers when the Router is sending or
receiving data over the broadband WAN port.
Diag
Red. The Diag LED lights up when the Router goes through
its self-diagnostic test during boot-up. It will turn off upon
successful completion of the diagnosis. The Diag LED also
lights up when you press the Reset button or click Apply to
save any changes made in the Web-based Utility.
Standard ports are straight-through ports, and uplink ports are crossover ports.
The 1-Port Router’s Front Panel LEDs
The LAN Indicators
Power
9
BEFSR11 shown above
If this LED stays on for an abnormally long period of time,
see the Troubleshooting section.
Green. The Power LED lights up green when the Router is
powered on.
10
Instant Broadband Series
Getting to Know the 3-Port
EtherFast Cable/DSL Router
EtherFast Cable/DSL Routers
The USB Icon
This USB icon denotes the presence of a USB port or connector.
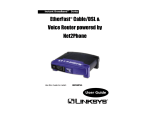
The 3-Port Router’s Rear Panel Ports
Your 3-Port Router comes with a USB cable that has two different types of
connectors. Type A, the master connector, is shaped like a rectangle and
plugs into your PC’s USB port. Type B, the slave connector, resembles a
square and connects to the USB port on the rear panel of your Router.
The 3-Port Router’s Ports
USB
BEFSRU31 shown above
The USB port (Type B - slave) can connect to
a USB-ready PC or a USB hub. This allows
you to enjoy an immediate, plug-and-play connection without even configuring a network adapter
for your PC. To work with USB ports, your PC
must be running Windows 98, 2000, or
Millennium.
USB ports do not work on PCs running
Windows 95 or Windows NT.
USB Type A
USB Type B
1, 2, 3
These three LAN ports connect to your PCs, hubs,
switches, print servers, or any other device with an
Ethernet port.
Uplink
The Uplink port connects to another hub or switch
for port expansion when you run out of open ports
for your network devices. Since the Uplink port
and the standard port right next to it share internal
wiring, you can only use one of the two ports at a
time.
Also, your PC must have a USB port installed and enabled. Some PCs may have a
disabled USB port. If your port doesn’t seem to be working, there may be jumpers
on the motherboard or a menu option in the BIOS to enable a PC’s USB port.
WAN
This WAN port connects to your cable or DSL
modem. Your modem connection will not work
from any other port.
Other motherboards have USB interfaces, but no ports. You can install your own
USB port and attach it to your PC’s motherboard using hardware purchased at retail
computer stores. See your PC’s User Guide for instructions.
Power
The Power port connects to the power adapter.
USB Compatibility with Your PC
To use the USB port on the 3-Port Router, you must have Windows 98, 2000, or
Millennium installed on your PC. USB cannot run in a Windows 95 or NT environment.
11
12
Instant Broadband Series
Buttons
The Reset Button
EtherFast Cable/DSL Routers
100
Orange. The 100 LED lights up when a
successful 100Mbps connection is made
through the corresponding port. If this
LED does not light up, then your connection speed is 10 Mbps.
USB
The USB LED lights up when the USB
port is successfully connected to a PC,
USB hub, or other USB device.
Details on the Reset button are found on page 7.
The 3-Port Router’s Front Panel LEDs
The WAN Indicators
Link
Green. The Link LED lights up when a successful connection is made between the Router and your broadband device
or network.
Act
Green. The Act LED flickers when the Router is sending or
receiving data over the broadband WAN port.
Diag
Orange. The Diag LED lights up when the Router goes
through its self-diagnostic test during boot-up. It will turn
off upon successful completion of the diagnosis. This LED
will also light up when you make changes in the Utility and
click Apply to save them.
The LAN Indicators
Power
Green. The Power LED lights up green when the
Router is powered on.
Link/Act
Green. The Link/Act LED serves two purposes. If
the LED is continuously lit up, the Router is successfully connected to a device through the corresponding RJ-45 port (1, 2, or 3). If the LED flickers, then that port is sending or receiving data to
and from the network.
Full/Col
Green. The Full/Col LED also serves two purposes. If this LED is continuously lit up, the connection made through the corresponding port is successfully running in Full Duplex mode. If the
LED is flickering, the connection is experiencing
collisions. Infrequent collisions are normal.
If this LED stays on for an abnormally long period of time,
see the Troubleshooting section.
If this LED flickers too often, there may be a
problem with your connection. See the
Troubleshooting section if you have problems.
13
14
Instant Broadband Series
Connecting the Cable/DSL Router to
Your Network
Overview
Unlike a hub or a switch, the Cable/DSL Router’s setup consists of more than
simply plugging hardware together. Since the Router acts as a DHCP server,
you will have to set some values for the Router and also configure your networked PCs to accept the IP addresses that the Router assigns them.
You will need the following data from your ISP (Internet Service Provider) to
install the Cable/DSL Router:
• Your broadband-configured PCs’ Computer Name and Workgroup Name
• Your broadband-configured PCs’ fixed
Internet IP Address
Only if applicable
• Your Subnet Mask
• Your Default Gateway
• Your Primary DNS Server IP address(es)
}
The installation technician from your ISP should have left this information
with you after the installation. Or, you can call your ISP to request the data.
EtherFast Cable/DSL Routers
Your Router’s firewall (NAT) protects your network of PCs with security so
users on the public, Internet side cannot “see” your PCs. This is why
your internal LAN, or network, is private.
Remember that your Router’s ports connect to two sides: your 10/100 LAN
port(s) and the Internet WAN port. The LAN port(s) transmit data at 10Mbps
or 100 Mbps, whereas the broadband port, or WAN port, transmits data at 10
Mbps, because 10Mbps is currently the maximum speed for cable and DSL
service.
IP Addressing: A Quick Lesson
What’s an IP Address?
Every device on an IP-based network, including PCs, print servers, and
routers, requires an IP address to identify
Since your Router is a device that
its “location,” or address, on the network.
Since the Internet is simply one huge global connects two networks, it needs two
IP addresses - one for the LAN side,
network, every PC that logs on to the
and one for the WAN side. In this
Internet also requires an IP address.
User Guide, you’ll see references to
the “WAN IP address” and the “LAN
There are two ways of assigning an IP
IP address.”
address to your network devices.
Static IP Addresses
Once you have the above values, you can begin the Installation and Setup of
your EtherFast Cable/DSL Router.
LANs and WANs
Simply put, a router is a network device that connects two networks together.
In this instance, your EtherFast Cable/DSL Router connects your Local Area
Network (LAN), or the group of PCs in your home or office, to the Wide
Area Network (WAN), that is, the Internet. Your Router processes and regulates the data that travels between these two networks.
Think of your Router as a network device with two sides: the first side is
made up of your private Local Area Network (LAN) of PCs, which this User
Guide sometimes calls the “internal LAN.” The other, public side is
the Internet, or the Wide Area Network (WAN), outside of your home or
office.
15
IP stands for Internet Protocol.
A static IP address is a fixed IP address
that you assign manually to a PC or other
device on the network. Since a static IP
address remains valid until you disable it,
static IP addressing ensures that the device
you assigned it to will always have that
same IP address. Static IP addresses are
commonly used with network devices such
as server PCs or print servers.
Since the Router has firewall security
(NAT), the only IP address that can
be seen from the Internet for your
network is the Router’s WAN IP
address.
However, even this WAN IP address
for the Router can be blocked, so that
your Router and network seem invisible to the Internet - see Blocking
WAN Requests on page 48.
If you use your Router to share your cable or DSL Internet connection, contact your ISP to find out if they have assigned a static IP address to your
account. If so, you will need that static IP address when configuring your
Router.
16
Instant Broadband Series
Dynamic IP Addresses
Connecting Your Hardware Together and Booting Up
A dynamic IP address is automatically assigned to a device on the network,
e.g., PCs and print servers. These IP addresses are called “dynamic” because
they are only temporarily assigned to the PC or device. After a certain time
period, they expire.
1. Before you begin, make sure that all of your hardware is powered off,
including your Router, PCs, hubs, switches, and the cable or DSL modem.
If a PC logs on to the network (or the Internet) and its dynamic IP address
has expired, the DHCP server will assign it a new dynamic IP address.
DHCP (Dynamic Host Configuration Protocol) Servers
PCs and other network devices using dynamic IP addressing are assigned a
new IP address by a DHCP server. DHCP frees you from having to assign
IP addresses manually every time a new user is added to your network.
DHCP servers can either be a designated PC on the network or another network device, such as the Cable/DSL Router.
By factory default, DHCP is enabled on your Router. If you already
have a DHCP server running on your network, you must disable one of the
two DHCP servers. If you run more than one DHCP server on your network,
you will experience network errors, such as conflicting IP addresses.
To disable DHCP on your Router, see page 44.
Even if you assign a static IP address to a PC, that PC can
still use DHCP’s dynamic IP addressing.
If the dynamic IP addressing fails to provide a dynamic IP
address for any reason, that PC automatically uses its default
static IP address.
ing Your Hardware Toging Up
17
EtherFast Cable/DSL Routers
2. A. If you have the 4-Port Cable/DSL Router, connect one end of a network cable to one of the LAN ports (labeled 1, 2, 3, or 4) on the back of
the Router, and the other end into a standard port on a network device, e.g.,
a PC, print server, hub, or switch. See page 66 for details on network
cabling.
A standard port is any port other than the WAN port
and the Uplink port. It’s a straight-through port.
Repeat the above step to connect more PCs or network devices to the
Router.
2. B. If you are connecting the 1-Port Router to just one PC, plug one end
of a network cable into the Router’s LAN port and the other end into the
PC’s network adapter port. Set the Crossover Switch to crossover mode
(X). If the crossover mode does not light up a Link LED, see page 10.
If you are connecting the 1-Port Router to a hub or switch, plug one
end of a network cable into the Router’s LAN port, and the other end into
to a standard port on your network’s hub or switch. Set the LAN port’s
Crossover Switch to its straight-through (II) mode.
If your hub or switch has no more standard ports available, connect the
Router using its LAN port to the Uplink port on the hub or switch. Set
the Crossover Switch to straight-through mode (II) for this set-up.
2. C. If you have the 3-Port Cable/DSL Router, connect one end of a network cable from the one of the Router’s LAN ports (labeled 1, 2, or 3) to a
port on a PC, hub, switch, or other network device.
The 3-Port Router features one USB plug-and-play port that connects
instantly to any USB-ready desktop or notebook PC. This allows you to
connect to and access your Router without even configuring any network
cards. Use the enclosed USB cable to connect your PC to the Router: the
Type A end connects to your PC’s USB port, while Type B connects to the
Router’s USB port.
18
Instant Broadband Series
3. Connect the network cable from your cable or DSL modem to the WAN
port on your Router’s rear panel. This is the only port that will work for
your modem connection.
4. Connect the power adapter to the Power port on the rear panel of the
Router, then plug the power adapter into a power outlet.
It is highly recommended that you plug your Router into a
power strip with surge protection.
• The Power LED on the front panel will light up green as soon as the
power adapter is connected properly.
• The Diag LED will light up red for a few seconds when the Router goes
through its self-diagnostic test. This LED will turn off when the self-test
is complete.
5. Power on the cable or DSL modem.
6. Press the Reset button on the Router’s front panel with a paper clip or a
pencil. Hold the button in until the Diag LED lights up and then turns off.
This will restore the Router’s factory default settings.
EtherFast Cable/DSL Routers
Uplinking: Connecting More Devices to Your Router
If your Router’s LAN ports are all full and you still have PCs and/or
devices to connect, add a hub or a switch to your Router.
To do so, use the Router’s Uplink port to connect to a standard port on a
hub or switch. If you have a PC/device connected to the port right next to
the Uplink port (on the 3- and 4-Port Routers), disconnect that PC/device
and plug it into an open port on the new hub or switch.
Since the Uplink port shares internal wiring with the port right next to it,
you can only use only one of these two ports at a time: these ports are
called shared ports.
If your new hub or switch also has an Uplink port, it too can be uplinked
when you next run out of ports, and so on.
Use the Router’s Uplink port to connect to a standard port on a hub or
switch. This leaves you with new, open ports on the hub or switch, to
which you can add more PCs and/or network devices.
See www.linksys.com for complete product lines of 10/100 Mbps hubs and
switches.
Technical Checkpoint:
Did you remember to check for Link LEDs for all your connections?
If all of your Link LEDs are not lighting up, make sure that all your
cables are securely plugged in, and that all of your hardware is powered on properly.
Your Router’s hardware installation is now complete!
Continue with the next section to configure
your Router and PCs.
19
20
Instant Broadband Series
Configuring Your Router’s USB Port
EtherFast Cable/DSL Routers
3. Select “Search for the best driver for your device (Recommended).”
Click Next.
Now that all of your Router’s hardware is connected together, you must
enable the PC that is connected to the Router through its USB port.
Since your Router acts as a network adapter for your PC, there’s no need for
you to install a USB adapter for that PC. Just follow the directions below to
enable your PC’s USB connection to the Router:
• If you are running Windows 98, continue on this page, below.
• If you are running Windows 2000, go to page 26.
• If you are running Windows Millennium, go to page 29.
After you finish this configuration, make sure that TCP/IP is
installed on your PC(s). For instructions on installing TCP/IP,
see page 65.
4. Select “Floppy disk drives” and click Next to start the search for your
driver.
You can also connect your Router’s USB port to other USB devices besides
USB-ready PCs, such as USB hubs.
USB Installation for Windows 98
1. Start up your PC in Windows 98.
2. Windows will display a message saying that it has detected new hardware.
Click Next.
21
22
Instant Broadband Series
5. A new window will appear, saying that Windows is now ready to install
the best driver for this device. Click Next to continue.
6. Windows will begin copying the files to your PC. Do not click Cancel or
press the Esc key during this process.
If Windows asks for your Windows operating system files before copying,
direct your PC to the location of those files, e.g,
c:\windows\options\cabs, or D:\Win98 (assuming that your
CD-ROM drive is named D).
EtherFast Cable/DSL Routers
7.
Windows will notify you that it has completed copying the driver files to
your PC. Click Finish.
8. Windows will ask you if you want to restart your PC. Click Yes so your
new installation will take effect.
If it does not ask you, go to Start, Shut Down, then select Restart and
click Yes.
Your USB installation is now complete.
Go to page 33 to configure your network
to work with the Router.
23
24
Instant Broadband Series
USB Installation for Windows 2000
EtherFast Cable/DSL Routers
3. When Windows asks you where to search for driver files, select “Floppy
Disk Drives” and click Next.
1. Start up your PC in Windows 2000. Windows will show a message
notifying you that the PC has found new hardware. Windows’ Hardware
Wizard will show a message to say that it is ready to start installing the
driver files to your PC. Click Next.
4. Windows will show a message saying that it has found the driver files.
Click Next.
2. Select “Search for a suitable driver for my device (Recommended)” and
click Next.
25
26
Instant Broadband Series
4. Windows will ask you if you want to continue with the installation.
Click Yes.
EtherFast Cable/DSL Routers
6. Windows will display a message saying that it has finished installing the
driver files on your PC. Click Finish.
5. Windows will copy the driver files to your PC.
If Windows asks for your Windows operating system files before copying,
direct your PC to the location of those files, e.g,
c:\windows\options\cabs, or D:\Win98 (assuming that your
CD-ROM drive is named D).
7. Go to Start, Settings, Control Panel, and Network to display the screen
below. Make sure that TCP/IP is installed for this PC.
Your USB installation is now complete.
Go to page 33 to configure your network
to work with the Router.
27
28
Instant Broadband Series
USB Installation for Windows Millennium
1. Start up your PC in Windows Millennium.
EtherFast Cable/DSL Routers
3. Windows will notify you that it is ready to install the driver file on to your
PC. Select “Specify a location” and type in “a:\Win98” in the field.
Click Next to continue.
2. Windows will notify you that new hardware has been detected (shown
above). Select “Automatic search for a better drive (Recommended)” and
click Next.
4. Windows will complete its search for driver files. Click Next to begin
installing the files.
29
30
Instant Broadband Series
5. Windows will display a message saying that it has finished installing the
driver files on your PC. Click Finish.
EtherFast Cable/DSL Routers
7. When your PC is finished restarting, click on Start, Settings, Control
Panel, and Network. Make sure that TCP/IP is installed for your PC.
6. Windows will ask you to restart your PC. Click Yes.
Your USB installation is now complete.
Go to page 33 to configure your network
to work with the Router.
31
32
Instant Broadband Series
Configuring Your Network with the
Cable/DSL Router
EtherFast Cable/DSL Routers
3. A username and password prompt will appear. Leave the User Name
field empty and type admin, which is the default password, into the
Password box. Click OK.
Configuring the Cable/DSL Router
Now that your Cable/DSL Router is connected to your network, you can
begin configuring your Router.
IMPORTANT! If you have previously enabled any Internet-sharing
proxy server software on any of your PCs, you must disable it now.
Some examples of proxy server software are Internet LanBridge,
Wingate, and Sygate. To disable your proxy server software:
4. The Cable/DSL Router’s Setup page will appear.
• If you are running Netscape Navigator: Click Edit >> Preferences >>
Advanced >> Proxies> and click Direct Connection to the Internet.
• If you are running Internet Explorer, click Start>> Settings>> Control
Panel>> Internet Options>> Connections>> LAN Settings. Remove
the checks from all three boxes. Click OK to continue.
Also, you must disable any Internet log-on software (such as Ivasion
Winpoet or Enternet 300) and any firewall software (such as
ZoneAlarm and Watchdog) on all of your PCs.
1. Make sure that each of your PCs has the TCP/IP protocol configured.
Otherwise, see page 64 now to do so, before configuring your Router.
2. Open your web browser and type http://192.168.1.1 in the
browser’s Address field. This number is the default IP address of your
Router. Press Enter.
5. Configure the following values:
Host Name & Domain Name These fields allow you to give a Host and
Domain name for the Router. Some ISPs require these names as identification. You may have to check with your ISP to see if your broadband
Internet service has been configured with Host and Domain names. In
most cases, leaving these two fields blank will still work.
33
34
Instant Broadband Series
LAN IP Address These values refer to your internal network settings.
Unless you have specific internal needs, there should be no reason to
change these values. For the internal LAN side, the Router’s default values are as follows:
• Private IP Address:
192.168.1.1
• Subnet Mask:
255.255.255.0
EtherFast Cable/DSL Routers
10. Reset the power on the cable or DSL modem, then restart the PC so
the new Router settings will take effect.
Your Cable/DSL Router is now configured on your network.
Continue on to the next section to complete your network setup.
Configuring PCs to Connect to the Cable/DSL Router
WAN IP Address These values refer to the external network (the Internet)
you connect to every time you access your Internet connection.
Most broadband ISPs assign their clients to a different IP address each
time they log on. If this is the case with your ISP, select Obtain an IP
Address Automatically and go to step 5.
If your ISP assigns you a fixed, static IP address, select Specify an IP
Address and enter the appropriate values into the IP Address, Subnet
Mask, Default Gateway Address and DNS (Required) fields provided
by your ISP.
If you need to enable PPPoE support, choose Enable. If you do
enable PPPoE, remember to remove any existing PPPoE applications already on any of your PCs. More information on PPPoE
can be found on page 41.
6. When you have properly configured the Setup window, click Apply, then
click Continue.
Now that your Router is configured, you will have to configure your other
PCs to accept the IP addresses that your Router will provide.
Note: Make sure that a network card or adapter has been successfully
installed in each PC you plan on configuring before continuing.
These instructions apply only to Windows 95 and Windows 98
machines. For TCP/IP setup under Windows NT, see your
Windows NT manual.
1. Click the Start button, select Settings, then Control Panel.
2. Double-click on the Network icon.
3. In the Configuration window, select the TCP/IP protocol line associated
with your network card/adapter. If there is no TCP/IP protocol line listed
for your card/adapter, go to page 64 to install the TCP/IP protocol now.
7. Select the DHCP tab.
8. DHCP is already enabled on your Router by factory default. By leaving
the setting on Enable, the Router is configured to automatically assign IP
addresses to each of your PCs.
Optional: In the Number of DHCP Users field, enter the number of PCs
you plan on networking to the Router. If you add more PCs to your network in the future, don’t forget to change this value.
If you already have a DHCP server on your network, select Disable for
the DHCP Server option. If you do so, you must assign your Router a new
static IP address.
9. Click Apply, then click Continue.
35
36
Instant Broadband Series
4. Click the Properties button, then choose the IP Address tab. Select
Obtain an IP address automatically. Click OK.
You have now completed the PC’s client settings, so it can connect to the
Router.
EtherFast Cable/DSL Routers
The Cable/DSL Router’s Web-based
Utility
Quick & Easy Router Administration
The EtherFast Cable/DSL Router uses a web browser-based administrative
Utility that is programmed into a chipset. All administrative tasks for the
Router are performed through this Setup Utility. The Utility can be accessed
through any PC on the network by typing http://192.168.1.1 into the
web browser’s Address field (even if that PC does not yet have Internet
access), shown below.
After entering the address value into the web browser, a password request
page will pop up, shown below.
Leave the User Name field blank and type “admin” into the Password field.
5. Click OK. Windows may ask for original Windows installation files. Direct
your PC to the location of the files, e.g., D:\win98 or D:\win95,
c:\windows\options\cabs.
6. Windows will ask you to restart the PC. Click Yes.
7. Repeat steps 1-6 for each PC on your network.
When all of your PCs are configured, the Cable/DSL Router
Setup and Configuration is complete.
If you want to learn more about the Router’s Web-based
Utility, proceed to the next section.
In this section, you’ll find brief descriptions of each web page in the Utility
and each page’s key functions. More detailed explanations and instructions
can be found by clicking each page’s Help button in your Router’s Setup
Utility.
To apply any settings you’ve changed on a page, click the Apply button, then
click Continue. To clear any values you’ve entered on any page, click
Cancel.
37
38
Instant Broadband Series
Setup
EtherFast Cable/DSL Routers
• WAN IP Address This is the IP address that your Router has, when seen
from the external WAN, or the Internet.
Note: The Setup
page in this picture may differ
slightly from the
one you see.
• MAC Address Cloning Click on "MAC Address" (next to WAN IP
Address) to display your Router's MAC address, which is a 12-digit code
assigned to a unique piece of hardware for identification, like a social
security number. Some ISPs require that you register the MAC address of
your network card/adapter, which was connected to your cable or DSL
modem during installation. If your ISPs require MAC address registration, find your adapter's MAC address by doing the following:
• If you are running Windows 98:
Go to Start, Run, type in "command," and press Enter. At the DOS
prompt, type "winipcfg."
• If you are running Windows 2000 or Millennium:
Go to Start, Run, type in "command," and press Enter. At the DOS
prompt, type "ipconfig/all." The"Physical Address" with 12 digits is your
Router’s MAC address.
The Basic Setup screen is the first screen you see when you access the Setup
Utility. If you have already installed and set up your Router, you have already
seen this screen and properly configured all of the screen’s values.
• Host Name This entry is required by some ISPs.
• Domain Name This entry is required by some ISPs.
• Firmware Version This entry shows the version and date of the firmware
you are using. Future versions of the Router’s firmware will be posted and
available for download on the Linksys Web site.
• LAN IP Address and Subnet Mask The IP Address and Subnet Mask of
the Router as it is seen on the internal LAN. The default value is
192.168.1.1 for the IP address and 255.255.255.0 for the Subnet Mask.
39
Enter those 12 digits into the fields below, and click Apply. This “clones”
your network adapter’s MAC address onto your Router, and prevents you
from having to call your ISP to change the registered MAC address to the
Router’s MAC address.
Note: This is a
sample screen.
Please enter
the MAC
Address for
your Network
Card/Adapter
into this field.
• Subnet Mask This is the Router’s Subnet Mask, as seen by external users
on the Internet (including your ISP). If you select “Obtain an IP address
automatically,” your ISP will assign these values.
40
Instant Broadband Series
• Default Gateway Address Your ISP will provide you with the Default
Gateway IP Address. If you select “Obtain an IP address automatically,”
your ISP will assign these values.
EtherFast Cable/DSL Routers
Password
• DNS (Domain Name Server) IP Address Your ISP will provide you with
at least one DNS Server IP Address. If you select “Obtain an IP address
automatically,” these values will be assigned by your ISP.
You can check whether the values you entered for the above
settings are correct by testing your Internet access.
• PPPoE (Point-to-Point Protocol over Ethernet) Some DSL-based ISPs
use PPPoE to establish communications with an end-user. If you are using
a DSL line, check with your ISP to see if they use PPPoE. If they do use
PPPoE, you must enable it. To enable PPPoE:
1. Click on the Enable option in the PPPoE section of the Setup screen.
2. Enter the User Name you use to log on to your Internet connection.
3. Enter your corresponding Password.
• Connect on Demand If you aren’t actively using the Internet, you can
configure your Router to cut your connection with your ISP after a certain
period of time. If you have been disconnected due to inactivity, Connect
on Demand enables your Router to automatically re-establish your connection as soon as you attempt to access the Internet again. If you wish to
activate Connect on Demand, choose the Enable option.
• Max Idle Time Max Idle Time is the number of minutes that passes
before the Router drops your Internet connection, due to inactivity. If you
want your Internet connection to remain on at all times, enter zero (0) in
this field and click Apply. Otherwise, enter in the number of minutes you
want to elapse before your Internet access disconnects.
It is strongly recommended that you set a password for the Router. When you
first power up the Router, there is no default Password setting assigned.
If you leave the password field blank, all users on your network will be able
to access the Router simply by entering the unit's IP address into their web
browser's location window.
If you select the Restore Factory Default option and click
Apply, you will clear all of the Router’s settings.
Do not restore the factory defaults unless you are having
difficulties with the Router and have exhausted all other
troubleshooting measures. Once the Router is reset, you
will have to re-enter all of your configuration data.
• Keep Alive Option This option keeps your PPPoE-enabled Internet access
connected indefinitely, even when it sits idle. It keeps the connection
alive by sending out a few data packets periodically, so your Internet service thinks that the connection is still active. To use this option, click on
the box next to Keep Alive to select it, and click Apply.
41
42
Instant Broadband Series
EtherFast Cable/DSL Routers
Status
DHCP Server This field shows the status of the Router's DHCP server
function, which is either enabled or disabled.
• WAN These fields display the WAN IP Address, WAN Subnet Mask and
WAN Default Gateway IP address of the Router, as seen by external users
on the Internet.
DNS (Domain Name System) IP Address These fields show the IP
Address(es) of the DNS currently used by the Router. Multiple DNS IP
settings are common. In most cases, the first available DNS entry is used.
DHCP
This tab displays the current status of the Router; it reflects the data and
selections you’ve entered under the Setup tab.
All of the information provided on this screen is read-only. To make changes,
select the Setup tab.
• Host Name This field shows the name of your Router. This entry is necessary for some ISPs.
• Firmware Version This field shows the installed version and date of the
firmware. Version dates are slightly more accurate than version numbers.
• PPPoE (Point-to-Point Protocol over Ethernet) This field shows
whether you have enabled the use of the Router’s PPPoE support.
A DHCP (Dynamic Host Configuration Protocol) server automatically
assigns IP addresses to each PC on your network for you. Unless you already
have one, it is highly recommended that you leave your Router enabled as a
DHCP server.
• DHCP Server DHCP is already enabled by factory default. If you
already have a DHCP server on your network, set the Router's DHCP
option to Disable and click Apply. If you disable DHCP, remember to
assign a static IP address to your Router.
• Starting IP Address Enter a value for the DHCP server to start with
when issuing IP addresses. This value must be (192.168.1.) 2 or greater,
because the default IP address for your Router is 192.168.1.1.
• LAN These fields display the current IP Address and Subnet Mask of the
Router, as seen by users on your internal network.
43
44
Instant Broadband Series
EtherFast Cable/DSL Routers
• Number of DHCP Users (Optional) Enter the maximum number of PCs
that you want the DHCP server to assign IP addresses to. This number
cannot be greater than 253.
To upgrade the Router’s firmware:
• DHCP Clients Table Click on the Clients Table button to show the current DHCP Client data. (This data is stored in temporary memory and
changes periodically).
2. Click on Upgrade Firmware to display a new window (shown below):
1. Select the Help tab (shown on the previous page).
Help
3. Enter your Router’s administration password into the Password Confirm
field.
4. Click the Browse button to find the firmware upgrade file that you downloaded from the Linksys Web site.
5. Double-click the Upgrade file. Click on the Upgrade button and follow
the instructions there.
Under the Help tab, you’ll find links to all of the Utility’s internal support
documentation, including the application that upgrades the Router’s firmware.
New firmware versions are posted on www.linksys.com, and can be downloaded for free. If your Router can access the Internet already, there’s no
need to download a newer firmware version, unless that version has a new
feature that you want to use. “Flashing,” or loading new firmware onto your
Router does not enhance the speed or the quality of your connection speed.
See page 48 for directions on enabling remote firmware upgrades (IP
Filtering).
45
46
Instant Broadband Series
IP Filtering
EtherFast Cable/DSL Routers
Blocking WAN Requests
• By enabling the Block WAN Request feature, you can prevent your network
from being “pinged,” or detected, by other Internet users. The Block WAN
Request feature also reinforces your network security by hiding your network ports. Both functions of the Block WAN Request feature make it more
difficult for outside users to work their way into your network.
• Click the Apply button to save your changes.
Using IPSec Pass Through
• This feature lets you use IPSec Pass Through. To use this feature, click on
Enable next to “IPSec Pass Through,” then click on Apply.
• To disable IPSec Pass Through, click on Disable and then click on Apply.
Using PPTP Pass Through
• Point-to-Point Tunneling Protocol is the method used to enable VPN
(Virtual Private Networking) sessions. To enable this feature, click on
Enable next to PPTP Pass Through, and then click Apply.
IP Filters block specific internal users from accessing the Internet and enable
VPN (Virtual Private Network) sessions. You can set up filters by using IP
addresses or network port numbers (or a range of ports).
Note: Only one VPN session may be conducted at a time.
• To disable this feature, click on Disable next to PPTP Pass Through, and
then click Apply.
Remote Management
and Remote Upgrades
must be activated
• This feature allows you to manage your Router
before
you leave to a
from a remote location, via the Internet. To enable
remote
location.
this feature, click on Enable, then click on Apply.
Using Remote Management
Setting Up Filters
• To set up a filter using IP addresses, enter the range of IP addresses you
wish to filter into the IP address fields. Users who have filtered IP addresses will not be able to access the Internet at all. If you only want to filter
one IP address instead of a range of IP addresses, enter the same value into
both fields. For instance, if you wish to filter the PC with the IP address of
192.168.1.5, enter 5 into both fields on one line: 192.168.1.5~ 192.168.1.5.
Click Apply when you’re done.
• To filter users by network port number, enter a network port number or a
range of network ports. Enter the port numbers you want to filter into the
port numbers fields. Users connected to the Router will no longer be able
to access any port number listed there.
47
• To disable Remote Management, click on Disable, then click on Apply.
Using Remote Upgrade
• This feature allows you to “flash,” or upgrade, your Router’s firmware from
a remote location. To enable Remote Upgrade, click on Enable, then click
on Apply.
• To disable this feature, click on Disable, then click on Apply.
48
Instant Broadband Series
IP Forwarding
Dynamic Routing
Forwarding sets up public services on your network, such as web servers, ftp
servers, or email servers.
With Dynamic Routing, you can automatically adjust to physical changes in
the network's layout. The Router, using the RIP protocol, calculates the most
efficient route for the network’s data packets to travel between the source and
the destination, based upon the shortest paths. The RIP protocol regularly
broadcasts routing information to other routers on the network.
When users send this type of request to your network via the Internet, the
Router will forward those requests to the appropriate PC. Before using
Forwarding, the Router's DHCP function must be disabled under the DHCP
tab and the Router must be assigned a new static LAN IP address.
If you need to forward all ports for one PC, use DMZ Hosting.
To add a server using Forwarding:
1. Enter the port number or range of ports used by the server. On the same
line, enter the LAN IP address of the server that you want the Internet
user(s) to access.
2. Configure as many entries as needed- the Router supports up to 10 ranges
of ports. Click Apply when you’re done.
49
EtherFast Cable/DSL Routers
To set up dynamic routing:
1. Select the correct working mode. Gateway Mode should be used if your
Router is hosting your network's connection to the Internet. Router Mode
should be selected if the Router exists on a network with other routers.
2. Select the protocol by which you transmit data on the network.
3. Select the protocol by which the Router receives network data.
4. Click the Apply button to save your changes.
50
Instant Broadband Series
Static Routing
EtherFast Cable/DSL Routers
2. Enter the following data to create a static route:
Destination LAN IP The Destination LAN IP address is the Address of
the remote network or host to which you want to assign a static route.
Enter the IP address of the host for which you wish to create a static route
here. If you are establishing a route to an entire network, be sure that the
network portion of the IP address is set to zero (0).
For example, the Router’s standard IP address is 192.168.1.1. Based on
this address, the address of the network to which the Router is connected
is 192.168.1, with the last digit (1, in this case) determining the Router’s
place on the network. Therefore, you would enter the IP address
192.168.1.0 if you wanted to route to the Router’s entire network, rather
than to just the Router.
Subnet Mask The Subnet Mask (also called the Network Mask) determines which portion of an IP address is the network portion and which
portion is the host portion. In the example above, the Network Mask is
255.255.255.0. This determines (by using the values 255) that the first
three numbers of an network IP address identify this particular network,
while the last digit (from 1 to 254) would identify the specific host.
If your Cable/DSL Router is connected to more than one network, you may
have to set up a static route between the two networks. A static route is a predetermined pathway that network data packets must travel to reach a specific
host or network. Click the Show Routing Table button to view the current
static routing configuration.
To create a static route entry:
1. Select Static Route Entry from the drop-down list. The Cable/DSL
Router supports up to 20 static route entries.
Default Gateway This IP address must be the IP address of the gateway
device that allows for contact between the Router and the remote network
or host.
Hop Count This value gives the number of nodes that a data packet passes through before reaching its destination. A node is any device
on the network, such as switches, PCs, etc.
Interface Interface tells you whether your network is on the internal
LAN or the WAN, or the external Internet. If you’re connecting to a subnetwork, select LAN. If you’re connecting to another network through
the Internet, select WAN.
3. Click Apply to save your changes.
51
52
Instant Broadband Series
DMZ Hosting
EtherFast Cable/DSL Routers
Logging
The Log feature provides you with a log of all incoming and outgoing URLs
or IP addresses for your Internet connection.
Outgoing Access Log lists all the URLS or IP addresses of Internet sites that
users on your network have accessed, and Incoming Access Log gives you a
log of all incoming Internet traffic.
The DMZ Hosting feature allows one local user to be exposed to the Internet
to use a special-purpose service such as Internet gaming and video-conferencing.
This data can also be accessed by other network users if the file is shared out.
• To activate logging, click on Enable next to “Access Log.”
Whereas IP Forwarding can only forward a maximum of 10 ranges of ports,
DMZ hosting forwards all the ports for one PC simultaneously.
• To expose one PC, enter the computer’s IP address and click Apply.
• Enter in the IP address of the PC that you want to send the log to. Make
sure that this PC is using a static IP address. Click Apply when you’re
done.
• Deactivate DMZ by entering a zero (0) in the field and clicking Apply.
• Click on Outgoing Access Log or Incoming Access Log to view each log.
• To disable Logging, click on Disable in the Log window, then click Apply.
53
54
Instant Broadband Series
Troubleshooting
Common Problems and Solutions
This section provides possible solutions to problems regarding the installation
and operation of the Cable/DSL Router. Read below description to solve your
problems. If you can’t find an answer here, check the Linksys website at
www.linksys.com.
1. I can’t connect to the Cable/DSL Router.
• Check to see that the Cable/DSL Router is properly installed, the LAN
connections are OK (Link LEDs should be on), and it is powered ON.
• Make sure that your PC and the Router are on the same network segment. If you are not sure, initiate the DHCP function and let the PC get
the IP address automatically.
• Make sure that your PC is using an IP address between 192.168.1.2 to
192.168.1.254 and thus compatible with the Cable/DSL Router default
IP address of 192.168.1.1.
• Also, the Subnet Mask must be set to 255.255.255.0 to match the
Cable/DSL Router’s Subnet Mask. You can check these settings for the
Router by going to Start, Settings, Control Panel, and Network:
check the Properties for the TCP/IP protocol.
2. The Diag LED stays lit when it should not be lit.
• The Diag LED lights up when the Router is first powered up.
Meantime, the system will boot up itself and check for proper operation. After finishing the checking procedure, the LED turns off to show
the system is working fine. If the LED remains lit after this time, the
device is not working properly. Try to re-flash the firmware by assigning a static IP address to the computer, then upgrade the firmware
again. If that doesn’t help, contact your dealer for further inspection.
3. I can’t browse through the Cable/DSL Router.
• Check if both ends of the network cable and power adapter are properly
connected. Check if the status LEDs on the front panel are functioning
properly.
• If using Windows 95 or Windows 98, check the TCP/IP setup on the
client side. Run "winipcfg" by clicking on the Start button, then selecting Run. The PC should have an IP address of 192.168.1.xxx ("xxx" is
from 2 to 254.) Subnet Mask is 255.255.255.0, the default gateway IP
55
EtherFast Cable/DSL Routers
should be the Router’s IP Address, and DNS (in "More".)
• Same as above, check the same setup values in the Status Monitor page
of the Cable/DSL Router.
4. When I enter a URL or IP address, I get a “Request timed out” error.
• Check to see if other PCs give you the same error message. If they do,
make sure that your workstations’ IP settings are correct: IP address,
Subnet Mask, Default Gateway and DNS Server data.
• If the PCs are configured correctly but still not working, check the
Cable/DSL Router. Make sure that it is connected and powered on.
Connect to the Router and check its settings. If you cannot connect to
it, check the LAN and power connections.
• If the Cable/DSL Router is configured correctly, check your Internet
connection. (DSL/cable modem, etc.) to see that it is working correctly.
5. I can’t obtain an IP address from my cable or DSL modem.
• Make sure that all of your cabling is properly connected and that all of
the Router’s WAN and LAN LEDs are lighting up.
• Power down your cable or DSL modem for a few seconds. Turn it back
on. After the modem goes through its self-test, check to see if you now
have an IP address.
• Make sure that your cable or DSL modem is DHCP-capable.
• You may have to enter the Host or Domain name in the Setup page of
the Router’s web-based utility. Go to page 33 for more information.
• Your ISP may require MAC Addresses. Check with your ISP. This
address can be obtained in the Status screen of the Router’s Web-based
Utility.
6. I can’t access my email or the Internet.
• Some ISPs,especially cable providers, configure their networks so that
you don’t have to enter a full Internet address into your web browser or
e-mail application to reach your home page or receive your e-mail.
• If your Internet home page address is something very simple, such as
“www”, instead of “www.linksys.com”, or your e-mail server’s address
is something like “e-mail” or “pop3”, instead of “pop.mail.linksys.com,”
you won’t be able to properly configure your Cable/DSL Router until
you determine the actual Internet addresses of your Web and e-mail
connections.
• You must obtain this information before connecting the Router to your
network. To do so, you can ask your ISP, or turn to page 61 to learn
how to find this data yourself by “pinging” your Router for an IP
address.
56
Instant Broadband Series
How many IP addresses can the Cable/DSL Router support? The Router supports a maximum of 253 IP addresses.
Does the Cable/DSL Router support ICQ send files? Yes, with the following fix:
ICQ menu-> preference -> connections tab-> check "I am behind a firewall
or proxy," and set the firewall time-out to 80 seconds in the firewall setting.
The Internet user can then send a file to a user behind the Router.
Is IPSec Pass-Thru supported by the EtherFast Cable/DSL Router? Yes, it is a
built-in feature that the Router automatically enables.
How do I get Napster to work with the Router? Napster is fully compatible
with the Router and requires no special settings.
Where is the Cable/DSL Router installed on the network? In a typical environment, the Router is installed between the Cable/DSL Modem and the LAN.
Plug the Cable/DSL Router into the cable or DSL modem's Ethernet port.
I set up an Unreal Tournament server, but others on the network cannot join.
What do I do? If you are running a dedicated Unreal Tournament server, you
must create a static IP address for each of the network’s PCs and forward
ports 7777, 7778, 7779, 7780, 7781, and 27900 to the IP address of the
server. If you want to use the UT Server Admin, forward another port (8080
usually works well), then in the [UWeb.WebServer] section of the server.ini
file, set the ListenPort to 8080 (to match the mapped port above) and
ServerName to the IP assigned to the Router from your ISP.
Frequently Asked Questions
Does the Cable/DSL Router support IPX or AppleTalk? No. TCP/IP is the only
protocol standard for the Internet and has become the global standard for
communications. IPX, a NetWare communications protocol used only to
route messages from one node to another, and AppleTalk, a communications
protocol used on Apple and Macintosh networks, can be used from LAN to
LAN connections, but those protocols cannot connect from WAN to LAN.
Does the WAN connection of the Cable/DSL Router support 100Mbps Ethernet?
Since broadband Internet connections like cable and DSL do not exceed
10Mbps, the Cable/DSL Router’s current hardware design only supports
10Mbps Ethernet on its WAN port. It does support 100Mbps through the
built-in auto-sensing Fast Ethernet 10/100 Switch on the LAN side of the
Router. (for the 3 and 4-Port Routers only)
What is Network Address Translation (NAT) and what is it used for? Network
Address Translation (NAT) translates multiple IP addresses on the private
LAN to one public address that is sent out to the Internet. This adds a level
of network security since the addresses of PCs connected to the private
LAN is never transmitted over the Internet. Furthermore, NAT allows the
Cable/DSL Router to be used with low-cost Internet accounts, such as DSL
or cable modems, where only one TCP/IP address is provided by the ISP.
The user may have 253 private addresses behind this single address provided by the ISP.
Does the Cable/DSL Router support any operating system other than Windows
95, Windows 98, Windows 2000, or Windows NT? Yes, but Linksys does not
provide technical support for setup, configuration or troubleshooting of any
non-Windows operating systems at this time.
57
EtherFast Cable/DSL Routers
Can multiple gamers on the LAN log on to one game server and play simultaneously with just one public IP address? It depends on which network game
you’re playing, and/or what kind of game server you are using. For example, Unreal Tournament does support multi-login with just one public IP
address.
How do I get Half-Life: Team Fortress to Work with the Router? The default
client port for Half-Life is 27005. The PCs on your LAN must have
"+clientport 2700x" to the HL shortcut command line; the x would be 6, 7,
8, and on up. This lets multiple PCs connect to the same server.
One exception: Version 1.0.1.6 won't let multiple PCs with the same CD
key connect at the same time, even if they’re on the same LAN (not a problem with Version 1.0.1.3). For hosting games, the HL server does not need
to be in the DMZ. Just forward port 27015 to the local IP of the server PC.
There remains, however, a problem with people being booted after a few
minutes with an "illegible server” message.
How can I block corrupted FTP downloads? If you are experiencing corrupted
files when you download a file with your FTP client, try using another FTP
program.
My Web pages hang (distorted), I get corrupted downloads, or nothing but junk
characters are being displayed on the screen. What do I do? Force your NIC
58
Instant Broadband Series
to 10Mbps or half duplex mode, and turn off the "Autonegotiate" feature on
it temporarily. (To do this, go to the Network Control Panel, in your
Ethernet Adapter's Advanced Properties tab). Check our web site at
www.linksys.com for more information.
If all else fails in the installation, what can I do? Reset the Router by holding
down the Reset button for at least three seconds and reset your cable or
DSL modem by powering the unit off and then on. Obtain and flash
(upload) the latest firmware release available on the Linksys website,
www.linksys.com.
How will I be notified of new Router firmware upgrades? All Linksys firmware
upgrades are posted on the Linksys website at www.linksys.com, where
they can downloaded for free. The Router's firmware can be upgraded with
TFTP programs. If your Router’s Internet connection is working well, there
is no need to download a newer firmware version, unless that version contains new features that you would like to use. Downloading a more current
version of Router firmware will not enhance the quality or speed of your
Internet connection, and may disrupt your current connection stability.
with a static IP address if you want to use DMZ Hosting.
If DMZ Hosting is used, does the exposed user/PC share the public IP address
with the Router? No.
Does the Router pass PPTP packets or actively route PPTP sessions? The
Router allows PPTP packets to pass through.
What is the maximum number of users supported by the Router? The Router
supports up to 253 users.
Is the Router cross-platform compatible? Any platform that supports Ethernet
and TCP/IP is compatible with the Router.
How many ports can be simultaneously forwarded? Theoretically, the Router
can establish 520 sessions at the same time, but you can only forward 10
ranges of ports.
Does the Router replace a modem? Is there a cable or DSL modem in the
Router? No, this version of the Router must work in conjunction with a
cable or DSL modem.
Does the Cable/DSL Router support IPsec? A new IPsec Pass Through features
is now available in firmware versions 1.30 and later, which can be downloaded at www.linksys.com.
Which modems are compatible with the Router? This Router is compatible
with virtually any cable or DSL modem that supports Ethernet.
Does the Router function in a Macintosh environment? Yes, but the Router's
setup pages are accessible only through Internet Explorer v4.0 or Netscape
Navigator v4.0 or higher for Macintosh PCs.
What are the advanced features of the Router? The Router's advanced features
include IP Filtering, IP Forwarding, Dynamic Routing, Static Routing, DMZ
hosting, and Logging.
What type of firewall does the Router have? The Cable/DSL Router uses NAT
(Network Address Translation) and TCP/IP port inspections.
What is the maximum number of VPN sessions allowed by the Router?
One VPN session at a time.
Does the Router do stateful packet inspection? No.
How big is the memory buffer on the Router? 512KB.
I cannot get the web configuration screen for the Router. What can I do? You
may have forgotten to remove the proxy server settings on your Internet
browser, e.g., Netscape Navigator or Internet Explorer. Or, remove the dialup settings on your browser. Check your browser documentation.
Does Linksys provided syslog support? No, Linksys does not currently provide
syslog support.
What is DMZ Hosting? Demilitarized Zone (DMZ) allows one IP address (or
computer) to be exposed to the Internet. Some applications require multiple
TCP/IP ports to be open. It is recommended that you set your computer
59
EtherFast Cable/DSL Routers
How can I check whether I have static or DHCP IP Addresses? Consult your ISP
to obtain this information.
How do I get mIRC to work with the Router? Under the Fowarding tab, set port
forwarding to 113 for the PC on which you are using mIRC.
60
Instant Broadband Series
Appendix
How to Ping Your ISP’s E-mail & Web Addresses
Almost all Internet addresses are configured with words and characters, i.e.,
www.linksys.com, www.yahoo.com, etc. However, these Internet addresses are
actually assigned to IP addresses, numerical values which are the true
addresses on the Internet.
For example, www.linksys.com is actually 206.135.116.3. Type it into your
web browser and you will bring up the Linksys home page every time.
However, IP and web addresses are sometimes long and hard to remember.
Because of this, certain ISPs will shorten their server addresses to single
words or codes on their customers’ web browser or e-mail configurations.
If your ISP’s e-mail and Web server addresses are configured with single
words (“www”, “e-mail”, “home”, “pop3”, etc.) instead of complete Internet
addresses or IP addresses, your Router may have problems sending or receiving email and accessing the Internet. This happens because your Router has
not been configured by your ISP to accept their abbreviated server addresses.
The solution is to find the true web addresses behind your ISP’s code words.
You can find these IP and web addresses of your ISP’s servers by “pinging”
them.
If you do not have your ISP’s web and e-mail IP addresses,
you must either get them from your ISP or follow these steps
prior to connecting your Cable/DSL Router to your network.
EtherFast Cable/DSL Routers
Step One: To Ping an IP Address
The first step to determining your ISP’s web and e-mail server address is to
ping its IP Address.
1. Power on the PC and the cable or DSL modem, and restore the network configuration set by your ISP if you have since changed it.
2. Click Start, then Run, and type "command" to bring up the DOS window.
3. At the DOS command prompt, type "ping mail" (assuming that the
location for which you’re trying to find an IP address is configured as
“mail”). Press Enter. Information such as the following data, taken from
a ping of Microsoft Network’s email server, will be displayed.
C:\>ping mail
Pinging mail [24.53.32.4] with 32 bytes of data:
Reply
Reply
Reply
Reply
from
from
from
from
24.53.32.4:
24.53.32.4:
24.53.32.4:
24.53.32.4:
bytes=32
bytes=32
bytes=32
bytes=32
time<10ms
time<10ms
time<10ms
time<10ms
TTL=128
TTL=128
TTL=128
TTL=128
Ping statistics for 24.53.32.4:
Packets: Sent = 4, Received = 4, Lost = 0 (0%
loss),
Approximate round trip times in milli-seconds:
Minimum = 0ms, Maximum = 0ms, Average = 0ms
4. Write down the IP address returned by the ping command. (In the
example above: 24.53.32.4.) This IP address is the actual IP address of
the server “mail”, or any other word or value you have pinged.
61
62
Instant Broadband Series
EtherFast Cable/DSL Routers
Step Two: Pinging for a Web Address
Installing the TCP/IP Protocol
While the IP address returned above would work as your e-mail server
address, it may not be permanent. IP addresses change all the time. Web
addresses, however, usually don’t. Because of this, you’re likely to have less
problems by configuring your system with web addresses rather than IP
addresses. Follow the instructions below to find the web address assigned to
the IP address you just pinged.
Follow these instructions to install the TCP/IP protocol on one of your PCs
only after a network card has been successfully installed inside the PC. These
instructions are for Windows 95 and Windows 98. For TCP/IP setup under
Windows NT, see your Windows NT manual.
1. At the DOS command prompt, type “ping -a 24.53.32.4”, where
24.53.32.4 is the IP address you just pinged. Information such as the following data will be displayed.
2. Double-click on the Network icon to bring up your Network window.
Select the Configuration tab.
1. Click the Start button. Choose Settings, then Control Panel.
C:\>ping -a 24.53.32.4
Pinging mail.msnv3.occa.home.com [24.53.32.4] with
32 bytes of data:
Reply
Reply
Reply
Reply
from
from
from
from
24.53.32.4:
24.53.32.4:
24.53.32.4:
24.53.32.4:
bytes=32
bytes=32
bytes=32
bytes=32
time<10ms
time<10ms
time<10ms
time<10ms
TTL=127
TTL=127
TTL=127
TTL=127
Ping statistics for 24.53.32.4:
Packets: Sent = 4, Received = 4, Lost = 0 (0%
loss),
Approximate round trip times in milli-seconds:
Minimum = 0ms, Maximum = 0ms, Average = 0ms
2. Write down the web address returned by the ping command. (In the
example above: mail.msnv3.occa.home.com.) This web address is the web
address assigned to the IP address you just pinged. While the IP address
of “mail” could change, it is likely that this web address will not.
3. Click the Add button.
4. Double-click on Protocol.
5. Highlight Microsoft under the list of manufacturers.
3. Replace your ISP’s abbreviated server address with this extended web
address in the corresponding Internet application (web browser, e-mail
application, etc.).
Once you have replaced the brief server address with the true server address,
your Router should have no problem accessing the Internet through that
Internet application.
63
64
Instant Broadband Series
6. Find and double-click TCP/IP in the list to the right (below).
EtherFast Cable/DSL Routers
Twisted-Pair Cabling
There are different grades, or “categories,” of twisted-pair cabling. Category
5 is the most reliable and most highly recommended. Category 3 is a good
second choice. Straight-through cables are used for connecting computers to a
hub. Crossover cables are used for connecting a hub to another hub (there is
an exception: some hubs have a built-in uplink port that is crossed internally,
which allows you to link or connect hubs together with a straight-through
cable instead).
You can buy pre-made Category 5
cables, or cut and crimp your own.
Category 5 cables can be purchased or
crimped as either straight-through or
crossover. Inside a Category 5 cable
are 8 thin, color-coded wires inside
that run from one end of the cable to
the other. All 8 wires are used. In a
straight-through cable, wires 1, 2, 3,
and 6 at one end of the cable are also
wires 1, 2, 3, and 6 at the other end. In
a crossover cable, the order of the
wires change from one end to the
other: wire 1 becomes 3, and 2
becomes 6. See the diagrams on the
next page for more
detailed information on
straight-through and
7. After a few seconds, the main Network window will appear. The TCP/IP
Protocol should now be listed.
crossover cabling.
8. Click OK. Windows may ask for original Windows installation files.
Supply them as needed, e.g., D:\win98, D:\win95, c:\windows\options\cabs.
9. Windows will ask you to restart the PC. Click Yes.
To determine which wire is wire number 1, hold the cable
so that the end of the plastic RJ-45 tip (the part that goes
into a wall jack first) is facing away from you. Face the
clip down so that the copper side faces up (the springy clip
will now be parallel to the floor). When looking down on
the copper side, wire 1 will be on the far left.
The TCP/IP Installation is now complete.
65
66
Instant Broadband Series
Crimping Your Own Network Cables
• Straight-Through Cabling
EtherFast Cable/DSL Routers
4-Port Router Specifications
Model Number
Standards
Protocol
Ports
Speed
Cabling Type
Topology
LED Indicators
BEFSR41
IEEE 802.3 (10BaseT), IEEE 802.3u (100BaseTX)
CSMA/CD
(LAN) Four 10/100 RJ-45 switched ports
(WAN) One 10Base-T Ethernet RJ-45 port
for the cable or DSL modem
(LAN) 10/100Mbps, (WAN) 10Mbps,
(10BaseT) UTP Category 3 or better
(100BaseTX) UTP Category 5 or better
Star
Power,
(LAN) Link/Act, Full/Coll, 100
(WAN) Link, Act, Diag
Environmental Specifications
• Cross-Over Cabling
67
Dimensions
Unit Weight
Power Input
Certifications
Operating Temperature
Storage Temperature
Operating Humidity
Storage Humidity
186mm x 154mm x 48mm (7.31” x 6.16” x 1.88”)
13.4 oz. (0.42 Kg)
External, 9V AC, 1 Amp
FCC Class B, CE Mark Commercial
0°C to 40°C (32°F to 104°F)
-20°C to 70°C (-4°F to 158°F)
10% to 85%, Non-condensing
5% to 90%, Non-condensing
68
Instant Broadband Series
1-Port Router Specifications
3-Port Router Specifications
Model Number
Standards
Protocol
Ports
Model Number
Standards
Speed
Cabling Type
Topology
LED Indicators
69
EtherFast Cable/DSL Routers
BEFSR11
IEEE 802.3 (10BaseT), IEEE 802.3u (100BaseTX)
CSMA/CD
(LAN) One 10BaseT/100BaseTX RJ-45 port
(WAN) One10BaseT Broadband Uplink port
(WAN) 10Mbps (10BaseT Ethernet)
(LAN) 10Mbps (10BaseT Ethernet) or
100Mbps (100BaseTX Fast Ethernet)
(10BaseT) UTP Category 3 or better
(100BaseTX) UTP Category 5 or better
Star
Power,
(LAN) Link/Act, Full/Coll, 100
(WAN) Link, Act, Diag
Protocol
Ports
Speed
Cabling Type
Topology
LED Indicators
BEFSRU31
IEEE 802.3 (10BaseT), IEEE 802.3u
(100BaseTX)
CSMA/CD
(LAN) Three 10/100 RJ-45 Switched ports
(WAN) One 10Base-T Ethernet RJ-45 port
for the cable or DSL modem
(LAN)10/100Mbps
(WAN) 10Mbps
(10BaseT) UTP Category 3 or better
(100BaseTX) UTP Category 5 or better
Star
Power
(LAN) Link/Act, Full/Coll, 100
(WAN) Link, Act, Diag
(USB) USB
Environmental Specifications
Environmental Specifications
Dimensions
Unit Weight
Power Input
Certifications
Operating Temperature
Storage Temperature
Operating Humidity
Storage Humidity
Dimensions
Unit Weight
Power Input
Certifications
Operating Temperature
Storage Temperature
Operating Humidity
Storage Humidity
186mm x 154mm x 48mm (7.31” x 6.16” x 1.88”)
12.6 oz. (0.35kg)
External, 7.5V DC, 7Amps
FCC Class B, CE Mark Commercial
0°C to 40°C (32°F to 104°F)
-20°C to 70°C (-4°F to 158°F)
10% to 85%, Non-condensing
5% to 90%, Non-condensing
186mm x 154mm x 48mm (7.31” x 6.16” x 1.88”)
13.4 oz. (0.42 Kg)
External, 9V AC, 1 Amp
FCC Class B, CE Mark Commercial
0°C to 40°C (32°F to 104°F)
-20°C to 70°C (-4°F to 158°F)
10% to 85%, Non-condensing
5% to 90%, Non-condensing
70
Instant Broadband Series
EtherFast Cable/DSL Routers
Customer Support
For help with the installation or operation of your Instant Broadband
EtherFast Cable/DSL Router, contact Linksys Customer Support at one of the
phone numbers or Internet addresses below.
Information
Customer Support
Fax
Email
Web site
FTP site
800-546-5797 (1-800-LINKSYS)
800-326-7114
949-261-1288
949-261-8868
[email protected]
http://www.linksys.com
fttp://ftp.linksys.com
www.linksys.com
© Copyright 2000 Linksys, All Rights Reserved.
71
73