1
Use & Care Guide
Manual de Uso y Cuidado
English/ EspaF,
o(
Model!Mode(o:
116_3t810
Kenmore
P/N
Soars
COtZDMVIOU00
Brands
- I(.CO1ZDMVZOUO
Managoman_
Corpora_(on_
Hoffmon
(L 60179
USA
v,'ww,k_nmor _.com
www_oar_om
Estoles_
Before Using Your New
Vacuum Cleaner .................
Packing List ....................
Kenmore Vacuum Cleaner Warranty
Important Safety Instructions .........
Paris and Features
.................
Assembly Instructions ..............
Handle
......................
Tools .........................
Power Cord ......................
Operating
Instructions .............
Power Cord .......................
2
2
. 3
4
5
6
6
7
8
Attachments ...................
Attachment
Use Table ..........
Vacuuming
Tips ................
t3
Performance/Safety
Features _, 14_15
Vacuum Cleaner Care ............ 16
9
9
Releasing the Handle
...........
OFF/FLOOR/CARPET
Switch ......
Pile Height Selection
............
Suggested Pile Height Settings .....
Performance Indicator
............
12
13
10
10
11
tl
11
Vacuum Cleaner Storage ........
16
Cleaning Exterior and Attachments
.16
Dust Bag Replacement ...........
17
Motor Safety Filter Cleaning ......
18
Exhaust Filter Replacement ..........
18
Dust Bag Cover Replacement
.....
19
Agitator
Cleaning .............
19
Clog Removal
.................
19
Troubleshooting
.................
21
Master Protection Agreements
.......
22
Requesting Assistance
Or Service ................ Back page
Please read this guide. It will help you assemble and operate your new Kenmore
cleaner tn the safest and most effective way,
vacuum
For more information about vacuum cleaner care and operation, call your nearest Sears
Parts and Repair Center or the Vacuum Cleaner Help Line listed on the cover of this guide,
You will need the complete model and serial numbers when requesting informatlom Your vacuum cleaner's model and serial numbers are located on the Model and Serial Number Plate.
Use the space below to record the model number and serial number of your new Kenmore
vacuum cleaner,
Model Nor
Serial
No.
Date of Purchase
Keep this book and your sales check (receipt) in o safe place for future reference.
I
PACKING
Your KENMORE
VACUUM
nents assembled
separately
1
I
1
t
]
LIST
CLEANER ispackaged
with the following
parts
and compo-
in the certain
Upright Vacuum Cleaner
Handle
Crevice Tool
Combination Brush
1
1
1
1
Pet Handt Mate TM
Telescoping Wand
Use & Care Guide
Repair Parts List
Each of the above assemblies are shown in detait inside the Repair Parts List,
Vacuum
Cleaner Help Line:
1-877-531-7321
8.00am-5:00pm
EST, M-F
(U.S.A. andCanada)
One Year Limited Warranty
When assembled, operated and maintained according to al! instructions supplied with
the product, if this vacuum cleaner fails due to a defect in material or workmanship
within one year from the date of purchase, return it to any Sears store, Sears Parts &
Repair Center or other Kenmore outlet for free repair°
If this vacuum cleaner is used for other than private family purposes, this warranty
applies for only 90 days from the date of purchase.
This warranty covers only defects in material and workmanship. Sears will NOT pay
for:
1_ Expendable items that can wear out from normal use, including but not limited to
filters, belts, light bulbs, and bags.
2_ A service technician to instruct the user in correct product assembly, operation or
maintenance.
3o A service technician to clean or maintain this product.
A. Damage to or failure of this product If it is not assembled, operated or maintained
according
to all instructions supplied with the product.
5. Damage to or failure of thIs product resulting from accident, abuse, misuse or use for
other than its intended purpose_
6o Damage to or failure of this product caused by the use of detergents, cleaners,
chemicals or utensils other than those recommended in all instructions supplied with
Z
the product.
Damage to or failure of parts or systems resulting
made to this product.
from unauthorized
Disclaimer of implied warranties; limitation of remedies
Customer's sole and exclusive remedy under this limited warranty
modifications
shall be product
repair as provided herein° Implied warranties, including warranties of merchantability
or
fitness for a particular purpose, are limited to one year or the shortest period allowed
by lawo Sears shall not be liable for incidental or consequential damages_ Some states
and provinces do not allow the exclusion or limitation of incidental or consequential
damages, or limitations on the duration of implied warranties of merchantability or
fitness, so these exclusions or limitations may not apply to you_
This warranty
Canada.
applies only while this vacuum cleaner is used in the United States and
Thiswarranty gives you specific legal rights, and you may also have other rightswhich
vary from state to state,
Sears Brands Management Corporation., Hoffman Eslates, IL 60179
Sears Canada lnc_, Toronto_ Ontario, Canada M5B 2BB
i i i
i illll
i,illll,
HI,,I,I,,ILI,
Read all instructions in this guide before assembling or using your vacuum cleaner.
kWARNING:
Your safety is important to use To reduce lhe risk of fire, electrical shock, injury to
persons or damage when using your vacuum cleaner, follow basic safety precautions including the following:
Use your vacuum cleaner only as
described in this guide. Use only with
Sears recommended attachments°
Keep hair, loose clothing, fingers, and eli
parts of body away from openings and
moving parts_
Disconnect electrical supply before
servicing or cleaning out the brush area°
Failure to do so could result in the brush
unexpectedly starting, causing persona_
injury from moving parts°
Turn off all controls before unplugglng_
Do not leave vacuum cleaner when
plugged In. Unplug from outlet when not
in use and before performlng maintenance.
To reduce the dsk of electrical shock - Do
not use outdoors or on wet surfaces_
Do not allow to be used as a toy. Close
attention Is necessary when used by or
near children_
Do not use with a damaged cord or plugo
If vacuum cleaner is not working as it
should, has been dropped, damaged, left
outdoors, or droppedtn water, return it to
a Sears Service Centen
Do not pull or carry by cord_ use cord as
a handle, close a door on cord, or pull
cord around sharp edges or corners.. Do
not run vacuum cleaner over cord. Keep
cord away from heated surfaces,
Do not unplug by pulling on cord, To
unplug, grasp the plug, not the cord_
Do net handle plug or vacuum cleaner with
wet hands°
Do not put any objects Into openings_
Do not use with any opening blocked;
keep free of dust, lint, hair, and anything
that may reduce air flowo
Use extra
care
when cleaning
on staffs.
Do not puton choirs, tables,etc, Keep on
floor°
Do not use vacuum cleaner to pick up
flammable or combustible liquids
(gasoline, cleaning fluid, perfumes, etc.), or
use in areas where they may be present.
The fumes from these substances can
create a fire hazard or explosion.
Do net pick up anything that is burning or
smoking, such as cigarettes, matches, or
hot ashes_
Do not use vacuum cleaner without dust
bag and/or filters Tn placer
Always replace the dust bag after
vacuuming carpet cleaners or freshener,
powders, and fine dush These products
clog the filters, reduce airflow and can
cause damage to the vacuum cleaner.
Failure to replace the dust bag could
cause permanent damage to the vacuum
cleaner_
Do not use the vacuum cleaner to pick up
sharp hard objects, small toys, pins, paper
clips, etc. They may damage the vacuum
cleaner or dust bag_
Unplug before connecting Pet Handt
MateTMo
You are responsible for making sure that
your vacuum cleaner is not used by anyone
unable to operate it properly.
SAVETHESEHNSTRUCTIONS
_roper assembly and safe use of your vacuum cleaner are your responstbilifles_ Your vacuun
:leaner is lntencled for Household use. Read this Use & Care Guide carefully for important
sse and safety information. This guide contains safety statements under warning and caution
;ymbols_
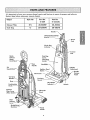
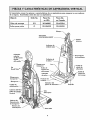
It is important
to know your vacuum cleaner's parts and features to assure its proper and safe use,=
Review these before using your vacuum cleaner_
Objecl
Style No.
Part No°
in USA
Exhaust Filter
Dust
Bag
EF-1
O
Part Nor
in Canada
20-86889
20-4032,4
20-50690
20-50510
Handle_
OFF/FLOOR/CARPET
Dust Bag
COVer
(Dusl Bacj
Instd_
Carrying
Furniture
Guard
Nozzle
Exhc=ust
Ff|ter Cover
Holder
Please pay special attention to these hazard alert boxes, and foffow any
_
instructionsgiven°
WARNING
statements
you to
such hazards
fire,
electric
shock, burns
and personal
Injury. alert
CAUTION
statements
alert as
you
to
suchhazards as personal injury and/or property damacje_
iii
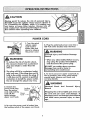
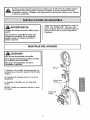
Before assembling the vacuum cleaner,
check the PACKING LIST. Use this list to
verify that you have received all the
components of your new Kenmore
_i_ WARNING
Electrical Shock Hazard
Vacuum
cleaner.
DO NOT plug inlo the electrical supply
until the assembly is complete. Failure
to do so could result in eletrlcal shock or
injury.
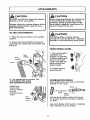
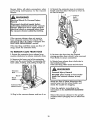
HANDLE
CAUTION
Do not overtighten.
Overtlghtenlng
could strip the screw
holes_
Do not operate
the vacuum cleaner
withoul the screw in place.
1. Remove the handle screw from the
body of the vacuum cleaner°
2. Position the handle assembly as shown
in the illustration,
3. Using a screwdriver, tighten handle
screw,,
NOTE: It may be necessary to adjust the
handle slightly.
I
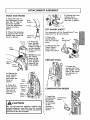
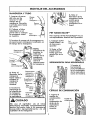
ATTACHMENT
ASSEMBLY
]
6. Rotate the hose
release lever
upwards to lock
the hose in place.
HOSE AND WAND
1. insert the tab on
the telescopic wand
into the "J"slot
on
the hose handle.
Twist the telescopic
wand 1o lock in
place.
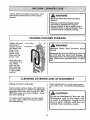
PET HANDI MATE TM
2_ Place the telescopic wand in the wand
holder and route the
hose as shown.
For operation of Pet Handi Mate
separate Use & Care Guide.
1. Place Pet
Handi Mate TM
into the storage
3. Snap the
hose handle
Into the hose
holder located
on the handle
of the vacuum
cleaner.
lever down
and
the
hose route
release
hose as
shown,
5_ Snap the
hose into the
hose cuff on
the side of
the vacuum
cleaner
Mate'"
CREVICE TOOL
1. insert the
crevice toof into
the holder on the
side of the vacuum cleaner as
shown,
_
Hose"-'_'F_
Teles_ap;c J_
Wand---_l_-
COMBINATION
Wand
I Jt
Holder---J I J
Hose
Pet
2_ Rotate the Pet
Handi Mate r_
back until it
snaps into place_
f
Hose
cuff_-._
BRUSH
._'_
Laver_-"_'k_
.
i
Do not operate the agitator
without the|
wand properly
inserted into the wand|
holder and the hose handle properly|
secured in the hose holder
see
area_
NOTE: Be sure
the raised
edge of the
hose handle
rests against
edge of the
hose holder,
4. Rotate the
TM
1_ Insert the
combination
brush into
the holder
on the back
of the
Vacuum
cleaner as
shown.,
J
Combln_tlon
Brush
K
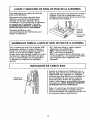
POWER CORD
1, Place the wand into the wand holder
and the hose handle into the hose holder°
NOTE: The wand and hose handle must
be in place before wrapping the power
cord°
2. Make sure that cord hook is in upright
position as shown,
3_ Wrap power cord loosely around cord
hook and carry handle°
4_ Lock power cord plug onto the power
cord.
WARNING
Electrical
Hazard
iWrapplng
Shock
and
Personal
Injur_
the cord Ioo tightly puts stress m
the cord and can cause cord damage, A
damaged cord is an eteclrical shock hazard
and
iage.
could cause personal injury
...........
or dam.
Power
Cord
\
_CAUTION
Moving parts! To reduce the risk of personal injury,
DO NOT touch the agitator when vacuum cleaner ts
on. Contacting the agffator while it is rotating
can
cut, bruise or cause other injuries° Always turn off
and unplug from electrical outlet before servicing.
Use caution when operating near children°
I
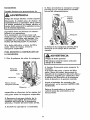
POWER CORD
I. Turnthe quick
release upper
cord hook to
either side and
down to release
the power cord,
4. Plug the polarized power cord into a
120 Volt outlet located near the floor.
WARNING
Personal Injury and Product Damage
Hazard
_WARNING
To reduce the risk of electric shock,
this vacuum cleaner has a polarized
plug (one blade is wider than the
other).
The plug will fit in a polarized outlet
only one wav_ If the plug does not fit
fully in the outlets reverse the plug_ If
it still does not fit, contact a qualified
technician to install the proper outlet.
Do not change the plug in any way.
When any abnormallty!failure
occurs,
stop using the product immediately
and disconnect the power plug_
)0 NOT use outlets above counters°
Damage from cord to items in
surrounding area could occur°
5. To store cord, turn upper cord hook to
the up position, then wrap cord loosely
around quick release cord hook and
carrying handle_
_WARNING
2_ Detach the
power cord plug
from the power
cord and pull the
cord off the
quick release
upper cord hook°
Locking
Powor
Cord-..._-b_
3o Be sure the power cord is locked into
the locking notch of the upper cord hook.
Electrical
Hazard
Shock
And
Personal
Injury
Wrapping the cord toe tightly puls stress on
the cord and can cause cord damage, A
damaged cord is an electrical shock hazard
and could cause personal injury or damage_
I
RELEASING THE HANDLE
I
Release the handle by pressing down on
the handle release pedal wlth your foot
and pul|ing back and down on the handle
with your hand,
Note: The ogttator does not rotate when
the vacuum cleaner is in the upright posttion_
I
OFF/FLOOR/CARPET
To start the vacuum cleaner, slide the
OFF!FLOOR/CARPET switch from the OFF
position to the FLOOR or CARPET position.
ill
i
ii
,_
i,ill
ii ii
OFF - turns both
suction and
brush motors off.
OFF/FLOOR/
CARPET
FLOOR - turns
Selector
on the suction
motor only, In
this position the
brush assembly
does not
revolve. Use
this setttncj for cleaning hardwood and tile
floors and when any attachments (tools)
are used°
CAUTION
To stop the vacuum cleaner, slide the
ON/FLOOR/CARPET switch to the OFF
_osilion,
i
]
illlll,lll
Refer to your carpet manufacturers
cleaning recommendations_ Some more
delicate carpets may require that they
be vacuumed with lhe agitator turned
off, to prevent carpet damage,
illl
SWITCH
CARPET- turnson boththe suctionand the
brushmotors,
i
Note: The acjttator does not rotate when
the vacuum cleaner is in the upright positiono
_CAUTION
Do not allow vacuum cleaner to remain
in one spot far any length of time when
the agitator is turning. Damage to carpet may occur.
I0
PILE HEIGHT SELECTION AND SETTING
To select a pile height setting:
Select a pile height setting by pressing
the HEIGHT ADJUST pedal on the side of
the nozzle_ The pile height setting shows
on the indicator window_ See SUGGESTED
PILE HEIGHT SETTINGS.
EIGHT
ADJUST
Pedal
color
Window
Attention: Refer to your carpet
manufacturers
cleaning
recommendations.
Some more delicate
carpets may require that they be
vacuumed with the agitator turned off to
prevent carpet damage°
SUGGESTED PILE HEIGHT SETTINGS
There are four (4) pile height settings on
the vacuum cleanen
l:or best deep down
cleaning, use the XLO setting, However,
you may need to rals_ the helght to make
some jobs easier, such as scatter rugs and
some deep pile carpets, and to prevent
the vacuum cleaner from shutting off.
Suggested
settings are:
HI - Shag, deep pite, or scatter rugs_
MED - Medium to deep pile.
LO - Low to medium pile_
XLO - Most carpets, bare floors, and
delicate carpets that require agitator to
be turned off.
CHECK BAG INDICATOR
When the vacuum cleaner _srunning with
normal air flow, the light on the CHECK
BAG indicator Is off. The light comes on
whenever the airflow becomes blocked_ If
that occurs, check the d_sposable dust bag,
motor safety filter and other possible ctog
locations shown in CLOG REMOVAL.
NOTE: It is normal for the CHECK BAG
indicator to come on when using certain
attachments, due to reduced airflow
through attachment=, No maintenance is
required°
ATTACHMENTS
CAUTION
,_
DO NOT use the hose when the vacuum
]
CAUTION
cleaner is in the use position.
Always return the vaccum cleaner to the
upright position before using the hose
When using attachments, be careful not
to overextend the stretch hose when
reaching. Trying to reach beyond the
hose stretch capability could cause the
vacuum cleaner to tip over.
and attachments°
illlll,
TO USE ATTACHMENTS
1. Place the vacuumcleaner in the upright
poslt|on_
DO NOT pull the vacuum cleaner
around the room by the hose_ Property
2_ Remove the hose handle and wand by
removing hose handle from hose holder and
lifting up_
damage
or personal injury could result,
TELESCOPING WAND
I, The wand length is
adjustable and
requires no assembly.,
To adjust, simply push
down on the wand
handre and slide the
upper wand to the
desiredheight.
===
===
mum
2, Extend wand to
desired length_
3, Use attachments as needed,
ATTACHMENT USE TABLE.
FOR ADDITIONAL REACH
See
COMBINATION BRUSH
The combination brush can be attached
directly to the wand.
Rotate hose
release lever
down to release
hose for
maximum hose
reach°
Combinallon _
Brush
Bru=h J
Holder
_
Use the brush holder w|thout the brush
for greater suction on furniture cushions
or stairs°
Use brush holder with brush for cleaning
loose surfaces suchas drapes.
12
I
ATTACHMENT
USE TABLE
I
CLEANING AREA
ATTACHMENT
Furntiuro*
CREVICE TOOL
4
COMB,..TIO.
B.US."
......
4
PETHAND/MATE"
€"
l
Belween
Cushtons*
...........
Sfaff_
4
I
Floors
,/
•/ = Applicable
* Always clean attachments before using on fabrics.
**Use the brush holder without the brush for greater suction on furnituce cushTonsor slatrs.
Use brush holder with brush for cleaning loose surfaces suchas drapes,
Carpet edges
Guide either side or the front
nozzle along the wall baseboard,
ii,
of the
ii
Ill IIII1,,"_'
'"
' " ,,,
WARNING
Personal Injury
Stairs
Set handle In full upright position,
Agitator stops rotatlng_ Use the crevice
tool, combination brush or Pet Handi
MateT_
Hazard
Use care if vacuum cleaner is placed on
stairs, If it fails, personal injury or properly damage could result.
Unit Tipping
When using the attachments
keep the
extension hose release lever in the locked
position when possible. This helps to keep
the vacuum cleaner from tipping over
when stretching the hose, If additional
hose is needed then unlock the release
Fever and pull out additional
hose. Use
caution not to tip over vacuum cleaner.
For best cleaning results, keep the airflow
passage clear, Unplug the vacuum
cteaner from the outlet before checktng_
See CLOG REMOVAL
_3
MOTOR PROTECTION SYSTEM
Motor Profector
Thermal Protector - Suction Motor
This vacuum cleaner has a thermal
protector which automatically trips to
protect the vacuum cleaner suction motor°
If a clog prevents the normal flow of air
to the motor, the thermal protector turns
the motor off automatically. This allows
the motor to cool in order to prevent
possible damage to the vacuum cleaner°
This vacuum cleaner has a motor
protector by-pass valve which prevents
motor overheating and damager The
valve opens to provide cooling air when a
clog prevents normal air flow to the
vacuum cleaner suction moton You will
notice a change of sound as air rushes
through the valve opening.
Thermal Prolector - Agitator Motors
This vacuum cleaner has thermal
protectors which automatically trip to
protect the agitator motors,The therma!
protectors turn the motors off
automatically. This allows the motors to
cool in order to prevent possible damage
to the vacuum cleanen
To reset thermal protectors: Turn the
vacuum cleaner off and unplug the power
cord from the outlet to allow the vacuum
cleaner to cool and the thermal
protectors to reset.
To correct problem, install a new dust
bag, if using attachments, adjust to allow
for greater air flowo
NOTE: The motor protector may open
when using aflachments or when cleaning
new carpet due to reduced airflow
caused by the attachments themselves or
by new carpet llnt filling the dust bag
quickly.
CAUTION
Always return the vaccum cleaner to the
upright position before using the hose
and attachements_ Failure to do so may
result in overheating
of the agitator
motors and can cause the thermal
protectors to trip.
NOTE: Do not block motor protector.
...................
Check for and remove clogs, and replace
bag if necessary. See CLOG REMOVAL
section, Also check and replace any
clogged filters. Wait approximately
40-,50
minutes before restarting vacuum cleaner.
14
OPERATION
_WARNING
As you vacuum, the red indicator light
will come on and stay on as long as the
sensor detects a high concentration of
particles passing through the vacuum
cleaner,
Electrical Shock And Personal Injury
Hazard
Disconnect electrical suppty before performing maintenance to the vacuum
cleaner. Failure to do so could result in
electrical shock or personal injury from
vacuum cleaner suddenly slarting,
TO CLEAN DIRT SENSOR OPTICS
The dirt sensor optics consist of two optic
cells located inside the dust bag port_
Occasionally, it may become necessary
to clean the two optic cells to assure
maximum performance°
AGITATOR OVERLOAD
PROTECTOR
It is recommended the optic cells be
cleaned:
• When the red light stays on
continuously.
• When dirt or dust adheres to the
optic cells.
• Whenever the dust bag is removed_
The agitator has built-in protection
against motor damage should the
agitator jam. If the agitator slows down
or stops, the
protector
shuts off
agitator overload
the agitator motors.
The vacuum cleaner
suction motor will
continue to run,
ffese!
Agitator_..._.
Bullon
.,_/i_-_._L_L_ _-
To correct problem:
Turn off and unplug
vacuum cleaner,
remove obstruction, then press AGITATOR
RESET BUTTON,
Optic Ceils
NOTE: A MtNIMUM
OF 20 SECONDS
NEEDS TO PASS BEFORE RESETTING
OVERLOAD,
To clean the sensor, wipe the optic cells
with a soft, dry cloth_ Never use cleaners
or liquids as they can help speed the
recoatlng of the optic cells and make it
necessary to clean them much sooner
than normal, The dirt sensor area can be
reached by removing the dust bag,
If the problem persists, have the vacuum
cleaner serviced by a Sears or other
qualified technician°
DIRT SENSOR
The electronic dirt sensor is a feature
which will detect particles as they pass
through the vacuum cleaner.
The dirt sensor indicators are located on
the nozzle of the vacuum cleaner,
° When little or no dirt is present the
dirt sensor is green_
* With medium or heavy concentration
the dirt sensor is red°
13
Always follow all safety precautions when
performing maintenance to the vacuum
,_WARNING
cJeaner_
Electrical Shock And Personal injury
Hazard
Disconnectelectrical supply befere
servicing or cleaningthe vacuum
cleaner,Failureto de so couldresult in
electrlcalshockor personalinjury from
vacuumcleaner suddenlystarting.
VACUUM
Gather the cord
and wrap it
loosely around
the upper and
lower cord
hooks° Lock
power cord
plug onto the
power cord.
CLEANER STORAGE
Power Cord
WARNING
Cord Hoot
Electrical
Hazard
And
Personal
Injury
Wrapping the cord too tighflyputs stress on
the cord and can cause cord damage. A
damaged cord is an electrical sheck hazard
and could cause personal injury or dam-
Store the vacuum cleaner in a
dry, indoor
area, on the
floor with the
handle locked
in the upright
position.
CLEANING
Sheck
age.
EXTERIOR AND ATTACHMENTS
Unplug cord from "wall eutlet.
Wash attachments
rinse and air dry_
in warm soapy water,
Do net clean in dishwash-
er.
Clean exterior using a clean, soft cloth that
has been dipped in a solution of mild liquid
detergent and water, then wrung dry° DO
NOT drip water on vacuum cleaner. Wipe
dry after cleantng_
..........
Do not use attachments
if they are wet.
Atlachments
used in dirty areas, such
as under a refrigeralor,
should not be
used on other surfaces until they are
washed_ They could leave marks.
To reduce static electricityand dust buildup, wipe outer surface of vacuumcleaner
and attachments_
16
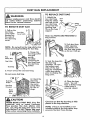
DUST BAG REPLACEMENT
......
............
TO REPLACE DUST BAG
!_ Unfold the
new dust bag_
Fold the safety
|Always unplug power cord from e|ectr|.
Jcal outlet before
performing
maintenance to the vacuum
cleaner.
new dust bag
away from the
TO REMOVE DUST BAG
fits on the bag
opening
supports, that
I. Pult on the
dust bag
cover latch
located on
the side of
the dust bag
cover°
Dust
Bag
"-- _ea,.Sa'e'lVab
///
"',
_
Note: See PARTS AND FEATURES for
Bag number.
OustBag
_Cove_Latch
_[/t
_b...
2. Push dust bag
collar opening
completely
over
the dust bag holder
as far as it will go_
NOTE: Do not pull on the bag safety stop
when removing/installlng
the dust bag.
c2oGrasp the
ust bag collar
and pull
gently_
carefully
removing the
dust bag from
the dust bag
holden
3, Tuck the bag into
the dust bag
chamber. Be sure
the bottom and
sides of the dust
bag are completely
within bag cavity
rior to closing the
ag cover.
Dust Bag
3o Throw away the used dust bag_
Do not reuse dust bag_
Dus! Bag
Holder
Dus! Bag
Chamber
4o Check the
dust bag
holder and
the motor
safety filter
for dirt or
4. Close the bag
coven You will
hear a distinct snap
when cover is
securely closed,
clogs,
CAUTION
Check to see that the dust bag is fully
placed in the bag chamber.
NEVER REUSE A DUST BAG. Very fine
materials,
such as carpet freshenera
face powder, fine dust, plaster, soot,
etc. can clog the bag and cause it to
burst before if is full. Change bag more
often when vacuuming these materia|s_
NOTE: if bag is not installed or not
Installed properly the bag safety stop
prevents the door from closing.
17
MOTOR SAFETY FILTER CLEANING
_,
Remove the dust bag as outlined in the DUST
BAG REPLACEMENT section,
WARNING
Electrical
Shock Hazard
If the filter_ located in the bottom of the dust
bag chamber_ is dlrty_ remove it by pul]lng
forward out from under the ribs,
Unplug power cord from electrical outlet,
Do not operale the vacuum cleaner
without the motor safely filler. Be sure the
filter is dry and properly installed to
prevent motor failure and/or electrical
shock,
iiiii
l
iii iiii
Wash the foam filter in warm soapy water,
rinse and dry thoroughly by squeezing the
filter in your hand and letting it air dryf
i
DO NOT wash in the dishwasher.
MOTOR SAFETY FILTER
DO NOT install damp,
Check motor safety
filter frequently
and clean when
dirty°
Replace the foam filter by sliding it back into
place under the ribs in the dust bag
chamber,
Replace the dust bag as outlined in the DUST
BAG REPLACEMENT section,
Filler
Cover
Molar
Filler
Safety
EXHAUST FILTER REPLACEMENT
The HEPA exhaust filter must be replaced
when dirty. It should be replaced
regularly depending on use conditions_
3. Place new filter cartridge into cover
making sure that airflow arrow on side of
cartridge points into cover_
The filter CANNOT be washed
lose its dust trapping ability.
Place foam seal of filter against the
vacuum cleaner body°
as it will
Note: See PARTS AND FEATURES
for the exhaust filter number.
Exhaust
Filter
1o Remove
exhaust filter
cover by
pressing the
release tab on
the cover and
rotating out
from vacuum
cleaner_
Seal Against
Vacuum Cleaner
2, Remove the
filter cartridge
from cover.
4. Replace the exhaust filter cover by
placing bottom tabs in slots and rotating
in until cover snaps into place,
1B
]
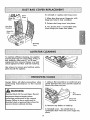
To reinstall
Htng_
Pin
Hole
or replace
dust bag cover.
1o Align dust bag cover hinge pin with
hinge pin hole in dust container°
2_ Rotate dust bag cover into ptaceo
3o You should hear a noticeable click
when hinge pin snaps into place.
Hinge
Pin
l
Dust Bag
Cover
To maintain efficient cleaning, the agitator
must be kept free of carpet fiber, string, or
hair build-up, After every 7 to 10 usest
unplug and turn vacuum cleaner over and
check agitator for fiber and hair build-upo
Use scissors to remove any butldoup entangled around the agitator.
I. Using a flat screwdriver or small coin pry
gently between the cover and the nozz|e to
access the clean-out port°
Always follow all safety precautions when
performing
maintenance
to the vacuum
cleane_
_WARNING
Flat
Screwdriver
Electrical Shock Or Persenat injury Hazard
Disconnec! electrical supply before
performing maintenance to the vacuum
cleaner. Failure to do so could result in
electrical _,hockor personal injury from the
vacuum cleaner sudden{y star!ing_
2. Remove any debris or build-upo
3o Reinstall cover° You should hear a
noticeable click when the cover snaps into
placer
19
Always
fo_low
allsafetyprecautions
when
performing
maintenance
to thevacuum
cleaner°
4. Stretch the extension hose to maximum
length and then allow the hose to return to
its natural length,,
Electrical
Shock
OrPersonal
Injury
Hazard
Disconnect
electrical supply before
performing maintenance
to the vacuum
cleaner. Failure to do so could result in
electrical shock or persanai injury from
the vacuum cleaner suddenly starting.
if the vacuum cleaner does not seem to
have adequate suction, first check if the
dust bag is full or if a filter is clogged, See
DUST BAG REPLACEMENT section,
If the dust bag and filter areas are free of
clogs, check the extension hose.
TO REMOVE CLOG FROM HOSE
1. Rotate the extension hose release lever
counter÷clockwise to release extension hose.
5, Re-insert the hose into the orlginal
storage position from which it was removed°
Press firmly to assure connection,
2, Remove the lower end of the extension
hose from the wand holder by grasping the
hose collar, twlstingt and pulling straight up°
6. Rotate hose release lever clockwise to
the locked position,,
If the dust bag, filter areas and the hose
I Personal Injury Hazard
I DO NOT place hands or Feet under| neath the vacuum cleaner at any
Wand
I time"
.....
areas are free of clogs, disconnect the
nozzle hose from the wand holder and
check the nozzle for cloggingo
Clean the agitator accordingto the
Instructions in the AGITATORCLEANING
section_
Hoed
3_ Plug inthe vacuum cleaner and turn tt on_
Return the vacuum cleaner to the upright
position before plugging Into an electrical
outleto
2O
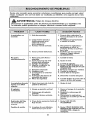
Review this table to find do-it-yourself solutions for minor performance problems, Any service
needed, other than maintenance described in this Use & Care Guide, should be performed
by a Sears or other qualified service agent,
WARNING
Disconnect electrical supply before performing maintenance to the vacuum cleaner,
Failure to do so could result in electrlcal shock or personal injur¥o
I
i__,,:
Vacuum cleaner
won't run.
:: _7::i
:i::_
:_:,ii
_,,I,
I
I, Unplugged
ot wall outlet,
2, Tripped circuit breaker
/blow replace at household
service panel.
3, Thermal protector tripped.
Poor job of dirt
plck-up.
Agitator does not
turn,
2_ Reset circuit breaker or fuse.
4. Defective wall outlet,
3o Allow vacuum cleaner to cool
40-50 minutes,
4, Check with a goad appliance
or lamp. Have outlet properly
serviced°
1.
2,
3,
4.
1.
2_
3_
4.
Change bag,
Adjust setting.
Replace agitator.
Check CLOG REMOVAL,
5,
6.
7.
8.
Cheek for clogs,
Replace hose.
Insert hose fully_
Check for clogs.
9,
Clean or change motor
safety filter and exhaust
filter.
Fuji Or clogg_"'_bSt
bag.
Wrong pile height setting.
Worn agitator,
Ctogged nozzle or
bag holder,
5. Clogged hose.
6, Hole inhose°
Z Hose not inserted fully,,
8o Motor protection system
activated_
9. Dirty filters,
Vacuum cleaner
picksup moveable
rugs or pushes too
hard.
I_ Plug in firmly, select the
desired setting on the touch
control
Wrong pile height setting.
1o Handle in full upright
2. Agitator
position,
overload tripped,
3. Thermal protector tripped,
Airflow restricted
with attachment use;
Io Attachment
air flow,
Sound changes.
2, New carpet fuzz clogged
air path.
use restricts
21
1. Adjust settlng_
1. Move handle from upright
_ostttono
2. Reset agitator overload pro
rector.
3. Allow vacuum cleaner to cool
40-50 minutes,
]. Check ATTACHMENTS for
fuzz, lint, pet hair or other
debris
2. Check CLOG REMOVAL and
clean hose_
N
Vacuum Cleaner Help Line:
1-.877-531-7321
8,00am-5:00pm ESToM-F
(UoS.A.andCanada)
Master Protection Agreements
Congratulations
on making a smart purchaser Your new Kenmore® product is designed
and manufactured for years of dependable
operatiom
But like all products, It may
require preventive maintenance or repair from time to timer That's when having a
Master Protection Agreement can save you money and aggravation.
The Master Protection Agreement
what the Agreement*
includes:
[]
also helps extend
the life of your new producL Here's
[]
Parts and labor needed to help keep products operating properly under normal
use, not Just defects. Our coverage goes well beyond the product warranty° No
deductibles, no functional fatlure excluded from coverage-real protection.
Expert service by a force of more than 10,000 authorized
Sears service
technicians, which means someone you can trust will be working on your product.
Unlimited service calls and nationwide service, as often as you want us, whenever
you want us.
*_No,,lemon" guarantee - replacement
of your covered product tf four or more
product failures occur within twelve months_
Product replacement if your covered product can't be fixed°
[]
Annual
[]
Fast help by phone - we call tt Rapid Resolution - phone support from a Sears representative on all products. Think of us as a "talking Use & Care Guide/'
Power surge protection against electrical damage duo to power fluctuations.
$250 Food Loss Protection annually for any food spoilage that is the result of
mechanical
failure of any covered refrigerator
or freezer.
Rental reimbursement if repair of your covered product takes longer than
promised_
10°/o discount off the regular price of any non-covered repair service and related
installed parts.
[]
[]
I_
[]
[]
[]
[]
Preventive
Maintenance
Check at your request-
no extra charger
Once you purchase the Agreement, a simple phone call is al! that it takes for you to
schedule service. You can call anytime day or night, or schedule a service appointment
online°
The Master Protection Agreement is a risk free purchase. If you cancel for any reason
during the product warranty period, we will provide a full refund. Or, a prorated refund
anytime after the product warranty period expires° Purchase your Master Protection
Agreement todayl
Some limitations
and exclusions apply. For prices and additional
U.S.A. call 1-800_827-6655.
* Coverage in Canada
800-361-6665,
information
in the
varies on some items. For full details call Sears Canada at 1-
Sears Installation Service
For Sears professional
installation of home appliances, garage door openers, water
heaters, and other major home items, in the U.S.A. or Canada call t-800-4-MY-HOME®_
22
Accesorios ......................
11
Cuadro do use de los accesorlos .....
12
Sugerencias pare aspirer ..............
12
Caracleristlcasde rondlmlento
.......
13-14
Culdado de la aspiradora ...............
15
Almacenarntento de la asptradera .... 15
Limpieza dol exterior y de los accesorias .
Antes de user su aspffadora nueva .......
1
Usta de embalaje ...................
1
Garantla de la asplradora 4e I(enmore ,., 2
inslrucclono_ importantes de
seguridarl ...........................
3
Piezas y caracteristlcas de asplradora
vertica! ...........................
4
Inslrucclonosde ensemble ...........
5-6
Montajo dol mango ...............
5
Montaje del accesorios ............
6
Cord6n el_ctrtco
.................
7
lnstrucciones de oporaci6n ..............
8
Cord6n el6ctrico ..................
8
Dosprendimlontq del mango .........
9
interrupter OFF/PISO!ALFROMBRA .... 9
Ajuste y selecci6n de nivelde pelo de la
alfrombra ........................10
Sugerenctas sabre el ajuste do ntvel de .
polo de la alfrombra ...............
10
Indicador de CHECK BAG .............
I0
Carnblo do la balsa para polvo ........
16
Cambto fillro de protecci6n al motor . o17
Cambio flltro de escape ............
17
Come relnstalar la cubierta de la balsa ,18
Lirnpioza det agitador ...............
18
C6mo ellmlnar los residues de basura
on los conductos ..................
18
Reconecimiento de problemas ......... 20
Acuerdos maestros do protecci6n .......
21
Infotmaci6n de asslsiancla
o sorvlcie ..............
pagina posterior
Perfavor lea esta guta que le ayudara a assemblary operar suaspiradora nuovade Kenmoroen
una manera m6s segura y efecflvao
Pare mas informact6n aeerca del cutdado y operacl6n do esta aspirador, llama a su centre de
partes y servtclo rn6s cercano o flame ala I[nea de ayuda al cffente que se encuentra en la
primera pag_naoCuando pregunt_ per informaci6n usted nocisltar6 el n0mero de serte complete y
modelo de la aspiradora qua estan on laplaca de los n0meros de modolo y serle,
Use el espacio de aba}o para registrar ei nOmoro de modelo y eerie de su nueva aspiradora de
Kenmore.
N0mero de Modelo
N_mero de Serie
Fecha de Compra
Malenga este libra y su roctbo on un lugar seguro para referenctas futures.
[
LJSTA
Su ASP1RADOR KENMORE
arado:
t
1
1
t
DE ENBALAJE
se empaca
[
con las slgutontes ptezas y componentes
Aspiradora
Ceplllo para sacudir
Herrarntenta pare
hendtduras
Cepillo para comblnaci6n
1
1
I
1
per sep-
Pet Handt Mate TM
Tube teloscopico
Manual de use y cutdado
Ltsta de partes
Coda uno de estos ensembles es mostrado detalladarnente
reparaci6no
t
en la lista de piezas pare
Linea de ayuda de Aspiradoras:
1-877-531-7321
8:OOam-5:OOpm
EST, M-F
(UoS_A. andCanada)
Garanffa limltada de un aEo
Siesta asptradora falla par un defecto en sus materiales o fabrlcaci6n en el peHodo de
un a_o desde la fecha de compra, cuando se |nstala, manege y mantiene siguiendo
todas los tnstrucclones incluidas con el producto, devu_lvala a cualquter ttenda Sears,
Sears Parts & Repair Center (Centre de Reparaciones y Piezas Sears) u a otto
distribuidor
Kenmore para que reparen el aparato de farina gratultao
St esta asptradora se utitlza para otros fines que no sea usa familiar privado, esta
garantia
es vc_lida solamente durante 90 dias desde la fecha de compra.
Esta garantia cubre exclusivamente los defectos de materia|es y fabricac|6n. Sears NO
pager6:
1_ Los elementos desechables que puedan desgastarse con un usa normal, lncluyendo
sin car_cter excluyente, flltros, correas, l_mparas y bolsaso
2_ A un t_cnico del servtc_o t_cnico pare que ensefie a| usuarto a insta!ar, mane|at o
mantener correctamente el producto.
3_ A un t_cntco dot servicto t@cnlco pare I|mptar o mantener este productoo
zL Da_os o aver[a de este producto sl no se ha tnstalado, mane|ado o mantenido
siguiendo todas las instrucc|ones tncluldas con el producto.
5. DeFies o averfa de este producto orlginados par acctdente, abuse, usa incorrecto u
usa del producto pare otros fines dfsttntos de los indicados_
6. Defies o aver[a de este producto causeries par el usa de detergentes, limp|adores,
productos qu[micos o utensillos dlferentes a !as recomendados en todas los
instrucciones que se incluyen con el productoo
Z Da_ios o averse de las ptezas o sistemas causados par modtflcaciones
no
autorizadas que se hayan hecho a este producto_
Limltaci6n de responsab|lidad de las garanfias }mpffcilas; llmltaci6n de remedies
I_| On|co y exclusive remedio del cliente bajo esta garantia limitada ser_ la reparaci6n
del producto segOn lo lndfcado en este documento. Las garant|as implicitas, |ncluyendo
los garantl'as de comerclablltdad
o idoneldad pare un prop6stto especffico, se lira|tan a
un aria o et periodo m_s carte permit|do par la ley. Sears no ser_ responsable par
dafios |ncidentales nt consecueneiales. Algunos estados o provinclas no permtten la
exclusi6n o limitact6n de defies |ncidentales
o consecuenciales, ni limitaclones en ra
duraci6n de los garantlas Implfcitas de comorciabilidad
o tdoneidad, par Io que estas
exclusiones o limitaciones podHan no apffcar en su caso_
Esta garant[a aplfca solamente cuando esta aspJradora se utilize en Estados Unidos o
Caned6.
Esta garantla le otorga derechos legales especificos, y usted podria tenor otros
derechos qua vaHan en func|6n de coda estadoo
Sears, Brands Management
Corporatien_, Hoffman Estates, IL 60179
Sears Canada inc,, Toronto, Ontario, Canada M5B 2B8
Leatodaslaxinstrucciones
eneslemanual
aniesdearmorousarsu
asplradora.
ADVERTENCIA
Su seguridad es muy importante para nosolros,Para reduclr el riesgo de incendb, choqueelicit|co,
lesi6ncorporalo dafias al utilizarsu aspiradora, actOede acuerdo con/as precauci0nesb6sicosde
segurk/ad, enlre el/as:
Use su aspiradora solamente como se
describe en este manual. Use solamente
con los accesorios recomendados por
Sears.
Mantenga el polo, ropas sueltas, dedos,
y todas los partes del cuerpo lejos de
aberturas y partes en movtmientoo
Apague todos los controles antes de
desenchufaro
Desconecte la fuente de electrtcidacl
antes de hacer el servlcio o I_mpiar el
6rea del cepillo. La falta de hacer esto
puede resuffar en ei s0blto arranque de|
cepilloo Causando lesiones personales
por partes en movimientoo
Use cuidado extra cuando limpie
escaleras. No la ponga sobre sillas,
mesas, etc. Mant_ngala sobre el piso.
Para reductr el riesgo de choque
e!_ctrico - No la use afuera o sobre
superficies mojadas.
No use la aspiradora
para levantar
ttquldos inflamables o combustibles
(gasolina, flutdo de Ilmpiar, perfurnes,
etc.), o la use en 6reas donde puedan
estar presentes_ Los vapores de estas
substancias pueden crear un peltgro de
lncendio o explosi6no
No permita que se |a use como un
Jugueteo Ponga especial atenct6n cuando
es usada per o cerca de nifioso
No levante nada que est_ ardiendo o
echanclo humor tat como cigarrillos,
f6sforos, o cenizas caltenteso
No la use con un cord6n o clavtja
dafiados. St la asp iradora no est6
trabajando
como _lebe, se la ha dejado
capr, dafiado, dejada afuera_ o
votteada en el agua, ret6rneia a un
Centro de Servicio Sears.
No use la aspiradora sin la bolsa de
polvo yio filtros en su lugar.
No deje la aspiradora cuando est_
enchufadao Desenchufe del
tomacorriente cuando no est6 en uso y
antes de hacer el servtcloo
Siempre cambie la bolsa de polvo
despu_s de timptar la alfombra,
limp|adores o refrescantes,
polvos, y
polvo fino. Estos productos obstruyen los
filtros, reducen la circulaci6n del atre y
ueden causar dafio a la aspiradora_ La
alia en cambtar la bolsa de polvo
puede causar dafio permanente a la
asptradora.
No la jale o arrastre def cord6n, use el
cord6n como una manila, clerre una
puerta sabre el cord6n, o tire de[
cord6n alrededor de bordes afilados o
esquinas. No paso la asplradora sobre
el cord6no Mantenga el cord6n lejos de
superficies caltentes.
No use la aspfradora para levantar
objetos duros afi|ados, pequefios
juguetes, alftleres, sujetapapeles, etc.
EIIos pueden dafiar la aspiradora o la
bolsa de polvo,
No desenchufe tirando de] cord6n. Para
desenchufar, tome la clavija, no el
cord6no
No tome la clavija o la aspiradora
los manos mojadas.
con
N ° ponga ntngOn obJeto en lax
aberturaso
Desenchufe
Handt Mate
antes de conectar el Pet
No Ja use con n|nquna abertura
bloqueada; mante'ngala
llbre de polvo,
hllachas, pe!o, y cualquter cosa que
pueda reducir la ctrculact6n del atre.
Usled es responsable de estar seguro de
que su aspiradora no es usada per
alguten incapaz de operarla
correctamente,
TM
GUARDEESTASINSTRUCCIONES
El armado y uso seguro de su aspfradora son su responsabllidad. Esta asplradora ha sldo disefiada exdusivomente para uso dorn_stico. Lea este Manual del propietario detenldamente, pues
contlene lnformacl6n tmportante sobre segurldad y uso.Esta guia contiene tnformacl6n sabre
seguridad debaJo de slrnbolosde adverttencla o culdado. ...........................
3
Es Important° concer las ptezas y caracter|sttcas de su asplradora para asegurar su use adecuado y seguro. Examrnelas antes de usar su asptradora.
Objecte
Est;lo No.
Pieza No.
en USA
Pieza No,
en Canada
Fittro de escape
EF-1
20-B6BB9
20-40324
Bolsa par° pone
O
20-50690
20-50510
Interrupter
O FF/FLOOR/CAR PET
He_ram[ent°
de handtduras
I _f_
| _
| _
Per favor ponga atenct6n especlal a los cuodros que le olertaran de postbles peltgros
Advertencla: Este tnformacl6n le alertar_ de peltgro de fuego, cheques electflcos,
quemadas y leslones, Culdado: Este tnformoct6n le alertara de peligros come lesiones
I
y dories de propledQd_
iiiiii
ii iiiiiiii
i
_ADVERTENCIA
Peligro de le_i6n personal y dafio al producto
Antes de armor la asptradora, revise la
LISTA DE EMBALAJE. Use esta tisto
para verificar que ha rectbido todos los
componentes de su nueva asptradora
I<enmore°
No conecfe la asplradora haste que
termine de armurlao De Io contrarlo
podr[a causer un cheque e|_ctrico o
lesi6n corporal.
,, ,,,
,
,,,,,,,,,,,,,lllljl/i
MONTAJE
,,
,,,,,,,,,,
,,,,,,,,,,,,,,IL
CUIDADO
No aprlele demaslado
el torn|lie.
S| |o aprleta demasiado podHa arruinar
los oriflclos para el tornillo.
No opere la aspiradora
instalado el tornil]o.
sin tener
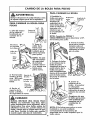
In Remover el tormtllo del mango que se
encuentro en la porte superior dela asp|rodora_
2. Coloque el mango come se ve en el
diagroma?
3. Apriete el torntllo con un destorntllador.
NOTA: Quiz6 sea necesario ajustar un poco
el mango°
DEL MANGO
]
MONTAJE
DEL ACCESOR|OS
MANGUERA Y TUBe
1, fnsertar el perno
del tube en los
Mango
de la
mangoranuras
de
"J"ladel
manguera_
manguerao Devuelta
a el tube para haste
\\
!
,_
====
PET HANDI MATETM
Tube
t_lesc6plco
3. Insertar el mango de la manguera en
el soporte para manguera locallzado en
el mango de Ea manguerao
Soportepare
L_
__
_"
la
ori!l=/,_L_,_Ef_
Mango
_
6. Rote el
liberador
de la
manguera hacia
arrtba para
asegurar la
manguera el su
tugar.
\
\
Ranura
"J"---_)
que atore.
2. Colocar el tube
telesc6pico
en el
porta tube y coloque
la manguera come
se muestrao
_
NOTA:
Aseg_rese de
levantar la
mango de la
manguera.
orilla
del
Desc6nselo
sobre el
soporte para
la manguerao
Para operar eJ Pet Handi Mate_vea
su
correspondiente Manual del Operador0
I. Coloque el Pet
Handt Mate TM en
al 6rea para
guardar
2o Rotor el Pet
Handt Mate TM
hasta que este
quedefljo
en su
lugar
HERRAMIENTA PARA HENDIDURAS
1. Inserte e!
herramlenta
para hendiduras
en el contenedor
de la aspiradora
como se muestrao
pare
4. Rotar el
Ilberador de la
manguera
hacla abajo y
coloque la
manguera
come de
muestra_
5, inserter la
manguera en
la boqutlta de
la manguera
en el lado de
la aspiradora.
_CUIDADO
No
use el agitador
sin
el tube
felesc6pico
]nsertado apropiadamente
dentro del porte tube y |a manguera
asegurada
apropiadamente
en el
sujelador de la manguera,
CEPILLO DE COMBINACI6N
i. Inserteel
cepillo de
combinact6n
en el
contenedor de
atr6s de la
asplradora
como se
muestra.
[
CORDON
1_Poner e| tuba telesc6plco el porta
tuba y el mango de lu manguera en el
soporte para la manguerao
NOTA: El tuba te|esc6plco y la manguera
deber6n ser colocudos en sus siffos correspondlentes antes de enrol|ar el cord6n
el_ctrico.
2_ AsegOrese de que el sujetador superior
del cord6n de liberaci6n r6ptda se encuentre en pos_cl6n hacia arriba.
3. Enrolte el cord6n electrlco alrededor
del gancho de liberac16n raplda del
cord6n y la manija para transportar.
4. Presione la ranura del enchufe sabre
el cord6n.
ADVERTENCIA
Choq=ueel_cfrlco V Peligro de dafios per_
sOnOleS
Enrollar et cord6n muy aprelado pone
estr6s en el corclbn ypuede causar que
este de daEe_ Un cord6n daEado es un
peligro de choque el_ctrlco ¥ puede
causar daEos personales,
ELi:CTRICO
l
\
_CUIDADO
iPartes en movlmiento! Para reducir el riesgo de
daEos corporales,
no toque el agitador
cuando |a
aspiradora est_ encendlda_ El tocar el agifador mlentras
qua estc_ giranda pueda cortar, contuslonar o causar
olras lesiones. Siempre desconecte del lomacorrienle
antes de clar mantenimiento.
Tenga cuidado al asplrar cerca de nifios_
CORD6N
1. Gtre el sujetador del cord6n
hacla abajo para
tiberar el cord6n
eidctrico,
ADVERTENCIA
Peilgro de lesi6n personal V daSo al producto
• Para reduc|r el riesgo de choque e|6ctrico, esta asplradora cuenta con una
clav|ja polarlzada (uno de los contactoe es m6s ancho que el otro)_
•
La clavlja s6to puade intraduclrse de
una manara en e| enchufe. Si la clavija no cabe bien en el enchufe, invi_rta|a. Si a0n no cabe, Ilame a un electricista para que instale un enchufe
correcto,
No altere
la clavija
de
ninguna manera.
ELIECTRICO
j
4_ Conecte el cord6n a[_ctrico polartzado
an un enchufe de 120 voltias qua se
encuentre cerca det piso,
ADVERTENCIA
Pellgro de |esi6n personal ¥ dafio al
_roducto
• Cuando alguna anormalidad/desperfacto ocurra, pare de usar el producto
inmediatamente
y descon6ctelo
de|
toma corriente.
NO use los enchufes locallzados sabre
los muebles. Los objelos cercanos podrian resultar da_ados.
5. Para guardar el cord6n, gire el
sujetador del cord6n hacia arrlva y
enredeIo_
i
i i
i
A_ADVERTENCIA
Choq.ue el_clrlco
2_ Desprenda el
enchufe deJ
cord6n e|_clrico
y quite el cord6n
del sutetador
supertor_
y Peligro de daaos per-
sonales
Hendidura
de
Cord6n
o|_clrlco
3. Est_ seguro de que el cord6n electrico
se manttern fijo en la hendidura de
fijacion del cjancho°
Enrollor el cord6n mu¥ apretado pone
estr_s en el cord6n y puecle causar que
este se daSe. Un cord6n da_ado es un
peligro de cheque el6ctrico y puede
causar dafios personales.
I
DESPRENDIMIENTO
]
DEL MANGO
libere el mango pisando el pedal de
ltberaci6n y tirando del mango hacia
abajo con la manoo
Nola: El agitador no girar6 cuando la
aspiradora est6 en posici6n vertical.
I
]
INTERRUPTOR OFF/PISO/ALFOMBRA
Para arrancar lq aspff.adora, desltce el
Interrupter OFF/PISO/ALFOMBRA
desde la
pos_ci6n OFF a la posict6n PISO o
ALFOMBRA_
_CUIDADO
Refl_rase alas recomendaclones de los fabr|cantes de su alfombra para su limpieza.
Algunas alfombras m6s dellcadas pueden
requerir que sean asplradas con el agitador
apagade, para prevenir datio a la alfombra.
Para parar a asp!radora, desIice el interruptor OFF/P SO/ALFOMBRA a la posict6n
OFF.
,_kCUIDADO
No permita que la asplradora este en
un sore lugar durante ning0n liempo
cuando el agitador est6 rotando. Se
puede dafiar |a alfombra.
- Apaga la sucOFF
cion (Apagado}
y el agtta-
Inlerrup'tor
._
FLOOR (Piso) hace andar el
motor de succt6n solamente_
En esta posici6n
e! montaje del ceptllo no da vueltas, Esta
posici6n debe set usada para Itmptar pisos
de madera dura y azulejos y cuando se
usan accesorlos (herramtentas).
do,d°rm°t°riza"
CARPET(Alfombra) -hace andar ambos
motores_el de succt6ny el del cepilloo
Nora: El agitador no gtrar_s cuando la
aspiradora est_ en postci6n vertical.
AJUSTE Y SELECCI(_N DE NIVEL DE PELODE LA ALFOMBRA
Pore selecclonar un ajuste de nivel de
pelo de Io aifombra:
Algunas alfombras m6s delicados pueden
requarlr et usa de la asplradora con el
agitador desconectado pare prevenir que
la alfombra
sea dofiada.
Seleccione una altura del pelo de la
alfombra usando el pedal pequefio
ubicado en la porte posterior de la
PowerMate_ E/nive[ del pelo la aifombra
se muestra en el Indicador. Consulte
SUGERENCIA5 SOBRE EL AJUSTE DE
NIVEL DEL PELO DE LA ALFONtBRA_
Atenci6n: Refi6rase a los
recomendaclones
del fobdcante
Itmptar su alfombrao
pare
[
1
SUGERENCIASSOBREELAJUSTEDE NIVEL DE PELODE LA ALFOMBRA t
HI - Pelo muy largo y suelto, tapetes,
alfombras muy acojtnadas_
MED - Pelo mediano a largo.
LO - Pelo corto a medfano.
XLO - La mayoria de las alfomIoras y pisos descubiertos, yen carpetas delicadas
que requieran que el agitodor este
apagadoo
Hay 4 ajustes de nivet. Use el ajuste XLO
boajO para obtener la meJor llmpleza a
ndo. Par otra porte, qulz6s se requlera
elevar el nlvel pare facilitar algunas
tareas, coma par eJemplo cuando se trata
de tapetes y algunas alfombras de pelo
largo, y pora impedfr que la aspiradora
se apague_ Se sugieren los slguientes
ajustes:
i
INDICADOR
DE CHECK BAG
Cuando la untdad esta trabajando con un
flujo de aire normal, la luz en Indicador de
CHECK BAG esta apagada. En cualquter
momenta que flujo de alre es restringido la
luz se enciende_ St esto ocurre, revise la
balsa del polvo, el filtro de seguridad al
motor y arras lugares con postbles btoqueos
mostrados en COMO ELIMINAR RESIDUOS
DE BASURA EN LOS CONDUCTOS_
Indlcador de
CHECK BAG
Nola: Es normal que el tndicador de bofsa
Ilena se active cuando se utiltzan clertos
accesorios debtdo ala reducct6n de aire. No
es necesario ningOn mantenImtento,
IO
1
1
ACCESORIOS
_CUIDADO
_CUIDADO
NO USE |a manguera cuando la
aspiradora este en uso
Cuando use los accesorios,
tonga cu|..
dado de no estirar demasiado la manguera expansible para tratar de alcanzar m_s lejos. S| trata de estlrar la manguera rods de Io debido, podria causar
que la aspiradora
so venga abajo.
Siempre regreso |a aspiradora a |a
poslci6n vortical anles de usar Ta
manguera y los accesorios.
PARA USAR ACCESORIOS
I. Colocar la asplradora
vertical
on postcl6n
2. Para remover la manguera y el tuba de
ia asptradora. Jalando hacia arrtba el
mango de la baquiffa de la manguerao
_,CUIDADO
NO tire de la aspiradora
par |a manguora on la habitaci6n. Podr|an ocurrir
dafios a sus pertenencias.
TUBO TELESC6PICO
telescoplo
es
)///
ajustab|o a|
tamafio y no
requtere ensamble,
para ajustar
el mango del tuba
y estire hasta
encontrar la altura
doseada
simpleme.le
womo
2. Extender el
Ii
tuba al tamafio
deseado.
3, Use los accesortos de acuordo a come
lOS necesfte. Ver la tabla do USO DE
ACCESORIOS,
CEPILLO PARA COMBINACIC)N
El cep|llo combtnado se puedo conectar
directamonte al tuba,
PARA UN ALCANCE ADtCIONAL
Gire hacia
abajo la
alanca de
beraci6n de
la manguera
expansible st
necostta
mc_x_mo
alcanceo
- Cepilfo para
sacud_r Copilt_
parr_ ¢ombtnaclbrl
Use el suJetador del ceptUo sin el ceplllo
para una mayor succi6n on muebles,
co}tnes o escaleras,
Use el sujotador del cepi!lo con el cepillo
para limpiar superficies suettas coma
cortinaso
CUADRO DE USO DE LOS ACCESORIOS
AREA
ALiMeiAR
Entre
ACCESORIO
Mumble.* coji.0_,
HENDIDURAS
'/
CEPILLOPARA
COMBINACI_)N**
t(
PETHANDI MATETM
_
ce,z..=*
/
Pi=0.
_/
_(
"/
E.¢ar0..
,/"
4"
= Aplicabre
* Stempre Iimpie los accesortos antes de usar sobre telas,
** Use el sujetador del cepiilo sin el cepillo para una mayor succi6n en mueblest cosines
o escaleras, Use eJ sujetador del cepillo con el copillo para llmplar superficies sueltas
come cortlnas_
Orillas de alFombras
GuFe uno do los coslados o la parle anterior
de la boqutlla a Io largo del horde de la
pared,
!A'DVE"TE"C,,
IPeligro de lesi6n personal
INO COLOQUE la aspiradora on la
lescalerao Si se cae, podrla causar lesi6n
Ipersonal o dafio a la prop|edad_
Escaleras
Ponga ta mani}a en la posici6n vertical
completa.
El acj1tador se detiene, Use la
herramienta rinconerao cepll]o comb!naci6n o Pet Handi Mate'=,
Para obtener !as mejores resuitados de
limpleza, mantencja desbloqueados los
conductos de flujo de alre_ Desconecle la
aspiradora del enchufe antes de examlnarla.
Volcando la Unidad
Cuando use los accesorlos mantencja la
alanca de seltar la manguera expansile en la poslcl6n cerrada cuando sea
posibleo Esto ayuda a mantener la aspiradora sin caerse cuando so esttra la
mancjuera.
Si se necesita manguera
adicional entonces abra la palanca de
soltar y saque mancjuera adictonaL Use
precauci6n para no voltear la asptradora.
12
I
|
I
I
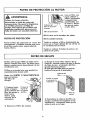
SISTEMA DE PROTECTION
DE MOTOR
Protector
de motor
Esta aspiradora cont[ene una v&buta de aire
que sirve come protector de meier y cuando un
bloqueo impida qua circule el aire al meier se
abre autom&ticamenle pare proveer un flujo de
atre fresco al motor,
Asi esta v_lvuta
tmpide el sobre
Protector Termal - Succi6n del Motor
Esta asplradora tiene un protector termal
qua se ajusta autom6ttcamente
pare
proteger ala asplradora del
sobrecalentamientoo
St una obstruccl6n
impide el flujo normal de aire al motor, el
protector termal apaga el motor
autom6tlcamentepara
permitlr que el
motor se enfr|e a fin de evitar posibles
dafios ala aspiradora.
calen{amiento det
motor y come
consecuencia qua
esta se dafe Usted
podr& notar un
sonido diferente al
norman cuande
asia v&lvuIa se
active y el atre pasa
per ella,r
Protector Termal- Motores de| agitador
Esta aspiradora esta equ|pada con
protectores de sobre ca[entamtento
en los
motores del agltarlor qua se activan
autom6ttcamente
pare la proteccE6n de
los motores_ Estos protectores
desconectan de toda corrtente el_ctrtca a
tos motores automc_ttcamente cuando
exlste un sobrecalentamiento_ Esto
permite que los motores se enfrIen y qua
no se vayan a fundtr o sufrir un
desperfectoo
Protector
Pare correg|r el problema: Consulte el cuadro
RECONOCIMIENTO DE PROBLEMAS
Nota: La v_lvula de desviaclOn puede estar
abierta mlentras se usan los accesodos o pare
timptar una alfombra nueva a cause de un flujo
reducldo de alre per los accesorios mismos o
per la pelusa de la affombra qua flene la boise
rapidamente.. Consutle el cuadro
RECONOCIMIENTO DE PROBLEMAS,
_CUIDADO
_ieml_re regrese la aspiradora ala
3osleE6n vertical antes de usar ra
nanguera y los accesorios. La falla de
;ste es el resu|tado del sobre
calentamlento de los motores cle|
r_gitador_ Esto puecle causer qua 8|
protector terma| se active.
Note: No obstruya el protector de motor,
Pare cotreglr el problemm Si esto ocurre,
apague la asptradora y desenchufe el
cord6n del tomacorrlente
pare permlt|r
qua la asptradora se enfr|e y que el
protector termal se reajuste.
Busque ¥
saque tas obstrucciones o camble la
bolsa, si es necesar|o. Examine tambi_n y
reemplace cualquler filtro obstruidoo
Espere aproximadamente
40-50 mlnutos
¥ enchufe |a asplradora y pr_ndala pare
ver si el protector del mater se ha
reajustado_
13
,_ADVERTENCIA
Peligro de choque ei6ctrico o lesi6n corporal
Desconecte la unidad antes de limp|aria
o darle servicio. De Io contrario podria
rOducirse un cheque el6ctrlco o causer
si6n corporal sila aspiradara
arranca
de manera imprevista.
= la luz verde |ndlca que la mayorfa del
poivo fue succiondo par la asplradora.
"La luz roja Tndica que la asp;radora
succiona el polvo.
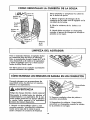
PROTECTOR DE SOBRECARGA DEL AGITADOR
OPERACIbN
AI pasar la asplradora, la luz roja del
indtcador de polvo enclende y sigue
encendlda mientras que el |ndicador
detecta una concentracl6n alta de polvo
pasando par la aspiradora,
El motor del
agttador tiene
Bot6np=ra reajustar
una protecct6n
el prolectord_
|
incorporada
r,ob_ecarga
d'_|
,,_
contra dane del
motor en caso
de que el
agitador se
ag|lador _
bloquee. Sl el
agttador se
pone lento o se detiene, e! protector de
sobrecarga
del agltador apaga el motor
del agitador.
El motor de succl6n
contlnuar6 funclonando_
PARA LIMPIAR LAS CELDAS
OPTICAS
Los 6pticos dei indtcador de poivo
conslste en dos celdas 6pttcas
locallzadas dentro del compartlmiento
pare la balsa, De vez en cuando es
necesario ltmpiar 1as dos celdas 5pflcas
pare que funcionen a su capac|dad
m6xtma.
Pare correg;r el problema: Apagu_, y
desconect_ la aspiradora, limple la
obstrucci6n, y despu6s pres|one el bot6n
del protector de sobrecarga°
Se recomlenda
limptar
los celdos 6ptlcas:
NOTA: UN MiNIMa
DE 20 SEGUNDOS
NECESITAN PASAR ANTES DE
REAJUSTAR EL PROTECTOR DE SABRE
CARGA.
Pare reajustar: EmpuJe el bot6n de
protecci6n de sobrecarga
del agitador_
Si el problema persister busque un
t6cnlco calificado
que haga el servicio
de la aspiradora.
INDICADOR
Ce|da
6pfica
"Cuando se enclende continuamente
luz roja,
= Cuando se adhtaren ta tierra o el
polvo en los celdas 6pttcos.
"Cuando se cambia la balsa para
polvo.
DE POLVO
Et indicador el_ctrico de polvo es una
caracteristlco que detecta el polvo mientras que paso par la aspiradora,
la
Pare ltmptar et tndicador, Itmptelo con un
trapo suave y seco, Nunca use
detergentes o lfqu|dos porque elias
pueden ensuciar m6s rc3pido las celdas
6pticas y serif necesario ltmpiarlas m6s
pronto de Io normal Se alcanza el
comparflm|ento para el ind|cador de
polvo abriendo la cubierta de polvo y
quitando la balsa pare polvo_
El indicador de polvo est6n localizados
en la porte delantera de la cubterta del
tndicadoro
!4
Siga siempre todas los tnstrucciones
seguridod antes de efectuar el
mantenimiento
o su aspirodora.
i
de
ALMACENAMIENTO
Recojael
_j_,ADVERTENcIA
Pellgro de choque e|_ctrlco o lesi6n
corporal
Desconecte la unidad anles de efectuar
el mantenimlento a su asplradora. De Io
contrario podria produclrse un cheque
el6ctrico o causer tesi6n corporal si la
aspiradora
arranca de manera imprevista.
DE LA ASPIRADORA
Cord6n
Guarde la aspiradora
baJo techo an un
lugar seco, con el mango en posici6n
verttcal_
cord6n y
enrr611elo en
los
sujetadores
superior e
inferior, sin
que quede
muy apretado_ Asegure
Io clavija
sobre el
cord6n de
podero
I
LIMPIEZA
_ADVERTENCIA
Pe|igro de choque el_ctrico o lesi6n
corporal
Si enrolla el cord6n muy apretado puede
tensarlo mucho y causerie dafios. De
da5arse, el cord6n podria causer
descargas el6ctricas y leslones o daRos
personaleso
DEL EXTERIOR Y DE LOS ACCESORIOS
Desconecte el cord6n el_ctrico de la clavija de Io pared°
Lave los accesorios an agua tibia jabonasa, enjuague y deje secar al atre. No
los lave an lavadora de plates.
Ltmpie el exterior con un trapo suave y
limpio, que ha sldo exprfmldo despu6s de
remojar en una soluci6n de ague y detergente liqufdo ligero_ NO rocfe agua sabre
la asplradora.
Seque el exterior con un
trapo seco despu_s de Iimplar_
....
i,ii, ,J,l,,UJ,/,,u
cu,D oo
No use los accesorios
sl estan
mojdos_
Los accesorios que se ulilicen en 6reas
suclas, debajo del refdgerador, no
deben usarse en arras superficies sin
antes set lavados. Podr[an dejar mar-
Limpie io superficte exterior del receptdculo y de los occesorios pare reducir [a
electricldod
est_=tica y [a acumulact6n de
polvo,,
cas,
_5
i
CAMBIO
DE LA BALSA PARA POLVO
I
l
PARA CAMBIAR LA BALSA
_ADVERTENCIA
.............
j 1. Desdoble
(a
balsa para polvo
nueva. Doble la
Siempre desconecle et cord6n _lectrlco antes
de reparar alguna parle de la aspiradora.
J
LengUolade
soguriclad
sogur dad
dela
PARA CAMBIAR LA BALSA PARA
POLVO
de Ja cublerta
iocalizado en el
costado de la
misma.
8o!saparo
p_vo
polvo en di_'eccl6n//
contraria a la
/
abertura que va
en el sujetador de
la balsa.
la cubler_a -.Lf J_|
' []-']_1
'-'-_'_J
'_
"'
_\
J
/
_//
NOTA: Consulte las PI_ZAS Y
CARACTER{STICA5 para determinar el N°o
de la balsa para polvo,,
Mecan_sma
de segurldad
2, Inserte la balsa
para polvo completamente sabre el
soporte de la balsa
su_etando la balsa
par el collar°
2. Tome el
collar de la
balsa para
polvo y tire con
cutdado para
retirar la balsa
para polvoo
de la balsa
la balsa
Balsa
NOTA: No jale
del mecanismo
de seguridad
de la balsa
cuando remueva o tnstale una
papa
,/
3. Tire la balsa
usada a la basurao NO rue6
va a usar la
bolsao
3. Coloque la balsa
en la c_mara de la
balsa de polvo.
Aseg0rese de que la
parte infertorde lo
botsa para polvo
est_ completamente
dentro de la cavidad
para la balsa antes
de cerrar la cubterta
de la botsa,
balsa para
po[vo nueva_
5uportede
In balsa
Covldadde
ia bo|sa --
4o Cierre la
cubterta de la
balsa. AI escuchar
un chasqutdo
caracter|sttco ser6
indicaci6n de que la
cubterta ha cerrado
bten.
Fi|frode
sogurldad
d01molar
4. Revise el
soporte de ta
["
balsa y el ftltro
de segurtdad al motor.
AsegOrese de que
la balsa para poTvo
est6 instalada
complete en |_or
cavidad de la
balsa,
CUIDADO
NUNCA REUTILICE UNA BALSA PARA
POLVO. Los mater_a]es muy finos, tales
coma desodorontes para alfombras, lalco
facial, polvo flno, yeso, holffn, pelusa de
a|fombras nuevas, elc. pueden atascar la
balsa y causar que se tampa antes do que
est6 Iiena. Cambie fa balsa m6s seguldo
cuando aspire esle tipo de materlales.
i
i
i
NOTA: Si la balsa para polvo no esta
lnstalada o no esta tnstalada
correctamente
el mecanismo de
seguridad de la balsa impedirc_ que la
balsa cierreo
i
16
FILTRO DE PROTECCION
,_
Peligro
i
AL MOTOR
Lave el ftltro con
ague callente y
jab6n, enju_guelo
y s_quelo blen
aprel_ndolo con
ta mane y dejando que se seque
al aire tibre_
ADVERTENCIA
de cheque e|_ctrico
Desenchufe el cable de poder del
tomacorriente, No opere la llmp[adora
sin el filtro primario o el filtro de
escape_ Est_ seguro que el fiitros est6
instalado proplamente pare prevenir
falla del motor y/o sacudida el6ctrica,
NO Io lave en ta lavadora
FILTRO DE PROTECCION
de platOSo
NO Io instale hOmedo,
Vuelva a colocar el filtro desliz_zndolo de
nuevo an su lugar debaJo de los estrlas en
la cavidad pare la balsa.
Revise et filtro de proteccf6n a| motor fiecuentemente y ffmp_elo cuando este sucio.
St el filtro esata sucio, sequel jalando
hacla afuera_
Vuelva a co|ocar |a balsa de polvo y la
cub|erta de polvo.
FILTRO DE ESCAPE
3. Ponga el nuevo flltro odentro de la
cubierta estando seguro de clue la flecha
de flujo de aim al costado de| filtro
apunta hacla la cubierta_
El sello grls det filtro debe set puesto
conlra el cuerpo de la aspiradera_
El filtro det escape HEPA se debe reemplazar cuando este sucio_ Se debe reemplazar regularmente dependlendo de las
condiclones usa.
El filtro no se puede laver pues perderi6 su
capactdad para alrapar potvo.
Cubierla de|
Nora: Ver PARTES Y CARACTERJSTICAS
c_ara el nOmero
el filtro de
escape_
I, Preslone hacia
abajo el seguro
de la cubierta del
f|ltro de escape y
t|rela hacta
afuera pare
remover de la
aspiradora_
Predoneel
s_u,o dD
fa cublerla
de1filtro
4. Reemplace la cubterta de! ftltro de
escape poniendo las lengUetas en las
hendiduras y empujando hasta que la
cubterta este en su lugar,
2_ Remueva el filtro de escape,
17
COMO
REiNSTALAR LA CUBIERTA DE LA BOLSA
.............
Pernode
Para reinstalar o remplazar
de la bolsa de polvo.
I
ra ceblerta
1. Altnee el perno de btsagra de la
cubierta de la bolsa con el agujero en la
cavidad de la bolsao
2, Glre la cublerta de la bolsa a su
lugar,
3. Usted debe escuchar un chasqutdo
cuando el perno de bisagra se encaja
presl6n en su lugar_
j
a
LINtPIEZA DEL AGITADOR
l
Para un asptrado eftcienle_ el agttador deber
set mantenldo libre de fibras de alfombra,
hllost o acumulact6n de polooLuego de 7 a 10
usos, desenchufe y cl_ vueffa a la asptradora
y revise el acjilador para vet si tlene acumulact6n do htlos,fibras o polo,
Usetljeraspara sacarcualquleracumulacl6n
alorada alrededordel acjitador,
C6MO ELIMINAR LOS RESIDUOSDE BASURA EN LOS CONDUCTOS I
Proceda slempre con precauciones de
seguridad antes de efectuar el mantenimiento a su aspiradora°
_I_ADVERTENCIA
Pellgro de cheque ef_ctrico o lesi6n corporal
Desconecte la unidad antes de efecluar el
mantenimienfo a su aspiradora, De Io con=
trarlo podrla producirse un cheque et6ctrico
o causar lesi6n corporal si la aspiradora
arranca de manera imprevisfa.
iiiiiiiiiiiiiiiii
iii
2, Remover cualquier clase de pelusa o
escombro acumutado
3o Reemplace la cubierta, Usted debe
escuchar un chasquido cuando fa cubterta a presi6n en su lugaro
I
1. Usandoun destorntllaclorpianoo una
moneda pequefia tntrod_zcaloculdadosamente en la ceja del la cublerta para
coder a ltmplar el conductodo limpieza
1B
IVIANGUERAS
Proceda
,_
4o Esttre at m6xlmo la mancjuera y lUeCjO
permtta qua se encoja hasta su tamafio
normal de aimacenamlento_
stempre con precauciones de
ADVERTENCIA
Pellgro de cheque el6ctrlco o tesi6n corporal
Desconecte la unlclad antes do efecfuar el
mantenlmlento a su asp radora, De Io centre- !
rio podria procluclrse un cheque el_ctrico o::
causer lesi6n corporal si ]a aspiradora arranca de manera imprevlsta.
segurtclad antes de efectuar el mantenimtento a su aspffadorao
Si la aspffadora no parece tener sufJciente succi6n, revise sl la balsa del po|vo
est6 llena o si el flltro est6 tapadoo Ver
CAMBIO DE LA BOLSA PARA POLVO y
FILTRO DE PROTECC16N AL MOTOR,
Si la balsa de! polvo y 6reas del filtro
est6n ltbres de trabas_ revlce la
manguera expansible°
PARA REMOVER
LA OBSTRUCCI6N
5. Reinserte la manguera adentro de la
abertura en et cuerpo de la cual rue
sacadao
DE
iii
LA MANGUERA
i
i
i iii
iiiiii
iiii
ADVERTENCIA
1. Gtre la palanca de salter ia manguera
Peligro de lesi6n personal
NO coloque nunca las manes ni los pies
debajo de ta unidad,
6, Aprtete firmemente para asecjurar la
conexi6n_
St la balsa del polvo y 6teas del filtro
est6n libres de trabas, desconecte la
boquilla de la mancjuera del porte-tuba y
chequee la boquttla par obst_cu!oso Gire
la palanca de liberact6n de la mancjuera
hacia la derecha a la poslct6n cerrada_
Manguera
expansible
Limpie el agitador de acuerdo a las
tnstruciones en la secci6n LIMPIEZA DEL
AGITADOR_
Manguera
expansible
Retorne la asplradora a la postci6n
vertical antes de enchufarla en un
tomacortente_
en dlreccton de las agujas del
reloj para soltar la mancjuera expansible_
2. Remueva et extreme inferior de la
mancjue.ra expansible
del porte-tube
roman do del cuello cle la manguera,
cjirando t y ttrando derecho hacta arribao
3, Enchufe la aspfradora
y enci_ndala.
19
Revise este recuadro pare encontrar soluclones a problemos clue puede corregtr usted
mlsmoo Cualquier otro serviclo debt ser realtzado par SEARS u otto acjonte de servlcio
callficado.
_ADVERTENCIA
Desconecfe
Io conlrarlo
Peligro de cheque el_clrlco
la aspiradoro antes de efecfuor el manlenimiento
a su aspiridoroo De
podria produclrse un cheque el6ctrico o causal lesi6n corporal.
III
La asptraclara no
enciende
I
iiiiiiiii,
L
i
I
iiiiiii1,1,
iii
I
IIIIII1'1
Est6 desconectada_
II
,i,1,111
iiii
,[ i,
!o Conecte bten, selecctone la
funclon deseada an el control
manual.
2o Cortac_rcuitos botado o
fusible quemado en el
tablerode servicto
de la residencia°
3. Protector termol acttvado.
4o Toma-corrlente
No aspire
satlsfactoriamenleo
defectuoso_
I., Balsa para polvo llena o
alascada,
2o Ajuste incorrecto de hive!
de pelo dela alfombra_
3o Agtlador desgas_adoo
4o Boquilla, o sujetador de
la bolsa, atascadao
5, Manguero atascada_
6. Manguera
rata,
7, La manguera
no est6 bien
insertada_,
8_
9_
Acttvact6n del s|stema de
_irotectt6n del motor,
Ilros de segurldad_
2, Restablezca el corfackcuitos
o camble elfuslble_
3., Desconecte la asptrodora y
permttaque se enfrf6, el
protector t6rmico se acffvara
par sl solo
4o Pru6belo con otro operate o
!6mpara. H6galo reparar
aproptadamenteo
1, Camble la balsa,
2. Ajuste e! ntveL
3. Camb_e el aqffador_
4_ ReviseCOMO ELIMINAR LOS
RESIDUES DE BASURA EN LOS
CONDUCTOS,
5. Revise ta mangura par residues,
6. Cambte la mancjuerao
Z Inserte blen la manguera
8. Determine sl exlsten bloqueos.
9_ Camble et filtro de proleccl6n al
motor y el f|ltro del escape.
La asplraclora levanla
tapetes o as diffcll
empujar.
t, Ajuste lncorrecto de nivel de
pelode ia alterable,
Io AJusteet nlvel,
El agiteder
no funciona,,
1. Mango en posici6n vertical
Io Moeva e! mango de la posfcF6n
vertical.
2_ Reajuste la sobrecarga del
agltadoro
3. Desconecte la asplradoray
permlta que se enfrl6 par 40-,50
re|notes,
2_ Sobrecarga del agltador
acfivado_
3. Protector t6rmtco activadoo
Restricci6n del ffujo
con el use de los
Camblo de senldo.
2.,
El usa de los accesorlos ltmita el
flujo de aire.
1. Revise USO DE LOS
ACCESORIOS
La pelusa de una alfombra
2. Revise C_MO ELIMINAR LOS
RESIDUES DE BASURA EN LOS
CONDUCTOS y limpie la
manguera.
nueva
obs_ruyo o! pelo d_ _Ira
2O
Linea
de ayuda de Aspiradoras:
1-877-531-7321
8:00am-5:00pm
EST, M-F
(U.S.Ao andCanada)
Acuerdos Maeslros de Protecci6n
Enhorabuena par hacer una campra inteligente_Su nuevo producto l(enrnore® est6 dfsefiado y fabrtcado para offeceHe aF,os de funclonamlento cenfiabte, Pero al tgual que tados los productos
pueden preclsar un mantenlrnlento preventive o alquna reparacl6n de vez en cuanda. Par este motive, tenet un Acuerdo Maestro de Prareccl6n puede ahorrarte dtnero e lnconven_entes,
E1Acuerdo Maestro de Protecc16ntarnbl_n le ayuda a pro!oncjar ;lavtda 0til de su nuevo producto_
A continuac!6n tndlcamos la que el Acuerdo* Incluye.*
I_
I_
r_
1_
Partes y mane de obra necesarios pare ayudar a qua estos productos funcione correctamente
bajo condiclanalas normales de usa, no stmplemente defectos. Nuestra
cobertura va touche m6s all6 de la garanfia dal producto. Ning0n deducible, ninguna averia funcionat quada excluida de la cobertura* protecci6n realm
Servicio experto offecido par una ltsta de m6s de I0_000 t_cnicos autorizados de|
servicio t6cnice de Sears, Io que slgnifica que algulen en quten usted puede confiar
estar6 trabajando en su producto,
N0mero ilimilada de Ilamadas al serviclo t_cnlco ¥ serviclo en lode |a naci6n, tan
continua coma usted has 1o soltctte, sin imporfar donde est,.
Garantla seHa de sustituci6n del producto. La sustituci6n de su producto cub|erie si
se producen cuatro o m_s averlas en dace meses_
Sustiluci6n del produclo par olro nuevo s| su producto cubierto no puede repararse_
Revisi6n ¥ mantenlmianlo
anual preventlvo slempre que Io desee y sin cargo algunoo
Ayuda r6pida par tel_fono - Nosotras Io Ilamamos Resotuci6n rbpida. Soporte telef6nico de un representante de Sears en todos los productos_ Piense en nosotros coma
un "manual deuso y cuidado",
Protecci6n centre subidas de tensibn que provoquen defies el6ctricos causeries par
las fluctuaciones de ia corrlente.
$250 de protecci6n centre la p6rdlda de alimentos
anuatmente en case de qua se
estropee alg0n alimento coma resultado de una averta mec_nica de cualquler congelador o refrigerador
cublertoo
Reembolso del atquiler si la reparacl6n
de su producto cubierto tome m6s ttempo
delprometidoo
10%de
descuento an el precto regular de cualquier servicio de reparacibn
no
cubiarto y de las piezas tnstaladas relactonadas.
Una vez que cornpre el Acuerd% s61o bastar6 ena simple Ilarnada telef6nica pare que pueda
prograrnar un servtcto Puede llarnar a cualquier hera del dra o de la noeher o concertar una cita
de servlclo en lfnea_
El Acuerdo maestro de proteccf6n es una compra Ilbre de Hesgos SI par cualquler raz6n cancela
durante el peHodo de cjarantfa de1 productot le devolversmos redo el dtnero. O_ un reernbolso prorrateado despu6s del peHodo de venclrnlento de la cjarantTa_ICornpre su Acuerdo maestro hay|
Apllcan algunas llmilaclones
Ilame al 1-800-827-6655_
y exclusiones0 Para precios y mc_s informaci6n
* La cobertura en Canada varia en algunos
ilame a Sears Canada ai 1-800-361-6665_
artlculos.
Pare oblener
en EE_UUo_
redes los deta|les,
Servicio de inslalaci6n de Sears
Para la instalaci6n profesional par parte de Sears de electrodom_sticos, abridoras de
puertas de cjarajes, catentadores de acjua y arras arttculos principalas pare el hocjar, en
EE_UU_o Canada llame al 1-800*4*MY-HOME®.
2!
manage
home
www.managemyhome.com
For repair - in your home - of all major brand appliances,
lawn and garden equipment, or heating and cooling systems,
no matter who made it, no matter who sold it!
For the replacement parts, accessories and
owner's manuals that you need to do-it-yourselL
::!i!i
For Sears professional installationof home appliances
and items like garage door openers and water heaters,
1-800-4-MY-HOME
(1-800-469-4663)
www_sears,,com
®
call anylime, day or night
(U S A andCanada)
www.sears.ca
Our Home
For repair of carry-in Items like vacuums,
and electronics,
lawn equipment,
call anytime for the location of the nearest
_i:i
Sears Parts & Repair Service Center
1-800--488-,1222
(U S.A.)
www.searsocom
1-800-469-4663
WWWoSearsoca
(Canada)
To purchase a protection agreement on a product serviced by Sears:
1-800-827.6655
(U_SA)
Pare pedir servicio de mparaciOn
a domicilio, y pare ordenar piezas:
1.888-SU-HOGAR®
(I-888-784-6427)
www-searsocom
$
1-81t11-361-6665
: :: •
(Canada)
Au Canada pour service en fran_.ais:
1.800.LE.FOYERMC
(I-800_533.6937)
www.sears.ca
rs
:i:
:::
:i
•
:
.......
® Reglslered Tradam_lk !
Trademark of KCD 1P LLC In the U_lted Slatas, or Se_rs Brands. LLC in other cat_nt_ies
t_'_Marca Regfstrada t TU Marca de Ff_bric_ de KCD tP LLC en Estados Unidos. o Sears BranrJs, LLC in aires palses
- Marque de commerce / _ M_rque d_pos_e de Seers Brands LLC