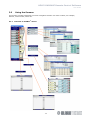
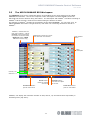
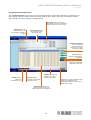
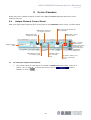
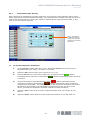
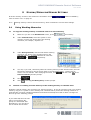
1
Remote Control Software
HELIX DN9848E
Remote Control Software V4.01
User Guide
HELIX DN9848E Remote Control Software
User Guide
Contact Details
Klark Teknik
Klark Teknik Building
Walter Nash Road
Kidderminster
Worcestershire
DY11 7HJ
England
Tel: +44 1562 741515
Fax: +44 1562 745371
Email: [email protected]
Websites: www.klarkteknik.com
HELIX DN9848E Remote Control Software V4.01 User Guide
DOC00056-HELIXRCS Issue B - September 2006
© Telex Communications (UK) Limited.
In line with the company’s policy of continual improvement, specifications and function may be
subject to change without notice. This User Guide was correct at the time of writing. E&OE.
2
HELIX DN9848E Remote Control Software
User Guide
CONTENTS
1
INTRODUCING THE HELIX DN9848E REMOTE CONTROL SOFTWARE ........................... 6
2
INSTALLING THE HELIX DN9848E RCS ADD-IN ................................................. 7
2.1
Minimum System Requirements...................................................................................... 7
2.2
Software Installation ..................................................................................................... 8
3
GETTING STARTED .....................................................................................10
3.1
Opening HELIX DN9848E RCS within the ELGAR Library Manager .......................................10
3.2
Using the Screens........................................................................................................13
3.2.1
Overview of FastNav® menus ................................................................................. 13
3.2.2
Navigation........................................................................................................... 14
3.2.3
Tool tips.............................................................................................................. 14
3.2.4
Using the on-screen controls .................................................................................. 14
3.2.5
Changing a name ................................................................................................. 16
3.3
The HELIX DN9848E RCS Workspace..............................................................................17
3.3.1
3.4
FastNav® unit bar................................................................................................. 18
Quick Tour of the HELIX DN9848E RCS Menu Screens.......................................................19
3.4.1
Memory View screens ........................................................................................... 20
3.4.2
Copy Channel View screen ..................................................................................... 23
3.4.3
DN9848E Units Home screen.................................................................................. 25
3.4.4
Input Groups screen ............................................................................................. 26
3.4.5
Output Groups screen ........................................................................................... 27
3.5
Working Online ...........................................................................................................28
3.5.1
Communications Overview ..................................................................................... 28
3.5.2
Online Operation .................................................................................................. 29
3.5.3
Troubleshooting ................................................................................................... 31
3.6
Protecting System Settings ...........................................................................................32
3.6.1
Panel Locks ......................................................................................................... 32
3.6.2
System Protect .................................................................................................... 33
4
INPUT CHANNELS .......................................................................................34
4.1
Input Channel Control Panel..........................................................................................34
4.2
PEQ and Protection Screens ..........................................................................................35
4.3
Setting Input Parameters..............................................................................................36
4.3.1
Naming an Input Channel ...................................................................................... 36
4.3.2
Gain and Delay .................................................................................................... 36
4.3.3
Parametric equalization (PEQ) ................................................................................ 37
4.3.4
Compression (channel protection)........................................................................... 37
3
HELIX DN9848E Remote Control Software
User Guide
4.4
Monitoring the Input Signals .........................................................................................38
4.4.1
Meters - peak ...................................................................................................... 38
4.4.2
Meters – gain reduction ......................................................................................... 38
4.4.3
Input Response graph ........................................................................................... 39
5
OUTPUT CHANNELS .....................................................................................40
5.1
Output Channel Control Panel........................................................................................40
5.2
Filters, PEQ and Dyn. Screens .......................................................................................41
5.3
Setting Output Parameters............................................................................................42
5.3.1
Naming an Output Channel .................................................................................... 42
5.3.2
Routing Page ....................................................................................................... 42
5.3.3
Signal Invert, Delay and Output Level ..................................................................... 44
5.3.4
Phase Adjustment (Filters Screen) .......................................................................... 45
5.3.5
High Pass and Low Pass Filters (Filters Screen) ......................................................... 47
5.3.6
Parametric Equalisation (PEQ Screen)...................................................................... 49
5.3.7
Compression (Dyn. Screen) ................................................................................... 51
5.3.8
Output Limiter (Dyn. Screen) ................................................................................. 52
5.4
Monitoring the Output Signals .......................................................................................53
5.4.1
Meters - peak ...................................................................................................... 53
5.4.2
Meters – gain reduction ......................................................................................... 53
5.4.3
Output Response graph ......................................................................................... 53
5.5
6
Output Muting on Selected Unit .....................................................................................54
CONFIGURING A HELIX DN9848E UNIT ..........................................................55
6.1
General......................................................................................................................55
6.2
Unit and Memory Identification ......................................................................................56
6.3
Display Delay Options ..................................................................................................57
6.4
Knob Mouse Direction ..................................................................................................58
6.5
PEQ Bandwidth or Q Selection .......................................................................................59
7
PROGRAMMING EQ .....................................................................................60
7.1
Parametric Equalisation (PEQ) .......................................................................................60
7.2
Dynamics ...................................................................................................................62
7.3
Filters ........................................................................................................................63
8
WORKING WITH MULTIPLE HELIX ADD-INS .......................................................64
8.1
Building your Network Remotely ....................................................................................64
8.2
The DN9848 Units Home Screen ....................................................................................64
9
STORING/RECALLING MEMORY SETTINGS ..........................................................67
9.1
Using Working Memories ..............................................................................................67
9.2
Unit (Device) Memories ................................................................................................69
9.3
Copy RCS Memories.....................................................................................................71
4
HELIX DN9848E Remote Control Software
User Guide
10
MANAGING GROUPS ....................................................................................72
10.1
Security – Grouping Password ....................................................................................72
10.2
Input Groups ...........................................................................................................74
10.3
Output Groups .........................................................................................................78
11
USING HELIX DN9848E RCS TO CONTROL A PROCESSING SYSTEM .........................82
11.1
Overview.................................................................................................................82
11.2
HELIX DN9848E unit interconnections..........................................................................82
11.2.1
Connecting the HELIX DN9848E units using the two-port switch ............................... 82
11.2.2
Connecting the HELIX DN9848E units to an Ethernet switch or hub........................... 83
11.3
11.3.1
Ethernet connection – standard ........................................................................... 83
11.3.2
Ethernet connection – wireless option................................................................... 84
11.3.3
Configuring the Network Devices ......................................................................... 84
11.3.4
Fault Finding Tips .............................................................................................. 91
11.4
Serial Connection (Option) .........................................................................................92
11.4.1
Serial connection details..................................................................................... 92
11.4.2
Connection Procedure ........................................................................................ 92
11.5
12
Ethernet Connection .................................................................................................83
The System Configuration Window ..............................................................................95
11.5.1
Finding ports and device names........................................................................... 95
11.5.2
The Port Configuration screen ............................................................................. 96
APPENDICES .............................................................................................98
12.1
Glossary of Terms and Abbreviations ...........................................................................98
12.2
Remote Control Connection Options .......................................................................... 100
12.2.1
Single-unit serial connections .............................................................................100
12.2.2
Multiple-unit Ethernet connections ......................................................................101
12.2.3
Multiple-unit serial connections...........................................................................103
12.2.4
Ethernet and serial ...........................................................................................104
12.3
Setting up the Lantronix UDS1100 Converter.............................................................. 105
12.3.1
Configuring the Lantronix UDS1100 ....................................................................105
12.3.2
Connecting the system equipment ......................................................................107
12.4
Mix Templates for Routing Pages .............................................................................. 109
12.4.1
Manual Mix (Routing Reset) ...............................................................................109
12.4.2
2 X 2 Way Crossover.........................................................................................109
12.4.3
2 X 4 Way Crossover.........................................................................................110
12.4.4
2 X 3 Way Crossover plus 2 Aux .........................................................................110
12.4.5
1 X 5 Way Crossover plus 3 Aux .........................................................................110
12.4.6
1 X 6 Way Crossover plus 2 Aux .........................................................................111
12.4.7
4 X Bi-Amp......................................................................................................111
12.5
Presets ................................................................................................................. 111
5
HELIX DN9848E Remote Control Software
User Guide
1
INTRODUCING THE HELIX DN9848E REMOTE CONTROL
SOFTWARE
The HELIX DN9848E Remote Control Software (HELIX DN9848E RCS) enables engineers to remotely
program a system of up to 16 HELIX DN9848E System Controller units from a laptop or PC for onward
downloading to the HELIX DN9848E System Controller units at a venue. Hence, programming can be
done in advance of a show from home or en route, leaving more time for fine-tuning.
At the venue, the settings can be quickly downloaded to the system. Thereafter, a HELIX DN9848E RCS
tablet/laptop PC can be used for real-time control of the system during both set-up and performance.
Using the HELIX DN9848E RCS offers an enhanced visual overview of unit performance, as well as
significant time-saving in switching between units, navigating ‘processing’ views and adjusting settings.
Furthermore, for optimal control during set-up, the tablet/laptop PC can be set up to communicate with
the system over a wireless connection, leaving the engineer free to move around the venue while
adjusting the processor settings. For performance, Ethernet communication is used, although there is
an option for conventional serial RS-232, if required. Settings can also be uploaded from the HELIX
DN9848E System Controller units to the HELIX DN9848E RCS.
In addition to the active settings, HELIX DN9848E RCS can also be used to remotely program the
32 lockable system memories and 5 user memories.
The HELIX DN9848E RCS runs as an Add-In to the Midas Klark Teknik ELGAR Library Manager, enabling
you to work on settings for your system controller devices alongside other Midas or Klark Teknik
devices, such as a H1000 console or DN9340 and DN9344 EQ units, and save them all in a single show
file. The show file can then be reused at subsequent venues. In addition, you can minimise time and
effort by copying settings between the HELIX DN9848E RCS Add-In units.
Please note that, for the purposes of this manual, a HELIX DN9848E unit is the actual physical version
connected to the system and an RCS unit is a unit in HELIX DN9848E RCS. Also, some of the
screenshots in the manual may appear slightly different to those on your screen due to configuration
and status of the system, units and your laptop/PC.
Note
Earlier DN9848 devices (non-E) may be connected to, and controlled using the HELIX DN9848E
RCS provided that the connection to these devices is in accordance with Appendix 12.2 of this
User Guide.
6
HELIX DN9848E Remote Control Software
User Guide
2
2.1
INSTALLING THE HELIX DN9848E RCS ADD-IN
Minimum System Requirements
Operating System:
Windows 2000 or Windows XP
Computer/Laptop:
Display resolution minimum 1024 X 768 pixels set at 96 DPI
Pentium III, 500MHz (or equivalent)
256MB RAM
Minimum 10MB of free disk space on hard drive
Connectivity:
Connection to the HELIX DN9848E units is via Ethernet (also with wireless
option), with the units operating V4.00 (or later) host code. There is also an
option for serial connection, which is done via the front panel. Full connection
options and respective equipment requirements are detailed in Section 11.
Software:
The following software must be installed prior to installing the HELIX DN9848E
Remote Control Software:
Microsoft .NET Framework 1.1 available at:
http://microsoft.com/downloads/details.aspx?FamilyId=262D25E3-F5894842-8157-034D1E7CF3A3&displaylang=en
Midas ELGAR Library Manager available at:
http://www.midasconsoles.com
7
HELIX DN9848E Remote Control Software
User Guide
2.2
Software Installation
HELIX DN9848E RCS Add-In is provided as an ‘.exe’ file from the Klark Teknik website
(www.klarkteknik.com) with an integral Setup Wizard that guides you through the installation process
on your laptop/PC.
Note
We recommend that you save the .exe file to your desktop - or other holding folder - rather
than opening the file while the Internet transfer is in progress. This will avoid the possibility of
the integral Setup Wizard interrupting the transfer, especially on slower internet connections.
After you have downloaded the .exe file, install it on your laptop/PC as follows:
1
Run the “DN9848ERCS_Vn_nn.exe” file (where “n_nn” is
the latest software version). The Setup Wizard should
appear on-screen within a few seconds.
2
Following the on-screen instructions, click
to go
to the Information window, which details the latest
improvements to the software. Previous users may find
this information particularly useful.
3
Click
to go to the Select Desination Location window.
Leave the Destination Directory as the preset default, that is,
“C:\Program Files\Klark Teknik Group\ELGAR”, unless you
have installed ELGAR in an alternative directory. In the
latter case, specify your alternative ELGAR destination
directory.
4
Click
once again; this will take you to the Ready to
Install window.
8
HELIX DN9848E Remote Control Software
User Guide
5
When you are ready to install, click
. After
to exit the Wizard.
successful installation, click
The HELIX DN9848E RCS will now be available through
the ELGAR Library Manager.
9
HELIX DN9848E Remote Control Software
User Guide
3
3.1
GETTING STARTED
Opening HELIX DN9848E RCS within the ELGAR Library
Manager
Note
To run HELIX DN9848E RCS you must have the Midas Klark Teknik ELGAR Library Manager
installed on your laptop/PC. The ELGAR Software and User Guide may be obtained from our
website at www.midasconsoles.com.
Note
To use the HELIX DN9848E RCS to control a processing system, see section 11 for details on
Ethernet connection, setting up and configuration, and section 3.5 for online operation.
HELIX DN9848E RCS runs as an Add-In to the ELGAR Library Manager, which provides a single
management window for various Midas and Klark Teknik remote programming software applications.
By opening multiple Add-Ins within the ELGAR Library Manager you can work on settings for the various
Midas and Klark Teknik devices associated with a show at the same time. For example, you can have a
series of Klark Teknik HELIX DN9848E System Controller Add-Ins to cover your system, plus a Midas
Heritage 1000 Add-In with settings for a H1000 console and a series of HELIX DN9340 Digital EQs.
Furthermore, as the concurrently opened Add-Ins are saved, reopened etc., as a single show file using
the ELGAR File menu commands, you will save time in file management.
To add HELIX DN9848E RCS devices to the ELGAR Library Manager
1
Open ELGAR by double clicking on the ELGAR icon on your desktop.
2
From the ELGAR main menu bar, select Tools >
Add Device > DN9848 E.
10
HELIX DN9848E Remote Control Software
User Guide
3
At the Add Multiple DN9848 E Devices
window, use the Number of Devices to
Add drop down list to select the
number of devices, you wish to add,
up to a maximum 16. For example, 9.
4
Click OK to add the devices.
A DN9848 Units Home screen (diagram right) is
opened inside the ELGAR Library Manager. The
HELIX DN9848E RCS units are automatically
inserted in FastNav® (highlighted by orange box)
and numbered sequentially from 1 upwards. The
highest numbered unit is selected.
The DN9848 Units Home screen is the workspace
where you remotely program scene EQ settings for
your HELIX DN9848E system controllers; see
section 3.4.3 for details.
To use the HELIX DN9848E RCS to control a
processing system, see section 11 for details on
Ethernet connection, setting up, configuration etc.,
and section 3.5 for online operation.
To add more HELIX DN9848E RCS devices to the ELGAR Library Manager
1
From the ELGAR main menu bar, select Tools > Add Device > DN9848 E.
2
In the Add Multiple DN9848 E Devices window, select the number of devices you wish to add using
the Number of Devices to Add drop down list; this will show only the number of available
devices left to add.
3
Click OK . These devices are added to the device list (left-hand side of screen), with each
new device being allocated the lowest available number. To cancel, click
right-hand corner of window.
Note
at the top
Devices can be added/removed, as required, at any time during HELIX DN9848E RCS
operation.
11
HELIX DN9848E Remote Control Software
User Guide
To remove a HELIX DN9848E RCS device from the ELGAR Library Manager
1
From the ELGAR main menu bar, select Tools >
Remove Device and highlight the device you wish to
remove from the list. (You can rename each device
for easy identification; see section 3.2.5.)
2
Release left-hand mouse button. The device will disappear from the device list.
You can only remove one device at a time. Repeat the above steps for any other devices you wish to
remove.
12
HELIX DN9848E Remote Control Software
User Guide
3.2
Using the Screens
This section provides information on screen navigation and the use of the controls, for example,
buttons, control knobs, faders etc.
3.2.1
Overview of FastNav® menus
13
HELIX DN9848E Remote Control Software
User Guide
3.2.2
Navigation
To move around the screens, click on the buttons in FastNav®; see section 3.2.1. Further screens, such
as the input and output response graphs, routing page and those from the buttons on the input and
output channel control panels, are all available from the DN9848 Units Home screen; see section 3.4.3.
3.2.3
Tool tips
‘Tool tips’ are boxes that appear for a short while
underneath the cursor when it pauses over certain
objects. These boxes contain a single line of text that
gives you useful information on the object, such as
the range of adjustment on a control knob (diagram
right), the function of a button or the description of a
field.
3.2.4
Using the on-screen controls
This section gives details on adjusting or resetting the on-screen controls, such as control knobs, faders
etc.
To adjust a control knob
1
Click on control knob to select it. A dotted box surrounding the
object will appear to indicate that it has been selected (see
diagram right).
2
Once selected you can adjust the control knob’s setting – shown in
the white box directly underneath - via the mouse or laptop/PC
keyboard; a combination of both may also be useful. The
on-screen control knob will rotate and the setting value will alter
accordingly.
Mouse: To adjust the value using the mouse, position the cursor within the dotted box and
click the left-hand mouse button. Then, while holding down the button, move the mouse to
make the required adjustment. The way in which the mouse movements alter the setting
depend on the Knob Mouse Direction configuration, see Section 6.4. When you have achieved
the required setting value, release left-hand mouse button. If you run out of adjustment
due to cursor reaching edge of screen, which may happen on the Delay control knobs due to
the large amount of adjustment available, select control knob again and repeat adjustment.
Keyboard: Using certain keys on your laptop/PC keyboard you can adjust the control knob
in regular increments (with the exception of frequency, which has a logarithmic scale). The
increment value is dependent on control knob function, adjustment range and unit type.
The keys give the following type of adjustment for each control knob, irrespective of Knob
Mouse Direction configuration:
Home and End keys take you to the minimum and maximum values, respectively.
Page Up and Page Down keys give coarse adjustment in positive and negative directions,
respectively. To protect the system these keys do not function for grouping rotaries.
u and v arrow keys give moderate adjustment in positive and negative directions,
respectively. To protect the system these keys do not function for grouping rotaries.
s and t arrow keys give fine adjustment in negative and positive directions,
respectively.
14
HELIX DN9848E Remote Control Software
User Guide
To adjust a fader (see section 5.3.2 "Routing Page”)
Just click on fader to select it. Then, while holding down the
left-hand mouse button, drag mouse up and down until you have
achieved the required value (shown in white box directly underneath
fader). Release left-hand mouse button.
To quickly reset a control knob or fader value to default using the mouse
1
Click on control knob or fader using the right-hand
mouse button, for example, the “Input D” Gain
control knob. A reset option box will appear.
2
Move cursor over option box to highlight it.
3
Click left-hand mouse button; value reverts to
default.
15
HELIX DN9848E Remote Control Software
User Guide
3.2.5
Changing a name
You can change the name of channels, units, memories etc. The following example shows you how to
change the name of an input channel but the principle is the same for any other name you wish to alter.
To change a name
1
Right click in the field whose name you
wish to change. For example, “Input A”
control panel on the DN9848 Units Home
screen.
2
Move cursor over Select All to highlight it.
3
Left click; all of input channel name is
highlighted.
4
At this point you can type in the new name, for example, “No3 i-p”.
Or:
With the name still highlighted, you can right-click again in
the name field to obtain a menu that allows you to:
Undo – undoes previous operation.
Cut – removes highlighted text and stores it ready for a
subsequent paste operation.
Copy – copies highlighted text without removing it and
stores it ready for a subsequent paste operation.
Paste – pastes stored text.
Delete - removes highlighted text completely without
storing it. Any subsequent paste operation will only paste the stored text from when
you last used Cut or Copy.
Please note that some of the above options are dependent on previous actions and current
operation, so they may not be available, as indicated by being ‘greyed out’. Also, certain
symbols are not allowed, for example, % and £.
16
HELIX DN9848E Remote Control Software
User Guide
3.3
The HELIX DN9848E RCS Workspace
The DN9848 Units Home screen (illustrated below) is the default screen when starting up the HELIX
DN9848E RCS software. The screen comprises a main workspace area with FastNav® down the
left-hand side and four buttons along the bottom. The workspace and FastNav® area alter according to
FastNav® button selection, while the four buttons along the bottom are static.
Five buttons in FastNav® emulate the functionality of the HELIX DN9848E. You can open up to 16
HELIX DN9848E units within a single show file, with each one each being allocated a unit bar in
FastNav®.
FastNav®: contains the five
main menu buttons. A list of
DN9848E units connected to
the system are shown below
DN9848 Units button (DN9848
Units Home screen only)
Message bar shows the current
main view and unit selected
Close window
button
Main
workspace
Unit bar, see
section 3.3.1
Mute All button:
mutes all outputs
of all units
Un-Mute All button:
unmutes all outputs
of all units
All Units Offline button:
puts all units offline
All Units Online button:
puts all units online
FastNav® can display the maximum number of units, that is, 16, and shows them sequentially in
ascending order (top down).
17
HELIX DN9848E Remote Control Software
User Guide
3.3.1
FastNav® unit bar
Each HELIX DN9848E unit in the system has a dedicated unit bar in FastNav® that displays unit
information, as detailed in the illustration below. Clicking on a unit bar selects its associated unit.
During online operation, the activity indicators of each RCS unit provide audio metering, which mirror
the activity indicators of the HELIX DN9848E unit.
Signal present indicator
Clip in progress
indicator
Unit’s unique
identification number
Limiter gain reduction
indicator
Online status indicator: mimics
Online button in DN9848 Units Home
screen, where red indicates offline,
green online and yellow
unavailable
Name of unit
Lighter background indicates
that this unit is selected
To select a unit
Click on the bar of the required unit under the DN9848 Units button in FastNav®; its background
will lighten to indicate it is the current selection. The view containing the input and output
channel control panels will appear.
18
HELIX DN9848E Remote Control Software
User Guide
3.4
Quick Tour of the HELIX DN9848E RCS Menu Screens
The HELIX DN9848E RCS workspace has five main screens, selectable via buttons in FastNav®:
•
Memory View – lets you copy/write working memory to/from HELIX DN9848E unit and RCS
unit memories.
•
Copy Channel View - lets you copy/paste input and output channels across RCS units.
•
DN9848E Units –gives you access to the control panels and response graphs of the input and
output channels, and also routing page and passwords.
•
Input Groups - lets you manage the input groups by creating and editing them.
•
Output Groups - lets you manage the output groups by creating and editing them.
Memory View - see section 3.4.1
Copy Channel View - see section 3.4.2
DN9848 Units - see section 3.4.3
Input Groups - see section 3.4.4
Output Groups - see section 3.4.5
19
HELIX DN9848E Remote Control Software
User Guide
3.4.1
Memory View screens
The Memory View has three screens, RCS Memories, Unit Memories and Copy RCS Memories, from which you can
manage the system units’ working memory. The screens are described in the following subsections and
operations involving the screens are described in detail within Section 9.
Each input has 32 lockable system memories (System 01 to System 32 for storing standard set-ups),
five free access user memories (User 01 to User 05 for storing set ups for the current show) and one
working memory. Each memory holds a store of 32 packets of memory, numbered from 1 to 32, with
each one corresponding to the 32 available system unit slots.
The working memory contains the current working settings for the system units and is stored in the
current RCS show file.
RCS Memories screen
The RCS Memories screen lets you store/recall the working memory of selected RCS units to/from one of
the system or user memory stores. You can reset working memories, and individual and collective
system and user memories on selected units. The RCS Memories screen also allows you to rename the
working memory on any RCS units. For a full description see Section 9.
Working Memories list: for
selecting unit(s) from which
working memory is copied
Locked/Protected
units are identified
by an * in the LC
column
Stored Memories list:
memory store locations
(32 system and 5 user)
Reset Memory button:
resets selected
memory to default
Reset System Memories
button: resets all
system memories to
default
Apply button: applies
memory name change
on selected units
Shows number and
name of currently
highlighted unit and,
below, selected
stored system or user
memory number
Select All button: selects
all units in above list
Reset Working Memories button:
resets working memories of
selected units to default
Allows you to change
the working memory
name on selected units
Deselect All button: deselects
all selected units
Recall Memory button:
recalls selected memory
to Working Memories list
20
Reset User Memories button:
resets all user memories
to default
Store Working Memory
button: stores working
memory of selected units
in selected memory
HELIX DN9848E Remote Control Software
User Guide
HELIX DN9848E Unit Memories
The Unit Memories screen lets you copy corresponding system and user memories between the RCS and
the actual physical units in the system. For a detailed description see Section 9.
Units list: for selecting
unit(s) that memory is
copied to/from
Comment field: gives details
on whether the operation is
successful or not
Locked & Protected units
are identified by an * in the LC
column
Memories list: unit
memory store locations
(32 system and 5 user)
Select All button: selects all
system and user memories
Deselect All button:
deselects all selected
system and user
memories
Read From Unit button:
reads memories from
selected unit(s)
Unit Progress status
bar: shows progress
of device memory
copying process
Select All button: selects
all units in above list
Memory Progress status bar:
shows progress of stored
memory copying process
Deselect All button:
deselects all selected
units
Cancel button: cancels
memory copying process
21
Write To Unit button: writes
selected memories to
selected unit(s)
HELIX DN9848E Remote Control Software
User Guide
Copy RCS Memories
The Copy RCS Memories screen lets you copy the memory of a single unit, which is stored in the HELIX
DN9848E RCS software, to the RCS memories of one or more of the other units in the system.
Memories list: destination
memories to which source
memory is copied
Source Unit field: for selecting
unit from which source memory
is copied
Destination Units(s) list: for
selecting which unit(s) the
source memory is copied to
Source Memory field: for
selecting memory to
copy
Select All button:
selects all system and
user memories
Deselect All button:
deselects all selected
system and user
memories
Select All button:
selects all destination
units
Deselect All button: deselects
all selected destination
units
Copy Memory button: copies source
memory of source unit to selected
destination memories of selected
destination unit(s)
22
HELIX DN9848E Remote Control Software
User Guide
3.4.2
Copy Channel View screen
The Copy Channel View screen gives you access to the Copy Input Channels and Copy Output Channels screens.
These screens let you copy and paste whole input or output channels or just selected elements from a
selected unit to selected channels of other units. A more detailed description of these processes appears
within Section 9.
Copy Input Channels screen
The Copy Input Channels screen lets you copy the following from the particular channel of a selected unit to
the selected channels of other units: the whole channel; gain, delay and mute settings; PEQs settings;
or protection settings.
Source Channel field:
for selecting input
channel to copy
Copy Options list: for selecting
which audio elements of
selected input channel you
wish to copy
Source Unit field: for
selecting unit from which
input channel is copied
Destination Channel(s)
list: for selecting input
channels to which
source input channel
is copied
Select All button:
selects all
destination units
Deselect All button:
deselects all selected
destination units
Select All button: selects
all destination units
Deselect All button:
deselects all selected
destination units
Locked
warnings will
appear here if
any channels are
locked
Destination Unit(s) list: for
selecting which units the input
channels are copied to
23
Copy button: copies selected input
channel of selected unit to
selected destination channel(s) of
destination unit(s)
HELIX DN9848E Remote Control Software
User Guide
Copy Output Channels screen
The Copy Output Channels screen lets you copy the following from a particular channel of a selected unit to
the selected channels of other units: the whole channel; gain, delay, mute and invert phase settings;
filter settings; dynamics settings; or PEQ settings.
Copy Options list: for selecting
which audio elements of selected
output channel you wish to copy
Source Unit field: for
selecting unit from
which output channel is
copied
Source Channel field:
for selecting output
channel to copy
Destination Channel(s)
list: for selecting
output channels to
which source output
channel is copied
Select All button:
selects all destination
channels
Deselect All button:
deselects all selected
destination channels
Select All button:
selects all
destination units
Deselect All button:
deselects all selected
destination units
Locked warnings will
appear here if any
channels are locked
Copy button: copies selected output
channel of selected unit to
selected destination channel(s) of
destination unit(s)
Destination Unit(s) list: for
selecting which unit(s) the
output channels are copied to
24
HELIX DN9848E Remote Control Software
User Guide
3.4.3
DN9848E Units Home screen
For a more detailed description see Section 8.3. Click on the DN9848 Units button to obtain the DN9848E
Units Home screen. This screen relates to the currently selected unit and contains the following:
•
Input channel control panels (A, B, C and D).
•
Output channel control panels (1 to 8, inclusive).
•
Unit’s name and number, and the name of the working memory.
•
Buttons for accessing DN9848E Unit Home page, input and output channel response graphs, routing
page and system password, and ones for muting/unmuting and putting the units online/offline.
•
Information sections that provide unit and RCS software, battery and communications port
information.
Information section
Mute Outputs button: mutes all
outputs on selected unit
HOME button: returns you
here from any of the DN9848
Units sub-screens
Unmute Outputs button:
unmutes all outputs
on select unit
Online button:
puts unit online
or offline, button
changes colour
accordingly
Input channel
control panel
Fader button:
gives access to
routing pages
Output channel
control panel
Input Response
button: takes
you to the
inputs’ overview
response graph,
see section 4.4.1
Details of the Helix
DN9848E RCS software
version
Passworsds button: password button
Output Response button: takes you to the
outputs’ overview response graph, see
section 5.4.1
The information section gives information on:
•
“Unit SW Version” - the HELIX DN9848E software installed in the physical unit.
•
“Battery” – provides information on state of unit’s battery, displaying “Good” or “Low”.
•
“PortName” – the name of the port assigned to the current unit, which can be edited and
changed in ELGAR, see section 11.3.3.
25
HELIX DN9848E Remote Control Software
User Guide
3.4.4
Input Groups screen
The Input Groups screen allows you to assign any inputs from the system units to a group. For a full
description of the Group management process see Section 10.
Groups can be password protected. The screen below shows the default screen, which has no groups
allocated.
Input group
name field
SETUP button: takes
you input group
setup screen
Input function buttons:
take you to Gain + Delay,
Prot., and PEQ screens
Remove Group button: deletes
currently selected input
group from store
Add Group button:
stores currently
selected input
group
Group Passwords button: For
allocating a password to a
group
Add Î button: adds
selected inputs(s) to
current input group
Í Remove button:
removes selected
inputs(s) from current
input group
This section shows
the channels
currently in the
selected input group
This section shows the
channels available for
transfer to input group
Jump to Channel button:
takes you to the
selected units on the
DN9848 Units Home
screen
26
HELIX DN9848E Remote Control Software
User Guide
3.4.5
Output Groups screen
The Output Groups screen allows you to assign any outputs from the system units to a group. For a full
description of the Group management process see Section 10.
Groups can be password protected. The screen below shows the default screen, which has no groups
allocated.
Output group
name field
SETUP button: takes
you output group
setup screen
Output function buttons:
take you to Gain + Delay,
Filters, PEQ, and Dyn.
screens
Remove Group button: deletes
currently selected output
group from store
Add Group button:
stores currently
selected output
group
Group Passwords button: For
allocating a password to a
group
Add Î button: adds
selected outputs(s) to
current output group
Í Remove button:
removes selected
outputs(s) from
current output group
This section shows the
channels currently in
the selected output
group
This section shows the
channels available for
transfer to output group
Jump to Channel button:
takes you to the
selected units on the
DN9848 Units Home
screen
27
HELIX DN9848E Remote Control Software
User Guide
3.5
3.5.1
Working Online
Communications Overview
Referring to the illustration above, in online mode the HELIX DN9848E RCS laptop/PC and units
exchange the following messages:
Metering Requests
and Responses
These obtain data for the Input, Dynamic EQ and Output ‘LED’ meters of
HELIX DN9848E RCS screen. The HELIX DN9848E RCS continually polls
the units in rotation.
Get All Requests
and Responses
These obtain settings from the specifically addressed unit. These may be
initiated by the user or automatically by the HELIX DN9848E RCS.
Data Packets
These carry the processor settings from the laptop/PC to the specifically
addressed units. Data Packets are only transmitted when you make
changes at the laptop/PC.
What happens when the wireless connection is interrupted
If the wireless connection drops, for example, due to a pillar interrupting the radio signal, the HELIX
DN9848E RCS suspends the Add-In settings so that no further changes can be made, although you may
freely navigate between screens. However, due to the network speed, there will be a delay during
which you may make some changes that are not registered at the unit.
During the drop, the HELIX DN9848E RCS continues to poll the units for metering requests. When a
response is detected, that is, the wireless connection is restored, the HELIX DN9848E RCS will come
back online as follows:
If you were making changes when the connection dropped, that is, data packets were lost, the
HELIX DN9848E RCS will send a Get All request to the system to re-synchronise the HELIX Add-Ins with
their physical counterparts before unfreezing the Device Screens. Your last change(s) are rolled back.
Synchronising to the physical units, that is, to the last settings you heard, avoids the possibility of
extreme changes in volume due to any dramatic adjustments you may have made due to the apparent
lack of effect as the units went offline.
28
HELIX DN9848E Remote Control Software
User Guide
If no changes were being made when the units went offline, that is, no data packets were lost,
the HELIX DN9848E RCS has no need to re-synchronise and smoothly reverts to normal operation
without sending a Get All request.
Note
3.5.2
Mute On: Normally, the Get All request overwrites the ‘Mute On’ settings at the RCS.
However, if the Get All is initiated automatically due to signal interruption, active Mute
buttons retain their status while the gain value at the unit is transferred to the Level field.
This enables Mutes to be applied to channels for sound testing purposes while ensuring their
true levels are not lost during signal interruptions.
Online Operation
Important!
We recommend that you always save your show file settings before going online, so that you have the
option of reverting to previous settings after a Get Working Memory from the Unit synchronisation. To set the
entire system online
1
Click on
(towards the bottom left-hand side of the screen).
If a unit is locked, it is not possible to write to that
unit and therefore the Set All function will be
disabled. It is possible to read memory from that unit
even if is locked.
If a unit is unlocked but that unit is in any group that
contains an absolute value, it is not possible to read
data from that unit as it would affect other channels
If a physical unit is locked and the
RCS unit is in an absolute group it is
not possible to go online at all.
There are two choices, either
remove that unit from the group or
physically turn the locking off at the
unit. Selecting the Remove From
Groups option causes a
confirmation window to appear.
Where there are no locking or grouping issues,
this window will appear.
2
At the Synchronise Data window, choose to Get Working Memory from the Unit to upload settings
from the units to overwrite the current PC settings in the respective Add-In Devices or Set
Working Memory on the Unit from the Computer to download the PC settings to the units, as required.
Click OK to continue.
To take the entire system offline
Click on
(towards the bottom right-hand side of the screen) to take the entire
system offline. The online/offline status boxes on the unit bars in FastNav® (DN9848 Units
Home screen) will update accordingly.
29
HELIX DN9848E Remote Control Software
User Guide
To set a particular unit online
1
Go to the DN9848 Units Home screen and select the respective HELIX DN9848E unit by clicking
on its unit bar in FastNav®.
2
Click
3
At the Synchronise Date window, choose to download the PC settings to
the Unit (Set Working Memory on the Unit from the Computer), or upload settings
from the Unit to overwrite the current PC settings in the respective
Add-In Devices (Get Working Memory from the Unit).
4
Click OK .
(see diagram right).
When contact is successfully established, the
(red) button changes to
(green) and
the online status bar on the unit bar (see section 3.3.1) also changes to green, while at the HELIX unit
the alphanumeric shows T/R activity. If the connection is not immediate the button changes to
(yellow) while it tries to establish wireless contact.
If online contact cannot be established, an error message is returned (immediately below). This must
be acknowledged by pressing OK . Thereafter, HELIX DN9848E RCS will continue polling the unit unless
taken Offline. Continuous polling is primarily designed to facilitate wireless communication, where the
link may briefly disappear, for example, when you walk behind an obstructing object. However, it can
also be useful when fault finding cabled communication, as the button will turn green as soon as the
problem is corrected.
Caution!
Changes should not be made to equalisation settings at the unit while the HELIX DN9848E
RCS is attempting to establish communication, as the unit and Add-In may lose
synchronisation.
To take a unit offline
1
Go to the DN9848 Units Home screen and select the respective HELIX DN9848E unit by clicking
on it unit bar in FastNav®.
2
Click on
(green).
To check the online status of the units in the system
Go to the DN9848E Units Home screen and check the activity of the online status indicator on
the unit bars; see section 3.3.1.
30
HELIX DN9848E Remote Control Software
User Guide
3.5.3
Troubleshooting
If you can’t get online using the online buttons
button (in unit’s main
If you are having difficulty setting units online, using either the
workspace) for a single unit or the
global button (towards the bottom left-hand side of the
screen) for all the units, try reloading the .ktg file. If required, save the file first.
If this does not solve the problem, try restarting Elgar.
If online communication cannot be established, check the following:
•
Cabling and power connections are in place.
•
Network communications are operating correctly, refer to section 11.3.4.
31
HELIX DN9848E Remote Control Software
User Guide
3.6
Protecting System Settings
To protect each unit against unauthorised users tampering with key parameters that may affect preset
room equalisation or result in equipment damage, there are two password protected lockouts: panel
locking and system protect. Both lockouts are accessed via the
button on the DN9848 Units Home
screen, which takes you to the Unit Locking window, shown below. You can only enter unit locking with
the unit online.
3.6.1
Panel Locks
Panel Locks has the following options:
Unlocked:
The physical unit will respond to all communication from the RCS.
Lock with Recall:
The physical unit will respond to calling and storing of user and system memories.
Lock with Recall and Mutes:
The physical unit will respond to calling and storing of user and system memories, and output
mute changes.
Lock with Mutes:
The physical unit will respond to output mute changes.
Full Lock:
The physical unit will not respond to any other messages.
To access a unit’s panel locking
1
Make sure you are at the DN9848 Units Home screen and selected unit is online, then click on
.
2
Type in the Panel Lock Password to activate the Panel Locks panel.
3
Select a Panel Locks option.
4
Click OK .
32
HELIX DN9848E Remote Control Software
User Guide
To change a unit’s Panel Lock Password
To be able to change Panel Lock Password the HELIX DN9848E RCS must first be online.
1
In the Unit Locking window, click on Change Password in the
Panel Locks section.
2
Type in a password of up to 12 characters in length,
which includes spaces.
3
Repeat the password in the lower field to confirm it and
click OK .
Provided the passwords in both fields match, HELIX DN9848E RCS
will confirm the change. If there was a mismatch, the change will
fail.
3.6.2
System Protect
Selecting Off in the System Protect panel locks out all output parameters (except mutes) and system
memories but allows user memories to be recalled and stored and inputs to be edited.
To access a unit’s system protect panel
1
Make sure you are at the DN9848 Units Home screen and selected unit is online, then click on
.
2
Type in the System Protect Password to activate the System Protect panel.
3
Select On or Off, as required, in the System Protect panel.
4
Click OK .
To change a unit’s System Protect Password
To be able to change System Protect Password the HELIX DN9848E RCS must first be online.
1
In the Unit Locking window, click on Change Password in the
System Protect panel.
2
Type in a password of up to 12 characters in length,
which includes spaces.
3
Repeat the password in the lower field to confirm it and
click OK .
Provided the passwords in both fields match, Helix RCS will confirm
the change. If there was a mismatch, the change will fail.
33
HELIX DN9848E Remote Control Software
User Guide
4
INPUT CHANNELS
Please refer to the “Input Channels” section of the HELIX DN9848E Operators Manual for a brief
technical overview.
4.1
Input Channel Control Panel
Each of the four input channels has a control panel, as shown below.
To access the input channel control panels
The control panels for each input are located on the DN9848 Units Home screen, as shown in
button in
section 3.4.3 on page 25. To access this screen, click on
.
FastNav® or click on
34
HELIX DN9848E Remote Control Software
User Guide
4.2
PEQ and Protection Screens
The PEQ and Protection screens are accessed via the buttons on an input channel control panel. PEQ is
the parametric equalisation view that lets you program any of the input channels; see
section 7 “Programming EQ”. Protect allows you to set up the compressor to improve the dynamics on
the input signals.
35
HELIX DN9848E Remote Control Software
User Guide
4.3
Setting Input Parameters
The signal processing for each input channel is programmed independently via the control panel
associated with each channel. The signal processing parameters are described below.
4.3.1
Naming an Input Channel
Input channel names are shown in the top left-hand corner of the channel control panels (see
section 4.1 on page 34). Each input channel has a default name, “Input A”, “Input B” etc. The new
name, which can be up to seven characters long, is retained after power down and is included in stored
settings.
To change the name of an input, see section 3.2.5 “Changing a name”
4.3.2
Gain and Delay
Gain and delay are also set on the input channel control panel, providing easy access for quick
adjustment during set up or performance.
To set the delay
Adjust the Delay control knob as required, see “To adjust a control
knob” on page 14. Range is 0.00ηs (microseconds) through ms
(milliseconds) to 1.000s (second). You can configure the delay units
to be measured in time (seconds) or distance (metric or imperial),
see section 6.3 on page 57.
To adjust the gain
Adjust the Gain control knob as required, see “To adjust a control
knob” on page 14. Range is 12.0dB through 0.0dB (default) to
-40.0dB and then there is an OFF position.
To switch the mute on and off
1
To switch on the Mute, click on the button that will change
to a red background to show that the mute is active.
Click button again to switch the mute off.
36
HELIX DN9848E Remote Control Software
User Guide
4.3.3
Parametric equalization (PEQ)
This section provides a simple overview of PEQ. For additional detail refer to Sections 5.3.6 and 7.1.
The HELIX DN9848E provides 12 parametric equalisation stages per input channel for equalising signal
in respect of room/venue characteristics. Each stage can be used across full range (20Hz o 20kHz) and
has Frequency, Q (bandwidth) and Level control knobs for setting and adjustment.
To set the PEQ
1
Click on the PEQ button on the input channel’s control panel. You will see the
PEQ screen for that input; see section 4.2 on page 35.
2
Set frequency (20 Hz to 20.00 kHz), bandwidth Q (0.08 to 3.0 Oct) and level
(-18.0 to 6.0 dB) using the appropriate control knobs, see diagram right. You
can also alter the frequency and level by clicking and dragging the target on
the graph; refer to section 7.1 on page 60.
PEQ sections that are not needed in the set up should be set to 0dB attenuation/boost at
the Level control knob.
To reset a single PEQ’s settings to default
1
To reset the PEQ values back to default, press
bottom of section.
2
Click YES at the window prompt.
at
To reset all of the PEQs’ settings to default
1
To reset the values of the 12 PEQ sections back to default,
(underneath the row of
buttons at
press
bottom of sections).
2
Click YES at the window prompt.
4.3.4
Compression (channel protection)
Each input has an independent full-range compressor
to improve the dynamics of the incoming signal levels.
The compressors are variable ratio and can be set to a
hard knee characteristic for a sharp gain reduction
response at the compression threshold, or soft knee for
a more ‘musical’ response. This screen has an
eight-segment signal meter (see section 4.4).
To set the compressor parameters
1
Click on Protect on the input channel’s control panel. You should see the Protect screen; see
section 4.2 on page 35.
2
Set threshold (-10.0 to 21.0 units), ratio (1:1 to 5:1), attack (40 µs to 100 ms) and release
(10 ms to 2000 ms) using the appropriate control knobs.
37
HELIX DN9848E Remote Control Software
User Guide
To reset the compressor parameters
1
To reset the compressor parameters back to
default, press
at bottom of section.
2
Click on YES at the Are you sure you want to Reset the
channel Protection? prompt.
To switch the compressor in/out of the circuit
To switch the compressor in or out of the circuit, press the In button to achieve required
condition, where
(button illuminated) shows compressor is in circuit and
(button extinguished) shows compressor is out of circuit.
To select hard/soft knee
To select soft knee or hard knee, press the Soft button to achieve required condition, where
(button illuminated) shows soft knee is selected and
(button extinguished)
shows hard knee is selected.
4.4
Monitoring the Input Signals
To monitor the input signals there is a peak meter on each input channel control panel and a gain
reduction meter on the protection screen. An input response graph provides an overview of all four
input signals.
4.4.1
Meters - peak
Each of the four inputs has a 9-segment peak signal meter on its control panel for monitoring the
internal signal clipping and compressor headroom or gain reduction.
The top segment (illuminated in diagram left) monitors the internal signal clipping. It operates
independently of meter’s other segments, illuminating when signal clipping is detected at any
stage in the processing circuits, regardless of whether the input level is above or below the
compressor and/or limiter thresholds. Hence, the audio engineer has full visibility of internal
signal clipping that may result in audio distortion.
12 dBu
available
headroom
Signal level - peak
4.4.2
Meters – gain reduction
The Compressor panel of the Prot. (protection) screen shows the gain reduction using an eight-segment
meter.
38
HELIX DN9848E Remote Control Software
User Guide
4.4.3
Input Response graph
The Input Response graph – accessed by pressing the button shown left on the
DN9848E Units Home screen (see section 3.4.3 on page 25) - lets you view a graph of
the input channels’ PEQ and protection settings, in any combination. Each input
channel on the graph is colour-coded for ease of identification. The tick boxes allow
you to switch the graph of each input on or off.
39
HELIX DN9848E Remote Control Software
User Guide
5
OUTPUT CHANNELS
Please refer to the “Output Channels” section of the HELIX DN9848E Operators Manual for a brief
technical overview.
5.1
Output Channel Control Panel
Each of the eight output channels has a control panel on the DN9848E Units Home screen, as shown below.
Filters button: takes you
to the Filters screen
Gain control knob: adjusts the
gain in decibels
Mute button: mutes
output channel
Delay control knob:
adjusts the delay
Meter: monitors
internal signal
clipping and output
levels that may
cause damage to
loudspeaker
equipment
Output channel
name
Phase button: inverts
the output signal
PEQ button: takes
you to the PEQ
screen
Dyn. button: takes you to
the Dyn. (dynamics)
screen
To access the output control panels
The control panels for each output are located on DN9848E Units Home screen, as shown in
button in
section 3.4.3 on page 25. To access this screen, click on
.
FastNav® or click on
40
HELIX DN9848E Remote Control Software
User Guide
5.2
Filters, PEQ and Dyn. Screens
The Filters, Dyn. and PEQ screens are accessed via the navigation buttons on the output channel control
panels. The Filters screen provides all, high and low pass filters and phase adjustment. Dyn. (dynamic)
screen has compressor for audio improvement and/or loudspeaker protection. PEQ is the parametric
equalisation view that lets you equalise the output signals. See section 7 “Programming EQ”.
41
HELIX DN9848E Remote Control Software
User Guide
5.3
Setting Output Parameters
Signal processing for each output channel is programmed independently via its associated control panel.
The signal processing parameters are described below.
5.3.1
Naming an Output Channel
Channel names are shown in the top left-hand corner of the channel control panels (see section 5.1 on
page 40). The default names are “Output 1”, “Output 2” etc. Each name, which is up to eight
characters in length, is retained after power down and included in stored settings.
To change the name of an output channel, see section 3.2.5 “Changing a name”
5.3.2
Routing Page
Each of the eight DN9848E outputs’ matrix can be acquired from any combination of the four A, B, C
and D inputs. For paired outputs, the source inputs are attenuated by 6dB prior to summing and the
ratio of the two signals used is adjustable. When all outputs are combined, the source inputs are
attenuated by 12dB prior to summing in equal proportion. (See HELIX DN9848E manual for Technical
Overview).
To set the routing for the outputs
1
Press the fader button (shown right) on the DN9848E Units screen; this will
take you to the routing page (below).
2
You can adjust the mix from scratch or load a mix setting from a template.
To adjust the mix using the latter option, see “To load a mix template” on
page 43.
To adjust the mix from scratch, manually set faders A, B, C and D on each
output to suit.
Important!
Delays for the summed channels must be set to the same value.
42
HELIX DN9848E Remote Control Software
User Guide
To load a mix template
The list above the Load Mix Template button are the preset standard mix setting options. You can
choose one and load it to configure your input fader settings on each output.
1
Click on the required mix from the template list to highlight it. For
example, “1 X 5 Way Crossover plus 3 Aux”. To view the fader
positions for each template, see section 12.1.
2
Click on Load Mix Template . You will see the
following message.
3
Click Yes to load the settings. The faders will
adjust according to the template’s settings.
43
HELIX DN9848E Remote Control Software
User Guide
5.3.3
Signal Invert, Delay and Output Level
Each output can be phase inverted by 180º (separate from the phase-alignment for crossover), delayed
for system alignment and the level attenuated or boosted.
Delay can be specified in terms of time or distance, see section 6.3 on page 57 for details.
The level entered here sets the baseline output level, that is, the ‘zero’ value, for the rotary output gain
controls.
To invert the output signal
Press the phase ( ) button. When
phase button is highlighted blue, thus
, the output signal is inverted.
To set the delay
Adjust the Delay control knob as required, see “To adjust a control
knob” on page 14. Range is 0.00µs to 300.00ms (or equivalent in
metres or feet).
To set the base level for the front panel gain control
Adjust the Gain control knob as required, see “To adjust a control
knob” on page 14. The range is –40.0dB to +12dB with an OFF
position just past –40dB. Setting the gain to OFF will mute the
output signal.
44
HELIX DN9848E Remote Control Software
User Guide
5.3.4
Phase Adjustment (Filters Screen)
To meet the demands of a wide range of situations, the Klark Teknik HELIX DN9848E provides two
all-pass filters with complementary control parameters for fine-tuning the phase response on each
output, for example, for alignment at crossover. The first filter is presented as a ‘phase shifter’ for
which you can set a specific phase shift at a reference frequency, for example, the HPF or LPF (typically
the crossover point). The second filter enables a 1st or 2nd order phase shift to be applied at a chosen
frequency. With 2nd order, the phase shift window can be shaped, that is, you can adjust the steepness
of the transition by setting the Q value.
To access the Filters screen (below), press Filters on the output channel control panel.
For detailed information on how these filters modify the signal, please refer to the Application Notes
section in the HELIX DN9848E Operators Manual.
To set a precise phase shift at a reference frequency
1
In the Phase Shift field on the Filters screen, adjust the Angle control
knob to select a phase angle between 0° and 180°.
2
Select the reference frequency from the Reference
example, “PEQ2” (see diagram right).
45
drop down list, for
HELIX DN9848E Remote Control Software
User Guide
To apply a 1st order phase adjustment in relation to a chosen frequency
1
In the All Pass field on the Filters screen, adjust the Frequency control
knob to select a frequency between 20.0 Hz and 20.00 kHz.
2
In the All Pass field, select 1st (1st order shift = 90º) from the
Enabled drop down list (see diagram right).
To apply a ‘shaped’ phase transition at a chosen frequency
1
In the All Pass field on the Filters screen, adjust the Frequency control knob to select a
frequency between 20.0 Hz and 20.00 kHz.
2
In the All Pass field, select 2nd (2nd order shift = 180º) from the Enabled
3
Adjust the Q (slope) control knob to select a Q value of between 0.4 Oct and 6.0 Oct.
drop down list.
To reset phase adjustment values
To reset any of the phase shift values to default in the Filters screen for any output, carry out the
following:
1
In the Filters screen, select the required output by pressing
appropriate output button just above the graph, for example,
“Output 4”.
2
In the Phase Shift section, press
3
Select Yes at the following prompt.
Note
at bottom of section.
APF, LPF +HPF: When the channel is in a group using absolutes, the data is copied to all
channels in the group.
46
HELIX DN9848E Remote Control Software
User Guide
5.3.5
High Pass and Low Pass Filters (Filters Screen)
The HELIX DN9848E provides the following high pass and low pass filter (HPF and LPF) options for
crossover purposes:
•
Bypass:
No Filter
•
Butterworth:
6, 12, 18, 24, 36 and 48dB/Octave
•
Linkwitz-Riley:
12 and 24dB/Octave
•
Bessel:
12, 18, 24, 36 and 48dB/Octave
•
Peaking 12dB (HPF only):
12dB/Octave 0-6dB Gain
•
Peaking 24dB (HPF only):
24dB/Octave 0-6dB Gain
To add a high pass filter to output processing
1
In the Phase Shift section of the Filters screen, select HPF from the
Reference drop down list.
2
In the High Pass section (see diagram right), adjust the Frequency
control knob or click and drag the target on the graph to select a
frequency of between 20.0 Hz and 15.00 kHz.
3
In the Type drop down list, select one of the filter options, for
example, “Peaking 12dB”.
4
Adjust the Slope/Peak Gain control knob (switches between slope and
gain, dependent on filter type) to select a slope/peak gain dB value
(range varies depending on type selected). At this point, you can
use the target on the graph to adjust both the frequency and
slope/peak gain simultaneously.
To add a low pass filter to output processing
1
In the Phase Shift section of the Filters screen, select LPF from the
Reference drop down list.
2
In the Low Pass section (see diagram right), adjust the Frequency
control knob or click and drag the target on the graph to select a
frequency between 50.0 Hz and 20.0 kHz.
3
In the Type drop down list, select one of the filter options, for
example, “Bessel”.
4
Adjust the Slope control knob to select a dB value (range varies
depending on type selected).
To bypass the high/low pass filter processing
1
In the Phase Shift section of the Filters screen, select LPF or HPF, as required, from the
Reference drop down list.
2
Select Bypass in the Type drop down list of the High Pass or Low Pass section, as appropriate.
The last selected values for each type of filter are retained in the background for easy
recall.
47
HELIX DN9848E Remote Control Software
User Guide
To reset phase adjustment values
To reset any of the pass values to default in the Filters screen, for any output, carry out the following:
1
In the Filters screen, select the required output by pressing
appropriate output button just above the graph, for example,
“Output 2”.
2
In appropriate section, that is, All Pass, High Pass or Low Pass, press
at bottom of section.
3
Select Yes at the window prompt. Prompt
will vary depending on section, see right for
example.
48
HELIX DN9848E Remote Control Software
User Guide
5.3.6
Parametric Equalisation (PEQ Screen)
For further details regarding PEQ refer to Section 7.1 of this guide.
The HELIX DN9848E provides six parametric equalisation stages on each of the eight output channels.
These equalise the output signal in respect of loudspeaker and/or system characteristics. The first and
last of these PEQ sections can, alternatively, be configured for lower and upper shelving equalisation.
All of the PEQ sections can be used across the full range from 20Hz to 20kHz and are set independently
of each other.
Any PEQ (from 1 to 6) can be used as the reference frequency for the Phase Shifter (see Section 5.3.4).
To set up PEQ with Q/bandwidth
To set up PEQ on an output channel with Q or bandwidth (depending on configuration), carry out the
following:
1
In the PEQ screen, select the required output by pressing the
appropriate output button just above the graph, for example,
“Output 2”.
2
Select the PEQ section (1 to 6) you wish to set up by clicking within it, for
example 1. The background of the section’s number will change to green to
show it is selected (see diagram right).
3
Set a centre frequency (21 steps per octave) and level using the Frequency
and Level control knobs or by using the target on the graph between
20.00 Hz and 20.00 kHz, and –12.0 dB and 12.0 dB, respectively.
4
Adjust the Q value using the Q control knob. This value can be configured
as Q or bandwidth (see section 6.5), with the ranges between 18.03 Q and
0.4 Q, and 0.08 Oct to 3.0 Oct, respectively.
If a PEQ section is not needed in the set up, set its level to 0 dB on the Level control
knob.
49
HELIX DN9848E Remote Control Software
User Guide
To set up a PEQ with Q shelving
Shelving is only available on sections 1 and 6. To set up PEQ on an output channel with Q shelving,
carry out the following:
1
In the PEQ screen, select the required output by pressing the
appropriate output button just above the graph, for example,
“Output 2”.
2
Select the PEQ section (1 or 6) you wish to set up by clicking within it, for
example, 1. The background of the section’s number will change to green to
show it is selected (see diagram right).
3
Set a centre frequency (21 steps per octave) and level using the Frequency
and Level control knobs or by using the target on the graph between
20.00 Hz and 20.00 kHz, and –12.0 dB and 12.0 dB, respectively.
4
On the Q control knob, select 6 dB/Oct (low shelving) or 12 dB/Oct (high
shelving), as required. Both these settings can be found at the high end
(fully clockwise) of the control knob setting, just past the 3.0 Oct
(Bandwidth) or 0.4 Q (Q) settings.
If either of the 1 or 6 PEQ sections is not needed in the set up, set its level to 0 dB on
the Level control knob.
To reset a single PEQ’s settings to default
To reset a PEQ’s settings to default, press the
button at the bottom of its section (directly underneath
the Level control knob). Select Yes at the window
prompt.
To reset all of the PEQs’ settings to default
To reset the settings of the six PEQ sections to default,
(underneath the row of
press the single
buttons at bottom of each PEQ section). Select Yes at
the window prompt.
50
HELIX DN9848E Remote Control Software
User Guide
5.3.7
Compression (Dyn. Screen)
Each output has an independent full range compressor to improve the audio dynamics and/or reduce
louder signal levels to avoid loudspeaker damage. The compressors are variable ratio and can be set to
a hard knee characteristic for a sharp gain reduction response at the compression threshold, or soft
knee for a more ‘musical’ response.
Meter: illuminated
segment shows the
compressor position
relative to the limiter
threshold
To set the compressor parameters
1
In the Compressor section of the Dyn. screen, adjust the Threshold control knob to give a
threshold value in the range –10.0 dBu to +21.0 dBu.
2
Adjust the Ratio control knob to give a ratio from 1:1 to 5:1.
3
Press the Soft button to select soft or hard knee, as required, where
(button
(button extinguished) shows hard knee
illuminated) shows soft knee is selected and
is selected.
4
Press the In button to select bypass state, where
(button illuminated) shows
(button extinguished) shows compressor
compressor included in signal path and
excluded form signal path. The relative position of the compressor threshold to the limiter
threshold will be indicated by an illuminated segment at the meter (see Dyn. screen
above), provided the compressor threshold is below the limiter threshold.
5
Adjust the Attack control knob to set the compressor attack time in the range 40 µs to
100 ms.
6
Adjust the Release control knob to set the release time between 10 ms and 2000 ms.
51
HELIX DN9848E Remote Control Software
User Guide
To reset the compressor settings to default
To reset all of the compressor settings to default,
press
. Select Yes at the window prompt.
5.3.8
Output Limiter (Dyn. Screen)
In addition to compression, each HELIX DN9848E output has a limiter to protect any attached
equipment being driven into clip and potentially being damaged. Notably, the HELIX DN9848E uses a
special ‘look-ahead’ limiter so that it can anticipate transient overshoots and act ‘immediately’ (see
Application Notes in HELIX DN9848E manual for further details). The limiter threshold can be adjusted
to accommodate the varying requirements of commercial equipment.
To set the limiter parameters
1
In the Limiter section of the Dyn. screen, select a threshold value in the range –10.0 dBu to
21.0 dBu on the Threshold control knob. The Threshold control knob has an OFF setting at its
full clockwise position (just past the 21.0 dBu setting), which switches the limiter out of the
circuit.
2
Adjust the Release control knob to set a release time between 1 ms and 100 ms.
3
Press the Soft button to select soft or hard knee, as required, where
(button
(button extinguished) shows hard knee
illuminated) shows soft knee is selected and
is selected.
To select hard/soft knee
Press the Soft button to select soft or hard knee, as required, where
(button
(button extinguished) shows hard knee is
illuminated) shows soft knee is selected and
selected.
To switch the limiter out of the circuit
Set the Threshold control knob to the OFF position, that is, full clockwise, to switch the limiter
out of the circuit.
To reset the limiter settings to default
To reset the settings to default, press
. A
prompt will appear (diagram right). Select Yes at
the window prompt.
52
HELIX DN9848E Remote Control Software
User Guide
5.4
5.4.1
Monitoring the Output Signals
Meters - peak
Each of the eight outputs has an 11-segment signal meter for monitoring internal signal clipping and
output levels that may cause damage to the loudspeaker equipment.
The top segment (illuminated in diagram left) monitors the internal signal clipping. It
operates independently of the rest of the meter, illuminating if signal clipping is detected at
any stage in the processing circuits regardless of whether the level of the final processed
signal is above or below the compressor and/or limiter thresholds. Hence, the audio engineer
has full visibility of any internal signal clipping that may result in audio distortion.
The 0 to –40 dBu signal meter is primarily designed to monitor the output level with respect
to excessive levels that may cause damage to the onward loudspeaker equipment.
5.4.2
Meters – gain reduction
Both the Compressor and Limiter panels of the Dyn. screen show the gain reduction using a 10-segment
meter.
5.4.3
Output Response graph
The Output Response graph– accessed by pressing the button shown left on the HELIX
DN9848E Units Home screen (see section 3.4.3 page 25) - lets you view a graph of
the output channels’ PEQ, filter and dynamics settings, in any combination. Each
output channel on the graph is colour-coded for ease of identification. The tick boxes
allow you to switch the graph of each output on or off.
Additionally, you can select filter and PEQ options for the selected outputs in the Filter Sections box.
Tick to determine
displayed channels
Choose to view both or
individual graphs
53
HELIX DN9848E Remote Control Software
User Guide
5.5
Output Muting on Selected Unit
You can mute/unmute single outputs or all of
the outputs simultaneously on a single unit from
the DN9848 Units Home screen (see section 3.4.3
on page 25):
To mute a single output:
To un-mute an output:
Press
on the output channel’s control panel; button will change to
red (as in diagram above) to show that muting is on.
Press
on the output channel’s control panel; button will revert to
grey background,
To mute all outputs:
Press
, to show that muting is off.
(top of DN9848 Units Home screen); all output channel
buttons will change to
To un-mute all outputs:
Press
channel
, to show that muting is on.
(top of DN9848 Units Home screen); all output
buttons will change to
54
, to show that muting is off.
HELIX DN9848E Remote Control Software
User Guide
6
6.1
CONFIGURING A HELIX DN9848E UNIT
General
The HELIX DN9848E provides various set up options for adapting the operation of the unit to best suit
your operational requirements and preferences, as follows:
•
Security features.
•
Naming of unit, memory, group, and input and output channels.
•
Unit numbering.
•
Display delay (time or distance).
•
Mouse direction for control knob adjustment.
•
PEQ units (bandwidth or Q).
•
Default unit temperature.
Please note that some of the configuration in this section is carried out from the Tools menu in ELGAR.
Only configurations specific to the HELIX DN9848E, that is, accessed from Tools > Options > DN9848E in
ELGAR, will be detailed here. For other ELGAR-related information, that is, setting up the environment
and communications, refer to the ELGAR Library Manager V2.02 User Guide.
55
HELIX DN9848E Remote Control Software
User Guide
6.2
Unit and Memory Identification
A single show file will usually have multiple HELIX Add-Ins equating to the physical HELIX DN9848E
units in your physical set up. Each Add-In is automatically given a unique address when it is added to
the HELIX DN9848E RCS. To make it easier to identify the Add-In in relation to its physical counterpart,
that is, the DN9848E HELIX unit that it will remotely program, you can rename each unit and change its
allocated number. You can also change the name of the unit’s memory, again for ease of identification.
All this is done in the DN9848 Units Home view.
The diagram below shows the unit’s name and the name of its current working memory (highlighted by
red and orange boxes, respectively). Both names can be up to 24 characters long and are retained
after power down, which is particularly useful for system reassembly when changing venues.
To change the name of a HELIX DN9848E unit, see section 3.2.5
Names can also be allocated to individual input and output channels via their associated menus
(see Sections 4.3.1 and 5.3.1).
To change the number of a HELIX DN9848E unit
As each new unit is added to the HELIX DN9848E RCS it is automatically assigned the lowest
available number, which is shown in the top left-hand corner of its unit bar in FastNav®. As there
are a maximum of 16 units that can be added to HELIX DN9848E RCS, the maximum allocated
number will only reach 16. However, with a total of 32 numbers available, you can change a
unit’s allocated number to anything up to 32.
1
Select the unit that you wish to change the number of, see section 3.3.1“” on page 18.
2
Click on the
and
arrows
adjacent to the currently selected
number, next to the unit’s name
field (see diagram). This unit
number change is reflected in the
bar of selected unit, which will
alter its position in the list to retain
numerical order.
56
HELIX DN9848E Remote Control Software
User Guide
6.3
Display Delay Options
The units of measurement used to specify the delay on the input and output channels can be set as time
or distance to suit user preference, as follows:
•
Time (milliseconds and microseconds).
•
Metric distance (metres).
•
Imperial distance (feet and inches).
To change the units of measurement
1
From the ELGAR menu, select select Tools > Options > DN9848E.
2
In the System Configuration window, select DN9848 from
to the
the Devices option. If necessary, click on
left of Devices to show the DN9848 option.
3
Select the display delay you
require from the Display Delays
drop-down menu, for example,
“Imperial (inches)”.
4
If you selected Metric or Imperial distance measurement,
specify the ambient temperature (in degrees centigrade) of
the venue using the Default Unit Temperature control knob, for
example, “23C” for 23°C. The HELIX DN9848E will use this
to adjust the speed of sound, which varies with
temperature, in the delay calculation so that accurate
delays are applied to the channels.
5
Click OK to select.
The delay units in the input and output menus change to the new selection and their values are
automatically converted accordingly.
57
HELIX DN9848E Remote Control Software
User Guide
6.4
Knob Mouse Direction
You can change the way in which the movement of the mouse affects the rate of control knob
adjustment. For example, you may wish to move the mouse up and for coarse adjustment, and left and
right for fine adjustment. There are two settings to choose from:
•
Up Down: Up and down mouse movement provides coarse adjustment, that is, the value changes
rapidly as you move the mouse up and down the screen. While moving the mouse left and right
gives fine adjustment, that is, the value changes slowly so that you arrive at the value you want
more accurately.
•
Left Right: Left and right mouse movement provides coarse adjustment, while up and down
movement gives fine adjustment.
To change the Knob Mouse Direction configuration
1
From the ELGAR menu, select select Tools > Options > DN9848E.
2
In the System Configuration window, select DN9848 from
to the
the Devices option. If necessary, click on
left of Devices to show the DN9848 option.
3
Select the configuration you require
for your mouse from the Knob Mouse
Direction drop-down menu, for example,
“Left Right”.
4
Click OK to select.
58
HELIX DN9848E Remote Control Software
User Guide
6.5
PEQ Bandwidth or Q Selection
You can choose to display Q (quality factor), defined as the positive ratio of centre frequency to
bandwidth, as a ratio (Q) or as a bandwidth (Oct).
To select PEQ bandwidth or Q
1
From the ELGAR menu, select select Tools > Options > DN9848E.
2
In the System Configuration window, select DN9848 from
to the
the Devices option. If necessary, click on
left of Devices to show the DN9848 option.
3
Select the option you require from the
PEQ Bandwidth or Q drop-down menu, for
example, “Q”.
4
Click OK to select.
59
HELIX DN9848E Remote Control Software
User Guide
7
7.1
PROGRAMMING EQ
Parametric Equalisation (PEQ)
To switch to an input channel’s Parametric Equalisation (PEQ) view
Click
(PEQ) on the input channel’s control panel.
Target cursor: adjust
frequency and level of selected
PEQ section by dragging the
target cursor
Input channel
selection buttons
Red graph: shows the response
of the selected PEQ section
Black graph:
shows combined
EQ
Input Channel:
Left click to select
an input channel
set-up section
Reset All:
Right click to reset the
values of all input filters.
Reset:
Right click to reset the values
of an individual input filter.
The graph shows the combined EQ (black) and the response of the selected PEQ section (red). There
are 12 input channel PEQ sections, which provide adjustment for frequency, bandwidth (Q) and level.
PEQ sections can also be adjusted directly on the graph by using the target cursor.
60
HELIX DN9848E Remote Control Software
User Guide
To switch to an output channel’s Parametric Equalisation (PEQ) view
Click
(PEQ) on the output channel’s control panel.
Target cursor: adjust
frequency and level of
selected PEQ section by
dragging the target
Output channel selection
buttons
Black graph: shows
combined EQ
Red graph: shows
the response of the
selected PEQ section
Output channel
set-up section
The graph shows the combined EQ (black) and the response of the selected PEQ section (red). There
are six output channel PEQ sections, which provide adjustment for frequency, band width (Q) and level.
PEQ sections can also be adjusted on the graph by using the target cursor.
To switch to another channel’s PEQ view
Click on appropriate input/output channel button, just above graph.
To activate a PEQ section
Click anywhere within a channel’s section to activate it. The graph adjusts according to the
new section’s settings. You can now adjust target.
To switch a PEQ section out of the circuit
Set the section’s level to 0.0 dB on the Level control knob.
61
HELIX DN9848E Remote Control Software
User Guide
To view the channels on a single graph
To view any combination of the channel signals on a single graph, click on either
or
on the DN9848 Units Home screen (see section 3.4.3), as
required.
7.2
Dynamics
To switch to an output channel’s Dynamics view
Click
(Dyn.) button on the output channel’s control panel.
The Compressor and Limiter sections are used to set the characteristics, such as hard/soft knee etc.
To switch to another output channel’s dynamic
Click on one of the buttons (just above Compressor/Limiter sections) associated with required
channel, for example,
.
62
HELIX DN9848E Remote Control Software
User Guide
7.3
Filters
To switch to an output channel’s Filter view
Click on
(Filters) on the output channel’s control panel.
Target cursor: The filter
frequency and slope/peak gain
are adjusted by clicking and
dragging the target cursor
Red graph: shows response of
selected filter
Output channel selection
buttons
Black graph:
shows overall
response
Filter mode
section
To switch to another output channel’s Filter view
Click on one of the buttons (above graph) associated with required channel, for example,
.
63
HELIX DN9848E Remote Control Software
User Guide
8
8.1
WORKING WITH MULTIPLE HELIX ADD-INS
Building your Network Remotely
Working within ELGAR enables you to open a series of HELIX Add-Ins (HELIX DN9848E system
processor devices) in a single show file to match your system. As with the physical system, the
maximum number of devices that can be held in any one file is 16.
In keeping with system protocol, each HELIX Add-In must be assigned a unique unit address, between 1
and 32. Addresses do not have to be assigned incrementally, but HELIX DN9848E RCS will
automatically use the lowest available address when you Add-In each new HELIX DN9848E device.
HELIX DN9848E RCS will not allow two devices to be assigned the same address.
8.2
The DN9848 Units Home Screen
To make it easier to work with multiple HELIX Add-Ins, a global DN9848 Units Home screen is provided that
has several multi-device facilities, including:
•
Switching between the devices.
•
Copying settings between devices (covered in sections 9 and 10).
•
Global online controls (covered in Section 3.5).
•
Function locking for system protection (covered in Section 3.5.3).
•
Global memory controls (covered in this section 9).
To switch to the DN9848 Units Home screen
Click on
and, if necessary, click
to obtain the screen below.
The DN9848 Units Home screen provides input and output control panels for all of the HELIX units in the
show file and some ‘global’ command buttons. (Only Copy Channels is described here; the other global
commands are described in sections 9 and 10).
64
HELIX DN9848E Remote Control Software
User Guide
To copy a unit’s input channel to input channels of selected units
1
Click
Channels screen.
2
Click in the Source Unit field and select the
unit you wish to copy the input channel
from, using the drop down list. For
example, “02 KLARK TEKNIK DN9848 E”.
3
Click in the Source Channel field and select
the input channel of the source unit you
wish to copy, using the drop down list.
For example, “Input C”.
4
From the Copy Options section, select the elements of the
channel you wish to copy by clicking in the circle next to your
required option. For example, Gain and Delay in the diagram
right.
5
Under Destination Unit(s):, select the unit(s)
that you wish to copy the input channel
to by placing a tick in adjacent box. For
example, “03 KLARK TEKNIK
DN9848 E”. To select all units, click on
. To deselect all selected
units, click on
.
6
Under Destination Channel(s), select the input channel(s) that you
wish to copy the selection into. For example, “Input D”. To
select all channels, click on
. To deselect all
selected channels, click on
.
7
When you are satisfied that your selections are correct, click
and then, if necessary,
65
, to obtain the Copy Input
.
HELIX DN9848E Remote Control Software
User Guide
To copy a unit’s output channel to output channels of selected units
1
Click
Channels screen.
2
Click in the Source Unit field and select the unit
you wish to copy the output channel from, using
the drop down list. For example, “02 KLARK
TEKNIK DN9848 E”.
3
Click in the Source Channel field and select
the output channel of the source unit that
you wish to copy, using the drop down list.
For example, “Output 6”.
4
From the Copy Options section, select the elements of the channel
you wish to copy by clicking in the circle next to your required
option. For example, Whole Channel in the diagram right.
5
Under Destination Unit(s):, select the
unit(s) that you wish to copy the
output channel to by placing a tick
in adjacent box. For example, “08
KLARK TEKNIK DN9848 E”. To
select all units, click on
. To deselect all selected units, click on
and then, if necessary,
, to obtain the Copy Output
6
Under Destination Channel(s), select the output channel(s) that you wish
to copy the selection to. For example, “Output 5”. To select all
channels, click on
. To deselect all selected channels,
click on
.
7
When you are satisfied that your selections are correct, click
66
.
.
HELIX DN9848E Remote Control Software
User Guide
9
STORING/RECALLING MEMORY SETTINGS
button in FastNav®;
All of the memory screens in this section are accessible via the
refer to section 3.4.1 on page 20.
Note
Working memory refers to the RCS memory, which contains the current show settings.
9.1
Using Working Memories
To copy the working memory of selected units to a stored memory
1
Make sure you are in the RCS Memories screen, press
2
Under Stored Memories, select the system or user
memory in which you wish to store the working
memories, for example, “System 18”.
3
Under Working Memories, tick the units whose working
memories you wish to copy and then store in the
selected memory. To select/deselect all units click
or
, respectively.
4
You can, if you wish, collectively name the working memory of the selected units; this will
become the name they will be stored under in the selected memory. Please refer to
section 3.2.5 for details. After changing the name, click
and then click Yes at the
Reset Individual Memory window prompt.
5
Click
6
Click Yes at the Copy From Working Memory window prompt.
, if necessary.
.
Caution on recalling a stored memory to the working memory of selected units
Recalling a stored memory will overwrite your working memory. If you do not wish to lose your working
memory, copy it to a system or user memory first. The RCS acts to protect the working memories of
units that are in Groups containing absolutes and should an attempt be made to effect a change the
RCS will give the following prompt.
If you select OK, then the unit
will be removed from ALL
groups it is associated with.
Alternatively, you can cancel
and no action will be taken.
67
HELIX DN9848E Remote Control Software
User Guide
To recall a stored memory to the working memory of selected units
1
Make sure you are in the RCS Memories screen, press
2
Under Working Memories, tick the units whose working memory you wish to replace by the
stored memory. To select/deselect all units click
or
, respectively.
3
Under Stored Memories, select the system or user memory from which you wish to recall the
working memories.
4
Click
5
Click Yes at the Write To Working Memory window prompt.
, if necessary.
.
To reset the working memory on selected units
1
Make sure you are in the RCS Memories screen, press
2
Under Working Memories, tick the units whose working memory you wish to reset. To
select/deselect all units click
or
, respectively.
3
Click
4
Click Yes at the Reset Working Memory window prompt.
, if necessary.
.
To reset an individual stored memory back to default on selected units
1
Make sure you are in the RCS Memories screen, press
2
Under Stored Memories, select the system or user memory you wish to reset.
3
Under Working Memories, tick the units whose selected stored memory you wish to reset. To
select/deselect all units click
or
, respectively.
4
Click
5
Click Yes at the Reset Individual Memory window prompt.
, if necessary.
.
To reset all system memories on selected units back to default
1
Make sure you are in the RCS Memories screen, press
2
Under Working Memories, tick the units whose system memories you wish to reset. To
select/deselect all units click
or
, respectively.
3
Click
4
Click Yes at the Reset All System Memories window prompt.
, if necessary.
.
To reset all user memories on selected units back to default
1
Make sure you are in the RCS Memories screen, press
2
Under Working Memories, tick the units whose user memories you wish to reset. To
select/deselect all units click
or
, respectively.
3
Click
4
Click Yes at the Reset All User Memories window prompt.
.
To lock the system memories, refer to section 3.5.3.
68
, if necessary.
HELIX DN9848E Remote Control Software
User Guide
9.2
Unit (Device) Memories
To copy the memories of selected devices to selected stored memories
1
Make sure you are in the Unit Memories screen, press
2
Under Units, tick the devices from which you wish to
copy the memories. To select/deselect all units click
or
, respectively.
3
Under Memories, tick the system or user memories in
which you wish to store the selected device memories.
or
To select/deselect all units click
, respectively. See diagram right.
4
Click
5
Click Yes at the Read Unit Memories window prompt.
, if necessary.
.
To copy selected stored memories to selected devices
1
Make sure you are in the Unit Memories screen, press
2
Under Memories, tick the system or user memories that you wish to copy. To
or
, respectively.
select/deselect all units click
3
Under Units, tick the devices that you wish to copy the memories to. To select/deselect all
units click
or
, respectively.
4
Click
5
Click Yes at the Write Unit Memories window prompt.
.
69
, if necessary.
HELIX DN9848E Remote Control Software
User Guide
Problems with copying
The Unit Progress and Memory Progress fields show the
progress of the reading/writing procedure. If there is a
problem, for example, the units are offline, this will be
detailed under the Comment column of the Units
section. The diagram right shows an example of the
display. Please note the Processing message, underneath
the Unit Progress and Memory Progress fields, which informs
you of the current activity of the RCS. You can press
to halt the process.
To lock the system memories, refer to section 3.5.3.
70
HELIX DN9848E Remote Control Software
User Guide
9.3
Copy RCS Memories
To copy an RCS unit’s memory to the memories of other RCS units
1
Make sure you are in the Copy RCS Memories screen, press
2
Select the RCS unit you are going to copy the
memory from using the Source Unit drop down list,
for example, “05 KLARK TEKNIK DN9848 E”.
3
Select the unit’s source memory from the Source
Memory drop down list, for example, “S06 DEFAULT”.
4
Under Destination Unit(s), tick the RCS units you
wish to copy the source unit’s memory to. To
or
select/deselect all units click
, respectively.
5
Under Memories, tick the RCS unit’s system and/or user
memories you are going to copy the source memory to.
or
To select/deselect all units click
, respectively.
6
Click
7
Click Yes at the Copy RCS Memory window prompt.
.
To lock the system memories, refer to section 3.5.3.
71
, if necessary
HELIX DN9848E Remote Control Software
User Guide
10 MANAGING GROUPS
The Input Groups and Output Groups screens allow you to manage the input and output channels in groups.
You can set up groups, delete groups and edit group names, as required. By grouping input or output
channels that have similar settings, you can save time by setting them up simultaneously instead of
each one individually.
Note
Groups that use absolute values have necessary restrictions that affect some management
processes. PEQ groups use absolute values for Frequency and Q, and offsets for level. Filter
groups have absolute values for all parameters except Phase Angle.
To initially access input and output groups in a new show file, you must first type in a password. This
security feature allows you to protect/unprotect your show file group settings any time you wish.
10.1
Security – Grouping Password
Groups are password protected to prevent unauthorised editing of the your input and output groups. To
be able to manage the groups you must first enter a password. We recommend that, the first time you
enter input/output grouping in a new file, you change the password so that your group settings are
protected.
You have to enter a grouping password on initially entering input/output grouping every time you open
a file. Group Locking is set to Locked as default.
To access an input or output group using a Grouping Password
1
Go to an input or output screen by clicking on
FastNav®.
2
Click on
3
Type in the group password (default is “password”). If
password is correct the Grouping Password window changes to
the one shown right, while an incorrect password has no
effect.
4
Make sure Group Locking is set to Unlocked, if not, select
Unlocked.
5
Click OK .
.
72
or
in
HELIX DN9848E Remote Control Software
User Guide
To change a Grouping Password
1
Go to an input or output screen by clicking on
FastNav®.
2
Click on
3
In the Grouping Password window, type in the Grouping Password and
click Change Password .
4
Type in new Grouping Password in the Please enter new Password field.
This can be up to 12 characters.
5
Type in your new Grouping Password again in the Please confirm your
Password field.
6
Click OK and then, in the Grouping Password window, click OK again.
or
in
.
To lock/unlock grouping
You can only edit grouping with Group Locking set to Unlocked. Group Locking is set to Locked as default.
You can lock grouping to prevent unauthorised editing of your groups. This is useful, for example, if
you have to leave your laptop/PC for a short while. This means you can lock the grouping and leave
your laptop/PC switched on with the program running. Then, when you return, you can unlock the
grouping and carrying on from where you left off, knowing that your group settings will be as you left
them.
1
Go to an input or output screen by clicking on
FastNav®.
2
Click on
3
In Group Locking, select Locked or Unlocked, as required.
4
Click OK .
, then type in the Grouping Password.
73
or
in
HELIX DN9848E Remote Control Software
User Guide
10.2
Input Groups
To add a new input group
1
Click
2
If you are entering Input Groups and Output Groups screens in your show file for the first time or
the groups are locked, you must first enter a password.
3
Click
4
Tick the elements that you wish your input group to contain in the Add Sections to the new Group
window.
5
Click Accept .
6
Click Yes . All of the inputs of the
RCS units are loaded into the
left-hand section of the Input Groups
screen.
in FastNav® to go to the in Input Groups screen, see section 3.4.4.
.
74
HELIX DN9848E Remote Control Software
User Guide
7
Tick the boxes of the input channels you wish to group
together.
8
Click
. A form pops up that
allows you to copy data from one
channel to another (using the same
set of options as the Copy Channels
pages earlier in this document).
Depending on the type of group,
various options will be allowed as to
what sections you are able to copy.
If the group contains a PEQ section,
this will be selected and greyed out
and will always be copied. This
action is taken because the PEQ
section contains absolute parameters
which MUST be the same value.
9
You can now change the name of your input group to make it more easily identifiable and
also edit the gain and delay, protection and PEQ settings, dependent on the elements you
selected in step 4. These are detailed in the following sections.
To change the name of an input group
1
Click in the current input group’s name field and
follow instructions detailed in section 3.2.5. The
input group’s panel will be updated with the new
name in FastNav®.
75
HELIX DN9848E Remote Control Software
User Guide
To change the settings of an input group
1
Select the input group that you wish to change the settings of by clicking on its panel below
the Input Groups button in FastNav®, for example,
2
.
To change the input group’s settings, click
,
or
to got to the
required screen (see diagram below); refer to section 7 for setting up details. Press
to go back to the Input Groups screen when set up has finished.
76
HELIX DN9848E Remote Control Software
User Guide
To add channels to an existing input group
1
Select the input group that you wish to add the channels to by clicking on its panel below
the Input Groups button in FastNav®, for example,
.
2
In the left-hand section of the screen, tick the input channels that you wish to add to the
input group.
3
Click
. A form pops up that
allows you to copy data from one
channel to another (using the same
set of options as the Copy Channels
pages earlier in this document).
Depending on the type of group,
various options will be allowed as to
what sections you are able to copy.
If the group contains a PEQ section,
this will be selected and greyed out
and will always be copied. This
action is taken because the PEQ
section contains absolute
parameters which MUST be the
same value.
This gives the option of choosing
one of the channels already in the list
to be master and its data copied to
the channels about to be added.
To remove channels from an input group
1
Select the input group that you wish to remove the channels from by clicking on its panel
below the Input Groups button in FastNav®, for example,
.
2
In the right-hand section of the screen, tick the input channels that you wish to remove
from the input group.
3
Click
. The selected input channels are transferred to the left-hand section and
removed from the input group.
To jump to the currently selected unit on the DN9848 Units Home screen
You can jump to the DN9848 Units Home screen, which will display the currently selected unit,
by clicking
.
To delete an input group
1
Select the input group that you wish to delete by clicking on its panel below the Input Groups
button in FastNav®, for example,
.
2
Click
3
Click Yes at the Remove Group window. Both the left- and right-hand sections and the input
group name field will empty and the input group’s panel will disappear from FastNav®. The
screen will change to that shown in section 3.4.4.
.
77
HELIX DN9848E Remote Control Software
User Guide
10.3
Output Groups
To add a new output group
1
Click
2
If you are entering Input Groups and Output Groups screens in your show file for the first time or
the groups are locked, you must first enter a password, see section 10.1.
3
Click
4
Tick the elements that you wish your output group to contain in the Add Sections to the new
Group window.
5
Click Accept .
6
Click Yes . All of the outputs of the
RCS units are loaded into the
left-hand section of the Output Groups
screen.
in FastNav® to go to the in Output Groups screen, see section 3.4.5.
.
78
HELIX DN9848E Remote Control Software
User Guide
7
Tick the boxes of the output channels you wish to
group together.
8
Click
. A form pops up that
allows you to copy data from one
channel to another (using the same
set of options as the Copy Channels
pages earlier in this document).
Depending on the type of group,
various options will be allowed as to
what sections you are able to copy.
If the group contains a PEQ or Filter
section, this will be selected and
greyed out and will always be
copied. This action is taken because
the sections contain absolute
parameters which MUST be the
same value.
9
You can now change the name of your output group to make it more easily identifiable and
also edit the gain and delay, filters, PEQ and Dyn. settings, dependent on the elements you
selected in step 4. These are detailed in the following sections.
To change the name of an output group
1
Click in the current output group’s name field and
follow the instructions detailed in section 3.2.5. The
output group’s panel will be updated with the new
name in FastNav®.
79
HELIX DN9848E Remote Control Software
User Guide
To change the settings of an output group
1
Select the output group that you wish to change the settings of by clicking on its panel
below the Output Groups button in FastNav®, for example,
2
.
To change the output group’s settings, click
,
,
or
to go
to the required screen (see diagram below); refer to section 7 for setting up details. Press
to go back to the Output Groups screen when you have finished setting up.
80
HELIX DN9848E Remote Control Software
User Guide
To add channels to an existing output group
1
Select the output group that you wish to add the channels to by clicking on its panel below
the Output Groups button in FastNav®, for example,
.
2
In the left-hand section of the screen, tick the output channels that you wish to add to the
output group.
3
Click
. A form pops up that
allows you to copy data from one
channel to another (using the same
set of options as the Copy Channels
pages earlier in this document).
Depending on the type of group,
various options will be allowed as to
what sections you are able to copy.
If the group contains a PEQ or Filter
section, this will be selected and
greyed out and will always be copied.
This action is taken because the PEQ
section contains absolute parameters
which MUST be the same value.
This form gives the option of
choosing one of the channels already
in the list to be master and its data
copied to the channels about to be added
To remove channels from an output group
1
Select the output group that you wish to remove the channels from by clicking on its panel
below the Output Groups button in FastNav®, for example,
.
2
In the right-hand section of the screen, tick the output channels that you wish to remove
from the output group.
3
Click
. The selected output channels will be transferred to the left-hand section
and removed from the output group.
To jump to the currently selected unit on the DN9848 Units Home screen
You can jump to the DN9848 Units Home screen, which will display the currently selected unit,
by clicking
.
To delete an output group
1
Select the output group that you wish to delete by clicking on its panel below the Output
Groups button in FastNav®, for example,
.
2
Click
3
Click Yes at the Remove Group window. Both the left- and right-hand sections and the output
group name field will empty and the output group’s panel will disappear from FastNav®.
The screen will change to that shown in section 3.4.4.
.
81
HELIX DN9848E Remote Control Software
User Guide
11 USING HELIX DN9848E RCS TO CONTROL A PROCESSING
SYSTEM
11.1
Overview
To control a system, the laptop/PC running HELIX DN9848E RCS is connected to one of the HELIX
DN9848E HELIX units. The laptop/PC then assumes control of the HELIX units’ system. The following
options for connecting the laptop/PC to the system are available:
Ethernet:
HELIX DN9848E units have a direct Ethernet LAN connection to the PC and can be
connected together using the unit’s two-port switch, or each one can be plugged into
an Ethernet switch or hub, all via their rear panel Ethernet sockets. The wireless
option offers increased flexibility during the event set-up, as the engineer can move
around freely with a laptop and adjust the equalisation while listening to the end
effect at any place in the venue.
Serial (option): The optional RS-232 serial connection is via the “PC PORT” on the front panel of the
first HELIX DN9848E unit. It is possible to connect to other HELIX DN9848E units
from the rear Ethernet port(s) when using a serial connection, but note that this will
be slower than using Ethernet.
The following sections describe how to connect the master HELIX DN9848E RCS laptop/PC to the system
for each option and also the interconnectivity of the HELIX DN9848E units.
11.2
HELIX DN9848E unit interconnections
The HELIX DN9848E units in your system can be interconnected via the units two-port switch, or each
one can be individually connected to an Ethernet switch or hub. For the connection of DN9848 units,
and also HELIX DN9340, DN9344, DN9340E and DN9344E units, refer to section 12.2.
Note
When connecting the Ethernet cable to the rear panel of a HELIX DN9848E unit, either of the
Ethernet sockets can be used.
11.2.1 Connecting the HELIX DN9848E units using the two-port switch
The diagram below shows a typical example of the HELIX DN9848E units interconnected using the
two-port switches to form a “daisy-chain” configuration.
82
HELIX DN9848E Remote Control Software
User Guide
11.2.2 Connecting the HELIX DN9848E units to an Ethernet switch or hub
The diagram below shows each HELIX DN9848E unit directly connected to an Ethernet switch or hub,
which is then connected top a laptop/PC.
11.3
Ethernet Connection
For familiarisation purposes, a basic Ethernet connection may be made to a single unit by connecting
the Ethernet cable to either of the unit’s rear panel Ethernet sockets and to the network socket on the
laptop PC or wireless access point (wireless option).
For Ethernet connectivity, the HELIX DN9848E units must be operating V4.00 (or later) host code. For
details on setting up the IP address of the HELIX DN9848E units, please refer to the HELIX DN9848E
System Controller Operators Manual. For HELIX DN9848E unit interconnection details, refer to
section 11.2.
11.3.1 Ethernet connection – standard
The standard system set up is via Ethernet connection. One end of the Ethernet cable is connected to
the network socket of the laptop/PC. The other end is either connected to an Ethernet socket on one of
the HELIX DN9848E units (daisy chain), or an Ethernet switch or hub, depending on system
configuration.
83
HELIX DN9848E Remote Control Software
User Guide
11.3.2 Ethernet connection – wireless option
The system set up for the wireless option Ethernet connection is via an Ethernet cable. One end is
connected to the network socket of the wireless access point. The other end is connected to either an
Ethernet socket on one of the HELIX DN9848E units (daisy chain), or an Ethernet switch or hub,
depending on system configuration. This system is operated remotely from a tablet or laptop PC.
11.3.3
Configuring the Network Devices
Before setting up the Ethernet system for operational purposes, you must first configure the system
devices, that is, the laptop/PC and HELIX DN9848E units to communicate with each other using TCP/IP
protocol. This is done by assigning them unique IP addresses on a shared system.
For a description of the Communications option in ELGAR’s System Configuration window and details on adding,
assigning, configuring and editing ports, saving configurations to a file etc., refer to the ELGAR Library
Manager User Guide. However, any HELIX DN9848E RCS-specific information is detailed in
section 11.5.
To configure an Ethernet device and assign a port to it
1
From the ELGAR menu, select Tools > Options.
84
HELIX DN9848E Remote Control Software
User Guide
2
In the System Configuration window, select Routing from the Communications option. If necessary,
to expand the Communications category.
click
3
Click Add Port .
4
Select Ethernet Port from the Port Type
list.
5
Type in unique port name (up to 12 characters),
for example, “Unit 1”.
drop down
85
HELIX DN9848E Remote Control Software
User Guide
6
Select the IP address of the HELIX DN9848E
unit you wish to connect to this port, for
example, “10.20.100.61”.
7
Make sure Echo is set to Generic Echo Off.
8
Click OK to accept port change, or Cancel to decline.
9
Assign port to device by selecting device
in List of Devices and selecting port in the
available ports appropriate to device in
drop down list (right-hand side), for
example, “Unit 1” .
The name of the assigned port will appear
under the Assigned Port column (highlighted
in yellow opposite).
10
Click OK .
Your system should now be ready for online operation, as described in section 3.5. Successful
communication with the HELIX DN9848E units is indicated by ‘rotating’ symbols at the bottom
right-hand corner of the LCD panel (“T1R1” → “T/R/” → “T―R―”).
86
HELIX DN9848E Remote Control Software
User Guide
IP Addressing
To uniquely identify every device, Ethernet connections use standard IP addresses comprising four
0-255 segments presented in dot notation, for example, 192.168.1.16. To accommodate widely varying
sizes of system, including those with sub-systems, the segments can be used in slightly differing ways.
The format used by a particular IP address is defined by its ‘subnet mask’, as follows:
a)
On a small ‘Class C’ system (less than 256 devices), the subnet mask is 255.255.255.0 indicating
that the first three segments identify the system and are shared by all of the equipment on the
system, while the last segment uniquely identifies each device, for example, in 192.168.1.16, the
system subnet is 192.168.1 and the Device ID is 16. Typically, this is the subnet mask used for
IP addresses on a HELIX DN9848E RCS system.
b)
For larger systems, the first one or two segments identify the system and the remaining
segments identify the sub-system, if relevant, and individual equipment. For example, a Class B
medium sized system uses a 255.255.0.0 subnet mask, indicating the first two segments identify
the system and the last two the sub-system and individual device.
Wireless Routing
For wireless connection, the laptop/PC wireless card and Access Point must be set up to locate and
recognise each other, noting that the airwaves are shared with other devices. This is done by initially
making a wired connection from the laptop/PC to the Access Point to assign the appropriate identifiers
etc. After configuration, the wired connection can be removed and the wireless one made. There is no
need to repeat the wired connection step on future set ups, provided no part of the wireless system has
changed.
Two identifiers are used in the recognition process, as follows:
Service Set Identifier (SSID) – The Access Point broadcasts this to enable nearby devices to
locate it. Broadcast may be disabled, so that the Access Point only flags its presence when
another device calls it by name, that is, its SSID. This mode should be used for the HELIX
DN9848E RCS wireless connection to provide security against unauthorised users accessing the
system.
Authentication code – This ensures that the device trying to connect to the Access Point has the
right to access the system, thus providing an extra layer of security against unauthorised users.
Although there are various authentication methods*, the worked example in the next section
specifically covers the basic Wireless Equivalent Privacy (WEP) key scheme, which uses a long
sequence of numbers as the key. If you wish to use a more complex scheme, please consult the
Access Point and wireless Ethernet card manuals.
* WPA-PSK (Wi-Fi Protected Access – Pre-Shared Key) is now available on Access Point and some wireless cards.
In addition, the broadcast channel of the Access Point can be specified (typically channels 1 to 11 are
available); this is particularly useful if there are other Access Points in the vicinity.
Note
Every Ethernet connection on your Laptop/PC has a different IP address. Therefore, when you
have both wired and wireless Ethernet cards on your laptop/PC, be sure to enter the correct
settings for each.
87
HELIX DN9848E Remote Control Software
User Guide
To configure an Access Point and wireless card (wireless set up only):
As set up procedures vary between the commercially available Access Points - and your Access Point
may have a Set Up Wizard - only essential guidelines can be given here. (Some Access Points store
their configuration details on a web page of the same IP address.) Please refer to your product User
Guides to ensure correct wireless operation. Also, operating systems vary amongst users only;
therefore only standard Windows XP wireless configuration screens are covered here. These can
generally be related to screens on other operating systems.
A
Access Point
1
Referring to the product’s manual, set up the Access Point to communicate with your
laptop/PC, ensuring you observe the following:
IP settings:
Use unique IP addresses in the same network address range. Set the Access Point IP
address to the same IP subnet value as your laptop/PC LAN and wireless card. Save the
subnet mask.
Note
Your Access Point will have a factory preset IP subnet address, so to locate it
initially you may be asked to temporarily reconfigure your laptop/PC to use
the same IP subnet address. After you have located and reconfigured the
Access Point to work on your normal laptop/PC IP subnet, remember to reset
your laptop/PC to its normal IP address.
Wireless Network Settings:
Set an SSID (Service Set Identifier) and disable SSID Broadcast. (If you are given the
option to ‘name’ the Access Point in the configuration details, it can be helpful to also use
the SSID as the name.)
Choose a broadcast channel to minimise interference with other nearby Access Points. To
avoid interference, channel numbers should differ by at least 5. Therefore, as most Access
Points default to Channel 11, Channels 1 – 6 are likely to offer the least interference from
other devices in the area.
Security Settings:
For choosing the Network Authentication type, refer to the product manual or use ‘Open
System’.
Set the data encryption to WEP (Wireless Equivalent Privacy) using, for example, 128 bits,
and generate a key. Usually you are asked to enter a phrase from which the key will be
generated. Make a note of the WEP key and keep it in a secure place (remember, the WEP
key is the security code for your wireless system).
Help
If your laptop appears to have problems talking to the system equipment, try
‘pinging’ it using the DOS Command Prompt ‘PING’ followed by the IP
address, for example, PING 192 168.1.10. If it says it cannot reach it,
rather than having timed out, then they are not using the same IP network
address range (in the example that’s 192 168 1 ) – check that you have
changed your laptop IP address back to its original setting. If that’s not the
problem, check that the Access Point was configured correctly.
If using WPA-PSK, configure the Access Point to use WPA-PSK and enter the exact
passphrase (also known as Shared Secret) as used on the client station.
88
HELIX DN9848E Remote Control Software
User Guide
B
Wireless Card
2
Open your laptop/PC’s Control Panel and locate
and open the Wireless Network Connection Properties
dialogue box. If your wireless card is set up
to use Windows to configure its wireless
systems, a screen similar to that shown left
is presented that has a Wireless Networks
tab. Follow the steps given here to configure
the card.
If the Wireless Networks tab is not
available, please refer to the wireless card
manual for configuration instructions. Make
sure that you use the SSID and WEP key
from the Access Point Configuration.
3
Highlight Internet Protocol (TCP/IP) in the list and
choose Properties to open the Internet
Protocol Properties screen (left). If you are
using DHCP refer to your Access Point
manual for details. Otherwise, select Use the
following IP address and type in an IP Address for
your wireless card using the same subnet
address as your Access Point and laptop.
Click OK to return to the previous screen.
4
Switch to the Wireless Networks tab (left).
Tick Use Windows to configure my wireless network
settings. (The SSIDs of previously added
networks automatically appear in the
network lists.)
5
At the bottom panel, click Add… to open the
Wireless network properties window.
6
Type in the SSID address of the Access Point
and turn WEP on. Set Key Index to 1.
Clear The key is provided for me automatically tick
box to unlock the Network key fields. Type
in and confirm the WEP key as noted in the
Access Point configuration.
7
Click OK to confirm the settings and close the
Wireless Network Connections screen.
continued…
89
HELIX DN9848E Remote Control Software
User Guide
8
The Access Point SSID should now appear in the lower
Preferred Networks list. If necessary, move the network SSID
to the top of the list, using the Move up button, so that
Windows automatically connects to it in preference to
other available networks.
9
Highlight the SSID in the lower list and click Refresh in the
upper panel. After one or two minutes, (depending on
signal strength and quality), Windows should pop up a
notification box to show that it has found a new network.
The SSID should now appear in the upper Available Networks
list, with an active transmitter symbol (as shown).
If the Access Point SSID is not yet visible in the Available
Networks list, refer the Help box below.
10
Help
Click OK to exit the dialogue box.
The Access Point SSID may take some time to register in the Available Networks list, as the Access
Point must complete a re-boot to effect the configuration changes. Try refreshing again but this
time exit the dialogue box by clicking OK . Wait at least two minutes to ensure the Access Point
re-boot has had time to complete, and then re-open the Wireless Network Connections
Properties dialogue box.
If the SSID still does not appear, open up the Network Connections window from the Control
Panel and ensure that the wireless connection is shown and not disabled. If it is correctly
enabled and you cannot make the connection, refer to your wireless hardware equipment
manuals for help.
90
HELIX DN9848E Remote Control Software
User Guide
11.3.4
Fault Finding Tips
The following tips cover some of the more likely errors in an Ethernet set up that will cause ELGAR to
report a failure in establishing a connection with the HELIX system. If none of these tips solve the
problem, please refer to your LAN administrator or the fault finding guidance in your wireless equipment
manuals. To contact Klark Teknik Service Support, please refer to our website at
http://www.klarkteknik.com/.
If your Ethernet connection failed when you opened HELIX DN9848E RCS:
1
Select Start > Programs > Accessories > Command Prompt to open the DOS Command prompt.
Verify the system connections and addressing as follows:
Verify the status and IP addresses of the LAN card and wireless card by typing IPConfig. If
the prompt returns, “Media disconnected”, you need to re-enable the LAN or Wireless
Network Connections in the Control Panel. If IP addresses are successfully found, verify
that their IP Subnet is correct; if not, change the IP address in the Control Panel.
Verify that the laptop can see the Access Point (if relevant) by pinging its address, that is,
type PING followed by the IP address at the C:\> prompt and press [Return]. If there is no
reply, you may have entered the IP address incorrectly at the configuration stage – refer
back to the configuration instructions.
2
Re-boot your laptop. (It is important that the laptop is re-booted after the system has
been connected and powered up, especially if you have changed the set up to/from
wireless). Verify that all cabling and power connections are in place and, where relevant,
that the Access Point is in a suitable location. The general criteria for a suitable location
include “line of sight”, free from major obstructions (especially metal objects) and away
from other electrical equipment.
It is common installation practice to site the Access Point on the top of the flight case with
its metal frame and range of electrical equipment radiating large amounts of radio waves.
Be assured - this is NOT recommended as being a suitable location.
It is important to remember that although wireless communication will work through walls
and floors there is no guarantee of reliability. In practice the more walls or floors that lie in
the transmission path, the less likely it is that satisfactory communication will be achieved.
When choosing a wireless access point to support your system it is strongly recommended
that the unit functions using 802.11n technology rather than 802.11g technology. This
superior standard uses MIMO (multiple-in, multiple-out) technology with multiple signal
antennas to improve the range and speed of wireless networks.
3
Ensure that the Helix Units are operating on host code V4.00 or later.
If your laptop/PC has a firewall:
Make sure that you configure the firewall to accept connections to the following ports:
Port 1001 – for TCP IP normal unit communications.
Port 30718 – for UDP device discovery.
91
HELIX DN9848E Remote Control Software
User Guide
11.4
Serial Connection (Option)
There is an option to control your system remotely from a laptop PC via an RS-232 connection.
11.4.1
Serial connection details
The system set up for serial connection is illustrated below.
11.4.2
Connection Procedure
The HELIX DN9848E RCS laptop/PC is connected to the daisy chain as follows:
To connect, set up and configure your system for serial operation
1
Connect the HELIX DN9848E units in a daisy chain configuration, see section 11.2.1.
2
Power up the HELIX DN9848E units and assign each one a unique Comms channel address,
as follows:
On the HELIX DN9848E unit’s front panel, press and hold the HOME (SETUP) button to
access the Comms menu page.
Use the left-hand DATA ENTRY knob to select a unique channel address between 1 and 32.
Press HOME (SETUP) to accept.
The front panel controls, except the HOME (SETUP) button, are locked out to facilitate remote
operation. The display indicates that the unit is under remote control.
Note
3
The order of the addresses does not need to mirror the order of the daisy chain
networking, but each unit MUST have a unique comms channel address.
Referring to the following table, connect your laptop/PC to the first HELIX unit in the daisy
chain.
HELIX DN9848E Unit
Connection
RS-232 input to front panel “PC
PORT”
Laptop/PC
Connection
Cable/Converter Required
D9 COM port
Host cable
USB port
KK systems USB/232 converter plus host cable
For details of converters plese refer to
http://www.klarkteknik.com/faq_connections.htm
92
HELIX DN9848E Remote Control Software
User Guide
4
Open ELGAR by clicking on the ELGAR
5
Select File > Open from the ELGAR menu to locate and open the KTG show file containing the
HELIX DN9848E unit settings.
6
From the ELGAR menu, select Tools > Options.
7
In the System Configuration window, select Routing from the Communications option. If necessary,
to expand the Communications category. (In this example, four HELIX DN9848E Addclick
Ins have been added.)
8
To find any new ports that may have been added to your system, click Find Ports and then
click Yes at the Reset Comms Resources window.
9
To find any new devices that may have been added to your system, click Find Device
Names and then click Yes at the Find Devices attached to this PC window.
10
When device polling has finished, click Add Port .
desktop icon.
93
HELIX DN9848E Remote Control Software
User Guide
11
Select Helix Serial Port from the Port
Type drop down list.
12
Rename the port name in the Port Name
field.
13
Click OK . The new port appears in the
Communications Ports list, under its new name.
14
Assign the port name to the
device by selecting the port
and device from the
Communications Ports and List of
Devices, and selecting the port
name in the
15
drop down list.
Click OK .
Your system should now be ready for online operation, as described in section 3.5. Successful
communication with the HELIX DN9848E units is indicated by ‘rotating’ symbols at the bottom righthand corner of the LCD panel (“T1R1” → “T/R/” → “T―R―”).
94
HELIX DN9848E Remote Control Software
User Guide
11.5
The System Configuration Window
This section details only the HELIX DN9848E RCS-specific functions and any ELGAR updates
incorporated for this new software.
11.5.1 Finding ports and device names
The area highlighted in the diagram, which contains the Find Ports , Find Device Names and Cancel
buttons, is new to ELGAR.
ELGAR automatically searches for ports at start up. If any HELIX devices are switched on after ElGAR
has been started, ELGAR may not find them immediately. These buttons are used to trigger ELGAR into
performing a search of the network to find any recently-added devices, such as DN9848E, DN9340E and
DN9344E, and also their non-‘E’ variants1, attached using UDS1100 converters. If found, these are
added to the List of Devices, where the Device Type column identifies which type of device a port refers to.
To find all ports on your system
1
In the System Configuration window, click on Find Ports .
2
Click Yes .
Any new port IP addresses will be added to the IP Address
drop down list in the Port Configuration window.
1
As this manual only currently details the use of the HELIX DN9848E RCS software with DN9848E units, the use of
non-‘E’ (Ethernet) variants, which require UDS1100 converters, has not been included. However, this information is
intended to be included in the next version of this manual.
95
HELIX DN9848E Remote Control Software
User Guide
To find new devices attached to your PC
1
In the System Configuration window, click on Find Device
Names .
2
Click Yes .
The status bar under the Cancel button shows the progress of device polling and the current port being
polled is shown under the List of Devices. Any new device name will be added to the List of Devices. To
cancel device polling, press Cancel .
Shows current port
being polled
Shows status of
new device polling
progress
11.5.2 The Port Configuration screen
The Port Configuration screen (shown below) allows you to select the type of port applicable to your
system, that is, Ethernet Port or KT Serial Port. This screen is accessed from the Add Port and Edit Port
buttons.
96
HELIX DN9848E Remote Control Software
User Guide
The Ethernet Port screen (shown below) allows you to:
•
Change the port name in the Port Name field.
•
Select the appropriate IP address from the IP Address
•
Identify an Ethernet port, whose allocated number is shown in the Port field. This port number,
not to be confused with an ELGAR ‘port’, represents the source port number in TCP connections.
It is the number that identifies the channel for remote initiating connections.
drop down list.
Caution!
Unless instructed to do otherwise, you should not alter this field, as changing it may
cause the serial connection not to work.
•
Select Generic Echo Off (usually for Ethernet) or Generic Echo On (usually for serial).
97
HELIX DN9848E Remote Control Software
User Guide
12 APPENDICES
12.1
Glossary of Terms and Abbreviations
A
H
Add-In
Product control software, such as HELIX
RCS, which works under the ELGAR
Library Manager Shell.
HELIX
B
Bandwidth
In EQ, the width of a band comprising a
range of frequencies that will be boosted
or cut above and below a selected centre
frequency.
HELIX DN9848E RCS
Software that allows remote
programming and control of HELIX
DN9848E units via a PC.
D
dB
All of the new Ethernet units from Klark
Teknik, which includes the HELIX EQ
system – DN9340E Dual EQ unit,
DN9344E Quad EQ unit and DN9331
RAPIDE Graphic Controller – as well as
the HELIX DN9848E System Controller.
The older version of HELIX comprised the
DN9340 master unit and DN9344 slave.
HPF
Abbreviation for decibel.
Abbreviation for high pass filter.
E
I
ELGAR
The ELGAR Library Manager Shell is the
generic container of a number of Midas
and Klark Teknik products, known as
Add-Ins. It provides a single place to
store, load and edit Remote Control AddIns, such as the Helix RCS.
IP address
Unique identifier for networked computer
or device. An IP address comprises a
32-bit numeric address written as four
numbers separated by periods, with each
number ranging from zero to 255.
EQ
L
Abbreviation for equalization, which is the
process of altering the levels of
frequencies that comprise a signal.
LAN
Equaliser
A device that boosts or cuts the volume
of specific frequencies in a signal.
LPF
Ethernet
The most common method of networking
computers in a local area network (LAN).
A physical standard that uses several
wires twisted in pairs to allow computerto-computer communication. Also, the
basic communications protocols over such
wires – the same protocols are also used
for Wireless Ethernet.
Abbreviation for local area network.
Short-distance network for linking a
group of computers together within a
building.
Abbreviation for low pass filter.
P
PC
Abbreviation for personal computer.
PEQ
Abbreviation for parametric equalisation
or parametric EQ. Equalisation where all
of the parameters of equalization can be
adjusted to any amount, such as centre
frequency, the amount of boost or cut in
gain, and the bandwidth or Q.
F
FastNav®
An area of the screen – or a screen itself
in the case of the HELIX EQ units – that
makes it easier to work with multiple
units.
Q
Q
The sharpness of the peak response in an
equalization circuit. Related to bandwidth
– the larger the bandwidth, the lower the
Q.
98
HELIX DN9848E Remote Control Software
User Guide
R
RCS
S
Shelving
A type of EQ in which all frequencies
above or below a selected frequency are
affected, where low shelving affects all
frequencies below the selected frequency
and high shelving all those above it.
Abbreviation for remote control software.
RS-232
Abbreviation for Recommended Standard
232. Also known as RS-232C, the
RS-232 is the standard for asynchronous
serial-port transfers set by the Electronic
Industries Alliance (EIA). The physical
interface has one wire used as the ground
wire, while the rest are dedicated to
detecting carrier signals, managing the
timing of data transfer, and sending and
receiving data. The RS-232 supports two
standard types of connector, the 25-pin
D-type and 9-pin D-type.
SSID
Abbreviation for service set identifier.
T
TCP/IP
Abbreviation for transmission control
protocol/internet protocol. Standard
communications protocol for transmitting
data over networks. TCP/IP is the basic
communication language or protocol of
the internet.
99
HELIX DN9848E Remote Control Software
User Guide
12.2
Remote Control Connection Options
This section gives the available options for connecting DN9848E and DN9848 units, and also HELIX
DN9340, DN9340E, DN9344 and DN9344E units, to enable remote control via a laptop or PC.
All units in a system must be running the same protocol version. The protocol version is determined by
the first digit in the software version, for example, if a DN9848E unit was running host software version
4.00, the protocol version is 4.
Note
12.2.1
Note
Although there are many combinations available for remote operation, it is always worthwhile
remembering that Ethernet provides faster operation than serial.
Single-unit serial connections
The following converters are the only converters supported by Klark Teknik. Even
though other converters may seem to work, we cannot guarantee their correct
functionality and compatibility when used with our products.
To connect a single unit via serial RS-232
The KT RS-232 host cable (supplied with every unit) is connected to the front panel of the unit and then
to the RS-232 port on the laptop/PC.
To connect a single unit – USB to front panel
The KT RS-232 host cable (supplied with every unit) is connected to the front panel of the unit and then
to a KK Systems USB232 USB-to-serial converter. The converter is then connected to a USB port on the
laptop/PC via a USB cable.
To connect a single non-Ethernet unit – USB to rear panel
A serial RS-485 cable is connected to the rear panel of a DN9848, DN9340 or DN9344 unit and then to a
B+B Systems USOTL4 USB-to-RS-485 converter, using a serial RS-485 cable. The converter is then
connected to a USB port on the laptop/PC via a USB cable.
100
HELIX DN9848E Remote Control Software
User Guide
12.2.2
Multiple-unit Ethernet connections
To connect any Ethernet units in an Ethernet system
This fast Ethernet-only system can incorporate the Ethernet units in any combination. Connect the units
using Ethernet cable, using one of the options in Section 11.2. The first unit is connected to the
laptop/PC via an Ethernet cable. The Ethernet cable can be connected direct to the laptop/PC or to a
wireless access point for wireless operation.
To connect non-Ethernet units in an Ethernet-to-serial system
The HELIX DN9848 units are daisy-chained using serial RS-485 cabling. The first HELIX DN9848 unit is
connected to a Lantronix UDS1100 Ethernet-to-serial converter via either a serial RS-232 or RS-485
cable. Connection to the laptop/PC can be either direct from the Lantronix unit or via a wireless access
point for wireless operation; both these options require Ethernet cable.
To set up the Lantronix UDS1100 converter, see Section 12.3.
In this system the speed of operation is limited by the serial connection.
101
HELIX DN9848E Remote Control Software
User Guide
To connect Ethernet and non-Ethernet units in an Ethernet/serial system
The PC is connected to the first Ethernet unit using one of the options in Section 11.3. The Ethernet
units are connected together using one of the options in Section 11.2. The last Ethernet unit is
connected to a Lantronix UDS1100 Ethernet-to-serial converter via an Ethernet cable. The Lantronix
converter is then connected to the first non-Ethernet unit via serial RS-485 cabling. All of the nonEthernet units are connected together in a daisy-chain configuration using RS-485 cabling.
To set up the Lantronix UDS1100 converter, see Section 12.3.
102
HELIX DN9848E Remote Control Software
User Guide
12.2.3
Multiple-unit serial connections
To connect a combination of non-Ethernet units serial-to-RS-485
Connect any combination of non-Ethernet units in a daisy chain configuration, using serial RS-485 cable.
Connect the first unit to the PC using any of the methods shown in Section 12.2.1.
To connect any combination of Ethernet units serial-to-Ethernet
Connect any combination of Ethernet units using Ethernet cable, using one of the options in
Section 11.2. Connect the first unit to the PC using the KT RS-232 host cable (supplied with every
unit); connect it to the front panel of the unit and then to the RS-232 port on the laptop/PC.
The speed of system operation is limited by the serial connection to the PC.
103
HELIX DN9848E Remote Control Software
User Guide
12.2.4
Ethernet and serial
To connect Ethernet and non-Ethernet units in a dual Ethernet-serial system
In this dual system the laptop/PC is connected to the Ethernet units via Ethernet and non-Ethernet units
via serial/USB. In the Ethernet system, connect the Ethernet units using Ethernet cable, using one of
the options in Section 11.2. Connect the first Ethernet unit to the PC via Ethernet using one of the
options in Section 11.3. In the serial system, connect the non-Ethernet units together in a daisy chain
configuration and connect the first of these units to the PC using any of the methods shown in
Section 12.2.1.
In this configuration the Ethernet system provides fast operation, while the serial provides slow
operation.
Note
In this configuration the Ethernet and serial networks are entirely separate, as they are
connected to the PC via different ports. This allows the networks to be running different
protocols. However, to do this the PC will need to be running two RCS programs of the
equivalent protocols.
104
HELIX DN9848E Remote Control Software
User Guide
12.3 Setting up the Lantronix UDS1100 Converter
12.3.1 Configuring the Lantronix UDS1100
Please note that the instructions given here relate to the Lantronix Device Installer V3.6 which has the
advantage of automatically locating your UDS1100, even if the factory set IP subnet address does not
match your laptop IP subnet. If your Device Installer is an earlier version please download the latest
version from the Lantronix website at http://ltxfaq.custhelp.com/cgibin/ltxfaq.cfg/php/enduser/std_adp.php?p_faqid=644.
To configure your UDS1100 Converter (all Ethernet setups)
1
Connect the device to your laptop/PC
OR if you are setting up a Wireless Network, connect it to the Access Point.
2
Install the Lantronix Device Installer (V3.6 or later).
3
Open the Windows Start>All
Programs menu and select the
Lantronix > Device Installer
application. The screen shown
right is opened.
4
Choose Search to locate network
devices.
Note: On the initial search, the
Device Installer will find the device
regardless of whether it is currently
on the same subnet IP address as
your laptop/PC.
5
Highlight the UDS1100 in the device
list and choose Assign IP to open the
Assign IP Address Wizard.
6
LAN connection: Refer to the
Network Administrator for guidance
on whether to obtain an IP address
automatically or assign a specific IP
address. Follow the on-screen
instructions to complete the
assignment.
Direct or Wireless: Choose Assign a
specific IP address and click Next> .
Follow the on-screen instructions,
entering an IP address on the same
subnet as your laptop/wireless card
and leaving the Default Gateway
value at 0.0.0.0.
7
105
On completion, click Finish to return
to the Device Installer screen.
HELIX DN9848E Remote Control Software
User Guide
8
Highlight your device in the
device list and double-click to
access the Device Details,
Web Configuration and Telnet
Configuration tabs.
9
Switch to the Web Configuration
tab and click Go to connect to
the UDS1100’s web
configuration pages (shown
below).
10
Under the Channel 1 heading on the lefthand side of screen, click on Serial Settings
to access the Serial Settings screen.
11
Make the following settings in the Port
Settings section:
Protocol:
as required (with Solo
Tracking you must use the
front panel RS-232 input
for the converter)
Baud Rate: “38400”
Data bits:
“8”
Parity:
“None”
Stop bits:
“2”
Flow control: “None”
Click OK . (Done! will appear next to OK
to showthat settings have been stored.)
Important!
Remember to change the Serial Protocol if you
change from RS-232 to RS-485 input or vice
versa.
106
HELIX DN9848E Remote Control Software
User Guide
12
Click Apply Settings to apply the changes;
you will see the “Please wait …”
message while the unit saves the
changes and reboots.
13
Close the Device Installer by selecting
File > Exit or by clicking on
in the top
right-hand corner of the window.
12.3.2 Connecting the system equipment
For an overview of the connections, please refer to the HELIX Remote Control Software: Brief Guide to
Setting Up an Ethernet System user guide.
To connect up a HELIX RCS Ethernet System:
1
Connect, power up and set up the addresses of your slave HELIX units in a daisy chain
network as described in the DN9340 Operators Manual. If using Solo Tracking, the ‘first’
HELIX in the daisy chain must be located in the FOH Stack for connection to the console.
2
Connect the UDS1100 Converter to the first
HELIX, as follows:
Serial port
For RS-232 communications (for example,
when using Solo Tracking), use a male D25
to male D9 cable joined to the host cable
(female D9 to 9-way mini DIN) to connect the
serial port of the Lantronix UDS1100
Converter to the PC port on the front panel of
the first HELIX unit in the daisy chain.
Activity
LEDs
OR
For RS-485 communications, use a male D25
to XLR cable to connect the UDS1100
Converter to the Comm In XLR plug on the
rear panel of the first HELIX unit in the daisy chain.
RJ-45
port
Power
socket
Important! Ensure that the Serial Protocol is set correspondingly to RS-232 or RS-485 in
the Lantronix Configuration web page. To view the page, enter the IP address of the
UDS1100 box into the web browser address field.
107
HELIX DN9848E Remote Control Software
User Guide
3
Connect the UDS1100 Converter as follows:
Direct:
Use CAT5 cross over cable to connect the UDS1100 RJ-45 port to the laptop/PC RJ45 port.
LAN:
Use CAT5 cable to connect the RJ-45 port on the UDS1100 to its network connection
point. Similarly, use CAT5 cable to connect the laptop/PC RJ-45 port to its network
point.
Wireless:
Position the Access Point to maintain line of sight visibility to your laptop as you
move around the venue during the sound testing, while remaining in the Access
Point’s radio limits, for example, use a high up location, generally no more than
100m from the furthest sound testing postion. Connect power to the Access Point
as indicated in the product manual.
Use CAT5 cable to connect the UDS1100 RJ-45 port to the Access Point RJ-45 (LAN)
port.
4
Using the provided AC power adapter, connect power to the Lantronix UDS1100 Converter.
5
Boot up (or re-boot) your laptop/PC and open ELGAR by double clicking on the ELGAR
desktop icon.
6
Select File > Open from the ELGAR menu and open the .KTG show file with the HELIX
settings. ELGAR initiates the Ethernet connection and reports success or failure. If it fails,
see Fault Finding tips.
7
In the upper Home tab of each HELIX Add-In:
- specify the Address of the slave unit that the Add-In relates to
- set COM Port to the number you allocated to the Virtual COM Port
- set Comms Mode to Generic Echo On for RS-232 or Generic Echo Off for RS-485 input to the
first HELIX.
Your system should now be ready for online operation.
108
HELIX DN9848E Remote Control Software
User Guide
12.4
Mix Templates for Routing Pages
The following subsections show the standard mix template settings selectable in the routing pages; see
section 5.3.2.
12.4.1
Manual Mix (Routing Reset)
12.4.2
2 X 2 Way Crossover
109
HELIX DN9848E Remote Control Software
User Guide
12.4.3
2 X 4 Way Crossover
12.4.4
2 X 3 Way Crossover plus 2 Aux
12.4.5
1 X 5 Way Crossover plus 3 Aux
110
HELIX DN9848E Remote Control Software
User Guide
12.4.6
1 X 6 Way Crossover plus 2 Aux
12.4.7
4 X Bi-Amp
12.5
Presets
The DN9848 is supplied complete with presets that can be copied but not edited. The DN9848E is not
supplied with these presets. If DN9848E users wish to use these presets, they are to be found on the
RCS host PC as: C:\Program Files\Klark Teknik group\Elgar\DN9848E Addin\presets & routing.ktg
111