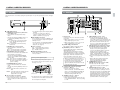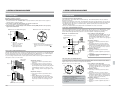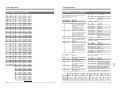
1
R
BR-D95U VIDEO CASSETTE RECORDER
INTRODUCTION
CONTROLS,
CONNECTORS
AND DISPLAY
CAUTION
CONNECTIONS
This section of instruction manual is specially edited for service
purpose with modified contents.
It is not recommended to use, this section for the substitution of
the original book in the merchandise.
MENU SWITCH
SETTING
MENU SWITCH
SETTING
DETAILS
PREPARATION
VIDEO CASSETTE RECORDER
BR-D95U
INSTRUCTIONS
RECORDING
PLAYBACK
OTHER
FUNCTIONS
COMPONENT DIGITAL
VIDEO CASSETTE RECORDER
AUDIO
INPUT
CH1
CH2
CH3
CH4
AES/EBU CH1
L
ANALOG CH1
R
CH2
CH3
CH4
LINE
CH2
CH3
CH4
CPN
SDI
AUDIO
MONITOR
VIDEO
INPUT
AUDIO INPUT / AUDIO MONITOR SELECT
BR-D95U
SIF
COMPONENT DIGITAL
ON
I
OFF
O
EDITING
Variable Motion
CH1
CH3
CH2
R
P
dB OVER dB
0
+4
R
P
dB OVER dB
0
+4
–10
+2
0
–20
–2
–30
–40
–4
CH4/TRACKING
R
P
dB OVER dB
0
+4
–10
+2
0
–20
–2
–30
–40
–4
–60
R
P
dB OVER dB
0
525
625
CTL TC UB DF SERVO CF GEN 16:9 AP
AUTO OFF P.READ V.VAR PB/EE REMOTE
COUNTER
CONDITION
0
–20
–2
–30
–40
–4
–60
–10
+2
MENU
0
RESET
VCON
REMOTE
HOLD
PB
PB/EE
VAR
SEARCH
SET
P.PLAY
–20
–2
STILL
–30
–40
–4
–60
PLAYER RECORDER
UB
+4
–10
+2
M
H
–60
ASSEM
VIDEO
DA1
S
DA2
DA3
F
DA4
EJECT
REC
PLAY
PAUSE/STILL
X1
X-1
PHONES
CH1
CH2
REC
CH3
CH4
TRACKING
IN
PULL FOR VARIABLE
METER MODE
FINE
PULL
RELEASE
PLAY
HOW TO USE
TIME CODE
POWER
ENTRY
OUT
CANCEL PREVIEW
TRACKING
SHIFT
REVIEW
INSERT
AUTO EDIT
TC
PREROLL
USER
TOP
VIDEO
AUDIO
STAND BY
REW
STOP
FF
SERVO/SYS
TIME CODE
ON SCREEN
OTHERS
EDITING SYSTEM
PHASE
ADJUSTMENT
PULL
RELEASE
REV
FWD
RS-232C
PROTOCOL
TROUBLESHOOTING
R
For Customer Use:
Enter below the Serial No. which is
located on the rear of cabinet. Retain
this information for future reference.
VICTOR COMPANY OF JAPAN, LIMITED
is a registered trademark owned by VICTOR COMPANY OF JAPAN, LTD.
is a registered trademark in Japan, the U.S.A., the U.K. and many other countries.
© 2002 VICTOR COMPANY OF JAPAN, LIMITED
Model No. BR-D95U
Serial No.
Printed in Japan
SL96197-002
• This manual provides instructions in English and
German.
English : pp. 2 to 151
German: pp. 154 to 174
• To maintain picture and sound quality, use the
exclusive head cleaning cassette after every 20
hours of operation.
For details on head cleaning, refer to page 11.
APPENDIX
SPECIFICA TIONS
This instruction book is made from 100% recycled paper.
SL96197-002
SAFETY PRECAUTIONS ( FOR USA AND CANADA )
IMPORTANT SAFEGUARDS
CAUTION
ATTENTION
RISK OF ELECTRIC SHOCK
DO NOT OPEN
RISQUE D'ELECTROCUTION
NE PAS OUVRIR
CAUTION: TO REDUCE THE RISK OF ELECTRIC SHOCK,
DO NOT REMOVE COVER (OR BACK).
NO USER-SERVICEABLE PARTS INDIDE.
REFER SERVICING TO QUALIFIED SERVICE PERSONNEL
1.
2.
3.
4.
5.
6.
7.
8.
9.
10.
11.
12.
13.
14.
15.
16.
17.
18.
19.
2
Read all of these instructions.
Save these instructions for later use.
All warnings on the product and in the operating instructions should be adhered to.
Unplug this appliance system from the wall outlet before cleaning. Do not use liquid cleaners or aerosol cleaners. Use a
damp cloth for cleaning.
Do not use attachments not recommended by the appliance manufacturer as they may cause hazards.
Do not use this appliance near water – for example, near a bathtub, washbowl, kitchen sink, or laundry tub, in a wet
basement, or near a swimming pool, etc.
Do not place this appliance on an unstable cart, stand, or table. The appliance may fall, causing
serious injury to a child or adult, and serious damage to the appliance.
Use only with a cart or stand recommended by the manufacturer, or sold with the appliance.
Wall or shelf mounting should follow the manufacturer’s instructions, and should use a mounting kit
approved by the manufacturer.
An appliance and cart combination should be moved with care. Quick stops, excessive force, and
uneven surfaces may cause the appliance and cart combination to overturn.
Slots and openings in the cabinet and the back or bottom are provided for ventilation, and to insure
reliable operation of the appliance and to protect it from overheating, these openings must not be
blocked or covered. The openings should never be blocked by placing the appliance on a bed, sofa, rug, or other similar
surface. This appliance should never be placed near or over a radiator or heat register. This appliance should not be placed
in a built-in installation such as a bookcase unless proper ventilation is provided.
This appliance should be operated only from the type of power source indicated on the marking label. If you are not sure of
the type of power supplied to your home, consult your dealer or local power company. For appliance designed to operate
from battery power, refer to the operating instructions.
This appliance system is equipped with a 3-wire grounding type plug (a plug having a third (grounding) pin). This plug will
only fit into a grounding-type power outlet. This is a safety feature. If you are unable to insert the plug into the outlet, contact
your electrician to replace your obsolete outlet. Do not defeat the safety purpose of the grounding plug.
For added protection for this product during a lightning storm, or when it is left unattended and unused for long periods of
time, unplug it from the wall outlet and disconnect the antenna or cable system. This will prevent damage to the product due
to lightning and power-line surges.
Do not allow anything to rest on the power cord. Do not locate this appliance where the cord will be abused by persons
walking on it.
Follow all warnings and instructions marked on the appliance.
Do not overload wall outlets and extension cords as this can result in fire or electric shock.
Never push objects of any kind into this appliance through cabinet slots as they may touch dangerous voltage points or short
out parts that could result in a fire or electric shock. Never spill liquid of any kind on the appliance.
Do not attempt to service this appliance yourself as opening or removing covers may expose you to dangerous voltage or
other hazards. Refer all servicing to qualified service personnel.
Unplug this appliance from the wall outlet and refer servicing to qualified service personnel under the following conditions:
a. When the power cord or plug is damaged or frayed.
b. If liquid has been spilled into the appliance.
c . If the appliance has been exposed to rain or water.
d. If the appliance does not operate normally by following the operating instructions. Adjust only those controls that are
covered by the operating instructions as improper adjustment of other controls may result in damage and will often
require extensive work by a qualified technician to restore the appliance to normal operation.
e. If the appliance has been dropped or the cabinet has been damaged.
f . When the appliance exhibits a distinct change in performance – this indicates a need for service.
When replacement parts are required, be sure the service technician has used replacement parts specified by the manufacturer that have the same characteristics as the original part. Unauthorized substitutions may result in fire, electric shock, or
other hazards.
Upon completion of any service or repairs to this appliance, ask the service technician to perform routine safety checks to
determine that the appliance is in safe operating condition.
The lightning flash with arrowhead symbol, within an
equilateral triangle, is intended to alert the user to the
presence of uninsulated “dangerous voltage” within
the product’s enclosure that may be of sufficient
magnitude to constitute a risk of electric shock to
persons.
The exclamation point within an equilateral triangle is
intended to alert the user to the presence of important
operating and maintenance (servicing) instructions in
the literature accompanying the appliance.
ATTENTION: POUR EVITER TOUT RISQUE D'ELECTROCUTION
NE PAS OUVRIR LE BOITER.
AUCUNE PIECE INTERIEURE N'EST
A REGLER PAR L'UTILISATEUR.
SE REFERER A UN AGENT QUALIFIE EN CAS DE PROBLEME.
Le symbole de l’éclair à l’intérieur d'un triangle
équilatéral est destiné à alerter l’utilisateur sur la
présence d’une “tension dangereuse” non isolée
dans le boîtier du produit. Cette tension est suffisante
pour provoquer l’électrocution de personnes.
Le point d’exclamation à l’intérieur d’un triangle
équilatéral est destiné à alerter l’utilisateur sur la
présence d’opérations d’entretien importantes au
sujet desquelles des renseignements se trouvent
dans le manuel d’instructions.
*Ces symboles ne sont utilisés qu’aux Etats-Unis.
WARNING:
TO REDUCE THE RISK OF FIRE OR ELECTRIC
SHOCK, DO NOT EXPOSE THIS APPLIANCE
TO RAIN OR MOISTURE.
AVERTISSEMENT:
POUR EVITER LES RISQUES D'INCENDIE OU
D'ELECTROCUTION, NE PAS EXPOSER
L'APPAREIL A L'HUMIDITE OU A LA PLUIE.
This unit should be used with 120 V AC only.
Ce magnétoscope ne doit être utilisé que sur du
courant alternatif en 120 V.
CAUTION:
To prevent electric shocks and fire hazards, do NOT
use any other power source.
ATTENTION:
Afin d'éviter tout resque d'incendie ou
d'électrocution, ne pas utiliser d'autres sources
d'alimentation électrique.
NOTE:
The rating plate (serial number plate) is on the rear of the unit.
INFORMATION
This equipment has been tested and found to comply with the
limits for a Class A digital device, pursuant to Part 15 of the
FCC Rules. These limits are designed to provide reasonable
protection against harmful interference when the eqipment is
operated in a commercial environment. This equipment
generates, uses, and can radiate radio frequency energy and, if
not installed and used in accordance with the instruction
manual, may cause harmful interference to radio communications.
Operation of this eqipment in a residential area is likely to
cause harmful interference in which case the user will be
required to correct the interference at his own expense.
REMARQUE:
La plaque d'identification (numéro de série) se trouve sur le
panneau arrière de l'appareil.
CAUTION
CHANGES OR MODIFICATIONS NOT APPROVED BY JVC
COULD VOID USER’S AUTHORITY TO OPERATE THE
EQUIPMENT.
This Class A digital apparatus meets all requirements of the
canadian Interference-Causing Eqipment Regulations.
Cet appareil numérique de la classe A respecte toutes les
exigences du Reglement sur le matériel brouilleur du Canada.
3
SAFETY PRECAUTIONS ( FOR EUROPE AND AUSTRALIA )
Warning Notice
FOR YOUR SAFETY (Australia)
1. Insert this plug only into effectively earthed threepin power outlet.
2. If any doubt exists regarding the earthing, consult
a qualified electrician.
3. Extension cord, if used, must be three-core correctly
wired.
POWER SYSTEM
Connection to the mains supply
This unit operates on voltage of 110 V to 240 V AC,
50 Hz/60 Hz.
䡲 Controlled EMC environment (for example purpose built broadcasting or recording studio), and the rural
outdoors environment (far away from railways, transmitters, overhead power lines, etc.)
WARNING:
TO REDUCE THE RISK OF FIRE OR ELECTRIC
SHOCK, DO NOT EXPOSE THIS APPLIANCE TO
RAIN OR MOISTURE.
IMPORTANT (In the United Kingdom)
Mains Supply (AC 230 V `)
WARNING – THIS APPARATUS
MUST BE EARTHED
The wires in this mains lead are coloured in
accordance with the following code;
GREEN-and-YELLOW: EARTH
BLUE
: NEUTRAL
BROWN
: LIVE
As the colours of the wires in the mains lead of this
apparatus may not correspond with the coloured
markings identifying the terminals in your plug, proceed
as follows.
The wire which is coloured GREEN-AND-YELLOW
must be connected to the terminal in the plug which is
marked with the letter E or by the safety earth symbol
or coloured GREEN or GREEN-AND-YELLOW. The
wire which is coloured BLUE must be connected to the
terminal which is marked with the letter N or which is
coloured BLACK. The wire which is coloured BROWN
must be connected to the terminal which is marked with
the letter L or coloured RED.
This apparatus is designed in compliance with ISO
7779/1999 (Acoustics -- Measurement of airborne
noise emmited by information technology telecommunications equipment), whose acoustic noise is
less than 70 dB.
CAUTION
To prevent electric shock, do not open the cabinet. No
user serviceable parts inside. Refer servicing to
qualified service personnel.
In order to keep the best performance and furthermore for electromagnetic compatibility we recommend to use
cables not exceeding the following length:
Port
Cable
Length
AC INPUT
Power supply cord
2.5 meters
SERIAL V/A IN
Coaxial cable
10 meters
SERIAL V/A OUT
Coaxial cable
10 meters
AES/EBU IN, OUT
Coaxial cable
10 meters
RS-232C
Shielded cable
3 meters
REMOTE
Exclusive cable
5 meters
WARNING
This is a Class A product. In a domestic environment
this product may cause radio interference in which
case the user may be required to take adequate
measures.
VIDEO CONTROL
Exclusive cable
5 meters
COMPOSITE IN, OUT
Coaxial cable
10 meters
REF IN
Coaxial cable
10 meters
Note:
Y/R-Y/B-Y IN, OUT
Coaxial cable
10 meters
The rating plate and the safety caution are on the rear
of the unit.
TIME CODE IN, OUT
Coaxial cable
10 meters
AUDIO IN CH1, CH2
Shielded twist pair cable
10 meters
WARNING
It should be noted that it may be unlawful to re-record
pre-recorded tapes, records, or discs without the
consent of the owner of copyright in the sound or video
recording, broadcast, or cable programme and in any
literary, dramatic, musical or artistic work embodied
therein.
CAUTION
RED colour indications on the operation panel are
provided but they are not safety related.
RED colour indications:
(1) For Cassette Recording Button
(2) For Level Over Audio In/Out Indicator
(3) For Tape Error Indicator
4
This equipment is in conformity with the provisions and protection requirements of the corresponding European
Directives. This equipment is designed for professional video appliances and can be used in the following
environments:
AUDIO OUT CH1, CH2
Shielded twist pair cable
10 meters
AUDIO MONITOR
Shielded cable
10 meters
PHONES
Cable with headphones
3 meters
The inrush current of this apparatus is 17 amperes.
Caution
When in case that the strong electromagnetic waves or magnetism is near the audio in ch1, ch2 cable, the sound
will contain noise.
In such case, please keep the cable away from the disturbance.
5
Thank you for purchasing the BR-D95U DIGITAL S
Video Cassette Recorder with electronic editing
capabilities.
● This unit can be used with either NTSC or PAL
signal systems. Before using this unit, first select
the signal system.
Signal system indication
The signal system
you select will be
indicated on the
counter display
Counter display
with “525” for NTSC
and “625” for PAL. For instructions on how to
select the signal system, refer to “4-2 VIDEO
SIGNAL SYSTEM SELECTION” on page 30.
● The optional SA-D95U digital interface board is
required for input/output of serial digital signals.
525
625
CONDITION
Whenever (NTSC) or (525) is specified in this
manual, the accompanying information applies only
to the NTSC signal system. Similarly, information
that is specified as (PAL) or (625) applies only to the
PAL signal system.
COMPONENT DIGITAL
This video cassette recorder uses the DIGITAL
S format. It can only be used with video tape
cassettes bearing the “
” or “
” logo.
COMPONENT DIGITAL
CAUTION: 4-channel audio
insert editing
Do not try to perform audio insert
editing on tapes with 4 audio channels
when using a 2-channel audio DIGITAL
S VCR (BR-D85U/E, BR-D80U/E, BRD750U/E).
If audio insert editing is executed,
audio signals recorded on DA3 and
DA4 will be erased.
● Do not record important material in the first two or
three minutes of a tape.
● It may be unlawful to use any material recorded
from TV broadcast programs or pre-recorded
programs without the consent of the owner of
copyright, except in cases where this material is
recorded exclusively for personal use.
● JVC is not liable for compensation for loss or
damage to recordings in the event this unit fails to
record or play back properly because the unit
malfunctions or a defective video cassette tape is
used.
● This unit is designed for professional use.
6
MAIN FEATURES
● Superb picture quality achieved by the DIGITAL S
format using 4:2:2 component digital processing
● Independently editable 4-channel PCM high-quality
sound
4-channel PCM high-quality sound with 16-bit 48
kHz sampling. 4-channel audio can be edited
independently.
● High-density metal tape based on the W-VHS
format
● Built-in time code generator/reader to enable
recording and reading of SMPTE/EBU-Standard
time code and user bits
● Pre-read function
This function makes it possible to execute A/B roll
editing using only one player (video/audio insert
only).
● Swap editing
The swap control function allows the player VCR to
be controlled from the recorder VCR via 9-pin
remote cable. This allows automatic editing even
when an editing controller is not available.
● Audio split editing
Audio edit start points can be set separately with
the video signal edit start point as a reference.
● Color frame servo function
This function ensures that continuity of the color
subcarrier phase is maintained during editing.
● Audio V fade function
This function fades the audio level during a
transition in V shape to reduce noise.
● Complete analog interface with input/output
terminals for composite, color difference component
and analog audio signals included as standard
● Internally installable serial digital interface board
optionally available for configuration of fully digital
systems
● Jog/search dial
● Built-in noiseless slow playback facility for noiseless
playback within a speed range of approximately
–1 to +1 normal
● Audio monitor facility for search
The D-9 format provides two linear audio channels,
enabling audio monitoring even during video shuttle
search.
● Tiltable front panel
● Playback audio output adjustment function
● Recording audio input adjustment function
● Video output adjustment function
CONTENTS
1 INTRODUCTION ............................................... 8
1-1 Outline .................................................... 8
1-2 Maintenance ........................................... 9
1-3 Precautions ............................................. 10
1-4 Video Cassette ....................................... 11
1-5 Head Cleaning ........................................ 11
2 CONTROLS, CONNECTORS AND DISPLAYS 12
2-1 Front Panel ............................................. 12
2-2 Sub Panel ............................................... 18
2-3 Rear Panel .............................................. 19
2-4 Counter Display ...................................... 21
2-5 On-screen Display .................................. 23
3 CONNECTIONS ................................................ 25
3-1 Input Connections ................................... 25
3-2 Output Connections ................................ 26
3-3 Control System Connections .................. 27
4 MENU SWITCH SETTING ................................. 28
4-1 Menu Display Modes .............................. 28
4-2 Video Signal System Selection ............... 30
4-3 Menu Switch Setting ............................... 31
4-4 Saving and Calling Up Menu Switch
Settings ................................................... 32
4-5 Calling Up Functional Menu Switch (Direct
Access Function) .................................... 33
4-6 User Page Registration/Change/Delete
(User Page Function) .............................. 34
4-7 How to Lock the Menu Switch Settings ..... 37
4-8 Recording Current Adjustment ............... 38
4-9 Hour Meter Data Display ........................ 39
5 MENU SWITCH SETTING DETAILS ................ 40
5-1 Menu Switch List ..................................... 40
5-2 Menu Switch Setting Content ................. 43
6 PREPARATION ................................................. 65
6-1 Operation Mode Lock ............................. 65
6-2 Standby ON/OFF .................................... 66
6-3 Loading and Unloading the Cassette ...... 67
7 RECORDING ..................................................... 68
7-1 Preparation for Recording ....................... 68
7-2 Input Video and Audio Signal Selection .. 69
7-3 Audio Monitor Output Signal Selection ... 70
7-4 Audio Record level Adjustment ............... 71
7-5 Basic Recording Operations ................... 73
7-6 Digital audio signal input/output .............. 74
8 PLAYBACK ....................................................... 75
8-1 Preparation for Playback ........................ 75
8-2 Basic Playback Operations ..................... 76
8-3 Audio Playback Level Adjustment .......... 77
8-4 Manual Tracking Adjustment .................. 79
8-5 Error Correction ...................................... 80
8-6 Audio V.Fade Function ........................... 80
8-7 Simplified Playback Speed
Adjustment Function ............................... 81
8-8 Shuttle Search/Jog Operation ................. 82
8-9 Variable Slow Playback .......................... 83
8-10 Program Playback .................................. 85
8-11 FF, REW and Counter Memory
Functions ................................................ 86
8-12 Repeat Playback ..................................... 86
9 OTHER FUNCTIONS ........................................ 87
9-1 Extra Line Data Recording/Playback ...... 87
9-2 EXTRA LINE, VITC LINE, V. BLANK
MASK and PB EXTENSION LINE
settings ................................................... 89
9-3 Simultaneous Operation ......................... 90
9-4 Fixed Time Cue Up Function .................. 91
9-5 Multi Cue-Up Function ............................ 92
9-6 Striping Rec Function ............................. 94
10 HOW TO USE TIME CODE ............................... 96
10-1 Time Code Display ................................. 96
10-2 Time Code Initial Setting (Preset) ........... 97
10-3 Time Code Recording .............................. 99
10-4 Time Code Playback ............................. 101
10-5 Sub Time Code Recording and
Playback ............................................... 102
10-6 Time Code Switch Setting for Editing ... 103
11 EDITING ........................................................... 104
11-1 Outline .................................................. 104
11-2 Color Frame Servo Setting ................... 105
11-3 Swap Editing ......................................... 107
11-4 Audio Split Editing ................................. 112
11-5 Other Function ...................................... 113
11-6 Manual Editing ...................................... 114
11-7 Editing with the Pre-read Function ........ 115
12 EDITING SYSTEM PHASE ADJUSTMENT .... 117
12-1 Connection ............................................ 117
12-2 Adjustment ............................................ 118
12-3 Dubbing Loop Function .......................... 122
13 RS-232C Protcol ............................................. 123
13-1 Command tables ................................... 123
13-2 RS-232C commands ............................ 124
13-3 Speed/data correspondence table ........ 134
13-4 Contents of the sense commands ........ 135
13-5 Menu switch setting information ........... 137
14 TROUBLESHOOTING .................................... 145
14-1 Warnings with Indicators ....................... 145
14-2 Troubles not to be Warned by
Indicators .............................................. 147
15 APPENDIX ....................................................... 148
15-1 Operation button combinations ............. 148
15-2 Optional Accessories ............................ 148
15-3 Index ..................................................... 149
16 SPECIFICATIONS ........................................... 150
7
1 INTRODUCTION
1 INTRODUCTION
1-1 OUTLINE
1-2 MAINTENANCE
This manual consists of the following sections.
Section 1 INTRODUCTION
Read this section carefully as it describes the
precautions to be taken when operating this unit
and the type of cassette to be used.
Section 9 OTHER FUNCTIONS
This section describes the following special functions.
• Setting the unit to record or play back information
added to a video signal on an extra video line.
• Simultaneous operation of more than one VCR
• Cue-up function
Section 2 CONTROLS, CONNECTORS AND
DISPLAYS
If you are already familiar with the operation of
professional VCRs, you will probably only need to
read this section to get started.
Section 10 HOW TO USE TIME CODE
This section describes time code presetting,
recording, and time code playback operation.
Section 3 CONNECTIONS
This section describes basic connections between
the BR-D95U and other units.
Section 11 EDITING
This section describes the editing operation and
pre-read editing.
Section 4 MENU SWITCH SETTING
This unit incorporates a “Menu” function which
allows you to set a variety of switches on screen.
Setting procedures and setting items are described
in this section.
Section 12 EDITING SYSTEM PHASE ADJUST
MENT
This section describes internal TBC phase
adjustment and the dubbing loop function.
Section 5 MENU SWITCH SETTING DETAILS
This section describes the menu switch items and
setting contents in detail.
Section 6 PREPARATION
This section describes how to set up the unit prior
to operation and notes any precautions that need to
be taken.
Section 7 RECORDING
This section describes recording operations and
settings.
Section 8 PLAYBACK
This section describes playback operations and
settings.
Section 13 RS-232C protocol
This section describes the data protocols used to
control of this unit with a personal computer or
other external RS-232C controller.
The video cassette recorder/player incorporates precision components. Regular maintenance is necessary to
maintain the performance level required for professional use. The information below will help you determine a
maintenance schedule that will ensure optimum performance over a long period of time.
● Maintenance
Just as regular oil changes, brake checks, and
tune-ups are essential to keep your car running well
over a long period, your VCR must be maintained
regularly to ensure optimum long-term
performance.
Continued use of the VCR without maintenance
may lead to the following malfunctions.
● Recording or playback cannot be executed.
● Picture and sound distortion.
● Repeated warnings (stopping the operation).
These malfunctions are mostly due to wear or
deterioration of the VCR's internal components.
Having these repaired can be expensive.
Moreover, a sudden malfunction can not only lead
to downtime and lost productivity, but can also
damage the video cassette.
Section 14 TROUBLESHOOTING
This section suggests ways to handle potential
difficulties or malfunctions.
Section 15 APPENDIX
This section includes descriptions of optional units
and the index for this manual.
Section 16 SPECIFICATIONS
● Keeping track of operation (running) time
The total operation time reached by an ordinary
home VCR in five to six years may be reached by a
professional VCR in as few as five to six months.
Therefore, it is important to closely monitor the total
operation time. You can check the running time on
the provided hour meter (drum running time). The
hour meter is shown on the counter display or onscreen display on the monitor.
Hour meter indication
The hour meter can be displayed by selecting
“DRUM HOUR” on the menu switch setting screen.
For details, refer to “Hour meter indication” on page
39.
● Maintenance schedule
Depending on the operation time, inspect or
replace the following mechanism components.
Replace the drum assembly (including the heads)
and head cleaner every 750 hours.
夡: Cleaning, check and adjustment
䡬: Check or replace as required. If replacement is
not required, clean it.
䢇: Replace.
Use time
Drum assembling
(including heads)
Head cleaner
Tape guide roller, etc.
Fixed head
Belt pinch roller, etc.
Driving system parts
Every 750H
䢇
1500H
䢇
3000H
䢇
4500H
䢇
6000H
䢇
䢇
䡬
夡
䡬
䡬
䢇
䢇
䡬
䢇
䡬
䢇
䢇
䢇
䢇
䡬
䢇
䢇
䡬
䢇
䡬
䢇
䢇
䢇
䢇
䢇
This table should be used as reference only. Actual maintenance requirements will vary according to how the unit
is used.
Maintenance consultation
Consult your local JVC dealer for more information about maintenance scheduling and costs.
8
9
1 INTRODUCTION
1 INTRODUCTION
1-3 PRECAUTIONS
1-4 VIDEO CASSETTE
The BR-D95U incorporates highly sophisticated and complex technology. To ensure proper operation, be sure to
take the following precautions.
Transportation
Condensation
Always hold this unit by the side panels when
carrying or moving it. If you hold it by the front panel,
the tilt panel may open and you could drop the unit.
● Do not use this unit immediately after moving it
from a cold place to a warm place or after switching
on a heater in a cold room. This will cause water
vapor to condense on the video head drum and
tape guides and may damage the tape and the
VCR.
Installation and storage
Head drum
● This unit contains precision components to ensure
the highest performance. For optimum long-term
performance, proper maintenance and care are
required. Consult your JVC dealer for replacement
of parts, adjustment and servicing.
● Use a soft cloth to clean the cabinet. Do not use
benzene or thinner as these may melt or cloud the
cabinet surface. To remove excessive dirt, clean
the unit with a mild detergent diluted with water,
then wipe it with a dry cloth.
Not recordable
Recordable
● When condensation occurs, the warning message
“02 1” is shown on the tape counter display. The
cassette is automatically ejected (see page 145).
The head drum then rotates automatically to dry
itself. Leave the VCR in this state with the power
on. Once the warning message “02 1” has turned
off, operation can be resumed.
VIDEO CASSETTE RECORDER
BR-D95U
POWER
COMPONENT DIGITAL
ON
I
OFF
O
Variable Motion
525
625
CTL TC UB DF SERVO CF GEN 16:9 AP
AUTO OFF P.READ V.VAR PB/EE REMOTE
CONDITION
COUNTER
RESET
VCON
REMOTE
MENU
SET
HOLD
PB
PB/EE
VAR
SEARCH
PLAYER RECORDER
UB
P.PLAY
STILL
M
H
Maintenance and cleaning
Slide
OFF
REC
ON
Video tape
䢇Cassettes bearing the “
” logo on the back
are provided with a safety slide to prevent
accidental erasure.
● Move the slide to OFF to prevent erasure.
● Move the slide to ON to allow recording.
OFF
REC
ON
● Avoid using the unit in places subject to the following conditions:
● extreme heat or cold
● strong magnetic field
● high humidity
● dust and soil
● vibrations
● Handle the unit carefully
Do not block the ventilation openings, or place
anything heavy on the unit. Do not put any foreign
materials into the cassette loading slot.
● Use the unit in a horizontal (flat) position only.
● Avoid violent shocks to the recording chassis
during transportation. Remove the cassette tape
from the unit prior to transportation.
● Avoid leaving tapes in the Still or Record Pause
mode for a long time as this may damage the tape.
● When not using the unit, set the [POWER] switch to
“OFF” to avoid unnecessary power consumption.
● Do not stand or sit on the unit. This will damage the
unit and may cause it to fall, resulting in injury.
● Do not install the BR-D95U in a location where it
exposed to radiation, x-rays or corrosive gases.
● Only cassettes bearing the “
” logo can be
used with this VCR.
● Cassettes bearing the S-VHS or VHS logo cannot be
used with this unit. If an S-VHS or VHS cassette is
inserted, it will be automatically ejected.
● Video cassettes cannot be used upside down.
● Leaving the tape in a partially wound condition for a
long time may damage the tape. Rewind the tape
to the beginning before storage.
● Tape performance cannot be maintained if a
cassette is used repeatedly. The more a tape is
used, the more dropouts occur. Do not use dirty
tapes or tapes which have been damaged as doing
so may shorten the service life of the rotary heads.
ASSEM
VIDEO
DA1
IN
ENTRY
OUT
S
DA2
DA3
F
DA4
EJECT
REC
PLAY
PAUSE/STILL
X1
X-1
CANCEL PREVIEW
SHIFT
REVIEW
INSERT
AUTO EDIT
TC
PREROLL
USER
VIDEO
AUDIO
STAND BY
TOP
REW
STOP
FF
SERVO/SYS
TIME CODE
ON SCREEN
OTHERS
PULL
RELEASE
REV
FWD
1-5 HEAD CLEANING
Repeated recording and playback leads to accumulation of dust and other particles on the video and audio heads.
Excessive accumulation will adversely affect the picture or sound quality. If head cleaning is not performed
periodically, a type of mosaic noise called block noise may appear in the picture or the sound may be interrupted.
Be sure to clean the tape transport system with a dedicated head cleaning tape (optionally available
DCL-5) once every 20 hours.
Use a dedicated head cleaning tape only. For details on use of the dedicated head cleaning tape, refer to the
instructions provided with it.
Block noise
Head Cleaning mode
About the provided power cables
Two power cables are provided with the BR-D95U.
Use the one that corresponds to your power-supply.
● When usage voltage is 120 V or less; use the
A-type (flat-pin type) power cable.
● When usage voltage is 127 V or over; use the
C-type (round-pin type) power cable.
10
This unit is provided with a built-in head cleaner. Use
it to remove dust from the heads.
STAND BY
REW
STOP
FF
SERVO/SYS
TIME CODE
ON SCREEN
OTHERS
Cleaning procedure
1. Unload the cassette.
2. Press the [STANDBY], [REW], [STOP] and [FF]
buttons simultaneously.
The built-in head cleaner in this unit cleans the
heads for about 5 seconds.
● If a cassette is inserted during head cleaning, the
head cleaning operation stops.
11
2 CONTROLS, CONNECTORS AND DISPLAYS
2-1 FRONT PANEL
2-1 FRONT PANEL
3
AUDIO
MONITOR
VIDEO
INPUT
AUDIO INPUT / AUDIO MONITOR SELECT
CH1
SDI
AES/EBU CH1
L
ANALOG CH1
R
CH2
CH4
CH3
21
1
2
VIDEO CASSETTE RECORDER
AUDIO
INPUT
2 CONTROLS, CONNECTORS AND DISPLAYS
CH2
CH3
CH4
LINE
CH3
CH4
CPN
ON
I
OFF
O
4
CH2
R
P
dB OVER dB
0
+4
–10
+2
0
–20
–2
–30
–40
–4
0
CH3
0
–20
–2
–30
–40
–4
–60
CH4/TRACKING
R
P
dB OVER dB
0
+4
–10
+2
–20
–2
–30
–40
–4
–60
R
P
dB OVER dB
0
+4
–10
+2
0
525
625
CTL TC UB DF SERVO CF GEN 16:9 AP
AUTO OFF P.READ V.VAR PB/EE REMOTE
COUNTER
CONDITION
RESET
VCON
REMOTE
VAR
SEARCH
MENU
SET
HOLD
PB
PB/EE
P.PLAY
M
H
S
PHONES
ASSEM
VIDEO
DA1
DA2
DA3
EJECT
REC
PLAY
REC
FINE
PULL
RELEASE
6
CANCEL PREVIEW
TRACKING
SHIFT
PLAY
OUT
ENTRY
REVIEW
3 Counter display
Usually displays tape time. With the MENU button
pressed, it displays menu switch and hour meter
settings. Displays warning codes when an
abnormality occurs. For details, refer to page 21.
4 Level meter section
Indicates the audio recording or playback levels.
● The [CH4/TRACKING] meter can be switched
between tracking display and CH4 audio level
display with the [METER MODE TRACKING]
button.
● Audio Level Display mode can be selected with
the [METER MODE FINE] button.
● When the audio level adjust mode is set to Unity,
the [P] or [R] indicator in the upper section of the
meter lights. The [P] indicator lights in the Play
Volume mode and the [R] indicator lights in the
Record Volume mode.
When the audio level adjust mode is set to
Variable, the indicator goes out. You can use
the audio level adjust knobs to adjust the levels
in this mode.
● The audio reference level can be set with menu
switch No. 257 <AUD REF. SIGNAL LEV.>
(-20 dB or -18 dB).
CH1
CH3
CH4/TRACKING
CH2
0
–2
–4
R
P
dB OVER dB
0
+4
–20
–30
–40
–60
0
–2
–4
R
P
dB OVER dB
0
+4
–10
–20
–30
–40
–60
+2
0
–2
–4
R
P
dB OVER dB
0
+4
–10
–20
–30
–40
–60
+2
0
–2
–4
5 [PHONES] headphone level adjust control
–10
–20
–30
–40
–60
Adjusts signal level output from the [PHONES]
jack.
12
POWER
COMPONENT DIGITAL
TOP
PREROLL
USER
VIDEO
AUDIO
STAND BY
REW
STOP
FF
SERVO/SYS
TIME CODE
ON SCREEN
OTHERS
0
CH3
–20
–2
–30
–40
–4
0
–20
–2
–30
–40
–4
–60
CH2
CH1
R
P
dB OVER dB
0
+4
–10
+2
0
–2
–4
–60
525
625
CTL TC UB DF SERVO CF GEN 16:9 AP
AUTO OFF P.READ V.VAR PB/EE REMOTE
REC
CH3
COUNTER
CONDITION
MENU
RESET
VCON
REMOTE
HOLD
PB
PB/EE
VAR
SEARCH
PLAYER RECORDER
SET
P.PLAY
STILL
M
H
ASSEM
VIDEO
DA1
S
DA2
DA3
F
DA4
EJECT
REC
PLAY
PAUSE/STILL
X1
TRACKING
METER MODE
PLAY
ENTRY
OUT
CANCEL PREVIEW
TRACKING
SHIFT
REVIEW
INSERT
AUTO EDIT
TC
TOP
PREROLL
USER
VIDEO
AUDIO
STAND BY
REW
STOP
FF
SERVO/SYS
TIME CODE
ON SCREEN
OTHERS
0
!
@
䡲 [TRACKING] tracking meter mode button
● Press this button to switch between CH-4 audio
level meter and tracking meter.
This button lights or blinks when the tracking
meter is selected. Blinking indicates that auto
tracking is OFF. (When setting menu switch No.
005 <AUTO TRACKING> to “OFF”)
䡲 [FINE] fine meter mode button
● Press this button to change the display
accuracy of the audio level meter.
When the [FINE] indicator is illuminated, the
meter display is in Fine mode. More precise
level adjustment is possible in this mode.
[TRACKING] adjust knob
Manually adjusts tracking during playback.
After setting the [CH4/TRACKING] meter to
Tracking Display mode with the [TRACKING
METER MODE] button, adjust this knob until the
meter swings to the maximum level.
* To manually adjust tracking, set menu switch
No. 005 <AUTO TRACKING> to “OFF (0)”.
[SEARCH] button
● Starts search at the search speed set by the
search dial.
● In the Menu Switch Setting mode, the menu
switch setting can be changed by turning the
jog dial while keeping this button pressed.
● During time code presetting, preset data can be
changed by turning the jog dial while keeping
this button pressed.
● Use this button to change the fixed time cue up
data or the video control adjust parameters.
[VAR/P.PLAY] button
● To engage the Variable mode, press this button.
The button will light when the Variable mode is
engaged. In this mode, you can use the search
dial to control slow-motion playback speed.
#
PULL
RELEASE
#
FWD
REV
11
9 [METER MODE] buttons
8 [REC] audio recording level adjust knobs
Adjust the recording level for each channel (CH1
to CH4). To adjust the audio recording level, pull
out the audio level adjust knobs. Turn clockwise
to increase the level and counterclockwise to
lower it.
When audio level adjust knobs are pushed in, the
Unity mode is engaged. Turning the knobs in this
mode has no effect on the audio level.
There are two ways to adjust recording levels:
One way is to independently adjust recording
levels for each channel (CH1 to CH4 channels);
the other is to use the CH1 or CH3 adjust knob as
a master volume control and the CH2 or CH4
knob as a balance control. You can select the
method you prefer with menu switch No. 215
<AUD REC VOLUME MODE1>.
O
UB
–20
–30
–40
–60
CH4
FINE
PULL
RELEASE
PULL
RELEASE
FWD
Adjust the playback level for each channel (CH1 to
CH4). To adjust the audio playback level, pull out
the audio level adjust knobs. Turn clockwise to
increase the level and counterclockwise to lower it.
When audio level adjust knobs are pushed in, the
Unity mode is engaged. Turning the knobs in this
mode has no effect on the audio level.
There are two ways to adjust playback levels:
One way is to independently adjust playback levels
for each channel (CH1 to CH4 channels); the other
is to use the CH1 or CH3 adjust knob as a master
volume control and the CH2 or CH4 knob as a
balance control. You can select the method you
prefer with menu switch No. 216 <AUD PB
VOLUME MODE1>.
I
OFF
12
CH4/TRACKING
R
P
dB OVER dB
0
+4
–10
+2
PULL FOR VARIABLE
REV
ON
X-1
7 [PLAY] audio playback level adjust knobs
S-VHS/VHS tapes cannot be used for either
recording or playback.
+2
CPN
IN
TC
Connect a set of headphones with a 6 mm-dia.
plug to listen to the audio channel selected with
the [AUDIO MONITOR] button.
2 Cassette loading slot
–10
–20
–30
–40
–60
6 [PHONES] jack
When power is ON, the counter display is
illuminated.
R
P
dB OVER dB
0
LINE
CH4
9 10
1 [POWER] switch
+4
AUTO EDIT
CH4
CH2
8
7
+2
INSERT
CH3
CH3
X1
PHONES
IN
METER MODE
BR-D95U
SIF
CH2
R
P
dB OVER dB
0
+4
–10
+2
PAUSE/STILL
TRACKING
5
CH4
CH3
CH2
CH1
–2
F
DA4
CH2
R
P
dB OVER dB
0
+4
–10
+2
–4
–60
CH4
PULL FOR VARIABLE
AES/EBU CH1
L
ANALOG CH1
R
0
STILL
–30
–40
–4
CH1
Variable Motion
UB
–20
–2
–60
CH3
AUDIO
MONITOR
VIDEO
INPUT
AUDIO INPUT / AUDIO MONITOR SELECT
SDI
PLAYER RECORDER
X-1
CH2
CH1
AUDIO
INPUT
22
23
24
Variable Motion
CH1
R
P
dB OVER dB
0
+4
–10
+2
17 16 15 14
VIDEO CASSETTE RECORDER
POWER
COMPONENT DIGITAL
18
BR-D95U
SIF
CH2
20 19
13
● Press this button while holding the [SHIFT]
button down. The button blinks and the Program
Play mode is engaged.
* Before engaging the Program Play mode,
engage the Still or Stop mode.
For details, refer to “Program Playback” on page
85.
Search/jog dials
Turn for search/jog operation.
The outer dial serves as a search control.
The inner dial serves as a jog control.
● During playback, turn the jog dial while holding
the [PLAY] button down to increase or decrease
the playback speed. Playback speed corresponds to the speed with which you turn the dial.
Turning the dial clockwise allows you to increase
playback speed to up to 2 times normal speed.
Turning it counterclockwise allows you to decrease playback speed until tape running stops.
If you stop turning the jog dial, normal playback
speed is restored.
● In the Variable mode, turn the outer search dial
for variable slow playback from -1x to +1x.
● When menu switch No. 301 <DIRECT
SEARCH> is set to “OFF”, hold the [PLAY]
button down and turn the search dial during play
to execute variable slow playback.
● In the Program Playback mode, hold the
[VAR/P.PLAY] button down and turn the inner
jog dial to set the initial speed for program
playback or to vary program playback speed.
● The jog dial is also used to select items when
setting the menu switches or to set data when
presetting the time code.
@
Caution
To use the search dial, first set it to the “STILL”
position (with power ON).
13
2 CONTROLS, CONNECTORS AND DISPLAYS
2 CONTROLS, CONNECTORS AND DISPLAYS
2-1 FRONT PANEL
2-1 FRONT PANEL
$ [PB PB/EE] button
%
^
&
*
(
)
Press to select the playback (PB) exclusive mode
or PB/EE auto switching mode. The selected mode
is shown by the indicators in the upper section of
the counter display. When the PB/EE Auto
Switching mode is engaged, set the VCR to the EE
mode with menu switch No. 314 <PB/EE MODE>.
[REMOTE] button
Press to select remote/local operation. When
remote operation is selected, “REMOTE” is shown
in the upper section of the counter display. In the
“REMOTE” mode, the unit can be operated via the
remote controller connected to the rear panel’s
[REMOTE IN (9P)] or [RS-232C] connector. On
the VCR itself, only the [STAND BY], [STOP] and
[EJECT] buttons will remain operable.
To operate the VCR locally, that is with its
operation buttons, press the [REMOTE] button so
that the “REMOTE” indicator goes out.
[VCON] button
Press to adjust the video/audio parameters.
Adjustable items are shown on the counter display.
Turn the jog dial while pressing the [SEARCH]
button to make adjustments.
You can adjust the video parameters by connecting
an optional video controller to the rear panel’s
[VIDEO CONTROL] connector. (See page 118.)
[RESET] button
Press to reset the CTL counter to “0:00:00:00”.
The time code and user bits cannot be reset.
When the edit points have been set, these
settings are canceled.
When setting the fixed time cue up, press this
button to reset the counter to “00:00:00:00”. For
details, refer to “Fixed Time Setting” on page 91.
[COUNTER] button
Press to switch the counter between CTL counter,
time code, or user bits display. Press this button while
pressing the [SHIFT] button to display user bits.The
selected counter display mode is shown by the
indicators in the upper section of the counter display.
CTL: CTL counter display
TC: Time code display
UB: User bits display
Input video signal button
Press to select input video signals. The selected
video signal is shown by the [VIDEO INPUT]
indicators.
SIF can only be selected when the optional
SA-D95U digital interface board is installed.
A menu switch is provided to prevent
misoperation. Refer to the menu switch setting for
No. 371 “INPUT SELECT SAFETY”.
[VIDEO INPUT] indicators
Show the type of video signal selected with the
input video signal switch.
SIF: Lights when serial video signal input (via rear
panel's [SERIAL V/A IN] connector) is
selected.
14
)
(
q
LINE: Lights when composite video signal input
(via rear panel's [COMPOSITE LINE IN]
connector) is selected.
CPN: Lights when component video signal input
(via rear panel's [COMPONENT IN]
connector) is selected.
All lit: All indicators light when the signal from the
internal signal generator is selected.
The type of signal can be selected with
menu switch No. 111 “REC SIGNAL
SELECT”.
Blinking: The indicator blinks if no signal is input or
if the wrong type of signal is input.
[AUDIO INPUT/AUDIO MONITOR SELECT]
indicators
Show whether the input or monitor audio signal is
selected. Press the [AUDIO INPUT] button or
[AUDIO MONITOR] button to switch between
the input or monitor indication.The channel
indicator blinks if the selected signal does not
conform to the standard.
Along with the input indication, the type of signal
(SDI, AES/EBU or ANALOG) is shown. With the
monitor indication, the audio channel (CH1, CH2,
CH3, or CH4) output to the monitor output L or R
channel is shown.The channels can be switched
with the audio signal select buttons. When
these three indicators (SDI, AES/EBU, ANALOG)
are lit simultaneously, audio signals (1 kHz sine
wave) from the built-in signal generator are
selected. The signals from the built-in signal
generator can be either 1 kHz audio signals or no
sound. This is selectable with menu switches
(No. 253 to No. 256).
When the input audio signal indication is selected,
these indicators blink if no SDI or AES/EBU signal
is input. SDI and AES/EBU can only be selected
when the optional SA-D95U digital interface board
is installed.
[AUDIO INPUT] button
Press to select the input audio signal for the
[AUDIO INPUT/AUDIO MONITOR SELECT]
indicators. The button illuminates when selected.
[AUDIO MONITOR] button
Press to select the monitor audio signal for the
[AUDIO INPUT/AUDIO MONITOR SELECT]
indicators. The button illuminates when selected.
Audio signal select buttons
Press to select the input audio signal or monitor
audio signal.
The selected audio signal is shown by the
[AUDIO INPUT/AUDIO MONITOR SELECT]
indicators.
r
e
r
25
VIDEO CASSETTE RECORDER
AUDIO
INPUT
VIDEO
INPUT
AUDIO INPUT / AUDIO MONITOR SELECT
CH1
SDI
AUDIO
MONITOR
AES/EBU CH1
L
ANALOG CH1
R
CH2
CH4
CH3
BR-D95U
POWER
SIF
CH2
CH3
CH4
LINE
CH2
CH3
CH4
CPN
COMPONENT DIGITAL
ON
I
OFF
O
Variable Motion
CH1
CH2
R
P
dB OVER dB
0
+4
–10
+2
R
P
dB OVER dB
0
+4
–10
+2
0
–20
–2
–30
–40
–4
0
CH3
–20
–2
–30
–40
–4
–60
0
–20
–2
–30
–40
–4
–60
12
CH4/TRACKING
R
P
dB OVER dB
0
+4
–10
+2
R
P
dB OVER dB
0
+4
–10
+2
0
–2
–4
–60
525
625
CTL TC UB DF SERVO CF GEN 16:9 AP
AUTO OFF P.READ V.VAR PB/EE REMOTE
CONDITION
COUNTER
RESET
VCON
REMOTE
MENU
SET
HOLD
PB
PB/EE
VAR
SEARCH
PLAYER RECORDER
27
UB
P.PLAY
–20
STILL
–30
–40
M
H
–60
ASSEM
VIDEO
DA1
IN
ENTRY
OUT
S
DA2
F
DA4
DA3
EJECT
PLAY
REC
PAUSE/STILL
X1
X-1
PHONES
CH1
CH2
REC
CH3
PULL FOR VARIABLE
CH4
TRACKING
METER MODE
FINE
PULL
RELEASE
PLAY
CANCEL PREVIEW
TRACKING
SHIFT
INSERT
AUTO EDIT
TC
PREROLL
REVIEW
USER
TOP
VIDEO
AUDIO
STAND BY
REW
STOP
FF
SERVO/SYS
TIME CODE
ON SCREEN
OTHERS
PULL
RELEASE
REV
FWD
w
e
w
28
q
29
t Setting buttons
䡲 [MENU] button
● Press this button to enter the Menu Switch
Setting mode.
Press this button again to switch back to the
Counter Display mode.
䡲 [SET] button
● Press this button to store menu switch setting
data in the VCR’s memory.
● Press this button to preset data in the time code
generator.
● Use this button to end video parameter
adjustment or to use the counter memory
function.
䡲 [HOLD] button
● Press this button to preset data in the time code
generator. To preset time code, the [COUNTER]
switch must be set at “TC”. To preset user bits, the
[COUNTER] switch must be set at “UB”.
* This button is effective only when the [INT/EXT]
switch on the time code setting section is set to
“INT” and the [PRESET/REGEN] switch is set
to “PRESET”.
26
y Operation buttons
● All buttons are illuminated when pressed.
● The labels printed under the operation buttons
indicate the menu items displayed when the
button is pressed in the Menu Switch Setting
(Direct Access) mode.
䡲 [EJECT] button
● Press to eject the cassette.
● TOP menu switch items are displayed when
this button is pressed in the Menu Switch
Setting mode.
䡲 [REC] button
● Engages the Record mode when pressed
together with the [PLAY] button.
● To monitor the EE picture during playback,
press and hold this button.
● Press this button in the Stop mode to check
preset data in the time code generator.
䡲 [PLAY] button
● Press to start playback. If pressed together with
the [REC] button, recording will start.
● Video menu switch items are displayed when
this button is pressed in the Menu Switch
Setting mode.
● When menu switch No. 301 <DIRECT
SEARCH> is set to “OFF”, hold this button
down and turn the search dial during play to
perform variable slow playback.
● By turning the jog dial while pressing this button
in the Play mode, you can vary playback speed
between 0 (Still) and +2 (double-speed) Refer
to “Simplified playback speed adjustment
function” on page 84.
● In the Program Playback mode, hold the
[VAR/P.PLAY] button down and press this
button to execute program playback.
@
15
2 CONTROLS, CONNECTORS AND DISPLAYS
2 CONTROLS, CONNECTORS AND DISPLAYS
2-1 FRONT PANEL
2-1 FRONT PANEL
䡲 [PAUSE/STILL]
● Engages the Pause mode when pressed during
recording. Press the [PLAY] button to resume
recording.
● Engages the Still mode when pressed in the
Play, Search or Stop (Standby On/Off) modes.
Press the [PLAY] button to resume playback.
● Audio menu switch items are displayed when
this button is pressed in the Menu Switch
Setting mode.
䡲 [STANDBY] button
● Switches the Standby mode between ON and
OFF in the Stop mode. The button is
illuminated in the Standby On mode.
● The head drum continues to rotate when the
Standby mode is on. This enables the unit to
quickly switch modes when another function is
engaged. The head drum does not rotate when
the Standby mode is off. This protects the
cassette tape and heads from damage.
● Servo and system menu switch items are
displayed when this button is pressed in the
Menu Switch Setting mode.
䡲 [REW] button
● Press this button to rewind the tape. The
maximum rewind speed during rewind can be
selected with menu switch No. 319 <FF/REW
MAX SPEED>.
● Output mode during rewinding can be selected
with menu switch No. 314 <PB/EE MODE>
(with the [PB PB/EE] button set to PB/EE Auto
Switching mode).
● Pressing this button together with the [PLAY]
button during playback slows playback speed
slightly to 0.93 times normal speed.
● Time code menu switch items are displayed
when this button is pressed in the Menu Switch
Setting mode.
䡲 [STOP] button
● Press this button to stop any operation. The
Output mode in this state can be selected with
[PB PB/EE] button.
● On-screen menu switch items are displayed
when this button is pressed in the Menu Switch
Setting mode.
䡲 [FF] button
● Press this button to fast-forward the tape. The
maximum fast-forward speed can be selected
with menu switch No. 319 <FF/REW MAX
SPEED>. The Output mode during fast-forward
can be selected with menu switch No. 314 <PB/
EE MODE> (with the [PB PB/EE] button set to
PB/EE Auto Switching mode).
16
u
i
o
● Pressing this button together with the [PLAY]
button during playback increases playback
speed slightly to 1.07 times normal speed.
● The drum hour meter is displayed when this
button is pressed in the Menu Switch Setting
mode.
Player/recorder select button
Selects the player or recorder in swap editing.
Press the [PLAYER] button to operate the player
and the [RECORDER] button to operate the
recorder. The button corresponding to the
selected unit will be illuminated.
(Refer to menu switch No. 372 <P+R AT SWAP
MODE> on page 58.)
Editing mode select buttons
Use to select assemble editing or insert editing
(VIDEO, DA-1 to DA4, TC). Set before preview or
actual editing.
[ASSEM] button: Press to execute assemble
editing. VIDEO, DA1 to DA4 and TC are all
recorded.
[INSERT] buttons: Press these buttons according
to the signal(s) you want to insert.
● A signal corresponding with an illuminated
button is “ON”. A signal corresponding with a
non-illuminated buttons is “OFF”.
● You cannot select both assemble and insert
editing. Pressing the [ASSEM] button
automatically switches OFF the [INSERT]
button and vice versa.
● Each of the [INSERT] buttons can be set to ON/
OFF during insert editing.
● The [DA1] to [DA4] audio insert buttons blink
when the audio edit IN point for the audio split
editing has been registered.
● The [ASSEM] button cannot be set to ON/OFF
during assemble editing.
[SHIFT] button
While pressing this button down, press the
[VAR/P.PLAY] button to start program playback.
While pressing this button, press the
[PREVIEW] button to execute the review
operation of editing.
While pressing this button, press the
[PREROLL] button to execute the fixed time cue
up operation. For details, refer to “Fixed Time
Cue Up” on page 91.
Press the [AUTO EDIT] button while pressing this
button to execute a “last edit”.
For other operation button combinations using the
[SHIFT] button, refer to “Operation button
combinations” on page 148.
@
Q
E
VIDEO CASSETTE RECORDER
AUDIO
INPUT
AUDIO
MONITOR
VIDEO
INPUT
AUDIO INPUT / AUDIO MONITOR SELECT
CH1
SDI
AES/EBU CH1
L
ANALOG CH1
R
CH2
CH4
CH3
BR-D95U
POWER
SIF
CH2
CH3
CH4
LINE
CH2
CH3
CH4
CPN
COMPONENT DIGITAL
ON
I
OFF
O
Variable Motion
CH1
CH2
R
P
dB OVER dB
0
+4
–10
+2
R
P
dB OVER dB
0
+4
–10
+2
0
–20
–2
–30
–40
–4
0
CH3
–20
–2
–30
–40
–4
–60
CH4/TRACKING
R
P
dB OVER dB
0
+4
–10
+2
0
–20
–2
–30
–40
–4
–60
R
P
dB OVER dB
0
+4
–10
+2
0
–2
–4
–60
525
625
CTL TC UB DF SERVO CF GEN 16:9 AP
AUTO OFF P.READ V.VAR PB/EE REMOTE
CONDITION
COUNTER
RESET
VCON
REMOTE
MENU
SET
HOLD
PB
PB/EE
VAR
SEARCH
PLAYER RECORDER
UB
P.PLAY
–20
STILL
–30
–40
M
H
–60
ASSEM
VIDEO
DA1
IN
ENTRY
OUT
S
DA2
DA3
F
DA4
EJECT
REC
PLAY
PAUSE/STILL
X1
X-1
PHONES
CH1
CH2
REC
CH3
PULL FOR VARIABLE
CH4
TRACKING
METER MODE
FINE
PULL
RELEASE
PLAY
CANCEL PREVIEW
TRACKING
SHIFT
INSERT
AUTO EDIT
REVIEW
30 31 32
p Edit point setting buttons
Use these buttons to register, erase, correct and
check edit points.
䡲 [IN] edit IN button
Use this button to enter the edit IN point and
show it on the counter display. Press this
button and the [OUT] button simultaneously to
display the duration of an edit. When the edit IN
point is entered, this button lights.
While pressing this button, turn the jog dial
clockwise to shift the IN point in the forward
direction or turn it counterclockwise to shift the
IN point in the reverse direction.
䡲 [ENTRY] button
Press this button while pressing the [IN] or
[OUT] button to enter the edit IN point or OUT
point.
䡲 [OUT] edit OUT button
Use this button to enter the edit OUT point and
show it on the counter display. Press this
button and the [IN] button simultaneously to
display the duration of an edit. When the edit
OUT point is entered, this button lights.
While pressing this button, turn the jog dial
clockwise to shift the OUT point in the forward
direction or turn it counterclockwise to shift the
OUT point in the reverse direction.
䡲 [CANCEL] button
Press this button while pressing the [IN] or
[OUT] button to cancel the edit IN or OUT point.
TC
PREROLL
USER
TOP
VIDEO
AUDIO
STAND BY
REW
STOP
FF
SERVO/SYS
TIME CODE
ON SCREEN
OTHERS
PULL
RELEASE
REV
FWD
33
Q [PREVIEW] button
Press to start editing rehearsal. this button will
light. During preview editing, you can press this
button again if you want to restart the preview. To
review an edit, press this button together with the
[SHIFT] button.
o
W [AUTO EDIT] button
Press to start auto editing. This button will light.
Press this button while pressing the [SHIFT]
button to execute a last edit.
E [PREROLL] button
Press this button when the tape is at the position
where you want recording to start after preroll.
The tape will be rewound from the point where
you press this button for the preroll duration set
with the menu switch No.320 “PREROLL TIME”.
During preroll operation, this button lights and
goes out when the preroll operation ends.
If an edit IN point has been already entered,
preroll is based on the edit IN point.
When this button is pressed in the Menu Switch
Setting mode, the menu switch items registered
for the user menu are shown.
17
2 CONTROLS, CONNECTORS AND DISPLAYS
2 CONTROLS, CONNECTORS AND DISPLAYS
2-2 SUB PANEL
2-3 REAR PANEL
The sub panel can be accessed by opening the operation panel. To open the operation panel, refer to the figure
below.
34
8
9
7
6
TIME CODE
IN
SERIAL V / A
OUT
1
AUDIO IN
AUDIO OUT
IN
CH1
CH1
OUT
CH2
CH2
L
CH3
CH3
R
CH4
CH4
VIDEO
COMPOSITE
RS-232C
REF
LINE IN
75
ON
TIME CDOE
DF
INT
FREE PRESET
EXT
REC
REGEN
OFF
8
ON
OFF
2
NDF
RF
HID
SERVICE USE ONLY
GND
ON
CF
36
OFF
4
(625) ON SCREEN
REMOTE IN (9P)
AES / EBU
IN
CH1/2
OUT
CH1/2
REMOTE OUT (9P)
CH3/4
CH3/4
VIDEO CONTROL
Y
Y
R-Y
R-Y
B-Y
LINE1
LINE2
B-Y
SUPER
IN
OUT
COMPONENT
37
38
OUT
COMPOSITE
35
AUDIO MONITOR
R [TIME CODE] switches
䡲 [DF/NDF] drop frame/non-drop frame mode
switch (NTSC only)
● To set the time code drop frame/non-drop
frame.
* Effective only when the [INT/EXT] switch is set
to “INT” and the [PRESET] switch is set to
“PRESET”.
DF: To write the time code in the Drop Frame
mode. The [DF] indicator lights on the
counter display.
NDF: To write the time code in the Non-drop
Frame mode.
䡲 [INT/EXT] time code select switch
● To select internal or external time code
generation.
INT: To use the internal time code generator.
EXT: To use an external time code generator.
䡲 REC/FREE Run mode select switch
● To select one of two Run modes available with
the internal time code generator.
* Effective only when the [PRESET/REGEN]
switch is set to “PRESET” and the [INT/EXT]
switch to “INT”.
REC: Time code runs only during recording.
FREE: Time code runs in real time regardless of
the VCR’s operating mode. Select this
position for editing.
䡲 PRESET/REGEN select switch
● To select the Internal Time Code Generator
mode.
* Effective only when the [INT/EXT] switch is set
to “INT”.
PRESET: Select this mode to preset time code
data.
REGEN: Select this mode when using the internal
time code generator in sync with a
playback time code signal.
T [CF] color frame servo switches
Use to switch the color frame servo ON/OFF.
● For the PAL signal system, select the 4 or 8
field color frame servo with the [4/8] switch on
the side.
18
● For the NTSC signal system, the [4/8] switch is
disabled.
* To set the color frame servo with these
switches, set menu switch No. 008 <CAP
LOCK> to “SW SEL”. (See page 105)
Y [ON SCREEN] select switch
Use to switch the on-screen menu ON/OFF. The
on-screen information is output from the [LINE-2
SUPER] connector.
* If menu switch No. 513 <EDIT ON SCREEN> is
set to “ON”, you cannot turn the on-screen
display off. (See page 24)
U Service connectors
1
2
3
1 [AC IN] socket
6 [TIME CODE IN] connector ... XLR
2 [SIGNAL GND] ground terminal
7
Connect to an AC power outlet via the provided
power cable.
● When usage voltage is 120 V or less; use the
A-type (flat-pin type) power cable.
● When usage voltage is 127 V or over; use the
C-type (round-pin type) power cable.
This terminal is a GND for signals among unit.
[RF] ... RF test signal output connector
[HID] ... Trigger signal output connector
[G] ... Ground connector
I [SERVICE USE ONLY] connector
Used to diagnose malfunctions and for other
service procedures.
How to open the operation panel
● Lift the bottom edge of the panel to open it.
The operation panel can be locked in 6 steps in
the range of 0 to 90˚.
3 [AES/EBU IN] connector .... BNC x 2
Accepts digital audio interface standard (AES/
EBU) digital audio signals.
These signals cannot be input if the optional
SA-D95U digital interface board is not installed.
Always input external sync signals when inputting
digital signals. Both video and audio must be
synchronized with the external sync signal.
When the serial digital inputs and outputs of
several VCRs are connected in series, do not
input the same signal to each VCR as they
may not be input correctly. Digital audio
signals, in particular, will not be input correctly
to the next VCR in the series.
4 [Y.R-Y.B-Y IN] component signal input
Lock release lever
Lock release lever
● To return the panel to its original position, pull the
lock release levers in the direction shown by the
arrows and push down the panel.
5
4
connector .... BNC x 3
● Accepts component video signals.
Set menu switch No. 104 <CPN LEV./SETUP
(525)> to select MII (LOW), Bcam (HIGH) and
the presence of setup signals (NTSC only).
The default setting is Bcam with setup.
5 [AUDIO IN] connector .... XLR x 4
● Accepts analog audio signals.
● Set the input level with menu switches No. 224
to 227 <AUDIO IN LEVEL>. The factory setting
is +4 dB.
8
9
● Accepts external LTC time code signals
conforming to the SMPTE/EBU standard.
Connect this connector to an external time code
generator. A signal containing a large amount of
jitter cannot be used for LTC time code. Be
sure to use a regenerated signal (stable signal
matched with the phase of video signals).
[REF IN] external sync signal input connector/
75 terminating switch (loop-through) .... BNC
● Accepts external reference sync signals.
Because of its loop-through design, this
connector can distribute signals to other units
through the opposite terminal. Set the
terminating switch to OFF when distributing
signals. If signal distribution is not desired or is
terminated at this unit, set the switch to ON.
● Does not accept signals with an input level over
1 Vp-p.
* When setting up an editing system, input a
black burst or standard color signal to
this unit. The [GEN] indicator will light.
[COMPOSITE IN] connectors
[LINE IN] video line input connector ...BNC
● Accepts composite video signals.
Input composite signals passed through the
TBC.
[SERIAL V/A IN] connectors ... BNC
● Accepts serial video/audio signals. The lower
connector is an active loop through connector.
If the VCR is not turned on, no signal will be output.
Serial signals cannot be input if the optional
SA-D95U digital interface board is not installed.
Always input external sync signals when inputting
digital signals. Both video and audio must be
synchronized with the external sync signal.
19
2 CONTROLS, CONNECTORS AND DISPLAYS
2 CONTROLS, CONNECTORS AND DISPLAYS
2-3 REAR PANEL
2-4 COUNTER DISPLAY
16
17
14
15
2
1
TIME CODE
SERIAL V / A
OUT
IN
1
COMPOSITE
RS-232C
AUDIO OUT
AUDIO IN
IN
CH1
CH1
OUT
CH2
CH2
Tape counter
CTL
REF
LINE IN
CONDITION
[SHIFT]+[COUNTER]
buttons
75
ON
OFF
2
REMOTE IN (9P)
AES / EBU
IN
CH1/2
CH3/4
OUT
CH1/2
Y
Y
R-Y
R-Y
LINE1
B-Y
B-Y
LINE2
M
H
S
F
UB
VIDEO CONTROL
OUT
COMPONENT
L
CH3
OUT
COMPOSITE
CH4
CH4
M
H
connector ... BNC x 3
● Outputs the component video signal.
Set menu switch No. 104 <CPN LEV./SETUP
(525)> to select MII (LOW), Bcam (HIGH) and
the presence of setup signals (NTSC only).
The default setting is Bcam with setup.
@ [COMPOSITE OUT] connectors
[LINE 1] connector
Outputs composite video signals.
[LINE 2 - SUPER] connector
Outputs composite video signals. When the
[ON SCREEN] switch on the sub panel is set
to “ON”, the time counter indication, operating
mode, etc. is superimposed on the screen
image. The menu switch items are shown in the
Menu Switch Setting mode.
Adjustment parameters and current settings are
displayed on screen when the video parameters
are being adjusted.
# [AUDIO MONITOR] connectors
● Outputs the audio signal selected with the front
panel's [AUDIO MONITOR] button and audio
signal select buttons.
● The output level can be set with menu switches
No. 232 to 233 <AUDIO MON LEVEL>. Factory
setting is +4 dB.
r
20
11
12
S
S
F
[COUNTER]
button
or
[SHIFT]+[COUNTER]
buttons
CONDITION
AUDIO MONITOR
! [Y.R-Y.B-Y. OUT] component signal output
F
Jog dial
M
H
Time code
TC
● Outputs digital audio interface standard (AES/
EBU) digital audio signals.
Digital signals cannot be output if the optional
SA-D95U digital interface board is not installed.
S
CONDITION
CH3
[COUNTER] button
R
0 [AES/EBU OUT] connector ... BNC x 2
M
SUPER
IN
10
H
User bits
REMOTE OUT (9P)
CH3/4
Menu setting display
[MENU]
button
VIDEO
F
3
13
H
$ [AUDIO OUT] connectors
● Output analog audio signals.
● The output level can be set with menu switches
No. 228 to 231 <AUDIO OUT LEVEL>. Factory
setting is +4 dB.
Hour meter display
S
F
When the VCR malfunctions
[VCON] button
4
M
5
Video control display
Warning display
% [TIME CODE OUT] connector ... XLR
● Outputs a time code signal to the external time
code generator. LTC time code conforming to
the SMPTE/EBU standard can be output.
Outputs a time code signal during search if menu
switch No. 452 <SEARCH LTC> is set to ON (1).
^ Control connectors
[RS-232C] connector ... D-Sub 9-pin
Connect equipment conforming to the RS-232C
interface standard such as a personal computer.
[REMOTE IN (9P)] connector ... D-Sub 9-pin
Connect an RS-422 serial editing remote control
unit.
[REMOTE OUT (9P)] connector ... D-Sub 9-pin
Connect a VCR with RS-422 serial interface.
Connect to the other VCR’s [REMOTE IN]
connector to operate it from this VCR.
[VIDEO CONTROL] connector ... D-Sub 15-pin
Use to adjust the built-in TBC from an optional
video remote controller (Sony's BVR-50).
& [SERIAL V/A OUT] connector ... BNC x 2
Outputs serial video/audio signals. When menu
switch No. 237 <EMBEDDED AUDIO> is set to
“OFF”, digital audio signals are not output.
When connecting to a VCR which is not equipped
to handle EMBEDDED AUDIO, set to “OFF”.
No signals are output if the optional SA-D95U
digital interface board is not installed.
H
M
S
F
H
M
1. Tape counter display
The display usually serves as a tape time counter
(hours, minutes, seconds, frames). CTL counter,
time code or user bits can be selected with the
front panel [COUNTER] switch. “NO TAPE” is
displayed if a cassette has not been loaded.
● The Menu Switch Setting mode is entered when
the [MENU] button is pressed.
How to reset the CTL counter
● Pressing the [RESET] button resets the CTL
counter to “0:00:00:00”. Time codes and user
bits cannot be reset.
● The CTL counter is also reset to “0:00:00:00”
when the cassette is ejected.
S
F
3. Hour meter data display
Hour meter data (drum operation time) can be
displayed in the Menu Switch Setting mode. For
details, refer to “Hour meter data display” on
page 39.
4. Video/audio control display.
Shows video and audio control adjustment items.
Select with the jog dial. Pressing the [VCON]
button restores the Tape Counter Display mode.
5. Warning code display
If a malfunction occurs, the corresponding warning
code is automatically displayed. For details, refer
to “Warnings with Indicators” on page 145.
2. Menu switch setting display
To select menu functions and perform menu
switch setting.
Menu functions and menu switch items can be
changed with the jog dial. See page 31 “Menu
Switch Setting” for details.
● The counter display shows symbols and
numbers.
● Pressing the [MENU] button restores the Tape
Counter Display mode.
21
2 CONTROLS, CONNECTORS AND DISPLAYS
2 CONTROLS, CONNECTORS AND DISPLAYS
2-4 COUNTER DISPLAY
2-5 ON-SCREEN DISPLAY
Indicator section
1. Tape counter display, etc.
CTL TC UB DF SERVO CF GEN 16:9 AP
AUTO OFF P.READ V.VAR PB/EE REMOTE
525
625
On-screen display
CONDITION
On-screen information is available only via the rear
panel [LINE 2 - SUPER OUT] connector.
Video/audio control display
[VCON] button
H
Indication
CTL
TC
UB
DF
SERVO
CF
GEN
(Blinking) GEN
M
S
F
Meaning when lit
The CTL counter is shown.
The time code is shown.
The user bits are shown.
The CTL counter or time code is in the
drop-frame mode. (525)
Servo is stable.
The color frame servo is set. This
indication lights during recording. When
the [CF] switch is ON and a tape with color
frame information is played back, this
indication also lights.
When the PLAYER is selected during
SWAP editing, the [CF] indication does not
light.
Signals are input to the [REF] connector.
The input digital audio signals cannot be
recorded correctly because no external
sync signal is input.
16:9
AP
Wide aspect ID signal is being played back.
A non-D-9 tape is played back.
AUTO OFF
P. READ
V. VAR
PB/EE
A malfunction or abnormality has occurred.
The VCR is in the Pre-read mode.
The video parameters can be adjusted.
The PB/EE Auto Switching mode is
selected.
The PB mode is selected.
The VCR is in the Remote mode.
PB
REMOTE
CONDITION
(Blinking)
Channel condition is normal.
Minor errors.
Major errors. Normal playback is not
possible.
Tracking is not correct.
Video signal system
4 525
The NTSC signal system is set.
4 625
The PAL signal system is set.
The video signal system can be set with menu switch No. D95
<525/625> (on the top menu). After selecting the video signal
system, turn this unit OFF then ON again to switch to the
selected video signal system.
* For adjustment of each item, refer to
“Video control adjustment” on page 118.
The following error messages may be
displayed during swap editing.
Indication
Meaning
PLAY
R: TCR 00:00:00:01
Player/recorder
TC read-out mode
indication
Menu switch No. 504 <INFORMATION SELECT>
Local
The player’s Local/
Remote is set to “Local”.
No Tape
No cassette is loaded in
the VCR.
Bump Error Bump error occurs.
No Edit Cmd The edit mode is not
selected.
Dur = 0
Duration is set to 0.
Servo Error Servo error occurs.
Split No A.
The audio insert mode is
not selected.
Rec Inh
Recording is not possible
on this cassette.
IN/OUT Rev The IN and OUT points
are reversed in terms of
the timeline.
Over 300%
Tape speed is more than
3x.
Over -200% Reverse tape speed is
more than -2x.
VTR No Play The VCR will not
function.During editing,
the VCR stops.
AuCondition Editing was interrupted
because of audio
conditions deteriorated.
NO CTL
Stops the operation when
insert editing is executed
in a non-recorded
section.
SUB read-out mode
Operation mode
STOP
SUB TCR 00:00:00:00
TCR 00:00:00:00
Sub time code
Counter
Counter mode
Counter mode
CTL
TCR
TC1
TC2
:
:
:
:
TCR•
TCG
UBR
UBG
LTC
:
:
:
:
:
CTL data
Time code reader data
Time code reader data (when the first field is played back)*
Time code reader data (when the second field is played
back)*
CTL interpolation mode
Time code generator data
User bits reader data
User bits generator data
LTC data
* Shown when the tape speed is less than ±0.3x.
Player/recorder indication
When the editing screen display is not shown during swap editing,
this indicates which VCR's data is currently displayed on the tape
counter.
P:When the player is selected (SUBTC is not shown)
R:When the recorder or both the recorder and player are selected.
Drop-frame display (NTSC only)
In recording or playback in the Drop-frame
mode, the counter display is as shown below.
TCR 00:00:00·00
Drop frame indication
2. Menu setting display
002:OPERATION LOCK
003:SYNC SELECT
OFF
3. Hour meter data display
DH:DRUM HOUR METER
0002
AUTO
005:AUTO TRACKING
●
Press the [STOP] button to release
error display indications.
● “No Tape” indication goes out when a
cassette tape is loaded.
ON
008:CAP LOCK(525)
SW SEL
009:CAP RE-LOCKING DIR.
ACCELERATION
4. Warning display
5. Tape remaining time display
WARNING 02 1
* During swap editing, player information is shown only by the
indicators in the
section when the player is selected. The [AUTO
OFF] indicator always shows recorder information.
22
CONDENSATION ON DRUM
E
F
CTL
PLAY
0:00:00:00
1. Tape counter display
● Shows data when the [ON SCREEN] switch on
the sub panel is set to ON.
● You can choose what information is shown with
menu switch No. 504 <INFORMATION
SELECT>.
Only time data is displayed when “TIME (0)” is
selected.
Both time data and VCR operation mode are
displayed when “TIME & MODE (1)” is selected.
● The display position can be shifted horizontally
with menu switch No. 501 <CHARA
H.POSITION> and vertically with No. 502
<CHARA V.POSITION>.
● Set the [ON SCREEN] switch on the sub panel
to OFF to turn off the on-screen display.
* If menu switch No. 513 <EDIT ON SCREEN>
is set to “ON”, you cannot turn the on-screen
display off.
● When menu switch No. 504 <INFORMATION
SELECT> is set to “TIME + SUB TC” or “TIME +
SUB TC + MODE”, sub time code information is
shown simultaneously on a different line.
2. Menu switch setting display
Press the [MENU] button to call up the menu
setting display on screen.
● Select a menu item by turning the jog dial. For
details, refer to “Menu switch setting” on
page 31.
● Pressing the [MENU] button restores the normal
display.
3. Hour meter data display
Hour meter data can be displayed in the Menu
Switch Setting mode. For details, refer to “Hour
meter data display” on page 39.
4. Warning code display
If a malfunction occurs, the corresponding warning
code is automatically displayed.
For details, refer to “Warnings with Indicators” on
page 145.
5. Tape remaining time display
When menu switch No. 505 <REMAIN ENABLE>
is set to “ENABLE(1)”, tape remaining time is
shown in 6 steps.
EF
F
E
F
E
F
E
E (blinking)F
E (blinking) F
No indication
Remaining time of 15 minutes or more
Remaining time of less than 15 minutes
Remaining time of less than10 minutes
Remaining time of less than 5 minutes
Remaining time of less than 2 minutes
Remaining time of less than 1 minutes
The remaining time is being calculated.
23
3 CONNECTIONS
2 CONTROLS, CONNECTORS AND DISPLAYS
2-5 ON-SCREEN DISPLAY
Operation mode display in the Variablemotion mode
3-1 INPUT CONNECTIONS
Player operation mode
-0:00:00:01
Noiseless slow-motion playback is available at
speeds of -1.0 to +1.0 times normal.
● Variable-motion playback at speeds outside this range
(from -1.0 times to +1.0 times) results in a distorted
picture.
● When variable-motion playback is performed at speeds
outside the range from -1.0 times to +1.0 times, “!”
appears with the operation mode on the on-screen
display.
Recorder operation mode
V•A1•A2•A3•A4•TC
P:STOP
R:SHTL STIL
CTL
E
F
CTL
-0:00:51:03
0:01:48:00
P
IN '
0:01:48:00
SPLIT
0:01:31:04
- :15:01 OUT
R
0:00:00:00
IN '
DUR.
:43:04 OUT'
0:00:43:04
+030
P
R
R
IN
OUT
Tape remain
Recorder current time
REMOTE IN (9P)
AES / EBU
Recorder edit point
Edit point registration
indications:
Show edit points
registered by pressing
the [ENTRY] button.
CH1
CH1
OUT
CH2
CH2
L
CH3
CH3
R
CH4
CH4
REF
LINE IN
75
ON
Y
Y
R-Y
R-Y
LINE1
IN
CH1/2
OUT
CH1/2
REMOTE OUT (9P)
CH3/4
CH3/4
VIDEO CONTROL
B-Y
B-Y
LINE2
SUPER
IN
OUT
COMPONENT
OUT
COMPOSITE
Variable mode
tape speed
AUDIO MONITOR
● Tape remain is shown when the remaining time is less
than 25 minutes (approx.).
● This display automatically appears whenever an editingrelated button is pressed (such as selecting the edit mode).
(With menu switch No. 513 <EDIT ON SCREEN> set to
“ON”)
● When menu switch No. 513 <EDIT ON SCREEN> is set
to “ON”, press the [STANDBY] + [SHIFT] to switch the
edit screen ON/OFF.
MUTING display
CONDITION ALARM display
● This unit outputs black signals from the built-in
signal generator via the <LINE 2 - SUPER OUT>
connector.
If video head output (error rate) is degraded during
playback, the “CONDITION ALARM” is shown on
screen.
MUTING
AUDIO OUT
AUDIO IN
IN
VIDEO
COMPOSITE
RS-232C
OFF
To display MUTING/CONDITION ALARM on screen, set menu switch No. 512 <MUTING/ALARM MESSAGE>
to “ON (1)”.
This can also be displayed even when setting the [ON SCREEN] switch on the sub panel to OFF.
Monitor screen
SERIAL V / A
OUT
1
2
The “MUTING” or “CONDITION ALARM” can be shown on screen to make it easy to check VCR operating status
on the monitor connected to the [LINE 2- SUPER OUT] connector.
● When the input signal is a black signal or when a
tape on which a black signal is recorded is played
back, the monitor’s screen will be black.
To differentiate between the types of black screen
described above, “MUTING” appears on the screen
when the black screen is due to black signals output
from the built-in signal generator.
IN
Player edit point
MUTING/CONDITION ALARM display
• In Record or EE mode:
When no video signal is input or input signals do not
contain a sync signal
• In Play mode:
When there are no recorded signals (no control signal
recorded) on the tape being played back (With menu
switch No. 120 <NO CTL MUTING> set to “ON”)
[TIME CODE IN]
[REF]
TIME CODE
Player
current time
Audio
sprit time
Duration
CTL
[COMPOSITE IN]
Editing mode
Operation mode
● -1.0 times slow-motion
playback: VAR -1.0
● -1.5 times slow-motion
playback: !VAR -1.5
[SERIAL V/A IN]
Editing screen display
Monitor screen
CONDITION ALARM
[AES/EBU IN]
[COMPONENT IN]
[SERIAL V/A IN]
Install the optional SA-D95U digital interface board to
input signals to this connector.
[AUDIO IN]
Set the audio input reference level with menu
switches No. 224 to 227 <AUDIO IN LEVEL>.
Digital signal synchronization
The input digital signal must be synchronized with the
video signals. To do this, input sync signals to the
digital signal output unit and the [REF] connector of
this unit.
Reference sync signal
[COMPONENT IN]
Accepts component video signals.
[AES/EBU IN]
Install the optional SA-D95U digital interface board to
input signals to this connector.
[TIME CODE IN]
To record the time code input from this connector, set
the [INT/EXT] switch on the sub panel to “EXT” and
menu switch No. 409 <EXT REGEN TC> to “LTC”.
The servo system of this unit automatically selects
the reference signal as shown in the table below
depending on the setting of the menu switch and the
operation.
Setting of menu
switch N. 003
<SYNC SELECT> Operation
AUTO
(Menu switch No. 512 <MUTING/ALARM MESSAGE> set to “ON
(1)”)
● When the “CONDITION ALARM” is displayed,
perform manual tracking adjustment or cleaning
with the dedicated head cleaning tape.
Error rate degradation can also be checked with
the [CHANNEL CONDITION] indicator on the
front panel (refer to page 22).
[AUDIO IN]
EXT
Input sync signal
Video input [REF] input
Recording
Playback
r
r
Recording
r
R
Playback
r
R : Synchronizes (highest priority)
r : Synchronizes.
: Does not synchronize.
• If video input and [REF] input are not available,
internal sync is performed.
(Menu switch No. 512 <MUTING/ALARM MESSAGE> set to “ON (1)”)
24
25
3 CONNECTIONS
3 CONNECTIONS
3-2 OUTPUT CONNECTIONS
3-3 CONTROL SYSTEM CONNECTIONS
[SERIAL V/A OUT]
[RS-232C]
[TIME CODE OUT]
[REMOTE IN (9P)]
TIME CODE
IN
IN
SERIAL V / A
OUT
1
TIME CODE
AUDIO OUT
AUDIO IN
CH1
CH1
VIDEO
COMPOSITE
RS-232C
IN
REF
LINE IN
75
ON
SERIAL V / A
OUT
1
REMOTE IN (9P)
AES / EBU
IN
CH1/2
OUT
CH1/2
CH3/4
CH3/4
Y
R-Y
R-Y
LINE1
B-Y
B-Y
LINE2
CH2
CH2
2
L
CH3
IN
CH1/2
OUT
CH1/2
REMOTE OUT (9P)
CH3/4
CH3/4
VIDEO CONTROL
CH3
SUPER
IN
OUT
COMPONENT
REMOTE IN (9P)
AES / EBU
REMOTE OUT (9P)
VIDEO CONTROL
Y
Y
R-Y
R-Y
LINE1
B-Y
B-Y
LINE2
OUT
CH2
CH2
L
CH3
CH3
R
CH4
CH4
SUPER
IN
OUT
COMPONENT
COMPOSITE
R
CH4
OUT
OUT
COMPOSITE
CH4
AUDIO MONITOR
AUDIO MONITOR
[COMPONENT OUT]
[AES/EBU OUT]
CH1
75
ON
OFF
OUT
Y
AUDIO OUT
CH1
REF
LINE IN
OFF
2
AUDIO IN
IN
VIDEO
COMPOSITE
RS-232C
[VIDEO CONTROL]
[COMPOSITE OUT]
[REMOTE OUT (9P)]
[AUDIO OUT]
[AUDIO MONITOR]
[SERIAL V/A OUT]
Install the optional SA-D95U digital interface board to
output signals from this connector.
● All video parameter settings except SCH phase can
be adjusted. (See page 119.)
[COMPONENT OUT]
Set the component output level with menu switch No.
104 <COMPONENT LEVEL>.
● All video parameter settings except SCH phase can
be adjusted. (See page 119.)
[AUDIO OUT]
Set the audio output reference level with menu
switches No. 228 to 231 <AUDIO OUT LEVEL>.
[AES/EBU OUT]
Install the optional SA-D95U digital interface board to
output signals from this connector.
[TIME CODE OUT]
Select the time code output method during search
with menu switch No. 452 <SEARCH LTC>.
[AUDIO MONITOR]
Set the audio output reference level with menu
switches No. 232 and 233 <AUDIO MON LEVEL>.
[COMPOSITE OUT]
● On-screen data is output only to the [LINE 2 SUPER] connector.
● Select the main time code or sub time code to
output VITC with menu switch No. 451 <VITC OUT
SELECT>.
● Video parameters can be adjusted. (See page 119.)
26
[REMOTE IN (9P)]
Connect an editing control for the RS-422 serial
interface.
Editing controller menu setting switches are available.
Menu switch No. 359 <JOG FEELING>
Menu switch No. 363 <CONTROLLER SELECT>
To control more than one VCR at the same time, set
menu switch No. 369 <PARA-RUN> to “ON”.
[RS-232C]
Connect to an RS-232C interface in a personal
computer or other control unit.
[REMOTE OUT (9P)]
Connect another VCR with an RS-422 interface. You
will be able to control the other VCR from this unit.
To control more than one VCR at the same time,
connect this connector to a [REMOTE IN] connector
of the subsequent VCR.
Editing remote control connection
● Set the editing timing to -7 frames from the editing
remote control.
● The preroll time should be set to 5 seconds or
more.
● When using the RM-G820U or RM-G870U editing
remote controller, execute the editing controller's
learn function before operating. Otherwise, the
number of retries will be increased.
● When the RM-G820 remote controller is connected
to this unit, set the menu switch No. 317 < 9PIN
DEVICE ID > to “JVC D80”. The remote controller’s
edit timing is automatically set to -7 frames.
[VIDEO CONTROL]
Connect an optional TBC remote control to operate
the built-in TBC video controls. The RM-G22U
cannot be connected.
When adjusting with a video controller, press the
[VCON] button to select “Remote” and activate the
settings. (Refer to “EDITING SYSTEM PHASE
ADJUSTMENT” on page 117.)
27
4 MENU SWITCH SETTING
4 MENU SWITCH SETTING
Besides the physical switches on the unit, a selection of MENU switches are provided. These can be displayed on
the counter display or a connected monitor. Data set in the MENU switches are stored in the VCR’s built-in
nonvolatile memory and are not erased even when the main power is turned off.
Also available on the top menu display are the following convenient functions for menu switch setting.
● Storing and calling up the current menu switch setting
● Restoring the menu switches to the factory setting
● Calling up the Direct Access group of menu switches which are clustered by function (Direct Access facility)
● Erasing all registered contents on the User Page (User Page facility)
● Menu lock function
4-1 MENU DISPLAY MODES
[Counter display]
Usual display
Usual display
H
M
S
F
CTL 1:23:45:20
1 Top menu display
[MENU] button
MENU
Top menu display
MENU
D95:525/625
SET+HOLD[POWER OFF>525
00A:MENU SETTING
SET+HOLD INITIAL
00B:DIRECT ACCESS
SET+HOLD>ON
00C:USER PAGE
SET+HOLD>INITIAL
00D:MENU LOCK
SET+HOLD>OFF
H
M
S
F
Jog dial
Jog dial
Menu switch setting display
002:OPERATION LOCK
OFF
003:SYNC SELECT
AUTO
H
M
S
F
H
M
S
F
H
M
S
F
005:AUTO TRACKING
MENU
ON
008:CAP LOCK(525)
Jog dial
SW SEL
009:CAP RE-LOCKING DIR.
ACCELERATION
Hour meter data display
Jog dial
DH:DRUM HOUR METER
0600H
MENU
Jog dial
User page display
U01 :(FOR USER)
U02 :(FOR USER)
U03 :(FOR USER)
MENU
U04 :(FOR USER)
U05 :(FOR USER)
28
The menu display consists of four types of display
modes.
● Press the [MENU] button to call up the menu screen.
The menu switch Nos. are shown on the counter
display. The selected menu switch No. blinks on the
on-screen display.
● Turn the jog dial to call up all four modes one after
another.
● Press the [MENU] button to restore the usual
display.
To select desired menu functions.
● D95: 525/625
Set the video signal system to NTSC or PAL.
525: NTSC signals
625: PAL signals
For details, refer to “4-2 VIDEO SIGNAL SYSTEM
SELECTION” on page 30.
● 00A: MENU SETTING
• INITIAL(0)
: Set the MENU switches to
the factory settings.
• USER-1 LOAD (1) : Set the MENU switches to
USER-2 LOAD (3) the stored settings in the
USER-3 LOAD (5) user memory area.
• USER-1 SAVE (2) : To store the current menu
USER-2 SAVE (4) switch setting in the user
USER-3 SAVE (6) memory area.
For details, refer to “4-4 Saving and Calling Up
Menu Switch Settings” on page 32.
● 00B DIRECT ACCESS (Direct Access facility)
With this switch set to ON (1), one-touch direct
access to a functionally-related group of MENU
switches such as SERVO and VIDEO or to the hour
meter data or the Menu switches on user page is
available simply by pressing the specified button on
the control panel.
For details, refer to “4-5 Calling Up Functional
Menu Switch (Direct Access Functions)” on
page 33.
● 00C USER PAGE (user page facility)
Erases all registered menu switch settings. To do
this, select this menu function and press the SET
and [HOLD] buttons simultaneously.
● 00D MENU LOCK function (menu lock facility)
Locks or unlocks menu switch settings.
OFF (0) : Settings can be changed.
ON (1) : Locking function is activated and menu
switch settings (except for the top menu)
cannot be changed.
4-1 MENU DISPLAY MODES
● 00E OPTIMUM REC CURRENT function (recording current automatic adjustment function)
To automatically adjust the recording current, select
this menu function and press the [HOLD] and [REC]
buttons simultaneously.
For details, refer to “Recording current adjustment”
on page 38.
● 00F FIXED TIME ENTRY
Sets the fixed time cue up point. To call up the
setting mode, select this menu and press the
[HOLD] button. For details, refer to “Fixed time cue
up function” on page 91.
2 MENU switch setting display
To access multiple menu switch items
The menu switches are organized in six functionally related groups.
• SERVO numbered 000
• VIDEO numbered 100
• AUDIO numbered 200
• SYSTEM numbered 300
• TIME CODE numbered 400
• ON-SCREEN numbered 500
• TBC/FRAME MEMORY numbered 600
3 Hour meter display
Shows the drum running hours.
4 User page display
Shows the menu switch data registered on the
user page.
29
4 MENU SWITCH SETTING
4 MENU SWITCH SETTING
4-2 VIDEO SIGNAL SYSTEM SELECTION
4-3 MENU SWITCH SETTING
This unit can be used with either the NTSC or PAL signal systems. The currently selected video signal system is
indicated by the 525/625 indicator on the counter display. To change the video signal system, follow the steps
below.
VIDEO CASSETTE RECORDER
AUDIO
INPUT
CH1
CH2
CH3
CH4
SIF
AES/EBU CH1
L
ANALOG CH1
R
CH2
CH3
CH4
LINE
CH2
CH3
CH4
CPN
SDI
Video signal system indicator
BR-D95U
VIDEO
INPUT
AUDIO INPUT / AUDIO MONITOR SELECT
AUDIO
MONITOR
POWER
COMPONENT DIGITAL
ON
I
OFF
O
Variable Motion
525 : NTSC
625 : PAL
CH1
CH4/TRACKING
R
P
dB OVER dB
0
R
P
dB OVER dB
0
R
P
dB OVER dB
0
+4
+4
+4
–10
+2
0
–20
–2
–30
–40
–4
VIDEO CASSETTE RECORDER
CH3
CH2
R
P
dB OVER dB
0
+4
–10
+2
0
–20
–2
–30
–40
–4
–60
BR-D95U
–10
+2
0
–20
–2
–30
–40
–4
–60
+2
0
–2
–4
–60
525
625
CTL TC UB DF SERVO CF GEN 16:9 AP
AUTO OFF P.READ V.VAR PB/EE REMOTE
CONDITION
COUNTER
RESET
VCON
REMOTE
MENU
SET
HOLD
PB
PB/EE
VAR
SEARCH
PLAYER RECORDER
UB
–10
P.PLAY
–20
STILL
–30
–40
M
H
–60
ASSEM
VIDEO
DA1
IN
ENTRY
OUT
S
DA2
DA3
F
DA4
EJECT
PLAY
REC
PAUSE/STILL
X1
X-1
AUDIO
INPUT
VIDEO
INPUT
AUDIO INPUT / AUDIO MONITOR SELECT
CH1
CH2
CH3
CH4
SIF
AES/EBU CH1
L
ANALOG CH1
R
CH2
CH3
CH4
LINE
CH2
CH3
CH4
CPN
SDI
AUDIO
MONITOR
POWER
COMPONENT DIGITAL
PHONES
ON
I
OFF
O
CH1
CH3
CH2
R
P
dB OVER dB
0
+4
R
P
dB OVER dB
0
–20
–30
–40
–4
–10
+2
0
–20
–2
–30
–40
–4
–60
R
P
dB OVER dB
0
525
625
CTL TC UB DF SERVO CF GEN 16:9 AP
AUTO OFF P.READ V.VAR PB/EE REMOTE
CONDITION
0
–20
–2
–30
–40
–4
–60
+2
0
–2
–4
–60
COUNTER
RESET
VCON
REMOTE
MENU
SET
HOLD
PB
PB/EE
–10
VAR
SEARCH
CH1
CH2
REC
CH3
PULL FOR VARIABLE
PLAY
–60
ASSEM
VIDEO
DA1
IN
ENTRY
OUT
S
PULL
RELEASE
CH4
H
M
S
S
F
F
SHIFT
REVIEW
DA2
DA3
DA4
EJECT
REC
PLAY
PAUSE/STILL
AUTO EDIT
PREROLL
USER
TOP
VIDEO
Jog dial
AUDIO
STAND BY
REW
STOP
FF
SERVO/SYS
TIME CODE
ON SCREEN
OTHERS
[MENU] button
X1
TRACKING
METER MODE
CANCEL PREVIEW
TRACKING
SHIFT
REVIEW
INSERT
AUTO EDIT
TC
PREROLL
USER
VIDEO
AUDIO
STAND BY
TOP
REW
STOP
FF
SERVO/SYS
TIME CODE
ON SCREEN
OTHERS
Jog dial
PULL
RELEASE
REV
FWD
[On-screen display]
D95:525/625
SET+HOLD[POWER OFF>525
00A:MENU SETTING
SET+HOLD INITIAL
00B:DIRECT ACCESS
SET+HOLD>ON
00C:USER PAGE
SET+HOLD>INITIAL
00D:MENU LOCK
SET+HOLD>OFF
D95:525/625
SET+HOLD[POWER OFF>525
00A:MENU SETTING
SET+HOLD INITIAL
00B:DIRECT ACCESS
SET+HOLD>ON
00C:USER PAGE
SET+HOLD>INITIAL
00D:MENU LOCK
SET+HOLD>OFF
[HOLD] button
[SET] button
PULL
RELEASE
REV
FWD
[HOLD] button
[Counter display]
[On-screen display]
Top menu display
H
M
CANCEL PREVIEW
TRACKING
TC
PLAYER RECORDER
[SET] button
H
METER MODE
PLAY
INSERT
F
[MENU] button
[Counter display]
TRACKING
STILL
M
H
FINE
PULL
RELEASE
CH4
P.PLAY
–20
–30
–40
X-1
PHONES
CH3
UB
+4
–10
+2
REC
PULL FOR VARIABLE
[SEARCH] button
CH4/TRACKING
R
P
dB OVER dB
0
+4
+4
–10
0
–2
CH2
FINE
Variable Motion
+2
CH1
M
S
F
Operation procedure
1. Press the [MENU] button to display the top
menu.
2. Turn the jog dial to select “D95: 525/625”.
“D95” is shown on the counter display and “D95”
blinks on screen.
Menu switch No. Set value No.
D95:525/625
SET+HOLD[POWER OFF>525
00A:MENU SETTING
SET+HOLD INITIAL
00B:DIRECT ACCESS
SET+HOLD>ON
00C:USER PAGE
SET+HOLD>INITIAL
00D:MENU LOCK
SET+HOLD>OFF
Menu switch setting
display
002:OPERATION LOCK
3. Hold the [SEARCH] button down and turn the
jog dial to select the set value.
Select “525” for NTSC or “625” for PAL.
OFF
003:SYNC SELECT
H
M
S
F
ON
008:CAP LOCK(525)
4. To change the menu switch setting, hold the
[SET] button down and press the [HOLD]
button.
[ The Normal Display mode is restored.
5. To apply the selected video signal system, turn
this unit OFF then ON again.
[ When the power is turned ON, the video signal
system is changed and the corresponding
video signal system indicator is shown on the
counter display (525 or 625 indicator).
• When a cassette tape recorded on a signal system other than that set for this unit is played back, the
corresponding indicator ([525] or [625]) blinks.
When the NTSC system is selected and a PAL tape is played back, the [625] indicator blinks.
When the PAL system is selected and an NTSC tape is played back, the [525] indicator blinks.
• If required, select the audio reference level (-20 dB/-18 dB) for recording with menu switch No. 257 <AUD.
REF. SIGNAL LEV. >. (See page 54.)
AUTO
005:AUTO TRACKING
SW SEL
009:CAP RE-LOCKING DIR.
ACCELERATION
300:DIRECT EJECT
ON
H
M
S
F
301:DIRECT SEARCH
ON
302:BACK SPACE
ON
307:PAUSE/STILL/STP TIME
5MIN
311:AUTO PLAY
OFF
Operation procedure
1. Call up the menu switch setting display.
Press the [MENU] button to call up the menu
screen on the counter display and on-screen
display. When the top menu is displayed, turn the
jog dial to show the menu switch setting screen.
● On-screen display data are output through the
rear panel [LINE2-SUPER] connector.
The counter display shows menu switch number.
2. Select a menu switch item to set by turning the
jog dial.
● The selected menu switch number blinks on the
on-screen display.
● The menu switch number changes on the
counter display.
3. Select the setting value of the menu switch by
turning the jog dial while pressing the
[SEARCH] button.
Repeat steps 2 and 3 to change other items.
4. Press the [SET] button to enter the finalized
settings in memory.
● During setting, “SET” blinks on the counter
display and “MENU SET” blinks on the onscreen display. When setting is complete, the
normal screen is restored.
300:DIRECT EJECT
OFF
H
M
S
F
301:DIRECT SEARCH
ON
302:BACK SPACE
ON
307:PAUSE/STILL/STP TIME
5MIN
311:AUTO PLAY
OFF
30
31
4 MENU SWITCH SETTING
4 MENU SWITCH SETTING
4-4 SAVING AND CALLING UP MENU SWITCH SETTINGS
4-5 CALLING UP FUNCTIONAL MENU SWITCH (Direct Access Function)
The set menu switch data can be saved and called up with the 00A MENU SETTING item on the top menu
display.
If you’re going to use the current menu switch setting again later, you can store it in the user memory area. Then,
if the setting is changed, you can restore it simply by calling the stored user data.
It is also possible to restore the initial factory settings.The menu switch setting can be saved in USER-1 SAVE,
USER-2 SAVE or USER-3 SAVE .
Operation procedure
VIDEO CASSETTE RECORDER
AUDIO
INPUT
VIDEO
INPUT
AUDIO INPUT / AUDIO MONITOR SELECT
CH1
CH2
CH3
CH4
AES/EBU CH1
L
ANALOG CH1
R
CH2
CH3
CH4
LINE
CH2
CH3
CH4
CPN
SDI
AUDIO
MONITOR
BR-D95U
POWER
SIF
COMPONENT DIGITAL
ON
I
OFF
O
Variable Motion
CH1
CH3
CH2
R
P
dB OVER dB
0
+4
R
P
dB OVER dB
0
R
P
dB OVER dB
0
+4
–10
+2
0
–20
–2
–30
–40
–4
CH4/TRACKING
+4
–10
+2
0
–30
–40
–4
R
P
dB OVER dB
0
525
625
CTL TC UB DF SERVO CF GEN 16:9 AP
AUTO OFF P.READ V.VAR PB/EE REMOTE
CONDITION
0
–20
–2
–30
–40
–4
–60
+2
0
–2
–4
–60
COUNTER
RESET
MENU
SET
HOLD
VAR
SEARCH
REMOTE
PLAYER RECORDER
UB
+4
–10
+2
–20
–2
–60
VCON
–10
PB
PB/EE
P.PLAY
–20
STILL
–30
–40
M
H
–60
ASSEM
VIDEO
DA1
IN
ENTRY
OUT
S
DA2
DA3
F
DA4
EJECT
REC
PLAY
PAUSE/STILL
X1
X-1
PHONES
CH1
CH2
REC
CH3
CH4
TRACKING
PULL FOR VARIABLE
METER MODE
FINE
PULL
RELEASE
CANCEL PREVIEW
TRACKING
SHIFT
PLAY
REVIEW
INSERT
AUTO EDIT
TC
TOP
PREROLL
USER
VIDEO
AUDIO
STAND BY
REW
STOP
FF
SERVO/SYS
TIME CODE
ON SCREEN
OTHERS
PULL
RELEASE
FWD
REV
[MENU] button
[SET] button
[HOLD] button
Jog dial
1. Press the [MENU] button and turn the jog dial
to call up the top menu on the on-screen
display and the counter display.
2. Select 00A: MENU SETTING.
● Turn the jog dial so that 00A appears on the
counter display and 00A blinks on the on-screen
display.
3. Select the saving or calling-up function and
execute it.
The Direct Access facility groups menu switches into major functionally related groups such as SERVO and
VIDEO for easier access. These groups can be called up directly on the menu display. Hour meter data and User
Page menu switches can also be accessed this way.
The Direct Access function can be turned on or off with 00B DIRECT ACCESS on the top menu display.
M
H
[On-screen display]
Top menu display
Set value
Item No.
H
M
S
F
D95:525/625
SET+HOLD[POWER OFF>525
00A:MENU SETTING
SET+HOLD INITIAL
00B:DIRECT ACCESS
SET+HOLD>ON
00C:USER PAGE
SET+HOLD>INITIAL
00D:MENU LOCK
SET+HOLD>OFF
Menu switch setting display
300: DIRECT EJECT
ON
301:DIRECT SEARCH
Memory
ON
302:BACK SPACE
ON
307:PAUSE/STILL/STP TIME
5MIN
311:AUTO PLAY
OFF
SAVE
S
When restoring the initial factory settings
Front panel operation buttons
REC
PLAY
VIDEO
AUDIO
STAND BY
REW
STOP
FF
SERVO/SYS
TIME CODE
ON SCREEN
OTHERS
EJECT
TOP
To call up the saved menu setting
(Recalling data stored in USER-1 SAVE )
● Select “USER-1 LOAD” by turning the jog dial
while pressing the [SEARCH] button.
+
F
On-screen display
D95:525/624
SET+HOLD[POWER OFF>525
00A:MENU SETTING
SET+HOLD INITIAL
00B:DIRECT ACCESS
SET+HOLD>ON
00C:USER PAGE
SET+HOLD>INITIAL
00D:MENU LOCK
SET+HOLD>OFF
+
[Counter display]
Enabling the Direct Access function
Setting
00B
● Select “INITIAL (0)” by turning the jog dial while
pressing the [SEARCH] button.
● Press the [HOLD] button while pressing the
[SET] button.
[ Factory settings are restored.
[ The Normal Display mode is restored.
* The fixed time data is not changed.
Procedure
Counter display
PREROLL
Access item
PAUSE/STILL
Control
button
Information on display
TOP menu SW
EJECT
TOP menu
VIDEO menu SW
PLAY
Menu SW numbered
100 and 600
AUDIO menu SW
PAUSE/
STILL
Menu SW numbered
200
SERVO/SYSTEM
menu SW
STANDBY Menu SW numbered
000 and 300
TC menu SW
REW
● Press the [HOLD] button while pressing the
[SET] button.
[ The saved menu switch setting in “USER-1
SAVE” comes up.
[ The Normal Display mode is restored.
The data stored in USER-2 SAVE or USER-3
SAVE can be recalled using USER LOAD-2 or
USER-3 LOAD , respectively.
ON-SCREEN menu STOP
SW
Menu SW numbered
500
To save the current menu switch setting
Hour meter
FF
Drum running hours
(Storing data in USER-1 SAVE )
● Select “USER-1 SAVE” by turning the jog dial
while pressing the [SEARCH] button.
User menu SW
PREROLL Menu switch on the
user page
Menu SW numbered
400
LOAD
Change
Call up
300: DIRECT EJECT
300: DIRECT EJECT
OFF
301:DIRECT SEARCH
ON
301:DIRECT SEARCH
ON
32
ON
302:BACK SPACE
302:BACK SPACE
ON
307:PAUSE/STILL/STP TIME
5MIN
311:AUTO PLAY
OFF
ON
307:PAUSE/STILL/STP TIME
5MIN
311:AUTO PLAY
OFF
+
● Press the [HOLD] button while pressing the
[SET] button.
[ The current menu setting is stored in the user
memory area. The data already saved is
updated.
[ The Normal Display mode is restored.
The labels under the front panel control buttons
indicate the functions that can be called up with
the Direct Access facility.
1. Press the [MENU] button and turn the jog dial
to call up the top menu on the on-screen
display and the counter display.
2. Turn the jog dial and select “00B DIRECT
ACCESS”.
● Turn the jog dial so that “00B” appears on the
counter display and “00B” blinks on the onscreen display.
3. Select “ON (1)” by turning the jog dial while
pressing the [SEARCH] button.
4. Press the [HOLD] button while pressing the
[SET] button.
The Direct Access function is set to ON.
[ The Normal Display mode is restored.
To disable Direct Access, select “OFF (0)” by
turning the jog dial while pressing the
[SEARCH] button, then press the [HOLD]
button while pressing the [SET] button.
Using the Direct Access function.
● Make sure the Direct Access function is set to
“ON”.
1. Press the [MENU] button to call up the menu
setting display.
2. Press the corresponding front panel control
button, depending on the item. (Refer to the
table on the left.)
[ The starting item is shown on the counter
display and the first data appears on the onscreen display, depending on what has been
selected.
Move the items by turning the jog dial.
Page down function
When menu switches for a function are shown on
more than one screen, you can display the menu
screen by group with the Direct Access function.
Then, each time the operation button corresponding to the same Direct Access function is pressed,
the menu screens in the group can be advanced
one screen at a time (page down function).
(e.g.) When the [PLAY] button is pressed with the
Direct Access function set to “ON”, the top screen
of menu switch #100 is shown. When the [PLAY]
button is pressed again, the next menu screen is
shown.
• If the group consists of one screen, the page
down function cannot be used.
33
4 MENU SWITCH SETTING
4 MENU SWITCH SETTING
4-6 USER PAGE REGISTRATION/CHANGE/DELETE (User page function)
4-6 USER PAGE REGISTRATION/CHANGE/DELETE (User page function) (con't)
Up to five menu switch settings can be registered on the user page (User Page function).
The User Page function allows you to register frequently used menu switches for quicker access when you want
to change the settings.
Counter display
On-screen display
Procedure
ON
H
Menu switch setting display
M
S
F
Registering a menu switch on the User Page
005:AUTO TRACKING
ON
002:OPERATION LOCK
OFF
300: DIRECT EJECT
1. Call up the menu switch setting screen.
Press the [MENU] button.
[ Call up the menu screen on the counter display
and on-screen display. When the top menu is
displayed, turn the jog dial to set to the
menu switch setting screen.
2. Turn the jog dial to select the menu switch you
want to register.
Menu switch selection is also possible using the
“Direct Access function”.
3. Press and hold the [SET] button.
During setting, “SET” blinks on the counter display
and “MENU SET” blinks on the on-screen display.
ON
H
M
S
F
301:DIRECT SEARCH
ON
302:BACK SPACE
ON
307:PAUSE/STILL/STP TIME
5MIN
311:AUTO PLAY
OFF
300: DIRECT EJECT
ON
H
M
S
F
301:DIRECT SEARCH
ON
302:BACK SPACE
ON
307:PAUSE/STILL/STP TIME
5MIN
311:AUTO PLAY
OFF
H
M
S
F
H
M
S
F
H
M
S
F
○ ○ ○ ○ ○ ○ ○ ○ ○ ○ ○ ○ ○ ○ ○ ○ ○ ○ ○ ○ ○ ○ ○ ○
Hold the [SET] button.
4. When the menu switch setting screen appears, turn
the jog dial to access the User Page screen.
MENU SET
*Memo: The User Page screen can be displayed
using the Direct Access function. See
page 33.
5. Select the line you want to register on the User
Page screen.
User Page display screen
While keeping the [SET] button pressed, turn the
U01:(FOR USER)
jog dial to select the line number (U01 - U05) you
U02:(FOR USER)
want to register.
[ The line number is displayed on the counter
U03:(FOR USER)
display; the line number blinks on the onU04:(FOR USER)
screen display.
U05:(FOR USER)
6. Release the [SET] button.
[ The menu switch setting is displayed and the
selected line is registered on the User Page.
Release the [SET] button.
7. To register more items, repeat steps 2 through 6.
301:DIRECT SEARCH
ON
Registration of up to five items is possible.
U02:(FOR USER)
8. To end User Page registration, press the
U03:(FOR USER)
[MENU] button. The normal display will be
U04:(FOR USER)
restored.
U05:(FOR USER)
34
While still keeping the [SET] button pressed (even after
the [SET] indication goes out), execute the next
operation.
Procedure
Changing the registered menu switch setting
301:DIRECT SEARCH
U04:(FOR USER)
U05:(FOR USER)
301:DIRECT SEARCH
ON
005:AUTO TRACKING
H
M
S
OFF
F
002:OPERATION LOCK
OFF
U04:(FOR USER)
U05:(FOR USER)
1. Press the [MENU] button to call up the menu
display mode.
2. Select the menu switch item to be changed
with the jog dial.
● The selected menu switch number blinks on the
on-screen display.
● The menu switch number changes on the
counter display.
3. Select the setting value by turning the jog dial
while pressing the [SEARCH] button.
● The counter display shows the setting value.
4. To change additional items, repeat steps 2 to 3.
H
M
S
F
MENU SET
5. Press the [SET] button to register the new
setting.
[ During setting, “SET” blinks on the counter
display and “MENU SET” blinks on the onscreen display. When setting is complete, the
normal screen is restored.
• When steps 2 through 6 are performed on an already
registered line, the new menu switch setting replaces
the original line.
• Registered lines on the User Page can be moved.
Select the menu switch you want to move and follow
steps 3 through 6.
• Items D95,00A to 00E on the top menu and the
DH:DRUM HOUR menu switch cannot be registered
on the User Page.
• The menu registered on the User Page is reset when
the unit is initialized (with menu switch 00A).
35
4 MENU SWITCH SETTING
4 MENU SWITCH SETTING
4-6 USER PAGE REGISTRATION/CHANGE/DELETE (User page function) (con't)
4-7 HOW TO LOCK THE MENU SWITCH SETTINGS (Menu switch lock function)
Procedure
To prevent accidental erasure of menu switch settings, you can lock the menu switch settings. This function is
not the same as operation lock.
Top menu screen
H
M
S
F
D95:525/625
SET+HOLD[POWER OFF>525
00A:MENU SETTING
SET+HOLD INITIAL
00B:DIRECT ACCESS
SET+HOLD>ON
00C:USER PAGE
SET+HOLD>INITIAL
00D:MENU LOCK
SET+HOLD>OFF
Check the User Page display.
Erasing all registered items on the User Page
1. Press the [MENU] button and turn the jog dial
to call up the top menu.
[ The top menu screen is shown on the onscreen display and counter display.
Top menu display.
H
M
S
F
2. Select “00C USER PAGE” on the top menu.
“00C” is shown on the counter display and “00C”
blinks on the on-screen display.
Top menu display
D95:525/625
SET+HOLD[POWER OFF>525
00A:MENU SETTING
SET+HOLD INITIAL
00B:DIRECT ACCESS
SET+HOLD>ON
00C:USER PAGE
SET+HOLD>INITIAL
00D:MENU LOCK
SET+HOLD>OFF
U01:(FOR USER)
H
M
S
F
3. While keeping the [SET] button pressed, press
the [HOLD] button.
[ All registered items on the User Page are
erased and the display returns to the normal
display mode.
U02:(FOR USER)
U03:(FOR USER)
U04:(FOR USER)
U05:(FOR USER)
H
M
S
F
User Page display
301:DIRECT SEARCH
ON
D95:525/625
SET+HOLD[POWER OFF>525
00A:MENU SETTING
SET+HOLD INITIAL
00B:DIRECT ACCESS
SET+HOLD>ON
00C:USER PAGE
SET+HOLD>INITIAL
00D:MENU LOCK
SET+HOLD>ON
Erasing registered items one at a time
002:OPERATION LOCK
H
M
S
F
OFF
214:PB V.FADE
5M
1. Press the [MENU] button to select the Menu
Switch Display mode.
U05:(FOR USER)
Hold the [SET] button down.
H
M
S
F
MENU SET
2. Turn the jog dial to access the User Page
display and select the menu switch item to be
erased.
* The selected menu switch number blinks on the onscreen display.
* The menu switch number is changed on the counter
display.
Activating the menu switch lock function
1. Press the [MENU] button and turn the jog dial
to call up the top menu.
[ The top menu screen is shown on the onscreen display and counter display.
2. Select “00D: MENU LOCK” on the top menu
with the jog dial.
“00D” is shown on the counter display and “00D”
blinks on the on-screen display.
3. Select “ON (1)” by turning the jog dial while
pressing the [SEARCH] button.
4. While keeping the [SET] button pressed, press
the [HOLD] button.
[ The menu switch lock function is set to “ON”
and the normal display is restored.
Normal display
To disable the menu switch lock function, select
“OFF (0)” by turning the jog dial while pressing
the [SEARCH] button. Then, while keeping the
[SET] button pressed, press the [HOLD] button.
340:SEARCH SPEED
X32
Procedure
H
M
S
F
CTL 1:23:45:20
When the menu switch lock function is
activated, only the top menu settings can be
changed. All other settings are locked.
3. Hold the [SET] button pressed.
[ During setting, “SET” is shown on the counter
display and on-screen display.
Turn the jog dial.
Menu switch display
601: V.BLANK MASK
While still keeping the [SET] button pressed
(even after the “SET” indication goes out),
perform the next operation.
OFF
H
M
S
4. Turn the jog dial to move to the other menu
switch screen page. Release the [SET] button.
[ The registered item on the User Page is
erased.
F
Release the [SET] button.
Check the User Page display.
5. To erase more items, repeat steps 2 through 4.
6. Press the [MENU] button to finish.
[ The normal display mode is restored.
U01:(FOR USER)
002:OPERATION LOCK
H
M
S
OFF
F
214:PB V.FADE
5M
340:SEARCH SPEED
X32
U05:(FOR USER)
36
37
4 MENU SWITCH SETTING
4 MENU SWITCH SETTING
4-8 RECORDING CURRENT ADJUSTMENT
4-9 HOUR METER DATA DISPLAY
Thanks to this function, it is not necessary to adjust the recording current each time the tape is changed.
When a tape with a different optimum recording current is used, this function allows you to take advantage of this
tape’s performance.
If automatic adjustment is performed on a tape which has been used many times, its optimum recording current
may be quite different from that of a new tape. In this case, perform automatic adjustment using the new tape.
VIDEO CASSETTE RECORDER
AUDIO
INPUT
AUDIO
MONITOR
VIDEO
INPUT
AUDIO INPUT / AUDIO MONITOR SELECT
CH1
CH2
AES/EBU CH1
L
ANALOG CH1
R
SDI
CH3
CH4
CH2
CH3
CH4
LINE
CH2
CH3
CH4
CPN
POWER
COMPONENT DIGITAL
CH1
R
P
dB OVER dB
0
+4
–10
0
–20
–30
–40
–4
CH4/TRACKING
R
P
dB OVER dB
0
+4
–10
+2
0
–20
–2
–30
–40
–4
–60
Procedure
CH3
CH2
R
P
dB OVER dB
0
+4
–2
R
P
dB OVER dB
0
M
H
H
M
S
S
F
00E:OPTIMUM REC CURRENT
HOLD+REC>START
00F:FIXED TIME ENTRY
00:00:00:00
F
OPTIMUM REC CURRENT
! ! PERFORM ! ! 10 05
(ABORT > MENU KEY)
H
M
S
F
OPTIMUM REC CURRENT
525
625
CTL TC UB DF SERVO CF GEN 16:9 AP
AUTO OFF P.READ V.VAR PB/EE REMOTE
CONDITION
I
O
0
–20
–2
–30
–40
–4
+2
0
–2
–4
–60
COUNTER
RESET
VCON
MENU
SET
HOLD
–10
VAR
SEARCH
REMOTE
PB
PB/EE
PLAYER RECORDER
P.PLAY
–20
STILL
–30
–40
M
H
–60
ASSEM
VIDEO
DA1
ENTRY
OUT
S
DA2
DA3
F
DA4
REC
EJECT
PLAY
PAUSE/STILL
X1
X-1
PHONES
CH2
CH1
REC
CH3
CH4
PULL FOR VARIABLE
Procedure
TRACKING
METER MODE
FINE
PULL
RELEASE
Drum running hours can be displayed on the counter
display and the on-screen display. Use this information as a guide to choosing the appropriate maintenance interval.
UB
+4
–10
+2
–60
IN
1. Light all [VIDEO INPUT] indicators with the
input video signal switch.
2. Select the PB/EE Auto Switching mode with
the [PB PB/EE] button.
3. Load a recording tape and engage the Stop
mode.
4. Press the [MENU] button and turn the jog dial
to call up the top menu.
[ The top menu screen is shown on the onscreen display and counter display.
5. Select “00E:OPTIMUM REC CURRENT” on the
top menu with the jog dial.
• “00E” is shown on the counter display and “00E”
blinks on the on-screen display.
6. While keeping the [REC] button pressed, press
the [HOLD] button.
[ Automatic recording current adjustment will
start.
It takes several minutes to complete the
automatic adjustment.
• To interrupt the adjustment, press the [MENU]
button twice.
• When adjustment is finished, the indication
shown on the left is displayed on the on-screen
display.
7. When the indication on the left figure is shown
on the on-screen display, press the [MENU]
button twice.
[ The previous display mode is restored.
ON
OFF
Variable Motion
+2
Activating the recording current adjustment
function
BR-D95U
SIF
CANCEL PREVIEW
TRACKING
SHIFT
PLAY
REVIEW
INSERT
TC
AUTO EDIT
PREROLL
USER
VIDEO
AUDIO
STAND BY
TOP
REW
STOP
FF
SERVO/SYS
TIME CODE
ON SCREEN
OTHERS
[MENU] button
[HOLD] button
PULL
RELEASE
REV
FWD
[FF] button
1. Press the [MENU] button.
[ The Menu Display mode is engaged.
2. Select the DH display by turning the jog dial.
[ Hour meter data (drum running hours) is
displayed on the counter display and the onscreen display (0000H - 9999 H).
3. To return to the normal display mode, press
the [MENU] button.
H
M
S
Direct Access
function
number
F
ON
D95:525/625
SET+HOLD[POWER OFF>525
00A:MENU SETTING
SET+HOLD INITIAL
00B:DIRECT ACCESS
SET+HOLD>ON
00C:USER PAGE
SET+HOLD>INITIAL
00D:MENU LOCK
SET+HOLD>OFF
When the Direct Access function is set to ON,
press the [FF] button to accelerate item
indication.
[FF] button
DH:DURM HOUR METER
0600
H
M
S
F
Drum running hours
! ! END ! ! 10 05
(PUSH MENU KEY)
OPTIMUM REC CURRENT
• When the adjustment cannot be completed, the
indication shown on the left is displayed on the
on-screen display.
In this case, change the recording position or
replace the recording tape.
! ! ERROR ! !
(PUSH MENU KEY)
38
39
5 MENU SWITCH SETTING DETAILS
5 MENU SWITCH SETTING DETAILS
5-1 MENU SWITCH LIST
5-1 MENU SWITCH LIST
Gives the names and brief description of the menu switches. See reference pages for details
Functions enclosed in
Functional
group
No
are not available on the PAL system.
Names
Description
Reference
Page
SERVO
002
003
005
008
008p
009
OPERATION LOCK
SYNC SELECT
AUTO TRACKING
CAP LOCK (525)
CAP LOCK (625)
CAP RELOCKING DIR
Operation mode lock ON/OFF ..........................................................................
Selects the reference sync signal (EXT or AUTO) for the servo system .........
Selects automatic or manual tracking ..............................................................
Selects the color frame servo sync system ......................................................
Selects the color frame servo sync system ......................................................
Selects the color frame servo lock direction .....................................................
43
43
43
43
44
44
VIDEO
104
111
112
119
120
124
128
130
133
138
139
140
141
142
143
144
145
146
147
138p
139p
140p
141p
142p
143p
144p
145p
146p
147p
148
CPN LEVEL/SETUP (525)
VD REC SIGNAL SEL.
ECC MODE
SLOW PICTURE
NO CTL MUTING
CHROMA ROTE
PB EXTENSION LINE
BLANKING WIDTH
LINE SETUP (525)
EXTRA LINE REC (525)
EXTRA-L R1 SEL (525)
EXTRA-L R2 SEL (525)
EXTRA-L R3 SEL (525)
EXTRA-L R4 SEL (525)
EXTRA LINE PB (525)
EXTRA-L P1 SEL (525)
EXTRA-L P2 SEL (525)
EXTRA-L P3 SEL (525)
EXTRA-L P4 SEL (525)
EXTRA LINE REC (625)
EXTRA-L R1 SEL (625)
EXTRA-L R2 SEL (625)
EXTRA-L R3 SEL (625)
EXTRA-L R4 SEL (625)
EXTRA LINE PB (625)
EXTRA-L P1 SEL (625)
EXTRA-L P2 SEL (625)
EXTRA-L P3 SEL (625)
EXTRA-L P4 SEL (625)
IN VBLANK YCOMB (525)
44
44
45
45
45
45
45
46
46
47
47
47
47
47
47
48
48
48
48
48
48
48
48
48
49
49
49
49
49
148p
IN VBLANK YCOMB (625)
149
VIDEO OUT SELECT
Selects Betacam or MII component level .........................................................
Selects the video signal created by internal generator .....................................
Selects level of error correction ........................................................................
Selects FIELD or FRAME slow motion playback mode. ..................................
Selects if the video output mutes when playing back a blank tape ..................
Selects the output chroma phase reference signal ..........................................
Selects the extension line output during playback ...........................................
Selects the H blanking width ............................................................................
Adds setup to composite signals ......................................................................
Selects the video signal that will be recorded on the extra line ........................
Selects the input signal line that will be recorded on extra line 1 .....................
Selects the input signal line that will be recorded on extra line 2. ....................
Selects the input signal line that will be recorded on extra line 3 .....................
Selects the input signal line that will be recorded on extra line 4 .....................
Selects how extra line information is added during playback ...........................
Selects which line to add extra line 1 information ............................................
Selects which line to add extra line 2 information ............................................
Selects which line to add extra line 3 information ............................................
Selects which line to add extra line 4 information ............................................
Selects the video signal that will be recorded on the extra line. .......................
Selects the input signal line that will be recorded on extra line 1 .....................
Selects the input signal line that will be recorded on extra line 2. ....................
Selects the input signal line that will be recorded on extra line 3 .....................
Selects the input signal line that will be recorded on extra line 4 .....................
Selects how extra line information is added during playback ...........................
Selects which line to add extra line 1 information ............................................
Selects which line to add extra line 2 information ............................................
Selects which line to add extra line 3 information ............................................
Selects which line to add extra line 4 information ............................................
Turns Y/C separation ON/OFF for composite signals in the
V. Blanking period ...........................................................................................
Turns Y/C separation ON/OFF for composite signals in the
V. Blanking period ...........................................................................................
Selects the timing for output video signals during editing ................................
49
50
214
215
216
219
221
222
223
224
225
PB V. FADE
AUD REC VOLUME MODE 1
AUD PB VOLUME MODE 1
SEARCH REC CH
SEARCH PB AT 1+3/2+4
MONITOR MIX MODE
CH3/4 OUT SEL AT 2CH
AUDIO IN LEVEL CH1
AUDIO IN LEVEL CH2
Enables V fades during playback at the audio edit transitions .........................
Selects audio REC level adjustment as individual channels or stereo pairs ....
Selects audio PB level adjustment as individual channels or stereo pairs .......
Selects the signal source for recording linear audio tracks ..............................
Switches the linear track audio ON/OFF during search ...................................
Selects the audio monitor mixing level .............................................................
Selects the signal output from the CH3/CH4 audio channels ..........................
Sets the audio input reference level for CH1 ....................................................
Sets the audio input reference level for CH2 ....................................................
50
50
51
51
51
51
52
52
52
AUDIO
40
49
Functional
group
AUDIO
SYSTEM
No
Names
226
227
228
229
230
231
232
233
236
AUDIO IN LEVEL CH3
AUDIO IN LEVEL CH4
AUDIO OUT LEVEL CH1
AUDIO OUT LEVEL CH2
AUDIO OUT LEVEL CH3
AUDIO OUT LEVEL CH4
AUDIO MON LEVEL LCH
AUDIO MON LEVEL RCH
PRO 48K S.R.CONV.
237
247
EMBEDDED AUDIO
DIG AUD AT SYNC IN
251
253
254
255
256
257
261
CH3/4 SOURCE SEL.
CH1 REC SIGNAL SEL
CH2 REC SIGNAL SEL
CH3 REC SIGNAL SEL
CH4 REC SIGNAL SEL
AUD REF. SIGNAL LEV
AUD SEL. AT SEARCH
300
301
302
307
311
312
314
317
319
320
323
328
340
351
352
357
359
363
DIRECT EJECT
DIRECT SEARCH
BACK SPACE
PAUSE/STILL/STP TIME
AUTO PLAY
AUTO REW
PB/EE MODE
9PIN DEVICE ID
FF/REW MAX SPEED
PREROLL TIME
PREROLL END MODE
EDIT POINT CLEAR
SEARCH SPEED
PREREAD
AUD PREREAD TIMING
DIAG AT POWER ON
JOG FEELING (REMOTE)
CONTROLLER SELECT
367
368
369
371
372
EDIT INTERRUPTION
STARTING PIC FREEZE
PARA-RUN
INPUT SELECT SAFETY
P+R AT SWAP MODE
373
374
375
376
377
378
MATCH FRAME
MENU OPEN SAFETY
AUD EDIT PRESET CH1
AUD EDIT PRESET CH2
AUD EDIT PRESET CH3
AUD EDIT PRESET CH4
Description
Reference
Page
Sets the audio input reference level for CH3 ....................................................
Sets the audio input reference level for CH4 ....................................................
Sets the audio output reference level for CH1 .................................................
Sets the audio output reference level for CH2 .................................................
Sets the audio output reference level for CH3 .................................................
Sets the audio output reference level for CH4 .................................................
Sets the output reference level for the LCH audio monitor ..............................
Sets the output reference level for the RCH audio monitor ..............................
Enables the sampling rate converter even when the input signal is
a professional 48K AES/EBU signal ................................................................
Disables the embedded audio signal from the SDI output signal .....................
Turns the embedded audio noise ON/OFF when the sync signal is input
from a different system ....................................................................................
Selects the input source for the CH3 and CH4 audio signals ..........................
Selects the built-in signal generator’s CH1 audio signal ..................................
Selects the built-in signal generator’s CH2 audio signal ..................................
Selects the built-in signal generator’s CH3 audio signal ..................................
Selects the built-in signal generator’s CH4 audio signal ..................................
Selects the audio recording reference level .....................................................
Selects the output audio track during search ...................................................
52
52
52
52
52
52
52
52
52
53
53
53
54
54
54
54
54
54
Enables /disables direct EJECT (accepts EJECT command from any mode) ..... 54
Direct search ON/OFF ...................................................................................... 54
Back space edit operation ON/OFF ................................................................. 54
Selects duration of long-time pause/still/standby ON ....................................... 55
Auto play operation ON/OFF ............................................................................ 55
Auto rewind operation ON/OFF ........................................................................ 55
Selects the modes in which the VCR automatically switches from PB to EE ... 55
Selects the device type ID returned to a 9-pin remote control ........................ 55
Selects the maximum tape speed in FF/REW modes ...................................... 55
Sets the PREROLL time ................................................................................... 56
Selects the mode engaged after preroll operation ........................................... 56
Selects whether the edit point data is cleared after performing the edit ........... 56
Selects the maximum search speed when using the search dial ..................... 56
Selects the video/audio preread function ......................................................... 56
Selects the output audio phase correction during audio preread ..................... 56
Enables/ disables automatic diagnosis operation at power ON ....................... 57
Selects the "feel" of an external editing /remote controller's JOG dial ............. 57
Changes the personality of the VCR to match the type of editing
controller connected ........................................................................................ 57
Enables/disables channel condition monitoring during editing ......................... 57
Selects video output source (freeze or tape) during servo lock ....................... 57
Enables simultaneous control of multiple VCR's from a single remote ............ 58
Switches ON a safety function to prevent accidental change of input router ... 58
Selects whether or not simultaneous operation of the player and
recorder is permitted ....................................................................................... 58
Switches the match frame mode ON/OFF during swap editing ....................... 58
Selects the method for opening the menu switch setting mode ....................... 58
Selects the ON/OFF execution command for the (DA-1) Insert mode ............. 59
Selects the ON/OFF execution command for the (DA-2) Insert mode ............. 59
Selects the ON/OFF execution command for the (DA-3) Insert mode ............. 59
Selects the ON/OFF execution command for the (DA-4) Insert mode ............. 59
41
5 MENU SWITCH SETTING DETAILS
5 MENU SWITCH SETTING DETAILS
5-1 MENU SWITCH LIST
5-2 MENU SWITCH SETTING CONTENT
When the contents of a menu item differ for NTSC and PAL, this is indicated after the menu item name by (525)
for NTSC and (625) for PAL. With PAL, “p” is shown after the menu No.
<SERVO> [ ] : Factory setting
Functions enclosed in
are not available on the PAL SYSTEM.
Functional
group
SYSTEM
TIME CODE
No
Names
381
382
383
384
385
386
387
JOG FEELENG (LOCAL)
9 PIN ID䡲---(1ST)
9 PIN ID-䡲--(2ND)
9 PIN ID--䡲-(3RD)
9 PIN ID---䡲(4TH)
MUTING AT NO TAPE
CF FLAG REPLY (525)
387p
CF FLAG REPLY (625)
389
390
391
393
395
MULTI CUE MODE
SWAP VTR SELECT
SYNCHRONIZATION
SYNC GRADE
AUTO-EE
Description
Reference
Page
Selects jog dial operation response level .........................................................
Sets the first digit of the ID code ......................................................................
Sets the second digit of the ID code .................................................................
Sets the third digit of the ID code .....................................................................
Sets the fourth digit of the ID code ...................................................................
ON/OFF of the EE signal output when no tape is loaded .................................
Selects the number of fields for which the color frame flag is set for
9-pin remote control ........................................................................................
Selects the number of fields for which the color frame flag is
set for 9-pin remote control .............................................................................
Switches Multi Cue mode ON/OFF ..................................................................
Selects the player VTR type during swap editing .............................................
Enables/disables the bump mode during swap editing ....................................
Selects the editing accuracy during swap editing .............................................
Selects whether the BR-D92 automatically switches to EE for single monitor
operation during swap editing .........................................................................
60
59
59
59
59
59
59
Menu SW
No.
On-screen
display
Counter
display
On-screen
display
60
60
60
60
60
VITC LINE-1 SEL (525)
VITC LINE-1 SEL (625)
VITC LINE-2 SEL (525)
VITC LINE-2 SEL (625)
CTL DF SELECT (525)
REGEN MODE
EXT REGEN TC
AUTO REGEN MODE
TCG CF FLAG
SUB TC (VITC) REC
VITC OUT SELECT
SEARCH LTC
UB PRESET AUTO
Selects the vertical interval line for adding VITC-1 ...........................................
Selects the vertical interval line for adding VITC-1 ...........................................
Selects the vertical interval line for adding VITC-2 ...........................................
Selects the vertical interval line for adding VITC-2 ...........................................
Sets the CTL counter to operate in NONDROP/DROP frame mode ...............
Selects what elements of time the code (TC, UB) are regenerated .................
Selects external source (LTC/ VITC) for regeneration .....................................
Selects the edit mode in which time code is regenerated. ...............................
Turns the color frame flag ON/OFF for the time code bit .................................
Selects whether incoming VITC is recorded onto the Sub-Time Code ............
Selects the VITC time code output source (Main/Sub) time code ...................
Selects whether LTC time code is output in the Search mode .........................
Selects if the user bit data stored in the memory is recorded preferentially .....
61
61
61
61
61
61
62
62
62
62
62
62
63
ON-SCREEN
501
502
504
505
512
513
CHARA H POSITION
CHARA V POSITION
INFORMATION SELECT
REMAIN ENABLE
MUTING/ALARM MESSAGE
EDIT ON SCREEN
Sets the horizontal display position of the on-screen data ...............................
Sets on-screen data vertical display position ...................................................
Selects the type of information shown by the on-screen display ......................
Enables/ disables the tape “Remaining Time” display indication .....................
Selects whether “MUTING” or “CONDITION ALARM” appears on-screen ......
ON/OFF of edit on-screen display ...................................................................
63
63
63
63
64
64
TBC.FRAME
MEMORY
601
620
V.BLANK MASK
DUBBING LOOP
Turns the V sync section masking ON/OFF during playback ........................... 64
Enables/ disables the Dubbing Loop (multi-gen test) function ......................... 64
Content
002
OPERATION
LOCK
[0]
1
[OFF]
ON
Switches the operation mode lock ON/OFF.
Set to ON to lock the VCR in the current mode.
When “OPERATION LOCK” is ON, you cannot
operate the control buttons, switches, knobs and
dials on the VCR or change any menu switch
settings other than this menu switch itself. Only the
[POWER] switch and the [PHONES LEVEL] adjust
knob remain operable.
003
SYNC SELECT
1
[3]
EXT
[AUTO]
Selects the reference sync signal used by the
servo system.
EXT : Synchronizes with the signal applied to
the[REF] input connector regardless of
VCR mode (playback or record).
AUTO : Synchronizes with the signal applied to
the [REF] input connector during
playback.The VCR locks to the video
input during recording. (If no signal is
present on the [REF] connector and video
input connector, the VCR synchronizes to
an internal clock signal regardless of this
menu's setting).
005
AUTO TRACKING
0
[1]
OFF
[ON]
Selects manual or automatic tracking adjustment in
the Play mode.
ON : The tracking value is automatically adjusted
to the optimum position when the Play mode
is engaged. The [TRACKING] knob is not
operable. When the Automatic Tracking mode
is engaged, tracking adjustment takes several
seconds. During this time, audio output
signals are derived from the linear tracks.
OFF : Tracking can be adjusted manually with the
[TRACKING] knob. When the meter
indication is set to “Tracking”, the
[TRACKING] button blinks.
008
CAP LOCK (525)
[0]
1
2
[SW SEL]
2 FIELD
4 FIELD
Selects the color frame servo sync system for
NTSC signals.
SW SEL : The color frame servo setting is
determined by the sub panel’s [CF]
switch setting.
2 FIELD : The frame servo is set. Color framing is
not executed.
4 FIELD : 4 field color frame servo is executed.
60
400
400p
401
401p
402
403
409
410
421
450
451
452
457
42
Setting
Item
43
5 MENU SWITCH SETTING DETAILS
5 MENU SWITCH SETTING DETAILS
5-2 MENU SWITCH SETTING CONTENT
5-2 MENU SWITCH SETTING CONTENT
[ ] : Factory setting
[ ] : Factory setting
Setting
Item
Menu SW
No.
On-screen
display
Counter
display
On-screen
display
Item
Content
On-screen
display
Setting
Counter
display
On-screen
display
Content
008p
CAP LOCK (625)
[0]
1
2
3
[SW SEL]
2 FIELD
4 FIELD
8 FIELD
Selects the color frame servo sync system for PAL
signals.
SW SEL : The color frame servo setting is
determined by the sub panel’s [CF]
switch setting.
2 FIELD : The frame servo is set. Color framing is
not executed.
4 FIELD : 4 field color frame servo is executed.
8 FIELD : 8 field color frame servo is executed.
112
ECC MODE
[0]
1
2
[NORMAL]
NO CANCEL
NO
CORRECTION
This menu activates or deactivates the error
correction circuit (error correction /error conceal).
NORMAL
: Activates all error correction
circuitry.
NO CONCEAL : NO error concealment is applied
NO CORRECTION: Neither the error concealment
nor the error correction circuits
function.
For details, refer to page 80.
009
CAP RE-LOCKING
DIR.
[0]
1
[ACCELERATION]
DECELERATION
Selects the color frame servo lock direction after
executing the bump function.
If the edit point shifts due to the color frame servo,
select + or - to adjust the edit point.
ACCELERATION : Moves the edit point in the +
direction (locks in the
acceleration direction).
DECELERATION : Moves the edit point in the direction (locks in the
deceleration direction).
119
SLOW PICTURE
0
[1]
FRAME
[FIELD]
Selects the “Field” or “Frame” slow play mode.
FRAME : Outputs a frame picture.
FIELD : Outputs a field picture.
120
NO CTL MUTING
0
[1]
OFF
[ON]
Selects the video signal output when a nonrecorded section (NO CTL) of the tape is played
back.
OFF : Still picture is output.
ON : Black picture is output.
124
CHROMA ROTE
[0]
1
[CPS]
CPN
Switches the output chroma phase reference for
component signals or composite signals.
CPS : Varies the phase so that the chroma level is
not changed with the composite vector scope.
CPN: Varies the phase so that the chroma level is
not changed with the component vector
scope.
Set this switch when adjusting the chroma phase
with the video control.
128
PB EXTENSION
LINE
0
[1]
OFF
[ON]
Sets whether or not the video signal extension line
is output during playback.
ON : Outputs the extension line.
When a tape recorded on this unit is played back,
all video signal lines are output.
OFF : Does not output the extension line.
Set to this position when playing back tapes not
recorded on this unit.
*During recording, the following signal lines are
recorded as the EXTENSION LINE.
[525]: LINE 20, 21, 22, 263, 282, 283, 284 and
525 (For LINE 282, the second half only)
[625]: LINE 19, 20, 21, 22, 331, 332, 333, 334 and
623
This menu functions only with tapes recorded on
this unit.
When a tape recorded on this unit is played back
on the BR-D80, BR-D750, BR-D92 or BR-D860,
the EXTENSION LINE is not played back.
For details, refer to page 89.
<VIDEO>
104
111
44
Menu SW
No.
CPN LEV./SETUP
(525)
VD REC SIGNAL
SEL.
0
[1]
2
3
LOW/ON
[HIGH/ON]
LOW/OFF
HIGH/OFF
1
COLOR BAR
[2]
4
5
[BLACK]
MULTI BURST
PULSE & BAR
This item should be applied to NTSC signals only.
Sets input/output levels for the [Y, R-Y, B-Y]
connectors on the rear panel.
Sets input/output levels and setup presence.
LOW/ON : Sets component signals to MII levels
with setup.
HIGH/ON : Sets component signals to Bcam levels
with setup.
LOW/OFF : Sets component signals to MII levels
without setup.
HIGH/OFF : Sets component signals to Bcam levels
without setup.
Selects the video signal output by the internal
signal generator. The selected signal is output in
the EE and Record modes.These signals do not
conform to the SMPTE standard.
COLOR BAR : Color bar is selected. (These are
75% color bar signals).
BLACK
: Black signal is selected.
MULTI BURST : Multi Burst signal is selected.
PULSE & BAR : Pulse & Bar signal is selected.
45
5 MENU SWITCH SETTING DETAILS
5 MENU SWITCH SETTING DETAILS
5-2 MENU SWITCH SETTING CONTENT
5-2 MENU SWITCH SETTING CONTENT
[ ] : Factory setting
[ ] : Factory setting
Setting
Item
Menu SW
No.
Counter
display
On-screen
display
Setting
Item
Content
[WIDE]
NARROW
Selects the video signal H blanking width.
WIDE
: H blanking width is set to the blanking
width used by analog video signals.
NARROW : H blanking width is set to the blanking
width used by digital video signals.
Use this position for digital video signal
dubbing.
133
LINE SETUP
(525)
0
[1]
OFF
[ON]
Selects whether or not setup should be added to
composite signals (NTSC only).
OFF : Setup is not added.
ON : Adds setup.
On-screen
display
138
EXTRA LINE REC
(525)
[0]
1
2
139
EXTRA-L R1 SEL
(525)
01
140
EXTRA-L R2 SEL
(525)
11
12
18
21
22
273
....
[0]
1
Counter
display
....
BLANKING WIDTH
On-screen
display
....
130
Menu SW
No.
....
46
On-screen
display
141
EXTRA-L R3 SEL
(525)
28
29
283
284
142
EXTRA-L R4 SEL
(525)
143
EXTRA LINE PB
(525)
[FIX]
USER (COLOR)
USER (MONO)
11
[First setting]
No. 139 ... 22
No. 140 ... 284
No. 141 ... 21
No. 142 ... 283
[0]
1
2
Content
Sets the input video signal line whose data will be
recorded on the extra line. Selects the fixed line or
user-set line.
FIX: Records the information from line 22 onto
extra line-1 and the information from line 284
onto extra line-2 in the Color mode.
USER (COLOR) : Records the information from 2
specified lines onto extra line-1
and line-2 in the Color mode.
Specify the lines with menu switches No. 139 and
No. 140.
USER (MONO) : Records the information from 4
specified lines onto extra lines 1
to 4 in the Black and White mode.
Specify the lines with menu switches No. 139 to
No. 142.
* When a recording is made with this menu switch
set to “USER (MONO)”, extra line data cannot be
played back normally on the BR-D50/D51/D52/
D80/D92/D350/D750/D860.
Sets video signal lines that will be recorded on
extra line 1, 2, 3 or 4.
It is possible to set each extra line independently.
•No. 139 <EXTRA-L R1 SEL> ... Sets extra line 1.
•No. 140 <EXTRA-L R2 SEL> ... Sets extra line 2.
•No. 141 <EXTRA-L R3 SEL> ... Sets extra line 3.
•No. 142 <EXTRA-L R4 SEL> ... Sets extra line 4.
Select 1 line from lines 11 to 22 and 273 to 284 for
each extra line.
* Extra lines 3 and 4 are effective only when menu
switch No. 138 <EXTRA LINE REC (525)> is set
to “USER (MONO)”.
Selects how extra line signal data is added to the
[MUTING]
playback video signal during playback.
AUTO
: Line data is not added to the
USER SETTING MUTING
playback video signal.
AUTO
: Extra line data is added to the
line selected for extra line
recording.
USER SETTING: Extra line data is added to the
four lines specified by the user.
Lines can be selected with menu
switches No. 144 to No. 147.
47
5 MENU SWITCH SETTING DETAILS
5 MENU SWITCH SETTING DETAILS
5-2 MENU SWITCH SETTING CONTENT
5-2 MENU SWITCH SETTING CONTENT
[ ] : Factory setting
[ ] : Factory setting
Item
Menu SW
No.
On-screen
display
On-screen
display
144
EXTRA-L P1 SEL
(525)
....
....
145
EXTRA-L P2 SEL
(525)
11
12
18
21
22
273
....
....
146
EXTRA-L P3 SEL
(525)
28
29
283
284
147
EXTRA-L P4 SEL
(525)
10
[First setting]
No. 144 ... 22
No. 145 ... 284
No. 146 ... 21
No. 147 ... 283
Setting
Counter
display
On-screen
display
[0]
1
2
144p
EXTRA-L P1 SEL
(625)
00
145p
EXTRA-L P2 SEL
(625)
146p
EXTRA-L P3 SEL
(625)
147p
EXTRA-L P4 SEL
(625)
148
IN VBLANK
YCOMB (525)
0
[1]
2
OFF
[ON]
OFF WITH21
Selects whether or not Y/C separation is applied to
composite signals in the V. Blanking period.
OFF : Y/C separation is not applied.
ON : Y/C separation is applied. Normally set to
this position.
OFF WITH21: Y/C separation is not applied to the
V. Blanking period and section of
line 21.
• To read composite signals containing teletext with
a teletext reader, set this switch to “OFF” or “OFF
WITH21”.
148p
IN VBLANK
YCOMB (625)
0
[1]
OFF
[ON]
Selects whether or not the Y/C separation is
applied to composite signals in the V. Blanking
period.
OFF : Y/C separation is not applied.
ON : Y/C separation is applied. Normally set to
this position.
• To read composite signals containing teletext with
a teletext reader, set this switch to “OFF”.
[MUTING]
AUTO
USER SETTING
Select 1 line from lines 10 to 22 and 273 to 284 for
each extra line.
Sets the input video signal line whose data will be
recorded on the extra line. Selects the fixed line or
user-set line.
FIX : Records the information from line 22 onto
extra line-1 and the information from line 623
onto extra line-2 in the Color mode.
USER (COLOR): Records the information from 2
specified lines onto extra line-1
and line-2 in the Color mode.
Specify the lines with menu switches No. 139p and
No. 140p.
USER (MONO) : Records the information from 4
specified lines onto extra lines 1
to 4 in the Black and White mode.
Specify the lines with menu switches No. 139p to
No. 142p.
* When a recording is made with this menu switch set to
6
15
16
18
21
22
319
33
34
35
334
335
623
[First setting]
No. 144 ... 22
No. 145 ... 623
No. 146 ... 21
No. 147 ... 334
“USER (MONO)”, extra line data cannot be played back
normally on the BR-D50/D51/D52/D350/D80/D92/
D750/D860.
141p
EXTRA-L R3 SEL
(625)
142p
48
EXTRA-L R4 SEL
(625)
15
16
18
21
22
319
....
EXTRA-L R2 SEL
(625)
6
....
140p
00
....
EXTRA-L R1 SEL
(625)
....
139p
33
34
35
334
335
623
[First setting]
No. 139 ... 22
No. 140 ... 623
No. 141 ... 21
No. 142 ... 334
Sets video signal lines that will be recorded on
extra line 1, 2, 3 or 4.
It is possible to set each extra line independently.
• No. 139p <EXTRA-L R1 SEL> ... Sets extra line 1.
• No. 140p <EXTRA-L R2 SEL> ... Sets extra line 2.
• No. 141p <EXTRA-L R3 SEL> ... Sets extra line 3.
• No. 142p <EXTRA-L R4 SEL> ... Sets extra line 4.
Select 1 line from lines 6 to 22, 319 to 335 and 623
for each extra line.
* Extra lines 3 and 4 are effective only when menu switch
No. 138p <EXTRA LINE REC (625)> is set to “USER
(MONO)”.
Selects how extra line signal data is added to the
playback video signal during playback.
MUTING : Line data is not added to the playback
video signal.
AUTO : Extra line data is added to the line
selected for extra line recording.
USER SETTING : Extra line data is added to the
four lines specified by the user.
Lines can be selected with menu
switches No. 144p to No. 147p.
EXTRA LINE PB
(625)
•No. 144 <EXTRA-L P1 SEL> ... Sets extra line 1.
•No. 145 <EXTRA-L P2 SEL> ... Sets extra line 2.
•No. 146 <EXTRA-L P3 SEL> ... Sets extra line 3.
•No. 147 <EXTRA-L P4 SEL> ... Sets extra line 4.
* When the information such as time code data is
superimposed on the same line, extra line data is not
output.
Content
143p
....
[FIX]
USER (COLOR)
USER (MONO)
On-screen
display
....
[0]
1
2
Selects the playback video signal line to add signal
data recorded on extra line 1, 2, 3 or 4 for output.
Effective only when menu switch No. 143 <EXTRA
LINE PB> is set to “USER SETTING”.
Menu SW
No.
....
EXTRA LINE
REC (625)
00
Content
....
138p
Item
Setting
Counter
display
Selects the playback video signal line to add signal
data recorded on extra line 1, 2, 3 or 4 for output.
Effective only when menu switch No. 143p
<EXTRA LINE PB> is set to “USER SETTING”.
• No. 144P <EXTRA-L P1 SEL> ... Sets extra line 1.
• No. 145P <EXTRA-L P2 SEL> ... Sets extra line 2.
• No. 146P <EXTRA-L P3 SEL> ... Sets extra line 3.
• No. 147P <EXTRA-L P4 SEL> ... Sets extra line 4.
Select 1 line from lines 6 to 22, 319 to 335 and 623
for each extra line.
* When the information such as time code data is
superimposed on the same line, extra line data is
not output.
49
5 MENU SWITCH SETTING DETAILS
5 MENU SWITCH SETTING DETAILS
5-2 MENU SWITCH SETTING CONTENT
5-2 MENU SWITCH SETTING CONTENT
[ ] : Factory setting
[ ] : Factory setting
Item
Menu SW
No.
149
On-screen
display
VIDEO OUT
SELECT
Item
Setting
Counter
display
On-screen
display
Content
[0]
1
2
Selects the video signal output timing during
[NORMAL]
SYNC DELAY editing.
NORMAL
: Shifts the position of output video
A ROLL
signals by 4H during editing.
Normally, set to this position.
*When shifting by 4H, information in
the input signal’s blanking sections
may be input to the image area. In
such a case, use “SYNC DELAY”
or “A ROLL”.
SYNC DELAY : Shifts the sync signal position
during editing, without shifting the
output video signals.
A ROLL
: Shifts the output video signals by 1
frame during editing.
Menu SW
No.
216
On-screen
display
AUD PB VOLUME
MODE 1
Setting
Counter
display
[0]
1
On-screen
display
[CH1/CH2/
CH3/CH4]
MAS-1 BAL-2/
MAS-3 BAL-4
Selects the function of the [AUDIO PB LEVEL]
volume controls.
CH1/CH2/CH3/CH4: Each of the 4 channels can
be adjusted independently with the
corresponding [AUDIO PB LEVEL] volume
control.
MAS-1 BAL-2/MAS-3 BAL-4: The [AUDIO PB
LEVEL] volume control for CH1 or CH3
operates as a master level control, enabling
the audio playback levels of CH1 and CH2 or
CH3 and CH4 to be adjusted simultaneously
as a stereo pair. The [AUDIO PB LEVEL]
volume control for CH2 or CH4 operates as a
balance control for its corresponding pair,
enabling audio playback balance to be
adjusted between CH1 and CH2 or CH3 and
CH4.
<AUDIO>
214
PB V. FADE
0
[1]
2
OFF
[5M]
10M
Selects whether or not the audio V. fade function is
used for smoother edited audio transitions during
playback.
OFF : The audio V. fade function is disabled.
5M : The audio V. fade function is enabled. Audio
transitions are faded out and faded in for 5
msec. To reduce noise, this position is
recommended.
10M : The audio V. fade function is enabled.
Audio transitions are faded out and faded in
for 10 msec.
215
AUD REC VOLUME
MODE 1
[0]
[CH1/CH2/
CH3/CH4]
MAS-1 BAL-2/
MAS-3 BAL-4
Selects whether the [AUDIO REC LEVEL] controls
operate on individual channels or stereo pairs.
CH1/CH2/CH3/CH4: Each of the 4 channels can
be adjusted independently with the
corresponding [AUDIO REC LEVEL] volume
control.
MAS-1 BAL-2/MAS-3 BAL-4: In this mode two
stereo pairs are formed: (CH1,CH2) and
(CH3,CH4). Each pair has one Master
Record Level and a Channel Balance control.
The controls labeled CH1 and CH3 operate as
a Master Record Level for their corresponding
pair. The controls labeled CH2 and CH4
operate as Balance Controls for their
corresponding pair. This menu setting allows
changing the recording level without changing
the stereo image, or vice versa.
1
50
Content
219
SEARCH REC CH
[0]
1
2
[CH1/CH2]
CH3/CH4
CH1+3/
CH2+4
Selects the signal source for recording onto the
linear audio tracks
CH1/CH2
: Records CH1 audio on the linear
track's L channel and CH2 audio
on the linear track's R channel.
CH3/CH4
: Records CH3 audio on the linear
track's L channel and CH4 audio
on the linear track's R channel.
CH1+3/CH2+4 : Records mixed CH1 and CH3
audio on the linear track's L
channel and mixed CH2 and CH4
audio on the linear track's R
channel.
221
SEARCH PB AT
1+3/2+4
[0]
1
[MUTING OFF]
MUTING ON
Selects whether or not the audio recorded on the
linear track is output during search when menu
switch No. 219 <SEARCH REC CH> is set to
CH1+2/CH3+4.
MUTING OFF : Audio is output.
MUTING ON : Audio is not output.
222
MONITOR MIX
MODE
[0]
1
2
[AVERAGE]
RMS
ADDITION
Selects the mixing method for the audio channels
being monitored.
AVERAGE : Low level (arithmetical mean)
RMS
: Medium level (geometrical mean)
ADDITION : High level (simple addition)
51
5 MENU SWITCH SETTING DETAILS
5 MENU SWITCH SETTING DETAILS
5-2 MENU SWITCH SETTING CONTENT
5-2 MENU SWITCH SETTING CONTENT
[ ] : Factory setting
[ ] : Factory setting
Item
Menu SW
No.
223
224
CH3/4 OUT SEL
AT 2CH
Item
Setting
Counter
display
On-screen
display
[0]
1
[MUTING]
CH1/CH2
Content
When audio recorded only on CH1 and CH2 with
the BR-D40, BR-D80, BR-D85 or BR-D750 is
played back, select whether or not to output this
audio on CH3 and CH4 as well.
MUTING : Audio is not output.
CH1/CH2 : Audio is output. Signals on CH1 are
output to CH3 and signals on CH2 are
output to CH4. The audio level meter
does not move.
AUDIO IN LEVEL
CH1
AUDIO IN LEVEL
CH2
AUDIO IN LEVEL
CH3
AUDIO IN LEVEL
CH4
0
1
[2]
3
–6DB
0DB
[4DB]
–20DB
Selects the analog audio reference input level.
Sets each of the four channels (CH1 to CH4).
–6DB : Sets the reference level to –6dB.
0DB : Sets the reference level to 0 dB.
4DB : Sets the reference level to 4 dB.
–20DB : Sets the reference level to –20dB.
AUDIO OUT LEVEL
CH1
AUDIO OUT LEVEL
CH2
AUDIO OUT LEVEL
CH3
AUDIO OUT LEVEL
CH4
0
1
[2]
–6DB
0DB
[4DB]
Selects the analog audio reference output level.
Sets each of the four channels (CH1 to CH4).
-6DB : Sets the reference level to -6 dB.
0DB : Sets the reference level to 0 dB.
4DB : Sets the reference level to 4 dB.
232
AUDIO MON
LEVEL LCH
0
1
–6DB
0DB
233
AUDIO MON
LEVEL RCH
[2]
[4DB]
236
PRO 48K S.R.
CONV.
[0]
1
[AUTO]
ON
225
226
227
228
229
230
231
52
On-screen
display
Setting
On-screen
display
Counter
display
237
EMBEDDED
AUDIO
0
[1]
OFF
[ON]
Disables the embedded audio signal from the SDI
output signal
Selects whether or not digital audio signals are
output from the rear panel [SERIAL V/A OUT]
connector together with the video signals.
OFF : Digital signals are not output.
ON : Digital signals are output.
247
DIG AUD AT
ASYNC IN
[0]
1
[NORMAL]
NOISE
REDUCE
Noise will be generated in embedded audio signals
if the embedded audio signals are input from a
different system than the reference sync signals, or
if no reference sync signals are input. This switch
allows you to specify whether or not to remove this
noise (effective only when the SA-D95 is installed).
NORMAL
: Noise is not removed. Normally
set to this position.
NOISE REDUCE : Processes the audio signal to
reduce noise.
251
CH3/4 SOURCE
SEL.
[0]
[CH3pSW/
CH4pSW]
CH3pCH1/
CH4pSW
CH3pSW/
CH4pCH2
CH3pCH1/
CH4pCH2
CH3pSW/CH4pSW: CH3 and CH4 audio input
signals are determined by the front panel’s
audio signal select buttons.
CH3pCH1/CH4pSW: CH3 audio input signals
come from the same source as CH1 audio
input signals.
CH4 audio input signals are determined by the
front panel’s audio signal select buttons.
CH3pSW/CH4pCH2: CH3 audio input signals
are determined by the front panel’s audio
signal select buttons.
CH4 audio input signals come from the same
source as CH2 audio input signals.
CH3pCH1/CH4pCH2: CH3 audio input signals
come from the same source as CH1 audio
input signals.
The CH4 audio input signals come from the same
source as CH2 audio input signals.
1
2
3
Selects the reference level of the audio output from
the rear panel [AUDIO MONITOR] connector.
-6DB : Sets the reference level to -6dB.
0DB : Sets the reference level to 0 dB.
4DB : Sets the reference level to 4 dB.
Enables the sampling rate converter even when
the input signal is a professional 48K AES/EBU
signal.Always ON for digital audio signals
conforming to other specifications.
AUTO : The sampling rate converter is set to
OFF.
Use this position normally.
ON : The sampling rate converter is forced
ON.
Set to this menu position when the incoming
AES/EBU signal cannot be externally
synchronized (audio signal is not in sync with
video signal).
Content
Menu SW
No.
On-screen
display
53
5 MENU SWITCH SETTING DETAILS
5 MENU SWITCH SETTING DETAILS
5-2 MENU SWITCH SETTING CONTENT
5-2 MENU SWITCH SETTING CONTENT
[ ] : Factory setting
[ ] : Factory setting
Item
Menu SW
No.
253
254
255
256
257
261
On-screen
display
CH1 REC SIGNAL
SEL
CH2 REC SIGNAL
SEL
CH3 REC SIGNAL
SEL
CH4 REC SIGNAL
SEL
AUD REF. SIGNAL
LEV.
AUD SEL. AT
SEARCH
Setting
Counter
display
On-screen
display
Item
Content
0
[1]
SILENCE
[1 kHz SINE]
Selects audio signals to output from the built-in
signal generator. Setting is possible for each
channel.
SILENCE : No signal
1 kHz SINE : Outputs audio signals with the
frequency of 1 kHz.
[0]
1
[–20 dB]
–18 dB
Sets the audio reference level during recording.
–20 dB : Sets the audio recording reference level to
–20 dB.
–18 dB : Sets the audio recording reference level to
–18 dB.
• The audio level meter reference level indication
changes according to the setting.
[0]
1
[LINEAR
AUDIO]
DIGITAL
AUDIO
Selects audio signals to output during search.
LINEAR AUDIO : Outputs linear audio.
DIGITAL AUDIO : Outputs digital audio.
• Noise may be heard while the digital search
sound is used. This is normal. It is not a
malfunction.
Menu SW
No.
On-screen
display
301
302
54
DIRECT EJECT
DIRECT SEARCH
BACK SPACE
0
[1]
0
[1]
OFF
[ON]
OFF
[ON]
OFF
[ON]
Enables or disables Direct Eject.
OFF : Eject is enabled only in the Stop
(STANDBY ON/OFF) mode.
ON : Eject is enabled in any mode.
0
1
2
3
4
5
6
[7]
1 SEC
10 SEC
30 SEC
1 MIN
2 MIN
3 MIN
4 MIN
[5 MIN]
When the unit remains in the Record Pause, Still or
Stop (Standby ON) mode for a long time, the Tape
Protection mode is engaged automatically. This
switch lets you determine how long (1 sec. to 5
min.) the unit will remain in one of these modes
before the Tape Protection mode is engaged.
In the Record Pause and Still modes, the tape is
advanced by 1 frame when the selected duration
has passed.
In the Stop (Standby ON) mode, the Standby OFF
mode is engaged.
311
AUTO PLAY
[0]
1
[OFF]
ON
Selects the mode engaged when the tape reaches
the beginning in the REW mode.
OFF : Stop (STANDBY-ON) is engaged.
ON : PLAY is engaged.
312
AUTO REW
[0]
1
[OFF]
ON
Selects the mode engaged when the tape reaches
the end in the PLAY or RECORD mode.
OFF : Stop (standby-on) mode is engaged.
ON : REW is engaged.
314
PB/EE MODE
[0]
[STOP/FF/
REW]
STOP
Selects the modes in which the EE mode is
automatically engaged.
STOP/FF/REW : Engages the EE mode in the
Stop, FF and Rewind modes.
STOP : Engages the EE mode in the Stop mode.
JVC D80
[JVC D860/
D92/D95]
DVW-A500
USER
SETTING
(382-385)
Selects the Device Type ID code returned by the
VCR after receiving a DEVICE TYPE REQUEST
via RS-422 port.
JVC D80 : Replies with ID code for the BRD750U/D350U/D80U/D50U/D85U and
BR-D51U.
317
9PIN DEVICE ID
Enables/disables entering the search mode
directly.
OFF : The search/jog dials can be used when the
[SEARCH] or [VAR] button is pressed.
ON : Search and jog can be enabled in any mode
except Record.
Enables or disables backspace editing using the
Record, Pause and Play buttons.
OFF : No backspacing after Record Pause
ON : Backspacing after Record Pause.
When set to OFF, recording will start more quickly
than when set to ON. However, transitional picture
quality is affected at the start of recording.
Content
PAUSE/STILL/
STP/TIME
1
0
[1]
On-screen
display
307
<SYSTEM>
300
Setting
Counter
display
0
[1]
2
3
*Set to “JVC D80” when using the RM-G820 editing
remote controller.
JVC D860/D92/D95: Replies with ID code for the
BR-D860U/D560U/D92U/D95U.
DVW-A500 : Replies with ID code for the DVWA500.
USER SETTING(382-385):Replies with ID code set
with menu switches No.382 to No.385.
319
FF/REW
MAX SPEED
[0]
1
2
[x60]
x32
x17
Selects the maximum tape speeds in FF and REW.
X60: The maximum tape speed is 60 times normal.
X32: The maximum tape speed is 32 times normal.
X17: The maximum tape speed is 17 times normal.
55
5 MENU SWITCH SETTING DETAILS
5 MENU SWITCH SETTING DETAILS
5-2 MENU SWITCH SETTING CONTENT
5-2 MENU SWITCH SETTING CONTENT
[ ] : Factory setting
[ ] : Factory setting
Item
Menu SW
No.
320
On-screen
display
PREROLL TIME
Counter
display
0
On-screen
display
0SEC
...
...
[5]
[5SEC]
Content
...
...
Sets the preroll time when the [PREROLL] button is
pressed.
The preroll time can be selected from 0 second to
15 seconds.
15
15SEC
323
PREROLL END
MODE
0
[1]
STANDBY-ON
[STILL]
Selects which operation mode is engaged after
preroll is executed.
STANDBY-ON : Engages the Standby ON mode.
STILL
: Engages the Still mode.
328
EDIT POINT
CLEAR
0
[1]
DISABLE
[ENABLE]
Selects whether the edit point data is cleared after
performing the edit
DISABLE : The edit point is not cleared.
ENABLE : The edit point is cleared.
340
351
SEARCH SPEED
PREREAD
[0]
1
3
[0]
1
2
3
352
56
Item
Setting
AUD PREREAD
TIMING
[0]
1
[x 32]
x 17
x6
[VID-OFF/
AUD-OFF]
VID-ON/
AUD-OFF
VID-OFF/
AUD-ON
VID-ON/
AUD-ON
[NORMAL]
OFF SET
Selects the maximum search speed when using
the search dial.
X32 : Maximum search speed is +/-32 times
normal.
X17 : Maximum search speed is +/-17 times
normal.
X6 : Maximum search speed is +/-6 times
normal.
Selects whether or not the preread function is
activated. Video and audio preread functions
can be set independently.
VID-OFF/AUD-OFF : Both video and audio
preread are disabled.
VID-ON/AUD-OFF : Only video preread is
enabled.
VID-OFF/AUD-ON : Only audio preread is
enabled.
VID-ON/AUD-ON : Both video and audio
preread are enabled.
* When using the [REC] button to start
recording, be sure to set this switch to “VIDOFF/AUD-OFF”.
Selects whether or not to apply correction during
audio preread. Correction is based on output audio
phase delay set with the audio control menu
<AUDIO OUTPUT PHASE>.
NORMAL : Does not apply correction.
OFF SET : Applies correction to the output audio
phase according to the delay of the
connected video device.
Menu SW
No.
On-screen
display
Setting
Counter
display
On-screen
display
Content
357
DIAG AT
POWER ON
[0]
1
[OFF]
ON
Selects whether or not self-diagnosis is executed
when the power is turned on.
OFF: Self-diagnosis is not executed.
ON : Self-diagnosis is executed.
However, if no tape is loaded when the power is
turned on, self-diagnosis does not take place.
While diagnostics are running (“DIAGNOSTIC”
blinks on the screen), you cannot load a cassette.
Do not try to forcibly load it.
After completion of diagnostics, a warning
indication is shown if there is an abnormality.
Refer to “Warnings with Indicators” on page 145.
359
JOG FEELING
(REMOTE)
[0]
1
2
3
4
[TYPE-1]
TYPE-2
TYPE-3
TYPE-4
TYPE-5
Alters the operation “feel” of the connected
editing controller's jog dial.
Five settings (TYPE-1 (0) to TYPE-5 (4)) are
available.
363
CONTROLLER
SELECT
[0]
1
2
3
4
5
6
7
[DEFAULT]
RM-450
NOT DEFINED
NOT DEFINED
NOT DEFINED
NOT DEFINED
NOT DEFINED
NOT DEFINED
This menu changes the characteristics of the VCR
to match specific types of controllers.
DEFAULT : Normally set to this position. This
position is ready for standard editing
controllers.
RM-450 : Set to this position for an editing remote
controller which outputs JOG
commands for synchronization.
(e.g.) SONY RM-450
NOT DEFINED - TYPE-7: Not defined.
367
EDIT INTERRUPTION
(525)
[0]
1
[OFF]
ON
Selects whether or not editing aborts when the
audio condition degrades during PREROLL.
OFF : Does not stop editing.
ON : Stops editing. Error message is shown on the
counter display.
368
STARTING PIC
FREEZE
[0]
1
[OFF]
ON
Selects playback pictures or a still image as the
video output until the servo locks.
OFF : A playback picture is displayed. The picture
may be noisy until the servo stabilizes.
ON : A still image is displayed. This changes to
playback video when the servo stabilizes.
* When this menu switch is set to “ON” and
playback starts from a still image containing the
block noise, still images containing block noise
are output until the servo indicator lights.
To avoid this, obtain a clear still image before
starting playback (using the jog dial or frame
advance/reverse buttons).
57
5 MENU SWITCH SETTING DETAILS
5 MENU SWITCH SETTING DETAILS
5-2 MENU SWITCH SETTING CONTENT
5-2 MENU SWITCH SETTING CONTENT
<TIME CODE>
[ ] : Factory setting
Item
On-screen
display
Counter
display
369
PARA-RUN
[0]
1
371
372
INPUT SELECT
SAFETY
P+R AT
SWAP MODE
Item
Setting
Menu SW
No.
[0]
1
[0]
1
On-screen
display
[OFF]
ON
[OFF]
ON
[ENABLE]
DISABLE
Content
Allows daisy chaining of several VCR’s via the
[REMOTE IN (9P)] and [REMOTE OUT (9P)]
connectors, enabling you to control all connected
VCRs at the simultaneously.
OFF : Set to this position to control the VCR
independently.
ON : Set to this position for a simultaneous
operation.
Apply this menu setting to all connected VCR's.
Switches ON a safety function to prevent
accidental change of input router
OFF : Disactivates this function. Signal is switched
when an input switch is pressed.
ON : Activates this function. To change the input
signal selection, press the input switch while
pressing the [SHIFT] button.
375
AUD EDIT
PRESET CH1
0
[1]
2
3
NO DEFINITION
[CH1]
CH2
CH1 OR CH2
376
AUD EDIT
PRESET CH2
0
1
[2]
3
NO DEFINITION
CH1
[CH2]
CH1 OR CH2
377
AUD EDIT
PRESET CH3
AUD EDIT
PRESET CH4
[0]
1
2
3
[NO
DEFINITION]
CH1
CH2
CH1 OR CH2
381
JOG FEELING
(LOCAL)
[0]
1
[NORMAL]
INSENSITIVE
382
9 PIN ID䡲---(1ST)
378
MUTING AT NO TAPE
0
[1]
15
F
0
[1]
0
[1]
15
F
0
[15]
[F]
[0]
1
Content
This mode allows edit controllers that have only two
audio channel capabilities to edit all four audio
channels. The audio insert edit command is
translated using the definition set by this menu to
perform CH1 through CH4 edits.
NO DEFINITION: Accepts no command.
CH1 : Executes insert edit of the channel selected
when the CH1insert command appears.
CH2 : Executes insert edit of the channel selected
when the CH2 insert command appears.
CH1 OR CH2 : Executes insert edit of the channel
selected when the CH1 or CH2
insert command appears.
Selects jog dial operation response level.
NORMAL
: Normally set to this position.
INSENSITIVE : Slower than NORMAL mode.
Sets the ID reply code when menu switch No.317
<9 PIN DEVICE ID> is set to “3: USER SETTING
(382-385)”. Specify a hexadecimal 4-digit ID code
with these four menu switches (set each digit with
each corresponding menu switch). Select
hexadecimal digits (0 to F).
0
...
386
9 PIN ID---䡲(4TH)
0
[1]
...
Selects the method for opening the menu.
OFF : Pressing the [MENU] button engages the
menu switch setting mode.
ON : Pressing the [MENU] + [SHIFT] buttons
simultaneously engages the menu setting
mode.
385
9 PIN ID--䡲-(3RD)
[F]
...
[OFF]
ON
This setting determines whether or not the
automatic match frame function is used.
OFF : Match-frame is disabled.
ON : Match-frame is enabled.
After an edit has been executed, the edit-out points
of both the player and recorder are automatically
registered as edit-in points for the next edit.
9 PIN ID-䡲--(2ND)
0
...
383
0
[15]
...
[0]
1
[OFF]
ON
On-screen
display
...
58
MENU OPEN
SAFETY
[0]
1
Setting
Counter
display
...
374
MATCH FRAME
On-screen
display
...
Selects whether or not simultaneous operation of
the player and recorder is permitted by pressing
the [PLAYER] and [RECORDER] buttons together
during swap editing.
ENABLE : Simultaneous operation for the player
and recorder is possible.
DISABLE : Simultaneous operation is not possible.
Before operation, select the VCR with
the [PLAYER] or [RECORDER] button.
Menu SW
No.
384
373
[ ] : Factory setting
[DISABLE]
ENABLE
Even when the PB mode is selected with the [PB
PB/EE] button, the EE mode is engaged when no
tape is loaded.
In this case, this switch is used to select whether
the audio and video signals are output or not.
DISABLE : The audio and video signals are output.
ENABLE : The audio and video signals are not
output.
59
5 MENU SWITCH SETTING DETAILS
5 MENU SWITCH SETTING DETAILS
5-2 MENU SWITCH SETTING CONTENT
5-2 MENU SWITCH SETTING CONTENT
[ ] : Factory setting
[ ] : Factory setting
Item
Menu SW
No.
387
On-screen
display
[1]
2
[4 FLD]
2 FLD OR
4 FLD
OFF
3
[0]
1
[0]
1
...
...
9
TYPE 9
15
[16]
10
20
0
7
11
[12]
13
14
15
18
[19]
20
21
22
0
10
Content
Selects a line in the vertical interval from line 10-20
for VITC time code insertion.
Sets the location for the first VITC line, which will
be inserted in the vertical interval.
Selects a line in the vertical interval from lines 7 to
22 for VITC time code insertion.
Sets the location for the first VITC line, which will
be inserted in the vertical interval.
Selects whether or not the multi cue-up function is
used.
OFF : Multi cue-up function is disabled. The normal
mode is engaged.
ON : The Multi Cue mode is engaged.
For more information about the multi cue-up
function, see page 92.
401
Sets according to the player VCR during swap
editing.
Normally set to “AUTO”.
AUTO : Set to this position when a BR-D95U, BRD92, BR-D52 or DVW-A500 is connected.
TYPE 1 to TYPE 9 : Not used.
401p
402
CTL DF SELECT
(525)
[0]
1
2
[TCG SETTING]
NON DROP
DROP
Sets the CTL counter to operate in the NONDROP
or the DROP frame mode.
TCG SETTING: Non-drop Frame mode is engaged
when the [DF/NDF] switch on the
sub panel is set to NDF. If it is set
to “DF”, the Drop Frame mode is
engaged.
NON DROP : Non-drop Frame mode is
engaged.
DROP
: Drop Frame mode is engaged.
403
REGEN MODE
[0]
1
2
[TC&UB]
TC
UB
Selects what elements of time the code (TC, UB)
are regenerated.
Selects TC or UB in the Time Code Regeneration
mode.
TC&UB : Regenerates time code and user bits.
TC
: Regenerates time code only. Preset UB
data are recorded onto the user bits.
UB
: Regenerates user bits only. Preset TC
data are recorded onto the time code.
391
SYNCHRONIZATION
0
[1]
DISABLE
[ENABLE]
Selects whether or not the BR-D95U's built-in editor
issues capstan bump commands for frame
accurate swap editing.
DISABLE : The bump function does not operate.
ENABLE : The bump function operates. (Set the
preroll time to 5 seconds or more).
393
SYNC GRADE
[0]
1
2
3
[ACCURATE]
+/-1 FRAME
+/-2 FRAME
ROUGH
Selects the editing accuracy during swap editing.
ACCURATE : 0 frame
+/-1FRAME : +1 frame
+/-2FRAME : +2 frames
ROUGH
: Rough
395
AUTO-EE
[0]
[RECORDER
ONLY]
AUTO-EE
Selects whether the BR-D95U automatically
switches from Playback to EE for single monitor
operation during swap editing.
RECORDER ONLY : Disables the auto EE function.
AUTO-EE : Enables the auto EE function. When
the player is selected, this unit enters
the EE mode and the player’s output
signals are automatically passed
through and displayed (this function is
useful for editing with only one monitor).
1
60
[AUTO]
TYPE 1
VITC LINE-1
SEL (625)
5
[6]
VITC LINE-2
SEL (525)
VITC LINE-2
SEL (625)
7
[8]
9
10
17
[18]
19
20
0
7
...
SWAP VTR
SELECT
400p
10
...
[OFF]
ON
0
...
390
MULTI CUE
MODE
VITC LINE-1
SEL (525)
...
389
400
On-screen
display
...
[0]
1
2
Counter
display
...
3
[8 FLD]
4 FLD OR
8 FLD
2 FLD OR
4 FLD OR
8 FLD
OFF
On-screen
display
...
CF FLAG REPLY
(625)
When color framing lock is applied, the STATUS
DATA CF lock bit transmitted from the 9-pin remote
connector is set to ON. This switch selects the field
unit where the CF lock bit is set to ON.
• NTSC
4FLD : The bit is set to ON with 4-field unit.
2FLD OR 4FLD: The bit is set to ON with 2 or
4-field unit.
OFF : The bit is set to OFF at all times.
• PAL
8FLD: The bit is set to ON with 8-field unit.
4FLD OR 8FLD : The bit is set to ON with 4 or
8-field unit.
2FLD OR 4FLD OR 8FLD : The bit is set to ON
with 2, 4 or 8-field unit.
OFF: The bit is set to OFF at all times.
Setting
Menu SW
No.
...
387p
Item
Content
...
On-screen
display
...
CF FLAG REPLY
(525)
Setting
Counter
display
13
[14]
15
20
[21]
22
Selects a line in the vertical interval from line 10-22
for VITC time code insertion.
Sets the location for the second VITC line, which
will be inserted in the vertical interval.
Selects a line in the vertical interval from lines 7 to
22 for VITC time code insertion.
Sets the location for the second VITC line, which
will be inserted in the vertical interval.
61
5 MENU SWITCH SETTING DETAILS
5 MENU SWITCH SETTING DETAILS
5-2 MENU SWITCH SETTING CONTENT
5-2 MENU SWITCH SETTING CONTENT
[ ] : Factory setting
[ ] : Factory setting
Item
Setting
Menu SW
No.
[LTC]
VITC
Selects LTC or VITC as the time code source for
locking the BR-D95’s built-in TC Generator to an
external master TC generator.
LTC : The TC generator locks to the LTC data
from the rear panel connector labeled TC
IN.
VITC : The TC generator locks to the VITC data
from the rear panel connector labeled VIDEO IN.
457
[0]
1
2
3
[ASM+INS]
ASM
INS
0FF
Selects the edit mode in which time code is
regenerated (even if the [PRESET/REGEN] switch
is set to “PRESET”).
ASM+INS : Regenerates in the Assemble and
Insert modes.
ASM
: Regenerates in the Assemble mode.
INS
: Regenerates in the Insert mode.
OFF
: The setting of the [PRESET/REGEN]
switch is used.
On-screen
display
Counter
display
409
EXT
REGEN TC
[0]
1
410
AUTO REGEN
MODE
On-screen
display
421
TCG CF FLAG
[0]
1
2
[OFF]
ON
AUTO
Selects whether the color frame flag is set to ON or
OFF for a vacant bit in the time code.
OFF : Sets the color frame flag to OFF.
ON : Sets the color frame flag to ON.
AUTO : Sets the color frame flag to ON or OFF
according to the relationship between the
video signals being recorded and the color
framing of the time code. (See page 106)
450
SUB TC(VITC)
REC
0
[1]
OFF
[ON]
Selects incoming VITC or memory preset as the
source of the data recorded onto the Sub-Time
Code
OFF : “00.00.00.00” is always recorded on the sub
time code.
ON : Input VITC is recorded in sub time code.
* If this menu switch is set to “OFF” and menu
switch No. 451 <VITC OUT SELECT> is set to
“OFF” or “TC”, the on-screen sub time code
indication will not advance in the Play mode.
This is the case even when playing back a tape
with sub time code recorded.
62
Setting
Item
Content
Menu SW
No.
451
VITC OUT
SELECT
0
[1]
2
SUB TC
[TC]
OFF
Selects the source for the VITC TC
superimposed on video output signal.
SUB TC : Sub time code is delivered to the
output VITC.
TC
: Main time code is delivered to the
output VITC.
OFF
: VITC is not output.
452
SEARCH LTC
0
[1]
OFF
[ON]
Enables or disables LTC output in the shuttle
Search mode.
LTC is output from the [TC OUT] connector.
OFF : LTC is output only in X1 tape speed.
*LTC is not output in the Program Playback
mode.
ON : LTC is output in all search speed modes.
(Continuous time code is not available).
On-screen
display
UB PRESET
AUTO
Counter
display
On-screen
display
Content
[0]
1
[OFF]
ON
When user bit data is TC-preset, the data is stored
in memory. Selects whether or not the user bit
data is automatically preset based on the stored
user bit data when the power is turned on.
OFF : The UB auto preset function is disabled.
ON : The UB auto preset function is enabled.
* When this is set to ON, user bit data from the
9-pin remote controller cannot be preset.
With these menu
switches, the
menu switch
setting screen
changes to the
normal onscreen data
display.
The actual
position of the
on-screen data
display is
moved.
Selects the On-Screen data display's horizontal
position from 7 possible locations.
The factory default position [0] is at the extreme
right of the monitor display. The position shifts
leftward as the numbers increase.
<ON-SCREEN>
501
CHARA
H POSITION
[0]
6
502
CHARA
V POSITION
[0]
11
504
INFORMATION
SELECT
0
[1]
3
4
TIME
[TIME+MODE]
TIME+SUB TC
TIME+SUB TC
+MODE
Selects on-screen display data.
TIME
: Displays time data only.
TIME+MODE : Displays time data and mode data.
TIME+SUB TC : Displays time data and sub time
data.
TIME+SUB TC+MODE: Displays time data, sub
time data and mode data.
* A slight delay occurs in the displayed time code
data. Do not dub the on-screen data as it is to a
tape for off-line editing.
505
REMAIN ENABLE
[0]
1
[DISABLE]
ENABLE
Selects whether of not the tape remaining information is displayed on screen.
DISABLE : Not displayed.
ENABLE : Displayed. For display contents, refer
to page 23.
Selects the On-Screen data display’s vertical
position from 12 possible locations.
The factory-set 0 position is at the bottom of the
monitor display. The position shifts upward as the
numbers increase.
When menu switch No. 504 <INFORMATION
SELECT> is set to “TIME+MODE” or “TIME+SUB
TC”, the position set with 10 is the same as that
with 11.
When menu switch No. 504 is set to “TIME+SUB
TC+MODE”, the position set with 9 or 10 is the
same as 11.
63
6 PREPARATION
5 MENU SWITCH SETTING DETAILS
6-1 OPERATION MODE LOCK
5-2 MENU SWITCH SETTING CONTENT
This unit is provided with an operation mode lock facility. This function prevents accidental changes to switch and
control settings. When this function is ON, currently selected modes and knob or switch positions cannot be
adjusted.
[ ] : Factory setting
Item
Menu SW
No.
512
On-screen
display
MUTING/ALARM
MESSAGE
Setting
Counter
display
[0]
1
On-screen
display
[OFF]
ON
Content
Selects whether “MUTING” or “CONDITION
ALARM” messages appear On-Screen.This menu
makes it easier to check the VCR’s operation
status.
The on-screen display is shown on the monitor
connected to the [VIDEO MONITOR OUT]
connector.
OFF : The “MUTING” and “CONDITION ALARM”
are not displayed.
ON : The “MUTING” and “CONDITION ALARM”
are displayed.
For more details, refer to the “MUTING/
CONDITION ALARM” display on page 24.
● Use menu switch No. 002 <OPERATION LOCK> to enable this function.
● With this function enabled, operation of all front panel control buttons, adjustment knobs, dials and switches is
disabled and changes to menu switch settings are not possible. When this function is activated, it is not possible
to change menu switch settings. However, the [PHONES LEVEL] control and menu switch No. 002
<OPERATION LOCK> (to release the operation mode lock function) can be used.
Procedure
[SEARCH] button
VIDEO CASSETTE RECORDER
AUDIO
INPUT
VIDEO
INPUT
AUDIO INPUT / AUDIO MONITOR SELECT
CH1
CH2
CH3
CH4
AES/EBU CH1
L
ANALOG CH1
R
CH2
CH3
CH4
LINE
CH2
CH3
CH4
CPN
SDI
AUDIO
MONITOR
BR-D95U
POWER
SIF
COMPONENT DIGITAL
ON
I
OFF
O
Variable Motion
513
EDIT ON
SCREEN
0
[1]
OFF
[ON]
CH1
Selects whether the edit on-screen display is ON or
OFF during editing. On-screen information is output
from the [LINE2 SUPER OUT] connector.
OFF : Does not show the edit on-screen display
during editing.
ON : Show the edit on-screen display during
editing.
620
64
V.BLANK MASK
DUBBING LOOP
0
[1]
2
[0]
1
2
3
OFF
[ON]
ON WITH
0.5H
[OFF]
3 TIMES
5 TIMES
10 TIMES
Enables/disables masking of the vertical interval.
OFF
: No masking.
ON
: Masks the vertical interval.
ON WITH 0.5H : Masks section for 0.5H in addition
to the vertical interval (analog
signals only).
* When this menu is set to “OFF”, only the
recordable sections of the signals output for V.
blanking in the EE mode are output (VITC,
EXTRA LINE, EXTENSION LINE).
When this menu is set to “ON”, VITC and EXTRA
LINE have priority in each menu setting (refer to
page 89).
Selects whether or not the multi-generation test
“Dubbing Loop Function” is used to aid adjusting an
analog component system to unity gain. When this
mode is active, the VCR automatically switches to
its internal color bar generator and continuously
builds the number of generations selected.
OFF
: The dubbing loop function is disabled.
3 TIMES : The dubbing loop function repeatedly
builds 3 generations every few seconds.
5 TIMES : The dubbing loop function repeatedly
builds 5 generations every few seconds.
10 TIMES : The dubbing loop function repeatedly
builds 10 generations every few
seconds.
* When set to any setting except OFF (0), this unit
enters the Dubbing Loop mode.
* For more details on the dubbing loop function,
refer to page 122.
R
P
dB OVER dB
0
+4
–10
0
–20
–2
–30
–40
–4
CH4/TRACKING
R
P
dB OVER dB
0
+4
–10
+2
0
–20
–2
–30
–40
–4
–60
R
P
dB OVER dB
0
525
625
CTL TC UB DF SERVO CF GEN 16:9 AP
AUTO OFF P.READ V.VAR PB/EE REMOTE
CONDITION
0
–20
–2
–30
–40
–4
+2
0
–2
–4
–60
COUNTER
RESET
VCON
REMOTE
MENU
SET
HOLD
PB
PB/EE
VAR
SEARCH
PLAYER RECORDER
UB
+4
–10
+2
–60
–10
P.PLAY
–20
STILL
–30
–40
M
H
–60
ASSEM
VIDEO
DA1
ENTRY
OUT
S
DA2
DA3
F
DA4
EJECT
REC
PLAY
PAUSE/STILL
X1
X-1
PHONES
CH1
CH2
REC
CH3
CH4
TRACKING
IN
PULL FOR VARIABLE
METER MODE
FINE
PULL
RELEASE
PLAY
CANCEL PREVIEW
TRACKING
SHIFT
REVIEW
INSERT
AUTO EDIT
TC
PREROLL
USER
VIDEO
AUDIO
STAND BY
TOP
REW
STOP
FF
SERVO/SYS
TIME CODE
ON SCREEN
OTHERS
[MENU] button
[SET] button
[HOLD] button
<TBC. FRAME MEMORY>
601
CH3
CH2
R
P
dB OVER dB
0
+4
+2
PULL
RELEASE
REV
FWD
Jog dial
1. Make all desired settings and operate as usual.
2. Engage the operation lock function.
Press the [MENU] button to call up the menu setting display.
Turn the jog dial and select menu switch No. 002 <OPERATION LOCK>.
1
2
If the Direct Access facility is ON, press the [STAND BY] button to call up the
menu item display more quickly.
3 Select “ON (1)” by turning the jog dial while pressing the [SEARCH] button.
4 Press the [SET] button.
The operation lock function is ON.
After the SET indication blinks for several seconds, the normal counter and
on-screen displays are restored.
3. To cancel the operation mode lock facility, set menu switch No. 002
<OPERATION LOCK> to “OFF (0)”.
65
6 PREPARATION
6 PREPARATION
6-2 STANDBY ON/OFF
6-3 LOADING AND UNLOADING THE CASSETTE
VIDEO CASSETTE RECORDER
AUDIO
INPUT
VIDEO
INPUT
AUDIO INPUT / AUDIO MONITOR SELECT
CH1
CH2
CH3
CH4
AES/EBU CH1
L
ANALOG CH1
R
CH2
CH3
CH4
LINE
CH2
CH3
CH4
CPN
SDI
AUDIO
MONITOR
BR-D95U
VIDEO CASSETTE RECORDER
AUDIO
INPUT
POWER
CH1
CH2
CH3
CH4
CH2
CH3
CH4
LINE
CH2
CH3
CH4
CPN
SDI
COMPONENT DIGITAL
ON
I
OFF
O
AUDIO
MONITOR
VIDEO
INPUT
AUDIO INPUT / AUDIO MONITOR SELECT
AES/EBU CH1
L
ANALOG CH1
R
SIF
POWER
COMPONENT DIGITAL
CH1
CH2
R
P
dB OVER dB
0
+4
–10
+2
0
–20
–2
–30
–40
–4
0
CH3
–20
–2
–30
–40
–4
–60
CH4/TRACKING
R
P
dB OVER dB
0
+4
–10
+2
0
–20
–2
–30
–40
–4
–60
R
P
dB OVER dB
0
+4
–10
+2
0
–2
–4
–60
525
625
CTL TC UB DF SERVO CF GEN 16:9 AP
AUTO OFF P.READ V.VAR PB/EE REMOTE
CONDITION
COUNTER
RESET
VCON
MENU
SET
HOLD
REMOTE
VAR
SEARCH
CH1
CH2
REC
CH3
UB
PB
PB/EE
P.PLAY
–20
[PB PB/EE] button
STILL
–30
–40
M
H
–60
ASSEM
CH4
VIDEO
DA1
S
DA2
DA3
F
DA4
EJECT
REC
PLAY
PULL FOR VARIABLE
METER MODE
FINE
PULL
RELEASE
Notes
● Output mode selection in
the Standby ON/OFF mode
Pressing the [PB PB/EE]
button switches between
Still output or the EE mode.
The counter display
changes to “PB” or “PB/
EE”.
In the EE mode, the input
signal can be monitored.
● When video and audio
signals are output from the
built-in signal generator;
To output video signals
from the signal generator,
press the [VIDEO INPUT]
button so that all [VIDEO
INPUT] indicators light.
Select the video signal type
from the signal generator
with menu switch No. 111
<VD REC SIGNAL SEL.>.
To output audio signals
(1 kHz, sine wave) from the
signal generator, set menu
switches No. 253 to No.
256 <CH1 to 4 REC
SIGNAL SEL.> to “1 kHz
SINE” and press the audio
signal select buttons to
select the required
channels. The
corresponding [AUDIO
INPUT] indicators will light.
PLAY
0
OUT
CANCEL PREVIEW
TRACKING
SHIFT
REVIEW
INSERT
AUTO EDIT
TC
PREROLL
USER
TOP
STAND BY
REW
–20
–2
–30
–40
–4
VIDEO
AUDIO
STOP
FF
0
CH3
–20
–2
–30
–40
–4
–60
CH4/TRACKING
R
P
dB OVER dB
0
+4
–10
+2
0
–20
–2
–30
–40
–4
–60
R
P
dB OVER dB
0
+4
–10
+2
0
–2
–4
–60
TIME CODE
ON SCREEN
I
O
OTHERS
CONDITION
RESET
VCON
MENU
SET
HOLD
REMOTE
CH2
REC
CH3
PULL
RELEASE
PULL
RELEASE
FWD
PLAY
PB
PB/EE
Standby ON mode: The tape is loaded and the head drums are rotating, permitting
quick start of operation when another mode is engaged.
The [STANDBY] button is illuminated.
Standby OFF mode: The tape is loaded but the drums are stationary. The tape
and the heads are protected against damage in this mode.
The [STANDBY] button’s light goes out.
The Output mode in the Standby ON and OFF modes can be selected with the [PB/
EE] button (see notes for details).
VIDEO
DA1
IN
ENTRY
OUT
S
DA2
DA3
F
DA4
EJECT
REC
PLAY
PAUSE/STILL
METER MODE
CANCEL PREVIEW
TRACKING
SHIFT
* The Standby ON mode is automatically switched to the Standby OFF mode
after about 5 minutes to protect the tape and the heads. The time when the
Standby OFF mode is engaged can be selected with menu switch No. 307
<PAUSE/STILL/STP TIME>.
REVIEW
INSERT
AUTO EDIT
TC
PREROLL
USER
TOP
VIDEO
AUDIO
STAND BY
REW
STOP
FF
X1
SERVO/SYS
TIME CODE
ON SCREEN
OTHERS
PULL
RELEASE
REV
FWD
[EJECT] button
Notes
● To call up the on-screen
display, set the [ON
SCREEN] switch on the
sub panel to “ON”. Onscreen data are output
through the rear panel
[LINE2-SUPER] connector.
● Be sure to use only
cassette tapes.
VHS/S-VHS cassettes
cannot be used.
Procedure
Standby ON mode is engaged when the cassette is loaded or when the Stop
mode is engaged with the STOP button.
To change the Standby ON mode to the Standby OFF mode, press the
[STANDBY] button.
[ The [STANDBY] button goes out, indicating that the Standby OFF mode has
been engaged.
To change the Standby OFF mode to Standby ON mode, press the [STANDBY]
button.
[ The [STANDBY] button is illuminated, indicating that the Standby ON mode
has been engaged.
P.PLAY
STILL
M
H
ASSEM
TRACKING
[STANDBY] button
Two different sub modes are available in the Stop mode.
[POWER]
switch
PLAYER RECORDER
UB
–20
–30
–40
–60
CH4
PULL FOR VARIABLE
REV
VAR
SEARCH
X-1
CH1
FINE
SERVO/SYS
525
625
CTL TC UB DF SERVO CF GEN 16:9 AP
AUTO OFF P.READ V.VAR PB/EE REMOTE
COUNTER
X1
PHONES
ENTRY
CH2
R
P
dB OVER dB
0
+4
–10
+2
PAUSE/STILL
TRACKING
IN
CH1
R
P
dB OVER dB
0
+4
–10
+2
PLAYER RECORDER
X-1
PHONES
ON
OFF
Variable Motion
Variable Motion
R
P
dB OVER dB
0
+4
–10
+2
BR-D95U
SIF
● Conditional EJECT
operation
When menu switch No.
301 <DIRECT EJECT> is
set to “OFF (0)”, the
[EJECT] button is enabled
only in the Standby ON or
OFF mode.
With this switch set to “ON
(1)”, tapes can be ejected
in any mode.
Loading the cassette
1. Turn the [POWER] switch on.
[ The counter display is illuminated.
* If a cassette is not loaded, the counter display indicates “No Tape” and the
on-screen display indicates “NO TAPE”. These are not shown when setting the
menu switches.
2. Load the cassette.
If tape tension is slack, tighten it before inserting the cassette. Insert the
cassette with the cassette label facing you. Press the center of the cassette
gently until the loading mechanism takes over.
[ The cassette is automatically drawn into the slot and the [STOP] button
lights.
When the cassette is fully loaded, the Standby ON mode is engaged and the
[STANDBY] button lights.
*When a cassette tape with the REC switch set to OFF is loaded, “REC Inh” is
shown on the tape counter display for about 2 seconds.
Unloading the cassette
1. Press the [EJECT] button.
[ The cassette is ejected.
The CTL counter is reset.
2. Remove the cassette from the slot.
Precautions
● Do not insert anything other than a cassette into the slot.
● Do not try to remove the cassette once automatic cassette loading has begun.
Wait until loading is complete, then press the [EJECT] button.
● In the PB mode, pressing
the [REC] button allows
you to monitor the input
signal. Pressing the
[STOP] button restores the
Play mode.
66
67
7 RECORDING
7 RECORDING
7-1 PREPARATION FOR RECORDING
VIDEO CASSETTE RECORDER
AUDIO
INPUT
CH1
CH2
CH3
CH4
AES/EBU CH1
L
ANALOG CH1
R
CH2
CH3
CH4
LINE
CH2
CH3
CH4
CPN
SDI
AUDIO
MONITOR
BR-D95U
VIDEO
INPUT
AUDIO INPUT / AUDIO MONITOR SELECT
7-2 INPUT VIDEO AND AUDIO SIGNAL SELECTION
POWER
SIF
COMPONENT DIGITAL
ON
I
OFF
O
Variable Motion
CH1
CH3
CH2
R
P
dB OVER dB
0
+4
R
P
dB OVER dB
0
+4
–10
+2
0
–20
–2
–30
–40
–4
CH4/TRACKING
R
P
dB OVER dB
0
+4
–10
+2
0
–20
–2
–30
–40
–4
–60
R
P
dB OVER dB
0
525
625
CTL TC UB DF SERVO CF GEN 16:9 AP
AUTO OFF P.READ V.VAR PB/EE REMOTE
CONDITION
0
–20
–2
–30
–40
–4
+2
0
–2
–4
–60
COUNTER
RESET
VCON
REMOTE
MENU
SET
HOLD
PB
PB/EE
VAR
SEARCH
PLAYER RECORDER
UB
+4
–10
+2
–60
–10
P.PLAY
–20
STILL
–30
–40
M
H
–60
ASSEM
VIDEO
DA1
ENTRY
OUT
S
CH1
CH2
REC
CH3
CH4
DA2
DA3
INSERT
VIDEO CASSETTE RECORDER
AUDIO
INPUT
AUDIO INPUT / AUDIO MONITOR SELECT
CH1
CH2
AES/EBU CH1
L
ANALOG CH1
R
SDI
AUDIO
MONITOR
AUDIO
MONITOR
VIDEO
INPUT
CH3
CH4
CH2
CH3
CH4
LINE
CH2
CH3
CH4
CPN
DA4
TC
CH1
CH2
CH3
CH4
CH2
CH3
CH4
LINE
CH2
CH3
CH4
CPN
METER MODE
FINE
PULL
RELEASE
PLAY
CANCEL PREVIEW
TRACKING
SHIFT
AUTO EDIT
REVIEW
PREROLL
EJECT
REC
PLAY
VIDEO INPUT
indicator
CH1
CH3
CH2
R
P
dB OVER dB
0
+4
R
P
dB OVER dB
0
+4
–10
+2
0
–20
–2
–30
–40
CH4/TRACKING
R
P
dB OVER dB
0
+4
–10
+2
0
–20
–2
–30
–40
–4
USER
SERVO/SYS
REW
TIME CODE
VIDEO
AUDIO
STOP
FF
ON SCREEN
R
P
dB OVER dB
0
525
625
CTL TC UB DF SERVO CF GEN 16:9 AP
AUTO OFF P.READ V.VAR PB/EE REMOTE
CONDITION
ON
I
OFF
O
0
–20
–2
–30
–40
–4
+2
0
–2
–4
–60
COUNTER
RESET
VCON
MENU
SET
HOLD
REMOTE
VAR
SEARCH
PLAYER RECORDER
UB
+4
–10
+2
–60
–10
PB
PB/EE
P.PLAY
–20
STILL
–30
–40
M
H
–60
ASSEM
VIDEO
DA1
ENTRY
OUT
S
DA2
DA3
F
DA4
EJECT
REC
PLAY
PAUSE/STILL
PAUSE/STILL
X1
X-1
X1
PHONES
CTL TC UB
TOP
POWER
COMPONENT DIGITAL
Variable Motion
–60
STAND BY
BR-D95U
SIF
SIF
GEN 16:9
REMOTE
525
625
CH1
CH2
REC
CH3
OTHERS
TRACKING
IN
CH1 CH2 CH3 CH4 [VIDEO INPUT] button
PULL
RELEASE
REV
CH4
CONDITION
PULL FOR VARIABLE
PULL FOR VARIABLE
VIDEO
INPUT
AUDIO INPUT / AUDIO MONITOR SELECT
AES/EBU CH1
L
ANALOG CH1
R
SDI
AUDIO
INPUT
–4
TRACKING
IN
[AUDIO INPUT] button Audio channel indicators
F
X-1
PHONES
When this unit is synchronized externally
REMOTE indicator (when using the
remote control unit)
When recording wide aspect
Counter mode
screen ID (menu switch No. 103)
indicators
The video and audio input signal select method is different depending on the setting of menu switch No. 371 <INPUT
SELECT SAFETY>. The procedure when menu switch No. 371 <INPUT SELECT SAFETY> is set to “OFF” is
described below.
METER MODE
FINE
PULL
RELEASE
PLAY
CANCEL PREVIEW
TRACKING
SHIFT
REVIEW
INSERT
AUTO EDIT
TC
PREROLL
USER
VIDEO
AUDIO
STAND BY
TOP
REW
STOP
FF
SERVO/SYS
TIME CODE
ON SCREEN
OTHERS
PULL
RELEASE
REV
FWD
FWD
Audio signal select buttons
Audio input
connector names
Front panel switch setting
1. Select the input video signal.
2. Select the input audio signal.
3. Select the audio monitor output.
Select the audio monitor output from the rear
panel [AUDIO MONITOR OUT] connectors or the
front panel [PHONES] jack.
For details of steps 1 to 3, refer to page 70.
4. Set the tape counter mode.
Set the time data to be shown on the counter
display and on-screen display. “CTL”, “TC” or
“UB” will be shown on the counter display.
5. Engage the Remote mode.
To operate this unit locally, press the [REMOTE]
button so that the “REMOTE” indicator on the
counter display goes out.
Menu switch setting
Set the menu switches as required.
● Video items
Reference sync signal items
• Select the reference sync system.
No. 003 <SYNC SELECT> ..... Page 43
Set to “EXT” to synchronize with an external sync
signal.
● Video items
• Wide aspect ID signal selection
No. 103 <WIDE ASPECT ID REC> ... Page 44
• Component video input level selection (NTSConly)
No. 104 <COMPONENT LEVEL> ... Page 44
• Recording a signal from the built-in signal
generator
No. 111 <VD REC SIGNAL SEL.> ... Page 44
Select a color bar signal, black picture, multi burst
or pulse & bar.
● Audio items
• Audio recording level adjustment mode selection
No. 215 <AUD REC VOLUME MODE 1>
For details, refer to page 50.
• Search audio recording selection
No. 219 <SEARCH REC CH> ..... Page 51
Select the type of audio to be recorded on the cue
track (2 tracks).
• Audio monitor output mode selection
No. 222 <MONITOR MIX MODE> ..... Page 51
Select the way mixed audio is output from the
[AUDIO MONITOR OUT] connectors or
[PHONES] jack.
• Input audio level selection (by channel from 1 to 4)
No. 224 to No. 227 <AUDIO INPUT LEVEL
CH 1–4> ... Page 52
Select the audio input level of the rear panel
[AUDIO IN] connectors from “+4 dB”, “0 dB”,
“-6 dB” and “-20 dB” for each channel.
● Record pause selection
• Backspacing selection
No. 302 <BACKSPACE> .... Page 54
● Set the relationship between the serial digital
video signal input and AES/EBU input
(Only when the optional SA-D95U digital interface board is installed)
• To input asynchronous professional 48 kHz AES/
EBU signal
No. 236 <PRO 48K S.R.CONV.> ... Page 52
Set to “AUTO” to input a serial digital audio signal
with professional 48 kHz sampling frequency from
a source unit which cannot be genlocked.
For time code and editing settings, refer to “10.
HOW TO USE THE TIME CODE” and “11. EDITING”.
* This unit cannot be used for sound-on-sound
editing. Inserted audio signals are delayed.
● Changing the video and
audio input signal select
method
Set menu switch No. 371
<INPUT SELECT SAFETY> to
“ON (1)” to prevent the setting
from being changed accidentally.
When set to “ON (1)”, the input
signal select methods are as
follows.
• Video signal: Press the
[VIDEO INPUT] button while
pressing the [SHIFT] button.
• Audio signal: Press the audio
signal select button while
pressing the [SHIFT] button.
Input video signal selection
Select the signal from rear panel video input connector or built-in signal generator.
1. Press the [VIDEO INPUT] button to select the video signal.
The [VIDEO INPUT] indicator corresponding to the pressed button lights.
SIF : Input a serial digital video signal to the rear panel [SERIAL V/A IN]
connector (effective only when the optional SA-D95U digital interface
board is installed).
LINE : Input composite video signals to the rear panel [COMPOSITE LINE IN]
connector.
CPN : Input component video signals to the rear panel [COMPONENT IN] connector.
SIF, LINE, CPN lit simultaneously: Records a color bar, black picture, multi
burst or pulse & bar from the built-in signal generator (select with menu
switch No. 111 <VD REC SIGNAL SEL.>).
Blinking : The indicator blinks if no signal is input or if the wrong type of signal is
input.
When composite monochrome signals are input, use the COMPONENT Y input, not the
LINE input. This will minimize degradation during signal processing. In this case, set
menu switch No. 104 <CPN LEV./SETUP> to “HIGH/ON” or “HIGH/OFF” in the [525]
mode.
Input audio signal selection
● When the [AUDIO MONITOR]
button is illuminated, the audio
channel indicator can be used
to select the audio monitor
signal. The orange “L” and “R”
indicators show the audio
monitor output connectors.
● The input source for CH3 and
CH4 audio signals can be
selected with menu switch No.
251 <CH3/4 SOURCE SEL.>.
● When the SDI, AES/EBU, and
ANALOG indicators are lit,
audio signals from the built-in
signal generator are recorded.
Select audio signals from the
built-in signal generator with
menu switches No. 253 to 256
<CH1 to 4 REC SIGNAL
SEL.>.
● The channel indicator blinks if
the selected signal does not
conform to the standard.
This unit is provided with independent four-channel input connectors for
analog audio, serial digital audio (AES/EBU), and SDI audio.
Select the audio signal to be recorded on each of the four audio channels (1to 4).
1. Press the [AUDIO INPUT] button so that the [AUDIO INPUT] button is
illuminated.
AUDIO
INPUT
2. Select the audio signal to be recorded on each of four audio channels
(1 to 4) by pressing the audio signal select button.
The channel indicator of the selected audio signal lights.
AUDIO INPUT / AUDIO MONITOR SELECT
CH1
CH2
AES/EBU CH1
L
ANALOG CH1
R
SDI
CH3
CH4
CH2
CH3
CH4
CH2
CH3
CH4
Notes:
• Audio can only be input to the [AES/EBU] or [SERIAL V/
A] connectors when the optional SA-D95U digital interface
board is installed.
• Always input external sync signals when inputting digital
signals. Both video and audio must be synchronized with
the external sync signal.
(Illustrated example)
•
•
•
•
68
● When the [AUDIO INPUT] button is illuminated, the audio channel indicator
can be used to select input audio signal.
The first audio channel on the tape: Audio to the [AES/EBU CH1] connectors is recorded.
The second audio channel on the tape: Audio to the [AUDIO IN CH2] connectors is recorded.
The third audio channel on the tape: Audio to the [SERIAL V/A IN] connectors is recorded.
The fourth audio channel on the tape: Audio to the [AUDIO IN CH4] connectors is recorded.
69
7 RECORDING
7 RECORDING
7-3 AUDIO MONITOR OUTPUT SIGNAL SELECTION
7-4 AUDIO RECORD LEVEL ADJUSTMENT
Select the audio to be output to the headphones jack or the rear panel [AUDIO MONITOR L/R] connectors. Select
a single channel or mixed audio from the four available channels. During playback, select the playback audio monitor
output signal.
L channel
● Audio signal recording level can be adjusted.
Channel indicators
[REC] volume controls
VIDEO CASSETTE RECORDER
AUDIO
INPUT
AUDIO
INPUT
AUDIO INPUT / AUDIO MONITOR SELECT
CH1
CH2
AES/EBU CH1
L
ANALOG CH1
R
SDI
AUDIO
MONITOR
[AUDIO MONITOR]
button
VIDEO
INPUT
CH3
CH4
CH2
CH3
CH4
LINE
CH2
CH3
CH4
CPN
PHONES
CH1
CH2
REC
CH3
CH4
CH1
CH2
CH3
CH4
SIF
CH2
CH3
CH4
LINE
CH2
CH3
CH4
CPN
R
P
dB OVER dB
0
R
P
dB OVER dB
0
R
P
dB OVER dB
0
● When the [AUDIO MONITOR] button is illuminated, the audio channel
indicator can be used for the audio monitor output signal.
2. Select the audio monitor output signal by pressing the audio signal select
button.
AUDIO INPUT / AUDIO MONITOR SELECT
CH1
CH2
CH3
CH4
AES/EBU CH1
L
ANALOG CH1
R
CH2
CH3
CH4
CH2
CH3
CH4
525
625
CTL TC UB DF SERVO CF GEN 16:9 AP
AUTO OFF P.READ V.VAR PB/EE REMOTE
CONDITION
0
–20
–2
–30
–40
–4
+2
0
–2
–4
–60
COUNTER
RESET
VCON
MENU
SET
HOLD
REMOTE
VAR
SEARCH
PLAYER RECORDER
UB
+4
–10
+2
–60
–10
PB
PB/EE
P.PLAY
–20
STILL
–30
–40
M
H
–60
ASSEM
CH1
CH2
REC
CH3
CH4
VIDEO
DA1
S
DA2
DA3
F
DA4
REC
EJECT
PLAY
PAUSE/STILL
X1
TRACKING
METER MODE
FINE
1
O
PLAY
ENTRY
OUT
CANCEL PREVIEW
TRACKING
SHIFT
REVIEW
INSERT
AUTO EDIT
TC
PREROLL
USER
VIDEO
AUDIO
STAND BY
TOP
REW
STOP
FF
SERVO/SYS
TIME CODE
ON SCREEN
OTHERS
PULL
RELEASE
REV
FWD
Audio signal select buttons
Select the audio signal from CH 1 to CH 4 to be output to the L and R channels
of the [AUDIO MONITOR] connectors and the headphones jack.
The selected channel indicator lights.
70
–20
–30
–40
–4
PULL FOR VARIABLE
2
I
OFF
X-1
PHONES
1. Press the [AUDIO MONITOR] button so that the [AUDIO MONITOR] button
is illuminated.
● Select the output level
mode for audio monitor
mixing output with menu
switch No. 222 <MONITOR
MIX MODE>.
● Setting the audio monitor
output level
Set the audio monitor L
and R channel output
levels to +4 dB, 0 dB or +6
dB with menu switches No.
232 and No. 233.
0
–2
IN
R channel
SDI
CH4/TRACKING
+4
–10
+2
–60
PULL
RELEASE
AUDIO
MONITOR
–20
–30
–40
–4
TRACKING
PLAY
● When the [AUDIO INPUT]
button is illuminated, the
channel indicator can be
used to select the input
audio signal.
R
P
dB OVER dB
0
+4
–10
0
–2
METER MODE
CH3
CH2
+4
+2
CH1 CH2 CH3 CH4
ON
Variable Motion
CH1
FINE
BR-D95U
POWER
COMPONENT DIGITAL
TRACKING
SIF
PULL FOR VARIABLE
VIDEO
INPUT
AUDIO INPUT / AUDIO MONITOR SELECT
AES/EBU CH1
L
ANALOG CH1
R
SDI
AUDIO
MONITOR
(Illustrated example)
● L channel of the [AUDIO MONITOR] connectors and headphones: Output mixed
audio of the first, second and fourth channels.
● R channel of the [AUDIO MONITOR] connectors and headphones: Output the
audio from the third channel.
● Recording level adjustment
in the Standby mode is
possible in the EE mode.
● During recording or audio
level adjustment, audio can
be monitored via the rear
panel [AUDIO MONITOR]
connectors or the front
panel [PHONES] jack. For
monitor output, refer to
page 70.
● When menu switch No. 215
[AUD REC VOLUME
MODE1] is set to “MAS-1
BAL-2/MAS-3 BAL-4”, the
master level adjust and
balance adjust functions
assigned to each volume
control are enabled even if
the corresponding channel
is in the Unity mode.
● The recording level of this unit can be adjusted either fixedly or manually.
To adjust the recording level, pull out the [REC] volume controls to engage the
Manual mode and push in them to engage the Fixed (Unity) mode.
Either mode can be selected independently for each audio channel.
Fixed recording level adjustment
Push in the [REC] volume controls to engage the Unity mode for recording level
adjustment.
● In the Unity mode, the [R] indicator on the upper section of the meter lights. This
means that adjustment is not possible with the [REC] volume controls.
Manual recording level adjustment
● Pull out the [REC] volume controls to engage the Manual mode for recording
level adjustment.
In the Manual mode, the [R] indicator on the upper section of the meter goes out.
There are two ways to adjust recording levels manually.
1 Adjust the audio level for each channel independently with the CH1 to CH4
[REC] volume controls.
2 Use CH1 and CH2 [REC] volume controls as one pair and CH3 and CH4 [REC]
volume controls as one pair. Adjust the audio level with the CH1 and CH3 [REC]
volume controls as a master volume control and the CH2 and CH4 [REC] volume
controls as a balance control.
Select the adjustment mode with menu switch No. 215 <AUD REC VOLUME
MODE 1>.
● The audio reference level
can be set with menu
switch No. 257 <AUD REF.
SIGNAL LEV.> (-20 dB or
-18 dB).
Menu switch setting
● Select the manual recording level adjustment mode with menu switch No. 215
<AUD REC VOLUME MODE 1>.
“CH1/CH2/CH3/CH4 (0)”: To independently adjust the recording level for each
channel with CH1 to CH4 [REC] volume controls.
“MAS-1 BAL-2/,MAS-3 BAL-4 (1)”: Use CH1 and CH3 [REC] volume controls for
master volume control and the CH2 and CH4
[REC] volume controls for balance control.
71
7 RECORDING
7 RECORDING
7-4 AUDIO RECORD LEVEL ADJUSTMENT
7-5 BASIC RECORDING OPERATIONS
● The audio level meter’s
reference level indication
changes depending on the
setting of menu switch No.
257 <AUD REF. SIGNAL
LEV.> (-20 dB or -18 dB).
1. Set the [CH4/TRACKING] meter to audio level.
2
• When the [METER MODE TRACKING] button is illuminated, press the
[METER MODE TRACKING] button.
VIDEO CASSETTE RECORDER
AUDIO
INPUT
[ The [METER MODE TRACKING] button goes out and the [CH4/TRACKING]
meter can be used for the CH4 audio level.
VIDEO
INPUT
AUDIO INPUT / AUDIO MONITOR SELECT
CH1
CH2
CH3
CH4
AES/EBU CH1
L
ANALOG CH1
R
CH2
CH3
CH4
LINE
CH2
CH3
CH4
CPN
SDI
AUDIO
MONITOR
BR-D95U
POWER
SIF
COMPONENT DIGITAL
ON
I
OFF
O
CH1
CH2
R
P
dB OVER dB
0
+4
–10
+2
R
P
dB OVER dB
0
+4
–10
+2
0
–20
–2
–30
–40
–4
0
CH3
–20
–2
–30
–40
–4
–60
CH4/TRACKING
R
P
dB OVER dB
0
+4
–10
+2
0
–20
–2
–30
–40
–4
–60
R
P
dB OVER dB
0
+4
–10
+2
0
–2
–4
–60
525
625
CTL TC UB DF SERVO CF GEN 16:9 AP
AUTO OFF P.READ V.VAR PB/EE REMOTE
CONDITION
COUNTER
RESET
VCON
MENU
SET
HOLD
VAR
SEARCH
REMOTE
PLAYER RECORDER
UB
PB
PB/EE
P.PLAY
–20
STILL
–30
–40
M
H
–60
ASSEM
VIDEO
DA1
S
DA2
DA3
F
DA4
EJECT
REC
PLAY
PAUSE/STILL
X1
X-1
PHONES
CH1
CH2
REC
CH3
CH4
TRACKING
IN
PULL FOR VARIABLE
METER MODE
FINE
PULL
RELEASE
2. Adjust the recording level for each channel (CH1 to CH4) separately with
the [REC] volume control.
• To perform fine adjustment, press the [METER MODE FINE] button.
METER MODE
[ The [METER MODE FINE] button is illuminated and the audio
level meter shows the fine level around -20 dBFS or -18 dBFS.
FINE
1
Variable Motion
PLAY
ENTRY
OUT
CANCEL PREVIEW
TRACKING
SHIFT
INSERT
AUTO EDIT
REVIEW
3
TC
PREROLL
USER
TOP
VIDEO
AUDIO
STAND BY
REW
STOP
FF
SERVO/SYS
TIME CODE
ON SCREEN
OTHERS
4
7
4,6
PULL
RELEASE
REV
FWD
5
TRACKING
Normal mode level indication
CH1
CH3
CH2
dB OVER dB
0
–10
–20
dB OVER dB
0
–10
–20
Fine mode level indication
CH1
CH4/TRACKING
dB OVER dB
0
–10
–20
dB OVER dB
0
–10
–20
–30
–40
–30
–40
–30
–40
–30
–40
–60
–60
–60
–60
CH3
CH2
CH4/TRACKING
dB OVER dB
dB OVER dB
dB OVER dB
+4
+4
+4
+4
+2
+2
+2
+2
dB OVER dB
0
0
0
0
–2
–2
–2
–2
–4
–4
–4
–4
• The reference input level shown by the audio level meter is -20 dBFS or
-18 dBFS.
Adjust with the master and balance controls
The CH1 and CH2 [REC] volume controls, and the CH3 and CH4 [REC]
volume controls work as one set.
The CH1 and CH3 [REC] volume controls serve as master volume control and
the CH2 and CH4 volume controls as balance control.
• Turn the CH1 or CH3 [REC] volume control.
The audio on CH2 or CH4 changes along with CH1 or CH3.
• Turn the CH2 or CH4 [REC] volume control to adjust the balance between
CH1 and CH2 or CH3 and CH4.
Pair
CH1
Pair
CH3
CH2
● Recording the video signal
by the internal signal
generator
Select the color bar signal,
black picture multi burst or
pulse & bar signal with
menu switch No. 111 <VD.
REC SIGNAL SEL.> and
press the [VIDEO INPUT]
button so that all [VIDEO
INPUT] indicators light.
● Refer to “10 HOW TO USE
THE TIME CODE” for time
code recording.
1. Turn the [POWER] switch “ON”.
2. Load the cassette.
Make sure that the protective slide on the cassette is set to “REC”.
[ The tape is loaded and the “STANDBY” button lights.
3. Adjust the audio signal recording level.
(See page 69 for audio recording level adjustment.)
4. Start recording.
Press the [PLAY] buttons while pressing the [REC] button.
[ The [REC] and [PLAY] buttons light and recording starts.
5. To temporarily stop recording
Press the [PAUSE/STILL] button.
[ The [PAUSE/STILL] button lights and recording is paused.
6. To re-start recording
Press the [PLAY] button.
[ The [PAUSE/STILL] button goes out and recording starts again.
7. To end recording
Press the [STOP] button.
[ The [REC] and [PLAY] buttons indicators go out and the tape stops.
The Standby ON mode is automatically engaged when the tape ends.
● When menu switch No. 312 <AUTO REW> is “ON (1)”, the tape is
automatically rewound to the beginning.
CH4
REC
Master volume control
Balance control
Notes
● Be sure to use only
cassette tapes.
VHS/S-VHS cassettes
cannot be used.
Balance control
Master volume control
● When the Play mode is switched to the E-E mode, the picture slightly shifts
downward for a moment. However, the recording is not affected.
* Even if the frame is advanced periodically in the Record-Pause mode (every 5 minutes
or so), the mode will still disengage after about 20 minutes to protect the heads and
the VCR will automatically enter the Standby Off mode.
You can specify the length of time that elapses before the frame is advanced in the
Record-Pause mode with menu switch No. 307 <PAUSE/STILL/STP TIME>.
If menu switch No. 351 <PRE READ> is set to “ON”, the Record mode cannot be
engaged. For recording, set it to “OFF”.
72
73
8 PLAYBACK
7 RECORDING
8-1 PREPARATION FOR PLAYBACK
7-6 DIGITAL AUDIO SIGNAL INPUT/OUTPUT
3
2
VIDEO CASSETTE RECORDER
VIDEO CASSETTE RECORDER
AUDIO
INPUT
VIDEO
INPUT
AUDIO INPUT / AUDIO MONITOR SELECT
CH1
CH2
CH3
CH4
SIF
AES/EBU CH1
L
ANALOG CH1
R
CH2
CH3
CH4
LINE
CH4
CPN
SDI
AUDIO
MONITOR
CH2
CH3
AUDIO
INPUT
BR-D95U
CH1
CH2
CH3
CH4
CH2
CH3
CH4
LINE
CH2
CH3
CH4
CPN
SDI
COMPONENT DIGITAL
I
OFF
O
AUDIO
MONITOR
1
CH3
CH2
R
P
dB OVER dB
0
+4
R
P
dB OVER dB
0
+4
–10
+2
0
–20
–2
–30
–40
–4
R
P
dB OVER dB
0
+4
–10
+2
0
–20
–2
–30
–40
–4
–60
R
P
OVER dB
0
525
625
CTL TC UB DF SERVO CF GEN 16:9 AP
AUTO OFF P.READ V.VAR PB/EE REMOTE
CONDITION
0
–20
–2
–30
–40
–4
–60
+2
0
–2
–4
–60
COUNTER
RESET
VCON
MENU
SET
HOLD
REMOTE
VAR
SEARCH
PLAYER RECORDER
PHONES
CH2
REC
CH3
P.PLAY
R
P
dB OVER dB
0
R
P
dB OVER dB
0
+4
+4
–10
S
–20
–2
–30
–40
–4
STILL
M
H
CH4/TRACKING
R
P
dB OVER dB
0
+4
0
PB
PB/EE
–20
–30
–40
CH3
CH2
R
P
dB OVER dB
0
+4
+2
–10
ASSEM
CH4
–10
+2
–10
+2
+2
VIDEO
DA1
DA2
DA3
0
–20
–2
–30
–40
–4
–60
F
DA4
EJECT
REC
PLAY
PAUSE/STILL
PHONES
X1
CH1
0
–20
–2
–30
–40
–4
–60
CH2
REC
0
–2
–4
–60
CH3
METER MODE
FINE
PLAY
ENTRY
OUT
INSERT
TC
TOP
VIDEO
AUDIO
PULL FOR VARIABLE
CANCEL PREVIEW
TRACKING
SHIFT
REVIEW
AUTO EDIT
PREROLL
USER
STAND BY
REW
STOP
FF
SERVO/SYS
TIME CODE
ON SCREEN
OTHERS
PULL
RELEASE
PULL
RELEASE
REV
I
COUNTER
RESET
VCON
MENU
SET
HOLD
REMOTE
VAR
SEARCH
OFF
O
REMOTE indicator
(when using the
remote control unit)
Counter mode
indicators
PLAYER RECORDER
UB
PB
PB/EE
When this unit is
synchronized externally
P.PLAY
–20
STILL
–30
–40
M
H
–60
ASSEM
VIDEO
DA1
IN
ENTRY
OUT
S
DA2
DA3
F
DA4
EJECT
REC
PLAY
PAUSE/STILL
X1
METER MODE
PLAY
CTL TC UB
GEN
REMOTE
TRACKING
CANCEL PREVIEW
TRACKING
SHIFT
REVIEW
INSERT
AUTO EDIT
TC
PREROLL
USER
TOP
VIDEO
AUDIO
STAND BY
REW
STOP
FF
SERVO/SYS
TIME CODE
ON SCREEN
OTHERS
525
625
CONDITION
PULL
RELEASE
REV
FWD
FWD
This unit does not execute emphasis recording.
When digital audio signals containing emphasis information are input to this
unit, this unit automatically de-emphasizes these signals before recording.
The emphasis function is always OFF when digital audio signals are recorded
on this unit.
Note:
• Analog or digital audio output may not be clear when a tape whose audio
has been recorded on its audio channels with emphasis both ON and OFF
is played back on the BR-D85U/D80U/D51U/D50U/D750U/D350U
DIGITAL S VCR.
A sampling rate converter is provided for the BR-D95U’s AES/EBU input. This
enables input of both professional-standard and consumer-standard digital
signals with sampling frequencies of 48 kHz, 44.1 kHz and 32 kHz. However,
the following signals are muted and cannot be recorded. In this case, the
[AUDIO INPUT/AUDIO MONITOR SELECT] indicator blinks.
• Professional mode, CCIT J17
• Consumer mode, data mode ON
• Consumer mode, 4-channel mode
Digital audio signal output status bit
The sampling rate converter converts the digital audio signal output status bit
from this unit to professional mode signals with a sampling frequency of 48
kHz and emphasis OFF regardless of the type of input signals.
74
CONDITION
–10
CH4
FINE
PULL FOR VARIABLE
525
625
CTL TC UB DF SERVO CF GEN 16:9 AP
AUTO OFF P.READ V.VAR PB/EE REMOTE
TRACKING
IN
PULL
RELEASE
ON
X-1
–60
X-1
CH1
POWER
COMPONENT DIGITAL
UB
+4
–10
+2
CH1
CH4/TRACKING
BR-D95U
SIF
Variable Motion
Variable Motion
CH1
VIDEO
INPUT
AUDIO INPUT / AUDIO MONITOR SELECT
AES/EBU CH1
L
ANALOG CH1
R
POWER
ON
Front panel switch setting
1. Select the audio monitor output.
Select the audio monitor output from the rear
panel [AUDIO MONITOR OUT] connectors or the
front panel [PHONES] jack.
• For the selection procedure, refer to “Audio
monitor output selection” on page 70.
2. Set the tape counter mode.
Set the time data to be shown on the counter
display and the on-screen display. “CTL”, “TC” or
“UB” will be shown on the counter display.
3. Engage the Remote mode.
To operate this unit locally, press the [REMOTE]
button so that the [REMOTE] indicator on the
counter display goes out.
To operate this unit via the RS-422 or RS-232C
serial remote interface, press the [REMOTE]
button so that the [REMOTE] indicator lights.
Menu switch setting
Set the menu switches as required.
● Reference sync signal items
• Select the reference sync system.
No. 003 <SYNC SELECT> ..... Page 43
Set to “EXT” to synchronize with an external sync
signal.
● Tracking adjustment selection
• Auto tracking/manual tracking selection
No. 005 “AUTO TRACKING” .... Page 43
● Video items
• Component video output level selection (NTSC
only)
No. 104 <CPN LEV./SETUP (525)> ... Page 44
• Error correction mode selection
No. 112 <ECC MODE> ... Page 45
● Audio items
• Audio V. fade function selection
Select whether audio noise in transitions should
be reduced or not.
No. 214 <PBV. FADE> ..... Page 50
• Audio output level adjustment mode selection
Select automatic or manual adjustment.
No. 216 <AUD PB VOLUME MODE 1> ... Page 51
• Set the output to CH3 and CH4 when playing
back a tape with two-channel audio (CH1 and
CH2).
No. 223 CH3/4 OUT SEL AT 2CH ... Page 52
• Audio output level setting
Select the reference output level for the audio
output connectors (CH1 to CH4 ) from +4 dB, 0
dB and -6 dB.
No. 228 to No. 231 <AUDIO OUT LEVEL CH1 —
CH4> ... Page 52
• Audio monitor output level setting
Select the reference output level for the L and R
audio monitor output channels from +4 dB, 0 dB
and -6 dB.
No. 232 to No. 233 <AUDIO MON LEVEL LCH —
RCH>
● Auto Play mode selection
Set whether the tape is automatically played back
from the beginning or not.
● Output picture selection when playback starts
Select the output picture that will be displayed
until the servo has stabilized after starting play
back.
No. 368 <STARTING PIC FREEZE> ... Page 57
● Setting the video signal vertical blanking period
masking
No. 601 <V. BLANK MASK> ..... Page 64
75
8 PLAYBACK
8 PLAYBACK
8-2 BASIC PLAYBACK OPERATIONS
8-3. AUDIO PLAYBACK LEVEL ADJUSTMENT
[SERVO] indicator
Notes
● Masking the video signal
vertical blanking period
If menu switch No. 601
<V. BLANK MASK> set to
“ON (1)” or “ON WITH
0.5H (2)” the signal
superimposed on the
vertical blanking period will
not be output.
However, VITC or Extra
line data will be output.
● Tracking adjustment
For manual tracking
adjustment, set the menu
switch No. 005 <AUTO
TRACKING> to “OFF (1)”.
The [TRACKING] button
blinks when the level meter
section shows the tracking
meter.
● Output picture selection
when playback starts
Select the picture that will
be output until the capstan
servo and drum servo
stabilize after playback
starts with menu switch
No. 368 <STARTING PIC
FREEZE>.
When this menu switch is
set to “ON”, the freeze
picture displayed before
playback starts is output.
Once the servo is stabilized, output automatically
switches to the playback
picture.
● Play back the section of
tape where control signals
have not been recorded
and set the picture output
with menu switch No. 120
<NO CTL MUTING>.
“OFF”: A freeze picture is
output.
“ON”: A black picture is
output.
* Even if the frame is advanced
periodically in the Still mode
(every 5 minutes or so), the
still mode will disengage after
about 20 minutes to protect the
heads and the VCR will
automatically enter the
Standby Off mode. The time
that elapses until the frame is
advanced can be selected with
menu switch No. 307
<PAUSE/STILL/STP TIME>.
76
● Audio signal output levels can be adjusted.
2
VIDEO CASSETTE RECORDER
AUDIO
INPUT
VIDEO
INPUT
AUDIO INPUT / AUDIO MONITOR SELECT
CH1
CH2
CH3
CH4
AES/EBU CH1
L
ANALOG CH1
R
CH2
CH3
CH4
LINE
CH2
CH3
CH4
CPN
SDI
AUDIO
MONITOR
BR-D95U
POWER
SIF
COMPONENT DIGITAL
ON
I
OFF
O
1
VIDEO CASSETTE RECORDER
AUDIO
INPUT
Variable Motion
CH2
R
P
dB OVER dB
0
+4
–10
+2
0
–20
–2
–30
–40
–4
0
CH3
–20
–2
–30
–40
–4
–60
CH4/TRACKING
R
P
dB OVER dB
0
+4
–10
+2
0
–20
–2
–30
–40
–4
–60
R
P
dB OVER dB
0
+4
–10
+2
0
–2
–4
–60
525
625
CTL TC UB DF SERVO CF GEN 16:9 AP
AUTO OFF P.READ V.VAR PB/EE REMOTE
COUNTER
CONDITION
RESET
VCON
REMOTE
HOLD
PB
PB/EE
VAR
SEARCH
PLAYER RECORDER
UB
MENU
SET
PHONES
P.PLAY
–20
CH1
CH2
REC
CH3
PULL FOR VARIABLE
M
H
–60
CH4
PLAY
CH2
REC
CH3
CH4
CH2
CH3
CH4
CH2
CH3
CH4
LINE
CH2
CH3
CH4
CPN
BR-D95U
POWER
SIF
COMPONENT DIGITAL
TRACKING
ON
I
OFF
O
Variable Motion
ASSEM
VIDEO
DA1
IN
ENTRY
OUT
S
DA2
DA3
F
DA4
CH1
EJECT
REC
PLAY
X1
+4
CANCEL PREVIEW
TRACKING
SHIFT
REVIEW
TC
PREROLL
USER
VIDEO
AUDIO
STAND BY
TOP
REW
STOP
FF
SERVO/SYS
TIME CODE
ON SCREEN
OTHERS
0
PULL FOR VARIABLE
FINE
TRACKING
CH4/TRACKING
R
P
dB OVER dB
0
+4
–10
+2
0
–20
–2
–30
–40
–4
–60
R
P
dB OVER dB
0
0
–20
–2
–30
–40
–4
+2
0
–2
–4
–60
CH1
CH2
REC
CH3
RESET
VCON
MENU
SET
HOLD
REMOTE
VAR
SEARCH
PB
PB/EE
PLAYER RECORDER
P.PLAY
STILL
M
H
ASSEM
CH4
VIDEO
DA1
ENTRY
OUT
S
DA2
DA3
F
DA4
EJECT
REC
PLAY
PAUSE/STILL
X1
TRACKING
METER MODE
FINE
1
COUNTER
UB
–20
–30
–40
–60
IN
PULL FOR VARIABLE
2
CONDITION
–10
X-1
PHONES
PULL
RELEASE
4
525
625
CTL TC UB DF SERVO CF GEN 16:9 AP
AUTO OFF P.READ V.VAR PB/EE REMOTE
+4
–10
+2
–60
FWD
PLAY
[REC] button 6
3,5
–30
–40
–4
PULL
RELEASE
REV
–20
–2
METER MODE
R
P
dB OVER dB
0
+4
–10
+2
INSERT
AUTO EDIT
CH3
CH2
R
P
dB OVER dB
0
PAUSE/STILL
TRACKING
METER MODE
FINE
PULL
RELEASE
CH1
STILL
–30
–40
X-1
PHONES
CH1
VIDEO
INPUT
AUDIO INPUT / AUDIO MONITOR SELECT
AES/EBU CH1
L
ANALOG CH1
R
SDI
AUDIO
MONITOR
CH1
R
P
dB OVER dB
0
+4
–10
+2
PLAY
CANCEL PREVIEW
TRACKING
SHIFT
REVIEW
INSERT
AUTO EDIT
TC
PREROLL
USER
VIDEO
AUDIO
STAND BY
TOP
REW
STOP
FF
SERVO/SYS
TIME CODE
ON SCREEN
OTHERS
PULL
RELEASE
REV
FWD
[PLAY] volume controls
1. Turn the [POWER] switch “ON”.
2. Load the cassette.
[ When the tape is loaded, the [STANDBY] button lights to indicate that the
Standby ON mode has been engaged.
* Be sure to use only DIGITAL S cassette tapes. VHS/S-VHS cassettes cannot
be used.
3. Start playback.
Press the [PLAY] button.
[ The [PLAY] button indicator lights and playback starts. The [SERVO]
indicator lights and the picture stabilizes.
• If menu switch No. 005 <AUTO TRACKING> is set to “ON (1)”, tracking is
automatically adjusted. As a result, it takes several seconds for the picture
to stabilize after the [SERVO] indicator lights.The [SERVO] indicator blinks
until the servo stabilizes.
• The [525] or [625] indicator blinks on the counter display if you try to play
back a tape not recorded in the same signal system as the one set for this
unit.
4. To temporarily stop playback
Press the [PAUSE/STILL] button.
[ The [PAUSE/STILL] button lights and the Still mode is engaged.
5. To re-start playback
Press the [PLAY] button.
[ The [PAUSE/STILL] button goes out and playback resumes.
6. To stop playback
Press the [STOP] button.
[ The [PLAY] button indicator goes out and the tape stops.
When the [STANDBY] button is pressed, the [STANDBY] button goes out
and the Standby OFF mode is engaged.
The Standby ON mode is automatically engaged when the tape ends. If menu
switch No. 312 <AUTO REW> is “ON (1)”, the tape is automatically rewound to
the beginning.
To monitor input signal during playback
The input signal (both video and audio) can be monitored for as long as the
[REC] button is kept pressed during playback.
Please note that the Record mode is engaged if the [PLAY] button is
pressed together with the [REC] button.
● Reference output level
selection for the audio
output connectors
Select the playback
audio output reference
level for each channel
from +4 dB, 0 dB and
-6 dB with menu switch
No. 228 to 231.
● Playback levels can be adjusted either fixedly or manually.
To adjust the audio playback level, pull out the [PLAY] volume controls to engage
the Manual mode or push them in to engage the Unity mode.
Either mode can be selected independently for each audio channel.
Audio Playback Level Lock mode
Push in the [PLAY] volume controls to engage the Unity mode for playback level
adjustment.
● In the Unity mode, the [P] indicator on the upper section of the meter lights. This
means that adjustment is not possible with the [PLAY] volume controls.
Manual audio playback level adjustment
● Selecting signals for
output from the CH3
CH4 audio connectors
When playing back a
tape recorded on a
2-channel DIGITAL S
VCR, use menu switch
No. 223 <CH3/4 OUT
SEL AT 2CH> to specify
whether or not these
signals are output from
the audio CH3/CH4
connector.
● When menu switch No.
216 [AUD PB VOLUME
MODE1] is set to “MAS-1
BAL-2/MAS-3 BAL-4”, the
master level adjust and
balance adjust functions
assigned to each volume
control are enabled even if
the corresponding channel
is in the Unity mode.
Pull out the [PLAY] volume controls to engage the Manual mode for playback level
adjustment.
In the Manual mode, the [P] indicator on the upper section of the meter goes out.
There are two ways to adjust playback level manually.
Adjust the audio level for each channel independently with the CH1 to CH4
[PLAY] volume controls.
Use CH1 and CH2 [PLAY] volume controls as one pair and CH3 and CH4
[PLAY] volume controls as one pair. Adjust audio levels using the CH1 and
CH3 [PLAY] volume controls as a master volume control and the CH2 and CH4
[PLAY] volume controls as a balance control.
1
2
Select the adjustment mode with menu switch No. 216 <AUD PB VOLUME MODE 1>.
Menu switch setting
• Select the manual playback level adjustment mode with menu switch No. 216
<AUD PB VOLUME MODE 1>.
“CH1/CH2/CH3/CH4 (0)”: To independently adjust the playback level for each
channel with the CH1 to CH4 [PLAY] volume controls.
“MAS -1 BAL2/MAS-3 BAL-4 (1)”: Use CH1 and CH3 [PLAY] volume controls
for master volume control and the CH2 and
CH4 [PLAY] volume controls for balance
control.
The [PB UNITY] indicator goes out and the Manual Playback Level Adjustment
mode is engaged.
77
8 PLAYBACK
8 PLAYBACK
8-3. AUDIO PLAYBACK LEVEL ADJUSTMENT
8-4 MANUAL TRACKING AJUSTMENT
● The audio level meter’s
reference level
indication changes
depending on the
setting of menu switch
No. 257 <AUD REF.
SIGNAL LEV.> (-20 dB
or -18 dB).
1. Set the [CH4/TRACKING] meter to audio level.
• When the [METER MODE TRACKING] button is illuminated or
METER MODE
blinked, press the [METER MODE TRACKING] button.
[ The [METER MODE TRACKING] button goes out and the
[CH4/TRACKING] meter can be used for the CH4 audio level.
FINE
[CH4/TRACKING] meter
TRACKING
VIDEO CASSETTE RECORDER
AUDIO
INPUT
VIDEO
INPUT
AUDIO INPUT / AUDIO MONITOR SELECT
CH1
CH2
CH3
CH4
AES/EBU CH1
L
ANALOG CH1
R
CH2
CH3
CH4
LINE
CH2
CH3
CH4
CPN
SDI
AUDIO
MONITOR
BR-D95U
POWER
SIF
COMPONENT DIGITAL
ON
I
OFF
O
Variable Motion
CH1
FINE
+4
CH1
CH3
CH2
0
dB OVER dB
0
–10
–20
dB OVER dB
0
–10
–20
CH1
dB OVER dB
0
dB OVER dB
0
–10
dB OVER dB
–10
–20
–20
–30
–40
–30
–40
–30
–40
–30
–40
–60
–60
–60
–60
CH3
CH2
dB OVER dB
dB OVER dB
+4
+4
+4
+2
+2
+2
0
0
0
0
–2
–2
–2
–2
–4
–4
–4
–4
Adjust with the master and balance controls.
The CH1 and CH2 [PLAY] volume controls, and the CH3 and CH4 [PLAY]
volume controls work as one set.
The CH1 and CH3 [PLAY] volume controls serve as master volume control and
the CH2 and CH4 volume controls as balance control.
• Turn the CH1 or CH3 [PLAY] volume control.
The audio on CH2 or CH4 changes along with CH1 or CH3.
• Turn the CH2 or CH4 [PLAY] volume control to adjust the balance between
CH1 and CH2 or CH3 and CH4.
Pair
CH1
0
–20
–2
–30
–40
–4
R
P
dB OVER dB
0
525
625
CTL TC UB DF SERVO CF GEN 16:9 AP
AUTO OFF P.READ V.VAR PB/EE REMOTE
CONDITION
0
–20
–2
–30
–40
–4
+2
0
–2
–4
–60
COUNTER
RESET
VCON
MENU
SET
HOLD
REMOTE
VAR
SEARCH
PLAYER RECORDER
UB
+4
–10
+2
–60
–10
PB
PB/EE
P.PLAY
–20
STILL
–30
–40
M
H
–60
ASSEM
VIDEO
DA1
ENTRY
OUT
S
DA2
DA3
F
DA4
EJECT
REC
PLAY
PAUSE/STILL
X1
X-1
PHONES
CH1
CH2
REC
CH3
CH4
TRACKING
IN
PULL FOR VARIABLE
METER MODE
FINE
PULL
RELEASE
PLAY
CANCEL PREVIEW
TRACKING
SHIFT
REVIEW
INSERT
AUTO EDIT
TC
PREROLL
USER
VIDEO
AUDIO
STAND BY
TOP
REW
STOP
FF
SERVO/SYS
TIME CODE
ON SCREEN
OTHERS
PULL
RELEASE
REV
FWD
[TRACKING] adjust knob
[METER MODE TRACKING] button
This unit is equipped with an automatic tracking facility which operates during
playback to maintain optimum tracking (with menu switch No. 005 <AUTO
TRACKING> set to “ON (1)”).
With some tapes, noise may still appear — particularly if the tape was recorded on
a different VCR. In this case, manual tracking adjustment is also possible.
● In the Auto Tracking
• The reference output level shown by the audio level meter is -20 dBFS or
-18 dBFS.
CH4/TRACKING
R
P
dB OVER dB
0
+4
–10
+2
–60
dB OVER dB
+4
–30
–40
–4
CH4/TRACKING
+2
–20
–2
Fine mode level indication
CH4/TRACKING
R
P
dB OVER dB
0
+4
–10
+2
TRACKING
Normal mode level indication
CH3
CH2
R
P
dB OVER dB
0
2. Adjust the playback level for each channel (CH1 to CH4) separately with
the [PLAY] volume control.
• To perform fine adjustment, press the [METER MODE FINE] button.
[ The [METER MODE FINE] button is illuminated and the audio
level meter shows a reference fine level of around -20 dBFS or
METER MODE
-18 dBFS.
mode, the [METER
MODE TRACKING]
button lights.
1. Set menu switch No. 005 <AUTO TRACKING> to “OFF (0)”.
2. Set the [CH4/TRACKING] meter for tracking.
Press the right [TRACKING METER MODE] button.
[ The [METER MODE TRACKING] button blinks when the meter is switched to
Tracking mode.
3. Adjust until the tracking meter level reaches the maximum.
The Auto Tracking mode can be restored by setting menu switch No. 005 <AUTO
TRACKING> to “ON (1)”.
Pair
CH3
CH2
CH4
PLAY
Master volume control
Balance control
Balance control
Master volume control
78
79
8 PLAYBACK
8 PLAYBACK
8-5 ERROR CORRECTION
8-7 SIMPLIFIED PLAYBACK SPEED ADJUSTMENT FUNCTION
Error correction of digital playback signals is performed with the error correction
circuit and the error conceal circuit.
The playback speed can be increased or decreased in two ways (simplified playback speed adjustment function).
When two VCRs are being played back, this function helps synchronize playback operation (sync operation).
[IN] button
Error correction circuit : Errors in playback data caused by dropouts or mistracking are corrected using the results of the data
operation.
Error conceal circuit
: Major errors that the error correction circuit cannot
correct are concealed with the previous frame data.
[OUT] button
VIDEO CASSETTE RECORDER
AUDIO
INPUT
AUDIO INPUT / AUDIO MONITOR SELECT
CH1
CH2
CH3
CH4
AES/EBU CH1
L
ANALOG CH1
R
CH2
CH3
CH4
LINE
CH2
CH3
CH4
CPN
SDI
AUDIO
MONITOR
VIDEO
INPUT
BR-D95U
POWER
SIF
COMPONENT DIGITAL
ON
I
OFF
O
[PLAYER] button
Variable Motion
CH1
CH3
CH2
R
P
dB OVER dB
0
+4
R
P
dB OVER dB
0
+4
–10
+2
0
–20
–2
–30
–40
–4
CH4/TRACKING
R
P
dB OVER dB
0
+4
–10
+2
0
–20
–2
–30
–40
–4
–60
R
P
dB OVER dB
0
525
625
CTL TC UB DF SERVO CF GEN 16:9 AP
AUTO OFF P.READ V.VAR PB/EE REMOTE
CONDITION
0
–20
–2
–30
–40
–4
–60
+2
0
–2
–4
–60
COUNTER
RESET
VCON
REMOTE
MENU
SET
HOLD
PB
PB/EE
VAR
SEARCH
PLAYER RECORDER
–10
P.PLAY
–20
STILL
–30
–40
M
H
–60
ASSEM
VIDEO
DA1
ENTRY
OUT
S
DA2
F
DA4
DA3
EJECT
REC
PLAY
PAUSE/STILL
X1
X-1
PHONES
CH1
CH2
REC
CH3
CH4
TRACKING
IN
Switching the setting of menu switch No. 112 <ECC MODE> turns the error
correction circuit ON/OFF.
The relationship between the menu setting and error correction operation is shown
in the table below.
Menu setting
NORMAL
NO CONCEAL
NO CORRECTION
Error correction circuit
o
o
x
Error conceal circuit
o
x
x
o : Activated
x : Deactivated
• Normally set to “NORMAL (0)”.
• Turning part or all of the error correct circuit OFF allows you to compare noise
levels and check the head service life. For comparison, play back a moving
picture.
For example, when switching between “NORMAL” and “NO CONCEAL” shows a
big difference in picture quality, it indicates that the error conceal circuit works
and that a major error has occurred. In this case, the heads may no longer be
serviceable and should be replaced.
8-6. AUDIO V. FADE FUNCTION
Major changes in waveforms during audio transitions may be heard as noise during playback.
To reduce this noise, an Audio V. Fade function is provided. When this is operating, audio transitions are detected
and the audio level is faded in a V shape during playback.
This function can be set with menu switch No. 214 <PBV. FADE>.
OFF (0) : The V. fade function is disabled.
5M (1) : The V. fade function is enabled and audio transitions are faded out and faded in for 5 msec to reduce
noise. For best results, this position is recommended.
10M (2) : The V. fade function is enabled and audio transitions are faded out and faded in for 10 msec to reduce
noise.
80
PULL FOR VARIABLE
METER MODE
FINE
PULL
RELEASE
PLAY
[RECORDER] button
UB
+4
–10
+2
CANCEL PREVIEW
TRACKING
SHIFT
[ENTRY] button
[PREVIEW] button
REVIEW
INSERT
AUTO EDIT
TC
PREROLL
USER
VIDEO
AUDIO
STAND BY
TOP
REW
STOP
FF
SERVO/SYS
TIME CODE
ON SCREEN
OTHERS
Jog dial
PULL
RELEASE
REV
FWD
[PLAY] [REW] [FF]
button button button
Increasing/decreasing the playback speed
by 7%
1. During playback, press the [FF] or [REW] button
while pressing the [PLAY] button.
While the [FF] button is pressed: The playback
speed is increased by about 7%.
While the [REW] button is pressed: The
playback speed is decreased by about 7%.
2. Operation differs depending on which button you
release first.
If you release the [PLAY] button first, playback
speed increased/decreased by about 7% is
maintained (Latch mode).
• To return to the normal speed, press the [PLAY]
button again.
If you release the [FF] or [REW] button first, the
normal playback mode is restored.
Synchronized Running mode
The tapes loaded on two VCRs can be played back in
sync with the same time code data.
Connection
• Connect the [REMOTE IN] connector of the
controlled VCR and the [REMOTE OUT]
connector of the control VCR with a 9-pin cable.
• Input external sync signals to synchronize the
two VCRs.
Setting
• Set the Remote/Local switch to “Remote” on the
controlled VCR and set the Remote/Local switch
to “Local” on the control VCR.
Operation
1. Set menu switch No. 372 <P+R AT SWAP
MODE> to “ENABLE”.
2. Press the [PLAYER] and [RECORDER] buttons
at the same time. Both buttons light up.
3. If the edit mode (assemble, insert) is selected,
release it.
4. Search the position from which you want to start
playback using the control VCR’s jog dial, etc.
5. Press the [ENTRY] button while pressing the [IN]
button to determine the edit IN point for
synchronized playback.
[ The time code data determined by the control
VCR is registered as the playback start point
on the two VCRs.
6. Press the [PREVIEW] button to start the
synchronized tape running.
The phase is adjusted just before the edit IN
point for synchronization.
81
8 PLAYBACK
8 PLAYBACK
8-8 SHUTTLE SEARCH/JOG OPERATION
8-9 VARIABLE SLOW PLAYBACK
Noiseless variable slow playback from -1.0x to +1.0x is available. Triple-pair playback heads assure optimum
picture quality.
[SEARCH] button
VIDEO CASSETTE RECORDER
AUDIO
INPUT
CH1
SDI
Notes
● Selecting modes in which
Shuttle Search can be
engaged.
AUDIO
MONITOR
AES/EBU CH1
L
ANALOG CH1
R
X32, X17 or X6 speed can
be selected with menu
switch No. 340 <SEARCH
SPEED>.
● Use menu switch No. 221
<SEARCH PB AT 1+3/
2+4> to select whether or
not audio is recorded on
the cue track when menu
switch No. 219 <SEARCH
REC CH> is set to CH1+3/
CH2+4.
● Slow Picture mode
With menu switch No. 119
<SLOW PICTURE>
FRAME (0): Slow-motion
frame playback
FIELD (1): Slow-motion
field playback
CH4
CH3
[VAR/P.PLAY] button
BR-D95U
POWER
SIF
VIDEO CASSETTE RECORDER
CH2
CH3
CH4
LINE
CH2
CH3
CH4
CPN
ON
I
OFF
O
AUDIO
INPUT
COMPONENT DIGITAL
CH1
CH2
R
P
dB OVER dB
0
+4
–10
+2
R
P
dB OVER dB
0
+4
–10
+2
0
–20
–2
–30
–40
0
CH3
–20
–2
–30
–40
–4
CH4/TRACKING
R
P
dB OVER dB
0
+4
–10
+2
0
–20
–2
–30
–40
–4
–60
R
P
dB OVER dB
0
+4
–10
+2
0
–2
–4
–60
525
625
CTL TC UB DF SERVO CF GEN 16:9 AP
AUTO OFF P.READ V.VAR PB/EE REMOTE
CONDITION
COUNTER
RESET
VCON
MENU
SET
HOLD
REMOTE
VAR
SEARCH
CH1
CH2
REC
CH3
PB
PB/EE
VIDEO
DA1
S
DA2
DA3
CH4
CH3
CH4
LINE
CH3
CH4
CPN
CH1
+4
EJECT
REC
PLAY
0
X1
–20
–30
–40
–4
METER MODE
FINE
PLAY
ENTRY
OUT
CANCEL PREVIEW
TRACKING
SHIFT
REVIEW
AUTO EDIT
TC
PREROLL
USER
TOP
VIDEO
POWER
COMPONENT DIGITAL
REW
STOP
FF
TIME CODE
ON SCREEN
OTHERS
CH4/TRACKING
R
P
dB OVER dB
0
+4
–10
+2
0
–20
–2
–30
–40
–4
–60
Search dial
AUDIO
STAND BY
SERVO/SYS
R
P
dB OVER dB
0
+4
–10
+2
PAUSE/STILL
CH3
CH2
R
P
dB OVER dB
0
F
DA4
TRACKING
INSERT
BR-D95U
SIF
ON
I
OFF
O
Variable Motion
–2
CH4
IN
PULL FOR VARIABLE
PULL
RELEASE
CH3
PLAYER RECORDER
STILL
M
H
ASSEM
CH2
CH2
CH2
P.PLAY
–20
–30
–40
–60
CH1
UB
X-1
PHONES
VIDEO
INPUT
AUDIO INPUT / AUDIO MONITOR SELECT
AES/EBU CH1
L
ANALOG CH1
R
SDI
AUDIO
MONITOR
–60
● Maximum Search speed
CH2
Variable Motion
–4
With menu switch No. 301
<DIRECT SEARCH>
set to “OFF (0)”, Shuttle
Search starts only when
the [SEARCH] button is
pressed.
When set to “ON (0)”,
Search can start from any
mode except REC and
REC Pause mode.
VIDEO
INPUT
AUDIO INPUT / AUDIO MONITOR SELECT
R
P
dB OVER dB
0
0
–20
–2
–30
–40
–4
+2
0
–2
–4
–60
CONDITION
COUNTER
RESET
VCON
REMOTE
MENU
SET
HOLD
PB
PB/EE
VAR
SEARCH
PLAYER RECORDER
UB
–10
P.PLAY
–20
STILL
–30
–40
M
H
–60
ASSEM
VIDEO
DA1
ENTRY
OUT
S
DA2
DA3
F
DA4
EJECT
REC
PLAY
PAUSE/STILL
X1
X-1
PHONES
CH1
CH2
REC
CH3
CH4
TRACKING
IN
PULL
RELEASE
REV
525
625
CTL TC UB DF SERVO CF GEN 16:9 AP
AUTO OFF P.READ V.VAR PB/EE REMOTE
+4
–10
+2
–60
PULL FOR VARIABLE
FWD
METER MODE
FINE
PULL
RELEASE
PLAY
CANCEL PREVIEW
TRACKING
SHIFT
REVIEW
INSERT
AUTO EDIT
TC
PREROLL
USER
VIDEO
AUDIO
STAND BY
TOP
REW
STOP
FF
SERVO/SYS
TIME CODE
ON SCREEN
OTHERS
Search dial
PULL
RELEASE
REV
FWD
Jog dial
Rapid visual search can be performed with either of two concentric dials; the outer
one serving as a shuttle search dial and the inner one as a jog dial.
● Audio recorded on the tape’s longitudinal cue track or digital audio track is output
during shuttle search and jog operation. (Select the audio during search with
menu switch No. 216 <AUD SEL. AT SEARCH>.)
Variable slow playback can be executed using either of the two methods described
below.
Method 1
1. Press the [VAR/P. PLAY] button to engage the Variable mode. The button
lights.
Shuttle search control
1. Turn the outer dial in the Play/Still/Stop/FF/REW modes.
Turn the dial to FWD (clockwise) to search in the forward direction and to REV
(counterclockwise) to search in the reverse direction.
[ Search starts. Search speed changes as given below in both forward and
reverse directions depending on how far the dial is turned.
Center (STILL) 0[0.03[0.07[0.10[0.20[0.50[ 1.00 [2[4[ 6[
10 [ X32
The maximum search speed can be selected with the menu switch No. 340
<SEARCH SPEED>.
● The Still mode is engaged when the dial is set at the center still click position.
Play speed is X1 (normal) at the first click position in both forward and reverse
directions. Noiseless playback is available from about -1.0x to +1.0x.
In this case, the audio signals on the digital truck of tape are output.
2. To stop search operation
Press PLAY, STOP, FF, or REW depending on which mode is to be engaged
next.
[ The selected mode is engaged. There is no change in the dial position.
When the [SEARCH] button is pressed, search operation starts at the speed
corresponding to the current position of the dial.
Jog operation
2. Turn the search dial.
Variable slow playback from -1 x to +1x is available.
• Turning the search dial all the way in the REV direction gives you -1x speed.
Turning it all the way in the FWD direction gives you +1x speed.
When the search dial is set to “STILL”, a still picture is displayed.
• The variable slow playback speed is shown on screen.
3. To stop variable slow playback
Press the operation button such as the [PLAY], [STOP], [PAUSE/STILL] and
[SEARCH] buttons.
Cautions
● The V. fade function is enabled only in the Playback, Program Playback or
Variable Slow Playback +1x mode. Under the following conditions, the V. fade
function may also be disabled in the Variable Slow Playback +1x mode.
1. In the first15 seconds after the Variable Slow Playback +1x mode is
activated.
2. When playing a tape recorded on the BR-D40/DY-70 or some BR-D80/
D85s.
● When playback speed is changed from + to – and vice versa, gray lines may
appear at the top or bottom of the screen (except with normal D9-format video
signals). This is normal. It is not a malfunction.
● Noise may appear when the Variable Slow Playback +1x mode is activated.
This is normal. It is not a malfunction.
1. Turn the inner jog dial.
● Turn the dial in the FWD direction (clockwise) to advance the tape.
Turn the dial in the REV direction (counterclockwise) to reverse the tape.
Search speed corresponds to the speed with which the dial is turned.
● The Still mode is engaged whenever you stop turning the dial.
82
83
8 PLAYBACK
8 PLAYBACK
8-9 VARIABLE SLOW PLAYBACK
8-10 PROGRAM PLAYBACK
[PLAY] button
[PLAY] button
VIDEO CASSETTE RECORDER
AUDIO
INPUT
VIDEO
INPUT
AUDIO INPUT / AUDIO MONITOR SELECT
CH1
CH2
CH3
CH4
AES/EBU CH1
L
ANALOG CH1
R
CH2
CH3
CH4
LINE
CH2
CH3
CH4
CPN
SDI
AUDIO
MONITOR
VIDEO CASSETTE RECORDER
POWER
AUDIO
INPUT
ON
I
OFF
O
CH1
CH2
CH3
CH4
AES/EBU CH1
L
ANALOG CH1
R
CH2
CH3
CH4
LINE
CH2
CH3
CH4
CPN
SDI
AUDIO
MONITOR
VIDEO
INPUT
AUDIO INPUT / AUDIO MONITOR SELECT
SIF
COMPONENT DIGITAL
CH1
CH3
CH2
R
P
dB OVER dB
0
+4
R
P
dB OVER dB
0
+4
–10
0
–20
–2
–30
–40
–4
POWER
COMPONENT DIGITAL
0
–20
–2
–30
–40
–4
R
P
dB OVER dB
0
525
625
CTL TC UB DF SERVO CF GEN 16:9 AP
AUTO OFF P.READ V.VAR PB/EE REMOTE
CONDITION
0
–20
–2
–30
–40
–4
+2
0
–2
–4
–60
COUNTER
RESET
VCON
MENU
SET
HOLD
REMOTE
VAR
SEARCH
CH1
PLAYER RECORDER
–10
+4
PB
PB/EE
P.PLAY
–20
M
H
S
0
F
VIDEO
DA1
ENTRY
OUT
DA2
DA3
DA4
EJECT
REC
PLAY
CH1
CH2
REC
CH3
CH4
METER MODE
FINE
PLAY
CANCEL PREVIEW
TRACKING
INSERT
AUTO EDIT
TC
PREROLL
TOP
STAND BY
REW
VIDEO
AUDIO
STOP
FF
–20
–30
–40
–4
CH4/TRACKING
R
P
dB OVER dB
0
REVIEW
USER
SERVO/SYS
TIME CODE
ON SCREEN
OTHERS
0
–20
–2
–30
–40
–4
+2
0
–2
–4
–60
CH1
CH2
REC
CH3
CONDITION
COUNTER
RESET
VCON
REMOTE
MENU
SET
HOLD
PB
PB/EE
VAR
SEARCH
PLAYER RECORDER
UB
–10
P.PLAY
–20
STILL
–30
–40
M
H
–60
ASSEM
CH4
VIDEO
DA1
ENTRY
OUT
S
DA2
DA3
F
DA4
EJECT
REC
PLAY
PAUSE/STILL
X1
TRACKING
IN
PULL FOR VARIABLE
REV
525
625
CTL TC UB DF SERVO CF GEN 16:9 AP
AUTO OFF P.READ V.VAR PB/EE REMOTE
+4
–10
+2
–60
METER MODE
FINE
SHIFT
I
O
X-1
PHONES
Search dial
PULL
RELEASE
PULL
RELEASE
FWD
1. To use this function, be sure to set the direct search function to OFF.
• Set menu switch No. 301 <DIRECT SEARCH> to “OFF (0)”.
3. When you want to start variable slow playback, hold the [PLAY] button down
and turn the search dial.
The variable slow playback is executed in the range of +0.90x to +1.10x
according to the turning direction and angle of the search dial.
• Turning the search dial all the way in the REV direction gives you +0.90x
speed. Turning it all the way in the FWD direction gives you +1.10x speed.
When the search dial is set to “STILL”, the Normal Playback mode (x1.0) is
engaged.
• Turning the search dial varies the playback speed in 1% steps. The variable
slow playback speed is shown on screen.
4. Release the [PLAY] button to restore the normal playback mode.
Method 3
Turn the jog dial while pressing the [PLAY] button during playback to increase or
decrease the playback speed according to the jog dial’s rotation direction and
speed.
• Set menu switch No. 301 <DIRECT SEARCH> to “ON”.
To increase playback speed
● Turn the jog dial clockwise (in the FWD direction) while pressing the [PLAY]
button. The playback speed can be increased up to 2 times normal depending
on how fast you rotate the dial.
● When you stop turning the jog dial, normal playback speed is restored.
SHIFT
REVIEW
INSERT
AUTO EDIT
TC
PREROLL
USER
VIDEO
AUDIO
STAND BY
TOP
REW
STOP
FF
SERVO/SYS
TIME CODE
ON SCREEN
OTHERS
Jog dial
PULL
RELEASE
REV
FWD
The program playback function lets you vary tape playback speeds between +0.90x
and +1.1x.
Program playback is possible after setting the initial speed value. During program
playback, the playback speed can be varied.
Variable slow playback can be engaged during normal playback.
2. Press the [PLAY] button to engage the Play mode.
PLAY
CANCEL PREVIEW
TRACKING
[SHIFT] button
Method 2
● Audio quality differs
depending on the setting
of menu switch No. 261
<AUD SEL. AT
SEARCH>. When
“DIGITAL AUDIO” is
selected, audio will be
distorted.
0
–2
X1
Jog dial
● When variable-motion
playback is performed at
speeds outside the
range from -1.0 x to +1.0
x, “!” appears with the
operation mode display
on-screen. This
produces a distorted
picture.
CH3
R
P
dB OVER dB
0
+4
–10
+2
–60
TRACKING
IN
PULL FOR VARIABLE
–30
–40
PAUSE/STILL
X-1
PHONES
PULL
RELEASE
–20
–2
–4
ASSEM
R
P
dB OVER dB
0
+4
–10
+2
STILL
–30
–40
–60
CH2
R
P
dB OVER dB
0
UB
+4
–10
+2
–60
ON
OFF
Variable Motion
CH4/TRACKING
R
P
dB OVER dB
0
+4
–10
+2
–60
BR-D95U
SIF
Variable Motion
+2
[VAR/P.PLAY] button
BR-D95U
Counter display
H
M
TCR
S
F
PLAY +1.042
00:00:00:01
Engage the Stop or Still mode.
1. Engage the Program Playback mode.
While holding the [SHIFT] button down, press the [VAR/P. PLAY] button.
• The [VAR/P. PLAY] button blinks and the Program Playback mode is
engaged.
2. Set the program playback speed.
While pressing the [VAR/P. PLAY] button, turn the jog dial.
• Turn the jog dial to set the playback speed in the range of +0.90x to +1.1x.
(0.1% step).
Turn the jog dial clockwise to accelerate the playback speed and
counterclockwise to decelerate it.
• The program playback speed is shown on the counter.
3. Execute program playback.
While holding the [VAR/P. PLAY] button down, press the [PLAY] button.
• Playback continues at the set speed.
During program playback, the [PLAY] and [VAR/P. PLAY] buttons blink.
4. To change the playback speed during program playback, hold the [VAR/P.
PLAY] button down and turn the jog dial.
5. To stop program playback, press any operation button, i.e. [STOP], [PLAY],
[PAUSE/STILL] and [SEARCH] buttons.
To decrease playback speed
● Turn the jog dial counterclockwise (in the REV direction) while pressing the
[PLAY] button. The playback speed can be decreased until the tape stops
depending on how fast you rotate the dial.
● When you stop turning the jog dial, normal playback speed is restored.
84
85
8 PLAYBACK
9 OTHER FUNCTIONS
8-11 FF, REW AND COUNTER MEMORY FUNCTIONS
2 extra lines for color signals and 4 extra lines for black and white signals are provided for each frame. A data
added to the V blanking section of input signals is recorded on the tape as an extra line. In the Play mode, this
extra line information is added to the video signal for output.
[SET] button
9-1 EXTRA LINE DATA RECORDING/PLAYBACK
VIDEO CASSETTE RECORDER
AUDIO
INPUT
CH1
SDI
AUDIO
MONITOR
VIDEO
INPUT
AUDIO INPUT / AUDIO MONITOR SELECT
AES/EBU CH1
L
ANALOG CH1
R
CH2
CH4
CH3
CH2
CH3
CH2
CH3
BR-D95U
POWER
SIF
CH4
LINE
CH4
CPN
COMPONENT DIGITAL
ON
I
OFF
O
Variable Motion
CH1
CH3
CH2
CH4/TRACKING
R
P
dB OVER dB
0
R
P
dB OVER dB
0
R
P
dB OVER dB
0
R
P
dB OVER dB
0
+4
+4
+4
+4
–10
+2
0
–20
–2
–30
–40
–4
–10
+2
0
–20
–2
–30
–40
–4
–60
–10
+2
0
–20
–2
–30
–40
–4
–60
+2
0
–2
–4
–60
525
625
CTL TC UB DF SERVO CF GEN 16:9 AP
AUTO OFF P.READ V.VAR PB/EE REMOTE
CONDITION
COUNTER
RESET
VCON
MENU
SET
HOLD
REMOTE
VAR
SEARCH
PLAYER RECORDER
UB
–10
PB
PB/EE
P.PLAY
–20
STILL
–30
–40
M
H
–60
ASSEM
VIDEO
DA1
IN
ENTRY
OUT
S
DA2
DA3
F
DA4
EJECT
REC
PLAY
PAUSE/STILL
X1
X-1
PHONES
CH1
CH2
REC
CH3
CH4
TRACKING
PULL FOR VARIABLE
METER MODE
FINE
PULL
RELEASE
PLAY
CANCEL PREVIEW
TRACKING
SHIFT
REVIEW
INSERT
AUTO EDIT
TC
PREROLL
USER
TOP
VIDEO
AUDIO
STAND BY
REW
STOP
FF
SERVO/SYS
TIME CODE
ON SCREEN
OTHERS
PULL
RELEASE
REV
FWD
[PREROLL] [REW] [FF]
button
button button
Notes
Output mode selection in FF
and REW modes
With menu switch No. 314
<PB/EE MODE> set to
“STOP/FF/REW (0)”, press
the [PB/EE] button to engage
the Still Output mode or EE
mode.
To fast-forward or rewind the tape
Press the [FF] or [REW] button.
[ The [FF] or [REW] button lights and the tape is fast-forwarded or rewound.
Maximum FF and REW speeds can be set to 60 times, 32 times or 17 times
normal with menu switch No. 319 <FF/REW MAX SPEED>. Factory setting:
60 times normal
Counter memory function
Setting procedure
● Set the counter mode to “CTL” with the front panel [COUNTER] button.
Auto REW function setting
With menu switch No. 312
<AUTO REW>
The tape is automatically
rewound to the start when it
comes to an end in the Play
or Record mode.
● Menu switch indication for
extra line
NTSC : (525) is displayed
after the menu
switch name.
PAL : p is displayed after
the menu switch
number and (625) is
displayed after the
menu switch name.
● For details of menu
switches No. 138 to No.
142, refer to page 47.
Extra line recording
Select the line containing the information to be recorded on an extra line.
1. Setting the input signal line for extra-line recording
Select with menu switch No. 138 <EXTRA LINE REC>.
FIX (0)
NTSC: Records line 22 information in the input
signal onto extra line-1 and line 284
information onto extra line-2. Factory
setting.
PAL : Records line 22 information in input signals
onto extra line-1 and line 623 information
onto extra line-2. Factory setting.
USER SETTING
(1)
Two user-specified lines in the input signal are
recorded onto extra line-1 and 2 for color signal
data. Four user-specified lines in the input signal
are recorded onto the extra line-1 to 4 for blackand-white data.
To specify the lines for color signals, set menu
switches No. 139 and No. 140. For black-and-white
signals, set menu switches No. 139 to No. 142.
Counter memory operation
1. Specify a tape section to be recalled.
Press the [RESET] button while pressing the [SET] button at the desired
section.
[ The counter is reset to “0:00:00:00” and this section is entered in this unit.
* When the counter display mode is set to “TC”, the value at the specified
point is entered.
• Press the [SET] button to check the entered value on the counter display.
2. Start Counter Search.
In the Stop mode, press the [PREROLL] button while pressing the [SET]
button.
The tape fast-forwards or rewinds and stops automatically at or near counter
0:00:00:00 in CTL mode.
In time code mode, the tape stops automatically at or near the entered value.
2. Selecting an input signal line when USER SETTING (1) is selected in
Step 1.
● Set the line to record on extra line-1 with menu switch No. 139 <EXTRA-L R1
SEL> (color or black-and-white signal).
● Set the line to record on extra line-2 with menu switch No. 140 <EXTRA-L R2
SEL> (color or black-and-white signal).
● Set the line to record on extra line-3 with menu switch No. 141 <EXTRA-L R3
SEL> (black-and-white signal only).
● Set the line to record on extra line-4 with menu switch No. 142 <EXTRA-L R4
SEL> (black-and-white signal only).
8-12 REPEAT PLAYBACK
With this function activated, tape playback is automatically repeated when the tape
ends.
Setting
● Set menu switch No. 311 <AUTO PLAY> to “ON (1)”
● Set menu switch No. 312 <AUTO REW> to “ON (1)”
Start playback
When the tape ends, it is rewound to the start and automatically begins
playback. This procedure is repeated continuously.
86
87
9 OTHER FUNCTIONS
9 OTHER FUNCTIONS
9-1 EXTRA LINE DATA RECORDING/PLAYBACK
9-2 EXTRA LINE, VITC LINE, V. BLANK MASK and PB EXTENSION LINE settings
Extra line data playback
● Menu switch indication for
extra line
NTSC : (525) is displayed
after the menu
switch name.
PAL : p is displayed after
the menu switch
number and (625) is
displayed after the
menu switch name.
● For details of menu
switches No. 143 to No.
147, refer to page 47–48.
● When menu switch No. 128
<PB EXTENSION LINE> is
set to “ON”, the extra line
information in the video
signal line is not output.
The menu switches below are used to select whether or not the extra line information
should be added to the video signal during playback, and if so, how it should be
added.
1. Select how the extra line information is to be added to the playback video
signal with menu switch No. 143 <EXTRA LINE PB>.
MUTING (0)
Extra line information is not added to output video
signals. Factory setting.
AUTO (1)
When video signals are output, extra line
information is added to the line selected for extra
line recording.
USER SETTING
(3)
When video signals are output, extra line
information is added to the two user-specified lines.
Color signal data is output on two lines and blackand-white signal data is output on four lines.
To specify the lines for color signals, set menu
switches No. 144 and No. 145. For black-and-white
signals, specify the lines with menu switches No.
144 to No. 147.
Setting range and priorities for the following menu switches are shown below.
No. 138 to 147 EXTRA LINE, No. 601 V. BLANK MASK, No. 400 to 401 VITC LINE SELECT and No. 128 PB
EXTENSION LINE.
NTSC
[525] LINE No.
523 524 525
1
2
3
4
5
6
7
8
9
10
11
12
13
14
15
16
17
18
19 20
21
22 23
24
25
26
27
28
SYNC
VITC SETTING RANGE
High
EXTRA LINE SETTING RANGE
V. BLANK MASK SETTING LINE
Priority
V. BLANK MASK ON
V. BLANK MASK ON WITH 0.5H
EXTENSION SETTING LINE
[525] LINE No.
Low
261 262 263 264 265 266 267 268 269 270 271 272 273 274 275 276 277 278 279 280 281 282 283 284 285 286 287 288 289 290
SYNC
High
VITC SETTING RANGE
EXTRA LINE SETTING RANGE
Priority
V. BLANK MASK ON
V. BLANK MASK ON WITH 0.5H
V. BLANK MASK SETTING LINE
Low
EXTENSION SETTING LINE
Analog output signal is masked.
Notes on the extra line
user setting
● Extra line information is not
output if the selected lines
are the same as those set
with menu switch No. 400
and No. 401.
2. Select a line on which extra line information should be added to the
playback video signal when USER SETTING (3) is selected in Step 1.
● Set the line for extra line-1 information with menu switch No. 144 <EXTRA-L
P1 SEL> (color or black-and-white signal).
● Set the line for extra line-2 information with menu switch No. 145 <EXTRA-L
P2 SEL> (color or black-and-white signal).
● Set the line for extra line-3 information with menu switch No. 146 <EXTRA-L
P3 SEL> (black-and-white signal only).
● Set the line for extra line-4 information with menu switch No. 147 <EXTRA-L
P4 SEL> (black-and-white signal only).
PAL
[625] LINE No.
620 621 622 623 624 625
1
2
3
4
5
6
7
8
9
10
11
12
13
14
15
16
17
18
19
20
21
22
23
24
25
SYNC
VITC SETTING RANGE
High
EXTRA LINE SETTING RANGE
V. BLANK MASK SETTING LINE
V. BLANK MASK ON
V. BLANK MASK ON WITH 0.5H
Priority
Low
EXTENSION SETTING LINE
Analog output signal is masked.
[625] LINE No.
308 309 310 311 312 313 314 315 316 317 318 319 320 321 322 323 324 325 326 327 328 329 330 331 332 333 334 335 336 337
SYNC
VITC SETTING RANGE
High
EXTRA LINE SETTING RANGE
V. BLANK MASK SETTING LINE
EXTENSION SETTING LINE
88
V. BLANK MASK ON
V. BLANK MASK ON WITH 0.5H
Priority
Low
89
9 OTHER FUNCTIONS
9 OTHER FUNCTIONS
9-3 SIMULTANEOUS OPERATION
9-4 FIXED TIME CUE UP FUNCTION
More than one BR-D95U can be operated at the same time with one RS-422 serial remote controller.
The tape can be cued to the position whose time data (fixed time) is recorded with “00F: FIXED TIME ENTRY” on
the top menu page (fixed time cue up function). Useful to cue up the tape to a specified position.
9-pin remote connector
[SET] button
[HOLD] button
[COUNTER] button
RS-422 serial remote controller
VIDEO CASSETTE RECORDER
AUDIO
INPUT
AUDIO
MONITOR
REMOTE IN
First VCR
REMOTE IN
Second VCR
CH1
CH2
CH3
CH4
CH2
CH3
CH4
LINE
CH2
CH3
CH4
CPN
CH1
RS-232C
SERIAL V / A
IN
OUT
1
LINE IN
VIDEO
COMPOSITE
RS-232C
LINE IN
SERIAL V / A
IN
OUT
1
RS-232C
–20
–2
–30
–40
–4
LINE IN
R
P
dB OVER dB
0
+4
–10
0
VIDEO
COMPOSITE
CH3
CH2
R
P
dB OVER dB
0
+4
VIDEO
COMPOSITE
BR-D95U
POWER
SIF
COMPONENT DIGITAL
ON
I
OFF
O
Variable Motion
Last VCR
+2
SERIAL V / A
IN
OUT
1
VIDEO
INPUT
AUDIO INPUT / AUDIO MONITOR SELECT
AES/EBU CH1
L
ANALOG CH1
R
SDI
9-pin remote cable
0
–20
–2
–30
–40
–4
–60
R
P
dB OVER dB
0
525
625
CTL TC UB DF SERVO CF GEN 16:9 AP
AUTO OFF P.READ V.VAR PB/EE REMOTE
CONDITION
0
–20
–2
–30
–40
–4
–60
+2
0
–2
–4
–60
COUNTER
RESET
VCON
REMOTE
MENU
SET
HOLD
PB
PB/EE
VAR
SEARCH
PLAYER RECORDER
UB
+4
–10
+2
[SEARCH] button
CH4/TRACKING
R
P
dB OVER dB
0
+4
–10
+2
–10
P.PLAY
–20
STILL
–30
–40
M
H
–60
ASSEM
VIDEO
DA1
IN
ENTRY
OUT
S
DA2
DA3
F
DA4
EJECT
REC
PLAY
PAUSE/STILL
X1
X-1
PHONES
2
REMOTE IN (9P)
AES / EBU
IN
CH1/2
OUT
CH1/2
REMOTE OUT (9P)
CH3/4
CH3/4
VIDEO CONTROL
Y
Y
R-Y
R-Y
B-Y
2
REMOTE IN (9P)
OUT
CH1/2
REMOTE OUT (9P)
CH3/4
CH3/4
VIDEO CONTROL
REMOTE IN (9P)
IN
CH1/2
OUT
CH1/2
REMOTE OUT (9P)
CH3/4
CH3/4
VIDEO CONTROL
CH2
REC
CH3
PULL FOR VARIABLE
R-Y
CH4
TRACKING
B-Y
IN
METER MODE
FINE
PULL
RELEASE
OUT
COMPONENT
CH1
Y
B-Y
B-Y
IN
Y
R-Y
AES / EBU
R-Y
B-Y
OUT
COMPONENT
2
Y
R-Y
AES / EBU
IN
CH1/2
B-Y
IN
Y
PLAY
REMOTE OUT
Connection
[REMOTE IN] connector with a 9-pin remote cable, the second VCR’s [REMOTE
OUT] connector to the third [REMOTE IN] connector, and so on.
Setting
● In the Fixed Time Registering mode, press the
[RESET] button to reset to
“00:00:00:00”.
USER
AUDIO
REW
STOP
FF
SERVO/SYS
TIME CODE
ON SCREEN
OTHERS
PULL
RELEASE
REV
FWD
[PREROLL] button
Registering the fixed time data
1. Press the [MENU] button to display the menu setting screen.
2. Turn the jog dial to select the top menu “00F: FIXED TIME ENTRY”.
• The time data currently registered is shown on screen.
00E:OPTIMUM REC CURRENT
Time data
3. Press the [HOLD] button.
[ The Fixed Time Data Registering mode is engaged and the time data
currently registered is shown on the counter display.
The uppermost digit blinks.
Operation
• Recording, playback, fast-forward and rewind on all the VCRs can be controlled
at the same time with the RS-422 serial remote controller.
Simultaneous operation with the BR-D95U
When the BR-D95U is used instead of the RS-422 serial remote controller, set as
follows.
BR-D95U used for simultaneous operation (first VCR)
• If you want to operate the first VCR at the same time, set menu switch No. 369
<PARA-RUN> on the first VCR to “ON (1)”. If not, set to “OFF (0)”
• Set the operation mode to “Local”. Press the [REMOTE] button so that the
“REMOTE” indicator on the display goes out.
Second VCR
• Set menu switch No. 369 <PARA-RUN> to “OFF (0)”.
• Set the operation mode to “Remote”.
Third and subsequent VCRs
• Set menu switch No. 369 <PARA-RUN> to “ON (1)”.
• Set the operation mode to “Remote”.
When the [PLAYER] button is pressed...
• If menu switch No. 369 <PARA-RUN> on the first VCR is set to “OFF (0)”;
[ The [PLAYER] button is illuminated.
• If menu switch No. 369 <PARA-RUN> on the first VCR is set to “ON (1)”;
[ The [PLAYER] and [RECORDER] buttons are illuminated.
Any operation executed on the first VCR will automatically be executed on all the other
VCRs as well.
Jog dial
00F:FIXED TIME ENTRY
00:00:00:00
● 00A: MENU in the top
menu
Even though INITIAL is
selected for SETTING,
registered data is not reset.
Set the all connected VCRs as follows.
• Set menu switch No. 369 <PARA-RUN> to “ON (1)”.
• Press the front panel [REMOTE] button to engage the VCR in the Remote mode
(the “REMOTE” indicator lights on the display).
Operation
90
REVIEW
TOP
PREROLL
VIDEO
STAND BY
OUT
1 Connect the 9-pin remote connector of the RS-422 serial remote controller to the
first VCR’s [REMOTE IN] connector.
2 Connect the first VCR’s [REMOTE OUT] connector to the second VCR’s
With a remote controller
that requires the VCR to
reply to commands, set
menu switch No. 369
<PARA RUN> to “OFF”
for the first VCR, and
“ON” for the second and
subsequent VCRs.
*The recorder's variable
playback speed is -1.0x
to +1.0x. The player’s
variable playback speed
is -2.0x to +3.0x.
SHIFT
AUTO EDIT
TC
COMPONENT
[SHIFT] button
REMOTE OUT
CANCEL PREVIEW
TRACKING
INSERT
* The time data does not blink on screen.
Register the time data on the counter display.
● Checking the registered
time data
The registered time data
can be checked on screen
by displaying “00F: FIXED
TIME ENTRY”. Press the
[HOLD] button to display
the registered time data on
the counter display.
4. Turn the jog dial to select the digit.
The selected digit blinks.
5. Set the time data by turning the jog dial while pressing the [SEARCH] button.
6. Repeat steps 4 and 5 to set the value for each digit.
7. When setting is complete, press the [SET] button.
“SET” is shown on the counter display.
The set time data is registered and the normal screen is restored.
Fixed time cue up operation
1. Load a recorded tape.
2. Select the counter display mode with the [COUNTER] button.
• “TC” or “UB”: The tape is cued up according to the time code registered on the
tape.
• “CTL”: The tape is cued up according to the time data shown on the CTL
counter.
3. Press the [PREROLL] button while pressing the [SHIFT] button.
The tape is cued up to the registered position.
91
9 OTHER FUNCTIONS
9 OTHER FUNCTIONS
9-5 MULTI CUE-UP FUNCTION
9-5 MULTI CUE-UP FUNCTION
In the Multi Cue-Up mode, up to 8 cue points can be specified and cued up. To engage the Multi Cue-Up mode,
set menu switch No. 389 <MULTI CUE MODE> to “ON”.
CH1
[ASSEM] button
1 2
+4
0
CH1
CH3
CH2
R
P
dB OVER dB
0
+4
R
P
dB OVER dB
0
+4
–10
0
0
–20
–2
–30
–40
–4
CH4/TRACKING
R
P
dB OVER dB
0
+4
–10
+2
–20
–2
–30
–40
–4
–60
525
625
CTL TC UB DF SERVO CF GEN 16:9 AP
AUTO OFF P.READ V.VAR PB/EE REMOTE
CONDITION
0
–20
–2
–30
–40
–4
–60
COUNTER
RESET
VCON
REMOTE
MENU
SET
HOLD
PB
PB/EE
0
VAR
SEARCH
CH2
CH1
REC
–60
CH3
PULL FOR VARIABLE
M
H
–60
ASSEM
VIDEO
DA1
IN
ENTRY
OUT
S
DA2
DA3
CONDITION
0
–20
–2
–30
–40
–4
–60
0
–2
–4
–60
CH2
CH1
REC
CH3
EJECT
RESET
VCON
REMOTE
MENU
SET
HOLD
PB
PB/EE
VAR
SEARCH
PLAYER RECORDER
P.PLAY
–20
STILL
–30
–40
M
H
–60
ASSEM
CH4
VIDEO
DA1
S
DA2
DA3
F
DA4
EJECT
REC
PLAY
PAUSE/STILL
X1
TRACKING
IN
ENTRY
OUT
INSERT
TC
F
DA4
COUNTER
UB
PLAY
REC
PAUSE/STILL
PULL FOR VARIABLE
X1
METER MODE
CANCEL PREVIEW
TRACKING
AUTO EDIT
PREROLL
TOP
VIDEO
AUDIO
STAND BY
REW
STOP
FF
SERVO/SYS
TIME CODE
ON SCREEN
OTHERS
TRACKING
METER MODE
CANCEL PREVIEW
TRACKING
SHIFT
PLAY
7
● In the Multi Cue-Up
mode, recording and
editing operations are
disabled.
525
625
CTL TC UB DF SERVO CF GEN 16:9 AP
AUTO OFF P.READ V.VAR PB/EE REMOTE
–10
FINE
CH4
FINE
PULL
RELEASE
–20
–30
–40
–4
+2
X-1
PHONES
X-1
PHONES
0
–2
–60
R
P
dB OVER dB
0
+4
–10
+2
STILL
–30
–40
–4
–30
–40
–4
P.PLAY
–20
–2
PLAYER RECORDER
CH4/TRACKING
R
P
dB OVER dB
0
+4
–10
+2
UB
–10
+2
–20
–2
R
P
dB OVER dB
0
+4
–10
+2
R
P
dB OVER dB
0
+4
–10
+2
+2
CH3
CH2
R
P
dB OVER dB
0
3 4 5
INSERT
AUTO EDIT
REVIEW
TC
PREROLL
USER
TOP
VIDEO
AUDIO
STAND BY
REW
STOP
FF
SERVO/SYS
TIME CODE
ON SCREEN
OTHERS
PULL
RELEASE
PULL
RELEASE
REV
SHIFT
REVIEW
USER
PULL
RELEASE
REV
FWD
[PREROLL] button
[ENTRY] button
[CANCEL] button
FWD
8
6
[ENTRY] button
1. Engage the Multi Cue-Up mode.
• Set menu switch No. 389 <MULTI CUE MODE> to “ON”. The [ASSEM] button
blinks and the Multi Cue-Up mode is engaged.
2. Set the Counter mode to “TC” with the [COUNTER] button.
3. Play back the tape. Pause the tape at the scene you want to specify as the
cue point.
4. Specify the cue point.
• Press the [ENTRY] button while pressing the [VIDEO] button. The first cue
point is specified and the [VIDEO] button lights.
• To specify the second cue point, press the [ENTRY] button while pressing the
[DA1] button.
• Up to 8 cue points can be specified with the button operation shown in the
table below.
Cue
point
PLAY
Operation buttons Display
1
VIDEO + ENTRY
The [VIDEO] button lights.
2
DA1 + ENTRY
The [DA1] button lights.
3
DA2 + ENTRY
The [DA2] button lights.
4
DA3 + ENTRY
The [DA3] button lights.
5
6
DA4 + ENTRY
TC + ENTRY
The [DA4] button lights.
7
IN + ENTRY
The [IN] button lights.
8
OUT + ENTRY
The [OUT] button lights.
● When power is turned off,
all specified cue points are
cancelled.
● If the Multi Cue mode is
engaged again before the
power is turned off, the last
cue point specified before
the Multi Cue mode was
previously disengaged can
still be used.
To change the specified cue point
Display the image at the cue point you want to change and press the [ENTRY]
button while holding down the corresponding cue point button.
(e.g.) To change the fourth cue point
• Locate the cue point you want to change and press the [ENTRY] button while
holding down the [DA3] button.
To erase the specified cue point
While holding down the button corresponding to the cue point you want to
erase, press the [CANCEL] button.
The corresponding button goes out and the cue point is erased.
(e.g.) To erase the 6th cue point
• While holding down the [TC] button, press the [CANCEL] button. The [TC]
button goes out and the 6th cue point is erased.
5. Perform the Cue-Up operation
Hold down the button corresponding to the required Cue-Up point and press the
[PREROLL] button.
(e.g.) To Cue-Up the third cue point
• Hold down the [DA2] button and press the [PREROLL] button. The third cue
point is cued up and the corresponding still picture is displayed.
6. Quit the Multi Cue mode.
Set menu switch No. 389 <MULTI CUE MODE> to “OFF”.
The [ASSEM] button goes out and the normal mode is engaged.
The [TC] button lights.
To check specified cue points
Press each button for which a cue point is specified. The time of the specified
cue point is displayed on the counter display.
(e.g.) To check the third cue point, press the [DA2] button.
92
93
9 OTHER FUNCTIONS
9 OTHER FUNCTIONS
9-6 STRIPING REC Function
9-6 STRIPING REC Function
Menu setting details
When preparing a tape for editing, you can use this function to record the video signals, time code and user bits
set with the <STRIPING REC MENU> on the entire tape.
On screen
VID. SOURCE
Counter
Video BLACK
<STRIPING REC MENU>
V I D.SOURCE BLACK
AUD.SOURCE (MUTING)
TCG PRESET 00:58:00:00
UBG PRESET 00 00 00 00
REC INH
REC+PLAY
STOP
START
EXIT
CTL TC UB DF SERVO CF GEN 16:9 AP
AUTO OFF P.READ V.VAR PB/EE REMOTE
H
M
525
625
CONDITION
S
F
● After this operation, all
buttons except for
[EJECT], [STOP] and
[REC] buttons have no
effect.
● When the [STOP] button
is pressed in this step,
the menu is closed and
the STRIPING REC
mode is released.
● Audio signals are not
recorded.
● Editing operations such
as assembly and insert
cannot be executed. If
an operation other than
the current mode is
executed, for example
when the [PLAY] button
is pressed during rewind,
STRIPING REC ends.
● When another operation
is performed during
recording ([REC] +
[PLAY]), STRIPING REC
ends.
94
Operation
1. If the [RECORDER] or [PLAYER] button is illuminated, press the button so
that it goes off.
2. Press the [REMOTE] button to select the “LOCAL” mode for local
operation.
3. Press the [REC] button while holding down the [SHIFT] button to open the
<STRIPING REC MENU>.
[ The current settings are displayed on screen and the counter display.
● The [REC] button blinks.
● The Stop mode is engaged if the tape is running.
4. Load a cassette tape.
[ When the [REC] switch on the cassette is set to “OFF”, “REC INH” blinks on
screen.
5. Change the settings if required.
● Refer to the menu setting contents and procedures on page 95. The settings
are retained even if the power is turned off.
6. Press the [PLAY] button while holding down the [REC] button to start
STRIPING REC.
[ The tape is rewound automatically to the beginning and recording starts.
● During rewind, the [REC] and [REW] buttons blink alternately.
● When recording starts, the blinking “STRIPING” indication lights. The
[PLAY] and [REC] buttons blink simultaneously.
● When the end of the tape is reached, “Complete” is shown on the counter
display, the tape is automatically rewound to the beginning and STRIPING
REC ends.
● The following settings which are automatically set with the STRIPING REC
are reset to the original settings when STRIPING REC is complete.
• VIDEO INPUT] button
• [COUNTER] button
• TIME CODE] (INT/EXT, REC/FREE, PRESET/REGEN) switches
• Menu switch No. 111 <VD REC SIGNAL SEL.>
• If menu switch No. 457 <UB AUTO PRESET> is set to “ON”, the registered
user bit data is restored.
• Audio muting is released.
7. Press the button on the front panel as required so that the “Complete”
indication goes out.
AUD. SOURCE
TCG PRESET 00:58:00:00
UBG PRESET 00 00 00 00
Non-drop frame/drop
frame indication (NTSC
only)
Set with the menu
switch No. 416.
Drop frame:
00:00:00•00
Non-drop frame:
00:00:00:00
● Dropped data cannot be
set in the Drop Frame
mode. Data has 2
frames which are added
(in the Drop Frame
mode).
Settings
BLACK
SIF
LINE
CPN
(MUTING)
Desired value
Desired value (0 - F)
Contents
Selects the video signals to be recorded. If noninput signals are selected, the indication blinks.
BLACK : Selects the built-in black signal. The built-in
color bar signal cannot be selected.
SIF
: Selects the AES/EBU signals. This cannot
be selected if the SA-D95U is not installed.
LINE : Selects composite signals.
CPN : Selects component signals.
Muting is always on. Setting is not possible.
Presets the time code.
Presets the user bits.
Setting
1. Open the <STRIPING REC MENU>.
Press the [REC] button while holding down the [SHIFT] button.
2. Turn the jog dial to select the item to be set.
3. Change the setting.
● VID. SOURCE: Selecting the video signals
While pressing the [SEARCH] button, turn the jog dial to select the signal.
● TCG PRESET: Setting the time code
1. Press the [HOLD] button.
[ The digit for the time code blinks.
2. Select the digit with the jog dial.
[ The selected digit blinks.
3. While pressing the [SEARCH] button, turn the jog dial to change the
numeric value.
● To cancel the setting, press the [HOLD] button.
[ The menu item selection menu is restored.
● To set all digits to 0, press the [RESET] button.
4. Press the [SET] button to register the setting.
●UBG PRESET: Setting the user bits
1. Press the [HOLD] button.
[ The digit for user bits blinks.
2. Select the digit with the jog dial.
[ The selected digit blinks.
3. While pressing the [SEARCH] button, turn the jog dial to change the
numeric value.
● To cancel the setting, press the [HOLD] button.
[The menu item selection menu is restored.
● To set all digits to 0, press the [RESET] button.
4. Press the [SET] button to register the setting.
4. End menu setting.
It is not necessary to end menu setting to start STRIPING REC right away.
Press the [STOP] button to close the menu and restore normal operation.
95
10 HOW TO USE TIME CODE
10 HOW TO USE TIME CODE
Time codes and user bits can be recorded and played back as time data.
The time code area on the tape is divided into the main time code sector used for time data for editing and the sub
time code sector which can be used for optional recording of time code.
10-2 TIME CODE INITIAL SETTING (PRESET)
The BR-D95U includes a built-in time code generator so that initial values can be set as desired for the time code
and user bits.
User bit data is stored in the built-in nonvolatile memory and retained even when the power is turned off. The
stored data can be preferentially recorded on the tape for editing (UB auto preset function).
10-1 TIME CODE DISPLAY
Notes
● On-screen display data are
output through the rear
panel [LINE2-SUPER]
connector.
(When the [ON SCREEN]
switch on the sub panel is
set to ON.)
● The on-screen display
position can be moved with
menu switches No. 501
and 502.
To display selected time data on the counter display and the on-screen display
during playback or recording.
[TC] indicator
[UB] indicator
VIDEO CASSETTE RECORDER
AUDIO
INPUT
VIDEO
INPUT
AUDIO INPUT / AUDIO MONITOR SELECT
CH1
CH2
CH3
CH4
AES/EBU CH1
L
ANALOG CH1
R
CH2
CH3
CH4
LINE
CH2
CH3
CH4
CPN
SDI
AUDIO
MONITOR
POWER
SIF
COMPONENT DIGITAL
display during slow play of
±1.0 times normal or
slower
1st field or 2nd field is
shown.
TC1: 1st field
TC2: 2nd field
ON
I
OFF
O
Variable Motion
CH1
CH3
CH2
R
P
dB OVER dB
0
+4
R
P
dB OVER dB
0
+4
–10
+2
0
–20
–2
–30
–40
–4
CH4/TRACKING
R
P
dB OVER dB
0
+4
–10
+2
0
–20
–2
–30
–40
–4
–60
R
P
dB OVER dB
0
525
625
CTL TC UB DF SERVO CF GEN 16:9 AP
AUTO OFF P.READ V.VAR PB/EE REMOTE
CONDITION
0
–20
–2
–30
–40
–4
–60
+2
0
–2
–4
–60
COUNTER
RESET
VCON
REMOTE
MENU
SET
HOLD
PB
PB/EE
VAR
SEARCH
PLAYER RECORDER
UB
+4
–10
+2
–10
P.PLAY
–20
STILL
–30
–40
M
H
–60
ASSEM
VIDEO
DA1
ENTRY
OUT
S
DA2
DA3
F
DA4
EJECT
REC
PLAY
PAUSE/STILL
X1
X-1
PHONES
CH1
CH2
REC
CH3
CH4
TRACKING
IN
PULL FOR VARIABLE
METER MODE
FINE
PULL
RELEASE
CANCEL PREVIEW
TRACKING
SHIFT
PLAY
INSERT
AUTO EDIT
REVIEW
[SHIFT] button
● Time code reader data
BR-D95U
TC
PREROLL
USER
VIDEO
AUDIO
STAND BY
TOP
REW
STOP
FF
SERVO/SYS
TIME CODE
ON SCREEN
OTHERS
PULL
RELEASE
REV
FWD
[COUNTER] button
Set the COUNTER switch to TC or UB.
• Set the counter to the Time Code Display mode with the [COUNTER] button.
• Press the [COUNTER] button while pressing the [SHIFT] button to set the
counter to the User Bits Display mode.
“TC” or “UB” is shown on the display depending on the setting.
TC: Displays time code data.
UB: Displays user bits.
TC UB
CONDITION
User bits
User bits are provided to
allow user-specified data to
be included in the time code
data. User bits are recorded
and played back with the
time code.
User user bits can be preset,
recorded, played back, and
displayed.
• The user bits set for each
VCR can be recorded at all
times (UB PRESET AUTO).
• However, you cannot set
sub time code user bits.
H
M
Hour Minute
S
F
VIDEO CASSETTE RECORDER
AUDIO
INPUT
● Drop Frame/Non-Drop
Frame mode (NTSC only)
In the NTSC system, the
actual number of frames
per second is approximately 29.97. However,
the number of frames used
by the time code processing standard is 30. To
compensate for this
difference, the Drop Frame
mode drops the 00 frame
and the 01 frame once
every minute (except the
tenth minute). In the NonDrop Frame mode, no
frames are dropped and
the difference between
actual tape time and the
time code is ignored.
● In the Drop Frame mode,
the front panel [DF]
indicator lights.
AUDIO INPUT / AUDIO MONITOR SELECT
VIDEO
INPUT
CH1
CH2
CH3
CH4
SIF
AES/EBU CH1
L
ANALOG CH1
R
CH2
CH3
CH4
LINE
CH2
CH3
CH4
CPN
SDI
AUDIO
MONITOR
BR-D95U
POWER
ON
I
OFF
O
COMPONENT DIGITAL
Variable Motion
TIME CDOE
DF
NDF
RF
SERVICE USE ONLY
HID
GND
INT
EXT
OFF
ON
CF
FREE PRESET
REC
REGEN
8
ON
OFF
4
(625) ON SCREEN
TIME CDOE
DF
INT
FREE PRESET
NDF
EXT
REC
Front sub panel
REGEN
Setting
Front sub panel switches for time code setting
● Set the [PRESET/REGEN] switch to “PRESET”.
● Set the [REC/FREE] switch as desired.
REC: Time code preset in the time code generator runs in the Record mode.
FREE: Time code runs from the preset point in the time code generator.
● Set the [INT/EXT] switch to “INT”.
● Set the [DF/NDF] switch as desired. (NTSC only):
DROP (0)
: Sets the Running mode of the built-in time code generator to
the Drop Frame mode.
NON DROP (1) : Sets the Running mode of the built-in time code generator to
the NON Drop Frame mode.
Second Frame
Front panel setting
TCR : Time code reader data (see the
left column)
TCG : Time code generator data
UBR : User bits reader data
UBG : User bits generator data
TCR • : CTL (control) signal interpolation mark
● Select the Counter Display mode to TC or UB.
TCR 00:00:00:00
Menu switch setting
Time code mode display
:.... Non-drop
. .... Drop frame
● Menu switch No. 457 <UB PRESET AUTO> setting
When user bit data is preset from the 9-pin remote controller, set this to “OFF”.
When this is set to “ON”, user bit preset data from the 9-pin remote controller is
ignored.
Sub time code data display
Sub time code, marked with “SUB”, is
displayed with the main time code on the
on-screen display.
● Sub time code is shown when:
• Sub time code is output through the
VITC output (with menu switch No. 504
<INFORMATION SELECT> set to
“TIME+SUB TC (3)” or “TIME+SUB
TC+MODE (4)”).
SUB TCR 00:00:00:00
TCR 00:00:00:00
SUB: Sub time code
96
97
10 HOW TO USE TIME CODE
10 HOW TO USE TIME CODE
10-2 TIME CODE INITIAL SETTING (PRESET)
10-3 TIME CODE RECORDING
[SET] button
VIDEO CASSETTE RECORDER
AUDIO
INPUT
VIDEO
INPUT
AUDIO INPUT / AUDIO MONITOR SELECT
CH1
CH2
CH3
CH4
AES/EBU CH1
L
ANALOG CH1
R
CH2
CH3
CH4
LINE
CH2
CH3
CH4
CPN
SDI
AUDIO
MONITOR
BR-D95U
POWER
SIF
COMPONENT DIGITAL
ON
I
OFF
O
CH1
CH2
R
P
dB OVER dB
0
+4
–10
+2
0
–20
–2
–30
–40
–4
0
CH3
–20
–2
–30
–40
–4
–60
CH4/TRACKING
R
P
dB OVER dB
0
+4
–10
+2
0
–20
–2
–30
–40
–4
–60
R
P
dB OVER dB
0
+4
–10
+2
0
–2
–4
–60
525
625
CTL TC UB DF SERVO CF GEN 16:9 AP
AUTO OFF P.READ V.VAR PB/EE REMOTE
CONDITION
COUNTER
RESET
VCON
MENU
SET
HOLD
REMOTE
VAR
SEARCH
PLAYER RECORDER
VIDEO CASSETTE RECORDER
PB
PB/EE
AUDIO
INPUT
P.PLAY
VIDEO
DA1
S
DA2
DA3
F
DA4
AUDIO
MONITOR
EJECT
REC
PLAY
CH1
CH2
REC
CH3
CH4
PAUSE/STILL
X1
PULL FOR VARIABLE
VIDEO
INPUT
CH1
CH2
CH3
CH4
CH2
CH3
CH4
LINE
CH2
CH3
CH4
CPN
POWER
SIF
METER MODE
FINE
ENTRY
OUT
CANCEL PREVIEW
TRACKING
SHIFT
PLAY
REVIEW
INSERT
TC
AUTO EDIT
PREROLL
USER
TOP
VIDEO
STAND BY
REW
STOP
FF
SERVO/SYS
TIME CODE
ON SCREEN
OTHERS
I
OFF
O
Variable Motion
Jog dial
AUDIO
ON
COMPONENT DIGITAL
TRACKING
IN
PULL
RELEASE
AUDIO INPUT / AUDIO MONITOR SELECT
AES/EBU CH1
L
ANALOG CH1
R
SDI
STILL
M
H
ASSEM
BR-D95U
UB
–20
–30
–40
–60
X-1
PHONES
Recording time code data output from the built-in time code generator
[SEARCH] button
Variable Motion
R
P
dB OVER dB
0
+4
–10
+2
There are two different ways of recording time code or user bits; recording the data output from the built-in time
code generator and recording externally generated time code or user bits.
The user bit auto preset function allows preferential recording of data stored in the built-in nonvolatile memory.
[HOLD] button
PULL
RELEASE
REV
FWD
TIME CDOE
[REC] button
DF
[STOP] button
NDF
RF
HID
SERVICE USE ONLY
GND
INT
EXT
OFF
ON
CF
FREE PRESET
REC
REGEN
8
ON
OFF
4
(625) ON SCREEN
TIME CDOE
Notes
● To cancel a setting, press
the [HOLD] button before
the [SET] button has been
pressed.
● In the preset mode (steps
1 to 4), press the [RESET]
button to set all digits to
“0”.
● Time code data starts
running as soon as
presetting is finished if the
front sub panel [FREE/
REC] switch is set to
“FREE”.
Procedure
H
H
H
H
H
M
M
M
M
M
S
S
S
S
S
F
F
F
F
F
1. Engage the Time Code Generator Preset mode.
Press the [HOLD] button.
[ The first digit on the counter display blinks.
2. Set the value for the blinking digit by turning
the jog dial while pressing the [SEARCH]
button.
[ The value of the blinking digit changes. Use the
hexadecimal (0-9, A-F) for user bits.
3. Shift the digit by turning the jog dial.
[ The blinking digits shift to the next one.
4. Set desired values for all digits.
Repeat steps 2 - 3.
5. Presetting is completed by pressing the [SET]
button.
[ The selected data are preset in the built-in time
code generator. When preset is finished, the
normal on-screen and counter displays are
restored.
The user bit data is stored in the built-in memory.
Checking the values set in the time code
generator
H
M
S
F
Procedure
(Do this with the tape unloaded or in the Stop mode)
1. Press the [REC] button to show the value set in
the time code generator.
To check the user bit data stored in the built-in
memory, set the counter display mode to “UB” and
menu switch No. 457 <UB PRESET AUTO> to
“ON (1)”.
2. Pressing the [STOP] button restores the
normal display mode.
DF
INT
FREE PRESET
NDF
EXT
REC
Front sub panel
REGEN
Setting
Front sub panel switch setting
Auto regeneration mode
during editing
Use menu switch No.
410 <AUTO REGEN
MODE> to enable time
code regeneration during
editing even with the
[PRESET/REGEN]
switch set to “PRESET”.
● To copy VITC when
SDTI signals are input to
the BR-D95U, both the
[SERIAL] connectors
and [TIME CODE]
connectors must be
connected.
Contents of
the time code
Switch setting
[INT/EXT]
[REC/FREE]
Time code preset in the
built-in time code
generator is recorded.
“INT”
“REC” or
“FREE”
“PRESET”
Recorded in sync
with the time code
recorded on the tape.
“INT”
“REC” or
“FREE”
“REGEN”
[PRESET/REGEN]
Menu switch setting
● Menu switch No. 403 <REGEN MODE>: Set as desired in the Regen mode.
● Menu switch No. 450 <SUB TC (VITC) REC>
When set to OFF (0): “00:00:00:00” is always recorded on the sub time code.
When set to ON (1): Input VITC is recorded in the sub time code.
Factory setting: ON (1)
● Setting of menu switch No. 457 <UB PRESET AUTO>
OFF (0): The user bit auto preset function is disabled. The user bit data from
the built-in time code generator is recorded.
ON (1): The user bit auto preset function is enabled. The user bit data stored
in the built-in memory is recorded.
Procedure
1. Press the [REC] button in the Stop mode and check the value of the builtin time code generator.
[ The data value stays on display when the [REC] button is pressed.
● Press the [STOP] button to restore the normal display mode.
2. Record the time code and user bits.
[ Press the [PLAY] button while pressing the [REC] button.
● TCG or UBG is shown on the on-screen counter display.
3. To stop recording, press the [STOP] button.
98
99
10 HOW TO USE TIME CODE
10 HOW TO USE TIME CODE
10-3 TIME CODE RECORDING
10-4 TIME CODE PLAYBACK
Recording the time code data output from the external time code generator
Externally generated time code can be recorded after being regenerated with the
time code data output from the built-in time code generator.
Time code is output through the rear panel [TC OUT] and [VIDEO OUT] connectors during playback. VITC time
code with the time code data superimposed on the video signal is output through the [VIDEO OUT-LINE] connector.
Sub time code is output through the [VIDEO OUT-LINE] connector as VITC time code when menu switch No. 451
<VITC OUT SELECT> is set to “SUB TC”. Only the main time code is output through the [TC OUT] connector.
[COUNTER] button
VIDEO CASSETTE RECORDER
AUDIO
INPUT
AUDIO INPUT / AUDIO MONITOR SELECT
VIDEO
INPUT
CH1
CH2
CH3
CH4
AES/EBU CH1
L
ANALOG CH1
R
CH2
CH3
CH4
LINE
CH2
CH3
CH4
CPN
SDI
AUDIO
MONITOR
BR-D95U
POWER
SIF
VIDEO CASSETTE RECORDER
ON
BR-D95U
I
AUDIO
INPUT
OFF
CH1
CH2
CH3
CH4
AES/EBU CH1
L
ANALOG CH1
R
CH2
CH3
CH4
LINE
CH2
CH3
CH4
CPN
SDI
O
AUDIO
MONITOR
Variable Motion
VIDEO
INPUT
AUDIO INPUT / AUDIO MONITOR SELECT
COMPONENT DIGITAL
POWER
SIF
COMPONENT DIGITAL
ON
I
OFF
O
Variable Motion
CH1
–20
–2
FREE PRESET
R
P
dB OVER dB
0
+4
–10
0
INT
–30
–40
–4
NDF
HID
GND
EXT
OFF
REC
REGEN
8
ON
CH4/TRACKING
R
P
dB OVER dB
0
0
–20
–2
–30
–40
–4
–10
+2
0
–20
–2
–30
–40
–4
–60
ON
CF
525
625
CTL TC UB DF SERVO CF GEN 16:9 AP
AUTO OFF P.READ V.VAR PB/EE REMOTE
CONDITION
PULL
RELEASE
DF
INT
FREE PRESET
NDF
EXT
REC
RESET
VCON
MENU
SET
HOLD
REMOTE
VAR
SEARCH
PB
PB/EE
PLAYER RECORDER
P.PLAY
–20
STILL
–30
–40
M
H
–60
ASSEM
VIDEO
DA1
ENTRY
OUT
S
DA2
DA3
F
DA4
EJECT
REC
PLAY
PAUSE/STILL
CH1
CH2
REC
CH3
CH4
X1
TRACKING
METER MODE
2. Menu switch setting
● Select the external time code to be regenerated.
● Menu switch No. 409 <EXT REGEN TC> (Initial setting: LTC (0))
LTC (0): Regenerates the LTC time code input through the rear panel
[TC IN] connector.
INSERT
● User bit data selection
● Menu switch No. 457 <UB PRESET AUTO> (initial setting OFF (0))
OFF (0): User bits regenerated by the time code generator of this unit is
recorded.
ON (1):
The user bit auto preset function is activated and the user bit
data stored in the built-in memory is recorded.
● Select the sub time code.
● Menu switch No. 450 <SUB TC (VITC) REC> (Initial setting: ON(1))
OFF (0): “00:00:00:00” is always recorded on the sub time code.
ON (1):
Records the input VITC time code in the sub time code.
SHIFT
REVIEW
AUTO EDIT
TC
PREROLL
USER
VIDEO
AUDIO
STAND BY
TOP
REW
STOP
FF
SERVO/SYS
TIME CODE
ON SCREEN
OTHERS
PULL
RELEASE
REV
FWD
Setting
● When you are using this
deck as a player, the
recording time code may
not be regenerated when
you output embedded
audio (SERIAL V/A OUT)
signals to the BR-D750U,
BR-D85U or BR-D80U. In
this case, set menu switch
No. 237 <EMBEDDED
AUDIO> to “OFF”.
Input LTC time code should be regenerated (matched in
terms of sync and phase) with video signals. Make sure you
input an external sync signal to the feeding equipment.
VITC (1): Regenerates the VITC time code superimposed on the video
signal input through the rear panel VIDEO IN connector.
PLAY
CANCEL PREVIEW
TRACKING
[PLAY] button
REGEN
1. Front sub panel switch setting
● Select the External Time Code Generator mode by setting the [INT/EXT]
switch to “EXT”.
The [FREE/REC] and [PRESET/REGEN] switch settings are not necessary.
● Select the Counter Display or On-screen Display mode to TC or UB with the
[COUNTER] and [SHIFT] buttons.
3. Record the time code.
Press the [PLAY] button while pressing the [REC] button.
[ The selected time code will be recorded.
COUNTER
UB
–10
FINE
Front sub panel
100
–4
X-1
PHONES
PULL FOR VARIABLE
● Regeneration operation
• When time code is being
regenerated with input
time code, the built-in time
code generator stops
counting when no time
code is input.
● In the Play mode, time
code regeneration is based
on the playback time code
value.
● Inserting time code
If only time code data is
being inserted, record it on
the main time code. It is not
possible to insert it in the
sub time code.
0
–2
OFF
4
(625) ON SCREEN
TIME CDOE
Automatically selected
according to the mode of
the received time code
(Drop Frame or Non-drop
Frame).
+2
–60
IN
SERVICE USE ONLY
Notes
● Drop/Non-drop Frame
mode selection (NTSC
only)
R
P
dB OVER dB
0
+4
+4
–10
+2
–60
RF
CH3
CH2
R
P
dB OVER dB
0
+4
+2
TIME CDOE
DF
● On-screen display of sub
time code
Sub time code is displayed
with the main time code
when menu switch No. 451
<VITC OUT SELECT>
is set to “SUB TC (0)”.
1. Front panel switch setting
● Select a Counter Display mode to TC or UB with the [COUNTER] and [SHIFT]
buttons.
2. Menu switch setting
● For VITC time code output, select a line to be added to the video signal.
● Menu switch No. 400 <VITC LINE-1 SELECT>
(Initial setting: NTSC 16 LINE/PAL 19 LINE)
● Menu switch No. 401 <VITC LINE-2 SELECT>
(Initial setting: NTSC 18 LINE/PAL 21 LINE )
● Select VITC time code output through the [VIDEO OUT] connector.
Menu switch No. 451 <VITC OUT SELECT>
SUB TC (0)
: Outputs the VITC time code recorded in the sub time code.
TC (1)
: Outputs the time code recorded in the main time code.
OFF
: VITC time code is not output from the [VIDEO OUT]
connector.
Factory setting : TC (1)
● Select the Time Code Output mode during search.
Menu switch No. 452 <SEARCH LTC>
OFF (0) : Outputs time code through the [TC OUT] connector during search
at X1.
ON (1) : Outputs time code through the [TC OUT] connector during search
at all speeds. Continuous time code is not available.
3. Play back the time code.
Press the [PLAY] button.
[ The selected time code is played back.
TCR or UBR is shown with the on-screen time code data.
● LTC time code is output from the [TC OUT] connector.
● Main or sub time code selected with menu switch No. 451 <VITC OUT
SELECT> is superimposed on video signals and output to the line selected
with menu switch No. 400 and No. 401 from the [VIDEO OUT] connector.
101
10 HOW TO USE TIME CODE
10 HOW TO USE TIME CODE
10-5 SUB TIME CODE RECORDING AND PLAYBACK
10-6 TIME CODE SWITCH SETTING FOR EDITING
In addition to the main time code used for editing, this unit can also record (and play back) an optional sub time
code in the time code data area on the tape.
VIDEO CASSETTE RECORDER
AUDIO
INPUT
AUDIO INPUT / AUDIO MONITOR SELECT
Recording sub time code
VIDEO
INPUT
CH1
CH2
CH3
CH4
AES/EBU CH1
L
ANALOG CH1
R
CH2
CH3
CH4
LINE
CH2
CH3
CH4
CPN
SDI
AUDIO
MONITOR
BR-D95U
POWER
SIF
ON
I
OFF
O
COMPONENT DIGITAL
Variable Motion
● In the sub time code sector, you can record either the same data as in the main
time code or the VITC time code received through the [VIDEO IN] connector.
TIME CDOE
DF
Notes
● When menu switch No. 450
<SUB TC<VITC> REC> is
set to “ON (1)”
The sub time code is
regenerated with the VITC
signal superimposed on the
video signal from the
[VIDEO IN] connector.
1. Select data to be recorded on the sub time code.
● Menu switch No. 450 <SUB TC (VITC) REC>
OFF (0): “00:00:00:00” is always recorded on the sub time code.
ON (1): Records the VITC received from the [VIDEO IN] connector on the
sub time code.
Initial setting: ON (1)
GND
INT
EXT
OFF
ON
CF
FREE PRESET
REC
REGEN
8
ON
OFF
4
(625) ON SCREEN
TIME CDOE
DF
INT
FREE PRESET
NDF
EXT
REC
REGEN
● Set the switches on the BR-D95U (recording VCR) as follows.
● Sub time code data is output through the [VIDEO OUT] connector as a VITC time
code signal superimposed on the video signal.
1. Enable sub time code playback.
● Set menu switch No. 451 <VITC OUTSEL> to “SUB TC (0)”.
Factory setting: TC (1)
No sub time code data is
output through the rear
panel [TC OUT] connector.
Only main time code (LTC)
is output from the built-in
time code reader.
HID
Front sub panel
2. Record the sub time code.
Press the [PLAY] button while pressing the [REC] button.
The selected time code will be recorded.
Play back the sub time code.
● [TC OUT] connector output
NDF
RF
SERVICE USE ONLY
Note
If there is no external sync
signal generator available,
send a video input signal to
the [VIDEO REF IN] connector
on the recording VCR.
Front panel switch setting
● [INT/EXT] switch: Set to “INT”.
● [REC/FREE] switch: Set to “FREE”.
● [PRESET/REGEN] switch: Set to “PRESET”.
● Set the menu switches as required.
2. Play back the sub time code.
Press the [PLAY] button.
[ Sub time code data is output through the [VIDEO OUT] connector as a VITC
time code signal superimposed on the video signal.
Sub time code data (indicated with SUB) is shown with the main time code
on the on-screen display (with menu switch No. 504 <INFORMATION
SELECT> set to “TIME+SUB TC (3)” or “TIME+SUB TC+MODE (4)”).
● When menu switch No. 457 <UB PRESET AUTO> is set to “ON (1)”, the user
bit data stored in memory is recorded.
● Send an external sync signal to the [VIDEO REF IN]
connector for editing.
Deliver a black burst or a standard color signal as an external sync signal.
Time Code Signal Flow
Time code data flow depends on the setting of the menu switch or the [INT/EXT]
switch.
Use this as a reference for switch setting.
INT/EXT switch
Internal time code
generator
Recording area
INT
Recording
system
Main time
code domain
TC OUT
Playback system
EXT
TC IN
LTC
TC
LINE OUT
OFF
00:00:00:00
VITC
Sub time
code domain
Menu switch No.409
VIDEO IN
<EXT REGEN TC>
(LINE /
COMPONENT/
SERIAL V/A)
102
ON
SUB TC
Menu switch No.451
<VITC OUT SELECT>
Menu switch No.450
<SUB TC (VITC) REC>
103
11 EDITING
11 EDITING
11-1 OUTLINE
11-2 COLOR FRAME SERVO SETTING
Two electronic editing modes are available: insert editing and assemble editing. Signals from a video camera, onair signals and playback signals from another VCR can be used in either type of editing.
NTSC : 4-field color frame servo function available
PAL : 4 or 8-field color frame servo function available
VIDEO CASSETTE RECORDER
Assemble editing
Insert editing
AUDIO
INPUT
With assemble editing, scenes are added one after
the other in predetermined order. Video, audio, and
control signals are recorded simultaneously. To
ensure stable editing, CTL signals must be recorded
prior to the first edit point for a period exceeding the
preroll time (typically, about 30 seconds).
Preroll point
Edit-in point
Edit-out point
Recorder
Insert editing allows you to insert new audio or video
material between existing scenes that have already
been recorded. You can choose different video and
audio and combine them for insertion.
CTL signals must be recorded continuously in the
section where the new material is being inserted.
Before editing, record CTL signals for a period
exceeding the editing time.
Preroll point
Edit-in point
* Since the full erase head operates during assemble
editing, a non-recorded segment is produced after the
postroll point. If assemble editing is applied in the
middle of a recorded tape, the picture will be distorted
after the postroll point.
● Preroll time
It takes a few seconds for the tape to stabilize after
tape running is started. To ensure that the tape is
stable before it reaches the edit point, the tape
must start running a few seconds before the edit-in
point (prerolling).
Select the preroll time from 0 to 15 seconds with
the recorder’s menu switch No. 320 <PREROLL
TIME>. Use the remote control setting only when
executing editing via a remote controller.
● CTL counter values based on the TIMER-1
PRESET command (44.00) from the editing
controller can be preset only in the Non-drop Frame
mode (NTSC).
104
CH2
CH3
CH4
CH2
CH3
CH4
LINE
CH2
CH3
CH4
CPN
I
OFF
O
TIME CDOE
DF
NDF
HID
GND
INT
EXT
OFF
ON
CF
Front sub panel
FREE PRESET
REC
REGEN
8
ON
OFF
4
(625) ON SCREEN
OFF
8
ON
CF
4
(625)
[CF] indicator
525
Recording
CONDITION
H
M
S
F
CTL signals required
Cautions
● The displayed image may be distorted when the
editing mode is preset from an editing controller
during editing or the mode is switched between
EE and PB. This is normal. It is not a
malfunction. The distortions appear in the
editing output image but are not recorded.
● The V. Fade function may not function correctly
when a tape with edited audio is played back.
This is normal. It is not a malfunction.
● Noise may be recorded if all insert modes are
canceled during editing with any of editing mode
select buttons. This is normal. It is not a
malfunction.
● Noise may be heard when editing is on or off in
the Playback mode. This is normal. It is not a
malfunction.
POWER
ON
COMPONENT DIGITAL
RF
Recorder
● Program Playback speed can be varied between
90% and 110%. The range is always the same
even if an external controller or other unit is
connected that sets the range outside this limit.
BR-D95U
SIF
SERVICE USE ONLY
Edit-out point
● To record CTL signals, record a black picture from the built-in signal generator or connect a camera or a
standard TV signal generator and record the output signals.
● Editing is not possible from the very beginning of the tape. The first edit-in point must be registered after the
preroll section.
● Audio signals are not output when color bar signal from the built-in signal generator are inserted for editing
(including preview). Do not select the audio channel for insertion of the color bar signal from the built-in
signal generator. It may not be possible to insert the signal properly on the audio channel.
VIDEO
INPUT
CH1
Variable Motion
CF
CTL signals required
AUDIO INPUT / AUDIO MONITOR SELECT
AES/EBU CH1
L
ANALOG CH1
R
SDI
AUDIO
MONITOR
䡲 Color frame-related menu
switches
• No. 009 <CAP RELOCKING DIR.>
Selects the direction of
the color frame servo
lock.
• No. 387 <CF FLAG
REPLY>
Selects the field unit for
the color frame flag
transmitted from the 9-pin
remote control connector.
(See page 106.)
• No. 421 <TCG CF FLAG>
Turns the color frame flag
for the time code bit ON/
OFF. (See page 106)
䡲 Color frame editing is still
possible even when
material that does not
contain color frame
information (have no 4-field
NTSC color frame
information or 8-field PAL
color frame information) is
inserted in a color framerecorded section. Once the
new material has been
inserted, color frame
editing can be performed
by re-editing. In this case,
the [CF] indicator on the
main unit lights.
● Color frame information is always recorded regardless of the setting of the front
sub panel’s CF switches and menu switches (except during editing).
NTSC : 4-field color frame
PAL : 8-field color frame
● During recording, the CF indicator lights on the counter display.
● If you want to synchronize time code with color frame, set menu switch No. 421
<TCG CF FLAG> to “ON” or “AUTO”.
Playback
The color frame servo function can be set with the front sub panel’s CF switches
and menu switches.
䡲 Front sub panel switch setting
• Set menu switch No. 008 <CAP LOCK (525)> or No. 008p <CAP LOCK (625)>
to “SW SEL”.
• Set the [CF] switch on the front sub panel to “ON”.
For PAL, select the 4 or 8-field color frame servo with the [4/8] switch.
When the [CF] switch is set to “OFF”, the frame servo is activated.
䡲 Menu switch setting
• For NTSC, set menu switch No. 008 <CAP LOCK (525)> to “4FIELD”.
• For PAL, set menu switch No. 008p <CAP LOCK (625)> to “4FIELD” or
“8FIELD”.
Menu switch No. 008 <CAP LOCK>
SW SEL : Select with the front sub panel’s [CF] switches.
2FIELD : Playback is performed with the 2-field servo system. Color framing is
not executed.
4FIELD : Playback is performed with the 4-field color frame servo system.
8FIELD : Playback is performed with the 8-field color frame servo system (PAL
only).
● [CF] indicator
If the front sub panel [CF] switches are set to any position except OFF, the CF
indicator lights whenever a tape with color frame information is played back.
Editing precision during color frame editing
When the color frame servo function is used, the edit point may shift to
maintain color frame continuity even though menu switch No. 393 <SYNC
GRADE> is set to “ACCURATE”.
105
11 EDITING
11 EDITING
11-2 COLOR FRAME SERVO SETTING
11-3 SWAP EDITING
䡵 Color frame reference
VIDEO IN
LINE IN monochrome input
COMPONENT IN
SDI IN
REC
PB
REF IN
REF IN
LINE IN color signal input
REF IN
REF IN is
Gen locking
REF IN is not
Gen locking
REC
LINE IN
EDIT PB
LINE IN
PB
REF IN
Internal
reference
signal
Color frame
information is
recorded according
to the time code.
Internal reference
signal
The color frame sync condition of the playback shown in the table above changes depending on the setting of menu switch No. 008 <CAP
LOCK>.
䡵 TC color frame flag setting
● The time code color frame flag can be set and recorded only when the front sub panel’s [TIME CODE]
switches are set as follows.
[INT/EXT] switch
: INT
[PRESET/REGEN] switch : PRESET
When the [TIME CODE] switches are set as above, the time code color frame flag is recorded according to
the setting of menu switch No. 421 <TCG CF FLAG MODE>.
Menu switch During playback During EE output
NO. 421 <TCG
CF FLAG
TCG CF FLAG setting
CF FLAG being recorded on tape
MODE>
OFF
ON
AUTO
OFF information OFF information
is output
is output
ON information ON information
is output
is output
The information
recorded on the
tape is output.
The same
setting as the
one of TCG CF
FLAG being
recorded on the
tape is output.
OFF information is recorded
ON information
is recorded
● When recording time code with the [INT/EXT] switch set to “INT”
and the [PRESET/REGEN] switch set to “PRESET” (except in
editing)
* Time code is based on the information recorded before the
recording is paused. (i.e. “REC” [ “PAUSE” [ “REC” ) with the
REGEN or REC RUN setting.
● To record time code during assemble or time code insert editing
(with tape recorded on BR-D95U).
* Set menu switch No. 410 <AUTO REGEN MODE> to a valid
setting (or set to “OFF” if the [PRESET/REGEN] switch is set to
“REGEN”) and the [INT/EXT] switch is set to “INT” under the 4field (8-field in PAL) color frame servo.
● When recording time code under any conditions except those
described above.
OFF information
is recorded
ON information ● When recording time code with the [INT/EXT] switch set to “INT”
is recorded
and the [PRESET/REGEN] switch set to “PRESET” (except in
editing)
* Time code is based on the information recorded before the
recording is paused. (i.e. “REC” [ “PAUSE” [ “REC” )with the
REGEN or REC RUN setting.
● To record time code during assemble or time code insert editing
(with tape recorded on BR-D95U).
* Set menu switch No. 410 <AUTO REGEN MODE> to a valid
setting (or set to “OFF” if the [PRESET/REGEN] switch is set to
“REGEN”) and the [INT/EXT] switch is set to “INT” under the 4field (8-field in PAL) color frame servo.
OFF information ● When recording time code under any conditions except those
described above.
is recorded
* The set time code value may shift when menu switch No. 421 <TCG CF FLAG MODE> is set to “ON” or “AUTO” and recording is
performed with TC PRESET.
䡵 9P color frame flag
9P color frame flag is set when the setting of menu switch No. 387 <CF FLAG REPLY> matches that of menu
switch No. 008 <CAP. LOCK>.
106
This unit is provided with a SWAP editing function which enables automatic editing without a controller. When this
unit is connected to a player provided with a RS-422 serial remote connector (9-pin), you can operate both units
using the recorder’s controls.
An on-screen function allows you to check editing data for faster, more efficient editing.
During swap editing, all the player can be operated from the recorder.
Editing procedure
STEP-1
STEP-2
STEP-3
STEP-4
STEP-5
STEP-6
STEP-7
Preparation
Edit mode
selection
Edit point
entry
Preview editing
(rehearsal)
Edit point
correction
Editing
(actual)
Review
(check)
Preparation
Editing
Next
edit
Check
● When only edit start is performed automatically, steps 4, 5 and 7 can be omitted depending on the editing
method (for example, preview editing is not required).
STEP-1 preparation
Connection
• Make sure all video and audio input/output connectors are properly connected.
• Connect the BR-D95U’s [REMOTE OUT(9P)] connector to the player’s RS-422 serial remote connector with
the 9-pin remote cable.
Setting
䡲 Setting the player
• Set the VCR operation mode to the REMOTE mode.
• Adjust the video control parameters.
• Adjust the playback level with the audio playback level adjust knobs (this is not necessary for UNITY).
• Set the edit OUT point registering method with menu switch No. 373.
䡲 Setting the recorder
● Front panel setting
• Set the VCR operation mode to “Local” with the
[REMOTE] button (the [REMOTE] indicator on
the display goes out).
• Select the input signal with the video and audio
input signal select buttons.
• Adjust the recording level with the audio recording
level adjust knobs (this is not necessary for
UNITY).
• Set the counter mode with the [COUNTER]
button.
● Front sub panel setting
Set the time code-related switches for time code
editing.
(When editing the time code, be sure to input an
external sync signal to the recorder and player.)
• [INT/EXT] switch: Set to “INT”.
• [REC/FREE] switch: Set to “FREE”.
• [PRESET/REGEN]: Set to “PRESET”.
● Menu switch setting
• No. 003 <SYNC SELECT>: Set to “EXT (1)” to
synchronize with an external sync signal.
• No. 320 <PREROLL TIME>: Set the preroll time.
• No. 328 <EDIT POINT CLEAR>: Set whether or not
the edit IN point is canceled when editing is complete.
• No. 367 <EDIT INTERRUPTION>: Set whether or
not the editing operation is stopped when an error
occurs in the video signal during preroll editing .
• No. 372 <P+R AT SWAP MODE>: Set whether or
not pressing the [RECORDER] and [PLAYER]
buttons simultaneously is possible.
• No. 373 <MATCH FRAME>:This setting determines
whether or not the match frame function is used.
• No. 390 <SWAP VTR SELECT>: Set according
to the type of player VCR. Normally set to “AUTO”.
• No. 391 <SYNCHRONIZATION>: Switch the
Bump mode ON/OFF during swap editing.
• No. 393 <SYNC GRADE>: Select the editing
accuracy during swap editing.
• No. 395 <AUTO EE>: Set whether or not the auto
EE function is used during swap editing.
Set to “AUTO-EE (1)” when using only one
monitor for editing.
• No. 513 <EDIT ON SCREEN>: Selects whether
or not the edit display is shown on screen during
editing.
107
11 EDITING
11 EDITING
11-3 SWAP EDITING
11-3 SWAP EDITING
[ENTRY] button
● Preparation of the recording (editing master) tape
• Use the learn function
when the connected player
is a non-DIGITAL S VCR.
To activate the learn
function, press the
[RECORDER] and [SHIFT]
buttons simultaneously.
By using the learn function,
you can reduce the
number of retries in editing.
[IN] button
Assemble editing
CH1
CTL signals must be recorded for a period exceeding the preroll time before the
first edit IN point.
Non-recorded tape
• Record video signals such as a black picture from the built-in signal generator
for a period exceeding the preroll time before the first edit IN point.
• When editing time code, record time code in the section before the first edit IN
point.
(e.g.)
Set the time code of the first edit IN point to “00:00:00:00” and record time code
for 20 seconds in the section before the edit IN point.
• Set the REC Run mode to the time code preset mode and preset the time code
to “23:59:40:00”.
• Record time code for 20 seconds or more.
Edit IN point
00:00:00:00
Beginning of the tape
23:59:40:00
• After recording is complete, set the [REC/FREE] switch FREE.
Insert editing
CTL signals or time code data must be recorded continuously in the section for
insertion.
STEP-2 editing mode selection
VIDEO CASSETTE RECORDER
AUDIO
INPUT
VIDEO
INPUT
AUDIO INPUT / AUDIO MONITOR SELECT
CH1
CH2
CH3
CH4
AES/EBU CH1
L
ANALOG CH1
R
CH2
CH3
CH4
LINE
CH2
CH3
CH4
CPN
SDI
AUDIO
MONITOR
BR-D95U
POWER
SIF
COMPONENT DIGITAL
ON
I
OFF
O
[ASSEM] button
[INSERT]
button
Variable Motion
CH1
CH3
CH2
R
P
dB OVER dB
0
+4
R
P
dB OVER dB
0
+4
–10
+2
0
–20
–2
–30
–40
–4
CH4/TRACKING
R
P
dB OVER dB
0
+4
–10
+2
0
–20
–2
–30
–40
–4
–60
R
P
dB OVER dB
0
525
625
CTL TC UB DF SERVO CF GEN 16:9 AP
AUTO OFF P.READ V.VAR PB/EE REMOTE
CONDITION
0
–20
–2
–30
–40
–4
+2
0
–2
–4
–60
COUNTER
RESET
VCON
REMOTE
MENU
SET
HOLD
PB
PB/EE
VAR
SEARCH
PLAYER RECORDER
UB
+4
–10
+2
–60
–10
P.PLAY
–20
STILL
–30
–40
M
H
–60
ASSEM
VIDEO
DA1
IN
ENTRY
OUT
S
DA2
DA3
F
DA4
EJECT
REC
PLAY
CH1
CH2
REC
CH3
PULL FOR VARIABLE
CH4
To disengage the editing
mode
• Press the illuminated button
again to turn off the editing
mode. The button’s light will
go out.
• When the [ASSEM] button
is illuminated, press the
[INSERT] button to
disengage the Assemble
mode. When the [INSERT]
button is illuminated, press
the [ASSEM] button to
disengage the Insert mode.
108
PLAY
VIDEO
DA1
IN
ENTRY
OUT
DA2
DA3
DA4
X1
TRACKING
METER MODE
FINE
PULL
RELEASE
ASSEM
PAUSE/STILL
X-1
PHONES
CANCEL PREVIEW
TRACKING
SHIFT
REVIEW
INSERT
AUTO EDIT
TC
PREROLL
USER
TOP
VIDEO
AUDIO
STAND BY
REW
STOP
FF
SERVO/SYS
TIME CODE
ON SCREEN
OTHERS
INSERT
TC
R
P
dB OVER dB
0
+4
–10
0
–20
–2
–30
–40
–4
0
● Insert editing
To execute insert editing, press the [INSERT] button(s) ON for the signal(s) you
want to insert (VIDEO, DA1, DA2, DA3, DA4).
Even while insert editing is in progress, each button can be turned ON/OFF as
required. To insert time code, set the [TC] button to ON.
–20
–2
–30
–40
–4
–60
R
P
dB OVER dB
0
525
625
CTL TC UB DF SERVO CF GEN 16:9 AP
AUTO OFF P.READ V.VAR PB/EE REMOTE
CONDITION
0
–20
–2
–30
–40
–4
–60
+2
0
–2
–4
–60
COUNTER
RESET
VCON
REMOTE
MENU
SET
HOLD
PB
PB/EE
VAR
SEARCH
PLAYER RECORDER
UB
+4
–10
+2
–10
P.PLAY
–20
STILL
–30
–40
M
H
–60
ASSEM
VIDEO
DA1
S
DA2
F
DA4
DA3
EJECT
REC
PLAY
PAUSE/STILL
X1
X-1
PHONES
CH2
CH1
REC
CH3
CH4
TRACKING
IN
PULL FOR VARIABLE
METER MODE
FINE
PULL
RELEASE
PLAY
ENTRY
OUT
CANCEL PREVIEW
TRACKING
SHIFT
REVIEW
INSERT
AUTO EDIT
TC
PREROLL
USER
TOP
VIDEO
AUDIO
STAND BY
REW
STOP
FF
SERVO/SYS
TIME CODE
ON SCREEN
OTHERS
PULL
RELEASE
REV
FWD
[CANCEL] button
STEP-3 edit point entry
● Whenever you enter a new
edit point, the previously
registered edit point is
automatically canceled.
● Edit points can be entered
during normal VCR
playback.
● If an edit IN point has not
been entered, an edit IN
point will be entered
automatically at the point
where the [AUTO EDIT]
button is pressed.
● Variable playback speed
during swap editing
The recorder’s variable
playback speed is -1.0x to
+1.0x. The player's
variable playback speed is
-2.0x to +3.0x.
FWD
● Assemble editing
To execute assemble editing, press the [ASSEM] button ON beforehand. Once
editing starts, ON/OFF is not possible.
CH4/TRACKING
R
P
dB OVER dB
0
+4
–10
+2
PULL
RELEASE
REV
CH3
CH2
R
P
dB OVER dB
0
+4
+2
[RESET] button
[OUT] button
● Press the [AUTO EDIT]
button while pressing the
[SHIFT] button to execute
a “last edit”.
Enter the edit IN points for the player and recorder and the edit OUT point for the
player or recorder.
1. Press the [PLAYER] or [RECORDER] button to select the VCR to be operated.
2. Search the edit IN point with the search dial or jog dial.
3. Enter the edit IN point by pressing the [ENTRY] button while pressing the [IN]
button.
[ The [IN] button is illuminated and the edit IN point is entered.
䡲 Enter the edit IN points for both the player and recorder.
4. Press the [PLAYER] or [RECORDER] button to select the VCR for which the edit
OUT point is entered.
5. Search the edit OUT point with the search dial or jog dial and engage the Still
mode.
6. Enter the edit OUT point by pressing the [ENTRY] button while pressing the
[OUT] button.
[ The [OUT] button is illuminated and the edit OUT point is entered.
䡲 Correcting or canceling the edit point
● Correcting the edit point
• Turn the jog dial while pressing the [IN] and [OUT] buttons to correct the
edit point in frames.
● Correct the duration.
• Turn the jog dial while pressing the [IN] and [OUT] buttons simultaneously.
Frame correction is possible.
● Canceling the edit point
• To cancel the edit IN or OUT point
Press the [CANCEL] button while pressing the [IN] or [OUT] button.
• To cancel both edit IN and OUT points simultaneously
Press the [RESET] button.
• To cancel the player and recorder edit points as well as the audio split
point: Press the [AUTO EDIT] + [CANCEL]. The selected edit modes
(ASSEM, INSERT) and VAR SPEED are not canceled.
䡲 Checking the entered edit point/duration time (length of the edit)
• Checking the entered edit point
IN
OUT
ENTRY
To view the registered edit point on the counter display,
press the [IN] or [OUT] button.
* If no edit point has been entered, the display will be
[OUT]
[IN]
blank (edit point is not shown).
button button
• Checking the duration time
Pressing the [IN] and [OUT] buttons simultaneously
shows the edit duration on the counter display.
109
11 EDITING
11 EDITING
11-3 SWAP EDITING
11-3 SWAP EDITING
[IN] button
CH1
CH2
R
P
dB OVER dB
0
+4
–10
+2
R
P
dB OVER dB
0
+4
–10
+2
0
–20
–2
–30
–40
–4
0
CH3
–20
–2
–30
–40
–4
–60
0
–20
–2
–30
–40
–4
–60
[SEARCH] button
[OUT] button
CH4/TRACKING
R
P
dB OVER dB
0
+4
–10
+2
R
P
dB OVER dB
0
+4
–10
+2
0
–2
–4
–60
525
625
CTL TC UB DF SERVO CF GEN 16:9 AP
AUTO OFF P.READ V.VAR PB/EE REMOTE
CONDITION
COUNTER
RESET
VCON
REMOTE
MENU
SET
HOLD
PB
PB/EE
VAR
SEARCH
PLAYER RECORDER
UB
P.PLAY
CH2
CH1
REC
CH3
–20
STILL
–30
–40
M
H
–60
ASSEM
CH4
VIDEO
DA1
S
DA2
DA3
PULL FOR VARIABLE
METER MODE
FINE
CANCEL PREVIEW
TRACKING
SHIFT
PLAY
OUT
[PREVIEW] button
REVIEW
INSERT
AUTO EDIT
TC
PREROLL
USER
–30
–40
–4
EJECT
REC
PLAY
0
CH3
–2
–30
–40
–4
CH4/TRACKING
R
P
dB OVER dB
0
+4
–10
+2
0
–20
–60
PAUSE/STILL
–20
–2
–30
–40
–4
–60
R
P
dB OVER dB
0
+4
–10
+2
0
VIDEO
CONDITION
STAND BY
REW
STOP
FF
TIME CODE
ON SCREEN
OTHERS
RESET
VCON
REMOTE
MENU
SET
HOLD
PB
PB/EE
–2
STILL
–30
–40
–4
–60
CH2
REC
CH3
M
H
–60
ASSEM
CH4
VIDEO
DA1
S
DA2
DA3
F
DA4
EJECT
PLAY
REC
PAUSE/STILL
[STOP] button
X1
TRACKING
METER MODE
FINE
FWD
PLAYER RECORDER
P.PLAY
X-1
CH1
PULL FOR VARIABLE
PULL
RELEASE
REV
VAR
SEARCH
UB
ENTRY
OUT
INSERT
TC
AUDIO
SERVO/SYS
COUNTER
–20
IN
TOP
525
625
CTL TC UB DF SERVO CF GEN 16:9 AP
AUTO OFF P.READ V.VAR PB/EE REMOTE
X1
PHONES
ENTRY
–20
–2
F
DA4
TRACKING
IN
PULL
RELEASE
CH2
R
P
dB OVER dB
0
+4
–10
+2
0
X-1
PHONES
CH1
R
P
dB OVER dB
0
+4
–10
+2
PULL
RELEASE
PLAY
CANCEL PREVIEW
TRACKING
SHIFT
REVIEW
[SHIFT] button
[PREVIEW] button
AUTO EDIT
PREROLL
USER
TOP
VIDEO
AUDIO
STAND BY
REW
STOP
FF
SERVO/SYS
TIME CODE
ON SCREEN
OTHERS
[AUTO EDIT]
button
PULL
RELEASE
REV
FWD
[STOP] button
Search dial
STEP-4 preview editing
● When menu switch No. 367
<EDIT INTERRUPTION> is
set to “ON (1)” and an error
occurs in the video signals
during preroll, actual editing
will not take place.
* If time code is
discontinuous in preview,
the preroll point will not be
cued up in actual editing.
To avoid this, the recorder
enters the Stop mode after
it passes the IN point in the
Preview mode. (only in
Assemble Editing)
[Editing screen display]
Recorder operation mode
V•A1•A2•A3•A4•TC
P:PLAY
R:SEL
CTL
E
F
CTL
0:00:05:00
0:01:48:00
P
IN
0:01:48:00
'
SPLIT
0:02:31:04
- :15:01 OUT
R
0:00:00:00
IN '
DUR.
:43:04 OUT'
0:00:43:04
You can skip STEP-4 and STEP-5 and advance to STEP-6.
1. Press the [PREVIEW] button.
• The [PREVIEW] button is illuminated and both player and recorder start
prerolling.
• When the player and recorder complete prerolling, they automatically enter the
Play mode and start preview (rehearsal) editing. After the recorder passes the
IN point, it enters the Stop mode*. In this case, the recorder’s operation mode
is shown as “SEL” (Select EE) in the editing screen display.
䡲 If the edit duration (from the IN point to the OUT point) is long and you only want
to preview the edit IN point, press the [STOP] button to end preview editing.
● During insert editing, it is
possible to change the
channel being inserted.
● Set whether or not the edit
point is automatically
cleared after editing is
complete with menu switch
No. 328 <EDIT POINT
CLEAR>
䡲 Counter display in the Preview mode
A pseudo-advanced time code value is displayed on this unit and in the
recorder’s counter in the editing screen display. This gives the user an
approximate idea of the running time.
The normal on-screen display shows the time code value at the stop position.
(only in Assemble Editing)
1. Press the [AUTO EDIT] button.
The [AUTO EDIT] button lights and both player and recorder start
AUTO EDIT
prerolling.
When the player anzd recorder finish prerolling, both enter the Play
mode automatically. When the recorder reaches the edit IN point, it
automatically switches to the Record mode (actual recording starts).
Editing ends automatically at the edit OUT point.
When an edit has been completed, the recorder continues to run the
tape for about 2 seconds (recording for assemble editing and
playback for insert editing), then rewinds it automatically one frame
before the edit OUT point and enters the Still mode.
䡲 To stop editing before completion, press the [AUTO EDIT] button or press the
[ENTRY] button while pressing the [OUT] button.
1
2
3
4
STEP-7 review (check)
Recorder counter display
section
STEP-5 correcting the edit point
If correction is not necessary, skip STEP-5 and advance to STEP-6.
● If a major correction is required, enter the edit point again in STEP-3. The previously
entered edit point is automatically canceled.
● If only a minor correction is required,
1. Press the [PLAYER] or [RECORDER] button to select the VCR for correction.
2. Turn the jog dial while pressing the [IN] or [OUT] button to correct the edit IN or
OUT point in frames.
110
STEP-6 editing (actual)
● This step is optional.
1. Press the [PREVIEW] button while pressing the [SHIFT] button.
• The recorder rewinds the tape automatically to the edit IN point and starts
playback.
• After the edit OUT point is passed, the tape runs for about 1 seconds and the
VCR enters the Still mode.
䡲 To cancel the review operation after it has started
Press the [STOP] button.
111
11 EDITING
11 EDITING
11-4 AUDIO SPLIT EDITING
11-5 OTHER FUNCTION
This function allows you to specify the audio edit IN point independently of the video edit IN point (in ordinary
editing, audio and video signals have the same edit point). This enables independent insertion of audio and video.
• Audio split editing is possible only in the Insert Edit mode.
• It is not possible to set the audio edit IN point separately for each channel (DA1/DA2/DA3/DA4).
Additional editing functions available with the BR-D95U include:
• Last edit function
• Variable-motion editing
• Motion memory function
CH1
R
P
dB OVER dB
0
+4
Insert
buttons
CH3
CH2
R
P
dB OVER dB
0
R
P
dB OVER dB
0
+4
–10
+2
0
–20
–2
–30
–40
–4
R
P
dB OVER dB
0
+4
–10
+2
0
–20
–2
–30
–40
–4
–60
525
625
CTL TC UB DF SERVO CF GEN 16:9 AP
AUTO OFF P.READ V.VAR PB/EE REMOTE
CONDITION
0
–20
–2
–30
–40
–4
–60
+2
0
–2
–4
–60
COUNTER
RESET
VCON
REMOTE
MENU
SET
HOLD
PB
PB/EE
VAR
SEARCH
PLAYER RECORDER
UB
+4
–10
+2
[SEARCH] button
CH4/TRACKING
–10
P.PLAY
–20
STILL
–30
–40
M
H
–60
ASSEM
VIDEO
DA1
S
DA2
DA3
F
DA4
EJECT
REC
PLAY
PAUSE/STILL
X1
X-1
525
625
CTL TC UB DF SERVO CF GEN 16:9 AP
AUTO OFF P.READ V.VAR PB/EE REMOTE
Video IN point
Audio IN point
OUT point
Recorder
[IN]
button
Audio signal [SHIFT]
button
Direction for delay
Direction for advance
V•A1•A2•A3•A4•TC
P:STOP
R:SHTL STIL
CTL
E
F
CTL
-0:00:51:03
0:01:48:00
P
0:01:48:00
IN '
SPLIT
0:01:31:04
- :15:01 OUT
R
0:00:00:00
IN '
DUR.
:43:04 OUT'
0:00:43:04
• Correcting the audio edit IN
point
Turn the jog dial while
pressing the [SHIFT] and
[IN] buttons to correct the
audio edit IN point in
frames.
COUNTER
CONDITION
RESET
VCON
REMOTE
HOLD
PB
PB/EE
PLAYER RECORDER
VAR
SEARCH
PHONES
DA1
S
DA2
DA3
SET
ENTRY
OUT
INSERT
TC
Video signal
CANCEL PREVIEW
SHIFT
REVIEW
AUTO EDIT
REC
PLAY
PULL FOR VARIABLE
PAUSE/STILL
X1
PREROLL
USER
TOP
VIDEO
TRACKING
ENTRY
OUT
INSERT
TC
TOP
VIDEO
AUDIO
PULL
RELEASE
METER MODE
CANCEL PREVIEW
TRACKING
SHIFT
PLAY
REVIEW
AUTO EDIT
PREROLL
USER
STAND BY
REW
STOP
FF
SERVO/SYS
TIME CODE
ON SCREEN
OTHERS
PULL
RELEASE
REV
FWD
AUDIO
STAND BY
REW
STOP
FF
SERVO/SYS
TIME CODE
ON SCREEN
OTHERS
[SHIFT] button
PULL
RELEASE
REV
[AUTO EDIT] button
[ENTRY] button
Jog dial
Procedure
SHIFT
䡲 Disengaging the Audio Split mode
IN
• Press the [CANCEL] button while pressing the [SHIFT] and [IN]
buttons.
CANCEL
[The audio insert button lights, showing that the Audio Split
Edit mode has been disengaged.
[AUTO EDIT] button
[PREVIEW] button
FWD
5. Enter the edit OUT point for the player or recorder.
The edit OUT point is set at the same point for audio and video.
6. Press the [AUTO EDIT] button. Editing starts automatically.
112
CH4
FINE
EJECT
1. Engage the Insert Edit mode.
Press the insert mode buttons ([VIDEO], [DA1], [DA2], [DA3], [DA4] buttons] as
required.
* Press the [VIDEO] button and at least one of the audio channels ([DA1], [DA2],
[DA3] or [DA4] ).
2. Enter the edit IN point for both player and recorder.
The entered edit IN point is used as the edit IN point for video.
3. Search the recorder’s audio edit IN point with the search or jog dial operation
and engage the Still mode.
4. Enter the audio edit IN point by pressing the [ENTRY] button while pressing the
[SHIFT] and [IN] buttons.
IN
ENTRY
[ The selected audio insert button blinks, showing that the audio
IN point has been entered.
SHIFT
CH3
P.PLAY
F
DA4
X-1
IN
REC
IN
STILL
VIDEO
CH2
UB
MENU
M
H
ASSEM
CH1
Variable-motion initial
speed value setting
Setting procedure
1. In the Variable mode,
turn the search dial to
select the initial speed
value.
[ The initial speed
value is determined
by the rotation angle
of the search dial
and is shown on the
screen and counter
display.
2. Press the [SET] button
to define the initial
speed value.
• After this operation, the
initial speed value
does not change even
if the search dial is
turned.
• To change this value,
press the [STOP]
button to release the
Variable mode, then
select the initial speed
value again.
• If the [STOP] button is
not pressed, the initial
speed value is called
when the Variable
mode is engaged
again after being
released.
Search dial
䡲 Last edit:
Once editing has been completed, the last edit can be recalled and executed.
Press the [AUTO EDIT] button while pressing the [SHIFT] button. Each time
this operation is repeated, the last edit and current edit are switched.
䡲 Variable-motion editing
The BR-D95U’s Variable-Motion editing mode allows you to play back tapes on
the player at variable speed (-2x to 3x). This is ideal for variable-motion editing
and other special effects.
● Operation: On the recorder (BR-D95U)
1. Press the [RECORDER] button to set the VCR operation mode to “recorder”.
2. Select the recorder’s editing mode (insert or assemble).
3. Register the recorder’s edit points.
4. Press the [PLAYER] button to set the VCR operation mode to “player”.
5. Register the player’s edit IN point.
6. Press the [SEARCH] button while pressing the [SHIFT] button.
The player enters the Variable mode.
To release the Variable mode, press the [STOP], [FF] , [REW] or [SEARCH]
button. To engage the Variable mode again, execute the operation in step 6.
7. Set the playback speed.
• The player plays back the tape at the specified speed (from -2x to 3x).
Speed is set by the direction and angle of the search dial rotation.
• Press the [SET] button to register the variable-motion initial speed value.
Refer to the left column.
• The player’s playback speed is shown on the recorder’s counter display in
percentages (e.g. -200%: -2x, 300%: 3x ).
Playback speed can also be determined automatically by setting all four edit
points.
8. Press the [AUTO EDIT] button to start editing.
Notes:
● Use the variable speed value for the player shown on the BR-D95U’s
counter display as a guide. Actual playback speed depends on the player.
● Use a variable speed within the range -1x through 1x. When the BR-D95U
is used as a player, out-of-range variable speed will distort the picture and/
or sound.
113
11 EDITING
11 EDITING
11-5 OTHER FUNCTION
11-7 EDITING WITH THE PRE-READ FUNCTION
䡲 Motion memory function
(Editing screen)
Tape speed
● Operation : on the recorder (BR-D95U)
When editing with a camera or a VCR (player) without an RS-422 serial remote connector, use the BR-D95U’s
[AUTO EDIT] and [PREROLL] buttons for editing.
䡲 Use the BR-D95U as the recorder.
1. Select assemble or insert editing with the edit mode select buttons.
• For insert editing, select the signal to be edited.
2. Search the edit IN point with the search and jog dials on the recorder and
engage the Still mode.
3. Input the signal from the player or camera.
4. Press the recorder’s [AUTO EDIT] button.
• The recorder prerolls and starts the editing operation.
• Recording starts automatically at the edit IN point.
5. To stop editing, press the recorder’s [AUTO EDIT] button.
• The recorder enters the Still mode. The edit OUT point is automatically
entered as the edit IN point for the next edit.
6. Repeat steps 1 to 5 to continue editing.
114
A
Player 1
C
Special-effects
device
Player 2
Recorder
Special-effects
device
Player
Recorder
C
B
B
Moving picture and sound (two players)
Moving picture and sound
(picture from one player and pre-read picture from
the recorder)
Edit point settings required for two players and one
recorder.
Edit point settings required for one player and one
recorder.
Source material is obtained from the player's playback
picture and the pre-read picture.
Material from the recorder can be obtained automatically.
Pre-read picture
Picture from player 1
Wipe and mix effects, etc.
11-6 MANUAL EDITING
Pre-read A/B roll editing system
A
Source material is on two tapes.
One tape is played back by each player.
Editing
operation
• When 128 steps are
stored in the motion
memory, the [PREVIEW]
button stops blinking and
lights steadily.
• Use the variable speed
value for the player
shown on the BR-D95U’s
counter display as a
guide. Actual playback
speed depends on the
player.
Conventional A/B roll editing system
Picture with
effects
Motion memory
The number of steps
Duration remaining
Feature Comparison of Pre-Read with Conventional A/B Roll Editing.
Source
material
1. Register the edit IN points for the recorder and player (do not register the
edit OUT point for the player).
2. Press the [PLAYER] button to set the VCR operation mode to “player”.
3. Press the [SEARCH] button while pressing the [SHIFT] button to engage the
Variable mode. Press the [SET] button to register the variable-motion initial
speed value. Refer to the “Variable-motion initial speed value setting” in the
margin on the previous page.
4. Set the playback speed (first speed) to be stored in the motion memory by
turning the search dial.
5. Press the [PREVIEW] button to reproduce the motion memory data and turn
the search dial to control the playback speed.
After the edit IN point, the playback speed set by the angle of the search dial
rotation is stored in memory.
• Up to 128 steps can be stored in the motion memory. The number of steps
remaining is shown on the editing screen.
• When the motion memory function is activated, “MM” is shown on the
editing screen. As long as MM data is stored in memory, the [PREVIEW]
button will blink.
6. Register the edit OUT point to end the motion memory setting.
• To store the speed in memory again, press the [PREVIEW] button. The
edit OUT point is automatically canceled.
• To check the stored data, press the [PREVIEW] button while pressing the
[SHIFT] button (Motion preview).
7. Press the [AUTO EDIT] button to start editing.
If playback speed has not been stored in the motion memory, turning the
search dial during editing also controls the playback speed. However, speed
data cannot be stored in memory during editing.
The pre-read function makes it easy to add A/B roll editing-style wipes and fades even when using only one player. Pre-read
works by reading out the image or sound at the recording start position just before recording starts during editing. Special effects
or mixer can then be added to the read-out picture or sound which is then recorded at its original position together with the
incoming material. And because both sources (the player and recorder) can handle moving pictures, you’ll be able to achieve
smooth, natural and professional looking special editing effects. Pre-read can be used with both video and audio signals.
Configuration
V•A1•A2•A3•A4
P:VAR
R:SHTL STIL
CTL
E
F
CTL
12:00:00:00
0:00:01:00
P
IN
0:00:01:00
120 OUT
+050 MM R
IN
12:00:00:00
P
OUT
R
The motion memory function allows you to manually store the player’s playback
speed data in memory. You can call up this data later for variable-motion
editing.
A
A
Recorded picture
Recorded picture
C
Picture from player 2
B
C
Playback picture
Playback pictures and
sound from players 1/2
are mixed (wiped) for
recording.
B
The playback picture and sound
from the player and the pre-read
picture from the recorder are
mixed (wiped) for recording.
䡵 Setting the pre-read function...Set before making the pre-read connection.
● BR-D95U menu switch No. 351 <PREREAD>
Set menu switch No. 351 <PREREAD> to “OFF” when using an editing controller with pre-read capability. Set menu
switch No. 351 <PREREAD> to “ON” when using an editing controller with no pre-read capability. This menu switch can
be switched ON/OFF independently for video and audio.
● When audio pre-read is performed, it is recommended to use the [AUDIO REC] volume knobs preset position because
audio level for recording cannot be checked.
● Setting the audio output phase for audio pre-read
Use <AUDIO PHASE> in the audio control menu to adjust the audio output phase to correspond with the video output
phase (see page 118).
● Correcting audio output phase delay during audio pre-read
To correct audio output timing, set menu switch No. 352 <AUD PREREAD TIMING> to “OFF SET”. Correction is
performed by detecting the delay of the external video device based on the delay set with <AUDIO PHASE> in the audio
control menu.
Cautions
● Before the pre-read menu switch setting is released, be sure to disconnect the units for pre-read editing.
Otherwise, a loop occurs in the connection cables, causing excessive sound volume and distortion which may
damage the connected equipment.
● It is not possible to rewrite sub time code data when the pre-read function is used.
115
12 EDITING SYSTEM PHASE ADJUSTMENT
11 EDITING
To ensure accurate, error-free editing with an AB roll editing system or any other multiple-unit system, you must
adjust the phase of the built-in time base corrector (TBC) after connecting all system components.
Phase adjustment must be updated each time you replace a connection cable, add or replace one of the units, or
make any other changes.
11-7 EDITING WITH THE PRE-READ FUNCTION
Example of editing system configuration
An example of a pre-read editing system is shown below.
Monitor
Monitor
Monitor
Program
output
Main
monitor
Pre-read
output
12-1 CONNECTION
Connection
Genlocking signal
(B.B)
Preview
switch
AUDIO
VIDEO
Special-effects
device
AUDIO
Special-effects
device
Player
VIDEO
Player 1
VIDEO
Recorder
BR-D95U
AUDIO
REF IN
Player 2
REF IN
Recorder
BR-D95U
BR-D95U
REF IN
BR-D95U
AUDIO MONITOR
VIDEO OUT
GPI 3/4
GPI 1/2
Editing controller
9-pin (RS-422)
9-pin (RS-422)
RM-G820U
● Preview switcher
Automatically switches the signal shown on the main monitor in conjunction with editing controller operation.
(e.g. SW-320 from Imeginics Co., Ltd.)
● Enables editing without separate monitors for program output and pre-read output.
● When using an editing controller provided with the pre-read function, is not necessary to set menu switch No.
351 <PRE READ> on the BR-D95U to “OFF”.
Usable controller: RM-G820U
● When using the RM-G820U, check that the model name shown on its packing case ends with (A) and that (A)
is indicated on the serial number plate on the controller.
● The RM-G820U is not ready for audio insert editing on CH3 and CH4. To select insertion on CH3 and CH4 with
this unit, change the settings of menu switch No. 377 <AUD EDIT PRESET CH3> and No. 378 <AUD EDIT
PRESET CH4>.
Positions indicating (A)
Input player 1
Input player 2
B.B OUT
These two cables
should be the
same length.
PGM OUT
MONITOR OUT
Special-effects device (switcher)
Input A
Monitor
SW1
PLAYER
PLAYER
RECORDER
RECORDER
DC 9V IN
Input A
SYNC
IN
MONITOR IN
RECORDER
Vectorscope
ON
GPI
9P
10KEY IN
Waveform monitor
POWER
OFF
MONITOR OUT
9P
PLAYER
(A)
Notes:
• Note on the special effects generator
As most special effects generators provided with a DVE (Digital Video Effect) function have a built-in frame
memory, one frame delay occurs if the pre-read function of the BR-D95U is used. To avoid this, only use
special effects generators with no frame memory (such as JVC’s KM-3000) or ones provided with a function
that allows you to bypass the frame memory.
• When menu switch No.351 <PRE READ> is set to “VID-ON” or “AUD-ON”, the Record mode cannot be
engaged (pressing both the [REC] and [PLAY] buttons has no effect).
• When editing with the pre-read function, the material on the tape in the recorder is replaced with the specialeffects pictures. If you want to keep the original material, be sure to back up the original tape.
• When video phase shifting is obvious in video signals inserted for pre-read editing, adjust the video phase
(refer to page 120).
• If the editing controller is not provided with the pre-read function, set menu switch No. 351 <PRE READ> of
the recorder BR-D95U to “ON”.
116
VIDEO IN
Upgrading is required if the RM-G820U
without (A) indication is used.
RM-G820U(A)
(A)
VIDEO OUT
Input B
Genlocking signal
(B.B)
Input B
75 Ø
1 Send external reference sync signals from the sync signal generator to the system components.
2 Composite video signals are delivered as video signals.
* When editing on directly connected VCRs without a switcher, adjustment of system and subcarrier phases
is not necessary.
117
12 EDITING SYSTEM PHASE ADJUSTMENT
12 EDITING SYSTEM PHASE ADJUSTMENT
12-2 ADJUSTMENT
12-2 ADJUSTMENT
Adjust the items shown on the counter or on screen display by pressing the front panel [VCON] button.
[SEARCH] button
VIDEO CASSETTE RECORDER
AUDIO
INPUT
VIDEO
INPUT
AUDIO INPUT / AUDIO MONITOR SELECT
CH1
CH2
CH3
CH4
SIF
AES/EBU CH1
L
ANALOG CH1
R
CH2
CH3
CH4
LINE
CH2
CH3
CH4
CPN
SDI
AUDIO
MONITOR
BR-D95U
VIDEO CASSETTE RECORDER
I
AUDIO
INPUT
COMPONENT DIGITAL
OFF
CH2
R
P
dB OVER dB
0
+4
–10
+2
0
–20
–2
–30
–40
–4
0
–20
–2
–30
–40
–4
–60
0
–20
–2
–30
–40
–4
–60
R
P
dB OVER dB
0
+4
–10
+2
0
–2
–4
–60
525
625
CTL TC UB DF SERVO CF GEN 16:9 AP
AUTO OFF P.READ V.VAR PB/EE REMOTE
CONDITION
COUNTER
RESET
VCON
MENU
SET
HOLD
SEARCH
REMOTE
VAR
CH1
CH2
REC
CH3
VIDEO
DA1
S
DA2
DA3
CH4
CH3
CH4
LINE
CH3
CH4
CPN
PB
PB/EE
CH1
P.PLAY
+4
REC
EJECT
PLAY
X1
0
–20
–2
OUT
ENTRY
INSERT
–30
–40
–4
TC
TOP
VIDEO
R
P
dB OVER dB
0
+4
–10
+2
PAUSE/STILL
CH3
CH2
R
P
dB OVER dB
0
F
DA4
TRACKING
IN
SIF
COMPONENT DIGITAL
ON
I
OFF
O
Variable Motion
STILL
M
H
ASSEM
CH3
UB
–20
–30
–40
–60
CH4
CH2
CH2
CH2
POWER
PLAYER RECORDER
X-1
PHONES
CH1
AES/EBU CH1
L
ANALOG CH1
R
SDI
AUDIO
MONITOR
CH4/TRACKING
R
P
dB OVER dB
0
+4
–10
+2
BR-D95U
VIDEO
INPUT
AUDIO INPUT / AUDIO MONITOR SELECT
O
Variable Motion
CH3
CH1
R
P
dB OVER dB
0
+4
–10
+2
0
–20
–2
–30
–40
–4
–60
AUDIO
CH4/TRACKING
R
P
dB OVER dB
0
+4
–10
+2
R
P
dB OVER dB
0
525
625
CTL TC UB DF SERVO CF GEN 16:9 AP
AUTO OFF P.READ V.VAR PB/EE REMOTE
CONDITION
0
–20
–2
–30
–40
–4
–60
+2
0
–2
–4
–60
COUNTER
RESET
VCON
MENU
SET
HOLD
REMOTE
VAR
SEARCH
PLAYER RECORDER
UB
+4
–10
+2
–10
PB
PB/EE
P.PLAY
–20
STILL
–30
–40
M
H
–60
ASSEM
VIDEO
DA1
ENTRY
OUT
S
DA2
DA3
F
DA4
EJECT
PLAY
REC
PAUSE/STILL
X1
X-1
PULL FOR VARIABLE
METER MODE
FINE
PULL
RELEASE
CANCEL PREVIEW
TRACKING
PLAY
SHIFT
AUTO EDIT
REVIEW
PREROLL
USER
PHONES
STAND BY
REW
STOP
FF
SERVO/SYS
TIME CODE
ON SCREEN
OTHERS
CH2
CH1
REC
CH3
CH4
TRACKING
IN
PULL
RELEASE
PULL FOR VARIABLE
FWD
REV
METER MODE
FINE
PULL
RELEASE
PLAY
CANCEL PREVIEW
TRACKING
SHIFT
REVIEW
INSERT
AUTO EDIT
TC
PREROLL
USER
VIDEO
AUDIO
STAND BY
TOP
REW
STOP
FF
SERVO/SYS
TIME CODE
ON SCREEN
OTHERS
PULL
RELEASE
FWD
REV
Counter display
Counter display
[VCON] button
Adjustment items
Adjustment items displayed on screen or on the unit’s display are listed in the table below.
● Video control menu (page 1 on screen)
䡬: Possible X: Impossible
Display
On screen
display
Video signals
Counter
display
On screen display
POWER
ON
Adjustment
value
Adjustment contents
LINE
CPN
<VIDEO CONTROL MENU> 1/2
000
VIDEO
GAIN
000
CHROMA GAIN
000
CHROMA PHASE
000
SETUP
LEVEL
000
VID (H)
PHASE
0
VID (V)
PHASE
00
SYSTEM PHASE
000
SC
PHASE
000
SCH
PHASE
OFF
VIDEO
ALL UNITY
OFF
VIDEO
REMOTE
Jog dial
[VCON] button
Operation
SDI
Main TBC 9-pin
unit remote
control
VIDEO GAIN Vgain
Output video level
-128 to +64
䡬
䡬
䡬
䡬
䡬
䡬
CHROMA
GAIN
Cgain
Output chroma level
-128 to +64
䡬
䡬
䡬
䡬
䡬
䡬
CHROMA
PHASE
Cphas
Output chroma phase
-128 to +127
䡬
䡬
䡬
䡬
䡬
䡬
● For individual adjustment, set “VIDEO ALL UNITY” to “off”.
● To make adjustments with the optional TBC remote control unit connected to the rear panel [VIDEO CONTROL]
connector, be sure to set “VIDEO REMOTE” to “ON”.
● YC dealy volume of the TBC remote control(BVR-50) is unavailable.
● You can select the output chroma phase reference signal with menu switch No. 124 <CHROMA ROTE>
(component or composite signals).
SETUP LEVEL Setup
Output setup level
-128 to +127
䡬
䡬
䡬
䡬
䡬
䡬
Adjustment
VID (H) PHASE Hphas
Output video (horizontal) phase
-128 to +127
䡬
䡬
䡬
䡬
X
䡬
This section describes the procedure for adjusting video setting value on the operation panel.
VID (V) PHASE Vphas
Output video (vertical) phase
SYSTEM
PHASE
Output system phase
Sphas
-5 to +5
䡬
䡬
䡬
䡬
X
X
-64 to +64
䡬
䡬
䡬
䡬
䡬
䡬
1. Press the [VCON] button to display the adjustment items on the counter display.
2. Select the adjustment item by turning the jog dial.
[ Adjustment items are shown on the counter display or on screen.
SC
SCph
Output SC phase
0 to 511
䡬
䡬
䡬
䡬
䡬
䡬
SCH
SCHph
Output SCH phase
0 to 255
䡬
X
X
䡬
X
X
VIDEO ALL
UNITY
Vunity
Standard setting ON/OFF
ON/OFF
VIDEO
REMOTE
Vrem
External video controller ON/OFF
ON/OFF
4. Repeat steps 2 to 3 to adjust other items.
● Audio control menu (page 2 on screen)
Display
On screen
Counter
display
Adjustment contents
Adjustment
value
AUDIO PHASE Aphas
Output audio phase
-480 to +720
On screen (page 1)
On screen (page 2)
<VIDEO CONTROL MENU> 1/2
000
VIDEO
GAIN
000
CHROMA GAIN
000
CHROMA PHASE
000
SETUP
LEVEL
000
VID (H)
PHASE
0
VID (V)
PHASE
00
SYSTEM PHASE
000
SC
PHASE
000
SCH
PHASE
OFF
VIDEO
ALL UNITY
OFF
VIDEO
REMOTE
<AUDIO CONTROL MENU> 2/2
+000
PHASE
AUDIO
118
3. Adjust the value by turning the jog dial while pressing the [SEARCH] button.
• The adjustment items on screen can be selected with the cursor.
• When making an adjustment, refer to an actual signal waveform as shown in the “Adjustment outline for each
item” below.
Audio signals
ANALOG AES/
SDI
EBU
䡬
䡬
Counter display
Adjustment
item
Adjustment
value
䡬
Main
unit
Operation
TBC
remote
control
9-pin
䡬
X
X
5. Press the [SET] or [VCON] button to finish.
[The normal counter display is restored.
• To reset all video parameters to the default settings, set the adjustment item “VIDEO ALL UNITY” to “ON”.
• To independently set items in the Unity mode, select the desired item and press the [RESET] button. Only the
selected item is set to the standard value.
* Set the output timing for the analog/
digital audio playback signal.
Settings below 00 advance the
output timing, while settings above
00 delay the output timing.
(1 sample: approx. 20 µs)
119
12 EDITING SYSTEM PHASE ADJUSTMENT
12 EDITING SYSTEM PHASE ADJUSTMENT
12-2 ADJUSTMENT
12-2 ADJUSTMENT
Adjustment outline for each item
● Video level/setup level/chroma level/chroma phase
Use menu switch No. 124 <CHROMA ROTE> to specify whether the chroma phase reference signal is a
composite signal or component signal.
1. Play back a cassette tape with standard color signals recorded on it.
Do not use the built-in color bar signal for adjustment.
2. Adjust the knobs so that the displays on the waveform monitor (WFM) and the vectorscope (VSC)
appear as illustrated below.
䡲 Waveforms on the WFM (NTSC signal)
䡲 Waveforms on the VSC (NTSC signal)
R
A:
Video level
MG
System phase/subcarrier phase/SCH phase
The system phase can be varied with the subcarrier-unit step. The relationship between the sync and burst
phase does not change.
The phase in the subcarrier can be varied. The relationship between the sync and burst phase does not change.
● To adjust the phase with reference to sync phase, follow the system phase adjustment procedure described below.
● To adjust the phase with reference to subcarrier phase, adjust the system phase as described below, then
adjust the subcarrier phase.
● To vary sync and burst phase (SCH), adjust it with <SCH PHASE> in the video control menu.
System phase (SYSTEM PHASE) adjustment
System phase adjustment matches the VCR’s blanking phase with the switcher’s correct blanking phase. Switch
between the switcher reference signal and the input VCR signal and adjust until there is no change in phase
position. Without this adjustment, video distortion occurs after completion of fading during switching.
Waveforms on a waveform monitor
Phase setting for genlocking signal
1. Set the waveform monitor (WFM)’s input to B and
synchronize with input B. Set the H sync position
with the WFM’s H POSITION volume control to
50% of the H sync level. (Refer to the upper figure
on the left.)
Adjustment of Player 1
2. Select Player 1 with the special-effects device
(switcher).
3. Play back the reference color bar on Player 1.
4. Set the WFM’s input to A and synchronize with
input B. Set the [SYSTEM PHASE] item of Player
1 to the same H sync position as step 1. (Refer to
the lower figure on the left.)
Adjustment of Player 2
5. Select Player 2 with the special-effect device
(switcher).
6. Repeat steps 3 and 4 to adjust the system phase
of Player 2.
YL
The WFM enlarges in 0.1 µsec.
B
B:
Setup level
A: Video level
Adjust to 100 IRE. (NTSC)
Adjust to 0.7 V (PAL)
B: Setup level (NTSC only)
Adjust against deviation.
G
CY
Genlocking signal
(H sync)
50%
C: Chroma level/chroma phase
Adjust the two knobs so that the lighting point of
each vector waveform is located within the
mark.
50%
Match
Player’s video output
(H sync)
50%
Video (H) phase (VID (H) PHASE) adjustment
50%
The video phase determines where a picture is located with respect to the sync signal. You can adjust this using
the same waveform monitor used for system phase adjustment. Set the WFM reference sync to INT and adjust
while observing blanking until no part of the VCR picture is missing in the rising section.
If you’re not using a waveform monitor, wipe the picture with the switcher reference signal and adjust until the
entire picture can be seen on the monitor.
• The KM-D600 switcher is self-adjusting. No
adjustment is required.
(Pay attention to sync fall)
Subcarrier phase (SC PHASE) adjustment
NTSC signal
waveforms
Player 1
Match
Player 2
(WFM: Inside reference sync signal)
120
Adjustment of Player 1
1. Select Player 1 with the special-effects device
(switcher).
2. Play back the reference color bar on Player 1.
3. Set the WFM’s input to A and synchronize with
input A. Adjust the video phase by setting the [VID
(H) PHASE] item of Player 1 so that none of the
image is missing. (Refer to the upper figure on the
left.)
Adjustment of Player 2
4. Select Player 2 with the special-effects device
(switcher).
5. With the WFM’s input set to A and input A
synchronized, adjust the video phase by setting
the [VID (H) PHASE] item of Player 2 in the same
way as step 3. (Refer to the lower figure on the
left.)
System subcarrier phase adjustment matches the VCR subcarrier with the reference subcarrier of the switcher.
Adjust so that the reference subcarrier overlaps the VCR subcarrier.
Phase setting for genlocking signal
Waveforms on the vector scope (NTSC signal)
1. Set the vector scope’s input to B and synchronize
with input B. Adjust the phase of the burst signal to
Burst signal
Burst signal
the reference line with the vector scope (Refer to
Fig. 2 on the left.).
Adjustment of Player 1
2. Select Player 1 with the special-effects device
(switcher).
3. Play back the reference color bar on Player 1.
Fig. 2
4. Set the vector scope’s input to A and synchronize
Fig. 1
with input B. Adjust the phase of a burst signal to
the reference line by setting the [SC PHASE] item
* ● Adjustment of the KM-D600 switcher is not
of Player 1. (Refer to Fig. 2 on the left.)
necessary as it is self-adjusting.
Adjustment of Player 2
● Adjustment of the KM-3000 switcher is not necessary
5. Select Player 2 with the special-effects device
as it is a component switcher.
(switcher).
● Composite switchers other than the KM-D600 must
6. Repeat steps 3 and 4 to adjust the subcarrier of
be adjusted.
Player 2.
R
R
MG
YL
MG
YL
B
G
CY
B
G
CY
121
13 RS-232C protocol
12 EDITING SYSTEM PHASE ADJUSTMENT
12-3 DUBBING LOOP FUNCTION
13-1 Command tables
The dubbing loop function allows you to effectively perform analog video signal adjustment.
BASIC TABLE
The dubbing loop function loops video signals and generates color bar signals from the built-in signal generator.
The picture passes through the looped video signal circuit and is fed back and stored in the memory circuit. Then,
instead of outputting color bar signals from the signal generator, the picture stored in memory is output and
passed through the looped video signal circuit the designated number of times. The same effect is obtained each
time this pseudo-dubbing is repeated and the video signal can be adjusted according to the picture output.
VIDEO
LINE
IN
Video signal
recording circuit
Video signal
playback circuit
1
2
2
Error
3
Cassette
Out
5
Color bar
output
Monitor TV
Color bar
Built-in signal
generator
Color bar output
4
Enter
CueUp with
Data
Not Target
6
In Shift(+)
7
In Shift(-)
6
7
8
9
In Flag
Reset
Out Flag
Reset
In Flag
Recall
Out Flag
Recall
Clear
8
Out Shift(+) Go to In
9
Out Shift(-) Goto Out
A
ACK
Play
B
NAK
FwdShuttle
X4
FwdShuttle
X0.09
FwdShuttle
Still
FwdShuttle
X6
Stop
C
Stored in the
memory circuit
5
In Entry
ClearError Out Entry
D
VIDEO
LINE1
OUT
3
Complate
4
VIDEO
LINE2
OUT
Color bar signal
0
0
1
E
F
A
Standby
On
Standby
Off
Preroll
C
Auto Edit
B
CueUp with
Data
D
UB Preset
Review
CTL Data
Reset
In Data
Preset
Out Data
Preset
Edit Preset
Eject
Valiable
Fwd
Valiable
Rev
Full Ee
On
Ee off
Fwd
Shuttle
Rev
Shuttle
Select Ee
On
Ee off
RevShuttle Memory
X1
RevShuttle Memory
X4
Search
RevShuttle
X0.09
RevShuttle
Still
RevShuttle
X6
Still
Rec
Ff
E
TC Preset
Preview
Rec Pause
Rew
Edit On
Edit Off
Preroll
Preroll Time
Time Sense
Preset
Status
Timer Mode
Sense
Select
TC Data
Sense
CTL Data
Edit Preset
Sense
(4ch)
In Data
Sense
Out Data
TimeCode
Sense
Switch Preset
UB Data
Sense
JVC Status
Memory
Sense
Switch Preset
SubTC Data
Sense
SubUB Data
Sense
F
JVC-1 Table
Select
Basic Table
Select
Rec Request
VTR Ind.
Note
• For the dubbing loop function, use the composite video signal.
JVC-1 TABLE
0
1. Connect the rear panel's video input connector and video output connector with the cable.
2. Set menu switch No. 620 <DUBBING LOOP> to activate the dubbing loop function.
OFF (0)
: The dubbing loop function is disabled.
3 TIMES (1) : The dubbing loop function repeats 3 times.
5 TIMES (2) : The dubbing loop function repeats 5 times.
10 TIMES (3) : The dubbing loop function repeats 10 times.
• When the menu switch is set to any position except OFF (0), the Dubbing Loop mode is activated.
3. While referring to the color bar on the monitor, adjust the video control parameters so that color changes in the
picture are minimized.
1
2
3
0
1
Complate
2
Error
3
Cassette
Out
4
5
5
In Entry
6
7
ClearError Out Entry
Not Target
6
In Shift(+)
7
In Shift(-)
In Flag
Reset
Out Flag
Reset
In Flag
Recall
Out Flag
Recall
Clear
Rom
Version
8
9
A
Standby
On
Standby
Off
Preroll
B
C
Fwd
Shuttle
Rev
Shuttle
Full Ee
On
Ee off
ACK
B
NAK
Play
Memory
Memory
Search
Memory
Switch Sense
Tape Remain
Sense
Status
Sense
TC Data
Sense
CTL Data
Sense
Out Shift(-) Goto Out
A
D
F
CTL Data
Reset
In Data
Preset
Out Data
Preset
Timer Mode
Select
Analog Data
Select
Rec
Ff
JVC-1 Table
Select
Basic Table
Select
Rec Request
Rec Pause Panel Switch
Sense
Rew
C
E
Device Type
Request
Eject
Valiable
Fwd
Valiable
Rev
D
Play after
CueUp with Data
Out Shift(+) Go to In
8
9
4. To end the dubbing loop mode, set menu switch No. 620 <DUBBING LOOP> to “OFF (0)” and press the [SET]
button.Normal operation is restored.
4
Enter
JVC Status
Sense
VTR Ind.
Panel Switch
Set
Memory
Switch Preset
E
F
122
Stop
Still
123
13 RS-232C protocol
13 RS-232C protocol
13-2 RS-232C Commands
13-2 RS-232C Commands
䡲 Receiving
• The VCR always receives commands from the
controller. The VCR also replies to all “sense”
commands such as StatusSense/TimeSense.
• Switch Remote/Local on this unit to “Remote”.
䡲 RS-232C specifications
9PIN D-SUB
1
5
6
PIN No.
2
3
4
5
6
Signal
RxD
TxD
DTR
GND
DSR
9
Operation
Reception data
Transmission data
Data terminal ready
Signal ground
Data set ready
Direction
VCR p CPU
VCR [ CPU
VCR [ CPU
VCR p CPU
Note: CPU means a controller such as a personal
computer.
Mode
Character length
Parity check
Start bit
Stop bit
Data rate
Bit construction
:
:
:
:
:
:
Non-synchronized
8 bits
None
1
1
9600 bps
p
p
D0 D1 D2 D3 D4 D5 D6 D7
Start bit
Stop bit
䡲 Basic format
(1) The VCR returns [0A: ACK]·[0B: NAK]·[02:Error]
in response to each byte sent from the controller.
Eg.: E5: EditPreset
CPU
VTR
E5
3*
0A
3*
0A
0A
CPU: Controller such as a personal computer
VCR: BR-D95 series
• In response to the first byte sent from the
controller, the VCR returns either [ACK], [NAK]
or [Error] within 100 µs.
• The controller confirms the reply from the VCR
and then outputs the second byte. The VCR
returns either [ACK], [NAK] or [Error] within
100 µs.
• The controller confirms the reply from the VCR
and then outputs the third byte. The VCR
returns either [ACK], [NAK] or [Error] within
100 µs.
(2) When the data is recognized by the controller, the
VCR returns the standard byte data.
Eg.: D7: StatusSense
CPU
VTR
D7
**
**
**
**
**
CPU: Controller such as a personal computer
VCR: BR-D95 series
• The VCR starts to output data within 100 µs
after receiving the first byte from the controller.
Stop bits are inserted between output data.
124
䡲 Time management
Command output timing is managed as follows:
• The minimum command interval is 10 ms.
• The minimum byte interval is 100 µs when the
controller outputs the next byte without confirming
the [ACK], [NAK] or [Error] returned from the
VCR.
䡲 Processing method when an error occurs
(1) When NAK (0B) is returned
The first byte command that the VCR was unable
to receive is sent. Output another command.
(2) When Error (02) is returned <The Error section of
StatusSense (bit-0 of the first byte) describes the
Error mode.>
• The VCR receives an illegal command for the
second byte and later. With ClearError [41],
the previous byte is canceled.
• When ClearError [41] is transmitted repeatedly
because Error [02] is returned more than once,
ACK [0A] is returned to release the Error mode.
The Error mode can also be released by
canceling the commands being input with Clear
[56].
(3) If ACK [0A], NAK [0B], Error [02] or Data is not
returned
The VCR does not recognize the byte. Cancel the
commands being input with Clear [56] and transmit
the command again.
(The VCR replies within 1 ms after receiving the
command from the controller.)
(4) When NotTarget [05] is returned
The target point on the tape specified with
CueUpWith Data/Preroll does not exist. Input a
different value and try again.
䡲 Return command from the VCR
01: Completion
Basic/JVC-1 Table
The VCR outputs this command after completing
the requested operation (CueUp With Data/Preroll/
AutoEdit, etc.).
02: Error
Basic/JVC-1 Table
The VCR outputs this command when invalid data
is received.Bit-0 (Error) of the first byte is set for
[D7: StatusSense].
In this condition, the VCR will not accept any
command except the StatusSense command.
The Error mode can be released with [41:
ClearError] or [56: Clear].
To cancel the entire command, use [56: Clear]. To
cancel only the most recently transmitted data,
use [41: ClearError].
03: Cassette Out
Basic/JVC-1 Table
The VCR outputs this command when the eject
operation is complete.
05: Not Target
Basic/JVC-1 Table
The VCR outputs this command when CueUp
With Data/Preroll operation cannot be completed
normally.
0A: ACK
Basic/JVC-1 Table
This command is returned when the defined
command is received.
0B: NAK
Basic/JVC-1 Table
This command is returned when an undefined or
invalid command is received.
ASCII code
Basic/JVC-1 Table
Alphanumeric equivalents for certain “Sense”
commands.
30: Zero
31: 1
32: 2
33: 3
34: 4
35: 5
36: 6
37: 7
38: 8
39: 9
61: a
62: b
63: c
64: d
65: e
66: f
67: g
68: h
69: i
6A: j
6B: k
6C: l
6D: m
6E: n
6F: o
70: p
71: q
72: r
73: s
74: t
75: u
76: v
77: w
78: x
79: y
7A: z
20: Space
2D: -
䡲 Auxiliary commands to the VCR
40: Enter
Basic/JVC-1 Table
If this command is transmitted during data transmission, data transmitted after this command will
be zero (=30) or space (=20). More information
on how to use this command can be found in the
descriptions of related commands where its use is
valid.
41: Clear Error
Basic/JVC-1 Table
In the Error mode, this command cancels the last
numeric/data command.
The Error mode is engaged when bit-0 (Error) of
the first byte in D7: StatusSense is “1”.
56: Clear
Basic/JVC-1 Table
In the Error mode, this command releases the
command.
TxD
RxD
56
0A
The Error mode is engaged when bit-0 (Error) of
the first byte in D7: StatusSense is “1”.
ASCII code
Basic/JVC-1 Table
Alphanumeric equivalents for certain Preset
commands.
30: Zero
31: 1
32: 2
33: 3
34: 4
35: 5
36: 6
37: 7
38: 8
39: 9
61: a
62: b
63: c
64: d
65: e
66: f
67: g
68: h
69: i
6A: j
6B: k
6C: l
6D: m
6E: n
6F: o
70: p
71: q
72: r
73: s
74: t
䡲 Corresponding commands
3A: Play key
Playback
TxD
RxD
Basic/JVC-1 Table
3A
0A
3B: Fwd-4 Key
4x playback in the forward direction
TxD
RxD
75: u
76: v
77: w
78: x
79: y
7A: z
20: Space
2D: -
Basic Table
3B
0A
3C: Fwd-0.09 Key
Basic Table
0.09x playback in the forward direction
TxD
RxD
3C
0A
3D: Fwd Still Key
Still playback
TxD
RxD
3D
0A
3E: Fwd-6 Key
6x playback in the forward direction
TxD
RxD
Basic Table
Basic Table
3E
0A
125
13 RS-232C protocol
13 RS-232C protocol
13-2 RS-232C Commands
13-2 RS-232C Commands
3F: Stop Key
Stop
TxD
RxD
Basic/JVC-1 Table
3F
TxD
RxD
0A
42: CueUp With Data
Basic Table
Execute CueUp to the desired point on the tape.
The same as B2: CueUpWithData.
• The VCR returns [01: Complete] after CueUp is
complete.
• When the specified point is not on the tape, the
VCR returns [05: NotTarget].
TxD
RxD
10H
3*
42
0A
10S
3*
1H
3*
0A
1S
3*
0A
10M
3*
0A
10F
3*
0A
1M
3*
0A
0A
0A
0A
01
4A
0A
4B: Rev-4 Key
4x playback in the reverse direction
TxD
RxD
Basic Table
4B
0A
4C: Rev-0.09 Key
Basic Table
0.09x playback in the reverse direction
TxD
RxD
4C
0A
4D: Rev Still Key
Still playback
TxD
RxD
Basic Table
0A
4E: Rev-6 Key
6x playback in the reverse direction
TxD
RxD
TxD
RxD
Basic Table
4E
0A
Basic/JVC-1 Table
4F
0A
50: In Entry
Basic/JVC-1 Table
Registers the current time as IN point.
TxD
RxD
126
50
0A
TxD
RxD
52
0A
53: Out Flag Reset
Basic/JVC-1 Table
Disables the registered OUT point.
TxD
RxD
53
54
55
0A
58: Go-To In
Basic/JVC-1 Table
Executes CueUp to the point registered on the
tape with [50: In Entry] and [E3: In Data Preset].
• The VCR returns [01: Complete] when CueUp is
complete.
• When the specified point is not on the tape, the
VCR returns [05: NotTarget].
• When the IN point is not registered, the VCR
returns [0B: NAK].
TxD
RxD
58
0A
01
59: Go-To Out
Basic/JVC-1 Table
Executes CueUp to the point registered on the
tape with [51: Out Entry] and [E4: Out Data Preset].
• The VCR returns [01: Complete] when CueUp is
complete.
• When the specified point is not on the tape, the
VCR returns [05: NotTarget].
• When the IN point is not registered, the VCR
returns [0B: NAK].
TxD
RxD
59
0A
01
TxD
RxD
5A
0A
5B: Memory Search
Basic/JVC-1 Table
Executes CueUp to the point registered on the
tape with [5A: Memory].
• The VCR returns [01: Complete] when CueUp is
complete.
• When the specified point is not on the tape, the
VCR returns [05: NotTarget].
• When the Memory point is not registered, the
VCR returns [0B: NAK].
TxD
RXD
5B
0A
01
03
**
A0
0A
A1: Standby Off Key
Standby Off
TxD
RxD
0A
55: Out Flag Recall
Basic/JVC-1 Table
Enables the disabled OUT point.
21
Basic/JVC-1 Table
A1
A2
0A
01
A3: Eject Key
Eject
TxD
RxD
Basic/JVC-1 Table
A3
0A
03
• When the Eject operation is completed properly,
the VCR returns [03: Cassette Out].
A5: Variable Fwd Key
Basic/JVC-1 Table
Variable playback in the forward direction.
Specify the speed with the second byte of TxD.
Refer to the speed/data correspondence table.
(See page 134.)
TxD
RxD
A5
**
0A
0A
Auxiliary commands
• Clearing with [56: Clear] and [41: ClearError]
has no effect.
• [40: Enter] has no effect.
A6: Variable Rev Key
Basic/JVC-1 Table
Variable playback in the reverse direction.
Specify the speed with the second byte of TxD.
Refer to the speed/data correspondence table.
TxD
RxD
A6
**
0A
0A
Auxiliary commands
• Clearing with [56: Clear] and [41: ClearError]
has no effect.
• [40: Enter] has no effect.
Basic/JVC-1 Table
AB
0A
AC: Rew Key
Rewinding.
TxD
RxD
Basic/JVC-1 Table
AC
0A
B2: CueUp With Data
Basic/JVC-1 Table
Executes CueUp to the desired point on the tape.
Same as 42: CueUpWithData. (Basic only)
• The VCR returns [01: Complete] after CueUp is
complete.
• When the specified point is not on the tape, the
VCR returns [05: NotTarget].
0A
A2: Preroll Key
Basic/JVC-1 Table
Rewinds the tape for the preroll time.
• The preroll time is specified by [E6: Preroll Time
Preset].
• When it is not specified, the VCR’s menu setting
is used.
• The VCR returns [01: Complete] after preroll is
complete.
TxD
RxD
AB:FF Key
Fast-forwarding.
TxD
RxD
72
• The first byte is fixed at 21.
• The second byte shows the type of software
(D9 = “03”).
• The third byte shows version information.
A0: Standby On Key
Basic/JVC-1 Table
Standby On
TxD
RxD
0A
54: In Flag Recall
Basic/JVC-1 Table
Enables the disabled IN point.
TxD
RxD
72: ROM version
JVC-1 Table
Returns the CPU (ROM)’s program version.
TxD
RxD
0A
5A: Memory
Basic/JVC-1 Table
Registers the current time as the Memory point.
4D
4F: Still Key
Still playback
51
52: In Flag Reset
Basic/JVC-1 Table
Disables the registered IN point.
TxD
RxD
1F
3*
• Input values of 0 to 9 which follow the second
byte of TxD are expressed with ASCII code.
Auxiliary commands
• [56: Clear] is valid for the second TxD byte or
later. All commands back to the first byte are
cleared.
• When [02: Error] occurs, [41: ClearError] is valid.
The previous command (one byte) is cleared.
• [40: Enter] is valid for the second TxD byte or
later. Whatever has not yet been specified is
regarded as [30: Zero].
4A: Rev-1 Key
Basic Table
1x playback in the reverse direction
TxD
RxD
51: Out Entry
Basic/JVC-1 Table
Registers the current time as OUT point.
TxD
RxD
10H
3*
B2
0A
10S
3*
1H
3*
0A
1S
3*
0A
10M
3*
0A
10F
3*
0A
1M
3*
0A
0A
0A
01
1F
3*
0A
• Input values of 0 to 9 which follow the second
byte of TxD are expressed with ASCII code.
Auxiliary commands
• [56: Clear] is valid for the second byte or later of
TxD. All commands back to the first byte are
cleared.
• When [02: Error] occurs, [41: ClearError] is
valid. The previous command (one byte) is
cleared.
• [40: Enter] is valid for the second TxD byte or
later. Whatever has not yet been specified is
regarded as [30: Zero].
B2: Play after CueUp With Data
JVC-1 Table
Executes CueUp and engages the Play mode.
The VCR returns [01: Complete] after CueUp is
complete.
When the specified point is not on the tape, the
VCR returns [05: NotTarget].
TxD
RxD
10H
3*
B2
0A
10S
3*
1H
3*
0A
1S
3*
0A
10M
3*
0A
10F
3*
0A
1M
3*
0A
0A
0A
01
1F
3*
0A
• Input values of 0 to 9 which follow the second
byte of TxD are expressed with ASCII code.
Auxiliary commands
• [56: Clear] is valid for the second TxD byte or later.
All commands back to the first byte are cleared.
• When [02: Error] occurs, [41: ClearError] is valid.
The previous command (one byte) is cleared.
• [40: Enter] is valid for the second TxD byte or
later. Whatever has not yet been specified is
regarded as [30: Zero].
127
13 RS-232C protocol
13 RS-232C protocol
13-2 RS-232C Commands
13-2 RS-232C Commands
B5: Fwd Shuttle Key
Basic/JVC-1 Table
Shuttle search playback in the forward direction.
• Specify the Fwd Shuttle Mode. The speed is
specified by the second byte.
• Specify the adjustment speed.
TxD
RxD
B5
3*
0A
0A
• The second TxD byte consists of numeric data
and is expressed with “30”, “31”, “32” ... “38”,
“39”, “3A”, “3B” and “3C”.
• When invalid data is received, the VCR returns
“02: Error”.
• The speeds corresponding to each value are
shown below.
Data
30
31
32
33 34
35 36 37 38
Speed Still 0.03 0.09 0.20 0.50 1
39
3A
10
17 or 32
Data
3B
2
4
6
3C
Adjustment speed -10% +10%
Auxiliary commands
• [56: Clear] is valid for the second TxD byte or
later. All commands back to the first byte are
cleared.
• When [02: Error] occurs, [41: ClearError] is
valid. The previous command (one byte) is
cleared.
[40: Enter] has no effect.
B6: Rev Shuttle Key
Basic/JVC-1 Table
Shuttle search playback in the reverse direction.
Specify the Fwd Shuttle Mode. The speed is
specified by the second byte.
Specify the adjustment speed.
TxD
RxD
B6
3*
0A
0A
• The second TxD byte consists of numeric data
and is expressed with “30”, “31”, “32” ... “38”,
“39”, “3A”, “3B” and “3C”.
• When invalid data is received, the VCR returns
“02: Error”.
• The speeds corresponding to each value are
shown below.
Data 30 31 32 33 34 35 36 37 38
Speed Still 0.03 0.09 0.20 0.50 1
39
3A
10
17 or 32
2
4
6
Auxiliary commands
• [56: Clear] is valid for the second TxD byte or later.
All commands back to the first byte are cleared.
• When [02: Error] occurs, [41: ClearError] is valid. The
previous command (one byte) is cleared.
• [40: Enter] has no effect.
C0: Auto Edit Key
Basic Table
Executes Auto Edit on the VCR.
• The editing channel must be selected with [E5/
E9: Edit Preset].
• Use with [FA: Rec Request].
• Set the preroll time with [E6: Preroll Time Preset].
• When preroll time is not specified, the VCR’s
menu setting is used.
• The VCR returns [01: Complete] after Auto Edit
is complete.
[0B: NAK] is returned to the player.
TxD
RxD
C0
0A
0A
01
C1: Preview Key
Basic Table
Execute Preview on the VCR.
• The editing channel must be selected with [E5/
E9: Edit Preset].
• Use with [FA: Rec Request].
• Set the preroll time with [E6: Preroll Time Preset].
• When preroll time is not specified, the VCR’s
menu setting is used.
• The VCR returns [01: Complete] after Preview is
complete.
[0B: NAK] is returned to the player.
TxD
RxD
FA
C1
0A
0A
01
C2: Review Key
Basic Table
Execute Review on the VCR.
• [C0: Auto Edit] must be complete.
• Set the preroll time with [E6: Preroll Time Preset].
• When preroll time is not specified, the VCR’s
menu setting is used.
• The VCR returns [01: Complete] after Review is
complete.
[0B: NAK] is returned to the player.
TxD
RxD
C2
0A
01
C4: Full EE On
Basic/JVC-1 Table
Checks VCR’s input signals.
TxD
RxD
C4
0A
The VCR returns [0B: NAK] to the player.
C5: EE Off
Basic/JVC-1 Table
Releases EE check.
TxD
RxD
C5
0A
C8: Select EE On
Basic Table
Checks the input signals to the editing channel
selected by [E5/E9: Edit Preset].
TxD
RxD
C8
0A
The VCR returns [0B: NAK] to the player.
C9: EE Off
Basic Table
Releases EE check.
TxD
RxD
128
FA
C9
0A
CA: Rec Key
Basic/JVC-1 Table
Recording
Use with [FA: Rec Request].
TxD
RxD
FA
CA
0A
0A
The VCR returns [0B: NAK] to the player.
CB: Rec Pause Key
Basic/JVC-1 Table
Recording is paused.
Use with [FA: Rec Request].
TxD
RxD
FA
CB
0A
0A
The VCR returns [0B: NAK] to the player.
CE: Edit On Key
Basic Table
The channel selected with [E5: Edit Preset] is
engaged in the Edit mode.
Use with [FA: Rec Request].
TxD
RxD
FA
0A
CF
0A
The VCR returns [0B: NAK] to the player.
D1: Device Type Request
JVC-1 Table
Returns the model name of the connected VCR.
TxD
RxD
• The third and fourth RxD bytes express individual bit information (Data1/Data2) for the
specified address.
• When invalid data is received, the VCR returns
“02: Error”.
Auxiliary commands
• When [02: Error] occurs, [56: Clear] is valid. All
commands back to the first TxD byte are cleared.
• When [02: Error] occurs, [41: ClearError] is valid.
The previous command (one byte) is cleared.
• [40: Enter] is invalid.
D4: Tape Remain Sense
JVC-1 Table
Recalls remaining tape time information.
TxD
RxD
D4
3*
1H
**
**
**
**
D3
**
0A
**
**
• Refer to “Menu Switch setting” to find out more
about menu switch contents.
• Specify the address data you want to recall with
the second TxD byte.
The corresponding addresses are as follows.
01 :Servo/System-1 information
10 :System-3 information
40 :System-5 information
89 :System-7 information
87 :System-9 information
91 :System-11 information
94 :System-14 information
0a :Video information-2
0c :Video information-4
1b :Video-6 information
1e :Video-8 information
0f :Video-10 information
1d :Video-12 information
06 :Audio-3 information
03 :Audio-5 information
08 :System-2 information
20 :System-4 information
88 :System-6 information
90 :System-8 information
09 :System-10 information
92 :System-12 information
0b :Video information-3
0d :Video-5 information
0e :Video-7 information
1c :Video-9 information
1f :Video-11 information
05 :Audio-2 information
07 :Audio-4 information
30 :Audio-6 information
3*
10M
3*
1M
D6: Preroll Time Sense
Basic Table
Shows the preroll time setting.
The VCR returns the value set by [E6: Preroll Time
Preset] or the value set with the VCR’s menu.
TxD
RxD
D6
3*
10S
D1
• Uses ASCII code to express “0” to “9”, “a” to “z”,
and “space”.
• For example, d = “64”, 9 = “39”, 5 = “35” and
space = “20” for the BR-D95.
D3: Memory SwitchSense
JVC-1 Table
Recalls menu switch content.
TxD
RxD
80: TimeCode-1 information
79: TimeCode-3 information
78: TimeCode-5 information
83: OnScreen-2 information
86: TBC information-3
CE
0A
The VCR returns [0B: NAK] to the player.
CF: Edit Off Key
Basic Table
Stops the editing operation.
The VCR enters the Play mode after editing is
complete.
TxD
RxD
31: Audio-7 information
81: TimeCode-2 information
77: TimeCode-4 information
82: OnScreen-1 information
84: TBC information-1
3*
1S
D7: Status Sense
Shows the VCR status.
TxD
RxD
Basic/JVC-1 Table
D7
**
**
**
**
**
• For an explanation of the meaning of each bit,
refer to “Sense command details”.
D8: Current TC Sense
Basic/JVC-1 Table
Shows the current TC time data.
TxD
RxD
D8
3*
10S
3*
10H
3*
1H
3*
10M
3*
1S
3*
10F
3*
1F
3*
1M
• Values after the first RxD byte from 0 to 9 are
expressed in ASCII code.
D9: Current CTL Sense
Basic/JVC-1 Table
Shows the current CTL time data.
TxD
RxD
D9
3*
10S
3*
10H
3*
1H
3*
10M
3*
1S
3*
10F
3*
1F
3*
1M
• Values after the first RxD byte from 0 to 9 are
expressed in ASCII code.
• The most significant bit at 10H expresses
“minus”.
129
13 RS-232C protocol
13 RS-232C protocol
13-2 RS-232C Commands
13-2 RS-232C Commands
DA: In Data Sense
Shows the set IN point.
TxD
RxD
Basic Table
DA
3*
10S
3*
10H
3*
1H
3*
10M
3*
1S
3*
10F
3*
1F
3*
1M
DB
3*
10S
3*
10H
3*
1H
3*
10M
3*
1S
3*
10F
3*
1F
3*
1M
DB
**
DATA0
**
DATA1
**
DATA2
**
DATA3
• For an explanation of the meaning of each bit,
refer to “EC:Panel Switch Preset”.
DC: Current TC UB Sense
Basic Table
Shows the current TC UB data.
TxD
RxD
DC
**
10H
**
10S
**
1H
**
1S
**
10F
**
10M
**
1M
**
1F
• Values after the first RxD byte from 0 to f (HEX)
are expressed in ASCII code.
DD: JVC Status Sense
Basic/JVC-1 Table
Shows the VCR status.
TxD
RxD
DD
**
**
**
**
• For an explanation of the meaning of each bit,
refer to “Sense command details”.
DE: Current Sub Tc Sense
Basic Table
Shows the current SUB-TC time data.
TxD
RxD
DE
3*
10S
3*
10H
3*
1S
3*
1H
3*
10F
3*
10M
3*
1F
DF
**
10H
**
1H
**
10M
**
1S
**
10F
**
1F
TxD
RxD
10H
3*
E0
0A
10S
3*
1H
3*
0A
1S
3*
3*
1M
• Values after the first RxD byte from 0 to 9 are
expressed in ASCII code.
0A
1M
3*
0A
1F
3*
0A
0A
0A
• Values after the second TxD byte from 0 to 9 are
expressed in ASCII code.
Auxiliary commands
• [56: Clear] is valid for the second TxD byte or
later. All commands back to the first byte are
cleared.
• When [02: Error] occurs, [41: ClearError] is
valid. The previous command (one byte) is
cleared.
• [40: Enter] is valid for the second TxD byte or
later. Whatever has not yet been specified is
regarded as [30: Zero].
E1: TC UB Data Preset
Basic Table
Presets the TC UB data.
TxD
RxD
10H
**
E1
1H
**
10M
**
1M
**
0A
0A
0A
0A
10S
**
1S
**
10F
**
1F
**
0A
0A
0A
0A
0A
• Values after the first RxD byte from 0 to f (HEX)
are expressed in ASCII code.
Auxiliary commands
• [56: Clear] is valid for the second TxD byte or
later. All commands back to the first byte are
cleared.
• When [02: Error] occurs, [41: ClearError] is
valid. The previous command (one byte) is
cleared.
• [40: Enter] is valid for the second TxD byte or
later. Whatever has not yet been specified is
regarded as [30: Zero].
E2: Counter Reset
Basic JVC-1 Table
Resets the CTL counter.
TxD
RxD
E2
40
0A
0A
Auxiliary commands
• [56: Clear] is valid for the second TxD byte. All
commands back to the first byte are cleared.
• When [02: Error] occurs, [41: ClearError] is
valid. The previous command (one byte) is
cleared.
• [40: Enter] is required for the second TxD byte.
130
Basic/JVC-1 Table
10H
3*
E3
1H
3*
10M
3*
1M
3*
0A
0A
0A
0A
10S
3*
1S
3*
10F
3*
F
3*
0A
10M
3*
0A
10F
3*
E3: In Data Preset
Presets the IN point.
TxD
RxD
**
1M
• Values after the first RxD byte from 0 to f (HEX)
are expressed in ASCII code.
E0: TC Data Preset
Basic Table
Presets the TC data.
0A
• Values after the first RxD byte from 0 to 9 are
expressed in ASCII code.
DB: Panel Switch Sence
JVC-1 Table
Shows the various settings on the front panel.
TxD
RxD
TxD
RxD
**
10S
• Values after the first RxD byte from 0 to 9 are
expressed in ASCII code.
DB: Out Data Sense
Basic Table
Shows the set OUT point.
TxD
RxD
DF: Current Sub UB Sense
Basic Table
Shows the current SUB TC UB data.
0A
0A
A
TxD
RxD
0A
• Values after the second TxD byte from 0 to 9 are
expressed in ASCII code.
Auxiliary commands
• [56: Clear] is valid for the second TxD byte or
later. All commands back to the first byte are
cleared.
• When [02: Error] occurs, [41: ClearError] is
valid. The previous command (one byte) is
cleared.
• [40: Enter] is valid for the second TxD byte or
later. Whatever has not yet been specified is
regarded as [30: Zero].
E4: Out Data Preset
Basic/JVC-1 Table
Presets the OUT point.
TxD
RxD
10H
3*
E4
0A
1H
3*
0A
10S
3*
1S
3*
0A
10M
3*
0A
10F
3*
0A
1M
3*
0A
A
F
3*
0A
0A
• Values after the second TxD byte from 0 to 9 are
expressed in ASCII code.
Auxiliary commands
• [56: Clear] is valid for the second TxD byte or
later. All commands back to the first byte are
cleared.
• When [02: Error] occurs, [41: ClearError] is
valid. The previous command (one byte) is
cleared.
• [40: Enter] is valid for the second TxD byte or
later. Whatever has not yet been specified is
regarded as [30: Zero].
E5: Edit Preset
Basic Table
Selects the edit mode.
TxD
RxD
E5
3*
0A
3*
0A
0A
• Each bit is defined as follows:
7 6 5 4 3 2
First byte
1
E6: Preroll TimePreset
Basic Table
Sets the preroll time.
The set value should be less than 59 seconds.
If the preroll time is not set with this command, use
the VCR’s menu switch setting.
0
0 0 1 1 0 INS ASM Video
Second byte 0 0 1 1 0 TC Aud2 Aud1
Auxiliary commands
• [56: Clear] is valid for the second TxD byte or later.
All commands back to the first byte are cleared.
• When [02: Error] occurs, [41: ClearError] is valid.
The previous command (one byte) is cleared.
• [40: Enter] is invalid.
E6
3*
0A
3*
0A
0A
Auxiliary commands
• [56: Clear] is valid for the second TxD byte or later.
All commands back to the first byte are cleared.
• When [02: Error] occurs, [41: ClearError] is valid.
The previous command (one byte) is cleared.
• [40: Enter] is invalid.
E7: Timer Mode Select
Basic/JVC-1 Table
Switches the current timer.
TxD
RxD
E7
3*
0A
0A
• Each bit is defined as follows:
7 6 5 4 3 2
1
0
First byte 0 0 1 1 0 UB CTL TC
• CTL = 32, LTC = 31, LTC UB = 35
Auxiliary commands
• [56: Clear] is valid for the second TxD byte or later.
All commands back to the first byte are cleared.
• When [02: Error] occurs, [41: ClearError] is valid.
The previous command (one byte) is cleared.
• [40: Enter] is invalid.
E8: Analog Data Set
JVC-1 Table
Sets values for specified audio and video settings.
TxD
RxD
E8
**
0A
**
0A
**
0A
0A
• Selects the setting item and sets the data as
shown below with the input values for the
second TxD byte or later.
The second byte: Selects the setting item (DATA0)
The third/fourth byte: Sets the data (DATA1, DATA2)
A/V Setting items
DATA0 DATA1 DATA2
Tracking volume
20
00-FF
—
Output video level
70
00-C0
—
Output chroma level
71
00-C0
—
Output video H phase
72
00-FF
—
Output setup level
73
00-FF
—
Output chroma phase
74
00-FF
—
Output video V phase
75
03-0D
—
Output system phase
76
03-0D
—
Output SC phase
77
Low-order High-order 0000-011F
Output SCH phase
78
00-FF
—
Output audio phase
79
Low-order High-order 20FE-D002
Auxiliary commands
• [56: Clear] is valid when [02: Error] occurs. All
commands back to the first TxD byte are cleared.
• When [02: Error] occurs, [41: ClearError] is valid.
The previous command (one byte) is cleared.
• [40: Enter] is invalid.
131
13 RS-232C protocol
13 RS-232C protocol
13-2 RS-232C Commands
13-2 RS-232C Commands
E9: Edit Preset 2
Basic Table
Selects the Edit mode for 4 channels.
TxD
RxD
E9
3*
0A
3*
0A
3*
0A
7
0
0
0
6
0
0
0
5
1
1
1
4
1
1
1
3
0
0
DA4
2
INS
TC
DA3
1
ASM
Aud2
DA2
EB
CPN
0A
**
**
0A
**
0A
3
**
0A
0A
2
1
0
VID DIG LINE
GEN VID
3
2
UB
1
TC
2
1
0
4
IS
IS
IS
IS
CH4 1 CH4 0 CH3 1 CH3 0
132
0
CF
PB
FLD /EE
0
0
1
0
1
—
Internal
1
—
—
Bit name
IS**1
IS**2
ANA
0
0
AES/EBU
0
1
SDI
1
—
Internal
1
1
Bit name
AUDIO INPUT/AUDIO
MONITOR
Setting
MS**R
Bit name
MON/IPT
OFF
0
0
MONITOR
0
R CH
0
1
INPUT
1
L CH
1
0
L+R CH
1
1
CF ON/OFF SW
COUNTER
Bit name
Setting
UB
TC
Setting
Bit name
CF SW
CTL
0
0
CF OFF
0
TC
—
1
CF ON
1
UB
1
0
Setting
ED
**
0A
**
0A
**
0A
0A
• Refer to “Menu Switch Setting” to find out more
about menu switch contents.
• The setting of the menu switch changed with
this command is reset to the default setting
when the VCR is turned OFF.
• The second byte expresses the address
(Data0).
01 :Servo/System-1 information
10 :System-3 information
40 :System-5 information
89 :System-7 information
87 :System-9 information
91 :System-11 information
94 :System-14 information
0a :Video information-2
0c :Video information-4
1b :Video-6 information
1e :Video-8 information
0f :Video-10 information
1d :Video-12 information
06 :Audio-3 information
03 :Audio-5 information
31 :Audio-7 information
81 :TimeCode-2 information
77 :TimeCode-4 information
82 :OnScreen-1 information
84 :TBC information-1
08 :System-2 information
20 :System-4 information
88 :System-6 information
90 :System-8 information
09 :System-10 information
92 :System-12 information
0b :Video information-3
0d :Video-5 information
0e :Video-7 information
1c :Video-9 information
1f :Video-11 information
05 :Audio-2 information
07 :Audio-4 information
30 :Audio-6 information
80 :TimeCode-1 information
79 : TimeCode-3 information
78 :TimeCode-5 information
83 :OnScreen-2 information
86 :TBC information-3
F6: JVC Table-1 On
Basic/JVC-1 Table
Use the JVC Table-1 commands.
TxD
RxD
F6
0A
F7: Basic Table On
Basic/JVC-1 Table
Use the Basic Table commands.
JVC Table-1 is set to OFF.
TxD
RxD
F7
0A
FA: Rec/DubRequest
Basic/JVC-1 Table
Send this command before sending commands
such as [CA: REC], [CB: RECPause].
TxD
RxD
FA
0A
• The recording standby mode is maintained until
the REC or STOP command or Error release
command is transmitted.
FB: VTR IND
Basic/JVC-1 Table
Checks that a VCR is connected.
TxD
RxD
FB
0A
• The third and fourth bytes express individual bit
information for the specified address. These are
expressed as Data1/Data2 information.
• The rewritten data can be checked with D3:
MemorySwitchSense. The D3 command
applies only to JVC Table-1.
CF 4/8 SW
Bit name
Setting
PB/EE
Bit name
CF FLD
PB/EE
0
4 FIELD
0
PB
1
8 FIELD
1
8 FIELD: (625) only
REMOTE
Setting
TxD
RxD
The corresponding addresses are as follows.
AUDIO INPUT SELECT
Setting
ED: Memory Switch Preset
Basic/JVC-1 Table
Rewrites the contents of the menu switch.
Auxiliary commands
• When [02: Error] occurs, [56: Clear] is valid. All
commands back to the first TxD byte are cleared.
• When [02: Error] occurs, [41: ClearError] is valid.
The previous command (one byte) is cleared.
• [40: Enter] is invalid.
Bit name
3
REMOTE
1
LOCAL
0
Auxiliary commands
• [56: Clear] and [41: ClearError] are invalid.
• [40: Enter] is invalid.
Fourth byte (DATA2)
5
CF
SW
1
Rem/9pin
7
6
5
4
MS
MS
MS
MS
CH2 L CH2 R CH1 L CH1 R
6
0
LINE
PB PB/EE
Third byte (DATA1)
7
0
SIF
MS**L
• Settings are defined with the input values for the
second TxD byte or later. The bit assignment is
shown below.
Second byte (DATA0)
7
6
5
4
MS
MS
MS
MS
CH4 L CH4 R CH3 L CH3 R
2
LINE
0
Setting
• REC RUN : 1: Rec Run 0: Free Run
REGEN
: 1: Regene 0: Preset
EXT
: 1: Ext
0: Int
Auxiliary commands
• [56: Clear] is valid for the second TxD byte or later.
All commands back to the first byte are cleared.
• When [02: Error] occurs, [41: ClearError] is valid.
The previous command (one byte) is cleared.
• [40: Enter] is invalid.
EC: Panel Switch Preset
JVC-1 Table
Switches various settings on the front panel.
0A
3
DIG VID
AUDIO MONITOR SELECT
7 6 5 4 3 2
1
0
The first byte 0 0 1 1 0 REC RUN REGEN EXT
EC
4
Bit name
VID GEN
• Each bit is defined as follows:
TxD
RxD
5
Setting
3*
0A
6
VIDEO INPUT SELECT
0
Video
Aud1
DA1
Auxiliary commands
• [56: Clear] is valid for the second TxD byte or
later. All commands back to the first byte are
cleared.
• When [02: Error] occurs, [41: ClearError] is
valid. The previous command (one byte) is
cleared.
• [40: Enter] is invalid.
EB: TC Switch Preset
Basic Table
Switches the time code generator function.
TxD
RxD
7
IS
IS
IS
IS
MON
CH2 1 CH2 0 CH1 1 CH1 0 /IPT
0A
• Each bit is defined as follows:
First byte
Second byte
Third byte
Fifth byte (DATA3)
0
Rem
/9pin
133
13 RS-232C protocol
13 RS-232C protocol
13-3 Speed/data correspondence table
13-4 Contents of the sense commands
Data
00-1D
1E-2C
2D-3A
3B-44
45-4B
4C-50
51-56
57-59
5A-5C
5B-60
61
62
63
64
65
66-68
69
6A
6B
6C-6E
6F
70
71
72
73
74
75
76
77
78
79
7A
7B
7C
7D
7E
7F
134
Speed
STILL
0.03
0.07
0.10
0.13
0.17
0.20
0.23
0.27
0.30
0.33
0.34
035
0.37
0.38
0.40
0.44
0.45
0.47
0.50
0.54
0.56
0.58
0.60
0.63
0.65
0.67
0.70
0.72
0.75
0.78
0.80
0.84
0.87
0.90
0.93
0.97
Data
80
81
82
83
84
85
86
87
88
89
8A
8B
8C
8D
8E
8F
90
91
92-94
95
96
97
98
99
9A
9B
9C
9D
9E-A0
A1
A2
A3
A4
A5
A6-A8
A9
AA
AB
AC-AE
AF
B0
B1
B2
B3
B4
B5
B6
B7
Speed
1.00
1.04
1.07
1.11
1.15
1.20
1.24
1.30
1.33
1.38
1.43
1.49
1.54
1.60
1.65
1.72
1.78
1.84
2.00
2.13
2.21
2.29
2.37
2.46
2.55
2.64
2.74
2.84
3.00
3.30
3.40
3.50
3.70
3.80
4.00
4.40
4.50
4.70
5.00
5.40
5.60
5.80
6.00
6.30
6.50
6.70
7.00
7.20
Data
B8
B9
BA
BB
BC
BD
BE
BF
C0-C1
C2
C3-C4
C5
C6
C7-C8
C9-CA
CB-CC
CD
CE-CF
D0-D1
D2
D3
D4-D5
D6
D7
D8
D9
DA-DB
DC
DD
DE
DF
E0
E1
E2
E3
E4
E5
E6
E7
E8
E9
EA
EB
EC
ED
EE
EF
F0
F1-FF
Speed
7.50
7.80
8.00
8.40
8.70
9.00
9.30
9.70
10.00
10.70
11.10
11.50
12.40
13.00
14.00
15.00
16.00
17.00
18.00
19.00
20.00
21.00
22.00
23.00
24.00
25.00
26.00
27.00
28.00
29.00
31.00
32.00
33.00
34.00
35.00
37.00
38.00
39.00
41.00
42.00
44.00
45.00
47.00
49.00
50.00
52.00
54.00
56.00
58.00
The bit assignment for each status data byte returned
with D7: Status Sense is as follows:
Status (No. 1): First byte
Bit-2
Bit-1
DEW
Tape Begin
Bit
Bit-7
Bit-6
Bit-5
Status
Undefined
Undefined
Short FF/REW
Bit-0
Tape End
Bit-4
REC Inhibit
Bit-3
Bit-2
Cassette Out
Servo Lock
Bit-1
Bit-0
Undefined
Error
Remarks
Always “1”
Always “0”
Short FF: Detects the beginning
of the tape and fast-forwards
the tape until Stand-By On is
engaged.
Short REW: Detects tape end
and rewinds the tape until
Stand-By On is engaged.
Indicates that a cassette with
no safety tab has been loaded
or that recording prohibition
has been selected with the
VCR’s memory switch.
No tape is loaded in the VCR.
During tape playback, both the
capstan and drum servo are
locked.
Always “0”
Shows that an invalid command
has been received. In this status,
a continuously transmitted
command will not be accepted.
To release the Error mode,
cancel the commands one byte
at a time with 41: Error Clear. Or
cancel all commands with 56:
Clear.
Condensation.
The tape winding start sensor
is detected.
The tape winding end sensor
is detected.
Status (No. 3) Third byte
Bit
Bit-7
Bit-8
Bit-6
Bit-5
Bit-4
Bit-3
Bit-2
Bit-1
Status
Unused
Unused
Unused
Unused
Unused
Unused
Unused
Search mode
Bit-0
Unused
Remarks
Always “0”
Always “0”
Always “0”
Always “0”
Always “0”
Always “0”
Always “0”
During CueUp/Preroll (only
when controlled from the RS232C)
Always “0”
Status (No. 4) Forth byte
Bit
Bit-7
Bit-6
Bit-5
Bit-4
Bit-3
Bit-2
Bit-1
Bit-0
Status
Play Mode
FF Mode
REW mode
Stop mode
Stand-by mode
Eject
REC mode
Unused
Remarks
Playback
Fast-forward
Rewind
Stop
Standby-Off
Tape is ejected
Record
Always “0”
Status (No. 2) Second byte
Bit
Bit-7
Status
EE
Bit-6
A1 EE Mode
Bit-5
Video Mute
Bit-4
Audio Mute
Bit-3
Warning
Speed Code-3
Speed Code-2
Speed Code-1
Speed Code-0
Remarks
Externally input video signals
are output.
Externally input audio (A1)
signals are output.
Video signals are muted
(returned from the DS microprocessor).
Audio signals are muted
(returned from the AUDIO
microprocessor.).
Shows that the VCR is in the
Auto-Off mode.
0 SPD 0.03 SPD 0.1 SPD 0.2 SPD 0.5
0.03
0.1
0.2
0.5
0
0
0
0
0
0
0
0
0
0
1
1
0
1
0
1
Status (No. 5) Fifth byte
Bit
Bit-7
Bit-6
Bit-5
Status
Pause mode
Unused
Shuttle Fwd
Bit-4
Shuttle Rev
Bit-3
Bit-2
Bit-1
Bit-0
Speed Code-3
Speed Code-2
Speed Code-1
Speed Code-0
Remarks
Pause
Always “0”
During Shuttle/Jog/Variable
search in the forward direction
During Shuttle/Jog/Variable
search in the reverse direction
Refer to the table below.
Refer to the table below.
Refer to the table below.
Refer to the table below.
SPD 1.0 SPD 2.0 SPD 4.0 SPD 6.0 SPD 10 SPD 17 SPD 32 SPD
1.0
2.0
4.0
6.0
10
17
32
0
0
0
0
1
1
1
1
1
1
1
1
0
0
0
0
0
0
1
1
0
0
1
1
0
1
0
1
0
1
0
1
135
13 RS-232C protocol
13 RS-232C protocol
13-4 Contents of the sense commands
13-5 Menu switch setting information
The bit assignment for status data each byte returned
with DD: JVC Status Sense is as follows:
JVC Status (No. 1) First byte
Bit
Bit-7
Bit-6
Bit-5
Bit-4
Bit-3
Bit-2
Bit-1
Bit-0
Status
Undefined
Undefined
Unused
Unused
Unused
Unused
JVC Table 1
Local
Remarks
Always “1”
Always “0”
Always “0”
Always “0”
Always “0”
Always “0”
JVC Table-1 is selected.
“Local” is selected.
JVC Status (No. 2) Second byte
Bit
Bit-7
Status
Generator
Bit-6
UB
Bit-5
TC
Bit-4
CTL
Bit-3
Bit-2
CTL
Interpolation
DF
Bit-1
LTC
Bit-0
Unused
Remarks
The TC generator is selected
for the current timer mode.
UB is selected for the current
timer mode.
TC is selected for the current
timer mode.
CTL is selected for the
current timer mode.
CTL
Interpolation
DF is selected for the current
timer mode.
LTC is selected for the
current timer mode.
Always “0”
JVC Status (No. 4) Forth byte
Bit
Bit-7
Status
TBC board
Bit-6
TC board
Bit-5
DA3 Ins Lamp
Bit-4
DA4 Ins Lamp
Bit-3
Auto mode
Bit-2
Bit-1
Bit-0
Unused
Unused
Unused
Remarks
The TBC board is installed.
Always “1”
The TC board is installed.
Always “1”
Audio-3 Insert editing mode
is selected.
Audio-4 Insert editing mode
is selected.
Auto Edit/Preview/Review
being executed.
Always “0”
Always “0”
Always “0”
The set value expresses the corresponding bit value.
2 bits or more are expressed as follows:
0
1
2
3
4
5
:
0
1
10
11
100
101
:
Bit-6
Status
REC Run
Regen
Bit-5
Bit-4
Ext
TC Ins Lamp
Bit-3
DA1 Ins Lamp
Bit-2
DA2 Ins Lamp
Bit-1
V Ins Lamp
Bit-0
Assem Lamp
136
Remarks
TC setting is 1: REC Run 0:
Free Run.
TC setting is 1: Regen 0:
Preset.
TC setting is 1: Ext 0: Int
TC Insert editing mode is
selected.
Audio-1 Insert editing mode
is selected.
Audio-2 Insert editing mode
is selected.
Video Insert editing mode is
selected.
Assemble editing mode is
selected.
7
D1
D2 328
6
5
No. Menu switch name
307 PAUSE/STILL/STP
TIME
6
5
4
3
2
002
1
0
003 003
Corresponding menu switches
No.
Menu switch name
Setting
002
OPERATION LOCK
OFF
0
ON
1
EXT
1
AUTO
3
OFF
0
ON
1
003
005
3
2
1
307 307 307
0
311 314
SERVO information/SYSTEM information-1
DATA0 01
7
D1 005
D2
4
Corresponding menu switches
SYNC SELECT
AUTO TRACKING
311 AUTO PLAY AT
TAPE BEGIN
314 PB/EE MODE
Set value
328 EDIT POINT CLEAR
SYSTEM information-4
DATA0 20
7
6
5
Setting
1 SEC
10 SEC
30 SEC
1 MIN
2 MIN
3 MIN
4 MIN
5 MIN
OFF
ON
STOP/FF/REW
STOP
DISABLE
ENABLE
4
D1 317 317
D2
323
3
2
Set value
0
1
2
3
4
5
6
7
0
1
0
1
0
1
1
0
320 320 320
320
Corresponding menu switches
SYSTEM information-2
DATA0 08
7
6
5
D1
D2
4
312
3
2
1
0
302 301 300
D95
Corresponding menu switches
No.
Menu switch name
Setting
D95
525/625
525
JVC Status (No. 3) Third byte
Bit
Bit-7
SYSTEM information-3
DATA0 10
300
DIRECT EJECT
301
DIRECT SEARCH
302
312
BACK SPACE
Set value
0
625
1
OFF
0
ON
1
OFF
0
ON
1
OFF
0
ON
1
AUTO REW AT
OFF
0
TAPE END
ON
1
No. Menu switch name Setting
Set value
317 9PIN DEVICE ID JVC D80
0
JVC D860/D92/D95
1
DVW-A500
2
USE SETTING (382–385)
3
320 PREROLL TIME
0SEC
0
:
:
15SEC
15
323 PREROLL END
STANDBY-ON
0
MODE
STILL
1
SYSTEM information-5
DATA0 40
7
6
5
4
D1
391
D2 390 390 390 390
3
395
2
1
0
393 393
Corresponding menu switches
No. Menu switch name
390 SWAP VTR SELECT
391 SYNCRONIZATION
393 SYNC GRADE
395 AUTO-EE
Setting
AUTO
:
TYPE-9
DISABLE
ENABLE
ACCURATE
+/-1FRAME
+/-2FRAME
ROUGH
RECORDER
ONLY
AUTO-EE
Set value
0
:
9
0
1
0
1
2
3
0
1
137
13 RS-232C protocol
13 RS-232C protocol
13-5 Menu switch setting information
SYSTEM information-6
DATA0 88
7
D1
D2 351
6
Corresponding menu switches
5
4
319 319
3
2
351
1
0
No.
Menu switch name
Setting
319
FF/REW MAX SPEED
X60
0
X32
1
X17
2
PREREAD
SYSTEM information-7
DATA0 89
7
6
5
Set value
VID OFF/AUD OFF
0
VID ON/AUD OFF
1
VID OFF/AUD ON
2
VID ON/AUD ON
3
4
D1
D2 359 359 359
3
2
1
Menu switch name
Setting
DIAG AT POWER ON
OFF
ON
1
359
JOG FEELING
(REMOTE)
TYPE-1
TYPE-2
TYPE-3
TYPE-4
TYPE-5
0
1
2
3
4
6
367
(525)
0
Set value
X32
0
X17
1
X6
3
EDIT
OFF
0
INTERRUPTION
4
3
D1
D2
2
1
Corresponding menu switches
Menu switch name
Setting
CONTROLLER
DEFAULT
0
SELECT
RM-450
1
CMX AEGIS
Setting
Set value
FREEZE
ON
1
008 CAP LOCK (525)
SWSEL
0
369 PARA-RUN
OFF
0
2FLD
1
ON
1
371 INPUT SELECT
OFF
0
373 MATCH FRAME
2
:
NOT DEFINED
7
7
6
5
4
D1 374 373 372 371
D2
386 381
3
2
1
0
369 368 367
340 340
Set value
0
1
4FLD
2
LOW/OFF
2
SWSEL
0
HIGH/OFF
3
2FLD
1
0
4FLD
2
BLACK
2
DISABLE
1
8FLD
3
MULTI BURST
4
OFF
0
009 CAP RE-LOCKING DIR. ACCELERATION
0
ON
1
DECELERATION
1
0
381 JOG FEELING
NORMAL
0
INSENSITIVE
1
386 MUTING AT NO TAPE
DISABLE
0
ENABLE
1
378 AUDIO EDIT
PRESET
CH4
No. Menu switch name Setting
104 CPN LEVEL/SETUP LOW/ON
(525)
HIGH/ON
1
1
377 AUDIO EDIT
PRESET
CH3
SYSTEM information-10
DATA0 09
0
ON
OFF
376 AUDIO EDIT
PRESET
CH2
3
2
1
112 112 111
ENABLE
ON
6
5
4
378 377 377
No. Menu switch name
375 AUDIO EDIT
PRESET
CH1
008p CAP LOCK (625)
7
6
5
4
D1
120 111 119
D2 104 104
111
Corresponding menu switches
No. Menu switch name
Set value
:
Corresponding menu switches
1
0
7
D1 378
D2
363 363 363
7
6
5
4
3
2
1
0
D1 387
009 008p 008p 008 008
D2 387 387p 387p 352
OFF
SYSTEM information-11
DATA0 91
0
VIDEO information-2
DATA0 0A
ON
352 AUD PREREAD
TIMING
387 CF FLAG REPLY
(525)
387p CF FLAG REPLY
(625)
3
2
1
0
376 376 375 375
Setting
Set value
NO DEFINITION
CH1
CH2
CH1 OR CH2
0
1
2
3
NO DEFINITION
CH1
CH2
CH1 OR CH2
0
1
2
3
NO DEFINITION
CH1
CH2
CH1 OR CH2
0
1
2
3
NO DEFINITION
CH1
CH2
CH1 OR CH2
0
1
2
3
112 ECC MODE
1
PULSE& BAR
5
NORMAL
0
1
NORMAL
0
NO CONCEAL
1
NO CORRECTION
2
4FLD
1
FRAME
0
2FLD OR 4FLD
2
OFF
3
8FLD
4FLD OR 8FLD
0
1
2FLD OR 4FLD
OR 8FLD
2
OFF
3
7
6
5
4
D1 383 383 383 383
D2 385 385 385 385
119 SLOW PICTURE
120 NO CTL MUTING
FIELD
1
OFF
0
ON
1
VIDEO information-3
DATA0 0B
7
6
5
D1 139 139 139
D2 140 140 140
3
2
1
0
382 382 382 382
384 384 384 384
Corresponding menu switches
No. Menu switch name
111 VD REC SIGNAL SEL. COLOR BAR
OFFSET
SYSTEM information-14
DATA0 92
Corresponding menu switches
5
SYSTEM information-12
DATA0 94
368 STARTING PIC
Set value
SYSTEM information-8
DATA0 90
138
SEARCH SPEED
374 MENU OPEN SAFETY
357
No.
363
340
Setting
SAFETY
0
357
No.
Menu switch name
372 P+R AT SWAP MODE
Corresponding menu switches
7
No.
351
Corresponding menu switches
351
13-5 Menu switch setting information
Setting
Set value
382 9 PIN ID (1ST)
0
:
F
0
:
15
383 9 PIN ID (2ND)
0
:
F
0
:
15
384 9 PIN ID (3RD)
0
:
F
0
:
15
385 9 PIN ID (4TH)
0
:
F
0
:
15
4
3
2
1
0
139
138 138
140 140 140 139 139
Corresponding menu switches
No. Menu switch name
Setting
138 EXTRA LINE REC
(525)
FIX
0
USER (COLOR)
1
USER (MONO)
Set value
2
139 EXTRA-L R1 SEL
(525)
10
11
:
22
273
:
284
00
01
:
12
18
:
29
140 EXTRA-L R2 SEL
(525)
10
11
:
22
273
:
284
00
01
:
12
18
:
29
139
13 RS-232C protocol
13 RS-232C protocol
13-5 Menu switch setting information
13-5 Menu switch setting information
VIDEO information-4
DATA0 0C
7
6
5
4
3
D1 144 144 144 144
D2 145 145 145 145 145
2
1
0
143 143
145 144 144
Corresponding menu switches
Setting
143 EXTRA LINE PB
(525)
273
18
:
:
284
29
10
0
:
:
22
12
273
18
:
:
284
D1
D2
149
No. Menu switch name
Setting
Set value
USER (COLOR)
1
00
:
12
273
:
284
00
:
12
18
:
29
142p EXTRA-L R4 SEL
(625)
6
:
22
319
:
335
623
00
:
16
18
:
34
35
147 EXTRA-L P4 SEL
(525)
00
:
12
273
:
284
00
:
12
18
:
29
USER (MONO)
140p EXTRA- LR2 SEL
(625)
29
VIDEO information-7
DATA0 0E
5
4
3
2
1
0
130
128
149 148 148 124
133
7
6
D1
D2
2
6
:
22
319
:
335
623
00
:
16
18
:
34
35
6
:
22
319
:
335
623
00
:
16
18
:
34
35
5
4
3
2
1
141 141 141 141 141
142 142 142 142 142
VIDEO information-9
DATA0 1C
0
141
142
No. Menu switch name
Setting
Set value
No. Menu switch name
Setting
Set value
124 CHROMA ROTE
CPS
0
CPN
1
141 EXTRA-L R3 SEL
(525)
OFF
0
11
:
22
273
:
284
01
:
12
18
:
29
142 EXTRA-L R4 SEL
(525)
11
:
22
273
:
284
01
:
12
18
:
29
128 PB EXTENSION LINE
ON
130 H BLANKING WIDTH WIDE
133 LINE SETUP (525)
148 IN VBLANK
YCOMB (525)
NARROW
1
OFF
0
ON
1
OFF
0
ON
1
OFF WITH21
2
149 VIDEO OUT SELECT NORMAL
140
1
0
VIDEO information-11
DATA0 1F
7
7
6
5
4
3
2
1
0
D1 144p 144p 144p 144p
143p 143p
D2 145p 145p 145p 145p 145p 145p 144p 144p
Corresponding menu switches
Corresponding menu switches
Corresponding menu switches
146 EXTRA-L P3 SEL
(525)
3
:
0
146
147
00
:
16
18
:
34
35
USER SETTING
12
5
4
3
2
1
146 146 146 146 146
147 147 147 147 147
6
:
22
319
:
335
623
1
:
6
141p EXTRA-L R3 SEL
(625)
AUTO
22
7
D1
D2
0
138p EXTRA LINE REC
145 EXTRA- L P2SEL
(525)
6
Corresponding menu switches
VIDEO information-10
DATA0 0F
FIX
0
139p EXTRA- LR1 SEL
(625)
D1
D2
5
4
3
2
1
0
141p 141p 141p 141p 141p 141p
142p 142p 142p 142p 142p 142p
Set value
MUTING
0
6
Setting
Setting
10
7
No. Menu switch name
No. Menu switch name
(625)
VIDEO information-8
DATA0 1E
Set value
Set value
144 EXTRA- L P1SEL
(525)
7
7
6
5
4
3
2
1
0
D1 139p 139p 139p 139p
138p 138p
D2 140p 140p 140p 140p 140p 140p 139p 139p
Corresponding menu switches
No. Menu switch name
VIDEO information-5
DATA0 0D
VIDEO information-6
DATA0 1B
Corresponding menu switches
No. Menu switch name
Setting
143p EXTRA LINE PB
(625)
MUTING
0
AUTO
1
USER SETTING
3
Set value
144p EXTRA-L P1 SEL
(625)
6
:
22
319
:
335
623
00
:
16
18
:
34
35
145p EXTRA-L P2 SEL
(625)
6
:
22
319
:
335
623
00
:
16
18
:
34
35
6
D1
D2
5
4
3
2
1
0
146p 146p 146p 146p 146p 146p
147p 147p 147p 147p 147p 147p
Corresponding menu switches
No. Menu switch name
Setting
Set value
146p EXTRA-L P3 SEL
(625)
6
:
22
319
:
335
623
00
:
16
18
:
34
35
147p EXTRA-L P4 SEL
(625)
6
:
22
319
:
335
623
00
:
16
18
:
34
35
0
SYNC DELAY
1
AROLL
2
141
13 RS-232C protocol
13 RS-232C protocol
13-5 Menu switch setting information
13-5 Menu switch setting information
VIDEO information-12
DATA0 1D
7
6
236 PRO 48K S.R.CONV.
5
4
D1
D2
3
2
1
0
1
237 EMBEDDED AUDIO
OFF
0
ON
1
261 AUD SEL AT SEARCH
LINEAR TRACK
0
DIGITAL TRACK
1
148p
Corresponding menu switches
No. Menu switch name
Setting
148p IN VBLANK
OFF
0
ON
1
YCOMB (625)
AUDIO information-2
DATA0 05
7
D1 214
D2 221
AUTO
ON
0
6
5
4
3
2
214
219 219 215 216
Set value
1
0
6
5
4
3
227 226 226 225
231 230 230 229
2
1
0
225 224 224
229 228 228
10M
2
MAS-1 BAL-2
/MAS-3 BAL-4
1
CH1/CH2/CH3/CH4
0
MAS-1 BAL-2
/MAS-3 BAL-4
1
CH1/CH2
0
CH3/CH4
1
CH1+3/CH2+4
2
MUTING OFF
0
MUTING ON
1
226 AUDIO IN LEVEL
CH3
227 AUDIO IN LEVEL
CH4
228 AUDIO OUT LEVEL
AUDIO information-3
DATA0 06
7
D1 233
D2
CH1
6
5
4
3
2
1
0
233 232 232 261 223 222 222
237 236
Corresponding menu switches
No. Menu switch name
Setting
222 MONITOR MIX
AVERAGE
MODE
223 CH3/4 OUT SEL
AT 2CH
232 AUDIO MON LEVEL
LCH
233 AUDIO MON LEVEL
RCH
142
Set value
0
RMS
1
ADDITION
2
MUTING
0
CH1/2
1
-6DB
0
0DB
1
4DB
2
-6DB
0
0DB
1
4DB
2
229 AUDIO OUT LEVEL
CH2
230 AUDIO OUT LEVEL
CH3
231 AUDIO OUT LEVEL
CH4
0
1
OFF
0
ON
1
251 CH3/4 SOURCE SEL. CH3pSW/CH4pSW
-6DB
0
0DB
1
4DB
2
-20DB
3
-6DB
0
0DB
1
4DB
2
-20DB
3
-6DB
0
0DB
1
4DB
2
-20DB
3
-6DB
0
0DB
1
4DB
2
-6DB
0
0DB
1
4DB
2
AUDIO information-6
DATA0 30
7
6
D1 257
D2
5
4
3
256 255 254 253
2
TIME CODE information-2
DATA0 81
7
1
6
5
D1
D2
0
1
3
CH2
NORMAL
NOISE REDUCE
0DB
-20DB
1+3/2+4
MUTING
Set value
3
1
221 SEARCH PB AT
248 AUD DIG I/F
Setting
CH3pCH1/CH4pCH2
5M
219 SEARCH REC CH
No. Menu switch name
0
2
225 AUDIO IN LEVEL
410 AUTO REGEN MODE
248 247
Corresponding menu switches
-6DB
4DB
TC&UB
0
1
0
0
1
2
224 AUDIO IN LEVEL
CH1
2
CH3pCH1/CH4pSW
OFF
Set value
3
CH3pSW/CH4pCH2
Setting
214 PB V.FADE
MODE1
251
4
Set value
No. Menu switch name
Setting
216 AUD PB VOLUME
403 REGEN MODE
5
ASYNC IN
No. Menu switch name
MODE1
D1
D2 251
6
Corresponding menu switches
Corresponding menu switches
215 AUD REC VOLUME CH1/CH2/CH3/CH4
7
247 DIG AUD AT
AUDIO information-4
DATA0 07
7
D1 227
D2 231
AUDIO information-5
DATA0 03
0
TC
1
UB
2
ASM&INS
0
ASM
1
INS
2
OFF
3
4
409
3
2
1
0
Corresponding menu switches
No. Menu switch name
Setting
409 EXT REGEN
LTC
0
VITC
1
Set value
0
TIME CODE information-3
DATA0 79
Corresponding menu switches
7
D1 451
D2
6
5
457
4
3
2
1
0
452 451 450
No. Menu switch name
Setting
253 CH1 REC SIGNAL
SILENCE
0
1 kHz SINE
1
No. Menu switch name
Setting
SILENCE
0
450 SUB TC (VITC) REC
OFF
0
1 kHz SINE
1
ON
1
SEL.
254 CH2 REC SIGNAL
SEL.
255 CH3 REC SIGNAL
SEL.
256 CH4 REC SIGNAL
SEL.
Set value
SILENCE
0
1 kHz SINE
1
SILENCE
0
1 kHz SINE
1
257 AUDIO REF. SIGNAL -20 dB
LEV.
Corresponding menu switches
451 VITC OUT SELECT
452 SEARCH LTC
0
-18 dB
1
457 UB PRESET AUTO
Set value
SUB TC
0
TC
1
OFF
2
OFF
0
ON
1
OFF
0
ON
1
TIME CODE information-1
DATA0 80
7
6
5
4
3
2
1
0
D1 401 401 401 401 400 400 400 400
D2 410 410
403 403 402 402
-6DB
0
0DB
1
4DB
2
-6DB
0
No. Menu switch name
0DB
1
400 VITC LINE-1 SELECT
4DB
2
Corresponding menu switches
(525)
401 VITC LINE-2 SELECT
(525)
402 CTL DF SELECT
(525)
Setting
10
Set value
0
:
:
20
10
10
0
:
:
20
10
TCG SETTING
0
NON DROP
1
DROP
2
143
14 TROUBLESHOOTING
13 RS-232C protocol
13-5 Menu switch setting information
TIME CODE information-4
DATA0 77
7
6
5
4
3
2
1
0
D1 401p 401p 401p 401p 400p 400p 400p 400p
D2
Corresponding menu switches
No. Menu switch name
Set value
7
:
22
0
:
15
7
:
22
0
:
15
401p VITC LINE-2 SEL
(625)
TIME CODE information-5
DATA0 78
7
6
5
D1
D2
ON SCREEN information-2
DATA0 83
7
D1 504
D2
6
5
4
3
504 513 512 504
No. Menu switch name
Setting
504 INFORMATION
TIME
SELECT
4
3
421 421
2
1
Setting
OFF
0
ON
1
AUTO
2
Set value
502 CHARA V POSITION
505 REMAIN ENABLE
Setting
0
Set value
:
:
6
0
0
:
:
11
11
TIME + SUBTC
+ MODE
4
Warning messages on
the on-screen display
CONDITION
AUTO OFF
WARNING 01 1
H
M
S
F
OFF
0
ON
1
As this unit uses a microcomputer, it may not
function correctly due to noise from outside or
interference noise. In this case, unplug the power
cord and plug it again. Then, check the operation.
7
D1
D2 620
6
5
4
3
2
1
LAMP FAILURE
Warning
code
620
Corresponding menu switches
Setting
6
5
OFF
0
3TIMES
1
5TIMES
2
10TIMES
3
4
On-screen display
Warning code information
Behavior and actions to be taken
0A
FAN FAILURE
The power turns OFF after
about 9 minutes.
Turn the [POWER] switch OFF. Wait for at
least 5 minutes, then turn the power ON
again.
If the warning indication is displayed again,
consult your local JVC dealer.
01
1
(AUTO OFF)
LAMP FAILURE
Tape sensor LED broken.
Behavior: Stops, with no operation possible.
Action: Turn the power off and then on.
02
1
CONDENSATION ON
DRUM
Condensation on drums.
Behavior: Cassette ejected and drum begins
to rotate. When condensation is
eliminated, the indicator goes out
and cassette can be loaded.
Action: Leave the power ON and wait until
the waraning message goes out.
06
1
INVALID ERROR
S-VHS/VHS cassette in use. Behavior: Cassette ejected.
Action: Use Digital-S cassette tape.
08
1
(AUTO OFF)
SUP TENSION
FAILURE
Tape tension abnormal.
Behavior: Stops, with no operation possible.
Action: Turn the power off and then on.
32
32
FAILURE LOADING
Tape loading not possible.
Behavior: Cassette ejected.
Action: Load the cassette again.
FAILURE UNLOADING
Tape unloading not possible.
Behavior: Stops, with no operation possible.
Action: Turn the power off and then on.
Set value
TBC information-3
DATA0 86
7
3
2
D1
D2
Sub code
0
1
0
601 601
Corresponding menu switches
No. Menu switch name
Setting
601 V BLANK MASK
OFF
0
Set value
DISABLE
0
ON
1
ENABLE
1
ON WITH 0.5H
2
1~
2
33
1~
33
2
(AUTO OFF)
144
Warning messages on
the counter display
Main code
0
6
3
0
2
1
0
501 501 501
Corresponding menu switches
1
TIME + SUBTC
1
620 DUBBING LOOP
6
5
4
3
502 502 502 501
505
0
TIME + MODE
ON
No. Menu switch name
ON SCREEN information-1
DATA0 82
Set value
This machine features self-diagnostic circuitry which allows it to detect and report any malfunctions that may
occur. When a malfunction is detected, the cause will be shown on the monitor display and on the VCR’s counter
display. The warning code system consists of a main code (the code number) and a sub code (verbal description), e.g. 02 1 CONDENSATION ON DRUM. The front panel [AUTO OFF] indicator will normally be illuminated.
* When the [AUTO OFF] indicator is illuminated, the unit is no longer operable. The [AUTO OFF] indicator can be
canceled by turning the power off and on again. If the indicator remains lit even after turning the power off and ←
on, malfunctions are possible. Consult your local JVC dealer.
OFF
TBC information-1
DATA0 84
No. Menu switch name
501 CHARA H POSITION
0
MESSAGE
0
421 TCG CF FLAG
No. Menu switch name
1
512 MUTING/ALARM
513 EDIT ON SCREEN
Corresponding menu switches
7
D1 502
D2
2
Corresponding menu switches
Setting
400p VITC LINE-1 SEL
(625)
14-1 WARNINGS WITH INDICATORS
Refer to “1.8 WARNING DETECTION CIRCUIT” on page 1.12 of the service manual.
145
14 TROUBLESHOOTING
14 TROUBLESHOOTING
14-1 WARNINGS WITH INDICATORS
14-2 TROUBLES NOT TO BE WARNED BY INDICATORS
Warning
code
On-screen display
Warningcode information
Behavior and actions to be taken
41 1
(AUTO OFF)
CASSETTE EJECT
FAILURE
Cassette does not come
out in Eject.
Behavior: Stops, with no operation possible.
Action:
Turn the power off and then on.
56 1~
56 9
TAPE DEFECTIVE
Tape defect.
Tape loose
Behavior: Cassette ejected.
Action:
If no abnormality is found in tape,
reload the cassette.
57 1~
57 2
END LEADER
DETECTION
Tape end sensor abnormal.
Behavior: Tape is rewound. If tape end is still
detected 3 seconds later, cassette
is ejected.
Action:
Reload the cassette.
58 1~
58 2
BEGIN LEADER
DETECTION
Tape beginning sensor
abnormal.
Behavior: Tape is fast-forwarded. If tape
begin is still detected 3 seconds
later, cassette is ejected.
Action:
Reload the cassette.
70 1
(AUTO OFF)
DRUM MOTOR
FAILURE
Drum stops motion.
Behavior: Stops, with no operation possible.
Action:
Turn the power off and then on.
71 1
(AUTO OFF)
CAPSTAN MOTOR
FAILURE
Capstan stops its motion.
Behavior: Stops, with no operation possible.
Action:
Turn the power off and then on.
72 1~
72 8
(AUTO OFF)
SUP REEL MOTOR
FAILURE
Supply reel motor motion
abnormal.
Behavior: Stops, with no operation possible.
Action:
Turn the power off and then on.
73 1~
73 8
(AUTO OFF)
TU REEL MOTOR
FAILURE
Takeup reel motor motion
abnormal.
Behavior: Stops, with no operation possible.
Action:
Turn the power off and then on.
If there are any abnormalities when the self-diagnostics run after the power is turned on, the following warning indications are
shown. Self-diagnostics are executed when menu switch No. 357 <DIAG AT POWER ON> is set to “ON”. The warning code is
shown in 6 digits. “ x ” mark shows unspecified.
80xxxx
CPU BUS FAILURE
Signal communication
between VCR’s microprocessors abnormal.
820100
820300
EEPROM FAILURE
EEPROM signal
communication in VCR
abnormal.
840100
SYSCON REF FAILURE
System controller reference
signal failure.
850100
M/S REF
FAILURE
Behavior: Only warning indicator is active.
Action: Consult your local JVC dealer.
860100
TC REF FAILURE
Time code reference failure.
MECHA(NO TAPE)
FAILURE
*1 Abnormal mechanical
operation.
DIAG WARNING 800400
Action
● Set [REMOTE] button to “LOCAL”.
● Set Menu switch No. 002 <OPERATION
LOCK> to “OFF”.
● Press [MENU] button to restore normal
mode.
Not recordable
● Protective slider on the cassette not at
“REC”
● Menu switch No. 351 <PRE READ> is set
to “VID-ON” or “AUD-ON”.
● Set cassette’s protective slider to “REC”.
Playback impossible
● S-VHS/VHS cassette in use
● S-VHS/VHS cassette not acceptable
On-screen display does
not come up
● Monitor not connected to [LINE2-SUPER
OUT]
● [ON SCREEN] switch on the sub panel set
to OFF.
● Connect monitor to [LINE2-SUPER OUT].
● Set [ON SCREEN] switch to ON.
Noise appears on part of
the playback picture.
● Set menu switch No. 351 <PRE READ> to
“OFF”.
● The heads are dirty.
● Clean the heads as instructed on page 11.
● Menu switch No. 005 <AUTO TRACKING>
set to “OFF”.
● Set menu switch No. 005 <AUTO TRACKING> to “ON”.
If noise appears when set to “ON”, set to
“OFF” and perform manual tracking
adjustment.
● Set menu switch No. 112 <ECC MODE> to
“NORMAL”.
● Menu switch No. 112 <ECC MODE> set to
“NO CONCEAL” or “NO CORRECTION”
Tape counter does not run. ● CTL counter does not run on a nonrecorded section of the tape as no CTL
signal is recorded on such a section.
● Counter is in Menu Switch Setting mode.
● Press [MENU] button and enter Tape
Counter mode.
Menu setting cannot be
changed.
● Menu switch No. 00D <MENU LOCK> is
set to “ON”.
● Set menu switch No. 00D <MENU LOCK>
to “OFF”.
Input signal cannot be
switched.
● Menu switch No. 371 <INPUT SELECT
SAFETY> is set to “ON”.
● Set menu switch No. 371 <INPUT SELECT SAFETY> to “OFF” or press the
signal switch while pressing the [SHIFT]
button.
● The optional SA-D95U digital interface
board is not installed.
● Install the SA-D95U. Otherwise, digital
signals cannot be selected.
The Menu Switch
Setting mode cannot be
engaged.
● Menu switch No. 374 <MENU OPEN
SAFETY> is set to “ON”.
● Set menu switch No. 374 <MENU OPEN
SAFETY> to “OFF” or press the [MENU]
button while pressing the [SHIFT] button.
During playback, the onscreen sub time code
indication does not
advance.
● Menu switch No. 450 <SUB TC (VITC)
REC> is set to “OFF” and menu switch No.
451 <VITC OUT SELECT> is set to “OFF”
or “TC”.
● Sub time code is not recorded normally.
● Set menu switch No. 450 <SUB TC (VITC)
REC> to “ON” or menu switch No. 451
<VITC OUT SELECT> to “SUB TC”.
CPU BUS FAILURE
(PUSH MENU KEY)
When the MENU button is pressed, the
indication goes out.
* Serial digital signals are used in conformity
with SMPTE259M for video and with AES/
EBU for audio.
*1 If the C02XXX indicator appears when the
power is turned ON it means that
condensation has occurred. Press the
[MENU] button until the indicator goes out.
Once the indicator has gone out, you can
operate the unit as usual.
146
Cause
● The [REMOTE] button is set to “Remote”.
● Menu switch No. 002 <OPERATION
LOCK > set to“ ON”
● Menu setting mode entered
On-screen display
Mechanical controller
reference signal failure.
C0xxxx
Symptoms
Not operable
147
15 APPENDIX
15-1 Operation Button Combinations
REC+PLAY
REC+HOLD
SET+HOLD
PLAY+FF
PLAY+REW
PLAY+ jog dial
PLAY+ search dial
SEARCH+ jog dial
STOP+STANDBY+
REW+FF
SET+RESET
SET+PREROLL
SHIFT+PREROLL
SHIFT+SEARCH
IN+ENTRY
OUT+ENTRY
IN+OUT
IN+CANCEL
OUT+CANCEL
IN+PREROLL
OUT+PREROLL
IN+jog dial
OUT+jog dial
IN+OUT+jog dial
SHIFT+IN+ENTRY
SHIFT+IN
SHIFT+IN+jog dial
SHIFT+IN+CANCEL
SHIFT+PREVIEW
SHIFT+AUTO EDIT
SHIFT+input video
signal or audio signal
select button
SHIFT+MENU
SHIFT+COUNTER
PLAYER+RECORDER
SHIFT+STANDBY
SHIFT+RECORDER
CANCEL+AUTO EDIT
Starts recording
Starts recording current
adjustment (top menu 00E)
Sets the top menu (00A — 00D)
(SET)
1.07x playback
0.93x playback
STILL — 2x playback
Variable playback (0.9x to 1.1x
playback)
Changes menu switch setting
value (menu switch setting)
Changes time code data (time
code setting)
Changes fixed time data (top
menu 00F)
Starts head cleaning
(No tape)
Registers counter memory point
Starts counter search
Starts fixed time cue up
Variable mode (Only the player
during swap editing)
Registers the IN point
Registers the OUT point
Duration display
Cancels the IN point
Cancels the OUT point
Cues the IN point
Cues the OUT point
Corrects the IN point
Corrects the OUT point
Corrects the duration
Registers the audio split point (IN
point)
Indicates the audio split point (IN
point)
Corrects the audio split point (IN
point)
Cancels the audio split point (IN
point)
Review
Last edit
Switches input signal when
menu switch No.371<INPUT
SELECT SAFETY> is set to “ON”.
Opens the menu switch setting
display when menu switch No.
374 <MENU OPEN SAFETY> is
set to “ON”.
ON/OFF switching of the counter
mode (user bits)
Recorder and player
simultaneous operation mode
Switches the edit on-screen
display ON/OFF
Activates the learn function
To cancel the player and recorder
edit points as well as the audio
split point:
SHIFT+REC
Open the<STRIPING REC MENU>
SHIFT+P. PLAY
P. PLAY+PLAY
P. PLAY+ jog dial
Program Playback mode
Starts the program playback.
Sets the program playback speed.
148
15 APPENDIX
15-2 OPTIONAL ACCESSORIES
SA-D95U Digital Interface Board
Install in the BR-D95U. This is used to input and
output video and audio digital signals.
Rack Mount Adapter SA-K67
SA-K67 is a rack mount adapter used to mount this
unit on a 19" EIA standard rack.
䡲 Mount rail & bracket
When mounting the unit on a rack with the SAK67, a mount rail and mount bracket are also
required.
Recommended models:
● Acuryde Co., Ltd. 2038-22 (mount rail)
BK2038 (bracket)
䡲 Installation
1. Secure the rack mount adapter to the VCR with 6
M4 screws.
2. Secure the slide rail inner member to the VCR with
6 M4 screws.
3. Mount the slide rail outer members on the front
and rear ends of the rack using the bracket.
4. Pull out the rails in the slide rail outer members
until you hear a click.
5. Fit the right and left slide rails on the VCR into the
pulled-out rails and push them in together. The
rails will be blocked by right and left springs, so
press the springs with your fingers and push the
VCR further in.
Precautions
● Do not use screws 8 mm or longer to secure the
rack mount adapter and slide rail inner members to
the VCR, as doing so may damage the printed
circuit boards inside the VCR.
● The handle on the rack mount adapter is only for
sliding the VCR in and out. Do not lift the VCR with
this handle.
● When installing the VCR in a rack, make sure there
is sufficient clearance above and below the VCR for
heat radiation.
● Some racks may require that you mount the slide
rails in a particular way. If you have any questions,
consult the rack dealer.
15-3 INDEX
A.
Adjustment ............................................................ 118
Assemble editing ................................................... 104
Audio emphasis ....................................................... 74
Audio input connectors ............................................ 19
Audio input switch ................................................... 24
Audio monitor switch ............................................... 14
Audio output connectors ......................................... 20
Audio recording level ............................................... 71
Audio split editing .................................................. 112
Audio V. fade function ............................................. 80
C.
Cassette tape .......................................................... 11
Channel condition indicator ..................................... 22
Color frame servo setting ...................................... 105
Condensation .......................................................... 10
Counter memory ..................................................... 86
Counter switch ........................................................ 21
D.
Diagnosis connector ................................................ 18
Direct access ........................................................... 33
Drop frame .............................................................. 98
Dubbing loop function ........................................... 122
E.
Editing system phase adjustment ......................... 117
Error conceal ........................................................... 80
Error correction ....................................................... 80
Extra line playback .................................................. 88
Extra line recording ................................................. 87
F.
Fine meter mode button .......................................... 13
Fixed time cue up function ...................................... 91
H.
Head cleaning ......................................................... 11
Hour meter .............................................................. 39
I.
Insert editing .......................................................... 104
L.
Last edit ................................................................. 113
M.
Main code .............................................................. 101
Masking setting ....................................................... 64
Match frame ............................................................ 58
Meter mode setting button ...................................... 15
Menu switch list ....................................................... 40
Menu switch setting ................................................. 28
Menu switch setting button ...................................... 15
Menu switch setting contents .................................. 43
Monitor output connector section ............................ 26
Motion memory function ........................................ 114
Mute/alarm condition display ................................... 24
Multi cue-up function ............................................... 92
N.
Non-drop frame ....................................................... 97
O.
Optional equipment ............................................... 148
Operation buttons.................................................... 12
Operation mode lock ............................................... 65
P.
Power switch ........................................................... 12
Pre-read function .................................................. 115
Preview switcher ................................................... 116
Program playback ................................................... 85
R.
Recording current adjustment ................................. 38
Reference sync signal ............................................. 25
Remote connector ................................................... 20
Remote button ......................................................... 14
Repeat playback ..................................................... 86
S.
Search/jog dial ........................................................ 13
Simplified playback speed adjustment function ...... 81
Simultaneous operation .......................................... 90
Slow play ................................................................. 24
Standby ON/OFF .................................................... 16
Striping rec function ................................................ 94
Subcarrier phase adjustment ................................ 121
Sub code ............................................................... 102
Sub time code display ............................................. 96
Sub time code playback ........................................ 102
Sub time code recording ....................................... 102
Swap editing ......................................................... 107
Synchronized running mode ................................... 81
T.
Time code display ................................................... 96
Time code generator setting buttons ...................... 18
Time code playback .............................................. 101
Time code presetting............................................... 97
Time code recording ............................................... 99
Time code setting switch section ............................ 18
Top menu ................................................................ 28
U.
User page................................................................ 34
User bit auto preset function ................................... 63
V.
Variable-motion editing ......................................... 113
Variable slow playback ........................................... 83
Video control connector .......................................... 27
Video input connectors ........................................... 25
Video input switch ................................................... 14
Video phase adjustment........................................ 118
W.
Warning ................................................................. 145
149
16 SPECIFICATIONS
16 SPECIFICATIONS
䢇 General
Tape speed
57.737 mm/sec. (525), 57.795 mm/s (625)
Signal format
NTSC standard (525), PAL standard (625)
Dimensions
429 mm (W) x 189 mm (H) x 569 mm (D) (16-15/16" x 7-1/2" x 22-7/16")
Weight
Approx. 22 kg (48.5 lbs.)
Power consumption
Approx. 1.7 A to 0.8 A
Power supply
AC 110 V to 240 V ~, 50 Hz/60 Hz
Record/play time (w/DS-104)
(Record/play) Approx. 104 min.
REW/FF time (w/DS-104)
Approx. 3 min.
Operating temperature
5˚C to 40˚C (41˚F to 104˚F)
Storage temperature
-20˚C to 60˚C (-4˚F to 140˚F)
Operating humidity
30% to 80%RH
DIMENSIONS
16
Type D-9 (Digital S)
12.65 mm
Unit: mm
569
Format
Tape width
Input
Output
Composite
1 Vp-p, 75 ohms, unbalanced
Component
Y: 1 Vp-p/R-Y, B-Y, 0.7 Vp-p, 75 ohms, unbalanced
Composite
1 Vp-p, 75 ohms, unbalanced
Component
Y: 1 Vp-p/R-Y, B-Y, 0.7 Vp-p, 75 ohms, unbalanced
External input
0.43 Vp-p (B.B) (525), 0.45 Vp-p (B.B) (625), 75 ohms, unbalanced
Sampling frequency
Quantization
Y: 13.5 MHz, R-Y/B-Y: 6.75 MHz
8 bits
Frequency range
Y: 0 - 5.75 MHz, +1.0 dB/-3.0 dB (analog component in/out)
R-Y/B-Y: 0 - 2.75 MHz, +1.0 dB/-3.0 dB
S/N
More than 50 dB (analog composite in/out)
More than 55 dB (analog component in/out)
More than 60 dB (digital in/analog component out)
429
VIDEO CASSETTE RECORDER
AUDIO
INPUT
CH1
CH2
CH3
CH4
CH2
CH3
CH4
LINE
CH2
CH3
CH4
CPN
174
15
BR-D95U
POWER
SIF
COMPONENT DIGITAL
ON
I
OFF
O
Variable Motion
CH2
R
P
dB OVER dB
0
+4
–10
+2
–20
–2
Input
Line input
-20/-6/0/+4 dBs, high impedance, balanced
Output
Line output
-6/0/+4 dBs, low impedance, balanced
Monitor output
-6/0/+4 dBs, low impedance, balanced
CH3
CH1
R
P
dB OVER dB
0
+4
–10
+2
0
–30
–40
–4
0
–20
–2
–30
–40
–4
–60
CH4/TRACKING
R
P
dB OVER dB
0
+4
–10
+2
0
–20
–2
–30
–40
–4
–60
R
P
dB OVER dB
0
+4
–10
+2
0
–2
–4
–60
525
625
CTL TC UB DF SERVO CF GEN 16:9 AP
AUTO OFF P.READ V.VAR PB/EE REMOTE
CONDITION
COUNTER
RESET
VCON
REMOTE
MENU
SET
HOLD
PB
PB/EE
VAR
SEARCH
PLAYER RECORDER
UB
P.PLAY
–20
STILL
–30
–40
M
H
–60
ASSEM
VIDEO
DA1
S
DA2
DA3
F
DA4
EJECT
REC
PLAY
PAUSE/STILL
X1
X-1
PHONES
CH1
CH2
REC
CH3
CH4
TRACKING
IN
PULL FOR VARIABLE
Sampling frequency
VIDEO
INPUT
AUDIO INPUT / AUDIO MONITOR SELECT
AES/EBU CH1
L
ANALOG CH1
R
SDI
AUDIO
MONITOR
䢇 Audio signal
Headphone
22.5
䢇 Video signal
METER MODE
FINE
PULL
RELEASE
PLAY
ENTRY
OUT
CANCEL PREVIEW
TRACKING
SHIFT
REVIEW
INSERT
AUTO EDIT
TC
PREROLL
USER
TOP
VIDEO
AUDIO
STAND BY
REW
STOP
FF
SERVO/SYS
TIME CODE
ON SCREEN
OTHERS
PULL
RELEASE
REV
FWD
-∞ to -14 dBs, 8 ohms
48 kHz
Quantization
16 bits
No. of channels
4
Frequency response
20 Hz to 20 kHz
Dynamic range
85 dB or more
Wow & flutter
Below a measurable value
Design and specifications subject to change without notice.
䢇 Time code
LTC input
0 ± 6 dBs, high impedance, balanced
LTC output
0 ± 3 dBs, low impedance, balanced
䢇 Accessories
Power cable (A Type: 125 V, 7 A / C Type: 250 V, 10 A)
Repeat Tye x 1
䢇 When the optional SA-D95U is installed
Serial video/audio input
Conforming to SMPTE259M/CCIR656-III
Serial video/audio output
Conforming to SMPTE259M/CCIR656-III, 800 mVp-p ± 10%
Digital audio input
1 Vp-p, 75 ohms, unbalanced, conforms to AES/EBU standard
Digital audio output
1 Vp-p/3 Vp-p or more (switchable with built-in switch), 75 ohms, unbalanced,
conforms to AES/EBU standard
Design and specifications subject to change without notice.
150
151