1
mmJENN.AIR
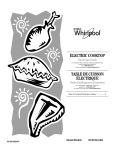
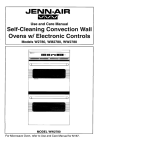
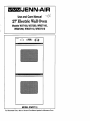
Use and Care Manual
27' Electric
- -DI
Wall Oven
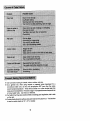
Models W27100, W27200, WM27160,
WM27260, WW27110, WW27210
_b,!_!!_!_!_ t _!!_t _<=<_
_t<i _i_i_i___i_i _ii<i_ii_i
.............
i-
i
.........
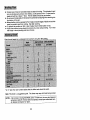
MODEL WW27110
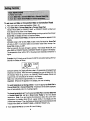
For Microwave Oven, refer to Use and Care Manual packed in Microwave Oven,
Congratulations on your choice of a Jenn-Air wall oven. Your Jenn-Air
convection oven combines the best of four cooking methods: conventional
baking or roasting, convection baking, convection roasting and broiling in a
self-cleaning oven. (Note: OnlyModelsW27200,WM27260andWW27210
have the convection option.)
The Jenn-Air convection oven is actually a conventional oven that circulates
heated air within the oven. As both bake and broil heating elements cycle on
and off with the thermostat, a fan keeps the heated air circulating around the
food. The constantly recirculating heated air in the convection oven strips
away the _ayerof cooler air that surrounds the food. Consequently, many
foods cook more quickly. Evenly distributed heat makes multiple rack
cooking possible. Convection roasted meats retain their natural flavor and
juiciness with less shrinkage than conventional roasting.
In addition to the many exclusive benefits of convection cooking, your JennAir oven is also a fine full featured conventional bake and broil oven. You can
cook your "old favorite" recipes as you have in the past. The conventional
bake oven also gives you the flexibility of preparing various foods when
convection cooking may not be as beneficial, as when cooking foods in
covered casseroles or clay pots. The broil element is convenient for top
browning and oven broiling of foods.
Before you begin cooking with your new oven, please take a few minutes to
read and become familiar with the instructions in this book. On the following
pages you will find a wealth of information regarding all aspects of using your
new oven. By following the instructions carefully, you will be able to fully
enjoy and properly maintain your oven and achieve excellent results with the
food you prepare.
Should you have any questions about using your Jenn-Air oven, write to us.
Be sure to provide the model number.
Jeflfl-Air Customer Assistance
c/o Maytag Customer Service
P,O, Box 2370
Cleveland, TN 37320-2370
Baking
Baking Chart ...................................................................................... 17
Causes of Cake Failure ..................................................................... 18
Convect Baking ........................................................................... 18-19
Convect Cooking on Multiple Racks ................................................. 19
General Recommendations ............................................................... 17
Before You Call for Service .............................................................. 34-35
Broiling
Broiling Chart ..................................................................................... 25
Broiling Tips ....................................................................................... 25
To Broil .............................................................................................. 24
Caring for Your Oven
Adjust Oven Temperature ........................................................... 32-33
Cleaning Other Surfaces ................................................................... 31
Oven Light Bulb Replacement ........................................................... 31
Cleaning
Cleaning the Lower Oven (Models WW27110 & WW27210 Only) ...29
Self-Cleaning Process ................................................................. 26-30
Clock Controls
Clock ControlledBaking and Roasting ........................................ 13-15
Time of Day Clock............................................................................. 11
Timer ................................................................................................. 12
Oven Operation
Oven Control Panel ......................................................................... 6-7
Rack Positions..................................................................................... 9
Setting Controls................................................................................... 8
Oven Operation (Models WW27110 & WW27210 Lower Oven Only)
Oven Control Panel ........................................................................... 10
Setting Controls................................................................................. 10
Roasting
ConventionalRoasting Recommendations ....................................... 20
Convect Roasting ........................................................................ 22-23
Frozen Convenience Foods .............................................................. 23
General Roasting Recommendations ............................................... 20
Roasting Chart .................................................................................. 21
Safety Precautions............................................................................... 4-5
Read before operating your oven
All appliances - regardless of the manufacturer - have the potential through
improper or careless use to create safety problems. Therefore the following
safety precautions should be observed:
1.
2.
3.
4.
5.
6.
7.
8.
9.
10.
11.
12.
13.
14.
15.
16.
Be sure your appliance is properly installed and grounded by a qualified
technician.
Never use your appliance for warming or heating the room.
Children should not be left alone or unattended in area where appliance
is in use. They should never be allowed to sit or stand on any part of the
appliance.
Wear proper apparel. Loose-fitting or hanging garments should never be
worn while using the appliance.
Do not repair or replace any part of the appliance unless specifically
recommended in this manual. All other servicingshould be referredto an
authorized Jenn-Air Service Contractor.
Flammable materials should not be stored in an oven.
Do not use water on grease fires. Smother fire or flame or use dry
chemical or foam-type extinguisher.
Use only dry pothofders. Moist or damp potholdem on hot surfaces may
result in burns from steam. Do not let potholder touch hot heating
elements. Do not use a towel or other bulky cloth.
Use care when opening oven door. Let hot air or steam escape before
removing or replacing food.
Do not heat unopened food containers. Build-up of pressure may cause
container to burst and result in injury.
Keep oven vent ducts unobstructed.
Alwaysplaceovenrackaindesiredlocationwbileoveniscool.
Ifrackmust
be moved while oven is hot, do not let potholder contact hot heating
element in oven.
Do not clean door gasket. The door gasket is essentialfor a good seal.
Care should be taken not to rub, damage, or move the gasket.
Do not use oven cleaners in a self-cleaning oven. No commercial oven
cleaner or oven liner protective coating of any kind should be used in or
around any part of the oven.
Clean only parts listed in this manual.
CAUTION: BEFORE SELF-CLEANING THE OVEN, REMOVE FOOD,
BROILER PAN AND OTHER UTENSILS.
4
17.
18.
19.
20.
21.
Listenforfan. Afan noiseshouldbe heardduringthebake, convectbake,
convect roast, broil and cleaning cycles. If not, call a serviceman.
DO NOTTOUCH HEATING ELEMENTS OR INTERIOR SURFACES OF
OVEN. Heating elements may be hot even though they are dark in color.
Interior surfaces of any oven become hot enough to cause burns. During
and after use, do not touch, or let clothing or other flammable materials
contact heating elements or interior surfaces of oven until they have had
sufficient time to cool. Other surfaces of the appliance may become hot
enough to cause burns-among these surfaces are: oven vent openings
and surfaces nearthese openings, oven doors, windowsof oven doors.
PREPARED FOOD WARNING: Follow food manufacturer's instructions.
If a plasticfrozen food container and/or its film cover distorts, warps or is
otherwisedamaged during cooking, immediately discard the food and its
container. The food could be contaminated.
This appliance has been tested for safe performance using conventional
cookware. Do not useany devices or accessories that are not specificatly
recommended in this manual. Do not use add-on convection systems.
The use of devices or accessories that are not expressly recommended
in this manual could create serious safety hazards, result in performance
problems, and reduce the life of the components of the appliance.
Do not allow aluminum foil to contact heating element.
IMPORTANT
SAFETY
NOTICE
AND WARNING
The California Safe Drinking Water and Toxic Enforcement Act of 1986
(Proposition 65) requires the Governor of California to publish a list of
substances known to the State of California to cause cancer or reproductive
harm, and requires businesses to warn customers of potential exposures to
such substances. Users of this appliance are hereby warned that when the
oven is engaged in the self-clean cycle, there may be some low level exposure
to some of the listed substances, including Carbon Monoxide. Exposure to
these substances can be minimized by properly venting the oven to the
outdoors during the self-clean cycle.
- SAVE THESE
INSTRUCTIONS
5
-
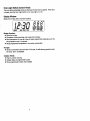
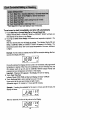
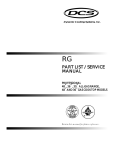
The control panel is designed for ease in programming. The Display Window features
Indicator Words which will flash to prompt you for the next step.
To program
1, Touch the function pad to give command desired.
2, Touch Up or Down Arrow Pad(s) to enter time or temperature.
Note: Four seconds after selecting a time or t_mperature, the time or temperature will
automatically be entered. If more than fifteen seconds elapse between touching a pad
and touching Up or Down Arrow Pad(a), the control is not set and Display will return
to previous Display.
o
ug._
IF
@
Use for conventional baking or roasting.
Use for top browning or oven broiling.
Use to set self-cleaning process.
Use for clock controlled cooking.
Use for clock controlled cooking and cleaning when a delayed start
is desired.
Use to set time of day.
Use to signal expiration of a time period up to 11 hours and 55
minutes.
_i
Use for Convection Baking.
Use for Convection Roasting.
Cancels all programming except Timer and Clock.
Use to enter time or temperature.
6
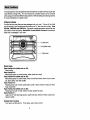
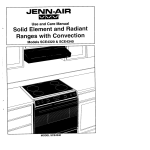
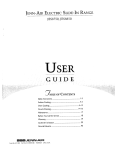
Oven Light Switch
(Control
Panel)
The oven light automatically comes on whenever the oven door is opened. When door
Js closed, push the Oven Light Switch to turn oven light on or off.
Display
Window
Shows time of day, timer, and oven functions.
I
CLEAN
CO
STOP
Display Numbers:
• Show time of day.
• Countdown of time remaining when using time functions.
• Show temperature of oven as it rises to reach programmed temperature and the
set temperature once it is reached.
• Recall programmed temperature or time when commanded.
Prompts:
• Serve as a reminder to shut oven door, if it is open, for self-cleaning operation when
the word, "door", is displayed.
Indicator Words:
•
•
•
Flash to prompt next step.
Indicate status of programmed function.
Show programmed function when recalled.
7
To set oven on Bake or Convection
Bake or Convection
Roast
1. Place oven reckson properrack positions.(See p. 9.)
2. Touch Bake Pad or Convect Bake Pad or Convect Roast Pad.
IndicatorWords BAKE or CONVECT BAKE or CONVECT ROAST will flash and
three dasheswill be shownin the Display.
Note: If morethanfifteen secondselapse betweentouchinga pad andtouchingan
Arrow Pad, the Displaywill returnto previousDisplay.
3. Touch Up or Down Arrow Pad(a) until desiredoven temperatureappearsin the
Display.
(Allowablerangeis 100° to 550°.) Note: In bake mode,firsttap of an Arrow Pad
will give you 350°, In convectionbake and convectionroast mode, firsttap of an
Arrow Pad willgive you 3250.
Afterfour seconds,the oven will beginto preheat. The indicatorWords ON, and
eitherBAKEor CONVECT BAKEor CONVECT ROAST willappear inthe Display.
The temperatureshown will be t O0° or the actua_oven temperaturewhichever is
higher.
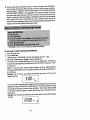
Example: If at 10 o'clock you set the oven for 350°for convectionbaking, after four
secondsthe Displaywill show:
'o:1
Duringthe preheat,the Displaywillshow a rise in 5° incrementsuntilprogrammed
temperatureisreached, Whenthe oven ispreheated,the ovenwill beep once,the
ON IndicatorWord will go off and the CONVECT BAKE indicatorWords and
programmedoven temperaturewill remainin the Display.
Note: Oven willpreheat for approximately7 to 11 minutes.
Important: Whenever ON appears in the Display,the oven is heating.
To recall temperature sat during preheat: Touch the appropriateBake Pad or
Convect Bake Pad or Convect Roast Pad, Ternpereturewill be brieflydisplayed,
then will automaticallyreturnto on-goingprogram.
To change temperature set: Touch appropriateBake Pad or Convect Bake Pad
or Convect Roast Pad and Up or Down Arrow Pad(s) for the new desired
temperature. Note: If you are loweringthe temperaturebelowthe current oven
temperature, the IndicatorWord ON will appear briefly in the Display and the
preheatbeepwillsound.Then, theDisplaywillshow programmedtemperatureand
IndicatorWord BAKE or CONVECT BAKE or CONVECT ROAST only.
4. Touch Cancel Off Pad to turn oven off at end of baking,
8
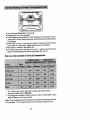
The rackpositionsnotedare generallyrecommendedfor thebest browningresultsand
mostefficientcookingtimes. For manyfood items, excellentresultscan be achieved
whenusingonaofsevera/differentrackpositions.
Refertobakingand reastingsections
for recommendationsfor specificfoods.
Different Racks
One flat reckand one offsetreckare packagedwith your oven. The use of the offset
rack is denotedin the listbelowand the charts as an "o"after the rack number. Note
W27200, WM27260 and WW27210: Convectionmodelsreceiveda secondflat rack
tobe usedforthree reckbaking.Note WW27110 and WW27210 Owners: Anadditional
offsetrack is packagedin your oven.
4 (flat rack)
3o (offset rack)
1 (flat rack)
Rack Uses
Rack Position #4o (offset rack on #4):
Most broiling.
Rack Position #3:
Most baked goodson cookiesheets, cakes (sheetand layer).
Rack Position #3o (offset rack on #3):
Mostbaked goodson cookiesheets,frozenconveniencefoods,freshfruit pie,cream
pie, layer cakes, main dish souffle.
Rack Position #2:
Roastingsmallcuts of meat, cakes (tube, bundt or layer), frozen fruit pie, pie shell,
large casseroles.
Rack Position #20 (offset rack on #2):
Roastingsmall cutsof meat, loaves of bread, angelfood cake.
Rack Position #1:
Largecuts of meat and large poultry,angelfood cake, loavesof bread, custardpie,
dessert souffle.
Multiple Rack Cooking:
Two racks, use #2o and #4. Three racks,use #1 ,#3o, and #4.
9
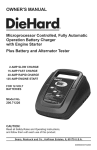
__
Controlsfor
UpperOven
/
Select
Knob
/__.
Temp
Knob
Oven IndicatorLight
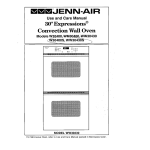
Model WW27110
Select Knob
•
This knob controls the oven operation. To operate the oven, turn to desired setting
and turn Temp Knob to desired setting.
The settings are:
Off
Bake
Broil
The oven will not operate when knob is on this setting. Keep knob on
this position when oven is not in use.
Use for baking or roasting.
Use for top browning or oven broiling of foods.
Temp Knob
• Use to set oven temperature. Be sure the indicator mark is in line with the exact
temperature desired. This knob is used with all oven operation settings noted on
the Select Knob.
Oven Indicator
•
Light
Indicates when oven is turned to an operating position. Light will glow until the
desired temperature is reached. It will cycle on and off as this temperature is
maintained during cooking.
1. Locate oven racks on proper rack positions.
2. Turn Temp Knob to desired temperature.
3. Turn Select Knob to Bake setting. When the Oven indicator Lightcycles off, the oven
is preheated to the selected temperature. Place the food in the oven. The Oven
Indicator Light will cycle on and off throughout the baking process. Preheat on/y
when necessary. Refer to baking and roasting sections as to when preheating is
recommended.
4. After baking, turn both Temp and Select knobs to Off position.
10
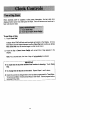
When electrical power is supplied or after power interruption,the last clock time
displayedbefore powerwas Interruptedwill flash. Time will advance and continueto
flash untilclockis reset.
To set time of day
1. Touch Clock Pad.
IndicatorWord TIME willflash and time digitswil_remainin the Display, (If more
than fifteen secondselapse betweentouchingClock Pad and touchingan Arrow
Pad, Clock Pad mustbe touched again in orderto set clock.)
2. Touch the Up or Down Arrow Pad(s) until correct time of day appears in the
Display.
Note: Four secondslater, the time of day will automaticallvbe entered,
IMPORTANT
• To recall time of day when another time function is showing: Touch Clock
Pad,
• To change time of day set on the clock: Repeat Steps 1 anci2 above.
• Clocktimecannot bechangedwhen ovenhas been programmedforTimed Bake,
Timed ConvectBake,TimedConvectRoast or Self-clean. Cancelprogrambefore
reprogrammingclock.
11
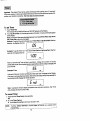
Important: This interval Timer can be usedto remind youwhen a period, up to 11 hoursand
55 minutes, expires. Itcan be usedindependentlyof any otheroven activityandcan be set while
another oven function isoperating. The Timer does not controlthe oven.
To set Timer
I. TouchTimer Pad.
The Indicator Word TIMER will flash and "0HR:00" appears in the Display.
2. Touch Up Arrow Pad until the desired number of minutes or hours and minutes appear
in the Display.
Note: If more than fifteen seconds elapse between touching theTimar Pad andUp Arrow
Pad, Timer Pad must be touched again.
Example: TosettheTImerforSminutes, touch:TimerPadandL
bArrowPad.Afterfour
seconds, the Display will show:
:05
r,_R
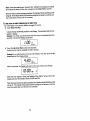
Example: To set the Timer for I hour, touch:Timer Pad and Up Arrow Pad. After four
seconds, the Displaywill show:
1"1:00
/1MER
After four seconds, the Timer will start to countdown. Display will countdown in minutes
untilthe lastminute.When the last minuteis reached there will be a beep and Displaywill
go to seconds.
I
Example: 55 sec.
I
:SS
At the end of time set, the timer will beep four times and "End" will appear in the Display.
If the timer is notcancelled (see below), there will be two beeps every thirty seconds for
five minutesand the Display wilt remain as below.
[ End
...
Note: Countdown will have display precedence over other time functions. After Timer
ends, Display will return to time of day.
To cancel Timer
1. Touch and hoidTImer Pad for three seconds.
OR
2. a. TouchTimer Pad and
b. Touch Down Arrow Pad untiltime is returned to "00".
NOTE:
programming.
Touching Cancel Off Pad to cancel beeps will cancel ALL selected oven
12
............. i_iiiii
;iiiii!ili
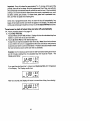
&6
you want bakingto start immediately.
To set oven to start immediately and shut off automatically
1. Touch Bake Pad or Convect Bake Pad or Convect Roaat Pad.
Indicator Words BAKE or CONVECT BAKE or CONVECT ROAST will flash end
three dashes willbe shownin the Display
2. Touch Up or Down Arrow Pad(s) until desiredoven temperatureappears in the
Display.
Afterfour secondsthe oven will begin to preheat. The IndicatorWords ON and
BAKE or CONVECT BAKE or CONVECT ROAST will appearin the Display. The
temperatureshownwill be 100° or the actualtemperatureof the oven,whichever
is higher.
Example: If at 10 o'clockyouset the ovenfor 3500for convectionbaking, afterfour
seoondsthe Displaywill show:
/0:00
Duringthe preheat,the Displaywill show a rise in 5° incrementsuntilprogrammed
temperatureis reached. When the oven is preheated,the oven willbeep once,the
ON indicator word will go off, and the CONVECT BAKE Indicator Words and
programmedoven temperature will remain in the Display.
Important: WheneverON appears in the Display,the oven is heating.
3. Touch Cook Time Pad.
indicatorWords COOK TIME will flesh and Displaywill show "OHR:00".
4. Touch Up Arrow Pad to enter cookinghours and minutes.
Hoursere to left of colonand minutesto rightof colon.
(Allowable range is f0 minutes to 1f hours end 55 minutes.)
Example: If cookingtime selectedfor the oven is 2 hours and 30 minutes,the
Displaywill show:
After four seconds,the time of day returns to the Display.
13
Important: Oven will preheat for approximately7 to 11 minutes.At the end of the
preheat,there willbe one beep. At end of programmedCookTime, oven will shut
offautomaticallyand retainedheat willcontinueto cookthe food. Clockcontrolled
cookingis not recommendedfor baked _temsthat requirea preheatedoven,such
as cakes,cookies,pies, breads. For these foods, place food in preheatedoven,
then use Timerto signalend of bakingtime.
At the end of programmedCook Time, the oven will shut off automatically,four
beeps willbe heard and the word"End"will appear in the Display.The beeps will
continueat one beep per minutefor one houror untiltheCancel Off Pad istouched.
To set oven to start at future time and shut off automatically
1-4. Followprecedingsteps1-4 on page 13.
5. Touch Stop Time Pad.
IndicatorWords STOP TIME willflash. Displaywillshowthe calculatedstoptime
based on currenttime of day and cook time.
6. Touch Up Arrow Pad to enter desiredstop time.
A stoptime canonlybe acceptedfor later in the day. Note: Since foodcontinues
to cook ifleft in the oven, it is suggestedthat the clockcontrolsbe used primarily
tostartthe ovenwhen no one isin thekitchen. Provisionsshouldbe madeto have
the food removed as soon as the cook time is completed.
Example: If at 10 o'clockyou set theoven for350° convectionbakingand 2 hours
and 30 minutescookingtime, the calculated stop time would be "12:30". The
Displaywould show:
,oo"
If you want the stoptime to be 1 o'clock,touchUp Arrow Pad until1:O0appears
in the Display. The Displaywould show:
/00"
After four seconds, the Displaywill returnto currenttime of day, thus showing:
j ooo 22°o.
14
At the end of the delayed period, the DELAY Indicator Word will go off, the ON
Indicator Word will appear and the oven will begin to heat. 100° or thecurrent oven
temperature, whichever is higher, will be shown. As the oven heats, the Display
will show a rise in increments of 5° until programmed temperature is reached.
At the end of programmed Cook Time, the oven will shut off automatically, four
beeps will be heard and "End" will appear in the Display. If oven is not cancelled,
"End" will remain in the Display and there will be one beep every minute for I hour.
IMPORTANT
• To recall time function programmed:
Touch the appropriate time pad.
• To cancel timed function only: Hold Cook Time Pad for four seconds. This will
only cancel cook time and stop time, not programmed bake mode.
•
If more than fifteen seconds elapse between touching a function pad and touchin
an Arrow Pad, the oven is not set and Display will return to previous Display.
15
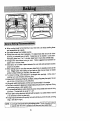
• When cookingfoods for the firsttime in your new oven, use recipe cookingtimes
and temperaturesas a guide.
• Use tested recipesfrom reliablesources.
• Preheatthe oven onlywhen necessary. For baked foods that rise and for richer
browning,a preheated oven is better. Casseroles can be started in a cold oven.
Preheatingtakes from 7 to 11 minutes;place food in oven after preheat beep.
• Arrangeoven racksbefore turningon oven. Followsuggestedrackpositionson
page 9 and in variouscharts.
• Allowabout Ito 11/2
inohesof spacebetweenthe oven side walls and pans to allow
properair circulation.
• When bakingfoods in morethan one pan, place them on oppositecornersof the
rack. Stagger pans when baking on two recksso that one pan does not shield
anotherunlessshieldingis intended.(See above left,)
• To conserveenergy, avoid frequent or prolongeddoor openings. At the end of
cooking,turn oven off before removingfood.
• Alwaystest for doneness(fingertip,toothpick,sidespullingaway frompan). Do not
rely on time or brownnessas only indicators.
• Use good qualitybaking pans and the size recommendedin the recipe.
• Dull,dark,enameledor glasspanswillgenerallyproducea brown,crispcrust.Shiny
metal pans producea light,golden crust.
• Forconventionalbaking,cookiesheet shouldbe withoutsides and made of shiny
aluminum. The best size to usa is 14" x 12".
• Frozenpies in shiny aluminumpans shouldbe baked on a cookiesheet on rack 2
or be removedto a dull or glasspan.
• Ifedge of piecrustbrownstoo quickly,fold a stripoffoilaroundrimof crust,covering
edge, (See above right.)
NOTE; to
A cooling
operate
fan
afterthe
willoperateduringallcookingmodes.
oven is turned off untilthe oven
The
has
fan
cooled
mayalsocontinue
down.
16
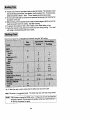
Note; For ConventionsJBake use the Bake Pad.
_
i
We
_d
......
* An "o" after a racknumber impliesthat the offsetrack shouldbe used.
** The timesgiven are based on specific brands of mixes or recipestested. Actual
timeswill dependon the ones you bake.
*** The ConvectBaketemperatureis 25°F lowerthan recommendedon package mix
or recipe.
17
• Use convectionbaking for breads, cakes, cookies,and pies.
• As a general rule, when using recipes or prepared mixes developed for a
oonventionatbake oven, set the oven temperature 25°F lower than the recipe
recommendedtemperature. Times will be similar to or a few minuteslessthan
reciperecommendedtimes. Thechartonpage17 comparestimes andtemperatures
of many baked foods. Use this as a reference.
• Forbetter browning,placecookie sheetsand bakingpans lengthwise,side to side
on the rack.
• Cookiesheetsshouldbewithoutsidesandmadeofshinyaluminum. The bestsize
to use for cookie sheets is 16" x 12"or smaller.
18
For best results,bakefoodson one rackat a time as describedinthis manual. However,
very good results can be obtained when baking quantities of foods on multiple racks.
Quantity cooking provides both time and energy savings.
Convec_ Bake is suggested for most multiple rack cooking, especially three rack
cooking, because the circulating heated air resultsin more even browning. For two rack
cooking, the conventional bake oven provides very good baking resultsespecially when
pans can be staggered, such as with layer cakes and fresh pies.
Many foods can be prepared on three racks at the same time. These are just a few
examples: cookies, cupcakes, rons, biscuits, muffins, pies, pizzas, appetizers, and
snack foods.
To obtain the best results in multiple rack cooking, follow these suggestions:
• Use temperature and times in this manual as a guidefor best results.
• Fortwo rackbaking, rackpositions#2o and 4 are bestfor mostbaked productsbut
positions#2 and 4 also provideacceptableresults.
• Forthree rack bakinguse positions#1, 3o and 4. One exceptionis pizza. (See p.
23.)
• Sincefoodson positions#1 and4 willusuallybedonebeforefoods on position#3o,
additionalcookingtime willbe needed for browningfoods on the middle rack. An
additionalminute is needed for thin foods such as cookies. For foods such as
biscuits,rolls,or muffins,allow1 to 2 more minutes. Frozenpiesand pizzas,which
shouldbe baked on a cookiesheet, need about2 to 4 more minutes.
• Staggersmall pans,such as layer cake pans, in the oven.
• Frozenpies in shinyaluminum pansshouldbe placed on cookiesheets and baked
on rack positions #1, 3o and 4.
• Cookie sheets should be placed lengthwise, side to side, in front of the fan for more
even browning.
• Oven mealsare recommended for energy conservation. Use rack positions #1 and
30 or #2o and 4 and Convect Roast.
19
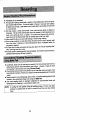
• Preheating is not necessary.
• Foropenpan roasting,placemeat or poultryonthe slotted portionof thetwo-piece
pan includedwiththe oven. Do not add water to the pan. Use open pan roasting
fortendercutsof meat. Lesstendercutsof meat need to be cookedby moistheat
in a coveredpan.
• For best results,a meat thermometeris the most accurate guide to degree of
doneness. The tip of the thermometershouldbe locatedin the thickestpart of a
roast,not touchingfat, bone, or gristle. For turkeys and large poultryproducts,
insertthe tip of the thermometer into the thickest part of the inner thigh.
• Place roastfat side up to allowself bastingof meat duringroasting.
• Since meats continueto cook after being removedfrom the oven, remove roast
from oven when it reaches an internaltemperatureabout 5 degrees below the
temperaturedesired.
• For lessloss ofjuices and easier carving,allowabout 15 minutes"standingtime"
after removingmeat from oven.
• ForbestresultsJnroastingpoultry,thawcompletely. Dueto the structureof poultry,
partiagythawed poultrywillcook unevenly.
• If preferr d, tendercuts of meat can be mastedin the conventionalbake oven by
following the general recommendationsgiven above. However, meats will roast
mor quicklyin the convectoven using Convect Roast.
• Conventionalbake is bestfor less tendercuts of meat that requirea longer,moist
heat methodof cooking.Followyourrecipefortimesandtemperaturesfor covered
meats.
• Meatscookedinovencookingbags,dutchovens,orcoveredmastingpansare best
cookedin the conventionalbake oven usingthe Bake Pad.
• Use meat roasting cherts in standard cookbooksfor recommendedtimes and
temperaturesfor masting in a conventionalbake oven.
NOTE; A coolingfan will operate during all cookingmodes. The fan may also I
contJnUedown,
to operate after the oven is turned off untilthe oven has cooled
2O
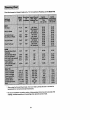
Chart time based on thawed meats only. For Conventional Roasting use the Bake Pad.
....
8
N,,,,
,s
s ;,
;
,s
_ ...............
;;
_
=s
=
.....
o,
s_
.......
...........................
_
s;i!
_.......
81
_,
g,:
N
.............
I_
......
,1
_,sN
* WhenusingtheConvectRoastrnede, thereisnoneedtoprehsattheovenortolowerthe
temperaturefromconventionalroasttemperatures.
** Notrecommendedforconvectioncooking, Mostprecookedhamshaveto becoveredwhile
roasting,thustherewouldbe notime savingswhenusingthe convectmode.
21
• Tender cuts of meat and poultrycan be roasted to a rich golden brown in the
convectionoven. Followgeneral recommendationsfor mastingand useConvect
Roast,
• Refer to convectionmeat roasting chart for recommendedcookingtemperature
and time, The chartcan serve as a guideto help plan meal serving time,
• Minutes per pound will vary accordingto the size, shape, quality, and initial
temperatureof meat as well as the electrical voltage in yourarea. Times are based
on refrigeratorcold meat.
• A large cut of meat will usuallyrequirefewer minutesper poundto roastthan a
smallercut of meat.
• Do not use a roastingpan with highsides; use pan providedwith oven.
• Do not cover meat. Allow the circulating hot air to surround the meat and seal in
the juices.
• Since the breast meat on a large turkey cooks more quicklythan the thigh area,
placea "foilcap" overthe breastarea afterdesiredbrownnessis reachedto prevent
overbrowning.(See above.)
• A stuffedturkeywill requirean extra.30 to 60 minutesdependingon size. Stuffing
shouldreach an internaltemperature of 165°F.
Convect Roasting: Frozen to Finish
Meats (exceptpoultry)may be roastedfrozen tofinish. Followthese guidelinesforthe
most satisfactoryresults.
• Use temperaturesfor roastingfreshmeats as recommendedby mostcookbooks.
Generally, most meats are roasted at 325°F. For best results do not use
temperaturesbelow 3O0°F,
• Usetimesforroastingfreshmeatsgiveninyourfavoritecookbooksasapproximate
guidesfor roastingfrozen meats. Roastingtimes will vary due to factorssuchas
coldnessof meat,size, quality,or cut. tngenera.t,roastingtimes for frozen tofinish
in the convection oven will be approximatelythe same as fresh to finish in a
conventionalbake oven.
• The guidelinesgivenfor roastingfresh meats in the convectionoven also applyto
roastingfrozen meats.
• Insert meat thermometermidwayduring the cookingprocess.
22
_vJ
• Use the Convect Roast Pad for best results.
• Preheating the oven is not necessary.
• Follow package recommendations for oven temperature, foil covering and use of
eeekie sheets. Cooking times will be similar. See chart below for some exceptions
and examples.
• Center foods in the oven. If more than one food item is being cooked or if foods are
being cooked on multiple racks, stagger foods for proper air circulation.
• Most foods are cooked on rack position #3o.
• For multiple rack cooking, use racks #f, 30 and 4. However, pizzas should be
placed on cookie sheets and cooked on rack position #20, 3 and 4.
Here are a few examples of times and temperatures
.......
...........................
...........
i_;!
_
i;
_0_
: :?
_;
!_
_'
........
.....................
....................
* An "o" after a rack number implies that the offset rack should be used.
** Conventional bake uses the Bake Pad.
*** The times given are based on specific brands of mixes or recipes tested.
times will depend on the ones you cook.
Actual
Note: Convect roasting times will be similar to the conventional times because the oven
is not preheated. The time savings comes from not having to preheat the oven.
23
1. Piece oven rack on the rack position suggested in the chart. (See p. 25,)
Distancefrom broilingelementdepends on foods being prepared. Rack position
4o (offsetreck in position#4) is usuallyrecommendedunless otherwisestated.
2. Touch Broil Pad.*
Indicator Word BROIL will flash and Display will show three dashes.
Note: If more than fifteen seconds elapses between touching Broil Pad and
touching Up or Down Arrow Pad(s), the oven is not set and Displaywill returnto
previousDisplay.
NOTE* - ModelWW27110 andWW27210 LowerOven- Steps2 &3- TurnSelectKnob
to BRO L sett ng and Temp Knobto 550°F,
3. Touch Up or Down Arrow Pad(s).*
The firsttouchof an Arrow Pad will enter "HI" in the Display.The oven has a
variablebroilfeaturewhichmeansthata lowertemperaturecanbe selected. Touch
Down Arrow Pad if a lowertemperatureis desired.
Use "HI" broilfor mostbroil operetions.Use variablebroil fordelicate and long-term
items.
Four secondsafter entedng "HI" or entering a temperature,the broilelementwill
comeon and the IndicatorWords BROIL and ON will remain in the Displayalong
with the selectedBroiltemperature, If the variablebroilfeature was selected,the
IndicatorWord ON willcyclewith the element.
Example: If at 10 o'clockyou set the oven for broil ("HI"), the Displeywill show:
I /0:00 .L
4. Place food on broilerpan providedwith oven. Broilelement will preheatin 2 to 3
minutes. After broilelement is red, place food in oven. Ov_endoqr MUST b_ left
0p_en_t brqil stopoosition.
5. Touch Cancel Off Pad to turn off oven when food is cooked.
24
• Tender cuts of meat or marinatedmeats are best for broiling.This includesrib and
loincutsof steak,groundbeef, ham steaks, poultrypiecesor fish. Forbestresults,
steaksshouldbe at least 1" thick. Thinnersteaks should be pan-broiled.
• Do not coverbroflergridwithfoilsfncethfspreventsfat drippingsfromdrainfnginto
the bottom of the pan.
• Beforebroiling,removeexcessfatfrommeatandseoroedgesoffat(donoteutinto
meat) to prevent meat from curling. Salt after cooking.
• To prevent dry surface on fish or lean meats, brush melted butter on top.
• Foodsthat requireturningshouldbe turned onlyonce duringbroiling, Turn meat
with tongs to avoid piercing and loss of juices.
Chart time is based on a preheated broil element using the "HI" setting.
*An "o"after the rack numberimpliesthat the offset rack shouldbe used.
Note: This chart is a suggestedguide. The times may vary withfood being cooked.
wi))cycleon andoff. Ifthefan doesnotoperate,contactyourauthorizedJennService
NOTE: Air
Afan
comesContractorfor
on duringthe repair.
BROILcycle. If it doesnot,the oven broilelement
25
• Tender cuts of meat or marinated meets are best for broiling. This includes rib and
loincuts of steak, ground beef, ham steaks, poultry pieces or fish. For beet results,
steeks should be at least 1" thick. Thinner steaks should be pan-broiled.
• Do not cover broiler grid with foil since this prevents fat drippings from draining into
the bottom of the pen.
• Before broiling, remove excess fat from meat and score edges of fat (do not cut into
meat) to prevent meat from cuding. SaJt after cooking.
• To prevent dry surface on fish or lean meats, brush melted butter on top.
• Foods that require turning should be turned only once during broiling. Turn meat
with tongs to avoid piercing and loss of juices.
*An "o" after the rack number implies that the offset rack should be used,
Note: This chart is a suggested guide. The times may vary with food being cooked.
NOTE;
A fan comes on dudng the BROIL cycle. If it does not, the oven broil element
will cycle on and off. If the fan does not operate, contact your authorized JennAir Service Contractor for repair.
25
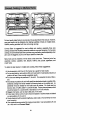
When the oven contrels are set to CLEAN, the oven heats to temperatures that ere
higher than those used for cooking. The high temperatures cause food soil to burn off
and substantially disappear. While this occurs, a device in the oven vent helps to
consume normal amountsof smoke. The oven is vented throughan openingunder the
control panel.
• Removethebroilerpan andanyother utensilsfrom the oven. These utensilscannot
withstandthe hightemperatures of the cleaning process.
• Clean spattersand spillsfromthoseareaswhichwill not becleaned duringthe selfcleaning process:
- centerfrontof ovenand doornear openingin door
- porcelainoven door liner (area outsidethe door
gasket).
- oven front frame.
Note: DO NOT CLEAN serial
oven front.
located
the
_
Togasket,
clean these areas, use hotplate
water and detergent,
on
_,
nonabrasivecleansers or soap filled steel wool pads.
Rinsethoroughly,beingcarefulnotto usean excessive
amountof waterthat would dampen the door gasket. Soil/eft in these areas will
be more difficu# to remove after the seIFcleaning process since the high beat will
bake on any soil that is present. DO NOT USE COMMERCIAL OVEN CLEANERS
TO CLEAN THESE AREAS.
• DO NOT ATTEMPTTO CLEAN,RUB, OR APPLYWATER TO GASKETON OVEN
DOOR. The gasket is essentialfor a good door seal. Rubbing or cleaning will
damage the gasket and may affect the seal,
• Wipe up excess grease and food spillovers which have not baked on the bottom of
the oven. Largeacoumulationsof soil can cause heavy smoke or fire in the oven
during the cleaning process. For ease of cleaning, the heating element can be lifted
slightly.
• Although smoke or fire in the oven is a normal occurrence and there is no safety
problem, there will be venting of excessive smoke and odor.
26
• The oven rackscan be cleanedin the oven. However,the oven rackswill discolor,
lose shininess,and becomedifficultto slide in and out if left in the oven duringthe
cleaning process, REMOVE RACKS FROM OVEN IF THIS DISCOLORATION
WILL BE OBJECTIONABLE. As a suggestion,do not leavethe racksin the oven
dudng each self-cleaningprocess if theydo not need to be oleaned since they will
discolorto a dullsilverafter one cleaning. Moderatelysoiledrackscan be cleaned
with a soapy S.O.S. pad or Seatch-Srite scour pad. 8tubbem stains need to be
removedinthe self-cleaningprocess.Be sureto readspecialtipson page 30 if oven
racksare cleaned dudng the self-cleaning proeass.
*Omit steps4 & 5 if you wish cleaning to begin immediately.
To set oven to start cleaning immediately
1, Close the oven door.
2. Touch Clean Pad.
IndicatorWords CLEAN TIME willflash and Display will show" HR : _ ".
3. Touch Up or Down Arrow Pad(a) to selectcleaning time.
The firsttouchofanArrow Pad will giveyou 3 hoursofcleaningtime. The cleaning
timecanbevarieddependingontheamountofsoil. Set"2:00"for lightsoilor "4:00"
for heavy soil.
Note: If more than fifteen seconds elapse between touching Clean Pad and
touchingan Arrow Pad, theoven isnotset andtime of daywill automaticallyreturn
to the Display.
Example: If at f0 o'clock you selected to self-clean your oven for 3 hours, the
Dis0,ayw,,,show
I 300
11NE
Four seconds after selectingdesiredcleaningtimethe Displaywill returnto timeof
dayandthe Ind[eatorWordsHR and TIME willgo off. The LOCKIndicatorWordand
thecoolingfan willcome on when the dooris latched. The IndicatorWord CLEAN
will remain and ON will appear and cycle withthe elementsto maintainthe clean
temperature.
Example: If at 10 o'clockyou selecteda 3 hourclean,afterfoursecondsthe Display
willshow:
I I0:00° ;
27
Note: Ifovendoorwas leftopen,the word"door"willflash inthe Displayand a signal
willcontinuouslybeep untilthe door is closed and the Clean Pad istouched.
Whenthe cleanfunctionhasbeen completed,the IndicatorWordsCLEAN and ON
willgo off. The IndicatorWordLOCKandthe coolingfanwillremainon untilthe oven
has cooleddown and the door has unlocked.
To set oven to start cleaning at e later time
1-3. Follow steps 1-3 in previoussectionon pages 27 and 28.
4. Touch Stop Time Pad.
IndicatorWords STOPTIME willflashin the Display.The calculatedstoptimewill
appearin Display.
Example: If at 10:00,you set the Clean timefor 3 hours,the calculatedstoptime
would be 1:00 and the Displaywouldshow:
I:00-.
'MeE
5, Touch the Up Arrow Pad to enter new stop time.
A stoptime can only be acceptedfor later in the day,
Example: If you wantthe stoptimeto be 4:30 instead of 1:00, then touchthe Up
Arrow Pad untilthe Disptayshows:
430 oatop
After four seconds,the Display will return to the Time of Day, thus showing:
[I0:00 u
.....
When the oven begins to clean, the IndicatorWord DELAY will go off and the
Displaywill show the IndicatorWords CLEAN and ON.
Whenthe cleanfunctionhas beencompleted,the IndicatorWordsCLEAN and ON
wiggo off. The IndicatorWord LOCK and the coolingfan will remain on untilthe
oven has cooled down and the door has unlocked.
28
To cancel self-clean
• Touch Cancel Off Pad.
• The ovendoorwillbe lockedwhilethe LOCKIndicatorWord remainsinthe Display.
Dependingon the lengthoftimethe oven hadbeen self-cleaning,it may take upto
45 minutesforthe oven tocooldown,the doorto unlockand coolingfanto turnoff,
IMPORTANT
• To recall cleaning time or stop time: Touchthe appropriatepad (Clean Pad
or Stop Time Pad).
• To ohange cleaning time or atop time before cleaning begins: Repeat the
steps on pages 27-28.
• Whenthe Clean Pad istouched,a fan comeson. If this fan isnot operating,the
ovenwillgothroughthecleaningprocessat a reducedoventemperatureand the
ovenwill notcleaneffectively. If the fan doesnotoperate,contactyour authodzed I
Jenn-Air Service Contractorfor service.
Sincetheupperovenisself-cleaning,its use is suggestedforfoodsthat have a tendency
to spatteror spi[Iover. The loweroven porcelainwalls and door,whichare of the same
high qualityporcelainas the upperoven,can be wipedclean w/thsoapand water if food
is not allowed to bake on a secondtime. Heavy spattering of spiHoverswill require
cleaningwithmild abrasive cleanserssuch as Bar Keepers Friend, S.O.S. or Bon Am/.
Householdammonia may be usedto loosensoilby placing½ cup householdammonia
in a glassdish on oven rack in a dosed, co_doven overnight.
• To remove difficultstains, use an oven cleaner such as Easy-Off on oven liner.
Follow oven cleaner directions, Do not spray electrical controls,temperature
sensingbulb,door gasketor exteriorof oven. Removeoven racksbefore spraying
with oven cleaner.
• For cleaningotherareas of the oven, clean oven racks with S.O.S. pads. Oven
window may be cleanedwith soap and water or a glass cleaner. Be careful not to
soak or rubthe oven door gasket.
29
Door and control
panel trim
The metal trim around the door and the control panel can be cleaned with a household
cleaner or soapy water, rinse well. Be careful not to use an excessive amount of water.
Glass
on the
oven
door
front
use any suitable glass cteaner or soapy water.
Control
Panel Area end Display
Window
Wipe with paper towels dampened with soapy water or glass cleaner. Do not spray any
cleaning solutions directly onto the Display window or use large amounts of soap and
water. Do not scrub with S.O.S. pads or abrasive cleaners.
To remove pull forward to the "stop" position; lift up
on the front of the rack and pull out.
\
Before replacing bulb, disconnect power to oven at the main fuse or circuit breaker
pane/. Be sure that the entire oven cavity including the light bulb is cool before attempting
to remove.
To replace
light bulb
1. Carefully unscrew the glass light lens.
2. To obtain firm grasp on the bulb, wear protective rubber
gloves. Remove by turning bulb to the left. Do not touch a
hot oven light bulb with a damp cloth as bulb will break. Note:
If the bulb does break and you wish to remove it, be certain
power supply is disconnected and wear protective gloves.
You may contact your authorized Jenn-Air Service Contractor
for service.
3. Replace bulb with a 40 watt oven-rated appliance bulb. Bulb
with brass base is recommended to prevent fusing of bulb
into socket.
4. Replace bulb cover and reconnect power to oven. Reset
clock.
31
]
j
f_._ _
Y
/
The oven temperaturecan be adjustedif all oven temperaturesare too low ortoo high
and the lengthof time to cook ALL foodsis too long or too shorL Do NOT adjustthe
temperatureif only one or two itemsare not bakingproperly.
To
1.
2,
3,
4.
adjust
Touch the Bake Pad
Touch and holdthe Up Arrow Pad until500° or higherappears in the Display,
Touch and holdthe Bake Pad for six secondsuntil"00°" appears in the Display
Touehthe Up or Down Arrow Pad(s) to enter the desired offset temperature,
(Allowablerange is -35 ° to +35°.) Four seconds later, the Display will return to
currenttime of day.
Note: DOnotchangethe temperaturesettingmore than 10° beforecheckingthe oven.
Important; The oven shouldbeadjustedonly 10° and theoven shouldbetested. (We
recommendbakingtwo 9" yellowlayer cakes using a purchasedbox mix.) if the oven
temperatureis stilltoo low or too high repeat the proceduredescribedabove.
32
The ovenTemp Knobcanbe adjustedifthe oventemperature istoo lowortoo highand
the lengthof time to cook ALLfoods is too longor too short. Do NOT adjustthe Temp
Knobif onlyone or two itemsare not bakingproperly.
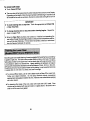
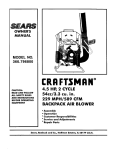
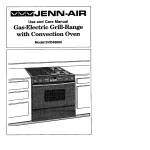
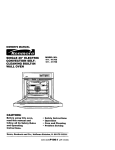
To adjust the Temp Knob
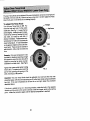
Turn the oven Temp Knob to Off. Removethe knoband turn it to the underneath side. (See Fig. t .} Loosenthetwo
screwsslightly.Holdingtheskirt inplace,
move the top screw by rotating the knob
one notch, as noted by one click, in
directionnecessary. Rotatescrewcountemlockwisefor hotterand clockwisefor
coolertemperature. If notchindentation
is notapparent,tightenscrewsuntilclicking isheard. There are seven notchesin
eachdirection. Move only one notch at a
time.
_Screw
oo
FIG.1
Example: Ifthe oven temperatureis too
coolandALLfoodsare requiringa longer
time periodto cook,the knob should be
rotatedto move the top screw counterclockwisefor a hotteroven, (See Fig 2.)
Tightenthe screws while tightly holding
knobtoskirt, To replaceknob,matchflat
part of knobopeningwith spring on the
shaft, returningto Off position.
FIG.2
Important: The oven Temp Knob should be adjusted one notchand then the oven
shouldbe tested. (We recommendbakingtwo 9" yellowlayer cakes usinga purchased
box mix.) If the oven temperatureis still too low or too high, repeat the procedure
described above.
If the knobis rotatedtoo far or in the wrong direction,rotatethe knob In the opposite
directionuntil the centerof the screwis directlyunderthe triangle, which is the starting
point. Initiate the procedureagain until the desiredtemperatureis reached.
33
Checkthe followinglistto be sure a servicecall is reallynecessary. A quickreference
of this manual may prevent an unneededservice call.
If nothing on the oven operates:
• check for a blown circuit fuse or a trippedmain circuitbreaker.
• checkif oven is prcpedyconnectedto electdc circuit in house.
If clock, indicator words, and/or lights operate but oven does not
heat:
• the controlsmay have been set incorrectly.
• clockcontrolsmay be set for delayedstart of oven.
If the oven light does not work:
• the lightbulb is looseor defective.
• oven lightdoes not work duringself-cleaningprocess.
If oven will not go through self-cleaning process:
• contrelsmay be improperlyset.
• checkthe clock contrelledsettingsand the currenttime of day on the clock,
If oven did not clean properly:
• oven may need longercleaningtime.
• excessivespillswere not removed priorto self-cleaningprocess,
If oven door will not unlock:
• oven may not have cooledto safe temperatureafter self-cleaningprocess.
• electriccurrentcoming intothe oven may be off.
If foods do not broil properly:
• the controlmay not be set properly.
• check rackposition,
• voltage into house may be low.
If baked food is burned or too brown on top:
• food may be positionedincorrectly in oven.
• oven not preheated properly.
If foods bake unevenly:
•
•
•
•
the oven may be installedimproperly.
checkthe oven rack with a level.
stagger pans, do not allow pans to touch each other or oven wall.
check instructionsfor suggestedplacementof pans on oven rack.
34
If oven baking results are less than expected:
• the pane being used may not be of the size or material recommended for best
results.
• there may not be sufficientroomaround sidesofthe pansfor properair circulation
in the oven.
• check instructionsfor preheating,rack positionand oven temperature.
If baking results differ from previous oven:
• oventhermostatcalibrationmay differbetweenold and new ovens. Followrecipe
and use and care directionsbeforecallingfor service sincethe calibrationon the
previousoven may have driftedto a too high or too low setting. (See pp. 32-33 AdjustingOven Temperature.)
If F plus a number appears in the Display:
• a fault code is beingshown. When a fault code appears and a continuous beep
sounds,touchthe Cancel Off Pad. If the fault code reappears,disconnectpower
to the oven and call an authorizedJenn-Air Service Contractor.
35