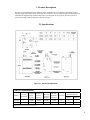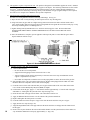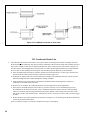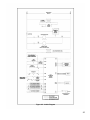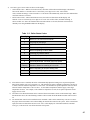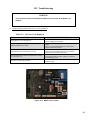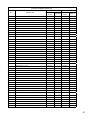
1
IN S TAL L AT ION , OP E R AT IN G AN D
S E R V IC E IN S T R U C T ION S F OR
C H G™ S E R IE S
C ON D E N S IN G H IGH E F F IC IE N C Y
GAS - F IR E D H OT WAT E R B OIL E R
Models:
• CHG150
• CHG225
Warning: Improper installation, adjustment, alteration, service or maintenance can cause property damage,
injury, or loss of life. For assistance or additional information, consult a qualified installer, service agency or the
gas supplier. This boiler requires a special venting system. Read these instructions carefully before installing.
100343-01-3/06
Table of Contents
I.
II.
III.
IV.
V.
VI.
VII.
VIII.
IX.
X.
XI.
XII.
XIII.
XIV.
XV.
Product Description................................................................... 3
Specifications............................................................................ 3
Before Installing......................................................................... 4
Locating The Boiler.................................................................... 4
Air For Ventilation...................................................................... 6
Venting....................................................................................... 8
A. Vent System Design............................................................ 8
B. Removing An Existing Boiler From Common Chimney....... 15
C. Vent/Intake System Assembly............................................. 15
Condensate Drain Line.............................................................. 20
Gas Piping................................................................................. 22
System Piping............................................................................ 23
A. General System Piping Precautions................................... 23
B. System Design.................................................................... 23
C. Standard Piping Installation Requirements......................... 32
D. Piping For Special Situations.............................................. 33
Wiring........................................................................................ 35
Start-up and Checkout............................................................... 39
Operation................................................................................... 44
Service and Maintenance.......................................................... 49
Troubleshooting......................................................................... 51
Parts......................................................................................... 55
Appendix A
Special Requirements For Side-Wall Vented
Appliances In The Commonwealth of Massachusetts.......... 68
Warranty..................................................................Back Cover
I Product Description
The CHG is an aluminum gas fired condensing boiler designed for use in forced hot water heating systems
requiring supply water temperatures of 180°F or less. This boiler may be vented vertically or horizontally with
combustion air supplied from outdoors. This boiler is not designed for use in gravity hot water systems or
systems containing significant amounts of dissolved oxygen.
II Specifications
Figure 2.1: General Configuration
Table 2.2: Specifications
MODEL*
NO. OF
SECTIONS
D.O.E.
MAXIMUM MINIMUM
HEATING
INPUT
INPUT
CAPACITY
(BTU/hr)
(BTU/hr)
(BTU/hr)
IBR NET
RATING
(BTU/hr)
AFUE (%)
VENT COLLAR
DIAMETERS (IN.)
INLET
EXHAUST
CHG150
3
150,000
30,000
135,000
117,000
93.1
4
3
CHG225
4
225,000
56,250
202,000
176,000
94.2
4
4
* MODELS SHOWN ARE FOR NATURAL GAS. ADD “LP” SUFFIX TO MODEL NUMBER SHOWN FOR PROPANE MODEL NUMBER (ie CHG225LP).
PERFORMANCE RATINGS ARE THE SAME FOR BOTH FUELS.
III Before Installing
1) Safe, reliable operation of this boiler depends upon installation by a professional heating contractor in strict
accordance with this manual and the authority having jurisdiction.
• In the absence of an authority having jurisdiction, installation must be in accordance with this manual and the National Fuel Gas Code, ANSI Z223.1.
• Where required by the authority having jurisdiction, this installation must conform to the Standard for Controls and Safety Devices for Automatically Fired Boilers (ANSI/ASME CSD-1).
2) CHG boilers utilize aluminum heat exchangers constructed, tested, and stamped in accordance with ASME Boiler and Pressure Vessel Code Case 2382-2. Some jurisdictions which require ASME boiler construction
do not recognize this Code Case and may not approve the installation of an aluminum boiler. Consult the
authority having jurisdiction before installing this boiler.
3) Read Section VI to verify that the maximum combustion air and exhaust pipe lengths will not be exceeded in
the planned installation. Also verify that the vent terminal is installed in the proper location.
4) Make sure that the boiler is correctly sized:
• For heating systems employing convection radiation (baseboard or radiators), use an industry accepted
sizing method such as the I=B=R Heat Loss Calculation Guide (Pub. #H21 or #H22) published by the
Hydronics Institute in Berkeley Heights, NJ.
• For new radiant heating systems, refer to the radiant tubing manufacturer’s boiler sizing guidelines.
• For systems including an Alliance™ indirect water heater, size the boiler to have either the DOE Heating
Capacity required for the Alliance™ or the net rating required for the heating system, whichever results in
the larger boiler.
• For systems that incorporate other indirect water heaters, refer to the indirect water heater manufacturer’s
instructions for boiler output requirements.
5) Make sure that the boiler received is configured for the correct gas (natural or LP).
6) Make sure that the boiler is configured for use at the altitude at which it is to be installed.
NOTICE
This product must be installed by a licensed plumber or gas fitter
when installed within the Commonwealth of Massachusetts. See
Appendix A for additional important information about installing
this product within the Commonwealth of Massachusetts.
IV Locating the Boiler
1) Observe the minimum clearances shown in Figure 4.1. These clearances apply to both combustible and noncombustible materials. Observe the minimum clearances to combustibles for vent pipe shown in Table 4.2.
2) Note the recommended service clearances in Figure 4.1. The recommended service clearances may be
reduced to the minimum combustible clearances with the understanding that servicing the boiler will become
increasingly difficult as the clearance is reduced.
3) Boiler may be installed on non-carpeted combustible surface.
4) The relief valve must be installed in the factory specified location.
5) The boiler should be located so as to minimize the length of the vent system.
6) The combustion air piping must terminate where outdoor air is available for combustion and away from areas
that will contaminate combustion air. Avoid areas near chemical products containing chlorine, chloride based
salts, chloro/fluorocarbons, paint removers, cleaning solvents and detergents.
Figure 4.1: Clearances To Combustible Or Non-combustible Material
Table 4.2: Clearances From Vent Piping To Combustible Construction
TYPE OF VENT PIPE
PIPE DIRECTION
ENCLOSURE
BURNHAM AL29-4C
ALTERNATE:
HEAT FAB SAF-T VENT
PROTECH FASNSEAL
Z-FLEX Z-VENT III
FLEX-L STAR-34
VERTICAL OR
HORIZONTAL
AT LEAST ONE SIDE OPEN,
COMBUSTIBLE MATERIAL ON A
MAXIMUM OF THREE SIDES
HORIZONTAL OR VERTICAL
WITH OFFSETS
ENCLOSED ON ALL FOUR SIDES
MINIMUM CLEARANCE
TO COMBUSTIBLE
MATERIAL
1”
2-1/2”
VERTICAL WITH NO OFFSETS
WARNING
OUTDOOR COMBUSTION AIR MUST BE PIPED TO THE AIR INTAKE. NEVER PIPE COMBUSTION
AIR FROM AREAS CONTAINING CONTAMINATES SUCH AS SWIMMING POOLS AND LAUNDRY
ROOM EXHAUST VENTS. CONTAMINATED COMBUSTION AIR WILL DAMAGE THE BOILER
AND MAY CAUSE PROPERTY DAMAGE, PERSONAL INJURY OR LOSS OF LIFE AND WILL VOID
THE MANUFACTURER’S WARRANTY.
V Air for Ventilation
Air for combustion must always be obtained directly from outdoors, however sufficient air for ventilation must
still be provided in the boiler room. Air for ventilation is required to keep various boiler components from overheating and is always obtained from indoors. To ensure an adequate ventilation air supply, perform the following
steps:
Step 1: Determine whether the boiler is to be installed in a confined space - A confined space is defined by the National Fuel Gas Code as having a volume less than 50 cubic feet per 1000 BTU/hr input of all appliances installed
in that space. To determine whether the boiler room is a confined space:
1) Total the input of all appliances in the boiler room in thousands of BTU/hr. Round the result to the next highest 1000 BTU/hr.
2) Find the volume of the room in cubic feet. The volume of the room in cubic feet is:
Length (ft) x width (ft) x ceiling height (ft)
In calculating the volume of the boiler room, consider the volume of adjoining spaces only if no doors are
installed between them. If doors are installed between the boiler room and an adjoining space, do not consider
the volume of the adjoining space, even if the door is normally left open. 3) Divide the volume of the boiler room by the input in thousands of BTU/hr. If the result is less than 50, the
boiler room is a confined space.
Example:
A CHG225 and a water heater are to be installed in a room measuring 6ft – 3 in x 7ft with an 8 ft ceiling. The
water heater has an input of 30000 BTU/hr:
Total input in thousands of BTU/hr = (225000 BTU/hr + 30000 BTU/hr) / 1000 = 255 MBTU/hr
Volume of room = 6.25 ft x 7 ft x 8 ft = 350 ft3
350/255 = 1.37. Since 1.37 is less than 50, the boiler room is a confined space.
Step 2a: If the boiler is to be placed in a confined space, provide two openings into the boiler room, one near the
floor and one near the ceiling. The top edge of the upper opening must be within 12” of the ceiling and the bottom
edge of the lower opening must be within 12” of the floor (Fig 5.1). The minimum opening dimension is 3 inches.
•
•
•
•
If the CHG boiler is the only gas-burning appliance in the boiler room, these openings must each have a
minimum free area of 100 square inches.
If other gas-burning appliances are in the boiler room, size the openings in accordance with the appliance
manufacturer’s instructions or the National Fuel Gas Code. Minimum opening free area is 100 square
inches even if opening requirements for other appliances are less.
If the total volume of both the boiler room and the room to which the openings connect is less than 50
cubic feet per 1000 BTU/hr of total appliance input, install a pair of identical openings into a third room.
Connect additional rooms with openings until the total volume of all rooms is at least 50 cubic feet per
1000 BTU/hr of input.
The “free area” of an opening takes into account the blocking effect of mesh, grills, and louvers. Where
screens are used, they must be no finer than ¼” (4 x 4) mesh.
Figure 5.1: Boiler Installed In A Confined Space, Ventilation Air From Inside
Step 2b: If the boiler is to be placed in an unconfined space the natural infiltration into the boiler room will provide adequate air for ventilation without additional openings into boiler room.
VI Venting
WARNING
Failure to vent this boiler in accordance with these instructions could result in unreliable boiler operation,
severe damage to the boiler or property, or unsafe operation:
•
•
•
•
•
•
Do not attempt to vent this boiler with galvanized, PVC, or any other vent system not listed in Table 4.
Do not attempt to mix components from different approved vent systems.
Do not obtain combustion air from within the building.
Do not install a barometric damper or drafthood on this boiler.
Do not attempt to use the vent system for this boiler with any other appliance.
Moisture and ice may form on the surfaces around the vent termination. To prevent deterioration, surfaces should be in good repair (sealed, painted, etc.)
A. Vent System Design
There are two basic ways to vent the CHG boiler:
• Horizontal (“side wall”) Venting - Vent system exits the building through an outside wall. Combustion air is
obtained through a separate pipe from outside.
• Vertical Venting - Vent system exits the building through a roof. Combustion air is obtained through a separate
pipe from outside.
A description of each of these venting options is listed in Tables 6.2a and 6.2b. For clarity, these vent options are numbered from 1 to 7. One of the vent option columns in Table 6.2 must match the planned vent and air intake system exactly. In addition, observe the following guidelines:
1) Approved vent systems - Use only one of the approved vent systems shown in Table 4. These systems are made of a
special stainless steel alloy (AL29-4C) for protection against corrosive flue gas condensate. They are also designed to
provide a gas tight seal at all joints and seams so that flue gas does not enter the building. Each approved vent system
has a unique method for installation - do not attempt to mix components from different vent systems. 2) Maximum Vent and Air Intake Lengths - The maximum length of the vent air intake piping depends upon the vent
option selected and the boiler size. See Table 6.2 for the maximum vent length. In addition to the maximum length of
piping shown in Table 6.2, the following fittings may also be used:
• Horizontal Vent Systems: One 90 deg. elbow
• Horizontal Air Intake Systems: One 90 deg. elbow
• Vertical Vent Systems: Two 90 deg. elbows
• Vertical Air Intake Systems: Two 90 deg. elbows
If additional elbows are desired, the maximum allowable vent length must be reduced by the amount shown in Table
6.6 for each additional elbow used. Termination fittings are not counted when counting additional elbows.
Example:
A 3” vent system is planned for a horizontally vented CHG150 which has the following components:
2 ft vertical pipe
1 90 elbow
5 ft horizontal pipe
1 90 elbow
3 ft horizontal pipe
1 45 elbow
4 ft horizontal pipe
1 termination elbow
The Vent Option #1 column in Table 6.2a describes a horizontal direct vent system using 3” vent pipe. From this
column, we see that a CHG150 may have a vent length of up to 55ft. The first 90 elbow and the termination elbow
are not considered. From Table 6.6, the equivalent length of the 3” 45 elbow is 4ft and the equivalent length of the
3” 90 degree elbow is 5.5ft. The maximum allowable run of straight pipe on this system is therefore:
55ft – 4 ft – 5.5ft = 40ft
Since the planned installation has only 14 ft of straight pipe, the planned vent length is acceptable.
Figure 6.1: Horizontal Direct Venting (Vent Options 1,2)
3) Minimum Vent and Air Intake Lengths - Minimum vent length is 2ft. Minimum air inlet length is 2ft.
4)
Permitted Terminals for Horizontal Venting (Vent Options 1,2) - The vent terminal is either a tee or an elbow
supplied by the vent system manufacturer and equipped with a rodent screen. Vent system manufacturer’s part
numbers for these fittings are shown in Table 6.5. In some cases, the elbows and tees shown in Table 6.5 require
separate rodent screens. When this is the case, vent manufacturer part numbers for these additional parts are shown
in Table 6.5 along with the termination fitting. The air intake fitting on a horizontal vent systems is always a 90 degree elbow with a rodent screen. This elbow is
made out of the same material as the rest of the air inlet system (either galvanized or PVC) and is installed as shown
in Figure 6.1.
5)
Horizontal Vent and Air Intake Terminal Location - Observe the following limitations on the vent terminal location
(also see Figure 6.3):
• Vent terminals must be at least 1 foot from any door, window, or gravity inlet into the building.
• Maintain the correct clearance and orientation between the vent and air intake terminals. The vent and air
intake terminals must be at the same height and their center lines must be between 12 and 36 inches apart. Both
terminals must be located on the same wall.
• The bottom of the vent and air intake terminals must be at least 12” above the normal snow line. In no case should
they be less than 12” above grade level.
• The bottom of the vent terminal must be at least 7 feet above a public walkway.
• Do not install the vent terminal directly over windows or doors.
• The bottom of the vent terminal must be at least 3 feet above any forced air inlet located within 10 feet.
• A clearance of at least 4 feet horizontally must be maintained between the vent terminal and gas meters, electric
meters, regulators, and relief equipment. Do not install vent terminal over this equipment.
• Do not locate the vent terminal under decks or similar structures.
• Top of vent terminal must be at least 5 feet below eves, soffits, or overhangs. Maximum depth of overhang is 3 ft.
• Vent terminal must be at least 6 feet from an inside corner.
• Under certain conditions, water in the flue gas may condense, and possibly freeze, on objects around the terminal
including on the structure itself. If these objects are subject to damage by flue gas condensate, they should be
moved or protected.
• If possible, install the vent and air intake terminals on a wall away from the prevailing wind. Reliable operation of
this boiler cannot be guaranteed if the terminal is subjected to winds in excess of 40 mph.
Table 6.2a: Summary of Horizontal Venting Options
VENT OPTION #
CLASSIFICATION USED IN THIS
MANUAL
HORIZONTAL
DIRECT VENT
HORIZONTAL
DIRECT VENT
6.1
VENT PIPE STRUCTURE
PENETRATION
WALL
WALL
AIR INTAKE PIPE STRUCTURE
PENETRATION
WALL
WALL
VENT PIPE SIZE
3”
4”
AIR INTAKE PIPE SIZE
4”
4”
CHG150
55 FT
N.R.
CHG225
N.R.
55 FT
CHG150
60 FT
N.R.
CHG225
N.R.
60 FT
MAXIMUM INTAKE
PIPE LENGTH
EXHAUST TERMINAL
3” 90 ELBOW
OR TEE
4” 90 ELBOW
OR TEE
AIR INTAKE TERMINAL
4” 90 ELBOW
4” 90 ELBOW
VENT MATERIAL
APPROVED VENT SYSTEM
SHOWN IN TABLE 6.5
AIR INTAKE MATERIAL
“N.R” - Not recommended “N.A.” - Not applicable
10
2
6.1
MAXIMUM VENT PIPE
LENGTH
ILLUSTRATED IN FIGURE
1
GALVANIZED OR PVC
3
(RESERVED
FOR FUTURE
USE)
4
(RESERVED
FOR FUTURE
USE)
5
(RESERVED
FOR FUTURE
USE)
Table 6.2b: Summary of Vertical Venting Options
VENT OPTION #
CLASSIFICATION USED IN THIS
MANUAL
6
VERTICAL
DIRECT VENT
VERTICAL
DIRECT VENT
6.4
6.4
VENT PIPE STRUCTURE
PENETRATION
ROOF
ROOF
AIR INTAKE PIPE STRUCTURE
PENETRATION
ROOF
ROOF
VENT PIPE SIZE
3”
4”
AIR INTAKE PIPE SIZE
4”
4”
CHG150
49.5 FT
N.R.
CHG225
N.R.
47 FT
CHG150
52 FT
N.R.
CHG225
N.R.
52 FT
MAXIMUM INTAKE
PIPE LENGTH
MAXIMUM VENT PIPE
LENGTH
ILLUSTRATED IN FIGURE
7
EXHAUST TERMINAL
RODENT SCREEN BY VENT SYSTEM
MANUFACTURER. SAME DIAMETER
AS VENT SYSTEM. SEE TABLE 6.5.
AIR INTAKE TERMINAL
4” 180 ELBOW
VENT MATERIAL
APPROVED VENT SYSTEM SHOWN
IN TABLE 6.5
AIR INTAKE MATERIAL
4” 180 ELBOW
GALVANIZED OR PVC
“N.R” - Not recommended “N.A.” - Not applicable
11
Figure 6.3a: Location of Vent Terminal Relative to Windows, Doors, Grade
Figure 6.3b: Location of Vent Terminal Relative to Meters and Forced Air Inlets
Figure 6.3c: Positioning Vent Terminal Under Overhangs
12
• Air intake terminal must not terminate in areas that might contain combustion air contaminates, such as near
swimming pools. See Section IV for more information on possible contaminates.
6)
Permitted Terminals for Vertical Venting (Vent Options 6, 7) - A rodent screen is installed in the end of the vent
pipe. Vent manufacturer part numbers for these screens are shown in Table 4. The air inlet terminal consists of a 180
degree elbow (or two 90 degree elbows) with a rodent screen as shown in Figure 6.4.
7) Vertical Vent Terminal Locations (Vent Options 6,7) - Observe the following limitations on the location of all vertical vent terminals (see Figure 6.4):
• The top of the vent pipe must be at least 2 feet above any object located within 10 feet.
• The vertical distance between top of the vent and air inlet terminal openings must be at least 12”.
• The bottom of the air inlet terminal must be at least 12” above the normal snow accumulation that can be
expected on the roof.
• The air intake terminal must be located on the roof and must be no further than 24” horizontally from the exhaust
pipe.
8) Wall thimbles – Wall thimbles are required where the vent pipe passes through combustible walls with less than the
required clearance shown in Table 4.2 or as required by local codes. Vent manufacturer’s wall thimble part numbers
are shown in Table 6.5.
9) Pitch of Horizontal piping – All horizontal vent piping must be pitched ¼” per foot so that any condensate which
forms in this piping will run towards the boiler. 10) Vertical and horizontal sections of piping must be properly supported. See vent system manufacturer’s instructions
for more information.
11) Fire Stops – Use fire stops where required by code or by the vent system manufacturer. Consult vent system
manufacturer’s literature for information on suitable fire stops.
Figure 6.4: Vertical Vent System (Vent Options 6,7)
13
Table 6.5: Burnham Vent/Air Intake System Components
Equivalent
Feet of Pipe
Vent System Component
Part
Number
3” Dia. Pipe x 1 Ft.
8116296U
4” Dia. Pipe x 1 Ft.
100176-01
3” Dia. Pipe x 3 Ft.
8116298U
4” Dia. Pipe x 3 Ft.
100177-01
3” Dia. Pipe x 5 Ft.
8116300U
4” Dia. Pipe x 5 Ft.
100178-01
3” Dia. Pipe x Adjustable
8116319U
4” Dia. Pipe x Adjustable
100179-01
**Equal to
Installed Length
(1.06 to 1.64)
3” Dia. 90° Elbow
8116294U
5.5
VENT FITTING
4” Dia. 90° Elbow
100180-01
8.0
3” 90 ELBOW
5.5
3” 45 ELBOW
4.0
4” 90 ELBOW
8.0
4” 45 ELBOW
4.5
1
3
5
3” Dia. 45° Elbow
8116292U
4.0
4” Dia. 45° Elbow
100181-01
4.5
3” Dia. Horizontal Drain Tee
8116156
4” Dia. Horizontal Drain Tee
100182-01
3” Dia. Vertical Drain Tee
8116157
4” Dia. Vertical Drain Tee
100183-01
3” Single Wall Thimble
8116116
4” Single Wall Thimble
100184-01
3” Double Wall Thimble
8116115
4” Double Wall Thimble
100185-01
Table 6.6: Vent/Air Intake Fitting
Equivalent Length
EQUIVALENT
LENGTH (ft)
7½
7½
---
---
Table 6.5a: Alternate Vent Systems and Vent Components
MANUFACTURER
HEAT FAB
14
VENT SYSTEM
SIZE
WALL
THIMBLES
3
7393GC
7393GCS
5391CI
ELBOW: 7314TERM
TEE: 7390TEE
9392
4
7493GC
7493GCS
5491CI
ELBOW: 7414TERM
TEE: 7490TEE
9492
3
FSWT3
ELBOW: FSELB9003 + FSBS3
TEE: FSTT3
FSBS3
4
FSWT4
ELBOW: FSELB9004 + FSBS4
TEE: FSTT4
FSBS4
3
2SVSWTEF03
ELBOW: 2SVSTEX0390
TEE: 2SVSTTF03
24SVSTPF03
4
2SVSWTEF04
ELBOW:
2SVEEWCF0490 + 2SVSTPF04
TEE: 2SVSTTF04
24SVSTPF04
SAF-T VENT
EZ SEAL
PROTECH
SYSTEMS
INC.
FASNSEAL
Z-FLEX
SVE
SERIES III
(“Z-VENT III”)
HORIZONTAL
TERMINATION
VERTICAL
TERMINATION
B. Removing an Existing Boiler From a Common Chimney
Read this only if the CHG boiler is replacing an existing boiler that is being removed from a common chimney. This section does not apply to the installation of a CHG boiler.
In some cases, when an existing boiler is removed from a common chimney, the common venting system may be too large for the remaining appliances. At the time of removal of an existing boiler, the following steps shall be followed with each appliance remaining connected to the common venting system placed in operation, while the other appliances remaining connected to the common venting system are not in operation.
(a)Seal any unused openings in the common venting system.
(b)Visually inspect the venting system for proper size and horizontal pitch and determine there is no blockage or restriction, leakage, corrosion and other deficiencies which could cause an unsafe condition.
(c)Insofar as practical, close all building doors and windows and all doors between the space in which all the
appliances remaining connected to the common venting system are located and other spaces of the building. Turn on clothes dryers and any appliance not connected to the common venting system. Turn on any exhaust
fans, such as range hoods and bathroom exhausts, so they will operate at maximum speed. Do not operate a
summer exhaust fan. Close fireplace dampers.
(d)Place in operation the appliance being inspected. Follow the lighting instructions. Adjust thermostat so the appliance will operate continuously.
(e)Test for spillage at the draft hood relief opening after 5 minutes of main burner operation. Use the flame of a match or candle, or smoke from a cigarette, cigar, or pipe.
(f) After it has been determined that each appliance remaining connected to the common venting system properly vents when tested as outlined above, return doors, windows, exhaust fans, fireplace dampers and any other gas-burning appliances to their previous condition of use.
(g)Any improper operation of the common venting system should be corrected so the installation conforms with the National Fuel Gas Code, ANSI Z223.1. When re-sizing any portion of the common venting system, the common venting system should be re sized to approach the minimum size as determined using the appropriate tables in Part 11 of the National Fuel Gas Code, ANSI Z223.1.
WARNING
NEVER COMMON VENT A CHG BOILER WITH OTHER APPLIANCES
C. Vent / Intake System Assembly
1) General Assembly Notes:
a) Where the use of “silicone” is called for in the following instructions, use GE RTV 106 for the vent collar. Air
inlet piping sections are sealed with any general-purpose silicone sealant such as GE RTV102. PVC air inlet piping sections are connected with PVC cement.
b) Longitudinal welded seams should not be placed at the bottom of horizontal sections of exhaust pipe.
c) Do not drill holes in vent pipe.
d) Do not attempt to mix vent components of different vent system manufacturers.
e) In some cases, there are differences between the vent system installation instructions in this manual and
those in the vent system manufacturer’s manual. Where such differences exist, this manual takes precedence over the vent system manufacturer’s manual.
CAUTION
Vent systems made by Burnham, Heat Fab, Protech, and Z-Flex rely on gaskets
for proper sealing. When these vent systems are used, take the following
precautions:
• Make sure that gasket is in position and undamaged in the female end of the pipe.
• Make sure that both the male and female pipes are free of damage prior to assembly.
15
2) This appliance requires a Special Gas Vent. The product is designed to use Burnham supplied AL 29-4C® Stainless
Steel vent system components when utilizing the supplied vent adaptor. The following manufacturers offer similar
AL 29-4C® components and are approved for use with this product. The use of these alternate manufacturer’s
venting systems can be utilized by connecting directly to the installed vent pipe (supplied adaptor is not required). See Table 6.5 for complete list of Burnham Vent System Components.
3) Install Vent Pipe, Burnham Gasketed Vent System.
Procedure for Joining Burnham Gasketed Vent Pipe and Fittings. See Fig. 6.7.
a) Wipe the male end of each joint using an alcohol pad to remove any dirt and grease.
b) Align weld seams in pipes and use a slight twisting motion to FULLY insert male end into female end of joint. Ensure bead in male end of pipe is below locking band and rest against the end of the female pipe. Verify
the factory-installed gasket is not dislodged or cut.
c) Tighten locking band by HAND with a 5/16” nut driver until snug plus ¼ turn. DO NOT SECURE
JOINTS WITH SHEET METAL SCREWS OR POP RIVETS. DO NOT PUNCTURE THE VENT
SYSTEM!
d) Once the installation is complete, operate appliance and inspect all joints to ensure that flue gases and/or liquid condensate will not escape. Figure 6.7: Burnham Gasketed Vent Joint Detail
4) Assembly of Flex-L-Intl. Star-34 Vent System:
a) Star-34 General Notes:
• Do not cut Star-34 vent components.
• Support horizontal piping sections at intervals of 48” or less.
• Vertical venting systems must be supported by at least one Star-34 Fire stop. An additional vertical support is required after any offset.
• Orient Star-34 components so that the arrows on the piping labels are in the direction of flue gas flow.
b) Start assembly of the vent system at the boiler. Remove the hose clamp shipped on the CHG vent collar. Bend the three hose clamp tabs on this collar outward slightly.
c) Clean the exterior of the male end of the first piece of pipe and the inside of the vent collar on the boiler. Use a cleaner such as Methyl Ethyl Keytone (MEK) or naptha.
d) On the male end of the pipe, apply a ¼” wide bead of silicone approximately ¼” from the end of the pipe and another ¼” bead against the joint side of the stop bead (Fig 6.7a). e) Insert the male end of the pipe into the boiler vent collar until it bottoms out.
f) Apply an additional bead of silicone over the outside of the joint and smooth out.
g) Replace and tighten the clamp on the vent collar.
h) Clean the female end of the first piece of pipe. Also clean the male end of the next piece of pipe.
i) Apply silicone as in step (d) (Fig 6.7b).
j) Align the longitudinal seams of the pipe and insert the male end of the second pipe into the female end of the first pipe.
16
k) Insert a Star-34 joiner band into the inlet of the beaded channel. Feed the joiner band in so that it makes its way around the channel and overlaps by approximately ½” (Fig 6.7b).
Figure 6.7a: Star-34 Connection to Vent Collar
Figure 6.7b: Star-34 Connections
l) Cut the excess joiner band so that it lays flat in the beaded channel (Fig 6.7b).
m)Fill the inlet of the beaded channel with silicone. Smooth the silicone over the channel inlet as well as the silicone between the female end and the stop bead of the male end (Fig 6.7b).
n) Repeat Steps (h) – (m) for the remaining Star-34 components.
p) Allow the silicone to cure per the silicone manufacturer’s instructions before operating the boiler. 5) Assembly of Z-Flex Z-Vent III:
a) General Notes:
• Non-expanded ends of SVE Series III piping sections may be cut using aviation snips or a 24 thread per inch
hacksaw. File or sand the cut end smooth before assembling. See the following instructions.
• Support horizontal piping sections at intervals of 48” or less.
• Vertical venting systems must be supported by at least one Z-Flex fire stop. An additional vertical support is required after any offset and as required by the Z-Vent III installation instructions.
b) Start assembly of the vent system at the boiler. Remove the hose clamp shipped on the CHG vent collar. Bend the three hose clamp tabs on this collar outward slightly.
c) Clean the exterior of the male end of the first piece of pipe and the inside of the vent collar on the boiler. Remove dirt, grease, and moisture from the surfaces to be sealed. Dry surfaces or allow to dry thoroughly.
d) On the male end of the pipe, apply a ¼” wide bead of high temperature silicone approximately ½ inch from the
male end of the pipe. Apply ¼” beads of silicone along both sides of the longitudinal seam (Fig. 6.8).
e) Insert the male end of the pipe into the boiler vent collar until it bottoms out.
f) Apply an additional bead of silicone over the outside of the joint and smooth out.
g) Replace and tighten the clamp on the vent collar.
h) The female end of each Z-Vent III component has a silicone sealing gasket. Examine all vent components to insure that the gasket integrity has remained during shipping. Gaskets must be in the proper position or flue gas could leak resulting in carbon monoxide poisoning.
17
i) Align the second piece of pipe with the first and push them together as far as they will go, but not less
than 1-3/4”.
j) Tighten gear clamp to a minimum torque of 40 in-lbs and a maximum of 50 in-lbs.
k) Repeat Steps (h) – (j) for the remaining Z-Vent III components.
l) In horizontal vent systems, a locking band or gear clamp must be used at either side of the wall penetration to prevent shifting of the vent system in and out of the wall. This applies to both combustible and non-
combustible walls.
n) Allow the silicone to cure per the silicone manufacturer’s instructions before operating the boiler. Figure 6.8: Z-Vent III Connection to Vent Collar
6) Assembly of Heat Fab Saf-T Vent EZ Seal:
a) Saf-T Vent General Notes:
These instructions cover the installation of Saf-T Vent EZ Seal. Saf-T Vent EZ Seal piping has integral gaskets installed in the female ends of the pipe which seal the joints. • In general, Saf-T Vent pipe sections may not be cut. Exceptions to this are the Saf-T Vent slip connector and connections to the boiler vent collar. In these cases, use a sharp pair of aviation snips, an
abrasive cut-off, or a plasma cutter. See the Saf-T Vent instructions for information on cutting the slip connector.
• Orient Saf-T Vent components so that the arrows on the piping labels are in the direction of flue gas flow.
• Support horizontal piping sections at intervals of 6 feet or less.
• Vertical venting systems must be supported by at least one Heat Fab support. An additional vertical support is required after any offset.
b) Connection to Boiler – Start assembly of the vent system at the boiler. Remove the hose clamp shipped on the
CHG vent collar. Bend the three hose clamp tabs on this collar outward slightly. Cut the male spigot” off of the first piece of pipe (Fig 6.9). If necessary, crimp the cut end of the pipe so that it can be inserted at least 1” into the collar. Clean the exterior of the male end of the first piece of pipe and the inside of the vent collar on the boiler with an alcohol pad. On the male end of the pipe, apply a ¼” wide bead of high temperature silicone approximately ½ inch from the male end of the pipe. Also apply a ¼” bead of silicone along the first 2 ½” of the longitudinal weld. Insert the male end of the pipe into the boiler vent collar until it bottoms out. Apply an additional bead of silicone over the outside of the joint and smooth out (Fig 6.9). Replace and tighten the clamp on the vent collar.
18
c) Assembly of Saf-T Vent EZ Seal Vent Components - Clean the male end of the next piece of pipe with an alcohol pad and make sure that it is free of burrs. Check the female end of the first piece of pipe to make sure that the gasket is in place and is undamaged. Using a slight twisting motion, insert the male end of the second fitting into the female end of the first fitting, taking care not to dislodge or cut the factory gasket. In extremely arid conditions, it may be easier to assemble these fittings if the gasket is moistened with water prior to assembly. Bend the locking tabs over the locking ring on the adjacent piece of pipe. Repeat these steps for the remaining Saf-T-Vent components.
Figure 6.9: SAF-T Vent Ezseal Connection to Vent Collar
7) Assembly of Protech FasNSeal
a) FasNSeal General Notes:
•
•
•
•
Do not cut 4” FasNSeal pipe. Consult FasNSeal instructions for method of cutting other 3” pipe.
Orient FasNSeal vent components so that the arrows on the piping labels are in the direction of flue
gas flow.
Support horizontal piping sections at intervals of 6 feet or less.
Vertical venting systems must be supported by at least one FasNSeal support. An additional vertical support is required after any offset.
b) Remove the hose clamp shipped on the CHG vent collar. Bend the three hose clamp tabs on this collar outward slightly. Clean the exterior of the male end of the first piece of pipe and the inside of the vent
collar on the boiler. Remove dirt, grease, and moisture from the surfaces to be sealed. On the male end of the pipe, apply a ¼” wide bead of high temperature silicone approximately 1/4 inch from the male end of the pipe. Insert the male end of the pipe into the boiler vent collar until it bottoms out. Apply an additional bead of silicone over the outside of the joint and the seams on the vent collar and smooth out (Fig 6.10). Replace and tighten the clamp on the vent collar.
c) All other joints in the FasNSeal venting system rely on a gasket in the female end of the pipe for a proper seal.
d) Align the longitudinal seam of both pipes. Insert the male end of the second pipe into the female end of the first pipe until the bead on the male end contacts the flare on the female end.
e) Tighten the locking band with a nut driver.
f) Repeat (d) and (e) for the remaining FasNSeal components.
g) Allow the silicone to cure per the silicone manufacturer’s instructions before operating the boiler.
8) Assembly of the air intake system:
a) Assemble the air intake system using either galvanized or PVC pipe.
b) If PVC piping is used, use PVC cement to assemble the PVC intake system components.
c) If galvanized piping is used, use at least two sheet metal screws per joint. Seal the outside of all joints.
d) 4” galvanized smoke pipe will fit inside the inlet collar on the CHG boiler. Depending upon the exact OD of the pipe used, it may be necessary to crimp this pipe. Secure with a single #10 sheet metal screw through the hole in the inlet collar and seal the outside of the joint with silicone. If PVC is used for the intake system, use a short piece of 4” galvanized pipe to connect the PVC to the boiler. Silicone the outside of the joint between the PVC and galvanized pipe.
e) Two 90-degree elbows may be used to make the 180-degree air intake termination elbow used on vertical direct vent installations.
9) Rodent Screens - A rodent screen is provided with the CHG boiler for installation in the air inlet terminal.
19
Figure 6.10: FasNSeal Connection to Vent Collar
VII Condensate Drain Line
1) All condensate which forms in the boiler or vent system collects in the sump under the heat exchanger and leaves
the boiler through the condensate trap. This trap allows condensate to drain from the sump while retaining flue gases
in the boiler. A length of drain hose is supplied with the boiler and is connected to the trap as shown in Figure 6.11.
This hose may be routed through the back of the boiler or to either side through the knockouts provided. Route this
hose to a drain or other suitable point for disposal. Note the following when disposing of the condensate:
a) If the condensate drain line must be extended, construct the extension from PVC or CPVC pipe. Insert the hose
provided with the boiler into the end of the extension as shown in Figure 6.11.
b) Condensate is slightly acidic. Do not use metallic pipe or fittings in the condensate drain line. Do not route the
drain line through areas that could be damaged by leaking condensate.
c) Some jurisdictions may require that the condensate be neutralized before being disposed of. Dispose of
condensate in accordance with local codes.
d) Do not route, or terminate, the condensate drain line in areas subjected to freezing temperatures.
e) If the point of condensate disposal is above the trap, it will be necessary to use a condensate pump to move
the condensate to the drain. In such cases, select a condensate pump that is approved for use with condensing
furnaces. If overflow from this pump would result in property damage, select a pump with an overflow switch
and use this switch to shut down the boiler. Alternatively, if heat is a necessity, use the overflow switch to trigger
an alarm.
f) Do not attempt to move the trap from the location shown in Figure 6.11. Do not attempt to substitute another trap
for the one provided with the boiler.
g) The vent shown in Figure 6.11 must be left open for the trap to work properly.
20
Figure 6.11: Condensate Piping Arrangement
WARNING
BOILER CONDENSATE IS CORROSIVE. ROUTE CONDENSATE DRAIN LINE IN A MANNER
SUCH THAT ANY CONDENSATE LEAKAGE WILL NOT CAUSE PROPERTY DAMAGE.
SOME JURISDICTIONS MAY REQUIRE THAT CONDENSATE BE NEUTRALIZED PRIOR TO
DISPOSAL.
21
VIII Gas Piping
Gas piping to the boiler must be sized to deliver adequate gas for the boiler to fire at the nameplate input at an
inlet pressure between the minimum and maximum values shown on the rating plate. For more information on
gas line sizing, consult the utility or the National Fuel Gas Code.
Figure 7.1 shows typical gas piping connection to the CHG boiler. A sediment trap must be installed upstream
of all gas controls. Install the factory provided manual shut-off valve outside the jacket with a ground joint
union as shown.
The boiler and its gas connection must be leak tested before placing the boiler in operation. When doing this,
the boiler and its individual shut-off must be disconnected from the rest of the system during any pressure
testing of that system at pressures in excess of 1/2 psi. When pressure testing the gas system at pressures of 1/2 psi or less, isolate the boiler from the gas supply system by closing its individual manual shut-off valve.
Figure 7.1: Gas Connection To Boiler
22
IX System Piping
A. General System Piping Precautions
CAUTION
THE HEAT EXCHANGER USED IN THE CHG IS MADE FROM A SPECIAL ALUMINUM ALLOY.
FAILURE TO TAKE THE FOLLOWING PRECAUTIONS COULD RESULT IN SEVERE BOILER
DAMAGE AND WILL VOID THE MANUFACTURER’S WARRANTY.
• INSTALL BOILER SO THAT THE GAS IGNITION SYSTEM COMPONENTS ARE PROTECTED FROM WATER
(DRIPPING, SPRAYING, RAIN, ETC) DURING APPLIANCE OPERATION AND SERVICE (CIRCULATOR
REPLACEMENT, ETC).
• OPERATION OF THIS BOILER IN A SYSTEM CONTAINING SIGNIFICANT AMOUNTS OF
DISSOLVED OXYGEN CAN CAUSE SEVERE HEAT EXCHANGER CORROSION DAMAGE.
• USE ONLY ANTIFREEZE SPECIFICALLY PERMITTED ON PAGE 39 OF THIS MANUAL.
• MAKE SURE THAT THE WATER USED TO FILL THE SYSTEM MEETS THE REQUIREMENTS OUTLINED
IN THE START-UP AND CHECKOUT SECTION XI OF THIS MANUAL.
• NEVER USE PETROLEUM BASED CLEANING OR SEALING COMPOUNDS IN THE BOILER SYSTEM.
THESE PRODUCTS COULD DAMAGE ELASTOMER SEALS AND GASKETS IN THE SYSTEM AND COULD
RESULT IN PROPERTY DAMAGE.
• THIS BOILER IS NOT DESIGNED FOR USE IN SYSTEMS CONTAINING SIGNIFICANT AMOUNTS OF
MAKEUP WATER. REGULAR ADDITIONS OF MAKEUP WATER MAY CAUSE SEVERE HEAT EXCHANGER
DAMAGE.
• BEFORE CONNECTING BOILER, MAKE SURE THAT THE SYSTEM IS FREE OF SEDIMENT, FLUX AND
ANY RESIDUAL BOILER WATER ADDITIVES. FLUSH THE SYSTEM IF NECESSARY TO ENSURE THAT
THESE CONTAMINATES ARE REMOVED.
• MAINTAIN THE PRESSURE IN THE BOILER AT A MINIMUM OF 12 PSI.
• DESIGN SYSTEM TO ENSURE THAT THE FLOW FALLS WITHIN THE LIMITS CALLED FOR IN TABLE 8.1.
• THE MAXIMUM ALLOWABLE LOAD IS 20 kw (68 MBTU) PER CENTER SECTION AND 10 kw (34 MBTU)
PER END SECTION WITH LOAD BASED ON NET CALORIC VALUE. THIS EQUATES TO 75,000 BTU/HR
GROSS CALORIC INPUT FOR CENTER SECTION AND 37,500 BTU/HR GROSS CALORIC INPUT FOR AN
END SECTION.
• MAXIMUM ALLOWABLE DELTA T BETWEEN SUPPLY AND RETURN DURING OPERATION IS 45°F AT
MAXIMUM LOAD AND 63°F AT MINIMUM LOAD.
• THE PRODUCT SHALL AT ALL TIMES BE FILLED WITH CLEAN POTABLE WATER. THE ONLY
ALLOWABLE ADDITIVES ARE THE FERNOX PRODUCTS, ALPHI II (ANTI FREEZE), SUPERFLOC
(CLEANING), AND COPAL (ANTICORROSION) OR EQUIVALENTS. THE CHEMICAL ADDITIVES MUST
BE USED IN ACCORDANCE WITH THE CHEMICAL MANUFACTURERS RECOMMENDATIONS FOR USE
WITH ALUMINUM BOILERS AT ALL TIMES. THE pH OF THE SYSTEM HYDRONIC FLUID MUST BE
MAINTAINED BETWEEN 6.0 AND 8.5.
• THE MINIMUM ALLOWABLE WATER FLOW BASED ON A 5/1 TURN DOWN RATIO FOR HEAT INPUT
WITH THE MINIMUM FLOW CORRESPONDING TO MINIMUM FIRING RATE HEAT INPUT IS AS
FOLLOWS; CHG3 - 3 GPM, CHG4 - 5 GPM
B. System Design
Proper operation of the CHG boiler requires that the water flow through the boiler remain within the limits shown in
Table 8.1 any time the burner is firing. Failure to maintain the flow within these limits could result in erratic operation
or premature boiler failure. There are three basic methods that can be used to pipe the CHG boiler. The instructions on
the following pages describe three alternative methods for piping CHG boilers and explain how to size the circulator
and piping for each one. Additional information on hydronic system design may be found in Installation of Residential
Hydronic Systems (Pub. #200) published by the Hydronics Institute in Berkeley Heights, NJ.
Table 8.1: Flow Requirements Through Boiler
BOILER MODEL
CHG150
CHG225
MIN. REQUIRED FLOW
(GPM)
6
9
MAX. ALLOWABLE
FLOW (GPM)
15
23
23
Method 1: Primary/Secondary Piping - Boiler in Secondary Loop
This method can be used in heat-only applications as shown in Figure 8.2 or with an indirect water heater as
shown in Figure 8.3. This method relies on primary/secondary pumping to ensure that the required flow is always
maintained through the boiler. In this system, the flow rate through the boiler is completely independent of the flow
rate through the heating system. Use the following guidelines to ensure that boiler will have the required flow shown
in Table 8.1 regardless of the flow in the heating system.
1) Primary Loop Piping - Size the primary circulator and piping to obtain the design flow rate through the heating
system as you would on any other heating system. All piping between the expansion tank and secondary connection
tees must be at least as large as that shown in Table 8.5, column a. In order to keep the flow rates in the primary
and secondary loops independent of each other, provide at least 8 diameters of straight pipe upstream of the first
secondary tee and 4 diameters downstream of the second secondary tee. Keep the distance between the expansion
tank and the first secondary tee as short as practical.
2) Secondary Loop (“Boiler Loop”) Piping – All piping must be the size shown for the boiler in Table 8.5, column a.
To size the circulator:
a) Count all fittings in the planned secondary loop (the secondary loop consists of the shaded piping in Figure 8.4a). In doing so, do not count the secondary connection tees, unions, or the fittings supplied with the boiler (these have already been accounted for).
b) Using Table 8.7, find the equivalent lengths of all fittings in the secondary loop. Total these equivalent lengths and add them to the total length of planned straight pipe in the secondary loop. The result is the total equivalent length of the secondary loop.
c) Using Table 8.5, find the boiler size being installed and select a boiler secondary circulator that shows a “maximum equivalent length” (column d) in excess of the total equivalent length calculated in Step b.
3) Indirect Water Heater Loop Piping (If Indirect Water Heater is Used) – All piping must be the size shown in Table
8.6, column (a). If the indirect water heater connections are smaller than the pipe size called for in column (a),
reduce the pipe size at the indirect water heater connections. To size the circulator:
a) Count all fittings in the planned Indirect Water Heater Loop (the indirect water heater loop consists of the shaded piping in Figure 8.4b). In doing so, you will be counting some piping and fittings which are common to the heating system secondary (“boiler loop”) piping and which were counted in Step 2a above. Do not count the elbows or fittings supplied with the boiler.
b) Using Table 8.7, find the equivalent lengths of all fittings in the indirect water heater loop. Total these equivalent
lengths and add them to the total length of planned straight pipe in the indirect water heater loop.
The result is the total equivalent length of the indirect water heater loop.
c) Using Table 8.6, find the boiler size being installed and select an indirect water heater loop circulator that shows a “maximum equivalent length” (column f) in excess of the total equivalent length calculated in Step b.
Example – Assume that a CHG150 is to be installed in a heating system along with a AL40A indirect water heater. A
total of 15 ft of straight pipe will be installed between the boiler and the primary loop. A total of 20 ft of straight pipe
will be installed between the boiler and the indirect water heater. Fittings are arranged as shown in Figure 8.3. The
AL40A requires a flow rate of 8 GPM and has a head loss of 3.0 ft.
Total fittings in Secondary loop (“boiler loop”):
7 90 Elbows
2 Runs of Tees
1 Swing Check 2 Isolation Valves
Note: Unions, Secondary Connection Tees, and factory supplied fittings are ignored.
Calculate total equivalent length from Table 8.7:
15ft Straight Pipe + 7 Elbows x 3.75 + 2 Runs of Tees x 2.5 + 1 Swing Check x 10 + 2 valves x 0.8 = 57.85 Equivalent Feet Straight Pipe. From Table 8.5, we see that a Taco 007 will pump 8 GPM through a CHG150 with 148 equivalent feet of pipe, so Taco 007 is OK.
Total fittings in Indirect Water Heater Loop:
6 90 Elbows
1 Swing Check
2 Turns in Tees 2 Isolation Valves
Calculate total equivalent length from Table 8.7:
24
20 Straight Pipe + 6 Elbows x 3.75 + 2 Turns in Tees x 8 + 1 Swing Check x 10 + 2 valves x 0.8 = 70.1 Equivalent Feet Straight Pipe. From Table 8.6, we see that smallest circulator which will pump at 8 GPM through a CHG150 with 70.1 equivalent feet and an indirect water heater pressure drop of 3 ft is a Taco 0010.
Figure 8.2: Piping Method #1 - Heat Only
Figure 8.3: Piping Method #1 - Heat + Indirect Water Heater
25
Figure 8.4a: Piping Method #1 - Secondary Loop Piping (Shaded)
Figure 8.4b: Piping Method #1 - Indirect Water Heater Loop Piping (Shaded)
26
Table 8.5: Pipe and Circulator Sizing for Boiler Loop
(a)
(b)
PIPE SIZE
FLOW
(in NPT)
(GPM)
CHG150
1 1/4
8.0
Taco 007
148
CHG150
1 1/4
8.0
Taco 0010
224
CHG225
1 1/4
12.0
Taco007
138
CHG225
1 1/4
12.0
Taco 0010
208
BOILER MODEL
(c)
(d)
CIRCULATOR
MODEL
BOILER LOOP
MAX EQUIVALENT
LENGTH
(ft)
NOTE:
For piping method #1, “boiler loop” is heating system secondary loop
For piping method #2, “boiler loop” is heating system primary loop
Table 8.6: Pipe and Circulator Sizing for Indirect Water Heater Loop
(a)
(b)
(c)
PIPE SIZE
FLOW
MAX. I.W.H.
PRESSURE
DROP
(in NPT)
(GPM)
(ft HEAD)
CHG150
1 1/4
8.0
3.0
CHG150
1 1/4
8.0
3.0
CHG150
1 1/4
8.0
5.0
CHG150
1 1/4
10.0
CHG225
1 1/4
CHG225
CHG225
BOILER
MODEL
(d)
ALLIANCE™
INDIRECT WATER
HEATERS
AL26A, AL40A
ALG40, ALG50
AL26A, AL40A
ALG40, ALG50
(e)
(f)
CIRCULATOR
MODEL
I.W.H. LOOP MAX
EQUIVALENT
LENGTH
(ft)
Taco 007
26
Taco 0010
165
AL53A, AL79A
Taco 0010
96
5.0
ALG79 (NOTE 1)
Taco 0010
38
9.0
3.0
AL26A, AL40A
ALG40, ALG50
Taco 007
90
1 1/4
9.0
5.0
AL53A, AL79A
Taco 0010
97
1 1/4
10.0
5.7
ALG79, ALG100
(NOTE 2)
Taco 0010
60
Note 1: ALG100 or AL119A can be installed with CHG150, Taco 0010 and up to 96ft of 1 1/4 piping, however catalog rating will not be achieved.
Note 2: AL119A can be installed with CHG225, Taco 0010 and up to 60ft of 1 1/4 piping, however catalog rating will not be achieved.
Table 8.7: Fitting Equivalent Lengths
PIPE SIZE
EQUIVALENT LENGTH (ft)
90 ELBOW
1 1/4
3.75
TURN IN TEE
1 1/4
8.00
RUN OF TEE
1 1/4
2.50
SWING CHECK
GATE VALVE
1 1/4
1 1/4
10.00
0.80
FITTING
27
Method 2: Primary/Secondary Piping - Boiler in Primary Loop
This method can be used in heat-only applications as shown in Figure 8.8 or with an indirect water heater as shown in
Figure 8.9. Like Method 1, this method relies on primary/secondary pumping to ensure that the required flow is always
maintained through the boiler. In this system, the flow rate through the boiler is completely independent of the flow rate
through the heating zones. The boiler is installed in the heating system primary loop as shown.
This system provides more accurate control of the water temperature entering the heating zones as the number of
zones calling for heat changes. When this piping method is used, the boiler control is set to provide the highest supply
temperature required by any heating zone and some other means, such as 3-way valves, are used to control the water
temperatures required by any zones requiring lower temperature water. This system is only recommended when the
primary loop (shown bolded in Figure 8.10b) is to be constructed as part of the boiler installation and can be constructed
as shown. Also, if the boiler is to accurately control the temperature entering each secondary loop, the flow rate in the
primary loop must be at least as great as the sum of the flows through all secondary loops.
Use the following guidelines to ensure that boiler will have the required flow shown in Table 8.1 regardless of the flow in
the heating system. 1) Heating System Secondary Loop Piping - The heating system secondary loop piping is shown in Figure 8.10a. Size
each secondary zone circulator and piping to obtain the design flow rate for that zone as you would on any other heating
system. When the heating zone requires a water temperature below that to be controlled by the boiler, provide a mixing
valve or blending station for that zone. In order to keep the flow rates in the primary and secondary loops independent of
each other, provide at least 8 diameters of straight pipe upstream of the first secondary tee and 4 diameters downstream of
the second secondary tee.
2) Heating System Primary Loop (“Boiler Loop”) – The primary loop (“boiler loop”) piping is shown bolded in Figure
8.10b. All piping in this loop must be the size shown for the boiler in Table 8.5, column a. To size the circulator:
a) Starting at the boiler, trace a path through the heating system primary loop from the boiler supply connection to the
boiler return connection, counting fittings and straight pipe as you go. Where the primary loop breaks into parallel paths, follow just one of these paths (it doesn’t matter which one). Do not count the secondary connection tees, unions, or the fittings supplied with the boiler (these have already been accounted for).
b) Using Table 8.7, find the equivalent lengths of all fittings counted in (a). Total these equivalent lengths and add them to
the total length of straight pipe measured in step (a). The result is the total equivalent length of the primary loop.
c) Using Table 8.5, find the boiler size being installed and select a boiler primary circulator that shows a “maximum equivalent length” (column d) in excess of the total equivalent length calculated in Step b.
3) Indirect Water Heater Loop Piping (If Indirect Water Heater is Used) – All piping must be the size shown in Table 8.6,
column (a). If the indirect water heater connections are smaller than the pipe size called for in column (a), reduce the pipe
size at the indirect water heater connections. To size the circulator:
a) Count all fittings in the planned Indirect Water Heater Loop (the indirect water heater loop consists of the bolded
piping in Figure 8.10c). In doing so, you will be counting some piping and fittings which are common to the heating
system primary piping (the “boiler loop”) and which were counted in Step 2a above. Do not count the elbows or
fittings supplied with the boiler.
b) Using Table 8.7, find the equivalent lengths of all fittings in the indirect water heater loop. Total these equivalent lengths and add them to the total length of planned straight pipe in the indirect water heater loop. The result is the total equivalent length of for the indirect water heater loop.
c) Using Table 8.6, find the boiler size being installed and select an indirect water heater loop circulator that shows a
“maximum equivalent length” (column f) in excess of the total equivalent length calculated in Step b.
Method 3: Direct Connection to Heating System (Generally NOT Recommended)
The CHG can be connected directly to the heating system as is done with conventional boilers (Figure 8.11). If this is done, the flow rate through the boiler will equal the flow rate through the system. The flow rate through the system must therefore always remain within the limits shown in Table 8.1. For this reason, the pressure drop through the
entire system must be known, added to the boiler pressure drop, and a circulator selected which will provide the required flow at the total calculated pressure drop.
This method is generally not recommended because it is often very difficult to accurately calculate the pressure drop through the system. In replacement installations, it may be impossible to get an accurate measurement of the amount of piping and number of fittings in the system. In addition, if the system is zoned, the system flow may drop well
below the minimum required when only one zone is calling for heat.
The one advantage to this method is its installation simplicity. It may make sense to use this method when the boiler is to be installed with a new single zone system having a low-pressure drop. Pressure drop curves for the CHG Series boilers are shown in Figure 8.12. Calculation of the system pressure drop, and selection of the circulator, must
28 be performed by someone having familiarity with pressure drop calculations, such as an HVAC engineer.
Figure 8.8: Piping Method #2 - Heat Only
Figure 8.9: Piping Method #2 - Heat + Indirect Water Heater
29
Figure 8.10a: Piping Method #2 - Secondary Loop Piping (Bolded)
Figure 8.10b: Piping Method #2 - Primary Loop Piping (Bolded)
30
Figure 8.10c: Piping Method #2 - Indirect Water Heater Loop Piping (Bolded)
Figure 8.11: Piping Method #3 - Direct Connection of Boiler to Heating System
31
Head Loss (Feet w.c.)
6.00
5.00
4.00
3.00
CHG150
2.00
CHG225
1.00
0.00
0
5
Figure 8.12: Boiler Head Loss
10
15
20
25
Flow (GPM)
C: Standard Piping Installation Requirements
Observe the following guidelines when making the actual installation of the boiler piping:
1) The relief valve is packaged loose with the boiler and must be installed in the location shown in Figure 1. The relief
valve is set to open at 30 psi. If the valve is replaced, the replacement must have a relief capacity in excess of the
DOE heating capacity for the boiler. Pipe the discharge of the relief valve to a location where water or steam will
not create a hazard or cause property damage if the valve opens. The end of the discharge pipe must terminate in
an unthreaded pipe. If the relief valve discharge is not piped to a drain, it must terminate at least 6 inches above the
floor. Do not run relief valve discharge piping through an area that is prone to freezing. The termination of the relief
valve discharge piping must be in an area where it is not likely to become plugged by debris.
2) The fitting in which the gauge, relief valve and LWCO are to be mounted must not be moved from the factory
specified location (Figure 2.1).
DANGER
32
•
PIPE RELIEF VALVE DISCHARGE TO A SAFE LOCATION.
•
DO NOT INSTALL A VALVE IN THE RELIEF VALVE DISCHARGE LINE.
•
DO NOT INSTALL RELIEF VALVE IN A LOCATION OTHER THAN THAT SPECIFIED BY THE FACTORY.
•
DO NOT PLUG THE RELIEF VALVE DISCHARGE.
3) The return piping may be connected into the boiler through the back or sides of the boiler by rotating the drain elbow and
routing the return piping through the appropriate knockout.
4) Circulator (Required) - Usually at least two circulators will be required to properly install a CHG Series boiler. See previous
section (System Design) for information on sizing the circulators.
5) Expansion Tank (Required) - If this boiler is replacing an existing boiler with no other changes in the system, the old
expansion tank can generally be reused. If the expansion tank must be replaced, consult the expansion tank manufacturer’s
literature for proper sizing.
6) Fill Valve (Required) - Either a manual or automatic fill valve may be used. The ideal location for the fill is at the expansion
tank.
7) Automatic Air Vent (Required) - At least one automatic air vent is required. Manual vents will usually be required in other
parts of the system to remove air during initial fill.
8) Manual Reset High Limit (Required by some codes) - This control is required by ASME CSD-1 and some other codes. Install the high limit in the boiler supply piping just above the boiler with no intervening valves. Set the manual reset high
limit to 200°F. Wire the limit per Figures 9.1 & 9.2 in the Wiring section.
9) Flow Control Valve (Required) - The flow control valve prevents flow through the system unless the circulator is operating. Flow control valves are used to prevent gravity circulation or “ghost flows” in circulator zone systems through zones that are
not calling for heat.
10) Isolation Valves (Recommended) - Isolation valves are useful when the boiler must be drained, as they will eliminate having
to drain and refill the entire system.
11) Drain Valve (Required) - The drain valve is installed on the return tee located in the lower vestibule compartment as shown in
Figure 8.2.
12) Low Water Cut-off (Required) - The low water cut-off supplied with this boiler must not be removed.
D. Piping for Special Situations
1) Systems containing oxygen - Many hydronic systems contain enough dissolved oxygen to cause severe corrosion damage to
an aluminum boiler such as the CHG. Some examples include:
• Radiant systems that employ tubing without an oxygen barrier.
• Systems with routine additions of fresh water.
• Systems which are open to the atmosphere.
If the boiler is to be used in such a system, it must be separated from the oxygenated water being heated with a heat
exchanger as shown in Figure 8.13. Consult the heat exchanger manufacturer for proper heat exchanger sizing as well as
flow and temperature requirements. All components on the oxygenated side of the heat exchanger, such as the pump and
expansion tank, must be designed for use in oxygenated water.
2) Piping with a Chiller - If the boiler is used in conjunction with a chiller, pipe the boiler and chiller in parallel as shown in
Figure 8.14. Use isolation valves to prevent chilled water from entering the boiler.
3) Air Handlers - Where the boiler is connected to air handlers through which refrigerated air passes, use flow control valves in
the boiler piping or other automatic means to prevent gravity circulation during the cooling cycle.
33
Figure 8.13: Isolation of the Boiler From Oxygenated Water with A Plate Heat Exchanger
Figure 8.14: Chiller Piping
34
X Wiring
WARNING
All wiring and grounding must be done in accordance with
the authority having jurisdiction or, in the absence of such
requirements, with the National Electrical Code (ANSI/NFPA 70).
1) Line Voltage (120 VAC) Connections (Fig 9.1) – The line voltage connections are located in the junction box
on the right side of the vestibule:
• Black – Line voltage “hot”
• White – “Neutral” for boiler and circulators
• Red – “Heating” circulator “hot”
• Blue – “Indirect Water Heater “ circulator “hot”
• Green – Ground connection
2) Maximum circulator continuous current draw is 2A. When Piping Method #1 is used, it may be desirable to
use the boiler to directly control the primary circulator in addition to the secondary circulator. If this is done,
control both heating circulators using a relay with a 120VAC coil, such as a Honeywell R4222, as shown in
Figure 9.3. Select a relay with a contact rating in excess of the combined draw of the two circulators.
3) Low Voltage Connections (Fig 9.1) – These connections are screw terminals located on the terminal strip next
to the junction box on the left:
•
•
•
•
•
•
Terminals 1 and 2 – “Heating” thermostat connections
Terminals 3 and 4 – “External Limit Control” connections
Terminals 5 and 6 – “Outdoor Reset Sensor” connections
Terminals 7 and 8 – “Domestic Indirect Water Heater” thermostat connections
Terminal 9 – “Flame Signal Reading”
Heat anticipator setting for the thermostat connection is 0.1 A when thermostat is connected directly to
terminals 1 and 2.
CAUTION
•
WHEN MAKING LOW VOLTAGE CONNECTIONS, MAKE SURE THAT NO EXTERNAL POWER SOURCE IS PRESENT IN THE THERMOSTAT OR LIMIT CIRCUITS. IF SUCH A POWER SOURCE IS PRESENT, IT COULD DESTROY THE BOILER’S MICROPROCESSOR CONTROL (MCBA). ONE EXAMPLE OF AN EXTERNAL POWER SOURCE THAT COULD BE INADVERTENTLY CONNECTED TO THE LOW VOLTAGE CONNECTIONS IS A TRANSFORMER IN OLD THERMOSTAT WIRING.
4) If the outdoor sensor is connected to terminals 5 and 6, the boiler will adjust the target space heating set point supply water temperature downwards as the outdoor air temperature increases. If used, this sensor should be
located on the outside of the structure in an area where it will sense the average air temperature around the house. Avoid placing this sensor in areas where it may be covered with ice or snow. In general, locations where the sensor will pick up direct radiation from the sun should also be avoided. Avoid placing the sensor near potential sources of electrical noise such as transformers, power lines, and fluorescent lighting. Wire the sensor to the boiler using 22 gauge or larger wire. As with the sensor, the sensor wiring should be routed away from sources of electrical noise. Where it is impossible to avoid such noise sources, wire the sensor using a
2 conductor, UL Type CM, AWM Style 2092, 300Volt 60°C shielded cable. Connect one end of the shielding on this cable to ground.
35
36
Figure 9.1: Wiring Connections Diagram
Figure 9.2: Ladder Diagram
37
Figure 9.3: Wiring of Isolation Relay for Control of Two Heating Circulators
38
XI Start-up and Checkout
NOTE
SAFE LIGHTING AND OTHER PERFORMANCE CRITERIA WERE MET WITH THE GAS
TRAIN ASSEMBLY PROVIDED ON THE BOILER WHEN THE BOILER UNDERWENT
THE TEST SPECIFIED IN Z21.13.
Use the following procedure for initial start-up of the boiler:
1) If not already done, flush the system to remove sediment, flux, and traces of boiler additives. This should
be done with the boiler isolated from the system.
2) Fill the boiler and hydronic system with water meeting the following requirements:
pH between 6.5 and 8.5
Total Solids less than 2500 PPM
Hardness less than 120 PPM (7 Grains/Gallon)
Pressurize the system to at least 12 psi at the boiler
WARNING
•
If antifreeze is added to the system, use one of the following
approved products or their equivalent:
Fernox Alphi-11
GE-Betz Sentinel X500
•
NEVER ATTEMPT TO FILL A HOT EMPTY BOILER.
3) Check all new piping for leaks and purge piping sections that are filled with air. See the National Fuel Gas
Code for additional information on testing and purging gas lines.
WARNING
•
NEVER USE A FLAME TO CHECK FOR GAS LEAKS.
•
MAKE SURE THAT THE AREA AROUND THE BOILER IS CLEAR AND FREE FROM COMBUSTIBLE MATERIALS, GASOLINE AND OTHER FLAMMABLE VAPORS AND LIQUIDS
4) Vent system must be complete and free of obstructions before attempting to fire boiler. Make sure that the
silicone cure time called for in the vent assembly instructions has passed before firing boiler.
5) Inspect all line voltage wiring for loose or uninsulated connections.
6) Remove the dust cap from the condensate trap (Fig 6.11). Add water to the trap until water runs out the
condensate drain. Reinstall the dust cap.
39
CHG Series Lighting and Operating Instructions
40
7) Start the boiler using the lighting instructions on page 40. After the boiler is powered up, it should go through
the following sequence.
Sequence Display Meaning
1 U.125 or Blank Checking internal software (power-up only)
2
0.SWT Boiler in standby. SWT = Supply Water Temp. No call for heat.
(After call for heat from heating thermostat)
3 A.SWT Self-Check on Start-up
4 5.SWT Blower and circulator on. Checking for adequate air flow.
5 1.SWT Prepurge
6
2.SWT Trial for ignition
7
3.SWT Flame established. Boiler responding to a call for heat.
8) Upon initial start-up, the gas train will be filled with air. Even if the gas line has been completely purged of air,
it may take several tries for ignition before a flame is established. If more than 5 tries for ignition are needed,
it will be necessary to press the reset button to restart the boiler. Once a flame has been established for the first
time, subsequent calls for burner operation should result in a flame on the first try.
9) Inspect the flame visible through the window. On high fire the flame should be stable and mostly blue
(Fig.10.1). No yellow tipping should be present; however, intermittent flecks of yellow and orange in the flame
are normal. Figure 10.1: CHG Burner Flame
10) Check the inlet pressure and adjust if necessary. Verify that the inlet pressure is between the upper and lower
limits shown on the rating plate with all gas appliances on and off.
WARNING
THE CORRECT OUTLET PRESSURE FOR THE GAS VALVE HAS BEEN
FACTORY SET AND REQUIRES NO FIELD ADJUSTMENT. THIS SETTING IS
SATISFACTORY FOR BOTH NATURAL GAS AND PROPANE. ATTEMPTING TO
ADJUST THE OUTLET PRESSURE MAY RESULT IN DAMAGE TO THE GAS
VALVE AND CAUSE PROPERTY DAMAGE, PERSONAL INJURY OR LOSS OF
LIFE.
41
Figure 10.2: Gas Valve Detail
11) Perform a combustion test. On horizontally vented units, the sample probe may be inserted into the terminal. If this is not possible, and if no sample tap is present in the vent system, remove the flue temperature sensor and insert the analyzer probe in the sensor opening. On the CHG150 and CHG225 the flue temperature probe is located behind the lower vestibule door. For the boiler to operate, this sensor will need to be temporarily connected outside of the boiler. If it is removed, be sure to return the flue gas temperature sensor to its original position after combustion testing is complete. Check CO2 (or O2) and CO at both high and low fire. The boiler may be temporarily locked into high or low fire for 15 minutes as follows:
a) To lock the boiler in high fire, simultaneously press and hold the “Mode” button and “+“ button until the display flashes “H”, indicating that the boiler has been driven to high fire. After this happens, allow the
boiler to operate for approximately 5 minutes before taking combustion readings.
b) To lock the boiler in low fire, simultaneously press and hold the “Mode” button and “-“ button until the display flashes “L”, indicating that the boiler has been driven to low fire. After this happens, allow the boiler to operate for approximately 5 minutes before taking combustion readings.
At both high and low fire, CO readings should be less than 75 PPM. Typical CO2 readings are shown in Table
10.3.
Table 10.3: Typical CO2/O2 Combustion Readings Range
Model
Fuel
%CO2
%O2
CHG150
Natural Gas
8.2
6.3
CHG225
Natural Gas
8.7
5.4
CHG150
Propane
NA
NA
CHG225
Propane
10.2
5.4
WARNING
Each CHG series boiler is tested at the factory and adjustments
to the air-fuel mixture are normally not necessary. Consult a
BURNHAM representative before attempting to make any such
adjustments. Improper gas valve or mixture adjustments could
result in property damage, personal injury, or loss of life.
42
Normal modulation of the boiler should return 15 minutes after the boiler is locked in high or low fire.
12) Test any external limits or other controls in accordance with the manufacturer’s instructions.
13) Verify that the boiler starts and stops in response to calls for heat from the heating thermostat and indirect
water heater thermostat. Make sure that the appropriate circulators also start and stop in response to the
thermostats.
14) As shipped, the heating and indirect water heater set point supply temperatures are both set to 180°F. If necessary, adjust these to the appropriate settings for the type of system to which this boiler is connected. See the Operation Section of this manual for information on how to do this.
15) Adjust the heating and indirect water heater thermostats to their final set points.
43
XII Operation
1) The CHG boiler uses a microprocessor based control, known as a “MCBA”, to manage all boiler functions including flame supervision and modulation. Two set point or “target” boiler supply temperatures are stored in the MCBA’s memory; one for space heating and one for domestic water production. If an outdoor tempera-
ture sensor is connected to the boiler, the space heating supply set point will automatically adjust downwards as the outdoor temperature increases. For more information on this feature see the discussion on boiler water reset below.
The MCBA modulates the boiler input by varying the fan speed. As the fan speed increases, so does the amount of gas drawn into the blower. As a result, a fairly constant air-fuel ratio is maintained across all inputs.
The MCBA determines the input needed by looking at both current and recent differences between the supply temperature and the set point temperature. As the supply temperature approaches the set point temperature, the fan will slow down and the input drop. Depending on the model boiler, the minimum input is between 1/4 and 1/5 of maximum input.
The MCBA also monitors boiler return and flue temperatures. In addition, all other safety controls, including the low water cut-off and safety limit, are connected into the MCBA. The MCBA uses input from all of these controls to either shut down the boiler when an unsafe condition exists or, in some cases, to correct the
problem.
2) The display panel has three primary modes of operation. These are:
• Standby Mode – Displays boiler’s current status. This is the default operating mode.
• Parameter Mode – Used to change control settings
• Information Mode – Displays boiler operating temperatures
Under normal conditions, the boiler is in standby mode and the display looks like that shown in Figure 11.1. The three digits to the right of the decimal point are the boiler’s supply temperature. The digit to the left of
the decimal point is the boiler’s status code. A list of status codes, and their meanings, is shown in Table 11.3.
Figure 11.2 is a map of the menu structure for the control panel. Push the mode key to move from one mode to the next. As you change modes, the mode you are entering is shown on the display:
a) “PArA” for Parameter Mode
b) “Info” for Information Mode c) “Stby” for Standby Mode. Upon entering standby mode, “Stby” will briefly appear on the display and then the display will show the boiler’s status along with the supply temperature (Figure 11.1). The control will return to standby mode from any other mode if no key is pressed for 20 minutes.
Figure 11.1: Normal Display In Standby Mode
44
In standby mode, it is possible to view both the heating supply set point temperature and the “domestic hot water
reference set point”. The “domestic hot water reference set point” plus 45°F equals the boiler supply set point when
it is responding to a call from the indirect water zone. It is not the actual domestic hot water set point. The CHG is
designed for use with a storage type indirect water heater such as the Burnham Alliance™. The domestic water set point is controlled by the thermostat on the indirect water heater. The “default domestic water reference set point” is 135°F and target boiler supply temperature when responding to a call from the indirect water heater is therefore 180°F (135°F +45°F). The default heating supply set point (parameter 4) is 180°F.
In standby mode it is also possible to turn on or off either the heating or domestic water zone. There is normally no reason to turn off either of these zones and doing so is not recommended.
CAUTION
Pushing and holding the “+” while in standby mode will prevent the
boiler from responding to a call for heat. Pushing and holding the “-”
while in standby mode will prevent the boiler from responding to a
call for domestic water. If this happenS, “cOFF” or “dOFF” WIll appear
on the display. To turn back on the heating function, press and hold “+”
until “c” and the set point temperature Appears on the display. To turn
back on the domestic water function, press and hold “-” until “d” and
the set point temperature appears on the display. After pressing any
keys, and before leaving the installation, verify that the boiler fires
in response to a call for heat and domestic water.
In standby mode, if “Mode” and either “+” or “-“are simultaneously pushed and held for at least 2 seconds, the burner can be forced into either high or low fire. This feature is used for running combustion tests. After 15 minutes, the burner will automatically revert to modulation. If it is desired to revert to modulation before 15 minutes has passed, simultaneously pushing “+” and “-“ will restore modulation.
In Parameter mode both set points can be changed and both zones turned on or off. In addition, both zones can be configured for continuous pump operation. If the heating zone is set for continuous pump operation (parameter 3 set to 3), the heating pump will still shut down when there is a call for domestic hot water.
If either the heating supply set point (parameter 4) , or the DHW reference set point (parameter 1) are set above their factory set values, the boiler supply temperature will exceed 180°F and there is a possibility that the safety temperature limit will open. If this happens, the boiler will shut down and a “b26” error will appear on the display. The boiler will resume normal operation without manual intervention when the safety limit closes (this behavior is common on conventional boilers).
Information mode is used to view various temperatures and settings but cannot be used to change parameters or otherwise control the boiler. The information available is shown in Figure 11.2 and is largely self-explanatory. The digit to the left of the decimal point is the Step number and the digits to the right are the corresponding temperature.
In information mode, the “supply water temperature set point” (Step 6), is the supply temperature set point for the zone to which the boiler is currently responding (either heat or DHW). If an outdoor sensor is connected to the boiler, and the boiler is responding to a call for heat, this value will be the current point on the reset curve. When no call for heat or DHW is present, Step 6 shows the heating supply set point.
In some cases a “-22” will appear in Information Mode for a particular reading. This means that the reading is not applicable. For example, “-22” will appear for the outdoor temperature (Step 4) if no outdoor sensor is connected to the boiler. 45
46
Figure 11.2: Basic Menu Tree
3) Two basic types of errors codes are shown on the display:
• Soft Lockout Codes – When a soft lockout occurs, the boiler will shut down and the display will alternate
between the number “9” and the letter “b” followed by a two digit service code. A list of these codes, and their meanings, is shown in Table 13.3. The boiler will automatically restart once the condition that
caused the lockout is corrected. • Hard Lockout Codes – When a hard lockout occurs, the boiler will shut down and the display will flash the letter “E” followed by a two digit service code. A list of these codes, and their meanings, is shown in Table 13.4. Once the condition that caused the lockout is corrected, the boiler will need to be manually reset using the RESET button on the display. Table 11.3: Boiler Status Codes
First Digit
Boiler Status
0
Burner off - No call for heat or DHW
1
Pre-purge or post-purge
2
Ignition
3
Burner responding to call for heat
4
Burner responding to call for DHW
5
Checking air pressure switch
6
Burner off - Set point temperature has been reached
7
Call for heat ended. 10s heating post pump period
8
Call for DHW ended. 10s DHW post pump period
9 and b
Flashing
Burner off - on soft lockout. See Troubleshooting
Section to determine meaning of error code.
A
Boiler responding to call from heating zone
H
Burner on - Held in high fire
L
Burner on - Held in low fire
4) If an outdoor sensor is installed, the boiler will automatically adjust the heating zone set point temperature based on the outdoor reset curve in Figure 11.4. The maximum set point is defined by parameter 4 (factory set to 180°F) when the outdoor temperature is 0°F or below. The minimum set point temperature shown is 100°F when the outdoor temperature is 60°F or above. As the outdoor temperature falls the supply water target temperature increases. For example, if the outdoor air temperature is 30°F, the set point temperature for the supply water is 140°F. 5) An indirect water heater thermostat can be connected between terminals 7 and 8 on the terminal strip. When this thermostat closes, the central heating circulator will be turned off and the DHW circulator will be turned on. 6) An external limit control can be installed between terminals 3 and 4 on the terminal strip. Be sure to remove the jumper between terminals 3 and 4 when adding an external limit control to the system. If the external limit opens, the boiler will shut down and error code “b 26” will be displayed. If the limit installed is a manual reset type, it will need to be reset before the boiler will operate.
47
Figure 11.4: Outdoor Reset Curve
7) The sequence of operation for a CHG series boiler on a call for heat from a thermostat is as described below:
a) When power is first turned on, 120V is provided to the MCBA, the combustion fan and the LWCO trans- former. A separate 50VA transformer, connected directly to the MCBA, powers all other low voltage circuits.
b) For the first few seconds after power-up the control module goes through a self check. c) When there is a call for heat, the control module checks to make sure the air pressure switch is open. If it is, the combustion fan will be energized and will ramp up to ignition speed. When the air pressure switch closes, a 10 second prepurge is activated.
d) After the prepurge, the control module energizes the gas control valve and the spark for 4.5 seconds. If a flame is established and proved, the control allows the flame to stabilize for 5 seconds at the combustion fan ignition speed setting. If the flame fails to prove, the control module will attempt to light the burner 4 more times. If a flame is still not established, the control will lockout.
e) Once the flame stabilization period has ended, the MCBA allows the burner to modulate. The actual firing rate is dependent upon the measured current and recent differences between the set point temperature and the supply temperature. If an outdoor sensor is connected to the control module and the boiler is responding to a call for heat, the set point temperature will be determined by the outdoor reset curve shown in Figure 11.4.
f) Once the set point temperature is reached, the MCBA will turn the burner off and allow the combustion fan to operate in postpurge for 35 seconds before it turns off.
g) The central heating pump will continue to operate until the room thermostat has been satisfied. h) A demand for domestic hot water (DHW) is given priority on CHG series boilers. If a call for DHW is received while the boiler is responding to a call for heat, the heating circulator is deenergized until the call for DHW is satisfied.
48
XIII Service and Maintenance
IMPORTANT
WARRANTY DOES NOT COVER BOILER DAMAGE OR MALFUNCTION IF THE
FOLLOWING STEPS ARE NOT PERFORMED AT THE INTERVALS SPECIFIED.
1) Continuously:
a) Keep the area around the boiler free from combustible materials, gasoline and other flammable vapors and liquids.
b) Keep the area around the combustion air inlet terminal free from contaminates .
c) Keep the boiler room ventilation openings open and unobstructed.
2) Monthly Inspections:
a) Inspect the vent piping and outside air intake piping to verify they are open, unobstructed and free from leakage or deterioration. Call the service technician to make repairs if needed.
b) Inspect the condensate drain system to verify it is leak tight, open and unobstructed. Call the service technician if the condensate drain system requires maintenance.
c) Inspect the water and gas lines to verify they are free from leaks. Call the service technician to make repairs if required.
CAUTION
WATER LEAKS CAN CAUSE SEVERE CORROSION DAMAGE TO THE BOILER
OR OTHER SYSTEM COMPONENTS. IMMEDIATELY REPAIR ANY LEAKS
FOUND.
3) Required Annual Inspections and Service: In addition to the inspections listed above the following shall be performed by a service technician once every year.
a) Test the low water cutoff by pressing the “Test” button located at its end. The yellow light should come on and “E12” should flash on the display. Push the reset button on the display to restore normal operation. If the yellow light does not come on, determine why the low water cutoff is not working properly.
b) Follow the procedure for turning the boiler off found in the CHG Series Lighting and Operating Instructions.
c) Inspect the wiring to verify the conductors are in good condition and attached securely.
CAUTION
LABEL ALL WIRES PRIOR TO DISCONNECTION WHEN SERVICING
CONTROLS. WIRING ERRORS CAN CAUSE IMPROPER AND DANGEROUS
OPERATION. VERIFY PROPER OPERATION AFTER SERVICING.
49
d) Remove the ignition electrode and inspect it for oxides. Clean the oxides off the electrode with sandpaper. Inspect the ceramic insulator for cracks and replace the ignitor assembly as necessary.
e) Remove any accumulated debris from the air inlet screen.
f) Remove the attenuator hose and clean as necessary. (Note: The nylon cable tie used to hold the attenuator hose in place is releasable.)
g) Remove the combustion fan/gas valve assembly and inspect the fan and fan blade for lint and dust. Vacuum as required.
h) Remove the burner hood to access the burner and the chamber. i) Check the burner and clean off any foreign material that may have accumulated. This can be done by
dusting with a soft bristle type brush or a vacuum cleaner. DO NOT USE A WIRE BRUSH TO CLEAN
THE BURNER. Check for corrosion of the burner and its parts. If there is evidence of corrosion or
deterioration, replace immediately.
j) With the burner removed, inspect the combustion chamber and clean as necessary.
k) Clean heat exchanger. Use vacuum to remove accumulation of any loose particulate from the pins and
heat transfer surfaces. Clean the casting pins by flushing with clean water using a standard garden spray
nozzle. Do not use any cleaning agents or solvents. A soft nylon brush may be used in accessible area. Remove inspection cover and inspect Condensate collector sump. Drain and flush the condense collector
and condensate drain as required.
l) Do not use any cleaning agents or solvents.
m)Inspect the condensate trap to verify it is open and free from debris. Clean if necessary.
n) Reinstall the burner, burner hood, combustion fan, gas valve assembly and the attenuator hose.
o) Reconnect any wiring which has been disconnected.
p) Qualified service personnel should thoroughly inspect the heating system and correct any deficiencies prior to restarting the boiler.
q) Follow Section XI Start-up and Checkout instructions before leaving installation.
r) Perform the combustion test outlined in Section XI.
s) Ensure system water is within required PH range (6.0 and 8.5).
t) Inspect vent system.
• To ensure all joints and pipe connections are tight.
• To ensure it is free from debris, cracks, corrosion and/or deterioration. If any piping needs replacing,
do so immediately.
50
XIV Troubleshooting
WARNING
Turn off power to boiler before replacing fuses or working on
wiring.
A. Troubleshooting problems where no error code is displayed:
Table 13.1: No Error Code Displayed
CONDITION
POSSIBLE CAUSES
Display Blank, Fan off, LWCO lights off
• No 120VAC Power at boiler. Check breaker and wiring
between breaker panel and boiler
Display Panel Blank, Fan running
• Loose 120VAC connection wiring between boiler J-Box and
MCBA
• Blown “F1” fuse in MCBA (see Figure 13.2 for location).
Replace with 5A fuse provided
Display reads “U.125” continuously, Fan running
• Defective AT250 transformer
• Blown “F3” fuse in MCBA (see Figure 13.2 for location).
Replace with 4A slow-blow fuse provided
Boiler not responding to call for heat, Status code on display
=”0” (see Figure 11.1)
• Boiler is not seeing call for heat. Check thermostat or
zone wiring for loose connection, miswiring, or defective
thermostat/zone control.
Boiler fires, but display panel is blank
• Loose ribbon cable
• Defective display
Figure 13.2: MBCA Fuse Location
51
B. Trouble shooting problems where a soft lockout code is displayed. When a soft lockout occurs, the boiler will shut down and the display will alternate between the number “9” and the letter “b” followed by a two digit service code. The boiler will automatically restart once the condition that caused the lockout is corrected.
Table 13.3: Soft Lockout Codes Displayed
CODE
POSSIBLE CAUSES
Pressure switch circuit open
• Blockage in intake or vent system.
• Vent and/or intake system not constructed in accordance
with Part VI.
• Blocked or leaking pressure switch tubing
• Heat exchanger or burner blockage
• Terminals exposed to high winds
• Blockage in condensate trap above vent.
b 18
MCBA supply sensor detected temperatures in excess
of 200°F
• Heating load at time of error was far below the minimum
firing rate of the boiler
• Defective primary pump or no flow in primary loop (Piping
Method 1)
• Control system miswired so that boiler operation is
permitted when no zones are calling
b 19
MCBA return sensor detected temperatures in excess of
200°F
b 08
52
CONDITION
• See possible causes for “b18”
• Flow through boiler reversed
• Sensor wiring reversed
b 24
MCBA is reading a return sensor temperature higher
than the supply sensor temperature. Condition must be
present for at least 75s for this error code to appear.
• Flow through boiler reversed. Verify correct piping and
pump orientation.
• No boiler water flow. Verify that system is purged of air
and that appropriate valves are open.
• Sensor wiring reversed.
• Supply or return sensor defective.
b 25
Supply water temperature has risen too quickly
• See possible causes for “b18”
• Inadequate boiler water flow. Verify that pump is
operating and that pump and piping are sized per Part
VIII of this manual
b 26
Boiler safety limit, or external limit wired across terminals
3&4, is open.
• See possible causes for “b18”
• Defective supply sensor.
b 30
Temperature rise between supply and return is too high.
• Inadequate boiler water flow. Verify that pump is
operating and that pump and piping are sized per Part
VIII of this manual
b 61
Pressure switch circuit closed with fan off
• Blockage in pressure switch hose
• Pressure switch wires shorted together
• Defective pressure switch
• Loose or miswired fan speed harness (if “b61” error code
is observed while fan is running)
b 65
Fan is not achieving set point speed
• Loose or incorrect fan speed control connection
• Defective fan
C. Trouble shooting problems where a hard lockout code is displayed. When a hard lockout occurs, the boiler will shut down and the display will flash the letter “E” followed by a two digit service code. Once the condition that caused the lockout is corrected, the boiler will need to be manually reset using the RESET button on the display. Table 13.4: Hard Lockout Codes Displayed
CODE
CONDITION
POSSIBLE CAUSES
E 00
A flame signal was present when there should
be no flame.
• Defective gas valve - make sure inlet pressure is below maximum
on rating plate before replacing valve.
E 02
Flame failure after 5 tries to restart
• No gas pressure
• Gas pressure under minimum value shown on rating plate
• Gas line not completely purged of air
• Defective Electrode
• Loose burner ground connection
• Defective Ignition Cable
• Loose or defective gas valve harness
• Defective gas valve (check for 24 VDC at harness during trial for
ignition before replacing valve)
• Air-fuel mixture out of adjustment - consult factory
E 03
Gas valve error
• Loose or defective gas valve harness. Check electrical
connections.
• Defective gas valve (check for 24 VDC at harness during trial for
ignition before replacing valve)
E 04
Power failure occurred after lockout
• Some other error on this list occurred and power to the boiler was
then interrupted. Reset control and see if hard lockout reoccurs.
E 05
E 06
E 07
E 11
Internal control failure
• Reset the control. If problem reoccurs, replace the MCBA.
E 12
Low water cut-off circuit open
• If yellow light on LWCO is on, system is low on water
• If neither yellow nor green light is on, check LWCO harness and
check for 24VAC across AT140 transformer
E 13
E 14
E 15
E 16
E 17
Internal control failure
• Reset the control. If problem reoccurs, replace the MCBA.
E 18
MCBA supply sensor detected temperatures in • See possible causes for “b18” error. Also, check safety limit for
excess of 200°F for an extended period of time proper operation.
E 19
MCBA return sensor detected temperatures in
• See possible causes for “b19” error.
excess of 200°F for an extended period of time
E 28
Blower is not running when it should or fan
speed signal not being detected by MCBA
• Loose connection in 120 VAC fan wiring
• Loose or miswired fan speed harness
• Defective fan
E 29
Blower fan speed has not returned to zero rpm
• Miswired fan speed harness
• Defective fan
E 31
Shorted supply temperature sensor
• Shorted or miswired supply sensor wiring
• Defective supply sensor
E 32
Shorted return temperature sensor
• Shorted or miswired return sensor wiring
• Defective return sensor
E 35
Flue gas temperature sensor short circuit
• Shorted or miswired flue temp sensor wiring
• Defective flue temp sensor
E 36
Supply water temperature sensor circuit open
• Loose or miswired supply sensor wiring
• Defective supply sensor
E 37
Return water temperature sensor circuit open
• Loose or miswired return sensor wiring
• Defective return sensor
E 40
Flue gas temperature sensor circuit open
• Loose or miswired flue temp sensor wiring
• Defective flue temp sensor
E 44
Internal control failure
• Reset the control. If problem reoccurs, replace the MCBA.
E 52
Flue gas temperature over 230°F
• Heat exchanger needs to be cleaned
• Boiler over-fired
• Air-fuel mixture out of adjustment - consult factory
E 60
Internal control failure
• Reset the control. If problem reoccurs, replace the MCBA.
53
SERVICE RECORD
DATE
54
SERVICE PERFORMED
XV Parts
All CHG Series Repair Parts may be obtained through your local Burnham Wholesale
distributor. Should you require assistance in locating a Burnham distributor in your area, or
have questions regarding the availability of Burnham products or repair parts, please contact
Burnham Customer Service at (717) 481-8400 or Fax (717) 481-8408.
55
CHG REPLACEMENT PARTS LIST
CHG150
KEY
56
DESCRIPTION
CHG225
BURNHAM
PART #
QUANTITY
BURNHAM
PART #
QUANTITY
3
#8-32 x 1/4” H.W.H. Screw
100401-01
2
100401-01
2
4
Front Door Panel
100402-01
1
100402-02
1
5
#6-32 Hex Nylon Insert LockNut
100403-01
4
100403-01
4
6
Control Chassis Assembly
100404-01
1
100404-01
1
7
.125” ID x .250”OD Silicone Tubing
100405-01
1.25’
100405-01
1.25’
8
.125” ID x .250”OD Silicone Tubing
100406-01
5.0’
100406-01
5.1’
4
9
Vestibule Door Seal - Horizontal
100407-01
4
100407-02
10
Vestibule Door Seal - Vertical
100408-01
2
100408-01
2
11
#10 x 3/4 Hex Wsh Hd Screw
100409-01
22
100409-01
22
12
Lower Vestibule Door
100410-01
1
100410-02
1
13
U Type Speed Nut
100411-01
22
100411-01
22
14
Vinyl Grommet - .25” ID (For .875” Hole)
100412-01
1
100412-01
1
15
Miniature Hose Fitting 1/8” Barbed to 10-32 Male Thread
100413-01
2
100413-01
2
16
10-32 SS Hex Nut
100414-01
1
100414-01
1
17
#6-32 x 1/4” Hex x 1/2” Long Male-Female Steel Standoff
100415-01
4
100415-01
4
18
#6 -32 x 3/4 “ H.W.H. Screw
100416-01
4
100416-01
4
19
Center Vestibule Door
100417-01
1
100417-02
1
20
#10 x 1/2 Hex Wsh Hd Screw
808600492
25
808600492
26
21
#10 Flat Washer
80860635
4
80860635
4
22
Inspection Port Window
100420-01
1
100420-01
1
23
Upper Vestibule Door
100421-01
1
100421-02
1
24
Partition
100422-01
1
100422-02
1
25
#10 x 1/2 Truss Hd Screw
100423-01
21
100423-01
21
26
Shutter Bushing for .875” Hole
100424-01
2
100424-01
2
27
Flat Wire Clip (Ribbon Cable)
100425-01
2
100425-01
2
28
Right Side Panel Assembly
100426-01
1
100426-01
1
29
5/16 ID Cable Clamp
100427-01
1
100427-01
1
30
Left Side Panel Assembly
100428-01
1
100428-01
1
31
3/4” Boiler Drain Valve
100429-01
1
100429-01
1
32
1-1/4” x 3/4” x 1-1/4” Bk Reducing Tee
806601109
1
806601109
1
33
Vinyl Grommet - .1.625” ID (For 2.625” Hole)
100431-01
2
100431-01
2
34
M6 x 1.0 x 12 Hex Hd Cap Screw
100432-01
2
100432-01
2
35
Trap Tubing (Condensate Drain)
100433-01
3.5’
100433-01
3.5’
36
3/8-16 x 5/8 Hex Hd Cap Screw
100434-01
4
100434-01
4
37
3/8 Flat Washer
80860618
4
80860618
4
38
1-1/4” x 6” Bk Nipple
6066017
1
6066017
1
39
1-1/4” x 19” Bk Nipple
100437-01
1
100437-01
1
40
2” ID x 2.25” OD Polypro/Rubber Duct Hose
100438-01
19-1/2”
100438-01
14-3/4”
41
SAE # 32 Hose Clamp
100439-01
1
100439-01
1
43
#10-24 x 3/8” Hex Wshr Hd Type F
100440-01
NA
100440-01
1
44
Aluminum Cable Tie Mount
100441-01
7
100441-01
9
45
Vinyl Grommet - .825” ID (For 1.625” Hole)
100442-01
1
100442-01
1
46
1/4-20 x 1/2 Self Tapping Screw
100443-01
4
100443-01
4
CHG REPLACEMENT PARTS LIST
CHG150
KEY
DESCRIPTION
BURNHAM
PART #
CHG225
QUANTITY
BURNHAM
PART #
QUANTITY
47
Nylon Glide Foot 1”Dia x 3/4” Long
100444-01
4
100444-01
4
48
Combination Base / Rear Panel
100445-01
1
100445-02
1
49
Vesibule Top Panel Assembly
100446-01
1
100446-02
1
50
Vent Seal Gasket
100447-01
1
100447-02
1
51
Vent Adapter Assembly
100448-01
1
100448-02
1
52
8-32 Hex Nylon Insert Locknut
100449-01
4
100449-01
4
53
Display Board
100450-01
1
100450-01
1
54
Nylon Spacer .25”L x .313”OD x .166”ID
100451-01
4
100451-01
4
55
Graphics Overlay Mounting Plate
100452-01
1
100452-01
1
56
Graphic Overlay Membrane For Display
100453-01
1
100453-01
1
57
Top Panel
100454-01
1
100454-02
1
58
Shorty Bushing for .875” Hole
100455-01
1
100455-01
1
59
Hydro Level Model 1100 Probe LWCO
100456-01
1
100456-01
1
60
1-1/4” Supply Fitting
100457-01
1
100457-01
1
61
3/4” x 2” Bk Nipple
806600003
1
806600003
1
62
3/4” x 1/4” Reducing Bushing
100459-01
1
100459-01
1
63
3/4” x 3/4” 30 psi Relief Valve
81660319
1
81660319
1
64
Tridicator Gauge
100461-01
1
100461-01
1
65
#6 -32 x 1/2 “ H.W.H. Screw Type F Screw
100462-01
8
100462-01
8
66
#4-40 x 1/2” Slotted H.W.H. Type F Screw
100463-01
8
100463-01
8
67
#10-32 x 3/16” Ground Screw
100464-01
1
100464-01
1
68
Control Chassis
100465-01
1
100465-01
1
69
4 X 4 J-Box
100466-01
1
100466-01
1
70
4 X 4 J-Box Cover Plate
100467-01
1
100467-01
1
71
Resistor Clamp .312” Dia
100468-01
1
100468-01
1
72
Terminal Block .375” c/c, 9-Pole
100469-01
1
100469-01
1
73
Pressure Switch
100470-01
1
100470-01
1
74
40VA Transformer (LWCO Power Supply)
100471-01
1
100471-01
1
75A
Boiler Control Module (Natural Gas - Sea Level)
100472-01
1
100472-02
1
75B
Boiler Control Module (LP Gas - Sea Level)
100473-01
1
100473-01
1
76
50VA Transformer (Boiler Control Module)
100474-01
1
100474-01
1
77a
M5 x 0.8 x 25mm, Set Screw
100475-01
4
100475-01
4
77b1
M5 x 0.8 x 30mm, Set Screw
100476-01
NA
100476-01
1
77b2
M5 x 0.8 x 20mm, Set Screw
100477-01
1
100477-01
NA
77c1
M5 x 0.8 x 20mm, Socket Hd Cap Screw
100478-01
NA
100478-01
1
77c2
M5 x 0.8 x 12mm, Socket Hd Cap Screw
100479-01
1
100479-01
NA
M5 x 0.8, Nylock Hex Nut
100480-01
5
100480-01
5
Inlet Gas Elbow Flange Adapter w/ 4 mtg screws & o-ring
100481-01
1
100481-01
1
83
Combustion Air Blower
100482-01
1
100482-02
1
84
Venturi Gasket
100483-01
2
100483-01
2
85
Aluminum Pressure Tap Block
100484-01
1
100484-01
1
86
VK8115 Gas Control w/ 45.900.446- Venturi Manifold
100485-01
1
100485-02
1
87
Combustion Blower Flange Gasket
100486-01
1
100486-01
1
88
1/2” NPT T-Handle Gas Ball Valve (supplied loose)
100487-01
1
100487-01
1
78
79 thru 82
57
58
59
60
61
CHG REPLACEMENT PARTS LIST
CHG150
KEY
62
DESCRIPTION
CHG225
BURNHAM
BURNHAM
QUANTITY
QUANTITY
PART #
PART #
89
#6-32 x 13mm Hex x 92mm, Long Standoff
100488-01
2
100488-01
2
90
M6 x 1.0 x 75mm, Hex Head Screw
100489-01
16
100489-01
16
91
Manifold Seal Ring, EPDM
100490-01
8
100490-01
8
92
M6 x 1.0 x 30mm, SS Hex Socket Set Screw
100491-01
6
100491-01
6
93
M6 x 1.0, Lock Washer
100492-01
6
100492-01
6
94
M4 x 0.7 x 12mm, Phillips Pan Head Mach. Screw
100493-01
2
100493-01
2
95A
M4 x 0.7 x 20mm, SS Hex Socket Set Screw
100494-01
2
100494-01
2
95B
M4 x 0.7, Hex Nut, NP
100495-01
2
100495-01
2
96
M6 x 1.0 x 35mm, SS Hex Socket Set Screw
100496-01
8
100496-01
8
97
M6 x 1.0, Captive Washer Hex Nut
100497-01
8
100497-01
8
98
4.2 x 9.5mm, Pan Head Screw
100498-01
6
100498-01
6
99A
Condensate Trap Less Connecting Pipe
100499-01
1
100499-01
1
99B
Connecting Pipe For Condensate Trap
100500-01
1
100500-01
1
100
Water Manifold Mounting Plate
100501-01
2
100501-02
2
101
Return Manifold
100502-01
1
100502-02
1
102
Supply Manifold
100503-01
1
100503-02
1
103
Inspection Cover Plate
100504-01
1
100504-02
1
104
Inspection Cover Gasket, EDPM
100505-01
1
100505-02
1
105
Sight Glass Holder
100506-01
1
100506-01
1
106
Sight Glass
100507-01
1
100507-01
1
107
Sight Glass Gasket, 5mm
100508-01
2
100508-01
2
109
Ignition Electrode
100509-01
1
100509-01
1
110
Ignition Electrode Gasket, 5mm
100510-01
1
100510-01
1
111
Exhaust Pipe Lip Ring Seal
100511-01
1
100511-02
1
112
Burner Hood
100512-01
1
100512-02
1
113
Burner
100513-01
1
100513-02
1
114
Burner Hood Seal
100514-01
1
100514-02
1
115
Burner Air Distributor Plate
100515-01
1
100515-02
1
116
Nipple, Pressure Measuring, G1/8”
100516-01
1
100516-01
1
117
Hi Temperature Limit Switch
100517-01
1
100517-01
1
118
Sensor
100518-01
3
100518-01
3
119
M6 x 1.0, Nylock Hex Nut
100519-01
6
100519-01
6
120
Condensate Trap Gasket
100520-01
1
100520-01
1
121
X1 Outer Vestibule Line Voltage Harness
100521-01
1
100521-01
1
122
X2 Outer Vestibule Control Harness
100522-01
1
100522-01
1
123
X3/X4 Outer Vestibule Sensor Harness
100523-01
1
100523-01
1
124
Line Voltage Blower Harness / Ignition Ground Wire (j-box)
100524-01
1
100524-01
1
125
Inner Vestibule Gas Valve
100525-01
1
100525-01
1
126
Inner Vestibule Blower Control Harness
100526-01
1
100526-01
1
127
Inner Vestibule Hi Limit Harness
100527-01
1
100527-01
1
128
Inner Vestibule Sensor Harness
100528-01
1
100528-01
1
129
Inner Vestibule Line Voltage Blower Harness
100529-01
1
100529-01
1
130
Ignition (Spark) Cable Harness
100530-01
1
100530-01
1
131
Ribbon Cable Display Harness
100531-01
1
100531-01
1
132
Vented Dust Cap
100532-01
1
100532-01
1
63
CHG REPLACEMENT PARTS LIST
CHG150
KEY
64
DESCRIPTION
BURNHAM
PART #
CHG225
QUANTITY
BURNHAM
PART #
QUANTITY
Not Shown
11-1/2” Releasable Nylon Cable Wire Tie
100533-01
1
100533-01
1
Not Shown
6” Nylon Wire Tie
100534-01
10
100534-01
11
Not Shown
1-5/8” Hole Plug
100535-01
1
100535-01
1
Not Shown
5mm x 20mm Fast Acting, Ceramic Tube, 5 Amp Fuse
100536-01
1
100536-01
1
Not Shown
5mm x 20mm Time Delay, Glass Tube, 4 Amp Fuse
100537-01
1
100537-01
1
Not Shown
1/2” NPT x 3-1/2” Nipple
806600188
1
806600188
NA
Not Shown
1/2” NPT 90° Elbow
100539-01
1
100539-01
NA
Not Shown
Violet Jumper Wire
100540-01
1
100540-01
1
Not Shown
X5 Plug
100541-01
1
100541-01
1
Not Shown
Outdoor Sensor
100542-01
1
100542-01
1
Not Shown
4” Inlet Screen
100543-01
1
100543-01
1
65
66
67
Appendix A: Special Requirements For Side-Wall Vented Appliances
In The Commonwealth of Massachusetts
IMPORTANT
The Commonwealth of Massachusetts requires compliance with regulation 248 CMR 4.00 and 5.00 for
installation of side-wall vented gas appliances as follows:
1. For direct-vent appliances, mechanical-vent heating appliances or domestic hot water equipment, where the bottom of the vent terminal and the air intake is installed below four feet above grade the following requirements must be satisfied:
a.
b.
If there is not already one present, on each floor level where there are bedroom(s), a carbon
monoxide detector and alarm shall be placed in the living area outside the bedroom(s). The carbon monoxide detector shall comply with NFPA 720 (2005 Edition).
c.
A product-approved vent terminal must be used, and if applicable, a product-approved air intake must be used. Installation shall be in strict compliance with the manufacturer’s instructions. A copy of the installation instructions shall remain with the appliance or equipment at the completion of the installation.
d. A metal or plastic identification plate shall be mounted at the exterior of the building, four feet directly above the location of the vent terminal. The plate shall be of sufficient size to be easily read from a distance of eight feet away, and read “Gas Vent Directly Below”.
A carbon monoxide detector shall be located in the room that houses the appliance or equipment
and shall:
i.
ii.
iii.
iv.
Be powered by the same electrical circuit as the appliance or equipment such that only one
service switch services both the appliance and the carbon monoxide detector;
Have battery back-up power;
Meet ANSI/UL 2034 Standards and comply with NFPA 720 (2005 Edition); and
Have been approved and listed by a Nationally Recognized Testing Laboratory as recognized under 527 CMR.
2. For direct-vent appliances, mechanical-vent heating appliances or domestic hot water equipment, where the bottom of the vent terminal and the air intake is installed above four feet above grade the following requirements must be satisfied:
68
a.
b.
If there is not already one present, on each floor level where there are bedroom(s), a carbon
monoxide detector and alarm shall be placed in the living area outside the bedroom(s). The carbon monoxide detector shall comply with NFPA 720 (2005 Edition).
A product-approved vent terminal must be used, and if applicable, a product-approved air intake must be used. Installation shall be in strict compliance with the manufacturer’s instructions. A copy of the installation instructions shall remain with the appliance or equipment at the completion of the installation.
c.
A carbon monoxide detector shall :
i. Be located in the room that houses the appliance or equipment
ii. Be either hard-wired or battery powered or both; and
iii. Comply with NFPA 720 (2005 Edition)
SERVICE RECORD
DATE
SERVICE PERFORMED
69
SERVICE RECORD
DATE
70
SERVICE PERFORMED
SERVICE RECORD
DATE
SERVICE PERFORMED
71
9EARSIN3ERVICE
3ERVICE#HARGE
ASOF
2ETAIL0RICE
.O
#HARGE