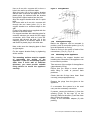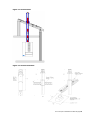
1
eco hometec
Variable Controlled Output
(VCO) Solar Compatible jjjjj
Condensing Boilers
EC 25 COMPACT
INSTALLATION &
USER
INSTRUCTIONS
PLEASE LEAVE WITH THE END USER
eco hometec
Unit 11E
Carcroft Enterprise Park
Carcroft
Doncaster
DN6 8DD
Tel. 01302 722266
Fax. 01302 728634
e.mail. [email protected]
http://www.eco-hometec.co.uk
D:\Septemeber2000Manuals\EC25CompactManual8070900.doc\30 June 2002
eco hometec has a policy of continuous improvement and reserves the right to change any
specification without notice. Your statutory rights are not affected.
eco hometec is committed to design, develop and produce environmentally friendly appliances
for both domestic and commercial applications
Page 2 ECO HOMETEC (UK) LTD.
Contents
1.
Safety Considerations .........................6
2.
Symbols...............................................6
2.1
Gas Safety....................................6
3.
Electrical Supply ..................................6
4.
Terms of Warranty...............................7
5.
Commissioning Certificate...................7
5.1
6.
Existing Installations ............................7
6.1
6.2
7.
Variable Controlled Output ...........8
Emissions. ....................................8
PPS Plastic Flue System..............8
Approvals .....................................8
Additional Features ......................8
Description of Appliances ....................8
8.1
8.2
8.3
9.
Prior to Connection.......................7
Expansion Vessels .......................8
Introduction..........................................8
7.1
7.2
7.3
7.4
7.5
8.
System water quality ....................7
EC 25 H Compact ........................8
EC 25HS Compact .......................9
EC EC 25S Compact....................9
Technical Information. .......................10
10. Unpacking & Items Supplied .............13
10.1
10.2
10.3
Environment & Packaging ..........13
Appliance....................................13
Check the type plate...................14
11. Accessories .......................................14
12. Operation...........................................15
15. Flues and Ventilation......................... 20
15.1
15.2
15.3
15.4
15.5
15.6
15.7
Maximum Flue Lengths.............. 20
Available Flue Components ....... 22
Condensate in the Flue.............. 23
Flueing Options .......................... 23
Installing a Concentric Flue........ 23
Vertical flue Installations ............ 24
Terminal Positions ..................... 27
16. Gas Supply........................................ 28
16.1
16.2
Gas Supply ................................ 28
LPG Gas Supply ........................ 28
17. Air Supply.......................................... 28
17.1
17.2
17.3
Concentric Flue.......................... 28
Conventionally Flue ................... 28
Compartment Ventilation ........... 29
18. Hydraulic Requirements .................... 30
18.1
18.2
18.3
Expansion Vessel ...................... 30
Condensate Drain ...................... 31
System By-Pass......................... 31
19. Electrical Connections....................... 31
20. Heating Control Options.................... 32
20.1
20.2
20.3
20.4
20.5
Connecting Room Thermostat ... 32
External temperature sensor...... 32
Cylinder Thermostat................... 33
Terminal block............................ 33
Laptop Serial Connection........... 33
21. Commissioning and Testing.............. 33
21.1
21.2
21.3
21.4
21.5
21.6
Electrical Checks ....................... 33
Gas Supply ................................ 33
Connection to Pipe-work ............ 33
Water Treatment ........................ 33
Flushing System Pipe-work ....... 33
Filling and Venting the System .. 34
Variable Controlled Output .........15
Variable pump ............................15
22. Combustion Ratio.............................. 34
13. Siting the Appliance...........................15
23. Output test function ........................... 34
12.1
12.2
13.1
Timber Framed Dwellings ..........16
14. Hydraulic Connections......................16
14.1
14.2
14.3
14.4
14.5
14.6
14.7
14.8
14.9
14.10
First Fixing Pipe-work.................16
Connections ...............................16
Clearances .................................16
Checks Before Siting..................17
Fixing the boiler. .........................17
Removing The Casing................17
Mounting the support bracket.....18
Fitting the O-rings.......................19
Mounting of the appliance ..........19
Connections ...............................20
23.1
23.2
Commissioning NG and LPG ..... 34
Flue System Check .................... 36
24. Control Setup .................................... 36
24.1
24.2
24.3
24.4
24.5
24.6
24.7
External temperature control...... 36
Switching on the appliance ........ 36
Setting the Output ...................... 36
Pump operation.......................... 36
8.1.5 Frost protection ................. 37
Weather compensation .............. 37
Setting the Heat Slopes ............. 37
25. Hot water production ......................... 38
EC 25 Compact Installation/User Manual page 3
25.1
25.2
25.3
25.4
Combi Type ’S’ Tap boiler ..........38
General operation ......................38
Pump operation..........................38
Hot Water Cylinder .....................39
26. Safety devices ...................................39
26.1
26.2
26.3
26.4
26.5
26.6
26.7
Electronic ignition .......................39
Flow protection...........................39
Max. temperature protection ......40
Static pressure ...........................40
Air supply monitoring..................41
Exhaust gas sensor (optional)....41
Display .......................................41
27. Menu structure ..................................42
28. Laptop Connection ............................44
28.1
28.2
28.3
Display current status.................44
History screen ............................44
Graphic screen...........................44
29. Fault Finding......................................45
29.1
29.2
Blocking actions .........................45
Interlocks....................................45
30. Electrical circuit diagram ...................47
30.1
Decommissioning the boiler .......48
31. User Instructions ...............................49
32. Annual Servicing. .............................49
33. Decommissioning the boiler. .............49
33.1
33.2
33.3
33.4
33.5
33.6
General ......................................49
Holiday .......................................49
Cleaning .....................................49
Control system codes.................49
Malfunction codes ......................49
Topping up .................................50
Page 4 ECO HOMETEC (UK) LTD.
33.7
Bleeding air from the system ..... 50
FIGURE 1
FIGURE 2
FIGURE 3
FIGURE 4
FIGURE 5
FIGURE 6
FIGURE 7
FIGURE 8
FIGURE 9
FIGURE 10
FIGURE 11
FIGURE 12
FIGURE 13
FIGURE 14
FIGURE 15
FIGURE 16
FIGURE 17
FIGURE 18
FIGURE 19
FIGURE 20
FIGURE 21
FIGURE 22
FIGURE 23
FIGURE 24
COMPONENT LOCATIONS ................ 12
PIPEWORK CONNECTIONS .............. 16
MINIMUM CLEARANCES .................. 17
REMOVING CASING ........................ 17
REMOVING THE CASING.................. 17
OVERALL DIMENSIONS ................... 18
FIXINGBRACKET ............................. 19
CONCENTRIC FLUE ........................ 20
FLUE DESIGN................................. 21
THERMAL LIFT ........................... 22
WALL TERMINAL ........................ 23
VERTICAL WALL TERMINAL ......... 24
VERTICAL FLUES ........................ 25
VERTICAL TERMINALS ................ 25
CONCENTRIC FLUES ................... 26
80MM FLUE TUBES .................... 26
FAN FLUED TERMINAL POSITIONS.. 27
CONTROLS TERMINAL ................ 32
CONNECTION TERMINAL BLOCK .. 32
OUTPUT TEST DISPLAY .............. 34
GAS VALVE ADJUSTMENTS .......... 35
SAMPLE POINTS ......................... 36
WIRING DIAGRAM....................... 46
STATUS DISPLAY ....................... 50
TABLE 1
TABLE 2
TABLE 3
TABLE 4
TABLE 5
TABLE 6
TABLE 7
TABLE 8
TABLE 9.
TABLE 10
TABLE 11.
TABLE 12
TABLE 13
TABLE 14
TABLE 15
DIMENSIONS & CONNECTIONS ........ 10
HEATING SPECIFICATIONS .............. 10
CAPACITIES & WEIGHTS ................. 10
HOT WATER SPECIFICATIONS ......... 11
CONNECTION VALUES .................... 11
EMISSION VALUES.......................... 11
COMPONENT LIST .......................... 13
EXTRA ITEMS AND ACCESSORIES .... 14
MINIMUM CLEARANCES .................. 16
FLUE RESISTANCE ......................... 21
FLUE TERMINAL POSITIONS. ........... 27
VENTILATION ................................. 29
EXPANSION VESSEL REQ. .............. 30
SYSTEM CONTENTS ....................... 30
CONTROL MENU ............................ 43
HEALTH & SAFETY
INFORMATION FOR THE INSTALLER AND SERVICE
ENGINEER
Under the current issue of the Consumer Protection Act and the Health and Safety at Work Act
it is a requirement to provide information on substances hazardous to health (COSSH
Regulations).
eco hometec takes every reasonable care to ensure that these products are designed and
constructed to meet these general safety requirements, when properly used and installed. To
fulfil this requirement each boiler is comprehensively tested before despatch.
When working on the appliance it is the Users/Installers responsibility to ensure that any
necessary personal protective clothing or equipment is worn appropriate to parts that could be
considered as being hazardous to health and Safety.
This appliance may contain some of the items below.
INSULATION AND SEALS
Glass Rope, Mineral Wool, Insulation Pads, Ceramic Fibre, Glass Insulation.
may be harmful if inhaled
may be irritating to the skin, eyes, nose or throat
When handling avoid inhalation and contact with eyes.
Use (disposable) gloves, face masks and eye protection.
After handling, wash hands and other exposed parts.
When disposing, reduce dust with water spray, ensure parts are securely wrapped.
GLUES, SEALANTS & PAINT
Glues, Sealant and Paints used in the product present no known hazards when used in the
manner for which they are intended.
EC 25 Compact Installation/User Manual page 5
1.
Safety Considerations
The installation of this appliance must be
carried out by a competent person in
accordance with the relevant Gas Safety
Regulations
(as
amended),
Building
Regulations, Model Water Bylaws and the
Building Standards (Scotland) Regulations.
eco hometec shall not be responsible for
any damage or loss resulting from failure to
carefully observe the instructions given.
The boiler, except for commissioning
purposes, should not be left operating
without the casing being attached and
firmly secured
2.
Symbols
In this manual the following symbols are
used.
This symbol
is used to indicate points
that are important, to ensure compliance
with safety regulations or to facilitate
installation or operation.
!
This symbol
is used to highlight points
that must be observed for the safety of
yourself and others.
2.1
Gas Safety
All gas appliances must, by law, be installed
by competent persons, e.g. members of
CORGI, in accordance with the Gas Safety
Regulations. Failure to install appliances
correctly could lead to prosecution
!
It is in your own interest and that of safety
to ensure that the law is complied with.
Installer training courses are available for
CORGI registered installers. Please contact
eco hometec for more information.
This installation manual contains all the
necessary information required to install and
commission the EC 25Compact range of
boilers.
Please read this manual thoroughly before
commencing installation. The installation
must be carried out in accordance with the
manual otherwise the warranty will be void.
Page 6 ECO HOMETEC (UK) LTD.
Use only original parts for service and
maintenance. After installation ensure the
manual is kept close to the boiler and
available for reference purposes.
The installation should also be in
accordance with current editions and
comply with the recommendations of the
following British Standard Codes of
Practice.
CP.331.3
Low pressure installation pipes.
BS.6798
Boilers of rated output not
exceeding 60kW.
BS.5546
Installation of gas hot water
supplies for domestic purposes.
BS. 5449.1
systems.
Forced circulation hot water
BS.5440.1
Flues (for gas appliances of
rated input not exceeding 60kW).
BS.5440.2
Air supply (for gas appliances
of rated input not exceeding 60kW).
3.
Electrical Supply
The wiring must comply with the current
I.E.E. Wiring Regulations.
The Health and Safety Document No. 635
and the Electricity at Work Regulations
1989 must be followed where applicable.
The boilers are supplied for 230V +10/-15%
50Hz operation.
! The method of connection to the mains
electrical supply MUST facilitate complete
electrical isolation of the boiler. This may be
achieved using a readily accessible 3 amp
fused double pole switch clearly labelled.
THESE APPLIANCES MUST BE
EARTHED.
This boiler is an EC
IMPORTANT
Certified Appliance and must not be
modified or installed in any way contrary to
these
‘Installation
and
Servicing
Instructions’.
The manufacturers instructions must NOT
be taken in any way as over-riding statutory
obligations.
4.
Terms of Warranty
Damages to the appliance resulting from the
following causes will invalidate the
warranty:
incorrect or unsuitable use of the boiler
Please ring the eco hometec technical
department for advice on suitability
faulty installation or servicing by the
purchaser or third parties
normal wear and tear
failure to maintain or service appliance in
compliance with this manual
in the case of chemical, electrochemical or
electric influences in as much as the fault
cannot be attributed to the manufacturer
failure to observe installation and/or
operating instructions
effects of fitting, servicing or repairing parts
with non-genuine origin parts (e.g. nongenuine boiler circuit control)
damage as a result of dust or other foreign
matter being sucked into the burner
influence of noxious vapours
installation and operation in inappropriate
rooms (e.g. in washrooms, launderettes,
swimming pools or hobby rooms)
continued use when apparatus is defective
or requires servicing
in the case of inappropriate alterations or
renovation work by the purchaser or by third
parties
oxygen corrosion, particularly when not
using diffusion-tight plastic pipes in floor
heating systems
corrosion as a result of inadequate system
water treatment.
interim building conditions with unregulated
heating operation (manual operation without
boiler protection)
interim building conditions with dust-polluted
combustion air
5.
Commissioning Certificate
The warranty is only recognised if a
completed
commissioning
certificate
(operational test form) is at hand (send in by
fax
or
post),
as
well
as
an
acknowledgement by eco hometec (u.k.) ltd.
5.1
System water quality
Before commissioning the appliance it is
essential to clean the installation in
accordance with BS 7593: 1992
Installation of in-line strainers is obligatory.
As a protection from corrosion and
impurities the water additive Fernox MB1
has to be used and maintained (4%).
6.
Existing Installations
6.1
Prior to Connection
IMPORTANT All eco hometec
boilers are low water content units. In order
to protect and prolong the working life of the
appliance, it is important the general
condition of older systems is carefully
considered.
When connecting to an existing
installation it is important that system
deposits are removed and are not
allowed to contaminate boiler.
This involves the application of a cleanser
and allowing it to circulate around the whole
system for a specified time, then flushing to
drain.
Consider high pressure flushing to
remove all debris in badly contaminated
systems.
It is important to select the
cleanser appropriate to the installation i.e.
for a new installation, or for an existing
installation. It is good practice to clean the
system prior to the installation of the new
boiler. The removal of debris, flux residue,
grease, metal swarf etc. from new systems
and any black magnetic iron oxide sludge
and lime scale from old systems is
essential.
In-line strainers must be fitted to the
return water connections for full protection.
All installations must be treated with Fernox
MB1 at a concentration of 4%.
If plastic pipes are used to connect the
boiler to radiators or under floor heating,
it is essential that only those types of
plastic pipe that incorporate an oxygen
diffusion barrier be used. If such pipes
EC 25 Compact Installation/User Manual page 7
are not used, the eco hometec guarantee
will become null and void.
6.2
Expansion Vessels
The EC25 Compact is designed for
connection to a fully pumped sealed heating
circuit only.
A suitable sized expansion vessel is
required to accommodate volume change
(expansion of water) when heated up to
maximum operational temperature.
Select an expansion vessel that matches
the volume of the CH system and the static
pressure.
Expansion vessels should be
connected to the system at a point close to
the pump inlet in order to maintain positive
pressure throughout the system.
Installation should comply with BS7074 part
1 and BS5449.
7.
Introduction
The boiler features the very latest in
technology.
The boilers incorporate a premixing, fully
modulating, gas burner, 3 bar pressure
relief valve, manometer and circulating
pump.
7.1
Variable Controlled Output
Unlike most boilers that simply switch on
and off the boiler incorporates an integral
compensating and modulating digital
controller that automatically adjusts the
boilers output depending on system load
requirements.
This feature, Variable Controlled Output,
(VCO) is the very latest from eco hometec
in condensing technology and ensures the
boiler maintains optimum efficiencies even
when operating at part load.
7.2
Emissions.
A further benefit of this very accurate
combustion process is the dramatic
reduction of the harmful emissions NOx 8.1
– 27.1 ppm and CO 2.9 – 66ppm.
Page 8 ECO HOMETEC (UK) LTD.
7.3
PPS Plastic Flue System
Due to the extremely low temperature flue
gases the boiler may be flued using the
lightweight and corrosion resistant eco
hometec PPS plastic flue system.
7.4
Approvals
The unit has been approved according to
the European standards (CE) and the
requirements for cleaner combustion (RAL
UZ61)
7.5
Additional Features
A unique corrosion resistant stainless steel
condensate heat exchanger.
Integral sensors (PTC) for monitoring flow
and return water temperatures.
3 way switching valve and facilities for
connection to an eco hometec DHW storage
module or similar.
Computer controlled combustion analysis
with built in fault diagnosis facility. These
readings can be down loaded onto a PC by
using a interface cable and software
available from eco hometec.
8.
Description of Appliances
8.1
EC 25 H Compact
The ‘H’ model is suitable for a central
heating system with hot water and heating
circuit(s) controlled using two or more zone
valves.
The appliance produces a low temperature
output for under-floor heating or a
fixed/variable temperature output for
connection to radiators. Flow temperature
to hot water cylinder can be set as required
(max. 85OC)
Hot water cylinders must be double feed
indirect and to aid efficiency and fast
recovery times (all appliances are hot water
priority) should be of the high recovery type.
Recommended minimum coil capacity
25kW.
The unit has a variable capacity of 32 to
100%, while the maximum capacity can be
set and adapted to the capacity of the CH
system.
8.2
EC 25HS Compact
The ‘HS’ range are higher specification.
With its 4 x 15mm connections it offers a
low temperature output, typically 55OC, for
under-floor heating or a fixed/variable
temperature output for connection to
radiators.
Despite the low boiler flow
temperatures feature ALL low temperature
under floor installations require an
obligatory mixing valve or high temperature
cut out thermostat installing as part of the
system controls.
Flow temperature to hot water cylinder can
be set as required (max. 85OC)
The unit has a variable capacity of 32 to
100%, while the maximum capacity can be
set and adapted to the capacity of the CH
system.
Hot water cylinders must be double feed
indirect and to aid efficiency and fast
recovery times (all appliances are hot water
priority) should be of the high recovery type.
Recommended minimum coil capacity
25kW.
8.3
EC EC 25S Compact
This unit has a built-in heat primary heat
exchanger and hot water production is
continuous.
The unit has a variable capacity of 32 to
100%, while the maximum capacity can be
set and adapted to the capacity of the CH
system.
EC 25 Compact Installation/User Manual page 9
9.
Technical Information.
Table 1
Dimensions & Connections
Product Identification Number
CE ~ 0063 AT3070
Dimensions (H x W x D)
600mm x 360mm x 300mm
Heating Circuit Connections
15mm
Gas Connection
15mm
Condense Drain Connection
15mm
Air Supply/Flue Connections
60mm-60mm (eccentric) 125/80mm (concentric)
Table 2
Heating Specifications
Models H, HS and S
EC25
Nominal Input To Heating
kW
Maximum Rated Input (S Type combi only)
7.2 – 24.5
kW
28
0
kW
7.1 – 24.2
0
Nominal Output To Heating 50/30 C
kW
7.9 – 25.9
CO2 % content at min/max load
CO2 %
8.2 – 8.8%
Nominal Output To Heating 80/60 C
0
Dew Point of Flue Gases
0C
52
Flue Gas Temp @ 80/600C (Amb 200C)
00C
<70oC
* Maximum Flue Resistance
Pa
185
pH value of condensate water
PH
4-5.5
0
Maximum Flow Temperature
0C
90
Min/Max filling pressure
bar
1.0 - 3.0
0
%
91.0 – 89.0 % (partial load – full load)
0
Efficiency @ 50/30 C
%
98.0 – 95.1 % (partial load – full load)
**Efficiency @ 50/300C
%
109 – 106.1% (partial load – full load)
Hot water efficiency in accordance with
CW-test measured over 24 hours
%
85
EPC
%
95.1
Efficiency @ 80/60 C
* At this resistance, the load will remain within the limits indicated on the data plate.
** European calculation methods are based on efficiency of 100% in units that do not
condense the flue gases, and of 110% in condensing units.
Table 3
Capacities & Weights
Model
EC25
Heating Water Capacity
litres
1.5
Heating Water Coil Capacity (S models)
Litres
3.1
Weight (empty)
Kg
35
Page 10 ECO HOMETEC (UK) LTD.
Table 4
Hot Water Specifications
Model
EC25S
Maximum Rated Input
kW
28
Modulating Output
kW
8-28
Hot Water Flow rates at ∆τ 30K (S type)
L/min
13
Maximum Tap Water Pressure
bar
8
Table 5
Connection Values
Min/Max Gas Pressure
mbar
20/25
Maximum Input Rate Natural Gas (H & HS Types)
m/h3
2.58
3
2.95
Maximum Input Rate Natural Gas (S Types)
m/h
Electrical Supply
VAC
230
Power Consumption Average
W
85
Thermostat Voltage
V
24
Table 6
Emission Values
CO2
natural gas: 8.2 – 8.8 %
CO (0 % O2)
natural gas: 2.9 – 66 ppm
NOx (0 % O2)
natural gas: 8.1 – 27.1 ppm
Noise Levels Pump high speed
50 dB(A)
Noise Levels Pump low speed
34 dB(A)
EC 25 Compact Installation/User Manual page 11
Figure 1 Component Locations
Page 12 ECO HOMETEC (UK) LTD.
Table 7
Pos.
Component List
Description
Manufacturer
1
Heat exchanger
Coopra
N 00 S 04 00 00 0009
2
Hot tap water boiler
Coopra
N 00 S 10 00 00 0001
3
Pump
Wilo
N 00 S 11 00 00 0004
4
Three-way valve
Honeywell
N 00 S 11 00 00 0003
5
Three-way valve internal parts
Honeywell
N 00 S 11 00 00 0002
6
Incandescent igniter
Norton
N 00 S 07 00 00 0013
7
Ionization pin
Sapco
N 00 S 07 00 00 0020
8
Burner
Furigas
N 00 S 02 00 00 0000
9
Condensation tray
Coopra
N 00 S 02 01 30 0001
10
Gas valve
Honeywell
N 00 S 02 00 00 0009
11
Fan
RMI
N 00 S 02 00 00 0006
12
Venturi tube
Honeywell
N 00 S 02 00 00 0010
13
Water pressure sensor
Huba
N 00 S 08 00 00 0010
14
Supply sensor
SHI
N 00 S 08 00 00 0011
15
Return sensor
SHI
N 00 S 08 00 00 0011
16
Safety device
Pentec
N 00 S 08 00 00 0008
17
Bleed valve
Honeywell
N 00 S 11 00 00 0001
18
Hot water sensor
SHI
N 00 S 08 00 00 0011
19
Flue Outlet
20
Boiler back casing
21
Condensate Discharge
22
Gas Connection
23
Heating Flow
24
Heating Return
25
Hot water Outlet
26
Cold water Inlet
27
Flow to Hot Water Cyl.
28
Return from Hot Water Cyl.
10.
Unpacking & Items Supplied
10.1
Environment & Packaging
The packaging provided for the purposes of
transport and protection of the appliance
consists predominantly of the following
materials:
cardboard
styropor
Do not include the packaging with the
domestic rubbish but find out from your local
authority how you can dispose of the
material. The styropor elements can also be
disposed of separately in this way.
Article code
10.2
Appliance
If you need to dispose of an appliance at
the end of its useful life, it will usually be
taken back by your supplier. If this not is
possible, do not deposit the appliance with
the domestic rubbish, but find out from your
the local authority what possibilities there
are for re-cycling or environmentally-friendly
processing of the materials.
Before unpacking, check that the type of
gas to be used is the same as that specified
on the packaging. If there are any queries
contact your supplier.
EC 25 Compact Installation/User Manual page 13
Follow the unpacking instructions on the
packaging. Take the handbook out of the
plastic packaging around the boiler.
10.3
Check the type plate
Check that the details stated on the type
plate agree with the present installation and
the intended use.
Mounting bracket.
11.
Accessories
The following items are also available from
eco hometec at extra cost.
Colour coded 1/4 Turn Isolating Valves.
Never use any type of gas other than that
which is specified on the type plate.
Stainless Steel Flexible Pipe Connections.
In line Filter/Strainers.
Never connect the appliance to any other
mains voltage than that which is specified
on the type plate.
Condensate sump pump for below ground
installations.
N.B. LPG installations must
not be installed below ground level.
The following items are supplied with the
Boiler.
eco hometec servicing software and RS
2323 interface cable for connection to a PC.
Extra Items and accessories
Installation and User manual (to be left with
the end user).
For more details please contact the
eco hometec technical department.
Table 8
Extra Items and accessories
EC25S EC25HS EC25H
X
X
X
X
X
X
X
X
X
X
X
X
X
X
X
X
X
X
X
X
X
X
X
X
X
X
Description
Concentric adapter (NL)
Cover (NL)
Cover for boiler construction (N)
Cover with expansion tank (NL)
Cover extended (NL)
Mounting frame with expansion tank (NL)
External sensor
Boiler sensor
Interface
Exhaust gas sensor
eco hometec comprehensive range of PPS flue kits, fittings and accessories. For more
information please see section on flues
Page 14 ECO HOMETEC (UK) LTD.
12.
Operation
A key component of the boiler is the
premixing gas burner, which is capable of
producing a Variable Controlled Output
(32% to 100% ratio). For Combi EC25S
types (32% to 115% ratio).
A unique feature of the burner is its shape,
which has been specially designed to suit
the geometry of the combustion chamber.
It is composed of a perforated sheet of
stainless steel. On the surface of this
burner, accurate quantities of premixed gas
and air are burnt almost without a visible
flame.
As a result of the extremely low combustion
temperatures produced during this process,
emissions of harmful atmospheric pollutants
are dramatically reduced.
12.1
Variable Controlled Output
The eco hometec on-board computerised
V.C.O. system with integral fault diagnostic
facility, ensures that optimum efficiency is
maintained when operating in both heating
and DHW modes.
According to the required flow temperature,
the burner modulates its output constantly.
To save electricity, a 310Volt DC, high
efficiency fan is used with a variable speed
and power capacity; if the heat demand
decreases, the fan will turn at a lower
speed, which results in a lower power
consumption.
The fan is programmed to supply given
amounts of air for specific burner outputs.
The fan sucks in air for combustion through
the air inlet. The airflow causes a negative
pressure in the Venturi tube, which results
in the correct quantity of gas being sucked
into the burner. The gas/air mixture is
ignited on the surface of the burner by
means of the incandescent ceramic igniter.
The combustion gases are then passed
down through the stainless steel heat
exchanger to atmosphere.
12.2
Variable pump
A variable speed integral circulating pump is
supplied, which operates at two speeds and
results in a lower power consumption.
This feature is to help maintain a
temperature difference of 20OC between the
flow and return temperatures on systems
using radiators.
13.
Siting the Appliance
In siting the boiler, the following limitations
MUST be observed
The appliance must be mounted on the wall
using the separately supplied support
bracket.
The connections available on the support
bracket depend on the type of appliance to
be mounted.
The boiler is not suitable for external use.
The position selected for installation MUST
allow adequate space for servicing in front
and below the boiler and for the circulation
of ventilation air around the boiler. The
position must allow for the correct routing of
a flue system.
The room must be dry and protected from
frost.
All eco hometec appliances are condensing
and pluming at the flue is a normal
occurrence. Flue terminal positions where
this, or the noise of flue gases discharging
from the flue could be a nuisance, must be
avoided.
Normally no part of the appliance, other
than the water pipe-work (900C) and flue
pipe (750C), will exceed 650C. However, any
combustible material near to the boiler or its
flue system and water pipe-work must be
protected to ensure it does not exceed
650C.
It is advisable when installing the
boiler to use an eco hometec P.P.S. plastic
concentric flue system. This not only
ensures that there is sufficient combustion
air, but also reduces room ventilation
EC 25 Compact Installation/User Manual page 15
requirements thus increasing the number of
possible suitable locations.
necessary. Detailed guidance on
subject can be found in BS. 6798.
The EC25 Compact models may be
installed on the inner face of an external
wall and some internal walls providing they
are flat, vertical, of a non-combustible
material and are capable of supporting the
weight of the boiler and any other ancillary
equipment.
Where installation will be in an unusual
location, special procedures may be
13.1
this
Timber Framed Dwellings
When installing the EC VCO
MODELS into a timber framed dwelling, it
must be fitted in accordance with the British
Gas publication ‘Guide for Gas Installations
in Timber Framed Housing’ ref. DM2.
For further advice contact the eco hometec
Technical Helpline.
Figure 2 Pipework Connections
14.
Hydraulic Connections
14.1
First Fixing Pipe-work
All the pipe-work and wiring connections
enter at the bottom of the unit. To ensure a
tidy installation it is important to consider at
the first fixing stage the order you arrange
the pipe-work and if applicable any cable
trunking.
Figure 2 shows the order in which to fix the
pipe-work.
14.2
1.
2.
3.
4.
5.
6.
7.
Connections
Gas
Heating Return
Heating Flow
Domestic Hot Water (Combi)
Cold Mains Water (Combi)
Flow to Hot Water Cylinder
Return Hot Water Cylinder
Page 16 ECO HOMETEC (UK) LTD.
14.3
Clearances
For ease of installation, necessary
inspection and commissioning, the following
clearances are recommended. To help
determine best location use dimensions
from figure 6.
Table 9. Minimum Clearances
Sides
50mm
Above
250mm
Below
150mm
Front
455mm
Figure 3 Minimum Clearances
14.4
Checks Before Siting
Before commencing to install this appliance
ensure the design specification complies
with all of the requirements contained in
these installation and servicing instructions
and any statutory documents which may
apply.
Figure 4 Removing Casing
Pull the casing upwards, lifting up and off
the locating lugs. Place the casing to one
side taking care not to scratch the casing or
control panel cover. (see fig. 5.)
Figure 5 Removing the Casing
The manufacturers instructions must
not be allowed to override statutory
requirements. More than one person may
be required to install the appliance.
14.5
Fixing the boiler.
When unpacking the unit for the first time,
take adequate precautions to protect the
surrounding floor coverings.
The boilers
are factory tested and contain residues of
water that could cause dampness and
possible staining if contact with carpets and
floor coverings is not prevented.
14.6
Removing The Casing
To remove the casing lay the unit down on
the floor with the casing facing upper most.
To open the casing, unscrew the clasp (4 in
Fig. 4). Using a No. 24 spanner.
Take any necessary precautions to protect
the surrounding working area and
decorations from dust and damage.
Make one final check on the location; pay
particular attention to the flue outlet
(consider pluming) and the condensate
discharge pipe route.
Install the combi ‘S type’ model as
close as possible to the hot water taps to
avoid the hot water pipes from becoming
too long. This prevents long delays and
unnecessary waste of water.
When you are satisfied the location meets
all the required criteria proceed as follows.
EC 25 Compact Installation/User Manual page 17
Figure 6 Overall Dimensions
14.7
Mounting the support bracket
For mounting the support bracket on a brick
wall of sufficient thickness, use the screws
and plugs supplied with the bracket. When
you have decided where the bracket is to be
mounted, proceed as follows (see Fig.7)
Page 18 ECO HOMETEC (UK) LTD.
Mark the position of the hole (10) in the
bracket.
Please remember when using power tools
to take all necessary safety precautions and
always wear safety goggles.
Use an 8 mm dia. concrete drill to bore a
hole in the wall to a sufficient depth.
Align the hole (10) in the support bracket
with the hole in the wall and pass one of the
plastic plugs (9) delivered with the bracket
through the support bracket into the hole.
Align the support bracket with aid of a spirit
level.
Drill holes with an 8 mm dia. concrete drill
through the two lower holes (11) in the
support bracket to a sufficient depth in the
wall.
Fit two of the plastic plugs supplied with the
bracket in the lower holes.
For support brackets with clamping plate for
eccentric exhaust gas canal and air supply
connection: drill a hole with an 8 mm dia.
concrete drill through the hole (12) in the
clamping plate to a sufficient depth in the
wall and fit a plastic plug in this hole also.
Note: make sure the clamping plate is fixed
at right-angles.
Fix the support bracket firmly by tightening
all the screws.
The mounting surface must be capable
of supporting the weight of the
appliance. If you use a mounting surface
other than a brick wall of sufficient
thickness, you must provide suitable
fixing devices to mount the appliance
securely.
Figure 7 FixingBracket
14.8
Fitting the O-rings
Before the appliance can be mounted in
position, each of connection points (1) to (5)
must be fitted with an O-ring.
Place an O-ring in the centre of each of the
connections (1) to (5) ( Fig. 2.1).
14.9
Mounting of the appliance
After mounting the support bracket and
installing the connections, the appliance can
be mounted in position.
Take account of the weight of the appliance
(approximately 35 kg).
Ensure that you adopt a correct posture
while lifting in order to prevent back
problems.
Check that the O-rings have been fitted
correctly (see paragraph above).
Remove the plugs from the pipes on the
appliance.
If a concentric flue system is to be used
carry out the necessary conversion
If present, remove the bellows (1) from the
opening (Fig.8). Fit the stop (2) on the
opening. Remove the slide (3) and the foam
part (4) from the opening.
Finally, fit the concentric adapter (5) with
packing.
EC 25 Compact Installation/User Manual page 19
Figure 8 Concentric Flue
Hold the appliance upright against the wall
at approximately. 5 cm above the place
where it will be mounted.
Press the
appliance into the guides and carefully allow
it slide downward, so that the hook on the
support bracket falls in the opening at the
back of the appliance and the pins below
the appliance drop into the corresponding
openings in the support bracket.
The connections on the appliance will then
mate up with the connection points on the
support bracket.
14.10 Connections
Gas and water tighten the gland nuts on
each of the connections (1) to (5) firmly.
Page 20 ECO HOMETEC (UK) LTD.
15.
Flues and Ventilation
The internal boiler flue system is
manufactured stainless steel and the flue
outlet may be connected to an external
P.P.S plastic or stainless steel flue system.
15.1
Maximum Flue Lengths
The flue materials, flue insulation, the
amount of vertical and horizontal pipe and
the amount of bends incorporated
determine the maximum permissible flue
length.
The excess fan pressure available for
overcoming the frictional resistance of the
flue system is 185 p.a.
Figure 9 Flue Design
Boiler output in relation to available flue Pa
lower outputs = more Pa and longer flue lengths
500
450
400
Available flue ~ Pa
350
300
250
200
150
100
50
0
25
26
27
28
29
30
31
32
33
Boiler output ~kW
For the purposes of flue design when using the eco hometec PPS 125mm/80mm concentric flue
system then refer to the table below for component resistances.
Table 10 Flue Resistance
COMPONENT RESISTANCE
P.a
80/125 Concentric 500 mm Fanned Flue Kit
80/125 1000mm length PPS/White Galvanised Concentric Flue
80/125 500mm length PPS/White Galvanised Concentric Flue
80/125 PPS/White Galvanised 900 elbow
80/125 PPS/White Galvanised 450 elbow
80mm 1000mm PPS flue pipe
80mm PPS 900 elbow
80mm PPS 450 elbow
80/125 Roof Terminal
Open terminal with stainless steel mesh
5.0
4.5
2.25
4.0
2.0
2.5
1.0
.5
7.5
2.5
For vertical external and internal flues there is a further gain from thermal lift.
This can be calculated from the graph below.
EC 25 Compact Installation/User Manual page 21
Figure 10 Thermal Lift
Thermal lift when
flue gas temp 80C and outside temp 10C
180
160
140
120
Uninsulated Flue
100
Insulated Flue
80
60
40
20
48
44
40
36
32
28
24
20
16
12
8
4
0
0
Flue lengths ~ m etres
Thermal lift is generated naturally in the vertical part of a flue system, reducing the overall
resistance of the system.
The available lift may be calculated from the Thermal lift graph and deducted from the total
calculated flue resistance.
15.2
Available Flue Components
80/125 Concentric 500 mm Fanned Flue Kit
80/125 1000mm length PPS/White Galvanised Concentric Flue
80/125 500mm length PPS/White Galvanised Concentric Flue
80/125 PPS/White Galvanised 90 degree elbow
80/125 PPS/White Galvanised 45 degree elbow
80mm 1000mm PPS flue pipe
80mm PPS 45 degree PPS Elbow
80mm PPS 45 degree connector
80/125 Roof Terminal
Pitched roof tile flashing
Aluminium flat roof terminal/chimney top flashing
80mm Wall Fixing Clamp
125mm Wall Fixing Clamp
80mm PPS flexible flue liner (per metre)
80mm PPS flexible flue liner 360-degree spacers
80mm PPS flexible flue liner chimney terminal
80mm PPS flexible flue liner chimney terminal clamp
80mm PPS flexible flue liner boiler flue connector
A range of 60mm PPS bends, tubes and connectors
If a concentric 125/80 flue system is to be used carry then the appliance will need the
conversion kit fitting. Please see previous section 14.9.
Page 22 ECO HOMETEC (UK) LTD.
For installations requiring greater flue
lengths - please contact the eco hometec
technical department for advise.
Measure and cut the concentric flue pipe to
pass through the previously made hole and
into the concentric 90o bend.
The flue should terminate with a suitable
terminal.
Apply a chamfered edge to the cut ends,
apply silicone lubricant and insert through
the wall and into the flue/air socket. The
overall projection of the finished pipe should
leave the air holes 20mm clear of the
surrounding wall as per figure 11.
In certain conditions pluming from the flue,
although harmless, may cause a nuisance.
Please site the flue outlet to minimise
any inconvenience the discharge of
combustion products or possible pluming
may cause.
Where a terminal is so sited to be less than
2m above the level of any ground, balcony,
flat roof, or place to which people have
access, or there is a likelihood of accidental
contact by persons or damage to the
terminal, a suitable guard MUST be fitted.
Terminal guards are available from
eco hometec.
15.3
Condensate in the Flue
Installed correctly, with a slight fall back to
the boiler, the flue pipe will self drain back
through the boilers internal condensate
route. Failure to observe this requirement
will result in condensate running out of the
flue pipe and over the external brickwork
causing possible staining and or freezing.
Make good to internal and external walls
and fix an external stainless steel terminal
guard if required.
Figure 11 Wall Terminal
Condensate formed must be cleared from
the flue system and adequate care is
required to ensure all flue pipes are self
draining. All internal and external potential
collecting points must be drained. In
addition to avoid freezing external flue
ductwork must be insulated.
To ensure the safe and satisfactory
operation of the boiler the chimney system
must be capable of the complete evacuation
of combustion products at all times.
15.4
Flueing Options
The boiler may be installed either as a room
sealed, fanned flued appliance using the
eco hometec P.P.S plastic 125mm/80mm
concentric flue system or alternatively,
conventionally flued, using a single skin
80mm P.P.S. plastic pipe.
15.5
Installing a Concentric Flue
Connect the concentric elbow into the
flue/vent connection.
The final location of the Flue Outlet terminal
should comply with figure 17 and table 11.
In certain circumstances the location of
the boiler may leave the flue outlet in a
position that does not comply with figure
17, or where pluming is a nuisance.
The eco hometec flue system has been
designed to overcome this and the 80mm
P.P.S. flue pipe may be simply re-routed to
terminate in a more suitable location. To
do this simply remove the 80mm
stainlesssteel flue grill and insert either a
900 or 450 bend
EC 25 Compact Installation/User Manual page 23
Note: two 450 may be used to form a swan
neck returning the flue pipe back to the wall
for clipping.
Route the pipe to the desired location and
terminate with a suitable bend to direct the
flue gases away from the wall or any
obstruction. When you are satisfied that
the location complies with the requirements
of figure 23 replace the stainless steel
80mm flue grill..
Alternatively a 900 terminal fitting may be
purchased from eco hometec and the flue
routed vertically.
Figure 12 Vertical Wall Terminal
15.6
Vertical flue Installations
For vertical flue applications a range of
fittings for both pitched and flat roofs are
available. Please contact eco hometec for
further advice.
Page 24 ECO HOMETEC (UK) LTD.
Figure 13 Vertical Flues
Figure 14 Vertical Terminals
EC 25 Compact Installation/User Manual page 25
Concentric vertical flue fittings are available
from eco hometec.
Figure 16 80mm Flue Tubes
Concentric flue components have push
together spigot and socket joints.
The
inner PPS flue gas tube has silicone seal
rings located in the socket component. The
outer air tube has EPDM rubber seal rings
located in the socket component.
To aid
assembly and assurance that the joints
have been fully pushed home, the seal rings
and make ends of tubes and fittings should
be lightly lubricated with silicone grease.
Additional 80/125mm concentric flues tubes
and fittings are available from eco hometec
details below:
Figure 15 Concentric flues
80mm 1000mm PPS flue pipe
80mm PPS 45 degree PPS Elbow
80mm PPS 45 degree connector
80mm Wall Fixing Clamp
80mm – 100mm increaser
A range of Flexible Flue liners are also
available details below.
80/125
1000mm
length
PPS/White
Galvanised Concentric Flue
80/125
500mm length PPS/White
Galvanised Concentric Flue
80/125 PPS/White Galvanised 90 degree
elbow
80/125 PPS/White Galvanised 45 degree
elbow
125mm Wall Fixing Clamp
Additional 80 PPS flues tubes and fittings
are available from eco hometec details
below:
Page 26 ECO HOMETEC (UK) LTD.
80mm PPS flexible flue liner (metre)
80mm PPS flexible flue liner 360-degree
spacers
80mm PPS flexible flue liner chimney
terminal
80mm PPS flexible flue liner chimney
terminal clamp
80mm PPS flexible flue liner boiler flue
connector
15.7
Terminal Positions
Figure 17
Fan Flued Terminal Positions.
Table 11. Flue Terminal Positions.
Terminal Positions
Min.Distance
A: Directly below an opening window or other opening, e.g. air brick
300mm
Directly above an opening window or other opening, e.g. air brick
300mm
B: Below gutters, soil pipes or drain pipes.
75mm
C: Below eaves
200mm
D: Below balconies or car port roof
200mm
E: From vertical drain pipes and soil pipes
150mm
F: From internal and external corners
300mm
G: Above ground roof or balcony
300mm
H: From a surface facing a terminal
600mm
J: From an opening in a car port (e.g. door, window) into a dwelling
1200mm
K: Vertically from a terminal on the same wall
1500mm
L: Horizontally from a terminal on the same wall
300mm
Fanned flues terminals should be at least 2m from any opening in a building which is directly
opposite and should not discharge products of combustion across adjoining boundaries.
EC 25 Compact Installation/User Manual page 27
16.
Gas Supply
The boiler is set for use with either natural
gas or LPG.
16.1
Gas Supply
Pipe-work from the meter to the boiler
MUST be of an adequate size.
DO NOT use pipes of smaller size than the
boiler inlet gas connection.
The gas supply to the boiler must be
capable of maintaining a minimum pressure
of 20 mbar measured at the inlet to the
boiler, with all other gas appliances working.
The installer should install a pressure test
point adjacent to the gas inlet connection.
16.2
LPG Gas Supply
For LPG the gas supply to the boiler must
be capable of maintaining a minimum
pressure of 37 mbar measured at the inlet
to the boiler, with all other gas appliances
working.
The complete installation MUST be
tested for soundness and purged in
accordance with C.P. 331.3
The gas valve fitted to the boiler is not
designed to withstand pressures in excess
of 60 mbar.
When carrying out the pressure test on the
service pipe-work it is essential that the gas
Page 28 ECO HOMETEC (UK) LTD.
cock fitted to the boiler is in the closed
position, failure to do so will result in serious
damage to the boiler.
All gas service pipe-work from the meter to
the boiler should be either mild steel pipe or
copper.
17.
Air Supply
17.1
Concentric Flue
If installed with a concentric flue and as a
room sealed appliance the boiler does not
require that room or internal space to have
a permanent air supply.
17.2
Conventionally Flue
Safe, efficient and trouble-free operation of
conventionally flued gas boilers is vitally
dependant on the provision of an adequate
supply of fresh air to the room in which the
appliance is installed. Ventilation by grilles
communicating directly with the outside air
or a ventilated adjacent room is required.
Where the combustion air is being taken
from an adjoining room the room itself must
be ventilated to satisfy the combustion air
requirement of the appliance. Where the
appliance is to be installed as a
conventionally flued appliance sufficient
combustion air should also be allowed. To
calculate the amount of free combustion air
required for the appliance table 12 should
be used.
Permanent openings are based
on the total maximum rated input.
Position ventilation grilles to avoid the risk of accidental obstruction by blocking or flooding. BS
5540.2
Table 12 Ventilation
Vent Position
Into room or internal space
2
Direct to outside air
High level
9 cm per kW of input
4.5 cm2 per kW of input
Low level
9 cm2 per kW of input
4.5 cm2 per kW of input
In a room or internal space
None required
None required
Into room or internal space
Direct to outside air
Conventionally flued appliance
Vent Position
2
High level
9 cm per kW of input
4.5 cm2 per kW of input
Low level
18 cm2 per kW of input
9.0 cm2 per kW of input
Any air vent, which is to supply air to an
open
flued
appliance,
must
not
communicate
with
any
room/space
containing a bath or shower or private
garage.
If further guidance on ventilation is required
then consult BS. 5440.2.
Detailed recommendations for air supply
requirements are given in BS.5440.2. and
can also be found in the CORGI Gas
Installer Manual. The following notes are
intended for general guidance only. Where
open flued appliances total input ratings
exceed 7 kW the room or internal space
containing them must have an air vent of
minimum effective area 4.5 cm2 for every 1
kW in excess of 7 kW.
17.3
Compartment Ventilation
Due to the low standing losses
compartment ventilation is not required.
EC 25 Compact Installation/User Manual page 29
18.
Hydraulic Requirements
The boilers are intended to be used in
conjunction with FULLY PUMPED, SEALED
systems subject to the requirements below.
They are NOT SUITABLE for use on gravity
circulation systems. The boiler must NOT
be used for direct hot water supply.
Underfloor Systems
Despite the low boiler flow
temperatures feature, in the event of control
and/or mechanical failure or incorrect
adjustment, to prevent damage to the
installation or associated pipe work ALL low
temperature under floor installations require
an obligatory mixing valve installing as part
of the system controls or a high limit
thermostat set at 60oC to interrupt the
demand for heat signal from the underfloor
heating controls.
EC25S Combi Types
In hard water areas suitable protection
should be provided to prevent the build up
of deposits in the primary hot water heat
exchanger. The appliance guarantee does
not extend to failure as a result of lime scale
or other contamination.
The central heating system should be in
accordance with the recommendations
given in BS. 6798 and BS. 5449.
Hot water cylinders must be double
feed indirect and to aid efficiency and fast
recovery times (all appliances are hot water
priority) should be of the high recovery type.
Recommended minimum coil capacity
25kW.
The boiler must be capable of being
adequately vented of air. Drain taps MUST
be located in accessible positions, which
permit the draining of the whole system including the boiler and hot water storage
vessel. Drain taps should be at least 1/2
inch BSP nominal size and be in
accordance with BS. 2879.
In
order to facilitate servicing of the
unit, full flow isolating valves must be fitted
Page 30 ECO HOMETEC (UK) LTD.
to all water and gas connections, (these
valves can be supplied by eco hometec as
an optional extra if required).
18.1
Expansion Vessel
An expansion vessel must be
fitted to all systems.
Table 13 Expansion Vessel Req.
*Vessel Charge & Initial System Pressure
*VC&ISP
Factor
0.5 bar
0.08 bar
1.0 bar
0.11 bar
1.5 bar
0.16 bar
EXAMPLE 1.
Central heating system filled to 1 bar.
Total system water content 60 litres
Multiply 60 (water content litres) x 0.11
(factor from chart) = 6.6 litres.
Vessel required 6.6 litres.
Vessel supplied 10 litres.
Vessel adequate.
EXAMPLE 2.
Central heating system filled to 1 bar.
Total system water content 150 litres
Multiply 150 (water content litres) x 0.11
(factor from chart) = 16.5 litres.
Vessel required 16.5 litres.
Vessel supplied 10 litres.
Vessel inadequate.
Additional vessel 6.5 litres required.
When system content unknown or difficult to
determine the following table can assist with
calculating water content.
Table 14 System Contents
Approx. Litres per kW
New Radiators
9
Old Radiators
13
U/Floor
Heating
22
Expansion vessels should be connected to
the system at a point close to the pump inlet
in order to maintain positive pressure
throughout the system.
The central heating system should be in
accordance with the recommendations
given in BS. 6798 and BS. 5449.
18.2
Condensate Drain
The condense discharge pipe should
be continued in ¾ inch plastic waste pipe
into the household drainage system or out
through the wall to an existing gully or soak
away. To minimise the risk of freezing all
condensate
waste
pipe-work
fitted
externally should be 32mm. (The existing
drainage system should be corrosion
resistant).
In order to avoid damage to the
boiler caused by a blocked drainage
system, the condense disposal pipe should
include a tundish. In these cases the
pipe-work connected to the internal
household drainage system should be fitted
with a deep seal running trap.
Horizontal runs of condense discharge pipe
must fall at a rate of 40mm per metre and
any external sections of pipe must be
protected against the risk of
freezing. Due care should be taken when
installing the condensate disposal system to
minimise the risk of blockage, as this would
cause the condensate to back up inside the
boiler.
eco hometec will not accept any liability for
damage caused to the boiler should this
situation occur.
If the connection to an existing drain is not
possible,
the
condensate
may
be
discharged in to a purpose-built soak away.
For further information regarding the
construction of a soak away, please contact
the eco hometec Technical Support
Department.
When the boiler is installed below ground
level, i.e. a basement or cellar, (NB the
appliance must not be installed below
ground when using LPG) provision should
be made for the disposal of the condensate
via a sump pump arrangement.
18.3
System By-Pass
The boiler is designed to operate at a
minimum flow rate. If zone valves are fitted
to all the heating circuits then an adequate
bypass (Honeywell DU 145 suggested)
should be installed across the flow and
return so that it is the first flow after the
pump and the last return to the boiler.
Please contact eco hometec Technical
Department for more information if required.
19.
Electrical Connections
Any external wiring to the boiler must
be carried out in accordance with the IEE
Wiring
Regulations
and
any
local
regulations.
The EC VCO MODELS is designed for 230
~ 240v 50Hz single phase operation. The
method of connection to the mains supply
should allow for complete electrical isolation
of the boiler, preferably by labelled double
pole switched spur. The boiler must be
protected by a 3 amp fuse.
The point of connection to the mains should
be readily accessible and adjacent to the
boiler. If the boiler is to be sited in a
bathroom the connection should be outside
the room.
It is essential that the electrical supply in the
property should be properly earthed in
accordance with current IEE Wiring
Regulations.
Using the 3 core cable supplied connect the
boiler to the mains electrical supply. An
on/off switch is located on the underside of
the boiler casing.
For the proper functioning of the appliance,
it is necessary that live and neutral be
correctly connected.
Check the status
code on the display if the display shows a
U, you must reverse the connections to the
mains plug in the power supply socket.
EC 25 Compact Installation/User Manual page 31
20.
Heating Control Options
Figure 19 Connection Terminal Block
The low voltage terminal strip can be used
to connect the following.
Hot water cylinder sensor.
External temperature sensor.
Room thermostat.
All of the above are available from
eco hometec
WARNING
Low
Voltage
Connections do not connect 240 volts to
the low voltage terminal strip.
Figure 18 Controls Terminal
20.1
Connecting Room Thermostat
Strip approximately 5 mm of the insulation
from the connecting wires for the room
thermostat .
Insert the stripped ends of the connecting
wires in the connections (1) and (2) of the
terminal block (Fig. 18). Ensure that the
wires do not cause a short circuit.
Tighten the screws firmly in the terminal
block.
20.2
The boiler control inputs are all low voltage
and must no be connected directly to the
mains.
The connection terminal block plug (fig. 18)
is located underneath the boiler see fig 19.
External temperature sensor.
External sensor (optional) available from
eco hometec.
This only requires an outside temperature
sensor. (Mounted on North facing wall)
The on board boiler weather compensating
controller is adjusted so the relationship
between the outside temperature and the
boilers flow temperature is sufficient to
maintain the building temperature.
As the outside air temperature rises and
falls a modulating control is achieved. Set
up this way the temperature for the house is
not controlled from one room, but on the
basis of the outside temperature.
Page 32 ECO HOMETEC (UK) LTD.
This temperature sensor must be an NTC
with a resistance of 12 kΩ at 25 °C (see
also the list of accessories).
resistance to earth using a suitable multi
meter.
21.2
Strip approximately 5 mm of the insulation
from the connecting wires for the sensor.
Insert the stripped ends of the connecting
wires in the connections (3) and (4) of the
terminal block (Fig. 18). Ensure that the
wires do not cause a short circuit.
Tighten the screws firmly in the terminal
block.
20.3
Cylinder Thermostat
Temperature sensor for hot water cylinder
(if applicable)
Gas Supply
Check the gas installation and purge the
supply in accordance with current Gas
Safety Regulations.
The gas valve fitted to the boiler is
not designed to withstand pressures in
excess of 60 mbar. When carrying out the
pressure test on the service pipe-work it is
essential that the gas cock fitted to the
boiler is in the closed position, failure to do
so will result in serious damage to the
boiler.
DHW sensor (optional) available from
eco hometec.
This temperature sensor must be an NTC
with a resistance of 10 or 12 kΩ at 25 °C.
If using LPG, care should be taken to
ensure that the storage tank has been
correctly vented.
Alternatively a standard cylinder thermostat
may be used.
The boiler is a low water content unit. When
connecting to an existing installation it is
important that old system deposits are
removed and are not allowed to
contaminate the appliance.
Strip approximately 5 mm of the insulation
from the connecting wires for the sensor.
Insert the stripped ends of the connecting
wires in the connections (5) and (6) of the
terminal block (Fig. 18). Ensure that the
wires do not cause a short circuit.
Tighten the screws firmly in the terminal
block.
20.4
Terminal block
When the connections have been made,
insert the terminal block (1) in the connector
(2) ( Fig. 19).
20.5
Laptop Serial Connection
For an extended diagnosis and display of
functions, a PC or laptop computer can be
connected to connector (3) (Fig. 19). The
required connecting cable and software is
available from eco hometec as an option.
21.
21.1
Commissioning and Testing
Electrical Checks
A “Preliminary Electrical System Check”
should be carried out to ensure earth
continuity, short circuit, polarity and
21.3
21.4
Connection to Pipe-work
Water Treatment
In order to protect and prolong the working
life of the appliance, it is important the
general condition of older systems is
carefully considered.
The removal of debris, flux residue, grease,
metal swarf etc. from new systems and any
rust, black magnetic iron oxide sludge and
lime-scale from old systems is essential.
Consider high pressure flushing to remove
all debris in badly contaminated systems.
Fit in-line filters for full protection. All
installations should be treated and
maintained with Fernox MB1 at a
concentration of 4%.
21.5
Flushing System Pipe-work
Before the final flow and return connections
are made to the boiler, the system must be
thoroughly flushed.
Ensure that all radiator valves are open.
EC 25 Compact Installation/User Manual page 33
Flush the system with clean water until the
discharge runs clear.
For further information about filling the
system contact the eco hometec Technical
Support Department.
Make good final connections to boiler.
21.6
Filling and Venting the System
22.
Combustion Ratio
Using a suitably approved filling loop
connected to the incoming mains cold water
supply, fill the system.
Due to the precise combustion processes it
is imperative that flue gas analysis
equipment be used when setting up the
burner.
The correct filling pressure is between 1 and
2 bar.
23.
Depending on the type of unit, the following
steps must be completed:
The boiler has a manual bleed valve located
on the top right hand side along with a short
piece of clear plastic hose. Open the
manual bleed valve and run water into hose
pipe until air bubbles stop.
All the air should be vented via this point.
If necessary, this bleeder can be replaced
with an automatic air vent.
Check the filling pressure of the unit shortly
after start-up, add water if necessary in
order to maintain the correct pressure.
Filling is only complete when the boiler, and
the heating system are completely vented.
The output test function can be activated by
pressing the ‘+’ and the ‘-’ pushbuttons
together for 5 seconds. The burner will now
immediately ignite and burn at full capacity.
Pressing the ‘+’ or ‘-’ pushbutton will cause
the burner to burn at maximum or minimum
capacity respectively.
Pressing the set/reset pushbutton will result
in the function being switched off.
Also, 20 minutes after the last time one of
the pushbuttons was pressed, the burner
will revert to normal operation.
While the output test function is active, the
following codes will appear in the display,
alternating with the measured flame
strength.
Figure 20 Output Test Display
The heating system should be fitted with
manual air vents at all high points.
CHECK TO MAKE SURE AN EXPANSION
TANK HAS BEEN FITTED TO THE
SYSTEM AND THE DISCHARGE PIPE
TERMINATES TO A SAFE LOCATION
Check for water soundness at design
operating temperature.
After commissioning, the system should be
thoroughly flushed whilst system water is
still warm.
Drain down system and make good to any
leaks.
Refill, add a suitable corrosion inhibitor
Fernox MB 1 at 4%.
Page 34 ECO HOMETEC (UK) LTD.
Output test function
maximum capacity
minimum capacity
23.1
Commissioning NG and LPG
Measure the standing gas pressure at the
measuring nipple on the gas tap. Nominal
pressure should be 20 mbar in the case of
natural gas, and 37 mbar in the case of
propane gas.
Remove the measuring cap from the
exhaust gas canal.
Insert the measuring probe of an exhaust
gas analysis device (CO2 meter) in the
measurement opening of the exhaust gas
outlet canal.
Adjust the central heating capacity to the
maximum setting (See Section 8).
Make sure there is sufficient heat removal
by turning on the central heating system.
Activate the chimney sweeper function
(See Section 24. The burner will now
operate at maximum capacity.
Read the CO2 value displayed on the
exhaust gas analysis equipment. If this
value does not agree with the correct value
as specified in the following table, you must
carefully adjust the screw (1) (Fig. 5.1).
Turn it counter clockwise in order to
increase the CO2 value and clockwise in
order to reduce it.
Set the burner to minimum capacity
(See Section 23).
Read the CO2 value displayed on the
exhaust gas analysis equipment. If the
value does not agree with the correct value
specified in the following table you must
carefully adjust the Torx-Screw (2) with aid
of a Torx screwdriver.
For this purpose you must temporarily
remove the plug (3). Turn it clockwise in
order to increase the CO2 value and counter
clockwise in order to reduce it.
Switch off the output test function again and
adjust the central heating capacity to the
original value. See Section 23.
CO2
maximum
capacity
minimum
capacity
natural gas
8.8%
propane gas
9.8%
8.2%
9.2%
Remember to allow 2 minutes for the
analyser to respond to any adjustments.
Figure 21 Gas valve adjustments
EC 25 Compact Installation/User Manual page 35
23.2
Flue System Check
In order to examine the flue pipe sealing,
with the boiler running, it is essential that an
O2 or CO2 reading is taken from the sample
point 3 (fig 21) positioned on the left of the
concentric adaptor.
The flue seal is satisfactory when the CO2
value is no more than 0.2% and the O2
value no more than 20.6%.
Figure 22 Sample Points
With a closed room thermostat and a
difference between the set value Tcentral heating
and a water temperature of more than
10°C, the burner will be ignited.
The status display will show ‘C’ if the central
heating water temperature increases by 3°C
above Tcentral heating, the burner will stop
burning, while the pump will continue to run.
The status display will show ‘C’.
When the room thermostat opens, the
overrun function of the pump will be started.
While the pump continues to run, the status
display will show ‘c’. The overrun time for
central heating operation and the set value
Tcentral heating can be set using the keys on the
display.
24.3
Setting the Output
When the room thermostat is closed and the
burner is ignited the capacity is modulated
between minimum and maximum capacity
by means of a variable fan speed.
24.
Control Setup
24.1
External temperature control
During central heating use the capacity of
the appliance is adjusted continuously to
match the heating demand, so that the flow
temperature (Tcentral heating) is variable
between 20 and 90 °C.
The on/off signal from the room thermostat
is converted into a modulating heating
demand by the on board digital control
system (by means of the applicable
algorithm Tcentral heating).
24.2
Switching on the appliance
Turn on the appliance using the on/off
switch located underneath the boiler casing
to the right of the casing latch.
Page 36 ECO HOMETEC (UK) LTD.
As soon as the burner is ignited, it will
remain at the starting speed for the first
minute.
At the end of this 10 second period the
burner will switch to low load for 10 minutes.
Thereafter, the capacity will be increased in
a linear manner.
When the supply temperature is 30°C below
Tcentral heating the control system will switch
immediately to a linear increase in the
capacity. Shortly before reaching the
maximum set capacity, the appliance will
start modulating.
From the moment that the measured central
heating temperature tcentral heating reaches the
set point Tcentral heating, the temperature will be
controlled by the opening and closing of the
room thermostat.
The maximum burner capacity is limited by
the minimum central heating water
circulation through the appliance.
24.4
Pump operation
The pump has two speeds: low (1750 rpm)
and high (2200 rpm). Normally the pump
runs at low speed. When a value for ∆t of
30 °C is reached, the pump switches to high
speed. If ∆t is lower than 10 °C, the pump
switches back to low speed. When the
heating demand is removed, the pump
continues to run for the pre-set overrun
time, at the end of which it is switched off.
24.5
8.1.5 Frost protection
If the temperature detected by the supply
sensor falls below 8 °C, the pump will be
switched on and will circulate water through
the central heating circuit. If the temperature
detected by the supply sensor falls below
3 °C, the burner will be ignited. As soon as
the return temperature reaches 15 °C, the
burner will be switched off. The pump will
continue to run for the pre-set overrun time.
It is also possible to set the pump to run
continuously.
24.6
Weather compensation
This function is only available if the optional
external sensor is connected. The external
temperature
control
determines
the
optimum set value of the central heating
temperature in relation to the prevailing
external temperature.
1
Determine Tref. day. This is the desired central
heating temperature for an external
temperature of 20 °C. Mark a point (3) by
the values concerned.
Draw a line between points (1) and (3).
The point where this line cuts Tbasis is point
(2).
Draw vertical lines from point (1) and from
point (2) to the x-axis. The points of
intersection with the x-axis are points (4)
and (5) respectively.
The S-factors can now be determined by
dividing the difference between Tcentral heating
max and Tbasis by the difference in external
temperature represented by points (5) and
(4):
-
Tcentral heating max - Tbasis
O/S = -------------------- x 10
T(5) – T (4)
The foregoing example follows from a
Tcentral heating max of 80 °C, a Tbasis of 50 °C and
a Tref day of 30 °C for an external
temperature of 20 °C and gives an O/S of
20.
Next you will find a number of empty graphs
that you can fill in yourself.
2
3
4
24.7
5
Setting the Heat Slopes
Depending on the installation, determine the
maximum supply temperature for the lowest
expected external temperature (set-point
Tcentral heating max).
Draw a horizontal line at this central heating
temperature to the point where it intersects
the external temperature concerned (point
(1) in the foregoing graph).
Determine the minimum desired central
heating temperature (Tbasis = O/b). and draw
a horizontal line at this value.
EC 25 Compact Installation/User Manual page 37
seconds continuous pumping through the
hot water circuit). During this period the
status display shows ‘h’.
Ttap boiler can be set with the aid of the keys
on the display.
25.2
General operation
For hot water operation the burner is
activated by means of a sensor that is fitted
in the hot water cylinder which measures
the temperature of the cold water supply
tcold.
The will be a burner demand for hot water
production in the following cases:
tcold < Tboiler - 5 °C
tcold falls more than 50 °C/min
As soon as one of the foregoing conditions
is satisfied, the burner will be ignited. The
status display shows ‘d.’. The burner
modulates the return temperature to a value
that is dependent on the pre-set water
temperature (Tset point) chosen by the user.
25.
Hot water production
25.1
Combi Type ’S’ Tap boiler
The appliance is provided with an integral
hot water store that keeps a limited quantity
of hot water water at a pre-set temperature
(tap boiler set-point, Ttap boiler).
This means that hot water is always
available. As soon as the temperature in
the tap boiler falls below Ttap boiler - 5 °C, the
burner ignites and functions on low load.
The status display shows ‘d’. As soon as the
water temperature increases above 93 °C,
the burner is switched off.
The pump continues to circulate water
through the hot water circuit.
The burner will again be ignited in order to
heat the contents of the tap boiler when the
return temperature falls below 70 °C.
If the temperature in the tap boiler is higher
than Ttap boiler, the heating demand will be
removed and the overrun function for hot
water operation will be activated (30
Page 38 ECO HOMETEC (UK) LTD.
The burner will be switched off when:
Treturn > Tset point + 5 °C
tset point has increased by 10 °C
tset point > Tboiler + 5 °C
If the burner no longer burns while there is
still a heating demand, the appliance will
continue to circulate water through the hot
water circuit until the return temperature
falls below
Tset point - 0 °C. The status display shows ‘d’.
If tcold is higher than Ttap boiler -5 °C, the
heating demand will be removed and the
overrun function for hot water operation will
be activated (30 seconds continuous
pumping via the hot water circuit).
During this period the status display shows
‘h’.
25.3
Pump operation
The pump has two speeds: low (1750 rpm)
and high (2200 rpm). Normally the pump
runs at low speed. When a value for ∆t of
30 °C is reached, the pump switches to high
speed. Only when ∆t is smaller than 10 °C
does the pump switch back to low speed.
When the heating demand is removed, the
pump continues to run for the pre-set
overrun time, at the end of which it is
switched off.
25.4
Hot Water Cylinder
A hot water cylinder boiler can be directly
connected to the EC25HS. The cylinder
temperature can be regulated by means of
a thermostat or an NTC temperature
sensor. When an NTC-sensor is used, the
appliance will modulate during the boiler
heating cycle. In the following process
description it is assumed that regulation
takes place by means of an NTC-sensor.
The NTC sensor measures the temperature
of the cold water supply. The hot water
cylinder is heated when the temperature
falls 5°C below the set temperature or the
temperature drops greater than 1°C per
minute.
As soon as there is a demand, the burner
will be ignited. The burner modulates the
return temperature to the set value Text_boiler.
(temp. of the hot water cylinder) The status
display shows ‘b’. Text_boiler can be set with
the aid of the keys on the display.
The burner will be switched off when:
tsupply > Tcentral heating max
treturn > Text_boiler + 5°C
When the burner is off and there is still a
heating demand, the appliance will continue
to circulate water through the boiler circuit
until the return temperature falls below
Text_boiler - 5 °C. The status display shows ‘b’.
When tcold is higher than Text_boiler -5 °C, the
heating demand will be removed and the
pump-overrun function for external-boiler
operation will be activated (30 seconds
overrun pumping via the boiler circuit).
The status display then shows ‘b’.
26.
Safety devices
26.1
Electronic ignition
The electronic ignition is protected against
overload. The maximum glow time per
ignition is 7 seconds (2 seconds preincandescence and 5 seconds in the
ignition phase). The incandescent ignition
can be operated a maximum of 5 times in a
short period. After these 5 attempts the
control system allows 1 ignition attempt
every minute. When the electronic ignition is
not used for 5 consecutive minutes, 5
consecutive ignition attempts will again be
possible. When the ignition of the burner is
delayed by the control system, the status
symbol changes to an 'o'.
26.2
Flow protection
The appliance is provided with a water
pressure sensor, which is used in
combination with the supply and return
sensors to protect the appliance against a
no flow situation.
For every burner start, the pump is stopped
and after a 2 second delay the static system
pressure is measured. Hereafter the pump
is restarted at high speed. The fan runs and
the pre-incandescence phase begins.
At the end of the ignition phase the system
pressure is measured again.
The following situations are possible:
Pressure difference < 0.06 bar:
1.
Air in the appliance
Pump or pump connection is broken. The
control system switches to the pump test
phase, in which the pump is switched on for
30 seconds and then off for 30 seconds.
During this test phase the control system
waits until a sufficient pressure difference is
created. The display shows ‘P’ continuously
and all heating demands are disregarded.
Pressure difference > 0.44 bar:
Too little flow. In this case the control
system also switches to the pump test
phase. During this test phase the control
system continues to wait until the pressure
difference is between 0.06 and 0.44 bar.
Pressure difference > 0.06 and < 0.44 bar:
The burner ignites and the flow monitoring
is taken over by the supply and return
sensor logic.
The pump is forced to switch over to low
speed until there is an increase in
temperature. In this way the pump is tested
EC 25 Compact Installation/User Manual page 39
at both speeds: high speed with the aid of a
pressure difference, low speed by means of
a temperature increase.
If, when the burner is ignited, the pressure
rises or falls by more than 0.1 bar within 4
seconds, then the burner will be switched
off. The control system then switches to the
pump test phase until sufficient pressure
difference has been created.
For central heating and hot water operation
the appliance modulates back when ∆T >
32 °C. The ∆T regulation in the programme
functions as follows:
∆T
< 32
complete
capacity
utilization
32 < ∆T < 40 capacity is reduced linearly
to low load at 40 °C
40 < ∆T < 45 low load
> 45
off
If the appliance is in central heating use and
Treturn > Tsupply + 5 °C, the burner will be
switched off. For hot water operation, this
check will only be carried out 20 seconds
after ignition in connection with the heat in
the tap boiler.
26.3
Max. temperature protection
The maximum temperature protection is
obtained with the aid of the supply and
return sensors. If one of these sensors
registers a temperature in excess of 93 °C,
the burner will always be switched off.
If one of these sensors registers a
temperature in excess of 105 °C, the control
system blocks all further heating demand
and starts pumping through the central
heating circuit in order to remove the
superfluous heat as quickly as possible. ‘H’
appears in the status display and the
temperature display will show the supply
temperature.
If during burning, one of these sensors
registers a temperature in excess of 105 °C,
the appliance will be immediately blocked
with a flashing ‘H’ on the status display and
the supply temperature on the temperature
display. Pressing the reset pushbutton on
the display can only discontinue this
Page 40 ECO HOMETEC (UK) LTD.
blocking. With a temperature in excess of
118 °C,
will be displayed.
The control system will then perform the
following three measurements.
1.
Before the control system ignites the
burner, the difference between supply and
return temperatures must be less than
20°C.
2.
The following check measurement
will be carried out each time the burner is
ignited. Both the supply temperature and
the ∆T will be measured just before the
burner is ignited. If the control system does
not detect an increase of three degrees in
the supply temperature or in ∆T after 10
seconds of burning, the burner will be
immediately shut down. The control system
will wait until ∆T is less than 5 °C and (if
there still a demand) will then make another
attempt at ignition. If this test is not
successful after three attempts, the control
system will block further operation with a
flashing ‘2' on the status display and the
supply temperature on the temperature
display.
Once in every two hours the difference
between supply and return temperatures
must have been less than 5 °C. Is this not
the case, than the burner will not be ignited
until this is the case.
While the system is waiting for this condition
to occur, the status display will show a ‘2'
continuously, and the temperature display
will show the supply temperature. A
combustion cycle will not be interrupted by
this protection.
26.4
Static pressure
The static pressure P in the appliance is
monitored. The following situations can
occur:
P <= 0.2 bar
All heating demand will be blocked, the
pump will be switched off and the status
display will show a P continuously.
The static pressure will be shown in the
temperature display. This is a indication that
the user must top up the appliance.
The blocking will only be discontinued when
the pressure exceeds 1.3 bar. This offers
the possibility to read the pressure in the
appliance during topping up.
The appliance
limitations
0.2 bar < P < 0.5 bar
The appliance functions normally but the
capacity will be limited to low load. On the
status display the normal status will be
replaced by ‘A’.
The capacity of the appliance is limited to
low load so that the user can still obtain
heat, but because of a reduced level of
comfort will realize that something is not in
order. In the status display, the letter
indicating the condition of the appliance
(rest, central heating use or hot water
operation) will alternate with ‘P’. The
temperature display will show the system
pressure. This condition will be discontinued
as soon as the pressure exceeds 1.3 bar.
P > 0.5 bar
The appliance
limitations
will
function
without
P > 3.5 bar
All heating demand will be blocked and the
pump will be switched off. This blocking will
only be discontinued when the pressure
falls below 3.0 bar. The pressure can be
read from the display.
26.5
Air supply monitoring
The speed of the fan is measured and
monitored. If this varies by more than 5
percent from the correct speed for a period
of more than 60 seconds, the control
system will be blocked and a flashing ‘5’ will
appear in the status display. This indicates
that there is a problem with the air supply to
the appliance or with the fan.
26.6
Exhaust gas sensor (optional)
The appliance can be fitted in the factory
with an optional exhaust gas sensor that is
connected to the control system. This
exhaust gas sensor switches the appliance
off if the exhaust gasses reach too high a
temperature.
will
function
without
80 °C < Texhaust gas < 90 °C
The temperature display will show the
supply temperature.
This condition will only be discontinued
when the exhaust gas temperature falls
below 60 °C.
90 °C < Texhaust gas < 95 °C
The control system locks-out all heating
demand.
The status display shows the letter ‘A’
continuously. The temperature display
shows the exhaust gas temperature. This
blocking will only be discontinued when the
exhaust gas temperature falls below 70 °C.
Texhaust gas > 95 °C
The control system locks-out operation, the
status display shows a flashing ‘A’.
The temperature display shows the current
exhaust gas temperature and the appliance
will require manually resetting.
26.7
Display
For normal burner operation the central
heating water temperature or the water
pressure will be displayed on the 2character display.
The status of the burner is shown on the
status display. After the ‘-’ pushbutton
(down) has been pressed, the version
number of the software will be displayed.
Example : U 21 means software version
055_21.
The following situations are possible:
Texhaust gas <80 °C
EC 25 Compact Installation/User Manual page 41
The following status codes may
displayed during normal operation.
Code
. (point)
0
C
c
d
b
h
o
P
be
Meaning
burner in operation
ready for use
central heating use
central heating pump overrun
Hot water operation
boiler operation
Hot water pump overrun
frost protection
system water pressure
If the control system detects a fault, the
burner will be switched off and every
heating demand will be blocked.
The following blocking codes are possible:
Malfuncti
on code
1 or 1.
2 or 2.
6 or 6.
4 or4.
F / F.
A
E
U
P
q
Description of malfunction
Supply sensor open or shortcircuit(ed)
Return sensor open or shortcircuit(ed)
Tank sensor open / shortcircuit(ed)
External sensor open or
short-circuit(ed)
Burner does not ignite or
goes out
Exhaust gas sensor > 80 °C
Control system internal fault
Neutral or Live reversed
Pump Test
Supply sensor > 105 °C
The fault indications are divided into two
different groups:
blocking and interlocking.
The interlocks give a flashing code on the
status display, the blocks give a nonflashing code.
The following lockout codes are shown as
flashing symbols:
Once operation is locked out, the control
system will wait until the fault is removed.
After this the control system will return to
normal operation. A lockout action can only
be cancelled by pressing the reset
pushbutton.
27.
Code
F
1
2
3/ 7/E
5
A
7
Meaning
Too many ignition attempts
Supply sensor failure
Too many flame faults detected
Control system internal fault
Fan malfunction
Exhaust gas sensor > 95 °C
Gas valve malfunction
Menu structure
Several parameters can be set by pressing the set/reset pushbutton on the display for longer
than 5 seconds. This brings you into the settings menu.
In order to see/change the following parameter, the set/reset pushbutton must be pressed once.
The value of the parameter can be changed by pressing the +/- pushbutton.
The menu contains the following parameters:
Page 42 ECO HOMETEC (UK) LTD.
Table 15 Control Menu
Letter
C
P
Description
maximum central heating water
temperature
overrun time for the central heating
pump
maximum central heating capacity
h
hot water supply
d1
t1
b2
O/b 3
O/S 3
O/d 3
pre-set hot water temperature
tank holding temperature
external boiler holding temperature
external sensor basic temperature
external sensor factor x 10
external
sensor
reference
temperature
return to standard setting:
by pressing the ‘+’ pushbutton the
standard values are restored (apart
from h and S)
O
r
S
pumping rate
(after a reset this is always 00)
Range
40 - 90 °C
Standard
82
1, 5, 10, 15, 20, 25 min
CO = continuous
30-100 %
30% = min. capacity
100% = max. capacity
00 = off (N30C)
01 = internal tank (N30K)
02 = external boiler (12k)
(N30B)
40 -70 °C
40 - 50 °C
40 - 70 °C
10 - 70 °C
1 - 100 °C
10 - 70 °C
5
80
60
40
60
50
20
30
= active changed
= factory setting changed
00 = speed
software
indicated
by
= always high
= always low
P/S
Max. Pressure Increase
V
window menu
1 = Central heating supply
temperature
2 = Central heating return
temperature
3 = Tcold
4 = Tank temperature
5= External boiler temperature
6 = Exhaust gas temperature
7 = Ionization value
8 = Water pressure (bar)
9 = Last interlocking
A = Last blocking
When the window menu mode is active, the normal display mode can be restored by pressing
the reset pushbutton again. If no entry is made for a period of three minutes, the display will
revert automatically to the normal display mode.
1 = These values are only visible as h = 01 (see above)
2 = These values are only visible as h = 02 and when a boiler sensor is connected
3 = These values are only visible when an external sensor is connected
EC 25 Compact Installation/User Manual page 43
28.
Laptop Connection
The EC25 has a special serial connection
that can only be used by the installer for
diagnosis with a PC.
The special cable and software required are
available to the installer as an option. Never
use a standard cable; this will result in
damage to the PC!
The software possibilities are:
28.1
Display current status
This screen gives the installer the possibility
to display an overview of the complete
status of the control system. This screen
gives the following information:
current temperatures as measured by the
control system
current and requested fan speed
status of the control system
measured ionization level
parameters that can be modified by the
installer
The status screen has a number of
pushbuttons with which several parameters
can be changed, such as the minimum and
maximum fan speeds.
28.2
History screen
The control system keeps a record of the
following data:
date of manufacture
number hours that the control system has
been active
number of successful ignition attempts
number of failed ignition attempts
number of flame faults
number of hours of burning for central
heating use
last 16 blockages
last 15 interlocks
These data will be saved in the memory of
the control system and will be maintained,
even when the power supply is switched off.
28.3
Graphic screen
This part of the programme gives the
installer the possibility to see a graphic
presentation of all measured temperatures
and other variables (such as fan speed). If
desired the measured values can be saved
on a diskette.
The saved information
displayed or printed.
Page 44 ECO HOMETEC (UK) LTD.
can
later
be
29.
Fault Finding
The following fault codes (blocking and interlocking) are saved. The last blocking code is
displayed in view mode A. (See Section 27 and table 15).
29.1
Blocking actions
Internal number
49, 58
65, 74
43
59
45
61
50
66
30
40
38
36
25, 26, 27, 28
31, 34, 35
39
0
29
41
32
29.2
Description
Supply sensor open
Supply sensor short-circuited
Return sensor open
Return sensor short-circuited
External sensor open
External sensor short-circuited
Hot water supply sensor open
Hot water supply sensor short-circuited
Flame detected with a closed gas valve
Flame sensor short-circuited
Phase and zero reversed
Supply sensor > 100 °C
Reference AD fault
Sample fault
50 Hz fault
E2PROM reading error
Exhaust gas sensor > 80 °C
Watchdog communication error
Water pressure error
Display code
1
1.
2
2.
4
4.
6
6.
F
F.
U
q
E
E
E
E
A
E
P
Interlocks
The last interlock code is displayed in view mode 9 (See Section 27 and table 15).
Internal number
1
2
24
21
3
4
10
12
19
9
8
5
6
7
11
20
14
Description
Ignition fault
Supply sensor fault
Too many flame faults
Flame out
Unknown fault
Watchdog fault
E2PROM fault
Faulty E2PROM Identification
Stack fault
Flame out
Fan fault
Gas valve relay fault
Safety relay fault
Ignition relay fault
Supply sensor > 105 °C
Flame not out in time
Exhaust gas sensor > 95 °C
Display code
F
1
2
2
3
3
3
3
3
3
5
7
E
E
E
E
A
EC 25 Compact Installation/User Manual page 45
Figure 23 Wiring Diagram
Page 46 ECO HOMETEC (UK) LTD.
30.
1
2
3
4
5
6
7
8
9
10
11
12
13
14
15
16
17
Electrical circuit diagram
Three-way valve
Gas valve
Central heating pump
Ionization pin
Incandescent igniter
Fan
Display
PC connection
Connection block installer
Room thermostat 24 V
External boiler
External temperature sensor
Water pressure sensor
Exhaust gas sensor
Temperature sensor for boiler
Temperature sensor for central heating supply
Temperature sensor for central heating return
EC 25 Compact Installation/User Manual page 47
30.1
Decommissioning the boiler
When
decommissioning
the
boiler,
precautions should be taken to avoid frost
damage. Therefore it is essential that both
the boiler and the central heating system
are completely drained down.
To do this remove the front casing and
connect a hose to the central heating drain
point.
The system should be vented by
opening the DHW valve and /or the manual
air vent on the central heating circuit.
Tag the boiler “DO NOT USE SYSTEM
DRAINED” and remove the fuse at the
isolating switch.
CORGI REGISTERED
INSTALLER OPPORTUNITIES
As a result of their incredible efficiency and technical
superiority the demand for eco hometec appliances
has surpassed all expectations.
To cope with the increasing request for installations
and technical advice we are looking to recruit
additional
eco hometec approved installers.
If you or your company would like to be considered
then please call our technical sales department for a
FREE information pack
or alternatively visit our web site
eco-hometec.co.uk
Page 48 ECO HOMETEC (UK) LTD.
31.
User Instructions
32.
Annual Servicing.
It is a condition of the boiler
warranty that all servicing and maintenance
be carried out annually by eco hometec
approved engineers only.
A service has to be carried out when every
12 months
33.
Decommissioning the boiler.
When
decommissioning
the
boiler,
precautions should be taken to avoid frost
damage. Therefore it is essential that both
the boiler and the central heating system
are completely drained down.
33.1
General
The appliance combines a maximum of
comfort with extremely simple operation.
As a user you need to adjust nothing other
than the desired times and temperatures on
the room thermostat or programmer,
irrespective of the time of year.
Depending on the value that you choose as
being the most comfortable, together with
the lowest possible use of energy, the
following tips can help to make the optimum
use of your appliance:
In order to limit the energy used, it is
recommended that all radiator valves should
be of the thermostatic type and in the rooms
to be heated be adjusted to provide a
comfortable temperature.
Close the radiator valves in rooms where
you require no heating.
Set the room thermostat to a lower
temperature some time before you retire to
bed.
For more information, please consult your
installer.
33.2
Holiday
Also during long-term absence, for example
in the holiday period, it is recommended that
you leave the appliance switched on.
Every 24 hours the appliance performs a
number of checks.
If the occurrence of frost can be excluded,
you should adjust the room thermostat to a
low temperature.
If the occurrence of frost cannot be
excluded, you should adjust the room
thermostat to a temperature of 12 °C or
higher.
Although the appliance is provided with
internal frost protection
this does not
protect the rest of the installation against
freezing.
NEVER isolate the mains and NEVER close
the gas tap.
33.3
Cleaning
Wipe the outside of the appliance regularly
with a soft, damp cloth. For this it is not
necessary to close the gas tap or to switch
off the electricity supply.
Never use aggressive or flammable
cleaning materials.
Remember that the pipes can reach high
temperatures.
33.4
Control system codes
During operation, the display (1) indicates
the status of the appliance in the form of a
code (Fig. 24).
Open the door for the display in order to
read the codes.
Status code
0
C
c
d
b
h
P
. (Decimal
point)
33.5
Meaning
ready for use
central heating use
central heating pump
overrun
hot water operation
boiler operation
hot water pump overrun
installation pressure
burner in operation
Malfunction codes
If any code other than those mentioned
above appears in the display, this will be a
malfunction code.
EC 25 Compact Installation/User Manual page 49
Figure 24 Status Display
The display lights continuously.
Malfuncti
on code
1 or 1.
2 or 2.
6 or 6.
4 or4.
F / F.
Code
F
1
2
3/ 7/E
5
A
7
Meaning
Too many ignition attempts
Supply sensor failure
Too many flame faults detected
Control system internal fault
Fan malfunction
Exhaust gas sensor > 95 °C
Gas valve malfunction
Press the set/reset key (2). This may end
the malfunction. The lock function will then
be ended and the malfunction code will
disappear from the display.
If the malfunction is not cured or keeps
recurring, you should contact your installer.
Malfunction code P: Water pressure
The last two positions in the display give an
indication of the measured water pressure.
The optimum water pressure is 2.0 bar.
With a pressure above 3.5 bar heat will no
longer be supplied. Contact your installer.
With a pressure under 0.5 bar the capacity
of the appliance will be limited while under
0.2 bar heat will no longer be supplied. In
both cases the water must be topped up in
the manner specified by your installer (to a
pressure of approximately 2 bar).
If the pressure lies between 0.5 and 3.5 bar,
this is an indication that there is air present
in the central heating installation. The
appliance will attempt to expel this air by
means of a bleed programme.
If this condition persists, you should contact
your installer.
Malfunctions that can only be remedied by a
service technician
Page 50 ECO HOMETEC (UK) LTD.
A
E
U
P
q
Description of malfunction
Supply sensor open or shortcircuit(ed)
Return sensor open or shortcircuit(ed)
Tank sensor open / shortcircuit(ed)
External sensor open or
short-circuit(ed)
Burner does not ignite or
goes out
Exhaust gas sensor > 80 °C
Control system internal fault
Neutral or Live reversed
Pump Test
Supply sensor > 105 °C
In the event of one of the above codes
being displayed contact your installer or the
eco hometec service department.
33.6
Topping up
Check periodically to determine whether the
water pressure is high enough. If the water
pressure is too low, a P will appear in the
display, alternating with another letter.
Add water in the manner specified by your
installer.
33.7
Bleeding air from the system
Approximately 1 week after the system is
installed, the radiators should be vented.
EC 25 Compact Installation/User Manual page 51
Save gas
Save money
Only boilers from
eco hometec are fitted with
Variable Controlled Output
eco hometec
Unit 11E
Carcroft Enterprise Park
Carcroft
Doncaster
DN6 8DD
Tel. 01302 722266
Fax. 01302 728634
http://www.eco-hometec.co.uk
[email protected]