1
Installation
Gas Connection
•
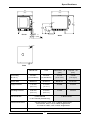
A ½" BSP female elbow (½" N.P.T female - Canada only) is provided at the bottom rear of the
oven.
•
A restraint chain anchor has been provided above the gas connection point for fitment of a
restraint chain when a flexible gas line is fitted.
•
It is important that adequately sized piping run directly to the connection joint on the oven with as
few tees and elbows as possible to give maximum supply volume.
•
A suitable jointing compound which resists the break down action of LPG must be used on every
gas connection.
•
Check all connections for leakages.
•
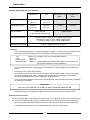
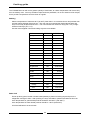
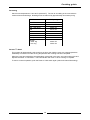
Check appliance name plate on oven front right hand for correct orifice size and operating
pressure for the gas being installed, before operation.
•
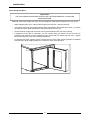
The appliance combination gas valve is fitted with an internal regulator for adjusting the operating
pressure. To access, remove appropriately marked side service panel from bottom right side of
oven. Unscrew and remove regulator cap from gas valve. Adjust regulator to achieve stated
pressure.
NOTE:
Pressure test points are located behind this side service panel also at bottom right side of oven.
Water Connection - Optional (not required for main oven operation)
•
If the manual addition of water into the oven for humidification or steaming effect on baked product
is required, the unit’s water connection can be used.
•
A cold water supply should be fitted to the water inlet (¾” BSP hose connection) which is located
on the rear of the right hand side of the unit.
•
Alternately, a connection elbow and sealing washer is supplied with this unit for direct
connection of a ½” ID hose, and is recommended for easy installation and service.
•
Connect water supply - Max inlet pressure 80psi / 550kPa.
•
Turn on water supply to check for leaks.
Important:
MAXIMUM INLET WATER PRESSURE IS 550 kPa / 80 psi.
Before Use
•
Operate the oven for about 1 hour at 200°C (400°F) to remove any fumes or odours which may be
present.
Lighting Instructions
•
Set the thermostat temperature.
•
Automatic ignition will light the burner.
•
If not, turn the thermostat off, and wait 5 minutes before relighting.
•
The burner will cycle on/off to maintain the set temperature.
•
Turn the thermostat off to shut-down the burner.
NOTE:
If the burner is not cycling to maintain temperature the ignition system has locked out. To reset turn
the thermostat to the ‘off’ position. Wait 5 minutes before relighting.
If the flame is lost during operation the ignition system will try three times to re-establish the flame with
a 30 second delay between each try, before going into lockout.
5