1
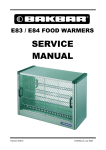
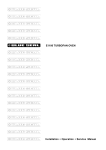
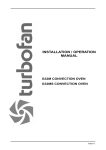
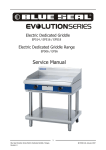
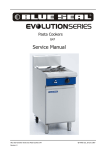
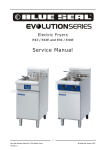
INSTALLATION / OPERATION
MANUAL
BM10 Planetary Mixer
1
F26290-4
WORLD-WIDE BRANCHES
UNITED KINGDOM
Blue Seal
67 Gravelly Business Park
Gravelly Park
Birmingham
West Midlands
B24 8TQ
Ph:
(121) 327 5575
Fax: (121) 327 9711
UNITED STATES
Moffat Inc
3765 Champion Blvd
Winston-Salem
North Carolina 27115
Ph:
(336) 661 0257
Fax: (336) 661 9546
CANADA
Serve Canada
22 Ashwarren Road
Downview
Ontario M3J1Z5
Toll Free:800 263 1455
Ph:
(416) 631 0601
Fax:
(416) 631 0315
[email protected]
www.servecanada.com
www.moffat.com
NEW ZEALAND
Christchurch
Moffat Limited
PO Box 10-001
16 Osborne Street
Christchurch
Ph:
(03) 389 1007
Fax: (03) 389 1276
Auckland
Moffat Limited
4 Waipuna Road
Mt Wellington
Auckland
Ph:
(09) 574 3150
Fax: (09) 574 3159
AUSTRALIA
Victoria
Moffat Pty Limited
740 Springvale Road
Mulgrave, Melbourne
Victoria 3171
Ph:
(03) 9518 3888
Fax: (03) 9518 3838
New South Wales
Moffat Pty Limited
3/142 James Ruse Drive, Rose Hill
PO Box 913, Smithfield
Sydney, N.S.W. 2142
Ph:
(02) 8833 4111
Fax: (02) 8833 4133
Western Australia
Moffat Pty Limited
67 Howe Street
Osbourne Park
WA 6017
Ph:
(08) 9202 6820
Fax: (08) 9202 6836
Queensland
Moffat Pty Limited
30 Prosperity Place
Geebung, Brisbane
Queensland 4034
Ph:
(07) 3630 8600
Fax
(07) 3630 8623
The reproduction or copying of any part of this manual by any means whatsoever is strictly forbidden unless authorized previously in
writing by the manufacturer.
In line with policy to continually develop and improve its products, Moffat Ltd. reserves the right to change the specifications and
design without prior notice.
© Copyright Moffat Ltd. April 2008
2
Contents
Introduction............................................................................................ 2
Specifications.......................................................................................... 3
Installation ............................................................................................. 4
Operation ................................................................................................ 5
Cleaning and Maintenance ..................................................................... 8
Competency Checklists........................................................................... 9
Operations Competency Checklist
Daily Cleaning Competency Checklist
Risk Assessment ................................................................................... 12
Replacement Parts List......................................................................... 13
Wiring Chart.......................................................................................... 14
Date Purchased .......................................................... Serial No.....................................................
Dealer.............................................................................................................................................
Service Agent ..................................................................................................................................
1
Introduction
Introduction
We are confident that you will be delighted with your PARAMOUNT MIXER, and it will become a most
valued appliance in your commercial kitchen.
A new mixer can seem very complex and confusing at first glance. To ensure you receive the utmost
benefit from your new Paramount, there are two important things you can do.
Firstly
Please read the instruction book carefully and follow the directions given. The time taken will be well
spent.
Secondly
If you are unsure of any aspect of the installation, instructions or performance of your oven, contact your
Paramount dealer promptly. In many cases a phone call could answer your question.
The Paramount BM10 is a dependable mixer for kneading and mixing all kinds of dough, egg, cream,
cookies, mayonnaise etc. The mixer works smoothly and reliably. There are 3 speeds and various style
attachments which can be selected to obtain the best results. These are made of alloy aluminum or
they’re of food hygiene standard.
This model Mixer is equipped with a powerful 1/3 HP motor and strong belt & gear drive design. The gears
are made of hardened alloy steel and a hardened steel worm wheel. A stainless steel safety guard or a
timer is available on all models.
With proper operation and maintenance this mixer will give you years of service, and obtain the best
results.
Safety Precautions
Improper installation, adjustment, alteration, service or maintenance can cause
property damage, injury or death.
Read the installation, operating and maintenance instructions thoroughly before
installing or servicing this equipment. Failure to do so may result in serious injury or
damage.
•
Keep hands and clothing away from the bowl and hob attachments when in operation.
•
Keep rigid objects away from the bowl and hub attachments when in operation.
•
Do not use this machine for any applications other than food processing.
•
Use the machine only with the electrical supply specified on the rating plate.
•
Disconnect the machine from its power source before carrying out any maintenance.
•
Do not disable or remove any of the safety mechanisms included with this machine.
•
Do not leave the machine in operation unattended.
•
Observe all maintenance and safety inspection schedules.
•
Ensure the machine and any accessories / attachments are in stable, upright position before
operating.
•
Ensure all safety features of the machine are fitted and operate correctly within the safety
requirements and procedures before operating the machine.
2
Specifications
Motor
1
/3 HP (0.25kW) powerful, ball bearing, ventilated within mixer enclosure.
Electrical Supply
230-240 Volts AC, 50Hz, 1P+N+E.
Transmission
The gears are constantly mesh in a special lubricant assuring long life; transmission gears are of
heat treated alloy steel, high accurate construction. All bearings are ball bearings. Positive timing
belt drive eliminates slip and speed variation.
Timer
The 15 minute timer will stop the mixer when the desired time has elapsed.
Safety Guard
Stainless steel safety guard smoothly rotates open. Fitted with a limit switch to shut off power
immediately to protect operator.
270
630
400
Dimensions
360
Model
Bowl
Capacity
BM10AT
10 litres
450
Net Weight
(approx.)
Motor Power
1
/3 HP (0.25kW)
62 Kg
3
Agitator Speed (RPM)
Low
Med
High
112
202
400
Installation
Before installing the mixer, check that the available electrical supply match that
of the mixer as stated on the mixer’s rating plate.
Unpacking
Immediately after unpacking the mixer, check it for possible shipping damage. If this machine is
found to be damaged after unpacking, save the packaging material and contact the carrier within
one day of delivery.
Location
Place the mixer in its operating location - this should be a sturdy level surface. There should be
adequate space around the mixer for the user to operate the control and install and remove bowls.
Holes are provided in the base to permanently secure the mixer, although this not necessary in
normal installations.
Floor models must be leveled front-back and side-to-side by sliding shims under the legs as
required.
Electrical Connection
The supply cord on this machine is provided with a three-pin 13A fused and earthed plug. It is
imperative that the outlet to which this plug is connected be properly earthed (grounded).
Prior to installation, test the electrical service to assure it agrees with the specifications on the
machine data plate located on the back side of the pedestal.
Permissible voltage fluctuation is ± 10% of nominal voltage.
Components having adjustments protected (e.g. paint sealed) by the manufacturer, are
only allowed to be adjusted by an authorised service agent.
Rotation
To start the motor, push the 'ON' button. The speed selector handle must be at one of the
numbers indicating a speed, not an intermediate rating.
4
Operation
Keep hands, clothing and utensils out of the bowl whilst the machine is in operation.
Failure to follow the operation instructions or improper use of the mixer may result in
damage to the mixer, or cause injury to the operator.
Important:
Great care must be taken to minimise dust emission when handling dry ingredients such as
flour. Bags should opened in the lower part of the bowl and poured from as close to the base
of the bowl as possible.
It is recommended that ingredients suppliers’ hazard data sheets are consulted prior to use.
The use of respiratory protective equipment during loading of the bowl may be required.
Controls
All models are furnished with an 'ON' - 'OFF' switch which controls power to the mixer.
The TIMER is used in conjunction with the 'ON' - 'OFF' switch for timed mixing operations and will stop
the mixer when the desired timed has elapsed.
The GEAR SHIFT LEVER is used to change speeds. Always stop the mixer before
changing speeds. To change speeds, turn the switch 'OFF', move the gear shift
lever to the desired speed, and turn the switch back 'ON'.
Speed 1 (Low) - This speed is for heavy mixtures such as bread dough, heavy
batters, and potatoes.
Speed 2 (Medium) - This speed is for light dough which must rise quickly, heavy
batters, and some whipping operations.
Speed 3 (High) - This speed is fast speed for light work such as whipping cream,
beating eggs, and mixing thin batters.
5
3
2
1
Operation
Mixing Bowl / Agitators
New mixers bowls and agitators (beaters, whip, and dough arms) should be thoroughly washed with hot
water and mild soap solution, rinsed with either a mild soda or vinegar solution, and thoroughly rinsed
with clean water BEFORE being put into service. This cleaning procedure should also be followed for
bowls and agitators before whipping egg whites or whole eggs.
Fitting the Bowl
The bowl must be installed before the agitator. To install the bowl, fully lower the bowl support (Fig. 1).
Position the bowl so the alignment bracket on the back of the bowl is in the bowl retainer and the
alignment pins on the front of the bowl support fit in the holes on the sides of the bowl.
Fitting the Agitators
To install an agitator, the bowl must be installed and fully lowered. Place the agitator in the bowl, push it
up on the agitator shaft, and turn it clockwise to seat the shaft pin in the slot of the agitator shank.
Dough Arm
It is frequently used for heavy bread dough, and preferable to be use at
low speed.
The moisture content of heavy dough is a critical when selecting proper
mixing speed. Never use 2nd speed when mixing heavy dough with an
Absorption Ratio (AR) of 50% or less.
3
2
Beater
It is commonly used for thin batters, cake and mashing potatoes, like
stuffing and preferable to be used at middle speed.
3
1
Whip
It is best for whipping cream and beating eggs and preferable to be used
at high speed.
2
1
6
Operation
Mixing Heavy Dough
The moisture content of heavy dough is a critical factor when selecting proper mixing speed. Never use
2nd speed when mixing heavy dough with an Absorption Ratio (AR) of 50% or less. To determine the
Absorption Ratio (AR) of a product, the water weight divide by the flour weight.
Example: Calculate the Absorption Ratio of a mixture containing 5 lbs. of water and 10 lbs. of flour.
AR = 5 ÷ 10 = 0.50 = 50 %
Product
Agitator
BM10AT
Whip
600 ml
Mashed Potatoes
Beater
4.5 kg
Mayonnaise (Litres Oil)
Beater
4 ltrs
Meringue (Litres Water)
Whip
0.75 ltrs
Waffle/Pan cake Batter
Beater
5 ltrs
Whip
2 ltrs
Sheet Cake Batter
Beater
4.5 kg
Cup Cake
Beater
10 doz.
Layer Cake
Beater
4.5 kg
Pound Cake
Beater
4.5 kg
Sugar Cookie
Beater
20 doz.
Bread or Roll Dough (Light / Medium, 60% AR) †
Hook *
Water
0.7 kg
Flour
1.1 kg
Bread or Roll Dough (Heavy, 55% AR) †
Hook *
Water
0.5 kg
Flour
0.9 kg
Thick Pizza Dough (60% AR) †
Hook *
Water
0.25 kg
Flour
0.4 kg
Raised Donut Dough (65% AR)
Hook *
Water
0.6 kg
Flour
0.9 kg
Whole Wheat Dough ( 70% AR)
Hook **
Water
0.65 kg
Flour
0.9 kg
Egg Whites
Whipped Cream
*
1st speed only.
** 1st speed & 2nd speed only.
†
If high gluten flour is used, reduce above dough batch size by 10%.
7
Cleaning / Maintenance
Cleaning Guidelines
C AUTIO N :
ALWAYS TURN OFF THE POWER SUPPLY BEFORE CLEANING OR MAINTENANCE
THIS UNIT IS NOT WATER PROOF.
DO NOT USE WATER JET SPRAY TO CLEAN INTERIOR OR EXTERIOR OF THIS UNIT.
The mixer should be thoroughly cleaned daily with a clean damp cloth and plastic scraper metallic
implements are not recommended.
Never use a metal or stiff brush to clean the mixer. Never clean the mixer with a water hose or any
fluid pressure.
Bowls and agitators should be removed from the mixer and cleaned in a sink. The bowl guard should
be removed periodically and wiped clean.
Maintenance Guidelines
The transmission case and planetary mechanism should be inspected weekly for leaks, damage,
etc. Should it become necessary to repack the ball bearings, an authorized service technician or the
manufacturer should be contacted. Use of unproved grease or lubricants may lead to damage and
void the unit’s warranty.
The bowl lift slides should be lubricated every six months, or more often under heavy usage.
Disconnect the unit from the power supply before removing the top housing or apron.
The drip cup should be inspected periodically for moisture or lubricant dripping. Remove the cup and
wipe it with a soft cloth.
Any parts found to be damaged, defective or worn out should be replaced immediately.
8
Competency Checklists
Guide Sheets for Staff Training
The pages in the following section of this manual should be copied and used when training staff to
operate the Paramount mixers. It is suggested that the competency assessment checklists be completed,
signed, and a copy kept in the personnel files for future reference.
Supervisors to Ensure
•
Competency check lists are copied and completed as part of the training of staff.
•
Correct training of staff to the required competency expectations.
•
The verification section of the competency check list is signed off.
•
A copy of the completed and signed competency check list is placed in personnel records as
evidence of operator competence.
9
Operations Competency Checklist
Paramount Planetary Mixer
Element:
3
Implement safe work procedures
Assessment Criteria
SUGGESTION — Use this form to train staff, and place a copy in personnel files.
“Can the operator”
Identify the purpose and use of:
• Equipment guards.
• Warning signs.
• Safety features.
Related to this equipment?
Identify:
• Machine-related health and safety risks of this equipment?
• Emergency procedures to be used with this equipment?
Operate this equipment correctly in normal and emergency situations?
Identify:
• OH&S reporting procedures related to hazard reporting for this machine?
Comments:
To gain competency in the use of the PARAMOUNT PLANETARY MIXER, the assessor must be
satisfied that the operator has consistently applied the knowledge and skills in all of the above elements.
This form should be signed off only when the assessor is satisfied that the
employee/trainee is competent to carry out all of the tasks described above.
Applicant’s signature:
Date:
/
/
Assessor’s signature:
Date:
/
/
10
Daily Cleaning Competency Checklist
Paramount Planetary Mixer
Element:
3
Implement essential hygiene and sanitation procedures.
Assessment Criteria
Maintain sound personal hygiene at all times when working with the PARAMOUNT MIXER?
Use appropriate protective and work clothing while working with the PARAMOUNT MIXER?
Identify:
• Product handling requirements during production process?
• Critical points in the process where contamination can be introduced?
• Why it is important to monitor hygiene and sanitation performance?
• The effect of poorly maintained equipment on the control of contamination and spoilage?
• Company policies and procedures regarding hygiene and sanitation?
• Actual and potential contamination and spoilage hazards?
• Solutions to rectify contamination and spoilage problems?
Use work practices and methods that reduce the risk of product contamination?
Remove contamination where appropriate in accordance with:
• Workplace hygiene and sanitation procedures?
• Procedures specific to the PARAMOUNT MIXER?
Comments:
To gain competency in the use of the PARAMOUNT PLANETARY MIXER, the assessor must be
satisfied that the operator has consistently applied the knowledge and skills in all of the above elements.
This form should be signed off only when the assessor is satisfied that the
employee/trainee is competent to carry out all of the tasks described above.
Applicant’s signature:
Date:
/
/
Assessor’s signature:
Date:
/
/
11
SUGGESTION — Use this form to train staff, and place a copy in personnel files.
“Can the Operator”
Risk Assessment
The following risk assessment covers the reasonably foreseeable hazards to health and safety arising from
the mixer and from systems of work associated with this machine.
Hazard Identified
Existing Controls
Consequences
Likelihood
Risk Rating
Cleaning the machine with buckets of
water or hoses is extremely dangerous
and may lead to electrocution. The
machine must be cleaned with a damp
cloth only.
Safe work cleaning practices
included in training manual
local workplace rules and
management.
Catastrophic
Rare
High
Microswitch on safety guard should never
be removed nor tampered with otherwise
machine could continue working with
moving parts exposed.
Safe work guidelines
reinforce non-authorised
tampering with the machine.
Access to microswitches
service item only.
Major injuries
Rare
Moderate
Electrical isolation switch should be fully
accessible to the operator. Recommend
no more than 1.5 metres above the floor
and within easy access by the operator.
Dependent on bakery
electrical policy.
Major injuries
Rare
High
Safety guard should not be removed.
Microswitch interlocked with
machine - controls will not
operate.
Major injuries
Unlikely
Moderate
Service panels should not be removed
whilst the machine is in operation nor still
connected to the power supply. The
machine must not be operated with any
service access panel removed.
Machine designed to be
accessed by authorised
service technicians only.
Warning signs clearly
evident.
Major injuries
Unlikely
Moderate
Hands or arms should not be placed
behind bowl whilst the machine is in
operation.
Safe operating procedure
reinforces this not to be
done.
Warnings in place.
Minor injuries
Unlikely
Low
Hands should never be placed near dough Bowl guarded during
hook whilst in motion.
operation. Safe operating
procedures highlight safe
work.
Major injuries
Unlikely
Moderate
Cleaning of the machine should not take
place whilst it is in operation nor still
connected to the power supply.
Correct cleaning procedure
detailed in training
procedure.
Major injuries
Unlikely
Moderate
The machine should never be connected
to alternate power source other than that
which it has been designed for and
specified within this manual.
External plug designed to
Australian / New Zealand
standards for the appropriate
power supply. Warnings in
manual.
Major injuries
Rare
Moderate
Risk Rating
Extreme Risk
High Risk
Moderate Risk
Low Risk
Immediate action required.
Senior management attention required.
Management responsibility must be specified.
Manage by routine procedures.
Based on AS4360 1999 Risk Management.
Owners and Operators of Paramount Equipment Please Note:
The risk ratings and control measures as outlined in this manual must be incorporated into your safety
management systems and procedures. Ensure effective risk control by reinforcing these procedures with
staff. For example: never clean any electrical equipment with buckets of water or pressurised hoses.
12
Replacement Parts List
Replacement Parts List
IMPORTANT:
Only genuine authorized replacement parts should be used for the servicing and
repair of this appliance. The instructions supplied with the parts should be followed
when replacing components.
For further information and servicing instructions, contact your nearest authorized
service branch (contact details are as shown on the reverse of the front cover of this
manual).
When ordering replacement parts, please quote the part number and the description as listed below. If
the part required is not listed below, request the part by description and quote model number and
serial number which is shown on the Rating Plate located on the front lower corner of the right hand side
panel.
Part No.
Description
BM10-12-001
BM10-12-003
BM10-12-004
BM10-12-002
Stainless Steel Bowl.
Aluminium Hook.
Stainless Steel Wire Whip.
Batter Beater.
13
Wiring Chart
14
15