1
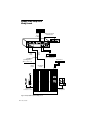
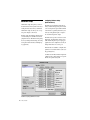
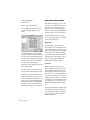
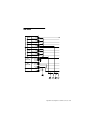
To configure audio interfaces:
1 In Pro Tools, choose Setups > Hardware.
2 From the Peripherals list, select your 192 I/O
or any audio interface you would like to adjust.
If you only have a single 192 I/O in your system,
it will already be selected by default.
3 Make sure Main tab is chosen.
When the Hardware Setup dialog is open,
the Left and Right arrows scroll through the
tabs; the Up and Down arrows scroll
through the Peripherals list.
4 From the Digital Format radio buttons, select
the desired format for the enclosure digital I/O
of your choice. Choices include: AES/EBU,
S/PDIF, and Optical (S/PDIF). Selecting Optical
(S/PDIF) resets the Optical I/O port to two channels of S/PDIF, or TOS-Link, supporting up to 96
kHz. When Optical (S/PDIF) is not selected, this
port defaults to eight channels of
Optical (ADAT) I/O.
8 From the Input and Output channel pop-up
menus, select the physical ports (such as Analog
1–2, Optical 5–6, and so on) that will be routed
to the Pro Tools input and output channels (Ch
1–2, 3–4, and so on). You can select default settings at any time by pressing the Set To Default
button on the lower edge of the Hardware Setup
dialog.
Certain functions and paths will be greyed-out
as a result of other selections. For example, the
Optical 1–8 channels will not be available for
session rates of 88.2 kHz or higher.
To differentiate inputs and outputs of the same
digital format, they are labelled differently in
the input and output channel pop-up menus.
For example, the stereo AES/EBU inputs and
outputs that are mounted on the 192 I/O enclosure are identified as AES/EBU [Encl]; the eight
channels of AES/EBU I/O that come on the Digital I/O card are listed as AES/EBU 1–2, AES/EBU
3–4, and so on.
5 From the Clock Source pop-up menu, select
the appropriate clock source for the system. In
most non-synchronized cases, you will use Internal. See “Synchronization Mode and Clock
Source” on page 23 for more information about
non-internal clock settings.
6 From the Ext. Clock Output pop-up menu, se-
lect the appropriate clock source to feed to devices attached to your I/O. Slave Clock is
automatically selected when a Legacy peripheral
has been declared. See “Clock Source and Loop
Master” on page 24.
7 For S/PDIF compatibility with Tascam DA30
DAT recorders, click on the Tascam button, under S/PDIF Format.
Chapter 3: Installation Overview
17