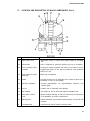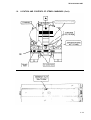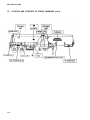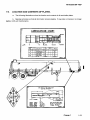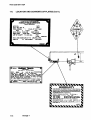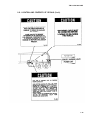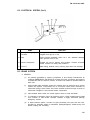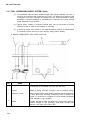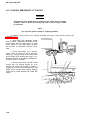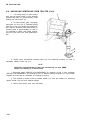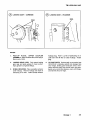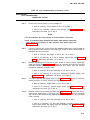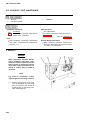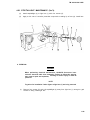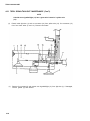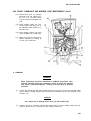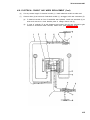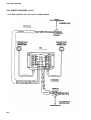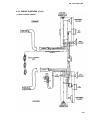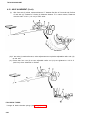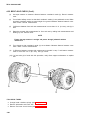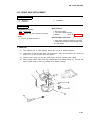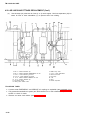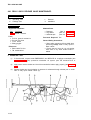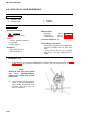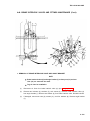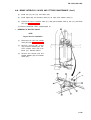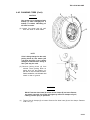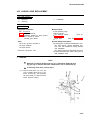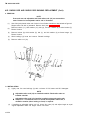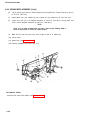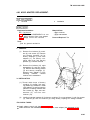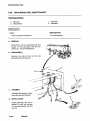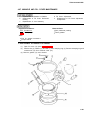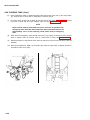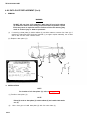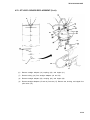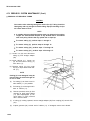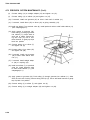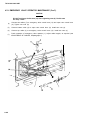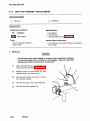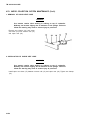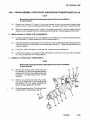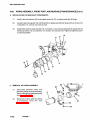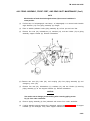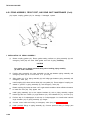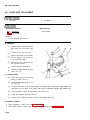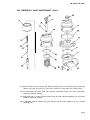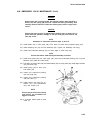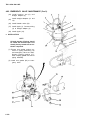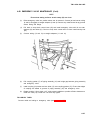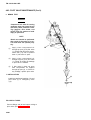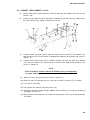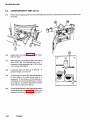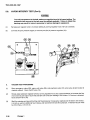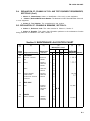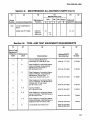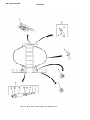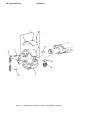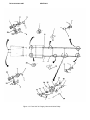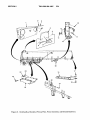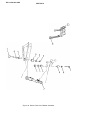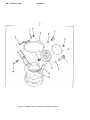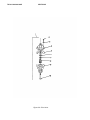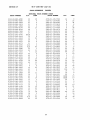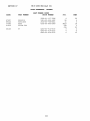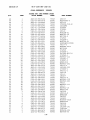
1
TM 9-2330-384-14&P
OPERATOR’S, UNIT, DIRECT SUPPORT AND GENERAL
SUPPORTMAINTENANCE MANUAL
INCLUDING
REPAIR PARTS AND SPECIAL TOOLS LISTS
FOR
SEMITRAILER, TANK, FUEL, 7500 GALLON, M1062
(2330-01-275-7475)
Fruehauf Corporation
Liquid and Bulk Tank Division
Contract No. DAAE07-87-C-J061
Approved for public release; distribution unlimited.
HEADQUARTERS, DEPARTMENT OF THE ARMY
9 JULY 1990
TM 9-2330-384-14&P
WARNING
STATIC ELECTRICITY AND FUEL ARE A DEADLY COMBINATION!
1. The M1062 7500 Gallon Fuel Tank Semitrailer carries flammable fuel. Loaded or empty,
operation and maintenance of the semitrailer can be dangerous. When loading and unloading fuel,
static electricity is formed. When performing maintenance, a wrench slipping on a fastener and striking
another metal object can create a spark; if a spark comes in contact with fuel or fuel vapors, a fire and
explosion will result.
2. Personnel must read and follow all WARNINGS listed on these pages before operating or
maintaining the M1062 7500 Gallon Fuel Tank Semitrailer. These pages contain a summary of all the
WARNINGS found in the manual.
3. Read Chapter 1, Section IV, General Safety Regulations and paragraph 2-18, General Fuel
Handling Requirements.
4. For First Aid information, refer to FM 21-11.
THE BEST DEFENSE AGAINST SERIOUS INJURY OR DEATH IS KNOWLEDGE
WARNING
ACCESS TO TANK
•
Use extreme caution when working or walking on top of semitrailer. Walkway can become slippery
due to moisture or fuel spillage. Failure to follow this warning may result in serious injury to
personnel.
•
Grabhandles on top of semitrailer are dismountable. Ensure that they are securely mounted before
using them. Failure to follow this warning may result in serious injury to personnel.
•
Use caution when opening manhole primary latch. If there is pressure buildup inside tank, it must
first be relieved, then manhole primary latch slowly opened. Failure to follow this warning may result
in serious injury or death to personnel.
•
Stand clear of fill cover when opening manhole. Pressure buildup inside tank may cause fill cover to
fly open. Failure to follow this warning may result in serious injury or death to personnel.
a
TM 9-2330-384-14&P
WARNING
BRAKES
• Cautiously feel each wheel hub and drum. Wheel hub or drum may be hot. Failure to follow this
warning may result in burns.
• Wipe clean excessive lubricant in area of brake shoe linings to avoid grease soaking the linings.
Replace grease soaked brake shoe linings. Failure to follow this warning may cause brakes to
malfunction, resulting in serious injury or death to personnel.
•
Wear safety goggles and face shield when performing leakage tests on valves. Failure to follow this
warning may result in serious eye injury due to high pressure air.
•
DO NOT use a drum that exceeds maximum wear specifications. Failure to follow this warning may
result in brake failure and serious injury or death to personnel.
• DO NOT cage brake chamber spring until chock blocks are properly positioned at wheels. Once
brake chamber springs are caged, semitrailer is without brakes and can roll. Failure to properly
chock wheels may result in serious injury or death to personnel.
•
Ensure that air lines do not rub against each other or any other surface when installed. Relocate or
provide support, as required. If air lines rub, a leak may develop resulting in brake lockup and
possible serious injury or death to personnel.
WARNING
CLEANING
•
Dry cleaning solvent P-D-680 is toxic and flammable. Always wear protective goggles, face shield,
and gloves, and use only in a well-ventilated area. Avoid contact with skin, eyes, and clothes and
DO NOT breathe vapors. DO NOT use near open flame or excessive heat. The solvent’s flash point is
100°F-138°F (38°C-59°C). If you become dizzy while using cleaning solvent, immediately get
fresh air and medical help. If solvent contacts eyes, immediately wash your eyes with water and get
medical aid.
WARNING
COMPRESSED AIR
•
Compressed air used for drying or testing purposes or to clear restrictions must not exceed 30 psi
(207 kPa). Wear protective clothing (goggles, face shield, and gloves) and use caution to avoid
injury to personnel.
b
TM 9-2330-384-14&P
WARNING
COUPLING AND UNCOUPLING
All personnel must stand clear of semitrailer and tractor during coupling and uncoupling operations.
Failure to follow this warning may result in serious injury or death to personnel.
WARNING
ELECTRICAL SYSTEM
DO NOT plug both inter-vehicular electrical cables into semitrailer. Failure to follow this warning may
result in damage to electrical system or form sparks causing a fire or an explosion.
When troubleshooting an electrical malfunction or performing electrical maintenance, ALWAYS
disconnect intervehicular electrical cable from semitrailer. Failure to follow this warning may create
a spark and explosion, resulting in serious injury or death to personnel.
WARNING
EMERGENCY VALVE
Socket valve is spring loaded. Use extreme caution when handling it. Piston and spring must be
compressed during disassembly and assembly, then carefully released. Failure to follow this
warning may result in injury to personnel.
WARNING
MAINTENANCE INSIDE TANK
When working inside tank, always provide adequate forced air ventilation at the manhole opening
with air directed into compartment where work is being performed. Forced air ventilation allows for
removal of any explosive quantities and contaminants resulting from the type of work being done
and serves to prevent oxygen deficiency. Failure to follow this warning may result in death to
personnel.
NEVER work alone inside a tank; a second person must be stationed at the manhole opening. The
person inside the tank must have a safety line and harness on in case of emergency for rescue
operations. If a rescue operation is required, summon assistance IMMEDIATELY. DO NOT attempt a
rescue until assistance has arrived.
DO NOT perform any welding procedure unless tank is purged. Failure to follow this procedure will
result in serious injury or death to personnel.
c
TM 9-2330-384-14&P
WARNING
FUEL HANDLING AND PURGING
• Follow all fuel handling and purging procedures precisely to prevent serious injury or death to
personnel.
•
Operator must be alert at all times for leaking or malfunctioning equipment. IMMEDIATELY stop all
fuel handling operations at the first sign of leaks or malfunctions. Corrective action must be
performed by qualified personnel before resuming any operations.
•
DO NOT open vent cap except to purge tank. With vent cap open, vapors inside tank could ignite if a
spark is produced. The resulting fire and explosion will result in serious injury or death to personnel.
• DO NOT breathe fuel fumes. They are toxic and can cause serious medical problems. Failure to
follow this warning may result in serious injury or death to personnel.
• DO NOT smoke while loading or unloading fuel, when handling fuel containers, or when located
within 50 ft. (15.25 m) of fueling and fuel storage areas. Failure to follow this warning may cause a
fire and explosion, resulting in serious injury or death to personnel.
•
Give IMMEDIATE medical attention to personnel exposed to hydrocarbon or toxic vapors. Signs of
distress are weakness, nausea, coughing or intoxication, nosebleed or cramps, or other unusual
symptoms. Qualified personnel able to administer artificial respiration and simple first aid must be
present.
•
DO NOT open emergency valve when bottom loading. Automatic shutoff of fuel flow, controlled by
jet level sensor, will not function with emergency valve open. Failure to follow this warning will result
in uncontrolled fuel spillage and danger of fire and explosion.
•
DO NOT mix incompatible fuels in tank. Dangerous fumes and explosion may result. Know what fuel
was previously carried so that preventive measures may be taken to ensure that harmful or
explosive fumes are not released, Failure to follow this warning may result in serious injury or death
to personnel.
• DO NOT perform fuel handling or purging operations in an electrical storm or if a storm is
threatening. Keep open flames or other sources of ignition, such as welding and cutting torches and
ordinary electrical equipment, away from area where fuel handling or purging operation is in
progress. Sufficient fire extinguishers MUST be present and manned. Failure to follow this warning
will result in serious injury or death to personnel.
• Should an emergency arise requiring entry into a tank which is not vapor-free, or which has an
oxygen content less than 19.5%, personnel entering tank must have an attached lifeline and wear
protective respiratory equipment in the form of self-contained breathing apparatus or a full
facepiece mask with a pressure supply of breathable air. Another person, also provided with
respiratory equipment, MUST be stationed at manhole opening and remain there with full ability to
watch personnel inside tank and summon assistance if a rescue operation is needed. Personnel
MUST NOT enter a tank which is in the explosive range.
d
TM 9-2330-384-14&P
WARNING
FUEL HANDLING AND PURGING (Con't)
•
If after purging procedures, semitrailer is left overnight, retest with combustible gas indicator set to
ensure a SAFE reading. Tanks may recharge themselves with seepage of undetected pockets of
vapors. Failure to follow this warning may result in serious injury or death to personnel.
•
Personnel engaged in fuel handling or purging operations must not wear wool, nylon, silk, rayon, or
other clothing that generates static electricity. Wear clean cotton clothing with no metal zippers.
Remove all contents from pockets. Wear rubber boots and gloves to keep fuel off skin, Use cotton
cloths for cleaning purposes. Before climbing onto semitrailer, grasp static ground wire to
discharge all static from body.
WARNING
GROUNDING
•
Connect bonding and grounding connection before beginning any fuel handling operation, or before
performing any unit, direct support, or general support maintenance. Maintain bonding and
grounding connection until after all fuel handling or maintenance is completed. DO NOT connect
semitrailer grounding cable to semitrailer grounding stud. Connections must be made to clean,
unpainted surfaces. An unbonded and ungrounded or improperly bonded and grounded semitrailer
could produce a spark. The resulting explosion will cause serious injury or death to personnel,
•
Walk grounding cables back to reels when stowing grounding cables. DO NOT let go of grounding
cables until they are fully wound onto reels. Failure to follow this warning may result in serious injury
to personnel.
WARNING
HANDLING HEAVY COMPONENTS
• The following components on semitrailer are heavy and awkward to handle: wheel and drum
assembly, pick-up plate, upper coupler assembly, landing gear, spare tire, spare tire carrier, hose
and gage stick tube assembly, cabinet, and axle assembly. Use caution, provide adequate support,
and use assistance when handling to avoid serious injury to personnel.
•
e
DO NOT perform upper coupler assembly replacement task unless tank is empty and wheels are
chocked. If tank is full, landing gear could collapse when front of semitrailer is lowered. Damage to
semitrailer or serious injury or death to personnel will result.
TM 9-2330-384-14&P
WARNING
OPERATION IN COLD
• Extreme cold is hazardous to personnel. Avoid prolonged exposure to cold weather and wear
protective clothing and gloves. Avoid touching metal surfaces with bare skin. Pay attention to first
signs of frostbite. If exposed skin comes in contact with fuel, frostbite can occur suddenly. If
frostbite occurs, immediately seek medical assistance.
WARNING
PREPARATION FOR SHIPMENT
• Explosive vapor level measurements must be taken at specified intervals prior to semitrailer ship
and rail movement. Failure to follow this procedure may result in serious injury or death to
personnel.
•
The M1062 Tank Semitrailer has not been designed for air transportability. Any attempt to transport
the semitrailer by air may result in an accident, causing damage to semitrailer or serious injury or
death to personnel.
WARNING
REFLECTORS AND DATA PLATES
•
DO NOT drill out rivet when replacing a damaged reflector or data plate. Drilling can produce a spark
which may cause an explosion and fire. Failure to follow this warning may result in serious injury or
death to personnel.
WARNING
STENCILING
•
Avoid excessive inhalation of vapors when stenciling. All stenciling procedures must be performed
in a well-ventilated area, A fire extinguisher must be on hand. Failure to follow this warning may
result in injury to personnel.
•
Personnel must wear protective face masks if spraying paint. If face masks are not available, apply
paint with brush only. Personnel must stay clear of work area where spray painting is taking place.
Failure to follow this warning may result in injury to personnel.
f
TM 9-2330-384-14&P
WARNING
WHEELS AND TIRES
•
DO NOT remove wheel nuts unless all rim clamps are loose. Removing wheel nuts with rim clamps
still tight may cause rim clamps to fly off, causing serious injury to personnel.
•
If any wheel stud is damaged and needs replacement, all wheel studs must be replaced. Replacing
only the damaged wheel stud and remounting the wheel may result in further damage and injury to
personnel.
• Remove and install spare tire to spare tire carrier with extreme caution. Spare tire is heavy.
Dropping it could cause serious injury to personnel.
•
g
Carefully follow all tire mounting and dismounting instructions. NEVER dismount a tire unless totally
deflated. NEVER mount or use damaged tires or rims. Failure to follow these instructions may result
in faulty positioning of tire or rim parts. The assembly could burst with sufficient force to cause
serious injury or death to personnel.
TM 9-2330-384-14&P
C1
CHANGE
NO. 1
HEADQUARTERS
DEPARTMENT OF THE ARMY
Washington, D.C., 17 June 1999
TECHNICAL
MANUAL
OPERATOR'S, UNIT, DIRECT SUPPORT, AND
GENERAL SUPPORT MAINTENANCE MANUAL
INCLUDING
REPAIR PARTS AND SPECIAL TOOLS LISTS
FOR
SEMITRAILER, TANK, FUEL, 7500 GALLON, M1062
(2330-01-275-7475)
TM 9-2330-384-14&P, dated 9 July 1990, is changed as follows:
1. Remove old pages and insert new pages as indicated below.
2. New, changed, or deleted material is indicated by a vertical bar in the margin of the page or by a deletion notice.
3. Added pages or changed page numbers are indicated by a vertical bar adjacent to the page number.
Remove Pages
i through 1-2
1-13and 1-14
1-17and 1-18
2-9 and 2-10
2-21 and 2-22
2-37 through 2-46
3-1 through 3-6
4-1 through 4-12
4-59 through 4-62
4-157 and 4-158
4-167 through 4-170
4-181 and 4-182
4-193 and 4-194
4
239 and
4-240 4
251
through4-2544
261 and
4-262
5-25through
5-28
B-7 and B-8
D-1 and D-2
E-3and
E-4 F-7
through
Figure 4
18-1
through
Figure
22
27-1
and Figure 28
30-1
through
Figure 32
36-1
through
Figure
37 41-1and
Figure
42
43-1 and
Figure44
47-1
and Figure 48
50-1
through
Bulk-2 (blank)
1-1 through
1-34
Insert Pages
i through 1-2
1-13 and 1-14
1-17 and 1-18
2-9 and 2-10
2-21 and 2-22
2-37 through2-46
3-1
through
3-6
4-1 through 4-12
4-59 through 4-62
4-157 and 4-158
4-167 through 4-170
4-181 and 4-182
4-193 and 4-194
4-239 and 4-240
4-251 through 4-254
4-261 and 4-262
5-25 through 5-42 (blank)
B-7 and B-8
D-1 and D-2
E-3 and E-4
F-7 through Figure 4
18-1 through Figure 22
27-1 and Figure 28
30-1 through Figure 32
36-1 through Figure 37
41-1
through
Figure
42
43-1 and Figure 44
47-1 and Figure 48
50-1 through Bulk-2 (blank)
I-1 through I-37 (blank)
G-9 and G-10
(continued)
File this change sheet in front of the publication, for reference purposes.
Approved for public release; distribution is unlimited.
TM 9-2330-384-14&P
C1
Index 3 through Index 6
Index 11 through Authorization Page
Sample DA Form 2028-2
DA Form 2028-2 (three)
Index 3 through Index 6
Index 11 through Authorization Page
Sample DA Form 2028-2
DA Form 2028-2 (three)
TM 9-2330-384-14&P
TECHNICALMANUAL
HEADQUARTERS
DEPARTMENT OF THE ARMY
Washington, D.C., 9 July 1990
TM 9-2330-384-14&P
OPERATOR'S, UNIT, DIRECT SUPPORT, AND
GENERAL SUPPORT MAINTENANCE MANUAL
INCLUDING
REPAIR PARTS AND SPECIAL TOOLS LISTS
FOR
SEMITRAILER, TANK, FUEL, 7500 GALLON, M1062
(2330-01-275-7475)
REPORTING ERRORS AND RECOMMENDING
IMPROVEMENTS
You can help improve this manual. If you find any mistakes or know of away to improve the procedures, please
let us know. Mail your letter, DA Form 2028 (Recommended Changes to Publications and Blank Forms), or DA
Form 2028-2, located in the back of this manual, direct to: Commander, U.S. Army Tank-automotive and
Armaments Command, ATTN: AMSTA-AC-NML, Rock Island, IL 61299-7630. A reply will be furnished to you.
You may also provide DA Form 2028-2 information to TACOM via datafax or e-mail:
TACOM's e-mail address is amsta-ac-nmI@ria-emh2.
army. m
Current as of 4 May 1990
TABLE OF CONTENTS
Page
CHAPTER1
Section
Section
Section
Section
CHAPTER
....................................................................................................
I
II
III
IV
General Information .................................................................................................
Equipment Description and Data .........................................................................
....
Technical Principles of Operation .................. ..........................................................
General Safety Regulations .....................................................................................
2
OPERATING
INSTRUCTIONS
...............................................................................
1-1
1-1
1-2
1-24
1-38
2-1
Section I
Section II
Section III
Description and Use of Operator's Controls and Indicators .......................................
Preventive Maintenance Checks and Services (PMCS) ...........................................
Operation Under Usual Conditions ......................................................................
...
2-1
2-6
2-26
Section
Operation
2-52
IV
CHAPTER 3
Under Unusual
Conditions
.......................................................................
OPERATOR MAINTENANCE .................................................................................
3-1
Section I
Lubrication Instructions
3-1
Section
Troubleshooting
II
...........................................................................................
Procedures
..................................................................................
Change1
3-6
i
TM 9-2330-384-14&P
TABLE OF CONTENTS(continued)
Page
CHAPTER4
UNITMAINTENANCE............................................................................................
4-1
Section I
Repair Parts; Special Tools; Test, Measurement, and Diagnostic
Equipment (TMDE): and Support Equipment ...........................................................
Section II
Service upon Receipt ...............................................................................................
Section III Preventive Maintenance Checks and Services (PMCS) ............................................
Section IV Troubleshooting Procedures ....................................................................................
Electrical System Maintenance ......... ......................................................................
Section V
Section VI Axle Assembly Maintenance ....................................................................................
Section VI Brake System Maintenance ......... - ..........................................................................
Section Vlll Wheels and Hubs Maintenance ................................................................................
Section IX Frame and Towing Assembly Maintenance ..............................................................
Section X
Suspension Maintenance .........................................................................................
........................
Section XI Body Maintenance ..........................................................................
Section XII Data Plates ..............................................................................................................
Section XIII Nonelectrical Gages Maintenance ............................................................................
Section XIV Lines, Fittings, and Valves Maintenance ...................................................................
Section XV Painting and Identification Marking ...........................................................................
Section XVI Preparation for Storage or Shipment ........................................................................
4-1
4-2
4-4
4-12
4-33
4-92
4-97
4-141
4-158
4-173
4-181
4-213
4-215
4-240
4-284
4-285
.........................
5-1
CHAPTER 5
Section
Section
Section
Section
Section
Section
DIRECT SUPPORT AND GENERAL SUPPORT MAINTENANCE
I
II
III
IV
V
VI
Axle Assembly Maintenance ....................................................................................
Brake System Maintenance .....................................................................................
Frame and Towing Assembly Maintenance ..............................................................
Body Maintenance .........................................................................
............... .. . ....
Nonelectrical Gages Maintenance .............................................
........................... Lines, Fittings, and Valves Maintenance ..................................................................
5-1
5-5
5-10
5-16
5-23
5-26
APPENDIX A
REFERENCES
A-1
APPENDIX B
MAINTENANCE
ALLOCATION
APPENDIX C
COMPONENTS
OF END ITEM AND BASIC ISSUE ITEMS LISTS .........................
APPENDIX
ADDITIONAL
D
........................................................................................................
AUTHORIZATION
C-1
D-11
LIST ....................................................................
APPENDIXE
EXPENDABLE/DURABLE
APPENDIX IF
REPAIR PARTS AND SPECIAL TOOLS LISTS (RPSTL)
SUPPLIES
AND MATERIALS
Introduction ...........................................................................
Repair Parts List
Section I
Section II
B-1
CHART .................................................................
LIST ..............................
E-1
.............................
........
F-11
........ ..
F-1
.. .................
IlluslFigure
Group 06
0608
0608
ii
Electrical System
Voltage Control Unit and Mounting Hardware .......................................
Control Box Component Paris ..............................................................
Change1
1
2
1-1
2-1
TM 9-2330-384-14&P
TABLE OF CONTENTS(continued)
Illus/Figure
0609
0609
0609
0613
0613
0613
0613
Side Marker Lights and Related Parts ...........
Marker Light Assembly, Rear Marker Light,
Turn Signal, and Taillight Assembly .............
and Blackout Light Assembly ..................
Front Half of Chassis Wiring and Related Parts ............
Rear Half of Chassis Wiring and Related Parts ............
Back Rear Chassis Wiring and Related Parts ..............
Component Parts for Convoy Warning Conduit Assembly ...
Front and
Rear Side
and Stop,
Rear Stop
Page
3
3-1
4
4-1
5-1
6-1
7-1
8-1
5
6
7
8
9
9-1
Group 11 Rear Axles
1101
Axle Tube Assembly ..................................
10
10-1
11
12
13
14
15
11-1
12-1
13-1
14-1
15-1
16
17
18
16-1
19
20
19-1
20-1
21
21-1
22
23
22-1
23-1
24
24-1
25
26
25-1
26-1
27
28
27-1
28-1
Group 12 Brakes
1202 Brakeshoe and Lining Assembly and Mounting Hardware ....
1206 Stack Adjuster, Camshaft, and Related Hardware ..........
1208 Front Half Air Supply Lines and Valve Relay ..............
120B Rear Air Supply to Reservoir Assemblies .................
1208 Air Supply Lines from Reservoir to Chambers .............
1208 Component Parts for Forward and Rear
Air Reservoirs .......................................
1208 Chamber and Related Hardware ........................
1208 Brake Interlock Valves and Related Hardware .............
Group 13
1311
1313
Wheels and Tracks
Wheel and Drum Assembly, Spacer, and
Related Hardware ....................................
Tires ...............................................
Group 15 Frame,
1501
1503
1504
1507
Towing Attachments,
Drawbars,
and Articulation
Systems
Grablhandles, Brackets, Pick-up Plate,
Frame Assembly, and Related Hardware .................
Upper Coupler Assembly and Related Hardware ...........
Tire Carrier Assembly and Related Hardware ..............
Landing Gear, Crank Handle, Pads, Brackets,
and Related Hardware .................................
Group 16 Springs
1601
1605
17-1
18-1
and Shock Absorbers
Springs and Related Hardware ..........................
Radius Rods and Related Hardware ......................
Group 18 Body, Cab, Hood, and Hull
1801
1801
Change1
Nose Adapter Bracket and Related Hardware .............
Splashguard and Components ..........................
iii
TM 9-2330-384-14&P
TABLE OFCONTENTS(continued)
1802
1808
1808
1808
1811
1811
Page
29
29-1
30
31
32
33
34
30-1
31-1
32-1
33-1
34-1
Fender and Attaching Hardware ........................
Ground Rod Tube Assembly, Stowage Cabinet,
and Related Hardware .................................
Grounding Reel and Mounting Hardware ..................
Hose and Grounding Rod Tube Assembly ................
Manhole Cover Assembly and Related Hardware ..........
Static Ball and Cable Assembly, Convoy Light ............
Group 22 Body, Chassis,
2202
2210
2210
2210
2210
2210
2210
2210
Illus/Figure
and Hull Accessory
Items
Reflectors and Mounting Hardware ......................
Labels, Front and Rear ................................
Hazardous Warning Placards ......................
Plates and Labels, Right Front .......................
Plates and Labels, Left Side ...........................
Labels, Middle Left ...................................
Plates, Inside Cabinet .................................
Labels, Top .........................................
...
35
36
36A
37
38
39
40
41
35-1
36-1
36A-1
37-1
38-1
39-1
40-1
41-1
41A
41A-1
Group 33 Special Purpose Kits
3307 Vapor Recovery Kit ................................
Weighing and Measuring
Group 47 Gages (Nonelectrical),
4702
4702
4702
Jet Level Sensor, Lines. and Related Hardware ...........
Jet Level Sensor Precheck Component Parts .............
Gage Marker Rod and Components .....................
42
43
44
42-1
43-1
44-1
Emergency Valve Control Lines and Component Pans ......
Vapor Collection and Component Parts ..................
Sump Drain and Components ..........................
Loading and Discharge Tube ...........................
Bottom Load Valve Assembly ..........................
45
46
47
48
49
Pilot Valve ..........................................
Vent Caps and Drain Plugs ......................
50
51
45-1
46-1
47-1
48-1
49-1
50-1
51-1
Bulk
Bulk-1
Group 72 Dispensing
7203
7203
7203
7203
7203
7203
7203
Group 95 General
9501
Section III
Sect'on IV
APPENDIX G
APPENDIX H
and Servicing Equipment
Use Standardized
Components
Parts
Bulk ................................................
Special Tools List (Not Applicable)
Cross-reference Indexes
National Stock Number Index ...........................
Part Number Index ...................................
Figure and Item Number Index .........................
I-1
1-8
1-23
LIST OF MANUFACTURED ITEMS ...............................
TORQUE LIMITS .............................................
G-1
Index .......................................................
iv
Devices
Change1
H-1
Index 1
TM 9-2330-384-14&P
CHAPTER1
INTRODUCTION
SectionI. GENERALINFORMATION
Paragraph
Number
Title
1-1
1-2
1-3
1-4
1-5
Scope ..................................................................................................................
Maintenance Forms, Records, and Reports ........................................................
Destruction of Army Materiel to Prevent Enemy Use ..........................................
Preparation for Storage or Shipment ..................................................................
Reporting Equipment Improvement Recommendations (EIRs) ...........................
1-1.
Page
Number
1-1
1-1
1-1
1-1
1-1
SCOPE.
a. This manual describes the operation and unit, direct support, and general support maintenance
of the M1062 7500 Gallon Fuel Tank Semitrailer, including repair parts and special tools lists.
b. Throughout the manual, the termscurbside
and
roadside
are
used
to describe
views
of
curbside
is
the
right
sideand roadside
is the
leftside.
1-2.
MAINTENANCE
FORMS,
RECORDS,
the
semitrailer.
AND REPORTS.
Department of the Army forms and procedures used for equipment maintenance will be those
prescribed by DA Pam 738-750, The Army Maintenance Management System (TAMMS).
1-3. DESTRUCTION
OF
ARMY
MATERIEL
TO
PREVENT
ENEMY
USE.
For destruction of Army materiel to prevent enemy use, refer to TM 750-244-6.
1-4.
PREPARATION
FOR STORAGE
OR SHIPMENT.
For information on preparing the M1062 750OGallon Fuel Tank Semitrailer for storage or shipment,
refer to Chapter 4, Section XVI.
1-5.
REPORTING
EQUIPMENT
IMPROVEMENT
RECOMMENDATIONS
(EIRs).
If your M1062 7500 Gallon Fuel Tank Semitrailer needs improvement, let us know. Send us an EIR.
You, the user, are the only one who can tell us what you don't like about your equipment. Let us know what
you don't like about the design or performance. Put it on an SF Form 368 (Quality Deficiency Report). Mail
it to us at: Commander, U.S. Army Tank-automotive and Armaments Command, ATTN: AMSTA-IM-OPIL,
Warren, MI 48397-5000. We will send you a reply.
Change 1
TM 9-2330-384-14&P
Section II. EQUIPMENTDESCRIPTIONAND DATA
Paragraph
Number
1-6
1-7
1-8
1-9
1-10
1-11
1-6.
Page
Number
Title
Equipment Characteristics, Capabilities, and Features .......................................
Location and Description of Major Components .................................................
Location and Contents of Stencil Markings .........................................................
Location and Contents of Plates .........................................................................
Location and Contents of Decals ........................................................................
Equipment Data ..................................................................................................
EQUIPMENT CHARACTERISTICS,
CAPABILITIES,
1-2
1-4
1-9
1-13
1-18
1-21
AND FEATURES.
a. The M1062 7500 Gallon Fuel Tank Semitrailer is a military adapted commercial semitrailer
designed to provide bulk petroleum line haul support over primary and secondary roads.
b. The semitrailer is designed to be towed by the M915/915A1/A2 tractor equipped with a fifth
wheel. Maximum allowable speed is 55 mi/h (88 km/h) on primary roads and 35 mi/h (56 km/h) on secondary
roads.
c. The semitrailer is capable of occasional hard bottom, salt- or freshwater fording to a depth of 20
in. (50.8 cm) without any special servicing or protection before or after fording.
d. All semitrailers are equipped with:
(1) A single compartment aluminum tank with acapacityof 7500 gallons plus 3% for expansion.
The tank is equipped with seven baffles, having offset manways, to minimize fuel surge
when in transit or when bottom loading.
(2) A piping assembly containing a roadside front port and a rear inlet. Fuel may be bottom
loaded at either opening and unloaded at front port ONLY.
(3) One manhole assembly with one 10 in. (25.4 cm) fill cover used during top loading. One
automatic vacuum vent and one automatic pressure/vacuum vent are installed into fill
cover. Manhole allows access to tank for inspection and repair.
(4) An automatic shut-off device (jet level sensor) mounted just inside the tank at the manhole
opening. When bottom loading, fuel flow will shut off when tank capacity is reached.
(5) A strainer assembly, located in jet level sensor circuit, which filters all fuel being bottom
loaded.
(6) A precheck system which operates from cabinet and functions to predict jet level sensor
failure.
(7) A vapor collection system allows for venting of vapors created during bottom loading and
unloading.
(8) An electrical system which operates under standard or blackout modes and includes:
(a) 12-volt electrical connector. Supplies 12 volts directly to the semitrailer's lights.
(b) 24-volt electrical connector. Supplies 24 volts directly to the blackout lights. With
voltage reduction provided by the voltage control unit, supplies 12 volts to the
semitrailer lights.
(c) ON/OFF toggle switch for optional convoy warning light (see Appendix D).
(d) Mounting bracket for convoy warning light at rear of roadside overturn rail.
(9)
1-2
Tandem axles with dual-mounted wheels.
Change1
TM 9-2330-384-14&P
1-6. EQUIPMENT CHARACTERISTICS, CAPABILITIES, AND FEATURES (Con’t).
(10) Full air, S-cam automatically adjusted brake components mounted on each axle.
Front and rear air reservoirs are mounted to frame brackets and are connected by air
hoses to four axle-mounted brake chambers.
(11) A brake interlock system which automatically sets the semitrailer parking/emergency
brakes during fuel bottom loading and unloading.
(12) A bolt-on upper coupler assembly.
(13) Landing gear with removable sand shoes. Two-speed operation is controlled by a
curbside handcrank.
1-3
TM 9-2330-384-14&P
1-7.
LOCATION AND DESCRIPTION OF MAJOR COMPONENTS.
FRONT VIEW
KEY
FUNCTION
NAME
1
Air Couplings
EMERGENCY air coupling (roadside) and SERVICE air coupling
(curbside) connect to tractor EMERGENCY and SERVICE air supply.
2
Placard Bracket
Provides a means to display fuel warning and fuel identification
number. Located also at roadside, rear, and curbside of
semitrailer.
3
Voltage Control Unit
Contains 12-volt and 24-volt receptacles. Regulates and directs
power flow to semitrailer lights.
4
Dummy Couplings
Protect EMERGENCY and SERVICE air couplings from dust and
damage.
5
Front Clearance and
Marker Lights
Mark front of semitrailer.
6
Grounding Stud
Unpainted ball used to attach grounding cables. Located also at
rear, top, and sides of semitrailer.
7
Emergency Valve
Remote Trip-Release
Closes emergency valve from front of semitrailer.
1-4
TM 9-2330-384-14&P
1-7.
LOCATION AND DESCRIPTION OF MAJOR COMPONENTS (Con't).
ROADSIDE VIEW
FUNCTION
KEY
NAME
8
Upper Coupler Assembly
Used to couple semitrailer to tractor.
9
Fire Extinguishers
Portable fire protection. Located on each side of semitrailer.
10
Ground Boards
Placed under landing gear sand shoes in sandy or muddy terrain.
11
Lift Points
Allow lifting of empty semitrailer. Located on each side of
semitrailer.
12
Side Clearance and
Marker Light
Marks midline of semitrailer. Located on each side of semitrailer.
13
Ground Rod Tube
Assembly
Stowage for ground rod. Tube may be locked at both ends.
14
Chock Block
Must be used in an emergency when parking/emergency brakes
are not functioning. Used to prevent semitrailer from rolling when
coupling, uncoupling, storing, or parking.
15
Convoy Warning Light
Mounting Bracket
Used to mount optional convoy warning light assembly.
16
Rear Side Clearance and
Marker Light and
Reflector Assembly
Marks rear of semitrailer. Located on each side of semitrailer.
17
Tie-downs
Located at upper coupler assembly and under bumper. Allow
tie-down of empty semitrailer.
1-5
TM 9-2330-384-14&P
1-7.
LOCATION AND DESCRIPTION OF MAJOR COMPONENTS (Con't).
ROADSIDE VIEW (Continued)
NAME
KEY
FUNCTION
18
Cabinet
Contains emergency valve and vapor vent control levers, precheck
controls, grounding reels, transfer hose reducers, and Basic Issue
Items (Bll).
19
Piping Assembly Rear
Inlet
Opening used to bottom load fuel.
20
Piping Assembly Front
Port
Opening used to bottom load or unload fuel.
21
Reflectors
Mark outline of semitrailer. Located on each side of semitrailer.
22
Sand Shoes
Swivel pads allow for leveling of uncoupled semitrailer.
23
Landing Gear
Used to support semitrailer when uncoupled from tractor.
Grounding Stud
Unpainted ball used to attach grounding cable.
6
1-6
TM 9-2330-384-14&P
1-7.
LOCATION AND DESCRIPTION OF MAJOR COMPONENTS (Con’t).
KEY
24
FUNCTION
NAME
Vapor Return Line
Allows safe venting of vapors when bottom loading or unloading
fuel.
25 Grabhandles
Offer a handhold for personnel climbing onto top of semitrailer.
26
Convoy Warning Light
Condulet
Housing for female receptacle into which convoy warning light is
plugged when light is in use. Cap is provided to cover receptacle
when not in use.
27
Triple Clearance Light
Assembly
Marks top of semitrailer.
28 Ladder
Provides access to top of semitrailer and a means to drain top of
semitrailer in event of fuel spillage.
29
Contains stop/taillights, turn signal/taillights, reflectors, and
blackout lights.
Light Box Installation
30 Bumper
Protects rear of semitrailer from damage.
31
Dual Wheels
Two wheels at end of each axle support semitrailer load.
32
Sump Drain Control
Lever
Allows complete drainage of fuel from tank sump and elimination
of condensation and other contamination.
33 Splashguards
6
Grounding Stud
Protect semitrailer, and vehicles traveling behind, from thrown dirt
or stones.
Unpainted ball used to attach grounding cable.
1-7
TM 9-2330-384-14&P
1-7.
LOCATION AND DESCRIPTION OF MAJOR COMPONENTS (Con't).
TOP VIEW
KEY
NAME
FUNCTION
34
Front Dam
Contains fuel in event of fuel spillage.
35
Vent Cap
Access port for cleaning tank interior. In the event of fire, fusible
cap melts to provide tank venting.
36 Walkway
Nonskid surface on top of semitrailer.
37
Valve opens to allow venting of vapors created during bottom
loading and unloading.
Vapor Vent
38 Manhole
Allows access to inside of tank. Fuel is top loaded through 10 in.
(25.4 cm) fill cover. Closure is by means of self-latching catches.
39
Rear Dam
Contains fuel in event of fuel spillage.
40
Overturn Rails
Protect manhole and vapor vent from damage in case of an
overturn accident. Also help contain fuel spillage. Roadside
overturn rail is part of vapor collection system.
41
Vapor Vent Hose
Provides airtight connection between vapor vent and roadside
overturn rail.
6
Grounding Stud
Unpainted ball used to attach grounding cable.
7
Emergency Valve
Remote Trip-Release
Closes emergency valve from top of semitrailer.
1-8
TM 9-2330-384-14&P
1-7.
LOCATION AND DESCRIPTION OF MAJOR COMPONENTS (Con't).
CURBSIDE VIEW
NAME
KEY
FUNCTION
42
Hose/Gage Stick Tube
Assembly
Stowage for transfer hoses and gage stick. Tube may be locked at
both ends.
43
Pick-up Plate
Acts as a skid plate when coupling semitrailer to tractor’s fifth
wheel.
44
Handcrank
Operates retractable landing gear legs.
45
Decontamination Kit
Mounting
Support bracket for M13 decontamination kit.
46
Spare Tire Carrier
Provides stowage for spare tire.
Grounding Stud
Unpainted ball used to attach grounding cable
6
1-8.
LOCATION AND CONTENTS OF STENCIL MARKINGS.
a.
The following illustrations show the location and contents of all semitrailer stencil markings.
b. Maintain all stencil markings so that the information remains legible. If any stencil marking is
no longer legible, notify unit maintenance.
1-9
TM 9-2330-384-14&P
1-8.
1-10
LOCATION AND CONTENTS OF STENCIL MARKINGS (Con’t).
TM 9-2330-384-14&P
1-8.
LOCATION AND CONTENTS OF STENCIL MARKINGS (Con't).
1-11
TM 9-2330-384-14&P
1-8.
1-12
LOCATION AND CONTENTS OF STENCIL MARKINGS (Con't).
TM 9-2330-384-14&P
1-9.
LOCATION AND CONTENTS OF PLATES.
a. The following illustrations show the location and contents of all semitrailer plates.
b. Maintain all plates so that all information remains legible. If any plate is missing or no longer
legible, notify unit maintenance.
0
LUBRICATION
............
I 1W."
0
CHART
.......
1.11,
1
0
IF
n
n
0
SERI.TAAILER. TAU TOO GALLON
BULK HAUL PETROLEUM
165SLING,PCINT
274'
IT.-
o
i-TIEDOWN
OVERALL
OVERALL
0 V PRIME;
NALL
SHE1
SKIPPING
LENGTH
HEIGHT
MINIM
EU,VUA
WIWI
TIED@
433 14.
115.11 19.
96.39 IN.
BYRN W. FT.
l@
In.
SHIP ALL
TRAILER
USE
(41 $1EMPTY "LT.
IN
IS
TO LIFT.
USE ALL 1.
TIEVOWNS TO SECURE.
YK05326.,
01
Change1
1-13
TM 9-2330-384-14&P
1-9.
LOCATION AND CONTENTS OF PLATES (Con't).
UQUID No BULK TAM DARSIONS
FRUEHAUFTRAILEROPERATIONS
OMAHA, NEBRASKA
MFG.S/N
DATE
CERT.
PRES.-DESIGN
1
P.S.I.G.
AT 125 * F MAX
TEST
3
P.S.I.G.
DATE
MATL-SHELL 5454-H32
HEAD 5454-0
WELD 5356
EXTR.6061
LINING NONE
CAP.BY COMPT: F.R. U.S. GAL
7500
D.O.T.-MC 306 - AL
TOTAL
MAXLOAD54000 LBS,AT 7.2 LBSJGALMAX
Llmrr-LD
1.5
P.S.LG UNLD
7500 GAL
0.5 P.S.I.G.
TKG5333-1
10
00
0
wo. my
FMAW"JAUR
OPERAT
DETROIT
00
HICHICAN ;A
Wa
'I
ovw
ofBOD,
L11. DATEOF Wg.r-------r
422
J.JSF
:lryp
MfOWN
GANIRALL AT
10000
LB. WITH llfltt.5(01
TIRE$ RILSKS.25
RIMS AT
105 F.B.I.
COLO OLMML
TO ALL APPLICABLE
FEDERAL
THIS VEHICLECONFORMS
A
MOTORVEHICLESAFETYSTANDARDS
IN EFFECT
ON THE
CF
DATE OF MAKFACTURE
SHOWN ABOVE.
ALL DATA SHOWN 15 APPLICABLE
AT MfOMMAY SPEEDS.
Ww
Iriggeml
KOBEL TA
TYPE TRAILER
WARRANTY
UOkAD AND @
TANK @
F@~
TRALER OpSRAT,,,
WARRANTSTHATYMSEMITRAUR
WLL BE FAM FAOMDERECTSM
0639M NAMALAND
@OFKUANSHIPFOR A PERA)B OFEIGHnEN'JE
(191MONTHS @
DATE OF ACCCPT@.
@TE@SLUETTNNO
1 T09-n-@
E@TION
DATE:
@
FXH 741MI
M-1062 IDENTIFICATION
SEMTVRA@A.
T@. 7@ @M.
ll@K H@ PETROLEUM
ARMY
W. _WSW:
2@1 275-7475
[:F@40.
M
O"D
0, FRONTRATION
AN'
W
7M5
CONTRACTNO@ OAAI!07-87@-JOGI
MMMWG
NFOR. @
NO.:
qmk qw
1-14
Change1
qwk Ink
mLmL%m
TM 9-2330-384-14&P
1-9.
LOCATION AND CONTENTS OF PLATES (Con't).
1-15
TM 9-2330-384-14&P
1-9. LOCATION AND CONTENTS OF PLATES (Con't).
1-16
TM 9-2330-384-14&P
LOCATION AND CONTENTS OF PLATES (Con't).
0
OVERFLOW SENSOR
PRECH
1.
READ THE SEMITRAILER TECHNICAL MANUAL
(TM 9-2330-394-14&P) BEFORE ATTEMPTING TO
USE THE PRECHECK.
2.
WHILE BOTTOM LOADING THE TANK OBSERVE
PRESSURE GAUGE READING, AND THEN OPEN
THE PRECHECK BALL VALVE.
3.
THE OVERFLOW SENSOR IS OPERATING PROPERLY. IF THE EMERGENCY VALVE CLOSES WITHIN
2 MINUTES AFTER THE PRECHECX VALVE IS
OPENED,. THIS WILL STOP THE FLOW OF FUEL
INTO T HE TANK, AS INDICATED BY A SUDDEN
INCREASE IN THE PRESSURE GAUGE READING.
TO RESUME LOADING. CLOSE THE PRECHECK
BALL VALVE.
4.
IF THE EMERGENCY VALVE DOES NOT CLOSE
WITHIN 2 MINUTES, STOP LOADING FUEL AND
CONSULT THE SEMITRAILER TECHNICAL MANUAL TROUBLESHOOTING INSTRUCTIONS.
0
PRESSURE
QAI pnF
HANDLE IN OPEN
POSITION
TURING (TYPI
HANDLE IN CLOSED
POSITION
PRFQHrCK
RAI i VAt VP
ME
3
0
0
lk
TKG5560-1 0
1-17
TM 9-2330-384-14&P
1-10.
LOCATION AND CONTENTS OF DECALS.
a. The following illustrations show the location and contents of all semitrailer decals.
b. Maintain all decals so that all information remains legible. If any decal is missing or no longer
legible, notify unit maintenance.
DANGER
CAUTION
BE CAREFUL AT ALL TIMES.
MAINTAIN GOOD BALANCE SUCH AS
BY HAVING TWO FEET AND ONE
HAND OR ONE FOOT AND BOTH
HANDS FIRMLY IN PLACE.
REPAINT OR REPLACE SURFACES
AND STRUCTURE AS REQUIRED FOR
SAFE, SUP-FREE ACCESS. DO NOT
GO ON ANY SLIPPERY SURFACE.
1-18
Change1
TM 9-2330-384-14&P
1-10. LOCATION AND CONTENTS OF DECALS (Con't).
1-19
TM 9-2330-384-14&P
1-10. LOCATION AND CONTENTS OF DECALS (Con't).
1-20
TM 9-2330-384-14&P
1-11. EQUIPMENT DATA.
DIMENSIONS
Center of Gravity
(front bulkhead flange to center of gravity):
Loaded . . . . . . . . . . . . . . . . . . . . . . . . . . . . . . . . .
Unloaded . . . . . . . . . . . . . . . . . . . . . . . . . . . . . . .
Front Bulkhead Flange to Kingpin Center . . . . . . .
Kingpin Center to Landing Gear Center . . . . . . . .
Kingpin to Midpoint of Tandem Axles . . . . . . . . . .
Overall:
Height [empty at 49.50 in.
(125.7 cm) coupler height] . . . . . . . . . . . . . .
Length . . . . . . . . . . . . . . . . . . . . . . . . . . . . . . . . .
Width (including tire bulge) . . . . . . . . . . . . . . . .
Tank:
Height (inside) . . . . . . . . . . . . . . . . . . . . . . . . . .
Length (from front bulkhead flange to
rear bulkhead flange) . . . . . . . . . . . . . . . . . . .
Weight (fully loaded and M915A1 tractor):
At semitrailer tandem axle . . . . . . . . . . . . . . . .
Total . . . . . . . . . . . . . . . . . . . . . . . . . . . . . . . . . . .
AXLE ASSEMBLIES
Quantity . . . . . . . . . . . . . . . . . . . . . . . . . . . . . . . . . .
Track . . . . . . . . . . . . . . . . . . . . . . . . . . . . . . . . . . . .
202 in. (513.1 cm)
274 in. (696 cm)
32.75 in. (83.2 cm)
96.75 in. (245.8 cm)
329.50 in. (836.9 cm)
121.44 in. (308.5 cm)
433 in. (1099.8 cm)
96.375 in. (244.8 cm)
59 in. (149.9 cm)
398 in. (1010.9 cm)
35,280 lb. (16 metric tons)
83,750 lb. (38 metric tons)
2
71.50 in. (181.6 cm)
BRAKE SYSTEM
Actuation . . . . . . . . . . . . . . . . . . . . . . . . . . . . . . . . .
Air Reservoirs, Quantity . . . . . . . . . . . . . . . . . . . . .
Brake Chamber:
Length of pushrod . . . . . . . . . . . . . . . . . . . . . . .
Quantity . . . . . . . . . . . . . . . . . . . . . . . . . . . . . . . .
Brake Linings . . . . . . . . . . . . . . . . . . . . . . . . . . . . .
Drum Size . . . . . . . . . . . . . . . . . . . . . . . . . . . . . . . .
75/8 in. (19.4 cm)
4
non-asbestos
16½ x 7 in. (41.9 x 17.8 cm)
ELECTRICAL SYSTEM
Power Source . . . . . . . . . . . . . . . . . . . . . . . . . . . . .
Voltage . . . . . . . . . . . . . . . . . . . . . . . . . . . . . . . . . .
tractor
12 or 24 vdc
FIRE EXTINGUISHERS
Location . . . . . . . . . . . . . . . . . . . . . . . . . . . . . . . . . .
Quantity . . . . . . . . . . . . . . . . . . . . . . . . . . . . . . . . . .
Type . . . . . . . . . . . . . . . . . . . . . . . . . . . . . . . . . . . . .
roadside and curbside
2
Purple-K-Powder (P-K-P)
FUEL LOADING/UNLOADING SYSTEM
Automatic Level Sensing Device . . . . . . . . . . . . . .
Fuel Filtering Method . . . . . . . . . . . . . . . . . . . . . . .
Fuel Transfer Hoses:
Length . . . . . . . . . . . . . . . . . . . . . . . . . . . . . . . . .
Quantity . . . . . . . . . . . . . . . . . . . . . . . . . . . . . . . .
Stowage (cluster) . . . . . . . . . . . . . . . . . . . . . . . .
air-operated S-cam
2
fluid jet
0.75 in. (19 mm) “Y” strainer with
screen
14 ft. (4.27 m)
2
1 horizontal tube: access at each end
lockable
1-21
TM 9-2330-384-14&P
1-11. EQUIPMENT DATA (Con't).
FUEL LOADING/UNLOADING SYSTEM (Continued)
Fuel Transfer Options:
Bottom loading:
Location . . . . . . . . . . . . . . . . . . . . . . . . . . . . .
Rate . . . . . . . . . . . . . . . . . . . . . . . . . . . . . . . .
Top loading:
Location . . . . . . . . . . . . . . . . . . . . . . . . . . . . .
Rate . . . . . . . . . . . . . . . . . . . . . . . . . . . . . . . .
Unloading:
Location . . . . . . . . . . . . . . . . . . . . . . . . . . . . .
Type . . . . . . . . . . . . . . . . . . . . . . . . . . . . . . . .
Precheck System:
Actuation . . . . . . . . . . . . . . . . . . . . . . . . . . . . . .
Location of controls . . . . . . . . . . . . . . . . . . . . .
Precheck valve . . . . . . . . . . . . . . . . . . . . . . . . .
Pressure gage . . . . . . . . . . . . . . . . . . . . . . . . . .
Grounding Reels:
Cable length [includes 15 ft. (4.58 m)
“Y” branch] . . . . . . . . . . . . . . . . . . . . . . . . . .
Location . . . . . . . . . . . . . . . . . . . . . . . . . . . . . . .
Quantity . . . . . . . . . . . . . . . . . . . . . . . . . . . . . . .
Grounding Studs, Quantity . . . . . . . . . . . . . . . . . .
Manhole:
Diameter . . . . . . . . . . . . . . . . . . . . . . . . . . . . . .
Fill cover diameter . . . . . . . . . . . . . . . . . . . . . .
front port or rear inlet
600 gpm (2271 Ipm)
manhole fill cover
600 gpm (2271 Ipm)
front port only
gravity or with assistance of
350-600 gpm (1325-2271 Ipm) pump
manual
roadside cabinet
½ in. (12.7 mm) ball-type
2½ in. (6.4 cm )
silicone oil-filled, 0-100 psi
(0-690 kPa)
50 ft. (15.25 m)
roadside cabinet
2
6
20 in. (50.8 cm)
10 in. (25.4 cm)
KINGPIN
Towing Facility . . . . . . . . . . . . . . . . . . . . . . . . . . . .
2 in. (5.1 cm) kingpin
LANDING GEAR
Operation (curbside) . . . . . . . . . . . . . . . . . . . . . . .
Type . . . . . . . . . . . . . . . . . . . . . . . . . . . . . . . . . . . .
handcrank
2 speed
SUSPENSION
Adjustable Radius Rods:
Location . . . . . . . . . . . . . . . . . . . . . . . . . . . . . . .
Quantity . . . . . . . . . . . . . . . . . . . . . . . . . . . . . . .
Fixed Radius Rods:
Location . . . . . . . . . . . . . . . . . . . . . . . . . . . . . . .
Quantity . . . . . . . . . . . . . . . . . . . . . . . . . . . . . . .
Springs:
Quantity . . . . . . . . . . . . . . . . . . . . . . . . . . . . . . .
Quantity of leaves . . . . . . . . . . . . . . . . . . . . . . .
Rated load . . . . . . . . . . . . . . . . . . . . . . . . . . . . .
roadside
2
curbside
2
4
3
10,000 lb. (4540 kg)
TANK
Capacity . . . . . . . . . . . . . . . . . . . . . . . . . . . . . . . . .
Construction . . . . . . . . . . . . . . . . . . . . . . . . . . . . . .
1-22
7500 gallons (28,387.5 I)
welded, 7 internal baffles
TM 9-2330-384-14&P
1-11. EQUIPMENT DATA (Con't).
TIRES
Inflation . . . . . . . . . . . . . . . . . . . . . . . . . . . . . . . . . .
Quantity . . . . . . . . . . . . . . . . . . . . . . . . . . . . . . . . .
Size. . . . . . . . . . . . . . . . . . . . . . . . . . . . .... . . ....
Type . . . . . . . . . . . . . . . . . . . . . . . . . . . . . . . . . . . .
95 psi (655 kPa)
8 plus spare
11 R 22.5
14 ply rating, highway tread, steel
belted, tubeless radial
Size. . . . .. . . . . . . .. . . . . . . . . . .. . . . . .......
Type . . . . . . . . . . . . . . . . . . . . . . . . . . . . . . . . . . .
22.5 x 8.25
dual
RIMS
WHEELS
Type. .... . . . . . .. . . ... . . . . . . . ... . . . . . . . . . . .. . . ..
5 spoke
1-23
TM 9-2330-384-14&P
Section III.
TECHNICAL PRINCIPLES OF OPERATION
Paragraph
Number
1-12
1-13
1-14
1-15
Title
Electrical System . . . . . . . . . . . . . . . . . . . . . . . . . . . . . . . . . . . . . . . . . . . . . . . . .
Brake System . . . . . . . . . . . . . . . . . . . . . . . . . . . . . . . . . . . . . . . . . . . . . . . . . . . .
Suspension System . . . . . . . . . . . . . . . . . . . . . . . . . . . . . . . . . . . . . . . . . . . . . . .
Fuel Loading/Unloading System . . . . . . . . . . . . . . . . . . . . . . . . . . . . . . . . . . . . .
Page
Number
1-24
1-27
1-30
1-31
1-12. ELECTRICAL SYSTEM.
a. GENERAL.
(1)
The M1062 7500 Gallon Fuel Tank Semitrailer electrical system supplies power to
semitrailer lights under both standard and blackout modes.
(2) Standard lights operate on either 12 volts or on 24 volts with voltage reduction
circuitry.
1-24
(3)
Blackout lights operate on 24 volts only.
(4)
Toggle switch located at roadside rear light box is used to direct power to optional
convoy warning light when light is in use.
TM 9-2330-384-14&P
1-12. ELECTRICAL SYSTEM (Con’t).
b. MAJOR COMPONENTS AND THEIR FUNCTION.
NAME
KEY
FUNCTION
1
Voltage Control Unit
Mounted on nose adapter at front of semitrailer. Regulates and
directs power flow from tractor to semitrailer lights. 12-volt and
24-volt electrical connectors are mounted on cover of unit.
2
12-volt Electrical
Connector
Male connector for tractor 12-volt intervehicular plug.
3
Resistors
Used to reduce incoming 24 V to 12 V.
4
24-volt Electrical
Connector
Male connector for tractor 24-volt intervehicular plug.
5
Circuit Breakers
Protect semitrailer circuits from too much current passing through.
Are a cycling or continuously self-resetting unit. Circuit breakers
CANNOT be reset manually.
6 Conduit
Metal tubing protects individual wires, or groups of wires, from
damage.
1-25
TM 9-2330-384-14&P
1-12. ELECTRICAL SYSTEM (Con't).
KEY
NAME
FUNCTION
7
Convoy Warning Light
Mounting Bracket
Used to mount convoy warning light.
8
Light/Reflector Installations
Mark front, midline, rear, and top of semitrailer. Must be in good
working condition for semitrailer to be mission ready.
KEY
N A M E
Convoy Warning Light
Toggle Switch
FUNCTION
9
1-26
ON/OFF power switch for convoy warning light.
TM 9-2330-384-14&P
1-12. ELECTRICAL SYSTEM (Con't).
KEY
NAME
FUNCTION
10
Convoy Warning Light
Condulet
Housing for female receptacle into which convoy warning light is
plugged when light is in use.
11
Cap
Covers female receptacle when not in use. Attached retaining
chain prevents loss of cap.
12 Female Receptacle
Threads into convoy warning light condulet. Contains recessed
female contacts for safety and protection.
I Metal tubing protects convoy warning light wires from damage.
6 Conduit
1-13. BRAKE SYSTEM.
a. GENERAL.
(1)
Air pressure generated by tractor’s compressor is sent through intervehicular air
couplings (EMERGENCY and SERVICE), a series of air lines, connectors, and valves to
a forward and rear air reservoir where it is stored until needed to actuate brakes at
each axle.
(2)
Axle-mounted brake chambers receive air pressure from air reservoirs when service
brakes are applied. Compressed air is converted inside brake chambers to
mechanical energy which travels from brake chamber pushrod through a series of
mechanical linkages to axle-mounted brake components.
(3)
Cam-actuated brake shoes are forced against drums to stop semitrailer.
(4)
If a planned or emergency loss of air pressure occurs, a large, powerful spring inside
rear chamber of each brake chamber releases to apply semitrailer parking/
emergency brakes.
(5)
A brake interlock system, mounted on piping assembly front port and rear inlet,
provides for automatic setting of semitrailer parking/emergency brakes during fuel
bottom loading and unloading.
1-27
TM 9-2330-384-14&P
1-13. BRAKE SYSTEM (Con't).
b. MAJOR COMPONENTS AND THEIR FUNCTION.
KEY
1
KEY
NAME
EMERGENCY and
SERVICE Air Couplings
NAME
FUNCTION
Provide conveniently operated, leak-free air connections between
tractor and semitrailer.
FUNCTION
2
SERVICE Supply Line
Delivers air pressure to air reservoirs and to semitrailer brakes
whenever service brake pedal in tractor is applied.
3
EMERGENCY Supply Line
Delivers constant air pressure to air reservoirs and to rear chamber
of each brake chamber.
1-28
TM 9-2330-384-14&P
1-13. BRAKE SYSTEM (Con't).
KEY
NAME
FUNCTION
4
Front and Rear Air
Reservoirs
Store compressed air under carefully controlled pressures until
needed for use.
5
Draincock Cable
Connected to front and rear air reservoir draincocks. When pulled,
allows drainage of moisture from air system.
6
Brake Chambers
Consist of two separate chambers:
Rear Chamber
Front Chamber
KEY
NAME
Receives a constant flow of air pressure to maintain spring
deactivated for normal operation. With loss of air pressure during
uncoupling, parking operations, or in an emergency, spring is
activated and causes a mechanical parking/emergency brake
operation.
Receives air pressure when service brakes in tractor are
applied. Air pressure is converted to mechanical energy and sent
to slack adjusters by way of brake chamber pushrod, and from
there along camshafts to brake shoe assemblies.
FUNCTION
7
Brake Shoe Assemblies
Attached to axle at spider. Actuated by S-cam at end of camshaft
to apply pressure for slowing or stopping drum rotation.
8
Slack Adjusters
Part of mechanical linkage. Function as an adjustable lever. Provide
a quick and easy method of adjusting brakes to compensate for
normal brake shoe lining wear. Are automatically self-adjusting
under normal conditions.
9 Camshafts
Connected to slack adjusters. S-cam at end of camshaft serves to
actuate brake shoe assemblies.
1-29
TM 9-2330-384-14&P
1-13. BRAKE SYSTEM (Con’t).
10
FUNCTION
NAME
KEY
Brake Interlock Valves
Mechanically actuated by connection of fuel loading transfer hose
to front port or rear inlet. Causes air system to lose air pressure
which sets semitrailer parking/emergency brakes.
1-14. SUSPENSION SYSTEM.
a. GENERAL.
1-30
(1)
The semitrailer uses a tandem axle suspension with front, center, and rear frame
hangers welded to frame.
(2)
The suspension system functions to tie front and rear axles together and to permit
independent vertical movement of each axle as determined by road surface.
(3)
Springs are supported and held in place between three frame hangers: two serve as
mounts for radius rods, while the third furnishes support for rear spring end.
(4)
Rubber bushings at most points of movement in suspension serve to cushion road
shock.
TM 9-2330-384-14&P
1-14. SUSPENSION SYSTEM (Con't).
b. MAJOR COMPONENTS AND THEIR FUNCTION.
KEY
1
NAME
Frame Hangers
FUNCTION
Mounting structure for fixed and adjustable radius rods. Assist in
holding springs in alinement.
2 Springs
Three leaf springs support semitrailer load and maintain straight
alinement of chassis to axles.
3 U-bolts
Secure springs to axle.
4
Semitrailer load is equalized through leveling action of this pivoting
assembly.
5
Equalizer Assembly
Axles
Secured to springs by U-bolts of heavy-duty construction. Attached
to axles are brake components and wheel assemblies.
6 Adjustable Radius Rods
Located roadside, Permit independent alinement of each axle.
Stabilize driving and braking forces.
7 Fixed Radius Rods
Located curbside. Stabilize driving and braking forces.
1-15. FUEL LOADING/UNLOADING SYSTEM.
a. GENERAL.
(1)
The semitrailer carries a 7500 gallon load of fuel in a single compartment welded
aluminum assembly. Seven internal baffles with staggered manways offer resistance
to fuel surge when in transit and during bottom loading.
1-31
TM 9-2330-384-14&P
1-15. FUEL LOADING/UNLOADING SYSTEM (Con't).
(2)
The semitrailer may be bottom loaded through either piping assembly front port or
rear inlet at a maximum rate of 600 gpm (2271 Ipm). Top loading at a maximum rate
of 600 gpm (2271 Ipm) is through the manhole fill cover. Fuel is unloaded by gravity
discharge, or with the assistance of a 350-600 gpm (1325-2271 Ipm) pump, through
piping assembly front port ONLY.
(3) Transfer hoses, stowed in curbside stowage tube, may be connected to provide
additional length of hose for fuel loading or unloading.
(4)
A precheck system. with controls in the roadside cabinet, functions to predict failure
of automatic shut-off device (jet level sensor) during bottom loading.
b. MAJOR COMPONENTS AND THEIR FUNCTION.
NAME
KEY
Piping Assembly
1
FUNCTION
A welded assembly that runs from emergency valve on underside
of semitrailer to a roadside front port and rear inlet.
2
Coupling
Welded to piping assembly. Provides a tap for precheck tubing.
3
Emergency Valve
Set in a closed position when loading. Manually opened to allow fuel
to leave tank when unloading. Emergency valve is operated by
means of a control lever in cabinet or by two remote trip-releases
(front roadside or top curbside).
4
Cabinet
Contains emergency valve and vapor vent control levers; precheck
controls; storage for two grounding cable reels; transfer hose
reducers; and Basic Issue Items (Bll).
1-32
TM 9-2330-384-14&P
1-15. FUEL LOADING/UNLOADING SYSTEM (Con't).
NAME
KEY
FUNCTION
5
Reducers
Used as an adapter to join 3 in. (7.6 cm) to 4 in. (10.3 cm) loading
hoses.
6
Rear Inlet
Uses a 2½ in. (6.4 cm) bayonet "D1" fitting to bottom load fuel.
7
Front Port
Uses a 4 in. (10.3 cm) camlock fitting to bottom load or unload fuel.
8
Butterfly Valve
A 4 in. (10.3 cm) valve which controls flow during loading and
unloading.
KEY
NAME
FUNCTION
9
Strainer Assembly
Filters contaminants from fuel being bottom loaded. Protects jet
level sensor from damage or malfunction caused by fuel
contaminants.
10
Center Plug
A ¼ in. (6.4 mm) plug which may be removed by the operator while
bottom loading to allow for clearing of minor contaminants from
strainer assembly.
1-33
TM 9-2330-384-14&P
1-15. FUEL LOADING/UNLOADING SYSTEM (Con't).
KEY
NAME
FUNCTION
11
Manhole
Provides access to inside of tank.
12
Precheck Tubing (Check
Valve-to-Jet Level
Sensor)
Delivers bottom loaded fuel to precheck can of jet level sensor:
When can is full, a “full-tank” condition is simulated, pressure of
fuel picked up by jet level sensor outlet orifice drops, and
emergency valve closes to stop bottom loading.
13
Jet Level Sensor
Automatic level sensing and shut-off device which is part of bottom
loading apparatus. Located at top inside of tank, just behind
manhole opening. Depends on pressure from bottom loading
source to force fuel through orifice. Automatically shuts off fuel al
emergency valve when fuel in tank reaches preset capacity.
14
Ladder
Provides access to top of semitrailer. Drains spilled fuel contained
within overturn rails and front and rear dams through its hollow
vertical rails.
15
Vapor Return Line
Connects vapor collection header to ground level adapter, which is
compatible with 4 in. (10.3 cm) quick disconnect field vapor
recovery system connection.
1-34
TM 9-2330-384-14&P
1-15. FUEL LOADING/UNLOADING SYSTEM (Con't).
NAME
KEY I
16 Fill Cover
FUNCTION
I
A 10 in. (25.4 cm) hinged opening in manhole allows top loading.
17
Pressure/Vacuum Vent
Helps prevent damage to tank if fuel is bottom loaded or unloaded
with vapor vent closed. Offers a means of venting vapors created
during fuel loading and unloading.
18
Vacuum Vent
Helps prevent collapse of tank if fuel is unloaded with vapor vent
closed.
19
Overturn Rail (Roadside)
Hollow construction. Carries vapors from vapor vent hose to rear
dam vapor collection header.
20
Vapor Vent Hose
Connects vapor vent to roadside overturn rail.
21
Vapor Vent
Located on top of semitrailer in front of manhole. Vent is spring
loaded and cable operated by a control lever in cabinet. Protects
tank from damage caused by vacuum or pressure during unloading
or loading.
1-35
TM 9-2330-384-14&P
1-15. FUEL LOADING/UNLOADING SYSTEM (Con't).
KEY
NAME
22 Precheck Valve
FUNCTION
Manually operated ball-type valve controls fuel flow through
precheck tubing.
23
Pressure Gage
Displays a pressure reading which indicates to operator whether
emergency valve is open or closed. Operaor does not activate
precheck cycle until pressure gage indicates a steady reading of
5-15 psi (34-103 kPa) .
24
Precheck Tubing
(Precheck Valve-toCheck Valve)
Delivers fuel from outlet of precheck valve to inlet of check valve.
25
Check Valve
Installed as a safety feature to permit fuel flow in one direction only,
as indicated by arrow on valve. If precheck tubing is damaged or
removed for maintenance, fuel will not leak from tank.
26
Precheck Tubing (Piping
Assembly-to-Precheck
Valve)
Delivers fuel from tap at piping assembly to inlet of precheck valve
inside cabinet.
27
Precheck Tubing (Piping
Assembly-to-Pressure
Gage)
Delivers fuel from tap at piping assembly to pressure gage inside
cabinet.
1-36
TM 9-2330-384-14&P
1-15. FUEL LOADING/UNLOADING SYSTEM (Con’t).
KEY
NAME
FUNCTION
Grounding Devices:
Provide a means to safely discharge accumulated static electricity.
28
Ground Rod
Stowed in roadside stowage tube. Driven into ground to provide a
safe ground when one is not readily available.
29
Grounding Reels
Two reels store two 50 ft. (15.25 m) cables, including a 15 ft.
(4.58 m) “Y” branch with alligator-type end connections. Stowed
in cabinet. Attach to ground rods, other vehicles, or portable
ground rod to safely discharge static electricity.
30
Grounding Stud
Located in six places: top, front, rear, roadside, and curbside.
Unpainted ball used to attach grounding cable.
1-37
TM 9-2330-384-14&P
Section IV. GENERAL SAFETY REGULATIONS
Paragraph
Number
1-16
1-17
Title
Scope . . . . . . . . . . . . . . . . . . . . . . . . . . . . . . . . . . . . . . . . . . . . . . . . . . . . . . . . . .
Safety Regulations . . . . . . . . . . . . . . . . . . . . . . . . . . . . . . . . . . . . . . . . . . . . . . . .
Page
Number
1-38
1-38
1-16. SCOPE.
a. Operation and maintenance of any fuel hauling semitrailer can be hazardous due to the
flammable and explosive nature of the load.
b. This section contains a summary of safety regulations which MUST be strictly followed when
operating or maintaining the M1062 Tank Semitrailer. Personnel who fail to follow these regulations
endanger the mission, equipment, and lives of themselves and innocent bystanders.
C.
manual.
Read and become familiar with all WARNINGS in the Warning Summary at the front of this
d. Throughout this manual, WARNINGS are placed as they pertain to specific operational or
maintenance procedures. Read these warnings and follow them exactly.
1-17. SAFETY REGULATIONS.
a. Refer to FM 10-20, FM 10-68, FM 10-69, and FM 10-71 to become familiar with safe fuel
handling procedures.
b. Personnel engaged in the operation and maintenance of the semitrailer must not wear
clothing that generates static electricity. DO NOT wear wool, nylon, silk, rayon, or other similar
materials. Remove all contents from pockets. Wear rubber boots and gloves during fuel loading and
unloading.
c. Before loading or unloading fuel, purging tank, or performing any unit, direct support, or
general support maintenance on semitrailer, connect all bonding and grounding connections. Refer to
paragraph 2-17 for information on proper bonding and grounding procedures.
d. Never climb on semitrailer without first touching grounding stud to discharge static
electricity from your body.
e. Under normal circumstances, perform all maintenance on semitrailer outdoors, away from
buildings, and with tank empty. The semitrailer tank should be checked to ensure that it is free of
vapors that could ignite during maintenance activities.
f. If circumstances require that maintenance be performed inside a building, semitrailer tank
must be thoroughly drained and purged, and exterior of semitrailer steam cleaned. Explosimeter test,
after purging, must read in the SAFE zone (see paragraph 4-68). Even if semitrailer has tested SAFE
with combustible gas indicator set, it MUST be retested prior to starting work each day and at regular
intervals throughout the day. This test can be accomplished by authorized unit or direct support
maintenance personnel with an MOS of 77 F or equivalent (see FM 10-20).
g. To reduce the risk of fire and explosion, DO NOT perform the following operations on
semitrailer unless tank is drained, purged, and exterior of semitrailer steam cleaned:
1-38
(1)
Replace any component that communicates with inside of tank and therefore comes in
contact with fuel or vapors (manhole, jet level sensor and tubing, emergency valve,
vapor collection system components, vent caps, sump drain, piping assembly, front
port, or rear inlet).
(2)
Troubleshoot electrical system with any test device other than the ohms scale of a
multimeter.
TM 9-2330-384-14&P
1-17. SAFETY REGULATIONS (Con't).
(3) Weld or solder.
(4)
Cut with acetylene torch or chisel and hammer.
(5) Drill (except aluminum).
h. Follow these rules if working inside a purged tank:
(1)
Always provide adequate forced air ventilation with air directed inside to compartment
where work is being performed.
(2)
NEVER work alone inside a tank; a second person must be stationed at the manhole
opening. The person inside the tank must have a safety line and harness on in case of
emergency for rescue operations.
(3)
If the person inside the tank encounters any difficulties, the person stationed at the
manhole must summon assistance IMMEDIATELY. DO NOT attempt a rescue until
assistance has arrived.
1-39/(1-40 Blank)
TM 9-2330-384-14&P
CHAPTER 2
OPERATING INSTRUCTIONS
Section I.
DESCRIPTION AND USE OF OPERATOR’S
CONTROLS AND INDICATORS
Paragraph
Number
2-1
2-2
Page
Number
Title
Introduction . . . . . . . . . . . . . . . . . . . . . . . . . . . . . . . . . . . . . . . . . . . . . . . . . . . . . .
Controls and Indicators . . . . . . . . . . . . . . . . . . . . . . . . . . . . . . . . . . . . . . . . . . . .
2-1
2-1
2-1. INTRODUCTION.
This section shows the location and function of all M1062 7500 Gallon Fuel Tank Semitrailer
controls and indicators. Before operating semitrailer, review this section thoroughly.
2-2.
KEY
CONTROLS AND INDICATORS.
NAME
LOCATION
FUNCTION
1
Emergency Valve Control Cabinet, roadside.
Lever
Pull lever to open emergency valve when unloading
fuel.
Push lever to close emergency valve when bottom or top
loading.
2
Vapor Vent Control Lever Cabinet, roadside.
Pull lever to open vapor vent on
top of semitrailer when bottom
loading or unloading fuel.
2-1
TM 9-2330-384-14&P
2-2. CONTROLS AND INDICATORS (Con't).
KEY
NAME
LOCATION
FUNCTION
3
Pressure Gage
Cabinet, roadside.
Indicates pressure in precheck
tubing.
Allows operator to
determine status of bottom
loading (whether emergency
valve is open or closed).
4
Precheck Valve
Cabinet, roadside.
Turn handle ¼ turn counterclockwise to open precheck valve and
activate precheck cycle. Turn
handle ¼ turn clockwise to close
precheck
valve,
deactivate
precheck cycle, and resume
bottom loading.
5
Emergency Valve
Remote Trip-release
Front of semitrailer, roadside.
Top of semitrailer, curbside.
Pull to close emergency valve,
Use when not at cabinet.
2-2
TM 9-2330-384-14&P
2-2. CONTROLS AND INDICATORS (Con't).
KEY
6
NAME
Butterfly Valve
LOCATION
FUNCTION
Piping assembly front port, Controls fuel flow during unloading. Turn ¼ turn counterclockroadside.
wise to open; ¼ turn clockwise to
close.
2-3
TM 9-2330-384-14&P
2-2. CONTROLS AND INDICATORS (Con't).
KEY
NAME
LOCATION
FUNCTION
Pull control lever to drain fuel
and/or condensation collected in
tank sump.
7
Sump Drain Control
Lever
Rear of semitrailer under tank
shell.
8
Air Reservoir Draincock
Cable
Rear of semitrailer, attached to Pull cable to open air reservoir
bumper.
draincocks. Release cable to
close air reservoir draincocks.
KEY
NAME
9
2-4
Gage Marker Disk
LOCATION
Inside tank, at manhole.
FUNCTION
Allows operator to gage amount
of fuel in tank when top loading.
TM 9-2330-384-14&P
2-2. CONTROLS AND INDICATORS (Con’t).
KEY
10
11
NAME
LOCATION
FUNCTION
Gage Stick
Stowed in curbside tube assem- When placed upright in tank,
calibrated marks on stick show
bly.
level of fuel in gallons or liters.
Convoy Warning Light
Toggle Switch
Rear of semitrailer, on front face ON/OFF power switch for convoy
of roadside light box installation. warning light.
2-5
TM 9-2330-384-14&P
Section II. PREVENTIVE MAINTENANCE CHECKS
AND SERVICES (PMCS)
Paragraph
Number
Title
General . . . . . . . . . . . . . . . . . . . . . . . . . . . . . . . . . . . . . . . . . . . . . . . . . . . . . . . . .
2-3
2-4
Intervals . . . . . . . . . . . . . . . . . . . . . . . . . . . . . . . . . . . . . . . . . . . . . . . . . . . . . . . .
Reporting Repairs.. . . . . . . . . . . . . . . . . . . . . . . . . . . . . . . . . . . . . . . . . . . . . . . .
2-5
General PMCS Procedures . . . . . . . . . . . . . . . . . . . . . . . . . . . . . . . . . . . . . . . . .
2-6
2-7
Specific PMCS Procedures . . . . . . . . . . . . . . . . . . . . . . . . . . . . . . . . . . . . . . . . .
2-8
Cleaning Agents . . . . . . . . . . . . . . . . . . . . . . . . . . . . . . . . . . . . . . . . . . . . . . . . . .
Leakage Definitions . . . . . . . . . . . . . . . . . . . . . . . . . . . . . . . . . . . . . . . . . . . . . . .
2-9
Table 2-1 Operator Preventive Maintenance Checks and Services (PMCS) . . . . . . . .
Page
Number
2-6
2-6
2-6
2-6
2-7
2-8
2-8
2-9
2-3. GENERAL.
a. To ensure that the M1062 7500 Gallon Fuel Tank Semitrailer is ready for operation at all
times, it must be inspected on a regular basis so that defects may be found before they result in
serious damage, equipment failure, or injury to personnel. This section contains systematic
instructions on inspections, adjustments, and corrections to be performed by the operator.
b. Before performing PMCS, read and follow all safety regulations found in Chapter 1, Section
IV, General Safety Regulations.
2-4. INTERVALS.
Perform PMCS, found in Table 2-1, at following intervals:
Perform Before (B) PMCS just before operating semitrailer.
Perform During (D) PMCS while operating semitrailer.
Perform After (A) PMCS right after operating semitrailer.
Perform Weekly (W) PMCS once each week.
Perform Monthly (M) PMCS once each month.
2-5. REPORTING REPAIRS.
All defects which the operator cannot fix must be reported on DA Form 2404, Equipment
Inspection and Maintenance Worksheet, immediately after completing PMCS. If a problem is found,
report it to unit maintenance IMMEDIATELY.
2-6. GENERAL PMCS PROCEDURES.
a. While performing PMCS procedures, always keep in mind CAUTIONS and WARNINGS.
b. While performing specific PMCS procedures, ensure that items are correctly assembled,
secure, serviceable, and adequately lubricated as defined below:
(1)
2-6
An item is CORRECTLY ASSEMBLED when it is in proper position and all parts are
present.
TM 9-2330-384-14&P
2-6. GENERAL PMCS PROCEDURES (Con't).
c.
(2)
Wires, nuts, hoses, fittings, or attaching hardware are SECURE when they cannot be
easily removed by hand or by wrench.
(3)
An item is SERVICEABLE if it is not worn beyond repair or likely to fail before next
scheduled inspection.
(4)
An item is ADEQUATELY LUBRICATED if it has been lubricated in accordance with
Chapter 3, Section I.
Perform inspections of welds, electrical conduits, tubing, and hoses as described below:
(1)
Check for loose or chipped paint, rust, or cracks where parts are welded together. If a
bad weld is found, notify unit maintenance.
(2)
Look for cracked, frayed, loose, or broken electrical conduit, tubing, and hoses. Report all unserviceable items to unit maintenance.
d. Where the instruction clean appears in a procedure, use guidelines found in paragraph 2-8.
Even if a procedure does not specify cleaning, be aware of any buildup of dirt, grease, oil, and debris.
Clean any such buildups using cleaning agents authorized in Appendix E and relubricate as required
(see Chapter 3, Section I).
2-7. SPECIFIC PMCS PROCEDURES.
a. Operator PMCS are provided in Table 2-1. Always perform PMCS in order listed. Once it
becomes a habit, anything that is not right can be spotted in a minute. If any defects are discovered
through PMCS, perform the appropriate troubleshooting task in Chapter 3, Section II. If any component
or system is not serviceable, or if given service does not correct problem, notify unit maintenance.
b. The PMCS procedures in Table 2-1 are performed at five intervals: Before, During, After,
Weekly, and Monthly. Before performing preventive maintenance, read all checks required for the
applicable interval and prepare tools needed to make all checks. Have several clean rags (Item 18,
Appendix E) handy. Perform ALL inspections at applicable interval.
c. The columns in PMCS table are defined as follows:
(1)
Item No. Provides a logical sequence for PMCS to be performed and is used as a
source number when recording PMCS results on DA Form 2404, Equipment inspection
and Maintenance Worksheet.
(2)
Interval. Specifies interval at which PMCS is to be performed.
(3)
Item To Be Inspected. Lists system and common name of items that are to be inspected. Included in this column are specific servicing, inspection, replacement, or
adjustment procedures to be followed.
NOTE
The terms “ready/available” and “mission-capable” refer to the same status: Equipment is on hand and is able to perform its combat mission (see
DA Pam 738-750).
(4)
Equipment Is Not Ready/Available If:. Explains when semitrailer is nonmission capable.
2-7
TM 9-2330-384-14&P
2-8. CLEANING AGENTS.
a. Keeping the semitrailer clean is an important part of proper PMCS. Equipment that is
covered with surface dirt, grease, and oil cannot be properly inspected, nor will it operate as well as it
should.
b. Keep excess lubricants away from exterior parts that do not require lubrication.
c.
Use only those authorized cleaning solvents or agents listed in Appendix E.
2-9. LEAKAGE DEFINITIONS.
a. It is important to know how fluid leakage affects the status of the semitrailer. Following are
types/classes of leakage an operator must know to determine whether the semitrailer is mission
capable. Learn these leakage definitions. When in doubt, notify unit maintenance.
CLASS I - Seepage of fluid (as indicated by wetness or discoloration) not great
enough to form drops.
CLASS II - Leakage of fluid great enough to form drops, but not enough to cause
drops to drip from item being inspected.
CLASS Ill - Leakage of fluid great enough to form drops that fall from item being
inspected.
b. A very important exception to leakage rules is leakage of fuel from semitrailer tank, piping
assembly, or precheck and jet level sensor tubing. NO FUEL LEAKAGE IS PERMITTED.
c. Equipment operation is allowed with minor (Class I or II) leakage. Of course, fluid levels in an
item/system affected with such leakage must be checked more frequently than required in PMCS.
When in doubt, notify unit maintenance.
d. Class Ill leaks must be reported IMMEDIATELY to unit maintenance.
2-8
TM 9-2330-384-14&P
Table. Unit PreventiveMaintenanceChecksand Services(PMCS).
B-Before
D-During
A-After
W-Weekly
INTERVAL
ITEMTOBEINSPECTED
I M PROCEDURE: Check for and have Repaired, Filled, or
A WM
NO. B D
Adjusted as required.
M-Monthly
EQUIPMENT
IS
NOT READY/
AVAILABLE IF:
NOTE
•
Perform these checks, in the order listed, within
designated interval, as you walk around
semitrailer.
•
Perform WEEKLY (W) and BEFORE (B) PMCS
if:
a.
You are operating semitrailer but have not
operated it since last weekly (W) check.
b.
You are operating semitrailer for the first time.
OVERALL CHECK FOR FUEL LEAKAGE FROM
TANK, PIPING ASSEMBLY, PRECHECK AND JET
LEVEL SENSOR TUBING.
a. Check for pools or small spots of fuel on ground,
which could indicate a fuel leak. Check for leaks in
precheck and jet level sensor tubing (see paragraph
1-15).
ANY FUEL LEAKS.
b. Inspect tank and piping assembly for cracks,
dents or bad welds.
Tank or piping
welds.
2
FRONT OF SEMITRAILER
0
a. Check pick-up plate for proper lubrication and
loose mounting bolts (see paragraph 1-7, Curbside
View). If bolts are loose, notify unit maintenance.
0
b. Check upper coupler assembly for proper
lubrication, looseness of mounting bolts, any bowed
condition, and cracks (see paragraph 1-7, Roadside
View). If bolts are loose, notify unit maintenance.
0
c. Check front clearance and marker lights and
reflector for cleanliness and cracks (see paragraph 17, FRONT View). Clean any dirty light or reflector lens.
If cracked or damaged, notify unit maintenance.
0
d. Check hazardous materials placards for broken
or missing clips. Make sure placards move freely.
Upper coupler
sembly is bowed or
cracked.
Change1
2-9
TM 9-2330-384-14&P
Table. UnitPreventiveMaintenanceChecksand Services(PMCS)(Con't).
B-Before
INTERVAL
ITEM
NO. 13 D A W
2
D-During
M
A-After
W-Weekly
ITEM TO BE INSPECTED
PROCEDURE: Check for and have Repaired, Filled, or
Adjusted as required.
FRONT OF SEMITRAILER
M-Monthly
EQUIPMENT IS
NOT READY/
AVAILABLE IF:
(Con't)
0
e. Check for tears or cracks in seals (1) of Air coupling seals are
EMERGENCY and SERVICE air couplings. If seals torn, cracked, or
are torn, cracked, ormissing, notify unit maintenance. missing.
0
Inspect front roadside emergency valve remote tripEmergency
release (3) for
valve
looseness
re- or damage.
mote trip release is
damaged or missing.
g. Inspect electrical conduit (2) to ensure that it is
properly supported with clips (5), it is not damaged,
and all connections at voltage control unit (6) are
tight. Notify unit maintenance of any looseness or
damage.
f.
h. Check grounding stud (4), located front roadside, Any damage is found
for looseness or damage. Clean any paint, grease, or that will prevent proper
dirt on grounding contact surface. If loose or damaged, grounding of semi-
2
3
4
5
ROADSIDE OF SEMITRAILER
3
2-10
0
a. Check that roadside fire extinguisher is present,
properly covered and secured, and fully charged.
0
b. Check that landing gear ground board is present
and securely stowed (see paragraph 1-7, Roadside
View).
Fire extinguisher is
missing or not fully
charged.
TM 9-2330-384-14&P
Table 2-1. Operator Preventive Maintenance Checks and Services (PMCS) (Con't).
B-Before
D-During
M-Monthly
M
EQUIPMENT IS
NOT READY/
AVAILABLE IF:
INTERVAL
ITEM
NO.
3
B
D
A
W
W-Weekly
A-After
ITEM TO BE INSPECTED
PROCEDURE: Check for and have Repaired, Filled, or
Adjusted as required.
ROADSIDE OF SEMITRAILER (Con't)
c. Check side clearance and marker light and
reflector for cleanliness and cracks (see
paragraph 1-7, Roadside View). Clean any dirty
light or reflector lens. If cracked or damaged,
notify unit maintenance.
CAUTION
Ensure that front port dust cap (7) is
properly installed. If front port dust
cap is not properly installed, brake interlock system will cause semitrailer
brakes to lock up.
d. Check that piping assembly front port dust
cap (7) and rear inlet cover (8) are latched in
place. Install front port dust cap with notch
alined with brake interlock paddle (10). Ensure
that paddle does not become pushed in.
e. Inspect brake interlock valves (9) and air Brake interlock valve:
lines at piping assembly front port and rear inlet and air lines are loose
or damaged.
for looseness or damage.
2-11
TM 9-2330-384-14&P
Table 2-1. Operator Preventive Maintenance Checks and Services (PMCS) (Con't).
B-Before
INTERVAL
ITEM
NO.
3
B
D
A
W
D-During
A-After
W-Weekly
ITEM TO BE INSPECTED
PROCEDURE: Check for and have Repaired, Filled, or
M Adjusted as required.
M-Monthly
EQUIPMENT IS
NOT READY/
AVAILABLE IF:
ROADSIDE OF SEMITRAILER (Con't)
f. Check grounding stud (4) at cabinet for
looseness or damage. Clean any paint, grease,
or dirt on grounding contact surface. If loose or
damaged, notify unit maintenance.
Any damage is found
that
will
prevent
proper grounding of
semitrailer.
g. Check that all Basic Issue Items (BII) in T r a n s f e r h o s e r e cabinet are present (see Appendix C). Check ducers missing.
that two transfer hose reducers (18) are
present.
h. Check that grounding reels (16) in cabinet Grounding reels are
damaged or missing.
are present and secured.
i. Check that emergency valve control lever Emergency valve or
(12) and vapor vent control lever (13) are vapor vent control
securely mounted to cabinet and are not levers damaged.
damaged.
2-12
TM 9-2330-384-14&P
Table 2-1. Operator Preventive Maintenance Checks and Services (PMCS) (Con't).
B-Before
INTERVAL
ITEM
NO.
3
B
D
A
W
D-During
W-Weekly
A-After
ITEM TO BE INSPECTED
PROCEDURE: Check for and have Repaired, Filled, or
Adjusted as required.
M-Monthly
M
EQUIPMENT IS
NOT READY/
AVAILABLE IF:
ROADSIDE OF SEMITRAILER (Con't)
i. Check pressure gage (15) and precheck
valve (17) for looseness or damage. Check that
pressure gage is filled with fluid and is not
cracked and leaking. Check that precheck
tubing (14) is securely connected to pressure
gage and precheck valve.
k. Check that ground rod is stowed in roadside Ground rod is damstowage tube (11) and that stowage tube doors aged or missing.
close properly at each end.
I. Check for fluid leakage from hubcaps (21) CLASS Ill leakage is
found.
at front and rear wheels.
m. Check level of lubricating oil at hubcaps (21)
of front and rear wheels. If level is below fill mark
(22), notify unit maintenance.
n. Check wheel nuts (19) and rim clamps (20) One or more wheel
rim
nuts
and/or
for looseness or damage.
clamps are missing.
cuts
have
o. Check tires for cuts, gouges, cracks, or Tires
sharp objects. Remove any objects lodged gouges, or cracks
that would result in
between tire treads or dual wheels.
during
tire
failure
operation. Tire missing or unserviceable.
2-13
TM 9-2330-384-14&P
Table 2-1. Operator Preventive Maintenance Checks and Services (PMCS) (Con?).
B-Before
INTERVAL
ITEM
NO.
3
B
D
A
W
D-During
M-Monthly
M
EQUIPMENT IS
NOT READY/
AVAILABLE IF:
W-Weekly
A-After
ITEM TO BE INSPECTED
PROCEDURE: Check for and have Repaired, Filled, or
Adjusted as required.
ROADSIDE OF SEMITRAILER (Con't)
p. Gage tires for proper inflation. Inflate tires to
95 psi (655 kPa).
WARNING
Cautiously feel each wheel hub and
drum. Wheel hubs or drums may be
hot. Failure to follow this warning may
result in burns.
q. Cautiously feel each wheel hub and drum.
Check for a wheel hub or drum that is hotter or
cooler than others. Overheating could indicate
improperly adjusted or defective wheel bearings
or a locked-up brake. A cool wheel hub and
drum could indicate an inoperative brake.
Report any abnormal conditions to unit
maintenance IMMEDIATELY.
r. Check that chock blocks are present (see
paragraph 1-7, Roadside View).
4
REAR OF SEMITRAILER
a. Pull on cable (25) at semitrailer bumper to
open air reservoir draincocks. Allow all
accumulated moisture to drain. When no more
water sprays or drips from air reservoirs,
release cable pull to close draincocks.
b. Remove security bolt (24). Place a suitable
drain pan under sump drain (26). If tank is
empty, pull on control lever (23) and allow any
water from condensation or remaining fuel to
drain from sump. If tank is loaded, operate
control lever only until water from condensation
is drained. Push on control lever to close sump
drain. Install security bolt.
c. Check that electrical conduit (2) at rear is
properly supported by clips (5) and is not
damaged.
2-14
TM 9-2330-384-14&P
Table 2-1. Operator Preventive Maintenance Checks and Services (PMCS) (Con’t).
B-Before
INTERVAL
ITEM
NO.
B D A W
4
D-During
A-After
W-Weekly
ITEM TO BE INSPECTED
PROCEDURE: Check for and have Repaired, Filled, or
M Adjusted as required.
M-Monthly
EQUIPMENT IS
NOT READY/
AVAILABLE IF:
REAR OF SEMITRAILER (Con't)
2-15
TM 9-2330-384-14&P
Table 2-1. Operator Preventive Maintenance Checks and Services (PMCS) (Con’t).
B-Before
INTERVAL
ITEM
NO.
4
B
D
A
W
D-During
A-After
W-Weekly
ITEM TO BE INSPECTED
PROCEDURE: Check for and have Repaired, Filled, of
M Adjusted as required.
EQUIPMENT IS
NOT READY/
AVAILABLE IF:
REAR OF SEMITRAILER (Con't)
d. Check grounding stud (4) on roadside of
bumper for looseness or damage. Clean any
paint, grease, or dirt on grounding contact
surface. If loose or damaged, notify unit
maintenance.
e. Check triple clearance light assembly (28)
and lights and reflectors at light boxes (30) for
cleanliness and cracks. Clean any dirty lights or
reflector lenses. If cracked or damaged, notify
unit maintenance.
f. Check splashguards (31) for presence.
Notify unit maintenance if missing.
g. Check that vapor return line (27) is securely
mounted with no obvious damage. Check that
dust cap (32) is in place.
h. Inspect ladder (29) for damage and security
of mounting. Notify unit maintenance of any
damage found.
2-16
M-Monthly
Any damage is found
will
that
prevent
proper grounding of
semitrailer.
TM 9-2330-384-14&P
Table 2-1. Operator Preventive Maintenance Checks and Services (PMCS) (Con’t).
Before
D-During
M-Monthly
M
EQUIPMENT IS
NOT READY/
AVAILABLE IF:
INTERVAL
ITEM
NO.
4
B
D
A
W
W-Weekly
A-After
ITEM TO BE INSPECTED
PROCEDURE: Check for and have Repaired, Filled, or
Adjusted as required.
REAR OF SEMITRAILER (Con’t)
i. Check for presence of plug (33) on roadside
of rear dam.
j. Check convoy warning light condulet (34) for
looseness or damage. If convoy warning light is
not installed, ensure that receptacle cap (35) is
in place.
k. If convoy warning light is installed, ensure
that cable is securely plugged into receptacle at
condulet (34).
5
UNDER SEMITRAILER
a. Look under semitrailer and check for signs of CLASS Ill leakage is
fluid dripping from area of drum (36) and down found.
inner surface of tires. Fluid leakage indicates a
damaged wheel oil seal.
2-17
TM 9-2330-384-14&P
Table 2-1. Operator Preventive Maintenance Checks and Services (PMCS) (Con’t).
Before
INTERVAL
ITEM
NO.
5
B
D
A
W
D-During
W-Weekly
A-After
ITEM TO BE INSPECTED
PROCEDURE: Check for and have Repaired, Filled, or
M Adjusted as required.
M-Monthly
EQUIPMENT IS
NOT READY/
AVAILABLE IF:
UNDER SEMITRAILER (Con’t)
rubbing, or
b. Look under semitrailer and check all air lines Kinks,
(38) for kinks, rubbing, or obvious damage. Air other obvious damlines should be well supported. Air line age is found.
connections to air reservoirs (39), brake valves
(37), and brake chambers should not be loose.
c. Check for loose or damaged suspension Suspension compocomponents. Check springs for a cracked leaf. If nents are damaged.
any suspension fastener is loose, notify unit
maintenance.
6
TOP OF SEMITRAILER
WARNING
Use extreme caution when working or
walking on top of semitrailer. Walkway
can be slippery due to moisture or fuel
spillage. Failure to follow this warning
may result in serious injury to personnel.
a. Check that rear ladder drains (44) are free of
debris that would hinder drainage in event of fuel
spillage.
b. Check that grabhandles (43) are present
and securely mounted to overturn rails.
2-18
TM 9-2330-384-14&P
Table 2-1. Operator Preventive Maintenance Checks and Services (PMCS) (Con't).
B-Before
INTERVAL
ITEM
NO.
6
B
D
A
W
A-After
W-Weekly
ITEM TO BE INSPECTED
PROCEDURE: Check for and have Repaired, Filled, or
M Adjusted as required.
D-During
M-Monthly
EQUIPMENT IS
NOT READY/
AVAILABLE IF:
TOP OF SEMITRAILER (Con't)
WARNING
DO NOT open vent cap. With vent cap
open, vapors inside tank could ignite
if a spark is produced. The resulting
fire and explosion will result in serious
injury or death to personnel.
c. Check for fuel leaks at rear vent cap (41). ANY FUEL LEAKS.
Check that vent cap is not loose. If fuel is leaking
from vent cap, or vent cap is loose, notify unit
maintenance IMMEDIATELY.
d. Check that manhole fill cover (42) is
securely closed (see paragraph 2-16).
Manhole fill cover will
not close.
e. Check emergency valve remote trip-release Emergency valve renote trip-release is
(3) for looseness or damage.
damaged or missing
f. Check grounding stud (4) on roadside and
curbside overturn rails for looseness or damage,
Clean any paint, grease, or dirt on grounding
contact surface. If loose or damaged, notify unit
maintenance.
Any damage is found
will
prevent
that
proper grounding of
semitrailer.
2-19
TM 9-2330-384-14&P
Table 2-1. Operator Preventive Maintenance Checks and Services (PMCS) (Con't).
B-Before
INTERVAL
ITEM
NO.
6
B
D
A
W
D-During
M-Monthly
M
EQUIPMENT IS
NOT READY/
AVAILABLE IF:
W-Weekly
A-After
ITEM TO BE INSPECTED
PROCEDURE: Check for and have Repaired, Filled, or
Adjusted as required.
TOP OF SEMITRAILER (Con't)
g. Check that vapor vent hose (46) is securely
mounted between vapor vent (47) and overturn
rail (45). If vapor vent or vapor vent hose are
loose or damaged, notify unit maintenance.
WARNING
DO NOT open vent cap. With vent cap
open, vapors inside tank could ignite
if a spark is produced. The resulting
fire and explosion will result in serious
injury or death to personnel.
h. Check for fuel leaks at front vent cap (41).
Check that vent cap is not loose. If fuel is leaking
from vent cap, or vent cap is loose, notify unit
maintenance IMMEDIATELY.
i. Check for presence of plugs at front of front
dam (40), on roadside and curbside.
2-20
ANY FUEL LEAKS.
TM 9-2330-384-14&P
Table. Unit Preventive Maintenance Checks and Services (PMCS) (Con't).
B-Befors
uring
M
ITEM TO BEINSPECTED
PROCEDURE: Check for and have Repaired, Filled, or
Adjusted as required.
INTERVAL
ITEM
NO.
B
D
A
W
7
A-After
M-Monthly
D-
CURBSIDE
W-Weekly
EQUIPMENT IS
NOT READY1
AVAILABLE IF:
OF SEMITRAILER
0
a. Check for fluid leakage
at front and rear wheels.
0
b. Check level of lubricating oil at hubcaps (21)
of front and rear wheels. If level is below fill mark
(22), notify unit maintenance.
9
c. Check wheel nuts (19) and rim clamps (20)
for looseness or damage.
20
from hubcaps
(21)
CLASS
found.
III leakage
Is
One or more wheel
nuts
and/or
rim
clamps are missing.
21
19
0
0
22
0
d. Check tires for cuts, gouges, cracks, or
sharp objects.
Remove any objects lodged
between tire treads or dual wheels.
0
0
a. Check tires for proper
to 95 psi (655 kPa).
inflation.
Tires
have
cuts,
gouges,
or Cracks
that would result in
tire
failure
during
operation.
Tire missing or unserviceable.
Inflate tires
Changel
2-21
TM 9-2330-384-14&P
Table. Unit Preventive Maintenance Checks and Services (PMCS) (Con't).
D- uring
B-Before
B
D
A
W
M
PROCEDURE: Check for and have Repaired,
Adjusted as required.
CURBSIDE OF SEMITRAILER
7
M-Monthly
W-Weekly
ITEM TO BEINSPECTIED
INTERVAL
ITEM
NO.
A-After
Filled, or
EQUIPMENT IS
NOT READY/
AVAILABLE IF:
(Con't)
WARNING
Cautiously feel each wheel hub and
drum. Wheel hubs or drums may be
hot. Failure to follow this warning may
result In burns.
f. Cautiously feel each wheel hub and drum.
Check for a wheel hub or drum that Is hotter or
cooler than the others. Overheating could
indicate Improperly adjusted or defective wheel
bearings, or a locked-up brake. A cool wheel
hub and drum could indicate an inoperative
brake. Report any abnormal conditions to unit
maintenance IMMEDIATELY.
g. Check that chock blocks (49) are present.
h. Check that transfer hoses and gage stick Transfer hoses are
arepresent and properly stowed in curbside
missing. Either stowage tube door is
damaged or missing.
doors close properly at each end.
. Check that spare tire (50) is present, in Spare tire is missing.
good condition, and securely mounted in spare
tire carrier. Ensure that spare tire is inflated to
95 psi (655 kPa)
j. Check grounding stud (4) on spare tire Any damage Is found
prevent
will
carrier for looseness or damage. Clean any that
paint, grease, or dirt on grounding contact proper grounding of
surface. If loose or damaged, notify unit semitrailer.
maintenance.
0
k. Check side clearance and marker light (53)
and reflector (54) for cleanliness and cracks.
Clean any dirty light or reflector ions. If cracked
or damaged, notify unit maintenance.
0
l. Check that landing gear ground board (51)
is present and securely stowed.
0
m. Check that curbside fire extinguisher (52) is Fire extinguisher
is
present, properly covered and secured,
and missing or not fully
fully charged.
2-22
charged.
TM 9-2330-384-14&P
Table 2-1. Operator Preventive Maintenance Checks and Services (PMCS) (Con’t).
B-Before
D-During
A-After
W-Weekly
INTERVAL
ITEM TO BE INSPECTED
ITEM
PROCEDURE: Check for and have Repaired, Filled, or
NO. B D A W M Adjusted as required.
7
CURBSIDE OF SEMITRAILER (Con't)
8
OPERATIONAL CHECKS
M-Monthly
EQUIPMENT IS
NOT READY/
AVAILABLE IF:
NOTE
l
Make operational checks after coupling semitrailer to tractor (see paragraph 2-12).
l
An assistant operator is required to
perform many of the following
checks.
a. Check landing gear for damage and proper
operation.
Landing gear is dam
a g e d o r will no
operate.
b. Check that tractor intervehicular electrical
cable and air connections are properly made
and secure (see paragraph 2-12).
c. Check operation of all lights (see
TM 9-2320-273-10 or TM 9-2320-283-10).
d. Test brake system by actuating the service
brakes.
Service brakes fail to
operate.
e. With semitrailer coupled to tractor, have an
assistant actuate the service brakes. Listen for
air leaks at air couplings, and at brake valves
and air reservoirs.
Air leaks are found.
2-23
TM 9-2330-384-14&P
Table 2-1. Operator Preventive Maintenance Checks and Services (PMCS) (Con't).
B-Before
INTERVAL
ITEM
NO.
8
B
D
A
D-During
W M
A-After
W-Weekly
ITEM TO BE INSPECTED
PROCEDURE: Check for and have Repaired, Filled, or
Adjusted as required.
M-Monthly
EQUIPMENT IS
NOT READY/
AVAILABLE IF:
OPERATIONAL CHECKS (Con't)
f. Push park brake control in on tractor control
panel (see TM 9-2320-273-10 or TM 9-2320283-10). Brake chamber pushrods should
retract to release brakes.
Brakes do not reease.
g. Pull park brake control out on tractor control
panel (see TM 9-2320-273-10 or TM 9-2320283-10). Brake chamber pushrods should
extend to apply brakes.
Brakes do not apply.
h. Note semitrailer brake action for signs of
grabbing, pulling to one side, or slow release.
Report any problem to unit maintenance
IMMEDIATELY.
Brakes do not funcion properly or semirailer pulls to one
side.
i. With tractor moving straight ahead, check if
semitrailer wanders or pulls to one side, or if
there is any unusual vibration or noises. Report
any problem to unit maintenance IMMEDIATELY.
Semitrailer does not
rack properly.
WARNING
Operator must be alert at all times for
leaking or malfunctioning equipment.
IMMEDIATELY stop all fuel handling
operations at first sign of leaks or malfunctions. Corrective action must be
performed by qualified personnel before resuming any operations.
NOTE
It is normal for emergency valve and
vapor vent control levers to offer resistance when pulled.
j. Check that emergency valve and vapor vent
control levers operate (see paragraph 2-2).
2-24
Control levers will not
operate.
TM 9-2330-384-14&P
Table 2-1. Operator Preventive Maintenance Checks and Services (PMCS) (Con't).
B-Before
INTERVAL
ITEM
NO.
8
B
D
A
W
D-During
A-After
W-Weekly
ITEM TO BE INSPECTED
PROCEDURE: Check for and have Repaired, Filled, or
M Adjusted as required.
M-Monthly
EQUIPMENT IS
NOT READY/
AVAILABLE IF:
OPERATIONAL CHECKS (Con't)
NOTE
If
semitrailer
parking/emergency
brakes have already been set, brake
interlock system will not operate. This
is normal.
k. Check operation of brake interlock system Brake interlock sys(see paragraph 1-13). While loading or unload- tern malfunctions.
ing fuel, check that semitrailer parking/emergency brakes automatically set when loading/
transfer hose is connected to piping assembly
front port or rear inlet. Listen for a brief exhausting of air under semitrailer.
I. While bottom loading fuel, open precheck
valve to activate the precheck cycle. Once
emergency valve has closed, resume bottom
loading (see paragraph 2-19). If emergency
valve does not close within two minutes, or if
bottom loading does not resume, refer to
troubleshooting instructions in Chapter 3. Report
any leakage in precheck system to unit
maintenance IMMEDIATELY.
ANY FUEL LEAKS.
m. While loading or unloading fuel, check for
fuel leaks at emergency valve, piping assembly,
front port, rear inlet, nozzles, and transfer
hoses. When bottom loading, check for leaks in
precheck tubing and around fittings at pressure
gage and precheck valve inside cabinet (see
paragraph 1-15). Report any leakage or
malfunction to unit maintenance IMMEDIATELY.
ANY FUEL LEAKS.
n. While unloading fuel, pull on emergency ANY FUEL LEAKS
valve control lever to close emergency valve BE- E m e r g e n c y v a l v e
FORE tank is empty (see paragraph 2-2). Fuel malfunctions.
flow should stop after piping is drained. Check to
see if fuel continues to flow from butterfly valve
at front port (see paragraph 2-2). If fuel continues to flow, emergency valve is malfunctioning.
Report any leakage or malfunction to unit maintenance IMMEDIATELY.
2-25
TM 9-2330-384-14&P
Section III.
OPERATION UNDER USUAL CONDITIONS
Paragraph
Number
2-10
2-11
2-12
2-13
2-14
2-15
2-16
2-17
2-18
2-19
2-20
2-21
2-22
2-23
Title
General . . . . . . . . . . . . . . . . . . . . . . . . . . . . . . . . . . . . . . . . . . . . . . . . . . . . . . . . .
Use of Chock Blocks . . . . . . . . . . . . . . . . . . . . . . . . . . . . . . . . . . . . . . . . . . . . . .
Coupling Semitrailer to Tractor . . . . . . . . . . . . . . . . . . . . . . . . . . . . . . . . . . . . . .
Towing Semitrailer . . . . . . . . . . . . . . . . . . . . . . . . . . . . . . . . . . . . . . . . . . . . . . . .
Uncoupling Semitrailer from Tractor . . . . . . . . . . . . . . . . . . . . . . . . . . . . . . . . .
Use of Dust Caps . . . . . . . . . . . . . . . . . . . . . . . . . . . . . . . . . . . . . . . . . . . . . . . .
Operating Manhole Fill Cover . . . . . . . . . . . . . . . . . . . . . . . . . . . . . . . . . . . . . . .
Bonding and Grounding Procedures . . . . . . . . . . . . . . . . . . . . . . . . . . . . . . . . . .
General Fuel Handling Requirements . . . . . . . . . . . . . . . . . . . . . . . . . . . . . . . . .
Bottom Loading (Preferred Method) . . . . . . . . . . . . . . . . . . . . . . . . . . . . . . . . .
Top Loading (Alternate Method) . . . . . . . . . . . . . . . . . . . . . . . . . . . . . . . . . . . .
Unloading Fuel . . . . . . . . . . . . . . . . . . . . . . . . . . . . . . . . . . . . . . . . . . . . . . . . . . .
Removal and Installation of Grabhandle . . . . . . . . . . . . . . . . . . . . . . . . . . . . . . .
Use of Convoy Warning Light . . . . . . . . . . . . . . . . . . . . . . . . . . . . . . . . . . . . . . .
Page
Number
2-26
2-26
2-28
2-30
2-31
2-33
2-34
2-35
2-37
2-39
2-45
2-48
2-50
2-50
2-10. GENERAL.
a. This section contains instructions for safely operating the M1062 7500 Gallon Fuel Tank
Semitrailer under usual conditions. Unusual operating conditions are defined and described in Section
IV of this chapter.
b. DO NOT attempt to operate semitrailer without first reading and becoming familiar with
information found in Chapter 1, Section II and in Section I of this chapter,
C.
Read and follow all safety regulations found in Chapter 1, Section IV.
d. Perform all Before (B) PMCS, Table 2-1, before operating semitrailer.
2-11. USE OF CHOCK BLOCKS.
a. There are two chock blocks (1) that are stowed in brackets under fenders (see
paragraph 1-7).
b. To chock the semitrailer wheels, follow these instructions:
(1)
2-26
If semitrailer is parked on level
ground, and neither axle
needs to be raised, BOTH axles must be chocked. Place
one chock block (1) in front of
tire at one end of one axle.
Place other chock block in
back of tire at other end of
other axle.
TM 9-2330-384-14&P
2-11. USE OF CHOCK BLOCKS (Con’t).
(2)
If semitrailer is parked on level
ground, and one end of axle or
entire axle needs to be raised,
axle that remains on ground
must be chocked. Place one
chock block (1) in front of tire
at one end of axle. Place other
chock block in back of tire at
other end of axle.
(3) If semitrailer is parked on an
incline with front of semitrailer
facing uphill, place chock
blocks (1) in back of tires at
each end of one axle.
(4) If semitrailer is parked on an
incline with front of semitrailer
facing downhill, place chock
blocks (1) in front of tires at
each end of one axle.
2-27
TM 9-2330-384-14&P
2-12. COUPLING SEMITRAILER TO TRACTOR.
WARNING
All personnel must stand clear of semitrailer and tractor during coupling
operation. Failure to follow this warning may result in serious injury or death
to personnel.
NOTE
Use a ground guide to assist in coupling operation.
a. Remove chock blocks from stowage brackets and place firmly behind wheels (see
paragraph 2-11).
b. Aline tractor with semitrailer. Slowly
back up tractor, maintaining alinement of fifth
wheel coupler jaws (2) with kingpin (1). Stop
tractor before its fifth wheel plate contacts
pick-up plate of semitrailer. Recheck alinement.
c. Check that kingpin (1) is approximately equal to height of tractor approach
ramps (3). If kingpin needs to be raised, have
ground guide lower landing gear legs by unstowing handcrank and rotating it clockwise until proper height is reached.
d. Slowly back tractor until fifth wheel
coupler jaws (2) engage kingpin (1). Inch
forward and check that coupling is locked. If
coupling is not locked, rock back and forth until
kingpin locks. Visually check coupling. Daylight
should not be visible between fifth wheel and
kingpin.
2-28
TM 9-2330-384-14&P
2-12. COUPLING SEMITRAILER TO TRACTOR (Con't).
e. Remove dummy couplings (13)
from SERVICE and EMERGENCY air couplings
(5 and 7) at front of semitrailer. Hang removed
dummy couplings to storage brackets (4).
NOTE
SERVICE air couplings are blue,
EMERGENCY air couplings are red.
f. Connect tractor SERVICE air coupling (6) to semitrailer SERVICE air coupling
(5). Connect tractor EMERGENCY air coupling
(8) to semitrailer EMERGENCY air coupling (7).
WARNING
DO NOT plug both intervehicular electrical cables into semitrailer. Failure
to follow this warning may result in
damage to electrical system or form
sparks causing a fire or an explosion.
g. Plug tractor intervehicular electrical cable (10) into electrical connector on cover of
semitrailer voltage control unit (12). If tractor uses a 12-volt system, plug into 7-contact electric
connector (11). If tractor uses a 24-volt system, plug into 12-contact electrical connector (9).
h. Free handcrank (15) from stowage
clip. Rotate handcrank counterclockwise to
raise landing gear legs (16) to FULL height.
Stow handcrank to stowage clip.
i. If used, stow ground boards (14) in
stowage brackets.
j. Remove chock blocks and return
them to stowage brackets (see paragraph
2-11).
2-29
TM 9-2330-384-14&P
2-12. COUPLING SEMITRAILER TO TRACTOR (Con't).
k. Pull air reservoir draincock cable (17) and allow all moisture to spray or drain from air
reservoirs.
l. Inside tractor, fully pressurize semitrailer air system (see TM 9-2320-273-10 or TM 92320-283-10).
m. Pull tractor forward and check operation of semitrailer brakes (see TM 9-2320-273-10 or
TM 9-2320-283-10).
NOTE
If semitrailer is connected to 24 V intervehicular electrical cable, turn signal/taillight operates also as stop/taillight. Stop/taillight will not operate.
n. Check operation of all lights (see TM 9-2320-273-10 or TM 9-2320-283-10).
2-13. TOWING SEMITRAILER.
a. DRIVING.
2-30
(1)
When driving tractor and semitrailer, overall length of unit must be kept in mind when
passing other vehicles and when turning.
(2)
Turning and backing operations will be affected because the semitrailer and tractor
are a hinged unit.
(3)
The semitrailer load will affect stopping and overall maneuverability. A partially loaded
semitrailer is more unstable than a fully loaded one. This is because fuel surge is more
pronounced with a partial load. Always drive semitrailer at safe speeds and make note
of any driving irregularities.
TM 9-2330-384-14&P
2-13. TOWING SEMITRAILER (Con't).
b. TURNING.
(1)
When turning corners, allow for semitrailer wheels to turn inside the turning radius of
tractor.
(2)
To make a right turn at an intersection, drive tractor halfway into intersection, then cut
sharply to right. This will allow for semitrailer shorter turning radius and will keep tires
off curb.
c. STOPPING.
(1)
For safe stopping, apply brakes gradually and smoothly.
(2)
During normal operation, apply brakes of tractor and semitrailer at the same time. On
steep grades or slippery surfaces, apply semitrailer brakes before tractor brakes. This
will help prevent semitrailer from jackknifing or swinging out of line of travel.
(3)
Keep brakes on full for a few moments after stopping in the event that braking sequence causes fuel surge inside semitrailer tank.
(4)
To ensure optimum braking capability, drain air reservoirs after every eight hours of
continuous operation (see paragraph 2-2).
d. PARKING. When tractor and semitrailer combination is to be parked, set parking/
emergency brakes to prevent vehicles from rolling. Place chock blocks in front or behind wheels, as
required (see paragraph 2-11).
e. BACKING.
(1)
Use a ground guide to ensure safe backing operations.
(2)
Adjust all tractor rearview mirrors before backing.
(3)
If semitrailer is to be backed to right, turn tractor steering wheel to left (counterclockwise). If semitrailer is to be backed to left, turn tractor steering wheel to right (clockwise).
(4)
When semitrailer has turned and backing in a straight line is required, turn tractor
wheels in direction semitrailer is moving. This will slowly bring tractor and semitrailer
into a straight line.
2-14. UNCOUPLING SEMITRAILER FROM TRACTOR.
WARNING
All personnel must stand clear of semitrailer and tractor during uncoupling
operation. Failure to follow this warning may result in serious injury or death
to personnel.
a. Set tractor and semitrailer brakes (see TM 9-2320-273-10 or TM 9-2320-283-10).
b. Remove chock blocks from stowage brackets and place firmly in front of wheels (see
paragraph 2-11).
2-31
TM 9-2330-384-14&P
2-14. UNCOUPLING SEMITRAILER FROM TRACTOR (Con't).
c. If in muddy, sandy, or snow covered
area, remove ground boards (1) from stowage
brackets and place on ground directly under
landing gear sand shoes (4).
d. To lower landing gear, disengage
handcrank (2) from clip on curbside landing
gear leg (3), pull out to obtain high speed position, and turn clockwise. After sand shoes (4)
contact ground or ground boards (1), push in
on handcrank to obtain slow speed position,
and turn a few more turns. Stow handcrank in
clip.
e. Unplug tractor intervehicular electrical cable (14) from electrical connector on cover of
semitrailer voltage control unit (13).
NOTE
Semitrailer parking/emergency brakes will automatically set when EMERGENCY air coupling (7) is disconnected.
f. Disconnect tractor SERVICE and EMERGENCY air couplings (5 and 7) from semitrailer
SERVICE and EMERGENCY air couplings (6 and 8). Remove dummy couplings (12) from storage
brackets (9) and install on semitrailer air couplings (6 and 8).
g. Pull outward on tractor’s primary release handle (11), then pull outward on secondary
release handle (10) until hook releases kingpin.
h. Slowly drive tractor away from semitrailer.
2-32
TM 9-2330-384-14&P
2-14. UNCOUPLING SEMITRAILER FROM TRACTOR (Con't).
2-15. USE OF DUST CAPS.
NOTE
Dust caps illustrated are transfer hose
dust caps. For location and illustration of front port and vapor collection
dust caps, refer to paragraph 2-19. All
dust caps are removed the same.
a. Dust caps (2) at piping assembly
front port, vapor collection adapter, and transfer hoses form a tight fit over fittings and protect against contamination or leakage.
b. Before a fitting can be used, remove dust cap (2) by pulling outward on ears
(1).
c. Always remember to latch dust cap
(2) in place after fitting is no longer in use. Push
inward on ears (1) to close dust cap.
2-33
TM 9-2330-384-14&P
2-16. OPERATING MANHOLE FILL COVER.
WARNING
l
Stand clear of fill cover (4) when opening manhole. Pressure buildup inside tank may
cause fill cover to fly open. Failure to follow this warning may result in serious injury or
death to personnel
l
Use caution when opening manhole primary latch (3). If there is pressure buildup inside
tank, it must first be relieved, then manhole primary latch slowly opened. Failure to
follow this warning may result in serious injury or death to personnel.
a. Remove dust cap (1) from vapor
collection adapter.
b. Pull vapor vent control lever in cabinet to open (see paragraph 2-2).
2-34
TM 9-2330-384-14&P
2-16. OPERATING MANHOLE FILL COVER (Con't).
c. Lift primary latch (3) slowly. Pull back on primary latch to release secondary latch on strongback (2). Lift up on strongback and open fill cover (4).
NOTE
Ensure that secondary latch on strongback (2) is engaged in primary
latch (3).
d. Close fill cover (4). Firmly press down to engage secondary latch on strongback (2) in
tongue of primary latch (3). Listen for a snapping sound. Close primary latch.
e. Push vapor vent control lever in cabinet to close (see paragraph 2-2). Install dust cap (1) at
vapor collection adapter.
2-17. BONDING AND GROUNDING PROCEDURES.
a. GENERAL INFORMATION.
(1)
Static electricity is created whenever fuel is handled. Static electricity can also be
created when maintenance is performed on semitrailer. You cannot prevent static
electricity.
(2)
Static electricity becomes a danger when it builds into a charge that may form a spark.
You can prevent sparks by following proper bonding and grounding procedures.
(3)
Bonding is an electrical connection between metallic units, for instance the semitrailer
and a fuel terminal facility. Bonding equalizes any static potential that might exist between units.
(4)
Grounding is an electrical connection between one or both of the bonded units and
ground. Grounding effectively discharges into the earth any static potential that might
exist or that might be generated.
(5)
If two or more units are bonded and one is grounded, the whole system is effectively
grounded.
2-35
TM 9-2330-384-14&P
2-17. BONDING AND GROUNDING PROCEDURES (Con't).
b. SPECIFIC PROCEDURES.
WARNING
Connect bonding and grounding connection before beginning any fuel handling operation or performing any maintenance on semitrailer. Maintain
bonding and grounding connection until after all fuel handling or maintenance is completed. DO NOT connect semitrailer grounding cable (4) to
semitrailer grounding stud (3). Connections must be made to clean, unpainted surfaces. An unbonded and ungrounded or improperly bonded and
grounded semitrailer could produce a spark. The resulting explosion will
cause serious injury or death to personnel.
NOTE
Illustration shows typical grounding procedure. For location of all
semitrailer grounding studs (3), refer to paragraph 1-7.
2-36
(1)
If at a facility (1) that has a grounding cable (2), connect facility’s grounding cable to
one of semitrailer grounding studs (3).
(2)
If at a facility (1) that has no grounding cable (2), or if in the field, open cabinet,
unwind semitrailer’s grounding cable (4) from reel, and firmly attach alligator end
clamp to ground rod (5).
TM 9-2330-384-14&P
2-17. BONDING AND GROUNDING PROCEDURES (Con't).
(3) If semitrailer's portable ground rod is used, remove from roadside stowage tube.
Drive portable ground rod well into ground (see FM 10-68).
WARNING
Walk grounding cables (4) back to reels when stowing grounding cables.
DO NOT let go of grounding cables until they are fully wound onto reels.
Failure to follow this warning may result In serious Injury to personnel.
(4) Maintain bonding and grounding connection until after all fuel handling or maintenance
is completed. Then disconnect connection. Stow semitrailer's grounding cable (4)
and portable ground rod (5), if used.
2-18. GENERAL FUEL HANDLING REQUIREMENTS.
WARNING
0 Follow all fuel handling procedures precisely to prevent serious Injury or death to personnel.
9 DO NOTsmoke while loading or unloading fuel, when handling fuel containers, or when
located within 50 ft. (15.3 m) of fueling or fuel storage areas. Failure to follow this warnIng may cause a fire and explosion, resulting In serious injury or death to personnel.
a. Refer to FM 10-20, FM 10-68, FM 10-69, and FM 10-71 to become familiar with safe fuel
handling procedures.
WARNING
DO NOT mix Incompatible fuels In tank. Dangerous fumes and explosion
may result. Know what fuel was previously carried so that preventive measures may be taken to ensure that harmful or explosive fumes are not released. Failure to follow this warning may result In serious Injury or death to
personnel.
b. If fuel to be loaded is not the same fuel as previously carried, refer toTable 8-1 in FM 10-71.
c. Personnel engaged in fuel handling must not wear wool, nylon, silk, rayon, or other clothing
that generates static electricity. Wear clean cotton clothing with no metal zippers, Remove all contents
from pockets. Wear rubber boots and gloves to keep fuel off skin. Use cotton cloths for cleaning
purposes. Before climbing onto semitrailer, grasp static ground wire to discharge all static from body.
d. Keep tractor and semitrailer coupled during fuel handling operations to ensure that vehicles
can be moved quickly in an emergency.
e. Ensure that cabinet door remains open during all fuel handling operations.
e.1. Ensure that hazardous materials placards reflect proper grade of fuel being carried.
Change1
2-37
TM 9-2330-384-14&P
2-18. GENERAL FUEL HANDLING REQUIREMENTS (Con't).
WARNING
Operator must be siert at all times for leaking or malfunctioning equipment.
IMMEDIATELY stop all fuel handling operations at first sign of leaks or malfunctions. Corrective action must be performed by qualified
personnel
before
resuming
any
operations.
f.
IMMEDIATELY stop all fuel handling operations at first sign of leaks or malfunctions.
g.
IN CASE OF AN EMERGENCY, to stop fuel flow, close emergency valve by:
(1)
pushing emergency valve control lover in cabinet, or
(2) pulling remote trip-release
at front roadside of tank, or
(3) pulling remote trip-release ahead of manhole, or
(4) closing cabinet door.
For location of these components refer to paragraph 2-2.
h. When loading fuel, bottom load whenever possible. Top load only when bottom loading is
not possible. Top loading causes more static electricity and vapors than bottom loading and the chance
of a fire is greater. Top loading pollutes the environment because the vapor collection system is not
used.
i. IMMEDIATELY wipe up fuel spills with cotton waste material and dispose of In closed metal
containers.
j.
IMMEDIATELY wash with soap and water if you got fuel on your skin.
k.
To remove fuel-soaked
clothes follow these steps:
(1) First wet your clothes with water.
(2) If water is not available, temporarily ground yourself by holding a place of grounded
equipment with your hands.
(3) Remove your hands from grounded equipment and take off your clothes. This grounding action removes danger of a static spark igniting your clothes.
I. Man all discharge nozzles and loading arms to avoid fuel spillage. DO NOT exceed
loading/unloading rates (see paragraph 1-11).
m. Two 14 ft. (4.3 m) long transfer hoses stowed in curbside stowage tube may be used as
required when added hose length is needed during fuel loading or unloading (see paragraph 1-7,
Curbside View).
n. When fuel is to be loaded into a source which cannot accept higher fuel flow rates afforded
by a 4 in. hose, use either 4-3 In. (10.2-7.6 mm) reducer stowed in cabinet, as needed.
o. If fire extinguishers are discharged for any reason, have qualified personnel recharge them
before next mission. The semitrailer is not mission-ready with missing or discharged fire extinguishers.
p. When bottom loading or unloading, connect fuel terminal facility's vapor collection hose to
semitrailer vapor collection system.
2-38
TM 9-2330-384-14&P
2-18. GENERALFUEL HANDLINGREQUIREMENTS(Con't).
q. When bottom or top loading, keep emergency valve CLOSED.
r.
When bottom loading or unloading, keep vapor vent OPEN.
s. When bottom loading, activate the precheck cycle to check for proper operation of automatic
shut-off (jet level sensor) circuit (see paragraph 2-19).
t. If a malfunction in automatic shut-off (jet level sensor) circuit causes semitrailer to not bottom
load, automatic shut-off circuit can be bypassed and semitrailer manually bottom loaded by:
(1) pulling emergency valve control lever to open emergency valve (see paragraph 2-2), and
(2) positioning observer at manhole opening to alert fuel handler when tank is to capacity.
When mission is complete, notify unit maintenance to troubleshoot the malfunction.
u. Make sure hazardous materials placards reflect the grade of the fuel being hauled in the
semitrailer.
2-19.
BOTTOM LOADING (PREFERRED METHOD).
a. TO BOTTOM
LOAD AT REAR INLET.
WARNING
DO NOTsmoke while loading or unloading fuel, when handling fuel containers,
or when located within 50 ft. (15.3 m) of fueling or fuel storage areas. Failure
to follow this warning may cause a fire and explosion, resulting in serious
injury or death to personnel.
(1)
Shut down tractor engine and set tractor and semitrailer parking/emergency
TM 9-2320-273-10 or TM 9-2320-283-10).
brakes (see
(2) Remove fire extinguishers from mounting brackets and take to point of operation.
(3) Open cabinet door. Secure door in open position with door prop.
WARNING
Connect bonding and grounding connection before beginning any fuel handling
operation. Maintain bonding and grounding connection until after fuel handling
is completed. DO NOT connect semitrailer grounding cable to semitrailer
grounding stud. Connections must be made to clean, unpainted surfaces. An
unbonded or ungrounded or improperly bonded and grounded semitrailer
could produce a spark. The resulting explosion will cause serious injury or
death to personnel.
(4)
Connect bonding and grounding connection (see paragraph 2-17).
Change1
2-39
TM 9-2330-384-14&P
2-19. BOTTOMLOADING(PREFERREDMETHOD)(Con't).
(5) Remove dust cap (1) and connect fuel terminal facility's vapor collection hose to adapter
(2).
(6) Push down and rotate rear inlet cover (4) counterclockwise
facility's loading hose to rear inlet bayonet fitting (3).
to open. Connect fuel terminal
2
dill
3
4
WARNING
DO NOT open emergency valve when bottom loading. Automatic shut-off of
fuel flow, controlled byjet level sensor,will not function with emergency valve
open. Failure to follow this warning will result in uncontrolled fuel spillage and
danger of fire and explosion.
(7)
Pull vapor vent control lever
(6) in cabinet to open vent.
DO NOT pull emergency
valve control lever (5).
7
6
5
CAUTION
When bottom loading, pressure must be
controlled so as NOT to exceed 50 psi
(345 kPa) on pressure gage (7). Failure to
follow this caution may cause leaks in
bottom loading system.
(8)
Begin to load fuel.
8
2-40
Change1
TM 9-2330-384-14&P
2-19. BOTTOMLOADING(PREFERREDMETHOD)(Con't).
NOTE
When bottomloadinga new semitrailerfor the first time, or when bottom
loadingfor firsttime aftertank hasbeenpurged,performsteps9 through12
to bleed air from linesbetweenjet levelsensorand emergencyvalve. Fuel
cannotbe bottomloadedwithair in lines.
(9)
Place an empty gallon container on top
of rear axle under bleeder valve (9).
(10) At emergency valve (11), remove nut
(10) at bleeder valve (9).
9
10
(11) Wait until gallon container is 1/2 to 3/4
full and liquid flow from bleeder valve (9)
is a steady stream of fuel.
(12) Install nut (10) on bleedervalve (9). Fuel
flow into tank will begin.
(1).
11
NOTE
Precheck cycle should be activated once tank is bottom loading steadily.
Pressure gage (7) will read 5-15 psi (34-103 kPa).
(13) Turn handle of precheck valve (8) 1/4 turn counterclockwise to open valve and activate
precheck cycle.
NOTE
When emergency valve closes, a screeching sound may be heard. Pressure
gage (7) reading will rise to 35-50 psi (241-345 kPa).
(14) Jet level sensor is functioning properly if emergency valve closes within two minutes and
fuel flow into tank stops. If emergency valve does not close within two minutes, shut down
fuel flow and perform troubleshooting (see Table 3-1).
(15) To resume bottom loading, turn handle of precheck valve (8) 1/4 turn clockwise to
deactivate precheck cycle. If fuel flow into tank does not resume, shut down fuel flow and
perform troubleshooting (see Table 3-1).
(16) When loading is complete, shut down fuel supply and push vapor vent control lever (6) in
cabinet to close vent.
(17) Disconnect fuel terminal facility's vapor collection hose from adapter (2). Install dust cap
(18) Drain fuel from fuel terminal facility's loading hose, if necessary. Disconnect fuel terminal
facility's loading hose from rear inlet bayonet fitting (3).
(19) Install cover (4) on rear inlet bayonet fitting by pushing down and rotating clockwise.
Change1
2-41
TM 9-2330-384-14&P
2-19. BOTTOMLOADING(PREFERREDMETHOD)(Con't).
WARNING
Walkgroundingcablesback toreelswhenstowinggroundingcables.DONOT
let go of groundingcablesuntilthey are fully woundonto reels. Failureto
followthiswarningmayresultin seriousinjuryto personnel.
(20) Disconnectbondingand groundingconnection.Stow groundingcablesand groundrod
(paragraph 2-17), if used. Close cabinet door.
(21) Stow fire extinguishers.
b. TO BOTTOM
LOAD AT FRONT PORT.
WARNING
DO NOTsmoke while
loading or unloading fuel,when handling fuel containers,
or when located within 50 ft. (15.3 m) of fueling or fuel storage areas. Failure
to follow this warning may cause a fire and explosion, resulting in serious
injury or death to personnel.
(1)
Shut down tractor engine and set tractor and semitrailer parking/emergency
TM 9-2320-273-10 or TM 9-2320-283-10).
brakes (see
(2) Remove fire extinguishers from mounting brackets and take to point of operation.
(3) Open cabinet door. Secure door in open position with door prop.
WARNING
Connect bonding and grounding connection before beginning any fuel handling
operation. Maintain bonding and grounding connection until after all fuel
handling is completed. DO NOT connect semitrailer grounding cable to
semitrailer grounding stud. Connections must be made to clean, unpainted
surfaces. An unbonded and ungrounded or improperly bonded and grounded
semitrailer could cause a spark. The resulting explosion will cause serious
injury or death to personnel.
(4)
2-42
Connect bonding and grounding connection (see paragraph 2-17).
Change1
TM 9-2330-384-14&P
2-19. BOTTOMLOADING(PREFERREDMETHOD)(Con't).
(5) Remove dust cap (1) and connect fuel terminal facility's vapor collection hose to adapter
(2).
NOTE
Whenfuelingat commercialfacilities,usecommercialpressurefuel
adapterassembly(seeAppendixD,AdditionalAuthorizationList).
Remove dustcap (12) and connect pressure fuel adapter (it used) and fuel terminal facility's
loading hose to front port camlock fitting. If loading hose will not reach, connect transfer
hoses stowed in curbside stowage tubes, as required.
(6)
13
2
12
WARNING
DO NOT open emergency valve when bottom loading. Automatic shut-off of
fuel flow, controlled by jet level sensor, will not function with emergency valve
open. Failure to follow this warning will result in uncontrolled fuel spillage and
danger of fire and explosion.
6 7
5
(7) Pull vapor vent control lever (6)
in cabinet to open vent. DO
NOT pull emergency valve
control lever (5).
(8)
Turn butterfly valve (13) 1/4
turn counterclockwise to open.
CAUTION
When bottom loading, pressure must
be controlled so as NOT to exceed 50
psi (345 kPa) on pressure gage (7).
Failure to follow this caution may
cause leaks in bottom loading system.
(9)
Begin to load fuel.
Change1
2-43
TM 9-2330-384-14&P
2-19. BOTTOMLOADING(PREFERREDMETHOD)(Con't).
NOTE
when
bottom
When bottomloadinga new semitrailerfor the first time,or
loading
for the
first time
aftertankhasbeenpurged,
perform steps
10 through
13tobleedairfromthelinesbetween
jetlevelsensor
andemergency
valve.
Fuelcannotbebottom
loaded
withairinlines.
(10) Place an empty gallon container on top
of rear axle under bleeder valve (9).
(11) At emergency valve (11), remove nut
(10) at bleeder valve (9).
9
10
(12) Wait until gallon container is 1/2 to 3/4
full and liquid flow from bleeder valve (9)
is a steady stream of fuel.
(13) Install nut (10) on bleeder valve (9). Fuel
flow into tank will begin.
109
11
NOTE
Precheck cycle should be activated once tank is bottom loading steadily.
Pressure gage (7) will read 5-15 psi (34-103 kPa).
(14) Turn handle of precheck valve (8) 1/4 turn counterclockwise to open valve and activate
precheck cycle.
NOTE
When emergency valve closes, a
screeching sound may be heard.
Pressure gage (7) reading will rise to
35-50 psi (245-345 kPa).
6 7
(15) Jet level sensor is functioning
properly if emergency valve closes
within two minutes and fuel flow
into tank stops. If emergency valve
does not stop within two minutes,
shut down fuel flow and perform
troubleshooting (see Table 3-1).
(16) To resume bottom loading, turn
handle of precheck valve (8) 1/4
turn clockwise to deactivate
precheck cycle. Iffuel flow into tank
does not resume, shut down fuel
flow and perform troubleshooting
(see Table 3-1).
2-44
Change1
8
TM 9-2330-384-14&P
2-19. BOTTOMLOADING(PREFERREDMETHOD)(Con't).
(17) When loading is complete, turn butterfly valve (13) 1/4 turn clockwise to close. Shut off fuel
supply.
(18) Push vapor vent control lever (6) in cabinet to close vent.
(19) Disconnect fuel terminal facility vapor collection hose from adapter (2). Install dust cap (1).
(20) Drain any residual fuel from fuel terminal facility's loading hose. Drain transfer hoses if
transfer hoses were used.
(21) Disconnect fuel terminal facility loading hose and pressure fuel adapter, if adapter was
used, from front port camlock fitting. Install dust cap (12). Drain transfer hose, if transfer
hose was used. Stow transfer hose if used.
13
2
12
WARNING
Walk grounding cables backto reels when stowing grounding cables. DO NOT
let go of grounding cables until they are fully wound onto reels. Failure to
follow this warning may result in serious injury to personnel.
(22)
Disconnect bonding and grounding connection
cables and ground rod, if used.
(see paragraph 2-17).
Stow grounding
(23) Close cabinet door and stow fire extinguishers.
2-20. TOP LOADING (ALTERNATE METHOD).
WARNING
DO NOTsmoke while loading or unloading fuel, when handling fuel containers,
or when located within 50 ft. (15.3 m) of fueling or fuel storage areas. Failure
to follow this warning may cause a fire and explosion, resulting in serious
injury or death to personnel.
a. Shutdown tractor engine and set tractor and semitrailer parking/emergency brakes (see TM 92320-273-10 or TM 9-2320-283-10).
Change1
2-45
TM 9-2330-384-14&P
2-20. TOPLOADING (ALTERNATIVE
METHOD)(Con't).
b. Remove fire extinguishers from mounting brackets and take to point of operation.
c.
Open cabinet door. Secure door in open position with door prop.
WARNING
Connect bonding and grounding connection before beginning any fuel handling
operation. Maintain bonding and grounding connection until after all fuel
handling is completed. DO NOT connect semitrailer grounding cable to
semitrailer grounding stud. Connections must be made to clean, unpainted
surfaces. An unbonded and ungrounded or improperly bonded and grounded
semitrailer could produce a spark. The resulting explosion will cause injury
or death to personnel.
d.
Connect bonding and grounding connection (see paragraph 2-17).
e. If loading hose will not reach manhole (1), connect transfer hoses stowed in curbside stowage
tubes, as required.
2
3
2-46
TM 9-2330-384-14&P
2-20. TOP LOADING (ALTERNATE METHOD) (Con't).
WARNING
l
Grabhandles on top of semitrailer are dismountable. Ensure that they are securely
mounted before using them. Failure to follow this warning may result in serious injury to
personnel.
l
Use extreme caution when working or walking on top of semitrailer. Walkway can become slippery due to moisture or fuel spillage. Failure to follow this warning may result
in serious injury to personnel.
l
Use caution when opening manhole primary latch. If there is pressure buildup inside
tank, it must first be relieved, then manhole primary latch slowly opened. Failure to
follow this warning may result in serious injury to personnel.
l
Stand clear of fill cover (4) when opening manhole (1). Pressure buildup inside tank may
cause fill cover to fly open. Failure to follow this warning may result in serious injury or
death to personnel.
f.
Open fill cover (4) on manhole (1) (see paragraph 2-16).
NOTE
To reduce vapors and static electricity, loading/transfer hose should be
placed as close to bottom of tank as possible.
g. Lower loading hose or transfer hose through fill opening and place as close to bottom of
tank as possible. Be careful not to damage jet level sensor.
WARNING
l
DO NOT breathe fuel fumes. They are toxic and can cause serious medical problems.
Failure to follow this warning may result in serious injury or death to personnel.
l
Give IMMEDIATE medical attention to personnel exposed to hydrocarbon or toxic vapors. Signs of distress are weakness, nausea, coughing or intoxication, nosebleed or
cramps, or other unusual symptoms. Qualified personnel able to administer artificial
respiration and simple first aid must be present.
h. Load fuel. While loading, watch disk (2) on gage marker rod (3) to determine fuel level in
tank. DO NOT overfill.
i. When loading is complete, close and latch fill cover (4) on manhole (1) (see
paragraph 2-16).
j.
Drain and disconnect loading hose and transfer hoses, if used. Stow transfer hoses if used.
WARNING
Walk grounding cables back to reels when stowing grounding cables. DO
NOT let go of grounding cables until they are fully wound onto reels. Failure
to follow this warning may result in serious injury to personnel.
k. Disconnect bonding and grounding connection. Stow grounding cables and semitrailer
ground rod, if used.
2-47
TM 9-2330-384-14&P
2-20. TOP LOADING (ALTERNATE METHOD) (Con't).
I.
Close cabinet door.
m. Stow fire extinguishers.
2-21. UNLOADING FUEL.
WARNING
DO NOT smoke while loading or unloading fuel, when handling fuel containers, or when located within 50 ft. (15.3 m) of fueling or fuel storage areas.
Failure to follow this warning may cause a fire and explosion, resulting in
serious injury or death to personnel.
a. Shut down tractor engine and set tractor and semitrailer parking/emergency brakes (see
TM 9-2320-273-10 or TM 9-2320-283-10).
b. Remove fire extinguishers from mounting brackets and take to point of operation.
c. Open cabinet door. Secure door in open position with door prop.
WARNING
Connect bonding and grounding connection before beginning any fuel handling operation. Maintain bonding and grounding connection until after all
fuel handling is completed. DO NOT connect semitrailer grounding cable to
semitrailer grounding stud. Connections must be made to clean, unpainted
surfaces. An unbonded and ungrounded or improperly bonded and
grounded semitrailer could produce a spark. The resulting explosion will
cause serious injury or death to personnel.
d. Connect bonding and grounding connection (see paragraph 2-17).
e.
Remove dust cap (1) and connect fuel terminal facility vapor collection hose to adapter (2).
f. If discharge hose does not reach facility which is receiving fuel, connect transfer hoses
stowed in curbside stowage tube, as needed. Remove dust cap (3) from front port. Connect discharge
hose from source receiving fuel to front port camlock fitting.
2-48
TM 9-2330-384-14&P
2-21. UNLOADING FUEL (Con't).
g. Pull vapor vent control lever (6) in
cabinet to open vapor vent.
h. Pull emergency valve control lever
(5) in cabinet to open emergency valve.
i. Turn butterfly valve (4) ¼ turn counterclockwise to open. Unload fuel.
j. When unloading is complete, push
emergency valve control lever (5) in cabinet to
close emergency valve.
k. Push vapor vent control lever (6) in
cabinet to close.
I. Drain discharge hose and transfer
hoses, if used. Turn butterfly valve (4) ¼ turn
clockwise to close.
m. Disconnect discharge hose from
front port camlock fitting. If used, disconnect
transfer hoses and stow. Install dust cap (3) to
front port.
n. Disconnect fuel terminal facility vapor collection hose from adapter (2). Install
dust cap (1).
WARNING
Walk grounding cables back to reels when stowing grounding cables. DO
NOT let go of grounding cables until they are fully wound onto reels. Failure
to follow this warning may result in serious injury to personnel.
o. Disconnect bonding and grounding connection. Stow grounding cables and semitrailer
round rod, if used.
p. Close cabinet door.
q. Stow fire extinguishers.
2-49
TM 9-2330-384-14&P
2-22. REMOVAL AND INSTALLATION OF GRABHANDLE.
a. REMOVAL.
(1)
Remove two lockpins (2) from
holes in two mounting brackets (3) and grabhandle (1).
(2) Remove grabhandle (1).
b. INSTALLATION.
(1) Slide grabhandle (1) inside
two mounting brackets (3).
(2) Aline holes and install two
lockpins (2).
2-23. USE OF CONVOY WARNING LIGHT.
a.
INSTALLATION.
WARNING
• Grabhandles on top of semitrailer are dismountable. Ensure that they are securely
mounted before using them. Failure to follow this warning may result in serious injury to
personnel.
• Use extreme caution when working or walking on top of semitrailer. Walkway can become slippery due to moisture or fuel spillage. Failure to follow this warning may result
in serious injury to personnel.
2-50
(1)
Unstow lockpin (8) by removing from holes in mounting bracket (9).
(2)
Slide holder tube of convoy warning light (1) into mounting bracket (9). Rotate convoy
warning light so that cable (2) can reach receptacle (7) with cable routed to outside of
grabhandle (3). Aline holes in holder tube and mounting bracket, and install lockpin
(8).
(3)
Remove cap (6) from receptacle (7). Remove cap from cable plug (4).
(4)
Install cable plug (4) into receptacle (7) alining cable plug with slot in receptacle.
Tighten ring (5) to secure connection.
(5)
Install cap of cable plug (4) into cap (6) of receptacle (7) to help keep cap threads
clean.
(6)
Turn on convoy warning light toggle switch (see paragraph 2-2).
TM 9-2330-384-14&P
2-23. USE OF CONVOY WARNING LIGHT (Con’t).
b. REMOVAL.
(1)
Turn off convoy warning light toggle switch (see paragraph 2-2).
WARNING
• Grabhandles on top of semitrailer are dismountable. Ensure that they are securely
mounted before using them. Failure to follow this warning may result in serious injury to
personnel.
• Use extreme caution when working or walking on top of semitrailer. Walkway can become slippery due to moisture or fuel spillage. Failure to follow this warning may result
in serious injury to personnel.
(2)
Remove cap of cable plug (4) from cap (6) of receptacle (7).
(3)
Untighten ring (5). Remove cable plug (4) from receptacle (7).
(4)
Install cap on cable plug (4). Install cap (6) on receptacle (7).
(5)
Remove lockpin (8) from mounting bracket (9) and holder tube of convoy warning
light (1).
(6)
Remove convoy warning light (1) from mounting bracket (9).
(7)
Stow lockpin (8) by installing through holes in mounting bracket (9).
2-51
TM 9-2330-384-14&P
Section IV. OPERATION UNDER UNUSUAL CONDITIONS
Paragraph
Number
2-24
2-25
2-26
2-27
2-28
2-29
Title
General . . . . . . . . . . . . . . . . . . . . . . . . . . . . . . . . . . . . . . . . . . . . . . . . . . . . . . . . .
Operation in Extreme Cold or Snow . . . . . . . . . . . . . . . . . . . . . . . . . . . . . . . . . .
Operation in Extreme Heat . . . . . . . . . . . . . . . . . . . . . . . . . . . . . . . . . . . . . . . . .
Operation in Dusty or Sandy Areas . . . . . . . . . . . . . . . . . . . . . . . . . . . . . . . . . .
Operation in Areas of High Humidity, Heavy Rain, and Saltwater . . . . . . . . . .
Fording Operations . . . . . . . . . . . . . . . . . . . . . . . . . . . . . . . . . . . . . . . . . . . . . . .
Page
Number
2-52
2-52
2-53
2-53
2-53
2-53
2-24. GENERAL.
a. This section contains instructions for safely operating the M1062 7500 Gallon Fuel Tank
Semitrailer under unusual conditions. In addition to normal preventive maintenance service, special
care must be taken to keep the semitrailer mission capable in extremes of temperature and humidity.
b.
For information on special driving instructions under unusual conditions, refer to FM 21-305.
c. For information on operation in cold weather, refer to FM 9-207.
d.
For information on operation in extreme heat or dusty, sandy conditions, refer to FM 90-3.
2-25. OPERATION IN EXTREME COLD OR SNOW.
WARNING
Extreme cold is hazardous to personnel. Avoid prolonged exposure to cold
weather and wear protective clothing and gloves. Avoid touching metal surfaces with bare skin. Pay attention to first signs of frostbite. If exposed skin
comes in contact with fuel, frostbite can occur suddenly. If frostbite occurs, immediately seek medical assistance.
a. Personnel operating or maintaining semitrailer in extreme cold or snow must be aware at all
times of dangers of frostbite.
b. Generally, operation in extreme cold causes lubricants to thicken or freeze and various
semitrailer components to become hard and brittle, and therefore easily damaged or broken. Cold
weather also causes electrical short circuits. The operator must be alert to effects of extreme cold on
semitrailer.
c. When halted or parked, clean ice, snow, or mud from underneath semitrailer and from
hoses, lines, tubes, and electrical connections.
d. Keep tires inflated to 95 psi (655 kPa).
e. When halted for short shutdown periods, park semitrailer in a sheltered spot out of wind. If
shelter is not available, park semitrailer with its rear facing into wind.
f. When halted for long shutdown periods, if high and dry ground is not available, prepare a
footing of planks or brush.
2-52
TM 9-2330-384-14&P
2-25. OPERATION IN EXTREME COLD OR SNOW (Con't).
g. Be cautious when placing semitrailer in motion after a shutdown. Thickened lubricants may
cause failure of components. Free frozen brake shoes, or tires frozen to ground, with care.
2-26. OPERATION IN EXTREME HEAT.
a. If possible, park semitrailer under cover to protect it from sun, sand, and dust.
CAUTION
DO NOT use gasoline or dry cleaning solvent to remove oil or grease spots
from tarpaulin. Use only water and a scrubbing brush. Failure to follow this
caution will damage tarpaulin.
b. Cover inactive semitrailer with tarpaulins if no other shelter is available. Tarpaulins are
subject to deterioration from mildew or attacks by insects or animals. Weekly, shake out and air
tarpaulins for several hours. Clean mildewed tarpaulin with a dry scrubbing brush. DO NOT clean with
water until mildew is removed. If mildew is found, examine tarpaulin to determine if it is rotted or
weakened. Replace tarpaulin, if damaged. If not damaged, treat tarpaulin as outlined in FM 10-16.
c. Semitrailers, inactive for long periods in hot and humid weather, are subject to rusting and
accumulation of fungi growth. Frequently inspect, clean, and lubricate to prevent deterioration.
2-27. OPERATION IN DUSTY OR SANDY AREAS.
a. When uncoupling semitrailer in sandy areas, use ground boards placed under sand shoes to
prevent landing gear from sinking.
b. Frequently inspect, clean, and lubricate to prevent damage to semitrailer components due
to contamination from sand (see Chapter 3, Section I).
2-28. OPERATION IN AREAS OF HIGH HUMIDITY, HEAVY RAIN, AND SALTWATER.
a. When uncoupling semitrailer in muddy areas, use ground boards placed under sand shoes
to prevent landing gear from sinking.
b. Dampness increases chances of corrosion. Inspect all surfaces and electrical connections
for signs of corrosion. Remove any signs of corrosion. Apply corrosion preventive compound (Item 7,
Appendix E) to all electrical connections.
c. Wash semitrailer thoroughly with clear water if it comes in contact with saltwater.
2-29. FORDING OPERATIONS.
a. Semitrailer is capable of saltwater or fresh-water fording to a depth of 20 in. (50.8 cm)
without any special servicing or protection required before fording.
b. After saltwater fording, wash semitrailer with clear water to guard against salt deposits
forming on surfaces and causing corrosion.
2-53/(2-54 Blank)
TM 9-2330-384-14&P
CHAPTER3
OPERATOR MAINTENANCE
Section 1. LUBRICATION
Paragraph
Number
Title
General ...............................................................................................................
Specific Lubrication Instructions ..........................................................................
3-1
3-2
3-1.
INSTRUCTIONS
Page
Number
3-1
3-1
GENERAL.
NOTE
These lubrication Instructions are MANDATORY.
a. The M1062 7500 Gallon FuelTank Semitrailer must receive lubrication with approved lubricants
at recommended intervals in order to be mission ready at all times.
b. The KEY lists lubricants to be used in all temperature ranges. Tabular listings show all lubrication
points, name the item to be lubricated, the required lubricant, the recommended interval, and the estimated
man-hours needed to perform the service. Notes at the end of the tabular listing provide specific lubrication
instructions.
c.
Broken arrow shafts
indicate lubrication points on both sides of the semitrailer.
d. Level of maintenance authorized to perform lubrication is indicated in parentheses on last line of
ITEM NAME entry.
e. Recommended intervals are based on normal conditions of operation, temperature, and
humidity. When operating under extreme conditions, lubricants should always be changed more frequently.
When in doubt, notify your supervisor.
3-2.
SPECIFIC LUBRICATION
INSTRUCTIONS.
a. Maintain a record of lubrication performed and report any problems noted during lubrication.
Refer to DA Pam 738-750 for maintenance forms and procedures to record and report any findings.
3-1
TM 9-2330-384-14&P
3-2.
SPECIFICLUBRICATIONINSTRUCTIONS(Cont'd).
WARNING
DrycleaningsolventP-D-680istoxicandflammable.Alwayswearprotective
goggles,faceshield,andglovesand useonlyina well-ventilatedarea. Avoid
contactwithskin,eyes,andclothesandDONOTbreathevapors. DO NOTuse
nearopenflameor excessiveheat. The solvent'sflash pointis 100*F-138*F
(38*C-59*C).If you becomedizzywhileusingcleaningsolvent,immediately
getfreshairandmedicalhelp.Ifsolventcontactseyes,immediately
washyour
eyeswithwaterand get medicalaid.
b. Use dry cleaning solvent (item 10, Appendix E) to clean grease fittings, lubrication points, and
surrounding areas before lubrication.
c. When lubricating at a grease fitting, apply enough grease to purge old grease from the lubricated
area. When old grease oozes from grease fitting, purging and relubrication are adequate.
WARNING
Wipe clean excessive lubricant in the area of brake shoe linings to avoid
grease soaking the linings. Replace grease soaked brake shoe linings. Failure
to follow this warning may cause brakes to malfunction, resulting in serious
injury or death to personnel.
d.
After lubrication, wipe clean excess oil or grease to prevent accumulation of foreign matter.
e.
Refer to FM 9-207 for instructions on lubrication in cold weather.
f.
lubricants.
After operation in dusty or sandy conditions, clean and inspect all points of lubrication for fouled
Change lubricants as required.
- KEY LUBRICANTS
OE/HDO-30
Oil, Lubricating, Engine
MIL-L-2104
GAA
Grease, Automotive and Artillery
MIL-G-10924
GO 80/90
Lubricating Oil, Gear, Multipurpose
MIL-L-2105
MAG-1
Grease, Ball and Roller Bearing
(73219) 18901
3-2
Change1
EXPECTED TEMPERATURES
+1 25*F (52C) to -25'F (-32'C)
INTERVALS
M = Monthly
ALLTEMPERATURES
(For Arctic Operation,
Refer to FM 9-207)
S = Semiannually
(every 6
months)
A = Annually
(every 12
months)
TM 9-2330-384-14&P
3-2.
SPECIFIC LUBRICATION INSTRUCTIONS (Cont'd).
INTERVAL*
LUBRICANT
M
GAA
UPPER COUPLER
ASSEMBLY
(See Note 1)
(0)
M
GAA
PICK-UP PLATE
(See Note 1)
(0)
A
GAA
LANDING GEAR:
GEARBOX & LEG
(2 grease fittings curbside,
1 grease
fitting
roadside)
(See Views A and B and
Note 2) (0)
INTERVAL
0
A
* LUBRICANT
GO 80/90
ITEM NAME
ITEM NAME
WHEEL BEARINGS
(Sea Note 3)
(0)
0
0
TOTAL MAN-HOURS
INTERVAL
M
A
MAN-HOUR
0.4
1.2
3-3
TM 9-2330-384-14&P
3-2.
SPECIFIC LUBRICATION INSTRUCTIONS (Cont'd).
INTERVAL * LUBRICANT
,.S
GAA
SLACK ADJUSTER
(2 grease fittings
per axle)
(0)
GAA
CAMSHAFT
(4 grease fittings
per axle)
(0)
00
S
INTERVALe
S
LUBRICANT
MAG-1
L
C
TOTAL MAN-HOURS
INTERVAL
S
3-4
Change1
ITEM NAME
MAN-HOUR
1.2
ITEM NAME
EMERGENCY VALVE/
VAPOR VENT CONTROL
CABLES
(1 grease fitting per
cable length)
(0)
TM 9-2330-384-14&P
LANDING
GEAR- CURBSIDE
LANDING
GEAR- ROADSIDE
GAA
GAA
NOTES:
1. PICK-UP PLATE, UPPER COUPLER
ASSEMBLY:
Wipesurfaces
clean,thenapplya
liberal coat of GAA.
2.
LANDING GEAR LEGS: Fully extend landing
gear legs and apply grease to lower portion.
Apply grease to all grease fittings.
3.
WHEEL BEARINGS: Place a suitable container
under hubcap. Remove hubcap and allow all
lubricating oil to drain. Install hubcap without
hubcapplug. Add 1 1/2 pintsof lubricatingoil or
until even with fill line on clear hubcap. Install
plug.
4.
OIL CAN POINTS: Semiannually, or as required, use
OE/HDO-30 to lubricate cabinet and stowage tube
door hinges, landing gear handcrank swivel, emergency valve and vapor vent control levers, two emergency valve remote trip-releases, vapor vent linkage,
and manhole fill cover hinge.
Change1
3-5
TM 9-2330-384-14&P
Section II. TROUBLESHOOTING PROCEDURES
Paragraph
Number
Page
Number
Title
3-3
General .........................................................
Troubleshooting Symptom Index ....................................
3-4
Table 3-1 Operator Troubleshooting Procedures ..............................
3-3.
3-6
3-7
3-8
GENERAL.
a. This section provides Information for identifying and correcting malfunctions which may
develop while operating the M1062 7500 Gallon Fuel Tank Semitrailer.
b. The troubleshooting symptom index in paragraph 3-4 lists common malfunctions which may
occur. The symptom index refers you to the proper page in Table 3-1 for a troubleshooting procedure.
c.
of the
item
Refer to Chapter1 Section
fitfor
a better
understanding
of
how
location
itemmentioned
of an in troubleshooting,
refer to
paragraph
1-7
is replaced.
d. Before performing
Chapter 1, Section IV.
troubleshooting,
a system
operates.
If
you
areunsure
or
to the
maintenance
taskwhere
the
read and follow all safety regulations found in
e. This section cannot list all malfunctions that may occur, nor all tests or inspections and
corrective actions. If a malfunction is not listed, or is not corrected by listed corrective actions, notify
unit maintenance.
f.
When troubleshooting
a malfunction:
(1) Locate symptom or symptoms in paragraph 3-4 that best describe malfunction.
(2) Turn to the page in Table 3-1 where the troubleshooting procedures for the malfunction in question are described. Headings at top of each page show how each
troubleshooting procedure is organized: MALFUNCTION, TEST OR INSPECTION (in
stop number order), and CORRECTIVE ACTION.
(3) Perform each stop in order listed until malfunction is corrected. DO NOT perform any
maintenance task unless the troubleshooting procedure tells you to do so.
3-6
TM 9-2330-384-14&P
3-4. TROUBLESHOOTING SYMPTOM INDEX.
Troubleshooting
Procedure
Page
BRAKES
Grabbing . . . . . . . . . . . . . . . . . . . . . . . . . . . . . . . . . . . . . . . . . . . . . . . . . . . . . . . .
None or Insufficient . . . . . . . . . . . . . . . . . . . . . . . . . . . . . . . . . . . . . . . . . . . . . . .
Slow Application or Release . . . . . . . . . . . . . . . . . . . . . . . . . . . . . . . . . . . . . . . .
Will Not Release . . . . . . . . . . . . . . . . . . . . . . . . . . . . . . . . . . . . . . . . . . . . . . . . . .
3-11
3-9
3-11
3-10
ELECTRICAL SYSTEM
Convoy Warning Light Does Not Operate . . . . . . . . . . . . . . . . . . . . . . . . . . . . .
Dim or Flickering Lights . . . . . . . . . . . . . . . . . . . . . . . . . . . . . . . . . . . . . . . . . . . .
Lamps Do Not Light:
All Lamps Fait . . . . . . . . . . . . . . . . . . . . . . . . . . . . . . . . . . . . . . . . . . . . . . . . .
One or More Lamps Fail . . . . . . . . . . . . . . . . . . . . . . . . . . . . . . . . . . . . . . . .
3-9
3-9
3-8
3-8
EMERGENCY VALVE
Cycles Open and Closed During Bottom Loading . . . . . . . . . . . . . . . . . . . . . . .
Does Not Open During Unloading . . . . . . . . . . . . . . . . . . . . . . . . . . . . . . . . . . . .
3-13
3-13
LANDING GEAR
Difficult, Binding, or Erratic Operation . . . . . . . . . . . . . . . . . . . . . . . . . . . . . . . .
3-12
PRECHECK SYSTEM
Emergency Valve Does Not:
Close Within Two Minutes of Start . . . . . . . . . . . . . . . . . . . . . . . . . . . . . . . .
Open After Precheck Cycle Completed . . . . . . . . . . . . . . . . . . . . . . . . . . . .
3-14
3-14
WHEELS AND TIRES
Dual Tires Rubbing . . . . . . . . . . . . . . . . . . . . . . . . . . . . . . . . . . . . . . . . . . . . . . . .
Noisy or Wobbly Tire and Rim Assemblies . . . . . . . . . . . . . . . . . . . . . . . . . . . .
Semitrailer Leans to One Side . . . . . . . . . . . . . . . . . . . . . . . . . . . . . . . . . . . . . .
Uneven Tire Wear . . . . . . . . . . . . . . . . . . . . . . . . . . . . . . . . . . . . . . . . . . . . . . . .
3-12
3-12
3-11
3-12
3-7
TM 9-2330-384-14&P
Table 3-1. Operator Troubleshooting Procedures.
MALFUNCTION
TEST OR INSPECTION
CORRECTIVE ACTION
ELECTRlCAL SYSTEM
1. ALL LAMPS FAIL TO LIGHT
Step 1.
Check that light switch in tractor is set to ON (see TM 9-2320-273-10 or
TM 9-2320-283-10).
Turn switch to ON position (see TM 9-2320-273-10 or TM 9-2320-283-10).
Step 2.
Check for tripped circuit breakers in tractor (see TM 9-2320-273-10 or
TM 9-2320-283-10).
Reset circuit breakers (see TM 9-2320-273-10 or TM 9-2320-283-10).
Step 3.
Check to see that tractor’s inter-vehicular electrical cable is securely connected to
correct electrical connector on voltage control unit at front of semitrailer (see paragraph 2-12).
Connect tractor’s intervehicular electrical cable securely to proper electrical
connector (see paragraph 2-12).
Step 4.
Check for damage to tractor’s intervehicular electrical cable (see
TM 9-2320-273-10 or TM 9-2320-283-10). Check for dirty or corroded pins on electrical connectors on voltage control unit (see paragraph 1-12).
Clean pins on semitrailer electrical connectors with a wire brush or clean rag
and apply corrosion preventive compound (Item 7, Appendix E). If damage to
tractor’s intervehicular electrical cable or electrical connectors on
semitrailer’s voltage control unit is found, notify unit maintenance.
2. ONE OR MORE LAMPS FAIL TO LIGHT
Step 1.
Check for tripped circuit breakers in tractor (see TM 9-2320-273-10 or
TM 9-2320-283-10).
Reset circuit breakers (see TM 9-2320-273-10 or TM 9-2320-283-10).
Step 2.
Check for damage to tractor’s intervehicular electrical cable (see TM 9-2320273-10 or TM 9-2320-283-10). Check for dirty or corroded pins on electrical connectors on voltage control unit (see paragraph 1-12).
Clean pins on semitrailer electrical connectors with a wire brush or clean rag
and apply corrosion preventive compound (Item 7, Appendix E) . If damage to
tractor’s intervehicular electrical cable or electrical connectors on
semitrailer’s voltage control unit is found, notify unit maintenance.
Step 3.
Trace electrical conduit between malfunctioning lamp and voltage control unit at
front of semitrailer (see paragraph 1-12). Check for breaks or other damage to
electrical conduit.
Notify unit maintenance if breaks or other damage is found.
3-8
TM 9-2330-384-14&P
Table 3-1. Operator Troubleshooting Procedures (Con't).
MALFUNCTION
TEST OR INSPECTION
CORRECTIVE ACTION
3.
CONVOY WARNING LIGHT DOES NOT OPERATE
Step 1.
Check that tractor’s 12-volt intervehicular electrical cable is connected to semitrailer’s 12-volt electrical connector (see paragraph 2-12). Convoy warning light does
not operate on 24 volts.
Connect tractor’s 12-volt intervehicular electrical cable to semitrailer’s 12-volt
electrical connector (see paragraph 2-12).
Step 2.
Check that convoy warning light toggle switch on front face of roadside light box is
turned on (see paragraph 2-2).
Turn on toggle switch (see paragraph 2-2).
Step 3.
Check that cable of convoy warning light is plugged into receptacle of condulet at
rear dam (see paragraph 2-23).
Plug cable of convoy warning light securely into receptacle of condulet at rear
dam (see paragraph 2-23).
Step 4.
4.
Perform all steps of Malfunction 2, “One or More Lamps Fail to Light”.
DIM OR FLICKERING LIGHTS
Step 1.
Check tractor battery for adequate charge (see TM 9-2320-273-10 or
TM 9-2320-283-10).
Have unit maintenance charge or replace tractor battery as required.
Step 2.
Check for damage to tractor’s intervehicular electrical cable (see
TM 9-2320-273-10 or TM 9-2320-283-10). Check for dirty or corroded pins on electrical connectors on voltage control unit (see paragraph 1-12).
Clean pins on semitrailer electrical connectors with a wire brush or clean rag
and apply corrosion preventive compound (Item 7, Appendix E). If damage to
tractor’s intervehicular electrical cable or electrical connectors on
semitrailer’s voltage control unit is found, notify unit maintenance.
BRAKES
5.
NO BRAKES OR INSUFFICIENT BRAKES
Step 1.
Check air pressure gage in tractor. It should read at least 65 psi (448 kPa) (see
TM 9-2320-273-10 or TM 9-2320-283-10).
If air pressure gage reads low, notify unit maintenance.
NOTE
SERVICE air coupling is blue.
Step 2.
Check that intervehicular SERVICE air coupling is properly connected (see paragraph 2-12).
Connect air coupling properly. Connect tractor’s SERVICE air coupling to
semitrailer’s SERVICE air coupling (see paragraph 2-12).
3-9
TM 9-2330-384-14&P
Table 3-1. Operator Troubleshooting Procedures (Con't).
MALFUNCTION
TEST OR INSPECTION
CORRECTIVE ACTION
Step 3.
Look under semitrailer and
check air lines for kinks,
breaks, or loose connections. Listen for leaks along
air lines, at connections, and
at valves (see paragraph
1-13).
If kinks, breaks, leaks,
or loose connections
are found, notify unit
maintenance.
Step 4.
Check air reservoir draincocks (1) for obstructions
which may prevent them
from closing.
Remove obstructions
from
air
reservoir
draincocks. If damage
is found, notify unit
maintenance.
6.
BRAKES WILL NOT RELEASE
Step 1.
Check that parking/emergency brakes in tractor are not set (see TM 9-2320-273-10
or TM 9-2320-283-10).
Release parking/emergency brakes in tractor (see TM 9-2320-273-10 or
TM 9-2320-283-10).
Step 2.
Check that tractor has developed sufficient air pressure to release semitrailer parking/emergency brakes. Air pressure should read at least 65 psi (448 kPa) (see
TM 9-2320-273-10 or TM 9-2320-283-10).
If air pressure gage in tractor shows insufficient air pressure, notify unit maintenance.
NOTE
EMERGENCY air coupling is red.
Step 3.
Check that intervehicular EMERGENCY air coupling is properly connected (see paragraph 2-12).
Connect air coupling properly. Connect tractor’s EMERGENCY air coupling to
semitrailer’s EMERGENCY air coupling (see paragraph 2-12).
3-10
TM 9-2330-384-14&P
Table 3-1. Operator Troubleshooting Procedures (Con't).
MALFUNCTION
TEST OR INSPECTION
CORRECTIVE ACTION
Step 4.
Check that brake interlock paddles at front port or rear inlet are not pushed in (see
Table 2-1, 13d).
Install front port dust cap with notch positioned so as not to push in on brake
interlock paddle (see Table 2-1, 3d).
Step 5.
Check for signs of damage to brake interlock valves at front port or rear inlet (see
paragraph 1-13).
If damage to brake interlock valves at front port or rear inlet is found, notify unit
maintenance.
Step 6.
Look under semitrailer and check air lines for kinks, breaks, or loose connections.
Listen for leaks along air lines, at connections, and at valves (see paragraph 1-13).
If kinks, breaks, leaks, or loose connections are found, notify unit maintenance.
7.
SLOW BRAKE APPLICATION OR RELEASE
Look under semitrailer and check air lines for kinks, breaks, or loose connections. Listen for
leaks along air lines, at connections, and at valves (see paragraph 1-13).
If kinks, breaks, leaks, or loose connections are found, notify unit maintenance.
8.
GRABBING BRAKES
Step 1.
Check that semitrailer’s air system is free of moisture.
Disconnect tractor SERVICE and EMERGENCY air couplings from semitrailer
(see paragraph 2-14). Pull on air reservoir draincock cable pull until all moisture is drained from air reservoirs (see paragraph 2-2). Connect tractor SERVICE and EMERGENCY air couplings to semitrailer (see paragraph 2-12). Fully
semitrailer
air
(see TM 9-2320-273-10 or
pressurize
system
TM 9-2320-283-10). Check brakes.
Step 2.
Look under semitrailer and visually inspect area of brake shoe linings. Be alert for
signs of oil or grease.
If any oil or grease is found, notify unit maintenance.
WHEELS AND TIRES
9.
SEMITRAILER LEANS TO ONE SIDE
Step 1.
Check for correct air pressure in all tires. Air pressure should be 95 psi (655 kPa),
Inflate tires to 95 psi (655 kPa).
3-11
TM 9-2330-384-14&P
Table 3-1. Operator Troubleshooting Procedures (Con't).
MALFUNCTION
TEST OR INSPECTION
CORRECTIVE ACTION
Step 2.
Look under semitrailer and check for a broken spring or other suspension component (see paragraph 1-14).
Report any damage to unit maintenance.
10. UNEVEN TIRE WEAR
Step 1.
Check for correct air pressure in all tires. Air pressure should be 95 psi (655 kPa).
Inflate tires to 95 psi (655 kPa).
Step 2.
Check for improper operator driving habits. High speed cornering causes wear on
edges of tires; rapid stopping causes wear in center of tire.
Correct driving habits as required.
Step 3.
Inspect wheel nuts and rim clamps for looseness (see Table 2-1, 3n and 7c).
If wheel nuts or rim clamps are loose, notify unit maintenance.
Step 4.
Check dual wheels to see that tires are matched (see paragraph l-l 1).
If tires are not matched, notify unit maintenance.
11. NOISY OR WOBBLY TIRE AND RIM ASSEMBLIES
Step 1.
Inspect tires for cuts, gouges, cracks, or other damage.
If any damage is found, notify unit maintenance.
Step 2.
Inspect wheel nuts and rim clamps for looseness (see Table 2-1, 3n and 7c),
If wheel nuts or rim clamps are loose, notify unit maintenance.
12. DUAL TIRES RUBBING
Check for proper tire and wheel size (see paragraph 1-11).
If tire and wheel are not proper size, notify unit maintenance.
LANDING GEAR
13. DIFFICULT, BINDING, OR ERRATIC OPERATION
Inspect landing gear gearbox on curbside leg for damage. Inspect legs for damage.
If damaged, notify unit maintenance.
3-12
TM 9-2330-384-14&P
Table 3-1. Troubleshooting Procedures (Con’t).
MALFUNCTION
TEST OR INSPECTION
CORRECTIVE ACTION
EMERGENCY VALVE AND PRECHECK SYSTEM
14. EMERGENCY VALVE DOES NOT OPEN DURING UNLOADING
Step 1.
From under semitrailer, trace control cable tubing between emergency valve and
cabinet (see paragraph 1-15). Check for damage to emergency valve control cable
and tubing that connects emergency valve and emergency valve control lever inside
cabinet (see paragraph 2-2). Check that union at tubing grease fitting, midway between cabinet and emergency valve, is connected.
If control cable and tubing are damaged, or if union is disconnected, notify unit
maintenance.
Step 2.
Check for damage to emergency valve control lever in cabinet or to two remote
trip-releases (top curbside and front roadside) (see paragraph 2-2).
If any damage to emergency valve control lever in cabinet or to remote trip-releases is found, notify unit maintenance.
15. EMERGENCY VALVE CYCLES OPEN AND CLOSED DURING BOTTOM LOADING
NOTE
If emergency valve is cycling open and closed, it will be making an on or off
screeching noise and tank will be filling slowly.
Step 1.
Check strainer assembly (3)
for obstruction. While fuel is
being bottom loaded, place
a suitable container under
strainer assembly. Remove
¼ in. (6.4 mm) center plug
(2) and allow force of fuel to
clear obstruction through
opening. Install plug.
If obstruction will not
clear, notify unit maintenance t o s e r v i c e
strainer assembly.
Step 2.
Check that air has been
properly bled from jet level
sensor lines (see paragraph 2-19).
Bleed air from jet level
sensor lines (see paragraph 2-19).
3-13
TM 9-2330-384-14&P
Table 3-1. Operator Troubleshooting Procedures (Con’t).
MALFUNCTION
TEST OR INSPECTION
CORRECTIVE ACTION
16. EMERGENCY VALVE DOES NOT CLOSE WITHIN TWO MINUTES OF START OF PRECHECK
CYCLE
Step 1.
While bottom loading, check pressure gage in cabinet for a low reading (see paragraph 2-19). If reading is less than 5-10 psi (34-69 kPa), fuel flow rate or pressure
generated by pump is too low; precheck system will not function.
Increase fuel flow rate or pressure generated by pump.
Step 2.
If malfunction persists, close precheck valve (see paragraph 2-2). Bottom load
manually with an observer stationed at manhole opening to gage fuel level (see
paragraph 2-18). Notify unit maintenance.
17. EMERGENCY VALVE DOES NOT OPEN TO ALLOW BOTTOM LOADING AFTER PRECHECK
CYCLE COMPLETED
Step 1.
Check that precheck valve is closed (see paragraph 2-2).
Close precheck valve (see paragraph 2-2).
NOTE
High pressure, high flow rates, low temperatures, or a combination of these
three factors, can cause emergency valve not to open again after precheck
valve has been closed. Performance of step 2 should correct the problem.
Step 2.
Shut down pumping operation for 10-15 seconds, then resume. DO NOT activate the
precheck cycle (see paragraph 2-19).
Emergency valve should open, allowing bottom loading to resume. If emergency valve does not open, notify unit maintenance.
3-14
TM 9-2330-384-14&P
CHAPTER 4
UNIT MAINTENANCE
Section I. REPAIR PARTS; SPECIAL TOOLS;
TEST, MEASUREMENT, AND DIAGNOSTIC EQUIPMENT (TMDE);
AND SUPPORT EQUIPMENT
Paragraph
Number
4-1
4-2
4-3
4-1.
Page
Number
Title
Common Tools and Equipment .....................................
Special Tools; Test, Measurement, and Diagnostic Equipment (TMDE);
and Support Equipment ..........................................
Repair Parts .....................................................
COMMON
TOOLS
4-1
4-1
AND EQUIPMENT.
For authorized common tools and equipment, refer to theModified
Table
Equipment (MTOE)applicable
to
your
unit.
4-2.
4-1
SPECIAL TOOLS; TEST, MEASUREMENT,
(TMDE); AND SUPPORT EQUIPMENT.
AND
of
Organization
and
DIAGNOSTIC
EQUIPMENT
For authorization of special tools, test, measurement, and diagnostic equipment (TMDE), and
support equipment required to maintain the M1062
TankSemitrailer
refer
Appendix
B, Mantenance
Allocation
Chart.
4-3.
REPAIR
PARTS.
Repair parts are listed and illustrated in Appendix F,Repair
Parts
and
Special
Tools
Lists.
4-1
TM 9-2330-384-14&P
Section II. SERVICEUPONRECEIPT
Paragraph
Number
4-4
4-5
4-6
4-4.
Title
General .................................................................................................................
Inspection Instructions ..........................................................................................
Servicing Instructions ............................................................................................
Page
Number
4-2
4-2
4-3
GENERAL.
When an M1062 7500 Gallon Fuel Tank Semitrailer is first received by the using unit, determine
whether it has been properly prepared for service and is in condition to perform its mission. Follow the
inspection instructions found in paragraph 4-5 and the servicing instructions found in paragraph 4-6.
4-5.
INSPECTION
INSTRUCTIONS.
WARNING
Dry cleaning solvent P-D-680 is toxic and flammable. Always wear protective
goggles, face shield, and gloves, and use only in a well-ventilated area. Avoid
contact with skin, eyes, and clothes and DO NOT breathe vapors. DO NOT use
near open flame or excessive heat. The solvent's flash point is 100*F-138*F
(38*C-59*C). If you become dizzy while using cleaning solvent, immediately
getfreshairand medical help. If solvent contacts eyes, immediately wash your
eyes with water and get medical aid.
a. Use dry cleaning solvent (item 10, Appendix E) to clean all exterior surfaces coated with rust
preventive compounds.
b. Remove any protective materials used on semitrailer during shipment. Unpack and properly stow
all Basic Issue Items (BII).
c. Perform Semiannual (S) preventive maintenance checks and services found in Table 4-1.
Correct any deficiency, if authorized by the Maintenance Allocation Chart (MAC) in Appendix B. If not
authorized, notify direct support maintenance.
WARNING
Grablhandles on top of semitrailer are dismountable. Be sure that they are
securely fastened before using them. Failure to follow this warning may result
in serious injury to personnel.
d. If semitrailer was shipped without grabhandles, unstow and install (see paragraph 2-22).
e. Make a complete visual inspection of the semitrailer to ensure that all accessories and required
publications are present.
4-2
Change1
TM 9-2330-384-14&P
4-6.
SERVICING INSTRUCTIONS.
a. If any system of the semitrailer does not operate properly, refer to troubleshooting
instructions found in Chapter3,Section
II or
in Section
IV of
thischapter.
b. Lubricate all lubrication points as described in Chapter 3, Section I, regardless of interval.
c. Schedule preventive maintenance services on DD Form 314, Preventive Maintenance
Schedule and Record.
d. Make a final, complete inspection of the semitrailer.
4-3
TM 9-2330-384-14&P
Section III. PREVENTIVEMAINTENANCECHECKS
AND SERVICES(PMCS)
Paragraph
Number
Page
Number
Title
General .................................................................................................................
4-7
4-8
Intervals ................................................................................................................
Reporting Repairs .................................................................................................
4-9
General PMCS Procedures ...................................................................................
4-10
Specific PMCS Procedures ...................................................................................
4-11
Table 4-1 Unit Preventive Maintenance Checks and Services (PMCS) ..............................
4-7.
4-4
4-4
4-4
4-4
4-5
4-6
GENERAL.
a. The M1062 7500 Gallon Fuel Tank Semitrailer must be inspected on a regular basis so that
defects are found before they result in serious damage, failure, or injury to personnel. This section contains
systematic instructions on inspections, adjustments, and corrections to be performed by unit maintenance.
b. Before performing PMCS, read and followthe safety regulations found in Chapter 1, Section IV,
General Safety Regulations.
4-8.
INTERVALS.
a.
Unit maintenance must perform PMCS, found in Table 4-1, at the following intervals:
(1) Monthly (M), once each month
(2) Semiannually (S), once every six months
(3) Annually (A), once each year.
b. Perform all Monthly and Semiannual
of annual inspections.
4-9.
REPORTING
inspections,
in addition to Annual inspections,
at the time
REPAIRS.
All defects shall be reported on DA Form 2404, Equipment Inspection and Maintenance Worksheet,
immediately after completing PMCS and before taking corrective action. These defects must also be reported
in the equipment log.
4-10.
GENERAL PMCS PROCEDURES.
a.
While performing PMCS procedures, always keep in mind CAUTIONs and WARNINGs.
b. While performing specific PMCS procedures, ensure that items are correctly assembled, secure,
serviceable, adequately lubricated, and not worn or leaking as defined below:
(1)
4-4
An item is CORRECTLY ASSEMBLED when it is in proper position and all parts are
present.
Change1
TM 9-2330-384-14&P
4-10. GENERALPMCS PROCEDURES(Con't)
(2) Wires, nuts, hoses, fittings, or attaching hardware are SECURE when they cannot be easily
removed by hand or by wrench.
(3) An item is SERVICEABLE if it is not worn beyond repair or likely to fail before the next
scheduled inspection.
LUBRICATED
if it hasbeenlubricated
in accordance
with
(4) An itemis ADEQUATELY
Chapter 3, Section I.
if
isto
theremuch
play
between
joining
parts, if
(5) AnitemisWORN
specifications
provided,
or
when
warning,
plates, or decals are not legible.
the item
does
not meetminimum
wear
caution, and data stencil markings,
(6) For a classification of LEAKING, see paragraph 2-9.
Perform inspections of welds, electrical conduits, tubing, and hoses as described below:
c.
(1) Check for loose or chipped paint, rust, or cracks where parts are welded together. If a bad
weld is found, notify direct support maintenance.
(2) Look for cracked, frayed, loose, or broken electrical conduit, tubing, and hoses. Tighten all
loose components. Repair or report unserviceable items.
(3) Check for loose or damaged couplings and fittings. Wet spots indicate leaks, but a stain
around a coupling or fitting can also mean a leak. If a leak comes from a loose coupling or
fitting, tighten it. Repair or report unserviceable items.
If
it
appearsin a
procedure,
fullyloosen
then tighten the item
to the given
torque.
d. Where the instructiontighten
no
torque
valve
is
given, refer
to
Appendix
H, torque
limits.
If one
of
an item's
fasteners
is found
to
be
loose,
is bestto
fully
loosen
all thefasteners,
then tighten
to the
propertorque.
e. Where the instruction clean appears in a procedure, use guidelines found in paragraph 2-8. Even
if a procedure does not specify cleaning, be aware of any buildup of dirt, grease, oil, and debris. Clean any
such buildups using cleaning agents authorized in Appendix E. Lubricate as required (see Chapter 3, Section
L)after cleaning.
4-11.
SPECIFIC PMCS PROCEDURES.
a. Unit PMCS are provided in Table 4-1. Always perform PMCS in the order listed. Once it becomes
b habit, anything that is not right can be spotted in a minute. If any defects are discovered through PMCS,
perform the appropriate troubleshooting task in Section IV of this chapter. If any component or system is not
serviceable, or if the given service does not correct the problem, notify direct support maintenance.
b.
The PMCS procedures in Table 4-1 are performed at three intervals:Monthly
Semiannually,
or Annually
or Annually. Before performing preventive maintenance, read all checks required for the
applicable interval and prepare tools needed to make all checks. Have several clean rags (Item
18, Appendix E) handy. Perform ALL inspections in the order listed within the designated
interval.
c.
The columns in PMCS table are defined as follows:
a logicalsequence
forPMCS
tobeperformed
andis usedasa source
(1) ItemNo. Provides
numberwhenrecordingPMCSresultson DAForm2404,Equipment
Inspection
and
Maintenance
Worksheet.
interval at
(2) Interval.Specifies
which
PMCS
is
tobeperformed.
Change1
4-5
TM 9-2330-384-14&P
4-11. SPECIFICPMCSPROCEDURES(Con't).
(3) ItemTo BeInspected. Listssystemandcommonnameof itemsthatare to be inspected.
(4) Procedures.Listsspecificservicing,inspection,replacement,or adjustmentproceduresto
be followed.
Table 4-1. Unit Preventive Maintenance Checks and Services (PMCS).
ITEM
NO.
M-Monthly
INERVAL ITEM TO BE
INSPECTED
MIT TA
S
1
S-Semiannually
A-Annually
PROCEDURES
STEAM
CLEANING
NOTE
Steam cleaning of semitrailer is performed to aid
in a careful SEMIANNUAL inspection.
Steam clean the exterior of semitrailer, including undercarriage.
2
OPERATIONAL
CHECK
NOTE
Perform operational check while coupled to tractor
(see paragraph 2-12).
Fully pressurize semitrailer air system (see TM 9 -2320-273-10 or
TM 9-2320-283-10). Apply a soap solution (Item 9, Appendix E) to
all couplings, air lines, fittings, air reservoirs, brake chambers, and
valves (see paragraph 4-39). Make note of any leaks, damage, or
loose connections found. Tighten loose connections or make repairs
as required (see paragraphs 4-38 through 4-44). If two or more
consecutive clips supporting air lines are damaged or missing,
purge semitrailer tank (see paragraph 4-68). Notify direct support
maintenance to make welding repairs to clips.
3
TANK AND
PIPING ASSEMBLY
a. Purge tank (see paragraph 4-68). Inspect tank interiorfor pitting,
scaling, or bad welds. If tank interior is damaged, notify direct
support maintenance.
b. Have direct support maintenance perform vapor integrity test
(see paragraph 5-8).
4-6
Change1
TM 9-2330-384-14&P
Table. UnitPreventiveMaintenanceChecksand Services(PMCS)Con't).
M-Monthly
ITEM -IN ERVAL ITEMTOBE
INSPECTED
NO. M S A
4
S-Semiannually
A-Annually
PROCEDURES
FRONTOF
SEMITRAILER
a. Inspectvoltagecontrolunit,electricalconnectors,
andwiringfor
damage, loose connections, corrosion, or dirt. Clean and tighten
components as required. If any component is damaged, replace
(see paragraphs 4-14 through 4-17, 4-29, and 4-30).
b. Check that electrical conduits coming into voltage control unit
are properly supported, are not damaged, and that connections are
not loose. Tighten any loose connections. If conduit is damaged,
replace (see paragraph 4-29).
c. Replace air coupling seals (see paragraph 4-38).
d. Inspect front roadside grounding stud for damage. It must be
unpainted, securely mounted, and clean. If grounding stud is
damaged, replace (see paragraph 4-64).
e. Inspect pick-up plate for loose mounting bolts, cracks, or other
damage. If loose, torque pick-up plate mounting bolts to 120 lb.-ft.
(163 N-m). If pick-up plate isdamaged, replace (see paragraph 4-51).
f. Inspect upper coupler assembly for loose mounting bolts,
cracks, bad welds, or a bowed condition. If loose, torque upper
coupler assembly mounting bolts to 120 lb.-ft. (163 N-m). If upper
coupler assembly is damaged, notify direct support maintenance.
5
ROADSIDE OF
SEMITRAILER
a. Inspect front port and butterfly valve and rear inlet for looseness
or damage. Be alert for signs of leaks. Tighten mounting screws if
loose. If any component is damaged, replace (see paragraph 4-80).
b. Inspect grounding stud at cabinet for damage. It must be
unpainted, securely mounted, and clean. If grounding stud is
damaged, replace (see paragraph 4-64).
c. Inspect ground rod tube assembly for looseness of mounting
hardware or damage. Tighten mounting hardware if loose.
d. Inspect cabinet and cabinet braces for looseness of mounting
hardware or damage. Tighten mounting bolts if loose. If cabinet is
damaged, notify direct support maintenance.
Change1
4-7
TM 9-2330-384-14&P
Table. Unit PreventiveMaintenanceChecksand Services(PMCS)Con't).
M-Monthly
ITEM INTERVAL ITEMTOBE
NO.
INSPECTED
M S A
--F TV
5
S-Semiannually
A-Annually
PROCEDURES
ROADSIDE OF
SEMITRAILER
(Con't)
CAUTION
Ensure that semitrailer tank is empty before
operating emergency valve and vapor vent control
levers.
NOTE
Emergency valve and vapor vent control levers
should offer resistance when pulled. This is normal.
e. Operate emergency valve and vapor vent control levers in
cabinet (see paragraph 2-2). Operation should be smooth and free
of binding. If operation is not smooth, trace cable and tubing
assembly and check for proper lubrication at union of tubing grease
fittings. Lubricate as required (see Chapter 3, Section I).
f. Check for breaks, kinks, or frays in emergency valve cable and
tubing assembly, or looseness of mounting hardware. Tighten
loose mounting hardware and/or replace damaged components as
required. Adjust length of cable at BOTH ends as required (see
paragraphs 4-74 and 4-76).
g. Inspect pressure gage and precheck valve in cabinet for
looseness or damage to mounting hardware or fittings. Turn handle
of precheck valve and check for smooth, free operation. If handle
turns with difficulty, precheck valve may have internal damage.
Check condition of all precheck tubing. Be alert for signs of leaks.
Tighten loose mounting hardware or fittings. Replace any damaged
component (see paragraph 4-72).
h. Check wheel bearing lubricant level at hubcaps. If level is below
fill mark, remove hubcap plug and add proper lubricant until even
with fill mark. Install plug (see Chapter 3, Section I).
i. Clean and inspect wheel bearings and replace wheel oil seals
(see paragraph 4-46).
4-8
Change1
TM 9-2330-384-14&P
Table. UnitPreventiveMaintenanceChecksand Services(PMCS)Con't).
M-Monthly
ITEM IN ERVAL ITEMTOBE
NO.
INSPECTED
M S A
5
S-Serniannually
A-Annually
PROCEDURES
ROADSIDE OF
SEMITRAILER
(Con't)
NOTE
If semitrailer is new, wheel nuttorque
should be
at
first
100, 500, and 1,000miles.Thereafter,
check
shouldbe
made
MONTHLY.
checked
j. Check torque of wheel nuts at each wheel. Wheel nuts should
be torqued to 250 lb.-ft. (339 N-m).
6
REAR OF
SEMITRAILER
Inspect grounding stud at roadside of bumper for damage. Itmust
be unpainted, securely mounted, and clean. If grounding stud is
damaged, replace (see paragraph 4-64).
7
UNDER
SEMITRAILER
a. Inspect brake linkage for damage or looseness of mounting
hardware. Tighten loose mounting hardware or replace
components as required (see paragraph 4-36, 4-37, and 4-40).
b. Inspect brake shoe linings for wear. If linings measure 1/4 in.
(6.35 mm) or less at their thinnest point, replace brake shoes (see
paragraph 4-35).
c. Adjust brakes and length of travel of brake chamber pushrod
(see paragraph 4-34).
d. With brakes adjusted, check for proper wheel bearing
adjustment. Adjust wheel bearings as required (see paragraph 447).
e. Inspect radius rods and equalizer for cracks, breaks, or
looseness of mounting hardware, Tighten loose mounting
hardware or replace components as required (see paragraphs 455 and 4-57).
f. Check springs for a cracked leaf and for looseness of rebound
bolts. Tighten rebound bolts if loose. If a cracked leaf is found,
replace springs on both roadside and curbside (see paragraph 456).
g. Check U-bolts for damage. Torque U-bolt nuts in a diagonal
sequence to 360 lb.-ft. (488 N-m).
Change1
4-9
TM 9-2330-384-14&P
Table. Unit PreventiveMaintenanceChecksandServices(PMCS)Con't).
M-Monthly
ITEM INTERVAL ITEMTOBE
INSPECTED
NO.
MSA
7
S-Semiannually
A-Annually
PROCEDURES
UNDER
SEMITRAILER
(Con't)
h. Inspectchassisforcracks,breaks,orbadwelds.Notifydirect
support maintenance of any damage found.
i. Inspect emergency valve for looseness of mounting bolts.
Inspect emergency valve or cable linkage for damage. Be alert for
signs of leaks. Tighten loose mounting bolts. If cable linkage is
damaged, replace (see paragraph 4-76). If emergency valve is
damaged, replace (see paragraph 4-82).
j. Inspect strainer assembly for looseness of mounting hardware
or damage. Be alert for signs of leaks. If strainer assembly is
damaged, replace (see paragraph 4-71).
k. Service strainer assembly (see paragraph 4-71).
8
TOP OF
SEMITRAILER
a. Open manhole fill cover (see paragraph 2-16). Inspect manhole
lid, fill cover gasket, and fill cover lid and latching mechanism for
damage. If any component is damaged, replace (see paragraph 467).
b. Inspect manhole fill cover vacuum and pressure/vacuum vents.
If gummed up, or if there are signs of obvious damage, replace (see
paragraph 4-67). Close manhole fill cover (see paragraph 2-16).
c. Inspect grounding studs at roadside and curbside overturn rail
for damage. They must be unpainted, securely mounted, and clean.
If grounding stud is damaged, replace (see paragraph 4-64).
d. Inspect nonskid surface of walkway. If nonskid surface is worn
off, use Deck Cover Compound (Item 6, Appendix E) to replace.
9
CURBSIDE OF
SEMITRAILER
a. Check wheel bearing lubricant level at hubcaps of front and rear
wheels. If level is below fill mark, remove hubcap plug and add
proper lubricant until even with fill mark. Install plug (see Chapter
3, Section I).
b. Clean and inspect wheel bearings and replace wheel oil seals
(see paragraph 4-46).
4-10
Change1
TM 9-2330-384-14&P
Table. Unit PreventiveMaintenanceChecksandServices(PMCS)Con't).
M-Monthly
ITEM INTERVAL ITEMTOBE
INSPECTED
NO. M S A
A-Annually
S-Semlannually
PROCEDURES
NOTE
If semitraileris new,wheelnuttorqueshouldbe
checkedatfirst100,500,and1,000
miles.Thereafter,
checkshouldbe madeMONTHLY.
c. Checktorqueofwheelnutsateachwheel.Wheelnutsshould
be torqued to 250 lb.-ft. (339 N-m).
d. Inspect hose and gage stick tube assembly for looseness of
mounting hardware or damage. Tighten mounting hardware if
loose.
e. Inspect grounding stud at spare tire carrier for damage. It must
be unpainted, securely mounted and clean. If grounding stud is
damaged, replace (see paragraph 4-64).
Change1
4-11
TM 9-2330-384-14&P
Section IV. TROUBLESHOOTING PROCEDURES
Paragraph
Number
Title
4-12
General .........................................................
4-13
Troubleshooting Symptom Index ....................................
Table 4-2 Unit Troubleshooting Procedures ...................................
4-12.
Page
Number
4-12
4-13
4-14
GENERAL.
a. This section provides information for identifying and correcting malfunctions which may
develop while operating the M1062 7500 Gallon Fuel Tank Semitrailer.
b. The troubleshooting symptom index in paragraph 4-13 lists common malfunctions which
may occur and refers you to the proper page in Table 4-2 for a troubleshooting procedure.
c. Refer to Chapter 1, Section III if unsure of how a system operates. If you are unsure of the
location of an item mentioned in troubleshooting, refer to paragraph 1-7 or to the maintenance task
where the item is replaced.
d. Before performing
Chapter 1, Section IV.
troubleshooting,
read and follow the safety regulations
found in
WARNING
When troubleshooting
an electrical malfunction, ALWAYS disconnect
Intervehicular electrical cable from semitrailer. Failure to follow this
warning may create a spark and explosion. resulting in serious Injury or
death to personnel.
e. When troubleshooting
cable from semitrailer.
an electrical malfunction, always disconnect Intervehicular electrical
f. Refer to paragraph 4-30 to determine routing of electrical wires and location of electrical
components.
g. This manual cannot list all malfunctions that may occur, nor all tests or inspections and
corrective actions. If a malfunction is not listed or is not corrected by listed corrective actions, notify
direct support maintenance.
h. When troubleshooting
a malfunction:
(1) Question the operator to obtain any information that might help determine the cause
of the problem. Before continuing, ensure that all applicable operator troubleshooting
was performed.
(2) Locate the symptom or symptoms in paragraph 4-13 that best describe the
malfunction. If the appropriate symptom is not listed. notify direct support
maintenance.
4-12
TM 9-2330-384-14&P
4-12. GENERAL (Con't).
(3) Turn to the page in Table 4-2 where the troubleshooting procedures for the
malfunction in question are described. Headings at the top of each page show how
each troubleshooting procedure is organized: MALFUNCTION, TEST OR INSPECTION
(in step number order), and CORRECTIVE ACTION.
(4)
Perform each step in the order listed until the malfunction is corrected. DO NOT
perform any maintenance task unless the troubleshooting procedure tells you to do
so.
4-13. TROUBLESHOOTING SYMPTOM INDEX.
Troubleshooting
Procedure
Page
BRAKES
Drag.. . . . . . . . . . . . . . . . . . . . . . . . . . . . . . . . . . . . . . . . . . . . . . . . . . . . . . . . . . .
Grab . . . . . . . . . . . . . . . . . . . . . . . . . . . . . . . . . . . . . . . . . . . . . . . . . . . . . . . . . . . .
Slow Application or Release . . . . . . . . . . . . . . . . . . . . . . . . . . . . . . . . . . . . . . . .
Will Not Release . . . . . . . . . . . . . . . . . . . . . . . . . . . . . . . . . . . . . . . . . . . . . . . . . .
4-23
4-23
4-24
4-23
ELECTRICAL SYSTEM
Lights:
All Lights on a Circuit Do Not Operate . . . . . . . . . . . . . . . . . . . . . . . . . . . . .
Convoy Warning Light Does Not Operate . . . . . . . . . . . . . . . . . . . . . . . . . . .
Flickers . . . . . . . . . . . . . . . . . . . . . . . . . . . . . . . . . . . . . . . . . . . . . . . . . . . . .
Single Light Does Not Operate . . . . . . . . . . . . . . . . . . . . . . . . . . . . . . . . . . .
4-17
4-20
4-20
4-14
EMERGENCY VALVE AND VAPOR VENT CABLE CONTROLS
Improper Operation . . . . . . . . . . . . . . . . . . . . . . . . . . . . . . . . . . . . . . . . . . . . . . .
4-27
EMERGENCY VALVE/JET LEVEL SENSOR
Bottom Loading :
No Flow . . . . . . . . . . . . . . . . . . . . . . . . . . . . . . . . . . . . . . . . . . . . . . . . . . . . . .
No Shutoff After Tank Is Full . . . . . . . . . . . . . . . . . . . . . . . . . . . . . . . . . . . . .
4-28
4-30
LANDING GEAR
Difficult Operation . . . . . . . . . . . . . . . . . . . . . . . . . . . . . . . . . . . . . . . . . . . . . . . . .
4-27
PRECHECK SYSTEM
Emergency Valve Does Not:
Close Within Two Minutes of Start . . . . . . . . . . . . . . . . . . . . . . . . . . . . . . . .
Open After Precheck Cycle Completed . . . . . . . . . . . . . . . . . . . . . . . . . . . .
4-30
4-32
SUSPENSION
Semitrailer Out of Alinement with Tractor (Dog Trailing) . . . . . . . . . . . . . . . . .
Improper Spring Action . . . . . . . . . . . . . . . . . . . . . . . . . . . . . . . . . . . . . . . . . . . .
Semitrailer Pulls Hard, Drags, Resists Roll . . . . . . . . . . . . . . . . . . . . . . . . . . . .
4-26
4-26
4-27
4-13
TM 9-2330-384-14&P
4-13. TROUBLESHOOTING SYMPTOM INDEX (Con't).
Troubleshooting
Procedure
Page
WHEELS AND TIRES
Dual Tires Rubbing . . . . . . . . . . . . . . . . . . . . . . . . . . . . . . . . . . . . . . . . . . . . . . . .
Loss of Air Pressure . . . . . . . . . . . . . . . . . . . . . . . . . . . . . . . . . . . . . . . . . . . . . .
Noisy . . . . . . . . . . . . . . . . . . . . . . . . . . . . . . . . . . . . . . . . . . . . . . . . . . . . . . . . . . .
Uneven Wear . . . . . . . . . . . . . . . . . . . . . . . . . . . . . . . . . . . . . . . . . . . . . . . . . . . .
Wobbly Tire and Rim Assemblies . . . . . . . . . . . . . . . . . . . . . . . . . . . . . . . . . . . .
4-26
4-25
4-24
4-25
4-24
Table 4-2. Unit Troubleshooting Procedures.
MALFUNCTION
TEST OR INSPECTION
CORRECTIVE ACTION
ELECTRICAL SYSTEM
1.
SINGLE LIGHT DOES NOT OPERATE
WARNING
When troubleshooting an electrical malfunction, ALWAYS disconnect
inter-vehicular cable from semitrailer. Failure to follow this warning may
create a spark and explosion, resulting in serious injury or death to
personnel.
NOTE
• Refer to paragraph 4-30 to determine routing of electrical wires and
location of electrical components.
• To ensure an accurate reading, probes of multimeter must contact bare
wire and unpainted metal surfaces.
Step 1.
Remove lamp from light socket (see paragraph 4-18). Check lamp
If there is no continuity, replace lamp (see paragraph 4-18).
Step 2.
Check continuity between ground side of light socket and frame. DO NOT remove
light housing while making this check (see paragraphs 4-20, 4-21, 4-24 through
4-26, or 4-28).
If there is continuity, go to step 3.
If there is no continuity, check light for damaged or corroded housing. Check
for loose or corroded screws mounting light to semitrailer. If screws are loose,
tighten. If any component is damaged or corroded, replace (see paragraphs
4-20, 4-21, 4-24 through 4-26, or 4-28).
4-14
TM 9-2330-384-14&P
Table 4-2. Unit Troubleshooting Procedures (Con't).
MALFUNCTION
TEST OR INSPECTION
CORRECTIVE ACTION
Step 3.
Visually check button contacts inside light socket for looseness, corrosion, or other
damage.
If button contacts are loose, corroded, or otherwise damaged, replace (see
paragraphs 4-20, 4-21, 4-24 through 4-26, or 4-28).
NOTE
• Use an extension wire, as required, long enough to reach between
connectors.
• Location of connectors will vary with light being checked. If connector is
inside light box at rear of semitrailer, stop/taillight must be removed (see
paragraph 4-20). If connector is at side clearance and marker light, cover
of condulet must be removed (see paragraph 4-25).
Step 4.
Trace circuit between button contact at light socket and first connector. Check
continuity in wire between button contact and first connector. Check for a short in
same length of wire. Check for loose, disconnected, or damaged connectors and
wires.
If there is continuity, that length of wire is O.K.
If there is no continuity or wire is shorted, replace wire (see paragraphs 4-20,
4-21, 4-24 through 4-26, or 4-28).
Step 5.
Check for continuity and a short in wire between first connector and next connector.
Repeat wire checks until circuit breaker in voltage control unit at front of semitrailer is
reached. Check for loose, disconnected, or damaged connectors and wires.
If there is no continuity, or if wire is shorted, replace wire (see
paragraph 4-29).
Step 6.
Check circuit across circuit breaker posts.
If there is continuity, circuit breaker is O.K.
If there is no continuity, replace circuit breaker (see paragraph 4-16).
NOTE
Perform step 7 if affected light operates on circuit breaker #1, #2, #5, #6,
#7, or #8.
Step 7.
Check continuity in wire between circuit breaker post and pin at front of 12-volt
electrical connector.
If there is continuity, that wire is O.K.
If there is no continuity, replace wire (see paragraph 4-17). While replacing
wire, visually inspect for a bent or corroded connector pin. If pin is damaged,
replace electrical connector as well (see paragraph 4-17).
4-15
TM 9-2330-384-14&P
Table 4-2. Unit Troubleshooting Procedures (Con't).
MALFUNCTION
TEST OR INSPECTION
CORRECTIVE ACTION
NOTE
Perform step 8 if affected light operates on circuit breaker #3, #4, or #9.
Step 8.
Check for continuity in wire between circuit breaker post and pin at front of 24-volt
electrical connector.
If there is continuity, that wire is O.K.
If there is no continuity, replace wire (see paragraph 4-17). While replacing
wire, visually inspect for a bent or corroded connector pin. If pin is damaged,
replace electrical connector (see paragraph 4-17).
NOTE
Perform step 9 if affected light operates on circuit breaker #7 or #8 and
malfunction occurred when semitrailer was connected to 24-volt
intervehicular cable.
Step 9.
Check for continuity in wire between pin #3 or #5 of 12-volt electrical connector and
resistor. Check for continuity in wire between resistor and pin B or J at front of 24-volt
electrical connector.
If there is continuity, that wire is O.K. Go to step 10.
If there is no continuity, replace wire (see paragraph 4-17). While replacing
wire, visually inspect for a bent or corroded connector pin. If pin is damaged,
replace electrical connector (see paragraph 4-17). If malfunction still exists,
go to step 10.
NOTE
Testing of each resistor, located on cover of voltage control unit, is the
same.
Step 10. Check resistor. Reading should be within range of 6-8 ohms.
If reading is within range of 6-8 ohms, resistor is O.K.
if reading is not within range of 6-8 ohms, replace resistor (see
paragraph 4-15).
Step 11. Troubleshoot tractor electrical system (see TM 9-2320-273-20 or TM 9-2320283-20).
If malfunction still exists, replace voltage control unit (see paragraph 4-14).
4-16
TM 9-2330-384-14&P
Table 4-2. Unit Troubleshooting Procedures (Con't).
MALFUNCTION
TEST OR INSPECTION
CORRECTIVE ACTION
2.
ALL LIGHTS ON A CIRCUIT DO NOT OPERATE
WARNING
When troubleshooting an electrical malfunction, ALWAYS disconnect
intervehicular cable from semitrailer. Failure to follow this warning may
create a spark and explosion, resulting in serious injury or death to
personnel.
NOTE
• Refer to paragraph 4-30 to determine routing of electrical wires and
location of electrical components.
• Refer to Table 4-3 to determine which lights operate off same circuit
breaker circuit.
• To ensure an accurate reading, probes of multimeter must contact bare
wire and unpainted metal surfaces.
Step 1.
Troubleshoot tractor electrical system (see TM 9-2320-273-20 or TM 9-2320283-20).
Step 2.
Check circuit across circuit breaker posts.
If there is continuity, circuit breaker is O.K. Go to step 3. If at circuit breaker #3,
#4, or #9, go to step 4.
If there is no continuity, replace circuit breaker (see paragraph 4-16). If
malfunction still exists, go to step 3. If at circuit breaker #3, #4, or #9, go to
step 4.
NOTE
Perform step 3 if at circuit breaker #1, #2, #5, #6, #7, or #8.
Step 3.
Check continuity in wire between circuit breaker post and pin at front of 12-volt
electrical connector.
If there is continuity, that wire is O.K. If at circuit breaker #1, #2, #5, or #6, go
to step 7. If at circuit breaker #7 or #8, go to step 5.
If there is no continuity, replace wire (see paragraph 4-17). While replacing
wire, visually inspect for a bent or corroded connector pin. If pin is damaged,
replace electrical connector (see paragraph 4-17). If malfunction still exists,
and if at circuit breaker #1, #2, #5, or #6, go to step 7. If at circuit breaker #7 or
#8, go to step 5.
4-17
TM 9-2330-384-14&P
Table 4-2. Unit Troubleshooting Procedures (Con’t).
MALFUNCTION
TEST OR INSPECTION
CORRECTIVE ACTION
NOTE
Perform step 4 if at circuit breaker #3, #4, or #9 (24-volt circuit).
Step 4.
Check for continuity in wire between circuit breaker post and pin at front of 24-volt
electrical connector.
If there is continuity, that wire is O.K. Go to step 7.
If there is no continuity, replace wire (see paragraph 4-17). While replacing
wire, visually inspect for a bent or corroded connector pin. If pin is damaged,
replace electrical connector (see paragraph 4-17). If malfunction still exists,
go to step 7.
NOTE
Perform step 5 if affected light operates on circuit breaker #7 or #8 and
malfunction occurred when semitrailer was connected to 24-volt
intervehicular cable.
Step 5.
Check for continuity in wire between pin #3 or #5 of 12-volt electrical connector and
resistor. Check for continuity in wire between resistor and pin B or J at front of 24-volt
electrical connector.
If there is continuity, that wire is O.K. Go to step 6.
If there is no continuity, replace wire (see paragraph 4-17). While replacing
wire, visually inspect for a bent or corroded connector pin. If pin is damaged,
replace electrical connector (see paragraph 4-17). If malfunction still exists,
go to step 6.
NOTE
Testing of each resistor, located on cover of voltage control unit, is the
same.
Step 6.
Check resistor. Reading should be within range of 6-8 ohms.
If reading is within range of 6-8 ohms, resistor is O.K. Go to step 7.
If reading is not within range of 6-8 ohms, replace resistor (see
paragraph 4-15). If malfunction still exists, go to step 7.
Step 7.
At each affected light, remove lamp from light socket (see paragraph 4-18). Check
lamp.
If there is no continuity, replace lamp (see paragraph 4-18).
4-18
TM 9-2330-384-14&P
Table 4-2. Unit Troubleshooting Procedures (Con't).
MALFUNCTION
TEST OR INSPECTION
CORRECTIVE ACTION
Step 8.
At each affected light, check continuity between ground side of light socket and
frame. DO NOT remove light housing while making this check (see paragraphs 4-20,
4-21, 4-24 through 4-26, or 4-28).
If there is continuity, proceed to step 9.
If there is no continuity, check light for damaged or corroded housing. Check
for loose or corroded screws mounting light to semitrailer. If screws are loose,
tighten. If any component is damaged or corroded, replace (see paragraphs
4-20, 4-21, 4-24 through 4-26, or 4-28).
Step 9.
At each affected light, visually check button contacts inside light socket for
looseness, corrosion, or other damage.
If button contacts are loose, corroded, or otherwise damaged, replace (see
paragraphs 4-20, 4-21, 4-24 through 4-26, or 4-28).
NOTE
• Use an extension wire, as required, long enough to reach between
connectors.
•
Location of connectors will vary with light being checked. If connector is
inside light box at rear of semitrailer, stop/taillight must be removed (see
paragraph 4-20). If connector is at side clearance and marker light, cover
of condulet must be removed (see paragraph 4-25).
Step 10. At each affected light, trace circuit between button contact at light socket and first
connector. Check continuity in wire between button contact and first connector.
Check for a short in same length of wire. Check for loose, disconnected, or
damaged connectors and wires.
If there is continuity, that length of wire is O.K.
If there is no continuity or if wire is shorted,
paragraphs 4-20, 4-21, 4-24 through 4-26, or 4-28).
replace
wire
(see
Step 11. Check for continuity and a short in wire between first connector and next connector.
Repeat wire checks until circuit breaker in voltage control unit at front of semitrailer is
reached. Check for loose, disconnected, or damaged connectors and wires.
If there is no continuity, or if wire is shorted, replace wire (see
paragraph 4-29).
Step 12. If malfunction still exists, replace voltage control unit (see paragraph 4-14).
4-19
TM 9-2330-384-14&P
Table 4-2. Unit Troubleshooting Procedures (Con't).
MALFUNCTION
TEST OR INSPECTION
CORRECTIVE ACTION
3.
LIGHT FLICKERS
WARNING
When troubleshooting an electrical malfunction, ALWAYS disconnect
intervehicular cable from semitrailer. Failure to follow this warning may
create a spark and explosion, resulting in serious injury or death to
personnel.
NOTE
• Refer to paragraph 4-30 to determine routing of electrical wires and
location of electrical components.
• To ensure an accurate reading, probes of multimeter must contact bare
wire and unpainted metal surfaces.
• Flickering lights are most often caused by loose or corroded connectors.
Check for these conditions while performing the troubleshooting steps.
Step 1.
Check that affected lamp is not loose in light socket (see paragraph 4-18).
Install lamp securely in light socket (see paragraph 4-18).
Step 2. Repeat steps 2-11 of Malfunction 1, “Single Light Does Not Operate”.
4.
CONVOY WARNING LIGHT DOES NOT OPERATE
WARNING
When troubleshooting an electrical malfunction, ALWAYS disconnect
intervehicular cable from semitrailer. Failure to follow this warning may
create a spark and explosion, resulting in serious injury or death to
personnel.
NOTE
• Refer to paragraph 4-30 to determine routing of electrical wires and
location of electrical components.
• To ensure an accurate reading, probes of multimeter must contact bare
wire and unpainted metal surfaces.
Step 1.
Check continuity in blue wire between pin #7 at front of 12-volt electrical connector
and outside post of circuit breaker #2.
If there is continuity, that wire is O.K. Go to step 2.
If there is no continuity, replace wire (see paragraph 4-17). While replacing
wire, visually inspect for a bent or corroded connector pin. If pin is damaged,
replace electrical connector (see paragraph 4-17). If malfunction still exists,
go to step 2.
4-20
TM 9-2330-384-14&P
Table 4-2. Unit Troubleshooting Procedures (Con't).
MALFUNCTION
TEST OR INSPECTION
CORRECTIVE ACTION
Step 2.
Check circuit across posts of circuit breaker #2.
If there is continuity, circuit breaker is O.K. Go to step 3.
If there is no continuity, replace circuit breaker (see paragraph 4-16). If
malfunction still exists, go to step 3.
NOTE
• Use an extension wire long enough to reach between connectors.
• Cover of condulet at side clearance and marker light must be removed to
gain access to connector at side clearance and marker light (see
paragraph 4-25).
Step 3.
Check for continuity and a short in blue wire between inside post of circuit breaker #2
and connector at side clearance and marker light. Check for loose, disconnected, or
damaged wire and connector.
If there is continuity, that length of wire is O.K. Go to step 4.
If there is no continuity, or if wire is shorted, replace wire (see paragraph
4-29). If malfunction still exists, go to step 4.
Step 4.
Remove stop/taillight from light box to gain access to convoy warning light toggle
switch and wiring (see paragraph 4-20). Check for continuity and a short in blue wire
assembly between connector at side clearance and marker light and terminal
(closest to roadside) of toggle switch.
If there is continuity, blue wire assembly is O.K. Go to step 5.
If there is no continuity, or if blue wire assembly is shorted, replace (see
paragraph 4-29). If malfunction still exists, go to step 5.
Step 5.
Turn convoy warning light toggle switch on (see paragraph 2-2). Check for continuity
across terminals of convoy warning light toggle switch.
If there is continuity, toggle switch is O.K. Go to step 6.
If there is no continuity, replace toggle switch (see paragraph 4-22). If
malfunction still exists, go to step 6.
Step 6.
Remove cover from condulet at rear dam (see paragraph 4-22). Ensure that convoy
warning light toggle switch is turned on (see paragraph 2-2). Check for continuity
and a short in blue wire assembly between terminal of toggle switch and connector
inside condulet.
If there is continuity, blue wire assembly is O.K. Go to step 7.
If there is no continuity, or if blue wire assembly is shorted, remove convoy
warning light conduit and replace blue wire assembly (see paragraph 4-29). If
malfunction still exists, go to step 7.
4-21
TM 9-2330-384-14&P
Table 4-2. Unit Troubleshooting Procedures (Con't).
MALFUNCTION
TEST OR INSPECTION
CORRECTIVE ACTION
Step 7.
Check continuity in brown wire assembly between ground terminal at blackout light
and connector inside condulet at rear dam.
If there is continuity, brown wire assembly is O.K. Go to step 8.
If there is no continuity, check for loose or corroded mounting hardware where
brown wire assembly is grounded at blackout light (see paragraph 4-19).
Check for a loose or damaged ground terminal at blackout light end of brown
wire. If mounting hardware at blackout light is loose, tighten. If mounting
hardware is corroded or otherwise damaged, replace (see paragraph 4-19).
Repair or replace brown wire assembly as required (see paragraph 4-29). If
malfunction still exists, go to step 8.
NOTE
White receptacle wire connects pin #1 of receptacle to brown wire assembly
inside condulet. Black receptacle wire connects pin #2 of receptacle to blue
wire assembly inside condulet.
Step 8.
Check for continuity and a short in white and black receptacle wires inside condulet
at rear dam.
If both white and black receptacle wires have continuity, receptacle with wires
is O.K. Go to step 9.
If there is no continuity in either or both wires, or if a wire is shorted, replace
receptacle with wires (see paragraph 4-22). If malfunction still exists, go to
step 9.
NOTE
Pin #1 of cable’s male plug corresponds to white cable wire. Pin #2
corresponds to black cable wire.
Step 9.
Remove dome from convoy warning light. Unplug terminals of white and black cable
wires from convoy warning light (see paragraph 4-23). Check for continuity and a
short in cable.
If there is continuity, cable is O.K. Replace convoy warning light (see
paragraph 4-23).
If there is no continuity, or if cable is shorted, replace cable (see paragraph
4-23). If malfunction still exists, replace convoy warning light (see paragraph
4-23).
Step 10. Troubleshoot tractor electrical system (see TM 9-2320-273-20 or TM 9-2320283-20).
4-22
TM 9-2330-384-14&P
Table 4-2. Unit Troubleshooting Procedures (Con't).
MALFUNCTION
TEST OR INSPECTION
CORRECTIVE ACTION
BRAKES
5.
BRAKES WILL NOT RELEASE
Step 1.
Check brake adjustment (see paragraph 4-34).
Adjust brakes (see paragraph 4-34).
Step 2.
Remove wheel and drum assembly (see paragraph 4-46). Inspect brake shoe
assembly for damage (see paragraph 4-35).
If brake shoes are damaged, replace’ (see paragraph 4-35).
6.
BRAKES GRAB
Step 1.
Check brake adjustment (see paragraph 4-34).
Adjust brakes (see paragraph 4-34).
Step 2.
Check for damage to brake chamber (see paragraph 4-40).
If brake chamber is damaged, replace (see paragraph 4-40).
Step 3.
Check for leaking or broken air line between ratio relay valve and brake chamber
(see paragraph 4-39).
If air line is leaking or broken, replace (see paragraph 4-39).
Step 4.
Remove wheel and drum assembly (see paragraph 4-46). Inspect brake shoe
assembly for wear or damage (see paragraph 4-35). Inspect linings for oil, grease,
or foreign material.
If brake shoe linings measure ¼ in. (6.35 mm) or less at their thinnest point, if
brake shoes are damaged, or if linings are oil or grease soaked, replace brake
shoes (see paragraph 4-35).
Step 5.
7.
Notify direct support maintenance to check drum for out-of-round condition.
BRAKES DRAG
Step 1.
Check brake adjustment (see paragraph 4-34).
Adjust brakes (see paragraph 4-34).
Step 2.
Remove wheel and drum assembly and inspect drum for damage (see paragraph
4-46). Inspect brake shoe assembly for damage (see paragraph 4-35).
If brake shoes are damaged, replace (see paragraph 4-35).
If drum is damaged, replace (see paragraph 4-46).
Step 3.
Notify direct support maintenance to check drum for out-of-round condition.
4-23
TM 9-2330-384-14&P
Table 4-2. Unit Troubleshooting Procedures (Con't).
MALFUNCTION
TEST OR INSPECTION
CORRECTIVE ACTION
8.
SLOW BRAKE APPLICATION OR RELEASE
Step 1.
Check for proper lubrication at camshaft and slack adjuster grease fittings (see
Chapter 3, Section I).
Lubricate according to instructions in Chapter 3, Section I.
Step 2.
Check brake adjustment (see paragraph 4-34).
Adjust brakes (see paragraph 4-34).
Step 3.
Check for kinks or restrictions in air lines (see paragraph 4-39).
WARNING
Compressed air used for clearing restrictions must not exceed 30 psi
(207 kPa). Wear protective clothing (goggles, face shield, and gloves) and
use caution to avoid injury to personnel.
Use compressed air to clear any restrictions. If restrictions cannot be
removed, or if airline is kinked, replace affected air line (see paragraph 4-39).
Step 4.
Check for defective relay quick release valve (see paragraph 4-41).
If relay quick release valve is defective, replace (see paragraph 4-41).
WHEELS AND TIRES
9. NOISY OR WOBBLY TIRE AND RIM ASSEMBLIES
Step 1.
Inspect for bent spacer (see paragraph 4-45).
If spacer is bent, replace (see paragraph 4-45).
Step 2.
Check rim alinement (see paragraph 4-48).
Aline rim as required (see paragraph 4-48).
Step 3.
Check wheel bearing adjustment (see paragraph 4-47).
Adjust wheel bearings as required (see paragraph 4-47).
Step 4.
Check for worn or damaged wheel bearings (see paragraph 4-46).
If wheel bearings are worn or damaged, replace (see paragraph 4-46).
4-24
TM 9-2330-384-14&P
Table 4-2. Unit Troubleshooting Procedures (Con't).
MALFUNCTION
TEST OR INSPECTION
CORRECTIVE ACTION
Step 5.
Inspect wheel for damage (see paragraph 4-46). Inspect rim for damage (see
paragraphs 4-45 and 4-49).
If wheel is damaged, replace (see paragraph 4-46). If rim is damaged, replace
(see paragraph 4-49).
Step 6.
Check for bent axle (see paragraph 4-32).
If axle is bent, notify direct support maintenance to replace axle.
10. LOSS OF TIRE AIR PRESSURE
Step 1.
Remove tire (see paragraph 4-45). Inspect tire for cuts, gouges, cracks, or sidewall
damage.
If tire is damaged, replace (see paragraph 4-45).
Repair damaged tire (see paragraph 4-49).
Step 2.
Inspect valve stem for damage (see paragraphs 4-45 and 4-49).
If valve stem is damaged, replace (see paragraph 4-49).
Step 3.
Inspect rim for damage (see paragraphs 4-45 and 4-49).
If rim is damaged, replace (see paragraph 4-49).
Step 4.
Remove wheel and drum assembly (see paragraph 4-46). Inspect wheel for
damage.
If wheel is damaged, replace (see paragraph 4-46).
11. UNEVEN TIRE WEAR
Step 1.
Remove tire (see paragraph 4-45). Inspect for bent spacer.
If spacer is bent, replace (see paragraph 4-45).
Step 2.
Inspect for bent rim (see paragraphs 4-45 and 4-49).
If rim is bent, replace (see paragraph 4-49).
Step 3.
Check brake adjustment (see paragraph 4-34).
Adjust brakes (see paragraph 4-34).
Step 4.
Visually inspect all brake operating parts: brake chamber, brake chamber pushrod,
slack adjuster, and camshaft (see paragraphs 4-36, 4-37, and 4-40).
Lubricate brake operating parts as required (see Chapter 3, Section I).
Replace any damaged components (see paragraphs 4-36, 4-37, and 4-40).
4-25
TM 9-2330-384-14&P
Table 4-2. Unit Troubleshooting Procedures (Con't).
MALFUNCTION
TEST OR INSPECTION
CORRECTIVE ACTION
Step 5.
Check wheel bearing adjustment (see paragraph 4-47).
Adjust wheel bearings (see paragraph 4-47).
Step 6.
Check axle alinement (see paragraph 4-31).
Aline axles (see paragraph 4-31).
Step 7.
Check for bent axle (see paragraph 4-32).
If axle is bent, notify direct support maintenance to replace axle.
12. DUAL TIRES RUBBING
Step 1.
Remove tire (see paragraph 4-45). Inspect for bent spacer.
If spacer is bent, replace (see paragraph 4-45).
Step 2.
Inspect for bent rim (see paragraphs 4-45 and 4-49).
If rim is bent, replace (see paragraph 4-49).
SUSPENSION
13. SEMITRAILER OUT OF ALINEMENT WITH TRACTOR (DOG TRAILING)
Step 1.
Inspect spring leaves for breaks or cracks (see paragraph 4-56).
If breaks or cracks are found, replace springs on each end of axle (see
paragraph 4-56).
Step 2.
Check to see if U-bolts are loose and springs are out of alinement in frame hangers
(see paragraph 4-56).
Loosen U-bolt nuts. Tap on springs to aline in frame hangers. Torque U-bolt
nuts in a diagonal sequence to 360 lb.-ft. (488 N•m) (see paragraph 4-56).
Step 3.
Check axle alinement (see paragraph 4-31).
Aline axles (see paragraph 4-31).
Step 4.
Check for bent axle (see paragraph 4-32).
If axle is bent, notify direct support maintenance to replace axle.
14. IMPROPER SPRING ACTION
Step 1.
Inspect spring leaves for breaks or cracks (see paragraph 4-56).
If breaks or cracks are found, replace springs on each end of axle (see
paragraph 4-56).
4-26
TM 9-2330-384-14&P
Table 4-2. Unit Troubleshooting Procedures (Con't).
MALFUNCTION
TEST OR INSPECTION
CORRECTIVE ACTION
Step 2.
Inspect for flattened, weak spring (see paragraph 4-56).
If spring is flattened or weak, replace springs on each end of axle (see
paragraph 4-56).
Step 3.
Check to see if U-bolts are loose and springs are out of alinement in frame hangers
(see paragraph 4-56).
Loosen U-bolt nuts. Tap on springs to aline in frame hangers. Torque U-bolt
nuts in a diagonal sequence to 360 lb.-ft. (488 N•m) (see paragraph 4-56).
15. SEMITRAILER PULLS HARD, DRAGS, OR RESISTS ROLL
Step 1.
Inspect spring to see if center bolt is broken or sheared and spring is out of alinement
in frame hanger. Inspect spring leaves for breaks or cracks (see paragraph 4-56).
If any damage is found, replace springs on each end of axle (see paragraph 4-56).
Step 2.
Inspect U-bolt nuts for looseness (see paragraph 4-56).
Torque U-bolt nuts in a diagonal sequence to 360 lb.-ft. (488 N•m) (see
paragraph 4-56).
Step 3.
Check axle alinement (see paragraph 4-31).
Aline axles (see paragraph 4-31).
Step 4.
Check for bent axle (see paragraph 4-32).
If axle is bent, notify direct support maintenance to replace axle.
LANDING GEAR
16. DIFFICULT OPERATION
Step 1.
Check for proper lubrication (see Chapter 3, Section I).
Lubricate according to instructions in Chapter 3, Section I.
Step 2.
Inspect handcrank for damage (see paragraph 4-52).
Replace handcrank (see paragraph 4-52).
Step 3.
Inspect cross-shaft for damage (see paragraph 4-52).
Replace cross-shaft (see paragraph 4-52).
Step 4.
Inspect gearbox on curbside landing gear leg for damage (see paragraph 4-52).
If damaged, replace curbside landing gear leg (see paragraph 4-52).
4-27
TM 9-2330-384-14&P
Table 4-2. Unit Troubleshooting Procedures (Con't).
MALFUNCTION
TEST OR INSPECTION
CORRECTIVE ACTION
Step 5.
Inspect for bent landing gear legs (see paragraph 4-52).
Replace affected landing gear leg (see paragraph 4-52).
Step 6.
Check to see that landing gear is not already fully extended or retracted.
Step 7.
Check to see that semitrailer is fully uncoupled from tractor (see paragraph 2-14).
EMERGENCY VALVE AND VAPOR VENT CABLE CONTROLS
17. IMPROPER OPERATION
Step 1.
Inspect emergency valve operator control levers in cabinet for damage (see
paragraph 4-74). Inspect emergency valve remote trip-release for damage (see
paragraph 4-75).
Replace if damaged (see paragraphs 4-74 and 4-75).
Step 2.
Trace emergency valve and vapor vent cable and tubing assembly between points of
operation. Check for proper lubrication at union of grease fittings (see paragraph 4-76).
Lubricate as required (see Chapter 3, Section I).
Step 3.
Trace emergency valve and vapor vent cable and tubing assembly between points of
operation. Check for breaks, kinks, or frays in cable and tubing assembly, or
looseness or damage to cable and tubing connections at vapor vent and emergency
valve (see paragraph 4-76).
Tighten or replace damaged components (see paragraph 4-76). Adjust length
of cable at BOTH ends as required (see paragraph 4-74).
Step 4.
If internal damage to vapor vent or emergency valve is suspected, replace (see
paragraphs 4-81 or 4-82).
EMERGENCY VALVE/JET LEVEL SENSOR
18. NO FLOW INTO TANK WHEN BOTTOM LOADING
Step 1.
Stop bottom loading (see paragraph 2-19). Check strainer assembly for obstruction
(see paragraph 4-71).
Service strainer assembly (see paragraph 4-71).
Step 2.
4-28
Resume bottom loading. Place a suitable container under bleeder valve. Remove nut
at bleeder valve (see paragraph 2-19). Check if fuel is flowing from bleeder valve.
TM 9-2330-384-14&P
Table 4-2. Unit Troubleshooting Procedures (Con’t).
MALFUNCTION
TEST OR INSPECTION
CORRECTIVE ACTION
NOTE
An inadequate flow is defined as a flow that is not a strong, full diameter
flow. An adequate flow will fill a gallon container at least half full within
approximately one minute.
If there is no flow, or if flow is inadequate, or full of air and spitting, problem is in
jet level sensor or in jet level sensor tubing. Go to step 3.
If there is an adequate steady flow of fuel, problem is NOT in jet level sensor or
in jet level sensor tubing. Problem is in emergency valve. Remove emergency
valve and repair. Be sure to replace all preformed packings (see paragraph
4-82).
Step 3.
Remove manhole lid (see paragraph 4-67). Purge tank (see paragraph 4-68).
Remove jet level sensor (see paragraph 4-70). Inspect jet level sensor for restricted
orifices or for other damage. Look for dirt or other contaminants clogging the two
orifices.
Clean jet level sensor and remove any dirt or other contaminants that are
clogging the orifices. If jet level sensor is damaged, obtain a replacement.
Install jet level sensor, but leave jet level sensor tubing disconnected (see
paragraph 4-70). Go to step 4.
If jet level sensor orifices are not restricted and no other damage is observed,
problem is in tubing between emergency valve and jet level sensor. Install jet
level sensor, but leave jet level sensor tubing disconnected (see paragraph
4-70). Go to step 4.
WARNING
Compressed air used for clearing tubing must not exceed 30 psi (207 kPa).
Wear protective clothing (goggles, face shield, and gloves) and use caution
to avoid injury to personnel.
Step 4.
At emergency valve, remove nut from bleeder valve. Tag and disconnect all jet level
sensor tubing from emergency valve and strainer assembly (see paragraph 4-70).
From emergency valve end, force clean compressed air into all tubing lengths. Have
an assistant positioned at jet level sensor end. Assistant should hold a clean rag
(Item 18, Appendix E) against ends of tubing as air is forced through and should look
for signs of escaping dirt or other contaminants. Assistant should also check that air
flow through tubing indicates that tubing is free of restrictions or leaks.
If jet level sensor tubing can be cleared with compressed air, connect tubing at
jet level sensor. Install nut at bleeder valve and connect jet level sensor tubing
at emergency valve and strainer assembly (see paragraph 4-70). Go to
step 5.
If jet level sensor tubing cannot be cleared or air flow through tubing indicates a
restriction or a leak, perform a visual inspection of tubing between jet level
sensor and emergency valve inside tank. Replace damaged tubing (see
paragraph 4-70). Go to step 5.
4-29
TM 9-2330-384-14&P
Table 4-2. Unit Troubleshooting Procedures (Con't).
MALFUNCTION
TEST OR INSPECTION
CORRECTIVE ACTION
If semitrailer is new or has been steam purged and the temperature is below
freezing, malfunction may have been caused by freezing in jet level sensor tubing or
in pilot valve on top of emergency valve. While troubleshooting, thawing will most
likely occur and no evidence of freezing may be discovered.
Step 5.
To safeguard against a recurrence of freezing, winterize bottom loading
system (see paragraph 4-84).
Step 6.
If cause of malfunction has still not been determined, remove pilot valve and repair,
Look for damage to diaphragm (see paragraph 4-83).
19. NO SHUTOFF WHEN BOTTOM LOADING AFTER TANK IS FULL
Check emergency valve control lever in cabinet to ensure that it is closed (see
paragraph 2-2). Automatic shutoff of bottom loading system will not occur with
emergency valve control lever set in the open position.
Step 1.
Push emergency valve control lever to close (see paragraph 2-2).
Step 2.
Remove pilot valve and replace pilot valve diaphragm (see paragraph 4-83).
Step 3.
Remove and repair emergency valve. Be sure to replace all preformed packings
(see paragraph 4-82).
PRECHECK SYSTEM
20. EMERGENCY VALVE DOES NOT CLOSE WITHIN TWO MINUTES OF START OF PRECHECK
CYCLE
WARNING
• DO NOT breathe fuel fumes. They are toxic and can cause serious
medical problems. Failure to follow this warning may result in serious
injury or death to personnel.
•
Give IMMEDIATE medical attention to personnel exposed to hydrocarbon
or toxic vapors. Signs of distress are weakness, nausea, coughing or
intoxication, nosebleed or cramps, or other unusual symptoms.
Qualified personnel able to administer artificial respiration and simple
first aid must be present.
Step 1.
Open manhole fill cover (see paragraph 2-16). Check that precheck tubing is
properly connected to jet level sensor (see paragraph 4-70).
If precheck tubing is connected to jet level sensor, go to step 2.
If precheck tubing is disconnected, connect precheck tubing to jet level sensor
(see paragraph 4-70).
4-30
TM 9-2330-384-14&P
Table 4-2. Unit Troubleshooting Procedures (Con"t).
MALFUNCTION
TEST OR INSPECTION
CORRECTIVE ACTION
Step 2.
While bottom loading, disconnect precheck tubing from jet level sensor (see
paragraph 4-70). Check fuel flow in precheck tubing. Flow should be a strong, full
diameter flow.
If flow is a strong, full diameter flow, go to step 4.
If flow is not a strong, full diameter flow, precheck tubing is either restricted or
leaking. Go to step 3.
WARNING
Compressed air used for clearing restrictions must not exceed 30 psi
(207 kPa). Wear protective clothing (goggles, face shield, and gloves) and
use caution to avoid injury to personnel.
NOTE
A suitable container must be used to catch any draining fuel. Ensure that all
spills are cleaned up.
Step 3.
From outside of tank, disconnect precheck tubing from coupling located in tank
shell, elbows at piping assembly, and elbow at pressure gage (see paragraph 4-72).
Open precheck valve (see paragraph 2-2). If handle of precheck valve turns with
difficulty, problem may be in precheck valve. Use compressed air to clear any
restrictions in precheck tubing and to check for leaks.
If no restrictions, leaks, or damage are found, go to step 4.
If precheck tubing can be cleared of restrictions, if no leaks are found, and if
handle of precheck valve operates without difficulty, connect all precheck
tubing (see paragraph 4-72).
If any length of precheck tubing cannot be cleared of restrictions, if leaks are
found, or if handle of precheck valve operates with difficulty, replace affected
component (see paragraph 4-72).
Step 4.
Purge tank (see paragraph 4-68). Remove jet level sensor (see paragraph 4-70).
Check for a cracked precheck can inside jet level sensor. Precheck can (smaller
inside can) should have two smaller and one larger plugged hole in bottom of can.
Check that proper holes are plugged.
If there is no damage to jet level sensor, go to step 5.
If jet level sensor is damaged, replace (see paragraph 4-70).
4-31
TM 9-2330-384-14&P
Table 4-2. Unit Troubleshooting Procedures (Con?).
MALFUNCTION
TEST OR INSPECTION
CORRECTIVE ACTION
WARNING
Compressed air used for clearing restrictions must not exceed 30 psi
(207 kPa). Wear protective clothing (goggles, face shield, and gloves) and
use caution to avoid injury to personnel.
Step 5.
Disconnect precheck tubing inside tank from jet level sensor and check valve (see
paragraph 4-72). Use compressed air to clear restrictions in precheck tubing and to
check for leaks.
If no restrictions or leaks are found, go to step 6.
If precheck tubing can be cleared of restrictions and no leaks are found,
connect precheck tubing to jet level sensor and check valve (see paragraph
4-72).
If precheck tubing cannot be cleared of restrictions or if leaks are found,
replace tubing (see paragraph 4-72).
Step 6.
Inspect check valve for proper installation. Check valve must be installed with arrow
pointing to inside of tank (see paragraph 4-72).
If check valve is correctly installed, go to step 7.
If incorrectly installed, install check valve in proper direction (see paragraph
4-72).
WARNING
Compressed air used for clearing restrictions must not exceed 30 psi
(207 kPa). Wear protective clothing (goggles, face shield, and gloves) and
use caution to avoid injury to personnel.
Step 7.
Remove check valve (see paragraph 4-72). Check for cracks or other damage.
Depress check valve and check for free movement. Direct compressed air through
inlet of valve; compressed air should pass through to outlet. Direct compressed air
through outlet of valve: no compressed air should pass through to inlet.
If check valve is damaged, replace (see paragraph 4-72).
21. EMERGENCY VALVE DOES NOT OPEN TO ALLOW BOTTOM LOADING AFTER PRECHECK
CYCLE COMPLETED
Purge tank (see paragraph 4-68). Remove emergency valve and pilot valve (see paragraphs
4-82 and 4-83).
Repair emergency valve and pilot valve (see paragraphs 4-82 and 4-83).
4-32
TM 9-2330-384-14&P
Section V. ELECTRICAL SYSTEM MAINTENANCE
Paragraph
Number
4-14
4-15
4-16
4-17
4-18
4-19
4-20
4-21
4-22
4-23
4-24
4-25
4-26
4-27
4-28
4-29
4-30
Page
Number
Title
Voltage Control Unit Replacement . . . . . . . . . . . . . . . . . . . . . . . . . . . . . . . . . . .
Resistor Replacement . . . . . . . . . . . . . . . . . . . . . . . . . . . . . . . . . . . . . . . . . . . . .
Circuit Breaker Replacement . . . . . . . . . . . . . . . . . . . . . . . . . . . . . . . . . . . . . . .
12-Volt and 24-Volt Electrical Connector Replacement . . . . . . . . . . . . . . . . . .
Lamp Replacement . . . . . . . . . . . . . . . . . . . . . . . . . . . . . . . . . . . . . . . . . . . . . . .
Blackout Light Maintenance . . . . . . . . . . . . . . . . . . . . . . . . . . . . . . . . . . . . . . . .
Stop/Taillight Maintenance . . . . . . . . . . . . . . . . . . . . . . . . . . . . . . . . . . . . . . . . .
Turn Signal/Taillight Maintenance . . . . . . . . . . . . . . . . . . . . . . . . . . . . . . . . . . . .
Convoy Warning Light Wiring Maintenance . . . . . . . . . . . . . . . . . . . . . . . . . . . .
Convoy Warning Light Assembly Maintenance . . . . . . . . . . . . . . . . . . . . . . . . .
Front Clearance and Marker Light Maintenance . . . . . . . . . . . . . . . . . . . . . . . .
Side Clearance and Marker Light Maintenance . . . . . . . . . . . . . . . . . . . . . . . .
Rear Side Clearance and Marker Light Maintenance . . . . . . . . . . . . . . . . . . . .
Reflector Replacement . . . . . . . . . . . . . . . . . . . . . . . . . . . . . . . . . . . . . . . . . . . .
Triple Clearance Light Assembly Replacement . . . . . . . . . . . . . . . . . . . . . . . . .
Electrical Conduit and Wires Replacement . . . . . . . . . . . . . . . . . . . . . . . . . . . .
Wiring Diagrams . . . . . . . . . . . . . . . . . . . . . . . . . . . . . . . . . . . . . . . . . . . . . . . . . .
4-33
4-36
4-38
4-40
4-42
4-44
4-48
4-52
4-56
4-60
4-62
4-69
4-74
4-78
4-79
4-82
4-87
4-14. VOLTAGE CONTROL UNIT REPLACEMENT.
a.
Removal
Equipment Conditions:
Ref
2-14
b.
Materials/Parts:
Conditions
Intervehicular electrical cable disconnected from semitrailer.
Tools:
Tool kit, general mechanic’s
Installation
Eight locknuts
Eight starwashers
Corrosion preventive compound (Item 7,
Appendix E)
General Safety Instructions:
l
When performing electrical maintenance,
ALWAYS disconnect intervehicular electrical cable from semitrailer.
4-33
TM 9-2330-384-14&P
4-14. VOLTAGE CONTROL UNIT REPLACEMENT (Con"t).
a. REMOVAL
WARNING
When performing electrical maintenance, ALWAYS disconnect intervehicular electrical cable from semitrailer. Failure to follow this warning
may create a spark and explosion, resulting in serious injury or death to
personnel.
(1)
Loosen two screws (10) and
open voltage control unit cover
(3). Prop cover open with cable
from a dummy coupling.
NOTE
Tag wires for installation.
(2)
Remove 18 nuts (4) and disconnect all terminals (2) from inside
posts of circuit breakers (12).
(3)
Remove four locknuts (8) from
connectors (11). Discard locknuts.
CAUTION
Use caution not to damage wires and
terminals.
(4) Remove four locknuts (6), eight
starwashers (7), and four screws
(9). Lift voltage control unit (5)
from nose adapter (1). Discard
locknuts and starwashers.
4-34
TM 9-2330-384-14&P
4-14. VOLTAGE CONTROL UNIT REPLACEMENT (Con?).
b. INSTALLATION
WARNING
When performing electrical maintenance, ALWAYS disconnect intervehicular electrical cable from semitrailer. Failure to follow this warning
may create a spark and explosion, resulting in serious injury or death to
personnel.
NOTE
Ensure that all wire connections are made to clean, uncorroded surfaces.
Coat all wire connections with corrosion preventive compound before they
are made.
(1)
Thread wires through holes in bottom of voltage control unit (5). Install four connectors (11)
to voltage control unit (5) with four new locknuts (8). For ease of installation, install outer
locknuts first.
(2)
Install voltage control unit (5) to nose adapter (1) with four screws (9), eight new starwashers
(7), and four new locknuts (6).
(3)
Refer to paragraph 4-30, Wiring Diagrams, and connect all terminals (2) to circuit breakers
(12). Install 18 nuts (4).
(4)
Close voltage control unit cover (3) and tighten two screws (10).
FOLLOW-ON TASKS:
l
l
Connect intervehicular electrical cable to semitrailer (see paragraph 2-12).
Check operation of lights (see TM 9-2320-273-10 or TM 9-2320-283-1 0).
4-35
TM 9-2330-384-14&P
4-15. RESISTOR REPLACEMENT.
a.
Removal
b.
Equipment Conditions:
R e f Conditions
4-14 Voltage control unit removed.
Tools:
l
l
Shop equipment, automotive maintenance
and repair, organizational maintenance,
common no. 1
Soldering gun
a. REMOVAL
NOTE
There are two resistors (1) mounted
to voltage control unit cover (5). Each
resistor is removed the same.
(1) Unsolder two wires (4) from resistor (1) .
(2) Remove two nuts (2), lockwashers, and screws (3). Remove resistor (1) from voltage control
unit cover (5). Discard lockwashers.
b. INSTALLATION
NOTE
There are two resistors (1) mounted
to voltage control unit cover (5). Each
resistor is installed the same.
(1)
4-36
Install resistor (1) to voltage control unit cover (5) with two screws
(3), new lockwashers, and nuts
(2).
Installation
Materials/Parts:
l
l
Two lockwashers
Solder
(Item 19, Appendix E)
TM 9-2330-384-14&P
4-15. RESISTOR REPLACEMENT (Con’t).
NOTE
Refer to paragraph 4-30, Wiring Diagrams, for proper connection of wires
(4).
(2)
Solder two wires (4) to resistor (1).
FOLLOW-ON TASKS:
Install voltage control unit (see paragraph 4-14).
Check operation of lights (see TM 9-2320-273-10 or TM 9-2320-283-10).
4-37
TM 9-2330-384-14&P
4-16. CIRCUIT BREAKER REPLACEMENT.
a.
Removal
b.
Equipment Conditions:
R e f Conditions
2-14 Intervehicular electrical cable disconnected from semitrailer.
Tools:
Tool kit, general mechanic’s
a.
REMOVAL
WARNING
When performing electrical maintenance, ALWAYS disconnect intervehicular
electrical
cable from
semitrailer. Failure to follow this
warning may create a spark and explosion, resulting in serious injury or
death to personnel.
NOTE
Note location of terminals (2) for installation.
(1)
Loosen two screws (5) and open
voltage control unit cover (1).
Prop cover open with cable from
a dummy coupling.
(2)
Remove four nuts (4) and disconnect two terminals (2) from circuit breaker (3).
(3) Remove circuit breaker (3).
4-38
Installation
General Safety Instructions:
When performing electrical maintenance,
ALWAYS disconnect intervehicular electrical cable from semitrailer.
TM 9-2330-384-14&P
4-16. CIRCUIT BREAKER REPLACEMENT (Con"t).
b. INSTALLATION
WARNING
When performing electrical maintenance, ALWAYS disconnect intervehicular electrical cable from semitrailer. Failure to follow this warning
may create a spark and explosion, resulting in serious injury or death to
personnel.
(1) Install circuit breaker (3).
(2)
Connect two terminals (2) to circuit breaker (3) with four nuts (4).
(3)
Close voltage control unit cover (1) and tighten two screws (5).
FOLLOW-ON TASKS:
Connect intervehicular electrical cable to semitrailer (see paragraph 2-12).
Check operation of lights (see TM 9-2320-273-10 or TM 9-2320-283-10).
4-39
TM 9-2330-384-14&P
12-VOLT AND 24-VOLT ELECTRICAL CONNECTOR REPLACEMENT.
4-17.
a.
Removal
b.
Equipment Conditions:
Ref
2-14
Materials/Parts:
Conditions
Intervehicular electrical cable disconnected from semitrailer.
Tool kit, general mechanic’s
Wire terminal kit
a. REMOVAL
WARNING
When performing electrical maintenance, ALWAYS disconnect intervehicular electrical cable from semitrailer. Failure to follow this warning
may create a spark and explosion, resulting in serious injury or death to
personnel.
NOTE
and
are
the
the
(1)
Loosen two screws (7) and open
voltage control unit cover (2).
Prop open cover with cable from
a dummy coupling.
(2)
Tag all wires (6) that connect to
electrical connector (1 or 3) to be
removed.
(3) Close voltage control unit cover
(2). Push pins through electrical
connector (1 or 3) and remove.
4-40
Tag marker
(Item 21, Appendix E)
General Safety Instructions:
When performing electrical maintenance,
ALWAYS disconnect intervehicular electrical cable from semitrailer.
Tools:
12-volt electrical connector (1)
24-volt electrical connector (3)
removed the same, except for
specific wire connections and
number of mounting hardware.
Installation
TM 9-2330-384-14&P
4-17.
12-VOLT AND 24-VOLT ELECTRICAL CONNECTOR REPLACEMENT (Con’t).
(4)
If removing 12-volt electrical connector (1), remove two nuts (4) and bolts (5), and remove
electrical connector. If removing 24-volt electrical connector (3), remove four nuts and bolts,
and remove electrical connector.
(5)
Remove pins from tagged wires (6).
b. INSTALLATION
WARNING
When performing electrical maintenance, ALWAYS disconnect intervehicular electrical cable from semitrailer. Failure to follow this warning
may create a spark and explosion, resulting in serious injury or death to
personnel.
NOTE
12-volt electrical connector (1) and 24-volt electrical connector (3) are installed the same, except for the specific wire connections and the number
of receptacle mounting hardware.
(1)
If installing 12-volt electrical connector (1), position at curbside hole in voltage control unit
cover (2) and install two bolts (5) and nuts (4). If installing 24-volt electrical connector (3),
position at roadside hole in voltage control unit and install four bolts and nuts.
NOTE
Refer to paragraph 4-30, Wiring Diagrams, for information on electrical
routing and connections at electrical connectors (1 or 3).
(2)
One at a time, push pins from new electrical connector (1 or 3). Connect correct tagged wire
(6) to pin and crimp. Reinstall pins in correct slot in electrical connector.
(3) Remove tags from wires (6).
(4)
Close voltage control unit cover (2) and tighten two screws (7).
FOLLOW-ON TASKS:
Connect intervehicular electrical cable to semitrailer (see paragraph 2-12).
Check operation of lights (see TM 9-2320-273-10 or TM 9-2320-283-10).
4-41
TM 9-2330-384-14&P
4-18. LAMP REPLACEMENT.
a.
Removal
b.
Equipment Conditions:
Installation
Materials/Parts:
R e f Conditions
2-14 Intervehicular electrical cable disconnected from semitrailer.
Corrosion preventive compound (Item 7,
Appendix E)
General Safety Instructions:
Tools:
When performing electrical maintenance,
ALWAYS disconnect intervehicular electrical cable from semitrailer.
Tool kit, general mechanic’s
a. REMOVAL
WARNING
When performing electrical maintenance, ALWAYS disconnect intervehicular electrical cable from semitrailer. Failure to follow this warning
may create a spark and explosion, resulting in serious injury or death to
personnel.
CAUTION
Use caution when removing lens (6).
(1)
Use a screwdriver to carefully lift up on lens (3) and remove. Remove lamp (1).
(2) If preformed packing (2) is damaged, replace.
b. INSTALLATION
WARNING
When performing electrical maintenance, ALWAYS disconnect intervehicular electrical cable from semitrailer. Failure to follow this warning
may create a spark and explosion, resulting in serious injury or death to
personnel.
(1) Install lamp (1).
(2)
4-42
Apply a thin coat of corrosion preventive compound to sealing lip of lens (3). Install lens.
TM 9-2330-384-14&P
4-18. LAMP REPLACEMENT (Con"t).
FOLLOW-ON TASKS:
Connect intervehicular electrical cable to semitrailer (see paragraph 2-12).
Check operation of light (see TM 9-2320-273-10 or TM 9-2320-283-10).
4-43
TM 9-2330-384-14&P
4-19. BLACKOUT LIGHT MAINTENANCE.
a.
b.
Removal
Connector Repair
Equipment Conditions:
Ref
2-14
Conditions
Intervehicular electrical cable disconnected from semitrailer.
c.
Installation
Materials/Parts:
Two starwashers
Corrosion preventive compound (Item 7,
Appendix E)
Tag marker
(Item 21, Appendix E)
Tools:
Shop equipment, automotive maintenance
and repair, organizational maintenance,
common no. 1
a. REMOVAL
WARNING
When performing electrical maintenance, ALWAYS disconnect intervehicular electrical cable from semitrailer. Failure to follow this warning
may create a spark and explosion, resulting in serious injury or death to
personnel.
NOTE
Tag wires for installation if other
lights at light box are being removed.
(1)
4-44
Remove four screws (3) and pull
turn signal/taillight (2) from light
box (1) enough to gain access to
blackout light (4) mounting hardware inside light box.
General Safety Instructions:
When performing electrical maintenance,
ALWAYS disconnect inter-vehicular electrical cable from semitrailer.
TM 9-2330-384-14&P
4-19. BLACKOUT LIGHT MAINTENANCE (Con’t).
(2)
Reach inside light box (1) and use a 9/16 in. wrench to remove two bolts (14), terminal (13)
from convoy warning light brown wire (7), and two starwashers (12). Pull blackout light (4)
and wires from light box (1), Discard starwashers.
(3)
At connector (5), disconnect blackout light wire assembly #24 from chassis gray wire assembly (8). At connector (6), disconnect blackout light wire assembly #23 from rear conduit
orange wire assembly (9).
b. CONNECTOR REPAIR
(1)
If damaged, cut connectors (5 and 6) from ends of blackout light (4) wires. Discard connectors.
(2)
Manufacture connectors (5 and 6) by assembling C-washer (10) and shell (11) on end of
blackout light wires.
4-45
TM 9-2330-384-14&P
4-19. BLACKOUT LIGHT MAINTENANCE (Con"t).
c. INSTALLATION
WARNING
When performing electrical maintenance, ALWAYS disconnect intervehicular electrical cable from semitrailer. Failure to follow this warning
may create a spark and explosion, resulting in serious injury or death to
personnel.
NOTE
Ensure that all wire connections are made to clean, uncorroded surfaces.
Coat all wire connections with corrosion preventive compound before they
are made.
(1)
4-46
At connector (5), connect blackout light wire assembly #24 to chassis gray wire assembly
(8). At connector (6), connect blackout light wire assembly #23 to rear conduit orange wire
assembly (9).
TM 9-2330-384-14&P
4-19. BLACKOUT LIGHT MAINTENANCE (Con"t).
(2)
Install blackout light (4) to light box (1) with two new starwashers (12), terminal (13) from
convoy warning light brown wire (7), and two bolts (14).
(3)
Install turn signal/taillight (2) with
four screws (3).
FOLLOW-ON TASKS:
Connect intervehicular electrical cable to semitrailer (see paragraph 2-12).
Check operation of light (see TM 9-2320-273-10 or TM 9-2320-283-10).
4-47
TM 9-2330-384-14&P
4-20. STOP/TAILLIGHT MAINTENANCE.
Button Contact Repair
Removal
C.
Equipment Conditions:
Ref
2-14
Installation
Materials/Parts:
Conditions
Intervehicular electrical cable disconnected from semitrailer.
Two button contacts
Two connectors
Corrosion preventive compound (Item 7,
Appendix E)
Tag marker
(Item 21, Appendix E)
Tools:
Tool kit, general mechanic’s
Wire terminal kit
General Safety Instructions:
When performing electrical maintenance,
ALWAYS disconnect intervehicular electrical cable from semitrailer.
a. BUTTON CONTACT REPAIR
WARNING
When performing electrical maintenance, ALWAYS disconnect lntervehicular electrical cable from semitrailer. Failure to follow this warning
may create a spark and explosion, resulting in serious injury or death to
personnel.
CAUTION
Use caution not to damage lens (8).
(1)
Use a screwdriver to carefully lift up on lens (8) and remove. Remove lamp (7).
(2)
Remove four screws (5) and pull stop/taillight (4) away from light box (1) enough to gain
access to wiring inside light box.
(3)
Loosen two grommets (9) and pull brown wire (2) and red wire (10) through stop/taillight (4).
(4)
Cut brown wire (2) and red wire (10) from two button contacts (6).
(5)
Install two new button contacts (6) to ends of brown wire (2) and red wire (10). Crimp button
contacts.
(6)
To ensure proper operation of stop/taillight (4), hold stop/taillight so that deeper slot of
socket is to the top. Thread brown wire (2) and red wire (10) through two grommets (9). Seat
grommets in stop/taillight with red wire to the right.
(7)
Install lamp (7).
4-48
TM 9-2330-384-14&P
4-20. STOP/TAILLIGHT MAINTENANCE (Con"t).
(8)
Install stop/taillight (4) to light box (1) with four screws (5).
(9)
Apply a thin coat of corrosion preventive compound to sealing lip of lens (8). Install lens.
b. REMOVAL
WARNING
When performing electrical maintenance, ALWAYS disconnect intervehicular electrical cable from semitrailer. Failure to follow this warning
may create a spark and explosion, resulting in serious injury or death to
personnel.
NOTE
Tag wires for installation if other lights at light box (1) are being removed.
(1)
Remove four screws (5) and pull stop/taillight (4) away from light box (1) enough to gain
access to wiring inside light box.
4-49
TM 9-2330-384-14&P
4-20. STOP/TAILLIGHT MAINTENANCE (Con?).
(2)
Reach inside light box (1) and cut connector (12) from red wire (10). Discard connector.
NOTE
Curbside stop/taillight has two brown wires (2) at connector (11).
4-50
(3)
Cut connector (11) from brown wire (2). Discard connector.
(4)
Remove stop/taillight (4) from light box (1). If damaged, remove gasket (3) and discard.
TM 9-2330-384-14&P
4-20. STOP/TAILLIGHT MAINTENANCE (Con"t).
c. INSTALLATION
WARNING
When performing electrical maintenance, ALWAYS disconnect intervehicular electrical cable from semitrailer. Failure to follow this warning
may create a spark and explosion, resulting in serious injury or death to
personnel.
NOTE
Ensure that all wire connections are made to clean, uncorroded surfaces. Coat all wire connections with corrosion preventive compound
before they are made.
Curbside stop/taillight has two brown wires (2) at connector (11).
(1)
Connect brown wire (2) from stop/taillight (4) to brown wire inside light box (1). Crimp new
connector (11).
(2)
Connect red wire (10) from stop/taillight (4) to red wire inside light box (1). Crimp new connector (12).
(3)
If removed, install new gasket (3). Install stop/taillight (4) to light box (1) with four screws (5).
FOLLOW-ON TASKS:
l
l
Connect intervehicular electrical cable to semitrailer (see paragraph 2-12).
Check operation of light (see TM 9-2320-273-10 or TM 9-2320-283-10).
4-51
TM 9-2330-384-14&P
4-21. TURN SIGNAL/TAILLIGHT MAINTENANCE.
a.
b.
Button Contact Repair
Removal
c.
Equipment Conditions:
Installation
Materials/Parts:
R e f Conditions
2-14 Intervehicular electrical cable disconnected from semitrailer.
Two button contacts
Two connectors
Corrosion preventive compound (Item 7,
Appendix E)
Tag marker
(Item 21, Appendix E)
Tools:
Tool kit, general mechanic’s
Wire Terminal Kit
General Safety Instructions:
l
When performing electrical maintenance,
ALWAYS disconnect intervehicular electrical cable from semitrailer.
a. BUTTON CONTACT REPAIR
WARNING
When performing electrical maintenance, ALWAYS disconnect intervehicular electrical cable from semitrailer. Failure to follow this warning
may create a spark and explosion, resulting in serious injury or death to
personnel.
CAUTION
Use caution not to damage lens (9).
(1)
Use a screwdriver to carefully lift up on lens (9) and remove. Remove lamp (8).
(2)
Remove four screws (4) and pull stop/taillight (5) away from light box (1) enough to gain
access to wiring inside light box.
(3)
Remove four screws (6) and pull turn signal/taillight (11) from light box (1).
NOTE
Curbside turn signal/taillight (11) has a green wire instead of a yellow wire
(12).
(4)
Loosen two grommets (10) and pull black and yellow wires (2 and 12) through turn signal/taillight (11).
(5)
Cut black and yellow wires (2 and 12) from two button contacts (7).
(6)
Install two new button contacts (7) to black and yellow wires (2 and 12). Crimp button contacts.
4-52
TM 9-2330-384-14&P
4-21. TURN SIGNAL/TAILLIGHT MAINTENANCE (Con"t).
(7)
To ensure proper operation of light, hold turn signal/taillight (11) so that deeper slot of socket
is to the top. Thread black and yellow wires (2 and 12) through two grommets (10). Seat
grommets in socket of turn signal/taillight with yellow wire to the right.
(6) Install lamp (8).
(9)
Install turn signal/taillight (11) to light box (1) with four screws (6).
(10) Install stop/taillight (5) to light box (1) with four screws (4).
(11) Apply a thin coat of corrosion preventive compound to sealing lip of lens (9). Install lens.
b. REMOVAL
WARNING
When performing electrical maintenance, ALWAYS disconnect intervehicular electrical cable from semitrailer. Failure to follow this warning
may create a spark and explosion, resulting in serious injury or death to
personnel.
NOTE
Tag wires for installation if other lights at light box (1) are being removed.
(1)
Remove four screws (4) and pull stop/taillight (5) away from light box (1) enough to gain
access to wiring inside light box.
4-53
TM 9-2330-384-14&P
4-21. TURN SIGNAL/TAILLIGHT MAINTENANCE (Con"t).
NOTE
Curbside turn signal/taillight (11) has a green wire instead of a yellow wire
(12).
(2)
Reach inside light box (1) and cut connector (14) from yellow wire (12). Cut connector (15)
from four black wires (2 and 13). Discard connectors.
(3)
Remove four screws (6) and remove turn signal/taillight (11) from light box (1). If damaged,
remove gasket (3) and discard.
4-54
TM 9-2330-384-14&P
4-21. TURN SIGNAL/TAILLIGHT MAINTENANCE (Con"t).
c. INSTALLATION
WARNING
When performing electrical maintenance, ALWAYS disconnect intervehicular electrical cable from semitrailer. Failure to follow this warning
may create a spark and explosion, resulting in serious injury or death to
personnel.
NOTE
Ensure that all wire connections are made to clean, uncorroded surfaces.
Coat all wire connections with corrosion preventive compound before they
are made.
(1)
If removed, install new gasket (3). Install turn signal/taillight (11) to light box (1) with four
screws (6).
NOTE
Curbside turn signal/taillight (11) has a green wire instead of a yellow
wire (12).
(2)
Connect yellow wire (12) with new connector (14). Connect four black wires (2 and 13) with
new connector (15). Crimp connectors.
(3)
Install stop/taillight (5) with four screws (4).
FOLLOW-ON TASKS:
Connect intervehicular electrical cable to semitrailer (see paragraph 2-12).
Check operation of light (see TM 9-2320-273-10 or TM 9-2320-283-10).
4-55
TM 9-2330-384-14&P
4-22. CONVOY WARNING LIGHT WIRING MAINTENANCE.
Removal of Toggle Switch
Installation of Toggle Switch
a.
b.
C.
d.
Materials/Parts:
Equipment Conditions:
Ref
2-14
One gasket
Two connectors
Two locknuts
Corrosion preventive compound (Item 7,
Appendix E)
Tag marker
(Item 21, Appendix E)
Conditions
Intervehicular electrical cable disconnected from semitrailer.
Tools:
Tool kit, general mechanic’s
Hand drill
Rivet gun
Wire terminal kit
Removal of Condulet and Receptacle
Installation of Condulet and Receptacle
General Safety Instructions:
l
When performing electrical maintenance,
ALWAYS disconnect intervehicular electrical cable from semitrailer.
a. REMOVAL OF TOGGLE SWITCH
WARNING
When performing electrical maintenance, ALWAYS disconnect intervehicular electrical cable from semitrailer. Failure to follow this warning
may create a spark and explosion, resulting in serious injury or death to
personnel.
NOTE
Tag wires for installation if lights are being removed from light box (1).
(1)
Remove four screws and pull stop/taillight (4) away from light box (1) enough to gain access
to wiring inside (see paragraph 4-20).
NOTE
Toggle switch (3) terminals should be marked to ensure proper installation
of terminals (2).
(2)
On outside of light box (1), remove rubber boot from toggle switch (3).
(3)
Remove nut and toggle switch (3).
(4)
Remove two screws and disconnect two terminals (2) from toggle switch (3) inside light box
(1).
4-56
TM 9-2330-384-14&P
4-22. CONVOY WARNING LIGHT WIRING MAINTENANCE (Con’t).
b. INSTALLATION OF TOGGLE SWITCH
WARNING
When performing electrical maintenance, ALWAYS disconnect intervehicular electrical cable from semitrailer. Failure to follow this warning
may create a spark and explosion, resulting in serious injury or death to
personnel.
NOTE
Ensure that all connections are made to clean, uncorroded surfaces. Coat
all wire connections with corrosion preventive compound before they are
made.
(1)
Connect two terminals (2) to toggle switch (3) inside light box (1), as marked, with two
screws.
(2)
Install toggle switch (3) to light box (1) with nut. Install rubber boot over toggle switch.
(3)
Install stop/taillight (4) to light box (1) with four screws (see paragraph 4-20).
4-57
TM 9-2330-384-14&P
4-22. CONVOY WARNING LIGHT WIRING MAINTENANCE (Con"t).
c. REMOVAL OF CONDULET AND RECEPTACLE
WARNING
When performing electrical maintenance, ALWAYS disconnect intervehicular electrical cable from semitrailer. Failure to follow this warning
may create a spark and explosion, resulting in serious injury or death to
personnel.
NOTE
To remove receptacle (14), perform steps 1-4.
(1)
Remove cap (7) from receptacle
(14). If cap is damaged, use side
cutters to remove rivet (8) securing retaining chain (9) to rear
dam (6).
(2)
Loosen two captive screws (10)
and remove cover (11). Remove
gasket from cover and discard.
(3)
Cut two connectors (19) and disconnect white and black receptacle wires (16 and 18) from
brown and blue wires (20 and
17). Discard connectors.
(4)
Remove receptacle (14) from
condulet (5).
(5)
Loosen nut (22) and disconnect
conduit (23) from straight adapter (21). Pull brown and black
wires (20 and 18) from condulet
(5).
(6)
Remove two locknuts (12),
screws (15), four washers (13),
and condulet (5) from rear dam
(6). Discard locknuts.
(7)
Remove straight adapter (21)
from condulet (5).
4-58
TM 9-2330-384-14&P
4.22.
d.
CONVOY WARNING LIGHT WIRING MAINTENANCE (Con't).
INSTALLATION
OF CONDULET AND RECEPTACLE
WARNING
When performing electrical maintenance, ALWAYS disconnect Intervehicular electrical cable from semitrailer. Failure to follow this warning
may create a spark and explosion, resulting In serious Injury or death to
personnel.
NOTE
9 Ensure that all connections are made to clean, uncorroded surfaces.
Cost all wire connections with corrosion preventive compound before
they are made.
a To Install receptacle (14), perform steps 4 through 7.
(1) install straight adapter (21) to condulet (5).
(2) install condulet (5) to rear dam (6) with two screws (15), four washers (13), and two new
locknuts (12).
(3) Thread brown and blue wires (20 and 17) through straight adapter (21) into condulet (5).
Connect conduit (23) to straight adapter and tighten nut (22).
(4) Install receptacle (14) to condulet (5).
(5) Connect brown wire (20) to white receptacle wire (16) with new connector (19). Connect blue
wire (17) to black receptacle wire (18) with new connector. Crimp connectors.
(6) Install new gasket to cover (11). Install cover and tighten two captive screws (10).
(7) If removed, use a rivet gun to install retaining chain (9) to rear dam (6) with rivet (8). Install
cap (7) on receptacle (14).
4-59
TM 9-2330-384-14&P
4-23. CONVOYWARNINGLIGHTASSEMBLYMAINTENANCE.
THISTASKCOVERS
b. Assembly
a. Disassembly
INITIAL SETUP
Equipment Conditions:
Ref
2-23
Materials/Parts:
Conditions
Convoy warning light removed from
mounting bracket.
- Two terminals
- Three lockwashers
- Silicone Compound (item 18.1,
Appendix E)
Tools:
• Tool kit, general mechanic's
• Torque wrench
• Wire terminal kit
a.
DISASSEMBLY
(1)
Loosen screw (3) from clamping ring (2). Remove clamping ring (2), dome (1), and gasket (7) from
convoy warning light (13). Discard gasket.
(2)
Unplug two terminals (4) of white and black cable wires (5 and 6) from convoy warning light (13).
Tag and mark wires.
NOTE
Perform step 3 only if repairing wire.
(3)
Cut terminals (4) from white and black cable wires (5 and 6) and discard.
(4)
Remove three nuts (10), lockwashers (11), bolts (15), and washers (14). Separate convoy warning
light (13) from base plate (12). Discard lockwashers.
(5)
Pull away cable (9) from base of convoy warning light (13).
b. ASSEMBLY
CAUTION
Ensure that only component parts of the convoy warning light assembly, as
listed in Appendix D, are used. The M1062 convoy warning light draws a
maximum of 5 amperes. Use of another convoy warning light, which draws
more than 5 amperes, may result in damage to electrical system.
(1)
4-60
Thread cable (9) through hole in base of convoy warning light (13) so that encased portion of cable
extends at least 3 in. (7.6 cm) from base. White and black cable wires (5 and 6) should be bared
for 3 in. (7.6 cm) from encased portion of wire.
Change1
TM 9-2330-384-14&P
4-23. CONVOYWARNINGLIGHTASSEMBLYMAINTENANCE(Con't).
(2)
Place a bead of silicone compound around
cable (9) at base of convoy warning light (13).
(3)
Position convoy warning light (13) over base
plate (12). Secure convoy warning light (13) to
base plate (12) with three bolts (15), washers
(14), new lockwashers (11), and nuts (10).
Torque nuts 10-20 lb.-in. (1-2 N-m).
1
NOTE
2
If repairing/replacing wire, crimp
two new terminals onto ends of
bared wires prior to performing
step 4.
(4)
3
4 5
4
-'0111
6
'0@
Plug two terminals (4) onto convoy warning
light (13). Connect black cable wire (6) to
positive connection, and connect white cable
wire (5) to negative connection.
CAUTION
Before installing dome (1), ensure
that white and black cable wires
(5 and 6) are under rotating
mechanism (8) of convoy warning
light (13). Failure to follow this
caution may result in damage to
light or cable wires.
7
14,
.4
8
13
NOTE
Ensure that gasket (7) of convoy
warning light (13) is in position
before installing dome (1).
(5)
12
11
Install new gasket (7) and dome (1) over
convoy warning light (13). Install clamping
ring (2) and screw (3), and tighten screw.
FOLLOW ON TASKS:
• Install convoy warning light to mounting bracket
(see paragraph 2-23).
• Check operation of light (see TM 9-2320-273-10
or TM 9-2320-283-10).
Change1
4-61
TM 9-2330-384-14&P
4-24.
FRONT CLEARANCE AND MARKER LIGHT MAINTENANCE.
I THIS TASK COVERS
a.
b.
Button Contact Repair
Removal
c.
Installation
Equipment Conditions:
M
Conditions
2-14 Intervehicular electrical cable disconnected from semitrailer.
Materials/Parts:
- One button contact
- Corrosion preventive compound
Appendix E)
Tools:
• Tool kit, general mechanic's
• Wire terminal kit
General Safety Instructions:
When performing electrical maintenance.
ALWAYS disconnect intervehicular electrical cable from semitrailer.
(Item 7,
a. BUTTON CONTACT REPAIR
WARNING
When performing electrical maintenance, ALWAYS disconnect Intervehicular electrical cable from semitrailer. Failure to follow this warning
may create a spark and explosion, resulting in serious Injury or death to
personnel.
CAUTION
Use caution
(1)
Carefully
not to damage lens (10).
to lift up on lens (10) and remove. Remove lamp (9).
use a screwdriver
2
6
9
10
4-62
TM 9-2330-384-14&P
4-24. FRONT CLEARANCE AND MARKER LIGHT MAINTENANCE (Con"t).
(2) Loosen two screws (20) and
open voltage control unit cover
(15). Prop cover open with cable
from a dummy coupling. Remove
two nuts and three terminals (16)
from top roadside circuit breaker
(17).
CAUTION
Use caution not to damage brown
wire (11) and terminal (16).
(3) Loosen nut (19) at connector
(18) and disconnect tubing (12)
from voltage control unit (14).
Remove brown wire (11) and tubing from voltage control unit.
CAUTION
Use caution when removing tubing
(12) from clips (13). Clips should be
lifted gently and only enough to release tubing. Improper handling of
clips will cause them to break.
(4)
Lift four clips (13) enough to free
tubing (12) from semitrailer. Remove two screws (6) and remove
front clearance and marker light
(5), tubing, and brown wire (11)
from semitrailer.
(5) Loosen nut (1) at elbow (2) and
disconnect tubing (12). Straighten tubing and remove brown wire
(11).
4-63
TM 9-2330-384-14&P
4-24. FRONT CLEARANCE AND MARKER LIGHT MAINTENANCE (Con’t).
(6)
Loosen grommet (7). Pull brown wire (11) through front clearance and marker light (5).
(7)
Cut brown wire (11) from button contact (8).
(8)
Install new button contact (8) to end of brown wire (11). Crimp button contact.
(9)
Install brown wire (11) through grommet (7) and front clearance and marker light (5). Seat
grommet in neck of housing.
(10) Install lamp (9).
(11) Thread brown wire (11) through tubing (12).
(12) Install tubing (12), brown wire (11), and front clearance and marker light (5) through hole in
bracket (3). Install front clearance and marker light with two screws (6).
CAUTION
Use caution when installing tubing
(12) under clips (13). When securing
tubing under clips, a soft-faced hammer should be used to tap clips back
into place. Improper handling of clips
will cause them to break.
(13) Bend tubing (12) to fit under four
clips (13). Bend clips to secure
tubing.
4-64
TM 9-2330-384-14&P
4-24. FRONT CLEARANCE AND MARKER LIGHT MAINTENANCE (Con’t).
(14) Thread brown wire (11) through
connector (18) into voltage control unit (14). Connect tubing
(12) at connector and tighten nut
(19).
(15) Inside voltage control unit (14),
connect three terminals (16) to
top roadside circuit breaker (17)
with two nuts.
(16) Close voltage control unit cover
(15) and tighten two screws (20).
(17) Apply a thin coat of corrosion preventive compound to sealing lip
of lens (10). Install lens.
b. REMOVAL
WARNING
When performing electrical maintenance, ALWAYS disconnect intervehicular electrical cable from semitrailer. Failure to follow this warning
may create a spark and explosion, resulting in serious injury or death to
personnel.
(1)
Loosen two screws (20) and open voltage control unit cover (15). Prop cover open with cable
from a dummy coupling. Remove two nuts and three terminals (16) from top roadside circuit
breaker (17).
CAUTION
Use caution not to damage brown wire (11) and terminal (16).
(2)
Loosen nut (19) at connector (18) and disconnect tubing (12) from voltage control unit (14).
Remove brown wire (11) and tubing from voltage control unit.
4-65
TM 9-2330-384-14&P
4-24. FRONT CLEARANCE AND MARKER LIGHT MAINTENANCE (Con"t).
CAUTION
Use caution when removing tubing
(12) from clips (13). Clips should be
lifted gently and only enough to release tubing. Improper handling of
clips will cause them to break.
4-66
(3)
Lift four clips (13) enough to free
tubing (12) from semitrailer. Remove two screws (6) and remove
front clearance and marker light
(5), tubing, and brown wire (11)
from semitrailer.
(4)
Loosen nut (1) at elbow (2) and disconnect tubing (12). Straighten tubing and remove brown
wife (11).
(5)
If damaged, remove gasket (4) and discard. Remove elbow (2) from front clearance and
marker light (5).
TM 9-2330-384-14&P
4-24. FRONT CLEARANCE AND MARKER LIGHT MAINTENANCE (Con’t).
c. INSTALLATION
WARNING
When performing electrical maintenance, ALWAYS disconnect intervehicular electrical cable from semitrailer. Failure to follow this warning
may create a spark and explosion, resulting in serious injury or death to
personnel.
NOTE
Ensure that all connections are made to clean, uncorroded surfaces.
Coat all wire connections with corrosion preventive compound before
they are made.
If two or more consecutive clips (13) are missing or damaged, tank must
be purged and tested with combustible gas indicator set (see paragraph
4-68). Replacement clips can then be welded to semitrailer (see
TM 9-237).
(1)
Install elbow (2) to front clearance and marker light (5). If removed, install new gasket (4).
(2)
Thread brown wire (11) through tubing (12).
(3)
Install tubing (12), brown wire (11), and front clearance and marker light (5) through hole in
bracket (3). Install front clearance and marker light with two screws (6).
CAUTION
Use caution when installing tubing (12) under clips (13). When securing
tubing under clips, a soft-faced hammer should be used to tap clips back
into place. Improper handling of clips will cause them to break.
(4)
Bend tubing (12) to fit under four clips (13). Bend clips to secure tubing.
4-67
TM 9-2330-384-14&P
4-24. FRONT CLEARANCE AND MARKER LIGHT MAINTENANCE (Con"t).
(5)
Thread brown wire (11) through
connector (18) into voltage control unit (14). Connect tubing
(12) at connector and tighten nut
(19).
(6)
Inside voltage control unit (14),
connect three terminals (16) to
top roadside circuit breaker (17)
with two nuts.
(7)
Close voltage control unit cover
(15) and tighten two screws (20).
FOLLOW-ON TASKS:
Connect intervehicular electrical cable to semitrailer (see paragraph 2-12).
Check operation of light (see TM 9-2320-273-10 or TM 9-2320-283-10).
4-68
TM 9-2330-384-14&P
4-25. SIDE CLEARANCE AND MARKER LIGHT MAINTENANCE.
a.
b.
C.
Button Contact Repair
Removal
Materials/Parts:
Equipment Conditions:
One button contact
One connector
One gasket
Corrosion preventive compound (Item 7,
Appendix E)
R e f Conditions
2-14 Intervehicular electrical cable disconnected from semitrailer.
Tools:
Tool kit, general mechanic’s
Wire terminal kit
Installation
General Safety Instructions:
When performing electrical maintenance,
ALWAYS disconnect intervehicular electrical cable from semitrailer.
a. BUTTON CONTACT REPAIR
WARNING
When performing electrical maintenance, ALWAYS disconnect intervehicular electrical cable from semitrailer. Failure to follow this warning
may create a spark and explosion, resulting In serious injury or death to
personnel.
4-69
TM 9-2330-384-14&P
4-25. SIDE CLEARANCE AND MARKER LIGHT MAINTENANCE (Con"t).
CAUTION
Use caution not to damage lens (6).
(1)
Carefully use a screwdriver to lift lens (6) and remove. Remove lamp (7).
(2) Loosen two screws (16) and remove cover (15) from condulet
(14) at inner surface of framerail
(10). Remove gasket from cover
and discard.
NOTE
On roadside, black wire (9) from side
clearance and marker light (3) connects to two black wires (17). On
curbside, black wire connects to two
brown wires.
4-70
(3)
Cut connector (18) at black wire
(9) and two black wires (17). Discard connector.
(4)
Loosen nuts (12 and 13) and disconnect conduit (1) from elbow
(11) and condulet (14).
(5)
Straighten conduit (1). pull from black wire (9), and remove.
TM 9-2330-384-14&P
4-25. SIDE CLEARANCE AND MARKER LIGHT MAINTENANCE (Con"t).
(6)
Remove two screws (4), side clearance and marker light (3), and elbow (11) from framerail
(10).
(7)
Loosen grommet (5) and pull black wire (9) through.
(8)
Cut black wire (9) from button contact (8). Discard button contact.
(9)
Install new button contact (8) to end of black wire (9) and crimp.
(10) Thread black wire (9) through elbow (11) and side clearance and marker light (3). Install
grommet (5) through black wire. Seat grommet in neck of housing.
(11) Install lamp (7).
(12) Install elbow (11) and side clearance and marker light (3) through hole in framerail (10) with
two screws (4).
(13) Thread black wire (9) through conduit (1). Connect conduit to elbow (11) and tighten nut
(12).
(14) Thread black wire (9) into condulet (14). Connect conduit (1) to condulet and tighten nut
(13).
(15) Connect black wire (9) to two black wires (17) with new connector (18). Crimp connector.
(16) Install new gasket to cover (15). Install cover on condulet (14) and tighten two screws (16).
(17) Apply a thin coat of corrosion preventive compound to sealing lip of lens (6). Install lens.
b. REMOVAL
WARNING
When performing electrical maintenance, ALWAYS disconnect intervehicular electrical cable from semitrailer. Failure to follow this warning
may create a spark and explosion, resulting in serious injury or death to
personnel.
(1)
Loosen two screws (16) and remove cover (15) from condulet (14). Remove gasket from
cover and discard.
NOTE
On roadside, black wire (9) from side clearance and marker light (3) connects to two black wires (17). On curbside, black wire connects to two
brown wires.
(2)
Cut connector (18) at black wire (9) and two black wires (17). Discard connector.
(3)
Loosen nuts (12 and 13) and disconnect conduit (1) from elbow (11) and condulet (14).
(4)
Straighten conduit (1), pull from black wire (9), and remove.
(5)
Remove two screws (4), side clearance and marker light (3), and elbow (11) from framerail
(10).
(6)
Remove elbow (11) from side clearance and marker light (3). If damaged, remove gasket (2)
and discard.
4-71
TM 9-2330-384-14&P
4-25. SIDE CLEARANCE AND MARKER LIGHT MAINTENANCE (Con't).
c. INSTALLATION
WARNING
When performing electrical maintenance, ALWAYS disconnect intervehicular electrical cable from semitrailer. Failure to follow this warning
may create a spark and explosion, resulting in serious injury or death to
personnel.
NOTE
Ensure that all connections are made to clean, uncorroded surfaces. Coat
all wire connections with corrosion preventive compound before they are
made.
4-72
(1)
Install elbow (11) on side clearance and marker light (3). If removed, install new gasket (2).
(2)
Install elbow (11) and side clearance and marker light (3) assembly through hole in framerail
(10) with two screws (4).
(3)
Thread black wire (9) through conduit (1). Connect conduit to elbow (11) and tighten nut
(12).
TM 9-2330-384-14&P
4-25. SIDE CLEARANCE AND MARKER LIGHT MAINTENANCE (Con't)
(4)
Thread black wire (9) into condulet (14). Connect conduit (1) to
condulet and tighten nut (13).
(5) Connect black wire (9) to two
black wires (17) with new connector (18). Crimp connector.
(6)
Install new gasket to cover (15).
Install cover on condulet (14) and
tighten two screws (16).
FOLLOW-ON TASKS:
l
l
Connect intervehicular electrical cable to semitrailer (see paragraph 2-12).
Check operation of light (see TM 9-2320-273-10 or TM 9-2320-283-10).
4-73
TM 9-2330-384-14&P
4-26. REAR SIDE CLEARANCE AND MARKER LIGHT MAINTENANCE.
Button Contact Repair
Removal
a.
b.
C.
Equipment Conditions:
Ref
2-14
Installation
Materials/Parts:
Conditions
Intervehicular electrical cable disconnected from semitrailer.
One button contact
One connector
Corrosion preventive compound (Item 7,
Appendix E)
Tag marker
(Item 21, Appendix E)
Tools:
Tool kit, general mechanic’s
Wire terminal kit
General Safety Instructions:
l
When performing electrical maintenance,
ALWAYS disconnect inter-vehicular electrical cable from semitrailer.
a. BUTTON CONTACT REPAIR
WARNING
When performing electrical maintenance, ALWAYS disconnect intervehicular electrical cable from semitrailer. Failure to follow this warning
may create a spark and explosion, resulting in serious injury or death to
personnel.
CAUTION
Use caution not to damage lens (9).
(1)
Carefully use a screwdriver to lift lens (9) and remove. Remove lamp (8).
(2)
Remove four screws (1) and pull stop/taillight (2) away from light box (3) enough to gain
access to wiring inside light box.
(3)
Remove four screws (6) and rear side clearance and marker light (5) from light box (3).
(4)
Loosen two grommets (11) from rear side clearance and marker light (5), and pull black wire
(10) through.
(5)
Cut black wire (10) from button contact (7). Discard button contact.
(6)
Install new button contact (7) to end of black wire (10). Crimp button contact.
(7)
Install two grommets (11) through black wire (10), Thread black wire through rear side clearance and marker light (5), and seat grommets in neck of housing.
4-74
TM 9-2330-384-14&P
4-26. REAR SIDE CLEARANCE AND MARKER LIGHT MAINTENANCE (Con"t).
(8) Install lamp (8).
(9)
Install rear side clearance and marker light (5) to light box (3) with four screws (6).
(10) Install stop/taillight (2) with four screws (1).
(11) Apply a thin coat of corrosion preventive compound to sealing lip of lens (9). Install lens.
b. REMOVAL
WARNING
When performing electrical maintenance, ALWAYS disconnect intervehicular electrical cable from semitrailer. Failure to follow this warning
may create a spark and explosion, resulting in serious Injury or death to
personnel.
NOTE
Tag wires for installation if other lights at light box (3) are being removed.
(1)
Remove four screws (1) and pull stop/taillight (2) away from light box (3) enough to gain
access to wiring inside light box.
4-75
TM 9-2330-384-14&P
4-26. REAR SIDE CLEARANCE AND MARKER LIGHT MAINTENANCE (Con"t).
NOTE
On curbside, black wire (10) from rear side clearance and marker light (5)
connects to two brown wires (12). On roadside, black wire connects to
three black wires. Curbside wiring is shown.
(2)
Cut connector (13) from two brown wires (12). Discard connector.
(3)
Remove four screws (6) and rear side clearance and marker light (5) from light box (3). If
damaged, remove gasket (4) and discard.
4-76
TM 9-2330-384-14&P
4-26. REAR SIDE CLEARANCE AND MARKER LIGHT MAINTENANCE (Con"t).
c. INSTALLATION
WARNING
When performing electrical maintenance, ALWAYS disconnect intervehicular electrical cable from semitrailer. Failure to follow this warning
may create a spark and explosion, resulting in serious injury or death to
personnel.
NOTE
Ensure that all connections are made to clean, uncorroded surfaces. Coat
all wire connections with corrosion preventive compound before they are
made.
(1)
If removed, install new gasket (4). Install rear side clearance and marker light (5) to light box
(3) with four screws (6).
NOTE
On curbside, black wire (10) from rear side clearance and marker light (5)
connects to two brown wires (12). On roadside, black wire connects to
three black wires. Curbside wiring is shown.
(2)
Connect black wire (10) to two brown wires (12) with new connector (13). Crimp connector.
(3)
Install stop/taillight (2) with four screws (1).
FOLLOW-ON TASKS:
Connect intervehicular electrical cable to semitrailer (see paragraph 2-12).
Check operation of light (see TM 9-2320-273-10 or TM 9-2320-283-10).
4-77
TM 9-2330-384-14&P
4-27. REFLECTOR REPLACEMENT.
a.
Removal
Materials/Parts:
b.
Installation
General Safety Instructions:
One rivet
DO NOT drill out rivet when replacing a
damaged reflector.
Tools:
Tool kit, general mechanic’s
Hand riveter
a. REMOVAL
WARNING
DO NOT drill out rivet (2) when replacing a damaged reflector. Drilling can
produce a spark which may cause an explosion and fire. Failure to follow
this warning may result in serious injury or death to personnel.
(1)
Remove damaged reflector (1) pieces away from rivet (2).
(2)
Pull on rivet (2) with pliers to remove. Discard rivet and reflector (1).
b. INSTALLATION
Install reflector (1) with new rivet (2).
4-78
TM 9-2330-384-14&P
4-28. TRIPLE CLEARANCE LIGHT ASSEMBLY REPLACEMENT.
a.
Removal
b.
Equipment Conditions:
Materials/Parts:
R e f Conditions
2-14 Intervehicular electrical cable disconnected from semitrailer.
l
One connector
Corrosion preventive compound (Item 7,
Appendix E)
General Safety Instructions:
Tools:
l
installation
Tool kit, general mechanic’s
Wire terminal kit
l
When performing electrical maintenance,
ALWAYS disconnect intervehicular electrical cable from semitrailer.
a. REMOVAL
WARNING
When performing electrical maintenance, ALWAYS disconnect intervehicular electrical cable from semitrailer. Failure to follow this warning
may create a spark and explosion, resulting in serious injury or death to
personnel.
4-79
TM 9-2330-384-14&P
4-28. TRIPLE CLEARANCE LIGHT ASSEMBLY REPLACEMENT (Con’t).
CAUTION
Use caution not to damage lens (9).
(1)
Carefully use a screwdriver to lift lens (9) and remove.
(2)
Cut connector (3) from black wire (5) and two brown wires (2). Discard connector.
(3)
Remove two screws (10) closest to conduit (6). Lift triple clearance light assembly (1) away
from semitrailer enough to allow tool to be placed on nut (7).
(4)
Loosen nut (7) at straight adapter (8) and disconnect conduit (6) from triple clearance light
assembly (1). Remove black wire (5) from triple clearance light assembly.
(5)
Remove four remaining screws (10) and triple clearance light assembly (1) from semitrailer.
If damaged, remove three gaskets (4) and discard.
(6)
Remove straight adapter (8) from triple clearance light assembly (1).
b. INSTALLATION
WARNING
When performing electrical maintenance, ALWAYS disconnect intervehicular electrical cable from semitrailer. Failure to follow this warning
may create a spark and explosion, resulting in serious injury or death to
personnel.
(1)
4-80
Install straight adapter (8) to triple clearance light assembly (1).
TM 9-2330-384-14&P
4-28. TRIPLE CLEARANCE LIGHT ASSEMBLY REPLACEMENT (Con't).
(2)
If removed, install three new gaskets (4) and triple clearance light assembly (1) to semitrailer
with six screws (10). Leave two screws closest to conduit (6) loose.
(3)
Thread black wire (5) through straight adapter (8) into triple clearance light assembly (1).
Connect black wire to two brown wires (2) and crimp new connector (3).
(4)
Connect conduit (6) to triple clearance light assembly (1) at straight adapter (8) and tighten
nut (7). Tighten two loose screws (10) closest to conduit.
(5)
Apply a thin coat of corrosion preventive compound to sealing lip of lens (9). Install lens to
triple clearance light assembly (1).
FOLLOW-ON TASKS:
• Connect intervehicular electrical cable to semitrailer (see paragraph 2-12).
• Check operation of light (see TM 9-2320-273-10 or TM 9-2320-283-10).
4-81
TM 9-2330-384-14&P
4-29. ELECTRICAL CONDUIT AND WIRES REPLACEMENT.
THIS TASK COVERS
a.
b.
Removal
Installation
INITIAL SETUP
Materials/Parts:
Equipment Conditions:
Ref
2-14
Conditions
Intervehicular electrical cable disconnected from semitrailer.
Connectors (as required)
Terminals (as required)
l
Corrosion preventive compound (Item 7,
Appendix E)
l Grease
(Item 12, Appendix E)
l Tag marker
(Item 21, Appendix E)
l
l
Tools:
l
l
l
Tool kit, general mechanic’s
Wire terminal kit
Tubing cutter
General Safety Instructions:
l
When performing electrical maintenance,
ALWAYS disconnect intervehicular electrical cable from semitrailer.
a. REMOVAL
WARNING
When performing electrical maintenance, ALWAYS disconnect lntervehicular electrical cable from semitrailer. Failure to follow this warning
may create a spark and explosion, resulting in serious Injury or death to
personnel.
NOTE
(1)
4-82
l
Refer to paragraph 4-30 for information on routing of electrical wires and
location of electrical components.
l
Removal of front clearance and marker light conduit is covered in paragraph 4-24. Removal of short length of conduit at side clearance and
marker light is covered in paragraph 4-25.
l
Tag wires for installation.
At each end of electrical conduit (1), cut wires (4) from connectors (5) :
(a)
If removing electrical conduit at front of semitrailer, disconnect wires from circuit breaker posts inside voltage control unit (2), then cut terminals (3) from wires.
(b)
To gain access to connectors at condulet (7) at side clearance and marker light, cover
of condulet must be removed (see paragraph 4-25).
(c)
To gain access to connectors inside rear light box, stop/taillight must be removed (see
paragraph 4-20).
(d)
To gain access to connectors at convoy warning light condulet, cover of condulet must
be removed (see paragraph 4-22).
TM 9-2330-384-14&P
4-29. ELECTRICAL CONDUIT AND WIRES REPLACEMENT (Con't).
(2)
If removing electrical conduit (1) at voltage control unit (2), at condulet (7) at side clearance
and marker light (6), at triple clearance light assembly, or at convoy warning light condulet,
loosen nut (9) and disconnect electrical conduit from connector (8).
CAUTION
Use caution when releasing electrical conduit (1) from under clips. Clips
should be lifted gently and only enough to release electrical conduit. Improper handling of clips will cause them to break.
(3)
Gently lift clips to release electrical conduit (1). Remove electrical conduit.
(4)
Inspect all grommets along electrical conduit routing. If grommets are damaged, replace.
4-83
TM 9-2330-384-14&P
4-29. ELECTRICAL CONDUIT AND WIRES REPLACEMENT (Con’t).
b. INSTALLATION
WARNING
When performing electrical maintenance, ALWAYS disconnect intervehicular electrical cable from semitrailer. Failure to follow this warning
may create a spark and explosion, resulting in serious injury or death to
personnel.
NOTE
l
Refer to paragraph 4-30 for information on routing of electrical wires and
location of electrical components.
•
Installation of front clearance and marker light conduit is covered in
paragraph 4-24. Installation of short length of conduit at side clearance
and marker light is covered in paragraph 4-25.
l
Refer to Appendix G for information on manufacturing electrical conduit
(1) and wires (4).
l
Ensure that all connections are made to clean, uncorroded surfaces.
Coat all wire connections with corrosive preventive compound before
they are made.
(1)
Cut electrical conduit (1) and wires (4) to length.
(2)
Feed all wires (4) through electrical conduit (1).
(3)
Apply grease to all grommets along electrical conduit routing.
(4)
Install one end of electrical conduit (1):
(a)
If installing electrical conduit at voltage control unit (2). at condulet (7) at side clearance
and marker light (6), at triple clearance light assembly, or at convoy warning light condulet, feed wires (4) through connector (8) and connect electrical conduit. Tighten nut
(9).
NOTE
To aid in installation at rear light box, bend electrical conduit before feeding
conduit through grommet into light box.
(b)
If installing electrical conduit at rear of semitrailer, feed wires and electrical conduit
through grommet into light box.
CAUTION
Use caution when securing electrical conduit (1) under clips. Improper handling of clips will cause them to break.
NOTE
If two or more consecutive clips are missing or damaged, notify direct support maintenance.
(5)
4-84
Bend electrical conduit (l), as required, and secure under clips by tapping clips with a softfaced hammer.
TM 9-2330-384-14&P
4-29. ELECTRICAL CONDUIT AND WIRES REPLACEMENT (Con't).
(6)
Cut any excess length of electrical conduit (1). Install electrical conduit at other end.
(7)
Connect wires (4) at each end of electrical conduit (1). as tagged, with new connectors (5):
(a)
If electrical conduit at front of semitrailer was replaced, install new terminals (3) on
wires and connect to circuit breaker posts in voltage control unit (2).
(b)
If cover of condulet (7) at side clearance and marker light (6) was removed to gain
access to connectors inside condulet, install cover (see paragraph 4-25).
4-85
TM 9-2330-384-14&P
4-29. ELECTRICAL CONDUIT AND WIRES REPLACEMENT (Con't).
(c)
If stop/taillight was removed to gain access to connectors inside rear light box, install
stop/taillight (see paragraph 4-20).
(d)
If cover of convoy warning light condulet was removed to gain access to connectors
inside, install cover of condulet (see paragraph 4-22).
FOLLOW-ON TASKS:
• Connect intervehicular electrical cable to semitrailer (see paragraph 2-12).
l Check operation of lights (see TM 9-2320-273-10 or TM 9-2320-283-10)
4-86
TM 9-2330-384-14&P
4-30. WIRING DIAGRAMS.
THIS TASK COVERS
a.
b.
General Instructions
Voltage Control Unit and 12-Volt and
24-Volt Electrical Connector Wiring
C.
d.
Voltage Control Unit and Front Chassis
Wiring
Rear Chassis Wiring
a. GENERAL INSTRUCTIONS
WARNING
When troubleshooting an electrical malfunction or performing electrical
maintenance, ALWAYS disconnect intervehicular electrical cable from
semitrailer. Failure to follow this warning may create a spark and explosion,
resulting in serious injury or death to personnel.
(1)
This paragraph contains wiring diagrams for the M1062 7500 Gallon Fuel Tank Semitrailer.
Refer to these wiring diagrams when performing electrical troubleshooting and when performing electrical repair and maintenance.
(2)
All wires, except blackout lights, are color-coded. The following abbreviations of wire colors
are used in the wiring diagrams:
BLK
BLU
BRN
GRA
GRN
ORN
RED
WHT
YEL
(3)
......
......
......
......
......
......
......
.....
......
......
.......
.......
.......
......
.......
.......
.......
.......
......
......
......
.....
......
......
......
......
......
Black
Blue
Brown
Gray
Green
Orange
Red
White
Yellow
Symbols. The following is a list of electrical components and the symbols used to identify
them in the wiring diagrams:
Item
Connector
Connector
Terminal
Symbol
Function
Crimp connection between two or more
wires.
Plug-in male/female connector.
Connecting element from wire to component.
4-87
TM 9-2330-384-14&P
4-30. WIRING DIAGRAMS (Con’t).
(4)
Major components in wiring diagrams are labeled. The following is a list of component abbreviations:
BO . . . . . . . . . . . . . . . . . . . . . . .
CWL . . . . . . . . . . . . ........
CB . . . . . . . . . . . . . . . . . . . . . . .
GND......................
12-v CONN . . . . . . . . . . . . . . . .
24-v CONN . . . . . . . . . . . . . . . .
RCPT . . . . . . . . . . . . . . . . . . . . .
RES . . . . . . . . . . . . . . . . . . . . . .
VCU......................
VRM . . . . . . . . . . . . . . . . . . . . .
Blackout
Convoy Warning Light
Circuit Breaker
Ground
12-volt Electrical Connector
24-volt Electrical Connector
Receptacle
Resistor
Voltage Control Unit
Voltage Reducer Module
(5)
The 12-volt electrical connector pins are identified by numbers; the 24-volt electrical connector pins are identified by letters; the convoy warning light receptacle pins are identified by
numbers.
(6)
Numbers have been assigned to the circuit breakers for ease of identification when performing electrical troubleshooting. These numbers can be found in the wiring diagrams. The
circuit breakers themselves have no numbers on them.
(7)
Table 4-3 identifies each circuit breaker by number, the corresponding chassis wire color,
and all lights/switches that operate off that circuit.
Table 4-3. M1062 Circuit Breaker Circuits.
Circuit Breaker
Number
1
Lights On Circuit
Chassis Wire Color
Black
l
l
l
l
2
Blue
Convoy Warning Light
3
Gray (Roadside)
Roadside Blackout Drive
4
Orange
Curbside/Roadside Blackout Stoplights
5
Brown
l
l
l
l
4-88
Roadside Side Clearance and Marker
Light
Roadside Rear Side Clearance and
Marker Light
Triple Clearance Light Assembly
Curbside/Roadside Running Lights (at
Turn Signal/Taillights)
Curbside/Roadside Front Clearance
and Marker Lights
Curbside Side Clearance and Marker
Light
Curbside Rear Side Clearance and
Marker Light
Curbside/Roadside Running Lights (at
Stop/Taillights)
6
Red
Curbside/Roadside Stoplights
7
Green
Curbside Turn Signal
8
Yellow
Roadside Turn Signal
9
Gray (Curbside)
Curbside Blackout Drive
TM 9-2330-384-14&P
4-30. WIRING DIAGRAMS (Con't).
(8) For information on manufacturing wires, wire assemblies, and electrical conduit, refer to
Appendix G.
b. VOLTAGE CONTROL UNIT AND 12-VOLT AND 24-VOLT ELECTRICAL CONNECTOR WIRING
4-89
TM 9-2330-384-14&P
4-30. WIRING DIAGRAMS (Con't).
c. VOLTAGE CONTROL UNIT AND FRONT CHASSIS WIRING
4-90
TM 9-2330-384-14&P
4-30. WIRING DIAGRAMS (Con't).
d. REAR CHASSIS WIRING
4-91
TM 9-2330-384-14&P
Section VI. AXLE ASSEMBLY MAINTENANCE
Paragraph
Number
4-31
4-32
Page
Number
Title
Axle Alinement . . . . . . . . . . . . . . . . . . . . . . . . . . . . . . . . . . . . . . . . . . . . . . . . . .
Bent Axle Check . . . . . . . . . . . . . . . . . . . . . . . . . . . . . . . . . . . . . . . . . . . . . . . . .
4-92
4-95
4-31. AXLE ALINEMENT.
THIS TASK COVERS
Axle Alinement
Equipment Conditions:
Ref
4-33
Conditions
All brake chamber springs caged.
Materials/Parts:
l
Two 5/16X18X2 in. UNC bolts
Personnel Required: Two
Tools:
Tool kit, general mechanic’s
50 ft. steel tape
Plumb line and bob
Torque wrench
l
l
l
l
AXLE ALINEMENT
NOTE
Before checking alinement, ensure that suspension components are not
damaged and that they are tightly secured to axles and frame hangers (see
paragraphs 4-55 through 4-57)
(1)
Position semitrailer, coupled to tractor, on hard, level ground, preferably concrete. Have
operator pull forward in a straight line at least twice to properly center front and rear wheel
track.
(2)
Uncouple tractor from semitrailer (see paragraph 2-14).
(3)
Adjust landing gear so that the underside of upper coupler assembly (1) is 49 in. (124.5 cm)
from ground.
(4)
Use needle nose pliers to hold plumb line and bob from hole in center of kingpin (2) to
ground. Mark spot (8) on ground with a sharp tool.
(5)
Install a 5/16X18X2 in. UNC bolt (5) into bottom threaded hole in spider (7) at each end of
front axle (3). Ensure that both bolts are threaded into spider the same amount.
(6)
Measure distance “A” from marked spot (8) to bolt (5) and record this measurement. Measure distance “B” from marked spot to bolt and record this measurement. Measurements
must be within 3/16 in. (4.8 mm) of each other.
4-92
TM 9-2330-384-14&P
4-31. AXLE ALINEMENT (Con't).
NOTE
To lengthen adjustable radius rod (10), a clockwise rotation (when looking
to front) is required.
(7)
If front axle (3) needs alinement, loosen four nuts (9) at adjustable radius rod (10) on roadside. Turn middle portion (11) as needed to lengthen or shorten.
(8)
Repeat steps 4 through 7 to check alinement of front axle (3). Continue to adjust length at
adjustable radius rod (10) until front axle is alined. Torque four nuts (9) to 110 lb.-ft.
(149 N•m).
4-93
TM 9-2330-384-14&P
4-31. AXLE ALINEMENT (Con't).
(9)
With front axle (3) alined, measure distance “C” between flat face of front axle and fiat face
of rear axle (4), outboard of U-bolts (6). Measure distance “D” in same manner, Distances
must be within 1/16 in. (1.6 mm) of each other.
(10) If rear axle (4) needs alinement, make adjustments as required at adjustable radius rod (10)
at rear axle.
(11) Ensure that four nuts (9) at rear adjustable radius rod (10) are tightened to 110 lb.-ft.
(149 N•m) when alinement is finished.
FOLLOW-ON TASKS:
Uncage all brake chamber springs (see paragraph 4-33).
4-94
TM 9-2330-384-14&P
4-32. BENT AXLE CHECK.
THIS TASK COVERS
Bent Axle Check
INITIAL SETUP
Equipment Conditions:
Ref
4-31
4-48
4-47
2-11
Tools:
Tool kit, general mechanic’s
Floor jack
Jackstands
• Tape measure
Conditions
Axle alinement checked.
Rims alined.
Wheel bearings adjusted.
Wheels chocked, front and rear.
l
l
l
BENT AXLE CHECK
NOTE
To ensure accurate measurements, dual wheel assemblies must have properly matched tires BEFORE proceeding with bent axle check (see paragraph 1-11). Tires must also be equally inflated to 95 psi (655 kPa).
(1)
Raise affected axle on a level plane and support on jackstands with wheel 4-6 inches (10.215.2 cm) off ground.
(2)
Cage brake chamber springs (see paragraph 4-33).
(3)
Scribe a vertical line with a horizontal crosshatch mark (3) on center tread of each outer tire
(1) at front. Rotate tires so that both crosshatch marks are equal height from ground. Marks
should be located level with frame hangers (4) while allowing clearance with underconstruction and frame members when measurements are taken.
4-95
TM 9-2330-384-14&P
4-32. BENT AXLE CHECK (Con't).
(4)
Use tape measure to measure distance between crosshatch marks (3). Record measurement.
(5)
Turn wheels halfway around so that both crosshatch marks (3) are positioned at rear, Make
sure both crosshatch marks are equal height from ground. Measure distance between crosshatch marks. Record measurement.
(6)
If difference between front and rear measurements is more than 1/4 in. (6.4 mm), axle (2) is
bent.
(7)
Determine average side measurement for front and rear by adding both measurements and
dividing by two. Record result.
NOTE
Ensure that tape measure is straight and passes through jackstands without
interference.
(8)
Turn wheels so that crosshatch marks (3) are at bottom. Measure distance between crosshatch marks. Record measurement.
(9)
If difference between average side measurement recorded in step 7 and bottom measurement is more than 1/4 in. (6.4 mm), axle (2) is bent.
(10) If a bent axle (2) is found with this procedure, notify direct support maintenance to replace
axle.
FOLLOW-ON TASKS:
l
l
l
4-96
Uncage brake chamber springs (see paragraph 4-33).
Remove jackstands and lower axle.
Remove and stow chock blocks (see paragraph 2-11).
TM 9-2330-384-14&P
Section VII. BRAKE SYSTEM MAINTENANCE
Paragraph
Number
Page
Number
Title
Caging and Uncaging Brake Chamber Spring . . . . . . . . . . . . . . . . . . . . . . . . . .
Brake Adjustment . . . . . . . . . . . . . . . . . . . . . . . . . . . . . . . . . . . . . . . . . . . . . . . . .
Brake Shoe Replacement . . . . . . . . . . . . . . . . . . . . . . . . . . . . . . . . . . . . . . . . . .
Camshaft Replacement . . . . . . . . . . . . . . . . . . . . . . . . . . . . . . . . . . . . . . . . . . . .
Slack Adjuster Replacement . . . . . . . . . . . . . . . . . . . . . . . . . . . . . . . . . . . . . . . .
Air Coupling Replacement . . . . . . . . . . . . . . . . . . . . . . . . . . . . . . . . . . . . . . . . . .
Air Lines and Fittings Replacement . . . . . . . . . . . . . . . . . . . . . . . . . . . . . . . . . .
Brake Chamber Replacement . . . . . . . . . . . . . . . . . . . . . . . . . . . . . . . . . . . . . . .
Relay Quick Release Valve Maintenance . . . . . . . . . . . . . . . . . . . . . . . . . . . . . .
Ratio Relay Valve Maintenance . . . . . . . . . . . . . . . . . . . . . . . . . . . . . . . . . . . . . .
Air Reservoir Replacement . . . . . . . . . . . . . . . . . . . . . . . . . . . . . . . . . . . . . . . . .
Brake Interlock Valves and Fittings Maintenance . . . . . . . . . . . . . . . . . . . . . . .
4-33
4-34
4-35
4-36
4-37
4-38
4-39
4-40
4-41
4-42
4-43
4-44
4-97
4-99
4-101
4-104
4-108
4-110
4-112
4-119
4-122
4-126
4-130
4-134
4-33. CAGING AND UNCAGING BRAKE CHAMBER SPRING.
THlS TASK COVERS
a.
Caging
b.
Uncaging
INITIAL SETUP
Tools:
l
Tool kit, general mechanic’s
General Safety Instructions:
l
DO NOT cage brake chamber spring until
chock blocks are properly positioned at
wheels.
4-97
TM 9-2330-384-14&P
4-33. CAGING AND UNCAGING BRAKE CHAMBER SPRING (Con’t).
a. CAGING
WARNING
DO NOT cage brake chamber spring until chock blocks are properly positioned at wheels. Once brake chamber springs are caged, the semitrailer is
without brakes and can roll. Failure to properly chock wheels may result in
serious injury or death to personnel.
(1)
Remove chock blocks from stowage brackets and place firmly in
front of and behind wheels (see
paragraph 2-11).
(2)
Remove nut (4), washer (3), and
release stud (2) from storage
sleeve (1).
(3)
Remove dust cap (5) from end of
rear brake chamber (6) and set
aside. Insert tab end of release
stud (2) in hole and turn 1/4 turn to
secure in slot inside rear brake
chamber.
(4)
Install washer (3) and nut (4) on
release stud (2). Fully tighten nut
to cage spring inside rear brake
chamber (6).
b. UNCAGING
(1)
Back off nut (4) from release stud (2) in rear brake chamber (6). Remove nut (4), washer
(3), and release stud, and install in storage sleeve (1).
(2)
Install dust cap (5).
(3)
Remove and stow chock blocks (see paragraph 2-11).
4-98
TM 9-2330-384-14&P
4-34. BRAKE ADJUSTMENT.
THIS TASK COVERS
Adjustment
INITIAL SETUP
Equipment Conditions:
Tools:
Ref
Conditions
2-11 Wheels chocked.
l
l
l
Tool kit, general mechanic’s
Floor jack
Jackstand
ADJUSTMENT
NOTE
If brake adjustment procedure does not correct wheel drag, wheel bearing
adjustment should be checked (see paragraph 4-47).
(1)
Place a suitable floor jack under axle in front of brake chamber (1) and raise wheels clear of
ground. Support axle with a suitable jackstand.
(2)
Cage brake chamber spring (see paragraph 4-33) or connect tractor’s EMERGENCY air coupling to semitrailer’s EMERGENCY air coupling and supply air to release the spring brakes
(see paragraph 2-12).
4-99
TM 9-2330-384-14&P
4-34. BRAKE ADJUSTMENT (Con't).
NOTE
When adjusting nut (3) is turned counterclockwise, it will turn hard and
slack adjuster (2) will make a loud ratcheting noise. This is normal.
(3)
At slack adjuster (2), turn adjusting nut (3) clockwise until brakes lock, Then turn adjusting
nut counterclockwise until wheels turn freely without brake shoe drag.
(4)
Uncage brake chamber spring (see paragraph 4-33) or disconnect tractor’s EMERGENCY air
coupling from semitrailer’s EMERGENCY air coupling (see paragraph 2-14).
(5)
Remove jackstand and lower axle.
(6)
Repeat steps 1 through 5 to adjust brakes at other wheels.
FOLLOW-ON TASKS:
Remove and stow chock blocks (see paragraph 2-11).
4-100
TM 9-2330-384-14&P
4-35. BRAKE SHOE REPLACEMENT.
THIS TASK COVERS
a.
b.
Removal
Inspection
C.
Installation
INITIAL SETUP
Equipment Conditions:
R e f Conditions
4-46 Wheel and drum assembly removed.
Materials/Parts:
l
l
l
Tools:
l
Tool kit, general mechanic’s
One return spring
Two shoe retainer springs
(Item 12, Appendix E)
Grease
General Safety Instructions:
l
Wipe clean excessive lubricant in the area
of brake shoe linings to avoid grease soaking the linings.
a. REMOVAL
(1)
Turn adjusting nut on slack adjuster until S-cam (11) is in released position.
(2)
Press down on bottom brake shoe (10) and remove. roller (8) and retainer (9). Lift the top
brake shoe (2) and remove roller and retainer.
(3)
Remove return spring (4) and two return spring pins (3). Discard return spring.
(4)
While holding bottom brake shoe (10), remove two shoe retainer springs (1), and top and
bottom brake shoes (2 and 10). Discard shoe retainer springs.
4-101
TM 9-2330-384-14&P
4-35. BRAKE SHOE REPLACEMENT (Con't).
b. INSPECTION
(1) Inspect all removed components
for damage. If damaged, replace.
(2)
Move S-cam (11) of camshaft up
and down by hand, and use a
steel rule to measure up-anddown movement. If movement is
greater than 1/16 in. (1.59 mm),
perform camshaft maintenance
to replace camshaft bearings and
bushing (see paragraph 4-36).
(3)
Inspect spider (7) for damage. If spider is damaged, notify direct support maintenance to
replace axle.
(4)
Inspect two anchor pins (6) for wear and looseness in bushings (5). Anchor pin should slide
smoothly inside bushing.
(5)
Install anchor pin (6) inside bushing (5) and move anchor pin up and down by hand. Use a
steel rule to measure the up-and-down movement. If movement is greater than 1/16 in.
(1.59 mm), anchor pin and bushing must be replaced.
(a)
Cut a slot in bushing (5) with a hacksaw blade. Use a chisel to drive out bushing, Discard
bushing.
(b) Grease new bushing (5).
(c)
Use a block of wood to drive bushing squarely into spider (7).
c. INSTALLATION
WARNING
Wipe clean excessive lubricant in the area of brake shoe linings to avoid
grease soaking the linings. Replace grease soaked brake shoe linings. Failure to follow this warning may cause brakes to malfunction, resulting in
serious injury or death to personnel.
(1)
Apply an even coat of grease to two anchor pins (6) and bushings (5). Wipe off excess
grease.
(2)
Position top brake shoe (2) over spider (7).
(3)
Install two new shoe retainer springs (1) to top brake shoe (2) at anchor pin (6) end.
4-102
TM 9-2330-384-14&P
4-35. BRAKE SHOE REPLACEMENT (Con't).
(4)
Position bottom brake shoe (10) at anchor pin (6) end. Swing back bottom brake shoe and
install two shoe retainer springs (1).
(5)
Install two return spring pins (3) and new return spring (4) at S-cam (11) end.
(6)
Install roller (8) and retainer (9) between top brake shoe (2) and S-cam (11).
(7)
Press down on bottom brake shoe (10) and install roller (8) and retainer (9).
FOLLOW-ON TASKS:
l
l
Install wheel and drum assembly (see paragraph 4-46).
Adjust brakes (see paragraph 4-34).
4-103
TM 9-2330-384-14&P
4-36. CAMSHAFT REPLACEMENT.
THIS TASK COVERS
a.
b.
Removal
Cleaning and Inspection
C.
Equipment Conditions:
Materials/Parts:
Conditions
Ref
4-35 Brake shoes removed.
4-37 Slack adjuster removed,
One bushing
One retaining ring
l Two bearings
l Four locknuts
l Six preformed packings
l Dry cleaning solvent
(Item 10, Appendix E)
l Grease
(Item 12, Appendix E)
l
l
Tools:
l
l
l
Tool kit, general mechanic’s
Retaining ring pliers
Torque wrench
General Safety Instructions:
References:
l
Installation
l
TM 43-0139
Dry cleaning solvent is flammable and must
not be used near open flame. Use only in a
well-ventilated area.
NOTE
l
For ease of removal, it may be necessary to remove carc paint from
camshaft (16) (see TM 43-0139).
l
If removing both camshafts (16) from same axle, tag camshafts. Lefthand and right-hand camshafts are not the same.
a. REMOVAL
(1)
Remove washer (7) from splined end of camshaft (16).
(2)
Remove retaining ring (11) from groove of camshaft (16) on inboard side of spider (1) and
discard,
(3)
Drive camshaft (16) from camshaft bracket (8). Remove washer (12) from inboard side of
spider (1).
(4)
Drive camshaft (16) from spider (1).
(5)
Remove one bearing (14) with preformed packings (13 and 15) from spider (1) and discard.
Remove other bearing (14) with preformed packings (13 and 15) from camshaft (16) and
discard.
(6)
Remove washer (18) from camshaft (16).
(7)
Remove four locknuts (3), washers (4), and bolts (6), and separate camshaft bracket (8)
halves. Remove bushing (10). Discard locknuts and bushing.
4-104
TM 9-2330-384-14&P
4-36. CAMSHAFT REPLACEMENT (Con’t).
b. CLEANING AND INSPECTION
WARNING
Dry cleaning solvent P-D-680 is toxic and flammable. Always wear protective
goggles, face shield, and gloves, and use only in a well-ventilated area.
Avoid contact with skin, eyes, and clothes and DO NOT breathe vapors. DO
NOT use near open flame or excessive heat. The solvent’s flash point is
100oF-138°F (38°C-59°C). If you become dizzy while using cleaning solvent, immediately get fresh air and medical help. If solvent contacts eyes,
immediately wash your eyes with water and get medical aid.
(1)
Use dry cleaning solvent to clean dirt and grease from all removed components.
(2)
Visually inspect bearing surfaces on camshaft for wear and corrosion. Replace, camshaft if
bearing surfaces are corroded or show wear or roughness that can be felt easily by hand.
(3)
Visually inspect camshaft S-cam (17) for excessive wear or flat spots along roller surfaces.
Replace camshaft if S-cam has excessive wear or flat spots.
4-105
TM 9-2330-384-14&P
4-36. CAMSHAFT REPLACEMENT (Con’t).
(4)
Visually inspect splined end of camshaft (16) for stripped or worn teeth. Replace camshaft if
damaged.
(5)
Inspect spider (1) and grease fitting (2) for damage. Remove grease fitting, if damaged. If
spider is damaged, notify direct support maintenance to replace axle.
(6)
Visually inspect inner surfaces of camshaft bracket (8) halves for burrs, rough areas, or other
damage. Replace camshaft bracket halves, if damaged.
c. INSTALLATION
NOTE
If both camshafts (16) were removed from same axle, install as tagged.
Left-hand and right-hand camshafts are not the same.
(1)
If removed, install new grease fitting (2) to spider (1).
(2)
Install new preformed packings (13 and 15) to each bearing (14). Press bearings into spider
(1) until fully seated.
NOTE
Washers (4) are installed on bolts (6) closest to axle.
(3)
Install two new preformed packings (5) to bushing (10). Assemble bushing and camshaft
bracket (8) halves with grease fitting (9) facing outboard. Install camshaft bracket halves to
axle bracket with four bolts (6), washers (4), and new locknuts (3). Do not fully tighten
locknuts.
(4)
Install washer (18) onto camshaft (16). Drive camshaft through spider (1).
(5)
Apply grease to two bearings (14) inside spider (1). Slide washer (12) and new retaining ring
(11) onto camshaft (16), inboard of spider. Drive camshaft through camshaft bracket (8).
Tap on S-cam (17) to ensure camshaft is fully installed. Ensure also that S-cam is in released
position (see paragraph 4-35).
(6)
Ensure that inner bearing (14) is fully seated and retaining ring (11) groove on camshaft (16)
is visible. Install retaining ring (11) on camshaft on inboard side of spider (1).
(7)
Torque four locknuts (3) to 15 lb.-ft. (20 N•m).
(8)
Install washer (7) on splined end of camshaft (16).
(9)
Lubricate grease fittings (2 and 9).
4-106
TM 9-2330-384-14&P
4-36. CAMSHAFT REPLACEMENT (Con’t).
FOLLOW-ON TASKS:
l
l
Install slack adjuster (see paragraph 4-37).
Install brake shoes (see paragraph 4-35).
4-107
TM 9-2330-384-14&P
4-37. SLACK ADJUSTER REPLACEMENT.
THIS TASK COVERS
a.
Removal
Inspection
b.
C.
Installation
INITIAL SETUP
Equipment Conditions:
R e f Conditions
4-33 Brake chamber spring caged.
Materials/Parts:
l
l
l
One retaining ring
Two cotter pins
(Item 12, Appendix E)
Grease
Tools:
l
l
l
l
Tool kit, general mechanic’s
Floor jack
Jackstands
Retaining ring pliers
a. REMOVAL
(1)
Remove two cotter pins (2) and discard. Remove two clevis pins (3).
(2)
Turn adjusting nut (9) on slack adjuster (5) clockwise to gain free play.
(3)
Remove retaining ring (7) and washer (8) at slack adjuster (5). Remove slack adjuster. Discard retaining ring.
4-108
TM 9-2330-384-14&P
4-37. SLACK ADJUSTER REPLACEMENT (Con't).
b. INSPECTION
Inspect splines on camshaft (6) and slack adjuster (5) for damage. If camshaft is damaged,
replace (see paragraph 4-36). If splines on slack adjuster are damaged, replace.
c. INSTALLATION
(1)
Install slack adjuster (5) to camshaft (6) with offset actuator rod (1) on side of slack adjuster
facing inside. Install washer (8) and new retaining ring (7).
(2)
Turn adjusting nut (9) on slack adjuster (5) counterclockwise until clevis pin holes in slack
adjuster aline with holes in clevis (4).
(3)
Install two clevis pins (3). Install two new cotter pins (2).
(4) Lubricate grease fitting (10).
FOLLOW-ON TASKS:
• Uncage brake chamber spring (see paragraph 4-33).
• Couple semitrailer to tractor and check operation of brakes (see paragraph 2-12).
4-109
TM 9-2330-384-14&P
4-38. AIR COUPLING REPLACEMENT.
THIS TASK COVERS
Removal
Installation
a.
b.
Seal Replacement
C.
/NIT/AL SETUP
Equipment Conditions:
Materials/Parts:
R e f Conditions
2-14 Tractor EMERGENCY and SERVICE air
couplings disconnected from semitrailer.
Tools:
l
l
Detergent
Antiseize tape
(Item 9, Appendix E)
(Item 22, Appendix E)
References:
l TM 9-2320-273-10 or
l TM 9-2320-283-10
Tool kit, general mechanic’s
l
a. REMOVAL
NOTE
EMERGENCY and SERVICE air couplings are removed the same.
(1)
Loosen nut (4). Hold elbow (3) and remove terminal bolt (8) and air coupling (9) assembly
from elbow.
(2)
Remove nut (4) and stat-washer (5). Remove terminal bolt (8) and air coupling (9) assembly
from nose adapter (6). Remove EMERGENCY or SERVICE tag (7).
(3)
Remove air coupling (9) from terminal bolt (8).
(4)
If damaged, remove nut (2) and elbow (3) from air line (1).
4-110
TM 9-2330-384-14&P
4-38. AIR COUPLING REPLACEMENT (Con't).
b. INSTALLATION
NOTE
l
EMERGENCY and SERVICE air couplings are installed the same.
• Antiseize tape should be applied at connection between elbow (3), terminal bolt (8), and air coupling (9).
(1)
If removed, install elbow (3) to air line (1) and tighten nut (2).
(2)
Install air coupling (9) to terminal bolt (8).
NOTE
EMERGENCY tag (7) is installed roadside: SERVICE tag (7) is installed
curbside.
(3)
Position tag (7) at nose adapter (6). Install terminal bolt (8) and air coupling (9) assembly
through tag and hole in nose adapter.
(4)
Install starwasher (5) on terminal bolt (8). Loosely install nut (4).
NOTE
Ensure that air coupling (9) is properly positioned when tight.
(5)
Hold elbow (3) and tighten terminal bolt (8) at elbow.
(6)
Hold terminal bolt (8) and tighten nut (4).
(7)
Connect tractor EMERGENCY and SERVICE air couplings to semitrailer (see paragraph 2-12).
(8)
Fully pressurize semitrailer air system (see TM 9-2320-273-10 or TM 9-2320-283-10).
(9)
Apply a soap solution to check for leaks at air coupling.
c. SEAL REPLACEMENT
NOTE
Dummy coupling seal is replaced the same.
(1)
Remove seal (10) from air coupling (9).
(2)
Clean groove in air coupling (9) where seal (10) was removed.
(3)
Partially collapse replacement seal (10) with fingers. Insert one side of seal flange in groove
of air coupling (9).
(4)
Push seal (10) into place. Face of seal must lie flat, with no twist or bulge.
4-111
TM 9-2330-384-14&P
4-39. AIR LINES AND FITTINGS REPLACEMENT.
THIS TASK COVERS
a.
b.
Replacement of Front Air Lines and Fittings
Replacement of Brake Interlock Assembly Air Lines
Replacement of Underconstruction Air
Lines and Fittings
C.
INITIAL SETUP
Equipment Conditions:
Materials/Parts:
Ref
Conditions
2-11 Wheels chocked.
2-14 Tractor EMERGENCY and SERVICE air
couplings disconnected from semitrailer.
Tools:
l
l
Tag marker
Antiseize tape
(Item 21, Appendix E)
(Item 22, Appendix E)
General Safety Instructions;
* Tool kit, general mechanic’s
l
Ensure that air lines do not rub against
each other or any other surface when installed.
a. REPLACEMENT OF FRONT AIR LINES AND FITTINGS
WARNING
Ensure that air lines (4 and 9) do not rub against each other or any other
surface when installed. Relocate or provide support, as required. If air lines
rub, a leak may develop, resulting in brake lockup and possible serious Injury or death to personnel.
NOTE
All male threads of fittings should be coated with antiseize tape if not already factory-coated with an antiseize compound.
(1)
To replace a leaking or damaged air coupling (6 or 7), refer to paragraph 4-38.
(2)
Replace any leaking or damaged air lines (4 and 9), elbows (11), or terminal bolts (1).
(3)
Replace any damaged grommets (5 and 8). To remove a grommet, air line (4 or 9) must first
be removed.
4-112
TM 9-2330-384-14&P
4-39. AIR LINES AND FITTINGS REPLACEMENT (Con’t).
1.
2.
3.
4.
5.
6.
7.
8.
9.
10.
11.
Terminal bolt
3/8 outside diameter clip
Brake interlock installation
3/8 in. outside diameter EMERGENCY air line
7/16 In. inside diameter grommet
EMERGENCY air coupling
SERVICE air coupling
11/16 In. inside diameter grommet
1/2 in. outside diameter SERVICE air line
1/2 in. outside diameter clip
90 degree elbow
CAUTION
(4)
l
Use caution when removing or installing air lines (4 or 9) at clips (2 or
10). Clips should be lifted gently and only enough to release air lines.
When securing air lines under clips, a soft-faced hammer should be
used to tap clips back into place. Improper handling of clips will cause
them to break.
l
If two or more consecutive clips (2 or 10) are missing or damaged, air
lines (4 or 9) will not be adequately supported. Damage to air lines may
result.
If two of more consecutive clips (2 or 10) are missing or damaged, notify direct support
maintenance.
4-113
TM 9-2330-384-14&P
4-39. AIR LINES AND FITTINGS REPLACEMENT (Con't).
b. REPLACEMENT OF BRAKE INTERLOCK ASSEMBLY AIR LINES
WARNING
Ensure that air lines (4) do not rub against each other or any other surface
when installed. Relocate or provide support, as required. If air lines rub, a
leak may develop, resulting in brake lockup and possible serious injury or
death to personnel.
NOTE
• For information on replacement of brake interlock valves and fittings,
refer to paragraph 4-44.
(1)
l
All male threads of fittings should be coated with antiseize tape if not
already factory-coated with an antiseize compound.
l
If replacing more than one air line (4). tag for installation.
Replace any leaking or damaged air lines (4).
CAUTION
(2)
4-114
l
Use caution when removing or installing air lines (4) at clips (2). Clips
should be lifted gently and only enough to release air lines. When securing air lines under clips, a soft-faced hammer should be used to tap clips
back into place. Improper handling of clips will cause them to break.
l
If two or more consecutive clips (2) are missing or damaged, air lines (4)
will not be adequately supported. Damage to air lines may result.
If two or more consecutive clips (2) are damaged or missing, notify direct support maintenance.
TM 9-2330-384-14&P
4-39. AIR LINES AND FITTINGS REPLACEMENT (Con't).
2. 3/8 In. outside diameter clip
4. 3/8 in. outside diameter EMERGENCY air line
12. Relay quick release valve
13. Inversion valve
14. Shuttle valve
15. Brake interlock valves
4-115
TM 9-2330-384-14&P
4-39. AIR LINES AND FITTINGS REPLACEMENT (Con’t).
c. REPLACEMENT OF UNDERCONSTRUCTION AIR LINES AND FITTINGS
WARNING
Ensure that air lines (4 and 9) and hose assemblies (17) do not rub against
each other or any other surface when installed. Relocate or provide support, as required. If air lines or hose assemblies rub, a leak may develop,
resulting in brake lockup and possible serious injury or death to personnel.
NOTE
• All male threads of fittings should be coated with antiseize tape if not
already factory-coated with an antiseize compound.
l
(1)
Release all air from front and rear air reservoirs by pulling air reservoir draincock cable (see
paragraph 2-2).
1
4.
9.
11.
12.
(2)
4-116
If replacing more than one air line (4 and 9) or hose assembly (17), tag
for installation.
Terminal bolt
3/8 in. outside diameter EMERGENCY air line
1/2 In. outside diameter SERVICE air line
90 degree elbow
Relay quick release valve
16.
17.
18.
19.
Ratio relay valve
1/2 in. hose assemblies
Brake chamber
Tie-strap
Replace any leaking or damaged air lines (4 and 9), hose assemblies (17), grommets (5 and
8), elbows (11), plugs (21), and tees (20). To remove a damaged grommet, air line (4 or 9)
must first be removed.
TM 9-2330-384-14&P
4-39. AIR LINES AND FITTINGS REPLACEMENT (Con't).
2.
4.
5.
8.
9.
10.
11.
12.
3/8 in. outside diameter clip
3/8 in. outside diameter EMERGENCY air line
7/16 in. inside diameter grommet
11/16 in. inside diameter grommet
1/2 in. outside diameter SERVICE air line
1/2 in. outside diameter clip
90 degree elbow
Relay quick release valve
16.
17.
18.
19.
20.
21.
22.
Ratio relay valve
1/2 in. hose assemblies
Brake chamber
Tie-strap
Tee
Plug
Hose separator
CAUTION
(3)
•
Use caution when removing or installing air lines (4 or 9) at clips (2 or
10). Clips should be lifted gently and only enough to release air lines.
When securing air lines under clips, a soft-faced hammer should be
used to tap clips back into place. Improper handling of clips will cause
them to break.
l
If two or more consecutive clips (2 or 10) are missing or damaged, air
lines (4 or 9) will not be adequately supported. Damage to air lines may
result.
If two or more consecutive clips (2 or 10) are damaged or missing, notify direct support
maintenance.
4-117
TM 9-2330-384-14&P
4-39. AIR LINES AND FITTINGS REPLACEMENT (Con't).
(4)
Use tie-straps (19) whenever air lines (4 or 9) need support. Use hose separators (22) between air lines or hose assemblies (17) to prevent them from rubbing.
2.
4.
5.
8.
9.
10.
11.
12.
3/8 in. outside diameter clip
3/8 in. outside diameter EMERGENCY air line
7/16 in. inside diameter grommet
11/16 In. inside diameter grommet
1/2 in. outside diameter SERVICE air line
1/2 in. outside diameter clip
90 degree elbow
Relay quick release valve
16.
17.
18.
19.
20.
21.
22.
Ratio relay valve
1/2 In. hose assemblies
Brake chamber
Tie-strap
Tee
Plug
Hose separator
FOLLOW-ON TASKS:
l
l
l
Connect tractor EMERGENCY and SERVICE air couplings to semitrailer (see paragraph 2-12).
Fully pressurize semitrailer air system (see TM 9-2320-273-10 or TM 9-2320-283-1 0). Use a soap
solution to check for leaks.
Remove and stow chock blocks (see paragraph 2-11).
4-118
TM 9-2330-384-14&P
4-40. BRAKE CHAMBER REPLACEMENT.
THIS TASK COVERS
b.
Removal
a.
Installation
INITIAL SETUP
Equipment Conditions:
Materials/Parts:
Conditions
Ref
4-33 Brake chamber spring caged.
l
l
l
Tools:
l
l
a.
l
Tool kit, general mechanic’s
Torque wrench
Two cotter pins
Two locknuts
Detergent
Tag marker
(item 9, Appendix E)
(Item 21, Appendix E)
References:
TM 9-2320-273-10 or
l TM 9-2320-283-10
l
REMOVAL
NOTE
If both brake chambers on axle are to be removed, ensure that both brake
chamber springs are caged before proceeding.
(1)
Release all air from front and rear air reservoirs by pulling on air reservoir draincock cable
(see paragraph 2-2).
4-119
TM 9-2330-384-14&P
4-40. BRAKE CHAMBER REPLACEMENT (Con’t).
NOTE
Roadside brake chamber (7) has three air lines. Curbside brake chamber
has two air lines.
(2)
Tag and disconnect all air lines (9) from brake chamber (7).
(3)
Measure threaded length of pushrod (11) and record measurement. Remove two cotter pins
(1) and clevis pins (2 and 3). Discard cotter pins.
(4)
Remove two locknuts (4) and washers (5) from two mounting studs (IO). Remove brake
chamber (7). Discard locknuts.
(5)
Remove fittings (8) from brake chamber (7) and retain.
(6)
If replacing brake chamber (7), remove clevis (14) and jamnut (12) from pushrod (11) and
retain.
b. INSTALLATION
(1) Install fittings (8) to brake chamber (7).
NOTE
Clevis (14) furnished with replacement brake chamber (7) will not fit M1062
slack adjuster (15). It should be discarded and clevis which comes with the
slack adjuster used instead.
(2)
4-120
If a new brake chamber (7) is being installed, remove clevis (14) and jamnut (12) from
pushrod (11) and discard. Install clevis and jamnut retained from original brake chamber.
Ensure that threaded length of pushrod is the same as when removed.
TM 9-2330-384-14&P
4-40. BRAKE CHAMBER REPLACEMENT (Con't).
(3)
Position brake chamber (7) with
mounting studs (10) through
brake chamber bracket (6). Install two washers (5) and new
locknuts (4). Torque locknuts to
130 lb.-ft. (176 N•m).
(4)
Install two clevis pins (2 and 3)
and two new cotter pins (1).
(5)
Measure distance from clevis pin
(3) to face of brake chamber (7).
Distance should be 7 5/8 in. (19.4
cm) ± 1/8 in. (0.3 cm).
(6)
If adjustment in distance is needed, back off jamnut (12) and turn adjusting nut (13) to adjust
length of brake chamber pushrod (11). Tighten jamnut.
(7)
Connect all air lines (9) to brake chamber (7) as tagged.
(8) Adjust brakes (see paragraph 4-34).
(9)
Couple semitrailer to tractor (see paragraph 2-12).
(10) Fully pressurize semitrailer air system (see TM 9-2320-273-10 or TM 9-2320-283-10).
(11) Apply a soap solution to check for leaks at brake chamber (7) and air lines (9).
FOLLOW-ON TASKS:
l Uncage brake chamber spring (see paragraph 4-33).
• Check operation of brake chamber.
4-121
TM 9-2330-384-14&P
4-41. RELAY QUICK RELEASE VALVE MAINTENANCE.
THIS TASK COVERS
a.
b.
Operating Test
Leakage Test
c.
d.
Removal
Installation
INITIAL SETUP
Equipment Conditions:
Ref
Conditions
2-11 Wheels chocked.
Materials/Parts:
l
l
l
Detergent
Tag marker
Antiseize tape
(Item 9, Appendix E)
(Item 21, Appendix E)
(Item 22, Appendix E)
Tools:
l
l
l
l
Tool kit, general mechanic’s
Channel lock oliers
Face shield
Safety goggles
References:
l TM 9-2320-273-10 or
l TM 9-2320-283-10
Personnel Required: Two
General Safety Instructions:
Wear safety goggles and face shield when
performing leakage tests on relay quick release valves.
l
Ensure that air lines do not rub against
each other or any other surface when installed.
l
a. OPERATING TEST
(1)
If disconnected, connect tractor EMERGENCY and SERVICE air couplings to semitrailer (see
paragraph 2-12). Fully pressurize semitrailer air system (see TM 9-2320-273-10 or
TM 9-2320-283-1 0).
(2)
Apply tractor service brakes and check that semitrailer brakes apply properly (see paragraph
2-12).
(3)
Release brakes and check whether air pressure is exhausted through exhaust port on underside of relay quick release valves (2).
4-122
TM 9-2330-384-14&P
4-41. RELAY QUICK RELEASE VALVE MAINTENANCE (Con't).
b. LEAKAGE TEST
WARNING
Wear safety goggles and face shield when performing leakage tests on relay
quick release valves (2). Failure to follow this warning may result in serious
eye injury due to high pressure air.
NOTE
If there are leaks found which cannot be corrected after performing steps 1
and 2, remove relay quick release valve (2) and replace damaged components.
(1)
With air system fully pressurized, apply a soap solution to relay quick release valves (2) and
check for leaks. No leakage is allowed. If leaks are found, tighten fittings.
(2)
Release brakes and allow two seconds for air to exhaust from exhaust port on underside of
relay quick release valves (2), Apply soap solution to exhaust port and check for leaks. No
leakage is allowed.
c. REMOVAL
NOTE
l
Tag air lines, fittings, and valve ports as they are removed to ensure
proper installation.
l
If disconnecting air lines to remove air reservoir (3 or 4), perform steps
1, 2, and 4.
(1) Disconnect tractor EMERGENCY and SERVICE air couplings from semitrailer (see paragraph 2-14). Pull on draincock cable (6) and release all air from front and rear air reservoirs
(3 and 4).
(2)
Disconnect two air lines (8) from brake chambers (7).
(3)
Remove two air lines (8) from relay quick release valve (2).
NOTE
There are two SERVICE air lines (1) connected to tee (10) at relay quick
release valve (2) at front air reservoir (3).
(4)
Disconnect SERVICE air line (1) from elbow (5) at top of relay quick release valve (2).
(5)
Use channel lock pliers to remove relay quick release valve (2) from nipple (9) at air reservoir
(3 or 4).
(6)
If removing relay quick release valve (2) from front air reservoir (3), remove tee (10). If
removing relay quick release valve from rear air reservoir (4), remove elbow (5).
(7)
Inspect tee (10) and elbow (5) for cracks or damaged threads. If damaged, replace.
4-123
TM 9-2330-384-14&P
4-41. RELAY QUICK RELEASE VALVE MAINTENANCE (Con't).
d. INSTALLATION
WARNING
Ensure that air lines do not rub against each other or any other surface when
installed. Relocate or provide support, as required. if air lines rub, a leak
may develop, resulting in brake lockup and possible serious injury or death
to personnel.
NOTE
l
Ail male threads of fittings should be coated with antiseize tape if not
already factory-coated with an antiseize compound.
l
install ail air lines and fittings to valve ports as tagged.
•
if connecting air lines after installing air reservoir (3 or 4), perform steps
3, 5, and 6.
(1)
if installing relay quick release valve (2) to front air reservoir (3), install tee (10). If installing
relay quick release valve to rear air reservoir (4), install elbow (5).
(2)
install relay quick release valve (2) to nipple (9) at air reservoir (3 or 4).
NOTE
There are two SERVICE air lines (1) connected to tee (10) at relay quick
release valve (2) at front air reservoir (3).
(3)
4-124
Connect SERVICE air line (1) to elbow (5) at top of relay quick release valve (2).
TM 9-2330-384-14&P
4-41. RELAY QUICK RELEASE VALVE MAINTENANCE (Con't).
(4)
Connect two air lines (8) to sides of relay quick release valve (2).
(5)
Connect two air lines (8) to brake chambers (7).
(6)
Connect tractor EMERGENCY and SERVICE air couplings to semitrailer (see paragraph 2-12).
Fully pressurize semitrailer air system (see TM 9-2320-273-10 or TM 9-2320-283-10).
FOLLOW-ON TASKS:
l
l
l
Perform OPERATING TEST (this paragraph).
Perform LEAKAGE TEST (this paragraph).
Remove and stow chock blocks (see paragraph 2-11).
4-125
TM 9-2330-384-14&P
4-42. RATIO RELAY VALVE MAINTENANCE.
THIS TASK COVERS
a.
b.
Operating Test
Leakage Test
c.
d.
Removal
installation
INITIAL SETUP
Equipment Conditions:
Ref
Conditions
2-11 Wheels chocked.
Materials/Parts:
l
l
l
Detergent
Tag marker
Antiseize tape
(item 9, Appendix E)
(item 21, Appendix E)
(item 22, Appendix E)
Tools:
l
l
l
Tool kit, general mechanic’s
Face shield
Safety goggles
Personnel Required: Two
General Safety instructions:
l
References:
l TM 9-2320-273-10 or
l TM 9-2320-283-10
l
Wear safety goggles and face shield when
performing leakage tests on ratio relay
valve.
Ensure that air lines do not rub against
each other or any other surface when installed.
a. OPERATING TEST
(1)
If disconnected, connect tractor EMERGENCY and SERVICE air lines to semitrailer (see paragraph 2-12). Fully pressurize semitrailer air system (see TM 9-2320-273-10 or TM 92320-283-10).
NOTE
Damage to other parts of air system
cause
parking/emergency
may
brakes to not release with air fully
pressurized.
(2)
4-126
With air system fully pressurized,
check to see that parking/emergency brakes are released. if not
released, ratio relay valve (3)
may be damaged.
TM 9-2330-384-14&P
4-42. RATIO RELAY VALVE MAINTENANCE (Con’t).
b. LEAKAGE TEST
WARNING
Wear safety goggles and face shield when performing leakage tests on ratio
relay valve (3). Failure to follow this warning may result in serious eye injury
due to high pressure air.
NOTE
if leaks are found which cannot be corrected after performing leakage test,
remove ratio relay valve (3) and replace damaged components.
With air system fully pressurized, apply a soap solution to ratio relay valve (3) and check for leaks.
No leakage is allowed. if leaks are found, tighten fittings.
c. REMOVAL
NOTE
l
Tag air lines, fittings, and valve ports as they are removed to ensure
proper installation.
l
if disconnecting air lines to remove air reservoir (10 or 12), perform
steps 1 through 4.
(1) Disconnect tractor EMERGENCY and SERVICE air couplings from semitrailer (see paragraph 2-14). Pull on draincock cable (9) and release all air from front and rear air reservoirs
(10 and 12).
4-127
TM 9-2330-384-14&P
4-42. RATIO RELAY VALVE MAINTENANCE (Con't).
(2)
Disconnect two SERVICE air lines (4) from tee (5).
(3)
Disconnect two EMERGENCY air lines (1) from elbows (2).
(4)
Disconnect air line (8) from brake chamber (11).
(5)
Remove air line (8) from underside of ratio relay valve (3).
(6)
Disconnect air line (7) from elbow (6) at underside of ratio relay valve (3).
(7)
Remove ratio relay valve (3) from front air reservoir (12). Remove two plugs from underside
of ratio relay valve.
(8)
Remove three elbows (2 and 6) and tee (5) from ratio relay valve (3).
(9)
inspect three elbows (2 and 6) and tee (5) for cracks or damaged threads. if damaged,
replace.
d. INSTALLATION
WARNING
Ensure that air lines do not rub against each other or any other surfacewhen
installed. Relocate or provide support, as required. if air lines rub, a leak
may develop, resulting in brake lockup and possible serious injury or death
to personnel.
NOTE
l
Ail male threads of fittings should be coated with antiseize tape if not already factory-coated with an antiseize compound.
l
install ail air lines and fittings to valve ports as tagged.
• if connecting air lines after installing air reservoir (10 or 12), perform
steps 3 and 5 through 8.
(1)
install three elbows (2 and 6) and tee (5) to ratio relay valve (3).
(2)
install two plugs to underside of ratio relay valve (3). install ratio relay valve to front air reservoir (12).
(3)
Connect air line (7) to elbow (6) at underside of ratio relay valve (3).
(4)
Connect air line (8) to underside of ratio relay valve (3).
(5)
Connect air line (8) to brake chamber (11).
(6)
Connect two EMERGENCY air lines (1) to elbows (2).
(7)
Connect two SERVICE air lines (4) to tee (5).
(8)
Connect tractor EMERGENCY and SERVICE air couplings to semitrailer (see paragraph 2-12).
Fully pressurize semitrailer air system (see TM 9-2320-273-10 or TM 9-2320-283-10).
4-128
TM 9-2330-384-14&P
4-42. RATIO RELAY VALVE MAINTENANCE (Con't).
FOLLOW-ON TASKS:
Perform OPERATING TEST (this paragraph).
• Perform LEAKAGE TEST (this paragraph).
• Remove and stow chock blocks (see paragraph 2-11).
l
4-129
TM 9-2330-384-14&P
4-43. AIR RESERVOIR REPLACEMENT.
THIS TASK COVERS
Removal
a.
INITIAL
b.
SETUP
Equipment Conditions:
Materials/Parts:
Ref
Conditions
4-41 Air lines disconnected from relay
quick release valve.
4-42 Air lines disconnected from ratio relay
valve, if removing front air reservoir.
Tools:
l
l
l
l
l
l
One sleeve
Four locknuts
Detergent
Tag marker
Antiseize tape
(Item 9, Appendix E)
(item 21, Appendix E)
(item 22, Appendix E)
General Safety instructions:
Tool kit, general mechanic’s
Cable cutter
l
Installation
l
Ensure that air lines do not rub against
each other or any other surface when installed.
References:
l TM 9-2320-273-10 or
l TM 9-2320-283-10
a. REMOVAL
NOTE
Tag all fittings as they are removed to ensure proper installation.
(1)
if removing rear air reservoir (3), disconnect EMERGENCY air line (14) from elbow (2) on
roadside.
(2)
Remove draincock (10) from air reservoir (3 or 13). DO NOT cut draincock cable (9).
(3)
Remove four locknuts (6) and screws (1). Lift up on air reservoir (3 or 13) and remove from
brackets (5). Remove four shock washers (4). Discard locknuts.
(4)
Remove relay quick release valve (8) and ratio relay valve (12), if present, from air reservoir
(3 or 13).
(5)
From rear air reservoir (3), remove elbow (2), two plugs (11), and nipple (7).
(6)
From front air reservoir (13), remove two plugs (11) and two nipples (7).
(7)
Inspect elbow (2), plugs (11), and nipples (7) for cracks or damaged threads. if damaged,
replace.
4-130
TM 9-2330-384-14&P
4-43. AIR RESERVOIR REPLACEMENT (Con't).
4-131
TM 9-2330-384-14&P
4-43. AIR RESERVOIR REPLACEMENT (Con't).
(8)
If draincock (10) is damaged, cut
draincock cable (9) at sleeve
(15). Discard sleeve. Replace
draincock.
b. INSTALLATION
WARNING
Ensure that air lines do not rub against each other or any other surface when
installed. Relocate or provide support, as required. If air lines rub, a leak
may develop, resulting in brake lockup and possible serious injury or death
to personnel.
NOTE
All male threads of fittings should be coated with antiseize tape if not already factory-coated with an antiseize compound.
Ensure that all fittings are installed as tagged.
(1)
Install two plugs (11) and two nipples (7) to front air reservoir (13).
(2)
Install elbow (2), two plugs (11), and nipple (7) to rear air reservoir (3).
(3)
Install relay quick release valve (8) and ratio relay valve (12) to air reservoir (3 or 13).
(4)
Place four shock washers (4) on two mounting brackets (5). Position air reservoir (3 or 13)
with shock washers between air reservoir and mounting brackets and bolt holes alined. Install
four screws (1) and new locknuts (6). Tighten locknuts so that shock washers are compressed to a thickness of ¼ in. (6.4 mm) ± Xs in. (1.59 mm).
(5)
Install draincock (10) to air reservoir (3 or 13).
(6)
If draincock (10) was replaced, pass one draincock cable (9) through loop at bumper.
(7)
Connect draincock cable (9) to other cable with new sleeve (15). Crimp sleeve with vise
grips. Cut excess length of cable.
(8)
If installing rear air reservoir (3), connect EMERGENCY air line (14) to elbow (2) at roadside.
4-132
TM 9-2330-384-14&P
4-43. AIR RESERVOIR REPLACEMENT (Con't).
(9)
Connect air lines to relay quick release valve (see paragraph 4-41).
(10) Connect air lines to ratio relay valve, if front air reservoir was removed (see paragraph 4-42).
(11) Couple semitrailer to tractor (see paragraph 2-12).
(12) Fully pressurize semitrailer air system (see TM 9-2320-273-10 or TM 9-2320-284-10).
(13) Apply a soap solution to check for leaks at all air reservoir fittings and air lines.
4-133
TM 9-2330-384-14&P
4-44. BRAKE INTERLOCK VALVES AND FITTINGS MAINTENANCE.
THIS TASK COVERS
a.
b.
c.
Operating Test
Leakage Test
Removal of Brake Interlock Valve and
Angle Bracket
installation of Brake Interlock Valve and
Angle Bracket
d.
e.
f.
g.
h.
i.
j.
Removal of Inversion Valve
Installation of Inversion Valve
Removal of Relay Quick Release Valve
Installation of Relay Quick Release Valve
Removal of Shuttle Valve
Installation of Shuttle Valve
INITIAL SETUP
Equipment Conditions:
Materials/Parts:
R e f Conditions
2-11 Wheels chocked.
Three locknuts
Detergent
Tag marker
Antiseize tape
Tools:
Tool kit, general mechanic’s
Face shield
Safety goggles
(Item 9, Appendix E)
(Item 21, Appendix E)
(Item 22, Appendix E)
General Safety Instructions:
Wear safety goggles and face shield when
performing leakage tests on brake interlock valves.
Ensure that air lines do not rub against
each other or any other surface when installed.
Personnel Required: Two
References:
TM 9-2320-273-10 or
TM 9-2320-283-10
a. OPERATING TEST
(1)
If disconnected, connect tractor EMERGENCY and SERVICE air couplings to semitrailer (see
paragraph 2-12). Fully pressurize semitrailer air system (see TM 9-2320-273-10 or
TM 9-2320-283-10).
(2)
Push in on paddle (12) of brake interlock valve (4) at front port (13). Listen for sound of air
exhausting through exhaust port on underside relay quick release valve (1).
(3)
Repeat step 2 to check operation of brake interlock valve (4) at rear inlet (10).
b. LEAKAGE TEST
WARNING
Wear safety goggles and face shield when performing leakage tests on
brake interlock valves. Failure to follow this warning may result in serious
eye injury due to high pressure air.
(1)
With semitrailer still coupled to tractor and with air system fully pressurized, apply a soap
solution to all brake interlock lines, fittings, and valves. There should be no leakage.
(2)
Push in on paddle (12) of brake interlock valve (4) at front port (13). Observe exhaust port on
underside of relay quick release valve (1). Air should exhaust for a period of approximately
two seconds. After two seconds, there should be no leakage.
(3)
Repeat step 2 to check for leakage while operating brake interlock valve (4) at rear inlet (10).
4-134
TM 9-2330-384-14&P
4-44. BRAKE INTERLOCK VALVES AND FITTINGS MAINTENANCE (Con’t).
c. REMOVAL OF BRAKE INTERLOCK VALVE AND ANGLE BRACKET
NOTE
Brake interlock valve (4) and angle bracket (7) at front port (13) and rear
inlet (10) are removed the same.
Tag air lines for installation.
(1)
Disconnect air lines from brake interlock valve (4) (see paragraph 4-39).
(2)
Remove two locknuts (6), washers (5), and screws (2). Remove brake interlock valve (4)
from angle bracket (7). Remove two elbows (3) from brake interlock valve. Discard locknuts.
(3)
If damaged, remove two nuts (8), screws (11), and four washers (9). Remove angle bracket
(7).
4-135
TM 9-2330-384-14&P
4-44. BRAKE INTERLOCK VALVES AND FITTINGS MAINTENANCE (Con't).
d. INSTALLATION OF BRAKE INTERLOCK VALVE AND ANGLE BRACKET
WARNING
Ensure that air lines do not rub against each other or any other surface when
installed. Relocate or provide support, as required. If air lines rub, a leak
may develop, resulting in brake lockup and possible serious injury or death
to personnel.
NOTE
All male threads of fittings should be coated with antiseize tape if not already factory-coated with an antiseize compound.
(1)
If removed, install angle bracket (7) with two screws (11), four washers (9), and two nuts (8).
(2)
Install two elbows (3) to brake interlock valve (4). Install brake interlock valve to angle bracket
(7) with two screws (2), washers (5), and new locknuts (6).
(3)
Connect air lines to brake interlock valve (4) (see paragraph 4-39).
(4) Perform LEAKAGE TEST (subparagraph b).
4-136
TM 9-2330-384-14&P
4-44. BRAKE INTERLOCK VALVES AND FITTINGS MAINTENANCE (Con't).
e. REMOVAL OF INVERSION VALVE
NOTE
Tag air lines for installation.
(1) Disconnect air lines from inversion valve (21) (see paragraph
4-39).
(2) Remove inversion valve (21)
from relay quick release valve
(1).
(3) Remove nipple (20), elbow (22),
and tee (23) from inversion valve
(21).
f. INSTALLATION OF INVERSION VALVE
WARNING
Ensure that air lines do not rub
against each other or any other surface when installed. Relocate or provide support, as required. If air lines
rub, a leak may develop, resulting In
brake lockup and possible serious injury or death to personnel.
NOTE
All male threads of fittings should be
coated with antiseize tape if not already factory-coated with an antiseize
compound.
(1) Install nipple (20), elbow (22),
and tee (23) to inversion valve
(21).
(2) Install inversion valve (21) to relay quick release valve (1).
(3) Connect air lines to inversion
valve (21) (see paragraph 4-39).
(4) Perform LEAKAGE TEST (subparagraph b).
4-137
TM 9-2330-384-14&P
4-44. BRAKE INTERLOCK VALVES AND FITTINGS MAINTENANCE (Con't).
g. REMOVAL OF RELAY QUICK RELEASE VALVE
NOTE
Tag air lines for installation.
(1)
Disconnect air lines from inversion valve (21), relay quick release valve (1), tee (14), and
elbow (25) (see paragraph 4-39).
(2)
Remove inversion valve (21) and
nipple (20) from relay quick release valve (1).
(3)
Remove tee (14), tee (15), and
elbow (25).
(4)
Remove nut (16) and starwasher
from terminal stud (18). Remove
relay quick release valve (1) and
terminal stud from support bar
(17).
(5)
Separate relay quick release
valve (1) from terminal stud (18).
(6)
Remove elbow (24) and plug (19)
from relay quick release valve
(1).
h. INSTALLATION OF RELAY QUICK RELEASE VALVE
WARNING
Ensure that air lines do not rub
against each other or any other surface when installed. Relocate or provide support, as required. If air lines
rub, a leak may develop, resulting in
brake lockup and possible serious injury or death to personnel.
NOTE
All male threads of fittings should be
coated with antiseize tape if not already factory-coated with an antiseize
compound.
(1)
Install elbow (24) and plug (19) to relay quick release valve (1).
(2)
Install terminal stud (18) to relay quick release valve (1).
(3)
Install terminal stud (18) to support bar (17) with starwasher and nut (16).
4-138
TM 9-2330-384-14&P
4-44. BRAKE INTERLOCK VALVES AND FITTINGS MAINTENANCE (Con't).
(4)
Install tee (15), tee (14), and elbow (25).
(5)
Install nipple (20) and inversion valve (21) to relay quick release valve (1).
(6)
Connect air lines to inversion valve (21), relay quick release valve (l), tee (14), and elbow
(25) (see paragraph 4-39).
(7) Perform LEAKAGE TEST (subparagraph b).
i.
REMOVAL OF SHUTTLE VALVE
NOTE
Tag air lines for installation.
(1)
Disconnect air lines from shuttle
valve (26) (see paragraph 4-39).
(2)
Remove locknut (28), screw
(32), and two washers (27). Remove shuttle valve (26) from
frame (31). Discard locknut.
(3)
Remove two elbows (29) and
straight adapter (30) from shuttle
valve (26).
4-139
TM 9-2330-384-14&P
4-44. BRAKE INTERLOCK VALVES AND FITTINGS MAINTENANCE (Con't).
j . INSTALLATION OF SHUTTLE VALVE
WARNING
Ensure that air lines do not rub against each other or any other surface when
installed. Relocate or provide support, as required. If air lines rub, a leak
may develop, resulting in brake lockup and possible serious injury or death
to personnel.
NOTE
All male threads of fittings should be coated with antiseize tape if not already factory-coated with an antiseize compound.
(1)
Install two elbows (29) and
straight adapter (30) to shuttle
valve (26).
(2)
Install shuttle valve (26) to frame
(31) with screw (32), two washers (27), and new locknut (28).
(3)
Connect air lines to shuttle valve
(26) (see paragraph 4-39).
(4)
Perform LEAKAGE TEST (subparagraph b).
4-140
TM 9-2330-384-14&P
Section VIII.
WHEELS AND HUBS MAINTENANCE
Paragraph
Number
4-45
4-46
4-47
4-40
4-49
Page
Number
Title
Changing Tires . . . . . . . . . . . . . . . . . . . . . . . . . . . . . . . . . . . . . . . . . . . . . . . . . . .
Wheel, Drum, and Wheel Bearing Maintenance . . . . . . . . . . . . . . . . . . . . . . . .
Wheel Bearing Check and Adjustment . . . . . . . . . . . . . . . . . . . . . . . . . . . . . . .
Rim Alinement . . . . . . . . . . . . . . . . . . . . . . . . . . . . . . . . . . . . . . . . . . . . . . . . . . .
Tire Maintenance . . . . . . . . . . . . . . . . . . . . . . . . . . . . . . . . . . . . . . . . . . . . . . . . .
4-141
4-147
4-152
4-154
4-156
4-45. CHANGING TIRES.
THIS TASK COVERS
a.
Removal
Installation
b.
INITIAL SETUP
Equipment Conditions:
Conditions
Ref
(TM 9-2320-273-10 or Semitrailer parking/
emergency brakes
TM 9-2320-283-10)
set.
Wheels chocked.
2-11
References:
TM 9-2320-273-10 or
TM 9-2320-283-10
Tools:
Floor jack or tractor jack (see
TM 9-2320-273-10 or TM 9-2320-283-10)
Semitrailer jacking block
Lug wrench
Torque wrench
General Safety Instructions:
Use extreme caution during removal of
spare tire from spare tire carrier.
DO NOT remove wheel nuts unless all rim
clamps are loose.
4-141
TM 9-2330-384-14&P
4-45. CHANGING TIRES (Con't).
a. REMOVAL
WARNING
Use extreme caution during removal of spare tire (3) from spare tire carrier
(4). Spare tire is heavy. Dropping it could cause serious injury to personnel.
NOTE
If semitrailer is coupled to tractor, wheels may be locked by disconnecting
EMERGENCY air coupling.
(1)
4-142
Disconnect chain (1). Loosen two wing nuts and free hook bolts (2) from rim of spare tire (3).
Remove spare tire from spare tire carrier (4).
TM 9-2330-384-14&P
4-45. CHANGING TIRES (Con't).
CAUTION
Use caution not to damage plastic
hubcap (7) when changing tire. If
hubcap is cracked, lubricating oil
will leak from axle.
(2) Loosen five wheel nuts (6) until
flush with ends of wheel studs.
NOTE
If tire is being changed on the road,
jacking block (9) and tractor jack
(10) must be used. If tire is being
changed at maintenance facility, a
floor jack may be used.
(3) Remove jacking block (9) from
cabinet. Place jacking block on
tractor jack (10) and position under axle in front of brake chamber.
Raise semitrailer until affected dual
wheel is clear of ground.
WARNING
DO NOT remove wheel nuts (6) unless all rim clamps (5) are loose. Removing wheels nuts with rim clamps still tight may cause rim clamps to fly off,
causing serious injury to personnel.
(4)
Tap on five rim clamps (5) to loosen. Remove five wheel nuts (6) and rim clamps. Remove
outer tire (3).
4-143
TM 9-2330-384-14&P
4-45. CHANGING TIRES (Con’t).
NOTE
Spacer (12) and inner tire (3) must
be worked loose evenly so that they
do not become jammed.
(5) If removing inner tire (3), remove
spacer (12).
(6) Remove inner tire (3).
b. INSTALLATION
CAUTION
Use caution not to damage plastic hubcap (7) when changing tire (3). If
hubcap is cracked, lubricating oil will leak from axle.
When installing tires (3) on wheel, tires should be rotated so that valve
stem passes between wheel spokes. Failure to follow this procedure may
result in damage to valve stem.
(1) Remove any foreign matter from
mounting faces of wheel and tire
rims. Use a wire brush if necessary. Inspect wheel stud (11)
threads, wheel nuts (6), and
spacer (12) for damage. If wheels
nuts or spacer are damaged, replace. If wheel studs are damaged. replace (see paragraph
4-46).
4-144
TM 9-2330-384-14&P
4-45. CHANGING TIRES (Con't).
NOTE
Inner tire (3) and spacer (12) must be worked evenly so that they do not
become jammed.
(2)
If removed, install inner tire (3) with rim mounting flange side facing out.
(3)
Install spacer (12) on wheel.
(4)
Install outer tire (3) with rim mounting flange side facing in and with valve stem (8) positioned
as close to 180 degrees away from inner tire valve stem as possible.
(5)
Install five rim clamps (5) and
wheel nuts (6). Tighten wheel nuts
in crisscross pattern shown.
(6)
Lower semitrailer to ground. Remove jacking block (9) from tractor jack (10) and stow in cabinet.
Stow tractor jack in tractor.
CAUTION
It is important that torque of wheel nuts (6) and rim alinement be checked.
Insufficient torque can cause rim slippage, resulting in broken valve stems,
worn parts, and damaged tires. Excessive torque can cause damage by
stripping wheel studs, collapsing a spacer, or forcing rims into an out-ofround condition. Improper rim alinement will cause tires to wobble and wear
unevenly.
(7)
Torque wheel nuts (6) in crisscross
pattern shown to 250 lb.-ft. (339
N•m).
(8)
Check rim alinement (see paragraph 4-48).
4-145
TM 9-2330-384-14&P
4-45. CHANGING TIRES (Con’t).
WARNING
Use extreme caution during installation of spare tire (3) to spare tire carrier
(4). Spare tire is heavy. Dropping it could cause serious injury to personnel.
NOTE
If tire (3) was changed on road and replacement spare tire is not immediately available, be sure to replace and mount one on semitrailer as soon as
possible.
(9)
Place replacement spare tire (3) in spare tire carrier (4). Hook two hook bolts (2) over rim
and tighten wing nuts securely. Connect chain (1).
FOLLOW-ON TASKS:
Remove and stow chock blocks (see paragraph 2-11).
Release semitrailer parking/emergency brakes (see TM 9-2320-273-10 or TM 9-2320-283-10).
4-146
TM 9-2330-384-14&P
4-46. WHEEL, DRUM, AND WHEEL BEARING MAINTENANCE.
THIS TASK COVERS
a.
b.
Removal
Cleaning and inspection
c.
Installation
INITIAL SETUP
Equipment Conditions:
Ref
Conditions
4-34 Brakes adjusted.
4-45 Tires removed.
Tools:
Tool kit, general mechanic’s
Drain pan
Torque wrench
4% in. wheel bearing adjusting nut wrench,
8 pt.
47A in. wheel bearing adjusting nut wrench,
6 pt.
Personnel Required: Two
References:
TM 9-214
Materials/Parts:
One cotter pin
One oil seal
One performed packing
Five locknuts
(item 5, Appendix E)
Abrasive cloth
Dry cleaning solvent
(item 10,
Appendix E)
Lubricating oil
(Item 15, Appendix E)
(Item 21, Appendix E)
Tag marker
General Safety instructions:
Dry cleaning solvent is flammable and must
not be used near open flame. Use only in a
well-ventilated area.
If any wheel stud is damaged and needs
replacement, all wheel studs MUST be replaced.
Wheel and drum assembly is heavy and
awkward to handle. Use caution, provide
adequate support, and use assistance during removal and installation.
4-147
TM 9-2330-384-14&P
4-46. WHEEL, DRUM, AND WHEEL BEARING MAINTENANCE (Con’t).
a. REMOVAL
(1)
Place a suitable container under hubcap (10). Remove hubcap and allow all lubricating oil to
drain. Remove preformed packing (9) from hubcap and discard.
(2)
Cage brake chamber spring (see paragraph 4-33).
(3)
Remove cotter pin (8) from axle nut (7). Remove axle nut and washer (6). Discard cotter pin.
WARNING
Wheel and drum assembly is heavy and awkward to handle. Use caution
provide adequate support, and use assistance during removal. Failure to
follow this warning may result in serious injury to personnel.
NOTE
Ensure that wheel bearings and bearing cups are tagged as they are removed. DO NOT mix.
(4)
4-148
Provide suitable support for wheel (14) and drum (19) assembly. Pull outward on wheel and
drum assembly and remove outer wheel bearing (12) as it becomes loosened. Remove
wheel and drum assembly from axle spindle (2).
TM 9-2330-384-14&P
4-46. WHEEL, DRUM, AND WHEEL BEARING MAINTENANCE (Con't).
(5)
Working from wheel (14) end, drive out inner wheel bearing (17) and oil seal (18). Remove
inner bearing cup (16) from wheel side. Remove outer bearing cup (13) from drum (19) side.
Discard oil seal.
CAUTION
DO NOT damage axle with chisel.
(6)
If metal wiper of oil seal (18) has remained pressed onto spindle (2), use a chisel to split it,
then remove from spindle.
(7)
To separate wheel (14) from drum (19), remove five locknuts (5), bolts (20), and ten washers (4). Discard locknuts.
b. CLEANING AND INSPECTION
WARNING
Dry cleaning solvent P-D-680 is toxic and flammable. Always wear protective
goggles, face shield, and gloves, and use only in a well-ventilated area.
Avoid contact with skin, eyes, and clothes and DO NOT breathe vapors. DO
NOT use near open flame or excessive heat. The solvent’s flash point is
100°F-138°F (38°C59°C). If you become dizzy while using cleaning solvent, immediately get fresh air and medical help. If solvent contacts eyes,
immediately wash your eyes with water and get medical aid.
(1)
Clean and inspect outer and inner wheel bearings and bearing cups in accordance with
TM 9-214. If any wheel bearing or bearing cup needs replacing, replace all wheel bearings
and bearings cups.
(2)
Clean ail removed components, axle spindle shoulder, and wheel hub with dry cleaning solvent. Remove any burrs with abrasive cloth and wipe clean with dry cleaning solvent.
(3)
Inspect drum for cracks, scoring, pitting, or grooves. Check edge of drum for cracks or
broken areas. If drum is damaged, notify direct support maintenance.
(4)
Inspect wheel for cracks or other damage. If damaged, replace wheel.
WARNING
If any wheel stud (3) is damaged and needs replacement, all wheel studs
must be replaced. Replacing only the damaged wheel stud and remounting
the wheel may result in further damage and injury to personnel.
(5)
inspect wheel studs (3) for damage. If damaged, remove all five wheel studs. Install five new
wheel studs.
(6)
Inspect all remaining removed components for damage. Replace if damaged.
4-149
TM 9-2330-384-14&P
4-46. WHEEL, DRUM, AND WHEEL BEARING MAINTENANCE (Con't).
c. INSTALLATION
NOTE
Ensure that wheel bearings are lightly coated with lubricating oil as they
are installed.
Install wheel bearings and bearing cups as tagged.
(1)
Install outer and inner bearing cups (13 and 16) inside wheel hub (15) until flush against wheel
hub shoulders.
(2)
Lubricate spindle (2) with lubricating oil. Install new oil seal (18) with metal wiper facing spider
(1) side.
(3)
Install inner wheel bearing (17) over spindle (2) until flush against oil seal (18).
(4)
If separated, install wheel (14) to drum (19) with five bolts (20), ten washers (4), and five new
locknuts (5). Torque locknuts to 250 lb.-ft. (339 N•m).
4-150
TM 9-2330-384-14&P
4-46. WHEEL, DRUM, AND WHEEL BEARING MAINTENANCE (Con't).
WARNING
Wheel and drum assembly is heavy and awkward to handle. Use caution,
provide adequate support, and use assistance during installation. Failure to
follow this warning may result in serious injury to personnel.
(5)
Using a suitable support, install wheel (14) and drum (19) assembly over axle spindle (2).
(6) Install outer wheel bearing (12).
(7)
Install washer (6) and axle nut (7). Torque axle nut to 125 lb.-ft. (170 N•m) while rotating
wheel (14) in both directions to properly seat outer and inner wheel bearings (12 and 17).
(8)
Back axle nut (7) off x to ¼ of a turn until first of two holes in axle spindle (2) alines with slot in
axle nut. Install new cotter pin (8) and bend back.
(9)
Uncage brake chamber spring (see paragraph 4-33).
(10) Lubricate new preformed packing (9) and hubcap (10) threads with lubricating oil. install
preformed packing to hubcap. Install hubcap to axle spindle (2) and torque to 70 lb.-ft.
(95 N•m).
(11) Remove hubcap plug (11) and add 1½ pt (0.7 I) of lubricating oil. Allow oil to seep through
outer and inner wheel bearings (12 and 17) and seek a level even with mark on hubcap (10).
DO NOT overfill. Install hubcap plug.
FOLLOW-ON TASKS:
Install tires (see paragraph 4-45).
Check for leaks.
4-151
TM 9-2330-384-14&P
4-47. WHEEL BEARING CHECK AND ADJUSTMENT.
THIS TASK COVERS
a.
Wheel Bearing Check
b.
Wheel Bearing Adjustment
INITIAL SETUP
Equipment Conditions:
Materials/Parts:
Conditions
Ref
4-34 Brakes adjusted.
One cotter pin
One preformed packing
Lubricating oil
(Item 15, Appendix E)
Tools:
Tool kit, general mechanic’s
4% in. wheel bearing adjusting nut wrench,
8 pt.
4% in. wheel bearing adjusting nut wrench,
6 pt.
Drain pan
Floor jack
Jackstand
Pry bar
Torque wrench
a.
WHEEL BEARING CHECK
(1)
Place a suitable floor jack under axle in front of brake chamber and raise wheels clear of
ground. Support axle with a suitable jackstand.
(2)
Cage brake chamber spring (see paragraph 4-33).
(3)
Turn wheels and note whether they turn hard. If wheels turn hard, perform WHEEL BEARING
ADJUSTMENT (subparagraph b).
(4)
Test for excessive wheel wobble:
(a)
Rest one end of pry bar (6) on floor under tire (7) and lift up on tire. Move pry bar up and
down while holding one hand against top of outer tire. if wheel bearings are adjusted
correctly, movement of wheels will be barely visible and will turn freely with no drag.
(b)
If there is excessive wheel wobble, perform WHEEL BEARING ADJUSTMENT (subparagraph b).
b. WHEEL BEARING ADJUSTMENT
(1)
Remove jackstand and lower wheels to ground. Loosen hubcap (4) ½ turn. Raise wheels
again and support axle with jackstand.
(2)
Place a drain pan under hubcap (4). Remove hubcap and allow all lubricating oil to drain.
Remove preformed packing (3) from hubcap and discard.
NOTE
General condition of outer wheel bearing may be inspected at this time. if
contamination or damage is found, service wheel bearings (see paragraph
4-46).
(3)
4-152
Remove cotter pin (1) from axle nut (2) and discard.
TM 9-2330-384-14&P
4-47. WHEEL BEARING CHECK AND ADJUSTMENT (Con't).
NOTE
If wheels still turn hard after axle nut (2) is tightened to 125 lb.-ft.
(170 N•m), it will be necessary to check condition of inner wheel bearing
(see paragraph 4-46) or recheck brake adjustment (see paragraph 4-34).
(4)
Check that axle nut (2) torque is set at 125 lb.-ft. (170 N•m), while rotating wheels in both
directions. Back off axle nut x to ¼ of a turn, until first of two holes in axle spindle alines with
slot in axle nut.
(5)
Install new cotter pin (1) through axle nut (2). Bend cotter pin back.
(6)
Uncage brake chamber spring (see paragraph 4-33).
(7)
Lubricate new preformed packing (3) and hubcap threads with lubricating oil. Install
preformed packing to hubcap (4). Install hubcap. Remove hubcap plug (5) and add 1½ pt
(0.7 I) of lubricating oil. Allow oil to seep through the bearings and seek a level even with
mark on hubcap window. DO NOT overfill. Install hubcap plug.
(8)
Torque hubcap (4) to 70 lb.-ft. (95 N•m).
FOLLOW-ON TASKS:
Check for leaks.
4-153
TM 9-2330-384-14&P
4-48. RIM ALINEMENT.
THIS TASK COVERS
a.
Rim Alinement Check
b.
Rim Alinement
INITIAL SETUP
Equipment Conditions:
Tools:
R e f Conditions
2-11 Wheels chocked.
Tool kit, general mechanic’s
Floor jack
Jackstand
Lug wrench
Torque wrench
a. RIM ALINEMENT CHECK
(1)
Place a suitable floor jack under axle in front of brake chamber and raise wheels clear of
ground. Support axle with a suitable jackstand.
(2)
Cage brake chamber spring (see paragraph 4-33).
(3)
Place block of wood (2) or other
rectangular object on surface beside tire (1). Rotate wheels.
(4)
Note variation, if any, in space between block of wood (2) and tire
(1) as wheels are rotated. If variation exceeds Ks in. (4.8 mm),
perform RIM ALINEMENT (subparagraph b).
(5)
Remove jackstand and lower axle.
b. RIM ALINEMENT
NOTE
If rim alinement procedure does not correct misalinement, rim, wheel,
or drum may be damaged and must be removed for further inspection
(see paragraphs 4-45, 4-46, and 4-49).
Ensure that rim clamps (3) remain in proper position.
Optimum wheel nut torque is 250 lb.-ft. (339 N•m).
(1)
4-154
Loosen wheel nuts (4) where inward deviation is greatest and tighten on opposite side.
TM 9-2330-384-14&P
4-48. RIM ALINEMENT (Con’t).
(2) Repeat RIM ALINEMENT CHECK
(subparagraph a).
(3) Torque all wheel nuts (4) to 250
lb.-ft. (339 N•m) (see paragraph
4-45).
FOLLOW-ON TASKS:
Uncage brake chamber spring (see paragraph 4-33).
Remove and stow chock blocks (see paragraph 2-11).
4-155
TM 9-2330-384-14&P
4-49. TIRE MAINTENANCE.
THIS TASK COVERS
a.
b.
Removal
Inspection
c.
Installation
INITIAL SETUP
Equipment Conditions:
References:
Conditions
Ref
4-45 Tire removed.
TM 9-2610-200-24
General Safety Instructions:
Tools:
Carefully follow all tire dismounting and
mounting instructions.
Tool kit, general mechanic’s
Safety cage
a. REMOVAL
WARNING
Carefully follow all tire dismounting instructions. NEVER dismount a tire unless totally deflated. Failure to follow these instructions may cause serious
injury or death to personnel.
(1)
Remove valve cap (2) and valve core from valve stem (3). Completely deflate tire (1).
Remove tire from rim (6) (see TM 9-2610-200-24).
(2)
Remove nut (4) and valve stem (3) from rim (6).
4-156
TM 9-2330-384-14&P
4-49. TIRE MAINTENANCE (Con't).
b. INSPECTION
(1) Inspect tire (1) for cuts, gouges, cracks, and sidewall damage. Check for protruding objects
on inside and outside of tire. Repair tire as required (see TM 9-2610-200-24).
(2) Inspect rim (6) for bends or other damage. Replace If bent or damaged.
(3) Inspect valve cap (2), valve core, and valve stem (3) for cracks or other damage. Replace if
cracked or damaged.
c. INSTALLATION
(1)
Install valve stem (3) through rim (6). Install nut (4) and securely tighten to seat grommet (5)
against rim.
WARNING
Carefully follow all tire mounting Instructions. NEVER mount or use damaged tires or rims. Failure to follow these Instructions may result In faulty
positioning of tire and/or rim parts. The assembly could burst with sufficient
foree to cause serious Injury or death to personnel.
(2)
Install tire (1) on
rim (6). Install valve core in valve stem (3). Using a safety cage, inflate tire
to 95 psi (655 kPa). DO NOT over Inflate tire. Install valve cap (2). Check for leaks in valve
stem area and around edge of rim. Check for proper seat of tire bead to rim (see
TM 9-2610-200-24).
FOLLOW-ON TASKS:
Install tire (see paragraph 4-45).
4-157
TM 9-2330-384-14&P
Section IX. FRAMEAND TOWINGASSEMBLYMAINTENANCE
Paragraph
Number
4-50
4-51
4-52
4-53
4-54
Page
Number
Title
4-158
4-159
4-161
4-168
4-170
Lockpin Replacement ..........................................................................................
Pick-up Plate Replacement .................................................................................
Landing Gear Replacement ................................................................................
Fire Extinguisher Mounting Bracket Maintenance ...............................................
Spare Tire Carrier Replacement .........................................................................
4-50. LOCKPIN
REPLACEMENT.
THIS TASKCO
Lockpin Replacement
Materials/Parts:
Tools:
• Tool kit, general mechanic's
• Wire cutter
- One sleeve
LOCKPIN REPLACEMENT
NOTE
Lockpins used to secure grabhandleorconvoy
warning light
assembly
to
mounting
brackets are
replaced
the
same.
This
task describes
replacement of a grabhandle lockpin.
(1)
(2)
Cut cable (5) from lockpin (3).
(3)
Install a new sleeve (4) at end of cable
(5) and pass replacement lockpin (3)
through loop formed in cable.
(4)
Pull loop in cable (5) tight around lockpin (3). Use vise grips to crimp sleeve
(4).
(5)
4-158
2
Remove lockpin (3) from grabhandle
(2)and mounting bracket (1).
Install lockpin (3) through grabhandle
(2) and mounting bracket (1).
Change1
3
4
5
TM 9-2330-384-14&P
4-51. PICK-UP PLATE REPLACEMENT.
THIS TASK COVERS
c.
Removal
Cleaning
a.
b.
Installation
INITIAL SETUP
Personnel Required: Two
Materials/Parts:
Six locknuts
Dry cleaning solvent(ltem 10, Appendix E)
(Item 12, Appendix E)
Grease
(Item 24, Appendix E)
Mylar tape
General Safety Instructions:
Tools:
Tool kit, general mechanic’s
Torque wrench
a.
Pick-up plate is heavy and awkward to
handle. Use caution, provide adequate
support, and use assistance during
removal and installation.
Dry cleaning solvent is flammable and must
not be used near open flame. Use only in a
well-ventilated area.
REMOVAL
WARNING
Pick-up plate (1) is heavy and awkward to handle. Use caution, provide adequate support, and use assistance during removal. Failure to follow this
warning may result in serious injury to personnel.
Remove six locknuts (4), washers (3),
and bolts (2). Remove pick-up plate (1)
from front crossmember and siderails.
Discard locknuts.
b.
CLEANING
(1)
Remove all traces of old mylar tape
from mounting surfaces of pick-up
plate (1) to front crossmember
and siderails.
4-159
TM 9-2330-384-14&P
4-51. PICK-UP PLATE REPLACEMENT (Con't).
WARNING
Dry cleaning solvent P-D-680 is toxic
and flammable. Always wear protective goggles, face shield, and
gloves, and use only in a well-ventilated area. Avoid contact with skin,
eyes, and clothes and DO NOT
breathe vapors. DO NOT use near
open flame or excessive heat. The
solvent’s flash point is 100°F-138°F
(38°C-59°C). If you become dizzy
while using cleaning solvent, immediately get fresh air and medical
help. If solvent contacts eyes, immediately wash your eyes with water
and get medical aid.
(2)
Use dry cleaning solvent to clean
mounting surfaces of pick-up plate
(1) to front crossmember and
siderails. Allow to dry thoroughly.
c. INSTALLATION
WARNING
Pick-up plate (1) is heavy and awkward to handle. Use caution, provide adequate support, and use assistance during removal. Failure to follow this
warning may result in serious injury to personnel.
CAUTION
To protect against corrosion and distortion of components, mylar tape must
be applied to mounting surfaces of pick-up plate (1) to front crossmember
and siderails.
(1)
Apply suitable width of mylar tape to all mounting surfaces of pick-up plate (1) to front
crossmember and siderails. Pierce holes in mylar tape at mounting bolt holes to prevent
water accumulation.
(2)
Install pick-up plate (1) to front crossmember and siderails with six bolts (2), washers (3),
and new locknuts (4). Torque locknuts to 120 lb.-ft. (163 N•m). Trim excess mylar tape.
(3)
Apply a thick coat of grease to pick-up plate (1) (see Chapter 3, Section I).
4-160
TM 9-2330-384-14&P
4-52. LANDING GEAR REPLACEMENT.
THIS TASK COVERS
a.
b.
Removal
Cleaning
c.
Installation
INITIAL SETUP
Equipment Conditions:
Materials/Parts:
R e f Condition
2-11 Wheels chocked.
2-12 Semitrailer parked on level ground
and coupled to tractor.
-Landing gear raised.
Two retaining rings
Nine locknuts
Dry cleaning solvent
(Item 10,
Appendix E)
(Item 24, Appendix E)
Mylar tape
General Safety Instructions:
Tools:
Landing gear is heavy and awkward to handle. Use caution, provide adequate support, and use assistance during removal
and installation.
Dry cleaning solvent is flammable and must
not be used near open flame. Use only in a
well-ventilated area.
Tool kit, general mechanic’s
Torque multiplier
Torque wrench
Personnel Required: Two
a.
REMOVAL
NOTE
Removal of curbside landing gear leg (11) is described. Roadside landing gear leg is removed the same, except that it has no handcrank (9).
If removing sand shoe, perform step 7.
(1) Unstow handcrank (9) from clip
(10) on landing gear leg (11). Remove locknut (5), two washers
(6), and screw (7). Remove handcrank. Discard locknut.
4-161
TM 9-2330-384-14&P
4-52. LANDING GEAR REPLACEMENT (Con't).
(2)
Remove nut (20), two washers (19 and 22), and bolt (23) securing cross-shaft (18) to landing
gear mainshaft (21).
(3)
If cross-shaft (18) is damaged, remove from other side mainshaft (21) in same manner.
(4)
Remove locknut (29), washer (28), and bolt (26) securing transverse brace (27) to landing
gear leg (11). Discard locknut. Loosen locknut (25) securing transverse brace to frame (3)
and move brace clear of landing gear leg.
(5)
Remove locknut (14), washer (13), and bolt (12) securing longitudinal brace (17) to landing
gear leg (11). Discard locknut. Loosen locknut (1) securing longitudinal brace to frame (3)
and move brace clear of landing gear leg.
4-162
TM 9-2330-384-14&P
4-52. LANDING GEAR REPLACEMENT (Con't).
WARNING
Landing gear is heavy and awkward to handle. Use caution, provide adequate support, and use assistance during removal. Failure to follow this
warning may result in serious injury to personnel.
(6)
Remove six locknuts (16), washers
(15), and bolts (8). Remove landing gear leg (11). Discard locknuts.
(7)
Remove two retaining rings (33) at
axle tube (31). Remove axle tube
and sand shoe (32) from landing
gear leg (11). Discard retaining
rings.
NOTE
Perform steps 8 and 9 if longitudinal and transverse braces (17 and 27) are
damaged and must be replaced.
(8)
Remove locknut (1), washer (2), and bolt (4). Remove longitudinal brace (17) from frame
(3). Discard locknut.
(9)
Remove locknut (25), washer (24), and bolt (30). Remove transverse brace (27) from frame
(3). Discard locknut.
4-163
TM 9-2330-384-14&P
4-52. LANDING GEAR REPLACEMENT (Con?).
b. CLEANING
(1)
Remove all traces of old mylar tape from mounting surfaces of landing gear and braces to
frame.
WARNING
Dry cleaning solvent P-D-680 is toxic and flammable. Always wear protective
goggles, face shield, and gloves, and use only in a well-ventilated area.
Avoid contact with skin, eyes, and clothes and DO NOT breathe vapors. DO
NOT use near open flame or excessive heat. The solvent’s flash point is
100°F-138°F (38°C-59°C). If you become dizzy while using cleaning solvent, immediately get fresh air and medical help. If solvent contacts eyes,
immediately wash your eyes with water and get medical aid.
(2)
Use dry cleaning solvent to clean mating surfaces of landing gear and braces to frame. Allow
to dry thoroughly.
c. INSTALLATION
CAUTION
To protect against corrosion and distortion of components, mylar tape must
be applied to mounting surfaces of landing gear and braces to frame.
NOTE
Installation of curbside landing gear leg (11) is described. Roadside
landing gear leg is installed the same, except that it has no handcrank
(9).
If installing sand shoe, perform step 12.
(1)
Apply suitable width of mylar tape
to all mounting surfaces of landing
gear and braces to frame. Pierce
holes in mylar tape at mounting
bolt holes to prevent water accumulation.
(2) If removed, install transverse
brace (27) to frame (3) with bolt
(30), washer (24), and new locknut (25). DO NOT fully tighten locknut.
(3) If removed, install longitudinal
brace (17) to frame (3) with bolt
(4), washer (2), and new locknut
(1). DO NOT fully tighten locknut.
4-164
TM 9-2330-384-14&P
4-52. LANDING GEAR REPLACEMENT (Con't).
WARNING
Landing gear is heavy and awkward to handle. Use caution, provide adequate support, and use assistance during installation. Failure to follow this
warning may result in serious injury to personnel.
(4)
Position landing gear leg (11) at frame (3) with mainshaft (21) fitted through hole in frame
(3). install landing gear leg to frame with six bolts (8), washers (15), and new locknuts (16).
DO NOT fully tighten locknuts.
(5)
install longitudinal brace (17) to landing gear leg (11) with bolt (12), washer (13), and new
locknut (14). DO NOT fully tighten locknut.
(6)
Install transverse brace (27) to landing gear leg (11) with bolt (26), washer (28), and new
locknut (29). DO NOT fully tighten locknut.
(7)
install handcrank (9) with screw (7), two washers (6), and new locknut (5).
(8)
Operate handcrank (9) to raise or lower curbside landing gear leg (11) to a height equal to
roadside landing gear leg. Check that holes in two mainshafts (21) are alined with each other.
If they are not alined, operate handcrank to adjust to the nearest alined position.
4-165
TM 9-2330-384-14&P
4-52. LANDING GEAR REPLACEMENT (Con't).
NOTE
Smaller washer (19) is installed on nut (20) side.
(9)
4-166
If cross-shaft (18) was removed from other side mainshaft (21), install with bolt (23), two
washers (19 and 22), and nut (20). Install cross-shaft to replacement landing gear leg mainshaft in same manner. Torque nuts to 15 lb.-ft. (20 N•m).
TM 9-2330-384-14&P
4-52. LANDING GEAR REPLACEMENT (Con't).
NOTE
Ensure lending gear log (11) Is square In relation to frame (3).
(10) Torque six locknuts (16) to
180 lb.-ft.
(244 N-m). Torque
locknuts (1, 16, 25, and 29) to
250 lb.-ft. (339 N-m).
3
(11) Trim excess mylar tape.
1
r
16
(12) Position sand shoe (32) at landing
gear log (11) with vertlcal edge of
sand shoe facing front of semitrailer. Slide In axis tube (31). Install two now retaining rings (33) at
axie tube ends.
31
32
(13) Refer to Chapter 3. Section I to lubricate landing gear.
1@@33
3
L:;;' FRONT
FOLLOW-ON TASKS:
Remove and stow chock blocks (see paragraph 2-11).
4-167
TM 9-2330-384-14&P
4-53. FIRE EXTINGUISHERMOUNTINGBRACKETMAINTENANCE.
ITHISTASKCOVER
c.
a. Removal
b. Cleaning
Equipment Conditions:
Ref
---
Conditions
Fire extinguisher removed.
Tools:
Tool kit, general mechanic's
Installation
Materials/Parts:
-
Four grommets
Four locknuts
Dry cleaning solvent
Mylar tape
(Item 10, Appendix E)
(Item 24, Appendix E)
General Safety Instructions:
Dry cleaning solvent is flammable and must not be
used near open flame. Use only in a well-ventilated area.
a. REMOVAL
(1)
Remove four locknuts (5), screws
(1), and washers (6) at fire
extinguisher mounting bracket (3).
Discard locknuts.
3
2
(2)
Remove fire extinguisher mounting
bracket (3) from frame (4).
10
(3)
Remove four grommets (2) from
fire extinguisher mounting bracket
(3). Discard grommets.
0
b. CLEANING
(1)
4-168
Remove all traces of old mylar tape
from mounting surfaces of fire
extinguisher mounting bracket (3)
and frame (4).
Change1
6
5
TM 9-2330-384-14&P
4-53. FIRE EXTINGUISHERMOUNTINGBRACKETMAINTENANCE.
WARNING
DrycleaningsolventP-D-680istoxicandflammable.Alwayswearprotective
goggles,faceshield,andgloves,anduseonlyinawell-ventilatedarea. Avoid
contactwithskin,eyes,andclothesandDONOTbreathevapors.DONOTuse
nearopenflameor excessiveheat. The solvent'sflashpointis 100*F-138*F
(38*C-59*C).If you becomedizzywhileusingcleaningsolvent,immediately
get fresh air and
medical help.Ifsolventcontactseyes,immediatelywashyour
eyeswithwaterand get medicalaid.
(2)
c.
Use dry cleaning solvent to clean surfaces of fire extinguisher mounting bracket (3) that come in
contact with frame (4). Allow to dry thoroughly.
INSTALLATION
CAUTION
To protect against corrosion and distribution of components, mylar tape must
be applied to surfaces of fire extinguisher mounting bracket (3) that come in
contact with frame (4).
(1)
Apply suitable width of mylar tape to all surfaces of fire extinguisher mounting bracket (3) that come
in contact with frame (4). Pierce holes in mylar tape at mounting bolt holes to prevent water
accumulation.
(2)
Install four new grommets (2) in fire extinguisher mounting bracket (3).
(3)
Install fire extinguisher mounting bracket (3) on frame (4) with four screws (1), washers (6), and new
locknuts (5).
(4) Trim excess mylar tape.
FOLLOW-ON TASKS:
Install fire extinguisher.
Change1
4-169
TM 9-2330-384-14&P
4-54.
SPARE TIRE CARRIER REPLACEMENT.
I THIS TASK COVERS
a.
b.
c.
Removal
Cleaning
Installation
IN
S
Materials/Parts:
Bgf r-andiflonsAppendix
E)
4-45
cleaningsolvent (Item10,
tape
Appendix
E) Tools:
carrieris
jack
handle.
Three locknuts
removed.
Spare tire *
Dry
Mylar
(Item
24
,
Safety
Instructions:
Toolkit,
general
mechanic's
9 Spare
tire
heavy and awkward to
Floor
caution, provide
adequate
Personnel Required:
Two
support,and use
assistance
during
removal and
installation. ,
Dry
cleaning
solvent
is
flammable
and must not
be
used
General
Use
nearopen
flame.Use only well-ventilated
in a area.
a. REMOVAL(1) Remove
two locknuts
(3).
sparetire carrier
(10)
to
cabinet
(13)
and
and frame.Discard
locknuts. (2) Remove
bolt
disconnect
cabinet brace (14)
from
washers
(2), and
(15),two washers
(5),
bolts (1)securing
and
locknut
(6),
spare
tire
carrier
(10). Discard
locknut.
WARNING
Sparetire
carrier
(10)
Is heavy
and
awkward to
handle.
Use caution,
provide adequate support, anduse assistance
during removal.
Failure to follow thiswarning
(3)
Place a
may result In Injury to personnel.
Remove
four nuts(7). washers
(8). and bolts
(4)
at
frame.
Remove
curbside
sparetire carrier.
(4) If
4-64).
(5)
and setaside (see paragraph
suitable floor jack
fromfront andrear
groundingstud (9) is
If
hookbolts
undersparetire carrier
of
spare
tire
(10).
carrier
not damaged, remove
(12) are damaged,
remove
two wingnuts
(11) and
of
carrier
hook
bolts. b. CLEANING
(1)
Remove
all
spare
tire
traces
of
oldmylar tapefrom
mounting
surfaces
TM 9-2330-384-14&P
4-54. SPARE TIRE CARRIER REPLACEMENT (Con’t).
WARNING
Dry cleaning solvent P-D-680 is toxic and flammable. Always wear protective
goggles, face shield, and gloves, and use only in a well-ventilated area.
Avoid contact with skin, eyes, and clothes and DO NOT breathe vapors. DO
NOT use near open flame or excessive heat. The solvent’s flash point is
100°F-138°F (38°C-59°C). If you become dizzy while using cleaning solvent, immediately get fresh air and medical help. If solvent contacts eyes,
immediately wash your eyes with water and get medical aid.
(2)
Use dry cleaning solvent to clean mounting surfaces of spare tire carrier (10) and braces to
frame. Allow to dry thoroughly.
c. INSTALLATION
CAUTION
To protect against corrosion and distortion of components, mylar tape must
be applied to mounting surfaces of spare tire carrier (10) and braces to
frame.
(1)
Apply suitable width of mylar tape to all mounting surfaces of spare tire carrier (10) and
braces to frame. Pierce holes in mylar tape at mounting bolt holes to prevent water accumulation.
(2)
If removed, install two hook bolts (12) and wingnuts (11).
4-171
TM 9-2330-384-14&P
4-54. SPARE TIRE CARRIER REPLACEMENT (Con’t).
WARNING
Spare tire carrier (10) is heavy and awkward to handle. Use caution, provide
adequate support, and use assistance during removal. Failure to follow this
warning may result in injury to personnel.
(3)
Place spare tire carrier (10) on a floor jack and raise into position. Loosely install front and
rear of spare tire carrier to curbside frame with four bolts (4), washers (8), and nuts (7).
(4)
Loosely connect cabinet brace (14) to spare tire carrier (10) with bolt (15), two washers (5),
and new locknut (6).
(5)
Loosely install spare tire carrier (10) to cabinet (13) and frame with two bolts (1), washers
(2), and new locknuts (3).
(6)
Tighten four nuts (7), two locknuts (3), and locknut (6) securely.
(7) Trim excess mylar tape.
(8)
Install grounding stud (9) (see paragraph 4-64).
FOLLOW-ON TASKS:
Install spare tire (see paragraph 4-45).
4-172
TM 9-2330-384-14&P
Section X. SUSPENSION MAINTENANCE
Paragraph
Number
Page
Number
Title
Radius Rod and Radius Rod Bushing Replacement . . . . . . . . . . . . . . . . . . . . .
Spring Replacement . . . . . . . . . . . . . . . . . . . . . . . . . . . . . . . . . . . . . . . . . . . . . . .
Equalizer and Equalizer Bushing Replacement . . . . . . . . . . . . . . . . . . . . . . . . .
4-55
4-56
4-57
4-173
4-176
4-179
4-55. RADIUS ROD AND RADIUS ROD BUSHING REPLACEMENT.
THIS TASK COVERS
a.
Removal
b.
Installation
INITIAL SETUP
Equipment Conditions:
Condition
Ref
2-11 Wheels chocked.
Tools:
Tool kit, general mechanic’s
Floor jack
Jackstand
Torque multiplier
Torque wrench
Materials/Parts:
Two locknuts
Four bushings
Detergent
(Item 9, Appendix E)
Personnel Required: Two
4-173
TM 9-2330-384-14&P
4-55. RADIUS ROD AND RADIUS ROD BUSHING REPLACEMENT (Con't).
a. REMOVAL
NOTE
Front and rear and adjustable and fixed radius rods (12) are removed the
same. Removal of an adjustable radius rod is illustrated.
(1)
Use a floor jack placed under end of axle in front of brake chamber to raise wheels off ground.
Support axle end with a jackstand. Remove tires (see paragraph 4-45).
(2)
Remove locknut (11), thick washer (10), bolt (9), and thin washer (8) at axle bracket (7).
Discard locknut.
(3)
Remove locknut (6), thick washer (5), bolt (1), and thin washer (2) at frame hanger (4).
Discard locknut.
(4)
Work bushings (3) loose and remove. Discard bushings.
(5)
Remove radius rod (12).
b. INSTALLATION
(1)
Lightly coat four new bushings (3) with a mixture of 50% water and 50% detergent.
NOTE
Adjustable radius rods (12) are installed roadside. Fixed radius rods are
installed curbside.
Adjustable radius rods (12) should be installed so that end casting with
stamped “F” is toward the front. To extend the adjustable radius rod, a
clockwise rotation (when looking to front) is required.
(2)
4-174
If installing an adjustable radius rod (12), loosen four nuts (13) and adjust length to equal
original adjustable radius rod length. Leave nuts loose.
TM 9-2330-384-14&P
4-55. RADIUS ROD AND RADIUS ROD BUSHING REPLACEMENT (Con't).
(3)
Position radius rod (12) between frame hanger (4) and axle bracket (7). Alining radius rod
and axle bracket holes, install one bushing (3) from outside of axle bracket.
NOTE
Ensure that radius rod (12) is installed to axle bracket (7) with locknut (11)
on outside.
(4)
Assemble thin washer (8) and other bushing (3) on bolt (9). Install bolt, thick washer (10),
and new locknut (11). DO NOT fully tighten locknut.
NOTE
To aid in alinement, axle may be raised or lowered, as required.
(5)
Alining radius rod (12) and frame hanger (4) holes, install one bushing (3) from inside of
frame hanger.
NOTE
Ensure that radius rod (12) is installed to frame hanger (4) with locknut (6)
on inside.
(6)
Assemble thin washer (2) and other bushing (3) on bolt (1). Install bolt, thick washer (5), and
new locknut (6).
(7)
Torque locknuts (6 and 11) to 360 lb.-ft. (468 N•m). If loose, torque four nuts (13) on adjustable radius rod (12) to 110 lb.-ft. (149 N•m).
(8)
Check that all suspension components are tightened to proper specification (see paragraphs
4-55 through 4-57).
(9)
Install tires (see paragraph 4-45). Remove jackstand. Lower end of axle and remove floor
jack.
(10) Check front and rear axle alinement and aline axles as required (see paragraph 4-31).
FOLLOW-ON TASKS:
Remove and stow chock blocks (see paragraph 2-11).
4-175
TM 9-2330-384-14&P
4-56. SPRING REPLACEMENT.
THIS TASK COVERS
a.
b.
Removal
Cleaning and Inspection
c.
Installation
INITIAL SETUP
Equipment Conditions:
Materials/Parts:
Two locknuts
Two rebound bolts
Dry cleaning solvent
(Item 10,
Appendix E)
Grease
(Item 12, Appendix E)
Conditions
Ref
2-11 Wheels chocked.
Tools:
Tool kit, general mechanic’s
Floor jack
Jackstand
Torque multiplier
Torque wrench
General Safety Instructions:
Dry cleaning solvent is flammable and must
not be used near open flame. Use only in a
well-ventilated area.
Personnel Required: Two
a. REMOVAL
(1)
Place floor jack under axle end in front of brake chamber and raise end of axle (13). Support
end of axle with jackstand. Remove both tires (see paragraph 4-45).
(2)
Use a floor jack to raise frame at bumper until spring (8) is clear of hangers (2).
(3)
Remove locknut (1) and rebound bolt (3) at frame hanger (2). Discard locknut and rebound
bolt.
(4)
Remove four nuts (12). washers (11), two U-bolts (4), saddle (9), and delrin liner (14).
NOTE
Rear spring rebound bolt at equalizer (6) is a welded piece and cannot be
removed.
(5)
Remove locknut (5) and rebound bolt (7) at equalizer (6). Discard locknut and rebound bolt.
(6) Remove spring (8).
b. CLEANING AND INSPECTION
WARNING
Dry cleaning solvent P-D-680 is toxic and flammable. Always wear protective
goggles, face shield and gloves, and use only in a well-ventilated area.
Avoid contact with skin, eyes, and clothes and DO NOT breathe vapors. DO
NOT use near open flame or excessive heat. The solvent’s flash point Is
100°F-138°F (38°-59°C). If you become dizzy while using cleaning solvent, immediately get fresh air and medical help. If solvent contacts eyes,
immediately wash your eyes with water and get medical aid.
(1)
4-176
Clean all removed components with dry cleaning solvent.
TM 9-2330-384-14&P
4-56. SPRING REPLACEMENT (Con’t).
(2)
Inspect all removed components for damage. If any leaf of spring is damaged, replace
springs on roadside and curbside.
c. INSTALLATION
(1)
Apply a thin coat of grease on inside surfaces of equalizer (6) and frame hanger (2).
NOTE
Rear axle (13) has no spacers (10).
(2)
Position spring (8) over axle (13). If installing spring over a front axle, ensure spring center
bolt fits in hole in spacer (10). If installing spring over a rear axle, ensure spring center bolt fits
in hole in axle spring seat.
(3)
If installing a rear spring (8), ensure spring end is hooked over welded rebound bolt at
equalizer (6).
NOTE
Install rebound bolt locknuts (1 and 5) to outside of frame hanger (2) and
equalizer (6).
(4)
If installing front spring (8), install new rebound bolt (7) and new locknut (5) at equalizer (6).
DO NOT fully tighten locknut.
(5)
Install new rebound bolt (3) and new locknut (1) at frame hanger (2). DO NOT fully tighten
locknut.
4-177
TM 9-2330-384-14&P
4-56. SPRING REPLACEMENT (Con't).
(6)
Tap on spring (8) to aline it in frame hanger (2) and equalizer (6). Torque locknuts (1 and 5)
to 50 lb.-ft. (68 N•m).
(7)
Install delrin liner (14), saddle (9), two U-bolts (4), four washers (11), and nuts (12).
(8)
Torque four nuts (12) in a diagonal sequence to 150 lb.-ft. (203 N•m). Torque same four
nuts in same diagonal sequence to 360 lb.-ft. (488 N•m).
NOTE
Paint, rust, or other contaminants can give a false torque reading. Step 9
must be performed to ensure a proper torque.
(9)
Back off four nuts (12) two turns, then torque to 360 lb.-ft. (488 N•m).
(10) Lower frame.
(11) Install tires (see paragraph 4-45).
(12) Remove jackstand and lower axle (13).
FOLLOW-ON TASKS:
Remove and stow chock blocks (see paragraph 2-11).
4-178
TM 9-2330-384-14&P
4-57. EQUALIZER AND EQUALIZER BUSHING REPLACEMENT.
THIS TASK COVERS
Removal
a.
b.
Installation
INITIAL SETUP
Equipment Conditions:
Ref
4-56
Conditions
Front or rear spring removed (if
replacing equalizer).
Materials/Parts:
One rebound bolt
Two bushings
Two locknuts
Detergent
(Item 9, Appendix E)
Tools:
Tool kit, general mechanic’s
Floor jack
Jackstand
Torque multiplier
Torque wrench
a. REMOVAL
(1)
If spring (11) has not been removed, place floor jack under rear axle in front of brake chamber and raise end of axle. Support end of axle with jackstand. Remove both tires (see paragraph 4-45).
(2)
If spring (11) has not been removed, use a floor jack to raise frame at bumper until spring is
clear of hangers (3).
(3)
If front spring (11) is installed and if equalizer (2) is being replaced, remove locknut (10) and
rebound bolt (1) at equalizer. Discard locknut and rebound bolt.
(4)
Remove locknut (9), thick washer (4), bolt (5), and thin washer (6). Discard locknut.
4-179
TM 9-2330-384-14&P
4-57. EQUALIZER AND EQUALIZER BUSHING REPLACEMENT (Con't).
(5) Work bushings (7 and 8) loose and remove. Discard bushings.
(6) Remove equalizer (2), if damaged.
b. INSTALLATION
(1)
Lightly coat two new bushings (7 and 8) with a mixture of 50% water and 50% detergent.
(2)
If removed, position equalizer (2) at frame hanger (3).
(3)
Alining equalizer (2) and frame hanger (3), install bushing (8) with a rawhide hammer.
NOTE
Bolt (5) at equalizer (2) must be installed with locknut (9) to outside.
(4)
Assemble thin washer (6) and bushing (7) on bolt (5). Install bolt, thick washer (4), and new
locknut (9). DO NOT fully tighten locknut.
(5)
If’ removed, install new rebound bolt (1) and new locknut (10). Torque locknut to 50 lb.-ft.
(68 N•m).
(6) Torque locknut (9) to 350 lb.-ft. (475 N•m).
(7)
If removed, install front or rear spring (11) (see paragraph 4-56).
(8)
Lower frame. Remove jackstand and lower axle.
4-180
TM 9-2330-384-14&P
Section XI. BODYMAINTENANCE
Paragraph
Number
4-58
4-59
4-60
4-61
4-62
4-63
4-64
4-65
4-66
4-67
4-68
Page
Number
Title
Fender and Center Fender Bracket Replacement ..............................................
Splashguard Replacement ..................................................................................
Nose Adapter Replacement ................................................................................
Piping Assembly Support Bracket Replacement .................................................
Ground Rod Tube Assembly Replacement .........................................................
Hose and Gage Stick Tube Assembly Replacement ..........................................
Grounding Stud Replacement .............................................................................
Grounding Reel Maintenance ..............................................................................
Light Box Replacement .......................................................................................
Manhole and Fill Cover Maintenance ..................................................................
Purging Tank .......................................................................................................
4-181
4-184
4-185
4-186
4-188
4-190
4-192
4-194
4-195
4-201
4-204
4-58. FENDER AND CENTER FENDER BRACKET REPLACEMENT.
I THIS TASK COVER
a.
Removal
Equiptment Conditions:
Ref
Conditions
Chock block disconnected from center fender bracket and removed.
b. Installation
Materials/Parts:
- Twenty locknuts
Personnel Required: Two
Tools:
Tool kit, general mechanic's
Change1
4-181
TM 9-2330-384-14&P
4-58.
a.
FENDER AND CENTER FENDER BRACKET REPLACEMENT (Con't).
REMOVAL
(1)
Remove eight locknuts (9), washers (8), and screws (7) from top of fender (2). Discard
locknuts.
(2) Remove top four locknuts (5), washers (6), and screws (4) securing center fender bracket
(10) to semitrailer. Loosen bottom two locknuts.
(3) Swing center fender bracket (10) down clear of fender (2).
(4) At front and rear fender brackets (1), remove six screws (13), washers (12), and locknuts
(11). Remove fender (2). Discard locknuts.
(5) If center fender bracket (10) is damaged, remove two bottom locknuts (5), washers (6), and
screws (3). Remove center fender bracket. Discard locknuts.
(6) Replace center fender bracket (10).
8
5
6
5
3
4
2
8
10
13
12
b. INSTALLATION
(1) If removed, loosely install center fender bracket (10) with two bottom screws (3), washers
(6), and new locknuts (5). Let center fender bracket hang down.
(2) Loosely install fender (2) to front and rear fender brackets (1) with six screws (13), washers
(12), and new locknuts (11).
(3) Swing center tender bracket (10) up into position against fender (2). Alining bolt holes,
loosely install eight screws (7), washers (8), and new locknuts (9).
4.182
TM 9-2330-384-14&P
4-58. FENDER AND CENTER FENDER BRACKET REPLACEMENT (Con't).
(4)
Loosely install top four screws (4), washers (5), and new locknuts (6).
(5)
Fully tighten six locknuts (6), eight locknuts (10), and six locknuts (11).
FOLLOW-ON TASKS:
Connect chock block to center fender bracket and stow.
4-183
TM 9-2330-384-14&P
4-59. SPLASHGUARD REPLACEMENT.
a.
Removal
Tools:
Tool kit, general mechanic’s
a. REMOVAL
(1)
Remove four nuts (5), bolts (3),
and mounting bracket (2).
(2) Remove splashguard (4) from
bumper (1).
b. INSTALLATION
(1) Position splashguard (4) and
mounting bracket (2) at bumper
(1).
(2)
4-184
Install four bolts (3) and nuts (5).
Tighten nuts securely.
b.
Installation
TM 9-2330-384-14&P
4-60. NOSE ADAPTER REPLACEMENT.
Removal
a.
Equipment Conditions:
Ref Conditions
4-38 SERVICE and EMERGENCY air couplings removed from nose adapter.
4-14 Voltage control unit removed.
b.
Installation
Materials/Parts:
Eight locknuts
Eight starwashers
Personal Required: Two
Tools:
Tool kit, general mechanic’s
a.
REMOVAL
(1)
Remove four locknuts (9), washers (8), and screws (5). Remove
two storage brackets (6) for
dummy couplings (7) from nose
adapter (1). Let dummy couplings hang from fuel warning
placard (2). Discard locknuts.
(2)
Remove four locknuts (10), eight
starwashers (3), and four screws
(4). Remove fuel warning placard
(2) and dummy couplings (7).
Remove nose adapter (1) from
mounting
Discard
brackets.
locknuts and starwashers.
b. INSTALLATION
(1) Thread cable loops of dummy
couplings (7) through fuel warning placard (2) extensions. Install
nose adapter (1) and fuel warning
placard to mounting brackets with
four screws (4), eight new starwashers (3) a n d f o u r n e w
locknuts (10).
(2)
Install two storage brackets (6) for dummy couplings (7) to nose adapter (1) with four screws
(5), washers (8). and new locknuts (9). Hang dummy couplings on storage brackets.
FOLLOW-ON TASKS:
Install voltage control unit (see paragraph 4-14).
Install SERVICE and EMERGENCY air couplings to nose adapter (see paragraph 4-38).
4-185
TM 9-2330-384-14&P
4-61. PIPING ASSEMBLY SUPPORT BRACKET REPLACEMENT.
a.
Removal
b.
Equipment Conditions:
Installation
Materials/Parts:
R e f Conditions
-Piping assembly supported with jackstand.
Four locknuts
Four lockwashers
Tools:
Tool kit, general mechanic’s
a. REMOVAL
CAUTION
Use caution when removing air lines (10) from clips. Clips should be
lifted gently and only enough to release air lines. Improper handling of
clips will cause them to break.
Use caution not to damage air lines (10).
(1)
Remove brake interlock air lines (10) from clips at support bracket (4).
(2)
Remove four nuts (8), lockwashers (7), washers (9), and two U-bolts (6) securing piping
assembly to support bracket (4). Discard lockwashers.
(3)
Remove four locknuts (3) eight washers (2), and four screws (1). Remove support bracket
(4) from frame (5). Discard locknuts.
b. INSTALLATION
CAUTION
Use caution not to damage air lines (10).
(1)
Install support bracket (4) to frame (5) with four screws (1), eight washers (2), and four new
locknuts (3). Tighten locknuts securely.
(2)
Install piping assembly to support bracket (4) with two U-bolts (6), four washers (9), new
lockwashers (7), and nuts (8).
4-186
TM 9-2330-384-14&P
4-61. PIPING ASSEMBLY SUPPORT BRACKET REPLACEMENT (Con’t).
CAUTION
Use caution when installing air lines (10) under clips. When securing air
lines under clips, a soft-faced hammer should be used to tap clips back into
place. Improper handling of clips will cause them to break.
NOTE
If two or more consecutive clips are missing or damaged, notify direct support maintenance.
(3)
Install brake interlock air lines (10) under clips at support bracket (4).
FOLLOW-ON TASKS:
Remove jackstand from piping assembly.
4-187
TM 9-2330-384-14&P
4-62. GROUND ROD TUBE ASSEMBLY REPLACEMENT.
b.
Removal
a.
Installation
Materials/Parts:
Equipment Conditions:
R e f Conditions
-Ground rod removed.
One locknut
Personnel Required: Two
Tools:
Tool kit, general mechanic’s
a.
REMOVAL
NOTE
If removing door (9), perform step 1.
Note position of washers (11) for installation.
(1)
4-188
Remove locknut (12), two washers (11), compression spring (6) and screw (10). Remove
door (9). Discard locknut.
TM 9-2330-384-14&P
4-62. GROUND ROD TUBE ASSEMBLY REPLACEMENT (Con’t).
(2)
At each end of ground rod tube assembly (1) remove nut (5) and washer (4) from top hook
bolt (3).
(3)
Pull down on two retaining straps (13) and remove ground rod tube assembly (1).
(4)
If a retaining strap (13) is damaged, remove nut (8) and washer (7) from bottom hook bolt
(3). Remove retaining strap. Remove two hook bolts from retaining strap.
b. INSTALLATION
NOTE
If installing door (9), perform step 3.
(1)
If removed, install hook bolts (3) to retaining strap (13). Install retaining strap to mounting
angle (2) with bottom hook bolt, washer (7), and nut (8).
NOTE
To gain enough length in retaining straps (13) to install ground rod tube
assembly (1), it may be necessary to loosen two nuts (8).
(2)
Install ground rod tube assembly (1) to two mounting angles (2) with two hook bolts (8),
washers (4) and nuts (5). If loosened, tighten two nuts (8).
(3)
Install door (9) to ground rod tube assembly (1) with screw (10), two washers (11), compression spring (6), and new locknut (12).
FOLLOW-ON TASKS:
Stow ground rod.
4-189
TM 9-2330-384-14&P
4-63. HOSE AND GAGE STICK TUBE ASSEMBLY REPLACEMENT.
a.
b.
Removal
Installation
Materials/Parts:
Equipment Conditions:
R e f Conditions
-Transfer hoses and gage stick
removed.
Ten locknuts
General Safety Instructions:
Hose and gage stick tube assembly is
heavy and awkward to handle. Use caution
and assistance during removal and installation.
Tools:
Tool kit, general mechanic’s
Personnel Required: Three
a. REMOVAL
WARNING
Hose and gage stick tube assembly (10) is heavy and awkward to handle.
Use caution and assistance during removal. Failure to follow this warning
may result in injury to personnel.
NOTE
If removing lockspring (9) from door (11), perform step 4.
(1)
Remove four locknuts (4) and washers (5) at four top hook bolts (6). Discard locknuts.
(2)
Pull down on four retaining straps (7) and remove hose and gage stick assembly (10).
(3)
If a retaining strap (7) is damaged, remove locknut (14) and washer (13) from bottom hook
bolt (6). Remove retaining strap. Remove two hook bolts from retaining strap. Discard
locknut.
(4)
Remove two locknuts (12), screws (3) and washers (2). Remove lockspring (9) from mounting channel (8). Remove lockspring from other end in same manner. Discard locknuts.
b. INSTALLATION
WARNING
Hose and gage stick tube assembly (10) is heavy and awkward to handle.
Use caution and assistance during installation. Failure to follow this warning
may result in injury to personnel.
NOTE
If installing lockspring (9), perform step 1.
(1)
4-190
Install lockspring (9) to mounting channel (8) with two washers (2), screws (3), and new
locknuts (12). Close door (11) and secure with lockspring. Repeat to install lockspring on
other end.
TM 9-2330-384-14&P
4-63. HOSE AND GAGE STICK TUBE ASSEMBLY REPLACEMENT (Con't).
(2)
If removed, install two hook bolts (6) to retaining strap (7). Install retaining strap to mounting
angle (1) with bottom hook bolt, washer (13), and new locknut (14),
NOTE
To gain enough length in retaining straps (7) to install hose and gage stick
assembly (10), it may be necessary to loosen four locknuts (14).
(3)
Install hose and gage stick tube assembly (10) to four mounting angles (1) with four top hook
bolts (6), washers (5) and new locknuts (4). If loosened, tighten four locknuts (14).
FOLLOW-ON TASKS:
Stow transfer hoses and gage stick.
4-191
TM 9-2330-384-14&P
4-64. GROUNDING STUD REPLACEMENT.
a.
b.
Removal
Cleaning
c.
Materials/Parts:
Installation
General Safety Instructions:
One locknut
One starwasher
Dry cleaning solvent (Item 10, Appendix E)
Dry cleaning solvent is flammable and must
not be used near open flame. Use only in a
well-ventilated area.
Grounding connections must be made to
clean, unpainted surfaces.
Tools:
Tool kit, general mechanic’s
NOTE
For location of all grounding studs (2), refer to paragraph 1-7.
a. REMOVAL
Remove locknut (3) grounding stud (2) and stat-washer (1). Discard locknut and starwasher.
b. CLEANING
WARNING
Dry cleaning solvent P-D-680 is
toxic and flammable. Always wear
protective goggles, face shield,
and gloves, and use only in a wellventilated area. Avoid contact with
skin, eyes, and clothes and DO
NOT breathe vapors. DO NOT use
near open flame or excessive heat.
The solvent’s flash point is
100°F-138°F (38°C-59°C). If you
become dizzy while using cleaning
solvent, immediately get fresh air
and medical help. If solvent contacts eyes, immediately wash your
eyes with water and get medical
aid.
If grounding stud (2) is covered with
grease or dirt, clean with dry cleaning
solvent.
4-192
TM 9-2330-384-14&P
4-64. GROUNDING STUD REPLACEMENT (Con't).
c.
INSTALLATION
WARNING
Grounding stud (2) must be Installed to clean, bare metal. An unbonded,
ungrounded, or improperly bonded or grounded semitraller could produce
a spark. The resulting explosion will cause serious injury or death to personnel.
(1) If mounting surface of grounding stud (2) is painted, scrape off paint to bare metal.
(2) Install now starwasher (1), grounding stud (2), and new locknut (3).
(3) Checkthat International
Grounding
Symbol
Grounding stud (2) must never be painted.
andDONOTPAINTstencilsarelegible.
4-193
TM 9-2330-384-14&P
4-65.
GROUNDING
REEL MAINTENANCE.
THIS TASK COVER
c. Assembly
d. Installation
a. Removal
b. Disassembly
Materials/Parts:
Tools:
* Tool kit, general mechanic's
a.
Four starwashers
REMOVAL
Remove four nuts (1), starwashers (8), and
screws (7) and grounding reel (6) from
cabinet (2). Discard starwashers.
b. DISASSEMBLY
Remove two clips (3 and 4) from two
grounding reel terminals (5).
1
8_4
la@
c.
ASSEMBLY
INSTALLATION
Install grounding reel (6) on
cabinet (2) with four screws
(7), new starwashers (8), and
nuts (1).
4-194
-,&ED
3
7
Install two clips (3 and 4) on two
grounding reel terminals (5).
d.
2
Change1
6
4
5
TM 9-2330-384-14&P
4-66. LIGHT BOX REPLACEMENT.
a.
Removal
Equipment Conditions:
Ref
4-20
4-19
4-21
4-26
Conditions
Stop/taillight removed.
Blackout light removed.
Turn signal/taillight removed.
Rear side clearance and marker light
removed.
4-22 Convoy warning light toggle switch
removed.
b.
Installation
Materials/Parts:
One connector
Three grommets
Four locknuts
Corrosion preventive compound (Item 7,
Appendix E)
(Item 21, Appendix E)
Tag marker
Tools:
Tool kit, general mechanic’s
Wire terminal kit
4-195
TM 9-2330-384-14&P
4-66. LIGHT BOX REPLACEMENT (Con't).
a. REMOVAL
NOTE
Tag wires for installation.
(1)
If removing light box (1) on roadside, cut connector (2) and disconnect chassis orange wire
(5) from rear conduit orange wire (7). Discard connector.
CAUTION
Use caution not to damage wires when removing conduits from light
box (1).
(2)
Remove four locknuts (8), washers (9), and bolts (10). If on roadside, pull light box (1) away
from chassis conduit (4), convoy warning light conduit (3), and rear conduit (6). If on
curbside, pull light box away from chassis conduit, triple clearance light conduit (12). and
rear conduit. Remove light box. Discard locknuts.
(3)
Remove three grommets from conduit holes in light box (1) and discard.
4-196
TM 9-2330-384-14&P
4-66. LIGHT BOX REPLACEMENT (Con't).
4-197
TM 9-2330-384-14&P
4-66. LIGHT BOX REPLACEMENT (Con't).
b. INSTALLATION
NOTE
l
Refer to wiring diagram, as required, to aid in wiring lights inside light
box (1) after installation (see paragraph 4-30).
l
Ensure that all wire connections are made to clean, uncorroded surfaces. Coat all wire connections with corrosion preventive compound
before they are made.
(1) Install reflectors (11) (see paragraph 4-27).
(2)
Install three new grommets to conduit holes in light box (1).
CAUTION
Use caution not to damage wires when installing conduits to light box (1).
(3)
4-198
Position light box (1) at bumper. If on roadside, feed chassis conduit (4) convoy warning light
conduit (3), and rear conduit (6) through grommets in light box. If on curbside, feed chassis
conduit, triple clearance light conduit (12), and rear conduit through grommets in light box.
Install light box with four bolts (10), washers (9), and new locknuts (8).
TM 9-2330-384-14&P
4-66. LIGHT BOX REPLACEMENT
4-199
TM 9-2330-384-14&P
4-66. LIGHT BOX REPLACEMENT (Con't).
(4)
If on roadside, connect chassis orange wire (5) to rear conduit orange wire (7) with new
connector (2). Crimp connector.
FOLLOW-ON TASKS:
Install
Install
Install
Install
Install
4-200
convoy warning light toggle switch (see paragraph 4-22).
rear side clearance and marker light (see paragraph 4-26).
turn signal/taillight (see paragraph 4-21).
blackout light (see paragraph 4-19).
stop/taillight (see paragraph 4-20).
TM 9-2330-384-14&P
4-67. MANHOLE AND FILL COVER MAINTENANCE.
a.
Replacement of Manhole Lid Gasket
Replacement of Fill Cover Preformed
Packing
Replacement of Vent Assembly
b.
c.
Equipment Conditions:
R e f Conditions
4-68 Tank purged.
d. Fill Cover Adjustment
e. Replacement of Fill Cover Adjustment
Components
Materials/Parts:
One preformed packing
Three gaskets
Tools:
Tool kit, general mechanic’s
Torque wrench
a. REPLACEMENT OF MANHOLE LID GASKET
(1)
Open fill cover (10) (see paragraph 2-16).
(2)
Remove nut (3), washer (2), and bolt (1) from clamping ring (4). Remove clamping ring and
manhole lid (15) from manhole collar (14).
(3) Remove gasket (13) and discard.
4-201
TM 9-2330-384-14&P
4-67. MANHOLE AND FILL COVER MAINTENANCE (Con't).
NOTE
Ensure that manhole collar (14), where gasket (13) is to be installed, is free
of nicks, corrosion, or dirt.
b.
(4)
Install new gasket (13) in groove of manhole collar (14). Ensure that gasket is evenly seated.
(5)
Install manhole lid (15) over manhole collar (14) with fill cover hinge (16) facing front.
(6)
Install clamping ring (4), bolt (1), washer (2), and nut (3). Torque nut to 10 lb.-ft. ( 14 N•m).
Tap around perimeter of clamping ring to ensure equal clamping, then torque nut to 25 lb.-ft.
(34 N•m). Repeat if necessary.
REPLACEMENT OF FILL COVER PREFORMED PACKING
(1) Open fill cover (10) (see paragraph 2-16).
(2) Remove preformed packing (7) and discard.
NOTE
Ensure that fill cover (10), where preformed packing (7) is to be installed, is
free of nicks, corrosion, or dirt.
(3)
Install new preformed packing (7) in fill cover (10). Ensure that preformed packing is evenly
seated.
(4)
Close fill cover (10) (see paragraph 2-16).
4-202
TM 9-2330-384-14&P
4-67. MANHOLE AND FILL COVER MAINTENANCE (Con't).
c. REPLACEMENT OF VENT ASSEMBLY
NOTE
Manhole has two vent assemblies in fill cover (10): one vacuum vent (6) and
one pressure/vacuum vent (9). Replacement procedures are the same.
(1)
Open fill cover (10) (see paragraph 2-16).
(2)
Remove vent (6 or 9) and gasket (5). Discard gasket.
NOTE
Ensure that fill cover (10), where gasket (5) is to be installed, is free of
nicks, rust, or dirt.
(3)
Install new gasket (5) and vent (6 or 9) in fill cover (10).
(4)
Close fill cover (10) (see paragraph 2-16).
d. FILL COVER ADJUSTMENT
(1)
Open fill cover (10) (see paragraph 2-16).
(2)
Loosen nut (8) on underside of fill cover (10).
(3)
With fill cover (10) closed, loosen or tighten bolt (17) in center of strongback (18) until latch
(12) just clears the secondary latch on strongback.
(4)
Open fill cover (10) and tighten nut (8), making sure that bolt (17) does not turn.
(5)
Close fill cover (10) and check clearances of latch (12) and secondary latch on strongback
(18).
(6)
If damage is found to fill cover adjustment components, replace (see REPLACEMENT OF FILL
COVER ADJUSTMENT COMPONENTS, subparagraph e).
e. REPLACEMENT OF FILL COVER ADJUSTMENT COMPONENTS
(1) Open fill cover (10) (see paragraph 2-16).
(2)
Remove nut (8) from underside of fill cover (10). Remove bolt (17) from top while strongback
(18) is open. Remove spring (11).
(3)
Install bolt (17) through strongback (18). Position replacement spring (11) and fill cover (10)
against strongback and tighten bolt.
(4)
Perform step 3 of FILL COVER ADJUSTMENT, subparagraph d.
(5) Install nut (8).
(6)
Close fill cover (10) (see paragraph 2-16).
4-203
TM 9-2330-384-14&P
4-68. PURGING TANK.
General Information
Draining Tank
a.
b.
c.
d.
General Safety Instructions (Con't):
Materials/Parts:
Pails
Rags
Purging (Preferred
Steam
Clean
Method)
Chemical Purging (Alternate Method)
(Item 18, Appendix E)
Tools:
Tool kit, general mechanic’s
Pipe wrench
Steam cleaner
Test Equipment:
Nomenclature
NSN
NSN 6665-00-664-4650 or
Combustible
gas indicator set NSN 6665-00-292-9945
References:
FM 10-20
TB 43-0212
Personnel Required: Three
General Safety Instructions:
DO NOT perform draining or purging
operations in an electrical storm.
Connect bonding and grounding connection before beginning draining and purging
operations. Maintain bonding and grounding connection until after all draining and
purging is completed.
Keep open flames or other sources of
ignition away from area where draining or
purging operation is in progress. Sufficient
fire extinguishers MUST be present and
manned.
When working inside tank, always provide
adequate air ventilation at the manhole
opening with air directed into compartment
where work is being performed.
NEVER work alone inside a tank: a second
person must be stationed at the manhole
opening. The person inside the tank must
have a safety line and harness on in case of
emergency for rescue operations.
In an emergency, personnel entering tank
which is not vapor free must wear an
attached lifeline and protective respiratory
equipment. Personnel MUST NOT enter a
tank which is in the explosive range.
Give IMMEDIATE medical attention to personnel exposed to hydrocarbon or toxic vapors.
Personnel engaged in draining and purging
operations must wear prescribed clothing.
Before climbing onto semitrailer, grasp
static ground wire to discharge all static
from body.
If semitrailer is left overnight after purging,
retest with combustible gas indicator set to
ensure a SAFE reading.
Compressed air used for drying tubing
must not exceed 30 psi (207 kPa).
a. GENERAL INFORMATION
(1)
Removal of combustible vapors and liquids requires a coordinated effort of properly skilled
safety and maintenance personnel. This maintenance procedure is to be performed by
authorized unit or direct support personnel with an MOS of 77F or equivalent.
(2)
A thorough reading of FM 10-20 and TB 43-0212 is essential for understanding proper draining
and purging methods.
4-204
TM 9-2330-384-14&P
4-68. PURGING TANK (Con't).
b. DRAINING TANK
WARNING
DO NOT perform draining operations in an electrical storm or if a storm
is threatening. Keep open flames or other sources of ignition, such as
welding and cutting torches and ordinary electrical equipment, away
from area where draining operation is in progress. Sufficient fire extinguishers MUST be present and manned. Failure to follow this warning
will result in serious injury or death to personnel.
Connect bonding and grounding connection before beginning draining
operations. Maintain bonding and grounding connection until after all
draining is completed. DO NOT connect semitrailer grounding cable to
semitrailer grounding stud. Connections must be made to clean, unpainted surfaces. An unbonded and ungrounded or improperly bonded
and grounded semitrailer could produce a spark. The resulting explosion
will cause serious injury or death to personnel.
Personnel engaged in draining operations must not wear wool, nylon,
silk, rayon, or other clothing that generates static electricity. Wear clean
cotton clothing with no metal zippers. Remove all contents from pockets. Wear rubber boots and gloves to keep fuel off skin. Use cotton
cloths for cleaning purposes. Before climbing onto semitrailer, grasp
static ground wire to discharge all static from body.
Give IMMEDIATE medical attention to personnel exposed to hydrocarbon
or toxic vapors. Signs of distress are weakness, nausea, coughing or
intoxication, nosebleed or cramps, or other unusual symptoms. Qualified personnel able to administer artificial respiration and simple first aid
must be present.
(1)
Park semitrailer 100 ft. (30.5 m) from any building, source of ignition, or sewer system. Raise
front of semitrailer by lowering landing gear enough to maintain tank sump at the lowest
position. Close all windows and doors of nearby buildings to prevent flow of vapors into areas
where flame and other sources of ignition may exist.
(2)
Uncouple tractor from semitrailer (see paragraph 2-14).
(3)
Connect bonding and grounding connection (see paragraph 2-17).
(4)
Place sufficient fire extinguishers 50 ft. (15.25 m) upwind and attend with qualified personnel.
(5)
Place conductive metal or galvanized pail under strainer assembly (see paragraph 1-15).
Ground pail to tank and to semitrailer’s common ground. Remove ¼ in. (6.4 mm) center plug
from strainer assembly and allow all fuel to drain.
4-205
TM 9-2330-384-14&P
4-68. PURGING TANK (Con't).
(6)
Place conductive metal or galvanized pails under drain points: front port (1) and sump drain
(8). Ground pails to tank and to semitrailer’s common ground.
(7)
Pull sump drain control lever to drain all fluid from sump drain (see paragraph 2-2). Remove
front port (1) dust cap and open butterfly valve (2) (see paragraph 2-2).
NOTE
Steps 8 and 9 must be performed to drain as much fuel as possible from
emergency valve. Even after these steps have been performed, there will be
approximately 3-4 cc of fuel remaining inside piston cavity of emergency
valve.
(8)
Drain fuel from emergency valve through front port (1) by pulling on emergency valve control
lever in cabinet. After 10 seconds, push on control lever to close (see paragraph 2-2).
(9)
Repeat procedure in step 8 three more times to drain as much fuel from emergency valve as
possible.
(10) Wipe dry all spilled fuel. Wash, dry, and store any cloths or mops used, or dispose of them in
accordance with local policy.
4-206
TM 9-2330-384-14&P
4-68. PURGING TANK (Con't).
c. STEAM CLEAN PURGING (PREFERRED METHOD)
WARNING
DO NOT perform purging operations in an electrical storm or if a storm is
threatening. Keep open flames or other sources of ignition, such as
welding and cutting torches and ordinary electrical equipment, away
from area where purging operation is in progress. Sufficient fire extinguishers must be present and manned. Failure to follow this warning will
result in serious injury or death to personnel.
Connect bonding and grounding connection before beginning purging
operations. Maintain bonding and grounding connection until after all
purging is completed. DO NOT connect semitrailer grounding cable to
semitrailer grounding stud. Connections must be made to clean, unpainted surfaces. An unbonded and ungrounded or improperly bonded
and grounded semitrailer could produce a spark. The resulting explosion
will cause serious injury or death to personnel.
Personnel engaged in purging operations must not wear wool, nylon,
silk, rayon, or other clothing that generates static electricity. Wear clean
cotton clothing with no metal zippers. Remove all contents from pockets. Wear rubber boots and gloves to keep fuel off skin. Use cotton
cloths for cleaning purposes. Before climbing onto semitrailer, grasp
static ground wire to discharge all static from body.
Give IMMEDIATE medical attention to personnel exposed to hydrocarbon
or toxic vapors. Signs of distress are weakness, nausea, coughing or
intoxication, nosebleed or cramps, or other unusual symptoms. Qualified personnel able to administer artificial respiration and simple first aid
must be present.
Should an emergency arise requiring entry into a tank which is not vaporfree, or which has an oxygen content less than 19.5%, personnel entering must have an attached lifeline and wear protective respiratory equipment in the form of self-contained breathing apparatus or a full
facepiece mask with a pressure supply of breathable air. Another person, also provided with respiratory equipment, MUST be stationed at
manhole opening and remain there with full ability to watch personnel
inside tank and summon assistance in the event a rescue operation is
needed. Personnel MUST NOT enter a tank which is in the explosive
range.
If semitrailer is left overnight after purging procedure, retest with combustible gas indicator set to ensure a SAFE reading. Tanks may recharge
themselves with seepage of undetected pockets of vapors. Failure to
follow this warning may result in serious injury or death to personnel.
(1) Ground semitrailer to steam cleaner. Ensure that semitrailer bonding and grounding
connection is made (see paragraph 2-17).
4-207
TM 9-2330-384-14&P
4-68. PURGING TANK (Con’t).
(2)
Remove dust cap from rear roadside vapor collection adapter (4). Remove dust cap from
front port (1). Open butterfly valve (2) (see paragraph 2-2). Remove cover from rear inlet (3)
and place a wedge of wood against diaphragm plate to open rear inlet adapter.
(3) Inside cabinet, pull emergency
valve and vapor vent control levers to open (see paragraph 2-2).
(4) Pull on sump drain control lever
(7) to open sump drain (8). Prop
control lever open with a block of
wood. Remove nut (10) from
bleeder valve at emergency valve
(9) under rear of semitrailer.
(5)
Remove ¼ in. (6.4 mm) center plug from strainer assembly (see paragraph 1-15).
(6)
Place conductive metal or galvanized pails under following drain points: front port (1) and
sump drain (8). Ground pails to semitrailer and to semitrailer’s common ground (see paragraph 2-17).
4-208
TM 9-2330-384-14&P
4-68. PURGING TANK (Con't).
(7)
Open manhole fill cover (12) (see paragraph 2-16).
(8)
Remove two vent caps (11).
CAUTION
Ensure that steam does not come in contact with electrical wiring and other
tank components. Heat from steam can damage painted surface of tank,
can weaken fusible plugs, and damage valve seats, gaskets, and diaphragms. Failure to follow this caution may result in damage to electrical
wiring and other tank components.
(9)
Introduce steam through two vent cap (11) openings and manhole opening in sufficient
volume to raise temperature of tank interior to 170°F (76°C).
(10) Remove transfer hoses from curbside hose and gage stick tube assembly (6). Introduce
steam into tube assembly.
(11) Steam tank and vapor collection system for at least three hours. Turn off steam source.
CAUTION
After purging, keep manhole fill cover (12) open during cool-down to prevent vacuum collapse of tank.
(12) Leave all openings open until tank is fully cooled, at least one hour.
(13) Use combustible gas indicator set to test air inside tank, vapor collection return line (5), front
port (1), and hose and gage stick tube assembly (6) (see FM 10-20). If reading indicates tank
is not safe, resume steam cleaning for 1 hour, then retest.
4-209
TM 9-2330-384-14&P
4-68. PURGING TANK (Con't).
WARNING
l
NEVER work alone inside a tank: a second person must be stationed at
the manhole opening. The person inside the tank must have a safety line
and harness on in case of emergency for rescue operations. In the event
a rescue operation is required, summon assistance IMMEDIATELY. DO
NOT attempt a rescue until assistance has arrived.
l
When working inside tank, always provide adequate forced air ventilation
at the manhole opening with air directed into compartment where work
is being performed. Forced air ventilation allows for removal of any explosive quantities and contaminants resulting from the type of work being done and serves to prevent oxygen deficiency. Failure to follow this
warning may result in death to personnel.
(14) If repair to tank is scheduled, emergency valve must be removed at this time (see paragraph
4-82), Even with tank drained and purged, approximately 3-4 cc of fuel remain inside piston
cavity of emergency valve. Vapor will continue to escape from emergency valve and create a
safety hazard,
WARNING
Compressed air used for drying tubing must not exceed 30 psi (207 kPa).
Wear protective clothing (goggles, face shield, and gloves) and use caution
to avoid injury to personnel.
(15) Open precheck valve inside cabinet (see paragraph 2-2). From outside tank, disconnect
precheck tubing from check valve, elbows at piping assembly, and pressure gage (see paragraph 4-72). Allow any fuel inside tubing to drain. Force compressed air through tubing lo dry
tubing. Thoroughly wipe up any fuel that drains.
(16) Enter tank when it tests SAFE and remove jet level sensor (see paragraph 4-70).
(17) Allow all fuel to drain from precheck and jet level sensor tubing. Force compressed air
through tubing lo dry tubing. Thoroughly wipe up any fuel that drains.
(18) Retest with combustible gas indicator set (see FM 10-20). Resteam as required until a SAFE
reading is obtained.
(19) Connect precheck tubing to pressure gage, elbows at piping assembly, and check valve (see
paragraph 4-72). Close precheck valve (see paragraph 2-2).
(20) Install jet level sensor and connect precheck and jet level sensor tubing at jet level sensor end
(see paragraph 4-70).
(21) After purging and obtaining a SAFE reading with combustible gas indicator set, disconnect all
bonding and grounding connections (see paragraph 2-17).
(22) Remove all pails at drain points and dispose of contents in accordance with local policy.
(23) Semitrailer is ready for tank inspection or repair, a change in material, or shipment, as applicable. Tank is also safe to be brought inside a building for maintenance.
4-210
TM 9-2330-384-14&P
4-68. PURGING TANK (Con't).
(24) Even if semitrailer has tested
SAFE with combustible gas indicator set, it must be retested
prior to starting work each day
and at regular intervals throughout the day.
(25) If removed, install emergency
valve (9) (see paragraph 4-82). If
removed, install nut (10) to
bleeder valve.
CAUTION
Purging introduces water into semitrailer’s bottom loading system. Winterization is needed to prevent freezing and damage to bottom loading system. If freeze-up occurs, semitrailer will not bottom load.
(26) After work is complete, and before loading fuel or shipping, winterize bottom loading system
(see paragraph 4-84).
(27) Install dust caps to rear roadside vapor collection adapter (4) and front port (1). Close rear
inlet (3) cover and butterfly valve (2). Push on sump drain control lever (7) to close tank
sump (8).
(28) Install ¼ in. (6.4 mm) center plug in strainer assembly (see paragraph 1-15).
4-211
TM 9-2330-384-14&P
4-68. PURGING TANK (Con't).
(29) Push emergency valve and vapor vent control levers in cabinet to close (see paragraph 2-2).
(30) Close two vent caps (11). Close manhole fill cover (12) (see paragraph 2-16).
d. CHEMICAL PURGING (ALTERNATE METHOD)
WARNING
DO NOT perform chemical purging unless TB 43-0212 has been thoroughly
read, understood, and all safety procedures followed.
(1)
Refer to TB 43-0212 for information on chemical purging.
(2)
If repair to tank is scheduled, remove emergency valve after purging (see paragraph 4-82).
Even with tank drained and purged, approximately 3-4 cc of fuel remain inside piston cavity of
emergency valve and create a safety hazard.
(3)
Follow instructions in subparagraph c, STEAM CLEAN PURGING, to dry precheck and jet level
sensor tubing.
(4)
When emergency valve is installed after tank repair is complete, winterize bottom loading
system (see paragraph 4-84).
4-212
TM 9-2330-384-14&P
Section XII. DATA PLATES
Paragraph
Number
Page
Number
Title
Data Plate Replacement . . . . . . . . . . . . . . . . . . . . . . . . . . . . . . . . . . . . . . . . . . .
4-69
4-213
4-69. DATA PLATE REPLACEMENT.
a.
Removal
Tools:
Tool kit, general mechanic’s
Hand drill
Rivet gun
Side cutters
b.
Installation
Materials/Parts:
Four rivets
4-213
TM 9-2330-384-14&P
4-69. DATA PLATE REPLACEMENT (Con't).
a.
REMOVAL
WARNING
DO NOT drill out rivets (4) if removing a data plate (3) from inside cabinet
(2). Cabinet is made of steel. Drilling a rivet from steel can produce a spark
which may cause an explosion and fire. Failure to follow this warning may
result in serious injury or death to personnel.
(1)
If removing a data plate (3) inside cabinet (2) use side cutters to remove four rivets (4). If
removing a data plate from aluminum framerail (1) at upper coupler assembly, use a hand
drill to drill out four rivets. Discard rivets.
(2) Replace data plate (3).
b. INSTALLATION
NOTE
For location of all data plates (3), refer to paragraph 1-9.
(1) Position data plate (3).
NOTE
Rivets (4) used on data plates (3) inside cabinet (2) are installed with washers (5).
(2)
4-214
Use a rivet gun to install data plate (3) with four new rivets (4).
TM 9-2330-384-14&P
Section XIII. NONELECTRICAL GAGES MAINTENANCE
Paragraph
Number
Page
Number
Title
Jet Level Sensor Replacement . . . . . . . . . . . . . . . . . . . . . . . . . . . . . . . . . . . . . .
Strainer Assembly Maintenance . . . . . . . . . . . . . . . . . . . . . . . . . . . . . . . . . . . . .
Precheck System Maintenance . . . . . . . . . . . . . . . . . . . . . . . . . . . . . . . . . . . . . .
Gage Marker Disk and Ground Wire Replacement . . . . . . . . . . . . . . . . . . . . . .
4-70
4-71
4-72
4-73
4-215
4-222
4-225
4-238
4-70. JET LEVEL SENSOR REPLACEMENT.
a.
b.
C.
Removal of Jet Level Sensor
Installation of Jet Level Sensor
Removal of Jet Level Sensor Tubing and
Fittings
Installation of Jet Level Sensor Tubing
and Fittings
General Safety Instructions:
Equipment Conditions:
R e f Conditions
4-68 Tank purged.
4-67 Manhole lid removed.
Materials/Parts:
Tag marker
Antiseize tape
d.
(Item 21, Appendix E)
(Item 22, Appendix E)
Tools:
When working inside tank, always provide
adequate forced air ventilation at the manhole opening with air directed into compartment where work is being performed.
NEVER work alone inside a tank; a second
person must be stationed at the manhole
opening. The person inside the tank must
have a safety line and harness on in case of
emergency for rescue operations.
Tool kit, general mechanic’s
4-215
TM 9-2330-364-14&P
4-70. JET LEVEL SENSOR REPLACEMENT (Con't).
a. REMOVAL OF JET LEVEL SENSOR
WARNING
l
When working inside tank, always provide adequate forced air ventilation
at the manhole opening with air directed into compartment where work
is being performed. Forced air ventilation allows for removal of any explosive quantities and contaminants resulting from the type of work being done, and serves to prevent oxygen deficiency. Failure to follow this
warning may result in death to personnel.
l
NEVER work alone inside a tank: a second person must be stationed at
the manhole opening.The person inside the tank must have a safety line
and harness on in case of emergency for rescue operations. In the event
a rescue operation is required, summon assistance IMMEDIATELY. DO
NOT attempt a rescue until assistance has arrived.
NOTE
l
If disconnecting precheck tubing (10) from jet level sensor (6), perform
step 1.
l
Tag tubing (4, 10, and 11) for installation.
(1)
Loosen nut (9) and disconnect precheck tubing (10) from jet level sensor (6),
(2)
Loosen two nuts (5) and disconnect tubing (4 and 11) from jet level sensor (6).
4-216
TM 9-2330-384-14&P
4-70. JET LEVEL SENSOR REPLACEMENT (Con't).
(3)
Remove three bolts (2) jet level sensor (6), and shield from mounting channel (3).
(4)
Remove clamp (7) and tubing (8) from jet level sensor (6).
(5)
Remove two straight adapters (1) from jet level sensor (6).
b. INSTALLATION OF JET LEVEL SENSOR
WARNING
When working inside tank, always provide adequate forced air ventilation
at the manhole opening with air directed into compartment where work
is being performed. Forced air ventilation allows for removal of any explosive quantities and contaminants resulting from the type of work being done, and serves to prevent oxygen deficiency. Failure to follow this
warning may result in death to personnel.
NEVER work alone inside a tank; a second person must be stationed at
the manhole opening. The person inside the tank must have a safety line
and harness on in case of emergency for rescue operations. In the event
a rescue operation is required, summon assistance IMMEDIATELY. DO
NOT attempt a rescue until assistance has arrived.
NOTE
If connecting precheck tubing (10) to jet level sensor (6), perform
step 5.
All male threads of fittings should be coated with antiseize tape if not
already factory-coated with an antiseize compound.
(1)
Install two straight adapters (1) to jet level sensor (6).
(2)
Install jet level sensor (6) and shield to mounting channel (3) with three bolts (2).
(3)
Connect tubing (4 and 11) to straight adapters (1) and tighten two nuts (5).
(4)
Install tubing (8) to jet level sensor (6) with clamp (7).
(5)
Connect precheck tubing (10) to jet level sensor (6) and tighten nut (9).
4-217
TM 9-2330-384-14&P
4-70. JET LEVEL SENSOR REPLACEMENT (Con't).
c.
REMOVAL OF JET LEVEL SENSOR TUBING AND FITTINGS
WARNING
When working inside tank, always provide adequate forced air ventilation
at the manhole opening with air directed into compartment where work
is being performed. Forced air ventilation allows for removal of any explosive quantities and contaminants resulting from the type of work being done, and serves to prevent oxygen deficiency. Failure to follow this
warning may result in death to personnel.
NEVER work alone Inside a tank; a second person must be stationed at
the manhole opening. The person inside the tank must have a safety line
and harness on in case of emergency for rescue operations. In the event
a rescue operation is required, summon assistance IMMEDIATELY. DO
NOT attempt a rescue until assistance has arrived.
NOTE
Tag all tubing at jet level sensor (6), emergency valve (12), and strainer
assembly (24) for Installation.
(1) At emergency valve (12) under
semitrailer, remove tubing (23)
from between straight adapter
(22) and outlet of strainer assembly (24). Remove tubing (25)
from between straight adapter
(26) and inlet of strainer assembly.
(2) Remove straight adapters (22
and 26) and bleeder valve (27)
from emergency valve (12).
(3) Loosen nuts (5) and disconnect
tubing (4 and 11) from jet level
sensor (6).
(4) Inside tank at emergency valve
(12), loosen nuts at straight
adapters (15 and 19) and disconnect tubing (4 and 11).
CAUTION
Use caution when releasing tubing (4 and 11) from under clips (13). Clips
should be lifted gently and only enough to release tubing. Improper handling of clips will cause them to break.
(5)
4-218
Remove tubing (4 and 11) from clips (13). Remove tubing from between emergency valve
(12) and jet level sensor (6).
TM 9-2330-384-14&P
4-70. JET LEVEL SENSOR REPLACEMENT (Con't).
(6)
Remove straight adapter (19) coupling (20), and nipple (21).
(7)
Remove tubing (14) from straight adapters (16 and 30).
(8)
Remove straight adapter (30), coupling (29), and nipple (28).
(9)
Remove straight adapters (15 and 16) from tee (17). Remove tee, bushing, and nipple from
pilot valve (18).
4-219
TM 9-2330-384-14&P
4-70. JET LEVEL SENSOR REPLACEMENT (Con't).
d. INSTALLATION OF JET LEVEL SENSOR TUBING AND FITTINGS
WARNING
l
When working inside tank, always provide adequate forced air ventilation
at the manhole opening with air directed into compartment where work
is being performed. Forced air ventilation allows for removal of any explosive quantities and contaminants resulting from the type of work being done, and serves to prevent oxygen deficiency. Failure to follow this
warning may result in death to personnel.
l
NEVER work alone inside a tank; a second person must be stationed at
the manhole opening. The person inside the tank must have a safety line
and harness on in case of emergency for rescue operations. In the event
a rescue operation is required, summon assistance IMMEDIATELY. DO
NOT attempt a rescue until assistance has arrived.
l
All male threads of fittings should be coated with antiseize tape if not
already factory-coated with an antiseize compound.
(1)
Install nipple, bushing, and tee (17) to pilot valve (18). Install straight adapters (15 and 16) to
tee.
(2)
Install nipple (28), coupling (29), and straight adapter (30).
(3)
Install tubing (14) between straight adapters (16 and 30).
(4)
Install nipple (21), coupling (20), and straight adapter (19).
CAUTION
Use caution when securing tubing (4 and 11) under clips (13). Improper
handling of clips will cause them to break.
(5)
Position tubing (4 and 11) between emergency valve (12) and jet level sensor (6). Allow a
6-12 in. (15.2-30.5 cm) slack loop in tubing at emergency valve and jet level sensor.
Secure tubing with clips (13). Use a soft-faced hammer to gently tap clips back into position.
NOTE
Install all tubing at jet level sensor (6), emergency valve (12), and strainer
assembly (24) as tagged.
(6)
4-220
At emergency valve (12), connect tubing (4 and 11) to straight adapters (15 and 19).
TM 9-2330-384-14&P
4-70. JET LEVEL SENSOR REPLACEMENT (Con't)
(7) At jet level sensor (6), connect
tubing (4 and 11) to straight
adapters (1) and tighten nuts (5).
(8) Install straight adapters (22 and
26) and bleeder valve (27) to
emergency valve (12).
(9) Install tubing (25) between
straight adapter (26) and inlet of
strainer assembly (24). Install
tubing (23) between straight
adapter (22) and outlet of strainer assembly.
FOLLOW-ON TASKS:
Install manhole lid (see paragraph 4-67).
4-221
TM 9-2330-384-14&P
4-71. STRAINER ASSEMBLY MAINTENANCE.
a.
b.
c.
Service
Removal
Disassembly
d.
e.
f.
Materials/Parts:
One gasket
Dry cleaning solvent (Item 10, Appendix E)
Rags
(Item 18, Appendix E)
Antiseize tape
(Item 22, Appendix E)
Cleaning and Inspection
Assembly
Installation
Personnel Required: Two
General Safety Instructions:
Dry cleaning solvent is flammable and must
not be used near open flame. Use only in a
well-ventilated area.
Compressed air used for drying purposes
must not exceed 30 psi (207 kPa).
Tools:
Tool kit, general mechanic’s
Pail
14 in. pipe wrench
a. SERVICE
NOTE
Assistance may be required to perform step 1.
(1)
Place a pail under strainer assembly. Hold body (10) with pipe wrench. Remove cap (6) and
gasket (8) from body and allow all fuel to drain. Dispose of fuel in accordance with local
policy.
(2) Remove screen (9) from body (10).
WARNING
Dry cleaning solvent P-D-680 is toxic and flammable. Always wear protective goggles, face shield, and gloves, and use only in a well-ventilated
area. Avoid contact with skin, eyes, and clothes and DO NOT breathe
vapors. DO NOT use near open flame or excessive heat. The solvent’s
flash point is 100°F-138°F (38°C-59°C). If you become dizzy while using
cleaning solvent, immediately get fresh air and medical help. If solvent
contacts eyes, immediately wash your eyes with water and get medical
aid.
Compressed air used for drying purposes must not exceed 30 psi
(207 kPa). Wear protective clothing (goggles, face shield, and gloves)
and use caution to avoid injury to personnel.
(3)
Use dry cleaning solvent to clean screen (9). Dry screen thoroughly with compressed air. Use
a clean rag dipped in dry cleaning solvent to wipe any dirt or contaminants from inside body
(10).
(4)
Inspect gasket (8) for damage. Replace gasket if damaged.
4-222
TM 9-2330-384-14&P
4-71. STRAINER ASSEMBLY MAINTENANCE (Con't).
(5) Install screen (9) inside body
(10).
(6)
Install new gasket (8) and cap (6)
on body (10). Hold body with pipe
wrench and tighten cap securely.
b. REMOVAL
(1)
Place a pail under strainer assembly to catch any draining fuel
when tubing (5 and 14) is disconnected.
(2)
Loosen nut (13) and disconnect
tubing (14) from straight adapter
(12). Loosen nut (4) and disconnect tubing (5) from straight
adapter (3). Dispose of any fuel
collected in pail in accordance
with local policy.
(3)
Hold body (10) with pipe wrench
and remove bushings (2 and 11)
from body. Remove body from
between mounting brackets (1).
(4)
Remove straight adapters (3 and 12) from bushings (2 and 11).
c. DISASSEMBLY
(1)
Remove cap (6) and gasket (8) from body (10). Remove plug (7) from cap.
(2) Remove screen (9) from body (10).
d. CLEANING AND INSPECTION
WARNING
Dry cleaning solvent P-D-680 is toxic and flammable. Always wear protective goggles, face shield, and gloves, and use only in a well-ventilated
area. Avoid contact with skin, eyes, and clothes and DO NOT breathe
vapors. DO NOT use near open flame or excessive heat. The solvent’s
flash point is 100°F-138°F (38°C-59°C). If you become dizzywhile using
cleaning solvent, immediately get fresh air and medical help. If solvent
contacts eyes, immediately wash your eyes with water and get medical
aid.
Compressed air used for drying purposes must not exceed 30 psi
(207 kPa). Wear protective clothing (goggles, face shield, and gloves)
and usecaution to avoid injury to personnel.
(1)
Use dry cleaning solvent to clean all removed components. Dry thoroughly with compressed
air.
4-223
TM 9-2330-384-14&P
4-71. STRAINER ASSEMBLY MAINTENANCE (Con't).
(2)
Inspect all components for
cracks, breaks, distortion, or
damaged threads.
(3) Replace any damaged component.
e. ASSEMBLY
(1) Install screen (9) inside body
(10).
(2)
Apply antiseize tape to threads of
plug (7). Install plug in cap (6).
Install gasket (8) and cap on body
(10), and tighten securely.
f. INSTALLATION
NOTE
All male threads of fittings should be coated with antiseize tape if not
already factory-coated with an antiseize compound.
Ensure that strainer assembly is installed with directional arrow on body
(10) facing rear of semitrailer.
(1)
Install straight adapters (3 and 12) to bushings (2 and 11).
(2) Position body (10) between mounting brackets (1). Install bushings (2 and 11) to body
through holes in mounting bracket.
(3)
4-224
Connect shorter tubing (14) coming from emergency valve elbow to straight adapter (12) at
inlet of body (10). Tighten nut (13). Connect longer tubing (5) going to underside of tank to
straight adapter (3) at outlet of body. Tighten nut (4).
TM 9-2330-384-14&P
4-72. PRECHECK SYSTEM MAINTENANCE.
a.
b.
c.
d.
Removal of Precheck Valve
Installation of Precheck Valve
Removal of Pressure Gage
Installation of Pressure Gage
Removal of Check Valve
Installation of Check Valve
Removal of Precheck Tubing
Installation of Precheck Tubing
General Safety Instructions:
Equipment Conditions:
Ref
Conditions
4-68 Tank purged if replacing precheck
system components inside tank.
Materials/Parts:
Two lockwashers
Three elbows
Three grommets
Grease
Rags
Antiseize tape
e.
f.
g.
h.
(Item 12, Appendix E)
(Item 18, Appendix E)
(Item 22, Appendix E)
When working inside tank, always provide
adequate forced air ventilation at the manhole opening with air directed into compartment’ where work is being performed.
NEVER work alone inside a tank: a second
person must be stationed at the manhole
opening. The person inside the tank must
have a safety line and harness on in case of
emergency for rescue operations.
Tools:
Tool kit, general mechanic’s
Drain pan
a.
REMOVAL OF PRECHECK VALVE
(1) Remove two nuts (9) lockwashers (10), screws (2), and
washers (1) and remove precheck valve (8) from mounting to
shelf of cabinet (11). Discard
lockwashers.
4-225
TM 9-2330-384-14&P
4-72. PRECHECK SYSTEM MAINTENANCE (Con't).
CAUTION
Use caution when releasing tubing (3
and 4) from under clips (5). Clips
should be lifted gently and only
enough to release tubing. Improper
handling of clips will cause them to
break.
(2)
Release tubing (3 and 4) from under clips (5). Place a suitable
drain pan under precheck valve
(8) and tubing. Loosen nuts (6)
and disconnect tubing from two
elbows (7). Dispose of any
drained fuel in accordance with
local policy. Ensure that any
spilled fuel is wiped up.
(3)
Remove two elbows (7) from precheck valve (8).
b. INSTALLATION OF PRECHECK VALVE
NOTE
All male threads of elbows (7) should be coated with antiseize tape if not
already factory-coated with an antiseize compound.
(1)
Install two elbows (7) to precheck valve (8).
(2)
Connect tubing (3 and 4) to elbows (7) and tighten nuts (6).
(3)
Install precheck valve (8) to shelf of cabinet (11) with two washers (1), screws (2) new
lockwashers (10), and nuts (9).
CAUTION
Use caution when securing tubing (3 and 4) under clips (5). Improper handling of clips will cause them to break.
(4)
Secure tubing (3 and 4) with clips (5). Use a soft-faced hammer to gently tap clips back into
position.
c. REMOVAL OF PRESSURE GAGE
(1)
4-226
Place a suitable drain pan under elbow (16). Loosen nut (15) and disconnect tubing (14) from
elbow. Dispose of any drained fuel in accordance with local policy. Ensure that any spilled fuel
is wiped up.
TM 9-2330-384-14&P
4-72. PRECHECK SYSTEM MAINTENANCE (Con’t).
CAUTION
Use caution not to damage pressure gage (13).
(2) Hold terminal bolt (12) and remove elbow (16).
(3)
Remove nut (17) and starwasher
(18). Remove terminal bolt (12)
and pressure gage (13) from
cabinet (11) .
(4) Remove terminal bolt (12) from
pressure gage (13).
d. INSTALLATION OF PRESSURE GAGE
NOTE
All male threads of elbow (16) and terminal bolt (12) should be coated with
antiseize tape if not already factory-coated with an antiseize compound.
(1)
Install terminal bolt (12) to pressure gage (13).
CAUTION
Use caution not to damage pressure gage (13).
(2)
Install terminal bolt (12) and pressure gage (13) through hole in cabinet (11). Install starwasher (18) and nut (17).
(3)
Hold terminal bolt (12) and install elbow (16).
(4)
Connect tubing (14) to elbow (16) and tighten nut (15).
4-227
TM 9-2330-384-14&P
4-72. PRECHECK SYSTEM MAINTENANCE (Con’t).
e. REMOVAL OF CHECK VALVE
WARNING
When working inside tank, always provide adequate forced air ventilation
at the manhole opening with air directed into compartment where work
is being performed. Forced air ventilation allows for removal of any explosive quantities and contaminants resulting from the type of work being done, and serves to prevent oxygen deficiency. Failure to follow this
warning may result in death to personnel.
NEVER work alone inside a tank; a second person must be stationed at
the manhole opening. The person inside the tank must have a safety line
and harness on in case of emergency for rescue operations. In the event
a rescue operation is required, summon assistance IMMEDIATELY. DO
NOT attempt a rescue until assistance has arrived.
(1)
From inside tank, loosen nut (20)
and disconnect tubing (21) from
elbow (19).
(2)
Hold bushing (27) and remove elbow (19).
(3)
Hold bushing (25) and remove
check valve (26) and bushing
(27) as an assembly. Separate
bushing from check valve.
(4)
Remove bushing (25) and nipple
(22) from coupling (24) welded to
tank floor (23).
4-228
TM 9-2330-384-14&P
4-72. PRECHECK SYSTEM MAINTENANCE (Con't).
f. INSTALLATION OF CHECK VALVE
WARNING
When working inside tank, always provide adequate forced air ventilation
at the manhole opening with air directed into compartment where work
is being performed. Forced air ventilation allows for removal of any explosive quantities and contaminants resulting from the type of work being done, and serves to prevent oxygen deficiency. Failure to follow this
warning may result in death to personnel.
NEVER work alone inside a tank: a second person must be stationed at
the manhole opening. The person inside the tank must have a safety line
and harness on in case of emergency for rescue operations. in the event
a rescue operation is required, summon assistance IMMEDIATELY. DO
NOT attempt a rescue until assistance has arrived.
NOTE
All male threads of elbow (19), bushings (25 and 27), and nipple (22) should
be coated with antiseize tape if not already factory-coated with an antiseize
compound.
(1)
Install nipple (22) and bushing (25) to coupling (24) welded to tank floor (23).
CAUTION
Ensure that check valve (26) is installed in proper direction. An improperly
installed check valve will cause malfunction of precheck system.
(2)
Install bushing (27) to check valve (26). Install bushing and check valve as an assembly to
bushing (25). Ensure that check valve is installed with arrow pointing to inside of tank.
(3)
Hold bushing (27) and install elbow (19).
(4)
Connect tubing (21) to elbow (19) and tighten nut (20).
4-229
TM 9-2330-384-14&P
4-72. PRECHECK SYSTEM MAINTENANCE (Con’t).
g. REMOVAL OF PRECHECK TUBING
CAUTION
Use caution when releasing tubing from under clips (5). Tubing should be
lifted gently and only enough to release tubing. improper handling of clips
will cause them to break.
NOTE
A suitable drain pan should be used to catch any draining fuel as tubing
lengths are disconnected. Dispose of any drained fuel in accordance
with local policy. Ensure that any spilled fuel is wiped up.
To remove tubing (3), perform steps 1 through 8.
To remove tubing (4), perform steps 9 through 16.
To remove tubing (14), perform steps 17 through 24.
To remove tubing (21), perform steps 25 through 27.
(1) Loosen nut (29) and disconnect
tubing (3) from straight adapter
(28).
(2) Inside cabinet (11), loosen nut
(6) and disconnect tubing (3)
from elbow (7).
(3) Release tubing (3) from under
clip (5) on top of shelf inside cabinet (11).
NOTE
if tubing (3) is not damaged, it may be
reused if there is sufficient length after cut is made.
(4)
Cut tubing (3) as close to end inside cabinet (1 1) as possible.
(5)
Pull tubing (3) out through hole in
back of cabinet (11).
(6)
Remove precheck valve (8) from
mounting to shelf inside cabinet
(11) (see subparagraph a). Remove elbow (7) from precheck
valve. Discard elbow.
(7)
If tubing (3) is being replaced, remove straight adapter (28) from coupling (24) at tank floor
(23).
(8)
Inspect grommet (30) at back wall of cabinet (11). If damaged, remove and discard.
4-230
TM 9-2330-384-14&P
4-72. PRECHECK SYSTEM MAINTENANCE (Con't).
(9)
Loosen nut (36) and disconnect tubing (4) from elbow (35).
(10) Inside cabinet (11), loosen nut (6) and disconnect tubing (4) from elbow (7).
(11) Release tubing (4) from under all clips (5).
NOTE
If tubing (4) is not damaged, it may be reused if there is sufficient length
after cut is made.
(12) Cut tubing (4) as close to end inside cabinet (11) as possible.
(13) Pull tubing (4) out through hole in back of cabinet (11).
4-231
TM 9-2330-384-14&P
4-72. PRECHECK SYSTEM MAINTENANCE (Con’t).
(14) Remove precheck valve (8) from
mounting to shelf inside cabinet
(11) (see subparagraph a). Remove elbow (7) from precheck
valve. Discard elbow.
(15) If tubing (4) is being replaced, remove elbow (35) from elbow (34)
at piping assembly (33).
(16) Inspect grommet (30) at back
wall of cabinet (11). If damaged,
remove and discard.
(17) Loosen nut (31) and disconnect tubing (14) from straight adapter (32).
(18) Inside cabinet (11). loosen nut (15) and disconnect tubing (14) from elbow (16).
(19) Release tubing (14) from under all clips (5).
NOTE
If tubing (14) is not damaged, it may be reused if there is sufficient length
after cut is made.
(20) Cut tubing (14) as close to end inside cabinet (11) as possible.
(21) Pull tubing (14) out through hole in back of cabinet (11).
(22) Remove elbow (16) from terminal bolt (12). Discard elbow.
(23) If tubing (14) is being replaced, remove straight adapter (32) from elbow (34).
(24) Inspect grommet (30) at back wall of cabinet (11). If damaged, remove and discard.
4-232
TM 9-2330-384-14&P
4-72. PRECHECK SYSTEM MAINTENANCE (Con't).
WARNING
l
When working inside tank, always provide adequate forced air ventilation
at the manhole opening with air directed into compartment where work
is being performed. Forced air ventilation allows for removal of any explosive quantities and contaminants resulting from the type of work being done, and serves to prevent oxygen deficiency. Failure to follow this
warning may result in death to personnel.
l
NEVER work alone inside a tank; a second person must be stationed at
the manhole opening. The person inside the tank must have a safety line
and harness on in case of emergency for rescue operations. In the event
a rescue operation is required, summon assistance IMMEDIATELY. DO
NOT attempt a rescue until assistance has arrived.
(25) From inside tank, disconnect tubing (21) from jet level sensor (see paragraph 4-70).
4-233
TM 9-2330-384-14&P
4-72. PRECHECK SYSTEM MAINTENANCE (Con’t).
(26) Loosen nut (20) and disconnect tubing (21) from elbow (19).
(27) Release tubing (21) from under all clips (5) inside tank and remove.
h. INSTALLATION OF PRECHECK TUBING
WARNING
l
When working inside tank, always provide adequate forced air ventilation
at the manhole opening with air directed into compartment where work
is being performed. Forced air ventilation allows for removal of any explosive quantities and contaminants resulting from the type of work being done, and serves to prevent oxygen deficiency. Failure to follow this
warning may result in death to personnel.
l
NEVER work alone inside a tank: a second person must be stationed at
the manhole opening. The person inside the tank must have a safety line
and harness on in case of emergency for rescue operations. In the event
a rescue operation is required, summon assistance IMMEDIATELY. DO
NOT attempt a rescue until assistance has arrived.
CAUTION
Use caution when securing tubing under clips (5). Improper handling of
clips will cause them to break.
NOTE
l
All male threads of all fittings
should be coated with antiseize
tape if not already factory-coated
with an antiseize compound.
l
For information on manufacturing
tubing lengths, refer to Appendix G.
l
To install tubing (21), perform
steps 1 through 3.
l
To install tubing (14), perform
steps 4 through 9.
l
To install tubing (4), perform
steps 10 through 15.
l
To install tubing (3), perform
steps 18 through 21.
(1) Position tubing (21) inside tank
between jet level sensor and
check valve (26). Allow slack in
tubing at each end. Secure tubing
with clips (5). Use a soft-faced
hammer to gently tap clips back
into position.
4-234
TM 9-2330-384-14&P
4-72. PRECHECK SYSTEM MAINTENANCE (Con't).
(2)
Connect tubing (21) to elbow (19) and tighten nut (20).
(3)
Connect tubing (21) to jet level sensor (see paragraph 4-70).
(4)
If removed, install new grommet (30) to hole in back wall of cabinet (11).
(5)
If removed, install straight adapter (32) to elbow (34) at piping assembly (33).
(6)
Install new elbow (16) to terminal bolt (12).
(7)
Apply grease to grommet (30). Push tubing (14) through grommet into cabinet (11). Allow
slack in tubing at each end. Secure tubing with clips (5). Use a soft-faced hammer to gently
tap clips back into position.
4-235
TM 9-2330-384-14&P
4-72. PRECHECK SYSTEM MAINTENANCE (Con't).
(8)
Connect tubing (14) to straight adapter (32) and tighten nut (31).
(9)
Connect tubing (14) to elbow (16) and tighten nut (15).
(10) If removed, install new grommet (30) to hole in back wall of cabinet (11).
(11) If removed, install elbow (35) to elbow (34) at piping assembly (33).
(12) Install new elbow (7) to precheck valve (8). Install precheck valve to shelf inside cabinet (11)
(see subparagraph b).
(13) Apply grease to grommet (30).
Push tubing (4) through grommet
into cabinet (11). Allow slack at
each end of tubing. Secure tubing with clips (5). Use a softfaced hammer to gently tap clips
back into position.
(14) Connect tubing (4) to elbow (7)
and tighten nut (6).
(15) Connect tubing (4) to elbow (35)
and tighten nut (36).
(16) If removed, install new grommet
(30) to hole in back wall of cabinet (11).
(17) If removed, install straight adapter (28) to coupling (24).
(18) Install new elbow (7) to precheck
valve (8). Install precheck valve
to shelf inside cabinet (11) (see
subparagraph b).
(19) Apply grease to grommet (30). Push tubing (3) through grommet into cabinet (11). Allow
slack at each end of tubing. Secure tubing with clip (5). Use a soft-faced hammer to gently
tap clip back into position.
(20) Connect tubing (3) to elbow (7) and tighten nut (6).
(21) Connect tubing (3) to straight adapter (28) and tighten nut (29).
4-236
TM 9-2330-384-14&P
4-72. PRECHECK SYSTEM MAINTENANCE (Con’t).
4-237
TM 9-2330-384-14&P
4-73. GAGE MARKER DISK AND GROUND WIRE REPLACEMENT.
a.
b.
Removal of Ground Wire
Installation of Ground Wire
Equipment Conditions:
Ref
CONDITIONS
4-68 Tank purged.
c.
d.
General Safety Instructions:
l
Tools:
l
l
Tool kit, general mechanic’s
Wire cutter
Personnel Required: Two
a.
REMOVAL OF GROUND WIRE
NOTE
Ground wire (2) may be frayed at end.
This is normal.
Cut ground wire (2) from gage marker rod
(1) and remove.
b. INSTALLATION OF GROUND WIRE
(1) Install ground wire (2) through
hole in gage marker rod (1) and
install one sleeve (4). Use vise
grips to crimp sleeve.
NOTE
Ground wire (2) is not attached to
tank floor: ground wire only rests on
tank floor.
(2) Install sleeve (3) approximately
6 in. (15.24 cm) from other end
of ground wire (2). Use vise grips
to crimp sleeve.
4-238
Removal of Gage Marker Disk
Installation of Gage Marker Disk
l
When working inside tank, always provide
adequate forced air ventilation at the manhole opening with air directed into compartment where work is being performed.
NEVER work alone inside a tank; a second
person must be stationed at the manhole
opening. The person inside the tank must
have a safety line and harness on in case of
emergency for rescue operations.
TM 9-2330-384-14&P
4-73. GAGE MARKER DISK AND GROUND WIRE REPLACEMENT (Con't).
c. REMOVAL OF GAGE MARKER DISK
WARNING
•
When working inside tank, always provide adequate forced air ventilation
at the manhole opening with air directed Into compartment where work
Is being performed. Forced air ventilation allows for removal of any explosive quantities and contaminants resulting from the type of work being done, and serves to prevent oxygen deficiency. Failure to follow this
warning may result In death to personnel.
•
NEVER work alone Inside a tank; a second person must be stationed at
the manhole opening. The person Inside the tank must have a safety line
and harness on In case of emergency for rescue operations. In the event
a rescue operation Is required, summon assistance IMMEDIATELY. DO
NOT attempt a rescue until assistance has arrived.
Remove jam nut (5) and disk (6) from gage marker rod (1).
d.
INSTALLATION
OF GAGE MARKER DISK
WARNING
•
When working Inside tank, always provide adequate forced air ventilation
at the manhole opening with air directed Into compartment where work
Is being performed. Forced air ventilation allows for removal of any explosive quantities and contaminants resulting from the type of work beIng done, and serves to prevent oxygen deficiency. Failure to follow this
warning may result In death to personnel.
•
NEVER work alone Inside a tank; a second person must be stationed at
the manhole opening. The person Inside the tank must have a safety line
and harness on In case of emergency forrescue operations. In the event
a rescue operation Is required, summon assistance IMMEDIATELY. DO
NOT attempt a rescue until assistance has arrived.
NOTE
To ensure proper calibration,
fications given.
disk (6) must be Installed according to speci-
Install disk (6) and jam nut (5) on gage marker rod (1). Adjust jam nut so that bottom edge of disk is
54.75 In. (139.1 cm) above tank floor.
4-239
TM 9-2330-384-14&P
Section XIV. LINES,FITTINGS,AND VALVES MAINTENANCE
Title
Page
Number
Emergency Valve Operator Maintenance ...........................................................
Emergency Valve Remote Trip-Release Replacement .......................................
Emergency Valve and Vapor Vent Cables and Tubing Maintenance ..................
Vent Cap Assembly Replacement ......................................................................
Vapor Collection System Maintenance ...............................................................
Sump Drain Replacement ...................................................................................
Piping Assembly, Front Port, and Rear Inlet Maintenance ..................................
Vapor Vent Replacement ....................................................................................
Emergency Valve Maintenance ..........................................................................
Pilot Valve Maintenance ......................................................................................
Winterization of Bottom Loading System ............................................................
4-240
4-244
4-246
4-252
4-254
4-257
4-260
4-266
4-267
4-278
4-281
Paragraph
Number
4-74
4-75
4-76
4-77
4-78
4-79
4-80
4-81
4-82
4-83
4-84
4-74. EMERGENCY VALVE OPERATOR MAINTENANCE.
THIS TASK COVERS
a.
b.
c. Adjustment of Cables
Removal
Installation
INITIAL SETUP
Materials/Parts:
Equipment Conditions:
Ref
- Four locknuts
- Grease
Conditions
Tank empty.
(item 12, Appendix E)
Tools:
* Tool kit, general mechanic's
a. REMOVAL
(1) Remove two nuts (4), loosen U-bolt (3), and disconnect cable (2) from emergency valve control lever
(14). Remove two nuts, loosen U-bolt, and disconnect cable from vapor vent control lever (9).
CAUTION
DO NOT hold large fusible nuts (10) when loosening two nuts (8).
Fusible nuts will strip if held.
(2) Loosen two nuts (8) and disconnect two cables (7) from emergency valve control lever (14) and vapor
vent control lever (9).
4-240
Change1
TM 9-2330-384-14&P
4-74. EMERGENCY VALVE OPERATOR MAINTENANCE (Con't).
(3)
Loosen nuts on two straight adapters (5).
(4)
Remove four locknuts (13), washers (12), and screws (11). Remove emergency valve operator (1) from cabinet (15). Discard locknuts.
(5)
Remove straight adapters (5) from emergency valve operator (1).
b. INSTALLATION
(1)
Install two straight adapters (5) to emergency valve operator (1). Position emergency valve
operator inside cabinet (15) and thread two cables (7) through straight adapters.
(2)
Install emergency valve operator (1) to cabinet (15) with four screws (11), washers (12), and
new locknuts (13).
(3)
Connect tubing (6) to each straight adapter (5) and tighten nuts.
4-241
TM 9-2330-384-14&P
4-74. EMERGENCY VALVE OPERATOR MAINTENANCE (Con?).
CAUTION
DO NOT hold large fusible nuts (10) when tightening nuts (8). Fusible nuts
will strip if held.
(4)
Connect two cables (7) to emergency valve control lever (14) and vapor vent control lever
(9). Tighten two nuts (8).
(5)
Connect bottom cable (2) to vapor vent control lever (9). Install two nuts (4).
(6)
Connect top cable (2) to emergency valve control lever (14). Install two nuts (4).
(7)
Check operation of emergency valve operator (1). Adjust cable lengths, as required (see
ADJUSTMENT OF CABLES, subparagraph c).
4-242
TM 9-2330-384-14&P
4-74. EMERGENCY VALVE OPERATOR MAINTENANCE (Con?).
c. ADJUSTMENT OF CABLES
NOTE
l
Adjustment in cable lengths may be made at emergency valve operator
(1) or at other end of cable (emergency valve, vapor vent, or emergency
valve remote trip-release).
l
If adjusting emergency valve remote trip-release cables (2), perform
steps 4 and 5.
(1)
At cabinet (15), push emergency valve control lever (14) and vapor vent control lever (9) to
close.
(2)
Pull on each control lever (9 and 14) in turn. There should be ½ -1 in. (1.3-2.5 cm) of free
travel before cables (7) tighten.
(3)
If too much free travel is noted, loosen nut (8) and shorten cable (7). If not enough free travel
is noted, lengthen cable.
(4)
Pull emergency valve control lever (14) and vapor vent control lever (9) to open.
(5)
Loosen four nuts (4) at U-bolts (3). Pull on cables (2) and take up all slack. Tighten nuts.
(6)
Lubricate cables (2 and 7) at grease fittings, as required (see Chapter 3, Section I).
4-243
TM 9-2330-384-14&P
4-75. EMERGENCY VALVE REMOTE TRIP-RELEASE REPLACEMENT.
a.
Materials/Parts:
l
b. Installation
Removal
Tools:
Two locknuts
l
Tool kit, general mechanic’s
Personnel Required: Two
a.
REMOVAL
NOTE
l
Removal of remote trip-release (4) on top, curbside of semitrailer is
shown. Remote trip-release at front, roadside is removed the same.
l
If disconnecting cable (2) and tubing (1), perform step 1.
(1)
Loosen two nuts (7). Remove nut
(11) from straight adapter (10).
(2)
Remove two locknuts (9) and
washers (8). Remove remote
trip-release (4) from mounting
bracket (3). Discard locknuts.
(3)
Remove two screws (6) from remote trip-release (4).
NOTE
If remote trip-release (4) has never been serviced, nut (5) is tack welded to
remote trip-release and cannot be removed.
(4)
4-244
Remove nut (5) and straight adapter (10) from remote trip-release (4) and set aside.
TM 9-2330-384-14&P
4-75. EMERGENCY VALVE REMOTE TRIP-RELEASE REPLACEMENT (Con?).
b. INSTALLATION
NOTE
If connecting cable (2) and tubing (1), perform steps 4 and 6.
(1)
Install straight adapter (10) to remote trip-release (4) with nut (5).
(2)
Install two screws (6) to remote trip-release (4).
(3)
Position remote trip-release (4) at mounting bracket (3) with cable (2) threaded through hole
in straight adapter (10) and U-bolt in remote trip-release.
(4)
Install nut (11) to straight adapter (10).
(5)
Install two washers (8) and new locknuts (9).
(6)
Take up slack in cable (2) and tighten two nuts (7).
(7)
Pull emergency valve control lever in cabinet to open (see paragraph 2-2), Pull on handle of
remote trip-release (4) and check that control lever in cabinet closes. If control lever in cabinet does not close, adjust length of cable (2) as required (see paragraph 4-74).
4-245
TM 9-2330-384-14&P
4-76.
EMERGENCY VALVE AND VAPOR VENT CABLES AND TUBING MAINTENANCE.
a.
b.
c.
d.
General
Removal of Cable and Tubing
Installation of Cable and Tubing
Disconnection of Cable and Tubing at
Emergency Valve
Equipment Conditions:
Ref
--
l
l
f.
g.
Connection of Cable and Tubing at
Emergency Valve
Disconnection of Cable and Tubing at
Vapor Vent
Connection of Cable and Tubing at
Vapor Vent
Materials/Parts:
Conditions
Tank empty.
l
l
Grease
Grease
(Item 12, Appendix E)
(Item 13, Appendix E)
Personnel Required: Two
Tools:
l
e.
Tool kit, general mechanic’s
Tubing bender
Tubing cutter
a. GENERAL
(1)
There are four cables installed on semitrailer that function to operate emergency valve and
vapor vent. Each cable is a one-piece structure which cannot be spliced.
(2)
Each cable is enclosed in tubing which is pieced. There are two sections of tubing per cable
length, joined together by a grease fitting.
(3)
The supporting hardware is the same along each cable and tubing assembly. Only the numbers vary.
(4)
It is important that grommets be used where called for. This will help prevent damage to
tubing.
b. REMOVAL OF CABLE AND TUBING
NOTE
(1)
4-246
l
This procedure describes removal of an entire cable (11) and tubing (5)
assembly.
l
To disconnect cable (11) and tubing (5) at emergency valve (6), refer to
subparagraph d.
l
To disconnect cable (11) and tubing (5) at vapor vent (3), refer to subparagraph f.
l
To disconnect cable (11) and tubing (5) at cabinet (7), refer to paragraph 4-74.
l
To disconnect cable (11) and tubing (5) at remote trip-release (1), refer
to paragraph 4-75.
Disconnect cable (11) and tubing (5) at each end.
TM 9-2330-384-14&P
4-76.
EMERGENCY VALVE AND VAPOR VENT CABLES AND TUBING MAINTENANCE
(Con't).
NOTE
If replacing only one length of tubing (5), cable (11) should be
pulled out only just past grease fitting (4).
(2)
From one end, pull cable (11) all
the way out.
(3)
Cut tubing (5) at several locations
along its length. Loosen nuts at
grease fitting (4).
CAUTION
Use caution when releasing tubing
(5) from under clips (2). Clips
should be lifted gently and only
enough to release tubing. Failure
to follow this caution will cause
clips to break off.
(4) Lift clips (2) and remove all
lengths of tubing (5). Remove
straight adapters at ends, as required. Remove grease fitting
(4).
(5) Inspect all grommets (8). Replace any damaged grommet.
(6)
Inspect grease fitting (4) and cable (11). Replace if damaged.
4-247
TM 9-2330-384-14&P
4-76.
EMERGENCY VALVE AND VAPOR VENT CABLES AND TUBING MAINTENANCE
(Con't).
c. INSTALLATION OF CABLE AND TUBING
NOTE
l
This procedure describes installation of an entire cable (11) and tubing
(5) assembly.
l
To connect cable (11) and tubing (5) at emergency valve (6), refer to
subparagraph e.
l
To connect cable (11) and tubing (5) at vapor vent (3), refer to subparagraph g.
l
To connect cable (11) and tubing (5) at cabinet (7), refer to paragraph
4-74.
l
To connect cable (11) and tubing (5) at remote trip-release (1), refer to
paragraph 4-75.
(1) Working from cabinet (7) end,
bend new length of tubing (5),
using old tubing as a guide. To
ensure smooth operation of cable
(11) inside tubing, do not kink or
deform any bends.
(2)
Apply grease to all grommets (8) to allow for easier installation of tubing (5).
CAUTION
(3)
l
Use caution when securing tubing (5) under clips (2). Improper handling
of clips will cause them to break.
l
If two or more consecutive clips (2) are missing or damaged, tubing (5)
will not be adequately supported.
Install new length of tubing (5) through grommets (8) and secure under clips (2) by tapping
gently on clips with a soft-faced hammer. If two or more consecutive clips are missing or
damaged, notify direct support maintenance.
(4) Connect tubing (5) at cabinet (7) end.
4-248
TM 9-2330-384-14&P
4-76.
EMERGENCY VALVE AND VAPOR VENT CABLES AND TUBING MAINTENANCE
(Con't).
CAUTION
l
Use caution when securing tubing
(5) under clips (2). Improper handling of clips will cause them to
break.
l
If two or more consecutive clips
(2) are missing or damaged, tubing (5) will not be adequately supported.
(5)
Bend other length of tubing (5) as
required. Install through grommets (8) and secure under clips
(2) in same manner as tubing at
cabinet (7) end. If two or more
consecutive clips are missing or
damaged, notify direct support
maintenance.
(6)
Connect tubing (5) at emergency
valve (6), vapor vent (3), or remote trip-release (1) end.
(7)
Cut tubing (5), as required, at
point of installation of grease fitting (4).
(8)
Connect tubing (5) lengths with
grease fitting (4) and tighten two
grease fitting nuts.
(9)
Install cable (11) through tubing
(5). Connect cable at each end.
(10) Adjust length of cable (11) (see
paragraph 4-74).
4-249
TM 9-2330-384-14&P
4-76. EMERGENCY VALVE AND VAPOR VENT CABLES AND TUBING MAINTENANCE
(Con’t).
d. DISCONNECTION OF CABLE AND TUBING AT EMERGENCY VALVE
(1)
Loosen nut (17) and disconnect
cable (11) from adjusting bolt
(19).
(2)
From inside cabinet (7), pull cable (11) away from emergency
valve (6) by manually pulling on
cable that is second cable down,
attached to emergency valve
control lever (top lever). Loosen
nut (15) and disconnect tubing
(5) from straight adapter (16).
(3)
Remove nut (15) from straight
adapter (16). Remove straight
adapter from emergency valve
(6).
(4)
Pull tubing (5) and cable (11)
from emergency valve (6).
(5)
If damaged, remove two nuts
(18) and adjusting bolt (19) from
lever (14).
e. CONNECTION OF CABLE AND TUBING AT EMERGENCY VALVE
(1)
If removed, install adjusting bolt (19) to lever (14) and install two nuts (18).
(2)
Install straight adapter (16) to emergency valve (6). From inside cabinet (7)) pull cable (11)
away from straight adapter by manually pulling on cable that is second cable down, attached
to emergency valve control lever (top lever).
(3)
Connect tubing (5) to straight adapter (16) and tighten nut (15).
(4)
From inside cabinet (7), push cable (11) through tubing (5). Connect cable to adjusting bolt
(19) and tighten nut (17).
NOTE
Cable (11) length may be adjusted at both ends.
(5)
Pull on emergency valve control lever in cabinet (7) and check operation of cable (11). To
adjust length of cable at emergency valve (6), turn two nuts (18) at adjusting bolt (19). To
adjust length of cable at cabinet, refer to paragraph 4-74.
(6)
Lubricate cable (11) at grease fitting (4), as required (see Chapter 3, Section I).
4-250
TM 9-2330-384-14&P
4-76.
EMERGENCY VALVE AND VAPOR VENT CABLES AND TUBING MAINTENANCE
(Con't).
f.
DISCONNECTION OF CABLE AND TUBING
AT VAPOR VENT
Loosen nuts (10 and 13).
g. CONNECTION OF CABLE AND TUBING AT
VAPOR VENT
(1) Connect tubing (5) at straight
adapter (12) and tighten nut
(13).
NOTE
Ensure that cable (11) posses between washers (9).
3
(2) Connect cable (11) to vapor vent
(3) and tighten nut (10).
(3) Adjust length of cable (11), as required (see paragraph 4-74).
4
4
3
Mz
5
7
5 13 12
10
b
IJ
4-251
TM 9-2330-384-14&P
4-77. VENT CAPASSEMBLYREPLACEMENT.
ITHISTASKCOVERS
---J
b. Installation
a. Removal
Equipment Conditions:
Ref
Conditions
4-68
Tank purged.
Materials/Parts:
- One gasket
- Two S-hooks
- Antiseize tape (item 22, Appendix E)
Tools:
General Safety Instructions:
• Tool kit, general mechanic's
• Pipe wrench
Use extreme caution when working or walking on
top of trailer.
a. REMOVAL
WARNING
Use extreme caution when walking or working on top of semitrailer. Walkway
can become slippery due to moisture or fuel spillage. Failure to follow this
warning may result in serious injury to personnel.
(1)
Open manhole fill cover, if closed, and allow
tank pressure to vent (see paragraph 2-16).
(2)
Remove screw (2) and S-hook (3), with
attached chain, from vent cap (1).
(3)
Remove two S-hooks (3 and 5) from chain
(4). Discard S-hooks.
(4)
Remove vent cap (1) from pipe nipple (6).
(5)
Remove and discard gasket (7).
2
3
1
4
5
7
6
4-252
Change1
TM 9-2330-384-14&P
4-77. VENT CAP ASSEMBLYREPLACEMENT(Con't).
b. INSTALLATION
WARNING
Useextremecautionwhenworkingorwalkingontopof semitrailer.Walkway
can becomeslipperydue to moistureor fuel spillage.Failureto follow this
warningmayresultin seriousinjuryto personnel.
(1)
Apply antiseize tape to threads of pipe nipple (6).
(2)
Install new gasket (7) inside vent cap (1).
CAUTION
DO NOT overtighten vent cap (1) or damage to gasket (7) will result.
(3)
Install vent cap (1) finger-tight. Then tighten vent cap (1) an additional 1/4 to 1/2 turn until gasket
(7) is firmly and evenly compressed.
(4) Attach two new S-hooks (3 and 5) to chain (4).
(5) Attach S-hook (3), with attached chain (4), to vent cap (1) with screw (2).
(6) Close manhole fill cover (see paragraph 2-16).
Changel
4-253
TM 9-2330-384-14&P
4-78.
VAPOR COLLECTION SYSTEM MAINTENANCE.
[THIS TASK COVER
a.
Removal of Vapor Return Line and
Adapter
Installation of Vapor Return Line and
Adapter
b.
c.
d.
Removal of Vapor Vent Hose
Installation of Vapor Vent Hose
Equipment Conditions:
Ref
Conditions
4-68 Tank purged.
Materials/Parts:
- One gasket
- Four lockwashers
Tools:
Personnel Required:
• Tool kit, general mechanic's
• Pipe wrench
• Wire cutter
a.
Two
General Safety Instructions:
Use extreme caution when working or
walking on top of semitrailer.
REMOVAL OF VAPOR RETURN LINE AND ADAPTER
(1)
Remove dust cap (1) and adapter (2) from vapor return line (6). If dust cap gasket (9) is
damaged, remove and discard. If dust cap is damaged, cut cable and remove dust cap from
adapter.
WARNING
Use extreme caution when working or walking on top of semitrailer.
Walkway can become slippery due to moisture or fuel spillage. Failure to
follow this warning may result In serious Injury to personnel.
(2)
Remove retaining strap (11) securing hose (12) to vapor return line (6).
(3)
Remove four nuts (5), lockwashers (7), washers (4), and two U-bolts (8) from two support
brackets (3). Lower vapor return line (6) to ground. Discard lockwashers.
(4) Remove retaining strap (13) and hose (12) from line at overturn rail (10).
4-254
TM 9-2330-384-14&P
4-78. VAPOR COLLECTION SYSTEM MAINTENANCE (Con't).
b. INSTALLATION OF VAPOR RETURN LINE AND ADAPTER
WARNING
Use extreme caution when working or walking on top of semitrailer.
Walkway can become slippery due to moisture or fuel spillage. Failure to
follow this warning may result in serious injury to personnel.
(1)
Connect hose (12) to line at overturn rail (10) with retaining strap (13).
(2)
Position vapor return line (6) with end inserted into hose (12). Loosely install vapor return line
to two support brackets (3) with two U-bolts (8), four washers (4), new lockwashers (7), and
nuts (5).
(3)
Connect vapor return line (6) to hose (12) and fully tighten retaining strap (11).
(4)
Fully tighten four nuts (5) at two U-bolts (8).
(5)
Install new gasket (9) to dust cap (1), if removed.
(6)
Install adapter (2) and dust cap (1) to vapor return line (6).
(7)
If removed, cut a length of cable and install through loops in dust cap (1) and adapter (2).
Secure with two crimped sleeves.
4-255
TM 9-2330-384-14&P
4-78. VAPOR COLLECTION SYSTEM MAINTENANCE (Con't).
c. REMOVAL OF VAPOR VENT HOSE
WARNING
Use extreme caution when working or walking on top of semitrailer.
Walkway can become slippery due to moisture or fuel spillage. Failure to
follow this warning may result in serious Injury to personnel.
Remove two clamps (14) and vapor
vent hose (15) from overturn rail (10)
and vapor vent (16).
d. INSTALLATION OF VAPOR VENT HOSE
WARNING
Use extreme caution when working or walking on top of semitrailer.
Walkway can become slippery due to moisture or fuel spillage. Failure to
follow this warning may result in serious injury to personnel.
Install vapor vent hose (15) between overturn rail (10) and vapor vent (16). Tighten two clamps
(14).
4-256
TM 9-2330-384-14&P
4-79. SUMP DRAIN REPLACEMENT.
a.
b.
Removal
Cleaning and Inspection
R e f Conditions
4-68 Tank purged.
l
Materials/Parts:
l
l
l
One locknut
Two lockwashers
Drain pan
Antiseize tape
Installation
General Safety Instructions:
Equipment Conditions:
l
c.
l
Dry cleaning solvent is flammable and must
not be used near open flame. Use only in a
well-ventilated area.
Compressed air used to dry and clear
passages must not exceed 30 psi
(207 kPa).
(Item 22, Appendix E)
Tools:
l
l
Tool kit, general mechanic’s
Pipe wrench
4-257
TM 9-2330-384-14&P
4-79. SUMP DRAIN REPLACEMENT (Con't).
a. REMOVAL
(1)
Place a drain pan under drain (12). Remove nut (7) and security bolt (5). Pull on sump drain
control lever (6) and allow all fluid to drain from tank sump (1).
(2)
At support bracket (13), remove two nuts (16), lockwashers (15), washers (14), and U-bolt
(11). Discard lockwashers.
(3) Remove pipe (12) from elbow (10).
(4)
Remove locknut (4), two washers (2), and bolt (17) and disconnect sump drain control lever
(6) from sump drain valve (3). Discard locknut.
(5)
Loosen sump drain valve (3) and pivot it clockwise 90 degrees.
(6)
Remove pipe (8) from sump drain valve (3). Remove elbows (9 and 10) from pipe.
(7)
Remove sump drain valve (3) from tank sump (1).
4-258
TM 9-2330-384-14&P
4-79. SUMP DRAIN REPLACEMENT (Con't).
b. CLEANING AND INSPECTION
WARNING
l
Dry cleaning solvent P-D-680 is toxic and flammable. Always wear protective goggles, face shield, and gloves, and use only in a well-ventilated
area. Avoid contact with skin, eyes, and clothes and DO NOT breathe
vapors. DO NOT use near open flame or excessive heat. The solvent’s
flash point is 100° F-138° F (38° C-59° C). If you become dizzy while using
cleaning solvent, immediately get fresh air and medical help. If solvent
contacts eyes, immediately wash your eyes with water and get medical
aid.
l
Compressed air used to dry and clear passages must not exceed 30 psi
(207 kPa). Wear protective clothing (goggles, face shield, and gloves)
and use caution to avoid injury to personnel.
(1)
Clean all removed components in dry cleaning solvent. Use compressed air to dry thoroughly
and to clear all passages.
(2)
Inspect all removed components for damage. Replace if damaged.
c. INSTALLATION
NOTE
Apply antiseize tape to pipe threads as components are installed.
(1)
Install sump drain valve (3) to tank sump (1). Leave 90 degrees loose from final installed
position.
(2)
Install pipe (8) and elbows (9 and 10). Tighten sump drain valve (3) to its fully installed
position.
(3)
Install pipe (12) to elbow (10). Install pipe to support bracket (13) with U-bolt (11), two
washers (14), new lockwashers (15), and nuts (16).
(4)
Connect sump drain control lever (6) to sump drain valve (3) with bolt (17), two washers (2),
and new locknut (4).
(5)
Push on sump drain control lever (6) to ensure that sump drain valve (3) is closed.
(6) Install security bolt (5) and nut (7).
4-259
TM 9-2330-384-14&P
4-80. PIPING ASSEMBLY, FRONT PORT, AND REAR INLET MAINTENANCE.
a.
b.
c.
Removal of Front Port Components
Installation of Front Port Components
Removal of Rear Inlet Components
Equipment Conditions:
R e f Conditions
4-68 Tank purged.
d.
e.
f.
Materials/Parts:
l
l
l
Tools:
l
l
l
l
Tool kit, general mechanic’s
Jackstand
Wire cutter
Installation of Rear Inlet Components
Removal of Piping Assembly
Installation of Piping Assembly
Three gaskets
Eight lockwashers
Sixteen locknuts
Grease
(Item 12. Appendix E)
Personnel Required: Two
a. REMOVAL OF FRONT PORT COMPONENTS
(1)
Remove dust cap (15) from adapter (3). Inspect dust cap gasket for damage. If damaged,
remove and discard.
(2)
If dust cap (15) is damaged, cut cable and remove dust cap.
4-260
TM 9-2330-384-14&P
4-80. PIPINGASSEMBLY,FRONTPORT,ANDREARINLETMAINTENANCE(Con't).
NOTE
Mark position of
brakeinterlockanglebracket(14)toensureinstallation
in sameposition.
(3)
Remove two locknuts (7), screws (1), and four washers (2) and remove brake interlock angle
bracket (14) from rear of piping assembly (6) flange. Let angle bracket hang. Discard locknuts.
(4)
Remove six remaining locknuts (7), screws (1), and twelve washers (2). Remove adapter (3), gate
valve (4), and two gaskets (5) from piping assembly (6) flange. Discard gaskets and locknuts.
b. INSTALLATION OF FRONT PORT COMPONENTS
c.
(1)
Loosely install gate valve (4), two new gaskets (5), and adapter (3) to piping assembly flange (6)
with six screws (1), twelve washers (2), and six new locknuts (7).
(2)
Install brake interlockangle bracket (14), as marked, to rearof piping assembly (6) flange with two
remaining screws (1), four washers (2), and two new locknuts (7). Tighten all eight locknuts in a
crisscross pattern.
(3)
If removed, install new gasket to dust cap (15). Install dust cap to adapter (3).
(4)
If cable was removed, cut a length of cable and thread through loops in dust cap (15) and adapter
(3). Secure cable with two crimped sleeves.
REMOVAL OF REAR INLET COMPONENTS
NOTE
Mark position of brake interlock angle bracket (14)to ensure installation
in same position.
(1)
Remove two locknuts (18), screws (16), and
fourwashers (17) and remove brake interlock
angle bracket (14) from rear of piping assembly
(6) flange. Let angle bracket hang. Discard
locknuts.
(2)
Remove six remaining locknuts (18), screws
(16), and 12 washers (17). Remove fitting (20)
andgasket (19) from piping assembly (6)
flange. Discard gasket and locknuts.
(3)
14
17
18
00
Remove poppet assembly (21) and preformed
packing (22) from piping assembly (6).
16
17
6
21
19
20
Change1
4-261
TM 9-2330-384-14&P
4-80. PIPINGASSEMBLY,FRONTPORT,ANDREARINLETMAINTENANCE(Con't).
d. INSTALLATIONOF REARINLETCOMPONENTS
(1)
Install preformed packing (22) and poppet assembly (21) on piping assembly (6) flange.
(2)
Loosely install new gasket (19) and fitting (20) on piping assembly (6) flange with six screws (16),
12 washers (17), and six new locknuts (18).
(3)
Install brake interlockangle bracket (14), as marked, on rearof piping assembly (6) flange with two
remaining screws (16), four washers (17), and two new locknuts (18). Tighten all eight locknuts in
a crisscross pattern.
14
18
17
COD
16
17
6
21
2
19
20
e.
23
REMOVAL OF PIPING ASSEMBLY
(1)
(2)
Disconnect precheck tubing from
precheck fittings at piping assembly.
Remove fittings from piping assembly
(see paragraph 4-72).
Disconnect control cable and tubing
at emergency valve (24) (see
paragraph 4-76).
2
6
1\
24
22
25
4-262
Change1
TM 9-2330-384-14&P
4-80. PIPING ASSEMBLY, FRONT PORT, AND REAR INLET MAINTENANCE (Con't).
NOTE
Mark location of brake interlock angle brackets (14) to ensure installation in
same position.
(3)
Perform step 3 of subparagraph a and step 1 of subparagraph c to remove brake interlock
angle brackets (14) from piping assembly (6) flanges.
(4)
Place a suitable jackstand under piping assembly (6) at front port and rear inlet.
(5)
Remove four nuts (10), lockwashers (11), washers (12), and two U-bolts (13) at piping
assembly support bracket (8). Discard lockwashers.
(6) Remove two nuts (25), bolts (23), and coupling (22) from piping assembly (6) and
emergency valve (24).
(7)
Remove four nuts (10), lockwashers (11), washers (12), and two U-bolts (13) securing
piping assembly (6) to two support brackets (9). Discard lockwashers.
CAUTION
Use caution not to damage precheck tubing when removing piping assembly (6) from under semitrailer.
(8)
Remove piping assembly (6) from jackstand and remove from under semitrailer.
(9)
If piping assembly support bracket (8) is damaged, replace (see paragraph 4-61). If support
brackets (9) are damaged, notify direct support maintenance.
4-263
TM 9-2330-384-14&P
4-80. PIPING ASSEMBLY, FRONT PORT, AND REAR INLET MAINTENANCE (Con't).
(10) Inspect coupling gasket (21) for damage. If damaged, replace.
f. INSTALLATION OF PIPING ASSEMBLY
(1)
Grease coupling gasket (21). Ensure gasket mating surfaces on piping assembly (6) and
emergency valve (24) are clean. Slide gasket onto end of piping assembly.
CAUTION
Use caution not to damage precheck tubing when installing piping assembly
(6) from under semitrailer.
(2)
Position piping assembly (6) under semitrailer so that gap between piping assembly and
emergency valve (24) is no more than ¼ in. (6.4 mm).
(3)
Slide gasket (21) off of piping assembly (6) and bridge gap between piping assembly and
emergency valve (24).
(4)
Install coupling (22) halves and two bolts (23) over gasket (21). Ensure edges of coupling are
seated in grooves in piping assembly (6) and emergency valve (24).
(5)
Rotate coupling (22) halves to about a 45° angle toward roadside to allow sufficient clearance
to install two nuts (25). Fully tighten nuts.
(6)
Install piping assembly (6) to two support brackets (9) and to piping assembly support
bracket (8) with four U-bolts (13), eight washers (12), new lockwashers (11), and nuts (10).
(7)
Perform step 2 of subparagraph b and step 2 of subparagraph d to install brake interlock
angle brackets (14) to piping assembly (6) flanges.
(8)
Connect control cable and tubing at emergency valve (24) (see paragraph 4-76).
(9)
Install precheck fittings to piping assembly (6). Connect precheck tubing to fittings (see
paragraph 4-72).
4-264
TM 9-2330-384-14&P
4-80. PIPING ASSEMBLY, FRONT PORT, AND REAR INLET MAINTENANCE (Con't).
4-265
TM 9-2330-384-14&P
4-81. VAPOR VENT REPLACEMENT.
Removal
a.
Equipment Conditions:
Conditions
Ref
4-68 Tank purged.
b.
Installation
Materials/Parts:
l
One gasket
Tools:
l
Tool kit, general mechanic’s
a. REMOVAL
(1)
Loosen clamp (4) and disconnect
vent hose (5) from vapor vent
(1).
(2)
Loosen nut (8) and nut (10).
(3)
Remove four nuts (2) and washers (3). Remove vapor vent (1)
from mounting flange.
(4)
Pull vapor vent (1) away from cable (7) and remove.
(5)
Remove gasket and discard.
(6)
Remove straight adapter (9) from
vapor vent (1).
b. INSTALLATION
(1) Install new gasket to mounting
flange of vapor vent (1).
(2)
Install straight adapter (9) to vapor vent (1).
(3)
Position vapor vent (1) at mounting flange, threading cable (7) through straight adapter (9)
and vapor vent. At vapor vent, ensure that cable is positioned between two washers (6).
(4)
Take up slack in cable (7) and tighten nuts (8 and 10).
(5)
Install four washers (3) and nuts (2).
(6)
Connect vent hose (5) to vapor vent (1) and tighten clamp (4),
FOLLOW-ON TASKS:
l
l
Check operation of vapor vent (see paragraph 2-2).
Adjust cable length at vapor vent or in cabinet, as required (see paragraph 4-74).
4-266
TM 9-2330-384-14&P
4-82. EMERGENCY VALVE MAINTENANCE.
a.
b.
c.
d.
e.
Removal
Disassembly
Cleaning and inspection
Equipment Conditions:
R e f Conditions
4-68 Tank purged.
4-76 Cable and tubing disconnected from
emergency valve.
Tools:
l
l
l
l
l
l
l
l
l
l
l
Tool kit, general mechanic’s
Pipe wrench
Vise
General Safety Instructions:
Materials/Parts:
l
Assembly
Installation
l
One retaining ring
One seal
Two gaskets
Eight preformed packings
Twenty starwashers
Dry cleaning solvent
(Item 10,
Appendix E)
(Item 12, Appendix E)
Grease
(Item 21, Appendix E)
Tag marker
(Item 22, Appendix E)
Antiseize tape
l
l
Dry cleaning solvent is flammable and must
not be used near open flame. Use only in a
well-ventilated area.
Compressed air used for cleaning or drying
purposes must not exceed 30 psi
(207 kPa).
Valve is spring loaded. Use extreme
caution when handling it.
Personnel Required: Two
a. REMOVAL
NOTE
l
l
Emergency valve is located directly above rear air reservoir under rear of
semitrailer.
Tag or mark jet level sensor tubing and fittings to ensure proper installation.
4-267
TM 9-2330-384-14&P
4-82.
EMERGENCY VALVE MAINTENANCE (Con’t).
(1)
Remove two nuts (19), bolts
(15). and coupling (18). Slide
coupling gasket (17) forward
onto piping assembly (16).
(2)
Remove 16 outside bolts (2 1) and
starwashers (22). Remove security bolt (26), pull back on sump
drain control lever (25) and remove emergency valve through
tank sump (23) opening enough
to gain access to jet level sensor
tubing (3 and 8). Discard starwashers.
(3)
Disconnect tubing (3 and 8) from
straight adapters (5 and 9).
(4)
Disconnect tubing (12 and 13)
from straight adapters (11 and
14).
(5)
Remove emergency valve from
under semitrailer. Remove gasket (20) and discard.
(6)
Remove coupling gasket (17)
from piping assembly (16).
4-268
TM 9-2330-384-14&P
4-82. EMERGENCY VALVE MAINTENANCE (Con't).
b. DISASSEMBLY
WARNING
Compressed air used for cleaning purposes must not exceed 30 psi
(207 kPa). Wear protective clothing (goggles, face shield, and gloves) and
use caution to avoid injury to personnel.
NOTE
Tag or mark jet level sensor tubing and fittings to ensure proper assembly.
(1)
Place emergency valve on a clean work surface. Clean exterior of emergency valve with
compressed air, as required.
(2) Remove nipple (10).
(3)
Disconnect tubing (4) from straight adapter (2). Remove nipple (1).
(4) Remove bleeder valve (24).
(5) Remove straight adapters (11 and 14).
(6)
Remove straight adapter (5), tee (6), and bushing.
(7)
Remove nipple from pilot valve (7), if damaged.
4-269
TM 9-2330-384-14&P
4-82. EMERGENCY VALVE MAINTENANCE (Con’t).
(8)
Remove four screws (27), starwashers (32), and retainers (31).
Remove screen (30). Discard
starwashers.
(9)
Remove plug (28) and preformed
packing (29). Discard preformed
packing.
(10) Remove pilot valve (7) and preformed packing. Remove any residual fluid from point where pilot
valve was installed. Discard preformed packing.
(11) Remove spring (43) from elbow (42) and lever (44).
(12) Scribe a line on flange of elbow (42), sump plate (40), and valve body (38) to aid in assembly
alinement.
(13) Remove eight screws (46) and washers (45). Separate elbow (42) from sump plate (40).
(14) Remove sump plate (40) and preformed packings (39 and 41). Discard preformed packings.
(15) Place socket valve (36) in a vise.
WARNING
Socket valve (36) is spring loaded. Use extreme caution when handling it.
Piston (33) and spring (49) must be compressed during disassembly, then
carefully released. Failure to follow this warning may result in injury to personnel.
CAUTION
Ensure that even pressure is applied when pushing down on piston (33). If
piston becomes jammed, damage to seal (47) and gray seal retainer cap
(48) may result.
NOTE
Assistance is required to perform step 16.
(16) Push down on piston (33) and remove nut assembly (50). Release pressure on piston and
remove metering rod (51).
4-270
TM 9-2330-384-14&P
4-82. EMERGENCY VALVE MAINTENANCE (Con't).
(17) Remove piston (33) and spring (49). Remove spring (54) from shaft (35). Remove gray seal
retainer cap (48) and seal (47) from inner surface of valve body (38). Discard seal.
(18) Lift valve body (38) from shaft (35). Remove preformed packing (34) from valve body.
Discard preformed packing.
(19) Place shaft (35) in a vise. Remove socket valve (36) and preformed packing (37) from shaft.
Discard preformed packing.
(20) If damaged, remove retaining ring (53) and rod cap (52) from metering rod (51). Discard
retaining ring.
4-271
TM 9-2330-384-14&P
4-82. EMERGENCY VALVE MAINTENANCE (Con’t).
(21) Remove nut (58) and screw (57) from lever (44). Remove lever from shaft (56).
(22) If damaged, drive out spring pin (59) and remove link (60).
(23) Remove gland (62) and shaft (56) from elbow (42). Remove preformed packing (63) from
gland and discard. Hold gland in a vise and tap on shaft. Remove preformed packing (61) and
discard.
(24) Remove cam (64) from inside elbow (42).
(25) If damaged, remove bushing (55) from elbow (42).
4-272
TM 9-2330-384-14&P
4-82. EMERGENCY VALVE MAINTENANCE (Con't).
c. CLEANING AND INSPECTION
WARNING
l
Dry cleaning solvent P-D-680 is toxic and flammable. Always wear protective goggles, face shield, and gloves, and use only in a well-ventilated
area. Avoid contact with skin, eyes, and clothes and DO NOT breathe
vapors. DO NOT use near open flame or excessive heat. The solvent’s
flash point is 100oF-138°F (38° C - 59° C). If you become dizzy while using
cleaning solvent, immediately get fresh air and medical help. If solvent
contacts eyes, immediately wash your eyes with water and get medical
aid.
l
Compressed air used for drying purposes must not exceed 30 psi
(207 kPa). Wear protective clothing (goggles, face shield, and gloves)
and use caution to avoid injury to personnel.
(1)
Clean all removed metal components with dry cleaning solvent and dry with compressed air.
(2)
Inspect all removed components for bends, cracks, and sharp edges. Inspect for damaged
threads. Replace all damaged components.
(3)
Inspect coupling gasket. If coupling gasket is damaged, replace.
d. ASSEMBLY
NOTE
All male threads of fittings should be coated with antiseize tape if not already factory-coated with an antiseize compound.
(1)
If removed, install bushing (55) to elbow (42).
(2)
Install new preformed packings (61 and 63) in gland (62).
(3)
Apply grease to shaft (56) and install through gland (62).
(4)
Position cam (64) inside elbow (42) and install shaft (56). Tighten gland (62).
(5)
If removed, install link (60) in lever (44) with spring pin (59).
(6)
Install lever (44) on shaft (56) with screw (57) and nut (58).
4-273
TM 9-2330-384-14&P
4-82. EMERGENCY VALVE MAINTENANCE (Con't).
(7)
Install new preformed packing (37) and socket valve (36) in shaft (35).
(8)
Install new preformed packing (34) in valve body (38).
(9)
Apply grease to new seal (47). Install seal and gray seal retainer cap (48) to inner surface of
valve body (38).
(10) Install socket valve (36) and shaft (35) through valve body (38). Secure socket valve in a
vise.
(11) Install spring (54) inside shaft (35).
(12) Install spring (49) inside valve body (38).
(13) If removed, install rod cap (52) and new retaining ring (53) on metering rod (51).
4-274
TM 9-2330-384-14&P
4-82. EMERGENCY VALVE MAINTENANCE (Con't).
WARNING
Socket valve (36) is spring loaded. Use extreme caution when handling it.
Piston (33) and spring (49) must be compressed during assembly, then
carefully released. Failure to follow this warning may result in injury to personnel.
CAUTION
Ensure that even pressure is applied when pushing down on piston (33). If
piston becomes jammed, damage to seal (47) and gray seal retainer cap
(48) may result.
NOTE
Assistance is required to perform steps 14 and 15.
(14) Install piston (33) in valve body (38). Push down on piston and compress spring (49).
(15) Install metering rod (51) and nut assembly (50). Tighten nut assembly until snug.
(16) Install new preformed packing (39) on outer edge of valve body (38).
NOTE
Ensure that marks made during disassembly are alined.
(17) Install sump plate (40) over valve body (38). Insert new preformed packing (41) in groove
between sump plate and valve body.
(18) Pull down on socket valve (36) and install elbow (42) on sump plate (40). Install eight washers
(45) and bolts (46).
(19) Install spring (43) to lever (44)
and elbow (42).
(20) Install new preformed packing
(29) and plug (28).
(21) Install new preformed packing
and pilot valve (7).
(22) Install screen (30) with four retainers (31), new starwashers
(32), and screws (27).
NOTE
Ensure that jet level sensor tubing
and fittings are assembled as
tagged or marked.
(23) If removed, install nipple to pilot
valve (7).
4-275
TM 9-2330-384-14&P
4-82. EMERGENCY VALVE MAINTENANCE (Con't).
(24) Install bushing, tee (6), and
straight adapter (5).
(25) Install straight adapters (11 and
14).
(26) Install bleeder valve (24).
(27) Install nipple (1). Connect tubing
(4) to straight adapter (2).
(28) Install nipple (10).
e. INSTALLATION
NOTE
All male threads of fittings should
be coated with antiseize tape if not
already factory-coated with an antiseize compound.
(1) Ensure that gasket mating surfaces on piping assembly (16)
and emergency valve are clean.
Grease coupling gasket (17).
Slide coupling gasket onto end of
piping assembly.
(2) Install new gasket (20) to emergency valve.
4-276
TM 9-2330-384-14&P
4-82. EMERGENCY VALVE MAINTENANCE (Con't).
NOTE
Ensure that mating surfaces at tank sump (23) are clean.
(3)
Raise emergency valve into position above rear air reservoir. Connect jet level sensor tubing
(3 and 8) as tagged, to straight adapters (5 and 9). Remove any material used to tag jet level
sensor tubing and fittings.
(4)
Pull back on sump drain control lever (25) and install emergency valve with 16 new starwashers (22) and bolts (21). Push on sump drain control lever to close. Install security bolt
(26).
(5)
Connect tubing (12 and 13) to straight adapters (11 and 14).
(6)
Pull coupling gasket (17) off piping assembly (16) and bridge gap between piping assembly
and emergency valve.
(7)
Install coupling (18) halves and two bolts (15) over coupling gasket (17). Ensure that edges
of coupling are seated in grooves of piping assembly (16) and emergency valve.
(8)
Rotate coupling (18) to about a 45° angle toward roadside to provide sufficient clearance to
install two nuts (19). Install two nuts and fully tighten.
FOLLOW-ON TASKS:
Connect cable and tubing to emergency valve (see paragraph 4-76).
4-277
TM 9-2330-384-14&P
4-83. PILOT VALVE MAINTENANCE.
a.
b.
c.
Removal
Disassembly
Cleaning and Inspection
Equipment Conditions:
Ref
Conditions
4-70 Jet level sensor tubing and fittings
disconnected from pilot valve.
d.
e.
f.
General Safety Instructions:
l
l
Materials/Parts:
l
l
l
Assembly
Bench Test
Installation
One preformed packing
One retaining ring
Dry cleaning solvent (Item 10, Appendix E)
Dry cleaning solvent is flammable and must
not be used near open flame. Use only in a
well-ventilated area.
Compressed air used for drying or testing
purposes must not exceed 30 psi
(207 kPa).
Tools:
l
Tool kit, general mechanic’s
a. REMOVAL
Remove pilot valve (1) from emergency valve (13). Remove preformed packing (12) and discard.
b. DISASSEMBLY
(1)
Remove six lockscrews (4) and washers (5).
(2)
Place access cover (2) in a vise. Tap on valve flange (10) and remove access cover and
diaphragm (6) from valve flange.
(3)
Remove retaining ring (7) and discard.
(4)
Remove valve disk (11), washer (8), and spring (9).
4-278
TM 9-2330-384-14&P
4-83. PILOT VALVE MAINTENANCE (Con’t).
c. CLEANING AND INSPECTION
WARNING
l
Dry cleaning solvent P-D-680 is
toxic and flammable. Always wear
protective goggles, face shield,
and gloves, and use only in a wellventilated area. Avoid contact with
skin, eyes, and clothes and DO
NOT breathe vapors. DO NOT use
near open flame or excessive heat.
The solvent’s flash point is
100° F-138° F (38° C-59° C). If you
become dizzy while using cleaning
solvent, immediately get fresh air
and medical help. If solvent contacts eyes, immediately wash your
eyes with water and get medical
aid.
l
Compressed air used for drying
purposes must not exceed 30 psi
(207 kPa). Wear protective clothing (goggles, face shield, and
gloves) and use caution to avoid
injury to personnel.
(1) Clean all removed components
with dry cleaning solvent.
(2)
Use compressed air to thoroughly
dry components and to clear all
passages.
(3) Replace any damaged components.
d. ASSEMBLY
(1)
Install valve disk (11), spring (9),
and washer (8) inside valve
flange (10). Compress valve disk
and install new retaining ring (7)
in valve disk groove.
(2) Install diaphragm (6) over valve
flange (10) with center cup of diaphragm fitted over end of valve
disk (11).
(3) Install access cover (2) with six
washers (5) and lockscrews (4).
Ensure that lockscrews are securely and evenly tightened.
4-279
TM 9-2330-384-14&P
4-83. PILOT VALVE MAINTENANCE (Con't).
e. BENCH TEST
WARNING
Compressed air used for testing
purposes must not exceed 30 psi
(207 kPa). Wear protective clothing (goggles, face shield, and
gloves) and use caution to avoid
injury to personnel.
NOTE
Bench test should be performed
after repair of pilot valve (1) to ensure that valve will operate properly.
(1)
Apply clean compressed air
through top port (3) of pilot valve
(1). Check that pilot valve opens.
Valve disk (11) will be pushed
down if pilot valve is open.
(2)
Apply clean compressed air
through top port (3) of pilot valve
(1). Check for leaks. No leakage
in pilot valve is allowed.
(3)
If pilot valve (1) does not open
with compressed air applied
through top port (3), or if there is
any leakage, replace pilot valve.
f. INSTALLATION
install new preformed packing (12) and
pilot valve (1) to emergency valve
(13).
FOLLOW-ON TASKS:
Connect fittings and jet level sensor tubing to
pilot valve (see paragraph 4-70).
4-280
TM 9-2330-384-14&P
4-84. WINTERIZATION OF BOTTOM LOADING SYSTEM.
THIS TASK COVERS
Winterization
INITIAL SETUP
Equipment Conditions:
Conditions
Ref
4-68 Tank purged.
Tools:
l
l
l
Tool kit, general mechanic’s
Shop equipment, automotive maintenance
and repair, organizational maintenance,
common no. 1
Battery filler syringe
Materials/Parts:
l
l
Antifreeze
Tag marker
(Item 1, Appendix E)
(Item 21, Appendix E)
General Safety Instructions:
l Compressed air used for drying purposes
must not exceed 30 psi (207 kPa).
4-281
TM 9-2330-384-14&P
4-84. WINTERIZATION OF BOTTOM LOADING SYSTEM (Con't).
WINTERIZATION
NOTE
Tag tubing (6, 7, 11, 14, and 15) to ensure proper installation.
(1)
If installed, remove nut (17) from bleeder valve (18).
(2)
Loosen nuts (8, 9, 12, 13, and 16) and disconnect tubing (6, 7, 11, 14, and 15). Drain all
liquid from tubing.
(3)
Remove pilot valve (1) from emergency valve (4). Separate pilot valve from tee (10). Drain
pilot valve completely.
WARNING
Compressed air using for drying purposes must not exceed 30 psi
(207 kPa). Wear protective clothing (goggles, face shield, and gloves) and
use caution to avoid injury to personnel.
(4)
Use compressed air to dry all tubing (6, 7, 11, 14, and 15) and pilot valve (1).
(5)
Use a clean syringe to remove all
liquid from socket valve (3) and
port (5) where pilot valve (1) was
installed.
(6)
Fill syringe with antifreeze and install antifreeze into port (5) until
full.
(7)
Install pilot valve (1). Fill port (2)
of pilot valve with antifreeze.
(8)
Connect tubing (6, 7, 11, 14, and 15) as tagged and tighten nuts (8, 9, 12, 13, and 16).
Install nut (17) on bleeder valve (18).
4-282
TM 9-2330-384-14&P
4-84. WINTERIZATION OF BOTTOM LOADING SYSTEM (Con't).
4-283
TM 9-2330-384-14&P
Section XV.
PAINTING AND IDENTIFICATION MARKING
Paragraph
Number
4-85
Title
Painting and Identification Marking . . . . . . . . . . . . . . . . . . . . . . . . . . . . . . . . . . .
Page
Number
4-284
4-85. PAINTING AND IDENTIFICATION MARKING.
a. PAINTING. Refer to TM 43-0139 for instructions on painting the M1062 7500 Gallon Fuel
Tank Semitrailer.
b. STENCIL MARKINGS.
(1)
If stencil markings are not legible, stencil must be repainted. Paint numerals or letters
in simple block type, using black paint.
WARNING
Dry cleaning solvent P-D-680 is toxic and flammable. Always wear protective
goggles, face shield, and gloves, and use only in a well-ventilated area.
Avoid contact with skin, eyes, and clothes and DO NOT breathe vapors. DO
NOT use near open flame or excessive heat. The solvent’s flash point is
100°F-138°F (38°C-59°C). If you become dizzy while using cleaning solvent, immediately get fresh air and medical help. If solvent contacts eyes,
immediately wash your eyes with water and get medical aid.
(2)
Before applying paint, clean all surfaces to be stenciled with dry cleaning solvent
(Item 10, Appendix E). Dry thoroughly.
WARNING
4-284
l
Avoid excessive inhalation of vapors when stenciling. All stenciling procedures must be performed in a well-ventilated area. A fire extinguisher
must be on hand. Failure to follow this warning may result in injury to
personnel.
l
Personnel must wear protective face masks if spraying paint. If face
masks are not available, apply paint with brush only. Personnel must stay
clear of work area where spray painting is taking place. Failure to follow
this warning may result in injury to personnel.
(3)
Apply paint to stencil with dabbing motion.
(4)
Allow paint to dry for 24 hours.
TM 9-2330-384-14&P
Section XVI.
PREPARATION FOR STORAGE OR SHIPMENT
Paragraph
Number
4-86
4-87
4-88
4-89
Title
General . . . . . . . . . . . . . . . . . . . . . . . . . . . . . . . . . . . . . . . . . . . . . . . . . . . . . . . . .
Preparation for Shipment . . . . . . . . . . . . . . . . . . . . . . . . . . . . . . . . . . . . . . . . . .
Loading and Movement.. . . . . . . . . . . . . . . . . . . . . . . . . . . . . . . . . . . . . . . . . . .
Limited Storage . . . . . . . . . . . . . . . . . . . . . . . . . . . . . . . . . . . . . . . . . . . . . . . . . .
Page
Number
4-285
4-285
4-288
4-289
4-86. GENERAL.
This section describes preparation of the M1062 7500 Gallon Fuel Tank Semitrailer for shipment
and for limited storage.
4-87. PREPARATION FOR SHIPMENT.
a. GENERAL.
(1) This paragraph provides instructions on preserving and otherwise protecting the
semitrailer for shipment.
(2)
Protection of semitrailer, tank interior, and all valves must be sufficient to protect
against deterioration and physical damage.
b. CLEANING.
(1)
Clean all dirt and foreign material from exterior of semitrailer using cleaning agents
specified in paragraph 2-8. After cleaning, dry semitrailer to remove excess cleaning
solutions or moisture. Use clean, dry, lint-free rags (Item 18, Appendix E).
WARNING
Dry cleaning solvent P-D-680 is toxic and flammable. Always wear protective
goggles, face shield, and gloves, and use only in a well-ventilated area.
Avoid contact with skin, eyes, and clothes and DO NOT breathe vapors. DO
NOT use near open flame or excessive heat. The solvent’s flash point is
100oF-138°F (36°C-59°C). If you become dizzy while using cleaning solvent, immediately get fresh air and medical help. If solvent contacts eyes,
immediately wash your eyes with water and get medical aid.
(2)
Clean excess oil or grease at lubrication points or grease fittings with dry cleaning
solvent (Item 10, Appendix E).
4-285
TM 9-2330-384-14&P
4-87. PREPARATION FOR SHIPMENT (Con't).
c. LUBRICATION AND MAINTENANCE.
(1)
Lubricate semitrailer according to instructions found in Chapter 3, Section I, Clean
excess grease and oil from lubrication points and grease fittings after lubrication and
before processing.
(2)
Perform Quarterly (Q) PMCS according to instructions found in Chapter 4, Section Ill.
d. PRESERVATION OF EXTERIOR.
NOTE
Grease or oil used as a preservative is effective for only a few days. Equipment so protected must be watched for signs of corrosion.
(1)
Coat all unpainted, exposed, machined metal surfaces on exterior of semitrailer with
corrosion preventive compound (Item 8, Appendix E). If preservative listed is not
available, oil or grease (as specified in Chapter 3, Section I) may be used.
(2)
If semitrailer is being shipped overseas, additional preservatives may be required.
e. PRESERVATION OF TANK INTERIOR AND VALVES.
(1)
Levels of Preservation. There are two levels of preservation when processing tank for
storage or shipment:
(a)
Level A preservation is required for domestic or overseas shipments and any
storage outside of buildings in excess of 90 days from the date of processing.
Periodic care and preservation are required during storage.
(b)
Level B preservation is used when there is limited processing for immediate use
shipment, and for domestic or overseas shipments (excluding open deck loading and any storage not to exceed 90 days from date of processing).
(2) Preservation By Purging.
(a)
Preservation by purging (see paragraph 4-68) satisfies the requirements of both
Level A and Level B preservation.
(b)
If tank is purged prior to storage or shipment, no further preservation is required
to protect tank interior and valves.
(c)
Preservation by purging is the preferred method when safety regulations, pertaining to the mode of shipment, require that the semitrailer be free of explosive
vapors.
(3) Level A Preservation.
4-286
(a)
Ensure that tank is fully drained and clean. Refer to Table 8-1 of FM 10-71 to
determine if lubricating oil to be added as preservative is compatible with fuel
previously carried.
(b)
Fill tank with 30-55 gal. (115-208 I) of lubricating oil (Item 14, Appendix E).
Drain tank.
(c)
Close all valves and sump drain. Close manhole and bolt closed through padlock
loop. Peen bolt end to deter pilferage.
TM 9-2330-364-14&P
4-87. PREPARATION FOR SHIPMENT (Con't).
(4) Level B Preservation.
f.
(a)
If semitrailer has been hauling diesel fuel (Item 11, Appendix E), add stabilizer
additive (Item 20, Appendix E) per manufacturer’s instructions to diesel fuel
remaining in tank.
(b)
Close all valves and sump drain. Close manhole and bolt closed through padlock
loop. Peen bolt end to deter pilferage.
PACKAGING/PACKING.
(1)
Cover lenses of semitrailer lights with greaseproof barrier material (Item 2, Appendix E) and cover with masking tape (Item 26, Appendix E).
(2)
Cover electrical receptacles with masking tape (Item 26 Appendix E) or with plastic
caps which will afford the same degree of protection.
(3)
Secure dust caps to front port and rear vapor collection adapter by wrapping tiestraps through loops.
(4)
Ensure that ground rod, gage stick, and both transfer hoses are stowed in their stowage tubes. Secure tube doors closed with bolt and nut. Peen bolt end to deter pilferage.
(5)
Wrap reducer spools inside cabinet with paperboard (Item 17, Appendix E). This will
ensure a snug fit when reducers are mounted. Mount reducers on spools.
(6)
Remove grabhandles from their mounting brackets (see paragraph 2-22). Reinstall
the securing lockpins in mounting bracket holes. Wrap grabhandles in paperboard
(Item 17, Appendix E) and tape (Item 25, Appendix E). Stow grabhandles inside cabinet.
(7)
Wrap fire extinguishers with their covers in paperboard (Item 17, Appendix E) and
tape (Item 25, Appendix E). Place each fire extinguisher in a separate shipping box
conforming to PPP-B-636, Grade W5c, and secure with tape (Item 25, Appendix E).
Stow boxes inside cabinet.
(8)
Wrap remaining Basic Issue Items (chock blocks, jacking block, and lug wrench) in
paperboard (Item 17, Appendix E), tape (Item 25, Appendix E), and stow inside cabinet.
(9)
Bolt cabinet door closed. Peen bolt end to deter pilferage.
(10) Ensure that ground boards are securely stowed in mounting brackets with handles
downward. Strap handles to landing leg knee braces.
g. MARKING. Provide any necessary identification and precautionary markings in accordance
with MIL-STD-129.
h. SHIPMENT OF ARMY DOCUMENTS. Prepare all Army shipping documents accompanying
semitrailer in accordance with DA Pam 738-750.
4-287
TM 9-2330-384-14&P
4-87. PREPARATION FOR SHIPMENT (Con't),
i.
SHIP AND RAIL MOVEMENT.
WARNING
Explosive vapor level measurements must be taken at specified intervals
prior to semitrailer ship and rail movement. Failure to follow this procedure
may result in serious injury or death to personnel.
j.
(1)
After semitrailer has been purged, explosive vapor level measurements must be
taken by trained personnel and must be LESS than 20% lower explosive level (LEL),
This measurement is to be taken every 12 hours after purging, until semitrailer is
shipped. One-half hour prior to loading, a reading MUST be taken. Tank must be
repurged if vapor levels reach 20% of the LEL.
(2)
Prior to shipping by ship or rail, semitrailer must be placed in a covered and ventilated
area with manholes open.
(3)
Hazardous cargo certification must be provided in accordance with TM 38-250
(AFR 71-4). Certification of this hazardous material shall be accomplished on
DD Form 1387-2 by the qualified specialist or technician who actually prepared and
inspected the semitrailer for shipment.
(4)
Loading, blocking, tie-down, and bracing on railcars will be accomplished with technical guidance from the Installation Transportation Officer (ITO) and in accordance with
the Association of American Railroad (AAR) published Rules Governing the Loading of
Department of Defense Material on Open-Top Cars.
WATER MOVEMENT.
(1)
The Installation Transportation Officer is responsible for initial coordination with the
Port of Embarkation (POE) to determine special requirements and for providing the
shipper with port of call information.
(2)
The Installation Transportation Officer must coordinate with unit personnel for any special equipment preparation or markings required by the POE.
4-88. LOADING AND MOVEMENT.
WARNING
The M1062 Tank Semitrailer has not been designed for air transportability.
Any attempt to transport the semitrailer by air may result in an accident,
causing damage to semitrailer or serious injury or death to personnel.
a. After semitrailer is loaded, ensure that both air reservoirs are empty by pulling on draincock
cable (see paragraph 2-2).
b.
View).
4-288
Ensure that both air couplings are protected by dummy couplings (see paragraph 1-7, Front
TM 9-2330-384-14&P
4-89. LIMITED STORAGE.
a. GENERAL. Commanders are responsible for ensuring that all semitrailers issued or
assigned to their command are maintained in a serviceable condition and properly cared for, and that
personnel under their command comply with technical instructions. Lack of time, trained personnel, or
proper tools may result in a unit’s being incapable of performing maintenance for which it is
responsible. In such cases, unit commanders may, with the approval of major commanders, place a
semitrailer that is beyond the maintenance capability of the unit in administrative storage or return it to
supply agencies.
b. LIMITED STORAGE INSTRUCTIONS.
(1)
Time Limitations. Administrative storage is restricted to a period of 90 days and must
not be extended unless semitrailer is reprocessed.
(2)
Storage Procedure. Perform disassembly only as required to clean and preserve exposed surfaces. Except as otherwise noted, and to the maximum extent consistent
with safe storage, place semitrailer in administrative storage in as nearly a completely
assembled condition as practicable. Install and adjust equipment so that the
semitrailer may be placed in service and operated with minimum delay.
(a)
The semitrailer should be stored on level ground in the most favorable location
available, preferably one which affords protection from exposure to the elements and from pilferage.
(b)
Perform Quarter/y (Q) PMCS on semitrailers intended for administrative storage
(see Chapter 4, Section Ill).
(c)
Provide access to semitrailer to permit inspection, servicing, and subsequent
removal from storage.
(3) Inspection In Storage.
(a)
Visual inspection of semitrailer in administrative storage must be conducted at
least once a month, and immediately following hard rain, heavy snowstorm,
windstorm, or other severe weather conditions. Perform disassembly as required to fully ascertain the extent of any deterioration or damage found. A record of these inspections must be maintained for each semitrailer in administrative storage, attached in such a manner as to protect the record from the elements.
(b)
When rust or deterioration is found on a critical or machined surface, reprocessing for administrative storage must be immediately accomplished. Repair any
damage caused to semitrailer by severe weather conditions. Deterioration or
damage to on-equipment materiel (OEM) must be repaired as necessary.
Painted surfaces showing evidence of deterioration must be thoroughly cleaned,
dried, and repainted, using paint of the same quality and color as the original
paint.
4-289/(4-290 Blank)
TM 9-2330-384-14&P
CHAPTER 5
DIRECT SUPPORT AND
GENERAL SUPPORT MAINTENANCE
Section I. AXLE ASSEMBLY MAINTENANCE
Paragraph
Number
Axle Assembly Replacement . . . . . . . . . . . . . . . . . . . . . . . . . . . . . . . . . . . . . . . .
5-1
5-1
Page
Number
Title
5-1
AXLE ASSEMBLY REPLACEMENT.
THIS TASK COVERS
a.
b.
Removal of Axle Assembly
Removal of Axle-mounted Components
C.
d.
Installation of Axle-mounted Components
Installation of Axle Assembly
INITIAL SETUP
Equipment Conditions:
Conditions
Ref
2-11 Wheels chocked.
4-40 SERVICE and EMERGENCY air lines
disconnected from brake chambers.
Tools:
l
l
l
l
l
l
Tool kit, general mechanic’s
Tool kit, welder’s
Torque multiplier
Torque wrench
Two floor jacks
Two jackstands
General Safety Instructions:
l
Axle assembly is heavy and awkward to
handle. Use caution, provide adequate
support, and use assistance during removal and installation.
References: TM 9-237
Personnel Required: TWO
5-1
TM 9-2330-384-14&P
5-1. AXLE ASSEMBLY REPLACEMENT (Con't).
a. REMOVAL OF AXLE ASSEMBLY
NOTE
Front and rear axle assemblies (6) are removed the same.
(1)
Place a floor jack under middle of affected axle assembly (6). Raise axle assembly and
remove all tires (see paragraph 4-45).
(2)
Remove four nuts (8), washers (7), and two U-bolts (3) from each end of axle assembly (6).
WARNING
Axle assembly (6) is heavy and awkward to handle. Use caution, provide
adequate support, and use assistance during removal. Failure to follow this
warning may result in serious injury to personnel.
(3)
Lower axle assembly (6) on floor jack and remove from under semitrailer.
b. REMOVAL OF AXLE-MOUNTED COMPONENTS
WARNING
Axle assembly (6) is heavy and awkward to handle. Use caution, provide
adequate support, and use assistance when raising. Failure to follow this
warning may result in serious injury to personnel.
5-2
(1)
Raise axle assembly (6) on floor jack and support with suitable jackstands. Remove floor jack.
(2)
Remove wheel and drum assemblies, wheel bearings, and oil seals (see paragraphs 4-46).
TM 9-2330-384-14&P
5-1. AXLE ASSEMBLY REPLACEMENT (Con't).
(3)
Remove brake shoes (see paragraph 4-35).
(4)
Remove slack adjusters and camshafts (see paragraphs 4-37 and 4-36).
(5)
Remove air line tie strap from axle. Remove brake chambers (see paragraph 4-40).
c. INSTALLATION OF AXLE-MOUNTED COMPONENTS
(1)
Install brake chambers (see paragraph 4-40). Secure air line tie strap around axle.
(2)
Install camshafts and slack adjusters (see paragraphs 4-36 and 4-37).
(3)
Install brake shoes (see paragraph 4-35).
(4)
Install wheel and drum assemblies, wheel bearings, and oil seals (see paragraph 4-46).
NOTE
Spacers (5) are NOT used on rear axle.
(5)
If working on a front axle, position two spacers (5). Weld spacers to axle assembly (6).
WARNING
Axle assembly (6) is heavy and awkward to handle. Use caution, provide
adequate support, and use assistance when raising. Failure to follow this
warning may result in serious injury to personnel.
(6)
Place a suitable floor jack under middle of axle assembly (6). Raise axle assembly enough to
remove jackstands.
d. INSTALLATION OF AXLE ASSEMBLY
WARNING
Axle assembly (6) is heavy and awkward to handle. Use caution, provide
adequate support, and use assistance when raising. Failure to follow this
warning may result in serious injury to personnel.
(1)
Position axle assembly (6), supported on floor jack, under semitrailer. Raise axle assembly
until it contacts underside of springs (1). Aline holes in axle with spring center bolts,
NOTE
l
At each spring (1), ensure that saddle (4) and delrin liner (2) are in position.
l
U-bolts (3) for rear axle assembly (6) are shorter than U-bolts for front
axle assembly.
(2)
At each spring (1), install two U-bolts (3), four washers (7), and nuts (8).
(3)
Torque four nuts (8) in a diagonal sequence to 150 lb.-ft. (203 N•m). Torque same four nuts
in same diagonal sequence to 360 lb.-ft. (488 N•m).
5-3
TM 9-2330-384-14&P
5-1. AXLE ASSEMBLY REPLACEMENT (Con’t).
NOTE
Paint, rust, or other contaminants can give a false torque reading. Step 4
must be performed to ensure a proper torque.
(4)
Back off four nuts (8) two turns. Torque to 360 lb.-ft. (488 N•m).
(5)
Install tires (see paragraph 4-45). Lower axle assembly (6) and remove floor jack.
FOLLOW-ON TASKS:
l
l
5-4
Connect SERVICE and EMERGENCY air lines to brake chambers (see paragraph 4-40).
Check axle alinement (see paragraph 4-31).
TM 9-2330-384-14&P
Section II. BRAKE SYSTEM MAINTENANCE
Paragraph
Number
Page
Number
Title
Drum Repair . . . . . . . . . . . . . . . . . . . . . . . . . . . . . . . . . . . . . . . . . . . . . . . . . . . . .
5-2
Brake Shoe Repair . . . . . . . . . . . . . . . . . . . . . . . . . . . . . . . . . . . . . . . . . . . . . . . .
5-3
Table 5-1 Drum Diameters . . . . . . . . . . . . . . . . . . . . . . . . . . . . . . . . . . . . . . . . . . . . . . . .
5-5
5-7
5-6
5-2. DRUM REPAIR.
THIS TASK COVERS
Drum Repair
a.
INITIAL SETUP
Equipment Conditions:
Conditions
Ref
4-46 Drum removed.
Tools:
l
l
l
a.
Materials/Parts:
l
Abrasive cloth
(Item 5, Appendix E)
General Safety Instructions:
l
Drum lathe
Dial Indicator
Micrometer
DO NOT use a drum that exceeds maximum wear specifications.
DRUM REPAIR
(1)
If drum has slight scores or grooves, polish with abrasive cloth.
WARNING
DO NOT use a drum that exceeds maximum wear specifications. Failure to
follow this warning may result in brake failure and serious injury or death to
personnel.
(2)
Measure inside diameter of drum. If inside diameter of drum measures more than 16.62 in.
(42.21 cm), discard drum (see Table 5-1).
(3)
Measure drum for taper. Maximum allowable taper is 0.010 in. (0.25 mm) measured from
outside edge of base of drum to brake shoe lining contact surface.
(4)
Check for out-of-round condition. Measure drum at front and rear of machined surface at a
minimum of four locations (45 degrees apart) and record the readings. A maximum of
0.015 in. (0.38 mm) out-of-round is allowed.
(5)
If drum exceeds taper or out-of-round allowances, machine drum. DO NOT machine drum to
more than 16.58 in. (42.11 cm) in diameter (see Table 5-1).
5-5
TM 9-2330-364-14&P
5-2. DRUM REPAIR (Con't).
Table 5-1. Drum Diameters.
Original
Maximum
Machining
Discard
16.50 In.
(41.91 cm)
16.58 in.
(42.11 cm)
16.62 In.
(42.21 cm)
FOLLOW-ON TASKS:
Install drum (see paragraph 4-46).
5-6
TM 9-2330-384-14&P
5-3. BRAKE SHOE REPAIR.
THIS TASK COVERS
Removal of Brake Shoe Linings
Cleaning and Inspection
a.
b.
C.
Installation of Brake Shoe Linings
INITIAL SETUP
Equipment Conditions:
Ref
Conditions
4-35 Brake shoes removed.
l
l
l
l
l
Forty-eight rivets
Dry cleaning solvent (ltem 10, Appendix E)
General Safety Instructions:
Tools:
l
Materials/Parts:
Tool kit, general mechanic’s
C-clamps
Drill & No. 29 drill bit
Rivet gun
Dry cleaning solvent is flammable and must
not be used near open flame. Use only in a
well-ventilated area.
• Compressed air used for drying purposes
must not exceed 30 psi (207 kPa).
l
a. REMOVAL OF BRAKE SHOE LININGS
(1)
Drill out 24 rivets (3) and remove
brake lining cam (2) and brake
lining anchor (1) from brake
shoe. Discard rivets.
(2) Repeat step 1 to remove brake
shoe linings from other brake
shoe.
5-7
TM 9-2330-384-14&P
5-3. BRAKE SHOE REPAIR (Con't).
b. CLEANING AND INSPECTION
WARNING
5-8
l
Dry cleaning solvent P-D-680 is toxic and flammable. Always wear protective goggles, face shield, and gloves, and use only in a well-ventilated
area. Avoid contact with skin, eyes, and clothes and DO NOT breathe
vapors. DO NOT use near open flame or excessive heat. The solvent’s
flash point is 100°F-138°F (38°C-59°C). If you become dizzy while using
cleaning solvent, immediately get fresh air and medical help. If solvent
contacts eyes, immediately wash your eyes with water and get medical
aid.
l
Compressed air used for drying purposes must not exceed 30 psi
(207 kPa). Wear protective clothing (goggles, face shield, and gloves)
and use caution to avoid injury to personnel.
(1)
Clean brake shoe with dry cleaning solvent and dry with compressed air.
(2)
Inspect brake shoe for damage. Look for a bent or severely corroded table, deformed web,
or broken welds. Look for flattened roller eyes or elongated anchor pin slots. If damaged,
replace entire brake shoe and lining assembly.
(3)
File off any burrs or high spots in brake shoe table (4).
(4)
Check for elongated rivet holes in brake shoe table (4). Pass a new rivet (3) through holes.
Rivet should fit freely without excess play. If holes are elongated, replace brake shoe and
lining assembly.
TM 9-2330-384-14&P
5-3. BRAKE SHOE REPAIR (Con't).
c. INSTALLATION OF BRAKE SHOE LININGS
NOTE
• Keep hands clean when handling brake linings.
l
DO NOT confuse brake lining cam (2) with brake lining anchor (1). Brake
lining anchor has smaller cross-section and is tapered.
(1)
Clamp brake lining anchor (1) and brake lining cam (2) to brake shoe table (4) with rivet holes
alined. Locate C-clamps as close as possible to rivet holes.
(2)
Starting at center and working toward ends, drive new rivets (3) squarely into holes.
(3)
Use a feeler gage to check brake lining cam (2) and brake lining anchor (1) to brake shoe
table (4) clearance. No more than a 0.006 in. (0.15 mm) feeler gage can fit between lining
and brake shoe table (4) along edges.
FOLLOW-ON TASKS:
Install brake shoes (see paragraph 4-35).
5-9
TM 9-2330-384-14&P
Section III.
FRAME AND TOWING ASSEMBLY MAINTENANCE
Paragraph
Number
5-4
5-5
Page
Number
Title
Upper Coupler Assembly Replacement . . . . . . . . . . . . . . . . . . . . . . . . . . . . . . .
Grabhandle and Convoy Warning Light Cable Assembly Repair . . . . . . . . . . .
5-10
5-14
5-4. UPPER COUPLER ASSEMBLY REPLACEMENT.
THIS TASK COVERS
a.
b.
Removal
Cleaning
C.
Installation
INITIAL SETUP
Equipment Conditions:
Ref
Condition
2-11 Wheels chocked.
-Tank empty
Materials/Parts:
l
l
l
l
Fourteen locknuts
Dry cleaning solvent (ltem 10, Appendix E)
(Item 12, Appendix E)
Grease
Mylar tape
(Item 24, Appendix E)
Tools:
l
l
l
5-10
Tool kit, general mechanic’s
Floor jack
Torque wrench
General Safety Instructions:
DO NOT perform task unless tank is empty
and wheels are chocked.
l
Use caution, provide adequate support,
and use assistance during removal and installation of upper coupler assembly.
l Dry cleaning solvent is flammable and must
not be used near open flame. Use only in a
well-ventilated area.
l
Personnel Required: Three
TM 9-2330-384-14&P
5-4. UPPER COUPLER ASSEMBLY REPLACEMENT (Con't).
a. REMOVAL
WARNING
DO NOT perform task unless tank is empty and wheels are chocked. If tank
is full, landing gear could collapse when front of semitrailer is lowered.
Damage to semitrailer or serious injury or death to personnel will result.
(1)
Position a floor jack (1) directly
under kingpin (2) at upper
coupler assembly (3). Raise floor
jack to full height.
(2)
Operate landing gear and lower
front of semitrailer until kingpin
(2) contacts floor jack (1).
WARNING
Upper coupler assembly (3) is
heavy and awkward to handle. Use
caution, provide adequate support, and use assistance during
removal. Failure to follow this
warning may result in serious injury to personnel.
NOTE
Centermost bolts (6) on each side
of upper coupler assembly (3)
should be removed last.
(3) Remove 14 locknuts (4), bolts
(6), and washers (5). Discard
locknuts.
(4)
Carefully lower upper coupler asunder
from
sembly
(3)
semitrailer. Remove from floor
jack.
b. CLEANING
(1)
Remove all traces of old mylar tape from mounting surfaces of upper coupler assembly to
frame.
5-11
TM 9-2330-384-14&P
5-4. UPPER COUPLER ASSEMBLY REPLACEMENT (Con't).
WARNING
Dry cleaning solvent P-D-680 is toxic and flammable. Always wear protective
goggles, face shield, and gloves, and use only in a well-ventilated area.
Avoid contact with skin, eyes, and clothes and DO NOT breathe vapors. DO
NOT use near open flame or excessive heat. The solvent’s flash point is
100°F-138°F (38°C-59°C). If you become dizzy while using cleaning
solvent, immediately get fresh air and medical help. If solvent contacts
eyes, immediately wash your eyes with water and get medical aid.
(2)
Use dry cleaning solvent to clean mounting surfaces of upper coupler assembly to frame. Dry
thoroughly.
c. INSTALLATION
CAUTION
To protect against corrosion and distortion of components, mylar tape must
be applied to mounting surfaces of upper coupler assembly (3) to frame.
(1)
Apply suitable width of mylar tape to mounting surfaces of upper coupler assembly (3) to
frame. Pierce holes in mylar tape at all mounting bolt holes in frame to prevent water
accumulation.
WARNING
Upper coupler assembly (3) is
heavy and awkward to handle. Use
caution, provide adequate support, and use assistance during
installation. Failure to follow this
warning may result in serious injury to personnel.
(2) Carefully lift upper coupler assembly (3) and place on floor
jack (1). balanced on kingpin (2).
(3)
5-12
Carefully raise floor jack (1) to full
height and position upper coupler
assembly (3) under semitrailer
with tie-down facing front. Aline
rearmost bolt holes of upper
coupler assembly with rearmost
bolt holes in frame.
TM 9-2330-384-14&P
5-4. UPPER COUPLER ASSEMBLY REPLACEMENT (Con't).
NOTE
On each side of upper coupler assembly (3), bolts (6) are installed in first
two holes, then in every other hole.
(4)
Loosely install 14 bolts (6), washers (5), and new locknuts (4).
(5)
Ensure that floor jack (1) is raised
so that upper coupler assembly
(3) is flush against semitrailer.
Torque 14 locknuts (4) to
120 lb.-ft. (163 N•m).
(6)
Trim excess mylar tape.
(7)
Apply a thick coat of grease to
upper coupler assembly (3) (see
Chapter 3, Section I).
5-13
TM 9-2330-384-14&P
5-5.
GRABHANDLE AND CONVOY WARNING LIGHT CABLE ASSEMBLY REPAIR.
THIS TASK COVERS
a.
Grabhandle Cable Assembly Repair
Equipment Conditions:
Conditions
Ref
4-68 Tank purged.
b.
Convoy Warning Light Cable Assembly
Repair
Tools:
l
l
l
Tool kit, general mechanic’s
Tool kit, welder’s
wire cutter
References: TM 9-237
a. GRABHANDLE CABLE ASSEMBLY REPAIR
(1) Remove two lockpins (3) from
grabhandle (2) and mounting
brackets (1).
(2)
Cut cable (5) and remove. Retain
two lockpins (3) if not damaged.
(3)
Cut a length of new cable (5) 19
in. (48.3 cm) long.
(4)
Make two loops at ends of cable
(5) and install two sleeves (4).
NOTE
Length of cable (5) and lockpin (3)
assembly should be 31 in. (78.7
cm).
(5)
Install two lockpins (3) through loops in cable (5). Pull loops tight. Use vise grips to crimp
sleeves (4).
(6)
Tack weld clip (6) to overturn rail to securely retain cable (5). Cable should not slip through
clip.
(7)
Install two lockpins (3) through grabhandle (2) and mounting bracket (1).
5-14
TM 9-2330-384-14&P
5-5. GRABHANDLE AND CONVOY WARNING LIGHT CABLE ASSEMBLY
REPAIR (Con’t).
b. CONVOY WARNING LIGHT CABLE ASSEMBLY REPAIR
(1)
If installed, remove convoy warning light from mounting bracket
(10) (see paragraph 2-23).
(2)
Cut cable (6) at sleeves (9 and
12) and remove. Retain lockpin
(11) if not damaged.
(3)
Cut a length of cable (6) 10.75 in.
(27.3 cm) long.
(4)
Form a 1/2 in. (13.0 mm) loop in
one end of cable (6) and install
sleeve (12), Use vise grips to
crimp sleeve.
NOTE
Length of cable (8) and lockpin (11) assembly should be 13 in. (33.0 cm).
(5)
Form a loop at other end of cable (6) and install sleeve (9). Install lockpin (11) through loop
formed in cable. Pull loop tight. Use vise grips to crimp sleeve.
NOTE
Clip (7) should be positioned at overturn rail close enough to ensure that
lockpin (11) will reach mounting bracket (10).
(6)
Tack weld clip (7) to overturn rail to securely retain cable (6). Cable should not slip through
clip.
5-15
TM 9-2330-384-14&P
Section IV. BODY MAINTENANCE
Paragraph
Number
5-6
Page
Number
Title
Cabinet Replacement . . . . . . . . . . . . . . . . . . . . . . . . . . . . . . . . . . . . . . . . . . . . .
5-16
5-6. CABINET REPLACEMENT.
THIS TASK COVERS
a.
b.
Removal
Cleaning
C.
Installation
INITIAL SETUP
Equipment Conditions:
Ref
Conditions
4-68 Tank purged.
-Reducers and Basic Issue items removed from cabinet.
4-72 Precheck system components removed from cabinet.
4-45 Spare tire removed from spare tire
carrier.
Materials/Parts:
Two straight adapters
Two grommets
l Five clips
l Ten locknuts
l Marking chalk
(Item 4, Appendix E)
l Dry cleaning solvent
(Item 10, Appendix E)
l Grease
(Item 12, Appendix E)
l Mylar tape
(Item 24, Appendix E)
l
l
Tools:
• Tool kit, general mechanic’s
l Tool kit, welder’s
l Floor jack
l Tubing cutter
Personnel Required: Two
References:
l
5-16
TM 9-237
General Safety Instructions:
Cabinet is heavy and awkward to handle.
Use caution, provide adequate support,
and use assistance during removal and installation.
l Dry cleaning solvent is flammable and must
not be used near open flame. Use only in a
well-ventilated area.
l
TM 9-2330-384-14&P
5-6. CABINET REPLACEMENT (Con't).
a. REMOVAL
(1)
Remove emergency valve operator from inside cabinet (7) (see paragraph 4-74).
(2)
Approximately 1 ft. (30.5 cm) back from rear wall of cabinet (7), cut two tubings (1).
(3)
If required, to allow removal of tubing pieces (3 and 11), file burred ends of two cables (2)
inside cabinet (7).
NOTE
Mark tubing pieces (3 and 11) to ensure proper installation.
(4)
Remove tubing pieces (3 and 11) from cabinet (7).
(5)
Unscrew two nuts (5) from straight adapters (6).
WARNING
Cabinet (7) Is heavy and awkward to handle. Use caution, provide adequate
support, and use assistance during removal. Failure to follow this warning
may result in serious Injury to personnel.
(6)
Place a suitable floor jack under cabinet (7).
5-17
TM 9-2330-384-14&P
5-6. CABINET REPLACEMENT (Con't).
(7)
Remove two locknuts (18), washers (17), and bolts (16) and
disconnect front brace (20) from
curbside framerail (19). Discard
locknuts.
(6) Remove locknut (21), two washers (15), and bolt (14) and
disconnect rear brace (22) from
spare tire carrier (23). Discard
locknut.
(9)
Inside cabinet (7), remove five locknuts (26), ten washers (25), and five bolts (24). Discard
locknuts.
(10) Remove two locknuts (29), washers (30), and bolts (27) and disconnect spare tire carrier
(23) brace from cabinet (7). Discard locknuts.
(11) Remove brace (26). Remove cabinet (7).
(12) Remove grounding stud and grounding reels from cabinet (7) and set aside (see paragraphs
4-64 and 4-65).
5-18
TM 9-2330-384-14&P
5-6. CABINET REPLACEMENT (Con't).
(13) Remove two nuts (6) and straight adapters (6) from rear wall of cabinet (7). Remove
grommets (10) and discard.
(14) Use location of clips for precheck tubing in removed cabinet (7) as a guide to mark location of
clips to be welded to replacement cabinet (see paragraph 4-72).
b. CLEANING
(1)
Remove all traces of old mylar tape from mounting surfaces of cabinet and braces to frame.
WARNING
Dry cleaning solvent P-D-680 is toxic and flammable. Always wear protective
goggles, face shield, and gloves, and use only in a well-ventilated area.
Avoid contact with skin, eyes, and clothes and DO NOT breathe vapors. DO
NOT use near open flame or excessive heat. The solvent’s flash point is
100o F-138°F (38°C-59°C). If you become dizzy while using cleaning
solvent, immediately get fresh air and medical help. If solvent contacts
eyes, immediately wash your eyes with water and get medical aid.
(2)
Use dry cleaning solvent to clean mounting surfaces of cabinet and braces to frame. Dry
thoroughly.
c. INSTALLATION
CAUTION
To protect against corrosion and distortion of components, mylar tape must
be applied to mounting surfaces of cabinet (7) and brace (20) to frame.
(1)
Apply suitable width of mylar tape to mounting surfaces of cabinet (7) and brace (20) to
frame. Pierce holes in mylar tape at mounting bolt holes to prevent water accumulation.
5-19
TM 9-2330-384-14&P
5-6. CABINET REPLACEMENT (Con't).
(2)
Install two straight adapters (6) to rear wall of cabinet (7) and tighten nuts (8). Install two new
grommets (10).
(3)
Install grounding stud and grounding reels (see paragraphs 4-64 and 4-65).
WARNING
Cabinet (7) is heavy and awkward
to handle. Use caution, provide
adequate support, and use assistance during installation. Failure to
follow this warning may result in
serious injury to personnel.
CAUTION
Use caution not to damage straight
adapters (6) on rear wall of cabinet
(7) when positioning cabinet
against frame.
(4) Raise cabinet (7) without braces
(20 and 22) on floor jack and position against frame.
5-20
TM 9-2330-384-14&P
5-6. CABINET REPLACEMENT (Con't).
(5)
Loosely install brace (26) and cabinet (7) with five bolts (24), ten washers (25), and five new
locknuts (28).
(6)
Loosely connect spare tire carrier (23) brace to cabinet (7) with two bolts (27), washers (30),
and new locknuts (29). Tighten locknuts (28 and 29).
(7)
Loosely connect rear brace (22) to spare tire carrier (23) with bolt (14), two washers (15),
and new locknut (21). Ensure brace is centered flush against pad at bottom rear corner of
cabinet (7).
(8)
Loosely connect front brace (20) to curbside framerail (19) with two bolts (16), washers
(17), and new locknuts (18). Ensure brace is centered flush against pad at bottom front
corner of cabinet (7).
NOTE
Refer to TM 9-237, Operator’s Manual for Welding Theory and Application,
for proper welding procedures.
(9)
Weld front brace (20) and rear brace (22) to cabinet (7),
(10) Weld five clips for precheck tubing to rear wall and shelf of cabinet (7), as marked.
(11) Trim excess mylar tape.
(12) Fully tighten two locknuts (18) and locknut (21).
(13) Thread two cables (9) through straight adapters (6) into cabinet (7). Connect two tubings (4)
and tighten two nuts (5).
(14) Apply grease to two grommets (10). Install two tubing pieces (3 and 11) through grommets,
as marked.
5-21
TM 9-2330-384-14&P
5-6. CABINET REPLACEMENT (Con’t).
CAUTION
To ensure that cables (2) do not become frayed or otherwise damaged, any
burrs on inside of tubing (1, 3, and 11) must be removed before connecting
tubing.
(15) Thread two new straight adapters (13) through two cables (2). Thread cables through two
tubing pieces (3 and 11) into cabinet (7).
(16) Connect two tubing (1) to two tubing pieces (3 and 11) with straight adapters (13). Leave
nuts (12) loose until after emergency valve operator is installed inside cabinet (7).
(17) Install emergency valve operator (see paragraph 4-74).
(18) Tighten nuts (12).
FOLLOW-ON TASKS:
l
l
l
5-22
Install precheck system components inside cabinet (see paragraph 4-72).
Install spare tire to spare tire carrier (see paragraph 4-45).
Stow reducers and Basic Issue Items inside cabinet.
TM 9-2330-384-14&P
Section V. NONELECTRICAL GAGES MAINTENANCE
Paragraph
Number
Page
Number
Title
Gage Marker Rod Replacement . . . . . . . . . . . . . . . . . . . . . . . . . . . . . . . . . . . . .
5-7
5-23
5-7. GAGE MARKER ROD REPLACEMENT.
THIS TASK COVERS
a.
Removal
b.
Installation
INITIAL SETUP
Equipment Conditions:
Ref
Conditions
4-68 Tank purged.
4-73 Gage marker disk and ground wire
removed.
Tools:
l
l
Tool kit, general mechanic’s
Tool kit, welder’s
Personnel Required: Two
General Safety Instructions:
When working inside tank, always provide
adequate forced air ventilation at the manhole opening with air directed into compartment where work is being performed.
l NEVER work alone inside a tank; a second
person must be stationed at the manhole
opening. The person inside the tank must
have a safety line and harness on in case of
emergency for rescue operations.
l DO NOT perform any welding procedure
unless tank is purged.
l
References:
l
TM 9-237
5-23
TM 9-2330-384-14&P
5-7. GAGE MARKER ROD REPLACEMENT (Con't).
a. REMOVAL
WARNING
•
When working inside tank, always provide adequate forced air ventilation
at the manhole opening with air directed into compartment where work
is being performed. Forced air ventilation allows for removal of any explosive quantities and contaminants resulting from the type of work
being done and serves to prevent oxygen deficiency. Failure to follow
this warning may result in death to personnel.
l
NEVER work alone inside a tank: a second person must be stationed at
the manhole opening. The person inside the tank must have a safety line
and harness on in case of emergency for rescue operations. If a rescue
operation is required, summon assistance IMMEDIATELY. DO NOT attempt a rescue until assistance has arrived.
Remove gage marker rod (1) from attachment to manhole collar (2), if present.
b. INSTALLATION OF GAGE MARKER ROD
WARNING
When working inside tank, always provide adequate forced air ventilation
at the manhole opening with air directed into compartment where work
is being performed. Forced air ventilation allows for removal of any explosive quantities and contaminants resulting from the type of work
being done and serves to prevent oxygen deficiency. Failure to follow
this warning may result in death to personnel.
NEVER work alone inside a tank: a second person must be stationed at
the manhole opening. The person inside the tank must have a safety line
and harness on in case of emergency for rescue operations. If a rescue
operation is required, summon assistance IMMEDIATELY. DO NOT attempt a rescue until assistance has arrived.
DO NOT perform any welding procedure unless tank is purged. Failure to
follow this warning will result in serious injury or death to personnel.
NOTE
Illustrations show proper location of gage marker rod (1) when installed.
To ensure proper calibration, gage marker rod must be installed according to specifications given.
Refer to TM 9-237, Operator’s Manual for Welding Theory and Application, for proper welding procedures.
(1)
Position gage marker rod (1) at manhole collar (2). Rod must be placed 2 in. (5.1 cm) to
curbside of rear midpoint of manhole collar. Top of rod must be placed 1 in. (2.5 cm) from
lower flange of collar.
(2)
Weld gage marker rod (1) to manhole collar (2).
5-24
TM 9-2330-384-14&P
5-7.
GAGE MARKER ROD REPLACEMENT (Con't).
1
1
2
2
(.19)
1 1912"
1.25(.19)
125
5)
.25
2 (.191
FOLLOW-ON TASKS:
agraphInstall
gage marker disk and ground wire (see par 4-73).
5-25
TM 9-2330-384-14&P
Section VI. LINES, FITTINGS,AND VALVESMAINTENANCE
Paragraph
Number
Vapor Integrity Test .....................................................................................................................
5-8
5-8.
Page
Number
Title
5-26
VAPOR INTEGRITY TEST.
THIS TASK COVERS
a. Pressure Test Preparation
b. Pressure Test Procedure
c. Vacuum Test Preparation
d. Vacuum Test Procedure
INITIAL SETUP
Equipment Conditions:
Ref
4-68
Conditions
Semitrailer drained
and purged.
2-17
Semitrailer bonded
and grounded.
Tools:
-Tool kit, general mechanic's
Materials/Parts:
Quick disconnect (NSN 4730-00-024-9490)
(Not included in kit; used for connecting air supply
hose to shop air supply.)
General Safety Instructions:
- Use extreme caution when working or walking
on trailer.
- Testing personnel must be registered with the
Department of Transportation (DOT) in
accordance with DOT 49CFRI80.409.
Test Equipment:
Pneumatic leakage test kit (NSN 2590-01 438-8806)
a.
PRESSURE TEST PREPARATION
WARNING
• Use extreme caution when walking or working on top of semitrailer. Walkway can
become slippery due to moisture or fuel spillage. Failure to follow this warning may
result in serious injury to personnel.
• Verify that tanker is properly grounded prior to performing test. Due to the dangers
of static electricity, grounding the semitrailer to the vehicle while refueling is
mandatory, regardless of the amount of fuel to be dispensed. Failure to follow this
warning may cause spark to ignite, resulting in serious injury or death to personnel.
Before performing maintenance on the semitrailer, the semitrailer must be grounded
to an approved (earth) ground and it must be safe to proceed. Failure to follow this
warning may cause a spark to ignite, resulting in serious injury or death to
personnel.
5-26
Change1
TM 9-2330-384-14&P
5-8.
VAPOR INTEGRITY TEST (Con't).
NOTE
• Perform the pressure test in an area having minimum temperature changes. Temperature
changes directly affect pressure readings.
• Visually inspect outside of tank and all associated piping. Look for stained areas that
indicate obvious leakage. Repair obvious leaks prior to performing pressure test.
(1)
Close butterfly valve (1) and rear sump drain (2).
(2)
Remove dust caps from three-inch rear inlet (4), four-inch front port (5), and vapor return line (3).
8.
1
01
5
4
3
Change1
5-27
TM 9-2330-384-14&P
5-8.
VAPOR INTEGRITY TEST (Con't).
(3)
Open manhole cover (6) and install test plate (8). Make sure test plate (8) is fastened securely.
(4)
Make sure clamp ring (7) for manhole cover (6) is fastened securely.
6
8
7
1@ke
(5)
Make sure both caps (9 and 10) for three-inch cleanouts are secured.
9
HIDDEN
10 HIDDEN
5-28
Change1
TM 9-2330-384-14&P
5-8.
VAPOR INTEGRITY TEST (Con't).
(6)
Install coupling assembly (11) on vapor
return line (3).
NOTE
Place regulator assembly in a convenient area.
(7)
Attach regulator assembly (12) to two hose assemblies (13). Attach two hose assemblies (13) to coupling
assembly (11).
13
0
1@14
1
13
Change1
5-29
TM 9-2330-384-14&P
5-8.
VAPOR INTEGRITY TEST (Con't).
(8)
Set gages (18 and 23) at zero before starting test.
(9)
Close shutoff valve (16), draincockvalve (20), and four valves (14,19, 26, and 28). Open two valves (21 and
27).
(10)
Set two valves (17 and 22) for reading positive pressure.
26
17
28
27
18
@3
17
22
-\@@(IREAD
5-30
Change1
I ;PO
VA
VE PPOSITIONFOR
SITIVE PRESS RE
N'
VALVE POSITION
FOR READING
POSITIVE PRESSURE
TM 9-2330-384-14&P
5-8.
VAPORINTEGRITYTEST (Con't).
WARNING
Do notoverpressurizetank. Failureto headthiswarningmayresultindeathorinjury
to personnelor seriousdamageto equipment.
NOTE
Thepneumatictest pressurein the tank mustbe reachedgradually.
(11)
Make sure pressure regulator (24) is set to lowest setting (turn regulator knob (15) fully counterclockwise) to
avoid overpressure in tank.
(12)
Connect shop air pressure supply to pressure port (25) at pressure regulator (24).
b.
PRESSURE TEST PROCEDURE
(1)
Open emergency valve (29), vapor vent valve (30), and precheck valve (31) using valve levers located in
roadside cabinet.
31
29
30
Open shutoff valve (16). Slowly adjust pressure
regulator(24) by turning regulator knob (15) clockwise
to increase flow of air into vapor return line and tank
until a pressure reading of 18.0 inches ±0.5 inchwater
column (wc) is obtained. Close shutoff valve (16).
(2)
(3)
Wait five minutes to verify that pressure reading remains
stable at 18.0 inches ± 0.5 inch wc. Initial test pressure
must be at 18.0 inches ± 0.5 inch wc.
WARNING
Do not overpressurize tank. Failure
to heed this warning may result in
death or injury to personnel or
serious damage to equipment.
(4)
If tank is overpressurized, close shutoff valve (16) and
open draincock valve (20) to reduce overpressure.
Close draincock valve (20) after tank pressure has
dropped to 18.0 inches ± 0.5 inch wc.
(5)
Atthe end of an additional five minutes, record the time
and final pressure. If pressure does not drop and tank
is leak free, go to step 6. If tank leaks more than 0.5
inch wc, repressurize tank per step 2 and then go to
step 6.
0
o
Change1
5-31
TM 9-2330-384-14&P
5-8. VAPOR INTEGRITY TEST (Con't).
(6)
Close vapor vent valve (30) using lower lever in roadside cabinet. At the end of an addtional five minutes,
record the time and final pressure.
(7)
If pressure in vapor vent line remains at 18.0 inches ± 0.5 inch wc, go to step 12. If pressure drops, go to step
8.
(8)
Look for leaks in vapor return line system (check vapor vent hood, vapor vent hose, cleanout caps, gasket,
and pipe joints).
NOTE
Safety bolt must be removed from rear sump drain control lever prior to opening rear
sump drain.
(9)
Return tank and piping system to normal atmospheric pressure by opening rear sump drain (2) and vapor vent
valve (30).
30
2
5-32
Change1
TM 9-2330-384-14&P
5-8.
VAPOR INTEGRITY
TEST (Con't).
(10)
Repair any leaks found in vapor vent line (para 4-81).
(11)
After repairing any leaks found in step 10, restart test at step 1.
(12)
Close vapor vent valve (30), and return vapor vent line to atmospheric pressure by opening draincock valve
(20).
30
20
(13)
Close draincock valve (20) and monitor pressure gage for five minutes, looking for an increase in pressure.
(14)
If no increase in pressure is indicated on pressure gage, vapor vent valve (30) is functional. Go to step 17.
If an increase in pressure is indicated, vapor vent valve (30) is faulty. Go to step 15.
Change1
5-33
TM 9-2330-384-14&P
5-8.
VAPORINTEGRITYTEST (Con't).
(15)
Return tank and piping system to normal atmospheric pressure by opening rear sump drain (2) and vapor vent
valve (30).
29
30
2
16
(16)
Repair vapor vent valve (para 4-76), and restart
test from step 1.
(17)
With emergency valve (29) still open, open vapor
vent valve (30) and repressurize tank, if
necessary, bringing pressure up to 18.0 inches
t 0.5 inch wc (see step 2).
(18)
If pressure does not drop, go to step 26. If
pressure drops, go to step 19.
(19)
Close emergency valve (29). Repressurize tank
to 18.0 inches t 0.5 inch wc per step 2, if
necessary. If 18.0 inches :t 0.5 wc pressure is
maintained once control shutoff valve is closed,
go to step 20. If pressure drops when shutoff
valve (16) is closed, go to step 23.
(20)
Visually locate the leak in discharge piping system
(check discharge valve, piping, sump drain, and
precheck valve circuit) (Chapter4, Section XIV).
5-34
Change1
0
TM 9-2330-384-14&P
5-8.
VAPOR INTEGRITY TEST (Con't).
(21)
Open rear sump drain (2) and butterfly valve (1), and
return tank pressure to normal.
(22)
Repair piping leak (para 4-80), and return to step 17.
(23)
Visually locate tank barrel leak (check cleanout
caps, manhole gasket, precheck
valve circuit,joints,
andseals).
(24)
Return tank and piping system to atmospheric
pressure by opening rear sump drain (2) and butterfly
valve (1).
(25)
Repair tank barrel leaks, and return to step 17.
(26)
Close emergency valve (29) with top lever in roadside cabinet. Return discharge piping to atmospheric
pressure by opening butterfly valve (1).
------
29
(27)
If pressure does not drop in five minutes, go to step 30. If pressure drops, go to step 28.
(28)
Return entire tank and piping to atmospheric pressure by opening rear sump drain (2) and butterfly valve (1).
NOTE
Although an emergency valve leak does not constitute a "K" stamp failure if the leak
is internal, proper emergency valve function is still required for safe tanker operation.
(29)
Repair emergency valve leak (para 4-74), and return to step 17.
(30)
If pressure does not drop, emergency valve is maintaining a pressure differential without leakage.
Change1
5-35
TM 9-2330-384-14&P
5-8.
VAPOR INTEGRITY TEST (Con't).
WARNING
Return tank and discharge piping system to atmospheric pressure. Failure to do so
may result in injury to personnel or damage to equipment.
(31)
Open draincock valve (20) and return tank and discharge piping system to atmospheric pressure.
20
VACUUM TEST PREPARATION
C.
NOTE
Visually inspect outside of tank and all associated piping. Look for stained areas that
indicate obvious leakage. Repair obvious leak areas prior to leak testing.
(1)
Close butterfly valve (1) and rear sump drain (2).
1
C2)
5-36
Change1
TM 9-2330-384-14&P
5-8.
VAPOR INTEGRITY TEST (Con't).
(2)
Make sure shutoff valve (16), valve (19), draincock valve (20), and two valves (28 and 27) are closed and two
valves (14 and 26) are open.
26
8@
0
0
28
0
27
(3)
Set two valves (17 and 22) for reading vacuum.
17
fVA
22
VALVE POSITION
FOR
FC
L READING
VACUUM
VALVE POSITIONFOR
READING VACUUM
Change1
5-37
TM 9-2330-384-14&P
5-8.
VAPORINTEGRITYTEST (Con't).
WARNING
Toavoidoverpressureinthetank,makesureregulatorissetto itslowestsetting.The
pneumatictest vacuumin the tankmustbe reachedgradually.Failureto followthis
warningmayresultin injuryto personnelor seriousdamageto equipment.
(4)
Set pressure regulator (24) to its lowest setting by turning regulator knob (15) fully clockwise.
(5)
Connect shop air pressure supply to vacuum port (32) of pressure regulator (24).
0
29
30
31
L@@-OhL
d.
VACUUM TEST PROCEDURE
(1)
Open emergency valve (29), vapor vent valve (30), and precheck valve (31) using valve levers located in
roadside cabinet. Open shutoff valve (16).
(2)
Slowly adjust pressure regulator (24) by turning regulator knob (115)counterclockwise) to increase the flow
of air and evacuate vapor return line and tank until a vacuum reading of 6.0 inches - 0.5 inch wc is obtained.
Close shutoff valve (16).
(3)
Wait five minutes and record the time and final pressure; if necessary, repressurize the tank to 6.0 inches +
0.5 inch wc, wait an additional five minutes, and record the time and final pressure. Initial test vacuum must
be 6.0 inches ± 0.5 inch wc.
5-38
Change1
TM 9-2330-384-14&P
5-8.
VAPORINTEGRITYTEST(Con't).
WARNING
Donotoverpressurizetank;seriousinjurytopersonnelordamageto equipmentmay
result.
(4)
If tank is overpressurized, close shutoff valve (116)and open draincock valve (20) to reduce tank pressure.
Once tank pressure has dropped to 6.0 inches ± 0.5 inch wc, close draincock valve (20).
(5)
Close vapor vent valve (30) using lower lever located in roadside cabinet.
(6)
It vacuum in vapor vent line remains at 6.0 inches ± 0.5 inch wc, go to step 10. If pressure drops, go to step
7.
(7)
Visually locate the leak in vapor return line (check vapor vent hood, vapor vent hose, and pipe joints).
(8)
Return tank and piping system to atmospheric pressure by opening rear sump drain (2) and vapor vent valve
(30).
2
(9)
Repair leak in vapor return line (para 4-78), and verify repair by testing per step 2.
(10)
Close vapor vent valve (30) and return vapor vent line to atmospheric pressure by opening draincock valve
(20).
(11)
Close draincock valve (20) and monitor pressure gage for vacuum increases.
(12)
If vapor vent line vacuum shows no increase, go to step 15. If a decrease in vacuum is detected, go to step
13.
(13)
Return tank and piping to atmospheric pressure by opening rear sump drain (2) and vapor vent valve (30).
(14)
Repair vapor vent valve (30) (para 4-78), and verify repair by testing per step 2.
(15)
Open vapor vent valve (30) and reevacuate tank, if necessary, bringing vacuum to 6.0 inches ± 0.5 inch wc,
per step 2.
Change1
5-39
TM 9-2330-384-14&P
5-8. VAPORINTEGRITYTEST(Con't).
(16)
If vacuum does not drop, go to step 25. If vacuum drops,
go to step 17.
(17)
Close emergency valve (29) using top lever in roadside
cabinet.
(18)
If necessary, reevacuate tankto 6.0 inches ± 0.5 inch wc,
per step 2. If vacuum is maintained once shutoff valve
(16) is closed, go to step 19. If vacuum drops when shutoff
valve (16) is closed, go to step 22.
(19)
Visually locate the leak in discharge piping system (check
discharge valves, piping, sump drain, and precheck valve
circuit).
29
16
2
(20)
Return tank and piping system to atmospheric
pressure by opening rear sump drain (2) and
butterfly valve (1).
(21)
Repair the leak in discharge piping system
(para 4-80), and verify repair by testing per
step 18.
(22)
Visually locate tank barrel leak by checking
cleanout caps, manhole gasket, precheck valve
circuit, joints, and seals.
(23)
Return tank and piping system to atmospheric
pressure by opening rear sump drain (2) and
butterfly valve (1).
5-40
Change1
W.
TM 9-2330-384-14&P
5-8.
VAPOR INTEGRITY TEST (Con't).
(24)
Repair tank barrel leaks, and verify repair by testing per step 18.
(25)
Close emergency valve (29) using top lever in roadside cabinet.
(26)
Return discharge piping to atmospheric pressure by opening butterfly valve (1).
(27)
If vacuum does not drop, emergency valve is maintaining a differential pressure without leaking; go to step
31. If vacuum drops, an emergency valve leak is the cause; go to step 28.
(28)
Return tank and piping to atmospheric pressure by opening rear sump drain (2) and butterfly valve (1).
NOTE
Although an emergency valve leak does not constitute a "K" stamp failure if the leak
is internal, proper emergency valve function is still required for safe operation.
(29)
Repair emergency valve leak (para 4-74), and verify repair by testing per step 18.
(30)
Return tank and discharge piping system to atmospheric pressure by opening draincock (20), butterfly valve
(1), and sump drain (2) located at rear of vehicle.
0
(31)
Return tanker to service by closing all valves and removing all test hardware from tanker.
NOTE
Refer to DOT 49CFR, paragraph 180.415, in regard to inspection markings
required for this test; markings will include test date (month and year), followed by
the letter "K."
Change1
5-41/(5-42 blank)
TM 9-2330-384-14&P
APPENDIX A
REFERENCES
A-1. SCOPE.
This appendix lists indexes and general references, field manuals, technical bulletins, and
technical manuals required for use with this manual.
A-2. INDEXES AND GENERAL REFERENCES.
a. The following indexes and general references should be frequently consulted for the latest
changes, or revisions, to references given in this appendix and for new information relating to materiel
covered in this manual.
b. Military Publication Indexes:
Consolidated Index of Army Publications and Blank Forms . . . . . . . . .
DA Pam 25-30
c. General References:
Authorized Abbreviations and Brevity Codes . . . . . . . . . . . . . . . . . . .
Catalog of Audiovisual Productions, Army Productions,
Volume I (PA) . . . . . . . . . . . . . . . . . . . . . . . . . . . . . . . . . . . . . . . . . . .
Dictionary of United States Army Terms . . . . . . . . . . . . . . . . . . . . . .
Operational Terms and Symbols . . . . . . . . . . . . . . . . . . . . . . . . . . . . .
The Standard Army Publications System (STARPUBS)
Users Guide . . . . . . . . . . . . . . . . . . . . . . . . . . . . . . . . . . . . . . . . . . . .
AR 310-50
DOD 5040.2-C-1
AR 310-25
FM 105-5-1
DA Pam 310-10
A-3. FORMS.
Refer to DA Pam 25-30, Consolidated index of Army Publications and Blank forms, for a current
and complete list of blank forms. Refer to DA Pam 738-750, The Army Maintenance Management
System (TAMMS), for instructions on the use of maintenance forms pertaining to this materiel.
A-4. FIELD MANUALS.
Aircraft Refueling . . . . . . . . . . . . . . . . . . . . . . . . . . . . . . . . . . . . . . . . .
Army Motor Transport Units and Operations . . . . . . . . . . . . . . . . . .
Basic Cold Weather Manual . . . . . . . . . . . . . . . . . . . . . . . . . . . . . . . .
Camouflage . . . . . . . . . . . . . . . . . . . . . . . . . . . . . . . . . . . . . . . . . . . . .
Desert Operations . . . . . . . . . . . . . . . . . . . . . . . . . . . . . . . . . . . . . . . .
First Aid for Soldiers . . . . . . . . . . . . . . . . . . . . . . . . . . . . . . . . . . . . . .
General Fabric Repair . . . . . . . . . . . . . . . . . . . . . . . . . . . . . . . . . . . . .
Manual for Wheeled Vehicle Driver . . . . . . . . . . . . . . . . . . . . . . . . . .
Mountain Operations . . . . . . . . . . . . . . . . . . . . . . . . . . . . . . . . . . . . . .
NBC Contamination Avoidance . . . . . . . . . . . . . . . . . . . . . . . . . . . . . .
NBC Decontamination . . . . . . . . . . . . . . . . . . . . . . . . . . . . . . . . . . . . .
NBC Protection . . . . . . . . . . . . . . . . . . . . . . . . . . . . . . . . . . . . . . . . . . .
Northern Operations . . . . . . . . . . . . . . . . . . . . . . . . . . . . . . . . . . . . . .
FM 10-68
FM 55-30
FM 31-70
FM 5-20
FM 90-3
FM 21-11
FM 10-16
FM 21-305
FM 90-6
FM 3-3
FM 3-5
FM 3-4
FM 31-71
A-1
TM 9-2330-384-14&P
A-4. FIELD MANUALS (Con,t).
Operation and Maintenance of Ordnance Materiel in Cold Weather
(0°F to - 65°F)
...........................................
Organizational Maintenance of Military Petroleum Pipelines, Tanks,
and Related Equipment . . . . . . . . . . . . . . . . . . . . . . . . . . . . . . . . . .
Petroleum Supply Point Equipment and Operations . . . . . . . . . . . . .
Petroleum Tank Vehicle Operations . . . . . . . . . . . . . . . . . . . . . . . . . .
Route Reconnaissance and Classification . . . . . . . . . . . . . . . . . . . . .
FM 9-207
FM 10-20
FM 10-69
FM 10-71
FM 5-36
A-5. TECHNICAL BULLETINS.
Color, Marking, and Camouflage Painting of Military Vehicles,
Construction Equipment, and Materials Handling Equipment . . . .
Description, Use, Bonding Techniques, and Properties
of Adhesives . . . . . . . . . . . . . . . . . . . . . . . . . . . . . . . . . . . . . . . . . . .
Equipment Improvement Report and Maintenance Digest . . . . . . . .
Maintenance in the Desert . . . . . . . . . . . . . . . . . . . . . . . . . . . . . . . . .
Purging, Cleaning, and Coating Interior Ferrous and
Terne Sheet Vehicle Fuel Tanks . . . . . . . . . . . . . . . . . . . . . . . . . . .
Security of Tactical Wheeled Vehicles . . . . . . . . . . . . . . . . . . . . . . .
Standards for Overseas Shipment or Domestic Issue
of Special Purpose Vehicles, Combat, Tactical,
Construction, and Selected Industrial and Troop
Support U.S. Army Tank-Automotive Materiel Readiness
Command Managed Items . . . . . . . . . . . . . . . . . . . . . . . . . . . . . . . .
Tactical Wheeled Vehicles: Repair of Frames . . . . . . . . . . . . . . . . .
TB 43-0209
TB ORD 1032
TB 43-0001-39
TB 43-0239
TB 43-0212
TB 9-2300-422-20
TB 9-2300-281-35
TB 9-2300-247-40
A-6. TECHNICAL MANUALS.
Camouflage Materials . . . . . . . . . . . . . . . . . . . . . . . . . . . . . . . . . . . . .
Organizational, Direct Support and General Support, Care,
Maintenance, and Repair of Pneumatic Tires and Inner Tubes . .
Deep Water Fording of Ordnance Materiel . . . . . . . . . . . . . . . . . . . .
Firefighting and Rescue Procedures in Theatres of Operations . . .
Inspection, Care, and Maintenance of Antifriction Bearings . . . . . .
Materials Used for Cleaning, Preserving, Abrading,
and Cementing Ordnance Materiel and
Related Items Including Chemicals . . . . . . . . . . . . . . . . . . . . . . . . .
Operator’s Manual for Truck, Tractor: Line Haul, 50,000 GVWR,
6X4, M915 (NSN 2320-01-028-4395) . . . . . . . . . . . . . . . . . . . . . . .
Operator’s Manual for Truck, Tractor: Line Haul, 50,000 GVWR,
6X4, M915A1 (NSN 2320-01-125-2640) . . . . . . . . . . . . . . . . . . . . .
Operator’s Manual for Welding Theory and Application . . . . . . . . .
Organizational Maintenance Manual for Truck, Tractor: Line Haul,
50,000 GVWR, 6X4, M915 (NSN 2320-01-028-4395) . . . . . . . . . .
A-2
TM 5-200
TM 9-2610-200-24
TM 9-238
TM 5-315
TM 9-214
TM 9-247
TM 9-2320-273-10
TM 9-2320-283-10
TM 9-237
TM 9-2320-273-20
TM 9-2330-384-14&P
A-6. TECHNICAL MANUALS (Con't).
Organizational Maintenance for Truck, Tractor: Line Haul,
50,000 GVWR, 6X4, M915A1 (NSN 2320-01-125-2640) . . . . . . . .
TM 9-2320-283-20-1)
TM 9-2320-283-20-2,
TM 9-2320-283-20-3
Packaging and Materiels Handling: Preparing of Hazardous
Materiels for Military Air Shipments . . . . . . . . . . . . . . . . . . . . . . . .
Packaging of Materiel: Preservation . . . . . . . . . . . . . . . . . . . . . . . . .
Painting Instructions for Field Use . . . . . . . . . . . . . . . . . . . . . . . . . . .
Procedures for Destruction of Tank-Automotive Equipment to
Prevent Enemy Use (U.S. Army Tank-Automotive Command) . .
Railcar Loading Procedures . . . . . . . . . . . . . . . . . . . . . . . . . . . . . . . .
TM 38-250
(AFR 71-4)
TM 38-230-1,
TM 38-230-2
TM 43-0139
TM 750-244-6
TM 55-601
A-7. OTHER PUBLICATIONS.
Army Medical Department Expendable/Durable Items . . . . . . . . . . . . . . . . .
Expendable/Durable Items (Except Medical, Class V, Repair Parts,
and Heraldic Items) . . . . . . . . . . . . . . . . . . . . . . . . . . . . . . . . . . . . . . . . . . .
Marking for Shipment and Storage . . . . . . . . . . . . . . . . . . . . . . . . . . . . . . . .
Methods of Preservation . . . . . . . . . . . . . . . . . . . . . . . . . . . . . . . . . . . . . . . . .
Packaging of Materiel . . . . . . . . . . . . . . . . . . . . . . . . . . . . . . . . . . . . . . . . . . .
Preparation for Shipment and Limited Storage of Wheeled Vehicles . . . .
Preparation for Shipment and Storage of Basic Issue Items for
Military Vehicles, Carriages, and Equipment . . . . . . . . . . . . . . . . . . . . . . .
CTA 8-100
CTA 50-970
MIL-STD-129
MIL-P-116
AR 700-15
MIL-V-62038
MIL-B-12841
A-3/(A-4 Blank)
TM 9-2330-384-14&P
APPENDIX B
MAINTENANCE ALLOCATION CHART
Section I. INTRODUCTION
B-1. GENERAL.
a. This section provides a general explanation of all maintenance and repair functions
authorized at the various maintenance levels.
b. The Maintenance Allocation Chart (MAC) in Section II designates overall authority and
responsibility for the performance of maintenance functions on the identified end item or component.
The application of the maintenance functions to the end item or component will be consistent with the
capacities and capabilities of the designated maintenance levels.
c. Section Ill lists the tools and test equipment (both special tools and common tool sets)
required for each maintenance function as referenced from Section II.
d. Section IV contains supplemental instructions and explanatory notes for a particular
maintenance function.
B-2. MAINTENANCE FUNCTIONS.
Maintenance functions will be limited to and defined as follows:
a. Inspect. To determine the serviceability of an item by comparing its physical, mechanical,
and/or electrical characteristics with established standards through examination (e.g., by sight,
sound, or feel).
b. Test. To verify serviceability by measuring the mechanical, pneumatic, hydraulic, or
electrical characteristics of an item and comparing those characteristics with prescribed standards.
c. Service. Operations required periodically to keep an item in proper operating condition,
i.e., to clean (includes decontaminate, when required), to preserve, to drain, to paint, or to replenish
fuel, lubricants, chemical fluids, or gases.
d. Adjust. To maintain or regulate, within prescribed limits, by bringing into proper or exact
position, or by setting the operating characteristics to specified parameters.
e. Aline. To adjust specified variable elements of an item to bring about optimum or desired
performance.
f. Calibrate. To determine and cause corrections to be made or to be adjusted on instruments
or test, measuring, and diagnostic equipments used in precision measurement. Consists of
comparisons of two instruments, one of which is a certified standard of known accuracy, to detect and
adjust any discrepancy in the accuracy of the instrument being compared.
g. Remove/Install. To remove and install the same item when required to perform service or
other maintenance functions. Install may be the act of emplacing, seating, or fixing into position a
spare, repair part, or module (component or assembly) in a manner to allow the proper functioning of
an equipment or system.
h. Replace. To remove an unserviceable item and install a serviceable counterpart in its place.
“Replace” is authorized by the MAC and is shown as the third position code of the SMR code.
i. Repair. The application of maintenance services, including fault location/trouble- shooting,
removal/installation, and disassembly/assembly procedures, and maintenance actions to identify
troubles and restore serviceability to an item by correcting specific damage, fault, malfunction, or
failure in a part, subassembly, module (component or assembly), end item, or system.
B-1
TM 9-2330-384-14&P
B-2. MAINTENANCE FUNCTIONS (Con’t).
j. Overhaul. That maintenance effort (service/action) prescribed to restore an item to a
completely serviceable/operational condition as required by maintenance standards in appropriate
technical publications (i.e., DMWR). Overhaul is normally the highest degree of maintenance
performed by the Army. Overhaul does not normally return an item to like new condition.
k. Rebuild. Consists of those services/actions necessary for the restoration of unserviceable
equipment to a like new condition in accordance with original manufacturing standards. Rebuild is the
highest degree of materiel maintenance applied to Army equipment. The rebuild operation includes the
act of returning to zero those age measurements (hours/miles, etc.) considered in classifying Army
equipment/components.
B-3. EXPLANATION OF COLUMNS IN THE MAC, SECTION II.
a. Column 1, Group Number. Column 1 lists functional group code numbers, the purpose of
which is to identify maintenance significant components, assemblies, subassemblies, and modules
with the next higher assembly. End item group number shall be “00.”
b. Column 2, Component/Assembly. Column 2 contains the names of components,
assemblies, subassemblies, and modules for which maintenance is authorized.
c. Column 3, Maintenance Function. Column 3 lists the functions to be performed on the
item listed in Column 2. (For a detailed explanation of these functions, see paragraph B-2.)
d. Column 4, Maintenance Level. Column 4 specifies, by the listing of a work time figure in the
appropriate subcolumn( the level of maintenance authorized to perform the function listed in
Column 3. This figure represents the active time required to perform that maintenance function at the
indicated level of maintenance. If the number or complexity of the tasks within the listed maintenance
function vary at different maintenance levels, appropriate work time figures will be shown for each
level. The work time figure represents the average time required to restore an item (assembly,
subassembly, component, module, end item, or system) to a serviceable condition under typical field
operating conditions. This time includes preparation time (including any necessary
disassembly/assembly time), troubleshooting/fault location time, and quality assurance/quality control
time in addition to the time required to perform the specific tasks identified for the maintenance
functions authorized in the Maintenance Allocation Chart. The symbol designations for the various
maintenance levels are as follows:
c
0
F
H
D
.................
.................
.................
.................
.................
Unit (Operator or Crew)
Unit (Organizational) Maintenance
Direct Support Maintenance
General Support Maintenance
Depot Maintenance
e. Column 5, Tools and Equipment. Column 5 specifies, by code, those common tool sets
(not individual tools) and special tools, TMDE, and support equipment required to perform the
designated function.
f. Column 6, Remarks. This column shall, when applicable, contain a letter code, in
alphabetic order, which shall be keyed to the remarks contained in Section IV.
B-4.
EXPLANATION OF COLUMNS IN TOOL AND TEST EQUIPMENT REQUIREMENTS,
SECTION Ill.
a. Column 1, Tool or Test Equipment Reference Code. The tool and test equipment
reference code correlates with a code used in the MAC, Section II, Column 5.
b. Column 2, Maintenance Level. The lowest level of maintenance authorized to use the tool
or test equipment.
B-2
TM 9-2330-384-14&P
B-4.
EXPLANATION OF COLUMNS IN TOOL AND TEST EQUIPMENT REQUIREMENTS,
SECTION Ill (Con't).
c. Column 3, Nomenclature. Name or identification of the tool or test equipment.
d. Column 4, National/NATO Stock Number. The National or NATO Stock Number of the tool
or test equipment.
e. Column 5, Tool Number. The manufacturer’s part number.
B-5. EXPLANATION OF COLUMNS IN REMARKS, SECTION IV.
a. Column 1, Reference Code. The code recorded in Column 6, Section II.
b. Column 2, Remarks. This column lists information pertinent to the maintenance function
being performed as indicated in the MAC, Section II.
Section II. MAINTENANCE ALLOCATION CHART
(2)
Unit
Maintenance
Group
Function
Number Component/Assembly
06
VOLTAGE CONTROL
UNIT
REPLACE
REPAIR
0609
LIGHTS
INSPECT
REPLACE
REPAIR
11
1100
12
1202
C
O
DS
GS
(6)
Depot
D
Equipment) Remarks
ELECTRICAL
0608
0613
(5)
(4)
Maintenance Level
(3)
1.0
1.0
0.1
0.6
1.0
LAMPS
REPLACE
REPAIR
0.2
1.0
CHASSIS WIRING,
CONNECTORS,
RECEPTACLE VEHICLE
COUPLING
INSPECT
REPLACE
REPAIR
0.4
1.5
1.5
INSPECT
SERVICE
REPLACE
ALINE
0.2
1.0
INSPECT
SERVICE
REPLACE
1.5
1.0
4.0
REAR AXLE
AXLE
1.0
BRAKES
SERVICE BRAKES
B-3
TM 9-2330-384-14&P
Section II.
MAINTENANCE ALLOCATION CHART (Con't)
(4)
Maintenance Level
Unit
Maintenance
Function
C
O
DS
GS
F
H
(Con’t)
CAMSHAFT
REPLACE
1.5
SHOE AND LINING
REPLACE
REPAIR
1.5
ADJUST
REPLACE
0.2
1.0
COUPLING, AIR
REPLACE
1.0
CHAMBER, AIR
REPLACE
2.0
VALVE ASSEMBLY
INSPECT
REPLACE
0.2
2.0
LINES, FITTINGS, BRAKE
INTERLOCK, AND HOSES
INSPECT
REPLACE
REPAIR
AIR RESERVOIRS
REPLACE
1.5
BEARING. HUB
INSPECT
SERVICE
REPLACE
ADJUST
0.3
1.0
1.5
0.3
WHEEL
REPLACE
1.5
DRUM, BRAKE
INSPECT
REPLACE
REPAIR
0.3
1.0
SEALS AND WIPERS
INSPECT
REPLACE
0.3
1.5
TIRES
INSPECT
SERVICE
REPLACE
REPAIR
0.1
0.4
INSPECT
ADJUST
REPLACE
0.3
0.5
1206
SLACK ADJUSTER
1208
AIR BRAKE SYSTEM
13
1311
1313
0.2
1.0
1.5
WHEELS
WHEEL ASSEMBLY
NUTS, STUDS, AND
WHEEL RINGS
B-4
0.6
2.0
1.0
1.0
1.0
(5)
(6)
Depot
Remarks
TM 9-2330-384-14&P
Section II.
(1)
MAINTENANCE ALLOCATION CHART (Con't)
(2)
(4)
Maintenance Level
(3)
Unit
Maintenance
Group
Function
lumber Component/Assembly
15
1501
C
DS
O
F
(6)
(5)
GS Depot
H
D
Tools and
Equipment Remarks
FRAME, TOWING
ATTACHMENTS
FRAME BUMPERS,
BRACKETS
INSPECT
REPLACE
GRABHANDLE
INSPECT
REPLACE
REPAIR
DRAIN LADDER
INSPECT
REPAIR
1, 2, 3
0.2
1.5
5
0.1
0.2
0.5
0.1
1, 2, 3, 4
1.5
1, 2, 3, 4, 6
UPPER COUPLER
[KINGPIN)
SERVICE
REPLACE
0.4
1504
CARRIER. SPARE WHEEL
REPLACE
1.2
1, 2, 3
1507
LANDING GEAR, CRANK,
JACK, PAD AND
BRACKETS
INSPECT
SERVICE
REPLACE
0.2
0.2
2.0
1, 2, 3
1503
16
1601
1605
18
1801
1802
1808
2.0
SPRINGS AND
SHOCK ABSORBERS
1, 2, 3
SPRINGS AND
ATTACHING PARTS
INSPECT
REPLACE
0.2
TORQUE, RADIUS AND
EQUALIZER RODS
INSPECT
REPLACE
0.2
BRACKETS, SPLASH
PLATES, MUDFLAPS,
AND NOSE ADAPTER
INSPECT
REPLACE
REPAIR
0.2
FENDERS AND
ATTACHING PARTS
INSPECT
REPLACE
0.1
STOWAGE HOSE TUBES
SERVICE
REPLACE
0.2
1.5
CABINETS
SERVICE
REPLACE
0.2
4.0
1, 2, 3
2.5
BODY, CAB, HOOD,
AND HULL
REELS, GROUNDING
STUDS
INSPECT
REPLACE
1, 2,
3
0.5
1.5
1, 2, 3
1.0
1, 2, 3
1, 2, 3, 4, 5, 6
3.0
1, 2, 3
0.1
0.5
B-5
TM 9-2330-384-14&P
Section II.
(1)
MAINTENANCE ALLOCATION CHART (Con’t)
(2)
(3)
Group
Maintenance
lumber Component/Assembly
Function
1811
TANK BODIES
COVER, MANHOLE
INSPECT
REPLACE
REPAIR
TANK
INSPECT
TEST
REPAIR
22
BODY CHASSIS OR
HULL, AND ACCESSORY ITEMS
2202
ACCESSORIES, TRANSFER HOSES, CAPS,
FUEL SERVICING
INSPECT
REPLACE
REPAIR
2210
DATA PLATES
REPLACE
47
4702
GAGES (NONELECTRICAL), WEIGHING,
AND MEASURING
DEVICES
GAGES. MEASURING
INSPECT
REPLACE
JET LEVEL SENSOR
REPLACE
PRECHECK, JET
LEVEL SENSOR
INSPECT
REPLACE
STRAINER
INSPECT
SERVICE
REPLACE
72
DISPENSING AND
SERVICING EQUIPMENT
7203
VALVE, EMERGENCY
INSPECT
REPLACE
REPAIR
VALVES
INSPECT
REPLACE
REPAIR
B-6
(6)
Remarks
TM 9-2330-384-14&P
Section II. MAINTENANCEALLOCATIONCHART(Con't)
(3)
(2)
(1)
(4)
Maintenance
Level
Maintenance Unit
Group
Number Component/Assembly Function
0
C
7203
(5)
(6)
DS GS Depot Toolsand
Equipment
Remarks
D
F
H
VALVE, EMERGENCY
(Con't)
LINES AND FITTINGS
Section
INSPECT
SERVICE
REPLACE
0.1
1,2,3,4
0.2
1.5
IIl. TOOL AND TEST EQUIPMENT
(2)
(3)
REQUIREMENTS
(4)
(5)
National/NATO
Stock Number
Tool
Number
Tool or Test
Equipment
Reference
Code
Maintenance
Level
1
O
Tool kit, General Mechanic's,
Automotive SC 5180-90-CL-N26
5180-00-177-7033
W 33004
2
O
Shop Equipment, Automotive Maintenance and Repair, Organizational
Maintenance Common No. 1
SC 4910-95-CL-A74
4910-00-754-0654
W 32593
Shop Equipment, Automotive Maintenance and Repair, Organizational
Maintenance, Common No. 1,
Less Power SC4910-95-CL-A73
4910-00-754-0653
W 32867
Shop Equipment, Automotive Maintenance and Repair, Unit Maintenance,
Common No. 2, Less Power
SC 4910-95-CL-A72
4910-00-754-0650
W 32730
3
4
O
O
Nomenclature
5
F, H
Tool kit, Welder's
SC 5180-90-CL-N39
5810-00-754-0661
W 58075
6
F, H
Shop Equipment, Automotive Maintenance and Repair, Field Maintenance
SC 4910-95-CL-A31
4910-00-754-0705
T24660
Shop Equipment, Automotive Maintenance and Repair, Field Maintenance,
Supplement SC 4910-95-CL-A62
4910-00-754-0706
T25619
7
8
F, H
O
Combustible Gas Indicator Set
6665-00-292-9945
6665-00-664-4650
B-7
TM 9-2330-384-14&P
Section IIl. TOOL AND TEST EQUIPMENT REQUIREMENTS (Con't)
(1)
(2)
Tool or Test
Equipment
Reference Maintenance
Code
Level
(3)
Nomenclature
9
(item Deleted]
10
[item Deleted]
11
O
Not Applicable.
Change1
National/NATO
Stock Number
5940-00-450-5802
Wire Terminal Kit
Section IV. REMARKS
B-8
(4)
(5)
Tool
Number
TM 9-2330-384-14&P
APPENDIX C
COMPONENTS OF END ITEM AND BASIC ISSUE ITEMS LISTS
Section I. INTRODUCTION
C-1. SCOPE.
This appendix lists Components of End Item and Basic Issue Items for the M1062 7500 Gallon
Fuel Tank Semitrailer to help you inventory items required for safe and efficient operation.
C-2. GENERAL.
The Components of End Item and Basic Issue Items Lists are divided into the following sections:
a. Section II. Components of End Item (COEI). This listing is for informational purposes only,
and is not authority to requisition replacements. These items are part of the end item, but are removed
and separately packaged for transportation or shipment. As part of the end item, these items must be
with the end item whenever it is issued or transferred between property accounts. Illustrations are
furnished to assist you in identifying the items.
b. Section III. Basic Issue Items (Bll). These are the minimum essential items required to
place the semitrailer in operation, to operate it, and to perform emergency repairs. Although shipped
separately packaged, BII must be with the semitrailer during operation and whenever it is transferred
between property accounts. The illustrations will assist you with hard-to-identify items. This manual is
your authority to request/requisition replacement Bll, based upon TOE/MTOE authorization of the end
item.
C-3. EXPLANATION OF COLUMNS.
The following provides an explanation of columns found in the tabular listing:
a. Column (1) - Illustration Number (Illus Number). This column indicates the number of the
illustration in which the item is shown.
b. Column (2) - National Stock Number. Indicates the National Stock Number (NSN)
assigned to the item and will be used for requisitioning purposes.
c. Column (3) - Description. Indicates the Federal item name and, if required, a description
to identify and locate the item. The last line for each item indicates the Federal Supply Code for
Manufacturer (FSCM) in parentheses, followed by the part number.
d. Column (4) - Unit of Measure (U/M). Indicates the measure used in performing the actual
operational/maintenance function. This measure is expressed by a two-character alphabetical
abbreviation (e.g., ea, in, pr).
e. Column (5) - Quantity Required (Qty Rqr). Indicates the quantity of the item authorized to
be used with/on the equipment.
Section II. COMPONENTS OF END ITEM
The M1062 7500 Gallon Fuel Tank Semitrailer does not have any Components of End Item
currently assigned.
C-1
TM 9-2330-384-14&P
Section Ill. BASIC ISSUE ITEMS
(1)
(2)
(3)
(4)
(5)
lllus
Number
National
Stock Number
Description
FSCM and Part Number
U/M
Qty
Rqr
1
2540-01-290-9726
BLOCK, CHOCK:
(in center fender bracket)
(5G881) 43HO
ea
2
BLOCK, JACKING: (used wlth tractor jack)
(in cabinet)
(74841) TKG 5455-1
ea
1
2
C-2
3
2510-00-741-7585
BOARD, GROUND, JACK:
(19207) 7417585
ea
2
4
5340-01-290-2727
COVER, WEATHERPROOF: (for fire extinguisher)
(7L093) 67637
ea
2
5
4210-01-290-0755
EXTINGUISHER, FIRE:
(7L093) A-A-393
ea
2
TM 9-2330-384-14&P
Section Ill. BASIC ISSUE ITEMS (Con't)
(1)
(2)
(3)
(4)
(5)
lllus
Number
National
Stock Number
Description
FSCM and Part Number
U/M
Qty
Rqr
6
4720-01-096-4390
HOSE ASSEMBLY, TRANSFER:
(in curbside stowage tube assembly)
(19207) 11685834
ea
1
7
4720-01-087-5876
HOSE ASSEMBLY, TRANSFER:
(in curbside stowage tube assembly)
(19207) 11685835
ea
1
8
5330-00-899-4509
ea
2
GASKET :
(use with hose assembly #11685834 or #11685835)
(96906) MS 27030-9
C-3
TM 9-2330-384-14&P
Section III. BASIC ISSUE ITEMS (Con't)
(1)
(2)
(3)
(4)
(5)
Illus
Number
National
Stock Number
Description
FSCM and Part Number
U/M
Qty
Rqr
C-4
9
4730-00-951-3293
REDUCER: (in cabinet)
(33813) 40CX30A
ea
1
10
4730-00-951-3296
REDUCER: (in cabinet)
(33813) 30CX40A
ea
1
11
5330-00-899-4509
ea
1
GASKET:
(use with reducer #40CX30A or #30CX40A)
(96906) MS 27030-9
TM 9-2330-384-14&P
Section Ill. BASIC ISSUE ITEMS (Con’t)
(1)
(2)
(3)
(4)
(5)
lllus
Number
National
Stock Number
Description
FSCM and Part Number
U/M
Qty
Rqr
12
5975-01-050-5707
ROD, GROUND:
(in roadside stowage tube assembly)
(97403) 13219EO462
ea
1
13
STICK, GAGE:
(in curbside stowage tube assembly)
(74841) TKG 5057-1
ea
1
14
WRENCH, LUG: (supplied with semitrailer)
(in cabinet)
(74841) TKG 5065-1
ea
1
WRENCH, LUG:
(order when replacement required)
(39428) 6679F2
ea
1
15
5120-01-077-7725
C-5/ (C-6 Blank)
TM 9-2330-384-14&P
APPENDIXD
ADDITIONALAUTHORIZATIONLIST
SectionI. INTRODUCTION
D-1. SCOPE.
a. This appendixlistsadditionalitemsyou areauthorizedforthesupportof theM10627500
Gallon
Fuel Tank Semitrailer.
b. This list identifies items that do not have to accompany the M1062 Tank Semitrailer and that do
not have to be turned in with it. These items are all authorized to you by CTA, MTOE, TDA, or JTA.
D-2.
EXPLANATION
OF LISTING.
National Stock Numbers, descriptions, and quantities are provided to help you identify and request
the additional items you require to support this equipment. The items are listed in alphabetical sequence by
item name.
Section II. ADDITIONAL
AUTHORIZATION
LIST
(1)
(2)
(3)
(4)
National
Stock Number
Description
FSCM and Part Number
U/M
Qty
Auth
4930-01-445-8098
Adapter, Pressure Fuel
(13854) 13854
ea
1
6150-01-319-2582
Cable Assembly, Power
(79409) 40707
ea
1
5340-00-558-8826
Insert, Screw Thread
(19207) 12296642
ea
1
4730-00-069-1187
Elbow, Pipe to Tube
(93061) 269NTA-6-4
ea
1
5330-01-205-8991
Gasket
(65063) 8422A388A
ea
1
5310-01-346-9445
Nut, Self-Locking
(45152) 1600460
ea
3
6220-01-354-7394
Orange Bubble
(65063) 8422CO02-04
ea
1
5330-01-169-8057
Packing, Preformed
(92003) 2661058A153
ea
1
P/N-12296639-1
Pipe, Black
(3/4" NPT x 2") 12296639-1
ea
1
Change1
D-1
TM 9-2330-384-14&P
Section II. ADDITIONALAUTHORIZATION
LIST(Con't)
(2)
(1)
Description
FSCM and Part Number
National
Stock Number
(3)
(4)
U/M
Qty
Auth
4930-01-133-6942
Poppet Assembly
(79318) 2721404
ea
1
5340-01-415-8674
Ring Clamp
(98905) 8422537A
ea
1
5305-01-337-9120
Screw, Cap, Hexagon Head
(45152) 1754140
ea
3
5940-00-926-0085
Terminal, Quick Disconnect
(59661) 95643216-5
ea
1
5310-01-198-7838
Washer
(14109) FSP7-2-1
ea
3
6220-01-355-4371
Warning Light
(45152) 1795570
ea
1
5310-00-582-5965
Washer, Lock
(96906) MS 35338-44
ea
3
D-2
Change1
TM 9-2330-384-14&P
APPENDIX E
EXPENDABLE/DURABLE SUPPLIES AND MATERIALS LIST
Section I. INTRODUCTION
E-1. SCOPE.
This appendix lists all expendable/durable supplies and materials you will need to operate and
maintain the M1062 7500 Gallon Fuel Tank Semitrailer. These items are authorized to you by
CTA 50-970, ExpendablelDurable Items (Except Medical, Class V, Repair Parts, and Heraldic Items),
or CTA 8-100, Army Medical Department Expendable/Durable Items.
E-2. EXPLANATION OF COLUMNS.
a. Column (1) - Item Number. This number is assigned to the entry in the listing and is
referenced in the INITIAL SETUP of maintenance paragraphs or narrative instructions to identify the
material needed.
b. Column (2) - Level. This column identifies the lowest level of maintenance that requires the
listed item.
C - Operator/Crew
O - Unit (Organizational)
F - Direct Support
G - General Support
c. Column (3) - National Stock Number. This is the National Stock Number assigned to the
item: use it to request or requisition the item.
d. Column (4) - Description. Indicates the Federal item name and, if required, a description
to identify the item. The last line for each item indicates the Federal Supply Code for Manufacturer
(FSCM) in parentheses, followed by the part number, if applicable.
e. Column (5) - Unit of Measure (U/M). Indicates the measure used in performing the actual
maintenance function. This measure is expressed by an alphabetical abbreviation (e.g., ea, in, gal). If
the unit of measure differs from the unit of issue, requisition the lowest unit of issue that will satisfy your
requirements.
E-1
TM 9-2330-384-14&P
Section II. EXPENDABLE/DURABLE SUPPLIES AND
MATERIALS LIST
(1)
(2)
Item
lumber Level
1
(3)
(4)
(5)
National
Stock Number
Description
U/M
O
2
ANTIFREEZE: Ethylene Glycol. Inhibited. Heavy-duty,
Single Package (81349) MIL-A-46153
6850-00-181-7929
1 Gallon Can
6850-00-181-7933
6850-00-181-7940
5 Gallon Can
55 Gallon Drum
O
BARRIER MATERIEL: Greaseproof
(81349) MIL-B-121
8135-00-171-0930
3
O
4
O
8020-00-297-6658
O
O
C
50 Sheets
sh
55 Gallon Drum
gal
1 Gallon Can
gal
5 Pound Carton
lb
DETERGENT: General Purpose, Liquid
(81349) MIL-D-16791
7930-00-282-9699
E-2
gr
CORROSION PREVENTIVE COMPOUND:
(81349) MIL-C-11796
O
8030-00-231-2354
9
1 Gross
ea
CORROSION PREVENTIVE COMPOUND:
(81349) MIL-C-83933
O
8030-00-935-7158
8
BRUSH: Paint. Oval 1-1/8 in.. H-B-491, Type I.
Class 2, Style 10
COMPOUND: Deck Cover, Type 2
MIL-C-81346B
8010-01-024-4008
7
yd
CLOTH: Abrasive, Crocus
(81348) P-C-458
5350-00-221-0872
6
100 Yard Roll
CHALK: Marking
(81348) SS-C-255
7510-00-223-6701
5
gal
gal
gal
1 Gallon Can
gal
TM 9-2330-384-14&P
SectIon II. EXPENDABLE/DURABLE SUPPLIES AND
MATERIALS LIST (Con't)
(1)
Item
Number
10
(2)
Level
(3)
National
Stock Number
C
C
C
O
C
C
C
gal
gal
14 Ounce Cartridge
1-3/4 Pound Can
6-1/2 Pound Can
oz
lb
lb
14 Ounce Can
oz
6 Gallon Can
65 Gallon Drum
gal
gal
1 Quart Can
6 Gallon Can
qt
gal
LUBRICATING OIL: OE/HDO 30
(81349) MIL-L-2104
9150-00-186-6681
9150-00-188-9858
9150-00-189-6729
17
5 Gallon Can
65 Gallon Drum
LUBRICATING OIL: Gear, Multipurpose, GO 80/90
(81349) MIL-L-2105
9150-01-035-5392
9150-01-035-5393
16
pt
gal
gal
LUBRICATING OIL: Engine PE-10-1
(81349) MIL-L-21260
9150-00-111-3199
9150-00-111-0208
15
U/M
(5
GREASE: Ball and Roller Bearing
(73219) 18901
9160-01-095-5512
14
U/M
GREASE: Automotive and Artillery
(81349) MIL-G-10924
9150-00-935-1017
9150-00-190-0904
9150-00-190-0905
13
1 Pint Can
5 Gallon Can
56 Gallon Drum
(5)
FUEL OIL, DIESEL: Winter. DF-1
(81348) VV-F-800
9140-00-286-5287
9140-00-286-5288
12
Description
DRY CLEANING SOLVENT: Type II
(81348) P-D-680
6850-00-110-4498
6850-00-274-5421
6850-00-285-8011
11
(4)
C
1 Quart Can
5 Gallon Can
55 Gallon Drum
qt
gal
gal
PAPERBOARD: Wrapping and Cushioning
(81348) PPP-P-291
8135-00-290-3402
250 Foot Roll
ft
E-3
TM 9-2330-384-14&P
Section II. EXPENDABLE/DURABLESUPPLIESAND
MATERIALSLIST(continued)
(1)
Item
Number Level
18
(3)
(4)
(5)
National
StockNumber
Description
U/M
(2)
RAG: Wiping, Cotton and Cotton Synthetic
(58536) A-A-531
C
7920-00-205-1711
18.1
O
19
O
20
C
21
6850-01-159-4844
3439-00-247-6921
oz
SOLDER: Lead
(81348) QQ-S-571
in
5 Gallon Can
gal
6850-01-246-6545
55 Gallon Drum
gal
TAG: Marker
(81349) MIL-T-12755
O
50 Each
260 Inch Roll
60 Yard Roll
ft
ft
TAPE: Pressure Sensitive Adhesive
(81348) PPP-T-97
C
60 yard roll
yd
TAPE: Pressure Sensitive Adhesive, Masking, Flat,
2 Inch Width (81349) MIL-T-2397
O
7510-00-473-9513
E-4
yd
TAPE: Mylar
(74841)
O
7510-00-952-7212
26
in
TAPE: Duct, 2 Inch Width
(07124) C-519
O
3 Inch Width STK 70062
6Inch Width STK 70095
25
ea
TAPE: Antiseize, 1/2 Inch width
(81349) MIL-T-27730A
O
5640-00-103-2254
24
SILICONE COMPOUND
(11862) 12346193
6850-01-246-6544
8030-00-889-3535
23
lb
STABILIZER ADDITIVE
(81349) M IL-S-53021
9905-00-537-8954
22
50 Pound Bale
Change1
60 Yard Roll
yd
TM 9-2330-384-14&P
APPENDIX F
REPAIR PARTS AND SPECIAL TOOLS LIST
Section I. INTRODUCTION
F-1. SCOPE.
This RPSTL lists and authorizes spares and repair parts; special tools; special test,
measurement, and diagnostic equipment (TMDE); and other special support equipment required for
performance of operator’s, organizational, and direct support and general support maintenance of the
M1062 7500 Gallon Fuel Tank Semitrailer. It authorizes the requisitioning, issue, and disposition of
spares, repair parts, and special tools as indicated by the Source, Maintenance, and Recoverability
(SMR) codes.
F-2. GENERAL.
In addition to Section I. Introduction, this Repair Parts and Special Tools List is divided into the
following sections:
a. Section ii, Repair Parts List. A list of spares and repair parts authorized by this RPSTL for
use in the performance of maintenance. The list also includes parts which must be removed for
replacement of the authorized parts. Parts lists are composed of functional groups in ascending
alphanumeric sequence, with the parts in each group listed in ascending figure and item number
sequence. Bulk materiels are listed in item name sequence. Repair kits are listed separately in their
own functional group within Section II. Repair parts for reparable special tools are also listed in this
section.
b. Section iii, Special Tools List. A list of special tools, special TMDE, and other special
support equipment authorized by this RPSTL [as indicated by Basis of Issue (BOI) information in the
DESCRlPTlON AND USABLE ON CODE column] for the performance of maintenance.
c. Section IV, Cross-reference index. A list, in National Item Identification Number (NIIN)
sequence, of all National stock numbered items appearing in the listing, followed by a list in
alphanumeric sequence of all part numbers appearing in the listings. National stock numbers and part
numbers are cross-referenced to each illustration figure and item number appearance. The figure and
item number index lists figure and item numbers in alphanumeric sequence and cross-references NSN,
CAGE, and part numbers.
F-3.
EXPLANATION OF COLUMNS (SECTIONS II AND Ill).
a. ITEM NO. [Column (1)]. Indicates the number used to identify items called out in the
illustration.
b. SMR CODE [Column (2)]. The Source, Maintenance, and Recoverability (SMR) code is a
5-position code containing supply/requisitioning information, maintenance category authorization
criteria, and disposition instruction, as shown in the following breakout:
Source Code
Maintenance Code
Recoverability Code
5th
position
How you get an item.
Who can install,
replace, or use
the item.
can do
Who
complete repaIr*
on the item.
Who determines disposition
action on an unserviceable
item.
Complete Repair: Maintenance capacity, capability, and authority to perform all corrective maintenance tasks of the
“Repair” function in a use/user environment in order to restore serviceability to a failed item.
*
F-1
TM 9-2330-384-14&P
F-3.
EXPLANATION OF COLUMNS (SECTIONS II AND Ill) (Con't).
(1)
Source Code. The source code tells you how to get an item needed for maintenance,
repair, or overhaul of an end item/equipment. Explanations of source codes follow:
Code
Application/Explanation
PA
PB
PC**
Stocked items: use the applicable NSN to request/requisition items with these source codes. They are authorized to
the category indicated by the code entered in the 3d position of the SMR code.
PD
PE
PF
PG
** Items coded PC are subject to deterioration,
MO - (Made
Level)
MF - (Made
Level)
MH - (Made
Level)
MD - (Made
at Unit
at DS
at GS
at Depot)
. . . . . . . . . . . . . . . . . . . . . . . . . . .....................
Items with these codes are not to be requested/requisitioned individually. They must be made from bulk materiel
which is identified by the part number in the DESCRIPTION
AND USABLE ON CODE (UOC) column and listed in the
bulk materiel group of the repair parts list in this RPSTL. If
the item is authorized to you by the 3d position code of the
SMR code, but the source code indicates it is made at a
higher level, order the item from the higher level of maintenance.
...............................................
AO - (Assembled
Unit Level)
AF - (Assembled
DS Level)
AH - (Assembled
GS Level)
AD - (Assembled
Depot)
by
by
by
at
Items with these codes are not to be requested/requisitioned individually. The parts that make up the assembled
item must be requisitioned or fabricated and assembled at
the level of maintenance indicted by the source code. If
the 3d position code of the SMR code authorizes you to
replace the item, but the source code indicates that the
item is assembled at a higher level, order the item from the
higher level of maintenance.
. . . . . . . . . . . . . . . . . . . . . . . . . . . . . . . . . . . ............
NOTE
Cannibalization or controlled exchange, when authorized, may be used as a
source of supply for items with the following source codes, except for those
source coded “XA”
XA - DO NOT requisition an “XA”-coded item. Order its next higher assembly.
XB - If an “XB” item is not available from salvage, order it using the CAGE and part number
given.
XC - Installation drawing, diagram, instruction sheet, field service drawing, that is identified by
manufacturer’s part number.
XD - Item is not stocked. Order an “XD”-coded item through normal supply channels using the
CAGE and part number given, if no NSN is available.
F-2
TM 9-2330-384-14&P
F-3.
EXPLANATION OF COLUMNS (SECTIONS II AND Ill) (Con't).
(2)
Maintenance Code. Maintenance codes tell you the level(s) of maintenance authorized to USE and REPAIR support items. The maintenance codes are entered in the
third and fourth positions of the SMR code as follows:
(a)
The maintenance code entered in the third position tells you the lowest maintenance level authorized to remove, replace, and use an item. The maintenance
code entered in the third position will indicate authorization to one of the following levels of maintenance.
Code
Application/Explanation
C
-
Crew or operator maintenance done within unit maintenance.
O
-
Organizational level can remove, replace, and use the item.
F
-
Direct support level can remove, replace, and use the item.
H
-
General support level can remove, replace, and use the item.
D
-
Depot level can remove, replace, and use the item.
NOTE
Some limited repair may be done on the item at a lower level of maintenance, if authorized by the Maintenance Allocation Chart (MAC) and SMR
codes.
(b)
The maintenance code entered in the fourth position tells whether or not the item
is to be repaired and identifies the lowest maintenance level with the capability to
do complete repair (i.e., perform all authorized “Repair” functions). This position will contain one of the following maintenance codes:
Code
(3)
Application/Explanation
O
-
Organizational is the lowest level that can do complete repair of the
item.
F
-
Direct support is the lowest level than can do complete repair of the
item.
H
-
General support is the lowest level that can do complete repair of the
item.
D
-
Depot is the lowest level that can do complete repair of the item.
Z
-
Nonreparable. No repair is authorized.
B
-
No repair is authorized. (No parts or special tools are authorized for the
maintenance of a “B”-coded item.) However, the item may be reconditioned by adjusting, lubricating, etc., at the user level.
Recoverability Code. Recoverability codes are assigned to items to indicate the disposition action on unserviceable items. The recoverability code is entered in the fifth
position of the SMR code as follows:
F-3
TM 9-2330-384-14&P
F-3.
EXPLANATION OF COLUMNS (SECTIONS II AND Ill) (Con't).
Recoverability
Codes
Application/Explanation
Z
-
Nonreparable item. When unserviceable, condemn and dispose of the item at
the level of maintenance shown in the 3d position of the SMR code.
O
-
Reparable item. When uneconomically reparable, condemn and dispose of
the item at unit level.
F
-
Reparable item. When uneconomically reparable, condemn and dispose of
the item at the intermediate direct support level.
H
-
Reparable item. When uneconomically reparable, condemn and dispose of
the item at the intermediate general support level.
D
-
Reparable item. When beyond lower level repair capability, return to depot.
Condemnation and disposal of item not authorized below depot level.
A
-
Item requires special handling or condemnation procedures because of
specific reasons (e.g., precious metal content, high dollar value, critical materiel, or hazardous materiel). Refer to appropriate manuals/directives for
specific instructions.
c. CAGEC [Column (3)]. The Commercial and Government Entity (CAGE) Code (C) is a
5-digit alphanumeric code which is used to identify the manufacturer, distributor, or Government
agency, etc., that supplies the item.
NOTE
When you use an NSN to requisition an item, the item you receive may have
a different part number from the part ordered.
d. PART NUMBER [Column (4)]. Indicates the primary number used by the manufacturer
(individual, company, firm, corporation, or Government activity), which controls the design and
characteristics of the item by means of its engineering drawings, specifications standards, and
inspection requirements to identify an item or range of items.
e. DESCRIPTION AND USABLE ON CODE (UOC) [Column (5)]. This column includes the
following information:
F-4
(1)
The Federal item name and, when required, a minimum description to identify the
item.
(2)
Spare/repair parts that make up an assembled item are listed immediately following
the assembled item line entry.
(3)
Part numbers for bulk materiels are referenced in this column in the line item entry for
the item to be manufactured/fabricated.
(4)
When the item is not used with all serial numbers of the same model, the effective
serial numbers are shown on the last line(s) of the description (before UOC).
(5)
The usable on code, when applicable (see paragraph F-5, Special information).
(6)
The statement “END OF FIGURE” appears just below the last item description in Column 5 for a given figure in both Section II and Section Ill.
TM 9-2330-384-14&P
F-3.
EXPLANATION OF COLUMNS (SECTIONS II AND Ill) (Con't).
f. QTY [Column (6)]. The QTY (quantity per figure column) indicates the quantity of the item
used in the breakout shown on the illustration figure, which is prepared for a functional group,
subfunctional group, or an assembly. A “V” appearing in this column in lieu of a quantity indicates that
the quantity is variable and the quantity may vary from application to application.
F-4. EXPLANATION OF COLUMNS (SECTION IV).
a. National Stock Number (NSN) Index.
(1)
STOCK NUMBER Column. This column lists the NSN by National Item Identification
Number (NIIN) sequence. The NIIN consists of the last nine digits of the NSN (e.g.,
NSN
5305-01-674-1467 ). When using this column to locate an item, ignore the first
NIIN
4 digits of the NSN. However, the complete NSN should be used when ordering items
by stock number.
(2)
F/G. Column. This column lists the number of the figure where the item is identified/
located. The figures are in numerical order in Section II and Section III.
(3)
ITEM Column. The item number identifies the item associated with the figure listed in
the adjacent FIG. column. This item is also identified by the NSN listed on the same
line.
b. Part Number Index. Part numbers in this index are listed by part number in ascending
alphanumeric sequence (i.e., vertical arrangement of letter and number combination which places the
first letter or digit of each group in order A through Z, followed by the numbers 0 through 9 and each
following letter or digit in like order).
(1) CAGEC Column. The Commercial and Government Entity (CAGE) Code (C) is a
5-digit alphanumeric code used to identify the manufacturer, distributor, or Government agency, etc., that supplies the item.
(2)
PART NUMBER Column. Indicates the primary number used by the manufacturer
(individual company, firm, corporation, or Government activity), which controls the
design and characteristics of the item by means of its engineering drawings, specifications standards and inspection requirements to identify an item or range of items.
(3)
STOCK NUMBER Column. This column lists the NSN for the associated part number
and manufacturer identified in the PART NUMBER and CAGEC columns to the left.
(4)
FIG. Column. This column lists the number of the figure where the item is identified/
located in Section II and Section Ill.
(5)
ITEM Column. The item number is that number assigned to the item as it appears in
the figure referenced in the adjacent figure number column.
c. Figure and Item Number Index.
(1)
F/G. Column. This column lists the number of the figure where the item is identified/
located in Section II and Section Ill.
(2)
ITEM Column. The item number is that number assigned to the item as it appears in
the figure referenced in the adjacent figure number column.
(3)
STOCK NUMBER Column. This column lists the NSN for the item.
(4)
CAGE Column. The Commercial and Government Entity (CAGE) Code (C) is a 5-digit
alphanumeric code used to identify the manufacturer, distributor, or Government
agency, etc., that supplies the item.
F-5
TM 9-2330-384-14&P
F-4. EXPLANATION OF COLUMNS (SECTION IV) (Con't).
(5)
PART NUMBER Column. Indicates the primary number used by the manufacturer
(individual company, firm, corporation, or Government activity), which controls the
design and characteristics of the item by means of its engineering drawings, specifications standards and inspection requirements to identify an item or range of items.
F-5. SPECIAL INFORMATION.
a. Usable On Code. The usable on code appears in the lower left corner of the DESCRlPTlON
column heading. Usable on codes are shown as “UOC: . . . . . . . . . ” in the DESCRIPTION column
(justified left) on the first line following applicable item description/nomenclature.
b. Fabrication Instructions. Bulk materiels required to manufacture items are listed in the Bulk
Materiel Functional Group of this RPSTL. Part numbers for bulk materiels are also referenced in the
DESCRIPTION column of the line item entry for the item to be manufactured/fabricated. Detailed
fabrication instructions for items source coded to be manufactured or fabricated are found in
Appendix G of this manual.
c. Assembly Instructions. Detailed assembly instructions for items source coded to be
assembled from component spare/repair parts are found in Chapters 4 and 5 of this manual. Items that
make up the assembly are listed immediately following the assembly item entry or reference is made to
an applicable figure.
d. Kits. Not applicable. There currently are no kits assigned to the M1062 7500 Gallon Fuel
Tank Semitrailer.
e. Index Numbers. Items which have the word “BULK” in the FIG. column will have an index
number shown in the ITEM column. This index number is a cross-reference between the National Stock
Number/Part Number Index and the bulk materiel list in Section II.
f. Associated Publications. Not applicable.
F-6. HOW TO LOCATE REPAIR PARTS.
a.
When National Stock Number or Part Number is Not Known:
(1)
First. Using the Table of Contents, determine the assembly group or subassembly
group to which the item belongs. This is necessary since figures are prepared for
assembly groups and subassembly groups, and listings are divided into the same
groups.
(2)
Second. Find the figure covering the assembly group or subassembly group to which
the item belongs.
(3)
Third. Identify the item on the figure and use the Figure and Item Number Index to find
the NSN.
b. When National Stock Number or Part Number is Known:
F-6
(1)
First. Using the National Stock Number or Part Number Index, find the pertinent National Stock Number or Part Number. The NSN Index is in National Item Identification
Number (NIIN) sequence [see paragraph F-4.a.(1)]. The part numbers in the Part
Number Index are listed in ascending alphanumeric sequence (see paragraph F-4. b).
Both indexes cross-reference you to the illustration/figure and item number of the item
you are looking for.
(2)
Second. After finding the figure and item number, turn to the illustration figure, verify
that the item is the one you’re looking for, then locate the item number in the repair
parts list for the figure.
TM 9-2330-384-14&P
F-7.
ABBREVIATIONS.
For standard abbreviations see MIL-STD-12, Military Standard Abbreviations
Drawings, Specifications, Standards, and In Technical Documents.
Abbreviations
NIIN .....................
RPSTL ...................
for Use on
Explanation
National Item Identification Number (consists of
the last 9 digits of the NSN)
Repair Parts and Special Tools List
F-7
SECTION
II
TM 9-2330-384-14&P
C01
0
@1
1
i@
r,
9
2
5
z
I
- 'I
< @*
+ @@clj II
1 1@
7
--
6
3
3
Figure 1. Voltage Control Unit and Mounting Hardware.
SECTION II
(1)
(2)
(3)
ITEN SMR
NO CODE NSN
TM 9-2330-384-14&P
(4)
C01
(6)
(5)
PART
CAGECNUbMER
(7)
DESCRIPTION AND USABLE ON CODES (UOC) QTY
GROUP06 ELECTRICAL SYSTEM
GROUP 0608
FIG.
*
*1 PAOZZ
6110014286031
4J564
DT-308
*
*
*
2
3
4
5
6
7
5975001521075
4730012970172
4730012970171
5310000614650
5310008942353
5305002253843
03743
61424
61424
96906
96906
80204
BL50
N6MC8
N10MC8
MS51943-31
MS16213-61
B1821BH025C100N
PAOZZ
PAOZZ
PAOZZ
PAOZZ
PAOZZ
PAOZZ
MISCELLANEOUS
ITEMS
1 VOLTAGE CONTROL UNIT AND
MOUNTING HARDWARE
CONTROL, ELECTRICAL
FOR COMPONENT
PARTS SEE FIG.2 .....................
LOCKNUT,ELECTRICAL
..................
ADAPTER,STRAIGHT,PI
.................
ADAPTER,STRAIGHT,PI
.................
NUT,SELF-LOCKING,HE
.................
WASHER,LOCK .........................
SCREW,CAP,HEXAGON
H .................
END OF FIGURE
1
4
2
2
4
8
4
SECTION II
TM 9-2330-384-14&P
4
3
2
1
1
5
1
13
1
1@ (7)
i
@ (77)
0
1
12
1
1
1
10
6
1
11
1
1
10
7
9
/101
1
a
Figure 2. Control
Box Component
Parts.
SECTION II
(1)
(2)
ITEM
SMR
NO CODE
(3)
NSN
TM 9-2330-384-14&P
(4)
C01
(6)
(5)
PART
CAGEC NUMBER
DESCRIPTION
(7)
AND USABLE ON CODES (UOC) QTY
GROUP 0608 MISCELLANEOUS ITEMS
FIG.
1
2
3
4
5
*
6
*
7
8
9
10
11
12
13
*
PAOZZ
PAOZZ
PAOZZ
PAOZZ
PAOZZ
PAOZZ
PAOZZ
PAOZZ
PAOZZ
PAOZZ
PAOZZ
PAOZZ
PAOZZ
5935008563513
5306002264824
5935008463884
5305000680500
5935008463883
5925011904632
5925009001904
5310005845005
5310004093355
5905005538197
5310009349739
5310002641337
5305008892997
81343
80204
96906
96906
96906
89346
13445
68505
24617
81349
96906
34895
96906
SAEJ560
B1621BH031C063N
MS75021-2
MS90725-3
MS75021-1
714250C1
30056-10
8X163
120376
RER75F1502R
MS35649-242
1041571-5
MS35206-215
2 CONTROL BOX COMPONENT PARTS
CONNECTOR,PLUG,ELEC
(12 VOLT) ......
BOLT,MACHINE
........................
CONNECTOR,RECEPTACL
(24 VOLT) ......
SCREW,CAP,HEXAGON
H .................
CONNECTOR,RECEPTACL
(24 VOLT) ......
CIRCUIT
BREAKER .....................
CIRCUIT
BREAKER .....................
NUT,PLAIN,HEXAGON
...................
NUT,PLAIN,HEXAGON
...................
RESISTOR,FIXED,WIRE
.................
NUT,PLAIN,HEXAGON
...................
WASHER,LOCK .........................
SCREW,MACHINE .......................
END OF FIGURE
2-1
1
2
1
4
1
1
8
4
2
2
4
4
4
SECTION
TM 9-2330-384-14&P
II
9
2
7
5
4
3
10
12
16
14
13
14
17
20
is
Figure 3. Front and Side Marker Lights and Related Parts.
SECTION II
(1)
(2)
(3)
ITEM SMR
NO CODE NSN
TM 9-2330-384-14&P
(4)
C01
(6)
(5)
PART
CAGECNUNMER
(7)
DESCRIPTION AND USABLEON CODES (UOC) QTY
GROUP: 0609 LIGHTS
FIG.
*
1
2
2
3
4
5
6
PAOZA
PBOOO
PBOOO
PAOZZ
PAOZZ
PAOZZ
MOOZZ
6220008975856
6220012856082
6220013151458
5331008975859
6240009145572
5999011803411
6 MOOZZ
7
8
9
* 10
PAOZZ
PAOZA
PAOZZ
MOOZZ
5325011271390
6220009058498
4730012899537
10 MOOZZ
11
12
13
14
15
16
17
18
19
20
PAOZZ
PAOZZ
PAOOO
PAOZZ
PAOZZ
PAOZZ
PAOZZ
PAOZZ
PAOZZ
PAOZZ
5330010823189
5305012888320
5975013172425
4730012970171
4730013193381
4730012970172
5330013181911
5340013203920
5320011235674
5340013182042
13226
74841
74841
13226
08108
13226
74841
51A
TKG5310-1
TKG5310-2
52
97
920120
STK14373-1
74841
STK14373-6
13226
13226
93061
74841
920123
B-50500012
N6ME4
LKA3332-1
74841
LKA3332-4
13226
24617
74841
61424
74841
61424
74841
74841
96906
74841
59
163137
TKG5526-1
N10MC8
TKG0571-1
N6MC8
TKG0573-1
TKG0572-1
MS2060OB8W6
TKGO084-4
3 FRONT AND SIDE MARKER LIGHTS
AND RELATED PARTS
LENS,LIGHT
(AMBER) .................
LIGHT,MARKER,CLEARA
.................
LIGHT,MARKER,CLEARA
.................
.O-RING .............................
LAMP,INCANDESCENT ..................
LIGHT-SWITCH .......................
WIRE,14GA,BLACK
(5.5 FT LG) MAKE
FROM P/N M22759-14-14-1
.............
WIRE,14GA,BLACK
FOR SIDE LIGHT
(1.5 FT LG) MAKE FROM P/N M22759-1414-1 ................................
GROMMET,METALLIC ...................
LIGHT,MARKER,CLEARA
................
ELBOW,PIPE TO TUBE .................
TUBING
(4.5 FT LG) MAKE FROM P/N
8588 ................................
TUBING
(1.0 FT.LG) MAKE FROM P/N
8588 ................................
GASKET ..............................
SCREW,TAPPING .......................
TEE,ELECTRICAL
COND .................
ADAPTER,STPAIGHT,PI
................
TEE,HOSE ...........................
ADAPTER,STRAIGHT,PI
................
GASKET .............................
COVER,ACCESS .......................
RIVET,BLIND ........................
PLATE,MENDING ......................
END OF FIGURE
3-1
4
2
2
1
1
1
1
1
1
1
1
1
2
12
2
2
1
1
1
1
2
1
SECTION II
TM 9-2330-384-14&P
3
2
4
19
12
13 1415
16
10
6
5
7
8
18
9
---------------------17
-------20
9
22
21
30
27
26
25
24
30
,
'A
.1
31
32
33
34 35 36 37
29
39 36 38
Figure 4. Rear Side Marker Light Assembly, Rear Marker Light, and
Stop, Turn Signal, and Taillight Assembly.
23
29
SECTION II
(2)
(3)
(1)
SMR
ITEM
CODE CAGEC
NO
TM9-2330-384-14&P
(6)
(5)
(4)
PART
DESCRIPTION AND USABLE ON CODES (UOC) QTY
NUMBER
GROUP: 0609 LIGHTS
FIG. 4 REAR SIDE MARKER LIGHT
ASSEMBLY , REAR MARKER LIGHT,
AND STOP, TURN SIGNAL, AND
TAILLIGHT ASSEMBLY
1
2
3
4
5
6
7
6
9
10
11
12
13
14
15
PAOZZ
PBOOO
PAOZZ
PAOZZ
PAOZZ
PAOZZ
PAOZZ
PAOZZ
PAOZZ
PAOZZ
PBOOO
PAOZZ
PAOZZ
PAOZZ
MOOZZ
13226
74841
98441
13226
93061
08108
13226
13226
24617
13226
74841
13226
08108
13226
74841
209
TKG5313-1
1/8HHP-S
M210-01-0365
68C-6-2
97
202
201R
162847
51R
TKG5311-2
52
97
55A
STK14372-4
16
17
18
19
20
20
21
22
23
24
PAOZZ
PAOZZ
PAOZZ
PAOZZ
PBOOO
PBOOO
PAOZZ
PAOZZ
PAOZZ
MOOZZ
13226
96906
13226
13226
74841
74841
13226
13226
08108
74841
56
MS35489-97
B-6C
69
TKG5312-2
TKG5312-3
75A
72
1157A
STK14377-3
2 5 PAOZZ 1 3 2 2 6 7 6
2 6 PAOZZ 1 3 2 2 6 M 7 0 - C 2 - C 3 6 5
2 7 MOOZZ 7 4 8 4 1 S T K 1 4 3 7 2 - 5
28
29
30
31
32
33
34
35
PAOZZ
PAOZZ
PAOZZ
PBOOO
PAOZZ
PAOZZ
PAOZZ
MOOZZ
9 6 9 0 6 MS35489-97
1 3 2 2 6 71R
13226 79
74841 TKG5312-1
96906 MS35489-97
13226 M70-02-0365
13226 7 6
74841 STK14373-2
36
37
38
39
PAOZZ 1 3 2 2 6
PAOZZ 0 8 1 0 8
PAOZZ 1 3 2 2 6
MOOZZ 7 4 8 4 1
75A
1157A
72
STK14375-1
GASKET
LIGHT ASSEMBLY,CLEA
.PLUG,PIPE
. L I G H T ASSEMBLY ,CLEA
.ADAPTER .STRAIGHT,PI
.LAMP, INCANDESCENT
.PACKING,PREFORMED
(RED)
LENS,LIGHT
SCREW ,TAPPING,THREA
LENS,LIGHT
LIGHT (MARKER ,CLEARA
.PACKING,PREFORMED
.LAMP,INCANDESCENT
.LIGHT-SWITCH
.WIPE,14 GAUGE (2 FT LG) MAKE FROM
PN M22759/14-14-8
.GROMMET,METALLIC
.GROMMET,NONMETALLIC
.LIGHT,MARKER,CLEARA
PACKING, PREFORMED
(LEFT)
STOP LIGHT-TAILLIGH
(RIGHT)
LIGHT ASSEMBLY,CLEA
.CONTACT ASSEMBLY, EL
.PACKING,PREFORMED
.LAMP,INCANDESCENT
(1.5 FT LG) MAKE
.WIRE,14
GAUGE
FROM PN M 2 2 7 5 9 / 1 4 - 1 4 - 4
.GROMMET,NONMETALLIC
.LIGHT,MARKER,CLEARA
.WIRE,14 GAUGE (1.5 FT (G) MAKE
FROM PN M 2 2 7 5 9 / 1 4 - 1 4 - 8
.GROMMET,NONMETALLIC
(RED)
LENS,LIGHT
GASKET
(LEFT)
STOP LIGHT-TAlLLIGH
.GROMMET,NONMETALLIC
.LIGHT,MARKER,CLEARA
.GROMMET,NONMETALLIC
(6.0 INCH) MAKE
.WIRE ,14 GAUGE
FROM M 2 2 7 5 9 / 1 4 - 1 4 - 1
.CONTACT A S S E M B L Y , E L
. LAMP,INCANDESCENT
.PACKING,PREFORMED
(6.0 INCH) MAKE
.WIRE,14 GAUGE
FROM M22759/14-14-2
END OF FIGURE
4-1
3
1
1
I
1
3
3
3
30
2
2
1
1
1
1
1
1
1
2
1
1
2
1
1
1
1
1
1
1
4
4
2
1
1
1
1
2
1
1
1
TM 9-2330-384-14&P
SECTION II
Figure 5. Rear Stop and Blackout Light Assembly.
SECTION II
(3)
(2)
(1)
SHR
lTEM
CODE CAGEC
NO
TH9-2330-384-14&P
(6)
(5)
(4)
PART
DESCRIPTION AND USABLE ON CODE (UOC) QTY
NUMBER
GROUP: 0609 LIGHTS
FIG. 5 REAR STOP AND BLACKOUT LIGHT
ASSEMBLY
1
2
3
4
5
6
7
8
PAOZZ
PAOZZ
PAOOO
XAOZZ
PAOZZ
PAOZZ
PAOZZ
PAOZZ
74841
96906
96906
96906
19207
19207
19207
19207
ZKA7799
MS16213-63
MS51330-1
MS53047-1
7526018
8694464
8338566
8338567
BOLT,EXTERNALLY REL
WASHER ,LOCK
STOP L I G H T - T A I L L I G H
.LIGHT,PARKING
.RETAINER,LENS
.GASKET
SHELL,ELECTRICAL CC
WASHER,SLOTTED
END OF FIGURE
5-1
4
4
2
1
1
1
4
4
TM 9-2330-384-14&P
SECTION II
Figure 6. Front Half of Chassis Wiring and Related Parts.
SECTION
II
(3)
(1)
(2)
ITEM
SMR
NO
CODE CAGEC
TM9-2330-384-14EP
(6)
(5)
(4)
PART
DESCRIPTION AND USABLE ON CODES (UOC) QTY
NUMBER
GROUP: 0613 HULL OR CHASSIS WIRING
HARNESS
FIG. 6 FRONT HALF OF CHASSIS WIRING
AND RELATED PARTS
1
2
3
4
PAOZZ
PAOZZ
AOOOO
MOOZZ
96906
96906
74841
74841
5
MOOZZ 74841
STK14373-5
6
MOOZZ
74841
STK14374-3
7
MOOZZ
74841
TKG5320-1-4
8
MOOZZ
74841
STK14375-4
9 PAOZZ 0 0 7 7 9
1 0 XDOZZ 1 4 7 2 6
11 PAOZZ 14109
12 AOOOO 7 4 8 4 1
13 MOOZZ 7 4 8 4 1
327638
B40718
FSP11-1-4
TKG5309-2
LKA3334-1
14
MOOZZ
74041
STK14377-1
15
MOOZZ
74841
LKA9655-1
16
MOOZZ
74841
TKG1336-6-1
17
MOOZZ
74841
STK14372-1
18
19
20
PAOZZ 14726
PFFZZ 74841
PFFZZ 74841
MS25036-108
MS25036-112
TKG5309-1
LKA3334-5
B4052B
TKG0149-6
TKG0149-4
TERMINAL,LUG
TERMINAL,LUG
CONCUIT ASSY ,ELEC
.TUBING (17.58FT.LG.) MAKE FROM
LS3967
(18.58FT.LG.)MAKE
,WIPE ,14 GAUGE
FROM P/N M22759-14-14-1
(18.58 FT.LG. )MAKE
.WIPE,14 GAUGE
FROM P/N M22759/14-14-5
(18.58FT.LG.)MAKE
.WIPE,14 GAUGE
COLOR GRAY.
FROM P/N GPT 14 AWG.
(18,58FT,LG.)MAKE
,WIPE,14
GAUGE
FROM F / N M22759/14-14-2
SPLICE,CONDUCTOR
CONNECTOR,PLUG,ELEC
GROMMET,NONMETALLIC
CONDUIT ASSY,ELEC
(17.5FT LG.)MAKE FROM P/N
.TUBING
LS3967
(18.5FT.LG.)MAKE
.WIPE ,14 GAUGE
FROM P / N M22759/14-14-4
(18.5FT .LG. )MAKE
.WIRE,14 GAUGE
FROM P/N GPT 14 AWG,COLORORANGE
(l8.5FT.LG.)MAKE
.WIPE,12 GAUGE
FROM P/N GPT 12 AWG COLORBLUE
(18.5FT.LG.)MAKE
.WlPE,14 GAUGE
FROM P/N M22759/14-14-E
SPLICE,CONDUCTOR
STRAP,RETAINING
STRAP,RETAlNING
END OF FIGURE
6-1
7
2
1
1
1
1
1
1
2
5
12
1
1
1
1
1
1
1
14
15
TM 9-2330-384-14&P
SECTION II
Figure 7. Rear Half of Chassis Wiring and Related Parts.
SECTION
II
(3)
(1)
(2)
ITEM
SMR
CODE CAGEC
NO
TM 9-2330-384-14&P
(6)
(5)
(4)
PART
DESCRIPTION AND USABLE ON CODE (UOC) QTY
NUMBER
GROUP: 0613 HULL CR CHASSIS WIRING
HARNESS
FIG. 7 REAR HALF OF CHASSIS WIRING
AND RELATED PARTS
1 AOOOO 7 4 8 4 1 T K G 5 3 0 9 - 3
2 MOOZZ 7 4 8 4 1 S T K 1 4 3 7 3 - 4
3 MOOZZ 7 4 8 4 1 S T K 1 4 3 7 4 - 2
4 MOOZZ 7 4 8 4 1 L K A 3 3 3 4 - 4
5 MOOZZ 7 4 8 4 1 TKG5320-1-3
6 MOOZZ
7
8
9
10
11
12
13
14
15
16
17
18
PAOZZ
PFFZZ
PFFZZ
PAOZZ
PAOZZ
PAOZZ
PAOZZ
PAOZZ
PAOZZ
PAOZZ
AOOOO
MOOZZ
74841
STK14375-3
14109
74841
74841
98410
00779
96906
14726
74841
13445
13445
74841
74841
FSP11-1-4
TKG0149-6
TKG0149-5
B231
327638
MS25036-112
B4052B
TKG5317-2
81264
5558
TKG5309-4
TKC5320-1-5
1 9 MOOZZ 7 4 8 4 1 S T K 1 4 3 7 7 - 2
2 0 MOOZZ 7 4 8 4 1 L K A 9 6 5 5 - 2
21 MOOZZ 7 4 8 4 1 L K A 3 3 3 4 - 2
22 MOOZZ 7 4 8 4 1 S T K 1 4 3 7 2 - 2
2 3 MOOZZ 74841
TKG1336-6-2
1
CONDUIT ASSY ,ELEC
(19.33FT.LG.)MAKE
.WIRE,14 GAUGE
FROM P / N M 2 2 7 5 9 / 1 4 - 1 4 - 1
(19.33FT.LG. )MAKE
.WIPE,14
GAUGE
FROM P/N M 2 2 7 5 9 / 1 4 - 1 4 - 5
.TUBING
(18.33FT.LG. )MAKE FROM P/N
LS3967
(20.08FT.LG.)MAKE
.WIPE,14 GAUGE
COLOR GRAY
FROM P/N GPT 14 AWG,
(19.33FT.LG. )MAKE
.WIRE,14 GAUGE
FROM P/N M22759/14-14-2
GROMMET,NONMETALLIC
STRAP ,RETAINING
OKRAP,RETAINING
SPLICE,CONDUCTOR
SPLICE,CONDUCTOR
TERMINAL,LUG
SPLICE,CONDUCTOR
LEAD,ELECTRICAL
BOOT,DUST AND MOIST
SWITCH,TOGGLE
CONDUIT ASSY,ELEC
(20,08 FT. LG)
.WIPE, 14 GAUGE
MAKE FROM P / N 8 1 1 4 7 S
(19.33FT.LG.)MAKE
.WIRE,14 GAUGE
FROM P / N M22759/14-14-4
.WIRE,14 GAUGE (19.33FT.LG.)MAKE
FROM P/N GPT 14 AWG,COLOR ORANGE
(18.33FT.LG.)MAKE FROM P/N
.TUBING
LS3967
(19.33FT.LG.)MAKE
,WIRE,14 GAUGE
FROM P / N M 2 2 7 5 9 / 1 4 - 1 4 - 8
(19.33FT.LG.)MAKE
.WIRE,12 GAUGE
AWG,COLOR
FROM P/N GPT 12
BLUE
END OF FIGURE
7-1
1
1
1
1
1
1
4
18
4
4
6
1
1
1
1
1
1
1
1
1
1
1
1
TM 9-2330-384-14&P
SECTION II
Figure 8. Back Rear Chassis Wiring and Related Parts.
SECTION II
(2)
(1)
(3)
SMA
ITEM
NO
CODE CAGEC
TM 9-2330-384-14&P
(6)
(5)
(4)
PART
DESCRIPTION AND USABLE ON CODES (UOC) QTY
NUMBER
GROUP: 0613 HULL OR CHASSIS WIRING
FIG. 8 BACK REAR CHASSIS MIRING AND
RELATED PARTS
1 PAOZZ 0 0 7 7 9 3 2 7 6 3 8
2 AOOOO 7 4 8 4 1 TKG5314-1
3 MOOZZ 7 4 8 4 1 STK14372-7
4
MOOZZ
74841 LKA3332-2
5
6
7
8
9
PFFZZ
PAOZZ
PAOZZ
AOOOO
MOOZZ
74841
23705
14109
74841
74841
TKG0149-4
FSP11-1-3
FSP11-1-4
TKG5315-1
STK14372-8
10
MOOZZ
74841
LKA9655-3
11
MOOZZ 74841
LKA3334-3
12
MOOZZ
74841
STK14375-2
13
MOOZZ
74841
STK14373-3
14
15
14
PAOZZ 1 9 2 0 7
PAOZZ 1 9 2 0 7
PAOZZ 1 9 2 0 7
8338561
8338562
8330564
SPLICE,CONDUCTOR
CONDUIT ASSY ,ELEC
(12.08FT.LG. )MAKE
.WIPE,14
GAUGE
FROM P / N M 2 2 7 5 9 / 1 4 - 1 4 - 8
(11.08FT.LG.)MAKE FROM P/N
.TUBING
8588
STRAP,RETAINING
GROMMET,NONMETTALLIC
GROMMET,NONMETALLIC
CONDUIT ASSY ,ELEC
(5.33FT.LG.)MAKE
.WIRE,14 GAUGE
FROM P/N M22759/14-14-8
(6.0FT.LG.)MAKE
.WIRE,14 GAUGE
FROM P/N GPT 14 AWG,COLOR ORANGE
(4.33 FT.LG.) CAKE FROM
.TUBING
LS3967
(5.33FT.LG.)MAKE
.WIRE,14 GAUGE
FROM P/N M22759/14-14-2
(5.33FT.LG.)MAKE
.WIRE,14 GAUGE
FROM P/N M 2 2 7 5 9 / 1 4 - 1 4 - 1
.SHELL,ELECTRICAL CC
.INSULATOR,BUSHING
.TERMINAL ASSEMBLY
END OF FIGURE
8-1
1
1
1
1
7
2
4
1
1
1
1
1
1
1
1
1
TM 9-2330-384-14&P
SECTION II
Figure 9. Component Parts for Convoy Warning Conduit Assembly.
SECTION
II
(3)
(2)
(1)
ITEM
SMR
CODE CAGEC
NO
TM9-2330-384-14EP
(6)
(5)
(4)
PART
DESCRIPTION AND USABLE ON CODES (UOC) QTY
NUMBER
GROUP: 0613 HULL OR CHASSIS WIRING
HARNESS
FIG. 9 COMPONENT PARTS FOR CONVOY
WARNING CONDUIT ASSEMBLY
1
2
3
4
5
6
7
8
9
10
PAOZZ
PAOZZ
A0000
PAOZZ
PAOZZ
PAOZZ
PAOZZ
PAOZZ
PAOZZ
MOOZZ
96906
14109
74841
79409
74841
74841
74841
26132
93061
74841
MS51943-31
FSP7-2-1
TKG5529-1
40701
TKG5489-1
TKG5499-1
TKG5501-1
B40448F
N6MC8
LKA3332-3
11
MOOZZ
74841
STK143737
12 MOOZZ
74841
STK14376-1
13
14
15
16
17
PAOZZ
PAOZZ
PAOZZ
PFFZZ
PFFZZ
96906
96906
79409
74841
74841
MS90728-8
MS20600B4W7
65-0085
TKG0149-5
TKG0149-4
NUT ,SELF-LOCKING.HE
WASHER
CONDUIT ASSY,CWL
.RECEPTACLE
.CONDULET
.GASKET,CONDULET
.COVER,CONDULET
.CONNECTOR,BUTT
.ADAPTER,STRAIGHT,PI
.TUBING (11 FT. 1 IN. LG.) MAKE
FROM P/N 8588
.WIPE,14GA.BROWN
(13.083FT.LG.)MAKE FROM P/N C14EBR
(12.083FT.LG.)MAKE
.WIRE,14GA,BLUE
FROM P/N TYPE GPT 14 AWG BLUE
SCREW,CAP,HEXAGON H
RIVET,BLIND
CAP,PROTECTION
STRAP,RETAINING
STRAP,RETAINING
END OF FIGURE
9-1
2
4
1
1
1
1
1
2
1
1
1
1
2
1
1
2
7
TM 9-2330-384-14&P
SECTION II
Figure 10. Axle Tube Assembly.
SECTION II
(2)
(3)
(1)
SWR
ITEM
CODE CAGEC
NO
TM 9-2330-384-14&P
(6)
(5)
(4)
PART
DESCRIPTION AND USABLE ON CODES (UOC) QTY
NUMBER
GROUP: 11 REAR AXLE
GROUP: 1101 HOUSING, BEAM, HOUSING
COVERS, PLUGS, SEALS, ETC.
FIG. 10 AXLE TUBE ASSEMBLY
1 PBFZZ 74841 A-CE6277-3
AXLE,VEHICULAR,NOND
END OF FIGURE
10-1
2
TM 9-2330-384-14&P
SECTION II
Figure 11. Brakeshoe and lining Assembly and Mounting Hardware.
SECTION II
(2)
(3)
(1)
ITEM
SHR
CODE CAGEC
NO
TM 9-2330-384-14&P
(5)
(4)
PART
DESCRIPTION AND USABLE ON CODES
NUMBER
(6)
(UOC) QTY
GROUP: 12 BRAKES
GROUP: 1202 SERVICE BRAKES
FIG. 11 BRAKESHOE AND LINING
ASSEMBLY AND MOUNTING
HARDWARE
1
2
3
4
5
6
7
8
9
10
11
PAOFF
PA FZZ
PAFZZ
PAFZZ
XAFZZ
PAOZZ
PAOZZ
PAOZZ
PAOZZ
PAOZZ
PAOZZ
74841
74841
74841
23705
74841
74841
23705
74841
74841
74841
14109
A-CF4854-1
A-CF4858-1
A-CF4857-1
541801
A-CF3379-1
A-CF3378-1
330733
A-CF1328-1
583015
A-CF3079-1
A-CE9911-1
BRAKE SHOE
.LINING,FRICTION
.LINING,FRICTION
.RIVET,TUBULAR
.SHOE
PIN, SHOULDER,HEADLE
ROLLER
RETAINER,SPECIAL
CLIP,RETAINING
SPRlNG,HELICAL,EXTE
SPRING,RETURN
END OF FIGURE
11-1
4
1
1
24
1
4
4
8
8
8
4
TM 9-2330-384-14&P
SECTION II
Figure 12. Slack Adjuster, Camshaft, and Related Hardware.
SECTION II
(3)
(1)
(2)
SMR
ITEM
CODE CAGEC
ND
TM 9-2330-384-14&EP
(6)
(5)
(4)
PART
DESCRIPTION AND USABLE ON CODES (UOC) QTY
NUMBER
GROUP:
1206 MECHANICAL BRAKE SYSTEM
F I G . 12 SLACK ADJUSTER, CAMSHAFT,
AND RELATED HARDWARE
1
2
3
4
5
4
7
8
9
10
11
12
13
14
15
16
17
18
19
20
21
22
23
23
PAOZZ
XDOZZ
PAOZZ
PAOZZ
PAOZZ
PAOZZ
PAOOO
PAOZZ
PAOZZ
PAOZZ
PAOZZ
PAOZZ
PAOZZ
PAOZZ
PAOZZ
PAOZZ
PAOZZ
PAOZZ
PAOZZ
PAOZZ
PAOZZ
PAOZZ
PAOZZ
PAOZZ
74841
14109
96906
96906
14109
74841
74841
96906
74841
74841
96906
96906
74841
74841
96906
14109
74841
96906
96906
14109
74841
14109
74841
74841
A-XA0068-1
FSP12-2-4
MS51522-17
MS27183-14
FSP5-5-20A-XA0417-1
A-CF4205-1
MS15001-1
TKG5517-1
A-XA0432-1
MS16624-1050
MS51943-33
A-CF4021-1
A-XA0412-1
MS15002-1
A-CD2285-1
A-CF4022-1
MS90728-32
MS16624-1162
AXA0415-1
A-XA0413-1
AXA0414-1
A-XA0420-1
A-XA0420-2
BUSHING, SLEEVE
FITTING,LUBRICATION
NUT,SELF-LOCKING,HE
WASHER,FLAT
SCREW,CAP,HEXAGON H
WASHER,CAM
ADJUSTER,SLACK,BRAK
.FITTING,LUBRICATION
.PARTS KIT, BPAKE ADJ
WASHER,FLAT
RING,RETAINING
NUT,SELF-LOCKING,HE
COVER,ACCESS
PACKING, PREFORMED
FITTING, LUBRICATION
BUSHING, CAMSHAFT
BRACKET,MOUNTING
BOLT,MACHINE
RING, RETAINING
PACKING, PREFORMED
BEARING, SLEEVE
PACKING, PREFORMED
LEFT HAND
CAMSHAFT,ACTUATING,
RIGHT HAND
CAMSHAFT,ACTUATING,
END OF FIGURE
12-1
8
4
8
16
8
12
4
1
1
4
4
8
4
8
4
4
4
8
4
8
8
8
2
2
TM 9-2330-384-14&P
SECTION II
Figure 13. Front Half Air Supply Lines and Valve Relay.
SECTION
II
(3)
(2)
(1)
SMR
ITEM
CODE CAGEC
NO
TM 9-2330-384-14&P
(6)
(5)
(4)
PART
DESCRIPTION AND USABLE ON CODE (UOC) QTY
NUMBER
GROUP:
1208 AIR BRAKE SYSTEM
F I G . 13 FRONT HALF AIR SUPPLY
LINES AND VALVE RELAY
1
2
3
4
5
6
PAOZZ
PAOZZ
PAOZZ
PAOZZ
PAOZZ
MOOZZ
98343
72914
93061
06853
14109
74841
10452S
11246
269NTA-8-6
212227
FSP11-1-4
STK40109-2
7
8
9
10
11
PFFZZ
PAOZZ
PAOZZ
PFFZZ
MOOZZ
74841
93061
93061
74841
74841
TKG0149-3
207ACBH-6
269NTA-6-6
TKG0149-4
STK40090-9
12
13
14
15
16
17
18
19
PAOZZ
PAOZZ
PAOZZ
PAOZZ
PAOZZ
PAOZZ
PAOZZ
PAOZZ
93061
93061
14109
06721
14109
74841
81343
81743
20
MOOZZ 74841
272NTA-6-6
2225P-6
FSP12-1-1
AE-86313
FSP12-17-1
VWA8862
6-2 100202BA
6-4 120202BA(LON
G NUT
STK40090-1
21
MOOZZ 74841
STK40090-8
22
23
24
PAOZZ 23705
PAOZZ 98743
PAOZZ 6A120
FSP11-1-3
10451E
1509
COUPLING H A L F , Q U I C K
SHAFT ,SHOULDERED
ELBOW,PIPE TO TUBE
DUMMY COUPLING,AUTO
GROMMET,NONMETALLIC
( 3 3 . 0 F T . LG. )MAKE FROM
TUBING,NYL
P/N STK40109
C L I P , S P R I N G TENSION
COUPLING,PIPE
ELBOW, PIPE TO TUBE
STRAP,RETAINING
(7.9FT.LG)MAKE FROM
TUBING,NYLON
P/N STK40090
TEE,PIPE TO TUBE
TEE,PIPE
PLUG,PIPE
VALVE,RELAY,AIR P R E
NIPPLE,PIPE
VALVE,RELAY,AIR PRE
ELBOW,PIPE TO T U B E
ELBOW, PIPE TO TUBE
(10IN.LG.) MAKE FROM
TUBING,NYLON
P/N STK40090
(27.3 FT. LG.)MAKE
TUBING,NYL
FROM P/N STK40090
GROMMET,NONMETALLIC
(EMERGENCY)
COUPLING HALF,QUICK
SEAL
END OF FIGURE
13-1
1
2
2
2
6
1
13
2
4
15
1
1
1
1
1
1
1
1
1
1
1
5
1
2
TM 9-2330-384-14&P
SECTION II
Figure 14. Rear Air Supply to Reservoir Assemblies.
SECTION II
(1)
(2)
(3)
ITEM
SMR
CODE CAGEC
NO
TM9-2330-384-14&P
(6)
(5)
(4)
PART
DESCRIPTION AND USABLE ON CODES (UOC) QTY
NUMBER
GROUP:
1208 AIR BRAKE SYSTEM
FIG, 14 REAR AIR SUPPLY TO
RESERVOIR ASSEMBLIES
1 PAOZZ 93061
2 MOOZZ 74841
68NTA-8-6
STK40109-1
3 PFFZZ 74841
4 PAOZZ 14109
5 MOOZZ 74841
TKG0149-1
FSP11-1-4
STK40109-4
6 PAOZZ 93061
7 MOOZZ 74841
272NTA-8-6
STK4010-3
8 MOOZZ 74841
STK40090-17
9 PAOZZ 93061
1 0 PAOZZ 81343
11 MOOZZ 74841
269NTA-8-4
6-8 100302BA
STK4009C-7
12 MOOZZ 74841
STK4009C-10
13
14
15
16
17
PAOZZ
PFFZZ
PAOZZ
PAOZZ
PAOZZ
96906
74841
93061
93061
79470
MS3367-6-9
TKG0149-2
26FNTA-6-6
68NTA-6-6
1472X8X8X4
ADAPTER,STRAIGHT,PI
(5.2 FT LG) MAKE FROM P/
TUBING,NYL
N STK40109
STRAP,RETAINING
GROMMET,NONMETALLIC
(4.7 FT LG) MAKE FROM
TUBING,NYLON
P/N STK40109
TEE,PIPE TO TUBE
(3.6 FT (G) MAKE FROM
TUBING,NYLON
P/N STK40109
(4.833FT.LG.)MAKE
TUBING,NYLON
FROM P/N STK40090
ELBOW,PIPE TO TUBE
ELBOW,PIPE TO T U B E . .
(3.0 FT LG) MAKE FROM P/
TUBING,NYL
N STK40090
TUBING, NYLON (5.0FT.LG.)MAKE FROM
P/N STK40090
STRAP,TIEDOWN, ELECT
STRAP ,RETAINING
ELBOW, PIPE TO TUBE
ADAPTER. STRAIGHT, PI
TEE, PIPE TO TUBE
END OF FIGURE
14-1
1
1
4
2
1
1
1
1
1
1
1
5
2
6
2
1
1
TM 9-2330-384-14&P
SECTION II
Figure 15. Air Supply lines from Reservoir to Chambers.
SECTION
II
(3)
(2)
(1)
ITEM
SMR
CODE CAGEC
NO
TM9-2330-384-14&P
(6)
(5)
(4)
PART
DESCRIPTION AND USABLE ON CODES (UOC) QTY
NUMBER
GROUP: 1208 AIR BRAKE SYSTEM
F I G . 15 AIR SUPPLY LINES FROM
RESERVOIR TO CHAMBERS
1
MOOZZ
74841
STK40109-5
2
3
PAOZZ
PBOOO
93061
74841
269NTA-8-6
TKG5092-2
4
5
6
7
PAOZZ
PAOZZ
PAOZZ
PBOOO
96906
80064
96906
74841
8
9
10
11
12
13
PAOZZ 0 6 7 2 1
PAOZZ 9 3 0 6 1
PAOZZ 14109
PAOZZ 09505
PAOZZ 74841
PAOZZ 0 6 7 2 1
MS90728-62
2624732
MS51943-35
TKG5092-1
62X 7454 BO
2225P-6
FSP12-1-1
MS3367-6-1
A-CE6477-1
62X 7432 BO
(1.10FT .LG.)MAKE FROM
TUBING,NYLON
P/N STK40109
ELBOW,PIPE TO T U B E
TANK, PRESSURE (FORWARD) FOR
COMPONENT PARTS SEE FIG 16
SCREW,CAP,HEXAGON H
WASHER, FLAT
NUT,SELF-LOCKING,HE
(REAR) FOR COMPONENT
TANK,PRESSURE
PARTS SEE FIG 16
HOSE ASSEMBLY,NONME
TEE ,PIPE
PLUG,PIPE
STRAP,TIE DOWN
SEPARATOR,HOSE
HOSE, ASSEMBLY,NONME
END OF FIGURE
15-1
2
4
1
8
8
8
1
2
3
1
1
1
3
TM 9-2330-384-14&P
SECTION II
Figure 16. Component Parts for Forward and Rear Air Reservoirs.
SECTION II
(2)
(3)
(1)
ITEM
SMR
CODE CAGEC
NO
TM 9-2330-384-14&P
(6)
(5)
(4)
PART
DESCRIPTION AND USABLE ON CODES(UOC) QTY
NUMBER
GROUP:
1208 AIR BRAKE SYSTEM
FIG. 16 COMPONENT PARTS FOR FORWARD
AND REAR AIR RESERVOIRS
29930
74841
19207
06721
06721
14109
86721
29930
74841
19207
06721
74841
C4898
1
2
3
4
5
6
7
8
9
10
11
12
13
PAOZZ
PAOZZ
PAOZZ
PAOZZ
PAOZZ
PAOZZ
PAOZZ
PAOZZ
PAOZZ
PAOZZ
PAOZZ
PAOZZ
PAOZZ
14
PAOZZ 06721
143981
A-CE5939-6
192075
AE-86313
121565-60
FSP12-1-1
N4302A
143981
A-CE5939-6
192075
AE-86313
VKA0351
VKA8994
121565-60
(FORWARD TANK)
PLUG, PIPE
(FORWARD)
TANK, PRESSURE
(FORWARD)
NIPPLE, PIPE
VALVE, RELAY, AlR PRE (FORWARD TANK).
COCK, DRAIN (FORWARD)
PLUG, PIPE FOR FORWARD RELAY VALVE)
VALVE, RATIC RELAY
PLUG, PIPE (REAR TANK)
TANK, PRESSURE (REAR)
NIPPLE, PIPE (REAR)
VALVE, RELAY, AIR PRE (REAR TANK)
BOLT, U (REAR TANK)
CONCUIT, METAL, FLEX I (PEAR OR
FORWARD TANK)
(REAR)
COCK, DRAIN
END OF FIGURE
16-1
2
1
2
1
1
2
1
2
1
1
1
1
1
1
TM 9-2330-384-14&P
SECTION II
Figure 77. Chamber and Related Hardware.
SECTION
II
(1)
(2)
(3)
ITEM
SMR
NO
CODE CAGEC
TM 9-2330-384-14&P
(6)
(5)
(4)
PART
NUMBER
DESCRIPTION AND USABLE ON CODES(UOC) QTY
GROUP: 1208 AIR BRAKE SYSTEM
FIG. 17 CHAMBER AND RELATED
HARDWARE
1
2
3
4
5
PAOZZ
PAOZZ
PAOZZ
PAOZZ
PAOZZ
50153
74841
96906
96906
74841
11M011
A-CF2662-EM4
MS27183-22
MS51922-49
ALA10049
STUD ASSEMBLY, RELEA
CHAMBER, AIR BRAKE
WASHER, FLAT
NUT, SELF-LOCKING, HE
TAG, INSTRUCTION
END OF FIGURE
17-1
4
4
8
8
4
TM 9-2330-384-14&P
SECTION II
Figure 18. Brake Interlock Valves and Related Hardware.
SECTICN II
(1)
(2)
(3)
ITEM
SMR
NO
CODE CAGEC
TM9-2330-384-14&P
(4)
PART
DESCRIPTICN
NUMBER
GROUP:
FIG.
1 PAOZZ
2 MOOZZ
3
4
5
6
93061
74841
269NTA-6-6
STK4C09C-5
PAOZZ 96906
PAOZZ 96906
PAOZZ 93061
MOOZZ 74841
MS27183-1
MS51943-31
68NTA-6-6
STK40090-2
7 MOOZZ
74841
STK4C09C-4
8
9
10
11
12
13
PACZZ 06853
PAOZZ 96906
PFFZZ 74841
PACZZ 93061
PAOZZ 74841
MOOZZ 74841
278614
MS90728-10
TKG0149-4
269NTA-6-4
TKG5303-1
STK4CO90-3
14
15
16
17
PAOZZ
PAOZZ
PAOZZ
MOOZZ
MS9C725-14
B-1GF4-1/4 IN
TKG5302-1
STK4009C-6
96906
12623
74841
74841
1208
(5)
(6)
AND USABLE
AIR
ON CODES(UOC)
BRAKE SYSTEM
18 BRAKE INTERLOCK VALVES AND
RELATED HARDWARE
ELBOW,PIPE
TO TUBE ..................
TUBING,NYLON
(4I IN.LG.)
MAKE FROM
P/N STK 40090 .......................
WASHER,FLAT .........................
.................
NUT,SELF-LOCKING,HE
ADAPTER,STRAIGHT,PI
.................
TUBING,NYLON
(II IN.LG.)MAKE
FROM P/
N STK40090....
......................
TUBING,NYLON
(381N.L.G.)
MAKE FROM
P/N STK 40090 .......................
VALVE,SHUTTLE ......
. ................
SCREW,CAP,HEXAGON
H.................
STRAP,RETAINING
.....................
ELBOW,PIPE
TO TUBE ..................
BRACKET,ANGLE....
...................
TUBING,NYLON
(371N.L.G.)
MAKE FROM
P/N STK40090 ........................
SCREW,CAP,HEXAGON
H.................
0.. ......
VALVE,GLOBE ...............
0....
BRACKET,ANGLE ..................
TUBE,NYLON
(35 IN.L.G.)
MAKE FROM
P/N STK40090 ........................
END OF FIGURE
18-1
QTY
2
1
6
4
1
1
1
1
1
8
4
1
1
4
2
1
1
SECTION
TM 9-2330-384-14&P
II
C01
9
8
12
11
5
3
2
14
-@
10
4
1
13
10
18
6 7
8
17
13
,j
15
16
19
21
20
22
Figure 19. Wheel and Drum Assembly, Spacer, and Related Hardware.
SECTION II
(1)
(2)
ITEM
SMR
NO CODE
(3)
NSN
TM 9-2330-384-14&P
(4)
C01
(6)
(5)
PART
CAGEC NUMBER
DESCRIPTION
(7)
AND USABLE ON CODES (UOC) QTY
GROUP 13 WHEELS AND TRACKS
GROUP 1311
FIG.
3110005419166
2530012909728
14109
14109
74841
14109
14109
74841
14109
60038
74841
60038
74841
A-CC7538-900
A-XA1005-1
A-XA0484-1
A-XA0409-1
A-CE8510-1
A-XA0408-1
A-CD7180-1
HM518445
A-CE5245-1
HM518445HM518410
A-CC5226-1
12 PBOFF
13 PAOZZ
14 PAOZZ
15 PAOZZ
16 PAOZZ
17 PAOZZ
18 PAOZZ
19 PAOZZ
20 PAOZZ
2530012856077
5310012918883
5305012904867
5310008329719
5307012921483
5310009385543
5330012897840
5340012908673
2530012905715
74841
74841
14109
96906
74841
23705
80201
74841
74841
A-CE6220-1
A-CD2813-1
FSP5-5-11
MS51922-61
A-CE9950-1
535885
533886
A-CE9120-1
A-CE8760-5
21
22
5365012897896
2640012861712
74841
74841
A-CE8766-7
A-CE8769-2
1
2
3
4
5
6
7
8
9
10
11
PBOZZ
PAOZZ
PAOZZ
PAOZZ
PAOZZ
PAOZZ
PAOZZ
PAOZZ
AOOOO
PAOZZ
PBOZZ
2530013334715
4730011985438
5331012897845
5315011987883
5310011991769
5310012918881
5340011987885
3110010069504
PAOZZ
PAOZZ
WHEEL ASSEMBLY
19 WHEEL AND DRUM ASSEMBLY,
SPACER, AND RELATED HARDWARE
PARTS KIT,HUB
CAP ...................
PLUG HUB ...........................
.O-RING .............................
PIN,COTTER ..........................
NUT .................................
WASHER,KEY ..........................
PLUG,EXPANSION
......................
CONE AND ROLLERS,TA .................
WHEEL AND DRUM ASSY .................
BEARING,ROLLER,TAPE
................
WHEEL,PNEUMATIC
TIR
(20 INCH & 5
STUD) ...............................
BRAKE DRUM
(16.5 X 7 INCH.) .......
WASHER,FLAT ........................
SCREW,CAP,HEYAGON
H ................
NUT,SELF-LOCKING,HE
................
STUD,PLAIN .........................
NUT,PLAIN,HEXAGON
..................
SEAL,PLAIN
ENCASED ..................
CLAMP,SYNCHRO .......................
RIM,WHEEL,PNEUMATIC
(22.5 X 8.25)
INCH) ...............................
SPACER,RING .........................
VALVE,PNEUMATIC
TIR .................
END OF FIGURE
4
4
4
4
4
4
4
4
4
2
1
1
10
5
5
5
5
4
20
8
4
8
SECTION
TM 9-2330-384-14&P
II
I
-Foa
@p
I
N@,t'N
\
\
N\
I <1
Figure 20. Tires.
SECTION
(1)
(2)
II
TM 9-2330-384-14&P
(3)
(4)
ITEM SMR
NO CODE NSN
CAGEC
CO1
(6)
(5)
PART
NUMBER
DESCRIPTION
AND USABLE
GROUP 1313 TIRES,
CHAINS
1 PCOFH 2610010453688
81348
GP3STYLXTYRACLR/
T/11.00R22.50/G/
TUBES,
ON CODES (UOC)
QTY
TIRE
FIG.
20 TIRES
TIRE,
PNEUMATIC, VEHI .................
END OF FIGURE
20-1
(7)
8
SECTION
II
TM 9-2330-384-14&P
2
C01
3
3
5
12
14
7
10
9
8
0
22
0
23
17
15
25
20
18
21
24
-J@
Figure 21. Grabhandles,
M
Brackets, Pick-up Plate, Frame Assembly, and Related Hardware.
SECTION II
(1)
(2)
(3)
ITE14 SMR
NO CODE NSN
TM 9-2330-384-14&P
(4)
C01
(5)
(6)
PART
CAGECNUMBER
(7)
DESCRIPTION AND USABLEON CODES (UOC) QTY
GROUP: 15 FRAME, TOWINGATTACHMENTS,
DRAWBARS, AND ARTICULATION
SYSTEMS
GROUP: 1501
FIG.
*
*
1
1
2
3
4
5
6
7
8
PAOZZ
PAOZZ
PAOZZ
PAOZZ
PAOZZ
PAOZZ
AFOZZ
PAOZZ
MOOZZ
5340012988285
5340012988286
5310007680318
5310000806004
5305002693211
5340012915190
9
10
11
12
13
14
15
16
17
18
19
20
21
22
23
24
25
PAOZZ
PAOZZ
PAOZZ
PAOZZ
PAOZZ
PAOZZ
PFOZZ
PAOZZ
PAOZZ
PAOZZ
XDHZZ
PAOZZ
PAOZZ
PAOZZ
PAOZZ
PFOZZ
PAOZZ
5315011710750
5340012909661
5310009359021
5310000806004
4010001714236
5305000680511
2510012905695
5310009517209
5310002416664
5305007272283
5310013063480
5306012899144
5310000806004
5310009359021
5340012902752
5305002693211
74841
74841
21439
96906
14544
74841
74841
04898
19207
TKG5265-1
TKG5265-2
01857-007
M327183-14
S1594
TKG5173-1
TKG5108-1
VKD5061-00
7068272
96652
74841
96906
96906
03670
80204
74841
96906
96906
80204
74841
74841
74841
96906
96906
74841
14544
21-09
TKG5154-1
MS51943-35
MS27183-14
14089
B1821BH038C125N
TKG5016-1
MS27183-22
MS51943-44
B1821BH063F150N
TKG5043-1
ZKA9866
ZKA 9865
MS27183-14
MS51943-35
TKG5341-1
S1594
FRAME ASSEMBLY
21 GRABHANDLES, BRACKETS, PICKUP PLATE, FRAME ASSEMBLY,
AND RELATED HARDWARE
BRACKET,MOUNTING
ROADSIDE ..........
BRACKET,MOUNTING
CURBSIDE ..........
NUT,PLAIN,HEXAGON
...................
WASHER,FLAT .........................
SCREW,CAP,HEXAGON
H .................
HANDLE,BOW ..........................
CABLE ASSY,GRABHAND .................
SWAGING SLEEVE,WIRE ................
ROPE,WIRE
(1.58 FT 26) MAKE FROM
P/N MIL-W-83420 .....................
PIN,LOCK ...........................
BRACKET,MOUNTING ....................
NUT,SELF-LOCKING,HE
.................
WASHER,FLAT .........................
GROMMET .............................
SCREW,CAP,HEXAGON
H .................
FRAME SECTION,STRUC .................
WASHER,FLAT .........................
.................
NUT,SELF-LOCKING,HE
SCREW,CAP,HEXAGON
H .................
FRAME ASSY,CHASSIS ..................
NUT,SELF-LOCKING,BL
.................
BOLT,EXTERNALLY
REL .................
WASHER,FLAT .........................
.................
NUT,SELF-LOCKING,HE
BRACKET,MOUNTING ....................
SCREW,CAP,HEXAGON
H .................
END OF FIGURE
21-1
1
1
8
8
8
1
1
1
1
2
2
8
8
8
8
1
6
6
6
1
24
24
12
12
2
12
SECTION II
TM 9-2330-384-14&P
I
ce2)
a
AIOTF@k
W
----
000@-@
-@ 2
V--
3
I
I
@ W ---
4
Figure 22. Upper Coupler Assembly
and Related Hardware.
SECTION
II
(2)
(3)
(1)
ITEM
SMR
CODE CAGEC
NO
TM 9-2330-384-14&P
(5)
(4)
PART
DESCRIPTION AND USABLE ON
NUMBER
(6)
CODES(UOC) QTY
GROUP: 1503 PINTLES AND TOWING
ATTACHMENTS
FIG. 22 UPPER COUPLER ASSEMBLY AND
RELATED HARDWARE
1
2
3
4
PBFZZ
PAFZZ
PAFZZ
PAFZZ
74841
96906
96906
96906
TKG5084-1
MS51943-44
MS27183-22
MS90727-164
FIFTH WHEEL ASSEMBLY
NUT, SELF-LOCKING, HE
WASHER, FLAT
SCREW, CAP, HEXAGON H
END OF FIGURE
22-1
1
14
14
14
TM 9-2330-384-14&P
SECTION II
Figure 23. Tire Carrier Assembly and Related Hardware.
SECTION
II
(2)
(3)
(1)
ITEM
SMR
CODE CAGEC
NO
TM 9-2330-384-14&P
(6)
(5)
(4)
PART
DESCRIPTION AND USABLE ON CODES(UOC) QTY
NUMBER
GROUP: 1504 SPARE WHEEL CARRIER AND
TIRE LOCK
FIG, 23 TIRE CARRIER ASSEMBLY AND
RELATED HARDWARE
1
2
3
4
5
6
7
8
9
10
11
12
PAOZZ
PAOZZ
PAOZZ
PAOZZ
PAOZZ
PAOZZ
PAOZZ
PFOZZ
PAOZZ
PAOZZ
PAOZZ
PAOZZ
96906
96906
96906
74841
21439
96906
96904
74841
96966
74841
14109
24617
MS90728-64
MS27183-14
MS51943-35
ZKA8903
01857-007
MS27183-18
MS90728-113
TKG5273-1
MS51468-C5
VKA0909
FSP7-F2-1
120375
SCREW, CAP, HEXAGON H
WASHER, FLAT
NUT, SELF-LOCKING, HE
BOLT, HOCK
NUT, PLAIN, HEXAGON
WASHER, FLAT
SCREW, CAP, HEXAGON H
SUPPORT TIRE
NUT, PLAIN, WING
BOLT, U, PIPE
WASHER
NUT, PLAIN, HEXAGON
END OF FIGURE
23-1
2
2
2
2
4
4
4
1
2
1
2
4
TM 9-2330-384-14&P
SECTION II
Figure 24. Landing Gear, Crank Handle, Pads, Brackets, and Related Hardware.
SECTION
II
(3)
(2)
(1)
ITEM
SMR
CODE CAGEC
NO
TM 9-2330-384-14&P
(4)
PART
DESCRIPTION
NUMBER
GROUP:
(5)
(6)
AND USABLE ON CODES(UOC) QTY
1507 LANDING GEAR, LEVELING
JACKS
FIG. 24 LANDING GEAR, CRANK HANDLE,
PADS, BRACKETS, AND
RELATED HARDWARE
1
2
3
4
5
6
7
8
9
10
11
12
13
14
15
16
17
18
19
20
21
PAOZZ
PAOZZ
PAOZZ
PAOZZ
PAOZZ
PAOZZ
PAOZZ
PAOZZ
PAOZZ
PFOZZ
PAOZZ
PAOZZ
PFOZZ
PFOZZ
PAOZZ
PAOZZ
PAOZZ
PAOZZ
PFOZZ
XDOZZ
PAOZZ
74841
96906
76301
96906
74841
96906
96906
96906
74841
74841
96906
14109
74841
14109
62793
74841
96906
96906
74841
6W170
96906
TKG5209-2
MS51943-44
32-21088-5
MS90727-164
TKG5208-1
MS27183-12
MS51967-5
MS27183-14
S-XA0244
S-0F4399-54
MS90727-162
S-0F0486-1
S-CE3719-2
S-CF0487-1
104JC05-28
TKG5209-1
MS27183-14
MS51943-35
S-CF4395-53
SWA6215
MS90728-70
BRACKET, MOUNTING
NUT, SELF-LOCKING, HE
WASHER, FLAT
SCREW, CAP, HEXAGON H
FRAME SECTION, STRUC
WASHER, FLAT
NUT, PLAIN, HEXAGON
WASHER, FLAT
BOLT, SHOULDER
LEG, SEMITRAILER RET
SCREW, CAP, HEXAGON H
RING, RETAINING
SHOE, JACK-SUPPORT
AXLE TUBE
WASHER, FLAT
BRACKET, MOUNTING
WASHER,FLA7
NUT, SELF-LOCKING, HE
LEG, SEMITRAILER RET
HANDLE, MANUAL CONTR
SCREW, CAP, HEXAGON H
END OF FIGURE
24-1
2
20
16
16
1
2
2
2
2
1
4
4
2
2
4
2
2
1
1
1
1
TM 9-2330-384-14&P
SECTION II
Figure 25. Springs and Related Hardware.
SECTION
II
(3)
(2)
(1)
ITEM
SMR
CODE CAGEC
NO
TM 9-2330-384-14&P
(6)
(5)
(4)
PART
NUMBER
DESCRIPTION AND USABLE ON CODES(UOC) QTY
GROUP: 16 SPRINGS AND SHOOK
ABSORBERS
GROUP:
1601 SPRINGS
FIG. 25 SPRINGS AND RELATED
HARDWARE
1
2
3
4
5
6
7
8
9
10
11
12
13
14
15
16
17
18
PAOZZ
PAOZZ
PBOZZ
PAOZZ
PA0ZZ
PAOZZ
PAOZZ
PAOZZ
PAOZZ
PAOZZ
PAOZZ
PAOZZ
PBOZZ
PAOZZ
PAOZZ
PAOZZ
PAOZZ
PAOZZ
96906
24617
74841
74841
74841
96906
74841
14109
14109
74841
74841
74841
74841
24617
74841
74841
96906
96906
MS51922-49
455394
U-CD0511-1
U-CE8801-1
U-XA0046-17
MS51943-50
U-XA0003-1
U-XA0004
U-XAC356-2
U-XAC015
U-XAC046-16
ZKA8295
U-CF1459-1
271760
U-CD4502-1
A-XA0495-1
MS27183-25
MS35690-1424
NUT, SELF-LOCKING, HE
SCREW, CAP, HEXAGON H
SPRING ASSEMBLY, LEA
SADDLE, PIPE COVERIN
BOLT, U
NUT, SELF-LOCKING, HE
WASHER, FLAT
BUSHING, EQUALIZER
WASHER
BOLT, SHOULDER
BOLT, U
BOLT, EXTERNALLY REL
EQUALIZER
SCREW, CAP, HEXAGON H
SPACER, PLATE
HOLDER, BRAKE
WASHER, FLAT
NUT, PLAIN, HEXAGON
END OF FIGURE
25-1
6
2
4
4
4
2
2
4
2
2
4
2
2
2
2
4
16
16
TM 9-2330-384-14&P
SECTION II
Figure 26. Radius Rods and Related Hardware.
SECTION II
(3)
(1)
(2)
ITEM
SMR
NO
CODE CAGEC
TM 9-2330-384-14&P
(6)
(5)
(4)
PART
DESCRIPTION AND USABLE ON CODES(UOC) QTY
NUMBER
GROUP:
1605 TORQUE, RACIUS, AND
STABILIZER RODS
FIG. 26 RADIUS RODS AND RELATED
HARDWARE
1
2
3
4
5
6
7
PAOZZ
PAOZZ
PAOZZ
PAOZZ
PAOZZ
PAOZZ
PAOZZ
74841
30003
74841
97907
96906
74841
74841
U-XAC016-X
67A3140117-1
U-XA0011
9235215
MS51943-50
U-XA0026
U-CF2640-1
BOLT, SHOULDER
WASHER, FLAT
BUSHING, RUBBER
WASHER, FLAT
NUT, SELF-LOCKING, HE
CONNECTING LINK, RIG
ROD, ALIGNING, VEHICU
END OF FIGURE
26-1
8
8
16
8
8
2
i
TM 9-2330-384-14&P
SECTION II
Figure 27. Nose Adapter Bracket and Related Hardware.
SECTION Il
(1)
(2)
(3)
ITEM SMR
NO CODE NSN
TM 9-2330-384-14&P
(4)
C01
(5)
(6)
PART
CAGECNUMBER
(7)
DESCRIPTION AND USABLE ON CODES (UOC) QTY
GROUP18 BODY, CAB, HOOD, AND HULL
GROUP 1801 BODY, CAB, HOOD, AND
HULL ASSEMBLIES
FIG.
1
2
3
4
*5
6
7
*8
9
10
*11
PAOOO
PAOZZ
PAOZZ
PAOZZ
PAOZZ
PAOZZ
PAOZZ
PAOZZ
PAOZZ
PAOZZ
PAOZZ
4730012856074
9905009997369
5340012902751
9905009997370
5305000680509
4730012687410
5310009826580
5310003404953
5310009359021
5310009221794
5305000680511
74841
96906
74841
96906
80204
06721
96906
96906
96906
96906
80204
TKG5219-1
MS53007-2
TKG5290-1
MS53007-1
B1821BH025C125N
10453110
M327183-1
MS51943-50
MS51943-35
MS16213-63
B1821BH03BC125N
27 NOSE ADAPTER BRACKET AND
RELATED HARDWARE
ADAPTER,STRAIGHT
T ..................
PLATE,IDENTIFICATIO
(EMERGENCY) ...
BRACKET,MOUNTING ...................
PLATE,IDENTIFICATIO
(SERVICE) .....
SCREW,CAP,HEXAGON
H ................
COUPLING HALF,QUICK ................
WASHER,FLAT ........................
NUT,SELF-LOCKING,HE
................
NUT,SELF-LOCKING,HE
.................
WASHER,LOCK .........................
SCREW,CAP,HEXAGON
H .................
END OF FIGURE
27-1
1
1
1
1
4
2
4
4
4
8
4
TM 9-2330-384-14&P
SECTION
II
2
3
4
FIgure 28. Splashguard
and Components.
SECTION
II
(3)
(2)
(1)
SMR
ITEM
CODE CAGEC
NO
TM9-2330-384-14&P
(6)
(5)
(4)
PART
DESCRIPTION AND USABLE ON CODES(UOC) QTY
NUMBER
GROUP:
1801 BODY, CAB, HOOD, AND
HULL ASSEMBLIES
FIG. 28 SPLASHGUARD AND COMPONENTS
1
2
3
4
PAOZZ
PAOZZ
PAOZZ
PAOZZ
9 6 9 0 6 MS51967-5
78680 100059
7 4 8 4 1 TKG5215-1
9 6 9 0 6 MS90725-36
NUT, PLAIN, HEXAGON
GUARD, SPLASH, VEHICU
BRACKET, MOUNTING
BOLT, MACHINE
END OF FIGURE
28-1
8
2
2
8
TM 9-2330-384-14&P
SECTION II
Figure 29. Fender and Attaching Hardware.
SECTION II
(2)
(3)
(1)
SMR
ITEM
CODE CAGEC
NO
TM 9-2330-384-14&P
(6)
(5)
(4)
PART
DESCRIPTION AND USABLE ON CODES(UOC) QTY
NUMBER
GROUP:
1802 FENDERS, RUNNING BOARDS
WITH MOUNTING AND ATTACHING
WINDSHEILD, GLASS, ETC.
FIG. 29 FENCER AND ATTACHING
HARDWARE
1
2
3
4
PFOZZ
PAOZZ
PAOZZ
PAOZZ
74841
97403
96906
96906
TKA9276
13222E0109
MS27183-14
MS51943-35
FENCER, VEHICULAR
SCREW, ROLLER ASSEMB
WASHER, FLAT
NUT, SELF-LOCKING, HE
END OF FIGURE
29-1
2
28
28
28
TM 9-2330-384-14&P
SECTION II
Figure 30. Ground Rod Tube Assembly, Stowage Cabinet, and Related Hardware.
SECTION II
(1)
(2)
(3)
ITEM
SMR
CODE CAGEC
NO
TM9-2330-384-14&P
(4)
PART
DESCRIPTION
NUMBER
(5) (6)
AND USABLE
ON CODES(UOC)
QTY
GROUP: 1808 STOWAGE RACKS, BOXES,
STRAPS, CARRYING CASES, CABLE
REELS, HOSE REELS, ETC.
FIG.
1 PAOZZ 7V618
2 PAOZZ 94231
3 PAOZZ 96906
4 PAOZZ 74841
5 PAGZZ 96906
6 PAOZZ 21439
7 PAOZZ 96906
8 PAOZZ 96906
9 PAOZZ 96906
10 PAOZZ 96906
11 PAOZZ 969O6
12 PFOZZ 74841
13 PFOOO 74841
14 XAOZZ 74841
15 PAOZZ 96906
16 PAOZZ 74841
17 PAOZZ 19204
18 PAOZZ 96906
19 PAOZZ 96906
ZKA9636
3-C7620-311
MS51967-8
TKG5230-1
MS27183-18
01857-0C7
MS16213-63
MS27183-14
MS51943-35
MS90728-113
MS90728 -64
TKG5161-1
TKG5198-1
TKGSC7C-1
NS90728-12
7KG5204-1
8437243-2
MS27183-1
MS51943-31
30 GROUND ROD TUBE ASSEMBLY,
STOWAGE CABINET,
AND
RELATED HARDWARE
... .........
WASHER,LOCK----..-----..
.........
NUT,PLAIN,HEXAGON......
..................
STRAP,RETAINING.
... .. ...
WASHER,FLAT ..... .....
...................
NUT,PLAIN,HEXAGON
WASHER,LOCK.... .......
.. .............
WASHER,FLAT ........
.. .............
.................
NUT,SELF-LOCKING,HE
...
SCREW,CAP,HEXAGON H.... .........
.......
.........
SCREW,CAP,HEXAG0N
H
BOX,ACCESSORIES STC ....
TUBE ASSEMBLY,METAL ... .. ... .........
PIPE,GROUND ROD TUB ......
SCREW,CAP,HEXAGON H................
COVER,ACCESS... ..
.... .. .......
...
... .. ............
SPRlNG,HELICAL,COMP
WASHER,FLAT ................
......
NUT,SELF-LCCKlNG,HE....
ENDOFFIGURE
30-1
4
4
4
1
2
2
2
12
2
6
1
1
1
2
2
SECTION II
TM 9-2330-384-14&P
C01
5
5
o
2
(OPTIONAL)
3
A
A
Figure 31. Grounding Reel and Mounting Hardware.
SECTION Il
(1)
(2)
ITEM
SMR
NO CODE
(3)
NSN
TM 9-2330-384-14&P
(4)
C01
(6)
(5)
PART
CAGEC NUMBER
DESCRIPTION
(7)
AND USABLE ON CODES (UOC) QTY
GROUP 1808 STOWAGE RACKS, BOXES,
STRAPS, CARRYING CASES, CABLE
REELS, HOSE REELS,
ETC.
FIG.
*
*
1
2
3
4
5
5
PAOZZ
PAOZZ
PAOZZ
PAOZZ
PAOZZ
PAOZZ
2540009305303
5310007320558
5310009221794
5305012104595
5342009769355
5999001345844
19207
96906
96906
97403
76545
81349
31 GROUNDING
MOUNTING
REEL AND
HARDWARE
CABLE ASSEMBLY AND
(GROUND REEL) ...
NUT,PLAIN,HEXAGON
...................
WASHER,LOCK .........................
SCREW,ROLLER
ASSEMB .................
CLIP ................................
(OPTIONAL) .........
CLIP,ELECTRICAL
10959979
MS51967-8
MS16213-63
13222E0109
21C100AMP
M83413/7-1
END OF FIGURE
31-1
2
8
8
8
4
4
SECTION II
TM 9-2330-384-14&P
2
1
3
4
1
-Z
Aii
7
8
cl 1
7
9
8
6
ON
10
00
Figure32.HoseandGrounding
RodTubeAssembly.
6
SECTION
II
(3)
(2)
(1)
SMR
ITEM
CODE CAGEC
NO
TM9-2330-384-14&P
(6)
(5)
(4)
PART
DESCRIPTION AND USABLE ON CODES(UOC) QTY
NUMBER
GROUP: 1808 STOWAGE RACKS, BOXES,
STRAPS, CARRYING CASES, CABLE
REELS, HOSE REELS, ETC.
FIG.
1
2
3
4
5
6
7
8
9
10
PAOZZ
PAOZZ
PAOZZ
PAOZZ
PFOOO
PAOZZ
PAOZZ
PAOZZ
PAOZZ
XAOZZ
74841
7V618
94231
96906
74841
73685
96906
96906
96906
74841
TKG5230-2
ZKA9836
3-0762D-311
MS51943-35
TKGS228-1
5697-C
MS90728-8
MS51943-31
TKA6754
32 HOSE AND GROUNDING ROD TUBE
ASSEMBLY
STRAP, RETAINING
BOLT, HOOK
WASHER, LOCK
NUT, SELF-LOCKING, HE
TUBE ASSEMBLY, METAL
• CATCH, FRICTION
• SCREW, CAP, HEXAGON H
• WASHER, FLAT
• NUT, SELF -LOCKING, HE
• TUBING
END OF FIGURE
32-1
4
8
8
8
1
2
4
4
4
2
TM 9-2330-384-14&P
SECTION II
Figure 33. Manhole Cover Assembly and Related Hardware.
SECTION II
(2)
(3)
(1)
SMR
ITEM
CODE CAGEC
NO
TM9-2330-384-14&P
(6)
(5)
(4)
PART
DESCRIPTION AND USABLE ON CODES(UOC) QTY
NUMBER
GROUP : 1811 TANK BODIES
FIG. 33 MANHOLE COVER ASSEMBLY AND
RELATED HARDWARE
1
2
3
4
5
4
7
8
9
10
11
12
13
14
15
PBOOO
PAOZZ
PAOZZ
PAOZZ
PAOZZ
PAOZZ
PAOZZ
PAOZZ
PAOZZ
PAOZZ
PAOZZ
PAOZZ
PAOZZ
PAOZZ
PAOZZ
13226
49632
49632
13226
49632
13226
49632
96906
49632
13226
13226
13226
49632
49632
49632
FVA97638X8
30290P
30310P
3030-BR
30360P
3716-BN
6234AL
MS51967-15
31198N
6238AL
8046AL167
9463CP
3550BN
31390P
31290P
MANHOLE TOP ASSEMBL
• BOLT, EXTERNALLY REL
• WASHER, LOCK
• NUT, PLAlN, HEXAGON
• CLAMP, LOOP
• GASKET
• VENT, INBREATHING
• NUT, PLAIN, HEXAGON
• PACKING, PREFORMED
• VALVE, POSITIVE CRAN
• COVER, MANHOLE
• COVER, MANHOLE
• GASKET
• BOLT, MACHINE
• SPRING
END OF FIGURE
33-1
1
1
1
1
I
2
1
1
I
1
1
1
1
1
1
TM 9-2330-384-14&P
SECTION II
Figure 34. Static Ball and Cable Assembly, Convoy Light.
SECTION II
(3)
(2)
(1)
ITEM
SMR
CODE CAGEC
NO
TM9-2330-384-14&P
(6)
(5)
(4)
PART
DESCRIPTION AND USABLE ON CODES(UOC) QTY
NUMBER
GROUP:
FIG.
1
2
3
4
5
6
7
PAOZZ
PAOZZ
PAOZZ
AFOOO
PAOZZ
PAOZZ
MFOZZ
74841 TKA7579
96906 MS16213-63
96906 MS51943-35
74841 TKG5108-2
96652 21-09
04898 VKD5061-00
74841 VKA8995-3
34
1811 TANK BODIES
STATIC BALL AND CABLE
ASSEMBLY, CONVOY LIGHT
STUD,BALL
WASHER, LOCK
NUT, SELF-LOCKING, HE
CABLE ASSY, LIGHT
• PIN, LOCK
• SWAGING SLEEVE, WIRE
• CABLE, 1-16 DIA (10.75FT.LG.) MAKE
FROM P/N MILW83420TYPE1-A1/8DIA7X19,
END OF FIGURE
34-1
6
6
6
1
1
2
1
TM 9-2330-384-14&P
SECTION II
Figure 35. Reflectors and Mounting Hardware.
SECTION
II
(2)
(3)
(1)
SMR
ITEM
NO
CODE CAGEC
TM9-2330-384-14&P
(6)
(5)
(4)
PART
DESCRIPTION AND USABLE ON CODES(UOC) QTY
NUMBER
GROUP: 22 BODY, CHASSIS, AND HULL
ACCESSORY ITEMS
GROUP: 2202 ACCESSORY ITEMS
FIG. 35 REFLECTORS AND MOUNTING
HARDWARE
1 PAOZZ 0 7 7 0 7 AD610CABS
2 PAOZZ 7 7 9 7 7 4 7 A
3 PAOZZ 7 1 9 5 1 98037R
RIVET, BLIND
REFLECTOR, INDICATIN
REFLECTOR, INDICATIN
(AMBER)
(RED)
END OF FIGURE
35-1
8
4
4
TM 9-2330-384-14&P
SECTION II
Figure 36. Labels, Front and Rear.
SECTION II
(3)
(1)
(2)
SMR
ITEM
CODE CAGEC
NO
TM9-2330-384-14&P
(4)
PART
DESCRIPTICN
NUMBER
(5)
AND USABLE EN CODES(UOC)
(6)
QTY
GROUP: 2210 DATA PLATES AND
INSTRUCTION
HOLDERS
FIG.
1 PAOZZ 74841
2 PFOZZ 14109
TKGO896-1
X-CE7964-1
36 LABELS,
FRONT AND REAR
MARKER,INDENTIFICATION .................
.................
CAUTION PLATE..
END OF FIGURE
36-1
1
1
SECTION
II
TM 9-2330-384-14&P
C01
5
a.
.
/
0
2
1
3
0
4
@2 2
I1,
0
10.1
1
1
4
i
a
Figure 36A. Hazardous Warning Placards.
SECTION II
(1)
(2)
(3)
ITEM SMR
NOCODE NSN
TM 9-2330-384-14&P
(4)
C01
(6)
(5)
PART
CAGEC
NUMER
(7)
DESCRIPTION
ANDUSABLE
ONCODES(UOC)QTY
GROUP
2210 DATAPLATESAND
INSTRUCTION
HOLDERS
FIG.
1
2
3
4
PAOZZ
PAOZZ
PAOZZ
PAOZZ
5310009261835
5310006151556
7690014232823
5310007616882
96906
28527
19207
96906
MS21083C3
2616950G001
12380149
MS51967-2
36A
HAZARDOUS WARNING
PLACARDS
NUT,SELF-LOCKING,HE
.................
WASHER,FLAT .........................
POSTER ..............................
NUT,PLAIN,HEXAGON
...................
END OF FIGURE
36A-1
16
32
4
16
SECTION II
TM 9-2330-384-14&P
2
1
SEMI-TRAILER. TANK 7500 GALLON
BULK HAUL PETROLEUM
@-38
.
165.
120'
274'
Too00
IT-
TIECOHIN
@-TIEDOWN
OVERALL
OVERALL
OVERALL
SHIPPING
SHIPPING
433 IN.
11S.19 IN.
WIN IN
ZIZB CU. FT.
10600 LOS.
LENGTH
HEIGHT
W107H
CUBAGE
WEIGHT
SHIP TRAILER I :T'P111yj
.
ME
USE ALL (4) SLI " 6
TO LIFT. USE ALL (4)
71100,11's TO SECURE
T ......
TIES 326
3
RUSTPROOFING DATA
THIS SEMITRAILER HAS BEEN MEATED WTH A CCAREC)SHONMEVENTATIVE
CCVA50UND CDNFORMING TO THE RECALAREMENTSOF ML C V218 T@ I
o
SEMITRAILER MANUFACTLEREA
SENITIRAN-ER
M 1052
0
SL,,Tmo@,,
CWRACT
W DAAf07 87 C JOSI
DATE@IED
@ICAT@
0
LIWO AW SM. T@ CROVISCHN
FRLEEHAUF TFLAALEROFfRATIONS
C@PoLmD SUP@IEFE
TKOU70 IM
4
LUBRICATION
CHART
A 11p A
SEE
L.11
I'll I OIL
I
I
Wo
$L.I@ WU@110
5 W
AMIN
UN
Z
LUSE
I..S6E
Figure 37. Plates and Labels, Right Front.
SECTION
II
(3)
(1)
(2)
ITEM
SMR
NO
CODE CAGEC
TM9-2330-384-14&P
(6)
(5)
(4)
PART
DESCRIPTION AND USABLE ON CODES(UOC) QTY
NUMBER
GROUP: 2210 DATA PLATES AND
INSTRUCTION HOLDERS
FIG, 37 PLATES AND LABELS, RIGHT
FRONT
1
2
3
4
PAOZZ
PFOZZ
PAOZZ
PFOZZ
74841
74841
74841
74841
TKA6640
TKG5326-1
TKG5470-1
TKG5327-1
RIVET, BLIND
PLATE, IDENTIFICATIO
DECAL
PLATE, IDENTIFICATIC
END OF FIGURE
37-1
8
1
1
1
TM 9-2330-384-14&P
SECTION II
Figure 38. Plates and Labels, Left Side.
SECTION
II
(3)
(2)
(1)
ITEM
SMR
NO
CODE CAGEC
TM9-2330-384-14&P
(6)
(5)
(4)
PART
DESCRIPTION AND USABLE ON CODES(UOC) QTY
NUMBER
GROUP: 2210 DATA PLATES AND
INSTRUCTION HOLDERS
FIG. 38 PLATES AND LABELS, LEFT
SIDE
1
2
3
4
5
6
7
PFOZZ
PAOZZ
PAOZZ
PAOZZ
PAOZZ
PFOZZ
PFOZZ
74841
74841
74841
74841
74841
74841
74841
TKG3469-1
TKA6640
TKA9848
TKA9551
TKA9552
TKG5334-1
TKG5333-1
PLATE, DESIGNATION
RIVET, BLIND
MARKER, IDENTIFICATI
MARKER, IDENTIFICATI
MARKER, IDENTIFICAT
PLATE, IDENTIFICATIO
PLATE, IDENTIFICATIO
END OF FIGURE
38-1
1
12
1
1
1
1
1
TM 9-2330-384-14&P
SECTION II
Figure 39. Labels, Middle Left.
SECTION II
(3)
(2)
(1)
SMR
ITEM
CODE CAGEC
NO
TM9-2330-384-14&P
(6)
(5)
(4)
PART
DESCRIPTION AND USABLE ON CODES(UOC) QTY
NUMBER
GROUP: 2210 DATA PLATES AND
INSTRUCTION HOLDERS
FIG. 39 LABELS, MIDDLE LEFT
1
2
PAOZZ 74841 TKA8654
PAOZZ 74841 TKA 8650
MARKER, IDENTIFICATI
MARKER, lDENTIFICATI
END OF FIGURE
39-1
1
1
TM 9-2330-384-14&P
SECTION II
Figure 40. Plates, Inside Cabinet
SECTION
II
(2)
(3)
(1)
SMR
ITEM
CODE CAGEC
NO
TM9-2330-384-14&P
(5)
(4)
PART
DESCRIPTION AND USABLE ON CODES(UOC)
NUMBER
(6)
QTY
GROUP: 2210 DATA PLATES AND
INSTRUCTION HOLDERS
FIG. 40 PLATES, INSIDE CABINET
1
2
3
4
5
6
7
8
PFOZZ
PAOZZ
PAOZZ
PFOZZ
PAOZZ
PAOZZ
PFOZZ
PFCZZ
74841
74841
96906
74841
74871
74841
74841
74841
TKG5328-1
TKG5332-1
MS27183-42
TKG5335-1
TKG54571-2
TKG5560-1
TKG5330-1
TKG5329-1
PLATE, lDENTIFICATIO
RIVET, BLIND
WASHER, FLAT
PLATE, INSTRUCTION
PLATE, WALK BACK
PLATE, PRECHECK
PLATE, INSTRUCTION
PLATE, INSTRUCTION
END OF FIGURE
40-1
1
18
14
1
1
1
1
1
TM 9-2330-384-14&P
SECTION II
Figure 41. Labels, Top.
SECTION II
(1)
(2)
13)
SMR
ITEM
NO
CODE CAGEC
TM 9-2330-384-14&P
(4)
PART
DESCRIPTICN
NUMBER
(6)
(5)
AND USABLE ON CODES (UOC) QTY
GROUP: 2210 DATA PLATES AND
INSTRUCTION
HOLDERS
FIG.
1 PAOZZ 74841
2 PAOZZ 74841
TKA8657
T-KA8662
41 LABELS,
MARKER,IDENTIFICATI
MARKER,IDENTIFICATI
TOP
.................
.................
END OF FIGURE
41-1
1
1
TM 9-2330-384-14&P
SECTION II
1
2
2 thru 51
3 thru 36
C01
37
38 thru 49
10
11
9
13
8
71
36
35
12
12
34
33
3
6
8
1
@4j
5
33
8
5
13
3
4
41@41 k5
32
33
31
5
1
0
A-'
16
16 5
33
12
22
29
22
5
31
28
17
12
16
21
7
17
20
-29
2
3
5
16
26
23
18
30
25
4
24
3
17
Figure 41A. Vapor Recovery Kit (sheet 1 of 3)
SECTION
TM 9-2330-384-14&P
II
C01
39
38
43
49
42
42
43
42
43
40
. 1.
41
'11\
42
42
47
46
48
42
45
.1
44
Figure 41A. Vapor Recovery Kit (sheet 2 of 3)
SECTION
II
TM 9-2330-384-14&P
C01
50
51
co::@
I
@t6
0
e
Figure
41A.
Vapor
Recovery
Kit(sheet
3of
3)
SECTION II
(1)
(2)
(3)
ITEM SMR
NO CODE NSN
TM 9-2330-384-14&P
(4)
C01
(5)
(6)
PART
CAGECNUMBER
(7)
DESCRIPTION AND USABLEON CODES (UOC) QTY
GROUP3307 SPECIAL PURPOSEKITS
FIG.
*
*
*
*
*
*
*
*
*
*
*
*
*
*
*
*
*
*
*
*
*
*
*
*
*
*
*
*
*
*
*
*
*
*
*
*
*
*
*
*
1
2
3
*4
5
6
7
*8
*9
10
11
PFFFF
PFFFF
PAFZA
PAFZZ
PFFZZ
PFFZZ
PAFZZ
PAFZZ
XAFZZ
PAFZZ
MFFZZ
2590014388806
12 PAFZZ
13 PAFZZ
14 PAFZZ
15 PFFZZ
16 PFFZZ
17 PAFZZ
18 PFFZZ
19 PFFZZ
20 PFFZZ
21 PFFZZ
22 PFFZZ
23 PFFZZ
24 PAFZZ
25 PFFZZ
26 PAFZZ
27 PFFZZ
28 PAFZZ
29 PFFZZ
30 PAFZZ
31 PAFZZ
32 PAFZZ
33 PFFZZ
34 PFFZZ
35 XAFZZ
36 PAFZZ
* 37 XAFFF
38 PAFZF
39 PAFZZ
40 PFFZZ
41 PFFZZ
42 PFFZZ
43 PAFZA
44 PFFZZ
45 PAFZZ
5310008238804
5305000712509
5310009050762
4820000608608
5305000680500
5310005825965
5340011620430
4730001932709
4820007204488
4730001961974
4730001961973
4730001961975
4730001961979
5305000712233
6685008277495
4730013908073
4820012717889
4820000608608
19207
19207
91816
81349
81343
07282
96906
96906
19207
75535
16003
57K3087
12461902
9559B-2PP
M4109-09-08-OOB
4-4-130137BA
16222
MS90725-3
MS35338-44
12461903
1023056
C43974-30.0
96906
80204
96906
81343
81343
96906
81343
30327
96906
81343
19207
85274
96906
81343
96906
81343
93061
98441
96906
96906
85274
81343
81343
18887
98441
19207
91816
91816
81343
81343
81343
91816
19207
81349
MS27183-9
B1821BH025C150N
MS51967-3
M4109-01-08-OOB
4-4-130238BA
MS51846-24
4-4-4-4-130538BA
MS35782-2
MS51846-30
4-2-130239BA
12461906
2205
MS51846-28
4-4-4-130438BA
MS51846-31
4-4-140131
V406P-4
EM-25
MS51846-35
MS90725-18
2020
4-2-130139BA
2-2-130138
AVR-093H
EM-12
12461904
D559B-2M-6
D559B-2M-1
M4109-01-08-OOB
4-4-4-140338BA
4-4-140137BA
9559B-2PP
12468902
M4109-09-08-OOB
41A-1
41A VAPOR RECOVERY KIT
VAPOR RECOVERY TEST .................
ASSEMBLY,REGULATOR .................
. VALVE,PLUG ........................
. COUPLING HALF,QUICK ...............
..NIPPLE ............................
-REGULATOR .........................
SCREW,CAP,HEXAGON
H ...............
WASHER,LOCK .......................
-STAND,
WELDMENT ...................
. SNAP HOOK .........................
..CHAIN,WELDLESS
MAKE FROM WELDLESS
CHAIN, P/N C43974, 30 IN. LG.
..WASHER,FLAT .......................
SCREW,CAP,HEXAGON
H ...............
NUT,PLAIN,HEXAGON
.................
COUPLING HALF,PNUEM ...............
..ELBOW .............................
. NIPPLE,PIPE .......................
..CROSS .............................
..COCK,DRAIN ........................
. NIPPLE,PIPE .......................
..ELBOW .............................
..STANDOFF ..........................
-PRESSURE
GAGE .....................
..NIPPLE,PIPE
.......................
..TEE ...............................
..NIPPLE,PIPE
.......................
..PIPE ADAPTER,FEMALE ...............
. VALVE, 3-WAY ......................
..MUFFLER,EXHAUST
...................
. NIPPLE,PIPE .......................
..SCREW,CAP,HEXAGON
H ...............
...............
. GAGE,DIFFERENTIAL,D
..ADAPTER,REDUCING
..................
-COUPLING ..........................
-TRANSDUCER,
VACUUM ................
..PNEUMATIC
MUFFLER,E ...............
COUPLING ASSEMBLY ..................
..VALVE,SAFETY
RELIEF ...............
..VALVE,
PRESSURE REL ...............
. COUPLING HALF,PNUEM ...............
..TEE ...............................
..NIPPLE ............................
..VALVE,PLUG ........................
-COUPLING ..........................
-COUPLING
HALF,QUICK ...............
1
1
4
3
8
1
2
8
1
1
1
14
2
6
1
5
4
1
1
2
1
4
1
1
1
1
1
2
2
1
4
1
4
1
1
1
1
1
1
1
1
6
3
1
SECTION
Il
TM 9-2330-384-14&P
(2)
(3)
(4)
ITEM
SMR
NO CODE
NSN
CAGEC
PART
NUMBER
DESCRIPTION
4730001932709
96906
81343
81343
91816
19207
19207
M351846-24
4-4-4-4-140538BA
4-4-140238BA
259B-2PP.5
12461908
12461893
..NIPPLE,PIPE
.......................
..CROSS .............................
..ELBOW .............................
..VALVE,
CHECK ......................
HOSE ASSEMBLY ......................
PAF TEST PLATE .....................
(1)
*
*
*
*
*
*
46
47
48
49
50
51
PAFZZ
PFFZZ
PFFZZ
PAFZZ
PAFZZ
PFFZZ
C01
(7)
(5)
AND USABLE
END OF FIGURE
41A-2
ON CODES (UOC)
QTY
1
1
1
1
2
1
SECTION II
TM 9-2330-384-14&P
20
21 TH RU 23
1
12
10
3
11
11
10
14
6
13
9
15
9
7
8
16
17
23
Part of item 20
Figure 42. Jet Level Sensor, Lines, and Related Hardware.
22
21
19
SECTION II
(3)
(2)
(1)
ITEM
SMR
CODE CAGEC
NO
TM9-2330-384-14&P
(6)
(5)
(4)
PART
DESCRIPTION AND USABLE ON CODES (UOC) QTY
NUMBER
GROUP: 47 GAGES (NONELECTRICAL).
WEIGHING AND MEASURING
DEVICES
GROUP: 4702 GAGES, MOUNTINGS, LINES,
AND FITTINGS
F I G . 42 JET LEVEL SENSOR, LINES,
AND RELATED HARDWARE
1 MOOZZ
74841
STK40090-15
2 PAOZZ 9 3 0 6 1 6 8 N T A - 6 - 4
3 MOOZZ 7 4 8 4 1 S T K 4 0 0 9 0 - 1 6
4 PAFZZ 6 4 5 4 8 F613D
5 PAFZZ 9 6 9 0 6 MS35842-11
6 MFFZZ 7 4 8 4 1 T K G 5 3 0 4 - 1 - 1
7
8
9
10
11
12
PAOZZ
PAFZZ
PAFZZ
PAFZZ
PAFZZ
MOOZZ
93061
74841
75364
75364
93061
74841
68NTA-8-4
TKG5459-1
TKG0510-13
VKA7792
68NTA-6-6
STK40090-13
13
14
15
16
PAFZZ
PAFZZ
PAFZZ
MOOZZ
81343
56161
96906
74841
6-6-6130438B
10503176
MS51846-1
STK40090-11
1 7 MOOZZ 7 4 8 4 1 S T K 4 0 0 9 0 - 1 2
18
19
20
21
22
23
PAOZZ
PAOZZ
PAOOO
PAOZZ
PAOZZ
PAOZZ
93061
96906
32869
32869
32869
32869
209P12-6
MS14314-2X
24388A3-4IN
24388ACAP3-4IN
24388AGSKT3-4IN
24388ASCRN3-4IN
(34.5FT.LG.) MAKE FROM
TUBING,NYLON
P/N STK40090
ADAPTER,STRAIGHT,PI
(34.5FT.LG.) MAKE FROM
TUBING,NYLON
P/N STK40090
SWITCH, PROXIMITY
CLAMP,HOSE
(4.0 FT. LG.) MAKE
TUBlNG,NEOPRENE
FROM P / N T K G 5 3 0 4 - 1
ADAPTER,STRATGHT,PI
VALVE,SADDLE
NIPPLE,PIPE
COUPLING,PIPE
ADAPTER,STPAIGHT.PI
(1.166FT,LG.)MAKE
TUBING, NYLON
FROM P/N STK40090
TEE, PIPE
BUSING,PIPE
NIPPLE,PIPE
(1.66FT.LG.(MAKE FROM P/N
TUBING
STK40090
(2.833FT.LG.)MAKE FROM P/N
TUBING
STK40090
BUSHING,PIPE
PLUG,PIPE
STRAINER,STYLE F
.CAP,BRONZE
.GASKET,COPPER
.SCREEN,BRASS
END OF FIGURE
42-1
1
2
1
1
1
1
1
1
2
2
8
1
1
1
1
1
1
2
1
1
1
1
1
TM 9-2330-384-14&P
SECTION II
Figure 43. Jet Level Sensor Precheck Component Parts.
SECTION II
(1)
(2)
(3)
ITEM SMR
NO CODE NSN
TM 9-2330-384-14&P
(4)
Col
(6)
(5)
PART
CAGECNUMBER
(7)
DESCRIPTION AND USABLEON CODES (UOC) QTY
GROUP: 4702 GAGES, MOUNTINGS, LINES,
AND FITTINGS
FIG.
*
1
2
3
4
5
6
PAOZZ
PAOZZ
PAOZZ
PFFZZ
PAOZZ
MOOZZ
5310000145850
5305002400194
4820013178235
5340012915200
6685013204820
45152
96906
74841
74841
5J172
74841
1379HX1
MS51849-76
TKG5548-1
TKG0149-2
TKG5504-1
STK40109-8
7
8
* 9
* 10
11
12
PAOZZ
PAOZZ
PAOZZ
XDOZZ
PAOZZ
MOOZZ
5325013182076
4730010918032
4730001960936
74841
93061
21450
12145
93061
74841
FSP11-1-14
68NTA-8-6
115224
C750B
279NTA-8-6
STK40109-7
13 PAOZZ 4730011156643
14 PAOZZ 4730010952034
15 MOOZZ
93061
93061
74841
269NTA-8-8
2225P-8
STK40109-9
*
*
*
4730010912809
16
17
18
19
PFFZZ
PAOZZ
PFFZZ
MOOZZ
5340012919213
4730010969127
5340012915199
74841
93061
74841
74841
TKG0149-3
68NTA-6-8
TKG0149-4
STK40090-14
20
* 21
22
23
24
* 25
PFFZZ
PAOZZ
PAOZZ
PAOZZ
PAOZZ
PAOZZ
5340012908670
5325013182077
4730000691187
4730009191803
5310009349758
5310000453296
74841
74841
93061
79470
96906
83298
TKG0149-1
FSP11-1-18
269NTA-6-4
W05465
MS35649-202
B20500-11
43 JET LEVEL SENSOR PRECHECK
COMPONENT PARTS
WASHER,FLAT .........................
SCREW,MACHINE .......................
VALVE,BALL ..........................
STRAP,RETAINING .....................
GAGE,PRESSURE,DIAL
..................
TUBING,NYLON
(3.OFT.LG.)MAKE
FROM
P/N STK40109 ........................
GROMMET,NONMETALLIC
.................
ADAPTER,STRAIGHT,PI
.................
BUSHING,PIPE ........................
VALVE,CHECK .........................
ELBOW,PIPE TO TUBE ..................
TUBING,NYLON
(25.5FT.LG.)MAKE
FROM
P/N STK40109 ........................
ELBOW,PIPE TO TUBE ..................
TEE,PIPE ............................
TUBING,NYLON
(5.lFT.LG.)MAKE
FROM
P/N STK40109 ........................
CLIP,SPRING
TENSION .................
ADAPTER,STRAIGHT,PI
.................
STRAP,RETAINING .....................
TUBING,NYLON
(5.OFT.LG.)MAKE
FROM
P/N STK40090 ........................
STRAP,RETAINING .....................
GROMMET,NONMETALLIC
.................
ELBOW,PIPE TO TUBE ..................
COUPLING,PIPE .......................
NUT,PLAIN,HEXAGON
...................
WASHER,LOCK .........................
END OF FIGURE
43-1
2
2
1
2
1
1
2
1
2
1
1
1
3
1
1
2
1
2
1
3
1
1
1
2
2
TM 9-2330-384-14&P
SECTION
1
II
2
1 1
@
111111
3
44@
5
5
4
Figure 44. Gage Marker Rod and Components.
SECTION
II
(3)
(2)
(1)
ITEM
SMA
CODE CAGEC
NO
TM9-2330-384-14&P
(6)
(5)
(4)
PART
DESCRIPTION AND USABLE ON CODES (UOC) QTY
NUMBER
GROUP: 4702 GAGES, MOUNTINGS, LINES,
AND FITTINGS
FIG. 44 GAGE MARKER ROD AND
COMPONENTS
1
2
3
4
5
PAFZZ
PAOZZ
PAOZZ
PAOZZ
MFOZZ
74841
74841
96906
04898
19207
TKG5l53-1
TKA1003
MS35691-33
VKA8994
7668272
STUD, CONTINUOUS THR
DISK,VALVE
NUT,PLAIN,HEXAGON
CONDUIT,METAL,FLEXI
(6FT LONG)
ROPE,WIRE
N VKA8995
MAKE
END OF FIGURE
44-1
FROM
P/
1
1
1
2
6
TM 9-2330-384-14&P
SECTION II
Figure 45. Emergency Valve Control Lines and Component Parts.
SECTION
II
(1)
(2)
(3)
ITEM
SMR
CODE CAGEC
NO
TM9-2330-384-14&P
(6)
(5)
(4)
PART
DESCRIPTION AND USABLE ON CODES (UOC) QTY
NUMBER
GROUP: 72 DISPENSING AND SERVICING
EQUIPMENT COMPONENTS
GROUP: 7203 VALVES, FITTINGS, LINES
FIG. 45 EMERGENCY VALVE CONTROL
LINES AND COMPONENT PARTS
1
2
3
4
5
6
PAOZZ
PAFZZ
PBOZZ
PAOZZ
PAOZZ
MOOZZ
97403 13222E0109
96906 M51943-35
7 4 8 4 1 TKG5276-1
21439 52C3861-3
23705 FSP11-1-3
7 4 8 4 1 LKA3342-3
7 PFFZZ
8 MOOZZ
74841
74841
TKG0149-4
VKA0583-2
9 MOOZZ
74841
LKA3342-6
10 PAOZZ 7 4 8 4 1
11 PAOZZ 05443
12 MOOZZ 74841
VKA3849
20032-A
LKA3342-4
13 MOOZZ
74841 LKA3342-8
14 MOOZZ
74841
VKA0583-4
15 PAOZZ 05443 10268-A
16 PAOZZ
96906 MS51967-5
17 PAOZZ 05443 20040-A
18 MOOZZ 7 4 8 4 1 LKA3342-1
19 MOOZZ 74841 VKA0583-3
20 MOOZZ 74841 LKA3342-7
21 MOOZZ 74841 LKA3342-5
22 MOOZZ 74841 VKA0583-1
23 MOOZZ 74841 LKA3342-2
SCREW ROLLER ASSEMB
NUT,SELF-LOCKING.HE
VALVE,REGULATING,FL
ADAPTER,STRAIGHT,PI
GROMMET,NONMETALLIC
(11.42 FT LG) MAKE FROM P/N
TUBING
STBW
STRAP, RETAINlNG
(26.5 FT LG) MAKE FROM P/N
CABLE
MILW83420 T Y P E - A 1 / 8 0 1 A 7 X 1 9
(11 FT LG) MAKE FROM P/N
TUBING
STBW
UNION,TUBE
RELAY-SWITCH
TUBING
(12.42 FT LG) MAKE FROM P/N
STBW
(12 FT LG) MAKE FROM P/N
TUBING
STBW
CABLE
(21.6 FT LG) MAKE FROM P/N
MILW83420TYPEl-A1/8D147X19
NUT,SELF-LOCKING,RO
NUT,PLAIN,HEXAGON
THUMBSCREW
(5.67 FT. LG.) MAKE FROM P/
TUBING
N STBW
CABLE (21 FT LG) MAKE FROM P/N
MILW83420TYPE1-A1/8D1DIA7X19
TUBING
(8.5 FT LG) MAKE FROM P/N
STBW
(8 FT LG) MAKE FROM P/N STBW
TUBING
CABLE (14 FT LG) MAKE FROM P/N
MILW83420TYPEl-A1/8D1A7X19
TUBING (6 FT LG) MAKE FROM P/N STBW
END OF FIGURE
45-1
4
4
1
8
1
1
24
1
1
4
2
1
1
1
1
2
1
1
1
1
1
1
1
TM 9-2330-384-14&P
SECTION II
Figure 46. Vapor Collection and Component Parts.
SECTION II
(3)
(2)
(1)
ITEM
SMR
CODE CAGEC
NO
TM9-2330-384-14&P
(6)
(5)
(4)
PART
DESCRIPTION AND USABLE ON CODES (UOC) QTY
NUMBER
GROUP: 7203 VALVES, FITTINGS, LINES
FIG. 46 VAPOR COLLECTION AND
COMPONENT PARTS
1
2
3
4
5
6
7
8
9
10
11
12
13
14
15
16
17
PAOZZ
PAOZZ
PAOZZ
PAOZZ
PAOZZ
PAOZZ
PAOZZ
PAOZZ
PAOZZ
PAOZZ
PAOZZ
PAOZZ
PAOZZ
PAOZZ
PAOZZ
PAOZZ
PAOZZ
81646 6 8 8 0
74841 TKG5300-1
81646 5456
74841 TKG5301-1
1 3 2 2 6 4626-9AL
1 3 2 2 6 9Q5805
1 3 2 2 6 9Q5847
13226 1 8 6 2 6 - F L
81349 M 8 3 2 4 8 / 1 - 2 4 5
74841 T K G 5 2 9 9 - 1
7V618 TKA7199
96906 MS27020-17
96906 MS27030-9
74841 VKA0619
96906 MS27183-18
01276 210104-85
29930 1 2 0 3 7 8
STRAP,RETAINING
HOSE,NONMETALLIC
CLAMP,LOOP
HOSE,NONMETALLIC
COVER,VENTILATORY
NUT, PLAIN, HEXAGON
WASHER,FLAT
STUD,PLAIN
PACKING,PREFORMED
HOSE,METALLIC
BOLT,U
COUPLING HALF, QUICK
GASKET
CAP, PROTECTIVE, DUST
WASHER, FLAT
WASHER, LOCK
NUT, PLAIN, HEXAGON
END OF FIGURE
46-1
2
1
2
1
1
4
4
4
1
1
2
1
1
1
4
4
4
TM 9-2330-384-14&P
SECTION II
Figure 47. Sump Drain and Components.
SECTION Il
(1)
(2)
(3)
ITEM SMR
NO CODE NSN
col
TM 9-2330-384-14&P
(4)
PART
CAGECNUMBER
DESCRIPTION AND USA33LEON CODES (UOC) QTY
GROUP: 7203 VALVES, FITTINGS,
FIG.
1
2
3
4
5
6
7
8
9
10
11
12
PAOZZ
PAOZZ
PAOZZ
PAOZZ
PAOZZ
PAOZZ
PAOZZ
PAOZZ
PAOZZ
PAOZZ
PAOZZ
PAOZZ
5305000712070
5310008095998
5310007680318
3040012905025
4730012899555
4730012899533
4730012899534
5306012897826
4710012909139
5310004079566
5310008807744
4820012903414
80204
96906
21439
74841
74841
74841
74841
74841
74841
96906
96906
74841
(7)
(6)
(5)
B1821BH050C175N
MS27183-18
01857-007
TKG5274-1
TKG5277-1
VKA1043
VKA1081
VKA7882
TKG5193-1
MS35338-45
M951967-5
TKG5045-1
47 SUMP DRAIN AND COMPONENTS
SCREW,CAP,HEXAGON
H .................
WASHER,FLAT .........................
...................
NUT,PLAIN,HEXAGON
LEVER,MANUAL CONTRO .................
NIPPLE,PIPE .........................
ELBOW,PIPE ..........................
ELBOW,PIPE ..........................
BOLT,U ..............................
PIPE,METALLIC .......................
WASHER,LOCK .........................
NUT,PLAIN,HEXAGON
...................
COCK,DRAIN ..........................
END OF FIGURE
47-1
LINES
1
2
1
1
1
1
1
1
1
2
2
1
SECTION
TM 9-2330-384-14&P
II
3
2
4
2
1
6
5
7
7
5
12
5
10
9
12
12
16
13
23
21
22
18
17
20
14
13
15
19
13
16
Figure 48. Loading and Discharge Tube.
SECTION II
(3)
(2)
(1)
SMR
ITEM
CODE CAGEC
NO
TM9-2330-384-14&P
(6)
(5)
(4)
PART
DESCRIPTION AND USABLE ON CODES (UOC) QTY
NUMBER
GROUP: 7203 VALVES, FITTINGS, LINES
FIG. 48 LOADING AND DISCHARGE TUBE
1
2
3
4
5
6
7
8
9
10
PAOZZ
PAOZZ
PAOZZ
PAOZZ
PAOZZ
PAOZZ
PAOZZ
PFOZZ
PAOZZ
PBOFF
96906
62793
96906
74841
96906
01276
29930
74841
79154
64548
MS90727-164
104J005-28
MS51943-44
TKG5192-1
MS27183-18
2l0104-8S
120378
TKG5169-1
75-4 1/2
F635AD
11
12
13
14
15
16
17
18
19
20
21
22
23
PAOZZ
PAOZZ
PAOZZ
PAOZZ
PAOZZ
PAOZZ
PAOZZ
PAOZZ
PBOZZ
PAOZZ
PAOZZ
PAOZZ
PAOZZ
79154
7V618
96906
96906
64548
14323
96906
96906
13226
96906
96906
96906
74841
M-2
TKA7199
MS27183-14
MS51943-35
F445
VKA1514
MS90728-64
MS51967-8
WD401-AL-V
MS90728-70
MS27028-17
MS27030-9
TKG5067-1
SCREW,CAP,HEXAGON H
WASHER,FLAT
NUT,SELF-LOCKING,HE
BRACKET,ANGLE
WASHER,FLAT
WASHER,LOCK
NUT,PLAIN,HEXAGON
PIPEASSEMBLY,METAL
COUPLING,CLAMP,PIPE
FOR COMPONENT
VALVE,REGULATING,FL
PARTS SEE FIG. 49 AND 50
GASKET
BOLT,U
WASHER,FLAT
NUT,SELF-LCCKING,HE
COUPLING,PIPE
GASKET
SCREW,CAP,HEXAGON
NUT,PLAIN,HEXAGON
VALVE ,GATE
SCREW, CAP,HEXAGON H
CAP,QUICK DISCONNEC
GASKET
ADAPTER,STRAIGHT,FL
END Of FIGURE
48-1
4
8
4
1
8
8
8
1
1
1
1
4
32
8
1
3
8
8
1
8
1
1
1
TM 9-2330-384-14&P
SECTION II
Figure 49. Bottom Load Valve Assembly.
SECTION II
(3)
(2)
(1)
SMR
ITEM
CODE CAGEC
NO
TM9-2330-384-14&P
(6)
(4)
(5)
PART
DESCRIPTION AND USABLE ON CODES (UOC) QTY
NUMBER
GROUP: 7203 VALVES, F FITTINGS, LINES
FIG. 49 BOTTOM LOAD VALVE ASSEMBLY
1
2
3
4
5
6
7
8
9
10
11
12
13
14
15
16
17
18
19
20
21
22
23
24
25
26
27
28
29
30
31
32
33
34
35
36
37
38
39
40
41
42
43
PAFZZ
PAFZZ
PAFZZ
PAFZZ
PAFZZ
PAFZZ
PAFZZ
PAFZZ
PAOZZ
PAOZZ
PAFZZ
PAFZZ
PAFZZ
PAFZZ
PAFZZ
PAFZZ
PAFZZ
PAFZZ
PAFZZ
PAFZZ
PAFZZ
PAFZZ
PAFZZ
PAFZZ
PAFZZ
PAFZZ
PAFZZ
PAFZZ
PAFZZ
PAFZA
PAFZZ
PAFZZ
PAFZZ
PAFZZ
PAFZZ
PAFZZ
PAFZZ
PAFZZ
PAFZZ
PAFZZ
PAFZZ
PAFZZ
PAFZZ
64548
96906
64548
64548
64548
64548
16069
64548
96906
96906
96906
64548
64548
96906
96906
96906
64548
96906
96906
64548
64548
64548
64548
96906
64548
64548
88044
96906
64548
64548
64548
64548
64548
64548
64548
64548
96906
96906
64548
96906
64548
96906
88044
4051-17
MS20470A4-4
4051-13
3706000-518-12
4021S2M3
2712519
2712520
4051-8
MS35338-41
MS90725-34
MS27769-4
2712515
2721205-1
MS35333-41
MS90725-34
MS90728-38
4051-7-5
MS35649-2312
MS171656
2712518
2712524-1
860062-N517-8
2712522-1
MS29513-212
2712521-1
2712517-1
AN960-816
MS29513-252
4051-2-5
4631062-250
2731616-1
4051-11-1
5105-18
4051-9
2661177
4051-11-2
MS29561-118
MS29513-263
4051-1
MS29513-111
4051-5
MS29512-10
AN814-10D
SCREEN, VALVE
RIVET,SOLID
RETAINER, VALVE
SCREW, MACHINE
GASKET
NUT
ROD, METERING BRASS
PLATE
WASHER, LOCK
BOLT, MACHINE
PLUG, PIPE
ELBOW, FLANGE TO TUB
BUSHING, MACHINE THR
WASHER, LOCK
BOLT, MACHINE
BOLT, MACHINE
SPRING
NUT, PLAIN, HEXAGON
PIN, SPRING
LEVER
CONNECTING LINK, RIG
PACKING, PREFORMED
RETAINER, PACKING
PACKIKG, PREFORMED
SHAFT, SHOULDERED
CAM, CONTROL
WASHER, FLAT
PACKING, PREFORMED
PISTON, VALVE
STRIP, CAP
SEAL
CAP
PUSH ON NUT
SHAFT, PISTON
SPRING
SPRING
PACKING, PREFORMED
PACHING, PREFORMED
BODY, VALVE
PACKING, PREFORMED
SOCKET, VALVE
PACKING, PREFORMED
PLUG, MACHINE THREAD
END OF FIGURE
49-1
1
2
4
4
1
1
1
1
16
16
2
1
1
25
16
25
1
1
1
1
1
1
1
1
1
1
1
1
1
1
1
1
1
1
1
1
1
1
1
1
1
2
1
TM 9-2330-384-14&P
SECTION II
Figure 50. Pilot Valve.
SECT ION I I
(1)
(2)
(3)
SMR
ITEM
CODE CAGEC
NO
TM9-2330-384-14&P
(4)
PART
DESCRIPTION
NUMBER
GROUP: 7203
FIG.
1
2
3
4
5
6
7
8
9
10
PAFFH
PAFZZ
PAFZZ
PAFZZ
PAFZZ
PAFZZ
PAFZZ
PAFZZ
PAFZZ
PAFZZ
64548
03038
80205
64548
64648
96906
88044
64548
64548
64548
2681193
LP503-6-8
NAS620C6
2681197
2633219
MS1603-4018
AN960010L
2681196
2681194
2813374-101
(5)
AND USABLE
VALVES,
50 PILOT
ON CODES(UOC)
FITTINGS,
LINES
VALVE
VALVE,CROSS .........................
.................
SCREW,SELF-LOCKING
WASHER,FLAT ........................
COVER,ACCESS .......................
DIAPHRAGM,VALVE,SPE
................
..........
. .......
..
RING,RETAINING
........................
WASHER,FLAT
SPRING,HELICAL,COMP
... .. ............1
.....
.
..........
.. .......
FLANGE,PIPE
DISK,VALVE .........................
END OF FIGURE
50-1
QTY
1
6
6
1
1
1
1
1
TM 9-2330-384-14&P
SECTION II
C01
1
2
3
4
5
6
@y
C@7
..........
8
Figure 51. Vent Caps and Drain Plugs
SECTION II
(1)
(2)
ITEM
SMR
NO CODE
(3)
NSN
TM 9-2330-384-14&P
(4)
C01
(6)
(5)
PART
CAGEC NUMBER
DESCRIPTION
AND USABLE ON CODES (UOC) QTY
GROUP: 7203 VALVES,
FIG.
*
*
*
*
1
2
3
4
PAOOO
PAOZZ
PAOZZ
MOOZZ
5
6
7
8
XAOZZ
PAOZZ
PAOZZ
PAOZZ
2910010354171
5305009845674
4030009548801
4010009580633
19207
96906
96906
81348
5330010658849
4030009487315
4730008470036
19207
19207
96906
29930
(7)
FITTINGS,
51 VENT CAPS AND DRAIN
LINES
PLUGS
11621224
CAP .................................
MS35206-294
SCREW,MACHINE
......................
MS87006-43
HOOK,CHAIN,S
.......................
RR-C-271
TY2 CL7
CHAIN,WELDLESS
MAKE FROM CHAIN
WELDLESS RR-C-271
TY2 CL7 16 IN.
-16
11621224-1
CAP ................................
11621224-2
GASKET .............................
MS87006-33
HOOK,CHAIN,S
.......................
444631
PLUG,PIPE ...........................
END OF FIGURE
51-1
2
2
2
1
LG.
2
2
2
3
TM 9-2330-384-14&P
SECTION II
(1)
(2)
ITEM
SMR
NO CODE
(3)
NSN
(4)
C01
(6)
(5)
PART
CAGEC NUMBER
DESCRIPTION
(7)
AND USABLE ON CODES (UOC) QTY
GROUP: 95 GENERAL USE STANDARDIZED
PARTS
GROUP:
FIG.
*
*
*
*
*
*
*
*
*
1 PAOZZ
2 PAOZZ
4010005852108
16003
81349
3
4
5
*6
*7
*8
*9
PAOZZ
PAOZZ
PAOZZ
PAOZZ
PAOZZ
PAOZZ
PAOZZ
4010010054775
9540006126376
4710012909305
4720012909215
4720012909216
4720012909217
81349
98897
7R766
40846
74841
74841
74841
*10
*11
*12
13
14
15
16
17
PAOZZ
PAOZZ
PAOZZ
PAOZZ
PAOZZ
PAOZZ
PAOZZ
PAOZZ
6145011699652
6145012895491
6145012896197
6145012912286
6145012895492
6145012896198
6145012902734
6145012302517
78174
81349
81349
81349
81349
81349
81349
81343
PAOZZ
PAOZZ
PAOZZ
6145008455959
6145011655633
6145003102593
77060
79550
64488
* 18
* 19
* 20
C43974
MILW83420TYPE1-A
1/8D1A7X19
M83420/3-001
LS3967
STBW
8588
STK40109
STK40090
TKG5304-1
C14EBR
M22759/12-12-1
M22759/14-14-8
M22759/14-14-1
M22759/14-14-5
M22759/14-14-2
M22759/14-14-4
TYPE GPT 14
LUE
954U
570D-3
81147S
9501 HARDWARE SUPPLIES
BULK MATERIEL,
COMMON
AND
BULK
CHAIN,WELDLESS
....................
ROPE,WIRE
.........................
ROPE,WIRE
1/16 DIA .................
12FT.
STRUCTURAL SECTION,
LENGTHS..
TUBE ASSEMBLY,METAL
.................
TUBE,METALLIC
.......................
TUBING,NONMETALLIC
..................
TUBING,NONMETALLIC
..................
TUBING,NONMETALLIC
1IN.
TD. X 1/
8IN. WALL X 12FT. LG ................
WIRE,ELECTRICAL
...................
WIRE,ELECTRICAL
...................
WIRE,ELECTRICAL
...................
WIRE,ELECTRICAL
...................
WIRE,ELECTRTCAL
...................
WIRE,ELECTRICAL
...................
WIRE,ELECTRTCAL
...................
AWGB WIRE,ELECTRICAL
...................
WIRE,ELECTRICAL
WIRE,ELECTRICAL
WIRE,ELECTRICAL
END OF FIGURE
BULK-1
12 GA.
12 GA.
14 GA.
BLUE ........
BLUE ........
GRAY ........
V
V
V
V
V
V
V
V
v
V
V
V
V
V
V
V
V
V
V
V
SECTION IV
TM 9-2330-384-14&P
C01
CROSS-REFERENCE INDEXES
STOCKNUMBER
5310-00-003-4094
5310-00-003-4094
5310-00-004-5033
5310-00-004-5033
4730-00-011-2578
5310-00-014-5850
5310-00-014-5850
6240-00-019-0877
4730-00-041-2651
5310-00-045-3296
5310-00-045-4007
4730-00-050-4203
4730-00-050-4203
4820-00-054-0658
5310-00-061-4650
5310-00-061-4650
5310-00-061-4650
5310-00-061-4650
5310-00-061-4650
5310-00-061-4650
5310-00-061-4650
5310-00-061-4650
5305-00-068-0500
5305-00-068-0500
5305-00-068-0509
5305-00-068-0509
5305-00-068-0511
5305-00-068-0511
5305-00-068-0511
4730-00-069-1187
4730-00-069-1187
4730-00-069-1187
5305-00-071-2069
5305-00-071-2069
5305-00-071-2070
5305-00-071-2233
5305-00-071-2237
5305-00-071-2509
5305-00-071-2509
5310-00-080-6004
5310-00-080-6004
5310-00-080-6004
5310-00-080-6004
5310-00-080-6004
5310-00-080-6004
5310-00-080-6004
5310-00-080-6004
NATIONAL STOCKNUMBERINDEX
STOCKNUMBER
FIG.
ITEM
46
48
30
32
42
40
43
5
45
43
49
12
12
43
1
9
18
25
26
27
30
32
2
41A
18
27
15
21
27
13
18
43
23
30
47
41A
18
30
41A
12
21
21
21
23
24
24
29
16
6
2
3
19
3
1
7
4
25
9
6
8
10
5
1
4
6
5
8
19
9
4
7
9
5
4
14
11
19
11
22
1
10
1
32
14
15
13
4
3
12
22
6
8
17
3
FIG.
ITEM
5310-00-080-6004
5310-00-080-6004
5310-00-081-4219
5310-00-087-4652
30
48
24
12
8
13
6
3
5975-00-133-8696
5999-00-134-5844
5940-00-143-4780
5940-00-143-4794
5940-00-143-4794
5320-00-151-5523
5975-00-152-1075
5330-00-165-1963
5310-00-167-0721
5310-00-167-0812
5310-00-167-0823
5940-00-168-3382
4010-00-171-4236
4010-00-171-4236
5325-00-171-9890
5325-00-171-9890
5325-00-171-9890
4730-00-172-0010
5330-00-172-1919
4730-00-188-3514
4730-00-188-3514
4730-00-188-3514
4730-00-193-2709
4730-00-193-2709
4730-00-196-0936
4730-00-196-0936
4730-00-196-1504
4730-00-196-1504
4730-00-196-1973
4730-00-196-1974
4730-00-196-1975
4730-00-196-1979
4730-00-204-1993
9905-00-205-2795
5305-00-225-3843
5305-00-225-3843
5305-00-225-3843
5306-00-225-8499
5306-00-226-4824
5306-00-226-4825
5305-00-226-4831
4730-00-230-1996
14
31
6
6
7
9
1
46
49
50
49
7
21
44
4
4
4
12
13
13
15
16
41A
41A
42
43
16
16
41A
41A
41A
41A
42
35
1
9
32
49
2
12
49
42
13
5
1
2
12
14
2
9
14
7
27
10
8
5
17
28
32
15
24
14
10
6
17
46
18
9
3
10
25
20
27
31
14
3
7
13
7
10
2
18
16
15
SECTION IV
TM 9-2330-384-14&P
CROSS-REFERENCE
STOCK NUMBER
5305-00-240-0194
5310-00-241-6664
5310-00-241-6664
5310-00-241-6664
5310-00-241-6664
5310-00-241-6728
5310-00-246-7422
5330-00-248-3839
5330-00-250-0226
2540-00-262-8318
5330-00-263-8032
5310-00-264-1337
5305-00-269-3211
5305-00-269-3211
5310-00-269-4040
5310-00-269-4040
4730-00-277-6324
4730-00-277-7331
4730-00-278-4622
5365-00-278-8803
4730-00-289-0155
4730-00-289-0155
4730-00-289-0155
6145-00-310-2593
6220-00-337-6471
5940-00-399-6676
5310-00-404-1402
5310-00-407-9566
5310-00-409-3355
5330-00-432-4218
5330-00-432-4219
5310-00-436-4203
5320-00-454-5156
5330-00-464-7329
4730-00-469-7797
4730-00-469-7797
6220-00-500-0437
4730-00-511-1677
5330-00-527-8116
5330-00-531-2924
3110-00-541-9166
4730-00-542-5796
2530-00-545-5406
5360-00-548-6741
4820-00-549-4746
4820-00-552-7809
5905-00-553-8197
FIG.
C01
INDEXES
NATIONAl STOCK NUMBER INDEX
ITEM
STOCK NUMBER
43
21
22
24
48
25
24
49
49
28
49
2
21
21
17
25
49
42
15
49
13
14
18
BULK
5
8
26
47
2
4
4
15
35
4
13
15
5
13
49
49
19
4
13
49
50
49
2
2
17
2
2
3
18
3
40
24
2
42
12
4
25
4
1
11
13
11
43
9
15
1
20
3
16
4
10
9
1
30
5
1
7
13
9
4
8
28
38
10
5
4
36
1
40
10
FIG.
ITEM
5330-00-565-4293
5935-00-572-9180
5310-00-582-5965
5310-00-584-5005
5310-00-584-5005
5320-00-584-9078
4010-00-585-2108
4010-00-585-2108
4820-00-595-5104
4820-00-595-5113
5310-00-596-8173
9540-00-612-6376
5310-00-615-1556
3040-00-631-4155
4730-00-640-6156
49
5
41A
2
23
49
BULK
41A
49
49
49
BULK
36A
13
48
5
7
8
8
12
2
1
11
1
29
33
4
2
2
21
5330-00-678-9047
2530-00-706-6614
4820-00-720-4488
5365-00-725-0969
5305-00-725-2317
5305-00-725-2317
5305-00-725-2317
5305-00-726-2551
5305-00-726-2551
5305-00-726-2551
5305-00-726-2567
5305-00-727-2283
5305-00-727-2283
4820-00-728-7467
5310-00-732-0558
5310-00-732-0558
5310-00-732-0558
6220-00-752-6018
5310-00-761-3706
5310-00-761-6882
4730-00-76S-9103
5310-00-768-0318
5310-00-768-0318
5310-00-768-0318
5310-00-768-0318
5310-00-773-7624
5365-00-803-7301
4730-00-808-6814
5310-00-809-5998
5310-00-809-5998
5310-00-809-5998
5
11
41A
50
23
30
48
22
24
48
25
21
24
18
30
31
48
5
33
36A
13
21
23
30
47
50
12
4
23
30
46
6
3
19
6
7
11
17
4
4
1
14
18
11
8
3
2
18
5
6
4
16
2
3
6
3
3
11
3
2
5
15
1-2
SECTION IV
TM 9-2330-384-14&P
CROSS-REFERENCE
STOCK NUMBER
5310-00-809-5998
5310-00-809-5998
5310-00-809-8540
5330-00-811-1105
5310-00-814-0673
5365-00-818-8087
5310-00-823-8803
5310-00-823-8803
5310-00-823-8804
6685-00-827-7495
5310-00-829-9981
5310-00-832-9719
5935-00-833-8561
5970-00-833-8562
5310-00-833-8567
5310-00-834-8732
4730-00-840-0796
6220-00-844-6471
6145-00-845-5959
5330-00-846-0501
5935-00-846-3883
5935-00-846-3884
5305-00-846-5703
5305-00-846-5703
4730-00-847-0036
4730-00-847-0036
4730-00-847-0036
5935-00-856-3513
5940-00-858-3621
5940-00-858-3621
5940-00-858-3621
5360-00-862-2860
4930-00-878-1308
5310-00-880-7744
5310-00-880-7744
5310-00-880-7744
5310-00-880-7744
5305-00-889-2997
4730-00-891-0798
5320-00-891-9081
5320-00-891-9081
5310-00-894-2353
6220-00-897-5856
5330-00-897-5857
5330-00-897-5857
5330-00-897-5859
5330-00-897-5859
C01
INDEXES
NATIONAL STOCK NUMBER INDEX
FIG.
ITEM
STOCK NUMBER
47
48
25
42
12
12
24
48
41A
41A
49
19
8
8
5
44
46
4
BULK
49
2
2
24
48
16
16
51
2
6
7
8
30
50
24
28
45
47
2
13
37
38
1
3
4
4
3
4
2
5
17
22
12
19
15
2
12
33
18
15
14
15
8
3
12
8
18
37
5
3
21
20
1
8
8
1
9
11
1
17
5
7
1
16
11
13
1
1
2
6
1
22
38
3
12
FIG.
ITEM
6220-00-897-5860
6220-00-897-5862
5330-00-899-4509
5330-00-899-4509
5925-00-900-1904
5310-00-905-0762
6220-00-905-8497
6220-00-905-8498
4730-00-908-3194
6240-00-914-5572
6240-00-914-5572
6240-00-914-5572
4730-00-919-1803
5310-00-922-1794
5310-00-922-1794
5310-00-922-1794
5310-00-922-1794
5310-00-922-1794
5310-00-926-1835
4
4
46
48
2
41A
4
3
42
3
4
4
43
5
27
30
31
34
36A
29
10
13
22
7
14
18
8
5
4
6
13
23
2
10
7
3
2
1
2540-00-930-5303
6240-00-931-6683
6240-00-931-6683
5310-00-934-9739
5310-00-934-9758
5310-00-935-9021
5310-00-935-9021
5310-00-935-9021
5310-00-935-9021
5310-00-935-9021
5310-00-935-9021
5310-00-935-9021
5310-00-935-9021
5310-00-935-9021
5310-00-935-9021
5310-00-935-9021
5310-00-935-9021
5310-00-938-5543
4030-00-948-7315
5310-00-951-7209
5310-00-951-7209
5310-00-951-7209
4030-00-954-8801
4010-00-958-0633
5340-00-976-9355
5310-00-982-6580
5310-00-982-6580
31
4
4
2
43
15
21
21
23
24
27
29
30
32
34
45
48
19
51
17
21
22
51
51
31
18
27
1
23
37
11
24
6
11
23
5
18
9
4
9
4
3
2
14
17
7
3
16
3
3
4
5
3
7
1-3
SECTION IV
TM 9-2330-384-14&P
C01
CROSS-REFERENCE INDEXES
STOCKNUMBER
5310-00-982-6580
5310-00-982-6580
5305-00-984-5674
5305-00-984-5674
5320-00-987-2984
5310-00-998-8178
5310-00-998-8178
9905-00-999-7369
9905-00-999-7370
4010-01-005-4775
3110-01-006-9504
5330-01-011-2204
5310-01-022-5552
5330-01-024-2311
2910-01-035-4171
4730-01-038-2350
4730-01-038-2350
2610-01-045-3688
2590-01-054-0253
2530-01-061-1351
5310-01-061-8727
4730-01-062-2570
5306-01-075-8519
5360-01-077-9428
5330-01-077-9759
5330-01-081-5070
5330-01-082-3189
5325-01-086-4841
5325-01-086-4841
5325-01-086-4841
4730-01-090-3237
4730-01-091-2809
4730-01-091-8032
4730-01-091-8032
4730-01-095-2034
2530-01-095-3561
4730-01-095-5833
4730-01-095-7717
4730-01-095-7717
4730-01-096-3169
4730-01-096-3204
4730-01-096-9127
4730-01-096-9128
4730-01-096-9128
4730-01-096-9128
5340-01-100-2536
4730-01-115-6643
NATIONAL STOCKNUMBERINDEX
STOCKNUMBER
FIG.
ITEM
FIG.
ITEM
30
32
51
51
40
46
48
27
27
BULK
19
12
26
33
51
41A
41A
20
45
7
33
42
28
33
12
48
3
8
13
45
42
43
14
43
43
17
13
13
15
14
13
43
14
18
42
41A
43
14
4
4
9
4
4
49
49
49
49
49
49
49
49
49
49
14
49
49
49
3
3
4
14
13
49
50
49
50
41A
16
16
49
BULK
BULK
50
21
34
50
49
3
4
49
7
2
49
50
9
25
34
8
21
36
17
34
20
7
35
31
23
8
6
3
6
32
30
12
19
7
16
17
18
25
2
26
8
10
2
9
4
19
10
4
9
5
10
21
5
14
19
16
6
39
9
18
8
2
6
2
17
7
2
4
3
8
22
2
9
1
4
45
1
11
15
4
2
4
15
20
15
11
6
22
5
7
11
1
8
14
1
12
3
2
10
23
17
16
5
11
52
13
4730-01-115-7362
5325-01-116-4683
5325-01-116-4683
5940-01-117-3419
5999-01-117-7996
5999-01-117-7996
5360-01-118-2274
3040-01-118-4154
3040-01-118-5519
3040-01-118-5954
5360-01-119-1338
5330-01-119-1339
5330-01-119-1372
5340-01-119-1830
5310-01-119-3088
4820-01-119-4886
4730-01-119-6895
5340-01-119-7121
4820-01-119-9189
4730-01-120-8048
5320-01-123-5674
5325-01-127-1390
5325-01-127-1390
4730-01-134-0856
4730-01-134-1278
3040-01-157-3343
5305-01-157-7390
3040-01-158-9242
5360-01-160-0505
5340-01-162-0430
2530-01-163-7340
2530-01-163-7340
5305-01-164-1601
6145-01-165-5633
6145-01-169-9652
5340-01-170-3165
5315-01-171-0750
5315-01-171-0750
4820-01-173-8502
3040-01-180-3166
5999-01-180-3411
5999-01-180-3411
5315-01-186-0829
5930-01-187-8026
5925-01-190-4632
4810-01-190-5606
4730-01-191-6528
1-4
SECTION IV
TM 9-2330-384-14&P
CROSS-REFERENCE
STOCK NUMBER
C01
INDEXES
NATIONAL STOCK NUMBER INDEX
FIG.
ITEM
STOCK NUMBER
9905-01-195-0663
5365-01-197-9549
4730-01-198-5438
5310-01-198-7838
5310-01-198-7838
2530-01-198-7860
5315-01-198-7883
5340-01-198-7685
5365-01-198-7892
5310-01-198-9325
9905-01-198-9327
5310-01-199-1769
5360-01-199-1776
4820-01-210-1251
5305-01-210-4595
5305-01-210-4595
5305-01-210-4595
2530-01-228-0246
35
12
19
9
23
24
19
19
24
25
36
19
11
18
29
31
45
11
2
16
2
2
11
14
4
7
12
9
2
5
11
15
2
4
1
7
3120-01-229-1130
6145-01-230-2517
5340-01-243-2769
2990-01-243-6393
5330-01-246-1043
4730-01-256-3734
4730-01-268-7410
6220-01-285-6072
6220-01-285-6073
4730-01-285-6074
2530-01-285-6076
2530-01-285-6077
5680-01-285-6078
2530-01-285-6079
2530-01-285-6080
6220-01-285-6081
6220-01-285-6082
6220-01-285-6084
4710-01-285-6085
4710-01-285-6086
2530-01-285-6089
2640-01-286-1712
5306-01-286-5426
4820-01-287-0736
2530-01-287-3978
5305-01-288-8320
5305-01-288-8320
2530-01-289-1013
25
BULK
46
33
33
48
27
4
4
27
12
19
33
15
15
4
3
4
32
30
11
19
33
48
13
3
4
16
8
17
1
10
6
9
6
20
2
1
7
12
1
7
3
31
2
11
5
13
1
22
14
10
17
12
9
7
FIG.
ITEM
5330-01-289-4925
5310-01-289-5011
6145-01-289-5491
6145-01-289-5492
4
23
BULK
BULK
19
9
11
14
5975-01-289-5976
5975-01-289-5976
6145-01-289-6197
6145-01-289-6198
5360-01-289-6220
5310-01-289-7782
5340-01-289-7791
5340-01-289-7792
5306-01-289-7824
5306-01-289-7825
5306-01-289-7826
5306-01-289-7831
5330-01-289-7840
5330-01-289-7843
5330-01-289-7845
5365-01-289-7896
5306-01-289-9133
5305-01-289-9143
5306-01-289-9144
5340-01-289-9157
5307-01-289-9168
5305-01-289-9212
5325-01-289-9265
5325-01-289-9265
5325-01-289-9265
5325-01-289-9265
5325-01-289-9265
4730-01-289-9533
4730-01-289-9534
4730-01-289-9537
4730-01-289-9545
4730-01-289-9555
4730-01-289-9559
4730-01-289-9566
7690-01-290-0170
7690-01-290-0171
7690-01-290-0172
7690-01-290-0173
7690-01-290-0174
7690-01-290-0175
2530-01-290-1329
2530-01-290-1329
16
44
BULK
BULK
11
45
33
46
23
16
47
5
19
12
19
19
25
45
21
46
34
12
6
7
8
13
14
47
47
3
42
47
42
48
38
38
39
41
41
36
13
16
13
4
12
15
10
15
5
3
4
12
8
1
18
14
3
21
10
17
21
14
1
5
11
7
7
5
4
6
7
9
9
5
10
23
4
5
1
1
2
1
15
4
1-5
TM 9-2330-384-14&P
SECTION IV
CROSS-REFERENCE
STOCK NUMBER
2530-01-290-1329
2530-01-290-1475
2530-01-290-1476
5306-01-290-2209
5310-01-290-2218
5315-01-290-2276
5365-01-290-2286
4720-01-290-2513
2590-01-290-2533
2590-01-290-2534
2510-01-290-2545
2510-01-290-2571
5306-01-290-2684
5306-01-290-2685
5306-01-290-2693
5306-01-290-2693
5306-01-290-2694
5306-01-290-2694
5306-01-290-2695
5340-01-290-2720
5340-01-290-2721
5340-01-290-2726
6145-01-290-2734
5340-01-290-2748
5340-01-290-2749
5340-01-290-2751
5340-01-290-2752
5340-01-290-2753
6150-01-290-2873
4820-01-290-3414
4820-01-290-3662
4820-01-290-3666
5306-01-290-3755
5340-01-290-3812
4730-01-290-3846
5340-01-290-3867
5340-01-290-3883
2530-01-290-3920
5306-01-290-4864
5305-01-290-4867
5340-01-290-4889
5340-01-290-4890
4820-01-290-4917
4720-01-290-4933
4720-01-290-4942
2510-01-290-5020
3040-01-290-5025
C01
INDEXES
NATIONAL STOCK NUMBER INDEX
STOCK NUMBER
FIG.
ITEM
16
12
17
33
33
11
26
15
24
24
24
22
24
26
30
32
46
48
25
18
48
30
BULK
is
25
27
21
28
7
47
44
42
25
18
45
11
12
12
25
19
24
24
48
46
46
29
47
11
23
2
2
3
6
3
8
19
10
5
1
9
1
1
2
11
12
5
12
4
16
16
12
13
3
24
3
14
12
2
8
11
16
10
8
17
23
12
14
16
1
19
10
4
1
4
2530-01-290-5074
6220-01-290-5151
6220-01-290-5152
6220-01-290-5152
2530-01-290-5683
2510-01-290-5695
2540-01-290-5696
2530-01-290-5715
7690-01-290-6382
5365-01-290-8307
5340-01-290-8322
5340-01-290-8666
5340-01-290-8669
5340-01-290-8670
5340-01-290-8670
5340-01-290-8671
5340-01-290-8672
5340-01-290-8673
5330-01-290-8877
4710-01-290-9139
4730-01-290-9198
4720-01-290-9206
4720-01-290-9215
4720-01-290-9216
4720-01-290-9217
4710-01-290-9305
5340-01-290-9661
4720-01-290-9709
2530-01-290-9728
5340-01-291-0261
5365-01-291-0730
4820-01-291-0991
4820-01-291-0991
2990-01-291-1277
6145-01-291-2286
5340-01-291-2319
5340-01-291-2319
5340-01-291-4556
2540-01-291-4558
4710-01-291-4596
3040-01-291-4627
2590-01-291-4632
5340-01-291-5190
5340-01-291-5199
5340-01-291-5199
5340-01-291-5199
5340-01-291-5199
1-6
FIG.
10
4
4
4
26
21
46
19
38
49
25
11
9
14
43
30
32
19
49
47
48
15
BULK
BULK
BULK
BULK
21
46
19
32
25
16
16
33
BULK
6
7
12
30
48
26
24
21
6
8
9
13
ITEM
1
20
26
33
7
15
5
20
3
13
4
9
16
3
20
4
1
19
22
9
16
13
7
8
9
5
10
2
11
6
15
5
14
7
13
19
8
13
12
8
6
13
5
20
5
17
10
TM 9-2330-384-14&P
SECTION IV
CROSS-REFERENCE
STOCK NUMBER
5340-01-291-5199
5340-01-291-5199
5340-01-291-5199
5340-01-291-5200
5340-01-291-5200
4820-01-291-5261
5310-01-291-8881
5310-01-291-8883
3120-01-291-8901
5340-01-291-9213
5340-01-291-9213
5307-01-292-1483
2510-01-292-3689
5307-01-292-3715
5310-01-292-5351
5310-01-292-5352
9905-01-292-8867
9905-01-292-8868
9905-01-292-8869
9905-01-292-8870
9905-01-292-8871
9905-01-292-8872
9905-01-292-8873
9905-01-292-8875
7690-01-293-7623
3120-01-293-9562
2530-01-294-7170
2530-01-294-7171
2530-01-296-3028
4730-01-297-0171
4730-01-297-0171
4730-01-297-0172
4730-01-297-0172
4730-01-297-0172
7690-01-297-7967
9905-01-298-8206
C01
INDEXES
NATIONAL STOCK NUMBER INDEX
ITEM
STOCK NUMBER
FIG.
18
43
45
14
43
45
19
19
12
13
43
19
25
44
12
25
37
37
40
38
38
40
40
40
39
12
23
25
11
1
3
1
3
9
37
38
10
18
7
14
4
3
6
13
1
7
16
16
3
1
10
7
2
4
1
7
6
8
7
4
2
21
8
16
2
4
14
3
16
9
3
1
5340-01-298-8285
5340-01-298-8286
2510-01-300-0244
5940-01-304-6301
5940-01-304-6301
5310-01-306-3460
5310-01-308-5778
5330-01-308-5870
5310-01-308-5959
5307-01-308-5984
2530-01-309-0983
6220-01-315-1458
4730-01-316-8636
5975-01-317-2425
4820-01-317-8235
5340-01-317-9614
5330-01-318-1911
5330-01-318-1912
5340-01-318-2042
5325-01-318-2076
5325-01-318-2077
4330-01-318-2805
4730-01-318-9772
4730-01-319-3381
5306-01-320-1049
5340-01-320-3920
6685-01-320-4820
5340-01-320-7096
5995-01-321-5779
5930-01-321-7107
5975-01-322-6364
5340-01-330-5495
2530-01-333-4715
9905-01-342-9148
9905-01-345-3539
9905-01-379-5693
1-7
FIG.
21
21
33
6
7
21
46
48
46
46
12
3
42
3
43
9
3
9
3
43
43
42
42
3
23
3
43
9
9
42
9
24
19
40
40
36A
ITEM
1
1
11
18
13
20
6
11
7
8
9
2
20
13
3
7
17
6
20
7
21
21
23
15
10
18
5
15
4
4
5
20
1
5
6
3
SECTION IV
TM 9-2330-384-14&P
CROSS-REFERENCE
CAGEC
PART NUMBER
74841
14109
14109
74841
14109
74841
74841
A-CC5226-1
A-CC7538-900
A-CD2285-1
A-CD2813-1
A-CD7180-1
A-CE5245-1
A-CE5939-6
74841
74841
74841
14109
74841
74841
74841
74841
14109
74841
74841
74841
74841
74841
74841
74841
74841
74841
74841
74841
74841
74841
14109
74841
74841
74841
74841
74841
74841
74841
14109
07707
06721
A-CE6220-1
A-CE6277-3
A-CE6477-1
A-CE8510-1
A-CE8760-5
A-CE8766-7
A-CE8769-2
A-CE9120-1
A-CE9911-1
A-CE9950-1
A-CF-4854-1
A-CF1328-1
A-CF2662-EM4
A-CF3079-1
A-CF3378-1
A-CF3379-1
A-CF4021-1
A-CF4022-1
A-CE4205-1
A-CF4858-1
A-XA0068-1
A-XA0408-1
A-XA0409-1
A-XA0412-1
A-XA0413-1
A-XA0420-1
A-XA0420-2
A-KA0432-1
A-XA0484-1
A-XA049S-1
A-XA1005-1
AD610ABS
AE-86313
88044
88044
88044
18887
14109
14109
12623
13226
13226
03743
AN814-10D
AN960-816
AN960C10L
AVR-093H
AXA0414-1
AXA0415-1
B-lGF4-1/4IN
B-50500012
B-60600011
BL50
C01
INDEXES
PART NUMBER INDEX
STOCK NUMBER
2530-01-290-9728
2530-01-333-4715
5365-01-197-9549
5310-01-291-8883
5340-01-196-7885
2530-01-163-7340
2530-01-163-7340
2530-01-285-6077
2530-01-290-5074
5340-01-290-2748
5310-01-199-1769
2530-01-290-5715
5365-01-289-7896
2640-01-286-1712
5340-01-290-8673
5360-01-199-1776
5307-01-292-1483
2530-01-285-6089
5340-01-290-3867
2530-01-290-1476
5360-01-289-6220
5315-01-290-2276
5340-01-291-4556
5340-01-290-3883
2530-01-285-6076
2530-01-296-3028
3120-01-291-8901
5310-01-291-8881
5315-01-198-7883
5330-01-289-7843
3120-01-293-9562
2530-01-290-1475
2530-01-290-3920
5310-01-292-5351
5330-01-289-7845
2530-01-294-7171
4730-01-198-5438
5320-00-454-5156
2530-01-290-1329
2530-01-290-1329
2530-01-290-1329
5365-00-278-8803
5310-00-167-0823
5310-00-167-0812
5330-01-011-2204
5330-01-077-9759
4820-01-210-1251
6220-00-905-8498
6220-00-905-8497
5975-00-152-1075
1-8
FIG.
19
19
12
19
19
19
16
16
19
10
15
19
19
19
19
19
11
19
11
11
17
11
11
11
12
12
12
11
12
19
19
12
12
12
12
12
19
25
19
35
13
16
16
49
49
50
41A
12
12
18
3
4
1
ITEM
11
1
16
13
7
9
2
9
12
1
12
5
20
21
22
19
11
16
1
8
2
10
6
5
13
17
7
2
1
6
4
14
21
23
23
10
3
16
2
1
15
4
11
43
27
7
35
22
20
15
8
18
2
SECTION IV
TM 9-2330-384-14&P
CROSS-REFERENCE
CAGEC
PART NUMBER
80204
B1821BH025C100N
80204
80204
B1821BH025C125N
B1821BH025C150N
80204
80204
80204
80204
B1821BH031C063N
B1821BH031C075N
B1821BH031C150N
B1821BH038C125N
80204
B1821BH038C150N
80204
B1621BH038C30ON
80204
B1821BH050C150N
80204
80204
B1821BH050C175N
B1821BH063F150N
80204
B1821BH063F200N
83298
98410
14726
14726
B20500-11
B231
B4044BN
B4052B
14726
12662
79154
15434
78174
16003
16003
12145
4J564
91340
B4071B
B475A
C-044-75-P-T0
C0505027400
C14EBR
C43974
C43974-30.0
C43974 X 30IN
DT-308
D12420-6
91816
91816
98441
98441
01276
01276
74841
74841
23705
D559B-2M-1
D559B-2M-6
EM-12
EM-25
FL5507GHG0320
FL5507GHG0540
FSP11-1-14
FSP11-1-18
FSP11-1-3
14109
FSP11-1-4
C01
INDEXES
PART NUMBER INDEX
STOCK NUMBER
5305-00-225-3843
5305-00-225-3843
5305-00-225-3843
5305-00-068-0509
5305-00-071-2509
5305-00-071-2509
5306-00-226-4824
5306-00-226-4825
5305-00-226-4831
5305-00-068-0511
5305-00-068-0511
5305-00-068-0511
5305-00-725-2317
5305-00-725-2317
5305-00-725-2317
5305-00-846-5703
5305-00-846-5703
5305-00-071-2069
5305-00-0'71-2069
5305-00-071-2070
5305-00-727-2283
5305-00-727-2283
5305-00-726-2551
5305-00-726-2551
5305-00-726-2551
5310-00-045-3296
5940-00-168-3382
5940-01-117-3419
5940-01-304-6301
5940-01-304-6301
9905-01-195-0663
4730-01-256-3734
4730-00-808-6814
6145-01-169-9652
4010-00-585-2108
4820-00-054-0658
5310-00-823-8803
5310-00-823-8803
4720-01-290-9208
4720-01-290-2513
5325-01-318-2076
5325-01-318-2077
5325-01-086-4841
5325-01-086-4841
5325-01-086-4841
5325-01-289-9265
5325-01-289-9265
5325-01-289-9265
1-9
FIG.
1
9
32
27
30
41A
2
12
49
15
21
27
23
30
48
24
48
23
30
47
21
24
22
24
48
43
7
9
6
7
6
35
48
4
BULK
BULK
41A
43
1
24
48
41A
41A
41A
41A
15
15
43
43
8
13
45
6
7
8
ITEM
7
13
7
5
15
13
2
18
16
4
14
11
7
11
17
21
20
1
10
1
18
11
4
4
1
25
10
8
18
13
10
2
9
3
10
1
11
10
1
15
2
39
38
36
29
13
8
7
21
6
22
5
11
7
7
TM 9-2330-384-14&P
SECTION IV
CROSS-REFERENCE
CAGEC
PART NUMBER
14109
14109
14109
14109
14109
FSP12-17-1
FSP12-2-4
FSP5-5-11
FSP5-5-20
FS27-2-1
13226
79318
79318
81348
96906
FVA9763BXB
F445
F635AD
GP3STYLXTYRACLR/
T/11.OOR22.50/G/
GRO11RED
HM518445
HM518445HM518410
LA-361-9
LKA3332-1
LKA3332-2
LKA3332-3
LKA3332-4
LKA3334-1
LKA3334-2
LKA3334-3
LKA3334-4
LKA3334-5
LKA3342-1
LKA3342-2
LKA3342-3
LKA3342-4
LKA3342-5
LKA3342-6
LKA3342-7
LKA3342-8
LKA9655-1
LKA9655-2
LKA9655-3
LP503-6-8
LS3967
M-2
MILW83420TYPE1-A
1/8DIA7X19
MS15001-1
96906
96906
96906
MS15002-1
MS16213-61
MS16213-63
96906
96906
96906
MS16624-1050
MS16624-1162
MS16633-4018
97783
60038
60038
46717
74841
74841
74841
74841
74841
74841
74841
74841
74841
74841
74841
74841
74641
74841
74841
74841
74841
74841
74841
74841
03038
98897
79154
81349
C01
INDEXES
PART NUMBER INDEX
STOCK NUMBER
FIG.
ITEM
13
14
13
12
19
12
9
23
33
48
48
20
5
4
16
2
14
5
2
11
1
16
10
1
5305-01-157-7390
9540-00-612-6376
5330-01-308-5870
4010-01-218-4109
35
19
19
5
3
8
9
3
6
7
8
7
6
45
45
45
45
45
45
45
45
6
7
8
50
BULK
48
BULK
3
8
10
7
10
4
10
10
13
21
11
4
4
18
23
6
12
21
9
20
13
15
20
10
2
4
11
2
4730-00-050-4203
4730-00-050-4203
4730-00-172-0010
5310-00-894-2353
5310-00-922-1794
5310-00-922-1794
5310-00-922-1794
5310-00-922-1794
5310-00-922-1794
5365-00-803-7301
5365-00-818-8087
5365-00-725-0969
12
12
12
1
5
27
30
31
34
12
12
50
6
8
15
6
2
10
7
3
2
11
19
6
5325-01-289-9265
5325-01-289-9265
4730-00-765-9103
5305-01-290-4867
5305-01-289-9212
5310-01-198-7838
5310-01-198-7838
5680-01-285-6078
4730-01-290-9198
4820-01-287-0736
2610-01-045-3688
9905-00-205-2795
3110-01-006-9504
3110-00-541-9166
6240-00-019-0877
1-10
TM 9-2330-384-14&P
SECTION IV
CROSS-REFERENCE
CAGEC
PART NUMBER
96906
96906
96906
96906
96906
MS171656
MS20470A4-4
MS20600B4W7
MS20600B8W6
MS20913-3
96906
96906
96906
MS21083C3
MS25036-108
MS25036-112
96906
96906
96906
MS27020-17
MS27028-17
MS27030-9
96906
MS27183-1
96906
96906
MS27163-12
MS27183-14
96906
MS27183-18
96906
MS27183-22
96906
96906
96906
96906
96906
96906
96906
96906
96906
96906
96906
96906
96906
96906
96906
96906
MS27183-25
MS27183-9
MS27769-4
MS29512-10
MS29513-111
MS29513-212
MS29513-252
MS29513-263
MS29561-118
MS3367-6-9
MS35206-215
MS35206-294
MS35333-41
MS35338-41
MS35338-44
MS35338-45
C01
INDEXES
PART NUMBER INDEX
STOCK NUMBER
5315-01-186-0829
5320-00-5B4-9078
5320-00-151-5523
5320-01-123-5674
4730-00-188-3514
4730-00-188-3514
4730-00-188-3514
5310-00-926-1835
5940-00-143-4780
5940-00-143-4794
5940-00-143-4794
4730-00-840-0796
4730-00-640-6156
5330-00-899-4509
5330-00-899-4509
5310-00-982-65BO
5310-00-982-6580
5310-00-982-6580
5310-00-982-6580
5310-00-081-4219
5310-00-080-6004
5310-00-080-6004
5310-00-080-6004
5310-00-080-6004
5310-00-080-6004
5310-00-080-6004
5310-00-080-6004
5310-00-080-6004
5310-00-080-6004
5310-00-080-6004
5310-00-809-5998
5310-00-809-5998
5310-00-809-5998
5310-00-809-5998
5310-00-809-5998
5310-00-951-7209
5310-00-951-7209
5310-00-951-7209
5310-00-809-8540
5310-00-823-8804
4730-00-277-6324
5330-00-263-8032
5330-00-248-3839
5330-00-250-0226
5330-00-527-8116
5330-00-531-2924
5330-00-846-0501
5975-00-133-8696
5305-00-889-2997
5305-00-984-5674
5310-00-167-0721
5310-00-045-4007
5310-00-582-5965
5310-00-407-9566
1-11
FIG.
49
49
9
3
13
15
16
36A
6
6
7
46
48
46
48
18
27
30
32
24
12
21
21
21
23
24
24
29
30
48
23
30
46
47
48
17
21
22
25
41A
49
49
49
49
49
49
49
14
2
51
49
49
41A
47
ITEM
19
2
14
19
14
10
6
1
1
2
12
12
21
13
22
3
7
18
8
6
4
3
12
22
6
8
17
3
8
13
2
5
15
2
5
3
16
3
17
12
11
42
40
24
28
38
37
13
13
2
14
9
8
10
TM 9-2330-384-14&P
SECTION IV
C01
CROSS-REFERENCE INDE
CAGEC
PART NUMBER
96906
MS35489-97
96906
96906
96906
96906
96906
30327
96906
96906
96906
96906
96906
MS35649-202
MS35649-2312
MS35649-242
MS35690-1424
MS35691-33
MS35782-2
MS35842-11
MS51330-1
MS51468-05
MS51846-1
MS51846-24
96906
96906
96906
96906
96906
96906
96906
MS51846-28
MS51846-30
MS51846-31
MS51846-35
MS51849-76
MS51922-17
MS51922-49
96906
96906
MS51922-61
MS51943-31
96906
96906
MS51943-33
MS51943-35
96906
MS51943-44
96906
MS51943-50
96906
96906
96906
96906
MS51967-15
MS51967-2
MS51967-3
MS51967-5
S
PART NUMBERINDEX
STOCKNUMBER
5325-00-171-9890
5325-00-171-9890
5325-00-171-9890
5310-00-934-9758
5310-00-829-9981
5310-00-934-9739
5310-00-241-6728
5310-00-834-8732
4820-00-720-4488
4730-00-908-3194
6220-00-337-6471
5310-01-289-5011
4730-00-230-1996
4730-00-193-2709
4730-00-193-2709
4730-00-196-1973
4730-00-196-1974
4730-00-196-1975
4730-00-196-1979
5305-00-240-0194
5310-00-087-4652
5310-00-269-4040
5310-00-269-4040
5310-00-832-9719
5310-00-061-4650
5310-00-061-4650
5310-00-061-4650
5310-00-061-4650
5310-00-061-4650
5310-00-061-4650
5310-00-814-0673
5310-00-935-9021
5310-00-935-9021
5310-00-935-9021
5310-00-935-9021
5310-00-935-9021
5310-00-935-9021
5310-00-935-9021
5310-00-935-9021
5310-00-935-9021
5310-00-935-9021
5310-00-935-9021
5310-00-935-9021
5310-00-241-6664
5310-00-241-6664
5310-00-241-6664
5310-00-241-6664
5310-00-061-4650
5310-00-061-4650
5310-00-761-3706
5310-00-761-6882
5310-00-905-0762
5310-00-880-7744
5310-00-880-7744
5310-00-880-7744
1-12
FIG.
4
4
4
43
49
2
25
44
41A
42
5
23
42
41A
41A
41A
41A
41A
41A
43
12
17
25
19
1
9
18
27
30
32
12
15
21
21
23
24
27
29
30
32
34
45
48
21
22
24
48
25
26
33
36A
41A
24
28
45
ITEM
17
28
32
24
18
11
18
3
19
5
3
9
15
17
46
24
20
26
30
2
3
4
1
15
5
1
4
8
19
9
12
6
11
23
5
18
9
4
9
4
3
2
14
17
2
2
3
6
5
8
4
14
7
1
16
SECTION IV
TM 9-2330-384-14&P
CROSS-REFERENCE
CAGEC
PART NUMBER
96906
MS51967-8
96906
96906
96906
96906
96906
96906
96906
96906
96906
96906
MS53007-1
MS53007-2
MS53047-1
MS75021-1
MS75021-2
MS87006-33
MS87006-43
MS90725-14
MS90725-18
MS90725-3
96906
96906
96906
13226
81349
81349
81349
81349
81349
81349
81343
MS90725-34
MS90725-36
MS90727-176
M210-01-0365
M22759/12-12-1
M22759/14-14-1
M22759/14-14-2
M22759/14-14-4
M22759/14-14-5
M22759/14-14-8
M4109-01-08-00B
81349
M4109-09-08-00B
81349
81349
81349
06721
M83248/1-245
M83413/7-1
M83420/3-001
N-3613-AD
80205
61424
NAS620C6
N10MC8
06721
61424
N4305A
N6MC8
93061
81349
81348
N6ME4
RER75F1502R
RR-C-271
TY2 CL7
-16
S-CE3719-2
S-CF0486-1
S-CF0487-1
S-CF4399-54
S-XA0244
SAEJ560
SCF004399641
SG21D1HPWPONCG
STBW
STK14372-1
74841
14109
14109
74841
74841
81343
74841
81349
7R766
74841
C01
INDEXES
PART NUMBER INDEX
STOCK NUMBER
5310-00-880-7744
5310-00-732-0558
5310-00-732-0558
5310-00-732-0558
9905-00-999-7370
9905-00-999-7369
6220-00-500-0437
5935-00-846-3883
5935-00-846-3884
4030-00-948-7315
4030-00-954-8801
5305-00-071-2237
5305-00-071-2233
5305-00-068-0500
5305-00-068-0500
5306-00-225-8499
5306-01-075-8519
5305-00-726-2567
6145-01-289-5491
6145-01-291-2286
6145-01-289-6198
6145-01-290-2734
6145-01-289-5492
6145-01-289-6197
4730-01-038-2350
4730-01-038-2350
5330-00-165-1963
5999-00-134-5844
4010-01-005-4775
4820-01-291-0991
4820-01-291-0991
5310-00-773-7624
4730-01-297-0171
4730-01-297-0171
2530-01-289-1013
4730-01-297-0172
4730-01-297-0172
4730-01-297-0172
4730-01-289-9537
5905-00-553-8197
4010-00-958-0633
2590-01-291-4632
5365-01-198-7892
2530-01-198-7860
2590-01-290-2534
5306-01-290-2684
5935-00-856-3513
2590-01-290-2533
6685-01-320-4820
4710-01-290-9305
1-13
FIG.
ITEM
47
30
31
48
27
27
5
2
2
51
51
18
41A
2
41A
49
28
25
4
BULK
BULK
BULK
BULK
BULK
BULK
41A
41A
41A
41A
46
31
BULK
16
16
50
1
3
16
1
3
9
3
2
51
11
3
2
18
4
2
4
5
3
7
3
14
31
4
7
10
4
14
4
11
13
15
16
14
12
15
40
4
45
9
5
3
5
14
3
4
14
7
3
16
9
9
10
4
24
24
24
24
24
2
24
43
BULK
6
13
12
14
10
9
1
19
5
5
17
TM 9-2330-384-14&P
SECTION IV
C01
CROSS-REFERENCE INDEXES
CAGEC
PART NUMBER
74841
74841
74841
74841
74841
74841
74841
74841
74841
74841
74841
74841
74841
74841
74841
74841
74841
74841
74841
74841
74841
74841
74841
74841
74841
74841
74841
74841
74841
74841
74841
74841
74841
74841
74841
74841
74841
74841
74841
74841
74841
74841
74841
74841
74841
74841
74841
74841
74841
74841
14544
STK14372-2
STK14372-4
STK14372-5
STK14372-7
STK14372-8
STK14373-1
STK14373-2
STK14373-3
STK14373-4
STK14373-5
STK14373-6
STK14373-7
STK14374-2
STK14374-3
STK14375-1
STK14375-2
STK14375-3
STK14375-4
STK14376-1
STK14377-1
STK14377-2
STK14377-3
STK40090
STK40090-1
STK40090-10
STK40090-11
STK40090-12
STK40090-13
STK40090-14
STK40090-15
STK40090-16
STK40090-17
STK40090-2
STK40090-3
STK40090-4
STK40090-5
STK40090-6
STK40090-7
STK40090-8
STK40090-9
STK40109
STK40109-1
STK40109-2
STK40109-3
STK40109-4
STK40109-5
STK40109-7
STK40109-8
STK40109-9
SWA6215
S1594
74841
74841
74841
T-KA8662
TKA 8650
TKA 9848
PART NUMBERINDEX
STOCKNUMBER
4720-01-290-9216
4720-01-290-9215
5340-01-330-5495
5305-00-269-3211
5305-00-269-3211
7690-01-290-0174
7690-01-293-7623
7690-01-290-6382
1-14
FIG.
7
4
4
8
8
3
4
8
7
6
3
9
7
6
4
8
7
6
9
6
7
4
BULK
13
14
42
42
42
43
42
42
14
18
18
18
18
18
14
13
13
BULK
14
13
14
14
15
43
43
43
24
21
21
41
39
38
ITEM
22
15
27
3
9
6
35
13
2
5
6
11
3
6
39
12
6
8
12
14
19
24
8
20
12
16
17
12
19
1
3
8
6
13
7
2
17
11
21
11
7
2
6
7
5
1
12
6
15
20
4
25
2
2
3
SECTION IV
TM 9-2330-384-14&P
C01
CROSS-REFERENCE INDEXES
CAGEC
PART NUMBER
74841
74841
TKA1003
TKA6640
74841
7V618
TKA6754
TKA7199
74841
74841
74841
74841
74841
74841
74841
74841
TKA7579
TKA8654
TKA8657
TKA9276
TKA9551
TKA9552
TKG0084-4
TKG0149-1
74841
TKG0149-2
74841
TKG0149-3
74841
TKG0149-4
74841
74841
TKG0149-5
TKG0149-6
75364
74841
74841
74841
74841
74841
74841
74841
74841
74841
74841
79318
74841
74841
74841
74841
74841
74841
74841
74841
74841
74841
74841
74841
74841
74841
TKG0510-13
TKG0571-1
TKG0572-1
TKG0573-1
TKG0591-7-3
TKG0896-1
TKG1336-6-1
TKG1336-6-2
TKG5016-1
TKG5043-1
TKG5045-1
TKG5046-1
TKG5067-1
TKG5070-1
TKG5084-1
TKG5092-1
TKG5092-2
TKG5108-1
TKG5108-2
TKG5153-1
TKG5154-1
TKG5161-1
TKG5169-1
TKG5173-1
TKG5188-1
TKG5193-1
PART NUMBERINDEX
STOCKNUMBER
4820-01-290-3662
5320-00-891-9081
5320-00-891-9081
5306-01-290-2694
5306-01-290-2694
5307-01-289-9168
7690-01-290-0172
7690-01-290-0173
2510-01-290-5020
7690-01-290-0170
7690-01-290-0171
5340-01-318-2042
5340-01-290-8670
5340-01-290-8670
5340-01-291-5200
5340-01-291-5200
5340-01-291-9213
5340-01-291-9213
5340-01-291-5199
5340-01-291-5199
5340-01-291-5199
5340-01-291-5199
5340-01-291-5199
5340-01-291-5199
5340-01-291-5199
5340-01-290-8669
5340-01-291-2319
5340-01-291-2319
4730-01-289-9545
4730-01-319-3381
5340-01-320-3920
5330-01-318-1911
7690-01-290-0175
2510-01-290-5695
4820-01-290-3414
5930-01-321-7107
4730-01-289-9566
2510-01-290-2571
2530-01-285-6079
2530-01-285-6080
5307-01-292-3715
5340-01-290-9661
2540-01-291-4558
4710-01-291-4596
5340-01-291-5190
5340-01-290-2721
4710-01-290-9139
1-15
FIG.
ITEM
44
37
38
32
46
48
34
39
41
29
38
38
3
14
43
14
43
13
43
6
8
9
13
18
43
45
9
6
7
42
3
3
3
42
36
6
7
21
21
47
42
48
30
22
15
15
21
34
44
21
30
48
21
48
47
2
1
2
10
11
12
1
1
1
1
4
5
20
3
20
14
4
7
16
20
5
17
10
10
18
7
16
19
8
9
15
18
17
3
1
16
23
15
19
12
4
23
14
1
7
3
6
4
1
10
12
8
5
4
9
TM 9-2330-384-14&P
SECTION IV
CROSS-REFERENCE
CAGEC
PART NUMBER
74841
74841
74841
74841
74841
74841
74841
74841
74841
74841
74841
74841
74841
74841
74841
74841
74841
74841
74841
74841
74841
74841
74841
74841
74841
74841
74841
74841
74841
74841
74841
74841
74841
74841
74841
74841
74841
74841
74841
74841
74841
74841
74841
74841
74841
74841
74841
74841
74841
74841
74841
74841
TKG5198-1
TKG5204-1
TKG5209-1
TKG5209-2
TKG5215-1
TKG5219-1
TKG5228-1
TKG5230-1
TKG5230-2
TKG5265-1
TKG5265-2
TKG5273-1
TKG5274-1
TKG5276-1
TKG5277-1
TKG5290-1
TKG5299-1
TKG5300-1
TKG5301-1
TKG5302-1
TKG5303-1
TKG5304-1
TKG5304-1-1
TKG5309-1
TKG5309-2
TKG5309-3
TKG5309-4
TKG5310-1
TKG5310-2
TKG5311-2
TKG5312-1
TKG5312-2
TKG5312-3
TKG5313-1
TKG5314-1
TKG5315-1
TKG5317-2
TKG5320-1-3
TKG5320-1-4
TKG5320-1-5
TKG5322-1
TKG5326-1
TKG5327-1
TKG5328-1
TKG5329-1
TKG5330-1
TKG5332-1
TKG5333-1
TKG5334-1
TKG5335-1
TKG5341-1
TKG5372
74841
74841
TKG5459-1
TKG5469-1
C01
INDEXES
PART NUMBER INDEX
STOCK NUMBER
4710-01-285-6086
5340-01-290-2726
5340-01-290-4889
5340-01-290-4890
5340-01-290-2753
4730-01-285-6074
4710-01-285-6085
5340-01-290-8671
5340-01-290-8672
5340-01-298-8285
5340-01-298-8286
2530-01-294-7170
3040-01-290-5025
4820-01-291-5261
4730-01-289-9555
5340-01-290-2751
4720-01-290-4933
4720-01-290-9709
4720-01-290-4942
5340-01-290-3812
5340-01-290-2720
4720-01-290-9217
6220-01-285-6082
6220-01-315-1458
6220-01-285-6084
6220-01-285-6081
6220-01-290-5151
6220-01-285-6072
6220-01-285-6073
6150-01-290-2673
2510-01-290-2545
9905-01-292-8867
9905-01-292-8868
9905-01-292-8869
9905-01-292-6872
9905-01-292-8873
5320-00-987-2984
9905-01-292-8870
9905-01-292-8871
9905-01-292-8875
5340-01-290-2752
6220-01-290-5152
6220-01-290-5152
4820-01-290-3666
9905-01-298-8206
1-16
FIG.
30
30
24
24
28
27
32
30
32
21
21
23
47
45
47
27
46
46
46
18
18
BULK
42
6
6
7
7
3
3
4
4
4
4
4
8
8
7
7
6
7
24
37
37
40
40
40
40
38
38
40
21
4
4
42
38
ITEM
13
16
16
1
3
1
5
4
1
1
1
8
4
3
5
3
10
2
4
16
12
9
6
3
12
1
17
2
2
11
31
20
20
2
2
8
14
5
7
18
5
2
4
1
8
7
2
7
6
4
24
26
33
8
1
TM 9-2330-384-14&P
SECTION IV
C01
CROSS-REFERENCE INDEXES
PART NUMBERINDEX
STOCKNUMBER
CAGEC
PART NUMBER
74841
74841
74841
74841
74841
74841
74841
74841
74841
74841
81343
75160
74841
74841
74841
74841
74841
74841
14109
74841
74841
74841
74841
74841
74841
14109
74841
74841
74841
74841
74841
74841
74841
74841
74841
74841
75364
74841
04898
TKG5470-1
TKG5471-2
TKG5498-1
TKG5499-1
TKG5501-1
TKG5517-1
TKG5526-1
TKG5529-1
TKG5548-1
TKG5560-1
TYPE GPT 14 AWGB
LUE
T23837
U-CD0511-1
U-CD4502-1
U-CE8801-1
U-CF1459-1
U-CF2640-1
U-XA0003-1
U-XA0004
U-XA0011
U-XA0015
U-XA0016-X
U-XA0026
U-XA0046-16
U-XA0046-17
U-XA0356-2
VKA0351
VKA0583-1
VKA0583-2
VKA0583-3
VKA0583-4
VKA0619
VKA0909
VKA1043
VKA1081
VKA3849
VKA7792
VKA7882
VKA8994
74841
04898
VKA8995-3
VKD5061-00
74841
93061
13226
79470
14109
74841
74841
74841
74841
7V618
VWA8862
V406P-4
WD401-AL-V
W05465
X-CE7964-1
ZKA 9865
ZKA7799
ZKA8295
ZKA8903
ZKA9836
7690-01-297-7967
9905-01-342-9148
5975-01-322-6364
5330-01-318-1912
5340-01-317-9614
2530-01-309-0983
5975-01-317-2425
4820-01-317-8235
9905-01-345-3539
6145-01-230-2517
4730-00-278-4822
2510-01-292-3689
5365-01-291-0730
5340-01-290-8322
5340-01-290-2749
2530-01-290-5683
5310-01-292-5352
3120-01-229-1130
5365-01-290-2286
5306-01-289-9133
5306-01-290-2685
3040-01-291-4627
5306-01-290-3755
5306-01-290-2695
5310-01-198-9325
5306-01-289-7825
5340-01-289-9157
5306-01-320-1049
4730-01-289-9533
4730-01-289-9534
4730-01-290-3846
4730-01-289-9559
5306-01-289-7826
5975-01-289-5976
5975-01-289-5976
2530-01-287-3978
4820-01-290-4917
4730-00-919-1803
9905-01-198-9327
5306-01-289-9144
5306-01-289-7831
5306-01-290-4864
5306-01-289-7824
5306-01-290-2693
5306-01-290-2693
1-17
FIG.
ITEM
37
40
9
9
9
12
3
9
43
40
BULK
3
5
5
6
7
9
13
3
3
6
17
15
25
25
25
25
26
25
25
26
25
26
26
25
25
25
16
45
45
45
45
46
23
47
47
45
42
47
16
44
34
21
34
13
41A
48
43
36
21
5
25
23
30
32
11
3
15
4
13
7
7
8
3
10
1
6
11
5
9
12
22
8
19
14
14
10
6
7
10
10
8
13
4
7
7
6
17
28
19
23
2
21
1
12
4
1
2
SECTION IV
TM 9-2330-384-14&P
CROSS-REFERENCE
CAGEC
PART NUMBER
74841
21439
ZKA9866
01857-007
78680
75535
05443
34895
98343
98343
06721
56161
30327
19207
50153
72914
21450
100059
1023056
10268-A
1041571-5
10451E
10452S
10453110
10503176
109Bl-4
10959979
11M011
11246
115224
08108
1157A
19207
19207
19207
19207
19207
24617
24617
29930
11621224
11621224-1
11621224-2
11668899
11670914
120375
120376
120378
19207
19207
19207
19207
19207
19207
19207
19207
97403
12380149
12461893
12461902
12461903
12461904
12461906
12461908
12468902
13222EO109
45152
1379HX1
03670
79470
79470
98343
07282
24617
14089
1469X6
1472X8X8X4
1509
16222
163137
13226
19207
18626-FL
192075
81343
05443
2-2-130138
20032-A
C01
INDEXES
PART NUMBER INDEX
STOCK NUMBER
5310-01-306-3480
5310-00-768-0318
5310-00-768-0318
5310-00-768-0318
5310-00-768-0318
2540-00-262-8318
5340-01-162-0430
5310-01-289-7782
5310-00-264-1337
4730-01-096-3204
4730-00-891-0798
4730-01-268-7410
4730-00-204-1993
4730-00-011-2578
2540-00-930-5303
2530-01-095-3561
3040-00-631-4155
4730-00-196-0936
4730-00-196-0936
6240-00-931-6683
6240-00-931-6683
2910-01-035-4171
5305-00-984-5674
5340-01-100-2536
5330-01-081-5070
5310-00-584-5005
5310-00-409-3355
5310-00-998-8178
5310-00-998-8178
9905-01-379-5693
5305-01-210-4595
5305-01-210-4595
5305-01-210-4595
5310-00-014-5850
5310-00-014-5850
4730-00-069-1187
4730-01-134-0856
5330-00-172-1919
5305-01-288-8320
5305-01-288-8320
5307-01-308-5984
4730-00-196-1504
4730-00-196-1504
2590-01-054-0253
1-18
FIG.
21
21
23
30
47
28
41A
45
2
13
13
27
42
42
31
17
13
42
43
4
4
51
51
51
41A
48
23
2
46
48
36A
41A
41A
41A
41A
41A
41A
41A
29
31
45
40
43
21
13
14
13
41A
3
4
46
16
16
41A
45
ITEM
20
2
3
6
3
2
10
15
12
23
1
6
14
19
1
1
2
18
9
23
37
1
5
6
52
15
12
9
17
7
3
51
2
9
37
22
50
44
2
4
1
3
1
13
19
17
24
6
12
9
8
3
10
34
11
TM 9-2330-384-14&P
SECTION IV
CROSS-REFERENCE
CAGEC
PART NUMBER
05443
13226
85274
32869
93061
13226
96652
20040-A
201R
2020
20245
207ACBH-6
209
21-09
76545
01276
21C100AMP
210104-8S
06853
85274
93061
212227
2205
2225P-6
93061
32869
32869
32869
91816
28527
80064
79316
79318
79318
79318
79318
79318
93061
2225P-8
24388ACAP3-4IN
24388ASCRN3-4IN
24388A3-4IN
259B-2PP.5
2616950G001
2624732
2633219
2661177
2681193
2681194
2681196
2681197
269NTA-6-4
93061
269NTA-6-6
93061
93061
269NTA-8-4
269NTA-8-6
93061
79318
45681
79318
79318
16069
79318
79318
79318
93061
93061
79318
79318
06853
93061
79318
94231
269NTA-8-8
2712515
2712517-1
2712518
2712519
2712520
2712521-1
2712522-1
2712524-1
272NTA-6-6
272NTA-8-6
2721205-1
2731616-1
278614
279NTA-8-6
2813374-101
3-07620-311
13445
30056-10
C01
INDEXES
PART NUMBER INDEX
STOCK NUMBER
5305-01-289-9143
6220-00-844-6471
6685-00-827-7495
5330-00-811-1105
4730-00-511-1677
5330-00-432-4218
5315-01-171-0750
5315-01-171-0750
5340-00-976-9355
5310-00-003-4094
5310-00-003-4094
2530-00-545-5406
4730-00-469-7797
4730-00-469-7797
4730-01-095-2034
4330-01-318-2805
4730-01-318-9772
4730-01-316-8836
5310-00-615-1556
5310-00-436-4203
4930-00-878-1308
5360-01-119-1338
4820-00-549-4746
4730-01-191-6528
5360-01-160-0505
5340-01-170-3165
4730-00-069-1187
4730-00-069-1187
4730-00-289-0155
4730-00-289-0155
4730-00-289-0155
4730-01-115-7362
4730-01-095-7717
4730-01-095-7717
4730-01-115-6643
4730-01-120-8048
3040-01-158-9242
3040-01-118-5519
5310-01-119-3088
3040-01-118-5954
3040-01-157-3343
5330-01-119-1372
3040-01-180-3166
4730-01-095-5833
4730-01-119-6895
5365-01-290-8307
5330-01-119-1339
4820-00-72B-7467
4730-01-091-2809
4820-01-173-8502
5310-00-004-5033
5310-00-004-5033
5925-00-900-1904
1-19
FIG.
45
4
41A
42
13
4
21
34
31
46
48
13
41A
13
15
43
42
42
42
41A
36A
15
50
49
50
50
50
50
18
43
13
14
18
14
13
15
43
49
49
49
49
49
49
49
49
13
14
49
49
18
43
50
30
32
2
ITEM
17
8
32
22
8
1
9
5
5
16
6
4
23
13
9
14
21
23
20
49
2
5
5
35
1
9
8
4
11
22
9
15
1
9
3
2
13
12
26
20
6
7
25
23
21
12
6
13
31
8
11
10
2
3
7
SECTION IV
TM 9-2330-384-14&P
CROSS-REFERENCE
CAGEC
PART NUMBER
49632
13226
49632
49632
13226
49632
13226
76301
00779
3029CP
3030-BR
3031CP
3036CP
3119BN
3129JCP
3139SL
32-21088-5
327638
23705
49632
79318
13226
81343
81343
81343
81343
81343
81343
81343
81343
81343
81343
81343
79318
79318
79318
79318
79318
79318
79318
79318
79318
79318
79318
79409
24617
29930
330733
3560-BN
3706000-518-12
3716 VT
4-2-130139BA
4-2-130239BA
4-4-130137BA
4-4-130238BA
4-4-140131
4-4-140137BA
4-4-140238BA
4-4-4-130438BA
4-4-4-140338BA
4-4-4-4-130538BA
4-4-4-4-140538BA
4021S2M3
4051-1
4051-11-1
4051-11-2
4051-13
4051-17
4051-2-5
4051-5
4051-7-5
4051-8
4051-9
40701
427587
444631
24617
13226
79318
13226
79318
13226
455394
46269AL
4631062-250
51A
5105-18
52
21439
80201
23705
81646
13445
19207
52C3861-3
533886
535885
5456
5558
5598-2M-6
C01
INDEXES
PART NUMBER INDEX
STOCK NUMBER
5306-01-290-2209
5310-01-061-8727
5310-01-290-2218
5340-01-289-7791
5330-01-024-2311
5360-01-077-9428
5306-01-286-5426
5310-00-246-7422
5940-00-858-3621
5940-00-858-3621
5940-00-858-3621
2530-01-228-0246
5305-01-164-1601
5330-01-246-1043
5330-00-565-4293
4810-01-190-5606
5340-01-119-7121
5360-00-548-6741
4820-01-119-4886
4820-00-595-5104
4820-00-595-5113
4820-00-552-7809
5360-01-11B-2274
5340-01-119-1830
3040-01-118-4154
5995-01-321-5779
5305-00-068-0509
4730-00-847-0036
4730-00-847-0036
4730-00-847-0036
2540-01-290-5696
4820-01-119-9189
6220-00-897-5856
5310-00-596-8173
5330-00-897-5859
5330-00-897-5859
4730-00-041-2651
5330-01-289-7840
5310-00-938-5543
5340-01-289-7792
5930-01-187-8026
1-20
FIG.
33
33
33
33
33
33
33
24
6
7
8
11
33
49
33
41A
41A
41A
41A
41A
41A
41A
41A
41A
41A
41A
49
49
49
49
49
49
49
49
49
49
49
9
18
16
16
51
25
46
49
3
49
3
4
45
19
19
46
7
41A
ITEM
2
4
3
5
9
15
14
3
9
11
1
7
13
4
6
33
21
5
16
27
42
48
25
41
18
47
5
39
32
36
3
1
29
40
17
8
34
4
9
1
8
8
2
5
30
1
33
3
12
4
18
17
3
16
39
TM 9-2330-384-14&P
SECTION IV
CROSS-REFERENCE
CAGEC
PART NUMBER
73685
19207
79550
74841
13226
81343
81343
81343
49632
13226
79409
30003
93061
93061
93061
5697-C
57K3087
570D-3
583015
59
6-2 100202BA
6-6-6
130438B
6-8 100302BA
6234AL
623BAL
65-0085
67A314C117-1
68C-6-2
68NTA-6-4
68NTA-6-6
93061
93061
93061
68NTA-6-8
68NTA-8-4
68NTA-8-6
81646
13226
19207
6880
69
7068272
13226
89346
13226
71R
714250C1
72
19207
13226
7526018
76
13226
68505
13226
64488
13445
19207
19207
19207
19207
19207
19204
40846
79318
19207
13226
13226
13226
13226
13226
79
8X163
6046AL167
61147S
81264
8338561
8338562
8338564
8338566
8338567
8437243-2
8588
86-0062-N517-8
8694464
9Q5805
9Q5847
920051
920102
920120
13226
920123
13226
920148
C01
INDEXES
PART NUMBER INDEX
STOCK NUMBER
5340-01-291-0261
6145-01-165-5633
5340-01-290-8666
5330-01-082-3189
4730-01-134-1278
4730-00-277-7331
4730-01-096-3169
2990-01-291-1277
2990-01-243-6393
5340-01-320-7096
5310-01-022-5552
4730-00-542-5796
4730-01-062-2570
4730-01-096-9128
4730-01-096-9128
4730-01-096-9128
4730-01-096-9127
4730-01-090-3237
4730-01-091-8032
4730-01-091-8032
5340-01-243-2769
5330-01-289-4925
4010-00-171-4236
4010-00-171-4236
6220-00-897-5860
5925-01-190-4632
5330-00-897-5857
5330-00-897-5857
6220-00-752-6018
5325-01-116-4683
5325-01-116-4683
5330-00-432-4219
5310-00-584-5005
2510-01-300-0244
6145-00-310-2593
2530-01-061-1351
5935-00-833-8561
5970-00-833-8562
5940-00-399-6676
5935-00-572-9180
5310-00-833-8567
5360-00-862-2860
5330-01-290-8877
5330-00-678-9047
5310-01-308-5778
5310-01-308-5959
5330-00-464-7329
6220-00-897-5862
5999-01-180-3411
5999-01-180-3411
5325-01-127-1390
5325-01-127-1390
5999-01-117-7996
1-21
FIG.
32
41A
BULK
11
3
13
42
14
33
33
9
26
4
42
14
18
42
43
42
14
43
46
4
21
44
4
2
4
4
5
4
4
4
2
33
BULK
7
8
8
8
5
5
30
BULK
49
5
46
46
4
4
3
4
3
4
4
ITEM
6
1
19
9
11
18
13
10
7
10
15
2
5
2
16
5
11
17
7
1
8
1
19
8
5
29
6
22
38
5
25
34
30
8
11
20
15
14
15
16
7
8
17
6
22
6
6
7
7
10
5
14
7
16
21
SECTION
IV
TM 9-2330-384-14&P
CROSS-REFERENCE
CAGEC
PART NUMBER
97907
89346
77060
91816
9235215
93931R96
954U
9559B-2PP
08108
97
C01
INDEXES
PART NUMBER INDEX
STOCK NUMBER
5999-01-117-7996
5310-00-404-1402
2530-00-706-6614
6145-00-845-5959
6240-00-914-5572
6240-00-914-5572
6240-00-914-5572
1-22
FIG.
4
26
11
BULK
41A
41A
3
4
4
ITEM
36
4
3
18
3
43
4
6
13
SECTION IV
TM 9-2330-384-14&P
CROSS-REFERENCE
FIG.
BULK
BULK
BULK
BULK
BULK
BULK
BULK
BULK
BULK
BULK
BULK
BULK
BULK
BULK
BULK
BULK
BULK
BULK
BULK
BULK
BULK
BULK
1
1
1
1
1
1
1
2
2
2
2
2
2
2
2
2
2
2
2
2
3
3
3
3
3
3
3
3
3
3
3
3
ITEM
1
2
2
3
4
5
6
7
8
9
10
11
12
13
14
15
16
17
17
18
19
20
1
2
3
4
5
6
7
1
2
3
4
5
6
7
8
9
10
11
12
13
1
2
2
3
4
5
6
6
7
8
9
10
C01
INDEXES
FIGURE AND ITEM NUMBER INDEX
STOCK NUMBER
CAGEC
4010-00-585-2108
16003
81349
4010-01-005-4775
9540-00-612-6376
4710-01-290-9305
81349
98897
7R766
40846
74841
74841
74841
78174
81349
81349
81349
81349
81349
81349
81343
4720-01-290-9215
4720-01-290-9216
4720-01-290-9217
6145-01-169-9652
6145-01-289-5491
6145-01-289-6197
6145-01-291-2286
6145-01-289-5492
6145-01-289-6198
6145-01-290-2734
6145-01-230-2517
6145-00-845-5959
6145-01-165-5633
6145-00-310-2593
77060
79550
64488
4J564
03743
61424
61424
96906
96906
80204
81343
80204
96906
96906
96906
89346
13445
68505
24617
81349
96906
34895
96906
13226
74841
74841
13226
08108
13226
74841
74841
13226
13226
93061
74841
5975-00-152-1075
4730-01-297-0172
4730-01-297-0171
5310-00-061-4650
5310-00-894-2353
5305-00-225-3843
5935-00-856-3513
5306-00-226-4824
5935-00-846-3884
5305-00-06B-0500
5935-00-846-3883
5925-01-190-4632
5925-00-900-1904
5310-00-584-5005
5310-00-409-3355
5905-00-553-8197
5310-00-934-9739
5310-00-264-1337
5305-00-889-2997
6220-00-897-5856
6220-01-285-6082
6220-01-315-1458
5330-00-897-5859
6240-00-914-5572
5999-01-180-3411
5325-01-127-1390
6220-00-905-8498
4730-01-289-9537
1-23
PART NUMBER
C43974
MILW83420TYPE1-A
1/8DIA7X19
M83420/3-001
LS3967
STBW
8588
STK40109
STK40090
TKG5304-1
C14EBR
M22759/12-12-1
M22759/14-14-8
M22759/14-14-1
M22759/14-14-5
M22759/14-14-2
M22759/14-14-4
TYPE GPT 14 AWGB
LUE
954U
570D-3
81147S
DT-308
BL50
N6MC8
N10MC8
MS51943-31
MS16213-61
B1821BH025C100N
SAEJ560
B1821BH031C063N
M375021-2
MS90725-3
MS75021-1
714250C1
30056-10
8X163
120376
RER75F1502R
MS35649-242
1041571-5
MS35206-215
51A
TKG5310-1
TKG5310-2
52
97
920120
STK14373-1
STK14373-6
920123
B-50500012
N6ME4
LKA3332-1
TM 9-2330-384-14&P
SECTION IV
C01
CROSS-REFERENCE INDEXES
FIG.
3
3
3
3
3
3
3
3
3
3
3
4
4
4
4
4
4
4
4
4
4
4
4
4
4
4
4
4
4
4
4
4
4
4
4
4
4
4
4
4
4
4
4
4
4
4
4
4
4
4
4
5
5
5
5
ITEM
10
11
12
13
14
15
16
17
18
19
20
1
2
3
4
5
6
7
8
9
10
11
12
13
14
15
16
17
18
19
20
20
21
22
23
24
25
26
27
28
29
30
31
32
33
34
35
36
37
38
39
1
2
3
4
FIGURE AND ITEM NUMBERINDEX
CAGEC
STOCKNUMBER
74841
13226
24617
74841
61424
74841
61424
74841
74841
96906
74841
13226
74841
15434
13226
93061
08108
13226
13226
24617
13226
74841
13226
08108
13226
74841
13226
96906
13226
13226
74841
74841
13226
13226
08108
74841
13226
74841
74841
96906
13226
13226
74841
96906
74841
13226
74841
13226
08108
13226
74841
74841
96906
96906
96906
5330-01-082-3189
5305-01-288-8320
5975-01-317-2425
4730-01-297-0171
4730-01-319-3381
4730-01-297-0172
5330-01-318-1911
5340-01-320-3920
5320-01-123-5674
5340-01-318-2042
5330-00-432-4218
6220-01-285-6073
4730-00-808-6814
4730-00-542-5796
6240-00-914-5572
5330-00-464-7329
6220-00-844-6471
5305-01-288-8320
6220-00-897-5862
6220-01-285-6084
5330-00-897-5859
6240-00-914-5572
5999-01-180-3411
5325-01-127-1390
5325-00-171-9890
6220-00-905-8497
5330-01-289-4925
6220-01-290-5151
6220-01-285-6072
5999-01-117-7996
5330-00-897-5857
6240-00-931-6683
5325-01-116-4683
6220-01-290-5152
5325-00-171-9890
6220-00-897-5860
5330-00-432-4219
6220-01-285-6081
5325-00-171-9890
6220-01-290-5152
5325-01-116-4683
5999-01-117-7996
6240-00-931-6683
5330-00-897-5857
5306-01-289-7831
5310-00-922-1794
6220-00-337-6471
6220-00-500-0437
1-24
PART NUMBER
LKA3332-4
59
163137
TKG5526-1
N10MC8
TKG0571-1
N6MC8
TKG0573-1
TKG0572-1
MS20600B8W6
TKG0084-4
209
TKG5313-1
C0505027400
M210-01-0365
68C-6-2
97
920051
201R
163137
920102
TKG5311-2
52
97
920120
STK14372-4
920123
MS35489-97
B-60600011
69
TKG5312-2
TKG5312-3
920148
72
1157A
STK14377-3
76
TKG5372
STK14372-5
MS35489-97
71R
79
TKG5312-1
MS35489-97
TKG5372
76
STK14373-2
920148
1157A
72
STK14375-1
ZKA7799
MS16213-63
MS51330-1
MS53047-1
TM 9-2330-384-14&P
SECTION IV
CROSS-REFERENCE
FIG.
5
5
5
5
5
6
6
6
6
6
6
6
6
6
6
6
6
6
6
6
6
6
6
6
6
7
7
7
7
7
7
7
7
7
7
7
7
7
7
7
7
7
7
7
7
7
7
8
8
8
8
8
8
8
8
ITEM
5
6
7
7
8
1
2
3
4
5
6
7
8
9
10
11
12
13
14
15
16
17
18
19
20
1
2
3
4
5
6
7
8
10
11
12
13
14
15
16
17
18
19
20
21
22
23
1
2
3
4
5
6
7
8
C01
INDEXES
FIGURE AND ITEM NUMBER INDEX
CAGEC
STOCK NUMBER
19207
19207
46717
19207
19207
96906
96906
74841
74841
74841
74841
74841
74841
00779
14726
14109
74841
74841
74841
74841
74841
74841
14726
74841
74841
74841
74841
74841
74841
74841
74841
14109
74841
98410
00779
96906
14726
74841
13445
13445
74841
74841
74841
74841
74841
74841
74841
00779
74841
74841
74841
74841
23705
14109
74841
6220-00-752-6018
5330-00-678-9047
6240-00-019-0877
5935-00-572-9180
5310-00-833-8567
5940-00-143-4780
5940-00-143-4794
5940-00-858-3621
5325-01-289-9265
5940-01-304-6301
5340-01-291-2319
5340-01-291-5199
5325-01-289-9265
5340-01-291-2319
5940-00-168-3382
5940-00-858-3621
5940-00-143-4794
5940-01-304-6301
6150-01-290-2873
2530-01-061-1351
5930-01-187-8026
5940-00-858-3621
5340-01-291-5199
5325-01-086-4841
5325-01-289-9265
1-25
PART NUMBER
7526018
8694464
LA-361-9
8338566
8338567
MS25036-108
MS25036-112
TKG5309-1
LKA3334-5
STK14373-5
STK14374-3
TKG5320-1-4
STK14375-4
327638
B4071B
FSP11-1-4
TKG5309-2
LKA3334-1
STK14377-1
LKA9655-1
TKG1336-6-1
STK14372-1
B4052B
TKG0149-6
TKG0149-4
TKG5309-3
STK14373-4
STK14374-2
LKA3334-4
TKG5320-1-3
STK14375-3
FSP11-1-4
TKG0149-6
B231
327638
MS25036-112
B4052B
TKG5317-2
81264
5558
TKG5309-4
TKG5320-1-5
STK14377-2
LKA9655-2
LKA3334-2
STK14372-2
TKG1336-6-2
327638
TKG5314-1
STK14372-7
LKA3332-2
TKG0149-4
FSP11-1-3
FSP11-1-4
TKG5315-1
SECTION IV
TM 9-2330-384-14&P
CROSS-REFERENCE
FIG.
8
8
8
8
8
8
8
8
9
9
9
9
9
9
9
9
9
9
9
9
9
9
9
9
9
10
11
11
11
11
11
11
11
11
11
11
12
12
12
12
12
12
12
12
12
12
12
12
12
12
12
12
12
12
12
ITEM
9
10
11
12
13
14
15
16
1
2
3
4
5
6
7
8
9
10
11
12
13
14
15
16
17
1
1
2
3
5
6
7
8
9
10
11
1
2
3
4
5
6
7
8
9
10
11
12
13
14
15
16
17
18
19
C01
INDEXES
FIGURE AND ITEM NUMBER INDEX
STOCK NUMBER
CAGEC
74841
74841
74841
74841
74841
19207
19207
19207
96906
14109
74841
79409
74841
74841
74841
14726
61424
74841
74841
74841
80204
96906
79409
74841
74841
74841
74841
74841
89346
74841
74841
23705
74841
74841
74841
14109
74841
14109
96906
96906
14109
96906
74841
96906
74841
74841
96906
96906
74841
74841
96906
14109
74841
80204
96906
5935-00-833-8561
5970-00-833-8562
5940-00-399-6676
5310-00-061-4650
5310-01-198-7838
5995-01-321-5779
5975-01-322-6364
5330-01-316-1912
5340-01-317-9614
5940-01-117-3419
4730-01-297-0172
5305-00-225-3843
5320-00-151-5523
5340-01-320-7096
5340-01-290-8669
5340-01-291-5199
2530-01-290-5074
2530-01-285-6089
2530-01-296-3028
2530-00-706-6614
5315-01-290-2276
2530-01-228-0246
5340-01-290-3867
5340-01-290-8666
5360-01-289-6220
5360-01-199-1776
3120-01-291-8901
5310-00-087-4652
5310-00-080-6004
5305-01-289-9212
4730-00-050-4203
2530-01-285-6076
4730-00-050-4203
2530-01-309-0983
5310-01-292-5351
5365-00-803-7301
5310-00-814-0673
5340-01-291-4556
5330-01-289-7843
4730-00-172-0010
5365-01-197-9549
5340-01-290-3883
5306-00-226-4825
5365-00-818-8087
1-26
PART NUMBER
STK14372-8
LKA9655-3
LKA3334-3
STK14375-2
STK14373-3
8338561
8338562
8338564
MS51943-31
FSP7-2-1
TKG5529-1
40701
TKG5498-1
TKG5499-1
TKG5501-1
B4044BN
N6MC8
LKA3332-3
STK14373-7
STK14376-1
B1821BH025C100N
M520600B4W7
65-0085
TKG0149-5
TKG0149-4
A-CE6277-3
A-CF-4854-1
A-CF4858-1
93931R96
A-CF3379-1
A-CF3378-1
330733
A-CF1328-1
583015
A-CF3079-1
A-CE9911-1
A-KA0068-1
FSP12-2-4
MS51922-17
MS27183-14
FSP5-5-20
MS15001-1
A-CF4205-1
MS15001-1
TKG5517-1
A-KA0432-1
MS16624-1050
MS51943-33
A-CF4021-1
A-XA0412-1
MS15002-1
A-CD2285-1
A-CF4022-1
B1821BH031C075N
MS16624-1162
SECTION IV
TM 9-2330-384-14&P
C01
CROSS-REFERENCE INDEXES
FIG.
ITEM
12
12
12
12
12
13
13
13
13
13
13
13
13
13
13
13
13
13
13
13
13
13
13
13
13
13
13
13
13
14
14
14
14
14
14
14
14
14
14
14
14
14
14
14
14
14
15
15
15
15
15
15
15
15
15
20
21
22
23
23
1
2
3
4
5
6
7
8
9
10
11
12
13
14
15
16
17
18
19
20
21
22
23
24
1
2
3
4
5
6
7
8
9
10
11
12
13
14
15
16
17
1
2
3
4
5
6
7
8
9
FIGURE AND ITEM NUMBERINDEX
STOCKNUMBER
CAGEC
5330-01-077-9759
3120-01-293-9562
5330-01-011-2204
2530-01-290-1475
2530-01-290-3920
4730-00-891-0798
3040-00-631-4155
4730-01-095-7717
2530-00-545-5406
5325-01-289-9265
14109
74841
14109
74841
74841
98343
72914
93061
06853
14109
74841
74841
93061
93061
74841
74841
93061
93061
96906
06721
14109
74841
81343
79470
74841
74841
23705
98343
98343
93061
74841
74841
14109
74841
93061
74841
74841
93061
81343
74841
74841
96906
74841
93061
93061
79470
74841
93061
74841
80204
80064
96906
74841
01276
93061
5340-01-291-9213
4730-00-511-1677
4730-00-289-0155
5340-01-291-5199
4730-01-095-5833
4730-00-469-7797
4730-00-188-3514
2530-01-290-1329
4730-00-765-9103
2530-01-287-3978
4730-01-134-1278
4730-00-069-1187
5325-01-086-4841
4730-01-096-3204
5330-00-172-1919
4730-01-091-8032
5340-01-290-8670
5325-01-289-9265
4730-01-119-6895
4730-01-115-7362
4730-01-096-3169
5975-00-133-8696
5340-01-291-5200
4730-00-289-0155
4730-01-096-9128
4730-01-134-0856
4730-01-095-7717
2530-01-285-6080
5305-00-068-0511
5310-00-436-4203
5310-00-935-9021
2530-01-285-6079
4720-01-290-2513
4730-00-469-7797
I-27
PART NUMBER
AYA0415-1
A-KA0413-1
AXA0414-1
A-XA0420-1
A-KA0420-2
10452S
11246
269NTA-8-6
212227
FSP11-1-4
STK40109-2
TKG0149-3
207ACBH-6
269NTA-6-6
TKG0149-4
STK40090-9
272NTA-6-6
2225P-6
MS20913-3
AE-86313
FSP12-17-1
VWA8862
6-2 100202BA
1469X6
STK40090-1
STK40090-8
FSP11-1-3
10451E
1509
68NTA-8-6
STK40109-1
TKG0149-1
FSP11-1-4
STK40109-4
272NTA-8-6
STK40109-3
STK40090-17
269NTA-8-4
6-8 100302BA
STK40090-7
STK40090-10
MS3367-6-9
TKG0149-2
269NTA-6-6
68NTA-6-6
1472XBXBX4
STK40109-5
269NTA-8-6
TKG5092-2
B1821BH038C125N
2624732
MS51943-35
TKG5092-1
FL5507GHG0540
2225P-6
SECTION IV
TM 9-2330-384-14&P
C01
CROSS-REFERENCEINDEXES
FIG.
ITEM
15
15
15
15
16
16
16
16
16
16
16
16
16
16
16
16
16
16
17
17
17
17
18
18
18
18
18
18
18
18
18
18
18
18
18
18
18
18
18
19
19
19
19
19
19
19
19
19
19
19
19
19
19
19
19
10
11
12
13
1
2
3
4
5
6
7
8
9
10
11
12
13
14
1
2
3
4
1
2
3
4
5
6
7
8
9
10
11
12
13
14
15
16
17
1
2
3
4
5
6
7
8
9
10
11
12
13
14
15
16
FIGURE AND ITEM NUMBERINDEX
STOCKNUMBER
CAGEC
4730-00-188-3514
4730-00-278-4822
5340-01-290-2748
4720-01-290-9208
4730-00-847-0036
2530-01-163-7340
4730-00-196-1504
2530-01-290-1329
4820-01-291-0991
4730-00-188-3514
2530-01-289-1013
4730-00-847-0036
2530-01-163-7340
4730-00-196-1504
2530-01-290-1329
5306-01-289-7825
5975-01-289-5976
4820-01-291-0991
2530-01-095-3561
2530-01-290-1476
5310-00-951-7209
5310-00-269-4040
4730-00-289-0155
96906
75160
74841
01276
29930
74841
19207
06721
06721
96906
06721
29930
74841
19207
06721
74841
04898
06721
50153
74841
96906
96906
93061
74841
96906
96906
93061
74841
74841
06853
24617
74841
93061
74841
74841
96906
12623
74841
74841
14109
14109
74841
14109
14109
74841
14109
60038
74841
60038
74841
74841
74841
14109
96906
74841
5310-00-982-6580
5310-00-061-4650
4730-01-096-9128
4820-00-728-7467
5305-00-068-0509
5340-01-291-5199
4730-00-069-1187
5340-01-290-2720
5305-00-071-2237
4820-01-210-1251
5340-01-290-3812
2530-01-333-4715
4730-01-198-5438
5330-01-289-7845
5315-01-198-7883
5310-01-199-1769
5310-01-291-8881
5340-01-198-7885
3110-01-006-9504
3110-00-541-9166
2530-01-290-9728
2530-01-285-6077
5310-01-291-8883
5305-01-290-4867
5310-00-832-9719
5307-01-292-1483
I-28
PART NUMBER
MS20913-3
T23837
A-CE6477-1
FL5507GHG0320
444631
A-CE5939-6
192075
AE-86313
N-3613-AD
MS20913-3
N4305A
444631
A-CE5939-6
192075
AE-86313
VKA0351
VKA8994
N-3613-AD
11M011
A-CF2662-EM4
MS27183-22
MS51922-49
269NTA-6-6
STK40090-5
MS27183-1
MS51943-31
68NTA-6-6
STK40090-2
STK40090-4
278614
427587
TKG0149-4
269NTA-6-4
TKG5303-1
STK40090-3
MS90725-14
B-1GF4-1/4IN
TKG5302-1
STK40090-6
A-CC7538-900
A-XA1005-1
A-XA0484-1
A-XA0409-1
A-CE8510-1
A-XA0408-1
A-CD7180-1
HM518443
A-CE5245-1
HM518445HM518410
A-CC5226-1
A-CE6220-1
A-CD2813-1
FSP5-5-11
MS51922-61
A-CE9950-1
SECTION IV
TM 9-2330-384-14&P
C01
CROSS-REFERENCEINDEXES
FIG.
ITEM
19
19
19
19
19
19
20
20
21
21
21
21
21
21
21
21
21
21
21
21
21
21
21
21
21
21
21
21
21
21
21
21
21
21
22
22
22
22
23
23
23
23
23
23
23
23
23
23
23
23
24
24
24
24
24
17
18
19
20
21
22
1
1
1
1
2
3
4
5
6
7
8
9
10
11
12
13
14
15
16
17
18
19
20
21
22
23
24
25
1
2
3
4
1
2
3
4
5
6
7
8
9
10
11
12
1
2
3
4
5
FIGURE AND ITEM NUMBERINDEX
STOCKNUMBER
CAGEC
5310-00-938-5543
5330-01-289-7840
5340-01-290-8673
2530-01-290-5715
5365-01-289-7896
2640-01-286-1712
2610-01-045-3688
23705
80201
74841
74841
74841
74841
81348
5340-01-298-8285
5340-01-298-B286
5310-00-768-0318
5310-00-080-6004
5305-00-269-3211
5340-01-291-5190
74841
74841
21439
96906
14544
74841
74841
04898
19207
96652
74841
96906
96906
03670
80204
74841
96906
96906
80204
74841
74841
74841
96906
96906
74841
14544
74841
96906
96906
80204
80204
96906
21439
74841
96906
96906
80204
74841
96906
74841
14109
24617
74841
96906
76301
80204
74841
4010-00-171-4236
5315-01-171-0750
5340-01-290-9661
5310-00-935-9021
5310-00-080-6004
5305-00-068-0511
2510-01-290-5695
5310-00-951-7209
5310-00-241-6664
5305-00-727-2283
5310-01-306-3480
5306-01-289-9144
5310-00-080-6004
5310-00-935-9021
5340-01-290-2752
5305-00-269-3211
2510-01-290-2571
5310-00-241-6664
5310-00-951-7209
5305-00-726-2551
5305-00-071-2069
5310-00-809-5998
5310-00-768-0318
5306-01-289-7824
5310-00-935-9021
5310-00-080-6004
5305-00-725-2317
2530-01-294-7170
5310-01-289-5011
5306-01-320-1049
5310-01-198-7838
5310-00-584-5005
5340-01-290-4890
5310-00-241-6664
5310-00-246-7422
5305-00-726-2551
2510-01-290-2545
I-29
PART NUMBER
535885
533886
A-CE9120-1
A-CE8760-5
A-CE8766-7
A-CE8769-2
GP3STYLXTYPACLR/
T/11.00R22.50/G/
TKG5265-1
TKG5265-2
01857-007
MS27183-14
S1594
TKG5173-1
TKG5108-1
VKD5061-00
7068272
21-09
TKG5154-1
MS51943-35
MS27183-14
14089
B1821BH038C125N
TKG5016-1
MS27183-22
MS51943-44
B1821BH063F150N
TKG5043-1
ZKA9866
ZKA 9865
MS27183-14
M351943-35
TKG5341-1
S1594
TKG5084-1
MS51943-44
MS27183-22
B1821BH063F200N
B1821BH050C150N
MS27183-18
01857-007
ZKA8903
MS51943-35
MS27183-14
B1821BH038C150N
TKG5273-1
MS51468-05
VKA0909
FSP7-2-1
120375
TKG5209-2
MS51943-44
32-21088-5
B1821BH063F200N
TKG5322-1
SECTION IV
TM 9-2330-384-14&P
C01
CROSS-REFERENCEINDEXES
FIG.
ITEM
24
24
24
24
24
24
24
24
24
24
24
24
24
24
24
24
25
25
25
25
25
25
25
25
25
25
25
25
25
25
25
25
25
25
26
26
26
26
26
26
26
27
27
27
27
27
27
27
27
27
27
27
28
28
28
6
7
8
9
10
11
12
13
14
15
16
17
18
19
20
21
1
2
3
4
5
6
7
8
9
10
11
12
13
14
15
16
17
18
1
2
3
4
5
6
7
1
2
3
4
5
6
7
8
9
10
11
1
2
3
FIGURE AND ITEM NUMBERINDEX
STOCKNUMBER
CAGEC
96906
96906
96906
74841
74841
80204
14109
74841
14109
91340
74841
96906
96906
74841
74841
80204
96906
24617
74841
74841
74841
96906
74841
14109
14109
74841
74841
74841
74841
96906
74841
74841
96906
96906
74841
30003
74841
97907
96906
74841
74841
74841
96906
74841
96906
80204
06721
96906
96906
96906
96906
80204
96906
78680
74841
5310-00-081-4219
5310-00-880-7744
5310-00-080-6004
5306-01-290-2684
2590-01-290-2534
5305-00-727-2283
5365-01-198-7892
2590-01-291-4632
2530-01-198-7860
5310-00-823-8803
5340-01-290-4889
5310-00-080-6004
5310-00-935-9021
2590-01-290-2533
5340-01-330-5495
5305-00-846-5703
5310-00-269-4040
2510-01-292-3689
5340-01-290-8322
5306-01-290-2695
5310-00-061-4650
5310-01-292-5352
3120-01-229-1130
5310-01-198-9325
5306-01-289-9133
5306-01-290-3755
5306-01-290-4864
5340-01-290-2749
5305-00-726-2567
5365-01-291-0730
2530-01-294-7171
5310-00-809-8540
5310-00-241-6728
5306-01-290-2685
5310-01-022-5552
5365-01-290-2286
5310-00-404-1402
5310-00-061-4650
3040-01-291-4627
2530-01-290-5683
4730-01-285-6074
9905-00-999-7369
5340-01-290-2751
9905-00-999-7370
5305-00-068-0509
4730-01-268-7410
5310-00-982-6580
5310-00-061-4650
5310-00-935-9021
5310-00-922-1794
5305-00-068-0511
5310-00-880-7744
2540-00-262-8318
5340-01-290-2753
I-30
PART NUMBER
MS27183-12
MS51967-5
MS27183-14
S-XA0244
S-CF4399-54
B1821BH063F150N
S-CF0486-1
S-CE3719-2
S-CF0487-1
D12420-6
TKG5209-1
MS27183-14
MS51943-35
SCF004399641
SWA6215
B1821BH038C300N
M951922-49
455394
U-CD0511-1
U-CE8801-1
U-XA0046-17
MS51943-50
U-XA0003-1
U-XA0004
U-YA0356-2
U-XA0015
U-XA0046-16
ZKA8295
U-CF1459-1
MS90727-176
U-CD4502-1
A-YA0495-1
MS27183-25
MS35690-1424
U-KA0016-X
67A314C117-1
U-YA0011
9235215
MS51943-50
U-XA0026
U-CF2640-1
TKG5219-1
MS53007-2
TKG5290-1
MS53007-1
B1821BH025C125N
10453110
MS27183-1
MS51943-31
MS51943-35
MS16213-63
B1821BH038C125N
MS51967-5
100059
TKG5215-1
SECTION IV
TM 9-2330-384-14&P
CROSS-REFERENCE
FIG.
ITEM
28
29
29
29
29
30
30
30
30
30
30
30
30
30
30
30
30
30
30
30
30
30
30
30
31
31
31
31
31
31
32
32
32
32
32
32
32
32
32
32
33
33
33
33
33
33
33
33
33
33
33
33
33
33
34
4
1
2
3
4
1
2
3
4
5
6
7
8
9
10
11
12
13
14
15
16
17
18
19
1
2
3
4
5
5
1
2
3
4
5
6
7
8
9
10
1
2
3
4
5
6
7
8
9
10
11
13
14
15
1
C01
INDEXES
FIGURE AND ITEM NUMBER INDEX
STOCK NUMBER
CAGEC
5306-01-075-8519
2510-01-290-5020
5305-01-210-4595
5310-00-080-6004
5310-00-935-9021
5306-01-290-2693
5310-00-004-5033
5310-00-732-0558
5340-01-290-8671
5310-00-809-5998
5310-00-768-0318
5310-00-922-1794
5310-00-080-6004
5310-00-935-9021
5305-00-071-2069
5305-00-725-2317
2540-01-291-4558
4710-01-285-6086
96906
74841
97403
96906
96906
7V618
94231
96906
74841
96906
21439
96906
96906
96906
80204
80204
74841
74841
74841
80204
74841
19204
96906
96906
19207
96906
96906
97403
81349
76545
74841
7V618
94231
96906
74841
73685
80204
96906
96906
74841
13226
49632
49632
13226
49632
13226
49632
96906
13226
13226
13226
49632
13226
49632
74841
5305-00-071-2509
5340-01-290-2726
5360-00-862-2860
5310-00-982-6580
5310-00-061-4650
2540-00-930-5303
5310-00-732-0558
5310-00-922-1794
5305-01-210-4595
5999-00-134-5844
5340-00-976-9355
5340-01-290-8672
5306-01-290-2693
5310-00-004-5033
5310-00-935-9021
4710-01-285-6085
5340-01-291-0261
5305-00-225-3843
5310-00-982-6580
5310-00-061-4650
5680-01-285-6078
5306-01-290-2209
5310-01-290-2218
5310-01-061-8727
5340-01-289-7791
5330-01-246-1043
2990-01-291-1277
5310-00-761-3706
5330-01-024-2311
2990-01-243-6393
2510-01-300-0244
5306-01-286-5426
5360-01-077-9428
5307-01-289-9168
I-31
PART NUMBER
MS90725-36
TKA9276
13222E0109
M327183-14
MS51943-35
ZKA9836
3-07620-311
MS51967-8
TKG5230-1
MS27183-18
01857-007
MS16213-63
MS27183-14
MS51943-35
B1821BH050C150N
B1821BH038C150N
TKG5161-1
TKG5198-1
TKG5070-1
B1821BH025C150N
TKG5204-1
8437243-2
MS27183-1
MS51943-31
10959979
MS51967-8
MS16213-63
13222E0109
M83413/7-1
21C100AMP
TKG5230-2
ZKA9836
3-07620-311
M351943-35
TKG5228-1
5697-C
B1821BH025C100N
MS27183-1
MS51943-31
TKA6754
FVA9763BXB
3029CP
3031CP
3030-BR
3036CP
3716 VT
6234AL
MS51967-15
3119BN
623BAL
8046AL167
3560-BN
3139SL
3129JCP
TKA7579
TM 9-2330-384-14&P
SECTION IV
CROSS-REFERENCE
FIG.
ITEM
34
34
34
34
34
34
35
35
35
36
36
36A
36A
36A
36A
37
37
37
37
38
38
38
38
38
38
38
39
39
40
40
40
40
40
40
40
40
41
41
41A
41A
41A
41A
41A
41A
41A
41A
41A
41A
41A
41A
41A
41A
41A
41A
41A
2
3
4
5
6
7
1
2
3
1
2
1
2
3
4
1
2
3
4
1
2
3
4
5
6
7
1
2
1
2
3
4
5
6
7
8
1
2
1
2
3
4
5
6
7
8
9
10
11
12
13
14
15
16
17
C01
INDEXES
FIGURE AND ITEM NUMBER INDEX
STOCK NUMBER
CAGEC
5310-00-922-1794
5310-00-935-9021
96906
96906
74841
96652
04898
74841
07707
12662
97783
74841
14109
96906
28527
19207
96906
74841
74841
74841
74841
74841
74841
74841
74841
74841
74841
74841
74841
74841
74841
74841
45152
74841
74841
74841
74841
74841
74841
74841
19207
19207
91816
81349
81343
07262
96906
96906
19207
75535
16003
96906
80204
96906
81343
81343
96906
5315-01-171-0750
5320-00-454-5156
9905-01-195-0663
9905-00-205-2795
7690-01-290-0175
9905-01-198-9327
5310-00-926-1835
5310-00-615-1556
9905-01-379-5693
5310-00-761-6882
5320-00-891-9081
9905-01-292-8867
7690-01-297-7967
9905-01-292-8868
9905-01-298-8206
5320-00-891-9081
7690-01-290-6382
7690-01-290-0170
7690-01-290-0171
9905-01-292-8871
9905-01-292-8670
7690-01-290-0172
7690-01-293-7623
9905-01-292-8869
5320-00-987-2984
5310-00-014-5850
9905-01-292-8875
9905-01-342-9148
9905-01-345-3539
9905-01-292-8873
9905-01-292-8872
7690-01-290-0173
7690-01-290-0174
4730-01-038-2350
5305-00-068-0500
5310-00-562-5965
5340-01-162-0430
5310-00-823-8804
5305-00-071-2509
5310-00-905-0762
4730-00-193-2709
I-32
PART NUMBER
MS16213-63
MS51943-35
TKG5108-2
21-09
VKD5061-00
VKA8995-3
AD610ABS
B475A
GR011RED
TKG0896-1
X-CE7964-1
MS21083C3
2616950G001
12380149
MS51967-2
TKA6640
TKG5326-1
TKG5470-1
TKG5327-1
TKG5469-1
TKA6640
TKA 9848
TKA9551
TKA9552
TKG5334-1
TKG5333-1
TKA8654
TKA 8650
TKG5328-1
TKG5332-1
1379HX1
TKG5335-1
TKG5471-2
TKG5560-1
TKG5330-1
TKG5329-1
TKA8657
T-KA8662
57K3087
12461902
9559B-2PP
M4109-09-08-00B
4-4-130137BA
16222
MS90725-3
MS35338-44
12461903
1023056
C43974-30.0
M327183-9
B1821BH025C150N
MS51967-3
M4109-01-08-00B
4-4-130238BA
MS51846-24
TM 9-2330-384-14&P
SECTION IV
CROSS-REFERENCE
FIG.
ITEM
41A
41A
41A
41A
41A
41A
41A
41A
41A
41A
41A
41A
41A
41A
41A
41A
41A
41A
41A
41A
41A
41A
41A
41A
41A
41A
41A
41A
41A
41A
41A
41A
41A
41A
41A
41A
42
42
42
42
42
42
42
42
42
42
42
42
42
42
42
42
42
42
42
18
19
20
21
22
23
24
25
26
27
28
29
30
31
32
33
34
35
36
37
38
39
39
40
41
42
43
44
45
46
47
48
49
50
51
52
1
2
3
3
4
5
6
7
8
9
10
11
12
13
14
15
16
17
18
C01
INDEXES
FIGURE AND ITEM NUMBER INDEX
STOCK NUMBER
CAGEC
81343
30327
96906
81343
19207
85274
96906
81343
96906
81343
93061
98441
96906
96906
85274
81343
81343
18887
98441
19207
91816
91816
19207
81343
81343
81343
91816
19207
81349
96906
81343
81343
91816
19207
19207
19207
74841
93061
74841
74841
79318
96906
74841
93061
74841
75364
75364
93061
74841
81343
56161
96906
74841
74841
21450
4820-00-720-4488
4730-00-196-1974
4730-00-196-1973
4730-00-196-1975
4730-00-196-1979
5305-00-071-2233
6685-00-827-7495
4730-01-038-2350
4730-00-193-2709
5340-01-100-2536
4730-01-062-2570
5930-01-321-7107
4730-00-908-3194
4730-01-090-3237
4820-01-290-3666
4730-01-289-9545
4730-01-289-9559
4730-01-096-9128
4730-00-277-7331
4730-00-204-1993
4730-00-230-1996
4730-00-196-0936
I-33
PART NUMBER
4-4-4-4-130538BA
MS35782-2
MS51846-30
4-2-130239BA
12461906
2205
MS51846-28
4-4-4-130438BA
MS51846-31
4-4-140131
V406P-4
EM-25
MS51846-35
MS90725-18
2020
4-2-130139BA
2-2-130138
AVR-093H
FM-12
12461904
D559B-2M-6
D559B-2M-1
5598-2M-6
M4109-01-08-00B
4-4-4-140338BA
4-4-140137BA
9559B-2PP
12468902
M4109-09-08-00B
MS51846-24
4-4-4-4-140538BA
4-4-140238BA
259B-2PP.5
12461908
12461893
11668899
STK40090-15
68NTA-6-4
STK40090-16
TKG0591-7-3
TKG5046-1
MS35842-11
TKG5304-1-1
68NTA-8-4
TKG5459-1
TKG0510-13
VKA7792
68NTA-6-6
STK40090-13
6-6-6
130438B
10503176
MS51846-1
STK40090-11
STK40090-12
115224
SECTION IV
TM 9-2330-384-14&P
CROSS-REFERENCE
FIG.
ITEM
42
42
42
42
42
43
43
43
43
43
43
43
43
43
43
43
43
43
43
43
43
43
43
43
43
43
43
43
43
43
44
44
44
44
44
45
45
45
45
45
45
45
45
45
45
45
45
45
45
45
45
45
45
45
45
19
20
21
22
23
1
2
3
4
5
6
7
8
9
10
11
12
13
14
15
16
17
18
19
20
21
22
23
24
25
1
2
3
4
5
1
2
3
4
5
6
7
8
9
10
11
12
13
14
15
16
17
18
19
20
C01
INDEXES
FIGURE AND ITEM NUMBER INDEX
STOCK NUMBER
CAGEC
4730-00-011-2578
4730-01-316-8836
4330-01-318-2805
5330-00-811-1105
4730-01-318-9772
5310-00-014-5850
5305-00-240-0194
4820-01-317-8235
5340-01-291-5200
6685-01-320-4820
30327
32869
32869
32869
32869
45152
96906
74841
74841
81349
74841
74841
93061
21450
12145
93061
74841
93061
93061
74841
74841
93061
74841
74841
74841
74841
93061
79470
96906
83298
74841
74841
96906
04898
19207
97403
96906
74841
21439
23705
74841
74841
74841
74841
74841
05443
74841
74841
74841
05443
96906
05443
74841
74841
74841
5325-01-318-2076
4730-01-091-8032
4730-00-196-0936
4820-00-054-0658
4730-01-091-2809
4730-01-115-6643
4730-01-095-2034
5340-01-291-9213
4730-01-096-9127
5340-01-291-5199
5340-01-290-8670
5325-01-318-2077
4730-00-069-1187
4730-00-919-1803
5310-00-934-9758
5310-00-045-3296
5307-01-292-3715
4820-01-290-3662
5310-00-834-8732
5975-01-289-5976
4010-00-171-4236
5305-01-210-4595
5310-00-935-9021
4820-01-291-5261
4730-00-041-2651
5325-01-086-4841
5340-01-291-5199
4730-01-290-3846
2590-01-054-0253
5310-01-289-7782
5310-00-880-7744
5305-01-289-9143
I-34
PART NUMBER
109B1-4
24388A3-4IN
24388ACAP3-4IN
20245
24388ASCRN3-4IN
1379HX1
MS51849-76
TKG5548-1
TKG0149-2
SG21D1HPWPONCG
STK40109-8
FSP11-1-14
68NTA-8-6
115224
C43974 X 30IN
279NTA-8-6
STK40109-7
269NTA-8-8
2225P-8
STK40109-9
TKG0149-3
68NTA-6-8
TKG0149-4
STK40090-14
TKG0149-1
FSP11-1-18
269NTA-6-4
W05465
MS35649-202
B20500-11
TKG5153-1
TKA1003
MS35691-33
VKA8994
7068272
13222E0109
MS51943-35
TKG5276-1
52C3861-3
FSP11-1-3
LKA3342-3
TKG0149-4
VKA0583-2
LKA3342-6
VKA3849
20032-A
LKA3342-4
LKA3342-8
VKA0583-4
10268-A
MS51967-5
20040-A
LKA3342-1
VKA0583-3
LKA3342-7
TM 9-2330-384-14&P
SECTION IV
CROSS-REFERENCE
FIG.
ITEM
45
45
45
46
46
46
46
46
46
46
46
46
46
46
46
46
46
46
46
46
47
47
47
47
47
47
47
47
47
47
47
47
48
48
48
48
48
48
48
48
48
48
48
48
48
48
48
48
48
48
48
48
48
48
48
21
22
23
1
2
3
4
5
6
7
8
9
10
11
12
13
14
15
16
17
1
2
3
4
5
6
7
8
9
10
11
12
1
2
3
4
5
6
7
8
9
10
11
12
13
14
15
16
17
18
19
20
21
22
23
C01
INDEXES
FIGURE AND ITEM NUMBER INDEX
STOCK NUMBER
CAGEC
74841
74841
74841
81646
74841
81646
74841
13226
13226
13226
13226
81349
74841
7V618
96906
96906
74841
96906
01276
29930
80204
96906
21439
74841
74841
74841
74841
74841
74841
96906
96906
74841
80204
91340
96906
74841
96906
01276
29930
74841
79154
79318
79154
7V618
96906
96906
19207
79318
80204
96906
13226
80204
96906
96906
74841
5340-01-243-2769
4720-01-290-9709
5340-01-289-7792
4720-01-290-4942
2540-01-290-5696
5310-01-308-5778
5310-01-308-5959
5307-01-308-5984
5330-00-165-1963
4720-01-290-4933
5306-01-290-2694
4730-00-840-0796
5330-00-899-4509
5340-01-289-9157
5310-00-809-5998
5310-00-003-4094
5310-00-998-8178
5305-00-071-2070
5310-00-809-5998
5310-00-768-0318
3040-01-290-5025
4730-01-289-9555
4730-01-289-9533
4730-01-289-9534
5306-01-289-7826
4710-01-290-9139
5310-00-407-9566
5310-00-880-7744
4820-01-290-3414
5305-00-726-2551
5310-00-823-8803
5310-00-241-6664
5340-01-290-2721
5310-00-809-5998
5310-00-003-4094
5310-00-998-8178
4710-01-291-4596
4730-01-256-3734
4820-01-287-0736
5330-01-308-5870
5306-01-290-2694
5310-00-080-6004
5310-00-935-9021
5330-01-081-5070
4730-01-290-9198
5305-00-725-2317
5310-00-732-0558
4820-01-290-4917
5305-00-846-5703
4730-00-640-6156
5330-00-899-4509
4730-01-289-9566
I-35
PART NUMBER
LKA3342-5
VKA0583-1
LKA3342-2
6880
TKG5300-1
5456
TKG5301-1
46269AL
9Q5805
9Q5847
18626-FL
M83248/1-245
TKG5299-1
TKA7199
MS27020-17
MS27030-9
VKA0619
MS27183-18
210104-8S
120378
B1821BH050C175N
MS27183-18
01857-007
TKG5274-1
TKG5277-1
VKA1043
VKA1081
VKA7882
TKG5193-1
MS35338-45
MS51967-5
TKG5045-1
B1821BHO63F200N
D12420-6
MS51943-44
TKG5188-1
MS27183-18
210104-8S
120378
TKG5169-1
C-044-75-P-TO
F635AD
M-2
TKA7199
MS27183-14
MS51943-35
11670914
F445
B1821BH038C150N
MS51967-8
WD401-AL-V
B1821BH03BC300N
MS27028-17
MS27030-9
TKG5067-1
TM 9-2330-384-14&P
SECTION IV
CROSS-REFERENCE
FIG.
ITEM
49
49
49
49
49
49
49
49
49
49
49
49
49
49
49
49
49
49
49
49
49
49
49
49
49
49
49
49
49
49
49
49
49
49
49
49
49
49
49
49
49
49
50
50
50
50
50
50
50
50
50
50
51
51
51
1
2
3
4
5
6
7
8
9
10
11
12
13
14
16
17
18
19
20
21
22
23
24
25
26
27
28
29
30
31
32
33
34
35
36
37
38
39
40
40
42
43
1
2
3
4
5
6
7
8
9
10
1
2
3
C01
INDEXES
FIGURE AND ITEM NUMBER INDEX
CAGEC
STOCK NUMBER
4820-00-595-5104
5320-00-584-9078
4820-01-119-4886
5305-01-164-1601
5330-00-565-4293
5310-01-119-3088
3040-01-118-5954
5340-01-119-1630
5310-00-045-4007
5306-00-225-8499
4730-00-277-6324
4730-01-120-8048
5365-01-290-8307
5310-00-167-0721
5305-00-226-4831
5360-01-118-2274
5310-00-829-9981
5315-01-186-0829
3040-01-118-5519
3040-01-180-3166
5330-01-290-8877
5330-01-119-1372
5330-00-250-0226
3040-01-157-3343
3040-01-158-9242
5310-00-167-0823
5330-00-527-8116
4820-00-595-5113
4820-01-119-9189
5330-01-119-1339
5340-01-119-7121
5310-00-596-BI73
3040-01-118-4154
5360-01-119-1338
5360-00-548-6741
5330-00-846-0501
5330-00-531-2924
4810-01-190-5606
5330-00-248-3839
4820-00-552-7809
5330-00-263-8032
5365-00-278-8803
4820-00-549-4746
5305-01-157-7390
5310-00-773-7624
5340-01-170-3165
4930-00-878-1308
5365-00-725-0969
5310-00-167-0812
5360-01-160-0505
4730-01-191-6528
4820-01-173-8502
2910-01-035-4171
5305-00-984-5674
4030-00-954-8801
79318
96906
79318
79318
79318
79318
16069
79318
96906
96906
96906
79318
79318
96906
80204
79318
96906
96906
79318
79318
79318
79318
96906
79318
45681
88044
96906
79318
79318
79318
79318
79318
79318
79318
79318
96906
96906
79318
96906
79318
96906
88044
79318
03038
80205
79318
79318
96906
88044
79318
79318
79318
19207
96906
96906
I-36
PART NUMBER
4051-17
MS2047OA4-4
4051-13
3706000-518-12
4021S2M3
2712519
2712520
4051-8
MS35338-41
MS90725-34
MS27769-4
2712515
2721205-1
MS35333-41
B1821BH031C150N
4051-7-5
MS35649-2312
MS171656
2712518
2712524-1
86-0062-N517-8
2712522-1
MS29513-212
2712521-1
2712517-1
AN960-816
MS29513-252
4051-2-5
4631062-250
2731616-1
4051-11-1
5105-18
4051-9
2661177
4051-11-2
MS29561-118
MS29513-263
4051-1
MS29513-111
4051-5
MS29512-10
AN814-10D
2681193
LP503-6-8
NAS620C6
2681197
2633219
MS16633-4018
AN960C10L
2681196
2681194
2813374-101
11621224
MS35206-294
MS87006-43
SECTION
IV
TM 9-2330-384-14&P
CROSS-REFERENCE
FIG.
ITEM
51
51
51
51
51
51
4
4
5
6
7
8
C01
INDEXES
FIGURE AND ITEM NUMBER INDEX
STOCK NUMBER
CAGEC
4010-00-958-0633
81348
5305-00-984-5674
4030-00-948-7315
4730-00-847-0036
19207
19207
96906
29930
I-37
PART NUMBER
RR-C-271
TY2 CL7
-16
11621224-1
11621224-2
MS87006-33
44463491
TM 9-2330-384-14&P
APPENDIX G
LIST OF MANUFACTURED ITEMS
Section I. INTRODUCTION
G-1. SCOPE.
a. This appendix includes complete instructions for making items authorized to be
manufactured or fabricated.
b. A part number index in alphanumeric order is provided for cross-referencing the part
number of the item to be manufactured to the paragraph which covers fabrication criteria.
c. Manufacturing instructions for the Vapor Integrity Test Fixture, which has no assigned Part
Number, are found in paragraph G-27.
d. Only items requiring complicated manufacturing instructions are illustrated.
e. All bulk materiels needed for manufacture of an item are listed by National Stock Number
(NSN), part number, or specification number in the manufacturing instructions.
f.
All dimensions given in Section II, Manufacturing Instructions, are in standard units.
Table G-1. Manufactured Items Part Number Cross-reference.
Part
Number
Paragraph
Number
LKA3332-1
G-4
Part
Number
STK14373-1
Paragraph
Number
Part
Number
Paragraph
Number
G-7
STK40090-12
G-23
G-7
STK40090-13
G-23
LKA3332-2
G-3
STK14373-2
LKA3332-3
G-6
STK14373-3
G-7
STK40090-14
G-23
LKA3332-4
G-5
STK14373-4
G-7
STK40090-15
G-23
LKA3334-1
G-2
STK14373-5
G-7
STK40090-16
G-23
LKA3334-2
G-2
STK14373-7
G-7
STK40090-17
G-16
LKA3334-3
G-2
STK14374-1
G-8
STK40109-1
G-19
LKA3334-4
G-2
STK14374-2
G-8
STK40109-2
G-19
LKA3334-5
G-2
STK14374-3
G-8
STK40109-3
G-19
STK14375-1
G-9
STK40109-4
G-19
LKA3342-1
G-26
LKA3342-2
G-26
STK14375-2
G-9
STK40109-5
G-19
LKA3342-3
G-26
STK14375-3
G-9
STK40109-7
G-24
LKA3342-4
G-26
STK14375-4
G-9
STK40109-8
G-24
LKA3342-5
G-26
STK14376-1
G-15
STK40109-9
G-24
LKA3342-6
G-26
STK14377-1
G-13
TKG1336-6-1
G-14
TKG1336-6-2
G-14
G-22
LKA3342-7
G-26
STK14377-2
G-13
LKA3342-8
G-26
STK14377-3
G-13
TKG5304-1-1
LKA9655-1
G-11
STK40090-1
G-18
TKG5320-1-3
G-16
LKA9655-2
G-11
STK40090-2
G-18
TKG5320-1-4
G-10
LKA9655-3
G-17
STK40090-3
G-18
VKA0583-1
G-25
STK14372-1
G-12
STK40090-4
G-18
VKA0583-2
G-25
STK14372-2
G-12
STK40090-5
G-18
VKA0583-3
G-25
VKA0583-4
G-25
STK14372-3
G-12
STK40090-6
G-18
STK14372-4
G-12
STK40090-7
G-18
VKA8995-1
G-21
STK14372-5
G-12
STK40090-8
G-18
VKA8995-2
G-20
STK14372-6
G-12
STK40090-9
G-18
VKA8995-3
G-20
STK14372-7
G-12
STK40090-10
G-18
STK14372-8
G-12
STK40090-11
G-23
G-1
TM 9-2330-384-14&P
Section II. MANUFACTURING INSTRUCTIONS
G-2. CHASSIS ELECTRICAL CONDUITS.
a.
Fabricate from QQA-200/1, $& in. outside diameter X .049 wall tubing.
b.
Cut to 17 ft. 6 in. long to make Part Number LKA3334-1.
c.
Cut to 18 ft. 4 in. long to make Part Number LKA3334-2.
d.
Cut to 4 ft. 4 in. long to make Part Number LKA3334-3.
e.
Cut to 18 ft. 4 in. long to make Part Number LKA3334-4.
f.
Cut to 17 ft. 6 in. long to make Part Number LKA3334-5.
g.
Apply paint that conforms to MIL-C-53039 or MIL-C-46168.
G-3. TRIPLE CLEARANCE LIGHT ASSEMBLY ELECTRICAL CONDUIT.
a.
Fabricate from 8588, s in. outside diameter X .035 wall tubing.
b.
Cut to 11 ft. 1 in. long to make Part Number LKA3332-2.
C.
Apply paint that conforms to MIL-C-53039 or MIL-C-46168.
G-4. FRONT CLEARANCE AND MARKER LIGHT ELECTRICAL CONDUIT.
a.
Fabricate from 8588, s in. outside diameter X .035 wall tubing.
b.
Cut to 4 ft. 6 in. long to make Part Number LKA3332-1.
C.
Apply paint that conforms to MIL-C-53039 or MIL-C-46168.
G-5. SIDE CLEARANCE AND MARKER LIGHT ELECTRICAL CONDUIT.
G-2
a.
Fabricate from 8588, g in. outside diameter X .035 wall tubing.
b.
Cut to 1 ft. long to make Part Number LKA3332-4.
C.
Apply paint that conforms to MIL-C-53039 or MIL-C-46168.
TM 9-2330-384-14&P
Section II. MANUFACTURING INSTRUCTIONS (Con’t)
G-6. CONVOY WARNING LIGHT ELECTRICAL CONDUIT.
a.
Fabricate from 8588, g in. outside diameter X .035 wall tubing.
b.
Cut to 11 ft. 1 in. long to make Part Number LKA3332-3.
C.
Apply paint that conforms to MIL-C-53039 or MIL-C-46168.
G-7. BROWN WIRES.
a.
Fabricate from M22759/14-14-1, #14 gage wire, brown.
b.
Cut to 5 ft. 6 in. long to make Part Number STK14373-1.
c.
Cut to 6 in. long to make Part Number STK14373-2.
d.
Cut to 5 ft. 4 in. long to make Part Number STK14373-3.
e.
Cut to 19 ft. 4 in, long to make Part Number STK14373-4.
f.
Cut to 18 ft. 6 in. long to make Part Number STK14373-5.
g.
Cut to 13 ft. 1 in. long to make Part Number STK14373-7.
h.
When installed in conduit, 6 in. on each end should extend past conduit ends.
G-8. GREEN WIRES.
a.
Fabricate from M22759/14-14-5, #14 gage wire, green.
b.
Cut to 1 ft. 6 in. long to make Part Number STK14374-1.
c.
Cut to 19 ft. 4 in. long to make Part Number STK14374-2.
d.
Cut to 18 ft. 6 in. long to make Part Number STK14374-3.
e.
When installed in conduit, 6 in. on each end should extend past conduit ends.
G-3
TM 9-2330-384-14&P
Section II. MANUFACTURING INSTRUCTIONS (Con't)
G-9. RED WIRES.
a.
Fabricate from M22759/14-14-2, #14 gage wire, red.
b.
Cut to 6 in. long to make Part Number STK143751.
c.
Cut to 5 ft. 4 in. long to make Part Number STK14375-2.
d.
Cut to 19 ft. 4 in. long to make Part Number STK14375-3.
e.
Cut to 18 ft. 6 in. long to make Part Number STK14375-4.
f.
When installed in conduit, 6 in. on each end should extend past conduit ends.
G-10. GRAY WIRE.
a.
Fabricate from GPT 14 AWG, #14 gage wire, gray.
b.
Cut to 18 ft. 6 in. long to make Part Number TKG5320-1-4.
C.
When installed in conduit, 6 in. on each end should extend past conduit ends,
G-11. ORANGE WIRES.
G-4
a.
Fabricate from GPT 14 AWG, #14 gage wire, orange.
b.
Cut to 18 ft. 6 in. long to make Part Number LKA9655-1.
C.
Cut to 19 ft. 4 in. long to make Part Number LKA9655-2.
d.
When installed in conduit, 6 in. on each end should extend past conduit ends.
TM 9-2330-384-14&P
Section Il. MANUFACTURING INSTRUCTIONS (Con't)
G-12. BLACK WIRES.
a.
Fabricate from M22759/14-14-8, #14 gage wire, black.
b.
Cut to 18 ft. 6 in. long to make Part Number STK14372-1.
c.
Cut to 19 ft. 4 in. long to make Part Number STK14372-2.
d.
Cut to 1 ft. 6 in. long to make Part Number STK14372-3.
e.
Cut to 2 ft. long to make Part Number STK14372-4.
f.
Cut to 1 ft. 6 in. long to make Part Number STK14372-5.
g.
Cut to 1 ft. 6 in. long to make Part Number STK14372-6.
h.
Cut to 12 ft. 1 in. long to make Part Number STK14372-7.
i.
Cut to 5 ft. 4 in. long to make Part Number STK14372-8.
j.
When installed in conduit, 6 in. on each end should extend past conduit ends.
G-13. YELLOW WIRES.
a.
Fabricate from M22759/14-14-4, #14 gage wire, yellow.
b.
Cut to 18 ft. 6 in. long to make Part Number STK14377-1.
c.
Cut to 19 ft. 4 in. long to make Part Number STK14377-2.
d.
Cut to 1 ft. 6 in. long to make Part Number STK14377-3.
e.
When installed in conduit, 6 in. on each end should extend past conduit ends.
G-14. BLUE WIRES.
a.
Fabricate from GPT 12 AWG, #12 gage wire, blue.
b.
Cut to 18 ft. 6 in. long to make Part Number TKG1336-6-1.
C.
Cut to 19 ft. 4 in. long to make Part Number TKG1336-6-2.
d.
When installed in conduit, 6 in. on each end should extend past conduit ends.
G-5
TM 9-2330-384-14&P
Section II. MANUFACTURING INSTRUCTIONS (Con't)
G-15. CONVOY WARNING LIGHT BLUE WIRE.
a.
Fabricate from STK14376, #14 gage wire, blue.
b.
Cut to 12 ft. 1 in. long to make Part Number STK14376-1,
C.
When installed in conduit, wire ends without fittings should extend 6 in. past
conduit ends.
G-16. GRAY WIRE ASSEMBLIES.
G-6
a.
Fabricate from GPT 14 AWG, #14 gage wire, gray.
b.
Cut to 20 ft. 1 in. long to make Part Number TKG5320-1-3.
c.
Install terminal, Part Number 8338564; insulator bushing, Part Number
8338562: and shell, Part Number 8338561 to one end of each gray wire.
d.
When installed in conduit, wire ends without fittings should extend 6 in. past
conduit ends.
TM 9-2330-384-14&P
Section II. MANUFACTURING INSTRUCTIONS (Con’t)
G-17. REAR CONDUIT ORANGE WIRE ASSEMBLY.
a.
Fabricate from GPT 14 AWG, #14 gage wire, orange.
b.
Cut to 6 ft. long to make Part Number LKA9655-3.
c.
Install terminal, Part Number 8338564: insulator bushing, Part Number
8338562: and shell, Part Number 8338561 to one end of orange wire (see
illustration for G-13).
d.
When installed in conduit, wire end without fittings should extend 6 in. past
conduit ends.
G-18. BRAKE AIR LINES.
a.
Fabricate from STK40090, g in. outside diameter nylon tubing.
b.
Cut to 10 in. long to make STK40090-1.
c.
Cut to 11 in. long to make STK40090-2
d.
Cut to 3 ft. 1 in. long to make STK40090-3.
e.
Cut to 3 ft. 2 in. long to make STK40090-4.
f.
Cut to 3 ft. 5 in. long to make STK40090-5.
g.
Cut to 2 ft. 11 in. long to make Part number STK40090-6.
h.
Cut to 3 ft. long to make Part Number STK40090-7.
i.
Cut to 27 ft. 3 in. long to make Part Number STK40090-8.
j.
Cut to 7 ft. 9 in. long to make Part Number STK40090-9.
k.
Cut to 5 ft. long to make Part Number STK40090-10.
I.
Cut to 4 ft. 10 in. long to make Part Number STK40090-17.
G-19. BRAKE AIR LINES.
a.
Fabricate from STK40109, ½ in. outside diameter nylon tubing.
b.
Cut to 5 ft. 2 in. long to make Part Number STK40109-1.
C.
Cut to 33 ft. long to make Part Number STK40109-2.
d.
Cut to 3 ft. 6 in. long to make Part Number STK40109-3.
e.
Cut to 4 ft. 7 in. long to make Part Number STK40109-4.
f.
Cut to 1 ft. 10 in. long to make Part Number STK40109-5.
G-7
TM 9-2330-384-14&P
Section II. MANUFACTURING INSTRUCTIONS (Con't)
G-20. GRABHANDLE AND CONVOY WARNING LIGHT CABLES.
a.
Fabricate from MIL-W-83420, Xs in. diameter 7 X 7 cable.
b.
Cut to 1 ft. 7 in. long to make Part Number VKA8995-2.
c.
Cut to 10 ft. ¾ in. long to make Part Number VKA8995-3.
G-21. GROUND WIRE.
a.
Fabricate from MIL-W-83420, KS in. diameter 7 X 7 cable.
b.
Cut to 6 ft. long to make Part Number VKA8995-1.
G-22. JET LEVEL SENSOR TUBING.
a.
Fabricate from TKG5304-1, 1 in. inside diameter X x in. wall neoprene tubing.
b.
Cut to 4 ft. long to make Part Number TKG5304-1-1.
G-23. JET LEVEL SENSOR TUBING.
a.
Fabricate from STK40090, s in. outside diameter nylon tubing,
b.
Cut to 1 ft. 8 in. long to make Part Number STK40090-11.
c.
Cut to 2 ft. 10 in. long to make Part Number STK40090-12.
d.
Cut to 1 ft. 2 in. long to make Part Number STK40090-13.
e.
Cut to 5 ft. long to make Part Number STK40090-14.
f.
Cut to 34 ft. 5 in. long to make Part Number STK40090-15.
g.
Cut to 34 ft. 5 in. long to make Part Number STK40090-16.
G-24. PRECHECK TUBING.
G-8
a.
Fabricate from STK40109, ½ in. outside diameter nylon tubing.
b.
Cut to 25 ft. 6 in. long to make Part Number STK40109-7.
C.
Cut to 3 ft. long to make Part Number STK40109-8.
d.
Cut to 5 ft. 1 in. long to make Part Number STK40109-9.
TM 9-2330-384-14&P
Section II. MANUFACTURING INSTRUCTIONS (Con't)
G-25. EMERGENCY VALVE CABLES.
a.
Fabricate from MILW83420 Type 1-A1, -3/16in. diameter 7 X 19 cable.
b.
Cut to 14 ft. long to make Part Number VKA0583-1.
c.
Cut to 26 ft. 6 in. long to make Part Number VKA0583-2.
d.
Cut to 21 ft. long to make Part Number VKA0583-3.
e.
Cut to 21 ft. 6 in. long to make Part Number VKA0583-4.
G-26. TUBING FOR EMERGENCY VALVE CABLES.
a.
Fabricate from Part Number STBW, 3/8in. outside diameter X .028 wall tubing.
b.
Cut to 5 ft. 8 in. long to make Part Number LKA3342-1.
c.
Cut to 6 ft. long to make Part Number LKA3342-2.
d.
Cut to 11 ft. 5 in. long to make Part Number LKA3342-3.
e.
Cut to 12 ft. 5 in. long to make Part Number LKA3342-4.
f.
Cut to 8 ft. long to make Part Number LKA3342-5.
g.
Cut to 11 ft. long to make Part Number LKA3342-6.
h.
Cut to 8 ft. 6 in. long to make Part Number LKA3342-7.
i
Cut to 12 ft. long to make Part Number LKA3342-8.
j.
Apply paint that conforms to MIL-C-53039 or MIL-C-46168.
G-9
TM 9-2330-384-14&P
[Paragraph G-27 Deleted]
G-10
Change 1
TM 9-2330-384-14&P
APPENDIX H
TORQUE LIMITS
H-1. SCOPE.
This appendix lists standard torque values and provides general information for applying torque.
Special torque values and tightening sequences are indicated in the maintenance procedures for
applicable components.
H-2. GENERAL.
a. Always use the torque values listed in Table H-l when the maintenance procedure does not
give a specific torque value.
b. Unless otherwise indicated, standard torque tolerance shall be ± 10%.
c. Torque values listed are based on clean, dry threads. Reduce torque by 10% when engine
oil is used as a lubricant.
d. If replacement fasteners are of higher grade than originally supplied, use torque
specifications for the original. This will prevent equipment damage due to over torquing.
Table H-1. Standard Torque Specifications.
TORQUE
Capscrew
Site
Inches
Thread
SAE
Grade 8
SAE
Grade 5
SAE
Grade 2
lb.-In.
N•m
lb.-In.
N•m
¼
20
50-60
6-7
108-144
12-16
¼
28
60-70
7-8
108-144
12-16
SAE
Grade, 8
SAE
Grade 5
Grade 2
lb.-ft.
N•m
lb.-ft.
N•m
lb.-ft.
N•m
5/16
18
9-12
12-16
13-17
18-23
20-25
27-34
5/16
24
9-12
12-16
15-20
20-27
20-25
27-34
3/8
16
15-20
20-27
20-30
27-41
35-45
48-61
3/8
24
18-24
24-33
25-35
34-48
35-45
48-61
7/16
14
20-30
27-41
40-50
54-68
50-70
68-94
7/16
20
25-35
34-48
45-55
61-75
60-80
81-109
½
13
35-50
48-68
55-70
75-95
80-100
108-136
½
20
40-55
54-75
65-85
88-115
90-110
122-149
9/16
12
50-65
68-88
80-100
108-136
100-140
136-190
H-1
TM 9-2330-384-14&P
Table H-1. Standard Torque Specifications (Con't).
TORQUE
Capscrew
Size
H-2
SAE
Grade 2
Inches
Thread
SAE
Grade 5
SAE
Grade 6
lb.-ft.
N•m
lb.-ft.
N•m
lb.-ft.
N•m
%3
18
55-75
75-102
80-110
108-149
120-150
163-203
5%
11
70-90
95-122
120-140
163-190
190-220
256-298
5%
18
80-100
108-136
120-140
163-190
190-220
258-298
?4
10
120-160
163-217
200-240
271-325
300-340
407-461
¾
16
140-180
190-244
200-240
271-325
300-340
407-461
54
9 or 14
110-140
149-190
340-380
461-515
500-550
678-746
1
8 or 12
160-200
217-271
500-550
678-746
800-850
1085-1153
TM 9-2330-384-14&P
INDEX
Subject
Paragraph
Page
4-37
4-108
4-38
4-39
4-43
4-110
4-112
4-130
4-31
5-1
4-32
4-92
5-1
4-95
4-47
4-46
4-32
4-19
4-152
4-147
4-95
4-44
5-6
4-58
5-16
4-181
4-65
4-64
4-62
4-63
4-66
4-67
4-60
4-61
4-68
4-59
2-17
2-19
4-84
4-194
4-192
4-188
4-190
4-195
4-201
4-185
4-186
4-204
4-184
2-35
2-39
4-281
4-34
4-99
4-39
4-43
4-112
4-130
A
Adjuster, slack, replacement . . . . . . . . . . . . . . . . . . . . . . . . . . . . . . . . . . . . . . .
Air:
Coupling replacement . . . . . . . . . . . . . . . . . . . . . . . . . . . . . . . . . . . . . . . . . . .
Lines and fittings maintenance . . . . . . . . . . . . . . . . . . . . . . . . . . . . . . . . . . .
Reservoir replacement . . . . . . . . . . . . . . . . . . . . . . . . . . . . . . . . . . . . . . . . . .
Axle:
Alinement . . . . . . . . . . . . . . . . . . . . . . . . . . . . . . . . . . . . . . . . . . . . . . . . . . . .
Assembly replacement . . . . . . . . . . . . . . . . . . . . . . . . . . . . . . . . . . . . . . . . . .
Bent, check . . . . . . . . . . . . . . . . . . . . . . . . . . . . . . . . . . . . . . . . . . . . . . . . . . .
B
Bearing, wheel:
Check and adjustment . . . . . . . . . . . . . . . . . . . . . . . . . . . . . . . . . . . . . . . . . .
Maintenance . . . . . . . . . . . . . . . . . . . . . . . . . . . . . . . . . . . . . . . . . . . . . . . . . . .
Bent axle check . . . . . . . . . . . . . . . . . . . . . . . . . . . . . . . . . . . . . . . . . . . . . . . . . .
Blackout light maintenance . . . . . . . . . . . . . . . . . . . . . . . . . . . . . . . . . . . . . . . .
Body maintenance:
Cabinet replacement . . . . . . . . . . . . . . . . . . . . . . . . . . . . . . . . . . . . . . . . . . . .
Fender and center fender bracket replacement . . . . . . . . . . . . . . . . . . . . .
Grounding:
Reel replacement . . . . . . . . . . . . . . . . . . . . . . . . . . . . . . . . . . . . . . . . . . . .
Stud replacement . . . . . . . . . . . . . . . . . . . . . . . . . . . . . . . . . . . . . . . . . . . .
Ground rod tube assembly replacement . . . . . . . . . . . . . . . . . . . . . . . . . . .
Hose and gage stick tube assembly replacement . . . . . . . . . . . . . . . . . . . .
Light box replacement . . . . . . . . . . . . . . . . . . . . . . . . . . . . . . . . . . . . . . . . . .
Manhole and fill cover maintenance . . . . . . . . . . . . . . . . . . . . . . . . . . . . . . .
Nose adapter replacement . . . . . . . . . . . . . . . . . . . . . . . . . . . . . . . . . . . . . . .
Piping assembly support bracket replacement . . . . . . . . . . . . . . . . . . . . . .
Purging tank . . . . . . . . . . . . . . . . . . . . . . . . . . . . . . . . . . . . . . . . . . . . . . . . . . .
Splashguard replacement . . . . . . . . . . . . . . . . . . . . . . . . . . . . . . . . . . . . . . . .
Bonding and grounding procedures . . . . . . . . . . . . . . . . . . . . . . . . . . . . . . . . .
Bottom loading (preferred method) . . . . . . . . . . . . . . . . . . . . . . . . . . . . . . . . .
Bottom loading system, winterization . . . . . . . . . . . . . . . . . . . . . . . . . . . . . . . .
Brake system maintenance:
Adjustment . . . . . . . . . . . . . . . . . . . . . . . . . . . . . . . . . . . . . . . . . . . . . . . . . . . .
Air:
Lines and fittings maintenance . . . . . . . . . . . . . . . . . . . . . . . . . . . . . . . . .
Reservoir replacement . . . . . . . . . . . . . . . . . . . . . . . . . . . . . . . . . . . . . . . .
Index 1
TM 9-2330-384-14&P
INDEX
Subject
Brake system maintenance (Con?) :
Camshaft replacement . . . . . . . . . . . . . . . . . . . . . . . . . . . . . . . . . . . . . . . . . .
Chamber:
Replacement . . . . . . . . . . . . . . . . . . . . . . . . . . . . . . . . . . . . . . . . . . . . . . . .
Spring:
Caging . . . . . . . . . . . . . . . . . . . . . . . . . . . . . . . . . . . . . . . . . . . . . . . . . . .
Uncaging . . . . . . . . . . . . . . . . . . . . . . . . . . . . . . . . . . . . . . . . . . . . . . . . .
Drum:
Diameters.. . . . . . . . . . . . . . . . . . . . . . . . . . . . . . . . . . . . . . . . . . . . . . . . . .
Repair . . . . . . . . . . . . . . . . . . . . . . . . . . . . . . . . . . . . . . . . . . . . . . . . . . . . . .
Interlock valves and fittings maintenance . . . . . . . . . . . . . . . . . . . . . . . . . . .
Principles of operation . . . . . . . . . . . . . . . . . . . . . . . . . . . . . . . . . . . . . . . . . .
Shoe:
Repair . . . . . . . . . . . . . . . . . . . . . . . . . . . . . . . . . . . . . . . . . . . . . . . . . . . . . .
Replacement . . . . . . . . . . . . . . . . . . . . . . . . . . . . . . . . . . . . . . . . . . . . . . . .
Slack adjuster replacement . . . . . . . . . . . . . . . . . . . . . . . . . . . . . . . . . . . . . .
Valve:
Ratio relay, maintenance . . . . . . . . . . . . . . . . . . . . . . . . . . . . . . . . . . . . . .
Relay quick release, maintenance . . . . . . . . . . . . . . . . . . . . . . . . . . . . . . .
Breaker, circuit, replacement . . . . . . . . . . . . . . . . . . . . . . . . . . . . . . . . . . . . . .
Butterfly valve replacement . . . . . . . . . . . . . . . . . . . . . . . . . . . . . . . . . . . . . . . .
Paragraph
Page
4-36
4-104
4-40
4-119
4-33
4-33
4-97
4-97
Table 5-1
5-2
4-44
1-13
5-6
5-5
4-134
1-27
5-3
4-35
4-37
5-7
4-101
4-108
4-42
4-41
4-16
4-80
4-126
4-122
4-38
4-260
5-6
4-36
1-6
4-77
5-16
4-104
1-2
4-252
4-40
4-119
4-33
4-33
4-45
1-6
4-72
4-16
2-8
4-78
4-1
1-7
4-29
4-97
4-97
4-141
1-2
4-225
4-38
2-8
4-254
4-1
1-4
4-82
C
Cabinet replacement . . . . . . . . . . . . . . . . . . . . . . . . . . . . . . . . . . . . . . . . . . . . . .
Camshaft replacement . . . . . . . . . . . . . . . . . . . . . . . . , . . . . . . . . . . . . . . . . . . .
Capabilities. and features, equipment characteristics . . . . . . . . . . . . . . . . . . .
Cap, vent, replacement . . . . . . . . . . . . . . . . . . . . . . . . . . . . . . . . . . . . . . . . . . .
Chamber, brake:
Replacement . . . . . . . . . . . . . . . . . . . . . . . . . . . . . . . . . . . . . . . . . . . . . . . . . .
Spring :
Caging . . . . . . . . . . . . . . . . . . . . . . . . . . . . . . . . . . . . . . . . . . . . . . . . . . . . .
Uncaging . . . . . . . . . . . . . . . . . . . . . . . . . . . . . . . . . . . . . . . . . . . . . . . . . .
Changing tires . . . . . . . . . . . . . . . . . . . . . . . . . . . . . . . . . . . . . . . . . . . . . . . . . . .
Characteristics, capabilities, and features of equipment . . . . . . . . . . . . . . . .
Check valve replacement . . . . . . . . . . . . . . . . . . . . . . . . . . . . . . . . . . . . . . . . . .
Circuit breaker replacement . . . . . . . . . . . . . . . . . . . . . . . . . . . . . . . . . . . . . . . .
Cleaning agents. . . . . . . . . . . . . . . . . . . . . . . . . . . . . . . . . . . . . . . . . . . . . . . . . .
Collection system, vapor, maintenance . . . . . . . . . . . . . . . . . . . . . . . . . . . . . .
Common tools and equipment . . . . . . . . . . . . . . . . . . . . . . . . . . . . . . . . . . . . .
Components, location and description of major . . . . . . . . . . . . . . . . . . . . . . .
Conduit and wires, electrical, replacement . . . . . . . . . . . . . . . . . . . . . . . . . . .
Index 2
TM 9-2330-384-14&P
INDEX
Subject
Controls and indicators ............................................
Convoy warning light:
Assembly maintenance ..........................................
Cable assembly repair ..........................................
Use ..........................................................
Wiring maintenance .............................................
Coupler assembly, upper, replacement ..............................
Coupling:
Air, replacement ...............................................
Semitrailer to tractor ............................................
Paragraph
Page
2-2
2-1
4-23
5-5
2-23
4-22
5-4
4-60
5-14
2-50
4-56
5-10
4-38
2-12
4-110
2-28
1-11
4-69
1-10
1-7
1-3
4-30
4-79
1-21
4-213
1-18
1-4
1-1
4-87
4-257
Table 5-1
5-2
4-46
2-15
5-6
5-5
4-147
2-33
4-19
4-29
4-44
4-82
4-23
5-5
2-23
4-22
4-24
1-12
4-26
4-27
4-60
5-14
2-50
4-56
4-62
1-24
4-74
4-78
D
Data, equipment .................................................
Data plates replacement ..........................................
Decals, location and contents ......................................
Description of major components ...................................
Destruction of Army materiel to prevent enemy use ...................
Diagrams, wiring .................................................
..............
Drain, sump, replacement ...........................
Drum:
Diameters .....................................................
Repair ........................................................
Wheel, and wheel bearing maintenance ............................
Dust caps, use of ................................................
E
Electrical system:
Blackout light maintenance .......................................
Conduit and wires replacement ...................................
Convoy warning light:
Assembly maintenance ........................................
Cable assembly repair ........................................
Use ........................................................
Wiring maintenance ...........................................
Front clearance and marker light maintenance ......................
Principles of operation ..........................................
Rear side clearance and marker light maintenance ..................
Reflector replacement ...........................................
Index 3
TM 9-2330-384-14&P
INDEX
Subject
Paragraph Page
Electricalsystem(Con't):
Side clearance and marker light maintenance ...................................................
Stop/taillight maintenance .................................................................................
Triple clearance light assembly replacement .....................................................
Turn signal/taillight maintenance .......................................................................
Voltage control unit replacement ........................................................
..............
Wiring diagrams ...............................................................................................
12-volt and 24-volt electrical connector replacement .........................................
Emergency valve:
Maintenance ....................................................................................................
Operator maintenance ...........................................................................
Vapor vent cables and tubing maintenance .......................................................
Equalizer and equalizer bushing replacement ............................................................
Equipment:
Characteristics, capabilities, and features .........................................................
Common tools and ........................................................................................
Data ..............................................................................
..................................
Diagnostic, special tools, test, measurement .....................................................
Improvement recommendations (EIRs), reporting ..............................................
Support ............................................................................................................
Extinguisher, fire, mounting bracket replacement ...........................................
...........
Extremes, operation in:
Cold or snow ....................................................................................................
..........................
Heat ...................................................................................
4-25
4-20
4-28
4-21
4-14
4-30
4-17
4-69
4-48
4-79
4-52
4-33
4-87
4-40
4-82
4-74
4-76
4-57
4-267
4-240
4-246
4-179
1-6
4-1
1-11
4-2
1-5
4-2
4-53
1-2
4-1
1-21
4-1
1-1
4-1
4-168
2-25
2-26
2-52
2-53
4-58
4-181
4-67
2-15
4-53
2-29
1-2
4-201
2-26
4-168
2-53
1-1
4-53
5-5
4-52
4-51
4-54
5-4
4-168
5-14
4-161
4-159
4-170
5-10
4-31
4-24
4-80
4-92
4-62
4-260
F
Fender and center fender bracket replacement .........................................................
Fill cover, manhole:
Maintenance ....................................
..........................................
. ..................
Operating ............................................
-- . . .......................... . ................
Fire extinguisher mounting bracket maintenance .......................... ............................
................. ...............
Fording operations ...................................................................
Forms, records and reports, maintenance ..................................................................
Frame and towing assembly:
Fire extinguisher mounting bracket replacement ..........................................
Grabhandle and convoy warning light cable assembly repair .............................
Landing gear replacement ................................................
- ..............................
Pick-up plate replacement ..................................................
. ............................
Spare tire carrier replacement .............................................
. ...................... ...
Upper coupler assembly replacement ..................................
. .........................
Front:
Axle alinement ...............................................................................
.. . . ......
Clearance and marker light maintenance ....................................................
Port maintenance ....................................................
...................... . . ... ...
Index 4
Change 1
TM 9-2330-384-14&P
INDEX
Paragraph Page
Subject
Fuel:
Handling requirements, general .................................................................................
Loading:
Bottom (preferred method) ................................................................................
Principles of operation ......................................................................................
Top (alternate method) .....................................................................................
Unloading:
..............................
Operation ....................................................................
Principles of operation ......................................................................................
..
2-18
2-37
2-19
1-15
2-20
2-39
1-31
2-45
2-21
1-15
2-48
1-31
4-70
4-73
5-7
4-72
4-63
4-52
4-215
4-238
5-23
4-225
4-190
4-161
2-18
1-17
2-37
1-38
5-5
2-22
5-14
2-50
2-17
4-65
4-64
4-62
4-73
4-59
2-35
4-194
4-192
4-188
4-238
4-184
5-5
2-22
4-63
5-14
2-50
4-190
G
Gage:
Jet level sensor replacement .......................................................
....
Marker disk and ground wire replacement .........................................................
Marker rod replacement ...................................................................
.. .. .......
Pressure, replacement ....................................................................
.. ..... .......
Stick tube assembly, hose and, replacement .....................................................
Gear, landing, replacement ........................................................................................
General:
Fuel handling requirements ...............................................................................
Safety regulations .....................................................
.......................................
Grabhandle:
Cable assembly repair ......................................................................................
Replacement ....................................................................................................
Grounding:
Procedures, bonding and ..................................................................................
Reel maintenance ..............................................................
..........................
Stud replacement .............................................................................................
Ground rod tube assembly replacement ....................................................................
Groundwire replacement ...........................................................................................
Guard, splash, replacement ...................................................
......... ...... ................
1
H
Handle, grab:
Cable assembly repair ......................................................................................
Replacement ....................................................................................................
Hose and gage stick tube assembly replacement ......................................................
Change 1
Index 5
TM 9-2330-384-14&P
INDEX
Subject
Paragraph
Indicators, controls and ...........................................
Integrity test, vapor ...............................................
interlock valves and fittings, brake, maintenance ......................
Page
2-2
5-8
4-44
2-1
5-26
4-134
4-70
4-215
4-52
2-9
4-161
2-8
4-19
4-66
4-44
4-195
4-23
5-5
2-23
4-22
4-24
4-26
4-25
4-20
4-28
4-21
4-89
4-39
4-60
5-14
2-50
4-56
4-62
4-74
4-69
4-48
4-79
4-52
4-289
4-112
2-19
2-20
4-88
2-39
2-45
4-288
1-10
1-9
1-8
1-18
1-13
1-9
J
Jet level sensor replacement
.......................................
L
Landing gear replacement .........................................
Leakage definitions ...............................................
Light:
Blackout, maintenance ..........................................
Box replacement ...............................................
Convoy warning:
Assembly maintenance ........................................
Cable assembly repair ........................................
Use ........................................................
Wiring maintenance ...........................................
Front clearance and marker maintenance ..........................
Rear side plearance and marker maintenance ......................
Side clearance and marker maintenance ...........................
Stop/taillight maintenance
.......................................
Triple clearance assembly maintenance ............................
Turn signal/taillight maintenance ..................................
Limited storage ..................................................
Lines and fittings, air, replacement .................................
Loading:
Fuel:
Bottom (preferred method) ....................................
Top (alternate method) .......................................
Movement and .................................................
Location and contents of:
Decals ......................................................
Plates ......................................................
Stencil markings .............................................
Index 6
TM 9-2330-384-14&P
INDEX
Subject
Lubrication instructions:
General. . . . . . . . . . . . . . . . . . . . . . . . . . . . . . . . . . . . . . . . . . . . . . . . . . . . . . .
Specific. . . . . . . . . . . . . . . . . . . . . . . . . . . . . . . . . . . . . . . . . . . . . . . . . . . . . .
Paragraph
Page
3-1
3-2
3-1
3-1
1-2
1-1
4-67
2-16
4-201
2-34
4-24
4-26
4-25
5-7
4-62
4-74
4-69
5-23
1-8
4-85
4-85
1-3
4-88
1-9
4-284
4-284
1-1
4-288
4-60
4-185
2-28
2-28
2-28
2-27
2-25
2-26
2-29
2-27
2-13
2-53
2-53
2-53
2-53
2-52
2-53
2-53
2-53
2-30
M
Maintenance forms, records, and reports . . . . . . . . . . . . . . . . . . . . . . . . . . . .
Manhole:
Maintenance . . . . . . . . . . . . . . . . . . . . . . . . . . . . . . . . . . . . . . . . . . . . . . . . . . .
Operating . . . . . . . . . . . . . . . . . . . . . . . . . . . . .. . .. .. . . . . . . . . . . ........
Marker:
Light:
Front clearance, maintenance . . . . . . . . . . . . . . . . . . . . . . . . . . . . . . . . . .
Rear side clearance, maintenance . . . . . . . . . . . . . . . . . . . . . . . . . . . . . .
Side clearance, maintenance . . . . . . . . . . . . . . . . . . . . . . . . . . . . . . . . . . . .
Rod, gage, replacement . . . . . . . . . . . . . . . . . . . . . . . . . . . . . . . . . . . . . . . .
Marking:
Location and contents of stencil . . . . . . . . . . . . . . . . . . . . . . . . . . . . . . . . . .
Painting. . . . . . . . . . . . . . . . . . . . . . . . . . . . . . . . . . . . . . . . .
Stencil . . . . . . . . . . . . . . . . . . . . . . . . . . . . . . . . . . . . . . . . . . . . . . . . . . . . . . . .
Materiel, Army, destruction of to prevent enemy use . . . . . . . . . . . . . . . . . .
Movement, loading and . . . . . . . . . . . . . . . . . . . . . . . . . . . . . . . . . . . . . . . . . . .
N
Nose adapter replacement . . . . . . . . . . . . . . . . . . . . . . . . . . . . . . . . . . . . . . . . .
O
Operation:
Areas of:
Heavy rain . . . . . . . . . . . . . . . . . . . . . . . . . . . . . . . . . . . . . . . . . . . . . . . . . .
High humidity . . . . . . . . . . . . . . . . . . . . . . . . . . . . . . . . . . . . . . . . . . . . . . . .
Saltwater . . . . . . . . . . . . . . . . . . . . . . . . . . . . . . . . . . . . . . . . . . . . . . . . . . .
Dusty areas . . . . . . . . . . . . . . . . . . . . . . . . . . . . . . . . . . . . . . . . . . . . . . . . . . .
Extreme cold or snow . . . . . . . . . . . . . . . . . . . . . . . . . . . . . . . . . . . . . . . . . . .
Extreme heat . . . . . . . . . . . . . . . . . . . . . . . . . . . . . . . . . . . . . . . . . . . . . . . . . .
Fording . . . . . . . . . . . . . . . . . . . . . . . . . . . . . . . . . . . . . . . . . . . . . . . . . . . . . . .
Sandy areas . . . . . . . . . . . . . . . . . . . . . . . . . . . . . . . . . . . . . . . . . . . . . . . . . . .
Towing semitrailer . . . . . . . . . . . . . . . . . . . . . . . . . . . . . . . . . . . . . . . . . . . . . .
Index 7
TM 9-2330-384-14&P
INDEX
Subject
Operator:
Emergency valve, maintenance . . . . . . . . . . . . . . . . . . . . . . . . . . . . . . . . . . .
PMCS:
General procedures. . . . . . . . . . . . . . . . . . . . . . . . . . . . . . . . . . . . . . . . . . .
Intervals . . . . . . . . . . . . . . . . . . . . . . . . . . . . . . . . . . . . . . . . . . . . . . . . . . . .
Preventive Maintenance Checks and Services (PMCS) . . . . . . . . . . . . . .
Reporting repairs . . . . . . . . . . . . . . . . . . . . . . . . . . . . . . . . . . . . . . . . . . . . .
Specific procedures . . . . . . . . . . . . . . . . . . . . . . . . . . . . . . . . . . . . . . . . . .
Troubleshooting:
General . . . . . . . . . . . . . . . . . . . . . . . . . . . . . . . . . . . . . . . . . . . . . . . . . . . . .
Procedures . . . . . . . . . . . . . . . . . . . . . . . . . . . . . . . . . . . . . . . . . . . . . . . . . .
Symptom index . . . . . . . . . . . . . . . . . . . . . . . . . . . . . . . . . . . . . . . . . . . . . .
Paragraph
Page
4-74
4-240
2-6
2-4
Table 2-1
2-5
2-7
2-6
2-6
2-9
2-6
2-7
3-3
Table 3-1
3-4
3-6
3-8
3-7
4-85
4-51
4-83
4-284
4-159
4-278
4-80
4-61
4-69
1-9
4-260
4-186
4-213
1-13
2-8
2-9
2-8
2-8
2-6
2-4
Table 2-1
2-5
2-7
2-6
2-6
2-9
2-6
2-7
4-7
4-10
4-8
Table 4-1
4-9
4-11
4-72
4-4
4-4
4-4
4-6
4-4
4-5
4-225
P
Painting and identification marking . . . . . . . . . . . . . . . . . . . . . . . . . . . . . . . . . .
Pick-up plate replacement . . . . . . . . . . . . . . . . . . . . . . . . . . . . . . . . . . . . . . . . .
Pilot valve maintenance . . . . . . . . . . . . . . . . . . . . . . . . . . . . . . . . . . . . . . . . . . .
Piping assembly:
Front port and rear inlet maintenance . . . . . . . . . . . . . . . . . . . . . . . . . . . . .
Support bracket replacement . . . . . . . . . . . . . . . . . . . . . . . . . . . . . . . . . . . .
Plates, data replacement . . . . . . . . . . . . . . . . . . . . . . . . . . . . . . . . . . . . . . . . . .
Plates, location and contents . . . . . . . . . . . . . . . . . . . . . . . . . . . . . . . . . . . . . . .
PMCS:
Cleaning agents. . . . . . . . . . . . . . . . . . . . . . . . . . . . . . . . . . . . . . . . . . . . . . . .
Leakage definitions . . . . . . . . . . . . . . . . . . . . . . . . . . . . . . . . . . . . . . . . . . . . .
Operator:
General procedures . . . . . . . . . . . . . . . . . . . . . . . . . . . . . . . . . . . . . . . . . . .
Intervals . . . . . . . . . . . . . . . . . . . . . . . . . . . . . . . . . . . . . . . . . . . . . . . . . . . .
Preventive Maintenance Checks and Services (PMCS) . . . . . . . . . . . . . .
Reporting repairs . . . . . . . . . . . . . . . . . . . . . . . . . . . . . . . . . . . . . . . . . . . . .
Specific procedures . . . . . . . . . . . . . . . . . . . . . . . . . . . . . . . . . . . . . . . . . .
Unit:
General:
Information . . . . . . . . . . . . . . . . . . . . . . . . . . . . . . . . . . . . . . . . . . . . . . . .
Procedures . . . . . . . . . . . . . . . . . . . . . . . . . . . . . . . . . . . . . . . . . . . . . . . .
Intervals . . . . . . . . . . . . . . . . . . . . . . . . . . . . . . . . . . . . . . . . . . . . . . . . . . . .
Preventive Maintenance Checks and Services (PMCS) . . . . . . . . . . . . . .
Reporting repairs . . . . . . . . . . . . . . . . . . . . . . . . . . . . . . . . . . . . . . . . . . . . .
Specific procedures . . . . . . . . . . . . . . . . . . . . . . . . . . . . . . . . . . . . . . . . . .
Precheck system maintenance . . . . . . . . . . . . . . . . . . . . . . . . . . . . . . . . . . . . .
Index 8
TM 9-2330-384-14&P
INDEX
Subject
Preparation for storage or shipment . . . . . . . . . . . . . . . . . . . . . . . . . . . . . . . . .
Pressure gage replacement . . . . . . . . . . . . . . . . . . . . . . . . . . . . . . . . . . . . . . . .
Purging tank. . . . . . . . . . . . . . . . . . . . . . . . . . . . . . . . . . . . . . . . . . . . . . . . . . . . .
Paragraph
Page
4-86
4-72
4-68
4-285
4-225
4-204
4-41
4-122
4-55
4-42
4-173
4-126
4-31
4-80
4-26
1-2
4-65
4-27
1-17
4-41
4-75
1-5
2-5
4-43
4-48
4-92
4-260
4-74
1-1
4-194
4-78
1-38
4-122
4-244
1-1
2-6
4-130
4-154
5-7
4-62
5-23
4-188
1-17
2-28
2-27
4-71
4-70
1-38
2-53
2-53
4-222
4-215
Q
Quick release valve, relay, maintenance . . . . . . . . . . . . . . . . . . . . . . . . . . . . .
R
Radius rod and radius rod bushing replacement . . . . . . . . . . . . . . . . . . . . . . .
Ratio relay valve maintenance . . . . . . . . . . . . . . . . . . . . . . . . . . . . . . . . . . . . . .
Rear:
Axle alinement . . . . . . . . . . . . . . . . . . . . . . . . . . . . . . . . . . . . . . . . . . . . . . . . .
Inlet, piping assembly, maintenance . . . . . . . . . . . . . . . . . . . . . . . . . . . . . . .
Side clearance and marker light maintenance . . . . . . . . . . . . . . . . . . . . . . .
Records, and reports, maintenance forms . . . . . . . . . . . . . . . . . . . . . . . . . . .
Reel, grounding, replacement . . . . . . . . . . . . . . . . . . . . . . . . . . . . . . . . . . . . . .
Reflector replacement . . . . . . . . . . . . . . . . . . . . . . . . . . . . . . . . . . . . . . . . . . . .
Regulations, safety . . . . . . . . . . . . . . . . . . . . . . . . . . . . . . . . . . . . . . . . . . . . . . .
Relay quick release valve maintenance . . . . . . . . . . . . . . . . . . . . . . . . . . . . . .
Remote trip-release, emergency valve, replacement . . . . . . . . . . . . . . . . . . .
Reporting equipment improvement recommendations (EIRs) . . . . . . . . . . . .
Reporting repairs . . . . . . . . . . . . . . . . . . . . . . . . . . . . . . . . . . . . . . . . . . . . . . . . .
Reservoir, air, replacement . . . . . . . . . . . . . . . . . . . . . . . . . . . . . . . . . . . . . . . .
Rim alinement . . . . . . . . . . . . . . . . . . . . . . . . . . . . . . . . . . . . . . . . . . . . . . . . . . .
Rod:
Gage marker, replacement . . . . . . . . . . . . . . . . . . . . . . . . . . . . . . . . . . . . . .
Ground, tube assembly, replacement . . . . . . . . . . . . . . . . . . . . . . . . . . . . . .
S
Safety regulations . . . . . . . . . . . . . . . . . . . . . . . . . . . . . . . . . . . . . . . . . . . . . . . .
Saltwater, operation in . . . . . . . . . . . . . . . . . . . . . . . . . . . . . . . . . . . . . . . . . . . .
Sandy areas, operation in . . . . . . . . . . . . . . . . . . . . . . . . . . . . . . . . . . . . . . . . .
Screen service . . . . . . . . . . . . . . . . . . . . . . . . . . . . . . . . . . . . . . . . . . . . . . . . . .
Sensor, jet level, replacement . . . . . . . . . . . . . . . . . . . . . . . . . . . . . . . . . . . . .
Index 9
TM 9-2330-384-14&P
INDEX
Subject
Service upon receipt:
General . . . . . . . . . . . . . . . . . . . . . . . . . . . . . . . . . . . . . . . . . . . . . . . . . . . . . . .
Inspection instructions . . . . . . . . . . . . . . . . . . . . . . . . . . . . . . . . . . . . . . . . . .
Servicing instructions . . . . . . . . . . . . . . . . . . . . . . . . . . . . . . . . . . . . . . . . . . .
Shipment, preparation for . . . . . . . . . . . . . . . . . . . . . . . . . . . . . . . . . . . . . . . . .
Shoe, brake:
Repair . . . . . . . . . . . . . . . . . . . . . . . . . . . . . . . . . . . . . . . . . . . . . . . . . . . . . . . .
Replacement . . . . . . . . . . . . . . . . . . . . . . . . . . . . . . . . . . . . . . . . . . . . . . . . . .
Side clearance and marker light maintenance . . . . . . . . . . . . . . . . . . . . . . . . .
Signal, turn, maintenance . . . . . . . . . . . . . . . . . . . . . . . . . . . . . . . . . . . . . . . . .
Slack adjuster replacement . . . . . . . . . . . . . . . . . . . . . . . . . . . . . . . . . . . . . . . .
Snow, operation in . . . . . . . . . . . . . . . . . . . . . . . . . . . . . . . . . . . . . . . . . . . . . . .
Spare tire carrier replacement . . . . . . . . . . . . . . . . . . . . . . . . . . . . . . . . . . . . .
Special tools, test, measurement and diagnostic equipment
(TMDE) and support equipment . . . . . . . . . . . . . . . . . . . . . . . . . . . . . . . . . .
Splashguard replacement . . . . . . . . . . . . . . . . . . . . . . . . . . . . . . . . . . . . . . . . . .
Spring:
Brake chamber:
Caging . . . . . . . . . . . . . . . . . . . . . . . . . . . . . . . . . . . . . . . . . . . . . . . . . . . . .
Uncaging . . . . . . . . . . . . . . . . . . . . . . . . . . . . . . . . . . . . . . . . . . . . . . . . . . .
Replacement . . . . . . . . . . . . . . . . . . . . . . . . . . . . . . . . . . . . . . . . . . . . . . . . . .
Stencil markings:
Location and contents of . . . . . . . . . . . . . . . . . . . . . . . . . . . . . . . . . . . . . . . .
Painting . . . . . . . . . . . . . . . . . . . . . . . . . . . . . . . . . . . . . . . . . . . . . . . . . . . . . . .
Stop/taillight maintenance . . . . . . . . . . . . . . . . . . . . . . . . . . . . . . . . . . . . . . . . .
Storage, limited . . . . . . . . . . . . . . . . . . . . . . . . . . . . . . . . . . . . . . . . . . . . . . . . . .
Storage or shipment, preparation for . . . . . . . . . . . . . . . . . . . . . . . . . . . . . . . .
Strainer assembly maintenance . . . . . . . . . . . . . . . . . . . . . . . . . . . . . . . . . . . .
Stud, grounding, replacement . . . . . . . . . . . . . . . . . . . . . . . . . . . . . . . . . . . . .
Sump drain replacement . . . . . . . . . . . . . . . . . . . . . . . . . . . . . . . . . . . . . . . . .
Support bracket, piping assembly, replacement . . . . . . . . . . . . . . . . . . . . . .
Suspension maintenance:
Equalizer and equalizer bushing replacement . . . . . . . . . . . . . . . . . . . . . .
Principles of operation . . . . . . . . . . . . . . . . . . . . . . . . . . . . . . . . . . . . . . . . .
Radius rod and radius rod bushing replacement . . . . . . . . . . . . . . . . . . . .
Spring replacement . . . . . . . . . . . . . . . . . . . . . . . . . . . . . . . . . . . . . . . . . . . .
Index 10
Paragraph
Page
4-4
4-5
4-6
4-87
4-2
4-2
4-3
4-285
5-3
4-35
4-25
4-21
4-37
2-25
4-54
5-7
4-101
4-69
4-52
4-108
2-52
4-170
4-2
4-59
4-1
4-184
4-33
4-33
4-56
4-97
4-97
4-176
1-8
4-85
4-20
4-89
1-4,
4-86
4-71
4-64
4-79
4-61
1-9
4-284
4-48
4-289
l-l,
4-285
4-222
4-192
4-257
4-186
4-57
1-14
4-55
4-56
4-179
1-30
4-173
4-176
TM 9-2330-384-14&P
INDEX
Subject
Paragraph
Page
Table 5-1
-5-6
Table 2-1
Table 4-1
2-9
4-6
Table 3-1
Table 4-2
4-20
4-68
3-8
4-14
4-48
4-204
1-13
1-12
1-15
1-14
6-8
1-27
1-24
1-31
1-30
6-26
4-45
4-49
4-54
4-141
4-156
4-170
4-1
4-2
2-20
2-13
4-1
4-1
2-45
2-30
2-12
2-14
4-28
2-28
2-31
4-79
3-3
Table 3-1
3-4
3-6
3-8
3-7
4-12
Table 4-2
4-13
4-12
4-14
4-13
4-62
4-63
4-188
4-190
T
Tables:
Brake drum diameters ..........................................
PMCS:
Operator ...................................................
Unit ........................................................
Troubleshooting procedures:
Operator ....................................................
Unit ........................................................
Tail/stoplight maintenance
.........................................
Tank, purging
...................................................
Technical principles of operation:
Brake system ..................................................
Electrical system ...............................................
Fuelloading/unloading system ....................................
Suspension system .............................................
Test, vapor integrity ..............................................
Tire:
Changing .....................................................
Maintenance ....................................................
Spars, carrier replacement
......................................
Tools:
Common .....................................................
Special ........................................................
Top loading (alternate method) .....................................
Towing semitrailer ................................................
Tractor:
Coupling to ....................................................
Uncoupling from ...............................................
Triple clearance light assembly .....................................
Troubleshooting:
Operator:
General .....................................................
Procedures ..................................................
Symptom index ..............................................
Unit:
General .................................................
Procedures .............................................
Symptom index ..............................................
Tube assembly:
Ground rod, replacement ........................................
Hose and gage stick, replacement ................................
-
Index 11
TM 9-2330-384-14&P
INDEX
Subject
Paragraph Page
Tubing:
Emergency valve and vapor vent cables, maintenance ......................................
Precheck, replacement .....................................................................................
Turn signal/taillight maintenance ................................ ...............................................
4-76
4-72
4-21
4-246
4-225
4-52
U
Uncaging brake chamber spring ............................... ................................................
4-33
Uncoupling semitrailer ................................................................................................
2-14
Unit:
Inspection instructions ......................................................................................
4-5
Procedures: ......................................................................................................
General:
4-7
Information ..................................................................................................
Procedures ......................................................................................
4-10
Intervals ...........................................................................
...............................
4-8
Preventative Maintenance Checksand Services(PMCS) ..............................
Table 4-1
Reporting repairs .............................................................................................
4-9
4-11
Specific procedures .........................................................................................
Servicing instructions ............................................................................................
4-6
Troubleshooting:
General ............................................................................................................
4-12
...................... Table 4-2
Procedures ...............................................................................
4-13
Symptom index ................................................................................................
Unloading fuel ....................................................................................................
.......
2-21
5-4
Upper coupler assembly replacement .......................................................................
Use of:
2-23
Convoy warning light ................................................................................
...........
Dustcaps .......................................................................................................
.....
2-15
4-97
2-31
4-2
4-4
4-4
4-4
4-6
4-4
4-5
4-3
4-12
4-14
4-13
2-48
5-10
2-50
2-33
V
Valve:
Brake interlock, and fittings, maintenance ..........................................................
Butterfly, replacement .........................................................................................
Check ....................................................................................
..................... ......
Emergency:
Maintenance ......................................................................................
.............
.... ..
Operator maintenance ...........................................................................
Remote trip-release replacement .....................................................................
Vapor vent cables and tubing maintnance .......................................................
Index 12
Change 1
4-44
4-80
4-72
4-134
4-260
4-225
4-82
4-74
4-75
4-76
4-267
4-240
4-244
4-246
TM 9-2330-384-14&P
INDEX
Paragraph
Subject
Valve(Con't):
Pilot ..................................................................................................
... .........
Precheck ................................................................
.........................................
Relay:
Quick release, maintenance .........................................................................
Ratio, maintenance ......................................................................................
Vapor:
Collection system maintenance ........................................
................................
Integrity test ...................................
... ............................... ...........................
Vent replacement ..................................................................
. ................... ..
Vent:
Cap Assembly replacement ...............................
.....................
Vapor, replacement ...................................................................
.
Voltage control unit replacement ........................................................
.... .............
Page
4-76
4-72
4-278
4-225
4-41
4-42
4-122
4-126
4-78
5-8
4-81
4-254
5-26
4-266
4-77
4-81
4-14
4-252
4-266
4-33
4-22
4-56
4-47
4-46
4-46
4-48
4-152
4-147
4-147
4-154
4-45
4-49
4-84
4-141
4-156
4-281
4-29
4-73
4-30
4-82
4-238
4-87
0
W
Warning light toggle switch, convoy, maintenance .......... ..........................................
Wheel:
Bearing:
Check and adjustment .......................................................................................
Maintenance ......................................................................................................
................
Drum .....................................................................................................
Rim alinement .........................................................
..............................................
Tire:
Changing ...............................................................................
............................
Maintenance ......................................................................
....... .... . ... .... ......
Winterization of bottom loading system ...............................................................
.
Wire:
Electrical conduit replacement ............................................
.......... ...... ..........
Ground, replacement ........................................................................
................
Wiring diagrams .......................................................
................ .... ..... ...............
Change 1
Index 13
TM 9-2330-384-14&P
By Order of the Secretary of the Army:
CARL E. VUONO
General, United States Army
Chief of Staff
Official:
THOMAS F. SIKORA
Brigadier
General, United States Army
The Adjutant General
Distribution:
To be distributed in accordance with DA Form 12-39-E. Block 0960, Operator, Unit, Direct
Support and General Support maintenance requirements for TM 9-2330-384-14&P.
*U.S.
GOVERNMENT PRINTING
OFFICE:
1991
543-025/20213
RECOMMENDED
CHANGES TO EQUIPMENT TECHNICAL PUBLICATIONS
FROM: (PRINT YOUR UNIT'S COMPLETE ADDRESS)
THENJOT
0 DOWN
DOPE
THE N
=ATH
ABOUT
IT ON THIS
THEN
..IOTDOWN
ITI FORM,
CAREFULLYTEIR
BAND
CAREFULLY
TEAR
I IT OUT, FOLD
DROP
17
fro IT IN THE MAIL.
IT AND DROP
4%4@
PUBLICATION NUMBER
TM X-XXXX-XXX-XX
BE EXACT. PIN-POINT WHERE IT IS
PAGE PARAFIGURE TABLE
NO
GRAPH
NO
NO
DATE SENT
PUBLICATION DATE
Date of TM
PUBLICATION
TITLE
Title of TM
IN THIS SPACE TELL WHAT IS WRONG AND
WHAT SHOULD BE DONE ABOUT IT:
ne pkv@-namber
p1led' '@DpOWS-tohC Wranj.
whim ale drv(er it, we Ireelve 4, re&1n1nj
rinj
ins feq of P.#^a," oucle- -iv be.
PRINTED
NAME,
GRADEORTITLE,ANDTELEPHONE
NUMBER
DA 1 FORM
JUL 79 2028-2
PREVIOUS EDITIONS
ARE OBSOLETE.
Sj/p,
SIGNHERE:
P.S. - IF YOUR OUTFIT WANTS TO KNOW ABOUT YOUR
RECOMMENDATION MAKE A CARBON COPY OF THIS
AND GIVE IT TO YOUR HEDGUARTERS.
I
REVERSE OF DA FORM 2028.2
FILL
IN YOUR
------------------------------------------------------------
UNIT'S
ADDRESS
FOLD BACK
DEPARTMENT OF THE ARMY
0
C0B 1st BN 2nd BDE
Fort
POSTAGE AND FEES PAID
DEPARTMENT OF THE ARMY
DOD314
Hood, TX. 76544
OFFICIAL BUSINESS
PENALTY FOR PRIVATE USE $300
Commander
U.S. Army Tank-automotive
and Armaments Command
ATTN: AIVISTA-AC-NML
Rock Island, IL 61299-7630
-----------------------------------------------------------------------------------------------------------------------
RECOMMENDED
CHANGESTO EQUIPMENTTECHNICALPUBLICATIONS
WITHTHIS PUBLICATION?
FROM: (PRINT YOUR UNIT'S COMPLETE ADDRESS)
THENJOT
DOWN
DOPE
THE
IT
ABOUT
ONTHIS
FORM,
DATE SENT
PUBLICATION
NUMBER
TM 9-2330-384-14&P
BE EXACT. PIN-POINT WHERE IT IS
PAGE
PARATABLE
FIGURE
NO
GRAPH
NO
NO
PUBLICATION
9 July
1990
I PUBLICATION TITLE
Operator's, Unit, DS, and
GS Maintenance Manual Including RPSTL for
Semitrailer, M1062 (NSN 2330-01-275-7475)
IN THIS SPACE TELL WHAT IS WRONG AND
WHAT SHOULD BE DONE ABOUT IT:
PRINTED NAME, GRADE OR TITLE, AND TELEPHONE NUMBER
DA 1FORM
79
JUL
2028-2
DATE
PREVIOUS EDITIONS
ARE OBSOLETE.
SIGN HERE:
P.S. - IF YOUR OUTFIT WANTS TO KNOW ABOUT YOUR
RECOMMENDATION
MAKE A CARBON COPY OF THIS
AND GIVE IT TO YOUR HEADGUARTERS.
REVERSE OF DA FORM 2028-2
- - - - - - - - - - - - - - - - DEPARTMENT
FOLD BACK
- - - - - - - - - - - - - - - - - - - - - - - - - - - - - - - - - - - - - - - - - -
OF THE ARMY
POSTAGE AND FEES PAID
DEPARTMENT OF THE ARMY
DOD314
OFFICIAL BUSINESS
PENALTY FOR PRIVATE USE $300
Commander
U.S. Army Tank-automotive
and Armaments Command
ATTN: AMSTA-AC-NML
Rock Island, IL 61299-7630
-----------------------------------------------------------------------------------------------------------------------
0
z
0
T
M
RECOMMENDED
CHANGES TO EQUIPMENT TECHNICAL PUBLICATIONS
WRONG
WITH THIS PUBLICATION?
FROM:(PRINTYOURUNIT'SCOMPLETEADDRESS)
THENJOT
DOWN
THE DOPE
IT ABOUT
ON
THISFORM,
DROPIT IN THEMAIL.
PUBLICATION NUMBER
TM 9-2330-384-14&P
BE EXACT. PIN-POINT WHERE IT IS
PAGE
PARAFIGURE
TABLE
NO
GRAPH
NO
NO
PUBLICATION DATE
9 July 1990
PUBLICATION TITLE Operator's, Unit, DS, and
GS Maintenance Manual Including RPSTL for
Semitrailer, M1062 (NSN 2330-01-275-7475)
IN THIS SPACE TELL WHAT IS WRONG AND
WHAT SHOULD BE DONE ABOUT IT:
PRINTED NAME, GRADE OR TITLE, AND TELEPHONE NUMBER
DA 1FORM
JUL 79 2028-2
DATESENT
PREVIOUS EDITIONS
ARE OBSOLETE.
SIGN HERE:
P.S. - IF YOUR OUTFIT WANTS TO KNOW ABOUT YOUR
RECOMMENDATION MAKE A CARBON COPY OF THIS
AND GIVE IT TO YOUR HEDQUARTERS.
REVERSE OF DA FORM 2028-2
FOLD BACK
- - - - - - - - - - - - - - - - - - - - - - - - - - - - - - - - - - - - - - - - - - - - - - - - - - - - - - - - - - - DEPARTMENT
OF THE ARMY
POSTAGE AND FEES PAID
DEPARTMENT OF THE ARMY
DOD314
OFFICIAL BUSINESS
PENALTY FOR PRIVATE USE $300
Commander
U.S. Army Tank-automotive
and Armaments Command
ATTN: AMSTA-AC-NML
Rock Island, IL 61299-7630
- - - - - - - - - - - - - - - - -
- - - - - - - - - - - - - - - - - - - - - - - - - - - - - - - - - - - - - - - - - -
- - - - - - - - - - - - - - - - - - - - - - - - - - - - - - - - - - - - - - - - - - - - - - - - - - - - - - - - - - - -
RECOMMENDED
CHANGESTO EQUIPMENT
TECHNICALPUBLICATIONS
WITH THIS PUBLICATION?
FROM: (PRINT YOUR UNIT'S COMPLETE ADDRESS)
_
TEA THE DOPE
THEN... JOT
DOWN
ITANDABOUT
DROPIT
IT ON THIS FORM,
CAREFULLY
CAREFULLY TEAR
)I IT OUT, FOLD
UTDROP
IT AND
IT
IT IN THE MAIL.
PUBLICATION NUMBER
TM 9-2330-384-14&P
BE EXACT. PIN-POINT WHERE IT IS
PAGE
PARAFIGURE
TABLE
NO
GRAPH
NO
NO
PUBLICATION DATE
9 July 1990
PUBLICATION TITLE Operator's, Unit, DS, and
GS Maintenance Manual Including RPSTL for
Semitrailer, M1062 (NSN 2330-01-275-7475)
IN THIS SPACE TELL WHAT IS WRONG AND
WHAT SHOULD BE DONE ABOUT IT:
PRINTED
NAME,GRADEORTITLE,ANDTELEPHONE
NUMBER
DA 1 FORM
JUL 79
2028-2
DATE SENT
PREVI0US EDITIONS
ARE OBSOLETE.
E:
P.S. - IF YOUR OUTFIT WANTS TO KNOW ABOUT YOUR
RECOMMENDATION MAKE A CARBON COPY OF THIS
AND GIVE IT TO YOUR HEDQUARTERS.
REVERSE OF DA FORM 2028-2
- - - - - - - - - - - - - - - - DEPARTMENT
FOLD BACK
- - - - - - - - - - - - - - - - - - - - - - - - - - - - - - - - - - - - - - - - - -
OF THE ARMY
T
M
0
POSTAGE AND FEES PAID
DEPARTMENT OF THE ARMY
DOD314
OFFICIAL BUSINESS
PENALTY FOR PRIVATE USE $300
Commander
U.S. Army Tank-automotive
and Armaments Command
ATTN: AMSTA-AC-NML
Rock Island, IL 61299-7630
-----------------------------------------------------------------------------------------------------------------------
PIN: 045817-000
This fine document...
Was brought to you by me:
Liberated Manuals -- free army and government manuals
Why do I do it? I am tired of sleazy CD-ROM sellers, who take publicly
available information, slap “watermarks” and other junk on it, and sell it.
Those masters of search engine manipulation make sure that their sites that
sell free information, come up first in search engines. They did not create it...
They did not even scan it... Why should they get your money? Why are not
letting you give those free manuals to your friends?
I am setting this document FREE. This document was made by the US
Government and is NOT protected by Copyright. Feel free to share,
republish, sell and so on.
I am not asking you for donations, fees or handouts. If you can, please
provide a link to liberatedmanuals.com, so that free manuals come up first in
search engines:
<A HREF=http://www.liberatedmanuals.com/>Free Military and Government Manuals</A>
– Sincerely
Igor Chudov
http://igor.chudov.com/