1
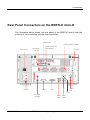
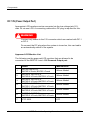
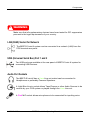
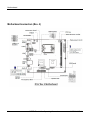
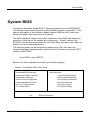
BEETLE /mini-K Operating Manual The reproduction, transmission or use of this document or its contents is not permitted without express authority. Offenders will be liable for damages. All rights, including rights created by patent grant or registration of a utility model or design, are reserved. Delivery subject to availability; technical modifications possible. Copyright© Wincor Nixdorf International GmbH, 2010 BEETLE /mini-K Operating Manual Edition Aug 2010 Contents Contents MANUFACTURERS CERTIFICATION AND NOTES ......................................1 TESTED SAFETY .............................................................................................. 1 BSMI (EMC FOR TAIWAN)...............................................................................1 IMPORTANT NOTES ..........................................................................................2 POWER CORD SELECTION ...............................................................................3 REPLACING THE LITHIUM BATTERY ...................................................................4 INTRODUCTION .............................................................................................. 6 ABOUT THIS MANUAL........................................................................................6 CARE OF THE BEETLE /MINI-K ........................................................................7 RECYCLING THE BEETLE /MINI-K ....................................................................7 WARRANTY .....................................................................................................8 DEVICE OVERVIEW ........................................................................................9 FRONT VIEW....................................................................................................9 BASIC OPERATION ...................................................................................... 10 BEFORE SWITCHING ON THE SYSTEM .............................................................. 10 Unpacking and checking the System ...................................................... 10 Setting up the device ............................................................................... 10 Cabling of the BEETLE /mini-K ............................................................... 11 Connecting to the Main Power Supply .................................................... 11 SWITCHING ON THE SYSTEM ...........................................................................11 BEETLE /MINI-K – THE COMPONENTS ...................................................... 12 FUNCTIONS & INDICATORS ON THE BEETLE /MINI-K .......................................12 – ON/OFF Button ............................................................................... 12 – POWER-ON Indicator (LED)........................................................... 12 – HARD-DISK DRIVE Indicator (LED) ............................................... 12 – USB Connector ............................................................................... 13 REAR PANEL CONNECTORS ON THE BEETLE /MINI-K......................................14 DC 12V (Power Output Port) ...................................................................15 Expansion Slots....................................................................................... 16 BEETLE /mini-K – Operating Manual 01750201097 A Contents Power Supply Unit ................................................................................... 16 VGA Connector for Monitor or LCD-Display ............................................17 Keyboard Connector (PS/2) ....................................................................17 Mouse Connector (PS/2) .........................................................................17 Parallel Interface LPT1 for Modular Printer ............................................. 17 Four COM ports for Standard PC Peripherals.........................................17 LAN (RJ45) Socket for Network .............................................................. 18 USB (Universal Serial Bus) Port 1 and 2 ................................................. 18 Audio Port Sockets .................................................................................. 18 HOW TO SLIDE OPEN THE TOP COVER OF THE CASE..........................................19 SYSTEM CONFIGURATION ............................................................................... 19 MOTHERBOARD CONNECTORS........................................................................20 Motherboard connectors (Rev. 3) ............................................................ 20 Motherboard connectors (Rev. 4) ............................................................ 21 Motherboard Details ................................................................................ 22 SYSTEM BIOS ............................................................................................... 24 SETUP ITEMS ................................................................................................ 25 APPENDIX .....................................................................................................27 TECHNICAL DATA FOR THE BEETLE /MINI-K ................................................... 27 01750201097 A BEETLE /mini-K – Operating Manual Manufacturers Certification and notes Manufacturers Certification and notes The device complies with the requirements of the EEC directive 2004/108/EC with regard to ‘Electromagnetic compatibility" and 2006/95/EC “Low Voltage Directive”. Therefore, you will find the CE mark on the device or packaging. Tested Safety In addition, the device has received the UL symbol and cUL symbol. BSMI (EMC for Taiwan) The device complies with the requirements of the BSMI (Bureau of Standards, Metrology and Inspection, Ministry of Economic Affairs) directive CNS14348 with regard to “Electromagnetic compatibility” with the limits for a Class B product. 1 BEETLE /mini-K – Operating Manual 01750201097 A Notes Important notes The BEETLE /mini-K conforms to the current safety standards for data processing equipment. 2 If this device is taken from a cold environment into the operating room, moisture condensation may form. The device must be absolutely dry before being put into service; an acclimatization period of at least two hours must therefore be observed. This device is equipped with a safety-tested power cable and may be connected only to a prescribed grounded-contact power socket. When setting up the device, ensure that the power socket on the device and the grounded-contact power socket are easily accessible. To disconnect the device from the supply voltage completely, switch off the device and disconnect the power plug. Ensure that no foreign objects (e.g. office clips) find their way into the device, as this may lead to electric shocks or short-circuits. Never plug in or unplug data communication lines during thunderstorms. Protect devices from vibrations, dust, moisture and heat. Always dispose of used parts, such as batteries, in an environmentally safe manner. The lithium battery must be disposed of in accordance with local regulations for special waste. In emergencies (e.g. damaged housing or damaged power cable, penetration by liquids or foreign bodies), the device must be switched off immediately, the power plug disconnected and the Customer Service of Wincor Nixdorf (WN) or your dealer must be notified. The device may only be repaired by authorized qualified personnel. Unauthorized opening of the device and inexpertly carried-out repairs may not only seriously jeopardize the safety of the user, but also cancel all warranty and liability agreements. BEETLE /mini-K – Operating Manual 01750201097 A Manufacturers Certification and notes Power Cord Selection If power cord is not provided with the display, user has to ensure that a certified power cord is used as required by the Safety Regulation of the country. Countries Safety Approvals USA UL Canada CSA Germany VDE Japan PSE Taiwan BSMI China CCC For other countries not mentioned in the above list, please check with the local authority. 3 BEETLE /mini-K – Operating Manual 01750201097 A Notes Replacing the Lithium Battery ! CAUTION Incorrect replacement of the Lithium Battery may lead to a risk of explosion The end user must replace the lithium battery only by identical batteries or types recommended by Wincor Nixdorf. Do not throw Lithium Batteries into the trash can. It must be disposed of in accordance with local regulations concerning special waste. ! WARNING Always make sure that the system is switched off before you replace the battery. 01750201097 A BEETLE /mini-K – Operating Manual 4 Manufacturers Certification and notes Push the spring latch and remove the Lithium Battery from its Socket Insert and press a new Lithium Battery of same type in the Socket. Make sure that you insert the Battery the right way round. 5 BEETLE /mini-K – Operating Manual 01750201097 A Introduction Introduction About this manual This manual describes the BEETLE /mini-K system. This documentation is intended to help you to work with the system and to serve as a reference work. The detailed table of contents helps you find the desired information quickly and easily. NOTE ! Notes call attention to important information. CAUTION Cautions are included to help you avoid damaging hardware or losing data. ! WARNING Warnings indicate conditions that, if not observed, can cause personal injury. The type and scope of application programs depend on the customer’s own selection; therefore, software will not be discussed further in this manual. Separate manuals are included in the scope of the connectable peripherals. For this reason, a more detailed description of these devices will not be provided here. For more information see the relevant manuals. 01750201097 A BEETLE /mini-K – Operating Manual 6 Introduction Care of the BEETLE /mini-K ! WARNING Clean your BEETLE /mini-K at regular intervals with a suitable plastic-surface cleaner. Make sure that the power plug is disconnected, connector cables are unplugged and that no liquid finds its way into the device. The glass surface of your Touch Screen should be cleaned with a mild, commercially available glass cleaning product. All pH neutral materials (pH 6 to 8) are to be used for cleaning purposes. Recycling the BEETLE /mini-K Environmental protection does not begin when time comes to dispose of the BEETLE /mini-K; it begins with the manufacturer. This product was designed according to our internal norm “Environmental conscious product design and development” The BEETLE /mini-K System is manufactured without the use of CFCs and CCHS and is produced mainly from reusable components and materials. The processed plastics can, for the most part, be recycled. Even the precious metals can be recovered, thus saving energy and costly raw materials. Please do not stick labels onto plastic case parts. This would help us to re-use components and material. You can protect our environment by switching on your equipment only when it is actually needed. If possible, even avoid the stand-by-mode as this wastes energy, too. Also switch your equipment off when you take a longer break or finish your work. There are still some parts that are not reusable. Wincor Nixdorf guarantees the environmentally safe disposal of these parts in a Recycling Center, which is certified pursuant to ISO 9001. 7 BEETLE /mini-K – Operating Manual 01750201097 A Introduction So don’t simply throw your BEETLE /mini-K system on the scrap heap when it has served its time, but take advantage of the environmentally smart, up-todate recycling methods! Please contact your competent branch office for information on how to return and re-use devices and disposable materials. Wincor Nixdorf is always ready to answer any questions you may have about our environmental protection policies. We look forward to your message. Warranty Wincor Nixdorf guarantees a limited warranty engagement for 12 months beginning with the date of delivery. This warranty engagement covers all those damages which occur despite a normal use of the product. Damages because of improper or insufficient maintenance, improper use of the product or unauthorized modifications of the product, inadequate location or surroundings will not be covered by the warranty. All parts of the product which are subject to wear and tear are not included in the warranty engagement. Please order spare parts at the Wincor Nixdorf customer service. 01750201097 A BEETLE /mini-K – Operating Manual 8 Device Overview Device Overview BEETLE /mini-K is a compact system that features the Open Architecture design concept with high level of retail peripheral integration. Front view 9 BEETLE /mini-K – Operating Manual 01750201097 A Basic Operation Basic Operation Before switching on the System Unpacking and checking the System Unpack the parts and check to see whether the delivery matches the information on the delivery note. If damage has occurred during shipping or if the package contents do not match the delivery note, promptly inform your Wincor Nixdorf sales outlet. NOTE Transport the device only in its original packaging (to protect it against impact and shock). Setting up the device Set up the BEETLE /mini-K system where it will not be exposed to extreme environ-mental conditions. Protect the device from vibrations, dust, moisture, heat and strong magnetic fields. ! CAUTION Make sure that the side ventilation slots on the BEETLE /mini-K system are not obstructed in order to ensure that the device has sufficient ventilation. 01750201097 A BEETLE /mini-K – Operating Manual 10 Basic Operation Cabling of the BEETLE /mini-K Follow the steps below in the order given when installing devices: The cable cover must be removed, if present. Plug one end of the power cable into the socket of the BEETLE /mini-K. Plug in and secure the data cable. Plug the other end of the power cable into the main power supply. ! WARNING Always make sure that the system is switched off when you do cabling works. Connecting to the Main Power Supply All devices belonging to the BEETLE /mini-K system that have a separate power cable must be connected to the same electric circuit. Make sure that all data cables on the system unit and peripherals are connected correctly. Plug the power cables belonging to the BEETLE /mini-K and the peripherals into the grounded-contact power sockets. Switching on the system To switch on the BEETLE /mini-K system, Push the ON button at the front of the box. 11 BEETLE /mini-K – Operating Manual 01750201097 A Components BEETLE /mini-K – The Components Functions & Indicators on the BEETLE /mini-K The illustration below shows the possible components of the BEETLE /mini-K system. – ON/OFF Button In an Micro ATX based system, the new soft touch power button replaces the main power switch that turns your system on and off. From an OFF state, you can switch the system ON by simply pressing the power button. From an ON state, pressing and holding the power button for four (4) seconds can turn OFF the system. The functions of the power button can also be altered in the Power Management section of the CMOS setup. – POWER-ON Indicator (LED) The indicator (LED) lights up Green when the system unit is switched on. – HARD-DISK DRIVE Indicator (LED) The indicator (LED) lights up Amber when the system unit is switched on. 01750201097 A BEETLE /mini-K – Operating Manual 12 Components – USB Connector The 2 contact points are meant for connection of Universal Serial Bus (USB) devices. Drives on the BEETLE /mini-K The BEETLE /mini-K is equipped with a 2 ½” Hard-Disk drive. The storage capacity is changed in line with market demand, but is currently at least 160 GB. There is no floppy-Disk drive or CD-ROM Drive in the system. 13 BEETLE /mini-K – Operating Manual 01750201097 A Components Rear Panel Connectors on the BEETLE /mini-K The illustration below shows the rear panel of the BEETLE /mini-K with the position of the connecting sockets and connectors. 2X Rear USB COM2*, COM3*, COM4* Main Switch DSUB openings (for future options) 12V Output DC Jack AC Inlet COM1 PCIe Slot Audio Port VGA LAN PS/2 MS PS/2 KB 01750201097 A USB1 USB2 BEETLE /mini-K – Operating Manual USB3 USB4 14 Components DC 12V (Power Output Port) Appropriate LCD monitors can be connected via the low voltage jack 12V, max. 3A via non-LPS. A connecting cable with a DC plug is required for this. ! WARNING Connect only cables to the 12V connector which are marked with DP-1 or DP-2. Do connect the DC plug when the system is turned on, this can lead to an automatically reboot of the system. Approved LCD Monitor List: The following are the approved LCD monitors that are allowed to be connected to the BEETLE /mini’s 12V Powered Output port: 15 Model Manufacturer 1 BA72R, BA72R /n, BA72R /cTouch, BA72R /rTouch Wincor Nixdorf 2 BA72R-2, BA72R-2 /n, BA72R-2 /cTouch, BA72R-2 /rTouch Wincor Nixdorf 3 BA72R-3, BA72R-3 /n, BA72R-3 /cTouch, BA72R-3 /rTouch Wincor Nixdorf 4 BA73R-1, BA73R-1 /n, BA73R-1 /cTouch, BA73R-1 /rTouch Wincor Nixdorf 5 BA73R-2, BA73R-2 /n, BA73R-2 /cTouch, BA73R-2 /rTouch Wincor Nixdorf 6 BA73R-3, BA73R-3 /n, BA73R-3 /cTouch, BA73R-3 /rTouch Wincor Nixdorf 7 KTC 5005 KTC BEETLE /mini-K – Operating Manual 01750201097 A Components Or alternately, the connecting LCD monitor includes its enclosure as fire hazard protection must be certified to relevant safety standards if it is not in the above approved list. ! WARNING Connecting LCD monitor that is not in the above approved list to the 12V Powered Output port may cause safety hazard and also endanger the user and nearby people. Please consult Wincor Nixdorf if in doubt. Expansion Slots There is one PCI Bus Master slot (rev. 2.2) on-board. Power Supply Unit The power supply unit automatically adjusts itself to the particular voltage. The power output of the power supply unit is maximum 220W. 01750201097 A BEETLE /mini-K – Operating Manual 16 Components VGA Connector for Monitor or LCD-Display You can connect a Monitor or LCD-Display to the BEETLE /MINI via the Blue 15-Pin D-Sub Jack on the VGA Connector. Keyboard Connector (PS/2) The BEETLE /mini-K has a Purple 6-pin Mini-DIN Jack for connecting a keyboard. NOTE Make sure that the connector is plugged firmly into the socket to prevent malfunctioning. Mouse Connector (PS/2) The BEETLE /mini-K has a Light-Green 6-pin Mini-DIN Jack for connecting a Standard Mouse using a PS/2 plug. Parallel Interface LPT1 for Modular Printer The BEETLE /mini-K standard Burgundy Parallel Interface LPT1 is intended for connecting a printer. Four COM ports for Standard PC Peripherals You can connect supplementary standard peripherals to the BEETLE /mini-K Via COM1 (Turquoise)/ COM2 (black)/ COM3 (black)/ COM4 (black). 17 BEETLE /mini-K – Operating Manual 01750201097 A Components ! WARNING Make sure that all supplementary devices have been tested for RFI suppression pursuant to the legal requirements of your country. LAN (RJ45) Socket for Network The BEETLE /mini-K system can be connected to a network (LAN) from the POS terminal rear panel. USB (Universal Serial Bus) Port 1 and 2 Two USB ports are available at the rear panel of BEETLE /mini-K system for connecting USB Devices. Audio Port Sockets The BEETLE /mini-K has a Lime Line-out socket can be connected to Headphones or preferably Powered Speakers. A Light-Blue Line-in socket allows Tape-Players or other Audio Sources to be records by your POS system or played through the Lime Line-out. A Pink MIC socket allows microphones to be connected for inputting voice. 01750201097 A BEETLE /mini-K – Operating Manual 18 Components How to slide open the top cover of the case Please see the picture as below: System configuration Please see the picture as below: 19 BEETLE /mini-K – Operating Manual 01750201097 A Motherboard Motherboard connectors Motherboard connectors (Rev. 3) 01750201097 A BEETLE /mini-K – Operating Manual 20 Motherboard Motherboard connectors (Rev. 4) 21 BEETLE /mini-K – Operating Manual 01750201097 A Motherboard Motherboard Details Processor Chipset System Memory Support Internal VGA Expansion Slots Onboard IDE Onboard LAN Onboard Audio Onboard I/O Connectors 01750201097 A Intel Desktop Processor, LGA775 E7400 Core2Duo 2.8GHz E5300 Pentium dual core 2.6GHz E1500 Celeron dual core 2.2GHz Intel G41, ICH7 800/1067/1333 MT/s (200/266/333 MHz) FSB Maximum 4GB on 1x DIMM socket DDR3 SDRAM, 1066/800MHz Support 1 GB / 2 GB / 4 GB RAM modules Support 1Gb, 512Mb DDR3 technologies for x8 and x16 devices. Single-channel Integrated Intel GMA950 graphics card. PCI Express 1.0a x4 PCIe Riser slot that carries 3 PCI Express root ports Support single-lane PCIe add-on card 2x SATA PCI Express Ethernet controller 10/100/1000 Mb ALC662 HD audio Codec 1x PCIe x4 slot (for 1-lane PCIe add-on card only) 2x SATA connector 2x USB header, 2 x 5 pin header, 2.54mm pitch (used for 2x Front USB & 2x Rear USB) 1x Wake-on-LAN 3x Fan connector supporting fan speed BEETLE /mini-K – Operating Manual 22 Motherboard System Monitoring & Management control thru PWM, 1 x 4 pins 1x Front Panel Interface (incl PC Speaker) 1x SMBUS 1x SDVO/DVI header 1x Parallel port header 3x COM port header (used for COM2,3,4) 1x Keyboard, PS/2 1x Mouse, PS/2 1x VGA 4x USB (on-board) 2x USB (via cable) 1x Ethernet (LAN) 1x Standard Serial, COM1 (on-board) 1x MIC/Line In, Line/Speaker Out 3x powered Serial, COM2,3,4 (via cables) Stand PC BIOS with extentions to support the defined hardware CPU temperature monitoring System voltage monitoring Dimension 6.69''x6.69'' Back Panel Connectors BIOS 23 BEETLE /mini-K – Operating Manual 01750201097 A System BIOS System BIOS This section describes Award BIOS™ Setup program built into the ROM BIOS. The Setup program allows users to modify the basic system configuration. This special information is then stored in battery-backed RAM so that it retains the Setup information when the power is turned off. The BIOS reads the system information contained in the CMOS and begins the process of checking out the system and configuring it. When it finishes, the BIOS will seek an operating system on one of the disks and then launch and turn control over to the operating system. The Setup program can be activated by pressing the <Del> key when the following message appears briefly at the bottom of the screen during the POST (Power On Self-Test). Press DEL to enter SETUP. Below is the menu displayed on entering the Setup program. Phoenix – AwardBIOS CMOS Setup Utility > Standard CMOS Features > Advanced BIOS Features > Advanced Chipset Features > Integrated Peripherals > Security Chip Configuration > Power Management Setup > PnP PCI Configurations > PC Health Status 01750201097 A > Frequency/Voltage Control DMI Information Load Fail-Safe Defaults Load Optimized Defaults Set Supervisor Password Set User Password Save & Exit Setup Exit Without Saving ↑ ↓ → ← : Select Line ESC : Quit F10 : Save & Exit Setup BEETLE /mini-K – Operating Manual 24 System BIOS Setup Items The main menu includes the following main setup categories. Standard CMOS Features Use this menu for basic system configuration. Advanced BIOS Features Use this menu to set the Advanced Features available on your system. Advanced Chipset Features Integrated Peripherals Use this menu to specify your settings for integrated peripherals. Power Management Setup Use this menu to specify your settings for power management. PnP / PCI Configurations This entry appears if your system supports PnP / PCI. PC Health Status Frequency/Voltage Control DMI Information Load Fail-Safe Defaults 25 Use this menu to change the values in the chipset registers and optimize your system’s performance. Use this menu to enter the hardware monitoring screen. Use this menu to specify your settings for frequency/voltage control. Use this menu to obtain information related to BIOS, system, base board. Use this menu to load the BIOS default values for the minimal/stable performance for your system to operate. BEETLE /mini-K – Operating Manual 01750201097 A System BIOS Load Optimized Defaults Use this menu to load the BIOS default values that are factory settings for optimal performance system operations. While Award has designed the custom BIOS to maximize performance, the factory has the right to change these defaults to meet their needs. Supervisor / User Password Use this menu to set User and Supervisor Passwords. Save & Exit Setup Save CMOS value changes to CMOS and exit setup. Exit Without Save Abandon all CMOS value changes and exit setup. 01750201097 A BEETLE /mini-K – Operating Manual 26 Appendix Appendix Technical Data for the BEETLE /mini-K Dimension (without cable cover) Width 254 mm Depth 216 mm Height 128 mm Weight approx. 3.7 kg Climatic category Operating Transport Storage IEC 721-3-3 IEC 721-3-2 IEC 721-3-1 Input voltage 100 - 120 VAC 200 - 240 VAC Max. power consumption 3A 1.5A Frequency of system voltage 60Hz 50 Hz 27 Class 3K3 Class 2K2 Class 1K2 BEETLE /mini-K – Operating Manual +5°C to +40°C -25°C to +60°C +5°C to +40°C 01750201097 A Published by Wincor Nixdorf Pte Ltd 2, Kallang Sector Singapore 349277 Part No.: 01750201097 A