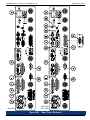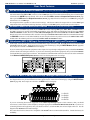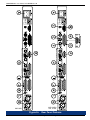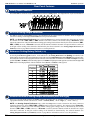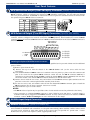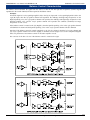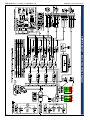
1
AMP-S8 Series+
(DA, SDA, HDA, and MDA Models)
Multi-Format Analog/Digital Audio Monitor
1U or 2U with HD-SDI, SD-SDI, AES, ANALOG Inputs,
HD-SDI, SD-SDI, AES, ANALOG Outputs, LCD Display,
Eight 53-Segment Level Meters, and Phase Indication
Document P/N 821640 Rev-B
User Manual
CONTENTS
Title and Contents .............................................................. 1
Important Safety Instructions and Introduction ................................... 2
Section 1: General Features and Specs .................... 3
Quick Start Guide ............................................................................. 3
Description and Features ................................................................... 4
Applications and Specifications .......................................................... 5
Installation ......................................................................................... 6
Section 2: Operation ........................................................... 7
Front Panel Features ......................................................................... 8
Rear Panel Features .......................................................................... 10
Introduction to the User Interface ...................................................... 16
User Interface Features ..................................................................... 18
Presets Definitions ............................................................................. 22
User Interface Function Guide ........................................................... 23
DM1, DM2, and DM3 Downmix Block Diagrams ............................. 33
Section 3: Technical Information ................................ 37
General Technical information ............................................................ 38
..
Balance Control Characteristics ......................................................... 39
AMP-S8 Series+ Interconnect Block Diagram .................................. 40
© 2006 Wohler Technologies Inc. ALL rights reserved
1
AMP-S8 Series+ User Manual P/N 821640 Rev-B
Important Safety Instructions
1)
Read these instructions.
2)
Keep these instructions.
3)
Heed all warnings.
4)
Follow all instructions.
5)
Do not use this apparatus near water.
6)
Clean only with dry cloth.
7)
Do not block any ventilation openings. Install in accordance with the manufacturer's instructions.
8)
Do not install near any heat source such as radiators, heat registers, stoves, or other apparatus (including
amplifiers) that produce heat.
9)
Do not defeat the safety purpose of the polarized or grounding-type plug. A polarized plug has two blades
with one wider than the other. A grounding type plug has two blades and a third grounding prong. The
wide blade or the third prong are provided for your safety. If the provided plug does not fit into your outlet,
consult an electrician for replacement of the obsolete outlet.
10) Protect the power cord from being walked on or pinched, particularly at plugs convenience receptacles
and the point where they exit from the apparatus.
11) Only use attachments/accessories specified by the manufacturer.
12) Use only with the cart stand, tripod, bracket, or table specified by the manufacturer, or sold with the
apparatus. When a cart is used, use caution when moving the cart/apparatus combination to avoid injury
from tip-over.
13) Unplug this apparatus during lightning storms or when unused for long periods of time.
14) Refer all servicing to qualified service personnel. Servicing is required when the apparatus has been
damaged in any way, such as when power-supply cord or plug is damaged, liquid has been spilled or
objects have fallen into the apparatus, the apparatus has been exposed to rain or moisture, does not
operate normally, or has been dropped.
15) Do not expose this apparatus to rain or moisture.
16) The apparatus shall be connected to a mains socket outlet with a protective earthing connection.
CAUTION!
In products featuring an audio amplifier and speakers, the surface at the side of the
unit, where the audio amplifier heat sink is internally attached, may get very hot after
extended operation. When operating the unit excercise caution when touching this
surface and ensure that external materials which may be adversely affected by heat
are not in contact with it. There is a Hot Surface label (see diagram) attached to the
aforementioned surface of the product.
Introduction
Congratulations on your selection of a Wohler Technologies AMP-S8 Series+ audio monitor unit. We are confident it represents the
best performance and value available, and we guarantee your satisfaction with it.
If you have questions or comments you may contact us at:
Wohler Technologies, Inc.
31055 Huntwood Avenue
Hayward, CA 94544
Phone: (510) 870-0810 Fax: (510) 870-0811
web: www.wohler.com
US Toll-Free: 1-888-596-4537
e-mail: [email protected]
The Tascam trademark is owned by Teac Inc.
2
© 2006 Wohler Technologies Inc. ALL rights reserved
AMP-S8 Series+ User Manual P/N 821640 Rev-B
Sect. 1: General Features and Specifications
Section 1
General Features
and Specifications
Quick Start Guide
Description
Features
Applications
Specifications
Installation
Wohler AMP-S8 Series+
Quick Start Guide
Use the information below to quickly set up your Wohler AMP-S8 Series+ product for immediate use. The illustration
below is provided to help you locate and identify the programming buttons described in this quick start guide. See page
25 for more information about selecting channels and downmixes for monitoring.
SINGLE
Button
L UP and
L DOWN
Buttons
AMP1-S8 (1U)
AMP2-S8 (2U)
UP
UP
SINGLE
ESC
L
DOWN
PAIRS
Button
L UP and
L DOWN
Buttons
UP
DOWN
INPUT
MUTE
GROUP
UP
DOWN
LEFT
RIGHT
SINGLE
PAIRS
DWNMX
SETUP
ESC
FN
ENTER
R UP and
R DOWN
Buttons
DOWNMIX
Button
R UP and
R DOWN
Buttons
PAIRS
R
DOWN
ENTER
INPUT
O
DOWNMIX
FN
GROUP
MUTE
FN
Button
SETUP
DOWNMIX
SINGLE
Button PAIRS Button
Button
FN
Button
When in Normal Operational Mode, the software for this family of products allows three fast channel selection modes;
Single, Pair, and Downmix. See above images for button locations. Select channels as follows:
Single Channel Select: Channel selection for the left and right speakers are controlled independently.
Hold down the FN Button, press and release the SINGLE Button. Use the L-UP and L-DOWN Buttons to cycle up
or down through the channels to be assigned to the left speaker channel. Use the R-UP and R-DOWN Buttons to
cycle up or down through the channels to be assigned to the right speaker channel. Channels are selected for
monitoring as they are displayed in the LCD.
Pair Channel Select: Channels are selected in pairs (1/2, 3/4, 5/6, or 7/8) with the first channel in the pair
routed to the left speaker and the second routed to the right speaker.
Hold down the FN Button, press and release the PAIRS Button. Use the R-UP and R-DOWN Buttons or L-UP
and L-DOWN Buttons to cycle up or down through the channel pairs assignable to the left/right speaker
channels. Channels are selected for monitoring as they are displayed in the LCD.
Downmix Select: Pre-configured downmixes of multi-channel selections may be selected.
Hold down the FN Button, press and release the DOWNMIX Button. Use the R-UP and R-DOWN Buttons or
L-UP and R-UP Buttons to cycle up or down through the downmix selections. Downmixes are selected for
monitoring as they are displayed in the LCD.
© 2006 Wohler Technologies Inc. ALL rights reserved
3
AMP-S8 Series+ User Manual P/N 821640 Rev-B
Section 1: General Features and Specifications
AMP-S8 Series+
Powered Analog/Digital Audio Monitor
Description
The AMP-S8 Series+ audio monitoring products are a complete, exceptionally high quality SD-SDI/HD-SDI, AES/EBU and
Analog stereo audio monitoring solution. The AMP-S8 Series+ comprehensive monitoring features are available in either a
compact one (1U AMP1) or two (2U AMP2) rackspace cabinet. A significant feature is the ability to process and monitor up to
eight channels from an HD-SDI and/or SD-SDI bitstream, two sets of four AES/EBU signal pairs (balanced and unbalanced), or
eight Analog channels. Eight high-resolution 53-segment tri-color LED bargraph audio level meters provide accurate and instantaneous visual level monitoring at a glance. A convenient high-contrast LCD display on the front panel shows the user settings and
status (as currently selected), type of signal, channel selection, mute status, and alternately, phase/correlation. Input presets may be
configured and easily recalled by the user.
Additionally, the unique design of the AMP-S8 Series+ provides optimally focused sound in an Ultra Near Field tm (1 to 3 feet)
environment, which allows higher SPL for the operator while reducing overall ambient sound and adjacent bay crosstalk.
There are four different configurations which vary according to SDI input type and configuration; the AMP-S8DA (no SDI), the
AMP-S8SDA (270 Mbps SDI), the AMP-S8HDA (1.5 Gbps HD-SDI), and the AMP-S8MDA (270 Mbps and 1.5 Gbps HDSDI).
Features
General AMP-S8 Series+ Features
• 1U or 2U Rack Spaces: highest fidelity in minimum size
AMP-S8HDA Features
• Two HD-SDI inputs with reclocked output of selected input
• Single HD-SDI input option available for cost savings
• AES/EBU, and Analog signal monitoring
• Demuxes any two HD-SDI groups to AES/EBU and Analog
• Four de-embedded AES balanced or unbalanced outputs
(8 channels) from two selected SDI Groups
• Select sources from HD-SDI, AES/EBU, or Analog for
metering/monitoring
• Four AES/EBU balanced inputs and loop-throughs on a DB25 connector
• AES output from HD-SDI input
• Eight Analog inputs on a balanced DB-25 connector
• Eight Analog outputs on a balanced DB-25 connector
• Comprehensive multi-channel to stereo downmix capability
• Unit configuration stored while unit is switched off
• Storage for ten preset monitoring settings for easy recall
• NTSC/PAL video encoder option available
AMP-S8SDA Features
• Two SDI inputs with reclocked output of selected input
• Single SDI input option available for cost savings
• Demuxes any two SDI groups to AES/EBU and Analog
• Select sources from SD-SDI, AES/EBU, or Analog for
metering/monitoring
• AES output from SD-SDI input
• Phase (polarity) correlation display of selected channels
• NTSC/PAL video encoder option available
• LCD status display on front panel
AMP-S8MDA Features
• Volume and balance controls
• Eight high-resolution 53-segment tri-color LED bargraph
level meters with simultaneous PPM dot over VU bar
• Two SDI inputs (either SD-SDI or HD-SDI) with reclocked
output of selected input
• Single SDI input option available for cost savings
• Demuxes any two SD-SDI or HD-SDI groups to AES/EBU
• Headphone output
• Composite NTSC or PAL outputs from SDI input option (for
SDI or HD-SDI models)
• Software is field upgradable
• Select sources from AC-3 carried on SD-SDI , HD-SDI, or
AES/EBU for metering/monitoring
• AES output from HD/SD-SDI input
• NTSC/PAL video encoder option available
AMP-S8DA Features
• Same as other models except no SDI input option
4
© 2006 Wohler Technologies Inc. ALL rights reserved
AMP-S8 Series+ User Manual P/N 821640 Rev-B
Section 1: General Features and Specifications
Applications
The AMP-S8 Series+ is ideally suited to provide high quality multi-channel digital and analog audio monitoring in a very compact
form. Ideal for use in VTR bays, mobile production vehicles, teleconferencing installations, multimedia systems, satellite links,
cable TV facilities, and on-air radio studios. Designed and manufactured in the U.S.A., the AMP-S8 Series+ is backed by a strong
warranty and a satisfaction guaranteed return policy.
Specifications
Analog Input Impedance:
27K Ω balanced, minimum
AES Input Configuration:
110 Ω balanced, 75 Ω unbalanced
AES Termination:
DIP switch selectable on rear panel
Analog Input Overload:
+24 dBu balanced
Analog Reference:
+8, +6, +4, or 0 dBu
Digital Reference:
-20, -18, or -9 dBFS
Meter Dynamics (AES Scale):
VU and PPM
Converted Analog
Out THD:
< 0.008%
Magnetic Shielding:
Less than 1 Gauss any adjacent
surface
Input Connectors:
AES:
D-SUB 25, BNC x4
SD-SDI, HD-SDI: BNC x2
Analog: D-SUB 25 ("Tascam"
pin-out on all D-sub connectors)
Power Consumption
(less than):
72 W
Level Meter Scale (standard): AES*
AC Mains Input:
100-240 VAC, 50-60 Hz
AES Input Sampling Rate:
32-48 KHz, auto-select
Chassis Dimensions
(H x W x D):
3.5 x 19 x 12.5 inches
89 x 483 x 317.5 mm
D to A Converter:
24-bit low jitter
Peak Acoustic Output:
(@ 2 ft.)
Depth is 14 inches (355.6 mm)
including controls/knobs
104 dB SPL
Weight:
Acoustic Distortion:
6% or less at worst case frequencies
above 140 Hz including cabinet resonance; typically less than 1.5%
Response, Sixth Octave:
80Hz – 18 KHz +/- 5 dB
(-10 dB @ 55 Hz, 21 kHZ)
Distortion, Electrical:
< 0.15% at any level below limit threshold
Hum and Noise, Analog:
Better than 68 dB below full output
Power Output,
High Frequency:
Low Frequency:
6 W RMS (each channel)
14 W RMS
18 lbs. (8.2 kg)
* Other level meter scales are available for specification at time of
manufacture including BBC, DIN, etc. Contact Wohler for more
information concerning alternate scales.
Units are certified to meet, at time of manufacture, all currently applicable product safety and EMC requirements, such as those of CE.
0 dbu ref. 0.775V RMS. Features and specifications subject to improvement without notice.
© 2006 Wohler Technologies Inc. ALL rights reserved
5
AMP-S8 Series+ User Manual P/N 821640 Rev-B
Section 1: General Features and Specifications
Installation
Mounting
The unit should be mounted where convenient for operating persons, ideally at approximately ear level for best high frequency
response. Its superior magnetic shielding eliminates concerns about locating it adjacent to most types of CRT monitors,
including even high-resolution color monitors.
Heat Dissipation
Heat dissipated by the speaker amps is conducted directly to the left side of the chassis; no special considerations for cooling are
necessary as long as the ambient temperature inside the rack area does not exceed approximately 40°C (104°F).
Sympathetic Vibration
Sympathetic vibration from other equipment (cables, etc.,) in the rack may be serious enough to interfere with the unit’s sound
quality out in the listening area. The use of thin card stock and/or felt or foam weather-stripping type materials between adjacent
vibrating surfaces, or tying up loose cables, etc., may be required to stop vibrations external to the unit.
Mechanical Bracing
Even though the 2U models are fairly heavy, the chassis is securely attached to the front panel at eight points along its surface, not
just at the four corners of the chassis ears. This feature will reduce or eliminate rear bracing requirements in many mobile/portable
applications. The weight of internal components is distributed fairly evenly around the unit.
Audio Connections and Cable Recommendations
Connection of the audio feeds is straightforward. Please refer to the system interconnect block diagram on page 40 for
clarification of the general signal paths into and out of the AMP-S8 Series+ units.
There are recommended limits to the length of cable that should be used for feeding HD-SDI signals sources to the HD-SDI inputs
of the AMP-S8HDA and AMP-S8MDA units. Recommendations are as follows:
Using Belden 1694A cable (or equivalent),
HD-SDI input2 (IN 1 and IN 2) = Up To 150 Meters (492 feet)
Note: The connections of all DB-25 connectors are compatible with Tascam* DB-25 to XLR cable assemblies. Consult the
factory for availability. All rear panel connectors are female except for the XLR connectors. *The Tascam trademark is owned
by Teac Inc.
Electrical Interference
Care should be exercised to apply proper input termination settings and avoid mismatched cable types and other similar causes of
undesired reflections in digital signal systems. If severe enough, such reflections can result in corruption of the digital datastream.
As with any audio equipment, maximum immunity from electrical interference requires the use of shielded cable; however,
satisfactory results can sometimes be obtained without it. The internal circuitry common is connected to the chassis.
AC Power
The unit's AC mains connection is via a standard IEC inlet, with safety ground connected directly to the unit's chassis. The
universal AC input (100-240VAC, 50/60Hz) switching power supply is a self-resetting sealed type, with automatic over-voltage
and over-current shutdown. There is no user-replaceable fuse in either the primary or secondary circuit.
6
© 2006 Wohler Technologies Inc. ALL rights reserved
AMP-S8 Series+ User Manual P/N 821640 Rev-B
Section 2
Operation
Front Panel Features
Rear Panel Features
Introduction to the User Interface
User Interface Features
User Interface Function Guide
NOTE: Throughout the manual, the following terms are used to refer to Serial Digital (SDI) signals:
• SD-SDI = refers only to standard SDI (270 Mbps).
• HD-SDI = refers only to high-definition SDI (1.5 Gbps).
• SDI = refers to either standard SDI (SD-SDI, 270 Mbps) or high defintion SDI (HD-SDI, 1.5 Gbps).
© 2006 Wohler Technologies Inc. ALL rights reserved
7
AMP-S8 Series+ User Manual P/N 821640 Rev-B
Section 2: Operation
Front Panel Features
Please refer to Figure-2a on the facing page to familiarize yourself with the front panel controls and indicators of the AMP-S8
Series+ units. The following sections describe the functions of each of the various controls and indicators found on the front panel
and are referenced, by number, to Figure-2a.
1
Speakers
The AMP2-S8 (2U) models feature two mid-range speakers (left and right) and one woofer speaker, while the AMP1-S8
(1U) models feature two mid-range speakers (left and right) and two woofer speakers.
All models of the AMP-S8 Series+ contain high performance transducers driven by three power amplifiers; two amplifier/
driver combinations handle midrange and high frequency information in the left and right (stereo) speaker channels, while the
third channel reproduces and sums the left and right channel information below the 500 Hz crossover point in the single
woofer (bass) speaker channel. Note that the woofer channel is NOT a dedicated LFE (subwoofer) or Center channel.
2
Headphone Jack
This jack accepts a standard 1/4” phone type stereo plug. Select the headphone audio sources as you would for the internal
speakers. When you plug in headphones the speakers will mute.
3
CHANNEL MIX (1-8) or Preset Select Buttons (1-4)
These buttons are used to select the channels to be summed into either or both speaker channels or to create and recall
presets when used in conjunction with the FN Button. See Item 7a on page 18 for a full description of the function of the
CHANNEL MIX Buttons.
4
Bargraph Meter Brightness Controls (Left and Right)
The brightness of the bargraph meters is adjusted using these two recessed trimpot controls. The left control adjusts the
brightness of the left four LED bargraphs and the right control adjusts the brightness of the right four bargraphs. Use a small
flat blade screwdriver or similar tool to adjust these controls. Clock-wise rotation increases the brightness.
5
Volume Control
This controls the loudness of the audio reproduced by the internal speaker channels or connected headphone.
6
CHANNEL MIX LEDs (1-8)
The AMP2-S8 (2U) model features dedicated LEDs above each bargraph, while the AMP1-S8 (1U) model uses the top
LED segment of each bargraph to indicate the channel mix selections. These LEDs are used to indicate the speaker mix of
selected channels. See Item 3 for channel mix information. See Item 7b on page 18 for a description of the function of the
CHANNEL MIX LEDs.
7
User Interface Controls and LCD Display
See the User Interface Features section starting on page 18 and the User Interface Function Guide starting on page 23
for instructions on the use of the User Interface Buttons and the LCD Display.
8
Audio Level Meters (1-8)
Source channels 1-8 are displayed via eight audio level meters (four on the left side of the front panel; four on the right side).
Meters are high-resolution LED bargraph displays with PPM dot over VU bar ballistic characteristics. In the AMP2 model these
level meters are 53-segment bargraphs with a dynamic range of -66 dB. In the AMP1 models these level meters are 26-segment
bargraphs with a dynamic range of 60 dB.
9
Balance Control
This control changes the volume balance between the left and right speaker channels. Please note that this control attenuates
the signal from the source, so that the left and right bass frequencies (summed together and reproduced in the woofer
channel) will respond to balance adjustments in tandem with the left and right speaker channels. See page 39 for more
information concerning the AMP-S8 Series+ balance control characteristics.
8
© 2006 Wohler Technologies Inc. ALL rights reserved
AMP-S8 Series+ User Manual P/N 821640 Rev-B
Section 2: Operation
AMP2-S8
AMP1-S8
Figure-2a:
Front Panel Features
© 2006 Wohler Technologies Inc. ALL rights reserved
9
AMP-S8 Series+ User Manual P/N 821640 Rev-B
Section 2: Operation
Rear Panel Features
Please refer to Figure-2b and Figure-2c on the following pages to familiarize yourself with the rear panel features of the AMP-S8 Series+
units. The following sections describe the functions of each of the various features found on the rear panels and are referenced, by letter, to
Figure-2b and Figure-2c.
NOTE: Throughout the manual, the following terms are used to refer to Serial Digital (SDI) signals:
• SD-SDI = refers only to standard SDI (270 Mbps).
• HD-SDI = refers only to high-definition SDI (1.5 Gbps).
• SDI = refers to either standard SDI (SD-SDI, 270 Mbps) or high defintion SDI (HD-SDI, 1.5 Gbps).
A
Power Connector
Attach a standard IEC-320 power cord between this connector and mains power.
B
OPT A - Rotary Switch (2U MDA Model only) or Reset Button (2U SDA Model only)
In the 2U SDA model, this opening features a recessed push-button with a momentary reset function for the SD-SDI input
module. Pressing the button with a small screwdriver or other tool will reset the SD-SDI input functions of the SDA unit.
In the 2U MDA model (but not HDA model) with the CVBS Video Output option installed (Item D), this opening features
a 10-position rotary switch for selecting related functions as shown in the following table:
When set to positions 1, 2, 3, or 4, the signals from the CVBS Video Output option (Item D) and the video supplied to
the internal LCD will be the format described for each position in the table (NTSC or PAL) regardless of the input format.
When set to positions 3 or 4, HD-SDI input signals are letterboxed, but SD-SDI input signals are not. Setting the switch to
positions 8 or 9, will force a hardware reset on the video scalar (919213) and audio de-embedder (919212) modules.
C
OPT B (2U) or OPT (1U) Rotary Switch
The OPT B (2U models) or OPT (1U models) opening features a 10-position rotary switch, which is reserved for future
options and should be left at the factory position 1.
D
CVBS Video Output (From SDI) Connector (Option for 2U SDA and MDA Models only)
This option is available only on the 2U rack SDA and MDA models.When the CVBS Video Out option is specified, a
female BNC connector installed here outputs CVBS (composite) video encoded from the selected SDI input (Item
E). HD-SDI signals are scaled for proper representation in composite video format. See Item B for how to select the type
of CVBS video output for the MDA model. When this option is installed, a select switch is also installed to allow selection
of the 910213 video scaler module for communication through the RS232 #2 connector (Item G).
This output functions regardless of other selection settings. This feature enables encoding of the SDI signal to CVBS
independent of other monitoring functions (as long as a valid SDI signal is present at the associated input).
E
SDI Input Connectors - IN1 and IN2 (SDA, HDA, and MDA Models only)
These BNC inputs accept SDI digital audio signals as follows (the DA model does not feature SDI capability):
• AMP-S8SDA = SD-SDI only (Standard, 270 Mbps)
• AMP-S8HDA = HD-SDI only (High-Definition, 1.5 Gbps)
• AMP-S8MDA = HD-SDI or SD-SDI (High-Definition, 1.5 Gbps or Standard, 270 Mbps)
Note that PCM signals embedded within an SDI bitstream are automatically de-embedded for montoring through the unit.
10
© 2006 Wohler Technologies Inc. ALL rights reserved
AMP-S8 Series+ User Manual P/N 821640 Rev-B
Section 2: Operation
AMP2-S8SDA,
HDA, or MDA
AMP2-S8DA
Figure-2b:
Rear Panel Features
© 2006 Wohler Technologies Inc. ALL rights reserved
11
AMP-S8 Series+ User Manual P/N 821640 Rev-B
Section 2: Operation
Rear Panel Features
F
SDI Re-Clocked Output Connector (SDA, HDA, and MDA Models only)
This connector outputs a re-clocked copy of the SD-SDI or HD-SDI signal fed to the SDI Input Connector (Item E)
selected for monitoring (IN 1 or IN 2). However, when an SDI input source is not selected for monitoring, the re-clocked output
will monitor the SDI IN 2 input by default. Also, the de-embedded AES Unbalanced Output Connector (Item M, page
14) or optional AES Balanced Output Connector (Item N, page 15) will monitor the last selected SDI audio group pair
from the last selected SDI input.
This output functions regardless of other selection settings. This feature enables the output of the re-clocked SDI signal
independent of the units other monitoring functions (as long as a valid SDI signal is present at the associated input).
G
RS232B Connector and Select Switch (2U SDA, HDA, and MDA Models only)
This connector is available only on the 2U rack AMP2-S8 models featuring SDI inputs (SDA, HDA, and MDA models).
This DB-9 connector is used for downloading programming, setup, and diagnostic information into and out of the 919212
audio de-embedder module. However, if the CVBS Video Output option is installed (Item D) in an SDA or MDA model,
then the select switch is installed to allow selection of the optional 910213 video scaler module for communication through
the RS232B connector as well. When installed, the switch is placed in the UP position to access the 910213 video scaler
module and in the DOWN position to access the 919212 audio de-embedder module.
H
Unbalanced AES / PCM Input Connectors (1-4) (AES1) and Termination
In this input section, there are four unbalanced female BNC input connectors (1, 2, 3, and 4) which accept standard AES
and PCM formatted signals. These inputs may be selected for monitoring by using the INPUT Button (Item 7i, page 21).
These inputs are referred to as AES1 in the LCD display.
If you are connecting downstream equipment to these inputs in a loop-through configuration, then you should Unterminate
(switch UP) the selected input connector. If you are not connecting downstream equipment, then you should Terminate
(switch DOWN) the selected input connector. Note that these termination DIP switches are also used to set the termination
of the Balanced AES/PCM Inputs (Item I) as well. See the diagram below for settings.
I
Balanced AES / PCM Input and Loop-Through Connector (AES2)
This female DB-25 connector accepts balanced AES signals. Inputs are internally connected to the loop-through outputs.
See diagram below for pin-out information. These inputs may be selected for monitoring by using the INPUT Button
(Item 7i, page 21). These inputs are referred to as AES2 in the LCD display.
1 = CH-1/2
2 = CH-3/4
3 = CH-5/6
4 = CH-7/8
If you are connecting downstream equipment to the AES Loop-Through outputs of this connector, then you should
unterminate (switch UP) the selected input by setting the appropriate Termination DIP Switch (Item H). If you are not
connecting downstream equipment, then you should terminate (switch DOWN) the selected input connector. See the
diagram under Item H for termination settings.
The connections for this connector are compatible with Tascam* DB-25 to XLR cable assemblies. Consult the factory for
availability.
12
© 2006 Wohler Technologies Inc. ALL rights reserved
AMP-S8 Series+ User Manual P/N 821640 Rev-B
AMP1-S8SDA,
HDA, or MDA
AMP1-S8DA
Figure-2c:
Rear Panel Features
© 2006 Wohler Technologies Inc. ALL rights reserved
13
AMP-S8 Series+ User Manual P/N 821640 Rev-B
Section 2: Operation
Rear Panel Features
J
Analog Input Connector
This female DB-25 connector accepts standard balanced, line level analog signals. See diagram below for pin-out information.
K
Metered Analog Output Connector
This DB-25 connector outputs analog signals as de-embedded from the selected sources or downmix, which are eligible for
conversion to analog. See the diagram under Item J above for pin-out information.
NOTE: The Analog Output Preference entry within the Setup menu is used to determine how this connector outputs
the channel mix when a DM1, DM2, or DM3 downmix selection is enabled. The default setting is Downmix, which
outputs the channel mix with individual channel scaling (gain settings) intact as determined by the selected downmix (DM1,
DM2, or DM3). However, if Discrete is selected, then all channels within the downmix are output from these connectors
at full gain without scaling of the channels as determined by the selected downmix. See Analog Output Preference (AOutPref) section on page 30 for information on how to set this parameter.
L
Reference Setting Rotary Switch (1-10)
This recessed 10-position rotary switch is used to set the Analog and Digital Reference Levels for the units level meters, as well
as selecting the Software Upgrade function. In the table shown, the Analog Reference Level (Analog, left column) is the
analog input level needed to turn on the bargraph segment at the associated Digital Reference Level (Digital, right column) value.
This is also the location on the bargraph level meter where the color transitions from GREEN to AMBER. Example: Choosing
position 2 (0 dBu = -20 dBFS) means an analog input level of 0 dBu will light up the LED segment associated with the digital -20
dBFS value on the bargraph meter and also transition from GREEN to AMBER at that segment.
M
Selected/Downmix Analog Output Connectors (Left and Right)
These two 3-pin male XLR connectors are analog outputs of the channel mix (or downmix) source as selected for the left and
right speaker channels. Pinout conections are: Pin-1 = Ground (shield), Pin-2 = High (+), Pin-3 = Low (-).
NOTE: The Analog Output Preference entry within the Setup menu is used to determine how these connectors
output the channel mix when a DM1, DM2, or DM3 downmix selection is enabled. The default setting is Downmix,
which outputs the channel mix with individual channel scaling (gain settings) intact as determined by the selected
downmix (DM1, DM2, or DM3). However, if Discrete is selected, then all channels within the downmix are output
from these connectors at full gain without scaling of the channels as determined by the selected downmix. See
Analog Output Preference (A-OutPref) section on page 30 for information on how to set this parameter.
14
© 2006 Wohler Technologies Inc. ALL rights reserved
AMP-S8 Series+ User Manual P/N 821640 Rev-B
Section 2: Operation
Rear Panel Features
N
O
AES Unbalanced Output (From SDI Input) Connector (Standard SDA, HDA, and MDA)
AES signals de-embedded from the selected SDI Input, IN1 or IN2 (Item E, page 10) are output from this female
Ω impedance connections. See the table and diagram
HD-15 connector, which is configured for unbalanced 75Ω
below for pinout information. See Item O for instructions on how to replace this standard unbalanced connector with
the optional integrated DB-25 balanced connector.
AES Balanced Output (From SDI Input) Connector (Option SDA, HDA, and MDA)
AES signals de-embedded from the selected SDI Input, IN1 or IN2 (Item E, page 10) can be output from this DB-25
connector, which is configured for balanced connections (110 Ω impedance). When installed, this balanced DB-25
connector replaces the unbalanced HD-15 connector in Item N. Pinout information for the balanced DB-25 connector is
shown below.
AES Output of
SDI Channels
1
N/C N/C N/C N/C
G
G = Ground
- = Cold
+ = Hot
2
3
4
-+ -+ -+ -+
G
G
G
N/C
13 12 11 10
9
8
7
6
5
4
3
2
25 24 23 22 21 20 19 18 17 16 15 14
1
1 = CH-1/2
2 = CH-3/4
3 = CH-5/6
4 = CH-7/8
Installing the Optional DB-25 Balanced Connector:
The female DB-25 balanced output option may be installed by qualified service personel without need for additional
parts as follows:
1) Remove power from the unit.
2) Remove the top cover from the chassis of the AMP-S8 Series+ unit (set the screws aside for later
reassembly).
3) The standard unbalanced HD-15 connector is attached to the rear panel by a plate. Under this connector and
plate is the cutout for the optional DB-25 connector. Inside the unit, the HD-15 connector (Item N) is
connected to an output PCB module (919224). Unplug the female DB-25 connector (Item O) from the other
end of this module. Note that the DB-25 connector terminates an internal ribbon cable.
4) Remove and set aside the two screws, nuts, and washers from the HD-15 connector plate attached to the rear
panel and remove the connector/plate/module assembly from the unit.
5) Use the two screws, nuts, and washers removed from the disassembled HD-15 connector plate to install the
DB-25 connector into the larger connector cutout now revealed.
6) Reassemble the top cover to the chassis.
NOTES:
• The DB-25 balanced option may be specified at time of order and the conversion performed at the factory.
• Once conversion to a balanced DB-25 connector is done (following steps 1-6 above), a special dongle is
available which may be plugged into the DB-25 connector to easily convert it (back) to an unbalanced HD-15
connector. Contact Wohler Technologies for more information on this dongle.
P
RS232A Input/Output Connector
This DB-9 connector is used for downloading programming, setup, and diagnostic information into and out of the unit.
Q
Remote Connector (Option for 2U Models only)
This option is available only on the 2U rack AMP2-S8 models. This connector is not installed in standard 2U models
and is available for installation with a retrofit kit, or as an option when ordering. When installed, it allows remote control
over input source selection or other other aspects of the system as may be specified in a special order. Contact
Wohler sales for special order inquiries (email: [email protected]).
© 2006 Wohler Technologies Inc. ALL rights reserved
15
AMP-S8 Series+ User Manual P/N 821640 Rev-B
Section 2: Operation
Introduction to the User Interface
There are two sections that may be referred to when learning how to operate the AMP-S8 Series+ user interface controls; the
User Interface Features section starting on page 18, which describes the units functions by feature and the User interface
Function Guide section starting on page 23, which describes the operation of the unit by function and also describes operation
in greater detail. Navigation, selection, and adjustment are performed by pressing the user interface buttons on the front panel
of the unit (see Figure-2d, page 17). The LCD Display provides the visual feedback and status indication for these operations.
Multi-Mode Color Codes
A mode, within the context of this manual, is understood to mean a state in which the monitor behaves a certain way. For
instance, in Setup Mode the AMP-S8 Series+ monitor allows a number of "setup" parameters to be accessed and adjusted.
Most of the User Interface control buttons are multi-functional; when pressed while the unit is in one mode they cause a
certain effect, but when pressed while the unit is in a different mode they cause a different effect. On the AMP-S8 Series+
front panel itself, color-coding is used to help identify the different functions of each button when used in different modes;
WHITE for Normal Operational Mode, BLUE for buttons used in conjunction with the FN Button, and YELLOW for
button functions when in SETUP Mode.
Within this manual, the printed names of controls are color-coded according to function. For instance, Item 7c (page 18) can
alternately be referred to as the L UP Button, SINGLE Button, or Button , depending on which mode the unit is in when
it is pressed.
All function descriptions in the User Interface Features section have color-coded dots next to them which indicate which
mode the function operates in. These dots are color coded as follows:
(WHITE) = button function when in Normal Operational Mode.
(BLUE)
= button function when used in conjunction with the FN Button.
(YELLOW) = button function when used for Setup Mode navigation and selection.
Default Operational Modes
The basic default operational state of the AMP-S8 monitor is referred to as the Normal Operational Mode. From this mode,
sub-modes are accessed. It is also in this mode that current operational status is displayed in the LCD display. The diagram
on page 17 (Figure-2c) shows an overview of the major operational modes that are available.
Using Buttons for Selection, Display, and Navigation
Buttons are pressed one at a time or in combination to enter sub-modes and set parameters. These are explained in detail in the
User Interface Features and Function Guide sections. The Setup Menu Navigation Flow Diagram on page 31 (Figure2e), provides a graphical overview of the operation and function of the buttons as used in Setup Mode.
General Monitoring Characteristics and Capabilities
Units are factory-configured for ALL user settings to be non-volatile. Whenever power to the unit is cycled (Off/On) the unit
will restore itself, so that each user setting such as Channel Selection(s), Input Type, etc., are automatically restored to the
units previous factory setting. However, the unit may be configured instead to have a fixed initial input type (Analog, AES,
SD-SDI, or HD-SDI) when the unit is turned on, with all other settings being non-volatile (revert to previous settings). See
Startup section on page 30 for more information about this setting. Any two of the eight metered channels (or a downmix of
from one to all eight) may be reproduced using the internal amplifiers and loudspeakers. Each of the AMP-S8 Series+ models
is capable of visually monitoring audio levels for the eight channels of the following source types:
AMP-S8MDA
AMP-S8HDA
• SD-SDI 1&2 or HD-SDI 1&2: Two 4-channel audio groups
• AES1 or AES2: Four PCM bitstreams (each equivalent to 2
• HD-SDI 1&2: Two 4-channel audio groups
• AES1 or AES2: Four PCM bitstreams (each equivalent to 2
analog channels)
analog channels)
• Analog: Eight Channels
16
• Analog: Eight Channels
AMP-S8SDA
AMP-S8DA
• SD-SDI 1&2: Two 4-channel audio groups
• AES1 or AES2: Four PCM bitstreams (each equivalent to 2
• AES1 or AES2: Four PCM bitstreams (each equivalent to 2
analog channels)
• Analog: Eight Channels
• Analog: Eight Channels
analog channels)
© 2006 Wohler Technologies Inc. ALL rights reserved
AMP-S8 Series+ User Manual P/N 821640 Rev-B
Section 2: Operation
Introduction to the User Interface
Figure-2c: Major Operational Modes, Submodes, and Parameters
Figure-2d: Front Panel User Interface Reference
© 2006 Wohler Technologies Inc. ALL rights reserved
17
AMP-S8 Series+ User Manual P/N 821640 Rev-B
Section 2: Operation
User Interface Features
Please refer to Figure-2d on page 17 to familiarize yourself with the front panel user interface controls of the AMP-S8 Series+ units. The
following sections describe these features and are referenced, by number/letter, to Figure-2d. For multi-function controls, a color-coded
dot identifies the mode in which a particular function operates; GRAY dot ( ) = Normal Operational Mode, BLUE dot ( ) =
FUNCTION (FN) Modes, YELLOW dot ( ) = Setup Mode). The user should refer to the User Interface Function Guide starting on
page 23 where operation is described in greater detail and contents are referenced by function rather than feature.
7a CHANNEL MIX 1-8 (PRESETS 1-4) Buttons
Configuring a CHANNEL MIX for Monitoring: > CHANNEL MIX Button 1-8
The mixing (summing) feature is activated whenever any CHANNEL MIX Button is pressed, and is indicated by the
selection display showing MIX in the upper right and left of the display.
Each repeated press of a Channel Mix Button sequencially assigns that channel to the left, both, right, or neither speaker
channel. With each successive button press, the color of the associated CHANNEL MIX LED (Item 7b), and the mixing/
routing of that channel, cycles through the following sequence: 1) GREEN (to left speaker only), 2) GREEN/AMBER
alternating (to both left and right speakers), 3) AMBER (to right speaker only), 4) OFF (not mixed or routed into either
speaker).
Recalling and Saving Presets: > FN Button + PRESETS Button 1-4
Press and hold the FN Button and then press the corresponding PRESETS Button (1-4). At the prompt, press the
NTER Button to accept the preset. See the Save Preset section on page 29 for how to save the current configuration as
a preset. See pages 28-30 for more information about creating, naming, recalling, and erasing input presets within Setup
Mode.
7b CHANNEL MIX LEDs 1-8
These LEDs are used to indicate the speaker mix of channels as selected when using the CHANNEL MIX Buttons (Item
7a). See CHANNEL MIX Selection section on page 25 or Item 7a above for a description of the function of these
indication LEDs.
7c L UP (SINGLE or
) Button
Selection Navigation Using the UP and DOWN Buttons: > L UP (or L DOWN) Button
The L UP and L DOWN (and R UP and R DOWN) Buttons are used to cycle through and select different channels or
channel combinations, depending on which Selection Mode is selected. See Single Channel Selection, Paired Channel
Selection, and Downmix Selection on page 25 for more information about using these buttons for channel selection.
Making Single Channel Selections: > FN Button + SINGLE Button
Single Channel Select Mode is enabled by pressing and holding the FN Button (Item 7j)and then pressing the SINGLE
Button. Press the L UP or L DOWN Buttons to cycle up or down through each channel selection for the left speaker;
press the R UP or R DOWN Buttons to cycle up or down through each channel selection for the right speaker.
Cycling Through Selections in Setup Mode: >
(or
) Button
In Setup Mode, the Button is used to cycle upward through selections, and the Button is used to cycle downward.
Also see Enabling Setup Mode (page 28) and the Setup Menu Navigation Flow Chart (Figure-2e, page 31).
7d L DOWN (PAIRS or
) Button
Selection Navigation Using the UP and DOWN Buttons: > L DOWN (or L UP) Button
The L UP and L DOWN (or R UP and R DOWN) Buttons are used to cycle through and select different channels or
channel combinations, depending on which Selection Mode is selected. See Single Channel Selection, Paired Channel
Selection, and Downmix Selection on page 25 for more information about using these buttons for channel selection.
Making Paired Channel Selections: > FN Button + PAIRS Button
Paired Channel Select Mode is enabled by pressing and holding the FN Button and then pressing the PAIRS Button.
After entering this mode, the L UP and L DOWN Buttons or R UP and R DOWN Buttons are used to cycle up or down
through channel pair selections 1/2, 3/4, 5/6, or 7/8 each channel being assigned, respectively, to the left and right speakers.
Cycling Through Selections in Setup Mode: >
(or
) Button
In Setup Mode, the Button is used to cycle downward through selections, and the Button is used to cycle upward.
Also see Enabling Setup Mode (page 28) and the Setup Menu Navigation Flow Chart (Figure-2e, page 31).
18
© 2006 Wohler Technologies Inc. ALL rights reserved
AMP-S8 Series+ User Manual P/N 821640 Rev-B
Section 2: Operation
User Interface Features
7e LCD Display
In Normal Operational Mode the high-contrast LCD Display is used to report the currently selected channels for
reproduction along with selected source type, mix type, and any SD/HD-SDI audio group information (for products with
the SDI inputs). In other modes the display will indicate phase correlation and mute status. In Setup Mode, the display is
used to navigate menus, select parameters, and recall and name presets.
In normal operation (not muted), the Input Lock Status indicator (center of second line in display) is used to show the lock
status of selected digital inputs (including SDI sources). If all four input channel pairs are not locked (or connected), then
four short dashes are displayed in the center of the second line of the display. Each dash (-) indicates a position for
displaying the channel pairs available for monitoring. The display appearance and order (from left to right) is: 1/2, 3/4, 5/6
and 7/8. The input status is updated whenever a change in status is detected. The Input Lock Status is active only if one
of the digital sources is selected via the INPUT Button (Item 7i), and applies only to the digital source that is selected.
Status Display Examples - Input Sources:
Source Status
(SD-SDI Input 2)
Mix Status
(Downmix
DM3)
SDI Group
(Group #1)
DM3
GP1
SD.SDI2
1 3 5 7
2 4 6 8
DM3
GP2
Input Lock Status
(Channels 1, 2, 3, 4,
5, 6, 7, 8 Locked)
Source Status
(HD-SDI Input 1)
Mix Status
(Downmix
DM3)
SDI Group
(Group #2)
Mix Status
(Custom)
MIX
HD.SDI1
GP3
SDI Group
(Group #3)
--
5 7
6 8
MIX
Mix Status
(Custom)
GP4
SDI Group
Input Lock Status
(Channels 1, 2, 3, 4 Not (Group #4)
Locked; Channels 5, 6, 7, 8
Locked)
7f R DOWN (ENTER) Button
Selection Navigation Using the UP and DOWN Buttons: > R DOWN (or R UP) Button
The R DOWN or R UP (and L DOWN or L UP) Buttons are used to cycle through and select different channels or
channel combinations, depending on which Selection Mode is selected. See Single Channel Selection, Paired Channel
Selection, and Downmix Selection on page 25 for more information about using these buttons for channel selection.
Using the ENTER Button:
When in Setup Mode, The ENTER Button and is pressed to accept menu selections. Also see Enabling Setup Mode
(page 28) and the Setup Menu Navigation Flow Chart (Figure-2e, page 31) for more detailed information.
7g R UP (ESC) Button
Selection Navigation Using the UP and DOWN Buttons: > R UP (or R DOWN) Button
The R UP or R DOWN (and L UP or L DOWN) Buttons are used to cycle through and select different channels or
channel combinations, depending on which Selection Mode is selected. See Single Channel Selection, Paired Channel
Selection, and Downmix Selection on page 25 for more information about using these buttons for channel selection.
Using the ESC Button:
In Setup Mode, the ESCButton is used to exit, or back out of, any of the menus within Setup Mode without accepting
changes. Also see Enabling Setup Mode (page 28) and the Setup Menu Navigation Flow Chart (Figure-2e, page 31)
for more detailed information.
© 2006 Wohler Technologies Inc. ALL rights reserved
19
Section 2: Operation
AMP-S8 Series+ User Manual P/N 821640 Rev-B
User Interface Features
7h GROUP (SETUP) Button
Selecting SDI GROUP:
> GROUP Button
When either of the the SDI inputs are selected for monitoring, the GROUP Button allows the user to select which two 4channel SDI audio groups are available for monitoring and presented to the left and right banks of four Level Meter
Bargraphs (Item 8, page 8).
When the buttons are pressed relatively rapidly, the order of selections are as follows: 3/4, 1/2, 1/3, 1/4, 2/3, 2/4, 3/4. But
after a selection is chosen and left until the display flashes once, slower button presses will toggle between the Group 1/2
and Group 3/4 selections. After this, rapid presses will again initiate the cycling as previously described. Since the first
two selections are more common choices, this features allows easy toggling between them. See SDI Group Definition,
SDI GROUP Selection , and SDI SUBGROUP Selection on page 26-27 for more information.
Enabling Setup Mode: > FN Button + SETUP Button
Setup Mode is enabled by pressing and holding the FN Button and then pressing the SETUP Button. See Enabling
Setup Mode (page 28) and the Setup Menu Navigation Flow Chart (Figure-2e, page 31) for more detailed information.
This mode is used to change unit features. Entries are cycled through using the or
Buttons and selections are
accepted by pressing the
Button. The currently displayed menu may be exited by pressing the
Button.
Current settable options in Setup Mode are:
• Recall Preset (RCallPSet)
NOTE: The RCallSet, PSetMode, and ErasePSet
• Save Preset (SavePSet)
options will not be available if a preset has not been
• Preset Mode Enable (PSetMode)
previously saved to the unit. See Save Preset
• Erase Preset (ErasePSet)
(SavePSet) on page 29 for how to save a preset of the
• SDI Delay
current unit configuration.
• Surround Gain (Srnd Gain)
• Startup
• Analog Output Preference (A-OutPref)
After entering Setup Mode:
The display will indicate the software, version number, and the menu selection: Setup: RCallPSet (if presets are saved).
Press the
Press the
Press the
Press the
Press the
Press the
Press the
Button, display changes to Setup: SavePSet
Button (again), display changes to Setup: PSetMode (if presets are saved)
Button (again), display changes to Setup: ErasePSet (if presets are saved)
Button (again), display changes to Setup: SDI Delay
Button (again), display changes to Setup: Srnd Gain
Button (again), display changes to Setup: Startup
Button (again), display changes to Setup: A-OutPref
Press the
Button (again), to cycle (return) to the first selection; Setup: RCallPSet
Button.
To select the current option, press the
To exit Setup Mode, press the
Button.
Refer to Enabling Setup Mode (page 28) and the Setup Menu Navigation Flow Chart (Figure-2e, page 31) for more
detailed information.
20
© 2006 Wohler Technologies Inc. ALL rights reserved
AMP-S8 Series+ User Manual P/N 821640 Rev-B
Section 2: Operation
User Interface Features
7i INPUT (DOWNMIX) Button
Selecting Input Sources or User Presets for Monitoring:
> INPUT Button
The INPUT Button is used to select the input source or user preset to be monitored.
In Normal Operational Mode each press of the INPUT Button cycles through the following sources: Analog, AES1
(unbalanced), AES2 (balanced), SD-SDI1 (or HD-SDI1), and SD-SDI2 (or HD-SDI2). In models without SDI capability,
only the Analog and AES inputs are cycled through.
When Preset Mode is enabled (see Preset Mode Enable section on page 29), each press of the Input Button cycles through
the named presets set up by the user (instead of cycling through the available inputs).
Enabling Downmix Mode and Selecting Mixes:
7j
> FN Button + DOWNMIX Button
In Downmix Mode the user may select from a number of different preconfigured mix types for monitoring through the
speakers. Downmix Mode is enabled by pressing and holding the FN Button and then pressing the DOWNMIX Button.
The seven downmix selections are cycled through using the L UP and L DOWN Buttons or R UP and R DOWN
Buttons.
Downmix Selection
page 25 for a and
description
of all Downmix selections available.
Φ
(FN)SeeButton
(Phaseon
Indication
Function)
Enabling Phase Indication Mode:
> Φ Button
Pressed by itself, theΦ Button enables the Phase/Correlation Indicator in the LCD Display. The average
correlation (phase) for the selected channel pair is indicated by a stationary block in one of three positions on the
second line of the display. A moving block may also be present in these positions to indicate the instantaneous (short
time sample) phase correlation. The three positions are as follows:
Center:
Left (-):
Right (+):
Only one channel active or zero correlation between the two channels
Selected channels are out-of-phase (-1 correlation maximum)
Selected channels are in-phase (+1 correlation maximum)
Note: With typical stereo program material, the moving block display is normal. With a single signal, or two completely unrelated signals selected for the speaker(s), no correlation information is available, so the phase indicator block will be at rest
in the center of the LCD. A mono in-phase signal fed to both right and left channels would result in the block being in the
right-most position indicating complete correlation of the two signals.
Enabling Channel Select Modes and Setup Mode:
> FN Button
Pressing and holding the FN Button and then pressing an additional button puts the unit into one of the alternative
modes. Below is a list of modes enabled by pressing and holding the FN Button and then pressing one of the other
buttons. See the reference for each button for information about the indicated mode.
Five categories of functions may be accessed using the FN Button in combination with other buttons:
• FN Button + SETUP Button
•
•
•
•
FN Button
FN Button
FN Button
FN Button
= Setup Mode (See Enabling Setup Mode on page 28 and the Setup Menu
Navigation Flow Chart on page 31)
+ SINGLE Button
= Single Channel Select Mode (see Single Channel Selection on page 25)
+ PAIRS Button
= Pair Channel Select Mode (see Pairs Channel Selection on page 25)
+ DOWNMIX Button
= Downmix Select Mode (see Downmix Selection on page 25)
+ PRESET Buttons 1-4 = Input Preset Selection (see Recalling a Preset on page 26)
© 2006 Wohler Technologies Inc. ALL rights reserved
21
AMP-S8 Series+ User Manual P/N 821640 Rev-B
Section 2: Operation
User Interface Features
7k MUTE Button
Pressing the MUTE Button allows the user to step through three mute states and an unmuted state. When the system is in
one of the mute states, all other information normally shown in the LCD Display, such as the Input Status Display, is
disabled and all other buttons are disabled until the unit is taken out of the Mute Mode.
First press mutes both speakers :
Mute LR
Second press mutes the Left speaker : Mute L
Third press mutes the Right speaker : Mute R
Fourth press returns the unit to Unmuted (normal) operation.
Muting functions affect the signals to the speakers/headphones and the rear panel Selected/Downmix Analog Output
Connectors (Item M, page 14). Muting does NOT affect the Metered Analog Outputs (Item K, page 14), except to
defeat scaling. When speakers are muted, the gain scaling of the Metered Analog Outputs is defeated so that no scaling is applied
during unit muting. See the Analog Output Preference parameter in the Setup Mode section on page 30 for more information.
Otherwise, the Metered Analog Outputs remain active even when the mute state is enabled.
Presets Definitions
• What is stored in a Preset?
The following parameters are stored in a named Preset:
1)
2)
3)
4)
5)
Name of the preset, in a maximum of 8 alpha-numeric characters.
Input Type (i.e. Analog, AES1, AES2, SDI 1, etc.)
Selected Channels
Channel Selection Mode (i.e. Single Channel Mode, Paired Channel Mode, etc.)
Selected SDI Groups.
• How will Presets generally be used?
There are two main uses of presets, depending on the application where the audio monitor panel is installed. In on-air live situations,
including Master Control and remote trucks, the unit will be setup ahead of time with presets defined for the input signals and their
selected channels. Preset Mode will be enabled so the user can easily select only from these valid monitoring modes.
In laboratory, testing, or other applications where the unit may not be connected to dedicated inputs, some presets may be defined
for rapid configuration, but Preset Mode may not necessarily be enabled, so that each of the inputs are accessible as in normal
operation.
We envision that Preset Mode will be enabled for most applications, and presets will be defined based on dedicated inputs to
the unit. The user will more easily be able to monitor the sources that are most important. Preset Mode can greatly reduce the
number of button pushes required to navigate from one source to another.
• How many presets are available?
Ten presets are available from the Setup Menu, and they are numbered 0-9. Preset 1 through Preset 4 are accessible using
the front panel button combination of FN Button and CHANNEL MIX Buttons 1-4.
• Is Preset Mode required in order to use presets?
No, you can Save and Recall presets 0-9 using the Setup Menu commands Save PSet, and RCall Pset. Also, presets
1-4 can be saved and recalled using the front panel button combination: FN Button and CHANNEL MIX Button 1-4.
• Do you need to have presets defined before entering Preset Mode?
Yes. If you do not have presets defined then it is not possible to enable Preset Mode. If you only have one preset defined, then
Preset Mode will leave the unit in that preset. If you have only two presets defined, then the INPUT Button will toggle between
them.
• How is Preset Mode enabled?
It is enabled under the Setup menu called PSet Mode (page 29). Options for this setting are Enabled and Disabled.
22
© 2006 Wohler Technologies Inc. ALL rights reserved
AMP-S8 Series+ User Manual P/N 821640 Rev-B
Section 2: Operation
User Interface Function Guide
This Function Guide references the operation of the AMP-S8 Series+ monitors by function rather than by feature and describes
most operations in greater detail than are found in the User Interface Features section (page 18). Before using this section, it is
recommended that the Introduction to the User Interface section starting on page 16 be referred to for an understanding of the AMPS8 Series+ overall capabilities and an insight into how the user interface is structured and manipulated.
User Interface Function Guide
CONTENTS
Default Modes:
Normal Operational Mode
Page
24
Selection Modes:
Page
Input Source Selection
24
Preset Mode Selection
24
Channel Mix Selection
25
Single Channel Selection
25
Paired Channel Selection
25
Downmix Selection
25
Recalling a Preset
26
SDI Group Definition
26
SDI Group Selection
27
Display Modes:
Page
Displaying Phase/Correlation Indication
Setup Mode:
27
Page
Enabling Setup Mode
28
Recall Preset
29
Save Preset
29
Preset Mode Enable
29
Erase Preset
30
Surround Gain
30
SDI Delay
30
Startup
30
Analog Output Preference
30
Setup Mode Menu Navigation Flow Chart
31
Operational State Modes:
Enabling Mute States
© 2006 Wohler Technologies Inc. ALL rights reserved
Page
32
23
AMP-S8 Series+ User Manual P/N 821640 Rev-B
Section 2: Operation
User Interface Function Guide
Default Modes
Normal Operational Mode:
This is the default operational state of the monitor when selection modes, operational state modes, display modes, and setup
modes are not enabled. In this mode the LCD display indicates the current operational status in regard to input source and
channel selection. The Normal Operational
is enabled by default
at unit power up.
DefaultMode
Auto-Monitor
Mode
Selection Modes
Standard Input Source Selection:
INPUT Button
In Normal Operational Mode, each press of the INPUT Button cycles through the input selections, each being visible in
the LCD Display in turn as shown:
• Analog
• AES1 (Unbalanced)
• AES2 (Balanced)
• SD-SDI1 or HD-SDI1 (Not available in DA model)
• SD-SDI2 or HD-SDI2 (Not available in DA model)
The selected input is enabled when it appears in the LCD display. In models without SDI capability, only the Analog and
AES inputs are cycled through.
Preset Mode Selection:
PRESET MODE + INPUT Button
When Preset Mode is enabled (see page 29), each press of the INPUT Button cycles through the preset names as previously
configured by the user. If an active (selected) preset is made inactive by selecting other channels or SDI groups for monitoring,
then pressing the INPUT Button will revert to the most recent preset state (as long as Preset Mode is enabled).
See Preset Mode Enable on page 29 for more information on how to select and set this parameter within the Setup Mode
menu (page 28).
(Continued)
24
© 2006 Wohler Technologies Inc. ALL rights reserved
AMP-S8 Series+ User Manual P/N 821640 Rev-B
Section 2: Operation
User Interface Function Guide
Selection Modes (Cont.)
Channel Mix Selection:
CHANNEL MIX Button 1-8
Press any of the eight CHANNEL MIX Buttons to activate the mixing (summing) feature. This mode is indicated by the
LCD Display showing MIX in the upper right and left of the display. For example, as follows:
MIX
AES1
MIX
1 3
2 4 --
Each press of a CHANNEL MIX Button sequencially assigns the selected channel to the left, both, right, or neither
speaker channel. All eight channels may be mixed/summed in this way. With each successive button press, the color of the
associated Channel Mix LED, and the mixing/routing of that channel, cycles through the following sequence:
• First Button Press:
• Second Button Press:
• Third Button Press:
• Fourth Button Press:
GREEN (routed to left speaker only),
GREEN/AMBER alternating (routed to both left and right speakers),
AMBER (routed to right speaker only),
OFF (not mixed or routed into either speaker).
Single Channel Selection:
FN Button + SINGLE Button
Single Channel Select Mode is enabled by pressing and holding the FN Button and then pressing the SINGLE Button.
After entering this mode, each press of the L UP and L DOWN Buttons will cycle up or down through channel selections
for the left speaker, while the R UP and R DOWN Buttons will cycle up or down through channel selections for the right
speaker. In the LCD display, the channel selections and speaker assignments are indicated by showing CH1, CH2, CH3,
CH4, CH5, CH6, CH7, or CH8 in the top left and top right corners of the display.
Paired Channel Selection:
FN Button + PAIRS Button
Paired Channel Select Mode is enabled by pressing and holding the FN Button and then pressing the PAIRS Button.
After entering this mode, each press of the L DOWN or R DOWN Buttons will step down through the channel pair
selections and each press of the L UP or R UP Buttons will step up through the same channel pair selections. In the LCD
display, the channel pair selections and speaker assignments are indicated by showing CH1/CH2, CH3/CH4, CH5/CH6,
or CH7/CH8 in the top left and top right corners of the display respectively. The CHANNEL MIX LEDs also indicate
these channel assignments by lighting up in the same manner as described in Channel Mix Selection section above.
Downmix Selection:
FN Button + DOWNMIX Button
Downmix Mode is enabled by pressing and holding the FN Button and then pressing the DOWNMIX Button. Downmix
selections are cycled through using the L DOWN and R DOWN Buttons or the L UP and R UP Buttons. In Downmix
Mode the user may select from seven different mix types for monitoring through the speakers. Note that in the DM
downmix modes indicated, Channel 4 is not reproduced because it normally carries the LFE channel, which is below 200
Hz.
DM1: This downmix is most suitable for a loudspeaker or headphone downmix of a multi-channel program. Left and Left
Surround input channels mix into the left speaker, Right and Right Surround input channels mix into the right
speaker. Center input channel mixes equally into both left and right speakers. Contribution of the Surround channel
mix is set by the Surround Gain entry (page 30) in the Setup Menu. DM1 is equivalent to one of the Japanese
ARIB Set 1 downmix formulas. See Diagram-A, page 33.
DM2: This downmix can be used to create a two channel mix which could be further decoded to multi-channel program by
the use of an external Surround decoder. Contribution of the Surround channel mix is set by the surround level
entry in the setup menu. DM2 is equivalent to one of the Japanese ARIB Set 2 downmix formulas. See Diagram-B,
page 34.
DM3: Same as DM1 but with surround level set to –3dB. DM3 is equivalent to one of the Japanese ARIB Set 3 downmix
formulas. See Diagram-C, page 35.
4+4: In this downmix channels 1..4 are summed to the left speaker, Channels 5..8 are summed to the right speaker.
MXA and MXB: Select one of these two downmixes to "custom" mix by adding Channels 1-8 into the left or the right
speakers using the CHANNEL MIX Buttons (see Channel Mix Selection above). Both MXA and MXB mix
selections are stored and are available for recall with each cycling of the units power (On/Off).
MIX: This mode appears whenever the CHANNEL MIX Buttons are pressed. The selection made in this mode is lost
whenever another mode is selected, or a preset is recalled. Presets saved in MXA or MXB mode are recalled in this
mode.
© 2006 Wohler Technologies Inc. ALL rights reserved
25
AMP-S8 Series+ User Manual P/N 821640 Rev-B
Section 2: Operation
User Interface Function Guide
Selection Modes (Cont.)
Presets:
Presets may be recalled, created, and replaced by either using the PRESETS Buttons 1-4 or by menu selection in Setup
Mode. Presets can only be erased in Setup Mode. See page 29-30 for how to recall, create, and erase presets within Setup
Mode.
Recalling a Preset: FN Button + PRESETS Button 1-4
PRESETS Buttons 1, 2, 3, 4 may be used to recall Presets 1-4 respectively, by pressing and holding the FN Button
and then pressing the corresponding PRESETS Button (1-4). This allows the user the option to recall that preset with the
following prompt.
RECALL PRESET?
Preset1: Off Air
Pressing the ENTER Button at this point will recall that preset.
Creating (Overwriting) a Preset:
If you do not wish to recall the preset at the prompt indicated above (Recalling a Preset), then pressing the
invokes a prompt to save (overwrite) the current state of the unit over that preset as follows:
Button
OVERWRITE PRESET
Preset1: Off Air
Pressing the ENTER Button at this point will prompt the user whether to Keep Old Name, where the existing name can be
retained by pressing ENTER. If the user presses ES C, then they will be prompted for a new preset name as follows:
AES 1
?@<A>BC
Name: A_
If the user presses the ENT Button before finishing the naming, then the preset is not saved and the existing preset is retained. To
enter the new name, select letters using the L UP and L DOWN Buttons or R UP and R DOWN Buttons. The current
selectable character appears between the < > symbols. Press the ENTER Button to accept the current letter and move
to the next letter. Naming will automatically end after eight characters are selected, or naming can be ended by pressing the
ENTER Button when the _DONE_ selection appears. The DONE selection comes before the numerals, and follows the
lower case alphabet. The character order is the order of ASCII characters. A chart showing the character order appears in
the SAVE Preset section on page 29.
Upon completion of naming the preset, the current state of the system is saved under that name and preset number. At any
time during this process the user may press the ESC Button and the preset will not be saved and the unit will return to Normal
Operation Mode.
See page 29-30 for more information about creating, naming, recalling, and erasing presets from the menu in Setup Mode.
SDI GROUP Definition:
NOTE: The embedded channels within an SDI signal are defined and referred to in this manual as shown in the chart below:
26
© 2006 Wohler Technologies Inc. ALL rights reserved
AMP-S8 Series+ User Manual P/N 821640 Rev-B
Section 2: Operation
User Interface Function Guide
Selection Modes (Cont.)
SDI GROUP Selection: GROUP Button
When either of the the SDI inputs are selected for monitoring, the
GROUP Button allows the user to select which two 4-channel
SDI audio groups are presented to the left and right banks of
four Level Meter Bargraphs.
When the buttons are pressed relatively rapidly, the order of
selections follows that shown in the table (right). But after a
selection is chosen and left until the display flashes once, slower
button presses will toggle between the Group 1/2 and Group
3/4 selections. After this, rapid presses will again initiate the cycling
as shown in the table. Since the first two selections are more
common choices, this features allows easy toggling between them.
Display Modes
Displaying Phase/Correlation Indication: Φ Button
Pressed by itself, the Φ Button enables the Phase/Correlation Indicator in the LCD Display. The average
correlation (phase) for the selected channel pair is indicated by a stationary block appearing within three positions on the
second line of the display. A moving block may also be present in these positions to indicate the instantaneous (short time
sample) phase correlation. The three positions are as follows:
Center:
Left (-):
Right (+):
Only one channel active or zero correlation between the two channels
Selected channels are out-of-phase (-1 correlation maximum)
Selected channels are in-phase (+1 correlation maximum)
Note: With typical stereo program material, the moving block display is normal. With a single signal, or two completely
un-related signals selected for the speaker(s), no correlation information is available, so the phase indicator block
will be at rest in the center of the LCD. A mono in-phase signal fed to both right and left channels would result in the
block being in the right-most position indicating complete correlation of the two signals.
© 2006 Wohler Technologies Inc. ALL rights reserved
27
AMP-S8 Series+ User Manual P/N 821640 Rev-B
Section 2: Operation
User Interface Function Guide
Setup Mode
Enabling Setup Mode:
FN Button + SETUP Button
Setup Mode is enabled by pressing and holding the FN Button and then pressing the SETUP Button. This mode is used
to change unit features. Menu selections and parameters are cycled through using the the P and D Buttons. Selections are
accepted by pressing the ENT E Button. The currently displayed menu may be exited without saving by pressing the
ESC Button. Current settable options in Setup Mode are:
• Preset Recall (RCallPSet)
• Preset Save (SavePSet)
• Preset Create (PSetMode)
• Preset Erase (ErasePSet)
• SDI Delay
NOTE: The RCallSet, PSetMode, and ErasePSet
options will not be available if a preset has not been
previously saved to the unit. See Save Preset
(SavePSet) on page 29 for how to save a preset of the
current unit configuration.
• Surround Gain (Srnd Gain)
• Startup
• Analog Output Preference (A-OutPref)
After entering Setup Mode:
The display will indicate the software, version number, and the menu selection: Setup: RCallPSet (if presets are saved).
Press theUPButton, display changes to Setup: SavePSet
Press theUPButton (again), display changes to Setup: PSetMode (if presets are saved)
Press theUPButton (again), display changes to Setup: ErasePSet (if presets are saved)
Press theUPButton (again), display changes to Setup: SDI Delay
Press theUPButton (again), display changes to Setup: Srnd Gain
Press theUPButton (again), display changes to Setup: Startup
Press theUPButton (again), display changes to Setup: A-OutPref
Press the
Button (again), to cycle (return) to the first selection; Setup: RCallPSet
To select the current option, press the ENTER Button.
To exit Setup Mode, press the ESC Button.
28
© 2006 Wohler Technologies Inc. ALL rights reserved
AMP-S8 Series+ User Manual P/N 821640 Rev-B
Section 2: Operation
User Interface Function Guide
Setup Mode (Cont.)
Recall Preset (RCallPSet):
This is a menu command, allowing the user to recall a stored preset. Pressing the
is active will present the user with the option of choosing a preset to recall:
Button while this menu
Choose
PresetNum
Preset1: Off Air
Pressing the and Buttons will scroll through the presets, showing each one by name. In the above example, Preset
1 is called “Off Air”. If a particular preset is not assigned, it will be indicated as follows:
Choose
PresetNum
Preset7: Unused
Pressing the ENTER Button with the desired preset shown will recall that preset, so the system state will be now setup
according to that preset.
Save Preset (SavePSet):
Pressing the L UP and L DOWN Buttons or R UP and R DOWN Buttons will scroll up or down through the presets,
showing each one by name. If a particular preset is not assigned, it will be indicated as follows:
Choose
PresetNum
Preset7:
Unused
Choosing an already used preset will display a warning to the user that they are about to overwrite the preset, as follows:
OVERWRITE
PRESET
Preset1: Off Air
If the user presses the ENTER Button, a prompt appears asking if the user would like to save the old name with the new
preset as follows.
Save Old Name?
Preset1: Off Air
Pressing the ENTER Button keeps the old name for the new preset. Pressing the ESC Button results in a prompt for
a new preset name as follows:
AES1
Name:
?@<A>BC
A_
Select letters using the L UP and L DOWN Buttons or R UP and R DOWN Buttons. The current selectable character
appears between the < > symbols. Press the ENTER Button to accept the current letter and move to the next letter. Naming
will automatically end after eight characters are selected, or end naming by pressing the ENTER Button when the _DONE_
selection appears. The _DONE_ selection comes before the numerals, and follows the lower case alphabet. The character
order is the order of ASCII characters. Characters are cycled through in the following order (left to right, top to bottom):
“ # $ % & ` ( ) * + ,- . / 0 1 2 3 4 5 6 7 8 9 : ; < = > ? @ A
B C D E F G H I J K L M N O P Q R S T U V W X Y Z [ \ ] ^ _
` a b c d e f g h i j k l m n o p q r s t u v w x y z { | } ~
Upon completion of naming the preset, the current state of the system is saved under that name and preset number.
At any time during this process the user may press the
Button and the preset will not be saved and the unit
will return to Normal Operational Mode.
Preset Mode Enable (PSetMode):
This is an alternative mode of operation. In Preset Mode, the INPUT Button cycles through the defined Presets.
With Preset Mode enabled, the user can approach the unit and press only the INPUT Button to access each stored
preset by name, rather than by signal type.
© 2006 Wohler Technologies Inc. ALL rights reserved
29
AMP-S8 Series+ User Manual P/N 821640 Rev-B
Section 2: Operation
User Interface Function Guide
Setup Mode (Cont.)
Erase Preset (ErasePSet):
This is a menu command that allows the user to erase a stored preset. Pressing the ENTER Button will allow the user
to choose a preset to erase:
Choose
PresetNum
Preset1: Off Air
The L UP and L DOWN Buttons or R UP and R DOWN Buttons select from among the available presets. Once a preset
has been chosen by pressing the ENTER Button, the user will be warned that the preset will be erased:
ERASE PRESET?
Preset1: Off Air
Pressing the ENTER Button will erase that preset. Pressing the ESC Button will not erase that preset. In either case,
control returns to the menu to choose another preset to erase:
Choose PresetNum
Preset2: VTR #2
Press the ESC Button to exit Setup Mode and return to Normal Operational Mode.
SDI Delay:
Changing the SDI Delay changes the latency of an SDI audio signal as it is de-embedded from SDI. This adjustment
allows precisely synchronizing an SDI audio signal to a video signal. To change SDI Delay, select SDI Delay and
then press the ENTERButton.
SDI Delay adjust screen display will indicate:
Setup —
—Setup
SDI Delay: 140 ms
Step through settings using
or
Buttons, select 140 ms (for example). To accept, press the ENTER Button.
Press the
Button to exit Setup Mode and return to Normal Operational Mode.
Surround Gain (Srnd Gain)::
To change Surround Gain, select Srnd Gain and then press the ENTER Button.
Surround Gain adjust screen display will indicate:
Setup —
—Setup
Srnd Gain -3dB
Step through settings using the or Buttons, select -9dB (for example). To accept, press the ENTER Button. To
exit without saving, press the ESC Button. Note that surround gain adjustments are only effective for downmixes
DM1 and DM2. In downmix DM3 the surround gain is fixed.
Startup:
The Startup entry within the Setup menu is used to determine the input, which is used by the unit at power up. When set
to Last Used, the unit will power up the same way that the unit was before power was interrupted. If the user needs the
unit to power up in Analog mode (for example), then user should select the Analog entry by stepping through available
entries using the or Buttons. Save the selection by pressing the ENTE Button. Press the E C Button to exit
Setup Mode and return to Normal Operational Mode.
Analog Output Preference (A-OutPref):
To change Analog Output Preference, select A-OutPref and then press the ENTER Button.
The Analog Output Preference entry within the Setup menu is used to determine how the Selected/Downmix
Analog Output Connectors (Item M, page 14) and Metered Analog Output Connector (Item K, page 14) on the rear
panel output the channel mix when the DM1, DM2, or DM3 downmix selections is enabled.
The default setting is Downmix, which outputs the channel mix with individual channel scaling (gain settings) intact as
determined by the selected downmix (DM1, DM2, or DM3). However, if Discrete is selected, then all channels within
the downmix are output from these connectors at full gain without scaling of the channels as determined by the selected
downmix. For example, the Center channel scaling is -3dB, and the Surround channel scaling is set in the Setup menu.
30
© 2006 Wohler Technologies Inc. ALL rights reserved
AMP-S8 Series+ User Manual P/N 821640 Rev-B
Section 2: Operation
User Interface Function Guide
Setup Mode (Cont.)
Discrete
ESC/
ENTER
AOut Pref
ESC/
ENTER
Up/Down
The ENTER Key will exit the current menu while
making the change to the current selection
Up/Down
The ESC Key will exit the current menu without
making any changes to the selection
Downmix
Up/Down
ESC/
ENTER
ESC
Startup
Enter
Last Used
Up/Down
ESC/
ENTER
SDI 2
Up/Down
Mute
ESC/
ENTER
ESC
Up/Down
Up/Down
SDI 1
-9 dB
SRND Gain
Up/Down
Up/Down
Up/Down
Up/Down
280 ms
ESC/
ENTER
AES 1
-6 dB
ENTER
ESC/
ENTER
Up/Down
Up/Down
Up/Down
ESC/
ENTER
ESC/
ENTER
ESC/
ENTER
ESC/
ENTER
AES 2
-3 dB
Up/Down
Up/Down
260 ms
Up/Down
240 ms
Analog
.etc .
ESC
ESC/ Enter
SDI Delay
ESC/
ENTER
ESC
Up/Down
ESC
Erase Preset
Enter
Enter
ESC/
ENTER
Erases
Preset
ERASE
PRESET?
0 ms
Enable
Preset Mode
20 ms
Up/Down
Up/Down
ESC
40 ms
Up/Down
ESC/
ENTER
ESC
Enter/
ESC
Up/Down
Up/Down
Enter
Select Preset
Number
60 ms
Up/Down
Enter/
ESC
Disable
Up/Down
NO
ESC
Save Preset
Enter
Select Preset
Number
Up/Down
Used
Already?
Enter
Up/Down
Saves or
Overwrites
Preset
ESC
ESC
Enter
Select Preset
Number
Up/Down
ESC
ESC
Select Preset
Name: AB<C>DEF
Up/Down/Enter
Enter
ESC
Recall Preset
SAVE OLD
NAME?
YES
DONE
Enter
Recalls
Preset
Fn-GROUP:
Setup Menu
Normal Operation
ESC
Figure-2e: Setup Menu Navigation Flow Diagram
© 2006 Wohler Technologies Inc. ALL rights reserved
31
AMP-S8 Series+ User Manual P/N 821640 Rev-B
Section 2: Operation
User Interface Function Guide
Operational State Modes
Enabling Mute States: Mute Button
Pressing the MUTE Button allows the user to step through three mute states and an unmuted state. When the system
is in one of the mute states, all other information normally shown in the LCD Display, such as the Input Status
Display, is disabled. All other buttons are disabled until the unit is taken out of the Mute Mode.
First press mutes both speakers :
Mute LR
Second press mutes the Left speaker : Mute L
Third press mutes the Right speaker : Mute R
Fourth press returns the unit to Unmuted (normal) operation.
Muting functions affect the signals to the speakers/headphones and the rear panel Selected/Downmix Analog
Output Connectors (Item M, page 14). Muting does NOT affect the Metered Analog Outputs (Item K, page 14),
except to defeat scaling. When speakers are muted, the gain scaling of the Metered Analog Outputs is defeated so that no
scaling is applied during unit muting. See the Analog Output Preference parameter in the Setup Mode section on page 30
for more information. The Metered Analog Outputs remain active even when the mute state is enabled.
32
© 2006 Wohler Technologies Inc. ALL rights reserved
© 2006 Wohler Technologies Inc. ALL rights reserved
(Ch-2)
Right Input
(Ch-6)
Right Surround Input
(Ch-3)
Center Input
(Ch-5)
Left Surround Input
(Ch-1)
Left Input
Fixed -3dB
1/(Root 2)
Input
Output
Input
Gain
Gain
k: -3dB, -6dB,
-9dB or Mute
Input
Output
Output
Input
Input
Input
Input
Input
Sum
Sum
Diagram-A:
AMP-S8 DM1 Downmix
Gain
Gain
Gain
Gain
Input
Input
Sum
Input
Fixed -3dB
a = 1/(Root 2)
Sum
Diagram A: AMP-S8 Series+ DM1 Downmix
Gain
Gain
Gain
Gain
Output
Output
07/17/03 Rev-A
Right
Left
AMP-S8 Series+ User Manual P/N 821640 Rev-B
Section 2: Operation
(See Downmix Selection on page 25)
33
34
(See Downmix Selection on page 25)
© 2006 Wohler Technologies Inc. ALL rights reserved
(Ch-2)
Right Input
(Ch-6)
Right Surround Input
(Ch-3)
Center Input
(Ch-5)
Left Surround Input
(Ch-1)
Left Input
Fixed -3dB
1/(Root 2)
Input
Input
Gain
Gain
k: -3dB, -6dB,
-9dB or Mute
Input
Gain
Gain
Output
Gain
Gain
Output
Output
Invert
Invert
Output
Output
Input
Input
Input
Input
Input
Input
Input
Diagram-B:
AMP-S8 DM2 Downmix
Input
Input
Input
Sum
Sum
Diagram B: AMP-S8 Series+ DM2 Downmix
Input
Sum
Input
Fixed -3dB
a = 1/(Root 2)
Sum
Gain
Gain
Gain
Gain
Output
Output
07/17/03 Rev-A
Right
Left
AMP-S8 Series+ User Manual P/N 821640 Rev-B
Section 2: Operation
© 2006 Wohler Technologies Inc. ALL rights reserved
(Ch-2)
Right Input
(Ch-6)
Right Surround Input
(Ch-3)
Center Input
(Ch-5)
Left Surround Input
(Ch-1)
Left Input
Fixed -3dB
1/(Root 2)
Input
Output
Input
Gain
Gain
Fixed -3dB
1/(Root 2)
Input
Output
Output
Input
Input
Input
Input
Input
Sum
Sum
Diagram-C:
AMP-S8 DM3 Downmix
Gain
Gain
Gain
Gain
Input
Input
Sum
Input
Fixed -3dB
a = 1/(Root 2)
Sum
Diagram C: AMP-S8 Series+ DM3 Downmix
Gain
Gain
Gain
Gain
Output
Output
07/17/03 Rev-A
Right
Left
AMP-S8 Series+ User Manual P/N 821640 Rev-B
Section 2: Operation
(See Downmix Selection on page 25)
35
AMP-S8 Series+ User Manual P/N 821640 Rev-B
(This page left intentionally blank)
36
© 2006 Wohler Technologies Inc. ALL rights reserved
Section 2: Operation
AMP-S8 Series+ User Manual P/N 821640 Rev-B
Section 3
Technical Information
General Technical Observations
Balance Control Characteristics
AMP-S8 Series+ Interconnect Block Diagram
© 2006 Wohler Technologies Inc. ALL rights reserved
37
AMP-S8 Series+ User Manual P/N 821640 Rev-B
Section 3: Technical Information
General Technical Observations
General Mechanical Observations
Elimination of cabinet and component sympathetic vibrations (resonances) requires considerable attention to mechanical details.
Because of this, and the physical constraints of the speakers' acoustic enclosures, even minor changes to any of the mechanical
details of the unit can seriously impair its acoustic performance. This especially applies to the speaker mountings. If mechanical
work on the unit is necessary, be sure to make adequate notes to permit accurate reassembly.
The proprietary method of magnetic shielding in the 2U models is usually degraded slightly by any disassembly of the unit, except
removal of the rear panel. Almost any maintenance or repair will require removal of the cover. If an immediately adjacent video
monitor shows magnetic interference after reassembly of the unit, it may have to be returned to the factory to restore the shielding
completely.
General Audio Circuitry Observations
Since a single-sided power supply is used, all amplifier sections are “biased” with a 1/2 supply reference, so all opamp signal
terminals on the main board should have a DC level of +12V, +/-0.7V. Signal inputs to the main audio board from any of the input
select circuits are via the balanced input stage, in lieu of the analog inputs on a basic unit. The signal pick-off for the headphones is
after the volume and balance controls. Speaker muting is controlled by circuitry that senses connection of headphones to the jack.
The power amps are attached to an aluminum heatsink plate (which is also connected to the circuit common for these devices). The
heatsink plate forms an operational module separate from the chassis, which allows access to the solder side of the circuit board
while power is applied to the circuitry. To avoid thermal shutdown of the power amp(s), they should NOT be operated without their
tabs being fastened securely to the heatsink plate.
Variations in the frequency response of different production runs of drivers sometimes requires minor adjustments in the equalization/
crossover components in individual runs of units. If any of the drivers (speakers) are replaced, it may be helpful to change certain
components to achieve maximum flatness of response. Contact Wohler Technologies for support in such matters.
The operating threshold of the woofer limiter is critical to both satisfactory reproduction of program transients and preventing
damage to, or destruction of, the speaker itself. The side speaker output limiter circuits are similarly important, though not as
critically adjusted.
The woofer power amps are arranged in a bridge configuration; care must be taken to avoid letting EITHER speaker terminal contact
the chassis (common) OR THE GROUNDED LEAD OF ANY TEST EQUIPMENT so as not to short out the power amps. The
side speaker outputs are single-ended, so these precautions are not necessary for them.
38
© 2006 Wohler Technologies Inc. ALL rights reserved
AMP-S8 Series+ User Manual P/N 821640 Rev-B
Section 3: Technical Information
Balance Control Characteristics
The balance control attenuates the signal from the source, so that the left and right bass frequencies (summed together and
reproduced in the woofer channel) will also respond to the balance control.
Example:
If an audio signal of a voice speaking English is fed to the left (A) input and a voice speaking Spanish is fed to the
right (B) input, then the left speaker channel will reproduce the midrange and high-range frequencies of the
English speaking voice, the right speaker channel will reproduce the midrange and high-range frequencies of the
Spanish speaking voice, and the woofer speaker channel will reproduce the summed (combined) low-range
frequencies of both voices.
If the balance control is rotated to the left (English), then the Spanish speaking voice in the right speaker channel
will diminish in volume and the Spanish speaking voice in the woofer speaker channel will also diminish.
Note that if the balance control is rotated completely to the left, the volume in both the left speaker channel and
left woofer speaker channel will increase slightly to maintain overall output level. See the simplified diagram
below for placement of the balance control in the audio amplifier circuit.
The converse of the above is true if the balance control is rotated to the right.
© 2006 Wohler Technologies Inc. ALL rights reserved
39
AMP-S8 Series+ User Manual P/N 821640 Rev-B
Section 3: Technical Information
AMP-S8 Series+
Interconnect Block Diagram
40
© 2006 Wohler Technologies Inc. ALL rights reserved
AMP-S8 Series+ User Manual P/N 821640 Rev-B
Section 3: Technical Information
NOTE:
PCB layout and schematic support documentation is available upon request.
Wohler Technologies, Inc.
Wohler Technologies, Inc.
31055 Huntwood Avenue
31055 Huntwood Avenue
Hayward, CA 94544
Hayward, CA 94544
1-888-596-4537 Fax: (510) 870-0811
Phone: (510) 870-0810 Fax: (510) 870-0811
web: www.wohler.com
US Toll-Free: 1-888-596-4537
e-mail:
[email protected]
www.wohler.com [email protected]
© 2006 Wohler Technologies Inc. ALL rights reserved
41
AMP-S8 Series+ User Manual P/N 821640 Rev-B
Wohler
Technologies, Inc. Inc.
Wohler
Technologies,
31055 Huntwood Avenue
31055 Huntwood Avenue
Hayward, CA 94544
Hayward, CA 94544
1-888-596-4537
Fax: (510) 870-0811
Phone: (510) 870-0810 Fax: (510) 870-0811
web: www.wohler.com
US Toll-Free: 1-888-596-4537
e-mail: [email protected]
www.wohler.com [email protected]
42
© 2006 Wohler Technologies Inc. ALL rights reserved