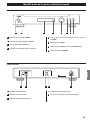
1
Z TU-1000 AM/FM (RDS) STEREO TUNER ENGLISH FRANÇAIS OWNERS MANUAL MODE D’EMPLOI MANUAL DEL USUARIO BEDIENUNGSANLEITUNG MANUALE DI ISTRUZIONI ESPAÑOL DEUTSCH ITALIANO IMPORTANT SAFETY INSTRUCTIONS CAUTION: TO REDUCE THE RISK OF ELECTRIC SHOCK, DO NOT REMOVE COVER (OR BACK). NO USER-SERVICEABLE PARTS INSIDE. REFER SERVICING TO QUALIFIED SERVICE PERSONNEL. The lightning flash with arrowhead symbol, within an equilateral triangle, is intended to alert the user to the presence of uninsulated “dangerous voltage” within the product’s enclosure that may be of sufficient magnitude to constitute a risk of electric shock to persons. The exclamation point within an equilateral triangle is intended to alert the user to the presence of important operating and maintenance (servicing) instructions in the literature accompanying the appliance. 1) 2) 3) 4) 5) 6) 7) Read these instructions. Keep these instructions. Heed all warnings. Follow all instructions. Do not use this apparatus near water. Clean only with dry cloth. Do not block any ventilation openings. Install in accordance with the manufacturer's instructions. 8) Do not install near any heat sources such as radiators, heat registers, stoves, or other apparatus (including amplifiers) that produce heat. 9) Do not defeat the safety purpose of the polarized or groundingtype plug. A polarized plug has two blades with one wider than the other. A grounding type plug has two blades and a third grounding prong. The wide blade or the third prong are provided for your safety. If the provided plug does not fit into your outlet, consult an electrician for replacement of the obsolete outlet. 10) Protect the power cord from being walked on or pinched particularly at plugs, convenience receptacles, and the point where they exit from the apparatus. 11) Only use attachments/accessories specified by the manufacturer. 12) Use only with the cart, stand, tripod, bracket, or table specified by the manufacturer, or sold with the apparatus. When a cart is used, use caution when moving the cart/apparatus combination to avoid injury from tip-over. 13) Unplug this apparatus during lightning storms or when unused for long periods of time. 14) Refer all servicing to qualified service personnel. Servicing is required when the apparatus has been damaged in any way, such as power-supply cord or plug is damaged, liquid has been spilled or objects have fallen into the apparatus, the apparatus has been exposed to rain or moisture, does not operate normally, or has been dropped. Company names and product names in this document are the trademarks or registered trademarks of their respective owners. 2 oo Do not expose this apparatus to drips or splashes. oo Do not place any objects filled with liquids, such as vases, on the apparatus. oo Do not install this apparatus in a confined space such as a book case or similar unit. oo The apparatus draws nominal non-operating power from the AC outlet with its POWER or STANDBY/ON switch not in the ON position. oo The apparatus should be located close enough to the AC outlet so that you can easily reach the power cord plug at any time. oo The mains plug is used as the disconnect device, the disconnect device shall remain readily operable. oo Products with Class construction are equipped with a power supply cord that has a grounding plug. The cord of such a product must be plugged into an AC outlet that has a protective grounding connection. oo If the product uses batteries (including a battery pack or installed batteries), they should not be exposed to sunshine, fire or excessive heat. For U.S.A. This equipment has been tested and found to comply with the limits for a Class B digital device, pursuant to Part 15 of the FCC Rules. These limits are designed to provide reasonable protection against harmful interference in a residential installation. This equipment generates, uses, and can radiate radio frequency energy and, if not installed and used in accordance with the instruc tions, may cause harmful inter ference to radio communications. However, there is no guarantee that interference will not occur in a particular installation. If this equipment does cause harmful interference to radio or television reception, which can be determined by turning the equipment off and on, the user is encouraged to try to correct the interference by one or more of the following measures: • R eorient or relocate the equipment and/or the receiving antenna. • Increase the separation between the equipment and receiver. • Connect the equipment into an outlet on a circuit different from that to which the receiver is connected. • Consult the dealer or an experienced radio/TV technician for help. CAUTION Changes or modifications to this equipment not expressly approved by TEAC CORPORATION for compliance will void the user’s warranty. oo CAUTION for products that use replaceable lithium batteries: there is danger of explosion if a battery is replaced with an incorrect type of battery. Replace only with the same or equivalent type. oo Caution should be taken when using earphones or headphones with the product because excessive sound pressure (volume) from earphones or headphones can cause hearing loss. WARNING: TO PREVENT FIRE OR SHOCK HAZARD, DO NOT EXPOSE THIS APPLIANCE TO RAIN OR MOISTURE. CAUTION For Canada Industry Canada’s Compliance Statement: This Class B digital apparatus complies with Canadian ICES-003. Cet appareil numérique de la classe B est conforme à la norme NMB003 du Canada. oo DO NOT REMOVE THE EXTERNAL CASES OR CABINETS TO EXPOSE THE ELECTRONICS. NO USER SERVICEABLE PARTS ARE INSIDE. oo IF YOU ARE EXPERIENCING PROBLEMS WITH THIS PRODUCT, CONTACT TEAC FOR A SERVICE REFERRAL. DO NOT USE THE PRODUCT UNTIL IT HAS BEEN REPAIRED. oo USE OF CONTROLS OR ADJUSTMENTS OR PERFORMANCE OF PROCEDURES OTHER THAN THOSE SPECIFIED HEREIN MAY RESULT IN HAZARDOUS RADIATION EXPOSURE. 3 For European customers Disposal of electrical and electronic equipment (a) All electrical and electronic equipment should be disposed of separately from the municipal waste stream via collection facilities designated by the government or local authorities. (b)By disposing of electrical and electronic equipment correctly, you will help save valuable resources and prevent any potential negative effects on human health and the environment. (c) Improper disposal of waste electrical and electronic equipment can have serious effects on the environment and human health because of the presence of hazardous substances in the equipment. (d)The Waste Electrical and Electronic Equipment (WEEE) symbol, which shows a wheeled bin that has been crossed out, indicates that electrical and electronic equipment must be collected and disposed of separately from household waste. (e) Return and collection systems are available to end users. For more detailed information about the disposal of old electrical and electronic equipment, please contact your city office, waste disposal service or the shop where you purchased the equipment. Disposal of batteries and/or accumulators (a) Waste batteries and/or accumulators should be disposed of separately from the municipal waste stream via collection facilities designated by the government or local authorities. (b)By disposing of waste batteries and/or accumulators correctly, you will help save valuable resources and prevent any potential negative effects on human health and the environment. (c) Improper disposal of waste batteries and/or accumulators can have serious effects on the environment and human health because of the presence of hazardous substances in them. (d)The WEEE symbol, which shows a wheeled bin that has been crossed out, indicates that batteries and/or accumulators must be collected and disposed of separately from household waste. Pb, Hg, Cd If a battery or accumulator contains more than the specified values of lead (Pb), mercury (Hg), and/or cadmium (Cd) as defined in the Battery Directive (2006/66/EC), then the chemical symbols for those elements will be indicated beneath the WEEE symbol. (e) Return and collection systems are available to end users. For more detailed information about the disposal of waste batteries and/or accumulators, please contact your city office, waste disposal service or the shop where you purchased them. 4 Contents Before Using the Unit . . . . . . . . . . . . . . . . . . . . . . . . . . . . . . . . . . . . . . . . . . . . 5 Before Using the Unit Read before operation Connection of Antenna . . . . . . . . . . . . . . . . . . . . . . . . . . . . . . . . . . . . . . . . . . 6 Identifying the Parts (main unit). . . . . . . . . . . . . . . . . . . . . . . . . . . . . . . . . . 7 Identifying the Parts (remote control). . . . . . . . . . . . . . . . . . . . . . . . . . . . . 8 Basic Operation . . . . . . . . . . . . . . . . . . . . . . . . . . . . . . . . . . . . . . . . . . . . . . . . . . 9 Troubleshooting. . . . . . . . . . . . . . . . . . . . . . . . . . . . . . . . . . . . . . . . . . . . . . . . . 11 Specifications. . . . . . . . . . . . . . . . . . . . . . . . . . . . . . . . . . . . . . . . . . . . . . . . . . . 11 oo Be careful to avoid injury when moving the unit, due to its weight. Get someone to help you if necessary. oo To protect easily scratched furniture, you may apply the felt pad supplied with the unit to the feet. oo As the unit may become warm during operation, always leave sufficient space around the unit for ventilation. The ventilation holes should not be covered. Make sure there is at least 20 cm (8") of space above and at least 5 cm (2") of space on each side of the unit. Do NOT place anything on top of the unit. oo The voltage supplied to the unit should match the voltage that is printed on the rear panel. If you are in any doubt regarding this matter, consult an electrician. oo Do not place the unit on the amplifier/receiver. oo Do not open the cabinet as this might result in damage to the circuitry or electrical shock. If a foreign object should get into the unit, contact your dealer or service company. oo When removing the power plug from the wall outlet, always pull directly on the plug, never yank the cord. oo Do not attempt to clean the unit with chemical solvents as this might damage the finish. Use a clean, dry cloth. oo Keep this manual in a safe place for future reference. oo When the unit is turned on, if a TV is turned on nearby lines might appear on the TV screen depending on the frequency of the TV broadcast. This is not a malfunction of the unit or the TV. If you see such lines, move the unit and the TV further apart. Maintenance If the surface of the unit gets dirty, wipe with a soft cloth or use diluted neutral cleaning liquid. Be sure to remove any fluid completely. Do not use thinner or alcohol as they may damage the surface of the unit. 5 ENGLISH oo Choose the installation location of your unit carefully. Avoid placing it in direct sunlight or close to a source of heat. Also avoid locations subject to vibrations and excessive dust, heat, cold or moisture. Connection of Antenna Install AM Loop Antenna As shown in the figure, install AM loop antenna. Connect AM Loop Antenna The AM loop antenna is suitable for most indoor applications. Adjust the position and direction of the antenna until clear sound can be received. Try to keep the antenna far away from the main unit, TV, speaker cable and power cable as much as possible. )0 Connection Method of Antenna Cable 1 Press down the lock handle. $0 *1' $17(11$ oo If you cannot receive a clear sound with the AM loop antenna connected, we recommend you to use an AM outdoor antenna. Connect FM Outdoor Antenna 2 Insert the wire into the hole. )0 $0 *1' $17(11$ 3 Release the fixing rod to restore its original shape. oo Keep the antenna far away from the source of noise (signal of fluorescent lamp, busy streets, etc.) Connect FM Indoor Antenna The FM indoor antenna is suitable for most indoor applications. Extend the antenna and move it in various directions until a clear signal is received. Mount the antenna with a pin or similar item in a location where the distortion is the least. )0 oo It would be dangerous to install the antenna close to the power cable; therefore, be sure to keep the antenna away from the power cable. Connect AM Outdoor Antenna $0 *1' FM/75 AM GND $17(11$ oo If you still cannot receive a clear sound with the FM indoor antenna connected, we recommend that you try an FM outdoor antenna. oo If the antenna can be extended above the window or any higher outdoor location, then the tuner may give a better performance. oo Do not disconnect the loop antenna. 6 Identifying the Parts (main unit) Front panel A C B D E F G H POWER indicator E Tuning/selecting station knob B POWER button F MODE button C Multifunction display window G BAND button (FM/AM/AUTO switch button) D Remote control sensor H MEMORY button ENGLISH A Rear panel a b c d e a FM antenna terminal d Right channel audio output b AM antenna terminals e AC power inlet (with fuse) c Left channel audio output 7 Identifying the Parts (remote control) j Remote control MEMORY k a g b c d e h l BAND (band switch button) TUNER (tuner switch button) i j k f Note before using the remote control oo Press the TUNER button to switch to the TUNER mode before operating the unit by using the remote control. oo The effective range of the remote control is no greater than 10m and an angle no greater than 30 degrees. l oo Buttons that are not listed or mentioned in the remote control diagram are not used for this unit. It is normal that there will be no response when you press them. Battery installation a MUTE b TUNING j (previous tuning button) Hold down 2 or 3 seconds for auto selection of the previous channel. c TUNING k (next tuning button) 1 Open the cover of the remote control unit. 2 Insert two AAA batteries. Make sure that the batteries are inserted with their positive ¥ and negative ^ poles positioned correctly. 3 Close the cover. Hold down 2 or 3 seconds for auto selection of the next channel. d PRESET j (previous station button) e PRESET k (next station button) f 0-9 (number buttons) g RDS Hold down 2 or 3 seconds for brightness adjustment. h i 8 MODE FREQ (frequency direct input) Basic Operation (1) Power ON / OFF FM/AM reception band Connect the power cord and signal cable of the unit. Then, press the POWER button on the front panel to turn the unit on (R). The power indicator on the front panel is on and the unit is in normal operating mode now. Auto selection: Press the Band button for “FM” or “AM”. Press and hold down the TUNING j button (m) to tune in a lower frequency. When a station is found, the tuning process will stop automatically. The display shows “ ”. Press the TUNING k button (,) to tune in a higher frequency. When a station is found, the tuning process will stop automatically. The display shows “ ”. To turn the unit off, press the POWER button on the front panel. The button is set to the off position (E), and the power indicator and eventually the unit are off. Disconnect the AC power cord from the main outlet when the appliance is not used for a long period of time. Band selection Pressing the BAND button on the front panel or the remote control will toggle through FM/AM/AUTO. When you select FM mode, “M” (MHz) is lit in the display and “F” appears after the station code. When you select AM mode, “K” (KHz) is lit and “A” appears in the display after the station code. Example: For 01A 1404K, “01” is the station code, “A” is for AM, and “1404K” is the station frequency. Direct input selection: Input the frequency of the broadcast you want to hear with the number buttons. Example: When you know a station frequency, you can directly input that frequency to select that station. When you know that the FM station frequency is 104.30MHz, press the FREQ button on the remote control and “------M” appears in the display. Then, press numbers 1, 0, 4, 3, and 0 in sequence. oo When the first number is bigger than 1, the display begins with the second number. When the first number is 1, the second number shows as "0". oo In FM mode, the last number you pressed is bigger than or equal to 5 shows as "5", and the number less than 5 shows as "0". When you select FM AUTO mode, “AT”, “F”, “M” and the station code are all shown in the display. Example: For 01F 104.30M, “ST” is stereo reception, “AT” is FM AUTO mode, “F” is for FM, and “104.30M” is the station frequency. 9 ENGLISH Example: For 01F 104.30M, “01” is the station code, “F” is for FM, and “104.30M” is the station frequency. Manual selection: Press the MODE button and the station frequency will blink in the display. Turn the TUNING knob on the front panel or hold down either TUNING j or k button (m or ,) and release it when the station you want to listen to is found. The frequency changes in fixed steps; “FM” is 50KHz, and “AM” is 9KHz. Basic Operation (2) Presetting stations Mute Manually presetting stations: Press the MEMORY button on the front panel or on the remote control. The station code will blink in the display. Then, turn the TUNING knob clockwise to select a higher station code or counterclockwise to select a lower station code. Alternatively, press either PRESET j or k button (. or /) to select the desired station code. Then, press the MEMORY button on the front panel or on the remote control. The station has been stored in your unit. To mute the sound temporarily, press the MUTE button on the remote control. “MUTE” will appear in the display. Press the MUTE button again to restore the sound. oo When the number is less than 10, press the number directly. If you do not press other buttons, wait for 1 or 2 seconds, and then the display shows the selected number. oo Alternatively, press the “0” button first, and then press a number. oo When the number is bigger than or equal to 10, press the number directly. Automatically presetting stations: Press and hold down the MEMORY button on the front panel on the remote control. FM tuning frequencies run from FM87.50 to 108.00 MHz, and AM tuning frequencies run from 522 to 1620 KHz . oo This function enables this unit to automatically tune into FM and AM stations with strong signals, and can store up to 80 of those stations. RDS Press the RDS button on the remote control to cycle the display throug the Time mode, PS mode, PTY mode and RT mode. RDS stations are automatically detected. oo If no RDS stations are found with the above operation, either -- : -- / NO PS / NO PTY / NO RT will be shown in the display. oo When an RDS is found, the time information, station's name, station program type, and Radio Text (no more than 64 characters) would appear in the display. Display brightness adjustment Press the RDS button on the remote control to adjust the brightness of characters in the display based on the brightness of the surrounding environment. If you hold down the RDS button for 2 or 3 seconds, the display brightness selection will toggle through “HIGH, LOW and OFF”. Selecting preset stations Press the MODE button on the front panel or remote control. The station's preset number will blink in the display. Then, turn the TUNING knob clockwise to select a higher preset number or counterclockwise to select a lower preset number. Alternatively, press either PRESET j or k button (. or /) to select the desired preset number. When the desired station has been selected, press the MODE button again. You can also select a preset station by pressing the corresponding number buttons on the remote control. oo When the number is less than 10, press the number button directly. If you do not press other button, wait for 1 or 2 seconds, then the pressed number is shown on the display. oo Alternatively, press 0 button first, and then press a number button. When the number is bigger than or equal to 10, press the number buttons directly. oo You can also press the PRESET j or k button (. or /) to review the preset radio stations. oo You can select up to 80 preset stations. 10 oo The unit automatically defaults to “HIGH” brightness at startup. Troubleshooting Specifications If you experience any problems with the unit, please take a moment to look through this chart before asking for repairs. If you still have a problem, contact your dealer or TEAC customer service/technical support (stated on the back cover). FM Tuner Frequency band . . . . . . . . . . . . . . . . . . . . . . . . . . . . . . . 87.5 MHz - 108 MHz Sensitivity . . . . . . . . . . . . . . . . . . . . . . . . . . . . . . . . . . . . . . . . . . . . (IHF) 12 dB µ Signal noise ratio . . . . . . . . . . . . . . . . . . . . . . . . . . . mono: 66 dB or above stereo: 60 dB or above No power e Check the connection to the AC outlet. Check and make sure the AC source is not a switched outlet and that, if it is, the switch is turned on. Make sure there is power to the AC outlet by plugging another item such as a lamp or fan into the outlet. AM Tuner Frequency band . . . . . . . . . . . . . . . . . . . . . . . . . . . . . . . 522 KHz - 1620 KHz Sensitivity . . . . . . . . . . . . . . . . . . . . . . . . . . . . . . . . . . . . . . . . . . . . . . . . . 55 dB µ Signal noise ratio . . . . . . . . . . . . . . . . . . . . . . . . . . . . . . . . . . 40 dB or above Remote control doesn't work. e Press the POWER button of the main unit to turn it on. e If the batteries are dead, change the batteries. e Within the specified range of 10m, point the remote control directly at the unit's front panel. No sound e Check the connection to the amplifier. e Check the operation of the amplifier. e Muting is activated. Press the MUTE button. Select the correct source. ENGLISH e Clear any obstacle between the remote control and the main unit. General Power Requirements . . . . . . . . . . . . . . . . . . . . . . . . . . . . . . AC 230 V , 50 Hz Power Consumption (nominal) . . . . . . . . . . . . . . . . . . . . . . . . . . . . . . . . 5 W Dimensions (W x H x D) . . . . . . . . . . . . . . . . . . . . . . . . . 435 x 84 x 331 mm Weight . . . . . . . . . . . . . . . . . . . . . . . . . . . . . . . . . . . . . . . . . . . . . . . . . . . . . . 5.2 kg Operating temperature . . . . . . . . . . . . . . . . . . . . . . . . . . . . . . . +5˚C - +35˚C Operating humidity . . . . . . . . . . . . . . . . . 5 % - 85 % (no condensation) Storage temperature . . . . . . . . . . . . . . . . . . . . . . . . . . . . . . . . –10˚C - +55˚C Accessories Power cord x 1 FM antenna x 1 AM antenna x 1 Remote control x 1 AAA battery x 2 Warranty card x 1 Owner's manual x 1 Cannot listen to any station, or signal is too weak. e Make sure the antenna is properly connected. e Tune in the station properly. oo Design and specifications are subject to change without notice. oo Weight and dimensions are approximate. oo Illustrations may differ slightly from production models. e If a TV is near the unit, turn it off. e Install the antenna again after relocating it to a better reception position. e An external antenna may be required. 11 oo N'exposez pas cet appareil aux gouttes ni aux éclaboussures. oo Ne placez pas d'objet rempli de liquide sur l'appareil, comme par exemple un vase. oo N’installez pas cet appareil dans un espace confiné comme une bibliothèque ou un meuble similaire. oo L’appareil tire un courant nominal de veille de la prise secteur quand son interrupteur POWER ou STANDBY/ON n’est pas en position ON. oo L’appareil doit être placé suffisamment près de la prise de courant pour que vous puissiez à tout moment atteindre facilement la fiche du cordon d’alimentation oo La fiche secteur est utilisée comme dispositif de déconnexion et doit donc toujours rester disponible. oo Les produits de Classe sont équipés d'un cordon d'alimentation ayant une fiche de terre. Le cordon de ces produits doit être branché dans une prise de terre. oo Si le produit utilise des batteries (y compris un pack d'accus ou des piles), elles ne doivent pas être exposées au soleil, au feu ou à une chaleur excessive. oo PRÉCAUTION pour les produits utilisant des batteries au lithium remplaçables : il existe un danger d'explosion en cas de remplacement par un type de batterie incorrect. Remplacez-les par des modèles identiques ou équivalents. oo Des précautions doivent être prises pour l'emploi d'écouteurs ou d'un casque avec le produit car une pression acoustique (volume) excessive dans les écouteurs ou dans le casque peut provoquer une perte d’audition. Pour les consommateurs européens Mise au rebut des équipements électriques et électroniques (a) Tout équipement électrique et électronique doit être traité séparément de la collecte municipale d'ordures ménagères dans des points de collecte désignés par le gouvernement ou les autorités locales. (b) En vous débarrassant correctement des équipements électriques et électroniques, vous contribuerez à la sauvegarde de précieuses ressources et à la prévention de potentiels effets négatifs sur la santé humaine et l'environnement. (c) Le traitement incorrect des déchets d'équipements électriques et électroniques peut avoir des effets graves sur l'environnement et la santé humaine en raison de la présence de substances dangereuses dans les équipements. (d) Le symbole de déchets d'équipements électriques et électroniques (DEEE), qui représente une poubelle à roulettes barrée d'une croix, indique que les équipements électriques et électroniques doivent être collectés et traités séparément des déchets ménagers. (e) Des systèmes de retour et de collecte sont disponibles pour l'utilisateur final. Pour des informations plus détaillées sur la mise au rebut des vieux équipements électriques et électroniques, veuillez contacter votre mairie, le service d'ordures ménagères ou le magasin dans lequel vous avez acquis l'équipement. Mise au rebut des batteries et/ou accumulateurs (a) Les batteries et/ou accumulateurs hors d'usage doivent être traités séparément de la collecte municipale d'ordures ménagères dans des points de collecte désignés par le gouvernement ou les autorités locales. (b) En vous débarrassant correctement des batteries et/ou accumulateurs hors d'usage, vous contribuerez à la sauvegarde de précieuses ressources et à la prévention de potentiels effets négatifs sur la santé humaine et l'environnement. (c) Le traitement incorrect des batteries et/ou accumulateurs hors d'usage peut avoir des effets graves sur l'environnement et la santé humaine car ils contiennent des substances dangereuses. (d) Le symbole de déchets d'équipements électriques et électroniques (DEEE), qui représente une poubelle à roulettes barrée d'une croix, indique que les batteries et/ou accumulateurs doivent être collectés et traités séparément Pb, Hg, Cd des déchets ménagers. Si une batterie ou un accumulateur contient plus que les valeurs spécifiées de plomb (Pb), mercure (Hg) et/ou cadmium (Cd) telles que définies dans la directive sur les batteries (2006/66/EC), alors les symboles chimiques de ces éléments seront indiqués sous le symbole DEEE. (e) Des systèmes de retour et de collecte sont disponibles pour l'utilisateur final. Pour des informations plus détaillées sur la mise au rebut des batteries et/ou accumulateurs, veuillez contacter votre mairie, le service d'ordures ménagères ou le magasin dans lequel vous les avez achetés. 12 Sommaire Avant d'utiliser l'unité Avant d'utiliser l'unité . . . . . . . . . . . . . . . . . . . . . . . . . . . . . . . . . . . . . . . . . . . 13 Branchement de l'antenne . . . . . . . . . . . . . . . . . . . . . . . . . . . . . . . . . . . . . . 14 À lire avant utilisation Identification des parties (unité principale). . . . . . . . . . . . . . . . . . . . . . . 15 Identification des parties (télécommande). . . . . . . . . . . . . . . . . . . . . . . 16 oo En raison du poids de l'unité, prenez garde à ne pas vous blesser quand vous la déplacez. Faites vous aider si nécessaire. Fonctionnement de base. . . . . . . . . . . . . . . . . . . . . . . . . . . . . . . . . . . . . . . . 17 oo Pour protéger les meubles susceptibles d'être rayés, vous pouvez mettre sur les pieds les patins en feutre livrés avec l'unité. Guide de dépannage. . . . . . . . . . . . . . . . . . . . . . . . . . . . . . . . . . . . . . . . . . . . 19 Caractéristiques techniques. . . . . . . . . . . . . . . . . . . . . . . . . . . . . . . . . . . . . 19 oo Il est possible que l’unité chauffe durant l’utilisation, laissez donc toujours un espace suffisant autour d'elle pour la ventilation. Les ouvertures de ventilation ne doivent pas être couvertes. Veillez à ce qu’il y ait un espace d’au moins 20 cm au dessus de l’unité et d’au moins 5 cm de chaque côté. Ne placez RIEN sur l’unité. oo La tension d’alimentation de l'unité doit correspondre à la tension imprimée sur la face arrière. Si vous avez des doutes à ce sujet, consultez un électricien. oo Choisissez soigneusement l’emplacement de votre unité. Évitez de l’exposer directement aux rayons solaires ou à une source de chaleur. Évitez aussi les endroits sujets aux vibrations, à une poussière excessive, à la chaleur, au froid et à l’humidité. oo N’installez pas l’unité sur un amplificateur ou autre appareil diffusant de la chaleur. oo Quand vous débranchez le cordon d'alimentation de la prise secteur, tirez toujours la prise, jamais le cordon. oo N’essayez pas de nettoyer l’unité avec des dissolvants chimiques, cela peut endommager la finition. Utilisez un chiffon propre et sec. oo Conservez ce mode d'emploi dans un endroit sûr pour référence ultérieure. oo Quand cette unité est en service, allumer un téléviseur à proximité peut entraîner l’apparition de lignes sur l’écran de celui-ci, en fonction de la fréquence de la télédiffusion. Ce n’est pas un mauvais fonctionnement de l’unité ni du téléviseur. Si vous voyez de telles lignes, éloignez l'unité du téléviseur. Entretien Si la surface de l’unité est sale, essuyez-la avec un chiffon doux ou utilisez un savon liquide neutre dilué. Veillez à enlever tout liquide. N’utilisez pas de diluant, ou alcool car ils peuvent endommager la surface de l’unité. 13 FRANÇAIS oo N’ouvrez pas le boîtier car cela peut endommager le circuit ou causer un choc électrique. Si un objet étranger pénètre dans l’unité, consultez votre revendeur ou le service après-vente. Branchement de l'antenne Installation de l'antenne cadre AM Inst allez l'ante nne cadre AM comme indiqué dans l'illustration. Branchement de l'antenne cadre AM L'antenne cadre AM convient à la plupart des utilisations en intérieur. Réglez la position et la direction de l'antenne jusqu'à ce qu'un son net puisse être capté. Essayez de maintenir l'antenne à aussi bonne distance que possible de l'unité principale, du téléviseur, des câbles d'enceinte et du câble d'alimentation. )0 Méthode de branchement du câble d'antenne 1 Abaissez le loquet de verrouillage. $0 *1' $17(11$ oo Si vous n'arrivez pas à bien capter le son avec l'antenne cadre AM, nous vous recommandons d'utiliser une antenne AM extérieure. Branchement de l'antenne FM extérieure 2 Insérez le fil dans l'orifice. )0 $0 *1' $17(11$ 3 Relâchez le loquet pour qu'il reprenne sa position d'origine. oo Maintenez l'antenne à distance des sources de parasites (lampe fluorescente, rues bruyantes, etc). oo Il serait dangereux d'installer l'antenne près du câble d'alimentation ; par conséquent, veillez bien à la maintenir à l'écart du câble d'alimentation. Branchement de l'antenne FM intérieure L'antenne FM intérieure convient à la plupart des utilisations en intérieur. Déployez l'antenne et orientez-la dans diverses directions jusqu'à ce que la réception du signal soit bonne. Fixez l'antenne avec une punaise ou un accessoire similaire à l'endroit où la distorsion est la plus faible. )0 FM/75 $0 *1' $17(11$ oo Si vous n'arrivez pas à bien capter le son avec l'antenne FM intérieure, nous vous recommandons d'utiliser une antenne FM extérieure. 14 Branchement de l'antenne AM extérieure AM GND oo Si l'antenne peut être amenée au-dessus de la fenêtre ou en un point plus élevé à l'extérieur, alors le tuner peut offrir de meilleures performances. oo Ne déconnectez pas l'antenne cadre. Identification des parties (unité principale) Face avant A C B D E F G H A Voyant d'alimentation POWER E Bouton de syntonisation/sélection de station B Interrupteur d'alimentation POWER F Touche MODE C Afficheur multifonction G Touche BAND (sélection de bande FM/AM/AUTO) D Capteur de télécommande H Touche MEMORY FRANÇAIS Face arrière a b c d e a Prise pour antenne FM d Sortie audio du canal droit b Prises pour antenne AM e Embase d'alimentation secteur (avec fusible) c Sortie audio du canal gauche 15 Identification des parties (télécommande) j Télécommande MEMORY k a g b c d e h l BAND (touche de changement de bande) TUNER (touche d'accès au tuner) i j k f Note avant utilisation de la télécommande oo Appuyez sur la touche TUNER pour passer en mode TUNER avant de piloter l'unité depuis la télécommande. oo La portée de fonctionnement de la télécommande ne dépasse pas 10 m et un angle de 30 degrés. l oo Les touches qui ne sont ni listées ni mentionnées dans le schéma de la télécommande ne servent pas pour cette unité. Il est donc normal qu'il n'y ait aucune réponse quand vous appuyez sur cellesci. Mise en place des piles a MUTE (coupure du son) b TUNING j (touche de syntonisation sur la station précédente) c Maintenez-la enfoncée 2 ou 3 secondes pour la sélection automatique du canal précédent. TUNING k (touche de syntonisation sur la station suivante) 1 Ouvrez le compartiment des piles de la télécommande. 2 Insérez deux piles AAA. Assurez-vous que les piles sont insérées avec les pôles plus ¥ et moins ^ correctement orientés. 3 Refermez le compartiment. Maintenez-la enfoncée 2 ou 3 secondes pour la sélection automatique du canal suivant. d PRESET j (touche de station mémorisée précédente) e PRESET k (touche de station mémorisée suivante) f 0-9 (touches numériques) g RDS Maintenez-la pressée 2 ou 3 secondes pour régler la luminosité. h i MODE FREQ (saisie directe de la fréquence) 16 Fonctionnement de base (1) Mise sous/hors tension Bande de réception FM/AM Branchez le cordon d'alimentation et le câble de signal de l'unité. Ensuite, appuyez sur l'interrupteur d'alimentation POWER de la face avant pour allumer l'unité (R). Le voyant d'alimentation de la face avant est allumé et l'unité est maintenant en mode de fonctionnement normal. Sélection automatique : Appuyez sur la touche Band pour sélectionner “FM” ou “AM”. Maintenez pressée la touche TUNING j (m) pour capter une fréquence inférieure. Quand une station est trouvée, le processus de syntonisation s'arrête automatiquement. L'écran affiche “ ”. Appuyez sur la touche TUNING k (,) pour capter une fréquence supérieure. Quand une station est trouvée, le processus de syntonisation s'arrête automatiquement. L'écran affiche “ ”. Pour éteindre l'unité, appuyez sur l'interrupteur d'alimentation POWER en face avant. L'interrupteur est en position off (E), le voyant d'alimentation puis l'unité s'éteignent. Débranchez le cordon d'alimentation de la prise secteur quand l'appareil reste inutilisé durant une longue période. Sélection de bande Appuyer sur la touche BAND de la face avant ou de la télécommande fait alterner entre FM/AM/AUTO. Si vous sélectionnez le mode FM, “M” (MHz) s'allume à l'écran et “F” apparaît après le code de la station. Exemple : Dans 01F 104.30M, “01” est le code de la station, “F” signifie FM, et “104.30M” est la fréquence de la station. Exemple : Dans 01A 1404K, “01” est le code de la station, “A” signifie AM, et “1404K” est la fréquence de la station. Sélection par saisie directe : Saisissez avec les touches numériques la fréquence de la station que vous voulez entendre. Exemple : Quand vous connaissez la fréquence d'une station, vous pouvez directement la saisir pour sélectionner cette station. Si vous savez que la fréquence de la station FM est 104.30 MHz, appuyez sur la touche FREQ de la télécommande et “------M” s'affiche à l'écran. Appuyez ensuite tour à tour sur les touches numériques 1, 0, 4, 3 et 0. oo Si le premier chiffre est supérieur à 1, l'affichage commence par le second numéro. Quand le premier chiffre est 1, "0" s'affiche comme second chiffre. oo En mode FM, si le dernier chiffre pressé est supérieur ou égal à 5, cela affiche "5", et s'il est inférieur à 5, cela affiche "0". Si vous sélectionnez le mode FM AUTO, “AT”, “F”, “M” et le code de la station s'affichent tous à l'écran. Exemple : Dans 01F 104.30M, “ST” indique la réception stéréo, “AT” le mode FM AUTO, “F” signifie FM, et “104.30M” est la fréquence de la station. 17 FRANÇAIS Si vous sélectionnez le mode AM, “K” (kHz) s'allume et “A” apparaît à l'écran après le code de la station. Sélection manuelle : Appuyez sur la touche MODE et la fréquence de la station clignotera à l'écran. Tournez le bouton TUNING en face avant ou maintenez pressée la touche TUNING j ou la touche k (m ou ,) et relâchez-la quand vous avez trouvé la station voulue. La fréquence change par paliers fixes ; 50 kHz pour “FM” et 9 kHz pour “AM”. Fonctionnement de base (2) Préréglage des stations Coupure du son Préréglage manuel des stations : Appuyez sur la touche MEMORY de la face avant ou de la télécommande. Le code de la station clignotera à l'écran. Ensuite, tournez le bouton TUNING dans le sens horaire pour sélectionner un code de station plus élevé ou dans le sens anti-horaire pour sélectionner un code de station moins élevé. Sinon, appuyez sur la touche PRESET j ou k (. ou /) pour sélectionner le code de station désiré. Ensuite, appuyez sur la touche MEMORY de la face avant ou de la télécommande. La station est mémorisée dans votre unité. Pour couper temporairement le son, appuyez sur la touche MUTE de la télécommande. “MUTE” s'affichera. Appuyez à nouveau sur la touche MUTE pour rétablir le son. oo Si le numéro est inférieur à 10, appuyez directement sur le numéro. Si vous n'appuyez pas sur d'autres touches, attendez 1 ou 2 secondes, puis l'écran affiche le numéro sélectionné. oo Sinon, appuyez d'abord sur la touche “0”, puis sur une touche numérique. oo Si le numéro est supérieur ou égal à 10, saisissez directement le numéro. Préréglage automatique des stations : Maintenez pressée la touche MEMORY de la face avant ou de la télécommande. Les fréquences de syntonisation FM vont de 87.50 à 108.00 MHz, et celles de syntonisation AM de 522 à 1620 kHz. oo Cette fonction permet à cette unité de trouver automatiquement les stations FM et AM à forts signaux, et peut mémoriser jusqu'à 80 de ces stations. Sélection des stations préréglées Appuyez sur la touche MODE de la face avant ou de la télécommande. Le numéro de mémoire préréglée (preset) de la station clignotera à l'écran. Ensuite, tournez le bouton TUNING dans le sens horaire pour sélectionner un numéro de preset plus élevé ou dans le sens antihoraire pour sélectionner un numéro de preset moins élevé. Sinon, appuyez sur la touche PRESET j ou k (. ou /) pour sélectionner le numéro de preset désiré. Quand la station désirée a été sélectionnée, appuyez à nouveau sur la touche MODE. Vous pouvez aussi sélectionner une station préréglée en appuyant sur les touches numériques correspondantes sur la télécommande. oo Si le numéro est inférieur à 10, appuyez directement sur la touche numérique. Si vous n'appuyez pas sur d'autres touches, attendez 1 ou 2 secondes, puis l'écran affiche le numéro sélectionné. oo Sinon, appuyez d'abord sur la touche 0, puis sur une touche numérique. Si le numéro est supérieur ou égal à 10, saisissez directement le numéro. oo Vous pouvez aussi appuyer sur la touche PRESET j ou k (. ou /) pour passer en revue les stations radio préréglées. oo Vous pouvez prérégler jusqu'à 80 stations. 18 RDS Appuyez sur la touche RDS de la télécommande pour faire passer tour à tour l'affichage en mode Temps, en mode PS (nom de la station), en mode PTY (type de programme) et en mode RT (texte radio). Les stations RDS sont automatiquement détectées. oo Si l'opération ci-dessus ne trouve aucune station RDS, l'écran affichera au choix -- : -- / NO PS / NO PTY / NO RT. oo Quand une station RDS est trouvée, les informations de temps, nom de station, type de programme de la station et texte radio (pas plus de 64 caractères) s'affichent à l'écran. Réglage de luminosité de l'afficheur Appuyez sur la touche RDS de la télécommande pour régler la luminosité des caractères affichés en fonction de la luminosité ambiante. Si vous maintenez la touche RDS pressée durant 2 ou 3 secondes, la luminosité de l'afficheur alterne entre “HIGH” (haute), “LOW” (basse) et “OFF”. oo Par défaut, l'unité revient automatiquement sur “HIGH” au démarrage. Guide de dépannage Caractéristiques techniques Si vous rencontrez des problèmes avec l'unité, veuillez prendre un moment pour parcourir ce tableau avant de solliciter une réparation. Si le problème persiste, contactez votre revendeur ou le service clientèle/technique de TEAC (coordonnées au dos de la couverture). Tuner FM Plage de fréquences . . . . . . . . . . . . . . . . . . . . . . . . . . . . 87.5 MHz - 108 MHz Sensibilité . . . . . . . . . . . . . . . . . . . . . . . . . . . . . . . . . . . . . . . . . . . . (IHF) 12 dB µ Rapport signal/bruit . . . . . . . . . . . . . . . . . . . . . . . . . mono : 66 dB ou plus stéréo : 60 dB ou plus Pas d’alimentation. e Vérifiez le branchement à la prise secteur. Vérifiez et assurez-vous que la source d’alimentation n’est pas une prise commutée et, si c’est le cas, qu'elle est en service. Vérifiez que la prise délivre bien du courant en y branchant un autre appareil tel qu'une lampe ou un ventilateur. La télécommande ne fonctionne pas. e Appuyez sur la touche POWER de l'appareil pour l'allumer. e Si les piles sont épuisées, changez-les. e Dans les limites de la portée de 10 m, pointez la télécommande directement vers la face avant de l'unité. Tuner AM Plage de fréquences . . . . . . . . . . . . . . . . . . . . . . . . . . . . 522 kHz - 1620 kHz Sensibilité . . . . . . . . . . . . . . . . . . . . . . . . . . . . . . . . . . . . . . . . . . . . . . . . . 55 dB µ Rapport signal/bruit . . . . . . . . . . . . . . . . . . . . . . . . . . . . . . . . . 40 dB ou plus Générales Alimentation électrique . . . . . . . . . . . . . . . . . . . . . . . . . . . . CA 230 V, 50 Hz Consommation électrique (nominale) . . . . . . . . . . . . . . . . . . . . . . . . . 5 W Dimensions (L x H x P) . . . . . . . . . . . . . . . . . . . . . . . . . . 435 x 84 x 331 mm Poids . . . . . . . . . . . . . . . . . . . . . . . . . . . . . . . . . . . . . . . . . . . . . . . . . . . . . . . . 5,2 kg Température de fonctionnement . . . . . . . . . . . . . . . . . . . . . +5˚C - +35˚C Hygrométrie de fonctionnement . . . 5 % - 85 % (sans condensation) Température de fonctionnement . . . . . . . . . . . . . . . . . . . . . -10˚C - +55˚C e Retirez tout obstacle entre la télécommande et l’unité. Pas de son e Vérifiez le branchement à l'amplificateur. e Vérifiez le fonctionnement de l'amplificateur. FRANÇAIS e La coupure du son (Mute) est activée. Appuyez sur la touche MUTE. Sélectionnez la source correcte. Accessoires Cordon d’alimentation x 1 Antenne FM x 1 Antenne AM x 1 Télécommande x 1 Pile AAA x 2 Carte de garantie x 1 Mode d'emploi x 1 Aucune station ne peut être captée, ou signal trop faible. e Vérifiez que l'antenne est correctement branchée. e Réglez correctement la station. e S’il y a un téléviseur près de l’unité, éteignez-le. oo Conception et caractéristiques techniques sont sujettes à changements sans préavis. oo Le poids et les dimensions sont des valeurs approchées. oo Les illustrations peuvent légèrement différer des modèles de production. e Réinstallez l'antenne après l'avoir déplacé à un endroit permettant une meilleure réception. e Une antenne externe est peut-être nécessaire. 19 oo No exponga este aparato a salpicaduras ni goteras. oo No coloque objetos que contengan líquidos, como por ejemplo vasos, sobre el aparato. oo No instale este aparato en lugares cerrados tales como estanterías o similares. oo Este aparato libera corriente nominal no válida para el funcionamiento a través de la toma de corriente, aún cuando el interruptor de encendido y activación (POWER o STANDBY/ON) no esté en la posición de encendido (ON). oo Este aparato debe situarse lo suficientemente cerca de una toma de electricidad como para poder alcanzar fácilmente el cable de corriente en cualquier momento. oo El enchufe que se conecta a la red es el dispositivo de desconexión, por lo que deberá permanecer siempre en prefecto estado de uso. oo Los productos con construcción de Clase están equipados con un cable de alimentación que tiene una clavija de enchufe con protección de tierra (3 puntas) . El cable de estos productos deberá conectarse a una toma de corriente que tenga conexión de protección de tierra. oo Si el producto utiliza pilas (esto incluye las pilas instaladas y los “packs” de pilas), se evitará su exposición directa al sol, al fuego o a cualquier otra fuente de calor excesivo. oo PRECAUCIÓN con los productos que emplean baterías de litio reemplazables: existe peligro de explosión si la batería se reemplaza por otra de tipo incorrecto. Reemplácela sólo por otra igual o de tipo equivalente. oo Deberá llevar cuidado si utiliza auriculares con este producto, ya que una excesiva presión sonora (volumen) procedente de los mismos puede causar perdidas de audición. Para consumidores europeos Deshacerse de aparatos eléctricos y electrónicos (a) Todos los aparatos eléctricos y electrónicos deben ser eliminados separados del resto de basura común y únicamente en los “puntos limpios” o bajo los procedimientos especificados por el gobierno o autoridades municipales locales. (b)Con la eliminación correcta de los equipos eléctricos y electrónicos estará ayudando a conservar recursos muy valiosos y a evitar los posibles efectos negativos en la salud humana y en el medio ambiente. (c) La eliminación incorrecta de los equipos eléctricos y electrónicos puede producir efectos muy dañinos en el medio ambiente y en la salud humana a causa de las sustancias peligrosas que pueden encontrarse en estos equipos. (d)El símbolo de Eliminación de Aparatos Eléctricos y Electrónicos (WEEE en inglés), identificado por un cubo de basura con ruedas tachado, indica que los equipos eléctricos y electrónicos deben ser eliminados de forma totalmente independiente con respecto a la basura doméstica. (e) Existen sistemas para la eliminación y recogida de este tipo de aparatos a disposición del usuario final. Si necesita más información acerca de la forma de deshacerse de aparatos eléctricos y electrónicos antiguos, póngase en contacto con su Ayuntamiento, con la correspondiente empresa del servicio de recogida de residuos o con el comercio en el que adquirió ese aparato. Deshacerse de pilas y/o acumuladores (a) Las pilas y/o acumuladores gastados deben ser eliminados separados del resto de basura común y únicamente en los “puntos de recogida” o bajo los procedimientos especificados por el gobierno o autoridades municipales locales. (b)Con la eliminación correcta de las pilas y/o acumuladores gastados estará ayudando a conservar recursos muy valiosos y a evitar los posibles efectos negativos en la salud humana y en el medio ambiente. (c) La eliminación incorrecta de las pilas y/o acumuladores gastados puede producir efectos muy dañinos en el medio ambiente y en la salud humana con motivo de las sustancias peligrosas que pueden encontrarse en estos equipos. (d)El símbolo WEEE, identificado por un cubo de basura con ruedas tachado, indica que las pilas y/o acumuladores gastados deben ser eliminados de forma totalmente independiente con respecto a la basura doméstica. Pb, Hg, Cd Si una pila o un acumulador contienen más cantidad de los valores especificados de plomo (Pb), mercurio (Hg), y/o cadmio (Cd) según está definido en la Directiva relativa a las pilas (2006/66/EC), entonces los símbolos químicos correspondientes a estos elementos estarán indicados debajo del símbolo WEEE. (e) Existen sistemas para la eliminación y recogida a disposición del usuario final. Si necesita más información acerca de la forma de eliminar pilas y/o acumuladores gastados, póngase en contacto con su Ayuntamiento, con la correspondiente empresa del servicio de recogida de residuos o con el comercio donde se adquirieron. 20 Índice Antes de usar la unidad . . . . . . . . . . . . . . . . . . . . . . . . . . . . . . . . . . . . . . . . . 21 Conexión de las antenas. . . . . . . . . . . . . . . . . . . . . . . . . . . . . . . . . . . . . . . . . 22 Identificación de las partes (unidad principal). . . . . . . . . . . . . . . . . . . . 23 Identificación de las partes (mando a distancia). . . . . . . . . . . . . . . . . . 24 Funcionamiento básico. . . . . . . . . . . . . . . . . . . . . . . . . . . . . . . . . . . . . . . . . . 25 Solución de posibles fallos. . . . . . . . . . . . . . . . . . . . . . . . . . . . . . . . . . . . . . . 27 Especificaciones. . . . . . . . . . . . . . . . . . . . . . . . . . . . . . . . . . . . . . . . . . . . . . . . . 27 Antes de usar la unidad Lea esto antes de llevar a cabo ninguna operación oo Lleve cuidado para evitar lesiones cuando mueva la unidad, debido a su peso. Solicite la ayuda de otra persona si es necesario. oo Para evitar que los muebles se rayen con facilidad, puede pegar en las patas los protectores de fieltro suministrados con la unidad. oo Como la unidad puede calentarse durante el funcionamiento, deje siempre suficiente espacio a su alrededor para la ventilación. Los agujeros de ventilación no deben taparse. Asegúrese de que hay al menos un espacio de 20 cm por encima y al menos 5 cm a cada lado. NO ponga nada encima de la unidad. oo El voltaje suministrado a la unidad deberá coincidir con el voltaje que está impreso en el panel posterior. Si tiene dudas al respecto, consulte a un electricista. oo Elija con cuidado el emplazamiento para la instalación de la unidad. Evite colocarla donde le dé la luz solar directa o cerca de una fuente de calor. Evite también lugares sujetos a vibraciones y a polvo, calor, frío o humedad excesivos. oo No sitúe esta unidad sobre el amplificador/receptor. oo No abra la carcasa porque podría causar daños en los circuitos o una descarga eléctrica. En caso de que se introduzca un objeto extraño en la unidad, contacte con su distribuidor o con un servicio técnico autorizado. oo Cuando desenchufe el cable de corriente de una toma de electricidad, tire siempre directamente del conector, nunca del cable. oo Conserve este manual en un lugar seguro para futuras consultas. oo Cuando la unidad está encendida, al encender una televisión cercana pueden aparecer líneas en la pantalla de la televisión, dependiendo de la frecuencia de la emisión de televisión. Esto no significa un mal funcionamiento de la unidad ni de la televisión. Si se ven tales líneas, aleje lo más posible esta unidad del aparato de televisión. Mantenimiento Si la superficie de la unidad se ensucia, límpiela con un paño suave o utilice un producto de limpieza líquido y neutro diluido. Asegúrese de secar completamente cualquier resto de fluido. No utilice disolvente ni alcohol ya que pueden dañar la superficie de la unidad. 21 ESPAÑOL oo No intente limpiar la unidad con disolventes químicos ya que podrían dañar el acabado. Utilice un paño limpio y seco. Conexión de las antenas Montaje de la antena de AM de bucle Monte la antena de AM de bucle como se muestra en la figura. Conexión de la antena de AM de bucle La antena de AM de bucle es adecuada para la mayoría de las aplicaciones de interior. Ajuste la posición y el direccionamiento de la antena hasta que se pueda recibir el sonido con claridad. Intente mantener la antena tan alejada como sea posible de la unidad principal, de televisores y del cable de corriente. )0 Método de conexión del cable de antena 1 Pulse la palanca de retención. $0 *1' $17(11$ oo Si no puede recibir el sonido con claridad, con una antena de AM de bucle, le recomendamos que utilice una antena de FM para exterior. Conexión de la antena de FM para exterior 2 Inserte el cable en el agujero. )0 $0 *1' $17(11$ 3 Suelte el mecanismo para que vuelva a su posición original. oo Mantenga la antena alejada de fuentes de ruido (señales de lámparas o luminosos fluorescentes, calles bulliciosas, etc.) Conexión de la antena de FM interior oo Sería peligroso instalar la antena cerca del cable de corriente; así pues, asegúrese de mantener la antena alejada del cable de corriente. La antena de FM de interior es adecuada para la mayoría de aplicaciones de interior. Extienda la antena y muévala en diversas direcciones hasta que se reciba una señal clara. Fije la antena con un alfiler o similar en la localización donde la distorsión sea la mínima. Conexión de la antena de AM de exterior )0 $0 *1' FM/75 AM GND $17(11$ oo Si con la antena de FM de interior conectada aún no puede recibir el sonido con claridad, le recomendamos que lo intente con una antena de FM de exterior. oo Si la antena puede ser extendida por encima de la ventana o cualquier emplazamiento exterior más elevado, entonces se mejorará el rendimiento del sintonizador. oo No desconecte la antena de bucle. 22 Identificación de las partes (unidad principal) Panel frontal A C B A Indicador de encendido “POWER” B Botón de encendido/apagado "POWER" C Visor de la pantalla multifunción D D Receptor de la señal del mando a distancia E F G H E Mando para sintonización/selección de emisoras "TUNING" F Botón de modo "MODE" G Botón de banda "BAND" (selector de FM/AM/AUTO) H Botón de memoria "MEMORY" Panel posterior ESPAÑOL a b c d e a Terminal de antena de FM d Salida de audio del canal derecho b Terminal de antena de AM e Conector de entrada de corriente (con fusible) c Salida de audio del canal izquierdo 23 Identificación de las partes (mando a distancia) Mando a distancia a g b c d e h i i FREQ (Introducción directa de frecuencia) j MEMORY (Memoria) k l BAND (Botón selector de banda) TUNER (Botón selector del modo "sintonizador") j k f Nota antes de utilizar al mando a distancia oo Pulse el botón TUNER y entre en el modo de “sintonizador” antes operar con el mando a distancia. oo El rango de alcance efectivo del mando a distancia no es mayor de 10 metros y su ángulo de efectividad no es mayor de 30 grados. l oo Los botones del mando a distancia sin asignación de funciones no se utilizan para esta unidad. Es normal que no haya respuesta cuando los pulse. Instalación de las pilas a MUTE (Silenciamiento) b TUNING j (Botón de sintonización de emisora anterior) Mantenga pulsado 2 o 3 segundos para la selección automática del canal anterior. c TUNING k (Botón de sintonización de emisora siguiente) Mantenga pulsado 2 o 3 segundos para la selección automática del canal siguiente. d PRESET j (Botón de emisora presintonizada anterior) e PRESET k (Botón de emisora presintonizada siguiente) f 0-9 (Botones numéricos) g RDS Mantenga pulsado 2 o 3 segundos para ajustar el brillo de la pantalla. h 24 MODE (Modo) 1 Abra la tapa del mando a distancia. 2 Inserte dos pilas AAA. Asegúrese de que las pilas se insertan con sus polos positivo (+) y negativo (-) correctamente posicionados. 3 Cierre la tapa. Funcionamiento básico (1) Encendido/Apagado Recepción en la banda de FM/AM Conecte el cable de corriente y el cable de señal de la unidad. A continuación pulse el botón interruptor de encendido/apagado para encender la unidad (R). El indicador de encendido se iluminará en el panel frontal y la unidad está ahora en su modo de funcionamiento normal. Selección automática (auto): Pulse el botón BAND para seleccionar “FM” o “AM”. Pulse y mantenga pulsado el botón TUNING j (m) para sintonizar una frecuencia inferior. Cuando se encuentre una emisora, el proceso de sintonización se detendrá automáticamente. La pantalla mostrará “ ”. Pulse el botón TUNING k (,) para sintonizar una frecuencia superior. Cuando se encuentre una emisora, el proceso de sintonización se detendrá automáticamente. La pantalla mostrará “ ”. Para apagar la unidad, pulse el botón de encendido/apagado en el panel frontal. El botón quedará en la posición de apagado (E) y el indicador de encendido y la unidad se apagarán. Desconecte el cable de corriente de la toma de electricidad si la unidad no se va a utilizar durante un largo período de tiempo. Selección de banda Pulsando el botón BAND en el panel frontal o en el mando a distancia cambiará secuencialmente entre FM/AM/AUTO. Cuando seleccione el modo de FM, “M” (MHz) se iluminará en la pantalla y “F” aparecerá después del código de emisora. Ejemplo: En “01F 104.30M”, “01” es el código de emisora, “F” significa FM y “104.30M” es la frecuencia de la emisora. Cuando seleccione el modo de AM, “K” (KHz) se iluminará en la pantalla y “A” aparecerá después del código de emisora. Selección mediante entrada directa: Introduzca la frecuencia de la emisora que desee escuchar con los botones numéricos. Ejemplo: Cuando conozca la frecuencia de la emisora, usted puede introducir directamente esa frecuencia para seleccionar la emisora. Cuando sepa que la frecuencia de la emisora de FM es 104.30MHz, pulse el botón FREQ en el mando a distancia y “------M” aparecerá en la pantalla. A continuación, pulse los números 1, 0, 4, 3 y 0 en secuencia. oo Cuando el primer número sea mayor que 1, la pantalla empezará con el segundo número. Cuando el primer número sea 1, el segundo número se mostrará como “0”. oo En el modo de FM, si el último número pulsado es mayor o igual que 5 se mostrará como “5” y si el número es menor que 5 se mostrará como “0”. Cuando seleccione FM AUTO, “AT, “F”, “M” y el código de la emisora se mostrarán todos en pantalla. Ejemplo: En 01F 104.30M, “ST” es recepción en estéreo, “AT” es el modo FM AUTO, “F” es FM y “104.30M es la frecuencia de la emisora. 25 ESPAÑOL Ejemplo: En 01A 1404K, “01” es el código de emisora, “A” significa AM y “1404K” es la frecuencia de la emisora. Selección manual: Pulse el botón MODE y la frecuencia de la emisora parpadeará en la pantalla. Gire el mando de sintonización TUNING en el panel frontal o mantenga pulsado cualquiera de los botones TUNING j o k (m o ,) y suéltelo cuando encuentre la emisora que desee escuchar. La frecuencia cambia en pasos fijos: 50KHz para “FM” y 9KHz para “AM”. Funcionamiento básico (2) Presintonizar emisoras Silenciamiento (MUTE) Presintonizar emisoras manualmente: Pulse el botón MEMORY en el panel frontal o en el mando a distancia. El código de la emisora parpadeará en la pantalla. A continuación, gire el mando de sintonización TUNING hacia la derecha para seleccionar un código de emisora superior o hacia la izquierda para seleccionar un código de emisora inferior. Alternativamente, pulse el botón PRESET j o k (. o /) para seleccionar el código de la emisora deseada. A continuación pulse el botón MEMORY en el panel frontal o en el mando a distancia. La emisora habrá quedado almacenada en la unidad. Para silenciar el sonido temporalmente, pulse el botón MUTE en el mando a distancia. En la pantalla aparecerá “MUTE”. Vuelva a pulsar otra vez el botón MUTE para restablecer el sonido. oo Cuando el número sea inferior a 10, pulse el número directamente. Si no pulsa otros botones, espere durante 1 o 2 segundos y a continuación la pantalla mostrará el número seleccionado. oo Alternativamente, pulse el botón “0” primero y a continuación pulse un número. oo Cuando el número sea mayor o igual que 10, pulse el número directamente. Presintonizar emisoras automáticamente: Pulse y mantenga pulsado el botón MEMORY en el panel frontal o en el mando a distancia. Las frecuencias de sintonización de FM van desde 87.50 hasta 108.00MHz y las de AM van desde 522 hasta 1620 KHz. oo Esta función permite a la unidad sintonizar automáticamente emisoras de FM y AM con señales fuertes, pudiendo almacenar hasta un total de 80 emisoras. Seleccionar emisoras presintonizadas Pulse el botón MODE en el panel frontal o en el mando a distancia. El número de presintonía de la emisora parpadeará en la pantalla. A continuación gire el mando de sintonización TUNING del panel frontal hacia la derecha para seleccionar un número de presintonía superior y hacia la izquierda para seleccionar un número de presintonía inferior. Alternativamente, pulse uno de los botones PRESET j o k (. o /) para seleccionar el número de presintonía deseado. Cuando la emisora deseada haya sido seleccionada, vuelva a pulsar el botón MODE otra vez. También puede seleccionar una emisora presintonizada pulsando los correspondientes botones numéricos en el mando a distancia. oo Cuando el número sea inferior a 10, pulse el botón numérico directamente. Si no pulsa otros botones, espere durante 1 o 2 segundos y a continuación la pantalla mostrará el número seleccionado. oo Alternativamente, pulse el botón “0” primero y a continuación pulse un botón numérico. Cuando el número sea mayor o igual que 10, pulse el botón numérico directamente. oo También puede pulsar uno de los botones PRESET j o k (. o /) para recorrer las emisoras de radio presintonizadas. oo Se pueden seleccionar hasta un total de 80 emisoras presintonizadas. 26 RDS Pulse el botón RDS en el mando a distancia para que la pantalla vaya cambiando cíclicamente y mostrando los Datos Horarios (Time), el Nombre del Servicio de Programa (PS), el Tipo de Programa (PTY) y el Texto por Radio (RT). Las emisoras RDS son detectadas automáticamente. oo Si no se encuentran emisoras RDS con la operación anterior, en la pantalla aparecerá cualquiera de los siguientes mensajes: -- : -- / NO PS / NO PTY / NO RT. oo Cuando se encuentra una emisora RDS, la información horaria, el nombre de la emisora, el tipo de programas de la emisora y el texto por radio (no más de 64 caracteres) aparecerán en la pantalla. Ajuste del brillo de la pantalla Pulse el botón RDS en el mando a distancia para ajustar el brillo de los caracteres de la pantalla en base a la luz ambiental que haya en el entorno. Si mantiene pulsado el botón RDS durante 2 o 3 segundos, el brillo de la pantalla cambiará secuencialmente entre “HIGH” (alto), “LOW” (bajo) u “OFF” (desactivado). oo La pantalla se pone por defecto automáticamente en brillo alto (HIGH) al encenderse la unidad. Solución de posibles fallos Especificaciones Si experimenta algún problema con la unidad, por favor tómese unos momentos para mirar la información que viene a continuación antes de solicitar una reparación. Si el problema persiste, póngase en contacto con su distribuidor o con el servicio técnico/de atención al cliente de TEAC (los encontrará en la contraportada). Sintonizador de FM Rango de frecuencias . . . . . . . . . . . . . . . . . . . . . . . . . 87.5 MHz - 108 MHz Sensibilidad . . . . . . . . . . . . . . . . . . . . . . . . . . . . . . . . . . . . . . . . . . (IHF) 12 dB µ Relación señal/ruido . . . . . . . . . . . . . . . . . . . . . . . mono: 66 dB o superior estéreo: 60 dB o superior No hay corriente e Compruebe la conexión a la toma de electricidad. Compruebe y asegúrese de que la toma de electricidad no es una toma con interruptor y que, si lo es, el interruptor está activado. Asegúrese de que llega corriente a la toma de electricidad enchufando en ella otro aparato como por ejemplo una lámpara o un ventilador. El mando a distancia no funciona. e Pulse el interruptor de encendido/apagado (POWER) de la unidad principal para encenderla. e Si las pilas están gastadas, cámbielas. e Dentro del rango especificado de 10 m, apunte con el mando a distancia directamente hacia el panel frontal de la unidad e Quite cualquier obstáculo que haya entre el mando a distancia y la unidad principal. No hay sonido e Compruebe la conexión al amplificador. e Compruebe el funcionamiento del amplificador. Sintonizador de AM Rango de frecuencias . . . . . . . . . . . . . . . . . . . . . . . . . 522 KHz - 1620 KHz Sensibilidad . . . . . . . . . . . . . . . . . . . . . . . . . . . . . . . . . . . . . . . . . . . . . . . 55 dB µ Relación señal/ruido . . . . . . . . . . . . . . . . . . . . . . . . . . . . . . 40 dB o superior General Requerimientos de alimentación . . . . . . . . . . . . . . . . . CA 230 V , 50 Hz Consumo de corriente (nominal) . . . . . . . . . . . . . . . . . . . . . . . . . . . . . . 5 W Dimensiones (ancho x alto x profundo) . . . . . . . . . 435 x 84 x 331 mm Peso . . . . . . . . . . . . . . . . . . . . . . . . . . . . . . . . . . . . . . . . . . . . . . . . . . . . . . . . . 5.2 kg Temperatura de funcionamiento . . . . . . . . . . . . . . . . . . . . . +5˚C - +35˚C Humedad de funcionamiento . . . . . . . 5 % - 85 % (sin condensación) Temperatura de almacenamiento . . . . . . . . . . . . . . . . . . . . –10˚C - +55˚C Accesorios Cable de corriente x 1 Antena de FM x 1 Antena de AM x 1 Mando a distancia x 1 Pilas AAA x 2 Tarjeta de garantía x 1 Manual del usuario x 1 e La función de silenciamiento (MUTE) está activada. Pulse el botón MUTE. Seleccione la fuente de entrada correcta. e Asegúrese de que la antena está correctamente conectada. oo El diseño y las especificaciones están sujetos a cambios sin previo aviso. oo El peso y las dimensiones son aproximados. oo Las ilustraciones pueden diferir ligeramente de los modelos de producción. e Sintonice la emisora correctamente. e Si hay una televisión cerca de la unidad, apáguela. e Instale la antena de nuevo después de cambiarla a un emplazamiento con mejor recepción e Quizás haga falta una antena exterior. 27 ESPAÑOL No se puede escuchar una emisora o la señal es demasiado débil. oo Setzen Sie den AI-1000 nicht Tropf- oder Spritzwasser aus. oo Stellen Sie keine Vasen oder andere mit Flüssigkeiten gefüllte Gefäße auf den Verstärker. oo Installieren Sie den AI-1000 nicht in geschlossenen Regalsyste men oder ähnlichen Möbelstücken. oo Der Verstärker bezieht auch dann einen geringen Ruhestrom aus dem Netz, wenn sich der POWER- oder STANDBY/ONSchalter nicht in der ON-Position befindet. oo Der Betriebsort des AI-1000 sollte in der Nähe der Wandsteck dose sein, so dass Sie jederzeit den Netzstecker erreichen. oo Der Netzstecker dient als Verbindungs-/Trennglied zur Span nungsversorgung. Achten Sie darauf, dass er stets in einwandfreiem Zustand ist. oo Der Netzstecker von „Class “-Produkten besitzt einen Schutz kontakt. Achten Sie darauf, dass die Wandsteckdose, an der Sie den AI-1000 anschließen, geerdet ist (Schutzkontaktsteckdose). oo Falls in diesem Produkt Batterien (inklusive Akkupack oder aus tauschbaren Trockenbatterien) verwendet werden, dürfen diese nicht direkter Sonne, Feuer oder großer Hitze ausgesetzt sein. oo ACHTUNG bei Verwendung von Lithium-Batterien: bei inkorrekt vorgenommenem Batteriewechsel besteht Explosionsgefahr. Ersetzen Sie verbrauchte Batterien ausschließlich durch frische des gleichen oder gleichwertigen Typs. oo Achten Sie auf Ihr Gehör, wenn Sie Ohr- oder Kopfhörer am AI‑1000 betreiben. Zu hoher Schalldruck von Ohr- oder Kopfhö rern kann Hörschäden oder Gehörverlust verursachen. Für Kunden in Europa Entsorgung von elektrischen Altgeräten und Batterien (a) Wenn das Symbol einer durchgestrichenen Abfalltonne auf einem Produkt, der Verpackung und/oder der begleitenden Dokumentation angebracht ist, unterliegt dieses Produkt den europäischen Richtlinien 2002/96/EC und/oder 2006/66/EC sowie nationalen Gesetzen zur Umsetzung dieser Richtlinien. (b)Diese Richtlinien und Gesetze schreiben vor, dass Elektro- und Elektronik-Altgeräte sowie Batterien und Akkus nicht in den Hausmüll (Restmüll) gelangen dürfen. Um die fachgerechte Entsorgung, Auf bereitung und Wiederverwertung sicherzustellen, sind Sie verpflichtet, Altgeräte und entladene Batterien/Akkus über staatlich dafür vorgesehene Stellen zu entsorgen. (c) Durch die ordnungsgemäße Entsorgung solcher Geräte, Batterien und Akkus leisten Sie einen Beitrag zur Einsparung wertvoller Rohstoffe und verhindern potenziell schädliche Auswirkungen auf die Gesund heit der Allgemeinheit und die Umwelt, die durch falsche Abfallentsor gung entstehen können. Die Entsorgung ist für Sie kostenlos. (d)Falls der Gehalt an Blei (Pb), Quecksilber (Hg) und/oder Cadmium (Cd) in Batterien/Akkus die in der Richtlinie zur Batterieentsorgung (2006/66/EC) angegebenen, zulässigen Höchstwerte übersteigen, wird die Bezeichnung des entsprechenden chemischen Elements oder der Elemente unterhalb der durchgestrichenen Abfalltonne angegeben. Pb, Hg, Cd (e) Weitere Informationen zur Wertstoffsammlung und Wiederverwertung von Altgeräten, Batterien und Akkus erhalten Sie bei Ihrer Stadtverwal tung, dem für Sie zuständigen Abfallentsorgungsunternehmen oder der Verkaufsstelle, bei der Sie das Produkt erworben haben. 28 Inhalt Danke, dass Sie sich für dieses TEAC-Produkt entschieden haben. Lesen Sie diese Bedienungsanleitung bitte aufmerksam durch, um die Leistung des TU-1000 in vollem Umfang nutzen zu können. Vor der ersten Inbetriebnahme . . . . . . . . . . . . . . . . . . . . . . . . . . . . . . . . . 29 Anschließen der Antennen. . . . . . . . . . . . . . . . . . . . . . . . . . . . . . . . . . . . . . 30 Bedienelemente und Anschlüsse des TU-1000 . . . . . . . . . . . . . . . . . . 31 Bedienelemente der Fernbedienung. . . . . . . . . . . . . . . . . . . . . . . . . . . . 32 Grundlegende Bedienung. . . . . . . . . . . . . . . . . . . . . . . . . . . . . . . . . . . . . . . 33 Hilfe bei Funktionsstörungen. . . . . . . . . . . . . . . . . . . . . . . . . . . . . . . . . . . . 35 Technische Daten. . . . . . . . . . . . . . . . . . . . . . . . . . . . . . . . . . . . . . . . . . . . . . . 35 Vor der ersten Inbetriebnahme Lesen und beachten Sie folgende Hinweise oo Aufgrund des Gewichts besteht beim Heben oder Tragen des TU-1000 Verletzungsgefahr. Falls erforderlich, bitten Sie Jemand um Hilfe. oo Um Kratzer auf empfindlichen Möbeln zu vermeiden, können die mitgelieferten Filzpolster unter den Standfüßen angebracht werden. oo Achten Sie auf ausreichenden Belüftungsabstand, da sich der TU-1000 während des Betriebs erwärmen kann. Verdecken Sie niemals die Belüftungsöffnungen. Achten Sie darauf, dass oberhalb stets mindestens 20 cm und seitlich mindestens 5 cm Belüftungs abstand verbleiben. Stellen Sie KEINE Gegenstände auf den Tuner. oo Die Spannung, an der der TU-1000 betrieben wird, sollte den Anga ben auf der Geräterückseite entsprechen. Falls Sie diesbezüglich Zweifel haben, kontaktieren Sie einen Elektrofachmann. oo Wählen Sie einen Aufstellungsort, an dem der TU-1000 nicht direktem Sonnenlicht oder anderen Wärmequellen ausgesetzt ist. Vermeiden Sie ebenfalls Betriebsorte mit erhöhtem Staubaufkom men oder solche, die Erschütterungen, Hitze, Kälte sowie Feuch tigkeit ausgesetzt sind. oo Betreiben Sie den TU-1000 nicht auf Verstärkern, Endstufen, Receivern oder anderen Geräten, die Wärme erzeugen. oo Öffnen Sie nicht das Gehäuse, da dies Schäden an der Elektronik oder einen Stromschlag verursachen kann. Falls ein Fremdkörper ins Geräteinnere eingedrungen ist, kontaktieren Sie Ihren Fach händler oder ein autorisiertes Servicecenter. oo Achten Sie beim Ziehen des Netzsteckers darauf, dass Sie stets am Stecker ziehen und niemals am Kabel. oo Reinigen Sie den TU-1000 nicht mit chemischen Lösungsmitteln, da diese das Gehäuse beschädigen können. Verwenden Sie ein sauberes, trockenes Tuch. oo Bei eingeschaltetem TU-1000 können, nach Einschalten eines Fernsehgeräts, Linien im Fernsehbild erscheinen. Hierbei handelt es sich nicht um Fehlfunktionen, sondern um Interferenzen, die unter bestimmten Umständen auftreten können. Falls dieser Effekt auftritt, vergrößern Sie den Abstand zwischen Tuner und TV-Gerät.. Pflegehinweis Falls die Gehäuseoberfläche verschmutzt ist, verwenden Sie zum Reinigen ein weiches Tuch oder milde Seifenlösung. Achten Sie darauf, dass die Gehäuseoberfläche vor der erneuten Inbetriebnahme des TU-1000 komplett trocken ist. Verwenden Sie niemals Verdünner oder Alkohol, da diese Substanzen die Gehäuseoberfläche beschädigen können. 29 DEUTSCH oo Bewahren Sie diese Bedienungsanleitung an einem sicheren Ort auf, um jederzeit Etwas darin nachschlagen zu können. Anschließen der Antennen Installieren der MW (AM) Rahmenantenne Anschließen der MW (AM) Rahmenantenne Installieren Sie die MW (AM) Rahmenantenne gemäß folgender Abbildung. Die MW-Rahmenantenne eignet sich zur Verwendung in Innen räumen. Richten Sie die Antenne auf beste Empfangsqualität aus. Achten Sie hierbei auf größtmöglichem Abstand zum Tuner, TVGeräten, Lautsprecherkabeln sowie Netzleitungen. )0 $0 *1' $17(11$ Anschließen der Antennenkabel 1 Drücken Sie den Hebel der Klemmbuchse herunter. oo Falls mittels MW-Rahmenantenne kein zufrieden stellendes Emp fangsergebnis erzielt werden kann, empfehlen wir die Verwendung einer MW-Außenantenne. Anschließen einer UKW (FM) Außenantenne 2 Stecken Sie das abisolierte Kabelende in die Öffnung der Klemmbuchse. )0 $0 *1' $17(11$ 3 Lassen Sie den Hebel los, so dass das Kabel festgeklemmt wird. oo Achten Sie auf größtmöglichen Abstand zwischen Antenne und etwaigen Interferenz-Quellen (Leuchtstoffröhren, stark befahrenen Straßen, usw.) oo Meiden Sie Starkstromkabel und Überlandleitungen, da es gefährlich ist, die Antenne in deren Nähe zu installieren. Anschließen der UKW (FM) Wurfantenne Die UKW-Wurfantenne eignet sich zur Verwendung in Innenräumen. Strecken Sie den Antennendraht auf volle Länge aus und richten Sie die Antenne auf besten Empfang aus. Befestigen Sie die Antenne mittels einer Nadel oder anderen geeigneten Befestigungsmitteln in dieser Position. Anschließen einer MW (AM) Außenantenne FM/75 )0 $0 *1' $17(11$ oo Falls mittels UKW-Innenantenne kein zufrieden stellendes Emp fangsergebnis erzielt werden kann, empfehlen wir die Verwendung einer UKW-Außenantenne. 30 AM GND oo Sofern eine Außenantenne oberhalb eines Fensters oder an einem anderen höher gelegenen Ort installiert werden kann, bietet diese bessere Empfangsleistung. oo Trennen Sie die Rahmenantenne nicht vom TU-1000. Bedienelemente und Anschlüsse des TU-1000 Frontansicht A C B D E F G H A Netzanzeige E TUNING-Regler zur Frequenz-/Senderwahl B Netzschalter (POWER-Taste) F MODE-Taste (Wählen der Betriebsart) C Multifunktionsdisplay G BAND-Wahltaste (UKW (FM)/MW (AM)/AUTO Umschaltung) D Fernbedienungssensor H MEMORY-Taste (wählt einen Senderspeicherplatz) Rückansicht b c d DEUTSCH a e a UKW (FM) Antennenanschluss d Audioausgang – rechter Kanal b MW (AM) Antennenanschluss e Netzanschluss (mit Sicherung) c Audioausgang – linker Kanal 31 Bedienelemente der Fernbedienung h Fernbedienung a g b c d e h i j k f MODE-Taste (zum Wählen der Betriebsart) i FREQ-Taste (zum direkten Wählen der Empfangsfrequenz) j MEMORY-Taste (wählt einen Senderspeicherplatz) k l BAND-Taste (wählt den Empfangsbereichs) TUNER-Taste (wählt den Tuner als zu steuerndes Gerät) Hinweise: l oo Betätigen Sie die TUNER-Taste und wählen Sie „TUNER“, bevor Sie die Fernbedienung weiter verwenden. oo Der effektive Betriebsradius der Fernbedienung beträgt maximal zehn Meter und der Richtwinkel beträgt maximal 30 Grad. oo Tasten der Fernbedienung, die hier nicht erklärt werden, besitzen keine Funktion zur Steuerung des Tuners. Daher ist es normal, dass bei deren Betätigen keine Funktion ausgelöst wird. a MUTE-Taste (Stummschaltung) b TUNING j-Taste Einsetzen der Batterien (länger als zwei Sekunden betätigen, um den vorherigen Sender zu wählen) c TUNING k-Taste (länger als zwei Sekunden betätigen, um den nächsten Sender zu wählen) d PRESET j-Taste (wählt den vorherigen Senderspeicherplatz) e PRESET k-Taste (wählt den nächsten Senderspeicherplatz) f 1 Öffnen Sie die Batteriefachabdeckung der Fernbedie nung. 2 Setzen Sie zwei Batterien des Typs „AAA“ ein. Achten Sie hierbei auf deren korrekte Polarität: ¥ kennzeichnet den Pluspol und ^ den Minuspol. 3 Schließen Sie die Batteriefachabdeckung. 0-9 (Zifferntasten) g RDS (DISP)-Taste (zum Ändern der Helligkeit länger als zwei Sekunden betätigen) 32 Grundlegende Bedienung (1) Ein-/Ausschalten UKW (FM)/MW (AM) Empfang Schließen Sie die Signalkabel und das Netzkabel am TU-1000 an. Schalten Sie den TU-1000 anschließend mittels Netzschalter auf der Gerätevorderseite ein. Der Schalter befindet sich nun in der ONPosition (R). Display und Netzanzeige leuchten, und der Tuner befindet sich im normalen Betriebsmodus. Automatische Senderwahl: Wählen Sie mittels BAND-Taste „FM“ oder „AM“. Betätigen Sie zum Auswählen eines Senders mit niedrigerer Emp fangsf requenz die TUNING j-Taste (m) anhaltend. Sobald ein Sender gefunden wird, stoppt die Sendersuche automatisch. Im Dis play wird „ “ angezeigt. Betätigen Sie zum Auswählen eines Senders mit höherem Frequenz wert anhaltend die TUNING k-Taste (,). Sobald ein Sender gefunden wird, stoppt die Sendersuche automatisch. Im Display wird „ “. Betätigen Sie zum Ausschalten ebenfalls den Netzschalter. Der Schalter befindet sich danach in der OFF-Position (E) und die Netzanzeige erlischt. Ziehen Sie den Netzstecker, wenn Sie den Tuner über einen längeren Zeitraum nicht verwenden. Wählen des Empfangsbereichs Betätigen Sie zum Umschalten zwischen UKW (FM)/MW (AM)/AUTO die BAND-Taste am Tuner oder auf der Fernbedienung. Bei Auswahl von UKW (FM) Empfang erscheint „M“ (MHz) im Display und „F“ nach der Sender-/Presetnummer. Beispiel: Im Display wird 01F 104.30M angezeigt. „01“ ist die Sender-/Presetnummer, „F“ kennzeichnet den Emp fangsbereich UKW (FM) und 104.30M (MHz) ist die Empfangs frequenz des Senders. Bei Auswahl von MW (AM) erscheint „K“ (kHz) im Display und „A“ nach der Sender-/Presetnummer. Beispiel: Im Display wird 01A 1404K angezeigt. „01“ ist die Sender-/Presetnummer, „A“ kennzeichnet den Emp fangsb ereich MW (AM) und 1404K (kHz) ist die Empfangsf re quenz des Senders. Manuelle Senderwahl: Betätigen Sie die MODE-Taste, die Empfangsfrequenz blinkt im Dis play. Verwenden Sie den TUNING-Regler am Tuner oder betätigen Sie die TUNING j oder TUNING k-Taste (m oder ,) auf der Fern bedienung anhaltend. Lassen Sie die entsprechende Taste los, sobald das Programm des gewünschten Senders wiedergegeben wird. Der Frequenzwert ändert sich hierbei in festen Schritten von 50 kHz bei UKW (FM) Empfang und 9 kHz bei MW (AM) Empfang. Direkteingabe der gewünschten Frequenz: Wenn Sie die Empfangsfrequenz eines Senders kennen, können Sie diese mittels Zifferntasten eingeben. Beispiel: Falls der gewünschte UKW-Frequenzwert 104.30MHz ist, betätigen Sie die FREQ-Taste auf der Fernbedienung. „------M“ erscheint im Display. Betätigen Sie anschließend der Reihenfolge nach folgende Zifferntasten: „1“, „0“, „4“, „3“ und „0“. oo Falls die erste eingegebene Ziffer größer als „1“ ist, erscheint diese automatisch als Zehnerstelle der UKW-Empfangsf re quenz. Falls die erste Ziffer „1“ ist, wird für die Zehnerstelle automatisch eine „0“ gesetzt. oo Falls die letzte Ziffer eines UKW-Frequenzwerts größer oder gleich „5“ ist, erscheint automatisch eine „5“ im Display. Falls sie kleiner als „5“ ist, erscheint eine „0“ im Display. Bei Auswahl von FM AUTO erscheinen „AT“, „F“, „M“ sowie die Sender-/ Presetnummer im Display. DEUTSCH Beispiel: Im Display wird AT01F 104.30M angezeigt. „ST“ steht für Stereoqualität, „AT“ kennzeichnet den automati schen UKW-Empfang (FM AUTO), „F“ den UKW (FM) Empfangs bereich und 104.30M (MHz) die Empfangsfrequenz. 33 Grundlegende Bedienung (2) Senderspeicherplätze (Presets) Stummschaltung Manuelle Preset-Belegung: Betätigen Sie die MEMORY-Taste am Tuner oder auf der Fernbedie nung. Die Sender-/Presetnummer blinkt im Display. Drehen Sie den TUNING-Drehregler im Uhrzeigersinn, um eine höhere Frequenz aus zuwählen oder gegen den Uhrzeigersinn, um einen niedrigeren Fre quenzwert einzustellen. Sie können die gewünschte Sender-/Presetnummer auch mittels PRESET j oder PRESET k-Taste (. oder /) auswählen. Betätigen Sie erneut die MEMORY-Taste am Tuner oder auf der Fern bedienung, um den Sender im gewählten Preset zu speichern. Betätigen Sie die MUTE-Taste auf der Fernbedienung, um die Wieder gabe stumm zu schalten. Durch nochmaliges Betätigen der MUTE-Taste auf der Fernbedienung wird die Stummschaltung wieder aufgehoben. oo Zur Eingabe einstelliger Presetnummern betätigen Sie die entspre chende Zifferntaste. Falls Sie keine andere Taste betätigen, warten Sie nach der Eingabe ungefähr zwei Sekunden, bis die Ziffer im Display erscheint. oo Sie können auch zuerst die Zifferntaste „0“ betätigen und danach die entsprechende Zifferntaste, die der gewünschten Presetnum mer entspricht. oo Geben Sie die beiden Ziffern nacheinander ein, falls die gewünschte Presetnummer größer oder gleich „10“ ist. Automatische Preset-Belegung: Betätigen Sie die MEMORY-Taste am TU-1000 oder auf der Fern bedienung anhaltend. Bei UKW-Betrieb wird der Frequenzbereich zwischen FM 87.50 - 108.00 MHz und bei MW-Betrieb der Frequenzbereich zwischen 522 - 1620 kHz durchsucht. oo Die Frequenzen von bis zu 80, während der Suche mit bester Empfangsqualität gefundener Sender, werden automatisch in den Presets gespeichert Aufrufen von Senderspeicherplätzen (Presets) Betätigen Sie zum Auswählen eines Senderspeicherplatzes (Presets) die MODE-Taste am TU-1000 oder auf der Fernbedienung. Die Sender-/ Presetnummer blinkt im Display. Drehen Sie den TUNING-Drehregler im Uhrzeigersinn, um eine höhere Frequenz auszuwählen oder gegen den Uhrzeigersinn, um einen niedrigeren Frequenzwert einzustellen. Sie können zum Auswählen der gewünschten Sender-/Presetnummer auch die PRESET j oder die PRESET k-Taste (. oder /) be tätigen. Sobald Sie die Empfangsfrequenz des gewünschten Senders eingestellt haben, betätigen Sie nochmals die MODE-Taste. Die gewünschte Sender-/Presetnummer kann auch mittels Ziffern tasten auf der Fernbedienung direkt ausdewählt werden. oo Zur Eingabe einstelliger Presetnummern betätigen Sie die entspre chende Zifferntaste. Falls Sie keine andere Taste betätigen, warten Sie nach der Eingabe ungefähr zwei Sekunden, bis die Ziffer im Display erscheint. oo Sie können auch zuerst die Zifferntaste „0“ betätigen und danach die entsprechende Zifferntaste, die der gewünschten Presetnummer entspricht, eingeben. Geben Sie die beiden Ziffern nacheinander ein, falls die gewünschte Presetnummer größer oder gleich „10“ ist. oo Sie können die gewünschte Sender-/Presetnummer auch mittels PRESET j oder PRESET k-Taste (. oder /) auswählen. oo Bis zu 80 Sender-/Presetnummern können gespeichert und aufgerufen werden. 34 RDS Betätigen Sie die RDS (DISP)-Taste auf der Fernbedienung, um zwischen „Zeitanzeige“, „PS-Modus“, „PTY-Modus“ und „RT-Modus“ umzuschalten. Suchen Sie anschließend mittels automatischer Sendersuche einen Sender, der RDS-Daten übermittelt. Sender, die RDS-Daten übermitteln, werden vom TU-1000 automatisch erkannt. oo Falls keine RDS-Sender gefunden werden, wird im Display eine der folgenden Meldungen angezeigt: „-- : --“ / „NO PS“ / „NO PTY“ / „NO RT“. oo Wird ein RDS-Sender gefunden, werden Uhrzeit, Stationskennung, Programmtyp, Radiotext (bis maximal 64 Zeichen Laufschrift) im Display angezeigt. Wählen der Display-Helligkeit Betätigen Sie zum Auswählen der Display-Helligkeitsstufe die RDS (DISP)-Taste auf der Fernbedienung. Die Helligkeit des Displays wird ebenfalls durch die Umgebungslicht verhältnisse beeinflusst. Bei jedem Betätigen der RDS (DISP)-Taste (länger als zwei Sekunden) wechselt die Helligkeit zwischen folgenden Stufen: „HIGH“, „LOW“ und „OFF“ oo Nach Einschalten des TU-1000 ist automatisch die hellste Be leuchtungsstufe des Displays (HIGH) aktiviert. Hilfe bei Funktionsstörungen Technische Daten Falls beim TU-1000 Funktionsstörungen auftreten sollten, versuchen Sie bitte, anhand der folgenden Hinweise selbst Abhilfe zu schaffen, bevor Sie sich an Ihren Fachhändler oder den TEAC-Kundenservice/ technischen Support wenden (Kontaktadressen finden Sie auf der Rückseite dieser Anleitung). UKW (FM) Tunerteil Frequenzbereich . . . . . . . . . . . . . . . . . . . . . . . . . . . . . . 87.5 MHz – 108 MHz Empfindlichkeit . . . . . . . . . . . . . . . . . . . . . . . . . . . . . . . . . . . . . . . (IHF) 12 dB µ Rauschabstand (S/N) . . . . . . . . . . . . . . . . . . . . . . . . . . . . . . . Mono: > 66 dB Stereo: > 60 dB Kein Strom e Überprüfen Sie die Verbindung zwischen Tuner und Wand steckdose. Stellen Sie sicher, dass diese nicht über einen Schalter ausgeschaltet ist. Überprüfen Sie die verwendete Steckdose, indem Sie andere Verbraucher (Ventilator, Lampe) daran testen. Die Fernbedienung funktioniert nicht. e Schalten Sie den TU-1000 mittels Netzschalter (POWER) ein. e Ersetzen Sie verbrauchte Batterien durch frische. e Richten Sie die Fernbedienung zum Übermitteln von Steue rungsbefehlen innerhalb des Betriebsradius von zehn Metern auf den Infrarotsensor auf der Gerätevorderseite. e Entfernen Sie etwaige Hindernisse zwischen Fernbedienung und Tuner. Keine Wiedergabe e Überprüfen Sie die Verbindungen zum Verstärker. e Überprüfen Sie die einwandfreie Funktion des Verstärkers. e Die Stummschaltung ist aktiviert. Betätigen Sie die MUTE-Taste. Sender werden nicht empfangen oder das Signal ist sehr schwach. e Vergewissern Sie sich, dass die Antenne korrekt angeschlossen ist. MW (AM) Tunerteil Frequenzbereich . . . . . . . . . . . . . . . . . . . . . . . . . . . . . . . 522 kHz - 1620 kHz Empfindlichkeit . . . . . . . . . . . . . . . . . . . . . . . . . . . . . . . . . . . . . . . . . . . . 55 dB µ Rauschabstand (S/N) . . . . . . . . . . . . . . . . . . . . . . . . . . . > 40 dB oder mehr Allgemein Spannungsversorgung . . . . . . . . . . . . . . . . . . . . . . . . . . . . . AC 230 V 50 Hz Leistungsaufnahme (nominal) . . . . . . . . . . . . . . . . . . . . . . . . . . . . . . . . . 5 W Abmessungen (B x H x T) . . . . . . . . . . . . . . . . . . . . . . . 435 x 84 x 331 mm Gewicht . . . . . . . . . . . . . . . . . . . . . . . . . . . . . . . . . . . . . . . . . . . . . . . . . . . . . 5,2 kg Betriebstemperatur . . . . . . . . . . . . . . . . . . . . . . . . . . . . . . . . . . +5˚ C - +35˚ C Luftfeuchtigkeit (Betrieb) . . . . . . . . . 5 % - 85 % (nicht kondensierend) Lagerungstemperatur . . . . . . . . . . . . . . . . . . . . . . . . . . . . . . –10˚ C - +55˚ C Zubehör Netzkabel x 1 UKW (FM) Wurfantenne x1 MW (AM) Rahmenantenne x1 Fernbedienung x 1 AAA-Batterien x 2 Garantiekarte x 1 Bedienungsanleitung x 1 oo Änderungen in Design und technischer Ausstattung vorbehalten. oo Gewichtsangaben und Abmessungen sind Näherungswerte. oo Illustrationen können geringfügig von den Produktionsmodellen abweichen. e Stellen Sie die Empfangsfrequenz eines Senders korrekt ein. e Schalten Sie TV-Geräte in unmittelbarer Nähe des Tuners aus. DEUTSCH e Wechseln Sie den Ort der Antenne und richten Sie sie auf besten Empfang aus. e Möglicherweise benötigen Sie eine Außenantenne. 35 oo Non esporre questo apparecchio a gocce o spruzzi d’acqua. oo Non appoggiare sopra l'apparecchio oggetti contenenti acqua o liquidi di altro genere. oo Non installare questo apparecchio in uno spazio ristretto come una libreria o luoghi simili. oo L'apparecchio consuma una insignificante quantità di corrente con l'alimentazione POWER o STANDBY/ON non in posizione ON. oo Questo apparecchio deve essere collocato sufficientemente vicino alla presa di corrente affinché questa possa essere raggiunta con facilità in ogni momento. oo La spina è utilizzata come dispositivo di scollegamento e deve rimanere sempre operabile. oo I prodotti costruiti in Classe sono dotati di un cavo di alimentazione con un polo di terra. Il cavo di un tale prodotto deve essere inserito in una presa AC con collegamento di protezione a terra. oo Se il prodotto utilizza batterie (incluso un pacco batterie o batterie installate), non dovrebbero essere esposte alla luce solare, fuoco o calore eccessivo. oo ATTENZIONE per i prodotti che utilizzano batterie al litio sostituibili: esiste il pericolo di esplosione se la batteria viene sostituita con una di tipo scorretto. Sostituire solo con lo stesso tipo o equivalente. oo Si deve usare cautela quando si usano auricolari o cuffie con il prodotto poiché una eccessiva pressione sonora (volume) negli auricolari o in cuffia può causare la perdita dell'udito. Per gli utenti europei Smaltimento delle apparecchiature elettriche ed elettroniche (a) Tutte le apparecchiature elettriche ed elettroniche devono essere smaltite separatamente dai rifiuti urbani mediante impianti di raccolta designati dal governo o dalle autorità locali. (b) Con lo smaltimento corretto di apparecchiature elettriche ed elettroniche, si contribuisce a risparmiare preziose risorse ed evitare potenziali effetti negativi sulla salute umana e l’ambiente. (c) Gli impianti di smaltimento improprio di rifiuti elettrici ed elettronici possono avere gravi conseguenze sull’ambiente e sulla salute umana a causa della presenza di sostanze pericolose nelle apparecchiature. (d) Il simbolo RAEE (Rifiuti Apparecchiature Elettriche ed Elettroniche), che mostra un bidone con ruote barrato, indica che le apparecchiature elettriche ed elettroniche devono essere raccolte e smaltite separatamente dai rifiuti domestici. (e) I centri di raccolta sono disponibili per gli utenti finali. Per informazioni più dettagliate circa lo smaltimento delle vecchie apparecchiature elettriche ed elettroniche, contattare il negozio dove è stato acquistato l’apparecchio o l’autorità locale. Smaltimento delle pile e/o accumulatori (a) I rifiuti di pile e/o accumulatori devono essere smaltiti separatamente dai rifiuti urbani mediante impianti di raccolta designati dal governo o dalle autorità locali. (b) Lo smaltimento corretto dei rifiuti di pile e/o accumulatori contribuisce a risparmiare preziose risorse ed evitare potenziali effetti negativi sulla salute umana e l’ambiente. (c) Lo smaltimento non corretto dei rifiuti di pile e/o accumulatori possono avere gravi conseguenze sull’ambiente e sulla salute umana a causa della presenza di sostanze pericolose in essi. (d) Il simbolo RAEE, che mostra un contenitore con ruote barrato, indica che le pile e/o accumulatori devono essere raccolti e smaltiti separatamente dai rifiuti domestici. Se una pila o accumulatore contiene più dei valori specificati Pb, Hg, Cd di piombo (Pb), mercurio (Hg) e/o di cadmio (Cd) come definito nella direttiva 2006/66/CE, i simboli chimici di questi elementi verranno indicati sotto il simbolo RAEE. (e) I centri di raccolta sono disponibili per gli utenti finali. Per informazioni più dettagliate circa lo smaltimento dei rifiuti di pile e/o accumulatori, contattare il negozio dove è stato acquistato l’apparecchio o l’autorità locale. 36 Indice Prima dell’uso. . . . . . . . . . . . . . . . . . . . . . . . . . . . . . . . . . . . . . . . . . . . . . . . . . . 37 Prima dell’uso Leggere prima di effettuare operazioni Collegamento dell’antenna. . . . . . . . . . . . . . . . . . . . . . . . . . . . . . . . . . . . . . 38 Identificazione delle parti (unità principale). . . . . . . . . . . . . . . . . . . . . . 39 Identificazione delle parti (telecomando). . . . . . . . . . . . . . . . . . . . . . . . 40 Operazioni di base . . . . . . . . . . . . . . . . . . . . . . . . . . . . . . . . . . . . . . . . . . . . . . 41 Risoluzione dei problemi. . . . . . . . . . . . . . . . . . . . . . . . . . . . . . . . . . . . . . . . 43 Specifiche. . . . . . . . . . . . . . . . . . . . . . . . . . . . . . . . . . . . . . . . . . . . . . . . . . . . . . . 43 oo Fare attenzione a evitare lesioni quando si sposta l’unità, a causa del suo peso. Farsi aiutare da qualcuno se necessario. oo Per proteggere i mobili da graffi, applicare i piedini in feltro forniti con. oo Poiché l’unità si riscalda durante il funzionamento, lasciare sempre spazio sufficiente intorno all’unità per la ventilazione. I fori per la ventilazione non dovrebbero essere coperti. Assicurarsi che ci siano almeno 20 cm di spazio al di sopra e almeno 5 cm su ogni lato dell’unità. NON collocare nulla sopra l’unità. oo La tensione di alimentazione dell’unità deve corrispondere alla tensione stampata sul pannello posteriore. Se si è in dubbio, consultare un elettricista. oo Scegliere il luogo per l’installazione dell’unità con attenzione. Evitare di esporla alla luce diretta del sole o vicino a una fonte di calore. Evitare anche luoghi soggetti a vibrazioni eccessive e polvere, calore, freddo o umidità. oo Non collocare l’apparecchio su un amplificatore o qualsiasi altro dispositivo che genera calore. oo Non aprire lo chassis in quanto ciò potrebbe causare scosse o corto circuiti elettrici. Se un oggetto estraneo dovesse entrare nell’unità, contattare il rivenditore o l’assistenza tecnica. oo Quando si rimuove il cavo di alimentazione dalla presa a muro, afferrare sempre la spina e non tirare il cavo. oo Non tentare di pulire l’unità con solventi chimici perché potrebbero danneggiare la finitura. Usare un panno asciutto e pulito. oo Conservare questo manuale in un luogo sicuro per future consultazioni. oo Quando l'unità è accesa, se un televisore è acceso nelle vicinanze possono apparire righe sullo schermo del televisore a seconda della frequenza della trasmissione televisiva. Questo non è un malfunzionamento dell'apparecchio o della TV. Se appaiono queste righe, tenere l'unità e il televisore più distanti. Manutenzione 37 ITALIANO Se la superficie dell’unità si sporca, strofinare con un panno morbido o utilizzare un liquido neutro diluito per la pulizia. Assicurarsi di rimuovere completamente qualsiasi traccia di liquido. Non usare diluenti o alcool in quanto potrebbero danneggiare la superficie dell’unità. Collegamento dell’antenna Installare l’antenna AM a telaio Come mostrato in figura, installare l’antenna AM a telaio. Collegare l’antenna AM a telaio L’antenna AM a telaio è adatta per applicazioni all’interno. Regolare la posizione e la direzione dell’antenna fino a quando a ricevere un suono chiaro. Cercare di mantenere l’antenna lontano il più possibile dall’unità principale, dalla TV, dai cavi degli altoparlanti e dal cavo di alimentazione. )0 Come collegare il cavo dell’antenna 1 Premere verso il basso la levetta di blocco. $0 *1' $17(11$ oo Se non è possibile ricevere l’audio chiaro con l’antenna AM collegata, si consiglia di utilizzare un’antenna AM esterna. Collegare l’antenna FM esterna 2 Inserire il filo nel foro. )0 $0 *1' $17(11$ 3 Rilasciare la levetta per fissare il cavo. oo Tenere l’antenna lontano dalla sorgente di rumore (lampada fluorescente, strade trafficate ecc.). Collegare l’antenna FM per interni L’antenna FM interna è adatta per applicazioni all’interno. Estendere l’antenna e spostare l’antenna in varie direzioni fino a ricevere un segnale chiaro. Fissare l’antenna con uno spillo o un oggetto simile nel luogo in cui la ricezione è migliore. )0 oo È pericoloso installare l’antenna vicino al cavo di alimentazione, quindi tenere l’antenna lontana dal cavo di alimentazione. Collegare una antenna AM esterna $0 *1' FM/75 AM GND $17(11$ oo Se non si è ancora in grado di ricevere un suono chiaro con l’antenna FM interna collegata, si consiglia di utilizzare l’antenna FM esterna. oo Se l’antenna può essere estesa sopra la finestra o qualsiasi luogo esterno, l’antenna esterna darà una migliore prestazione. oo Non scollegare l’antenna a telaio. 38 Identificazione delle parti (unità principale) Pannello frontale A C B D E F G H A Indicatore POWER E Manopola sintonia/selezione stazione B Pulsante POWER F Pulsante MODE C Finestra display multifunzione G Pulsante BAND (FM/AM/AUTO interruttore) D Sensore del telecomando H Pulsante MEMORY Pannello posteriore a b c d e Terminale antenna FM d Uscita audio canale destro b Terminali antenna AM e Presa di alimentazione AC (con fusibile) c Uscita audio canale sinistro ITALIANO a 39 Identificazione delle parti (telecomando) Telecomando a g b c d e h i i FREQ (Inserimento diretto della frequenza) j MEMORY k l BAND (pulsante di cambio banda) TUNER (Interruttore di opzioni Tuner) j k f Nota prima di utilizzare il telecomando oo Premere il pulsante TUNER per passare alla modalità TUNER prima di controllare l'unità utilizzando il telecomando. oo La portata effettiva del telecomando non è superiore a 10 metri entro un angolo non superiore a 30 gradi. l oo I pulsanti che non sono elencati o menzionati nel telecomando non vengono utilizzati per questa unità. È normale che non ci sia alcuna risposta se premuti. Installazione delle batterie a MUTE b TUNING j (pulsante di sintonia precedente) tenere premuto 2 o 3 secondi per la selezione automatica del canale precedente. c TUNING k (pulsante di sintonia successivo ) Tenere premuto 2 o 3 secondi per la selezione automatica del canale successivo. d PRESET j (pulsante preset precedente) e PRESET k (pulsante preset successivo) f 0-9 (pulsanti numerici) g RDS tenere premuto 2 o 3 secondi per la regolazione della luminosità. h 40 MODE 1 Aprire il coperchio del telecomando. 2 Inserire due batterie AAA. Assicurarsi che le batterie siano inserite correttamente con il loro polo positivo¥ e negativo ^. 3 Chiudere il coperchio. Operazioni di base (1) Accensione/spegnimento Ricezione della banda FM/AM Collegare il cavo di alimentazione e il cavo del segnale all’unità. Premere il pulsante POWER del pannello frontale per accendere l'unità (R). Ora l’indicatore di alimentazione sul pannello frontale è acceso. e l’unità è in modalità di funzionamento normale. Selezione automatica: Premere il pulsante Band su “FM” o “AM”. Tenere premuto il pulsante TUNING j (m) per sintonizzarsi su una frequenza più bassa. Quando viene trovata una stazione, la sintonia si arresta automaticamente. Il display mostra “ ”. Premere il pulsante TUNING k button (,) per sintonizzarsi su una frequenza più alta. Quando viene trovata una stazione, la sintonia si arresta automaticamente. Il display mostra “ ”. Per spegnere l’unità, premere l’interruttore POWER del pannello frontale in posizione OFF (E), l’indicatore di alimentazione e l’unità sono spenti. Staccare il cavo di alimentazione AC dalla presa di corrente principale quando l'unità non viene usata per un lungo periodo di tempo. Selezione della banda Premere il pulsante BAND del pannello frontale o del telecomando per alternare le voci FM/AM/AUTO. Quando si seleziona la modalità FM, appare “M” (MHz) sul display e “F” appare dopo il numero della stazione. Esempio: 01F 104.30M significa che 01 è il numero della stazione, “F” sta per FM e "104.30M" è la frequenza della stazione. Quando si seleziona AM, appare “K” (KHz) sul display e “A” appare dopo il numero della stazione. Esempio: 01A 1404K, significa che “01” significa che 01 è il numero della stazione, “A” sta AM, "1404K" è la frequenza della stazione. Quando si seleziona la modalità FM AUTO, appaiono “AT”, “F”, “M” e il numero della stazione sul display. Selezione manuale: Premere il pulsante MODE così che la frequenza della stazione inizierà a lampeggiare sul display. Ruotare la manopola TUNING del pannello frontale o tenere premuto uno dei pulsanti TUNING j o k (m o ,) rilasciarlo quando viene trovata la stazione che si desidera ascoltare (la frequenza cambia a un passo fisso: per “FM” è di 50 KHz, per “AM” è di 9 KHz). Selezione con inserimento diretto: Inserire la frequenza della trasmissione che si desidera ascoltare con i pulsanti numerici. Esempio: Quando si conosce la frequenza della stazione, è possibile inserire direttamente la sua frequenza. Supponendo che la frequenza della stazione FM sia 104.30 MHz, premere il pulsante FREQ del telecomando e “------ M” apparirà sul display. Poi premere in sequenza i numeri 1.0.4.3.0. oo Quando il primo numero è più grande di 1, il display inizia con il secondo numero. Quando il primo numero è 1, il secondo numero indica “0”. oo In modalità FM, se il numero dell’ultima pressione è maggiore o uguale a 5 viene visualizzato come “5”, se e il numero è inferiore a 5 viene visualizzato come “0”. Esempio: 01F 104.30M, significa che “AT” è la ricezione FM automatica, “ST” indica la ricezione stereo, “F” sta per FM, "104.30M" è la frequenza della stazione ITALIANO 41 Operazioni di base (2) Preselezione delle stazioni Mute Preselezione manuale delle stazioni: Premere il pulsante MEMORY del pannello frontale o del telecomando. Il numero della stazione lampeggerà sul display. Poi ruotare la manopola TUNING in senso orario per una frequenza più alta o in senso antiorario per una frequenza più bassa. In alternativa, premere uno dei pulsanti PRESET j o k (. o /) per selezionare il numero della stazione desiderato. Poi premere il pulsante MEMORY del pannello frontale o del telecomando. La stazione verrà memorizzata nell’unità. Per disattivare temporaneamente l’audio premere il pulsante MUTE del telecomando. Viene visualizzato "MUTE" sul display. Premere di nuovo il pulsante MUTE per ripristinare l’audio. oo Quando il numero è inferiore a 10, premere il numero direttamente. Se non si premono altri pulsanti, attendere 1 o 2 secondi, poi il display mostra il numero selezionato. oo In alternativa, premere prima il pulsante "0", quindi premere un numero. oo Quando il numero è maggiore o uguale a 10, premere il numero direttamente. Preimpostazione automatica delle stazioni: Tenere premuto il pulsante MEMORY del pannello frontale o del telecomando. Le frequenze FM di sintonizzazione vanno da FM87.50 a 108.00 MHz, quelle AM da 522 a 1620 KHz. oo Questa funzione consente a questa unità di sintonizzarsi automaticamente su stazioni FM e AM con segnali forti, e può memorizzare fino a 80 stazioni. Selezione delle stazioni preset Premere il pulsante MODE del pannello frontale o del telecomando. Il numero del preset della stazione lampeggia sul display. Ruotare quindi la manopola TUNING del pannello frontale in senso orario per selezionare una frequenza più alta o in senso antiorario per selezionare una frequenza più bassa. In alternativa, premere uno dei pulsanti PRESET j o k (. o /) per selezionare il numero di preset desiderato. Quando viene selezionata la stazione desiderata, premere il pulsante MODE. È anche possibile selezionare una stazione preset premendo i pulsanti numerici corrispondenti sul telecomando. oo Quando il numero è inferiore a 10, premere il numero direttamente. Se non si premono altri pulsanti, attendere 1 o 2 secondi, quindi il numero selezionato viene visualizzato sul display. oo In alternativa, premere prima il pulsante 0, quindi premere un pulsante numerico. Quando il numero è maggiore o uguale a 10, premere il numero direttamente. oo È possibile premere un pulsante PRESET j o k (. o /) per scorrere le preimpostazioni delle stazioni radio. oo È possibile selezionare fino a 80 stazioni preimpostate. 42 RDS Premere il pulsante RDS del telecomando per scorrere tra le modalità orario, PS, PTY e RT. Le stazioni RDS vengono rilevate automaticamente. oo Se nessuna stazione RDS viene trovata con l’operazione di cui sopra, appare sul display una delle seguenti indicazioni -- : -- / NO PS / NO PTY / NO RT. oo Quando viene trovata una stazione RDS, appaiono sul display le informazioni di orario, il nome della stazione, il tipo di programma della stazione, il testo della radio (non più di 64 caratteri). Regolazione della luminosità del display Premere il pulsante RDS del telecomando per regolare la luminosità dei caratteri sul display in base alla luminosità ambiente. Ogni volta che si tiene premuto il pulsante RDS per 2 o 3 secondi, la luminosità del display alternerà le voci “HIGH, LOW e OFF” (luminosità ALTA, BASSA e SPENTA). oo Il display ha la luminosità impostata su “HIGH” all’avvio. Risoluzione dei problemi Specifiche Se si verificano problemi con l'unità, si prega di leggere questa tabella prima di rivolgersi all'assistenza tecnica. Se il problema persiste, contattare il rivenditore o il servizio clienti/assistenza tecnica TEAC (indicato sul retro della copertina). Sintonizzatore FM Intervallo di frequenza . . . . . . . . . . . . . . . . . . . . . . . . . 87.5 MHz - 108 MHz Sensibilità . . . . . . . . . . . . . . . . . . . . . . . . . . . . . . . . . . . . . . . . . . . . (IHF) 12 dB µ Rapporto segnale/rumore . . . . . . . . . . . . . . . . . . . . . mono: 66 dB o più stereo: 60 dB o più Nessuna alimentazione e Controllare la connessione alla rete di alimentazione AC. Controllare e assicurarsi che la sorgente AC non sia una presa commutata e che, in tal caso, l’interruttore sia acceso. Assicurarsi che ci sia alimentazione dalla presa di corrente alternata inserendo nella presa un altro apparecchio, per esempio una lampada o un ventilatore. Il telecomando non funziona e Premere l’interruttore POWER dell’unità principale per accenderla. e Se le batterie sono scariche, cambiare le batterie. e Puntare il telecomando al pannello frontale dell'unità entro il raggio specificato di 10 m. e Togliere eventuali ostacoli tra il telecomando e l’unità principale. Nessun suono e Controllare i collegamenti all’amplificatore. e Controllare il funzionamento dell’amplificatore. e Il silenziamento è attivato. Premere il pulsante MUTE. Selezionare la sorgente corretta. Non si riesce ad ascoltare nessuna stazione o il segnale è troppo debole Sintonizzatore AM Intervallo di frequenza . . . . . . . . . . . . . . . . . . . . . . . . . 522 KHz - 1620 KHz Sensibilità . . . . . . . . . . . . . . . . . . . . . . . . . . . . . . . . . . . . . . . . . . . . . . . . . 55 dB µ Rapporto segnale/rumore . . . . . . . . . . . . . . . . . . . . . . . . . . . . . 40 dB o più Generali Requisiti di alimentazione . . . . . . . . . . . . . . . . . . . . . . . . . AC 230 V, 50 Hz Consumo (nominale) . . . . . . . . . . . . . . . . . . . . . . . . . . . . . . . . . . . . . . . . . . 5 W Dimensioni (L x A x P) . . . . . . . . . . . . . . . . . . . . . . . . . . . 435 x 84 x 331 mm Peso . . . . . . . . . . . . . . . . . . . . . . . . . . . . . . . . . . . . . . . . . . . . . . . . . . . . . . . . . 5,2 kg Temperatura di esercizio . . . . . . . . . . . . . . . . . . . . . . . . . . . . . . +5˚C - +35˚C Umidità in funzionamento . . . . . . . . . . . . 5 % - 85 % (senza condensa) Temperatura di stoccaggio . . . . . . . . . . . . . . . . . . . . . . . . . . –10˚C - +55˚C Accessori Cavo di alimentazione x 1 Antenna FM x 1 Antenna AM x 1 Telecomando x 1 Batterie AAA x 2 Cartolina di garanzia x 1 Manuale di istruzioni x 1 oo Design e specifiche sono soggetti a modifiche senza preavviso. oo Peso e dimensioni sono approssimativi. oo Le illustrazioni possono differire leggermente da modelli in produzione. e Assicurarsi che l'antenna sia collegata correttamente. e Sintonizzarsi sulla stazione in modo corretto. e Se un televisore è vicino all'unità, si consiglia di spegnerlo. e Installare l'antenna dopo la ricerca di una posizione migliore per la ricezione. e Può essere necessaria un'antenna esterna. ITALIANO 43 Z TEAC CORPORATION 1-47 Ochiai, Tama-shi, Tokyo 206-8530 Japan TEAC AMERICA, INC. 7733 Telegraph Road, Montebello, California 90640 U.S.A. TEAC CANADA LTD. 5939 Wallace Street, Mississauga, Ontario L4Z 1Z8, Canada TEAC MEXICO, S.A. DE C.V. Río Churubusco 364, Colonia Del Carmen, Delegación Coyoacàn, CP 04100, México DF, México TEAC UK Ltd. Suites 19 & 20, Building 6, Croxley Green Business Park, Hatters Lane, Watford, Hertfordshire, WD18 8TE, U.K. TEAC EUROPE GmbH Bahnstraße 12, D-65205 Wiesbaden-Erbenheim, Deutschland Phone: (042) 356-9156 Phone: (323) 726-0303 Phone: (905) 890-8008 Phone: (5255) 5010-6000 Phone: (0845) 130-2511 Phone: 0611-71580 This device has a serial number located on its rear panel. Please record the serial number and retain it for your records. Model name: TU-1000 Serial number: 1111. MA-1769A