1
@
"-'-'j
ll~~::
mI
::::::::
:::~:::
:~':':'.
I
::~::~~
.:.~:.:.:
'.;.;.;.',
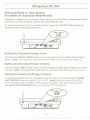
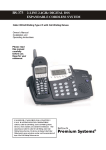
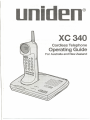
XC 340
Cordless Telephone
Operating Guide
For Australia and New Zealand
..
PRECAUTIONS
Before you read anything else,
please observe the following:
WARNING!
Uniden Corporation DOES NOT represent this unit to be waterproof.
To reduce the risk of fire, electrical shock, or damage to the unit, DO
NOT expose this unit to rain or moisture.
NICKEL-CADMIUM BATTERY WARNING
.
This equipment contains a Nickel-Cadmium Battery.
. The Nickel-Cadmium Battery contained in this equipment
may explode if disposed of in a fire.
.
Do not shprt circuit the battery.
.
Do not charge the Nickel-Cadmium Battery used in this
equipment in any other charger other than the one designed
to charge this battery. Using another charger may damage
the battery, or cause the battery to explode.
Uniden@ is a registered trademark of Uniden Corporation. Auto StandbyTM
and Auto TalkTMare trademarks of Uniden Corporation. Auto Standby is a
patented invention of Uniden Corporation.
)
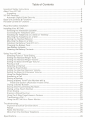
Table of Contents
Important Safety Instructions
About Your XC 340
2
4
Unpacking
,
4
,
XC 340 Features
Automatic Digital Code Security
Base Unit Controls & Functions
5
5
6
HandsetControl& Functions
8
,
Read this before installation
Installing Your XC 340
Selecting the Installation Location
Connecting the Telephone Line
Installing the Telephone on a Desk or Tabletop
Mounting the Telephone on a Wall
Setting the Handset Retainer
Mounting the Base on a Wall
Installing the Battery Pack (BT-161)
Charging the Battery Pack
Low Battery Indicator
Cleaning the Battery Contacts
11
11
11
12
13
13
13
14
15
15
15
""""""""""""""
;
Using Your XC 340
Selecting Pulse or Tone Dialing
Setting the Handset Ringer Tone
Setting the Handset Ringer Volume
Setting the Base Unit Ringer Volume
Placing a Call
Selecting a Channel
Using the Flash Button
Setting the Handset Receiver Volume
Setting the Base Unit Receiver Volume
Using the Redial Button
Answering a Call
Storinga Number
16
16
16
16
16
17
17
17
17
"... 17
17
18
19
"
Storing a Mixed Tone/Pulse Number with a
Pulse Dial System (Australian models Only)
Dialing a Stored Number
Storing One-Touch Dialing Numbers
Dialing a One-Touch Number """""""""""""""""""""""""""""'"
Chain Dialing
Erasing a Stored Number
Using the 2-Way Page/Intercom Feature
Transferringa Call
19
20
20
20
20
21
21
22
.'.
Using the XC 340 As a Room Monitor
23
Troubleshooting
Important Electrical Considerations
Range
RadioInterference
More than One Cordless Telephone
Specifications
24
25
25
,
25
25
26
ImportantSafety Instructions
When using your telephone equipment, basic safety precautions should always
be followed to reduce the risk of fire, electrical shock, and injury to persons,
including the following:
1. Read and understand all instructions.
2. Follow all warnings and instructions marked on the product.
3. Unplug this product from the wall outlet before cleaning. Do not use liquid
cleaners or aerosol cleaners. Use a dry cloth for cleaning.
4. Do not use this product near water; for example, near a bath tub, wash bowl,
kitchen sink or laundry tub, in a wet basement, or near a swimming pool.
5. Do not place this product on an unstable cart, stand, or table. The telephone
may fall, causing serious damage to the unit.
6. Slots and openings in the cabinet and the back or bottom are provided for
ventilation. To protect the product from overheating, these openings must
not be blocked or covered. These openings should never be blocked by
placing the product on a bed, sofa, rug, or other similar surface. This
product should never be placed near or over a radiator or heat register.
This product should not be placed in a bui~-in installation unless prope~
ventilation is provided.
7. This product should be operated only from the type of power source indicated
on the markinglabel. Ifyou are notsure ofthe typeof power supplyto yourho me,
consult your dealer or local power company.
8. Do not allow anything to rest on the power cord. Do not locate this product
where the cord will be damaged by personswalking on it.
9. Do not overload wall outlets and extension cords, as this can result in the risk
of fire or electrical shock.
1O. Never push obj~s of any kind into this product through cabinet slots, as they may
touch dangerous voltage points or short out parts that could result in a risk
of fire or electrical shock. Never spill liquid of any kind on the product.
11. To reduce the risk of electrical shock, do not disassemble this product.
Take it to qualified service personnel when some service or repair work
is required. Opening or removing covers may expose you to dangerous
voltages or other risks. Incorrect reassembly can cause electrical shock
when the appliance is subsequently used.
2
12. Unplug this product from the wall outlet and re1erservicing to qualified
service personnel under the following conditions:
A. When the power supply cord is damaged or frayed.
B. If liquid has been spilled into the product.
C. If the product has been exposed to rain or water.
D. If the product does not operate normally when following the operating
instructions. Adjust only those controls that are covered by the operating
instructions. Improper adjustment of other controls may result in damage,
and will often require extensivework by a qualified technician to restore
the product 10normal operation.
E. If the product has been dropped, or the cabinet has been damaged.
F. If the product exhibits a distinct change in performance.
13. Do not use the telephone to report a gas leak in the vicinity of the leak.
CAUTION: TO REDUCETHE RISK OF FIRE OR INJURY TO PERSONS BY
THE BATTERY, READ AND FOllOW THESE INSTRUCTIONS:
1. Use only the appropriate type and size battery pack specified in this
Operating Guide.
2. Do not dispose of the battery pack in a fire. The cell may explode.
3. Do not open or mutilatethe battery pack. Releasedelectrolyte is corrosive
and may cause damage to the eyes or skin. It may be toxic if swallowed.
4. Exercise care in handling the battery in order not to short the battery with
conducting materials such as rings, bracelets, and keys. The battery or
conductor may overheat and cause burns.
5. Charge the battery pack provided with or identifiedfor use with this product
only in accordance wijh the instructionsand limitations specified in the
instruction manual provided for this product.
6. Observe proper polarity orientation between the battery pack plug and socket.
SAVE THESE INSTRUCTIONS
3
I
About your XC 340
Congratulationson your purchase of the Uniden XC 340 Cordless Telephone.
The XC 340 is designed and engineered to exact standards for reliability, long
life, and outstanding performance. To get the most from your XC 340, please
read this Operating Guide thoroughly.
Unpacking
YourXC340boxshouldcontainthefollowingitems:
. BaseUnit
. Handset
.
.
.
.
.
Telephone Line Cord with Modular Plug
AC Adaptor
Rechargeable Battery Pack (BT-161)
This Operating Guide (read thoroughly)
Memory Storage Stickers
. Screws
If your XC 340 Cordless Telephone is not performing up to your expectations,
please try the simple steps listed in the Troubleshooting, Range, and Radio
Interference sections of this manual. If you are still unable to resolve the
problems, please contact Uniden Customer Service for assistance.
If the unit must be returned for service, ship or deliver the product, freight
prepaid to:
UNIDEN AUSTRALIA PTY. LIMITED
Technical Service Division
345 Princes Highway, Rockdale
NSW2216
4
UNIDEN NEW ZEALAND LIMITED
Corner Ti Rakau Drive and
Harris Road, East Tamaki
P.D.Box 38-630, Auckland
XC340 Features
. UltraClear Plus noise reduction provides the best quality sound of
a cordless telephone.
. Ten 30/39 MHz Channels
. 20-Number Memory
. Maximum Operating Range
. 3 One-Touch Memory Dialing Buttons
. Room Monitoring
. 2-Way Paging/Intercom
. Call Transfer
. 3-Way Communication
. Redial/Pause and Flash
. Auto Standby
. Auto Talk
. Tone/Pulse Dialing (Australian models Only)
. Automatic Digital Code Security
. Handset Volume Control/RingerVolume Control
. Base Unit Volume Control/RingerVolume Control
. Battery Saving Feature
. 2-Way Handset Mounting
. Reversible Handset Retainer
Automatic DigitalCode Security
Many cordless telephones operate similarly and on the same frequency.
Without digital code security, another Handset could make calls using your
Base Unit and telephone line. Therefore, to avoid any unauthorized calls
through your Base Unit, a Digital Code feature was added to your XC 340.
This Digital code is shared only between your Handset and Base Unit.
The Code is set automatically when you first use the phone.
To reset the Digital Code, be sure the Handset is on the Base Unit. Press
INT'COM on the Base Unit. The Base Unit and Handset will begin beeping.
Remove the Handset from the Base Unit and set it down again. The Base
Unit and Handset will stop beeping. The Digital Code is now reset randomly
to one of more than 65.000 codes.
If the Base Unit loses power while the Handset is off the Base, the Digital
Code may be erased. When this happens, the Handset will not function.
To establish communication between the Handset and Base Unit:
1. Remove the Handset from the Base Unit (if it is on the Base Unit).
2. Restore power to the Base Unit.
3. Place the Handset back on the Base Unit.
The CHARGE LED will blink to indicate that the Digital Security Code is set.
5
I
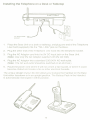
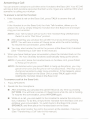
Base Unit Controls & Functions
RING - OFFLO HI Switch
TONE PULSESwitch
TEL
. UNE
DCIN9V +%-
BASEUNITAntenna
I
HandsetRetainer
INUSELED
Speaker
VolumeControl
(Onside)
...........
...........
IdI!R
...........
...........
...........
...........
...........
...........
...........
0
co@
..
0
0
..~.
-.
Microphone
CHANNEL
U,"'AC"AA
PLUS
~
IMrCOM
-..SPEAKERLED
t
SPEAKERButton
INTCOM Button
CHARGELED
Base Unit
RINGER Switch
Use to set the ringer volume level ("LO", "HI", or "OFF")
of the Base Unit for incoming calls, or the page alert tone
level when paged from the Handset.
TONE/PULSE
Switch
Use to select either Tone Dialing or Pulse Dialing.
(Functional on Australian Models only)
TEL LINE Jack
Plug a standard telephone line cord into this jack and the
other end of the cord into the standard telephone socket.
6
DC Input Jack
Plug the AC Adaptor cord into this jack. Then pluGthe
AC Adaptor into a standard wall outlet.
Handset Retainer Reverse this retainer to hang up the Handset when the
XC 340 is mounted on a wall.
Base Unit
Antenna
Collapsible antenna provides maximum communicatior,
Speaker
range
when fullyextended and in vertical position.
Lets you hear the caller, or the person talking to you from the
Handset. Also, enables you to hear the ringing when a call or
page is received.
Microphone
Use to talk to the caller, or the person paging you from the
Handset.
IN USE LED
Lights when the phone is in use; blinks when the Base Unit
rings. Also, blinks when you press INT'COM to place a call
on hold.
CHARGE LED
Lights when the Handset is on the Base Unit and the Batte.-y
Pack inside the Handset is charging.
INT'COM Button
Use to page the handset, or to receive a page from the
Handset, and activate the Intercom between the Base Unit
and Handset. Also, when a phone call is answered at the
Base Unit, use this button to page the Handset to pick up
the call. Then press INT'COM again or SPEAKER to transfer
the call.
(Note: The Base Unit's INT'COM function does not work
if the handset is in use or if its Ring On/Batt. save switch
is in the "Batt Save" position.)
SPEAKER Button
SPEAKER LED
Use to answer a phone call at the Base Unit and speak to the
caller. Also, after pressing INT'COM or SPEAKER to transfer
a call to the Handset, press SPEAKER to establish 3-way
communication among the Base Unit, Handset, and caller.
Lights when you press INT'COM to place a call on !loid, or
when you are using the Intercom functions.
Volume Control
Use to adjust the volume ieve! of the Speaker.
7
!
.
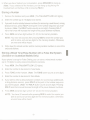
Handset Control & Functions
Handset
Antenna
TALK/BATT L°
LED
W
-L;
TALK Button
- -F'"
TALK
I
.:rj I
,
.
"DIU(
owre.
ABC
CS'
.K.
M\IO
G) @ @
1-9,0, TONE*,
# Button
TONEButton
ONE-TOUCH
DI~~
INTC Buttons
Button
FLASHlR.
TONE
Button
ON
c»
MTTLON.).,
OH
@)@@
paRS
CHANNELButton
'
1\N
I
'r
RING ON
BATT
BATTSAVE
Switch
SA~
WXYZ
(!)@@
" . ~~
@
€>
-~ -~ ~~..I
C mi
- -=~
- - - - -~
~ I
f~
~
I
MEM
Button
RDUP Button
VOLUME/R.VOL
Button
Handset
Antenna
Flexible antenna.
TALKI
The red LED lights steady when: (a) the phone is in use;
(b) you use MEM to store, erase, or dial a number in
memory. The red LED flashes every 3 seconds when the
Battery Pack is Iow and needs to be recharged.
BA TT LOW
LED
TALK Button
Press to place or answer a call. When finished, press this button
to hang up. Also, after paging the Base Unit to announce that
a call is waiting, press TALK to transfer the call. Press TALK
again to establish 3-way communication among the Handset,
Base Unit, and caller.
8
Numeric Keys
Use for dialing numbers and storing numbers in memory.
TONE
Button
(Australian
Models only)
When the TONE/PULSE switch on the Base Unit is in the
PULSE position, the TONE button allows tone dialing for
access to long distance services, etc. Also, use when storing
a mixed Tone/Pulse number. The TONE button counts as
one digit of the number.
ONE-TOUCH
DIAL Buttons
Special memory locations for storing numbers. Press the
appropriate button to dial a number.
INT'C Button
Use to page the Base Unit, or to receive a page from the
Base Unit, and to establish communication between the
Handset and Base Unit. Also, when a phone call is answered
at the Handset, use INT'C to place the call on hold and to
page the Base Unit to pick up the call.
FLASH/R.
TONE Button
This button has a dual function: (a) When making a call,
press to send a timed "hook-flash" on the telephone line for
accessing services such as call waiting, etc. (b) When the
telephone is not in use, press to select one type of the two
ringer tones.
CHANNEL
Button Use to select one of 10 channels for the clearest operation.
(Note: Operates only when the phone is in use.)
RING ON!
BATT SAVE
Switch
(On the side of the Handset) Set the switch to "RING ON"
to enable ringing when a call is received. Set the switch to
"BATT SAVE" to save battery energy when the Handset is
not in use, and disable ringing at the Handset.
MEM Button
Use when storing numbers in memory, erasing numbers from
memory, and to dial a stored number.
RDLlP Button
This button has a dual function: It redials the last dialed number,
or inserts a pause within memory dialing sequences.
VOLUME!
A.VOL Button
This button has a dual function: (a) When making a call,
press once to adjust the volume of the earpiece speaker
(loud or soft). (b) When the telephone is not in use, press
to select the Handset ringer volume (high or Iow).
9
I
Read This Before Installation
We have designed your telephone to conform to Australia or New Zealand Radio
Frequency regulations,and you can connect it to most telephone lines. However,
each device that you connect draws power from the phone line. We refer to the
power drawn as the device's ringer equivalence numberor REN. The REN is
shown on the bottom of your telephone (NewZealand Models only). If you are
using more than one phone or other deviceon ttle line, add up all the REN's.
If the total is more than five, your phones might not ring. In ruralareas, a total
REN of three might impair ringing operation.
Note: You must not connect your phone to any of the following;
.Coin operated systems
.Party-line systems
. Most electronic key phone systems
Your phone operates on standard radio frequencies. It is possible for other radio
units operating nearby on similar frequencies to unintentionally intercept your
conversation or cause interterence. Possible lack of privacy can occur with any
cordless telephone.
.IMPORTANT NOTICE
You must charge the new battery for at least 12 hours before
you use the phone.
10
Installing Your XC 340
,..--
Selecting the Installation Location
Select a location for the XC 340 to avoid excessive heat or hurnidity (as in a
kitchen or bathroom), The Base Unit of your XC 340 can be placed on a desk
or tab!etop near a standard 230/240V AC outlet and standard telephone line
socket, or mounted on a wall plate. Keep the Base Unit and Handset away from
sources of electrical noise, (motors, fluorescent lighting). Be sure there is
sufficient space to safely extend the Base Unit antenna fully.
I
Connecting the Telephone Li"e
Plug the telephone line cord from the Base Unit into a standard telephone
socket.
(Note: If you do not have a telephone socket, contact Te/eeom for further
information)
CAUTION:
.
Never install telephone wiring during a lightning storm.
.
Never install telephone jacks in wet locations unless the jack is specifically
designed for wet locations.
.
Never touch uninsuiated telephone wires or terminals unless the telephone
line has been disconnected at the network interface.
11 Use caution when installing or modifYing telephone lines.
11
Installing the Telephone on a Desk or Tabletop
TO TELEPHONE
SOCKET
AC ADAPTOR
1. Place the Base Unit on a desk or tabletop, and plug one end of the Telephone
Line Cord (supplied) into the "TEL LINE" jack on the Base.
2. Plug the other end of the Telephone Line Cord into the telephone socket.
3. Plug the AC Adaptor cord into the 9V DC input jack on the Base Unit.
(Note: Use only the AC Adaptor supplied with the XC 340.)
4. Plug the AC Adaptor into a standard 230/240V AC wall outlet.
(Note: The AC wall outlet should be switched on at all times.)
5. Route the power cord where it will not create a trip hazard, or where it could
become chafed and create a fire or other electrical hazards.
The unique design of your XC 340 allows you to place the Handset on the Base
Unit either facedown or in an upright position. The Battery Pack in the Handset
is automatically recharged in either position.
12
Mounting
the Telephone on a Wall
The XC340 is designed to be mounted directly on a wall.
Setting the Handset Retainer
1. Remove the Handset Retainer on the Base Unit by sliding it upward.
2. Flip the Retainer over so the tab is facing up.
3. Slide the Retainer back into the Base Unit.
+
~
I
I
1
1
1
1
~
+
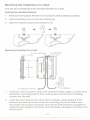
Mounting the Base On a Wall
To TELLINEJack
-11- 5 mm
-r
To DC IN 9V
Input Jack
~-----
100 mm
~
To Telephone
[Q]
~
~__n-
@'
Socket
1. Carefully select a location away from electrical cables, pipes, or other items
behind the mounting location that could cause a hazard when inserting
screws into the wall.
2. Insert two mounting screws 10cm apart vertically, allowing about 5mm
between the wall and screw heads for mounting the phone. Make sure
the screws are securely fastened, and that the wall material is capable for
supporting the weight of the Base Unit; otherwise, damage to the Base Unit
would result.
13
3. Plug one end of the Telephone Line Cord (supplied) into the "TEL LINE"
jack on the Base Unit. Lay the cord inside the molding on the bottom of
the Base Unit.
4. Plug the AC Adaptor cord into the 9V DC input jack on the Base Unit.
(Note: Use only the AC Adaptor supplied with the XC 340.) Place the cord
inside the molded channel on the bottom of the Base Unit.
5. Place the Base Unit onto the mounting screws and slide downward to
secure. Then hang the Handset on the Base Unit.
6. Plug the other end of the Telephone Line Cord into the telephone socket.
7. Plug the AC Adaptor into a standard 230/240V AC wall outlet.
8. Route the power cord where it will not create a trip hazard, or where it could
become chafed and create a fire or other electrical hazards.
Installing the Battery Pack (BT -161)
N
B
R
I
The built-in Memory Backup feature allows up to 3 minutes after disconnecting
the old Battery Pack for installing a new one without losing any phone numbers
stored in the telephone's memory.
1. Remove the battery compartment
cover on the back of the Handset
by sliding it down.
...
2. Connect the Nickel-Cadmium Battery
Pack by plugging it into the socket on
the top of the battery compartment.
(Note: The connector fits only one
way and requires only a minimal
amount of pressure to insert. Always
install the Battery Cable with the
BLACK wire to the left.)
3. Place the Battery Pack inside the
compartment and slide the battery
cover back. Make sure the wires from
the Battery Pack do not get caught in
the cover.
14
~
t
,.1
._".
-
---
Charging the Battery Pack
The rechargeable Nickel-Cadmium Battery Pack included with your XC 340 must
be charged for approximately 12-16 hours before using the phone for the first
time. Place the Handset on the Base Unit and make sure the CHARGE LED
lights. If the CHARGE LED does not light, check to see that the AC Adaptor is
plugged in and the wall outlet is switched on.
Low Battery Indicator
-
When the Battery Pack voltage level in the Handset is very Iow and needs to
be charged, the TALK/BA TT LOW LED flashes every 3 seconds. If this occurs
while you are on the phone, a short alert beep will also be heard. When this
happens, complete your call as early as possible, and return the Handset to
the Base Unit for charging. Once the battery is Iow, you will only be able to press
the TALK button to return the phone to Standby. Allow 12 to 16 hours without
any interruption for the handset to fully recharge.
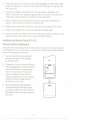
Cleaning the Battery Contacts
To maintain a good charge condition, it is important to clean all 8 charge contacts on the Handset and Base Unit about once a month. Use a pencil
eraser or other contact cleaner. Do not use any liquids or solvents.
CONTACTS
CONTACTS
...........
...........
...........
...........
...........
...........
~....
IDIen
"WJ<
"'" GII.
.
CONTACTS
...........
...........
...,.....
CD
1J@~
(jfci
@@@-
IN USE.
-.......
IHT'COM
c1J-@(iJ-@@)@)
CHARGE.
, . .----
........- .....
CID eR) CID CID
CONTACTS
15
(
I
0.1
I
Using Your XC 340
Selecting Pulse or Tone Dialing
(Available on Australian Models only)
Australian models can use either Pulse Dialing or Tone Dialing, depending on the.
local service. New Zealand models are Tone Dialing only.
To set the phone for Tone or Pulse Dialing, place the TONE/PULSE switch on
the Base Unit in the proper position.
Setting the Handset Ringer Tone
Press the
tones.
FLASH/R. TONE button on the Handset to select either of two ringer
(Note: This sets the ringer tones only when the phone is not in use.)
Setting the Handset Ringer Volume
Press the VOLUME/R. VOL button on the Handset to select either high or Iow ringer
volume. (Note: This sets the ringer volume only when the phone is not in use.)
Setting
the Base Unit Ringer Volume
To enable the Base Unit to ring when a call or page is received, set the BASE
UNIT RINGER switch to either "LO" or "HI". (Note: When a callis ON HOLD
at the Handset and the Base Unit is paged, the Base Unit willring even when
the BASE UN" RINGER switch is set in the "OFF" position.)
16
Placing a Call
To place a call with your XC340:
1. Remove the Handset from the Base Unit and press TALK.
2. Dial the number you are calling.
3. When you have finished the call, press TALK or return the Handset onto the
Base Unit.
NOTE: If you don't place the Handset back on the Base Unit, you will need
to press TALK TO HANG UP THE PHONE.
Selecting a Channel
The CHANNEL button on the Handset allows you to choose among ten factory
set channels. If you are receiving any interferenceon a channel, press the button
to switch to another channel. This function works only when the phone is in use.
NOTE: If you have more than one cordless phone in your house, they must
be set to different channels.
Using the Flash Button
I
Use FLASH to send a timed "hook-flash" on the telephone line for accessing
services such as call waiting, etc. To use this function, simply press the
FLASH/A.TONE button while operating the Handset.
Setting the Handset Receiver Volume
Whileon a phone call using the Handset, press the VOLUME/A. VOl button to
select e~her loud or soft earpiece speaker volume.
Setting the Base Unit Receiver Volume
While on a phone call using the Base Unit, slide the Volume Control to adjust the
volume level of the Speaker.
Using
the Redial Button
ADl/P dials the last number that you have called. This function is extremely
useful when the number you called is busy. To use this function, simply press
AOUP. The last number you called will then be dialed again.
NOTE: If any other key is pressed before ROUP, this function will not work.
17
Answering a Call
Youcan answeratelephonecall eitheratthe Handsetorthe Base Unit.YourXC 340
will ring at both locations (provided that both unit's ringers are switched ON) when
someone is calling your number.
To answer a call at the Handset:
1. If the Handset is not on the Base Unit, press TALK to answer the call.
-ORIf the Handset is on the Base Unit, the Auto Talk function, allows you to
answer the call by simply lifting the Handset from the Base Unit and beginning your conversation.
NOTE: Auto Talk function will not work if the Handset Ring ON/Baft Save
Switch is set to "Baft Save" position.
2.
.
After answering, you can place the call ON HOLD at any time by pressing
INT'C. You will hear a series of 3 beep tones while the call is holding.
To resume the conversation, press TALK.
.
You may also transfer the call to the person at the Base Unit, if desired.
(See "Transferring a Call" later in this manual.)
When you have finished your conversation, place the Handset back on the
Base Unit. The Auto Standby functions automatically hang up the phone.
NOTE: If you don't place the Handset back on the Base Unit, press TALK
to hang up the phone.
NOTE: Sometimes when you press TALK to hang up the phone, you may
get an error tone and the phone will not disconnect. This may occur
during conversations under noisy conditions. If this happens, place
the Handset back on the Base Unit or press TALK again while
holding the Handset close to the Base Unit.
To answer a
call at the Base Unit:
1.
Press SPEAKER.
2.
Speak into the microphone.
.
After answering, you can place the call ON HOLD at any time by pressing
INT'COM. You will hear a series of 3 beep tones while the call is holding.
To resume the conversation, press INT'COM again.
.
While on a call, you can switch to the Handset to resume the conversation, if desired. To do this, simply lift the Handset from the Base Unit and
continue your conversation. To switch back to the Base Unit, press
SPEAKER, and then place the Handset back on the Base.
.
You may also transfer the call to the person at the Handset, if desired.
(See "Transferring a Call" later in this manual.)
18
3. When you have finished your conversation, press SPEAKER to hang up.
(Note: If you switched to the Handset, you can hang up by placing the
Handset back on the Base Unit or pressing TALK.)
Storing a Number
1. Remove the Handset and press MEM. (The TALK/BATT LOW LED lights.)
2. Enter the number (up to 16 digits) to be stored.
3. If you wishto entera delaybetweennumbers(foraccessinga switchboard,or long
distanceservice),press ROUP at the point in the number sequence you wish
to pause. (Note: The RDUP button count~ as one digit.) Pressing ROUP
more than once will increase the length of the pause between numbers.
4. Press MEM and a two digit number (01-20) for the memory location.
NOTE:
Youhave20 seconds afterpressingMEMto enterthenumberyou
wish to store, and use two digits for the memory location. Otherwise,
an error tone willbe heard.
5. Write down the stored number and its memory location number on one of the
enclosed stickers.
Storing a Mixed Tone/Pulse Number with a Pulse Dial System
(Available on Australian Models Only)
If your phone is set up for Pulse Dialing, you can store a mixed mode number
(up to 16 digits) to easily access long distance services.
1.
Press MEM. (The TALK/BATT
LOW LED lights.)
2. Enter the number to be stored in Pulse Mode.
3. Press TONE on the Handset. (Note: The TONE buttoncountsas one digit.)
4. Enter the number to be stored in Tone Mode.
5.
If you wish to enter a delay between numbers (for accessing a switchboard,
or long distance service), press RDL/P at the point in the number sequence
you wish to pause. (Note: The RDUP button counts as one digit.) Pressing
RDUP more than once will increase the length of the pause between numbers.
6.
Press MEM and a two digit number (01-20) for the memory location.
NOTE:
You have 20 seconds after pressing MEM to enter the number you
wish to store and use two digits for the memory
an error tone will be heard.
19
location. Otherwise,
I
Dialing a Stored Number
To dial a number previously stored in memory, press TALK, then press MEM
and the memory location number (01-20).
Storing One-Touch Dialing Numbers
To store a ONE-TOUCH DIALlNG number:
1. Removethe HandsetandpressMEM.(TheTALK/BAITLOW LED lights.)
2. Enter the number (up to 16 digits) to be stored.
3. If you wish to enter a delay between numbers (for accessing a switchboard,
or long distance service), press RDL/P at the point in the number sequence
you wish to pause. (Note: The RDUP button counts as one digit.) Pressing
RDUP morethanoncewill increasethe lengthof the pause between numbers.
NOTE: You can also store a mixed tone-pulse number in a ONE-TOUCH
DIALlNG button. To do this, follow steps 2 through 5 in "Storing a
Mixed Tone/Pulse Number".
4. Press MEM and the ONE-TOUCH DIALlNG button (1, 2, or 3) you wish to
program.
NOTE: You have 20 seconds after pressing MEM to enter the number you
wish to store. Otherwise, an error tone will sound.
5. Write down the stored number and its ONE-TOUCH DIALlNG button number
on one of the enclosed stickers.
To store additional ONE-TOUCH DIALlNG numbers, repeat steps 1 through 5.
Dialing a One-Touch Number
To dial a number previously stored in a ONE-TOUCH DIALlNG button (1, 2, or
3), press TALK, and then press the ONE-TOUCH DIALlNG button for that number.
Chain Dialing
On certain occasions, after dialing a number, you may be requested by the party
or service you are calling to enter a special access code, such as when performing
a banking transaction. You can do this conveniently by first storing the access
code into one of the memory numbers. Then, after dialing the main number,
20
press MEM and the memory location number of the access code at
the appropriate time.
Erasing a Stored Number
1. Remove the Handset from the Base Unit.
2. Press MEM twice.
3. Press the memory location number or the ONE-TOUCH DIALlNG button you
want to clear.
Using the 2-Way Page/Intercom Feature
The 2-Way Page/Intercom function allows you to communicate between the
Base Unit and Handset. To use the Intercom function:
.
.
The RING ON/BAIT SAVE switch on the Handset must be in the "RING
ON" position.
The BASE UNIT RINGER switch must be set to either "LO" or "Hli'.
(Note: When a call is ON HOLD at the Handset and the Base Unit is
paged, the Base Unit will ring even when the BASE UNIT RINGER
switch is set to the 'OFF 11
position.)
I
Paging from the Base Unit
BASE
UNIT
HANDSET
INT'COM
again to(Ifdisconnect.
Press INT'COM.
no answer) press
Press TALK or INT'C, and answer the
page.
To end the conversation, press
INT'COM.
-
-ORTo end the conversation,
21
press TALK.
Paging from the Handset
BASE UNIT
HANDSET
Press INT'C. (If no answer, press INT'C
again to disconnect.)
Press INT'COM or SPEAKER, and
answer the page.
To end the conversation,
-OR-
press INT'COM.
To end the conversation,
press TALK.
Transferring a Call
When a phone call is answered at the Base Unit or Handset, you can transfer
that call to the other station (that is, from the Base Unit to the Handset, or from
the Handset to the Base Unit). You can also establish 3-way communication
among the two stations and the calling party.
Transferring
a Call from the Base Unit
BASE UNIT
HANDSET
Press INT'COM. The SPEAKER LED
flashes. (If no answer, press INT'COM
again to disconnect.)
Press TALK or INT'C, and answer the
page.
The Base Unit's INUSE LED flashes.
Announce there is a call waiting.
Press INT'COM to transfer call.
Talk to caller. (To transfer call back to
Base Unit, see "Transferring
a Call from
the Handset" on next page.)
Press SPEAKER to enable 3-way
conversation.
Press TALK to disconnect.
Press SPEAKER to disconnect.
22
Transferring
a Callfrom the Handset
BASE UNIT
HANDSET
Press INT'C. (If no answer, press INT'C
again to disconnect.)
Press SPEAKER or INrCOM, and answer
the page. The IN USE LED flashes.
Announce there is a call waiting.
Press TALK to transfer call.
Talk to caller. (To transfer call back to
a Call from
Handset, see "Transferring
the Base Unit" on previous page.)
Press TALK to enable 3-way conversation
Press SPEAKER
to disconnect.
Press TALK to disconnect.
Using the XC 340 as a Room Monitor
You may use the XC 340 Handset to monitor activity near the Base Unit without
anyone present at the Base Unit.
To turn Room Monitoring on:
1. Remove the Handset from the Base Unit.
2. Press INT'COM on the Handset.
3. Press TALK on the Handset. Two-way communications are now set up
between the Base Unit and the Handset.
NOTE: Press VOLUME/R. VOL on the Handset to adjust the earpiece
volumes to loud or soft.
To turn mon~oring off, press TALK at the Handset.
23
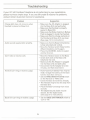
Troubleshooting
If your XC 340 Cordless Telephone is not performing to your expectations,
please try these simple steps. Ifyou are still unable to resolve the problems,
contact Uniden Customer Service for assistance.
Problem
Charge light does not come on when
Handset is placed on Base Unit.
.
.
Make sure the AC Adaptor is plugged
into the Base Unit and wall outlet.
Make sure the Handset is properly
seated in Base Unit.
.
Make sure the Nickel-Cadmium Battery
Pack is plugged in inside the Handset.
Make sure that the charge contacts on
the Handset and Base Unit are clean.
(See page 15, for instructions)
.
Audio sounds weak and/or scratchy.
Can't make or receive calls.
Suggestion
.
.
.
..
.
.
Handset can't ring or receive a page.
.
Make sure that the Base Unit antenna
is fully extended and vertical.
Move the Handset and/or Base Unit to
different locations and try again.
Press the CHANNEL button to select
another channel.
Move the Handset closer to the Base.
Check both ends of the Base Unit
telephone line cord.
Make sure the AC Adaptor is plugged
into the Base Unit and wall outlet.
Disconnect the AC Adaptor for a few
minutes, and then reconnect it.
Nickel-Cadmium Battery Pack may be
weak. Charge the battery on the Base
Unit for more than 12 hours.
Set the RING ON/BA TT SAVE switch
on the Handset to "RING ON".
. Extend the Base Unit antenna vertically.
The Handset may be too far away from
the Base Unit.
Place the Base Unit away from noise
sources.
The Digital Security Code may be
erased. Set the Digital Code.
(See page 5 for instructions.)
.
.
.
.
.
Base Unit can't ring or receive a page.
24
Set the BASE UNIT RINGER switch to
"LO" or "HI".
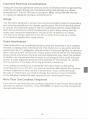
Important Electrical Considerations
Unplug all electrical appliances when you know an electrical storm is approaching.
Lightning can pass through your householdwiring and damage any device
connected to it. The XC 340 has no exception. Note:Pleasedo not attempt
to unplug any appliance during an electrical storm.
Range
The XC 340 is designed to achieve the maximum possible range for transmitting
and receiving according to the highest specifications. We have rated this phone
to operate at a maximum distance wnh the qualification that the range depends
upon the environment in which the telephone is used. Many factors limit the
range, and it would be impossible to include all the variables in our rating.
The Maximum Range rating of the XC 340 is meant to be used as a means
of comparison against other range claims.
Radio Interference
Radio interference may occasionally cause buzzing and humming in your cordless
Handset, or clicking noises in the Base Unft. This interference is caused by external
sources such as a TV, refrigerator, vacuum cleaner, fluorescent lighting, or electrical
storm. Your unft is NOT DEFECTIVE. If these noises continue and are too distracting,
please check around your home to see what appliances may cause the problem.
In addition, we recommend that the base not be plugged into a circuit that also
powers a major appliance because of the potential for interference. Be certain
that the antenna of the base unit is fully extended if necessary.
In the unlikely event that you consistently hear other voices or distracting
transmissions on your XC 340, you may be receiving radio signals from another
cordless telephone or other source of interference. If you cannot eliminate
this type of interference, you need to change the channel. Press CHANNEL
on the Handset to select the best channel for the clearest performance.
More Than One Cordless Telephone
If you wish to use more than one cordless telephone in your house, they must be
operated on different channels. Press CHANNEL to select one that provides the
clearest performance.
25
I
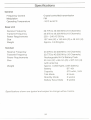
SpecificaJions
General
Frequency Control
Modulation
Operating Temperature
Crystal controlled transmission
FM
-10°C to 50°C
Base Unit
Receive Frequency
Transmit Frequency
Power Requirements
Size
Weight
39.775 to 40.000 MHz (10 Channels)
30.075 to 30.300 MHz (10 Channels)
230 240 AC 50 Hz
-
197 mm (W) x 140 mm (0) x 48 mm (H)
Approx. 0.445 kgms.
Handset
Receive Frequency
Transmit Frequency
Power Requirements
Size
Weight
30.075 to 30.300 MHz (10 Channels)
39.775 to 40.000 MHz (10 Channels)
Rechargeable Ni-Cd Battery Pack
55 mm (W) x 68 mm (0) x 307 mm (H)
(with antenna)
Approx. 0.283 Kgms. (with battery)
Battery
BT-161
Capacity
270 mAH, 3.6V
Talk Mode
6 hours
Standby Mode
Battery Save Mode
2 weeks
6 weeks
Specifications shown are typical and subject to change without notice.
26
WARRANTY
UNIDEN xc 340 1 YEAR WARRANTY
(Batteries and Accessories
are covered for 90 Days ONLY)
Note: Please keep your sales docket as it provides evidence of warranty. Warranty is only valid in the
country where the product has been purchased.
WARRANTOR: Uniden Australia Pty. Limited ACN 001865498
Uniden New Zealand Limited
ELEMENTS OF WARRANTY: Uniden warrants to the original retail owner for the duration of this
warranty, its XC 340 Cordless Telephone (hereinafter referredto as the Product),to be free from defects
in materials and craftsmanship with only the limitations or exclusions set out below.
WARRANTY DURATION: This warranty to the original retail owner only, shall terminate and be of no
further effect ONE (1) Year after the date of original retail sale. This warranty will be deemed invalid if
the product is: (A) Damaged or not maintained as reasonable and necessary, (B) Modified, altered or
used as part of any conversion kits, subassemblies, or any configurations not sold by Uniden. (C)
Improperly in~talled, (D) Repaired by someone other than an authorised
Uniden Repair Agent for a
defect or malfunction covered by this warranty, (E) Used in conjunction with any equipment or parts or
as a part of a system not manufactured
by Uniden, (F) Installed, programmed
or serviced by anyone
other than an authorised Uniden Repair Agent, (G) Where the Serial Number label of the product has
been removed or damaged beyond recognition.
PARTS COVERED:
accessories
This warranty covers for One year, the Base/Charging
(Antenna,
Unit and Handset only. All
Battery, AC Adaptor, Cable, Modular Plug, etc.) are covered for 90 Days only.
ST A TEM ENT OF REM EDY: In the event that the product does not conform to this warranty at any time
while this warranty is in effect, the warrantor at its discretion, will repair the defect or replace the product
and retum it to you without charge for parts and service. THIS WARRANTY DOES NOT COVER OR
PROVIDE FOR THE REIMBURSEMENT OR PAYMENT OF INCIDENTAL OR CONSEQUENTIAL
DAMAGES.
WARRANTY
CARD: If a warranty card has been included with this productthen
please fill it in and return
to us within 14days of purchase. Your name and the Serial number of the product will then be registered
in our database and this will help us process your claim with greater speed and efficiency should you
require warranty service.
PROCEDURE FOR OBTAINING PERFORMANCE OF WARRANTY: In the event that the product
does not conform to this warranty,-the Product should be shipped or delivered, freight pre-paid, with
evidence of original purchase (e.g., a copy of the sales docket), to the warrantor at:
UNIDEN AUSTRALIA PTY LIMITED
SERVICE DIVISION
345 Princess Highway, Rockdale, NSW 2216
Ph (02) 599 3100 FAX (02) 5993278
UNIDEN NEW ZEALAND LIMITED
Corner Ti Rakau Drive and Harris Road
East Tamaki, Auckland
Ph (9) 2738383 FAX (9) 2740009
Customers in other States should ship or deliver the Product
freight pre-paid to their nearest Uniden Authorised Repair Centre.
(Contact Uniden for the nearest Warranty Agent to you)
27
unid~n@
@ 1995 Uniden Corporation. All rights reserved.
UDZZO1340BZ
Printed in Hong Kong