1
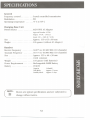
UnidE!n@
XC631Plus
Add-onHandsetand ChargingBase
Operating Guide
'f
'------
---
---
~
I
I
I
':1
I'
I;
Thispageintentionallyleft blank,
2
CONTENTS
bnportlntNotes
5
PleaseReadthisfirst
5
Safetylnfonnation
7
BatterySafetyPrecautions
9
PartsChecklist
11
Features
13
HandsetFunctions
15
Installation
17
SelectingtheInstallationLocation.. . . . . . . . . . . . . . . . . . . .17
InstallingtheBatteryPack
.18
ChargingtheBatteryPack
.18
LowBatteryIndicator
19
Cleaningthe BatteryContacts. . . . . . . . . . . . . . . . . . . . . . . .19
UsingYourXC631Plus
21
Registering your Handset for the first time . . . . . . . . . . . . . . .21
DigitalSecurityCode
21
To Change or Set a new Digital Security Code. . . . . . . . . . . . .21
PlacingaCall
22
SelectingaChannel
22
Usingthe Flash/RedialButton. . . . . . . . . . . . . . . . . . . . . . . .23
Redialingthe LastNumber Called. . . . . . . . . . . . . . . . . . . . .23
Usingthe Flash KeywithCallWaiting. . . . . . . . . . . . . . . . . . .23
Settingthe Handset ReceiverVolume. . . . . . . . . . . . . . . . . . .24
UsingtheHoldButton
24
AnsweringaCall
24
Transferinga Callto AnotherHandset. . . . . . . . . . . . . . . . . .25
Storinga Numberinto the Memory. . . . . . . . . . . . . . . . . . . .25
Storinga Mixed(Tone/Pu1seNumber. . . . . . . . . . . . . . . . . .26
StoringLongNumbers in Memory. . . . . . . . . . . . . . . . . . . . .27
DialingaStoredNumber
28
UsingthePageFeature
28
UsingtheCallWaitingFeature
.28
Troubleshooting
.29
Important Electrical Considerations.
. . . . . . . . . . . . . . . . . . .31
OperatingRange
31
RadioInterference
32
MorethanOneCordlessTelephone.. . . . . . . . . . . . . . . . . . .32
Spec~cations """"""""""""""""""
.33
Warranty
35
3
This
page intentionally
4
/eft blank.
IMPORTANTNOTES
PLEASE
READmIS FIRST
Thank you for purchasing your XC631 Plus Add on Handset and
Charging Base.
This product has been designed to expand your existing XC631
Cordless Telephone to give you the convenience
of multiple Handset
use. Please refer to the following Features Section for the benefits
you can now enjoy.
.
mE NEWHANDSET
MUSTBEREGISTERED
TOmE MAIN
BASEUNIT BEFOREUSINGFOR mE FIRST TIME.
PLEASEREFERTO PAGE21 "Registeringyour Handset for
first time use".
NOTE:
f~
EachHandset can be charged on the XC631 Plus Charging
Base or the xc631 Base Unit. The xc631 Plus Charging
Base is smaller than your existing XC631 Base Unit and
does not require
a telephone
connection.
The XC631 Plus can not be used separately. It must be
used in conjunction
with your XC631 Cordless telephone.
We have designed your telephone
Communications
Authority
connect it to most telephone
to conform to Australian
(ACA) regulations,
and you can
lines. However, each device that you
connect draws power from the phone line. We refer to the power
.
drawn as the device's Ringer Equivalence Number or REN. The REN
is shown on the bottom of your telephone. If you are using more
than one phone or other device on the line, add up all the REN's.If
the total is more than three, your phones might not ring.
NOTE:
f~
You must not connect your phone to any of
the following:
..
.
Coin operated systems
Party-linesystems
Mostelectronickeyphone systems
5
IMPORTANTNOTES
r:/::;
~
~
0
Your phone operates on standard radio frequencies. It is possible for
other radio units operating nearby on similar frequencies to unintentionally intercept your conversation or cause interference. Possible
lack of privacy can occur with any cordless telephone.
z
~
~
~
0
A
IMPORTANT
NOTICE
. Youmust charge the new batteryfor at
least 12 hours before you first use
the phone.
. Under power failure conditions,
~
~
~
.
this
telephone will not operate.
Please ensure that a separate telephone,
not dependent on local power, is
available for use in emergencies.
After the Handset has been fully charged,
the Handset MUSTbe placed onto the main
xc631 Base Unit to register it as an
additional Handset before first time use.
The Handset will not work with the Base
Unit until it has been registered.
6
SAFETYINFORMATI0 N
Whenusingyourtelephoneequipment,basic safetyprecautions
should always be followed to reduce the risk of fire, electrical shock,
and injury to persons, including the following:
1. Read and understand all instructions.
2. Follow all warnings and instructions marked on the product.
3. Unplug this product from the wall outlet before cleaning.
Do not use liquid cleaners or aerosol cleaners. Use a dry cloth
for cleaning.
4. Do not use this product near water; for example, near a bath
tub, wash bowl, kitchen sink or laundry tub, in a wet basement,
or near a swimming pool.
5. Do not place this product on an unstable cart, stand, or table.
The telephone may fall, causing serious damage to the unit.
6. Slots and openings in the cabinet and the back or bottom are
provided for ventilation. To protect the product from
overheating, these openings should never be blocked or covered.
This product should never be placed near or over a radiator or
heat register. This product should not be placed in a built-in
installation unless proper ventilation is provided.
7. This product should be operated only from the type of power
source indicated on the marking label. H you are not sure of the
type of power supply to your home, consult your dealer or local
power company.
8. Do not allow anything to rest on the power cord. Do not locate
this product where the cord will be damaged by persons walking
on it.
7
SAFETYINFORMATI0 N
z
0
~
0
9. Donotoverloadwall outlets and extensioncords,asthis can
result in the risk of fire or electricalshock.
10. Neverpush objectsof anykind into this product throughcabinet
slots,as theymaytouch dangerousvoltagepoints or short out
parts that could result in a risk of fire or electricalshock.Never
spill liquid of anykind on the product.
~
z
~
~
~
~
11. To reducethe risk of electricalshock, do not disassemblethis
product. Takeit to qualified servicepersonnelwhen serviceor
repair work is required. Openingor removingcoversmay
exposeyou to dangerousvoltagesor other risks. Incorrect
re-assemblycan causeelectrical shockwhenthe applianceis
subsequentlyused.
12. Unplugthis product from the wall outlet and refer servicingto
qualified servicepersonnelunder the following conditions:
A. Whenthe power supplycord is damagedor frayed.
B. If liquid hasbeenspilledinto the product.
C. If the product hasbeenexposedto rain or water.
D. If the product doesnot operatenormally whenfollowing the
operatinginstructions.Adjustonly thosecontrols that are
coveredbythe operatinginstructions.Improper adjustment
of other controls mayresult in damage,and will often
require extensivework by a qualified technicianto restore
to normal operation.
E. If theproducthasbeendropped,or thecabinethasbeen
damaged.
E
If the product exhibitsa distinct changein performance.
13. Do not usethe telephoneto report a gasleak in the vicinity of
the leak.
8
SAFETYINFORMATION
BATIERY SAFElY PRECAUTIONS
A.
To reduce the risk of fire or injury to persons by the
battery, read and follow these instructions:
~
tAj
~
1. Use only the operating type and size battery pack specified in
this Operating Guide.
2. Do not dispose of the battery pack in a fire. The cell may
explode.
3. Do not open or mutilate the battery pack. Released electrolyte
is corrosive and may cause damage to the eyes or skin. It may
be Toxic if swallowed.
4. Exercise care in handling the battery in order not to short the
battery with conducting materials such as rings, bracelets, and
keys. The battery or conductor may overheat and cause bums.
5. Charge the battery pack provided with or identified for use
with this product only in accordance with the instructions and
limitations specified in the instruction manual provided for
this product.
6. Observe proper polarity orientation between the battery pack
plug and socket.
SAVETIlESE INSTRUCTIONS
9
~
Z
~
0
~
~
0
Z
-
-----
Thispageintentionallyleft blank.
10
~
PARTSCHECKLIST
Congratulations on your purchase of this Uniden XC631 Plusadd
on Handset. This product has been designed and engineered to
exact standards for reliability, long life, and outstanding
perfonnance. To get the most from your new purchase, please read
this Operating Guide thoroughly.
Unpacking:
Your xc631 Plus box should contain the following items:
.
NiMH Rechargable
Batteries
Memory
StorageSticker
Handset
and ChargeBase
Uniden'
XC631Plus
Add-onHandsetandChargingBase
Operating
Guide
This Operating Guide
AC Adaptor
(read thoroughly)
11
PARTSCHECKLIST
If your Cordless Telephone is not perfonning
up to your expectations,
please try the simple steps listed in the Troubleshooting
section of
this manual. If you are still unable to resolve the problems,
please
contact your retailer or Uniden Customer Service for assistance, toll
free on 1800 632 789.
If the unit must be returned for service, ship or deliver the product,
freight prepaid to:
UNIDEN AUSTRALIAP1Y LID
Technical Service Division
345 Princes Highway, Rockdale
NSW 2216
Ph (02) 9599 3577
Fax (02) 95993278
~
rJ:J
~
~
U
~
~
U
rJ:J
5
~
12
FEATURES
XC631 plus Add-On Handset and Charging Base for use
with the xc631 Cordless Phone, which supports up to 4
Handsets (supplied with 2).
..
.
.
.
Calls can be transferred between Handsets.
Colour coded for easy personal ownership and recognition.
Up to four family members can have their own colour
coded Handset.
Each Handset can store up to 10 personal quick dial
memories.
Remote Charging
Extremely Portable - The xc631 clips onto clothing,allowing
the Handsetto be worn in any convenientposition.
Unique Styling - Awardwinningdesign.
Compact Design - Palm size for convenience.
Lightweight
- Weighs just llOgms including Battery.
Optional Pendant Clip - allowsthe user to wear the Uniden
xc631 Handsetcomfortablyaround the neck.
Optional Hands-Free Headset - givesthe ultimatehands-free
conversationwith the handset clipped onto the pendant clip or
clothing.
13
This
page intentionaUy
14
left blank.
HANDSETFUNCTIONS
HANDSET ANTENNA
TALK INDICATOR
TALK BUTTON
Handset Antenna
-
batt Iow
Indicator
Talk Indicator
Telescopic Antenna.
The red LED blinks when the Battery Pack is
low and needs to be recharged.
Press to place or answer a call.
When finished, press this button to hang up.
The Talk LEDlights when the phone is
in use and blinks when you use memory
functions.
Numeric Keys
Use for dialing numbers and storing numbers
in memory.
15
HANDSETFUNCTIONS
fDIIi1D
This button redials the last dialed number. When on
a call, press to send a timed "hook-flash"
on the
telephone line for accessing special
telephone services.
CiIIIID
Use to select 1 of the 10 channels for the clearest
operation. (Note: Operates only when the phone
is in use). If interference is heard during a
telephone conversation, simply press the channel
button to select a new channel.
-om
--
Usewhenstoringnumbersintothe memoryand
when dialing a stored number.
(Nr:
r./:J
Z
0~
~
U
~
~
~
~
r./:J
0
~
Each Handset
has its own set of dial memories.
~
When on a call and the call waiting tone is heard,
press this button and the current call will be put
on Hold and the incoming call will be answered.
This button adjusts the volume of the earpiece
speaker.
Loud
Soft
= 1\vo Beeps
= One
Beep
Pressing this button will put the call on hold.
Neither you nor the other party will hear any sound.
button on your handset. The
1. Press the
Talk light will flash at a slow rate to indicate that
the call is muted.
om
2. To resume the call, press the"
button. Doing
this will turn on the Talklight and restore the
connection, enabling you to resume speaking.
NOTE: If you put the call on hold and forget all about it, the call
ft>.
will be automatically be disconnected after 5 minutes.
'
16
INSTALLATION
Selecting the Installation Location
Select a location for the xc631 Plus to avoid excessive heat or
humidity (as in a kitchen or bathroom). The Charging Base can be
placed on a desk, tabletop or mounted on a wall near a standard
230/240VACoutlet.
r
NOTE: The xc631 Plus Charging Base does not connect to the
telephoneline.
17
IN S TAL LAT I 0 N
Installing the Battery Pack
z
~
0~
-
0
~
~
rJ.:;
z
~
1. Remove the battery compartment cover on the back of the
Handset by sliding it up.
2.
Connect the Nickel-Metal Hydride Battery Pack by plugging it into
the socket inside the battery compartment.
NOTE:
f~
The connector
fits only one way and requires
minimal amount of pressure
only a
to insert. Always install the
Battery Cable with the Black wire to the top.
3. Place the Battery Pack inside the compartment and slide the
battery cover back. Make sure the wires from the Battery Pack
do not get caught in the cover.
Charging the Battery Pack
The rechargeable Nickel-Metal Hydride Battery Pack included with
your XC631Plus must be charged for approximately 12-16 hours
before using the phone for the first time. Place the Handset on the
Charging Base and make sure the charge LEDlights.
If the charge LEDdoes not light;
18
INSTALLATION
a) Check to see that the ACAdaptor is plugged in and the wall
outlet is switched on.
b) Re-adjust the handset until the charge
c) Clean the charge contacts.
LEDlights up.
~
Z
r:./)
Low Battery Indicator
When the Battery Pack voltage level in the Handset is very low and
needs to be re-charged, the batt Iow LEDblinks. If this occurs
while you are on the phone, a short alert beep will also be heard.
When this happens, complete your call as early as possible, and
return the Handset to the Charging Base for charging. Allow 12 to 16
hours without any interruption for the handset to fully recharge.
Cleaning the Battery Charge Contacts
To maintain a good charge condition, it is important to clean all 6
charge contacts on the Handset and Charging Base about once a
month. Use a pencil eraser or other contact cleaner. Do not use any
liquids or solvents.
Clean charge
contacts regularly
Clean charge
contacts regularly
19
~
~
~
0
Z
This page intentionaUy
20
left blank.
USINGYOURXC631PLUS
Registering your Handset for first time use
After the Handset has been fully charged, the Handset MUST be placed
on to the main xc631 Base Unit to register it as an additional
before first time use.
Handset
The Handset will not work with the Base Unit until it has been
registered.
Digital Security Code
Many Cordless telephones operate similarly and on the same
frequency. Without digital code security, some one elses Handset could
make calls using your Base Unit and telephone line. Therefore, to help
prevent any unauthorised calls through your Base Unit, a Digital Code
feature has been added to your XC631 Plus.
The code is randomly selected from over 65,000 combinations. The
code is automatically set when you first place the Handset on to the
Base Unit. Before using for the first time you MUSTplace the
new Handset onto the original Base Unit to register it as an additional
Handset.
Once the Base Unit has transfered the security code to the new
Handset it can be used to make and receive calls on the same
Base Unit.
The additional Charging Base (smaller size) has been supplied for you
to conveniently locate and re-charge the additional Handset. This
Charging Base does not connect to a telephone line and it does not
assign the security code as explained above.
To change or set a new Digital Security Code
1. Remove the Handset from the Base Unit.
2. Unplug the AC Adaptor cord from the rear of the Base Unit for at
least 5 seconds
3. Hold down the Page button and plug the AC Adaptor back into the
Base Unit. "In Use" LED will blink twice.
21
Release the page button.
USINGYOURXC631PLUS
4. After five seconds unplug the ACAdaptor from the Base Unit again.
5. Plug the ACAdaptor back into the Base Unit to restore the power.
6. Place each Handset onto the Base Unit for at least 5 seconds.
The new Digital Security Code has now been transferred to all
Handsets.
Placing a Call
To place a call with your XC631Plus;
-
1. Removethe Handsetfromthe ChargingBaseand Press
2. Dial the number you are calling.
-_.
-
3. Whenyouhavefinishedthecall,press
Handset onto the Charging Base.
or returnthe
NOTE: If you don't place the Handset back on the Charging Base,'
!
cr.J
P
~
~
,
youwillneed to press
to hangup thephone.
Selecting a Channel
The
buttonon the Handsetallowsyouto chooseamong
10 factory set channels. If you are receiving any interference on a
4
N'J
\.D
~
channel, press the button to switch to another channel. If the noise
persists, or if a double beep is heard, move closer to the Base Unit
beforepressing
~
p
NOTE: If the noise or interference continues, refer to the
Z
~
NOTE: Changing channels when the operating environment is
~
'-'
cr.J
P
!
=
section entitled "Trouble-shooting" in this manual.
This function works only when the phone is in use.
extremely noisy may result in failure in communication
between the Handset and Base Unit. As a result the
Handset may fail to respond to keys pressed. To restore
Handset operation, re-cradle it on the base f2r about
6 seconds.
22
USINGYOURXC631PLUS
N~~:
i
Using the
H you have more than one cordless phone in your house,
they must be set to different channels.
IIfiEiIiIiIJ Button
When initiating a call, this button will operate as a redial button.
When on a call it will work as a flash button to access special
telephone network services.
N~TE:
i
H any other key is pressed before
Flash/Rdl
this
willworkas a FlashButton.
Redialing the Last Number Called
NOTE: Each Handset has independent dialing memory.
r
It will only redial the last number last dialed from that
particular Handset.
/
...
1. Remove the Handset from the Base Unit or Charging Base.
2. Pressl1li.
3. Press
l1li
4. Whenconversationis finished,press
or .place
Handsetback on Base Unitor ChargingBaseto hang up.
Using the Flash Key with Call Waiting
To access the Telstra'sCallWaitingService,you can either use the
BIB
orthe Flash/Rdl key.
1. While on a call, you will hear the Call Waiting signal
(series of beep tones) when there is an incoming call.
2. Press Flash/Rdl
then
«9 to switchto the incoming
call and put the current call on hold.
3. To switch back to original call, press
then 8.
23
Flash/Rdl
c:::
C/:J
~
Z
~
~
0
c:::
~
><
Cj
0'\
~
......
~
~
c:::
C/:J
USINGYOURXC631PLUS
«9call waitingprocedure
NOTE: The Flash/Rdl
r
&
togglescall betweenthe incoming and originalcall
and viceversa. The Flash/Rdl
&
procedure
will drop the current call connection and pick up the
incomingcall or the call on hold.
8
Setting the Handset Receiver Volume
Whileon the phone callusingthe handset,press the-button to select either loud or soft earpiece speaker volume.
Using the Hold Button
The
r./:J
~
N"'J
\.0
~
button allows you to put your call on hold.
r
NOTE: Note that while on hold, the call is muted.
~
~
~
armD
1. Pressthe BD
button on your handset, the talk lID will
flash at a slow rate to indicate the call is on hold.
2.
l1li
To resume the call press the
button. Doing this will turn
on the talk lID and restore the connection, allowing you to
resume conversation.
~
~
0
~
C-'
Z
t--4
Answering a Call
~
To answer a call at the Handset, press IIII.When
r./:J
NOTE: When the call is on hold neither you nor the other party
fD.
willhear anysound.
you have
finished your conversation, place the Handset back on the Charging
Base. TheAuto Standby functions automatically hang up the phone.
24
I
USINGYOURXC631PLUS
NOTE:
r
-
If you don't place the Handset back on the Charging
Base,press
to hangup the phone.
Sometimes when you press -you
may get an
error tone and the phone will not disconnect. This may
occur during conversations under noisy conditions.
If this happens, place the Handset back on the Charging
Baseor press
againwhileholdingthe Handset
close to the Base Unit.
Transferring a Call to Another Handset
To transfer a call, press
willflash).Press
GrII
8, 88
on your Handset, (the talk
or
0
LED
(correspondingcoloursfor
Blue, Green, Red and Yellow coded Handsets respectively).
--
~
Only the selected Handset will ring.
To pick up the call press
Tocancelthe transfer,press
Totransfer to all handsets press
on the selected Handset.
on the existingHandset.
l1li
thenO,
all Handsets will
ring. Whichever Handset answers first will receive the call.
Storing a Number into Memory
Youcan store up to 10 numbers(0-9) in the HandsetMemory.
rJ':J
.......
Z
Gj
~
~
~
~
~
NOTE: Each Handset has its own set of dial memories.
r
However, a particular memory can only be retrieved
from the Handset in which it was stored.
1. Remove
theHandsetandpressthe-(The talk LEDflashes.)
2.
Enter the number (up to 16 digits) to be stored.
25
button.
0"\
~
~
~
~
~
rJ':J
USINGYOURXC631PLUS
3.
I
If you wish to enter a delay between numbers (for accessing a
switch board or long distance service), press Flash/Rdl
at
the point in the number sequence you wish to pause.
(Note: The Flash/Rdl
Flash/Rdl
button counts as one digit. Pressing
more than once will increase the length of the
pause between numbers).
4. Press--
anda onedigitnumber(0-9) forthe
memory location.
5.
A 2-tone confirmation beep will be heard indicating that the
number has been stored.
NOTE: Youhave20 secondsafterpressing--
I
the number you wish to store, and use only one digit for
the memory location. Otherwise, an error tone will be heard,
,
rJj
-
~
6.
~
Storing a Mixed (TonelPulse) Number
~
~
~
\.D
U
><
~
~
0
~
to enter
Write down the stored number and its memory location number
on one of the enclosed stickers.
If your phone is set up for Pulse Dialing, you can store a mixed mode
number (up to 16 digits) to easily access long distance services.
1. Press
2.
(The talkIJID flashes)
Enter the number to be stored in Pulse Mode.
0
Press
Enter the number to be stored in Tone Mode.
c.,:,
Z
~
5.
If you wish to enter a delay between numbers (for accessing a
~
6. Press--
rJj
on the Handset. (Note: The
0
3.
4.
counts as one digit)
switch board or long distance service), press Flash/Rdl the point in the number sequence you wish to pause.
anda onedigitnumber(0-9) forthe
memory location.
26
at
USINGYOURxc631 PLUS
Storing Long Numbers in Memory
Attimes you may need to program a number longer than 16 digitsfor your alternate long distance service or for telephone banking. To
get around the 16 digit limitation (concerning memory location stor-
--
age), divide the number between two different locations. Assign the
first part of the number to one memory location, and assign the second part to another.
EXAMPLE:
Toprogram 100-639-5975-239-51-6237,
you coulddivideit as
1006395975
and 239516237
1. Tostore the firstpart ofthis sequence,press
0<0<08808008_0
- 80808- 80,_-
2. Tostore the secondpart, press
3. Todialthecomplete
number,
pressl1li,
waitfordialing
tostopandthenpress
-
-
0
It is best to split the number at pauses or convenient breaks in
the sequence, especially if you need to wait for necessary tones or
signals before continuing.
d
C/':J
~
Z
~
~
0
d
~
~
0',
~
~
I-C
~
d
C/':J
27
-
USINGYOURXC631PLUS
Dialing a Stored Number
IliII , then press
and then the memorylocationnumber (0-9)
To dial a number stored
in memory, press
Using the Page Feature
The Page Feature sends a signal from the Base Unit to the Handset
causing it to beep. This is useful for locating the Handset when it is
away from the Base Unit. Press the 8IJ
button on the Base Unit.
The Handset will emit a "found" tone for 60 seconds.
NOTE:
r~
If the handset is in use, it will not emit any sound. The
Handset will also not sound if it is out of communication
range. To turn off the found tone, press any button on
the Handset.
r.r.;
~
~
~
~
N""J
\D
~
~
~
0
~
c.:i
Z
~
rJ:J
Using the Call Waiting Feature
1. Whileon a call
2. Thecallwaitingtoneis heard,indicatingthatthere is a second
~
caller
3. Press_button
4. Theexistingcallis placedon hold and the incomingcall is
answered
5. Talkto the second caller
met
buttonto end the call
6. Press
7. Thephonewillring backindicatingthat the firstcalleris
stillon hold
8.
Press IliII button to answer the call
9.
Press
met
button to end the call
~
N~~: Pressing
the-~
buttonduringthecallwill
toggle between callers. The Pulse Mode Network does
not support the Call Waitingfeature.
28
TROUBLESHOOTIN G
If your Cordless Telephone is not performing to your
expectations, please try these simple steps. If you are still
unable to resolve the problems, contact Uniden Customer
Service for assistance.
Problem
Chargelightdoesnot comeon
whenHandset
isplacedonto
theXC631PlusChargingBase
or theXC631BaseUnit.
Audiosounds
weakand/or
scratchy.
Suggestion
.
.
MakesuretheACAdaptor
is plugged
intotheBaseUnitandwalloutlet.
MakesuretheHandset
is properly
.
.
.
.
Can'tmakeor receivecalls,or
seatedon the BaseUnit.
Makesurethat the chargecontacts
-
ontheHandset
andBaseUnitare
clean.(Seepage19forinstructions).
MakesurethattheBaseUnitand
Handset
antennas
arefullyextended.
Movethe Handsetand/or BaseUnit
to differentlocations
andtryagain.
Pressthe
buttonto
selectanotherchannel.
. TheHandsetMUSTbeplacedon to the
if the Handsetdoesnot ring
during an incomingcall.
mainXC631BaseUnit to registerit as
an additionalHandsetbeforefirst time
use.TheHandsetwill not work with
the BaseUnituntil it hasbeen
.
.
.
registered.
Makesurethat the BaseUnitand
Handsetantennasarefully extended.
Move
theHandset
closer
tothe
Base
Unit.
Makesurethe telephoneline cord
is connected
firmlyto thebaseand
.
telephonesocket.
MakesuretheACAdaptoris plugged
into the BaseUnitandwall outlet.
29
TROUBLESHOOTING
.
\..:)
Try unplugging some of the other
phones.
z~
~
0
0
:::t=
er.:;
~
~
I
You may have too many
extension phones on your telephone
line.
.
Handset can't ring or receive a
page.
Disconnect
.
12hours.
ExtendtheBaseandHandset
antennas fully.
The Handset may be too far away from
the Base Unit. Try moving closer.
.
.
Place the Base Unit away from noise
sources.
The Digital Security code may be
erased.
.
Charge the
battery on the Base Unitfor more than
.
If you lose a call after changing
channels.
it.
Battery Pack may be weak.
.
§§
0
~
~
the ACAdaptor for a few
minutes and reconnect
Set the Digital Security code.
(See Oa2e 21 for instructions).
You were probably
almost out of range.
Move closer to the base before
changing channels.
Before placing the
call again, place the Handset on the
.
Phone seems dead?
.
Power off and on again.
If you are unable to turn the
Handset ON/OFF,or if the base
consistently fails to respond
the keys being pressed.
base for at least 6 seconds.
Remove the Handset from Base Unit
to
(if it is on the Base Unit).
.
.
..
Removethe Handset battery for
5 minutes.
Unplug the base Unit from the main
power supply for 5 minutes.
Reinstall the battery to the Handset.
Restore power to the Base Unit.
Place the Handset back on the
BaseUnit.
30
TROUBLESHOOTING
Important Electrical Considerations
Unplug all electrical appliances when you know an electrical
storm is approaching. lightning can pass through your household wiring and damage any device connected to it.
The XC631Plus in no exception.
N~:
I
Pleasedo notattemptto unpluganyapplianceduring
an electricalstorm.
Operating Range
Your Handset and the Base Station can communicate over a
certain range. For clearest reception, keep the Base and Handset
antennas fully extended when using your Handset away from the
BaseUnit.
Do make a few trial calls in and around your home or office to
get a feel for the operating range in your particular surroundings.
NOTE:
~
I~
If you receive a call while you are out of range, the Handset
maynotring. Evenifit doesring,the callmaynotconnect
when you press the
l1li
button.
To receive the call, move closer to the Base Unit before you
press the
l1li
button again.
31
~
~
0
~
~
~
C/)
t::I::
0
0
~
~
Z
~
TROUBLESHOOTING
Radio Interference
z
Radio interference may occasionally cause buzzing and humming in
~
0
0
=c
crJ
~
interference is caused by external sources such as a TV,
c.,:,
~
~
your cordless Handset, or clicking noises in the Base Unit. This
refrigerator, vacuum cleaner, fluorescent lighting, or electrical
storm. Your unit is NOTDEFECTIVE.If these noises continue and
are too distracting, please check around your home to see what
appliances may cause the problem. In addition, we recommend that
the base not be plugged into a circuit that also powers a major
§§
0
~
~
appliance because of the potential for interference. Be certain that
-
the antenna of the base and Handset are fullyextended.
In the unlikely event that you consistently hear other voices or
distracting transmissions on your cordless telephone, you may be
receiving radio signals from another cordless telephone or other
source of interference. If you cannot eliminate this type of
interference,youneed to changethe channel.Press
-
on the Handset to select the best channel for the clearest
performance.
More than One Cordless Telephone
Ifyouwishto use more than one cordlesstelephonein yourhouse,
theymustbe operatedon differentchannels.Duringa conversation,
press the
buttonto selectone that providesthe
clearest performance.
32
SPECIFICATIONS
General
Frequency control.
. . . . . . . . .Crystal controlled transmission
Modulation
Operating temperature.
FM
. . . . .-00 C to 400 C
Charging Base Unit
Power Source. . . . . . . . . . . . .AAD650U ACAdapter
Approval Number
Output:
9V DC
14700
- 350
mA
- 240V AC
Input: 230
50 Hz
Size
Approx.119x63x80mm
Weight. . . . . . . . . . . . . . . . . .126 grams (withoutACAdaptor)
Handset
Receive Frequency.
Transmit Frequency.
. . . . . . . .30.075 to 30.300 MHz (10 channels)
. . . . . . .39.775 to 40.000 MHz (10 channels)
Size
Approx.195x46x30mm
(with antenna)
Weight. . . . . . . . . . . . . . . . . .110 grams (with batteries)
Power Requirements. . . . . . . .RechargeableNiMHBattery
Battery
CTA633
Capacity
TalkMode
Standby
Mode
140mAH
Approx. 3 hours
Approx. 4 days
r
N~~:
!
Shown are typical specifications and are subjected to
change without notice.
33
This page intentionally
34
left blank.
WARRANTY
UoideD
YEAR
XC6311
WARRAN1Y
(Batteries and Accessories are covered for 90 Days
Note: Please
has been
keep
your
ELEMENTS
defects
the
in materials
evidence
of warranty.
Warranty
ONLY)
is only valid
in the country
where
the
product
865498
Ply Ltd. ACN 001
Uniden
retail
necessary,
(C)
or malfunction
factured
Australian
warrants
and craftsmanship
of original
and
by Uniden,
Number
as it provides
to the
with
original
only the
retail
owner
limitations
for
the
duration
or exclusions
of this warranty,
its product
to be free
set out below.
DURATION: This warranty to the original retail owner only, shail terminate and of no further effect ONE (I) Year
date
reasonable
sold
[;niden
OF WARRAN1Y:
WARRANTY
after
docket
purchased.
WARRANTOR:
from
sales
sale.
(B)
covered
by Uniden,
This
Modified,
Improperly
(D)
by this warranty,
(F) Installed
of the product
has
warranty
altered
installed,
been
(E)
or serviced
removed
will he deemed
or used
Repaired
as part
invalid
Used in conjunction
by anyone
or damaged
other
beyond
if the product
of any conversion
by someone
other
with
than
than
any equipment
an authorlsed
is: (A) Damaged
kits,
subassemblies,
an authorised
Uniden
or parts
Uniden
or not
or as a part
Repair
Agent,
maintained
as
or any configurations
Repair
(G)
Agent
of a system
Where
not
for a defect
not manu-
the Serial
recognition.
STATEMENT
OF REMEDY:In the event that the product does not conform to this warranty at any time while this warranty is in
effect, the warrantor at its discretion, will repair the defect or replace the product and return it to you without charge
forpartsandservice.THIS WARRA:VIYDOESNOTCOVEROR PROVIDEFORTHE REIMBURSEMENT
OR PA¥MR'if OFINCIDENTALOR CO:;SEQUENTIAL
DAMAGES.THIS GUARANTEE
IS IN ADDmON TO AND DOESNOT IN ANYWAYAFFECTYOURRIGHTS
UNDERTHE CONSuMERGUARAI\TEE
ACT.
If a warranty card has been included with this product then please fill it in and return to us within 14 days
WARRANTY
CARD:
of purchase.
Your
name
and
process
claim
with
greater
your
the Serial
number
speed
of the
and efficiency
product
should
will
you
then
require
be registered
warr-.mty
in our
database
and
this will help
us
service.
PROCEDUREFOR OBTAINING PERFORMANCEOF WARRAN1Y:
In the event that the product does not conform to this warranty, the Product should be shipped or delivered, freight pre-paid,
with evidence of original purchase (e.g. a copy of the sales docket), with a full description of the problem, to the warrantor at:UNIDEN
AUSTRALIA
PlY.
LIMITED
SERVICE DIVISION
345 Princes Highway, Rockdale,
NSW 2216
Ph: (02)
9599
Free Call:
Customers
(Contact
95993100
1800
Fax:
632
in other
Uniden
(02)
States
should
for the nearest
NOTE:
r
3278
789
ship
or deliver
Warranty
Agent
the Product
freight
pre-paid
to their
nearest
Uniden
Authorised
Repair
Centre.
to you).
Keep your receipt of purchase in a safe place in case you
ever need warranty service. You should also save the carton
and packaging material for storage or shipping purposes.
35
Unid~n@
A ClearSignal of What'sAhead.
@ 1998 UNIDEN
CORPORATION.
ALLRIGHTSRESERVED.