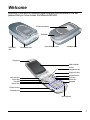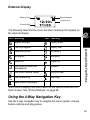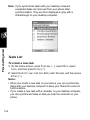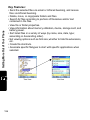
1
START HERE >
Welcome
Welcome to the world of Motorola digital wireless communications! We are
pleased that you have chosen the Motorola MPx200.
External display
Speaker
SD/MMC
slot
Handstrap hole
Sync/charger port
Headset jack
Earpiece
Main display
4-way
navigation key
Right soft key
Left soft key
Send key
Jog dial
Home key
Action button
End key
Back key
Keypad
Power button
Infrared port
Microphone
1
Motorola, Inc.
Consumer Advocacy Office
1307 East Algonquin Road
Schaumburg, IL 60196
1-800-331-6456 (United States)
1-888-390-6456 (TTY/TDD United States)
1-800-461-4575 (Canada)
www.motorola.com (United States)
www.motorola.ca (Canada)
MOTOROLA, the Stylized M Logo and all other trademarks indicated as such
herein are trademarks of Motorola, Inc. (R) Reg. U.S. Pat. & Tm. Off. All other
product or service names are the property of their respective owners.
© Motorola, Inc. 2003.
Software Copyright Notice
The Motorola products described in this manual may include copyrighted
Motorola and third-party software stored in semiconductor memories or other
media. Laws in the United States and other countries preserve for Motorola
and third-party software providers certain exclusive rights for copyrighted software, such as the exclusive rights to distribute or reproduce the copyrighted
software. Accordingly, any copyrighted software contained in the Motorola
products may not be modified, reverse-engineered, distributed, or reproduced
in any manner to the extent allowed by law. Furthermore, the purchase of the
Motorola products shall not be deemed to grant either directly or by implication,
estoppel, or otherwise, any license under the copyrights, patents, or patent
applications of Motorola or any third-party software provider, except for the normal, non-exclusive, royalty-free license to use that arises by operation of law in
the sale of a product.
Manual number: 6809469A51-O
Cover number: 8988485L61-O
2
Menu Map
Thisis the default menu on your MPx200. It can be accessed by
selecting programs with the left soft key from the home screen of your
phone.
•
•
•
•
•
•
•
•
•
•
•
•
•
Inbox
Contacts
Calendar
mMode
Pocket Internet
Explorer
ActiveSync
OfficeOnline
Call History
Caller ID
Favorites Manager
File Manager
MSN Messenger
Settings
•
•
•
•
•
•
•
•
•
•
•
•
•
•
•
•
•
•
•
•
SIM Manager
Speed Dial
Tasks
Voice Recorder
Windows Media
Accessories
•
•
•
•
Calculator
Infrared Receive
System Info
Task Manager
• Games
• Lemonade Inc.
• Solitaire
Telephony
Sounds
Profiles
Home Screen
About
Accessibility
Data Connections
Date and Time
Owner Information
Power Management
Regional Settings
Remove Programs
Security
Phone Settings
3
Contents
Welcome . . . . . . . . . . . . . . . . . . . . . . . . . . . . . . . . . . . . . . .1
Menu Map . . . . . . . . . . . . . . . . . . . . . . . . . . . . . . . . . . . . . .3
Safety and General Information . . . . . . . . . . . . . . . . . . . .7
Getting Started . . . . . . . . . . . . . . . . . . . . . . . . . . . . . . . . .14
What’s in the Box? . . . . . . . . . . . . . . . . . . . . . . . . . . . . . .14
About This Guide . . . . . . . . . . . . . . . . . . . . . . . . . . . . . . .14
Installing the SIM Card . . . . . . . . . . . . . . . . . . . . . . . . . .15
Installing the Battery . . . . . . . . . . . . . . . . . . . . . . . . . . . .17
Charging the Battery . . . . . . . . . . . . . . . . . . . . . . . . . . . .19
Getting to Know Your Phone . . . . . . . . . . . . . . . . . . . . . .21
Synchronizing with ActiveSync . . . . . . . . . . . . . . . . . . . .24
Finding Information . . . . . . . . . . . . . . . . . . . . . . . . . . . . .26
Learning to Use Your Phone . . . . . . . . . . . . . . . . . . . . . .27
Using the Displays . . . . . . . . . . . . . . . . . . . . . . . . . . . . . .27
Using the 4-Way Navigation Key . . . . . . . . . . . . . . . . . . .29
Action Button (A) . . . . . . . . . . . . . . . . . . . . . . . . . . . . . . .30
Home Key (h). . . . . . . . . . . . . . . . . . . . . . . . . . . . . . . .30
Home Screen. . . . . . . . . . . . . . . . . . . . . . . . . . . . . . . . . .30
Entering Text and Numbers on Your Phone. . . . . . . . . . .34
Securing Your Phone . . . . . . . . . . . . . . . . . . . . . . . . . . . .37
Sending and Receiving Calls . . . . . . . . . . . . . . . . . . . . .41
Making a Call . . . . . . . . . . . . . . . . . . . . . . . . . . . . . . . . . .41
Receiving a Call. . . . . . . . . . . . . . . . . . . . . . . . . . . . . . . .45
In-call Options . . . . . . . . . . . . . . . . . . . . . . . . . . . . . . . . .46
Reviewing Your Calls . . . . . . . . . . . . . . . . . . . . . . . . . . . .48
Shortcuts . . . . . . . . . . . . . . . . . . . . . . . . . . . . . . . . . . . . .50
4
Advanced Dialing Options . . . . . . . . . . . . . . . . . . . . . . . 52
Settings . . . . . . . . . . . . . . . . . . . . . . . . . . . . . . . . . . . . . . 53
Viewing and Changing Settings . . . . . . . . . . . . . . . . . . . 53
Synchronizing Information . . . . . . . . . . . . . . . . . . . . . . . 67
ActiveSync . . . . . . . . . . . . . . . . . . . . . . . . . . . . . . . . . . . 67
Synchronizing Information . . . . . . . . . . . . . . . . . . . . . . . 72
Synchronizing Using an Infrared Connection . . . . . . . . 74
ActiveSync Errors . . . . . . . . . . . . . . . . . . . . . . . . . . . . . 75
Messaging Features . . . . . . . . . . . . . . . . . . . . . . . . . . . . 78
Sending Email and SMS Messages . . . . . . . . . . . . . . . . 78
SMS Messages . . . . . . . . . . . . . . . . . . . . . . . . . . . . . . . 81
Receiving Email and SMS Messages. . . . . . . . . . . . . . . 82
Viewing Your Message Folders . . . . . . . . . . . . . . . . . . . 84
Managing Inbox . . . . . . . . . . . . . . . . . . . . . . . . . . . . . . . 85
Message Notifications . . . . . . . . . . . . . . . . . . . . . . . . . . 88
Sending SMS to Email Addresses . . . . . . . . . . . . . . . . . 89
Communicating with MSN Messenger . . . . . . . . . . . . . . 89
Office Online. . . . . . . . . . . . . . . . . . . . . . . . . . . . . . . . . . 92
Personal Organizer . . . . . . . . . . . . . . . . . . . . . . . . . . . . . 93
Contacts . . . . . . . . . . . . . . . . . . . . . . . . . . . . . . . . . . . . . 93
Calendar . . . . . . . . . . . . . . . . . . . . . . . . . . . . . . . . . . . . . 98
Tasks . . . . . . . . . . . . . . . . . . . . . . . . . . . . . . . . . . . . . . 103
Calculator . . . . . . . . . . . . . . . . . . . . . . . . . . . . . . . . . . . 106
News and Entertainment . . . . . . . . . . . . . . . . . . . . . . . . 107
mMODE . . . . . . . . . . . . . . . . . . . . . . . . . . . . . . . . . . . . 107
Pocket Internet Explorer . . . . . . . . . . . . . . . . . . . . . . . . 107
Media Player. . . . . . . . . . . . . . . . . . . . . . . . . . . . . . . . . 111
Playing Games . . . . . . . . . . . . . . . . . . . . . . . . . . . . . . . 117
Getting More Out of Your Phone . . . . . . . . . . . . . . . . . 122
5
SIM Manager . . . . . . . . . . . . . . . . . . . . . . . . . . . . . . . . .122
File Manager . . . . . . . . . . . . . . . . . . . . . . . . . . . . . . . . .125
Caller ID. . . . . . . . . . . . . . . . . . . . . . . . . . . . . . . . . . . . .127
Favorites Manager . . . . . . . . . . . . . . . . . . . . . . . . . . . . .131
Task Manager . . . . . . . . . . . . . . . . . . . . . . . . . . . . . . . .132
Troubleshooting . . . . . . . . . . . . . . . . . . . . . . . . . . . . . . .134
Specific Absorption Rate Data . . . . . . . . . . . . . . . . . . .136
Microsoft End User License Agreement . . . . . . . . . . .138
Index . . . . . . . . . . . . . . . . . . . . . . . . . . . . . . . . . . . . . . . .143
CTIA Safety Tips . . . . . . . . . . . . . . . . . . . . . . . . . . . . . . .145
6
Safety and General
Information
IMPORTANT INFORMATION ON SAFE AND EFFICIENT
OPERATION. READ THIS INFORMATION BEFORE USING YOUR
PHONE.
The information provided in this document supersedes the general
safety information in user guides published prior to
December 1, 2002.
Exposure to Radio Frequency (RF) Energy
Your phone contains a transmitter and a receiver. When it is ON, it
receives and transmits RF energy. When you communicate with your
phone, the system handling your call controls the power level at which
your phone transmits.
Your Motorola phone is designed to comply with local regulatory
requirements in your country concerning exposure of human beings to
RF energy.
Operational Precautions
To assure optimal phone performance and make sure human
exposure to RF energy is within the guidelines set forth in the relevant
standards, always adhere to the following procedures.
Phone Operation
When placing or receiving a phone call, hold your phone as you would
a wireline telephone.
Body-Worn Operation
To maintain compliance with RF energy exposure guidelines, if you
wear a phone on your body when transmitting, always place the
7
phone in a Motorola-supplied or approved clip, holder, holster, case,
or body harness for this phone, if available. Use of accessories not
approved by Motorola may exceed RF energy exposure guidelines. If
you do not use one of the body-worn accessories approved or
supplied by Motorola, and are not using the phone held in the normal
use position, ensure the phone and its antenna are at least 1 inch
(2.5 centimeters) from your body when transmitting.
Data Operation
When using any data feature of the phone, with or without an
accessory cable, position the phone and its antenna at least 1 inch
(2.5 centimeters) from your body.
Approved Accessories
Use of accessories not approved by Motorola, including but not limited
to batteries and antenna, may cause your phone to exceed RF energy
exposure guidelines. For a list of approved Motorola accessories, visit
our website at www.Motorola.com.
RF Energy Interference/Compatibility
Note: Nearly every electronic device is susceptible to RF energy
interference from external sources if inadequately shielded, designed,
or otherwise configured for RF energy compatibility. In some
circumstances your phone may cause interference.
Facilities
Turn off your phone in any facility where posted notices instruct you to
do so. These facilities may include hospitals or health care facilities
that may be using equipment that is sensitive to external RF energy.
8
Aircraft
When instructed to do so, turn off your phone when on board an
aircraft. Any use of a phone must be in accordance with applicable
regulations per airline crew instructions.
Note: Be aware that when the Airplane Mode feature is turned on,
then your phone cannot receive and make a call, including an
emergency call. In order to receive and make a call, you must turn off
the Airplane Mode feature and re-engage your phone’s RF capability.
Always obey the instructions of your airline crew.
Medical Devices
Pacemakers
Pacemaker manufacturers recommend that a minimum separation of
6 inches (15 centimeters) be maintained between a hand-held
wireless phone and a pacemaker.
• ALWAYS keep the phone more than 6 inches (15 centimeters) from
your pacemaker when the phone is turned ON.
• Do NOT carry the phone in the breast pocket.
• Use the ear opposite the pacemaker to minimize the potential for
interference.
• Turn OFF the phone immediately if you have any reason to suspect
that interference is taking place.
Hearing Aids
Some digital wireless phones may interfere with some hearing aids. In
the event of such interference, you may want to consult your hearing
aid manufacturer to discuss alternatives.
Other Medical Devices
If you use any other personal medical device, consult the
manufacturer of your device to determine if it is adequately shielded
from RF energy. Your physician may be able to assist you in obtaining
this information.
9
Use While Driving
Check the laws and regulations on the use of phones in the area
where you drive. Always obey them.
When using your phone while driving, please:
• Give full attention to driving and to the road.
• Use hands-free operation, if available.
• Use mono headset instead of stereo headset.
• Pull off the road and park before making or answering a call if
driving conditions so require.
Responsible driving best practices may be found in the “Wireless
Phone Safety Tips” at the end of this manual and at the following
websites: www.Motorola.com/callsmart or www.attws.com/
our_company/publiceducation.
Operational Warnings
For Vehicles with an Air Bag
Do not place a phone in the area over an air bag or in the air bag
deployment area. Air bags inflate with great force. If a phone is placed
in the air bag deployment area and the air bag inflates, the phone may
be propelled with great force and cause serious injury to occupants of
the vehicle.
Potentially Explosive Atmospheres
Turn off your phone prior to entering any area with a potentially
explosive atmosphere, unless it is a phone type especially qualified for
use in such areas and certified as “Intrinsically Safe.” Do not remove,
install, or charge batteries in such areas. Sparks in a potentially
explosive atmosphere can cause an explosion or fire resulting in
bodily injury or even death.
Note: The areas with potentially explosive atmospheres referred to
above include fueling areas such as below decks on boats, fuel or
10
chemical transfer or storage facilities, areas where the air contains
chemicals or particles, such as grain, dust, or metal powders. Areas
with potentially explosive atmospheres are often but not always
posted.
Blasting Caps and Areas
To avoid possible interference with blasting operations, turn OFF your
phone when you are near electrical blasting caps, in a blasting area,
or in areas posted “Turn off electronic devices.” Obey all signs and
instructions.
Batteries
Batteries can cause property damage and/or bodily injury such as
burns if a conductive material such as jewelry, keys, or beaded chains
touch exposed terminals. The conductive material may complete an
electrical circuit (short circuit) and become quite hot. Exercise care in
handling any charged battery, particularly when placing it inside a
pocket, purse, or other container with metal objects. Use only
Motorola original batteries and chargers.
Your battery or phone may contain symbols, defined as follows:
Symbol
Definition
Important safety information will follow.
Your battery or phone should not be disposed of in
a fire.
Your battery or phone may require recycling in
accordance with local laws. Contact your local
regulatory authorities for more information.
Your battery or phone should not be thrown in the
trash.
LiIon BATT
Your phone contains an internal lithium ion battery.
11
Seizures/Blackouts
Some people may be susceptible to epileptic seizures or blackouts
when exposed to blinking lights, such as when watching television or
playing video games. These seizures or blackouts may occur even if a
person never had a previous seizure or blackout.
If you have experienced seizures or blackouts, or if you have a family
history of such occurrences, please consult with your doctor before
playing video games on your phone or enabling a blinking-lights
feature on your phone. (The blinking-light feature is not available on all
products.)
Parents should monitor their children’s use of video game or other
features that incorporate blinking lights on the phones. All persons
should discontinue use and consult a doctor if any of the following
symptoms occur: convulsion, eye or muscle twitching, loss of
awareness, involuntary movements, or disorientation.
To limit the likelihood of such symptoms, please take the following
safety precautions:
• Do not play or use a blinking-lights feature if you are tired or need
sleep.
• Take a minimum of a 15-minute break hourly.
• Play in a room in which all lights are on.
• Play at the farthest distance possible from the screen.
Repetitive Motion Injuries
When you play games on your phone, you may experience occasional
discomfort in your hands, arms, shoulders, neck, or other parts of your
body. Follow these instructions to avoid problems such as tendonitis,
carpal tunnel syndrome, or other musculoskeletal disorders:
• Take a minimum 15-minute break every hour of game playing.
• If your hands, wrists, or arms become tired or sore while playing,
stop and rest for several hours before playing again.
• If you continue to have sore hands, wrists, or arms during or after
play, stop playing and see a doctor.
12
Master Reset
During a master reset the product is set to its default settings and all
data files, user settings, and preinstalled applications will be deleted.
A master reset should only be carried out by Motorola, or an
authorized service center. Data in the handset must be backed up
prior to the reset in order for it to be reinstalled following a master
reset. Motorola is not responsible for any data lost through
unauthorized resetting.
13
Getting Started
Getting Started
What’s in the Box?
Your wireless mobile phone comes with a battery, travel charger,
desktop charger cradle, USB data cable, stereo headset, mono
headset, companion CD, AT&T Wireless SIM card, user manual, and
product and service user data. You can purchase other accessories to
customize your phone for maximum performance and portability.
To purchase Motorola Original™ accessories, contact the Motorola
Customer Call Center at 1-800-331-6456 in the United States or
1-800-461-4575 in Canada.
About This Guide
This user guide describes how to use your Motorola wireless phone.
Optional Features
This label identifies an optional network, SIM card, or
subscription-dependent feature that may not be offered by
all service providers in all geographical areas. Contact your
service provider for more information.
Optional Accessories
This label identifies a feature that requires an optional
Motorola Original accessory.
14
Installing the SIM Card
Your SIM (Subscriber Identity Module) card contains your phone
number, service details, and phonebook/message memory. It is stored
in a recess in the battery compartment.
Caution: Do not bend or scratch your SIM card. Do not touch the gold
colored areas of your SIM card.
1 If the phone’s battery door is
already in place, push down
the battery door release
latch and lift the battery door
off the phone.
Getting Started
Action
2 Lift the battery up from the
bottom end and remove it
from the phone.
15
Action
Getting Started
3 Hold the SIM card
with the gold contact
side facing down and
the cut corner on the
left.
Cut corner
SIM card holder
4 With the SIM card
seated in the holder,
slide the retainer on
top of the SIM card
to secure it.
SIM card retainer
16
Installing the Battery
You must install and charge the battery to use your phone.
Your phone is designed for use only with Motorola Original
batteries and accessories. We recommend that you store
batteries in their protective cases when not in use.
Getting Started
Action
1 Insert the battery
into the back of the
phone, with the
contacts on the top
end of the battery in
alignment with the
contacts on the
phone.
2 Push the bottom end
of the battery into the
phone until it clicks
into the
compartment.
17
Action
Getting Started
3 Place the battery
cover back on the
phone, aligning the
tabs on the cover
with the groove on
the phone.
4 Slide the battery
cover in the direction
shown until it locks
into place.
18
Charging the Battery
New batteries are shipped partially charged. Before you can use your
phone, you need to install and charge the battery for 24 hours as
described in the following steps. Some batteries perform best after
several full charge/discharge cycles.
Action
Getting Started
1 Remove the sync/
charger cover.
2 Plug battery charger
or USB data cable
connector into the
sync/charger port.
3 Plug the other end of the charger into the electrical outlet. If using
the USB cable, plug the other end of the cable to your personal
computer’s USB port.
4 Your phone will indicate a full charge before 24 hours have
passed, however, allow your phone to charge for the full 24 hours
before first use.
19
Getting Started
20
Notes:
• You can also charge the battery with your phone in the desktop
charger cradle, plugged into to either the USB or travel charger.
• When you charge the battery, the bars of the charging status icon
scroll on your phone’s external display. When charging is complete,
the bars stop scrolling. You can use the phone during the charging
process. However, the battery will take longer to fully charge.
• When battery power is low, a low battery message displays. Charge
the battery immediately.
• If battery power is completely drained, the phone turns off
automatically.
• If the battery is “deeply discharged” and you plug in a charger, the
phone will not display that it is charging. Charge the phone for
approximately 15 minutes, disconnect then reconnect the charger.
The phone will then properly display that it is charging.
Getting to Know Your Phone
See page 1 for a basic phone diagram.
Function Buttons and Keys
Icon Name
Power
• Turn on your phone.
• Access the Quick List by quickly pressing and
releasing the power button (see “Quick List” on
page 33).
• Turn off the phone.
Jog dial
(up or
down)
In standby mode with the phone flip open:
• Turn the volume up/down.
• Record voice (press the jog dial straight in).
In standby mode with the phone flip closed:
• Turn the volume up/down.
When a call is ringing/incoming:
• Mute the ring.
• Ignore the incoming call, Double press.
When an incoming is connected:
• Turn the volume up/down.
a b Soft key
s
Send
Getting Started
p
Description
Perform the command shown on the screen
immediately above the key.
• Dial a phone number you entered using the
keypad.
• Dial a phone number you selected from the Call
History list.
• Answer an incoming call.
• Place a call on hold to answer a second
incoming call (call waiting).
• Change between an active call and a call that is
on hold.
• Activate the speakerphone.
• Pull up call history while at Home screen.
21
Getting Started
e
End
• End active data calls at any time.
• End a call when one party is on the line, and
end the active call when multiple parties are
connected.
h
Home
Display the Home screen and Quick List (see
“Quick List” on page 33). Press and hold Home
h to view the Quick List.
B
Back
Navigate to the previous screen, or backspace
over one or more characters when you are in a
text field.
A
Action
Confirm your selection. Pressing the blue Action
button is similar to pressing “Enter” on a
keyboard.
Move the selection focus up, down, left, or right,
4-way
navigation and move the cursor left or right in text fields.
key
1
#1 Button • Set up your voice mail.
• Press and hold to dial voice mail after initial setup.
• Press repetitively in the ‘abc’ text entry mode to
scroll through common punctuation: . , ? ! ' @ :.
*
*
Press to toggle text input mode.
Earpiece and Speaker
You hear voice calls through the earpiece, and ringtones and media
files through the speaker. You also can toggle between the earpiece
and speaker during a call. See “Additional Call Features” on page 47.
22
Jog Dial
Use the jog dial to adjust earphone/speaker/headset volume.
Increase volume
Voice Recorder
Infrared Port
Use the infrared port to perform sync and exchange files with a PC or
other wireless mobile devices.
Getting Started
Decrease volume
Headset Jack
Plug the headset into the headset jack for hands-free operation and to
listen to MP3 files.
Memory Card Slot
Insert a SD or MMC memory card into this slot to expand your phone’s
data storage capability.
Headset jack
SD/MMC card slot
Notes:
• Up to 10 MB of additional available memory exists on your MPx200
for user content. This may include contact, calendar and task
information as well as third party applications.
• Download applications to a SD/MMC card as often as possible rather
than using all of your phone’s 10 MB of memory.
23
Handstrap Hole
You can install a handstrap into the handstrap hole.
Getting Started
Synchronizing with ActiveSync
You can use Microsoft ActiveSync technology to synchronize
information between your desktop computer and/or a Microsoft
Exchange Server and your phone. ActiveSync compares your phone’s
information with the information on the desktop computer and/or the
server, and then updates all locations with the most recent
information.
Note: You can synchronize information directly with a Microsoft
Exchange Server if your company is running Microsoft Mobile
Information Server or Exchange Server 2003.
System Requirements
Minimum Desktop Computer Requirements
• Microsoft Windows XP, 2000, Millennium Edition (ME), NT
Workstation 4.0 with SP 6 or later, or Windows 98
• Microsoft Outlook 98 (2000 recommended) or later for
synchronization to the desktop or portable computer for e-mail,
calendar, contacts, tasks, and notes.
• Microsoft Internet Explorer 4.01 SP1 or later
• Hard disk drive with 12 to 65 MB of available hard disk space (actual
requirements will vary based on selection of features and user’s
current system configuration)
• Available 9 or 25-pin communications port (adaptor required for 25pin communications port), infrared port, or USB port (available for
Windows 98, Windows Millennium Edition, Windows 2000,
Windows® XP only)
• CD-ROM drive
• VGA graphics card or compatible video graphics adapter at 256 color
or higher
• Keyboard
24
• Microsoft Mouse or compatible input device
Requirements for Microsoft Outlook 2000
• Hard disk space requirements will vary depending on configuration;
custom installation choices may require more or less hard disk
space.
- 245 MB of available hard disk space with 115 MB on the hard disk
where the operating system is installed
• RAM requirements depend on the operating system used, plus an
additional 8 MB of RAM for each Office program running
simultaneously
- Windows ME, NT-32 MB of RAM plus an additional 8 MB of RAM
for each Office program running simultaneously
- Windows 2000 Professional-64 MB of RAM plus an additional 8
MB of RAM for each Office program running simultaneously
Getting Started
Options for Windows XP, 2000, ME, NT Workstation 4.0, or Windows
98
• Audio card/speakers for sound
• Microsoft Office 97, 2000, or XP
• Modem for remote synchronization
• Ethernet LAN connection for remote synchronization
Installing ActiveSync on your PC
ActiveSync is already installed on your phone.
Make sure to install ActiveSync 3.6 or later on your desktop computer
before connecting your phone to the desktop computer. ActiveSync is
available on the MPx200 Companion CD included in the box, or
download to your desktop computer for free from Microsoft’s website.
Enter the word “ActiveSync” in the search dialogue box and press
“Enter.
For more information about ActiveSync, see “Synchronizing
Information” on page 67.
25
Finding Information
Getting Started
The following table lists sources of information to help you use your
phone.
Information about
Source
Making a phone call
MPx200 User’s Guide (see “Making a
Call” on page 41)
Programs installed on the
phone
MPx200 User’s Guide (see “Programs
List” on page 33)
Installing additional
programs on the phone
MPx200 Companion CD
Connecting to and
ActiveSync Help on your desktop
synchronizing with a
computer
desktop computer and/or a
Microsoft Exchange Server
Text entry
MPx200 User’s Guide or MPx200
Getting Started guide
Last-minute updates and
detailed technical
information
Readme files, located in the Microsoft
ActiveSync folder on the desktop
computer
Up-to-date information on
the Microsoft Smartphone
operating system
http://www.microsoft.com/mobile
More information on the
device
http://www.hellomoto.com
Service-related information http://www.attwireless.com/smartphone
26
Learning to Use Your
Phone
See page 1 for a basic phone diagram.
Using the Displays
The Main Display
The Home screen (shown) is the standard display you see when you
are not on a call or using the menu.
Your current service provider
Number of unread messages
Use Favorites Manager to
customize which programs
are shown in the Favorites
Bar.
Current time
Next appointment
Quick links to mMode
Ring type or volume profile
(Press Action (A) to change
or customize profiles)
• The top of the display shows status indicators about your phone’s
current mode, or the name of the current activity or active program.
• The center of the display shows the Home screen, as well as email
messages, contacts, appointments, favorites, and other types of
information.
• The bottom of the display shows the soft key commands.
Note: The display shown may be different based on the specific
Home screen configuration chosen.
Learning to Use Your Phone
Status indicators
27
Status Indicators
Status indicators display at the top of your phone’s screen. The
following table lists common status indicators and their meanings.
Learning to Use Your Phone
Indicator Meaning
28
Indicator Meaning
New email or SMS
No signal
New voicemail
GPRS available
New instant
message
GPRS in use
Voice call active
Roaming
Data call active
Sync error
Call forwarding
Radio off
Call on hold
Ringer off
Missed call
Speaker
CallerID is ready
Multipress text input mode,
lowercase
CallerID is not yet
ready
Multipress text input mode,
uppercase
Battery level
Multipress text input mode,
caps lock
Low battery
T9 text input mode,
lowercase
Battery charging
T9 text input mode,
uppercase
No battery
T9 text input mode, caps lock
Signal strength
Numeric input mode
External Display
Battery level
Signal strength
Current time
Current date
The following table lists the icons and their meanings that appear on
the external display.
Icon Meaning
Icon Meaning
Battery level
Call in progress
Battery low
Data call active
No battery
No signal
Charging
Radio off
Ringer off
You have unread new
message(s)
Speaker
You have missed call(s)
GPRS in use
Call forwarding
Roaming
New instant message
Learning to Use Your Phone
Signal strength
Your phone’s display may differ based on the specific external LCD
Style chosen. See “Phone Settings” on page 66.
Using the 4-Way Navigation Key
Use the 4-way navigation key to navigate the menu system, change
feature settings and play games.
29
Note: Down and up are your primary movements within menus. Move
left and right to change feature settings, navigate contacts, and
edit text.
Action Button (A)
The Action button confirms your selection. In some cases, confirming
your selection accesses a program or setting.
Home Key (h)
See “Quick List” on page 33.
Use the Home key to access the Home screen and the Quick List.
Learning to Use Your Phone
Home Screen
30
See “The Main Display” on page 27.
• Display the Home screen to dial a number.
• The Home screen is your starting place for most tasks. You can
easily navigate to any program or setting on the phone from this
screen. The top of the Home screen displays the 5 icons that are
fixed by default. The first icon is always locked to mMode. The
remaining icons will stay in their default position unless they are
changed by the Favorites Manager application (see page 131 for
more information). Just select a program and press Action (A) to
open the program. You can also press Programs (a) to enter the
programs list. The Home screen also displays the current time, your
next appointment, the number of messages in Inbox, and your
current profile.
• Select your next appointment and press Action (A) to open Calendar,
and you can see all of your appointments for the day. To view Inbox,
select the email status showing the number of messages you have,
and press Action (A). To view Contacts, press Contacts (b).
• The Home screen automatically displays when you turn on the
phone or leave the phone idle, but you can navigate to it at any time
by pressing Home h.
• Press and hold Home h to access the Quick List.
To access the Home screen
• Press Home h.
To change Home screen settings
• See “Home Screen” on page 57.
Navigation Options from the Home Screen
Back Button
Press Back to navigate to the previous screen, or move the cursor
back to delete one or more characters in a text field.
To backspace and remove one character in a text field
• Press Back.
Learning to Use Your Phone
• Use the 4-way navigation key to select a program at the top of the
screen, and then press Action (A) to open the program.
• Use the 4-way navigation key to select an item in the center of the
Home screen, such as your next appointment, your email/SMS
information, or your profile type, and then press Action (A) to open
the program or access the settings associated with the item
selected.
• Press Programs (a) to display the list of programs available on your
phone, select a program, and then press Action (A).
• Press Contacts (b) to display the Contacts list, next select a contact,
and then press Action (A).
To backspace and remove multiple characters in a text field
• Press and hold Back.
Soft Keys
The two soft keys on your phone are located directly below the display
screen. Each soft key performs the command displayed immediately
above it on the screen. Both soft keys are context sensitive — their
31
function changes according to the phone’s status, for example, when
in a particular application or making a phone call.
Left Soft Key—Offers a quick way to access programs.
Right Soft Key—During normal use, displays the following:
• Contacts: displays to provide you with an alternative, quick way to
access your contacts list.
• Voicemail: displays when a voicemail is received but not played.”
• Messages: displays when new messages appear in the inbox.
Learning to Use Your Phone
Menu
On many screens, Menu is the right soft key. The Menu soft key
displays a list of options that are relevant to the screen you are
viewing. Selecting a menu option
will either perform the command or take you to another part of the
user interface where you can perform the command.
Press the Menu softkey to display
menu options
To access menu options
1 Press Menu on any screen where it is displayed.
2 Select a menu option, then press Action (A).
Note: Press Up to move to the bottom of the menu.
32
Programs List
The phone comes pre-installed with programs that you can start using
immediately. To install additional programs on your phone, refer to the
MPx200 Companion CD that came with the phone. The list of
programs which come preinstalled on your phone are as follows:
Inbox, Contacts, Calendar, mMode, Internet Explorer, ActiveSync,
OfficeOnline, Call History, Favorites Manager, File Manager, MSN
Messenger, SIM Manager, Speed Dial, Tasks, Voice Recorder, and
Windows Media. In addition, the Programs List offers three additional
folders in the menu list: Settings, Accessories, and Games.
To navigate to a program
1 On the Home screen, press Programs (a).
2 Select a program and press Action (A).
You can also use numbers to navigate quickly to programs and
settings on the phone. Press the number on the keypad that
corresponds to the number of the program or setting you want.
For example, in Programs, press 3 to open Calendar.
Note: You can also use numbers to select menu options by pressing
the number that corresponds to the menu option in descending
order. For example, to select Filter in the list of Contacts menu
options, press 4.
Quick List
Learning to Use Your Phone
Numbers
The Quick List displays a list of available profile types and commands
such as: turn off your phone, lock your phone, lock your phone’s
keypad, and turn on/off the Airplane Mode feature.
To access the Quick List
• Press Power, or press and hold Home h.
Note: Be aware that when the Airplane Mode feature is turned on,
then your phone cannot receive and make a call, including an
33
emergency call. In order to receive and make a call, you must
turn off the Airplane Mode feature and re-engage your phone’s
RF capability. Always obey the instructions of your airline crew.
Entering Text and Numbers on Your Phone
Learning to Use Your Phone
You can enter text and numbers on the phone using the keypad. The
phone supports 3 input modes for entering text and numbers:
Multipress, T9, and Numeric. The Multipress and T9 modes are used
for entering text, and the Numeric mode is used for entering numbers.
When you select a field that requires text or numeric entry, the phone
automatically defaults to the appropriate input mode. The status
indicator on the top of the display shows the input mode you are
currently using.
To change input modes
• Press and hold Asterisk (*) until the status indicator for the input
mode you want is shown at the top of the display.
The following table shows the complete list of input mode status
indicators.
Indicator
Mode
Multipress text input mode, lower case
Multipress text input mode, upper case
Multipress text input mode, caps lock
T9 text input mode, lower case
T9 text input mode, upper case
T9 text input mode, caps lock
Numeric input mode
34
Entering Text in Multipress Mode
To change the Multipress time out
1 On the Home screen, press Programs (a), select Settings, and then
select Accessibility.
2 Under Multipress time out, select the time interval you want for the
pause between keypresses, and press Done (a).
To enter punctuation in Multipress mode
• Press 1 repetitively to scroll through common punctuation: . , - ? !
@:1
Learning to Use Your Phone
You can enter a letter in multipress mode by pressing the number key
on which the letter appears. To enter the first letter on the number key,
press the key once. To enter the second letter, press the key twice,
and so on. The last letter entered remains underlined until you
complete the keypresses and move to the next letter.
For example:
• To enter the letter “s,” press 7777.
• To enter the word “hat,” press 44, 2, 8.
When you enter letters that are on the same number key, wait until the
underline disappears before entering the next letter so that your
phone can process the first letter. This pause is called the Multipress
time out, and you can adjust the length of the pause between
keypresses.
For example:
• To enter the word “cat,” press 222, pause, press 2, and
then press 8.
Entering Text in T9 Mode
When you are in T9 mode, just press the number keys that contain the
letters you want to form a word. T9 will then analyze your keypresses
and attempt to complete the word.
For example:
35
• To enter the word “shoe”, press 7, 4, 6, 3.
To enter text using T9 mode
1 Press and hold Asterisk * until the T9 indicator displays.
2 Enter the numerical sequence that represents the word you want to
enter.
3 Press Pound # to accept the word and enter a space after it, or
press 0 to scroll through the available words.
4 If you do not see the correct word, erase the word, and then press
and hold Asterisk * to change to Multipress mode, and manually
enter the word.
Learning to Use Your Phone
Having Trouble Entering a Word in T9 Mode?
If you cannot find the word you want in the T9 dictionary, change to
Multipress mode. Enter the word in Multipress mode and the word is
added to the T9 dictionary.
To enter punctuation in T9 mode
• Press 1, then 0 to scroll through common punctuation.
Entering Numbers in Numeric Mode
When you are in Numeric mode, press the number(s) you want to
enter on the keypad. If a field permits a numerical entry only, such as
the Work phone field in Contacts, the input mode will automatically
default to Numeric mode.
Inserting Symbol
The following is a list of the keys and their corresponding symbols in
input mode.
Special Key Functions
To enter a space
• In Multipress or T9 mode, press Pound # on the keypad.
36
To start a new line
• Press Action (A).
To change between uppercase and lowercase in text mode
• Press Asterisk * to change between uppercase and lowercase.
Note: In text mode, the first letter of a sentence is automatically
capitalized.
To lock caps
• Press Asterisk * twice. Press Asterisk * again to return to
lowercase.
To enter a number, an asterisk (*), or a pound sign (#)
• Change to Numeric mode, and press the corresponding key on the
keypad.
To delete characters
1 Press Back to backspace over a single character.
2 Press and hold Back to backspace and delete an entire text field.
To enter the plus (+) sign for international calls
• Press and hold 0.
Learning to Use Your Phone
To enter a symbol
• Press and hold Pound #, select a symbol, and then press Done (a).
You also can press 1 to select and enter a symbol.
Securing Your Phone
You can customize the level of your phone’s security by locking the
keypad, the entire phone, or the SIM card.
37
Locking the Keypad
The keypad lock turns off the keypad function to prevent accidental
keypresses.
To lock your keypad
• On the Home screen, press and hold End. The left soft key displays
Unlock, indicating that the phone is locked.
Learning to Use Your Phone
To unlock the keypad
• On the Home screen, press Unlock, and press Pound #.
Note: You still can receive calls and make emergency calls when the
keypad is locked.
38
Locking and Unlocking Your Phone
Locking the phone prevents access to personal data. When you turn
on this feature, the phone automatically locks after a specified time of
inactivity. A screen displays requiring your phone lock password
before access is granted.
Note: You still can receive calls and make emergency calls when the
phone is locked.
To lock the phone
1 Press Power to display the Quick List, select Device lock, and then
press OK (a).
2 Under Lock phone after, select a desired time period the phone is
inactive before it automatically locks.
3 Under Password, enter the password you want to use to access the
phone when it is locked.
4 Under Confirm password, enter the password again, and press Done
(a).
Note: After you select the time delay and create a password, you can
quickly lock your phone from the Quick List, without having to
view these settings.
To turn off phone lock
• On the Home screen, press Programs (a), select More, select
Settings, select More, select Security, select Disable Phone Lock, and
then press Done (a).
Locking the Subscriber Identity Module (SIM) Card
Locking the SIM card prevents you and others from using your phone
until the correct password is entered. You still can make emergency
calls when the SIM card is locked.
Learning to Use Your Phone
To unlock your phone
• Press Unlock, enter your password, and then press Unlock again.
39
To lock the SIM card
1 On the Home screen, press Programs (a), select More, select
Settings, select More, select Security, select Enable SIM Lock, and
then press Done (a).
2 Enter your PIN1 password (see page 38), and press Done (a).
Learning to Use Your Phone
To unlock the SIM card
1 On the Home screen, press Programs (a), select More, select
Settings, select More, select Security, select Disable SIM Lock, and
then press Action (A).
2 Enter your PIN1 password, and press Done (a).
40
Sending and Receiving
Calls
This chapter explains how to make and receive phone calls, view Call
History, and create shortcuts to help you manage calls more
efficiently.
Making a Call
There are several ways to make a call. The easiest way is to dial a
phone number from the Home screen.
To make a call
• On the Home screen, press the numbers on the keypad to enter the
phone number, and then press Talk s.
Sending and Receiving Calls
To make a call by entering a contact name
1 On the Home screen, press the keys on the keypad to spell the
contact name. For example, to call Scott, press 7, 2, 6,
8, 8.
2 When the contact name displays, select it, and press Talk s. If you
do not find the contact , press and hold B to clear the display.
Note: As you enter a phone number or contact name, the phone
searches Contacts, Call History, Speed Dial lists, and the
Subscriber Identity Module (SIM) card to find a matching name
and/or number. When you see the name of the person to call,
select it, and press Talk s.
41
AutoFilter matches number to a contact
AutoFilter matches number from
Call History
Making a Call from Contacts
To call someone from the Contacts list, select the person’s name and
press Talk s.
If a contact has more than one phone number, such as Work, Home,
and Fax, the Work phone number is set as the default. Press Talk s
to dial the default number, but you can change the default number at
any time. You can select or toggle to a contact person’s alternative
numbers by pressing up or down on the directional keypad.
Sending and Receiving Calls
To make a call by contact name
1 On the Home screen, press Programs (a), select Contacts (b), and
then press Action (A).
2 Select the contact name to call, and press Talk s.
Note: If you have a long list of contacts, enter the first few letters of a
contact’s name. Your phone searches the entire Contacts list to
display the name. if you did not find a contact by this method,
press and hold the Back (a) to clear the display and try again
or use another method.
To change the default number for a contact
1 On the Home screen, press Programs (a), select Contacts (b), and
then press Action (A).
42
2 Select the contact, and press Left (a) or Right (b) to change the
default number.
3 For example: If you change “w” to “m,” the default number changes
from Work phone (w) to Mobile phone (m).
Note: For more information about contact list abbreviations, see
"Contacts, Calendar and Tasks" on page 58.
To make a call from an open contact
1 On the Home screen, press Programs (a), select Contacts (b), and
then press Action (A).
2 Select the contact to call, and press Action (A).
3 Select the number you want to call, and press Talk s.
Making an International Call
To call someone internationally from the Contacts list, select that
person’s name and press Talk. Please make sure that the phone
number is preceded by a ‘+’ and the appropriate country code.
Alternatively a user can dial the number directly from the keypad and
can enter the ‘+’ symbol by pressing and holding the 0 key until the
‘+’ symbol appears.
You can display a list of phone numbers you have recently dialed and
choose a name or number from the list to call again.
To make a call using a recently-dialed phone number
1 On the Home screen, press Talk s to display a list of recentlydialed phone numbers.
2 Select the number or name for the person to call, and press Talk s
again.
Sending and Receiving Calls
Making a Call Using a Recently-dialed Number
43
Making a Call from the Call History List
The Call History list displays the last 25 calls you made, received, or
missed. Choose a name or number to call from the list.
To make a call from the Call History list
1 On the Home screen, press Programs (a), select Call History, and
then press Action (A).
2 Select the number or entry to call, and press Talk s.
Making a Call from a Hyperlink
When you see an underlined phone number as a hyperlink in an email
message, select the hyperlink and press Action (A) to make the call.
Making Emergency Calls
Sending and Receiving Calls
Calls to emergency service numbers can be made under any
circumstances, even if you have locked the SIM card and/or the
phone.
Notice: Be aware that when the Airplane Mode feature is turned on,
then the phone cannot receive a call and the phone cannot make a
call, including an emergency call. In order to receive and make a call,
you must turn off the Airplane Mode feature and re-engage the
phone’s RF capability. Always obey the instructions of your airline
crew.
To make an emergency call
• On the Home screen, enter 112 (the international emergency
number) and press Talk s.
Having Problems Making a Call?
Check to make sure that your phone contains a valid SIM card, that it
is turned on, unlocked, and in the service area of the selected service
provider’s network.
44
Receiving a Call
When receiving an incoming call, the caller’s information displays on
the screen if it is matched to a contact in your phone. If the caller’s
information is not available or not matched to a contact, Private will
appear. You can answer a call by pressing Talk s or Accept. If you
don’t want to take the call, press Reject.
Note: If you want to immediately silence the ring of an incoming call,
press the jog dial, and answer the call.
Caller ID information is
matched to a contact
Phone number is
identified as Work
number in Contacts
To reject an incoming call
• When the flip is closed, quickly press the jog dial down 2 times to
reject the call.
• When the flip is open, press End or Reject.
When you receive a call, the name and number of the caller display on
the screen. If the name of the caller is not in your Contacts list, only
the caller’s phone number displays.
Sending and Receiving Calls
To answer an incoming call
• When the flip is closed, open the cover to answer the call. To use this
function, first activate the flip answer function (see "Phone Settings"
on page 66).
• When the flip is open, press Talk s or Accept to answer the call.
45
To answer a second call using Call Waiting
• If you are talking on the phone when you receive a call, press Accept
or Talk s to place the first call on hold, and answer the second call.
• If you want to end the first call before answering the incoming call,
press End, and then press Accept or Talk s to accept the incoming
call.
• While on a call, if a second call is answered but the caller hangs up,
select 'Menu' and press 'Unhold' to rejoin the original call.
Note: Call Waiting is available only if you have subscribed to this
service. Check with your service provider.
To reject a Call Waiting call
• If you are talking on the phone when you receive a call and you do
not want to answer it, press Reject. This will keep your current call in
progress, but will reject the Call Waiting call.
In-call Options
Sending and Receiving Calls
While a call is in progress, you can press Menu to access menu
options.
The following table shows the menu options available when a call is in
progress. Some options are available only when multiple calls are in
progress or during a conference call.
46
Menu option
Function
End
Disconnects the call.
Hold
Places the active call on hold.
Unhold
Activates the call on hold.
Swap
Changes between two calls.
Save Contact
Creates a contact for the caller.
Conference
Joins together all existing calls, if you have
subscribed to this service.
Private
Breaks one call out of a conference and makes this
call active while the rest of the conference is on
hold.
Mute
Mutes the microphone for the active call. The other
party will not hear anything you say, but you can still
hear the other party.
Unmute
Turns the microphone back on for the active call.
Additional Call Features
To place a call on hold
• Press Hold.
To change between two calls
• Press Swap.
To end a call
• Press End to disconnect.
To listen to a Voicemail message
From the Home screen, press and hold 1 to automatically call
voicemail.
To change between the earpiece and the speaker
• During an incoming or outgoing call, you can toggle between the
earpiece and speakerphone by holding down Talk s.
Sending and Receiving Calls
To redial the last number called
• On the Home screen, press Talk s twice.
47
Reviewing Your Calls
Using Call History and Call Timers, you can view information about
phone calls you have made and received, recent incoming calls, and
how much time you have spent on the phone.
Call History
Call History displays the last 25 calls you have made, received, and
missed. Each entry in Call History contains the start time of the call,
the duration, the caller’s name, if available, and the caller’s number.
The oldest calls are automatically deleted from the list to make room
for new calls.
To view Call History
• On the Home screen, press Programs (a), select Call History, and
then press Action (A).
Note: You can filter Missed Calls, Incoming Calls, and Outgoing Calls.
Press Menu (b), select Filter, press Action (A), and select the
filter you want.
Sending and Receiving Calls
To view contact information from Call History
• Select the entry for the contact, press Menu (b), select Find Contact,
and then press Action (A).
To send an email message from Call History
• Select the contact, press Menu (b), select E-mail, and then press
Action (A).
To create a new contact from a number in Call History
• Select the entry, press Menu (b), select Save, and then press Action
(A). Make sure <New Item> is highlighted and then press Done (a)
to enter the contact information.
48
To remove an item from Call History
• Select the item, press Menu (b), select Delete, and then press Action
(A).
To remove all items in Call History
• Press Menu (b), select Delete List, and then press Action (A).
Call Timers
Call Timers contains the length of your last call, the total number of
calls made and received, calls by type (incoming, outgoing, roaming,
and data), and a lifetime counter. You can use Call Timers to keep
track of your calling patterns, to help you choose a calling plan or
estimate your monthly billing.
To view Call Timers
• On the Home screen, press Programs (a), select Call History, press
Menu (b), select View Timers, and then press Action (A).
Note: The Lifetime timers cannot be reset.
Sending and Receiving Calls
To reset Call Timers
• On the Home screen, press Programs (a), select Call History, press
Menu (b), select View Timers, and then press Action (A).
• Press Menu (b) and press Action (A) to reset all timers.
49
Shortcuts
You can assign speed dial numbers and voice tags as shortcuts to
quickly dial frequently-called phone numbers.
Speed Dials
You can assign speed dial numbers by pressing and holding one or
two keys. Choose speed dial entries from 2-99; speed dial 1 is
reserved for Voicemail access.
Note: A speed dial shortcut can be created only for a phone number
stored in Contacts.
Sending and Receiving Calls
To create a speed dial shortcut for a phone number
1 On the Home screen, press Programs (a), select Contacts (b), and
then press Action (A).
2 Open the contact and select the phone number to set up as a
speed dial.
3 Press Menu (b), select Add Speed Dial, and then press Action (A).
4 Under Keypad assignment, enter the speed dial number to
associate with the phone number, and press Done (a).
Note: You also can assign speed dial numbers to Web addresses and
email addresses that are stored in Contacts.
To make a speed dial call
• On the Home screen, press and hold the keypad number that you
have assigned as a speed dial number. If the keypad assignment is
two digits, press the first digit, then press and hold the second digit.
To view your speed dial numbers
• On the Home screen, press Programs (a), select More, select
Shortcuts, and then press Action (A).
Voice Tags
You can record voice tags to dial a phone number by speaking a word.
50
To create a voice tag for a phone number
1 On the Home screen, press Programs (a), select Contacts (b), and
then press Action (A).
2 Open the contact and select the phone number to set up as a voice
tag.
3 Press Menu (b), select Add Voice Tag, and then press Action (A).
4 Wait for the audio and visual cue and begin recording your voice
tag.
5 When prompted, repeat the voice tag to confirm.
6 If the voice tags match, the phone displays a confirmation and
replays the voice tag.
Note: You also can create voice tags for Web addresses and email
addresses that are stored in Contacts.
To view voice tags you have created
• On the Home screen, press Programs (a), select More, select
Shortcuts, and then press Action (A).
Viewing and Deleting Shortcuts
Once you set up speed dials and voice tags, you can view or delete
them in the Shortcuts list.
To view shortcuts
• On the Home screen, press Programs (a), select More, select
Shortcuts, and then press Action (A).
Sending and Receiving Calls
To make a call using a voice tag
1 On the Home screen, press and hold Record.
2 Say the word you have assigned as a voice tag for the phone
number you want to call. The phone will play back the voice tag and
then perform the specified Action (A).
3 If the phone misinterprets the word, press End and start over.
51
To delete shortcuts
1 On the Home screen, press Programs (a), select More, select
Shortcuts, and then press Action (A).
2 Select the shortcut to delete, press Menu (b), select Delete, and
then press Action (A).
Advanced Dialing Options
International calls require a country code and an area code to be
included in the phone number. The country code is separated from the
rest of the number sequence by a plus (+) sign.
Enter the recipient’s country code, area code and phone number, then
press Talk s to complete the call.
To insert an international country code
• Press and hold 0 until a plus sign (+) appears.
Note: You can insert a plus sign (+) into a contact’s number or dial it
directly from the keypad.
Some international calls require a three-second pause in the dialing
sequence for the call to process successfully.
Sending and Receiving Calls
To insert a 3-second pause in a dialing sequence
1 On the Home screen, press Programs (a), select Contacts (b), and
then press Action (A).
2 Select the contact, press Action (A), and then select the phone
number to modify.
3 Press Edit (a) and then press Left (a) or Right (b) to move the
cursor between the numbers where you want to insert a 3-second
pause.
4 Press Menu (b), select Insert Pause, and then press Action (A). The
letter “p” appears where the 3-second pause will occur in the
dialing sequence. You can also add a “p” via text entry.
5 Press Done (a).
52
Settings
Viewing and Changing Settings
You can view and change settings to personalize your phone for the
way you work. For example, you can change the sounds or use your
own sounds for ring tones, notifications, and reminders, use your own
image for the Home screen background, set up Call Forwarding and
Call Waiting to manage your calls more efficiently, and more.
To view Settings
• On the Home screen, press Programs (a), select More, select
Settings, and then press Action (A).
Note: To view the remaining settings, select More and press Action
(A).
Settings
Telephony
Use Telephony settings to set options for Call Forwarding, Call
Waiting, and Caller ID.
53
To view Telephony settings
• On the Home screen, press Programs (a), select More, select
Settings, select Telephony, and then press Action (A).
The following table lists the telephony settings and their functions.
Telephony
setting
Function
Call Barring
Block incoming and/or outgoing calls.
Settings
Call Forwarding Forward all or selected calls to another number.
Call Options
Change phone numbers, such as your voice mail
and SMS service center, answer incoming calls by
pressing any key, use advanced call options.
Call Waiting
Turn Call Waiting on or off.
Caller ID
Let your identification be known to all callers, only
your contacts, or no callers.
Channels
Configure cell broadcast.
Fixed Dialing
Limit your calling area to one or more specific
phone numbers and/or area codes.
Networks
Identify your current network and change your
network selection from Automatic to Manual.
Sounds
Sounds settings are used to customize the sounds for ring tones,
notifications, and reminders.
To display Sounds settings
• On the Home screen, press Programs (a), select More, select
Settings, select Sounds, and then press Action (A).
54
To use your own sound
1 Locate the sound file on your desktop computer and copy the file.
The file format must be .wav or .mid(MIDI type 0).
2 Open ActiveSync on your desktop computer, click Explore, doubleclick my Smartphone, double-click IPSM, double-click Application
Data, double-click Sounds, and then paste the sound file into the
Sounds folder.
Note: If a Sounds folder does not exist in this directory, create a new
one.
3 On your phone’s screen, press Programs (a), select More, select
Settings, select Sounds, and then press Action (A).
4 Select the item to customize, press Left (a) or Right (b) to select
the sound, and then press Done (a).
Note: Make sure that the phone is connected to your desktop
computer via USB or infrared before you open ActiveSync to
paste the sound file.
Use profiles settings to configure how your phone notifies you about
an incoming call, an approaching appointment, or an arriving
message. You can use Profiles to change notifications quickly based
on your situation. For example, you may want the phone to ring louder
if a client is calling, or you may not want the phone to ring at all, but
want to hear calendar reminders. The default profile used with your
phone is the Normal profile. When the name of the current profile
displays on the Home screen, you can rename it.
Settings
Profiles
To view Profiles settings
• On the Home screen, press Programs (a), select More, select
Settings, select Profiles, and then press Action (A).
Note: You also can assign Profiles settings by selecting Profile [Type]
from the Home screen.
55
Indicates your current profile
Preset Profiles
Settings
The following table shows the list of your phone’s default profiles and
their attributes.
Profile
name
Ring
type
Ring
volume
Notification Notification System sound
type
volume
volume
Normal
Ring
3
Play
sound
3
3
Silent
Vibrate Off
Vibrate
Off
Off
Meeting
Vibrate 1
Play
sound
1
Off
Loud
Ring
Play
sound
Loud
Loud
Loud
Automatic Toggles between Normal and Meeting, based on your
calendar.
56
Headset
Ring
3
Play
sound
3
3
Car
Ring
4
Play
sound
4
4
Loud
Play
sound
Loud
Loud
Speakerph Ring
one
To modify a profile on the Settings menu
1 On the Home screen, press Programs (a), select More, select
Settings, select Profiles, and then press Action (A).
2 Select the profile to modify, press Menu (b), and then select Edit
(a).
3 Modify the settings, and press Done (a).
Settings
To use profiles
1 On the Home screen, press Down to select Profile: [Type], and
press Action (A) button.
2 Select the profile, press Action (A) to set the profile, and then press
Done (a).
Notes:
• You also can select a different profile using the Quick List. Press
Power (or press and hold Home), select the profile, and then press
Action (A).
• When a headset is plugged into the phone, the Headset profile is
used automatically.
Home Screen
Use Home screen settings to change the Home screen layout, the
color scheme, the background image, and the time delay before the
Home screen appears when the phone is idle.
57
Settings
To view Home screen settings
• On the Home screen, press Programs (a), select More, select
Settings, select Home Screen, and then press Action (A).
To customize the Home screen with your own image
1 Locate your image file on your desktop computer and copy the
image file. The file format must be .gif, .jpg, or .bmp.
2 Open ActiveSync on your desktop computer, click Explore, doubleclick My Smartphone, double-click IPSM, double-click Application Data,
double-click Home h, and then paste the image file into the Home
folder.
3 On your phone’s Home screen, press Programs (a), select More,
select Settings, select Home Screen, and then press Action (A).
4 Select Background image, and press Left (a) or Right (b) to
select your image.
5 Press Done (a).
Notes:
• You can also select an image by selecting Background image and
pressing the Action (A) button. The complete list of images to
choose from displays.
• Make sure that the phone is connected to your desktop computer
via USB before you open ActiveSync to paste the image file.
• For best results, use images with a 176 x 200 screen resolution to fit
on the screen.
About
Use About settings to display information about your phone’s
operating system, including version numbers, copyright information
and available storage.
Note: Your phone handles up to 10 MB of user content, including 3rd
party applications, contacts, and calendar inputs.
58
To view About settings
• On the Home screen, press Programs (a), select More, select
Settings, select About, and then press Action (A).
Accessibility
Use Accessibility settings to configure the system font size, multipress
time out, confirmation time-out, and in-call alert volume.
To view Accessibility settings
• On the Home screen, press Programs (a), select More, select
Settings, select Accessibility, and then press Action (A).
Data Connections
Settings
Use Data Connections settings to set up General Packet Radio
Service (GPRS), Dial-up, Virtual Private Network (VPN), and Proxy
connections so you can connect to the Internet or your corporate
network. With a data connection, you can browse the Web, download
email, chat using MSN Messenger, or synchronize wirelessly with the
server.
Note: Your device has already been configured to allow you to
browse and chat. Contact your IT Manager or go to
www.attwireless.com/smartphone for information on mMode,
Mobile Internet plans, configuring email, or wireless
syncronizing with the server. Changing your settings without
AT&T Wireless consultation may disrupt your data service.
To view Data Connections Settings
• On the Home screen, press Programs (a), select More, select
Settings, select Data Connections, and then press Action (A).
Dial-up Connection
You need to set up a dial-up connection to connect directly to the
Internet or to your corporate network.
59
Settings
To create a dial-up connection to the Internet
1 On the Home screen, press Programs (a), select More, select
Settings, select Data Connections, and then press Action (A).
2 Press Menu (b), select Edit Connections, and then press Action (A).
3 Select Dial-up Connections, and press Action (A).
4 Press Menu (b), select Add, and then press Action (A).
5 Under Description, enter a name for the connection.
6 Under Connects to, press Left (a) or Right (b) to select The
Internet.
7 Enter the appropriate information for the remaining fields, and
press Done (a).
To create a dial-up connection to your corporate network
1 On the Home screen, press Programs (a), select More, select
Settings, select Data Connections, and then press Action (A).
2 Press Menu (b), select Edit Connections, and then press Action (A).
3 Select Dial-up Connections, and press Action (A).
4 Press Menu (b), select Add, and then press Action (A).
5 Under Description, enter a name for the connection.
6 Under Connects to, press Left (a) or Right (b) to select My
Corporate Network.
7 Enter the appropriate information for the remaining fields, and
press Done (a).
POP3/IMAP4 Connection
1 Select Programs > Inbox
2 Open the menu and select Options.
3 Select E-mail Setup.
60
Settings
4 Select Next to move forward with setting up your POP3/IMAP4
email account.
5 Fill in the fields for your account:
• Your name: [your Name]
• E-mail Address: [your email address]
• Server Type: [POP3 or IMAP4]
6 Select Next.
7 Fill in the fields for your account:
• Incoming mail server: [your POP3 incoming mail server]
• Outgoing mail server: [your POP3 outgoing mail server]
• Network: [The Internet]
8 Select Next.
61
Settings
9 Fill in the fields for your account:
• Username: [your username]
• Password: [your password]
• Domain (if necessary): [your domain]
• Check save password.
10 Select Next.
11 To complete setup select Finish.
12 Press Done (a).
13 To download your email, select Menu > Send/Receive E-mail.
Note: Visit www.attwireless/smartphone for a free Email Wizard and
information on supported email service providers.
VPN Connection
A VPN connection accesses your corporate network by using an
existing Internet connection.
To configure your phone with for a VPN connection into a corporate
network connection:
1 Go to Programs > Settings > Data Connections.
2 Open the menu and select Edit Connections.
3 Open VPN Connections.
4 Open the menu and select Add.
5 Fill in the fields for (Corporate Network) Dial-up:
• Description:
62
• Server:
• Connects from:
• Connects to:
• Username: [your username]
• Password: [your password]
• Domain: [your domain]
6 Press Done (a) twice.
A proxy connection accesses the Internet using an existing
connection to your corporate network.
To configure the MPx200 for a proxy server
1 Go to Programs > Settings > Data Connections.
2 Open the menu and select Edit Connections.
3 Open Proxy Connections.
4 Open the menu and select Add.
5 Fill in the fields for (proxy server) (HTTP):
• Description: i
• Connects from: My Corporate Network
• Connects to: The Internet
• Proxy: [Press the 1 key multiple times for the colon, the 8 key four
times for the numeral 8
Settings
Proxy Connection
63
Settings
64
6 Press Done (a).
7 Open the menu and select Add.
8 Fill in the fields for SOCKS4, for use with MSN Messenger:
• Description: IM
• Connects from: My Corporate Network
• Connects to: The Internet
• Proxy:
• Type: SOCKS4
9 Press Done (a) three times to close the Data Connections control
panel.
Date and Time
Use Date and Time settings to change the local time zone and the
current date and time, and to set the alarm.
To view Date and Time settings
• On the Home screen, press Programs (a), select More, select
Settings, select Date and Time, and then press Action (A).
Owner Information
Use Owner Information settings to enter and display personal
information, such as your name, phone number, and email address. In
the event that you lose your phone and it is found, you can be
contacted.
Power Management
Settings
To view Owner Information settings
• On the Home screen, press Programs (a), select More, select
Settings, select More, select Owner Information, and then press Action
(A).
Use Power Management settings to display power-saving settings and
change the backlight brightness, the backlight and display time-outs,
and to check the battery level.
To view Power Management settings
• On the Home screen, press Programs (a), select More, select
Settings, select More, select Power Management, and then press Action
(A).
Regional Settings
Use Regional Settings to change the language, date, and time style of
the phone, as well as number and currency formatting options.
65
To view Regional Settings
• On the Home screen, press Programs (a), select More, select
Settings, select More, select Regional Settings, and then press Action
(A).
Remove Programs
Remove Programs settings lets you remove programs installed on
your phone, with the exception of core programs that came with the
phone, such as Contacts, Calendar, and Pocket Internet Explorer. If
you accidentally remove a program on the device, you can find it on
the companion CD to reinstall.
Settings
To view Remove Programs settings
• On the Home screen, press Programs (a), select More, select
Settings, select More, select Remove Programs, and then press Action
(A).
Security
Use Security settings to turn on phone lock or SIM lock and to set the
phone lock password. See the Learning to Use your Phone section of
the user guide for more information on securing your phone.
To view Security settings
• On the Home screen, press Programs (a), select More, select
Settings, select More, select Security, and then press Action (A).
Phone Settings
Use Phone Settings to customize flip answer on/off control, display
style, and screen contrast.
To view Phone Settings
On the Home screen, press Programs (a), select More, select
Settings, select More, select Phone Settings, and then press Action (A).
Note: When you are on a data/GPRS call or talking using a headset,
the Flip answer function deactivates automatically. To end calls
under these situations, press End.
66
Synchronizing Information
This chapter introduces basic concepts and features of Microsoft
ActiveSync, and explains how to set up Server ActiveSync,
synchronize remotely, and create a synchronization schedule. This
chapter also gives an overview of the different types of Microsoft
Outlook information you can synchronize.
For more information about ActiveSync, see ActiveSync Help on your
desktop computer.
ActiveSync
Synchronizing Information
You can synchronize information on your desktop computer and/or a
Microsoft Exchange Server with the information on your phone.
Connecting to a company server requires assistance from an IT
professional. Contact your system administrator for information about
remote synchronization, see page 71. ActiveSync compares the
information on your phone with the information on your desktop
computer and/or the server and updates all locations with the most
recent information. With ActiveSync, you can:
• Keep your Outlook information up-to-date by synchronizing your
phone with your desktop computer.
• Synchronize Inbox, Calendar, and Contacts with a server so that
you have the latest information, even when your desktop computer is
turned off.
• Copy (rather than synchronize) files between your phone and your
desktop computer.
• Control when synchronization occurs by selecting a synchronization
schedule.
• Select which information types are synchronized and control how
much information is synchronized. For example, you can choose how
many weeks of past appointments to synchronize.
Note: Using Server ActiveSync, you can synchronize information
directly with a Microsoft Exchange Server if your computer is
running Microsoft Mobile Information Server 2002 or later.
67
Installing ActiveSync on Your PC
Before you begin synchronization, install ActiveSync 3.6 or above on
your desktop computer (Your companion CD contains ActiveSync 3.6,
or you can download ActiveSync for free from the Microsoft website).
ActiveSync is already installed on your phone.
Creating a Partnership
Synchronizing Information
After the installation is complete, the New Partnership Wizard helps
you set up a partnership between your phone and your desktop
computer and/or a server so that you can start synchronizing
information and customizing your synchronization settings. Your first
synchronization process automatically begins when you finish using
the wizard. After the first synchronization, your Outlook information
appears on your phone.
Notes:
• If you have a firewall on your desktop it may cause difficulities
establishing your partnership with your phone.
• To prevent synchronization problems, select Synchronize with
Microsoft Mobile Information Server and/or this desktop computer in
the New Partnership Wizard only if you are certain that your
computer is running Microsoft Mobile Information Server 2002 or
later and you know the server name. Otherwise, select Synchronize
with this desktop computer. For more information, contact your
network administrator or service provider.
68
Connection status
Server synchronization status
Desktop synchronization status
Select to connect and
synchronize
Select to synchronize
via IR or change synchronization settings
To start and stop synchronization
Setting Up Server ActiveSync
Before you can synchronize information with a server, you may need
to request server configuration information, such as your user name,
password, and the name of the Microsoft Mobile Information Server,
either from your service provider or network administrator. This
configuration information may have already been set up on your
phone.
Synchronizing Information
Connect your phone and desktop computer using infrared port on
your phone or cable before you begin to synchronize information.
1 On the Home screen, press Programs, select ActiveSync, and then
press Action.
2 To start synchronization, press Sync; to stop synchronization, press
Stop.
To set up Server ActiveSync
1 On the Home screen, press Programs, select ActiveSync, and then
press Action.
2 Press Menu, select Options, and then press Action.
3 Select Connection, and press Action.
69
Synchronizing Information
4 Under Username, enter your Microsoft Exchange user name.
5 Under Password, enter your Microsoft Exchange password.
6 Under Domain, enter the name of the domain for your Microsoft
Exchange Server (if required).
7 Select Save password if you want your phone to save your password
so that you need not enter it repeatedly.
8 In Server name, enter the name of the Microsoft Mobile Information
Server to which you want to connect.
9 Press Done.
10 To begin synchronizing with the server, press Sync.
Note: You can also set up a connection to synchronize remotely with
a server when you first create a partnership between your
phone and desktop computer.
To stop synchronizing with a server
You can stop your phone synchronizing an information type with a
server. However, to change to synchronizing with your desktop
computer instead, you need to change the synchronization settings on
the desktop computer. For more information about synchronization,
see ActiveSync Help on the desktop computer.
1 On the Home screen, press Programs, select ActiveSync, and then
press Action.
70
2 Press Menu, select Options, and then select the information type that
you no longer want to synchronize with a server, such as Calendar,
Contacts, or Inbox.
3 Clear the check box next to the information type that you no longer
want to synchronize with a server, and press Done.
Synchronizing Remotely
You can synchronize remotely with your computer or server, if you
have set up Server ActiveSync. Please consult your local Information
Technology (IT) manager and/or support personnel to administer the
appropriate setup and to assure that you have the correct server to
administer this feature.
To synchronize remotely with a desktop computer
To synchronize remotely with a server
Synchronizing Information
1 On the Home screen, press Programs, select ActiveSync, and then
press Action.
2 Press Menu, select Options, and then press Action.
3 Select PC Settings, and then press Action.
4 Select Include PC sync remotely when synchronizing, and then press
Action.
5 Under Connect To, select the appropriate computer name, and press
Done.
6 To start synchronization, press Sync.
Note: To synchronize remotely with a desktop computer, first turn
on the computer.
1 On the Home screen, press Programs, select ActiveSync, and then
press Action.
2 Press Menu, select Options, and then press Action.
3 Select the information type to synchronize with the server, press
Action, select the Synchronize [Information type] check box, and
then press Done.
71
Creating a Server Synchronization Schedule
You can create a server synchronization schedule so that your
information is automatically synchronized with the server at specified
time intervals.
To create a schedule to synchronize with a server when
your phone is connected to a desktop computer
1 On the Home screen, press Programs, select ActiveSync, and then
press Action.
2 Press Menu, select Options, select Schedule, and then press Action.
3 Select the When connected to my PC, synchronize with the server
every check box, and select a length of time.
4 Press Done.
Synchronizing Information
To create a schedule to synchronize with a server when
your phone is not connected to a desktop computer
(synchronize wirelessly)
1 On the Home screen, press Programs, select ActiveSync, and then
press Action.
2 Press Menu, select Options, select Schedule, and then press Action.
3 Select the When not connected to my PC, synchronize with the
server every check box and select a length of time.
4 Press Done.
Synchronizing Information
This section provides an overview of the types of Outlook information
you can synchronize. By default, ActiveSync does not automatically
synchronize all types of Outlook information. Use ActiveSync options
to turn synchronization on and off for specific information types.
72
Synchronizing Inbox
Synchronizing Calendar
Calendar items stored on your phone can be synchronized with
calendar items stored on your desktop computer or on a Microsoft
Exchange Server. By default, calendar items from the last 2 weeks will
be synchronized.
Calendar items created on your phone are copied to your desktop
computer and/or server during synchronization, and vice versa.
Similarly, Calendar items that are deleted from your phone are also
deleted from your desktop computer and/or server during
synchronization, and vice versa. This keeps your information up-todate in all locations.
Synchronizing Information
When you select Inbox for synchronization in ActiveSync, email
messages are synchronized as part of the general synchronization
process. During synchronization, the following events occur:
• Messages are copied from the Outlook Inbox folder on your desktop
computer, or from a Microsoft Exchange Server, to the Inbox folder
on your phone.
• By default, when synchronizing Inbox information with your desktop
computer, you receive messages only from the last 3 days and the
first 0.5 KB of each new message. You can also choose to download
file only attachments.
• By default, when synchronizing Inbox information with a server, you
receive messages only from the last three days and only the first 500
bytes of each new message.
• The messages on your phone and on your desktop computer are
linked. When you delete a message on your phone, it is deleted from
your desktop computer the next time you synchronize, and vice
versa.
• Messages in subfolders in other email folders in Outlook are
synchronized only if the folders have been selected for
synchronization in your phone’s Inbox.
Note: SMS messages are not received in Inbox through
synchronization. Instead, they are sent to your phone by way of
your service provider.
73
Synchronizing Contacts
Contacts stored on your phone can be synchronized with contacts
stored on your desktop computer or on a Microsoft Exchange Server.
By default, all of your contacts will be synchronized.
Contacts created on your phone are copied to your desktop computer
and/or server during synchronization, and vice versa. Similarly,
contacts that are deleted from your phone are deleted from your
desktop computer and/or server during synchronization, and vice
versa. This keeps your information current in all locations.
To synchronize the contacts stored on the SIM card with contacts
stored on your desktop computer or on a Microsoft Exchange Server,
first export the SIM contacts to your phone using SIM Manager. After
synchronizing, you import the phone contacts to the SIM card using
SIM Manager. Please refer to “SIM Manager” on page 122 for more
information.
Synchronizing Information
Synchronizing Tasks
Tasks stored on your phone can be synchronized with tasks stored on
your desktop computer. Task synchronization is automatically
selected in ActiveSync. By default, all of your incomplete tasks will be
synchronized.
Tasks created on your phone are copied to your desktop computer
during synchronization, and vice versa. Similarly, tasks that are
deleted from your phone are deleted from your desktop computer
during synchronization, and vice versa. This keeps your information
current in all locations.
Note: Tasks can be synchronized only with your desktop computer;
they cannot be synchronized with a server.
Synchronizing Using an Infrared Connection
You can use an infrared connection to quickly create a direct
connection between your phone and another mobile device or desktop
computer. This method is ideal for changing between multiple devices,
because there are no cables or adapters to change. When creating a
74
partnership, you must connect using infrared, a cable, or a cradle
connection.
For more information about synchronizing using an infrared
connection or other connection types, see ActiveSync Help on your
desktop computer.
ActiveSync Errors
Whenever ActiveSync cannot successfully synchronize your
information, an error displays on your phone.
To view more information about an ActiveSync error
Exchanging Files Between Your Phone and
Desktop PC
With ActiveSync, you can exchange files between your phone and
desktop PC.
Synchronizing Information
• Press Action when the error text is displayed. ActiveSync will then
display more information about the error that occurred.
Note: Some types of errors can interfere with automatic
synchronization. If you suspect that a scheduled automatic
synchronization has not occurred, you should attempt to
manually synchronize your information. Successfully
completing manual synchronization resets automatic
synchronization. For more information, see the “Synchronizing
Information” section of ActiveSync Help on your desktop
computer.
To exchange files between desktop PC and your phone
1 Connect your phone to your desktop computer.
2 In ActiveSync, click Explore. Windows Explorer opens the Mobile
Device window for your phone.
3 In Windows Explorer, browse to the file that you want to copy to
your phone or desktop computer.
75
4 Do one of the following:
• To copy the file to your phone, right-click the file and click Copy. Place
the cursor in the desired folder for your phone, right-click, and click
Paste.
• To copy the file to your desktop computer, right-click the file and click
Copy. Place the cursor in the desired folder for your desktop
computer, right-click, and click Paste.
Beaming Information
You can use your phone’s infrared port to send and receive (beam)
calendar appointments and contact cards between your phone and
Synchronize Information with another mobile device or desktop
computer that has an infrared port and supports VCards and VCal.
To beam a contact
Synchronizing Information
1 On the Home screen, press Programs (a), select Contacts,
and then press Action (A).
2 Select the contact to beam, press Menu (b) select Beam Contact,
and then press Action (A). Align the infrared ports so that they are
unobstructed and within close range of each other, then press Beam
(a).
Status information then displays the name of the device your
phone is beaming to, and whether the beaming process is
pending, done, or failed.
To beam an appointment
1 On the Home screen, press Programs (a), select Calendar,
and then press Action (A).
2 Select the appointment to beam, and press Action (A) to
open the appointment.
3 Press Menu (b), select Beam Appointment, and then press
Action (A).
4 Align the infrared ports so that they are unobstructed and
within close range of each other, then press Beam (a).
76
Status information displays the name of the device your phone is
beaming to, and whether the beaming process is pending, done, or
failed.
To receive beamed information
1 On the Home screen, press Programs (a), select More, select
Accessories, and then press Action (A).
2 Select Infrared Receive, and press Action (A).
3 Align the infrared ports so that they are unobstructed and
within close range of each other, then press Yes to receive
the information.
Note: Your phone can receive beamed files of any type, but some
files must need to be copied to your desktop computer for
viewing.
Synchronizing Information
77
Messaging Features
Sending Email and SMS Messages
Messaging Features
There are several ways to send email and SMS messages with your
phone. The most common way to send messages is from the Inbox or
from the Contacts.
For information about text input, see “Entering Text and Numbers on
Your Phone” on page 34.
Sending Messages from Inbox
You can send email messages by synchronizing, or by connecting
directly to an email server through your Internet service provider (ISP)
or a corporate network.
To configure an email account
You must configure your phone before you can send/receive email.
1 On the Home screen, press Programs (a), select Inbox, and then
press Action (A).
2 Press Menu (b), select Options, and press Action (A).
3 Select E-mail Setup and press Action (A).
4 Press Next and enter the necessary information. Press Finish (a)
when the configuration is complete.
Notes:
• You can only have one configurable inbox (email) at one time and
therefore only synchronize one type of email, either POP3 or
desktop. If you choose to synchronize your desktop email, it will wipe
out your POP3 settings.
• For more information visit www.attwireless/smartphone for a free
Email Wizard and information on supported email service providers.
78
Messaging Features
To compose an email or SMS message from Inbox
1 On the Home screen, press Programs (a), select Inbox, and then
press Action (A).
2 Press New, enter an email address or SMS number (phone number)
in the To field, or select a name from Contacts by pressing Menu (b)
and select Insert Contact, and then press Action (A).
3 Press Down twice and enter a subject.
4 Press Down, enter your message, and then press Send (s).
Notes:
• To insert the @ sign in an email address in Multipress mode, press
1 once. Then, when you need to insert the period in the email
address, press 1 again.
• To add multiple recipients, separate each name with a semicolon by
repeatedly pressing 1 in Multipress mode, until the semicolon
appears.
To request a delivery receipt for an SMS message you are composing
1 Before you send the SMS message, press Menu (b), select Message
Options, and then press Action (A).
2 Select the Request SMS text message delivery notification check
box, and then press Done (a).
79
Sending Messages from Contacts
You can quickly send a message to a contact if you have an email
address or SMS number (phone number) included in Contacts.
Messaging Features
To compose an email or SMS message from Contacts
1 On the Home screen, press Programs (a), select Contacts, and
then press Action (A).
2 Select the contact and press Action (A).
3 Select the email address or SMS number (phone number), and
press Action (A).
4 Enter a subject.
5 Press Down, enter your message, and then press Send s.
Inserting Predefined Text into Messages
Save time when composing mail by inserting predefined text into your
messages. You can edit the predefined text to create words or
phrases that you frequently use in messages.
To insert predefined text into a message
1 On the Home screen, press Programs (a), select Inbox, and then
press Action (A).
2 Press New and, in the Subj or body text field, press Menu (b), select
Insert Text, and then press Action (A).
3 Select the predefined text to insert into your message and press
Insert.
To edit your predefined text messages
1 On the Home screen, press Programs (a), select Inbox, and then
press Action (A).
2 Press Menu (b), select Options, select Predefined Text, and then
press Action (A).
3 Select and modify the text you want to change, and press Done (a).
80
Inserting Voice Recordings into Email Messages
Insert a voice recording into an email message when you want to
verbally explain information that is contained in the email message.
SMS Messages
Messaging Features
To insert a voice recording into an email message
1 On the Home screen, press Programs (a), select Inbox, and then
press Action (A).
2 Press New and, in the body text field, press Menu (b), and then
select Insert Recording.
3 Press Record to start recording, and press Stop to stop recording.
4 Press Done (a) to insert the recording into your message.
Note: You can create only one voice recording at a time. A new voice
recording replaces the prior recording.
These messages are delivered to your phone immediately. If your
phone is turned off when SMS messages arrive, you are notified the
next time you turn on your phone. A closed envelope icon ,
indicating an unopened SMS message, appears at the top of the
display, accompanied by an SMS sound alert. You can view new SMS
messages in Inbox.
You can send and receive SMS messages up to 160 characters over
the phone network. Longer SMS messages are automatically sent in
chunks as several small SMS messages, and will be unified as one
SMS message after receipt of all the small messages.
The advantages of SMS messages are:
• SMS messages are sent instantly.
• SMS messages can be sent or received during a voice or data call.
• Your SMS messages can be read by most recipients, because most
mobile phones support SMS.
Note: SMS messages are not synchronized, and you cannot use
them to send or receive attachments.
81
Messaging Features
To import SMS messages from the SIM card to Inbox
1 On the Home screen, press Programs (a), select Inbox, and then
press Action (A).
2 Press Menu (b), select Options, select Import Messages from SIM,
and then press Action (A).
Notes:
• You cannot export messages from your phone to a SIM card.
• SMS messages are not removed from the SIM card after they are
imported to Inbox.
Receiving Email and SMS Messages
You can receive email messages through Inbox synchronization or by
connecting to your email server. You can then view all of your email
messages in Inbox. When you connect to the email server or
synchronize Inbox with your desktop computer, only the first 5 KB of
each new message are downloaded by default to your phone’s Inbox.
If you are using an IMAP4 or POP3 server, only the first 1 KB of each
new message is downloaded by default. Small attachments are
downloaded and the original messages remain on the email server or
your desktop computer. SMS messages that are sent to you instantly
appear in Inbox, and are not synchronized.
Note: For more information about synchronizing Inbox, see
“Synchronizing Information” on page 67.
Opening Messages
Email and SMS messages that are sent to you are stored in Inbox.
To open a message
1 On the Home screen, press Programs (a), select Inbox, and then
press Action (A).
2 Select the message to open and press Action (A).
82
Notes:
• If there is an existing unread SMS message, your phone alerts
during boot up.
• If you want to create a Contacts for the sender, press Menu (b),
select Add Sender to Contacts, and then press Action (A).
When you accept a meeting request that arrives in Inbox, the meeting
immediately appears in Calendar on your phone, and a message will
be sent back to the meeting organizer the next time you synchronize
Inbox.
For more information about synchronizing Calendar, see “Beaming
Information” on page 76.
To accept a meeting request
1 On the Home screen, press Programs (a), select Inbox, and then
press Action (A).
2 Select the meeting request, press Action (A), and then press
Accept.
Messaging Features
Receiving Meeting Requests
Receiving Complete Messages
You can specify to receive messages in full, instead of receiving only
the first 0.5 KB set by default.
To receive a complete message
1 On the Home screen, press Programs (a), select Inbox, and then
press Action (A).
2 Select the message to receive in full, press Menu (b), select Mark
for Download, and then press Action (A).
The complete message will be retrieved the next time you synchronize
or connect to your email server.
Note: When you delete a message on your phone, it will also be
deleted from the email server the next time you connect.
83
Receiving Message Attachments
Messaging Features
You can download message attachments to your phone. Attachments
display as a list of hyperlinks at the bottom of the email message, and
are preceded by an attachment icon. The text of the hyperlink contains
the file name followed by the size of the attachment, so that you can
determine whether to download the attachment.
Note: On POP3 messages, the attachment size is omitted.
The attachment icon has the following three states:
• Not downloaded
• Downloaded
• Marked for download
To download an attachment
• In an open message containing a download attachment, select the
attachment and press Action (A).
The attachment download when you synchronize or request to send
and receive email.
To view a downloaded attachment
• In an open message containing a downloaded attachment, select the
attachment and press Action (A).
Note: You can view attachments only for file types that are supported
by your phone (.txt, .JPEG, .asf, .asx, .wax, .wm, wma, wmv,
wmx, wvx, .mp3). A third party application must be downloaded
to your phone to view attachment in other formats.
Viewing Your Message Folders
Your phone stores messages in the following folders.
• Deleted Items, where deleted messages are stored until you empty
this folder.
• s, where messages that you save before sending are stored.
• Inbox, where all received messages arrive by default.
84
• Outbox, where sent email messages are stored until you
synchronize or connect to your email server. SMS messages are
sent immediately over the network and will appear in your Outbox
folder for only a few seconds.
• Sent Items, where copies of email messages that you send are
stored.
Messaging Features
To view message folders
1 On the Home screen, press Programs (a), select Inbox, and then
press Action (A).
2 Press Menu (b), select Show Folders, and then press Action (A).
Note: If your email account supports folders, you can view multiple
folders that reflect the folder structure you have created on your
email server. Messages you download from the server will
automatically be placed in the appropriate folders on your
phone.
Managing Inbox
All email and SMS messages are stored in the Inbox. By default, the
most recently received messages display at the top of the Inbox list.
Use the menu options to quickly compose, delete, forward, and reply
to messages. You can also customize Inbox settings to control the way
you send, receive, and view messages.
Indicates opened email
Indicates new email
85
To view Inbox
• On the Home screen, press Programs (a), select Inbox, and then
press Action (A).
Inbox Menu Options
Messaging Features
Press New to compose a new message, or press Menu (b) to forward,
delete, and reply to messages, access customizable Inbox options,
and more.
To view Inbox menu options
• On the Home screen, press Programs (a), select Inbox, press Action
(A), and then press Menu (b).
The following table lists Inbox menu options and their functions.
Inbox menu option Function
New Message
Creates a new message.
Reply
Reply to an open or selected message.
Forward
Forward the selected message.
Delete
Delete the selected message.
Mark for Download Retrieve the entire email message from the
email server the next time you connect.
86
Mark as Read
Display the header text of a Inbox message in
lightface, which indicates that the message has
been read.
Mark as Unread
Display the header text of a Inbox message in
bold, which indicates that the message has not
been read.
Options
Display a list of Inbox options that you can
customize (see the following table).
Send/Receive Email Connect to your email server to send and
receive messages.
Show Folders
Display all message folders.
You can optimize your phone’s Inbox you can change the way your
messages display, specify how to sort your messages, specify the
volume and limit the size of messages you want to automatically
download, change your synchronization schedule, and more.
To customize Inbox Options
1 On the Home screen, press Programs (a), select Inbox, and then
press Action (A).
2 Press Menu (b), select Options, and then press Action (A).
3 Select the option to customize, and press Action (A).
4 Modify the settings to change, and press Done (a).
The following table lists the Inbox options and their functions.
Inbox option
Function
Display
Change the message information displayed in
Inbox.
Sending
Specify whether you want to include an original
copy of the message in your reply, save a copy of
your sent messages, or use Unicode for SMS
messages.
Receiving
Specify the volume and limit the size of new
messages that are automatically downloaded.
Predefined Text
Edit the predefined text that you can insert in
messages.
Messaging Features
Customizing Inbox Options
87
Messaging Features
Email Setup
Configure your phone to send and receive email
messages. Your service provider or network
administrator can provide you with the necessary
information to connect to your email server.
Automatic
Synchronization
Set up and change your synchronization
schedule.
Import Messages
from SIM
Import SMS messages from a SIM card to Inbox.
The messages are not removed from the SIM
card after they are imported.
Message Notifications
Your phone makes a sound to alert you when new messages arrive.
The number of unopened messages displays on the Home screen,
depending on your Home screen settings, and an envelope icon is
shown on the top of the display. You are notified in different ways for
the types of messages you receive.
Email messages: When you connect to your email server, you are
notified of new email messages by the closed envelope icon
shown at the top of the display, accompanied by an email sound alert.
You can view new email messages in Inbox.
Voicemail messages: You are notified of new Voicemail messages by
the new Voicemail icon
shown at the top of the display. To listen to
your new Voicemail messages, press Voice Mail, or dial your
Voicemail service number.
To modify a sound alert for notifications
1 On the Home screen, press Programs (a), select Settings, select
Sounds, and then press Action (A).
2 Select the item to modify, press Left (a) or Right (b) to choose a
new sound, and then press Done (a).
88
Sending SMS to Email Addresses
In order to send an SMS to an email address from a MPx200 phone,
you must enter information in the following way:
To:
0000000000 (you need to enter 10 zeros in the To field)
Subject: (enter the email address of the recipient)
Body:
(enter the message)
You can use MSN Messenger on your phone to send instant
messages. MSN Messenger on your phone provides the same chat
environment as MSN Messenger on your desktop computer. With the
features of this environment you can:
• Send and receive instant messages.
• View the status of others in your Messenger contacts list, or change
your own status (available, busy, out to lunch).
• Invite others to a chat conversation.
• Block contacts from seeing your status or sending you messages.
Messaging Features
Communicating with MSN Messenger
Getting Started with MSN Messenger
To use MSN Messenger, you need a Microsoft ®.NET Passport
account unless you already have a Hotmail account. To set up a
Microsoft.NET Passport account, go to: http://www.passport.com.
Once you have this account, you will need:
• To connect to the Internet with a modem or wireless connection on
your phone.
• To sign in to MSN Messenger using your Microsoft.NET Passport.
To sign in and out of MSN Messenger
1 On the Home screen, press Programs (a), select MSN Messenger,
press Action (A), and then press Sign In.
2 Enter your sign-in name (Example: [email protected]) and
password, and then press Sign In.
89
3 To sign out, press Menu (b), select Sign out, and then press Action
(A).
Note: If you do not sign out of MSN Messenger, you remain on a data
connection, which may result in additional charges from your
service provider.
Messaging Features
To send an instant message
1 Sign in to MSN Messenger.
2 Select the person in MSN Messenger to whom you want to send an
instant message, and press Send.
3 Enter your message, and press Send.
Note: To quickly add common messages, press Menu (b), select My
Text, and then select the text you want to use in the message.
For information about text input, see “Entering Text and Numbers on
Your Phone” on page 34.
To invite a contact to an ongoing chat
• Press Menu (b), select Invite, and then select a contact.
To see who is already chatting, or to change between chats
• Press Menu (b), and select Chats.
90
To accept or change between chats
• Press Menu (b), select Chats, and then select the contact to begin
chatting.
To add a contact
• In the Messenger contacts list, press Menu (b), select Add Contact,
and then follow the directions on the screen.
To block or unblock a contact from seeing your status and sending you messages
• In the Messenger contacts list, select the contact’s name, press Menu
(b), and then select Block or Unblock.
Messaging Features
To delete a contact
• In the Messenger contacts list, select the contact’s name, press Menu
(b), and then select Delete Contact.
To change your status
1 In the Messenger contacts list, select your name, and press Action
(A).
2 Select a status description, such as Away, and press Action (A).
Highlight your status and
press the Action (A)
button
91
Messaging Features
To change your displayed name
1 In the Messenger contacts list, press Menu (b), select Options, and
then select Passport Account.
2 Enter the name that you want others to see when you send instant
messages.
Note: You must be signed in to MSN Messenger to change your
display name.
Office Online
Allows you to access your office email, calendar, and your company’s
Global Address List in real-time from your phone. You can access one
corporate account (Microsoft Outlook or Lotus Notes) and up to 9
additional POP3 accounts.
To sign up from your phone:
1 From the Home screen, press Programs (a), select Office Online,
and press Action (A).
2 For more information, visit www.attwireless.com/officeonline.
92
Personal Organizer
This chapter introduces features on your phone that help you manage
and keep track of contacts, appointments, schedule and maintain a
“things to do” list, and calculator. This chapter also explains how to
send and receive contact and appointment information between your
phone and another mobile device or a desktop computer.
For information about synchronizing Contacts, Calendar, and Tasks,
see “Synchronizing Information” on page 67.
Contacts
The Contacts List
The Contacts list displays the names of your contacts alphabetically,
along with an abbreviation for the default communication method,
such as the person’s work phone number (w) or home phone
number (h).
Notes:
• If the contact card includes a work phone number, your phone will
automatically set it as the default number.
• The contacts along with the icon are the entries stored on the
SIM card. To edit the SIM contacts, refer to “SIM Manager” on page
122 for more information.
Personal Organizer
You can think of Contacts as an address book, where you store
information about people and businesses you communicate with in
contact cards. For example, you can store multiple phone numbers,
email, and street addresses, Web pages, and other information on
such as a birthday or anniversary date. You can use Contacts to dial
phone numbers and compose email and SMS messages directly from
a contact card.
To access Contacts
• On the Home screen, press Programs (a), select Contacts, and then
press Action (A).
93
Note: You can also access Contacts by pressing Contacts (a) on the
Home screen.
Personal Organizer
The following table shows possible abbreviations and their meanings
that might display in the Contacts list.
Abbreviation
w
w2
h
h2
m
pgr
car
sms
e
e2
e3
web
Meaning
Work phone
Second work phone
Home phone
Second home phone
Mobile phone
Pager
Car phone
SMS address
Email address
Second email address
Third email address
Web page
To call a contact using the default number
1 On the Home screen, press Programs (a), select Contacts, and
then press Action (A).
94
2 Select the contact to call, and press Talk.
Note: If you have a long list of contacts, enter the first few letters of
the contact’s name that you want to call. The phone will
search the entire Contacts list and display the name.
To call a contact using a number other than the default
number
1 On the Home screen, press Programs (a), select Contacts, and
then press Action (A).
2 Select the contact, press Left (a) or Right (b) to display the
abbreviation for the number you want to use, and then press Talk.
Note: Selecting another abbreviation changes the default number.
To find a contact by entering a name
To filter contacts
Personal Organizer
1 On the Home screen, press Programs (a), select Contacts, and
then press Action (A).
2 Begin entering the name of the contact you want until the name is
displayed. For example, to find “Sandra,” enter 7, 2, 6,
3, 7, 2 because these numbers correspond with the
letters for that name on the keypad.
1 On the Home screen, press Programs (a), select Contacts, and
then press Action (A).
2 Press Menu (b), select Filter, and then press Action (A).
3 Select a filter (Business, Miscellaneous, or Personal), and press
Action (A).
To create a new contact
1 On the Home screen, press Programs (a), select Contacts, and
then press Action (A).
2 Press New (b), enter the information for the new contact and press
Done (a).
95
Note: When you create a new contact on your phone, you can
synchronize Contacts with your desktop computer or a
server to keep your contact information current in all
locations.
To delete a contact
1 On the Home screen, press Programs (a), select Contacts, and
then press Action (A).
2 Select the contact to delete, press Menu (b), select Delete, and
then press Action (A).
Contact cards
Personal Organizer
A contact card displays all of the information that you have entered for
the contact, such as the name of the person or business, phone
numbers, email addresses, and more. From a contact card, select a
phone number and press s to dial the number. You can also select
an email address and press Action (A) to compose a message to the
contact.
To view a contact card
1 On the Home screen, press Programs (a), select Contacts, and
then press Action (A).
2 Select the contact to view, and press Action (A).
Number in bold denotes
default number
Work number
Mobile number
Email address
SMS message number
96
To call a contact from a contact card
1 On the Home screen, press Programs (a), select Contacts, and
then press Action (A).
2 Select the contact, and press Action to open the contact card.
3 Select the number to use, and press s.
To send an email from a contact card
To edit a contact
1 On the Home screen, press Programs (a), select Contacts, and
then press Action (A).
2 Select the contact to edit, and press Action (A) to open the contact
card.
3 Press Menu (b), select Edit, and then press Action (A).
4 Make the changes, and press Done (a).
Personal Organizer
1 On the Home screen, press Programs (a), select Contacts, and
then press Action (A).
2 Select the contact to whom you want to send an email message,
and press Action (A) to open the contact card.
3 Select the email address, and press Action (A).
4 Enter a subject, press Down (a), and compose your message in the
body text field, and then press s.
Contact Card Menu Options
Use the contact card menu options to quickly apply a speed dial
number or voice tag to the contact, change the default method for
communicating with the contact, beam the contact card to another
mobile device or desktop computer using infrared, delete the entire
contact card, or edit the card information.
To view contact card menu options
1 On the Home screen, press Programs (a), select Contacts, and
then press Action (A).
97
Personal Organizer
2 Select the contact to open, press Action (A), and then press Menu.
The following table lists the contact card menu options and their
functions.
Option
Function
Add Speed Dial*
Create a shortcut to a phone number, email address, or
Web URL by assigning 1 or 2 numbers as a speed dial.
Send SMS
Compose and send SMS message to the selected contact.
Add Voice Tag*
Create a shortcut to a phone number, email address, or
Web URL by assigning a recording.
Set As Default
Set the selected phone number or email address as the
default communication method for the contact.
Beam Contact
Send the contact card to another mobile device or desktop
computer using infrared.
Delete
Remove the contact card from the Contacts list.
Edit
Modify information on the contact card.
*For information about creating speed dials and voice tags, see
“Speed Dials” on page 50.
Calendar
Calendar is your phone’s scheduling program, where you can create
and view appointments, and view your calendar by day, week, or
month.
To access Calendar
• On the Home screen, press Programs (a), select Calendar, and then
press Action (A).
To create a new appointment
1 On the Home screen, press Programs (a), select Calendar, and
then press Action (A).
2 Press Menu (b), select New, and then press Action (A).
98
3 Enter information in the fields that display.
To set a reminder for the appointment, under Reminder, select
the amount of time that you want the reminder to appear
before the appointment.
4 Press Done (a).
Note: When you create a new appointment on your phone, you
can synchronize Calendar with your desktop computer or a
server to keep your schedule information current in all
locations.
1 On the Home screen, press Programs (a), select Calendar, and
then press Action (A).
2 Select the appointment to open, and press Action (A).
Personal Organizer
To view an appointment
To edit an appointment
1 On the Home screen, press Programs (a), select Calendar, and
then press Action (A).
2 Select the appointment to edit, press Action (A), and then press
Edit (a).
3 Make the changes, and press Done (a).
99
To delete an appointment
1 On the Home screen, press Programs (a), select Calendar, and
then press Action (A).
2 Select the appointment to delete, press Menu (b), select Delete,
and then press Action (A).
Viewing Your Schedule
You can view your schedule in calendar using three different views:
Agenda, Week, and Month.
Personal Organizer
Agenda View
Agenda is the default view for calendar information. This view displays
meetings and appointments scheduled for the current day. The
appointments appear in chronological order according to start time.
All-day appointments display as a single line at the top of the Agenda
view up to 3.
To view your agenda for the current day
• On the Home screen, press Programs (a), select Calendar, and then
press Action (A).
• If you are in Calendar and you are using the Week or Month view,
press Menu (b), select Agenda View, and then press Action (A).
Note: To look at your agenda for previous or approaching dates,
press Left or Right.
To view your agenda for a specific date
1 On the Home screen, press Programs (a), select Calendar, and
then press Action (A).
2 Select Menu (b), select Go to Date, and then press Action (A).
3 Enter the date you want to view, and press Done (a)
.
100
Week View
To view appointments for the week
1 On the Home screen, press Programs (a), select Calendar, and
then press Action (A).
2 Press Menu (b), select Week View, and then press Action (A).
Personal Organizer
The Week view shows your schedule for the specified week. This view
allows you to get a quick indication of your free and busy time, and
allows you to create an appointment at a selected time easily.
The Week view displays the hours from 9:00 A.M. to 5:00 P.M. in onehour increments by default on the left side of the screen. You can
press Up or Down to show the hours before or after those on the screen.
Note: If you press Up or Down and leave Week view, the hours last
shown will be displayed the next time you return to Week view.
101
Note: To change settings for Week View, press Menu (b), select
Options, and then press Action (a).
Personal Organizer
Month View
The Month view provides an overview of your monthly schedule arrow
indicators pointing up represent morning appointments, and the
arrows pointing down represent afternoon appointments. A box inside
the calendar day indicates an all-day event. If you have morning and
afternoon appointments plus an all-day event, a box surrounds that
calendar day.
To view your schedule for the month
1 On the Home screen, press Programs (a), select Calendar, and
then press Action (A).
102
To view your schedule for the month
1 Press Menu (b), select Month View, and then press Action (A).
Importing Calendar Information
Tasks
You can use tasks to track a personal or work-related project,
assignment, or errand from beginning to completion. A task can occur
once or repeatedly. A recurring task can repeat at regular intervals or
repeat based on the date you mark the task complete. For example,
you might want to pay a bill on the last Friday of every month, or get a
haircut when one month has passed since your last haircut.
Personal Organizer
You can import calendar information from another calendar program if
it uses the iCal or vCal format. The calendar information can be
imported from attachments in email messages, SMS messages, links
in Microsoft Pocket Internet Explorer, or by infrared.
The Tasks List
The Tasks list shows your “things to do”. An item followed by an
exclamation mark indicates high priority and an item with a down
arrow is marked as low priority. Overdue tasks display bold and red.
Completed tasks display with the corresponding check box selected.
103
Personal Organizer
Note: If you synchronize tasks with your desktop computer,
completed tasks are removed from your phone after
synchronization. They are then displayed in gray with a
strikethrough on your desktop computer.
104
Tasks List
To create a new task
1 On the Home screen, press Programs (a), select More, select
Tasks, and then press Action (A).
2 Select the Enter new task here field, enter the task, and then press
Action (A).
Notes:
• When you create a new task on your phone, you can synchronize
tasks with your desktop computer to keep your Tasks list current in
both locations.
• If you create a new task with a reminder on your desktop computer,
you can synchronize tasks so that you hear the reminder on your
phone.
To mark a task as complete
1 On the Home screen, press Program (a), select More, select Tasks,
and then press Action (A).
2 Select the task, and press Complete (b).
To mark a completed task as incomplete
1 On the Home screen, press Programs (a), select More, select
Tasks, and then press Action (A).
2 Select the task, and press Activate (b).
To delete a task from the Tasks list
Creating Voice Recorder
Use Voice Recorder to create short voice recordings. Recordings are
included in the All Notes list and are named consecutively (Recording
1, Recording 2, and so on).
To create a Voice Record
Personal Organizer
1 On the Home screen, press Programs (a), select More, select
Tasks, and then press Action (A).
2 Select the task, and press Delete (a).
1 Hold your phone’s microphone near your mouth.
2 Press jog dial, and press Record (b) to begin recording your voice
note.
3 Press Stop (a) to stop recording your voice note.
Notes:
• To listen to a recording, select it from the All Notes list, press Menu
(b), select Play, and then press Action (A).
• The length of time to record a Voice Record depends on the
remaining phone storage. To check the phone storage, please refer
to “About” on page 58 for more information.
105
To rename a recording
1 Press jog dial, and select the recording to rename.
2 Press Menu (b), select Rename, and then press Action (A).
3 Under Name, enter a new name for the recording, and press Done
(a).
Calculator
You can use Calculator to perform any of the standard operations for
which you would normally use a handheld calculator. Calculator
performs basic arithmetic, such as addition, subtraction, multiplication,
and division.
Personal Organizer
To open Calculator
• On the Home screen, press Programs (a), select More, select
Accessories, select Calculator, and then press Action (A).
To enter numbers and perform calculations
• Use the keypad to enter numbers and perform calculations.
• Press # to cycle through the available mathematical symbols, and
press * to enter a decimal point.
Note: You can also use the direction keys to display the available
mathematical symbols. Press Up for the plus sign (+), press
Down for the minus sign (-), press Left for the division sign (/),
and press Right for the multiplication sign (X).
To clear the current calculation or displayed number
• Press Clear (b).
To clear the last digit entered in a multiple-digit entry
• Press Back (a).
106
News and Entertainment
This chapter explains how to browse the Web using mMode,
Microsoft® Pocket Internet Explorer, play audio and video files using
Microsoft® Windows MediaTM Player, and play Games.
mMODE
mMode from AT&T Wireless is an entirely new world on your wireless
phone. mMode lets you email, download ring tones, and games. Try
the Web “mMode style” — get news, sports, music, and shopping —
all right on your wireless phone. You can even get directions if you get
lost, or locate the nearest ATM, restaurant, movie theater, and more.
To access mMode:
1 From the HOME screen, select mMode and press Action (a).
2 Follow the on-screen instructions for setup. For more information,
visit www.attwireless.com/mMode.
Pocket Internet Explorer
To access Pocket Internet Explorer
• On the Home screen, press Programs (a), select Internet Explorer,
and then press Action (a).
To disconnect from the Internet
News and Entertainment
Using Pocket Internet Explorer, you can browse the Web on your
phone. Pocket Internet Explorer on your phone supports Wireless
Application Protocol (WAP), Hypertext Markup Language (HTML),
and compact Hypertext Markup Language (cHTML). The browser
supports images and sounds, but it does not support frames on a Web
page.
• Press End (a).
107
Navigating in Pocket Internet Explorer
With Pocket Internet Explorer, the Favorites list is displayed as the
main screen instead of a home page. You can add your own favorites
to this list for quick access to Web sites you frequently visit. Press
Favorites to access your Favorites list from any Web page.
To view a favorite
1 On the Home screen, press Programs (a), select Internet Explorer,
and then press Action (a).
2 Select a favorite to view, and press Go (b).
To activate a link
• Select a link, and press Action (a).
Note: Scroll vertically or horizontally to see all available links.
To enter the address of a Web site
News and Entertainment
1 On the Home screen, press Programs (a), select Internet
Explorer, and then press Action (a).
2 Press Menu (b), select Go To, and then press Action (a).
3 Enter the Web address, and press Go (b).
108
To return to a Web page you previously visited in the same
session
• From a Web page, press Back (b).
To view a list of the most recently-visited Web pages
1 On the Home screen, press Program (a), select Internet Explorer,
and then press Action (a).
2 Press Menu (b), select Go To, and then press Action (a).
3 Select View History (b), and press Go.
To visit a Web page on the History list
1 On the Home screen, press Programs (a), select Internet Explorer,
and then press Action (a).
2 Press Menu (b), select Go To, and then press Action (a).
3 Select View History, and press Go (b).
4 Select the URL for a Web page, and press Go (b).
Note: While you are connected to the Internet, to change between
Pocket Internet Explorer and other programs on your phone,
press h. This will not close your Internet connection. To return
to the page you were viewing, press B.
Favorites List
If you see a Web page you want to visit another time, mark it as a
favorite. The next time you want to visit that Web page, just select it
from your Favorites list.
To add a Web page to your Favorites list
News and Entertainment
1 On the Home screen, press Programs (a), select Internet Explorer,
and then press Action (a).
2 Press Menu (b), select Go To, and then press Action (a).
3 Enter the Web URL, and press Go (b).
4 Press Menu (b), select Add Favorite, and then press Action (a).
109
5 Enter a name for the Web site as you want it to appear on your
Favorites list, and press Add (a).
Enter name of link
Enter address
Select folder
To create a new folder in Favorites
1 On the Home screen, press Programs (a), select Internet Explorer,
and then press Action (a).
2 Press Menu (b), select Add Folder, and then press Action (a).
3 Under Name, enter a name for the folder, and press Add (a).
News and Entertainment
To delete a favorite
1 On the Home screen, press Programs (a), select Internet Explorer,
and then press Action (a).
2 Select the favorite to delete, press Menu (b), select Delete, and
then press Action (a).
Cached Web Pages
The phone caches Web pages as they are downloaded to your phone
and stores them on your phone until the cache is full. If you go to a
page that is already stored on your phone, you will see the stored
version when you select the page. Choose Refresh from the menu to
see the latest Web content for that page.
To refresh a Web page you have recently visited
1 On the Home screen, press Programs (a), select Internet Explorer,
and then press Action (a).
110
2 Select the Web page to revisit from your Favorites list or History list,
and press Go (b).
3 Press Menu (b), select Refresh, and then press Action (a).
Pocket Internet Explorer Options
Use Pocket Internet Explorer options to change the way Web pages
display, change the network you want to connect to, and free space on
your phone.
To view Pocket Internet Explorer options
1 On the Home screen, press Programs (a), select Internet Explorer,
and then press Action (a).
2 Press Menu (b), select Options, and then press Action (a).
Media Player
Options
Function
General
Change the way Web pages are downloaded and
displayed. For example, you can omit displaying images,
turn off sound, fit the Web page to the screen, request a
warning before moving from secure Web pages to
nonsecure Web pages, allow cookies, or change the
language.
Connections
Change your network connection. For example, change
from “The Internet” to “My Corporate Network.”
Memory
Clear your temporary Internet files, cookies, and Web
history.
News and Entertainment
Using Windows MediaTM Player 7.0 or later, you can play Windows
Media audio and video files and MP3 audio files on your phone. You
can also copy digital music and video directly from your desktop
computer to your phone by using Media Player or ActiveSync. You can
also play Media files directly from a SD or MMC. For more information
about copying files to your phone, see the Media Player Help on your
desktop computer.
111
Media Player is easy to use; the controls are similar to the buttons on
a compact disc player.You can play audio or video files, skip to
another song or video, and increase or decrease the volume.
To access the Media Player
1 On the Home screen, press Programs (a), select More, and then
press Action (a).
To play or stop a file
News and Entertainment
• On the Local Content screen, press Play (a).
Note: To access the Local Content screen, press Select.
112
To skip to the beginning of the current file
• Press Left.
To skip to the beginning of the previous file
• Press Left twice quickly.
To skip to the next file
• Press Right.
To adjust the volume
• Press the jog dial to increase or decrease the volume.
To play a streaming media file on a network
1 On the Local Content screen, press Menu (b), select Open URL, and
then press Action (a).
2 Enter the Web URL, and press Play (b).
To play files randomly
1 On the Local Content screen, press Menu (b), select Settings, and
then press Action (a).
2 Select the Shuffle check box, and press Done (a).
To play files repeatedly
1 On the Local Content screen, press Menu (b), select Settings, and
then press Action (a).
2 Select the Repeat check box, and press Done (a).
To stop playback while using another program
1 On the Local Content screen, press Menu (b), select Settings, and
then press Action (a).
2 Select the Background play check box, and press Done (a).
When you are playing a file, you can use the menu options to start and
stop playback, skip to the next or previous file, display information
about a file, configure volume and playback settings, or add files to
your Favorites playlist.
News and Entertainment
Menu Options When Playing a File
113
To access menu options when playing a file
• Press Menu (b).
News and Entertainment
The following table lists the menu options and their functions that are
available when you play a file.
114
Option
Function
Play/Stop
Plays or stops playback of the current file.
Next
Skips to the next file on the current playlist. This command
is not available if the last file is the current selection.
Previous
Skips to the beginning of the current file on the current
playlist. If no file is playing, this command skips to the
previous file on the current playlist.
Open URL
Plays a streaming media file on a network (for example,
content streamed from an Internet radio station).
Properties
Displays information about the file that is playing.
Settings
Displays the Settings options, which enable you to adjust
the volume and various playback options.
Add to Favorites
Adds the streaming media file that is playing to the Favorites
playlist.
Local Content Screen Menu Options
By using the menu options from the Local Content screen, you can
start and stop playback, add files to your Favorites playlist, display
information about a file, configure volume and playback settings, or
delete a file.
To access Local Content screen menu options
• Press Menu (b).
The following table lists the Local Content screen menu options and
their functions.
Function
Play/Stop
Plays or stops playback of the current file.
Local Content
Displays the Local Content view playlist.
Favorites
Displays the Favorites view playlist.
Open URL
Plays a streaming media file on a network (for example,
content streamed from an Internet radio station).
Properties
Displays information about the selected file.
Settings
Displays the Settings screen, which lets you to adjust
the volume and specify various playback options.
Delete
Permanently deletes the selected file from the phone.
Media Player Favorites
You can connect to your favorite streaming media file and add it to
Favorites. The next time you want to listen to the streaming media file,
just select it from Favorites.
To connect to a streaming media file
1 On the Local Content screen, press Menu (b), select Open URL, and
then press Action (a).
2 Enter the URL, and press Play (b).
News and Entertainment
Option
115
To add a streaming media file to Favorites
1 Connect to a streaming media file on the Internet or other network.
2 Press Menu (b), select Add to Favorites, and then press Action
(a).
To play a favorite
1 On the Local Content screen, press Menu (b), select Favorites, and
then press Action (a).
2 Select an item, and press Play (b).
To delete a favorite
1 On the Local Content screen, press Menu (b), select Favorites, and
then press Action (a).
2 Select an item, press Menu (b), select Delete, and then press
Action (a).
News and Entertainment
Licenses
Some digital media content from the Internet, CD tracks, and videos
have associated licenses that protect them from being unlawfully
distributed or shared.
Licenses are managed and created using digital rights management
(DRM), which is the technology for securing content and managing
the rights for its access. Some licenses prevent you from playing
content that is copied to your phone.
Note: To ensure that the license is copied with the content, use the
Portable Device (or Copy to CD or Device) feature in Windows
MediaTM Player 7.0 or later on your desktop computer to copy
content to your phone. For more information about copying
content to your phone and other portable devices, see the
Windows MediaTM Player Help on your desktop computer.
Supported File Formats
Media Player supports the following types of file formats.
116
Format
Windows Media
File Name Extensions
TM
Moving Picture Experts Group
(MPEG)
.asf, .asx, .wax, .wm, .wma, .wmv, .wmx, .wvx
.mp3
Supported Audio and Video Codecs
Media Player can play files that have been compressed by using any
of the following audio and video codecs.
Audio Codecs
• Microsoft® Windows MediaTM Audio codec version 2.0, 7.0, and 8.0
• Fraunhofer IIS-A MPEG-1 Audio Layer-3 codec
Video Codecs
• Microsoft Windows MediaTM Video codec version 7.0 and 8.0
• Microsoft® MPEG-4 video codec version 3.0
• ISO MPEG-4 video codec version 1.0
Playing Games
News and Entertainment
READ BEFORE PLAYING GAMEs
A very small percentage of individuals may experience epileptic
seizures when exposed to certain light patterns or flashing lights.
Exposure to certain patterns or backgrounds on a television screen or
while playing video games, including games played on a Smartphone,
may induce previously undetected epileptic symptoms even in
persons who have no history of prior seizures or epilepsy. If you, or
anyone in your family, has an epileptic condition, consult your
physician prior to playing. If you experience any of the following
symptoms while playing a video game - dizziness, altered vision, eye
or muscle twitches, loss of awareness, disorientation, any involuntary
movement, or convulsions - IMMEDIATELY discontinue use and
consult your physician before resuming play.
117
Lemonade Inc.
Hardware Requirements
First make sure that you have previously installed Active Sync® and
that your phone is connected to your computer. Launch the Lemonade
Inc. Smartphone installation program. You can then follow the onscreen instructions to proceed with the installation. Should you need
instructions on how to synchronize your device with a PC, please refer
to “Synchronizing Information” on page 67.
Software Requirements
News and Entertainment
Operating System: Microsoft Smartphone 2002
Storage: 720 KB
118
Game Description
So you want to get rich? Selling lemonade is a simple business
indeed, but if you really want to succeed, you’ll need skills, judgment,
instinct and a little bit of luck. In Lemonade Inc., you get to control
every aspect of your lemonade business in an attempt to earn the
most profit out of every work day.
Weather and Temperature
Keep a close eye on weather and temperature. This will help you
estimate how many potential customers you should meet and decide
on an appropriate recipe and price. Keep in mind that what you see
every morning is a forecast, and as such, it may differ from the
weather and temperature you’ll experience during the day.
Tweaking your Recipe
Try different combinations and see what works best. Remember to
keep a good balance between lemon and sugar: you don’t want your
lemonade to be too sweet or too sour. It’s good to add ice cubes when
the temperature is higher: it keeps the lemonade cool, plus it allows
you to serve more cups per pitcher.
Buying Supplies
Buy all you need to last for a day, at least. You do not want to run out
of stock in the middle of a promising day. But remember that after a
certain time, you will lose some of your inventory (ice melts, lemons
spoil), so you cannot keep too much of everything either.
Advertising Your Product
Whenever you need a visibility boost, invest a few dollars in
advertising. It can be especially helpful when starting in a new
location, when your popularity is low.
Setting Your Price
Take all parameters into account and set an appropriate price for the
day. Watch out for customer types: they all have different sensitivity to
price. Try changing your price often and see what works best in what
situation. This is how you will really make the big bucks.
News and Entertainment
Selecting a Location
You’ll start in the suburbs, a free location. Learn the ins and outs of the
business, then switch to a more crowded area. Note that popularity
and satisfaction ratings are different for every location. Customer type
concentrations will also vary in the different parts of town.
119
Upgrading Your Stand
When you start making some good money, check out the various
upgrades you can buy for your stand. They will help you keep your
process efficient as you serve more and more customers.
News Flash
Watch out for news flashes. They give you hints on events happening
in the various parts of town that can dramatically change the outcome
of the day.
Solitaire
News and Entertainment
The object of Solitaire is to use all the cards in the deck to build up the
four suit stacks in ascending order, beginning with the aces. You win
the game when all cards are on the suit stacks.
To start a game of Solitaire
• On the Home screen, press Programs (b), select More, select
Games, select Solitaire, and then press Action (a).
Playing Solitaire
To start a new game of Solitaire
• In Solitaire, press Menu (b), and then select New Game.
120
To move cards in Solitaire
• Press the number or character above the card stack displaying the
card you want to move, and then press the number or character
above the card stack to which you want to move the card.
Note: Press Up to move a card to one of the four card stacks on the
upper right corner of the screen if it belongs there. For
example, if you have an ace displayed in one of the seven
stacks, press the number above the ace, and then press Up.
To play Solitaire
1. Move any aces on the 7 stacks to the 4 card spaces at the top of the
screen, and then make any other available plays.
2. When you have made all available plays, press Draw to turn over
cards.
Note: The card that is face up on the deck is always available for play.
News and Entertainment
121
Getting More Out of Your Phone
SIM Manager
Getting More Out of Your Phone
Use SIM manager to easily manage and maintain the SIM
phonebook.
To use SIM manager
• On the Home screen, press Programs (b). Select More and then
press Action (a). Select SIM Manager and then press Action (a).
To add a new phonebook entry to SIM card
• Press New, enter the name and phone number, press Done when
finished.
• When entering, press Menu (b), select Cancel and then press Action
(a) to discard and exit this function.
• When entering the phone number, press Menu (b), select Insert
Pause or Insert Wait and then press Action to insert a pause or a
wait symbol after the phone number.
To edit an entry
• Select an entry and press Menu. Select Edit and press Action to
edit this entry. Press Done when finished.
• When editing, press Menu (b), select Dial and press Action (a) to
dial the phone number. Select Delete and press Action to delete this
entry. Select Cancel and press Action (a) to discard and exit this
function.
122
To delete an entry
• Select an entry and press Menu (b). Select Delete and press Action
to delete this entry.
To make a phone call
• Select an entry and press Menu. Select Dial and press Action to dial
the phone number.
• Press Menu (b), select Import/Export and press Action, select
Contacts->SIM and press Action to copy the phone entries to the
SIM memory. Select SIM->Contacts and press Action to copy the
SIM entries to the phone memory.
• When the above function is selected, press Menu (b), select Select
All and press Action to select all entries. Select Unselect All and
press Action to clear all checks. Press Start to start to copy entries
to another location.
To import/export Inbox to SIM card
• Press Menu (b), select Import/Export and press Action, select
Inbox->SIM and press Action to transfer Inbox to SIM SMS.
To show SIM number
Getting More Out of Your Phone
To copy entries to the SIM or phone memory
• Press Menu (b), select SIM Number and press Action (a). Your SIM
number will be displayed on the screen.
123
To view SIM status
• Press Menu (b), select SIM Status and press Action to view the
phonebook and SMS storage status on the SIM card.
SMS Manager
You can manage the SMS on the SIM card with this function.
Getting More Out of Your Phone
To use the SMS Manager
• Press Menu (b), select SMS Manager, and press Action (a).
To add a SMS on SIM card
• Press New, enter the phone number of recipient and the content.
Press Save to store the SMS and press Cancel to discard and exit this
function.
To edit a SMS
• Select a desired SMS, press Menu (b), select Edit and press the
Action button.
• Edit the phone number of recipient and the content, when finished,
press Save to store the SMS without overwriting the original SMS.
Press Cancel to discard and exit this function.
To delete a SMS
• Select a desired SMS, press Menu (b), select Delete and press
Action (a).
124
File Manager
File Manager is for file and folder management in your phone. It
operates in 2 major views, Tree view and List view.
• Tree View displays the entire file structure in your phone’s memory.
The functions in Tree View primarily focus on folder management
(operates similar to Microsoft® Windows® File ExplorerTM).
• List View displays the details of the selected folder (its sub-folders
and files). The functions in List View are basically file-oriented.
If you are installing File Manager from a Companion CD, follow the
instructions on your computer screen and your phone screen. If you
are installing from a Storage Card, follow the instructions on your
Smartphone screen. We strongly recommend that you install File
Manager to the main unit (Smartphone’s local “Phone” storage). After
installing, select File Manager from your Smartphone’s Programs
menu to start it.
Getting More Out of Your Phone
Installing and Starting File Manager
125
Getting More Out of Your Phone
Key Features:
• Send the selected files via email or Infrared beaming, and receive
files via Infrared beaming.
• Delete, move, or copy/paste folders and files.
• Search for files according to portions of filenames and/or text
contained in the files.
• View file or folder properties.
• View information about memory utilization, device, storage card, and
battery power.
• Sort listed files in a variety of ways (by name, size, date, type;
ascending or descending order).
• Set viewing options such as font size, whether to hide file extensions,
etc.
• Create file shortcuts.
• Associate specific filetypes to start with specific applications when
selected.
Tree View
126
List View
When File Manager is initially invoked, it is in Tree View by default. To
switch to List View, press the Left Softkey. If the currently selected
folder contains no subfolders, pressing the Action button will also
switch to List View. If the selected folder in Tree View contains
subfolders, press Action to expand or collapses the tree for that
folder. For most functions, you must first select the file or folder you
wish to operate on, then select the desired command from the menus,
or press the shortcut key on your Smartphone keypad, if a shortcut
exists.
Use Caller ID to assign still or animated photos to the entries in your
Contacts, with selectable still or animated templates. When a person
calls you, his/her photo appears on your phone’s incoming call screen.
Display the photo with the size, position, and template you want. You
can also manage the Contacts in your phone from within Caller ID.
Installing and Starting Caller ID
If you are installing Caller ID from a Companion CD, follow the
instructions on your computer screen and your phone screen. If you
are installing from a Storage Card, follow the instructions on your
phone screen. After installing, select Caller ID from your phone’s
Programs menu to start it. Note that a Caller ID monitor icon displays
in the Title Bar. The icon looks like this when in a “ready state:”
(When not yet ready, this icon will first display temporarily:
)
Getting More Out of Your Phone
Caller ID
Template storage
Several animated Caller ID templates are included with your phone’s
software. You can download additional animated Caller ID templates
free from www.iastyle.com. Or, download the PIT Tool, make your own
templates, and use the tool to convert the GIF files into .pit files.
Remember to place templates either in the \\IPSM\My
Documents\Caller ID Photos folder in your phone, or in the \Caller
ID Photos folder of your Storage Card, so that Caller ID can find
them.
127
Photo file storage and file formats
Getting More Out of Your Phone
On your phone, the \\IPSM\My Documents\ folder is searched for
photo/image files by default. Use the Change Folder command on
the menu in the Assign Photo screen to search any desired folder.
You can use JPEG, BMP, still GIF, or animated GIF files for your Photo
IDs.
The main Caller ID screen lists your contact entries. Use Filter to
determine which entries are displayed.
128
This icon indicates an entry
in your Contacts.
Use the Filter submenu to
display only entries in your
Contacts, only entries on
your SIM card, only entries
who are members of a certain Group, or All entries.
This icon indicates an entry
in your SIM card.
Key Features:
• Create new Contacts or delete existing entries in your Pocket
Contacts
• Create, rename, and delete Groups
• Assign/unassign members to Groups
• Assign default photos to Groups
• Delete all manual filtering, and return to the original list view in one
easy step (Press U or select the “Reset Filter” command)
• Filter the list so that only contact entries in the specified category
display
• Assign individual Photo IDs to Contacts and set up the Display
Settings
• Preview a photo/template as it would look during an actual incoming
call
• Set default photos for Unknown callers; for those Not Found in your
Contacts; and a general Default Photo ID for entries in your Contacts
that have no individually-assigned photo
Assigning a Photo ID
Getting More Out of Your Phone
Note: The steps below are for the Assign Photo command on the
main menu (individual photo assignment), but this same basic
procedure can also be followed when:
• Assigning a Photo ID to a Group.
• Assigning “Unknown Photo”, “Not-found Photo”, and “Default
Photo”.
• Assigning an individual Photo ID using the Assign Photo
command in Detailed View.
Steps:
1. In the main Caller ID screen, select the desired contact entry in the
list.
2. Select Assign Photo from the menu, or press Left. The first Assign
Photo screen appears. In it, your JPEG, BMP, and GIF files will be
displayed as thumbnails in a visual photo browser. Use the Change
Folder command to access the image files in any folder of the
phone’s local storage, or on the Storage Card.
3. Choose the photo you want, then press Left (Next). A preview
screen opens. If Use Template is active in the Display Settings
screen, the photo is previewed in a template. Use the menu to
preview the Next Template or Previous Template. If Use Photo
Only is active in the Display Settings screen, the photo is previewed
according to the current Position setting in Display Settings. The
default position for the photo is “Lower Left.”
Note: The Display Settings screen can also be accessed from the
main menu at any time by selecting Options > Display
Settings.
4. If the Preview screen already shows the setup you want, press Done.
129
Getting More Out of Your Phone
Or, to access various setup options, press Menu.
130
Step 1
Step 2
Step 3 (photo only)
Step 3 (photo with
template)
Note: If you wish to temporarily disable the display of Photo IDs
during incoming calls, select Options from the main menu. In
the General screen, uncheck the Display photo during
incoming or waiting call checkbox. The phone will then recover
its original background image for incoming calls.
Detailed View
To enter Detailed View, select the desired Contact entry and then
press the Action button. The assigned Photo ID for that Contact
will display (if any), along with various data that has been
entered. The menu allows you to view Next or Previous, Edit
data, Delete the entry, Assign Photo, or Unassign Photo.
Select a phone number and then press the Action button to dial
that number. Or select an Email address to send Email, or select
a URL to invoke Internet Explorer and go to that URL.
To perform group maintenance, select Manage Group on the main
menu. Currently existing groups are listed in the Manage Group
screen. You can add a new group, rename an existing group, delete a
group, assign members to a group, and assign or unassign a Photo
ID. The procedure to assign a photo to a group is the same as for
individual Photo IDs.
When an incoming call is received, the individually-assigned Photo ID
takes precedence over all others. If no Photo ID has been individually
assigned, and that Contact is assigned to a group with a generic
group Photo ID, that group Photo ID displays. If neither an individual
Photo ID nor a group Photo ID has been assigned, then the general
default Photo ID displays during incoming calls.
Getting More Out of Your Phone
Managing Groups
Favorites Manager
Favorites Manager allows you to select four programs from the
Favorites Manager list and change their positions shown on the top of
the home screen.
Note: The first icon shown on the top of the home screen is always
locked to mMode.
131
To use Favorites Manager
Getting More Out of Your Phone
• On the Home screen, press Programs (b). Select More and then
press Action (a). Select Favorites Manager and then press Action
(a).
• Select a desired program and press Action (a).
• Scroll up or down to a desired position, press Action (a), and then
press Done.
Task Manager
Task Manager lists all the tasks and applications currently running on
your phone. You can easily activate any currently running task,
terminate the tasks, and refresh the list and amount of Free Memory.
To open Task Manager
On the Home screen, press Programs (a), select More, select
Accessories, select Task Manager, press Action (a).
To activate tasks
Select a desired task and press Action (or select Go To from the menu
or press Left).
To stop individual tasks
Select a desired task and press 7 (or select Stop from the menu).
To stop all tasks
To terminate all running tasks, press 2 (or select Stop All from the
menu).
To stop all tasks except the selected task
Select the one task you do not wish to stop, then select Stop All But
Selected from the menu.
132
To refresh the list of running tasks and the Free Memory
amount
To update the list of running tasks, and the amount of Free Memory,
press asterisk (“*”) (or select Refresh from the menu).
To view System Info
Select System Info from the menu to view details of your power/battery,
memory, flash, and device information.
Getting More Out of Your Phone
133
Troubleshooting
Troubleshooting
If problems occur when you use your phone, please refer to the table
below to find possible solutions. If your problem is not in the table, or
the problem still persists after you try these solutions, please seek
your original dealer for help.
Problems
Possible Solutions
Cannot turn on the phone
• Is the battery empty?
• Is the battery properly installed?
• Are the contacts on battery and phone clean? If
the contacts appear to be soiled, contact your
dealer to clean them.
Unable to make calls
• Is the reception of network signal in good
condition? Move to an open space, or a place
closer to window.
• Is network selection setting setup properly? If
necessary, try to select your network manually.
• Have you already activated the fixed dialing and
call barring functions? If yes, deactivate them
temporarily.
• Has the call cost exceeded your cost credit?
Check your remaining cost credit and reset the
call cost if necessary.
• Are you using your phone with other SIM cards
when SIM lock protection function has been
activated? Deactivate the function if necessary.
• Check to make sure Airplane Mode is Off
Unable to receive calls
• Is the reception of network signal in good
condition? Move to an open space, or a place
closer to window.
• Have you already activated call divert or call
barring functions? Deactivate them if necessary.
Your voice cannot be heard Have you already turned on the in-call mute
function? Turn it off if necessary.
134
Cannot use certain call
functions
To use certain advanced call functions (such as call
divert and call barring), you may need to subscribe
these services to your operator first.
There are noises during a
phone call
Avoid using the phone near a microwave oven,
speaker or TV. Their interference has adverse
effect to call quality.
• Have you subscribed the Internet (WAP) service
to your operator?
• Did you enter correct setting parameters (such as
APN and IP addresses) in WAP profile setup?
The screen shows “Insert
SIM”
• Is your SIM card correctly inserted into the
phone?
• Are the metal contacts on SIM card clean? If they
appear to be soiled, please contact your dealer to
clean them.
The battery cannot be
charged
• Is the battery charger correctly plugged into the
battery charger socket on the phone?
• Is the power cord of the charger damaged?
• Is the battery very old? Replace with a new
battery and try again.
• If the battery is “deeply discharged” and you plug
in a charger, the phone will not display that it is
charging. After charging for approximately 15
minutes, disconnect then reconnect the charger
the phone. It will then properly display that it is
charging.
The standby and talk time
is apparently shorter than
ever
• Your phone consumes more power when signal
reception is poor. Try to move to a better location
when you use the phone.
• Are you using a new battery? It takes several
charge discharge cycles for the battery to reach
its original capacity.
• Is the battery very old? Replace it with a new one.
• Are you using the phone in very high or low
temperature environment? The efficiency of a
battery can be effected by ambient temperature.
Cannot deactivate call
barring or call divert
functions
Is the reception of network signal in good
condition? Move to an open space, or a place
closer to window.
Phone appears to operate Check to see how much Flash Internal Storage
slowly
memory is available via the System Info
application. If you are approaching 10 MB then
remove most recently downloaded applications and
download these same applications to a SD/MMC
card.
Troubleshooting
Cannot connect to the
Internet
135
Specific Absorption Rate Data
The model phone meets the government’s requirements
for exposure to radio waves.
Your mobile phone is a radio transmitter and receiver. It is
designed and manufactured not to exceed limits for exposure
to radio frequency (RF) energy. These limits are part of
comprehensive guidelines and establish permitted levels of RF
energy for the general population. The guidelines are based on
standards that were developed by independent scientific
organizations through periodic and thorough evaluation of
scientific studies. The guidelines include a substantial safety
margin designed to assure the safety of all persons, regardless
of age and health.
The exposure standard for mobile phones employs a unit of
measurement known as the Specific Absorption Rate, or SAR.
Under the guidelines for your phone model, the SAR limit is
1.6 W/kg.1 Tests for SAR are conducted using standard
operating positions with the phone transmitting at its highest
certified power level in all tested frequency bands. Although
the SAR is determined at the highest certified power level, the
actual SAR of the phone while operating can be well below the
maximum value. This is because the phone is designed to
operate at multiple power levels so as to use only the power
required to reach the network. In general, the closer you are to
a base station, the lower the power output of the phone.
Before a phone model is available for sale to the public, it is
tested to confirm compliance with the guidelines. The tests are
performed in positions that conform to a uniform testing
methodology determined by an expert standards body.
While there may be differences between the SAR levels of
various phones and at various positions, they all meet the
governmental requirements for safe exposure. Please note
that improvements to this product model could cause
136
differences in the SAR value for later products; in all cases,
products are designed to be within the guidelines.
• The SAR limit for mobile phones used by the public is 1.6 watts/
kilogram (W/kg) averaged over one gram of body tissue. The
standard incorporates a substantial margin of safety to give
additional protection for the public and to account for any variations
in measurements.
• Additional related information includes the Motorola testing protocol,
assessment procedure, and measurement uncertainty range for this
product.
137
Microsoft End User License
Agreement
• You have acquired a device (“DEVICE”) that includes software licensed by Motorola, Inc.
(“Motorola”) from Microsoft Licensing Inc. or its affiliates (“Microsoft”), for use in
connection with wireless network services provided under separate agreement between
you and a wireless telecommunications provider (“Mobile Operator”). Those installed
software products of Microsoft origin, as well as associated media, printed materials, and
“online” or electronic documentation (“SOFTWARE”) are protected by international
intellectual property laws and treaties. SOFTWARE includes software already installed
on the DEVICE (“DEVICE Software”) and Microsoft software contained on any CD-ROM
disk accompanying the DEVICE (“Desktop Software”).
• The SOFTWARE is licensed, not sold. All rights reserved.
• IF YOU DO NOT AGREE TO THIS END USER LICENSE AGREEMENT (“EULA”), DO
NOT USE THE DEVICE OR COPY THE SOFTWARE. INSTEAD, PROMPTLY
CONTACT MOTOROLA FOR INSTRUCTIONS ON RETURN OF THE UNUSED
DEVICE(S) FOR A REFUND. ANY USE OF THE SOFTWARE, INCLUDING BUT NOT
LIMITED TO USE ON THE DEVICE, WILL CONSTITUTE YOUR AGREEMENT TO
THIS EULA (OR RATIFICATION OF ANY PREVIOUS CONSENT).
1. GRANT OF SOFTWARE LICENSE. This EULA grants you the following license:
1.1. DEVICE Software. You may use the DEVICE Software as installed on the
DEVICE (including as installed on removable media installed in the
DEVICE). All or certain portions of the DEVICE Software may be inoperable if a proper account is not established or maintained with an appropriate
Mobile Operator, or if the Mobile Operator’s network facilities are not operating or configured to operate with the DEVICE software.
1.2. Desktop Software. Desktop Software is included with your DEVICE, and
you may install and use the MicrosoftR ActiveSyncR 3.5 component on
one (1) or more computers to exchange information with one (1) or more
computing devices that contain a compatible version of the MicrosoftR
WindowsR for Smartphone 2002 Software. For other software component(s) contained in the Desktop Software, you may install and use such
components only in accordance with the terms of the printed or online end
user license agreement(s) provided with such component(s). In the
absence of an end user license agreement for particular component(s) of
the Desktop Software, you may install and use only one (1) copy of such
component(s) on the DEVICE or a single computer with which you use the
DEVICE.
1.3. Back-up Copy. If Motorola has not included a back-up copy of the DEVICE
Software with the DEVICE, you may make a single back-up copy of the
DEVICE Software. You may use the back-up copy solely for archival purposes.
1.4. MicrosoftR WindowsR 2000. If Microsoft Outlook 2000 is included with
your Device, the following terms apply to your use of Microsoft Outlook
2000: (i) regardless of the information contained in “Software Installation
and Use” section of the online EULA you may install one (1) copy of
Microsoft Outlook 2000 on one (1) computer to use, exchange data, share
data, access and interact with the DEVICE, and (ii) the EULA for Microsoft
138
Outlook 2000 is between Motorola and the end user - not between the PC
manufacturer and end user.
2. Speech/Handwriting Recognition. If the Software includes speech and/or
handwriting recognition component(s), you should understand that speech
and handwriting recognition are inherently statistical processes; that recognition errors are inherent in the processes; that it is your responsibility to
provide for handling such errors and to monitor the recognition processes
and correct any errors. Neither Motorola nor its suppliers shall be liable for
any damages arising out of errors in the speech and handwriting recognition processes.
3. Limitations on Reverse Engineering, Decompilation and Disassembly. You
may not reverse engineer, decompile, or disassemble the SOFTWARE,
except and only to the extent that such activity is expressly permitted by
applicable law notwithstanding this limitation.
4. Single DEVICE. The Device Software is licensed with the DEVICE as a single integrated product. The DEVICE Software may only be used as part of
the DEVICE, notwithstanding any installation of the DEVICE Software on
removable media.
5. Single EULA. The package for the DEVICE may contain multiple versions of
this EULA, such as multiple translations and/or multiple media versions
(e.g., in the user documentation and in the software). Even if you receive
multiple versions of the EULA, you are licensed to use only one (1) copy of
the DEVICE Software.
6. Rental. You may not rent or lease the SOFTWARE.
7. Software Transfer. You may not permanently transfer any of your rights
under this EULA with regard to the DEVICE Software or Desktop Software,
except as permitted by the applicable Mobile Operator. In the event that
the Mobile Operator permits such transfer, you may permanently transfer
all of your rights under this EULA only as part of a sale or transfer of the
DEVICE, provided you retain no copies, you transfer all of the SOFTWARE
(including all component parts, the media and printed materials, any
upgrades or backup copies, this EULA and, if applicable, the Certificate(s)
of Authenticity), and the recipient agrees to the terms of this EULA. If the
Software is an upgrade, any transfer must include all prior versions of the
SOFTWARE.
8. Termination. Without prejudice to any other rights, Motorola or Microsoft
may terminate this EULA if you fail to comply with the terms and conditions
of this EULA. In such event, you must destroy all copies of the SOFTWARE and all of its component parts.
9. Security Updates. The SOFTWARE may include digital rights management
technology. If SOFTWARE does contain digital rights management technology, content providers are using the digital rights management technology (“Microsoft DRM”) contained in the SOFTWARE to protect the integrity
of their content (“Secure Content”) so that their intellectual property, including copyright, in such content is not misappropriated. Owners of such
Secure Content (“Secure Content Owners”) may, from time to time, request
Microsoft, Microsoft Corporation or their subsidiaries to provide security
related updates to the Microsoft DRM components of the SOFTWARE
(“Security Updates”) that may affect your ability to copy, display and/or play
Secure Content through Microsoft software or third party applications that
139
utilize Microsoft DRM. You therefore agree that, if you elect to download a
license from the Internet which enables your use of Secure Content,
Microsoft Corporation or their subsidiaries may, in conjunction with such
license, also download onto your DEVICE such Security Updates that a
Secure Content Owner has requested that Microsoft, Microsoft Corporation
or their subsidiaries distribute. Microsoft, Microsoft Corporation or their
subsidiaries will not retrieve any personally identifiable information, or any
other information, from your DEVICE by downloading such Security
Updates.
10. Consent to Use of Data. You agree that Microsoft, Microsoft Corporation and
their affiliates may collect and use technical information gathered in any
manner as part of product support services related to the SOFTWARE.
Microsoft, Microsoft Corporation and their affiliates may use this information
solely to improve their products or to provide customized services or
technologies to you. Microsoft, Microsoft Corporation and their affiliates may
disclose this information to others, but not in a form that personally identifies
you.
11. Internet Gaming/Update Features. If the SOFTWARE provides, and you
choose to utilize, the Internet gaming or update features within the
SOFTWARE, it is necessary to use certain computer system, hardware, and
software information to implement the features. By using these features, you
explicitly authorize Microsoft, Microsoft Corporation and/or their designated
agent to use this information solely to improve their products or to provide
customized services or technologies to you. Microsoft or Microsoft
Corporation may disclose this information to others, but not in a form that
personally identifies you.
12. Internet-Based Services Components. The SOFTWARE may contain
components that enable and facilitate the use of certain Internet-based
services. You acknowledge and agree that Microsoft Corporation or their
affiliates may automatically check the version of the SOFTWARE and/or its
components that you are utilizing and my provide upgrades or supplements
to the SOFTWARE that may be automatically downloaded to your Device.
13. Links to Third Party Sites. The SOFTWARE may provide you with the ability
to link to third party sites through the use of the SOFTWARE. The third party
sites are NOT under the control of Motorola, Microsoft, Microsoft Corporation
or their affiliates. Neither Motorola, Microsoft nor Microsoft Corporation nor
their affiliates are responsible for (i) the contents of any third party sites, any
links contained in third sites, or any changes or updates to third party sites, or
(ii) webcasting or any other form of transmission received from any third party
sites. If the SOFTWARE provides links to third party sites, those links are
provided to you only as a convenience, and the inclusion of any link does not
imply an endorsement of the third party site by Motorola, Microsoft, Microsoft
Corporation or their affiliates.
14. Additional Software/Services. The SOFTWARE may permit Motorola,
Microsoft, Microsoft Corporation or their affiliates to provide or make available
to you SOFTWARE updates, supplements, add-on components, or Internetbased services components of the SOFTWARE after the date you obtain
your initial copy of the SOFTWARE (“Supplemental Components”).
14.1. If Motorola provides or makes available to you Supplemental Components and no other EULA terms are provided along with the Supplemental Components, then the terms of this EULA shall apply.
140
14.2. If Microsoft, Microsoft Corporation or their affiliates make available Supplemental Components, and no other EULA terms are provided, then
the terms of this EULA shall apply, except that the Microsoft, Microsoft
Corporation or affiliate entity providing the Supplemental Component(s)
shall be the licensor of the Supplemental Component(s).
14.3.Motorola, Microsoft, Microsoft Corporation and their affiliates reserve the
right to discontinue any Internet-based services provided to you or made
available to you through the use of the SOFTWARE.
15. UPGRADES AND RECOVERY MEDIA.
15.1.DEVICE Software. If the DEVICE Software is provided by Motorola separate from the DEVICE on media such as a ROM chip, CD ROM disk(s)
or via web download or other means, and is labeled “For Upgrade Purposes Only” or “For Recovery Purposes Only”, you may install one copy
of such DEVICE Software on the DEVICE as a replacement copy for the
existing DEVICE Software and use it in accordance with the Grant of
Software License section of this EULA.
15.2.Desktop Software. If any Desktop Software component(s) is provided
by Motorola separate from the DEVICE on CD ROM disk(s) or via web
download or other means, and labeled “For Upgrade Purposes Only” or
“For Recovery Purposes Only”, you may (i) install and use one copy of
such component(s) on the computer(s) you use to exchange data with
the DEVICE as a replacement copy for the existing Desktop Software
component(s).
16. COPYRIGHT. All title and intellectual property rights in and to the
SOFTWARE (including but not limited to any images, photographs,
animations, video, audio, music, text and “applets”, incorporated into the
SOFTWARE), the accompanying printed materials, and any copies of the
SOFTWARE, are owned by Microsoft or its suppliers (including Microsoft
Corporation). You may not copy the printed materials accompanying the
SOFTWARE. All title and intellectual property rights in and to the content
which may be accessed through use of the SOFTWARE is the property of the
respective content owner and may be protected by applicable copyright or
other intellectual property laws and treaties. This EULA grants you no rights
to use such content. All rights not specifically granted under this EULA are
reserved by Microsoft and its suppliers (including Microsoft Corporation).
17. EXPORT RESTRICTIONS. You acknowledge that SOFTWARE is subject to
U.S. export jurisdiction. You agree to comply with all applicable international
and national laws that apply to the SOFTWARE, including the U.S. Export
Administration Regulations, as well as end-user, end-use and destination
restrictions issued by U.S. and other governments. For additional
information, see http://www.microsoft.com/exporting/.
18. PRODUCT SUPPORT. Product support for the SOFTWARE is NOT
provided by Microsoft, its parent corporation, Microsoft Corporation, or their
affiliates or subsidiaries.
19. NO LIABILITY FOR CERTAIN DAMAGES. EXCEPT AS PROHIBITED BY
LAW, MICROSOFT SHALL HAVE NO LIABILTIY FOR ANY INDIRECT,
SPECIAL, CONSEQUENTIAL OR INCIDENTAL DAMAGES ARISING
FROM OR IN CONNECTION WITH THE USE OR PERFORMANCE OF THE
SOFTWARE. THIS LIMITATION SHALL APPLY EVEN IF ANY REMEDY
FAILS OF ITS ESSENTIAL PURPOSE.
141
20. FOR APPLICABLE LIMITED WARRANTIES AND SPECIAL PROVISIONS
PERTAINING TO YOUR PARTICULAR JURISDICTION, PLEASE REFER
TO YOUR WARRANTY BOOKLET INCLUDED WITH THIS PACKAGE OR
PROVIDED WITH THE SOFTWARE PRINTED MATERIALS.
142
Index
A
Accessibility................59
Accessories ................14
Accessories list...........15
ActiveSync
Installing .......................68
Audio codecs............117
B
Battery ........................17
Charging.......................19
Installing .......................17
Buttons .......................21
Back button ..................31
Function Buttons ..........21
C
Calendar
Schedule ....................100
E
Earpiece .....................22
Emergency calls .........44
H
Handstrap hole ...........24
Headset socket...........23
Home Screen
Customizing ................. 58
Viewing ........................ 58
I
Inbox...........................85
Infrared port................23
Input modes................34
Multipress mode .......... 35
Numeric mode ............. 36
T9 mode....................... 35
J
Jog dial .......................23
Call History .................48
Call Timers .................49
Contact cards .............96
Contacts list................93
K
Keypad .......................22
D
Data Connections.......59
L
Lock............................37
Locking the keypad ....37
Locking the SIM card..39
Locking the
Smartphone ............38
Dial-up connection........59
Proxy connection..........63
VPN connection............62
Display........................29
External display ............29
Main display .................29
Locking ........................ 37
Unlocking ..................... 38
M
Memory card ..............23
MSN Messenger.........89
143
O
optional accessory,
defined.................... 14
optional feature,
defined.................... 14
P
Phone Calls
Making a call................ 41
Receiving a call............ 45
Profiles ....................... 55
Presetting..................... 56
Viewing ........................ 55
Q
Quick List ................... 33
S
Security ...................... 66
Shortcuts .................... 50
Deleting........................ 51
Viewing ........................ 51
SIM card ..................... 15
Installing....................... 15
Locking ....................... 39
Unlocking ..................... 39
SMS messages .... 81, 89
Sounds ....................... 54
Customizing ................. 55
Displaying .................... 54
Space Maker ............ 130
Speaker...................... 22
Speed dials ................ 50
System Info .............. 130
144
T
Task Manager .......... 132
Telephony................... 53
V
Video codecs............ 117
Voice Notes .............. 105
Voice Recorder......... 105
Voice tags................... 50
✂
Wireless Phone Safety
Tips
“Safety is your most important call!”
Your Motorola wireless telephone gives you
the powerful ability to communicate by voice—
almost anywhere, anytime, wherever wireless
phone service is available and safe conditions allow.
But an important responsibility accompanies the
benefits of wireless phones, one that every user
must uphold.
When driving a car, driving is your first
responsibility. If you find it necessary to use your
wireless phone while behind the wheel of a car,
practice good common sense and remember the
following tips:
1 Get to know your Motorola wireless phone and its
features such as speed dial and redial. If available,
these features help you to place your call without taking
your attention off the road.
145
3 Position your wireless phone within easy reach. Be
able to access your wireless phone without removing
your eyes from the road. If you receive an incoming call
at an inconvenient time, if possible, let your voice mail
answer it for you.
4 Let the person you are speaking with know you are
driving; if necessary, suspend the call in heavy
traffic or hazardous weather conditions. Rain, sleet,
snow, ice, and even heavy traffic can be hazardous.
5 If you receive an incoming call at an inconvenient
time do not take notes or look up phone numbers
while driving. Jotting down a “to do” list or going
through your address book takes attention away from
your primary responsibility—driving safely.
6 Dial sensibly and assess the traffic; if possible,
place calls when you are not moving or before
pulling into traffic. Try to plan calls when your car will
be stationary. If you need to make a call while moving,
dial only a few numbers, check the road and your
mirrors, then continue.
7 Do not engage in stressful or emotional
conversations that may be distracting. Make people
you are talking with aware you are driving and suspend
conversations which have the potential to divert your
attention away from the road.
146
✂
2 When available, use a hands-free device. If possible,
add an additional layer of convenience to your wireless
phone with one of the many Motorola Original™ handsfree accessories available today.
✂
8 Use your wireless phone to call for help. Dial 9-1-1 or
other local emergency number in the case of fire, traffic
accident or medical emergencies.*
9 Use your wireless phone to help others in
emergencies. If you see an auto accident, crime in
progress or other serious emergency where lives are in
danger, call 9-1-1 or other local emergency number, as
you would want others to do for you.*
10 Call roadside assistance or a special
non-emergency wireless assistance number when
necessary. If you see a broken-down vehicle posing no
serious hazard, a broken traffic signal, a minor traffic
accident where no one appears injured, or a vehicle you
know to be stolen, call roadside assistance or other
special non-emergency wireless number.*
* Wherever wireless phone service is available.
147
For more information,
please call
1-888-901-SAFE
or visit the
CTIA Web site at
www.wow-com.com™
ITC00-011
148
✂
Check the laws and regulations on the use of
wireless telephones and their accessories in the
areas where you drive. Always obey them. The
use of these devices may be prohibited or
restricted in certain areas.
motorola.com
8988485L61-0