Download Savin 10512 Operating instructions
Transcript
2SHUDWLQJ,QVWUXFWLRQV *HQHUDO6HWWLQJV*XLGH 1 :KDW<RX&DQ'RZLWK7KLV0DFKLQH 2 *HWWLQJ6WDUWHG 3 &RPELQHG)XQFWLRQ2SHUDWLRQV 4 'RFXPHQW6HUYHU 5 8VHU7RROV6\VWHP6HWWLQJV 6 3DSHU7UD\6HWWLQJV 7 7URXEOHVKRRWLQJ 8 5HPDUNV 9 6HFXULW\ 10 6SHFLILFDWLRQ )RUVDIHDQGFRUUHFWRSHUDWLRQRIWKLVPDFKLQHSOHDVHEHVXUHWRUHDGWKH6DIHW\,QIRUPDWLRQ EHIRUH\RXXVHLW 7\SHIRU/'$ILFLR 7\SHIRU/'$ILFLR 3ULQWHGLQ-DSDQ (1 86$ % Introduction 7KLVPDQXDOFRQWDLQVGHWDLOHGLQVWUXFWLRQVRQWKHRSHUDWLRQDQGPDLQWHQDQFHRIWKLVPDFKLQH7RJHW PD[LPXPYHUVDWLOLW\IURPWKLVPDFKLQHDOORSHUDWRUVVKRXOGFDUHIXOO\UHDGDQGIROORZWKHLQVWUXFWLRQVLQ WKLVPDQXDO3OHDVHNHHSWKLVPDQXDOLQDKDQG\SODFHQHDUWKHPDFKLQH Notes 6RPHLOOXVWUDWLRQVLQWKLVPDQXDOPLJKWEHVOLJKWO\GLIIHUHQWIURPWKHPDFKLQH &HUWDLQRSWLRQVPD\QRWEHDYDLODEOHLQVRPHFRXQWULHV)RUGHWDLOVSOHDVHFRQWDFW\RXUORFDOGHDOHU Laser Safety: &'5+5HJXODWLRQV 7KLVHTXLSPHQWFRPSOLHVZLWKUHTXLUHPHQWVRI&)5VXEFKDSWHU-IRUFODVVODVHUSURGXFWV7KLV HTXLSPHQWFRQWDLQV$O*D$VIRXUEHDPODVHUGLRGHDUUD\PLOOLZDWWQDQRPHWHUZDYHOHQJWK IRUHDFKHPLWWHU7KLVHTXLSPHQWGRHVQRWHPLWKD]DUGRXVOLJKWVLQFHWKHEHDPLVWRWDOO\HQFORVHGGXU LQJDOOFXVWRPHUPRGHVRIRSHUDWLRQDQGPDLQWHQDQFH Warning: 8VHRIFRQWUROVDGMXVWPHQWRUSHUIRUPDQFHRISURFHGXUHVRWKHUWKDQWKRVHVSHFLILHGLQWKLVPDQXDO PD\UHVXOWLQKD]DUGRXVUDGLDWLRQH[SRVXUH 7KHPRGHOQDPHVRIWKHPDFKLQHVGRQRWDSSHDURQWKHIROORZLQJSDJHV&KHFNWKHW\SHRI\RXUPD FKLQHEHIRUHUHDGLQJWKLVPDQXDO)RUGHWDLOVVHHS³0DFKLQH7\SHV´ 7\SH/'$ILFLR 7\SH/'$ILFLR &HUWDLQW\SHVPD\QRWEHDYDLODEOHLQVRPHFRXQWULHV)RUGHWDLOVFRQWDFW\RXUORFDOGHDOHU 7ZRNLQGVRIVL]HQRWDWLRQDUHHPSOR\HGLQWKLVPDQXDO:LWKWKLVPDFKLQHUHIHUWRWKHLQFKYHUVLRQ )RUJRRGFRS\TXDOLW\WKHPDQXIDFWXUHUUHFRPPHQGVWKDW\RXXVHPDQXIDFWXUHUJHQXLQHWRQHU 7KHVXSSOLHUVKDOOQRWEHUHVSRQVLEOHIRUDQ\GDPDJHRUH[SHQVHWKDWPD\UHVXOWIURPXVHRISDUWVRWKHU WKDQPDQXIDFWXUHUJHQXLQHSDUWV Power Source 9+]$ %HVXUHWRFRQQHFWWKHSRZHUFRUGWRDSRZHUVRXUFHDVDERYH)RUGHWDLOVDERXWWKHSRZHUVRXUFH VHHS³3RZHU&RQQHFWLRQ´ ,QDFFRUGDQFHZLWK,(&WKLVPDFKLQHXVHVWKHIROORZLQJV\PEROVIRUWKHPDLQSRZHUVZLWFK aPHDQV32:(521 cPHDQV67$1'%< Note to users in the United States of America Notice: 7KLVHTXLSPHQWKDVEHHQWHVWHGDQGIRXQGWRFRPSO\ZLWKWKHOLPLWVIRUD&ODVV%GLJLWDOGHYLFHSXUVX DQWWR3DUWRIWKH)&&5XOHV7KHVHOLPLWVDUHGHVLJQHGWRSURYLGHUHDVRQDEOHSURWHFWLRQDJDLQVW KDUPIXOLQWHUIHUHQFHLQDUHVLGHQWLDOLQVWDOODWLRQ7KLVHTXLSPHQWJHQHUDWHVXVHVDQGFDQUDGLDWHUDGLR IUHTXHQF\HQHUJ\DQGLIQRWLQVWDOOHGDQGXVHGLQDFFRUGDQFHZLWKWKHLQVWUXFWLRQVPD\FDXVHKDUPIXO LQWHUIHUHQFHWRUDGLRFRPPXQLFDWLRQV+RZHYHUWKHUHLVQRJXDUDQWHHWKDWLQWHUIHUHQFHZLOOQRWRFFXU LQDSDUWLFXODULQVWDOODWLRQ,IWKLVHTXLSPHQWGRHVFDXVHKDUPIXOLQWHUIHUHQFHWRUDGLRRUWHOHYLVLRQUH FHSWLRQZKLFKFDQEHGHWHUPLQHGE\WXUQLQJWKHHTXLSPHQWRIIDQGRQWKHXVHULVHQFRXUDJHGWRWU\WR FRUUHFWWKHLQWHUIHUHQFHE\RQHPRUHRIWKHIROORZLQJPHDVXUHV 5HRULHQWRUUHORFDWHWKHUHFHLYLQJDQWHQQD ,QFUHDVHWKHVHSDUDWLRQEHWZHHQWKHHTXLSPHQWDQGUHFHLYHU &RQQHFWWKHHTXLSPHQWLQWRDQRXWOHWRQDFLUFXLWGLIIHUHQWIURPWKDWWRZKLFKWKHUHFHLYHULV FRQQHFWHG &RQVXOWWKHGHDOHURUDQH[SHULHQFHGUDGLR79WHFKQLFLDQIRUKHOS Warning &KDQJHVRUPRGLILFDWLRQVQRWH[SUHVVO\DSSURYHGE\WKHSDUW\UHVSRQVLEOHIRUFRPSOLDQFHFRXOGYRLG WKHXVHU VDXWKRULW\WRRSHUDWHWKHHTXLSPHQW Note to users in Canada Note: 7KLV&ODVV%GLJLWDODSSDUDWXVFRPSOLHVZLWK&DQDGLDQ,&(6 Remarque concernant les utilisateurs au Canada Avertissement: &HWDSSDUHLOQXPpULTXHGHODFODVVH%HVWFRQIRUPHjODQRUPH10%GX&DQDGD &RS\ULJKW Manuals for This Machine The following manuals describe the operational procedures of this machine. For particular functions, see the relevant parts of the manual. 1RWH ❒ Manuals provided are specific to machine type. ❒ Adobe Acrobat Reader is necessary to view the manuals as a PDF file. ❒ Two CD-ROMs are provided: • CD-ROM 1 “Operating Instructions for Printer / Scanner” • CD-ROM 2 “Scanner Driver & Document Management Utilities” ❖ *HQHUDO6HWWLQJV*XLGHWKLV0DQXDO Provides an overview of the machine. It also describes System Settings (such as paper trays and user codes settings), Document Server functions, and troubleshooting. ❖ 1HWZRUN*XLGH3')ILOH&'520 Describes procedures for configuring the machine and computers in a network environment. ❖ &RS\5HIHUHQFH Describes operations, functions, and troubleshooting for the machine's copier function. ❖ 3ULQWHU5HIHUHQFH Describes system settings and operations for the machine's printer function. ❖ 3ULQWHU5HIHUHQFH3')ILOH&'520 Describes operations, functions, and troubleshooting for the machine's printer function. ❖ 6FDQQHU5HIHUHQFH3')ILOH&'520 Describes operations, functions, and troubleshooting for the machine's scanner function. ❖ 0DQXDOVIRU'HVN7RS%LQGHU9/LWH DeskTopBinder V2 Lite is a utility included on the CD-ROM labeled “Scanner Driver & Document Management Utilities”. • DeskTopBinder V2 Lite Setup Guide (PDF file - CD-ROM2) Describes installation of, and the operating environment for DeskTopBinder V2 Lite in detail. This guide can be displayed from the >6HWXS@ dialog box when DeskTopBinder V2 Lite is installed. • DeskTopBinder V2 Lite Introduction Guide (PDF file - CD-ROM2) Describes operations of DeskTopBinder V2 Lite and provides an overview of its functions. This guide is added to the >6WDUW@ menu when DeskTopBinder V2 Lite is installed. i • Auto Document Link Guide (PDF file - CD-ROM2) Describes operations and functions of Auto Document Link installed with DeskTopBinder V2 Lite. This guide is added to the >6WDUW@ menu when DeskTopBinder V2 Lite is installed. ❖ 0DQXDOVIRU6FDQ5RXWHU9/LWH ScanRouter V2 Lite is a utility included on the CD-ROM labeled “Scanner Driver & Document Management Utilities”. • ScanRouter V2 Lite Setup Guide (PDF file - CD-ROM2) Describes installation of, settings, and the operating environment for ScanRouter V2 Lite in detail. This guide can be displayed from the >6HWXS@ dialog box when ScanRouter V2 Lite is installed. • ScanRouter V2 Lite Management Guide (PDF file - CD-ROM2) Describes delivery server management and operations, and provides an overview of ScanRouter V2 Lite functions. This guide is added to the >6WDUW@ menu when ScanRouter V2 Lite is installed. ❖ 2WKHUPDQXDOV • PS3 Supplement (PDF file - CD-ROM1) • Unix Supplement (Available from an authorized dealer, or as a PDF file on our Web site.) ii TABLE OF CONTENTS 0DQXDOVIRU7KLV0DFKLQH L 1RWLFH &RS\ULJKWVDQG7UDGHPDUNV 7UDGHPDUNV ,QIRUPDWLRQDERXW,QVWDOOHG6RIWZDUH +RZWR5HDG7KLV0DQXDO 6DIHW\,QIRUPDWLRQ 6DIHW\'XULQJ2SHUDWLRQ 3RVLWLRQVRI/DEHOVDQG+DOOPDUNVIRUR:$51,1*DQGR&$87,21 (1(5*<67$53URJUDP 0DFKLQH7\SHV 1. What You Can Do with This Machine $YDLODEOH)XQFWLRQV &RSLHU0RGH 3ULQWHU0RGH 6FDQQHU0RGH 'RFXPHQW6HUYHU0RGH 8VHU0DQDJHPHQW 6HFXULW\)XQFWLRQV 2. Getting Started *XLGHWR&RPSRQHQWV ([WHUQDO2SWLRQV &RQWURO3DQHO 'LVSOD\3DQHO 7XUQLQJ2QWKH3RZHU 7XUQLQJ2QWKH0DLQ3RZHU 7XUQLQJ2QWKH3RZHU 7XUQLQJ2IIWKH3RZHU 7XUQLQJ2IIWKH0DLQ3RZHU 3. Combined Function Operations &KDQJLQJ0RGHV 6DYLQJ(QHUJ\ -RE/LVW 0XOWL$FFHVV iii 4. Document Server 5HODWLRQVKLSEHWZHHQ'RFXPHQW6HUYHUDQG2WKHU)XQFWLRQV 'RFXPHQW6HUYHU'LVSOD\ 8VLQJWKH'RFXPHQW6HUYHU 6WRULQJ'DWD &KDQJLQJWKH)LOH1DPH8VHU1DPHRU3DVVZRUG 7R&KHFN'HWDLOVRI6WRUHG'RFXPHQWV 6HDUFKLQJIRU6WRUHG'RFXPHQWV 3ULQWLQJ6WRUHG'RFXPHQWV 3ULQW6HOHFWHG3DJHV (GLW)LOH 'HOHWLQJ6WRUHG'RFXPHQWV 9LHZLQJ6WRUHG'RFXPHQWVRQWKH:HE%URZVHU 'RZQORDGLQJ6WRUHG'RFXPHQWV )XQFWLRQV$YDLODEOHLQ'RFXPHQW6HUYHU0RGH 6HWWLQJVIRUWKH'RFXPHQW6HUYHU 5. User Tools (System Settings) 8VHU7RROV0HQX6\VWHP6HWWLQJV $FFHVVLQJ8VHU7RROV6\VWHP6HWWLQJV &KDQJLQJWKH'HIDXOW ([LWLQJ8VHU7RROV 6HWWLQJV<RX&DQ&KDQJHZLWK8VHU7RROV *HQHUDO)HDWXUHV 7LPHU6HWWLQJ .H\2SHUDWRU7RROV 8VHU&RGHV 5HJLVWHULQJD1HZ8VHU&RGH &KDQJLQJD8VHU&RGH 'HOHWLQJD8VHU&RGH 'LVSOD\LQJWKH&RXQWHUIRU(DFK8VHU&RGH 3ULQWLQJWKH&RXQWHUIRU(DFK8VHU&RGH &OHDULQJWKH&RXQWHU (PDLO'HVWLQDWLRQ 5HJLVWHULQJDQ(PDLO$GGUHVV &KDQJLQJD5HJLVWHUHG(PDLO'HVWLQDWLRQ 'HOHWLQJD5HJLVWHUHG(PDLO$GGUHVV 5HJLVWHULQJ(PDLO'HVWLQDWLRQVWRD*URXS 5HJLVWHULQJD1HZ*URXS 5HJLVWHULQJ(PDLO'HVWLQDWLRQVWRD*URXS 'HOHWLQJDQ(PDLO'HVWLQDWLRQIURPD*URXS 'LVSOD\LQJWKH'HVWLQDWLRQV5HJLVWHUHGLQ*URXSV &KDQJLQJD*URXS1DPH 'HOHWLQJD*URXS (QWHULQJ7H[W $YDLODEOH&KDUDFWHUV .H\V (QWHULQJ7H[W iv 6. Paper Tray Settings $FFHVVLQJ3DSHU7UD\6HWWLQJV &KDQJLQJ3DSHU7UD\6HWWLQJV ([LWLQJ3DSHU7UD\6HWWLQJV 6HWWLQJV<RX&DQ&KDQJHZLWK8VHU7RROV 7UD\3DSHU6HWWLQJV 'HVLJQDWLRQ6KHHW )URQW&RYHU %DFN&RYHU 6OLS6KHHWV 6HSDUDWLRQ6KHHWV 7. Troubleshooting ,I<RXU0DFKLQH'RHV1RW2SHUDWHDV<RX:DQW *HQHUDO 'RFXPHQW6HUYHU B/RDGLQJ3DSHU /RDGLQJ3DSHULQ7UD\7DQGHP7UD\ /RDGLQJ3DSHULQ7UD\DQG /RDGLQJ3DSHULQWKH/DUJH&DSDFLW\7UD\7UD\7UD\DQG7UD\ /RDGLQJ3DSHULQWKH2SWLRQDO$×7UD\.LW /RDGLQJ3DSHULQWKH,QWHUSRVHU 3DXVLQJ&RS\:KHQ8VLQJ)LQLVKHU%±6KHHW6WDSOHV D$GGLQJ7RQHU 5HSODFLQJ7RQHU x&OHDULQJ0LVIHHGV &KDQJLQJWKH3DSHU6L]H &KDQJLQJWKH3DSHU6L]HRIWKH2SWLRQDO$×7UD\8QLW7UD\ &KDQJLQJWKH3DSHU6L]HLQ7UD\RU &KDQJLQJWKH3DSHU6L]HRIWKH/DUJH&DSDFLW\7UD\7UD\DQG d$GGLQJ6WDSOHV %RRNOHW)LQLVKHU %RRNOHW)LQLVKHU6DGGOH6WLWFK )LQLVKHU%6KHHW6WDSOHV e5HPRYLQJ-DPPHG6WDSOHV %RRNOHW)LQLVKHU %RRNOHW)LQLVKHU6DGGOH6WLWFK )LQLVKHU%6KHHW6WDSOHV y5HPRYLQJ3XQFK:DVWH v 8. Remarks 'R VDQG'RQ WV 7RQHU +DQGOLQJ7RQHU 7RQHU6WRUDJH 8VHG7RQHU :KHUHWR3XW<RXU0DFKLQH 0DFKLQH(QYLURQPHQW 0RYLQJ 3RZHU&RQQHFWLRQ $FFHVVWRWKH0DFKLQH 0DLQWDLQLQJ<RXU0DFKLQH &OHDQLQJWKH([SRVXUH*ODVV &OHDQLQJWKH$XWR'RFXPHQW)HHGHU 2WKHU)XQFWLRQV ,QTXLU\ &KDQJLQJWKH'LVSOD\/DQJXDJH &RXQWHU 9. Security 6HFXULW\ 3ULPDU\6HFXULW\)XQFWLRQV ([WHQGHG6HFXULW\)XQFWLRQ 7HPSRUDULO\'LVDEOLQJ'RFXPHQW6HFXULW\ 2SHUDWLQJ(QYLURQPHQWDQG1RWHV 2SHUDWLQJ(QYLURQPHQW )RU$GPLQLVWUDWRU )RU8VHU 10.Specification 0DLQ0DFKLQH 'RFXPHQW6HUYHU $XWR'RFXPHQW)HHGHU 2SWLRQV %RRNOHW)LQLVKHU )LQLVKHU%6KHHW6WDSOHV /DUJH&DSDFLW\7UD\ 0XOWL%\SDVV7UD\7UD\ ,QWHUSRVHU 3XQFK8QLW 2WKHUV &RS\3DSHU 5HFRPPHQGHG3DSHU6L]HVDQG7\SHV 1RQUHFRPPHQGHG3DSHU 3DSHU6WRUDJH ,1'(; vi Notice ,PSRUWDQW Do not make copies of any item for which copying is prohibited by law. Copying the following items is normally prohibited by local law: Bank bills, revenue stamps, bonds, stock certificates, bank drafts, checks, passports, driver's licenses. This machine is equipped with a function that prevents making counterfeit bank bills. Due to this, images similar to bank bills may not be copied properly. 1 Copyrights and Trademarks 7UDGHPDUNV Ethernet is a registered trademark of Xerox Corporation. Microsoft, Windows and Windows NT are registered trademarks of Microsoft Corporation in the United States and/or other countries. Novell, NetWare and NDS are registered trademarks of Novell, Inc. PostScript® is a registered trademark of Adobe Systems Incorporated. Other product names used herein are for identification purposes only and may be trademarks of their respective companies. We disclaim any and all rights to those marks. The proper names of the Windows operating systems are as follows: • The product name of Windows® 95 is Microsoft® Windows 95. • The product name of Windows® 98 is Microsoft® Windows 98. • The product name of Windows® Me is Microsoft® Windows Millennium Edition (Windows Me). • The product names of Windows® XP are as follows: Microsoft® Windows® XP Professional Microsoft® Windows® XP Home Edition • The product names of Windows® 2000 are as follows: Microsoft® Windows® 2000 Advanced Server Microsoft® Windows® 2000 Server Microsoft® Windows® 2000 Professional • The product names of Windows NT® 4.0 are as follows: Microsoft® Windows NT® Server 4.0 • Microsoft® Windows NT® Workstation 4.0 ,QIRUPDWLRQDERXW,QVWDOOHG6RIWZDUH H[SDW • The software including controller, etc. (hereinafter “software”) installed on this product uses the expat Version 1.95.2 (hereinafter “expat”) under the conditions mentioned below. • The product manufacturer provides warranty and support to the software of the product including the expat, and the product manufacturer makes the initial developer and copyright holder of the expat, free from these obligations. • Information relating to the expat is available at: http://expat.sourceforge.net/ 2 Copyright (c) 1998, 1999, 2000 Thai Open Source Software Centre, Ltd. and Clark Cooper. Permission is hereby granted, free of charge, to any person obtaining a copy of this software and associated documentation files (the “Software”), to deal in the Software without restriction, including without limitation the rights to use, copy, modify, merge, publish, distribute, sublicense, and/or sell copies of the Software, and to permit persons to whom the Software is furnished to do so, subject to the following conditions: The above copyright notice and this permission notice shall be included in all copies or substantial portions of the Software. THE SOFTWARE IS PROVIDED “AS IS”, WITHOUT WARRANTY OF ANY KIND, EXPRESS OR IMPLIED, INCLUDING BUT NOT LIMITED TO THE WARRANTIES OF MERCHANTABILITY, FITNESS FOR A PARTICULAR PURPOSE AND NONINFRINGEMENT. IN NO EVENT SHALL THE AUTHORS OR COPYRIGHT HOLDERS BE LIABLE FOR ANY CLAIM, DAMAGES OR OTHER LIABILITY, WHETHER IN AN ACTION OF CONTRACT, TORT OR OTHERWISE, ARISING FROM, OUT OF OR IN CONNECTION WITH THE SOFTWARE OR THE USE OR OTHER DEALINGS IN THE SOFTWARE. $XWKRUV1DPH/LVW All product names mentioned herein are trademarks of their respective owners. The following notices are required to satisfy the license terms of the software that we have mentioned in this document: • This product includes software developed by the University of California, Berkeley and its contributors. • This product includes software developed by Jonathan R. Stone for the NetBSD Project. • This product includes software developed by the NetBSD Foundation, Inc. and its contributors. • This product includes software developed by Manuel Bouyer. • This product includes software developed by Charles Hannum. • This product includes software developed by Charles M. Hannum. • This product includes software developed by Christopher G. Demetriou. • This product includes software developed by TooLs GmbH. • This product includes software developed by Terrence R. Lambert. • This product includes software developed by Adam Glass and Charles Hannum. • This product includes software developed by Theo de Raadt. • This product includes software developed by Jonathan Stone and Jason R. Thorpe for the NetBSD Project. • This product includes software developed by the University of California, Lawrence Berkeley Laboratory and its contributors. 3 • This product includes software developed by Christos Zoulas. • This product includes software developed by Christopher G. Demetriou for the NetBSD Project. • This product includes software developed by Paul Kranenburg. • This product includes software developed by Adam Glass. • This product includes software developed by Jonathan Stone. • This product includes software developed by Jonathan Stone for the NetBSD Project. • This product includes software developed by Winning Strategies, Inc. • This product includes software developed by Frank van der Linden for the NetBSD Project. • This product includes software developed for the NetBSD Project by Frank van der Linden. • This product includes software developed for the NetBSD Project by Jason R. Thorpe. • The software was developed by the University of California, Berkeley. • This product includes software developed by Chris Provenzano, the University of California, Berkeley, and contributors. 4 How to Read This Manual 6\PEROV In this manual, the following symbols are used: R:$51,1* This symbol indicates a potentially hazardous situation that might result in death or serious injury if you use the machine without following the instructions under this symbol. Be sure to read the instructions, all of which are included in the Safety Information section. R&$87,21 This symbol indicates a potentially hazardous situation that may result in minor or moderate injury or damage; not injury if you use the machine without following the instructions under this symbol. Be sure to read the instructions, all of which are included in the Safety Information section. * The statements above are notes for your safety. ,PSRUWDQW If this instruction is not followed, paper might misfeed, originals damaged, or data lost. Be sure to read this. 3UHSDUDWLRQ This symbol indicates prior knowledge or preparation is required before operation. 1RWH This symbol indicates precautions for operation, or actions to take after misoperation. /LPLWDWLRQ This symbol indicates numerical limits, functions that cannot be used together, or conditions in which a particular function cannot be used. 5HIHUHQFH This symbol indicates a reference. > @ Keys that appear on the machine's display panel. { } Keys built into the machine's control panel. 1RWLFH • The image of the display panel may differ depending on installed options. 5 Safety Information When using this machine, the following safety precautions should always be followed. 6DIHW\'XULQJ2SHUDWLRQ In this manual, the following important symbols are used: R:$51,1* ,QGLFDWHVDSRWHQWLDOO\KD]DUGRXVVLWXDWLRQZKLFKLILQVWUXFWLRQV DUHQRWIROORZHGFRXOGUHVXOWLQGHDWKRUVHULRXVLQMXU\ R&$87,21 ,QGLFDWHVDSRWHQWLDOO\KD]DUGRXVVLWXDWLRQZKLFKLILQVWUXFWLRQVDUHQRW IROORZHGPD\UHVXOWLQPLQRURUPRGHUDWHLQMXU\RUGDPDJHWRSURSHUW\ R:$51,1* &RQQHFWWKHSRZHUFRUGGLUHFWO\LQWRDZDOORXWOHWDQGQHYHUXVHDQH[ WHQVLRQFRUG 'LVFRQQHFWWKHSRZHUSOXJE\SXOOLQJWKHSOXJQRWWKHFDEOHLIWKH SRZHUFDEOHRUSOXJEHFRPHVIUD\HGRURWKHUZLVHGDPDJHG 7RDYRLGKD]DUGRXVHOHFWULFVKRFNRUODVHUUDGLDWLRQH[SRVXUHGRQRW UHPRYHDQ\FRYHUVRUVFUHZVRWKHUWKDQWKRVHVSHFLILHGLQWKLVPDQ XDO 7XUQRIIWKHSRZHUDQGGLVFRQQHFWWKHSRZHUSOXJE\SXOOLQJWKHSOXJ QRWWKHFDEOHLIDQ\RIWKHIROORZLQJRFFXUV <RXVSLOOVRPHWKLQJLQWRWKHPDFKLQH <RXVXVSHFWWKDW\RXUPDFKLQHQHHGVVHUYLFHRUUHSDLU 7KHH[WHUQDOKRXVLQJRI\RXUPDFKLQHKDVEHHQGDPDJHG 'RQRWLQFLQHUDWHVSLOOHGRUXVHGWRQHU7RQHUGXVWPLJKWLJQLWHZKHQ H[SRVHGWRDQRSHQIODPH 'LVSRVDORIWRQHUFDQWDNHSODFHDWRXUDXWKRUL]HGGHDOHU 'LVSRVHRIWKHXVHGWRQHUERWWOHLQDFFRUGDQFHZLWKORFDOUHJXODWLRQV 'RQRWUHPRYHWKHWRQHUERWWOHIXVHUXQLWGXSOH[XQLWDQGSDSHUWUD\ DOODWRQFH7KHPDFKLQHPLJKWIDOODQGFDXVHLQMXU\0DNHVXUHWRILUVW UHWXUQHDFKFRPSRQHQWEDFNWRLWVRULJLQDOSRVLWLRQEHIRUHFKHFNLQJ RWKHUFRPSRQHQWV 6 R&$87,21 3URWHFWWKHPDFKLQHIURPGDPSQHVVRUZHWZHDWKHUVXFKDVUDLQDQGVQRZ 8QSOXJWKHSRZHUFRUGIURPWKHZDOORXWOHWEHIRUH\RXPRYHWKHPDFKLQH :KLOHPRYLQJWKHPDFKLQH\RXVKRXOGWDNHFDUHWKDWWKHSRZHUFRUGZLOOQRW EHGDPDJHGXQGHUWKHPDFKLQH :KHQ\RXGLVFRQQHFWWKHSRZHUSOXJIURPWKHZDOORXWOHWDOZD\VSXOOWKH SOXJQRWWKHFDEOH 'RQRWDOORZSDSHUFOLSVVWDSOHVRURWKHUVPDOOPHWDOOLFREMHFWVWRIDOOLQVLGH WKHPDFKLQH .HHSWRQHUXVHGRUXQXVHGDQGWRQHUERWWOHRXWRIWKHUHDFKRIFKLOGUHQ )RUHQYLURQPHQWDOUHDVRQVGRQRWGLVSRVHRIWKHPDFKLQHRUH[SHQGHG VXSSO\ZDVWHDWKRXVHKROGZDVWHFROOHFWLRQSRLQWV'LVSRVDOFDQWDNHSODFH DWDQDXWKRUL]HGGHDOHU 7KHLQVLGHRIWKHPDFKLQHFRXOGEHYHU\KRW'RQRWWRXFKWKHSDUWVZLWKD ODEHOLQGLFDWLQJWKH³KRWVXUIDFH´2WKHUZLVHDQLQMXU\PLJKWRFFXU 2XUSURGXFWVDUHHQJLQHHUHGWRPHHWKLJKVWDQGDUGVRITXDOLW\DQGIXQFWLRQ DOLW\DQGZHUHFRPPHQGWKDW\RXXVHRQO\WKHH[SHQGDEOHVXSSOLHVDYDLOD EOHDWDQDXWKRUL]HGGHDOHU 7 Positions of Labels and Hallmarks for RWARNING and RCAUTION This machine has labels and markings for RWARNING,RCAUTION at the positions shown below. For safety, please follow the instructions and handle the machine as indicated. Finisher 3000B(Staple Cartridge) ZJBH470E 8 ENERGY STAR Program As an ENERGY STAR Partner, we have determined that this machine model meets the ENERGY STAR Guidelines for energy efficiency. The ENERGY STAR Guidelines intend to establish an international energy-saving system for developing and introducing energy-efficient office equipment to deal with environmental issues, such as global warming. When a product meets the ENERGY STAR Guidelines for energy efficiency, the Partner shall place the ENERGY STAR logo onto the machine model. This product was designed to reduce the environmental impact associated with office equipment by means of energy-saving features, such as Low-power mode. • Low Power Mode This product automatically lowers its power consumption 15 minutes after the last copy or print job has finished. Printing is still possible in Low Power Mode, but if you want to make copies press the {(QHUJ\6DYHU} key first. 5HIHUHQFH For details about how to change the default interval, see p.66 “Energy Saver Timer”. • Off Mode (Copier only) To conserve energy, this product automatically turns off 90 minutes (Type 2: 120 minutes) after completing the last copy or print job. Printing is still possible in Off Mode, but if you want to make copies, press the operation switch first. 5HIHUHQFH For details about how to change the default interval, see p.66 “Auto Off Timer”. • Sleep Mode (Printer, Scanner installed) If the printer features are installed, this product automatically lowers its power consumption even further 90 minutes (Type 2: 120 minutes) after completing the last copy or print job. Printing is still possible in Sleep Mode, but if you want to make copies press the operation switch first. 5HIHUHQFH For details about how to change the default interval, see p.66 “Auto Off Timer”. 9 • Duplex Priority The ENERGY STAR Program recommends use of the Duplex function. By conserving paper, this function has environmental benefits. For applicable machines, duplex function (one-sided original → two-sided copies) is selected when the operation switch or the main power switch is turned on, the {(Q HUJ\6DYHU} key is pressed, or when the machine resets automatically. 5HIHUHQFH To change the settings of the Duplex Priority mode, see “Duplex Mode Priority”, Copy Reference. 6SHFLILFDWLRQ Low Power Mode Off Mode Sleep Mode Duplex Priority Copying function only Multiple function printer with copying, printing, scanning functions Type 1 Type 2 Type 1 Type 2 Power consumption 340 W 350 W 345 W 355 W Default interval 15 minutes 15 minutes Recovery Time 40 sec. 40 sec. Power consumption 6W -- Default interval 90 minutes Recovery Time 360 sec. or less -- Power consumption -- 50 W Default interval -- 90 minutes Recovery Time -- 360 sec. or less 120 minutes -- 120 minutes 1 Sided → 2 Sided ❖ 5HF\FOHG3DSHU In accordance with the ENERGY STAR Program, we recommend use of environmentally friendly recycled paper. Contact your sales representative for recommended paper. 10 Machine Types This machine comes in two models that differ by copy speed. To determine which model you have, see the machine's inside front cover. Type 1 Copy speed Type 2 90 copies/minute (A4K, 81/2" 105 copies/minute (A4K, 81/2" × 11"K) × 11"K) 11 12 1. What You Can Do with This Machine Available Functions You can use this machine as a copier, printer, or scanner. This machine also has a Document Server function which has File Merge, Insert Printing and On Demand Printing functions. GXMFPZ2E &RSLHU0RGH In copier mode you can make basic copies and also copy using more sophisticated techniques, such as reduction/enlargement or combining several originals onto one copy. You can install several options for using sort, staple, and saddle stitch functions. 3ULQWHU0RGH You can print documents under various environments. 6FDQQHU0RGH You can use this machine as a network scanner. It is also possible to e-mail the scanned image as an attached file via the LAN, or Internet. 13 :KDW<RX&DQ'RZLWK7KLV0DFKLQH 'RFXPHQW6HUYHU0RGH You can save the documents from copy and printer functions to the hard disk. Documents can be printed later, or the machine can be controlled from the computer. Scanned, copied, or printed documents can be stored on the hard disk, or you can view the document's thumbnails on the computer. The documents can also be downloaded to the computer. *1 *1 The stored documents can be viewed, printed, or downloaded using the Web browser. These functions are also available when DeskTopBinder V2 Professional/Lite is installed in the computer. The machine shown below is equipped with options. GXDOCU3E 1RWH ❒ You can save the following: • Data from documents scanned using the Auto Document Feeder (ADF), and the exposure glass • Data sent from a computer ,PSRUWDQW ❒ Do not turn off the main power switch when the On indicator is lit or blink- ing. If you turn it off during an operation, the memory or hard disk might be damaged. ❒ The machine should not be subjected to strong impacts. Strong shocks damage the hard disk or delete stored files. 14 $YDLODEOH)XQFWLRQV ❖ 2Q'HPDQG3ULQWLQJ If you save a document in the Document Server, you can print it out at any time using print settings such as duplex and stapling. ❖ )LOH3ULQWLQJ You can merge and print documents stored in the Document Sever, sent from a computer, or scanned. ❖ 2SHUDWLRQIURPFRPSXWHU If you install DeskTopBinder V2 Professional (optional) or DeskTopBinder V2 Lite on the computer, you can check the contents of stored documents, print copies for confirmation and perform other operations. These operations are also possible using the Web browser. You can also perform operations on data stored in the Document Server from the computer, rather than from the machine. 5HIHUHQFH For more detailed information, see the DeskTopBinder V2 Professional/Lite manuals. For more information about the Web browser, see p.52 “Viewing Stored Documents on the Web Browser” and Network Guide. 15 :KDW<RX&DQ'RZLWK7KLV0DFKLQH 8VHU0DQDJHPHQW You can limit users of the machine, and restrict certain functions with user codes. You can limit the user of the key operator tools to the key operator only. See p.69 “Key Operator Code”. 8VLQJWKH8VHU&RGH The user is requested to enter a registered user code to operate the machine. You can check machine use by each user. ❖ 0DQDJLQJLWHPV • You can set the functions permitted to each user, as shown below. • You can output list of usage amounts for each user. The functions you can restrict are as follows: Function Limitation Usage amount management Copy ❍ ❍ Printer ❍ ❍/Auto program Scanner ❍ ❍(manages the number of scannes) Document Server *1 ❍ (depending on the mode to store the document) *1 When you print the documents by pressing the {'RFXPHQW6HUYHU} key, the copy counter shows the number of copies for the documents stored in copy and Document Server mode, and the print counter shows the number of documents stored in printer mode. 5HIHUHQFH p.69 “User Code Management” and p.75 “User Codes” 6HFXULW\)XQFWLRQV The security functions protect the documents from being copied without permission or unauthorized access through the network. See p.149 “Security”. ❖ 6HFXULW\)XQFWLRQV • Protecting stored documents (setting passwords) • Protecting data remaining in memory • Authenticating administrator (setting the key operator code). See p.69 “Key Operator Code”. 16 ❖ ([WHQGHG6HFXULW\)XQFWLRQ By setting a password, documents will be protected from illegitimate accesses. See p.74 “Extended Security”. 2. Getting Started Guide to Components ZJBH030N 1. Exposure glass 7. Paper tray Place single-page originals here face down for copying. Place copy paper here. Tray 1 is a tandem tray where paper on the left side automatically moves to the right when paper there has run out. 2. Auto Document Feeder (ADF) The ADF automatically feeds a stack of originals one by one. 8. Main power switch This indicator lights when you press the operation switch. Press to turn the main power on or off. We recommend you only turn this switch off when the machine is not going to be used for an extended period of time (e.g. over a vacation). See p.24 “Turning On the Power”. 5. Operation switch 9. Toner cover Press when you want to use the machine. The On indicator lights when this switch is pressed. See p.24 “Turning On the Power”. 10. Suspend/Resume switch 3. Control panel See p.20 “Control Panel”. 4. On indicator 6. Front cover Open to remove misfed paper. Open to change the toner bottle. Press to momentarily stop copying. Pressing again resumes the stopped operation. 17 *HWWLQJ6WDUWHG ZJBH040E 1. Ventilation hole Prevents overheating. Do not obstruct the ventilation hole by placing or leaning an object near it. If the machine overheats, a fault might occur. 18 ([WHUQDO2SWLRQV External Options 4 5 *1 *2 *4 *5 6 *3 1 2 3 1. Booklet finisher 4. A3/11" × 17" tray unit Sorts, stacks, staples, and punches copies. The saddle stitch function is also available. *1: Finisher upper tray *2: Finisher shift tray 1 *3: Finisher shift tray 2 Holds A3/11" × 17" size paper. 2. Finisher 3000B (100-sheet staples) Sorts, stacks, staples, and punches copies (optional punch unit required) *4: Finisher upper tray *5: Finisher shift tray 3. Interposer Inserts cover or slip sheets between copies. 1RWH ❒ If you install the A3/11" × 17" tray unit on your machine, you cannot use it as a tandem tray. 5. Multi bypass tray (Tray 7) This tray can be used the same way as others. 6. Large Capacity Tray (LCT) Holds 4,550 sheets of paper. Other options: • Punch Unit • Output Jogger 19 *HWWLQJ6WDUWHG Control Panel ZJAS060N 1. Status indicator Machine status is described by this indicator. By default, this indicator is turned off. You can select the status indicator lit or not. See p.63 “Status Indicator”. 1RWH ❒ If the status indicator is blinking red, paper jam has occurred in the current copy job. Bring up the current job screen. The main power switch is turned off or ready to make copies. 2. {6FUHHQ&RQWUDVW} knob Flashing green Scanning originals Lit green Copying (ready to scan originals) Press to change the language of the display. Flashing red Toner has nearly run out. Off Lit red Paper jam or other malfunction Adjusts display panel brightness. 3. {/DQJXDJH6HOHFWLRQ} key 4. {&KHFN0RGHV} key Press to check settings. 5. {,QWHUUXSW} key Press to make interrupt copies during a copy run. See “Interrupt Copy”, Copy Reference. 6. {(QHUJ\6DYHU} key 20 Switch to and from Energy Saver mode. See p.28 “Saving Energy”. &RQWURO3DQHO 7. {&OHDU0RGHV} key 17. {-RE/LVW} key Press to clear previously entered copy job settings. Shows the job list for a copy job or jobs stored in the Document Server. 8. {3URJUDP} key 18. {1HZ-RE} key Press to register or recall a program. See “Program”, Copy Reference. Use this key to set up the next copy job while a copy job or storing data in the Document Server is in progress. 9. {6WRS} key Press to stop a job in progress such as scanning originals, or printing. 10. {6WDUW} key Press to start copying, scanning, or printing documents. 11. {6DPSOH&RS\} key Press to make a single set of copies or prints before starting a long copy run. By checking a sample set and making necessary changes to image quality settings before starting a multiple copy run, you can save time and paper. See p.46 “Sample copy”. 12. {&OHDU} key Press to delete a number entered. 13. {} key Show errors and machine status. B: Data In indicator. See p.32 “Multi-Access”. L: Service Call indicator x: Misfeed indicator. See p.113 “x Clearing Misfeeds”. M: Open Cover indicator d: Add Staple indicator. See p.127 “d Adding Staples”. D: Add Toner indicator. See p.111 “D Adding Toner”. 20. {&RXQWHU} key Press to see the total number of copies made. See p.148 “Counter”. 21. {8VHU7RROV} key Use to enter the number of copies. Press to access the User Tools menu where you can customize default settings. See p.57 “User Tools (System Settings)”. 15. Function keys 22. {7UD\3DSHU6HWWLQJV} key Press to enter a value or confirm a setting. 14. Number keys Press the appropriate key to select one of the functions. • Copier • Document Server • Printer • Scanner 19. Indicators Specify the paper tray settings for delivery. See p.93 “Paper Tray Settings”. 23. Display panel Shows operation status, error messages, and function menus. See p.23 “Display Panel”. 16. Function status indicators These show the status of the functions. • Green: active. • Red: interrupted. Press the function key to change the display, and then follow the displayed instructions. 21 *HWWLQJ6WDUWHG 1RWH ❒ You can adjust the angle of the control panel. 22 &RQWURO3DQHO 'LVSOD\3DQHO The display panel shows machine status, error messages, and function menus. ,PSRUWDQW ❒ A force or impact of more than 30 N (about 3 kgf) will damage the display panel. The default is to display the screen for copying when you first turn the power on. The function items displayed serve as selector keys. You can select or specify an item by lightly pressing them. When you select or specify an item on the display panel, it is highlighted like this: . Keys appearing as cannot be used. ❖ ,QLWLDO&RS\'LVSOD\ 4 3 2 5 6 7 1 8 1. Original mode, Image Density and Special Original mode. 6. Sort, Stack, Staple or Punch 2. Operational messages. 3. Operational status. 4. The number of originals, copies, 7. Functions you can select. Press an and printed pages. 8. This indicator shows when toner 5. You can register up to two fre- mode. item to bring up its function menu e.g. press >5HGXFH(QODUJH@ to bring up the Reduce/Enlarge menu. has nearly run out. quently used reduce/enlarge ratios other than the fixed reduce/enlarge ratios. 23 *HWWLQJ6WDUWHG Turning On the Power This machine has two power switches. ❖ 2SHUDWLRQVZLWFKULJKWIURQWVLGHRIWKHH[SRVXUHJODVV Press to activate the machine. Once the machine has warmed up, you can make copies. ❖ 0DLQSRZHUVZLWFKOHIWVLGHRIWKHPDFKLQH When the machine will not be used for an extended period of time, turn off the main power switch. 1RWH ❒ This machine automatically goes into Low Power mode, or turns itself off if you do not use it for a specified period of time. See p.66 “Auto Off Timer” and p.66 “Energy Saver Timer”. 7XUQLQJ2QWKH0DLQ3RZHU A Make sure the power cord is firmly plugged into the wall outlet. B Turn on the main power switch. Make sure that the main powr indicator lights up. ,PSRUWDQW ❒ Do not turn off the main power immediately after switching it on. Doing so may result in damage to the hard disk or memory, leading to malfunction. 24 7XUQLQJ2QWKH3RZHU 7XUQLQJ2QWKH3RZHU A Press the operation switch to make the On indicator light up. 1RWH ❒ If the power is not turned on when the operation switch is pressed, check the main power switch is on. If off, turn it on. 7XUQLQJ2IIWKH3RZHU A Press the operation switch to make the On indicator go out. 1RWH ❒ Even if you press the operation switch, the indicator remains lit and blinks in the following cases: • When communication with external equipment is in progress. • When the hard disk is active. 7XUQLQJ2IIWKH0DLQ3RZHU ,PSRUWDQW ❒ Do not turn off the main power switch when the On indicator is lit or blink- ing. Doing so may result in damage to the hard disk or memory, leading to malfunction. ❒ Pull out the power cord after turning off the main power switch. Not doing so may result in damage to the hard disk or memory, leading to malfunction. A Make sure the On indicator is unlit. B Turn off the main power switch. Make sure that the main power indicator goes out. 25 *HWWLQJ6WDUWHG 26 3. Combined Function Operations Changing Modes 1RWH ❒ You cannot switch modes when accessing user tools or during interrupt cop- ying. ❒ The default display is the screen for copying, which appears when you turn the power on. You can change this setting. For details about such settings, see p.62 “Function Priority”. ZJBH490N 27 &RPELQHG)XQFWLRQ2SHUDWLRQV 6DYLQJ(QHUJ\ - Low Power Mode If you do not operate the machine for a specified period of time after an operation, or when you press the {(QHUJ\6DYHU} key, the display disappears and the machine goes into Low Power mode. When you press the {(QHUJ\6DYHU} key again, the machine returns to the “Ready” status. In Low Power mode, the machine uses less electricity. 1RWH ❒ You can change the Panel Off Timer. See p.67 “Panel Off Timer”. - System Reset The machine automatically returns to its initial condition when a job is finished, after a specified period of time. This function is called “System Reset”. 1RWH ❒ You can change the System Reset Timer. See p.67 “System Auto Reset Timer”. - Auto Off The machine automatically turns itself off after a job is finished, after a specified period of time. This function is called “Auto Off”. 1RWH ❒ You can change the Auto Off Timer. See p.66 “Auto Off Timer”. ❒ Auto Off Timer will not operate in the following cases: • • • • • • • • • 28 When a warning message appears When the service call message appears When paper is jammed When the cover is open When the “Adding Toner” message appears When toner is being added When the User Tools or Counter screen is displayed When fixed warm-up is in progress When printer or other functions are operating &KDQJLQJ0RGHV • When operations have been interrupted during printing • When the Data In indicator is on or blinking • When the sample print or confidential print screen is displayed -RE/LVW In the Job List, you can check and delete the contents of jobs in the print queue and jobs currently printing. 1RWH ❒ In the Job List, jobs reserved using copy mode and Document Server mode are displayed. When >3ULQW3ULRULW\@ in System Settings is set to >-RE2UGHU@, jobs reserved using copy mode, printer mode, Document Server mode, Web browser, DeskTopBinder V2 Professional (optional) or DeskTopBinder V2 Lite are displayed. ❒ You can set the length of interval between the end of a job and the start of a new job with the User Tools. See p.65 “Time Interval between Printing Jobs”. Even if you have set the interval, you can start printing a job before the set time has elapsed by pressing >6WDUW3ULQWLQJ@. 5HIHUHQFH For setting the time interval, see p.65 “Time Interval between Printing Jobs”. For setting Web browser, see Web browser's Help menu, and for setting DeskTopBinder V2 Professional (optional) or DeskTopBinder V2 Lite, see the manuals. &KHFNLQJWKHOLVW A Press the {-RE/LVW} key. The job list appears. 29 &RPELQHG)XQFWLRQ2SHUDWLRQV B Select the number of the job you want to check. The icons below show the operation mode of stored documents. Job printed using copy mode. Job printed using printer mode. Job printed using Document Server mode. Job printed using DeskTopBinder V2 Professional/Lite Job printed using Web browser. 1RWH ❒ If more than ten jobs are registered, press >U3UHYLRXV@ or >T1H[W@ to scroll the screen. C Press >'HWDLO@. D Check the contents of the list. E Press >2.@. The display returns to the job list menu. &KDQJLQJWKHRUGHURIMREV A Press the {-RE/LVW} key. B Select the number of the job you want to change the order. 1RWH ❒ You can change the order of jobs only in standby mode. C Press >&KDQJH2UGHU@. D Change the order using >U3UHYLRXV@ or >T1H[W@. E Press >2.@. 30 &KDQJLQJ0RGHV 'HOHWLQJMREV A Press the {-RE/LVW} key. The job list appears. B Select the number of the job to be deleted. 1RWH ❒ You can delete a job during printing. C Press >'HOHWH-RE@. D Press ><HV@. The display returns to the job list menu. 31 &RPELQHG)XQFWLRQ2SHUDWLRQV Multi-Access You can carry out another job using a different function while the current job is being performed. Performing multiple functions simultaneously like this is called “Multi-Access”. This allows you to handle jobs efficiently, regardless of how the machine is being used. For example: • While making copies, you can scan documents to store in the Document Server. • While printing documents saved in the Document Server, the machine can receive print data. • While printing print data, you can set coppying operations. 1RWH ❒ You can set the priority of functions, see p.63 “Print Priority”. As default, the “Display Mode” is set to first priority. - Sample operations The tables on the following pages show sample operations for when “Print Priority” is set to “Interleave”. See p.63 “Print Priority”. |: Simultaneous operations are available. $: Operation is enabled when the relevant function key is pressed and remote switching (of the scanner) is done. ❍: Operation is enabled when the {,QWHUUXSW} key is pressed to interrupt the current operation. →: Operation is performed automatically once the current operation ends. ×: The operation must be started once the current operation ends. (Simultaneous operations are not available.) 32 0XOWL$FFHVV Interrupt Copying Copy DeskTopBinder V2 Professional/Lite Printing from Document Server Printing from Document Server Scanning a document to Store in Document Server Operations for document Server Document Server Scanner Operations for scanning | → → ❍ ❍ | | → $ $ $ $ *2 | | *3 | → → ❍ ❍ | | | $ $ $ $ *2 | | Operations for copying ❍ ❍ ❍ × × | | | × × × × × | Copying ❍ ❍ ❍ × × | → → × × × × × → *1 *1 *1 *1 *4 Scanning Stapling Stapling ❍ ❍ | | | $ $ $ $ Sort *2 *1 *3 *2 | | Sort print | | | ❍ ❍ | → → | | | | | | Stapling | → | ❍ ❍ | → → | | | | *4 Operations for scanning $ $ $ ❍ ❍ | | | × | | *3 *3 × $ $ $ | × × × × | Operations for Document $ $ $ ❍ ❍ | | | $ $ × Server × × | $ × Scanning a document to store in Document Server × × | Scanning × × × × $ | | | | | | → → → | | | | Data reception Print Print × *1 Scanner Printer Printing Operations for copying × Data reception Sort × Copying Stapling Copy Operations for copying Operations for copying Mode before you select Document Server Printer Interrupt Copying Mode after you select × × | | | × ❍ ❍ | | | $ × × Printing from Document $ | | ❍ ❍ | | | | | | | *5 *3 *5 Server | | *5 33 &RPELQHG)XQFWLRQ2SHUDWLRQV *1 *2 *3 *4 *5 DeskTopBinder V2 Professional/Lite Printing from Document Server Printing from Document | | | | | | | | | | | | *3 Server | × Printing from Document | | | | | | | | | | | | *3 Server | × Simultaneous operations are only available after the preceding job documents are all scanned and >1HZ-RE@ appears. You can scan a document after the preceding job documents are all scanned. During stapling, printing automatically starts after the current job. Stapling is not available. Simultaneous operations are possible when you press >1HZ-RE@. 1RWH ❒ Stapling cannot be used at the same time for multiple functions. 34 Printing from Document Server Scanning a document to Store in Document Server Operations for document Server Document Server Scanning Scanner Operations for scanning Stapling Print Printing Data reception Copying Operations for copying Sort Stapling Copy Web Browser DeskTopBinder V2 Professional/Lite Mode before you select Operations for copying Printer Interrupt Copying Mode after you select 4. Document Server Relationship between Document Server and Other Functions The following table describes the relationship between the Document Server and other machine functions. Function name From where documents are stored Displaying a list *1 Printing stored documents *2 Sending document Copier Copier/Document Server Enabled Enabled Disabled Printer Personal compuEnabled ter Enabled Disabled Scanner Scanner Disabled Enabled *4 *1 *2 *3 *4 Disabled *3 You can also display stored documents from a Web browser. See p.52 “Viewing Stored Documents on the Web Browser”. You can print stored documents from a Web browser. See p.44 “Printing Stored Documents”. If DeskTopBinder V2 Professional (optional) or DeskTopBinder V2 Lite is installed on your computer, all the stored documents can also be printed from your computer. You can display stored documents from scanner mode. See “Viewing a List of Stored Files”, Scanner Reference. You can e-mail stored documents from scanner mode. See “Using E-mail with the Document Server”, Scanner Reference. 35 'RFXPHQW6HUYHU 'RFXPHQW6HUYHU'LVSOD\ ❖ 'RFXPHQW6HUYHU0DLQ'LVSOD\ 7 2 3 1 8 6 5 4 ZJBS100N 1. Operating status and messages. 2. The title of the currently selected screen. 3. The numbers of originals, copies, and printed pages. 4. The operation keys. 5. The stored operation mode. 6. Icons to show the operation mode. is appeared when setting the password. 7. Pressing >2UGHU@ displays the documents in the selected order. 8. Press a desired key, and the documents are sorted in the order of the pressed key. The icons below show the operation mode when documents stored in the Document Server. Function Icon 36 Copier Printer Scanner -- 8VLQJWKH'RFXPHQW6HUYHU Using the Document Server 6WRULQJ'DWD ❖ )LOH1DPH Saved documents will automatically be named “COPY0001”, “COPY0002”. You can change assigned file names. ❖ 8VHU1DPH You can register user names to distinguish the person or department that saved the documents. To assign a user name, you can register it using the name assigned to the user code or entering the name. 5HIHUHQFH For more information about user codes, see p.75 “User Codes”. ❖ 3DVVZRUG You can set a password for saved documents, and use it to prevent others printing them. When a password is set for the documents, appears against the document name. 5HIHUHQFH To store documents in a mode other than Document Server mode, see References for the respective functions. ,PSRUWDQW ❒ Data stored in the machine might be lost if some kind of failure occurs. The manufacturer shall not be responsible for any damage that might result from loss of data. For long-term storage of data, we recommend use of DeskTopBinder V2 Lite or DeskTopBinder V2 Professional (optional). For more information, contact your local manufacture. 1RWH ❒ Data stored in the Document Server is set to be deleted after 3 days (72 hours) by the factory default setting. You can specify the period after which the stored data is deleted automatically. See p.73 “Auto Delete File” . 37 'RFXPHQW6HUYHU A Press the {'RFXPHQW6HUYHU} key. ZJAS343N B Press >6FDQ2ULJLQDO@ when the list appears. C Enter a file name, user name, or password if necessary. 1RWH ❒ If you do not register a file name, one is automatically assigned. 5HIHUHQFH p.39 “To register or change a user name” p.40 “To change a file name” p.41 “To set or change a password” D Place originals. 5HIHUHQFH For more information about types of originals that can be placed and how to place them, see Copy Reference. 38 8VLQJWKH'RFXPHQW6HUYHU E Make any desired settings. 5HIHUHQFH For setting of scanning that you can use, see p.53 “Functions Available in Document Server Mode”. For settings of scanning, see Copy Reference. F Press the {6WDUW} key. The document is saved in the Document Server. 1RWH ❒ To stop scanning, press the {6WRS} key. To resume a paused scanning job, press >1R@ in the confirmation dialog box. To delete saved images and cancel the job, press ><HV@. ❒ When a password has been set for the document, enter it, and then press >2.@. ❒ Saved documents appear on the “Select Files to Print” display. If it is not displayed, press >6FDQQLQJ)LQLVKHG@. 7RUHJLVWHURUFKDQJHDXVHUQDPH A Display the “Stored File” display. B Press >8VHU1DPH@. If user names have already been registered, the “Change User Name” display appears. To use an unregistered user name, press >1RQSURJUDPPHG1DPH@. 5HIHUHQFH p.75 “User Codes” 39 'RFXPHQW6HUYHU ,IUHJLVWHUHGXVHUQDPHVDUHXVHG A Select a registered user name from the list, and then press >2.@. To change your user name to an unregistered user name, proceed to the next step. 5HIHUHQFH p.75 “Registering a New User Code” ,IWKHUHDUHQRUHJLVWHUHGXVHUQDPHV A Enter the new user name, and then press >2.@. B Enter the user name, and then press >2.@. 1RWH ❒ You can type up to 20 characters for user name. 5HIHUHQFH p.91 “Entering Text” ,IQRUHJLVWHUHGXVHUQDPHVDUHXVHG A Press >1RQSURJUDPPHG1DPH@. B Enter the new user name, and then press >2.@. 5HIHUHQFH p.91 “Entering Text” 7RFKDQJHDILOHQDPH A Bring up the “Stored File” display. B Press >)LOH1DPH@. The “Change File Name” display appears. C Press >'HOHWH$OO@ to delete the previous file name. 40 1RWH ❒ You can also use >%DFNVSDFH@ to delete unnecessary characters. 8VLQJWKH'RFXPHQW6HUYHU D Enter a new file name, and then press >2.@. 1RWH ❒ A string of up to 20 characters can be entered as a file name. Note that only 16 characters of each file name will appear in the document list. 5HIHUHQFH p.91 “Entering Text” 7RVHWRUFKDQJHDSDVVZRUG A Bring up the “Stored File” display. B Press >3DVVZRUG@. C Enter the password using the number keys (four-digits), and then press >2.@ or the {} key. &KDQJLQJWKH)LOH1DPH8VHU1DPHRU3DVVZRUG A Press the {'RFXPHQW6HUYHU} key. B Select the document for which the user name, file name, or password is to be changed. 1RWH ❒ If a password has already been set for the document, enter it, and then press >2.@. 41 'RFXPHQW6HUYHU C Press >(GLW)LOH@. D Press >&KDQJH)LOH1DPH@, >&KDQJH8VHU1DPH@, or >&KDQJH3DVVZRUG@. E Enter the new file name, user name, or password using the letter keys or number keys, and then press >2.@. 5HIHUHQFH p.39 “To register or change a user name” p.40 “To change a file name” p.41 “To set or change a password” F Press >2.@. 7R&KHFN'HWDLOVRI6WRUHG'RFXPHQWV A Press the {'RFXPHQW6HUYHU} key. B Select the document for which you want to display detailed information. 1RWH ❒ If a password has been set for the document, enter it, and then press >2.@. C Press >'HWDLO@. Detailed information about the document is displayed. 1RWH ❒ If you have selected several documents, use >U@ and >T@ to view the details of each. ❒ Press >2.@. The “Select Files” display appears. 42 8VLQJWKH'RFXPHQW6HUYHU 6HDUFKLQJIRU6WRUHG'RFXPHQWV You can use either >6HDUFKE\8VHU1DPH@ or >6HDUFKE\)LOH1DPH@ to search for documents stored on the Document Server. You can also list stored documents in the order you prefer. 1RWH ❒ If you install DeskTopBinder V2 Professional (optional) or DeskTopBinder V2 Lite on the computer, you can search and rearrange documents from the computer. 5HIHUHQFH For more detailed information, see the DeskTopBinder V2 Professional/Lite manuals. 7RVHDUFKE\XVHUQDPH A Press the {'RFXPHQW6HUYHU} key. B Press >6HDUFK@. C Press >6HDUFKE\8VHU1DPH@. 1RWH ❒ If you also press >6HDUFKE\)LOH1DPH@, you can enter the file name simulta- neously. D To specify a registered user name, select the user name from the displayed list, and then press >2.@. 1RWH ❒ To specify an unregistered user name, follow the procedures below. E To specify an unregistered user name, press >1RQSURJUDPPHG1DPH@, enter the name, and then press >2.@. 5HIHUHQFH p.91 “Entering Text” F Press >2.@. Only files beginning with the name entered appear in the “Select Files to Print” display. 1RWH ❒ To display all files saved in the Document Server, press >)LOH/LVW@. 43 'RFXPHQW6HUYHU 7RVHDUFKE\ILOHQDPH A Press the {'RFXPHQW6HUYHU} key. B Press >6HDUFK@. C Press >6HDUFKE\)LOH1DPH@. 1RWH ❒ If you also press >6HDUFKE\8VHU1DPH@, you can enter the user name simul- taneously. D Enter the file name, and then press >2.@. E Press >2.@. Only files beginning with the name entered appear in the “Select Files” display. 5HIHUHQFH p.91 “Entering Text” 1RWH ❒ To display all files saved in the Document Server, press >)LOH/LVW@. 3ULQWLQJ6WRUHG'RFXPHQWV You can print documents stored in the Document Server with the procedures below. 1RWH ❒ You can print stored documents from a network computer with the Web browser. For details about how to start the Web browser, see Network Guide. 3ULQWLQJIURPWKHOLVW A Press the {'RFXPHQW6HUYHU} key. B Select the document to be printed. 44 8VLQJWKH'RFXPHQW6HUYHU 1RWH ❒ If a password has been set for the document, enter the password, and then press >2.@. ❒ You can select up to 30 documents. ❒ If sizes, resolutions or quality of selected documents are not the same, the documents may not be printed. ❒ If you want to change the order of printing, cancel the selection, and select documents in the desired order. ❒ If you press >'HOHWH)LOH@, selection of all documents will be canceled. ❒ When multiple documents are printed at the same time, print settings made for the document printed first are applied to all other documents. C Enter the required number of copies using the number key. 1RWH ❒ Up to 9999 can be entered. D Press the {6WDUW} key. &KDQJHWKHSULQWVHWWLQJVZKHQSULQWLQJ A Select the document to be printed. B Press >3ULQW6HWWLQJV@. The “Print Settings” display appears. User names, file names, and print order of documents appear. 1RWH ❒ The print settings made for printing in copier or printer mode are stored by pressing >6DYH3ULQW6HWWLQJV@, and applied to the next printing. ❒ When multiple documents are printed at the same time, print settings ❒ ❒ ❒ ❒ made for the document printed first are applied to all other documents. When you press >6DYH 3ULQW 6HWWLQJV@, the changed print settings and the number of print are stored. If you print more than one set using the sort function, you can check the print result by printing out only the first set. See p.46 “Sample copy”. If you select multiple files, you can confirm file names or print order you selected in step A by scrolling through the list with >T@ and >U@. Press >)LOH/LVW@ to return to the “File List” display. C Enter the required number of copies using the number keys. 1RWH ❒ Up to 9999 can be entered. 45 'RFXPHQW6HUYHU D Press the {6WDUW} key. The machine starts printing. 6WRSSLQJSULQWLQJ A Press the {6WRS} key. B Press >6WRS@. &KDQJLQJWKHQXPEHURIFRSLHVGXULQJSULQWLQJ 1RWH ❒ The number of copies can only be changed when the sort function is selected in print settings. A Press the {6WRS} key. B Press >&KDQJH4XDQWLW\@. C Use the number keys to enter a new number of copies. D Press the {} key. E Press >&RQWLQXH@. Printing restarts. 3UHVHWFRS\ You can set the next job while printing a document stored in the Document Server. 5HIHUHQFH For details about settings, see “Preset Job”, Copy Reference. 6DPSOHFRS\ If you print multiple sets using the sort function, you can check the print order or print settings are correct by printing out only the first set using the {6DPSOH &RS\} key. 1RWH ❒ This function can be used only when the sort function is selected. 46 8VLQJWKH'RFXPHQW6HUYHU A Select the document to be printed. 1RWH ❒ If a password has been set for the document, enter it, and then press >2.@. ❒ You can search for a document using >6HDUFKE\8VHU1DPH@ or >6HDUFKE\)LOH 1DPH@. See p.43 “Searching for Stored Documents”. ❒ You can sort document names in the list by user name, file name, or date. To sort the documents, press >8VHU1DPH@, >)LOH1DPH@, or >'DWH7LPH@. ❒ To cancel a document selection, press the highlighted document again. B Check the print settings. C Press the {6DPSOH&RS\} key. The first set is printed. D Press >3ULQW@. Printing restarts. 1RWH ❒ Press >6XVSHQG@ to cancel printing and return to the Print Settings menu where you can change the settings. 47 'RFXPHQW6HUYHU 3ULQW6HOHFWHG3DJHV You can print the first page or selected pages of the document selected in the Select Files to Print display to check content. A Select the document to be printed. 1RWH ❒ If a password has been set for the document, enter it, and then press >2.@. ❒ You can search for a document using >6HDUFKE\8VHU1DPH@ or >6HDUFKE\)LOH 1DPH@. See p.43 “Searching for Stored Documents”. ❒ You can sort document names in the list by user name, file name, or date. To sort documents, press >8VHU1DPH@, >)LOH1DPH@, or >'DWH7LPH@. ❒ To cancel a document selection, press the highlighted document again. B Press >3ULQW6HOHFWHG3DJH@. 3ULQWLQJWKHILUVWSDJH You can print only the first page of the selected document to check content. If two or more documents are selected, the first page of each is printed. A Press >VW3DJH2QO\@. 3ULQWLQJWKHVSHFLILHGSDJHV You can print specified pages of the selected document to check content. /LPLWDWLRQ ❒ You cannot print specified pages if two or more documents are selected. A Press >6SHFLI\3DJH@. B Enter the first page number to be printed using the number keys. C Press >3DJHWR3DJH@. D Enter the last page number to be printed using the number keys. C Press the {6WDUW} key. 48 8VLQJWKH'RFXPHQW6HUYHU (GLW)LOH &RPELQLQJ)LOHV You can combine two or more files stored in the Document Server. Follow the procedure below to combine files. 1RWH ❒ You cannot recover the original files from the new file. ❒ You cannot combine files if they are currently being used by another function. ❒ You can combine up to 30 files. A Press the {'RFXPHQW6HUYHU} key. B Select documents you want to combine. 1RWH ❒ If the password has been set for the document, enter it, and then press >2.@. ❒ The files are combined in the order of being selected. ❒ The print settings for the file selected first are stored. C Press >(GLW)LOH@. D Press >&RPELQH)LOHV@. E Enter the new file name. 1RWH ❒ For setting the file name, see p.40 “To change a file name”. ❒ If you do not set the file name, the name of the file selected first will be the name of the combined file. F Press >2.@. 49 'RFXPHQW6HUYHU ,QVHUWLQJ'RFXPHQWV You can insert a file into files already stored in the Document Server. Follow the procedure below to insert a file. 1RWH ❒ You cannot recover the original file from the new file. ❒ You cannot insert files into a file that is currently being used by another func- tion. A Press the {'RFXPHQW6HUYHU} key. B Select the document to be inserted in. 1RWH ❒ If a password has been set for the document, enter it, and then press >2.@. C Press >(GLW)LOH@. D Press >,QVHUW)LOH@. E Select the document you want to insert into. F Enter the page number to insert the file using the number keys. G Press >%HIRUH6SHFLILHG3DJH@ or >$IWHU6SHFLILHG3DJH@. H Press >2.@. 'HOHWLQJ3DJHV Follow the procedure below to delete pages from a file stored on the Document Server. 3UHSDUDWLRQ To check the page numbers, print the file. See p.44 “Printing Stored Documents”. A Press the {'RFXPHQW6HUYHU} key. B Select the document containing the pages you want to delete. 1RWH ❒ If a password has been set for the document, enter it, and then press >2.@. C Press >(GLW)LOH@. D Press >'HOHWH3DJHV@. E Enter the number of the page you want to delete using the number keys. 50 8VLQJWKH'RFXPHQW6HUYHU F If you want to delete a series of pages, press >3DJHWR3DJH@, and then enter the number of the last page you want to delete. 1RWH ❒ If you want to delete only one page, proceed to step G. ❒ If you enter the last page number, the whole file will be deleted. G Press >2.@. H Press ><HV@ in the confirmation dialog box. 'HOHWLQJ6WRUHG'RFXPHQWV ,PSRUWDQW ❒ You can store up to 3,000 documents in the Document Server. No more doc- uments can be stored when there are 3,000 documents in the Document Server. You should delete unnecessary documents. 1RWH ❒ You can delete all stored documents at once with User Tools. See p.73 “Delete All Files”. ❒ You can delete stored documents from a network computer using the Web browser. For details about how to start the Web browser, see Network Guide. A Press the {'RFXPHQW6HUYHU} key. B Select the document to be deleted. 1RWH ❒ If a password has been set for the document, enter it, and then press >2.@. ❒ You can delete multiple documents at once. See p.73 “Delete All Files”. ❒ You can search for a document by user name or file name, using >6HDUFKE\ 8VHU1DPH@ or >6HDUFKE\)LOH1DPH@ respectively. See p.43 “Searching for Stored Documents”. ❒ You can sort document names in the list by the user name, file name, or date. To sort documents, press >8VHU1DPH@, >)LOH1DPH@, or >'DWH7LPH@. ❒ If you cannot find the document using its name, you can print the first page of a document to check its contents. See p.48 “Print Selected Pages”. ❒ Press the selected line again to cancel the print job. C Press >'HOHWH)LOH@. D Press ><HV@ to delete the document. 51 'RFXPHQW6HUYHU 9LHZLQJ6WRUHG'RFXPHQWVRQWKH:HE%URZVHU 5HIHUHQFH For settings of the Web Browser, see Network Guide. For details about the Web Browser, see Help menu. A Start the Web browser. B Enter “http:// (the IP address of this machine) /” in the [Address] box. The top page appears on the Web browser. C Click >'RFXPHQW6HUYHU@. The Document Server File List appears. 1RWH ❒ The Document Server File List can be displayed without showing thumbnails. Click >'HWDLOV@. D Click the Properties icon of the document you want to check. The information of that document appears. E Confirm the content of the document. 1RWH ❒ To enlarge the preview of the document, click >3UHYLHZ@. 'RZQORDGLQJ6WRUHG'RFXPHQWV 1RWH ❒ An option is required to download documents stored in copier or printer mode. A Start the Web browser. B Enter “http:// (the IP address of this machine) /” in the [Address] box. The top page appears on the Web browser. C Click >'RFXPHQW6HUYHU@. The Document Server File List appears. D Click the Properties icon of the document you want to download. 1RWH ❒ The Document Server File List can be displayed as thumbnails. Click >7KXPEQDLO@. E Select PDF, JPEG, or Multi-pageTIFF as the file format by clicking one of 52 the icons. )XQFWLRQV$YDLODEOHLQ'RFXPHQW6HUYHU0RGH Functions Available in Document Server Mode Functions that you can use during scanning or printing documents in Document Server mode are as shown below. Function Key Display Web Browser Scanning Printing Batch Mode ❍ × — Mixed Sizes ❍ × — Custom Size Originals ❍ × — SADF Mode ❍ × — Thin Mode ❍ × — Face Up ❍ × — Auto Image Density ❍ × — Dark Background ❍ × — Manual Image Density ❍ × — Original Type Setting ❍ × — Number of Sets × ❍ ❍ Program × × — Auto Paper Select ❍ ❍ ❍ Manual Paper Select ❍ ❍ ❍ Reduce/Enlarge ❍ × — Create Margin ❍ × — Zoom ❍ × — Auto Reduce/Enlarge ❍ × — Size Magnification ❍ × — Directional Magnification (%) ❍ × — Directional Size Magnification (inch) ❍ × — Sort × ❍ ❍ Stack × ❍ ❍ Staple × ❍ ❍ Punch × ❍ ❍ 1 Sided → 2 Sided/2 Sided → 2 Sided ❍ × — 1 Sided Combine ❍ × — 2 Sided Combine ❍ × — 53 'RFXPHQW6HUYHU Function 54 Key Display Web Browser Scanning Printing Book → 1 Sided × ❍ ❍ Book → 2 Sided × ❍ ❍ 2 Sided → 1 Sided × ❍ ❍ 1 Sided → Booklet 2 Sided → Booklet × ❍ ❍ 1 Sided → Magazine 2 Sided → Magazine × ❍ ❍ Mix 1 & 2 Sided × × — Specify Pages to Print in Duplex × ❍ ❍ Repeat × × — Double Copy × ❍ ❍ Centering ❍ ❍ ❍ Cornering × ❍ ❍ Scanning Position ❍ × — Border Erase ❍ × — Center Erase ❍ × — Center/Border Erase ❍ × — 3 Edges Full Bleed × ❍ ❍ Inside Erase ❍ × — Outside Erase ❍ × — Margin Adjustment × ❍ ❍ Background Numbering × ❍ ❍ Preset Stamp × ❍ ❍ User Stamp × ❍ ❍ Date Stamp × ❍ ❍ Stamp Text × ❍ ❍ Page Numbering × ❍ ❍ Covers × ❍ ❍ Designate × ❍ ❍ Chapter × ❍ ❍ Designation Sheet Copy × ❍ ❍ Blank Slip Sheets × ❍ ❍ Slip Sheets × ❍ ❍ 
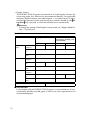
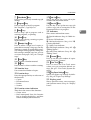
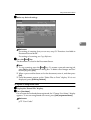
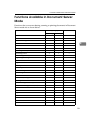
)XQFWLRQV$YDLODEOHLQ'RFXPHQW6HUYHU0RGH 1RWH ❒ “Cornering” and “Specify Pages to Print in Duplex” are enabled only in Doc- ument Server mode. ❒ You can select the printing position from eight types using “Cornering” when you print a document stored in the Document Server. ❒ You can print the specified pages of documents stored in the Document Server using “Specify Pages to Print in Duplex”. 55 'RFXPHQW6HUYHU Settings for the Document Server ❖ &RSLHU'RFXPHQW6HUYHU)HDWXUHV6HHS´*HQHUDO)HDWXUHVµ&RS\5HIHUHQFH General Features Items Default Function: Scanning -- Function: Printing -- ❖ 6\VWHP6HWWLQJV6HHS´*HQHUDO)HDWXUHVµS´7LPHU6HWWLQJµDQGS´.H\ 2SHUDWRU7RROVµ Items Default Warm Up Notice ON Copy Count Display Up Output: Document Server OFF Paper Tray Priority: Copier Tray 1 Timer Setting Copier/Document Server Auto Reset Timer 60 seconds Key Operator Tools Auto Delete File After 3 days Delete All Files -- Password Management for Stored Files Do not Unlock General Features 56