1
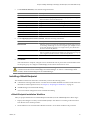
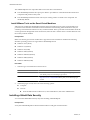
vShield Quick Start Guide
vShield Manager 5.0.1
vShield App 5.0.1
vShield Edge 5.0.1
vShield Endpoint 5.0.1
This document supports the version of each product listed and
supports all subsequent versions until the document is replaced
by a new edition. To check for more recent editions of this
document, see http://www.vmware.com/support/pubs.
EN-000839-00
vShield Quick Start Guide
You can find the most up-to-date technical documentation on the VMware Web site at:
http://www.vmware.com/support/
The VMware Web site also provides the latest product updates.
If you have comments about this documentation, submit your feedback to:
[email protected]
Copyright © 2010 – 2012 VMware, Inc. All rights reserved. This product is protected by U.S. and international copyright and
intellectual property laws. VMware products are covered by one or more patents listed at
http://www.vmware.com/go/patents.
VMware is a registered trademark or trademark of VMware, Inc. in the United States and/or other jurisdictions. All other marks
and names mentioned herein may be trademarks of their respective companies.
VMware, Inc.
3401 Hillview Ave.
Palo Alto, CA 94304
www.vmware.com
2
VMware, Inc.
Contents
About this Book 5
1 Introduction to vShield 7
vShield Components at a Glance 7
Deployment Scenarios 10
2 Preparing for Installation 13
System Requirements 13
Deployment Considerations 14
3 Installing the vShield Manager 17
Obtain the vShield Manager OVA File 17
Install the vShield Manager Virtual Appliance 18
Configure the Network Settings of the vShield Manager 18
Log In to the vShield Manager User Interface 19
Synchronize the vShield Manager with the vCenter Server 20
Register the vShield Manager Plug-In with the vSphere Client 20
Change the Password of the vShield Manager User Interface Default Account 21
4 Installing vShield Edge, vShield App, vShield Endpoint, and vShield Data
Security 23
Running vShield Licensed Components in Evaluation Mode 23
Preparing Your Virtual Infrastructure for vShield App, vShield Edge, vShield Endpoint, and vShield
Data Security 23
Installing vShield Endpoint 27
Installing vShield Data Security 28
5 Uninstalling vShield Components 31
Uninstall a vShield App Virtual Appliance 31
Uninstall a vShield Edge from a Port Group 31
Uninstall a vShield Data Security Virtual Machine
Uninstall a vShield Endpoint Module 32
32
6 Upgrading vShield 33
Upgrade the vShield Manager 33
Upgrade vShield App 34
Upgrade vShield Edge 34
Upgrade vShield Endpoint 35
Upgrade vShield Data Security 36
7 vShield Installation Fails 37
VMware, Inc.
3
vShield Quick Start Guide
Index 39
4
VMware, Inc.
About this Book
®
This manual, the vShield Quick Start Guide, describes how to install and configure the VMware vShield™
system by using the vShield Manager user interface, the vSphere Client plug-in, and command line interface
(CLI). The information includes step-by-step configuration instructions, and suggested best practices.
Intended Audience
This manual is intended for anyone who wants to install or use vShield in a VMware vCenter environment.
The information in this manual is written for experienced system administrators who are familiar with virtual
machine technology and virtual datacenter operations. This manual assumes familiarity with VMware
Infrastructure 4.x, including VMware ESX, vCenter Server, and the vSphere Client.
VMware Technical Publications Glossary
VMware Technical Publications provides a glossary of terms that might be unfamiliar to you. For definitions
of terms as they are used in VMware technical documentation, go to http://www.vmware.com/support/pubs.
Document Feedback
VMware welcomes your suggestions for improving our documentation. If you have comments, send your
feedback to [email protected].
Technical Support and Education Resources
The following technical support resources are available to you. To access the current version of this book and
other books, go to http://www.vmware.com/support/pubs.
Online and Telephone
Support
To use online support to submit technical support requests, view your product
and contract information, and register your products, go to
http://www.vmware.com/support.
Customers with appropriate support contracts should use telephone support
for the fastest response on priority 1 issues. Go to
http://www.vmware.com/support/phone_support.html.
Support Offerings
To find out how VMware support offerings can help meet your business needs,
go to http://www.vmware.com/support/services.
VMware Professional
Services
VMware Education Services courses offer extensive hands-on labs, case study
examples, and course materials designed to be used as on-the-job reference
tools. Courses are available onsite, in the classroom, and live online. For onsite
pilot programs and implementation best practices, VMware Consulting
VMware, Inc.
5
vShield Quick Start Guide
Services provides offerings to help you assess, plan, build, and manage your
virtual environment. To access information about education classes,
certification programs, and consulting services, go to
http://www.vmware.com/services.
6
VMware, Inc.
Introduction to vShield
1
®
This chapter introduces the VMware vShield™ components you install.
This chapter includes the following topics:
n
“vShield Components at a Glance,” on page 7
n
“Deployment Scenarios,” on page 10
vShield Components at a Glance
VMware vShield is a suite of security virtual appliances built for VMware vCenter Server integration. vShield
is a critical security component for protecting virtualized datacenters from attacks and misuse helping you
achieve your compliance-mandated goals.
vShield includes virtual appliances and services essential for protecting virtual machines. vShield can be
configured through a web-based user interface, a vSphere Client plug-in, a command line interface (CLI), and
REST API.
vCenter Server includes vShield Manager. The following vShield packages each require a license:
n
vShield App
n
vShield App with Data Security
n
vShield Edge
n
vShield Endpoint
One vShield Manager manages multiple vShield App, vShield Edge, vShield Endpoint, and vShield Data
Security instances.
n
vShield Manager on page 8
The vShield Manager is the centralized network management component of vShield, and is installed as
a virtual appliance on any ESX™ host in your vCenter Server environment. A vShield Manager can run
on a different ESX host from your vShield agents.
n
vShield App on page 8
vShield App is a hypervisor-based firewall that protects applications in the virtual datacenter from
network based attacks. Organizations gain visibility and control over network communications between
virtual machines. You can create access control policies based on logical constructs such as VMware
vCenter™ containers and vShield security groups—not just physical constructs such as IP addresses. In
addition, flexible IP addressing offers the ability to use the same IP address in multiple tenant zones to
simplify provisioning.
VMware, Inc.
7
vShield Quick Start Guide
n
vShield Edge on page 9
vShield Edge provides network edge security and gateway services to isolate the virtual machines in a
port group, vDS port group, or Cisco Nexus 1000V. The vShield Edge connects isolated, stub networks
to shared (uplink) networks by providing common gateway services such as DHCP, VPN, NAT, and
Load Balancing. Common deployments of vShield Edge include in the DMZ, VPN Extranets, and multitenant Cloud environments where the vShield Edge provides perimeter security for Virtual Datacenters
(VDCs).
n
vShield Endpoint on page 10
vShield Endpoint offloads antivirus and anti-malware agent processing to a dedicated secure virtual
appliance delivered by VMware partners. Since the secure virtual appliance (unlike a guest virtual
machine) doesn't go offline, it can continuously update antivirus signatures thereby giving uninterrupted
protection to the virtual machines on the host. Also, new virtual machines (or existing virtual machines
that went offline) are immediately protected with the most current antivirus signatures when they come
online.
n
vShield Data Security on page 10
vShield Data Security provides visibility into sensitive data stored within your organization's virtualized
and cloud environments. Based on the violations reported by vShield Data Security, you can ensure that
sensitive data is adequately protected and assess compliance with regulations around the world.
vShield Manager
The vShield Manager is the centralized network management component of vShield, and is installed as a virtual
appliance on any ESX™ host in your vCenter Server environment. A vShield Manager can run on a different
ESX host from your vShield agents.
Using the vShield Manager user interface or vSphere Client plug-in, administrators install, configure, and
maintain vShield components. The vShield Manager user interface leverages the VMware Infrastructure SDK
to display a copy of the vSphere Client inventory panel, and includes the Hosts & Clusters and Networks
views.
vShield App
vShield App is a hypervisor-based firewall that protects applications in the virtual datacenter from network
based attacks. Organizations gain visibility and control over network communications between virtual
machines. You can create access control policies based on logical constructs such as VMware vCenter™
containers and vShield security groups—not just physical constructs such as IP addresses. In addition, flexible
IP addressing offers the ability to use the same IP address in multiple tenant zones to simplify provisioning.
You should install vShield App on each ESX host within a cluster so that VMware vMotion operations work
and virtual machines remain protected as they migrate between ESX hosts. By default, a vShield App virtual
appliance cannot be moved by using vMotion.
The Flow Monitoring feature displays network activity between virtual machines at the application protocol
level. You can use this information to audit network traffic, define and refine firewall policies, and identify
botnets.
8
VMware, Inc.
Chapter 1 Introduction to vShield
vShield Edge
vShield Edge provides network edge security and gateway services to isolate the virtual machines in a port
group, vDS port group, or Cisco Nexus 1000V. The vShield Edge connects isolated, stub networks to shared
(uplink) networks by providing common gateway services such as DHCP, VPN, NAT, and Load Balancing.
Common deployments of vShield Edge include in the DMZ, VPN Extranets, and multi-tenant Cloud
environments where the vShield Edge provides perimeter security for Virtual Datacenters (VDCs).
Standard vShield Edge Services (Including Cloud Director)
Firewall
Supported rules include IP 5-tuple configuration with IP and port ranges for
stateful inspection for TCP, UDP, and ICMP.
Network Address
Translation
Separate controls for Source and Destination IP addresses, as well as TCP and
UDP port translation.
Dynamic Host
Configuration Protocol
(DHCP)
Configuration of IP pools, gateways, DNS servers, and search domains.
Advanced vShield Edge Services
Site-to-Site Virtual
Private Network (VPN)
Uses standardized IPsec protocol settings to interoperate with all major firewall
vendors.
Load Balancing
Simple and dynamically configurable virtual IP addresses and server groups.
vShield Edge supports syslog export for all services to remote servers.
Figure 1-1. vShield Edge Installed to Secure a vDS Port Group
VMware, Inc.
9
vShield Quick Start Guide
vShield Endpoint
vShield Endpoint offloads antivirus and anti-malware agent processing to a dedicated secure virtual appliance
delivered by VMware partners. Since the secure virtual appliance (unlike a guest virtual machine) doesn't go
offline, it can continuously update antivirus signatures thereby giving uninterrupted protection to the virtual
machines on the host. Also, new virtual machines (or existing virtual machines that went offline) are
immediately protected with the most current antivirus signatures when they come online.
vShield Endpoint installs as a hypervisor module and security virtual appliance from a third-party antivirus
vendor (VMware partners) on an ESX host. The hypervisor scans guest virtual machines from the outside,
removing the need for agents in every virtual machine. This makes vShield Endpoint efficient in avoiding
resource bottlenecks while optimizing memory use.
Figure 1-2. vShield Endpoint Installed on an ESX Host
vShield Data Security
vShield Data Security provides visibility into sensitive data stored within your organization's virtualized and
cloud environments. Based on the violations reported by vShield Data Security, you can ensure that sensitive
data is adequately protected and assess compliance with regulations around the world.
Deployment Scenarios
Using vShield, you can build secure zones for a variety of virtual machine deployments. You can isolate virtual
machines based on specific applications, network segmentation, or custom compliance factors. Once you
determine your zoning policies, you can deploy vShield to enforce access rules to each of these zones.
n
Protecting the DMZ on page 11
The DMZ is a mixed trust zone. Clients enter from the Internet for Web and email services, while services
within the DMZ might require access to services inside the internal network.
10
VMware, Inc.
Chapter 1 Introduction to vShield
n
Isolating and Protecting Internal Networks on page 11
You can use a vShield Edge to isolate an internal network from the external network. A vShield Edge
provides perimeter firewall protection and edge services to secure virtual machines in a port group,
enabling communication to the external network through DHCP, NAT, and VPN.
n
Protecting Virtual Machines in a Cluster on page 12
You can use vShield App to protect virtual machines in a cluster.
n
Common Deployments of vShield Edge on page 12
You can use a vShield Edge to isolate a stub network, using NAT to allow traffic in and out of the network.
If you deploy internal stub networks, you can use vShield Edge to secure communication between
networks by using LAN-to-LAN encryption via VPN tunnels.
n
Common Deployments of vShield App on page 12
You can use vShield App to create security zones within a vDC. You can impose firewall policies on
vCenter containers or Security Groups, which are custom containers you can create by using the vShield
Manager user interface. Container-based policies enable you to create mixed trust zones clusters without
requiring an external physical firewall.
Protecting the DMZ
The DMZ is a mixed trust zone. Clients enter from the Internet for Web and email services, while services
within the DMZ might require access to services inside the internal network.
You can place DMZ virtual machines in a port group and secure that port group with a vShield Edge. vShield
Edge provides access services such as firewall, NAT, and VPN, as well as load balancing to secure DMZ
services.
A common example of a DMZ service requiring an internal service is Microsoft Exchange. Microsoft Outlook
Web Access (OWA) commonly resides in the DMZ cluster, while the Microsoft Exchange back end is in the
internal cluster. On the internal cluster, you can create firewall rules to allow only Exchanged-related requests
from the DMZ, identifying specific source-to-destination parameters. From the DMZ cluster, you can create
rules to allow outside access to the DMZ only to specific destinations using HTTP, FTP, or SMTP.
Isolating and Protecting Internal Networks
You can use a vShield Edge to isolate an internal network from the external network. A vShield Edge provides
perimeter firewall protection and edge services to secure virtual machines in a port group, enabling
communication to the external network through DHCP, NAT, and VPN.
Within the secured port group, you can install a vShield App instance on each ESX host that the vDS spans to
secure communication between virtual machines in the internal network.
If you utilize VLAN tags to segment traffic, you can use App Firewall to create smarter access policies. Using
App Firewall instead of a physical firewall allows you to collapse or mix trust zones in shared ESX clusters.
By doing so, you gain optimal utilization and consolidation from features such as DRS and HA, instead of
having separate, fragmented clusters. Management of the overall ESX deployment as a single pool is less
complex than having separately managed pools.
For example, you use VLANs to segment virtual machine zones based on logical, organizational, or network
boundaries. Leveraging the Virtual Infrastructure SDK, the vShield Manager inventory panel displays a view
of your VLAN networks under the Networks view. You can build access rules for each VLAN network to
isolate virtual machines and drop untagged traffic to these machines.
VMware, Inc.
11
vShield Quick Start Guide
Protecting Virtual Machines in a Cluster
You can use vShield App to protect virtual machines in a cluster.
In Figure 1-3, vShield App instances are installed on each ESX host in a cluster. Virtual machines are protected
when moved via vMotion or DRS between ESX hosts in the cluster. Each vApp shares and maintains state of
all transmissions.
Figure 1-3. vShield App Instances Installed on Each ESX Host in a Cluster
Common Deployments of vShield Edge
You can use a vShield Edge to isolate a stub network, using NAT to allow traffic in and out of the network. If
you deploy internal stub networks, you can use vShield Edge to secure communication between networks by
using LAN-to-LAN encryption via VPN tunnels.
vShield Edge can be deployed as a self-service application within VMware Cloud Director.
Common Deployments of vShield App
You can use vShield App to create security zones within a vDC. You can impose firewall policies on vCenter
containers or Security Groups, which are custom containers you can create by using the vShield Manager user
interface. Container-based policies enable you to create mixed trust zones clusters without requiring an
external physical firewall.
In a deployment that does not use vDCs, use a vShield App with the Security Groups feature to create trust
zones and enforce access policies.
Service Provider Admins can use vShield App to impose broad firewall policies across all guest virtual
machines in an internal network. For example, you can impose a firewall policy on the second vNIC of all guest
virtual machines that allows the virtual machines to connect to a storage server, but blocks the virtual machines
from addressing any other virtual machines.
12
VMware, Inc.
Preparing for Installation
2
This chapter introduces tan overview of the prerequisites for successful vShield installation.
This chapter includes the following topics:
n
“System Requirements,” on page 13
n
“Deployment Considerations,” on page 14
System Requirements
Before you install vShield in your vCenter Server environment, consider your network configuration and
resources. You can install one vShield Manager per vCenter Server, one vShield App or one vShield Endpoint
per ESX™ host, and one vShield Edge per port group.
Hardware
Table 2-1. Hardware Requirements
Component
Minimum
Memory
8GB for all vShield components
Disk Space
n
n
n
n
NICs
8GB for the vShield Manager
5GB per vShield App per ESX host
200MB per vShield Edge
6GB for vShield Data Security per ESX host
2 gigabit NICs on an ESX host for all vShield components
Software
For the latest interoperability information, see the Product Interoperability Matrix at
http://partnerweb.vmware.com/comp_guide/sim/interop_matrix.php.
These are the minimum required versions of VMware products.
n
VMware vCenter Server 4.0 Update 2 or later
n
VMware ESX 4.0 Update 2 or later for each server
NOTE vShield Endpoint and vShield Data Security require ESXi 5.0 Patch 1 and later or ESXi 4.1 Patch 3
and later.
n
VMware, Inc.
VMware Tools
13
vShield Quick Start Guide
For vShield Endpoint and vShield Data Security, you must upgrade your virtual machines to hardware
version 7 or 8 and install VMware Tools 8.6.0 released with ESXi 5.0 Patch 1. For more information, see
“Install VMware Tools on the Guest Virtual Machines,” on page 28.
n
VMware vCloud Director 1.0 or later
n
VMware View 4.5 or later
Client and User Access
n
PC with the VMware vSphere Client
NOTE If you added ESX hosts by name to the vSphere inventory, ensure that DNS names are provided.
Otherwise, vShield Manager cannot resolve the IP addresses.
n
Permissions to add and power on virtual machines
n
Access to the datastore where you store virtual machine files, and the account permissions to copy files
to that datastore
n
Enable cookies on your Web browser to access the vShield Manager user interface
n
vShield Manager port 443 accessible from the ESX host. This port is required to download the OVF file on
the ESX host for deployment.
n
Connect to the vShield Manager using one of the following supported Web browsers:
n
Internet Explorer 6.x and later
n
Mozilla Firefox 1.x and later
n
Safari 1.x or 2.x
Deployment Considerations
Consider the following recommendations and restrictions before you deploy vShield components.
n
Preparing Virtual Machines for vShield Protection on page 15
You must determine how to protect your virtual machines with vShield. As a best practise, you should
prepare all ESX hosts within a resource pool for vShield App, vShield Endpoint, and vShield Data
Security depending on the vShield components you are using. You must also upgrade your virtual
machines to hardware version 7 or 8.
n
vShield Manager Uptime on page 15
The vShield Manager should be run on an ESX host that is not affected by downtime, such as frequent
reboots or maintenance mode operations. You can use HA or DRS to increase the resilience of the vShield
Manager. If the ESX host on which the vShield Manager resides is expected to require downtime, vMotion
the vShield Manager virtual appliance to another ESX host. Thus, more than one ESX host is
recommended.
n
Communication Between vShield Components on page 15
The management interfaces of vShield components should be placed in a common network, such as the
vSphere management network. The vShield Manager requires connectivity to the vCenter Server, vShield
App and vShield Edge instances, vShield Endpoint module, and vShield Data Security virtual machine.
vShield components can communicate over routed connections as well as different LANs.
n
Hardening Your vShield Virtual Machines on page 15
You can access the vShield Manager and other vShield components by using a web-based user interface,
command line interface, and REST API. vShield includes default login credentials for each of these access
options. After installation of each vShield virtual machine, you should harden access by changing the
default login credentials. Note that vShield Data Security does not include default login credentials.
14
VMware, Inc.
Chapter 2 Preparing for Installation
Preparing Virtual Machines for vShield Protection
You must determine how to protect your virtual machines with vShield. As a best practise, you should prepare
all ESX hosts within a resource pool for vShield App, vShield Endpoint, and vShield Data Security depending
on the vShield components you are using. You must also upgrade your virtual machines to hardware version
7 or 8.
Consider the following questions:
How Are My Virtual Machines Grouped?
You might consider moving virtual machines to port groups on a vDS or a different ESX host to group virtual
machines by function, department, or other organizational need to improve security and ease configuration
of access rules. You can install vShield Edge at the perimeter of any port group to isolate virtual machines from
the external network. You can install a vShield App on an ESX host and configure firewall policies per container
resource to enforce rules based on the hierarchy of resources.
Are My Virtual Machines Still Protected if I vMotion Them to Another ESX Host?
Yes, if the hosts in a resource pool are prepared, you can migrate machines between hosts without weakening
the security posture. For information on preparing your ESX hosts, see “Prepare All ESX Hosts,” on
page 24.
vShield Manager Uptime
The vShield Manager should be run on an ESX host that is not affected by downtime, such as frequent reboots
or maintenance mode operations. You can use HA or DRS to increase the resilience of the vShield Manager. If
the ESX host on which the vShield Manager resides is expected to require downtime, vMotion the vShield
Manager virtual appliance to another ESX host. Thus, more than one ESX host is recommended.
Communication Between vShield Components
The management interfaces of vShield components should be placed in a common network, such as the vSphere
management network. The vShield Manager requires connectivity to the vCenter Server, vShield App and
vShield Edge instances, vShield Endpoint module, and vShield Data Security virtual machine. vShield
components can communicate over routed connections as well as different LANs.
VMware recommends that you install vShield Manager in a different vCenter environment from the one that
vShield Manager manages. Each vShield Manager manages a single vCenter Server environment.
CAUTION Ensure that vCenter is not running on a vShield App protected host that it is managing.
Hardening Your vShield Virtual Machines
You can access the vShield Manager and other vShield components by using a web-based user interface,
command line interface, and REST API. vShield includes default login credentials for each of these access
options. After installation of each vShield virtual machine, you should harden access by changing the default
login credentials. Note that vShield Data Security does not include default login credentials.
n
vShield Manager User Interface on page 16
You access the vShield Manager user interface by opening a web browser window and navigating to the
IP address of the vShield Manager’s management port.
VMware, Inc.
15
vShield Quick Start Guide
n
Command Line Interface on page 16
You can access the vShield Manager, vShield App, and vShield Edge virtual appliances by using a
command line interface via vSphere Client console session. To access the vShield Endpoint virtual
appliance, refer to the instructions from the anti-virus solution provider. You cannot access the vShield
Data Security virtual machine by using the command line interface.
n
REST Requests on page 16
All REST API requests require authentication with the vShield Manager.
vShield Manager User Interface
You access the vShield Manager user interface by opening a web browser window and navigating to the IP
address of the vShield Manager’s management port.
The default user account, admin, has global access to the vShield Manager. After initial login, you should
change the default password of the admin user account. See “Change the Password of the vShield Manager
User Interface Default Account,” on page 21.
Command Line Interface
You can access the vShield Manager, vShield App, and vShield Edge virtual appliances by using a command
line interface via vSphere Client console session. To access the vShield Endpoint virtual appliance, refer to the
instructions from the anti-virus solution provider. You cannot access the vShield Data Security virtual machine
by using the command line interface.
Each virtual appliance uses the same default username (admin) and password (default) combination as the
vShield Manager user interface. Entering Enabled mode also uses the password default.
For more on hardening the CLI, see the vShield Command Line Interface Reference .
REST Requests
All REST API requests require authentication with the vShield Manager.
Using Base 64 encoding, you identify a username-password combination in the following format:
username:password. You must use a vShield Manager user interface account (username and password) with
privileged access to perform requests. For more on authenticating REST API requests, see the vShield API
Programming Guide.
16
VMware, Inc.
Installing the vShield Manager
3
VMware vShield provides firewall protection, traffic analysis, and network perimeter services to protect your
vCenter Server virtual infrastructure. vShield virtual appliance installation has been automated for most virtual
datacenters.
The vShield Manager is the centralized management component of vShield. You use the vShield Manager to
monitor and push configurations to vShield App, vShield Endpoint, and vShield Edge instances. The vShield
Manager runs as a virtual appliance on an ESX host.
VMware vShield is included with VMware ESX 4.0 and 4.1. The base VMware vShield package includes the
vShield Manager and vShield App. You can configure the vShield App firewall rule set to monitor traffic based
on IP address-to-IP address communication.
Installing the vShield Manager is a multistep process. You must perform all of the tasks that follow in sequence
to complete vShield Manager installation successfully.
To enhance your network security posture, you can obtain licenses for vShield App, vShield Endpoint, and
vShield Edge.
This chapter includes the following topics:
n
“Obtain the vShield Manager OVA File,” on page 17
n
“Install the vShield Manager Virtual Appliance,” on page 18
n
“Configure the Network Settings of the vShield Manager,” on page 18
n
“Log In to the vShield Manager User Interface,” on page 19
n
“Synchronize the vShield Manager with the vCenter Server,” on page 20
n
“Register the vShield Manager Plug-In with the vSphere Client,” on page 20
n
“Change the Password of the vShield Manager User Interface Default Account,” on page 21
Obtain the vShield Manager OVA File
The vShield Manager virtual machine is packaged as an Open Virtualization Appliance (OVA) file, which
allows you to use the vSphere Client to import the vShield Manager into the datastore and virtual machine
inventory.
VMware, Inc.
17
vShield Quick Start Guide
Install the vShield Manager Virtual Appliance
You can install the vShield Manager virtual machine on an ESX host in a cluster configured with DRS.
With vShield 5.0 and later, you can install the vShield Manager in a different vCenter than the one that the
vShield Manager will be interoperating with. A single vShield Manager serves a single vCenter Server
environment.
The vShield Manager virtual machine installation includes VMware Tools. Do not attempt to upgrade or install
VMware Tools on the vShield Manager.
Procedure
1
Log in to the vSphere Client.
2
Create a port group to home the management interface of the vShield Manager.
The vShield Manager management interface must be reachable by all future vShield Edge, vShield App,
and vShield Endpoint instances.
NOTE Do not place the management interface of the vShield Manager in the same port group as the Service
Console and VMkernel.
3
Select File > Deploy OVF Template.
4
Click Deploy from file and click Browse to locate the folder on your PC that contains the vShield Manager
OVA file.
5
Complete the installation.
The vShield Manager is installed as a virtual machine in your inventory.
6
Power on the vShield Manager virtual machine.
Configure the Network Settings of the vShield Manager
You must use the command line interface (CLI) of the vShield Manager to configure an IP address, identify
the default gateway, and set DNS settings.
You can specify up to two DNS servers that the vShield Manager can use for IP address and host name
resolution. DNS is required if any ESX host in your vCenter Server environment was added by using the
hostname (instead of IP address).
Procedure
1
Right-click the vShield Manager virtual machine and click Open Console to open the command line
interface (CLI) of the vShield Manager.
The booting process might take a few minutes.
2
After the manager login prompt appears, log in to the CLI by using the user name admin and the password
default.
3
Enter Enabled mode by using the password default.
manager> enable
Password:
manager#
18
VMware, Inc.
Chapter 3 Installing the vShield Manager
4
Run the setup command to open the CLI setup wizard.
The CLI setup wizard guides you through IP address assignment for the vShield Manager’s management
interface and identification of the default network gateway. The IP address of the management interface
must be reachable by all installed vShield App, vShield Edge, and vShield Endpoint instances, and by a
Web browser for system management.
manager# setup
Use CTRL-D to abort configuration dialog at any prompt.
Default settings are in square brackets '[]'.
IP Address (A.B.C.D):
Subnet Mask (A.B.C.D):
Default gateway (A.B.C.D):
Primary DNS IP (A.B.C.D):
Secondary DNS IP (A.B.C.D):
Old configuration will be lost.
Do you want to save new configuration (y/[n]): y
5
(Optional) If you have configured network settings for the vShield Manager before, you must reboot the
system.
6
Log out and log back in to the CLI by using the user name admin and the password default.
7
Ping the default gateway to verify network connectivity.
manager> ping A.B.C.D
8
From your PC, ping the vShield Manager IP address to validate that the IP address is reachable.
Log In to the vShield Manager User Interface
After you have installed and configured the vShield Manager virtual machine, log in to the vShield Manager
user interface.
Procedure
1
Open a Web browser window and type the IP address assigned to the vShield Manager.
The vShield Manager user interface opens in a web browser window using SSL.
2
Accept the security certificate.
NOTE You can use an SSL certificate for authentication. Refer to the vShield Administration Guide.
The vShield Manager login screen appears.
3
Log in to the vShield Manager user interface by using the user name admin and the password default.
You should change the default password as one of your first tasks to prevent unauthorized use. See
“Change the Password of the vShield Manager User Interface Default Account,” on page 21.
4
VMware, Inc.
Click Log In.
19
vShield Quick Start Guide
Synchronize the vShield Manager with the vCenter Server
Synchronize with your vCenter Server to display your VMware Infrastructure inventory in the vShield
Manager user interface.
You must have a vCenter Server user account with administrative access to complete this task. If your vCenter
password has non-Ascii characters, you must change it before synchronizing the vShield Manager with the
vCenter Server.
NOTE The vShield Manager virtual machine does not appear as a resource in the inventory panel of the vShield
Manager user interface. The Settings & Reports object represents the vShield Manager virtual machine in the
inventory panel.
Procedure
1
Log in to the vShield Manager.
2
Click Settings & Reports from the vShield Manager inventory panel.
3
Click the Configuration tab.
4
Click the vCenter tab.
5
Type the IP address or hostname of your vCenter Server in the IP address/Name field.
6
Type your vSphere Client login user name in the User Name field.
7
Type the password associated with the user name in the Password field.
8
Click Save.
Register the vShield Manager Plug-In with the vSphere Client
The vSphere Plug-in option lets you register the vShield Manager as a vSphere Client plug-in. After the plugin is registered, you can configure most vShield options from the vSphere Client.
Procedure
1
Click Settings & Reports from the vShield Manager inventory panel.
2
Click the Configuration tab.
3
Click vSphere Plug-in.
4
Click Register.
For NAT environments, you may need to modify the plug-in script download location. By default, the
vShield Manager address is used as vShield_Manager_IP:443.
20
5
If you are logged in to the vSphere Client, log out.
6
Log in to the vSphere Client.
7
Select an ESX host.
8
Verify that the vShield tab appears as an option.
VMware, Inc.
Chapter 3 Installing the vShield Manager
Change the Password of the vShield Manager User Interface Default
Account
You can change the password of the admin account to harden access to your vShield Manager.
Procedure
1
Log in to the vShield Manager user interface.
2
Click Settings & Reports from the vShield Manager inventory panel.
3
Click the Users tab.
4
Select the admin account.
5
Click Update User.
6
Enter a new password.
7
Confirm the password by typing it a second time in the Retype Password field.
8
Click OK to save your changes.
VMware, Inc.
21
vShield Quick Start Guide
22
VMware, Inc.
Installing vShield Edge, vShield App,
vShield Endpoint, and vShield Data
Security
4
After the vShield Manager is installed, you can obtain licenses to activate the vShield App, vShield Endpoint,
vShield Edge, and vShield Data Security components. The vShield Manager OVA package includes the drivers
and files required to install these add-on components. A vShield App license allows you to use the vShield
Endpoint component as well.
This chapter includes the following topics:
n
“Running vShield Licensed Components in Evaluation Mode,” on page 23
n
“Preparing Your Virtual Infrastructure for vShield App, vShield Edge, vShield Endpoint, and vShield
Data Security,” on page 23
n
“Installing vShield Endpoint,” on page 27
n
“Installing vShield Data Security,” on page 28
Running vShield Licensed Components in Evaluation Mode
Before purchasing and activating licenses for vShield Edge, vShield App, an vShield Endpoint, you can install
and run evaluation modes of the software. When run in evaluation mode, intended for demonstration and
evaluation purposes, your vShield Edge, vShield App, and vShield Endpoint are completely operational
immediately after installation, do not require any licensing configuration, and provide full functionality for 60
days from the time you first activate them.
When run in evaluation mode, vShield components can support a maximum allowed number of instances.
After the 60-day trial period expires, unless you obtain licenses for your software, you cannot use vShield. For
example, you cannot power on vShield App or vShield Edge virtual appliances or protect your virtual
machines.
To continue using the vShield App and vShield Edge functionality without interruptions or to restore the
features that become unavailable after the 60-day trial, you need to obtain and install license files that activate
the features appropriate for the vShield component you purchased.
Preparing Your Virtual Infrastructure for vShield App, vShield Edge,
vShield Endpoint, and vShield Data Security
Before you install add-on components, you must prepare your ESX host and vNetwork environments. You
install vShield App, vShield Endpoint, and the vShield Data Security feature on ESX hosts. You install vShield
®
Edge on a port group, vNetwork Distributed Switch (vDS) port group, or a Cisco Nexus 1000V.
VMware, Inc.
23
vShield Quick Start Guide
Install vShield Component Licenses
You must install licenses for vShield Edge, vShield App, and vShield Endpoint before installing these
components. You can install these licenses after vShield Manager installation is complete by using the vSphere
Client. A vShield App license allows you to use the vShield Endpoint component as well.
Procedure
1
From a vSphere Client host that is connected to a vCenter Server system, select Home > Licensing.
2
For the report view, select Asset.
3
Right-click a vShield asset and select Change license key.
4
Select Assign a new license key and click Enter Key.
5
Enter the license key, enter an optional label for the key, and click OK.
6
Click OK.
7
Repeat these steps for each vShield component for which you have a license.
Prepare All ESX Hosts
Prepare all ESX hosts in your vCenter environment for vShield add-on functions.
vShield virtual appliances include VMware Tools. Do not attempt to alter or upgrade the VMware Tools
software on a vShield virtual appliance.
NOTE The network connection of a virtual machine is interrupted when you protect it with vShield App. If
vCenter Server is running on a virtual machine and it becomes disconnected from the network, the vShield
App installation process might halt without completing. Do not install vShield App on the same host as the
VMware vCenter Server virtual machine.
Prerequisites
n
Verify that you have an IP address for the management (MGMT) port of each vShield App virtual
appliance. Each IP address should be reachable from vShield Manager and sit on the Management network
used for vCenter and ESX host management interfaces.
n
Local or network storage in which to place the vShield App.
Procedure
24
1
Log in to the vSphere Client.
2
Select an ESX host from the inventory tree.
3
Click the vShield tab.
4
Accept the security certificate.
5
Click Install for the vShield App service.
6
Under vShield App, provide the following information.
Option
Description
Datastore
Select the datastore on which to store the vShield App virtual machine files.
Management Port Group
Select the port group to host the vShield App management interface. This
port group must be able to reach the vShield Manager’s port group.
IP Address
Type the IP address to assign to the vShield App management interface.
VMware, Inc.
Chapter 4 Installing vShield Edge, vShield App, vShield Endpoint, and vShield Data Security
Option
Description
Netmask
Type the IP subnet mask associated with the assigned IP address.
Default Gateway
Type the IP address of the default network gateway.
7
Select the vShield Endpoint check box.
8
Click Install.
You can follow the progress of the vShield App installation on the Recent Tasks pane of the vSphere Client
screen.
9
After installation of all components is complete, do the following:
n
vShield App: At this point, vShield App installation is complete. Go to the vShield App > App
Firewall tab at the datacenter, cluster, or port group container level to configure firewall rules. Each
vShield App inherits global firewall rules set in the vShield Manager. The default firewall rule set
allows all traffic to pass. You must configure blocking rules to explicitly block traffic. To configure
App Firewall rules, see the vShield Administration Guide.
NOTE If you have installed vShield App on a stateless ESX, you must follow the steps in “Install
vShield App on a Stateless ESX Host,” on page 25 before rebooting the host.
CAUTION Do not modify service virtual machines through the vCenter client. This may break
communication between vShield Manager and vShield App and compromise the security of your
network.
n
vShield Endpoint: To complete installation, see “Installing vShield Endpoint,” on page 27.
n
vShield Data Security: To complete installation, see “Installing vShield Data Security,” on page 28.
What to do next
When all of the components are installed, perform one of the following tasks.
n
vShield App. At this point, vShield App installation is complete. Select vShield App > App Firewall at
the datacenter, cluster, or port group container level to configure firewall rules. Each vShield App inherits
global firewall rules set in vShield Manager. The default firewall rule set allows all traffic to pass. You
must configure blocking rules to explicitly block traffic. To configure App Firewall rules, see the vShield
Administration Guide.
NOTE If you installed vShield App on a stateless ESX server, you must follow the steps in “Install vShield
App on a Stateless ESX Host,” on page 25 before rebooting the host.
n
vShield Endpoint: To complete installation, see “Installing vShield Endpoint,” on page 27.
n
vShield Data Security: To complete installation, see “Installing vShield Data Security,” on page 28.
Install vShield App on a Stateless ESX Host
If you installed vShield App on a stateless ESX host, you must perform the steps below before rebooting any
of the ESX hosts on which vShield App is installed.
Prerequisites
n
Install vShield App on the stateless ESX host.
n
Ensure that the firewall configuration changes done on the host by the VIB are complete.
VMware, Inc.
a
In the vCenter client, select the stateless ESX host from the inventory panel.
b
Click the Configuration tab.
25
vShield Quick Start Guide
c
n
Check that a DVFilter entry appears in the Incoming Connections under the Firewall panel. If no
DVFilter entry appears, click Refresh.
Create a host profile. For more information, see the vSphere Installation and Setup Guide.
Procedure
1
Edit the host profile.
a
In the vCenter client, select Home > Management > Host Profiles.
b
Select the profile to edit.
c
Click Edit Host Profile.
d
Select Networking Configuration > Host Port Group > vmservice-vmknic-pg > IP address
settings > How is IPv4 address determined.
e
Type the IP address as 169.254.1.1 and Subnet mask as 255.255.255.0.
f
Select Networking Configuration > Host Port Group > vmservice-vmknic-pg > Determine how
MAC address for vmknic should be decided.
g
Select User must explicitly choose the policy option.
2
Save the host profile.
3
In a web browser, type https://vsm-ip/bin/offline-bundles/VMware-vShield-fastpathesx5x-5.0.1-556798.zip and download the zip file.
4
Use the host profile you created in step 1 and the offline bundle you downloaded in Step 3 to update the
stateless ESX configuration.
Install a vShield Edge
Each vShield Edge virtual appliance has External and Internal network interfaces. The Internal interface
connects to the secured port group and acts as the gateway for all protected virtual machines in the port group.
The subnet assigned to the Internal interface can be RFC 1918 private space. The External interface of the vShield
Edge connects to an uplink port group that has access to a shared corporate network or a service that provides
access layer networking.
Each vShield Edge requires at least one IP address to number the External interface. Multiple external IP
addresses can be configured for Load Balancer, Site-to-Site VPN, and NAT services. The Internal interface can
have a private IP address block that overlaps with other vShield Edge secured port groups.
®
You can install one vShield Edge per port group, vDS port group, or Cisco Nexus 1000V.
If DRS and HA are enabled, a vShield Edge will be migrated dynamically.
Procedure
1
Log in to the vSphere Client.
2
Go to View > Inventory > Networking.
3
On a vDS, create a port group.
This port group is the Internal port group.
26
4
Move a tenant’s guest virtual machines to the Internal port group.
5
Select the new Internal port group.
6
Click the Edge tab.
VMware, Inc.
Chapter 4 Installing vShield Edge, vShield App, vShield Endpoint, and vShield Data Security
7
Under Network Interfaces, enter the following information.
Option
Description
External
Port Group
Select the external port group in the vDS. This port group homes a physical
NIC and connects to the external network.
IP Address
Type the IP address of the external port group.
Subnet Mask
Type the IP subnet mask associated with the specified external IP address.
Default Gateway
Type the IP address of the default network gateway.
Internal
8
9
Port Group
This is the selected internal port group.
IP Address
Type the IP address of the internal port group.
Subnet Mask
Type the IP subnet mask associated with the specified internal IP address.
Under Edge deployment resource selection, enter the following information.
Option
Description
Resource Pool
Select the resource pool where the vShield Edge should be deployed if you
are installing vShield Edge on a dvPort Group that spans multiple resource
pools. If the selected port group is on a single resource pool, the Resource
Pool IP is automatically filled in.
Host
Select the ESX host on which the datastore resides if you are installing vShield
Edge on a dvPort Group that spans multiple hosts. If the selected port group
is on a single host, the host is host IP is automatically filled in..
Datastore
Select the datastore on which to store the vShield Edge virtual machine files.
Click Install.
After installation is complete, configure services and firewall rules to protect the virtual machines in the
secured port group. To configure a vShield Edge, see the vShield Administration Guide.
CAUTION Do not modify vShield Edge virtual machines through the vCenter client since this may break
communication between the vShield Edge and vShield Manager. To remove a vShield Edge virtual
machine, uninstall vShield Edge from the vShield Manager
Installing vShield Endpoint
The installation instructions that follow assume that you have the following system:
n
A datacenter with supported versions of vCenter Server and ESXi installed on each host in the cluster. For
information on the required versions, see Chapter 2, “Preparing for Installation,” on page 13.
n
vShield Manager 5.0 installed and running.
n
Anti-virus solution management server installed and running.
vShield Endpoint Installation Workflow
After you prepare the ESX host for vShield Endpoint installation, install vShield Endpoint in these stages:
1
Deploy and configure a security virtual machine (SVM) to each ESX host according to the instructions
from the anti-virus solution provider.
2
Install VMware Tools 8.6.0 released with ESXi 5.0 Patch 1 on all virtual machines to be protected.
VMware, Inc.
27
vShield Quick Start Guide
The vShield Endpoint host component adds two firewall rules to the ESX host:
n
The vShield-Endpoint-Mux rule opens ports 48651 to port 48666 for communication between the host
component and partner security VMs.
n
The vShield-Endpoint-Mux-Partners rule may be used by partners to install a host component. It is
disabled by default.
Install VMware Tools on the Guest Virtual Machines
VMware Tools include the vShield Thin Agent that must be installed on each guest virtual machine to be
protected. Virtual machines with VMware Tools installed are automatically protected whenever they are
started up on an ESX host that has the security solution installed. That is, protected virtual machines retain the
security protection through shut downs and restarts, and even after a vMotion move to another ESX host with
the security solution installed.
Prerequisites
Make sure that the guest virtual machine has a supported version of Windows installed. The following
Windows operating systems are supported for vShield Endpoint 5.0:
n
Windows Vista (32 bit)
n
Windows 7 (32/64 bit)
n
Windows XP (32 bit)
n
Windows 2003 (32/64 bit)
n
Windows 2003 R2 (32/64 bit)
n
Windows 2008 (32/64 bit)
n
Windows 2008 R2 (64 bit)
Procedure
1
2
Select the type of installation for VMware Tools.
ESX Version of the Host
Action
ESX 5.0 Patch 1
Follow the installation instructions in Installing and Configuring VMware
Tools till the point you see the Setup Type wizard.
ESX 4.1 Patch 3 or later
Follow the installation instructions in the Knowledge Base article
http://kb.vmware.com/kb/2008084 till the point you see the Setup Type
wizard.
in the Setup Type wizard, select one of the following options:
n
Complete.
n
Custom.
n
From the VMware Device Drivers list, select VMCI Driver, then select vShield Driver.
Installing vShield Data Security
You can install vShield Data Security only after installing vShield Endpoint.
Prerequisites
Verify that vShield Endpoint has been installed on the host and guest virtual machines..
28
VMware, Inc.
Chapter 4 Installing vShield Edge, vShield App, vShield Endpoint, and vShield Data Security
Procedure
1
Log in to the vSphere Client.
2
Select an ESX host from the inventory tree.
3
Click the vShield tab.
4
Click Install next to vShield Data Security.
5
Select the vShield Data Security checkbox.
6
Under vShield Data Security, enter the following information.
7
Option
Description
Datastore
Select the datastore on which to add the vShield Data Security service virtual
machine.
Management Port Group
Select the port group to host the vShield Data Security’s management
interface. This port group must be able to reach the vShield Manager’s port
group.
To configure a static IP, select the Configure static IP for management interface checkbox.
Enter the IP address, Netmask, and Default Gateway details.
NOTE If you do not select Configure static IP for management interface, an IP address is assigned using
Dynamic Host Configuration Protocol (DHCP).
8
Click Install.
The vShield Data Security virtual machine is installed on the selected host.
VMware, Inc.
29
vShield Quick Start Guide
30
VMware, Inc.
Uninstalling vShield Components
5
This chapter details the steps required to uninstall vShield components from your vCenter inventory.
This chapter includes the following topics:
n
“Uninstall a vShield App Virtual Appliance,” on page 31
n
“Uninstall a vShield Edge from a Port Group,” on page 31
n
“Uninstall a vShield Data Security Virtual Machine,” on page 32
n
“Uninstall a vShield Endpoint Module,” on page 32
Uninstall a vShield App Virtual Appliance
Uninstalling a vShield App removes the virtual appliance from the network and vCenter Server.
CAUTION Uninstalling a vShield App places the ESX host in maintenance mode. After uninstallation is
complete, the ESX host reboots. If any of the virtual machines that are running on the target ESX host cannot
be migrated to another ESX host, these virtual machines must be powered off or migrated manually before the
uninstallation can continue. If the vShield Manager is on the same ESX host, the vShield Manager must be
migrated prior to uninstalling the vShield App.
Procedure
1
Log in to the vSphere Client.
2
Select the ESX host from the inventory tree.
3
Click the vShield tab.
4
Click Uninstall for the vShield App service.
If you are uninstalling vShield App on a stateless ESX host, ignore the VIB uninstallation errors.
5
if the ESX host was in maintenance mode before you started uninstalling vShield App, remove the vShield
App virtual machines manually after the automatic uninstallation is complete.
The instance is uninstalled.
Uninstall a vShield Edge from a Port Group
You can uninstall a vShield Edge from a secured port group by using the vSphere Client.
Procedure
1
VMware, Inc.
Log in to the vSphere Client.
31
vShield Quick Start Guide
2
Go to View > Inventory > Networking.
3
Click the Edge tab.
4
Click Uninstall.
Uninstall a vShield Data Security Virtual Machine
After you uninstall the vShield Data Security virtual machine, you must uninstall the virtual appliance
according to the instructions from the VMware partner.
Procedure
1
Log in to the vSphere Client.
2
Select an ESX host from the inventory tree.
3
Click the vShield tab.
4
Click Uninstall for the vShield Data Security service.
Uninstall a vShield Endpoint Module
Uninstalling a vShield Endpoint module removes a vShield Endpoint module from an ESX host. You must
perform these steps in the following order.
CAUTION If vShield Data Security is installed on the ESX host, you must uninstall it before uninstalling vShield
Endpoint.
Uninstall Products That Use vShield Endpoint
Before you uninstall a vShield Endpoint module from a host, you must uninstall all products that are using
vShield Endpoint from that host. Use the instructions from the solution provider.
Uninstall the vShield Endpoint Module from the vSphere Client
Uninstalling an vShield Endpoint module removes the vShield Endpoint Module from an ESX host.
Procedure
32
1
Log in to the vSphere Client.
2
Select an ESX host from the inventory tree.
3
Click the vShield tab.
4
Click Uninstall for the vShield Endpoint service.
VMware, Inc.
Upgrading vShield
6
To upgrade vShield, you must first upgrade the vShield Manager, then update the other components for which
you have a license.
This chapter includes the following topics:
n
“Upgrade the vShield Manager,” on page 33
n
“Upgrade vShield App,” on page 34
n
“Upgrade vShield Edge,” on page 34
n
“Upgrade vShield Endpoint,” on page 35
n
“Upgrade vShield Data Security,” on page 36
Upgrade the vShield Manager
You can upgrade vShield Manager to a new version only from the vShield Manager user interface. You can
upgrade vShield App and vShield Edge to a new version from the vShield Manager user interface or by using
REST APIs.
Prerequisites
If you are using vShield Endpoint 4.1, uninstall vShield Endpoint before upgrading vShield Manager.
CAUTION Do not uninstall a deployed instance of vShield Manager appliance.
Procedure
1
Download the vShield upgrade bundle to a location to which vShield Manager can browse.
The name of the upgrade bundle file is something like VMware-vShield-Manager-upgrade_bundlebuildNumber.tar.gz.
2
From the vShield Manager inventory panel, click Settings & Reports.
3
Click the Updates tab.
4
Click Upload Settings.
5
Click Browse and select the VMware-vShield-Manager-upgrade_bundle-buildNumber.tar.gz. file.
6
Click Open.
7
Click Upload File.
8
Click Install to begin the upgrade process.
VMware, Inc.
33
vShield Quick Start Guide
9
Click Confirm Install.
The upgrade process reboots vShield Manager, so you might lose connectivity to the vShield Manager
user interface. None of the other vShield components are rebooted.
10
Right-click the vShield Manager virtual machine and click Open Console to open the vShield Manager
command line-interface (CLI).
11
After you see the e1000_watchdog_task: NIC Link is up message, log in to the vShield Manager user
interface.
12
Click the Updates tab.
The Installed Release panel displays the build number of the vShield release that you just installed.
What to do next
n
Clear the browser cache on all clients that have accessed the previous version of the product. This action
clears the cached javascript or other files from that version that might have changed in the current version.
n
Relogin to vShield Manager user interface.
Upgrade vShield App
Upgrade vShield App on each host in your datacenter.
Procedure
1
Log in to the vSphere Client.
2
Select Inventory > Hosts and Clusters.
3
Select the host on which you want to upgrade vShield App.
4
Click the vShield tab.
The General tab displays each vShield component that is installed on the selected host and the available
release.
5
Select Update next to vShield App.
6
Select the vShield App checkbox.
7
Click Install.
Upgrade vShield Edge
Upgrade vShield Edge on each port group in your datacenter.
Procedure
1
Log in to the vSphere Client.
2
Select Views > Inventory > Networking.
3
Click the vShield Edge tab.
4
Click Upgrade.
What to do next
When you upgrade vShield Edge from a prior release, vShield Edge is in the compatibility mode. You can
switch to the regular mode.
34
VMware, Inc.
Chapter 6 Upgrading vShield
In compatibility mode, the default firewall policy is applied only on the internal interface. All traffic in in/out
direction on external and VPN interfaces is allowed. When you switch to regular mode, the default firewall
policy rules are not modified initially. When you change the firewall configuration, the default firewall rules
for vShield Edge 5.0.1 are applied where incoming traffic is blocked and outgoing traffic is allowed. For more
information, see the vShield Administration Guide.
After vShield Edge is upgraded, the Command Line Interface (CLI) credentials on the vShield Edge appliance
are reset. To log in to CLI, use the default user name and password and then reset the password.
Upgrade vShield Endpoint
The upgrade procedure to follow depends on the product version that you are using.
Upgrade vShield Endpoint
To upgrade vShield Endpoint from 4.1 to a later release, you must first uninstall vShield Endpoint on each
host in your datacenter, upgrade vShield Manager, and then install the new release.
1
If the protected virtual machines are running in a cluster, deactivate DRS.
2
Deactivate all Trend DSVAs. This is required to remove vShield related VFILE filter entries from the virtual
machines.
3
If you had deactivated DRS in step 1, re-activate it.
4
Uninstall vShield Endpoint on each host in your datacenter. For more information, see “Uninstall the
vShield Endpoint Module from the vSphere Client,” on page 32.
5
Upgrade VMware vCenter to the required version. For more information, see Chapter 2, “Preparing for
Installation,” on page 13.
6
Upgrade each host to the required VMware ESX version. For more information, see Chapter 2, “Preparing
for Installation,” on page 13.
7
Upgrade vShield Manager. For more information, see “Upgrade the vShield Manager,” on page 33.
8
Install vShield Endpoint. For more information, see “Installing vShield Endpoint,” on page 27.
Upgrade vShield Endpoint from 5.0 to a Later Version
To upgrade vShield Endpoint from 5.0 to a later version, you must first upgrade vShield Manager, then update
vShield Endpoint on each host in your datacenter.
Procedure
1
Log in to the vSphere Client.
2
Select Inventory > Hosts and Clusters.
3
Select the host on which you want to upgrade vShield Endpoint.
4
Click the vShield tab.
The General tab displays each vShield component that is installed on the selected host and the available
version.
5
Select Update next to vShield Endpoint.
6
Select the vShield Endpoint check box.
7
Click Install.
VMware, Inc.
35
vShield Quick Start Guide
Upgrade vShield Data Security
Upgrade vShield Data Security on each host in your datacenter. It is recommended that you upgrade vShield
Endpoint before upgrading vShield Data Security.
Procedure
1
Log in to the vSphere Client.
2
Go to Inventory > Hosts and Clusters.
3
Select the host on which you want to upgrade vShield App.
The Summary tab displays each vShield component that is installed on the selected host and the available
release.
36
4
Select Update next to vShield Data Security.
5
Select the vShield Data Security checkbox.
6
Click Install.
VMware, Inc.
vShield Installation Fails
7
Installing vShield App results in an error.
Problem
When a vShield App installation fails, you receive a prompt to uninstall the product.
Cause
When you uninstall vShield vApp, all required components might not be removed.
Solution
1
Click Uninstall to uninstall all vShield components. For more information, see Chapter 5, “Uninstalling
vShield Components,” on page 31.
2
If the error message indicated a problem in installing the VIB, reboot the ESX host.
3
Reinstall vShield App.
VMware, Inc.
37
vShield Quick Start Guide
38
VMware, Inc.
Index
C
L
changing the GUI password 21
CLI
configuring vShield Manager network
settings 18
hardening 16
client requirements 13
cluster protection 12
communication between components 15
configuring vShield Manager network
settings 18
licensing
evaluation mode 23
installation 24
logging in to the GUI 19
D
P
password change 21
plug-in 20
preparing virtual machines for protection 15
protecting a cluster 12
protecting virtual machines 15
deployment
cluster 12
DMZ 11
deployment considerations 14
deployment scenarios 10
DMZ 11
R
E
T
ESX host preparation 24
evaluating vShield components 23
thin agent installation 28
G
GUI, logging in 19
H
hardening
CLI 16
REST 16
vShield Manager GUI 16
I
installation
licenses 24
vShield App 24
vShield Edge 26, 27
vShield Endpoint 24
vShield Endpoint thin agent 28
vShield Manager 18
isolating networks 11
VMware, Inc.
REST 16
S
synchronizing with vCenter 20
system requirements 13
U
uninstall
vShield App 31
vShield Data Security 32
vShield Edge 31
vShield Endpoint module 32
unregister a vShield Endpoint SVM 32
upgrade
vShield App 34
vShield Edge 34
vShield Endpoint 35
vShield Manager 33
upgrade Endpoint, 5.0 to later version 35
V
vCenter, syncing from vShield Manager 20
vMotion 15
vShield
component communication 15
deployment scenarios 10
evaluating components 23
hardening 15
preparing an ESX host 24
39
vShield Quick Start Guide
vShield App 8
vShield Edge 9
vShield Endpoint 10
vShield Manager 8
vShield App
about 8
common deployments 12
installation 24
licensing 24
uninstall 31
vShield Data Security 10
vShield Edge
about 9
common deployments 12
installation 26
isolating networks 11
licensing 24
uninstall 31
vShield Endpoint
about 10
installation 24, 27
installation steps 27
licensing 24
thin agent installation 28
uninstall 32
unregister SVM 32
vShield Manager
about 8
changing the GUI password 21
installation 18
logging in to GUI 19
network settings 18
registering plug-in 20
syncing with vCenter 20
uptime 15
vShield Manager GUI 16
vShield Zones, vShield Manager 8
vSphere Client plug-in 20
40
VMware, Inc.