1
About this guide
Deep Security provides a single platform for server security to protect physical, virtual, and cloud servers as well as
hypervisors and virtual desktops. Tightly integrated modules easily expand to offer in-depth defenses, including antimalware, web reputation, intrusion prevention, firewall, integrity monitoring, and log inspection. It is available in
agentless and agent-based options that can all be managed through a single console across physical, virtual, and
cloud server deployments.
This guide is intended to help users to get the best productivity out of the product. It contains a collection of best
practices which are based on knowledge gathered from previous enterprise deployments, lab validations, and lessons
learned in the field.
Examples and considerations in this document provide guidance only and do not represent strict design
requirements. The guidelines in this document do not apply to every environment but will help guide you through the
decisions that you need to configure Deep Security for optimum performance.
Trend Micro Incorporated reserves the right to make changes to this document and to the products described herein
without notice. Before installing and using the software, please review the readme file and the latest version of the
applicable user documentation.
This document is designed to be used in conjunction with the following guides, all of which provide more detail about
Deep Security than are given here:
Trend Micro Deep Security v9.0 Installation Guide
http://files.trendmicro.com/documentation/guides/deep_security/Deep_Security_9_SP1_Install_Guide_EN.pdf
Trend Micro Deep Security v9.0 Administrator’s Guide
http://files.trendmicro.com/documentation/guides/deep_security/Deep_Security_9_SP1_Admin_Guide_EN.pdf
________________________________________________________________________________________________________
This Best Practice Guide Contains:
Deployment considerations and recommendations
Guidance in sizing server and storage resources for Deep Security implementation
Upgrade guidelines and scenarios
Configuration recommendations to maximize system performance and reduce administrative
overhead
Best practice tips for VDI, private and public cloud environments.
2
Acknowledgements
This guide was made possible by the following individuals who volunteered their time and expertise to this project:
Marlon Beriña, Aldrin Ceriola, Saif Chaudhry, Jennifer Chua, Jason Dablow, Erwin Dusojan, Mohamed Inshaff,
Jill Maceda, Marion Mora, Robert See and Hugo Strydom.
We would also like to thank the following people for their significant support and contribution during development and
review:
Mahmood Azmat, Cenen Enalbes, Evgeny Faddeenkov, Mason Lee, Will C Lin, Hao Liu, Jason Liu, Dave Lu, Ryan Mao,
Dietmar Metzler, Rodel Villarez, Jay Yaneza, Robert Ynares, Alwin Yu, Keanu Beltran and Patty Macapinlac.
Document version: 2.0
Release date: March 28, 2014
3
Table of Contents
1 Environment ........................................................................................................................................................................... 6
1.1 Operating Systems ................................................................................................................................................................................ 6
1.2 Database Systems ................................................................................................................................................................................. 6
1.3 VMware vSphere and vShield Compatibility with Deep Security ........................................................................................ 7
1.4 VMware tools and vShield Endpoint Drivers (for Agentless Anti-Malware) ................................................................... 7
2 Sizing Considerations .......................................................................................................................................................... 8
2.1 Deep Security Manager ...................................................................................................................................................................... 8
2.2 Database ................................................................................................................................................................................................... 8
2.3 Deep Security Virtual Appliance ..................................................................................................................................................... 9
2.4 Deep Security Relay............................................................................................................................................................................10
3 Installation and Deployment ............................................................................................................................................... 11
3.1 Deep Security Components ............................................................................................................................................................... 11
3.1.1 Deep Security Manager .................................................................................................................................................... 11
3.1.2 Deep Security Agent/Relay........................................................................................................................................... 14
3.1.3 Deep Security Virtual Appliance .................................................................................................................................18
3.1.4 Database............................................................................................................................................................................... 21
3.2 VMware Components ........................................................................................................................................................................ 23
3.3 Deployment Scenario Samples .....................................................................................................................................................25
3.4 Testing Deep Security ....................................................................................................................................................................... 27
4 Upgrade and Migration ...................................................................................................................................................... 28
5 Configuration ....................................................................................................................................................................... 31
5.1 UI Configurations .................................................................................................................................................................................. 31
5.1.1 Dashboard............................................................................................................................................................................ 31
5.1.2 Alerts...................................................................................................................................................................................... 31
5.1.3 Policies .................................................................................................................................................................................. 31
5.2 Module Configurations .....................................................................................................................................................................34
5.2.1 Anti-Malware ....................................................................................................................................................................34
5.2.2 Web Reputation ................................................................................................................................................................ 41
5.2.3 Firewall ................................................................................................................................................................................. 41
5.2.4 Intrusion Prevention..................................................................................................................................................... 45
5.2.5 Integrity Monitoring...................................................................................................................................................... 46
5.2.6 Log Inspection ................................................................................................................................................................ 49
5.3 Administration and System Settings ......................................................................................................................................... 49
5.3.1 Recommendation Scan ............................................................................................................................................... 49
5.3.2 System Settings ............................................................................................................................................................. 50
6 Performance Tuning and Optimization........................................................................................................................... 54
6.1 Deep Security Manager .................................................................................................................................................................... 54
6.1.1 Configure the Deep Security Manager's Maximum Memory Usage .......................................................... 54
6.1.2 Configure Multiple Managers ..................................................................................................................................... 54
6.1.3 Performance Profiles .................................................................................................................................................... 55
6.2 Deep Security Virtual Appliance .................................................................................................................................................. 59
6.2.1 Adjust the Heap size settings of the Filter Driver ............................................................................................. 59
4
6.2.2 Preventing Heap Size Exhaustion ........................................................................................................................... 59
6.3 Database................................................................................................................................................................................................ 60
6.3.1 Exclude Database files from Anti-malware scans ............................................................................................ 60
6.3.2 Auto-growth and Database Maintenance ............................................................................................................ 60
6.3.3 Database Indexing ......................................................................................................................................................... 60
7 Disaster and Recovery ........................................................................................................................................................ 61
7.1 High Availability ....................................................................................................................................................................................61
7.1 High Availability ....................................................................................................................................................................................61
7.2 Removing a virtual machine from Deep Security protection in a disaster................................................................... 61
7.3 Recovering a physical machine (with DSA) in a disaster ................................................................................................... 62
7.4 Recovering an inaccessible DSVA ............................................................................................................................................... 63
7.5 Isolating a Deep Security Issue..................................................................................................................................................... 63
8 Other Deployment Scenarios ........................................................................................................................................... 66
8.1 Multi-tenant environment ............................................................................................................................................................... 66
8.2 Environments using Teamed NICs ...............................................................................................................................................67
8.3 Air-Gapped Environments ...............................................................................................................................................................67
8.4 Solaris Zones ....................................................................................................................................................................................... 68
8.5 Microsoft Cluster Servers............................................................................................................................................................... 68
8.6 Virtualzed Environments (VDI) .................................................................................................................................................... 68
8.7 Private, Public and Hybrid Cloud Environments .................................................................................................................... 70
5
______________________________________________________________________________________________
1 Environment
Deep Security 9.0 consists of several components work together to provide protection. The information
provided in this section will help you to determine compatibility and recommended software for:
a)
b)
c)
d)
1.1
Operating Systems
Database Systems
VMware vSphere and vShield Compatibility
VMware Tools and the vShield Endpoint Driver
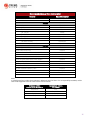
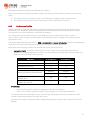
Operating Systems
Recommended Platforms
Windows
Linux
Deep Security
Manager*
Windows Server 2012 (64-bit)
Windows Server 2008 (64-bit)
Windows Server 2003 SP2 (64-bit)
RHEL 5 (64 bit)
RHEL 6 (64 bit)
Deep Security
Relay
Windows Server 2012 (64-bit)
Windows 8 (64-bit)
Windows 7 (64-bit)
Windows 2008 (64-bit)
Windows Server 2003 (64-bit)
Windows XP SP3 (64-bit)
RHEL 5 (64-bit)
RHEL 6 (64-bit)
CentOS 5 (64-bit)
CentOS 6 (64-bit)
Hotfixes and updates for the operating systems recommended above should be kept up-to-date to
ensure optimal performance, stability, and security.
Refer to the Readme and Installation Guides for a complete list of supported systems.
http://downloadcenter.trendmicro.com/index.php?clk=tbl&clkval=4329®s=NABU&lang_loc=1
1.2
Database Systems
Microsoft SQL
Deep Security Manager
SQL 2008
SQL 2012
(All Service Packs)
Oracle
Oracle 10g
Oracle 11g
*You must install the database software, create a database, and create a user account (which Deep Security
Manager will use to access the database) before you install Deep Security.
6
1.3
VMware vSphere and vShield Compatibility with Deep Security
VMware and Deep Security compatibility charts change often, especially as new versions of vSphere are
released.
To get up-to-date information for the latest compatibility chart, refer to
http://esupport.trendmicro.com/solution/en-US/1060499.aspx
* Deep Security 9.0 features such as Agentless Recommendation Scan, Scan Cache and Hypervisor
Integrity Monitoring, require at least ESXi 5.1. To utilize these new features, we recommend running
Deep Security 9.0 on an ESXi 5.1 environment.
* The Deep Security Virtual Appliance (DSVA) 9.0 and the Deep Security Filter Driver (DSFD) 9.0 do
not support ESX 4.1. To support ESXi 4.1, use the Deep Security Manager 9.0 with DSVA 8.0 SP2 and
the Deep Security Filter Driver 8.0 SP2.
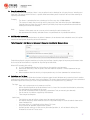
1.4
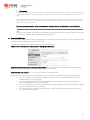
VMware tools and vShield Endpoint Drivers (for Agentless Anti-Malware)
The agentless anti-malware operations provided by Deep Security require the vShield Endpoint driver to
be installed on the virtual machines to be protected.
VMware includes the VMware vShield Endpoint Driver in VMware Tools 5.x, but the installation program
does not install it on Guest VMs by default. To install it on guest VM, review the installation options in the
table below:
Available VMware Tools Installation Options
Installation Option
Typical
Complete
Custom
vShield Endpoint
vShield Endpoint does
NOT install
vShield Endpoint
installs
You must explicitly
install vShield Endpoint
Action
DO NOT select this option
Select if you want all features
Expand VMware Device Drivers > VMCI
Driver
Select vShield Drivers and choose This
feature will be installed on local drive.
Note:
Network Copy Performance Issue with vShield Endpoint
http://kb.vmware.com/selfservice/microsites/search.do?language=en_US&cmd=displayKC&externalId=2034490
-
The vShield Endpoint driver that came with ESXi 5.0 Patch 4 causes an issue where files copied over
the network was slow. VMware released a fix and is bundled into the VMware tools that came with
ESXi 5.0 U2.
http://www.vmware.com/support/vsphere5/doc/vsp_esxi50_u2_rel_notes.html
-
The fix for this issue for 5.0 U2 was not carried over to 5.1. Users getting this problem on a 5.1
environment must apply 5.1 U1.
http://www.vmware.com/support/vsphere5/doc/vsphere-esxi-51u1-release-notes.html
7
_________________________________________________________________________________________________
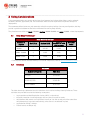
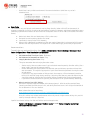
2 Sizing Considerations
Sizing recommendations rely greatly on the type of environment and various other factors such as network,
hardware, software, applications, etc. These estimates were based on experience and previous enterprise
deployments.
The recommendations below may not accurately reflect the required settings for every configuration, but they
provide a guideline to determine the best environment for running Deep Security.
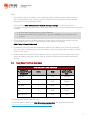
They have been classified into Small (1-10,000), Medium (10,000-20,000) and Large (20,000 – above) deployments.
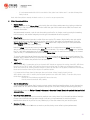
2.1
Deep Security Manager
Deep Security Manager
# of CPUs
System RAM
Memory
allocated to DSM
JVM process
# of DSM
nodes
1 - 10,000
2
8-12 GB
4-8 GB
1-2
10,000 - 20,000
4
16 GB
12 GB
2
20,000 - above
4
24 GB
16 GB
3
Number of
Agents
*To change the default allocated memory to the DSM JVM process, refer to Maximum Memory Usage.
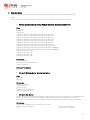
2.2
Database
Database
Number of Agents
HDD Size
1-10,000
10-20 GB
10,000-20,000
20-30 GB
20,000-above
30-40 GB
The table above helps determine the initial database size to set for the Deep Security Database. These
estimates are provided based on the following assumptions:
•
•
•
•
•
Log Inspection and Web Reputation Service (WRS) is not enabled.
Intrusion prevention is enabled properly with very few false positive events.
Anti-Malware (AM) events are insignificant in terms of size and are not part of the calculation.
Anti-Malware only logs events occasionally, unless there is an outbreak in place.
Log Retention Period is 30 days.
Firewall events are 50 per day.
8
Notes:
1.
Other factors, such as the modules in use, number of security updates held, the number of policies,
etc, will affect database size. In general, centrally collected Firewall and Intrusion prevention event
logs form the bulk of the database volume.
Event retention (DSM > Administration > System Settings > Storage), is relevant to maintain a
reasonable sized database. Make sure to review these settings as this will help determine how much space
is needed.
• 1 Firewall event log entry takes up roughly 250 bytes
• 1 Intrusion Prevention event log entry takes up roughly 300-1024 bytes depending on the
rule type
2.
For environments where a significant amount of Firewall events are anticipated, consider disabling
“Out of allowed policy” events. This can be done on each agent or on the policy.
DSM > Policy > Firewall > Advanced.
3.
Environments with large retention requirements should rely on SIEM or Syslog server for log storage.
If logs are stored in SIEM or Syslog, lesser data would be stored in the Deep Security database, and thus
requires lesser space.
4.
Imported software in the Deep Security Manager also play a big part in terms of space usage. Always
review the number of software versions you plan to keep in the database and remove unnecessary
versions.
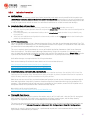
2.3
Deep Security Virtual Appliance
Deep Security Virtual Appliance
Number of
Protected Virtual
Machines*
vCPU
RAM
Filter Driver
Memory Heap
Size
Below 50
2
2 GB
256 MB
100
2
4 GB
256 MB
150 - 200
4
8 GB
1 GB
250
6
12 GB
1.5 GB
250 (AM Only)
2
4 GB
1 GB
* Protected virtual machines per ESXi Host.
To know more about adjusting the Filter Driver Memory Heap Size, refer to the following article:
http://esupport.trendmicro.com/solution/en-US/1095995.aspx
9
2.4
Deep Security Relay
Deep Security Relay
Number of Agents
# of Relays
1-10,000
1-2
10,000-20,000
2-3
20,000-above
3-4
In determining the number of Deep Security Relays required for an environment, review the expected number
of download connections from Deep Security Agents (DSA) and Deep Security Virtual Appliances (DSVA).
Establish how much of the DSA and the DSVAs need to be updated within an expected time frame.
(Example: 50 Agents need to get the updates in 1 hour)
Notes:
1.
The Deep Security Relay (DSR) throughput is dependent upon the size of the packages downloaded by the
DSA/DSVA. For example, the download package size for the first time activation of an agent may
be between 50 - 100 MB, but the typical updates after initial activation will be less than this e.g. 1 – 10 MB.
2.
The main load a DSR would expect to serve is during the initial activations, for this reason it is
strongly recommended to do phase rollouts. Stage the deployment and gradually add endpoints
to the system.
3.
To rollout an update to an endpoint as fast as possible, then more relay servers are required.
Increasing the number of relays simply means updates gets pushed out faster to the endpoints.
Example:
•
•
To rollout a 10MB update to 20,000 endpoints within 30 minutes, deploy 4 Deep Security
Relays.
To rollout a 10MB update to 20,000 endpoints within 1-2 hours, 2 Deep Security Relays are
sufficient.
10
_________________________________________________________________________________________________
3 Installation and Deployment
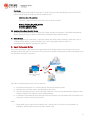
Deep Security is composed of several components that need to communicate with each other. When deploying in
a highly segmented network environment, knowledge about the various ports it uses will be useful for preventing
unintended functionality disruptions. Make sure to note all ports that are required are open and, not reserved for
other purposes.
Refer to the article below for a list of ports required in Deep Security:
http://esupport.trendmicro.com/solution/en-us/1060007.aspx
3.1
Deep Security Components
Deep Security Manager (DSM) v.9.0 ONLY supports the Deep Security Agent/Deep Security Relay/
Deep Security Virtual Appliance of versions 7.5 SP4, 8.0 SP1, and 9.x.
3.1.1
Deep Security Manager
A. Deployment Considerations
1.
Use the Fully Qualified Domain Name.
Define DSM to use its fully qualified domain name and that it is resolvable by all other components.
If this was not defined correctly during the install, this can be modified under:
DSM > Administration > System Information.
The manager address/name specified in the “Network Map with Activity Graph” screen will be the one used
by the other components to contact DSM.
2. Place all Deep Security install packages on the same directory during initial install.
Deep Security imports the Agent, Relay, Appliance and Filter Driver install packages
into the Deep Security Manager during installation. Doing so will save you time from having to
manually import them into the console after the install.
In small scale environments, this also makes deploying the Deep Security Relay to the same machine
as DSM, easier. The installer checks for the Deep Security Relay package, and if present and selected, will
automatically continue with the Deep Security Relay installation once the Deep Security Manager has
successfully installed.
11
3.
Deploy at least one secondary DSM node.
This is always recommended to be deployed for redundancy. No more than 3 DSM nodes are
recommended.
See Configure Multi-Node Managers.
Multi-node deployment is not meant to address geographic dispersion. Therefore, DSM nodes
and the DB must be in same network segment (i.e. NO DSM1/DB in London with DSM2 in Paris
connected via WAN.
B. Other Recommendations
1.
Maximum Memory for the DSM installer
The installer is configured to use 1GB of contiguous memory by default. If the installer fails and you receive
a "java.lang.OutOfMemoryError" error during installation, you may need to configure the installer to use
less memory.
Refer to http://esupport.trendmicro.com/solution/en-US/1098020.aspx for more details.
2. Load Balancer Support
Deep Security Manager can now specify a hostname and port that supersede the defaults in order to put
a load balancer in front of:
The manager user interface port (4119)
The manager heartbeat port (4120)
The relay port (4122)
To configure load balancers, go to DSM > Administration > System Settings > Advanced > Load Balancers
This setup is recommended for Multi-Tenant (Service Provider) environments (especially in the cloud).
Using a load balancer allows the following:
•
•
Tunneling for 4119, 4120 and 4122 traffic over 443 (three load balancers with 3 addresses).
Ability to add and remove DSM nodes on demand, without generating update traffic going to each
DSA and DSVA in the environment.
Load balancers can be configured to use different ports for different traffic. If the load balancer supports
port re-direction, it can be used to expose all of the required protocols over port 443 (using 3 load
balancers).
12
In all cases the load balancer should be configured as TCP load balancer (not SSL Terminating) with
sticky-sessions. This ensures a given communication exchange will occur directly between Agent/
Virtual Appliance and the Manager from start to finish. The next connection may balance to a different node.
On environments with a fixed number of DSM nodes, there is no need to use a load balancer in front of
the DSM.
For high availability and scalability, the Deep Security Manager by default, provides the URL address of
all nodes to all agents and virtual appliances. The agents and virtual appliances use the list to randomly
select a Manager node and continue to try the rest of the list until a node can be reached. If it can't
reach any nodes it waits until the next heartbeat and tries again.
13
3.1.2
Deep Security Agent/Relay
A. Deployment Considerations
1.
DNS Resolution
Ensure that each computer can resolve the fully qualified domain name of the Deep Security Manager
for a successful deployment.
2. Time Synchronization
The clock on a Deep Security Agent/Relay (DSA/DSR) machine must be synchronized with Deep
Security Manager (DSM) to within a period of 24 hours.
3.
Take time to decide on the best deployment method to use for your environment.
The Deep Security Agent can be deployed using various methods, including but not limited to:
• Manual deployment
• Group Policy (msiexec in silent mode)
• Enterprise Deployment Software (i.e. SCCM)
• Bundled in Templates
• Custom Scripts
The type of agent deployment mechanism used will help prepare you for future DSA/DSR upgrades.
Sample Scenarios:
• If GPO or Enterprise Deployment Software is used, it will be easier to perform an Agent upgrade
as the update package can just be pushed via the same method.
• If the Agent is bundled into virtual machine templates, then you will need to remember to update
the templates as part of the overall Agent upgrade process.
Deployment via DSM is not an available option; however, pushing software updates/upgrades
through DSM is possible. If you plan on performing upgrades via the DSM, the overhead of
pushing all of these upgrade packages via the network should be taken into consideration.
4. Installation via Remote Desktop
Installing the Deep Security Relay/Agent over Windows Remote Desktop is NOT recommended because
of the temporary loss of connectivity during the install process. Using the following command line
switch when starting Remote Desktop will allow the install program to continue on the server after the
connection is lost:
mstsc.exe /admin (mstsc.exe /console - for earlier Windows versions)
14
5. Other Anti-Malware software on the same machine
Only have one Anti-malware or one firewall application in a machine. Make sure to remove other
Anti-malware or firewall application.
6. OfficeScan Client and Deep Security
If the client machine where DSA/DSR will be installed on has a previous OfficeScan client, make sure
that the drivers (tmactmon, tmevtmgr and tmcomm) are fully uninstalled prior to installation. DSA and
the OffliceScan client use the same name for drivers, however, DSA cannot use OfficeScan client's
drivers and vice versa.
7.
Coordinated Protection
Consider using coordinated protection (DSA + Agentless). When virtual machines are protected by the
coordinated approach, if the Agent goes offline, protection from the Appliance is automatically
activated.
Coordinated approach provides the following benefits:
• Provides mobility to the virtual machines. They can be moved between data centers or cloud
providers and the protection moves with them.
• Performance improvement. While the Deep Security Agent is active on the virtual machine, the
Virtual Appliance automatically passes traffic through to the Agent.
• Allows you to implement the additional Log Inspection module on the virtual machine by using
the Deep Security Agent to provide the protection.
Do note that coordinated protection is only applicable to certain features, such as the Firewall and Web
Reputation. Refer to the chart below for details:
For Coordinated Approach to be implemented for a particular protection module, both the Agent and
the Appliance have to implement that protection.
8. Check the FQDN of the machine before and after DSA installation.
A brief network interruption occurs during the agent installation process. Sometimes, this can affect
DHCP auto registration. It is recommended to verify the computer’s FQDN (ping -a <ip or server name>)
before and after the install. Should an issue with auto registration be encountered, use
ipconfig /registerdns or reboot the computer.
9. Using DSA with iptables (on Linux agents) or Windows Firewall
To avoid conflict, the DSA installation will disable iptables (Linux) or Windows Firewall (Windows) by
default. In situations where the DSA firewall feature is NOT used, refer to the steps below to prevent the
installer from disabling iptables or make any changes to the native Windows Firewall.
For Windows:
Refer to the following article for details on how to modify the DSA MSI package to prevent it from
changing the Windows Firewall:
http://esupport.trendmicro.com/solution/en-us/1055458.aspx
15
For Linux:
Use at least Deep Security 9.0 Service Pack 1. In order to leave iptables untouched by the DSA, the user
must create or touch an empty file with the following path:
/etc/use_dsa_with_iptables
If that file is present then the DSA scripts will not disable iptables.
# touch /etc/use_dsa_with_iptables
# service iptables restart
# service ip6tables restart
10. Install multiple Deep Security Relays
At least one Deep Security Relay is required for a Deep Security environment. Trend Micro recommends
installing multiple Relays to achieve redundancy and optimize the bandwidth usage.
11. Relay Groups
Set up relay groups for redundancy. If one Relay Group has multiple Relay members, each Relay acts as
a backup for the others. If you have multiple sites, that is geographic region or office, it is
recommended to setup Relay Groups for each site.
B. Agent Deployment Scripts
Deep Security Manager's deployment script generator can be used to generate scripts that can be run on
computers where the agent will be installed. The script can be modified, to optionally perform subsequent tasks
like activation and Policy assignment.
Consider using deployment scripts in these scenarios:
•
•
•
•
Environments where there is a need to deploy and activate multiple agents.
Automate the activation process and deployment of policies.
Activate and deploy to clients in environments where the server cannot communicate/discover clients
directly but clients can reach the server without problem.
In Amazon Elastic Compute Cloud (Amazon EC2) environments, can be bundled with the endpoint and
used while instances are being auto scaled.
Notes:
1.
Deployment Scripts support basic function only. It cannot fulfill all need for all environments so
customers should adjust the scripts for their specific need.
16
Some environments might experience a delay in starting the ds_agent service. If the dsa_control
activation signal is sent before the ds_agent service is started, this might prevent the activation from
working successfully. Extend the sleep time in the scripts to prevent this.
Example:
In AWS testing, concurrent launching of 100 instances had better results when the sleep time
is set to more than 60 seconds. This highly depends on AWS’s system loading. Disk I/O, CPU
loading, network bandwidth and database configuration.
2.
In Amazon Web Services (AWS EC2) environments, the new instances must be able to access the
URLs specified in the generated deployment script. This means that DSM must be either internet facing,
connected to AWS via VPN/Direct Link, or that DSM be deployed on Amazon Web Services
as well.
3.
The base tenant MUST have agent packages imported before using deployment scripts. (for both single
and multi-tenant deployments)
4.
Agent Initiated Activation feature must be configured correctly in DSM, if scripts will be used to do
activation tasks.
Allow Agent-Initiated Activation option must be enabled on the Administration > System Settings >
Agents tab.
17
3.1.3
Deep Security Virtual Appliance
A. Deployment Considerations
1.
Allow DSM to put the ESXi host in/out maintenance mode
When installing the driver, the ESXi server will be put into maintenance mode, thus, schedule the deployment
of DSVA and the Filter Driver carefully.
When preparing the ESX box, allow the Deep Security Manager to automatically bring the host
into and out of maintenance mode (via the deploy wizard).
2. DSVA and Filter Driver Package
It is required to download the Filter driver and DSVA installer packages onto Deep Security Manager
prior to deploying DSVA and adding the vCenter server onto DSM.
3.
DNS Resolution
Ensure that the DSVA can resolve the FQDN of the Deep Security Manager and that the ESX server is
able to connect to the DSM FQDN at port 4119. There will be issues installing the driver and deploying
DSVA if ESX cannot do so.
Ensure that the DSM and vShield Manager FQDN can be resolved by DSVA.
4. VMware tools
There is no need to update the VMware tools within the Deep Security Virtual Appliance. DSVA uses the
device drivers that come with the version of tools it was built with. When an upgrade of tools is done, DSVA
may not start.
5. Change the default password.
Default password for the deployed DSVA image is “dsva”. We recommend that this be changed after
the install. To do so, press <F2> and select the option “Configure Password” on the console.
6. Do not vMotion DSVAs.
Make sure that the DSVAs do not vMotion. For this reason, the recommended naming convention for the
appliances is to use the name of the ESXi host (it is located on) pre-fixed or suffixed.
Example:
ESXi Hostname (Delta-12)
DSVA Hostname (Delta-12-DSVA)
Doing it this way can allow you to easily identify which DSVA belongs to which ESXi host. The DSVA
deployment wizard will set the “Automation Level” to “Disabled” in the DRS settings for the cluster. This
means that the DRS will not vMotion the DSVA by default.
7.
Make sure DSVAs are always on and the first to start up after maintenance.
If maintenance is required on the ESXi host and DSVA needs to be shut down, ensure that it is the first VM to
start running after the maintenance.
18
8. vCenter account in vShield Manager
Make sure vShield Manager has the correct vCenter settings, specifically the vCenter account.
In the vShield Manager console > Setting and Reports:
9. Management Interface
Once DSVA is deployed, when configuring the network settings, make sure that its management interface
has a connection to DSM.
On vCenter, right-click on DSVA image then select ‘Edit Properties’, then check the connection for the
Flexible Network Adapter (Network adapter 1 by default) :
10. Protected Virtual Machines
When creating VMs to be protected by DSVA, note the following considerations:
-
VMware Tools 5.0 or later with the vShield driver installed.
*VMware vShield Manager and VMware vShield Endpoint drivers are required if you want to implement AntiMalware protection on your virtual machines.
-
Virtual Disks Supported: LSI Logic parallel, LSI SAS or VMware paravirtual SCSI driver (Buslogic is not
supported)
For issues involving the Anti-Malware module not working as expected, you may refer to the following articles:
http://esupport.trendmicro.com/solution/en-US/1098103.aspx
http://esupport.trendmicro.com/solution/en-us/1060525.aspx
19
B. Other Recommendations
Smart Protection Server
In agent-less anti-malware environment, the actual scanning of the files takes place on the Deep Security Virtual
Appliance (DSVA), as there is no agent on the endpoint.
DSVA uses the conventional scanning method (recommended) that does not make use of Smart Protection
Server. There is a feature called “Web Reputation” which is used by the DSVA. When someone tries to access a
URL on the VM, the rating of that URL is checked by the DSVA first. This makes sure that the URL is not a
malicious URL. To check the rating of the URL, DSVA has to send that query to the Smart Protection Server.
Smart Protection Network is available globally on the Internet by Trend Micro. By default DSVA will use that.
Ensure these sites are allowed through your company firewall/proxy when using the global Smart Protection
Server:
ds90-en.url.trendmicro.com (Used for Web Reputation queries - WRS)
ds8.icrc.trendmicro.com (Used for File Reputation queries – Anti-Malware Smart Scan)
To void Internet traffic going to the global servers, it is recommended to install a local standalone Smart
Protection Server. The installer and guides can be downloaded from:
http://downloadcenter.trendmicro.com/index.php?regs=NABU&clk=latest&clkval=4225&lang_loc=1
20
3.1.4
Database
A. Deployment Considerations
1.
Place the database on the same network as the Deep Security Manager
The DSM must be co-located on the same network as its database with the connection speed of 1GB LAN or
higher. Connections over WAN are discouraged.
DSM relies heavily on the database to function. Any increase in latency can have a serious negative impact
on DSM performance and availability.
2. Dedicated Database Server
It is recommended that the database server be installed on a separate machine.
3.
It is recommended to use Microsoft SQL Enterprise or Oracle.
a.
Microsoft SQL Enterprise Server
o
o
o
o
o
b.
Create the DSM database in SQL first prior to DSM installation.
Make sure that “Remote TCP connections” is enabled in your Database Server.
http://msdn.microsoft.com/en-us/library/bb909712(v=vs.90).aspx
The database account that will be used should have db_owner rights for the DSM database.
The dbcreator server role is required if Multi-Tenancy is used.
Set the database with Simple Recovery model.
http://technet.microsoft.com/en-us/library/ms189272.aspx
Oracle Database Server
o
o
o
o
o
Ensure that the Oracle Listener service is started and accepts remote TCP connections
on your Database Server.
Create the *‘dsm’ database user.
*Any other user name may be used.
Grant the CONNECT, RESOURCE roles and the UNLIMITED TABLESPACE system privilege
to the user ‘dsm’.
Assign the CREATE SEQUENCE, CREATE TABLE and CREATE TRIGGER system privileges
to the user ‘dsm’.
If you plan to use multi-tenancy, grant the CREATE USER, DROP USER, ALTER USER,
GRANT ANY PRIVILEGE and GRANT ANY ROLE system privileges to the user ‘dsm’.
4. Use a TCP/IP connection to the database
Connecting to the database via the TCP/IP channel is recommended.
In situations where the use of named pipes is required to connect to the SQL Server, a properly
authenticated Microsoft Windows communication channel must be available between Deep Security
Manager's host and the SQL Server host.
21
This may already exist if:
- The SQL Server is on the same machine as Deep Security Manager,
- both servers are members of the same domain, or
- a trust relationship exists between the two servers.
If no such communication channel is available, Deep Security Manager will not be able to communicate
with the SQL Server over named pipes.
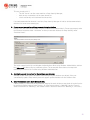
5. Ensure correct connection settings are used during installation.
During install, the DSM installer would ask you for Database connection details. Ensure you properly enter
the Database hostname under “Hostname” and the pre-created database for Deep Security under
“Database Name”.
The install supports both SQL and Windows Authentication. When using Windows Authentication, click on
the “Advanced” button to display additional options. The screenshot above shows an example for
connecting to a named SQL instance using Windows Authentication.
6. Avoid using special characters for the database user (Oracle)
Although Oracle allows special characters when configuring the database user object, if they are
surrounded by quotes. Deep Security does not support special characters for the database user.
7.
Keep the database name short (Microsoft SQL)
If Multi-tenancy is planned for the environment, keeping the main database name short will make it easier
to read the database names of your Tenants. (ie. If the main database is "MAINDB", the first Tenant's
database name will be "MAINDB_1", the second Tenant's database name will be "MAINDB_2", and so on. )
22
3.2
VMware Components
Deployment Considerations
1.
Ensure the latest security patches are applied to vCenter, ESXi, and vShield Manager.
For version compatibility details, refer to http://esupport.trendmicro.com/solution/en-US/1060499.aspx
2. Ensure all VMware components are tied to an NTP server
It is recommended you use the same NTP server for the entire environment, and ensure they are all
synchronized.
3.
Use vShield 5.1 to take advantage of the new features of Deep Security 9.0.
Features such as Agentless Recommendation Scan, Scan Cache and Hypervisor Integrity Monitoring, require
at least vShield 5.1. Both ESXi 5.0 and 5.1 can run with vShield 5.1.
4. Deploying vShield Manager
The OVA package for the vShield Manager appliance can be downloaded from VMware’s web site. It will be
found under “vCloud Networking and Security” section on the web site. This appliance can be deployed on
any vCenter. It does NOT have to be on the vCenter that it will be connecting to. You will need one vShield
Manager to connect to each vCenter.
5. vCenter and vShield Manager Passwords
Login credentials that have access to vCenter and vShield Manager are required when connecting the
components to Deep Security. Always remember to update the connection details in Deep Security each
time the password for these accounts change to avoid synchronization issues.
This can be done via DSM > Computers > Right Click on vCenter > Properties.
For more details on the permissions, refer to:
http://esupport.trendmicro.com/solution/en-US/1098184.aspx
6. Deploying the vShield driver on VMs
a.
For VDI environments:
- Enable the driver in the gold image.
b.
For mass deployments:
- Run this command run from a “command prompt” to automatically install the Endpoint driver
without user intervention.
setup.exe /S /v "/qn REBOOT=R ADDLOCAL=ALL REMOVE=Hgfs"/v "/qn ADDLOCAL=VMCI,VShield
REMOVE=Hgfs"
23
c.
For environments where VMs are already up and running and could not be reconfigured and
recomposed:
- Login to vCenter using vSphere client
- In the Inventory > Hosts and Clusters view, select the host, cluster, or datacenter and click the
Virtual Machines tab.
- Control-click or Shift-click to select the virtual machines.
- Right-click the selected virtual machines and click Guest > Install/Upgrade VMware Tools.
- Choose “automatic tools upgrade” option and enter the below listed MSI arguments in the text
field box. This will specify which VMware Tools components to include/exclude.
/v “/qn ADDLOCAL=VMCI,VShield REMOVE=Hgfs”
More details about the MSI parameters can be found here:
http://pubs.vmware.com/vsphere-50/index.jsp?topic=/com.vmware.vmtools.install.doc/GUIDCD6ED7DD-E2E2-48BC-A6B0-E0BB81E05FA3.html
- Verify on random VM’s to ensure the driver is running using “sc query vsepflt” in the command
prompt.
7. Multiple vCenters
Deep Security supports multiple vCenter servers. Virtual Machine UUIDs must be unique across all vCenter
instances. For example, adding a VM to the inventory on multiple vCenter servers can result in duplicate
UUID issues.
When using “Linked Mode” each linked vCenter server must be added individually to DSM.
8. Stateless Hosts
When deploying to stateless hosts, sometimes, the DVFilter port (2222) is not open by default from the ESX
firewall. This could cause communication issues between the Filter Driver on ESX and DSVA.
Ensure that communication to the ESX host via TCP 2222 is allowed.
For more information about deploying on Stateless hosts, consult the Deep Security Installation Guide.
24
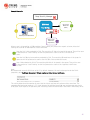
3.3
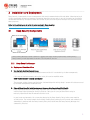
Deployment Scenario Samples
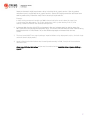
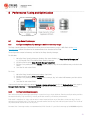
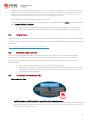
Standard Small Scale Deployment
This small standard deployment only requires a single DSM infrastructure.
• Database installed on a separate machine.
• Both DSM and Database should be located in the same datacenter.
• 1-2 Relays for updates.
• Use 10 minute heartbeat for all systems.
Refer to the heartbeat section for additional details on heartbeat.
25
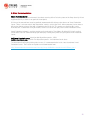
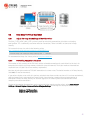
Medium Scale Deployment with VPN users
Scenario: Remote systems connect to VPN regularly
Two DSM nodes are recommended for redundancy.
• DSM and DB both located in the Datacenter.
• Bi-directional communication used.
• 1-2 Relays for updates.
• 10 minute heartbeat for servers.
• 60 minute heartbeat for desktops and internal laptops.
• 10 minute heartbeat for remote laptops
(will vary, heartbeat frequency needs to be less than average VPN session frequency)
Refer to the heartbeat section for additional details on heartbeat and communication methods.
26
3.4
Testing Deep Security
Validate and test Deep Security features and functionality after deployment. You may refer to the following link for
guidelines on testing each module of Deep Security. The link also provides for testing integration with VMware,
Active Directory and SIEM tools, along with failover/high availability tests and scenarios.
http://esupport.trendmicro.com/solution/en-US/1098449.aspx
27
_________________________________________________________________________________________________
4 Upgrade and Migration
General Upgrade Recommendations:
1.
Before upgrading the Deep Security manager, make a full backup of the Deep Security Manager database. In the
rare even that you have difficulty with the upgrade this will allow you to roll back by installing the previous
manager (with a temp database) then re-pointing it at the restored database (in dsm.properties).
2.
Perform the upgrade on a non-peak hour or low-peak hours.
3.
The Deep Security Filter Driver and the Deep Security Virtual Appliance must always be upgraded to the same
version. Upgrading one without the other can cause unprecedented issues or leave both in a non-functional
state.
4.
For multi-node DSM:
a. Upgrade must be done on all DSM nodes.
Example: Upgrade DSM node 1 then node 2 and then node 3.
b.
5.
All nodes must run on the same version prior to upgrade.
If a previous version of Deep Security Manager is installed on your system, chose between the "upgrade the
existing installation", and the "overwrite the existing installation":
a. Upgrading the installation will upgrade the Deep Security Manager to the latest version but will not
overwrite your policies, Intrusion Prevention Rules, Firewall Rules, Application Types, etc. or change any of
the security settings being applied to the computers on your network.
When upgrading from 8.0, all of the configuration and event data retains. The only significant change is
that the settings that were at the 'global' level before will become part of the base policy. All other policies
(security profiles) that existed in 8.0 are changed to be child policies of the Base Policy. The effective
settings that apply to the computers are the same, only the structure is different.
b.
Overwriting the existing installation erases all data associated with the previous installation and then
installs the latest filters, rules, policies, etc.”
6. In a Multi-Tenant environment;
a. When the installer runs and detects an existing installation. It offers an upgrade option. If upgrade is
selected the installer first informs other nodes to shut down and then begins the process of upgrading
b.
7.
The primary Tenant is upgraded first, followed by the Tenants in parallel (five at a time). Once
the installer finishes, the same installer package should be executed on the rest of the Manager nodes.
For environments with large databases, schema modification during an upgrade can take significant amounts
of time (8+ hours), so make sure to plan ahead.
8. DSM supports managing components running 1 major version back (i.e. DSM 9.0 can manage DSA/DSVA 8.0)
28
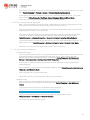
Upgrading from Deep Security 8.0 SP2 (and ESXi 4.1 to 5.x)
when using Agentless Protection
1
2
3
Remove Deep Security and
VMware Components
Upgrade and Install VMware
Components
Upgrade Deep Security
Components
a. Deactivate all the Virtual
Appliances.
a. Install or upgrade ESXi 4.1 to 5.0.
Make sure ESXi 5.0 (build 474610
or later) is applied.
a. Backup the Deep Security
database (highly recommended)
b. Uninstall Deep Security Filter
Driver (Restore ESXi) and vShield
Driver from ESXi.
c. Uninstall vShield Endpoint Guest
Drivers from VMs.
b. Install vShield Driver on the ESXi
and Install vShield Endpoint drivers
on VMs
b. Upgrade the Deep Security
Manager first and then Deep
Security Relays.
c. Install the Deep Security Filter
Driver on the ESXi (Prepare ESXi)
d. Upgrade the Deep Security
Virtual Appliance and Agents then
activate
e. Upgrade Deep Security Notifier
on protected VMs
Note:
•
•
Uninstalling a vShield Endpoint module puts the ESXi host into maintenance mode and reboots it.
When upgrading the vShield Manager on a vCenter, you will have to deactivate all the Virtual Appliances
running on that vCenter because all the Virtual Appliances on that vCenter require an active vShield
Manager.
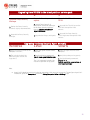
Upgrading from Deep Security 8.0 SP2 when using
Agent-based Protection Only
1
2
3
Upgrade Deep Security
Manager
Import Components
Deploy
a. Backup the Deep Security
database (highly recommended)
a. Import Deep Security 9
component installation packages
to the Deep Security Manager
console (Software Updates >
Import Software)
a. Upgrade Relays
b. Upgrade the Deep Security
Manager first and then Deep
Security Relays.
b. Upgrade Agents and Notifier
29
Upgrading from 9.0 GM to the latest patch or service pack
1
2
3
Upgrade Deep Security
Manager
Upgrade the relays and
agents.
Upgrade the filter driver and
DSVA.
a. Backup the Deep Security
database (highly recommended)
a. Import Deep Security 9
component installation packages
to the Deep Security Manager
console (Software Updates >
Import Software)
a. Upgrade the Filter Driver on the
ESXi host through the DSM
console.
b. Upgrade the Deep Security
Manager.
b. Upgrade the Relays and Agents.
b. Upgrade the Deep Security
Virtual Appliance through the DSM
console.
Windows
Upgrading the Deep Security Agent Manually
Linux
Solaris
a. Copy the agent installer to the
computer and run it.
a. Copy the agent installer to the
computer.
a. Copy the agent installer to the
computer.
b. The installer detects the
previous agent version and
upgrades it.
b. Run the following command:
rpm –U <new agent installer rpm>
b. Unzip the package using gunzip.
The “-U” argument instructs the
installer to perform an upgrade.
c. Run the following command:
pkgadd –v –a
/opt/ds_agent/ds_agent.admin –d
<new agent package>
Note:
•
Agent Self-Protection must be disabled on computers that you plan to upgrade. To configure Agent SelfProtection, go to the Computers tab on the Policy/Computer Editor > Settings page.
30
_________________________________________________________________________________________________
5 Configuration
Because Deep Security is a modular solution that can be adapted to many different environments, there is no right
or wrong way to configure the product. Below are some common settings, exclusions, and other helpful
configurations which appear in most Deep Security deployments. Always double check with your company’s policies
before adapting these recommendations.
5.1
UI Configurations
5.1.1
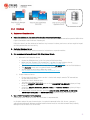
Dashboard
We recommend that at least the following widgets are included and placed on the area best seen on the dashboard
page:
a.
b.
c.
d.
Alert Status – to keep you informed on any critical items that may need immediate attention such as
security updates and protection on computers getting offline.
Computer Status – gives you a good overview of agents’ status.
My Account Status – will show information about the user currently logged in.
Security Update Status – shows information about out-of-date vs. up-to-date agents
Create multiple dashboards and group them by use (ie. General, Anti-Malware Dashboard, Updates, etc.). This allows
for easier management for large scale environments. The tabbed view allows administrators to easily switch between
them. The dashboards each have a different time and computer filter allowing for many different views into the
system.
5.1.2
Alerts
By default, most alerts are enabled. In large environments, in might be beneficial to remove some alerts so only ones
that need to be taken action on are triggered. With all alerts enabled, a manager or less technical savvy person will
get the idea that Deep Security isn’t working properly. Alerts should be tweaked to give you the most relevant
information so you can take action on them accordingly.
5.1.3
Policies
Policies provide a logical way for replicating security settings to servers and desktops that share similar security
requirements. We recommend that machines with similar settings, software installed, application, or function be
grouped strategically when assigning policies.
Note that the default policies built in with Deep Security are meant to be examples and should not be used without
prior configuration.
a.
Policies vs. Computer Level Rule and Configuration Assignment
The best practice is to assign most rules through Policies for ease of management.
Advantages for using Policies:
- Make changes to the policy settings and the ability to test it first prior to assigning it to the machines.
- Allows for a quick removal of rules and configuration by simply taking out a machine from the policy
or assigning it an entirely new one.
- Ability to duplicate the policy and use it as a baseline setting for succeeding policies to be created.
When to use Computer Level rule assignment:
- When leveraging automatic assignment
- When there are many varying computers (ie. Each machine uses different applications, different OS
updates, etc. making them virtually impossible to group)
31
Note: If using a combination of both policy and computer level assignments, keep in mind that if you
un-assign a policy from a computer, rules may still be in effect on the computer if they were
assigned independently of the policy.
b.
Policy Groupings
Below are some recommended machine groupings to effectively take advantage of policies:
•
By Operating System
(e.g.: Windows 2008 Servers, Windows XP Machines, and Linux)
•
By Server Function
(e.g.: Mail Servers, Web Servers, User Laptops, and Point of Sale Systems)
•
By Application installed/version
(e.g. Officescan Servers, Oracle 10 Database Servers, MS SQL 2005 Servers)
Grouping machines properly is the key to managing recommendation scans effectively.
When a Recommendation scan is performed on an individual member of a policy, the recommendations
for that particular agent (DSA) will be seen on the policy as well.
Accepting (applying) the recommendations at the policy level will apply the rules to all members of the
policy. The advantage to this method is ease of maintenance. The disadvantage, however, is the possibility of
assigning rules to members that do not actually need them. This is the reason why it is recommended that
machines are grouped accordingly if users don't want to see the vulnerability being triggered for machines
that should not be affected.
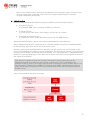
Deep Security 9 supports multiple levels of policy inheritance. A newly created policy can be
configured to inherit all or some of its settings from a parent policy. This lets you create a tree
structure of security policies. For example, you can create a parent policy called "Windows Server" and
two child policies, "Windows Server 2008" and "Windows Server 2003", inherited from their parent
policy. Each of those child policies can in turn have child policies of their own for different editions of
Windows Server.
Sample Policy grouping with policy inheritance:
32
c.
Policy Names
As a best practice, using a naming convention for policies can ease the burden of managing multiple policies
in the environment.
Example:
Workstation Base Policy
|
|_USBU-Workstations
|
|_USBU-Workstations-Win7
|
|_USBU-Workstations-WinXP
|
|_APACBU-Workstations
|
|_EUBU-Workstations
33
5.2
Module Configurations
5.2.1
Anti-Malware
a.
Configuration
Policies -> Common Objects > Other -> Malware Scan Configuration > Scan Settings
Recommended Real-time Scan Configuration
General
Recommendation
Files to Scan
Directories to Scan
All Files
All directories
Actions
Active Action
Custom Actions:
Disabled
Enabled
For Virus
For Trojans
For Packer
For Spyware
For Other Threats
Possible Malware upon Detection
Clean
Delete
Quarantine
Quarantine
Quarantine
Quarantine
Options
Enable Spyware / Grayware Scan
Scan Compressed Files
Maximum size of individual extracted files
Maximum Levels
Maximum number of files to extract
Scan Embedded Microsoft Office Objects
Scan for Exploit Code in Microsoft Office Objects
OLE Layers to Scan
Enable Intellitrap*
Enable Network Directory Scan
Scan Files When
Alert when…
Enabled
Enabled
30
2
10
Enabled
Enabled
3
Disabled
Enabled**
Read/Write
Enabled
* IntelliTrap helps block real-time compressed executable files and pairing them with other malware
characteristics. Because IntelliTrap identifies such files as security risks and may incorrectly block safe files, if
users regularly exchange real-time compressed executable files, disable IntelliTrap.
(Intellitrap only works in Real-Time mode.)
**Network scanning should be disabled to maintain maximum performance during Real Time Scan.
However, these network resources must be protected by a local AV scanner. Leave enabled if there is no other
file scanner for these network shares.
34
Recommended Scheduled Scan Configuration
General
Recommendation
Files to Scan
Directories to Scan
All Files
All directories
Actions
Active Action
Disabled
Custom Actions
For Virus
For Trojans
For Packer
For Spyware
For Cookie
Enabled
Clean
Delete
Quarantine
Quarantine
Delete
For Other Threats
Possible Malware – Upon Detection
Quarantine
Quarantine
Options
Enable Spyware / Grayware Scan
Scan Compressed Files
Maximum size of individual extracted files
Enabled
Enabled
60
Maximum Levels
Maximum number of files to extract
Scan Embedded Microsoft Office Objects
Scan for Exploit Code in Microsoft Office Objects
OLE Layers to Scan
Enable Intellitrap
3
10
Enabled
Enabled
3
Disabled
Enable Network Directory Scan
CPU Usage
Scan Files When
Alert when…
Enabled
Medium
Read/Write
Enabled
35
Recommended Manual Scan Configuration
General
Recommendation
Files to Scan
Directories to Scan
All Files
All directories
Actions
Active Action
Disabled
Custom Actions
For Virus
For Trojans
For Packer
For Spyware
For Cookie
Enabled
Clean
Delete
Quarantine
Quarantine
Delete
For Other Threats
Possible Malware – Upon Detection
Quarantine
Quarantine
Options
Enable Spyware / Grayware Scan
Scan Compressed Files
Maximum size of individual extracted files
Enabled
Enabled
60
Maximum Levels
Maximum number of files to extract
Scan Embedded Microsoft Office Objects
Scan for Exploit Code in Microsoft Office Objects
OLE Layers to Scan
Enable Intellitrap
2
10
Enabled
Enabled
3
Disabled
Enable Network Directory Scan
CPU Usage
Scan Files When
Alert when…
Enabled
High
Read/Write
Enabled
Note:
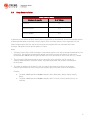
In choosing actions to take when malware is detected, note that there is a corresponding secondary action
that will be triggered when the initial action fails to execute.
Primary Action
Secondary Action
Quarantine
Pass
Clean
Quarantine
Delete
Clean
Deny
Quarantine
(configured on the console)
(hardcoded)
36
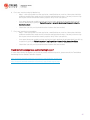
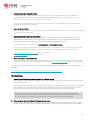
b.
Scan Schedule Setting
In addition to scan configurations, there is also an option to set a schedule for all types of scans, including realtime scan. This can be useful if there is a specific timeframe where you’d like to turn off real-time scanning to
improve performance.
Example:
-
Note:
c.
-
File Server is scheduled to have a backup of all files every day at 2:00-4:00am.
This server will most likely have high activity during this time and whitelisting the 2:00-4:00am
timeslot from real-time scan activity would significantly help improve performance for both the
backup task and server resource.
Perform a full manual scan on a server prior to running the actual backup task.
We recommend that weekly scheduled scans are performed on all protected machines.
Multithreaded processing
Real-time scan uses multithreaded scans by default. However, for on-demand and scheduled scans, this option
needs to be configured depending on the environment.
Policy/Computer > Anti-Malware > Advanced > Resource Allocation for Malware Scans
Enable the option for physical machines using the physical Deep Security Agent to improve performance. Note
that a restart of the machine is required for any change to take effect.
When NOT to enable this setting:
• It is NOT recommended to turn this option on for agentless environments.
• When multi-threading is not an option, since the machine resource is limited (common for cpubound tasks)
• When resource should be held by a single operator only at a time (common for io-bound tasks)
d.
Quick Scan vs. Full Scan
Deep Security 9 added the Quick Scan feature to improve agent based (Windows only) scanning time. It enables
scanning only those critical files most likely to be infected. This allows more frequent quick scans to be scheduled
with lower impact and leaving full scans to be performed on a less frequent basis (e.g. weekly).
Full Scan:
- Runs a full system scan on all processes and files.
- Utilizes the configuration set under Manual Scan (ie. Scans files based on the directories, extensions,
files configured to be included in the scan)
- Can be run at scheduled times by creating a Scheduled Task, or manually (on-demand).
- Can be run on all platforms supporting Anti-Malware
- Takes longer to complete
Quick Scan:
- Fast high level scan of critical system areas for currently active threats.
- Will look for currently active malware but it will not perform deep file scans to look for dormant or
stored infected files.
- On larger drives, it is significantly faster than a Full Scan.
- Only available for Windows Agent based systems.
- No configurable settings, will not use any scan configuration (ie. will not check settings like
Directories to Scan or Files to Scan)
37
-
e.
Quick Scan is only available on-demand. You cannot schedule a Quick Scan as part of a
scheduled task.
Scan Cache
This feature is only available for environments running Deep Security 9.0 on vShield 5.1 environments (ie.
Agentless protection via DSVA). It enables de-duplication of scanning in Malware and Integrity Monitoring scans,
producing a performance increase on scan times for subsequent scans or similar VMs (For instance VDI linked
clones).
•
•
•
•
Works best when VMs are linked clones (VDI is prime case)
Designed to avoid scanning identical files twice.
Scan cache is stored in the DSVA memory
When a VM is vMotioned to another host, the scan cache information is not moved with it to avoid
conflicts with the target cache. The target DSVA’s cache would apply to the newly migrated VM.
Recommendations:
To modify the scan cache configurations: Go to DSM > Administration > System Settings > Advanced > Scan
Cache Configurations > View Scan Cache Configurations
•
•
•
Anti-Malware Real Time Scan Cache : 15 Minutes
Anti-Malware On Demand Scan Cache: 1 Day
Integrity Monitoring Scan Cache: 1 Day
Things to remember when changing the cache values:
-
•
Shorter expiry times on cache means it gets refreshed more frequently. Consider setting it to a
lower value if you want to increase security.
Create dedicated Scan Cache policies for VMs that you want to keep separate and have their
own scan cache. This might be appropriate if you have different departments sharing the same
infrastructure.
If you have a very large number of VMs per host (for example, a VDI environment), monitor
the disk I/O and CPU usage during scanning. If scanning takes too long, consider increasing the
size of the cache or adjusting the Scan Cache Settings to achieve the required performance.
If you need to increase cache size you may need to adjust DSVA system memory accordingly.
When to use the “Use USN” Setting:
USN means 'Update Sequence Number (USN) change journal'. With the setting enabled, Deep
Security can check the USN value of a file, and during Real-time Scans it will read partial content of
files to determine if files are identical.
More information can be found here:
http://msdn.microsoft.com/en-us/library/aa363798%28v=VS.85%29.aspx
Using this setting may reduce performance and usually needs a higher cache setting. Only use this
setting if stronger security is required.
Specific Scan Cache Settings for VMs and Policies can be changed under:
Policy > Anti-Malware > Advanced > VM Scan Cache or under Policy > Integrity Monitoring >
Advanced > VM Scan Cache
38
f.
Scan Exclusions
The following scan exclusions can be set in the Common Objects section of the Administration Tab.
Note:
Please use these as a starting point and refine these lists as per your environment and paths.
•
General Exclusions and Excluding Windows Update or Automatic Update Files
Files:
pagefile.sys
NTUser.pol
registry.pol
${Windir}\Software Distribution\Datastore\DataStore.edb
${Windir}\Software Distribution\Datastore\Logs\Edb*.log
${Windir}\Software Distribution\Datastore\Logs\Res1.log
${Windir}\Software Distribution\Datastore\Logs\Res2.log
${Windir}\Software Distribution\Datastore\Logs\Edb.chk
${Windir}\Software Distribution\Datastore\Logs\tmp.edb
${Windir}\Software Distribution\Datastore\Logs\hiberfil.sys
${Windir}\Software Distribution\Datastore\Logs\pagefile.sys
${Windir}\Software Distribution\Datastore\Logs\Edbres00001.jrs
${Windir}\Software Distribution\Datastore\Logs\Edbres00002.jrs
${Windir}\Security\*.edb
${Windir}\Security\*.sdb
${Windir}\Security\*.log
${Windir}\Security\*.chk
Directories:
${allusersprofile}\
${Windir}\system32\GroupPolicy\
${Windir}\Cluster\
Extension Exclusions:
*.pst
•
Microsoft Windows Server Domain Controllers
Files:
TEMP.edb
EDB.chk
Directories:
${Windir}\SYSVOL\
${Windir}\NTDS\
${Windir}\ntfrs\
${Windir}\system32\dhcp\
${Windir}\system32\dns\
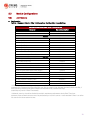
• Microsoft SQL Server
Because scanning may hinder performance, large databases should not be scanned. Since Microsoft SQL
Server databases are dynamic, exclude the directory and backup folders from the scan list. If it is
necessary to scan database files, a scheduled task can be created to scan them during off-peak hours.
Directories:
${ProgramFiles}\Microsoft SQL Server\MSSQL\Data\
${Windir}\WINNT\Cluster\
Q:\
# if using SQL Clustering
# if using SQL Clustering
39
• File Servers
Access to files over shared drives results in a degradation of performance. To scan some file types, only
a fraction of content is required. Others file types require a full scan or even decompression and a full
scan.
Trend Micro recommends that file servers are excluded from scanning and then perform the scanning
on the local file server itself. With exclusions in place, there is no need to scan the file as it is accessed
which increases performance.
For a more comprehensive list of recommended scan exclusions for Microsoft, refer to this link:
http://social.technet.microsoft.com/wiki/contents/articles/953.microsoft-anti-virus-exclusion-list.aspx
Note:
If there are any custom applications or applications not mentioned here then please contact the vendor
of that software to get their recommended scan exclusions.
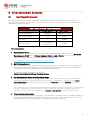
g.
Quarantine Settings:
With agent-less Anti-Malware feature, quarantined files are stored in the Deep Security Virtual Appliance (DSVA).
Therefore, keep enough free space on a DSVA disk.
The default quarantined file settings are the recommended settings.
DSM > Policy > Anti-malware > Quarantine > Sizing and limitations
Maximum disk space used to store quarantined files: this represents the maximum space that the DSM sets
aside for a DSVA. Files from all protected VMs must share this space
Maximum file size to scan: this is the largest file that can be quarantined
Quarantined files will be automatically deleted from a Virtual Appliance under the following circumstances:
• If a virtual machine (VM) undergoes vMotion, quarantined files associated with that VM will be
deleted from the Virtual Appliance.
• If a VM is deactivated from the Deep Security Manager, quarantined files associated with that
VM will be deleted from the Virtual Appliance.
• If a Virtual Appliance is deactivated from the Deep Security Manager, all the quarantined files stored
on that Virtual Appliance will be deleted.
• If a Virtual Appliance is deleted from the vCenter, all the quarantined files stored on that Virtual
Appliance will also be deleted.
40
5.2.2
Web Reputation
The default security level “Medium” is suitable for most users. However if you want further security, you can adjust it
to “High” level.
Web Reputation queries will go to the Smart Protection Server (if enabled) or our cloud WRS servers. It is
recommended to setup a local Smart Protection Server in house to limit the amount of internet queries required
which potentially leads to performance degradation.
If you have specific web pages to be allowed or blocked, configure them in the Exceptions tab. By default, Web
Reputation is enabled to port 80 and 8080. If you have an HTTP proxy server using other ports, configure it in the
Advanced tab.
1. Create a new Port List from Shared > Port Lists including you proxy port.(Such as 3128)
2. Choose the created Port List at Web Reputation > Advanced > Ports.
Other setting recommendations:
• Block pages that have not been tested by Trend Micro: Unchecked (could cause false positives if checked)
• Include internal company URLs in the Allowed list under exceptions. Wildcards are supported.
• Ensure that your company firewall/proxy allows traffic going to ds90-en.url.trendmicro.com when using the
global smart protection server.
5.2.3
Firewall
Firewall configuration and administration must be performed carefully. There is not one set of rules that fits all
environments. This guide aims to give users best practice tips and recommendations that can be used as reference
and serve as a guideline when building your own rules.
a.
Inline vs. Tap Mode
•
Always use Inline mode (DSM > Policies > Settings > Network Engine > Network Driver Mode)
When operating Inline, the live packet stream passes through the network engine. Stateful tables are
maintained, Firewall Rules are applied and traffic normalization is carried out so that Intrusion Prevention
rules can be applied to payload content.
•
Use “Inline mode” with rules set to “Detect” when there is a need to test the configuration and rules before
deploying them in to the production environment. This way, the real world process of analyzing the traffic
takes place without having to perform any action such as blocking/denying of packets.
Running Deep Security in Tap Mode is NOT recommended and is not the best practice to perform tests or
evaluate Deep Security. Traffic patterns in this mode are not representative of how the network will behave
should the administrator decide to switch to Inline mode.
b. Firewall Rule Actions
Make sure you understand the difference between the firewall rule actions before creating your rules. Each rule
can take one of the following actions:
•
Deny – this action explicitly blocks traffic that matches the rule
•
Force allow – if a packet matches a force allow rule it is passed but still filtered by Intrusion Prevention.
No events logged. This action type must be used for UDP and ICMP traffic.
•
Bypass – this allows traffic to bypass both Firewall and Intrusion prevention analysis. Should always
be created in pairs (for both incoming and outgoing traffic). Use this setting only for media-intensive
protocols.
41
c.
•
Log only – if a packet matches a log only rule it is passed and an event is logged. No other action will be
taken
•
Allow – if a packet matches an allow rule it is passed, and any other traffic not covered by a rule will be
implicitly denied. Use with caution.
Restrictive vs. Permissive Firewall
Typically firewall policies are based on one of two design strategies. Either they permit any service unless it is
expressly denied or they deny all services unless expressly allowed. It is best practice to decide what type of
firewall you would like to implement. This helps reduce administrative overhead in terms of creating and
maintaining the rules.
•
Permissive Mode (Reactive)
- Permits all traffic by default, and only blocks traffic it believes to be malicious based on
signatures or other information.
- Easy to implement, however, provides minimal security and requires complex rules.
- This mode is rarely used except in cases where customers aren’t using the firewall but
want to leverage it to block a port.
- Deny rules are used to explicitly block traffic.
•
Restrictive Mode (Proactive)
- Recommended best practice from a security perspective.
- Stop all traffic by default, and only allow traffic explicitly permitted.
- If the primary goal of your planned firewall is to block unauthorized access, the emphasis needs
to be on restricting rather than enabling connectivity.
- Easier to maintain and more secure.
- Allow rules are used to only permit certain traffic across the firewall and deny everything else.
Note:
Allow rules explicitly allow traffic that matches it to pass, in addition, it implicitly denies everything else not
defined. Be careful when creating allow rules without defining related rules correctly as doing so can cause one
to block all traffic apart from what the allow rule is created for.
d.
Stateful Inspection
Stateful Configurations should be used when the Firewall is ON.
The stateful filtering engine inspects and validates each packet on an individual basis. This involves analyzing the
packet within the context of traffic history, correctness of the packet’s header values, and protocol state
transitions. This enables protection against attacks such as denial of service, provided a default configuration
with stateful TCP/ICMP/UDP is enabled and only solicited replies are allowed.
If the UDP stateful option is enabled, Force Allow must be used when running UDP servers (e.g. DHCP).
If there is not a DNS or WINS server configured for the Deep Security Agents, a Force Allow, Incoming UDP Ports
137 rule may be required for NetBIOS.
Stateful logging should be disabled unless required for ICMP/UDP protocols.
e.
Interface Isolation
Interface Isolation allows you to force a computer to use only one interface at any one time. This feature
prevents attackers from bridging across two interfaces. It is commonly used to protect users with wireless
laptops.
Configure this via the Policy > Firewall > Interface Isolation.
- Enter string patterns that will match the names of the interfaces on a Computer (in order of priority).
- Use the limit to one active interface option to limit the number of active interfaces to one at any
given time.
42
-
It is not recommended that this be enabled at the global level. Make sure it is enabled through the
Policy instead.
Note: Interface patterns accept wildcards such as (*) as well as regex expressions.
f.
Other Recommendations
•
Bypass Rules
Bypass rules operate like Force Allow but also skip the rest of the packet processing pipeline so Intrusion
Prevention is also skipped. Use this action for traffic that you’d like to allow across both the Firewall and
Intrusion Prevention.
We recommend to create a pair of rules for each type of traffic. (ie. Create a rule bypassing the incoming
traffic (request), and another outgoing rule to bypass the outbound traffic (response)
•
Rule Priority
Rule priority determines the order in which filters are applied. This means, high priority rules get applied
before low priority rules. When actions share the same priority, the orders of precedence for rules are:
Bypass, Force Allow, and then Deny. However, a Deny action with a higher priority will take precedence
over a Bypass action with a lower priority.
Note that Allow rules can only have a priority of 0. Keep this in mind when using Allow rules to implicitly
deny traffic (any traffic not matching the Allow rules are denied). This means, when a Deny rule is added to
the list, it will take precedence over all existing Allow rules in place. For traffic that must always be allowed
(such as ARP), it is recommended to use the action Force Allow.
To simplify administration of firewall rules, consider reserving certain priority levels to specific actions. For
example, apply a default Priority 3 to rules that use Bypass, Priority 2 for Force Allow rules and Priority 1 for
Deny rules. This reduces the potential for rule conflicts.
•
ARP Traffic
Always allow ARP. If a computer relies on dynamic ARP include an appropriate rule to allow ARP. ARP forms
the basis of the TCP/IP stack. ARP facilities provide translation from IP addresses to Ethernet addresses,
which are essential for sending packets to other systems on the local LAN segment. Without this conversion,
there can be no other form of peer-to-peer IP communication.
It is important that Deep Security Manager does not instruc a Deep Security Agent to drop
ARP packets, unless that is actually desired (configuration uses static ARP tables). To ensure this please
follow these guidelines:
- Enable the Trend Micro-provided ARP force allow rule.
- Do not prevent broadcast ARP packets.
•
Out Of Allowed Policy
“Out of Allowed Policy (Open Port)” events can help quickly identify misconfigurations in rules. Generating
these events for TCP, UDP and ICMP advanced settings can assist with building and tweaking your policy.
Configure this under the Policy > Firewall > Advanced > Generate Firewall Events for packets that are Out of
Allowed Policy.
•
Use Port, IP and MAC lists
These lists are objects that can be reused by multiple rules. Using these lists in the configuration of multiple
Firewall rules facilitates configuration changes since only a single common list must be updated.
Modifications done on any of the lists are picked up by all the rules where they are used/assigned.
•
Number of rules
Do not assign more than 300 rules as much as possible; doing so can affect system performance.
43
•
Document all firewall rule changes
Utilize the “Description” field of the firewall rule to note why, when and for what purpose the rule was
created for. Note when and why rules are created and deleted for easier maintenance.
For more tips and information about the Deep Security Firewall, you may refer to the following link:
http://esupport.trendmicro.com/solution/en-us/1098015.aspx
44
5.2.4
Intrusion Prevention
a.
Modifying Rules
Intrusion Prevention (formerly called Deep Packet Inspection) rules must never be modified at the global level
(DSM > Policy > Common Objects > Rules > Intrusion Prevention Rules) because there is no way to restore them.
Configuration must be done by overriding the Policy or Computer. This way, the default master copy of the rules
is kept on a global level and can be used as a reference should there be a need to revert back changes.
b.
Using Detect Only or Prevent Mode
• If a specific rule is causing false positives, place that rule in Detect Only mode or un-assign it.
• Any rule, requiring configuration should be assigned in Detect Only mode until the rule can be configured for
that computer.
• For new deployments, we recommend setting rules to Inline Detect mode to make it easy to identify any
false positives.
• After tests and additional configuration has been made, switch a rule to Prevent mode to start blocking the
packets that match the rule.
c.
HTTP Protocol Decoding
The HTTP Protocol Decoding filter is the most important filter in the Web Server Common Application Type. This
filter is responsible for decoding the HTTP traffic before the other rules inspect it. In addition this filter also allows
you to control various components of the decoding process.
This rule is required should you choose to use any of the Web Application Common or Web Server Common
filters that require it. The Deep Security Manager automatically assigns this rule when it is required by other
rules. As each web application is different, the Policy that uses this filter should be run in a Detect Only mode for
a period of time before switching to Prevent mode to determine if any configuration changes are required.
Quite often changes are required to the list of illegal characters.
Refer to the following KB articles for more details on this rule and how to tune it:
http://esupport.trendmicro.com/solution/en-us/1098016.aspx
http://esupport.trendmicro.com/solution/en-us/1054481.aspx
http://esupport.trendmicro.com/solution/en-us/1096566.aspx
d.
Cross Site Scripting and Generic SQL Injection Rules
Two of the most common application-layer attacks are SQL injection and cross-site scripting (XSS). Cross Site
Scripting and SQL Injection rules intercept the majority of attacks by default. Customization can be required to
adjust the drop score for specific resources causing false positives.
Both these rules are smart filters and need custom configuration for web servers. Customers who have output
from Web Application Vulnerability Scanners should leverage that information when applying protection. For
example, if the username field on login.asp page is vulnerable to SQL Injection, ensure the SQL Injection rule is
configured monitor that parameter with a low threshold to drop on.
More details on this may be found here:
http://esupport.trendmicro.com/solution/en-US/1098159.aspx
e.
Filtering SSL Data Streams
Deep Security Manager supports Intrusion Prevention analysis of SSL traffic and is able to filter SSL encrypted
data streams. Filtering of SSL traffic is only supported by the Deep Security Agent, not the Deep Security
Appliance. The Agent does not filter SSL connections that use compression.
This can be assigned and configured on the individual computer. Open the Details window of the computer you
wish to configure, go to Intrusion Prevention > Advanced > SSL Configurations > View SSL Configurations.
Note than in using this feature, there will be a performance impact and is not recommended for servers with
high numbers of connections per second.
45
If this feature is used, it is recommended to disable the inspection of HTTP responses to avoid any performance
degradation. All web attacks that we protect against are included in the HTTP request and not the HTTP
response, disabling inspection on responses will improve performance.
To configure this:
1. Go to the computer or Policy > Intrusion Prevention
2. Select a rule with Web Server Common app type, right click > Application Type Properties
3. Go to Configuration tab > uncheck Inherited.
4. Uncheck Monitor responses from Web Server.
5. Update the changes to the computer/policy.
f.
Other Recommendations
•
•
•
•
•
Set the rules to only log dropped packets to save disk space.
If rules will be manually assigned, do not assign more than 300 rules as much as possible as it can affect
system performance.
Use recommendation scan to apply needed rules to get the best protection and performance.
Only select the Always Include Packet Data option (Rule Properties > General > Events) when interested
in examining the source of attacks. Otherwise leaving packet data logging on will result in much larger
log sizes.
Application Types under Intrusion Prevention rules should be checked prior to use.
Example:
The Trend Micro OfficeScan and Trend Micro OfficeScan NT Listener application types are inspecting
incoming ports 8080, 4343, 26964, 24880, 46485 by default.
OfficeScan ports can be changed, specially the random 5 digit client port. Make sure that these rules are
re-configured to match your OfficeScan settings before assigning.
Interface Tagging
“Interface Types” is a very useful feature that is used in conjunction with Firewall or Intrusion Prevention rules. We
use Interface Types when we need to assign firewall or IP rules to a specific interface on machine that has multiple
interfaces.
By default, the Firewall and Intrusion Prevention rules are assigned to all interfaces on the computer. If there are
some special rules, for instance, you want to apply only to the wireless network interface; this is where Interface
Types comes into play.
Configured under Policy > Interface Types > Network Interface Specificity
When creating a policy, think about the difference in protection for different interfaces. Consider populating the
Interface Type based on the different networks available to all potential Deep Security Agent protected machines.
5.2.5
Integrity Monitoring
Monitoring the operating system and application files and directories is an excellent way to ensure the integrity of
the data on your server. Unexpected changes to these files can be a good indicator that something suspicious has
occurred and should be investigated. It is good to note that rules created for Integrity Monitoring should be as
specific as possible to improve performance, avoid conflicts and false positives. (Example: Don’t try to create a rule
that monitors the entire hard drive)
a.
Using integrity monitoring to protect against malware
Integrity Monitoring can be used to monitor files and registries. Malware normally infects a system by modifying
certain registry keys and various system files. The default Deep Security rules allow you to monitor the integrity
of a machine by monitoring the things most commonly changed by malware in an infected system. Here are a
few example rules that are applicable for all types of situation in Windows platform:
46
- Rule 1002773 – Microsoft Windows – ‘Hosts’ file modified
- Rule 1002776 – Microsoft Windows – ‘All Users’ Startup programs modified
- Rule 1002778 – Microsoft Windows – System dll or exe file modified
Unless new software or a security patch is installed, there is no clear reason any of these files should be modified.
When such an event is raised, the administrator can check what’s happening on the machine to make sure the
machine is not compromised.
It is also possible to create custom rules to monitor specific threats. When a user knows the behavior of a
particular virus he is trying to contain in your environment, he can create a special monitoring rule that checks
for certain registry keys or files created by the virus. This can help determine if the spread of the virus is being
contained or not.
Note that Integrity Monitoring detects changes made to the system, but will not prevent or undo the this change.
b.
Baselines
Baselines are automatically created when the Integrity Monitoring rules are assigned to a computer. Retrieving
Baselines is a must. Trend micro recommends to “Scan Computers for Integrity Check” for all non-Windows
computers.
c.
Rules from a recommendation scan
Recommended Integrity Monitoring rules typically result in too many monitored entities and attributes. The best
practice is to decide what is critical and what should be monitored, then create custom rules or tune out of the
box rules.
Pay attention to the rules that monitor the frequently changed properties (ie. Process IDs, open ports, etc) as
they can be very noisy and may need some tuning.
Trusted-Source-Based Event Tagging
When Integrity Monitoring feature is being used, depending on the rules and settings, you might find it difficult to
search through the events to determine which are good and informational events, and which events you need to
investigate further.
The Deep Security auto-tagging feature helps to group and label multiple events to suppress security events for
legitimate changes.
To configure this feature, go to DSM > Events and Reports > Integrity Monitoring Events > Auto-Tagging > Trusted
Source.
Deep Security has taken this a step further by allowing administrators to automatically tag authorized changes by
using internal reference servers, Certified Safe Software Service that Trend Micro is hosting in the cloud, or by
comparing it with other computers in a group. Certified Safe Software Service is a cloud-based database of
signatures of Trend Micro certified known-good files. More information on how to enable Trusted-Source-Based
Event Tagging can be found in the Online Help and Admin Guide of Deep Security.
Selecting the Trusted Source:
a.
Local Trusted Computer
Use this when implementing a “Golden Host” model wherein applications and files installed on the Golden Host
is used as basis for comparison.
This model is most useful when:
•
•
•
There are in-house applications that are installed on the local trusted computer.
Software, service packs, patches, etc. are installed on the local trusted computer and can use it as reference
for other computers.
The local trusted computer is malware-free and secure.
47
•
The local trusted computer contains Integrity Monitoring rules that are similar to the computer that will use
it as reference.
Best Practices:
•
The security events from the Trusted Computers must be collected before the security events from the
other computers. You can use scheduled task to automatically scan trusted computers.
•
Create two scheduled Integrity Monitoring scans.
- First scan scans only trusted computers
- Second scan excludes trusted computers
•
For customers who wish to only trust events that have been generated as part of a maintenance window,
they can leverage the “Pause Collection” functionality available in the Auto-Tag Rule properties.
This functionality disables automatically adding new information to the Known Good Store based on changes
to the trusted source when the collection has been paused. When paused, the events from
associated computers related to previously trusted events will continue to be tagged however new
information will not be added to the Known Good Store until collection is resumed.
b.
Certified Safe Software Service
Use this when there are no local reference servers and users are free to install and upgrade software by
themselves or at any given time. In this scenario, files are compared against Trend Micro’s database of knowngood files.
Best Practices:
• Make sure that the DSM has connectivity to the internet for it to be able to query this cloud-based
service.
c.
•
Certified Safe Software Service only supports SHA-1. If this service will be used, make sure that
Policy > Integrity Monitoring > Advanced tab > Content Hash Algorithms is set to SHA-1.
•
Among the three Trusted-Source-Based Event Tagging mechanisms, this is the most safe and secure
since there is no need to maintain a reference server. Trend Micro is responsible for making sure that
it’s cloud service only contains known-good files.
•
Since Auto-Tag rules can have precedence over other Auto-Tag rules, it is recommended that it goes first
(top priority).
Trusted Common Baseline
Use this when a group of computers can use each other as reference. Baselines of the computers in this group
will be added to the common baseline. The computers in this group should be secured and free of malware
because changes in one computer will automatically be added to the baseline. When a similar
event occurred on another computer in the group, the event will automatically be tagged.
Best Practices:
• Make sure that the Trusted Common Baseline Auto-tagging rule is in place before any Integrity Monitoring
rules have been applied to the computers in the common baseline group.
•
Group the computers that share the same Operating System and function, for example:
Microsoft SQL servers running on Windows 2008 R2.
•
Note that the setup and maintenance compared to Local Trusted Computer are easier but the level of
protections is lower because all computers in the group are considered trusted. Since Auto-Tag rules can
have precedence over other Auto-Tag rules, it is recommended that this is the last (least priority).
48
5.2.6
Log Inspection
Events from the Windows event log and other application specific logs are a great source of information about the
health of your server and applications. Have an automated solution to inspect these log files for suspicious events
and alert is great functionality to include in your defense in depth strategy.
This feature is especially useful in having easier access to important events in log files monitored without having to
manually trace through it.
•
Log inspection rules must be properly configured to work correctly. Note that most recommended rules
work fairly well but Windows Event rules need to be tuned to gather security events relevant to customer
requirements. If not tuned properly, events for this feature can overwhelm the DSM database if too many log
entries are triggered and stored.
•
Severity Clipping
a. “Send Agent/Appliance events to syslog when they equal or exceed the following severity level”
- This should normally be changed when a syslog server is used. This setting determines which Events
triggered by those rules get sent to the syslog server (if syslog is enabled.)
b.
“Store events at the Agent/Appliance for later retrieval by DSM when they equal or exceed the following
severity level”
- This setting determines which Log Inspection Events are kept in the database and displayed on the
Log Inspection Events screen. Custom rules can be made to monitor logs that are not in the built in
set of rules.
5.3
Administration and System Settings
5.3.1
Recommendation Scan
The recommendation engine is a framework that exists within Deep Security Manager, which allows the system to
suggest and automatically assign security configuration. The goal is to make configuration of computers easier and
only assign security required to protect that computer.
Note that when running a recommendation scan, the performance impact affects the DSM, so make sure to schedule
these when no other tasks are running.
a.
Run recommendation scans weekly
Recommendation Scans can heavily tax the DSM so scanning too frequently can result in poor DSM
performance. Hence, systems that don’t change often (servers) can be scanned less frequently. Systems that
lack control over when changes occur (workstations) should be scanned more frequently.
Ongoing scans for recommendations are not advised, this setting should be set to ‘No’.
(Policy/Computer > Settings > Scanning > Recommendations > Perform ongoing scans for recommendations)
Setting ongoing scans to automatically start will mean administrators have no control over when it will occur,
best practice is to create a new scheduled task with type “Scan Computers for Recommendations” to take place
once a week instead.
b.
Run scans after a major change (application of a patch, install of new application, etc.)
Scans should be performed after major changes to the computer to determine any additional required
protection.
c.
Run scans after applying a new Security Update.
This allows you to use the recently released rules and get the latest updates assigned/unassigned.
49
d.
Assign recommended rules to the policy not the computer
As a best practice, recommended rules should be assigned to the policy and not directly to Computers
Rules recommended can be applied automatically only to the machine where the recommendations scan was
run.
Refer to the Policy section for additional details.
e.
Run the scan on computers with similar functions
In environments with similar computers, scans can be performed on subset of computers to gather baseline
recommendations for all.
f.
Automatic Assignment of Intrusion Prevention Recommendations
This option is off by default. (Policy/Computer > Intrusion Prevention > General > Recommendations)
It is not recommended to enable this option on the computer level. An exception to this would be when the
machine is on its own and cannot be associated with other machines in a group. When this is enabled, Intrusion
Prevention rules will automatically be enabled on the machine when the rule is found to be applicable or a
matching application is found on the machine related to the rule.
See Policy vs Computer Level for more details.
Having this setting disabled will give administrators better control over assigning and un-assigning
recommended rules.
5.3.2
a.
System Settings
Communication Direction
This option can be set at the policy or computer level. The default “Bidirectional” method is recommended and
is used in most production deployments.
Manager Initiated should typically only be used for machines in the DMZ that can’t reach the Manager in the
Datacenter.
Agent Initiated method is good for environments where the Agent is behind a firewall such as mobile
workstations. A disadvantage in using this mode is that policies cannot be updated on demand. The system must
wait for the next heartbeat before the policy change can be pushed down.
To configure this setting, go to Policy/Computer > Settings > Computer > Communication Direction
b.
Heartbeat Settings
This can be configured at the policy or computer level. Look for it under Policy/Computer > Settings > Computer
> Heartbeat.
•
Heartbeat Interval
Servers – 10 Minutes
Desktops – 60 Minutes
The most important factor when choosing the interval setting is the acceptable amount of time between
when an event triggers and when the events are delivered to the DSM. Choosing a high frequency can
have a negative performance impact on the DSM.
Why would servers require a lower heartbeat?
They are typically more critical assets and Administrators want to be notified of events more frequently.
50
If protection is still in place when roaming, why would an Administrator want a laptop to still have
connectivity to DSM when off network?
They may want the ability to update the policy on the laptop when roaming. Also, events are stored in
the DSM with the event timestamp, not the timestamp when they were delivered to DSM. Historical
events can quite often be overlooked for devices that haven’t performed a heartbeat in the last 24 hours
•
Number of Heartbeats that can be missed before an alert is raised
By default, the value is 2. This means, if a heartbeat is missed after 2 attempts, the agent will get tagged
as Offline. We recommend this value be increased in most environments so agents that are actually
online don’t get tagged as offline too often.
In addition, if a heartbeat fails, events are stored locally to the DSAs or DSVAs until connectivity is
restored.
•
c.
When using a SIEM/Syslog server to store events, heartbeat settings becomes less of a concern. Agents
send events via Syslog in real-time, without batching and waiting for the next heartbeat.
Agent-Initiated Activations
This option is most commonly used for environments with large, distributed installations where it is more
desirable for the activation to be initiated by the agent rather than by DSM.
•
•
•
•
Very useful when a large number of computers are added to a Deep Security installation and scripting
can be used to automate the activation process. See Deployment Scripts.
For Agent-Initiated Activation to succeed, the Allow Agent-Initiated Activation option must be enabled
on the Administration > System Settings > Agents tab.
Also used when server cannot communicate/discover clients directly but clients can reach server
without problem.
Deep Security Agents can initiate the activation process using a locally-run command-line tool.
To activate:
Use “Run as administrator” to open cmd.exe, and then run the command:
dsa_control /a dsm://dsmhost:4120/
During activation, the agent can determine the assigned policy and apply it. Additionally agents can
request scans or updates after they have been activated. This could be used to tightly integrate scans to
other changes such as patch management
Refer to the product Online Help or Administrator’s Guide for additional details.
•
Allow reactivation of cloned VMs
Used in environments with VM clones. (ie. Clone new VM/instance from pre-activated VM, templates or
AWS images, or when switching an orphan managed VM/instance back to the vCenter or cloud managed
VM/instance)
If enabled, DSM recognizes the VM as a clone and reactivates it as a new computer.
Notes:
- VM/Instance must be managed under Cloud Account/vCenter
- VM/Instance must have unique system IDs (BIOS UUID, MAC addresses, hostname, IP, etc.)
- Make sure the network communication in environment has no communication issues, this helps
prevent the host from becoming offline or getting a mismatch.
- Cloned VM – Original VM must remain activated
- Clone activation will not migrate any policies or settings from original VM.
•
Allow reactivation of Unknown VMs
Allows previously activated VMs which have been removed from their cloud environment and deleted
from DSM to be reactivated if they are added back to the inventory of VMs.
51
Useful when the server deleted the agent by accident or when the server deactivated agent but the
agent did not receive the deactivation request.
Note:
- The VM MUST have valid server certificate but no activation record on current DSM server(s).
- Unknown activation will not migrate any policies or settings from original VM.
d.
Send Policy Changes Immediately
By default this setting is turned on. This means any change made to any setting within the Deep Security
environment, all affected computers are immediately updated.
Change the setting via the Policy/Computer > Settings > Computer > Automatically send policy changes to
computers.
It is recommended that this option is disabled and instead, use a scheduled task to update and send policy
changes to agents manually. Manual/scheduled updates allow more control for an administrator to follow the
existing change control process. Scheduled Tasks can be set to update machines during maintenance windows,
off hours, etc.
To monitor when machines were last updated, administrators can use the “Last Successful Update” information
on the Computers tab of DSM.
e.
Agent Self-Protection
By default, if Anti-malware functionality is installed, DSA can protect its services, installation directories and
status from any modification, including shutdown via the Self Protection setting.
If this setting is turned on, make sure to enable and set a password for the local override setting under
Policy/Computer > Settings > Agent Self Protection. Doing so gives you the option to input a password to
override the agent protection should you find the need to reset or do maintenance for the protected agent.
Agent self-protection can also be disabled on the agent side by executing the following command:
dsa_control –harden=0 –passwd=password
*Where passwd is the override password defined.
You may also use dsa_control -–reset to completely reset (deactivate) the agent and disable Agent
Self-protection.
f.
Scheduled Tasks
Tasks can be configured to automate certain common tasks by schedule. Below is a list of recommended tasks to
set up:
•
•
•
Download Security Updates (Frequency: Once Daily)
Scan Computers for Malware (Frequency: Once Weekly, or in accordance to company policy)
Scan Computers for Recommendations (Frequency: Once Weekly)
Note:
When scheduling recommendation scans, it is best practice to set the task by group (i.e. per policy, or for
a group of computers, no more than 1,000 machines per group) and spread it in different days. E.g.
Database server scans are scheduled every Monday; Mail server scans are scheduled every Tuesday, and
so forth.
Recommendation scans can be CPU intensive on the DSM (Manager) so setting different schedules per
group will help avoid any performance issues. Schedule recommendation scans more frequently for
systems that change often.
•
Send Policy (Frequency: Once Weekly, and run as needed)
52
g.
Log Retention
The best practice is to run the data pruning feature built into DSM. If there is a compliance requirement to keep
log sets for a longer period of time, the recommendation is to use third party SIEM products to store the data.
Configure this under Administration > System Settings > Storage
•
•
h.
Event retention is relevant to maintain a reasonably sized database
Default retention time settings are:
- 7 days for security events (AM, FW, IPS, IM, LI)
- “Never” for system/agent events (as these can be useful for audit history purposes)
- 13 weeks for counters (used for reporting, and very small in comparison to the security event logs)
Using Tags for Events
Tagging events allow administrators to manually tag events with predefined or custom labels. The use of tags in
events makes log monitoring and review more efficient.
To configure tags and do auto-tag rules, go to Policies > Common Objects > Other >Tags.
See also Trusted-Source-Based Event Tagging
i.
Active Directory Synchronization for Users and Computers
Deep Security supports the discovery of computers using Active Directory and importing users for user
management.
Non-SSL based LDAP is not supported to synchronize user account information because this information is
considered sensitive and shouldn't be sent unencrypted. Domain controllers need to support LDAPS (port 636)
for directory synchronization to work. Refer to the following links for more details on enabling LDAPs:
http://support.microsoft.com/kb/321051
http://www.christowles.com/2010/11/enable-ldap-over-ssl-ldaps-on-windows.html
Discovering and synchronization of computers with Active Directory on the other hand can be done using
standard LDAP (port 389) as the information retrieved is not sensitive (ie. User credential information is not
pulled down).
53
_________________________________________________________________________________________________
6
Performance Tuning and Optimization
6.1
Deep Security Manager
6.1.1
Configure Deep Security Manager's Maximum Memory Usage
The Deep Security Manager (DSM) default setting for maximum memory usage is 4GB. Refer to the Sizing
Considerations section to determine the recommended size allocated to the DSM.
To configure the amount of memory available to the Deep Security Manager:
For Windows:
1.
2.
3.
4.
Go to the Deep Security Manager directory (the same directory as Deep Security Manager.exe).
e.g. C:\Program Files\Trend Micro\Deep Security Manager.
Create a new file called Deep Security Manager.vmoptions.
Edit the file by adding the line: -Xmx8g (in this example, “8g” will make 8 GB memory available to the
DSM.)
Save the file and restart DSM.
For Linux:
1.
2.
3.
4.
Go to the Deep Security Manager directory (/opt/dsm)
Create a new file called dsm_s.vmoptions.
Edit the file by adding the line: -Xmx8g (in this example, “8g” will make 8 GB memory available to the
DSM.)
Save the file and restart DSM.
You can verify the new setting by going to System > System Information and in the System Details area, expand
Manager Node > Memory. The Maximum Memory value should now indicate the new configuration setting.
6.1.2
Configure Multiple Managers
Run and install multiple managers operating in a parallel using a single database. Running multiple nodes provides
increased reliability, high availability, virtually unlimited scalability and better performance.
Each node is capable of all tasks and no node is more important than any of the others. Users can log in to any
node to carry out their tasks. The failure of any node cannot lead to any tasks not being carried out. The failure of
any node cannot lead to the loss of any data.
No more than 3 manager nodes are recommended. With 3 nodes it is possible to manage up to 100.000 endpoints.
54
Each node must run the same version of the Manager software.
Note: In a multi-node manager environment all agents and virtual appliances have the addresses of all manager
nodes.
•
•
The agents and virtual appliances use the list of addresses to randomly select a node to contact
They continue to try the rest of the list until no nodes can be reached (or are all busy).
6.1.3
Performance Profiles
Performance profiles determine the number of concurrent operations that can take place for specific types of
functionality. This includes the amount of Agent/Appliance-initiated connections that the Manager will accept,
and settings for scan storm avoidance in virtualized environments.
This setting allows you to tune the limits for a given DSM and set how loaded you want it to be. It allows
users to control scans are done in an environment (ie. Run unlimited scans, or choose to limit them to prevent
performance issues)
You may change the performance profile via DSM > Administration > System Information. Click the desired Manager
on the map, from here the Performance Profile can be changed via the drop-down menu.
Refer to the tables below for a general idea on what each type of profile can handle:
1.
Aggressive Profile - By default, new installations use the "Aggressive" performance profile which is
optimized for a dedicated Manager. This means, the computer hosting the Manager does not perform any
other task (database server, web server, etc.)
Operation
2-core system
8-core system
Activations
10
20
Updates
25
50
Recommendation Scans
5
12
100
100
20 Active
50 Active
40 Queued
40 Queued
Simultaneous Endpoint Disk &
Network Jobs
50
50
Simultaneous Endpoint Disk &
Network Jobs per ESX
3
3
Check Status
Agent/Appliance-Initiated Heartbeats
When to use:
•
•
Virtualized Environments (Agentless deployment with DSVA and VMware)
Hyper-V, Citrix or other hypervisors where Physical Agents are used to provide protection
This default profile limits concurrent scans to 3 per ESX host and 50 globally for Physical machines or VMs
on other virtualization platforms to prevent scan storms.
Concurrent limit includes Anti-Malware scans, Recommendation Scans, Integrity Scans, Baseline Rebuild, and
Updates.
55
Sample Scenario:
Deep Security Manager
ESX Host
Total: 150 VMs
50 Virtual
Machines
(DSA)
DSVA
100 Physical Machines
100 Virtual
Machines
(Agentless)
When a scan is triggered for all 250 machines, Deep Security will process the request as below, instead of
running the scan for all 250 machines at the same time:
Scan the first 3 VMs protected by DSA. The remaining 47 VMs will placed in the queue. They will be seen
in the console as “Scan Pending” and will be processed as soon as the first 3 finishes their
scans.
Scan the first 50 physical machines protected by DSA. The remaining 50 machines will be placed in
queue and will be processed as soon as the first 50 is finished with their scans.
Scan 1 VM protected by DSVA. The remaining 99 VMs will be placed in the queue. They will be seen
in the console as “Scan Pending” and will be processed as soon as the 1 agentless VM finishes
its scan.
Note:
Max concurrent scans for DSVA are set to “1” by default. However, this can be changed under the DSVA
properties, go to Settings > Scanning > Virtual Appliance > Max Concurrent Scans.
This setting determines the number of scans that the virtual appliance will perform at the same time. The
recommended maximum number is “5”. If you increase the number beyond 10, scan performance may begin
to degrade. Scan requests are queued by the Virtual Appliance and carried out in the order in which they arrive.
56
2. Standard Profile – Similar overall settings with aggressive, but is set to a lower limit.
Operation
2-core system
8-core system
Activations
5
10
Updates
16
46
Recommendation Scans
3
9
65
100
20 Active
50 Active
40 Queued
40 Queued
Simultaneous Endpoint Disk &
Network Jobs
50
50
Simultaneous Endpoint Disk &
Network Jobs per ESX
3
3
Check Status
Agent/Appliance-Initiated Heartbeats
When to use:
•
3.
Use only when the DSM is installed on a system with other resource-intensive software
and resources are limited.
Unlimited Agent Disk & Network Usage - This setting is identical to Aggressive but has no limit on
Endpoint disk and network usage operations.
Operation
2-core system
8-core system
Activations
10
20
Updates
25
50
Recommendation Scans
5
12
100
100
20 Active
50 Active
40 Queued
40 Queued
Simultaneous Endpoint Disk & Network
Jobs
Unlimited
Unlimited
Simultaneous Endpoint Disk & Network
Jobs per ESX
Unlimited
Unlimited
Check Status
Agent/Appliance-Initiated Heartbeats
When to use:
•
Fully Physical Environments
Using this profile will run as many scans as possible concurrently and assumes no shared disk.
4. *Limited Disk and Network Usage - This profile exists only on older versions of Deep Security. If you
upgraded your Deep Security environment, you may see this as an additional profile.
57
5. Custom Performance Profile – If further tuning of the default profiles is desired, please contact Trend Micro
Technical Support for assistance.
Some of the symptoms that help determine if a custom performance profile is needed are:
• Frequent agent heartbeat rejections
• Recommendation scans that take too long to complete
• Anti-Malware scans that take too long to complete
58
6.2
Deep Security Virtual Appliance
6.2.1
Adjust the Heap Size Settings of the Filter Driver
The DSA_FILTER_HEAP_MAX_SIZE is primarily used for maintaining connection state tables and loading
configuration. This is commonly used when Intrusion Prevention, Firewall and WRS are turned on in Deep
Security.
To increase the heap size, refer to the following article:
http://esupport.trendmicro.com/solution/en-US/1095995.aspx
* Default Heap Size Setting for Deep Security 9.0
=
256 MB
For recommended Heap Size Values, refer to Sizing Considerations.
6.2.2
Preventing Heap Size Exhaustion
The number of VM’s running on the ESXi host and the estimated connections for each VM will be the basis for
computing the adjusting the heap memory needed for your environment. The higher number of connections
required means a higher filter driver memory requirement.
Consider adjusting the number of TCP/UDP connections to a lower value. The default number set in Deep Security
9.0 (1000) fit most environments.
If you notice a higher value set for this (perhaps migrated value from an older version or if it has been customized),
note that lowering this value would help prevent heap size exhaustion. Lowering the maximum number of
connections means the Deep Security will be more aggressive in removing older stale connections before
accepting new active connections.
To change the number of connections (can be set on individual agents or on the policy), go to DSM > Policy >
Settings > Network Engine > Advanced Network Engine Settings and change the settings of the following:
Maximum TCP Connections
Maximum UDP Connections
59
6.3
Database
6.3.1
Exclude Database files from Anti-Malware scans
To optimize and establish a stable DB performance, make sure to exclude database related files (Example: dsm.mdf
and dsm.ldf) from any type of anti-malware scanning.
6.3.2
Auto-growth and Database Maintenance
For Microsoft SQL Databases, ensure less auto-growth events moving forward by adjusting the default auto-growth
settings to a higher value.
Each time an auto-growth event is performed, SQL Server holds up database processing. This means that
processing against that database will be held up until the auto-growth event completed. This could equate to
slower response time for other SQL commands that are being processed against the database that is
growing.
Monitor and perform Database maintenance jobs to ensure things are working normally and to prevent having
large fragmented database which could lead to performance issues.
6.3.3
Database Indexing
It’s recommended to periodically rebuild the index of the database to improve performance.
Indexes are specialized data structures that operate on tables (and sometimes views) in the database engine used
to aid in the searching for and sorting of data. Indexes are vital to the database engine returning results quickly.
As data is modified in the underlying tables that the indexes operate on, the indexes become fragmented. As
the indexes become more and more fragmented, query times can begin to suffer. The remedy to this situation is to
either reorganize or rebuild the index in MS SQL or Oracle.
Below are some useful links with additional information on how to do this:
Rebuilding SQL Server Indexes
http://www.sql-server-performance.com/tips/rebuilding_indexes_p1.aspx
Index Rebuilding Techniques
http://www.remote-dba.net/t_tuning_index_rebuilding.htm
60
_________________________________________________________________________________________________
7
Disaster and Recovery
Deep Security utilizes a database for all of its configurations and settings. It is highly recommended that
a proper disaster recovery plan is in place. This provides the best chance of successfully recovering a
production environment in the quickest amount of time in case there is a disaster situation.
•
•
•
•
7.1
It is important to make sure a regular backup of the Deep Security database is scheduled. This should
be noted most specially when applying a patch or an upgrade to the software.
Use Microsoft SQL Server Management Studio (for SQL DBs) or Oracle’s Recovery Manager
(for Oracle DB) tool to back up the database.
Make sure you are not storing your backups in the same physical location as the database files. When your
physical drive goes bad, you should be able to use the other drive or remote location that stored the
backups in order to perform a restore.
Only restore the database from the same version number as the Deep Security Manager.
High Availability
Database clustering is supported in both Oracle and Microsoft SQL environments and is recommended for disaster
recovery situations.
Oracle Data Guard and Microsoft SQL database mirroring both have no side effects in regular Deep Security
functionality and can be safely used.
To recover from a disaster, make sure the database is fully mirrored or restored and available in the environment.
Have a cold standby DSM ready and point it at the mirrored/restored database and start the service.
7.2
Removing a virtual machine from Deep Security protection in a disaster
If only a select number of machines need to be isolated and removed:
1.
Deactivate the affected virtual machines.
Go to DSM > Computers > Locate the machines > Right Click > Actions > Deactivate
2.
If there is no immediate access to the DSM console, use one of the following:
a. If there is another ESXi host that has no Deep Security protection, vMotion the VM to this host.
b. If all ESXi hosts are protected, login to the local DSVA VM and reset the appliance. Note that doing
this will mean all VMs protected by that DSVA will now be unprotected.
If several VMs have the issue and need to be isolated and removed:
1.
Deactivate the affected virtual machines.
Go to DSM > Computers > Locate the machines > Right Click > Actions > Deactivate
61
2.
Deactivate DSVA.
Go to DSM > Computers > Locate the DSVA > Right Click > Actions > Deactivate
3.
If necessary, unprepare the ESXi host and uninstall the vShield Endpoint.
To unprepare and remove the Deep Security Driver:
Go to DSM > Computers > Locate the ESXi Host > Right Click> Restore ESX…
To remove the vShield Driver:
- Login to the vShield Manager console.
- Change the view to Host & Clusters
- Expand Datacenters and select the datacenter where the affected ESXi host resides.
- Click on the affected ESXi and go to the Summary tab.
- Under the vShield Endpoint service, click Uninstall.
Note that when removing the filter driver, the ESXi host will be placed in maintenance mode and will be
required to reboot.
In an agentless environment, Firewall and Stateful checks are done in the Filter Driver residing on the ESX
host itself. As such, in a disaster scenario, shutting down the DSVA will only impair or shut down Anti-Malware,
Integrity Monitoring and Recommendations Scan functionalities. If the issue relates to a firewall rule blocking
traffic on virtual machines, put the ESXi host in maintenance mode and un-prepare it.
7.3
Recovering a physical machine (with DSA) in a Disaster
Sometimes, assigning an incorrect policy or rule can completely isolate a machine from the network. To remove a
faulty rule or policy, do one of the following:
1.
If rules have been applied to the policy only, remove the faulty rule from the policy and trigger a Send
Policy to the affected machines.
-
2.
If rules have been applied directly on the machines, open the details for each affected machine and remove
the faulty rule.
-
3.
Go to Policy > Double click the affected Policy > Firewall/IP > Assign/Unassign the rule and hit
Save.
On the affected machines > Right Click > Send Policy
Go to the affected machine > Double click for details > Firewall/IP > Assign/Unassign the rule and
hit Save.
Under Overview > Actions > Send Policy or Right click on the affected machine under Computers >
Actions > Send Policy.
If you do not know which rule is at fault, remove the entire policy from the machine.
-
Right Click on the affected machine > Actions > Assign Policy > None
Right Click on the affected machine > Actions > Send Policy
4.
If the rule involved is a Firewall or Intrusion prevention rule, you can also consider turning off the Firewall
and Intrusion Prevention State to “Off”. You can do this locally on the affected machine or on the Policy
under the General tab.
5.
If DSM can no longer communicate with the agents, logon locally to the machine and trigger an agent reset
to completely clear all configurations on the agent and deactivate it.
On the command prompt of the local agent, run:
dsa_control /r
62
The “Reset” action does the following:
– Cleans up all DSA configuration settings and DSA memory
– Removes relation between DSA and DSM
– Removes corresponding entries from the Database
Refer to Agent Self Protection for more details.
6. Reactivate using a new policy without the recent change.
7.4 Recovering an inaccessible DSVA
Take the following steps to recover an inaccessible DSVA:
1.
2.
3.
4.
5.
6.
7.
Reboot the DSVA.
If a reboot does not fix it, shut down the existing DSVA.
Login to DSM and attempt to deactivate the inactive DSVA and wait until you get the error “Deactivation
Failed”. (Computers > DSVA > Right Click > Actions > Deactivate)
Clear warnings and errors for that DSVA. (Computers > DSVA > Right Click > Actions > Clear Warnings and
Errors)
Deploy a new DSVA from DSM. (Computers > ESX Host > Right Click > Actions > Deploy Appliance)
Activate the new DSVA. (Computers > DSVA > Right Click > Actions >Activate)
Reactivate all the VMs to the new DSVA.
Note that when you replace a faulty DSVA, all logs, settings and quarantined files from the original DSVA are lost.
7.5 Isolating a Deep Security Issue
1.
As opposed to deactivating or uninstalling the agent, it is recommended to isolate the module causing the
issue first. Ideally, check related event logs first for information and clues regarding the issue on hand.
If no related logs are observed and multiple features are used, turn off the suspected module one by one to
find the culprit.
For example, if the issue involves HTTP traffic being blocked, turning off WRS and then the Firewall would
be the first thing to try.
2.
3.
For issues involving WRS:
- If traffic to a certain site is blocked, consider adding it to the “Allowed” URLs. Do this by going to
the Policy/Computer > Web Reputation > Exceptions tab. Enter the URL in the allow list, save and
send the policy.
-
If adding the site to the allow list does not help, turn off Web Reputation. Policy/Computer > Web
Reputation > General > Web Reputation State.
-
If WRS is already off and the issue still persists, consider checking other features enabled.
For issues involving the Firewall:
- Note if a new rule or a modification on a rule has taken place. Un-assign the suspect rule and verify
if the issue persists.
-
If you are not aware which rule is causing the issue, consider removing the policy assigned to the
affected machine. Verify if issue still persists.
-
If no recent change has been done but traffic is blocked, turn the Firewall off. To do this, go to
Policy/Computer > Firewall > General > Firewall State.
63
-
If the firewall is off and the issue persists, verify that Firewall Stateful Configurations are also set to
None. Policy/Computer > Firewall > General > Firewall Stateful Configurations
-
If both settings are turned off and the issue persists, switch the Network Engine to “Tap” mode.
Do this via the Policy/Computer > Settings > Network Engine > Network Driver Mode.
Should the issue still persist, check the other features that are enabled.
4.
5.
For issues involving Intrusion Prevention:
- Note if a new rule update has been applied or a modification on a rule has taken place. Un-assign
the suspect rule or rollback the security update. Verify if the issue persists.
-
If you are not aware which rule is causing the issue, consider removing the policy assigned to the
affected machine. Verify if issue still persists.
-
If no recent change or update has been applied, but traffic is blocked, switch the behavior from
“Prevent” to “Detect” or turn off Intrusion Prevention. Both settings may be found under
Policy/Computer > Intrusion Prevention > General > Intrusion Prevention State/Behavior.
-
If Intrusion Prevention is turned off and the issue still persists, switch the Network Engine to “Tap”
mode. Do this via the Policy/Computer > Settings > Network Engine > Network Driver Mode.
-
Should the issue still persist, check the other features that are enabled.
For issues involving Anti-Malware:
Performance Related:
- If there are performance or access issues experienced when the AM module is turned on, consider
adding the directory/file being scanned to the exclusion list first. To do so, go to the Scan
Configuration used by the Computer/Policy. Do so under Policy/Computer> Anti-Malware >
General > Select scan type > Configuration > Edit > Exclusions. Verify if the issue still persists.
-
If adding the file/directory to the exclusion does not work, remove the policy assigned to the
affected machine.
-
If the issue persists, try to turn off Anti-Malware protection. Go to Policy/Computer> Anti-Malware
> General > Anti-Malware State.
-
If the issue continues, de-activate the agent.
-
Should the issue still persist, check other features that are enabled.
Detection Issues:
- If the issue involves malware not being detected, verify the Anti-Malware state and make sure it
does not have any errors. Check for failure events under Policy/Computer > Anti-Malware >
Events.
*Consult the following articles for Anti-Malware state verification:
http://esupport.trendmicro.com/solution/en-US/1098103.aspx
http://esupport.trendmicro.com/solution/en-us/1060525.aspx
-
Verify Smart Protection settings and make sure there are no connection failures.
Policy/Computer > Anti-Malware > Smart Protection.
-
Should the issue persist, contact support.
64
6. For issues involving Integrity Monitoring:
- Note if a new rule update has been applied or a modification on a rule has taken place. Note the
additional modifications made and re-review the configuration changes. You may also un-assign
the suspect rule or rollback the security update. Verify if the issue persists.
7.
-
If no recent change or update has been applied, but alerts continue to get generated, turn off
Integrity Monitoring by going to Policy/Computer > Integrity Monitoring > General > Integrity
Monitoring State.
-
Should the issue still persist, check the other features that are enabled.
For issues involving Log Inspection:
- Note if a new rule update has been applied or a modification on a rule has taken place. Note the
additional modifications made and re-review the configuration changes. You may also un-assign
the suspect rule or rollback the security update. Verify if the issue persists.
-
If no recent change or update has been applied, but alerts continue to get generated, turn off Log
Inspection by going to Policy/Computer > Log Inspection > General > Log Inspection State.
-
Should the issue still persist, check the other features that are enabled.
Trend Micro Knowledge Base and Contacting Support
If issues found during the recovery and isolation process continue to persist, please consult the Trend Micro
Knowledge Base or contact Technical Support.
http://esupport.trendmicro.com/en-us/business/pages/technical-support.aspx
http://esupport.trendmicro.com/en-us/business/pages/about-support.aspx
65
_________________________________________________________________________________________________
8 Other Deployment Scenarios
8.1
Multi-Tenant Environment
Multi-Tenancy allows you to create independent environments of Deep Security with the same manager and
database infrastructure. It can be used by service providers or enterprises that require strong isolation between
departments or lines of business.
Multi-Tenant vs Single Tenant Deployment
Single Tenant
Multi-Tenant
Managed Computers
100,000
1,000,000 or more
Deep Security Nodes
1-5
1 - 50
1
1 - 10,000
1 (with or without
replication)
1 - 100
Databases
Database Servers
Recommendations:
1.
Reconnaissance IP List
In a multi-tenant environment, the tenants may have to manually add the DSM IP address in the Ignore
Reconnaissance IP list found in Policies > Common Objects > Lists > IP Lists. This is to avoid getting the
warning message "Reconnaissance Detected: Network or Port Scan”.
http://esupport.trendmicro.com/solution/en-us/1096120.aspx
2. Multi-Database Servers
Multi-tenancy relies on using multiple databases in case of MS SQL or multiple users in case of Oracle. To
scale further, Deep Security Manager can be connected to multiple database servers and automatically
distribute the new tenants across the available set of database servers.
To configure additional databases to use, go to:
Administration > System Settings > Database Servers
3.
Use the chargeback feature to monitor tenant usage
Monitoring can help determine the percentage usage of Deep Security Manager by hours of protection.
Deep Security Manager records data about Tenant usage. This information is displayed in the Tenant
Protection Activity widget on the Dashboard, the Tenant Properties window's Statistics tab, and the
Chargeback report.
This information can be customized to determine what attributes are included in the record. It also provides
the ability to monitor the usage of the overall system and look for indicators of abnormal activity. For
instance if a single Tenant experiences a spike in Security Event Activity they may be under attack.
4. Tenant pending deletion state
Tenants can be deleted; however the process is not immediate. This ensures that all the tenant related jobs
are finished before the records are deleted. The longest job runs every week, so the tenant, will be in the
pending deletion state for approximately 7 days before the database is removed.
66
5. Multi-tenant options under System Settings
• Allow Tenants to use the Relays in my "Default Relay Group" (for unassigned Relays):
Gives tenants automatic access to relays setup in the primary Tenant. This saves Tenants from
having to setup dedicated relays for security updates.
• Allow Tenants to use the "Backup" Scheduled Task:
Determines if the Backup Scheduled Task should be available to Tenants. In most cases backups
should be managed by the database administrator and this option should be left checked.
• Allow Tenants to use the "Run Script" Scheduled Task:
Scripts present a potentially dangerous level of access to the system, however the risk can be
mitigated because scripts have to be installed on the Manager using file-system access.
8.2
Environments using Teamed NICs
Windows NIC teaming software creates a new virtual master interface, which adopts the MAC address of the first
slave interface. By default, the Windows Agent will bind to all virtual and physical interfaces during installation. As a
result, in a teamed NIC environment the Agent will bind to the physical interfaces as well as the virtual interface
created by the teaming software. The Agent cannot function properly with multiple interfaces having the same MAC
address.
1.
To function properly in a Teamed-NIC environment the Agent must be bound only to the virtual interface
created by the teaming software.
http://esupport.trendmicro.com/solution/en-us/1054496.aspx
2.
Using the Agent in a teamed NICs environment on Windows 2003 requires SP 2 or later, or the installation
of the following patch: http://support.microsoft.com/kb/912222/article.
3.
The Agent's network driver is bound to the network interfaces only at install or upgrade time. After
installation, it is not possible for the bindings to be automatically adjusted when you add or remove
network interfaces to or from a Teamed NIC.
Doing so can lead to network connectivity problems, or to the system not being properly protected. After
adding or removing a network interface in a teamed environment where the Agent's network driver is
installed, you should verify that the driver is only bound to the virtual interface and not bound to any
physical adapters.
4.
8.3
On Solaris systems with multiple interfaces on the same subnet, the operating system may route packets
through any of the interfaces. Because of this, any Firewall Stateful Configuration options or Intrusion
Prevention Rules should be applied to all interfaces equally.
Air-Gapped Environments
At least one Deep Security Relay is required in every Deep Security Environment. It must be able to download
Updates from the Trend Micro Update Server so the rest of the Relays, Agents and Appliances connect to that
Relay for Update distribution.
However, if your environment requires that the Deep Security Relay is not allowed to connect to a Relay or
Update server via the Internet, then an alternative method is available to import a package of Updates to a
Relay for distribution to other Deep Security Software Components.
The following resources provide details on generating an update bundle:
http://esupport.trendmicro.com/solution/en-US/1060674.aspx
http://files.trendmicro.com/documentation/guides/deep_security/Deep_Security_9_SP1_Admin_Guide_EN.pdf
67
Another tool is the Trend Micro Update Utility. This tool is a Windows application that provides a mechanism for
downloading software component updates from the Trend Micro Active Update and Intelligent Active Update
repositories via the internet. This can be used to bundle product updates into a ZIP file, which can then be
manually delivered to Deep Security Relays (DSR) in an air-gapped environment.
Please contact Trend Micro support to request for this tool.
To avoid confusion when working in an air-gapped scenario, it is recommended to disable the following options
under System Settings > Updates:
•
•
8.4
Allow Agents/Appliances to update from this source if Deep Security Relays are not available
Agents can update components automatically when not in contact with Deep Security Manager
Solaris Zones
When working with Solaris Zones keep in mind that it allows multiple instances of Solaris to run in one shared kernel.
The Deep Security Agent for Solaris is only supported to run with the Global/Root Zone. Refer to the article below for
more details:
http://esupport.trendmicro.com/solution/en-us/1058701.aspx
8.5
Microsoft Cluster Servers
Cluster servers involve two separate installations of the underlying operating system with shared resources
(databases, disks, IP addresses, etc) that get swapped back and forth when the cluster performs a failover.
Deep Security can be configured to protect one node in the cluster or both. Some points to consider in this
environment are:
•
•
8.6
Ensure that you are installing DSA to a local disk and not a shared disk.
If the cluster software uses a network heartbeat with a dedicated network interface card, ensure
that no rules are assigned to this interface. You may also create bypass rules that will ensure that
the heartbeats aren't inspected.
Virtualized Environments (VDI)
VMware Horizon View
1.
Install the VMware vShield Endpoint in-guest driver with the Golden Image
When using either the traditional install method or Microsoft Deployment Toolkit (MDT), when preparing the
Golden Master Image(s), make sure that you install the necessary VMware vShield Endpoint in-guest driver
which is a part of the VMware Tools.
68
2.
Persistent and Non-Persistent VMs
Both non-persistent and persistent View desktops need antivirus protection. Agentless protection is
recommended for both scenarios. Make sure you install VMware tools in the virtual machine before it is
converted into a parent virtual machine for linked clones.
If the Agent-based protection is required, make sure to install an un-activated DSA on the VM before it
becomes the parent virtual machine.
3.
Deep Security Notifier
You may choose to install the Trend Micro Notifier software on the golden image as well, but this component
is optional and is not required.
4. Automating Virtual Machine Activations
DSVA can instantiate and activate Virtual Agents for virtual machines as they are created and assign
automatically a specific Policy. Event-based tasks should be created so it can trigger Instant Protection
functionality when VMs are added to a virtual environment protected by DSVA.
To configure event-based tasks, go to Administration > Event-Based Tasks
Event based tasks can use conditions to trigger the action. The conditions use standard regex expressions.
To know more about regex use and to test the expressions configured, you may refer to these sites:
http://www.regular-expressions.info/ (Regex reference)
http://regexpal.com/ (Regex expression tester)
5. Note the number of protected VMs
DSM must control the maximum number of protected VMs that run on each protected ESXi host. Improper
sizing can degrade the DSVA performance. Please refer to Sizing Considerations section in this document.
For additional best practice details on running Anti-Malware protection for VMware View, you may refer to this
document:
http://www.vmware.com/files/pdf/VMware-View-AntiVirusPractices-TN-EN.pdf
Citrix XenDeskop
1.
Install a deactivated Deep Security Agent on a Master image.
Deep Security Virtual Appliance (Agentless) does not work with a pure Citrix environment (ie. VMs running
on Citrix XenServer).
For these environments, the physical agent based solution is recommended. Install the Agents in the master
image (deactivated) and then perform Agent based activation in the provisioning process. Use an Event
Based Task to assign the correct policy based on the attributes available (I.e. Computer Name)
DSVA (Agentless) can be used to provide protection for the pooled Citrix VDI desktops if they are
running on top of VMware vSphere. VMware tools would also need to be installed within the master
image to include the necessary vShield Endpoint driver to use appliance based protection.
2. Deep Security Agent and the Citrix target device driver
On Citrix PVS 6.0 Environment, if you plan on installing (In-Guest) Deep Security Agent, the Citrix Target
device driver may not be able to connect successfully to the Provisioning Server due to a possible conflict.
69
If you plan on installing Deep Security Agent on a Windows operating system that is connected to a PVS
server using disk provisioning, the temporary workaround is to change the tbimdsa driver loading order
during system startup from PNP_TDI to NDIS.
To do so, manually change the loading order of tbimdsa driver used by Deep Security Agent.
•
•
•
Go to HKEY_LOCAL_MACHINE\SYSTEM\CurrentControlSet\Services\tbimdsa
Add or modify String “Group” Value to: NDIS
Add or modify DWORD “Start” Value to: 0
By changing the (Group) from PNP_TDI to NDIS and Start value from 3 to 0, it allows tbimdsa driver
to load after Citrix driver has loaded.
•
Reboot the machine and the PVS Target Device will be able to connect to the vDisk upon boot-up.
Refer to http://esupport.trendmicro.com/solution/en-US/1098061.aspx for more details.
Citrix XenApp
1.
Citrix XenApp’s API Hooks
Citrix’s API hooks can prevent the DSA service from starting. In order to resolve this, the ds_agent.exe must
be added into XenApps exclusion list.
http://support.citrix.com/article/CTX107825
8.7
Private, Public & Hybrid Cloud Environments
Amazon Web Services (AWS)
Deep Security Manager can now be connected to Amazon Web Services to provide instance discovery and
collect additional information about the instances. This can be used to automate security, for example assigning
a policy based on an Amazon Security Group.
Have a dedicated account for Deep Security. This ensures that you can refine the rights and permissions or
revoke the account at any time. It is recommended that you give Deep Security an Access/Secret key with no
more than read-only permissions.
vCloud Environment
Deep Security Manager can now connect to the vCloud director to discover machines to protect. If this is used
with a public cloud, it can help with agent management. If vCloud is used within a private or community cloud
where Deep Security Manager is deployed, the vCloud support can work together with the vCenter integration to
provide agentless protection to vCloud.
vCloud director (vCD) workloads are presented in Deep Security in the following hierarchy :
• vCloud Director Instance
• Virtual Datacenter
• vApp
• Virtual Machine (Being the endpoint that can be protected)
This enables the administrator to select virtual machines belonging to certain vDC/vApp’s to be protected.
1.
Multiple vCD instances can be presented but always ensure the following rules are applied:
- Ensure all vCenters that vCD used for resources are already configured in the Administrative side of
the portal.
70
-
Present vCD instances at vCD System object. This will allow for all for all workloads to be discovered
in vCD.
2.
The following vCloud Director settings must be configured correctly:
- vCD public URL
- vCD public REST API base URL
(System - > Administration -> Public Addresses)
3.
The vCloud organization account to be used by DSM to access vCloud must have the “Administrator View"
Right. This can be verified by checking the user’s role properties in vCloud, then go to Rights for this Role >
All Rights > General folder.
4.
Consider the following settings when adding the vCloud Director Instance:
- Ensure the name is descriptive.
- Enter the Address of the vCloud Director instance as follows:
-
vcloud.mycompany.com
There is no need to add “http” or “https” in the from field of the Address
There is no need to add the organization name at the end of the URL.
5. When importing the vCloud resources into Deep Security Manager, the username must include "@orgName".
For example if the vCloud account's username is kevin and the vCloud Organization you've given the
account access to is called CloudOrgOne, then the Deep Security User must enter kevin@CloudOrgOne as
their username when importing the vCloud resources.
6. When adding more than one vCloud Director instance, ensure that the corresponding Provider Virtual
Datacenter resources have been added to DSM. This includes :
- All vCenter instances used for Provider Virtual Datacenters
- All vShield Manager instances used for Provider Virtual Datacenters
7. Public Catalog VMs must have the vShield Driver installed as part of the template configuration before
adding the vApp/VM to the Catalog.
8. Configure the vCenter Database to Assign Unique UUIDs to New Virtual Machines:
http://kb.vmware.com/selfservice/microsites/search.do?language=en_US&cmd=displayKC&externalId=200660
5
Other Useful References:
http://esupport.trendmicro.com/solution/en-US/1102173.aspx
http://esupport.trendmicro.com/solution/en-US/1102253.aspx
71