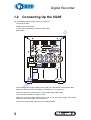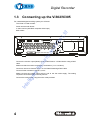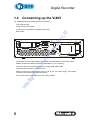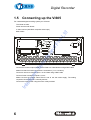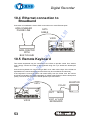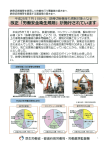
1
Ltd cu rity an dF ire Vi101/Vi205/Vi302/Vi305/Vi405/Vi605 Digital Recorder User Manual Product ranges covered by this manual Vi302 Vi305 Vi405 Vi605 ige nt Se Vi101 Int ell Vi205 Document Reference Date Firmware Vi610f.doc 04/03/2008 From Vi0XXc20 Videoswitch Telephone 01252-851510 Ocean House, Redfields Industrial Park Fax 01252-851296 Redfields Lane, Church Crookham Email [email protected] Hants GU52 0RD Web www.videoswitch.co.uk Vi610g.doc nt ige ell Int cu rity Se ire an dF Ltd Digital Recorder Contents: 1 Start Here ..................................................................1 Connecting Up the Vi101 .......................................................................................................2 1.2 Connecting Up the Vi205 .......................................................................................................3 1.3 Connecting up the Vi302/Vi305 .............................................................................................4 1.4 Connecting up the Vi405........................................................................................................5 1.5 Connecting up the Vi605........................................................................................................6 1.6 Setting Date/Time ..................................................................................................................7 1.7 Recording...............................................................................................................................8 1.8 Routine Checks......................................................................................................................8 1.9 Care of the Hard Drive(s) .......................................................................................................8 1.10 Critical Alerts ..........................................................................................................................9 HELP........................................................................10 ire 2 Ltd 1.1 Context sensitive on-line help ..............................................................................................10 2.2 INFO screens .......................................................................................................................10 an dF 2.1 INFO-1 Configuration.......................................................................................................10 2.2.2 INFO-2 Status ..................................................................................................................10 2.2.3 INFO-3 Drives ..................................................................................................................11 2.2.4 INFO-4 Record.................................................................................................................11 2.2.5 INFO-5 Play .....................................................................................................................11 2.2.6 INFO-6 Remote................................................................................................................11 2.2.7 INFO-7 Ethernet...............................................................................................................11 3 cu rity 2.2.1 LIVE .........................................................................12 Viewing Full Screen Images ................................................................................................12 3.2 Quad Display........................................................................................................................12 3.3 Multi-Screen .........................................................................................................................13 3.4 Spot monitor(s).....................................................................................................................13 3.5 Tagging Images ...................................................................................................................13 4 Se 3.1 FIND .........................................................................14 FIND-1 Date/Time ................................................................................................................14 4.2 FIND-2 Sweep......................................................................................................................15 4.3 FIND-3 Event List.................................................................................................................16 4.4 FIND-4 Incidents ..................................................................................................................17 ige 5 nt 4.1 PLAY........................................................................18 Play Events ..........................................................................................................................19 5.2 Play Incidents.......................................................................................................................19 5.3 Tagging Images ...................................................................................................................19 Int 6 ell 5.1 BURN .......................................................................20 6.1 BURN-1 Edit Incident ...........................................................................................................20 6.2 BURN-2 Multiple Incidents ...................................................................................................21 7 PSW (Passwords) ...................................................22 7.1 Log-On .................................................................................................................................22 7.2 Log-Off .................................................................................................................................23 8 FN (Functions) ........................................................24 8.1 Using Functions ...................................................................................................................24 8.2 Repeating last used Function ..............................................................................................24 9 9.1 i MENU.......................................................................25 Date/Time.............................................................................................................................25 Digital Recorder 9.2 Record..................................................................................................................................26 9.3 Display .................................................................................................................................30 9.4 Alarms ..................................................................................................................................34 9.5 Domes..................................................................................................................................40 9.6 Network ................................................................................................................................41 9.7 Configuration........................................................................................................................46 10 Connections............................................................51 Audio ....................................................................................................................................51 10.2 Ethernet connection to a PC ................................................................................................52 10.3 Ethernet connection to a LAN ..............................................................................................52 10.4 Ethernet connection to Broadband ......................................................................................53 10.5 Remote Keyboard ................................................................................................................53 10.6 Dial-Up Access.....................................................................................................................54 10.7 ire 10.6.1 Ltd 10.1 Connecting a Dial-up Adaptor..........................................................................................54 Wireless PIR ........................................................................................................................54 an dF 11 Technical Data ........................................................56 11.1 Power-On Reset ..................................................................................................................56 11.2 Accessories Included ...........................................................................................................56 11.3 Changing the Hard Drive .....................................................................................................56 11.4 Connector Pin-Outs .............................................................................................................57 Alarms (Vi101, Vi205, Vi302, Vi305)................................................................................57 11.4.2 Alarms (Vi405 and Vi605) ................................................................................................58 11.4.3 Relays (Vi405 and Vi605) ................................................................................................59 11.4.4 Remote Keyboards ..........................................................................................................60 11.4.5 11.5 cu rity 11.4.1 PSTN Modem ..................................................................................................................61 Specifications .......................................................................................................................62 Storage ............................................................................................................................62 11.5.2 Digital recording/Replay...................................................................................................62 1.1.1 Display .............................................................................................................................62 1.1.2 Se 11.5.1 Control and Interface .......................................................................................................62 11.5.2.1 Dome Control (Vi405 and Vi605) ...................................................................63 Remote Viewing...............................................................................................................63 11.5.4 Power, Physical & Environmental ....................................................................................64 1.1.3 Upgrades .........................................................................................................................64 11.5.5 CE Marking ......................................................................................................................65 11.5.6 Ventilation ........................................................................................................................65 11.5.7 Safety...............................................................................................................................65 ell ige nt 11.5.3 Int 12 Warranty Fax-Back .................................................67 ii Digital Recorder 1 Start Here Please fill in the warranty fax-back form on page 67 and return it to Videoswitch The Vi101, Vi205, Vi302, Vi405 and ViX05 digital recorders from Videoswitch are part of the ViX05 range • These products are designed to be easy to use whilst offering high quality digital video recording and playback, primarily for CCTV security applications. • The video images from all connected cameras are continuously recorded onto the built-in hard drives. When the drives are full, the ViX05 keeps on recording, overwriting the oldest images. • Images are retained for a specified user programmable number of days, typically 31. All images recorded within the period will be available for replay. Older image are no longer available. • Several methods are provided for finding the recorded images you want quickly, including date/time searches and activity or alarm event searches • The built-in CD writer allows a selected part or parts of the recorded information to be written onto a CD, typically to back-up an incident for use as evidence by the Police. • The recording process continues all the time, even when playing back or writing to CD. • Audio recording is standard on the Vi205, Vi405 and Vi605. • Ethernet is also a standard feature allowing remote viewing via a local area network (LAN) or via Broadband Ethernet • An optional dial-up module allows images to be viewed on a PC via a telephone line Note: ige nt Se cu rity an dF ire Ltd • Int ell This manual covers a range of products and therefore describes features that do not exist in all models. 1 Digital Recorder 1.1 Connecting Up the Vi101 For a standard digital recording system you will need The V101 recorder Some cameras with lenses A video monitor (with BNC composite video input). Int ell ige nt Se cu rity an dF ire Ltd BNC cables Connect the monitor output (MAIN) of the Vi101 to a Video Monitor using a BNC cable Make sure that the monitor termination is switched on (i.e. to 75 Ohms) Connect a camera to Camera Input 1 on the Vi101 using a BNC cable Connect further cameras to Inputs 2,3,4 etc Make sure that the voltage select switch is set to suit the mains supply. The setting required in UK and Europe is normally 230Vac. Connect the mains power using the mains cable provided 2 Digital Recorder 1.2 Connecting Up the Vi205 For a standard digital recording system you will need The Vi205 recorder Some cameras with lenses A video monitor (with BNC composite video input). Int ell ige nt Se cu rity an dF ire Ltd BNC cables Connect the monitor output (MAIN) of the Vi205 to a Video Monitor using a BNC cable Make sure that the monitor termination is switched on (i.e. to 75 Ohms) Connect a camera to Camera Input 1 on the Vi205 using a BNC cable Connect further cameras to Inputs 2,3,4 etc Make sure that the voltage select switch is set to suit the mains supply. The setting required in UK and Europe is normally 230Vac. Connect the mains power using the mains cable provided 3 Digital Recorder 1.3 Connecting up the Vi302/Vi305 For a standard digital recording system you will need The Vi302 or Vi305 recorder Some cameras with lenses A video monitor (with BNC composite video input) S1 1 3 5 2 4 6 7 9 11 8 10 12 ETHERNET CAMERAS MAIN ire ALARMS/RELAY M SPOT1 13 14 15 CAM 2 Digital Video RecorderCAM 2 16 MIC LINE OUT AUDIO OPTION LINE IN www.videoswitch.co.uk cu rity KEYBOARDS AC POWER INPUT MODEM an dF MONITORS Ltd BNC cables Se Connect the monitor output (MAIN) of the Vi302/Vi305 to a Video Monitor using a BNC cable Make sure that the monitor termination is switched on (i.e. to 75 Ohms) Connect a camera to Camera Input 1 on the Vi302/Vi305using a BNC cable nt Connect further cameras to Inputs 2,3,4 etc ige Make sure that the voltage select switch is set to suit the mains supply. The setting required in UK and Europe is normally 230Vac. Int ell Connect the mains power using the mains cable provided 4 Digital Recorder 1.4 Connecting up the Vi405 For a standard digital recording system you will need The Vi405 recorder Some cameras with lenses A video monitor (with BNC composite video input) ire Ltd BNC cables Digital Video Recorder M ETHERNET RELAYS/DOMES PSTN/ISDN GPS S1 MAIN SPOT1 SPOT2 ALARM INPUTS TILLS/PIRS SPOT3 PC KBD KEYBOARDS EXPANSION TO NEXT DVR MONITORS AC POWER INPUT an dF S-VIDEO CAMERAS AUDIO MIC S2 S1 1 CAM 2 3 CAM 2 5 CAM 2 7 CAM 2 9 CAM 2 11 CAM 2 13 CAM 2 15 CAM 2 2 CAM 2 4 CAM 2 6 CAM 2 8 CAM 2 10 CAM 2 12 CAM 2 14 CAM 2 16 CAM 2 S2 LINE IN cu rity S3 LINE OUT www.videoswitch.co.uk Connect the monitor output (MAIN) of the Vi405 to a Video Monitor using a BNC cable Se Make sure that the monitor termination is switched on (i.e. to 75 Ohms) Connect a camera to Camera Input 1 on the Vi405 using a BNC cable Connect further cameras to Inputs 2,3,4 etc nt Make sure that the voltage select switch is set to suit the mains supply. The setting required in UK and Europe is normally 230Vac. Int ell ige Connect the mains power using the mains cable provided 5 Digital Recorder 1.5 Connecting up the Vi605 For a standard digital recording system you will need The Vi605 recorder Some cameras with lenses A video monitor (with BNC composite video input) ire Ltd BNC cables AUDIO LINE OUT MIC an dF D ig it a l V id e o R e c o rd e r LINE IN PSTN/ISDN GPS EXPANSION TO NEXT DVR ETHERNET S-VIDEO RELAYS/DOMES M PC KBD S1 MAIN SPOT1 SPOT2 SPOT3 ALARM INPUTS TILLS/PIRS KEYBOARDS AC POWER INPUT S2 1 CAM 2 2 CAM 2 3 CAM 2 4 1 2 CAM 2 5 S3 5 4 CAM 2 OUT 6 CAM 2 7 CAM 2 8 CAM 2 9 CAM 2 10 CAM 2 11 CAM 2 12 CAM 2 13 CAM 2 14 CAM 2 15 CAM 2 16 CAM 2 6 7 8 9 IN 10 11 12 13 14 15 16 Se 3 cu rity www.videoswitch.co.uk MONITORS Connect the monitor output (MAIN) of the Vi605 to a Video Monitor using a BNC cable nt Make sure that the monitor termination is switched on (i.e. to 75 Ohms) Connect a camera to Camera Input 1 on the Vi605 using a BNC cable ige Connect further cameras to Inputs 2,3,4 etc ell Make sure that the voltage select switch is set to suit the mains supply. The setting required in UK and Europe is normally 230Vac. Int Connect the mains power using the mains cable provided 6 CAMERAS Digital Recorder 1.6 Setting Date/Time For proper operation of the ViX05 Digital Recorder it is essential that the date and time are set correctly. If the system clock has an invalid date or time when the ViX05 is powered up (or at any time during operation), the date and time setting window will be automatically displayed 7 The format for the date and time is DD/MM/YY HH:MM:SS where: 3 5 6 8 9 DD is the day of the month (00 to 31), • MM is the month (01 to 12), • YY is the year (e.g. 04 for the year 2004), • HH is the hour in 24-hour format (00 to 23), • MM is the number of minutes past the hour (00 to 59) and • SS is the number of seconds past the minute (00 to 59). cu rity 0 • ire 4 2 an dF 1 Ltd If this occurs, use the number keys to enter the date and time. ell OK ige Press OK to finish: nt Í Í Se The arrow keys may be used to move the cursor to different positions if only some digits need changing: Int If you need to adjust the time and date at any other time press the MENU key and press the right arrow key to enter the Date/Time menu. Note that the time is automatically adjusted forwards or backwards by an hour at the appropriate dates to take account of British Summertime so no user action is required. 7 Digital Recorder 1.7 Recording The ViX05 Digital Recorder should now be fully operational and recording images from all cameras. The default image retention period is 31 days unless set otherwise in the menu. Routine Checks Ltd 1.8 ire If the ViX05 is not recording, the message RECORDING STOPPED will be displayed on the video monitor. This should only happen if there is no video, if no hard drive is fitted or if it is faulty, or if record timers have been set to disable recording. an dF Although the system is intended for continuous un-attended operation, it is recommended that the user regularly check that images from all cameras replay correctly. Any potential problems with the cameras or recording system will then be detected as soon a possible, rather than continuing un-noticed until a critical incident needs to be recalled from the system. 1.9 cu rity Similarly, when a CD has been created you should check that it plays back correctly, before the images on the hard drive in the ViX05 become over-written. The CD may be checked by either by playing it on the ViX05 or on a PC. Care of the Hard Drive(s) Int ell ige nt Se A hard drive is a delicate mechanical item that should be handled with care. Before moving a ViX05 that has been powered up, or removing a hard drive, remove power and wait for 30 seconds for the drive to stop spinning. This is a precaution to avoid possible damage to the hard drive. 8 Digital Recorder 1.10 Critical Alerts The ViX05 constantly monitors the hard drive, camera inputs and system so that detected fault conditions will be reported to the user as soon as possible by means of a “critical alert” message on the screen. Alerts are also added to the event list. • FailTest This alert indicates that the self-test has failed following Press the HELP key then the MON key twice, to call up the “INFO-2 Status” screen. One of a number of fault conditions may be noted. If a checksum error is reported, enter the menu, change any setting and return to LIVE mode so that settings are saved. Try changing a password also. Switch off the ViX05, wait 10 seconds and switch on again. Try a power-on reset If the problem persists, contact your supplier. ire Ltd an dF • HD1, 2,3 Fail – try the This alert indicates that a hard drive is not working. cu rity Check that the drive drawers are correctly fitted Check the lock in the drive drawer is turned full counterclockwise Press the HELP key then the MON key three times, to call up the “INFO-3 Drives” screen. Press OK to rescan the drives. Se Check the DISC ACTIVITY LED is flickering Check that the red DISC POWER led it lit. This alert indicates that the hard drive may stop working soon nt • HD1, 2,3 SMART The SMART monitoring detects imminent failure of a hard drive, so if this warning occurs, the drive should be changed at the earliest opportunity. ell ige • F IN D Int To cancel a critical alert, press the FIND key several times until the “FIND-3 Event” screen is displayed. View the recent alerts (press TAG to see latest). Press OK to cancel critical alerts. Note that if the alert condition persists, the alert message will re-appear. 9 Digital Recorder 2 HELP 2.1 Context sensitive on-line help Ltd The Vix05 Digital Video Recorder (DVR) includes a built-in help system that provides information about all the menu options and screen modes. Most of the information in this manual is available in this help system. Í cu rity Í an dF Press these keys to scroll through the help information. ire Just press the HELP key at any time to call up information on the currently displayed screen. INFO screens nt 2.2 Se Press HELP again to return to the screen or Manu item that you were at prior to entering the HELP mode. ige While in HELP mode, you can press the MON key to view information about the DVR via a number of information screens: Int ell Press the MON key to cycle through these screens: 2.2.1 INFO-1 Configuration This screen displays the model, serial number and firmware revision. 2.2.2 INFO-2 Status This screen displays the current system status, including alarms and Ethernet/modem connections. 10 Digital Recorder 2.2.3 INFO-3 Drives This screen shows the type and size of CD and hard drives fitted. The SMART disc monitoring status is also displayed. Drives can be re-scanned by pressing the OK key. 2.2.4 INFO-4 Record Ltd Information related to the record process is displayed here, including image update rate and the expected number of day’s data retention. ire 2.2.5 INFO-5 Play an dF Information related to the currently displayed play image’s displayed here, including image date/time, number and authentication status. 2.2.6 INFO-6 Remote cu rity Information related remote access is displayed here, which can be useful in diagnosing remote access issues 2.2.7 INFO-7 Ethernet Se The Vi101, Vi205, Vi302 and Vi305 have this screen that can be useful in diagnosing network issues. nt To return to viewing live images, press this key: Int ell ige LIVE 11 Digital Recorder 3 LIVE Press this key to view live images on the main monitor. This key may be pressed at any time to exit from any other screen. Viewing Full Screen Images ire 3.1 Ltd LIVE an dF Select full screen views of different cameras on the main monitor by pressing the NUMBER keys: 2 3 To select cameras 1 to 9 either press the required number and wait a moment for the camera to select, Alternatively enter 01, 02, 03 etc. 4 5 6 To select cameras 10 to 16, enter the number 10 to 16. 7 8 9 cu rity 1 Se 0 Quad Display Int 3.2 ell ige nt To step forwards or backwards through the cameras, press one of these keys: Select quad display on the main monitor by pressing the QUAD key. Cameras 1, 2, 3 and 4 will be displayed together. Press again to see cameras 5, 6, 7 and 8. Successive presses will select the next set of four camera images. Press a number key to revert to full screen display of one camera. 12 Digital Recorder 3.3 Multi-Screen Select 9-camera Multi-Screen display on the main monitor by pressing MULTISCREEN key. Press again to display a 16-camera multi-screen image. the ire Ltd Press a number key to revert to full screen display of one camera. 3.4 Spot monitor(s) an dF Press the MON key to select a spot monitor (displayed on bottom right of screen prior to the camera number). Press MON again to step through the monitor options. Note that the main monitor is the default, and only the camera number is displayed. 3 4 5 6 7 8 9 To select cameras 10 to 16, enter the number 10 to 16. ige ell 0 To select cameras 1 to 9 either press the required number and wait a moment for the camera to select, Alternative, enter 01, 02, 03 etc. Se 2 nt 1 cu rity Select the camera to be displayed on the selected monitor by pressing the NUMBER keys: Int To step forwards or backwards through the cameras, press one of these keys: 3.5 Tagging Images If you something occurs that you may wish to go back to, press the TAG key to create an event in the event log. This makes it easy to get back to the same point using the FIND-3 Events screen. TAG 13 Digital Recorder 4 FIND If there is a CD in the CD drive with previously stored images on it, the ViX05 will replay from the CD. Otherwise, the ViX05 will replay from the built-in hard drive. This mode finds images by date and time. Press this key to enter the Date/Time search mode: 7 3 5 6 8 Se 4 2 9 nt 1 ige 0 The format for the date and time is DD/MM/YY HH:MM:SS where: cu rity Use the NUMBER keys to enter any date and time for which there is still video available. • DD is the day of the month (00 to 31), • MM is the month (01 to 12), • YY is the year (e.g. 04 for the year 2004), • HH is the hour in 24-hour format (00 to 23), • MM is the number of minutes past the hour (00 to 59) and • SS is the number of seconds past the minute (00 to 59). Í Int ell Scroll through dates and times using the ARROW keys: Í Sometimes it is useful to press the TAG key when in search mode, to call up the latest available recorded images an dF F IN D Ltd FIND-1 Date/Time ire 4.1 Note that as any digit of the date and time is changed, the corresponding image is immediately found on the hard drive and displayed. the Í Í This is facility. When you have found what you want, use the play keys to view the video: 14 “active search” Digital Recorder 4.2 FIND-2 Sweep An alternative to the date/time search is the sweep facility. Press this key until the sweep mode is displayed: Use these keys to scan through the whole range of recorded images: To step in finer time increments, press the OK key to access the fine mode. Note that the slider changes from a solid block to a magnifying glass icon. ire Í Í Ltd F IN D an dF Press again to cancel. To quickly step between start, middle and end, press this key: cu rity TAG Int ell ige nt Se When you have found what you want, use the play keys to view the video: 15 Digital Recorder 4.3 FIND-3 Event List When activity detection or alarm contacts are being used, events will be created in the event list. This screen allows you to quickly find an event and play the video associated with it. Ltd Press the FIND key until the FIND-3 screen is displayed: System events and critical alerts also appear in the event list. F IN D Use the up/down keys to scroll through events and the left/right keys to select different pages of events. Millions of events can be recorded before older ones are over-written. As events are highlighted, the corresponding image will be immediately recalled and displayed if it is still present on the hard drive(s). cu rity Í Í an dF ire Entering the EVENT screen clears any critical alert conditions. If a critical alert problem still exists, new alert events will be created. Se Í Í ige TAG nt Press this key to go to the latest event: Int ell When you have found what you want, use the play keys to view the video: 16 Digital Recorder 4.4 FIND-4 Incidents If one or more incidents have been set (refer to BURN, section 6) they can be selected and replayed via this screen. This is particularly relevant when playing a CD. Ltd Press the FIND key until the FIND-4 screen is displayed: When playing from a CD, all the stored video is within one or more incidents. This screen allows you to select which incident to play. an dF ire F IN D To select the incident you wish to replay, use these keys: Se Í cu rity Í ige nt To play the incident forwards from the start, press the “play forward” key: Int ell To play the incident backwards from the end, press the “play backwards” key: 17 Digital Recorder 5 PLAY If there is a CD in the CD drive with previously stored images on it, the ViX05 will replay from the CD. If the CD has more than one incident, use the FIND-4 screen to select each incident (see section 4.4). • If there is no CD in the CD drive, the ViX05 will replay from the built-in hard drive. The function of each key is: ire cu rity Step backwards one image Step forwards one image Press the forward or reverse play keys repeatedly to increase the replay speed. an dF Having found what you want using the FIND key, you can use these keys to move forwards and backwards through the recorded video images. Ltd • Se Play backwards (press again to increase speed) ige nt Play forwards (press again to increase speed) Pause at currently displayed image - Int + ell To select the most recent or earliest recorded image, press one of these keys: When unit is in playback mode you can also using the function menu 15 zoom command to zoom in on a specific area of replay. 18 Digital Recorder 1 2 3 4 5 6 7 8 9 Ltd View different cameras by pressing the NUMBER keys: Play Events an dF 5.1 ire 0 Press these keys to step backwards or forwards through events in the event list: cu rity Play Incidents Se 5.2 Í Í Press these keys to step backwards or forwards through incidents in the incidents list: ell Int Í ige nt Í 5.3 Tagging Images If you have found an image or section of video that you may wish to go back to, press the TAG key to create an event in the event log. This makes it easy to get back to the same point using the FIND-3 Events screen. TAG 19 Digital Recorder 6 BURN BURN-1 Edit Incident BURN Create an “incident” by pressing this key. cu rity TAG Change the duration of the incident as required using the left/right keys: The start and end times can also be individually adjusted by using the UP and DOWN arrow keys to highlight the start or end times, and the LEFT and RIGHT keys to adjust the time. Alternatively if you highlight the start time and press TAG it will be set to the current play image. Similarly if you highlight the end time and press TAG it will be set to the current play image. ell ige nt Se Í Í If there is a CD in the CD drive that is not blank, the BURN screen will not be displayed. an dF Call up the BURN-1 screen by pressing this key. ire 6.1 Ltd To burn a section of video recording to CD you must go to the middle the video that you wish to backup, using the FIND and PLAY facilities as described in sections 4 and 5. Then do the following: Int Press the “Open CD drawer” button on the CD drive and place a new CD-R in the CD drive. Press the “Open CD drawer” button again to close the drawer. Start writing to CD by pressing this key: OK 20 Note that you can only write incidents to a blank CD. When an important incident has been written to a CD, always check that the CD plays back correctly, either by playing it on the VIX05 or on a PC. Digital Recorder 6.2 BURN-2 Multiple Incidents Up to 10 incidents may be set before burning to CD. Use the BURN-2 screen to manage multiple incidents and the BURN-1 screen to edit individual incidents. Use the BURN key to switch between the BURN-1 and BURN-2 screens: Ltd BURN cu rity Í an dF Í ire While in the BURN-2 screen, use these keys to highlight an incident: Use these keys to select whether you wish to include the highlighted incident when you burn to CD: Se Í Í ell BURN ige nt Use the BURN key to return to the BURN-1 screen to set a new incident or to alter the length or times of an incident. OK 21 Int While in the BURN-2 screen, start writing all selected incidents to CD by pressing this key: Note that you can only write incidents to a blank CD. When an important incident has been written to a CD, always check that the CD plays back correctly, either by playing it on the VIX05 or on a PC. Digital Recorder 7 PSW (Passwords) Passwords may be set in the menu to prevent unauthorised access to various features of the ViX05. Which features that are protected by each password may be defined in the CONFIGURATION menu. Log-On Ltd 7.1 ire To log-on to the ViX05 and thereby gain access to functions protected by the password: an dF Press this key: PSW 2 3 4 5 6 7 8 9 Se 1 cu rity Enter the correct password using the NUMBER keys: nt 0 Int OK ell Press this key: ige Note that all 6 digits must be entered even if the leading ones are zeros/ A message on the screen will indicate whether user access has been granted. Four different passwords may be set up, each with different rights. Note that you may be granted access but still have insufficient rights to access some features of the ViX05. 22 Digital Recorder 7.2 Log-Off When you have finished accessing password-protected features, you should log-off again to prevent other users gaining unauthorised access. Ltd Press this key: ire PSW an dF Press this key: OK cu rity The password-protected features are now protected again. Int ell ige nt Se Note that log off will occur automatically after 1 minute if no keys are pressed. 23 Digital Recorder 8 FN (Functions) 8.1 Using Functions Ltd The FN key provides access to functions as listed below. Press the FN key again as required to see the available functions listed on the screen. ire To activate a function, first press: an dF FN Then enter the required function number (1, 2 or 3 digits) 0 1 2 3 4 5 6 7 8 9 cu rity When you have the required number, press the OK key to finish. OK Repeating last used Function Se 8.2 nt To repeat the last function used, press: Int ell OK ige FN 24 Digital Recorder 9 MENU Please note that the following menu items may differ slightly between models depending on which features are available. Ltd The menu system in this DVR allows many aspects of it operation to be customised to suit a specific installation. The factory default settings that this unit is shipped with provide a standard configuration that records all connected cameras continuously with a data retention period of 31 days. ire The factory defaults may be restored at any time via the CONFIGURATION menu. [v] Select the next menu item [^] Select the prior menu item [>] Go a level deeper into the menu [<] Come out of a level in the menu an dF If you need to deviate from the factory defaults, navigate through the menu using these keys: cu rity [TAG] Select the default setting of a menu item [MON] A quick exit when in the middle of editing Se When editing a string such as a camera title, you can use the [Inc] and [Dec] keys to insert and delete characters. In some cases, the [OK] key needs to be pressed to start an action within the menu. nt Date/Time ige 9.1 Press [OK] to start editing the date and time. Enter the current date and time using the [0-9] keys. ell Use the [<]and [>] keys to move between the digits as required if you do not want to re-enter the whole date and time. Int The required format is DD/MM/YY HH:MM:SS. Press [OK] when you have finished editing the date and time, or press [MON] to cancel. It is essential for the correct operation of this DVR that The current date and time is set in its internal clock. All recorded images are date and time stamped so this information forms part of the recorded evidence. Battery backup ensures that the clock continues working even when power is removed for short periods of time. If there is an invalid date-time in the internal clock, the date/time entry screen will automatically appear on the screen. It may also be accessed at any time via the menu. The internal clock will, like any clock, drift a little over time and will need setting from time to time. If you want perfect accuracy all the time, consider installing a Vi-GPS satellite receiver. 25 Digital Recorder Summer/Winter Time When this option is set to Automatic, the internal clock automatically moves forwards an hour during March and back an hour in October for daylight saving. No adjustment by the user is required when the clocks change. The times and dates suit most European countries. The Summer and Winter time modes may also be set manually if required. Record Ltd 9.2 This part of the menu lets you define the period that images are retained for, the rate and the image quality of recorded images. an dF ire It also includes timers so that recording can be started and stopped at various times of day, or the record rate can be altered at various times of day. Separate weekday and weekend timers are provided so that weekends can be treated differently to weekdays. Auto Record Mode The AUTO record mode is the default record mode that allows you to simply specify how many days you wish images to be retained for. The DVR will do all the necessary image rate calculations to make sure that this is achieved. Non-Alarm Record Settings cu rity These menu settings apply when no alarm or activity event is in progress. Days Set the number of days that you wish images to be retained for before being over-written. The rate at which images are recorded will be adjusted automatically to achieve this period. Se If a longer retention period is selected, the rate at which images are recorded will slow down. nt If a shorter retention period is specified, the rate at which images are recorded will speed up (up to the maximum of the DVR). ige The hard drive capacity also affects the image rate for a given retention period, a larger drive capacity resulting in a quicker record rate. ell Image quality also affects record rate, a higher quality being at the expense of reduced record rate. Int Use the INFO-4 screen to see the actual image rate, accessed by pressing the [MON] key 4 times while in the HELP mode. Non-Alarm Cameras (Auto) Use the [>], [<], [^] and [v] keys to select which cameras that are to be recorded in nonalarm conditions. Normally, all blocks should be set such that all connected cameras are recorded. Use the [TAG] key to set the default state. Record Timers Recording may be restricted to certain times of day. These times may be different for Weekdays and Weekends. 26 Digital Recorder Weekday Record Times Turn the block on to specify when recording is to occur on Monday, Tuesday, Wednesday, Thursday and Friday. The normal setting is to have all blocks on for continuous recording. Press [TAG] to default this setting. Weekend Record Times Turn the block on to specify when recording is to occur on Saturday and Sunday. Ltd The normal setting is to have all blocks on for continuous recording. Press [TAG] to default this setting. ire Alarm Record Settings These menu settings apply when an alarm or activity event is in progress. an dF The occurrence of alarms is unpredictable so the data retention period is affected by alarms. Rate This specifies the overall image rate that is used when an alarm or activity event is in progress. The rate is shared between cameras. Alarm Cameras (Auto) cu rity Under alarm conditions, this option specifies whether all cameras are recorded or just those with alarms. To ensure full security coverage, it is recommended that all cameras are selected. Custom Record Mode Se If custom record mode is selected, image pretension set by number of days is no longer used. Instead, the installer is responsible for setting the record rate on each camera. nt Different rates may be selected for day and night. The day and night times may be different for weekday and weekends. ige In addition, different rates may be set for use under alarm conditions. Enable Custom Mode ell Set to YES only if you wish to use custom mode rather than the auto record mode. Int If you select custom mode, you must set record rates for each camera under day and night, non-alarm and alarm conditions. The time for which images will be retained is dependent on these rates and is indicated on the rates setup screen. Day/Night Timers These timers specify what is considered day and night by subsequent options. Weekdays and weekends are treated separately. Day and night may be considered as just two different time periods rather than actually day and night. For example AM and PM, if this happened to be more relevant to the particular installation. Weekday Daytime Highlight each hour that is to be considered as daytime during weekdays. use the [TAG] key to toggle all hour blocks on and off. 27 Digital Recorder Weekend Daytime Highlight each hour that is to be considered as daytime during weekends. Use the [TAG] key to toggle all hour blocks on and off. Non-Alarm Record Rates These menu settings apply when no alarm or activity event is in progress. Day Ltd The non-alarm daytime record rate for each camera is set here. If the requested rates cannot be achieved, the DVR will scale down all rates such that they can be achieved. The actual rate are displayed in square brackets []. ire Note that cameras with activity detection enabled are given a rate of at least 1 picture per second (pps)and those with remote access in progress, a rate of at least 3 pps. [^][v] Change rate by whole numbers [+][-] Change rate by fractional amount [TAG] Default rate to zero (Off) or maximum [OK] Copy rate of this camera to all others cu rity Night an dF [<][>] Move cursor to each camera The non-alarm night-time record rate for each camera is set here. If the requested rates cannot be achieved, the DVR will scale down all rates such that they can be achieved. The actual rate are displayed in square brackets []. Se Note that cameras with activity detection enabled are given a rate of at least 1 picture per second (pps)and those with remote access in progress, a rate of at least 3 pps. [<][>] Move cursor to each camera nt [^][v] Change rate by whole numbers [+][-] Change rate by fractional amount [OK] ige [TAG] Default rate to zero (Off) or maximum Copy rate of this camera to all others ell Alarm Record Rates Day Int These menu settings apply when an alarm or activity event is in progress. The alarm daytime record rate for each camera is set here. Note that these setting only apply to those particular cameras with alarm status. The requested rates for other cameras will be as per the non-alarm settings. If the requested rates cannot be achieved, the DVR will scale down all rates such that they can be achieved. The actual rate are displayed in square brackets []. Note that cameras with activity detection enabled are given a rate of at least 1 picture per second (pps)and those with remote access in progress, a rate of at least 3 pps. [<][>] Move cursor to each camera [Inc][Dec] Change rate by 5pps steps [^][v] Change rate by whole numbers 28 Digital Recorder [+][-] Change rate by fractional amount [TAG] Default rate to zero (Off) or maximum [OK] Copy rate of this camera to all others Night The alarm night-time record rate for each camera is set here. Ltd Note that these setting only apply to those particular cameras with alarm status. The requested rates for other cameras will be as per the non-alarm settings. If the requested rates cannot be achieved, the DVR will scale down all rates such that they can be achieved. The actual rate are displayed in square brackets []. ire Note that cameras with activity detection enabled are given a rate of at least 1 picture per second (pps)and those with remote access in progress, a rate of at least 3 pps. [Inc][Dec] Change rate by 5pps steps [^][v] Change rate by whole numbers [+][-] Change rate by fractional amount [TAG] Default rate to zero (Off) or maximum Copy rate of this camera to all others Alarm Cameras (custom) cu rity [OK] an dF [<][>] Move cursor to each camera Under alarm or activity conditions, you can select here whether all cameras are recorded or just those with alarms or activity. Quality Se Each camera may be assigned a different image quality. As you change the quality, you can see the effects on the visible parts of the image. nt A higher image quality (size) results in more disc space being used for a given record rate (or slower update for a given data retention period). ige Conversely, a lower image quality (size), results in less disc space being used for a given record rate (or faster update for a given data retention period). [<][>] select camera ell [^][v] Adjust quality Int [TAG] Set defaults [OK] Make all camera the same Image Size Control This is a global setting for image size that affects the recorded image quality of all cameras. When you have selected this overall image size, go into the Quality menu where you can individually adjust camera quality and see the effects. Audio Sensitivity If audio record has been enabled in the CONFIGURATION menu, this setting adjust audio sensitivity. Do a test recording to check that audio is being recorded satisfactorily. If clipping distortion is apparent, reduce sensitivity. 29 Digital Recorder If on the other hand, the audio is masked by background noise, try increasing the sensitivity. or altering the location of the microphone. Monitor Live Audio This setting determines whether live audio is output to the speaker on not. If the microphone is close to the speaker then audio feedback may occur if this option is enabled. Display Ltd 9.3 ire This section of the menus deals with settings that affect the appearance of the displayed images and associated text. Titles an dF Titles allow meaningful descriptions to be entered identify the DVR and the cameras. Titles may be entered either via the built-in keypad, or via a PC keyboard that may be plugged directly into some Videoswitch DVR models. Location cu rity This text string describes the DVR or its location. This is useful when remotely accessing the DVR via Ethernet. It is also used to identify the DVR when it is set up to send emails. Use these keys to enter and edit the text: [>] Move cursor right [<] Move cursor left Se [^][v] Change character at cursor [Inc] Insert a space at the cursor Delete the character at the cursor [TAG] Set the default or blank title [MON] Exit this menu setting Camera Titles ige nt [Dec] ell To give a camera a title, select the required camera and use these keys to enter and edit the text: Move cursor right [<] Move cursor left Int [>] [^][v] Change character at cursor [Inc] [Dec] Insert a space at the cursor Delete the character at the cursor [+][-] Select a predefined title [TAG] Set the default or blank title [MON] Exit this menu setting Show Camera Titles You can choose how the cameras are identified on the main monitor in the various screen formats. This can be useful to avoid cluttering the screen too much. 30 Digital Recorder Full Screen Titles Select whether you wish to identify the full screen camera by its number, by its title or not at all. Note that the camera number of the currently selected monitor is always displayed in the bottom right of the screen. PIP Titles Select whether you wish to identify the PIP cameras by number, by title or not at all. Quad Titles Ltd Select whether you wish to identify the QUAD cameras by number, by title or not at all. x9 Titles ire Select whether you wish to identify the 9-way multiscreen cameras by number, by title or not at all. x16 Titles an dF Select whether you wish to identify the 16-way multiscreen cameras by number, by title or not at all. Text Alignment [<][>][^][v] Move position of text [MON] Return to menu Time/Date Position cu rity Use this menu option to adjust the position of the all the displayed text. This may be useful if you have a monitor that is over-scanning. Se Use this menu option to adjust the position of the Date and Time to suit you preference. Note that some locations may conflict with other text. [<][>][^][v] Move position of Date and Time Return to menu nt [MON] Auto Sequence (Main Monitor) ige The cameras displayed on the main monitor may be sequenced automatically Sequence Mode Int ell Select whether you want random sequencing, normal sequencing, or sequencing across multiple units (this last option only applies to models capable of supporting multi-unit configurations) Camera List Specify her which cameras you want to be included in the sequence. [<][>] Move cursor to select camera [^][v] Include/Exclude camera [MON] Exit this level A solid block indicates that a camera is included, a dash indicates that it is excluded. Dwell Times A separate auto-sequencing dwell time may be specified for each camera in this part of the menu. [0..9] Enter a dwell time in seconds 31 Digital Recorder [<][>] Move cursor [^][v] Scroll selected digit [TAG] Set the default dwell time [OK] Copy this dwell time to all cameras Multi-Unit Sequencing Ltd If you have enable multi-unit sequencing, the cameras to be sequenced on each unit should be set here. Camera List ire Select each unit in turn and specify which cameras are to be included in multi-unit sequencing. [<][>] Move cursor to select camera an dF [^][v] Include/Exclude camera [MON] Exit this level A solid block indicates that a camera is included, a dash indicates that it is excluded. Dwell Time [0..9] Enter a dwell time in seconds [TAG] Set the default dwell time Spot Monitor Options Se PIP Mode cu rity When multi-unit sequencing is selected, a common dwell time is used for all cameras. The spot monitor may be setup to automatically change camera or to change to autosequencing at different times of day. nt Weekday Spot Daytime ige Set the blocks on to indicate daytime hours during weekdays. [<][>] Select hour of day [^][v] Turn block on or off ell Weekend Spot Daytime Int Set the blocks on to indicate daytime hours during weekends. [<][>] Select hour of day [^][v] Turn block on or off Day Spot Camera This is the camera number that the spot monitor will display when the Spot Daytime starts, or if the unit powers up in the daytime. [^][v] Select camera [<] Exit this level 32 Digital Recorder Day Sequence Spot This option specifies whether the spot monitor will auto-sequence when the Spot Daytime starts, or if the unit powers up in the daytime. [^][v] Select auto-sequence [<] Exit this level Night Spot Camera Ltd This is the camera number that the spot monitor will display when the Spot Daytime ends, or if the unit powers up in the night-time. [^][v] Select camera Exit this level ire [<] Night Sequence Spot an dF This option specifies whether the spot monitor will auto-sequence when the Spot Daytime ends, or if the unit powers up in the night-time. [^][v] Select auto-sequence [<] Exit this level Power-Up Options cu rity When the DVR powers up, for example following a power loss, the following settings may be specified in the menu... Main Monitor Format Following power-up the main monitor screen format can be set to Full, PIP, Quad, x9 multiscreen or x16 multiscreen. Exit this level Sequence Main nt [<] Se [^][v] Select format Following power-up the main monitor may be set to auto-sequence. [<] ige [^][v] Select whether to auto-sequence Exit this level ell Main Camera Specify the full screen camera that will be displayed on power-up. [<] Int [^][v] Select camera Exit this level PIP Camera Specify the PIP camera that will be displayed on power-up if PIP mode has been selected. [^][v] Select camera [<] Exit this level 33 Digital Recorder 9.4 Alarms This DVR has a number of alarms inputs that may be connected to contacts, typically in PIR detectors. When an alarm occurs a number of actions may triggered, including: Add event to event log • Send an Email • Call an alarm center • Change record rate • Change cameras that are recorded • Pull-up alarmed camera onto a monitor • Call up a preset on a dome camera an dF Alarm Inputs ire Ltd • This sub-menu allows the alarm inputs to be set up. cu rity Alarm Polarities Alarm contacts may be set as normally open or normally closed. If you select normally closed and nothing is connected to the alarm input, the system will register an alarm. Se Camera Mapping Normally alarm1 maps to Camera 1, Alarm2 to Camera2 etc. nt Some models of Videoswitch DVR support alarm mapping whereby each alarm input may be assigned to any camera. Some cameras may therefore have multiple alarm input associated with them. ige [^][v][<][>] use these keys to set the mapping Preset Mapping Int ell Some models of Videoswitch DVR have dome control. In these models, alarms may be mapped to presets so that when an alarm occurs, the dome goes to a particular preset position. Alarm Timers The alarms may be programmed to be operative only during particular hours of the day. These hours may be different for weekdays and weekends. Weekday Alarm Times Specify during which hours of each weekday the alarm inputs are active [<][>] Move cursor to select hour of day [^][v] Select whether alarm is active A block indicates that the alarm is active, a dash that is it disabled. Weekend Alarm Times Specify during which hours of the weekend the alarm inputs are active 34 Digital Recorder [<][>] Move cursor to select hour of day [^][v] Select whether alarm is active A block indicates that the alarm is active, a dash that is it disabled. Enable Alarms all day Ltd This menu option allows some or all cameras to have their alarms enabled all day, irrespective of the Weekday and Weekend alarm time settings. [<][>] Move cursor to select camera [^][v] Select whether alarm is always active ire Activity Detection an dF Activity detection may be enabled on any of the cameras. If movement is detected, a number of actions may occur, including: Add event to event log Send an Email Call an alarm center Change cameras that are recorded cu rity Change record rate Pull-up alarmed camera onto a monitor Activity Zones [OK] Se Activity zones may be selected for each camera to specify what area the image is to be monitor for movement. Select/deselect zone at cursor [<][>][^][v] Move cursor and select/deselect All zones on/off, default sens/pix nt [TAG] ige A "+" indicates that a zone is selected. If activity is detected, this will become solid block. ell As well as specifying the activity zones, you also need to specify the sensitivity and the number of pixels that need to be simultaneously active. Int Enter two digits, [0..9] for sensitive and [0..9] for number of active pixels. A higher sensitivity setting makes the unit more sensitive to activity. The higher the pixel count, the less sensitive the unit will be to spurious triggering. Activity Timers The alarms may be programmed to be operative only during particular hours of the day. These hours may be different for weekdays and weekends. Weekday Activity Times Specify during which hours of the weekend the activity detection is active [<][>] Move cursor to select hour of day [^][v] Select whether alarm is active 35 Digital Recorder A block indicates that the activity is enabled, a dash that is it disabled. Weekend Activity Times Specify during which hours of the weekend the activity detection is active [<][>] Move cursor to select hour of day [^][v] Select whether alarm is active A block indicates that the activity is enabled, a dash that is it disabled. Ltd Enable Activity all day This menu option allows some or all cameras to have their alarms enabled all day, irrespective of the Weekday and Weekend alarm time settings. ire [<][>] Move cursor to select camera Display Active Pixels an dF [^][v] Select whether activity is always active Selecting this option causes activated pixels to be highlighted on the normal full screen. This option is useful when setting up and performing walk tests, but would typically be turned off for normal operation. cu rity [^][v] Select whether to display active pixels Wireless PIR Inputs UP to 64 wireless PIRs may be installed (for those models of Videoswitch DVRs that support wireless PIRS). Se Wireless PIRs are particularly suitable for perimeter protection where the sensors are widely spaced and installing cabling would be inconvenient and expensive. When a wireless PIR detects someone, the following actions may set set to occcur: Add event to event log • Send an Email • Call an alarm center • Change record rate • Change cameras that are recorded • Pull-up alarmed camera onto a monitor • Call up a preset on a dome camera Int ell ige nt • Wireless PIRs 1-16 The following menu options apply to wireless PIRS 1-16: Enable PIRs Specify which wireless PIRs are installed. [<][>] Move cursor to select PIR [^][v] Select whether PIR is installed Weekday Times Specify during which hours of the week the wireless PIR detection is active [<][>] Move cursor to select hour of day 36 Digital Recorder [^][v] Select whether PIR is active Weekend Times Specify during which hours of the weekend the wireless PIR detection is active [<][>] Move cursor to select hour of day [^][v] Select whether PIR is active Wireless PIRs 17-32 Ltd The following menu options apply to wireless PIRS 17-32: Enable PIRs Specify which wireless PIRs are installed. ire [<][>] Move cursor to select PIR Weekday Times an dF [^][v] Select whether PIR is installed Specify during which hours of the week the wireless PIR detection is active [<][>] Move cursor to select hour of day Weekend Times cu rity [^][v] Select whether PIR is active Specify during which hours of the weekend the wireless PIR detection is active [<][>] Move cursor to select hour of day Wireless PIRs 33-48 Se [^][v] Select whether PIR is active The following menu options apply to wireless PIRS 33-48: nt Enable PIRs Specify which wireless PIRs are installed. ige [<][>] Move cursor to select PIR ell [^][v] Select whether PIR is installed Weekday Times Int Specify during which hours of the week the wireless PIR detection is active [<][>] Move cursor to select hour of day [^][v] Select whether PIR is active Weekend Times Specify during which hours of the weekend the wireless PIR detection is active [<][>] Move cursor to select hour of day [^][v] Select whether PIR is active Wireless PIRs 49-64 The following menu options apply to wireless PIRS 49-64: 37 Digital Recorder Enable PIRs Specify which wireless PIRs are installed. [<][>] Move cursor to select PIR [^][v] Select whether PIR is installed Weekday Times Ltd Specify during which hours of the week the wireless PIR detection is active [<][>] Move cursor to select hour of day [^][v] Select whether PIR is active ire Weekend Times [<][>] Move cursor to select hour of day [^][v] Select whether PIR is active Camera Mapping an dF Specify during which hours of the weekend the wireless PIR detection is active cu rity Each of the 64 wireless PIRs may be mapped to a camera. It will be this camera that is pulled-up in full screen. Preset Mapping Each of the 64 wireless PIRS may be mapped to a preset number. If the PIR is triggered, this preset will be called up on the camera to which the PIR is also mapped. This only applies do domes which have telemetry control. Se Critical Alerts Critical alerts are conditions that require user intervention. If a critical alert condition arises, it is recorded in the event log. nt A message is also displayed on the main monitor to alert the user attention is required. ige Critical alerts are reset by pressing [OK] while viewing the event log. ell Critical alerts arise if a hard drive fails, if a system self-test fails, or if video is lost from a user defined list of which input should have video. Video Loss Int Specify here which cameras should be present. If any lose video, a critical alert will be raised. [<][>] Move cursor to select a camera input [^][v] Select whether camera should be present [TAG] Default to all currently connected cameras Erase Event List The event list can be erased here. Use with care as the events cannot be retrieved once erased. Press [OK] to erase all events. 38 Digital Recorder Pull-Up and Restore This part of the menu deals with the pull-up of a camera on a monitor under alarm conditions. Pull-Up Monitor Specify here on which monitor an alarm camera should be displayed. Pull-Up Hold Time Ltd When an alarm condition occurs the associated camera is displayed for this hold time, even if other cameras also have alarms meanwhile. If other cameras have alarms these will then be displayed in turn, each one being shown for the specified hold time. Enter hold time ire [0..9] [<][>][^][v] Change hold time set default hold time an dF [Tag] Sequence Time When multiple alarmed cameras exist, once the hold time has elapsed for each, they will start sequencing with a programmable sequence time. Enter sequence time [<][>][^][v] Change sequence time [Tag] cu rity [0..9] set default sequence time Relay Hold Time Se Whenever an alarm, activity or wireless PIR event occurs, the alarm relay activates. When all alarm conditions have cleared, the relay will stay activated until the relay hold time has expired. [0..9] nt When the record rate is modified by alarms, this condition will also apply until the alarm relay deactivates. Enter relay hold time set default relay hold time ell [Tag] ige [<][>][^][v] Change relay hold time Restore Camera Int Following the pull-up of one or more alarmed cameras, this setting determines whether the original pre-alarm camera is restored, or whether the last alarmed camera is left on the monitor. [^][v] Select whether pre-alarm camera is restored Restore Tour1 This setting determines whether Tour1 is invoked when an alarm condition clears. [^][v] Select whether Tour1 is restored Restore Preset1 This setting determines whether Preset1 is invoked when an alarm condition clears. [^][v] Select whether Preset1 is restored 39 Digital Recorder 9.5 Domes The following section only applies to DVR models that support telemetry controlled domes or pan and tilt heads. DVRs that do not directly support dome control can by controlled directly by Videoswitch Joystick keyboards as they have the dome protocols built in. Protocol set-up Ltd Videoswitch DVRS that have built-in telemetry dome control provide two independent outputs. Domes with different protocols may be connected to each. DOMES-1 protocol (twisted pair) Specify here which protocol is to be applied to all domes connected to the DOMES-1 output an dF DOMES-2 protocol (twisted pair) ire [^][v] Select protocol Specify here which protocol is to be applied to all domes connected to the DOMES-2 output [^][v] Select protocol Up-the-coax protocol Specify here which up-the-coax protocol is to be used. cu rity Type of control for each camera Each dome camera needs to be assigned to either: DOMES-1 output DOMES-2 output Co-ax telemetry control Se Control via an external Vi-K2 keyboard Dwell/Speed/Tour Settings ige Dwell Time nt When setting tours or preset from within this menu, the following parameters may need to be set. All domes are different so these do not apply to all domes. Speed ell This specifies the dwell time within a tour. Int This specifies the speed at which the dome moves to a preset. Include preset in tour This specifies whether presets are to be included in a tour as they are programmed. This only applies to types of dome that use this method. Preset Programming Dome preset positions may be set here. Note that with some times of dome, the presets have to be set via the dome menu. Go to Preset This may be used to check preset positions. Some types of dome require that you call up a preset prior to setting its new position. [^][v] Select preset 40 Digital Recorder [OK] Go to preset Set Preset [^][v] Select preset [OK] Set preset to current position Tour Programming Ltd Dome tours may be set here. Note that with some times of dome, the tours have to be set via the dome menu. Use the FN key to start and stop tours. ire If an alarm accours, tours will be suspended but can be re-instated after the alarm has finished. Refer to Alarm section. Start Programming Tour an dF [^][v] Select a tour [OK] Start programming tour Add Preset to Tour [^][v] Select a preset Finish Programming Tour [OK] Finish programming tour DVR Driven Tours cu rity [OK] Add preset to tour No of Presets in Tour Se As well as programming tours into the domes, the DVR can sequentially invoke presets to create a tour. This is done independently for each dome camera. Use the FN key to start and stop DVR driven tours. Dwell Time ige nt Program the presets 1, 2, 3 etc into a dome that you wish to use for the tour. Use this menu setting to specify how many are to be sequenced. Network Int 9.6 ell Specify here for how many seconds you wish to dwell on each preset before moving on to the next one. Images from this DVR can be remotely viewed and menus accessed via: Telephone line - connect Vi PSTN module to the modem port. Local area network - connect to the Ethernet port. Broadband - connect a router to the Ethernet port. IP Address If you wish to use the Ethernet port for local or Ethernet access, you need to give the DVR an IP address. 41 Digital Recorder If the DVR is on a network with other computer equipment, a compatible number should be chosen. You may need to consult whoever is responsible for the network who can assign you a number. Ltd If you are connecting only to a broadband router, the default IP address should be satisfactory. The router will also need setting. See our web site for details: www.videoswitch.co.uk To set the IP address of the DVR: [0..9] Enter IP address ire [<][>] Move cursor [^][v] Change digit at cursor an dF [TAG] Set default IP address Note that the IP address consists of four numbers separated by dots. Each number should be entered with no leading zeroes. For example, an IP address might be: 192.169.0.2 Ports cu rity The DVR has four IP ports. Port 4 has a fixed piort number of 80 and is used to send emails and alarm center messages. It can also be used for HTTP access. The other ports are used for remote access from the Vi-Viewer or other client software. Port1 Se This port is used for remote access from the Vi-Viewer or other Videoswitch client software. [0..9] Enter port [<][>] Move cursor ige [TAG] Set default port nt [^][v] Change digit at cursor Port2 ell This port is used for remote access from the Vi-Viewer or other Videoswitch client software. [0..9] Enter port Int [<][>] Move cursor [^][v] Change digit at cursor [TAG] Set default port Port3 This port is used for remote access from the Vi-Viewer or other Videoswitch client software. If a Vi-MPEG4 option module is being used via a router, set this port to 8080 typically so the router can direct HTTP access to the DVR (as well as to the Vi-MPEG4 module). [0..9] Enter port [<][>] Move cursor [^][v] Change digit at cursor [TAG] Set default port 42 Digital Recorder MPEG4 Port This is the port number of an asscociated Vi-MPEG4 option module. Normally is would be 80, but if multiple systems are connected via a router and sharing a IP address, it will be necessary to set different port numbers for, each MPEG4 module and to enter the corresponding port number here. [0..9] Enter port Ltd [<][>] Move cursor [^][v] Change digit at cursor [TAG] Set default port ire Sub-Net Mask [0..9] Enter Sub-Net Mask an dF [<][>] Move cursor [^][v] Change digit at cursor [TAG] Set default Sub-Net Mask Gateway [0..9] Enter Gateway cu rity [<][>] Move cursor [^][v] Change digit at cursor [TAG] Set default Gateway Se Central Station IP Address nt This DVR may be setup to make an IP call to a alarm central station when an alarm or critical alert occurs. Set the IP address of the PC running the alarm monitoring software: ige [0..9] Enter IP address [<][>] Move cursor ell [^][v] Change digit at cursor Port Int [TAG] Set default IP address Set the port you wish to use for the alarm monitoring software: [0..9] Enter port [<][>] Move cursor [^][v] Change digit at cursor [TAG] Set default port Call Triggers The following options determine under what conditions a call is sent: 43 Digital Recorder On Critical Alert Enable this option if you want a call to be sent if a critical alert occurs [^][v] Select whether calls are required On Activity Enable this option if you want a call to be sent if a activity occurs On Alarm Enable this option if you want a call to be sent if an alarm occurs ire [^][v] Select whether calls are required Ltd [^][v] Select whether calls are required On Wireless PIR [^][v] Select whether calls are required Email an dF Enable this option if you want a call to be sent if a wireless PIR alarm occurs This DVR may be setup to send an email when an alarm or critical alert occurs. The email can be sent to up to three different recipients. cu rity The following settings need configuring: Mail server IP Address The IP address of your mail server must be entered here to enable emails to be sent. Se If the DVR is on a network that includes a mail server, then the IP address of this should be entered. If mail is sent and received directly via an internet service provider, then the IP address of the service provider's email server should be entered. ige nt A Videoswitch utility Vi-resolve, downloadable from www.videoswitch.co.uk may be used to determine the IP address of your email server. [0..9] Enter IP address of email server [<][>] Move cursor ell [^][v] Change digit at cursor Int [TAG] Set default IP address of email server #Recipient 1 Enter the email address of the person that you wish to be notified in case of an alarm or critical alert condition. [<][>] Move cursor [^][v] Change character at cursor If the DVR model has an input for a PC keyboard, this is the quickest way to enter the email address. Recipient 2 Enter the email address of a second recipient that you wish to be notified in case of an alarm or critical alert condition. Leave blank if not required. 44 Digital Recorder Recipient 3 Enter the email address of a third recipient that you wish to be notified in case of an alarm or critical alert condition. Leave blank if not required. Email Triggers The following options determine under what conditions an email is sent: Status Reports Ltd The DVR can send routine status reports to provide a confidence check that the system is operating correctly. Status report can be sent daily, weekly on monthly. [^][v] Set report frequency ire Status Report Time The time of day that the routines status reports are sent can be set here: an dF [0..9] Enter time [<][>] Move cursor [^][v] Change digit at cursor [TAG] Default On Critical Alert cu rity Enable this option if you want an email to be sent if a critical alert occurs [^][v] Select whether emails are required On Activity Enable this option if you want an email to be sent if a activity occurs Se [^][v] Select whether emails are required On Alarm nt Enable this option if you want an email to be sent if an alarm occurs ige [^][v] Select whether emails are required On Wireless PIR Enable this option if you want an email to be sent if a wireless PIR alarm occurs Int RS232 ell [^][v] Select whether emails are required Some Videoswitcvh DVRs have an RS232 port that may be used for a varieny of purposes. Remote access is possible via the PSTN telephone network using an external Vi-PSTN module. Note that image update is not as fast as broadband via the Ethernet port. Mode Specify here what the RS232 port is to be used for [^][v] Select the RS232 mode [TAG] Set default Baud Rate [^][v] Select the required baud rate [TAG] Set default 45 Digital Recorder For a Videoswitch modem, the baud rate should be 115200. PSTN rings If a modem is being used, specify here how many rings should occurs before the DVR answers the call. [^][v] Set number of ring Ltd [TAG] Set default RS232 Baud Rate ire If the DVR is to be remotely controlled via an RS232 cable, the baud rate may be set here. For use with a modem the rate should be 115.2K baud. [^][v] Set baud rate 9.7 Configuration an dF [TAG] Set default Multi unit configuration cu rity This part of the menu deals with basic configuration of the DVR that is normally carried out only during installation. Some Videoswitch DVRs may be linked to produce larger systems. In this case each has to be programmed with a unit number and the total number of linked units. Se In a multi-unit configuration, cameras are called up on a remote keyboard by entering the required camera number 1 to 256. The user does not see the boundary between units. From a configuration point of view, each unit is treated separately, and settings can be different on each unit as required. nt Unit Number ige Multiple DVRs may be linked to provide a system with more than 16 cameras. Cameras 1 to 256 may then be called up using a remote keboard. ell In multi-unit configurations, give each unit in the linked chain a unique number, starting at 1 for the master and incrementing by one for each subsequent unit. In single-unit installations, set the unit number to none. Int [^][v] set unit number Number of Linked Units Multiple DVRs may be linked to provide a system with more than 16 cameras. Cameras 1 to 256 may then be called up using a remote keboard. In multi-unit configurations, each unit should be told the total number of inter-connected units in this option: [^][v] set number of linked units Simultaneous Control If this option is set, in a multi unit configuration, all units will switch between live and play mode simultaneously. If this option is not set, each unit can be controlled independently. 46 Digital Recorder Passwords This DVR has a comprehensive method of password protection. Logged Off Access Rights Specify here what access right you wish to be available to users who do not enter a password. [<][>] Move cursor to each type of access [^][v] Set whether logged-off user has access Ltd [TAG] Set default ire User1 User 1 Password Specify here a numeric password for USER1. [0..9] Enter password [<][>] Move cursor [^][v] Change digit cu rity [TAG] Set default password an dF User 1 can be any category of user that you wish, for example the security guard. User 1 Access Rights Specify here what access right you wish to be available to users who log on with the USER1 password. Se [<][>] Move cursor to each type of access [^][v] Set whether USER1 has access nt [TAG] Set default User2 ige User 2 can be any category of user that you wish, for example a supervisor. User 2 Password ell Specify here a numeric password for USER2. [0..9] Enter password Int [<][>] Move cursor [^][v] Change digit [TAG] Set default password User 2 Access Rights Specify here what access right you wish to be available to users who log on with the USER2 password. [<][>] Move cursor to each type of access [^][v] Set whether USER1 has access [TAG] Set default 47 Digital Recorder User3 User 3 can be any category of user that you wish, for example a manager. User 3 Password Specify here a numeric password for USER3. [0..9] Enter password [<][>] Move cursor Ltd [^][v] Change digit [TAG] Set default password User 3 Access Rights ire Specify here what access right you wish to be available to users who log on with the USER3 password. [^][v] Set whether USER1 has access [TAG] Set default User4 an dF [<][>] Move cursor to each type of access cu rity User 3 can be any category of user that you wish, for example the installer. User 4 Password Specify here a numeric password for USER4. [0..9] Enter password [^][v] Change digit [TAG] Set default password Se [<][>] Move cursor nt User 4 Access Rights ige Specify here what access right you wish to be available to users who log on with the USER4 password. [<][>] Move cursor to each type of access ell [^][v] Set whether USER1 has access Int [TAG] Set default Camera Inputs The following options affect the camera inputs: Brightness It is important that the cameras are set up correctly to produce standard levels of video out. However, if there is some loss due to long cable runs, this setting can provide compensation. This setting does not affect the spot monitor outputs. If the cable runs are such that the loss is too great, launch amplifiers at the affected cameras end may be required. Colour Boost It is important that the cameras are set up correctly to produce standard levels of video out. 48 Digital Recorder However, if colour saturation is reduced due to long cable runs, it can be boosted here. Termination You can specify here whether individual camera inputs are terminated (with 75 ohms). All camera inputs should be terminated unless they are looped through to other equipment that terminates them. [<][>] Select camera input Ltd [^][v] Turn termination on or off Record Audio Select here whether you wish to record audio or not. ire [TAG] Turn termination on or off for all cameras an dF Altering this setting may affect video images that have already been recorded. It is therefore recommended that it is set either on or off during installation and not changed during normal operation. Incident Filename [0..9] Enter a numeric filename Restore Factory Defaults cu rity Incidents are given numeric filenames that automatically increment each time a CD is written to (burnt). This menu option allows the starting numeric filename to be specified. If you press [OK] in this menu option, you will reset all menus options back to their factory defaults. Se This can be very useful and is recommended after major software updates. nt However is can undo a lot of work if significant customisation of the configuration has been undertaken. Get Config from CD ige When incidents are written to a CD, the configuration of the unit is also written. ell This menu option allows a configuration to be retrieved from CD. This can be very useful when multiple sites need the same configuration. Int Getting configuration from CD should only be performed on a DVR which is the same type and has the same software revision as the unit that created the CD. Erase Hard Drive(s) These menu options reset the drives to a clean starting point where no images, events of audio is retrievable. Note that the erase operation actually only removes indexes, so the actual data will still be on the drives, although not accessible except with specialist equipment. Erase Hard Drive 1 Press [OK] to perform a disc erase of hard drive 1. Erase Hard Drive 2 Press [OK] to perform a disc erase of hard drive 2 (only available if the DVR has multiple drives). 49 Digital Recorder Erase Hard Drive 3 Press [OK] to perform a disc erase of hard drive 3 (only available if the DVR has multiple drives). Erase All Hard Drives Int ell ige nt Se cu rity an dF ire Ltd Press [OK] to perform a disc erase of all fitted hard drives (only available if the DVR has multiple drives). 50 Digital Recorder 10 Connections 10.1 Audio Connect a microphone either directly to the MIC input or via a microphone amplifier to the LINE input. • The LINE output is used to drive either a speaker with a built-in amplifier or a separate amplifier and speaker. ire Ltd • cu rity an dF POWER AMPLIFIER MICROPHONE AMPLIFIER Int ell MICROPHONE ige nt Se ViX05 ELECTRET MICROPHONE Note: Audio is not supported on the Vi302 or Vi305. 51 SPEAKER OR HEADPHONES Digital Recorder 10.2 Ethernet connection to a PC PC ire an dF CAT5 CROSS-OVER CABLE Ltd ViX05 10.3 Ethernet connection to a LAN CAT5 CABLE Int ell ige nt Se cu rity PC ETHERNET HUB OR SWITCH 52 ViX05 Digital Recorder 10.4 Ethernet connection to Broadband Connection to broadband is via an ADSL router with one or more Ethernet ports. ADSL ENABLED PHONE LINE Ltd CAT5 CABLE cu rity ADSL ROUTER WITH BUILT-IN HUB an dF ire ViX05 10.5 Remote Keyboard Se Two remote keyboards may be connected to the ViX05 to provide control from another room. Simply connect the VIX05 to the keyboard using Cat 5 (or similar twin twisted pair cable). nt Connect the keyboard to a monitor using a BNC co-ax cable. All the keys of the ViX05 are duplicated on the remote keyboard and the ViX05 may be controlled in the same way. MONITOR CAT5 CO-AX Int ell ige If the keyboard is more than about 100 metres away from the ViX05, then the monitor should be connected to the ViX05 separately via a BNC cable (RG59) to ensure best picture quality. The CAT5 data connection should operate up to 500 metres. OUT ViX05 53 MON Vi-K1 or Vi-K2 KEYBOARD Digital Recorder • A keyboard connected to the Main Keyboard input will control the main monitor. • A keyboard connected to the Spot Keyboard input will control the spot monitor. • Keyboards may be daisy-chained if further control positions are required. 10.6 Dial-Up Access Ltd Images may be viewed on a PC via a telephone line (PSTN) if an optional external Vi-PSTN adaptor is attached. “Vi-Connect” Software for the PC is available on the Internet: www.videoswitch.co.uk ire A PC with a modem is required to view the images. an dF 10.6.1 Connecting a Dial-up Adaptor • Connect the adaptor to the telephone socket using the cable provided with the ViPSTN adaptor. • Install Vi-Connect software in the PC that is to be used to dial into the ViX05. A modem must be fitted for PSTN use. Se cu rity VI-PSTN PSTN Phone socket Int ell ige nt Vi205/Vi405/Vi605 10.7 Wireless PIR The Vi405 and Vi605 support up to 64 wireless PIR detectors via a masthead transceiver unit that connects to the TILLS input (see www.videoswitch.co.uk for details). 54 Digital Recorder Ltd Vi405 or Vi605 cu rity an dF ire Wireless PIR Masthead Unit Each of the external detectors must be configured with a different address • Each PIR address that is to be used must be enabled in the DVRs ALARM menu • Connect Wireless PIR Masthead Units to the TILLS input on the DVR as follows: Se • Masthead Unit (Transceiver) Vi405 or ViX05 DVR “TILLS” RJ45 Connector (CAT5) TX Pin 1 ige nt Screw Terminals ell 0V CAT5 Cable Int Link +12V to RX Pin 1 Pin 5 Pin 5 TILLS Input of DVR Not connected Pin 5 +12V Pin 1 0V Tx Rx Masthead Transceiver 55 Digital Recorder 11 Technical Data 11.1 Power-On Reset Ltd If you wish to perform a power-on-reset to restore all settings to their factory defaults, press the TAG key while you apply power, and keep pressing it until the ViX05 has powered up and displays FACTORY RESET. Note that this process will reset all user settings, including camera titles. The TAG key will need to be pressed for about 10 seconds. ire The factory configuration can also be recalled via the CONFIGURATION menu. an dF 11.2 Accessories Included ViX05 Mains Cable cu rity Vi-X2 Alarm Break-out module (Vi405, Vi605) Vi-X3 Relay/Dome Break-out Module (Vi405, Vi605) Vi-X4 Alarm/Relay Break-out module (Vi101, Vi205, Vi302, Vi305) Hard Drive Key Se Manual CAT5 Ethernet Cable nt Blank CDs ige 11.3 Changing the Hard Drive ell Hard drives are sensitive mechanical devices that may be damaged by shock or vibration. Always protect them from shock and vibration when transporting. Int Remove power from the ViX05 before removing the hard drive. Wait for 30 seconds for the drive to stop spinning before moving the ViX05 or removing the hard drive. Moving a drive that is still spinning can damage it. The hard drive drawers require a special key to unlock them. This is supplied with the ViX05. Insert the key, and turn it clockwise to unlock the drive. To put a hard drive back into the ViX05, make sure that the lock in the drive drawer is in the unlocked position. Carefully slide the drawer in as far as it can go with the handle in the up position. Carefully push the handle down such that the drawer is pulled into the drive bay. When it is properly located, lock the drawer by turning the key counter-clockwise. After changing a drive, re-apply power to the ViX05. 56 Digital Recorder 11.4 Connector Pin-Outs 11.4.1 Alarms (Vi101, Vi205, Vi302, Vi305) 8 7 6 5 4 3 2 1 an dF 25 24 24 22 21 20 19 18 17 16 15 14 Signal In/Out 1 Alarm 1 In 2 Alarm 2 In 3 Alarm 3 4 Alarm 4 5 Alarm 5 6 Alarm 6 7 Alarm 7 8 Alarm 7 9 Alarm 8 10 Alarm 10 In 11 Alarm 11 In 12 Alarm 12 In Alarm 13 In Alarm 14 In Alarm 15 In 16 Alarm 16 In 23 Relay 1 Out 24 Relay 2 Out 25 Alarm Common (Ground) In 15 In In ell ige nt Se In Int 14 cu rity Pin Number 13 ire Ltd 13 12 11 10 9 In In In In Note: The Vi-X4 breakout adaptor supplied with the Vi101, Vi205, Vi302 and Vi305provides a convenient means of making connection to the alarm inputs via screw terminals. 57 Digital Recorder 11.4.2 Alarms (Vi405 and Vi605) Physical: 25-way D-Type (female) 8 7 6 5 4 3 2 1 an dF 25 24 24 22 21 20 19 18 17 16 15 14 Signal In/Out 1 Alarm 1 In 2 Alarm 2 In 3 Alarm 3 4 Alarm 4 5 Alarm 5 6 Alarm 6 7 Alarm 7 8 Alarm 7 9 Alarm 8 10 Alarm 10 In 11 Alarm 11 In 12 Alarm 12 In Alarm 13 In Alarm 14 In Alarm 15 In 16 Alarm 16 In 25 Alarm Common (Ground) In 15 In In In ell ige nt Se In Int 14 cu rity Pin Number 13 ire Ltd 13 12 11 10 9 In In In Note: The Vi-X2 breakout adaptor supplied with the Vi405 and Vi605 provides a convenient means of making connection to the alarm inputs via screw terminals. 58 Digital Recorder 11.4.3 Relays (Vi405 and Vi605) Physical: 25-way D-Type (female) 8 7 6 5 4 3 2 1 25 24 24 22 21 20 19 18 17 16 15 14 In/Out 1 Relay 1 (Alarms) 2 Relay 2 (critical Alerts) 3 Relay 3 4 Relay 4 5 Relay 5 6 Relay 6 an dF Signal cu rity Pin Number 7 Se 8 9 Dome 2 RS485 - Output 11 Dome 1 RS485 - Output 12 Dome 2 RS232 Output 13 Dome 1 20mA output 17 18 ige ell 16 Output Int 15 nt 10 14 19 20 21 12V Led/Beeper power Output 22 Dome 2 RS485 + Output 23 Dome 1 RS485 + Output 24 Dome 1 RS232 Output 25 Ground Output 59 ire Ltd 13 12 11 10 9 Digital Recorder Note: The Vi-X3 breakout adaptor supplied with the Vi405 and Vi605 provides a convenient means of making connection to the relay and dome outputs via screw terminals. 11.4.4 Remote Keyboards Physical: RJ45 Electrical: RS485 Pin Number Signal In/Out 1 RS485+ (A) In 2 RS485- (B) In 3 Not used N/a 4 +12V for Keyboard Out 5 0V for keyboard Out 6 Not used N/a 7 Twisted-Pair Video+ Out 8 Twisted-Pair Video- Out cu rity an dF ire Ltd PIN1 PIN8 Note: Se A standard CAT5 patch cable may be used to connect the ViX05 to the optional Vi-K1 or ViK2 keyboard. Int ell ige nt Note: The Spot 1 and Spot 2 outputs are not able to display different images, but provide a convenient means of having more remote keyboards. 60 Digital Recorder 11.4.5 PSTN Modem Physical: 9-way D-type (female) Electrical: RS232 2 3 4 5 7 8 9 an dF 6 ire Ltd 1 Signal In/Out 1 DCD In 2 RXD In 3 TXD Out 4 DTR 5 GND 6 +8V 7 RTS 8 CTS 9 RI cu rity Pin Number Out In/Out Int ell ige nt Se Out 61 Out In In Digital Recorder 11.5 Specifications 11.5.1 Storage 80 to 2250 Gbytes (and more as larger drives are developed) CD writer Quick and easy backup to CD-R using “BURN” key Ltd Hard drives 11.5.2 Digital recording/Replay 4, 6, 9, 10, 12 or 16, with programmable titles (16 characters) Image Retention 1 to 999 days, image rate calculated automatically (custom mode allows time-lapse recording for up to 5 years) Colour/Monochrome Auto sense Gain, Brightness, Colour Adjustable via menu Resolution 720 x 576 pixels x 16.8 million colours Image size 6k to 40k bytes, dynamically variable, typically 18K Compression method Wavelet Hardware/Software Embedded RISC processor, proprietary Videoswitch operating system (non PC) Simultaneous processing Record, Live, Play, Remote and CD backup cu rity an dF ire Camera inputs Se Image authentication every image is tagged with time, date, image number and other information and is protected with a digital security signature for authentication. 0.5 to 1V pk-pk, 75 Ohms (switch able via menu), composite PAL (BNC), all inputs have loop-through BNCs nt Video inputs On Vi605 ige Loop-Though 25 pictures per second (Vi302) 50 pictures per second (Vi205, Vi305, Vi405 and Vi605) ell Maximum record rate Int 1.1.1 Display Main monitor output Composite (BNC), 1V pk-pk composite PAL Spot monitor outputs BNC, 1V pk-pk composite PAL Main monitor display modes Full screen, PIP, quad, 9-way and16-way split (16 camera models only) Auto Sequencing 1-99 seconds, full and quad, main and spot monitors Covert (hidden) any cameras may be hidden from view on the monitors 1.1.2 Control and Interface Keypad 62 35 single function keys Digital Recorder An input for each monitor. RJ45, RS485, 9600-baud (1 start, 8 data, 1 stop) data, with built-in balun for twisted pair video connection to remote keyboards with attached monitors ASCII Keyboard Input Plug in a PC keyboard for easy camera title setup (Vi405 and Vi605) Passwords 4 passwords with fully programmable rights. Also programmable rights when not logged on. Search modes Date/time search, sweep, event list, and incidents Timers Record, alarm, activity and custom (weekday and weekend) Audio Bandwidth Single channel audio, 3.2kHz (optimised for speech) Microphone input 3.5mm jack, -56dB, 20k Ohms, suits electret microphone Line input/output 2 phono connectors, -30dB level, 47k Ohms Audio sensitivity control 30db range, via menu Alarm inputs 4 to 24 inputs, suit normally open or normally closed voltfree contacts, inputs mapped Activity detection 16 x 12 zones, programmable sensitivity Relays 1 relay (Vi101), 2 relays (Vi205, Vi302, Vi305), 6 relays (Vi405, Vi605) Relay Contact Rating: 24Vdc, 200mA max normally open or closed Alarm/activity response Pull-up full screen display, maximum record rate Events log 10,000,000 alarm, activity, and system and till events per hard drive Se cu rity an dF ire Ltd Remote keyboard Inputs Incident list Up to 10 incidents may be saved onto one CD ige Atomic clock option GPS satellite receiver input to synchronise clock (Vi405 and Vi605) In the event of any unexpected condition, the system will automatically restart Dome Control (Vi405 and Vi605) Int 11.5.2.1 ell Watchdog timer 3 RS232 inputs for till and/or barcode reader data (Vi405 and Vi605). Expanders available for 8 or 16. nt Till and bar code inputs Interfaces RS485 (x2), Rs232 (x2), Up-the-Coax (x16) Telemetry (coax) BBV Telemetry (twisted pair) RS485, RS232 and 20mA. Protocols include JVC, VCL, BBV, Dennard, Sanyo, Samsung, Forward Vision, Mercer, Molynx/Bewator, Merit-LiLin, Borsatec, Pelco-D 11.5.3 Remote Viewing Ethernet 63 100baseT, TCP/IP, suitable for connection to broadband router or LAN. Software supplied. Digital Recorder Ethernet bandwidth The data bandwidth used when streaming video is limited to a maximum of 1.6Mbits/second to prevent overloading the network. PSTN (option) Adaptors are available for dial-up remote access Remote viewing software Vi-Viewer may be used on a PC running Windows 2000 or Windows XP. Ltd 11.5.4 Power, Physical & Environmental 90-135 Vac 2 Amps or 180-265 Vac 1 Amp, 47-63Hz Temperature 5 to 35deg C (operating), -10 to 40deg C (storage) Humidity 5 to 95% non-condensing ire Mains Power input Vi101 165mm x 200mm x 310mm (WxHxD), 6kg Dimensions/Weight (Boxed) 275mm x 380mm x 475mm (WxHxD), 8kg an dF Dimensions/Weight (Unit) Vi205 Dimensions/Weight (Unit) 165mm x 200mm x 310mm (WxHxD), 6kg Dimensions/Weight (Boxed) 275mm x 380mm x 475mm (WxHxD), 8kg cu rity Vi302, Vi305, Vi405 Dimensions/Weight (Unit) 355mm x 100mm x 390mm (WxHxD), 7kg Dimensions/Weight (Boxed) 480mm x 295mm x 580mm (WxHxD), 9kg Dimensions/Weight (Unit) 1.1.3 Upgrades ell ige Remote viewing Software Int Firmware upgrades 480mm x 295mm x 580mm (WxHxD), 16kg nt Dimensions/Weight (Boxed) 355mm x 150mm x 390mm (WxHxD), 13kg Se Vi605 Remote viewing software (Vi Viewer) is available on the Internet: www.videoswitch.co.uk. It is also copied onto the CD each time incidents are written. Firmware upgrades will be made available on CD and the Internet (free of charge) Camera Upgrades If you have fewer than the maximum possible camera input for the model, an upgrade code can be purchased to enable the other inputs. Hard Drive Upgrades Replacement hard drives are available to increase the drive capacity. 64 Digital Recorder 11.5.5 CE Marking This product is CE marked. It has been fully tested and complies with 89/336/EEC Electromagnetic Compatibility and 73/23/EEC Low Voltage directives, and with EN 60950:2000 safety standards. Ltd Warning: This is a Class A product. In a domestic environment this product may cause radio interference in which case the user may be required to take adequate measures. 11.5.6 Ventilation ire The ViX05 Digital Recorder has ventilation holes in the base, front and rear. Using internal fans, the unit creates a continuous flow of air through the unit to control the temperature of the disc drives and other internal components. an dF The ventilation holes must not be obstructed otherwise the lifetime and reliability of the system may be affected. 11.5.7 Safety Int ell ige nt Se cu rity For warranty and safety reasons, the cover of this equipment must not be removed. There are no user serviceable parts inside. 65 Digital Recorder Serial Number of ViX05 Notes Int ell ige nt Se cu rity an dF ire Ltd Notes 66 Digital Recorder 12 Warranty Fax-Back Ltd Please fill-in and fax or post this form (or a copy) back to Videoswitch. This will enable us you to inform you of free upgrades when they become available. If this form is filled in fully and returned within 1 month of purchase the warranty on this product will be extended from 1 year to 2 years for no extra charge. Serial Number of ViX05 ire (This is on the label under ViX05) an dF Your Name Company Name ige Date Purchased nt Se cu rity Address & Email Int ell Purchased From Fax to: 01252-851296 Or Send to: Videoswitch, Ocean House, Redfields Industrial Park, Redfields Lane Church Crookham, Fleet, Hants GU52 0RD 67 nt ige ell Int cu rity Se ire an dF Ltd nt ige ell Int cu rity Se ire an dF Ltd