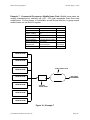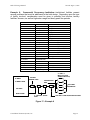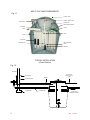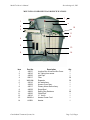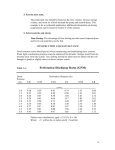
1
MULTI-FLO WASTEWATER TREATMENT SYSTEMS
ENGINEERING MANUAL
Revised April 6, 2010
NOTE:
This manual is applicable for the use of the Enviro-Guard ENV-0.75 and
Enviro-Guard ENV-0.75M. The Enviro-Guard is a Multi-Flo FTB-0.75 integrating
one specific alternative for pretreatment and flow equalization. Designers may
elect to provide different pre-treatment capacity and/or flow equalization
techniques as may be needed to address specific design requirements.
Please contact the factory if there are any questions concerns, or issues
regarding the application of the Enviro-Guard or Multi-Flo.
This manual is a compilation of all manuals and related information provided
to design, install, operate, maintain, and pump the Multi-Flo FTB-Series of
wastewater treatment devices. Please consult the factory for information not
provide in this manual or to address unique issues.
Consolidated Treatment Systems, Inc.
1501 Commerce Center Drive
Franklin, OH 45005
937-746-2727
www.multi-flo.com
MULTI-FLO WASTEWATER TREATMENT SYSTEMS
DESIGN MANUAL
Consolidated Treatment Systems, Inc.
1501 Commerce Center Drive
Franklin, OH 45005
937-746-2727
www.multi-flo.com
Multi-Flo Design Manual
Revised August 1, 2002
Multi-Flo -Series Onsite Wastewater Treatment Systems
Introduction
Onsite wastewater treatment refers to the process of treating and disposing, dispersing, or
recycling of wastewater at or near its point of generation. Historically, the phrase has been
synonymous with “septic system” because that was the only design alternative available. With
the advent of different design technologies, septic systems are just one of several available
alternatives. Because treated wastewater—effluent—is a valuable resource, owners have the
flexibility in how they use this resource. Multi-Flo systems provide owners with options as to
how they treat and recycle wastewater.
The suitability and design of septic systems rely upon native soils to treat and disperse
wastewater. In fact, treatment and dispersal are essentially combined in the same
process. For this reason, septic system use is limited to those soils where both
functions can be accomplished. Multi-Flo units allow owners to separate treatment and
dispersal and address each separately. If soil is the selected dispersal alternative, the
design can be based solely upon the ability of the soil to transmit water from the site.
Owners may have options, depending on local codes, to use the treated wastewater for
beneficial purposes such as recycling into plumbing systems or irrigating gardens and
turf. The Multi-Flo series provides owners with alternatives unavailable to those who
rely solely upon septic systems.
The Multi-Flo -series are capable of treating typical domestic wastewater daily flows
equal to rated capacities, which are shown in Table 1. The Multi-Flo FTB-series design
is based on the same principles as many municipal wastewater treatment plants. These
design principles have been adapted for the small flows developed by individual
residences or small commercial/residential developments.
Table 1—Multi~Flo -Series
Model
FTB-0.5
Rated Flow
(gpd)
500
O2 Transfer
(Max., lb/day)
3.6
FTB-0.6
600
3.6
FTB-0.75
750
3.6
FTB-1.0
1000
7.2
FTB-1.5
1500
10.8
This manual serves as a guide to design an onsite wastewater treatment system using
Multi-Flo units. The manual includes recommendations for both residential and
commercial applications.
The recommendations include typical flow data and
component suggestions. A failure to consider these recommendations may result in
poor unit operation or additional maintenance.
Consolidated Treatment Systems, Inc.
Page 1
Multi-Flo Design Manual
Revised August 1, 2002
Definitions
The following definitions are critical to understanding the design, installation and
operation of Multi-Flo units. These definitions have been purposely simplified so they
can be understood by a wide range of readers.
ANSI/NSF Standard 40: A performance certification standard intended for onsite
wastewater treatment systems having a flow for between 400 and 1500 gpd (gallons per
day) and a single point of discharge.
CBOD5: The concentration of oxygen (expressed as mg/L) utilized by microorganisms
in the non-nitrogenous oxidation of organic matter during a five-day period at a
temperature of 20oC.
Clarify: A process of separating from wastewater fats, oils, grease, and floatable
materials, which float to the surface; and solids, which sink to the bottom.
Commercial Occupancy: A building used for commerce or industry.
Dispersal: A process for recycling treated wastewater back into the environment.
Dosing: A process for periodic discharge of wastewater to a Multi-Flo unit.
Effluent: The discharge from a treatment component or system.
Flow Equalization: A process for mitigating variations in flow by holding wastewater in
a tank and dosing the wastewater into the Multi-Flo unit.
Flow Equalization Tank: A watertight, airtight tank, timer, and pumping system having
a detention time of 16-to-24 hours used to capture and retain solids, grit, and scum, and
then meter the water into the Multi-Flo unit through periodic dosing.
FOG: Fats, oils, and grease in wastewater.
Frequenter: A visitor to and/or customer of a commercial occupancy.
Grease Trap: A tank for capturing and retaining fats, oil, and grease.
Maintenance: Periodic activities intended to maintain the efficiency and effectiveness
of the system.
Mixed Liquor. The contents of the Multi-Flo aeration chamber consisting of, but not
limited to, partially treated wastewater and microbial colonies that oxidize the organic
material in the wastewater.
Consolidated Treatment Systems, Inc.
Page 2
Multi-Flo Design Manual
Revised August 1, 2002
Onsite Wastewater Treatment System. A device or combination of devices, which
may include tanks, vessels, pumps, aerators, aerators, and other mechanical
equipment, intended to treat and disperse wastewater at or near the point of generation.
Pre-aeration: Aeration of wastewater to reduce the CBOD5 prior to discharge to the
Multi-Flo unit.
Pre-Aeration Tank: A tank used to reduce partially the CBOD5 of the wastewater
before the wastewater enters the Multi-Flo unit.
Pretreatment Tank: A watertight, airtight tank having a detention time from 12-to-24
hours used to capture and retain solids, grit, and scum before the wastewater enters
the Multi-Flo unit.
Residential Occupancy: A building used to house individuals and families.
Septic System: An onsite wastewater treatment system comprised of a septic tank
and soil absorption system.
Septic Tank: A watertight, airtight tank having a detention time of 24-to-48 hours, or
more, used to clarify wastewater and capture fats, oil, greases, and inert solids.
Soil Absorption System: A system consisting of trenches and pipes—or equivalent
“gravelless” devices—used to disperse water into the soil where additional treatment
may occur and the water is dispersed from the site.
Trash Trap: A watertight, airtight tank for capturing and retaining solids.
Seeding: A process for facilitating bacterial growth by providing mixed liquor from
another Multi-Flo unit.
TKN (Total Kjeldahl Nitrogen): The quantity of organic nitrogen and ammonia
(expressed in mg/L) found in wastewater.
TN: The total quantity of nitrogen (expressed in mg/L-N) that exists in the wastewater.
Nitrogen may be in the form of ammonia, TKN, nitrate or nitrite.
TSS: The quantity of solids (expressed in mg/L) that can be readily removed from a
well-mixed sample with standard laboratory filtering procedures.
Typical Domestic Wastewater: Wastewater having the characteristics as shown in
Table 2:
Consolidated Treatment Systems, Inc.
Page 3
Multi-Flo Design Manual
Revised August 1, 2002
Table 2—Typical Domestic Wastewater
Constituent
Value
CBOD5
100-300 mg/L
TSS
100-350 mg/L
FOG
30 mg/L
TKN
60 mg/L
Wastewater: Water generated as a result of human activities and containing feces,
urine, blood, food byproducts, rinse water, laundry water, process water, and the like.
Design Principles
The goal of wastewater treatment is to return to the environment water that does not
pose a public health or environmental threat. The role of the Multi-Flo in this process is
to remove from water organic materials and pathogens through biological treatment.
Each model of the Multi-Flo FTB-Series has a specific design rating. Each rating is
intended to identify the volume of typical domestic wastewater that the system can treat
in a 24-hour period. The flow during this 24-hour period, as tested under ANSI/NSF
Standard 40, is shown in Table 3.
Table 3—Typical Flo Regime Under ANSI/NSF Standard 40
Time of Day
Percent of Total Hydraulic Load
6:00 AM-9:00 AM
35
11:00 AM-2:00 PM
25
5:00 PM-8:00 PM
40
Additional treatment may be necessary where the flow regime varies from Table 3
and/or the wastewater does not meet the criteria of typical domestic wastewater.
Typical domestic wastewater may include small quantities of medicines, cleaners,
antibiotics, and other substances that, in large quantities, will adversely affect the
operation of the system. The water will have a pH of approximately 7.0 and may have
minute concentrations of heavy metals. If the pH is above 9.0 or less than 6.0, and/or
there are high concentrations of harmful substances and heavy metals, additional
treatment will be necessary.
Depending on the occupancy, an additional tank may be installed upstream of the MultiFlo. This additional component may be a "trash trap," "pretreatment tank," "flow
equalization tank," or "pre-aeration tank." The name will vary with the intended function
of the tank, and the function of the tank is related to its capacity and components. A
trash trap is the smallest of these, and its function is simply to capture and retain large
solids such as tampons, disposable diapers, and so forth. No additional treatment or
function is expected, and the capacity of the tank may be as small as 250 gallons.
Consolidated Treatment Systems, Inc.
Page 4
Multi-Flo Design Manual
Revised August 1, 2002
A pretreatment tank is larger than a trash trap, and its function is to capture and retain
fats, oils, grease, and smaller solids such as dental floss. The capacity of a
pretreatment tank is related to the flow from the occupancy. A flow equalization tank
serves as a pretreatment tank, but its primary function is to retain wastewater for
periodic dosing into the Multi-Flo. A pre-aeration tank is intended to provide additional
oxidation. This tank will contain additional aerators to facilitate a partial digestion of
organic material prior to its discharge to the Multi-Flo unit. A pre-aeration tank may also
serve as a flow equalization tank.
86"
753
4"
58"
54"
63"
Figure 1—Multi-Flo FTB-0.5
86"
1"
742
58"
54"
71"
Figure 2—Multi-Flo FTB-0.6
Consolidated Treatment Systems, Inc.
Page 5
Multi-Flo Design Manual
Revised August 1, 2002
903
4"
1"
782
62"
58"
71"
Figure 3—Multi-Flo FTB-0.75
93"
823
4"
68"
64"
78"
Figure 4—Multi-Flo FTB-1.0
88"
63"
751
4"
1"
584
54"
135"
Figure 5—Multi-Flo FTB-1.5
Every county of almost every state regulates the design, installation, operation, and
maintenance of onsite wastewater treatment systems. Some counties have few
regulations while others maintain comprehensive programs that include licensing,
certifications, plan review, and mandatory maintenance. Generally, these regulations
mandate residential system sizing, usually based on the number of bedrooms.
Commercial occupancies generally use building code parameters to establish design
Consolidated Treatment Systems, Inc.
Page 6
Multi-Flo Design Manual
Revised August 1, 2002
flow. These parameters are based on number of patrons, square footage of retail
space, restaurant seats, and other indicators of potential wastewater generation. Some
codes may consider alternative values to establish flow, such as actual water use for
similar facilities, but most codes are prescriptive in setting design flows.
Listed in Table 4 are recommended sizing and components for single-family dwellings
based on a design flow of 150 gpd/bedroom.
Multi-family occupancies are more susceptible to abuse by tenants, who may be
unaware that they are using onsite wastewater treatment. For these occupancies, a
pretreatment tank may eliminate maintenance issues related to grease and solids put
into the system. Table 5, which is based on a flow of 150 gpd/bedroom, illustrates
recommended components, volumes, and ratings for multiple family dwellings.
Number of
Bedrooms
1-2
1-2
3
3
4
4
5
5
Table 4—Multi-Flo Sizing for Single-Family Dwellings
Garbage
Recommended Size
Required Capacity of Multi-Flo
Disposal? of Pretreatment Tank
(gpd)
No
Optional
500 gpd
Yes
Optional
500 gpd
No
Optional
500 gpd
Yes
Optional
500 gpd
No
Optional
600 gpd
Yes
Optional
600 gpd
No
Optional
750 gpd
Yes
500 gallon
750 gpd
Table 5—Multi-Flo Sizing for Multi-Family Dwellings
Required Capacity
Number of
Recommended Size
of Multi-Flo
Bedrooms of Pretreatment Tank
if needed, (gal)
(gpd)
Served
1
Optional
500
2
500
500
3
500
500
4
500
600
5
500
750
6
750
1000
7
750
1200
8
750
1200
9
750
1500
10
1000
1500
Consolidated Treatment Systems, Inc.
Page 7
Multi-Flo Design Manual
Revised August 1, 2002
3-BEDROOM RESIDENCE
FLOW=450 GPD
CONTROL PANEL WITH ALARMS
LOCATE AS CONVENIENT
INFLUENT WASTEWATER
Figure 7 - Basic Multi-Flo Installation
3-BEDROOM RESIDENCE
FLOW=450 GPD
CONTROL PANEL WITH ALARMS
LOCATE AS CONVENIENT
PRETREATMENT
TANK
INFLUENT WASTEWATER
Figure 8 - Multi-Flo Installation With Pre-Treatment
3-BEDROOM RESIDENCE
FLOW=450 GPD
CONTROL PANEL WITH DOSING TIMERS
AND ALARMS, LOCATE AS CONVENIENT
1250 GAL SEPTIC/
PUMP TANK
INFLUENT WASTEWATER
EFFLUENT PUMP W/TIMER
Figure 9 - Multi-Flo Installation With Flow Equalization
Consolidated Treatment Systems, Inc.
Figure 7 shows a basic installation.
In this example, the Multi-Flo FTB0.5
serves
a
three-bedroom
residence.
It receives and
discharges flow by gravity. Effluent
is dispersed through a drainfield
sized in accordance with applicable
codes. In this example, the MultiFlo provides both the storage of a
septic
tank
and
wastewater
treatment normally associated with
the drainfield.
The soil acts to
“polish” the effluent of residual
pathogens, solids, and organic
material.
Figure 8 shows a basic Multi-Flo
installation with the addition of a
pretreatment tank. “Pretreatment” is
essential when the wastewater is
laden with solids or has other
unusual
characteristics.
Pretreatment accomplishes several
functions: capture and storage of
solids, homogenization of the
wastewater, and partial removal of
organic material. Pretreatment may
enhance treatment is generally not
essential
for
successful
performance.
Flow equalization may be needed
when high variation exists. Such
cases arise when much or all of the
flow is generated during one or two
short periods of a day or week. As
an
extreme
example,
flow
equalization would help when all
wastewater is generated in the
morning and evening, there are
parties on Friday evenings, and all
laundry is washed on Saturdays.
Flow equalization provides a method
to capture, homogenize, and meter
wastewater into the Multi-Flo,
Page 8
Multi-Flo Design Manual
Revised August 1, 2002
maximizing operational efficiency.
Flow equalization functions by placing a pump on a timer that operates over a 24-hour
cycle. The design flow will be divided into 48 or 96 equal doses, each of which will be
discharged at 15-to-30 minute intervals, depending on the design. For example, a 500
gpd FTB-0.5 can receive 48 doses of about 10.4 gallons, each dose discharged at 30minute intervals.
Flow equalization also provides the benefits of pretreatment. As shown in Figure 9, the
flow equalization tank is actually a two-compartment septic tank-pump chamber. The
septic tank portion acts as a pretreatment tank while the pump chamber holds partially
treated water for dosing into the Multi-Flo.
Design Requirements for Commercial Occupancies
Although the Multi-Flo has been used primarily for residential facilities, including both
single-family and multiple-family dwellings, Multi-Flo can be effectively used for
commercial occupancy including various types of food services. Because of hydraulic
surges, grease, use of chemicals and cleaning agents, additional pre-treatment facilities
may be required when the Multi-Flo is used for certain types of commercial facilities.
OFFICE
FTB 0.5 MULTI-FLO
10 EMPLOYEES
EFFLUENT DISPERSAL
300 GAL. TRASH TRAP
(OPTIONAL)
OFFICE
FTB 1.5 MULTI-FLO
75 EMPLOYEES
EFFLUENT DISPERSAL
750 GAL. TRASH TRAP
Figure 10—Commercial Occupancy Multi-Flo Installation with Flow Equalization
Consolidated Treatment Systems, Inc.
Page 9
Multi-Flo Design Manual
Revised August 1, 2002
Design Flow and Loads
Essential to proper design of commercial systems is a characterization of the flow and
organic and solids loadings the occupancy will generate. These values may be
obtained from several sources. If the facility is existing, meter readings may provide the
answers. For new facilities, design values may already be established in plumbing or
sanitary codes. Standard engineering texts also provide values. Listed below in Table
6 are typical design values.
Table 6—Wastewater Flow and Organic Load
Type of Facility
Apartment
Assembly Hall (no kitchen)
Bowling Alley (no kitchen)
Church (no kitchen)
Country Club
Country Club
Drive-In Theaters
Employee (no showers)
Employee (showers)
Food Service
Ordinary Restaurant
24-Hour Restaurant
Freeway Restaurant
Tavern (limited food)
Carry-out (single-service)
Carry-out
Fast Food Chain
Hospital (not incl. Personnel)
Hospital personnel (additional)
Laundry (coin-operated)
Mobile Home Park
Motel and Hotel, regular
Resort hotel, cottage
Add for self-service laundry
Nursing Home (not incl. Kitchen or
laundry)
Office Building (per 8-hr shift)
Service Station
Schools
Day/type
Add for showers
Add for cafeteria
Add for school employees
Boarding school
Shopping Center (no food
Consolidated Treatment Systems, Inc.
Flow
Gal/Unit/Day
150 gal/bedroom
5 gal/seat
75 gal/lane
3 gal/sanctuary seat
50 gal/member
20 gal/employee
5 gal/car space
20 gal/employee
35 gal/employee
CBOD5
mg/L
50 gal/seat
75 gal/seat
100 gal/seat
30 gal/seat
50 gal/100 sq.ft./floor
sp.
20 gal/employee (add’l)
100 gal/seat
200 gal/bed
20 gal/employee
400 gal/machine
200 gal/space
150 gal/room
75 gal/room
400 gal/machine
100 gal/bed
600-800
600-800
600-800
400
600-800
240
240
240
240
400
240
240
240
240
CBOD5
lb/DAY/UNIT
.30 lb/bedroom
.01 lb/seat
.15 lb/lane
.01 lb/seat
.17 lb/member
.04 lb/employee
.01 lb/car space
.04 lb/employee
.07 lb/employee
.35 lb/seat
.50 lb/seat
.70 lb/seat
.10 lb/seat
.70 lb/100 sq.ft./fl. sp.
240
1000
400
240
600
240
240
240
600
400
.04 lb/employee
.80 lb/seat
.70 lb/bed
.04 lb/employee
2.00 lb/machine
.40 lb/space
.30 lb/room
.15 lb/room
2.00 lb/machine
.30 lb/bed
20 gal/employee
250 gal/water closet
240
240
.04 lb/employee
.50 lb/fixture
15 gal/student
5 gal/student
5 gal/meal
15 gal/employee
75 gal/student
100 gal/1000
sq.ft./floor sp
240
240
600
240
240
400
.03 lb/student
.01 lb/student
.03 lb/meal
.03 lb/employee
.15 lb/student
.30 lb/1000 sq.ft.fl.sp.
Page 10
Multi-Flo Design Manual
Revised August 1, 2002
Table 6—Wastewater Flow and Organic Load
Flow
Gal/Unit/Day
Type of Facility
service or laundry)
Travel Trailer or RV Park
W/out water/sewer hook-up
With water/sewer
75 gal/space
100 gal/space
CBOD5
mg/L
400
400
CBOD5
lb/DAY/UNIT
.25 lb/space
.30 lb/space
Four flows must be considered during the design: maximum month average daily flow,
minimum monthly average daily flow, peak daily flow, and peak hourly flow. Each of
these will be different, and the combination of these flows is essential developing the
most efficient design. Typically, the Multi-Flo unit will be sized to treat the maximum
month average daily flow. If there are multiple Multi-Flo units operating in parallel, they
will be placed into service depending on how the flow varies over a year’s time. Flow
equalization must be sized to hold the peak daily flow. And if the peak hourly flow is
high, flow equalization must be sufficient to hold this additional flow above the peak
daily flow.
Ideally, flow should be spread over a 24-hour period. The minimum effective capacity of
the treatment tank should be two-thirds the peak daily flow. Churches and meeting
halls may have only one or two days each week during which they are in use. Flow
equalization may spread the large single-day flows over two or three days, depending
on the maximum month average daily flow.
When flow equalization is used, a separate trash trap is generally not needed. For
greater efficiency, a two-compartment septic tank should be considered for use as the
flow equalization tank
The size and pumping frequency of the pump depends upon the volume of wastewater
to be treated. Typically, an 11-gallon dose is given over a five-minute interval. Such
low loading minimizes the need for larger pumps.
The following table gives
recommended pumping frequency and volume/dose:
Table 7—Dose Volume
Flow (gal/day)
Doses/Day
Gal/Dose
250
24
11
500
48
11
750
72
11
1000
96
11
1500
96
16
For food service occupancies, grease traps will also be required. The capacities of
these grease traps may be set in local plumbing codes. Generally, the minimum
capacity is 750 gallons. When the required capacity exceeds 1000 gallons, two or more
tanks located in series should be considered. Only plumbing fixtures located in the
kitchen should be connected to the grease trap.
Consolidated Treatment Systems, Inc.
Page 11
Multi-Flo Design Manual
Revised August 1, 2002
CONTROL PANEL
KITCHEN WASTEWATER
1,000 GAL GREASE TRAP
4" PVC PIPE (TYP)
1250 GAL TANK/W PUMP & TIMER
FTB-1.0
Figure 11—Plan View Showing Grease Trap
Even if flow equalization and a grease trap are not required, a trash trap is
recommended to capture fats, oil, grease, and other material from entering the MultiFlo. Such material includes, but is not limited to, tampons, sanitary napkins, cleansing
pads, contraceptives, dental floss, and so forth.
The following recommendations address designs for different applications:
§
Single Family Residence: A trash trap is not recommended unless a garbage
disposal is installed. If a trash trap is provided, it should have a capacity of 300to-500 gallons.
§
Rental Housing, Multiple Family or Mobile Home Parks: A trash trap having a
capacity of 50 percent of the average daily flow should be provided.
§
Offices and Public Buildings without Kitchen Facilities: A small trash trap
with a capacity of 25-to-50 percent of the daily average flow should be provided.
Although such facilities do not have a grease problem, they do frequently
experience problems with paper towels and sanitary napkins. It may be
advisable for the owner to use wall-mounted hand dryers or cloth towel
dispensers.
§
Gas Stations, Garages or Auto Repair Shops: A trash trap having a capacity
of 50 percent of the average daily flow should be provided. Under no
circumstances should wash bays, floor drains or oil separators be connected to
the Multi-Flo.
§
Campgrounds: A trash trap with a capacity of 50 percent of the daily flow
should be installed. It is not advisable to discharge the contents of the dump
station into the Multi-Flo since there is usually a large amount of bacterial
retardants and other chemicals that may kill off the bacteria in the Multi-Flo.
§
Weekend Cottages or Winter Homes: Facilities with small daily flows,
intermittent or seasonal usage should not have a trash trap installed.
Consolidated Treatment Systems, Inc.
Page 12
Multi-Flo Design Manual
Revised August 1, 2002
§
Restaurants, Hospitals, Nursing Homes or Schools: Facilities having kitchen
and laundry facilities require trash traps or grease traps. Contact your Multi-Flo
representative for specific recommendations on the design of systems to serve
the above types of facilities.
§
Facilities Served By Two Or More Multi-Flo Plants in Parallel: Provide a
trash trap before a distribution box if the flow is to be split between two or more
Multi-Flo units.
The treatment capacity of each Multi-Flo unit is based upon the oxygen requirements
necessary to treat typical domestic wastewater. The Multi-Flo aerator is designed to
treat a minimum of 1.5 lb-CBOD5/day. Where wastewater has a higher organic
concentration, additional oxidation capacity will be required. Often this additional
capacity is provided by adding aeration to the pretreatment tank. For example,
foodservice wastewater frequently has a CBOD5 greater than 1000 mg/L due to soluble
grease, cleaning agents, etc. Because of the higher oxygen demand, a longer retention
in the aeration stages is required.
Pre-aeration meets the additional oxygen
requirements. Pre-aeration can usually be accomplished by installing one or more
Multi-Flo aerators in either the grease trap or trash trap.
Pre-aeration provides benefits beyond oxidation. Some chemicals may be volatilized or
directly oxidized by exposure to oxygen. Air aids in cooling and emulsifying fats, oil and
grease so that they float to the surface. Generally, the wastewater will be homogenized
so that the Multi-Flo does not experience sudden changes in wastewater character.
The microbes that perform the wastewater treatment occur naturally. When started,
these bacteria take from six-to-eight weeks to acclimate themselves to the wastewater
and colonize in sufficient concentration that measurable treatment occurs. “Seeding”
can be used to eliminate this start-up performance lag. Seeding is accomplished by
obtaining about 50 gallons of mixed liquor from another Multi-Flo unit. The alreadyacclimated, concentrated colony should experience no delay in acclimating to the new
unit so that a performance lag may be circumvented.
Cellular activity varies with the temperature. Microbes are less active in the winter, so
seeding is essential for winter-time startup.
Table 8 should be used to determine the minimum hydraulic capacity of Multi-Flo
systems to serve commercial facilities that do not have kitchen or laundry wastes. In
some cases, pretreatment facilities may be required if average wastewater strength
exceeds 300 mg/L CBOD5 or if large volumes of wastewater are generated during peak
periods. Whenever the daily wastewater flow is great enough to require more than one
Multi-Flo unit, flow splitting should be used for even flow between or among units. MultiFlo are not operated in series, nor should the flow be split between or among units of
different capacities.
Please contact our local factory representative to determine if additional facilities may
be required.
Consolidated Treatment Systems, Inc.
Page 13
Multi-Flo Design Manual
Revised August 1, 2002
Table 8—Recommended Multi-Flo Selections
Recommended Size
Average Daily Flow
of Pretreatment-Tank
Multi-Flo Unit(s)
0 – 500 gpd
501 – 600 gpd
601 – 750 gpd
751 – 1000 gpd
1001 – 1200 gpd
1201 – 1500 gpd
1501 – 2000 gpd
2001 – 2250 gpd
2251 – 3000 gpd
3001 – 4500 gpd
4501 – 6000 gpd
300 gallon
300 gallon
500 gallon
500 gallon
750 gallon
1000 gallon
1000 gallon
1000 gallon
1500 gallon
2000 gallon
2000 gallon
FTB-0.5
FTB-0.6
FTB-0.75
FTB-1.0
Two FTB-0.6
FTB-1.5
Two FTB-1.0
Three FTB-0.75
Two FTB-1.5
Three FTB-1.5
Four FTB-1.5
In designing a system for a commercial occupancy, the designer should consider the
following:
§
Maximum Month Average Daily Flow
§
Minimum Month Average Daily Flow
§
Peak Daily Flow
§
Peak Hourly Flow
§
Concentration and Mass of CBOD5 for Flows
§
Concentration and Mass of TSS for Flows
Operation And Maintenance Procedures For Seasonal Or Intermittent Use
Facilities
Frequently, Multi-Flo systems are installed on facilities that are used intermittently or
seasonally. Because of the reduced or sporadic loading that these installations receive,
the routine service and maintenance requirements are different from that normally
expected of a year-round residence. The following recommendations are for the
operation and maintenance of both residential and commercial systems that will not be
operated on a full-time basis.
Seasonal Facilities are characterized by regular usage for several consecutive months,
followed by several months during which no flow enters the unit. If the periods of nonuse exceed three months, the Multi-Flo should be shut down and “winterized” by the
following procedures:
1) Disconnect the unit at the breaker box and unplug alarm.
2) Completely pump out all sludge and liquids from the basin.
3) Flush and clean effluent filters, if installed, and Multi-Flo filter “socks.”
4) Fill unit with clean water.
Consolidated Treatment Systems, Inc.
Page 14
Multi-Flo Design Manual
Revised August 1, 2002
5) Take the aerator out of the unit and clean it by lightly coating it with oil to prevent
rusting. Store the aerator upright until the next season operation resumes.
Upon resuming normal use, install the aerator, plug in the alarm, re-connect the unit at
the breaker box, and seed the unit. Winterizing and start-up should be performed by an
authorized Multi-Flo distributor to insure proper operation of the system.
Intermittent use facilities are characterized by periodic occupancy followed by periods of
vacancy. Typically, the vacancy will not last longer than three months. If the unit will be
unused for less than three months, timed aeration may be better. Timed aeration
consists of connecting the aerator to a timer that limits aeration operation at from two-tofour hours daily. Timed aeration will prevent anaerobic conditions and reduce the
power consumption.
1) Weekend use: If the system will be used for short periods but on a regular basis
(i.e., every weekend throughout the year), timed aeration timed aeration may be
provided during periods of non-use.
2) Vacation homes: If the system will be used for several weeks followed by
several months of vacancy, the Multi-Flo may be shut off during vacancies.
Pumping is generally unnecessary. If possible, the Multi-Flo should be allowed
to run a few days after flow has stopped to oxidize any remaining organic
material. As a part of start-up, the Multi-Flo distributor should check the unit to
insure that the system is operational.
During periods of occupancy, the Multi-Flo unit must be operated in accordance with the
manufacturer's recommendations and NSF certification.
During start-up, units may be prone to “sudsing,” which is the production of foam from
laundry detergents. Laundering should be limited during this period.
Where freezing is a danger, the Multi-Flo should be pumped during vacancies. Where
uplift is a possibility, the uplift restraint must be provided.
Consolidated Treatment Systems, Inc.
Page 15
Multi-Flo Design Manual
Revised August 1, 2002
Design Examples
Examples 1, 2, and 3: Residential Occupancies—Residential occupancies are
generally designed based on the number of bedrooms, the daily flow assigned for each
bedroom. Figure 12 shows typical layouts for single- and multiple-family dwellings. A
trash trap is generally optional for single-family, owner-occupied dwellings. A trash trap
is advisable for all rental property.
SINGLE FAMILY
BASIC INSTALLATION
3 BEDROOM
HOUSE
EFFLUENT DISPERSAL
FTB 0.5 MULTI-FLO
INSTALLATION WITH TRASH TRAP OR PRE-TANK
FTB 0.75 MULTI-FLO
5 BEDROOM
HOUSE
EFFLUENT DISPERSAL
500 GAL. TRASH TRAP
MULTIPLE FAMILY INSTALLATION
3 BEDROOM
CONDO
FTB 1.5 MULTI-FLO
3 BEDROOM
CONDO
EFFLUENT DISPERSAL
700 GAL. TRASH TRAP
3 BEDROOM
CONDO
Figure 12—Examples 1, 2, & 3
Consolidated Treatment Systems, Inc.
Page 16
Multi-Flo Design Manual
Revised August 1, 2002
Example 4:
Commercial Occupancy, Office Buildings—Office buildings are
designed based on the number of employers, frequenters, and based upon the
presence of foodservice facilities. Figure 13 shows a layout of an office building that
does not possess foodservice facilities. In designing a system for an office building,
consideration must be made for the fact that the design flow may be generated within
an 8-to-10 hour period. Thus, flow equalization may be essential to address surges into
the Multi-Flo unit. Figure 13 illustrates two typical office building layouts.
Table 10—Example 4 Information
Parameter
Value
Hydraulic Loading
20-25 Gal/Employee
20-25 Gal/Parking Space
Organic Loading
.04 Lb CBOD5/Employee (240 mg/L
CBOD5)
Grease Trap
Not Required
Trash Trap
500 Gallon
Pre-Aeration:
Not Required
Flow Equalization
OFFICE
Recommended
FTB 0.5 MULTI-FLO
10 EMPLOYEES
EFFLUENT DISPERSAL
300 GAL. TRASH TRAP
(OPTIONAL)
OFFICE
FTB 1.5 MULTI-FLO
75 EMPLOYEES
EFFLUENT DISPERSAL
750 GAL. TRASH TRAP
Figure 13—Example 4
Consolidated Treatment Systems, Inc.
Page 17
Multi-Flo Design Manual
Revised August 1, 2002
Example 5:
Commercial Occupancy, Retail Shopping Center Without
Foodservice—Retail space wastewater flow is generally calculated based on the
number of employees and number of frequenters. Often, the number of frequenters is
estimated from the area of retail space.
Table 11—Example 5 Information
Parameter
Value
(Retail Sales) 0.1 gal per sq. foot
Hydraulic Loading
(Office Space) 20-25 gal per employee
Organic Loading
Retail Sales: .3 lb BOD per 1000 sq ft
of floor space
Office Space: .04 lb BOD per
employee
Grease Trap
Not Required
Trash Trap
750 Gallon
Pre-Aeration:
Not Required
Flow Equalization
Recommended
FTB 1.5 MULTI-FLO
4000 SQ. FT.
4 EMPLOYEES
2000 SQ. FT.
2000 SQ. FT.
2 EMPLOYEES 2 EMPLOYEES
EFFLUENT DISPERSAL
750 GAL. TRASH TRAP
2000 SQ. FT.
2 EMPLOYEES
2000 SQ. FT.
2 EMPLOYEES
Figure 14—Example 5
Consolidated Treatment Systems, Inc.
Page 18
Multi-Flo Design Manual
Revised August 1, 2002
Example 6: Commercial Occupancy, With Retail Shopping Plaza With Food
Service/Laundry—It is important to provide adequate treatment (and pre-treatment)
capacity for this type of facility. The initial design should indicate whether or not a food
service or laundromat is proposed so that the Multi-Flo system can be properly
designed. Failure to properly design the treatment system will probably result in a
system failure when the food service or laundromat is added.
Parameter
Hydraulic Loading
Table 12—Example 6 Information
Value
20,000 sq. ft. @ 0.1 gal/sq.ft.
20 seat restaurant @50 gals/seat
6 machine laundromat @ 400 gal/machine
Organic Loading
Example
BOD of 600-800 mg/L for new facility
20,000 [email protected] lb/BOD/1000 sq.ft.
20 seats(restaurant) @0.35 lb BOD/seat
washing machines @ 2.0 lb BOD/machine
Grease Trap
Trash Trap
Anticipated Service
Requirements
required
required: min. capacity of 2700 gal.
routine inspection
pumping
filter cleaning
Total
2000 gal.
1000 gal.
2400 gal.
5400 gal/day
6.0 lb BOD
7.0 lb BOD
12.0 lb BOD
24.4 lb/day
1-2 months
6-12 months
3-12 months
1000 GAL. TRASH TRAP
(PRE-AERATION OPTIONAL)
4 - FTB 1.5 MULTI-FLO
KITCHEN
RESTAURANT
W/10 SEATS
RETAIL
RETAIL
2000 SQ. FT.
2000 SQ. FT.
DISTRIBUTION
BOX
EFFLUENT
DISPOSAL
RETAIL
10000 SQ. FT.
GREASE TRAPS
LAUNDROMAT
W/6 MACHINES
LINT TRAP
3000 GAL. TANK W/TIMER & PUMP
Figure 15—Example 6
Consolidated Treatment Systems, Inc.
Page 19
Multi-Flo Design Manual
Revised August 1, 2002
Example 7: Commercial Occupancy—Mobile Home Park—Mobile home parks are
usually characterized by relatively low (100 – 200 gpd) wastewater flows from each
mobile home. For this reason, it is advisable, as well as cost effective, to group several
mobile homes on one Multi-Flo system.
Table 13—Example 7 Information
Parameter
Value
Hydraulic Loading
1400 gal./day
0.40 lb BOD per space per
Organic Loading
day
Pre-aeration
not required
not required unless there is
Flow equalization
a separate laundry building
seeding for start-up not required
Anticipated Service
Requirements
routine inspection
pumping
filter cleaning
Total
3-6 months
1-2 years
1-2 years
MOBILE HOME
MOBILE HOME
FTB 1.5 MULTI-FLO
MOBILE HOME
EFFLUENT
DISPERSAL
MOBILE HOME
MOBILE HOME
1000 GAL.
TRASH TRAP
MOBILE HOME
MOBILE HOME
Figure 16—Example 7
Consolidated Treatment Systems, Inc.
Page 20
Multi-Flo Design Manual
Revised August 1, 2002
Example 8: Commercial Occupancy—Institution—Institutional facilities present
several problems that must be addressed in the total design. Depending upon the type
of facility involved, consideration must be given to possible food service, laundry
facilities, showers, as well as high water usage and heavy peak flow periods.
Parameter
Hydraulic Loading
Organic Loading
grease trap
trash trap
Pre-aeration
Flow equalization
seeding for start-up
Anticipated service
requirements
40 BEDS
Table 14—Example 8 Information
Value
Total
hospital
200 gal/bed
nursing home
100 gal/bed
school
15 gal/student
employee
20 gal/person
kitchen
5 gal/person
showers
5 gal/student
laundry
400 gal/machine
hospital
0.7 lb BOD/day per bed
nursing home
0.3 lb BOD/day per bed
school
0.03 lb BOD/day per student
employee
0.04 lb BOD/day per employee
kitchen
0.03 lb BOD/day per meal
showers
0.01 lb BOD/day per student
laundry
2.0 lb BOD/day per machine
required
required
3,000 gal.
required if oxygen requirements exceed the capacity of
the Multi-Flo unit
"
"
routine inspection
monthly
pumping
6-12 months
filter cleaning
6-12 months
1000 GAL.
GREASE TRAP
35 EMPLOYEES
4 - FTB 1.5
MULTI-FLO (W/4
AERATORS EACH)
DISTRIBUTION
BOX
EFFLUENT
DISPERSAL
KITCHEN
RESTROOMS
2 - 1500 GAL. TRASH
TRAP
3000 GAL. FLOW EQUALIZATION TANK
Figure 17—Example 8
Consolidated Treatment Systems, Inc.
Page 21
WASTEWATER TREATMENT SYSTEMS
PROCEDURES FOR
ASSEMBLY AND INSTALLATION
A Division of Consolidated Treatment Systems, Inc.
1501 Commerce Center Drive
Franklin, OH 45005
Tel: 937-746-2727
Fax: 937-746-1446
www.multi-flo.com
MULTI-FLO TANK COMPONENTS
Fig. 1.1
ACCESS COVER
PRIMARY SENSOR ASSY
JUNCTION BOX
SURGE BOWL
SPRING RING RETAINER
AIR TUBING
OUTLET
INLET
UNION
FILTER
EXPANDER
AERATOR POWER
CORD
AIR INTAKE PIPE
AERATOR
TYPICAL INSTALLATION
(Cross Section)
Fig. 1.2
BUILDING
ALARM BOX
GRADE
2" minimum to
bottom of lid from
grade
POWER SOURCE
FOUNDATION
2
SEWER LINE
TO EFFLUENT
DISPOSAL SYSTEM
Rev: 11/21/02
MULTI-FLO
Procedures for
Assembly and Installation
Unless otherwise noted, the instructions within this manual may be used for all models
(FTB 0.5, FTB 0.6, FTB 0.75, FTB 1.0 and FTB 1.5) of the MULTI-FLO wastewater
treatment unit.
The installation must comply with state and local regulations
.
SECTION 1.0
SITE PREPARATION
1.10
LOCATION
1.11
An accurate, detailed site plan is essential for successful installation of
MULTI-FLO units. The site plan should show the locations and elevations of the
wastewater treatment unit and effluent disposal system. Check to make sure the
site plan accurately reflects the conditions actually existing at the site and that all
required set-backs (i.e., to property lines, wells, etc.) are being met.
1.20
GRADE AND GROUND CONTOUR
1.21
Position the wastewater treatment unit in accordance with the plan. Confirm the
accuracy of the elevations shown in the plan.
SURFACE WATER MUST NOT ENTER THE SYSTEM AROUND THE ACCESS
COVER OR FROM THE DISCHARGE PIPE.
1.30
COVER EXPOSURE
1.31
The access cover must be exposed at all times to permit the system to function
properly and to allow for routine maintenance. There should be a minimum of
two (2) inches between the bottom of the lid and the finished grade (refer to Fig.
1.2).
1.40
BUILDING SEWER LINE
1.41
Make sure that the sewer pipe from the building has the proper slope to meet the
inlet invert of the MULTI-FLO and maintain the grade requirements for the
exposure of the cover.
1.50
EXCAVATION PREPARATION
1.51
Mark off an area at least one foot larger than the dimensions of the MULTI-FLO
and maintain the grade requirements for the exposure of the cover.
1.60
EXCAVATION (refer to Fig. 1.3)
3
Rev: 11/21/02
1.61
Prepare the excavation. The opening should follow the area laid out in Section
1.51. Determine the required depth of the excavation based upon the elevation
of the invert of the inlet sewer line (B) or the elevation of the finished grade (D),
both of which should conform with the site plan. These dimensions are given for
each model in Figure 1.3. NOTE: If the distance from the finish grade elevation
to the bottom of the excavation exceeds the dimension (D) shown in Figure 1.3, a
riser will be required (refer to Section 2.40). If digging in soil containing large
rocks or clods of dirt, it may be necessary to remove an extra 6” to allow for
bedding material (refer to Item 1.63).
MULTI-FLO TANK DIMENSIONS
Fig. 1.3
A
MODEL
NUMBERS
FTB 0.5
FTB 0.6
FTB 0.75
FTB 1.0
FTB 1.5
D
B
C
A
B
C
D
=
=
=
=
A
63
71
71
78
135 X 63
DIMENSIONS
B
C
58
56
58
56
65
63
65
63
58
56
D
76
75
79
83
76
OUTSIDE DIAMETER
INLET INVERT FROM BOTTOM OF EXCAVATION
OUTLET INVERT FROM BOTTOM OF EXCAVATION
FINAL GRADE FROM BOTTOM OF EXCAVATION
1.62
Level the floor of the excavation.
1.63
If bedding material is required, place at least six inches of sand, pea gravel or
other similar, suitable granular material on the bottom and smooth out evenly. If
ground water is present, use pea gravel or class 2 river rock to build a base for
the system. In all cases, the bottom should be level and well compacted. Note:
Localized soil and groundwater conditions may require specialized
procedures to assure proper installation.
4
Rev: 11/21/02
SECTION 2.0
INSTALLATION OF THE TANK
2.10
PLACING THE WASTEWATER TREATMENT UNIT INTO THE EXCAVATION
(Refer to Fig. 2.1)
2.11
Rig the tank to lift. See unit specifications for actual weights. Except for the FTB
1.5, ropes can be attached to the inlet and outlet. Note: The FTB 1.5 has lifting
hooks that must be used.
2.12
Slowly lower the tank into the hole, setting it carefully on the bottom.
2.13 Position the unit, so that the inlet (higher four inch pipe) is aligned with the sewer
line from the building. (See Fig. 1.3)
BACKFILLING PROCEDURES
Fig. 2.1
ACCESS COVER
GRADE
INLET
PIPE
EARTH BACKFILL
OUTLET
PIPE
BASIN
SAND OR
SELECT FILL
6" CRUSHED STONE OR
SET ON UNDISTURBED
EARTH
5
UNDISTURBED EARTH
Rev: 11/21/02
2.20
LEVELING THE WASTEWATER TREATMENT UNIT
CAUTION: The system must be level. A tilted system will not work.
2.21
Place a level across the center tower in several directions. Adjust the tank until it
is level. Leveling can be accomplished by shifting the bedding materials.
Bedding materials must be evenly distributed to support the weight of the filled
tank. DO NOT USE WEDGES OR OTHER DEVICES TO LEVEL THE TANK.
2.22
An alternative to using a mechanical level is to plug the outlet pipe with a four
inch plastic pipe cap. Fill the area outside of the circular weir with water. As
noted in 2.21, adjust the unit until it is perfectly level.
2.30
FILLING THE TANK WITH WATER
CAUTION: To avoid damage from floatation always fill the tank.
2.31
Fill the tank with clean water. Do not fill with water from a pond, river or ground
water in the excavation because this water will contain silt or sediment.
2.32
While filling, check frequently to make certain that the tank remains level. If the
tank shifts or seems to settle unevenly, discontinue filling and make the
necessary corrections to level the tank.
2.33
When the water begins to flow over the weir, stop filling the tank.
2.40
BACKFILLING THE TANK (Fig. 2.1)
2.41
Once the tank has been leveled and has been filled with at least two (2) feet of
water, backfilling can begin.
2.42
Using sand, pea gravel or other selected fine material carefully begin backfilling
(by hand) until there is approximately 2-3’ of compacted fill around the tank.
2.43
After checking the tank to insure it is level, place the access lid on the tank and
carefully backfill to the bottom of the outlet pipe. Care should be taken with the
backfilling procedures to prevent damaging the tank with rocks or clods of dirt,
especially if the original soil is used for backfilling.
2.44
Glue and firmly insert the inlet and outlet sewer pipes (4” Sch. 40 PVC) into their
respective fittings. CAUTION: To prevent any damage to the inlet or outlet
pipes due to settling or backfilling, make sure that both the inlet and outlet
pipes are set on undisturbed or firmly packed fill material prior to final
backfilling.
2.45
Finish backfilling to a level approximately 2 inches below the access lid. When
landscaping is completed, the access lid should be at, or above, finished grade
level.
6
Rev: 11/21/02
2.46
If the final elevation of the MULTI-FLO is below grade so that surface water can
enter the access opening of the plant, (1) a dosing pump can be installed prior to
the MULTI-FLO; or (2) a riser (not exceeding 20”) can be provided on the
MULTI-FLO. CAUTION: The addition of a riser will make access for service
more difficult.
2.50
INSTALLATION OF FILTER BAGS AND EXPANDERS
2.51
Carefully place an expander into the bag and slide it to the bottom. Be careful
not to rip or tear the bag. Even the smallest opening will cause the unit to
malfunction.
2.52
Insert the closed end of the filter bag into one of the holes in the hanger plate.
2.53
Continue this process until all filters and expanders are installed. All holes in the
hanger plate must have a filter and an expander.
2.60
INSTALLATION OF SPRING FASTENERS
2.61
All filters and expanders must be installed.
2.62
Grasp the spring fastener. (See Fig. 2.2)
2.63
Squeeze the arms of the fastener together until it will slip into the filter bag up to
the grooves. (See Fig. 2.3)
2.64
Release the spring, so that the top of the groove in the fastener is on top of the
ring that is inside the filter. The bottom of the groove should be in contact with
the underside of the hanger plate. The fastener is now holding the filter to the
hanger plate. (See Fig. 2.4)
2.65
Place a second spring fastener in the filter at a right angle, so that it lies across
the first fastener.
2.66
Continue until each filter has two fasteners in place.
7
Rev: 11/21/02
SPRING FASTENERS INSTALLATION
Fig. 2.2
Fig. 2.3
Fig. 2.4
2.70
AERATOR ASSEMBLY AND INSTALLATION
2.71
Remove all parts of the aerator from the box. This should include: aerator, legs
(3), tee, 1/2” plug, 1/2” nipple, and the owner’s manual.
2.72
Screw the three (3) legs into the angular threaded holes in the bottom of the
aerator cross-shaped piece. Make sure the leg is screwed all the way into the
cross.
2.73
A plastic cap should be on the plain end of each leg.
2.74
Turn the aerator on its side and spin the impeller by hand several times. THIS
STEP IS IMPORTANT.
2.75
With the aerator in the position shown (See Fig. 2.5) assemble the plastic tee to
the nipple on the aerator.
2.76
Screw the one-half inch plug into the bottom of the tee.
2.77
Screw the threaded end of the air intake pipe into the top of the tee.
8
Rev: 11/21/02
AERATOR ASSEMBLY
Fig. 2.5
Foam Cap
(Caplug)
Air Tubing
Primary Sensor
Sensor Wires
Union
Plastic Tie
Power Cord
Air Pipe
Aerator
Tee
1/2" Plug
Impeller
2.78
Attach the sensor assembly (Fig. 2.6) with the union to the air intake pipe.
Tighten as much as possible by hand. NOTE: Be sure that the O ring seal is in
the union half of the assembly.
2.79
Tie the aerator power cord to the air intake pipe with the plastic ties. CAUTION:
Do not pull or stretch the power cord. To facilitate removal, a nylon rope or
chain can be attached to the lifting ring on the top of the aerator.
2.80
By grasping the air intake pipe, carefully lower the aerator assembly through the
center of the tank opening to the bottom. CAUTION: Be sure to keep the air
tubing from crimping which will prevent air flow.
9
Rev: 11/21/02
SENSOR ASSEMBLY
Fig. 2.6
Air Tubing
Power Cord
Sensor
Union
Air Intake
2.81
Air Tubing
Run the aerator power cord through the fittings as shown in figure 2.6 and into
the junction box. CAUTION: Use care when running the power cord through
the fittings. Damage to the cord will void the warranty.
SECTION 3.0
ELECTRICAL CONNECTIONS (ALARM AND AERATOR)
(Refer to specific sheet of direction for each model)
SECTION 4.0
START-UP PROCEDURES
4.10
CHECKING THE AERATOR
4.11
Once the aerator and alarm have been installed, and all electrical work is
completed, power should be supplied to the aerator and alarm.
4.12
Check the aerator to insure proper operation. If no air bubbles are observed
coming from the aerator, immediately disconnect the power source. Refer to
Items 1A, 1B, and 1C of the Trouble-Shooting Checklist for corrective action.
10
Rev: 11/21/02
4.20
CHECKING THE FILTERS
4.21
Once the aerator is running, check each filter to see if any air bubbles are
escaping under the filter ring. If so, remove the clips, re-adjust the filter and reinstall the clips. Some adjustment may be necessary to eliminate the bubbles.
4.30
CHECKING THE ALARM
4.31
With the power being supplied to the aerator and alarm, press the “test” button to
activate the alarm. Note: YOU MUST HOLD THE TEST BUTTON DOWN FOR
6-to-7 SECONDS BEFORE THE ALARM ACTIVATES.
4.32
Shut the power off to the aerator and check if the alarm is activated. Again,
allow 6-to-7 seconds for the alarm to sound.
4.33
If the alarm is not activated during these tests, refer to Items IIA and IIC of the
Trouble-Shooting Checklist for corrective action.
4.34
If the alarm activates after 10-15 minutes of operation, reverse the white and
black sensor wires in the alarm.
4.40
UNIT START-UP
4.41
Once the aerator and alarm have been checked and are operational, the unit is
ready to receive sewage flows.
4.42
Normally, it is not necessary to add any chemicals or enzymes to facilitate unit
start-up. It is helpful, however, to restrict the discharge of excessive amounts of
gray water from showers and laundry during the initial 6-to-8 weeks of use.
4.43
If the MULTI-FLO system exhibits a gray dishwater appearance in the aeration
chamber, or has a noticeable odor, contact the factory or the local authorized
representative for the proper procedure to follow to attain normal operation.
SECTION 5.0
USE OF A PRETREATMENT TANK (Fig. 5.1)
MULTI-FLO has been designed and certified to function without the use of pretreatment tank. However, installation of a pre-treatment tank, if used to address local
requirements or to reduce maintenance problems, will not adversely affect unit
performance if it is properly sized and installed.
If a pre-treatment tank is installed, the liquid capacity of the pre-tank should be
between 50-to-100 percent of the treatment capacity of the MULTI-FLO. Slightly larger
tanks can be used with the FTB 0.5 and FTB 0.6. Please refer to the MULTI-FLO
Design Guide for details.
11
Rev: 11/21/02
5.11
The use of a pre-tank may cause septic odors to escape from the MULTI-FLO
during periods of heavy usage (i.e., laundry). In these cases, a 4-inch Schedule
40 elbow can be installed on the inlet pipe to the MULTI-FLO. A 12-inch piece of
pipe should be added to extend below the surface of the water (refer to Fig. 5.1).
MULTI-FLO INLET DEVICE WHEN INSTALLED AFTER A PRE-TANK
Fig. 5.1
4” Sch. 40 Elbow
12” Extension
12
Rev: 11/21/02
WASTEWATER TREATMENT SYSTEMS
MANUAL
FOR
OPERATION, MAINTENANCE
AND
TROUBLE-SHOOTING
A Division of Consolidated Trmt. Systems, Inc.
1501 Commerce Center Drive
Franklin, OH 45005
Tel: 513-746-2727
Fax: 513-746-1446
www.consolidatedtreatment.com
I.
BASIC OPERATION AND MAINTENANCE REQUIREMENTS
The following is a description of the normal maintenance required to insure continuous
satisfactory operation of the M ULTI-FLO systems:
START UP:
Allow 6-to-8 weeks for sufficient bacteria to provide proper treatment in the M ULTI-FLO.
During this period, there may be sudsing from to laundry wastes. Sudsing can be reduced
by limiting the volume of laundry washed daily and by using a low-sudsing detergent. In
situations where excessive laundry water is expected, “seed” the M ULTI-FLO with “mixed
liquor” from another unit. To prevent short-term hydraulic overloads, spread out laundry
washing.
PUMPING EXCESS SOLIDS:
Periodic pumping is necessary to remove excess bacteria and other solids. For a typical
single-family dwelling, the M ULTI-FLO will require pumping at 2-to-4 year intervals. M ULTIFLO representatives can advise customers when their M ULTI-FLO should be pumped.
FILTER CLEANING:
Filters should be cleaned whenever a M ULTI-FLO is pumped. Filters may need to be
laundered if the aerator is shut off for extended periods or they are plugged by grease, soap,
residue or solids.
AERATOR REPLACEMENT:
The average life expectancy of the aerator is 3-4 years. New and replacement have a twoyear warranty.
ALARM:
M ULTI-FLO alarm systems indicate both aerator failure and filter plugging. Although the
homeowner will not normally experience immediate filter plugging, the M ULTI-FLO service
representative should be notified as soon as the alarm is activated.
SERVICE CONTRACT:
M ULTI-FLO units require periodic maintenance. With the purchase of each M ULTI-FLO,
every owner receives a two-year service contract, which provides a warranty on all parts
service, including a minimum of two inspections of the unit each year. After the initial two
years of operation, owners are urged to maintain their service contracts to insure regular
inspection and service of the M ULTI-FLO system. NOTE: The warranty does not include
misuse or abuse of the system.
REPLACEMENT PARTS/SERVICE:
Contact the factory for the name of the closest sales/service representative.
1
Rev: 12/08/04
SUMMARY OF MAINTENANCE REQUIREMENTS (Residential)
Start up period............................................................6-to-8 weeks after sewage first enters unit
Pumping frequency....................................................every 2-to-4 years
Filter cleaning.............................................................every 2-to-4 years
Aerator replacement ..................................................3-to-4 years
Routine inspection frequency ....................................every 6 months (minimum)
NOTE: Due to differences in wastewater strength, increased user abuse, and hydraulic surges,
additional treatment facilities and/or increased maintenance may be required. Please check with
your M ULTI-FLO representative.
2
Rev: 12/08/04
II.
EQUIPMENT AND MATERIAL ESSENTIAL FOR SERVICING MULTI-FLO UNITS
100’ garden hose with spray nozzle
100’ extension cord
1/3 hp submersible pump (little giant) with outlet made of flex pipe.
Small utility pump with 1/2 - 5/8” garden hose (6’) on inlet and outlet (Teal model IP
Simer Minivac Model M40 or equal.)
579E,
Pliers - standard with insulated handles
Pliers - channellock
Caulking gun
Caulking, silicone
Hammer
Electrical tape
Wire nuts
Knife
Screwdriver
Replacement parts:
aerator
filter bag expanders
filter bags
stainless steel spring clips
pressure switches (for old style units)
alarm
latch assembly
Wiping rags
Gasket material
Adhesive for gasket
Volt ohm amp meter
Sample collection jars (1 quart capacity)
3
Rev: 12/08/04
III.
SERVICING PROCEDURES
Note:
During all service procedures, be sure to observe good hygiene practices, including wearing
gloves and proper hand washing.
Step 1
Layout garden hose, wiping cloths, tools, electrical tape, utility pumps, and extension cord.
Step 2
Turn off electrical power to M ULTI-FLO.
Step 3
Remove lid to M ULTI-FLO. Check surge bowl for signs of high water or foaming. Check the area
around the M ULTI~FLO for signs of previous overflow.
Step 4
Wash the inside of the lid and surge bowl of M ULTI-FLO.
Step 5
Remove the surge bowl and check the gasket on both the bottom and top. If it is loose, re-glue it;
if it is damaged, replace it with new gasket material.
Step 6
Check the filters for possible plugging by running water into the center chamber and check for a
quick, noticeable rise in the water level inside of the tower. If filters are plugged, follow procedures
outlined under “Filter Cleaning.”
Step 7
Collect a sample of the mixed liquor for a settleable solids test.
Step 8
Using the utility pump, vacuum the top of the weir to remove accumulated solids. Follow
procedures outlined in this manual under “Cleaning the Hanger Plate and Weir: Procedure.” Check
for sludge build-up in the bottom of the filter bags. If the solid accumulation on top of the weir is
excessive (greater than 1/2” thick) or appears to noticeably be more concentrated in one area,
check for a torn filter(s), improper placement of clips, thin filter material, or a gap between the
hanger plate and the ring on the top of the filter. Make appropriate corrections.
Step 9
Remove aerator and check for accumulation of foreign material wrapped around impeller.
Step 10
Replace aerator and check the intake tube to insure that it does not have any blockage. On newer
units, check to ensure the clear plastic tube is not twisted or kinked. .Kinks in the hose will cut off
aeration to the treatment tank and allow septic conditions to develop. The plastic line on pressure
switch unit must not kink.
Step 11
Reinstall the surge bowl. Make sure that the flat surface of the surge bowl is placed next to
the electrical box or that the black marking stripes align properly.
Step 12
Close lid to M ULTI-FLO. Make sure the lid is properly secured with a tamper-proof bolt, padlock or
other approved locking device.
Step 13
Turn on the electrical power to the M ULTI-FLO.
Step 14
Check out alarm system.
Step 15
After appropriate settling time (possibly 24 hours) check setteable solids reading to determine if
the M ULTI-FLO should be pumped before the next routine service call. Advise homeowner
accordingly.
Step 16
Be sure to leave the owner notice of the inspection/service call, inspection results, service
provided, and recommendations.
4
Rev: 12/08/04
IV.
PUMPING
Bacteria and other microorganisms present in the wastewater use soluble organic material
as a food source, converting it into more microorganisms (biomass), water, and carbon dioxide.
As the colony matures, the numbers of microorganisms increase until they exceed the supply of
organic material to maintain them. Due to the resulting starvation, organisms will begin to die and
then be metabolized as new organisms are formed. Metabolized organisms reduce the overall
solids (or “sludge”) volume.
There will be a gradual increase in solids) due to the accumulation of inert remains of dead
organisms and non-degradable material in the wastewater. As the solids increase, the mixed liquor
becomes thicker, reducing the scouring effect on the filters. Periodically, the solids must be
pumped from the M ULTI-FLO to prevent filter plugging and maintain adequate aeration within the
system.
PUMPING FREQUENCY:
The rate of solids accumulation—and resultant pumping—is dependent upon the quantity
and strength of wastewater entering the plant, i.e.; the greater the waste load, the more frequently
the M ULTI-FLO should be pumped. Normally, residential systems should be pumped every 2-to-4
years. Units serving commercial occupancies may need to be pumped every 1-2 years, depending
on the waste load.
DETERMINING PUMPING FREQUENCY:
Trained service personnel can help owners establish a pumping frequency by performing a
24-hour settleable solids test of the mixed liquor during semi-annual service:
Procedure
1. Mark a quart jar into 10 equal portions
2. While aerator is running, fill the jar with mixed liquor suspended solids by lowering the jar
into the center aeration chamber.
3. Measure the percent of the original volume occupied by the sludge after it has settled for
24 hours.
The optimum level of settleable solids (24 hours) is normally between five and 50 percent.
Whenever the percent of settled sludge exceeds 50%, the unit should be pumped.
PROCEDURE FOR PUMPING THE MULTI-FLO:
1. Shut off the M ULTI-FLO and allow solids to settle for 30-60 minutes.
2. Remove access cover and the surge bowl.
3. Lower the hose into the center aeration chamber. Care should be taken to avoid knocking or
damaging the aerator, air intake tubing or power cord. Be careful with the older model FTB 0.75
because the aerator sits on a platform.
4. Pump solids from the bottom. If the filters are not to be removed, be sure to hose down the
filters and the bottom of the hanger plate.
5
Rev: 12/08/04
5. Pump down the tank, until the liquid level is at the top of the aerator. This will leave sufficient
seed material to allow start-up conditions to develop.
6. In areas with a high water table, immediately refill the M ULTI-FLO with clear water to prevent
shifting or flotation.
V.
FILTER CLEANING
Under normal operating conditions, the filters in the M ULTI-FLO do not require manual
cleaning or backwashing. The extent of the bacterial buildup on filter surfaces is limited by the
constant scouring from the aeration and sloughing of the solids.
The biomat that develops on the surface of the filter enhances filtration. Therefore, cleaning
of the filters is not recommended unless actual plugging is occurring. The following conditions may
cause plugging of the filters to occur:
1. Excess buildup of solids in the M ULTI-FLO (see Pumping Procedures).
2. Extended septic conditions (see Aerator Replacement). Normally, the filters will not plug unless
septic conditions exist for a period more than 7-to-10 days.
3. Excessive grease entering the M ULTI-FLO. This may become a problem at a food service
facility or in a home with a garbage disposal.
4. Hydraulic overload. (See Troubleshooting Guide for remedies.)
5. Organic overload. (See Troubleshooting Guide.)
CLEANING PROCEDURE (Standard Procedure):
1. Remove spring ring retainer from filter.
2. Without removing the filters, grasp the filter by the ring at the top and move it up and down in the
weir to scrape off the accumulated solids and biomat.
3. Check the interior of the filter. If there is an accumulation of sludge in the bottom, remove the
filter and pour the sludge into the aeration chamber.
4. Replace the filter in weir and push back in place. Replace the spring ring retainer.
5. If the water fills up the filter as fast as it is being pushed down through the weir, no further
cleaning is required. Follow the same procedure with the remaining filters. NOTE: This
procedure is only recommended when done during routine pumping. If the above
procedure does not adequately cleanse the filters, or if the plugging resulted from other
causes perform the following procedures:
a. Replace the existing filters with a clean set.
b. Launder the old filters on gentle cycle and allow them to air dry (do not use a heated dryer
as this will damage filters). Add bleach with the detergent (or during the rinse cycle) to
enhance the cleaning of the filters and provide personal health protection.
Do not attempt to clean the filters by washing them with a garden hose or pressure
washer. This can damage the filters or leave a residue within the fabric which will cause
the filters to plug prematurely.
Hydraulic or organic overloads should be considered if filters plug frequently (i.e., less than
12 month intervals), or shortly after the unit goes into operation. Contact the M ULTI-FLO distributor
or factory representative for assistance.
6
Rev: 12/08/04
VI.
CLEANING THE HANGER FILTER PLATE AND WEIR
Often, “pin floc” (less than 0.03 inches in diameter) forms as a result of over-oxidation of the
sludge. Pin floc is observed in units with low hydraulic loads and long retention times, which allow
digestion of the bacterial cells to occur. These fine, mostly inert, solids may pass through the filter
fabric, especially if an inadequate biomat has formed on the filter surface. Pin floc may occur in
new units though hydraulic surges (laundry, showers, etc.) may also force some of the small
particles through the filters.
Pin floc usually settles to the bottom of the filters. However, some of the particles may be
carried upward through the filters and settle on the upper surface of the hanger filter plate. It will be
necessary periodically to remove the settled solids from both the hanger plate and inside of the
filters to prevent solids from being carried over the weir.
PROCEDURE:
1. pump the settled solids off the top of the hanger plate using a 1/2 to 5/8 inch garden hose for an
intake and discharge,. Place the discharge end into the center chamber.
2. If there is a significant amount of settled sludge in the bottom of the filters, pump the sludge out
using a 4 foot section of 3/4 inch PVC pipe attached to the end of the intake hose. If there is no
access to a pump, remove the filter and pour the sludge into the center aeration chamber. If
surface discharge of the effluent is used it is good policy to plug the 4 inch discharge line until
cleaning is completed.
CLEANING FREQUENCY:
Under ordinary conditions, the top of the hanger and weir should be cleaned during each
routine inspection (every 6 months). Sludge should be removed from the interior of the filters
whenever it exceeds 6 inches in depth or if clumps of floc float at the top of the filter (approximately
once every 12 months).
It is not advisable to remove or clean the filters more than is necessary. Unnecessary
cleaning will wear or damage filters and expanders.
VII.
AERATOR REPLACEMENT
PROCEDURE:
1. Turn off the electricity before working on aerator.
2. Remove the three wire nuts and disconnect the aerator electrical cord from the main power
cable.
3. Loosen the pressure fitting in the center tower and gently pull the power cord through so that the
aerator is free.
4. Grasp the air intake tube and raise the aerator until the upper union (located in the middle of the
air intake tube) is visible.
5. Disconnect the sensor (upper) portion of the intake and lay it back on the hanger plate. The
aerator is now free and can be moved from the M ULTI-FLO.
7
Rev: 12/08/04
6. Change aerators and replace in the M ULTI-FLO by following the above procedure in reverse.
VIII.
ALARM REPLACEMENT
PROCEDURE:
1. Turn off the electricity before working on the alarm.
2. Unplug the alarm or disconnect the power cord.
3. Unscrew the face plate of the alarm.
4. Remove the two wire nuts and disconnect the green and white sensor wires.
5. Remove the alarm box from the wall or mounting bracket and replace with a
new alarm.
6. Reconnect the sensor wires (white to white; black to black).
7. Replace the face plate; plug in the alarm and restore power.
8. Check alarm by pressing test button.
IX.
SAMPLE COLLECTION
M ULTI~FLO units produce an effluent exceeding the performance requirements of NSF
Standard 40 (Class I) for aerobic treatment plants: 30 day average of <25 mg/l CBOD and <30 mg/l
TSS. Local health agencies may require periodic sampling to confirm this performance. If this is
necessary, the following procedure should be followed.
To collect samples from the M ULTI~FLO, care must be taken to get a reliable and
uncontaminated samples as effluent is discharged from the unit.
1. Provide a suitable port on the outlet of the M ULTI~FLO (see Fig. 1). The port should be at least
6” in diameter, with a minimum depth of 8” below the effluent line.
2. Using a clean cloth, wipe the interior of the effluent line, where it enters the sampling port, to
remove any debris that may have accumulated.
3. Drain water into the cleanout before the M ULTI~FLO, to generate a flow through the unit. Allow
the flow to continue for approximately one (1) minute to flush the line.
4. Shut off the water and dip the water out of the sampling port. Discard this water.
5. Turn on the water and collect a sample as effluent flows into the sampling port. Do not collect
water that has accumulated in the sampling port. Take care to avoid catching dirt or other
debris while collecting the sample
Treatment Plant Effluent
8
To Disposal
Rev: 12/08/04
MULTI~FLO WASTE TREATMENT SYSTEM
OPERATIONAL CONTROL CHART
OPERATION
CONDITION
COLOR:
AERATION TANK
ODOR
PERCENT
SETTLEABLE
SOLIDS
EFFLUENT
QUALITY
FILTER
CONDITION
POSSIBLE
PROBLEM
CORRECTIVE ACTION
Plant start-up
0-6 weeks
Clear to light brown;
White suds
None
< 5%
Clear
No signs of plugging
None: Normal start-up
condition
No action required
Re-check in 6 months
Light loading to plant;
insufficient food for
organisms sudsing due to
hydraulic overload during
laundry
Reduce frequency of laundry to 23x a day.
Refer to Troubleshooting Section
IV-A
None: typical operation
condition
No action required;
re-check in 6 months
No immediate problem.
May require pumping in
the next 6 months
None; re-check in 6 months
(routine) Pumping may be
recommended if not on service
contract (refer to Troubleshooting
Section IV, Pumping)
Plant start-up
0-6 weeks
Clear to light brown;
Heavy whites suds
periodically overflow
under lid, mostly during
laundry.
None
< 5%
Clear
No signs of plugging;
possible grey growth on
filter hanger plate
Normal operation:
typically less than 2 years
of use since last pumping
Light brown to medium
brown
None
5 – 30%
Clear
No signs of plugging
Normal operation:
2-3 years of use since last
pumping
Medium brown to dark
brown
None
20 – 50%
Clear
No plugging or slight
plugging observed
Normal operation:
typically 3 – 5 years of
use since last pumping
Very dark brown with
heavy brown foam.
Possible foaming
problems (refer to
Troubleshooting
Section V)
Plant in operation for
more than 3 months:
poor treatment
Grey,
minimal turbulence
Plant in operation for
more than 3 months: poor
treatment
Previous plant operation
has been normal.
Sudden unexpected
development of poor
treatment and operation
Bluish grey, similar to
dishwater; white soap
suds with overflow of
white suds under lid.
Good turbulence
observed.
Grey to black
Slight to moderate
plugging. Water level
surges when flow enters
the plant.
Plant needs to be
pumped
Slight
> 50%
Clear
Slight to
moderate
septic odor
< 5%
Turbid to
bluish grey
Possible plugging within
3 – 4 months
Slight
< 5%
Turbid, cloudy
Plugging with 2 – 3
months.
Organic overload
0 – 50%
Turbid to
bluish grey
Possible plugging,
greyish slime observed
on filter hanger plate
Discharge of toxic
materials into plant
Strong, may
be septic or
from some
type of
chemical
Insufficient aeration
1. Pump sludge from tank
2. Replace filters if plugging is
observed (i.e., water level
remains elevated in surge
bow)
Refer to Troubleshooting Section I:
Aerator
Refer to Troubleshooting Section
VI – D
1. Identify source of toxic material
2. Eliminate above source
3. Pump plant and re-start.
Contact factory.
WASTEWATER TREATMENT SYSTEMS
CCESS COVERA
PRIMARY SENSOR ASSY
JUNCTION BOX
SURGE BOWL
SPRING RING RETAINER
AIR TUBING
OUTLET
INLET
UNION
FILTER
EXPANDER
AIR INTAKE PIPE
AERATOR POWER
CORD
AERATOR
PROCEDURE FOR PUMPING THE MULTI~FLO:
1.
Shut off the MULTI~FLO and allow solids to settle for 30-to-60 minutes.
2.
Remove access cover and the surge bowl.
3.
Lower hose carefully into the center aeration chamber. Care should be
taken to avoid knocking or damaging the aerator, air intake tubing or power
cord. Be especially careful with the old style FTB 0.75 as the aerator sits on
a platform.
4.
Pump solids from the bottom. If the filters are not removed, be sure to rinse
the filters and the bottom of the hanger plate.
5.
In areas with a high water table, immediately re-fill the tank with clear water
to prevent shifting or floatation. In all instances, re-fill the tank to a level that
covers the aerator. To prevent the motor from overheating, do not allow
the aerator to run unsubmerged.
MULTI-FLO WASTEWATER TREATMENT SYSTEMS
OWNER’S MANUAL
Revised August 8, 2002
Consolidated Treatment Systems, Inc.
1501 Commerce Center Drive
Franklin, OH 45005
937-746-2727
www.multi-flo.com
Multi-Flo Owner’s Manual
Revised August 8, 2002
THE MULTI-FLO ONSITE WASTEWATER TREATMENT SYSTEM
CONGRATULATIONS! You are the owner of a complete wastewater treatment system that
combines aeration and filtration in one compact unit. Your system is tested and certified under
NSF, International, ANSI/NSF Standard 40, as a Class I system. The Multi-Flo system meets
the needs for onsite wastewater treatment beyond the capabilities of septic tanks. Like all onsite
wastewater treatment alternatives, your Multi-Flo unit must be operated and maintained in
accordance with the Manufacturer’s requirements and service provider’s instructions. When
properly operated and maintained, your unit will produce an effluent that that meets all
certification requirements.
HOW DOES THE MULTI-FLO OPERATE?
One of the features of the Multi-Flo is that the entire treatment process takes place within a
single tank. Wastewater flows into the tank. An aerator near the bottom draws air in and
disperses it. This process transfers oxygen throughout the system. The oxygen, which is
dissolved in the water, provides an environment conducive to the growth of aerobic bacteria.
These bacteria effectively consume the organic materials. Consider your Multi-Flo a living
organism and treat it as such.
Another feature are the filter “socks,” suspended in the tank, which support additional bacteria
and strain all effluent before it leaves the unit. Solids are retained in the system. There is no bypass for solids.
IMPORTANT ITEMS TO REMEMBER
Multi-Flo units have an initial break-in period of six-to-eight weeks, during which time bacteria
establish themselves in the unit. The development of these biological colonies occur naturally
with the addition of sanitary wastes, so we recommend you use all your plumbing facilities in a
normal manner from initial start-up. You may notice a tendency for the unit to foam from
laundry wastes during this period. This is normal, and it should cease by the sixth week. You
can help by using moderate amounts of low-sudsing biodegradable detergents. Break-in can be
accelerated by “seeding,” which is a process by which microbial growth is introduced from
another aerobic treatment unit.
Multi-Flo units are designed to treat typical domestic wastewater. Flows from and materials in
garage catch basins, storm water drains, sumps, and the like will adversely affect Multi-Flo
operation. Excessive amounts of cleaners, solvents, paints, greases, etc., will lead to a failure
and service calls.
The following of these simple rules will decrease or eliminate maintenance problems and
prolong the life and efficiency of your unit.
§
Obtain and maintain a service agreement with an authorized Multi-Flo service provider.
§
Check that your unit’s access lid is securely tightened down.
Consolidated Treatment Systems, Inc.
Page 1 of 6 Pages
Multi-Flo Owner’s Manual
Revised August 8, 2002
§
Check the alarm by pressing the button to activate the light and buzzer on the audio-visual
alarm.
§
Keep the surface water from ponding around the unit.
§
Call your service provider at the first sign of trouble.
§
Follow your service provider’s advice. He/she is trained to ensure that your unit operates at
its maximum efficiency.
§
Use low-sudsing, low phosphate biodegradable detergents.
§
Contact your service provider if the system is to be used intermittently or if extended periods
of non-use is anticipated.
§
Keep un-disposable items out of your system. These items but are not limited to: wet
strength paper towels, disposable baby diapers, sanitary napkins, rubber and plastic products,
rags, grit, and coffee grounds.
§
Avoid discharging a water softener backwash into the system.
§
Avoid placing grease into your system. Excessive grease will bind the filter socks.
§
Do not pour solvents, paints, etc., into your system. These substances will harm the bacteria
and plug the filters.
§
Always keep your aerator running unless instructed otherwise by your service provider.
§
Do not service the unit yourself. Contact your service provider to maintain your Multi-Flo
unit.
§
Contact your service provider if you intend to be away from your residence for an extended
period.
ALARM SYSTEM and ALARM CONDITION
Every Multi-Flo unit comes equipped with an audio-visual alarm system. This alarm should be
mounted in a conspicuous location. If an abnormal condition develops, you will be notified with
a light and buzzer. Silence the buzzer by pressing the “silence” button on the alarm. If the light
should stay on, call your service provider.
Check your audio-visual alarm periodically by holding the “test” button for approximately 10-to12 seconds or until the light flashes and the buzzer sounds. Push the “Silence” button. Contact
your service provider if your “test” button fails to activate the alarm.
If your alarm goes off, there are several steps you can take to determine the possible nature of the
malfunction.
1.
Is the alarm activated during a non-flow period, i.e., late at night, early morning? If
so, the probable cause is the aerator.
2.
Is the alarm activated intermittently while washing clothes or taking a shower? If so,
filter failure (1–2 weeks) may be impending.
Consolidated Treatment Systems, Inc.
Page 2 of 6 Pages
Multi-Flo Owner’s Manual
Revised August 8, 2002
MAINTENANCE PROGRAM
YOUR MULTI-FLO UNIT REQUIRES PERIODIC SERVICING.
Maintenance of your Multi-Flo is essential to ensure its proper operation and longevity.
During your initial two-year warranty, an authorized service representative will inspect your unit
at six-month intervals and make any necessary adjustments to it at no cost to you. The only
exception is for the replacement of “out of warranty” and “physically abused” parts or abuse to
the treatment process. Moreover, this warranty will not cover other treatment and dispersal
components and devices, such as trash traps, drain fields, pump stations, and the like.
For continued service, your service provider will offer an annual service contract at the end of
the warranty. Please contact your service provider for details.
In the event a problem arises or service is required, refer to the unit’s data plate (located on the
alarm and access lid) or the service label for instructions on contacting your closest service
provider. Occasional pumping is required, due to accumulation of solids. The pumping cost
may not be covered under your maintenance and service program. If you need parts or service,
please contact the factory for the name of the service provider nearest you.
Your Multi-Flo system is designed and intended to treat typical domestic wastewater (i.e., human
bodily waste and liquid waste generated by the occupants of dwellings). To insure optimum
performance and longevity, do not discharge any type of non-residential wastewater or other
high-strength waste, including commercial food service waste, without contacting the
manufacturer to determine if this will be acceptable without additional treatment.
IMPORTANT: Multi-Flo units must be installed and maintained in compliance with all state
and local laws and regulations. This includes compliance with all regulations concerning proper
effluent disposal and the pumping and disposal of solids and byproducts pumped from the unit.
MULTI-FLO WARRANTY DOES NOT COVER THE COST OF SERVICE CALLS, LABOR,
OR MATERIALS REQUIRED DUE TO THE FOLLOWING:
1.
Misuse, abuse, or any repair or alteration performed by anyone other than authorized
Multi-Flo personnel
2.
Use of components other than authorized Multi-Flo replacement components.
3.
Non-wastewater flows caused by infiltration, storm water connections, leakage from
improperly maintained plumbing fixtures, water softener backwash, etc.
4.
Failure to maintain electrical power to the treatment system in accordance with the
requirements of the Manufacturer or the authorized Multi-Flo service provider.
Consolidated Treatment Systems, Inc.
Page 3 of 6 Pages
Multi-Flo Owner’s Manual
Revised August 8, 2002
5.
Disposal into the Multi-Flo of non-biodegradable materials (i.e., plastics, coffee
grounds, etc.) chemicals, solvents, grease, oil, paint, or any other substance, including
but not limited to medicines, metals, toxins, volatile substances, and the like that are
deleterious to the development and maintenance of the biological treatment process.
6.
Short-term or daily wastewater flows to the Multi-Flo that exceeds the unit’s
hydraulic or organic design capabilities.
7.
Any usage contrary to Multi-Flo owner’s manual and/or the Multi-Flo
representative’s recommendations.
MULTI-FLO MODEL SPECIFICATIONS
Item
FTB 0.5
FTB 0.6
Treatment (gal/day)
500
600
Volume (gal)l
500
600
CBOD (lb/day)
1.5
1.5
Diameter (in)
63”
71”
Total Height (in)
86”
86”
Grade to Inlet Invert (in)
17 ¾”
16 ½”
Grade to Outlet Invert (in)
21”
20”
Excavation Depth (in)
75 ¾”
74 ½”
No. of Aerators
1
1
No. of Filters
30
30
Shipping Weight (lb)
380
420
Inlet Invert* (in)
58”
58”
Outlet Invert* (in)
54 ¾”
54 ½”
* From Bottom of Excavation – See Drawing
FTB 0.75
750
750
1.5
71”
90 ¾”
16”
19 ½”
78 ½”
1
30
450
62 ½”
59”
FTB 1.0
1000
1000
3.0
78”
93”
14 ¾”
18 ½”
82 ¾”
2
30
580
68”
64 ¼”
FTB 1.5
1500
1500
4.5
135”x63”
86”
17 ¾”
21”
75 ¾”
3
60
920
58”
54 ¾”
MULTI-FLO WASTEWATER SYSTEM SPECIFICATIONS
Wastewater Treatment Performance (ANSI/NSF Standard 40 Evaluation)
TEST RESULTS
(Mean Results)
CBOD5
TSS
Consolidated Treatment Systems, Inc.
INFLUENT
(mg/L)
150
195
EFFLUENT
(mg/L)
5
5
REDUCTION
(%)
97
98
Page 4 of 6 Pages
Multi-Flo Owner’s Manual
Revised August 8, 2002
MULTI-FLO COMPONENTS AND SPECIFICATIONS
7
1
8
9
2
3
10
11
12
4
5
13
6
Item
1
2
3
4
5
6
7
8
9
10
11
12
13
14
14
Part No.
A5037
A9510
A5025
B5017
W49104L
A3016
A3008
A6517
A5029
A6002
A5026
A9516
A6603-4
A10031
Consolidated Treatment Systems, Inc.
Description
Junction Box & Junction Box Cover
Air Tubing from sensor
Inlet Pipe
Filter
Expander
Air Intake Assy.
Access Cover Assy.
Primary Alarm Sensor Assy.
Surge Bowl
Spring Ring Retainers
Outlet Pipe
¾ ” Union
Aerator Power Cord
Aerator
Qty.
1
1
1
30
30
1
1
1
1
60
1
1
1
1
Page 5 of 6 Pages
Multi-Flo Owner’s Manual
Revised August 8, 2002
WARRANTY
Consolidated Treatment Systems, Inc., warrants the parts in each aerobic treatment unit to be free
from defects in material and workmanship for a period of two (2) years from date of installation for
treatment of household wastewater when properly registered with the manufacturer. Consolidated
Treatment Systems, Inc., sole obligation under this warranty is as follows: Consolidated Treatment
Systems, Inc., shall fulfill this warranty by repairing or exchanging any component part, FOB Factory,
that shows evidence of defects, provided said component part has been paid for and is returned through an
authorized dealer, transportation prepaid. The warrantee must also notify Consolidated Treatment
Systems, Inc., of the defect complained of. There is no informal dispute settlement mechanism available
under this LIMITED WARRANTY.
No warranty is made as to the field performance of any unit. This LIMITED WARRANTY
applies only to the parts manufactured by Consolidated Treatment Systems, Inc., does not include any
portion of the household plumbing, drainage, or installation of disposal system. Components or
accessories supplied by Consolidated Treatment Systems, Inc., but manufactured by others, are warranted
only to the extent of and by the terms and conditions of the original manufacturer’s warranty. In no event
shall Consolidated Treatment Systems, Inc., be responsible for delay or damages of any kind or character
resulting from, or caused directly or indirectly by, defective components or materials manufactured by
others.
Recommendations for special applications will be based on the best available experience of
Consolidated Treatment Systems, Inc., and published industry information. Such recommendations do
not constitute a warranty of satisfactory performance.
This LIMITED WARRANTY extends to the consumer of the product. As used herein,
“consumer” is defined as the purchaser who first uses the unit or the subsequent user(s) for the 2 years
after its initial installation. It is the first user’s or servicing dealer’s obligation to make known to the
subsequent user(s) the terms and conditions of this warranty.
This warranty is a LIMITED WARRANTY and no claim of any nature shall be made against
Consolidated Treatment Systems, Inc., unless and until the consumer, or his legal representative, notifies
Consolidated Treatment Systems, Inc., in writing of the defect complained of and delivers the product
and/or defective part(s), freight prepaid, to the factory or an authorized service station.
Consolidated Treatment Systems, Inc., reserves the right to revise, change, or modify the
construction and design of the aerobic treatment units for household wastewater, or any component part
or parts thereof, without incurring any obligation to make such changes or modifications in equipment
previously sold. Consolidated Treatment Systems, Inc., also reserves the right, in making replacements of
component parts under this warranty, to furnish a component part which, in its judgment, is equivalent to
the part replaced.
UNDER NO CIRCUMSTANCES WILL CONSOLIDATED TREATMENT SYSTEMS, INC.,
BE RESPONSIBLE TO THE WARRANTEE FOR ANY OTHER INCIDENTAL OR
CONSEQUENTIAL DAMAGES, INCLUDING BUT NOT LIMITED TO LOST PROFITS, LOST
INCOME, LABOR CHANGES, DELAYS IN PRODUCTION AND/OR IDLE PRODUCTION, WHICH
DAMAGES ARE CAUSED BY A DEFECT IN MATERIAL AND/OR WORKMANSHIP IN ITS
PRODUCT OR PARTS SOME STATES DO NOT ALLOW THE EXCLUSION OR LIMITATION OF
INCIDENTAL OR CONSEQUENTIAL DAMAGES SO THE ABOVE LIMITATION OR
EXCLUSION MAY NOT APPLY TO YOU.
THIS WARRANTY IS EXPRESSLY IN LIEU OF ANY OTHER EXPRESS OR IMPLIED
WARRANTY, INCLUDING ANY WARRANTY OF MERCHANTABILITY OR FITNESS, AND OF
ANY OTHER OBLIGATION ON THE PART OF CONSOLIDATED TREATMENT SYSTEMS, INC.,
SOME STATES DO NOT ALLOW LIMITATIONS ON HOW LONG AN IMPLIED WARRANTY
LASTS, SO THE ABOVE LIMITATION MAY NOT APPLY TO YOU. THIS WARRANTY GIVES
YOU SPECIAL LEGAL RIGHTS AND YOU MAY HAVE OTHER RIGHTS, WHICH VARY FROM
STATE TO STATE.
Consolidated Treatment Systems, Inc.
Page 6 of 6 Pages