1
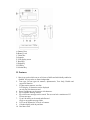
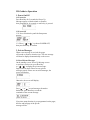
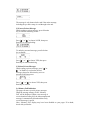
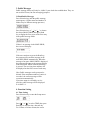
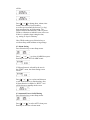
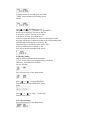
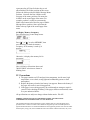
Contents
I. Pager Layout...................................1
II. Features…………......................... 2
III. Guide to Operation......................5
1. Power On/Off.............................................5
1.1 Power On..................................................5
1.2 Power Off ................................................5
2. Private Messages.................................. ....6
2.1 Read Private Messages ..........................6
2.2 Protect Private Messages ......................8
2.3 Delete Private Messages ........................9
2.4 Memory Full Indication.............. ..........9
3. Public Message.......................................10
3.1 Read Public Message ..........................10
4. Function Setting......................................12
4.1 Time Setting .........................................12
4.2 Alarm Setting .......................................14
4.3 Automatic Power On/Off Setting .......15
4.4 Melody Setting .....................................17
4.5 Contrast Setting....................................18
4.6 Alert Mode Setting ..............................18
4.7 Public Message Alert Mode Setting....19
4.8 Display Memory Occupancy ..............21
IV. Precautions............................ 23
A. Battery Door
B. Battery Lock
C. Chain Slot
D. Sounder
E. LCD display screen
F. Read Key
G. Right Key
H. Left Key
I. Selection Key
II. Features
1. Max.6 cap codes which can set as Private or Public and individually enabled or
disabled. All cap codes are frame independent.
2. Tone type: 24 tone types for numeric, alphanumeric, Tone Only, Disable and
urgent call function.
3. 5*8 dot-matrix structure, two-line
LCD display, 20 characters can be displayed
on each line, 40 characters total.
4. Power Up Message can be set up to 40 characters.
5. Up to 24 Public message folders.
6. Up to 60 Private messages can be stored. The user can lock a maximum of 35
Private messages.
7. Up to 100 entries can be stored and allocated
freely to any public message folder.
8. LCD can be adjusted to 20 levels of contrast.
9. Calendar display with day and date.
10. Real time clock.
11. Private messages can be locked, unlocked and
deleted, either individually or all.
12. Repeated message indication "
" and
indication for message error
(blinking erroneous characters)
13. Message time stamping.
14. Receiving alert function settable for each entry of
Public message.
15. Unread message indication.
16. No message indication.
17 .Three alert modes: buzzer, motor, mute.
18. In range or out of range indication.
19. Backlight.
20. Low battery indication "
" and "LOW CELL"
alert. The indication will disappear only when
the user replaces the old battery with a new one.
The pager will shutdown if the power is too
low. Follow the steps below when
replacing battery:
(a). Switch off the pager.
(b). Unlock and push open the battery
compartment cover. Take out the old battery.
(c). Put the new AAA alkaline battery into the
compartment. Make sure that the polarity
is correct.
(d). Refit the battery compartment cover and
lock it.
(e). Switch on the pager.
21 .Melody function is disabled when standard
A, B, C, D tone alert is selected by service
provider. Otherwise, 10 melodies are available
for user selection.
22.Memory display.
23.Automatic power on/off.
24.Fast reading message function.
25 .Urgent Call : when selected as Valid, pager will
alert with a special “Two Tone + Vibrate” alarm or
“Two Tone” alarm. This Urgent Call will override any Alert Mode
setting, and will always take first priority.
Urgent Call can be set in any address and any tone type individually
and more than one . Alert will stop when any key is pressed.
26. Low Battery Special Alert option: the display will read “LOW BATTERY”
and vibrate B pattern for 3 seconds, then repeat after 15minutes. “LOW
BATTERY” will remain on the screen until the battery is replaced
together with the low battery icon .If a new message comes in (or No service
is displayed )then this will take priority, but the icon will remain on the screen .
Once the message has finished displaying, then the “Low Battery” text will be
displayed again.
27. Special Out of Range option: when out of the service area, pager will display “NO
SERVICE” and generate ‘A’ pattern vibration until a key is pressed. It will then
vibrate for 3 seconds every 15 minutes as a reminder until back in service.
III. Guide to Operation
1. Power On/Off
1.1 Power On
Press Read key for 2 seconds, the Power Up
Message appears, with the sound or vibration
alert generated for 16 seconds, or until a key is pressed.
1.2 Power Off
1.2.1 Press Selection key until the Setup menu
appears:
1.2.2 Press "
" or " " to choose POWER OFF,
then press Read key to confirm.
2. Private Messages
When a new message is received, the pager
will sound or vibrate to alert the user. The new message
will then be displayed automatically on the screen.
2.1 Read Private Messages
On the standby screen, Power Up Message screen
or real time clock screen, press Read key
or " " , " " to display the private message.
Pager will first check if there are any private
messages stored. If there are no stored messages, the
screen will display:
Otherwise, the screen will display:
Press " " or " " to read messages forward or
backwards, press Read key to read the
remainder of the current message.
If pre-time stamp function is pre-programmed on the pager,
the first and last page of the private
message will be:
The message is only deemed to be read if the entire message,
including the pre-time stamp, is read through to the end.
2.2 Protect Private Message
Whilst reading a private message, press Selection
key to enter the following screen:
Press " " or " " to choose LOCK, then press
Read key to confirm locking:
To unlock a protected message, press Selection
key to display:
Press " " or " " to choose YES, then press
Read key to confirm unlocking.
2.3 Delete Private Messages
While reading a private message, press " " or
" " " or Read key to select the desired
message, then press Selection key twice to
enter the following screen:
Press "
" or " " to choose YES, then press
Read key to confirm.
2.4 Memory Full Indication
The pager can store up to 60 private messages.
When the message memory is full, “Memory
Full” will be displayed. When a new message is
received under memory full, the oldest unprotected
message is automatically deleted and the newly
received message is stored.
Note: “Memory Full” display may have been disabled on your pager. If in doubt,
check with your dealer.
3. Public Messages
Public message folders will only be visible if your dealer has enabled them. They are
not used for Private (On-Site messaging) purposes.
3.1Read Public Messages
Press Selection key until the public message
menu appears. (Folder names and number of
folders may be different among operators.)
Press Selection key or " " or " " to choose
the desired MAIL DROP, then press Read
key to display the first screen of the first entry
in the public message folder.
If there is no message in the MAIL DROP,
the screen will display:
If the user continues to press the Read key,
the program will search the message in the
next MAIL DROP automatically. When the
message of no more MAIL DROP is displayed,
the program will return to the message display
in the first MAIL DROP when the Read key
is pressed. The receiving time and date will
be displayed on the first screen of each entry.
Note: Public messages can be protected or
deleted. If the maximum number of entries is
exceeded , the earliest message will be
overwritten automatically.
If pre-time stamp is selected by service
provider, public message will be displayed
as in Point 2.1.
4. Function Setting
4.1 Time Setting
Press Selection key to enter the Setup menu:
Press " " or " " to select TIME, then press
Read key to enter the time, date and day.
For 12-hour or 24-hour format, the screen
will be:
Press " " or " " to change hour, minute, time
format, date and day. Press Read key
to set the next item until the last one (i.e. day),
then press Read key to finish setting. The
pager will detect automatically, with very short
sounds or vibrations to indicate errors to the user
if there is a mistake when setting the date,
e.g. setting 31 days in February.
Note: Whilst setting, press Selection key to
exit from Setup menu without saving settings.
4.2 Alarm Setting
Press Selection key to enter Setup menu:
Press "
" or "
" to select ALARM, then press
Read key to enter "SET ALARM" menu:
If 24-hour format is selected by the user in
the “TIME” menu, the alarm setting screen
will be :
Press " " or "
" to set time and alarm on
or off. Press Read key to finish setting. Also,
if alarm function is enabled, a “BELL” icon
will be shown on standby mode screen.
4.3 Automatic Power On/Off Setting
Press Selection key to enter Setup menu:
Press " " or " " to select AUTO, then press
Read key to enter the relevant menu:
If 24-hour format is selected by the user in the
“TIME” menu, the auto on/off setting screen
will be:
press " " or " " and Read key to set
Automatic On/Off ( i.e. "ENABLE" or "DISABLE"),
and Power On/Off time. The time on the left
is the power on time. The time on the right
is the power off time. Press Read key to
set the next item until the last one. If an invalid setting is made,
the pager will sound or vibrate and return to the initial setting status
automatically to alert the user to reset (e.g. the
Automatic Power On/Off time is the same). Also,
if auto on/off function is enabled, a “ON”
icon will be shown on standby mode screen.
4.4 Melody Setting
Melody function is disabled when standard
A, B, C, D tone alert is pre-programmed by your dealer.
Otherwise, 10 melodies are available
for user selection.
Press Selection key to enter Setup menu:
Press "
" or "
" to select MELODY.
Press Read key to enter "MELODY" Setup
menu:
Press " " or "
" to select. " " means this
item has been chosen.
4.5 Contrast Setting
Press Selection key to enter Setup menu:
Press " " or " " to select CONTRAST,
then press Read key to enter "SET
CONTRAST":
" to adjust LCD contrast,
Press " " or "
then press Read key to confirm.
4.6 Alert Mode Setting
Press Selection key to enter Setup menu:
Press " " or " " to select ALERT, then
press Read key to enter the relevant
Setup status:
Press " " or " " to select alert modes of
BUZZER, MOTOR or MUTE, then press
Read key to confirm.
Note: the pager may have been pre-programmed in one mode only. If in doubt, check
with your dealer.
4.7 Public Message Alert Mode Setting
Press Selection key to enter Setup menu:
" or " " to select ALERT, then
Press "
press Read key to enter the relevant
Setup menu:
Press " " or " " to select PUBLIC, then press
Read key to enter Public Message Alert
Mode Setting:
(If the public message folders have been disabled by your dealer, the screen
will be blank when PUBLIC is selected).
The number of folders provided is subject to
operator’s offer. Press " " or " " to select
folder. Press Read key to toggle between
" " and " ". " " represents alert on. " "
represents alert off. Press Selection key to exit
when finished. The folder position on this screen
follows the folder position in Public Message Menu.
Positions 1-4 means the first 4 folders on the
first page of the menu, positions 5-8 means the
4 folders on the second page of the menu. For
example, position 3 on this screen means the
folder at the bottom left of the first page of Public
Message Menu, position 6 here represents the
folder at the top right of the second page of the
menu.
4.8 Display Memory Occupancy
Press Selection key to enter Setup menu:
Press " " or " " to select MEMORY, then
press Read key to check the memory
occupancy. If all memory is used up, it
appears:
Otherwise, it displays the memory left in
percentage:
Note: All choice of functions above and
"MAIL DROP" selection are shown in
blinking form.
IV. Precautions
1) The pager contains an LCD and precision components. Avoid water, high
temperature, severe shock, strong light and combustible gaseous or dust
atmospheres.
2) Replace the battery when the low battery icon appears. Remove the battery if
the pager will not be in use for long periods.
3) If the pager is not working properly, do not dismantle or attempt to repair it
yourself. After checking the battery, if the pager still does not function, return
it to your authorised dealer.
All specifications are subject to change without further notice. E & OE.
FEDERAL COMMUNICATIONS COMMISSION RADIO AND TELEVISION
INTERFERENCE STATEMENT FOR A CLASS ‘B’ DEVICE
This equipment has been tested and found to comply with the limits for a Class B digital device,
pursuant to Part 15 of the FCC Rules. These limits are designed to provide reasonable protection
against harmful interference in residential installation. This equipment generates uses and can radiate
radio frequency energy and, if not installed and used in accordance with the instructions, may cause
harmful interference to radio communications. However, there is no guarantee that interference will not
occur in a particular installation. If this equipment does cause interference to radio or television
reception, which can be determined by turning the equipment off and then on, the user is encouraged to
try to correct the interference by one more of the following measures:
z
Reorient or relocate the receiving antenna.
z
Increase the separation between the equipment and receiver
z
Connect the equipment into a different outlet so that the equipment and receiver are on different
branch circuits
z
Consult your dealer or an experienced radio/TV technician for help.
This device complies with Part 15, of the FCC Rules. Operation is subject to the following two
conditions: (i) this device may not cause harmful interference, and (ii) this device must accept any
interference received including interference that may cause undesired operation.
CE Declaration of Conformity for Alphanumeric Pager GEO 40A7
The Manufacturer hereby declares that the equipment identified above and to which this Declaration
relates conforms with the protection requirements of Council Directive 89/336/EEC on the
approximation of the laws of the Member States relating to electromagnetic compatibility.
Changes or modifications not expressly approved by the Manufacturer could void the user’s authority
to operate the equipment and invalidate any warranty.
*********************************************************************