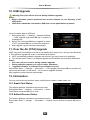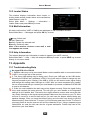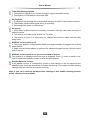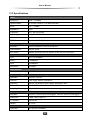
1
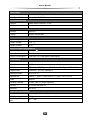
Thank you for purchasing DVBS2 800CA Digital Satellite Receiver. This manual will help you to install, use and maintain the receiver. Please read this manual carefully before operating your unit and keep it for future reference. Warning & Note In this manual, pay special attention to the following marks that indicate hazardous situations. Warning: Alert user to the operation which could result in device damage or data loss, and the presence of a hazardous situation which could result in serious injury. Note: Remind user of presence of possible problems and information of any importance to help understand, use and maintain the installation. Note: The information in this user’s manual is subject to change without notice. The photos and function explanations in the manual are for reference. If any discrepancy exists, please contact your local dealer for assistance. Trademark Manufactured under license from Dolby Laboratories. Dolby and the double-D symbol are trademarks of Dolby Laboratories. The terms HDMI and HDMI High-Definition Multimedia Interface, and the HDMI Logo are trademarks or registered trademarks of HDMI Licensing LLC in the United States and other countries. Other trademarks, product and company names mentioned herein are the property of their respective owners. User’s Manual Safety Instruction Read following items carefully before operating your new VAST receiver. Installation This receiver should be installed horizontally. Unbalanced installation may cause damage. Install the receiver in a place with: Good ventilation (leave space not less than 10cm around this receiver) No heat source (radiator, heater, fireplace, amplifier, etc) Low humidity (especially not bathroom, kitchen, etc) No direct sunlight Low vibration Maintenance Unplug this receiver from power socket before changing connections between this unit and other related equipments. Don’t unplug or insert signal, audio and video cables when this receiver is on. To avoid the risk of lightning strike, unplug power adapter of the receiver from power socket in lightning storm. Unplug power adapter from power socket when the unit is not going to be used for a long time or is damaged. When moving this receiver from hot to cold or vice versa, turn the unit off for 1 hour before to prevent moisture build up. To avoid the risk of fire or electric shock, don’t expose this receiver to rain, water and don’t put object with liquid on this unit. Do not cover vents of this receiver with paper, table cloth, curtains, etc. Don’t put heavy objects on this receiver. Unplug power adapter of this receiver from power socket before cleaning. To reduce damage, clean this unit with dry cloth. Do not let liquid spill or spray liquid into this device to avoid serious damage. Power Socket and Power Adapter Make sure the power pack is not covered as this pack will get warm. Do not insert or pull out power adapter with wet hands to avoid electric shock. Do not use damaged power adapter. If power adapter is damaged, contact your local dealer for replacement to avoid risk of fire or electric shock. RCU Battery Batteries should be installed in accordance with the polarity markings (+/-) on battery compartment. Remove batteries if RCU is not used for a long period of time. Replace batteries if there is not enough power and dispose of battery waste with the environment in mind. Accessory Only use accessories specified by the manufacturer, as other unsupported accessories may cause damage to the receiver. 1 User’s Manual Contents 1. Before Using the Receiver .................................................................................................. 4 1.1 Main Features ............................................................................................................... 4 1.2 Front Panel ................................................................................................................... 5 1.3 Conditional Access (CA) ............................................................................................... 5 1.4 Rear Panel .................................................................................................................... 6 1.5 Remote Control Unit (RCU) .......................................................................................... 7 1.6 Learning Instructions ..................................................................................................... 8 2. Installation ............................................................................................................................ 9 2.1 Connect TV ................................................................................................................... 9 2.2 Connect Optional IR Target ......................................................................................... 13 2.3 Connect other Device ................................................................................................. 13 2.4 Power on ..................................................................................................................... 14 2.5 Search Channel .......................................................................................................... 14 3. Basic Operation .................................................................................................................. 15 3.1 Channel Change ......................................................................................................... 15 3.2 Volume Control ........................................................................................................... 15 3.3 Channel Information Bar ............................................................................................. 15 3.4 Channel List ................................................................................................................ 16 3.5 Audio Selection ........................................................................................................... 16 3.6 Aspect Mode ............................................................................................................... 16 3.7 Teletext ........................................................................................................................ 16 3.8 Closed Caption (Subtitles) .......................................................................................... 16 3.9 PVR Hotkey Menu ...................................................................................................... 17 4. Personal Video Recording (PVR) ...................................................................................... 17 4.1 HDD Speed Test ......................................................................................................... 17 4.2 Set Recording Parameter ........................................................................................... 17 4.3 Quick Recording ......................................................................................................... 18 4.4 Schedule Recording .................................................................................................... 18 4.5 Operation while Recording .......................................................................................... 19 4.6 Playback Recorded File .............................................................................................. 20 4.7 Edit Recorded File ...................................................................................................... 21 4.8 Time Shift .................................................................................................................... 23 5. USB Application ................................................................................................................. 23 5.1 MP3 ............................................................................................................................. 23 5.2 Digital Photo ................................................................................................................ 24 6. HDD Management .............................................................................................................. 24 6.1 Clean up USB device .................................................................................................. 24 6.2 Format USB Device .................................................................................................... 24 7. Electronic Program Guide (EPG) ...................................................................................... 24 7.1 View EPG Information ................................................................................................. 24 7.2 Schedule Program ...................................................................................................... 25 7.3 Schedule Manage ....................................................................................................... 25 8. Channel Search .................................................................................................................. 25 8.1 Signal Finding ............................................................................................................. 25 8.2 Installation ................................................................................................................... 26 8.3 TP Edit ........................................................................................................................ 26 9. Settings ............................................................................................................................... 27 9.1 Common Setting ......................................................................................................... 27 2 User’s Manual 9.2 AV Setting.................................................................................................................... 27 9.3 Factory Default ............................................................................................................ 28 9.4 Modify System Password ............................................................................................ 28 9.5 Parental Control .......................................................................................................... 28 10. USB Upgrade .................................................................................................................... 29 11. Over the Air (OTA) Upgrade ............................................................................................ 29 12. Information........................................................................................................................ 29 12.1 Smart Card Status .................................................................................................... 29 12.2 Softcell Service Status .............................................................................................. 29 12.3 Loader Status ............................................................................................................ 30 12.4 Mail Information ........................................................................................................ 30 12.5 Help Information ........................................................................................................ 30 13. Appendix ........................................................................................................................... 30 13.1 Troubleshooting/Help ................................................................................................ 30 13.2 Specifications ............................................................................................................ 33 14. Acronym ............................................................................................................................ 35 3 User’s Manual 1. Before Using the Receiver 1.1 Main Features VAST Certified High Definition Mpeg2/4 Compliant 12V/240V Operation, for Home or RV use Signal Finder with Beeper USB PVR Ready STi-7111 450MHz Main Processor Time Shift Function Infrared target to place the receiver out of view (optional) MP3 Playback and Photo Browse 8 Day Electronic Program Guide Subtitles Supported Parental Control Function System Password Supported PAL/NTSC Video System Over the Air Secure Software Download Standby with Low Power Consumption HDMI Output Component Output CVBS Output Dolby Digital Audio Coaxial & S/P DIF Digital Audio Outputs Stereo Audio Outputs USB 2.0 interface RF Modulator Function DiSEqC1.0/1.2 supported Irdeto Secure Silicon Conditional Access 4 User’s Manual 1.2 Front Panel Name Function 1. STANDBY Switch between operation and standby modes 2. RESET Press the reset button in the event the unit freezes 3. DISPLAY Clock is displayed when unit is in Standby, CH# when on 4. IR Infrared remote sensor 5. MENU Display/exit from main menu 6/9. Adjust volume or move cursor left/right 7/8. Change channels or move cursor up/down 10. OK Display channel list or confirm operation 11. Smart card slot Open the cover to insert smart card 1.3 Conditional Access (CA) Your VAST receiver requires the smart card to be inserted at all times to enjoy programs. Note: The VAST smart card is already inserted Insert Smart Card 1. Open the right-hand cover on front panel. 2. Face the side with electronic chip downwards and insert the smart card into the lower slot horizontally according to arrow direction. Notes: • The Smart Card number is displayed under Information in the system setting menu. • Please note the smart card number in case of queries. • Do not bend or damage the smart card. • Do not place the smart card in hot environment or under direct sunlight. 5 User’s Manual • • • Use a dry soft cloth too clean the surface of the smart card gently. Do not place into liquid or cleaning agent. If the smart card does not work properly, please contact your local dealer. 1.4 Rear Panel Name Function 1. LNB IN Connect to satellite dish 2. LOOP OUT Loop out the satellite signal to another receiver 3. D-AUDIO Output digital audio signal to amplifier 4. S/P DIF Output digital audio signal to amplifier 5. IR Connect to IR extender (optional, contact dealer to purchase) 6. USB Connect to USB device for recording, pictures or upgrading 7. ETHERNET Connect to Ethernet 8. HDMI Output video and audio signal to TV (support high definition output) 9. Y/Pb/Pr Output Y/Pb/Pr video signal to TV (support high definition output) 10/11. R/L-AUDIO Output right/left audio signal to TV or amplifier 12. VIDEO Output CVBS video signal to TV 13. RF OUT Output analog signal to TV 14. RF IN Input terrestrial TV signal 15. DC power input port (2.1mm) 16. RS-232 Serial port used for software upgrade (Authorised personnel only) 6 User’s Manual 1.5 Remote Control Unit (RCU) Name Function 1. Learning buttons SET To program learning remote function TV/AV Change TV source TV Turn TV On/Off VOL+/- Turn TV volume up/down CH+/- Change channel on TV 2. Buttons on the Remote Control Unit Switch between operation and standby modes MUTE Mute/restore sound TV/RADIO Switch between TV and radio modes INFO Display channel information bar AUDIO Display audio select window HELP Display help information window TEXT Display Teletext information (If Available) SUBT Display Close Caption (Subtitles) ASPECT Adjust aspect ratio to suit TV CH+/- Change channels PAGE/ Page up/down V+/- Adjust volume EPG Display electronic program guide RECALL Back to previously viewed channel Change channels or move cursor up/down Adjust volume or move cursor left/right OK Display channel list or confirm operation MENU Display/exit from main menu EXIT Back to previous menu or exit from operation 0~9 Change channels by entering numbers Colour keys Functions depend on specific applications 7 User’s Manual 3. Buttons for PVR functions INFO Display playback progress bar or time shift progress bar Small jump backward when playback Small jump forward when playback PVR Display short cut window PLAY/PAUSE Pause playback or pause playing to start time shift STOP Stop playback, recording or time shift REC Record current program or display recording information Fast backward (x2, x4, x8, x16, x32 speed) Fast forward (x2, x4, x8, x16, x32 speed) Notes: • The buttons mentioned in the manual refer to RCU keys. • Please operate according to instructions on screen. 1.6 Learning Instructions The RM-06 has learning ability to take over the use of the main TV remote for the basic functions: 1) Source 2) Volume+/3) Existing ATV or DTV channel control +/- where available Instructions: 1. Depress SET key of the STB RCU for 3secs, the red light will increase in intensity. 2. Aim TV RCU at the sensor of the STB RCU, then press key on the STB RCU that you want to pair. The light will flash slowly and when complete the light will flash fast. 3. When pairing of buttons is completed press the SET key to exit learning mode. 8 User’s Manual 2. Installation Connect TV and other devices, then you can power on the receiver and search channels. 2.1 Connect TV Please choose one of following 5 ways to connect TV. 1. Connect TV Using HDMI Cable 1. Connect LNB IN port on the receiver to satellite dish with an RF cable. 2. Connect HDMI port on the receiver to HDMI port on TV. 9 User’s Manual 2. Connect TV Using YpbPr Cable (Component) 1. Connect LNB IN port on the receiver to satellite dish with an RF cable. 2. Connect Y (green)/Pb (blue)/Pr (red) ports on the receiver to Y/Pb/Pr ports on TV. 3. Connect R-AUDIO (red) L-AUDIO (white) ports on the receiver to corresponding ports on TV with an RCA cable. 10 User’s Manual 3. Connect TV Using RCA Cable (included in package) 1. Connect LNB IN port on the receiver to satellite dish with an RF cable. 2. Connect VIDEO (yellow) port on the receiver to corresponding port on TV. 3. Connect R-AUDIO (red)/L-AUDIO (white) ports on the receiver to corresponding ports on TV. 11 User’s Manual 4. Connect TV Using RF Cable (For use with older TV’s or Commercial use) There are 2 ways to connect TV using RF cable. 1. Connect LNB IN port on the receiver to satellite dish with an RF cable. 2. Connect RF OUT port on the receiver to corresponding port on TV. 3. Tune your TV to channel 38 (default) you can do this by either entering manual tuning on your TV or selecting to auto tune function on your TV. If your TV is Digital you will need to select ATV (analogue) to view the VAST decoder via this method. Analog Signal Input from RF IN Port 1. Connect RF IN port on the receiver to your terrestrial TV signal source with an RF cable. 2. Connect RF OUT port on the receiver to corresponding port on TV. 12 User’s Manual 2.2 Connect Optional IR Target Connect Optional IR Target to IR port and then you can place the receiver out of sight. 2.3 Connect other Device For connection of other devices, please refer to following details: nd Connect LOOP OUT port on the receiver to LNB IN port on 2 receiver with an RF cable. Connect D-AUDIO port on the receiver to corresponding port on amplifier with a D-AUDIO cable, or connect S/P DIF port on the receiver to corresponding port on amplifier with an S/P DIF cable, or connect R-AUDIO (red) L-AUDIO (white) ports on the receiver to corresponding ports on amplifier with an RCA cable. Connect USB port on the receiver to USB device with a USB cable Connect ETHERNET port on the receiver to Ethernet with a network cable (RJ-45). 13 User’s Manual Note: If you encounter any problem during the connections, please contact your local Dealer. 2.4 Power on 1. Connect one end of power adapter to power input port on the receiver. 2. Connect the other end of power adapter to the mains power socket. 3. Turn on the power switch on power socket, the receiver will boot up and you will see the receiver go through the scanning process Note: Please turn on your TV and switch it to corresponding AV mode according to actual connection. For example, if HDMI cable is connected, switch your TV to HDMI mode. 2.5 Search Channel When the unit is first powered on the receiver will search channels automatically. After searching is complete programs will be displayed. If not read on to complete the initial set up. Note: For more search details, please refer to 8. Channel Search. 14 User’s Manual 3. Basic Operation This section describes operations such as channel change, volume control and other basic operations when playing program. 3.1 Channel Change You can change channels using following methods: 1. Select Next/Previous Channel Press or CH+/- keys to select next/previous channel. 2. Select Channel by Channel Number 1. Press number keys to input a channel number. 2. Press OK key or wait for 3 to 5 seconds to display in full screen. 3. Select Channel in Channel List For detailed operations, please refer to 3.4 Channel List. 3.2 Volume Control Press or V-/+ keys to adjust volume. Press MUTE key to mute/restore sound. 3.3 Channel Information Bar Press INFO key once or press keys to display channel information bar. When channel information bar is displayed on screen, press INFO key to display detailed channel information. Press EXIT key to remove the channel information bar. 1. 2. 3. 4. 5. 6. Detailed information of current program Channel number and name TV/radio mode icon Current and next program information Current audio mode Encryption Status 15 User’s Manual 7. 8. 9. 10. Standard/high definition mode icon Resolution Current time Signal strength and quality 3.4 Channel List Channel list is available for you to browse channels easily and quickly. Press OK key to display channel list of current service mode. 1. Press TV/RADIO key to switch between TV and radio modes. 2. Press keys to switch among different channel lists. 3. Press PAGE/ keys to page up/down. 4. Press keys to select a channel. 5. Press OK key to play it in full screen. 3.5 Audio Selection 1. Press AUDIO key to display audio selection window. 2. Press keys to select an audio language and press OK key to confirm. 3. Press keys to select left, right or stereo. 4. Press EXIT key to save and exit. Note: This function needs your local operators support. 3.6 Aspect Mode 1. Press ASPECT key to change between the different aspect ratios. 2. Use this function to best suit your TV, by default the decoder is set to 16:9. 3. Press EXIT key to save and exit. 3.7 Teletext An electronic newspaper in which you can browse multiple pages of information, such as news, traffic, stock, weather, etc. 1. Press TEXT key to display Teletext information. 2. The first page shows the index. You can operate according to operation help information or key instructions on screen. 3. Press EXIT key to hide the Teletext information. Note: This function needs local operator support, this function may not be available. 3.8 Closed Caption (Subtitles) Press SUBT key to switch on/off CC, this function is used for the hearing impaired. Note: This function is not available on all programs, local newspapers will highlight CC next to the program in the TV guide. 16 User’s Manual 3.9 PVR Hotkey Menu This menu provides some hotkey PVR functions. Press PVR key to display hotkey key menu. Notes: • Time shift can be started in this menu. • For more details about PVR functions, please refer to 4. Personal Video Recording (PVR). 4. Personal Video Recording (PVR) You can record programs on USB device for later playback. This receiver provides PVR functions, such as quick recording, schedule recording, time shift, etc. Notes: • USB device should be connected to USB port on rear panel before operation. • Radio programs can’t be recorded. • If space on your USB device is insufficient, recording will stop automatically. • During operation, don’t unplug the USB device. • This receiver supports recording programs of two channels under the same TP simultaneously. But the second recording is only available by quick recording. 4.1 HDD Speed Test If the speed of USB device is not fast enough, it may not work correctly. After connecting the USB device to the receiver, you can test its speed. Select Main Menu → PVR Function → HDD Speed Test and press OK key to enter. 1. Press OK key to start testing. 2. Press EXIT key when finished. 4.2 Set Recording Parameter Note: If you don’t set recording parameters, system will record programs according to default settings. This function is handy if a program starts early or over runs. Select Main Menu → PVR Function → PVR Setting and press OK key to enter. Schedule Start Time Offset You can set schedule start time offset value. Press keys to select a time from 0 to -30 minutes. For example, if scheduled start time is “13:00” and offset value is “-5 Min”, the real start time is 12:55. Schedule Stop Time Offset You can set schedule stop time offset value. Press keys to select a time from 0 to 30 minutes. For example, if scheduled stop time is “13:00” and offset value is “5 Min”, the real stop time is 13:05. Schedule Reminder Set reminder time before starting schedule recording. Press keys to select 30 Sec, 60 Sec, 90 Sec, 120 Sec or OFF. 17 User’s Manual Divide Record by EPG Event You can record programs in several files according to EPG events, such as news, weather report, etc. Select “OFF” to record programs in one file, or select “ON” to record programs in several files according to EPG events. PVR Icon Time out Set on screen duration of PVR icon. Press keys to select Always, 5 Sec, 10 Sec (default), 30 Sec or 60 Sec. If “Always” is selected, PVR icon is displayed on screen all through the recording. Default Recording Duration Set default recording duration of quick recording. Press keys to select one from 1 to 24 hours. Note: Near recording end time, system will remind you whether to increase record duration. If you increase duration, recording will continue. After setting, press OK key to save and exit. 4.3 Quick Recording If you want to record current program instantly, you can use this function. 1. Start Recording When watching program, press REC button to start recording and “ ” is displayed in top left corner of screen. To record program of another channel, change channels while recording and press REC key again. Note: Due to the amount of channels on VAST it is only possible to record within one TP. 2. Stop Recording 1. After pressing the STOP key when recording, a recording list will pop up on screen. 2. Select a recording and press OK key to stop. Note: If you playback program while recording, press STOP key to stop playback, and press STOP key again to stop recording. 4.4 Schedule Recording You can schedule to record future programs, and system will start recording automatically. In addition, you can modify schedules and delete unwanted schedules. Select Main Menu → PVR Function → Schedule and press OK key to enter. Note: You can schedule recording in the EPG directly. For detailed operations, please refer to 7.3 Schedule Program. 1. Add Schedule 1. Press Green key to display add schedule window. 2. Set schedule parameters as follows: 18 User’s Manual Schedule Type: Press keys to select Rec or Play. Schedule Start Time: Press OK key to display calendar window. Set schedule start date and time according to screen information. Schedule End Time: Press number keys to input end time. Schedule Mode: Press keys to select Once, Daily or Weekly. If “Weekly” is selected, press OK key to pop up weekly window. Select one or more days with keys and press OK key to confirm, then highlight “OK” and press OK key to save and exit. Channel Name: Press OK key to display channel list, select a channel with keys and press OK key to confirm. 3. Move cursor to “OK” and press OK key to save the new schedule. 2. Modify Schedule 1. Press keys to select a schedule. 2. Press Yellow key to display modify schedule window. You can modify schedule start time, end time and mode. For detailed operations, please refer to 4.4.1 Add Schedule. 3. Delete Schedule 1. Press keys to select a schedule. 2. Press Red key to delete this schedule, and mark it with “ ”. If you want to cancel this setting, press Red key again. 3. After pressing EXIT key, a message box pops up for confirmation. 4. Select “OK” and press OK key to confirm or select “Cancel” and press OK key to cancel the operation. Note: You can press Blue key to delete all schedules and press Blue key again to cancel the setting. 4.5 Operation while Recording 1. View/Modify Recording Information While recording program, you can view recording information, rename files and modify recording duration if needed. Select Main Menu → PVR Function → Recording Info and press OK key to enter, or highlight “Modify Record” in PVR hotkey menu and press OK key to enter, or press REC key to enter directly if you are watching program under recording. Index: Press keys to select R1 or R2. Mode: Display recording mode (Quick or Schedule). 19 User’s Manual Channel Name: Display channel name. File Name: You can rename the file if needed. Press OK key to pop up a keyboard. For detailed operations, please refer to 4.7.3 Rename Recorded File. Valid Record Time: Display valid recording time. Past Time: Display past time. Duration: Press keys to select a recording duration. System will record according to the modified duration. Select “Pause” and press OK key to pause recording. Select “Resume” and press OK key to resume valid recording. Select “OK” and press OK key to save the setting. Select “Cancel” and press OK key to cancel the setting. 2. Change Channel While recording program, you can watch other live programs under the same TP. Press OK key to display available channel list under this TP. For detailed operations, please refer to 3.4 Channel List. 3. Playback Program During recording, you can playback current program. For detailed operations, please refer to 4.8 Time Shift. 4.6 Playback Recorded File You can playback recorded files. Select Main Menu → PVR Function → File List and press OK key to enter, or highlight “Start Play Back” in PVR hotkey menu and press OK key to enter. 1. Press keys to select a file. 2. Press OK key to playback it. While playback, you can operate as follows: 1. Pause Press PLAY/PAUSE key to pause playing. Press PLAY/PAUSE key again to resume playing. 2. Fast backward/forward Press REW/FF keys to fast backward/forward. Press PLAY/PAUSE key to play at normal speed. 3. Playback Progress Bar If you press the INFO key, playback progress bar is displayed. It displays current file information, playback progress and operation help information. 20 User’s Manual 1. TV icon 2. File name 3. File group name 4. Decoding standard 5. Standard/high definition mode icon 6. Watching point time (hh:mm:ss)/total time (hh:mm:ss) 7. Playback progress 8. Operation help information 4. Jump backward/forward 1. Press INFO key to display playback progress bar. 2. Press REW/FF keys to jump backward/forward, or press keys to jump to previous/next chapter. 3. Press PLAY/PAUSE key to play at normal speed. 5. View Recorded File Information 1. Press INFO key to display playback progress bar. 2. Press INFO key again to display detailed information of current file. 3. Press EXIT key to remove it. 6. Stop Playback Press STOP key to stop playback manually. 4.7 Edit Recorded File You can delete, group, rename and lock recorded files. Select Main Menu → PVR Function → File List and press OK key to enter, or highlight “PVR Function” in PVR hotkey menu and press OK key to enter.. 1. Delete Recorded File 1. Press keys to select a file. 2. Press Red key to delete this file, and mark it with “ ”. If you want to cancel this setting, press Red key again. 3. After pressing EXIT key, a message box pops up for confirmation. 4. Select “OK” and press OK key to confirm or select “Cancel” and press OK key to cancel the operation. 21 User’s Manual 2. Group Recorded File 1. Press keys to select a file. 2. Press Green key to pop up group edit window. 3. Select a group and press OK key to add the selected file to this group. 4. Press EXIT key to save and exit. In addition, you can add, delete and rename groups. Add Group Press Green key to pop up a keyboard. For detailed operations, please refer to 4.7.3 Rename Recorded File. 1. 2. 3. Delete Group Press keys to select a group. After pressing Red key, a message box pops up for confirmation. Select “OK” and press OK key to confirm or select “Cancel” and press OK key to cancel the operation. Rename Group 1. Press keys to select a group. 2. Press Yellow key to pop up a keyboard. For detailed operations, please refer to 4.7.3 Rename Recorded File. 3. Rename Recorded File 1. Press keys to select a file. 2. Press Yellow key to pop up a keyboard. 3. Input the file name. Please refer to following operations: Select characters on the keyboard with arrow keys and press OK key to input. Select “Clear” and press OK key to delete all characters on title bar. Select “Caps On/Off” and press OK key to switch between lowercase and capital. Select “Back” and press OK key to delete last character on title bar. Select “OK” and press OK key to confirm renaming. Select “Cancel” and press OK key to cancel renaming. 4. Press EXIT key to save and exit. The new recorded file name appears in file list. 4. Lock Recorded File 1. Press keys to select a file. 2. Press Blue key to lock this file, and mark it with “ ”. If you want to cancel this setting, press Blue key again. 3. Press EXIT key to save and exit. Note: System password is required to unlock files and view programs of locked files. 22 User’s Manual 4.8 Time Shift Press PLAY/PAUSE key in non-menu mode, or highlight “Start Time Shift” in PVR hotkey menu and press OK key, the receiver records current program on USB device in the background temporarily. You can playback it as if playback a recorded file. 1. Time Shift Operation You can perform pause/play, fast backward/forward, etc. For detailed operations, please refer to 4.6 Playback Recorded File. You can also press INFO key to display time shift progress bar. It displays current channel information, playback progress and operation help information. 1. 2. 3. 4. 5. 6. 7. TV icon Channel name Playback progress Decoding standard Standard/high definition mode icon Watching point time (hh:mm:ss)/total time (hh:mm:ss) Operation help information 2. Stop Time Shift Press STOP key or change to another channel to stop time shift and return to play live program. 5. USB Application You can play MP3 and browse photos. Note: USB device should be connected to USB port before use, don’t remove when in use. 5.1 MP3 Select Main Menu → Multimedia → MP3 and press OK key to display MP3 list. 1. Press keys to select an MP3 file. 2. Press OK key to play it, and you can operate as follows: OK key: Pause/resume playing Green key: Play files at random Red key: Play all files in order Blue key: Play the selected file repeatedly 3. Press EXIT key to exit. 23 User’s Manual 5.2 Digital Photo Select Main Menu → Multimedia → Digital photo and press OK key to display photo list. 1. Press Green key to switch between file list and icon view modes. 2. Press keys to select a JPG file. 3. Press OK key to display it in full screen, or press Blue key for slide show. 4. Press EXIT key to exit. 6. HDD Management 6.1 Clean up USB device You can view free space of USB device and delete recorded files if necessary. Press PVR key in non-menu mode to display hotkey key window and select “Start Play Back” and press OK key to enter. The icon in bottom left corner of window displays used and free space of USB device. If you want to delete recorded files, please refer to corresponding operations in 4.7 Edit Recorded File. 6.2 Format USB Device Warning: This function will format your USB device, and all files will be deleted. Select Main Menu→ PVR Function → HDD Format and press OK key to enter. 1. Highlight “OK” and press OK key, a warning box pops up for confirmation. 2. Select “OK” and press OK key to confirm or select “Cancel” and press OK key to cancel the operation. 7. Electronic Program Guide (EPG) In this guide, you can view program information of current service mode based on date and time. In addition, you can schedule to play or record future programs. 7.1 View EPG Information The EPG simultaneously displays several channels programs for now & next on the one page. Each program is displayed according to its time bounds. By pressing the right arrow key you can check upcoming programs over the coming days. Press EPG key to enter directly in non-menu mode. 24 User’s Manual 1. Current date and time 2. Detailed information of the selected program 3. Channel list 4. Time slice bar 5. Program list 6. Operation help information keys: Select channel keys: Select program OK key: Play current program in full screen or schedule future program Red/Green keys: Switch to next/previous day 7.2 Schedule Program 1. Press keys to select a future program. 2. Press REC key to pop up EPG schedule window. 3. Set schedule type and mode. For detailed operations, please refer to 4.4.1 Add Schedule. 4. Highlight “OK” and press OK key to save the new schedule. The scheduled program is marked with “ ” (record) or “ ” (play). If you want to cancel this setting, press OK key again. 5. Press EXIT key to save and exit. Notes: • System will remind you near the airtime of the scheduled programs. • For more details about schedule recording, please refer to 4.4 Schedule Recording. 7.3 Schedule Manage All the scheduled programs are displayed in this window. You can cancel or restore schedules. 1. Press Blue key to display book list when program list is highlighted. 2. Press keys to select a schedule. 3. Press OK key to cancel or restore it. 4. Press EXIT key to save and exit. 8. Channel Search You can set parameters to search channels. This function in the VAST box is of limited operation as the receiver automatically searches channels for you. 8.1 Signal Finding You can calculate bearing, elevation and LNB skew of satellite dish according to your location, and adjust satellite dish manually. In addition, you can search channels if the signal is locked. Select Main Menu → Signal Finding and press OK key to enter. 1. Press number keys to select a region and enter 25 User’s Manual the next menu. 2. Press keys to set latitude and longitude of local, and press OK key to enter select LNB window. (Approximate is fine) 3. Press keys to select LNB type according to your LNB and set LNB frequency according to your LNB type (default is 10700 LNB also known as 10.7). The details are on the sticker on the LNB. 4. After setting, press OK key to enter signal detection window. You can adjust satellite dish manually according to calculation result displayed on screen. 5. Press OK key to search channels if the signal is locked with green coloured bars. 6. Press EXIT key to save and exit. 8.2 Installation Note: This function is for custom/complex configurations. Select Main Menu → Installation →Installation and press OK key to enter. 1. Set parameters as follows: LNB Power: If your receiver is connected to LNB, select “ON”. The default status is “ON”. Note: Do not change this setting unless your LNB is powered on by other satellite receiver. L.O. (MHz): Press keys to select LNB type according to your LNB. Low/High Freq: If “LNB Type” is set to “Custom”, you can set LNB frequency according to your LNB type. 22K: Press keys to select ON or OFF according to connection of 22K switch. Note: If “LNB Type” is set to “9750/10600” or “Custom-Dual”, 22K switch will operate automatically. DiSEqC: Press keys to select a proper port according to connection of DiSEqC switch. TP Setup: Press keys to select a TP. You can also press Yellow key to display TP edit window. For more details, please refer to 8.3 TP Edit. 2. Press EXIT key to save and exit. 8.3 TP Edit Note: This function in the VAST box is of limited operation as the receiver automatically searches channels for you. Select Main Menu → Installation →Installation and press OK key to enter, and press Yellow key to display TP edit window. 1. Add TP 1. Press Green key to add a TP. 2. Press or number keys to set proper values. 3. Press EXIT key to save the new TP. 26 User’s Manual 2. Modify TP 1. Press Yellow key to move cursor to parameter list. 2. Press or number keys to set proper values. 3. Press EXIT key to save the new TP. 3. TP Search Search channels according to the selected TP. 1. Press Yellow key to move cursor to TP list. 2. Press keys to select one TP. 3. Press Red key to search channels. 9. Settings 9.1 Common Setting Select Main Menu → Settings → Common Settings and press OK key to enter. 1. Set parameters as follows: Menu Language: Press keys to select a language for menu. Menu Transparence: Press keys to select a transparency level from 70% to 100%. Region: Press keys to select a region. 2. Press EXIT key to save and exit. 9.2 AV Setting Select Main Menu → Settings → AV Settings and press OK key to enter. 1. Set parameters as follows: TV Mode: The default is “PAL”. Aspect Mode: Press keys to select 4:3 or 16:9. Subtitle: Select “ON” to enable Subtitle. Resolution: Press keys to select a proper resolution. Note: If your TV does not support the selected resolution, there is no video output on screen. In this case, continue to press keys until the video appears again. Audio Set: Press keys to select Stereo, Left, Right or Mono. Audio Decode: The receiver can output two types of digital audio signal via S/P DIF port. If your digital amplifier has Dolby digital decoder, set it to “AC-3” to output encoded signal. If not, set it to “PCM” to output decoded signal. Note: If there is no Dolby digital provided in the program, even though you set it to “AC-3”, program cannot be played with Dolby sound. TV Channel: If TV is connected to your receiver with RF cable, press keys to select a channel from 21 to 69. The default is “38”. Note: After setting, switch your TV to the selected RF channel or select auto tune on your TV. 27 User’s Manual 2. Press EXIT key to save and exit. 9.3 Factory Default Warning: This function will restore system settings to factory defaults and erase all channels. Select Main Menu → Settings → Advance Settings → Factory Default and press OK key, a warning box pops up for confirmation. Select “OK” and press OK key to confirm or select “EXIT” and press OK key to cancel the operation. System will reboot after restoring. 9.4 Modify System Password System password is required to view the locked recorded file or enter some menus, such as Advance Settings, etc. The default password is “1234”. You can change it if necessary. Select Main Menu → Settings → Advance Settings → Modify System Password and press OK key to enter. 1. Press number keys to input new password. 2. Input new password again for confirmation. 3. Press EXIT key to save and exit. Note: Don’t forget the password, if forgotten you will need to contact your local dealer. 9.5 Parental Control You can set parental level for programs and modify parental control password. 1. Modify PG Password PG password is required to view programs beyond the set parental level. You can modify it if necessary. Select Main Menu→ Parental Control → Modify PG Password and press OK key to enter. 1. Press number keys to input new password. 2. Input new password again for confirmation. 3. Press EXIT key to save and exit. Note: Don’t forget the password. If the password is lost you will need to contact your local dealer. 2. User Parental Level Select Main Menu→ Parental Control → Modify PG Password and press OK key to enter. 1. Highlight “User Parental Level” and press keys to select a parental control level. 2. After setting, press EXIT key to save and exit. Note: Parental control password is required to view programs beyond the set level. 28 User’s Manual 10. USB Upgrade Warning: Don’t turn off the receiver during Software upgrade. Notes: • Before operation, please download new version software to root directory of the USB device. • USB device should be connected to USB port on rear panel before operation. You can transfer data by USB port. 1. Select Main Menu → Settings → Advance Settings → USB Upgrade and press OK key to display a message box. 2. Select “OK” and press OK key to upgrade or select “EXIT” and press OK key to cancel the operation. 3. After upgrade, system reboots automatically. 11. Over the Air (OTA) Upgrade VAST may send new software over the air via satellite from time to time, and you can download it. This software upgrade will occur in the following situations: VAST automatically software upgrades the receiver (you don’t need to do anything). You choose to see if there is a software upgrade on the satellite and manually download it. Notes: • Don’t turn off your receiver during software upgrade. • During software upgrade, you can’t do other operations. • “Upgrade Software” is activated if new software is found. Select Main Menu → Settings → Information → OTA Upgrade and press OK key, system will reboot and download it. It will take 5 ~ 10 minutes to upgrade software. After upgrade, system reboots automatically. 12. Information You can view smart card number, status, softcell service status, loader status, etc. 12.1 Smart Card Status This window displays information about smart card. Select Main Menu → Settings → Information → Smart Card Status and press OK key to enter. 12.2 Softcell Service Status This window displays information about softcell service. Select Main Menu → Settings → Information → Softcell Service Status and press OK key to enter. 29 User’s Manual 12.3 Loader Status This window displays information about loader, including Irdeto access loader status and manufacturer loader status in chip ID. Select Main Menu → Settings → Information → Loader Status and press OK key to enter. 12.4 Mail Information All mails received from VAST or SatKing are displayed in mail information window. Select Main Menu → Messages and press OK key to enter. keys: Select mail OK key: Read mail Red key: Delete the selected mail Blue key: Delete all mails Note: If the receiver receives a new mail, a mail icon appears on screen. 12.5 Help Information This window displays help information to assist to operate your VAST receiver. Select Main Menu → Help → Help Info and press OK key to enter, or press HELP key to enter directly in non-menu mode. 13. Appendix 13.1 Troubleshooting/Help No signal E50-32 or E48-32 1. Satellite cable may not be connected. Make sure the satellite cable is connected into the “LNB in” port on the rear of the receiver. 2. The wrong LNB setting may be being used. Check your LNB type on the LNB sticker. Normally the LNB will be a wideband 10700, if this is the case no need to change this setting and proceed to point 3 below. If the LNB is 11300 you will need to enter signal finding and change this setting under LNB type to 11300. After you have completed your installation we recommend that you contact your local dealer to purchase a wideband 10700 LNB to receive all channels. 3. If this is a new installation the dish may not be aligned correctly: Enter the signal finding menu and complete the setup process. This will give you more details on the alignment settings for the satellite dish. Proceed to the signal detection screen and move the dish very slowly listening to the signal intensity beeper. Make sure the volume on your TV & the receiver is turned up to around half way so you can hear the beeper without doing any speaker damage. Once you have the beeper going move the dish very slowly to get the fastest beeping. Now check the TV screen, you should see green bars on the TV screen if so simply press ok and the receiver will tune the channels for you. Using a separate signal finder/meter out near the dish can also be of great assistance. Further help can be obtained from your local dealer. 30 User’s Manual Card/Service Activation 1. If this is the first start up of a new system/installation you need to activate your card but don’t this until you can receive and view channel 800 (info channel). Activating your card prior to being able to watch channel 800 means that the card won’t receive the “hit” and once you have signal you will need to manually “hit” the card. Card activation can be done online at www.mysattv.com.au. The process can also be done via fax using the form enclosed with the decoder. Until the activation process is complete you can’t view any channels except for tuning/info channels. Step 1 have channel 800 running, Step 2 Activate your card. If you continue to have trouble activating your service you can call VAST, the number is on the activation form enclosed. 2. If the unit has been switched off at the mains or has lost signal for a period of time the card may have missed some card updates. You can “Re-Hit” the card at www.mysattv.com.au or Phone VAST, have your VAST card number ready. 3. E-04, E-05, E06 Smart card is inserted incorrectly or is not making connection properly. Re-Insert the VAST smart card with the chip facing down and in the direction of the arrow into the card slot. If this still doesn’t eliminate these error codes remove the card and wipe the gold contacts with a soft cloth. Important don’t use any fluid. If the card is inserted incorrectly the card can’t be activated. Picture Breaks up 1. The satellite dish needs to be aligned more accurately. Heavy cloud will make this worse. 2. Connect signal cable securely. 3. The satellite dish size is too small, consult your local dealer on advice on the correct dish size for your area. 4. If your LNB is getting old it may need to be replaced, contact your local dealer to purchase a new wideband 10700 LNB. No sound 1. Audio cable is disconnected or incorrectly connected. Connect audio cable correctly. 2. The receiver is in mute mode. Press MUTE key to restore sound. 3. Volume is set to minimum. Increase volume on both your TV and receiver to a proper level. 4. If you are using RCA cable make sure the colours are matching, ie white to white and red to red. RCU Doesn’t Work 1. Batteries are flat. Replace the batteries. 2. RCU is not aimed at the receiver or IR target (optional). Aim RCU at the receiver. 3. Other Devices in the room are interfering with the remote, disconnect wireless headphones and other devices using Infrared. Receiver Doesn’t Record Programs 1. The space on USB device is insufficient. Delete unnecessary files and make space for new recording. 2. Conflicts with current program being recorded. Stop current recording or wait until the recording is finished. 3. The speed of USB device is not fast enough to support record function. Use HDD Speed test to confirm USB device is suitable. If the device is not fast enough use a different USB device. 31 User’s Manual Time Shift Doesn’t Operate 1. The speed of USB device is not fast enough to support timeshift function. 2. The capacity of USB device is less than 2GB. No Playback 1. To playback the recorded files of scrambled channels, the VAST card must be inserted. 2. The satellite signal became weak during in recording. 3. Not enough free space on USB device. No picture 1. Video cable is disconnected or incorrectly connected. Connect video cable correctly, ie yellow to yellow. 2. The receiver is in radio mode. Switch it to TV mode. 3. The source on your TV is incorrectly set, change the source to match with the cable being used. DISPLAY on front panel is off 1. The power adapter is disconnected. Make sure power adapter is plugged into a mains power socket. 2. Make sure the power adaptor or optional 12V cable are plugged into the 12V jack on the rear of the unit. DISPLAY on front panel is on, but no sound and no picture The receiver is in standby mode if the clock is displayed. Press eration mode then channel numbers or scan will be displayed. button to switch to op- Satellite Receiver Freezes If the satellite receiver is unresponsive, frozen on one channel or will not respond to the standby button, press the reset button to restart the receiver. This restart will retain existing settings within the receiver and rescan channels. Note: If you can’t solve the problems after referring to this trouble shooting section, please contact your local dealer. 32 User’s Manual 13.2 Specifications Tuner Frequency 950 ~ 2150MHz Symbol Rates 2~45,000 (DVB-S) 2~45,000 (DVB-S2) Level -65 ~ -25dBm Impedance 75Ω Connector IEC 169-24 Female LNB Supply 13V/18V/OFF, 400mA max. LNB Switch 22KHz DiSEqC 1.0,1.1,1.2, USALS Compatible Channel Decoding Standard DVB-S EN300421 DVB-S2 EN302307 Demodulation QPSK, 8PSK FEC Mode QPSK-1/2,2/3,3/4,5/6,7/8. 8PSK 1/2,2/3,3/4,3/5,4/5,5/6,8/9. Processor & Memory CPU STi-7111 450MHz Flash 128MBytes DDR 256MBytes EEPROM 32 Kbyte Demultiplexer Standard ISO/IEC 13818-1 Audio Decoding Standard ISO/IEC 13818-3 Channel Left, Right, Stereo, Dual Mono Decoding MPEG-1 & MPEG-2 layer I and II (Musicam), MP3 Dolby AC3 MPEG-4 HE-AAC+ ISO/IEC 14496-3 Sampling Frequency 32,44.1,48 KHz Video Standard ISO/IEC-13818-2,MPEG-2MP@ML, MPEG-4 AVC/H.264 [email protected] Resolution 1080i,720p,576p.576i TV System PAL/NTSC Aspect 4:3,16:9 RF Modulator Channels 21~69 (470~860MHz) 33 User’s Manual Data Output IP Data EN-301 192-7 Supported Via RJ-45 Low Speed Data Supported Via RS-232 Conditional Access System Irdeto Secure Silicon 3.11 HL CAS Version 3 USB Version USB 2.0 Supply 5Volts, 500mA Max Power Adaptor Input Voltage 100-240V~ 50/60Hz Output Voltage 12V Output Current 2.0A Receiver Power Requirements Input Voltage 12VDC Input Current 2.0A via 2.1mm DC Jack Power Consumption 18W max, inc’s LNB power consumption Connections HD Video HDMI x1, Component x1 SD Video CVBS x1 RF Modulator RF Out Male Pal Type x1, RF In Female Pal Type x1 IEC-169-2 Digital Audio Coaxial x1, S/P DIF (Optical) x1 Analogue Audio RCA L+R x1 Satellite RF LNB In F-Type x1, LNB Loop Out F-Type x1 IEC-169-24 USB Rear x1 Infrared Extender 3.5mm Jack x1 (Target Optional) RS-232 9 Pin Din sub-male x1 Ethernet RJ-45 x1 Physical Characteristics Size Weight Operating ture 220mm (L) × 180mm (W) × 46mm (H) 750grams Tempera- 0℃ ~ 40℃ 34 User’s Manual 14. Acronym CC CVBS DVBS-2 DVB-S EPG FTA HDD HDMI HDTV STB RCU LNB TV OSD OTA USB PVR IR RCA RF SDTV S/P DIF DiSEqC UHF REC FF Rew Closed Caption (Subtitles) Composite Video Broadcast Signal Digital Video Broadcasting Satellite MPEG4 H.264 Digital Video Broadcasting Satellite Electronic Program Guide Free to Air Hard Disk Drive High Definition Multimedia Interface High Definition Television Set top Box Remote Control Unit Low Noise Block Television On Screen Display Over the Air Universal Serial Bus Personal Video Recording Infrared Radio Corporation of America Radio Frequency Standard Definition Television Sony/Philips Digital Interface Format Digital Satellite Equipment Control Ultra-High Frequency Record Fast Forward Rewind Please note specifications are subject to change without notice, for latest specifications please refer to www.satking.com.au 35