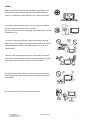
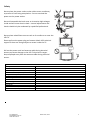
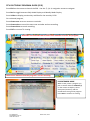
1
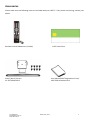
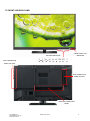
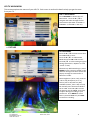
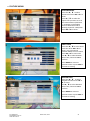
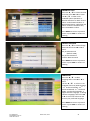
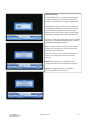
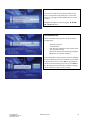
ea a o e uc o e o eu a ee uc o ma ua a a e ace o u u e e e e ce. Altech UEC, 2014 Table of Contents General Accessories............................................................................................3 Important Safety Instructions...............................................................4 Installation............................................................................................6 TV Front and Rear Panel.......................................................................8 Connections..........................................................................................9 Remote Control...................................................................................11 DTV - Basic Operation..........................................................................12 OSD Menu LED TV Main Menu.............................................................................16 Picture Menu......................................................................................16 Sound Menu.......................................................................................18 Channel Menu....................................................................................21 Feature Menu.....................................................................................25 Set up Menu.......................................................................................33 PC Set up Menu..................................................................................33 Media Menu Photo Menu.......................................................................................36 Music Menu.......................................................................................37 Movie Menu......................................................................................38 PVR and e-Book Menu.......................................................................39 VAST Menu VAST Set Up and Operation...............................................................40 VAST Decoder Features and Menu.....................................................45 VAST PVR Functions ...........................................................................52 VAST PVR Setup .................................................................................56 Troubleshooting.................................................................................58 Product Warranty..............................................................................59 Legal Matters.....................................................................................61 Help and Information.........................................................................63 Altech UEC, 2014 Accessories Please make sure the following items are included with your LED TV. If any items are missing, contact your dealer. VAST Smart Card Remote Control & Batteries (2 x AAA) User Manual/VAST Registration Form/ VAST PVR Activation Card Stand / Neck / Screws AL-32TVCM421PVR For assistance: [email protected] www.uec.com.au Altech UEC, 2014 3 Safety Please immediately pull out the AC power plug if there is an abnormal sound or smell or the LED TV has sound but no picture. Immediately contact Altech UEC technical support. The LED TV should be kept free from rain, damp and dust to prevent electrical shock and short circuits. Do not cover the ventilation openings with table cloth, curtains, newspapers, etc. The LED TV should be kept from high temperature heating objects or direct sunlight. It requires good ventilation. Allow 10cm between the LED TV and other appliances or built-in cabinet walls. You may clean the display panel with a soft clean cloth after pulling out the power plug. Do not repeatedly wipe the panel, nor scrape, tap or strike the panel with a hard object. Do not wipe the LED TV with any petrol, chemical or alcohol based solvents as it will lead to product damage of the panel and cabinet. Do not place the LED TV on an unstable surface. For assistance: [email protected] www.uec.com.au Altech UEC, 2014 4 Safety Do not place the power cord or other cables across a walkway to prevent it from being trampled on. Do not overload the power cord or power socket. Do not disassemble the back cover as it contains high voltages inside and will cause electric shock. Internal adjustments and checks should only be conducted by a qualified professional. Do not place naked flame sources such as lit candles on or near the LED TV. Please pull out the power plug and contact Altech UEC technical support if there are foreign objects or water inside the TV. Pull out the power cord and antenna cable during electrical storms to prevent damage to the LED TV by electric surges. Keep all people away from the antenna cable during electrical storms. QUICK HELP Description DTV Mode Channel Lock/Unlock Password (default) Child Lock Password (default) Change Pin Code (default) Channel Auto Search Password Channel Digital Manual Search Password Delete Channel Password Software Upgrade Password Information 0000 0000 0000 0000 0000 0000 0000 VAST Mode Parental Control PIN/Channel Lock PIN (default) 1234 Installation Set Up PIN (default) 1234 For assistance: [email protected] www.uec.com.au Altech UEC, 2014 5 Installation Thank you for your purchase of this product. Please read this manual carefully and keep it safe for reference. Please use the power cord designated for this product. When an extension cord is required, use one with the correct power rating. The cord must be grounded. The product should be installed on a flat surface to avoid tipping. Space should be maintained between the back of the product and the wall for proper ventilation. If you would like to mount the TV to the wall, please see “Preparing the LED TV for Wall Mounting” below for additional information. Avoid installing the product in the kitchen, bathroom or other places with high humidity. Preparing Your LED TV For Wall Mounting The LED TV can either be kept on the stand or mounted to the wall for viewing. If you choose to mount the LED TV to the wall, please follow the instructions below. • • • • • • • Unplug all the cables and cords from your LED TV Place the LED TV face down on a soft and flat surface (blanket, foam, cloth, etc.) to prevent any damage to the display. Remove the stand screws to remove the stand The mounting bracket is made up of two parts – the wall bracket and the TV bracket. Attach the TV bracket to the TV via the screws included with your wall mount kit. (Please check the instruction manual of the wall mount for further information.) Attach the wall bracket to the wall with the appropriate screws. Ensure the wall is suitable to hold the weight of the TV. (Please check the instruction manual of the wall mount for further information.) Slide the TV bracket into the wall bracket. Ensure the wall mount is secured IMPORTANT: TV should only be wall mounted by a professional installer. For assistance: [email protected] www.uec.com.au Altech UEC, 2014 6 Important Notes RESET: Like any product controlled by microprocessors, this TV may hang or become unresponsive. In the unlikely event that this occurs, simply disconnect the power and reconnect after 10 seconds. REMOTE: To prevent leakage that may result in bodily harm or damage the remote: 1. Install AAA batteries correctly and make sure that the polarities are correctly aligned with the battery compartment markings. 2. Do not mix batteries (Old and New or Carbon and Alkaline, etc.) 3. Remove the batteries when the remote is not used for a long time. My music, movie or image files do not play? Due to the large variation of file sizes, compression formats and codec available, playback of all files cannot be guaranteed. I cannot record onto my USB flash drive (for DTV) ? FAT 32 formatted flash drive is required. Time shift functionality does not work (for DTV) ? FAT 32 formatted flash drive is required. Warning!!! Screen Burn in To prevent the screen from burn in, do not leave static images including menu screens displayed for a long period of time. Screen burn in is not covered by the manufacturer’s warranty. ATTENTION: Do not try to update the TV unless directed by a qualified service technician. Misconfigured product due to an incorrect/unauthorised software update is not covered by the manufacturer’s warranty. For assistance: [email protected] www.uec.com.au Altech UEC, 2014 7 BUTTON FUNCTIONS FRONT PANEL LED INDICATOR SIDE CONNECTION PANEL FOR VAST SIDE CONNECTION PANEL FOR DTV BOTTOM CONNECTION PANEL For assistance: [email protected] www.uec.com.au Altech UEC, 2014 8 CONNECTIONS Bottom Connection Panel: Side Connection Panel for DTV: Side Connection Panel for VAST Power: Connect the AC power to the mains. HDMI1 / HDMI2 Connect the HDMI output of an accessory device to the HDMI input on the TV. Select the appropriate HDMI input source using the SOURCE button on the remote. VGA / PC Audio In: Connect the VGA output of the PC to the VGA input on the TV. Connect the PC audio output of the PC to the PC Audio IN on the TV. Select the PC input source using the SOURCE button on the remote. Y / Pb / Pr In: Component input terminal. Select COMPONENT input source using the SOURCE button on the remote. COAXIAL: Digital TV sound output RF IN: Connect the antenna to the RF IN port. Please refer to the Antenna Connection section on page 10. AUDIO / VIDEO IN: Connect the Audio and Video output jack of external devices (DVD, VCR, Digital camera, etc.) using an AV cable - Yellow (Video), White and Red (Left and Right audio). Select the AV input source using the SOURCE button on the remote. USB: Insert a USB flash drive that contains your Media files into the USB slot on the side connection panel for DTV. Select MEDIA input source using the SOURCE button on the remote. For assistance: [email protected] www.uec.com.au Altech UEC, 2014 9 VAST CONNECTIONS LNB IN: Connect the coaxial cable to the LNB on satellite dish USB: USB port provision for recording functionality and software upgrade via USB. ETHERNET: Connects to Ethernet (currently disabled; for future support) CARD: Smartcard slot RESET: Button to RESET or REBOOT the VAST decoder ANTENNA CONNECTION HANDY TIPS 1. Do not put the coaxial cable close to the mains lead to avoid signal noise. 2. Do not place the coaxial cable under the TV. 3. To obtain quality picture and sound, a roof aerial antenna with the correct coaxial cable (75Ω) and with the correct terminating plug must be used in the installation. Notes: 1. Contact your local antenna dealer for assistance in installing the correct aerial antenna system that will suit your particular area and obtain the necessary accessories required. 2. Additional equipment, cables, adapter plugs and other accessories are not supplied with this TV set. WARNING: Please do not use a spanner or shifter on the LNB (F) connector. For assistance: [email protected] www.uec.com.au Altech UEC, 2014 10 Switch between STANDBY and ON mutes the audio. Press MUTE again or press VOL+ to restore audio . Press to switch the remote to send out TV command – Press to select the aspect ratio . - Press to switch the remote to send out VAST command – Press to select a TV channel directly when watching TV. The channel changes after 2 seconds or press OK button to change immediately. -/--) – Press to enter HELP notes in VAST mode - Press to change the channel digits in TV mode ) – Press to return to previously viewed channel – Launches the TV menu – Launches the VAST menu in VAST mode ▲/▼/◄/►/ - Allows you to navigate the on-screen menus and select the system settings to your preference –Displays EPG (Electronic Program Guide)information –Exits menu or sub menu i –Displays the information on the current input source Changes the channel to the next/previous channel Selects the input source PC channel images automatic calibration shortcuts Short press: Switches between TV and Radio channels - Press and Hold: launches TV and Radio bouquets in VAST mode Increase/decrease the volume level Turns the Teletext ON or OFF HOLD ON or OFF the current page display in Teletext in TV mode Turns subtitles ON or OFF Displays a sub-page of other options in TV mode Press to toggle to the different Picture mode options for optimum viewing Press to toggle to the different Sound mode options for optimum sound Set the TV to turn OFF after a user specified time Launches the Multi-Audio options and allows the user to select the language of the audio in DTV (if Multi-Audio is supported in the program) Shows the recordings in VAST mode Returns to the index/initial page in TV mode ► Play/Pause Reveals or Hides the text in TV mode ■ Stops playback Changes the size of the Teletext in TV mode Press to start recording I◄◄ ►►I – Plays previous/next media file ◄◄ ►► Rewinds/Fast forwards playback - Functions as required by application from various menu options For assistance: [email protected] www.uec.com.au Altech UEC, 2014 11 Available button functions on the bottom of the LED TV Press Press / to scan through channels in VAST mode / Press Press Press Press to scan through channels in TV mode / to increase/decrease the volume level to launch the TV main menu screen to select the input source button to alternately switch the TV ON/Standby Ensure that power is supplied to the TV. Press the button to switch ON the TV. The front LED status indicator will change from RED to GREEN to indicate that the TV is ON. The TV will always boot up in VAST mode everytime it is powered ON as shown in the images below: Once it finishes with the VAST boot up sequence, it will display the VAST channels if your TV is connected to a VAST satellite dish and if the smartcard inserted is already activated to receive VAST channels. If it’s not connected to a satellite dish, “E50-32 searching for signal” appears on-screen. This is normal and you can still use all the other INPUT sources (DTV, AV, Component, HDMI1, HDMI2, PC and Media) and its functions on your TV except VAST. o mo e e a For assistance: [email protected] www.uec.com.au ou o e ec o co ac ou a e e a a a o ea e e e o e ec o o ec c a o ec ca a a ce. Altech UEC, 2014 a e 12 There are several methods in changing channels. • • • Press / buttons on the remote or on the bottom of the TV to change the channel to the next/previous channel. Via Numeric Keypad – Press the appropriate number to tune to the desired channel. For 2 digit DTV channels, press the -/-- button followed by the numbers to tune to the channel. Via TV Guide (EPG) – press TV Guide button on the remote then use the ↑ / ↓ navigation arrows to select a channel and press OK to tune. Press EXIT to view the channel. Press / buttons on the remote or on the bottom of the TV to increase/decrease the volume level. Press button on the remote to enable TV . Press again to disable. a Insert a high quality and high speed flash drive into the USB slot on the side connection panel for DTV. Record: In DTV mode, press the RECORDER ( currently watching. ) button on the remote to record the program you are Timeshift: In DTV mode, press PLAY/PAUSE (►II) button on the remote to start timeshift, then press PLAY/PAUSE (►II) button again to resume watching. The front panel LED indicator starts flashing GREEN and RED alternately during recording and timeshifting. For assistance: [email protected] www.uec.com.au Altech UEC, 2014 13 Press the button on the remote to mute the audio. A mute icon is displayed on the bottom left corner of the TV screen to indicate that the TV is in mute. Press again to restore the audio of the TV. Note: The line level audio output is not muted when the TV is in mute. Press on the remote to display the tuned channel, program title and time slot. Press again to launch the program information, Channel frequency, Bandwidth, Signal Strength and Quality. Press the > arrow key to show the next program and information. Press again to exit and resume TV viewing. Press on the remote to select the various INPUT sources available (ATV→DTV→AV→Component→VAST →HDMI1→HDMI2→PC→Media). Use the ↑/↓ navigation arrows to select the desired INPUT source and press to launch. For assistance: [email protected] www.uec.com.au Altech UEC, 2014 14 TV Press on the remote to launch the EPG. Use the ↑↓←→ navigation arrows to navigate. Press e to toggle between Daily Mode Display and Weekly Mode Display. Press e ow to display previous day and Blue for the next day’s EPG. On a selected program, Press Press Press Press ee o ce to set an auto tune reminder. ee w ce to cancel the auto tune reminder and set recording. ee ce to cancel recording. to resume TV viewing. em eco co ca e a e co ca e o am a a u o u e em e o eco e e o o am. . While in EPG, select a program you plan to watch and Press on the remote to display a short description/summary and the classification rating of the program. Press For assistance: [email protected] www.uec.com.au Altech UEC, 2014 to resume TV viewing. 15 LED TV MAIN MENU This section explores the menus of your LED TV. Each menu is outlined in detail to help you get the most from your TV. LED TV MAIN MENU Press LED MENU to launch the TV’s Main Menu. Press the ▲ / ▼ to navigate and select through the five main sections (PICTURE → SOUND → CHANNEL → FEATURE → SET UP). • PICTURE PICTURE MODE Press the ▲ / ▼ to select Picture then Press OK or ► to enter. Press the ▲ / ▼ to select Picture Mode then Press OK or ► to enter. Press ▲ / ▼ to select among the given settings (Standard → Optimal → Vivid → Soft → User). Shortcut Key: While watching TV, Press PMODE on the remote to toggle on the different settings and select. Leave the pop up message to timeout after a selection is made. Note: Brightness (-50 to +50), Contrast (-50 to +50), Sharpness (-5 to +5), Colour (-50 to +50) and Tint (Only available in NTSC, -50 to +50) can only be manually set if the Picture Mode is set to USER. Press OK or ► to enter the Setting. Use the ◄/ ► arrow keys to adjust settings according to your preference. Press MENU to return back to previous MENU or press EXIT to resume TV viewing. For assistance: [email protected] www.uec.com.au Altech UEC, 2014 16 COLOUR TEMPERATURE Press the ▲ / ▼ to select Colour Temperature then Press OK or ► to enter. Press ▲ / ▼ to select among the given settings (Standard → Cool → Warm) and Press OK to select. NOISE REDUCTION Press the ▲ / ▼ to select Noise Reduction then Press OK or ► to enter. Press ▲ / ▼ to select among the given settings (Off → Low → Middle → High) and Press OK to select. RESET Press the ▲ / ▼ to select Reset then Press OK or ► to enter. Press OK to reset all Picture settings to default. For assistance: [email protected] www.uec.com.au Altech UEC, 2014 17 • SOUND SOUND MODE Press the ▲ / ▼ to select Sound then Press OK or ► to enter. Press ▲ / ▼ to select Sound Mode then Press OK or ► to enter. Press ▲ / ▼ to select among the given settings (Standard → Movie → Music → Speech → User) and Press OK to select. Note: Bass (-50 to +50), Treble (-50 to +50) and EQ (100Hz, 300Hz, 1KHz, 3KHz & 8KHz, -50 to +50) can only be manually set if the Sound Mode is set to USER. Press OK or ► to enter the Setting. Use the ◄/ ► arrow keys to adjust settings according to your preference. Press MENU to return back to previous MENU or press EXIT to resume TV viewing. For assistance: [email protected] www.uec.com.au Altech UEC, 2014 18 BALANCE Press the ▲ / ▼ to select Balance then Press OK or ► to enter. Press the ◄/ ► arrow keys to adjust settings (-50 to +50) according to your preference. Press MENU to return back to previous MENU or press EXIT to resume TV viewing. info: Balance adjusts the volume level of right and left speakers. SURROUND Press the ▲ / ▼ to select Surround then Press OK or ► to enter. Press the ▲ / ▼ arrow keys to select among the given settings (Off → On) and Press OK to select. info: Surround ON produces sound that will make you feel like you are sitting in a movie theatre or concert hall. Automatic Volume Levelling (AVL) Press the ▲ / ▼ to select AVL then Press OK or ► to enter. Press the ▲ / ▼ arrow keys to select among the given settings (Off → On) and Press OK to select. Info: Automatic Volume Levelling (AVL) maintains a consistent sound level set by the viewer regardless of the channel or program. If you find yourself constantly changing the volume (i.e. turning it down for gunshots and then up for dialogue; turning volume up for programming and then back down for loud commercials), turning on the AVL is recommended. For assistance: [email protected] www.uec.com.au Altech UEC, 2014 19 DIGITAL OUTPUT (SPDIF) Press the ▲ / ▼ to select SPDIF then Press OK or ► to enter. Press the ▲ / ▼ arrow keys to select among the given settings (Off → PCM→ Bitstream) and Press OK to select. Info: Only select Bitstream and PCM if you are connecting a coaxial cable from the Coaxial output of the TV to an amplifier/AV receiver capable of decoding both Dolby Digital /DTS Bitstreams and PCM audio signals. Select Bitstream - to get Dolby Digital/DTS (stereo, 5.1, etc.) sound content in a program (if supported). Select PCM – to get “CD like” audio sound Select OFF – if you are not using the digital output of the TV (no connection from Coaxial output to an amplifier/AV receiver RESET Press the ▲ / ▼ to select Reset then Press OK or ► to enter. Press OK to reset all Sound settings to default. For assistance: [email protected] www.uec.com.au Altech UEC, 2014 20 • CHANNEL MENU (ATV/DTV) CHANNEL MENU Press the ▲ / ▼ to select Channel then Press OK or ► to enter. Press ▲ / ▼ to select the option that you want to set in the Channel Menu (Channel Management → Country→ TV Connection→ Auto Search → Digital Manual Search → Analogue Manual Search → LCN On/Off) then Press OK or ► to enter. CHANNEL MANAGEMENT Info: Channel Management lets you: -Lock a channel to prevent unauthorised viewing of the channel. Once a channel is locked, a password (default: 0000) is required to access it. -Swap and organise the channels in order of your choice so when you press CH+/- on your remote, the channels are sorted in the order of your preference (i.e. channel order is as follows: 7, 24, 1, 30, 9, etc.). So when you are watching Ch1, the next channel is 30 when you press CH+ and the previous channel is channel 24 if you press CH-. -Skip some channels so the remote will skip these channels. -Delete channels. If you delete a channel, this channel will no longer be in the Channel Manager List and will not be able to tune to this channel anymore. You need to rescan the channels again so that the deleted channels are back on the Channel Manager. -Rename channels For assistance: [email protected] www.uec.com.au Altech UEC, 2014 21 CHANNEL LOCK, SWAP AND SKIP Press ▲ / ▼ to select a channel and press: -Red button to lock a channel. Key in password (default: 0000). A appears on the padlocked column indicating that the channel is locked. Press RED button again to unlock the channel. -Blue button to Swap Channel position. The selected channel will blink. Press ▲ / ▼ to select the other channel to be swapped. Press OK to execute swap. -Yellow button to Skip. A appears on the skip column indicating that the channel is skipped. Press Yellow button again to cancel skip. DELETING A CHANNEL Press ▲ / ▼to select a channel press: -Green button to Delete a channel. Key in password (default: 0000). A appears on the X column indicating that the channel is marked for deletion. The channel is not yet deleted until you Press OK and a pop up message appears “Do you want to delete the selected items?” Use the ◄► arrow keys to select OK/Cancel and press OK to confirm selection. NOTE: You need to rescan the channels again so that the deleted channels are back on the Channel Manager. For assistance: [email protected] www.uec.com.au Altech UEC, 2014 22 RENAMING A CHANNEL Press ▲ / ▼ to select a channel and press: -OK. An onscreen keyboard appears. Use the ◄►▲▼arrow keys to navigate and press OK to select the characters on the keyboard. Press the following buttons to: Red – to type space Green – to toggle between upper/lower case Yellow – to delete previous character Blue – to save the renamed channel Press MENU to return to previous menu. COUNTRY SELECTION Press ▲ / ▼ to select Country and press OK or ► to enter: Use the ▲ / ▼ to navigate and press OK to select the appropriate country, i.e. Australia Press MENU to return to previous menu or press EXIT to resume TV viewing. TV CONNECTION Press ▲ / ▼ to select TV Connection and press OK or ► to enter: Use the ▲ / ▼ to navigate and press OK to select between Antenna or cable depending on your actual connection. Press MENU to return to previous menu or press EXIT to resume TV viewing. For assistance: [email protected] www.uec.com.au Altech UEC, 2014 23 to select Auto Search and Press ▲ / press or ► to enter. Key in password (default: 0000) Use the ▲ / to navigate and press to select on the available options (All → Digital → Analogue). A pop up message “Are you sure?” Use the ◄► to select OK and press to confirm Antenna or Cable depending on your actual connection. Select All if you have both Digital and Analogue TV signals in your area. In Australia, only Digital TV signals are available, hence Analogue Manual Search is unavailable. Press to return to previous menu or press to resume TV viewing. to select Digital Manual Press ▲ / Search and press or ► to enter. Key in password (default: 0000) Use the ▲ / to select Channel Press or ► to enter. Use the ▲ / to select Channel and press to confirm. Use the ▲ / to select Channel and Press to start manual search. Press to return to previous menu or press to resume TV viewing. For assistance: [email protected] www.uec.com.au Altech UEC, 2014 24 • FEATURE MENU FEATURE MENU Press the ▲ / ▼ to select Feature then Press OK or ► to enter. Press ▲ / ▼ to select the option that you want to set in the Feature Menu (Child Lock → Language→ Clock Sleep Timer→ Auto Power Off→ Hearing Impaired → PVR) then Press OK or ► to enter. CHILD LOCK Press the ▲ / ▼ to select Child Lock then Press OK or ► to enter. Key in Password (default: 0000) to access menu. Press OK or ► to enter and use▲ / ▼ to select between ON or OFF, then Press OK to confirm. Press MENU to return to previous menu or press EXIT to resume TV viewing. KEYPAD LOCK Press the ▲ / ▼ to select Keypad Lock then Press OK or ► to enter. Use▲ / ▼ to select between ON or OFF, then Press OK to confirm. Press MENU to return to previous menu or press EXIT to resume TV viewing. For assistance: [email protected] www.uec.com.au Altech UEC, 2014 25 PARENTAL LOCK Press the ▲ / ▼ to select Parental Lock then Press OK or ► to enter. Use ▲ / ▼ to select on the available options (No Block → Block R and above → Block AV and above → Block MA and above → Block M and above → Block PG and above → Block G and Block ALL) then Press OK to confirm. Press MENU to return to previous menu or press EXIT to resume TV viewing. CHANGE PIN CODE Press the ▲ / ▼ to select Change PIN Code then Press OK or ► to enter. Key in Old Password (default: 0000) Key in New Password Confirm New Password Press MENU to return to previous menu or press EXIT to resume TV viewing. LANGUAGE Press the ▲ / ▼ to select Language then Press OK or ► to enter. Use the ▲ / ▼ to select on the available sub menu (OSD Language → 1st Preferred Subtitle → 2nd Preferred Subtitle → 1st Preferred Audio → 2nd Preferred Audio → Digital Teletext Language → Analog Teletext Language) then Press OK or ► to enter the sub menu and choose your preferred language. Press MENU to return to previous menu or press EXIT to resume TV viewing. For assistance: [email protected] www.uec.com.au Altech UEC, 2014 26 CLOCK Press the ▲ / ▼ to select Clock then Press OK or ► to enter. Use the ▲ / ▼ to select on the available options depending on the country set in the Channel Menu, i.e. Australia (New South Wales → Victoria → Queensland → Tasmania→ Western Australia → Northern Territory) and Press OK or ► to confirm selection. Press the ▲ / ▼ to select DST then Press OK or ► to enter. Select ON or OFF depending on the time of the year whether DST is currently on or not and Press OK or ► to confirm selection. Press MENU to return to previous menu or press EXIT to resume TV viewing. SLEEP TIMER Press the ▲ / ▼ to select Sleep Timer then Press OK or ► to enter. Use the ▲ / ▼ to select on the available options (Off → 15min → 30min → 45min → 60min → 75min→ 90min→ 105min→ 120min) and Press OK or ► to confirm selection. Press MENU to return to previous menu or press EXIT to resume TV viewing. For assistance: [email protected] www.uec.com.au Altech UEC, 2014 27 AUTO POWER OFF Press the ▲ / ▼ to select Auto Power Off then Press OK or ► to enter. Use the ▲ / ▼ to select on the available options (Off → 1 Hour → 2 Hours → 4 Hours ) and Press OK or ► to confirm selection. Press MENU to return to previous menu or press EXIT to resume TV viewing. HEARING IMPAIRED Press the ▲ / ▼ to select Hearing Impaired then Press OK or ► to enter. Use the ▲ / ▼ to select On or Off and Press OK or ► to confirm selection. Press MENU to return to previous menu or press EXIT to resume TV viewing. For assistance: [email protected] www.uec.com.au Altech UEC, 2014 28 PVR (DTV Mode) Press the ▲ / ▼ to select PVR then Press OK or ► to enter. Use the ▲ / ▼ to select on the sub menu (Record File Format → Partition Select → Timer→ Record List → Record Start → Timeshift Start) and Press OK or ► to enter the sub menu. Press MENU to return to previous menu or press EXIT to resume TV viewing. Info: Timeshift is a temporary recording stored in the USB Flash Drive when you press PLAY/PAUSE (►II) button while watching live broadcast and resume watching later by pressing the PLAY/PAUSE (►II) button again. This recording is lost if you switch to a new channel. IMPORTANT: PVR function of the DTV is available only if a USB Flash Drive is connected to the USB port of the TV. It is highly recommended to use well known and reputable brands of high speed USB Flash Drive for the PVR functions (recording and timeshift) of this DTV. For assistance: [email protected] www.uec.com.au Altech UEC, 2014 29 RECORD FILE FORMAT Press the ▲ / ▼ to select Record File Format then Press OK or ► to enter. Use the ▲ / ▼ to select between TS or PS and Press OK or ► to confirm selection. Info: A Program Stream (PS) is just a container format for multiplexed audio, video and metadata. Data meant to be stored and copypasted is encoded in a Program Stream. DVD as an example used Program stream for its content. The Transport Stream (TS) is a container format for transmission as well as storage of audio, video and metadata. It can carry multiple ‘programs’ in a single container. This is why Blu-ray uses MPEG Transport Stream for its content. Press MENU to return to previous menu or press EXIT to resume TV viewing. PARTITION SELECT Press the ▲ / ▼ to select Partition Select then Press OK or ► to enter. Press the Green button to Set Default Partition. Press the Red button to format the Hard drive. Press MENU to return to previous menu or press EXIT to resume TV viewing. For assistance: [email protected] www.uec.com.au Altech UEC, 2014 30 TIMER Press the ▲ / ▼to select Timer then Press OK or ► to enter. A pop up window appears on the screen with a list of timer programs both set as auto tune reminder or record. Press: -Green button to Delete All timer programs -Red button to Delete the selected timer program -Blue button to Edit the timer program -Yellow button to Add timer program Pressing the Yellow (Add) or Blue (Edit) buttons will launch the Timer Edit Menu on the screen. Press OK or ► to enter Recorder: Press the ▲ / ▼ to select either ON or OFF then press OK or ► to confirm. Set to ON if you want to record the program. Set to OFF if you want an auto tune reminder. Press OK or ► to enter Type: Press the ▲ / ▼ to select either DTV or RADIO Set to DTV or RADIO if you want to record DTV programs or RADIO programs respectively. Press OK or ► to enter Channel: Press the ▲ / ▼ to select either DTV or RADIO channels (depending on the Type selected). Press OK or ► to enter Start Time/Duration/Date: Press the ▲/ ▼ to increase/decrease the digit and ◄► to move the cursor to the next digit. Press OK or ► to confirm selection Press OK or ► to enter Mode. Press the ▲/ ▼ to select on the available options (Once → Daily → Weekly→ Monthly) Press MENU to Save settings. Press EXIT to resume TV viewing (changed settings are not saved). For assistance: [email protected] www.uec.com.au Altech UEC, 2014 31 Press the ▲ / to select Record List then Press or ► to enter. A pop up window appears on the screen with a list of recordings in the Flash Drive. Press: -▲ / to select a recording and press to playback. - e button to Delete the selected recording. Press to return to previous menu or press to resume TV viewing. to select Record Start then Press the ▲ / Press or ► to enter. Shortcut: Press the button A pop up window appears on the screen “Do you want to start Recording?” Press to start Recording. Press the ▲ / to select Timeshift Start then Press or ► to enter. Shortcut: Press the ► button A pop up window appears on the screen “Do you want to start Timeshift?” Press to start Timeshift. Press press to return to previous menu or to resume TV viewing. The front panel LED indicator starts flashing GREEN and RED alternately during recording and timeshifting. A pop up message appears on the screen “Stop timeshift for channel change?” when changing a channel from a currently viewed timeshifted program. Select and Press to confirm channel change. For assistance: [email protected] www.uec.com.au Altech UEC, 2014 32 • SETUP MENU SETUP MENU Press the ▲ / ▼to select Setup then Press OK or ► to enter. Press ▲ / ▼ to select the option that you want to set in the Setup Menu (OSD Timer→ PC Setup→ HDMI Mode→ Blue Screen→ Aspect Ratio → Reset TV Setting→ Software Upgrade) then Press OK or ► to enter. OSD (On Screen Display) TIMER Press the ▲ / ▼ to select OSD then press OK or ► to enter. Press ▲ / ▼ to select the options available (5sec-> 10 sec→ 15 sec→ 20 sec → 25 sec → 30 sec → Never) then Press OK or ► to confirm selection. Info: OSD Timer is the time you set for the On Screen Display before it times out. PC SETUP Press the ▲ / ▼ to select PC Setup/HDMI then press OK or ► to enter. Select the following options available: Auto Adjust: Press OK or ► to auto adjust H Position/V Position: Press OK or ► to enter and use ◄►to adjust the level (-16 to +16) and press OK to confirm selection. Phase: Press OK or ► to enter and use ◄►to adjust the level (0 to +63) and press OK to confirm selection. Clock: Press OK or ► to enter and use ◄►to adjust the level (-50 to +50) and press OK to confirm selection. HDMI Mode Press the ▲ / ▼to select HDMI then press OK or► to enter. Select Under Scan or Over Scan then press OK or ► to confirm selection. NOTE: PC Setup/HDMI Mode menu is only available if a VGA/HDMI inputs are connected to the TV. BLUE SCREEN Press the ▲ / ▼ to select Blue Screen then press OK or ► to enter. Select ON or OFF then press OK or ► to confirm selection For assistance: [email protected] www.uec.com.au Altech UEC, 2014 33 ASPECT RATIO Press the ▲ / ▼ to select Aspect Ratio then Press OK or ► to enter. Press ▲ / ▼ to select the options available (4:3→16:9→ Full→ Zoom 1→ Zoom 2 → Panorama) then Press OK or ► to confirm selection. Shortcut: Press the ASPECT button on the remote RESET TV SETTING Press the ▲ / ▼ to select Reset TV Setting then Press OK or ► to enter. If Child Lock is ON, you have to key in the password (default: 0000). A pop up message appears on screen “Do you want to reset Database to default?” Press ◄►to select OK and press OK to confirm selection. The TV will reset and will prompt you again to the installation process. For assistance: [email protected] www.uec.com.au Altech UEC, 2014 34 SOFTWARE UPGRADE Please contact Altech UEC technical support for assistance. IMPORTANT: Software upgrade shall be performed by a qualified service technician authorised by Altech UEC. Any unauthorised software upgrade done on the product is not covered by the manufacturer’s warranty. For assistance: [email protected] www.uec.com.au Altech UEC, 2014 35 MEDIA OPERATION MEDIA MENU Media operation is available only if a USB Flash Drive containing your MEDIA files is plugged on the USB port on the side connection panel for DTV. Press SOURCE button. Press the ▲ / ▼ to select MEDIA then Press OK or ► to enter. Press ◄►to select on the available MEDIA options (PHOTO→ MUSIC→ MOVIE→ PVR→ e-BOOK). PHOTO Press ◄►to select PHOTO. Press OK to enter and you will see the root directory of the USB highlighted. Press OK to enter into the contents of the USB. Select the appropriate folders with photo files. Press OK or ►to playback the file. Press I◄◄ / ►►I to view the previous/next photo or you can leave it to do a slideshow presentation. Press ◄ to return to previous folder or Press EXIT to return to previous Menu. NOTE: Some photo file formats may not be supported by the Media Player. For assistance: [email protected] www.uec.com.au Altech UEC, 2014 36 MUSIC Press ◄►to select MUSIC. Press OK to enter and you will see the root directory of the USB highlighted. Press OK to enter into the contents of the USB. Select the appropriate folders with music files. Select the music file and Press OK or ►to playback the file. Press: I◄◄ / ►►I to playback the previous/next music file. ◄◄ / ►► to rewind/fast forward the music file ►II to play/pause the music file to toggle between random play, play all, repeat all and repeat track Press ◄ to return to previous folder or Press EXIT to return to previous Menu. NOTE: Some music file formats may not be supported by the Media Player. For assistance: [email protected] www.uec.com.au Altech UEC, 2014 37 MOVIE Press ◄►to select MOVIE. Press OK to enter and you will see the root directory of the USB highlighted. Press OK to enter into the contents of the USB. Select the appropriate folders with movie/video files. Select the movie/video file and Press OK or ►to playback the file. Press: I◄◄ / ►►I to playback the previous/next movie/video file ◄◄ / ►► to rewind/fast forward the movie/video file ►II to play/pause the movie/video file i to launch available functions and progress bar on the screen to toggle between the Repeat modes (Repeat One → Repeat All→ Repeat Off) to launch Movie Setup and select on the options available (Program → Subtitle→ Audio → Repeat) to set time for playback at the specified point in time. Press 0-9 to enter a value and use the ◄►to move to the next/previous number place. Press OK to jump playback at that specified time. Press ◄ to return to previous folder or Press EXIT to return to previous Menu. NOTE: Some video file formats may not be supported by the Media Player. For assistance: [email protected] www.uec.com.au Altech UEC, 2014 38 PVR Press ◄►to select PVR. Press OK to enter and you will see the root directory of the USB highlighted. Press OK to enter into the contents of the USB. Select the appropriate folders with PVR recording files. Select the recording and Press OK or ►to playback the file. Press: I◄◄ / ►►I to playback the previous/next recording ◄◄ / ►► to rewind/fast forward the recording ►II to play/pause the recording i to launch available functions and progress bar on the screen to toggle between the Repeat modes (Repeat One → Repeat All→ Repeat Off) to launch Movie Setup and select on the options available (Program → Subtitle→ Audio → Repeat) to set time for playback at the specified point in time. Press 0-9 to enter a value and use the ◄►to move to the next/previous number place. Press OK to jump playback at that specified time. Press ◄ to return to previous folder or Press EXIT to return to previous Menu. NOTE: Recordings from other PVRs may not be supported by the Media Player. e-BOOK Press ◄►to select e-BOOK. Press OK to enter and you will see the root directory of the USB highlighted. Press OK to enter into the contents of the USB. Select the appropriate folders with your e-Book files. Select the file and Press OK or ►to launch the file. NOTE: Some e-Book file formats may not be supported by the Media Player. For assistance: [email protected] www.uec.com.au Altech UEC, 2014 39 VAST MODE - SET UP AND OPERATION This LED TV has a built-in Australian VAST certified HD Satellite Digital Receiver. When operating your TV in VAST mode, please make sure to press the VAST.M button on your remote to activate the VAST functions on the remote. Dish Alignment If this screen is being displayed on startup, then the unit is not receiving signal. This is either because the dish is not aligned properly and the signal is weak, or the LNB on the DISH is a frequency other than 10.7GHz. In order to configure your alignment, or change LNB settings, just press ‘HELP’ button on the remote and this screen will appear. For assistance: [email protected] www.uec.com.au Altech UEC, 2014 40 Dish Alignment (Continued) Select your approximate location, press ‘OK’ on the remote and this screen will appear showing you the co-ordinates to align to. NOTE: Compass bearing is aligned to true north) Press ‘OK’ on the remote once more to change the LNB setting and this screen will appear. Now Press the number on the remote which corresponds to your LNB frequency (usually #1) and press ‘OK’. For assistance: [email protected] www.uec.com.au Altech UEC, 2014 41 Dish Alignment (Continued) This screen displaying a satellite finder will then appear. You can now align your dish, once the bar turns green press ‘OK’ on the remote. If the bar is yellow or red then you will need to fine tune your alignment. This screen will then appear. ‘Signal Found’ is displayed at the top of the screen then the unit will begin to scan in services and channel 800 will appear. The smart card can then be registered and activated at: www.mysattv.com.au For any issues with activation call VAST on: PH: 1300 99 3376. For assistance: [email protected] www.uec.com.au Altech UEC, 2014 42 Changing the LNB Setting Press the MENU button to launch the menu. Then, navigate to the following menu screens: • • • • Advanced Options Installation setup Enter the setup pin (The default is 1234) LNB setup Select the LNB type by pressing OK to select first item and use ◄ and ► to scroll. Press OK to confirm selection. Enter in the correct LNB value by pressing OK on the LNB Frequency option and then enter the new LNB value. Press OK to confirm selection. Press OK on the “Accept these settings” button. You will be returned to the Satellite installation menu. Press OK on “Satellite Rescan” to rescan the VAST decoder with the new LNB settings. For assistance: [email protected] www.uec.com.au Altech UEC, 2014 43 R F F R Resetting to factory defaults can be useful if you have changed some settings and lost some functions. Resetting will restore the VAST decoder back to its original configuration and you will lose all personalized settings. The only setting that is not reset is the LNB setting. Please manually edit this setting to the correct value. Advanced Options NOT : To perform factory reset, press Menu default PIN: 1234) Reset to Factroy Defaults. Installation Set UP (enter e e Ethernet functionality is planned for future support. New user manuals will be available on the website when this feature is available. ma a The smart card is paired to this VAST decoder which means that the smart card provided with your VAST decoder cannot be used in any other VAST decoder. Similarly you will not be able to use any other card in your VAST decoder. ee u o There is a reset button on the side panel for VAST. This can be used to reset your VAST decoder in the case of a video freeze for example. The VAST decoder will reboot after a few seconds. For assistance: [email protected] www.uec.com.au Altech UEC, 2014 44 The information plate (i-Plate) displays information about the current and next event at the bottom of the TV screen. You can open the i-Plate by pressing the button on the remote. To change to a different channel carry-out the following: • • Press the button on the remote to change the channel to the next/previous channel respectively, or When the i-Plate is open, press the ◄►arrow buttons on the remote. This allows you to browse the programme information of the other channels without changing the channel you are presently viewing. You can set the timeout value for the information plate (iPlate) from the Information Display Timeouts menu. The i-Plate will only timeout when changing channels from the button. If you have manually opened the i-Plate, the button must be pressed to remove it. The extended i-Plate displays a short description about the currently selected i-Plate programme, see screen on the left. To remove the extended i-Plate, you must press the button again or the button to remove both the extended and i-Plates, see diagram below. For assistance: [email protected] www.uec.com.au Altech UEC, 2014 45 VAST TV GUIDE The TV Guide offers you programming information for up to 8 days (if supported by the broadcaster). To access the TV Guide, press the TV GUIDE button on the remote. Use the ▲▼◄►arrow buttons on the remote to scroll through the TV Guide grid. The CH± buttons will move the grid right/left by 24 hours. Press the DISPLAY (i) button to launch the extended information of the highlighted event. REMINDER POP-UPS There are two types of reminders - banner and autotune, these are used to either “remind” you of a programme or to automatically tune the decoder to a channel at a specific time. Once a reminder is set on the selected programme, the reminder icon will be displayed on the i-Plate indicating to the user that a reminder is set. How to Set a Reminder To set a banner, select the required programme you want to be reminded about (either on the i-Plate or TV Guide) and press the OK button, a B icon appears next to your selected programme, confirming that the banner is set. To change the reminder from a banner to an autotune, press the OK button again, changes the icon to an A confirming that an autotune banner is set. How to Delete Reminder Highlight the programme which the reminder was set on in the i-Plate, then press the OK button until the Cancel reminder appears. You can also delete a reminder from the TV Guide. For assistance: [email protected] www.uec.com.au Altech UEC, 2014 46 BANNER SCREEN A banner reminder will display a pop-up 30 seconds before the start of the programme for which the reminder is set. You may ignore the reminder or choose to tune to the selected programme by pressing the OK button, see the banner screen. AUTOTUNE REMINDER SCREEN An autotune reminder tunes the decoder to another channel, but first displays a pop-up 5 seconds before the start of the programme for which the reminder was set. You may cancel the reminder by pressing the EXIT button or tune immediately to the selected programme by pressing the OK button. If you do nothing, the decoder will automatically tune to the selected channel and the pop-up will timeout, see autotune screen. SUBTITLES Subtitles are enabled by pressing the SUBTITLE button on the remote. A banner will appear showing the user that Subtitles are ON. If subtitles are available on the playout, they will be displayed while subtitles are ON. To disable subtitles, press the SUBTITLE button again. A banner will appear saying “Subtitles OFF”. For assistance: [email protected] www.uec.com.au Altech UEC, 2014 47 This VAST decoder has a parental control feature to control viewing in your home. Access to this feature is controlled by entering the PG PIN code. The default pin for the parental lock is 1234. You can change the default pin in the menus. This PG PIN code will be blocked if entered incorrectly multiple times. If this occurs you must proceed by carrying out a factory reset of the VAST decoder. The PG pin code pop-up will appear when changing channels to a parental blocked program or when a parental blocked program begins. After the third incorrect pin entry, the pin code is locked, you must then do a factory reset of the VAST decoder in the Menus. After the factory reset, the pin entry attempts is reset to 3 as soon the correct PG pin code is entered. All programs that are blocked must comply with the Australian Broadcast standard. A valid PG PIN code is required to enter the Parental Control Menu. For assistance: [email protected] www.uec.com.au Altech UEC, 2014 48 The button ( ) switches the audio ON or OFF. When the volume is ON, a blue bar is visible showing the level your volume is set. When the volume is OFF, the blue bar is extinguished. However, when the button is pressed again, the volume level will be unchanged. For assistance: [email protected] www.uec.com.au Altech UEC, 2014 49 VAST MENU The menu is used to set up the decoder for the user’s environment and preference. Launch the menu by pressing the VAST MENU button on the remote. Navigate through the menu using the ▲▼◄►, OK and EXIT buttons. TELEVISION SETUP TELEVISION SETUP Video and audio setup options can be found by navigating to: • • • • Advanced Options TV Installation Edit the TV Installation menu options with the required settings. Select the “Accept these settings” and press OK button to save the settings. If the HD Output Format option has been changed, it will temporarily switch the resolution and launch a popup on the screen. Press OK on this popup to confirm that the settings are correct. Press EXIT or let the popup time out and the resolution setting will be restored to the previous setting. For assistance: [email protected] www.uec.com.au Altech UEC, 2014 50 ASPECT RATIO To alter the Aspect Ratio, commence the following: 1. 2. 3. 4. 5. Press VAST MENU on the remote On the screen, select ‘Advanced Options' Select 'TV Installation' Select 'Aspect Ratio' Select 'Accept These Settings' and press OK to save these changes. Shortcut: press 'VAST.M', then press 'ASPECT' button on the remote. TIME ZONE SETUP Time zone setup options can be found by navigating to: • • Advanced Options Local Time Select the correct region and the local time will be adjusted automatically. SOFTWARE UPGRADE Software upgrades can be done over the air. When an upgrade is available for your VAST decoder, the menu option will be accessible. If there is no upgrade available, the menu option will be greyed out. Press OK on this option (if it is available) and the new code download will start. Follow the instructions on the download screen. ERROR BANNERS An error banner is displayed when there is a network error or input error from the user or in the instance where signal is lost. For assistance: [email protected] www.uec.com.au Altech UEC, 2014 51 VAST PVR FUNCTIONS - Insert the hard drive’s USB cable into the USB port on the - Turn on the hard drive’s power switch (if applicable). - the “PVR Setup” menu screen. - In this menu, you can see the current status of the hard drive. Hard Drive Format - The hard drive format will take a few minutes. Once completed, the HDD Status should say “Connected and working” Hard Drive Problems RECORDING There are a number of ways to schedule a recording. - Instant Record If you want to record the program you are currently watching, press the record on the remote control. A record start icon will appear and a red dot will appear in the iplate that the event is recording. TV Guide (EPG) Record - - Scroll in the TV Guide to highlight the program you would like to record, that recording is scheduled. IMPORTANT: TV Guide Recording is not possible when the TV is on Standby mode. For assistance: [email protected] www.uec.com.au Altech UEC, 2014 52 Timer Recording - r recording can be - r as a single be accessed. - can start. - recording - r Scroll to the Scheduled List icon and to launch the Scheduled List screen that recording is scheduled. remote r recording change the a fie . the recording. Scheduled List. recording, user manual. IMPORTANT: Timer Recording is not possible when the TV is on Standby mode. For assistance: [email protected] www.uec.com.au Altech UEC, 2014 53 CONF ICTS This is a single tuner decoder which means it can decode only one channel at a time; you have to watch the same channel as is recording or alternatively you can record a channel and view a recorded file from the hard drive. If you try to record 2 programs that overlap on different channels, a message will inform you that there is a conflict. TI S IFT PAUS IV TV P If you press pause while watching live TV, the program will pause until a later time when you can resume viewing. To resume viewing, press the play/pause button again. As soon as the decoder is paused, a timeshift buffer is created. TI S IFT UFF R The timeshift buffer contains a list of programs that have occurred since pausing the decoder. The timeshift buffer is reset when changing channel or when entering the TV Guide. The timeshift buffer contents can be displayed by pressing the green button when the iplate is visible (if a timeshift buffer is available, a line will appear above the iplate indicating its availability). The Event Log, containing the list of programs, will be shown. Use the up/down keys to scroll through the programs in the Event Log. Press OK on the desired program to start playing that program from the beginning. If you press OK to play back a PG-blocked program, the parental pin (default: 1234) will be required before the program starts playing. A green dot indicates the program that is currently playing. A red dot indicates the program that is currently recording (i.e. the program playing on the live TV broadcast on that channel). For assistance: [email protected] www.uec.com.au Altech UEC, 2014 54 TI S IFT UFF R R S T The timeshift buffer will be reset on every channel change. The timeshift buffer will also be reset when it becomes full, which occurs when live TV is paused for 24 hours. Viewing timeshift buffer and Recording: - If you are watching behind live and a scheduled recording starts on another channel, you will be given the option to: Continue watching the timeshift buffer until the point when the decoder performed a channel change to start the recording. Or, cancel the recording and allow the timeshift buffer to continue. If no response is received, the decoder will start the recording but continue playing back the remaining programs in the timeshift buffer. Once the timeshift buffer has been exhausted, the PVR will switch to live TV on the channel on which the recording occurred. P A AC - The playlist contains a list of recorded programs - The maximum of 500 recorded programs are allowed in the playlist. - Use the up and down arrow keys to move through the recorded programs. - Press OK on a program to start it playing back. Programs can be deleted from the playlist by pressing the red button on the selected program. S The playlist is sorted with the newest recorded programs at the beginning of the list. To sort the list in alphabetical order, press the yellow button. To sort the list according to start time, press the yellow button again. For assistance: [email protected] www.uec.com.au Altech UEC, 2014 55 SC U IST SC U IST - The playlist contains a list of programs that will be recorded in the future. - A maximum of 100 programs can be scheduled for recording at one time. - Use the up and down arrow keys to move through the list. Programs can be deleted from the playlist by pressing the red button on the selected program. S To sort the list in alphabetical order, press the yellow button. To sort the list according to recording start time, press the yellow button again. T R Timer recordings can be set up from this screen. Please see the “Timer recording” section of this manual for more info. TUP NU There are a number of configurable options on the PVR. Press the PVR button, scroll to the PVR Setup icon and press OK to launch the PVR Setup menu screen. The screen on the left will be shown. eco e Programs tend to run past the times listed in the TV Guide due to inaccuracies in the broadcast information. The Record Start Offset adds extra time to the start of a recording. (e.g. if a program starts at 10:00am and the Start Offset is set to 5 minutes, the recording will start at 9:55am). The Record Stop Offset adds extra time to the end of a recording. (e.g. if a program ends at 11:00am and the Stop Offset is set to 10 minutes, the recording will stop at 11:10am. Note that these offsets will be adjusted if two recordings are scheduled to record one after the other. Since the decoder can only decode one channel at a time, the offsets will be adjusted accordingly. For assistance: [email protected] www.uec.com.au Altech UEC, 2014 56 um e Pressing the jump back button briefly will jump back by the period of time set in the “small jump backward” setting. Pressing and holding the jump back button will jump back by the period of time set in the “big jump backward” setting. Pressing and holding the fast forward button will jump forward by the period of time set in the “big jump backward” setting (minimum 10 minutes). ae co ec a e To remove your hard drive, press OK on “Safely disconnect hard drive” before removing. This will safely shut down the drive and ensure all recordings are stored securely. - F Press OK on the “Hard drive format” option to correctly configure the hard drive for use the first time it is connected to the PVR. Format hard drive can also be used to erase all recorded programs on the hard drive. If the hard drive becomes corrupted and unusable, the “Hard drive format” option can recover the drive, but all recordings will be lost. INFO - To view the information about your hard drive, press the PVR button, scroll to the PVR Info icon and press OK - The PVR Info screen will be displayed. - The green/red bar is a graphical representation of the hard drive storage capacity. Green indicates available space, red indicates space used by recordings. - Press OK to launch the Help screen to provide more information about the features. For assistance: [email protected] www.uec.com.au Altech UEC, 2014 57 DTV TROUBLE SHOOTING Problem Solution No picture or sound Picture is OK but no sound Remote control does not work No TV signal No external video signal Picture lacks colour or is too dark All channels lose colour intermittently Check the power supply is plugged in and turned on Make sure the volume is not muted; increase volume level Check the battery polarities; replace with new batteries Check the source is set to DTV. Check the antenna signal status Check the input source is set correctly Check colour brightness and contrast settings Check the antenna is connected properly. Check for any antenna damages Check Antenna Poor reception, loss of colour Check Antenna Lead Call a professional antenna installer Diagonal stripes on picture Ghost images appear USB media files do not work Check the flash drive is FAT 32 formatted Photo, Music, Video, PVR and e-Book format files might not be supported Check the flash drive is FAT 32 formatted Use reputable high-quality, high-speed USB 2.0 HDD or USB stick Timeshift and PVR do not work VAST PVR FUNCTION TROUBLE SHOOTING Problem Solution Hard Drive Not Connected Check that the power is connected to the hard drive, and the power switch is turned on (if applicable). Check that the USB cable is connected from the hard drive to the USB port at the rear of the decoder properly. Hard Drive has Incorrect Format Press PVR to launch the PVR menu, scroll right to the PVR Setup icon, and press OK to launch the PVR Setup screen. Scroll down to the format drive option Press OK to start the format, and then OK to confirm. The format will take a few minutes to complete. When the format is complete, the HDD status will show “Connected and working”. There is no more space on the hard drive for new recordings, you will need to delete some recordings or insert a new hard drive. Hard Drive is Full To delete recorded programs: -Press the PVR button -Press OK on the Playlist icon to launch the playlist. -Scroll to a program you wish to delete. -Press the red button to delete, and then OK to confirm. Hard Drive Space only says 1TB when I have Connected a 2TB Drive The PVR Ready extension supports a maximum of hard drive capacity of 1TB (1000GB). If your hard drive has a larger capacity, the PVR will only use 1TB. dŝŵĞďĂƐĞĚZĞĐŽƌĚŝŶŐǁŽŶ͛ƚ^ĐŚĞĚƵůĞďĞĐĂƵƐĞŽĨ/ŶǀĂůŝĚsĂůƵĞƐ Please check that the date you have entered is in YYYY-MM-DD format, and the time/duration is in the HH:MM format. Please check that the date and time are not in the past. The maximum recording duration for Timebased recordings is 24 hours, please ensure that the duration is shorter than “24:00” For assistance: [email protected] www.uec.com.au Altech UEC, 2014 58 WARRANTY Congratulations on your purchase of an Altech UEC product. Altech UEC’s commitment to quality includes our after sales support and servicing. Should this product develop a manufacturing fault, Altech UEC hereby provides you with a warranty against defects as follows: Warranty The product is guaranteed to be free from defects in workmanship and parts for a period of 12 months from the date of purchase. Defects that occur within this warranty period where the product is installed correctly and used under normal operation and care will be replaced, repaired or refunded at our sole discretion. The benefits of this warranty are in addition to all rights and remedies in respect of the product that the consumer has under the Competition and Consumer Act 2010 and similar state and territory laws. Our goods come with guarantees that cannot be excluded under the Australian Consumer Law. You are entitled to a replacement or refund for a major failure and compensation for any other reasonably foreseeable loss or damage. You are also entitled to have the goods repaired or replaced if the goods fail to be of acceptable quality and the failure does not amount to a major failure. Proof of Purchase: This warranty is valid for the original purchase and is not transferable to another unit. Please keep your purchase receipt or tax invoice as proof of purchase and proof of date purchased. Extent of Warranty: This warranty is limited to workmanship or parts. All defective products will be repaired or replaced. The warranty does not cover batteries or any other consumable. Normal Wear and Tear: This warranty does not cover normal wear and tear to the product or remote control unit. Exclusions: The warranty does not cover: I. Any defect caused by an accident, misuse, abuse, improper installation or operation, lack of reasonable care, unauthorized tampering or modification, loss of parts or attempted repair by a person not authorized by Altech UEC. II. Any failure that is attributable to incorrect installation, operated or maintained in accordance with the operating instructions provided with the product. III. Any product that been used for the purpose other than domestic use. IV. Any damage caused by improper power input or improper cable connection. V. Any damage resulting from unauthorized software upgrade done by unauthorized and non-qualified technicians. For assistance: [email protected] www.uec.com.au Altech UEC, 2014 59 Complete the details on this form and retain in the event of warranty service being required (purchase receipt attached) PURCHASER’S NAME:__________________________________________________________________ ADDRESS CITY STATE POST CODE:________________________________________________________ DATE OF PURCHASE INVOICE/SALES DOCKET NO:___________________________________________ STORE DETAILS:_______________________________________________________________________ How to Make a Claim: This warranty against defects is provided by Altech UEC, Level 2, 27 Sirius Road, Lane Cove West, NSW 2066, phone (02) 9425 5777. If a defect in the product is detected within 12 months, you are entitled to claim a warranty. Please first contact the supplier that you made your original purchase from or send your warranty claim to: Altech UEC (Pty) Ltd 27 Sirius Road Lane Cove West, NSW 2066, Australia Fax: (02) 9425 5799 Altech UEC Technical Support Phone: (02) 9425 5777 (Operating Hours Mon-Fri 8.30 a.m. -5.30 p.m. EST) Email: [email protected] For assistance: [email protected] www.uec.com.au Altech UEC, 2014 60 LEGAL MATTERS to pu Introduction is desi to nd cted se the with this product networ ope to of this product f he content o thi or is e ft ope the pecific si s to the d used se incorpo ed in this product son which e the ope or se ces on anua are u ect to change without prior notice. DIY Installations Disclaimer rie to co r e or the potent r in this of it is not e ROVI his product incorpo es cop ht protection t int c ropert hts se of this cop ht protection t orpo ntended f t erse en t de tr d of For assistance: [email protected] www.uec.com.au ense fr ories or is p r s ries Altech UEC, 2014 en ch nd e 61 DVB is a registered trademark of the DVB Project. HDMI, the HDMI Logo, and High-Definition Multimedia Interface are trademarks or registered trademarks of HDMI Licensing LLC in the United States and other countries. e ec ua o e The whole of the AL-32TVCM421PVR VAST Certified 32 Integrated LED/LCD HD TV User Manual, including the graphics, menus and information contained herein are the subject of intellectual property rights, including copyright, under domestic law and international conventions. All rights are reserved. All intellectual property rights of this product are owned by Altech UEC. Hacking of the conditional access system or facilitating anyone else doing so is STRICTLY PROHIBITED. Failure to adhere to this prohibition is a criminal offence. Some components are licensed under GPL and LGPL licenses. For further information regarding the licenses and which components are licensed under these licenses please visit http://www.uec.com.au. The source code for these components can be obtained by written request to: The Technical Support Team, Altech UEC (PTY) LTD 27 Sirius Road Lane Cove West NSW 2066 +61 2 9425 5777 Please note that there is a fee associated with the written request to cover shipping, handling, processing and the cost of media. Altech UEC reserves the right to exclude or include GPL/LGPL components from its products as it sees fit. Digital Satellite Technology is rapidly evolving. As a result of this, it is not possible to predict what the requirements will be in a few years’ time. The manufacturer cannot guarantee that this product will be able to run all available services in future. For assistance: [email protected] www.uec.com.au Altech UEC, 2014 62 HELP AND INFORMATION Websites Digital TV from Satellite Manufacturer (Altech UEC) Information on VAST www.mysattv.com.au www.uec.com.au www.vastdigital.com.au TELEPHONE Altech UEC Austrailia +61 2 9425 5777 EMAIL Sales Support [email protected] [email protected] If you have comments, suggestions or want to provide feedback on the product, visit www.uec.com.au. The smartcard is unique to each VAST decoder and cannot be replaced or changed with another VAST decoder without first contacting the call centre. The contents of this manual are subject to change without prior notice. For the latest AL-32TVCM421PVR VAST User Manual go to website www.uec.com.au. The network operator is entitled to upgrade the software by downloads to your VAST decoder, to ensure that only approved services are being received, and that the VAST decoder remains compatible with the network's platform. For assistance: [email protected] www.uec.com.au Altech UEC, 2014 63 For assistance: [email protected] www.uec.com.au Altech UEC, 2014 64 For assistance: [email protected] www.uec.com.au Altech UEC, 2014 65 For assistance: [email protected] www.uec.com.au Altech UEC, 2014 66 For assistance: [email protected] www.uec.com.au Altech UEC, 2014 67 www.uec.com.au Altech UEC, 2014