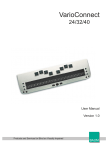
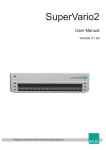
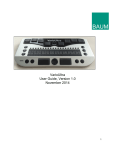
1
VarioPro 64 / VarioPro 80
User manual
BAUM
BAUM
VarioPro 64 / VarioPro 80
User manual
V 1.1 April 2006
(c) 2005 Copyright by
BAUM Retec AG
,QGHU$X,
D-69257 Wiesenbach
Tel. +49 (0) 6223 / 4909 -0
e-mail: [email protected]
All rights reserved. No part of this manual may be reproduced, translated or
transmitted in any form or by any means, electronic or mechanical, including
photocopying, microfilming, recording, or information recording and retrieval systems,
for any purpose, without the express written permission of Baum Retec AG.
1
1 Table of contents
1
2
3
4
Table of contents............................................................................................... 2
Introduction: VarioPro 64 and VarioPro 80 ..................................................... 3
About this manual ............................................................................................. 4
Description of the device.................................................................................. 5
4.1
Keys and operators ...................................................................................... 5
4.2
Mains adapter and power supply.................................................................. 6
4.3
Theft protection ( Kensington Desktop MicroSaver) ..................................... 6
5 The VarioPro System Menu .............................................................................. 8
5.1
The lines of the basic System Menu and their meaning. .............................. 9
5.1.1
First line: name of the Braille display..................................................... 9
5.1.2
Second line: Status ............................................................................... 9
5.1.3
Third line: serial number...................................................................... 10
5.2
The advanced System Menu...................................................................... 10
5.2.1
Fourth Line: protocol/emulation........................................................... 10
5.2.2
Fifth line: Communications Channel.................................................... 11
5.2.3
Sixth line: Auto-power-off .................................................................... 11
5.2.4
Seventh line: Sound volume................................................................ 11
5.2.5
Eighth Line: dot strength ..................................................................... 12
5.2.6
Ninth line: Restore factory settings...................................................... 12
5.2.7
Tenth line: Quit menu and save settings ............................................. 12
5.3
Self-test ...................................................................................................... 13
5.4
Switch on/off, Reset ................................................................................... 13
5.5
Firmware updates....................................................................................... 14
6 Installation and connection ............................................................................ 15
6.1
Connection types........................................................................................ 15
6.1.1
Serial connection................................................................................. 15
6.1.2
USB port.............................................................................................. 15
6.2
Connecting to Virgo 4................................................................................. 16
6.3
Other screen readers ................................................................................. 17
7 Key assignment ............................................................................................... 18
7.1
Virgo 4........................................................................................................ 18
7.2
Other protocols........................................................................................... 19
7.2.1
As Handy-Tech (HT) ........................................................................... 19
7.2.2
As PowerBraille (PB)........................................................................... 19
8 Help with malfunctions ................................................................................... 20
9 Technical details ............................................................................................. 21
9.1
VarioPro 64 ................................................................................................ 21
9.2
VarioPro 80 ................................................................................................ 21
10 Additional modules ......................................................................................... 22
10.1 Overview .................................................................................................... 22
10.1.1 Audio module ...................................................................................... 23
10.1.2 Speech module ................................................................................... 24
10.1.3 Telephony module............................................................................... 25
10.1.4 Status module ..................................................................................... 26
10.1.5 “Screen magnification” module............................................................ 27
10.2 Connecting the modules to VarioPro.......................................................... 28
11 Contact details................................................................................................. 29
2
2 Introduction: VarioPro 64 and VarioPro 80
Congratulations on buying your new VarioPro. You have just acquired one of two
new Braille displays which offer a new dimension in functionality, flexibility and
adaptability.
VarioPro is a new Braille display with either 64 or 80 Braille cells designed primarily
for workstation usage.
The display has universal and simple connections:
• USB – a straightforward cable connection
• Serial – the standard communication channel/port (even for older laptops)
The highly robust casing is made from light metal with an integrated non-slip plastics
upper surface for installation of the keyboard. Such techniques are found in modern
camera bodies and are already used in Pronto. They allow us to construct very
elegant, stable and robust equipment.
The new VarioPro Braille displays allow additional modules to be attached – a new
milestone in the development of useful equipment for blind PC users. Their
outstanding feature is the combination of the most up-to-date technology with a triedand-tested simple design.
3
3 About this manual
Chapter 4 contains a description of the device and its power supply, and Chapter 5
contains general information and the System Menu settings.
Chapter 6 describes the installation process and gives details on how to connect
VarioPro to various communication channels/ports.
Chapter 7 describes the Braille key functions under various screen readers.
The screen reader determines which functions are assigned to the Braille keys, and
thus how VarioPro works with such applications.
Chapter 8 contains hints and tips to help sort out minor errors yourself.
Chapter 10 describes the various additional modules, their connection and
application.
At the end of the manual you will find details of our branches and our Hotline number
which you are welcome to ring with questions and suggestions.
We hope you enjoy working with your new Braille display.
Baum Retec AG.
4
4 Description of the device
4.1 Keys and operators
VarioPro does not require its own on/off switch and is powered from the PC or from
the mains. As soon as VarioPro receives power it switches itself on and emits a
corresponding tone.
On the front are the Braille cells – 64 with VarioPro 64, and 80 with VarioPro 80.
Above each cell is a cursor routing- or positioning-key.
On both the left and right of the Braille cells are three small round keys, known as
Display keys. On the left they are numbered D1 to D3 from top to bottom, and on the
right D4 to D6 from top to bottom (cf the numbering of the Braille dots) and can be
pressed individually or in combinations.
On the front edge there are wide cylindrical ‘Rollbars’ (three with VarioPro 64 and
four with VarioPro 80). They are easy to use with the thumb and allow upward and
downward movement with perceptible and quiet switching movements.
The functions of the operators vary according to the screen reader used (Virgo,
Blindows, Window Eyes, JAWS or other screen readers).
5
The communications channels/ports are located in the recess at the back of the
device on the right, approximately 2cm deep. On the far left is the round socket for
the serial port; in the middle the square socket for the USB port (mini-USB port) and
on the far right the mains adapter socket (5 volt).
The non slip plastics upper surface is an ideal support for the PC keyboard.
The cover on both ends can be unscrewed to allow additional modules to be
connected, thus allowing VarioPro to be adapted to suit your needs. The modules
can be connected to the left or right of VarioPro. Several can be connected together
(see Chapter 10).
4.2 Mains adapter and power supply
VarioPro Braille displays are powered from the PC with a USB cable connection.
When using the serial port the mains adapter must be used to acquire the correct
level of power: insert the adapter’s small plug into the right-hand socket on the back
of the device and then plug the adapter into a mains outlet. Please use only the
original mains adapter for VarioPro to avoid possible damage.
NB!!
Under no circumstances should the adapter from an older Vario40 or Vario80 be
used, as they work at a much higher voltage which will almost certainly damage your
VarioPro.
4.3 Theft protection ( Kensington Desktop MicroSaver)
To protect VarioPro from theft, particularly where it is used in a public area, the
optional Kensington MicroSaver can be installed. VarioPro’s casing has been
specially designed so that it can be installed.
Kensington is the industry standard anti-theft device for computers (it can be bought
in specialist shops).
It consists of the following:
6
- MicroSaver (1.8m steel cable with a locking mechanism and 2 keys)
- 3 stick-on anchor plates which can withstand 370kg of pull
- fixing kit (cleaning pad, special glue).
Install as follows:
- on the underside of the main VarioPro module there is a circular recess with a
positioning stud where the anchor plate is to be stuck
- instructions for sticking the plate are included with the Kensington MicroSaver
- the steel cable threaded through the anchor plate is then pulled out through a gap
at the back of the casing.
7
5 The VarioPro System Menu
As soon as VarioPro receives power, either by plugging in the mains adapter or
connecting it to a PC with the USB cable, the first lines of the System Menu appear
on the Braille cells. This menu contains information relating to the Braille display.
If necessary, the settings can be changed on the advanced System Menu.
Usually you will pay no attention to the System Menu, as it disappears as soon as
data are transferred from the PC to the Braille display or your screen reader reads
out some text, so that you can work with the Braille display.
The basic System Menu consists of three lines giving the name of the device, its
serial number, the communication channel/port being used, and the
protocol/emulation used.
It will often prove necessary to install special settings or values, which must be done
on the advanced System Menu which can be accessed directly with its own key
combination.
The lines in the System Menu can be accessed upwards with D1 (top left), and
downwards with D3 (bottom left). Whenever the System Menu is called up the first
line will be displayed.
Items can be selected in the advanced System Menu by pressing one of the cursor
routing/position keys above the display. The active or selected item is indicated with
Braille dots 7 and 8.
The lines of the System Menu will be described below.
To quit the advanced menu, browse through to the “Menu off” option and press a
cursor routing/position key over the word “off”; this is done automatically as soon as
data has been exchanged between the PC and the Braille display.
All settings are automatically saved when quitting the System Menu and remain
active until next amended.
NB:
How do you open the System Menu when Vario is connected to the computer?
Interrupt the power supply briefly by pulling out the USB cable or mains adapter cable
and plugging it back in.
The connection between VarioPro and the computer application will thus be lost and
the System Menu will appear. Then simply move the cursor to quit the System Menu
and return to the previous application.
If the System Menu keeps disappearing because the screen reader is constantly
exchanging data, either close the screen reader down or interrupt the USB
connection and connect the mains adapter.
8
5.1 The lines of the basic System Menu and their meaning.
NB:
If reading this document as an RTF file on the PC, the BlackBrl.ttf font must be
installed from the accompanying installation CD so that the Braille version of the
menu can be seen, otherwise only cryptic symbols will appear. As each line is also
written in text, this is not strictly necessary.
5.1.1 First line: name of the Braille display
This is the first entry in the System Menu. It displays the name of the Braille display.
Menu 1: - Device Name
BAUM VarioPro 64
BAUM VarioPro 64
or
BAUM VarioPro 80
BAUM VarioPro 80
5.1.2 Second line: Status
This shows the communications channel/port in use, the protocol (emulation) and the
version number of the software.
Menu 2: - “Status”
Status: ccc pppp ver.xxx
Status:ccc pppp ver.xxx
ccc = communication channel (auto, USB or serial (COM))
ppp = active protocol
ver.xxx = software version
9
5.1.3 Third line: serial number
This shows the serial number of the Braille display
Menu 3: “Serial number”
Serial number: xxxxxxxx
Serial number: xxxxxxxx
5.2 The advanced System Menu
The additional options here allow you to optimise the set-up of your Braille display.
You can select the communication channel/port and protocol (emulation), change the
values of the auto-power-off and volume, or restore the factory settings.
All settings are saved as soon as you quit the System Menu.
All current and selected settings are indicated by Braille dots 7 and 8 underneath the
relevant value.
To select, simply press one of the cursor routing/position keys above the relevant
value.
Open the advanced System Menu by first pressing both outer cursor routing/position
keys, and then both upper display keys (P1, P80, D1, D4, or P1, P64, D1, D4). Hold
all four keys for at least 5 seconds or until the device beeps.
The menu will open at the last entry “Menu off”; use D1 and D3 to browse through the
menu options.
5.2.1 Fourth Line: protocol/emulation
The protocol (emulation) can be set here. The following protocols are available:
default (the new BAUM protocol)
vario 80 (old BAUM protocol)
ht (Handy-Tech)
pb1 (PowerBraille)
pb2 (PowerBraille)
Menu 4: Protocol
Protocol: default vario80 ht pb1 pb2
10
Protocol: default vario80 ht pb1 pb2
The appropriate protocol (emulation) for your particular screen reader must be
selected.
5.2.2 Fifth line: Communications Channel
Select the port to be used for data transfer between the PC and the Braille display.
‘Auto’ is the default setting which means that the correct port will be selected
automatically.
Menu 5: Comm. Channel
Comm. channel: auto usb serial
Comm. Channel: auto usb serial
5.2.3 Sixth line: Auto-power-off
Set the length of time after which the Braille display will shut down automatically,
when no more data are to be transferred and no keys pressed. The options are: 5
minutes, 15 minutes, 1 hour, 2 hours, never. Press the cursor routing/position key
above the desired setting (15 minutes is the standard length).
Menu 6: Auto-power-off
Auto-power-off: 5min 15min 1h 2h never
Auto power off: 5min 15min 1h 2h never
5.2.4 Seventh line: Sound volume
Here the sound volume can be adjusted, and the tones can be switched on and off.
A sample tone will be emitted after changes to the volume are made.
Menu 7: Sound volume
Sound volume 0 1 2 3 4 5
Sound volume: 0 1 2 3 4 5
11
5.2.5 Eighth Line: dot strength
The strength with which the pins in the Braille cells are set can be amended here, i.e.
set them to feel hard and sharp, or soft and round.
Menu 8: Dot strength
Dot strength: 1 2 3
Dot strength: 1 2 3
5.2.6 Ninth line: Restore factory settings
This option allows the Braille display settings to be restored to their status at the time
of delivery. Click on one of the cursor routing/position keys above a word.
Menu 9: Restore factory settings
Restore factory settings
Restore factory settings
The factory settings are as follows:
- Comm. Channel to PC:
- Protocol:
- Auto-power-off:
- Dot strength:
- Sound volume:
(auto)
default (new BAUM protocol)
after 15 minutes
3
3
“BAUM VarioPro (xxxxxxxx)”, where xxxxxxxx
is the serial number.
5.2.7 Tenth line: Quit menu and save settings
Press one of the position keys above the word “off”. When quitting the menu all
changes will be saved automatically, and the Braille display will resume its normal
user status.
Menu 10: “menu off”
Menu off
12
Menu off
All settings will now be saved automatically.
Press one of the cursor routing/position keys above the word ”off” to execute this
command.
5.3 Self-test
The Self-test function can only be accessed from the advanced System Menu.
In the System Menu, press the first two and the last two cursor routing/position keys
on the Braille display together to launch Self-test. The dots of each Braille cell will be
activated one after the other and then cleared; the pressed keys will also be
displayed. As soon as data have been transferred from the PC to the Braille display
the Self-test will end and the display will return to normal.
Once Self-test has been launched, dot B1 then B2, B3, B7, B4, B5, etc. will be set on
each cell until all 8 dots are set. They will then be cleared one by one until all are
cleared. This process is then repeated.
Press and hold the keys as follows:
D1 to set dots B2B5 in the first cell
D2 to set dots B3B6 in the first cell
D3 to set dots B7B8 in the first cell
D4 to set dots B2B5 in the last cell
D5 to set dots B3B6 in the last cell
D6 to set dots B7B8 in the last cell
Turning a roll bar moves a pattern of B2B3B5B6 to the left or right depending on the
direction.
Pressing a roll bar produces a dash with B7B8 above this roll bar.
Pressing a cursor routing/position key sets B1B4 in the Braille cell underneath.
5.4 Switch on/off, Reset
The Braille display switches on when power is supplied to it, and switches off when
the power supply is disconnected. Power is supplied either through the mains
adapter with a serial port connection, or via a USB cable if VarioPro is connected to
the PC’s USB port. Appropriate tones are emitted when the display is switched on
and off. There is no on/off switch.
When communication ceases with the PC and no keys are pressed on the Braille
display, the device will switch off automatically once the ‘auto-power-off’ time span
13
has elapsed. The elapsed time will be reset to 0 whenever a key is pressed or data
transferred from the PC.
When the device is switched on and either a USB or serial connection established, if
the connecting cable is pulled out or the PC switched off, the device will switch off
after 1-2 minutes provided no valid signal is transmitted.
When the device is switched off and the USB cable is inserted, the device will ‘wake
up’.
5.5 Firmware updates
So that you can prepare yourself for the future and always acquire the latest VarioPro
developments, it is now possible to update the Braille display’s software. All you have
to do is to connect the Braille display to the PC and the update program will
automatically bring the display up-to-date. This program is so designed that the
Braille display can still be used and a new update attempted should an update fail.
The update can be launched with both USB and serial connections.
During a software update the Braille display beeps every second and a status bar
appears on the Braille cells.
14
6 Installation and connection
6.1 Connection types
Depending on the operating system used VarioPro can be connected to a variety of
communication channels/ports.
6.1.1 Serial connection
Before connecting, make sure that the power supply to the computer is switched off.
Operating system:
- Windows 2000/XP
VarioPro can be connected to one of the serial ports COM1 to COM4 with the cable
supplied.
One end of the serial cable has a 9-pole so-called SUB-D plug which plugs into the
serial port on the PC. It has the same trapezoidal shape as the port itself to avoid any
confusion. Make sure that the power supply is cut off before plugging it in.
The other end of the cable has a 3-pole round plug, similar to that found on
headphones. This end goes into the left-hand round serial socket in the recess at the
back of the device on the right.
To provide power to the Braille display plug in the mains adapter. Insert the adapter
cable plug into the right-hand socket in the recess at the back of the device on the
right, and plug the other end into a mains outlet.
If your computer (Notebook) has Power Management we recommend that it be
switched off in BIOS and/or Windows, otherwise communication problems between
VarioPro and the computer may arise.
6.1.2 USB port
Operating system:
- Windows 2000/XP
The widely-used USB port, now present on every PC and Notebook, has almost
completely superseded the serial port. The main advantages of USB are its plug-andplay facility and its speed. USB devices may be plugged into, and unplugged from
active devices without fear of damage. A live screen reader may not necessarily
continue to drive a Braille display, however, without being restarted.
15
When the Braille display is connected to the PC, the new hardware will be recognised
immediately and the PC will search for a driver. Insert the driver CD and let the PC
search for the new driver on it. This will then be installed automatically – follow any
instructions as appropriate.
The driver installation dialog will appear once again – let the PC search for, and
automatically load the appropriate driver again.
NB:
Installation of the two drivers is absolutely essential so that VarioPro can talk to the
PC via the USB port. One of the drivers installs the correct USB access (the virtual
COM-port), and the other the Braille display.
During installation you may receive a warning that the driver is not certified by
Microsoft - install it anyway.
When VarioPro has been connected to the USB port and the driver installed from the
CD supplied, the Braille display will be contacted as though connected to a serial
port; the driver is simulating a so-called virtual serial port. This has the advantage
that VarioPro can be used with screen readers that can only support serial Braille
displays.
Installing this driver means that in future a USB port on the computer will be regarded
as a serial port, e.g. as COM3. To ascertain which virtual COM-port has been
created, go to the Start menu on the PC, select Settings > Control Panel > System;
on the ‘Hardware’ tab select ‘Device manager’ and look through the list of ports.
Insert the rectangular plug of the USB cable into the USB port on the computer.
The other end of the cable has a small square plug which fits into the USB port on
VarioPro, i.e. the middle socket in the recess at the back of the device on the right.
USB ports do not talk to all operating systems. We recommend Windows XP.
Windows 2000, Me and 98 support USB, but DOS, Windows 3.11, 95 and NT do not.
When connecting the Braille display simultaneously to USB and serial ports, and the
Com. channel setting “auto” is selected, the USB port will only supply power to the
Braille display, and data will be transferred via the serial port.
6.2 Connecting to Virgo 4
Virgo 4.6 and later versions provide for direct operation of the Braille display.
Open the Virgo menu, select Braille/Braille display (or Braille options/Braille display)
and then select ‘VarioPro 64’ or ‘VarioPro 80’. From the dropdown list headed
“Connection:” select the serial port in current usage (USB will be treated as a virtual
serial port). Before making the connection make sure that the protocol in the System
Menu has been set to “default” (new BAUM protocol [see Chapter 5.2.1])
16
6.3 Other screen readers
A driver is under development for Blindows, but in the meantime VarioPro can be
used in the VarioPro 80 emulation.
A driver is already available for JAWS should you not wish to use the emulation of
another Braille display. The JAWS driver is in the JFWDRV directory of the VarioPro
installation CD supplied. It also contains the “Readme-JFWDRV-ENG.txt” file with
information on the current version of the driver.
A driver will soon be available for Windows Eyes, but for the time being other
emulations can be used.
To use the Braille display with a screen reader for which there is currently no driver,
switch VarioPro to one of the emulations for other Braille displays. In the advanced
System Menu, select a suitable Braille display emulation and apply this display to
your screen reader. Emulations for “Baum” (Vario 80), “Handytech” and
“PowerBraille” are available. Under “port”, give the serial port to which the Braille
display is currently connected (USB will be treated as a virtual serial port).
17
7 Key assignment
Standard assignments for commands and screen navigation, depending on the
screen reader program.
7.1 Virgo 4
D1 = Previous element, or upwards
D2 = Braille display scroll left
D3 = Next element, or downwards
D4 = Upwards in hierarchy
D5 = Braille display scroll right
D6 = Downwards in the hierarchy
D1D3D6 = Display attribute with dots 7,8 on/off
D3D5D6 = Cursor with all dots set/underlined
D2D3D6 = Switch between 6/8-dot Braille
D2D5 = Speech on/off
D1D4 = Go to beginning of foreground window
D3D6 = Go to end of foreground window
D1D3D4D6 = Read out current foreground window
D1D2D3 = Continuous reading
D4D5 = Shift navigation to mouse pointer
D5D6 = Shift navigation to focus
D1D2 = Cursor up
D2D3 = Cursor down
D1D3 = Shift-Tabulator
D4D6 = Tab key
D1D2D3D5 = Return
D3D4 = Simulate Alt+F4
D1D3D4 = Minimise all windows
D2D3D4 = Launch Start menu
D1D2D3D4D5 = Quick menu on/off
D1D2D3D6 = Switch Virgo menu on/off
D1D2D4 = Update Virgo files
D1D2D5 = Window-specific Help
D2D3D5 = Display "Program Wizard"
D2D5D6 = De/activate "Screen Wizard"
D1D6 = Navigation to Bookmark No. 1
D1D2D6 = Navigation to Bookmark No. 2
D1D4D6 = Navigation to Bookmark No. 3
D1D4D5D6 = Navigation to Bookmark No. 4
D1D5D6 = Navigation to Bookmark No. 5
D1D2D4D6 = Navigation to Bookmark No. 6
D1D2D4D5D6 = Navigation to Bookmark No. 7
D1D2D5D6 = Navigation to Bookmark No. 8
D2D4D6 = Navigation to Bookmark No. 9
18
7.2 Other protocols
When switching to another display protocol the key assignments are coordinated with
the currently simulated display type or screen reader.
7.2.1 As Handy-Tech (HT)
In the Handy-Tech emulation the keys are assigned as follows:
D1 = HT-key up
D2 = HT-key B1
D3 = HT-key down
D4 = HT-key B2
D5 = HT-key B3
D6 = HT-key B4
7.2.2 As PowerBraille (PB)
In the PowerBraille emulation the keys are assigned as follows:
D2 = Left PB-key
D5 = Right PB-key
D1 = left rocker up
D3 = left rocker down
D4 = right rocker up
D6 = right rocker down
D2D6 = convex PB-key
D3D5 = concave PB-key
19
8 Help with malfunctions
Minor things can happen which visibly affect the performance of a Braille display but
which cannot be called a “real malfunction. A few examples and hints are described
below.
1. The Braille display shows no characters.
Check that the device is switched on.
Has a program been launched which is accessing the Braille display’s port?
Check that the correct protocol has been loaded.
Was the correct port selected when the screen reader was loaded?
2. The display is seemingly showing the wrong characters.
Check the cable connection to the computer.
3. After switching on there is no reaction from the display either when the
System Menu is called up or a computer application is launched.
If VarioPro does not react, turn off the power supply, pull out all plug connections and
reinsert them after ca. 2 minutes. If the System Menu is still not displayed or the pins
flicker quickly, please contact the Service department.
4. VarioPro is switched on and the display suddenly stops reacting.
You have not used the display for longer then the auto-power-off time limit. Move the
cursor to ‘wake up’ the display.
20
9 Technical details
9.1 VarioPro 64
Desktop 64-cell Braille display for universal connection
Dimensions: 458 x 23.9 x 260 mm (width x height x depth)
Mass: 3010g
Function keys: three keys on both the left and right of the Braille display, one key
above each Braille cell and three rollbars on the front edge; designed for various
functions and optimised usage.
Ports: USB, serial
Screen Readers: with VIRGO, Blindows, JAWS, Window Eyes or other screen
readers.
Power supply: via the USB port, or mains adapter with a serial connection
9.2 VarioPro 80
Desktop 80-cell Braille display for universal connection
Dimensions: 561 x 23.9 x 260 mm (width x height x depth)
Mass: 3720g
Function keys: three keys on both the left and right of the Braille display, one key
above each Braille cell and four rollbars on the front edge; designed for various
functions and optimised usage.
Ports: USB, serial
Screen Readers: with VIRGO, Blindows, JAWS, Window Eyes or other screen
readers.
Power supply: via the USB port, or mains adapter with a serial connection
Declaration of conformity / compliance
CE – see appendix.
21
10 Additional modules
10.1 Overview
VarioPro acts as the base module for ‘docking’ various additional modules.
These modules expand the functionality of VarioPro and allow optimum use of
different applications according to the user’s personal preferences.
Various modules are available whose keys, buttons and functionality allow the
various system requirements to be coordinated in the most efficient manner. The
modules’ ‘building block’ principle allows several modules to be attached to each
other or on both sides of VarioPro. They are screwed firmly to VarioPro so that any
unintentional loosening of the modules when working is avoided.
The additional modules can be used as stand-alone devices without being linked to
VarioPro (in Version 1 this option is only available with the magnification module). In
such cases the appropriate driver from the installation CD must be loaded.
The modules and their operators are described below. Which functions these
operators perform depends on the individual functions loaded onto the modules
themselves. These are usually application- and user-specific and dependent on the
screen reader. For this reason a more detailed description cannot be given here.
22
10.1.1
Audio module
This module is designed specifically to merge audio files simply. The easy-to-use
sliders simplify the control and regulation of the position of 5 channels and the
balance.
Operators, top down:
- 5 vertical sliders P1 to P5
- 1 horizontal slider P6
- 5 keys K1 to K5 with tactile identifiers
- 1 rollbar
P1 – P5
P6
K1 – K5
Rollbar
23
10.1.2
Speech module
This module provides an elegant way of adjusting the various speech settings.
Operators, top down:
- 3 keys, C1 to C3
- 4 sliders P1 to P4
- 5 cursor keys CrL (left), CrU (up), CrR (right), CrD (down), CrM (middle)
- 4 control keys K1 to K4
C1 – C3
P1 – P4
CrL,CrU,CrR,
CrD,CrM
K1 – K4
24
10.1.3
Telephony module
This is a special module for use by telephonists. It can also be set up as an advanced
status module.
Operators, top down:
- 4 keys C1 to C4
- Keypad with 16 keys K1 to K16
- 12 Braille cells
- 1 rollbar
C1-– C4
K1 – K4
K13 – K16
12 Mod.
Rollbar
25
10.1.4
Status module
Displays status information on 4 Braille cells.
Operators, top down:
- 4 keys C1 to C4
- 4 Braille cells
C1 – C2
C3 – C4
4 cells
26
10.1.5
“Screen magnification” module
This module allows screen magnification settings to be adjusted and the applications
to be driven with the built-in trackball.
Operators, top down:
- 4 screen magnification keys (1x, smaller, bigger, inverse)
- 3 mouse keys
- 1 trackball
27
10.2 Connecting the modules to VarioPro
Undo the screws on the left or right ends of VarioPro (depending on which side the
modules are to be connected) and remove the black facing.
The above image shows a side view of a VarioPro. On the left and right are the
deep-set screws which hold the facing on. Once these screws have been taken out
the black facing can be removed. Small metal blocks are delivered with the modules
which are used to secure the modules with these same screws.
The red plugs are electrical contacts between the Braille display and the module. The
ribbon-cable supplied with the module is inserted into this connector. Finally, the
facing can then be screwed onto the module.
Further modules can attached in the same manner.
The image shows a VarioPro with attached status module.
28
11 Contact details
BAUM Retec AG,
Schloss Langenzell,
68257 Wiesenbach,
Germany.
Tel. +49 (0) 6223 / 4909 - 0
Email
Website
[email protected]
www.baum.de
Subject to alterations
Information supplied without liability
Copyright December 205 BAUM Retec AG
© 2005 Copyright by
BAUM Retec AG
Schloss Langenzell,
69257 Wiesenbach,
Germany
All rights reserved. No part of this manual may be reproduced or transmitted in any
form or by any means, electronic or mechanical, including photocopying, recording,
or information recording and retrieval systems, for any purpose, without the express
written permission of BAUM Retec AG.
29
30