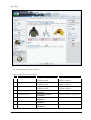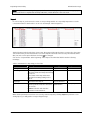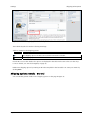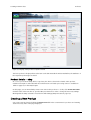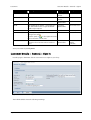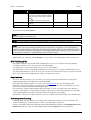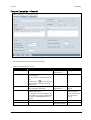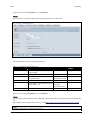
1
ePages 5 Merchant User Guide - Version 5.02 - The information contained in this document is subject to change without notice at any time. This document and all of its parts are protected by copyright. All rights, including copying, reproduction, translation, storage on microfilm and all forms of archival and processing in electronic form are expressly reserved. All corporations, products, and trade names are trademarks or registered trademarks of the respective owners. Copyright © 2005 ePages Software GmbH All rights reserved. Should you have questions or suggestions about our products, please contact us at the following address: ePages Software GmbH Leutragraben 1 07443 Jena Germany Tel.: +49 (0) 36 41 / 5 73 – 10 0 Fax: +49 (0) 36 41 / 5 73 – 11 1 E-mail: [email protected] WWW: www.ePages.com Jena, September 2005 Page 2 Merchant User Guide Table of Contents Table of Contents 1. Introduction ..............................................................9 General Information .............................................................. 9 Prerequisites ........................................................................ 9 2. 3. Quick Start ..............................................................11 Administration Page ................................................17 Data Management for Signed-in Users - Administrator Menu. 17 Editing Sign-in Data ..................................................................17 Deletion Confirmation ............................................................................... 18 Signing Out ..............................................................................18 History ............................................................................... 19 Favorites ............................................................................ 19 Tray ................................................................................... 19 Setup Assistant .................................................................. 19 Repeating Functionality ...................................................... 20 Context-Sensitive Help ..............................................................20 Opening Shop Views .................................................................20 Shop Home Page .............................................................................. 20 Preview............................................................................................ 21 Default Settings ........................................................................22 Visibility ...................................................................................23 Batch Processes in Tables .........................................................23 Sorting in Tables .......................................................................24 Sorting Using Column Headings ........................................................ 24 Sort via Sorting Key .......................................................................... 25 Navigation History ....................................................................25 Using HTML Commands in Entry Fields .......................................26 WYSIWYG Editor ........................................................................26 Attribute Types .........................................................................28 Using Text with Value Selection .................................................29 Import and Export .....................................................................30 Export.............................................................................................. 30 Import ............................................................................................. 31 4. Settings ..................................................................33 Shop Status ....................................................................... 33 General ....................................................................................33 Optimization.............................................................................33 Utilization.................................................................................34 Shop Address ..................................................................... 35 User Management............................................................... 35 Creating a New User ..................................................................35 User Details - General................................................................35 Country Settings ................................................................. 36 Regional Settings ......................................................................36 Languages ................................................................................36 Currencies ................................................................................36 Special Case - Swiss Francs .............................................................. 37 E-mail Settings ................................................................... 37 E-mail Settings - General ...........................................................37 E-mail Settings - Events .............................................................37 Merchant User Guide Page3 Table of Contents Event E-mail - Details ....................................................................... 38 Special Case: E-mail messages for the merchant ........................................ 39 Special Case: Contact e-mail for the customer............................................ 40 Tax Calculation ................................................................... 40 Tax Matrix.................................................................................40 Tax Areas..................................................................................40 Tax Classes...............................................................................41 Tax Model.................................................................................41 Shipping and Payment ........................................................ 42 Shipping Methods.....................................................................42 Creating New Shipping Methods ....................................................... 42 General Properties for Shipping Methods ................................................... 43 Fixed Price Shipping Methods.................................................................... 43 Shipping Methods with Free Shipping Limits .............................................. 44 Payment Methods .....................................................................44 Creating New Payment Methods........................................................ 45 General Properties for Payment Methods ................................................... 46 Direct Debit Payment Methods................................................................... 47 Fixed Price Payment Methods .................................................................... 48 Payment Methods with Exemption Limits ................................................... 48 Payment Method with Credit Card, Manual ................................................. 48 Payment Method with WorldPay................................................................. 50 Payment Method via T-Pay......................................................................... 54 Dependencies...........................................................................56 Shipping Options ......................................................................57 Shipping Options: Details - General ...........................................58 Shipping Options: Details - Selecting .........................................59 Deferred Payment .....................................................................61 Customer Settings .............................................................. 64 Customer Groups ......................................................................64 Registration ..............................................................................64 Countries..................................................................................65 Sign In......................................................................................65 Customer Attributes ..................................................................66 Creating a New Customer Attribute....................................................66 Editing the Details of an Attribute .....................................................66 Shopping Basket and Orders............................................... 67 Add to Basket Action ........................................................................ 67 Adding a Duplicate Product .............................................................. 67 Minimum Order Value.......................................................................68 Allow Tax Area Selection...................................................................68 Confirm Terms and Conditions ..........................................................68 Texts ........................................................................................68 Product Settings ................................................................. 69 Stock........................................................................................69 Auto Cross Selling.....................................................................70 eBay Settings ..................................................................... 71 Preparation...............................................................................71 General eBay Settings ...............................................................72 eBay Accounts ..........................................................................72 eBay Accounts - Details .................................................................... 73 Authentication ................................................................................. 73 Request Authentication ............................................................................. 73 Apply Authentication................................................................................. 74 Templates.................................................................................74 Templates – Details ......................................................................... 74 Page 4 Merchant User Guide Table of Contents Configuring Notification E-mail ..................................................75 5. Products .................................................................77 Product Details ................................................................... 77 General Product Details – Prices/Stock ......................................77 General Product Details – Description........................................80 General Product Details – Attributes ..........................................81 Product Details – Images– Images .............................................81 Slideshow........................................................................................ 83 Product Details - Categories ......................................................83 Product Details - Variations .......................................................84 Creating a Variation.......................................................................... 84 Working with Variations.................................................................... 87 Variation Products .................................................................................... 87 Variation Products and Cross Selling ......................................................... 88 Extending Variations Later ................................................................88 Product Details - Prices .............................................................89 Quantity Discount/Bulk Prices ..........................................................89 Value Discount.................................................................................90 Discount Calculation For Product Prices ............................................90 Product Details – Cross Selling ..................................................91 Cross Selling - Accessories ............................................................... 91 Cross Selling - Related Products........................................................ 92 Cross Selling - Product Comparison................................................... 92 Product Details – eBay ..............................................................93 Creating a New Product ....................................................... 93 Product Bundles ................................................................. 94 Associated Products .................................................................94 Information About Bundles........................................................94 Product Types..................................................................... 95 Default Product Type .................................................................95 Creating a New Product Type .....................................................95 Product Type – General Details ..................................................96 Product Type – Details – Attributes ............................................96 Creating a New Attribute ...................................................................96 Attribute – Details ............................................................................96 Attribute – Details - Value Selection.................................................. 97 Product Type – Details – Layout.................................................99 Price Lists .......................................................................... 99 Creating New Price Lists .......................................................... 100 Price List Details – General...................................................... 100 Price List Details – Customer Groups ....................................... 101 Price List Details - Customers .................................................. 101 Price List Details - Shopping Basket Discount........................... 101 Import and Export ............................................................. 102 BMECat-Import ................................................................. 102 Product Searches ............................................................. 103 Product Search in the Administration Area ............................... 103 Searching Text ............................................................................... 104 Inventory Search ............................................................................ 104 Advanced Product Search ............................................................... 105 Product Search in the Shop ..................................................... 105 6. Customers.............................................................107 Customer Details – General - Address................................ 107 Merchant User Guide Page 5 Table of Contents Customer Details – General - Customer Account................. 109 Customer Details – General – Sign In................................. 110 Customer Details – General - Attributes ............................. 111 Customer Details - Orders ................................................. 111 Creating New Customers ................................................... 112 Import and Export ............................................................. 112 Searching for Customers ................................................... 112 Simple Search ........................................................................ 113 Advanced Search .................................................................... 113 7. Categories.............................................................115 Types of Structure Elements .............................................. 116 Basic Category ........................................................................ 116 Categories .............................................................................. 117 Creating a Category ......................................................................... 117 Category Details - Pages .................................................................. 117 Category Details - General ............................................................... 117 Category Details - Products ..............................................................118 Category Details - Layout .................................................................118 Articles................................................................................... 118 Design Your Own Pages ........................................................... 120 Link........................................................................................ 121 Home Page ............................................................................. 121 Contact Information ................................................................ 122 Terms and Conditions ............................................................. 123 Customer Information ............................................................. 124 Promotional Products.............................................................. 125 Promotional Products - General Properties .......................................125 Promotional Products - Products ......................................................125 Import and Export ............................................................. 126 Categories - Import/Export ...................................................... 126 Category - Product Assignment - Import/Export......................... 126 BMECat-Import ................................................................. 127 8. Design ..................................................................129 Styles............................................................................... 129 Applying Template Styles ........................................................ 129 General .................................................................................. 130 Navigation Bars............................................................................... 131 General Design Attributes ................................................................ 131 Symbol Set .....................................................................................133 Navigation .............................................................................. 133 Navigation Elements .......................................................................135 Customization ........................................................................ 136 Customization Information .......................................................................137 Horizontal Areas ............................................................................ 138 Vertical Areas................................................................................. 139 Content Area .................................................................................. 140 Settings ........................................................................... 141 9. Orders ..................................................................143 Search ............................................................................. 144 Simple Search ........................................................................ 144 Advanced Search .................................................................... 145 Orders – General .............................................................. 145 Page 6 Merchant User Guide Table of Contents Editing Address and Order Details ........................................... 147 Order Details.................................................................................. 148 Orders – Documents ......................................................... 149 Packing Slip............................................................................ 150 UPS Packing Slip..................................................................... 151 Requirements ................................................................................. 151 Activating Order Tracking................................................................. 151 Exporting Delivery Data ............................................................................152 Importing to WorldShip and Generating a Tracking Number........................152 Order Tracking Activating .........................................................................156 Order Tracking in the Shop ....................................................................... 157 Invoice ................................................................................... 157 Credit Note ............................................................................. 159 Finalizing Documents .............................................................. 160 WorldPay.......................................................................... 161 General WorldPay Information ................................................. 161 Registration with WorldPay ..............................................................161 Testing a WorldPay Transaction....................................................... 162 Finalizing the Transaction with WorldPay......................................... 162 WorldPay Transactions ............................................................ 162 WorldPay Order Searches ........................................................ 163 T-Pay................................................................................ 163 T-Pay allgemein ...................................................................... 163 Zahlungsvorgang aus Sicht des Kunden .......................................... 163 T-Pay-Transaktionen................................................................ 165 Auslösen der Transaktion ............................................................... 165 Suche nach T-Pay-Transaktionen ............................................. 166 10. Marketing .............................................................167 Newsletter Campaigns ...................................................... 167 Creating a Newsletter Campaign .............................................. 167 Newsletter Campaigns – Details – General ............................... 167 Newsletter Campaigns – Details – Newsletter........................... 169 Creating a New Newsletter .............................................................. 169 Newsletter Details – General........................................................... 170 Sending a Newsletter ............................................................................... 171 Creating Newsletter Content ..................................................................... 171 Newsletter Details – Attachments ....................................................173 Newsletter Details – Recipients .......................................................173 Newsletter Campaigns – Details – Addressees ......................... 174 Subscriptions for Registered Users ...........................................................174 Subscriptions for Non-Registered Users ....................................................174 Addressee List ................................................................................175 Manually Entering Addressees.................................................................. 175 Adding from the Tray ................................................................................ 175 Importing Addressees .....................................................................175 Coupons .......................................................................... 176 Coupon Campaign – General ................................................... 177 Coupon Campaign – Condition ................................................ 178 Coupon Campaign – Coupon Codes ......................................... 178 Using Coupons in Newsletters ........................................................ 179 Pangora ........................................................................... 181 Pangora Export – General Properties ........................................ 182 Pangora Export – Products ...................................................... 183 Export .................................................................................... 183 Pangora Export Errors ..................................................................... 184 Merchant User Guide Page 7 Table of Contents Kelkoo ............................................................................. 184 Kelkoo – General Properties .................................................... 184 Kelkoo – Products ................................................................... 185 Export .................................................................................... 185 Kelkoo Export Errors ....................................................................... 187 Google Registration .......................................................... 187 Froogle............................................................................. 187 Froogle– General Properties .................................................... 188 Froogle – Products .................................................................. 189 Export .................................................................................... 189 Froogle Export Errors ...................................................................... 189 Trusted Shops .................................................................. 190 etracker ........................................................................... 190 Product Recommendations ............................................... 192 eBay ................................................................................ 192 Offers ..................................................................................... 193 Batch Processing ........................................................................... 194 Duplicate................................................................................................ 194 Creating Repeating Offers........................................................................ 194 Verify ..................................................................................................... 194 Upload to eBay ....................................................................................... 194 Delete .....................................................................................................195 Update All Offers .....................................................................................195 Create New Offer ............................................................................ 195 Offer Settings/eBay Assistant ......................................................... 195 Title ........................................................................................................195 Category ................................................................................................. 196 Details ....................................................................................................197 Layout .....................................................................................................197 Shipping ................................................................................................ 198 Payment ................................................................................................. 199 Verification............................................................................................. 199 Default Values ........................................................................ 199 Orders .................................................................................... 199 Performing Searches for eBay Offers ........................................ 200 Simple Search................................................................................ 201 Advanced Search ........................................................................... 201 11. Glossary................................................................202 12. Index ....................................................................205 Page 8 Merchant User Guide General Information Introduction 1. Introduction General Information This software is a modern and future-proof e-business platform for mid-sized businesses. Simple administration and a high range of functionality provide the foundation for efficient and successful online business. With it, you can serve the complete bandwidth of clients from a simple Web shop to a complex corporate e-commerce solution. The standardized technology platform is highly flexible and extendable. This allows quick implementation of customer-specific customizations. The many functions of our standard software provide the foundation for quick implementation of varied business models with low operating costs. The program provides a high degree of scalability. Together with the high-performance database, the highest requirements for data volume and access can be met. The focus of the software, in addition to the large standard package of features, is on security, modular architecture, scalability, high availability, and on a user-friendly interface. The program lets you, as the merchant, set up a Web shop on the Internet. You can maintain your shop, offer your products, and take care of your customers, all without a lot of help from a service provider. This software is an uncomplicated, attractively priced, and effective introduction to e-commerce. With this system, you are setting up an additional sales channel for your area of business. You can reach your customers on the Internet without specialized technical knowledge or excessive hardware costs. Prerequisites The program is browser-based. In order to work comfortably and enjoy all the advantages of the modern graphic user interface, you should use the following browsers: - Recommended: Internet Explorer 5.5 and above Mozilla 1.6 and above The program is optimized for a screen resolution of 1,024 x 786 pixels and a color depth of at least 65,000 colors. Your browser must allow JavaScript and the use of session cookies. Note: Check whether your browsers block pop-up windows. Since the program opens new windows, pop-ups must be allowed for complete functionality. Otherwise, certain functions cannot be used. Merchant User Guide Page9 Quick Start 2. Quick Start After the following steps, your shop will be ready to be opened for business: Sign In In your browser, enter the Internet address that was sent to you for your shop. It should be structured as follows: http://<servername>/epages/Store.storefront/?ObjectPath=/Shops/<shopname>&ViewActi on=MBO-ViewMBO Note that <shopname> is the name or ID of your shop. The first time you sign in, enter your user name and password. This information has either been sent to you or you have already defined it yourself in the course of setting up the shop. Caution: The first thing you should do is change your password so that no unauthorized person can use the system. See the chapter Editing Sign-in Data on page 17. The setup assistant will now take you through four steps for configure the most important settings. This will help you quickly set up a functional shop with an appealing design. Creating Categories The next step is to set up a basic catalog structure. In the upper navigation bar, click Categories. First, we will create a category called Products. You can assign your products to this category later. Enter the values as shown in Figure 1. Figure 1: Information for the category Products Save your entries by clicking Save. Now you have to set the category to Visible. To do this, click the Products link in the table. After this, click the General tab. On the page in Figure 2, click the option button Yes for the option Visible. Merchant User Guide Page11 Quick Start Figure 2: Switching the Products category to visible Save your entries by clicking Save. For more details on how to create additional categories and complex structures, see the Categories chapter on page 115. Create Products In the second step, create a product and assign it to a category. To do this, click Products in the upper navigation bar. Click the New Product link. The most important data you need to enter is a product number, a price, and the correct tax class. Set the status for Visible to Yes. Of course, you can also fill out the other fields right now, if you like. Click the Description link. Here you must enter at least the name for the product. Save your entries by clicking Save. Finally, assign the product to the category Products. To do this, click the Categories tab. Click the drop-down menu listing all the existing categories and select the category Products. See Figure 3. Page 12 Merchant User Guide Quick Start Figure 3: Selecting the category Products Save your entries by clicking Save. For a complete description on how to best implement and use all the product functions, refer to Products on page 77. Testing Essential System Settings This section describes how to check several system parameters. These settings are available when you first start but should still nevertheless be checked. Verify the country settings. To do this, click Settings in the upper navigation bar. Then, on the next page, click the for linkCountry Settings. For a comprehensive description for editing the country settings, refer to Country Settings on page 36. At least one shipping and one payment method are set up by default. If you would like to verify these settings, click the Shipping and Payment link in the context menu. First you will see the shipping methods page. To modify the settings for this method or to define additional methods, refer to Shipping Methods on page 42. Click the Payment Methods tab to see the default payment methods. With this payment method active, your shop is functional immediately. To modify the settings for this method or to define additional methods, refer to Payment Methods on page 44. When this is done, you have fulfilled all the prerequisites to operate your shop. Home Page Design Elements You have already used the setup assistant to define a basic design and to enter important data to identify your shop. This is usually enough to present your customers a beautiful shop with an appropriate design. Of course, you have many options for designing the shop to meet your individual needs. There are a number of function and design elements available for this. At this point, we would like to give you a short overview of the basic shop home page elements including information about what the elements do, how you can access them in the administration area, and where you can find the corresponding detailed descriptions in the user guide. Figure 4 shows a shop home page with highlighted design elements. Merchant User Guide Page 13 Quick Start Figure 4: Default design elements for the shop home page The design elements used are as follows: Table 1: Home page design elements No. Name Path in Administration Area Description in Manual 1 Shop logo Design >> Settings or Setup Assistant Settings on page 141 or Setup Assistant on page 19 2 Shop Name Settings >> General or Setup Assistant Shop Status on page 33 or Setup Assistant on page 19 3 Slogan Design >> Settings or Setup Assistant Settings on page 141 or Setup Assistant on page 19 4 Link to Home Page Design >> <current style> >> Navigation Navigation Elements, on page 135 5 Contact Information Categories >> Contact Information Contact Information, on page 122 6 Link to Contact Form Design >> <current style> >> Navigation Navigation Elements, on page 135 7 Terms and Conditions Categories >> Terms and Conditions Terms and Conditions, on page 123 8 Customer Information Categories >> Customer Information Customer Information, on page 124 Page 14 Merchant User Guide Quick Start No. Name Path in Administration Area Description in Manual 9 Link to Shopping Basket Design >> <current style> >> Navigation Navigation Elements, on page 135 10 List of Main Categories Design >> <current style> >> Navigation Navigation Elements, on page 135 11 Home Pages text Categories >> Home Page 12 Compressed basket view Design >> <current style> >> Navigation Home Page, on page 121 Navigation Elements, on page 135 13 Full-text product search Design >> <current style> >> Navigation Navigation Elements, on page 135 14 Products on the Home Page Categories >> Products 15 Sign-in pane Design >> <current style> >> Navigation Basic Category, on page 116 Navigation Elements, on page 135 16 Promotional Products Categories >> Promotional Products Promotional Products, on page 125 17 Items on the Home Page Categories >> Pages Articles, on page 118 - Create items here. 18 Currency drop-down menu Design >> <current style> >> Navigation Navigation Elements, on page 135 19 Flags for language selection Design >> <current style> >> Navigation Navigation Elements, on page 135 20 Info text Design >> Settings 21 Trusted Shops seal Design >> <current style> >> Navigation Settings on page 141. Navigation Elements, on page 135 22 Copyright Design >> Settings or Setup Assistant Settings, on page 141 Use the navigation elements to position the links and functions. For more information on this, see Navigation on page 133. The chapter Design on page 129 contains a detailed description about how to customize the layout and design. Testing Before you make the Internet address of your Web shop public, it is a good idea to test your Web shop as if you were your own customer. When you do this, you can check whether your settings or changes (for your logo, design, products, and so on) have been correctly applied and are displayed as planned. It is also important to check whether e-mail messages such as registration confirmations or order confirmations are being sent. Sign yourself in as a customer and provide a valid e-mail address to which messages can be sent. Note: If e-mail messages are not being sent properly although you entered all the addresses correctly, have your provider check the system settings. If the tests run to your satisfaction, delete all the sample data (products, customers, etc.) and make the Internet address of your shop available to your clientèle. We wish you a successful Internet venture! Merchant User Guide Page 15 Administration Page 3. Administration Page The administration page appears immediately after you sign in. Figure 5: Administration page after sign-in The page is divided into the following three functional areas: the main navigation bar (shown as area number 1 above), the left navigation area (area number 2), and the working area (area number 3) in the middle of the page. The book symbol (in the red circle) is displayed for each area that has context sensitive help. For more on this, see Context-Sensitive Help on page 20. You can open this home page from any point in the administration area. To do so, click the logo to the right in the navigation bar. Data Management for Signed-in Users - Administrator Menu To edit your own user data or to sign off of the system, use the functions in the administrator menu found on the upper part of the left navigation bar. Editing Sign-in Data At this point, check your data as a registered user. Enter the desired changes in the respective text fields. The individual fields have the following meanings: Merchant User Guide Page17 Administration Page Table 2: Fields for user data Field Name Meaning Name for Display Data Management for Signed-in Users - Administrator Menu Field Type Entry field, alphanumeric User Name User Name for Registration Entry field, alphanumeric E-mail If you forget your current password for Entry field, signing into the administration area, a alphanumeric new password will be sent to the address entered here. Old Password Enter the currently valid password Entry field, here. alphanumeric New Password Entry field, alphanumeric Password Entry field, Confirmation alphanumeric Language Display language for administration Drop-down menu Deletion Confirmation See Deletion Confirmation below. Check box Automatically sign-in Access to the administration area Check box via cookies without the sign-in process. Cookies must be allowed in the browser to do this. Example Shop Administrator admin [email protected] admin Shopadmin Shop admin To change the password or create a new one, you must enter the currently valid password in the Old Password field. If you do not enter the current password, the password change will not take effect. Note: Even if you use a long password, only the first 8 characters are checked. The rest of the characters after the 8th are not relevant for security and will be ignored. For this reason, you should only use passwords of up to 8 characters in length. Deletion Confirmation Before data is deleted, you will be asked whether you are sure you want to delete the data. Only after you confirm the deletion is the data deleted. Caution: If you clear the Deletion Confirmation check box, every deletion is executed immediately and without deletion confirmation. You will not be able to cancel this action later. Consider this before clearing the selection. We recommend that only experienced users deactivate this feature. Caution: If the Automatic Sign-in with Cookie option is selected, everyone who uses your computer will have access to the administration area. Make sure that, in this case, only authorized persons have access to the computer. Save your entries by clicking Save. Signing Out If you want to leave the administration area of your shop, click Sign out in the administrator menu. Sign out to make sure that the connection to the system is correctly and securely ended and that no unauthorized user can access the administration area of your site. Page 18 Merchant User Guide History Administration Page After you sign out, the sign-in page will appear again. History The History list saves the links to the last ten pages opened while working in the administration area. The page last opened is at the beginning of the list and is displayed in bold letters. You can easily save the pages you visit often by assigning them to your favorites (see chapter Favorites). Do this by clicking the symbol (light blue star with a green plus sign). Favorites This area contains the Web pages in your administration area that you need most often. Click the links in this list to access those pages more quickly and easily. You can simply transfer these addresses from the History. See the chapter History. Your favorites remain even after signing off and are available to you when you sign in again. You can have an unlimited number of favorites. Tray The tray is an area for temporarily storing various groups of objects. Use this to easily collect and store objects in one area of the program so that you can use them in another area. Examples of the kind of objects you can store here are products or customers. The box shows all the object groups that you have created during the current session. The number of elements in the group is shown in parentheses. Note: One group is created for customers and a separate group for categories. For products, there is a group for each product type. To save objects in the tray, use the corresponding save functions in the individual working areas, for example, batch processing actions for products or customers. Setup Assistant Use the setup assistant to easily make changes to the basic settings for the shop design, description, and contact data. You can do this in four steps and without having to learn more about the functions for designing your styles. Note: Remember that the setup assistant will overwrite existing settings. Click Finish to apply the changes to the shop in your system. Merchant User Guide Page 19 Administration Page Repeating Functionality Caution: When you apply the data by clicking Finish, the following data will be overwritten: - A style of the same name in the style list; any previous changes will be lost. Any given shop name, slogan, and existing logo. - The address information that you entered for the contact information page. See Contact Information on page 122. All e-mail sender information in the contact information page and for the e-mail settings. See E-mail Settings on page 37. - Fields in which you did not enter any information will not overwrite the existing data. Repeating Functionality Context-Sensitive Help Context-sensitive Help is available for every function and view area. Open the Help function by clicking the ). book symbol ( Links on the Help pages lead to further explanations. The following functions are available from within Help: Go back one page. Go forward one page. Display the Table of Contents for the entire Help section. Save a bookmark for this page. Print the current page. Opening Shop Views Shop Home Page You can open the home page of your Web shop at any time. To do this, click the name of your shop shown in the administrator menu as a link. See Figure 6. Page 20 Merchant User Guide Repeating Functionality Administration Page Figure 6: Link to the shop home page This link is located in the same place on all the pages in the administration area. The shop view opens in a new browser window so that you can conveniently keep track of both areas, that is, the working area of the administration area in one window and the shop view in the new window. Note that your administrator sign-in is used for this shop view. When you sign out of the shop, you are also automatically signed out of your administration. If you would like to use the shop as a non-registered customer or with a different registration, first close the browser and then re-open the browser with the shop in a new window. Preview Some actions in the working area directly effect the view in the shop, for example, product image updates, price changes, or new language activation, and so on. For each of these actions, you can use the context menu to make immediate changes in the corresponding area in the shop. To do this, click the View in Shop link. See Figure 7 and Figure 8. Merchant User Guide Page 21 Administration Page Repeating Functionality Figure 7: Shop view, opened for categories Figure 8: Shop view, opened for a product Default Settings Default settings in this context are preset settings. If you make a number of values available for specific parameters (for example, currencies, language, shipping method, and so on), there is always one value that is selected or active. This is the default value. The user can choose to use this value or to select another value. It is best to set the value of the default setting to one that corresponds to what your customers use most. Page 22 Merchant User Guide Repeating Functionality Administration Page Simply click the option button for the parameter that you would like to define as the default setting. Save your entries by clicking Save. Visibility Frequently, you can set the visibility for parameters or objects, for example, via check boxes in tables or option buttons in forms. If you activate visibility, the customer can see these parameters in the Web shop and edit them if necessary. If you clear the corresponding field, the customer can no longer see the element. In this way, you can first prepare specific settings and functions in advance, for example, for products or shipping methods, but activate them later or reserve the option to turn them on or off. Select the parameter check box that is supposed to be visible and available to the customer. Save your entries by clicking Save. Figure 9: Example of visibility Note: Newly created elements such as products, categories, and so on, are set by default to Not Visible so that you can first collect all the necessary data without the element already appearing in the shop. Batch Processes in Tables Batch processes in tables are actions that apply to a number of selected table entries at one time. The batch processing actions are located in a drop-down menu underneath the corresponding table. See Figure 10. Merchant User Guide Page 23 Administration Page Repeating Functionality Figure 10: Table with batch processing First select the objects that should be the target of batch processing. Then choose the action from the drop-down menu. Finally, start the action by clicking the Execute button. Note: The Select All function works on all the entries displayed. In order to be able to select other entries, they must first be visible. The following general actions will not be further explained in the individual chapters: Table 3: General batch processing actions Action Comment Add to Tray Selected items are added to the tray. For more information about this, see Tray on page 19. Set Visible For more on this, see Visibility on page 23. Set not Visible For more on this, see Visibility on page 23. Duplicate Generate an exact copy of the original item. Delete For more on this, see Deletion Confirmation on page 18. Delete all (...) Deletes all the table entries. Selection is not necessary. The individual chapters only explain special batch processing actions or describe particular features relating to the general actions. Sorting in Tables Sorting Using Column Headings In some tables, mainly the long ones, you can sort the table by columns. Page 24 Merchant User Guide Repeating Functionality Administration Page Each column heading is a link. When you click the link, the column is sorted. The small arrows to the left next to the column heading indicate the sort direction of the currently active column. The left arrow pointing upwards indicates ascending sort order. The right arrow pointing downwards indicates descending sort order. Clicking on the column heading or the arrow reverses the current sort direction as indicated by the filled arrow. In multi-page lists, the first page is displayed after sorting. Sort via Sorting Key Another way of sorting table entries is to sort using a sorting key. Every table row has a key field. In this field, you type in a numerical value which determines the position of the respective row in the table. An example of this is shown in Figure 11. Figure 11: Sorting with the sorting key Changing the key values lets you sort the table entries any way you like. The sorting key is entered in increments of 10 so that new entries can be sorted quickly and without a lot of work. After sorting, the key fields are again displayed in increments of 10. Note: This sorting action affects both the shop display and the administration area. Navigation History If you are in the detail view of an attribute, for example, and want to return to the previous table, use the Navigation History. This shows you the path you used to arrive in the detail view and which detail view you are accessing. If you want to return to the table, simply click the link with the table name. In Figure 12, you see the Navigation History above the detail view for the attribute Material. Click the Product Types link to see a table showing the product types. Click Jacket to open the table of attributes associated with Jacket. Merchant User Guide Page 25 Administration Page Repeating Functionality Figure 12: Example of navigation history Using HTML Commands in Entry Fields There are text fields in the program where you can insert HTML tags for building entire Web pages or for displaying simple text more effectively to the user. These fields can be identified by the symbol to the left above the field name, . For simple formatting, the functions bold, italics or underline are the most useful. The tags listed in Table 4 will cover most if not all of your requirements. Table 4: Selection of HTML formatting tags Tag Meaning Use Effect <b> The following text is shown in bold. <b>Bold</b> Bold <i> The following text is shown italicized. <i>italic</i> Italic <u> The following text is shown underlined. <u>underlined</u> Underlined <s> The following text is shown struck out. <s>struck out</s> </s> struck out <br /> A carriage return is inserted at this point in at <br/>this point the text. The text is continued on the next line. Note: For further information about design options, we recommend consulting publications about HTML or the site http://www.selfhtml.org/ (only partially in English). WYSIWYG Editor Together with the previous chapter, the program offers an easy way to format HTML fields: a WYSIWYG editor. WYSIWYG (What You See Is What You Get) means that during editing text is displayed exactly as your customers will see it in the shop. You format the text not with HTML tags directly but using buttons with formatting functions. This has the advantage for you that you can simply and professionally design texts without knowing formatting commands. This editor can be used for all text fields that are indicated by the HTML symbol . Start the editor by clicking the HTML symbol. The text in the corresponding field is moved into the editor. The editor is opened in a separate browser window, as shown in the following figure. Page 26 Merchant User Guide Repeating Functionality Administration Page Figure 13: WYSIWYG editor The editor offers the following functions: Table 5: WYSIWYG editor functions Tag Meaning The selected text is shown in bold. The selected text is shown italicized. The selected text is shown underlined. The selected text is shown struck out. The text is left-aligned. The text is centered. The text is shown right-aligned. The selected rows are shown as a numbered list. 1. … 2. ... 3. … The selected rows are shown as an unordered list. • … • … • … Each click moves the selected text one tab to the right. Each click moves the selected text one tab to the left. Select some text and click a color in the matrix. The text is shown in the selected color. Merchant User Guide Page 27 Administration Page Tag Repeating Functionality Meaning Select some text and choose a font. The text appears in the selected font. Select text and choose a format template. The text appears with the applied formatting. You must separate the text to be formatted by pressing Enter and inserting a carriage return, otherwise the whole text will be formatted! After you have edited the text in the editor and wish to save your changes, click Apply. The text is then entered in the original text field formatted in HTML. Save your entries by clicking Save. Caution: If you do not finish by clicking Save, the changes will not be saved in the text field and will not be shown in the shop! Note: More complex additions such as links, images, and so on, must be added manually at the correct location in the text field. Attribute Types When creating attributes, for example, for product types, you need to define the attribute type. This means that you define whether this attribute should be displayed and processed as, for example, a character string (text), a number, a date, or a logical value in the system. In other words, you define what kind of value you or the customer can enter here. The individual attribute types have the following meanings: Table 6: Overview of the variable types for entry fields Type Meaning Use Example Text Character string, word, sentence Entry fields for names, addresses, text, and Text field so on. You can use any character. There are no length restrictions. Languagedependent text Languagedependent text These variable types are used when different content is displayed for the various languages. There are no length restrictions. Bills Invoices Text with value selection Text for building a set of possible values These fields are used to collect data for the contents of a drop-down menu. With this, you can define drop-down menus yourself. For more on this, see Using Text with Value Selection on page 29. Material: Goretex Sympatex Leather Languagedependent text with value selection Languagedependent text for building a set of possible values You use these fields the same way as text with value selection. At the data collected here are language-dependent. For more details, see Languages on page 36 and Using Text with Value Selection on page 29. Material: Goretex/Goretex Sympatex/Sympate x Leder/Leather Integer Integer Page 28 255 Merchant User Guide Repeating Functionality Administration Page Type Meaning Use Example Decimal number Floating-point decimal numbers Yes/No Logical variable Option button. At this point, the user makes Option button a Yes or No decision. Visibility Money A fixed-point number with a specific number of decimal places for saving money entries. Entry field for prices Date Date fields for days from 01.01.0001 up to 12.31.9999. 12.06.2004 Time Time field for the hours in the range of 00:00:00 to 23:23:59 11:11 Date and Time Combination of date Entry fields for exact times. The entry format 12.6.2004T11:11 and time is defined by the current country setting. For Germany, the format is DD.MM.YYYYThh:mm:ss. File File name You can use this field to assign a file to a product. Productinfo.pdf Languagedependent file File name Use this attribute to make a separate file available for each language. Productinfo_en.pdf Productinfo_en.pdf 15.23 €21.95 Using Text with Value Selection As described in Table 6, Text with value selection and Language-dependent text with value selection are variable types for setting up drop-down menus. The following example demonstrates this: Let us assume you sell shoes in your shop. Although these shoes are made of various materials, it is always the same materials: Goretex, Sympatex, and leather. Therefore, you need to create a Material attribute for each product of the type Shoe and enter the material the shoe is made out of. Create a product type called Shoe (for more on this, see Product Types, on page 95 ) with (for simplicity's sake) a single attribute called Material of type Text with value selection. Now enter the values for the drop-down menu. In the first entry field, enter the ID for the first material– Goretex. In the second entry field, enter a name for the material that should be displayed in the shop. When using the type language-dependent text with value selection, you would, at this point, enter a display name for every active language since the name displayed is dependent on the language. Save your entries by clicking Save. After this, collect the same information for the other materials, Sympatex and leather. See Figure 14. Merchant User Guide Page 29 Administration Page Repeating Functionality Figure 14: Sample text with value selection – default value entries complete What is the result of all this prepatory work? Create a new product called Hiking Shoe. For more information about creating new products, see chapter Product Details on page 77. Create a product number and click Attributes. Select a product type Shoe. You can then select the material from the dropdown menu. Import and Export Use this function to export data from the shop system to use in other systems or to edit further. You can also go in the other direction and import prepared data into the shop system. In order to complete the import, you need to set the data up in a CSV file. This is a simple text file that contains the individual data for each item. Each piece of data is separated by a semicolon. There is one line per item in the file. Exporting data from the system generates a CSV file. We recommend using an export file as a template. If no item for the type that you want to import exists in the shop, create one. After this, start the export and this will produce an example of a formatted file as a template. Now take the data sets in the export file and use them as template entries for importing data. Use the respective context menu for starting the import and export functions. Click the Import and Export link. Export The page is used for both functions. The individual fields have the following meanings: Table 7: Parameters for exporting product data Field Name Meaning Field Type Item type Drop-down menu Formatting Regional settings for the data format in Drop-down menu the export file, for example, for currency or time information. Languages Setting that defines which fields relevant for a language will be exported. Example Drop-down menu When you have finished modifying all the settings, start the export process by clicking Export. The process finishes up by prompting you to save the file or to open it immediately. Page 30 Merchant User Guide Repeating Functionality Administration Page Note: Verify your brower settings for pop-up windows. Since the program opens new windows, pop-ups must be allowed for complete functionality. Otherwise, certain functions cannot be used. Import In order to import, you first need to create a corresponding CSV file. It is especially important to use the correct field names in the header. You can see an example of this in Figure 15. Figure 15: Field names in the header of the import file The field names in the header have of two parts, the name and the ID. The name corresponds to the name of the fields in the product detail views. You can modify this information if necessary. The internal names (IDs) are enclosed in square brackets and may not be changed. You need to set parameters at the beginning of the import. The individual fields have the following meanings: Table 8: Parameters for importing product data Field Name Meaning Field Type Item Type Drop-down menu Formatting Drop-down menu For defining how numbers, currency, and time formats are interpreted during the import. The formats in the import file must match the formatting setting for the import. Languages Irrelevant for the import. Import File Enter the name of the import file along Entry field, with the path information in this field. alphanumeric You can also Browse to the file and enter the information in that manner. Example Drop-down menu C:\temp\import.csv When all the parameters have been set correctly, start the import by clicking Import. If problems occur during import, you will get the corresponding message. Merchant User Guide Page 31 Shop Status Settings 4. Settings Shop Status General The individual fields have the following meanings: Table 9: Fields for general shop status Field Name Meaning Field Type Example Created on Creation date of the online shop Display Monday, April 25, 2005 Link to Home Page The shop is open/closed Display Depending on the option selected, the Option button shop is available to your customers on the Internet. This name is language-dependent. Entry field, alphanumeric Text field, Language-dependent information displayed to the customer if the shop alphanumeric is closed. For more information about formatting, see Using HTML Commands in Entry Fields on page 26 and WYSIWYG Editor on page 26. Shop Name Shop Closed Message Milestones <h3>Short technical break… Save your entries by clicking Save. Optimization The shop pages that your customers see contain both static and dynamic content. Dynamic content is data that is only read from the database and inserted into the page right before the Web page is displayed. This includes data about prices, descriptions, and so on. Reading and inserting the data right before it is displayed ensures that current values are always displayed. However, accessing the database and inserting the data into the Web page costs time, time which is required to build the Web page itself. The more dynamic data needed to be processed, the longer it takes to display the shop page. Your customers expect up-to-date pages with fast loading times. For this reason, it is a good idea to find the optimum setting between current content and quicker availability of the page. One way to do this is to save the pages which have content that does not change. After being requested, these pages are read into cache and then displayed. They do not have to be built first. This means that these pages can be displayed immediately. These pages have an enormous speed advantage over pages that cannot be cached. On the Optimization page, define which page types are to be updated at which intervals. The important thing for you to remember while doing this is how often you change and update the data on these pages. For example, if you change the prices of your products weekly, you only need to regenerate the pages which display prices only every week after the price change. During the rest of the week, these pages can be loaded and displayed from cache. Merchant User Guide Page33 Settings Shop Status The same applies for stock data. When inventory levels are evaluated for display in the shop, the optimization must be set in such a way that when stock level changes during the order process, the corresponding pages are updated. For more on this, see Stock on page 69. Save your entries by clicking Save. If you need to make extensive changes to data and information, you can update all the pages at one time. To do this, click Update Immediately. Note: If you make changes to shop data while in the administration area and these changes are not immediately visible in the shop, check the period of validity setting. If necessary, click Update Immediately. Remember the following: - Optimization does not apply to non-registered users. If you open a page from the administration area via View in Shop or open the home page from the administrator menu, you will see always the current page. Customers will not see the changes until after the administrator has started the update or it has been performed automatically. The speed advantage gained by the optimization is effective for the customers. However, for you as the merchant, there are no effects. We recommend that, while setting up the shop, you select the Always update option in order to apply frequent changes immediately. When your shop goes into Live operation, activate the maximum periods of validity possible for your shop. Utilization Your shop is based on a shop type that makes certain functions available. Some of the functions are limited according to the type of shop. This means that you can manage only a certain number of products or create only a limited number of pages (Categories/Freely Designable Pages) in this shop. The Utilization page gives you an overview of how many of your resources you have left. The individual symbols have the following meanings: Table 10: Legend for resource symbols Symbol Meaning The function has been activated for the shop. The function has been not activated for the shop. Status bar The status bar shows how much of a limited function is being utilized. A red bar indicates that the limit has been reached. Note: Contact your provider when you reach a utilization limit or when you would like to use functions that have not yet been released for your shop. Page 34 Merchant User Guide Shop Address Settings Shop Address This shop address data are used when the address information for the shop is made public. For example, this is the sender address on invoices and packing slips. Furthermore, this information is used when address information needs to be submitted to third party systems, for example, Pangora or Kelkoo. Save your entries by clicking Save. User Management You can authorize other users to access the administration area of your shop by giving them their own signon account. These users have the same rights and can use the same functions. The table lists all the administrators who are authorized to access your administration area. Except for your own entry, all the other user names are shown as links which let you access the details of the individual administrators. The link for the user name of the administrator who is currently signed on is not active as a link. You can edit your own data in the administrator menu. For more on this, see Data Management for Signed-in Users - Administrator Menu on page 17. The individual symbols have the following meanings: Table 11: Status symbols for users Symbol Meaning The user is active, that is, he is authorized to sign into the administration area. The user is not active, that is, he is not authorized to sign into the administration area. You can run batch processing actions to process the table entries. For the basics, see Batch Processes in Tables on page 23. Creating a New User To create a new user, enter the name of the user in the left entry field in the last table row. This is then used as the user name for signing on. In the second field, enter a display name for the user. This is displayed in the administrator menu. Save your entries by clicking Save. Click the user name to open the details page. Edit the data as described in User Details - General below. Note: For new users, the system assigns the default password admin. Either you or the new user must enter this as the old password in order to create a new password. User Details - General You can edit the data the same way as described in Data Management for Signed-in Users - Administrator Menu on page 17. However, there are two exceptions: - Use the Sign in allowed field to set whether an administrator can sign in and have access to the administration area. You can remove a user. To do this, click the Delete button. Merchant User Guide Page 35 Settings Country Settings Country Settings Regional Settings Regional Settings have priority over the settings for display language as well as over the number and date formats. The extent to how data formats can differ from each other is demonstrated in the comparison between German and English (UK/USA) country settings in Table 12. Table 12: Regional settings for Germany and the USA German (de_DE) English (en_UK) Date Currency Decimal number 15.10.04 15.10.2004 15/10/04 15/10/2004 15. Oktober 2004 Freitag, 15. Oktober 2004 29,95 € 29,95 2.999,95 15th October 2004 Friday 15th October 2004 £29.95 29.95 2,999.95 English (en_US) 10-15-04 or 10/15/04 10-15-2004 or 10/15/2004 October 15, 2004 Friday, October 15, 2004 $29.95 29.95 2,999.95 Change the default settings or add another country. Save your entries by clicking Save. Note: The regional settings listed in the drop-down menu are part of the installation. If you need additional settings, contact your provider. Languages In order to switch languages, activate the drop-down menu and select the language you want. Save your entries by clicking Save. Caution: You must make sure you create and manage all the text for the product data and its associated contents in the relevant languages. As soon as you have activated an additional language, check all the objects (products, customers, categories, and so on) for language-dependent fields and enter the translations. If the text data does not exist in the corresponding languages, it cannot be displayed. Note: Note that for language-dependent fields, a translation can no longer be displayed if you delete the corresponding language. Note: The languages listed are part of the installation. If you need additional languages, contact your provider. Currencies When the shop page is opened, the prices are displayed in the currency that is associated with the regional settings. This is the currency that is marked as default. The customers can select the currency they want to use for their orders by using the currency drop-down menu. This remains active until a different language is explicitly selected or the session ends. In addition, the currency can no longer be changed once a product has been placed in the shopping basket. Page 36 Merchant User Guide E-mail Settings Settings In order to make a new currency available, click the drop-down menu at the end of the table, and select the desired currency. Save your entries by clicking Save. Note: The currencies listed are part of the installation. If you need additional currencies, contact your provider. Caution: Products, which are not priced in a particular currency cannot be put in the shopping basket or even ordered with that currency. The same applies for shipping methods. In you want to offer products at no charge, such as pamphlets or brochures, enter the price as 0.00. Special Case - Swiss Francs Due to the fact that in Switzerland, the smallest unit of currency is 5 Rappen, all the prices must be rounded to increments of 5 Rappen, that is, every price must end with 5 or 0. As soon as you enter prices in the currency Swiss Francs, the system checks the entry and rounds the price whenever necessary. E-mail Settings You have the option of sending the customer various notification, confirmation, and informational e-mail messages. E-mail Settings - General On this page, define the sender settings that are used to send e-mail messages. You can also enter an extended address that will be more descriptive for the customer. This extended address consists of not only the simple e-mail address; you can also enter a descriptive name. While doing so, be sure to keep to the following formatting conventions: name <emailaddress> Note: This address is the default sender for all e-mail messages. It is used when no other address has been entered for the individual e-mail messages. You can also enter a signature which is inserted at the end of each e-mail message. You can also format the signature with HTML tags. For more information about formatting, see Using HTML Commands in Entry Fields on page 26 and WYSIWYG Editor on page 26. Create a signature for every active language. You can also make the format of the signature conform to country-specific conventions. Save your entries by clicking Save. E-mail Settings - Events Define which actions or events cause e-mail messages to be automatically sent to the customers. In the table, all the events that initiate the sending of an e-mail message are listed. In addition to the default events, the total number of events available also depends on the functions activated for your shop. Use the check box in the last column to define whether e-mail messages should be sent automatically for an event or not. Merchant User Guide Page 37 Settings E-mail Settings Save your entries by clicking Save. You can configure every e-mail message separately. To do so, click the name of the event to go to the associated e-mail details. Event E-mail - Details The detail page for most of the event e-mail is basically the same. For special cases, see below. The individual fields have the following meanings: Table 13: Fields for event e-mail messages Field Name Meaning Active Sender Address CC Address BCC Address Subject Text When the Yes option is selected, the email message is sent when this event is triggered. Special sender for the respective event. This entry overwrites the default sender in the general e-mail settings. Recipient of a copy of the e-mail; this address is displayed with the other recipients. Recipient of a copy of the e-mail; this address is not displayed with the other recipients (blind copy). A short note about the contents. Field Type Example Option button Entry field, alphanumeric [email protected] Entry field, alphanumeric [email protected] Entry field, alphanumeric [email protected] Entry field, Welcome to the shop alphanumeric Text, alphanumeric You have Notification text that is displayed as successfully language-dependent text. registered… For more information about formatting, see Using HTML Commands in Entry Fields on page 26 and WYSIWYG Editor on page 26. Save your entries by clicking Save. The fields in e-mail messages are used mainly as follows: Page 38 Merchant User Guide E-mail Settings Settings Figure 16: Using details in the e-mail message Special Case: E-mail messages for the merchant There are also event e-mail messages that the system sends only to the merchants: - Warning for stock level reached Product Sold Out T-Pay Incorrect Settings For these e-mail messages, there is an additional entry field in the general properties called the Recipient field. Merchant User Guide Page 39 Settings Tax Calculation Special Case: Contact e-mail for the customer Your customer can contact you via a contact form in the shop. To enable this, you need to place the link to this contact form in the navigation elements on your shop page. See Navigation on page 133. The customer can open, fill out, and send a form. This information is sent to you by e-mail. For these e-mail messages, there is an additional entry field in the general properties labeled the Recipient field. Enter the e-mail address for the recipient of the customer e-mail messages here. Note: The contact form is only displayed in the shop if the recipient address has been entered. Tax Calculation Tax Matrix Your provider will supply you with a table with the most widely used tax classes in the main tax areas. This is called the tax matrix. The standard default entries are marked with an asterisk (*). If necessary, you can also change the sales tax rates for the individual tax classes. To do this, click Customize. As soon as you click Customize, you will be able to set new tax areas and tax classes. Note: After doing this, you can no longer return to the default tax matrix. Once you have made the decision to customize this tax matrix for your shop, you are required to manage the tax settings yourself. Otherwise, your provider keeps the tax matrix up-to-date. Save your entries by clicking Save. Tax Areas Note: You cannot modify the tax areas until you first click Customize on the tax matrix page. See Tax Matrix above. Page 40 Merchant User Guide Tax Calculation Settings Figure 17: Tax areas Enter a name to create a new tax area. Then enter the display names into the language-dependent fields in the next column. Save your entries by clicking Save. Note: When a new customer registers, this preset tax area will always be suggested as the default. Tax Classes Note: You cannot modify the tax areas until you first click Customize on the tax matrix page. See Tax Matrix on page 40. Enter a name to create a new tax class. After this, enter the display names into the language-dependent fields in the next column. Save your entries by clicking Save. Note: The preset tax class will be set as the default when new products are added. Tax Model Depending on the business model, you need to set your prices in the shop so that they can be displayed with or without sales tax. Caution: When you sell to end consumers, all your prices must be displayed as retail prices! Select the option that should be valid for your shop. Save your entries by clicking Save. Note: This setting affects the price that you have entered for your products. If you have set the wholesale price here, also define wholesale prices for the products. Merchant User Guide Page 41 Settings Shipping and Payment Caution: If a price has already been successfully set and you switch between retail and wholesale, the price cannot be automatically recalculated! If you switch to Wholesale Price, you only have input fields for the wholesale price in the product details. If you switch to Net Price, you can only set or edit retail prices. Shipping and Payment Shipping Methods The system provides three calculation models as the basis for the shipping methods: Free Shipping: This model describes methods without additional costs, that is, you offer the customer free shipping and delivery, for example. Flat Rate: At this point and independent of the scope of the delivery, the various suppliers specify set delivery prices. This means you can create a separate shipping method for each supplier who offers flat rate delivery. Free Shipping Over: Using the free shipping over model, you offer your customers Free Shipping and Delivery when they order above a preset volume. All the methods for the shipping of your goods defined so far are listed under shipping methods. The individual symbols have the following meanings: Table 14: Status of the shipping methods Symbol Meaning Shipping method visible. Shipping method not visible. If you would like to change the set values for one of the methods, click its name in the table. You can define this sequence using the sorting key in the last column of the table. For more details, see Sort via Sorting Key on page 25. Save your entries by clicking Save. You can use batch processing commands to manage the table entries. For the basics, see Batch Processes in Tables on page 23. Creating New Shipping Methods To create a new shipping method, enter a name for the method. After this, click the drop-down menu for the calculation models and select a suitable one. See Figure 18. Page 42 Merchant User Guide Shipping and Payment Settings Figure 18: Creating a new shipping method Save your entries by clicking Save. Depending on the calculation model you select, you need to enter general and special parameters. To do so, click the name of the shipping method. General Properties for Shipping Methods The properties and parameters for the individual shipping methods can be differentiated according to their underlying calculation model. The general parameters are the same for all shipping methods. The individual fields have the following meanings: Table 15: General parameters for all shipping methods Field Name Meaning ID Visible Default Name Note Field Type Entry field, alphanumeric Option button Definition of the default method Option button Name used to display the method. This Entry field, is language-dependent. alphanumeric Additional information for the shipping Entry field, alphanumeric method. The contents are displayed to the customer during the order process. Printed on the packing slip. Example PickupByCustomer Pick-up Please check in at the shipping office. Save your entries by clicking Save. Fixed Price Shipping Methods You need to enter special parameters for this shipping method. The individual fields have the following meanings: Table 16: Special fields for shipping with a flat rate model Field Name Meaning Field Type Example Tax Class Drop-down menu Normal Shipping Price Merchant User Guide Selection for the tax rate that applies to this method Price for this shipping method Entry field, numeric 12.00 € $14.00 Page 43 Settings Shipping and Payment Note that you need to enter prices for every currency that you have made visible in your Web shop. The fields for this are visible, depending on the currency settings. Save your entries by clicking Save. Shipping Methods with Free Shipping Limits For this shipping method, you need to enter special parameters. The individual fields have the following meanings: Table 17: Special fields for free shipping and delivery above a certain order amount Field Name Meaning Field Type Example Tax Class Selection for the tax rate that applies to Drop-down menu this method Normal Shipping price Price for this shipping method. Entry field, numeric 8,00 € $10.00 Free above an order value The order limit, at which shipping is free Entry field, numeric 100.00 € $130.00 Price Free above an order value refers to … At this point, define how the order value is calculated, above which shipping is free of charge to the customer. Drop-down menu Save your entries by clicking Save. The field Price "Free above an order value" refers to… has the following options: Table 18: Options for calculating shipping price Action Comment Products Price limit refers to the total of the product prices in the shopping basket. Products, coupons Price limit refers to the total of the prices of the products and the values of the coupons in the shopping basket. Products, coupons, shopping basket discount Price limit refers to the total of the prices of the products and the values of the coupons in the shopping basket and the shopping basket discount. Caution: Note that the name and shipping price field are displayed dependent on your defined currencies and languages. If you make changes to the currencies and languages, check how it affects your shipping method data! Payment Methods Seven calculation models build a basis for the payment methods you create: At no charge: The customer incurs no further costs. Flat Rate: Here you can pass costs on to the customer, for example, payment fees for cash on delivery. Free Shipping Over: Here you can define payment methods where the customer pays the delivery costs or not depending on the order volume. Page 44 Merchant User Guide Shipping and Payment Settings Direct Debit: As with At no charge, the customer incurs no additional costs at this point. This model makes sure that during the ordering process in the shop, the customer's bank information is requested. Credit Card: User this method to offer your customers all the credit cards you accept and manually process. WorldPay: When using this method, the customer is routed to the secure WorldPay system for payment. That is where data collection and the actual transaction take place. For more information, see Payment Method with WorldPay on page 50 and WorldPay on page 161. T-Pay: To select the payment method and make the transaction itself, the customer is forwarded to the T-Com payment system where the transaction is completed. For more details, see Payment Method via T-Pay on page 54 and T-Pay on page 163. The icon in front of the ID indicates the status of a method and also indicates its visibility. The individual symbols have the following meanings: Table 19: Status of payment methods Symbol Meaning Payment method visible Payment method not visible The sequence of the entries in the table is defined by the sorting key in the last column. For more details, see Sort via Sorting Key on page 25. Save your entries by clicking Save. If you click the ID of a payment method, you open the detail view and can edit the method parameters. You can use batch processing actions to manage the table entries. For the basics, see Batch Processes in Tables on page 23. Creating New Payment Methods If you would like to create a new payment method, enter a name for the method. Then click the drop-down menu in the next column and select a calculation model to base the method on. Merchant User Guide Page 45 Settings Shipping and Payment Figure 19: Creating a new payment method Save your entries by clicking Save. Click the name to edit the details. General Properties for Payment Methods The general properties are for all payment methods are the same, independent of the calculation model. Figure 20: Parameters for payment method without additional costs The individual fields have the following meanings: Page 46 Merchant User Guide Shipping and Payment Settings Table 20: General parameters for all payment methods Field Name Meaning ID Visible Default Discount Name Note Definition of the default method Percentage discount for the payment method. Name used to display the method. This is language-dependent. Additional information about the shipping method. The contents are displayed to the customer during the order process. Printed on the packing slip. Field Type Example Entry field, Invoice alphanumeric Option button Option button Entry field, numeric 10 Entry field, alphanumeric Entry field, alphanumeric Invoice Please check in at the shipping office. Save your entries by clicking Save. Note: You can use the Note field to record bank information. This is very useful when the Payment in advance method is used and the customer needs to know where to transfer the money so that the goods can be delivered. Direct Debit Payment Methods Using the calculation model Direct Debit directly effects the order process. If the customer chooses the payment method Direct Debit, he will need to fill out a form with his account information for a direct debit before the end of the order process. See Figure 21. Figure 21: Account information request for the calculation model Direct Debit Note: The data are checked for completeness, however not for exactness; no validation is performed as to whether the account indicated exists or has sufficient funds. Merchant User Guide Page 47 Settings Shipping and Payment Fixed Price Payment Methods In addition to the general properties, the following special parameters apply to the Flat Rate payment method. The individual fields have the following meanings: Table 21: Parameters for payment methods with flat rate Field Name Meaning Tax Class Prices for Payment Price for this payment method per available currency Field Type Example Drop-down menu no example Entry field, numeric 4,00 € $5.00 Save your entries by clicking Save. Payment Methods with Exemption Limits In addition to the general properties, the following special parameters apply to the Flat Rate payment method. The individual fields have the following meanings: Table 22: Parameters for payment methods with free shipping over Field Name Meaning Field Type Example Tax Class Normal Drop-down menu Base Price Price for this payment method per available currency. Entry field, numeric 10,00 € $15.00 Limit The order limit, at which the payment costs are waived. Entry field, numeric 100,00 € $150.00 Price for the limit …. At this point, define how the order value is calculated, above which payment is free of charge to the customer. Drop-down menu Save your entries by clicking Save. The price limit refers to the total of the prices of the products, the values of the coupons in the shopping basket, shopping basket discount, and shipping costs. Table 23: Options for calculating shipping price Option Comment Products Price limit refers to the total of the product prices in the shopping basket. Products, coupons Price limit refers to the total of the prices of the products and the values of the coupons in the shopping basket. Products, coupons, shopping basket discount Price limit refers to the total of the prices of the products and the values of the coupons in the shopping basket and the shopping basket discount. Products, coupons, shopping basket discount, shipping costs Price limit refers to the total of the prices of the products, the values of the coupons in the shopping basket, shopping basket discount, and shipping costs: Payment Method with Credit Card, Manual You can also set up payment per credit card for your customers. You process the transaction manually. At this point, you can set up all the credit cards that you would like to accept from your customers. In addition to the general properties, the following special settings apply to the Credit Card, manual payment method. Page 48 Merchant User Guide Shipping and Payment Settings Figure 22: Overview of credit cards with manual processing The page is divided into two sections: a table with the list of accepted credit cards and an area for selecting the credit card logos to be displayed in the shop. The table shows all the credit cards that you accept in your shop and manually process. In addition to the name of the card, you also see the additional card information that the customers must enter during the order process. For more information, see Attribute Types page 28.For more details, see Sort via Sorting Key on page 25. You can define new credit cards by entering the name of the card and selecting the corresponding options from the drop-down menus. The individual fields have the following meanings: Table 24: Input parameters for credit cards Column Meaning Field Type Example MasterCard Credit Card Name of the Credit Card Entry field, alphanumeric Credit Card Identification Code (CIC) A specific set of numbers, usually in the signature field on the back side of the credit card. Drop-down menu Issue Number Special issue numbers on some credit Drop-down menu cards Issue Date Issue date on some credit cards Drop-down menu The following options with the corresponding effects in the shop are listed in the drop-down menus: Table 25: Options in the drop-down menus Option Meaning Entry mandatory Customer must enter the required value. Entry optional Customer can enter the required value if desired. No entry The field is not displayed. Save your entries by clicking Save. Merchant User Guide Page 49 Settings Shipping and Payment The example in Figure 23 shows a possible entry mask for credit card information during the order process. Figure 23: Entering credit card information by the customer In order to visually tell your customers which credit cards you accept in your shop, in the bottom section of the page in Figure 22 select the credit card logos to be displayed. Click Credit Card Logos and select the check boxes for the corresponding cards. Save your entries by clicking Save. The prerequisite for display in the shop is the positioning of the associated navigation element Logos for accepted credit cards (Credit Card, Manual) on your shop page. For more information, see the Design chapterNavigation in the on page 133 section. Payment Method with WorldPay The basics about working with WorldPay can be found in the chapter WorldPay on page 161. In addition to the general properties, the following special parameters apply to the Worldpay payment method. Page 50 Merchant User Guide Shipping and Payment Settings Figure 24: Special WorldPay parameters The set-up for parameters and settings corresponds to the general process when preparing and configuring the WorldPay payment method. 1. Register at WorldPay Click this link to register as a merchant with WorldPay. After registration is complete, you will receive an installation ID. Enter this installation ID in the Installation ID field on the page in Figure 24. 2. To your WorldPay administration This link takes you to your WorldPay administration area where you can process your WorldPay data and orders. You need to set a few parameters in the WorldPay administration so that the data exchange between the WorldPay system and your shop occurs correctly. To do this, open the Configuration Options in your WorldPay administration. See Figure 25. In the Callback URL field, enter the Internet address that is displayed in Figure 24 into the field with the same name. Merchant User Guide Page 51 Settings Shipping and Payment Figure 25: Entering the callback URL and the callback password on WorldPay At the same time, enter a password in the field Callback password, which you should also enter in the Callback password field in Figure 24. When data is transmitted, both entries are compared to each other and the transaction is only continued if both passwords match. 3. Settings for payment processing These setting options need to be specified in your contract with WorldPay. Your customers are forwarded to the WorldPay system to enter their payment information. Use the option For entries for payment to define how your customers will see these pages. If the Go to the WorldPay Server option has been selected, the customer is forwarded completely to the WorldPay system. After the information has been entered, the customer is forwarded back to your shop. If you have selected the option Embed the form in the shop (using iFrame), the WorldPay pages are integrated into the shop display: Page 52 Merchant User Guide Shipping and Payment Settings Figure 26: WorldPay page, embedded in the shop page The disadvantage of this layout is the relatively small display area in which the WorldPay pages are displayed. Therefore we recommend the option Go to the WorldPay Server. However, you can also modify the WorldPay page in your WorldPay administration so that it fits in the available area. In the field Finalize Transaction, you determine how the transaction is be finalized and when the payment is booked from the customer account. For more details, see Finalizing the Transaction with WorldPay on page 162. Before you release the payment method for your customers, you need to test the process to make sure it functions correctly. To do this, you can select the corresponding mode in the Operational Mode field: Test mode-OK The transaction data are not validated in WorldPay but otherwise processed normally. With this, you can perform positive test runs. WorldPay sends its responses with the comment that these are test runs and not real transactions. Test mode-Error With this, you simulate transactions that are sent back by WorldPay as invalid. In this way, you can perform negative test runs. Live This is the setting for “real” transactions that customers carry out with WorldPay using your shop. Merchant User Guide Page 53 Settings Shipping and Payment Note: As soon as you have sufficiently tested the payment method and have released it for your customers, set the operational mode to Live, otherwise the invoiced sums cannot be booked from your customers. 4. Activating your account In order to offer your customers the WorldPay payment method as well as to advertise the WorldPay logo on your shop page, you need to have your shop accepted and your account activated by WorldPay. To do so, click the Activate Your WorldPay Account link and fill out the displayed form. 5. Selecting credit cards After activation by WorldPay, you are allowed to display the WorldPay logo in your shop. In addition, you can also display the logos of the credit cards for which you have a contract with WorldPay. There is a navigation element for displaying the WorldPay logo together with the credit card logos, Logos for accepted credit cards. For more information about using navigation elements, see Navigation on page 133. Save your entries by clicking Save. For more information about transactions with WorldPay, see WorldPay on page 161. Payment Method via T-Pay Die Grundlagen für die Arbeit mit T-Pay lesen Sie im Kapitel T-Pay, Seite 163. Für Zahlungsmethode mit TPay gelten neben den allgemeinen Eigenschaften weitere, spezielle Parameter. Page 54 Merchant User Guide Shipping and Payment Settings Abbildung 27: Spezielle Einstellungen für T-Pay 1. Bei T-Pay registrieren Sollten Sie sich noch nicht bei T-Pay angemeldet haben, können Sie unter Punkt 1 den Link Bei T-Pay registrieren nutzen, um die Registrierung aufzurufen. 2. Ihr T-Pay-Konto einrichten Im Verlauf des Registrierungsprozesses bei T-Com erhalten Sie die MerchantID, eine ShopID und einen Code MerchantSecrets. Diese Daten tragen Sie in die entsprechend gleichlautenden Felder im Punkt 2 ein. Zusätzlich legen Sie in diesem Punkt Ihren Betriebsmodus fest. Bevor Sie die Bezahlmethode T-Pay für Ihren Shop freischalten, empfehlen wir einen Testbetrieb. Stellen Sie dazu den Betriebsmodus entweder auf Test oder Test mit Limitierungsabfrage ein. In diesem Modus werden die Transaktionen, außer für Micromoney, nicht berechnet. Sind alle Test erfolgreich, nehmen Sie mit dem Support von T-Pay Kontakt auf und lassen Ihren Shop freischalten. Danach ändern Sie den Betriebsmodus auf Live und schalten die Zahlungsmethode für Ihre Kunden sichtbar. Achtung: Schalten Sie die Zahlungsmethode T-Pay erst nach Absprache mit dem Support von T-Pay live. Anderenfalls treten für Sie und Ihre Kunden Fehler im Transaktionsprozess mit T-Pay auf. 3. Auswahl der Bezahlvarianten Im Punkt 3 legen Sie fest, welche der T-Com-spezifischen Bezahlvarianten Sie Ihren Kunden anbieten. Diese Varianten werden Ihren Kunden dann auf der T-Com-Bezahlseite angeboten, siehe Abbildung 28. Merchant User Guide Page 55 Settings Shipping and Payment Abbildung 28: Auswahl der Bezahlvariante bei T-Pay 4. Auswahl der Kreditkarten Wenn Sie Kreditkarten über T-Pay akzeptieren, können Sie die Symbole dieser Karten im Shop anzeigen. Markieren Sie die Kontrollkästchen der betreffenden Kreditkarten. Hinweis: Die Kreditkartensymbole werden über ein Navigationselement auf der Shopseite platziert und angezeigt. Zur Arbeit mit Navigationselementen lesen Sie Navigation, Seite 133. Sichern Sie alle Eingaben mit Speichern. Achtung: Sollten Sie im Punkt 2 falsche Daten eingetragen haben, wird bei der Transaktion ein E-MailEreignis ausgelöst. Dadurch wird Ihnen eine E-Mail mit der Fehlerangabe gesandt. Dafür müssen Sie in den E-Mail-Einstellungen für das E-Mail-Ereignis T-Pay – Fehlerhafte Einstellungen eine entsprechende Empfängeradresse eintragen. Zu E-Mail-Ereignissen lesen Sie E-mail Settings, Seite 37. Dependencies Here you can define which payment method applies to which shipping method, that is, which payment method the customer can select when he chooses a shipping method. Page 56 Merchant User Guide Shipping and Payment Settings If you would like to activate a payment method for a specific shipping method, select the corresponding check box. If you clear the selection, the customer will not be able to select this payment method and relate it to the shipping method. Save your entries by clicking Save. Note: Newly created payment methods are assigned default shipping methods. At the same time, new shipping methods are assigned to all payment methods. Clear the selections for the combinations that you do not offer. Caution: Make sure that at least one combination is activated. Otherwise, no orders can be filled in the shop. Shipping Options You can offer your customers a service in the connection with the order via shipping options. This is where you can advertise services such as gift wrapping or something similar. The customer can select this service during the order process and add it to his shopping basket. Figure 29: List of the shipping options you have created In the entry fields above the table, enter the name of the link that forwards your customers to the current shipping options. See Figure 30. Merchant User Guide Page 57 Settings Shipping and Payment Figure 30: Link to the shipping options in the shop The individual symbols have the following meanings: Table 26: Status for the shipping options Symbol Meaning The shipping option is visible to the customer and can be selected. The shipping option is not visible to the customer and cannot be selected. Use the ID to access the details. The options are displayed in the table in the same order as in the shop. For more details, see Sort via Sorting Key on page 25. Define new shipping options by entering an ID in the entry field in the last table row. Save your entries by clicking Save. Shipping Options: Details - General You can edit the general details for the shipping options on the page in Figure 31. Page 58 Merchant User Guide Shipping and Payment Settings Figure 31: General details for shipping options The individual fields have the following meanings: Table 27: Fields for general details for shipping options Field Name Meaning ID Visible Name Description Price Tax Class Show Entry Field Field Type Entry field, alphanumeric Option button Name used to display the option. This Entry field, is language-dependent. alphanumeric Description and information displayed Entry field, alphanumeric for customers. This is languagedependent. For more information about formatting, see Using HTML Commands in Entry Fields on page 26 and WYSIWYG Editor on page 26. Price for this payment method per Entry field, numeric available currency. Drop-down menu Option button Display of an entry field for the shipping option. In this field, the customer can enter text that is submitted together with the shipping option. Example Greeting card Greeting card Delivery of the order together with a greeting card. Formulate your own personalized message … 3.00 € Save your entries by clicking Save. Shipping Options: Details - Selecting In addition to the basic settings, you can define which shipping option variations your customers can select. Merchant User Guide Page 59 Settings Shipping and Payment Figure 32: Overview of the variations for a shipping option The customer can select from these variations in the shop. You can describe each variant with a name and perhaps a short explanation and/or image. Save your entries by clicking Save. If you have uploaded an image for a selection, the image file name will appear as a link in the Image column. When you click the link, the image is displayed to the right in the preview window. If you would like to view the image in its original size, click the display in the preview window. To create a new option, enter a name for it in the first entry field in the last table row. If you would like to upload an image for it, enter the name and path of the image file in the next entry field. Or you can also click Browse to find the file and then enter the name in the entry field. Save your entries by clicking Save. Note: When you provide an image for a selection, you need to immediately indicate and upload the file when you create the selection. Shipping options and their variations are available to customers in the shopping basket. The customer can select one variation. See Figure 33. Page 60 Merchant User Guide Shipping and Payment Settings Figure 33: Selecting shipping options Note: The selected option applies to the entire shopping basket and not for individual products. Deferred Payment You can offer your shop customers the deferred payment option for the payment methods Direct Debit, Credit Card, manual, and WorldPay. Merchant User Guide Page 61 Settings Shipping and Payment Figure 34: Settings for deferred payment You have the option of defining different interest rates for various durations, starting with a minimum amount. The durations (in months) that your customers can select are defined in the table. You can create a deferred payment table per currency. To set up or edit deferred payment, first select the currency for which the installments should be defined. Then, in the Minimum Amount column, enter the amount from which you would like to make deferred payments available for your customers. After this, set the interest rates for the individual durations. In the entry fields for the durations for which you do not offer monthly payments, do not enter a value. Note: For interest rates, simply enter the annual interest rate; the system calculates the monthly amounts. Save your entries by clicking Save. You need to activate the payment scheduling for the payment methods for which deferred payment is available. The payment methods available for this are Direct Debit, Credit Card, manual, and WorldPay. As soon as a customer has reached the minimum order amount which qualifies for deferred payment and selects a corresponding payment method, the option of financing is offered. See Figure 35. On the financing page, the customer sees the financing applicable for the amount in his shopping basket. He can then select whether he would like to make deferred payments and if so, for how long: Page 62 Merchant User Guide Shipping and Payment Settings Figure 35: Selecting financing variations In the order information summary, the financing selected is displayed one more time: Figure 36: View of the financing in the order summary Merchant User Guide Page 63 Settings Customer Settings In the Payment Method line, in addition to the payment rate parameters, the additional amount that the customer must pay for using this payment method is indicated. In our example, this is €1.99. This is the difference of the total amount and the subtotal: 341.94 – 339.95 = 1.99. The total amount is calculated based on the financing model selected. Refer to the table in Figure 35. The installments are calculated according to the following formula: R= P ⋅ q Z ⋅ (q − 1) InterestRate (q = 1 + with regular monthly payments) Z 12 ⋅100 q −1 Here, Z is the duration in months and P the order value in the currency indicated. Our example in Figure 36 results in P = € 339.95, Z=6, interest=2%: q= 1 + R= 2 = 1.00167 12 ⋅100 339,95€ ⋅1,00167 6 ⋅ (1,00167 − 1) = 56.99 €. 1,00167 6 − 1 Customer Settings Customer Groups In Customer Groups, you can create different groups to assign your customers to. Such groups are a good way to offer customers various forms of price reductions (discounts, and so on) or services (for example, newsletters, and so on). To create a customer group, enter the name of the group. Save your entries by clicking Save. Customers are initially assigned to certain customer groups both when they register and when they order without registering. You decide which groups they are assigned to by using the Default option button in the table. Only merchants can change and update a customer's customer group. This is done in the customer administration area. See Customer Details – General - Address on page 107 ff. Registration In order to customize offers, prices, and services for your customers, you need your customers' personal information. You need to ask your customers for the information necessary to perform these actions. The simplest way to get this information is to set up a form that the customer fills out when registering in your shop. There are two types of customer attributes: the system attributes and the attributes you define yourself. The system attributes are created by default; you can use them but you cannot change them. If you would like to request addition information from your customers, you can define special attributes. See Customer Attributes on page 66. Page 64 Merchant User Guide Customer Settings Settings In the New Registration area, set which attributes will be displayed and requested on the registration form. Use the check boxes in the Visible column to select which attributes should be visible or not. This determines whether a particular attribute will be displayed on the registration form and can be completed by the customer. In addition, you can set whether the customer is required to complete the field. To do this, select the check box in the Mandatory column. Since registered users always need a user name and password to be identified in the system, the Sign In and Password fields are by default visible and marked as required fields. The Customers without Registration area is for requesting data from unregistered customers. These customers need to at least indicate a delivery and billing address. You can activate the mandatory fields in the same way as in the Registration area, that is, by selecting the check boxes in the Visible and Mandatory columns. Billing and shipping addresses do not always have to be identical. You can set the required entry fields in the Shipping Address area in the table. You can also select the applicable check boxes in order to define which fields in the form the customers are required to complete. Save your entries by clicking Save. Note: The system can only send order confirmations and other system-generated e-mail messages to the customer if you require the E-mail field. Countries You have the option of making the selection of a country for an address easier and faster. You can set up a selection of countries with a default country selection representing the country where most of your customers reside. Note: Note that you must guarantee the order processing and shipping for all the countries you include in your list. Only include those countries in your list for which you can deliver under the given conditions. You can define the sequence using the sorting key in the last column of the table. For more details, see Sort via Sorting Key on page 25. If you would like to add a country to your shop country list, select this country from the drop-down menu. Save your entries by clicking Save. Sign In Activating the first option Sign into the shop requires that your customers first sign in. This means that only registered customers with a sign in may enter and browse in your shop. New customers can only access the shop after you configure this option in your administration area. This is only allowed in a B2B business model. For the second Identify returning customer option, you can give your registered customers the opportunity to connect quickly to your Web site without having to sign in again. If this option is active, a cookie containing the customer's sign in information is saved on the customer's computer. The next time the shop address is opened, it automatically requests the customer's sign in data from the cookie. If this Merchant User Guide Page 65 Settings Customer Settings information is correct, the customer is immediately sign in without having to actually go through the sign in procedure. Save your entries by clicking Save. Caution: Automatic sign in only functions if customers allow cookies to be stored on their computer. Otherwise, the sign in information cannot be stored and then read. Customer Attributes Here you can create your own attributes for your customers if the current attributes are insufficient for your needs; for more information, see Registration on page 64. This is only available for registered customers. In the table, you see the list with the attributes you have defined. You can define the sequence using the sorting key in the last column of the table. For more details, see Sort via Sorting Key on page 25. The order you specify here will be the order in which the attributes are displayed in the registration form. Click the ID to edit the details of an individual attribute. Caution: When you delete an attribute, all the customer data saved in this attribute are deleted. Creating a New Customer Attribute Enter the ID and name the new attribute. Define the attribute type using the drop-down menu in the Type column. For more information, see Attribute Types on page 28. Save your entries by clicking Save. Click the name to define additional details. Editing the Details of an Attribute The individual fields have the following meanings: Table 28: Attribute Detail Fields Field Name Meaning ID Type Name Bubble Help Text Field Type Entry field, alphanumeric Display Name used to display the attribute. Entry field, This is language-dependent. alphanumeric Short explanation of the field contents Entry field, for the user. This is languagealphanumeric dependent. Example ContactInfo How did you find out about us? Save your entries by clicking Save. Page 66 Merchant User Guide Shopping Basket and Orders Settings The attributes of type Text with value selection and Language-dependent text with value selection are exceptions to this. In addition to the general properties, theses attributes have additional values that need to be created and managed. For more on this, see Using Text with Value Selection on page 29. Shopping Basket and Orders Figure 37: Shopping basket and order settings Add to Basket Action In the Add to Basket feature section, you can determine what happens when a customer “puts” a product in the shopping basket in your shop. If the feature above is active, the customer remains on the page and can continue shopping. If you select Opens the basket, the shopping basket is displayed to the customer. Adding a Duplicate Product The second section Adding a duplicate product controls what happens to a product in the shopping basket when an identical product is added. The following options are possible: Table 29: Options for adding a duplicate product Option Comment Increases the number in the The number of a product already in the shopping basket increases shopping basket accordingly. Merchant User Guide Page 67 Settings Option Shopping Basket and Orders Comment Replaces the product in the When this option is selected, the previous entry for a particular product in basket the basket is completely overwritten by the new entry of the same product. For example, if you have five of the same product on order in the basket and you select this same product again in the shop, the order for this product in the basket will be reduced again to 1. Does not change the number in the shopping basket The entry in the shopping basket remains unchanged. Create a news line item Creates a new line item Minimum Order Value You can set a minimum order amount for your shop. This means that every customer must have enough products in their shopping basket to meet this total amount in order to initiate an order. Use the drop-down menu Price for the Minimum Order Value refers to … to define how the minimum order amount is calculated, whether the minimum order amount is calculated from the total of the product prices, or whether, for example, the shipping and payment costs will also be included in the calculation. Allow Tax Area Selection You can give your customers the option of selecting a tax area during the order process. Note: If you make different tax areas available for selection, remember to take the tax conditions for this area into account. Remember that you as a merchant must check whether the billing address of the customer corresponds with the selected tax area or that the customer is entitled to make purchases in the selected tax area. Confirm Terms and Conditions Use this option to require customers to accept your terms and conditions orders before they can place an order. However, this requires that you make your terms and conditions easily accessible on your page. For more on this, see Terms and Conditions on page 123. Save your entries by clicking Save. Texts Frequently, it is necessary to display order information and supplemental information to the customer in the shop. You have three areas available to you for this purpose, above and beneath the shopping basket as well as on the confirmation page. For each message, there is language-dependent entry field. All fields are HTML fields. For more information about formatting, see Using HTML Commands in Entry Fields on page 26 and WYSIWYG Editor on page 26. Save your entries by clicking Save. The message texts are displayed in the shop as follows: Page 68 Merchant User Guide Product Settings Settings Figure 38: Display of the upper and lower shopping basket text Product Settings Stock Use this function to adapt the ordering process in the shop when stock levels become critical. Note: The prerequisite for this function is that you fill out the product Stock Level field. If this field is not filled, the subsequent options will be ignored. On this page, you can define how the order process in the shop should continue if an ordered product is no longer available, that is, the stock level is the same or less than zero: Table 30: Options for a stock level the same or less than "0" Option Comment This remains available without restrictions Merchant User Guide The order process is not effected at all, that is, the current stock level is ignored. All the processes continue as if the product were available. Page 69 Settings Product Settings Option Comment A notification about possible delivery delay is displayed. The customer can add the product to his basket with no order restrictions, but will be notified of possible delivery delays. You can formulate the notification message in the corresponding text field yourself. You need to provide a notification for every active language. It cannot be added to the shopping basket When this option is selected, products with a stock level of "0" or less can no longer be ordered. You can also display an additional notification message here. It is set to "Not Visible" The product is no longer displayed in the shop and cannot be ordered. Save your entries by clicking Save. Note: If a product reaches the stock level 0 during an order, that is, two items are on stock but four items have been ordered, the shopping basket will only accept the available amount. Caution: If you increase the stock level in the administration area, the product will not automatically be Visible again, since there could be other reasons for it to be Not Visible. You must set the product to Visible either in the details or using batch processing. See Products on page 77. You can configure the system to notify you as soon as a product has reached the stock level 0, that is, reached or fallen below the minimum stock level. To do this, configure the corresponding e-mail message in the e-mail settings. For more details, see E-mail Settings - Events on page 37. Auto Cross Selling As opposed to manual cross selling (refer to Product Details – Cross Selling on page 91), automatic cross selling is based on evaluations of customer buying behavior. For this, data is collected about how often a product is bought in relation to another product. Note: This function can slow down the display of products because multiple products have to be read from the database and statistical information managed and evaluated. The individual fields have the following meanings: Table 31: Auto cross selling fields Field Name Meaning Collect Statistics Visible Number of Product Recommendations Page 70 Field Type Example Option button Activation/deactivation of the automatic collection of product data for automatic cross selling. Statistics collection must be activated in order for the corresponding database to be set up and to provide data for meaningful cross selling suggestions. Display of cross selling products in the Option button online shop Number of cross selling products to be Entry field, numeric 5 displayed per product. The range of values is from 1 to 20. Merchant User Guide eBay Settings Field Name Settings Meaning Minimum Correlation How often a product needs to be sold along with another in order to be displayed as a cross selling product. The range of values is from 1 to 100. Field Type Example Entry field, numeric 3 Save your entries by clicking Save. Figure 39: Automatic cross selling display in the shop eBay Settings eBay (www.eBay.com) has become one of the largest sales platforms on the Internet. You can sell your products and services using eBay in addition to your own online shop. This allows you to improve customer awareness and increase your customer base. Preparation In order to integrate eBay with ePages 5, you must understand the functions and rules of the eBay platform. eBay offers this information on the eBay site. Merchant User Guide Page 71 Settings eBay Settings One prerequisite for successfully using the functionality is a valid registration as a seller at eBay. Only after you are registered in the eBay system as a valid seller can you offer items and receive orders in the eBay system. You can find more information at: - http://sell.ebay.com/sell http://pages.ebay.com/education/index.html http://pages.eBay.com/help/index.html General eBay Settings On this page, you configure how offers created in eBay affect your stock level. You can configure the system so that quantities are automatically reduced as soon as products are placed in eBay and sold. The following options are possible: Table 32: Options for decreasing stock levels for eBay transactions Option Comment When sending an offer to eBay If this option is active, the stock level is reduced immediately when the product is uploaded to eBay as an offer. If the offer ends without a sale, the stock level is changed to reflect this. When the sale ends Stock levels are changed when the offer ends and a bidder has won the product. When an offer is finalized in The stock level is changed after the bidder finishes the order process in the the shop shop for the product won. You can also define a default rating with additional text on this page that is used if you wish to provide ratings for finalized orders. See Orders on page 199. Save your entries by clicking Save. eBay Accounts To create a new account, enter the name of the new account. Then select the eBay country page you want to use from the drop-down menu. Save your entries by clicking Save. Note: You can only create an account for a specific country if the language and currency for this country have been created. Note: If you want to create an account for a country that is not included in the selection box, contact your provider. Note: You can only delete accounts for which no offers exist. For accounts that contain at least one offer, the check box is grayed-out and cannot be selected. Page 72 Merchant User Guide eBay Settings Settings To see or change details about individual accounts, click the name of the account. eBay Accounts - Details You must also use this page to perform or renew your authentication with eBay. See the following chapter about this. On the lower portion of the page, you must provide the item location. Select a defined value in the dropdown menus Country and Region. In the lower field City, enter the location of your product. Authentication To improve security, eBay has introduced a new authentication mechanism. You, as the merchant, register with your eBay sign in and password only once with eBay. You then receive something that is called a token from eBay that is saved in the shop system. This token is used to authorize further data transfer with eBay that you perform. It is used, among other things, to upload offers, query offer statuses, and to download sales data. You cannot exchange any data with eBay with authentication. The authentication has a time limit and must be renewed periodically. There are two ways to receive a token for an account. Either you can request a new token from eBay or you can use a valid token from another account. Request Authentication Click the Request Authentication button. The system verifies whether a connection to eBay can be created and shows the results. Click the Request Authentication from eBay link to request the token. You are then brought to the corresponding eBay page and must sign in with your eBay member name and password. See Figure 40. Figure 40: Signing in on eBay eBay verifies the information and generates a token. To transfer this to your shop, eBay requires your permission: Merchant User Guide Page 73 Settings eBay Settings Figure 41: Token transfer to your shop Click the Agree and Continue > button so that the token can be transferred. As a result, you see a confirmed authentication in your account details. See Figure 42. Figure 42: Successful authentication Apply Authentication If you already have an account with valid authentication, you do not have to request the token for a new account through eBay, but can instead use the token from the other account. Note: The token can only be exchanged between live systems. Templates eBay gives you the option of presenting your products using your own design and layout. This is done in your shop administration area by creating your own templates and putting sale items onto eBay using these templates. If you would like to create a new template, enter a name for the template. Save your entries by clicking Save. To edit details for the new or another existing template , click the name. See Templates – Details below. Batch processing actions are available to manage templates. For the basics, see Batch Processes in Tables on page 23. Templates – Details Page 74 Merchant User Guide eBay Settings Settings Figure 43: Page designing an eBay sale template You can change the name of the template here if necessary. The content of the template itself is managed in the text field Sale Content. In this field, you can enter HTML formatting tags or use the WYSIWYG editor. For more information about formatting, see Using HTML Commands in Entry Fields on page 26 and WYSIWYG Editor on page 26. Note: Due to security reasons, eBay restricts the use of active page contents such as JavaScript, Flash etc. If you use such elements in your templates, your pages might not display properly on eBay. Therefore, you should check how your sales on eBay are displayed and make the necessary changes to your templates. The placeholders in the box to the right of the sale text are used to include product data. During placement of the offer, these placeholders are replaced with the data for the current product. To do so, click the name of the placeholder. Instructions about using these templates with your eBay offers are available in the description of how to use the eBay assistant at Title on page 195. Configuring Notification E-mail The customer who wins your product in eBay must initiate the actual order process for the product in your shop. To be able to do so, he must be sent an e-mail message explaining what to do next. This e-mail message contains a link. When he clicks this link, he is transferred to the shop, the purchased product is placed in the basket, and from there, the order process continues as if the eBay customer is a normal shop customer. Note: The customer can, at this point, add additional products to the shopping basket. You can give him the option of adding the eBay product to the shopping basket again. The prerequisite for this is that, you need to go to the Shopping Basket and Orders settings for the action Adding a duplicate product and select the option Creates a new line item in the basket. For more on this, see Shopping Basket and Orders on page 67. Merchant User Guide Page 75 Settings eBay Settings You can add your own notes, information, or advertising to the content of the system generated e-mail message containing the link at any time. For further instructions, see Event E-mail - Details on page 38. Page 76 Merchant User Guide Product Details Products 5. Products Click the product number in the table to see the product details in the working area. Click the status symbols to the left next to the product number. This opens a new browser window containing the product details. The individual symbols have the following meanings: Table 33: Product symbol legend Symbol Meaning Sufficient product in stock and visible Product in stock, inventory below minimum level, visible Product not in stock, visible Product in stock, not visible Product in stock, inventory below minimum level, not visible Product not in stock, not visible The product is master product, that is, variations of this product have been defined. See Product Details - Variations on page 84. The product is a sub-product, that is, a variation of a master product. For more information on this, see Product Details - Variations on page 84. The product is a product bundle, that is, multiple products are combined into one packet. For more on this, see Product Bundles on page 94. Click New Product in the context menu to create a new product. For more details, refer to the chapter Creating a New Product on page 93. Batch processing actions are available to manage the table entries. For the basics, see Batch Processes in Tables on page 23. The following special actions can be performed: Table 34: Special batch processing actions for product administration Action Comment Duplicate The system creates each copy as a new product with its own unique product number, since every product number may only exist once. Duplicates are created as Not Visible. Delete all Products Delete all the products with a single action. Make note of the deletion confirmation settings. See Deletion Confirmation on page 18. Product Details General Product Details – Prices/Stock Here you can collect basic information for your product such as prices, units, manufacturer information, and so on. Further important parameters include the descriptions on page 80, and special product characteristics on page 81, which you can open via the Description and Attributes links on the lower part of page. Merchant User Guide Page77 Products Product Details Figure 44: General product details–prices/stock The individual fields have the following meanings: Table 35: Product Detail FieldsGeneral Prices/Stock Field Name Meaning Product Number Unique product name, corresponds to Entry field, the ID for other objects alphanumeric, max. 255 characters. Visible List Price Field Type Example eg_1000111010 Option button Price of the product, displayed in the shop. You can enter one price per available currency. Entry field, currency 339,95 € Daily Price Dependent Option button Tax Class Drop-down menu Normal Order Unit Drop-down menu Item Price refers to Enter the number of order units that your price applies to. The order unit you select is displayed Minimum Order Quantity If the customer enters a lower amount Entry field, numeric 1.00 in the shopping basket, the amount is automatically increased to the minimum order quantity. Page 78 Entry field, numeric $1.00 Merchant User Guide Product Details Products Field Name Meaning Field Type Example Interval Enter the unit intervals for the minimum order quantity of your product. Entry field, numeric 1.00 Reference Unit Information about the comparability of Entry field, numeric 1 Item your product. See the example below. and drop-down menu Amount in Product Number of products or amount of product per reference unit. Entry field, numeric 1.00 Manufacturer Entry field, alphanumeric Manufacturer Product Product number of the manufacturer No. Entry field, alphanumeric Weight Entry field, numeric 4.89 kilograms and drop-down menu Dimensions (Length, Height, Width in mm) Entry fields, numeric 600 mm Stock Level You have several options for dealing with products with a stock level of 0. See Stock on page 69. Eureka Entry field, numeric 12 items Minimum Stock Level Here enter a value for the stock level at Entry field, numeric 2 items which you must order new supplies for the product. Delivery Period Entry field, numeric 3 days Note: The minimum stock level should not be smaller than the minimum order quantity. This means that when you sell products, for example, as a six-pack, the minimum order quantity should also be six. What is a reference unit? In order to compare the prices of similar products from different manufacturers, there needs to be a common starting point. Therefore, according to PangV, a comparable unit of quantity needs to be indicated as the reference unit. For example, pretend you would like to buy some chocolate from a food retailer. A bar of chocolate X from manufacturer A weighs 150 grams and costs 1.49 €, a bar of chocolate Y from manufacturer B weighs 75 grams and costs 0.99 €. In order to compare both products more easily, the reference unit for both is declared as 100 g. Based on this, chocolate X costs 1.10 € per reference unit and chocolate Y costs 1.32 €. This makes it easy to see without having to calculate which chocolate is more attractively priced. You should also offer this service to your customers in the Web shop. The system calculates the reference price using the values in the List Price, Reference Unit, and Amount in Product fields. So if, for example, you indicate a reference unit of 100 g, you sell your product for 10.00 € and the product weighs 250 grams, the reference price for 100g is 4.00 €. Save your entries by clicking Save. Merchant User Guide Page 79 Products Product Details General Product Details – Description Figure 45: General product details – description The individual fields have the following meanings: Table 36: Product detail fields - general description Field Name Meaning Name Page 80 Field Type Name used to display the product. This Entry field, is language-dependent alphanumeric Example Eureka El Capitan IV Merchant User Guide Product Details Products Field Name Meaning Field Type Description Descriptive text for the product, which Text field, is displayed in lists, for example. This alphanumeric is language-dependent. For more information about formatting, see Using HTML Commands in Entry Fields on page 26 and WYSIWYG Editor on page 26. Dome tent for four persons. 2 doors. Long Description A detailed description of the product to Text field, alphanumeric displayed in the product detail view. This is language-dependent. For more information about formatting, see Using HTML Commands in Entry Fields on page 26 and WYSIWYG Editor on page 26. Dome tent for four persons. 2 doors and well-cut apses create efficient use of space thereby making… Keywords for Search Engines They are used for internal searches as well as for external search engines. camping tent geodetic dome light weight Mark as New The product is highlighted in the online Option button shop. For sale Defining whether a product for sale is Option button + available or should only be displayed. date field Use the After option along with the associated date field to automate switching from Not for sale to For sale. Entry field, alphanumeric Example Save your entries by clicking Save. General Product Details – Attributes Here you manage the product attributes defined by the assigned product type. You define these attributes when you assign the product type. For more on this, see Product Types on page 95. Now you are in the position to define as many additional attributes for your products as you need. Save your entries by clicking Save. You can select another product type from the Product Type drop-down menu at any time. Note: As soon as variations of a product exist (see Product Details - Variations on page 84), the product type assignment can no longer be changed. Product Details – Images– Images Here you can upload your prepared images in various sizes, modify the size assignment, and also generate slideshows from individual images. The program makes four image size formats available, which you can use in various areas in the shop. You probably prefer that the images displayed in the product list be smaller than those in the product detail view. The formats are small (100 pixel x100 pixel), medium (200 pixel x 200 pixel), and large (original size), as well as a separate format for images for promotional products with a width of 150px. Merchant User Guide Page 81 Products Product Details The small format is for product lists, where a small product image should be shown next to the product name in shop tables. The medium image is used for displaying product details in the shop. You can display a large image to your customers in a separate window. Figure 46: Product details – images There are several steps involved in assigning images to products: First of all, you need to specify the image source. Here you have two options. Either the image files are located on your hard drive and you load them up onto the Web shop server, or you enter the link where the image file is located and the image is read from there whenever it is needed. The prerequisite for this is that the image is publicly available on the Internet or is located on your Web page. The advantage of this is that, for example, these product images can be used in multiple areas but are managed from a single location. If you upload image files, you have the option of generating and saving each image in each size format. This is done by downsizing the original format into small, medium, and promotional image sizes and then generating a separate file for each format. Since image size has a significant effect on the loading time of a Web page, you can minimize the loading time by wisely choosing where to use any of the three image formats on your pages. Caution: This cannot be done automatically with every image type. The size of the following file types can be automatically formatted when uploaded: *.jpg, *.gif, *.png, *.bmp. Note: This automatic image formatting only works when images are uploaded. The images cannot be generated after the fact with this function. Linked images can only be used in their original size. If you would like to upload an image as a file on your server, enter the path in the File or Link entry field or use the Browse button to look for the file. Notes: The image symbols behave like option buttons. Click the symbols to select them. A colored symbol has been selected; a gray one is inactive. Page 82 Merchant User Guide Product Details You designate an image as a promotional product by clicking the promotional view Products button. The images marked like this are used for products on the home page of the shop or on the promotional products page. For more on this, see Promotional Products on page 125. Save your entries by clicking Save. Slideshow If you would like to display a product to your customers, for example, from all sides, you can set up a slideshow and present it in the shop. To do this, upload all the images you need for the slideshow into the image list. Then click the slideshow symbol for each image to go into the slideshow. See Figure 47. Figure 47: Assigning a product to a slideshow You can view the slideshow in the preview area. Use the elements in the lower preview area for navigation. Your customers will see these images displayed similarly in the shop. You start the slideshow by clicking in an infinite loop. Click to stop or end the slideshow. Use the elements to switch either forwards or backwards to the next image. and The images are played back in the sequence in which they are listed in the table. Note: Slideshows can only be viewed in the shop if JavaScript is allowed in the customer's browser. Product Details - Categories You assign a product to a category by selecting the category from the drop-down menu in the last row of the table. Save your entries by clicking Save. Note: A product should always be assigned to at least one category. Merchant User Guide Page 83 Products Product Details To remove a product from one or more categories, you need to remove the category assignments. Note: No “Confirm Deletion” window appears since no data is being deleted, only the assignment. Product Details - Variations Variations are product groups, whose products are differentiated by only a few attributes. A classical example of this is items of clothing such as T-shirts or a type of jacket. Here the typical distinguishing features are properties such as size and color. Variation products are completely separate products unto themselves. You can modify any individual property if necessary. Caution: If you delete the master product, all the derived variation products will be deleted as well. Note: You cannot derive any further variations from a variation product. Creating a Variation The basis for creating variations is product types and the use of the variable type Text with value selection or Language-dependent text with value selection. The basic descriptions for this are found in chapter Product Types on page 95, and in chapter Using Text with Value Selection on page 29. It is a good idea to plan advance how to set up your product groups and then work with special product types per grouping. This means that you first define a product type. Define the master product as a new product and assign it to a product type, which includes the attribute type Text with value selection. Figure 48: Variations – creating the master product and assigning the product type With this, the requirements for creating variation products have been fulfilled. Click the Variations tab. Page 84 Merchant User Guide Product Details Products You will see an overview of the variation attributes that you have defined and their values. Now select the jacket variations you would like to offer. See the example in Figure 49. Figure 49: Variations - value selection Note: As long as a variation product is using a variation value, the check box is deselected, and the selection cannot be removed. If you would like to select this check box again, you need to delete all the variation products that use this value. According to this example, variation products of type Jacket can now be defined with the colors red and blue and in all sizes. Save your entries by clicking Save. Click Variations. You now see the page shown in Figure 50. In the table, there is a column with a drop-down menu for each variation attribute; here the columns Color and Size. In the drop-down menus for the Color and Size columns, you find the values that you selected on the Variation Attributes page. See Figure 50. Merchant User Guide Page 85 Products Product Details Figure 50: Variations – selecting the variations You create a variation product as follows: - Select a color from the Color drop-down menu Select a size from the Size drop-down menu Save your entries by clicking Save. The product number is automatically assigned by the system and the name is derived from the master product. The new variation product inherits all the properties of the master product and also has the definite properties color (for example, red) and size (for example S). Note: During the procedure you can also assign a separate product number before you click Save. In both drop-down menus, there is an entry named All. When you select this entry in both fields and click Save, all the possible variations are automatically created from the highlighted default values. See Figure 51. Page 86 Merchant User Guide Product Details Products Figure 51: Variations – all variations created automatically Working with Variations Master products are indicated in the product list with a symbol next to the product number. Variation Products Note the following differences: - - The batch process Duplicate is not available for variation products. In the table, the display sequence can be defined using the sorting key. See also Sort via Sorting Key on page 25. -You can set a default setting for the variation products, for example, the variation product, defining which is to be displayed first in the shop. For more about default settings, refer to Default Settings on page 22. Category assignments made via the master product cannot be removed from the variation product. However, additional assignments to other categories can be made. To edit the details of variation products, click the product number. Save your entries by clicking Save. Note: You have the option of selecting a separate type of variation display for each product type. For more on this, see Product Type – Details – Layout on page 99. Merchant User Guide Page 87 Products Product Details Variation Products and Cross Selling In addition to the manual assignment of cross selling products (see Product Details – Cross Selling on page 91), cross selling products can also be preset for variation products via the master product. They are displayed in a defined sequence before the assigned products. Basically a variation product takes on the cross selling products of the master product without these products being able to be changed. However, you can make changes to the default cross selling products themselves. To do this, you need to add the corresponding product(s) on variation product level to the list again so that the entries are doubled. Make the desired changes to these new entries and save them. The system then displays the updated data in the shop. Extending Variations Later Define a new attribute of type Text with value selection and proceed as described under Figure 49. Now the attribute is available to the master product for building variations. Switch to the Attributes area in the details of the master product and select a default value for the existing variation products, that is, the first variation. See Figure 52. Figure 52: Default setting for the first variation value With this, all the existing variation products receive this value for the new attribute. Save your entries by clicking Save. After this, go to the Variation Attributes page. Page 88 Merchant User Guide Product Details Products Product Details - Prices In addition to the list price of your products that you manage in the general properties (Prices/Stock), you can define bulk pricing and discounts for each product, including expiration dates. The prerequisite for creating such price variants are price lists. For more on this, see Price Lists on page 99. Figure 53: Extended product price structure In the upper part of the page, you see the list price for your product, in the currencies for which you have entered prices. Quantity Discount/Bulk Prices In this section, define discounts based on unit numbers. You can define bulk pricing and/or volume discounts. Define the price discounts in the table in Figure 53. Next to the column in the table where the amount is entered, there are two columns in each of which a price list can be displayed. Note: The price lists in which the product is already included are marked with an asterisk * after the name of the price list. This gives you a quick overview of which price lists are associated with the product. After you have selected a list, the corresponding data is displayed in the column. In the entry field of the Amount column, enter the number of products the customer must buy to receive a lower price. In the Bulk Price column, enter the price that should apply to this amount. You can also enter a discount for your customers if they buy the amount indicated. The discount is calculated in percent. Note: If you offer both bulk pricing and a discount, the bulk price will be charged first and then the discount is subtracted. Save your entries by clicking Save. Merchant User Guide Page 89 Products Product Details Figure 54: Combined price list Note: The discount entered last effects all subsequent list entries if no other discounts are entered. To remove the discount on subsequent entries, enter a 0 in the next or the effected discount field. Remember that you can create customer and customer group-specific price lists. You can define prices for individual customers by entering the price or discount for the amount of 1 and assign only the one customer to the list. The second price list column lets you edit two price lists at the same time. Select a second list from the drop-down menu via the second price list column. With this, you have the option of comparing, for example, lists of various currencies or periods of validity to each other. Value Discount In addition to quantity discounts and bulk pricing, you can configure a value discount for each product. With this, you can give your customers a further discount, if they buy so much of a product that the total of the prices exceeds the set limit. Select the price list for which you would like to set the discounts. If you would like to create a new discount, enter the limit in the entry field in the Value column. In the associated field in the Discount column, define the discount as a percentage. Save your entries by clicking Save. Discount Calculation For Product Prices Since you can assign more than one discount for each product, the sequence for calculating the discount needs to be defined. The individual discounts are calculated sequentially as follows: Page 90 Merchant User Guide Product Details Products Using the product price to start with, bulk pricing is applied first. This results in a reduced unit price per product for the corresponding number of items. After this, the quantity discount is calculated. The total from bulk pricing minus the quantity discount is compared with the limit for the value discount. If the limit is reached or exceeded, the percentual price discount set for this limit is calculated and applied. The price reductions are displayed to the customer in the shop: Figure 55: Display of the discount for a product Product Details – Cross Selling When using cross selling, additional products are offered in relation to a particular product. These are accessories or related products. The purpose of this offer based on related products is to motivate the customer to buy not only the current product but also the related product. Manual cross selling is divided into three areas – Accessories, Related Products, and Product Comparison. Cross Selling - Accessories Accessories should be products that extend or improve the functionality of the basic product or are necessary to use the product (fuel, batteries, and so on). Merchant User Guide Page 91 Products Product Details Figure 56: Cross selling - accessories The area heading indicates how many products are assigned as accessories. In addition to the product number and the name, you have a Comment column. This comment is displayed with the product in the shop. Enter a note or description here why or how this product enhances the current product. A comment field is offered for every language in your shop. If you would like to place products in the table, you need to add them from the tray. For more information on working with the tray, see Tray on page 19. Note: Clicking Remove Assignment only removes the assignment of products to each other. No products are deleted. Therefore, no “Confirm Deletion” window appears. Cross Selling - Related Products Products that lend themselves well to being related products are products that enhance the functionally of the base product, that are necessary to use the product, or that make using the product more comfortable, for example, flashlights for tents, and so on. The functionalities in the table correspond to those in the table for the Accessories area. For more information about this, see the chapters Cross Selling - Accessories on page 91 the explanations for Figure 56. Cross Selling - Product Comparison Product comparison is not so much about offering the customer product enhancements than it is presenting alternatives for the chosen product. You can use this function to show the customer similar products you are offering and therefore show him products for sale that he otherwise may not have ever seen. The functions in this area also correspond to those of the accessories area. For more explanation, see Cross Selling - Accessories on page 91 in Figure 56. We recommend comparing products of the same type since then these products all have the same attributes, which make it possible at all to generate a meaningful comparison. Page 92 Merchant User Guide Creating a New Product Products Figure 57: Display of the product comparison table The basis product is displayed first as the item to the left. Beneath the Add to Basket line, the attributes of the respective product type are listed. Product Details – eBay As soon as you create an eBay offer for a product, this offer is shown in the details of this product. A detailed description of the table with all of the functions and batch processing actions is available in Offers on page 193 in the eBay chapter. On this page, you can immediately create a new offer for this product. To do this, click Create New Offer. Click the name of the new offer to open the eBay assistant and to enter or change all necessary settings. Working with the eBay assistant is described in Offer Settings/eBay Assistant on page 195. Creating a New Product You create a new product by clicking the New Product link in the context menu for products and entering all the necessary data on the page displayed. Merchant User Guide Page 93 Products Product Bundles First enter a unique value in the Product Number field. A product cannot be saved without a valid number. Repeated numbers are rejected by the system. After this, enter the additional general product details for prices/stock, description, and attributes. The definite field descriptions can be found in the chapters General Product Details – Prices/Stock on page 77; General Product Details – Description page 80; General Product Details – Attributes page 81. Save your entries by clicking Save. Caution: Save your changes before you click the tab for entering additional data. Otherwise, the changes will be lost! Note: Visibility is set to Not Visible by default. When all the data has been entered, set the product to Visible in order to display it in the shop. Product Bundles A product bundle is a packet or set made up of products that belong together and that are then usually offered at a lower price. Open the corresponding page by clicking the New Product Bundle link in the Products context menu. The home page for a new product bundle corresponds to one for "normal" products. This is also the place you first define the most important parameters and then after saving are able to access additional tabs. For more information on this, see Creating a New Product on page 93. Make note of the following exceptions: You cannot enter any values in the Stock Level and Minimum Stock Level fields. These values result from the smallest values of each of the individual products. The Reference Unit field and the corresponding Amount in Product field are inactive, since the packets are not comparable to other products due to their individual compilation. Save your entries by clicking Save. The data are collected and processed in the Images, Categories, Prices, Cross Selling, and eBay tabs exactly the same way as for standard products. The corresponding explanations for this are found in the chapters Product Details – Images– Images on page 81, Product Details - Categories on page 83, Product Details - Prices on page 89, Product Details – Cross Selling on page 91, Product Details – eBay on page 93. Associated Products You must select and put together the products that make up the packet. To add more products to the list, you have to add them from the tray. For more information on working with the tray, see Tray on page 19. In the Quantity column, you can set the quantity of a product offered in the bundle. Enter the corresponding value in the respective entry field. Save your entries by clicking Save. Information About Bundles You should take note of the following information about working with product bundles: Page 94 Merchant User Guide Product Types Products - The stock level and minimum stock level of the bundle are determined by the smallest respective value for the individual products. - After the order has been placed, the inventory for all the associated components is updated at the same time. - Only products of the same value-added tax class can be assigned to a bundle. - The status Not for sale is taken into account for bundle products. If one of the bundle products is set to Not for sale, the entire bundle cannot be sold. - During import, the bundles are imported as normal products. The assignments for the individual products are not retained. - The unit price is calculated by adding the respective list prices of the individual products together. Any price discounts defined in the price lists are not taken into consideration at this point. Product Types Product types let you group your products and assign attributes to them. You can view the details for the individual product types by clicking the link in the ID column. Or you can open the details for a product type in a new browser window. To do so, click the symbol in front of the product type ID, . Caution: When you delete a product type, all the products that belong to this type are deleted as well. Default Product Type The first product type created becomes the Default product type. This is the “original type” on which all the other product types are based. This means that all the attributes that this product type “owns” are automatically assigned to all the other types which follow. In this way, you can specify attributes that apply to all products. Note: If you would like no common attributes, simply delete all the default product type attributes. Caution: When you delete an attribute, all the product data contained in this attribute are lost. Creating a New Product Type You create a new product type by entering an ID and a name for the new product type. Enter a name in the second entry field. Save your entries by clicking Save. Merchant User Guide Page 95 Products Product Types Product Type – General Details The name is language-dependent; enter a value for every defined language. Save your entries by clicking Save. Product Type – Details – Attributes Figure 58: Product types – details - attributes This is where you manage the attributes. Access the details by clicking the ID. Note: In Figure 58, you see two attributes that cannot be deleted. They are made available by the default product type and can only be edited via this type. See Default Product Type on page 95. Save your entries by clicking Save. Creating a New Attribute You create a new attribute by filling out all the entry fields in the last row. See Figure 58. Use the drop-down menu in the Type column to set the attribute type. For more information, see Attribute Types on page 28. Save your entries by clicking Save. Now click the ID to enter details; to do this, refer to the next chapter. Attribute – Details Use attribute details to set the display format in the shop. Page 96 Merchant User Guide Product Types Products Figure 59: Product type – attributes - details The individual fields have the following meanings: Table 37: Fields for attributes Field Name Meaning ID Visible Supports HTML formatting. Name Bubble Help Text Text attribute setting, see Attribute Types on page 28. Use this to determine whether the texts that are later entered in the field should be able to be formatted with HTML. Name used to display the attribute. This is language-dependent. Short explanation of the field contents for the user. This is languagedependent. Field Type Example Entry field, alphanumeric Option button Option button TentWeight Entry field, alphanumeric Entry field, alphanumeric Weight Tent weight (travel weight) Note: If you have created an attribute of the type Text with value selection or Language-dependent text with value selection, you need to edit the possible values in addition to the general details. This is described in detail in the chapter Using Text with Value Selection on page 29. Attribute – Details - Value Selection For the attributes Text with value selection and Language-dependent text with value selection, there is an additional tab which opens the page for entering the default values. See Using Text with Value Selection on page 29. Merchant User Guide Page 97 Products Product Types Figure 60: Page for entering default values To create new values, enter the ID. In the next field, enter the value. Save your entries by clicking Save. Page 98 Merchant User Guide Price Lists Products Product Type – Details – Layout You can set up a different layout for each product type. You select this layout from a specified set of layout options. Figure 61: Selecting the layout for products and variations The page is divided into two sections. In the upper section, you see layout variations for the products belonging to a product type. In the lower section, select how the product variations should be displayed as a group. Save your entries by clicking Save. If you have a large number of variations of a product, you should use the second layout because then the page will display faster. If there are only a few variations, the first layout is best. Layout 3 is best for just a few variations with different images to be displayed. Price Lists You can use price lists to set time limits on the prices for your products as well as set bulk pricing and discounts. You can also define which customers or customer groups to offer special prices to. However, in order to create product price structures, price lists must first be defined. To do this, make a selection from the Price Lists context menu. Merchant User Guide Page 99 Products Price Lists Figure 62: Price lists The individual symbols have the following meanings: Table 38: Symbols in the table for price lists Symbol Meaning Price list is active. The current date lies within the list validity period Price list is not active. The current date lies outside of the list validity period Batch processing actions are available to manage the table entries. For the basics, see Batch Processes in Tables on page 23. Creating New Price Lists To create a new price list, enter the ID and the name for the list. After this, select the currencies from the currency drop-down menu for which you would like to enter prices. In the last two fields, enter the time frame the price list should remain valid, first the start date, and in the last field, the end date. Caution: For the start and end date, you also need to enter the time frame next to the date information, otherwise the entry is invalid. Enter the dates in the current language-dependent format. The German format is as follows: TT.MM.JJ SS:MM, for example, 01.01.05 08:15. Save your entries by clicking Save. Click the ID to enter additional properties. Price List Details – General The individual fields have the following meanings: Page 100 Merchant User Guide Price Lists Products Table 39: Fields for general price list details Field Name Meaning ID Name Name used to display the price list. This is language-dependent. Valid from Valid until Field Type Example Entry field, alphanumeric Entry field, alphanumeric Date field Date field RegularCustomers_E U For regular customers (€) 01.01.06 00:00 30.06.05 23:59 Save your entries by clicking Save. Price List Details – Customer Groups You can set up price lists for target groups. This puts you in the position to offer specific customer groups special prices, which do not apply to your customers in general. All the defined customer groups are listed in the drop-down menu in the lower part of the table. Select the customer groups for which the price list should be limited. Save your entries by clicking Save. Note: Only one price list can be selected for a customer or customer group. Price List Details - Customers You can assign not only customer groups to price lists but also individual customers. In order to assign selected customers, use the tray. See also Tray on page 19. Click the Add customers from tray link. Note: If a customer is directly assigned to a price list, this has a higher priority than if the customer is assigned to a price list from within a customer group. This means that if one price list is selected for a customer and another for a customer group, in which the same customer is a member, the customerspecific list applies to the customer. Note: Only one price list can be selected for a customer or customer group. Price List Details - Shopping Basket Discount Use this function to give your customers and customer groups discounts on their shopping baskets. This lets you define various shopping basket values from which you give certain price discounts. Merchant User Guide Page 101 Products Import and Export Figure 63: Settings for Shopping Basket Discounts This page lists the discount ranges that you have created for this price list. You can see what percentual reductions you are giving for specific shopping basket values. You can modify percent values, define new discounts, and delete entries. If you would like to create a new value and give it a discount, enter the shopping basket value in the entry field in the Minimum Amount column. In the associated entry field in the Discount column, define the discount as a percentage. Save your entries by clicking Save. Import and Export You can read a general description about importing and exporting in the chapter Import and Export on page 30. Note: Verify your brower settings for pop-up windows. Since the program opens new windows, pop-ups must be allowed for complete functionality. Otherwise, certain functions cannot be used. BMECat-Import Der BMECat-Import unterstützt die BMECat-Version 1.2 mit den Transaktionen <T_NEW_CATALOG>, <T_UPDATE_PRICES>, <T_UPDATE_PRODUCTS>. Die einzelnen Felder haben folgende Bedeutung: Tabelle 40: Felder für BMECat-Import Field Name Meaning Importdatei Modus Page 102 Field Type Geben Sie den Pfad direkt ein oder Eingabefeld, nutzen Sie Durchsuchen, um den Pfad alphanumerisch der Datei einzutragen. Optionsfeld Prüfen – Die XML-Datei wird auf Syntaxfehler, fehlende Elemente, richtige externe Verweise, auf richtige Einheiten usw. geprüft. Importieren – Die XML-Datei wird komplett geprüft und importiert Example C:\BMECat\BMEcat.x ml Merchant User Guide Product Searches Products Steuergebiet Kataloge ignorieren Kataloge sofort sichtbar Produkte sofort sichtbar Auswahl des Steuergebietes ist Voraussetzung für die Zuordnung der richtigen Steuerklasse. Kataloge werden nicht importiert Auswahlfeld Kontrollkästchen Kontrollkästchen Kontrollkästchen Sichern Sie alle Eingaben mit Speichern. Hinweis: Beim Prüfen wird keine Prüfung auf interne Abhängigkeiten und fehlerfreie Importierbarkeit vorgenommen. Diese Prüfung erfolgt vor dem Importieren. Im Ergebnis von Prüfen und Importieren werden Fehler oder Warnungen angezeigt. Warnungen können ignoriert werden, wenn diese als bedeutungslos erachtet werden. Bei Fehlern wird der Import des betreffenden Datensatzes abgebrochen. Folgende allgemeine Hinweise sind noch zu beachten: - Merkmalgruppensystem und Klassifikationssysteme werden ignoriert Buyer und Supplierangaben werden ignoriert Userdefined Extensions werden ignoriert Product Searches Products are the most important elements of your shop type. Therefore, the access to individual products or product groups must be uncomplicated and convenient. Not only is catalog management important for this, you also need an easy to use search mask with extensive filter options. Product Search in the Administration Area For you as a merchant, it is important to be able to access not only specific products but also to search for whole groups with the same properties, for example, to check whether a product has fallen below a minimum stock level or for all products of a certain type. You have access to the product search on every page in the Products area. It is always visible in the upper area of the corresponding page. You can choose between the simple standard search and the advanced product search. The following buttons are important for searches: / Switch between stock and text search Start the search according to the entries in the search fields. You can also start the search with Enter. Reset the search. The search mask is emptied and all the entries are deleted from the search fields. Merchant User Guide Page 103 Products Product Searches / Switch between simple and advanced search. Note: When you use multiple search fields, remember that the search fields are AND searched by default, that is, a data set must fulfill all the criteria that have been defined in the search fields and not just one of them. Note: The product search also applies to attributes and products set to Not Visible. Both master products as well as variation products are covered by the search. See Product Details - Variations on page 84. Searching Text The text in the Product Number search field is used to search within the product number of the individual articles for matches. Note: Searching by product number is quicker than searching via the Text Search field because, in this case, only one field per data set is evaluated. Searching with the Text Search field includes the following product parameters: Product Number, Product Name, Manufacturer Name, Manufacturer Product Number, Short Description, Long Description, Key Words for Search Engines, as well as all the attributes based on the Text variable type. For more about variable types, see Attribute Types on page 28. In addition, the fields, in which file names are saved, are also searched. With this, you can also search for the names product images used or attached files such as pdf files, video files, and so on. Use the Language drop-down menu to determine which Translation Field will be searched for languagedependent fields. Note: You can use the placeholder * in the text fields for portions of the search text you do not wish to enter or cannot enter. Capitalization is not noted. The system searches for character strings in which the search text appears, regardless of where this is in the target text. Inventory Search There are two fields for searching inventory: the Stock Level field and Minimum Stock Level field. Use the Stock Level search field to query the stock levels of individual products. To do this, enter a number. Note: The search results list, all the products, whose stock level is the same or smaller than the number searched. If you want to list all the products that have reached a minimum stock level or have already fallen below it, select the Stock level below minimum check box. Note: Inventory searches also return variation products and single products. Master products are not included in the search. Page 104 Merchant User Guide Product Searches Products Advanced Product Search An advanced search is actually a simple search with additional filter options. Using these fields, you can restrict the search further according to product types and the Visible / Not Visible property. Remember that when using multiple fields, they are AND searched; for more information on this, refer to the corresponding instructions above. Product Search in the Shop The customer has a convenient search function at his disposal to facilitate choosing products in the shop. Note: The product search mask belongs to the navigation elements. You need to place it on the page according to the page structure of your shop. For more details, see Navigation on page 133. Customers can only search for visible products; for more about visibility, see Visibility on page 23. This search does not include editorial content, for example, such as items or freely designable pages, and so on. The customer can also choose between a simple and an advanced search. Merchant User Guide Page 105 Customers 6. Customers The symbol to the left of the customer number shows the customer's status. See Table 41. The individual symbols have the following meanings: Table 41: Customer symbols Symbol Meaning Customer is active and can sign in. Customer is inactive and cannot sign in. The customer is a registered customer. To open the detail view for individual customers, click the customer number. You can also open the details in a new browser window. To do this, click the status symbol to the left of the customer number. This is helpful if you wish to work in the original table instead of the detail view without having to rebuild the table (for example, if the table was the result of a search). If you wish to add a new customer, click New Customer and proceed as described in Creating New Customers on page 112. If you wish to change the basic settings for working with customer data, click the Customer Settings link. For more on this, see chapter Customer Settings on page 64. Batch processing actions are available to manage the table entries. For the basics, see Batch Processes in Tables on page 23. The following special actions can be performed: Table 42: Special batch processing actions for product administration Action Comment Assign to Customer Group Simple assignment of multiple customers to a customer group. Caution: If you delete a customer, the customer's orders will also be deleted. Customer Details – General - Address All the attributes listed here can be released for the registration form so that the customer will have to add this information himself when registering. For more information on releasing the attributes for registration, see Registration on page 64. Merchant User Guide Page107 Customers Customer Details – General - Address Figure 64: Customer details - address information The first page of the customer details is for the administration of all address information. You can use this data to communicate with the customer, extract billing and shipping addresses, and so on. With the exception of the Birthday field, all of the fields are alphanumeric, meaning you can enter any character. Birthdays must be in the date format, for example, 01.01.2001. Note: Details on the individual date formats are located in Attribute Types on page 28. You can have up to three e-mail addresses for each customer. The e-mail fields have the following meanings: Table 43: E-mail settings in the address information Field Name Meaning Field Type Send HTML E-mail Option button Example E-mail Entry field, All system-generated e-mail messages alphanumeric related to the customer are sent to this address if the customer is not a registered customer. For more information, refer to chapter Customer Details – General – Sign In on page 110. m.mustermann@ provider.de Business E-mail Business e-mail address of the customer m.mustermann@ provider.de Page 108 Entry field, alphanumeric Merchant User Guide Customer Details – General - Customer Account Customers Field Name Meaning Field Type Example Private E-mail Private e-mail address of the customer Entry field, alphanumeric [email protected] Save your entries by clicking Save. Customer Details – General - Customer Account In the Customer Account section, you collect and edit all the data that are important for the customer classification (customer number, customer group) as well as data relevant for accounting and payment transactions. See Figure 65. Figure 65: Customer details - customer account The individual fields have the following meanings: Table 44: Fields for the customer account Field Name Meaning Field Type Example Customer Number This is a unique number. You can accept the Entry field, number generated by the system or use your alphanumeric own. Customer Group When the customer registers and creates a Drop-down menu Regular customer new account, the customer group you set in the Customer Setting - Customer Groups is set as default. See Customer Groups on page 64. Allow Orders Order block for registered customers Account Holder Merchant User Guide 1001 Option button Entry field, alphanumeric Max Mustermann Page 109 Customers Field Name Customer Details – General – Sign In Meaning Account Number Bank Code Bank Code Bank Name VAT ID VAT identification number - merchants who can deduct VAT receive a separate VAT ID number upon request. Tax Area Field Type Example Entry field, numeric 1234567890 Entry field, numeric 13245678 Entry field, alphanumeric A bank Entry field, alphanumeric DE 123 456 789 Drop-down menu EU country Last confirmed Link Date entry for displaying the last time changes were made. ) to the right next to the Click the symbol ( field to enter the current date. Internal Note Field for information and notes about the customer. The customer cannot see these notes. Text field, alphanumeric This contact is a sample customer… Save your entries by clicking Save. Customer Details – General – Sign In Use this page to administer data for customer access rights to your shop: Figure 66: Customer details - sign in The individual fields have the following meanings: Page 110 Merchant User Guide Customer Details – General - Attributes Table 45: Sign in fields Field Name Meaning Customers Field Type Example Allow sign in This is where you give the customer the right Option button to access the areas of your shop that require signing in. Name Display name in the sign in box in the online Entry field, shop if the customer has signed in. alphanumeric Max Mustermann User Name Sign in name for the online shop Entry field, alphanumeric mmustermann Password The password can be any length. But the system only evaluates the first eight characters. Entry field, alphanumeric Password Send New Password If a customer forgets his password or user name, you can send a new password with this function. The system automatically generates the password and sends it to the e-mail address entered in the E-mail field. Link Repeat password Field for re-entering the password due to security reasons. Entry field, alphanumeric Send HTML E-mail Password Option button E-mail All system-generated, customer-relevant email messages are sent to the registered customer at this address. Entry field, alphanumeric m.mustermann@ provider.de Confirmation Question A security mechanism that works together with the confirmation answer to replace a forgotten password. Entry field, alphanumeric What is my grandmother's cat's name? ID Confirmation Answer The customer enters his answer to the confirmation question here. Entry field, alphanumeric Nostradamos Note: The e-mail address in the E-mail field is always used if the customer is registered. If there is no sign-in information for the customer (he has only ordered, but never registered), the system uses the email address from the E-mail field in the Address section. See Customer Details – General - Address on page 107. Save your entries by clicking Save. Customer Details – General - Attributes The Attributes section contains all the attributes that you added in Customer Attributes on page 66. Save your entries by clicking Save. Customer Details - Orders In addition to the customer data, you can also list the orders this customer has previously placed. To see the details of an order, click the order ID. A comprehensive description of all the functions relevant to orders can be found in chapter Orders on page 143. Merchant User Guide Page 111 Customers Creating New Customers Creating New Customers Note: Some customers assume that after they enter the invoice and shipping address while placing the order, they have already become registered customers. If necessary, let your customers know that they must go through the registration process to be saved as a registered customer. One way of doing this is to display an appropriate message during the order process or on the order confirmation page. For more on this, see Texts on page 68. In the context menu, click New Customer. This opens the mask for entering new customers. Fill out all the fields as described in chapters Customer Details – General - Address on page 107 ff. Save your entries by clicking Save. Note: You cannot save the new customer data until you have collected a password for the new customer. Import and Export You can read a general description about importing and exporting in the chapter Import and Export on page 30. Customer data has a restriction in that it can only be exported. Importing it is not possible. Note: Verify your brower settings for pop-up windows. Since the program opens new windows, pop-ups must be allowed for complete functionality. Otherwise, certain functions cannot be used. Searching for Customers A search function is available to help you specifically access special customers or customer groups within a large group of customers. You can choose between a simple search and an advanced search. Each search has a corresponding search mask in which you enter your search terms. The following buttons are important for searches: Start the search according to the entries in the search fields Reset the search. All the entries are deleted from the search fields. / Switch between simple and advanced search. Note: You can use the placeholder * in the text fields for portions of the search text you do not wish to enter or cannot enter. Capitalization is not noted. The system searches for character strings in which the search text appears, regardless of where this is in the target text. Page 112 Merchant User Guide Searching for Customers Customers Note: The search fields are AND searched by default. In other words, a dataset must meet all the criteria defined by the entries in the search fields and not just one of them. Simple Search Here you can search using the fields Name, Customer Number, and E-mail. Enter the search term and click . Advanced Search With the advanced search mask, you can set up complex filters for a very granular search. Figure 67: Advanced search mask The individual fields have the following meanings: Table 46: Search fields in the advanced search mask Search field Meaning Name Search in the Display Name field. Customer Number Field Type Example Entry field, alphanumeric Pattern Entry field, alphanumeric 100 E-mail Search the E-mail field. This address is Entry field, used for all system e-mail messages alphanumeric such as order confirmations, new passwords, and so on. @provider.de Street Search the Street field. Flower Way ZIP / Postal Code / City Search in the ZIP / Postal Code and City Entry field, fields. alphanumeric Customer Group Merchant User Guide Entry field, alphanumeric 99 Neust Drop-down menu Page 113 Customers Search field Searching for Customers Meaning Sign In Field Type Example Entry field, alphanumeric Mmuster Entry field, numeric 499.00 € Purchase Volume Search by the customer's total purchase volume. This lists all the customers with a purchase volume that is greater than the amount you enter here. Time frame Query of the amount of time to create a Date field certain purchase volume. In the first field, enter the start date; in the second field, enter the end date. Click the symbol to insert the current date. 10/05/2004 Product Number Search for customers, who have bought the same product. de_3201212002 Time frame Search for customers, who bought the Date field same product during a specific time frame. See Time Frame for Purchase Volume. Entry field, alphanumeric 10/05/2004 Note: When you enter a date for a time frame search, the system assumes that the time is 0:00 A.M. Fill out all of the search fields you need and click Page 114 to search. Merchant User Guide Categories 7. Categories In your shop, you will display various types of content from various areas. On the one hand, this will include product information such as prices, pictures, descriptions, and so on. On the other hand, you will have pure text information such as articles, information on upcoming events, or something similar. This information should be made available to the customer systematically. Figure 68 shows an example of this type of structure. Figure 68: Example of structural hierarchies Categories are structure elements with which you can divide the contents of your Web shop into functional groups. Starting off with one basic category, all additional structural or hierarchical levels extend into a tree structure. The basic category cannot be deleted. The symbol next to the category ID displays type and status. The individual symbols have the following meanings: Merchant User Guide Page115 Categories Types of Structure Elements Table 47: Category symbols Symbol Structural Element / Meaning Category, visible Category, not visible Item, visible Item not visible Link, visible Link, not visible Freely designable page, visible Freely designable page, not visible Click the ID for the detail view on each page. Batch processing actions are available to manage the table entries. For the basics, see Batch Processes in Tables on page 23. The following special actions can be performed: Table 48: Special batch processing actions for categories Action Comment Duplicate Results in an identical image with the same general data and the same category and product assignments. Only the ID is different since each ID may only be used once within a category Move to Use this function to move categories or other elements to a different place in your tree structure. Note: If you, as the merchant, go to the Web shop from the administration page to check a category, you will see the category even if this has been set to Not Visible. When you go to the next higher category level, this category will no longer be displayed as a subcategory as long as the status is set to Not Visible. While doing this, take note of the optimization settings. See Optimization on page 33. Note: When you move categories, all associated and subordinate elements such as subcategories and products are moved as well, that is, these assignments remain in place. Caution: If a category contains subcategories and it is deleted, it will be deleted together with their contents. The products retain their assignments intact and only the category assignments are deleted. Types of Structure Elements Structure elements are divided into various types that differ in regard to function and content. Basic Category The basic category is the root of your catalog tree. You cannot delete this structure element. However, you can edit the general properties of the basic category and directly assign your products. As with the other categories, the basic category also has general properties, subcategories, and products. Page 116 Merchant User Guide Types of Structure Elements Categories Note: All the products assigned to the basic category are shown on the shop home page. For more on assigning products, see Category Details - Products on page 118. Categories Creating a Category Search for the level in which you wish to add a new category. Enter an ID and a name for the category. Use the drop-down menu in the next column to determine the structure element type. Save your entries by clicking Save. Click the ID to edit the properties for this category and to assign products. Category Details - Pages Here you find all the structure elements located under the current category. Category Details - General The individual fields have the following meanings: Table 49: Entry fields for category properties Field Name Meaning Field Type Example ID Entry field, alphanumeric Equipment Visible Option button Name Name used to display the category. This is language-dependent. Text Text Field Informational text for the short description of the category contents. This display is language-dependent. For information about formatting, see Using HTML Commands in Entry Fields on page 26 and WYSIWYG Editor on page 26. Image Enter the path or use the Browse button to enter the path to the image file. Scale Image Upload and display the category image Check box in the shop at an optimized size (50 x 50 pixel). (Delete) Delete category image. Entry field, alphanumeric Equipment Big and small things - make your equipment complete. Browsing is worth it! Entry field, alphanumeric Button Save your entries by clicking Save. If you click the link with the name of the image file, the image will appear in a new browser window in the original size. Merchant User Guide Page 117 Categories Types of Structure Elements Category Details - Products To assign additional products to a category, you must add them from the tray. To do this, click the link Add Tray on page 19. products from the tray at the end of the table. For more information on working with the tray, see If you want to remove product assignments, select the check box at the beginning of the row for the corresponding product and click Unassign. The sequence of the products in the table determines the display sequence in the shop. To change this sequence, you must change the sorting key in the last column. For more details, see Sort via Sorting Key on page 25. If you wish to edit product details, click the number of the product. For more on this, see Product Details on page 77. Category Details - Layout For categories, you have a selection of layout variations. The layout variations available in the table should help you design easy-to-view product arrangements and category pages. In general, you can define whether the pages should be displayed above or below the product list. In addition, you can define whether the pages should be displayed in one or more columns. Note: If you arrange the pages in more than one column, these pages are displayed first from the left to the right and so on downwards. This means that the first element in the multi-column arrangement is on the top left, the second to the right in the same row and so on. When all the columns are filled, the following elements are listed in the next row starting from the left. Note that all the page elements are arranged, not only the subcategories. Page elements are all table entries on the Pages tab. Articles The Article components let you edit text messages and present them in the shop. Contrary to the Freely designable page, see on page 120, an article has a predefined format or layout and set attributes. To add an article, proceed as described in Creating a Category on page 117; only now you must select the type Article and save all the entries. Click the ID for the new list entry and record the special parameters for articles. See Figure 69. Page 118 Merchant User Guide Types of Structure Elements Categories Figure 69: General properties for article pages The individual fields have the following meanings: Table 50: Fields for articles Field Name Meaning Field Type Example ID Entry field, alphanumeric (max. 255 characters) NewShopServices Visible Option button Name Name used to display the category. This is language-dependent. Summary Short summary of the contents. This is Text Field displayed language-dependent. For information about formatting, see Using HTML Commands in Entry Fields on page 26 and WYSIWYG Editor on page 26. Merchant User Guide Entry field, alphanumeric Fresh wind in the online shop Milestones offers a fresh design, ... Page 119 Categories Types of Structure Elements Field Name Meaning Field Type Text Text Field Article text that is displayed as language-dependent text. For information about formatting, see Using HTML Commands in Entry Fields on page 26 and WYSIWYG Editor on page 26. <p>Your requirements for our shop have grown - and we have grown, too… Attachment File attachment for the article. Enter the Entry field, path directly or use the Browse button alphanumeric to enter the path of the image file. Flyer_en.pdf Delete Attachment Button Attachment Label Title for the link to the attachment Entry field, alphanumeric Image Image for the article. Enter the path directly or use the Browse button to enter the path of the image file. Entry field, alphanumeric Scale Image Upload and display the image in the shop at an optimized size (50 x 50 pixel). Check box Delete article image. Button Editorial date of the article. to automatically set the Click current date. Entry field, date format (Delete) (Delete) Date Example Print our Specials 06/24/04 Save your entries by clicking Save. Design Your Own Pages Our Freely Designable Page components let you add individually designed Web pages to your Web shop. You are not bound to any design templates for this. This gives you the chance to freely implement design and function. For more information about formatting, see Using HTML Commands in Entry Fields on page 26 and WYSIWYG Editor on page 26. To add a Freely Designable Page, proceed as described in Creating a Category, on page 117. However, here you now select the type Freely Designable Page. Save your entries by clicking Save. Click the ID for the new list entry and record the special parameters for the freely designable page. The individual fields have the following meanings: Table 51: Fields for a Freely Designable Page Field Name Meaning Field Type Example ID Entry field, alphanumeric TentInfo Visible Option button Name Page 120 Name used to display the category. This is language-dependent. Entry field, alphanumeric Tent care and tips for pitching Merchant User Guide Types of Structure Elements Categories Field Name Meaning Field Type Text Contents of the page. This is displayed Text Field language-dependent. For information about formatting, see Using HTML Commands in Entry Fields on page 26 and WYSIWYG Editor on page 26. Example <h2>Tent care and tips for pitching</h2> <br /> <h3>Care</h3> <p>… Save your entries by clicking Save. Link With Link you have a component for placing links on other pages in your Web shop. The individual fields have the following meanings: Table 52: Fields for creating a link Field Name Meaning ID Visible Field Type Example Entry field, alphanumeric Home page Option button New Window Display in a new browser window. Option button Name Name used to display the link. This is language-dependent. Entry field, alphanumeric Web Site URL/address of the Web site you wish Text Field to open with this link. Always enter absolute links in this form: http://... You can enter a separate URL for each language. About the manufacturer http://www.meindl.d e Save your entries by clicking Save. Home Page As with the Contact Information, Terms and Conditions, Customer Information, and the Promotional Products, the home page is only used once. Use this design option to welcome customers to your site, to inform them of the latest changes, or to present special offers. Note: The home page is always shown as part of the first page in the shop. In the Text field, you can use HTML tags to format the content that you wish to present to your customers on the home page. For more information about formatting, see Using HTML Commands in Entry Fields on page 26 and WYSIWYG Editor on page 26. Save your entries by clicking Save. Note: To display products on the home page in the shop, you assign the corresponding products to the basic category. For more details, see Basic Category on page 116. Merchant User Guide Page 121 Categories Types of Structure Elements Contact Information The contact information is an important, and legally required (in Germany) component of your Web shop. The German Teleservices Act (§6) has required commercial Web sites to include a contact information page since January 1, 2002. This must include the following information: - Name and address of the company Telephone, fax, and e-mail address Owner/board/stockholder/shareholders (depending on the company status) Company location/applicable court Registration number VAT identification number Party responsible for the contents (name of the responsible party in the sense of the media services national contract) It must be possible to open the contact information page from every page on the Web site. The positioning of the contact information in the shop is done in the Design area by assigning the element Link to contact information to a specific page area. For more information, see Navigation on page 133. Enter or change the necessary contact information in the corresponding form. See Figure 70. Figure 70: General properties for the contact information The individual fields have the following meanings: Page 122 Merchant User Guide Types of Structure Elements Table 53: Fields for Contact Information Field Name Meaning Categories Field Type Example Title The text that appears as the title of the Entry field, browser window and as the page alphanumeric heading. This is language-dependent Contact Information Text Text Field Introductory text For information about formatting, see Using HTML Commands in Entry Fields on page 26 and WYSIWYG Editor on page 26. Milestones Demostore GmbH is a fictitious company. This fictitious company allows us…. Company Company name Milestones Demostore GmbH Address Company address Text Field For information about formatting, see Using HTML Commands in Entry Fields on page 26 and WYSIWYG Editor on page 26. ACME Company Software GmbH <br> Leutragraben 1 <br> 07743 Jena, Germany Phone Phone number for the company. Entry field, alphanumeric 1234568 Fax Fax number for the company. Entry field, alphanumeric 87654321 E-mail E-mail address for the company. Entry field, alphanumeric [email protected] Entry field, alphanumeric Karl Kaufmann Managing Director Additional Text Entry field, alphanumeric Text Additional information about the company. This is language-dependent. For information about formatting, see Using HTML Commands in Entry Fields on page 26 and WYSIWYG Editor on page 26. Commercial Registry:...<p>Tax Identification<br>VAT ID:...<br>Tax No.....<p>Bank Details<br>Bank:...<br >Account No.:...<br>Bank Code:...<br>SWIFT:... Save your entries by clicking Save. Terms and Conditions The terms and conditions are a required component of the Web shop, and strict regulations also apply here. Terms and conditions have been legally regulated since 2002 (German BGB, paragraph 305 ff). There they are defined as “all pre-formulated contractual requirements for a multitude of contracts that one party (the user) provides to the other contract party when a contract is concluded". They apply when the purchaser is explicitly referred to them during the conclusion of a contract, when the purchaser has the reasonable opportunity to inform himself of the contents of these requirements and is in agreement with them. If the customer says nothing about the terms and conditions, then this is considered as being in agreement. It is therefore important that you can easily add your terms and conditions to the shop and that your customer can easily access them. Merchant User Guide Page 123 Categories Types of Structure Elements Closely connected to the terms and conditions is the customer information, which supplements the terms and conditions and explains the business requirements in greater detail as well as provides additional information. For more information, see Customer Information below. Note: You can set up the order process so that the customer must confirm the terms and conditions before the purchase can be completed. See Shopping Basket and Orders on page 67. The individual fields have the following meanings: Table 54: Fields for Terms and Conditions Field Name Meaning Field Type Example Title The text that appears as the title of the Entry field, browser window and as the page alphanumeric heading. This is language-dependent. Terms and Conditions Text Contents of the page. This is displayed Text language-dependent. For information about formatting, see Using HTML Commands in Entry Fields on page 26 and WYSIWYG Editor on page 26. <p><b>Time of contract conclusion:</b><br> Clicking the order button sends a binding order to the basket… Save your entries by clicking Save. Note: The terms and conditions are displayed in the shop by using the Navigation command in the Design area. For more on this, see Navigation on page 133. Note: You should review the default set of terms and conditions installed and adapt it, if necessary, to the current requirements of your shop or replace it with your own set of terms and conditions. Customer Information Customer information is a supplement to the terms and conditions, see Terms and Conditions on page 123. This is meant to notify customers of the conditions of use, as well as the processes and procedures in the shop. As opposed to the terms and conditions, customer information is meant to be more informational and explanatory in nature. The individual fields have the following meanings: Table 55: Entry field for customer information Field Name Meaning Field Type Title The text that appears as the title of the Entry field, browser window and as the page alphanumeric heading. This is language-dependent. Text Contents of the page. This is displayed Text language-dependent. For information about formatting, see Using HTML Commands in Entry Fields on page 26 and WYSIWYG Editor on page 26. Page 124 Example Customer Information Merchant User Guide Types of Structure Elements Categories Save your entries by clicking Save. Note: The link to the contact Information page is displayed using the Navigation function in the Design area of the shop. For more on this, see Navigation on page 133. Note: You should review the default set of customer information installed and adapt it, if necessary, to the current requirements of your shop or replace it with your own set of customer information. Promotional Products If you wish to start promotional activities in your shop and offer promotional items, use the Promotional Products page. Promotional Products - General Properties The individual fields have the following meanings: Table 56: Fields for Promotional Products Field Name Meaning Field Type Example Entry field, alphanumeric Promotional Products Name Title of the page, on which the promotional products are displayed. This is language-dependent. Text Text Field Informational text that is displayed together with the title on the page with the promotional products. This is language-dependent. For information about formatting, see Using HTML Commands in Entry Fields on page 26 and WYSIWYG Editor on page 26. Image Image for the page with the promotional products. Enter the path directly or use the Browse button to enter the path of the image file. Entry field, alphanumeric Scale Image Upload and display the image in the shop at an optimized size (50 x 50 pixel). Check box (Delete) <h1>Special Offers in the Milestones Demo Shop</h1> The items on these pages… Delete Image Save your entries by clicking Save. Promotional Products - Products If you want to add new products to the table, you must add them from the tray. If you have added a product group to the tray, click the Add Products from Tray button. For more information on working with the tray, see Tray on page 19. Note: There are two navigation elements for displaying promotional products in the shop: Promotional Products and Link to the Promotional Products. They are positioned in the shop using the Navigation function in the Design area. For more on this, see Navigation on page 133. Merchant User Guide Page 125 Categories Import and Export Import and Export You can read a general description about importing and exporting in the chapter Import and Export on page 30. Note: Verify your brower settings for pop-up windows. Since the program opens new windows, pop-ups must be allowed for complete functionality. Otherwise, certain functions cannot be used. Regarding categories, there are two import and export types. Note the following features for these types: Categories - Import/Export With the import/export categories, you can export the catalog structure of your shop or read it into the system. This refers to all of the structure elements, see Types of Structure Elements on page 116 and their properties and how they are arranged in the catalog structure or hierarchy. You can see a sample of this kind of export file in Figure 71. Figure 71: Category export file If there is no entry in the Parent Object [Parent] column, the corresponding elements area assigned to the basic category. Category - Product Assignment - Import/Export During a category-product assignment import/export, the product-category assignments are imported or exported. This where it is defined which products are assigned to which category. An example of this is shown in Figure 72: Page 126 Merchant User Guide BMECat-Import Categories Figure 72: Category import/export file All promotional products are assigned to the category Pages/PromotionalProducts. If you would like to import products into this special category, you need to use this name as the category name. Caution: In order to perform a category-product assignment import, the products used and a corresponding catalog structure must be available. If you make this available per import, you need to first perform the product import and the category import, and then after this, the category-product assignment import. BMECat-Import Zum BMECat-Import lesen Sie im Kapitel Produkte den Abschnitt BMECat-Import, Seite 102. Merchant User Guide Page 127 Styles Design 8. Design The Design option has in-depth functions to help you adapt the layout and design of your shop to your needs. Styles A style contains all the information for the presentation of your shop. You can work with different styles. In the table, you see preview image for each style, the name, and the status of the visible function. The image shows the layout of the shop based on the respective style. If you make changes to the style, these changes are not visible in the preview image in the table. As soon as a style is edited and the changes have been saved, the change is indicated by a symbol (paintbrush) on the preview image. In addition, the date of the last change to the respective style is entered in the table. The style, when set to visible, determines the appearance of the shop for your customers. You can edit any other style without this having any effect on how the shop is presented to your customer. This allows you to prepare other styles and test them. You can activate one of the other styles at any time. Click the Visible option button for the corresponding style. Save your entries by clicking Save. Transfer new styles from the Templates section. This is described in the chapter Applying Template Styles below. Batch processing actions are available to manage the table entries. For the basics, see Batch Processes in Tables on page 23. Note: During deletion, styles which you have given names to are completely deleted. Default styles can be added again in their original state from the Templates section. Applying Template Styles If you would like to expand the current display options for your shop, you need to add new styles to the list. To do this, select a new style from the templates. Open the Templates section. You can either use these styles unchanged for your shop design or use them as a basis for individual customizations. To transfer a template style to the table, select the option button for the style you want and click Apply. This loads the style into the table for you own styles. You do not need any Web design knowledge for the majority of the functions for editing styles. HTML knowledge is helpful for certain configuration parameters. Here you should read the corresponding literature or ask a specialist for help. The Web pages used to display your shop are normally divided into a maximum of seven functional areas. See Figure 73. Merchant User Guide Page129 Design Styles Figure 73: Structure of a shop site The following areas are defined: Area 1: Area 2: Area 3: Area 4: Area 5: Area 6: Area 7: Header Top Left Content Area Right Bottom Footer It is important to understand these divisions since many of the following functions and parameters are based on these areas. General In the General section, you set the name of the style and which of the seven areas will be used in your shop and how they will be positioned in the browser. Note: If you do not change the name of a style and reload the style with the same name from the templates, any changes you have made will be written over and the style will be reset to its original settings. You must confirm this in the “Confirm Deletion” window. Page 130 Merchant User Guide Styles Design Note: As long as you work within a style, you will have View in Shop in the context menu. Click this link to see how this style appears in the shop. Navigation Bars In this section, you define which navigation areas should be displayed in your shop. Each style defines a certain relationship of the seven page areas to each other. You can see this page structure to the right of the Navigation Bars section. In the upper section of the page, there are three basic layouts to select from. They differ mainly in the relative arrangements of the areas Left and Right in relation to the areas Top, Bottom, Header, and Footer. Used the check boxes to the left next to the layout preview to set which of the areas will appear on the Web page. Save your entries by clicking Save. Note: Note that the navigation elements assigned to the areas are deactivated if their corresponding areas are deactivated. If necessary, you will have to assign the navigation elements to the other areas. See Navigation on page 133. General Design Attributes The General Design Attributes section defines the general appearance of your page in relation to the browser. Figure 74: Defining the general design attributes Here you can vary the position of your page in the browser window as follows: Merchant User Guide Page 131 Design Styles Page Width: This offers pre-defined page widths that correspond to various screen resolutions. For this, the individual page widths are defined as follows: Table 57: Page widths for layouts Page Width Full width (100%) Full width including border (90%) Optimized for 800 x 600px (770px) Optimized for 1024 x 768px (994px) Optimized for 1024 x 768px with border (800px) Optimized for 1024 x 768px with border (910px) Optimized for 1024 x 768px with border (950px) Meaning For the page layout, 100% of the browser window width is used, that is, the entire width of the browser window. (relative page width, changes according to the width of the browser window) For the page layout, 90% of the browser window width is used. The padding on the edge of the browser window uses a total of 10%. (relative page width, changes according to the width of the browser window) This layout is optimized for a screen resolution of 800 x 600 pixels. This displays the page in the browser at a width of 770 pixels. (absolute page width, does not change according to the width of the browser window) Layout optimized for a resolution of 1024 x 768px. The pages are displayed in the browser at a width of 994 pixels. (absolute page width, does not change according to the width of the browser window) Layout optimized for a resolution of 1024 x 768px. The pages are displayed in the browser at a width of 800 pixels. (absolute page width, does not change according to the width of the browser window) Layout optimized for a resolution of 1024 x 768px. The pages are displayed in the browser at a width of 910 pixels. (absolute page width, does not change according to the width of the browser window) Layout optimized for a resolution of 1024 x 768px. The pages are displayed in the browser at a width of 950 pixels. (absolute page width, does not change according to the width of the browser window) Page Alignment The page can be aligned to the left or centered in the browser window. Select the corresponding value from the drop-down menu. Top Padding Set whether your page will be displayed directly on the top edge of the browser window or if padding should be inserted. Select the distance from the drop-down menu. Along with the position, you can also set a background color and a background image for the entire shop. Background Color Select a background color that best complements your shop. There are two ways of adding color: If you know the color code, enter it in the form #RRGGBB (RR - red percentage, GG - green percentage, BB blue percentage). The coding of colors in HTML will not be discussed here. Please consult the corresponding technical literature. Or first click the Background Color field and then select a color from the color palette in the right section of the page in Figure 74. This inserts the color code of the selected color into the Background Color field. Page 132 Merchant User Guide Styles Design Background Image Instead of a background color, you can select a background image for your pages. In the field, enter the name of the file that contains the image or add it using the Browse function. After saving, the name of the background image is displayed below the entry field as a link. A default template for the background image installed during the installation procedure is used. This is displayed using the Template Graphic link. symbol. A background image is no longer If you do not want to use a background image, click the displayed in the shop and the name of the link changes to Restore template. Click this link to immediately restore the default template for the background image without having to search for file names. Note: If you set both a background color and a background image, the background image will always be on top of the background color. Therefore, if you want to display the color, delete the background image. If the background is to be filled completely, the image must be resized to fit the area or you need to select Tile Graphics. Tile Graphic: Background images can either be displayed as a single image or repeatedly displayed so that the background of the entire page is filled. This arranges copies of the image next to and below each other until they fit the whole page. Select Yes if the image should fill the whole page. Save your entries by clicking Save. Symbol Set Some functions and statuses are triggered or displayed with symbols. There are pre-defined sets of symbols as well. In this overview of the various symbol sets, you can select the one that best suits your shop. Click the option button for the corresponding symbol set. Table 58: The various simple symbol sets Action Use SimpleSymbols Use this for a light background SimpleSymbolsAlt Alternate symbols that are not very dependent on the background. This is not suitable for very dark background colors. SimpleSymbolsDark Use this for a dark background. SimpleSymbolsMedium This can be used with a non-white background. Save your entries by clicking Save. Navigation After determining which areas are to be active for your shop pages, you need to add functions to these areas. You determine where the navigation and display elements will be arranged on your shop site. Merchant User Guide Page 133 Design Styles Figure 75: Setting up navigation The top section of the page shows the page structure that you defined in General. The display shows where you can distribute the functions in the areas. The navigation and display elements that you can distribute are shown in the list to the left in Figure 75. These are all elements that you can still distribute on the page. The list to the right shows which elements you have already assigned to the selected area. You can assign every area any available navigation element. However, it does not make much sense to do this. For information about which elements are best suited for which areas, see Navigation Elements on page 135. Navigation elements that are already assigned to other areas are marked with a star (*). In the overview, click the area you wish to customize. This is highlighted in yellow. Extend the functionality of the right area by selecting available elements from the list. Then click >>. You can also remove elements from the left list again. Select the elements and click the << button. This removes your selection from the right list and moves it into the left list. Page 134 Merchant User Guide Styles Design You can also set the sequence for the navigation elements in this area. Use the sorting key in the last column in the right list. For more details, see Sort via Sorting Key on page 25. When you are done entering the sorting key, click Save Sort Order. Navigation Elements Every navigation element is available for every area. However, due to their function and design, certain functions work best in certain areas. They work in other areas, but are out of place and disturb the design. The navigation elements are described below together with suggestions for where they should be placed. You should check out the information about the divisions for horizontal and vertical areas in the Customization area. See Customization on page 136. Table 59: Using navigation elements Navigation Element Meaning on a shop Web page Logo Displays the shop logo. Also serves as a link to the shop's home page. Link to Home Page Optimized for Horizontal areas, especially in the Header area Vertical and horizontal areas Shop name Displays the shop name and slogan. Horizontal areas, especially in the Header area List of main categories Vertical list of the main catalog categories with a list heading Vertical areas Link to Categories Link to the page on which the main categories are displayed in the content area Vertical and horizontal areas Links to First Level Categories List of the links to the main categories Vertical and horizontal areas Promotional Products List of product names that are assigned to the Promotional Products page. Vertical areas Link to Promotional Products Link to the Promotional Products page Vertical and horizontal areas Compressed Basket View The compressed basket view with a display of the individual products, prices, shipping method, total price, and link to the basket. Vertical areas Basket Status Displays the number of products in the basket and the Vertical areas current total price, link to the basket. Link to Shopping Basket Vertical and horizontal areas Sign in Offers functions for the shop login and log off, to Vertical areas register as a new customer and newsletter subscriber, access to My Account Full-text Product Search Product search or opens a detailed search mask Vertical areas Link to the General Terms and Conditions Vertical and horizontal areas Link to Contact Information Vertical and horizontal areas Link to Customer Information Vertical and horizontal areas Merchant User Guide Page 135 Design Styles Navigation Element Meaning on a shop Web page Optimized for Country Selection List of all active country settings for the shop with country names Vertical areas Flags for Country Selection Selection of the country settings using flag symbols Vertical and horizontal areas, whereby the horizontal areas are preferable here Currency Selection Lists all active currencies for the shop with the switch currency function Vertical areas Symbols for Currency Selection Currency selection via logos Vertical and horizontal areas Logos for Accepted Credit Cards (Credit Card, manual) Display of the logos for the credit cards you accept and Vertical areas manually process. See also Payment Method with Credit Card, Manual on page 48. Logos for Accepted Credit Cards (WorldPay) Display of the symbols for the payment option via WorldPay and the credit cards accepted for this. See also Payment Method with WorldPay on page 50. Logos for Accepted Credit Cards (T-Pay) Display of the logos for the credit cards you accept via Vertical areas T-Pay. For more on this, see Payment Method via T-Pay on page 54. Informational Text Displays a short text with general information, contact Vertical areas telephone number, and so on. Copyright Notice Displays the copyright notice. Link to Contact Form Vertical areas Vertical and horizontal areas Vertical and horizontal areas Trusted Shops Seal of Approval For more on this, see Trusted Shops on page 190. Trusted Shops seal of approval with text Displays the Trusted Shops seal of approval with a text Vertical areas referring to the money-back guarantee. For more on this, see Trusted Shops on page 190. Vertical areas Note: The navigation elements can only be placed in the areas: Header, Top, Left, Right, Bottom, and Footer, but not in the content area. Customization Although the wide selection of styles helps you set up a basic design, the Customization function allows you to individually design different areas according to Figure 73. You can change individual details such as the color, font and type size, dimensions, and so on. Page 136 Merchant User Guide Styles Design Figure 76: Page for customizing individual areas In the upper part of the working area, you see the structural presentation with the individual areas active for the current style as in the Navigation section. For more on this, see Navigation Bars on page 131. Note: Here in the Customization module, the middle content area is also active and can be selected and edited. If you consecutively activate all the areas, you will see that there are a considerable number of parameters that can be set. There are three groups with parameters and properties that correspond and can be summarized together. The areas can be divided as follows: Horizontal areas: Vertical areas: Content area header, top, bottom, footer left, right Customization Information The parameters for the individual modules are not shown until the design is complete. There are parameters that influence each other and are interdependent. These interactive effects must be taken into consideration. The following information should be helpful: Merchant User Guide Page 137 Design Styles The parameters set in the Customization tab overwrite the same parameters in different modules. For example, if a background image is used in a style and you assign your own special background image via Customization, then the special background image will be displayed. You can also overwrite individual colors by changing the parameters in Customization. Background images always take precedence over background colors. This means that if you load a background image and also set a background color, the background image will cover the color. And if you select an image set with background images and use Customization to select a background color, the colors in the background will be covered by the image. Note the effect of individual area parameters on other areas. The height information for horizontal areas, and the width information for vertical areas will affect the size of the content areas, for example. Assign colors for all the pages with a set color and an available color set as described in on page 132 Background Color. All sizes and dimensions for the examples are shown in pixel (px). You can also use other sizes for style sheets, such as percent (%). For more information on the possible settings and how to use them, please consult the corresponding specialist literature or Web sites, such as http://de.selfhtml.org (only partially in English). Horizontal Areas The individual fields have the following meanings: Table 60: Fields for horizontal areas Field Name Meaning Example Height Indicates the height of the area in pixels 27px Padding Distance from the text to the edge of the area. Four values can be entered. These values describe the distances to the edge of the area in a clockwise direction. 0 10px 0 10px Margin Distance of the area from the side edge or to the other areas. The side edge is determined in the module Layout - General Design Attributes on page 131. Four values can be set here. Their meanings are the same as for padding. 0 0 0 0 Align Elements Position of the text entries within the area: Align left, centered, align right. Align right Background Color For more information about entering background colors, read the corresponding section on page 132. transparent Background Image Here you can determine which image will be used as the background. Enter either the name of the image file or click Browse ... to search for the file. As soon as an image is assigned as a background image, you can display it via the link beneath the entry field. For more information about background images and the associated link, read the corresponding section on page 133. Text Size and color of the text 10px / #666666 Heading Size and color for headings 12px / #134B83 Link Size and color of links #666666 Rollover color Color of a link, when the user positions the cursor on it. #666666 Page 138 Merchant User Guide Styles Design Field Name Meaning Button Background image, which can be put under a link or under an area, which contains an active element such as a link. Tabs are an example of this. Proceed as described for the Background Image field. Active Button An active button is a button that is used to open an assigned function. The activation is highlighted though a change in the layout (for example, a different background image). Example Vertical Areas The individual fields have the following meanings: Table 61: Fields for vertical areas Field Name Meaning Example Width Indicates the width of the area in pixels. 190px Padding Distance from the text to the edge of the area. Four values can be entered. These values describe the distances to the edge of the area in a clockwise direction. 8 px 10px 10 px 10px Background Color For more information about entering background colors, read the corresponding section on page 132. #D9DCDF Background Image Here you can determine which image will be used as the background. Enter either the name of the image file or click Browse ... to search for the file and enter it in the field. As soon as an image is assigned as a background image, you can display it via the link beneath the entry field. For more information about background images and the associated link, read the corresponding section on page 133. Tile Graphic For more information, see Tile Graphic on page 133. Text Size and color of the text 11px / #000000 Heading Size and color for headings 12px / #134B83 Link Size and color of links 11px / #134B83 Rollover Color Color of a link, when the user positions the cursor on it. #2464A3 Context Boxes There are areas called content boxes in the vertical navigation areas. It consists of a header and the box for the contents. Header - Background Color transparent Header - Header image Background Image. Background image for the header. For more information, see Box - Background Image Background Image. Box – Row for a Box/Link Background Color The function elements in the box are arranged by rows. You #EFF1F2 can assign a background color to the row area here. For more information, see Background Color. Background image for the box. For more information, see Save your entries by clicking Save. Merchant User Guide Page 139 Design Styles Content Area Whereas the other areas contain mainly functional elements such as menus and links, the content area contains the product data and all the other information for your customers. The size of the content area is determined by the height and width information of the other areas, as well as the padding, while the “rest” of the window is left for the contents. Figure 77: Settings for the content area The individual fields have the following meanings: Table 62: Parameters for the content area Field Name Meaning Example Padding Distance from the text to the edge of the area. Four values can be entered. These values describe the distances to the edge of the area in a clockwise direction. 0 10px 0 10px Background Color For more information about entering background colors, read the corresponding section on page 132. #FFFFFF Page 140 Merchant User Guide Styles Design Field Name Meaning Background Image Here you can determine which image will be used as the background. Enter either the name of the image file or click Browse ... to search for the file and enter it in the field. As soon as an image is assigned as a background image, you can display it via the link beneath the entry field. For more information about background images and the associated link, read the corresponding section on page 133. Tile Graphic For more information, see Tile Graphic on page 133. Example Text Size and color of the text Heading 1 – 3 You can format up to 3 levels of headings. Enter the size and 18px / #134B83 color for each heading. 13px / #134B83 12px / #000000 11px / #000000 Link Size and color of links 11px / #134B83 Rollover Color Color of a link, when the user positions the cursor on it. transparent Price Emphasis For setting the size and color of prices. 15px / #DE0000 Products on the Home Page Background Image Background image for the product presentation on the home page. See Background Image. Lists, Tables, and Dialogs Here you can format the header, the footer, and set different display options for rows on different pages. Dialogs are sections in the content area, where you have access to functions via links or where entry fields are filled. An example of this is the My Account area. Header – Font Color #D1D3D6 Header - Background For more information, see Background Color. Color Header – Background For more on this, see Background Image. Image List/Table Data - Light To improve legibility, you can give the table rows alternating #EFF1F2 Row light and dark color shading. Enter the color code for the lighter color in the field. List/Table Data -Dark Enter the color code for the darker rows. Row Footer - Background Color For more information, see Background Color. Footer - Background Image For more on this, see Background Image. #E5E7E8 #D1D3D6 Separator Image In the content area, certain sections can be marked off by a separator. As soon as you have loaded an image, the option Tile Graphic becomes active. For more details, see Tile Graphic on page 133. Save your entries by clicking Save. Merchant User Guide Page 141 Design Settings Settings The settings in the Design area refer to the content of certain display elements of your shop page such as logo, slogan, copyright information, and so on. The individual fields have the following meanings: Table 63: Fields for general design settings Field Name Meaning Informational text Copyright Notice Slogan Logo Link Logo Delete Navigation element for information and notes for the customer. See Navigation Elements on page 135. The text is language-dependent. For more information about formatting, see Using HTML Commands in Entry Fields on page 26. Navigation element for the notification of copyright protection. See Navigation Elements on page 135. The text is language-dependent. For more information about formatting, see Using HTML Commands in Entry Fields on page 26. Navigation element, see Navigation Elements on page 135. The text is language-dependent. For more information about formatting, see Using HTML Commands in Entry Fields on page 26. Link to the logo. Make sure the link starts with http://www... . The link can be language-dependent. Navigation element, see Navigation Elements on page 135. Enter either the name of the image file or click Browse ... to search for the file and enter it in the field. After clicking Save, the image is displayed in the preview area. If the check box is selected and you click Save, the image is deleted without the "Confirm Deletion" window. Field Type Example Text field, alphanumeric Have questions?<br />Our toll-free hotline… Entry field, alphanumeric Copyright © ePages 2005 Text field, alphanumeric Well prepared to meet your goals Entry field, alphanumeric http://www.epages. milestones.de Entry field, alphanumeric Logo.gif Check box Save your entries by clicking Save. Page 142 Merchant User Guide Orders 9. Orders If you open the Orders page (from the main navigation bar or the context menu), no orders are shown initially. You can use the link Orders to display all new orders. New orders are orders for which no status has been set. You can also perform a search to find the order you wish to see. Proceed as described in on page 144 Search. Note: Since each order can have different status levels, the last set status appears in the table. To open the page with the order details, click the corresponding order number. Note: You can have the system automatically inform the customers per e-mail as soon as you have set a status for an order. The corresponding e-mail function must be active for this. See E-mail Settings on page 37. Batch processing actions are available to manage the table entries. For the basics, see Batch Processes in Tables on page 23. The following special actions can be performed: Table 64: Special batch processing actions for user management Action Comment Set status You can set up to ten status levels for the orders. The following status levels are available: Viewed, Rejected, In Process, Pending, Ready for Shipment, Partially Dispatched, Dispatched, Shipment Finished, Partially Invoiced, Partially Paid, Paid, Closed, Archived. Export Selected orders are saved in a text file. They can be opened by any text processing program and processed or saved for archiving purposes. Caution: You can only delete orders with the status Rejected or Archived. Note: Verify your brower settings for pop-up windows. Since the program opens new windows, pop-ups must be allowed for complete functionality. Otherwise, certain functions cannot be used. Merchant User Guide Page143 Orders Search Search Figure 78: Advanced search form for orders The following buttons are important for searches: Start the search according to the entries in the search fields The search mask is reset and all the entries are deleted from the search fields. / Switch between simple and advanced search. Note: You can use the placeholder * in the text fields for portions of the search text you do not wish to enter or cannot enter. Capitalization is not noted. The system searches for character strings in which the search text appears, regardless of where this is in the target text. Note: The search fields are AND searched by default. In other words, a dataset must meet all the criteria defined by the entries in the search fields and not just one of them. Simple Search The individual fields have the following meanings: Page 144 Merchant User Guide Orders – General Orders Table 65: Search fields in the simple search mask Search Field Meaning Field Type Status Drop-down menu Order Number Text that needs to be included in the number being searched for. Entry field, alphanumeric Time frame Query of the time frame of an order Date field In the first field, enter the start date; in the second field, enter the end date. Click the symbol to insert the current date. Example 100* 05.07.2005 Note: When you enter a date for a time frame search, the system assumes that the time is 0:00 A.M. Advanced Search If the search settings for the simple search are not sufficient, then use the advanced search. Along with the fields for the simple search, there are three more status fields and one more fields for a search by product number. You can search based on various status combinations as well as for orders with a specific product. Note: If you need an overview of all orders for a customer, then go to the Customer area to display the details for the customers. All of the customer's orders are listed in the Orders tab. Orders – General The general properties of an order provide you with an overview of all necessary order data such as the current processing status, products ordered, delivery and invoice address, and so on. Merchant User Guide Page 145 Orders Orders – General Figure 79: Detail view of orders The individual fields have the following meanings: Table 66: Fields for order details Field Name Meaning Status Page 146 After you have clicked Save, the current date is added to the selected status. Multiple statuses can be set. Registered customers can view the status in the shop. Field Type Example Check box Merchant User Guide Orders – General Orders Field Name Meaning Field Type Example Order Number Unique number that is assigned by the system when the order is created. You can change it here. You can send current order information to customers at any time. The order confirmation is sent to the address entered in the customer details in the User Account in the E-mail field. See Customer Details – General – Sign In on page 110. During the order process, customers can enter a comment about the order. It is displayed here. Comments or information about the order. For internal use. This activates the order information to processing. You can only delete orders with the status Rejected or Archived. If you delete orders with the status Rejected, the stock for the product is “increased” again by the order amount. Entry field, alphanumeric 1005 Send Order Confirmation Mail Order Comment Internal Order Comment Edit Delete Link Display Text field, alphanumeric Button Call the customer back. Note: In the table shown in Figure 78, the last status set is always shown for the order. Note: Due to security reasons, credit card data in the database for orders paid to you by credit card (payment method Credit Card, manual are deleted after the order is set to the status of Paid. The only information that remains is a note that the order was paid by credit card. Note: Before the order confirmation e-mail message can be sent, the e-mail event Order confirmation must be active. For more on this, see E-mail Settings on page 37. Caution: Before you leave this page, save your entries with Save. If you don't, this information will not be applied. This also applies to changes made with Edit or Documents. Editing Address and Order Details Additional order data, such as the address information, article list, shipping and payment methods, can be edited by clicking Edit. The page shown in Figure 80 appears for editing. Merchant User Guide Page 147 Orders Orders – General Figure 80: Order details for addresses and article lists Use this page to change the address information for the invoice and shipping, and to edit the article list by deleting and adding articles, and changing invoice and shipping methods. Order Details The individual fields have the following meanings: Table 67: Fields for order details Field Name Meaning Quantity Shipping Method Payment Method Quantity / Product Number Add Products from Tray Page 148 Field Type Example Entry field, numeric 2 Drop-down menu Drop-down menu Add a specific quantity of a product by Entry field, numeric, 3, directly entering the quantity and Entry field, eg_100111011 product number. Finish your entries by alphanumeric clicking . Link Merchant User Guide Orders – Documents Field Name Update Apply Cancel Orders Meaning Field Type Delete a product from an order. The product itself is not deleted The order is recalculated and displayed with the new values. This processing status remains until you accept the changes with Apply or cancel all changes with Cancel. After the update, you will receive a message that the data have not been permanently saved. Saves of all changes. Changes are deleted. The order retains the data that was saved last. Button Example Button Button Button Caution: You must update the page before you apply the changes. Note: It is also a good idea to notify the customers about changes made to their orders. To do this, use, for example, the Send Order Confirmation Mail link. See Orders – General on page 145. Orders – Documents For each order, you can generate various documents, such as invoices, packing slips, and credit notes. The link is only active if you are not in Edit Mode for an order. All the documents that you have created for the associated order are listed n the table on this page. You can access the details for any of these documents via the document type. Since you can create more than one document of a type, the number in the document column next to the number of the order shows the consecutive number of the type. As soon as you finalize a document, the date of finalization is displayed in the last table column. The symbol in front of the name also shows this document status: Table 68: Symbols for order documents Symbol Meaning Document is active and can be processed. Document is finalized and can no longer be edited. If you would like to generate a new document, select the type from the drop-down menu beneath the table. Save your entries by clicking Save. Take note of the following information when working with order documents: - Finalized documents cannot be selected and therefore can also not be deleted. - You can change the quantities of the individual order items in the documents. These changes do not affect the order, that is, the changed quantities are not applied to the order. Merchant User Guide Page 149 Orders Orders – Documents - Changes in to the order only affect documents that are created after the changes have been made. Documents that were created before the changes remain unchanged. - Changes made to quantities in the documents do not affect inventory levels. Details in individual documents are edited depending on the type: Packing Slip Figure 81: Packing slip view If a line item number is marked with a star (*), this means that this product is also listed in other packing slips belonging to this order. The individual fields have the following meanings: Table 69: Fields for a packing slip Field Name Meaning The print view is seen in a separate browser window Packing Slip Number This number is suggested by the system and consists of the order number and a running number for packing slips. Print View Page 150 Field Type Example Link Entry field, alphanumeric 1001-1 Merchant User Guide Orders – Documents Orders Field Name Meaning Packing Slip Date The creation date is automatically set. Date field 19.04.05 If you need to make manual changes, enter the desired date in the required format. Click to insert the current date. Adapt the order quantity to the delivery Entry field, numeric 2 quantity. Delete a line item Link Quantity Field Type Example Save your entries by clicking Save. Note: Always click Save after you enter the packing slip number and date. Otherwise, the current data will not be applied to the print view. Note: If you have included a note for the shipping method, it is displayed with the sender data. Note: When printing via the browser and depending on the browser settings, overlapping headers and footers (such as the base number, Internet address, date) may also be printed. You can change these settings. For Internet Explorer, click File >> Page Setup in the navigation bar. This has a Header and Footer section. The values entered here are printed on every page printed via the browser. If you do not wish to print any of this information, simply delete the entries in the two fields. Always finish your editing by clicking Finalize. For more details, see Finalizing Documents on page 160. UPS Packing Slip Along with its delivery service, UPS offers software that you can use to create the necessary shipping documents and track orders. This program is called WorldShip. This always gives you the latest status of the goods you have shipped. The system lets you use the UPS Packing Slip functions in the shop, not only in the administration area for you as the merchant but also in the shop for your customers. This means that even your customers are kept up-to-date on the current shipping status of the goods they have ordered. Requirements In order to offer this service to your customers, you need to meet certain requirements. This includes registering with UPS and installing the program WorldShip. First sign up with UPS and register. To do this, open the www.ups.en site and click Register. After registration, log in and apply for a customer number in the My UPS menu. Among other things, you need this customer number to install the WorldShip program. In the next step, request the WorldShip software from UPS. To do this, click the menu option Business Solutions on the UPS site. To left, click the Portfolio of Services link. On the following page, you will again see the WorldShip link to the left. Click it, fill out the form displayed, and submit it. UPS will then send you the software. After you receive it, install it. Follow the instructions provided by UPS. Activating Order Tracking For UPS packing slips, the functions and editing of the individual parameters correspond mainly to the normal packing slip. For more information on this, see Packing Slip on page 150. Features of the UPS packing slip include the UPS Tracking Number parameters, the UPS Registration and Software link where you can order WorldShip software and the Export function. See Figure 82. Merchant User Guide Page 151 Orders Orders – Documents Figure 82: UPS Packing Slip In the UPS Tracking Number field, enter the number which is a prerequisite for order tracking. This number is generated for the respective Worldship shipment and you transfer this to the form in Figure 82. For this, you need to submit the packing slip data to WorldShip. To do this, use the Export function. Exporting Delivery Data The delivery data must be transferred to the WorldShip program. From here, these data are transmitted to UPS and the UPS tracking number is generated. Importing to WorldShip and Generating a Tracking Number Start WorldShip and activate in the Import function in the File menu. After this, the import window opens and you can enter the file that you have exported out of the shop system: Page 152 Merchant User Guide Orders – Documents Orders Figure 83: Determining the import file and parameters The first thing you need to do is set the Open Shipments option in the Import To field. The Field Separator and Text Delimiter fields are set by default to the values in the figure. Be sure to check them and correct any divergent options. Enter the name of the import file in the field Import File is located in: or load using the Browse function. Since the file always contains a header, you need to select the check box First row contains field names. Two list fields are arranged in the lower part of the form. The individual fields in the import file are listed in the one to the left. In the one to the right, you see the fields, which WorldShip uses internally. In order for your data to be correctly applied and processed, the import file fields must be mapped to the corresponding fields in the WorldShip database. In order to simplify mapping, the import file fields have been given the same names as the internal WorldShip fields. However, you need to map some of the fields to the Receiver tab and others to the Shipment tab. The following mapped items are defined by default: Table 70: Field name mapping between the import file and the field names in the internal UPS tables Import File Field Names Internal UPS Field Names Tab Receiver Receiver: Company Name Receiver: Company Name Receiver: Contact Person Receiver: Contact Person Receiver: Address Line 1 Receiver: Address Line 1 Receiver: City/Town Receiver: City/Town Receiver: Country/Territory Receiver: Country/Territory Merchant User Guide Page 153 Orders Orders – Documents Import File Field Names Internal UPS Field Names Receiver: Postcode Receiver: Postcode Receiver: State/Province Receiver: State/Province Receiver: Telephone Number Receiver: Telephone Number E-mail Address 1 E-mail Address 1 Name of E-mail Recipient 1 Name of E-mail Recipient 1 Company Address for Return To/Forward For Company Address for Return To/Forward For Contact Person for Return To/Forward For Contact Person for Return To/Forward For Address 1 for Return To/Forward For Address 1 for Return To/Forward For City/Town for Return To/Forward For City/Town for Return To/Forward For Postcode for Return To/Forward For Postcode for Return To/Forward For Country/Territory for Return To/Forward For Country/Territory for Return To/Forward For State/Territory for Return To/Forward For State/Territory for Return To/Forward For E-mail Address for Return To/Forward For E-mail Address for Return To/Forward For Telephone for Return To/Forward For Telephone for Return To/Forward For Tab Shipment Shipment Actual Weight Shipment Actual Weight Description of Goods Description of Goods Reference 1 Reference 1 Reference 2 Reference 2 In Figure 84, you see an example of the field mapping in the Receiver tab. Page 154 Merchant User Guide Orders – Documents Orders Figure 84: Field mapping for receiver data On this page, map data relevant to the receiver, such as address, contact person, and so on. On the Shipment tab, synchronize all the fields that include shipment data. See Figure 85. Merchant User Guide Page 155 Orders Orders – Documents Figure 85: Field mapping for shipment data Map the data as follows: - Select the field in the right list field for external data fields by clicking. Select the corresponding field in the left list field for internal data fields by clicking. Click the Map button. Note: You only have to do this mapping the first time you perform an import. The mapping is retained for all the following import actions. If all the options are set correctly and all the fields are mapped, click Import. Continue to edit the shipment as described in the WorldShip instructions. To generate the tracking number required for shipment tracking, click Finish after completing all your entries. Among other things, this saves the shipment in the shipping history and gives you the option of seeing the UPS tracking number. Order Tracking Activating You need to transfer the UPS tracking number that you generated for the order in WorldShip into the shop administration and enter the respective UPS packing slip in the UPS Tracking Number field provided. In order to activate order tracking, you need to save the entries. After saving, the Track Shipment link is displayed in addition to the UPS tracking number. Page 156 Merchant User Guide Orders – Documents Orders Use this link to open the UPS page where you can see the status of your shipment. Order Tracking in the Shop As soon as the tracking number has been entered and saved, the shipment tracking link also becomes available for the corresponding customer. The customer opens order tracking in My Account under the Query Order Status option. Figure 86: Opening order tracking for customers Invoice In order to generate an invoice for an order, you first need to create a document of type Invoice. You can edit the details of an invoice on the page in Figure 87 by clicking the type ID for that invoice. Merchant User Guide Page 157 Orders Orders – Documents Figure 87: Invoice view If a line item number is marked with an asterisk (*), this means that this product is also listed in other invoices belonging to this order. The individual fields have the following meanings: Table 71: Fields for an invoice Field Name Meaning Print View Invoice No. Page 158 The print view is seen in a separate browser window This number is suggested by the system and consists of the order number and a running number for invoices. Field Type Example Link Entry field, alphanumeric 1001-1 Merchant User Guide Orders – Documents Orders Field Name Meaning Invoice Date The creation date is automatically set. Date field 19.04.05 If you need to make manual changes, enter the desired date in the required format. Click to insert the current date . Adapting the order quantity to the Entry field, numeric 2 invoice quantity Delete a line item Link Quantity Field Type Example Save your entries by clicking Save. Note: Always click Save after you enter the invoice number and invoice date since otherwise the current data will not be accepted into the print view. Note: If you have included a note for the payment method, it is displayed with the sender data. Note: When printing via the browser, depending on the browser settings, overlapping headers and footers (such as the base number, Internet address, date) may also be printed. You can change these settings. For Internet Explorer, click File >> Page Setup in the navigation bar. This has a Header and Footer section. The values entered here are printed on every page printed via the browser. If you do not wish to print any of this information, simply delete the entries in the two fields. Always finish your editing by clicking Finalize. For more details, see Finalizing Documents on page 160. Credit Note As with packing slips and invoices, you first need to generate a document of type Credit Note in order to issue a credit note. After this, click the type ID for credit note in order to edit the details. You can see the credit note details page in Figure 88. Merchant User Guide Page 159 Orders Orders – Documents Figure 88: Credit note view Edit the credit note as you would an invoice. For more basic information, see Invoice on page 157. Finalizing Documents If you would like to save your documents in an inalterable state, you can use the Finalize function. After clicking Finalize, documents can still displayed and printed but they can no longer be edited or deleted. In this way after finalizing the corresponding process, you can save all of your documents in the system in a tamper-proof state. You will have to create new documents for possible amendments and corrections. Page 160 Merchant User Guide WorldPay Orders WorldPay General WorldPay Information The company WorldPay (http://www.WorldPay.de) belongs to the Royal Bank of Scotland Group. They provide electronic payment solutions. The WorldPay payment method offers an interface between your shop and the WorldPay payment system. With this, you can offer payment options for your shop by credit card and, within Germany, by direct debit. WorldPay checks the customer's payment data and only permits transactions with secure data. Note: Since the recording and processing of an end customer's payment data is performed by WorldPay, you as the merchant are not involved in the handling of this sensitive data and therefore cannot be held liable. Registration with WorldPay Two registrations are necessary. You must first register as a merchant and go through the registration process. This qualifies you for an installation ID and access to the WorldPay administration area. After this, you can configure your shop for the WorldPay payment method. For more details, see Payment Method with WorldPay on page 50. After you set up and test the payment method, you need to have WorldPay release your shop. Only after this can you offer your customers this payment method in your shop and display the WorldPay logo with the accepted credit cards. Since the basic settings have already been made by your service provider, all the necessary Internet addresses are available to you. You can find these in the settings for the WorldPay payment method. See Payment Method with WorldPay on page 50 as well as Figure 89. Merchant User Guide Page 161 Orders WorldPay Figure 89: Settings for WorldPay Testing a WorldPay Transaction Since this payment procedure is completed and checked by an external system, it is recommended that you test this payment method before you provide it to your customers. Enter a corresponding test mode ID in the Text Mode field. See also Payment Method with WorldPay on page 50. Finalizing the Transaction with WorldPay In the payment method settings, you can configure whether you would like to manually finalize a transaction or whether this should happen automatically. For more on this, see Payment Method with WorldPay on page 50. The Automatically with Order option means that the transaction is finalized as soon as the customer has entered and confirmed the payment information. After this, the amount is immediately booked from the customer's account. If you have selected the Manually in the WorldPay Administration option, the withdrawal of the amount from the customer's account does not occur until after you have finalized the order in your WorldPay account. To do this, open the To your WorldPay Administration link in Figure 89 your account with WorldPay. WorldPay Transactions The Amount column shows the value from the basket; the Auth. amount is the value in the currency that the customer paid to WorldPay. Page 162 Merchant User Guide T-Pay Orders In the AVS column, you can read the AVS Code for the transaction. The AVS code (Address Verification System) is a four-digit number used to show how and with what result customer data was verified. This code is displayed for each WorldPay transaction. Not all WorldPay accesses support this AVS code. It depends on the customer's bank and the type of contract you signed with WorldPay. The code structure and the meaning of the individual areas are found in the AVS Code area in the lower part of the page. WorldPay Order Searches There is a special search mask for WorldPay orders. You can search based on two criteria, by the transaction number and the time frame during which the transaction took place. For more about searches, see Search on page 144. T-Pay T-Pay allgemein T-Pay ist das Bezahlsystem der Deutschen Telekom. Den Kunden werden verschiedene sichere Varianten angeboten. Diese reichen von der Benutzung von Guthabenkarten bis zur Zahlung per Kreditkarte. Die Kunden werden für den Bezahlvorgang auf das T-Pay-System geleitet, wo die Transaktionsdaten erfasst werden. Sie als Händler müssen die Transaktion in Ihrer Shop-Administration abschließend auslösen. Voraussetzung für die Nutzung dieses Bezahlsystems ist eine Registrierung der Kunden und von Ihnen als Händler bei T-Pay. Alle Informationen zum Thema T-Pay finden Sie unter www.t-pay.de. Für das Shop-System sind die Bezahlvarianten Micromoney, Telekom-Rechnung, Lastschrift und Kreditkarte eingerichtet. Zur Händler-Registrierung und Einstellung aller erforderlichen Parameter in der Shop-Administration sowie zum Testen lesen Sie Payment Method via T-Pay, Seite 54. Zahlungsvorgang aus Sicht des Kunden Der Kunde wählt während des Bestellvorganges die Zahlungsmethode auf Basis T-Pay aus. Im nachfolgenden Prozess wird er auf die Seiten von T-Pay geleitet. Dort werden ihm die von Ihnen freigegebenen Bezahlvarianten angezeigt, von denen er eine auswählt. Danach muss er sich identifizieren. Nach erfolgreicher Anmeldung gibt er je nach ausgewählter Zahlungsvariante die erforderlichen Daten ein. Abschließend überprüft er alle Daten in einer Übersicht und bestätigt die Transaktion, siehe Abbildung 90. Merchant User Guide Page 163 Orders T-Pay Abbildung 90: Prüfen und Bestätigung der Transaktion durch den Kunden Danach wird er wieder in Ihren Shop zurück geleitet und bekommt hier die Bestellbestätigung angezeigt. Diese enthält die Zahlungsmethode und die Transaktions-ID, die durch T-Pay vergeben wurde: Page 164 Merchant User Guide T-Pay Orders Abbildung 91: Bestellbestätigung mit T-Pay-Transaktions-ID T-Pay-Transaktionen Nachdem der Kunde die Transaktion bestätigt hat, wird diese in die Liste der T-Pay-Transaktionen eingetragen. Die Spalte Status informiert Sie über den aktuellen Stand der Transaktion. Lesen Sie dazu Auslösen der Transaktion, unten. Auslösen der Transaktion Wenn einer Ihrer Kunden eine T-Pay-Transaktion auf dem T-Pay-System erfolgreich beendet hat, wird diese Transaktion mit dem Status Autorisiert in die Liste der T-Pay-Transaktionen eingestellt. Das bedeutet, dass der Kunde von seiner Seite aus die Transaktion für gültig und abgeschlossen erklärt hat. Damit erfolgt aber noch keine Zahlung an Sie als Händler. Sie müssen die Transaktion von Ihrer Seite her auslösen. Dazu markieren Sie in der Tabelle die Transaktionen, die Sie auslösen möchten und klicken auf Zahlung auslösen. Erst nach dieser Aktion erfolgt die Zahlung an Sie. In der Tabelle wird für die betreffenden Transaktionen der Status auf Bezahlt gesetzt und das jeweilige Kontrollkästchen deaktiviert. Merchant User Guide Page 165 Orders T-Pay Suche nach T-Pay-Transaktionen Mit Hilfe einer Suche können Sie Ihre T-Pay-Transaktionen gruppieren und filtern. Dabei können Sie nach drei Kriterien filtern, nach der Transaktions-Nr., dem Status und dem Zeitraum, in dem die Transaktion durchgeführt wurde. Ansonsten entspricht die Suche für T-Pay-Transaktionen der allgemeinen Suche für alle Bestellungen. Wie prinzipiell mit der Suche gearbeitet wird, lesen Sie im Kapitel Search, Seite 144. Page 166 Merchant User Guide Newsletter Campaigns Marketing 10. Marketing This module provides the functions for starting sales-promotion activities, for building and strengthening customer loyalty, and for providing all your users with important and useful information about all the aspects of your shop. Newsletter Campaigns The newsletter addressees are managed by campaign, meaning they receive all the newsletters from a particular campaign. Addressees are not assigned to specific newsletters, but instead to campaigns. View the details for the specific campaigns by clicking the ID. The individual symbols have the following meanings: Table 72: Table symbols for newsletter campaigns Symbol Meaning Blue symbol: Campaign is active and therefore visible in the shop; customers can sign up for it. Gray symbol: The campaign is not active and therefore not visible in the shop; customers cannot sign up for it. However, the corresponding newsletter can still be sent. Addressees are customers that were assigned in the administration area. Batch processing actions are available to manage the table entries. For the basics, see Batch Processes in Tables on page 23. Creating a Newsletter Campaign Enter an ID and a name for the campaign. Save your entries by clicking Save. Click the ID to edit the details of this campaign. Newsletter Campaigns – Details – General The general details contain parameters, which describe the campaign and are also the default newsletter settings. Merchant User Guide Page167 Marketing Newsletter Campaigns Figure 92: General details for newsletter campaigns The individual fields have the following meanings: Table 73: General fields for a newsletter campaign Field Name Meaning ID Visible Name Description Language Sender Name Sender E-mail Page 168 Name used to display the campaign. This is language dependent. Descriptive text for the campaign displayed in the shop. This is language-dependent. For more information about formatting, see Using HTML Commands in Entry Fields on page 26 and WYSIWYG Editor on page 26. Language used for the campaign. One feature is the language selection called International. Campaigns created with this option are valid for all languages. Together with the sender's e-mail address, this comprises an extended email address: for example, Milestones Team <[email protected]> This address is used as the default sender for all campaign newsletters; however, it can be overwritten for each newsletter. Field Type Example Entry field, alphanumeric Option button Entry field, alphanumeric, max. 255 characters Text Field NewProducts_DE New ideas at Milestones Every month, we'll let you know how we have expanded our selection of products and services. Drop-down menu Entry field, alphanumeric Milestones Team Entry field, alphanumeric [email protected] Merchant User Guide Newsletter Campaigns Marketing Field Name Meaning Field Type Example Test E-mail Every newsletter in the campaign uses this address for test newsletters. See Newsletter Details – General on page 170 – Test Newsletter. This subject is used as the default setting for all newsletters; however, it can be adapted for each newsletter. Entry field, alphanumeric [email protected] Subject Entry field, New ideas at alphanumeric, max. Milestones 255 characters Save your entries by clicking Save. Newsletter Campaigns – Details – Newsletter To open the details for a newsletter, click the ID. You can also create new newsletters and run batch processing actions in the table. The individual symbols have the following meanings: Table 74: Status for the newsletter Symbol Meaning The newsletter has not yet been sent. The newsletter has not yet been sent, however a sending date has been entered on which the newsletter will automatically be sent. The newsletter has been sent. Changes can no longer be made. However, you can still duplicate the newsletter. The following symbols supplement the status symbols and apply to the send date: Table 75: Symbols for the send date Symbol Meaning No send date was entered. The newsletter has not yet been sent. The planned send date has been entered. This is the date when the newsletter was sent. Batch processing actions are available to manage the table entries. For the basics, see Batch Processes in Tables on page 23. The following special actions can be performed: Table 76: Special batch processing actions for newsletters Action Comment Duplicate The send date and subscriber list will not be applied. Creating a New Newsletter Create a new newsletter by filling out the entry fields in the last row of the table. In the first field, enter the ID for the newsletter. In the second field, enter the display name for the current language. Save your entries by clicking Save. Merchant User Guide Page 169 Marketing Newsletter Campaigns All additional data is recorded in the details as described in the following chapter. To do so, click the ID of the newsletter. Newsletter Details – General Figure 93: Newsletter details The individual fields have the following meanings: Table 77: Fields for newsletters Field Name Meaning ID Name Use HTML Subject Page 170 Field Type Example Entry field, BooksAndMaps alphanumeric Name used to display the newsletter. Entry field, Announcement: This is language dependent. alphanumeric, max. Books and cards 255 characters In the text format, all HTML commands Option button will appear as text. Used as a subject in the newsletter e- Entry field, Travel literature at mail message. alphanumeric, max. Milestones 255 characters Merchant User Guide Newsletter Campaigns Field Name Marketing Meaning Text Newsletter Content For more information about formatting, see Using HTML Commands in Entry Fields on page 26 and WYSIWYG Editor on page 26. For more on this, see Creating Newsletter Content below. Add Products and Use this function to add product Categories from Tray information to the newsletter. For more information on the tray, see Tray on page 19. Sender Name Together with the sender's e-mail address, this comprises an extended email address: for example, Milestones Team <[email protected]> Sender E-mail Field Type Example Text Field In every tour, you need not only the right equipment bus also the right travel literature.<br/> We are excited… Link Entry field, alphanumeric Milestones Team Entry field, alphanumeric Date field [email protected] Sending Date Time at which the newsletter is automatically sent. Sent Date Test E-mail Display Use this function to test the mailing of the newsletter as well as the layout and design of the e-mail message as a recipient. To do this, click the symbol after the entry field. For adding coupon information to the Drop-down menu newsletter. After selecting and saving, two new functions are activated for it. For more details, see Coupons on page 176 and especially Using Coupons in Newsletters on page 179. Coupon Campaign 10.5.2005 08:30 [email protected] Save your entries by clicking Save. Sending a Newsletter The newsletter can be sent in two ways. You can enter a send date and finish with Save. Or you can use the Send Now function. Any send date that happens to be indicated is ignored. After the newsletter has been sent, the corresponding data can no longer be changed and the newsletter cannot be sent again. Creating Newsletter Content The text field contains a section that allows the customer to unsubscribe from the newsletter. This should be a component of every newsletter. Note: You should not delete this part of the newsletter since it is fairly standard to inform customers of the option of unsubscribing. Take advantage of all your options to send attractive, informative, and personalized newsletters. You want to present the appropriate products in the newsletter and at the same time, personally address your customers. To do this, proceed as follows: Merchant User Guide Page 171 Marketing Newsletter Campaigns Select the products that you wish to present and add them to the tray. For more information about working with the tray, see Tray on page 19. Insert these products in the newsletter by using the Add Products and Categories from the Tray link. The name, description, price, a small picture, and any variations of the selected product are automatically inserted at the cursor position. The pictures are assigned to the newsletter as attachments and a reference to them is entered in the text. Use placeholders for customer data to address the customers personally. To insert a placeholder in the Text field, click the name. This is immediately copied into the field at the current cursor position. To expand the example with a personal introduction, see Figure 94. Figure 94: Text using personal data Now the results are as follows: Page 172 Merchant User Guide Newsletter Campaigns Marketing Figure 95: Personalized newsletter with product data Note: For customers who subscribed to the newsletter as non-registered users, you can only use the placeholder for the display name. No data are stored for the other placeholders. Newsletter Details – Attachments If you also used the tray to insert images with the product and catalog data, these images will be saved as attachments to the newsletter and a reference to them will be generated in the text in the Text field. If you click the name of the file, the image is displayed. If you do not wish to send any images, delete the pictures from the attachment list as well as the corresponding link in the text. Note: This deletes the assignment of the image as an attachment, but does not delete the product image itself. This remains associated with the product. Newsletter Details – Recipients This overview lists all the customers to whom the newsletter was sent. Merchant User Guide Page 173 Marketing Newsletter Campaigns Along with the name, the e-mail address where the newsletter was sent, and the time it was sent are also displayed. If there is a large number of recipients, this time may deviate slightly from the planned send time. Newsletter Campaigns – Details – Addressees Only the customers in this list can receive the campaign newsletter. The customer should subscribe to the newsletter himself. However, if necessary, the administrator can assign customers to a newsletter campaign. Subscriptions for Registered Users Registered users can view the available campaigns in the shop in the My Account section under Newsletter and can subscribe to the newsletter. See Figure 96. Figure 96: Subscribing to the newsletter for registered users Due to security reasons, the customer receives an e-mail message that asks him to confirm that he has subscribed to the newsletter. This is to avoided unauthorized people from subscribing to the newsletter. Unsubscribing from newsletter is done the same way. Only after the customer has confirmed unsubscribing by e-mail is his status for the corresponding newsletter set to Unsubscribed. Note: The subscription and unsubscription of newsletters and the corresponding confirmations are events for which the system sends e-mail confirmations. You need to activate the associated e-mail events. For e-mail events, see E-mail Settings - Events on page 37. If you, as the administrator, assign customers to newsletters, then no event is triggered. Subscriptions for Non-Registered Users Unregistered customers can also subscribe to newsletters. For them to do this, you as the merchant must set up the navigation element Sign in, Navigation on page 133. This provides the Subscribe to Newsletter link in the shop. Page 174 Merchant User Guide Newsletter Campaigns Marketing Addressee List The individual symbols have the following meanings: Table 78: Status symbols for the addressee list Symbol Meaning The addressee is a registered customer who has subscribed to the newsletter. The addressee is a registered customer who has unsubscribed from the newsletter. The addressee is not a registered customer and signed in as a subscriber to this newsletter. The addressee is not a registered customer and unsubscribed from this newsletter. There are two ways to add new addressees: Manually Entering Addressees Enter the name in the first entry field in the last table row and enter the new recipient address in the second entry field. Save your entries by clicking Save. Adding from the Tray Use this method to add registered users to the campaign. To use the tray, see Tray on page 19. For registered customers, deleting from the list only removes the assignment to the campaign. The rest of the customer data remains intact. Batch processing actions are available to manage the table entries. For the basics, see Batch Processes in Tables on page 23. The following special actions can be performed: Table 79: Special batch processing actions for addressee administration Action Comment Subscribe Set the status to Subscribed. Unsubscribe Set the status to Unsubscribed. Delete For registered customers, this is the removal of the assignment to the campaign. Unregistered customers are deleted from the system for this campaign. Caution: Deleting also deletes subscription status (subscribed, unsubscribed) for the corresponding customer. If one of the customers is added to the campaign later, the status is automatically set to subscribed. This can lead to legal problems if a customer receives a newsletter from which he had actually unsubscribed. Think about this before deleting a customer from the addressee list. Importing Addressees You can use this function to load subscriber lists prepared elsewhere. The data must exist in a simple text file where individual values are separated by semicolons. See Figure 97 for an example of this kind of file. Merchant User Guide Page 175 Marketing Coupons Figure 97: Addressees import file The title row shows the sequence of the data. Start the import in the Import Addressees section. Enter the name of the file with the path information in the Import File field on the page or use the Browse function to find the file and enter its name in the field. To begin the import, click Import. Coupons A coupon campaign contains all the necessary settings, requirements, and codes for offering coupons. Note: Coupon campaigns can always only be created for one currency. For the same action in another currency, you need to also create a separate campaign. The Redeemed column is a good indicator of the success of your marketing tactics, since you can see here how well the coupon campaign was accepted. Click the ID to open the details of the coupon campaign. You can create a new campaign in the table. To do this, enter the ID and name of the new coupon campaign. Define for which currency the coupons will be issued and credited. Save your entries by clicking Save. Batch processing actions are available to manage the table entries. For the basics, see Batch Processes in Tables on page 23. Note: All coupons that are left over in the possession of customers after the deletion of a campaign and are not redeemed, lose their validity and are no longer recognized by the system. Page 176 Merchant User Guide Coupons Marketing Coupon Campaign – General Figure 98: General details for coupon campaigns The individual fields have the following meanings: Table 80: Parameters for coupons Field name/ ID Meaning ID Time Period Name Description Currency Absolute value Merchant User Guide Field Type Example Entry field, alphanumeric Date field NewPayment Time frame of validity for the coupons in the campaign. It is necessary to enter the date and time. Use the symbols next to every date field to enter the current date along with the time. Name used to display the campaign. Entry field, This is language dependent. alphanumeric Text field Description of the campaign. This is language dependent. For information about formatting, see Using HTML Commands in Entry Fields on page 26 and WYSIWYG Editor on page 26. Display Absolute amount per coupon Option button + entry field, numeric 05/01/05 00:00 New payment method Using the new payment method "cash on delivery" is rewarded with a coupon. €4 Page 177 Marketing Field name/ ID Coupons Meaning Percentage Value Field Type Value of the coupon is proportional to Option button + the value of the goods in the shopping entry field, numeric basket Only waive shipping Option button Minimum order value Shopping basket value at which the Entry field, numeric coupon can be redeemed. Coupon code length Variable length of the coupon code for Drop-down menu different uses and security levels Number of valid Number of coupons that should be Entry field, numeric coupons accepted by the system. Redemption voids Use this option to control whether Option button coupon coupons can be redeemed more than once or not. If the Yes option has been selected, each coupon can be used only once. Example 5% 50 € 16 100 Save your entries by clicking Save. Note: You can only edit the parameters on this page if no coupon code has yet been generated. If codes exist, changes can no longer be saved. If you would like to edit the values again, you need to delete the coupon code. Caution: An entry field for entering the coupon code is made available to the customer in the shopping basket. However, this field is only then displayed if there is a least one coupon campaign valid for the current time frame. Coupon Campaign – Condition You can link the validity of the coupons to certain conditions. For example, you can configure a coupon so that it can only be redeemed if the customer has used a certain payment method. The list shows the items that are limited to a specific coupon. This means that only if this item is active in the order process will the coupon be credited. Note: The items subject to different conditions or that are of various types are "AND linked", that is, they must be used together by the customer. The different items are inserted into the table from the tray. For more information on the tray, see Tray on page 19. Coupon Campaign – Coupon Codes After you have edited all the basic settings and perhaps defined conditions, you need to generate the coupon codes for the campaign in order to make them available for your customers. This is necessary if you do not plan on distributing the codes to your customers per newsletter. You can generate the character strings automatically. Enter the number of codes that you want to generate into the Code Generator field. Start the process by clicking Generate. Page 178 Merchant User Guide Coupons Marketing Or, if you want, you can also create the codes manually. This is an option if you want your codes to have a specific structure, for example, that the code always starts with the same letter combination. Enter the code in the entry field in the last table row and then click Save. Note: As soon as you have generated coupon codes, you can no longer modify the basic settings on the General page. If you would like to be able to change the parameters again, you need to delete all the coupons. Batch processing actions are available to manage the table entries. For the basics, see Batch Processes in Tables on page 23. The following special actions can be performed: Table 81: Special batch processing actions for coupon codes Action Comment Export all coupon codes For saving all the coupon codes in a text file for use in external systems. Note: Deleted coupon codes lose their validity and can no longer be redeemed. Using Coupons in Newsletters For basic information on newsletters, see Newsletter Campaigns on page 167. Note: You do not need to generate any coupon codes. The system generates a new code for each newsletter that is sent. It is important that after you create the newsletter that you select and assign the coupon campaign. See Figure 99. Merchant User Guide Page 179 Marketing Coupons Figure 99: Selecting a coupon campaign for the newsletter After selecting the campaign and clicking Save, you have special functions available to your newsletter: a new placeholder for the coupon code and the option of displaying coupon campaign information. How this is done is shown in Figure 100. Page 180 Merchant User Guide Pangora Marketing Figure 100: Integrating coupon information into the newsletter You have two options. If you would like send to the coupon code, place the Coupon Code placeholder in the newsletter text. When the newsletter is sent, a separate coupon code is generated and entered for each customer. The other option is to use a coupon template. Here you add not only the code but also additional information about the coupon campaign. This information includes the name and description of the coupon campaign, the price reduction the coupon is providing, and the coupon code itself. Save your entries by clicking Save. Pangora Pangora is a product search engine for shopping on the Internet. Examples of shopping areas are: http://shopping.t-online.de/, http://www.shopping24.de, http://shopping.rtl.de or http://shopping.lycos.de/. The prerequisite is that you register with Pangora. For this, you can use the corresponding function on www.pangora.de or the link Register with Pangora. The Pangora export function lets you generate a product list in Pangora format and save it on the server as an XML file. This file is then read by Pangora and processed accordingly. Without registration, export can be started, but Pangora will not process the data. Merchant User Guide Page 181 Marketing Pangora You will first see the page with the active country settings for which an export can be run. You can export products for the countries listed in the table. The generally available countries can be selected from the drop-down menu in the last row of the table. Pangora currently offers an export for the following countries: - Germany United Kingdom Italy France Austria These countries are stored in the program. The prerequisite for activating one of these countries is that the corresponding regional settings, language, and currency must be present. See Country Settings on page 36. Note: Even after being deleted from the table, the country entry is still available in the drop-down menu. The country is only completely removed from the drop-down menu when you delete the corresponding regional settings Country Settings on page 36. Pangora Export – General Properties Figure 101: General settings for a Pangora export for a specific country The individual fields have the following meanings: Table 82: Fields for Pangora export settings Field Name/ ID Meaning Register with Pangora Merchant ID ID Page 182 Field Type Example Link You receive this ID when you register with Pangora. Regional setting Entry field, alphanumeric Display 1234 en_EN Merchant User Guide Pangora Field Name/ ID Marketing Meaning Language Currency Automatically Add to The product is added to the basket as Basket soon as a customer is forwarded over the external product link into the shop. Shipping Method The price for the method you select here is displayed together with the product on the external site. Image All the attachments for the product are listed in this drop-down menu. An image file is expected for the export. Field Type Example Display Display Option button German € Drop-down menu Drop-down menu If you wish to include other file types with the product type, such as PDF files, then you may only select one image file from the drop-down menu. Promotional Text Description Export File A short description of the product, Drop-down menu max. 25 characters. A description of the product, max. Drop-down menu 4,000 characters. Link to the export file. For more on this, Link see Export below. Save your entries by clicking Save. Note: If one of the fields ID, Language, or Currency is empty, the export will not be successful. Pangora Export – Products Along with the general settings, you must determine which products are to be exported. To enter products in the export list, you must add them from the product overview to the tray. See Tray on page 19. Batch processing actions are available to manage the table entries. For the basics, see Batch Processes in Tables on page 23. The following special actions can be performed: Table 83: Special batch processing actions for Pangora export Action Comment Remove Assignment If you remove products from the export list, the products themselves are not deleted. Assign All Products All the shop products are immediately included in the export list. Export Start the export of the prepared product list into Pangora format on the General page. See Figure 101. To do this, click Export. When this is finished, you are returned to the general properties page. This now contains a link to the exported file. See Figure 101 . Merchant User Guide Page 183 Marketing Kelkoo Pangora Export Errors When products are included in the export file, the system checks whether all the restrictions for the Pangora export have been met. If a product does not fulfill one of the criteria, an error is displayed after the process is complete. There are two classes of errors: simple errors where the data can be automatically corrected in such a way that the product can be exported, and serious errors where the product cannot be exported. After a process is completed, you will get an error message for each error. Then you can edit and correct the data accordingly. If errors occur, the error messages will provide additional details. To display the details, click the Details link. Kelkoo Kelkoo offers a product search engine that is available on the Internet. Here you can add your products there so that customers searching for products at www.kelkoo.de also see your products. Your products are sorted into the Kelkoo product catalog structure. Your products will appear in these categories with a link directly to your shop together with products from other suppliers. To be able to export your products to Kelkoo, you must register with Kelkoo since only registered users may upload products. To open the registration page, click the Register at Kelkoo link in Figure 102. You will first see the page with the active country settings for which an export can be run. You can export products for the countries listed in the table. The generally available countries can be selected from the drop-down menu in the last row of the table. These countries are stored in the program. The prerequisite for activating one of these countries is that the corresponding regional settings, language, and currency must be present. See Country Settings on page 36. Note: Even after being deleted from the table, the country entry is still available in the drop-down menu. The country is only completely removed from the drop-down menu when you delete the corresponding regional settings under Country Settings on page 36. Kelkoo – General Properties Figure 102: General Kelkoo export settings per country The individual fields have the following meanings: Page 184 Merchant User Guide Kelkoo Marketing Table 84: Fields for general Kelkoo export settings Field Name/ ID Meaning Register with Kelkoo Country Regional setting Language Currency Automatically Add to The product is added to the basket as Basket soon as a customer is forwarded over the external product link into the shop. Shipping Method The price for the method you select here is displayed together with the product on the external site. Image All the attachments for the product are listed in this drop-down menu. An image file is expected for the export. Field Type Example Link Display Display Display Option button Germany German € Drop-down menu Drop-down menu If you wish to include other file types with the product type, such as PDF files, then you may only select one image file from the drop-down menu. Description A description of the product, max. 160 Drop-down menu characters. Save your entries by clicking Save. Note: If one of the fields [Country, Language, or Currency are empty, then the export will not be successful. Kelkoo – Products Along with the general settings, you must determine which products are to be exported. To enter products in the export list, you must add them from the product overview to the tray. See Tray on page 19. Batch processing actions are available to manage the table entries. For the basics, see Batch Processes in Tables on page 23. The following special actions can be performed: Table 85: Special batch processing actions for Kelkoo export Action Comment Remove Assignment If you remove products from the export list, the products themselves are not deleted. Assign All Products All the shop products are immediately included in the export list. Export The export of the prepared products is done in two steps: Save the product list in Kelkoo format in the export file and upload the export file to Kelkoo. Merchant User Guide Page 185 Marketing Kelkoo To save the product list in the export file in the corresponding Kelkoo format, go to the General page and click the Export button. See Figure 102. The number on the Export button indicates how many products are to be exported. Finally, you must indicate where the export file is to be stored on your computer and what it is to be called. See Figure 103. Figure 103: Save the export file Note: Verify your brower settings for pop-up windows. Since the program opens new windows, pop-ups must be allowed for complete functionality. Otherwise, certain functions cannot be used. Note: Remember the file name and the directory; you will need this information to upload the export file to Kelkoo. You must upload the export file to Kelkoo. For this, open the Kelkoo login page. Use the Register with Kelkoo link on the page in Figure 102. After you sign in, select the country for which you want to upload the product list. This must correspond to the country, for which you have set the export. Your Kelkoo administration page will be displayed. See. Click the Upload product data link. In the next field in, enter the export file name. You can either enter the file name directly or use Browse to select it. Note: The extension *.kel is the default extension used by the system, however, this can be changed by the provider. Do not open or edit the export file, otherwise the correct read-in of the exported file to Kelkoo cannot be guaranteed. Start the upload by clicking Submit Catalog. When this is complete, the products are available for the Kelkoo search. Page 186 Merchant User Guide Google Registration Marketing Kelkoo Export Errors When products are included in the export file, the system checks whether all the restrictions for the Kelkoo export have been met. If a product does not fulfill one of the criteria, an error is displayed after the process is complete. There are two classes of errors: simple errors where the data can be automatically corrected in such a way that the product can be exported and serious errors where the product cannot be exported. After a process is completed, you will get an error message for each error. Then you can edit and correct the data accordingly. If errors occur, the error messages will provide additional details. To display the details, click the Details link. Google Registration Something important for the success of your shop is not only that your regular customers known the address of you shop, but also that the shop and your shop products can be found by Internet search engines. To do this, you need to register your shop address with the search engines. The program provides a registration function for registering with Google, one of the most used search engines. The link under Shop Home Page is your shop address. This is how it is entered into Google. In the "Comment about the Shop" field, you can enter comments or information about the shop. This is to provide information to the employees of Google Services and is not displayed as shop information in the search results. Registration of your site with Google does not guarantee that it will be included in the search index. For more information on this, also refer to the Google Web site. Note: Make sure that as many sites as possible link to your shop. The more sites that are linked to your shop, the greater the chance that your shop address will be included in the index and will be found during a Google search. Froogle Froogle (www.froogle.com) is a product search engine on the Internet based on Google technology (www.google.com). In the same way that users use Google to search the Internet for information about Web sites, Froogle searches specifically for products. You will first see the page with the active country settings for which an export can be run. You can export products for the countries listed in the table. The generally available countries can be selected from the drop-down menu in the last row of the table. These countries are stored in the program. The prerequisite for activating one of these countries is that the corresponding regional settings, language, and currency must be present. See Country Settings on page 36. Note: Even after being deleted from the table, the country entry is still available in the drop-down menu. The country is only completely removed from the drop-down menu when you delete the corresponding regional settings under on page 36 Country Settings . Merchant User Guide Page 187 Marketing Froogle Froogle– General Properties Figure 104: General settings for Froogle export The individual fields have the following meanings: Table 86: Froogle export settings Field Name/ ID Meaning Field Type Register with Froogle Link Country Regional setting Language Currency Automatically Add to The product is added to the basket as Basket soon as a customer is forwarded over the external product link into the shop. Shipping Method The price for the method you select here is displayed together with the product on the external site. Image All the attachments for the product are listed in this drop-down menu. An image file is expected for the export. Display Display Display Option button Example Germany German € Drop-down menu Drop-down menu If you wish to include other file types with the product type, such as PDF files, then you may only select one image file from the drop-down menu. Description FTP Server Name FTP Server Port Page 188 Description of the product Only change the entry after conferring with your provider. Only change the entry after conferring with your provider. Drop-down menu Entry field, hedwig.google.com alphanumeric Entry field, numeric 21 Merchant User Guide Froogle Marketing Field Name/ ID Meaning User Name FTP transfer is password protected. You Entry field, numeric bnfroogle must retrieve an FTP user name from your Froogle administration area. This is not identical with the sign in name for the Froogle administration area. For more information about how to do this, visit www.froogle.com under the link Feed Instructions. Open the FTP Instructions document. Password for Froogle data transfer per Entry field, numeric pwfroogle FTP Note that recently exported products Link are not displayed until after the automatic FTP upload. Password To Froogle Product Search Field Type Example Save your entries by clicking Save. Froogle – Products Along with the general settings, you must determine which products are to be exported. To enter products in the export list, you must add them from the product overview to the tray. See Tray on page 19. Batch processing actions are available to manage the table entries. For the basics, see Batch Processes in Tables on page 23. The following special actions can be performed: Table 87: Special batch processing actions for Froogle export Action Comment Remove Assignment If you remove products from the export list, the products themselves are not deleted. Assign All Products All the shop products are immediately included in the export list. Export Start the export of the prepared product list into Froogle format on the General page. See. To do this, click Export. The data are first saved in a file on the server and are automatically transferred to the Froogle server once a day. Froogle Export Errors When products are included in the export file, the system checks whether all the restrictions for the Froogle export have been met. If a product does not fulfill one of the criteria, an error is displayed after the process is complete. There are two classes of errors: simple errors where the data can be automatically corrected in such a way that the product can be exported and serious errors where the product cannot be exported. After a process is completed, you will get an error message for each error. Then you can edit and correct the data accordingly. If errors occur, the error messages will provide additional details. To display the details, click the Details link. Merchant User Guide Page 189 Marketing Trusted Shops Trusted Shops Bei Ihren Kunden besteht ein hohes Sicherheitsbedürfnis bezüglich des Online-Einkaufs. Mit einer Zertifizierung von Trusted Shops (www.TrustedShops.de) gewährleisten Sie diese Sicherheit gegenüber den Kunden und bauen so Vertrauen zu Ihrem Shop auf. Neben der Prüfung auf Sicherheit, Datenschutz und Kundenservice bietet Trusted Shops eine Geld-zurück-Garantie und umfangreichen Kundenservice an. Diese Software ist für die Trusted Shops-Zertifizierung optimal vorbereitet. Durch dieses Gütesiegel bieten sich Ihnen als Händler auch noch eine Reihe weiterer Vorteile: - Sie werden als seriöser, geprüfter Online-Händler geführt und auf der Trusted Shops-Webseite aufgelistet Reduzierte Kaufabbruchrate, weil die Kunden dem Gütesiegel vertrauen Ihr Shop wird auf dem Portal für sicheres Einkaufen mit beworben Alle notwendigen Informationen finden Sie unter http://www.trustedshops.de/de/shops/index.html. Wenn die Prüfung erfolgreich abgeschlossen ist, erhalten Sie von Trusted Shops eine Trusted Shop-ID. Die Trusted Shop-ID tragen Sie in das Eingabefeld ein. Sichern Sie alle Eingaben mit Speichern. Danach haben Sie die Berechtigung und Möglichkeit, in Ihrem Shop das Gütesiegel von Trusted Shops zu präsentieren. Dafür stehen zwei Navigationselemente zur Verfügung, die Sie entsprechend auf Ihrer Webseite anordnen können, für die Grundlagen siehe dazu Navigation, Seite 133. Der Kunde kann auf das Siegel klicken und wird auf die Seite von Trusted Shops geleitet, die ihm die Vorteile und Sicherheiten eines Online-Shops anzeigt, der Mitglied bei Trusted Shops ist. etracker etracker Web controlling (www.etracker.de) is an Internet application for evaluating user data. These data are recorded and analyzed during the duration. Depending on the services offered, there may be a fee. etracker normally offers recording and evaluation of visits, click behavior, pages opened, click paths, viewing times, and so on. Use these numbers to evaluate and influence the success and effectiveness of your Web site. Based on a cooperation agreement between etracker and the provider, the shop system transmits additional data to the etracker evaluation to enable additional statistical evaluations. To be able to use the functions and the data, you must register with etracker. Use the Register with etracker link. This link redirects you to the special etracker registration page for merchants. Enter your data in the form and submit it. After you register, a security code will be generated for you on the etracker site. See Figure 105. To access this page, log on to the etracker site, click the HTML Code link, and then click Automatic code generation on the next page. Page 190 Merchant User Guide etracker Marketing Figure 105: Your etracker security code Enter the security code in the Security Code field. Save your entries by clicking Save. After registering, you will receive an address from etracker which you can use to immediately access your statistic page. You can find this address on your etracker page under Settings on the Direct Login Bookmark. In order to let you quickly access this address, you have the option of saving it in the general etracker details. Simply copy the address into the Direct Login Bookmark field. After saving, the etracker access link lets you immediately enter in your etracker administration area with just a click. You can select which of your shop pages will send data to etracker. To do this, click the Pages tab. The table lists all pages that can send data to etracker. You can set the importance of each page with the check box in the Importance column. This means that the data for the pages set as most important are shown first on the statistics page. Use the check box in the last column to determine the Web page that will actually transmit values to etracker. Only these values will be evaluated for statistics and sent to you. Merchant User Guide Page 191 Marketing Product Recommendations Save your entries by clicking Save. Note: Depending on your optimization settings, you will need to update your pages after saving them. For more on this, see Optimization on page 33. To view the evaluations and statistics for your shop, open your etracker administration page. Product Recommendations An important marketing and advertising instrument is customer-to-customer recommendation of your shop and products. This information exchange is based on e-mail. With the first option button, Enable product recommendations, you determine whether this function will be available to the customers or not. You can also define whether this function is available only to your registered users or whether all shop customers can use the product recommendation function. Sending e-mail messages with recommendations is extra work for your system. You can keep this under control with the field Maximum number of recommendations. Here you can enter a maximum number of product recommendations per day and per registered customer. Note: This limitation can only be set for registered customers. If this function is available to all customers (registered and unregistered), then all customers can send product recommendations up to a maximum limit. This is set at 100 recommendations per customer per day. Save your entries by clicking Save. Caution: For the system to be able to send product recommendation e-mail messages, this must be activated in the e-mail settings. For more on this, see E-mail Settings on page 37. In order to initiate a product recommendation, the customer must click the Recommend Product link. eBay For information about these settings, see eBay Settings on page 71. Page 192 Merchant User Guide eBay Marketing Offers Figure 106: Overview of current eBay offers The Offer column contains the name of the offer. The symbol shows the status. If you click the name, you open the offer details page. This page is described in the following section. The individual symbols have the following meanings: Table 88: Symbols for eBay offers Symbol Meaning The offer is created, but not yet tested and not yet entered in eBay. It can still be edited. The offer is created and tested but not yet entered in eBay. It can still be edited. The offer has been created, has been confirmed, and will be placed in eBay at the set time. It can still be edited. The offer has been placed in eBay and the offer is running. It can no longer be edited. The sale is finalized. The product has been sold. The offer has finalized. The product has not been sold. The offer has been created as a "Buy It Now" offer, but has not yet been confirmed or placed in eBay. It can still be edited. The offer has been created as a "Buy It Now" offer, and has been confirmed, but has not yet been placed in eBay. It can still be edited. The offer has been created as a "Buy It Now" offer, has been confirmed, and will be placed in eBay at the set time. It can still be edited. The offer has been placed in eBay as a "Buy it Now" offer and the offer is running. It can no longer be edited. The offer is finalized, and the product has been sold for a fixed price. The offer is finalized, and the product has not been sold for a fixed price. Merchant User Guide Page 193 Marketing eBay In the Bid column, you see the current bid for the product and how many bidders have bid on the item. If you have more than one product to offer for sale, you will see the number of products offered that have been bid on in round brackets. Batch Processing Duplicate Use Duplicate to create identical copies of selected offers with identical properties and parameters. Note: When you duplicate running and finished offers, the new offer is created in the start status. Creating Repeating Offers You can schedule a repeating item. This means that offers with the same details can be repeated periodically. Note: A prerequisite for creating recurring items is that the initial offer exists as a planned offer with a set start time. See also Offer Creation – Details on page 197. Select Schedule a Repeat Item from the drop-down menu and click Execute. You can now set the repetition intervals. Enter the interval between offers and how often the offers should be created: Figure 107: Setting repetition intervals After entering all the necessary values, start the action by clicking Create. Verify The current settings are tested for correctness and whether the offer can be put into eBay without any errors. Note: You can only test new offers. This means that offers that are not yet running in eBay or that are already finalized. Upload to eBay Use this action to immediately enter the offers into eBay. For this, it does not matter whether a manual or a planned start time has been defined. Page 194 Merchant User Guide eBay Marketing Note: An offer must be verified before it can be sent to eBay. Offers that have not yet been verified cannot be entered into eBay. Delete To remove offers from the table, use the batch processing action Delete. Note: Offers that are running in eBay or are finished are only removed from the table and not deleted in the eBay system. Update All Offers Use this function to query the current status of all the offers in the table at eBay. Create New Offer To create a new offer on eBay, you must select at least one product and place it in the tray. For general information about working with the tray, see Tray on page 19. When creating new offers, default values are used. See also on page 199 Default Values. To edit settings and properties further, open the eBay assistant by clicking the name of the offer. It is also possible to create a new offer directly from a product. For more on this, see Product Details – eBay on page 93. Offer Settings/eBay Assistant The eBay assistant in the shop system takes you step-by-step through the necessary settings to enable you to prepare the data necessary to create eBay offers comfortably and smoothly. Note: We recommend becoming familiar with the meaning and use of the individual values. To do so, read the information in the chapter Preparation on page 71, as well as the instructions you have received from eBay as you registered as a seller. Also, make sure you have an overview of which functions incur additional fees. The assistant contains seven steps that can be done sequentially or in any order. Caution: To save entered or changed data on individual pages, you must make the changes to the pages by going back and forth using the Next >> or < < Previous buttons. Only by doing this are the data saved. If you change pages using the links in the tab headings, the data are not saved. This also applies if you leave the assistant without confirming your changes via Next >> or << Previous. To start the assistant, click the name of the respective offer. Title The individual fields have the following meanings: Table 89: Properties of the Title page Field Name Meaning Field Type Product Link Offer type Merchant User Guide The options are provided by eBay. Example Drop-down menu Page 195 Marketing eBay Field Name Meaning eBay Account You decide which eBay page the offer Drop-down menu is placed on. For more on this, see eBay Accounts on page 72. Name Field Type Entry field, alphanumeric Subtitle This is a short description of the offer, Entry field, which is displayed on the eBay page alphanumeric and also in the gallery directly under the name of the offer. Description Text field, Description of the offer that is alphanumeric displayed for eBay bidders. For information about formatting, see Using HTML Commands in Entry Fields on page 26 and WYSIWYG Editor on page 26. Product data is displayed via the template. Template + The selected template is applied to the Drop-down menu description. See also Templates on page 74. Assign Example Deuter Hydro 2 <P><STRONG><FONT size=5>Deuter Hydro 2.0</FONT></STRONG > </P> <P>New 2004. Small drinking system backpack with …. Caution: If you select another eBay account that is based on a different eBay platform and you save this change, the settings made under Shipping and Payment are lost. Note: Due to security reasons, eBay restricts the use of active page contents such as JavaScript, Flash, and so on. If you use such elements in your templates, it is possible that your pages will not be displayed properly on eBay. Therefore, you should check how your eBay offers are displayed and make the necessary changes to your templates. Save your entries by clicking Next >>. Category Each offer must be assigned to a specific eBay category. When the page is displayed, you see the category number that is assigned to your product in the Category field. During creation, you see a 0. You also see the main eBay catalog categories. There are three ways of entering a category number: - - If you know the number of the category, you can enter it directly. In the Last Used Categories drop-down menu, the numbers and the names of categories that you have used most recently are listed. Click this number in the drop-down menu to transfer it to the Category field. Click through the category structure until you arrive at the correct category. Select this and the category number is transferred to the Category field. As long as the category name is a link, you must continue following the structure, as only categories with no sub-categories can be used for assignment. To select a category, click the respective option field. The number in entered in the Category field and this offer is placed in this category. Page 196 Merchant User Guide eBay Marketing Save your entries by clicking Next >> or << Previous. Details In the third step, you define settings that determine the process for the offers. Figure 108: eBay Assistant, step 3 The individual fields have the following meanings: Table 90: Properties of the Details page Field Name Meaning Field Type Quantity The number depends on your user profile in eBay. Entry field, numeric 1 Start Price It must be at least 1 € total. Entry field, currency 1 € Buy It Now If you activate "Buy It Now", you cannot Option field + 74,95 € use a private offer. Entry field, currency Private Offer Start Time Example Option button Use the symbol data and time. to enter the current Option field + Entry field, date/time format Duration 12/22/04 10:38 Option button Save your entries by clicking Next >> or << Previous. Layout Use this page to take advantage of the additional options eBay offers to present your item more effectively. See http://pages.eBay.de/help/sell/promoting_ov.htmlhttp://pages.ebay.de/help/sell/promoting_ov.html. Note: Note that using certain eBay options may incur additional fees. You will see how much your offer costs after verification. See Verify on page 194. Merchant User Guide Page 197 Marketing eBay Figure 109: eBay Assistant, step 4 The drop-down menus for image types list all the images that you have available for the product. For more on this, see Product Details – Images– Images on page 81. The address of the image is automatically entered in the respective entry field. If you would like to link to an image which is not listed in the dropdown menu, enter the address of the image in the entry field. You can test whether the image is available at any time by clicking Preview. Save your entries by clicking Next >> or << Previous. Shipping In step five of the assistant, you can define shipping methods that you wish to offer to your eBay customers. eBay presents a selection of shipping types to choose from. To activate additional shipping methods for your offer, select them from the drop-down menu. Enter a corresponding value in the entry field in the Price column. Save your entries by clicking Save. You can offer a maximum of three shipping methods. Note: The shipping methods listed here are only buyer information. They should correspond to those you offer in your shop. The types that are valid for the customer are shown in the order finalization process in the shop. For more information, read the caution box in Title on page 195. Go from page to page by clicking Next >> or << Previous or click the tab headings. Page 198 Merchant User Guide eBay Marketing Payment Parallel to the shipping methods, eBay offers a specific set of payment methods that you can choose from on each country page. You may select as many as you like but you must select at least one method. To assign a payment method to your offer, select it from the drop-down menu at the end of the table. Save your entries by clicking Save. For more information, see the Caution section in Title on page 195. Note: If your preferred payment method is not listed, select the entry See Article Description and refer there to your desired payment method. Note: The shipping methods listed here are only buyer information. They should correspond to those you offer in your shop. The methods that are valid for the customer are shown in the order finalization process in the shop. Go from page to page by clicking Next >> or << Previous or click the tab headings. Verification The last step of the eBay assistant is verification of all properties. This is done to make sure the offer is correctly created in eBay. Click the Verify button or Activate Scheduling to test your settings. If all the information is correct, the fees for the offer are displayed. If one of your settings does not correspond to eBay requirements, an error message is displayed. After a successful verification, you can either immediately place the offer in eBay or let the offers with a scheduled start time be placed in eBay at the time indicated. If an offer starts or ends on eBay, the properties can no longer be changed. Use the Orders tab to see the order for the respective offer after the offer is completed. For more on this, see Orders below. Default Values There are many settings for an offer, and many properties are the same for most offers. For this reason, you can assign standard values to these settings to avoid having to enter them again for each offer. These settings can be changed at any time so that you can create your own default settings to use as a template. To do so, click the link Customize Default Values for Offers. The parameters that should be entered are part of the offer properties and are described there. See Offer Settings/eBay Assistant on page 195. Orders As soon as a bidder buys or wins your product, this offer is marked as finalized and entered into the table of eBay orders. Merchant User Guide Page 199 Marketing eBay Figure 110: Overview of eBay orders The individual columns have the following meaning: Table 91: Table columns for eBay offers Column Name Comment Offer Initial offer for the order. The symbol indicates the eBay platform. User Account to send an e-mail message to the eBay user, who won the offer. Click address in his eBay customer profile. Price Price for which he won the offer. Customer Name of the bidder in the customer administration of the shop. Any customer whose details are transferred for the first time from eBay is created in the system as an unregistered customer. The eBay e-mail address is saved during this process. During further data transfers, the customer is "recognized" using this e-mail address and all the eBay orders for this customer are bundled. Order Order number, when an offer has been finalized in the online shop. Otherwise, a notification is issued that the order is not yet finalized. Feedback Note: The bidder must finalize the entire process in your shop. For this, he receives a corresponding email message from the system. See Configuring Notification E-mail on page 75. Since it is usual in eBay for the seller and the buyer to rate one another, you can submit a rating for the buyer on this page. To do so, select one of the three options and enter an appropriate comment in the Feedback Text field. Afterwards, submit the rating for this order by selecting the appropriate check box and clicking Send Feedback. The rating submitted is displayed in the last column of the table by a symbol. Note: You can only submit a rating for each offer once. Making a correction by submitting a second rating is not possible! eBay orders are indicated in the list of all orders by the eBay symbol. Performing Searches for eBay Offers There is a simple and an advanced search. Page 200 Merchant User Guide eBay Marketing The following buttons are important for searches: Start the search according to the entries in the search fields. Reset the search. All the entries are deleted from the search fields. / Switch between simple and advanced search. Simple Search For the simple search, you use three fields to filter orders: Offer Number, eBay Account, and Status. Advanced Search The advanced search offers you additional search fields. When entering time values, the time and date must always be entered completely. Use the calendar ) to automatically enter the current date and time. symbol ( Merchant User Guide Page 201 eBay Glossary 11. Glossary Administration Area All the Web pages that the merchant can use after sign-in to fulfill his responsibilities. Each role in the shop system works in a separate area within the hierarchy in order to clearly separate responsibilities. Administration Page The Web site that appears after signing in where all functions are performed. You can access all necessary functions on this page. The navigation bar, the left navigation area, and the working area are displayed here. Attribute A freely-definable descriptor for a product or customer. Attributes are used to define properties, for example, prices, dimensions, colors, and so on. Batch Processing An action that affects multiple elements at one time. This option is mainly offered in tables, where multiple instances of the same action can be combined into a multiple or batch process. For example, the deletion of more than one table row at one time. Button A function area on Web pages used to trigger actions. They are usually graphically designed to look like buttons. Catalog This term describes the entire inventory of all the products. This catalog is the equivalent of a mail-order catalog. Categories are used to set up structured hierarchies. Category A subgroup of a catalog. Categories act as containers for product groups, for example, computers, office supplies, shoes, and so on. Check box A field in a form; this is selected or cleared by clicking it with the cursor. It is used to make specific selections. Context Menu A menu which changes its functional contents according to the chosen working area. Cookie A small file containing text information that is sent from a Web server to a Web browser. This information is saved on the hard drive and can be recalled later. Cookies are often necessary for Internet applications. See also Session Cookies. Currency Format A currency-dependent format for price information. The system formats the prices according to the set currency. Default Setting The status of the attributes. If the status has been set, the attribute or the value will be used as the default value until the user makes a different selection. Duplicate Making a 1:1 copy, with the exception of the ID. This is helpful, for example, when creating products from a template product (if one exists), from which a majority of the attributes can be transferred. Entry field These are the fields in forms where the user can enter information. Favorite Web pages that are repeatedly opened and used. This page is saved as a link in a special folder and can be opened with a single click. Merchant User Guide Page202 eBay Glossary FTP File Transfer Protocol FTP is a protocol for transmitting data over networks. This is used to transfer files between different computers, regardless of the operating system and location. HTML (Hyper Text Markup Language) source code for Web pages that determines how the content is displayed. Individual HTML formatting instructions are called HTML tags. ID This is a unique piece of identification for a data element (product, customer, attribute, and so on.) This ID is used in the database and is not identical to the name displayed on the Web pages. Furthermore, IDs serve to uniquely classify data when exporting and importing and to manage objects in multiple languages. Link A link to another Internet page or to a document. Localization Preparation of the data and content of a Web page so it can be displayed in another language. Some attributes can be localized, that is, you can collect different values for these attributes in various languages. They are then displayed in the respective language, for example, descriptions or names. Merchants A role in the shop system structure. The merchant selects a shop type from among those offered by the provider and then uses it to offer his products to end customers. He can define shop structure and design. Name Name for an object or method in the administration area and in the online shop. This is language-dependent. In this way, a more descriptive name can be displayed in any language on the Web pages. Navigation Bar Active area with a structure of links for selecting specific functions. In the program, it is shown on the top section of the administration page. Navigation History Navigation bar that shows how you arrived at your current location in the program. The individual hierarchy levels are shown as links so that you can go backwards step-by-step. Option button A field in a form that requires you to make a decision. Option buttons present several possible options, only one of which can be selected. PangV German Price Indication Ordinance. This sets forth which regulations a merchant must observe when setting prices in Germany. For a version of these regulations in German, see http://bundesrecht.juris.de/bundesrecht/PangV/ Path / file path Information about the location of a file on a storage medium, for example, C:\Windows Mixer\system\notepad.exe. Pixel A pixel is the smallest graphical unit that a computer can display. Provider Providers provide hardware and software solutions. Usually, consulting services are also offered. Reference Unit The base unit of quantity used for comparing products by reverse calculating the price of the products. For an example, see reference unit on page 76.reference unit Merchant User Guide Page 203 Glossary Session Cookies A session cookie is a piece of text that is written to the browser's memory when specific Web pages are opened (at the beginning of a session). A session cookie authorizes you to use all the functions on a Web site. After signing out or closing your browser (to end a session), the session cookie is deleted. Shift Lock Key A key that activates continuous capitalization. Deactivate this feature by pressing the key again. When this key is activated, this is usually indicated by a small light on the keyboard. Shop See Web shop Shop Types Products of the provider that he sells or leases to merchants or shop operators. Each shop type is offered with specific functions and in varying price classes. Shop types are the basis for shops that you offer to your merchants. Sign In A procedure for obtaining access to a program by entering a user name and password. Frequently, the combination of both a user name and password is called a sign-in. Storefront The “customer page” of a Web shop. All the Web pages that belong to your shop. Text Field The field in a form where you can type a large amount of text. It is mainly meant for entering descriptions or item names. Tool Tip A short informational text; this is displayed automatically when you move the cursor over a specific functional area. The presence of a ToolTip is often indicated by a symbol next to an entry field. Upload If you want to publish files or pages on the Internet, you have to copy them onto a server computer. This copying procedure (from a local computer to a remote computer) is called uploading. URL An abbreviation for Uniform Resource Locator, the unique Internet address of a Web page. The URL is used to open a page in the browser. Variable Variables are placeholders for concrete values which are first entered by the user when the shop is online. Variable Types You can define various types of variables. The type of variable defines how the system can process it. For more details, see Attribute Types on page 28. Visibility The status of data; this determines whether these data can be seen by the customer in the Web shop or not. Web Shops An Internet program that contains all the functions necessary for selling products or services. In this program, the shop is created based upon a shop type that the ePages provider has defined. The merchant generates a shop online, modifies the structure and design, and enters his products and services into the system to open his Internet sales channel. Working Area The portion of the administration page in which data and tables are displayed and managed. The content is dependent upon the function selected in navigation. Page 204 Merchant User Guide eBay Index 12. Index A Accessories Administration Page 91 17 Left Navigation Area Main Navigation Bar Working Area 17 17 17 Administrator Menu AVS Code 17 163 B BMECat-Import 102, 127 C Categories 115 Articles Basic Category Category Contact Information Creating Customer Information Design Your Own Pages General Properties Home Page Layout Link Pages Products Promotional Products Promotional Products – General Properties Promotional Products – Products Structure Elements Terms and Conditions Category Export Category Import Country Settings Currencies Languages Regional Settings Coupons Conditions Coupon Codes General Properties Credit Note Cross Selling Accessories Product Comparison Related Products Currencies 118 116 117 122 117 124 120 117 121 118 121 117 118 125 125 125 116 123 126 126 36 36 36 36 176 178 178 177 159 88, 91 91 92 92 36 Swiss Francs 37 Customer Export Customer Settings 112 64 Merchant User Guide Countries Creating a New Customer Attribute Customer Attribute Details Customer Attributes Customer Groups Registration Sign In Customers Address Information Advanced Search Creating New Customer Account Orders Search Sign In Simple Search Special Attributes 65 66 66 66 64 64 65 107 107 113 112 109 111 112 110 113 111 D Default Settings Deferred Payment Deletion Deletion Confirmation Design Navigation Settings 22 61 18 129 133 142 E eBay Accounts Authentication Default Values Offers Orders Search Settings Templates 93, 192 72 73 199 193 199 200 71 74 E-mail Events Special Cases E-mail Settings E-mail System Set-Up Events etracker Export Category Export Customer Export Product Export 39 37 38 37 190 30 126 112 102 F Favorites Froogle 19 187 Export 189 Page 205 Index Export Errors Export List General Details 189 189 188 G Google Registration Context Sensitive History HTML Tags Program WYSIWYG Editor 187 20 20 19 26 26 26 I Import Category Import Customer Import Product Import Import File Invoice 30, 31 126 112 102 31 157 K Kelkoo Export Export Errors Export List General Details Optimization Order Tracking Orders Advanced Search Credit Note Documents Editing Details Finalizing Documents General Properties Invoice Order Details Packing Slip Search Settings Simple Search T-Pay UPS Packing Slip WorldPay WorldPay General Information 184 185 187 185 184 Pangora Export Export List General Details Payment Methods 36 33 M 167 N Navigation Bars Navigation Elements Navigation History Newsletter Recipients Sending 131 135 25 173 171 Newsletter Campaigns 167 Addressees Creating New General Details Importing Addressees Newsletters Attachment Content Creation 174 167 167 175 Page 206 145 159 149 147 160 145 157 148 150 144 67 144 163 151 161 161 169 173 171 181 183 183 182 Pangora Export Errors Marketing 33 151 143 P L Languages Loading Times 169 170 174 O H Help Creating New General Details Subscription At No Charge Creating New Credit Card, Manual Deferred payment Dependencies Direct Debit Flat Rate Free Shipping From WorldPay Price Lists Creating New Customer Groups Customers General Details Shopping Basket Discount Prices Product Bundles Associated Products Product Comparison Product Export Product Import Product Recommendations Product Search 184 44 46 45 48 61 56 47 48 48 50 99 100 101 101 100 101 89, 90 94 94 92 102 102 192 Merchant User Guide eBay Inventory Search Shop Search Function Text Search Product Settings Auto Cross Selling Stock Level Options Product Types Attribute Details Attributes Creating a New Creating a New Attribute Default Product Type Details Layout Value Selection for Attributes Products Bulk Prices Category Description Discount Calculation Images Prices Prices/Stock/Dimensions Quantity Discount Search Slideshow Special Attributes Value Discount Variations Index 104 105 104 69 70 69 95 96 96 95 96 95 96 98 97 77 89 83 79 90 81 89 77 89 103 83 81 90 84 Productss Creating New 93 R Registered User Accessing User Data Sign Out Related Products 17 18 92 S Search Settings Setup Assistant Shipping Methods Creating New Dependencies Fixed Price Free Shipping Free Shipping From 103 33 19 42 42 56 43 43 44 Shipping Options General Details Selecting 58 59 Shipping Options Shop Address Shop Home Page Shop Name Shop Preview 57 35 20 33 21 Merchant User Guide Shop Status General Details 33 33 Shopping Basket Actions Confirm Terms and Conditions Minimum Order Amount Notification Messages Selecting the Tax Area Settings Shopping Basket Discount Signed-in Users Edit Sorting Key Styles Content Area Customization General General Design Attributes Horizontal Areas Templates Vertical Areas Symbol Set 67 68 68 68 68 67 101 17 25 129 140 136 130 131 138 129 139 133 T Tables Batch Processes in Tables Sorting Using Column Headings Sorting with the Sorting Key Tax Areas Tax Calculation Tax Classes Tax Matrix Tax Models Text with Value Selection Usage T-Pay Allgemein Bezahlvorgang Konto einrichten Suche Transaktionen Transaktionen Transaktionen auslösen Tray Trusted Shops 23 24 25 40 40 41 40 41 29 54 163 163 55 166 165 165 19 190 U Updating Web Pages User Management 33 35 Creating Users General Details 35 35 Utilization 34 V Variable Types Date 28 29 Page 207 Index Date and Time 29 Decimal Numbers 29 File 29 Integer 28 Language-Dependent File 29 Language-Dependent Text 28 Language-Dependent Text with Value Selection 28 Money 29 Text 28 Text with Value Selection 28 Time 29 Yes/No 29 Variations Creating New Cross Selling Extending Page 208 84 84 88 88 Variation Products Visibility 87 23 W WorldPay Activation Administration Finalization Operational Modes Order Searches Payment Processing Registration Test WorldPay Orders WYSIWYG Editor 50 54 51 162 53 163 52 51, 161 162 162 26 Merchant User Guide