1
Step 5 - Remove Current Backplate
Unscrew the current backplate and
remove it from the wall. Be careful
not to let the wires fall into the wall.
TIP: If needed, wrap the wires
around a pencil or pen to keep
them from falling inside the wall.
Step 6 - Mount New Base
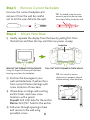
1) Gently separate the display from the base by pulling first from
the bottom and then the top until the two pieces unsnap.
Backplate
PULL OUT WITH THUMBS IN THESE AREAS.
W1/O/B
Y2
Y1
TIP: Use a level to ensure
thermostat is properly aligned
before marking screw locations.
W2
2) Position the base against your
wall, and determine if wall anchors
from current thermostat align with
screw locations of new base.
3) If base does not align with existing
anchor holes, mark new screw
locations with a pencil.
Drywall: Drill 3/16" hole for the anchor
Plaster: Drill 7/32” hole for the anchor
4) Pull wires through opening in base
and secure to the wall using
provided screws.
9
W3/AUX
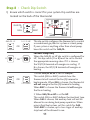
REMOVE THE THERMOSTAT BACKPLATE:
Using the Finger Pull Areas, pull the front
housing away from the backplate.
SENSOR