1
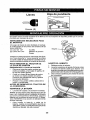
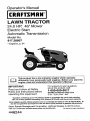
Operator's Manual
II IIIIIIIIIIIIIII
II
I I_IIUIIIIIIIIIIIIIII
(RRFTSMRH•
IIIIIIIIIIIIIII
LAWN TRACTOR
24.0 HR* 46" Mower
Electric Start
Automatic Transmission
Model No.
917.28857
................
Espah, ol, p. 34
This
differently
productfrom
haspreviously
a low emission
built engines.
engine which
Before
operates
you start the
engine, read and understand this Operator's Manual.
IMPORTANT:
Read and follow all Safety
Rules and Instructions before
operating this equipment.
For answers
to your questions
about this product, Call:
1-800-659-5917
SEARS Craftsman Help Line
5 am - 5 pro, Mon - Sat
Gasoline containing up to 10% ethanol (EIO) Jsacceptable for use in this machine.
The use of any gasoline exceeding 10% ethanol (El0) will void the product warranty,
Esta mdquine puede utilizar gasolina con un contenido de hasta el 10% de etanol (El0). El
uso de una gasolina que supere el 10% de etanol (EIO) anulard la garantfa del producto,
Sears Brands Management Corporation, Hoffman Estates, IL 60179 U.S.A.
Visit our Craftsman
446244
website:www.sears.comJcraftsman
*Asratedbytheenginemanufacturer
Warranty ................................................
2
Safety Rules ..........................................
3
Product Specifications.,
.........................
6
Assembly/Pre-Operation
....................... 7
Operation ...............................................
9
Maintenance
Schedule ........................
16
Maintenance
........................................
16
Service and Adjustments ..................... 21
Storage ................................................
27
Troubleshooting
...................................
28
Sears Service ........................ Back Cover
Craftsman Riding Equipment Warranty
CRAFTSMAN FULL WARRANTY
FOR TWO YEARS from the date of purchase, all non-expendable parts of this riding equipment are
warranted against any defects in material or workmanship. A defective non-expendable part will
receive free in-home repair or replacement if repair is impossible.
FOR FIVE YEARS from the date of purchase, the frame and front axle of this riding equipment are
warranted against any defects in matedal or workmanship. A defective frame or front axle will receive
free in-home repair or replacement if repair is impossible.
............
FOR 90 DAYS from the date Of purchase, the battery (an expendable part) of this riding equipment
is warranted against any defects in material or workmanship (our testing proves that it will not hold a
charge). A defective battery wilt receive free in-home replacement.
ADDITIONAL LIFETIME LIMITED WARRANTY on CAST IRON FRONT AXLE (if equipped}
FOR AS LONG AS IT IS USED by the original owner after the fifth year from the date of purchase, the
cast iron front axle (if equipped) of this riding equipment is warranted against any defects in material or
workmanship. With proof of purchase, a defective cast front axle wiI] receive free in-home replacement.
WARRANTY SERVICE
For warranty coverage details to obtain free repair or replacement, call 1-800-659_59t 7 or visit the
web site: www.craftsman.com
In all cases above, if part repair or replacement is impossible, the riding equipment will be replaced
free of charge with the same or an equivalent model.
All of the above warranty coverage is void if this dding equipment is ever used while providing
commercial services or if rented to another person.
This warranty covers ONLY defects in material and workmanship. Warranty coverage does NOT
include:
* Expendable parts (except battery) that can wear out from normal use within the warranty period,
including but not limited to blades, spark plugs, air cleaners, belts, and oil filters.
• Standard maintenance servicing, oil changes, or tune-ups.
• Tire replacement or repair caused by punctures from outside objects, such as nails, thorns,
stumps, or glass.
. Tire or wheel replacement or repair resulting from normal wear, accident, or improper operation or
maintenance.
* Repairs necessary because of operator abuse, including but not limited to damage caused by
towing objects beyond the capability of the riding equipment, impacting objects that bend the
frame, axle assembly or crankshaft, or over-speeding the engine.
* Repairs necessary because of operator negligence, including but not limited to, electrical and
mechanical damage caused by improper storage, failure to use the proper grade and amount
of engine oil, failure to keep the deck clear of flammable debris, or failure to maintain the riding
equipment according to the instructions contained in the operator's manual.
° Engine (fuel system) cleaning or repairs caused by fuel determined to be contaminated or oxidized
(stale). In general, fuel should be used within 30 days of its purchase date.
° Normal deterioration and wear of the exterior finishes, or product label replacement.
This warranty gives you specific legal rights, and you may also have other rights which vary from
state to state.
Sears
Brands
Management
Corporation,
Hoffman
Estates,
IL 60179
_IbDANGER:
This
cutting machine is capable of amputating
hands and feet and
throwing objects. Failure to observe the following safety instructions
could result
in serious injury or death,
_,WARNING: In orderto preventaccidental starting when setting up, transporting,
adjusting or making repairs, always disconnect spark plug wire and place wire where
it cannot contact spark plug.
_,WARNING:
Do not coast down a hill in
neutral, you may lose control of the tractor.
_i, WARNING: Tow only the attachments
that are recommended by and comply with
specifications of the manufacturer of your
tractor. Use common sense when towing,
Operate only at the lowest possible speed
...............when on a slope. Too heavy of a load, while
on a slope, is dangerous. Tires can lose
traction with the ground and cause you to
lose control of your tractor.
_WARNING:
Engine exhaust, some of
its constituents, and certain vehicle components contain or emit chemicals known to
the State of California to cause cancer and
birth defects or other reproductive harm.
_WARNING:
Battery posts, terminals and
related accessories contain lead and lead
compounds, chemicals known to the State of
California to cause cancer and birth defects
or other reproductive harm. Wash hands
after handling.
I. GENERAL OPERATION
• Read, understand, and follow aUinstructions on the machine and in the manual
before starting.
• Do not put hands or feet near rotating
parts or under the machine. Keep clear
of the discharge opening at all times.
• Only allow responsible adults, who are
familiar with the instructions, to operate
the machine.
• Clear the area of objects such as rocks,
toys, wire, etc,, which could be picked
up and thrown by the blades.
• Be sure the area is clear of bystanders
beforeoperating. Stop machineifanyone
enters the area,
• Never carry passengers.
• Do not mow in reverse unless absolutely
necessary. Always look down and behind
before and while backing.
-
•
•
•
•
•
•
.
.
•
•
•
Never direct discharged materialtoward
anyone. Avoid discharging material
against a wall or obstruction. Material
may ricochet back toward the operator.
Stop the blades when crossing gravel
surfaces.
Do not operate machine without the entire grass catcher, discharge chute, or
other safetydevices in place and working.
Slow down before turning.
Never leave a running machine unattended. Always turn off blades, set
parking brake, stop engine, and remove
keys before dismounting.
Disengage blades when not mowing.
Shut off engine and wait for all parts to
come to a complete stop before cleaning
the machine, removing the grass catcher,
or unclogging the discharge chute.
Operate machine only indaylight or good
artificial light.
Do not operate the machine while under
the influence of alcohol or drugs.
Watch for traffic when operating near or
crossing roadways.
Use extracarewhen loading or unloading
the machine into a trailer or truck.
Always wear eye protection when operating machine.
Data indicates that operators, age 60
years and above, are involved in a large
percentage of riding mower-related injuries. These operators should evaluate
their ability to operate the ridingmower
safely enough to protect themselves and
others from serious injury.
Followthe manufacturer's recommendation forwheel weights or counterweights.
Keep machine free of grass, leaves or
other debris build-up which can touch hot
exhaust/engine parts and burn. Do not
allow the mower to plow leaves or other
debris which can cause build-up to occur. Clean any oil or fuel spillage before
operating or storing the machine. Allow
machine to cooJ before storage.
II.SLOPE
OPERATION
°
Slopes
area major
factor
related
tolossof
controlandtip-over
accidents,
whichcan
resultinsevere
injuryordeath,Operation•
onallslopes
requires
extracaution.
Ifyou
cannot
back
uptheslope
orffyou
feeluneasy •
onit,donotmowit.
• Mowupanddown
slopes,
notacross. °
• Watch
forholes,
ruts,bumps,
rocks,
or
other hidden obiects. Uneven terrain
could overturn the machine. Tall grass
can hide obstacles,
° Choose a low ground speed so that you
will not have to stop or shift while on the
slope.
° Do not mow on wet grass. Tires may lose
traction.
..........Always keep the machine in gear when
going down slopes. Do notshiftto neutral
and coast downhill.
• Avoid starting, stopping, or turning on a
slope, lfthetires losetraction, disengage
the blades and proceed slowly straight
down the slope.
• Keep all movement on the slopes Slow
and gradual
Do not make sudden
changes in speed or direction, which
could cause the machine to roll over.
Use extra care while operating machine
with grass catchers or other attachments;
they can affect the stability of the machine. Do no use on steep slopes.
Do not try to stabilize the machine by
putting your foot on the ground,
• Do not mow near drop-offs, ditches,
or embankments. The machine could
suddenly roll over if a wheel is over the
edge or if the edge caves in.
II1, CHILDREN
°
•
Keep children out of the mowing area
and in the watchful care of a responsible
adult other than the operator.
Be alert and turn machine off if a child
enters the area.
Before and while backing, took behind
and down for small children,
Never carry children, evenwiththe blades
shutoff. They may falloffand be seriously
injured or interfere with safe machine
operation. Children who have been given
rides inthe past maysuddenly appear in
the mowing area for another ride and be
run over or backed over bythe machine.
Never allow children to operate the machine.
Use extra care when approaching blind
corners, shrubs, trees, or other objects
that may block your view of a child.
IV. TOWING
. Tow only with a machine that has a hitch
designed for towing. Do not attachtowed
equipment except at the hitch point.
• Followthe manufacturer's recommendation forweight limits for towed equipment
and towing on slopes.
• Never allow children or others in or on
towed equipment.
• Onslopes, theweightofthetowedequipment may cause loss of traction and loss
of control.
Travel slowly and allow extra distance to
stop,
V. SERVICE
SAFE HANDLING OF GASOLINE
To avoid personal injury or property damage, use extreme care inhandling gasoline,
Gasoline is extremely flammable and the
vapors are explosive,
° Extinguish all cigarettes, cigars, pipes,
and other sources of ignition.
• Use only approved gasoline container,
• Never remove gas cap or add fuel with
the engine running. AIIow engine to cool
before refueling,
• Never fuelthe machine indoors.
• Never storethe machine or fuel container
where there is an open flame, spark, or
pilot light such as on a water heater or
other appliances.
• Never fill containers inside a vehicle or
on a truck or trailer bed with plastic liner.
Always place containers on the ground
away from your vehicle when filling.
_IbWARNING: CHILDRENCAN BE INJURED
BYTHIS EQUIPMENT,The American Academy of Pediatrics recommends that children
be a minimum of 12 year of age before operating a pedestrian controlled lawn mower
and a minimum of 16 years of age before
operating a riding lawn mower,
Tragic accidents can occur if the operator
is not alert to the presence of children.
Children are often attracted to the machine
and the mowing activity, Never assume
that children will remain where you last
saw them.
4
• Remove
gas-powered
equipment
from •
thetruckortrailerandrefuel
it onthe
ground.
Ifthisisnotpossible,
thenrefuel •
such
equipmentwith
aportable
container,
rather
thanfroma gasoline
dispenser
nozzle.
• Keep
thenozzle
incontact
withtherim .
ofthefueltankorcontainer
opening
at
alltimes
untilfueling
iscomplete.
Donot
useanozzle
lock-open
device.
•
• Iffuelis
spilled
onclothing,
change
clothingimmediately.
.
• Never
overfill
fueltank.
Replace
gascap
andtighten
securely.
GENERAL SERVICE
•
............
•
•
•
•
•
•
Never operate machine ina closed area.
Keep all nuts and bolts tightto be surethe
equipment is in safe working condition.
Maintain or replace safetyand instruction
labels, as necessary.
Be sure the area is clear of bystanders
before operating. Stop machine ifanyone
enters the area.
Never carry passengers.
Do not mow inreverse unless absolutely
necessary. Always look down and behind
before and while backing.
Never carry children, even with the
blades shut off. They may fall off and
be seriously injured or interfere with safe
machine operation. Children who have
been given rides inthe pastmaysuddenly
appear in the mowing area for another
ride and be run over or backed over by
the machine.
Keep children out of the mowing area
and inthe watchful care of a responsible
adult other than the operator.
•
•
•
•
•
•
•
•
•
•
Nevertamperwithsafetydevices. Check
their proper operation regularly.
Keep machine free of grass, leaves, or
other debris build-up. CIean oil or fuel
spillage and remove any fuel-soaked debris. AIIowmachinetocool beforestodng.
tf you strike a foreign object, stop and
inspectthe machine. Repair, if necessary,
before restarting.
Never make any adjustments or repairs
with the engine running.
Checkgrass catchercomponents andthe
discharge chute frequently and replace
with manufacturer's recommended parts,
when necessary.
Mower bladesaresharp. Wrapthe blade
or wear gloves, and use extra caution
when servicing them.
Checkbrakeoperationfrequently. Adjust
and service as required.
Be alert and turn machine off if a child
enters the area.
Before and while backing, look behind
and down for small children.
Mow up and down slopes (15° Max), not
across.
Choose a lowgroundspeed so that you
will nothave to step or shiftwhile on the
slope.
Avoid starting, stopping, or turning on a
slope. Ifthetires Iosetraction, disengage
the blades and proceed sIowly straight
down the slope.
If machine stops while going uphill,
disengage blades, shift into reverse and
back down slowly.
Do notturn on slopes unless necessary,
and then, turn slowly and gradually
downhill, if possible.
When loading or unloading this machine,
do not exceed the maximum recommended operation angle of 15 °.
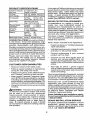
PRODUCT
SPECIFICATIONS
Gasoline Capacity
and type:
3.0 Gallonsi11,35 L
Regular Unleaded
Oil q_/pe:
(API: SG-SL)
SAE 30 (above 32"Ft0_C)
SAE 5W30 (below 32°F/0°0
Oil Capacity:
W! Filter:
W/out Filter:
Spark Plug:
Champion QC12YC
(Gap: .040"/1.02 ram)
Ground Speed
(Mph/Kph):
Forward:
Reverse:
Charging
System;
3 Amps Battery
5 Amps Headlights
Battery:
AmpiHr:
Min. CCA:
Case size:
Blade Bott Torque:
45-55 Ft, Lbs./62-75 Nm
64 Oz./1,96 L
60 OzJ1,77 L
0 - 5.2/8,4
0 - 2.9/4,7
28
230
UIR
CONGRATULATIONS onyourpurchaseof
a new tractor. It has been designed, engineered and manufactured to giveyouthe best
.................possible dependability and performance.
Should you experience any problemyou cannot easily remedy, please contact aSears or
other qualifiedservice center. We have competent, well-trained representatives and the
proper tools to service or repair this tractor.
Please read and retain this manual. The
instructions will enable you to assemble
and maintainyour tractor properly. Always
observe the' SAFETY RULES".
CUSTOMER
Inthe state ofCalifornia the above is required
by law (Section 4442 of the California Public
Resources Code). Other states may have
similar laws. Federal laws apply on federal
lands. A spark arrester for the muffler is
availablethrough your nearestSears service
center (See REPAIR PARTS manual),
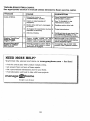
REPAIR PROTECTION AGREEMENTS
Congratulations on making a smart purchase. Your new Craftsman® product is
designed and manufactured for years of
dependable operation. But like all products,
it may require repair from time to time. That's
when having a Repair Protection Agreement
can save you money and aggravation.
Purchase a Repair Protection Agreement
now and protect yourself from unexpected
hassle and expense.
Here's what's included in the Agreement:
• Expertservice by our 12,000 professional
repair specialists.
• Unlimited service and no chargefor parts
and labor on all covered repairs.
• Product replacement if your covered
product can't be fixed.
•
Discount of 10% from regular price of
service and service-related parts not
covered bythe agreement; also, 10% off
regular price of preventive maintenance
check.
•
Fast help by phone - phone support
from a Sears representative on products
requiring in-home repair, plus convenient
repair scheduling.
RESPONSIBILITIES
• Read and observe the safety rules.
• Follow a regular schedule in maintaining,
caring for and using your tractor.
• Follow instructions under "Maintenance"
and "Storage" sections of this manual.
• Wear proper Personal Protective Equipment (PPE) while operating this machine,
including (at a minimum) sturdy footwear,
eye protection, and hearing protection. Do
not mowinshortsand/oropentoedfootwear.
• Always let someone knowyou are outside
mowing.
_t, WARNING: This tractor is equipped with
an internal combustion engine and should
not be used on or near any unimproved
forest-covered, brush-covered or grasscovered land unless the engine's exhaust
system is equipped with a spark arrester
meeting applicable local or state laws (if
any). If a spark arrester is used, it should
be maintained in effective working order by
the operator.
Once you purchase the Agreement, asimple
phone call is all that it takes for you to schedule service. You can call anytime day or night,
or schedule a service appointment online.
Sears has over 12,000 professional repair
specialists,
who have access to over 4.5
million qualil¥ parts and accessories, That's
the kind of professionalism you can count on
to help prolong the life of your new purchase
for years to come. Purchase your Repair
Protection Agreement today!
Some limitations
and exclusions apply.
For prices and additional information call
1-800-827-6655,
SEARS INSTALLATION SERVICE
For Sears professional installation of home
appliances, garage door openers, water
heaters, and other major home items, inthe
U,S.A. call 1-800-4-MY-HOME®
Keys
Slope Sheet
(2) Keys
Your new tractor has been assembled at the factory with the exception of those parts left
unassembled for shipping purposes.
TOOLS REQUIRED
FOR ASSEMBEY
...........A socket wrench Set will make assembly
easier, Standard wrench sizes are listed.
(1) 1/2" wrench
Tire pressure gauge
(2) 7/16" wrenches Utility knife
Pliers
When right or left hand is mentioned in this
manual, itmeans when you areintheoperating
position (seated behind the steering wheel),
TO REMOVE
TRACTOR
FROM
CARTON
UNPACK CARTON
• Remove all accessible loose partsand
parts cartons from carton.
• Cut along dotted lines on all four panels
of carton. Remove end panels and lay
side panels flat.
• Check for any additional loose parts or
cartons and remove.
BEFORE
REMOVING
TRACTOR
FROM SKID
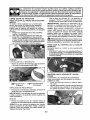
TO CHECK BATTERY
1, Lift hood to raised position.
NOTE: If this battery is put into service after
month and year indicated on label (label is
located between terminals) charge battery
for minimum of one hour at 6-10 amps, (See
"BATTERY" in Maintenance section ofthis
manual for charging instructions),
• For battery and battery cable installation
see "REPLACING BATTERY" in the
"Service and Adjustments" section inthis
manual.
LABEL
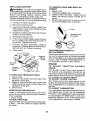
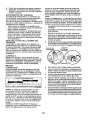
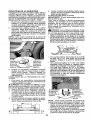
ADJUST SEAT
1. Sit in seat,
2, Liftup adjustment lever (A) and slide seat
until a comfortable position is reached
which allows you to press clutch/brake
pedal al! the way down,
3. Release lever to lock seat in position.
::
,/CHECKLIST
NOTE:
Youmaynowrollyourtractor
offthe
skid.Fol]owthe
appropriateinstruction
below Before you operate your new tractor, we
toremove
thetractor
fromtheskid.
wish to assure that you receive the best
_I_ WARNING;
Before starting, read, understand and follow all instructions in the
Operation section of this manual. Be sure
tractor is in a well-ventilated
area. Be sure
the area in front of tractor is clear of other
people and objects.
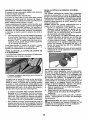
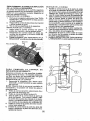
TO ROLL TRACTOR OFF SKID
Operation
section for location
function
of controls)
(See
and
1. Raise attachment lift lever to itshighest
position.
2. Release parking brake by depressing
brake pedal.
Place freewheel control in disengaged
position to disengage transmission (See
_TOTRANSPORT" inthe Operation section of this manual).
4. Roll tractor forward off skid.
5. Remove banding holding the deflector
shield up against tractor.
Continue with the instructions that follow.
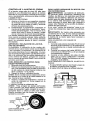
CHECK TIRE PRESSURE
The tires on your tractor were overinfIated at
the factory for shipping purposes. Correct
tire pressure is important for best cutting
performance,
• Reduce tire pressure to PS! shown on
tires.
CHECK DECK LEVELNESS
For best cutting results, mower housing
should be properly leveled. See "TO LEVEL
MOWER" in the Service and Adjustments
section of this manual,
CHECK FOR PROPER POSITION OF
ALL BELTS
See the figures that are shown for replacing
motion and mower blade drive belts in the
Service and Adjustments section ofthis manua]. Verify that the belts are routed correctly.
CHECK BRAKE SYSTEM
After you learn how to operate your tractor,
check to seethatthe brake is operating properly. See"TO CHECKBRAKE" inthe Service
and Adjustments section of this manual,
performance and satisfaction from this
Quality Product.
Please review the following checklist:
`/All assembly instructions have been completed.
`/No remaining loose parts in carton.
,/Battery
is properly
prepared and
charged.
,/Seat is adjusted comfortably and tightened
securely.
,/All tires are properly inflated. (For snipping purposes, the tires were overinflated
at the factory).
,/Be sure mower deck is properly leveled
side-to-side/front-to-rear for best cutting
results. (Tires must be properly inflated
for leveling).
,/Check mower and drive belts. Be sure
they are routed properly around pulleys
and inside all belt keepers.
,/Check wiring. See that all connections
are still secure and wires are properly
clamped.
,/Before driving tractor, be sure freewheel
control is in "transmission engaged"
position (see "TO TRANSPORT in the
Operation section of this manual).
While learning how to use yourtractor, pay extra attention to the following important items:
Z Fuel
Engine
at proper
level,clean, regular
tankoilisisfilled
with fresh,
unleaded gasoline.
v" Become familiar with all controls, their location and function. Operate them before
you start the engine.
¢" Be sure brake system is in safe operating
condition.
,/Be sure Operator Presence System and
Reverse Operation System (ROS) are
working properly (See the Operation and
Maintenance sections in this manual).
,/It isimportantto purgethel_ansmissionbefore
operating your tractor for the first time. Follow properstarting andtransmission purging
instructions (See "TO STARTENGINE"and
"PURGETRANSMISSlON"intheOperation
section of this manual).
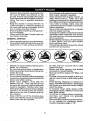
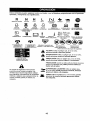
These
symbols
mayappear
onyourtractor
orinliterature
supplied
withtheproduct.
Learn
andunderstand
theirmeaning.
R
REVERSE
N
H
NEUTRAL
HiGH
L
I',,.I
LOW
CHOKE
SLOW
FAST
IGNmON
Ira8
ENGINE
OFF
REVERSE
OPERATION
ENGINE_ ON
ENGINE
START
PARKING
BRAKE
MOWER
HEIGHT
SWITCH
MOWER
LIFT
sYSTEm(RGS_
LIGHTS
ON
FUEL
BATTERY
REVERSE
FORWARD
CRUISE
coNTROL
CLUTCH/BRAKE
PEDAL
......
ATTACHMENT
CLUTCH
DISENGAGED
FREE
(Automatic
ATTACHMENT
CLUTCH
ENGAGED
WHEEL
Models
only)
DANGERf
KEEP HANDS
AND !FEET AWAY
&
&
&
KEEP
AREA CLEAR
(SEE SAFETY
ELOPE HAZARDS
RULES SECTION)
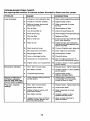
DANGER indicates a hazard which, if not avoided,
will result in death or serious injury.
WARNING indicates a hazard which, if not avoided,
could result in death or serious injury.
CAUTION indicates a hazard which, if not avoided,
might result in minor or moderate injury.
CAUTION when used without the alert symbol,
indicates a situation that could result in damage
to the tractor and/or engine,
Failure to follow instructions
could result in serious injury or
death, The safety alert symbol
is used to identify safety information about hazards which can
result in death, serious injury
and/or property damage.
HOT SURFACES indicates a hazard which,
if not avoided, could result in death, serious injury
and/or property damage.
FIRE indicates a hazard which, if not avoided,
could result in death, serious Injury and/or
property damage.
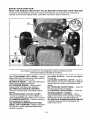
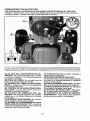
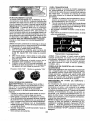
KNOW YOUR TRACTOR
READ THIS MANUAL AND SAFETY RULES BEFORE OPERATING ",(OURTRACTOR
Compare the illustrations with your tractor to familiarize yourself with the locations of
various controls and adjustments. Save this manual for future reference.
Our tractors conform to the applicable safety standards of the
American National Standards Institute,
(A) ATTACHMENT LIFT LEVER - Used to
raise and lower the mower or other attachmerits mounted to your tractor.
(B) BRAKE PEDAL- Used for braking the
tractor and starting the engine.
((3) PARKING BRAKE - Locks clutch/
brake pedal into the brake position.
(D) THROTTLE/CHOKE CONTROLUsed for starting and controlling engine
speed.
(E) ATTACHMENT CLUTCH LEVER
- Used to engage the mower blades, or
other attachments mounted to your tractor,
(F)IGNITION SWITCH - Used for starting
and stopping the engine.
(G) REVERSE OPERATION SYSTEM
(ROS) "ON" POSITION - Allows operation
of mower or other powered attachment
while in reverse.
(H) LIGHT SWITCH - Turns the headlights
on and off,
(J) CRUISE CONTROL LEVER - Used to
set forward movement of tractor at desired
speed without holding the forward drive
pedal.
(K) FORWARD DRIVE PEDALUsed for
forward movement of tractor.
(L) REVERSE DRIVE PEDALUsed for
reverse movement of tractor.
(M) FREEWHEEL
CONTROL - Disengages transmission
for pushing or slowly
towing the tractor with the engine off.
(P) SERVICE REMINDER/HOUR
METER
- Indicates when service is required for the
engine and mower,
10
The operation of any tractor can result in foreign objects thrown int_
the eyes, which can result in severe eye damage,
Always wear safety]
glasses or eye shields while operating your tractor or performing any]
adjustments
or repairs.
We recommend
standard safety glasses ora_
wide vision safety mask worn over spectacles.
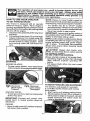
HOW TO USE YOUR TRACTOR
TOSET PARKING BRAKE
Your tractor is equipped with an operator
presence sensing switch, When engine is
running, any attempt by the operator to leave
the seat without first setting the parking brake
wilt shut off the engine.
1. Depress brake pedal (B) altthewaydown
and hold.
2. Pull parking brake lever (C) upand hold,
release pressure from brake pedal (B),
then release parking brake lever. Pedal
should remain in brake position. Make
...........
sure parking brake will hold tractor secure.
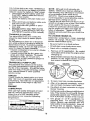
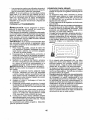
STOPPING
MOWER BLADES • To stop mower blades, move attachment
clutch controito disengaged position (r_).
(1"_1)Attachment
ClutchControl
"Engaged....
(r_)
Attachment
ClutchControl
Disengaged"
GROUND DRIVE • To stop ground drive, depress brake pedal
al! the way down.
IMPORTANT: Forward and reverse drive
pedals return to neutral position when not
depressed.
ENGINE • Move throttle control (D) between half and
full speed (fast) position.
|
NOTE: Failure to move throttle control between half and full speed (fast) position, before stopping, may cause engine to "backfire",
• Turn ignition key (F) to "STOP" position
and remove key. Always remove keywhen
leavingtractorto prevent unauthorized use.
• Never use choke to stop engine.
IMPORTANT: Leavingthe ignitionswitch in
any position otherthan "STOP" will causethe
battery to discharge and go dead,
NOTE; Undercertain conditions when tractor
is standing idle with the engine running, hot
engine exhaust gases may cause "browning" of grass. To eliminate this possibility,
always stop engine when stopping tractor
on grass areas.
_CAUTION"
Always stop tractor completely, as described above, before leaving
the operator'sposition,
TO USE THROTTLE CONTROL
Always operate engine at fuI_speed (fast).
• Operating engine at tess than ful! speed
(fast) reduces engine's operating efficiency.
• Full speed (fast) offers the best mower
performance.
TO MOVE FORWARD AND BACKWARD
The direction and speed of movement
is controlled by the forward and reverse
drive pedals.
1. Start tractor and release parking brake.
2, Slowiy depressforward (K) or reverse (L)
drive pedal to begin movement, Ground
speed increases the further down the
pedal is depressed.
11
TO USE CRUISE CONTROL
The cruise control feature can be used for
forward travel only.
SYSTEM CHARACTERISTICS
The cruise control should only be used
while mowing or transporting on relatively
smooth, straight surfaces, Other conditions
such as trimming at slow speeds may cause
the cruise control to disengage, Do not use
the cruise control on slopes, rough tertian
or while trimmimg or turning.
• With forward drive pedal (K) depressed to
desired speed, pull cruise control lever (J)
up and hold while lifting your foot off the
pedal, then release the lever.
To disengage the cruise control, depress the
brake pedal or tap on forward drive pedal.
TO ADJUST MOWER CUTTING HEIGHT
The position of the attachment lift lever (A)
determines the cutting height.
NOTE: Adjust gauge wheels with tractor on
a flat level surface,
1. Adjust mower to desired cutting height
(See "TO ADJUST MOWER CUTTING
HEIGHT" in this section of manual).
2. With mower in desired height of cut position, gauge wheels should be assembled
so they are slightly offthe ground. Install
gauge wheel in appropriate hole. Tighten
securely.
3. Repeat for all, installing gauge wheel
in same adjustment hole.
TO OPERATE MOWER
Your tractor is equipped with an operator
presence sensing switch. Any attempt
by the operator to leave the seat with the
engine running and the attachment clutch
engaged will shut off the engine. You must
remain fully and centrally positioned in the
seatto preventthe engine from hesitating or
cutting off when operating your equipment
on rough, rolling terrain or hills.
1. Select desired height of cut with attachment lift lever.
2. Start mower blades by engaging attachment clutch control.
• Put attachment lift lever in desired cutting height slot.
The cutting height range is approximately
1" to 4". The heights are measured from
the ground to the blade tip with the engine
not running. These heights are approximate
and may vary depending upon soil conditions, height of grass and types of grass
being mowed.
• The average lawn should be cut to approximately 2-1/2" during the coot season and to over 3" during hot months.
For healthier and better looking lawns,
mow often and after moderate growth.
, For best cutting performance, grass over
6" in heightshould be mowed twice. Make
the first cut relatively high; the second to
desired height.
TO ADJUST GAUGE WHEELS
Gauge wheels are properly adjusted when
they are slightly off the ground when mower
is at the desired cutting height in operating
position, Gauge wheels then keep the deck
in proper position to help prevent scalping
in most terrain conditions.
TO STOP MOWER BLADES
Disengage attachment clutch control.
_CAUTION:
Do not operate the mower
without either the entire grass catcher, on
mowers so equipped, orthe deflector shield
(S) in place.
12
REVERSE OPERATION SYSTEM (ROS)
Your tractor is equipped with a Reverse
Operation System (ROS). Any attempt by
the operator to travel in the reverse direction
with the attachment clutch engaged will shut
off the engine unless ignition key is placed
in the ROS "ON" position.
_WARNING:
Backing up with the attachment clutch engaged while mowing is
strongly discouraged. Turning the ROS"ON",
to allow reverse operation with the attachment clutch engaged, should only be done
when the operator decides it is necessaryto
reposition the machine with the attachment
engaged. Do not mow in reverse unless
absolutely necessary.
USING THE REVERSE OPERATION
SYSTEM Only use if you are certain no children or
............other bystanders will enter the mowing area.
1. Depress brake pedal all the way down.
2. With engine running, turn ignition key
counterclockwise to ROS "ON" position.
3. Look down and behind before and while
backing.
4. Slowly depress reverse drive pedal to
start movement.
5. When useoftheROS is nolonger needed,
turn the ignition key clockwise to engine
"ON" position.
ROS"ON"Position
Engine "ON"Position
(NormalOperating)
TO OPERATE ON HILLS
_k.WARNING: Do not drive up or down
hillswith slopes greater than 15° and do not
drive across any slope, Use the slope guide
provided at the back of this manual.
• Choose the slowestspeed before starting up or down hills.
- Avoid stopping or changing speed on hills.
• If stopping is absolutely necessary, push
brake pedal quickly to brake position and
engage parking brake.
• Torestart movement, slowly release parking brake and brake pedal.
, Slowly depress appropriate drive pedal to
slowest setting.
• Make all turns slowly.
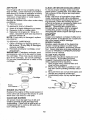
TO TRANSPORT
When pushing or towing your tractor, be
sure to disengage transmission by placing
freewheel control in freewheeling position.
Freewheel control is located at the rear
drawbar of tractor.
1. Raise attachment lift lever to its highest
position.
2. Pullfreewheel control outand intotheslot
and release so it is held inthe disengaged
position.
• Do not push or tow tractor at more than
two (2) MPH,
- Tore-engagetransmission, reverse above
procedure.
Transmission Engaged
Transmission Disengaged
NOTE; To protect hood from damage when
transporting your tractor on atruck or atrailer,
be sure hood isclosed and secured to tractor.
Use an appropriate means of tying hood to
tractor (rope, cord, etc,).
TOWING CARTS AND OTHER ATTACHMEN'IS
Tow only the attachments that are recommended by and comply with specifications
of the manufacturer of your tractor. Use
common sense when towing. Too heavy of
a load, while on a slope, is dangerous. Tires
can lose tractionwith the groundand cause
you to lose control of your tractor.
SERVICE REMINDER/HOUR METER
Service reminder shows the total number
of hours the engine has run and flashes to
indicate that the engine or mower needs servicing. When service is required, the service
reminder will flash for two hours. To service
engine and mower, see the Maintenance
section of this manual.
NOTE: Service reminder runs when the ignition key is in any position but "STOP". For
accurate reading, be sure key remains inthe
"STOP" position when engine is not running.
13
BEFORE
STARTING
THE
CHECK ENGINE OIL LEVEL
ENGINE
2. Sit on seat inoperating position, depress
brake pedal and set parking brake.
3. Move attachment clutch to disengaged
position,
4. Move throttle control to choke position.
NOTE: Before starting, read the warm and
cold starting procedures below,
5. Insert key into ignition and turn key
clockwise to start position and release
key as soon as engine starts. Do not run
starter continuously for more than fifteen
seconds per minute. If the engine does
not start after several attempts, move
throttle control to fast position, wait a
few minutes and try again, If engine still
does not start, move the throttle control
back to the choke position and retry.
The engine in your tractor has been shipped,
from the factory, already filled with summer
weight oil.
1. Check engine oil with tractor on level
ground.
2. Remove oil fill cap/dipstick
and wipe
clean, reinsertthe dipstick and screwcap
tight, wait for a few seconds, remove and
read oil level. If necessary, add oil until
"FULE' mark on dipstick is reached. Do
not overfill.
° For cold weather operation you should
change oil for easier starting (See the oil
viscosity chart in the Maintenance section
of this manual).
• To change engine oit, see the Maintenance
section in this manual.
.......
ADD GASOLINE
- Fill fuel tank to bottom
WARM WEATHER STARTING (50°F/10 °
C and above)
6, When engine starts, move the throttle
control to the fast position.
• The attachments and ground drive can
now be used. Ifthe engine does not accept
the load, restart the engine and allow it to
warm up for one minute using the choke
as described above.
of filler neck, Do
not overfill,
Use fresh, clean, regular
unleaded
gasoline with a minimum
of
87 octane. (Use of leaded gasoline will
increase carbon and lead oxide deposits
and reduce valve life). Do not mix oil with
gasoline, Purchase fuel in quantities that
can be used within 30 days to assure fuel
freshness,
_CAUTION:
Wipe offany spilled oil or fuel.
Do not store, spill or use gasoline near an
open flame.
IMPORTANT:
when operating in temperatures below 32°F(0°0),
use fresh, clean
winter grade gasoline to help insure good
cold weather starting,
CAUTION:
Alcohol blended fuels (called
gasohol or using ethanol or methanol) can
attract moisture which leads to separation
and formation of acids during storage. Acidic
gas can damage thefuelsystemofan
engine
while in storage, To avoid engine problems,
the fuel system shouid be emptied before
storage of 30 days or longer. Drain the gas
tank, start the engine and let it run until the
fuel lines and carburetor
are empty.
Use
fresh fuel next season. See Storage instructions for additional information.
Never use
engine or carburetor cleaner products in the
fuel tank or permanent damage may occur,
TO START
COLD WEATHER STARTING ( 50°F/10 ° C
and below)
6. When engine starts, leavethrottle control
in choke position until engine warms up
and begins to run roughly. Once rough
running begins, immediately move the
throttle control to the fast position. Engine
warm-up may take from several seconds
to several minutes (the colder the temperature, the longer the warm-up).
AUTOMATIC TRANSMISSION WARM UP
Before driving the unit in cold weather, the
transmission should be warmed up as follows:
1. Be sure the tractor is on level ground.
2. Release the parking brake and let the
brake slowly return to operating position.
3. AIIow one minutefortransmissionto
warm up. This can be done during the
engine warm up period.
• The attachments can also be used during the engine warm-up period after the
transmission has been warmed up.
NOTE: ffata high altitude (above 3000 feet)
or in cold temperatures (below 32°F/0°C)
the carburetor fuel mixture may need to be
adjusted for best engine performance (see
"TO ADJUST CARBUR ETOR" inthe Service
and Adjustments section of this manual).
ENGINE
When starting the engine for the first time or
if the engine has run out of fuel, it will take
extra cranking time to move fuel from the
tank to the engine,
1. Be sure freewheel control is in the transmission engaged position.
14
..........
PURGE TRANSMISSION
_CAUTION:
Neverengage or disengage
freewheel lever while the engine is running.
Toensure proper operation and performance,
it is recommended that the transmission be
purged before operating tractor for the first
time. This procedure will remove anytrapped
air inside the transmission which may have
developed during shipping of your tractor.
IMPORTANT: Should your transmission
require removal for service or replacement,
it should be purged after reinstallation before
operating the tractor,
1. Place tractor safely on a level surface that is clear of objects and open - with
engine off and parking brake set.
2. Disengage transmission
by placing
freewheel control in disengaged position
(See "TO TRANSPORT" in this section
of manual).
3,
Sitting in the tractor seat, start engine.
After the engine is running, move throttle
control to slow position. Disengage parking brake.
_kCAUTION: At any time, during step 4,
there may be movement of the drive wheels.
4. Depress forward drive pedal tofull forward
position and hold for five (5) seconds and
release pedal. Depress reverse drive
pedal to full reverse position and hold
for five (5) seconds and release pedal.
Repeat this procedure three (3) times.
5. Shutoff engine and set parking brake.
6. Engage transmission by placing freewheel control in engaged position (See
"TO TRANSPORT" in this section of
manual).
7. Sitting in the tractor seat, start engine.
After the engine is running, move throttle
control to half (1/2) speed. Disengage
parking brake.
8. Drive tractor forward for approximately
five feet then backwards for five feet.
Repeat this driving procedurethreetimes.
Your transmission is now purged and now
ready for normal operation.
15
MOWING TIPS
• Tire chains cannot be used when the
mower housing is attached to tractor,
• Mower should be properly leveled for
best mowing performance. See "TO
LEVEL MOWER HOUSING" in the
Service and Adjustments section of this
manual.
• The left hand side of mower should be
used for trimming.
- Drive so that clippings are discharged
onto the area that has already been
cut. Have the cut area to the right of
the tractor. This will result in a more
even distribution of clippings and more
uniform cutting.
• When mowing large areas, start by
turning to the right so that clippings will
discharge away from shrubs, fences,
driveways, etc. After one or two rounds,
mow in the opposite direction making
left hand turns until finished.
• If grass is extremely tall, it should be
mowed twice to reduce load and possible fire hazard from dried clippings.
Make first cut relatively high; the second
to the desired height.
- Do not mow grass when it is wet.
Wet grass will plug mower and leave
undesirable clumps. Allow grass to dry
before mowing.
• Always operate engine at full throttle
when mowing to assure better mowing
performanceand properdischarge of
material. Regulate ground speed by
selecting a low enough speed to give
the mower cutting performance as well
as the quality of cut desired.
• When operating attachments, select a
ground speed that will suit the terrain
and give best performance of the attachment being used,
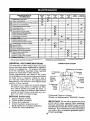
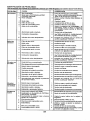
MAINTENANCE
BEfORe
SCHEDULE
EVERV
8
HOURS
EAt.
USE
iu
Check
Check
Brake
Pressure,,
EVERY
50
HOURS
EVERY
100
I-_OIJRS
_m_tBRY
Sf_ASON
BEFORE
STORAGE
iv"
Operation
Tire
eVeRY
25
HOURS
.
v'
If
Check
Opo,.,o,
P...... &.OS_y,to.;_ V
A
Check
C
ChecWReplace
for Loose
T
Lubrication
0
Check
Battery
R
Clean
Battery
Otean
Debris
Check
Transaxle
Check
Mower
Check
V-Belts
Check
Engine
Change
Chan_e
1,/
Fasteners
Mower
Blades
Chart
ar_dTerrninals
Off
Steering
i/'
v'
Cooling
,, ,
..
if
i/
Levelness
Oil
Engine
Lave,!,
0i
5,_Tne
I_
(w th o
Oil (without
fleer}
oil fi_ter_
G
Clean
Air
|
Inspect
N
Replace,Oil
Filter
(If equipped}
Clean
Engine
Cooling
Fins
Replace
v"
Plate
A_r Filter
Replace
v'
Level
NE Clean
Replace
v"
....
_
..
Screen
MuffledS,
Spark
Air
.......
An'aster
If
....
V'
Plug
Filter
Fuel
p,ark
Paper
Iv"
Cartridge
v"
F!!ter
GENERAL RECOMMENDATIONS
The warranty on this tractor does not cover
items that have been subjected to operator
abuse or negligence, To receive full value
from the warranty, operator must maintain
tractor as instructed in this manual.
Some adjustments will need to be made
periodicallyto properly maintain your tractor.
At least once a season, check to see if
you should make any of the adjustments
described in the Service and Adjustments
section of this manual.
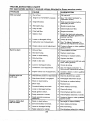
• At least once a year you should replace
the spark plug, clean or replace air filter,
and check blades and belts for wear. A
new spark plug and clean air filter assure
proper air-fuel mixture and help your engine run better and last longer.
BEFORE EACH USE
1. Check engine oil level.
2. Check brake operation,
3, Check tire pressure,
4. Check operator presence and
ROS systems for proper operation.
5. Check for loose fasteners.
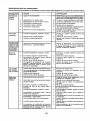
LUBRICATION
CHART
_Steering
e Spin die ---!;_L_r_
OFront
-.-1
[-'J|
k
Pivot Bolts
_) Spindte
,.
tb'4
_'---.A
Wheel
--_. "%.-:_\ C_
Bearing
_d_-_---_-=-"_
L
F I_
I'_[ _--.
_erk
_\\_"_
Steering / _
_
_,
Sector
I [ [ i!:
I t t \
Gear
_ [ -'_,,;":_-_:
Teeth
_J
I t
_
OGeneral Purpose Grease
(_Refer to Maintenance "ENGINE"
16
Front
-(1.!)
,
Wheel
Bearing
-Zerk
Engine
Section
IMPORTANT: Do not oil or grease the pivot
points which have special nylon bearings,
Viscous lubricants will attract dust and dirt
that will shorten the life of the self-lubricating
bearings. Ifyou feel they must be lubricated,
use only a dry, powdered graphite type lubricant sparingly.
TRACTOR
Always observe safety rules when performing any maintenance.
BRAKE OPERATION
If tractor requires more than five (5) feet to
stop at highest speed in highest gear on a
level, dry concrete or paved surface, then
brake must be serviced. (See "TO CHECK
BRAKE" in the Service andAdjustments
section of this manual).
TIRES
• Maintain proper air pressure in all tires
(See PSI on tires).
- Keep tires free of gasoline, oil, or insect
control chemicals which can harm rubber.
• Avoid stumps, stones, deep ruts, sharp
objects and other hazards that may
cause tire damage.
NOTE: To seal tire punctures and prevent
flat tires due to slow leaks, tire sealant
may be purchased from your local parts
.............
dealer. Tire sealant also prevents tire dry
rot and Corrosion,
OPERATOR PRESENCE SYSTEM AND
REVERSE OPERATION SYSTEM (ROS)
Be sure operator presence and reverse
operation systems are working properly. If
your tractor does not function as described, repair the problem immediately.
• The engine should not start unless the
brake pedal is fully depressed, and the
attachment clutch control is in the disengaged position.
CHECK OPERATOR PRESENCE
SYSTEM
• When the engine is running, any attempt by the operator to leave the seat
without first setting the parking brake
should shut offthe engine.
• When the engine is running and the
attachment clutch is engaged, any attempt by the operator to leave the seat
should shut off the engine.
• The attachment clutch should never operate unless the operator is in the seat.
ROS "ON"Position
Engine "ON"Position
(NormalOperating)
CHECK REVERSE OPERATION (ROS)
SYSTEM
• When the engine is running with the
ignition switch in the engine "ON" position and the attachment clutch engaged,
any attempt by the operator to drive in
reverse should shut off the engine.
• When the engine is running with the
ignition switch in the ROS "ON" position
and the attachment clutch engaged,
any attempt by the operator to drive in
reverse should NOT shut off the engine.
BLADE CARE
For best results mower blades must be
sharp. Replace worn, bent or damaged
blades.
CAUTION: Use only a replacement
blade approved by the manufacturer of
yourtractor. Using a blade not approved
by the manufacturer of yourtractor is
hazardous, could damage yourtractorand
void your warranty.
BLADE REMOVAL
1. Raise mower to highest positronto allow access to blades,
NOTE: Protect your hands with gloves
and!or wrap blade with heavy cloth,
2. Remove blade bolt by turning counterclockwise.
3, install new blade with stamped
"GRASS SIDE" facing the ground,
IMPORTANT: To ensure proper assembly,
center hole in blade must align with star
on mandrel assembly.
4. install and tighten blade bolt securely
(45-55 Ft. Lbs./62-75 Nm torque).
IMPORTANT: Special blade bolt is heat
treated.
Blade c;*_._/_---_
_L_
Blade Bolt _.
_7_
_i
(Special)___._Sta
Center Hole - L_
t
Mandrel
Assemby
r
BATTERY
Your tractor has a battery chargingsystem
which is sufficientfor normal use. However, periodic charging of the battery with
an automotive charger will extend its life.
° Keep battery and terminalsclean.
- Keep battery bolts tight.
Keep small vent holes open.
• Recharge at 6-10 amperes for I hour.
NOTE; The original equipment battery on
....your tractor is maintenance free. Do not
attempt to open or remove caps or covers.
Adding or checking level of electrolyte is
not necessary.
17
TO CLEAN BATTERY AND TERMINALS
Corrosion and dirt on the battery and terminals can cause the battery to "leak" power.
1. Disconnect BLACK battery cable first
then RED battery cable and remove
battery from tractor.
2. Rinse the battery with plain water and
dry,
3. Clean terminals and battery cable ends
with wire brush until bright.
4. Coat terminals with grease or petroleum jelly.
5. Reinstall battery (See "REPLACING
BATTERY" in the SERVICE AND ADJUSTMENTS
section of this manual).
TRANSAXLE
COOLING
The transmission
fan and cooling fins
should be kept clean to assure proper
cooling.
Do not attempt to clean fan or transmission while engine is running or while the
transmission
is hot, To prevent possible
damage to seals, do not use high pressure
water or steam to clean transaxle.
- Inspect cooling fan to be sure fan blades
are intact and clean.
• Inspect cooling fins for dirt, grass clippings and other materials. To prevent
damage to seals, do not use compressed air or high pressure sprayer to
clean cooling fins.
TRANSAXLE
NOTE: Although multi-viscosity oils
(5W30, 10W30 etc.) improve starting in
cold weather, they will result in increased
oil consumption when used above
32°F/0°C.
Check your engine oil level
more frequently to avoid possible engine
damage from running low on oil.
Change the oi! after every 50 hours of operation or at least once a year if the tractor
is not used for 50 hours in one year.
Check the crankcase oil level before starting the engine and after each eight (8)
hours of operation.
Tighten oil fill cap/
dipstick securely each time you check the
oil level.
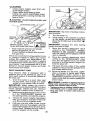
TO CHANGE ENGINE OIL
PUMP
Determine
temperature
range
before oil change. All oil must
service classification SG-SL.
expected
meet API
• Be sure tractor is on level surface.
• Oil wil!drain more freely when warm.
• Catch oil in a suitable container,
t.
Remove oil fill cap/dipstick. Be careful
not to allow dirt to enter the engine when
changing oil.
2. Slide oil drain extension from the docking
position on the engine blower housing
and extend outward from engine,
FLUID
pDo°Cking
sition
The transaxle was sealed at the factory
and fluid maintenance
is not required for
the life of the transaxle.
Should the transaxle ever leak or require servicing, contact
your nearest Sears or other qualified
service center.
V-BELTS
Check V-belts for deterioration and wear
after t00 hours of operation and replace
if necessary. The belts are not adjustable.
Replace belts ff they begin to slip from
Oil Drain
3. To open, twist cap counter-clockwise
4, After oil is drained completely, replace
cap and twist clockwise until it stops.
5. Re-attach oil drain extension to engine
blower housing.
6. Refill engine with oilthrough oilfitt dipstick
tube. Pour slowly. Do not overfi!l. For approximate capacity see "PRODUCT SPECIFICATIONS" section of this manual.
wear.
ENGINE
LUBRICATION
Only use high quality detergent oil rated
with API service classification SG-SL.
Select the oil's SAE viscosity grade
according to your expected operating
temperature,
7. Use gauge on oil fill cap/dipstick for
checking level. For accurate reading,
tighten dipstick cap securely onto the
tube before removing dipstick. Keep oil
at "FULC' line on dipstick. Tighten cap
onto the tube securely when finished.
I8
AIR FILTER
Your engine will not run properly using a
dirty air filter. Clean the foam pro-cleaner
after every 25 hours of operation or every
season. Service paper cartridge every
100 hours of operation or every season,
whichever occurs first.
Service air cleaner more often under dusty
conditions.
1. Remove cover.
TO SERVICE PRE-CLEANER
2. Wash it in liquid detergent and water.
3. Squeeze it dry in a clean cloth.
4. Saturate it in engine oil. Wrap it in
clean, absorbent cloth and squeeze to
remove excess oil.
NOTE: If very dirty or damaged, replace
pre-cleaner.
TO SERVICE CARTRIDGE
............t. Clean cartridge by tapping gently on
flat surface. If very dirty or damaged,
replace cartridge.
2. Reinstall precleaner cartridge, cover
and secure.
IMPORTANT: Petroleum solvents, such
as kerosene, are not to be used to clean
the cartridge. They may cause deterioration of the cartridge. Do not oil cartridge.
Do not use pressurized air to clean or dry
cartridge.
_Knobs.._
Cover
CLEAN AIR INTAKE/COOUNG AREAS
To insure proper cooling, make sure the
grass screen, cooling fins, and other external surfaces of the engine are kept clean
at all times.
Every 1O0 hours of operation (more often
under extremely dusty, dirty conditions),
remove the blower housing and other cooling shrouds. Clean the cooling fins and
external surfaces as necessary. Make sure
the cooling shrouds are reinstalled.
NOTE: Operating the engine with a
blocked grass screen, dirty or plugged
cooling fins, and/or cooling shrouds
removed will cause engine damage due to
overheating.
MUFFLER
Inspect and replace corroded muffler and
spark arrester (if equipped) as it could create a fire hazard and/or damage.
SPARK PLUG(S)
Replace spark plug(s) atthe beginning
of each mowing season or after every
100 hours of operation, whichever occurs
first. Spark plug type and gap setting a_,
shown in PRODUCT SPECIFICATIONS
section of this manual,
IN-LINE FUEL FILTER
The fuel filter should be replaced once
each season. If fuel filter becomes
clogged, obstructing fuel flow to carburetor, replacement is required.
1. With engine cool, remove filter and
plug fuel line sections.
2. Place new fuel filter in position in fuel
line with arrow pointing towards carburetor.
3. Be sure there are no fue] line leaks and
clamps are properly positioned.
4. Immediately wipe up any spilled gasoline.
_Oartridge
Foam
Clamp.
Z_']
Pre-Cleaner--'f _._
!'L
Fuel Filter_
ENGINE OIL FILTER
Replace the engine oilfilter every season or
every other oil change if the tractoris used
more than 100 hours in one year.
CLEAN AIR SCREEN
Air screen must be kept free of dirt and
chaff to prevent engine damagefrom
overheating, Clean with a wire brushor
compressed air to remove dirt and stubborn dried-gum fibers.
19
_"--_-_,
CLEANING
, Clean engine, battery, seat, finish, etc.
o1 all foreign matter.
• Clean debris from steering plate.
Debris can restrict clutch/brake pedal
shaft movement, causing belt slip and
loss of drive.
Washout Port
_1_CAUTION: Avoid all pinch points and
movable parts
Clutch/brake pedal
Steering
Steering System, Dash,
Fender and Mower N_otShown
CAUTION:
_'_
Pinch
_
Points
•
Keep finished surfaces and wheels
free of all gasoline, oil, etc.
•
Protect painted surfaces with automotive type wax.
We do not recommend using a garden hose
or pressure washer to clean your tractor
unless the engine and transmission
are
covered to keep water out. Water in engine
or transmission will shorten the useful life of
your tractor. Use compressed air or a leaf
blower to remove grass, leaves and trash
from tractor and mower.
DECK WASHOUT PORT
"four tractor's deck is equipped with a
washout port on its surface as part of its
deck wash system. It should be utilized after each use.
1. Drive the tractor to a level, clear spot
on your lawn, near enough to a water
spigot for your garden hose to reach.
IMPORTANT: Make certain the tractor's
discharge chute isdirected AWAY from your
house, garage, parked cars, etc. Remove
bagger chute or mulch cover if attached.
2. Make sure the attachment clutch control
is in the "DISENGAGED" position, set
the parking brake, and stop the engine.
3. Thread the nozzle adapter (packaged
with your tractor's Operator's Manual)
onto the end of your garden hose.
4. Pull back the lock collar of the nozzle
adapter and push the adapter onto the
deck washout port at the left end of the
mower deck. Release the lock collar to
tockthe adapter on the nozzle.
IMPORTANT: Tug hose ensuring connection )s secure.
5. Turn the water on.
6. While sitting in the operator's position
on the tractor, re-start the engine and
place the throttle lever {n the Fast ",_j_"
position.
IMPORTANT: Recheck the area making
certain the area is clear.
7. Move the tractor's attachment clutch
control to the "ENGAGED" position.
Remain in the operator's position
w_ththe cutting deck engaged until the
deck is cleaned.
8. Move the tractor's attachment clutch
control to the "DISENGAGED" position, Turn the ignition key to the STOP
position to turn the tractor's engine off.
Turn the water off.
9. Pull back the lock collar of the nozzle
adapter to disconnect the adapter from
the nozzle washout port,
10. Move the tractor to a dry area, preferably a concrete or paved area. Place
the attachment clutch control in the
"ENGAGED" position to remove excess
water and to help dry before puttingthe
tractor away.
A(_WARNING: A brokenor missingwashout
fittingcould exposeyou or othersto thrown
objectsfrom contactwith the blade.
• Replacebrokenor missingwashoutfitting
immediately,priorto usingmoweragain.
- Plug any holes in mower with bolts and
Iocknuts.
2O
WARNING:
TOAVOID
SERIOUS
INJURY,
BEFORE
PERFORMING
ANYSERVICE
ORADJUSTMENTS:
1.
2.
3.
4.
5.
Depress brake pedal fully and set parking brake.
Place attachment clutch in "DISENGAGED" position.
Turn ignition key to "STOP" and remove key.
Make sure the blades and all moving parts have completely stopped.
Disconnect spark plug wire from spark plug and place wire where it cannot
come in contact with plug.
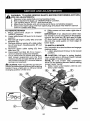
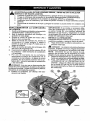
TO REMOVE MOWER
1. Place attachment clutch in "DISENGAGED" position.
2. Lower attachment lift lever to its lowest
position.
3, Roll belt off engine pulley (M) and belt
keepers ((3),
4. Remove retainer spring (K), slide collar
(L) off and push housing guide (P) out
of bracket.
5. Remove clutch cable spring (Q) from
idler arm (R).
6. Disconnect front link (E) from mower remove retainer spring and washer.
7. Go to either side of mower and disconnect mower suspension arm (A) from
chassis pin (B) and rear lift link (C) from
rear mower bracket (D) - remove retainer
springs and washers.
CAUTION: After rear lift links are disconnected, the attachment lift leverwill be spring
loaded. Have a tight grip on lift lever when
changing position of the lever,
8. Slide mower out from under right side of
tractor,
IMPORTANT: If an attachment other than
the mower is to be mounted on the tractor,
remove the front ]ink (E) and rear lift links
(C) from tractor and hook the clutch spring
(Q) into the cable guide on front edge of
lower dash.
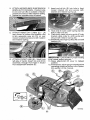
TO INSTALL MOWER
Besuretractor ison level surfaceandengage
parking brake.
1. Lower attachment lift lever to its lowest
position.
_lb CAUTION: Lift lever is spring loaded.
Have a tight grip on liftlever, lower it slowly
and engage in lowest position.
NOTE: Be sure mower side suspension
arms (A) are pointing forward before sliding
mower under tractor.
2. Slide mower under tractor until it is centered under tractor.
,
21
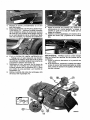
3. ATTACH MOWER SIDE SUSPENSION
ARMS (A) TO CHASSIS - Position hole
in arm over pin (B) on outside of tractor
chassis and secure with retainer spring.
4, Repeat on opposite side of tractor.
7.
8. Hook end of clutch cable spring (Q) into
hole in idler arm (R).
9. Push clutch cable housing guide (P) into
bracket, slide collar (L) onto guide and
secure with retainer spring (K).
10. Install belt onto engine pulley (M) and belt
keepers CG).
5. ATTACH REAR LIFT LINKS (C) - Lift
rear corner of mower and position slot
in link assembly over pin (D) on rear
mower bracket and secure with washer
and retainer spring.
6.
Insert end of link (E) into hole in front
mower bracket (H) and secure with
washer and retainer spring (J).
IMPORTANT;
Check belt for proper
in all mower pulley grooves.
11. Raise attachment
lift lever to
position,
12. If necessary, adjust gauge wheels
operating mower as shown in the
tion section of this manual,
ATTACH FRONT LINK (E) - Work from
left side of tractor, Insert rod end of link
assembly through front hole in tractor
front suspension
bracket (F).
(
22
routing
highest
before
Opera-
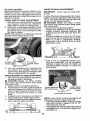
TO LEVEL MOWER
Make sure tires are properly inflated to the
PSI shown ontires, lftires areover or under
inflated, it may affect the appearance of your
lawn and lead you to think the mower is not
adjusted properly,
VISUAL SIDE-TO-SIDE ADJUSTMENT
1. With all tires properly inflated and if your
lawn appears unevenly cut, determine
which side of mower is cutting lower.
2. With a 3/4" or adjustable wrench, turn lift
link adjustment nut (A) to the left to lower
LH side of mower, or,to the dghtto raise
LH side of mower.
NOTE: Each full turn of adjustment nut will
change mower height about 3/16".
Turn:nut righl
to:raise mower
Turn nut left
to lower mower
3. Test your adjustment by mowing some
uncut grass and visually checking the
appearance. Readjust, ifnecessary, until
you are satisfied with the results.
PRECISION SIDE-TO-SIDE ADJUSTMENT
1. Withall tiresproperlyinflated, parktractor
on level ground or driveway.
CAUTION: Blades are sharp. Protect
your hands with gloves and/or wrap blade
with heaW cloth.
2. Raise mower to its highest position.
3. At both sides of mower, position blade at
side and measure the distance (A) from
bottom edge of blade to the ground. The
distance should be the same on both
sides.
4,
if adjustment is necessary, see step 2 in
Visual Adjustment instructions above.
5. Recheck measurements, adjust ifnecessap] until both sides are equal.
A; IA
FRONT-TO-BACK ADJUSTMENT
IMPORTANT:
to-side.
Deck must be level side-
Toobtain the best cutting results, the mower
blades should be adjusted so the front tip is
1/8" to 1/2" lower than the rear tip when the
d_lLower
is in its highest position.
CAUTION; Blades are sharp. Protect
your hands with gloves and/or wrap blade
with heavy cloth.
• Raise mower to highest position.
• Position any blade so the tip is pointing
straight forward. Measure distance (B)
to the ground at front and rear tip of the
blade.
o lffronttip of blade is not 1/8" to 1/2" lower
than the rear tip, go to the front of tractor.
• With an 11116" or adjustable wrench,
loosen jam nut A several turns to clear
adjustment nut B.
• With a 3/4" or adjustable wrench, turn
front link adjustment nut (B) clockwise
(tighten) to raise the front of mower, or,
counterclockwise (loosen) to lower the
front mower.
Tighten adjust nut
B to raise mower
Loosen:adjust:
nut :Bto lower:
mower
Loosen jam nut A first
NOTE: Each full turn of the adjustment nut
will change mower height about I/8'L
• Recheck measurements, adjust ff necessary until front tip of blade is 1/8" to 112"
lower than the rear tip.
• Hold adjustment nut in position withwrench
and tighten jam nut securely against adjustmentnut.
23
TO REPLACE MOWER BLADE DRIVE
BELT
The mower blade drive belt may be replaced
without tools. Park the tractor on level surface. Engage parking brake.
BELT REMOVAL 1. Remove mowerfrom tractor (See'q'O REMOVE MOWER"inthissectionofmanual).
2. Work belt off both mandrel pulleys and
idler pulleys.
3, Pull belt away from mower.
BELT iNSTALLATION 1. Work belt around both mandrel pulleys
and idler pulleys
2, Make sure belt is in all pulley grooves
and inside all belt guides,
3. Install mower (See "To Install Mower" in
this section of this manual).
Mandrel
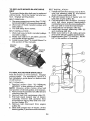
BELT INSTALLATION 1, Install new beltfrom tractor rear to front,
over the steering plate (F) and above
clutch brake pedal shaft (G),
2, Pull belt toward front of tractor and roll
belt onto engine pulley (E),
3. Pull belt toward rear of tractor. Carefully
work belt down around transmission
cooling fan and onto the input pulley (D),
Be sure belt is inside the belt keeper.
4. Install belt on centerspan idler (C).
5. Install belt through stationary" idler (A)
and clutching idler (B).
6, Make sure belt is in all pulley grooves
and inside all belt guides and keepers.
7, Install mower (See "TO INSTALL MOWER" in this section of manual).
Idler
Pulleys
Mandrel
,Pulley
TO REPLACE MOTION DRIVE BELT
Park the tractor on level surface. Engage
parking brake. For assistance, there is a
belt installation guide decal on bottom side
of left footrest.
BELT REMOVAL 1. Remove mower (See "TO REMOVE
MOWER" in this section of manual).
NOTE: Observe entire motion drive belt
and position of alt belt guides and keepers.
2. Remove beltfrom stationary idler (A)and
clutching idler (B),
3. Remove belt from centerspan idler (C),
4, Pull belt slack toward rear of tractor,
Carefully remove belt upwards from
transmission input pulley and over cooling fan blades (D).
5. Remove belt downward from engine
pulley (E),
6. Slide belt toward rear of tractor, off the
steering plate (F)and remove from tractor,
24
TO CHECK BRAKE
If tractor requires more than five (5) feet to
stop at highest speed in highest gear on a
level, dry concrete or paved surface, then
brake must be serviced.
You may also check brake by:
1. Park tractor on a level, dry concrete or
paved surface, depress brake pedal
all the way down and engage parking
brake.
2. Disengage transmission by placing
freewheel control in "transmission disengaged" position.Pull freewheel control out and intothe slot and release so
it is held in the disengaged position.
The rear wheels must lock and skid
when you try to manually push the tractor
forward. If the rear wheels rotate, then the
brake needs to be serviced. Contact a
...........
Sears or other qualified service center.
FRONT WHEEL TOE-IN!CAMBER
Your new tractor front wheel toe-in and
camber is set at the factory and is normal.
The front wheel toe-in and camber are
not adjustable. If damage has occurred to
affect the factory set front wheel toe-in or
camber, contact a Sears or other qualified
service center.
TO REMOVE WHEEL FOR REPAIRS
t. Block up axle securely.
2. Remove axle cover, retaining ring and
washers to allow wheel removal (rear
wheels have a square key- Do not lose).
3. Repair tire and reassemble,
NOTE: On rear wheels only: align grooves in
rearwheel hub and axle. Insert square key.
4, Replace washers and snap retaining ring
securely in axle groove.
5. Replace axle cover.
NOTE: To seal tire punctures and prevent
flat tires due to slow leaks, purchase and
use tire sealantfrom Sears. Tire sealant also
prevents tire dry rot and corrosion.
Washers
Retaining
Ring \\\\
Axle Cover
Wheel Only)
25
TO START ENGINE WITH A WEAK BATTERY
._IkWARNING, Lead-acid batteries generate
explosive gases. Keep sparks, flame and
smoking materials away from batteries.
Always wear eye protection when around
batteries.
lfyour batteryistooweakto starttheengine, it
should be recharged. (Sea"BATTERY" inthe
MAINTENANCE section of this manual).
If "jumper cables" are used for emergency
starting, follow this procedure:
IMPORTANT: Your tractor is equipped with
a 12voltsystem. The othervehicle must also
be a 12 volt system. Do not use yourtractor
battery to start other vehicles.
TO ATTACH JUMPER CABLES 1. Connect one end of the RED cable tothe
POSITIVE (+) terminal of each battery(AB),taking care notto short againsttractor
chassis.
2. Connect one end of the BLACK cable
to the NEGATIVE (-) terminal ((3) of fully
charged battery.
3. Connect the other end of the BLACK
cable (D) to good chassis ground, away
from fuel tank and battery.
TO REMOVE CABLES, REVERSE ORDER
1. BLACK cablefirst from chassis and then
from the fully charged battery.
2. RED cable last from both batteries,
Weakor Dead
Battery
Fully Charged
Battery
REPLACING BATTERY
_Jt,WARNING: Do not short battery terminals byallowing a wrench orany other object
to contact both terminals at the same time.
Before connecting battery, remove metal
bracelets, wristwatch bands, rings, etc.
Positive terminal must be connected first to
prevent sparking from accidentalgrounding.
1, Lift hood to raised position.
2. Remove terminal cover.
3. Disconnect BLACK battery cable then
RED battery cable and carefully remove
battery from tractor.
4. Install new battery with terminals insame
position as old battery.
5. Reinstall terminal cover.
6, First connect RED battery cable to positive (+) battery terminal with bolt and nut
as shown. Tighten securely.
7. Connect BLACK grounding cable to
negative (-) batteryterminal with remaining bolt and nut. Tighten securely
8. Close hood.
__'__
Negative
_._ _
"__
Terminal
_
f
_ _.(Black)
Cab!e
_,_-_
_'"_
Cover
__f_
Positive ._
"_"L_.._
(Red)-"Cable
_,\
_
/I
_X_--._.._._._"
TO REPLACE HEADLIGHT BULB
1. Raise hood.
2. Remove bulb holderfromthe hole inthe
backside of the grill.
3. Replace bulb in holder and install bulb
holder securely back into the hole in the
backside of the grill.
4. Close hood.
INTERLOCKS AND RELAYS
Loose or damaged wiring may cause your
tractor to run poorly, stop running, or prevent
it from starting.
• Check wiring.
TO REPLACE FUSE
Replace with 30 amp automotive-type plugin fuse. The fuse holder is located behind
the dash.
26
TO REMOVE HOOD AND GRILL ASSEMBLY
1, Raise hoed.
2, Unsnap headlight wire connector.
3. Stand in front of tractor. Grasp hood at
sides, tilt toward engine and lift off of
tractor.
4. When replacing hood, be sure to reconnect the headlight wire connector.
Headlight Wire
Connector
TRANSMISSION REMOVAL/'
REPLACEMENT
Should your transmission require removal for
service or replacement, it should be purged
after reinstallation and before operating the
tractor. See "PURGE TRANSMISSION" in
the Operation section of this manual.
ENGINE
TO ADJUST THROTTLE CONTROL
CABLE
The throttle control has been preset at
the factory and adjustment should not be
necessary Check adjustment as described
below before loosening cable. If adjustment
is necessary, see engine manual.
TO ADJUST CHOKE CONTROL
The choke control has been preset at the
factory and adjustment should not be necessary. If adjustment is necessary, see engine
manual.
TO ADJUST CARBURETOR
Your carburetor has been preset atthe factory
and adjustment should not be necessary.
However, minor adjustment may be required
to compensate for differences in fuel, temperature, altitude or load. Ifthe engine does
need adjustment, see engine manual
Immediately prepare your tractorfor storage
at the end of the season or if the tractor will
be used for 30 days or more.
RNING: Never store the tractor with
gasoline in the tank inside a building where
fumes may reach an open flame or spark.
Allow the engine to cool before storing in
any enclosure.
TRACTOR
When tractor is to be stored for a period
of time, clean it thoroughly, remove all dirt,
grease, leaves, etc. Storein aclean, dry area.
1. Clean entire tractor (See "CLEANING" in
the Maintenance section of this manual).
2. Inspect and replace belts, if necessary
(See belt replacement instructions in the
Service and Adjustments section of this
manual),
3. Lubricate as shown in the Maintenance
section of this manual.
4. Be sure that all nuts, bolts and screws
are securely fastened. Inspect moving
parts for damage, breakage and wear.
Replace if necessary.
5. Touch up all rusted or chipped paint
surfaces; sand lightly before painting.
BATTERY
• Fully charge the battery for storage.
° After a period of time in storage, battery
may require recharging.
- To help prevent corrosion and power
leakage during long periods of storage,
battery cables should be disconnected
and battery cleaned thoroughly (see "TO
CLEAN BATTERY AND TERMINALS" in
the Maintenance section of this manual).
• After cleaning, leave cables disconnected
and place cables wherethey cannot come
in contact with battery terminals.
• tf battery is removed from tractor for
storage, do not store battery directly on
concrete or damp surfaces.
• Empty the fuel tank by starting the engine
and letting it run until the fuel lines and
carburetor are empty.
- Never use engine or carburetor cleaner
products inthe fuel tank or permanent
damage may occur.
• Use fresh fuel next season.
NOTE: Fuel stabilizer is an acceptable alternative in minimizing the formation of fuel
gum deposits during storage. Add stabilizer
to gasoline in fuel tank or storage container.
Always followthe mix ratiofound on stabilizer
container. Run engine at least 10 minutes
after adding stabilizer to allowthestabilizer to
reach the carburetor. Do not empty the gas
tank and carburetor if using fuel stabilizer.
ENGINE OIL
Drain oil (with engine warm) and replace
with clean engine oil. (See "ENGINE" in
the Maintenance section of this manual).
CYLINDER(S)
1. Remove spark plug(s).
2. Pour one ounce of oilthrough spark plug
hole(s) into cylinder(s).
3. Turn ignition key to start positionfor a
few seconds to distribute oil.
4. Replace with new spark pIug(s).
OTHER
• Do not store gasoline from one season to
another.
• Replace your gasoline can if your can
starts to rust. Rust and/or dirt in your
gasoline will cause problems.
• If possible, store your tractor indoors and
cover it to give protection from dust and
dirt.
° Cover your tractor with a suitable protective cover that does not retain moisture.
Do not use plastic. Plastic cannotbreathe
which allows condensation to form and
will cause your tractor to rust.
IMPORTANT: Never cover tractor while
engine and exhaust areas are still warm,
ENGINE
FUEL SYSTEM
IMPORTANT: It is important to prevent
gum deposits from forming in essential fuel
system parts such as carburetor, fuel hose,
er tankduringstorage. Also, alcohol blended
fuels (called gasohol or using ethanol or
methanol) can attract moisture which leads
to separation and formation of acids during
storage. Acidic gas can damage the fuel
system of an engine while in storage.
27
TROUBLESHOOTING CHART:
See appropriate section in manual unless directed to Sears service center.
PROBLEM
CAUSE
Will not start
1
Out of fuel.
2
Engine not "CHOKED"
3
Engine f_ded.
4
Bad spark plug.
5
Dirty air filter.
5
Clean/replace
6
Dirty fuel filter.
6
Replace fuel filter.
7
Water in fuel,
7
Empty fuel tank and carburetor,
refill tank with fresh gasoline and
replace fuel filter.
8
Loose or damaged wiring,
9
Carburetor
10
Hard to start
1
Fill fuel tank.
i2
See "TO START ENGINE" in
Operation section,
3 i Wait several minutes before
attempting to start.
_4
out of adjustment.
Engine valves out of adjustment.
Replace spark plug.
See "To Adjust Carburetor" in
Service and Adjustments section.
10
Contact a Sears or other qualified
service center.
1
2
2
Bad spark plug.
3
Weak or dead batten],
4
Dirty fuel filter.
Clean/replace
Recharge or replace battery.
Replace fuel filter,
5
Stale or dirty fuel,
6
Loose or damaged wiring.
air filter.
FReplace spark plug.
3
4
5
air filter.
Check all widng,
_9
Dirty air filter.
Carburetor
,,,
1
propedy,
Empty fuel tank and refill tank wit_
fresh, clean gasoline.
Check all wiring,
out of adjustment.
7
8
Engine valves out of adjustment.
1
Clutch/brake
2
Attachment
3
Weak or dead battery.
4
Blown fuse,
5
Corroded battery terminals.
5
6
Loose or damaged wiring.
6
See "To Adjust Carburetor" in
i Serv ce and Adjustments section.
Contact a Sears or other qualified
service center,
,,,
Engine will not
turn over
Engine clicks but
will not start
1
Depress clutchlbrake
2
Disengage
3
Recharge or replace battery.
pedal not depressed,
clutch is engaged,
4
pedal,
attachment
clutch.
Replace fuse.
!7
i
Clean battery terminals,
Check all widng.
7
Faulty ignition switch.
Check/replace
ignition switch.
8
Faulty solenoid or starter.
8
Checklreplace
solenoid or starter.
9
Faulty operator
switch(as),
9
Contact a Sears or other quaEfied
service center,
1
Weak or dead battery.
2
Corroded battery terminals.
2
Clean battery terminals,
3
Loose or damaged widng,
3
Check all wiring.
Faulty solenoid
4
Check/replace
4
presence
or starter.
28
1
Recharge or replace battery.
solenoid or starter.
TROUBLESHOOTING CHART:
See appropriate section in manual unless directed to Sears service center,
PROBLEM
Loss of power
CAUSE
CORRECTION
1
Cutting too much grassttoo
2
3
fast.
1
Ra{se cutting height/reduce speed.
Throl_Ie in "CHOKE" position.
2
Adjust throttle control.
Build-up of grass, leaves and
trash under mower.
3
Clean underside
housing.
4
Dirty air filter.
4
Clean/replace air filter.
5
Low oil level!dirty
5
Check oil leve!/change oil,
Clean & ragaporchange
oil.
of mower
6
Fautty spark plug.
6
7
Dirty fuel fifter`
7
Replace fuel filter.
8
Stale or dirty fuel.
8
Empty fuel tank and refill tank with
fresh, clean gasoline.
9
Water in fuel.
9
Empty fuel tank and carburetor,
refili tank with fresh gasoline and
replace fuel fitter.
10
Spark plug wire _oose.
10
Connect & tighten spark plug wire,
11
Dirty engine air screen/fins.
11
Clean engine air screen/fins,
12
Dill'y/clogged
12
Clean/replace
13
Loose or damaged widng.
13
Check all wiring.
14
Carburetor
14
See "To Adjust Carburetor" in
Service and Adjustments section.
15
Contact a Sears or other qualified
service center,
15
muffler.
out of adjustment.
Engine valves out of adjustment.
...........
,,,,,,,,,,,,
.......,,,,,,,,,,,,,,,,.,
,,,,
,, ,,,
spark plug.
muffler.
,
1
Worn, bent or loose blade.
1
Replace blade. Tighten blade bolt.
2
Bent btade mandrel.
2
Contact a Sears or other qualified
service center,
3
Loose/damaged
3
Tighten loose part(s).
Replace damaged parts.
Engine continues to
run when operator
leaves seat with attachment clutch engaged
1
Faulty operator-safety
control system.
1
Check widng, switches and
connections, [f not corrected,
contact a Sears or other
Poor cut - uneven
cutting
1
Worn, bent or loose blade.
t
Replace blade. Tighten blade bolt,
2
Mower desk not level
2
Level mower deck.
3
Buildup of grass, leaves, and
trash under mower.
3
Clean underside
housing.
4
Bent blade mandrel.
4
contact a Sears or other
qualified service center,
Clogged mower deckvent from
build-up of grass, leaves, and
trash around mandrels.
5
Clean around mandrels
open vent holes.
Excessive
vibration
5
part[s).
presence
29
of mower
to
TROUBLESHOOTING CHART:
See appropriate section in manual unless directed to Sears service center.
CAUSE
PROBLEM
Mower blades will
not rotate
CORRECTION
1
Obstruction
in clutch mechanism,
2
Worn/damaged
3
Frozen idler pulley,
4
Frozen blade mandrel,
mower
drive belt
1
Remove obstructbn.
2
Replace mower drive belt.
3
Replace idler pu[tey.
4
Contact a Sears or other
qualified service center.
/
Place throttle control in "FAST _
position,
Engine speed too slow,
discharge
2
Travel speed too fast,
2
Shift to stower speed,
3
Wet grass.
3
Allow grass to dry before mowing,
4
Mower deck not level.
4
Level mower deck.
5
Low/uneven
5
Check tires for proper PSI.
6
Worn, bent or loose blade.
6
Replace/sharpen
blade bolt,
tire air pressure.
Clean underside of mower
housing.
Buildup of grass, leaves and
trash under mower,
Headlight(s)
not
working
(if so equipped)
8
Mower drive belt worn.
8
Replace mower drive belt.
9
Blades improperly
9
Reinstall blades sharp edge down.
will not
installed.
10
Improper blades used.
11
Clogged mower deck vent holes
11
from buildup of grass, leaves, and
trash around mandrels,
Clean around mandrels to
open vent holes,
,1
Light sw_ch is "OFF",
1
Turn Iight switch "ON '_',
Bulb(s) or lamp(s) burned out.
2
Replace bulb(s) or lamp(s).
Faulty light switch,
3
Check!replace
4
Loose or damaged wiring,
4
Check wiring and connections,
5
Blown fuse,
5
Replace fuse.
!1
Bad battery cell(s).
1
Replace battery.
2
Poor cable connections.
2
Check/clean
i3
Faulty regulator
3
Replace regulator.
!4
Faulty alternator.
4
Replace alternator.
2
3
Battery
charge
blade. Tighten
(if so equipped),
30
10
Replace with blades listed in
this manual.
light switch,
ail connections.
TROUBLESHOOTING CHART:
See appropriate section in manual unless directed to Sears service center.
PROBLEM
CAUSE
Loss of drive
,,_,,,,,,,,
CORRECTION
1
Freewheel control in
"DISENGAGED" position,
t
2
Debris on steering plate (ff
equipped),
3
Motion drive belt worn, damaged,
or broken.
3
Replace motion drive belt.
4
Air trapped in transmission
shipment or servicing.
4
Purge transmission,
5
Axle key misslng,
5
Install axle key at rearwheeL See
"TO REMOVE WHEEL" in the
Service and Adjustments sec_Jon,
1
Engine throttle control not se: 1
between half and fult speed (fastl
position before stopping engine'
Move throttlecontrol between
half and full speed (fast} position
before stopp!ng e,n,glne.
1
Reverse operation system (ROS)
is not "ON" while mower or other
attachment is engaged.
Turn ignition key to ROS "ON"
position. See Operation section,
!2
during
w,,,,
Engine "backfires"
when turning
engine "OFF"
Engine dies .when
tra_or
is snittea
into reverse
INE DMORE
HELP?
I
Place freewheel control in
"ENGAGED" position.
See "GLEANING" in the
maintenance section.
[ You II fin(] the answer arLd more on managemyhome.com
!.Find
this
i " Get answers
ii
i
all
and
other
product
manuals
_
online.
from our team of home experts.
" Get a personalized
" Find information
i
your
- for free!
maintenance
plan for your
home.
and tools to he[p with home projects.
bTDughtto you _ Sea_
i
31
SUGGESTED
co
P.3
GUIDE
FOR SIGHTING
SLOPES
ONLY RIDE UP AND
NOT ACROSS HILL
t5 DEGREES
!
DOWN
FOR SAFE OPERATION
HILL,
MAX.
down the face of slopes, never across the face. Do not mow
WARNING:
To avoid
serious
injury,
operate
your tractor
and
slopes greater
than 15
degrees.
Make
turns gradually
to up
prevent
tipping or loss of control. Exercise extreme caution when
changing direction on slopes.
1. Fold this page along dotted line indicated above.
2. Hold page before you so that its left edge is vertically paral!el to a tree
trunk or other upright structure.
3. Sight across the fold in the direction of hill slope you want to measure.
4. Compare the angle of the fold with the slope of the hill.
Garantfa ..........................................................
Regias de Seguridad ......................................
Especificaciones del Producto ........................
MontajeiPre Operaci6n ...................................
Operacibn .......................................................
Mantenimiento ................................................
Garanfia
para
GARANTiA
equipoe
COMPLETA
tractores
33
34
37
38
40
47
Programa de Mantenimiento ...........,.............. 47
Servicio y Ajustes ........................................... 52
Atmacenamiento ............................................. 58
Identificaci6n de Problemas ........................... 59
Servicio Sears ............................. Contraporteda
Craftsman
DE CRAFTSMAN
PeR DOS AI_OS dearie la fecha de compra, redes tas partes no sustitutbles de este equipo tractor est_n
garantizadas
contra cualquier defecto de material o mane de obra. Una parte no aus_ituibie defectuosa
recibir,_ reparaciSn o reemplazo gratuito en case si Ia reparaci6n es imposible.
PeR CINCO AI_O8 desde la fecha de compra, el bastidor y el eje delantero de este equipo tractor est_n
garantizados centre cualquier defecto de material o mane de obra. Un bactidor o eje delantero defectuoso
.... recibJr_ reparaci6n o reemplazo gratuito en casa si la reparaci6n es imposible.
DURANTE 90 D[AS desde la fecha de compra, la bateria (una parte sustituible) de este equipo tractor
est_ garantizada centre cualquier defecto de material o mane de obra (nuestra prueba comprueba que no
contendrA carga). Una bateria defectuosa recibir& un reemplazo gratuito en case.
GARANTIA LIMITADA
estd provisto)
DE POR VIDA ADICIONAL
en el EJE DELANTERO
DE HIERRO
COLADO
(si
DURANTE EL TIEMPO EN QUE SE USE par el propietario original despuds del quinto argo a partir de la
fecha de compra, er eje dalantero de hierro colado (si eat& provisto) de este equipo tractos est_ garantizado
contra cualquier defecto de material o mano de obra. Con el comprobante de compra, un eje delantero de
hierro colado recibird un reemplazo gratuito en casa.
SERVICIO
DE GARANTIA
Para conocer los detatles de la cobertura de garantia para obtener una reparaci6n
Ilame al 1-800-659-5917
6 visite el sitio web: www, craftsman.corn
o reemplazo
En todos los casos anteriores, si el reempiazo es imposib[e, el equipo tractor serd sustituido
el mismo mode[o o uno equivalente.
Toda Ia cobertura de garantfa anterior ser_, nula sieste
servicios comerciales o si se alquila aotra persona.
gratuito,
sin cargo con
equipo tractor se utiliZa alguna vez para brindar
Esta garantia cubre 0 NICAM ENTE defectos de matedal y mane de obra. La cobertura de garantia NO incluye:
• Partes sustituibles (excepto la bateria) que ae puedan desgastar per el use normal dentro del per[ode de
garantia inciuso, pare sin limitarse a, cuohi[las, buj[as, filtros de aire, ¢orreas y filtros de aceite.
. Servicios de mantenimiento estgndar, cambios de aceite o afinaciones,
• Reemplazo o reparaci6n de neum_ticos per pinchazos causeries per objetos externos come clavos,
espinas, tocones o vidrios.
• Reemptazo o reparaci6n de nauru&rices o ruedas per desgaste normal, accidentes e per operacidn o
mantenimiento
incorrecto&
•
Reparaciones necesadas per abuse del operador inc]uao, pete sin limitarse a, daSos causados par
remolcar objetos qua superen [a capacidad deJ equipo tractor, chocar contra objetos que doblen el
bastidof; el ensamb}e del eje o el cigI3e_al o sobrepasar _avelocidad del motor.
• Reparaciones necesarias per negligencia deI operador, incluso (pero sin timitarse a efto) daEos el_ctricos
y mecdnicos causeries per el aimacenamiento incorrecto, per no user el grade y la cantidad correctos de
aceite de motor, per no mantener del mueffe libre de residues inflamablea o per no mantener el equipo
tractor de acuerdo con Ins instrucciones qua contiene el manual de! operador.
• Limpieza o reparaciones
dei motor (sistema de combustible)
cuando se determina qua se us6
combustible contaminado y oxidado (sarro). En general, e[ combustible debe usarse dentro de los 80
dfas posteriorea e su compra.
• Deterioro y desgaste normal de los acabados extedores o auatitucidn de r6tulos de producto&
Esta garantia le otorga derechos Iegales especificos, y ustecl tambi_n puede tener otros detaches que
varlan de un estado a otro.
Sears Brands Management Corporation, Hoffman Estates, IL 60179
33
_I=PELIGRO:
Esta Maquina cortadora
es capaz de amputar
objetos, si no se observan
las |nstruceiones
de seguridad
lesiones graves o la rouerte.
_ADVERTENCIA:
Siempre desconecte el alambre de la bujia y p6ngalo donde no pueda entrar
en contacto con la buj_a, para evitar el arranque
pot accidente, durante la preparaci6n, el transporte, el ajuste o cuando se hacen reparaciones.
_iADVERTENCIA: No avarice cuestaabajo a punto rouerto ya que podria perder el control del tractor.
_DVERTENCIA:
Remolque sotarnente los
accesorios recomendados y conformes alas
caracteristicas indicadas por el fabricante de su
tractor. Tenga cuidado y prudencia al utilizar el
tractor. Cuando se encuentre en un declive, oper
utilizando exclusivamente la velocidad m&s baja.
En caso de un declive una carga excesiva podria resultar peligrosa. Los neum&ticos pueden
pettier la tracci6n con el suelo y haeerle pettier
el control de su tractor.
_,DVERTENCIA:
Eltubo de escape del motor,
algunos de sus constituyentes y algunos componentes del vehiculo contienen o desprenden
productos quimicos conocidos en el Estado de
California come causa de c&ncer y defectos al
nacimiento u otros dahos reproductivos.
_DVERTENCIA:
Los bomes, terminales y accesorios relativos de la bateria contienen plomo
o compuestos de plomo, productos quimicos
conocidos en el Estado de California como causa
de c_ncer y defectos a] nacirniento u otros da6os
reproductivos. Lavar las manos despu_s de
manipularlos,
1. FUNCIONAMIENTO
GENERAL
, Leer, entender y seguir todas las instrucciones
sobre la m&quina yen el manual antes de
empezar.
• No poner las manos o los pies cerca de partes
giratorias o debaio de Ia m&quina, mantener
siempre Iimpia Ia abertura de descarga.
° Permitir el funcionarniento de Ia m_.quina s61o
a adultos que tengan familiaridad con las
instrucciones.
• Limpiar el &rea de objetos como piedras,
juguetes, cables, etc. que pueden ser recogi_
dos y disparados con Ias cuchillas.
• Asegurarse de que el &tea est_ libre de otras
personas antes de ponerfa en marcha. Parar
la m&quina si alguien entra en el &rea.
• Nunca Ilevar pasajeros.
• No cortar roarcha atr&s al no set absolutamente necesario. Mirar siempre abajo y
delante mientras se procede atr&s.
• Nunca dirigir el material descargado hacia nadie. Evitar descargar material contra paredes
u obstrucciones. El material podria rebotar
hacia el operador. Parar las cuchillas cuando
se pasan superficies de grava.
las manosy
siguientes
los pies y de lanzar
se pueden producir
• No maneje la m_.quina si no tiene la trampa
para c6sped completa, lacanaleta de descarga
u otros dispositivos de seguridad en su lugar
yen funcionamiento.
• Ralentizar antes de girar.
- Nunca dejar una m&quina encendida sin vigiIancia. Apagar siempre las cuchillas, poner el
freno de estacionarniento, parar el motor, y
quitar Ias Ilaves antes de bajar.
• Desenganche Iashojas cuando no est_ cortando c_sped. Apague el motor y espere hasta que
todas las partesse detengan pot coropleto antes de limpiar Ia m&quina, retirar Iatrampa para
c(_sped o destapar la canaleta de descarga.
• Hacer funcionar Ia m_quina s61ocon la luz det
dia o Iuz artificial buena.
• No hacer funcionar ta rn_tquina estando bajo
los efectos de alcohol o droga.
• Poner atenci6n al tr&fico cuando se opera
cerca de calles o se cruzan.
• Poner Ia m,_xima atenci6n al cargar o descargar la m&quina en una caravana o carni6n.
• Llevar siempre gafas de protecci6n cuando se
hace funcionar la m_quina.
° Los dates indican que los operadores a partir
de los 60 afios est&n afectados por un gran
porcentaje de heridas relativas a la conducci6n
deI cortac_sped. Estos operadores tendrian
que evaluar su habilidad de hacer funcionar
el cortac6sped de modo Io bastante seguro
para proteger a si mismos y a otras personas
de heridas graves.
• Seguir [as recomendaciones det fabricante
para los pesos y contrapesos de Ias ruedas.
• Mantener la m&quina tibre de hierba, hojas u
otros escombros que pueden tocar el tubo de
escape/partes del motor calientes y quemarse.
No permitir que el puente del cortac_sped
cargue hojas u otros residuos que pueden
causar acumulaciones. Limpiar toda salpicadura de aceite o carburante antes de hacer
operaciones sobre la m&quina o guardarla.
Dejarla enfriar antes de guardarla.
tl. FUNCIONAMIENTO
EN PENDIENTES
Las pendientes son el mayor factorde accidentes
relativos a Ia p_rdida de control y vuelco, que
pueden causar severas heridas o rouerte. El funcionamientoen pendientesrequiere una atenci6n
extra. Si no es posiblehacer roarcha atrds en una
pendiente o site sientes incomodo,no la cortes.
° Cortar hacia arriba y abajo de una pendiente,
no de modo horizontal.
•Poner atenciones a los hoyos, las raices, los
bultos, las piedras u otros objetos escondidos.
El terreno irregular puede volcar la m&quina.
La hierba alta puede esconder obst&culos.
34
° Tener el m&ximo cuidado cuando se acerca
a cantos ciegos, arbustos, &rbo[es u otros
objetos que pueden impedir la vista de niSoso
• Escoger una velocidad de marcha baja de
rhode que no sea necesario pararse o cambiar
estando en una pendiente.
° No cortar Ia hierba mojada. Las ruedas pueden
perder tracci6n.
Poner siempre una rnarcha cuando se est,.
en pendientes. No poner en punto muerto e ir
cuesta abajo.
° Evitar arrancar, pararse o girar en una pendiente. Si las ruedas pierdentracci6n, desconectar
las cuchillas y preceder despacio cuesta abajo
en la pendiente.
° Mantener rode los movimientos en ias pendientes lentos y gradual. No hacer cambios
repentinos de velocidad o direcei6n, ya que
pueden causar el escape de la m_.quina.
° Poner la m_rtxJmaatenci6n cuando la m&quina
funciona con captadores de hierba u otros
dispositivos enganchados; pueden afec_ar la
..............estabilidad de la m_,quina. No usar en pendientes empinados.
- No intentar estabilizar la m&quina poniendo el
pie en el terreno.
• No cortar cerca de bajadas, cunetas y oriI]as.
Las m,_,quinapuede velcarse improvisamente
si una rueda est& en el borde o se hunde.
IV. REMOLQUE
• Remolcar s61ocon una m&quina que tonga un
gancho disefiado para remolcar.Enganchar el
equipo o remolcar s61o en el puntodispuesto
aI efecto.
• Seguir Iasrecomendacionesdel productorcon
respecto a los limites del equipo per remolcar
y el remolque en pendientes.
• Nunca permitir que ni6os u otras personas
est_n dentro del equipo per remotcar.
- En pendientes, el peso del equipo remolcado
puede causar la p_rdida de tracci6n y la p_rdida de control,
, Viajar despacio y dejar rn&s distancia para
frenar.
Iil. NINES
_ADVERTENCIA:
LOS Nli_OS PUEDEN
SUFRIR DANES CON EL use DE ESTE EQU[PO, La Academia Estadounidense de Pediatr_a
(American Academy of Pediatrics) recemienda
que s61o se permita aniSos con una edad mfnima de 12 a6os manejar m&quinas eortac_sped
manuales, y aI menos de 16 aSos para manejar
tractores cortac6sped.
Si el operador no pone atenci6n a la presencia
de los nifios pueden ocurrir accidentes tr&gicos.
Los nifios a menudo est&n atrafdos per la m_.quina y ]as actividad de cortar. No dar per hecho
de que los niSos se queden adonde estaban la
_ltima vez que los vistes.
• Mantener Ios nifios fuera de] _.rea de corte y
vigitados per un aduito responsable que no sea
el operador.
° Estar alerta y apagar la m&quina si un nifios
entra en el &rea.
° Antes y durante Ia marcha atr&s, mirar adelante
y abajo para ver si hay niSos pequeSos.
° Nunca Ilevar niSos, inciuso si hay las cuchillas
apagadas. Podrian caer y herirse seriamente
o interferir con el funcionamiento seguro de ]a
m&quina, los nifios que se han Ilevado precedentemente pueden aparecer de pronto en e]
&rea de corte per otro paseo y ser atropellados
o tumbados per la m_.quina.
° Nunca dejar que los niSos manipulen la m_.quina.
35
V. SERVICIO
MANIPULACI6N SEGURA DE LA GASOLINA
Para evitar heridas persona[es o daSos alas
eosas, poner el m_lximo cuidado a Is hera de
manipular la gasolina. La gaso]ina es extremamente inflamable y los vapores son explosives.
• Apagar todos los cigarrillos,cigarros, pipas y
otras fuentes de ignici6n.
• Usar s6Io contenedorespara gasolina aprobados.
• Nunca quitar el tap6n de ta gasolina o afiadir
carburante con el motor en marcha, dejar
enfriar el motor antes del aba_"tecimiento de
la gasolina.
• Nunca abastecer ta m_.quina al interior de un
local.
• Nunca guardar la m_.quina o el contenedor
del carburante donde haya una llama abierta,
chispas o una luz piloto come un calentador
de agua u otros dispositivos.
• Nunca Ilenar los contenedores aI interior de
un vehiculo o en una caravana o cami6n
recubiertos con un forro de pl&stico. Colocar
siempre los contenedores en el terreno lejos
del vehlcu[o euando se est_ ilenando.
• Quitar el equipo de gas de] cami6n o caravana
y abastecerlo en el terreno. Si no es posible0
abastecer dicho equipo con un contenedor port&tiI, m&s bien que de un surtidor de gasolina.
° Mantener la boquiIla a contacto del borde
del dep6sito de carburante o ]a abertura del
contenedor durante toda la operacidn de
abastecimiento. No utilizar un disposiUvo con
boquilla cerrada-abierta,
° Si se vierte carburante sobre Ia ropa, cambiarse la ropa inmediatamente.
° Nunca ilenar el dep6sito m&s de Io debido,
Volver a co[ocar el tap6n del gas y cerrar de
mode firme.
OPERACIONES DE SERVICIO GENERALES
, Nunca hacer funcionar la m_.quina en un &tea
cerrada.
° Mantener todas las tuercas y pemos apretados
para asegurarse de que trabaja en condiciones
seguras.
• Nunca modificar los dispositivos de seguridad.
Controlar su correcto funcionamiento regutarmente.
• Mantener la m_.quina libre de hierba, hojas
u otros residues acumulados. Limpiar las
salpicaduras de aceite o catburante y quitar
cuaJquier cosa mojada con carburante. Dejar
que la m&quina se enfrie antes de guardarla.
- Si se goipeaun objeto ajeno, hay que paTarse
e inspeccionar la m_quina. Reparar, si es
necesario, antes de volver a poner en marcha.
• Nunca hacer ning0n ajuste o reparaci6n con
el motor en funciSn.
• Verifique los componentes de Ia trampa para
c@spedy la canaleta de descarga con frecuenciay sustituyacon repuestos recomendades
per el fabricante cuando sea necesario.
• Las cuchillas del cortac_sped son afiladas.
Envolver la cuchi]la,ponerse guantes y poner
la maxima atenci6n cuando se hacen operaclones en elias.
• Controlar el funcionamiento del freno frecuentemente. Ajustar y hater las operaciones de
mantenimiento cuando eso sea necesario.
• Estar alerta y apagar la m,_quina si un nifos
entra en el &rea.
• Antes y durante la marcha atrAs, mirar adelante
y abajo para vet si hay nir_os pequeSos.
• Cortar hacia arriba y abajo de una pendiente
(15 ° Max), no de mode horizontal.
• Escoger una velocidad de marcha baja de
mode que no sea necesario pararse o cambiar
estando en una pendiente.
• Evitar arrancar, pararse o girar en una pendienre. Si Ias naedas pierden traoci6n, desconeetar
las cuchillas y preceder despacio cuesta abajo
en ]a pendiente.
• Si la m&quina se para mientras va cuesta
arriba, desconectar ]as cuchillas, poner Ia
marcha atr&s y ir hacia atr_.s despacio.
• No girar estando en pendientes si no es necesario, y luego girar despacio y gradualmente
cuesta abajo, si es posible.
• AI cargar o desoargar la m&quina, no sobrepase
el _.ngulom_'Jm0 recomendado de 15°.
- Mantener y sustituir las etiquetas de seguridad
e instrucci6n, cuando sea necesario,
• Asegurarse de que el _.rea est6 libre de otras
personas antes de ponerla en marcha, para [a
m&quina si alguien entra en el &tea.
• Nunca Ilevar pasajeros.
• No cortar marcha atr&s al no set absolutamente
necesario. Mirar siempre abajo y delante
mientras se precede atr&s.
- Nunca Ilevar niSos, incluso si hay las cuchillas
apagadas. Poddan caer y henrse seriamente
o interferir con el funcionamiento seguro de la
mAquina, los niSos que se han tlevado precedentemente pueden aparecer de pror_o en el
&tea de corte per otro paseo y set atropellados
o tumbados per la m&quina.
• Mantener los hires fuera del &rea de corte y
vigilados per un adulto responsable que no sea
el operador.
36
ESPECIFICACIONES DEL PRODUCTO
Capacidad y Tipo
de Gasolina:
3,0 Galenas/11.35 L
Regu|ai" Sin P!omo
Tipo de Aceite
_,Pl: SG-SL):
SAE 30 (sobre 32_F/0°C)
SAE 5W30 (deabajo32=F/0"C)
Capacidad
Aceite:
Con Filtro:
Sin Filtro:
de
Bujfa
64 Oz./1,96
60 OzJ1.77
Veloctdad de
Recarrido
(Mph/Kph):
Champion
(Abertura:
Marcha
Ade[ante:
Atr,_s:
QCI2YG
.040"I1.02
Sistema de
Carga:
3 Amps Bateria
5 Amps Luces
Bateda:
Amp/Hr:
Min. CCA:
Medelo Tamafie:
TorsiSn del Pemo
de [a Cuchilta:
45-55 FL Lbs./62-75
En ei estado de California, Ia lay exige Io anterior
(Secci6n 4442 del "California Public Resources
Code"). Otros estados pueden contar con otras
leyes parecidas. Les Ieyes federales se ap]ican
en [a tierras federales. Su centre de Servi¢io m,_s
cercano tiene disponible amortiguadores de chis.
pas para el silenciador. (Yea Ia seccibn de Partes
de Repuesto en e] manual Ingles del duer3o.)
L
L
ram)
0 - 5228,4
0 - 2,9,/4,7
28
230
UIR
Nm
.........FELICITACIONES per la compra de su tractor.Ha
side disefado, plani§cadoy fabdcado para dadeta
major confiabilidady el major rendJmientoposible.
En el case de qua se encuentre con cualquier
problema que no pueda solucionar idcilrnente,
haga el favor de ponerse en contacto con un
centre de servicio Sears o con un otto centre de
senzicio cualificado. Cuenta con representantes
bien capacitados y cornpetentes y con las herramientas adecuadas para darle servicio o para
reparar este tractor.
Haga el favor de leer y de guardar este manual.
Estas instruc-ciones le permitir_n montar y mantener su untdad en forrna adecuada. Siempre
observe las "REGLAS DE SEGURIDAD."
RESPONSABIMDADES
DEL CLIENTE
• Lea y observe las regias de seguridad.
• Siga un prograrna regular de mantenimiento,
cuidado y use de su tractor.
• Siga las instrucciones descritas en las secciones "Mantenirniento" y '_Alrnacenamiento"
de este manual.
- Utilice prendas de seguridad adecuadas a[
manejar la m&quina, incluidos (come mlnimo)
calzadode seguridad, galas protectoras y protecci6n auditiva. No utilice pantalones cortes
yio calzado abierto cuando torte Ia hierba.
• Inforrne siernpre a alguien de qua se dispone
a cortar Ia hierba en el exterior.
_kDVERTENCIA:
Este tractor viene equipado
con un motor de combustidn interna y no se debe
usar sobre, o cerca, de un terreno no desarrollado
cubierto de bosques, de arbustos o de c@sped,
o rnenos qua el sistema de escape del motor
venga equipado con un amortiguador de chispas
que cumpla con las leyes locales o estatales (si
exJsten). Si se usa un amortiguador de chispas,
el operador debe rnantenedo en condiciones de
trabajo eficientes.
37
ACUERDOS
DE, PROTECClON
PARA
LA REPARAClON
Congratulaciones
per su buena cornpra. Su
nuevo producto Craftsman@ est& dise_ado y
fabricade para funcionar de mode fiabie per
muchos aSos. Pero corno todos los productos,
puede necesitar alguna reparacibn de tante en
tanto. En este case tener un Acuerdo de Proteccibn para la Reparacibn puede hacer[es ahorrar
dinero y fastidios,
Compre ahora un Acuerdo de ProtecciSn para ta
ReparaciSn y prot@gese de molestias y gastos
inesperados,
Un Acuerdo incluye los puntos siguientes:
• Servic|o experto de nuestros 12.000 espeolatistas profesionales en la reparaci6n.
• Servieio ilimitado sin cargo alguno para
las partes y la mane de obra sobre todas Jas
reparaciones garantizadas.
• Sustitucibn del producto si su producto
garantizado no puede ser arreglado,
o Descuento de] 10% sobre el precio corriente
del servicio y de las partes relativas al servicie
no cubierEasper el acuerdo; tambi6n el t0%
menos sobre el precio cordente de un control
de mantenimiento preventive.
• Ayuda r_ptda per te|6fono- soporte telef6nF
co per parte de un representante Sears sobre
productosque requieren un arreglo en casa, y
adernds una programacibn sobre los arreglos
mAs convenientes,
Cuando se ha cornprado el Acuerdo, basta con
una Ilamada telefSnicapara programar el sewicio.
Puede ttamarcuando quiera, dia y noche o fijar
en linea una cita para obtener el servicio. Sears
tiene rodsde 12.000 especialistas profesionales
en la reparaci6n, que tienen acceso a m&s de
4.5 millones de partes y accesorios de calidad.
Este es el tipo de profesionalidad con qua puede
contar para ayudar a alargar ta vida de[ producto que acaba de cornprar, per touches aSos.
iCompre hey su Acuerdo de Protecci6n para Is
ReparaciSnJ
Se apliean alganas limit_clones y exclusiones,
Para conocer los precios y tener male Informacibn, ilame al 1-800-827-6655.
SERVICIO
DE INSTALACION
SEARS
Para fa inetafacidnprofesional Sears de aparatos de casa, puertas de garaje, calentadores de
agua y otros importantes articulos para la casa,
en U.S.A liamar a
1-800-4-MY-HOME®
Llaves
Hoja de pendiente
Llaves (2)
Su tractor nuevo ha side montado en ta f_brica con la excepci6n de aque[Ias partes que no se han
montado per razones de envio.
HERRAMIENTAS NECESARIAS PARA
EL MONTAJE
Un juego de llaves de tube facilitar& el montaje.
A continuaci6n se enumeran los tamafios de Ias
Ilaves est_.ndar.
(1) Llave de 1/2"
Cuchillo
(2) Llaves de 7/16"
Medidor de presiSn
Pinzas
Etiqueta
Cuando en este manual se mencionan los t_rminos "mane derecha" o "mane izq uierda" ee refiere
a cuando usted se encuentra en la posici6n de operacidn (sentado/a detr&s deIvolante de direcci6n).
PARA REMOVER
EL TRACTOR DE
LA CAJA DE CARTON
DESEMPAQUF. LA CAJA DE CARTON
•
Remueva todae las partes sueltas que
est_n accesibles, y las cajas de partes, de
la ¢aja de cart6n grande.
•
Certar a Io targo de las lineas de puntos
en todos los cuatro panetes de cart6n.
Remover los paneles de cierre y aplanar
los panetes laterales,
Revise si hay partee sueltas adicienales o
cart6n y remu6valas.
ANTES DE REMOVER
EL TRACTOR DE
LA CORREDERA
VERIFIQUE
AJUSTE
EL ASIENTO
1. Si_ntese sobre el asiento.
2. Levante la palanca del ajuste (A) haciaarriba
y mueva el asiento basra que alcance una
posicidn c6modaque le permitapresionar completamentesobre el pedal del embraguetfreno.
3. Desconecte la palanca para trabar el asiente
en Ia posici6n.
LA BATERiA
I. Levante deI capota a la posici6n levantada.
AVISO: Siesta bateria esta utitizada despu6s dei
rues y argo indicado sobre Ia etiqueta (la etiqueta
que se encuentra entre los terminales), cargue Ia
bater[a per uq minimo de una hera a 6-10 amp&
(Vea "BATER[#' en Ia secci6n de Mantenimento
de este manual).
•
Para instale Ia bateria, y cable de la
bateria, realice el procedirniento descrito en
"REEMPLAZAR LA BATERI_' del capitulo de
Servicio y Ajustes de este manual.
38
AVISO: Ahora puede rodar o conducir su tractor
fuera de la corredera. Siga las siguientes instruociones para remover e[ tractor de la corredera.
_La, DVERTENOIA: Antes de empezar, leer, entender y seguir todas las instrucoiones presentes
en la secc[6n de Operaciones de este manual.
Asegurarse que el tractor est_ en un _.rea bien
ventilada. Asegurarse que la zona delante del
tractor est_ libra de otras personas y objetos.
PARA HACER
RODAR
EL TRACTOR
FUERA DE LA CORREDERA
ev'ea la secci6n de Ia operaci6n para la Iocalidad y
la funcibn
de los controles)
1. Apriete la manilla de levantamientodel pist6n
y, Ievante la patanca de levantamiento del
accesono a su posici6n m&s alta.
2. Suelte el freno de estacionamiento presionando el pedal del freno.
3. Ponga el control de la rueda libre en la
posici6n de giro libre para desenganchar la
transmisi6n. (Vea "PARA TRANSPORTAR"
....en la secci6n de Operaci6n de este manual).
(Vea "PARA TRANSPORTAR" en la secci6n
de Operaci6n de este manual).
4. Haga rodar el tractor hacia delante fuera de
la corredera.
5. Remueva Ias bandas que sujetan la protecci6n contra la descarga en contra del tractor.
REVISION
DE LA PRESION
DE LAS
LLANTAS
Las Ilantas en su unidad fueron infladas demasiado en la f_brica por razones de envio. La
presi6n de las llantas correctas es irnportante
para obtener el mejor rendimientoen el corte.
° Reduzca la presiSnde los neum_tticosa la PSi
que se indica en estos.
REVISI6N
DE LA NIVELACI6N
DEL
CONJUNTO
Para obtener los mejoras resuitados en el corte,la
caja de ta segadora tiene que estar nivelada en la
forma adecuada. Vea "PARA NIVELAR LACAJA
DE LA SEGADORh:' en ]a secci6n de Servicio y
Ajustes de este manual.
REVISION DE LA POSICION ADECUADA
DE TODAS LAS CORREAS
Vea las figuras que aparecen para cambiar las
correas de impulsi6n de la cuchilla de la segadora y de movimiento en la secci6n de Servicio y
Ajustes de este manual. Verifiqueque las correas
sigan su paso correcto.
REVISION
DEL SISTEMA DE FRENOS
Una vez que usted haya aprendido a manejar su
tractor, verifique que el freno funcione correctamente, Ver "PARA VERIFICAR SI FUNCIONA
BIEN EL FRENO" en el capitulo de servicio y
ajustes de este manual.
tf LISTA DE REVISION
Antes de operar y de disfrutarde su tractor nuevo,
le deseamos que reciba el mejor rendimientoy la
mayor satisfaction de este productode calidad.
a el favor de revisar fa Iista a continuacion:
Se han completado todas las instrucciones
de montaje.
No quedan partes sueltas en la caja de
cartbn.
La bateria est_ preparada y cargada en forma
adecuada.
vf El asiento ha sido ajustado en forma c6moda
y apretado en forma segura.
J Todas las Ilantas han sido infladasen forma
adecuada. (Para fines de envio, las Itantas
se infiaron demasiado en la f&brica.)
t/( Aseg_rese que el conjunto segador estL=
nivelado en forma adecuada, de ladoa lado y
desde adelante hacia art&s, para obtener los
mejores resultados en et corte. (L.as llantas
tienen que estar infladas en forma adecuada
para Ia nivelac[6n.)
J" Revise las correas de imputsi6n y de la
segadora. Aseg_rese que recorran el paso
adecuado alrededor de las poleas y dentro
de todos los fijadores de las correas.
t/" Revise el atambrado. Fijese que todas las
conexiones todavia est_n seguras y que los
alambres est_n sujetos en forma adecuada.
J" Antes de conducir el tractor, aseg6rese que
el control de rueda libre este en la posici6n
de "transmisi6n enganchada" (Vea "PARA
TRANSPORTAR" en la secci6n de la Operaci6n de este manual),
AI mismo tiempo que aprende a como usar su
tractor, preste atencion extra a los puntos de
im_ortancia que se presentan a continuacion:
V" El aceite deI motor tiene que Ilegar aI nivel
adecuado.
vf El estanque de combustible t[ene que estar
_Ienocon gasolina sin plomo regular, nueva
y limpia.
J" Familiar_cese con todos los controles - su
ubicaci6n y su funci6n. Op_relos antes de
hacer arrancar el motor.
vf Aseg_rese 9ue el sistema de frenos est_ en
una condicion de operaci6n segura.
ti" Asegurarse de que el Sistema de Presencia
del Operador y el Sistema de Funcionamiento
Atr_s (ROS) funcionan de modo adecuado
(Vet las Secciones de Funcionamiento y
Mantenimiento en este manual},
J" Es [mportante purgar la transmisi6n antes
de operar su tractor por la primera vez. Siga
las instrucciones adecuadas para el empiezo
ypara purgar (Vea "PARA EMPESAR EL
MOTOR" y "PARA PURGAR LA TRANSMISION" en la secci6n de la Operaci6n de
este manual.
39
Estos simbolos pueden aparecer sabre su tractor o en ]a ]iteratura proporcionada con el producto.
Aprenda y comprenda sus significados.
R
MARCHA
N
ATR,_,S
NEUTRO
6
!\!
L
ESTRAI_GU* P,.-_P[OO
LACION
BAJO
"
MOTOR
APAGAI)O
_
MOTOR
MOTOR
S_STEMA ENCENI)_DO EN MARCHA
FUIgCIQNAMIENTO
ATRAS[ROB)
E:::3
LUOES
ENSENDIDAS
H
AITO
COMBUSTIBLE
BATER{A
_F
MARqHA
FRENODE
BS_ACIONA_IENTO
AccEsoRIo DEL
EMBRAGUE
ENGANCHAOO
ALTUBADE LA LEVANTAMIENTO
SEGAI)OFIA
DE LA SEGADORA
,T, %W c.0t.o
MARC.APA_.cA
OEMA.OO
PE_A..BPR..O_
ATRAS HACIAADELANTE
......................
LENTO
ACCESORIO0EL
PELIGRO,GUARDELAB
EMBRAGUE
MANOSY LOB PIESLEJO8
DESENGANCHADO
CRUCE.O
DE EMBRAGUE
MANTEN_AEL
AREA
PELIGROSOE
DESPEJADA
PENDIENTES
(Vealasecc_6nde las ragtasde segurldad)
PELIGRO indica un peligro qua, si no se evita,
provooa muerte o leoiones graves.
ADVERTENCIA
un opeligro
que,graves.
si no se evita,
puede
provooar indica
muerte
tesioneo
RUEDA LIBRE
(Solamente para los
modelos automagco)
PRECAUC16N
un peligro
que,
si no se evita,
puede
provocarindica
lesiones
ligeras
o moderadas.
PRECAUC|ON cuando Be utiliza sin el simbo(o de BriBe,
indica una situacidn que puede provocar daSoo al
tractor ylo al motor.
&
No $eguir Ias siguientes instruccianes
puede provocar heridas o muerte. Los
simbolos de arise do segu_idadBe ufilizan
para identificar informaciones do seguridad
relotivas a peligros que puedenprovocar Ia
muerie, hefidas graves y.todafios a la
m_quina.
!
SUPERFICIES CAUENTES indica un peligro que,
si no se evita, puede provocar la muerte, lesiones
graves yto danes a la mdquina.
FUEGO indica un peligro que. si no se evita, puedo
provocar la muerte, lesiones graves yio danos
a |a m_quina.
40
FAMILtAR|CESE
CON SU TRACTOR
LEA ESTE MANUAL LAS REGLAS DE SEGURIDAD ANTES DE OPERAR SU TRACTOR
Compare Ias ilustraciones con su tractor para famiIiarizarse con Ias ubicaciones de los diversos
controles y ajustes. Guarde este manual para referencia en el futuro.
Nuestros tractores cumplencon losest_ndares de seguridad del American National Standard ]nst_'ute,
(A) PALANCA DEL LEVANTAMtENTO DEL ACCESORIO - Se usa para levantar, bajar y ajustar
ef conjunto segador o los dem&s accesorios
montados en su tractor.
(B) PEDAL DEL FRENO- Se usa para frenar el
tractor y para hacer arrancar el motor.
(C) PALANCA DEL FRENO DE ESTACIONAMIENTO- Asegura el pedal del embrague!freno
en la posici6n dei freno.
(D) CONTROL DE ACELERACI6NtESTRANGULACION - Se usa para hacer arrancar y
controlarla ve]ocidaddeI motor.
(E) PALANCA DEL EMBRAGUE DEL ACCESORIO - Se usa para enganchar las cuchillas
segadoras, o los dem_.s accesorios montados
en su tractor,
(F) INTERRUPTOR DE IGNICION - Se usa para
hater arrancar o hacer parar el motor.
(G) S,ISTEMA DE FUNC]ONAMIENTO HACIA
ATRAS (ROS) EN POSICI6N "ON" - Permite la
operacibndel conjuntosegador o otro accesorio
accionado mientras que en rev_s.
41
(H) INTERRUPTOR DE LA LUZ - Enciende y
apaga las Jutes deranteras.
(J) PALANCA DE MANDO CRUCEROSe utiliza para fijar el movimiento hacia adelante
def tractor a Ia velocidad deseada sfn apretar el
pedal de marcha atr_s.
(K) PEDAL DE MARCHAADELANTE - Se utiUza
para el movimiento del tractor hacia adelante.
(L) PEDAL DE MARCHAATRAS - Se utiliza para
el movimiento del tractor hacia atr&s.
(M) CONTROL DE RUEDA LIBRE - Desengancha Ia trans-misi6n para empujar o arrastrar,
(P) DISPOSITIVO DE AVISO DE SERVICIO/
CRONOMETRO- Indica cudndo hay que hacerles el servicio aI motory a la cortadora.
'La operaci6n
de cualquier
tractor puede hacer que saiten objetos extra*os
dentro de sus ojos, Io que puede producir da_os graves en _stos. Siempre use
anteojos
de seguridad
o protecciones
para los ojos mientras opere su tractor
o cuando haga ajustes o reparaciones.
Recornendamos
galas de seguridad o
una m_scara
COMe
USAR
de visi6n
amPlt a de segudda
SU TRACTOR
PARA AJUSTAR EL FRENO DE ESTACIONAMtENTO
Su tractor viene equipado con un interrupter
sensor que exige la presencia det operador.
Cuando el motor est& funcionando, si el operador trata de bajarse del asiento sin primero
aplicar el freno de estacionamiento, se apagar&
el motor,
I. Presione el pedal del freno (B) completamerits y sostengato.
2, Jale hacia arriba la palanca deI freno de
mane (C) y mant_ngala en esa posici6n;
suelte gradualmente el pedal del freno (B),
y luego sueite la pa]anca del freno de mane.
Aseg0rese que e/freno de estacionamiento
va a sujetar el tractor en forma segura.
•
d usada
Gire la liars
sobre las galas.
de ignici6n
(F) a la posici6n
de
apagado "STOP" y remueva la llave at abam
donar el tractor para evitar el use noautor[zado.
IMPORTANTE: Dejando e! interrupter de la
ignici6n en cualquier posici6n otra que "STOP"
causar i que la bateria se descargue (muerta).
AVISO: Bajo ciertas condiciones, cuando el
tractor est,- parade con el motor andando en
vacio, los gases de escape del motor caliente
pueden hacer que et c_sped se ponga "caf_."
Para eliminar esta posibilidad, siempre pare el
motor cuando pare elttactor en _reas con c_sped.
h_PREOAUClON:
Siempre pare el tractor cornpletamente, seg0n se ha descdto anteriormente,
antes de abandonar Ia posici6n del operador,
PARA USAR EL CONTROL DE LA ACELERACION (D)
Siempre opere et motor a una aceleraci6n
comp]sta.
• Si el motor funeiona a una velocidad inferior a
la m_lxima (r&pida), su rendimiento d[sminuye,
• El rendimiento bptimo se obtiene a Ia velocidad
m_Lxima(r&pida).
PARADA
CUCHILLAS DE LA SEGAOORA • Mueva ta control del embrague del accesorio
a la posici6ndesenganchado (t_).
MOVERSE HACIA ADELANTE Y HACIA
ATR,_S
La direcci6n y la velocidad de movimientos
est&n controlados per los pedales de marcha
adelante y atr&s.
1, Poner en marcha el tractor y quitar el freno
(?)"Eogaoo.. o" ( )"Do,oogaoo,.do" de mane.
(Engaged)
(Disengaged)
2. Apretar Ientamente el pedal marcha adelante
(K) y atr&s (L) para iniciar el movimiente. M&s
IMPULSI6N DE RECORRLDO se aprieta el pedal y mayor es Ia velocidad.
o Para parar el mecanismo impulsor,presione el
pedal del freno completamente.
tMPORTANTE: Los pedales de marcha adelante
y atr_.svuelven a Ia posici6n neutra cuando no
est_.n apretados.
MOTOR *
o Mover la palanca (D) de mando entre la
posici6n de veloeidad media y m&xima (r_pida).
AVISO:Si no se mueve la patanca de mando
entre la posici6n de velocidad media y m_,xima
(r&pida), antes de pararse, se puede causar un
"retorno de llama" del motor.
42
UTILIZAR EL MANDO CRUCERO
El mando crucero se puede utiiizar s61odurante
la marcha hacia adelante.
CARACTERiSTtCAS TECNICAS
El control de velocidad crucero s61odebe usarse
mientras el tractor est6 en labores de siega o
transportaci6n, movi6ndose sobre superficies que
est6n relativamente planas y rectas.
Otras condiciones de trabajo, come la poda, que
requiere ve[ocidades bajas, poddan desengranar
el control de velocidad crucero. No emplee el
control de velocidad crucero mientras eltractor se
desplaza per elevaciones, terrenos escarpados
o mientras et tractor est6 en Iabores de poda o
vimndo.
I. Oon el pedal (K) de marchaadelante apretado
a la velocidad deseada, mover la palanoa de
mando de crueero hacia adelante hasta la
posioi6n "SET' y mantenerla mientras se levanta el pie del pedal, lueoo soltar la palanca
(J) de mando de crucero,
Para desconectar el mando de crucero, e pujar
la palanca hacia atr&s en la posiei6n "OFF", o
apretar completamente el pedal del freno.
PARA AJUSTAR LA ALTURA DE CORTE DE
LA SEGADORA
PAPA AJUSTAR LAS RUEDAS CALIBRADORA$
Las ruedas calibradoras estdn bien ajustadas
cuando se encuentran un poco a distancia de]
terreno al mismo tiempo que la segadora est6 a
la altura de corte deseada, Entonces ]as ruedas
calibradoras mantienen el conjunto segador en
posici6n para prevenir el corte raspeo en casi
todos los terrenos.
AVISO: Ajuste las ruedas calibradoras con el
tractor en una superficie nivelada plana.
t. Ajuste la segadora a la altura de corte
deseada con la manitla de ajuste de altufa (Vea "PARA AJUSTAR LA ALTURA DE
CORTE DE LA SEGADOR._' en la secci6n
de Operaci6n de este manual).
2. Con la eegadora a la altura deseada para Ia
posici6n de corte, se tienen que montar ]as
ruedas calibradoras de mode que queden
un poco sobre el suelo. Instale las ruedas
calibradoras en el agujero adecuado con el
perno con resalto, la arandela de 3/8, y la
tuerca de seguridad de 3/8-t6 y apri_telos
en forma segura.
3. Repita el procedimiento para et lade opuesto
instalando la rueda calibradora en el mismo
agujero de ajuste.
La posici6nde la palanca elevadora (A) determina
a qu6 altura se cortar& el c_sped.
• Coloque la palanca elevadora en la ranura de
la altura deseada.
La gama de Ia altum de cortees de aproximadamente 1 a 4 pulgadas. I.as alturas se miden
desde el suelo a la punta de la cuchilta cuando
el motor no est& funcionando. Estas alturas son
aproximadas y pueden variar dependiendo de [as
condiciones del suelo, de la altura det c_sped y
del tipo del c_sped que se est& segando.
• El c_sped promedio debe cortarse aproximadamente a 2-1/2 pulgadas durante la temporada fria y sobre 3 pulgadas durante los meses
ca]urosos. Para obtener un c_sped m&s saludable y de meier apariencia, siegue a menudo
y despu6s de un crecimiento moderado.
. Para obtener el meier rendimiento de torte, el
c_sped que tiene m&s de 6 pulgadas de altura
debe segarse dos veces, Haga el primercorte reIativamente alto; el segundo a }a altura deseada,
PARA OPERAR LA SEGADOPA
Su tractor viene equipada con un interrupter
sensor que exige la presencia deI operador, Si
el motor est& funcionando y el embrague del
accesorio est& enganchado y el operador trata
de bajarse det asiento, se apagar_, el motor.
Tiene que mantenerse sentado completa y
centra]mente en el asiento para impedir que el
motor vacile o se apague cuando se opere su
equipo en terreno disparejo, dspero o en cerms.
1. Seleccione la altura de corte deseada.
2, Baje la segadora con el control de levantamiento del accesorio.
3, Haga arrancar la_scuchillas de la segadora
enganchando el control del embrague del
accesorio.
PARA PARAR LAS CUCHILLAS DE LA SEGADORA - desenganche el control del embrague
del accesorio.
_IkPRECAUCI6N: No opere la segadora sin,
ya sea, el recogedor de c6sped complete en Ias
segadoras asi equipadas o con Ia protecci6n
contra fa descarga (S) en su lugar,
43
FUNCIONAMIENTO ATRAS
Tu tractor est& equipado con el Sistema de Funcionamiento Atr&s (ROS), CuaIquier tentativa del
operador de viajar marcha atr&s con el embrague
puesto apagar& et motor a rnenos queta llave de
(gnici6n s.eponga en la posici6n de "ON" del ROS.
ATENOION: Ir marcha atrAs con el embrague
puesto para cortar, no es recomendabte, Poniendo el ROSen posici6n "ON", para permitir el
funcionamiento atr_s con et embrague puesto, se
tiene que hacer s61o cuando el operador Io considera necesario para reposicionar Ia mAquina con
el dispositivo embragado. No siegue en rev_s
a menos que sea absolutamente necesario.
USAR EL S]STEMA DE FUNCtONAMIENTO
ATR/_S ....Utiiice el tractor solamente si estb seguro de que
no ingresar&n niSos ni otras personas o animales
al area deride se va a cortar el c6sped.
I. Presionar el pedal freno hasta el fondo.
2. Con el motor en marcha, girar la Itave del
interrupter de la igniciSn en el sentido inverse
aI de Ias agujas deI reloj hasta la posici6n
"ON".
3 Mire haoia abajo y hacia atr_s no s61o antes
de ir marcha art&s, sine mientras est@yendo
marcha atrbs.
4. Presione lentamente el pedal reverse de Ja
imputsi6n para comenzar el movimiento.
5. Cuando el use del ROS es mbs necesario, d@
vuelta a [a Ilave de ignici6n en el sentido de
{as agujas del reloj hasta la posici6n"ON".
Posici6n ROS "ON"
Motor en posiciSn "ON"
PARA OPERAR EN CERROS
_IbADVERTENCIA: No maneje hacia arriba o
hacia abajo en certes con pendientas superioresa 15° y no maneje atravesando ninguna
pendiente. Utilice la guia de la pendiente
proporcionada en la parte posteriora de este
manual.
• Escoja Ia velocidad m_.s tenta antes de arrancar hacia arriba o hacia abajo en cerros.
• Evite parar o cambiar la velocidad en certes.
• Si es absolutamente necesario el parar, empuje
e! pedal de freno r&pidamente a Ia posici6n de
freno y enganche el freno de estacionamiento.
" Para voiver a empezar con el movimiento,
suelte Ientamente, elfreno de estacionamiento
y el pedal de freno.
• Apretar despacio el pedal apropiado hasta la
posici6n m_s lenta,
• Gire siempre lentamente.
44
PARA TRANSPORTAR
Cuando empuje o arrastre su tractor asegdrese
de desenganchar la transmisi6n poniendo el
control de la rueda libre en la posici6n de marcha
de rueda libre, El control de marcha de rueda
tibre esta situado en Ia barra de tracci6n trasera
del tractor.
I. Levante la palanca de levantamiento del accesorio a la posici6n m&s alta con el control
de levantamiento del accesorio.
2. Tire deI mando de la rueda Iibre hacia afuera
y hacia abajo hasta que se coloque en Ia gula
y su@Italode manera que se mantenga en Ia
posici6n de desenganchada.
• No empuje o arrastre el tractor a m,_s de dos
(2) MPH.
• Para volver a ac_Jonar ta transmisiSn, invierta
este procedimiento.
Transmisi6n Enganchada
Transmisi6n Desenganchada
AVISO: Para proteger el cap6 contra el da6o
cuando transporte su tractor en un cami6n o
remolcador, aseg_rese que el cap5 est@cerrado
y asegurado al tractor. Use tos medics apropiados para amarrar el cap6 al tractor (cuerdas,
cordeles, etc.),
REMOLQUE DE CARRETILLAS O OTROS
ACCESORIOS
Remolque solamente los accesoriosrecomendados y especificados per eI fabricante dot tractor.
Use sentido comL_ncuado este remo]cando. Las
cargas pesadas, cuando este yendo sobre una
pendiente, son peligrosas, Ias Ilantas pueden
perder su tracci6n con el terreno y pueden oca_
sionar que pierda el control de su tractor.
MECANISMO DE AVtSO DE SERVIClO /
CRON6METRO
El mecanismo de arise de servicio muestra el
nSmero total de horas que ha estado en funcionamiento el motor, y se enciende y se apaga
de manera intermitente cuando el motor o la
cortadora necesitan servicio. Cuando se requiere
servicio, el mecanismo de arise de servicio se
enciende y se apaga intermitentemente per un
lapse de dos betas. Para hacerles el servicio al
motor y a la cortadora, lea el capltulo de Mantenirniento de aste manual.
NOTA: El dispos_k,o de aviso de se_cio funciona
cuando Ia llave de ignici6n o arranque se encuentra en cualquier posici6n menos en "STOP"
("PARE"). A fin de garantizar la precisi6n de [a
lectura, aseg_rese de que el arranque permanezca en la posiciSn"STOP" cuando el motor est@
apagado.
ANTES
DE HACER ARRANCAR
EL
PARA HACER ARRANCAR
EL MOTOR
A] hacer arrancar el motor por la pdmera vez o
si se ha acabado e! combustible del motor, se
necesitar,_tiempo para el arranque extra para
mover el combustib[e desde el estanque hasta
el motor.
1. Aseg_rese que el control de rueda Iibre este '
en ]a posiciSn enganchada.
2, Si_ntase en el silIbn en la posiciSn de operaei6n, suelte el pedal del freno y ponga et
freno de estacionamiento+
3. Mueva el embrague del aecesorio a ¿a
posici6n desenganchado disengaged.
4. Mueva la palanca de controi de la ace[eraci6n
a la pos[ciSn de estrangulaci6n.
AVISO: Antes de arrancar, lea Las instrucciones siguientes para el arranque en clima fr{o y
tempfado.
5. lnserte la Ifave en la ignici6n y gire la llave
en el sentido que giran tas manillas del reloj
a la posici6n de arranque start, y suelte la
Ilave tan pronto como arranque e( motor. No
haga funcionar el arrancador continuamente
pot m_s de quince segundos por minuto. Si
el motor no arranca despu_s de ratios intentarlos, mueva el control de la aceleraciSn a
la posici6n de r&pido, espere unos cuantos
minutos y b'ate de nuevo. Si el motor sigue sin
funcionar, mueva el control de la aceleraci6n
a la posici6n de estrangulaci6n y intente de
MOTOR
REVISE EL NIVEL DE ACEITE DEL MOTOR
EI motor en su tractor ha sido enviado desde la
f_.brica Ileno con aceite de calidad para verano.
1. Revise el aceite del motor con el tractor en
terreno nivelado.
2. Remueva la tapaivafilla indicadora de nivet de
relleno def aceite y Iimpielas, vuelva a insertar
la varilla [ndicadora de nivel y atornille la tapa
hasta que quede apretada, espere por unos
cuantos segundos, remu_vata y lea el nivel
del aceite. Si es necesario, agregue aceite
basra que se haya alcanzado Ia marca Xeno
(FULL) en la varilla indicadora de niveI. No Io
Ilene demasiado.
• Para la operaci6n en clima frio, debe cambiar
el aceite para poder arrancar m_.s f&cifmente
(Vea "Tabla de Viscosidad Del Aceite" en la
seccibn de Mantenimento de este manual).
• Para cambiar el aceite del motor, vea la secci6n
...... de Mantenimento en este manual.
AGREGUE GASOLINA
• Uene el estanque de combustible. Llene
hasta la parte inferior deI cue[Io de relleno de1
estanque de gaso[ina. No to Ilene demasiado.
Use gasolina regular, sin plomo, nueva y [impia con el mfnimo de 87 octanos. (El uso de
gasolina con plomo aumentar& los dep6sitos
de 6xido de plomo y carbono y se reducir_, la
duraci6n de la v&lvuta). No mezcle el aceite
con la gasolina. Para asegurar que Ia gasolina
utilizada sea fresca compre estanques los cuales puedan ser utilizados durante los primeros
30 dias.
Ruevo+
_PRECAUCI6N:
Limpie el aceite o el combustible derramado. No almacene, derrame o use
gasolina cerca de una llama expuesta+
IMPORTANTE: Cuando se opere en temperaturas por debajo de 32°F (OoC) use gasolina de
inviemo limpia y nueva para auedar a asegurar
un buen arranque en clima frio+
PRECAUClON: Combustibles mezclados con
alcohol (conocidos como gasohof, o el uso de
etanol o metanot) pueden atraer la humedad,
la que conduce a la separaci6n y formaci6n de
&cidos durante el almacenamiento. La gasolina
acidica puede daSar el sistema del combustible
de un motor durante el almacenamiento. Para
evitar los problemascon el motor, se debe vaciar
el sistema de combustible antes de guardarlo por
un per{ode de 30 dias o m_s. Vacie el estanque
de combustible, haga arrancar el motor y h&galo
funcionar hasta que Ias I{neas de! combustible y el
carburador queden vacios. La pr6ximatemporada
use combustible nuevo. Vea Ias Instrueciones
para el Almacenamiento para m&s informaci6n.
Nunca use productosde limpieza para el motor o
para el carbu rador en el estanque de]combustible
pues se pueden producir daSos permanentes.
ARRANQUE CON TIEMPO TEMPI_ADO
(50°F110°C Y M/_S)
6. Cuando arranque el motor, mueva el control
de Ia aceleraci6n a la posicibn de r&pido.
• Los accesorios y el embrague ahora pueden
ser utitizados+Si el motorno acepta esta carga,
vuelva a arrancar el motor para permitirle que
se caliente pot un minuto utilizando el estrangulador como describido ardba.
ARRANQUE CON TIEMPO FRiO (50°F/10°C
Y MENOS)
6. AI hater arrancar el motor, mantenga el
control de la aceleraci6n a Ia posicibn de estrangu[aci6n hasta que el motor se caliente y
empieze funcionar mal+ Una vez que empieze
a funcionar real, mueva inmediatamente el
control de la ace|eraci6n a la posici6n r&pida.
El calentamiento del motor puede tomar a
partir de varios segundos a vados minutos
(cuanto m&s fria es latemperatura, m&s largo
es el calentamiento),
CALENTAMIENTO PARA LA TRANSMISION
AUTOMATICA
Antes de conducir la unidad en un tiempo frio, la
transmisi6n debe set calentada como las instrucclones siguientes:
1. AsegOrese que el tractor este situado en una
supeff_cie nk,elada.
2. Alivie el freno de estacionamiento y deje que
el freno vuelva a la posici6n de operaci6n.
3. Permita que Iatransmisi6n se caliente durante
un minuto. Esto puede set echo dumnte e!
tiempo de calentamiento del motor.
45
• Losaccesoriospuedenserutilizadosduranteel
perJodo de] recalentamiento del motor despu_s
que ia tmnsmisi6n halla side calentada.
AVISO: Si se encuentra a mucha altura (sobre
3000 pies) o en clima frfo (per debajo de 32°F
[0°C]), la rnezcla de] combustible del carburador
debe set ajustada para el rnejor rendimiento
del motor. (Vea "PARA AJUSTAR EL CARBURADOR" en ta secci6n de Servicfo y Ajustes de
este manual).
PURGAR LA TRANSMISI(_N
..........
_,PRECAUCI6N:
Nunca enganche o desen9anche la palanca del control de rueda libra
cuando el motor esta funcionando.
Para asegurar la operacf6n y ejecuciSn adecuada,
es recomendado que la transmisi6n sea purgada
antes de operar el tractor para ta pdmera vez.
Este proceso remover& cualquier aira adentro
de Ia transmisi6n que se halla formado durante
el transporte de su tractor.
IMPORTANTE: Si per acaso su transmisi6n debe
set removida para servicio o reemptazo, debe
ser purgada despu6s de la reinstalaci6n y antes
de operar el tractor.
_. Para mayor seguridad, ubique el tractor en
una superficJe nivelada, despejada de cualquier objeto y abierta, con el motor apagado
y el freno de mane puesto.
2. Desenganche la transmisidn poniendo el
control de rueda libre en la posicidn de desenganchado (Vea "PARA EL TRANSPORTE" en
esta secci6n de este manual).
3. Sentado en eJ as]ante det tractor, empiece
et motor. Despu_)s que este cordendo el motor, mueva el control de estrangu]aci6n a Ia
posicidn de lento. Quitar el freno de mane.
j_I, PREOAUCION: En el transcurso de] paso 4,
puede que de pronto se pongan en movimiento
las ruedas.
4. Apretar el pedal de marcha aria]ante hasta
el rondo, mantener per cinco (5) segundos
y soltar el pedal. Apretar el pedal de marcha
atr_.s has_tael rondo, mantener per einco (5)
segundes y so]tar el pedal. Repetir el procedira]ante tres (3) veces.
5. Apague el motor y embrague ef freno de
estacionamiento.
6. Enganche la transmisi6n poniendo el contro_
de rueda Iibre en fa posici6n de conducir (Vea
"PARA TRANSPORTAR" en esta secciSn der
manual).
7. Sentado en el asiento del tractor, err}piece el
motor. Oespu_s que este corriendo el motor,
mueva el control de estrangulaci6n media
(I/2) velocidad. Quitar el freno de mane
8. Conduzca su tractor hacia adelante durante
aproximadamente cinco pies y entonces hacia marcha atr&s cinco pies (I50 cm). Repita
este preceso tres (3) veces.
Su transmisiSn esta ahora purgado y dispuesto
para la operaci6n normal.
CONSEJOS PARA SEGAR
• I'4ose pueden usar fas cadenas para tas[tantas
cuando la caja de la segadora est_ adjunta a]
tractor.
• La segadora debe estar nivelada en forma
adecuada para obtener el meier rendimiento
at segar. Vea "PARA NIVELAR LA CAJA DE
LA SEGADORi_' en la secc/Sn de Servicio y
Ajustes de este manual.
• El lade izquierdo de la segadora se debe usar
para recorte.
• Maneje de mode que los recortes se descarguen
en e{ &rea que ya ha side cortada. Mantenga
et &tea de corte a la derecha de] tractor. Esto
producir&una distdbuci6n mAs pareja de los
recortes y un corte m&s uniforme.
• At segar las &rea grandee, empiece girando a
la derecha de mode que tos recortes se descarguen, aiej&ndose de los arbustos, cereos,
entradas de autom6viles, etc. Despu_s de una
o dos vue|tas, siegue en la direccibn opuesta,
hacienda virajes a {a izqu{erda, hasta que
termine.
46
• Si el c_sped est,_ demasJado alto, se debe
segar dos races para reducir la carga y los
posibles peligros de incendio debido a los
recortes secos. Haga el primer corte relativemanta alto; el segundo a la a{tura deseada.
* NO siegue et c_sped cuando est_ mojado. Et
c_sped rnojado taponar& ta segadora y dejar&
montones indeseabtes. PermJta que se seque
el c_sped antes de segaflo.
. SiernpreopereelmotorconunaaceleracJ6n
completa cuando siegue para asegurarse
de conseguir un mejor rendimiento y una
descargaaprop]adadetos materia_es. Regu_e
la velocidad de recorrido seleccionando un
cambio Io suficJentemente bajo para obtener un
rendimiento de corte de parle de su segadora
y tambi_n la calidad del corte deseada.
* Cuando opere con accesorios, seleccione una
velocidad de recorrido que se acomode al terreno y le permita obtener el meier rendimtento
del accesorio qua se est& usando.
PROGRAMADE
MANTENIMIENTO
._N'_DE CA_
CAOAUSO
6
HORAS
C_._A
CA_
so
HOP.AS
HORAS
CADA I
_oo TEMPORA_
CA_
HORA_;
_L_,,_z_r_
ill i,i,
Ravis_r la oper_ci6n d_t _reno
A_r
la presi_ri
d_
)_s gantas
_
T _;_;;_Li_;_do
dop_o_
R
V
r
V
F
I'/
d'(_o_
ratBu_e_fesistsmad ROS
IV"
T Tob_o
_.b,=o_,_
0
R u,.p=
_,ba=_.a
v_t.-.l._=
..................................
If
Rev_ r el e_fri_m_ nt¢dclt_ar_j_
V
Limpie los k'Bsid_osde b plac_ d= dlr_ct6n
in_pec_ne
_ .................
...................
_ev_ar
_i_
_aS ¢orrea_
$_p_zo
Rsvisa.r el nk_l _el a_
V_
_
........................
k_(_
V'
_e$molor
V
_
I_
oo ,o,o,°0,o
oo,
4 i,oo°,,o,
v .....................
M c_,_ _=.i_
_ _o_(o_.
,_o_
0
Limp_r eI filt,_ d_ alrs
T
Lim_at _ mji_la _e a_e
O
_t_soe_io_.ar el sil_.imdod
V_._
_ ................
........................
V'=
V
R a_ua_otda_]s_
Cat, bier _l fil_m_e acei_e (si e_luir,ado)"
Catm0i(_r
3,_JP,b_t
'
V_.2
Im i0_is
el ¢_r_ucho
#
V
de p_pet dsl t_i_
d,s _lt_
...............
_
V"
_#_2
Cambia_"el _1{_O
da co_bustibl_
RECOMENDACIONES
GENERALES
La garant_a de este tractor no cubre los artlculos que hart estado sujetos al abuso o a la negligencia det operador. Para recibirtodo el valor
de la garantia, el operador tiene que mantener
la segadora segSn las instrucciones descritas
en este manual.
Hay algunos ajustes que se tienen que hacer
en forma peri6dica para poder mantener su
tractor adecuadamente.
AI menos una vez cada estaci6n comprobar
si es necesario efectuar los adjustes descritos
en ]as secciones de Servicio y Ajustes de este
manual.
• Una vez at aho, cambie la buj{a, limpie o
cambie el filtro de aire y revise si las cuchillas y las correas est_,n desgastadas. Una bujla nueva y un filtro de aim limpio aseguran
una mezc[a de aire-combustible adecuada y
ie ayudan a que su motor funcione mejor y
que dure m_.s.
ANTES DE CADA USO
1. Revise el nivel del aceite de] motor.
2. Revise la operaci6n de los frenos.
3. Revise la presiSnde las Ilantas.
4. Ver[fique que et sistema de presencia del
operado y ROS funcionen adecuatamente.
5. Revise si hay sujetadores sueItos.
TABLA DE LUBRICACION
OPemo articuladodeI volant
P=
(_) Accesoriode----_---_r---(_)
Accesoriode
_) Accesodo-'_T; ll_-'.-t
'''."
" TI
de Grasadel
_ $ ", "\ t _
"..
la R_eda
Delantera
._ _._....."_.j"_
de Grasade(
[_" _.
J F, "_'. Rodamiemo
_
I"\
,7 delaRueda
(_ Plancha/ __
Delantera
delengran_eI f _')
) _\-,
deSectorde
i i .I._;_-_L.
I !
r'4_--
Grasa de proposito general
Refi_rase a la secci6n del "MOTOR" en
Mantenimiento
IMPORTANTE: No aceite o engrase los puntos
pivotes, los que tienen rodamientos de nil_n
especiales. Los lubric_ntes viscosos atraer_.n
polvo y mugre, Io que acortara ]a duraci6n de
los rodamientos. Si cree que [ubdcarse, use
solamente un lubricante tipo grafito de polvo seco
en forma moderada.
47
TRACTOR
Siempre observe las reglas de seguridad cuando
d@mantenimientoo
OPERACION DEL FRENO
Si el tractor necesita m#.s de cinco (5) pies para
detenersea la mA.vjmavelocidad al cambio m_ alto
en una supe_cie nivelada, de hormig6n o pavimentada, hay que hacerle el se_cio alfreno. Ver "PARA
VERIF[CAR Sl FUNCIONA BIEN EL FRENO" en
el capitulo de Ser'_4doy ajustes de este manual.
LLANTAS
• Mantenga todos los neum&ticoscon la presiSn
de aire adecuada (Ver la PSi que so indica en
estos).
• Mantenga Ins Ilantas sin gasolina, aceite o
substancias quimicas para control de insectos
que pueden daSar la goma.
• Evite los tocones, las piedras, tas grietas profundas, los objetos afilados y otros peligros
que pueden daSar a Ias Ilantas.
AVISO: Para arreglar [as Ilantas perforadas
y p6ra prevenir que tenga Ilantas pinchadas a
causa de pequeSas fugas, puede eomprar el
sello para Ilantas de su comerciante de partes de
................ repuesto m&s eercano. Elsello previene que las
Ilantas se sequen y tambi_n la corrosi6n.
SISTEMA PRESENCIA OPERADOR Y SlSTEMA FUNCIONAMIENTO ATRAS (ROS)
Asegurarse de que el sistema de presencia
del operador y el sistema funcionamiento atr&s
funcionen bien. S[ tu tractor no funci6n como
descrito, reparar el problema inmediatamente.
• El motor no arrancar& si el pedal de embragueifreno est_ compietamente presionado y
el mando deI embrague del accesorio est,.
desconectado:
VI_R1FI#Z S[STEMA PRESENCIA OPERADOR
• Cuando el motor est& en marcha cualquier
tentat va del operador de abandonar etasiento
sin haber puesto el freno de estacionamiento
primero, apagar_, el motor.
. Cuando el motor est& en marcha y el embrague
del accesorio es_ conectado, eualquier tentativa deI operador de abandonar el asiento,
apagar_, el motor.
• El embrague deI accesorio no tendria que
funcionar nunca si el operador no est,_ en su
asiento.
VF_RIFII_ZSISTEMAFUNCIONAMIENTOATRh, S
(ROS)
• Cuando el motor est,. en marcha con el interruptor de ]lave en posici6n de motor "ON" y el
embrague del aceesorio conectado, cualquier
tentativa deI operador de viajar marcha atr&s
apagar& el motor.
PosiciSn ROS "ON"
• Cuando el motor est,. en rnarcha con el inte• rruptor de ilave del sistema de funcionamiento
atr&s (ROS) en la posici6n "ON" y el embrague
del acc-esodo conectado, cualquier tentativa del
operador de viajar marcha art&s, NO apagar_.
el motor.
CUlDADO DE LA CUOHILLA
Para obtener resultados 6pt[mos, ins cuchillas
de la cortadora deben estar aflladas. Reemplace
las cuchillas que est_n gastadas, dobladas o
daSadas.
REMOCION DE LA CMCH1LLA
1. Levante la segadora a su posici6n m_.salta
para permitir e] acceso a Ins cuchillas.
AVlSO:
Proteja sus manos con guantes y/o
envuelva la cuchilla con una tela gruesa.
2. Remueva el perno de la cuchilla dandole
vueltas en el sentido inversoal de Ins agujas
del reloj.
3. Instale la nueva cuchilla con el estampado
"THIS SIDE UP" en la direccion de la segadora y deI conjunto del mandril.
IMPORTANTE: Para asegurar la [nstalacion apropiada, posicioneel agujero central de lacuchilla
con la estrella del conjunto del mandril.
4. lnstale y apriete el perno de Ia cuchilIa firmemente (Par 45-55 pies/libras/62-75 Nm).
1MPORTANTE: El perno especial de Ia cuchilla
es termotratado.
Cuchilla_
L._
_¢_-_
/
CenjuntodeI
Central j"_'--_;k'v-/_
])
"_Estrella
Pernode Ia_Cuchill_'_._
BATERiA
Su tractor cuenta con un sistema de carga de la
bateria que es suficiente para el uso normal, Sin
embargo, si se carga la bater_a peri6dicamente,
con un cargador de autom6viJes, se prolongar_
su duraci6n,
• Mantenga la bateria y los terminales Iimpios.
• Mantenga los pemos de la bateda apretados.
• Mantenga los agujeros de ventilaci6n pequeSos abiertos.
• Vuetva a cargar de 6-10 amperes por 1 hora,
AVI$O: La bateria del equipo original de su
tractor no becesita servicio. No intente abrir o
remover Ins tapas o cubiertas, No esnecesario
aSadir o verificar el niveI deI _Iectr63[to.
PARA LIMPIAR LA BATERIA Y LOS TERMINALES
La corrosi6n y la mugre de la bateria y de los
terminales pueden producir"escapes" de potencia
en Ia bated&
I. Remueva Ia protecciSnde los terminales.
2. Desconecte el cable de la bateria NEGRO
primero y luego el cable de la baterfa ROJO
y remueva Ia baterfa del tractor.
3. Enjuague la bateria con agua corriente y
s@quela.
4. Umpie los terminales y los extremos del cable
de la bater{a con un cepi!lo de alambre hasta
que queden bri!lantes.
Motor en posici6n"ON"
(Operaci6n Normal)
48
5.
6.
Cubra los terminales con grasa o parafina.
Reinstale la bater[a (Vea "Reemplazar la
Bateria" en ta secci6n de Servicio y ajustas
de este manual).
ENFRIAMIENTO DEL TRANSEJE
Las aletas de enfdamiento y el ventilador de
]a transmisi6n tienen que mantenerse limpios
para asegurar e] enfriamiento adecuado.
No trate de limpiar e] ventilador o la transmisi6n
cuando el motor est_ funcionando o mientras Ia
transmisi6n est@caliente.
• lnspeccione el ventitador de enfriamiento
para asegurarse qua ]as aspas del ventilador
est_n intactas y limpias.
• Inspeccione las aletas de enfriamiento para
verificar si hay mugre, recortesde c_sped u
otros materiales. Para impedir daSos a las
juntas, no use un rociador de aire compresado o de alta presibn para timpiar las aletas
de enfdamiento
NIVEL DEL FLUtDO DE LA BOMBA DEL
TRANSEJE
.............El transeje ha sido sellado en Ia f&brica y el
mantenimiento del fluido no es necesario para
la vida del transeje. En el caso de que el transeje se fittrase o necesitase servicio, haga el
favor de ponerse en contacto con un centro de
serAcio Sears o con un otro centro de servicio
cualificado.
Revise el nivel de] aceite del c_.rterantes de
arrancar el motor y despu6s de cada ocho (8)
horas de uso continuado. Apriete la tapa del
re[leno/varilla indicadora de nivel de] aceite en
forma segura cada vez qua revise el nivel del
aceite.
PARA CAMBIAR
ELACEITE
DEL MOTOR
Determine la garna de la temperatura esperada
antes de carnbiar el aceite. Todo el aceite debe
cumplir con laclasificaciSn de servicioAPt SG-SL
Aseg_rese que eltractor est@en unasupe rficie
nivelada.
•
EI aceite se drenar& m&s f&cilmente cuando
est@catiente.
•
Recoja el aceite en un envase adecuado.
1. Remueva Ia tapa!varilla indicadora de nivel
para relleno del aceite. Tenga cuidado de no
permitir que Ia mugre entre en el motor cuando
cambie el aceite.
2.
Deslice el accesorio de purgadel aceite desde
]a posici6n de ensamblaje en el alojamiento
de la turbina del motor y sep&relo del motor.
Posici6ntfe
Ensamblaje
Extensor
de drenaje
CORREAS V
Revise las correas V para verificar si existe
deterioro y desgaste despu_s de 100 horas de
operaci6n y c&mbielas si es necesario. Las correas no son ajustables. Cambie las correas si
empiezan a desfizarse debido al desgaste.
MOTOR
LUBRICACI6N
Use solamente aceite de detergente de a]ta
ca]idad cEasificadocon ]a dasificaci6n SG-SL
de servicio AP[. Seleccione la calidad de viscosidad deI aceite SAE segSn su temperatura de
operaci6n esperada.
CAUDADES
OE VISCOSIDAD
3,
4.
Para abrirlo, gire la tapa hacia la izquierda.
Una vez qua haya vaciado completamente el
aceite, vuelva a colocar la tapa y girela hacia
ta derecha hasta el tope.
5. Vuelva a fijar el accesorio de purga del aceite
en el alojamiento de la turbina del motor.
6. Vuetva a Ilenar el motor con aceite a trav@s
del tubo de la varilla indicadora de nivel para
reI]eno del aceite. Vac{elo lentamente, No Io
liana demasiado. Para la capacidad aproximada yea]as "Especificaciones del Producto"
secci6n de este manual.
DE SAE
7.
AVISO: A pesar de que Ios aceites de multiviscosidad (5W30, 10W30, etc.) mejoran
el arranque en clima frio, estos aceites de
multiviscosidad van a aumentar el consumo de
aceite cuando se usan en temperat_aras sobre
32 ° F (0 ° C). Revise el nivel del aceite del motor m&s a menudo, para evitar un posible daSo
en el motor, debido a qua no tiene suficiente
aceite.
Cambie el aceite despu_s de 50 horas de
operaci6n o por Io menos una vez at aSo si el
tractor se utiliza menos 50 horas el aSo.
49
Useun medidoren latapa/varillaindicadoradel
niveIparareI[enodeI aceite pararevisareI nivel.
Mantengael aceiteen ta lineade llano (FULL)
en lavariila indicadora de niveLApriete latapa
en el tubo en forma segura cuando termine.
FtLTRO DE AIRE
LIMPIEZA DE LA ENTRADA DE AIRE!AREAS
Su motor no va a funcionar en forma adecuada
DE ENFRIAMIENTO
si usa un filtro sucio. Limpie el elemento del
Para asegurar un enfriarniento adecuado,
prefiltro de espuma despu_s de cada 25 horas
aseg_rese que la rejilla del c_sped, las aletas
de operaci6n o carla temporada. Dele service al de enfriamiento, y otras superficies extemas del
cartucho de papel cada t00 horas de operaci6n
motor se mantengan limpias en todo memento.
o cada temporada, Io que suceda pdmero.
Cada I00 horas de operaci6n (m&s a menudo
Dele servicio al filtro de aire m&s a menudo bajo
bajo condiciones extremadamente polvorosas
condiciones polvorosas
o sucias), remueva la caja deI ventilador y otras
I, Remueva las la cubierta,
tapas de enfriamiento. Limpie las aletas de enPARA DARLE SERVtCIO AL PREFILTRO.
fdamiento y las superficies extemas, seg_n sea
necesario. AsegSrese que se vuelvan a instalar
2. L_.ve]o on detergente liquido y agua.
Ias tapas de enfriamiento.
3. $_quelo apret&ndolo en un pa_o limpio.
4. Impregnar en aceite de motor. Envu_lvalo en
AVISO: Si se opera la m_.quina con una rejilIa
un paso Iimpio y absorbente y apd@telopara
del c_sped bloqueada, sucia, o con las aletas
remover el exceso de aceite.
de enfdamiento taponadas, y/o las tapas de
AVISO: Siesta sucio o da6ado reemplace el
enfriamiento removidas se producir& daSo en el
prefiltro.
motor debido al calentamiento excesivo.
PARA DARLE SERVIC[O AL CARTUCHO
SILENCIADOR
1. Limpie el cartucho golpe&ndolo suavemente
Inspeccione y cambie el si[enciador corroidoy el
en una superficie plana. Si el cartucho esta
- amortiguador de chispas (siviene equipado) pues
muy sucio o daSado c&mbielo.
pueden crear un peligro de incendi0_f/6daSos.
2. Reinstale el cartucho del prefiltro,la cubierta
BUJJA(S)
y aseg6relos.
Cambie las bujla(s) al comienzo do carla temAVlSO: Los solventes de petr61eo, tales corno
porada de siega o despu_s de cada 100 horas
el kerosene, no se deben usar para timpiar el
de operaci6n, Io que suceda primero, El tipo de
cartucho. Pueden producir el deterioro de este,
bujia y el ajuste de la abertura aparecen en "ESNo aceite el cartucho. No use aire de presi6n para
PECIFICACIONES DEL PRODUCTO" secci6n
limpiarlo o secarlo.
de este manual,
FILTRO DE COMBUSTIBLE EN LINEA
El filtro de combustible debe cambiarse una
vez cada temporada, Si el filtro de combustible
se tapona, obstruyendo el flujo de] combustible
hacia et carburador, es necesario cambiado.
1. Con et motor frio, remueva el filtro y tapone
Ias secciones de Ia Ifnea de combustible.
2, Ponga el filtro de combustible nuevo en su
posici6n en ta linea de combustible con la
flecha seSalando hacia el carburador.
3, Aseg6rese de que no hayan fugas en Ia
Iinea del combustible y que las grapas
est_n colocadas en forma adecuada.
4, ]nmediatamente limpie toda la gasolina tierramada.
Cubierta_
Cartucho
Espuma
FILTRO DE ACEITE DEL MOTOR
Cambie el filtro de aceite del motor cada temporada ovez per medio que cambie eI aceite, si el
tractor se usa m&s de 100 betas en un aSo.
Abrazadera
LIMPIEZA DE LA REJILLA DE AIRE
La rejilla de aire debe rnantenerse sin mugre y
paja para evitar el daSo aI motor debido al sobrecalentamiento. Lfmpiela con un cepillo de alambre
o con aire comprimido para remover Ia mugre y
tas fibras de goma secas, pegadas.
_
Filtrode _-"
combustible
5O
/"_-_
]t
"_
_)u) 3
LIMPIEZA
4.
•
Limpfe todo material extraSo de{ motor, ia
bateria, el asiento, el pulido, etc.
•
Limpie los desechoe de la placa gufa. Los
desechos pueden limitar el movimiento del eje
del pedal del treno/embrague, Io que hark que
patine la correa y que se pierda la tracci6n.
_II_PRECAUCI6N: Evite todos los puntos de
enganche y las piezas m6vites.
Eche hacia atr&s la abrazadera de cierre del
adaptador de ta boqui]la y empuje _ste en el
puerto de lavado de la cub]erla en el ext]'emo
izquierdode lacubierta de ta segadora, Suelte
Ia abrazadera de cierre para fijar el adaptador
en ]a boquilla.
Puedo de
Lavado
Adaptador
Pedal Del
Plata
De
IMPORTANTE: Tire de la mnanguerapara asegurarse de que la conexi6n est& bien flja.
5.
6.
,_PUNTOSDE
ENGANCHE
SISTEMADEDIRECCION,
SALPICADERO,
GUARDABARROS YSEGADORA NO MOSTRADOS
•
•
IMPORTANTE: Vuelva a comprobarla zona para
aseguramsede que est_ despejada.
Mantenga Ias superficies pulidasy las ruedas
sin derrarnes de gasoIina, aceite, etc.
Proteja las superficies pintadas con cerat_po
automotriz.
No recomendamos que se utilice una manguera
de jard{n o agua a presi6n para [impiar el
tractor a no set que el motor y la transmisi6n
est_n cubiertos para protegerlos del agua.
El agua en el motor y la transmisi6n acortan la
vida _til del tractor. Utilizar aire comprimido o un
soplador de hojas para remover hierba, hojas y
basura del tractor y cortac_spedes.
PUERTO DE LAVADO DE LA CUBIERTA
La cubierta de su tractor est& equipada con un
puerto de lavado sobre la superficie que forma
parte del sistema de lavado de Ia cubierta. Se deberta utilizarcada vez quese haya usado el tractor.
1.
Abra la Ilave de] agua.
Desde la posici6n del operador del tractor,
vuelva a arrancar el motor y.ponga la palanca
de aceleraci6n en la posicJSn"Fast" (rdpido).
Lleve el tractor a un lugar horizontaly despejado de su cdsped, Io bastante cerca de
una boca de riego como para que Ifegue la
manguera del jardfn.
IMPORTANTE: AsegSrese de que [a boca de
descarga del tractor est_ orientada LEJOS de
su casa, garaje, coches aparcados, etc. Quite
ia boca de ensacado o cubierta de mantillo si
estd acoplada.
2.
Mueva el control del embrague del accesor]o
a Ia posiei6n"DESENGANCHADO", ponga el
freno de estacionamiento y apague el motor.
3. Enrosque el adaptador de la boquiIla (empaquetado con el manual del operador deI tractor) en el extremo de la manguera del jard{n.
51
7.
Mueva e[ control del embraguedel accesodo a
la posici6n "ENGANCHAR". Mant_ngase en Ia
posici6n del operador conla cubierta de corte
acoplada hasta que la cubierta est_ limpia.
8. Mueva el control del embrague del accesodo a
la pos]ci6n "DESENGANCHADO". Gire la Ilave
de encendido a la posici6n STOP paraapagar
el motor del tractor. Oierre la ]lave det agua.
9, Tire hacia atr&s la abrazadera de cierre del
adaptador de ]a boquilla para desconectar el
adaptador de] puerto de lavado de la cubierta.
10. Lleve el tractor a una zona seca, preferentemente de cemento o pavimentada. Mueva
e_ control del embrague del accesorio a la
posici6n "ENGANCHAR" para quitar el exceso de agua y ayudar a que se seque antes
de guardar e] tractor.
_,ADVERTENCIA:
Si el accesorio de lavado
estd roto o no estd, Ud. y otras personas
estardn expuestos a que la hoja les lance
aquellos objetos con los que entre en contacto.
.
Sustituya inmediatamente el accesorio de
lavado roto o que fatta antes de volver a
usar la segadora.
•
Tape todos los oriflcios de la segadora con
pernos y tuercas de seguridad.
4_IbADVERTENCIA:PARA
EVITAR
LESIONES
SERIAS,
ANTES
DEDAR
CUALQUIER
SERVICIO
ODEHACER
AJUSTES:
1,
2.
3,
4.
Presione el pedal de freno cornpletamente y aplique el freno de estacionarniento,
Ponga el ernbrague del accesorio en fa posiciSn desenganchado (DISENGAGED).
Ponga la Ilave de ignici6n en la posici6n de apagado (STOP) y rernu_vala.
Aseg_rese que Ias cuchillas y que todas las partes movibles se hayan detenido completarnente,
5. Desconecte el alarnbre de Ia bujia y p6ngalo en donde no pueda entrar en contacto cor
_sta.
PARA. DESMONTAR
LA CORTADORA
DE CESPED
1. Suelte el ernbrague poni_ndolo en Ia posiciSn
"DISENGAGED" ("DESACTWADO").
2. Baje la patanca elevadora de montaje a la
posici6n de rn&s abajo.
3. Ruede la correa de polea deI motor (M) y
tijadors de Ia correa (G).
4, Retire el resorte de sujeci6n (K), deslice fa
abrazadera (L) hasta quitarla, y saque a
....... prem6n Ia guia de la caja (P) hasta que se
salga de] soporte.
5, Retire et resorte deI cable del embrague (Q)
del brazo del engranaje (R).
6, DesConecte la pieza de uni6n anterior (E) de
[a cortadora- retire el resorte de contenci6n
y {aarandeta,
7. Pot uno de los lados de la cortadora,
desconecte el brazo de suspensiSn de la
cortadora (A) del chasis y la pieza de uni6n
posterior (C) de Ia barra posterior de la cortadora (D) - retire los resortes de contenci6n
_ly ias arandelas.
CUIDADO: Una vez que se desconecten las
piezas de uni6n posteriores,]a palanca elevadora
funcionar_ a resorte. Sujete con fuerza _apalanca
elevadora al cambiada de posici6n.
8. Deslice la cortadora pot debajo del Iado
derecho del tractor.:
IMPORTANTE: Si se monta un accesorio diferente deL cortac6sped aI tractor, hay que quitar
el estribo frontal (E) y los estrJbos traseros de
etevaci6n (C) del tractor y enganchar el resorte
de ernbrague (Q) er_la guta del cabIe en el borde
fronta[ del salpicadero rna.sbajo.
INSTALE LA SEGADORA
Aseg_rese de que el tractor se encuentre en una
superficie nivelada, y ponga el freno de mano.
1. Haga descender la palanca elevadora a su
_lPOSiCi6n m&s baja.
CUIDADO: La palanca elevadora funciona
a reserve, Suj_telacon fuerza, h&gala descender
lentamente y tr&nquela en la posici6n rn_s baja.
NOTA: Cerci6rese de que tos brazos de suspensiSn de los Jados de la segadora (A) est_n
dirigidos hacia adelante antes de deslizarla por
2. Deslice ta SEGADORA por debajo del tractor
hasta que quede bien centrada debajo de _ste.
3. FIJE LOS BRAZOS DE SUSPENSION
LATERALES DE LA CORTADORA (A) AL
CHASIS - Ubique el orificio del brazo encima
de la clavija (B) que hay en la parte exterior
del chasis det tractor, y fije]o con una resorte
de contencion.
52
4.
Realice el mismo procedlmiento en el otto
lade clel tractor.
5. FIJE LAS PIEZAS DE PROPULSION POSTERIORES (C) - Levante la parte posterior
de Ia cortadora, ubique la ranura de Ia pieza
de uni6n (D) per encima de la clavija que hay
en la barra posterior de la cortadora y fljela
con una arande]a y un resorte de contenci6n.
6, FIJE LA PIEZA DE UNION ANTER{OR (E)
- Trabaje per el lade izquierdo dal tractor.
tntroduzcaet extreme de la barra de la pieza
de uni6n per el odficio anterior de la barra de
suspensi6n anterior de[ tractor (F),
7. Introduzca el otto extreme de la pieza de
uni6n (E) en el orificio que se encuentra en
la barra anterior de ]a ¢ortadora (H), y fijelo
per medio de una arandela y un resorte de
eontenci6n (J).
8. Retire eI resorte del cable de] embrague (Q)
deI braze dal engranaje (R).
9.
Retire el resorte de sujeci6n (K), deslice la
abrazadera (L) basra quitada, y saque a
presi6n la guia de ]a caja (P) hasta que se
salga dei soporte.
10. Instale Ia correa pas&ndoIaFor encima de la
polea del motor (M) y fijadors de la correa
(G).
IMPORTANTE: Verifique que la correa encaje
bien en todas las mnuras de las poieas de la
cortadora.
11. Suba la palanca etevadora a ia posici6n de
m&s arriba.
12. Si es necesario,ajuste las rueditas del calibre
antes de porter en funcionamiento ]a terradora, come se ilustra en el capitulo de Manejo
de este manual.
®
PARA NIMELAR LA SEGADORA
Aseg_rese de que los neum&ticos est@ninftados
a la PSI que se indica en estos. Si es_n demasiado inttados o poco inflados, el c4sped no Ie
quedar_, bien cort_do, 1ocual podr& !Ievarlo a pensar que la S_EGADORA no est& bien regulada.
REGULACtON VISUAL DE LADO A I_ADO
1. Si todos los neum&ticos est,_n correctamente
inflados y el cesped parece haber quedado
cortado desparejo, determine qu_ lado de Ia
cortadora est& cortando m&s al ras.
2. Con una ilave inglesa de 3/4" o de calibre
regulable, haga girar hacia la izquierda la
tuerca de ajuste de la pieza de uni6n (A)
para bajar lado izquierdo Ia cortadora, o bien
h&gala girar hacia lado derecho Ia derecha
para subirla.
NOTA: Cada vuelta completa de la tuerca de
ajuste har& variar la altura de la cortadora aproximadamente 3/16 _'.
Hagagirar la
tuerca hacia i
la derecha
segadora
5. Vuelva a veriticarIas medidas y ajuste nuevamente, en caso necesario, hasta que ambos
lados queden iguales.
AJUSTE DE DELANTE A ATRAS
IMPORTANTE: El piso debe quedar bien nivelado de lado a iado.
Para que el c_sped Ie quede perfectamente
cortado, las cuchillas de Ia cortadora deben
ajustarse de tal manera que ta punta anterior
quede 1/8" a 1/2" m_.s abajo que la punta posterior cuando la cortadora se encuentre en su
posici6n m_s alta.
j_CUIDADO:
Lasguantes
cuchillaso son
afiladas.
Prot4ase las manos con
envuelva
las cuchillas con tela gruesa, o bien haga ambas cosas.
• Suba la SEGADORA a la posici6n m&s alta.
• Ubique cualquiera de las hojas de la cuchiIIa
de tal manera que la punta quede apuntando
directamente hacia adelante. Mida Ia distancia
(B) que hay entre Ia punta anterior y el suelo y
entre Ia punta posterior y el suelo.
• Si la punta anterior de la hoja de la cuchiIla
no est& 1/8" a 1/2" m&s abajo que la punta
posterior, dirijase a la parte de adetante deI
tractor.
• Con una Ilave inglesa de 11/t6" o de calibre
regulable, afloje la tuerca A, d&ndole varias
vueItas para despejar la tuerca de ajuste B.
• Con una Have inglesa de 3/4" o de calibre
regutable, haga girar la tuerca de ajuste de ta
pieza de uni6n anterior (B) en sentido horario
(ajustar) para elevar la parte de adelante de
la cortadora, o bienen sentido antihorario
(affo|ar) para bajarla.
Hagagirar la
tuercahacia
Ia izquierda
,para bajarla
segadora
3.
Pruebe la regulaci6n reafizada cortando
c@sped cjue aun no haya cortado y observando como 9ueda. Vuelva a ajustar, en
caso necesano, hasta obtener resultados
satisfactgrios.
REGULACION DE LA PRECISION DE LADO
A LADO
1. Con todos los neum&ticos correctamente
inflados, estacione el tractor a nivel del suelo
o en la entrada a la casa.
_, CUIDADO: Las cuchillas son afiladas. Prot4jase Ias manos con guantes o envuelva las cuchilIas con tela gruesa, o bien haga ambas cosas.
2. Suba la SEGADORA a ]a posici6n m_s alta.
3. A ambos lados de .la cortadora, ubique la
cuchilla hacia un lado y mida Ia distancia (A)
que hay entre el borde inferior de ta cuchilla
y el suelo. Dicha distancia debe ser la misma
a ambos lados.
4. En caso que sea necesario realizar un ajuste,
lea tos paso 2 de las instrucciones de ReguIaci6n Visual que aparecen m&s arriba.
e la tuerca
de regulaci6n
de altura B
para levantar ia
segadora
de aitura B para
baiar la segadora
A primero
NOTA: Cada welta completa de la tuerca de
ajuste har_ variar Ia altura de la cortadora t/8".
- Vuelva a verificar las medidas y ajuste nuevamente, en caso necesario, hasta que ia punta
anterior de la ho]a de la cuchiHa quede 1/8" a
1/2" m_s abajo que la punta posterior.
* Mantenga en la posici6n la tuerca de ajuste
por medio de una llave inglesa, y apriete bien
Ia tuerca contra dicha tuerca de ajuste.
54
PARA CAMBIAR LA CORREA DE |MPULSION
DE LA CUCHILLA SEGADORA
La correa de impulsi6n de la cuchilla segadora
se puede cambiar sin herramientas. Estacione el
tractor en una superficie nivelada. Enganche el
freno de estacionamiento,
REMOCION DE LA CORREA -
MONTAJE DE LA OORREA
1. Instale ta correa nueva de la parte de atr&s
a la parte de adelante del tractor, pas&ndola
por encima de la plata de direcci6n (F) y del
v&stago del pedal del embrague/freno (G).
2. Jale la correa hacia la parte de adelante del
tractor y p&seloporsobre la poleadel motor (E).
3. Jale la correa hacia la parte de atr&s del
tractor. Con mucho cuidado, mueva la correa
hacia abajo y p&sela alrededor del ventilador
de transmisi6n y pot encima de ia polea de
entrada (O). Cerci6rese de que la correa est6
calzada dentro del guardacorrea.
4. Coloque |a correa sobre el pifi6n central (O).
5. Pase la correa a trav_s del pifiOn estacionario
(A) y de[ pifi6n del embrague (B).
6. AsegOrese de que la correa calce en todas
las ranuras de ias poleas y dentro de todas
las guias y guardacorreas.
7. Instale[aSEGADORA(Ver"PARAMONTAR
LA SEGADOR/_ en este capttulo del manual).
1.
Remueva la segadora det tractor (Vea "PARA
REMOVER LA SEGADOR_' de esta secci6n
de este manual).
2. Haga salir la correa de las poleas deI mandril
y de las poleas de gu_a.
3. Tire la correa afej_.ndola de la segadora.
tNSTALACION DE LA CORREA
1. Haga rodar fa correa alredeor de ambas
poleas de[ manddn y de las poleas-gutas.
2. Aseg0rese fas correas esten en todas ]as
ranuras de las peleas y at intedor todas Ias
guias de la correa.
3. Instale lasegadora (v_a" PARA INSTALAR LA
SEGADORA" en esta secciSnde este manual).
PARA
CAMBIAR
LA CORREA
IMPULSION DE MOVIMIENTO
DE
Estacione el tractor en una supe_cie nivelada.
Ponga el freno de mano. Si necesita asistencia,
del lado de abajo del apoyapi6s hay una guia
pr&ctica para el montaje de la correa.
DESMONTAJE DE LA CORREA
1. Desmonte la cortadora (Ver "PARA DESMONTAR LA CORTADORA" en este capRulo
deI manual).
NOTA: Observe toda la correa de impulsi6n de
movimiento y Ia posici6n de todas las gulas y
guardacorreas.
2. Retire Ia correa del pifi6n estacionario (A) y
del pi_6n de embrague (B).
3. Retire la correa del pifi6n central ((3).
4. Jale el cable de la correa hacia ta parte de
atr&s del tractor. Con mucho euidado, retire
la correa de Ia polea de entrada de la transmisi6n, movi6ndola hacia arriba y pasz_ndola
por encima de Ias paletas del ventilador(D).
5. Retire ]a correa de [a polea del motor movi_ndola hacia abajo (E).
6. Deslice la correa hacia la parte de atr&s del
tractor, retfrela de la placa de direcci6n (F) y
quRela del tractor.
55
CONTROLAR
Y AJUSTAR
EL FRENO
PARA HACER ARRANCAR EL MOTOR CON
UNA BATERIA BAJA
_DVERTENCIA:
Las batedas de d.cido-plomo generan gases explosivoe. Mantenga ]as
chispas, las llamas y los materiales para fumar
alejados de las baterfas, Siempre use una protecci6n para los ojos alrededor de las bateHas.
Si su bateria est& demasiado baja come para
hacer arrancar e[ motor tiene que volverse a
cargar. (Vea "Baterfa" en la secci6n de Mantenimiento de este manual).
Si se usan "cables de empalme" para un arranque de emergencia, siga este procedimiento:
IMPORTANTE: Su tractor esta equipado con
un sistema de 12 volts. El otro vehicu[o tambi6n
tiene que tener un sistema de 12 volts. No use
la baterla de su tractor para hacor arrancar a
otros vehiculos.
PARA ADJUNTAR LOS CABLES DE
EMPALME 1. Conecte cada extreme del cable ROJO con el
terminal (A-B) POSITIVe (+) de cada baterfa,
preocup__ndose de no hacer cortocircuito en
el chasis,
2. Conecte un extreme del cable NEGRO con
el terminal (C) NEGATIVe (-) de una bateria
completamente cargada.
3. Conecte el otro extreme del cable (D) NEGRO con un buena CONEXION A TIERRA
DEL CHASIS, alejado del estanque de combustible y de la bateria,
PARA REMOVER LOS CABLES, INVIERTA EL
ORDEN
1, El cable NEGRO primero del chasis y luego de
la bateHa completamente cargada.
2. El cable ROJO al L_ltimode ambas baterias.
Si el tractor exige rods de cinco (5) pies para
pararse a una velocidad m&s a]ta en et cambio
m&s alto en una superficie niveIada de hormig6n
seco o pavimentada, entonces se debe controlar
y ajustar el freno.
CONTROL DEL FRENO
1. Aparcar e! tractor en una superficie nivelada
de hormig6n seco e pavimentada, presionar
el pedal del freno hasta el rondo y accionar
e_freno de estacionamiento.
2. Desembragar la transmisi6n colocando e]
mando de la rueda libreen la posici6n "transmisi6n desembragada". Tirar el mando de la
rueda libre fuera y dentro la ranura y soltar
as{ se coloca en la posici6n desembragada.
Las ruedas traseras tiene que bloquearse y patinar cuando se intenta empujar hacia adelante
el tractor manualrnente. Si ]as ruedas traseras
giran, es necesario ajustar el freno o eustituir
las zapatas,
..... IMPRESION / |NCLINACION DE LAS RUEDAS DELANTERAS
La impresi6n e inclinaci6n de las ruedas delanteras de su nuevo tractor vienen asi de f&brica
y son normales. La impresi6n y ta inclinaci6n de
]as ruedas delanteras no son regulabfes. En case
que se produzca algQn daSo que afecte la impresi6n o la inclinaci6n de las ruedas delanteras tal
come vinieron de f&brica, p6ngase en contacto
con un centre de servicios Sears u etro centre de
servicios autorizado.
PARA REMOVER LAS RUEDAS PARA
HACER REPARACIONES
1. Bloquee el eje en forma segura.
2. Remueva ta cubierta del eje, el anillo de retenci6n y las arandelas para permitir la remoci6n
de las ruedas (la rueda trasera contiene una
Itave cuadrada - no la pierda),
3. Repare Ia I]anta y vu_lvala a montar,
AVfSO, En las ruedastraseras solamente: alinee
las ranuras en el cube de la rueda trasera en el
eje. lnserte la lave cuadrada.
4. Vuelva a colocar Ias arandelas e inserte el
anil]o de retenci6n en forma segura en la
ranura del eje.
5, Vuelva a colocar la cubierta del eje.
AVISO:
Para arreglar las Ilantas perforadas
y p_ra prevenir que tenga llantas pinchadas a
causa de pequer_as fugas, comprar de su commerciante Sears y utilizar el sel[o para Ilantas.
Else[[o previene que Ias flantas se sequen y
tambi@n la corrosi6n,
Bater{a D_bil o
Descargada
Arandelas
Anillo
de
Retenci6n
Cubierta
deleie
_
Llave Cuadrada (rueda..._
trasera solamente)----"
t
56
Bater[a
Completamente
Cargada
REEMPLAZAR LA BATERIA
PAPA REMOVER EL CONJUNTO DEL CAP6
Y DEL ENREJADO
1. Levante el cap6.
2. Desabroche el conector del alambre de las
luces delanteras.
3. P&rese delante del tractor. Agarre el cap6 en
los Iados, inclinelo un po¢o hacia e] motor y
s&quelo del tractor.
4. Para voIvel' a _nstalar et cap6, aseg_rese de
volver a conectar el conector deJ alambre de
las luces.
_DVERTENCIA:
Nohagacortocircuitocon los
terminales de _abateria al permitir que una llave
de tuerca o cualquier otro objeto entre en contacto
con ambos terminales a la misma vez. Antes de
instalar la baterla remueva ias pulseras de metal,
los relojes de pulsers de metal, los anil]os, etc.
El terminal positivo tiene que conectarse primero
pars evitar tas chispas debido a ta conexibn a
tierra pot accidente.
1.
2.
3.
Levantamos la capota a la posici6n levantada.
Remueve la protecci6n de los terminales.
Desconecte el cable de la bater{a NEGRO
primero y luego el cable de la bateria ROJO
y remueva la bater_a del tractor.
4. tnstale la nueva bateda con los t_rminos en
misma posicibn como Ia baterfa vieja.
5. Reemplazamos cubierta terminal,
6. Primero, conecte el cable de la bateHa ROJO
con el terminal positivo (+) con el perno
hexagonal y la tuerca seg_n se muestra.
Apribtelos en forms segura.
7. Conecte el cable de conexiSn a tierra NEGRO al terminal negativo (-) con el perno
hexagonal y latuerca que queden, Apri@tolos
en forms segura.
8. Cerramos ]a capota.
Headlight Wire
Connector
TRANSMISION
REMOCI(_N/REEMPLAZO DELATRANS MISION
Si por acaso su transmisi6n debe ser removida
pars servicio o reemplazo, debe set purgada
despu_s de ]a reinstalaci6n y antes de operar el
tractor, Vea"PURGAR LATRANSMISION en la
secci6n de la Operacibn de este manual.
MOTOR
PAPA AJUSTAR EL CABLE DE CONTROL DE
LA ACELERACION
PARA CAMB|AR LA BOMBILLA DE LA LUZ
DELANTERA
I, Levante el cap6.
2. Tire eI sujetador de fa bombilla fuera del
agujero en la parte trasera del enrejado.
8. Cambie Ia bombilla en el sujetador y empuje
e_sujetador de la bombiUa, en forms segura,
hacia atr&s en el agujero en la parte trasera
del enrejado.
4. Cierre el cap6.
ENTRECIERRE Y REL_:S
Elalambrado suelto o da_ado puede producir el
real funcionamiento de su tractor, o que deje de
funcionar, o ]e impidael arrancar.
, Revise el alambrado, Vea eI diagrama del
a_ambrado el_ctrico en la secci6n de Partes
de Repuesto.
PARA CAMBIAR EL FUSIBLE
C_mbieto pot un fusible tipo enchufable de 30
stops, tipo automotriz, El sujetador del fusible
est_ ubicado detr,_sdeI tablero.
57
El controlde laaceleraci6n ha sido preajustado en
la f&brica y no deberla necesitar ajustes. Revise
los ajustesque se describen a continuaci6n,antes
de soltar el cable. Si el ajuste es neoesario, yea
de manual de motor,
PARA AJUSTAR EL CONTROL DE
ESTRANGULACI_N
El controlde la estrangulaci6nha sido preajustado en la f&bricay no debeHa necesitar ajustes,
PARA AJUSTAR EL CARBURADOR
El carburador ha sido preajustado en la f_,brica
y no debeda necesitar ajustes. Sin embargo, se
pueden necesitar ajustes de menor importancia
pars compensarpor las diferencias en el combustible,temperatura, altura o carga, Si el carburador
necesita ajustes, yea de manual de motor,
Inmediatamente
prepare
sutractor
para
elaima-•
cenamiento
alfinal
delatemporada
osieltractor
nosevaausar
pot30dfasom&s.
_Z)iLADVERTENOIA: Nunca almacene el tractor
con gasolina en e! estanque dentro de un edificio
en donde los gases pueden alcanzar una llama
expuesta o una chispa. Permita que el motor se
enfrfe antes de almacenarlo en cualquier recinto
privado.
TRACTOR
Ouando el tractor se va a almacenar pot cierto
periodo de tiempo, IJmpiela cuidadosamente,
quite toda la mugre, ta grasa, las hojas, etc,
Gu_trdela en una &tea limpia y seca.
1, Limpie todo el tractor (vea "LIMPIEZ_' en Ia
secci6n de Mantenimiento en este manual).
2, Inspeccione y cambie Ias correas, si es necesario (yea Ias instrucciones para el cambio de
...................
las correas en Ia secciSn de Servicio y Ajustes
de este manual).
3, Lubriquelo, segOn se muestra en la secci6n
de Mantenimiento de este manual,
4, Aseg0rese qua todas tastuercas, los pernos y
los ternilIos est6n sujetados en forma segura,
Inspeccione las partes movibles para verificar
si hay daSo, rotura o desgaste. C&mbielas si
es necesario.
5. Retoque todas superficies pintadas oxidadas
o picadas; aplique lija antes de pintar.
BATERiA
• Cargue Ia baterJa completamente antes de
guardarla.
- Despu6s de cierto periodo de tiempo en almacenamiento, ta bateria puede necesitar vo]ver
a cargarse,
• Para ayudar a evitar ta corrosi6n y las fugas
de potencia durante largos periodos de almacenamiento, se deben desconectar los cables
de la bateria y se debe limpiar cuidadosamente (yea "PARA UMPIAR LA BATERIA Y LOS
TERMINALES" en la secci6n de Mantenimientode este manual).
• Despu_s de Iimpiarla, deje los cables desconectados y p6ngalos en donde no puedan
entrar en contacto con los terminales de la
bateria,
• Si se remueve la baterfa del tractor para el
almacenamiento, no la guarde directamente
sobre concreto o sobre superficies h_medas.
MOTOR
SISTEMA DE COMBUSTIBLE
IMPORTANTE: Es important evitar qua se
forman depositos de gema en partes fundamentales del sistema de combus-tible tales
come el carburader, el filtro dot combustible,
la manguera del combustibles mezclados con
alcohol (conocido como gasohol o que tienen
etano[ o metanol) pueden atraer humedad, Io
Due conduce a la separaci6n y a la formaci6n
e acudos durante elalmacenamiento. La gasolina acidica puede dafiar el sistema de combustible de un motor durante el periodo de afmacenamiento,
58
Vaciar el dep6sito del carburante poniendo en
marcha el motor y dej&ndolo funcionar hasta
que el carburante termine el carburador est6
vacio.
• Nunca use los productos para limpieza del
carburador o dot motor en el estanque de
combustible pues se pueden producir daQos
permanentes.
• Use combustible nuevo Ia pr6xima temporada.
AVISO: El estabitizador de combustible es una
a]ternativa aceptable para reducir a un minimo
la formaci6n de dep6sitos de goma en el combustible durante el perlodo de almacenarniento.
Agregue estabi]izador a la gasolina en el estanque de combustible oen el envase para el
almacenamiento. Siempre siga la proporci6n de
mezcla que se encuentra en el envase deIestabilizador. Haga funcionar et motor por Io menes 10
minutos despu#s de agregar el estabilizador, para
permitir qua _ste Ilegue al carburador. No vaciar la
gasolina del estanque de gasolina y el carburador
si se est& usando estabilizador de combustible,
ACEITE DEL MOTOR
Drone el aceite (con el motor caliente) y c_.mbielo
con aceite de motor limpio. (Vea "MOTOR" en
la secci6n de Mantenimiento" de este manual.)
ClLINDRO(S)
1, Remueva la(s) bujla(s).
2. Vac{e una onza de aceite a trav&s del
agujero(s) de la bujia en el cilindro(s).
3. Gire la [lave de ignici6n a la posici6nde ':Arranque" (Start), pot unos cuantos segundos
para distribuir el aceite.
4, Cambie pot bujia(s) nueva(s).
OTROS
• No guarde Ia gasolina de una temporada a la
otra.
• Cambie el envase de ]a gasolina si se empieza a oxidar. La oxidaci6n y/o ]a mugre en su
gasolina producir,_n problemas,
• Si es posible, guarde su unidad en un recinto
cerrado y ct_brala para protegerla contra e[
polvo y la mugre.
• Cubra su unidad con un forro protector adecuado que no retenga la humedad. No use
pl&stico.El pl&stico no puede respirar, Io que
permite la formaci6n de condensaci6n, Io qua
producirA la oxidaci6n de su unidad.
IMPORTANTE: Nunca eubra el tractor mientras
el motor y las areas de escape todavia estan
catientes.
IDENT[FICAC|ON DE PROBLEMAS:
Vea ia secciSn apropiada en el manual a menos que est6 dirigido a un centre de servicio Sears.
,,,,,,
PROBLEMA
No arranoa
CAUSA
t.
2+
CORRECCiON
3.
Sin co'mbustible,
Motorsinta'ESTRANGULACI(§N"
(CHOKE) adecoada.
Motor ahogado.
l"i Uene el estanque de combustible.
'" '
2+ Vsa"PARAHACERARRANCARELMOTOW' en la secciSn de operaciSn+
3. Espere varies minutes antes detratar de
4.
5.
6.
Bujia male,
Filtro de aim sucio.
Filtro de combustible sucio.
4.
5,
6.
7.
Ague en el combustible,
8o
Alambrado suelto o daSado+
7+ Vaciar el estanque de combustible y el
carburedor, vuek+a a [lenar el estanque
con gasoline nueva cambie el filtro de
combustibte,
8. Revise todo el alambredo.
9.
Carburador desajustado.
9.
Vea"PARA AJUSTAR EL CARBURADOR"
en la secciSnde Servicio y Ajustes.
_0.
Pongase sn contacto con un centre de
ssrvicio cualificado "SEARS".
alTancar,
10.
V_lvulas deI motor desajustadas.
Oambie la bujia,
Limpie/cambie el filtro de ake.
Cambie el filtro de combustible.
Dificil do
1.
Filtm de airs sucio,
t+
Limpie/cambie el filtm de airs.
arrancar
2.
8uj{a male.
2.
Cambie la bujia.
3,
Bateria beja 0 descargada,
3.
Vu_lva a cargaro carnbie Is bateda,
4.
Fi?tro de combustible sucio.
4.
Cambie el t_ltro de combustible.
5.
Combustible rancio o suc{o,
5.
s.
Aiambrado sue[to 0 daSado+
6.
VaciarelestanquedecombustibieyvueLva
a lienarlo con gasoline nueva.
Revise todo el atambrado,
7+
Carburador dssajustado,
7+
Vea"PARAAJUSTAR ELCARBURADOR"
an ta secciSn dR Servi¢_oy Ajustes.
e.
V&Ivui_ del motor desajustadas,
8.
Pongase en contacto con un centre de
serv[cio cualiflcado "SEARS",
El motor no
1.
Pedal del freno no presionado.
_+
Presione el pedal del freno,
la vuelta
2.
Elembraguedelaccesofioest&enganchado,
2+
Desenganche el embrague del accesorio.
3+
4+
Bateria baja o descargada.
Fusible quemado,
3.
4.
Vuelva a cargar o cambie la bateria.
Gamble s] fusible.
5.
Termina[esde Ia bateria corroidos.
5.
Limpie los terminales de la bater_a.
6,
Alambrado suslto 0 de,ado,
6.
Revise todo el alambrado.
7,
a.
InterruptordelaigniciSnfallado,
Solenoids 0 arrancador fallados,
7.
6,
Revise/cambiee[interruptordelaignJciSn.
Revise/cambie el solenoide o arrancador,
9.
lnterruptor(es) que exige(n) Ia presencia
del operador fellado,
g+
Pongase en contacto con un centre de
servicio cua]ificado "SEARS",
....
Et motor
suena pete
no arranca
i P_rdida
fuerza
de
,,,, ,,,,
!+
Bater_a baja o descargada
_+ Vuelva a cargar 0 cambie ta bateda,
2.
Tezminales de la bater[a cozroidos.
2.
Umpie los terminales de la bater[a,
3+
Alambrado suelto o daSado.
3.
Revise todo el elambrado.
4,
Solenoids o arrancador fallades.
4.
Revise/camb!e el solenoids o arrancador,
1+
2+
C0rta mucho c_sped, muy rdpido.
Aceleraei&n en la posiciSn de "ESTRAN+
GULACION" (CHOKE),
AcumulaciSn de e_sped, hojas y basura
debajo de la segadora+
t+
2.
Elsvelaalturadecorte/reduzca]avelocid#.d
Ajuste el control de ta aceleraciSn,
3+
Umpie la parts inferior de la cajade la
segadora.
4+
5+
6.
Filtro de airs sucio,
Nivel de aceite bajoiaceife sucio,
Bujfa fal?ada.
7,
e.
Filtro de combustible sucio+
Combustible ranc[o o sucio.
4. i tJmpie/cambie el fiflro de airs.
5. Revise el nivet de aceite/cambie el aceRe.
6. [Jmpie y vuelva a ajustar Ia abertuta o
camb]e Ia buj_a.
7+ Cambie el filtro de combustible.
6. Vaciar el estanque de combustible y vuelva
a Ilenado con gasoline nueva,
3.
,,,,,,,,,,
59
IDENTIFICACI6N
DE PROBLEMAS:
Vea la seccibn apropiada en e! manual a menos que est6 dirigido a un centre de servicio Sears,
PROBLEMA
P_rdida de
fuerza
CAUSA
9.
CORRECC|ON
Agua en el combustibie.
9.
(sigue)
Vibraci6n
excesiva
Afambrado de la buj{a suelto.
Rejilla/aletas de aire deI motor sucias.
Silenciador sucio/taponado.
Alambrado suetto o dahado.
Carbumdor desajustado.
10.
11.
12.
13.
14.
V,_lv_las del motor desajustadas.
15.
Vaciarelestanquede combustib]syelcarburador, vuelva a Ilenar elestanque con gasoline nuevay cambie elfiltro de combustible.
Conecte y apriete el alambTe de ]a bujfa.
Limpie las rsjitla/aletas de airs del motor.
Limpieicambie el silenciador.
Revise todo et alambrado.
Vea "PARAAJUSTAR EL CARBURADOR"
en la secci6n de Servicioy Ajustes.
Pongase en contacto con un centre de
servicio cualificado "SF_J_RS",
I.
Cuchilla desgastada, doblada o suelta.
1.
2.
Mandril de la cuchilta doblado°
2.
3.
Parts(s) suelta(s)/daSada(s).
3.
Apr_ete la(s) parts(s). Cambie las pastes
daSadas.
Sistemade controlqueexige la preseacia
dei operader-seguddadfal]ado,
1.
Revise el alambrado, los interruptores
y ]a cone×iones.Si no est&n correctas.
Pongase en contacto con un centre de
servicio cualificado "SEARS".
Cuchille desgastada, doblada o sue]ta.
t.
El conjunto segador no est_mivelado.
Acumulaci6n de c6sped, hojas y basura
debajo de la segadora.
Mandril de Ia cuchilla doblado.
2.
s.
Gambie la suchilla. Apriete el pemo de
la cuchi}la.
Nivele el conjunto segador.
Limpie la parte inferior de ia cajade Ia
segadora.
Cambie la mandril de la cuchilla.
Limpie alrededor de los mandriles pars
abdr los de ventilaci6n.
El motor €ont|n_afunc{onando 1.
cuando el op.
erador
se beta
de|
asie rtto
Coll
el embrague
delaccesor|o
Cambie la cuchilla. Apriete el pemo de
lacuchilia.
Gamble la mandd! de la cuchilla.
e;rlganchado
El sorts
dispare|o
Los agujeros de venti]aci6n del conjunto
I segador taponadosdebido a ]a acumulaci6n deck-sped, hojas y basura alrededorde los mandriles.
Lee cuchillas segadoras no rotan
Ma|a descarga del
c&sped
4.
5.
Obstrucci6nen s]mecanismodelembrag us.
Lacorrea de impulsionde lasegadora est&
desgastada/daSada.
Poles de guia atascada.
Mandril de la cuchilla atascade.
1.
Remaeva la obstrucci6n.
2.
Cambie Ia correa de impulsi6n de ia
segadora.
Gamble la poles de guia.
Cambie la mandril de ]a cuchiUa.
Velocidad deI motor muy lenta.
1.
Ve]ocidad de recorrido demasiado r_.pida.
O_sped mojado.
2.
3.
Elconjunto segador no est&nive[ado.
Presi6n de airs de Ias tlantas baja o
d{spareja.
Cuchilla desgastada, dob;ada o suelta.
4.
5.
Acumulaci6n de c6sped, hojas y basura
debajo de lasegadora.
La cortes de impulsibn de Ia segadora est&
desgastada o desajustada.
Las cuchitlas est&n mal coninstaladas.
7.
Cuchillas
inadecuadas
en use.
3.
4.
6.
8.
9.
10.
Los agujeros de ventilaci6n del conjunto
agu eros ssgador taponados debido a Ia
acumulaci6n de c_sped, hojas y basura
alrededor de los mandriles.
6O
11.
Ponga "_Icontrpl de Ia aceIeraciSn in la
posici6n de "RAPIDO" (fast).
Cambie a una velocidad m_s lenta.
Permita que se seque el c6spedantes
de segar.
Nivele el conjunto segadoro
Revise las tlantas pars verificarquetienen
la presi6n de airs.
Cambie/afile Ia cuchilla. Apriete e] perno
de la cuchilla.
Limpie la parts inferior de la caiade la
segadora.
Cambieiajuste la cerrea de impulsion de
Ia segadom.
Vuelva a instalar lss cuchillas slbordeafilado
hacia abaio.
Cambie per las cuchillas enumeradas en
este manual,
Limpie alrededor de los mandrites pars
abdr los de venti{eci6m
IDENTIFICACION
DE PROBLEMAS:
Vea la secci6n apropiada en el manual a menos que est_ dirigido a un centro de servicio Sears.
PROBLEMA
"
CORRECCI6N
CAUSA
Las |uz (ces)
de lantera(s)
no func|ona.
ndo
1.
2.
E{ interruptor est& °APAGADO"(OFF),
Bomb|lie(s) o Ibmpara(s) quemada(s).
1.
=ENCIENDK' (ON) el interruptor.
2,
Cambie la bomb|lie(s) o l&mpara(s],
3.
lnterruptor de la luz fallado,
,3.
Revise/cambie el interruptor de la luz,
4.
Alambrado suelto o dabado,
4.
Revise el alambrado y Ias conexiones,
_ 5,
Fusiblequemado,
_ 5. _ Cambie el fusible.
1.
2.
3.
4.
Cambie la bateria,
ReviseAimpie todas las cables.
Cambie el regulador,
Cambie el attemador.
El control de rueda libreest__enla posici6n
"DESENGANCHADO" (disengaged).
Residuos es en de la place de direcci6n,
1.
La corraa de tmpulsi6n de impulsi6n de
movirniento,
4. Aire atrapado en latransporte o elaervicio.
5, Llave cuadrada de eje es ausente.
&
Ponga el control de rueda libre enla
posici6n "EN GANGHADO"(d[sengaged) _
Vea"LIMPIEZA" an Iasecci6n de Manteni*
mento de este manual,
Reemplace Ia correa de movimien-to esta
gastada, da_,ada 0 rote,
Purgue la transmisi6n,
Vea "PAPA REMOVER LAS RUEDAS"
en ta seccibn de Servicio y Ajustes de
este manual,
El motor tier
"contraex,
plosiones'
oMando
SIE
"APAGA"
1.
EIcor, tfolde laaceleraci6n de]motor no rue
ajustado en la posici6nde velocidad media
i Y m_lxima (r&pida)antes de pare el motor,
1.
Mueva el control de la aceleraci6n ala
posicibn de velocidad media y mz_lxima
(rbpida) antes de para el motor.
El tractor se
ponen marcha atr_s
1.
E| sistema defuncionamiento atr_s (ROS)
no est_ "ON =, cuando enganche la segadora o otto accesedo,
1.
Girar el ROSen le posici6n "ON",Vea ]a
secci6n de operaci6n,
La bateria
no carga
P_rdida de
impulsi6n
1.
2,
Elemento(s) de ta bateda malo(s),
Males conexionesde cables.
3.
4.
Reguladorfallado (si equipado).
Alternador fallade,
1.
2.
3.
61
2,
4.
5,
62
GUfA SUGERIDAPARA MEDIRLAS PENDIENTESCON LA VISTA PARAUNA
OPERACIONSEGURA
t
A
•
B
ADVERTENCIA:
•
Para evitar dafios graves, haga funclonar su tractor arrlba I
y aba[o de las pendientes, nunca transversalmente
con respecto aras
|
pendlentee. No cotter pendientes mayores de 15 grados. Haga los
vlraJes gradualmente pare evkar volearse o la p_rdlda de control.
|
|
Tenga mucho cuidado suando cambie de dtrecci6n snlas
I
pendlentes.
1. Plegar esta p_gina a Io largo de la ]faea punteada arriba indicada.
2, Tenet la pdglna ante de ai mlsmos de modo que su horde _zquierdo sea vertical
paralelo at tronco del drbol u otra estructura vertical.
3. Mirar a tray,s det piiegue en dfreccl6n de la pendiente qua se qulera medir.
4. Comparar el dngulo del pliegue con la pend|ente dei terreno.
NEED MORE HELP?
Youq_Ifind the answer and mo_e on managemyhome.com
- for free!
_i
i " Findthisand allyour otherproductmanuaLsonline.
i " Get answersfrom ourteam ofhome experts.
! - Get a personalized
maintenanceptanforyourhome.
i . Findinformation
and toolsto helpwithhome projects.
manage
home
Your
Home
For repair - in your home - of all major brand appliances,
lawn and garden equipment, or heating and cooling systems,
no matter who made it, no matter who sold it!
For the replacement parts, accessories
and
owner's manuals that you need to do*it-yourself.
For Sears professional installation of home appliances
and items tike garage door openers and water heaters.
1-800-4-MY-HOME
(1-80_9-4663)
_,,_W.S
@
Anytime, day or night
(LLS.A.and Canada)
ea i"s, COm
_.$eat_;.ca
Our Home
For repair of carry-in products like vacuums, lawn equipment,
and electronics, carl or go on-line for the nearest
Sears Parts and Repair Center.
I-B00-488-1222
Anytime,day or nighl (U.S.A. only)
www,_ear,s
=corn
To purchase a protection agreement (U.S,A,)
or maintenance agreement (Canada) on a product serviced by Sears:
1-800-827-6655
(U.SA)
1-800-361-6665
(Canada)
Para pedir sepAcb de reparaci6n
a domidiio, y para ordenar piezas:
1-SB8-SU-HOGAR ®
(1,888-784,6427)
© _._rs B_and_, LLC
® Registered Trademark / T_ Trademark I s_ Service Mark o_ Sears B_nds, LLC
® Mavca Regish'ada /
Ma_'c_ade F&b_Ca t
Mar,:;a de Se_'icio de Sears Brands,
uc Malque
09.12.11
BD
de commerce
/ u_ Ma_ue
d,_po,_e
de Seats
LLC
Brands, LLC
Printed in the U.S.A,