1
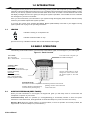
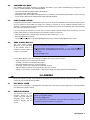
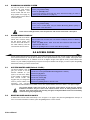
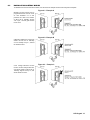
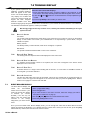
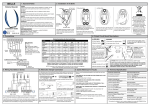
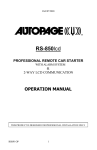
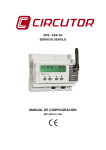
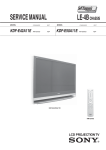
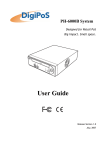
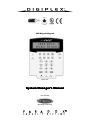
LCD Keypad Keypad
DGP2-641
System Manager’s Manual
Also includes
Operating Instructions
TABLE OF CONTENTS
INTRODUCTION ........................................................... 4
Legend .......................................................................................... 4
BASIC OPERATION ..................................................... 4
Auditory F eedback (B eep Tone s) ................................................
Confidentia l Mode .......................................................................
Partitione d System .......................................................................
Area Sta tus Display ......................................................................
4
5
5
5
ARMING ........................................................................ 5
Exit Delay Tim er ..........................................................................
Regula r Arm ing............................................................................
Stay Arming .................................................................................
Instant Arming .............................................................................
Force Arming ...............................................................................
Bypass Progr amm ing ...................................................................
One -Touch B uttons ......................................................................
Keyswitc h Arming .......................................................................
Auto-Arming ................................................................................
5
5
6
6
6
6
7
7
7
DISARMING .................................................................. 7
Dela ye d Fire Zone ......................................................................
Fire S afety Tips ..........................................................................
Minim izing Home Fir e Haza rds.................................................
Hom e F ire Warning System .......................................................
Burgla r Alarm .............................................................................
17
18
18
18
18
VOICE-ASSISTED ARM/DISARM MODULE
INTRODUCTION ......................................................... 19
ACCESS CODES ........................................................ 19
HOW DO I USE IT? ..................................................... 19
THINGS YOU SHOULD KNOW .................................. 19
Whe n Accessing your InTouch... ...............................................
Whe n Arming or Disar ming.......................................................
Whe n Activating or De activating a PGM ... ...............................
Whe n Using your Intouch... .......................................................
19
19
19
20
TELEPHONE BUTTON FEATURES........................... 20
Entry Delay Timer ........................................................................ 7
Disarm ing an Ar med S ystem ....................................................... 8
Alar m M emory Display ............................................................... 8
INTOUCH EXAMPLE .................................................. 20
ACCESS CODES .......................................................... 8
INDEX .......................................................................... 23
System M aster Code (Def ault 123456) ........................................ 8
Dele ting Use r Acce ss C odes ........................................................ 8
Programm ing User Ac cess Codes ................................................ 9
Use r Options............................................................................... 11
Access Contr ol User Options ..................................................... 11
INTOUCH SYSTEM CHECKLIST ............................... 21
USING ACCESS CONTROL....................................... 12
Entering & Exiting ..................................................................... 12
Arming and Disarm ing with C ard .............................................. 12
How Ac cess Control Works....................................................... 13
TROUBLE DISPLAY ................................................... 14
Eve nt R ecord Display ................................................................ 14
ADDITIONAL FEATURES........................................... 15
Programm able Outputs ( PGMs) .................................................
Keypa d Settings .........................................................................
Set Time & Date .........................................................................
Programm ing C hime Zone s .......................................................
Panic Alarms ..............................................................................
Quick F unction B uttons .............................................................
15
15
15
16
16
16
TESTING AND MAINTENANCE ................................. 16
Burgla r Alarm Testing ...............................................................
Fire Alarm Testing .....................................................................
System M aintenance ..................................................................
System Test ................................................................................
16
16
17
17
FIRE AND BURGLAR ALARMS................................. 17
Standa rd Fire Zone ..................................................................... 17
User’s Manual 3
1.0 INTRODUCTION
Your Digip lex S ecurity S ystem is an advan ce d te ch nolog y security system that will pro vi de yo u with reli able security
p rotectio n a nd power fu l feature s th at ar e e asy to use. Th e e lega nt and u se r-fr iend ly LCD keypa d will allo w you easy
a ccess to your se cu rity syste m's functions an d in for ma ti on at the tou ch of a bu tton . The 32- ch aracter LCD screen
will d isplay messa ges and me nus to guid e you throu gh the system’s oper ations. Your Installer can even custo mize
the message s for your home o r b usiness.
S ince you will communicate your in struction s to yo ur system th roug h th e ke yp ad, please re ad this ma nua l car efully
a nd have your Insta ller expla in basic syste m op eration .
If yo u ha ve th e InTouch Voi ce Assisted Arm/Disa rm Modu le (A PR3-ADM2 ) conne cted to yo ur Digi plex security
syste m, plea se re fe r to pag e 19 fo r oper ati ng instr uctio ns.
1.1
LEGEND
In dicates a war ning or a n i mp ortant n ote.
In dicates u se fu l in fo rmation or a tip.
[SQU ARE
BRA CKET S ]
In dicates in fo rmation that mu st be entere d on th e ke yp ad.
2.0 BASIC OPERATION
The follo wing sectio ns will in tro duce you to the ro les o f the buttons, lig hts, a nd messages on your LCD ke yp ad.
Figure 2.1: Basic Overview
“AC” LIGHT:
ON = AC power
OF F = Power failure
T he LCD screen w ill guide you
w ith detailed messages .
“ STATU S” LIGHT:
When Green:
ON = All zones are closed.
OFF = One or more z ones are open.
FLASH = Exit Delay
When Red:
ON = Area(s) armed
OFF = Area(s) disarmed
FLASH = Sys tem in Alarm
Use the arrow buttons to scroll
through the current menu w hen
the arrows appear in the LC D
screen.
ACT ION BUTTONS:
Eac h button’s function is explained in the following sections of the manual.
[ C LEA R ] = Eras es current data entry
or reverts to the preceding step.
2.1
[ E N TER ] = Saves current data and
exits current menu.
AUDITORY FEEDBACK (BEEP TONES)
Wh en you en te r information o n the keypad, the keypad will g uide yo u with b eep ton es to commun ica te the
a ccep tan ce o r r ejection of yo ur entries.
Confirm ation Be ep: Wh en a n op eration (i.e. arming /di sa rming) is su ccessfu lly entere d or wh en the system
switch es to a new status/mode, th e ke ypa d emits an intermi ttent beep ton e ( “BEEP -B EEP -BEEP -BEEP -BEEP ”).
Rejec tion Be ep: Whe n the system reverts to a previou s sta tus, o r wh en an ope ration is in co rrectly en te red, the
keypa d e mits a co nti nuou s be ep to ne (“BEEEEEEEEEEP ”).
4 User’s Manual
2.2
CONFIDENTIAL MODE
Your Insta ller can pro gram keypads to not d isplay th e status o f your system automa ticall y by ch ang ing the LCD
scree n to Confide ntial Mode . In Con fid ential Mod e:
• The zones and status messages will NOT be displayed
• The indicator lights will NOT illuminate
• Depending on how your keypad was programmed by your installer, you must either press a button or enter your User
Access Code to illuminate the indicator lights and activate Normal Mode.
2.3
PARTITIONED SYSTEM
A sepa rated system is ca lled a Partitione d S ystem, which can be useful in situation s wher e sha red security systems
a re more p racti ca l. Your installer can design you r syste m to re co gnize up to four sep arate pro te cted a reas. Fo r
e xa mple, a co mpany th at h as both an office a rea an d a wareh ouse ar ea can arm an d disarm ea ch a rea sepa rately
a nd control the access to e ach area .
If yo u ha ve acce ss to mor e than o ne a rea, an d you ne ed to sele ct a sp ecific ar ea(s) whe n pro mpted by you r LCD
keypa d, follow eithe r o ne of the follo wi ng th ree method s to make yo ur se lectio n:
• Press the keypad button corresponding to the area you wish to select (i.e. 1, 2,...4).
• Press the [0] button for all areas.
• Use the [S
S] and [T
T] buttons, and press [E NT ER ] when the area you want to select appears on the scre en.
2.4
AREA STATUS DISPLAY
The A rea Sta tu s Display
a llows you to view the status
o f th e se lecte d area s in a
P artitioned System (Refer to
section 2.3 on pa ge 5).
How do I s ee the status of the a re as?
1) En ter you r [AC CESS C OD E ], then p ress the [1] bu tton .
2) Pre ss th e button co rrespo ndin g to the are a (i.e . 1, 2,...4 ), or use the [S
S ] an d
[T
T ] buttons and pre ss [ ENT ER] whe n the a rea you want to view ap pear s o n
the scre en.
3) Pre ss [C LEA R] to exit.
In Are a Status Di sp lay mod e, the follo wi ng information will scroll on the LCD scree n:
•
•
•
•
•
•
“read y”: if all zones in the selected area are closed.
“not ready”: if zones in the selected area are open.
open zones within that area (i.e. “Front Door Open”).
“Trouble(s)”: (section 7.0 on page 14) if a trouble has occurred.
“Alarms in Memory”: (section 4.3 o n page 8) if an alarm has occurred.
“Armed” ; “Force Armed” ; “Instant Armed” ; “Stay Armed”: displays the arming status of the selected area.
3.0 ARMING
Wh en your system is a rmed, it can re sp ond to any bre ach in th e protected zone s by causing an a larm an d se nding
a re port to you r Cen tr al Mo nitorin g Station.
3.1
EXIT DELAY TIMER
Wh en you arm your system, i t will tr igger the E xit Delay Timer to pro vid e yo u with e noug h time to exit the pr otected
a rea be for e the syste m is armed.
3.2
REGULAR AR MING
Thi s metho d is u se d for th e
e ve ryday a rming of yo ur
syste m. All zon es with in th e
p rotecte d are a must b e
close d to Re gula r arm th e
syste m.
How do I Regular a rm t he s ystem ?
1) En ter you r [AC CESS C OD E ].
2) Pre ss th e [A RM] button.
3) If you ha ve acce ss to more than o ne ar ea, se lect the a rea(s) you wish to
Regu lar arm (refer to se ction 2 .3 on p age 5).
LCD Keypad 5
3.3
STAY AR MING
Stay armin g will pa rtia lly arm
you r system to permit you to
r emain in you r home or office
b y armin g th e o uter zo nes
( perime ter ) of the p rotecte d
a rea
( i.e .
d oors
an d
win dows).
3.4
3) If you ha ve acce ss to more than o ne ar ea, se lect the a rea(s) you wish to
Sta y arm (re fer to sectio n 2.3 o n page 5) .
How do I Instant arm?
1) E nte r yo ur [A CC ESS C ODE ].
2) P ress the [5] bu tton .
3) If you ha ve acce ss to more than o ne ar ea, se lect the a rea(s) you wish to
Instan t arm (re fer to sectio n 2.3 o n page 5) .
FORCE ARMING
For ce a rming all ows you to
q uickly arm your system
whe n zon es
ar e o pen.
Howe ve r, once th e ope n zon e
is closed, your system will
the n a rm tha t zone as well.
3.6
2) P ress the [ST AY ] button.
INSTANT AR MING
Thi s featur e is th e same as
Stay armin g excep t tha t the re
is n o Entry Dela y. The refore,
a ny armed zo ne that is
b reache d will i mme diately
g ener ate a n alarm.
3.5
How do I S ta y arm?
1) E nte r yo ur [A CC ESS C ODE ].
How do I Force arm?
1) E nte r yo ur [A CC ESS C ODE ].
2) P ress the [F ORC E ] b utto n.
3) If you ha ve acce ss to more than o ne ar ea, se lect the a rea(s) you wish to
Force arm (refer to se ction 2 .3 o n p age 5).
BYPASS PROGRAMMING
You can bypass ce rta in zo nes
whe n yo u arm th e p rotecte d
a rea( s). When a zo ne is
b yp asse d, it wil l b e i gnore d
the next time your system is
a rmed. O nce your are a is
d isa rmed, the syste m will
u nbypass the zon e.
How do I Bypas s a zone?
1) E nte r yo ur [A CC ESS C ODE ].
2) P ress the [B YP ] bu tton .
3) E nte r the zone numb er ( i.e . 01, 0 2,...4 8), or use th e [S
S] a nd [T
T] buttons an d
pre ss [ BYP ] o nce the zone you wan t to b ypa ss a ppea rs on the scre en. If
“bypa ssed ” d oes n ot a ppea r o n the screen a nd th e ke ypa d emits a Re jectio n
Be ep, you ma y not have access to bypass that zo ne.
4) Repe at step 3 until all zones you want to bypass have bee n se lecte d.
5) P ress the [EN T ER] butto n to save and e xi t.
In orde r to bypass a zon e, the follo wi ng co ndition s must b e me t:
- The zone must h ave the B yp ass op tio n p rogr ammed by the in stall er.
- Yo ur Use r A ccess Co de must be p rogra mmed to e nabl e the B ypa ss option .
- Yo ur Use r A ccess Co de must ha ve a ccess to the zone’s Are a A ssig nment.
- The zone’s area mu st be disarme d b efore the zone can be bypa ssed .
Fire Zones ca nnot be by pas sed.
3.6.1
BY PAS S REC A L L
B yp ass Recall re instates th e
zon es that were bypassed th e
la st time your system was
a rmed.
How do I a ctivate Bypas s Re call?
1) E nte r yo ur [A CC ESS C ODE ].
2) P ress the [B YP ] butto n.
3) P ress the [MEM ] bu tton.
Zone s bypassed the last time your system was ar med are bypa ssed .
4) P ress the [EN T ER] butto n to save and e xi t.
6 User’s Manual
3.7
3.8
3.9
ONE-TOUCH BUTTONS
If en able d b y your In stalle r, yo u can access the fo llowing feature s without using yo ur User Access Cod e b y pre ssing
a nd hold ing the desire d One -To uch button.
BUTTON
FEATURE
BUTTON
FEATURE
[A RM]
Reg ular ar m
[DIS ARM ]
Disarm a Stay/Instant a rmed are a
[STA Y ]
Stay arm
[5]
In stant arm
[F OR CE ]
Fo rce arm
[6]
Chan ge displa y settin gs
[BY P ]
Bypa ss Prog ramming
[7]
Vie w Even t Record di sp lay
KEYSWITCH AR MING
A key can be used to ar m an d disarm your system using two fo rms o f keyswitches. With a Maintaine d Key switch,
p lace the key in the “O N” position to ar m yo ur system, and p lace the key in the “O FF” p ositi on to disarm you r
syste m. With a Mom entary Key switch, pla ce the ke y in the “O N” po sition br iefly th en place it back in the “ OFF”
p ositi on to a rm the system. Repe at this process to disa rm with a Momentary Keyswitch.
AUTO-ARMING
If e nable d by you r Installer, you can set the time th at a n area will arm itse lf au toma ticall y.
3.9.1
TIM ED A U T O -AR M IN G
Your instal ler can set Ti me d
A uto-Ar mi ng to function in
e ith er Fo rce o r Stay armin g
mo de. A sixty-se co nd E xit
Del ay se quen ce will beg in
p rior
to
your
system
a utomatica lly a rming itse lf at
the pr ogra mme d time .
How do I s et the Auto-Arming time r?
1) E nte r yo ur [A CC ESS C ODE ].
2) P ress the [0] bu tton .
3) P ress the [M EM] b utton .
4) If you have acce ss to mo re than one area , press the ar ea’s numb er, o r use
the [S
S ] an d [T
T] buttons and pr ess the [A CC ] bu tton whe n the a rea you want
to progr am a ppe ars o n th e scree n.
5) E nte r the time you want the a rea to b e armed accord ing to the 24 -hou r clo ck
(i.e. 9 a .m. i s 09:00 a nd 9 p.m. is 2 1:0 0).
6) P ress the [EN T ER] butto n to save and e xi t.
3.9.2
NO M OVEM EN T AU T O -AR M IN G
Your system can be p rogr ammed to se nd a rep ort to your Cen tra l Mo nitorin g Station a nd/or arm the system if there
is no activity in the a rea d uring a specified p eriod of time. Your in stalle r can set No Movement Au to -Armin g to
fun ction in e ith er Re gula r o r Stay arming mod e.
4.0 DISARMING
Wh en your system is disar me d, it dea ctivates a ny a larms in p rogre ss, and it d eactiva te s the zones so the al arm wi ll
n ot be trig gere d i f zones are br eached .
4.1
ENTRY DELAY TIMER
Your insta ller will prog ram de si gnated entry po ints ( i.e . the fro nt doo r) with an Entry Dela y Timer. Th is dela y gives
you time to e nter th e armed pre mises an d enter your code to disarm your system before the ala rm i s trigge red.
LCD Keypad 7
4.2
DISARMING AN ARMED SYSTEM
You can o nly d isarm an are a
to wh ich yo ur User A cce ss
Cod e is assig ned . User
A ccess Cod es with the “ Arm
O nly” ( se ction 5.4 on page 11)
o ption e nable d cann ot disarm
a n armed system.
How do I disarm the sy stem ?
1) E nte r yo ur [A CC ESS C ODE ].
2) P ress the [D ISA RM] button.
If you ha ve acce ss to more than o ne ar ea, se lect the a rea(s) you wish to
disar m (re fe r to sectio n 2.3 o n page 5 ).
How do I disarm a sy stem in a la rm ?
1) E nte r yo ur [A CC ESS C ODE ].
2) In th e case of a false alarm, ca ll you r Cen tra l Mo nitoring Stati on quickly to
ad vise them of the false alar m.
In t he c ase of a burgla r alarm, lea ve the prem ises and call the Polic e f rom a sa fe plac e.
4.3
ALARM MEMORY DISPLAY
Your system will recor d all th e
a larms th at occu rred durin g
the last arme d p eriod . Th e
zon es in ala rm wi ll remain in
the A larm Memory until th e
n ext time tha t are a is ar me d.
How do I v ie w the list of a la rm s that oc curred?
Whe n an ala rm ha s occu rred , the LCD screen will d isp lay “A larms in Memory
[ MEM ] to Vi ew”.
1) P ress the [MEM] bu tton . Ea ch zo ne that wa s b reache d while ar me d will
ap pear be low “Alar m in :” .
2) P ress the [C LE AR ] bu tton to exit the Ala rm Memo ry Displa y.
5.0 ACCESS CODES
A ccess Code s al low acce ss to the system. You r system su ppo rts up to 96 User A cce ss Code s. Code s a re given a
User Nu mber between 02 and 96 ( User Number 01 is th e System Master Cod e). Yo ur Installer will pr ogra m Use r
A ccess Code s to be four, six, or variab les of one to six digits in le ngth. Each digit can b e an y va lue b etwe en zero
a nd nin e. If your Insta ller pro gramme d yo ur system to accept a va riab le co de len gth , you ha ve to pre ss th e [EN TER ]
b utton a fter en ter ing your User Access Code .
5.1
SYSTEM MASTER CODE (Default 123456)
The Syste m Master Code wi ll How do I change the Sys tem Mas ter Code?
g ive you access to all the 1) Enter the cu rren t [SYST EM MA ST ER COD E ] (d efault: 1 2345 6).
fea tur es availa ble on you r
2) Press the [0 ] butto n.
syste m, as we ll as the a bility
3) Press the [AC C] button.
to ad d, mo dify, o r dele te a ny
User Acce ss Co des. We 4) Enter the numbe r [01] .
sug gest tha t you chan ge this 5) Enter a [N EW CODE ] .
cod e to pre ve nt o th ers fr om 6) Press the [ENT ER] bu tton to sa ve an d exit.
a ccessing
an d
cha nging
o ptions wi tho ut a uth orization . Yo ur In stalle r can set Th e System Master Co de to b e either 4 or 6 dig its in leng th.
The S yst em Maste r Code has ac cess to all Acces s Control Doors and all Acc ess Cont rol
fe ature s a t a ll tim es. O nly the c ard’s serial num ber and t he choice of arming m ethod can be
changed. If the other options a re m anually c ha nged, the Syst em Mas ter Code will imme diat ely
reve rt to its origina l program ming.
5.2
DELETING USER ACCESS CODES
To de lete Use r A cce ss Codes, fol low steps 1 to 5 in Fi gure 5 .1 on p age 9, but press th e [CL EA R] button in Step 5, 6
a nd 7. O nce th e information is erased , pre ss th e [EN TER ] b utton to save and exit.
8 User’s Manual
5.3
PROGRAMMING USER ACCESS CODES
The S ystem Master a nd Use rs with th e Ma ster feature can p rogr am User Access Cod es with Use r Option s and
A rea Assign me nts. Fig ure 5.1 on pag e 9 describes th e steps you would follo w to prog ram Use r A ccess Co des.
If the keypad emits a Rejection Be ep at a ny po int d uring the pr ogra mmin g proced ure, yo u ma y have chosen an
e xisting User Cod e or you d o not have a ccess to ce rta in Use r Option s ( se ction 5.4 ) and A rea A ssig nments ( step 7
in Figure 5.1 on page 9). Use r’s with th e Master feature ca n on ly a ssig n Use r Op tio ns and Area Assignmen ts that
the y are assigne d to. Fo r e xa mple, i f a User with the Master fe ature is a ssign ed Use r O ption 1 and Are a 2, they can
o nly a ssig n O ptions 1 and A rea 2 to a User Access Cod e.
Figure 5.1: Programming User Access Codes
Enter your [ACCESS
feature).
COD E]
(System Master Code or User Access Code with Master
Press [0] to enter the Programming Menu.
From Programming Menu, press [A CC].
Enter the 2-digit User Number you want to program; press the [T
T] button to scroll the
list of codes then press [ACC ] once the desired code appears on the screen.
Enter a User Code within the brackets. Press the [S
S] button to reach the User Options
screen.
NOTE: The User Code is a Personal Identification Number (P.I.N.).
Program the User Options by pressing the number on your keypad corresponding to
the User Option you wish to enable. The option is considered ON when the number
appears within the brackets. Proceed to step 7 by pressing the [S
S] button. For a
detailed description of the User Options refer to section 5.4 on page 11.
Option [3]: Duress
Options [1] and [2] : Master Feature
Option [4]: Bypass
[1] OFF = Master Feature disabled.
[1] ON, [2] OFF = User can only modify User Option [5]: Arm Only
Option [6]: Stay and Instant Arm
Access Codes.
[1] ON, [2] ON = User has full Master rights. Option [7]: Force Arm
User can create, modify, and program User Option [8]: OFF - Access keypad’s
Access keypad’s
options, User Access Options and Area
partitions only
Assignments.
ON - Access any
partition assigned
to user
LCD Keypad 9
Users are able to perform actions (arming, disarming, etc.) only in the area(s) they are
assigned. To assign an area(s) to a User Access Code, enter the number corresponding
to the area you wish to assign (i.e. [1] = area 1, ...[4] = area 4).
Press the [T
T] button to return to the User Options; press the [S
S] button to proceed to
step 8; or press the [ENT ER ] button to save and exit programming mode.
NOTE: If no area is assigned, and if PGMs are programmed by your Installer, the User
can only control the PGMs. Refer to section 8.1 on page 15 for a more detailed
explanation of PGMs.
A) Enter the 2-digit Access Level (i.e. 00, 01,...15) within the first set of brackets.
An Access Level determines which Access Control Doors a User is allowed to pass
through. There are 16 possible Access Levels which are usually programmed by your
Installer. Access to all Access Control Doors is Access Level 00.
B) Enter the 2-digit Schedule (i.e. 00, 01,...15) in the second set of brackets.
Schedules, programmed by your Installer, determine the hours, days, and holidays that
Users are permitted through Access Control Doors. Each user is assigned a Schedule
through the User Access Code. To provide access at all times, assign Schedule 00.
Program the Access Control User Options by pressing the number on your keypad that
corresponds to the Option you wish to assign. The option is considered ON when the
number appears within the brackets. For a detailed description of the User Access
Control Options, refer to section 5.5 on page 11. Press the [S
S] button to proceed to step
10.
Option [1] : Access Card is Activated
Option [2] : Can Disarm with Access Card
Option [3] : Extended Unlocked Period
Options [4], [5], [6] & [7] : Arming with Card
Option [4] OFF = Disable the Arming with Card feature
Option [4] ON, options [5], [6] & [7] OFF = Regular Arm
Options [4] & [5] ON, options [6] & [7] OFF = Stay Arm
Options [4] & [6] ON, options [5] & [7] OFF = Instant Arm
Options [4] & [7] ON, options [5] & [6] OFF = Force Arm
Option [8] : Access to Armed Access Control Doors
Enter the Access Control Card’s serial number within the brackets on the screen by
either using the keypad buttons, or presenting the card to the keypad’s reader.
Press the [ENTER] button to save and exit.
10 User’s Manual
5.4
USER OPTIONS
O ptions [1] and [2]: Ma ster Featur e
Wh en option [1] i s OFF, the User ca nno t pro gram other Users i nto the system.
Wh en option [1] i s ON and o pti on [2 ] is O FF, th e User can on ly mod ify existin g User A ccess Co des.
Wh en both op tio ns [1] and [2] are ON, th e User h as Ful l Ma ster rig hts. Th e User can cre ate or modify User Access
Cod es, User Optio ns, Use r Acce ss Control O pti ons, Access Ca rd Numbers and A rea Assign ments accordi ng to
the ir o wn pr ogra mmin g. For example , if th e Fu ll Master User ha s access to ar ea #1 and option [4] (B ypa ss) only, the
Ful l Master User ca n only assig n area # 1 a nd optio n [4] to othe r Users in the system.
O ption [3]: Du ress
Wh en op tio n [3 ] is ON, th e Duress fe ature is en able d. Thi s feature is u se d when some one forces a User to ar m o r
d isa rm an are a(s). B y e ntering a User A ccess Code (P.I.N.) reser ve d fo r the Du ress fea tur e, the system will ar m o r
d isa rm the a rea(s), and then sen d a sile nt al arm to the Central Mon ito ring Sta tio n.
O ption [4]: B ypass
Wh en option [4 ] is ON, the Bypass feature is e nable d. This fea tur e a llows the User to d eactiva te zone s when arming
the ar ea(s).
O ption [5]: A rm O nly
Wh en option [5 ] is O N, the Ar m On ly fe ature is en able d. The Use r can arm assi gned ar eas with either a car d o r
cod e, bu t cann ot di sa rm. When the op tio n is O FF, the User can either ar m or d isa rm a ssig ned are as.
O ption [6]: Stay & Instant A rm
Wh en op tio n [6 ] is ON, the Stay and Instant Arm features are enab led. The User can no w Stay or In stan t Ar m thei r
a ssig ned are as.
O ption [7]: Fo rce A rm
Wh en option [7] i s ON, the For ce ar m feature is ena bled . The Use r ca n now Fo rce a rm the ir assig ned ar eas.
O ption [8]: A rea Access
Wh en option [8] is ON, the ke yp ad wi ll p ermit a ccess to all th e a reas assigned to th e User Access Cod e. When
o ption [8] is OFF, the keypad will only pe rmit acce ss to the a reas it contro ls. For e xa mple, the keypad is assigned
a rea 1 onl y, and you r User A ccess Co de is a ssign ed are as 1 to 4. If the op ti on is O N, yo u ca n acce ss all four are as
from the keypad. If the o pti on is O FF, yo u can o nly a ccess area 1.
B y de fa ult al l Users ca n Regula r arm the syste m.
5.5
ACCESS CONTROL USER OPTIONS
O ption [1]: A cce ss Card is A ctivated
Wh en option [1 ] is ON, the Access Control Card is activate d a nd ca n b e u se d whe n A ccess Con tr ol is enab led in the
syste m. When the optio n i s OFF, the Access Con tro l Ca rd ca nnot be used .
O ption [2]: Disar mi ng with A ccess Ca rd
Wh en o pti on [2] is ON, a User’s A ccess Control Ca rd can unlo ck an d disar m an a rmed A ccess Control Do or (see
section 6.2.2 on pag e 12).
For option [2] to function in the O N pos ition, option [5 ] “Arm Only ” in the Use r O pt ions m us t
be disable d (refe r to sec tion 5.4 on page 11).
O ption [3]: Ca rd with Extend ed Unlocked Pe riod
Wh en op tio n [3] is O N, “E xten ded Un locked Pe riod ” is enab led. “Extend ed Unl ocke d Per iod” r efers to th e ti me
p eriod p rogr ammed into each Access Co ntr ol Door by yo ur In stalle r th at extend s the unl ocke d time o f th e doo r. Fo r
e xa mple, if you r Installer sets the Un locke d per iod of th e doo r to 30 se co nds and the E xten ded Unlo cke d Perio d to
1 5 seconds, th en a User Access Co de with “Extende d Unlocked Pe riod ” enab led will h ave a to ta l o f 4 5 se co nds to
pa ss throu gh th e door.
O ptions [4] to [7]: Arming with Card
O ptions [4] to [7] de fin e the type of armin g wh en arming with an Acce ss Control Card (re fer to se ction 6.2.1 on page
1 2). You can eithe r Reg ular ar m, Stay arm, Instant a rm, or Force arm.
[4] O N, [5 ] to [7 ] OFF = Re gula r A rm
[4] & [5] ON, [6] & [7] O FF = Stay A rm
[4] & [6] ON, [5] & [7] O FF = In stan t Arm
[4] & [7] ON, [5] & [6] O FF = Force Ar m
LCD Keypad 11
O ption [8]: A cce ss to A rmed Access Contro l Doo rs
Wh en op tio n [8 ] is enab led, th e Access Con tro l Ca rd can be u sed to open an arme d Acce ss Control Do or. When a
vali d A cce ss Control Card is presen te d to a rea der that is assigne d to a zone an d the zon e is ar me d, a ccess will be
g ranted a nd the E ntr y Dela y will b egin . Whe n option [8] is ON, e xtra secur ity is provid ed since a user mu st en ter a
User Access Cod e to di sa rm the ar ea.
For option [8 ] to f unct ion in the O N position, option [5] “Arm Only ” in the User Options ( re fer
to sect ion 5 .4 on page 11 ) and option [2 ] “ Disa rm ing w it h Acce ss Card” in the Acc ess Cont rol
User Options (ref er to sec tion 5.5 on pa ge 11) m us t be disabled.
6.0 USING ACCESS CONTROL
6.1
ENTERING & EXITING
Dep end ing on ho w your system is i nstall ed, the re are vario us ways to en ter a nd exit A ccess Co ntr ol Do ors:
1 ) Pr esent yo ur Access Contro l Car d to the re ader. Th e syste m will verify tha t the card
is a llowed access accord ing to its assigne d A cce ss Level and Sche dule . If i t is
accepted , the system wil l u nlock the do or. The rea der ’s ligh t can be pro gramme d b y
the installer to turn gre en or exting uish briefly to in dicate th at the do or can be
op ene d. Th e re ader ca n also be p rogra mmed b y the insta ller to a udib ly inform you
that th e d oor can be op ene d.
2 ) Whe n th e motion de te ctor d ete cts mo vement (Requ est for Exit), i t will un lock the
do or to p ermit pa ssa ge fr om in si de.
3 ) En te r you r User A ccess Co de on a keypad an d p ress [AC C].
4 ) If th e A ccess Con tro l Doo r is o n a “Door Unlocked Sched ule” , yo u may b e a ble to
op en Access Control Doors with out usin g a User Acce ss Code or an Access Control
Card . Dep end ing o n th e do or’s pr ogrammin g, th e doo r can re ma in un locked du ring
the entire pr ogra mme d sched ule or the door can unl ock once a valid Access Control
Card is pre se nted to the read er d uring th e sched ule a nd the n will r emain unlocked
for the remain der of th e sched ule.
6.2
ARMING AND DISARMING WITH CARD
6.2.1
AR M IN G
WIT H
CA R D
An Acce ss Con tr ol Card can b e pr ogra mme d to a rm area s assi gned to the d oor wh en i t is p resented to
th e read er (doo r) twice with in app roximately 5 secon ds witho ut op enin g the d oor.
The Access Control card must be:
•
•
•
•
6.2.2
presented to a door during its assigned Schedule (refer to step 8 in Figure 5.1 on page 9).
presented to a door within its assigned Access Level (refer to step 8 in Figure 5.1 on page 9).
programmed to allow arming (options [4] and [5] in section 5.5 on page 11).
assigned to all areas that are assigned to the Access Control Door (refer to step 7 in Figure 5.1 on page
9), or assigned to at least one of the areas assigned to the Access Control Door depending on how your
Installer has programmed the Access Control Door.
DIS A RM IN G
W IT H
CA R D
To d isa rm an d u nlock a n A ccess Co ntr ol Do or wh en th e a rea assigned to it is ar me d, pr esent you r Access
Control Card to th e read er (doo r).
The Access Control card must be:
•
•
•
•
12 User’s Manual
presented to a door during its assigned Schedule (refer to step 8 in Figure 5.1 on page 9).
presented to a door within its assigned Access Level (refer to step 8 in Figure 5.1 on page 9).
programmed to allow disarming (option [2] in section 5.5 on page 11).
assigned to all areas that are assigned to the Access Control Door (refer to step 7 in Figure 5.1 on page
9), or assigned to at least one of the areas assigned to the Access Control Door depending on how your
Installer has programmed the Access Control Door.‘
6.3
HOW ACCESS CONTROL WOR KS
To illu strate ho w Access Con tro l fun ction s, we wil l u se thre e simp le Acce ss Control System e xa mples:
Figure 6.1: Example A
B onn ie’s Access Control Card is
p rogr ammed with A cce ss Level
0 1 and Sche dule 0 1. If she
p resents her card to th e rea der
o n Do or 02 o n Tuesday, Au gust
3 at 3 p.m., she will gain access
to the room.
Figure 6.2: Example B
If B onnie p resents he r car d to the
r eade r on Doo r 02 on S atu rday
o r o n a Ho liday at 3 p .m., she will
b e denie d acce ss.
Figure 6.3: Example C
If we chan ge Bo nnie ’s Access
L evel to 0 2 a nd she pre se nts her
car d to the rea der on Do or 02 on
Tu esday, Aug ust 3 at 3 p .m., she
will be d enie d a cce ss.
LCD Keypad 13
7.0 TROUBLE DISPLAY
If you r syste m e xp erien ces a ny
How do I v iew t he Trouble Displa y?
p roble ms, “ Troub le(s) [TRBL ] to
1) Pr ess the [ TR BL ] button when “ Troub le(s) [TRB L] to Vie w” appe ars on the
V iew” will appe ar o n the LCD
LCD scree n. The G roup Hea ding with th e tro uble will ap pear o n the screen .
scree n. The Tro uble Displa y will
S] a nd [T
T ] butto ns to scroll between the G rou ps e xp erien ci ng a
o nly di sp lay the tro uble s th at 2) P ress th e [S
troub le.
o ccur in the ar ea(s) to wh ich the
keypa d ha s been assigne d. 3) Pr ess the [N UMB ER] of th e Trou ble you wish to view.
P oten tial tro ubles ha ve been
sorted into eig ht grou ps. O nly the tro ubles which are relevant to yo u a re listed and describ ed below. If a trouble that is
n ot descr ibed or listed below a ppears, contact your Installer.
We strongly sugge st t ha t if a ny troubles occur, c ontac t your Installe r im mediate ly to hav e your
s yste m serviced.
7.0.1
GR OU P 1: S YS T EM
AC Fa ilure
The co ntr ol p anel has detected a po wer fail ure. Thi s means th at your system is r unni ng on the ba ckup
battery. If this trou ble occu rs whe n you r e stabli sh me nt is not exp erien cin g a p ower fa ilure, ca ll you r
In stalle r for re pairs.
Battery Trou ble
The backup ba ttery is di scon necte d, n eeds to b e recharg ed, or repla ce d.
Bell A bsent
The system h as d etecte d tha t the bell or siren i s not co nne cted .
7.0.2
GR OU P 5: ZO NE TA MP ER
The zo ne(s) that wa s tampere d wi th will be di sp layed on the LCD scree n.
7.0.3
GR OU P 6: ZO NE LOW BA T T ER Y
If a wir eless d evice's ba ttery need s to be rep laced, the zon e tha t is a ssig ned to the d evice will be
displa ye d o n th e LCD screen .
7.0.4
GR OU P 7: ZO NE FAU L T
7.0.5
GR OU P 8: C LO CK LOS S
A wire less device is n o lon ger commu nicating with i ts recei ve r, or a conn ectio n or Cl eanMe TM tr ouble is
occurring with your smoke detecto rs.
The time and date have bee n re se t to the d efault. This is the on ly tr ouble that we recommen d that you
co rrect. “Clo ck Lo ss [8] to S et” wi ll app ear on th e LCD scre en after you pr ess the [TR BL ] button. Refe r to
se ctio n 8 .3 o n p age 15 to set the time and da te.
7.1
EVENT RECORD DISPLAY
The Event Recor d Display will
r ecord
the
user- initiated
a ction s that occurre d in your
syste m as we ll a s an y alar ms
o r tr oubl es (i.e. “Access
G ranted ”). You will o nly be
a ble to vi ew the e ve nts tha t
o ccur red
in
the
a rea(s)
a ssig ned to yo ur User Access
Cod e.
How do I vie w the Eve nt Rec ord?
1 ) E nter your [A CC ESS CODE ].
2 ) P ress the [7 ] b utto n.
3 ) If you h ave access to more tha n one a rea, select the area (s) you wi sh to
view (refer to se ction 2 .3 on p age 5).
4 ) Use th e [S
S] and [T
T] butto ns to scro ll between the even ts.
5 ) P ress the [ CL EAR ] b utton to exit.
O nce you ha ve e ntered E ve nt Re co rd Display mode , you can cha nge the o rder tha t the Even t Record scree ns
a ppea r by pr essin g the [7 ] bu tton. If yo u alre ady know the numbe r of th e even t you want to view, pr ess the [ME M]
b utton a fter ste p 3 a bove, and then en te r the e ve nt's numbe r.
14 User’s Manual
8.0 ADDITIONAL FEATURES
8.1
PROGRAMMABLE OUTPUTS (PGMS)
Your system i nclude s Prog rammab le O utputs (PG Ms) that can be pro gramme d b y yo ur In stalle r. A PG M trigg ers
whe n a p rede ter mined even t or se ries o f events occurs i n you r system. Th e P GMs can be pro grammed to reset
smoke ala rms, tu rn on ligh t switche s, ope n o r clo se g arag e door s an d mu ch mor e. A sk yo ur In stalle r abou t this
u se fu l fea tur e.
8.2
KEYPAD SETTINGS
You can modi fy the keypa d settings to suit your nee ds ( Re fe r to Figur e 8 .1 o n p age 15 ).
1 ) Scro lling S peed r efe rs to the amou nt o f time tha t a message will re main on the screen b efore moving to the next
message .
2 ) Ba cklig ht re fe rs to th e illumina tio n beh ind th e butto ns a nd LCD scree n.
3 ) Con tra st refers to ho w da rk o r pa le chara cters will appe ar on the scre en.
Figure 8.1: : Modifying LCD screen settings
8.3
SET TIME & DATE
How do I res et the tim e and date ?
1) E nte r yo ur [A CC ESS C ODE ] and p ress the [T RB L] butto n.
2) P ress the [8] bu tton .
3) To cha nge the time, pla ce th e cursor un der the numbe r yo u want to chang e
by using the [ S] butto n and e nter the time acco rding to a 2 4-ho ur clock (i.e.
9 a.m. is 0 9:00 and 9 p .m. is 21:00 ).
4) To chan ge the d ate, p lace the cursor u nde r th e numbe r you wan t to chang e
an d e nter th e co rrect da te a ccord ing to ye ar/month/day.
5) P ress the [EN T ER] butto n to save and e xi t.
LCD Keypad 15
8.4
PROGRAMMING CHIME ZONES
You can p rogr am the ke ypa d
to e mi t a r apid, inter mi ttent
b eep
tone
when ever
d esigna te d zo nes are o pene d
o r on ly when op ened be twee n
cer tain ho urs. These zo nes
a re r efe rred to a s Ch ime
Zon es. Your insta ller can also
p rogr am yo ur Chime zone s to
b eep up on closure.
How do I program c him e zones?
1) En ter you r [AC CESS C OD E ].
2) Pre ss th e [9] button.
3) Pre ss th e [1] button to ch ime a zon e. The n e nter th e
nu mb er correspo ndin g to the zone to be chimed, or use
the [S
S] and [T
T] buttons to scroll the list of zones. Press
the [A CC ] b utton to chime or unchi me the zone tha t
ap pears on the scr een. Press [E NTE R ] to save.
OR
Pre ss th e [2] button to se t th e time pe riod a chimed zon e
will bee p. En te r the time that the chimed zon e(s) will start
be eping whe n ope ned (HH:MM). Enter the time tha t the
chimed zone (s) wil l stop bee ping whe n open ed (HH:MM).
4) Pre ss [CL EA R ] to exit chime pro grammin g.
8.5
PANIC ALARMS
Your syste m can be pr ogra mme d to send a n alar m to you r Central Mon ito ring Station to re quest help fro m the
p olice, a medical facility, the fire d epar tmen t, or an yo ne you wish when you press a pre- determine d combina tio n of
b utton s. To gene rate a panic ala rm, simultaneo usly p ress a nd hold the b utton comb ination s displ ayed in Table 1 on
pa ge 16 . Yo ur insta ller can prog ram th e alarm to b e either silen t or aud ible .
Table 1: Panic Buttons
Panic Alarm Types
8.6
Buttons to be pressed and held
simultaneously
Emerg ency P anic
Pre ss & hold the [1] a nd [3] bu ttons
Auxilia ry P anic
Pre ss & hold the [4] a nd [6] bu ttons
Fire Pan ic
Pre ss & hold the [7] a nd [9] bu ttons
QUICK FUNCTION BUTTONS
You will only nee d to use th e
Q uick Fu nctio n Buttons upo n
you r Insta ller ’s or Ce ntral
Mo nitoring Station's requ est.
O nly the Syste m Master Cod e
o r User Access Cod es with
the Master feature e nable d
will be a ble to acce ss th ese
fun ction s.
How do I a cces s the Quic k Function Buttons?
1) E nte r yo ur [A CC ESS C ODE ]
2) P ress the [0] bu tton .
3) P ress the:
[ST AY ] butto n to se nd a test rep ort to th e Ce ntral Monitori ng Station .
[F ORC E ] b utto n to ca ll the Win load softwa re.
[A RM ] bu tton to answ er the Winlo ad software .
[D ISAR M] butto n to ca nc el commun icati on with the Winl oad softwar e.
9.0 TESTING AND MAINTENANCE
9.1
BURGLAR ALARM TESTING
Two peop le are n eede d to co mp lete th is test. On e perso n wi ll wa tch the LCD scr een on the keypa d while the othe r
p erson walks aro und the p rotecte d are as a nd op ens the zone s (i.e. ope ns th e doo rs a nd wind ows tha t are
p rotecte d, walk in the path o f the motion de tectors, etc.). Th e L CD scre en will displa y the o pen ed zon es, but if a
zon e does not register, contact your Insta ller.
9.2
FIRE ALARM TESTING
Do NOT use an ope n fla me o r b urnin g ma te rials to test your fire de tection de vices. Your Insta ller will provid e d etails
o n the b est way to test your system.
16 User’s Manual
9.3
SYSTEM MAINTENANCE
9.4
SYSTEM TEST
Und er normal use yo ur syste m req uire s no ma intena nce o th er tha n re gula r testi ng. We recommend that you r
Installer chan ge th e battery e ve ry thre e yea rs.
S pea k to you r Install er be fo re
con ducting a System Te st
since th e system must b e
p rogr ammed to respon d to
the test instructions. It is
n ormally recommen ded that
you con duct the system te st
o nce a we ek, but co nta ct yo ur
Installer
for
instructions
con ce rning yo ur pa rticu lar
syste m.
How do I c onduct the sys tem te st?
1) Call you r Ce ntral Moni tor ing Sta tio n to advise th em th at you a re te stin g yo ur
system.
2) E nte r yo ur [A CC ESS C ODE ].
3) P ress the [8] bu tton .
The system wi ll test a ll its co nnections and can sen d a r epor t to you r Ce ntral
Moni tor ing Station. If the syste m detects a prob lem, the Tro uble Disp lay will
show o n the LCD scree n (Re fer to section 7.0 o n pa ge 14). Ca ll your Instal ler
for repa irs if any Trou bles occu r.
10.0 FIRE AND BURGLAR ALARMS
10.1
STANDARD FIRE ZONE
Dur ing a fire al arm, the bell/
sire n e mi ts an inter mi ttent
sou nd (BEEP - BEEP -BEEP ) until
sile nced or r eset. If the zon e
is a Sta nda rd Fire Zone , yo ur
syste m can immedia te ly sen d
a n aler t to your Ce ntral
Mo nitoring Station.
How do I disarm a false a larm ?
1) E nte r yo ur [A CC ESS C ODE ] on the keypad.
2) Call yo ur Central Mo nitorin g Station quickly to advise them of th e false
ala rm.
The Fire Zone may res et its elf once the problem has c le are d. If it does not , simultaneously
pres s a nd hold the [CL EA R] and [ ENT ER] but tons for two seconds.
10.2
DELAYED FIRE ZONE
If the zo ne is a Dela ye d Fire
Zon e, there is an automa tic
d elay b efo re you r system
con tacts
you r
Ce ntral
Mo nitoring Sta tio n. Refe r to
Fig ure 1 0.1 on p age 18 to
p revent
u nnecessary
r epor tin g o f false alarms.
What do I do if the fire a la rm is ac cide ntally triggered?
1) P ress the [C LE AR ] bu tton within 30 second s of th e alarm.
2) Clea r the pro blem fro m the area (i.e. clea r the smo ke from arou nd the smoke
de tector).
3) If th e p roble m rema ins after 9 0 second s, the ala rm will sou nd agai n. Pre ss
[C LE AR ] ag ain.
The system wi ll d elay repo rting th e aler t fo r anothe r 3 0 se co nds.
If you ar e una ble to can ce l th e false ala rm, you r system will send an al ert. Cal l yo ur Cen tra l
Mo nitorin g Station to advise th em o f the fa lse a larm.
The Fire Zone m ay res et itself once the sm oke has cleared. If it does not, simultaneously
pres s a nd hold the [CL EA R] and [ ENT ER] but tons for two seconds or speak t o your installe r.
LCD Keypad 17
Figure 10.1: Delayed Fire Zone
10.3
FIRE SAFETY TIPS
How shou ld yo u prepa re in ca se o f a fire in yo ur home or b usiness?
•
•
•
•
•
•
•
•
10.4
Remind everyone to escape first, then call for help.
Develop a fire escape plan and designate a meeting place ou tside.
Practice the escape plan frequently.
Plan two ways to escape from every room, if possible.
Practice feeling the way out with eyes closed.
Instruct everyone never to sta nd up du ring a fire, always crawl under the smoke and keep mouths covered.
Instruct everyone never to return to a burning building for any reason; it may cost them their life.
Check smoke alarms regularly. Working smoke alarms dramatica lly increase everyone's chances of surviving a fire.
MINIMIZING HOME FIRE HAZARDS
How can you avoid the three most commo n ca uses of fi res a t home ?
• Never leave cooking food unattended. It is the leading cause of fire injuries. Cooking fires often result from unattended
cooking and human error, rather than mechanical failure.
• Stay alert wh en smoking. Careless smoking is the leading cause of fire dea ths. Smoke detectors and smolder-resistant
bedding and upholstered furniture are significant fire deterrents.
• Maintain your heating system. Faulty heating systems are the second leadin g cau se of residential fires.
10.5
HOME FIRE WARNING SYSTEM
10.6
BURGLAR ALARM
Hou sehold fires are especia lly dan gero us at nigh t. Fire s p rodu ce smoke an d de adly ga se s th at ca n over co me
o ccup ants while they sleep. To wa rn agai nst fi re, smoke detectors sh ould be in stalle d outsi de each separ ate
slee ping are a in the immedia te vici nity of the b edro oms an d on ea ch ad ditiona l sto ry of the fa mily living unit,
in cl udin g b asements.
If your ar me d syste m is breach ed, the bu rglar ala rm d evice s specific to yo ur syste m will be trigge red. If you r keypad
is in Normal Mod e:
• The Status Light ma y flash red
• “In Alarm” will appear on LCD scre en.
• Bell or siren may be activated
In c ase of a burgla r alarm, le ave the pre mises and call the police sta tion from a s afe pla ce.
18 User’s Manual
Voice-Assisted Arm/Disarm Module
Operating Instructions
11.0 INTRODUCTION
Con gratula ti ons o n ch oosing the Par adox In To uch Vo ice -Assisted A rm/Disar m Modu le (APR3 -ADM2). InTou ch
turn s a ny tou ch -to ne telep hone into a ke yp ad. With InTou ch , you can n ow arm or disar m you r Dig iplex security
syste m as wel l as activate or dea ctivate you r InTou ch ’s output all fro m your teleph one . Usin g d eta iled voice prompts
to gui de your way, the InTouch is as simple as picking up you r tele phon e.
12.0 ACCESS CODES
InTou ch u se s your Dig iplex User Access Cod e to g rant yo u acce ss to yo ur Digip lex S ecurity System. Th e Use r
A ccess Co de enter ed on your Digip lex syste m keypad is th e sa me you wou ld use to e nte r o n yo ur te leph one.
13.0 HOW DO I USE IT?
S TE P 1:P ick up you r telep hon e an d d ial the te leph one numbe r of the line that your In To uch is con nected to. The
InTou ch will no w ask yo u to en ter you r Dig iplex Use r A cce ss Co de.
S TE P 2:E nter yo ur Digiple x User Access Code .
If your Digiplex Se curity Sy stem is program me d to acc ept variable c ode lengths, y ou m us t
press the [# ] k ey afte r ente ring your Us er Acc ess Code .
S TE P 3:K eys [1 ] to [4] on you r te leph one r eprese nt a reas 1 to 4. To arm or disar m you r Digiple x S ecurity S ystem,
p ress the d esired a rea’s nu mb er on you r te leph one. This will to ggle the area ’s ar mi ng state from ar me d to
d isa rmed an d vice versa (refer to se ction 1 6.0 on page 2 0).
S TE P 4:To activate or de activate the InTouch’s ou tpu t, pre ss the [#] key an d th en the [0] key (re fe r to section 1 6.0
o n page 20 ).
14.0 THINGS YOU SHOULD KNOW
14.1
WHEN ACCESSING YOUR INTOUCH...
14.2
WHEN ARMING OR DISAR MING...
14.3
WHEN ACTIVATING OR DEACTIVATING A PGM...
• If you are using an an swering machine or service, call the InTouch, hang up after one ring, wait between 10 and 255
seconds (depending on how Intouch was programmed by your Installer), and then call the InTouch again to access it.
• You will only be able to arm or disarm areas that your User Code has access to.
• If you were to arm an area with an open zone, Digiplex will Force arm the area. This will only happen with User Access
Codes that have th e Fo rce arming feature enabled.
• Your InTo uch’s o utput can be used to turn on lights, open or close a garage door and much more. Ask your installer
about this useful feature.
• If the InTouch’s o utput is not operational, you will not be able to activate or deactivate the output.
LCD Keypad 19
• Your installer can program the output to deactivate either manu ally or follow a time r. If programmed to be deactivated
manually, the output will remain activated until you deactiva te it. If programmed to follow a timer, the output will
deactivate after the timer has elapsed.
14.4
WHEN USING YOUR INTOUCH...
• In some ca ses, your telephone’s tone may not be powerful enough to interrupt the InTouch’s voice prompt. If this is the
case, simply wa it for th e InTouch’s voice prompt to finish before entering your actio n.
• If your Digiplex Security S ystem and InTouch share the same telephon e number, yo u may be interrupted at times when
using your InTouch.
15.0 TELEPHONE BUTTON FEATURES
Cle ar = [*]
If yo u have ma de an error, press th e [*] button on yo ur telep hone to cle ar the er ror an d then r e-en ter the
in fo rmation.
A ctivate/Deactiva te InTouch Ou tp ut = [ #] , [0]
To activate o r d eactiva te the InTouch’s output, p ress the [#] b utton a nd th en the [0] bu tton on your tele phon e.
Han g Up = [#] , [9 ]
Wh en you wish to han g up , p ress th e [#] button a nd then th e [9 ] button to i mme diately ha ng u p. The InTouch wi ll
con fir m the han g up with “ Good -bye”.
If t he hang-up feat ure is not used a nd if no action is perform ed a fter 2 minut es, the InTouch
w ill hang up automa tic ally.
16.0 INTOUCH EXAMPLE
Nel so n h as a Digip lex S ecurity S ystem and an InTouch hoo ke d up at ho me. His secur ity syste m ha s two a reas.
B oth a reas are pre se ntly ar me d and the In To uch’s ou tp ut, which is ho oked up to h is ga rage do or ope ner, is
d eactiva te d. Nelson is on his wa y home and wishes to disarm both a reas and ope n h is gar age doo r. Nelson
p erforms the follo wing:
Nelson first dia ls the te leph one nu mber of the li ne to whi ch the InTouch is con nected to .
When the InTouch picks up , it will pr ompt Nel so n with the followin g:
“Pl ease enter your code .”
Nelson enter s his Use r A ccess Co de.
The In To uch th en promp ts Ne lso n with the followin g:
“Ar ea 1 Armed ”
“Ar ea 2 Armed ”
“Ou tp ut is Deactiva te d”
“To modi fy, e nter Are a n umber ”
Nelson pre sses th e [1] key o n h is tele phon e to disa rm A rea 1.
Your User Acce ss Code must also have a cces s to the areas to which the InTouch is assigned
t o.
20 User’s Manual
The In To uch th en promp ts Ne lso n with the followin g:
“Ar ea 1 Disa rmed”
“Ar ea 2 Armed ”
“Ou tp ut is Deactiva te d”
“To modi fy, e nter Are a n umber ”
Nelson pre sses th e [2] key o n h is tele phon e to disa rm A rea 2.
The In To uch th en promp ts Ne lso n with the followin g:
“Ar ea 1 Disa rmed”
“Ar ea 2 Disa rmed”
“Ou tp ut is Deactiva te d”
“To modi fy, e nter Are a n umber ”
Nelson th en presses the [# ] key and then the [0] ke y on his te leph one to a ctivate the ou tp ut which in tu rn wi ll
acti va te the gar age do or.
The In To uch th en promp ts Ne lso n with the followin g:
“Ou tp ut is Acti va ted ”
Nelson then pre sse s the [#] key a nd th en the [9] key o n his tele pho ne to termin ate the call .
The In To uch th en promp ts Ne lso n with the followin g:
“Go odb ye ”
17.0 INTOUCH SYSTEM CHECKLIST
Tele pho ne Number : ___ ____ ___ ____ ___ ____
O utput A ctivates: _ ____ ____ ___ ____ ___ ____
O utput fol lows:
NOutput Timer
NMa nua l Dea ctivation
O utput Timer Le ngth: _ ____ _ Nsec. or Nmin.
Cal l, ha ng-u p, an d the n ca ll back within __ __ sec.
Numb er of ri ngs b efore InTouch answer s: ____
P artition Assignmen t: N1
N2
N3
N4
LCD Keypad 21
Warranty
The Se ller warra nts its p rodu cts to be fre e from defects in ma te rials and workmanship un der nor mal u se for a p eriod
o f o ne yea r (except as in dicated o th erwise). Except as spe cifically state d he rein, a ll expre ss o r implie d warra nties
wha tsoe ve r, statutory o r otherwise, inclu ding wi tho ut limita tio n, any impl ied war ranty of merchan tab ility a nd fitness
for a p articu lar purp ose, are expr essly e xclu ded. B ecause Sell er d oes n ot insta ll o r conn ect th e p rodu cts and
b ecause the pro ducts ma y be used in conju nctio n with p rodu cts no t ma nufactured by Se ller, Sell er can not
g uara ntee th e performa nce of the security syste m. Sel ler oblig ation an d liabil ity und er th is warr anty is expressly
li mi ted to repair ing or repla ci ng, at S elle r's op tio n, any prod uct n ot me eting the spe cifications. In no even t shal l the
S eller b e l iable to th e buyer or an y other pe rson fo r a ny l oss or da ma ges wh ether dir ect or ind irect or conse quen tia l
o r in cid ental, in clu ding withou t limita tio n, an y damag es for lost pro fits, stole n g ood s, o r claims by an y other party
cau se d by d efe ctive goo ds o r o th erwise arising from th e improp er, incorr ect or other wi se faulty instal lation or use of
the mer ch andise sold .
22 User’s Manual
INDEX
A
Acc ess Codes
Deleting .............................................................8
InTouch Access Codes ........................................19
Programming ......................................................9
System Master ....................................................8
User ..................................................................8
Acc ess Control
Card Assignment ...............................................10
Entering & Exiting ..............................................12
Acc ess Control User Options
Acc ess t o Armed Access Control Doors ..................12
Act ivate Card ....................................................11
Armi ng with Card ..............................................11
Can Disarm with Access Card ...............................11
Exten ded Unlocked Peri od ...................................11
Programming ....................................................10
Acc ess Level ...........................................................10
Alarm Memory Di splay ................................................8
Alarm,Testi ng .........................................................16
Area
Ass ignment ......................................................10
see also Partit ioned Sys tem
Area Ac cess, in User Options .....................................11
Area St at us Display ...................................................5
Armi ng
Automatic Arming ................................................7
Force Arming ......................................................6
Instant Arming ....................................................6
Keyswi tch Arming ................................................7
Regular Arming ...................................................5
Stay Armi ng .......................................................6
wit h Card .........................................................12
wit h InTouch ....................................................19
Auto-Arming
No Movement Auto-Arming ...................................7
Timed Auto-Arming ..............................................7
B
Battery
Disconnected ....................................................14
Low, i n a Zone ..................................................14
Beep Tones
Confirmati on beep ...............................................4
in Opened or Closed Zones, see Chime Zones
Rejection beep ....................................................4
Bell Di sconnected ....................................................14
Burglar Al arms ........................................................18
Butt on s
One-Touc h .........................................................7
Quick Function ..................................................16
Bypass
Bypass Recall ......................................................6
Programming ......................................................6
C
Card, Access Cont rol
Act ivati ng .........................................................11
Armi ng with ......................................................12
Ass ign .............................................................10
Disarming with ..................................................12
Chi me Zones ..........................................................16
Cl oc k, Set Time an d D ate ..........................................15
Confidential Mode ......................................................5
D
Date, Set ...............................................................15
Deac tivating a Securit y Syst em ....................................7
Delay Timer
Entry .................................................................7
Exit ...................................................................5
Delayed Fire Zone ...................................................17
Deleting User Acc es s Codes .........................................8
Disarmin g
Armed System ....................................................8
InTouch ...........................................................19
wit h Card .........................................................12
Display
Alarms In Memory ...............................................8
Area St at us ........................................................5
User Act ions in Memory ......................................14
Duress, in User Options ............................................11
E
Emergency Buttons ..................................................16
Entering and Exiting, Ac cess Control Doors ..................12
Entry Delay Ti mer ......................................................7
Erasing User Access Codes ..........................................8
Event Record Displ ay ...............................................14
Exit Delay Timer ........................................................5
Exten ded Unlocked Peri od .........................................11
F
Fi re
Delayed Fire Zone .............................................17
Mi nimizing Home Fire Hazards .............................18
Safety Tips .......................................................18
Standard Fire Zone ............................................17
Warning System ................................................18
Fi re Alarm, Testing ..................................................16
Force Arming ............................................................6
I
Ignori ng Zones when Arming, s ee Bypass Programming
Instant Arming ..........................................................6
InTouch
Acc ess Codes ....................................................19
Acc ess ing .........................................................19
Act ivati ng a Programmable Output .......................19
Armi ng ............................................................19
Deac tivat ing a Programmable Output ....................19
Disarming ........................................................19
How to Use ......................................................19
Tel ephone But tons .............................................20
K
Keypad, LCD
Butt on s .............................................................4
Light s ................................................................4
Mess ages ...........................................................4
LCD Keypad 23
Settin gs ...........................................................15
Keyswi tch Arming ......................................................7
L
LCD Keypad ..............................................................4
Level , Access ..........................................................10
M
Mast er Code .............................................................8
Mast er Feature, in User Opti ons .................................11
N
No Movement Auto-Arming
.........................................7
O
One-Touc h but tons ....................................................7
Outputs , Programmable (PGM) ..................................15
P
Pani c Alarms ...........................................................16
Partitioned System ....................................................5
Power Fai lure, see Troubl e
Programmabl e Ou tputs (PGM)
Act ivati ng Through InTouch .................................19
in DigiplexNE Security System .............................15
Programming
Acc ess Control Cards ..........................................10
Acc ess Control User Options ................................10
Acc ess Levels ....................................................10
Chi me Zones ....................................................16
Schedules ........................................................10
User Acc ess Codes ......................................... 9–10
User Options .......................................................9
Q
Quick Function Bu ttons
Answer Winload Sofware .....................................16
Call Win load Software ........................................16
Cancel Communic at ion with Winl oad Software ........16
Send Test Report ...............................................16
R
Recall, Bypassed Zones ..............................................6
Regular Arming .........................................................5
Request for Exit ......................................................12
S
Safety Tips , Fire ......................................................18
Schedules ..............................................................10
Separated System
see Parti tioned System
Siren D isconnected ..................................................14
Standard Fire Zone ..................................................17
Stay Armi ng .............................................................6
System Master Code ..................................................8
System Test ...........................................................17
T
Tampered Zones .....................................................14
Tes ting and Maintenance
24 User’s Manual
Burglar Al arm ...................................................16
Fi re Alarm ........................................................16
System Maint enance ..........................................17
System Test .....................................................17
Time, Set ...............................................................15
Timed Auto-Arming ....................................................7
Timer
Entry Delay ........................................................7
Exit Delay ..........................................................5
Trouble
AC Failure ........................................................14
Battery ............................................................14
Bell/Si ren Disconnected ......................................14
Cl oc k ...............................................................14
Low Battery, Zone .............................................14
System ............................................................14
Zone Fault ........................................................14
Zone Tamperi ng ................................................14
U
Unlocked Period, Extended ........................................11
User Options
Acc ess Control , see Acc es s Control User Options
Area Ac cess ......................................................11
Arm Only .........................................................11
Bypass ............................................................11
Duress .............................................................11
Force Arm ........................................................11
Mast er Feature ..................................................11
Programming ................................................ 9–10
Stay & Instant Arm ............................................11
V
Viewing
Alarms In Memory ...............................................8
Area St at us ........................................................5
User Act ions in Memory ......................................14
NOTES
___________________________________________________________________
___________________________________________________________________
___________________________________________________________________
___________________________________________________________________
___________________________________________________________________
___________________________________________________________________
___________________________________________________________________
___________________________________________________________________
___________________________________________________________________
___________________________________________________________________
___________________________________________________________________
___________________________________________________________________
___________________________________________________________________
___________________________________________________________________
___________________________________________________________________
___________________________________________________________________
___________________________________________________________________
___________________________________________________________________
___________________________________________________________________
___________________________________________________________________
___________________________________________________________________
___________________________________________________________________
___________________________________________________________________
___________________________________________________________________
___________________________________________________________________
___________________________________________________________________
___________________________________________________________________
___________________________________________________________________
___________________________________________________________________
___________________________________________________________________
___________________________________________________________________
___________________________________________________________________
___________________________________________________________________
___________________________________________________________________
___________________________________________________________________
___________________________________________________________________
___________________________________________________________________
___________________________________________________________________
___________________________________________________________________
LCD Keypad 25
NOTES
___________________________________________________________________
___________________________________________________________________
___________________________________________________________________
___________________________________________________________________
___________________________________________________________________
___________________________________________________________________
___________________________________________________________________
___________________________________________________________________
___________________________________________________________________
___________________________________________________________________
___________________________________________________________________
___________________________________________________________________
___________________________________________________________________
___________________________________________________________________
___________________________________________________________________
___________________________________________________________________
___________________________________________________________________
___________________________________________________________________
___________________________________________________________________
___________________________________________________________________
___________________________________________________________________
___________________________________________________________________
___________________________________________________________________
___________________________________________________________________
___________________________________________________________________
___________________________________________________________________
___________________________________________________________________
___________________________________________________________________
___________________________________________________________________
___________________________________________________________________
___________________________________________________________________
___________________________________________________________________
___________________________________________________________________
___________________________________________________________________
___________________________________________________________________
___________________________________________________________________
___________________________________________________________________
___________________________________________________________________
___________________________________________________________________
26 User’s Manual