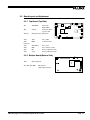
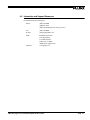
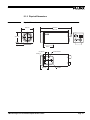
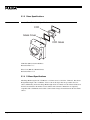
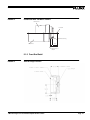
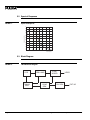
1
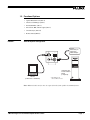
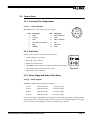
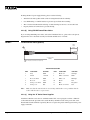
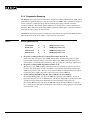
TM-6703
Progressive Scan Double Speed Shutter Camera
Operation Manual
69-0061
Rev. A
Notice
The material contained in this manual consists of information that is proprietary to PULNiX America, Inc., and may only
be used by the purchasers of the product. PULNiX America, Inc. makes no warranty for the use of its product and assumes
no responsibility for any errors which may appear or for damages resulting from the use of the information contained
herein. PULNiX America, Inc. reserves the right to make changes without notice.
Warranty
All of our solid state cameras have a full three-year warranty. If any such product proves defective during this warranty
period, PULNiX America, Inc. will repair the defective product without charge for parts and labor or will provide a
replacement in exchange for the defective product. This warranty shall not apply to any damage, defect or failure caused
by improper use or inadequate maintenance and use.
Certifications
CE Compliance
The TM-6703 has been certified to conform to the requirements of Council Directive 89/336/EC for electromagnetic
compatibility and to comply with the following European Standards:
Immunity:
EN500082-2/1995
Emissions:
EN55022:1995 Class A / CISPR 22:1993
All PULNiX products bearing the CE mark have been declared to be in conformance with the applicable EEC Council
Directives. However, certain factory installed options or customer requested modifications may compromise
electromagnetic compatibility and prohibit use of the CE mark. Please note that the use of interconnect cables that are not
properly grounded and shielded may affect CE compliance.
Contact the PULNiX Applications Engineering Department for further information regarding CE compliance.
FCC
This equipment has been tested and found to comply with the limits for a Class A digital device, pursuant to Part 15 of the
FCC Rules. These limits are designed to provide reasonable protection against harmful interference when the equipment
is operated in a commercial environment. This equipment generates, uses and can radiate radio frequency energy and, if
not installed and used in accordance with the instruction manual, may cause harmful interference to radio
communications. Operation of this equipment in a residential area is likely to cause harmful interference in which case the
user will be required to correct the interference at his own expense.
WARNING
Changes or modifications to this unit not expressly approved by the party responsible
for FCC compliance could void the user’s authority to operate the equipment.
TM-6703 Operation Manual
Printing:April 26, 1999
PULNiX America, Inc.
1330 Orleans Drive
Sunnyvale, CA 94089
Tel: (408) 747-0300
Tel: (800) 445-5444
Fax: (408) 747-0880
E-mail: [email protected]
www.pulnix.com
Table of Contents
1 INTRODUCTION
1.1
1.2
1.3
Product Description .......................................................................... 1
Features ........................................................................................... 1
Functional Options ........................................................................... 3
2 INSTALLATION
2.1
2.2
3.2
..................................................................... 4
Getting Started ................................................................................. 4
2.1.1 Unpacking Instructions ........................................................ 4
2.1.2 Components List ................................................................. 4
2.1.3 Accessories ......................................................................... 4
Camera Setup .................................................................................. 5
2.2.1 Connector Pin Configurations ............................................. 5
2.2.2 Rear Panel .......................................................................... 5
2.2.3 Power Supply and Power Cable Setup ................................ 5
2.2.4 Attaching the Video Output ................................................. 7
2.2.5 Attaching the Camera Lens ................................................. 7
2.2.6 Back Focusing the Lens ...................................................... 7
2.2.7 Auto Iris Lens Setup ............................................................ 8
2.2.8 Non-Interlace Black & White Monitors ................................. 8
3 OPERATION
3.1
.................................................................... 1
.......................................................................... 9
Modes of Operation .......................................................................... 9
3.1.1 Asynchronous Reset Mode ................................................. 9
3.1.2 Driving /VINIT ...................................................................... 10
3.1.3 Shutter Control Switch ........................................................ 11
3.1.4 Progressive Scanning ......................................................... 14
3.1.5 Option 7-2 ........................................................................... 15
3.1.6 V-Sync Output Selection for Async Mode (OP51-2) ............ 15
3.1.7 Integration ........................................................................... 16
3.1.8 External Input Signals ......................................................... 16
Board Layout and Adjustment .......................................................... 17
3.2.1 Top Board (Top Side) .......................................................... 17
3.2.2 Bottom Board (Bottom Side) ............................................... 17
4 TROUBLESHOOTING
4.1
4.2
........................................................... 18
Problems and Solutions ................................................................... 18
4.1.1 Symptom: No Video ............................................................. 18
4.1.2 Symptom: Dark Video .......................................................... 18
4.1.3 Symptom: Non-synchronized Video .................................... 18
Information and Support Resources ................................................ 19
i
Table of Contents
5 APPENDIX
5.1
5.2
5.3
5.4
.............................................................................20
Specifications ................................................................................... 20
5.1.1 Product Specifications ......................................................... 20
5.1.2 Physical Dimensions ............................................................ 21
5.1.3 Glass Specifications ............................................................ 22
5.1.4 C-Mount Specifications ........................................................ 22
5.1.5 Front End Detail ................................................................... 23
Spectral Response ........................................................................... 24
Block Diagram .................................................................................. 24
Timing Chart ..................................................................................... 25
5.4.1 Pixel Mapping (Horizontal) ................................................... 25
5.4.2 Vertical Frame Output Timing .............................................. 25
ii
List of Figures
FIGURE 1.
TM-6703 System Configuration
FIGURE 2.
12P-02 Interface Cable (optional)
FIGURE 3.
Asynchronous Reset
FIGURE 4.
VINIT (Vertical Initialization) Trigger Specifications
FIGURE 5.
Equivalent Circuit
FIGURE 6.
External Pulse Width Control (Async Mode)
FIGURE 7.
Internal Fast Reset
..................................................................... 12
FIGURE 8.
Internal Slow Reset
.................................................................... 13
FIGURE 9.
Scan Output
............................................................................... 15
FIGURE 10.
I/O Jumpers
................................................................................ 15
FIGURE 11.
Integration Timing
FIGURE 12.
Internal Input Signals
................................................................. 16
FIGURE 13.
Physical Dimensions
.................................................................. 21
FIGURE 14.
Camera Front End - Glass Specifications
FIGURE 15.
Combination With “CS-Mount” Camera
FIGURE 16.
TM-6703 Imager Location
FIGURE 17.
Spectral Response
FIGURE 18.
TM-6703 Block Diagram
FIGURE 19.
Pixel Mapping (Horizontal)
FIGURE 20.
Vertical Frame Output Timing
iii
................................................. 3
.............................................. 6
.................................................................. 9
.................... 10
....................................................................... 10
.............................. 12
....................................................................... 16
.................................. 22
...................................... 23
.......................................................... 23
..................................................................... 24
............................................................. 24
......................................................... 25
..................................................... 25
April 22, 1999
TM-6703 Progressive Scan
Double Speed Shutter Camera
Operation Manual
1
INTRODUCTION
1.1 Product Description
The TM-6703 is a high resolution monochrome camera with three scanning modes: Non-interlace
double speed scanning VGA format (60Hz); two-row scanning (120Hz); and partial scanning (100 and
200 lines). Features include compact size, rugged construction, double speed scan, asynchronous reset
and electronic shutter, non-interlace 60Hz analog video (VGA), and partial scanning. The double speed
mode is standard, thus the images can be displayed on a standard VGA monitor.
Applications include high speed image capturing, machine vision, computer graphics, gauging,
avionics, microscopy, character and fine pattern recognition, document reading and high end
surveillance.
1.2 Features
•
1/2" progressive scan interline transfer CCD
Advantages include:
-
648H x 484V active pixels for very high resolution and superior image quality
Square pixels (9.0 x 9.0 µm) for precise dimensional measurements
Double speed scanning
Partial scan capability allows 120Hz two-row scanning (combining two lines), 100 and 200 lines
of partial scan as well as 60Hz frame scanning. All images are centered in the video frame
- High speed electronic shutter capability results in high dynamic resolution of moving objects
- Progressive scanning eliminates interlace image deterioration
- High sensitivity and low noise at fast scanning, excellent S/N ratio (>50db)
Page 1
INTRODUCTION
•
Asynchronous reset
The TM-6703 resets with an external reset pulse (VINIT). This feature is especially important for
capturing moving objects at a precise location in the field of view, for applications such as a
conveyer belt process, fast event observation, and still picture capturing.
•
Integration
The TM-6703 is capable of capturing high resolution integration images. Integration can last from
1/60 sec. to several seconds.
•
VGA display output
The TM-6703’s VGA output scans out at 60Hz non-interlace. Because the double speed mode is
standard, images can be displayed on a standard VGA monitor. PULNiX PVM-1200 series
monitors or equivalent B/W multi-sync monitors can be used to display non-interlace images.
Please contact your PULNiX representative for display monitor information.
•
Sync input (external sync) or output (clock and sync) selection (optional, OP7-2))
Rear board jumpers enable sync input/output selection. When the jumpers are set to internal sync,
the camera accepts HD and VD sync and video output from pin #4 of the 12-pin connector. If the
jumpers are set to OP7-2, then HD, VD and clock output are provided for a frame grabber to take
the data.
•
“One shot sync” (optional, OP51-2)
The composite sync of the video output can be selectable with the rear panel jumper (resistor
location). Continuous V-sync mode outputs the V-sync at all times regardless of async reset or
normal rate V-sync during async mode stand-by. Async V-sync mode outputs the V-sync once only
at async reset (at Vinit trigger) and no V-sync during the stand-by period (H-sync only in video
composite sync) until the next Vinit comes in. These modes can be selected based on a frame
grabber’s sync capability for async reset.
•
Three-Year Warranty
The CCD solid state image sensor allows the camera to maintain a superior performance level
indefinitely while requiring virtually no maintenance. PULNiX backs all of the TM Series cameras
with a three-year warranty.
WARNING:
Page 2
Unscrewing the camera cover or opening the camera in any way
will void this warranty.
TM-6703 Progressive Scan Double Speed Shutter Camera
INTRODUCTION
1.3 Functional Options
FIGURE 1.
•
Optical Filter Removal (OP3-2)
•
Glassless CCD Imager (OP21)
•
Internal IR Filter (OP3-1)
•
Pixel Clock, HD, and VD output (OP7-2)
•
One Shot Sync (OP51-2)
•
Remote Head (OP10-1)
TM-6703 System Configuration
Power
External Sync
Integration
Video Output*
VIDEO
SHUTTER
9 0 1
2
8
3
7
6 5 4
PULNiX Multi-Sync
Monitor
(PVM-1242 or PVM-942)
ASY
N
O
MAN
P
T
GAIN
POWER
Computer with
Frame Grabber
Board
(if required)
* Video Output is the
same as BNC connector
Note: Additional cable interface may be required from the frame grabber board manufacturer.
TM-6703 Progressive Scan Double Speed Shutter Camera
Page 3
INSTALLATION
2
INSTALLATION
The following instructions are provided to help you to set up your video camera system quickly and
easily. It is suggested that you read through these instructions prior to unpacking and setting up your
camera system.
2.1 Getting Started
2.1.1 Unpacking Instructions
It is recommended that the original packing cartons for the cameras and lenses be saved in case there is
a need to return or exchange an item.
It is also recommended that any equipment being sent to another location for field installation be bench
tested to assure that everything is fully operational as a system.
2.1.2 Components List
Please begin by checking your order against the Components List (below) to assure that you have
received everything as ordered, and that nothing has been overlooked in the packing materials. If any
item is missing, please contact your PULNiX representative immediately.
•
TM-6703 camera
•
TM-6703 data sheet
•
TM-6703 manual (by request)
2.1.3 Accessories
Following is a list of additional accessories or equipment that may be recommended or required for your
particular application. Please check with your PULNiX representative prior to the installation of your
video system to determine what you might need.
Page 4
•
Cable (power/video) 12P-02
•
PVM-1242 or PVM-942 multi sync monitor
•
Power supply PD-12P
TM-6703 Progressive Scan Double Speed Shutter Camera
INSTALLATION
2.2 Camera Setup
2.2.1 Connector Pin Configurations
2.2.1 (a)
12-Pin Connector
1
2
The TM-6703 has a 12-pin connector for power input.
Description
Pin#
8
10
3
Pin#
9
11
7
12
Description
1
GND
7
VD in (out OP7-2)
2
+12V DC
8
GND
3
GND
9
HD in (out OP7-2)
4
Video Out (clk out OP7-2)
10
N/C
5
GND
11
Integration
6
VINIT In
12
GND
4
6
5
2.2.2 Rear Panel
PULNiX
Functions and controls located
on the camera rear panel:
•
12-pin connector (power, I/Os)
•
BNC video cable connector
•
Shutter speed selection dial
•
ASY/MAN switch (asynchronous shutter and manual shutter switch)
•
N/P and O/T switches (scanning mode selection)
•
Manual gain control adjustment
VIDEO
SHUTTER
9 0 1
2
8
3
7
6 5 4
ASY
N
O
MAN
P
T
GAIN
POWER
Rear Panel
2.2.3 Power Supply and Power Cable Setup
2.2.3 (a)
Power Supplies
PULNiX recommends the following power supplies:
K25-12
110V AC/12V DC
2.1A power supply
P-15-12
220V AC/12V DC
2.1A power supply
K50-12
110V AC/12V DC
4.2A power supply
PD-12P
110V AC/12V DC
0.5A power supply
For users providing power through the 12-pin connector, the PD-12P power supply is available with the
12-pin mating connector already attached to the leads from the power supply. The PD-12 power supply
can be connected to the PULNiX power cable via a terminal strip or directly.
TM-6703 Progressive Scan Double Speed Shutter Camera
Page 5
INSTALLATION
If wiring the PD-12 power supply directly, please note the following
•
Twist the lead ends together and tin solder for strength and electrical continuity
•
Use shrink tubing or a similar insulator to prevent exposed leads from touching
•
The +12V lead is marked with a red stripe or white lettering; be sure not to reverse the leads
•
Properly insulate all connections to prevent shorting
2.2.3 (b)
Using PULNiX Power/Video Cables
If you are using PULNiX power cables, such as the 12P-02, KC-10, etc., please refer to the pin-out
diagram. The color coded leads use Grey for Ground and Yellow for +12V DC.
FIGURE 2.
12P-02 Interface Cable (optional)
Flying
Leads
32mm
1
2,000mm± 10mm
(2 Meters)
1 PC-12P (Hirose Part #10A-10P-12S/PC12P)
12P-02 Interface Cable
Note:
Pin#
Lead Color
Function
Pin#
Lead Color
Function
1
Gray
GND
7
Black coax
VD Input
2
Yellow
+12VCD
8
White coax shield
GND
3
Red coax shield
GND
9
White coax
HD Input
4
Red coax
Video
10
Brown
N/C
5
Orange coax shield
GND
11
Blue
Integration
6
Orange coax
N/C
12
Black coax shield
N/C
Make sure that the unused leads are not touching and that there is no possibility that the
leads could short due to exposed wires.
2.2.3 (c)
Using the “K” Series Power Supplies
Attach the 110V line cord to the two terminals marked “AC”. Do not plug the cord into a 110V AC
socket until later in the procedure. Next, attach the Grey and Yellow leads of the power cable to the
Ground and 12V DC terminals respectively. Be sure to replace the plastic terminal guard on the power
supply at this time.
Page 6
TM-6703 Progressive Scan Double Speed Shutter Camera
INSTALLATION
Note:
The “K” series power supplies are designed primarily for OEM users who will be
mounting the power supply inside a protective enclosure. For use in exposed situations,
the DC-12N and PD-12 are recommended.
2.2.3 (d)
Building Your Own Power Cables
If you are building your own power cables, consult the pin-out for the camera purchased and connect the
Ground and +12V power leads of the PC-12P power connector to Pin #1 and Pin #2, respectively
(power must be DC regulated, and of sufficient current to properly power the camera).
2.2.3 (e)
Attaching the Power Cable to the Connector
The 12-pin connector is keyed and will only fit in one orientation. Rotate the connector while applying
slight pressure until the keyways line up. Press the connector into place until firmly seated.
The power cord may now be plugged into the 100V AC socket, and the camera powered up.
2.2.4 Attaching the Video Output
Most users utilize the BNC connector for video output from the camera. Connect the output from the
camera to the input of your monitor, VCR or switching device. The input of the monitor should be
balanced for 75Ω termination. Standard RG-59 type coaxial cable should carry a full video signal for up
to 500 feet.
Users wishing to output the video and input the power and sync to a camera over a single cable can use
the PULNiX multi-conductor cables, such as the 12P-02, the KC-10, etc. The mini coaxial leads in
PULNiX multi-conductor cables are designed for short runs of no longer than 100 feet.
Note: Make sure that no extraneous wires are visible which could cause a short.
2.2.5 Attaching the Camera Lens
The TM-6703 camera accepts standard C-mount lenses. To attach the C-mount lens to the camera,
carefully engage the threads and rotate the lens clockwise until it firmly seats on the mounting ring. Do
not force the lens if it does not seat properly. Please note that some lenses with extremely long
flangebacks may exceed the mounting depth of the camera.
2.2.6 Back Focusing the Lens
To backfocus the TM-6703 camera, first attach a C-mount lens in the lens mount. Be sure that the lens is
properly mounted.
Set the lens focus to infinity (if the lens is a manual iris, set the iris to a high f-stop while still retaining a
well-illuminated image). Obtain the best focus possible at this setting, then loosen the two miniature hex
head set screws (hex socket size: 0.89mm) locking the focus ring in place. Now turn the entire lens and
focus ring assembly back and forth until the best image is obtained. Tighten the focus ring set screws.
Your backfocus is now set.
TM-6703 Progressive Scan Double Speed Shutter Camera
Page 7
INSTALLATION
2.2.7 Auto Iris Lens Setup
Auto-iris lenses with full video input (1 Vpp) can be used with the PULNiX TM-6703, although this
camera model does not come equipped with auto-iris output.
Note:
Make sure that the power is removed from the camera before connecting or disconnecting
the auto-iris lens. There is a small chance that damage could occur to the auto-iris lens by
plugging or unplugging it while the camera is powered up.
To install the auto-iris lens in a PULNiX camera for which the auto-iris output is not supplied, wire the
signal (video) on the lens into the terminal 1 Vp to peak video output on the camera (pin 4 of 12 pin
connector).
Point the camera at a light area and then quickly towards a darker area. If everything is working
properly, the iris should adjust for the light change.
2.2.8 Non-Interlace Black & White Monitors
The PULNiX PVM-942 / 1242 non-interlace black and white monitor, or an equivalent model, can be
used to display the TM-6703’s various display modes. In standard operation, including RS-170
interlace, 60 Hz non-interlace, 30 Hz non-interlace and 120 Hz non-interlace (two-row scanning mode),
the display is normal. In the partial scanning mode, the vertical extends to fill the monitor screen and the
images will be distorted vertically.
Page 8
TM-6703 Progressive Scan Double Speed Shutter Camera
OPERATION
3
OPERATION
3.1 Modes of Operation
The TM-6703 is designed to accommodate a high resolution, on-line inspection reset mechanism with
full frame shutter. It accepts external horizontal sync (HD, TTL Levels) to lock the camera and VINIT
pulse for resetting the camera asynchronously. The shutter speed can be controlled by either an external
double pulse, or by internal speed control by setting the 10-position shutter speed dial switch on the
back panel.
3.1.1 Asynchronous Reset Mode
For the asynchronous reset mode, select ASY on the back panel of the camera.
The TM-6703's asynchronous reset is flexible. External HD can be applied for phase locking if required.
Applying a VINIT pulse resets the camera's scanning and purging of the CCD. Do not supply VD if the
asynchronous reset is used. Instead, use HD to synchronize the camera to the external device.
When external VINIT is high (5V), the TM-6703 expects the async pulse input and the video output will
be black video. It resets at the negative going pulse edge and captures the frame regardless of the shutter
speed (fast or slow mode). The video output is kept disabled as the CCD is discharged continuously
during VINIT high. When the first VINIT pulse comes in, it resets the timing and outputs the image. If
the switch is set to NRM (normal mode), the video output will be real time with manual shutter.
FIGURE 3.
Asynchronous Reset
EXTERNAL VINIT
ASYNC RESET
INTERNAL VD
SG (TRANSFER GATE)
DISCHARGE PULSES
NON-INTERLACE OUTPUT
VIDEO
SHUTTER
VIDEO
TM-6703 Progressive Scan Double Speed Shutter Camera
Page 9
OPERATION
3.1.2 Driving /VINIT
The TM-6703 VINIT input circuit equivalently has 10K ohm input resistance (Figure 4, “VINIT
(Vertical Initialization) Trigger Specifications,” on page 10). To drive this circuit, at least 0.5mA of
current is required to drive the camera.
Note:
FIGURE 4.
The VINIT signal must be a defined, clean pulse for the asynchronous reset function to
work properly. Some triggering systems (e.g., optical isolators, mechanical relays, noisy
electrical devices, etc.) have bounce or rapid transition between high and low states. It is
highly recommended that the input VINIT pulse be analyzed by test equipment to ensure
proper signal characteristics. If an unspecified signal is used, improper camera
performance may result.
VINIT (Vertical Initialization) Trigger Specifications
+5V
TTL
Level
t
0V
t
Min.
2H
Max.
500H
H = 31.8µs
Note: PULNiX does not recommend voltage levels less than standard 0 to 5 V.
FIGURE 5.
Equivalent Circuit
VINIT
10K
Page 10
TM-6703 Progressive Scan Double Speed Shutter Camera
OPERATION
Position
Manual Shutter Mode
Async Reset Mode
0
No Shutter
No Shutter
1
1/125
1.0H
1/32,000
2
1/250
2.0H
1/16,000
3
1/500
4.0H
1/8,000
4
1/1,000
8.0H
1/4,000
5
1/2,000
16.0H
1/2,000
6
1/4,000
32.0H
1/1,000
7
1/8,000
64.0H
1/500
8
1/16,000
128.0H
1/250
9
1/32,000
Mode 0:
Mode 1-4:
Mode 5-8:
Mode 9:
Note:
78
9 01
2 3
The shutter control switch is located on the rear panel of the camera. The dial can be
set from 0 to 9. The settings are detailed below.
4 56
3.1.3 Shutter Control Switch
Shutter determined by pulse width
Normal Mode
Fast Mode
Slow Mode
Pulse Width Mode
Manual shutter speeds lower than 1/1,000 (i.e., longer in duration) are not applicable for
partial scan due to the short frame rate.
3.1.3 (a)
External Pulse Width Control Mode
To select the External Pulse Width Control mode, set the shutter speed dial switch to “9”. Apply a pulse
width control VINIT signal to the camera via an external event trigger. The internal reset pulse will be
latched to HD. At the 9th HD timing from the external pulse leading edge (negative going edge), the
CCD discharge pulse will be generated to clear the images. The internal VD is generated at the
following edge (positive going edge) of the external pulse, and resets the internal timing, including the
video sync.
The shutter speed will be the same as the external pulse width, but the integration delays 9H from the
leading edge of the external pulse width. For the immediate reset option, please contact PULNiX.
One frame of video output will start from the rising edge of the pulse width control for progressive
format. The camera will output the same video from memory when VINIT is kept high (5V), and update
the image upon receiving the next pulse. At async mode, with external pulse input high, the video output
is disabled as the camera keeps discharging the CCD image and only will provide black video.
TM-6703 Progressive Scan Double Speed Shutter Camera
Page 11
OPERATION
FIGURE 6.
External Pulse Width Control (Async Mode)
X
External
Pulse
Width
VINIT
HD
Internal VD
9H
Transfer Gate
Pulse
9H
X
Exposure Time
Discharge pulse
Composite
Video
3.1.3 (b)
Internal Fast Reset Mode (Async Mode)
For Internal Reset Mode, set the 10-position dial switch from “1” to “4”. When this mode is selected,
the camera resets with internal VD timing, which is latched to Hd, and video output is also synchronized
with internal VD timing without further delay. The shutter speed is controlled by the dial switch.
FIGURE 7.
Internal Fast Reset
External pulse
VINIT
min. 2H
HD
Internal VD
9H
Transfer Gate
Pulse
Exposure Time
Purge pulse (discharge)
Composite
Video
Page 12
TM-6703 Progressive Scan Double Speed Shutter Camera
OPERATION
3.1.3 (c)
Internal Slow Reset Mode (Async Mode)
For Internal Slow Reset Mode, set the 10-position shutter speed dial switch from “5” to “8”. When the
external VINIT pulse is applied, internal VD is latched to Hd and a second internal VD signal is
generated to set up the shutter speed period. Video output timing starts right after the second internal
VINIT.
FIGURE 8.
Internal Slow Reset
External pulse
VINIT
min. 2H
HD
Internal VD
9H
Transfer Gate
Pulse
9H
Discharge pulse
EXPOSURE TIME
Composite
Video
TM-6703 Progressive Scan Double Speed Shutter Camera
Page 13
OPERATION
3.1.4 Progressive Scanning
The TM-6703 uses a state-of-the-art CCD called a “Progressive scanning interline transfer CCD” which
scans all lines sequentially from top to bottom at one frame rate (60 Hz). Like a non-interlace computer
screen, it generates a stable crisp image without alternating lines and provides full vertical TV
resolution of 484 lines. The interline transfer architecture is also important to generate simultaneous
shuttering. This is different from full frame transfer architecture which requires a mechanical shutter or
strobe light in order to freeze the object motion.
The TM-6703 outputs the progressive scanned image with an electronic shutter in three different modes.
These modes are selected via the switches on the rear panel of the camera.
TABLE 1.
Scanning Mode Settings
Normal Mode
N
O
(60Hz progressive scan)
Double Scan
N
T
(120Hz progressive scan)
100 Line Scan
P
O
(200Hz progressive scan)
200 Line Scan
P
T
(125Hz progressive scan)
1.
Progressive scanning double speed output (Normal mode. Select N, O)
2.
On the rear panel of the camera, select NRM (normal mode), N and O. This produces straight
forward signal output equivalent to non-interlace VGA format (60Hz). Real-time double speed
CCD output is converted through normal analog video processing into 75Ω 1Vp-p output format.
Progressive scanning 120Hz output (Rear switches: N, T)
3.
This mode provides 120Hz scanning of the full field of view, but with only 242 lines of vertical
resolution. The CCD signals of each row combine to scan 242 lines; the frame speed therefore is
120Hz of non-interlace video. The async reset, electronic shutter and integration function work as
normal. The analog output is the same as 75Ω, 1Vp-p format at the 120Hz rate.
Partial scanning output (Rear switches: P, T for 100 lines; P, O for 200 lines)
By selecting 100 line partial scan (P, T), the TM-6703 outputs the central 100 lines of video. It
repeats the same lines at a rate of 200 frames/sec. with the fast dump blanking of unused lines. The
asynchronous reset and electronic shutter functions are maintained at each partial scan.
By selecting 200 line partial scan (P, O), the TM-6703 outputs the central 200 lines of video at a
rate of 125 frames/sec. The partial scan keeps the same resolution as full progressive scan, but with
a narrower field of view.
Page 14
TM-6703 Progressive Scan Double Speed Shutter Camera
OPERATION
FIGURE 9.
Scan Output
Center
of Image
Normal scan
VD
Partial scan
VD (partial scan)
Center
100 lines
Fast dump
3.1.5 Option 7-2
In order to connect the TM-6703 camera to various frame grabbers, internal jumper settings allow the
TM-6703 to accept external HD and VD sync at double speed (fH = 31.468 KHz), or to output HD, VD
and pixel clock for variable scan frame grabbers. This option can be requested when ordering the TM6703.
FIGURE 10.
I/O Jumpers
CLOCK
W1
W2
VIDEO
W`1 (VD)
OUT
IN
W12
Last connection
not used; do not
OUT
connect to this
IN
position.
W2
(HD)
BOTTOM BOARD, TOP SIDE
REAR BOARD (FACING INWARD)
Standard settings (inputs)
Output set
3.1.6 V-Sync Output Selection for Async Mode (OP51-2)
At async image capturing, some frame grabbers cannot take the specific frame when continuous video
sync presents. The TM-6703 video output is normally composite sync with frame rate V-sync regardless
of the actual image or blank image.When it is asynchronously reset, the newly reset V-sync may be
random to normal sync rate and can be very close to the regular rate V-sync. This may be problematic to
the frame grabber in capturing the correct image.By selecting the rear plate board jumper, the V-sync
output occurs only at the async reset, and no V-sync occurs until the next Vinit (async trigger) comes in.
The frame grabber can then look for this V-sync and capture the correct timing.
TM-6703 Progressive Scan Double Speed Shutter Camera
Page 15
OPERATION
3.1.7 Integration
Integration times can vary depending on the specific application. Pin #11 of the 12-pin connector is
integration control. It accepts standard TTL inputs. High is considered 5 volts, and Low is considered 0
volts. When a low is applied to pin #11, the integration process begins. Integration blocks the transfer
gate of the image data out of the CCD array. Upon returning the signal back to high (which is required
to end the process). the image is output upon the next regular transfer.
FIGURE 11.
Integration Timing
Vertical Sync.
(VD)
1
( VD
freq.)sec
CCD Transfer
(SG)
1
( VD
freq.)sec
1
( VD
freq.)sec
9H
1
( VD
freq.)sec
1
( VD
freq.)sec
1
( VD
freq.)sec
Integration Signal
Example #1
yields 2 frames of exposure
Integration Signal
Example #2
yields 3 frames of exposure
NOTE: Integration may be controlled in increments of frame times only.
H = 1/horizontal frequency.
When the integration signal is set back to high (5 volts), the image data will not move out of the CCD
array until the transfer gate occurs. Sg’s occur 9H after the start of the VD. For example, if the camera is
set to expose for 1.5 frame times, the actual exposure is for 2 frame times because the array is still
accumulating light until the sg of that field (or frame if field mode). The remaining image data acquired
before the start of the integration may also be output.
NOTE: The camera should be in normal mode during integration.
3.1.8 External Input Signals
FIGURE 12.
Internal Input Signals
1/HD frequency
+5Volts HD
TTL Level
0 Volts
1 - 2µsec.
1/VD frequency
+5Volts VD
TTL Level
0 Volts
1 to 9H
Page 16
TM-6703 Progressive Scan Double Speed Shutter Camera
OPERATION
3.2 Board Layout and Adjustment
3.2.1 Top Board (Top Side)
W5
W6
W7-W9
VR1
VR2
back plate
VR3
VR4
VR5
VR7
AGC/MGC
Left: AGC
Right: MGC
Gamma
Down: On (0.45)
Up: Off (1.0)
CDS pulse delay adjustment
AGC
MGC
Set at 2.0V
Controlled from
AGC MAX
PED
RG
Vsub
Set at 2.5V
Set at 50 mV of video
Factory adjustment only
Factory adjustment only
VSUB
AGC
MAX
GAMMA
PED
RG
3.2.2 Bottom Board (Bottom Side)
ASY
MAN
VR2
PLL adjustment
W1 (VD), W2 (HD)
HD and VD
input/output selection
PLL
TM-6703 Progressive Scan Double Speed Shutter Camera
Page 17
TROUBLESHOOTING
4
TROUBLESHOOTING
4.1 Problems and Solutions
Following are troubleshooting tips for common problems. Generally, problems can be easily solved by
following these instructions. If the following remedies fail to offer a solution to your problems, please
contact a PULNiX representative.
4.1.1 Symptom: No Video
Remedies: Check that the following are properly connected and operational.
•
Power supplies
•
Power cables
•
Main power source
•
Shutter control
•
Async mode
•
Lens
4.1.2 Symptom: Dark Video
Remedies: Check that the following are properly connected and operational.
•
Shutter selection
•
Iris opening on the lens
•
Async mode (with 5 volt level at Pin #6)
4.1.3 Symptom: Non-synchronized Video
Remedies: Check that the following are properly connected and operational.
Page 18
•
Proper mode output
•
Frame grabber software camera selection
TM-6703 Progressive Scan Double Speed Shutter Camera
TROUBLESHOOTING
4.2 Information and Support Resources
For further information and support:
Phone:
(408) 747-0300
(800) 445-5444
(800) 3-PULNIX (24-hour message access)
Fax:
(408) 747-0660
E-mail:
[email protected]
Mail:
PULNiX America Inc.
Sales Department
1330 Orleans Drive
Sunnyvale, CA 94089
ATTN: Video Applications
Web Site:
www.pulnix.com
TM-6703 Progressive Scan Double Speed Shutter Camera
Page 19
APPENDIX
5
APPENDIX
5.1 Specifications
5.1.1 Product Specifications
TABLE 2.
Product Specifications Table
Imager
Pixels
Cell size
Photosensitive Pixels
694 H x 496 V
9.0 H x 9.0 V µm
648 H x 484 V
Output sensitivity
12µV/e-
Micro lens
Standard
Scanning
525 lines at 60Hz (double speed mode)
Sync
Pixel clock
TV resolution
Min. illumination
Video output
Display mode video
S/N ratio
Internal/External auto switch
HD/VD, 4.0 Vp-p impedance 4.7KΩ
fHD = 31.468KHz / fVD = 60Hz
25.49MHz
500 H x 484 V
2.0 lux, f = 1.4 without IR cut filter
Analog 1.0 Vp-p composite video, 75Ω, sync negative non-interlace
Analog only fHD=31.468KHz, fVD=60Hz (VGA)
50dB min AGC = OFF, 56dB typical
AGC
On / Off (off = std)
MGC
Manual gain adjustable (6dB to 26dB)
Gamma
Lens mount
Power requirement
Operating temp.
Vibration & Shock
Size
Weight
Power cable
Power supply
Page 20
1/2" progressive scan interline transfer CCD with on-chip microlens
0.45 or 1.0 (1.0=std)
C-mount
12 V DC 500 mA
-10°C to +50°C
Vibration: 7Grms (10Hz to 2000Hz), Shock: 70G
46.1mm x 39.4mm x 140.0mm (1.78" x 1.52" x 5.41")
240 grams (9.0 oz.)
12P-02
K25-12V or PD-12
TM-6703 Progressive Scan Double Speed Shutter Camera
APPENDIX
5.1.2 Physical Dimensions
Physical Dimensions
FIGURE 13.
140.8 mm
46.3 mm
128.1 mm
VIDEO
PULNiX
39.4 mm
SHUTTER
9 0 1
2
8
3
7
6 5 4
ASY
N
O
MAN
P
T
GAIN
POWER
7.0 mm
40 mm
2x 11.0 mm
1/4-20 UNC-2B
2x M3 x 8
30.4 mm
TM-6703 Progressive Scan Double Speed Shutter Camera
2x M6x1
Page 21
APPENDIX
5.1.3 Glass Specifications
FIGURE 14.
Camera Front End - Glass Specifications
CCD
Glass Cover
CCD Glass
CCD Glass (BK-7) 0.75mm thickness
Refractive Index = 1.5
Glass Cover (BD-65) 1.0mm thickness
Refractive Index = 1.51
5.1.4 C-Mount Specifications
The Flange Back Length of the “CS-Mount” is 12.5mm versus 17.526 of the “C-Mount”. The shorter
Flange Back Length of the “CS-Mount” allows room for the stripe filter incorporated in the color
camera. Additionally, the shorter Flange Back Length allows for reduction of the effective diameter of
the first lens and reduces the number of lens elements. The common C-Mount lens is completely
compatible with a CS-Mount camera when a 5mm extension ring is inserted between the lens and the
camera.
Page 22
TM-6703 Progressive Scan Double Speed Shutter Camera
APPENDIX
FIGURE 15.
Combination With “CS-Mount” Camera
CS-Mount Lens
Focal Point
5mm Extension Ring
C-Mount Lens
5
12.5
17.526
Flange Surface of
C-Mount
5.1.5 Front End Detail
FIGURE 16.
TM-6703 Imager Location
TM-6703 Progressive Scan Double Speed Shutter Camera
Page 23
APPENDIX
5.2 Spectral Response
FIGURE 17.
Spectral Response
1.0
0.9
0.8
Relative Sensitivity
0.7
0.6
0.5
0.4
0.3
0.2
0.1
0
300
400
500
600
700
800
900
1000
1100
Wave Length (nm)
5.3 Block Diagram
FIGURE 18.
TM-6703 Block Diagram
CCD
TIMING
GEN.
Page 24
CDS & AMP
SYNC
GEN.
SYNC
ADDED
PLL/XTAL
VIDEO
EXT. HD
TM-6703 Progressive Scan Double Speed Shutter Camera
APPENDIX
5.4 Timing Chart
5.4.1 Pixel Mapping (Horizontal)
FIGURE 19.
Pixel Mapping (Horizontal)
HORIZONTAL RESET
45
TOTAL CLOCK PER 1H = 810 pixels
740
738
ACTIVE PIXEL
116
117
O.B.
10
11
DUMMY
1
764
738
739
740
741
DUMMY
O.B.
60
CCD OUTPUT
BLANK 202
PIXEL CLOCK
OPTICAL BLACK
ACTIVE PIXEL
OPTICAL BLACK
694
691
690
682
35
683
DUMMY
34
11
1
10
CCD LINE CONTENT
DUMMY
5.4.2 Vertical Frame Output Timing
FIGURE 20.
Vertical Frame Output Timing
VD
9H
TOTAL HORIZONTAL SCANNING = 525H
484
484 ACTIVE PIXELS
30
1
8 O.B.
4
484
1
HORIZONTAL LINES
4 O.B.
11H
VIDEO OUTPUT
BLANK = 41H
3H
3H
35H
NORMALMODE
479 480 481 482 483 484
PARTIAL SCAN (VARIABLE)
EXAMPLE
100 LINE SCAN
FAST DUMP
2.5 x (488-100) µsec
3H
3H
3H
200 LINE SCAN
199 200
TM-6703 Progressive Scan Double Speed Shutter Camera
3H
2
3
1
2
3
1
2
3
35H
99 100
FAST DUMP
2.5 x (488-200) µsec
1
35H
Page 25
,
Industrial Products Division
PULNiX America, Inc.
1330 Orleans Drive
Sunnyvale, CA 94089
Tel: 408-747-0300
Tel: 800-445-5444
Fax: 408-747-0660
Email: [email protected]
www.pulnix.com