1
Key Voice
Voice Processing
SYSTEM
SUPERVISOR AND
SUBSCRIBER
GUIDE
Everything Your Business Calls For
NOTICE
NOTICE TO END USER: CAREFULLY READ THE FOLLOWING TERMS AND CONDITIONS.
USE OF THE SOFTWARE CONTAINED IN THIS PACKAGE CONSTITUTES YOUR
ACCEPTANCE OF THESE TERMS AND CONDITIONS AND AGREEMENT TO ABIDE BY
THEM.
If you do not agree with the terms and conditions of this Agreement, return the package and its entire
contents to the location where you obtained it for a refund.
In return for acquiring a license to use the Key Voice Technologies Inc. software and documentation
contained in this package ("the Software"), and for acquiring the accompanying documentation, you,
the original purchaser ("You"), agree as follows:
1.
License Grant: You are granted a nonexclusive, personal license to: (a) use the Software on a
single personal computer system (b) copy the Software solely for the purpose of installing it on
your computer and for backup and archival storage. You may not transfer, sell, lease or distribute
copies of the Software to others. You may assign your rights under this Agreement to a third party
provided the third party agrees in writing to be bound to the terms of this Agreement and you
transfer all copies of the Software to the third party or destroy any copies not transferred. Any
other attempt to sublicense, assign or transfer any of the rights, duties or obligations hereunder is
void.
2.
No Other Rights: You acknowledge that the Software is copyrighted and is proprietary. The
license granted above is not a sale of the Software, and except as stated above, this Agreement
does not give you any rights to patent, copyright, trade secrets, trademarks or any other rights or
licenses with respect to the Software. You agree to hold the Software in confidence and to take
reasonable steps to prevent unauthorized copying or distribution.
3.
No Modification or Reverse Compilation: YOU MAY NOT MODIFY, ALTER, TRANSLATE,
DISASSEMBLE OR DECOMPILE THE SOFTWARE OR DOCUMENTATION OR ANY
COPY, IN WHOLE OR IN PART.
4.
Limited Warranty: Key Voice Technologies, Inc. warrants that the original diskettes are free from
defects in material and workmanship, assuming normal use, for a period of ninety (90) days from
the date of purchase. If a defect occurs during this period, you may return your faulty disk along
with a dated proof of purchase; it will be replaced free of charge.
EXCEPT FOR THE EXPRESS WARRANTY OF THE ORIGINAL DISKETTES SET FORTH
ABOVE, NO OTHER WARRANTIES ARE GRANTED, EXPRESS OR IMPLIED, BY STATUTE
OR OTHERWISE, REGARDING THE DISKS AND RELATED MATERIALS, THEIR FITNESS
FOR ANY PURPOSE, THEIR QUALITY, THEIR MERCHANTABILITY, OR BOTH.
THE LIABILITY UNDER THE WARRANTY SET FORTH ABOVE SHALL BE LIMITED TO
THE AMOUNT PAID BY THE CUSTOMER FOR THE PRODUCT. IN NO EVENT SHALL THE
MANUFACTURER OR DISTRIBUTORS BE LIABLE FOR ANY SPECIAL, CONSEQUENTIAL,
OR OTHER DAMAGES FOR BREACH OF WARRANTY.
Information in product documentation is subject to change without notice, and does not represent a
commitment on the part of Key Voice Technologies Inc. No part of Key Voice manuals may be
reproduced or transmitted in any form or by any means, electronic or mechanical, including
photocopying, for any purpose other than the purchaser's personal use, without the written permission
of Key Voice Technologies, Inc. Products mentioned in this documentation that are not manufactured
by Key Voice Technologies, Inc. may be trademarks or registered trademarks of their respective
manufacturers.
© Copyright Key Voice Technologies, Inc., 1991-1998.
All rights reserved.
LIMITED WARRANTY
The initial hardware and software of all Key Voice Technologies, Inc. (“Key Voice”) products
accompanying this installation manual shall be referred to collectively herein as the “Product”. NonKey Voice products are warranted solely by the manufacturer in accordance with the manufacturer’s
warranty, and are sold by Key Voice “as is”. Key Voice warrants, to its purchaser, its authorized
dealers and the end users of the Product, that, under normal operating conditions, (a) the Product
hardware (except for fuses, lamps and other consumables) and the medium on which the Product
software is contained will be free from defects in material and workmanship, and (b) the Product
software will perform substantially in accordance with the specifications set out in the user guide
accompanying the Product which is prepared by Key Voice, in each case for a period of one year,
measured from the manufacturing date stamped on the Product hardware or software, as the case may
be, provided however, development products, i.e., products which have not yet been approved by Key
Voice for production, are sold pursuant to Key Voice’s field trial agreement and are warranted as set
out therein. Key Voice’s sole obligation under this warranty or under any other legal obligation with
respect to the Product is to repair or replace, at its option, the Product at its Sarasota, Florida,
headquarters, free of charge, if the Product is deemed defective by Key Voice during the warranty
period, with refurbished or new equipment or parts, at Key Voice’s option, when the Product is
returned to Key Voice, freight or postage prepaid, during the warranty period, provided however, if
Key Voice is not able, using reasonable efforts, to cure or correct a defect, Key Voice’s sole obligation
shall then be to refund (or cause to be refunded) an equitable portion of the price Key Voice was paid
for the Product. This warranty does not apply if, in the sole judgment of Key Voice, the Product, or
any part(s) or component(s) thereof, have been improperly installed or installed or used in combination
or in assembly with hardware or software not supplied by Key Voice and which are not compatible
with the Product or which are of inferior quality, design or performance, or the Product, or any part(s)
or component(s) thereof, have been improperly handled, misused, abused, altered, tampered with,
accidentally damaged, or damaged or malfunction or fail to function due to neglect, negligence,
contamination (by liquid or otherwise) or as a result of any other causes beyond Key Voice’s
reasonable control, including extraordinary wear and tear and acts of God such as fire, flood, water, or
lightning or other incidence of excessive or insufficient voltage or failure to follow instructions.
Repair, wiring, or alteration of the Product other than as specifically authorized by Key Voice or its
authorized repair agent is prohibited and will void this warranty. This warranty does not cover costs
associated with installation, removal, or reinstallation of the Product. Key Voice does not warrant that
the Product is compatible with all telephone or switching systems or that the Product is invulnerable or
immune from unauthorized or fraudulent use, or unaccounted for access to the Product. THIS
WARRANTY IS EXCLUSIVE, BEING IN LIEU OF ALL OTHER WARRANTIES EXPRESS OR
IMPLIED, INCLUDING, BUT NOT LIMITED TO, ANY IMPLIED WARRANTY OF
MERCHANTABILITY OR FITNESS FOR A PARTICULAR PURPOSE.
LIMITATION OF LIABILITY
WITHOUT EXPANDING UPON THE FOREGOING WARRANTY, THE MAXIMUM LIABILITY
OF KEY VOICE UNDER ANY WARRANTY, STATUTORY, EXPRESS OR IMPLIED, IS
LIMITED TO THE PURCHASE PRICE OF THE PRODUCT. KEY VOICE SHALL HAVE NO
RESPONSIBILITY FOR DAMAGE TO PROPERTY OR ANY OTHER LOSS OR INJURY,
INCLUDING CONSEQUENTIAL, INCIDENTAL, OR INDIRECT DAMAGES, SUCH AS LOSS
OF PROFITS OR LOSS OF BUSINESS INFORMATION, DAMAGES DUE TO BUSINESS
INTERRUPTION OR ANY OTHER PECUNIARY LOSS, EVEN IF KEY VOICE HAS BEEN
ADVISED OF THE POSSIBILITY OF SUCH DAMAGES, OR PUNITIVE DAMAGES,
RESULTING FROM THE PURCHASE, POSSESSION, INSTALLATION, OPERATION, REPAIR,
USE OF PURCHASE, POSSESSION, INSTALLATION, OPERATION, REPAIR, USE OF OR
INABILITY TO USE, THE PRODUCT, OR THE UNAUTHORIZED OR THE FRAUDULENT USE
OF, OR UNACCCOUNTED FOR ACCESS TO, THE PRODUCT, ALL SUCH CLAIMS BEING
HEREBY EXPRESSLY WAIVED. THE PURCHASER’S EXCLUSIVE WARRANTY AND
REMEDY SHALL BE ONLY AS STATED HEREIN.
This warranty gives you specific legal rights and you may also have other rights which may vary from
state to state. Some states do not allow limitation on how long an implied warranty lasts or the
exclusion or limitation of incidental or consequential damages, so the above limitations may not apply
to you. If the Magnuson Moss Act should be held to apply to the sale of the Product by a court of
competent jurisdiction, the implied warranty of fitness for a particular purpose shall extend for one year
from the date of manufacture. No Key Voice dealer nor any other person or entity other than Key
Voice may extend or modify this warranty, and no such modification or extension shall be effective
unless it is in writing.
SYSTEM SUPERVISOR AND SUBSCRIBER GUIDE 9.0 VER. 1
Table of Contents
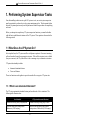
1. Performing System Supervisor Tasks .....................................................1-1
1.1 What Does the VP System Do?....................................................................................1-1
1.1.1 What is an Automated Attendant?........................................................................1-1
1.1.2 What is Voice Mail?.............................................................................................1-2
1.2 Understanding Supervisor Responsibilities..................................................................1-4
1.3 Calling into a Supervisor Mailbox to Perform Supervisor Functions ..........................1-8
1.3.1 Creating, Modifying, or Deleting a Mailbox over the Telephone ......................1-11
1.3.2 Creating a Broadcast Message over the Telephone............................................1-15
1.3.3 Disabling or Re-enabling a Port over the Telephone .........................................1-16
1.3.4 Temporarily Forcing the System into Day, Lunch, or
Night Service Mode over the Telephone..................................................................1-17
1.3.5 Modifying the Greeting Played by a Routing Box over the Telephone .............1-18
1.3.6 Modifying the Single-Digit Call Routing in a Routing Box
over the Telephone ...................................................................................................1-21
1.4 Performing Supervisor Functions from VP System Screens......................................1-24
1.4.1 Creating, Modifying, or Deleting a Mailbox through VP System Screens ........1-28
1.4.2 Creating, Modifying, or Deleting a Group Box through VP System Screens....1-47
1.4.3 Modifying Company Business Hours through VP System Screens...................1-50
1.4.4 Modifying Company Holidays through VP System Screens .............................1-52
1.4.5 Modifying the Greeting Played by a Routing Box
through VP System Screens .....................................................................................1-54
1.4.6 Recording a Greeting through the Routing Box Screen.....................................1-54
1.4.7 Modifying the Routing in a Routing Box through VP System Screens .............1-55
1.4.8 Adjusting Subscriber Access to Features through VP System Screens..............1-60
1.4.9 Screen Illustrations ............................................................................................1-68
Business Hours Screen (NT-based VP Systems) .....................................................1-69
Class of Service Screen, Message Tab (NT-based VP Systems) .............................1-70
Class of Service Screen, Greetings Tab (NT-based VP Systems)............................1-71
Class of Service Screen, Call Holding Tab (NT-based VP Systems).......................1-72
Class of Service Screen, Call Restrictions Tab (NT-based VP Systems).................1-73
Group Box Screen (NT-based VP Systems).............................................................1-74
Holidays Screen (NT-based VP Systems) ................................................................1-75
i
SYSTEM SUPERVISOR AND SUBSCRIBER GUIDE 9.0 VER. 1
Mailbox Screen, General Tab (NT-based VP Systems) .......................................... 1-76
Mailbox Screen, Call Transfer Tab (NT-based VP Systems).................................. 1-77
Mailbox Screen, Recording Tab (NT-based VP Systems) ...................................... 1-78
Mailbox Screen, Message Delivery Tab (NT-based VP Systems) .......................... 1-79
Mailbox Screen, Pager Tab (NT-based VP Systems).............................................. 1-80
Mailbox Screen, Distribution Lists Tab (NT-based VP Systems)........................... 1-81
Mailbox Screen, Hotel Tab (NT-based VP Systems) .............................................. 1-82
Routing Box Screen (NT-based VP Systems) ......................................................... 1-83
Business Hours Screen (DOS-based VP Systems) .................................................. 1-84
Class of Service Screen (DOS-based VP Systems) ................................................. 1-85
Group Box Screen (DOS-based VP Systems) ......................................................... 1-86
Holiday Schedule Screen (DOS-based VP Systems) .............................................. 1-86
Mailbox Page 1 Screen (DOS-based VP Systems).................................................. 1-87
Mailbox Page 2 Screen (DOS-based VP Systems).................................................. 1-87
Mailbox Page 3 Screen (DOS-based VP Systems).................................................. 1-88
Mailbox Page 4 Screen (DOS-based VP Systems).................................................. 1-88
Routing Box Screen (DOS-based VP Systems) ...................................................... 1-89
2. Using a Mailbox as a Subscriber .......................................................... 2-1
2.1 Identifying Yourself as the Mailbox Owner .................................................................2-1
2.2 Completing the New User Tutorial...............................................................................2-2
2.3 Selecting Main Menu Options ......................................................................................2-4
2.4 Listening to Messages...................................................................................................2-7
2.4.1 Listening to New Messages..................................................................................2-8
2.4.2 Selecting Options Between Messages ..................................................................2-9
2.5 Sending a Message .....................................................................................................2-12
2.6 Changing Mailbox Options.........................................................................................2-14
2.6.1 Recording a Name ..............................................................................................2-15
2.6.2 Recording a Greeting..........................................................................................2-15
2.6.3 Changing a Password .........................................................................................2-17
2.6.4 Changing the Call Transfer Service....................................................................2-17
2.6.5 Changing the Message Notification Service ......................................................2-18
2.6.6 Changing the Pager Service................................................................................2-19
2.6.7 Reviewing Messages Scheduled for Future Delivery.........................................2-19
2.6.8 Changing the Personal Distribution Lists...........................................................2-20
ii
SYSTEM SUPERVISOR AND SUBSCRIBER GUIDE 9.0 VER. 1
2.6.9 Retrieving a Message Already Sent to Another Mailbox...................................2-20
2.6.10 Logging into and out of ACD Boxes................................................................2-20
2.7 Listening to Question Box Answers...........................................................................2-21
2.8 Changing Languages in a Mailbox.............................................................................2-22
2.9 Placing an Outgoing Call from a Mailbox..................................................................2-22
2.10 Exiting a Mailbox .....................................................................................................2-23
iii
SYSTEM SUPERVISOR AND SUBSCRIBER GUIDE 9.0 VER. 1
iv
SYSTEM SUPERVISOR AND SUBSCRIBER GUIDE 9.0 VER. 1
1. Performing System Supervisor Tasks
Once the installing technician sets up the VP system at a site, an on-site system supervisor
must be appointed to perform day-to-day system maintenance tasks. This document defines
the tasks a system supervisor may need to perform and details the procedures for completing
each task.
Before you attempt to complete any VP system supervisor functions, you must be familiar
with the basic capabilities and structure of the VP system. These points are discussed in the
following section.
1.1 What Does the VP System Do?
In its simplest form, the VP system acts like a telephone receptionist. It answers incoming
calls and transfers them to the appropriate extension. If the called extension is not available
(busy or no answer), the VP system offers to take a message or try an alternative extension.
VP system functionality includes:
•
•
Automated attendant features
Voice mail features
These two functions work together to provide smooth call coverage at a VP system site.
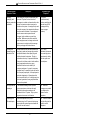
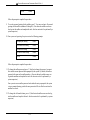
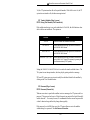
1.1.1 What is an Automated Attendant?
The VP system automated attendant features perform the tasks of a live attendant. The
following table illustrates how.
Live Attendant
VP System Automated Attendant
Answers an incoming call by lifting telephone.
Answers an incoming call by going “off-hook.”
Greets the caller with a phrase such as,
“Welcome to [XYZ Company].”
Greets the caller by playing a pre-recorded
greeting such as, “Welcome to [XYZ Company].”
1-1
SYSTEM SUPERVISOR AND SUBSCRIBER GUIDE 9.0 VER. 1
Live Attendant
VP System Automated Attendant
Asks to whom the caller wishes to speak.
Plays a pre-recorded greeting that prompts the
caller to either dial the extension of the party they
are trying to reach or choose from a list of voiced
options to route the call to a specific department
or group.
Listens to the caller’s response.
Listens to the digits dialed by the caller.
Says, “Please hold.”
Plays a pre-record phrase, “Please hold...”
Calls the required extension by hook-flashing
and dialing the extension number.
Calls the required extension by hook-flashing and
dialing the extension number.
Listens for busy tone, ring tone, answer, etc.
Listens for busy tone, ring tone, answer, etc.
If the extension is busy, offers to let the caller
hold. If the extension does not answer, offers
to take a message or try another extension.
If the extension is busy, plays a pre-recorded
prompt offering the option to hold. If the
extension does not answer, plays a pre-recorded
prompt offering to take a message or try another
extension.
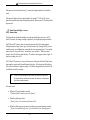
1.1.2 What is Voice Mail?
The term voice mail refers to systems that can record a voice message and treat it like a mail
message.
In a typical office environment, the live attendant takes a message from a caller and writes it
down on a piece of paper. The attendant then places the slip in the recipient’s in-box or
mailbox. The box owner then retrieves and reads the message placed in the box.
In contrast, the VP system records a message from a caller and places it in a voice mailbox.
The mailbox owner can later retrieve the message by calling into the VP system and listening
to the recording. The table below compares how the VP system processes voice messages
compared to a live attendant.
Live Attendant
Attendant listens as the caller dictates his/her
message, writing it down on a piece of paper.
VP System Voice Mail
VP system records the message as the caller
speaks.
1-2
SYSTEM SUPERVISOR AND SUBSCRIBER GUIDE 9.0 VER. 1
Live Attendant
VP System Voice Mail
Attendant places the message slip in a mailbox
belonging to the recipient.
VP system stores the voice message
electronically in the recipient’s voice mailbox.
Attendant dials the code to turn on message
waiting lamp on the recipient’s telephone.
VP system dials the code to turn on the
message waiting lamp on the recipient’s
telephone.
Recipient sees the message waiting lamp is on,
and retrieves message slips from the message
mailbox.
Recipient sees the message waiting lamp is on
and dials the VP system to retrieve messages.
Recipient reads messages left on message slips.
VP system plays messages recorded by callers
in the voice mailbox.
All VP systems are designed using the Box concept. A box contains a set of instructions that
tells the program what to do with a call it is handling. By sending calls to different boxes
created on the system, the system effectively processes calls—including playing certain
prompts or greetings to callers, collecting information and messages from callers, and routing
calls to certain extensions based on digits dialed by callers.
When you use the automated attendant capabilities in the VP system, the system uses Routing
boxes to answer incoming calls, play a listing of options to callers, and route each call to a
specific mailbox (or another type of box on the system) based on either digits dialed by the
caller or on other criteria the technician defined when the system was set up. The mailboxes
transfer calls to their associated extensions and store messages for system subscribers. Each
mailbox can also be set up to forward calls to another phone or extension number, deliver
messages to another phone or pager, play one of 10 pre-recorded greetings to callers, screen
calls, queue calls when the extension is busy, or record call conversations.
In addition to Routing boxes and mailboxes, the standard VP system provides several other
types of boxes:
•
•
•
•
•
Question box
Directory box
Account Number box
Group box
ACD box
1-3
SYSTEM SUPERVISOR AND SUBSCRIBER GUIDE 9.0 VER. 1
This document discusses how you can make modifications to mailboxes and Routing boxes,
which are the two most commonly used box types. Because these other types of boxes are
used in conjunction with more intricate system setups, adjusting their functionality is best left
to a certified VP system technician. Therefore, if you find you need to adjust the operation of
any boxes other than mailboxes or Routing boxes, contact your VP system technician.
Note:
All VP system products use the same software design, but each has
different limitations on the number of boxes allowed on the system and
whether the system includes an attached keyboard and monitor, which
allows a system supervisor to make modifications from the system’s PC unit.
Information provided in this manual is designed to accommodate all VP
system types. Therefore, certain sections and procedures may not be
applicable to certain VP system users.
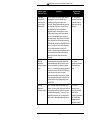
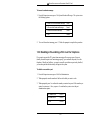
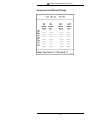
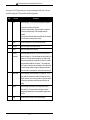
1.2 Understanding Supervisor Responsibilities
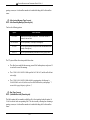
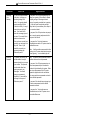
The tasks a system supervisor may need to periodically perform are summarized in the table
below. The procedure for completing each of these tasks is detailed in this guide.
Note that most administrative functions can be performed by the system supervisor over the
telephone, by simply calling into the VP system and logging into a supervisor mailbox. Other
functions, however, must be performed from the VP system PC because they require the
supervisor to make adjustments to fields on VP system program screens.
Some VP systems do not include a keyboard and monitor. Therefore, functions on these
systems that require screen modifications cannot be completed by the system supervisor. If a
particular task requires keyboard input, it is identified as such in the table below. If you
cannot complete a particular task you must perform because the system does not include a
keyboard and monitor, contact the VP system technician.
1-4
SYSTEM SUPERVISOR AND SUBSCRIBER GUIDE 9.0 VER. 1
Possible System
Supervisor Tasks
Description
Keyboard Input
Required?
Creating,
modifying, and
deleting subscriber
mailboxes.
Each employee (or group of employees) who
uses the VP system to record voice mail
messages in a mailbox or forward calls to other
phone or extension numbers is assigned a
mailbox on the system. As employees join and
leave the company, their associated mailboxes
must be created or deleted. If an employee’s
need to access certain system features
changes, his/her mailbox may need to be
modified. Mailboxes must also be modified
when employees want to change numbers the
system uses in conjunction with its message
delivery and pager notification features.
For certain
modifications only
(such as modifying the
second through fifth
message delivery
phone or pager
number).
Creating and
maintaining group
distribution lists.
Group distribution lists provide subscribers an
easy way to send one message they record to
multiple individuals, without specifying each
individual recipient’s extension. Though a
subscriber can set up 1-4 personal distribution
lists specific to his/her needs in his/her mailbox,
many organizations also set up group
distribution lists that can be used by all
company employees. A group list a company
maintains may, for example, contain the names
of all company employees, of all employees in a
particular department, of all employees that
work a specified shift, etc. As employees join or
leave an organization, these group distribution
lists must be updated.
Yes. Group
distribution lists cannot
be created by system
supervisors by calling
into the system over
the telephone.
Issuing broadcast
messages.
The broadcast message feature provides
system supervisors a technique for easily
distributing information messages to all
mailboxes on the VP system. Only a system
supervisor has access to this feature.
No. Broadcast
messages are created
by calling into the
system over the
telephone.
Disabling ports.
Re-enable ports.
Should a telephone line or port be
malfunctioning, the VP system technician may
request that the system supervisor disable the
line until it can be serviced.
No. Ports are disabled
only by calling into the
system over the
telephone.
1-5
SYSTEM SUPERVISOR AND SUBSCRIBER GUIDE 9.0 VER. 1
Possible System
Supervisor Tasks
Description
Keyboard Input
Required?
The VP system can be set up to play different
greetings and to process calls differently
according to the time of day each call is
received. Three different modes can be set up
on the system: Day Service, Lunch Service,
and Night Service. Each service mode is
assigned a specific time segment of the day.
Calls received within a mode’s time segment
are routed to a particular box, which plays a
particular greeting. Many systems, for instance,
have calls route to a different box that plays an
Office Closed greeting during the Night Service
hours. From time to time it may be necessary
for the system supervisor to force the VP
system to temporarily process calls according to
a service mode that is other than the current
mode (to extend the Lunch hour mode for
example).
No. The system is
temporarily forced into
a particular mode by
calling into it over the
telephone.
Modifying
designated
company business
hours.
A system supervisor may need to change the
hours associated with the Day Service, Lunch
Service, and Night Service modes (explained
above). If, for example, the company extends its
business hours from 5:00 PM to 6:00 PM during
a particular time of the year, the system
supervisor may need to extend the Day Service
hours (during which the system routes calls to a
box that plays an Office Open greeting) to last
until 6:00 PM.
Yes. System
supervisors must adjust
the Business Hours
screen.
Modifying
designated
company holidays.
Up to 20 holiday dates can be defined on the
system. On each holiday, calls can be routed to
a special Routing box, in which you can record
a specific holiday greeting. From time to time,
especially from year to year, you may need to
add, modify, or delete specified holiday dates.
Yes. System
supervisors must
modify the scheduled
dates from the
keyboard. (Supervisors
can record holiday
greetings over the
telephone, however.)
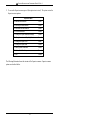
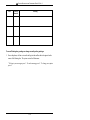
Temporarily
forcing the VP
system into Day,
Lunch, or Night
Service mode.
1-6
SYSTEM SUPERVISOR AND SUBSCRIBER GUIDE 9.0 VER. 1
Possible System
Supervisor Tasks
Description
Modify the
greeting played by
a Routing box.
When a call comes into the VP system, it is
processed by a Routing box, which plays a
greeting to the caller and may offer the caller
options on how the call can proceed (“Press 2
for Sales,” for example). You may need to
modify the greeting played by a particular
Routing box, if for example, you want to
customize the greeting played by the Routing
box that answers calls on a particular holiday or
if you need to add or eliminate a routing option
voiced to callers (such as, “Press 5 for
Customer Service”).
No. Either interface
can be used.
Modify the routing
in a Routing box.
As discussed above, when a call comes into the
VP system, it is processed by a Routing box,
which plays a greeting to the caller and may
offer the caller options on how the call can
proceed (“Press 2 for Sales,” for example). You
may need to add or eliminate a routing option
available to callers (such as, “Press 5 for
Customer Service”) or modify the box to which
the call is routed when callers select the option
(you may want to send the call to mailbox 399
instead of 395, for example). When you change
single-digit key routing, you must also change
the greeting voiced by the routing box, as
discussed above.
No. Either interface
can be used to modify
single-digit call routing.
Note that you can
modify the routing
technique (routing
based on day of week,
call sequence, etc.),
only through the
screen interface.
1-7
Keyboard Input
Required?
SYSTEM SUPERVISOR AND SUBSCRIBER GUIDE 9.0 VER. 1
Possible System
Supervisor Tasks
Description
Adjusting
subscriber access
to system
features, including
preventing
subscribers from
dialing certain
telephone
numbers.
You can modify the VP system features to
which a group of subscribers is permitted
access by modifying the class of service
assigned to the subscribers. Making class of
service modifications allows you to also prevent
the VP system from dialing certain phone
numbers, such as long distance numbers, when
making outgoing calls from a subscriber’s
mailbox. Outgoing calls may be made by the
VP system to deliver messages to a subscriber,
page a subscriber, or because the subscriber
called into the mailbox and selected an option to
have the system place an outgoing call.
Keyboard Input
Required?
Yes. System
supervisors must
adjust the Class of
Service screen.
1.3 Calling into a Supervisor Mailbox to Perform
Supervisor Functions
To access system supervisor functions by calling into the system, you must log into a
supervisor mailbox. A supervisor mailbox is any mailbox that has been assigned supervisor
privileges in the mailbox’s assigned class of service. (The mailbox’s assigned class of
service defines the features and options to which the mailbox owner is permitted access.)
Consult with the technician who installed the VP system for a list of which mailboxes have
been assigned supervisor privileges.
To log into a supervisor mailbox from the telephone and access supervisor functions:
1. From a telephone, call into voice mail and log into a supervisor mailbox. The system
voices the Main menu:
“To listen to your messages press 1. To send a message press 2. To change your options
press 3.”
1-8
SYSTEM SUPERVISOR AND SUBSCRIBER GUIDE 9.0 VER. 1
2. To access the Supervisor menu, press 6 (this option is not voiced). The system voices the
Supervisor menu options:
Supervisor Menu
For Mailbox Administration
Press 1
For Routing box Administration
Press 2
For Question box Administration
Press 3
For Port Administration
Press 4
To Change the System Broadcast Message
Press 5
To Change the voice mail Day / Night Service
Press 6
To Change the System Time
Press 7
To Change the System Date
Press 8
To Modify System Parameters
Press 9
To Perform First Time Setup
Press 0
To Exit
Press #
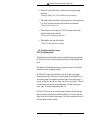
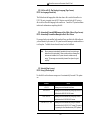
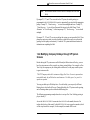
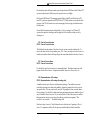
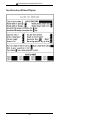
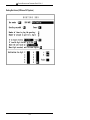
The following illustration shows the structure of the Supervisor menus. Supervisor menu
options are described below.
1-9
SYSTEM SUPERVISOR AND SUBSCRIBER GUIDE 9.0 VER. 1
1. Add
2. Delete
3. Modify
4. Suspend
5. Restore
6. Reset
#. Exit
Enter box number
Enter box number
1. Mailbox functions
2. Routing box functions
3. Question box functions*
4. Port functions
5. Broadcast functions
6. Night / day functions
7. System time*
8. System date*
9. System parameters*
0. First time setup*
#. Exit
Enter box number
1. Add
2. Delete
3. Modify
#. Exit
1. Modify greeting
2. Modify routing
#. Exit
1. Add
2. Delete
3. Modify
#. Exit
1. Modify greeting
2. Record question
#. Exit
Enter port number
1. Disable a port
2. Enable a port
#. Exit
1. Day service
2. Night service
3. Lunch service
#. Exit
Structure of Supervisor Menus
* IMPORTANT:
Select and modify these options ONLY under the guidance of a VP
system technician. This guide does not include information on
working with these options. Using these options incorrectly may
impair the ability of the VP system to effectively process calls and
perform messaging functions.
1-10
Enter the
greeting
number
Enter the
digit
Enter the
greeting
number
Enter the
question
number
SYSTEM SUPERVISOR AND SUBSCRIBER GUIDE 9.0 VER. 1
1.3.1 Creating, Modifying, or Deleting a Mailbox over the
Telephone
You can create, modify, or delete a mailbox using options on the Mailbox Administration
menu. Specifically, you can use this menu to:
•
Add or delete a mailbox
•
Change a mailbox greeting (the mailbox owner can also perform this function by
logging into the mailbox)
•
Change a mailbox password (the mailbox owner can also perform this function by
logging into the mailbox)
•
Change the call transfer, pager, and message notification numbers (the mailbox
owner can also perform this function by logging into the mailbox)
•
Suspend a mailbox (rendering it inaccessible to the mailbox owner) and restoring
access to a suspended mailbox)
To create, modify, or delete a mailbox over the telephone:
1. From the Supervisors menu, press 1 for Mailbox Administration.
2. When prompted, enter the number of the mailbox you want to add, modify, or delete.
The system voices the number back to you.
3. When prompted, press 1 to confirm the number or press # if the number you entered was
incorrect. Once you confirm, the system voices the Mailbox menu options:
Mailbox Menu
To Add
Press 1
To Delete
Press 2
To Modify
Press 3
To Suspend
Press 4
To Restore
Press 5
To Reset
Press 6
1-11
SYSTEM SUPERVISOR AND SUBSCRIBER GUIDE 9.0 VER. 1
To Exit
Press #
4. To add a new the mailbox to the system, press 1. The system adds the new mailbox to
the mailbox database. All default settings in the mailbox are set to the default parameters
settings specified in prototype mailbox 9994. The default password for the mailbox is the
same as the mailbox number.
5. To delete the mailbox from the system, press 2. The system deletes the mailbox from the
mailbox database.
6. To modify the mailbox on the system, press 3. The system voices the Options menu:
Options Menu
To Record your Name
Press 1
To Record your Greeting
Press 2
To Change your Password
Press 3
To Change your Call-Transfer feature
Press 4
To Change your Message Notification feature
Press 5
To Change your Pager feature
Press 6
To Review msgs scheduled for Future Delivery
Press 7
To Change your Personal Distribution Lists
Press 8
To Retrieve a Message Previously Sent
Press *
To Return to the Main Menu
Press #
7. To record the mailbox owner’s name, press 1. (Note that each mailbox owner can also
log into the mailbox and complete this task—this does not need to be performed by a
system supervisor.)
8. Once you record the name, the system voices the following prompts:
To Replay
Press 1
To Re-record
Press 2
To Delete
Press 3
1-12
SYSTEM SUPERVISOR AND SUBSCRIBER GUIDE 9.0 VER. 1
To Exit
Press #
Follow the prompts to complete the procedure.
9. To record a personal greeting for the mailbox, press 2. You can record up to 10 personal
greetings for the mailbox (numbered 0 through 9). (Note that each mailbox owner can
also log into the mailbox and complete this task—this does not need to be performed by a
system supervisor.)
10. Once you record a greeting, the system voices the following prompts:
To Replay the Greeting
Press 1
To Re-record the Greeting
Press 2
To Delete the Greeting
Press 3
To Choose a New Greeting
Press 5
To Exit
Press #
Follow the prompts to complete the procedure.
11. To change the mailbox password, press 3. Note that to change the password, you must
first enter the current password when prompted by the system. By default, the mailbox
password is the same as the mailbox number. (Also note that each mailbox owner can
log into the mailbox and complete this task—this does not need to be performed by a
system supervisor.)
Once you enter a new mailbox password and confirm the entry as prompted, the system
voices a prompt informing you that the new password will be in effect the next time the
mailbox is accessed.
12. To change the call transfer feature, press 4. (Note that each mailbox owner can also log
into the mailbox and complete this task—this does not need to be performed by a system
supervisor.)
1-13
SYSTEM SUPERVISOR AND SUBSCRIBER GUIDE 9.0 VER. 1
13. The system voices a prompt identifying the current call transfer set up, then voices the
options:
Press 1 if you would like to change the number
Press * to turn this feature on or off, or
Press # if you are satisfied
Follow the prompts to complete the procedure.
14. To change the message notification feature, press 5. (Note that each mailbox owner can
also log into the mailbox and complete this task—this does not need to be performed by a
system supervisor.)
15. The system voices a prompt identifying the current message notification setup, then
voices the notification options:
Press 1 if you would like to change the number
Press * to turn this feature on or off, or
Press # if you are satisfied
Follow the prompts to complete the procedure.
16. To change the pager feature, press 6. (Note that each mailbox owner can also log into the
mailbox and complete this task—this does not need to be performed by a system
supervisor.)
17. The system voices a prompt identifying the current pager set up, then voices the paging
options:
Press 1 if you would like to change the number
Press * to turn this feature on or off, or
Press # if you are satisfied
Follow the prompts to complete the procedure.
1-14
SYSTEM SUPERVISOR AND SUBSCRIBER GUIDE 9.0 VER. 1
18. To review messages scheduled for future delivery, press 7. (Note that each mailbox
owner can also log into the mailbox and complete this task—this does not need to be
performed by a system supervisor.)
19. The system voices a prompt identifying any message scheduled for future delivery, then
voices the options:
To Listen to the Message
Press 1
To Hear the Next Message (scheduled for future delivery)
Press 2
To Cancel the Message
Press 4
To Exit
Press #
Follow the prompts to complete the procedure.
1.3.2 Creating a Broadcast Message over the Telephone
A broadcast message is heard by all mailbox owners when they open their mailbox. The
broadcast message can only be recorded by a mailbox owner with Supervisor privileges. This
type of message is different from any other message in the VP system in the following ways:
•
The broadcast message does not activate any mailbox notification services (message
waiting lamps, pagers, etc.).
•
The mailbox owner’s New and Old message counts are not affected by a broadcast
message.
•
The broadcast message is sent to all mailboxes. It is not possible to select which
mailboxes are to receive the broadcast message.
Once a supervisor records a broadcast message, it is played to each mailbox owner the next
time he/she opens his/her mailbox. The message is played only one time to each mailbox
owner (the next time an owner logs in to his/her mailbox, the broadcast message is not
repeated).
1-15
SYSTEM SUPERVISOR AND SUBSCRIBER GUIDE 9.0 VER. 1
To issue a broadcast message:
1. From the Supervisors menu, press 5 for System Broadcast Message. The system voices
the following options:
To Hear the Current Broadcast Message
Press 1
To Re-record the Broadcast Message
Press 2
To Delete the Broadcast Message
Press 3
To Exit
Press #
2. To record a broadcast message, press 2. Follow the prompts to complete the procedure.
1.3.3 Disabling or Re-enabling a Port over the Telephone
If you want to prevent the VP system from answering calls on one or more of its ports
(usually because the port is not functioning properly), you can disable the port(s) over the
telephone. Should you find later you want to re-enable a port that was previously disabled,
you can also perform this function by calling into the system.
To disable or re-enable a port:
1. From the Supervisors menu, press 4 for Port Administration.
2. When prompted, enter the number of the line with which you want to work.
3. When prompted, press 1 to confirm the number you entered or press # if the number you
entered was incorrect. Once you press 1 to confirm, the system voices the port
administration options:
To Disable a Port
Press 1
To Enable a Port
Press 2
To Exit
Press #
1-16
SYSTEM SUPERVISOR AND SUBSCRIBER GUIDE 9.0 VER. 1
4. To shut down a port, press 1 to disable it. If you disable a port, all calls using that port
are immediately terminated.
5. To enable a port that is currently shut down, press 2.
1.3.4 Temporarily Forcing the System into Day, Lunch, or
Night Service Mode over the Telephone
A system supervisor can override the regular Day Service, Lunch Service, or Night Service
mode by forcing the VP system into another mode. The VP system switches to the new
service mode and remains in that mode until it is time for the system to automatically switch
out of that mode and into another. For example, assume that Day Service mode runs from
8:00 AM until 5:00 PM and Lunch Service mode runs from noon until 1:00 PM. If the
supervisor calls in at 9:00 AM (the VP system is in Day Service mode) and forces the VP
system into Night Service mode, the VP system remains in Night Service mode until noon. It
then automatically switches to Lunch Service mode.
To force the VP system into Day Service, Lunch Service, or Night Service mode:
1. From the Supervisors menu, press 6 for Day / Night service. The system voices the
following options:
To Change to Day Service Mode
Press 1
To Change to Night Service Mode
Press 2
To Change to Lunch Service Mode
Press 3
To Exit
Press #
2. Press a number to indicate the mode in which you want the voice mail system to
temporarily operate. Follow the prompts to complete the procedure.
1-17
SYSTEM SUPERVISOR AND SUBSCRIBER GUIDE 9.0 VER. 1
1.3.5 Modifying the Greeting Played by a Routing Box over the
Telephone
Note:
Only the mailbox that is designated as the “Owner” of the Routing box (the
Owner box is specified on the Routing box’s setup screen) can make
changes to the Routing box. Therefore, you must log into the owner’s
mailbox (if this is different than the supervisor mailbox) over the phone,
before you can make changes to the Routing box. When prompted for the
box number you want to modify, you can then indicate the Routing box
number.
Understanding the Routing Box Setup and Routing Box Greetings
By default, the VP system is pre-configured with 3 Routing boxes to process calls. Routing
box 800 answers calls during office open business hours (Day Service), box 801 answers
calls after Day Service hours, and box 821 routes calls after they have already passed through
box 800 or 801.
The VP technician who set up the VP system can familiarize you with modifications that
were made to this Routing box structure, including additional Routing boxes that were
created.
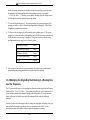
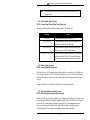
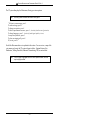
Up to 10 different greetings can be recorded and stored in each Routing box. The chart
below is provided for you to note Routing box greetings set up on the system:
Box
Greeting
Number
Greeting
1-18
SYSTEM SUPERVISOR AND SUBSCRIBER GUIDE 9.0 VER. 1
Box
Greeting
Number
Greeting
To record Routing box greetings or change currently active greetings:
1. From a telephone, call into voice mail and log into the mailbox that is designated as the
owner of the Routing box. The system voices the Main menu:
“To listen to your messages press 1. To send a message press 2. To change your options
press 3.”
1-19
SYSTEM SUPERVISOR AND SUBSCRIBER GUIDE 9.0 VER. 1
2. Press 3 to change options. The system voices the Options menu:
Options Menu
To Record your Name
Press 1
To Record your Greeting
Press 2
To Change your Password
Press 3
To Change your Call-Transfer feature
Press 4
To Change your Message Notification feature
Press 5
To Change your Pager feature
Press 6
To Review msgs scheduled for Future Delivery
Press 7
To Change your Personal Distribution Lists
Press 8
To Retrieve a Message Previously Sent
Press *
To Return to the Main Menu
Press #
3. From the Options menu, press 2.
4. When prompted, enter the number of the Routing box whose greeting you want to
change.
5. When prompted, press 1 to confirm the number you entered or press # if the number you
entered was incorrect. Once you press 1 to confirm, the system voices the following
options, which relate to the currently active greeting:
To Replay the Greeting
Press 1
To Re-record the Greeting
Press 2
To Delete the Greeting
Press 3
To Choose a New Greeting
Press 5
To Exit
Press #
6. If you intend to re-record the greeting, first press 1 to replay it. By replaying the greeting
you can 1) ensure you are re-recording the greeting you intended to modify, and 2) note
1-20
SYSTEM SUPERVISOR AND SUBSCRIBER GUIDE 9.0 VER. 1
all the call routing options that are currently provided in the greeting so you can restate
the appropriate call routing options in the new greeting you record (for example,
“…Press 2 for Sales…”). Note that you can modify the single-digit call routing options
by following the procedure provided later in this section.
7. To re-record the greeting, press 2. The system prompts you to enter the number of the
greeting you want to re-record. Enter the greeting number (0 through 9). Then, follow
the prompts to complete the procedure.
8. To choose a new greeting to play as the currently active greeting, press 5. The system
prompts you to enter the number of the greeting you would like to activate or to press star
for the currently active greeting. If you press *, the system voices the currently active
greeting number and greeting, then re-voices the options:
To Replay the Greeting
Press 1
To Re-record the Greeting
Press 2
To Delete the Greeting
Press 3
To Choose a New Greeting
Press 5
To Exit
Press #
9. Once you press 5 and enter a new greeting number, the system voices a confirmation
prompt stating the greeting number and voicing the now-active greeting.
1.3.6 Modifying the Single-Digit Call Routing in a Routing Box
over the Telephone
The VP system can be set up to voice greetings to callers that include single-digit call routing
options, such as, “Press 2 for Sales…” On a system set up this way, a call is transferred to a
certain mailbox when the caller presses 2 during or after the greeting. You can control the
digit(s) callers can dial and the route their calls subsequently take using the following
procedure.
Note that if you use the following procedure to change the single-digit call routing set up, you
must update the Routing box greeting to relay new instructions to the caller. Use the
procedure presented earlier in this section to update the greeting as necessary.
1-21
SYSTEM SUPERVISOR AND SUBSCRIBER GUIDE 9.0 VER. 1
Note:
Only the mailbox that is designated as the “Owner” of the Routing box (the
Owner box is specified on the Routing Box setup screen) can make changes
to the Routing box. Therefore, you must log into the owner’s mailbox (if this
is different than the supervisor mailbox) over the phone, before you can
make changes to the Routing box. When prompted for the box number you
want to modify, you can then indicate the Routing box number.
1. From a telephone, call into voice mail and log into the mailbox that is designated as the
owner of the Routing box. The system voices the Main menu:
“To listen to your messages press 1. To send a message press 2. To change your options
press 3.”
2. Press 3 to change options. The system voices the Options menu:
Options Menu
To Record your Name
Press 1
To Record your Greeting
Press 2
To Change your Password
Press 3
To Change your Call-Transfer feature
Press 4
To Change your Message Notification feature
Press 5
To Change your Pager feature
Press 6
To Review msgs scheduled for Future Delivery
Press 7
To Change your Personal Distribution Lists
Press 8
To Retrieve a Message Previously Sent
Press *
To Return to the Main Menu
Press #
3. From the Supervisors menu, press 2 for Routing box administration.
4. When prompted, enter the number of the Routing box with which you want to work.
1-22
SYSTEM SUPERVISOR AND SUBSCRIBER GUIDE 9.0 VER. 1
5. When prompted, press 1 to confirm the number you entered or press # if the number you
entered was incorrect. Once you press 1 to confirm, the system voices the Routing Box
administration menu options:
To Add
Press 1
To Delete
Press 2
To Modify
Press 3
To Exit
Press #
6. To make modifications to the Routing box, press 3. The system voices the options:
To Change the Greeting
Press 1
To Change the Routing
Press 2
To Exit
Press #
7. To change the routing structure, press 2. The system voices the prompt, “For digits zero
through nine, please enter the digit, or press * for special routing options.”
8. Press the digit for which you want to modify the call routing. The system voices a
prompt identifying the current call routing set up for the digit.
9. When prompted, press 1 to change the routing for the digit. Then, when prompted, enter
the number of the box to which you now want callers who press the digit to route. The
system voices a prompt stating the new call routing structure.
Note that you can make special call routing refinements by pressing * in step 8 above.
The system voices the following special routing options:
To change the destination for the star digit
Press *
To change the destination for the pound digit
Press #
To change the No Digits Destination
Press 1
To change the Invalid Digit Destination
Press 2
To change the Voice Detected Destination
Press 3
1-23
SYSTEM SUPERVISOR AND SUBSCRIBER GUIDE 9.0 VER. 1
Once you access this menu, be advised that you must not press # to exit it, since the # key
invokes a change to the destination for the pound key. If you want to return to the
previous menu, simply make no entry when you hear the special routing options prompt.
1.4 Performing Supervisor Functions from VP System
Screens
To access program screens on which you can perform supervisor functions you must log onto
the VP system PC using the Customer/Administrator password. The technician who installed
the VP system can provide this password to you.
The procedure you use to access system screens depends on whether the VP system is DOSbased or NT-based. The VP system technician can inform you which type of system you
have and which procedures you must follow in this document to access program screens.
WARNING:
It is critical you make no modifications to any field on any screen or to any
file on the VP system unless you are directed to by this guide or by the VP
system installation technician. Incorrect modifications you make may impair
the ability of the VP system to perform call processing and messaging
functions.
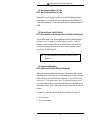
To access screens through the DOS-based VP system screen interface:
1. From the LINE STATUS screen, press <F10>. The Main menu displays, and you are
prompted to enter a password.
2. Type the password then press <Enter> to log on to the VP system. The Main menu
displays.
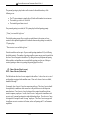
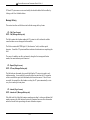
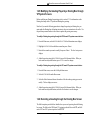
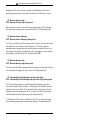
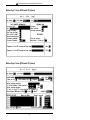
The following illustration shows the structure of the DOS-based VP system menus. Note that
depending on the type of VP system installed and the password you entered to log on, you
may not have access to all menus and options.
1-24
SYSTEM SUPERVISOR AND SUBSCRIBER GUIDE 9.0 VER. 1
Line Status
screen
Mail Box
screen 1
Page
Page 2
Mail Box
screen 2
Page 3
Exit
Display Line Status
Mail Box
screen 3
Question Box
screen
Mail Box
Routing Box
screen
Question Box
Box Information
Routing Box
Group Box
screen
Group Box
System Information
Main menu
Directory Box
screen
Directory Box
ACD Box
ACD Box
screen
Account Number
Acct Number Box
screen
Display Database
Optional Features
To screen
To file
Box menu
To printer
Database
Display
screen
Optional feature box
setup screen
General Information
screen
Line Information
screen
Business Hours
screen
General
Line Information
Holiday Schedule
screen
Business Hours
Holiday Schedule
Call Transfer
screen
Call Transfer
Technical
screen
Technical
Class of Service
Class of Service
screen
Optional Features
Optional Features
menu screen
System menu
DOS-based VP System Menus
1-25
SYSTEM SUPERVISOR AND SUBSCRIBER GUIDE 9.0 VER. 1
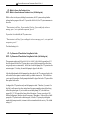
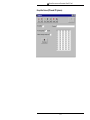
To access screens through the NT-based VP system screen interface:
1. From the Windows NT desktop, double-click the VP DATABASE icon. You are prompted
to enter a password.
2. Type the password then press <Enter> to log on to the VP system. The Main screen
displays.
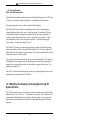
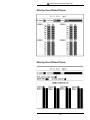
The following illustration shows the structure of the NT-based VP system menus. Note that
depending on the type of VP system installed and the password you entered to log on, you
may not have access to all menus and options.
1-26
SYSTEM SUPERVISOR AND SUBSCRIBER GUIDE 9.0 VER. 1
Database
Display
screen
To screen
To file
To printer
Mail Box
screen
Question Box
screen
File
Routing Box
screen
Mail Box
Group Box
screen
Question Box
Boxes
Routing Box
System
Directory Box
screen
Group Box
ACD Box
screen
Directory Box
Diagnostics
Help
ACD Box
Acct Number box
screen
Account Number Box
Optional feature box setup
menu screen
Optional Features
Main menu bar
Boxes menu
General
screen
Line Information
screen
General
Business Hours
screen
Line Information
Business Hours
Holiday Schedule
screen
Holiday Schedule
Class of Service
Class of Service
screen
PBX Information
PBX Information
screen
Optional Features
Prompt Recorder
Optional feature setup
menu screen
System menu
Trace Setup
screen
Trace Setup
Custom Flags
Diagnostics menu
Custom Flags
screen
NT-based VP System Menus
1-27
SYSTEM SUPERVISOR AND SUBSCRIBER GUIDE 9.0 VER. 1
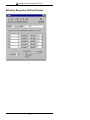
1.4.1 Creating, Modifying, or Deleting a Mailbox through VP
System Screens
You can create, modify, or delete a mailbox using options on VP system screens. Through
the screen interface, intricate technical modifications can be made to the mailbox that cannot
be made through the VP system telephone interface. This guide includes instructions on
making on-screen entries in fields that do not require an in-depth knowledge of the VP
system. Before making modifications to fields other than those documented here, contact the
VP system installation technician.
To create, modify, or delete a mailbox through the DOS-based VP system screen
interface:
1. From the Main menu, select BOX INFORMATION. The Box Information menu displays.
2. Highlight MAIL BOX from the Boxes menu then press <Enter>. To add a new box, press
<F2>. To modify or delete an existing box, press<F4>.
3. Enter the box number you want to create, modify, or delete, then press <Enter>. If you
are creating a box, the VP system makes a copy of prototype mailbox 9994 (a template
mailbox) and displays the new box. If you are modifying or deleting an existing box, the
VP system displays the box’s setup screen. You can make modifications to the box from
this screen or delete the box completely. If you want to delete the box, verify you are
viewing the box you want to delete, then press <F3>. When you are prompted to confirm
the deletion, press <Y>.
For information on making modifications to fields on this screen, consult the information
provided below and the program’s online help file (accessible by pressing <F1>).
4. When you have made necessary modifications, press <F10> to save the changes.
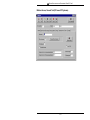
To create, modify, or delete a mailbox through the NT-based VP system screen
interface:
1. From the Main screen, access the BOXES pull-down menu.
2. Select MAILBOX from the Boxes menu.
3. Select the New button at the top of the screen to create a new box. When prompted, enter
the number of the box you want to create. The VP system makes a copy of prototype
mailbox 9994 and displays the new box. To modify or delete an existing box, select the
1-28
SYSTEM SUPERVISOR AND SUBSCRIBER GUIDE 9.0 VER. 1
Select button and choose the number of the box you want to modify or delete. The box
displays on-screen. To delete the box, verify you are viewing the box you want to delete,
then select the Delete button. When you are prompted to confirm the deletion, select the
Yes button.
For information on making modifications to fields on this screen, consult the information
provided below and the program’s online help file (accessible by pressing <F1>).
4. When you have made necessary modifications, select the Save button to save the
changes.
Working with the Mailbox Screen
Note:
See section 1.4.9 for screen illustrations.
The field descriptions provided below identify the function of many of the fields on the
MAILBOX screen. Be advised that due to differences in the screen design between DOS-based
and NT-based VP systems, the placement of fields on several system screens vary slightly.
Fields used in DOS-based VP systems are prefaced below with VP, and fields used in NTbased VP systems are prefaced with NTVP. If the NTVP field resides on a certain tab on the
screen or if the VP field resides on a certain screen page, the tab or page is identified next to
the field name.
Several field descriptions discuss setting fields to YES or NO settings. In NT-based VP
systems, this equates to checking or un-checking the field’s checkbox, which you do by
clicking on it.
VP: Box Number (Page 1 screen)
NTVP: Box Number
Every box has its own unique box number, which can range from 1 to 9899. You cannot
change this field on the screen. To view a different box, press <F4> (select a box number),
<F5> (previous mailbox), or <F6> (next mailbox). If you want to add a new mailbox, press
<F2> (add). (NT-based VP system users can also select from icons at the top of the screen.)
The box number is the number an outside caller dials to reach the mailbox owner. The VP
system looks inside the mailbox specified for the owner’s extension number and transfers the
1-29
SYSTEM SUPERVISOR AND SUBSCRIBER GUIDE 9.0 VER. 1
call to that number. The mailbox number can be the same as its owner’s extension number, or
it can be different. For example, an arbitrary range of mailbox numbers 5100 through 5109
can transfer calls to extensions 20 through 29.
Hint:
For setup and system maintenance ease, create mailboxes with numbers
that match the extensions to which they transfer calls.
VP: First Name (Page 1 screen)
NTVP: Name (first)
The first name of the individual to which the mailbox is assigned is used for record-keeping,
and it appears on the database listing.
Prior to initiating a transfer, in standard operation the VP system plays the system prompt
“Please hold while I transfer your call to [name],” inserting the called party’s name.
If you insert the @ symbol before the name in this field, (for example, “Mary” becomes
“@Mary”), the recorded name is substituted with the system prompt “that extension.”
If you insert the & symbol before the first name, no system prompt or recorded name plays.
VP: Last Name (Page 1 screen)
NTVP: Name (last)
The last name of the individual to which the mailbox is assigned is used in conjunction with
the Directory box feature. It also appears on the database listing.
The mailbox is not included in the system directory voiced to callers requesting it if the @
symbol is inserted before the first letter of the last name (for example, “Jones” becomes
“@Jones”). (The mailbox is also not included in the system directory if no Name prompt has
been recorded for the mailbox.)
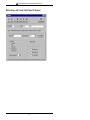
VP: Transfer Type (Page 1 screen)
NTVP: Transfer Type area (Call Transfer tab)
When a call is routed to the mailbox, the first action taken is to transfer the call to the number
specified in the TO: field. The VP system offers several options as to how the call is
1-30
SYSTEM SUPERVISOR AND SUBSCRIBER GUIDE 9.0 VER. 1
transferred. For information on selecting or modifying a transfer type, consult the VP system
technician.
VP: To (Page 1 screen)
NTVP: Transfer to (Call Transfer tab)
This field contains the number to which the VP system transfers the calls that route to this
mailbox. The owner of the mailbox can call in and remotely change the number in the TO:
field (unless the number is enclosed in brackets). After logging into a mailbox and selecting
the Options menu, he/she is prompted, “To change your call transfer feature, press 4.”
VP: Get Caller’s Name (Page 1 screen)
NTVP: Get Caller’s Name (Call Transfer tab)
If you select YES in this field, the VP system prompts the caller for his/her name before
transferring the call (if the caller does not speak a name, the VP system transfers the call
anyway). If the transfer type is set to SCREEN, when the called party answers, the VP system
prompts:
“I have a call from [caller’s name] for [mailbox owner’s name]. Press 1 to take the call,
press 2 if you would like me to take a message...”
If the transfer type is set to WAIT FOR ANSWER, when the called party answers, the VP system
simply announces the caller’s name and connects the call.
VP: Record All Calls (Page 1 screen)
NTVP: Record Every Call (Call Transfer tab)
If you select YES in this field, the VP system remains on the line after completing the transfer
and records the conversation. The recorded conversation is stored as a message in the
mailbox.
VP: Currently Enabled (Page 1 screen)
NTVP: Currently Enabled (Call Transfer tab)
Use this field to turn the call transfer service on or off from the keyboard. The owner of a
mailbox also can call in and remotely change his/her call transfer setup. If this field is set to
1-31
SYSTEM SUPERVISOR AND SUBSCRIBER GUIDE 9.0 VER. 1
YES,
the VP system transfers calls to the specified number. If the field is set to NO, the VP
system does not transfer calls, but takes messages instead.
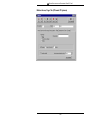
VP: Transfer Schedule (Page 1 screen)
NTVP: During This Schedule (Call Transfer tab)
If the mailbox transfer type is any value other than NO TRANSFER, this field indicates when
calls to this box are transferred. The options are:
Schedule
ALWAYS
Result
Calls to this mailbox are transferred at all times.
DAY SERVICE
Calls are transferred only during Day Service, as defined in
the BUSINESS HOURS screen.
NIGHT SERVICE
Calls are transferred only during Night Service, as defined in
the BUSINESS HOURS screen.
SCHEDULE A, B, C, or D
Calls are transferred only during the schedule, as defined on
the MAILBOX PAGE 3 screen (VP systems) / by pressing the
View Schedules button (NTVP systems).
Setting the CURRENTLY ENABLED? field to NO overrides the transfer schedule feature. The
VP system does not attempt transfers, but does play the greeting and takes a message.
NT-based VP system users can view and modify the schedules defined for the mailbox by
clicking on the View Schedules button.
VP: Password (Page 1 screen)
NTVP: Password (General tab)
When an owner tries to open his/her mailbox to retrieve messages, the VP system asks for a
password. The password can be up to 10 digits long and can consist of the digits 0 through 9
and the character *. For security reasons, it is recommended that box owners use passwords
at least 4 characters long and that they change them regularly.
If the password is set to 0000 (four zeros), the VP system allows access to the mailbox
without asking for a password. Use this feature with caution.
1-32
SYSTEM SUPERVISOR AND SUBSCRIBER GUIDE 9.0 VER. 1
If the password is enclosed in brackets [ ], it cannot be changed remotely by the mailbox
owner.
If the password begins with two question marks (for example, ??1234), the VP system
ignores the question marks when checking the password (the user enters 1234 when asked for
the password.
VP: Name Recorded (Page 1 screen)
NTVP: Name button
This field indicates whether the mailbox owner has recorded his/her own name. On NTbased VP systems, an existing recording is signified by a red light displaying on the button.
On DOS-based VP systems, when you bring the cursor into this field, a menu appears,
offering the option to play, delete, copy, or record the name. By selecting RECORD you can
record the name via a telephone line connected to the voice processing board. To record the
name, select RECORD, press <Enter>, and call into voice mail line 1. When voice mail
answers, select RECORD and speak the name. To end the recording, press <Enter> again. To
hear the recording, select PLAY.
On NT-based VP systems, you can record the name by clicking on the Record Name button,
then using the controls on the Sound Recorder dialog box. At the lower right of the dialog,
click on the circle button to begin recording. Click on the rectangle button (to the left of the
circle button) to end the recording.
Note:
If there is no name recorded for the mailbox, the mailbox is not included in
the system directory and the system prompt “that extension” is used instead
of the name in various phrases.
The name is used:
•
When the VP system initiates a transfer:
“Please hold while I transfer your call to [name].”
•
When the called party is busy:
“[Name] is busy. You are number [number] in line.”
•
When the called party does not answer and there is no personal greeting recorded:
“[Name] is not available right now. If you would like to leave a message press 1.”
1-33
SYSTEM SUPERVISOR AND SUBSCRIBER GUIDE 9.0 VER. 1
•
When the VP system calls the owner to deliver his/her new messages (message
notification):
“Message for [name]. Press 1 if you would like to hear your messages.”
•
When another mailbox owner uses the send message feature to send a message to this
box. The VP system plays the name for this box and asks for confirmation:
“[Name]—if this is correct, press 1.”
•
When the directory feature is being used. The VP system plays each name that
matches the letters entered by the caller.
“[Name]—if this is the person you want, press 1.”
•
When a mailbox owner opens his/her mailbox.
“[Name]—You have [number] new messages.”
VP: Greeting Recorded (Page 1 screen)
NTVP: Record Greeting button
This field indicates whether the mailbox owner has recorded his/her own personal greeting.
On NT-based VP systems, an existing recording is signified by a red light displaying on the
button.
If this mailbox is allowed multiple greetings in its assigned class of service, this field only
reports the status of the first greeting, greeting 0.
On DOS-based VP systems, when you bring the cursor into this field, a menu appears,
offering the options to play, delete, copy, or record the greeting. By selecting RECORD, you
can record the greeting via the telephone line connected to the voice processing board. To
record the greeting, select RECORD, press <Enter>, and call in to voice mail line 1. When the
VP system answers, select RECORD and speak the greeting. To end the recording, press
<Enter> again. To hear the recorded greeting, select PLAY.
On NT-based VP systems, you can record the greeting by clicking on the Record Greeting
button, then using the controls on the Sound Recorder dialog box. At the lower right of the
dialog, click on the circle button to begin recording. Click on the rectangle button (to the left
of the circle button) to end the recording.
1-34
SYSTEM SUPERVISOR AND SUBSCRIBER GUIDE 9.0 VER. 1
The personal greeting is played when a caller is routed to the mailbox and any of the
following occur:
•
•
•
The VP system attempts to transfer the call, but the called number does not answer
The transfer type is set to NO TRANSFER
The transfer-bypass feature is used
If no personal greeting is recorded, the VP system plays the default greeting prompt:
“[Name] is not available right now.”
This default greeting prompt, like every other recorded phrase in the system, can be rerecorded to suit a particular application. If neither the name nor the greeting is recorded, the
VP system plays:
“That extension is not available right now.”
Note that a mailbox can have up to 10 pre-recorded greetings (numbered 0-9), with 0 being
the default greeting). The number of greetings a mailbox owner can pre-record is specified in
the class of service assigned to the mailbox. By calling in from any telephone and opening
his/her mailbox, each mailbox user can record his/her greetings or select one of their prerecorded greetings as their active greeting (the greeting played to callers).
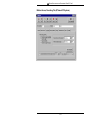
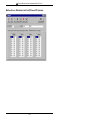
VP: Class of Service (Page 1 screen)
NTVP: Class of Service (General tab)
This field indicates the class of service assigned to the mailbox. A class of service is a set of
privileges that are assigned to the mailbox owner. There are 8 classes of service available,
numbered 0 through 7.
For example, class of service 7 may have supervisor privileges. This class of service should
be assigned only to mailboxes whose owners are to be provided access to the Supervisor
menu functions. Class of service 1 may be designed to be assigned to mailboxes that are
issued to temporary employees. As such, class of service 1 may provide its mailboxes with
access to only 1 personal greeting and no other additional privileges. Class of service 3 may
be designed to be assigned to most “average” employees. This class of service may provide
its mailboxes access to a certain set of features, such as call queuing and P.A. call announce
capabilities.
1-35
SYSTEM SUPERVISOR AND SUBSCRIBER GUIDE 9.0 VER. 1
NT-based VP system users can view and modify the classes of service by clicking on the
Review Class of Service button.
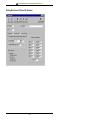
VP: Restricted - Client Of (Page 1 screen)
NTVP: Restricted Access (General tab)
If a valid mailbox number is entered into this field, the VP system treats this mailbox as a
restricted mailbox. A restricted mailbox can receive messages only from other mailbox
owners and can send messages only to its host mailbox, which is the mailbox number entered
in this field. The restricted mailbox cannot perform any other mailbox functions.
VP: (No such field)
NTVP: Uses VCM
This field indicates whether the mailbox owner is a Visual Call Management (VCM) user.
VP: Sequence to Turn ON/OFF Message-Waiting Lamp (Page 1 screen)
NTVP: Sequence to Turn on/off Message-Waiting Lamp (General tab)
This field indicates the sequence of digits the VP system uses to turn on the message-waiting
lamp at the extension associated with this mailbox. Consult the VP installation technician for
information on the entry that must be made in this field.
VP: New (Page 1 screen)
NTVP: New Messages (General tab)
This field cannot be changed from the keyboard. It indicates the number of new messages in
the mailbox. A message is new if the mailbox owner has not yet listened to it. Once the
owner has listened to the message, it becomes an old message. A mailbox can hold a
maximum of 200 messages.
VP: Old (Page 1 screen)
NTVP: Old Messages (General tab)
This field cannot be changed from the keyboard. It indicates the number of old messages in
the mailbox. Once the owner has listened to and/or saved a message, it becomes an old
message. A mailbox can hold a maximum of 200 messages.
1-36
SYSTEM SUPERVISOR AND SUBSCRIBER GUIDE 9.0 VER. 1
VP: Pager Number (Page 2 screen)
NTVP: Pager Number (Pager tab)
This field indicates the telephone number of the paging service. The mailbox owner may
change the number remotely. Normally, access codes for outside lines are not required here.
To restrict pager calls to use lines in a particular line group, enter the letter (A, B, C, or D) of
the line group in braces { } before the telephone number (for example, {A}5551212).
Consult the VP system technician for more information.
Tone or Voice pagers can be set up under the Message Delivery portion of this screen.
Consult the VP system technician for more information.
The pager number can contain the digits 0 through 9 and the characters * and pound #, as
well as the several special characters: Consult the VP system technician for more
information.
VP: Pager Type (Page 2 screen)
NTVP: Pager Type area (Pager tab)
The VP system supports both Tone and Display (digital) pagers in this section of the mailbox
programming. This field specifies which type of pager the mailbox owner has.
When a caller asks the VP system to page a mailbox owner, the VP system looks for a free
line on which to call the paging service. If no lines are free to make the call, the VP system
queues the request and re-tries every 10 seconds for about 10 minutes.
VP: Times to Call (Page 2 screen)
NTVP: Call the Pager X times (Pager tab)
The VP system calls the pager the number of times indicated in this field. This can be useful
in circumstances when the pager is turned off for a period or is temporarily out of pager
range.
VP: Minutes Between Calls (Page 2 screen)
NTVP: At Intervals of X Minutes (Pager tab)
If you enter a number greater than 1 in the above field, this field instructs the VP system how
long it is to wait between the re-calls.
1-37
SYSTEM SUPERVISOR AND SUBSCRIBER GUIDE 9.0 VER. 1
Note:
This field is used to tell the VP system how long to wait between calls to the
paging service.
VP: Call Schedule (Page 2 screen)
NTVP: Activate Pager During These Times (Pager tab)
The pager notification feature follows a time schedule. The options are:
Schedule
ALWAYS
DAY SERVICE
NIGHT SERVICE
SCHEDULE A, B, C, or D
Result
Pager notification is available at all times.
Pager notification is available only during Day Service, as
defined on the BUSINESS HOURS screen.
Pager notification is available only during Night Service,
as defined on the BUSINESS HOURS screen.
Pager notification is available only during the schedule, as
defined on the MAILBOX PAGE 3 screen (VP systems) /
by pressing the View Schedules button (NTVP systems).
VP: Enabled (Page 2 screen)
NTVP: Currently Enabled (Pager tab)
If this field is set to YES, the pager feature for this mailbox is currently on. If this field is set
to NO, the pager feature is off. Use this field to turn the service on or off from the keyboard.
Note that the mailbox owner also can call in and remotely turn the pager notification service
on or off.
Setting this field to NO overrides the call schedule set in the previous field.
VP: After Playing Greeting (Page 2 screen)
NTVP: After Playing Greeting area (Recording tab)
When a caller has been routed to a mailbox and is listening to the greeting, he/she always has
various options available by dialing the appropriate digit. If the caller does not dial a digit by
the time the VP system finishes playing the greeting, the VP system immediately takes
whatever action is specified in this field. If the caller does dial a valid digit from the
available options, his/her selection overrides the action entered in this field.
1-38
SYSTEM SUPERVISOR AND SUBSCRIBER GUIDE 9.0 VER. 1
• WAIT FOR A DIGIT
This option is to be used only if the mailbox owner instructs the caller to choose an
option in the personal greeting. This option provides the caller more time to enter a
digit. If the caller does not enter a digit, the VP system then takes whatever action is
specified in the field AFTER LEAVING MESSAGE.
If a caller hangs up during the playing of the mailbox greeting, there are times when
the VP system might begin recording a message before it detects that the call has
ended. In these cases, the mailbox ends up containing a short, blank message. By
using the WAIT FOR DIGIT option rather than RECORD IMMEDIATELY, you will
eliminate these false messages.
• RECORD IMMEDIATELY
The VP system voices the prompt, “Please speak after the tone,” and records the
caller’s message.
Note:
If a caller hangs up during the playing of the mailbox greeting, there are
times when the VP system may begin recording a message before detecting
the call has ended. In these cases, the mailbox ends up containing a short,
blank message. By using the WAIT FOR DIGIT option rather than RECORD
IMMEDIATELY, you eliminate these false messages.
• PAGE IMMEDIATELY
The VP system looks at what type of pager this mailbox is using. If the PAGER TYPE
field is set to NONE or the PAGER NUMBER field is blank, the VP system takes
whatever action is specified in the AFTER LEAVING MESSAGE field (VP systems) or
AFTER RECORDING MESSAGE field (NTVP systems).
If the PAGER TYPE is TONE, the VP system takes a message and calls the mailbox
owner’s pager.
If the PAGER TYPE is DISPLAY / DIGITAL, the VP system asks the caller to enter
his/her own telephone number then calls the mailbox owner’s pager and relays that
number (no message is taken).
1-39
SYSTEM SUPERVISOR AND SUBSCRIBER GUIDE 9.0 VER. 1
Note:
If the PAGER TYPE is DISPLAY / DIGITAL and the Pager notification service
is currently turned off (either manually or due to the call schedule), callers
hear the system prompt, “I’m sorry, I am unable to page that party right
now,” and the call continues by taking whatever action is specified in the
AFTER LEAVING MESSAGE field (VP systems) or AFTER RECORDING
MESSAGE field (NTVP systems).
• RECORD THEN PAGE
The VP system looks at what type of pager this mailbox is using. If the PAGER TYPE
field is set to NONE or the PAGER NUMBER field is blank, the VP system records a
message, but does not activate the pager.
If the PAGER TYPE is TONE, the VP system takes a message, then calls the pager. If
the PAGER TYPE is DISPLAY / DIGITAL, the VP system records a message, then calls
the pager. It sends the mailbox number to the pager display.
VP: If Caller Chooses “Other Options” (Page 2 screen)
NTVP: If Caller Chooses “Other Options” (Recording tab)
The caller chooses other options by pressing 3 during the mailbox greeting. You have the
following options:
Option
GO TO BOX
SAY GOODBYE
Action Indicated
Allows the call to route to another box. The new box number is
entered in the next field.
The VP system says, “Good-bye,” and hangs up.
RETURN
The VP system goes back to the previous box that handled this call
(usually a Routing box).
HANG UP
The VP system immediately terminates the call by going on-hook.
VP: Box (Page 2 screen)
NTVP: (Unlabeled Box field) (Recording tab)
This field contains the box number to which the call is to be transferred when the option GO
TO BOX is selected in the corresponding field. This box is usually a Routing box containing a
1-40
SYSTEM SUPERVISOR AND SUBSCRIBER GUIDE 9.0 VER. 1
greeting or menu, or it is the mailbox number of an individual taking calls for this mailbox
owner.
VP: After Leaving Message (Page 2 screen)
NTVP: After Recording Message (Recording tab)
You have the following options:
Option
GO TO BOX
SAY GOODBYE
Action Indicated
Allows the call to route to another box. The new box number is
entered in the next field.
The VP system says, “Good-bye,” then hangs up.
RETURN
The VP system goes back to the previous box that handled this call
(usually a Routing box).
HANG UP
The VP system immediately terminates the call by going on-hook.
The VP system follows the action specified here when:
•
The caller has recorded his/her message, pressed # for further options, and pressed 1
to send or 4 to cancel the message.
•
The AFTER PLAYING GREETING field specified WAIT FOR DIGIT, and the caller did not
enter a digit.
•
The AFTER PLAYING GREETING field called for a paging option, but the pager’s
ENABLED field is set to NO (in this case, the caller first hears the system prompt, “I
am not able to page that party right now.”).
VP: Box (Page 2 screen)
NTVP: (Unlabeled Box field) (Recording tab)
This field contains the box number to which the call is to be transferred when the option GO
TO BOX is selected in the corresponding field. This box is usually a Routing box containing a
greeting or menu, or it is the mailbox number of an individual taking calls for this mailbox
owner.
1-41
SYSTEM SUPERVISOR AND SUBSCRIBER GUIDE 9.0 VER. 1
VP: If Call is via D.I.D., Play Greeting in Language (Page 2 screen)
NTVP: Use Language (General tab)
This field indicates the language that callers hear when a call is routed to this mailbox via
D.I.D. This entry is required, since the D.I.D. digits are received before the VP system is
able to ask the caller which language he/she wants to use. Consult the VP system installation
technician for information on completing this field.
VP: Automatically Forward NEW Messages to Box X After X Hours (Page 2 screen)
NTVP: Automatically Forward New Messages to Box X After X Hours
If a message has been in a mailbox for the number of hours specified in this field and has not
yet been listened to by the owner, the VP system forwards the message to another mailbox or
to a Group box. To disable the auto-forward feature, leave this field blank.
Note:
When a message is automatically forwarded in this way, the original copy is
deleted from the original mailbox. When a mailbox receives a message that
has been auto-forwarded, the VP system informs the mailbox owner by
saying, “This message was automatically forwarded from [name of original
recipient].”
VP: Schedule (Page 2 screen)
NTVP: During X (Recording tab)
Use this field to select when new messages are to be automatically forwarded. The options
are:
Schedule
ALWAYS
DAY SERVICE
NIGHT SERVICE
SCHEDULE A, B, C, or D
Result
Messages are auto-forwarded at all times.
Messages are auto-forwarded only during Day Service, as
defined on the BUSINESS HOURS screen.
Messages are auto-forwarded only during Night Service,
as defined on the BUSINESS HOURS screen.
Messages are auto-forwarded only during the schedule,
as defined on the MAILBOX PAGE 3 screen (VP systems)
/ by pressing the View Schedules button (NTVP systems).
1-42
SYSTEM SUPERVISOR AND SUBSCRIBER GUIDE 9.0 VER. 1
NT-based VP system users can view and modify the schedules defined for the mailbox by
clicking on the View Schedules button.
Message Delivery
This section describes each field associated with the message delivery feature.
VP: Call (Page 2 screen)
NTVP: Call (Message Delivery tab)
This field contains the telephone number the VP system is to call to inform the mailbox
owner that there are new message in his/her mailbox.
The field can contain the DTMF digits 0-9, the characters * and #, and other special
characters. Consult the VP system installation technician for information on completing this
field.
The owner of a mailbox can call in and remotely change the first message notification
number, but cannot indicate special characters.
VP: Repeat (Page 2 screen)
NTVP: X Times (Message Delivery tab)
This field indicates the number of successful calls that the VP system is to make to each
telephone number. A successful call is generally defined as one where the VP system has
seized an available line port, dialed the number, and detected an answer. If the call is not
successful (for example, the called number was busy) the VP system automatically re-tries
every few seconds up to twenty times.
VP: Interval (Page 2 screen)
NTVP: Intervals of X (Message Delivery tab)
If the field to the left of this field contains a number greater than 1 or there are additional call
number sequences, this field indicates the interval (in minutes) between calls to this number
and/or the interval before proceeding to the next call number sequence.
1-43
SYSTEM SUPERVISOR AND SUBSCRIBER GUIDE 9.0 VER. 1
VP: Schedule (Page 2 screen)
NTVP: During X (Message Delivery tab)
This field indicates when the VP system is to deliver messages to this number. The options
are:
Schedule
Result
ALWAYS
This number is called any time there are new messages in
the mailbox.
DAY SERVICE
This number is called only during Day Service, as defined
on the BUSINESS HOURS screen.
NIGHT SERVICE
This number is called only during Night Service, as defined
on the BUSINESS HOURS screen.
SCHEDULE A, B, C, or D
This number is called only during the schedule, as defined
on the MAILBOX PAGE 3 screen (VP systems) / by
pressing the View Schedules button (NTVP systems).
NT-based VP system users can view and modify the schedules defined for the mailbox by
clicking on the View Schedules button.
VP: Run This Sequence X Times (Page 2 screen)
NTVP: Run This Cycle X Times (Message Delivery tab)
This field indicates the number of times the VP system is to run the message delivery
sequence. Once the VP system calls every number listed, it has run the message delivery
sequence one time.
VP: Currently Enabled (Page 2 screen)
NTVP: Deliver These Messages (Message Delivery tab)
This field indicates which messages the VP system is to deliver. The options are:
Option
DISABLED
Action Indicated
The VP system does not deliver any messages for the
mailbox.
1-44
SYSTEM SUPERVISOR AND SUBSCRIBER GUIDE 9.0 VER. 1
Option
Action Indicated
URGENT MSGS ONLY
The VP system delivers only messages marked as urgent.
Non-urgent messages are not delivered.
ALL MESSAGES
The VP system delivers all messages sent to the mailbox.
Setting this field to DISABLED overrides the field indicating the schedule.
The owner of a mailbox can call in remotely and turn his/her message delivery feature ON or
or change the first number to be called. The other telephone numbers, if in use, cannot
be changed remotely.
OFF
VP: Schedule (Page 3 screen)
NTVP: Schedule (Schedule dialog box)
The four schedules (A, B, C, and D) can be applied to any of four features: call transfer,
pager notification, automatic forwarding of new messages, and message delivery. The
feature or features assigned to a schedule operate only between the START and END times for
the days specified.
VP: Start (Page 3 screen)
NTVP: Start (Schedule dialog box)
This field indicates the time at which this schedule begins on the day. Time is indicated in
24-hour format (for example, 8:00 PM is specified as 20:00).
VP: End (Page 3 screen)
NTVP: End (Schedule dialog box)
This field indicates the time at which this schedule ends on the day. Time is indicated in 24hour format (for example, 8:00 PM is specified as 20:00).
Note:
If you want the schedule to be active all day, enter 00:00 for the START time
and 24:00 for the END time.
1-45
SYSTEM SUPERVISOR AND SUBSCRIBER GUIDE 9.0 VER. 1
VP: Hotel Guest Privileges Only (Page 4 screen)
NTVP: Hotel Guest Privileges Only (Hotel tab)
When set to YES, this field restricts the options available to the mailbox. When the mailbox
owner opens his/her mailbox, the only options are listening to his/her messages or scheduling
a wake-up call.
VP: Wake-Up Time (Page 4 screen)
NTVP: Wake-Up Time (Hotel tab)
This field displays the time the VP system places a call the extension indicated in the
TRANSFER TO field. The VP system does not actually place the call at the time specified here
unless the CURRENTLY SCHEDULED field (below) is set to YES. The mailbox owner can also
schedule a wake-up call by calling into the system.
VP: Currently Scheduled (Page 4 screen)
NTVP: Currently Scheduled (Hotel tab)
If this field is set to YES, the VP system calls the extension indicated in the TRANSFER TO
field at the time specified in the WAKE-UP-TIME field.
VP: Enabled (Page 4 screen)
NTVP: Enabled (Distribution lists tab)
Each mailbox can create up to 4 personal distribution lists, each containing up to 20 mailbox
numbers. This field controls how many lists are available to the mailbox. Use this field to
indicate whether the corresponding list is available to the mailbox owner.
VP: Members (Page 4 screen)
NTVP: (Unlabeled Members fields)
Each distribution list can contain up to 20 members. Only mailboxes can be members of a
personal distribution list (you cannot include a Group box on the list). These fields indicate
the mailboxes currently included as part of each distribution list.
1-46
SYSTEM SUPERVISOR AND SUBSCRIBER GUIDE 9.0 VER. 1
1.4.2 Creating, Modifying, or Deleting a Group Box through VP
System Screens
Group distribution lists, which are defined in a Group box, provide subscribers an easy way
to send one message they record to multiple individuals, without specifying each individual
recipient’s extension. Though a subscriber can set up 1-4 personal distribution lists specific
to his/her needs in his/her mailbox, many organizations also set up group distribution lists
that can be used by all company employees. A group list a company maintains may, for
example, contain the names of all company employees, of all employees in a particular
department, of all employees that work a specified shift, etc.
When a mailbox owner wants to send a message to a Group box, he/she logs into his/her
mailbox, then selects the option to send the message. At the prompt, “Please enter the box
number,” the mailbox owner enters the number of the Group box containing the mailboxes to
which the message is to be sent.
To create, modify, or delete a Group box through the DOS-based VP system screen
interface:
1. From the Main menu, select BOX INFORMATION. The Box Information menu displays.
2. Highlight GROUP BOX from the Boxes menu then press <Enter>. To add a new box, press
<F2>. To modify or delete an existing box, press<F4>.
3. Enter the box number you want to create, modify, or delete, then press <Enter>. If you
are creating a box, the VP system displays the new box. If you are modifying or deleting
an existing box, the VP system displays the box’s setup screen. You can make
modifications to the box from this screen or delete the box completely. If you want to
delete the box, verify you are viewing the box you want to delete, then press <F3>.
When you are prompted to confirm the deletion, press <Y>.
For information on making modifications to fields on this screen, consult the information
provided below and the program’s online help file (accessible by pressing <F1>).
4. When you have made necessary modifications, press <F10> to save the changes.
To create, modify, or delete a Group box through the NT-based VP system screen
interface:
1. From the Main screen, access the BOXES pull-down menu.
1-47
SYSTEM SUPERVISOR AND SUBSCRIBER GUIDE 9.0 VER. 1
2. Select GROUP BOX from the Boxes menu.
3. Select the New button at the top of the screen to create a new box. When prompted, enter
the number of the box you want to create. The VP system displays the new box. To
modify or delete an existing box, select the Select button and select the number of the
box you want to modify or delete. The box displays on-screen. To delete the box, verify
you are viewing the box you want to delete, then select the Delete button. When you are
prompted to confirm the deletion, select the Yes button.
For information on making modifications to fields on this screen, consult the information
provided below and the program’s online help file (accessible by pressing <F1>).
4. When you have made necessary modifications, select the Save button to save the
changes.
Working with the Group Box Screen
Note:
See section 1.4.9 for screen illustrations.
The field descriptions provided below identify the function of many of the fields on the
GROUP BOX screen. Be advised that due to differences in the screen design between DOSbased and NT-based VP systems, the placement of fields on several system screens vary
slightly.
Fields used in DOS-based VP systems are prefaced below with VP, and fields used in NTbased VP systems are prefaced with NTVP. If the NTVP field resides on a certain tab on the
screen or if the VP field resides on a certain screen page, the tab or page is identified next to
the field name.
Several field descriptions discuss setting fields to YES or NO settings. In NT-based VP
systems, this equates to checking or un-checking the field’s checkbox, which you do by
clicking on it.
VP: Box Number
NTVP: Box Number
This field displays the Group box number. A box number can be any number between 1 and
9899 (boxes 9900 - 9999 are reserved for the system). You cannot change the box number on
1-48
SYSTEM SUPERVISOR AND SUBSCRIBER GUIDE 9.0 VER. 1
the screen. To view a new box, use keys <F4> (select a box number), <F5> (previous Group
box), or <F6> (next Group box). To add a new Group box, press <F2> (add). (NT-based VP
system users can also select from icons at the top of the screen.)
VP: Name Recorded
NTVP: Record Name button
This field identifies whether the name of the Group box has been recorded. On NT-based VP
systems, an existing recording is signified by a red light displaying on the button.
The name is played as soon as a caller selects to send a message to the Group box.
On DOS-based VP systems, when you bring the cursor into this field, a menu appears,
offering the option to play, delete, copy, or record the name. By selecting RECORD you can
record the name via a telephone line connected to the voice processing board. To record the
name, select RECORD, press <Enter>, and call into voice mail line 1. When voice mail
answers, select RECORD and speak the name. To end the recording, press <Enter> again. To
hear the recording, select PLAY.
On NT-based VP systems, you can record the name by clicking on the Record Name button,
then using the controls on the Sound Recorder dialog box. At the lower right of the dialog,
click on the circle button to begin recording. Click on the rectangle button (to the left of the
circle button) to end the recording.
VP: Number of Messages
NTVP: Number of Messages Currently in Box
This field cannot be changed from the keyboard. It indicates the number of messages in the
Group box.
VP: Max Message Time
NTVP: Max Message Length X Seconds
This field is used to specify the maximum length of a message (in seconds) that can be sent to
this Group box.
1-49
SYSTEM SUPERVISOR AND SUBSCRIBER GUIDE 9.0 VER. 1
VP: List of Members
NTVP: (Unlabeled List of Members area)
These fields indicate the current members of the Group box. To add a mailbox to the group,
enter the mailbox number on this list. To delete a mailbox from the group, move the cursor
to the mailbox number to be deleted, and delete the number from the field. A Group box can
contain up to 50 members.
To send messages to groups containing more than 50 mailboxes, use one of the following
methods:
•
Use the Send to Multiple Mailboxes option to send the message to additional Group
boxes. After selecting the first Group box and recording the message, press the # key
for more options. From the menu that plays, choose option 6 to send the message to
several mailboxes or Group boxes.
•
Connect a Group box to a text file, which can contain an unlimited number of
members. Create a text file in the C:\VM\ directory with the name GBOxxxx.LST,
where xxxx is the number of an existing Group box. Note that if the existing Group
box number is less than 4 digits, you must include leading zeros before the mailbox
number in this filename. For example, to create an extended member file for Group
box 601, create a text file named GBOX0601.LST and list each additional mailbox on a
separate line in the file (do not duplicate members in the Group box screen and the
text file).
1.4.3 Modifying Company Business Hours through VP System
Screens
Use the BUSINESS HOURS screen to define the Day Service mode period and Lunch Service
mode period. By default, any period not defined as part of Day Service or Lunch Service is
considered part of Night Service mode.
The VP system automatically switches between Day Service mode, Night Service mode, and
Lunch Service mode based on the times you enter in these fields. (See section 1.2 for more
information on how the system uses service modes and the hours you designate.)
1-50
SYSTEM SUPERVISOR AND SUBSCRIBER GUIDE 9.0 VER. 1
To modify the company business hours through the DOS-based VP system screen
interface:
1. From the Main menu, select SYSTEM INFORMATION. The Box Information menu
displays.
2. Highlight BUSINESS HOURS from the menu then press <Enter>. The BUSINESS HOURS
screen displays.
3. Modify the business hours on the BUSINESS HOURS screen. For information on making
modifications to fields on this screen, consult the information provided below and the
program’s online help file (accessible by pressing <F1>). When you have made
necessary modifications, press <F10> to save the changes.
To modify the company business hours through the NT-based VP system screen
interface:
1. From the Main screen, access the SYSTEM pull-down menu.
2. Select BUSINESS HOURS from the menu. The BUSINESS HOURS screen displays.
3. Modify the business hours on the BUSINESS HOURS screen. For information on making
modifications to fields on this screen, consult the information provided below and the
program’s online help file (accessible by pressing <F1>). When you have made
necessary modifications, select the Save button to save the changes.
Working with the Business Hours Screen
Note:
See section 1.4.9 for screen illustrations.
For each day of the week, enter the opening and closing times for the business. If the
business is closed all day, enter 00:00 in both the DAY SERVICE BEGINS and DAY SERVICE
ENDS fields. This places the VP system in the Night Service mode for that entire day.
If the business is open 24 hours on a particular day, enter 00:00 for the DAY SERVICE BEGINS
time and 24:00 for the DAY SERVICE ENDS time.
1-51
SYSTEM SUPERVISOR AND SUBSCRIBER GUIDE 9.0 VER. 1
Note:
All times must be entered in 24-hour format—for example, enter 8:00 PM as
20:00).
If prompts171, 172, and 173 are recorded on the VP system, the initial greeting (as
programmed in the LINE INFORMATION screen) is automatically preceded with the appropriate
prompt. Prompt 171, “Good morning…” is voiced from midnight until noon. Prompt 172,
“Good afternoon…” is voiced from Noon until the time set in the field Change “Good
Afternoon “ to “Good Evening.” At this time prompt 173, “Good evening…” is voiced until
midnight.
If prompts 171, 172, and 173 are not recorded on the system, you can ignore this field. These
prompts are not pre-recorded, since they should be recorded in the same voice as the initial
greetings for best quality and continuity. Consult the VP system installation technician for
information on completing this field.
1.4.4 Modifying Company Holidays through VP System
Screens
Besides having the VP system answer calls differently at different times of the day, you can
have the system answer calls in a special way during various holidays. For example, on New
Year’s day, the company may be working with a smaller staff, so they may want the system
to greet customers with:
“The XYZ Company wishes all its customers a Happy New Year. Our service personnel are
not available today, but will be back as usual tomorrow. For Sales, press 1, or press 0 to
speak to an operator.”
You may pre-define up to 20 holiday dates. For each holiday, you can specify a different
Routing box to which calls will be sent. During the holiday, the VP system uses the greeting
and call routing scheme you have defined in that Routing box.
The following programming example shows how to set up a New Year’s holiday greeting to
play on January 1.
Access the HOLIDAY SCHEDULE screen and select JANUARY as the month, then enter 1 to
indicate the first day of the month. In the field INITIAL BOX, enter a spare box number (which
will be set up later in this example). In this example, box number 8500 is used.
1-52
SYSTEM SUPERVISOR AND SUBSCRIBER GUIDE 9.0 VER. 1
The VP system is now advised of the New Year’s holiday. Each time a call arrives on
January 1, the VP system routes the call to box 8500.
Note:
Holiday greetings are in effect for the entire 24-hour period of the calendar
day.
To complete this example, Routing box 8500 must be created. You add Routing boxes by
accessing the ROUTING BOX screen. Press <F2> to add a Routing box and type 8500 in the
window that displays. Once you create a Routing box, you can record a greeting in it (in this
example, a New Year’s specific holiday greeting) and set up the various routing options as
described in this guide.
Note:
See section 1.4.9 for screen illustrations.
To modify the designated company holidays through the DOS-based VP system
screen interface:
1. From the Main menu, select SYSTEM INFORMATION. The Box Information menu
displays.
2. Highlight HOLIDAY SCHEDULE from the menu then press <Enter>. The HOLIDAY
SCHEDULE screen displays.
3. Modify the company holidays on the HOLIDAY SCHEDULE screen. When you have made
necessary modifications to the screen press <F10> to save the changes.
To modify the designated company holidays through the NT-based VP system screen
interface:
1. From the Main screen, access the SYSTEM pull-down menu.
2. Select HOLIDAY SCHEDULE from the menu. The HOLIDAY SCHEDULE screen displays.
3. Modify the company holidays on the HOLIDAY SCHEDULE screen. When you have made
necessary modifications, select the Save button to save the changes.
1-53
SYSTEM SUPERVISOR AND SUBSCRIBER GUIDE 9.0 VER. 1
1.4.5 Modifying the Greeting Played by a Routing Box through
VP System Screens
Before modifying any Routing box greetings, refer to section 1.3.5 for information on the
Routing box setups on the VP system and Routing box greetings.
Note that if you use the following procedure to change the greeting in a Routing box, you
must update the Routing box call routing structure to relay new instructions to the caller. Use
the procedure presented earlier in this section to update the greeting as necessary.
To modify a Routing box greeting through the DOS-based VP system screen interface:
1. From the Main menu, select BOX INFORMATION. The Box Information menu displays.
2. Highlight ROUTING BOX from the Boxes menu then press <Enter>.
3. Enter the box number you want to modify, then press <Enter>. The box’s setup screen
displays.
4. Adjust the greeting using the ROUTING BOX screen field discussed below. When you
have made necessary modifications, press <F10> to save the changes.
To modify a Routing box greeting through the NT-based VP system screen interface.
1. From the Main screen, access the BOXES pull-down menu.
2. Select ROUTING BOX from the Boxes menu.
3. Select the Select button and choose the number of the box whose greeting you want to
modify. The box displays on-screen.
4. Adjust the greeting using the ROUTING BOX screen field discussed below. When you
have made necessary modifications, select the Save button to save the changes.
1.4.6 Recording a Greeting through the Routing Box Screen
The field description provided below identifies how you record a greeting from the Routing
box screen. The field used in DOS-based VP systems is prefaced below with VP, and field
used in NT-based VP systems is prefaced with NTVP.
1-54
SYSTEM SUPERVISOR AND SUBSCRIBER GUIDE 9.0 VER. 1
VP: Greeting Recorded
NTVP: Record Greeting button
This field identifies whether a greeting has been recorded for the Routing box. On NT-based
VP systems, an existing recording is signified by a red light displaying on the button.
The greeting is played as soon as a caller is routed to the Routing box.
On DOS-based VP systems, when you bring the cursor into this field, a menu appears,
offering the option to play, delete, copy, or record the greeting. By selecting RECORD you
can record the greeting via a telephone line connected to the voice processing board. To
record the greeting, select RECORD, press <Enter>, and call into voice mail line 1. When
voice mail answers, select RECORD and speak the greeting. To end the recording, press
<Enter> again. To hear the recording, select PLAY.
On NT-based VP systems, you can record the greeting by clicking on the Record Greeting
button, then using the controls on the Sound Recorder dialog box. At the lower right of the
dialog, click on the circle button to begin recording. Click on the rectangle button (to the left
of the circle button) to end the recording.
The greeting can also be recorded remotely by the owner of the Routing box. Note that once
a Routing box has been assigned an owner, the Routing box is allowed the same number of
greetings as the owner mailbox, as defined in the mailbox’s assigned class of service. The
greetings are numbered 0 - 9.
Once the VP system has finished playing the greeting, it may optionally play the time or date,
depending on the contents of the BOX NAME field.
1.4.7 Modifying the Routing in a Routing Box through VP
System Screens
The VP system can be set up to voice greetings to callers that include single-digit call routing
options, such as, “Press 2 for Sales…” On a system set up this way, a call is transferred to a
certain mailbox when the caller presses 2 during or after the greeting. You can control the
digit(s) callers can dial and the route their calls will subsequently take using the following
procedure.
1-55
SYSTEM SUPERVISOR AND SUBSCRIBER GUIDE 9.0 VER. 1
Note that if you use the following procedure to change the single-digit call routing set up, you
must update the Routing box greeting to relay new instructions to the caller. Use the
procedure presented earlier in this section to update the greeting as necessary.
To modify call routing through the DOS-based VP system screen interface:
1. From the Main menu, select BOX INFORMATION. The Box Information menu displays.
2. Highlight ROUTING BOX from the Boxes menu then press <Enter>.
3. Enter the box number you want to modify, then press <Enter>. The box’s setup screen
displays.
4. Make changes to the ROUTING BOX screen to modify the call routing used when calls are
sent to this box. For information on modifying fields on this screen, consult the
information provided below and the program’s online help file (accessible by pressing
<F1>). When you have made necessary modifications, press <F10> to save the changes.
To modify call routing through the NT-based VP system screen interface:
1. From the Main screen, access the BOXES pull-down menu.
2. Select ROUTING BOX from the Boxes menu.
3. Select the Select button and choose the number of the box you want to modify or delete.
The box’s setup screen displays.
4. Make changes to the ROUTING BOX screen to modify the call routing used when calls are
sent to this box. For information on modifying fields on this screen, consult the
information provided below and the program’s online help file (accessible by pressing
<F1>). When you have made any necessary modifications, select the Save button to save
the changes.
Working with the Routing Box Screen
Note:
See section 1.4.9 for screen illustrations.
1-56
SYSTEM SUPERVISOR AND SUBSCRIBER GUIDE 9.0 VER. 1
The field descriptions provided below identify the function of certain fields on the ROUTING
BOX screen. Be advised that due to differences in the screen design between DOS-based and
NT-based VP systems, the placement of fields on several system screens vary slightly.
Fields used in DOS-based VP systems are prefaced below with VP, and fields used in NTbased VP systems are prefaced with NTVP. If the NTVP field resides on a certain tab on the
screen or if the VP field resides on a certain screen page, the tab or page is identified next to
the field name.
VP: Route Call Based On
NTVP: Route Call Based On area
There are 5 techniques you can use to route calls:
•
Based on the digit(s) dialed by the caller
•
Based on the day-of-week (Sunday, Monday, etc.) the call is received
•
Based on the call’s sequence number (first call goes to box [number], second call
goes to box [number], etc.).
•
Based on the results of a database lookup
•
Based on whether the VP system is in Day Service, Lunch Service, or Night Service
mode or the call is received on a defined holiday
DIGITS DIALED
While the VP system is playing the Routing box greeting, callers can press a key at any
time to make a selection from the menu, or they can dial a mailbox directly. When the
caller presses a key, the VP system immediately stops playing the greeting and processes
the dialed digit.
If the caller does not dial a digit and the end of the greeting is reached, the VP system
pauses to wait for a response, then, if no response (DTMF or spoken word) is detected, the
system performs whatever action is specified in the field IF NO DIGITS DIALED.
1-57
SYSTEM SUPERVISOR AND SUBSCRIBER GUIDE 9.0 VER. 1
If a digit is dialed, the VP system checks the field DIGIT RECEIVED, WAIT FOR MORE
DIGITS:
*
If this field is set to NO, the VP system immediately attempts to route the call
based on the single digit dialed. If the DESTINATION FOR DIGIT field contains a
valid box number, the call is immediately sent to the new box. This means that
menu selections take priority over extension numbers (for example, if the
DESTINATION FOR DIGIT 1 is a valid box, the caller cannot dial mailboxes
beginning with a 1, as the VP system routes the call as soon as it received the
first 1 in the extension number).
*
If this field is set to YES, the VP system waits to see if the caller is dialing a
sequence of digits (for example, entering a box number). If additional digits are
detected, and they correspond to a valid mailbox, Routing box, etc., the call is
routed to that box. If only one digit is detected, the VP system consults the
DESTINATION FOR DIGIT fields and routes the call to the box specified. Since the
VP system must wait for additional digits, call routing is not executed as quickly
as when this field is set to NO.
DAY-OF-WEEK
The VP system plays the Routing box greeting. Once the greeting ends, the call
immediately routes to the box specified in one of the digit destination fields. On NTbased VP systems, routing is as indicated on the Routing box screen. On non-NT-based
VP systems, routing is as follows:
Day on Which
Call is Received
Box to Which Call is Routed
Sunday
Box specified in DESTINATION FOR DIGIT 1 field
Monday
Box specified in DESTINATION FOR DIGIT 2 field
Tuesday
Box specified in DESTINATION FOR DIGIT 3 field
Wednesday
Box specified in DESTINATION FOR DIGIT 4 field
Thursday
Box specified in DESTINATION FOR DIGIT 5 field
Friday
Box specified in DESTINATION FOR DIGIT 6 field
Saturday
Box specified in DESTINATION FOR DIGIT 7 field
1-58
SYSTEM SUPERVISOR AND SUBSCRIBER GUIDE 9.0 VER. 1
If the caller dials any digit while the Routing box greeting is playing, the VP system stops
the greeting and routes the call based on the day (not based on the digit dialed).
CALL SEQUENCE NUMBER
The VP system plays the Routing box greeting. Once the greeting ends, the call
immediately routes to the box specified in one of the digit destination fields, in numerical
order. On non-NT-based VP systems, the first call to the Routing box goes to the box
specified in the field DESTINATION FOR DIGIT 1. The second call goes to the box
specified in the field DESTINATION FOR DIGIT 2, etc. When the VP system reaches digit 0
(or encounters a digit for which no box is specified), it repeats the cycle starting with
digit 1.
Call Number
Box to Which Call Will Be Routed
First call to this box
Box specified in DESTINATION FOR DIGIT 1 field
Second call to this box
Box specified in DESTINATION FOR DIGIT 2 field
Third call to this box
Box specified in DESTINATION FOR DIGIT 3 field
Fourth call to this box
Box specified in DESTINATION FOR DIGIT 4 field
Fifth call to this box
Box specified in DESTINATION FOR DIGIT 5 field
etc.
etc.
If the caller dials any digit while the Routing box greeting is playing, the VP system stops
the greeting and routes the call based on call number (not based on the digit dialed).
DATABASE LOOKUP
The VP system has the ability to accept up to 20 digits from the caller and use these to
look up a database entry. The system converts these digits to a box number, based on the
contents of the database. The VP system then routes the call to that box. For information
on routing calls based on database lookup, contact the VP system installation technician.
DAY/NIGHT SERVICE
The VP system plays the Routing box greeting. Once the greeting ends, the call
immediately routes to the box specified in one of the digit destination fields, based on the
VP system’s current service mode. On non-NT-based VP systems, if the VP system is in
1-59
SYSTEM SUPERVISOR AND SUBSCRIBER GUIDE 9.0 VER. 1
Day Service mode, the call routes to the box associated with DESTINATION FOR DIGIT 1.
During Night Service mode, the call routes to the box associated with DESTINATION FOR
DIGIT 2, etc., as shown in the table below.
Service Mode
Box to Which Call is Routed
DAY SERVICE
Box specified in DESTINATION FOR DIGIT 1 field
NIGHT SERVICE
Box specified in DESTINATION FOR DIGIT 2 field
LUNCH SERVICE
Box specified in DESTINATION FOR DIGIT 3 field
HOLIDAY SERVICE
Box specified in DESTINATION FOR DIGIT 4 field
If the caller dials any digit while the Routing box greeting is playing, the VP system stops
the greeting and routes the call based on the service mode (not based on the digit dialed).
VP: Destination for Digit fields
NTVP: Destination for Digit fields
While the VP system is playing the Routing box greeting, the caller can press a key at any
time to make a selection. When the caller presses a key, the VP system immediately stops
playing the greeting and consults these fields to see where the call is to be routed.
Traditionally, the VP system uses the # key to allow mailbox owners to access the voice mail
gateway (box 9992). Therefore, it is strongly recommended you program DESTINATION FOR
DIGIT # as 9992 in every Routing box so mailbox owners can access the gateway at any time.
Though you can program any other digit as the voice mail gateway, all user documentation is
written based on you using the # key.
1.4.8 Adjusting Subscriber Access to Features through VP
System Screens
Each mailbox on the system is assigned a class of service. The class of service assigned to
the box dictates which VP system features the mailbox owner has access to and how he/she
can use those features. To control a subscriber’s (or a group of subscribers’) access to certain
system features, you modify the class of service assigned to the mailbox. (Note that the class
of service modifications you make affect all mailboxes assigned that class of service.)
1-60
SYSTEM SUPERVISOR AND SUBSCRIBER GUIDE 9.0 VER. 1
There are 8 classes of services (0 through 7) that can be set up then applied to mailboxes on
the VP system. Two of them are pre-configured on the system. Class of service 0 is assigned
by default to the prototype mailbox 9994, which serves as a template for every mailbox that
you create on the system. Class of service 7 is assigned supervisor mailbox privileges by
default.
You can view and change the class of service number assigned to a mailbox by accessing the
MAILBOX SETUP screen for the mailbox. Refer to information provided earlier in this section
for procedures on modifying a mailbox.
To modify the classes of service set up on the system through the DOS-based VP
system screen interface:
1. From the Main menu, select SYSTEM INFORMATION. The Box Information menu
displays.
2. Highlight CLASS OF SERVICE from the menu then press <Enter>. The CLASS OF SERVICE
screen displays.
3. Make changes to the CLASS OF SERVICE screen to modify classes of service you assign to
mailboxes. For information on modifying fields on this screen, consult the information
provided below and the program’s online help file (accessible by pressing <F1>). When
you have made necessary modifications, press <F10> to save the changes.
To modify the classes of service set up on the system through the NT-based VP
system screen interface:
1. From the Main screen, access the SYSTEM pull-down menu.
2. Select CLASS OF SERVICE from the menu. The CLASS OF SERVICE screen displays.
3. Make changes to the CLASS OF SERVICE screen to modify classes of service you assign to
mailboxes. For information on modifying fields on this screen, consult the information
provided below and the program’s online help file (accessible by pressing <F1>). When
you have made necessary modifications, select the Save button to save the changes.
Working with the Class of Service Screen
Note:
See section 1.4.9 for screen illustrations.
1-61
SYSTEM SUPERVISOR AND SUBSCRIBER GUIDE 9.0 VER. 1
Be advised that due to differences in the screen design between DOS-based and NT-based VP
systems, the placement of fields on several system screens vary slightly.
Fields used in DOS-based VP systems are prefaced below with VP, and fields used in NTbased VP systems are prefaced with NTVP. If the NTVP field resides on a certain tab on the
screen or if the VP field resides on a certain screen page, the tab or page is identified next to
the field name.
Several field descriptions discuss setting fields to YES or NO settings. In NT-based VP
systems, this equates to checking or un-checking the field’s checkbox, which you do by
clicking on it.
VP: Class of Service Number
NTVP: Class of Service Number
This field indicates the number of the class of service you are currently working with. To
move to the next class of service number, press <F6>. Once you assign a class of service to a
mailbox, the mailbox inherits all the privileges and restrictions defined in the class of service.
VP: Class of Service Name
NTVP: Class of Service Name
Use this field to give the class of service a meaningful name. This helps remind you of the
purpose for the class of service. Sample names include Supervisors, Subscribers, etc.
VP: Maximum Number of Greetings
NTVP: Maximum Number of Greetings (Greetings tab)
A mailbox can have up to 10 pre-recorded personal greetings. The mailbox owner may
record these greetings, store them in the mailbox, choose the greeting that is to be active at
any specific time. You may want to offer use of all 10 greetings to users or restrict them to
fewer greetings. Use this field to define how many personal greetings users with this class of
service should be allowed to record. If you set the field to 0, callers who route to a mailbox
belonging to this class of service always hear the pre-recorded system prompt, “That
extension is not available...” The default setting is 10.
Note that in class of service 7, this field must be set to allow at least 2 greetings. Class of
service 7 is assigned to mailbox 70, the supervisor mailbox that by default controls the
1-62
SYSTEM SUPERVISOR AND SUBSCRIBER GUIDE 9.0 VER. 1
Routing boxes on the system. Because you usually set up Routing boxes with at least 2
greetings, this parameter must be set to at least 2 in the supervisor mailbox class of service.
VP: Maximum Greeting Length
NTVP: Maximum Greeting Length (Greetings tab)
When a mailbox owner calls in to re-record his/her personal greeting, the VP system limits
the length of the new greeting to the value entered in this field. The default setting is 60.
VP: Maximum Number of Messages
NTVP: Maximum Number of Messages (Messages tab)
The VP system can hold up to 200 messages per mailbox. However, you may want to restrict
some mailboxes to a lower limit (to conserve disk space). Use this field to define the
maximum number of messages that can be stored in mailboxes assigned this class of service.
Once the limit is reached for a particular mailbox, callers attempting to leave more messages
in the mailbox are told that the box is full. The default setting is 200.
VP: Maximum Message Length
NTVP: Maximum Message Length (Messages tab)
The value in this field defines the maximum length of a message (in seconds) that a caller can
leave for mailboxes belonging to this class of service. The default setting is 60.
VP: Automatically Delete Old Messages from System After X Days
NTVP: Automatically Delete Old Messages from System After X Days (Messages tab)
The VP system deletes messages saved as Old from mailboxes belonging to this class of
service after the number of days you specify. An old message is one the mailbox owner has
listened to, but has not yet deleted. If you enter 0 in this field, an old message is deleted at
midnight on the day the message became old. If you enter 1 in this field, an old message is
deleted at midnight on the day following the day the message became old.
To disable deletion of Old messages, enter 99 in this field. However, do this with caution,
since accumulating messages may create disk storage problems. The default setting is 30.
1-63
SYSTEM SUPERVISOR AND SUBSCRIBER GUIDE 9.0 VER. 1
VP: Automatically Delete NEW Messages After X Days
NTVP: Automatically Delete NEW Messages After X Days (Messages tab)
Note:
Use this parameter with caution. Improper use may cause important
messages to be lost.
The VP system deletes new messages from mailboxes belonging to this class of service after
the number of days you specify. A new message is one the mailbox owner has not yet
listened to. If you enter 0 in this field, a new message is deleted at midnight on the day the
message was received. If you enter 1 in this field, a new message is deleted at midnight on
the day following the day the message was received.
To disable the deletion of new messages, retain the default setting of 99 in this field. This is
the default operating mode. If you enter a number other than 99 in this field, remember
that messages are deleted whether or not the mailbox owner has listened to them.
VP: Supervisor Status
NTVP: Supervisor Status
This field defines whether mailboxes belonging to this class of service should have supervisor
privileges. A supervisor can perform certain actions not available to regular mailbox owners.
For example, a supervisor can add a mailbox or delete a mailbox by calling in from any
telephone. The default setting in class of service 0 is NO, in class of service 7 is YES.
VP: Access to Group Boxes
NTVP: Access to Group Boxes
By setting this field to YES, you allow subscribers assigned this class of service to access all
Group boxes set up on the system. The default setting is YES.
VP: Dial-Out Allowed
NTVP: Dial-Out Allowed
This field indicates whether the owner of a mailbox belonging to this class of service is
allowed to place outgoing calls from the mailbox. The default setting is NO.
1-64
SYSTEM SUPERVISOR AND SUBSCRIBER GUIDE 9.0 VER. 1
VP: Access to P.A.
NTVP: Callers Can Page via PA System
When a caller is listening to a mailbox owner’s greeting, one of the features the VP system
offers is the option to have the call announced over the P.A. system. Use this field to allow
or deny access to the P.A. feature for callers to mailboxes belonging to this class of service.
The default setting is YES.
VP: Play Menu After Greeting
NTVP: Play System Menu after Personal Greeting (Greetings tab)
If an extension is busy or does not answer, the VP system plays the mailbox owner’s personal
greeting. After playing the greeting, it can announce the options available to the caller (for
example, “If you would like to leave a message, press 1. To try another extension, press 3, or
to speak with an operator, press 0.”). If the mailbox owners do not record these options as
part of their greetings, set this field to YES so that the VP system plays the menu. If you want
to allow each mailbox owner to decide which options to offer, set this field to NO and instruct
each mailbox owner to include the options in his/her personal greeting. The default setting is
NO.
VP: Allowed to Receive Faxmail
NTVP: Allowed to Receive Faxmail
This field applies only if the system has the optional FaxMail module. Select YES here if the
mailboxes in this class of service are allowed to receive FaxMail. Select NO if you do not
want callers to be able to send fax documents into these mailboxes. The default setting is NO.
VP: Operator Box (Day) (Night)
NTVP: Operator Box (Day) (Night)
When a caller is listening to a mailbox greeting, one of the options is to dial zero to reach an
operator. Use these fields to indicate the mailbox to which the call should be routed if the
caller indicates that he/she wishes to speak with an operator. The default setting is 888.
1-65
SYSTEM SUPERVISOR AND SUBSCRIBER GUIDE 9.0 VER. 1
VP: When Exiting Open Mailbox, Go To Box
NTVP: When Exiting Open Mailbox, Go To Box
When a mailbox owner has logged in to his/her box, has concluded listening to messages,
changing options, etc., and has selected to exit from the Main menu, this field tells the VP
system where to send the call. VP system users should retain the default setting in this field
as 821.
VP: Max Lines Allowed To Hold For One Box
NTVP: Maximum Number of Lines Allowed to Hold for this Mailbox (Call Holding tab)
You can limit the number of lines that can simultaneously hold for a mailbox belonging to
this class of service. For example, if you set this number to 3, and lines 1, 3, and 6 are
holding for a mailbox, subsequent callers are not offered the option to hold. Instead, they
hear the personal greeting recorded for the box, so they can leave a message, try another
extension, etc. The default setting is 2.
Note:
If you want to disable the call queuing feature for the class of service, set
this field to 0.
VP: Digits Allowed While Holding
NTVP: Digits Caller Can Dial While Holding (Call Holding tab)
While a caller is in the queue holding for an extension, he/she can press a digit to leave the
queue and process the call differently. By default, the options open to the caller are the same
as those available when the caller hears the personal greeting (“If you would like to leave a
message, press 1. To try another extension, press 3, or to speak with an operator, press 0.”).
If you want to restrict the caller to fewer choices while in the queue, use this field to specify
which digits are allowed. All other digits are ignored by the VP system while the caller is in
the queue.
For example, if you enter 13 in this field, the only options available to the caller are:
1
3
To leave a message
To try another extension
1-66
SYSTEM SUPERVISOR AND SUBSCRIBER GUIDE 9.0 VER. 1
VP: While In Queue, Say Position In Line
NTVP: While in Queue Announce Position in Line (Call Holding tab)
While a caller is in the queue, holding for an extension, the VP system can keep him/her
informed on the progress of the call. If you set this field to YES, the VP system announces to
the caller:
“That extension is still busy. You are number [#] in line. If you would prefer to leave a
message, press 1, or to speak with an operator, press 0.”
If you select NO in this field, the VP system voices:
“That extension is still busy. If you would prefer to leave a message, press 1, or to speak with
an operator, press 0.”
The default setting is NO.
VP: Try Extension X Times Before Going Back to Caller
NTVP: Try Extension X Times Before Going Back to Caller (Call Holding tab)
This parameter applies only if the MAX LINES ALLOWED TO HOLD field is greater than 0. If
the caller chooses to hold, the VP system plays a series of hold prompts to the caller (these
are typically music or commercials). At the end of each hold prompt, the VP system tries the
extension again. If it is busy, the next hold prompt is played to the caller.
After the defined number of hold prompts have been played, the VP system goes back to the
caller and offers the options to remain on hold, try another extension etc. This field allows
you to specify the number of hold prompts that should be played before the VP system offers
these options to the caller.
As shipped, the VP system has only one hold prompt recorded. Therefore, if you enter 3 in
this field, a caller queued to a busy station hears this same prompt three times before being
offered the options again. If you record the second hold prompt (147), the caller hears
prompt 146, 147, 146 again before being offered the options. You may record up to 100
different hold prompts, which are played in sequence. (Remember: At the end of each hold
prompt, the VP system tries the extension again). After the VP system plays the highest
number hold prompt recorded, it returns to the lowest number after the next try. The default
setting is 3.
1-67
SYSTEM SUPERVISOR AND SUBSCRIBER GUIDE 9.0 VER. 1
Note:
The time between tries to a busy extension is determined by the length of
each hold prompt recorded. The prompt supplied with the VP system
(prompt 146) is approximately 30 seconds.
VP: Restricted Numbers
NTVP: Restricted Numbers (Call Restrictions tab)
When a mailbox owner calls in to change his/her call-transfer number, pager number, or
message notification number, you may want to prevent him/her from changing it to certain
numbers, such as long-distance numbers.
These fields allow you to define digit sequences that are to be blocked. The VP system looks
at each of these Digits fields to determine if any of them match the number entered by the
mailbox owner. If the number entered by the caller begins with the digits specified in the
Digits field, the VP system defines the number entered as a match.
For example, if you enter the digits 1900 in one of the Digits fields, the VP system considers
the telephone numbers 1-900-555-1212, 1-900-123-4567, 1-900-111-2222 to be matches.
Telephone number 1-901-555-1212 would not be considered a match.
If you enter the digit 0 in one of the Digits fields, the VP system considers all numbers
beginning with 0 to be matches. This would include calls to the operator (0), calls to the longdistance operator (00), international calls (011), and any operator-assisted call (0 followed by
telephone number).
If the caller enters a number that matches one of the digit strings you enter here, the VP
system informs the mailbox owner that the number is not acceptable and retains the current
set up.
1.4.9 Screen Illustrations
This section provides illustrations of screens discussed in this guide. For information on
other VP system screens, contact the VP system technician.
1-68
SYSTEM SUPERVISOR AND SUBSCRIBER GUIDE 9.0 VER. 1
Business Hours Screen (NT-based VP Systems)
1-69
SYSTEM SUPERVISOR AND SUBSCRIBER GUIDE 9.0 VER. 1
Class of Service Screen, Message Tab (NT-based VP Systems)
1-70
SYSTEM SUPERVISOR AND SUBSCRIBER GUIDE 9.0 VER. 1
Class of Service Screen, Greetings Tab (NT-based VP Systems)
1-71
SYSTEM SUPERVISOR AND SUBSCRIBER GUIDE 9.0 VER. 1
Class of Service Screen, Call Holding Tab (NT-based VP Systems)
1-72
SYSTEM SUPERVISOR AND SUBSCRIBER GUIDE 9.0 VER. 1
Class of Service Screen, Call Restrictions Tab (NT-based VP Systems)
1-73
SYSTEM SUPERVISOR AND SUBSCRIBER GUIDE 9.0 VER. 1
Group Box Screen (NT-based VP Systems)
1-74
SYSTEM SUPERVISOR AND SUBSCRIBER GUIDE 9.0 VER. 1
Holidays Screen (NT-based VP Systems)
1-75
SYSTEM SUPERVISOR AND SUBSCRIBER GUIDE 9.0 VER. 1
Mailbox Screen, General Tab (NT-based VP Systems)
1-76
SYSTEM SUPERVISOR AND SUBSCRIBER GUIDE 9.0 VER. 1
Mailbox Screen, Call Transfer Tab (NT-based VP Systems)
1-77
SYSTEM SUPERVISOR AND SUBSCRIBER GUIDE 9.0 VER. 1
Mailbox Screen, Recording Tab (NT-based VP Systems)
1-78
SYSTEM SUPERVISOR AND SUBSCRIBER GUIDE 9.0 VER. 1
Mailbox Screen, Message Delivery Tab (NT-based VP Systems)
1-79
SYSTEM SUPERVISOR AND SUBSCRIBER GUIDE 9.0 VER. 1
Mailbox Screen, Pager Tab (NT-based VP Systems)
1-80
SYSTEM SUPERVISOR AND SUBSCRIBER GUIDE 9.0 VER. 1
Mailbox Screen, Distribution Lists Tab (NT-based VP Systems)
1-81
SYSTEM SUPERVISOR AND SUBSCRIBER GUIDE 9.0 VER. 1
Mailbox Screen, Hotel Tab (NT-based VP Systems)
1-82
SYSTEM SUPERVISOR AND SUBSCRIBER GUIDE 9.0 VER. 1
Routing Box Screen (NT-based VP Systems)
1-83
SYSTEM SUPERVISOR AND SUBSCRIBER GUIDE 9.0 VER. 1
Business Hours Screen (DOS-based VP Systems)
1-84
SYSTEM SUPERVISOR AND SUBSCRIBER GUIDE 9.0 VER. 1
Class of Service Screen (DOS-based VP Systems)
1-85
SYSTEM SUPERVISOR AND SUBSCRIBER GUIDE 9.0 VER. 1
Group Box Screen (DOS-based VP Systems)
Holiday Schedule Screen (DOS-based VP Systems)
1-86
SYSTEM SUPERVISOR AND SUBSCRIBER GUIDE 9.0 VER. 1
Mailbox Page 1 Screen (DOS-based VP Systems)
Mailbox Page 2 Screen (DOS-based VP Systems)
1-87
SYSTEM SUPERVISOR AND SUBSCRIBER GUIDE 9.0 VER. 1
Mailbox Page 3 Screen (DOS-based VP Systems)
Mailbox Page 4 Screen (DOS-based VP Systems)
1-88
SYSTEM SUPERVISOR AND SUBSCRIBER GUIDE 9.0 VER. 1
Routing Box Screen (DOS-based VP Systems)
1-89
SYSTEM SUPERVISOR AND SUBSCRIBER GUIDE 9.0 VER. 1
1-90
SYSTEM SUPERVISOR AND SUBSCRIBER GUIDE 9.0 VER. 1
2. Using a Mailbox as a Subscriber
2.1 Identifying Yourself as the Mailbox Owner
When you call in to the VP system, you are treated as an outside caller and you can leave
messages, transfer to an extension, and access features available to outside callers. To listen
to the messages in a mailbox, you must identify yourself to the VP system as the mailbox
owner by logging into the mailbox.
To log into a mailbox, you must access the voice mail gateway by calling into system box
9992. Normally, you access this system box via a Routing box. By default, on all Routing
boxes set up on the system, the # key routes callers who press it to box 9992 (the gateway
box). If you set up additional Routing boxes, it is strongly recommended that you retain the
9992 setting beside the # key on Routing box setup screens. This way, a caller can press #
from almost anywhere in the system to access the voice mail gateway, which provides access
to system mailboxes.
You can also access the voice mail gateway by pressing # when the VP system is playing the
greeting for a mailbox (for example, “Hi, this is Mary. Sorry I can’t take your call. Leave
me a message after the tone…”).
When your call is routed to the voice mail gateway (box 9992), the VP system prompts you
to enter your mailbox number. Once you enter a valid mailbox number, the system prompts
you for the password to the mailbox. Once you enter the valid password, you gain access to
the mailbox, including all the messages it stores.
Hint:
If the VP system pauses for a few seconds after you finish entering the
password, press the # key. This informs the VP system you have finished
dialing.
If the password entered is invalid, the VP system asks the caller for the mailbox and password
up to two more times. If the correct password is not entered during the second or third
attempt, the VP system says, “Good-bye,” and disconnect the call.
2-1
SYSTEM SUPERVISOR AND SUBSCRIBER GUIDE 9.0 VER. 1
If you press # once when asked for the password, the VP system assumes you do not want to
log in to the mailbox.
2.2 Completing the New User Tutorial
The first time a new owner opens his/her mailbox, the VP system provides a brief tutorial
session that explains a few basic functions, then allows the owner to record his/her name and
personal greeting and select a password. The tutorial text and functionality is described
below.
Tutorial Part
Tutorial
Introduction
Recording
Your Name
Tutorial Text
Keypress Results
“Welcome to your new
mailbox. In order to
familiarize you with your new
mailbox, we would like to
briefly describe some of its
features. You may exit from
this tutorial at any time by
pressing the pound key.”
If you press #, the tutorial stops and the
system voices the mailbox Main menu.
Pressing # does not permanently remove the
tutorial, the next time you log into the mailbox
the tutorial starts again.
“There are times when I need
to say your name. For
example, when the system is
about to transfer a call to your
extension, the caller will hear:
‘Please hold while I transfer
your call to Mary Jones.’ I
need to record your name.
Press 1 if you would like to
record your name.
Otherwise, press 2.”
If you press 1, the system prompts you to
record your name. After recording the name,
the system voices it back to you and allows
you to accept the recording or re-record or
delete it.
If you press *, the tutorial stops and the system
voices the mailbox Main menu. Pressing *
does permanently disable the tutorial. It will
not be played the next time you log into the
mailbox.
If you press 2, the VP system does not prompt
you to record a name and proceeds to the next
step in the tutorial.
If you press # or * the tutorial ceases as
described above, and the VP system voices
the mailbox Main menu.
Note: Until the mailbox owner records his/her
name, the VP system substitutes the prompt,
“that extension” as a default.
2-2
SYSTEM SUPERVISOR AND SUBSCRIBER GUIDE 9.0 VER. 1
Tutorial Part
Recording
Your
Greeting
Entering a
Password
Tutorial Text
Keypress Results
“If you are not able to answer
your phone, I will play your
personal greeting to the
caller. Your greeting should
sound something like this:
‘Hello, this is Mary. I’m sorry I
cannot take your call right
now. If you would like to
leave me a message, press 1,
or press 3 if you would like to
speak to someone else.’
Once you have recorded your
greeting, you can change it at
any time. Press 1 if you
would like to record your
personal greeting now.
Otherwise, press 2.”
If you press 1, the VP system prompts you to
record your greeting (if the mailbox is allowed
multiple greetings in its assigned class of
service, the greeting recorded here is greeting
0). After the system records the greeting, it
plays it back to you and allows you to accept it
or re-record or delete it.
“To protect your privacy, you
will be asked to enter your
password each time you open
your mailbox. This prevents
unauthorized callers from
gaining access to your
messages. You should
change your password
frequently. If you would like
to change it now, press 1.
Otherwise, press 2.”
Note: By default, each new mailbox uses the
mailbox number as the initial password.
If you press 2, the VP system does not prompt
you to record a greeting and proceeds to the
next part of the tutorial.
If you press # or * the tutorial ceases as
described above and the VP system voices the
mailbox Main menu.
Note: Until the mailbox owner records his/her
greeting, the VP system substitutes the system
default greeting “...is not available right now.”
If you press 1, the VP system prompts you to
enter a new password up to the maximum
number of digits allowed by the system. When
you enter a new password, the VP system
repeats the digits and asks for confirmation.
You can accept the new password or select to
enter a different password.
If you press 2, the tutorial does not prompt you
to enter a new password, and the default
password is retained.
If you press # or *, the tutorial ceases as
described above, and the VP system voices
the mailbox Main menu.
2-3
SYSTEM SUPERVISOR AND SUBSCRIBER GUIDE 9.0 VER. 1
Tutorial Part
Including
Your Name
in the
System
Directory
Tutorial Text
Keypress Results
“If you would like to be
included in the dial-by-name
directory, press 1. Otherwise
press 2”.
If the last name field of the mailbox on the
mailbox screen is blank (or if it consists entirely
of digits), the VP system offers you the option
to have your name included in the system’s
directory, which is available to callers
attempting to access a specific party.
If you press 1, the VP system prompts you to
indicate the numbers on the telephone keypad
corresponding to the letters that spell out the
first 3 letters of your last name. Once you
enter the numbers (letters), the VP system
repeats them.
If you press 2, your name is not included in the
dial-by-name system directory.
If you press # or *, the tutorial ceases as
described above, and the VP system voices
the mailbox Main menu.
Note: If there is no name recorded for this
mailbox, it will not be included in the directory.
Concluding
the tutorial
“Thank you for taking part in
the tutorial. The tutorial will
be repeated each time you
open your mailbox. If you
would like to cancel it, press
the star key now.”
If you press *, the tutorial is disabled for the
mailbox. If you press nothing, the mailbox
Main menu plays and the tutorial will repeat
the next time you log into the mailbox.
2.3 Selecting Main Menu Options
When you open your mailbox, the VP system voices your name and tells you how many
messages you have. For example, “John Smith, you have five new messages (two of these are
marked urgent) and one old message.”
2-4
SYSTEM SUPERVISOR AND SUBSCRIBER GUIDE 9.0 VER. 1
The VP system then plays the Main menu, offering you various options:
Note:
Not every system or mailbox has access to every option.
“To listen to your messages, press 1.
To send a message, press 2.
To change your options, press 3.
To listen to questionnaire answers, press 4. (heard only if mailbox owns a Question box)
To change languages, press 5. (heard only if multi-lingual capability is in use)
For supervisor functions, press 6.
To place an outgoing call, press 0.
Or, to exit, press #.”
Each of the Main menu choices is explained in this section. For an overview, a map of the
voice menus you hear in the VP system is shown in below. Optional features (Fax
Distribution, Talking Classifieds, Outbound Telemarketing, IVR) are not included.
Note:
If the VP system is equipped with one or more optional modules, this menu
may be slightly modified.
2-5
SYSTEM SUPERVISOR AND SUBSCRIBER GUIDE 9.0 VER. 1
Message menu
8. Rewind
9. Fast forward
0. Pause
1. New message
2. Old messages
*. Get Faxmail *
#. Exit
Enter box number to which
message should be sent,
or press star for directory.
Options menu
Main Voice menu
1. Listen to messages
2. Send a message
3. Change options
4. Listen to questionnaire
answers
5. Change languages
6. Supervisor functions
7. Fax *
9. Short-cut to new messages
0. Place an outgoing call
1. Change name
2. Change greeting
3. Change password
4. Transfer number
5. Notification number
6. Pager number
7. Review future delivery
8. Personal distribution lists
9. Enable tutorial
0. ACD logon / logoff
*. Retrieve sent message
#. Exit
#. Exit
1.
2.
3.
4.
5.
6.
7.
8.
9.
*.
Send
Replay
Re-record
Cancel
Send with confirmation
Send mutliple copies
Add a Fax document*
Append
Recap
Schedule for future
delivery
1. Replay message
2. Next message
3. Save message as new
4. Delete message
5. Message time and date
61. Forward the message
62. Reply to message
63. X-fer to message sender
7. Tag Faxmail for retrieval *
*. Get Faxmail *
#. Exit
Questionnaire answer menu
1. New answers
2. Old answers
#. Exit
1. Play a greeting
2. Re-record a greeting
3. Delete a greeting
4. Change TC category *
5. Select the active greeting
#. Exit
Supervisor menu
8. Replay previous answer
9. Skip to next answer
0. Pause
See section on
supervisor functions
Goes to box defined in
field labeled "After exiting
open Mail box, go to box" in
System Information screen
Map of the VP System Voice Menus
2-6
1. Replay answer set
2. Next answer set
3. Save answer set as new
4. Delete answer set
5. Hear time and date
#. Exit
SYSTEM SUPERVISOR AND SUBSCRIBER GUIDE 9.0 VER. 1
2.4 Listening to Messages
If you press 1 from the Main menu to listen to messages, the VP system asks you whether
you want to hear new messages (those you have not heard before) or saved (old) messages
(those you have heard before, but have not yet deleted):
“For new messages, press 1.
For saved messages, press 2.
Or, to exit, press #.”
If you make no choice, or choose # to exit, the VP system returns you to the Main menu.
When the VP system voices messages, it plays each one in turn beginning with the oldest. If
any of the messages are marked urgent, the VP system plays them first. As the VP system
plays each message, it provides certain information about the message.
Before the message plays, the system provides the following information:
•
If the sender indicated the message is urgent, the VP system says, “This message is
marked urgent.” Urgent messages are played before non-urgent messages.
•
If the sender indicated the message is private, the VP system says, “This message is
marked private.” Private messages cannot be forwarded to another mailbox.
•
If you indicated the message is to be deleted, the VP system reminds you that it is
marked for deletion, “You have asked for this message to be deleted.” The message
is deleted a few minutes after you exit from your mailbox.
•
If the sender specified that he/she wants to be informed when you hear the message,
the VP system says, “The sender will be notified that you have received this
message.”
•
If the message was sent to a Group box of which you are a member, rather than
specifically to your mailbox, the VP system tells you the name of the Group box, for
example, “Message for all managers.”
After the message plays, the system provides the following information:
•
If there was an account number associated with the call, the VP system says the
account number, for example, “from 5552211.”
2-7
SYSTEM SUPERVISOR AND SUBSCRIBER GUIDE 9.0 VER. 1
•
If the message was sent by another mailbox owner from within his/her mailbox, the
VP system says the name of the sender, for example, “From Ted Smith” (see note
below).
•
If the message was manually forwarded, the VP system says who the original
recipient was, for example, “This message was forwarded from Mary Jones” (see
note below).
•
If the message was automatically forwarded, the VP system says who the original
recipient was, for example, “This message was automatically forwarded from Mary
Jones” (see note below).
•
The VP system plays the message time and date (see note below).
2.4.1 Listening to New Messages
If you press 1 to listen to new messages, the VP system plays each of the new messages in
turn. Any urgent messages are played first (oldest first), then any non-urgent messages are
played (oldest first). The VP system pauses between each message to allow you to decide
what to do with the message. When you have heard all new messages, the VP system says,
“You have no more new messages,” and returns you to the Main menu.
Note:
While listening to a message, you can fast-forward by pressing 9 or rewind
by pressing 8. Listening to Saved (Old) Messages
If you press 2 to listen to saved messages, the VP system plays each of the old messages.
Any urgent messages are played (oldest first), then any non-urgent messages are played
(oldest first). The VP system pauses between messages to allow you to decide what to do
with the message. The fast-forward, rewind, and pause functions operate as they do during
new message playback.
2-8
SYSTEM SUPERVISOR AND SUBSCRIBER GUIDE 9.0 VER. 1
2.4.2 Selecting Options Between Messages
Each time the VP system plays a message, it ends by offering you the following choices:
“To replay the message, press 1.
To save and play the next message, press 2.
To save the message as new, press 3.
To delete the message, press 4.
To adjust the volume, press 5.
For more options, press 6.
Or to exit, press #.”
Each option is defined below. If you do not press a digit, the VP system returns you to the
Main menu.
•
Replay Message—The VP system plays the current message again.
•
Next Message—The VP system moves on to the next message in the mailbox, saving
the current message as an old message. If you have just listened to the last new
message, the VP system says, “You have no more new messages.”
•
Save As New—The VP system moves on to the next message, but stores the current
message as a new message (as if you have not yet listened to it). This option can also
be used to undelete a message you have asked to be deleted (see below).
Note:
•
When you save a message as new, mailbox functions such as message
waiting lamp control and message notification also treat the message as
new (the message waiting lamp remains on).
Delete Message—The VP system marks the message to be deleted, and temporarily
stores it as a saved message. The message is not actually deleted until you exit from
the mailbox. If you play the message again, after requesting that it be deleted, the VP
system says, “You have asked for this message to be deleted,” then plays the
message. If you decide you do not want to delete the message, press 3 to save the
message as new. Once you press 3, the message is no longer marked for deletion.
It is good practice to delete messages as soon as possible to prevent the mailbox from
becoming full of old, unneeded messages. Saved messages may be scheduled for
automatic deletion after a certain number of days.
2-9
SYSTEM SUPERVISOR AND SUBSCRIBER GUIDE 9.0 VER. 1
•
More Options—The VP system offers the following options:
“To forward a copy of this message, press 1.
To reply to the message, press 2.
To speak with the sender of the message, press 3.
To delete the message, press 4.
To hear the time and date of the message, press 5.
Or to exit, press #.”
Note:
•
The VP system offers options 2 and 3 only if it has enough information to
perform the functions (see the description of these options below).
Forward the Message—The VP system prompts you to indicate the mailbox to
which you want to forward the message, “Please enter the box number. If you do not
know the box number, press star.” Enter the box number or press * to use the system
dial-by-name directory. You have the following sending options:
“To add your comments to the beginning of the message, press 1.
To add your comments to the end of the message, press 2.
To forward the message without comment, press 3.
To exit without forwarding, press #.”
If you select option 1 or 2, the VP system prompts you to speak your comments.
Once you record your comments, they are added to the message, and the message is
forwarded.
•
Reply to a Message—The VP system places you in the mailbox of the sender
(assuming the message came from another subscriber on the system). If the message
was manually forwarded, your reply is sent to the person who forwarded it. If the
message was automatically forwarded, the reply is sent to the person who sent the
original message.
If the message was left by a caller rather than a mailbox owner, the VP system cannot
send a reply. If in this case and you press 2 at the More Options menu, the VP
system says, “That was not a valid entry.”
2-10
SYSTEM SUPERVISOR AND SUBSCRIBER GUIDE 9.0 VER. 1
Note:
•
The reply to message option is available only if a message was sent by
another mailbox owner from within his/her open mailbox (the sender has
logged in to his/her mailbox and chosen option 2, Send a message, from the
Main menu).
Transfer to Message Sender—The operation is slightly different, depending on
whether the message is from an outside caller or from a mailbox owner:
If the message is from an outside caller:
This option is available only if the sender’s telephone number is attached to the
message (as the account number). When you select the transfer to sender option, the
VP system interprets the account number as a telephone number. It places you on
hold and dials the digits stored in the account number. When it has finished dialing
the number, it connects you with the called party.
Certain additional conditions apply to this feature:
*
If you select this option, the VP system assumes the account number
associated with the message is a valid telephone number and tries to dial it.
Do not use this option if the account number is not a telephone number.
*
Before making the outgoing call, the VP system checks the RESTRICTED
DIGITS fields in the mailbox’s assigned class of service. If the telephone
number is restricted, the VP system does not make the call.
If the message is from a mailbox owner:
The VP system places you on hold and dials the extension number associated with
the sender’s mailbox. Certain additional conditions apply to this feature:
*
The sender’s mailbox call transfer feature must be enabled. If disabled, you
hear the mailbox owner’s personal greeting just as if you had called the VP
system and entered the mailbox number.
*
Your telephone system must support extension-to-extension transfers.
•
Delete the Message—See the delete message option description above.
•
Hear the Time and Date—The VP system plays the time and date the message was
received. The VP system consults the PC clock for this function, so it is important to
ensure the clock is set to the correct date and time. You can configure the VP system
2-11
SYSTEM SUPERVISOR AND SUBSCRIBER GUIDE 9.0 VER. 1
to automatically play the message time and date at the beginning or end of the
message on the OTHER CUSTOMIZATIONS screen (VP systems) / GENERAL
INFORAMTION screen (NTVP systems).
2.5 Sending a Message
If you press 2 from the Main menu to send a message, the VP system prompts you to indicate
the box number. You can send a message to any mailbox or Group box, or to several
mailboxes or Group boxes. You can also send a message to one of the personal distribution
lists defined for the mailbox.
To send a message to…
Do this
A single mailbox
Enter the mailbox number
Several mailboxes
Enter the first mailbox number
All members of a Group box
Enter the Group box number
All members of a personal distribution list
Enter the distribution list number
If you do not know the box number of the person to whom you want to send the message,
press * to access the dial-by-name system directory.
Once you have entered the box number, the VP system plays the name of the owner of that
box and asks you to confirm you have indicated the correct box. For example:
“John Smith. If this is correct, press 1.”
2-12
SYSTEM SUPERVISOR AND SUBSCRIBER GUIDE 9.0 VER. 1
If you press 1, the VP system asks you to record your message after the tone. Once you
record the message, the VP system offers the following options:
Digit
1
Function
Send
Description
Send the message. You are offered the following sending options:
1. Send with normal delivery (the default).
2. Send as an urgent message. Urgent messages are played first.
3. Send as a private message. Private messages cannot be
forwarded.
5. Send and be notified when recipient has listened to the message.
(This is the same as choosing option 5 below).
2
Replay
Play the message back, so you can hear how it sounds.
3
Re-record
Delete this message, and record a new one.
4
Cancel
Delete this message, without sending it.
5
Send with
confirmation
Send the message, and have the VP system notify you when the
recipient first listens to it. Once the message has been heard by the
recipient, the VP system sends a message to your mailbox, telling
you when the message was received and who received it (in case it
was automatically forwarded to a third party). This message from
the VP system is treated as a normal message in that it activates all
the normal message notification, pager, message-waiting features.
(This is the same as choosing option 1 above, and then pressing 5).
6
Multiple send
Send this message to several mailboxes or Group boxes. The VP
system sends the message to the mailbox (or Group box) you first
specified, then asks you for more box numbers. Enter each mailbox
(or Group box) number when asked, then press # when you are
finished.
8
Append
Continue making the recording of this message from the point
where you left off. You may continue recording up to the total
message length allowed by the receiving mailbox’s assigned class
of service.
9
Recap
Play back the last 5 seconds of the recorded message.
2-13
SYSTEM SUPERVISOR AND SUBSCRIBER GUIDE 9.0 VER. 1
Digit
*
Function
Schedule
Description
Schedule this message for delivery at a future time and date. The
VP system prompts you to enter the time and date for delivery of the
message, then plays back the information you entered for
confirmation. Choosing this option takes the place of pressing 1
(send), which would deliver the message immediately.
2.6 Changing Mailbox Options
If you press 3 from the Main menu to change the mailbox options, the VP system voices the
Options menu:
“To record your name, press 1.
To record your greeting, press 2.
To change your password, press 3.
To change your call transfer feature, press 4.
To change your message notification feature, press 5.
To change your pager feature, press 6.
To review messages scheduled for future delivery, press 7.
To change your personal distribution lists, press 8.
To reactivate the tutorial, press 9.
To retrieve a message you have already sent to another mailbox, press *.
Or, to return to the Main menu, press #.”
Note:
If this mailbox is the owner of an ACD box, the menu also includes an option
to log agents into or out of the ACD group.
If you do not make a selection, the VP system returns you to the Main menu.
2-14
SYSTEM SUPERVISOR AND SUBSCRIBER GUIDE 9.0 VER. 1
2.6.1 Recording a Name
If you press 1 from the Options menu to record a name in the mailbox, the VP system plays
the current recording of the name and prompts you to change it:
“To replay your name, press 1.
To re-record your name, press 2.
To delete your name, press 3.
Or, to exit, press #.”
If you press 1, the VP system plays the current recording of the name, then plays the menu
again.
If you press 2, the VP system asks you to record your name after the tone. Speak the name,
then press # to end the recording. If you do not press #, the VP system will record a few
seconds of silence before ending the recording. This will slow the progression of calls to the
mailbox. Once the name has been recorded, the VP system plays the above menu again.
If you press 3, the VP system deletes the current recording of the name. If you press #, you
return to the Options menu.
2.6.2 Recording a Greeting
If you press 2 from the Options menu to record a greeting, the VP system examines the class
of service assigned to the mailbox and checks to see if you are the owner of any other box in
the system (Routing box, Questions box, etc.). The next prompt you hear depends on:
•
Whether the mailbox is allowed to record multiple greetings, a single greeting, or no
personal greeting, as defined in the assigned class of service. If the mailbox is not
permitted to record a personal greeting, the VP system says, “That was not a valid
entry,” and plays the Options menu again. When a call is routed to this mailbox, the
caller hears the default system greeting, “[Name] is not available right now...”
•
Whether the mailbox is the owner of one or more other system boxes. If the mailbox
is an owner of another system box, the VP system prompts you to select which box
you want to change the greeting in, “Please enter the box number.”
2-15
SYSTEM SUPERVISOR AND SUBSCRIBER GUIDE 9.0 VER. 1
If you enter a number for a box that you do not own, the VP system says, “I’m sorry,
you do not own that box.” then re-plays the Options menu. If you enter a number of
a box that you do own, the VP system plays the following menu:
“To replay the greeting, press 1.
To re-record the greeting, press 2.
To delete the greeting, press 3
To select a new active greeting, press 5.
Or, to exit, press #.”
Options 1, 2, and 3 function the same way as when you use them to record a name for
the mailbox (see above). The only difference involves boxes that are allowed
multiple greetings. If the box is allowed multiple greetings and you select option 1,
2, or 3, the VP system prompts you to indicate the number of the greeting (0 – 9) you
want to modify.
Note:
If a mailbox is not allowed any greetings, then any boxes “owned” by that
mailbox are also not allowed any greetings.
Enter the greeting number (or press * if you want to work with whichever greeting is
currently active). If the number you enter is higher than the maximum number of
greetings allowed by the assigned class of service, the VP system says, “That was not
a valid entry,” and replays the Greeting menu. If the greeting number is valid, the
VP system allows you to play, re-record, or delete it using the same functionality it
uses when you play, re-record, or delete the mailbox name (see above).
Note:
If the mailbox is allowed multiple greetings, recording one of the greetings
does not affect which greeting is active. That is, if greeting 0 is currently the
active greeting, recording greeting 1 does not automatically make it the
active greeting. You must use option 5 to activate a different greeting.
Option 5 allows you to select another greeting as the currently active greeting. The
active greeting is the greeting played to callers when they are routed to the mailbox.
Once you select a new active greeting, the VP system plays the greeting back to you
for confirmation.
2-16
SYSTEM SUPERVISOR AND SUBSCRIBER GUIDE 9.0 VER. 1
Note:
If the class of service assigned to the mailbox allows multiple greetings
(ranging from 0 to 9), record greeting 0 first since this is the active greeting
by default. You can then record additional greetings 1 through 9, as allowed
by the class of service.
2.6.3 Changing a Password
If you press 3 from the Options menu to change your password, the VP system prompts you
to enter a new password. The password can contain the digits 0 – 9 and the character *, and it
can be up to 10 digits/characters long.
Once you enter a new password, the VP system prompts you to re-enter it for confirmation.
This ensures you do not accidentally mis-enter the password you intended to use. Once you
enter the same password twice, the VP system plays the prompt, “Your password has been
changed and will be in effect the next time you call.”
If you do not re-enter the password when prompted or you do not enter two matching
password as prompted, the VP system does not accept the new password and plays the
prompt, “Your password has not been changed.”
Note:
If you do not want to password-protect a mailbox, enter 0000 (four zeros) as
the password. If the mailbox contains the password 0000, the VP system
does not prompt the mailbox owner to enter a password when logging into
the mailbox. Be advised that when the mailbox does not prompt for a
password, anyone can open it. You are strongly urged to always passwordprotect a mailbox and change the password regularly for maximum security.
Note:
Mailbox owners are barred from remotely changing their passwords if the
password field entry is enclosed in brackets [ ] on the MAILBOX screen.
2.6.4 Changing the Call Transfer Service
If you press 4 from the Options menu to change the call transfer service, the VP system
announces the current state of the service. If the service is currently enabled (on), you hear
the prompt, “Your calls are currently being transferred to [number]. Press 1 if you would
2-17
SYSTEM SUPERVISOR AND SUBSCRIBER GUIDE 9.0 VER. 1
like to change the number.” If the call transfer service is currently disabled (off), you hear
the prompt, “Your calls are currently being transferred to voice mail. Press 1 if you would
like to change the number.”
Press * to toggle the call transfer service on (callers are transferred to the telephone) and off
(callers hear the mailbox greeting immediately). After you press *, the VP system voices a
confirmation prompt indicating the current state of service.
Press 1 if you want to enter a new call transfer number. The VP system asks you for the new
number, “Please enter the new number.” Once you enter the new number, the VP system
plays the confirmation prompt, “Your calls are currently being transferred to [number].”
Press # to accept the number and return to the Options menu, or press 1 to enter a different
number.
Note:
Mailbox owners are barred from modifying the call transfer number if the
number is enclosed in brackets [ ] on the MAILBOX screen.
When you specify a call transfer number, you can enter the following special characters:
•
### is interpreted as a hook-flash.
•
*** is interpreted as a pause. The default length of the pause is equal to one comma
(,). To remotely enter a longer pause, enter ****** (6 stars).
You may enter the number of a telephone outside of the telephone system, provided the
telephone system supports this feature and the VP system has been programmed to perform
external transfers. Long distance (toll) numbers can be restricted in the mailbox owner’s
assigned class of service.
2.6.5 Changing the Message Notification Service
If you press 5 from the options menu to change the message notification feature, the VP
system informs you of the current state of the feature, “Your message notification feature is
[telephone number],” or, “Your message notification feature is off. Press 1 to change the
number or press pound if you’re finished.”
2-18
SYSTEM SUPERVISOR AND SUBSCRIBER GUIDE 9.0 VER. 1
To change the message notification number, use the technique described above for changing
the call transfer service. To toggle the message notification feature on or off, press *, also as
described above.
Note:
This option allows you to change the first telephone number the VP system
calls to inform you that you have new messages. You can also toggle
message notification on and off using this option.
2.6.6 Changing the Pager Service
If you press 6 from the Options menu to change the pager service, the VP system informs you
of the current state of the feature, “Your pager service is [telephone number],” or, “Your
pager service is off. Press 1 to change the number or press pound if you’re finished.”
To change the pager service, use the technique described above for changing the call transfer
service. To toggle the pager service feature on or off, press *, also as described above.
2.6.7 Reviewing Messages Scheduled for Future Delivery
If you press 7 from the Options menu to review future delivery messages, the VP system
plays information about the next message you have scheduled for future delivery, “Message
for [receiving mailbox owner’s name] [date] at [time],” or, “You have no messages
scheduled for future delivery.”
If you currently have messages scheduled for future delivery, the VP system plays the
following menu of options:
“To listen to the message, press 1.
To hear the next message, press 2.
To cancel the message, press 4.
Or, to exit, press #.”
You can only listen to or cancel future delivery messages from this menu. If the contents of
the message are not satisfactory you must delete the message, then return to the Main menu
and press 2 to re-record and reschedule the message.
2-19
SYSTEM SUPERVISOR AND SUBSCRIBER GUIDE 9.0 VER. 1
If you do not have any messages scheduled for future delivery, or after you have listened to
all of the future delivery messages, the VP system says, “You have no [more] messages
scheduled for future delivery,”
2.6.8 Changing the Personal Distribution Lists
If you press 8 from the Options menu to change a personal distribution list, the VP system
prompts you through the process of making personal distribution list modifications. This
option allows you to add mailboxes to or remove mailboxes from a personal distribution list.
2.6.9 Retrieving a Message Already Sent to Another Mailbox
If you press * from the Options menu to retrieve a previously sent message, the VP system
prompts you to enter the recipient’s mailbox number. If the mailbox contains messages you
have sent, and the mailbox owner has not yet listened to those messages, the VP system plays
each one. After each message plays, the VP system allows you to skip it, re-play it, re-record
it, or delete it.
2.6.10 Logging into and out of ACD Boxes
If you press 0 from the Options menu for ACD administration, the VP system asks you to
indicate the number of the ACD box you want to modify. Enter the ACD box number. The
VP system voices the following options:
“To add an extension to this ACD group, press 1.
To remove an extension, press 2.
To exit, press #.”
If you select option 1 or 2, the VP system asks you for the extension number.
Note:
Enter an extension number, not a mailbox number. The numbers listed in
the ACD box are extension numbers.
2-20
SYSTEM SUPERVISOR AND SUBSCRIBER GUIDE 9.0 VER. 1
Once the VP system adds the extension you specified to or deletes it from the ACD group,
the system voices the confirmation prompt, “Extension [number] has been [added to /
deleted from] ACD group [name].”
2.7 Listening to Question Box Answers
If the mailbox owns one or more Question boxes, you can press 4 to listen to answers
recorded as messages in the mailbox. If you press 4 from the Main menu to listen to answers,
the VP system asks you whether you want to listen to new or old questionnaire answers:
“For new questionnaire answers, press 1.
For old questionnaire answers, press 2.
Or, to exit, press #.”
When you select option 1 or 2, the VP system searches through all the Question boxes owned
by the mailbox and plays any old or new messages it finds.
Note:
Questionnaire answers are arranged in sets, with each set consisting of the
answers supplied to the questions (1 through n) recorded in the Question
box.
While the VP system plays back a set of answers, you can press 8 to replay the last answer.
You can also press 9 to skip forward to the next answer and press 0 to pause the playback.
To resume playback you have paused, press 0 again or wait 30 seconds and the VP system
will automatically resume playback.
After an entire set of questionnaire answers has played, the VP system voices the following
options:
“To replay the message, press 1.
To play the next message, press 2.
To save the message as new, press 3.
To delete the message, press 4.
For message time and date, press 5.
To exit, press #.”
2-21
SYSTEM SUPERVISOR AND SUBSCRIBER GUIDE 9.0 VER. 1
The same basic message play features apply when you are listening to Question box answers
as when you listen to regular messages. Press 1 to replay the entire set of answers, press 2 to
save the set as an old set and proceed to the next set of answers, press 3 to save the set as a
new set of answers, and press 4 to delete the answers. When you have listened to all sets of
answers, the VP system plays the system prompt, “You have no more [new / old] messages.”
Note:
You cannot forward a Question box answer to another mailbox.
2.8 Changing Languages in a Mailbox
If you press 5 at the Main menu, the VP system switches to the next language. For example,
assume that the first language on the system is English, the second language is French, and
the third language is Spanish. If you are listening to the Main menu in English, and you press
5, the VP system restarts the menu again in French. French is now the current language for
the call. All menus and prompts are played in French. If you record a greeting, it should be
in French.
If you go back to the Main menu, and press 5 again, the VP system starts playing the Main
menu in Spanish. Spanish is now the current language for the call. All menus and prompts
are played in Spanish. If you record a greeting, it should be in Spanish.
2.9 Placing an Outgoing Call from a Mailbox
If you press 0 from the Main menu to place an outgoing call, the VP system checks the class
of service assigned to the mailbox to verify this feature is available to you. If it is not, the VP
system says, “I’m sorry, that was not a valid entry.”
If you are authorized to use the outgoing call feature, the VP system prompts you for the
number to which you want to be connected, and it places a conference (three-way) call to that
number.
2-22
SYSTEM SUPERVISOR AND SUBSCRIBER GUIDE 9.0 VER. 1
2.10 Exiting a Mailbox
If you press # from the Main menu to exit, the VP system closes the mailbox and routes your
call to a new box. To determine where to send your call, the VP system looks at the CLASS
OF SERVICE screen in the field WHEN EXITING OPEN MAILBOX, GO TO BOX.
2-23
SYSTEM SUPERVISOR AND SUBSCRIBER GUIDE 9.0 VER. 1
2-24