1
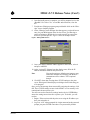
M204 v5.7.2 Release Notes
Microplex Systems Ltd.
8525 Commerce Court
Burnaby, BC V5A 4N3
Canada
Tel: +1 604 444-4232
Fax: +1 604 444-4239
Support: +1 800 665-7798
Internet: [email protected]
FTP: ftp.microplex.com
URL: http://www.microplex.com/
OVERVIEW
These release notes expand on the new features and changes incorporated
into firmware versions 5.7 to 5.7.2 for the M204 PCMCIA Print Server.
NEW FEATURES
Lucent WaveLAN Support
With version 5.7.1 firmware and higher, the M204 can now support the
915MHz and 2.4GHz WaveLAN PCMCIA cards for wireless network
printing adding another network connection option to this print server
model. Prior to version 5.7.1, the M204 supported Ethernet and Token
Ring PCMCIA cards only.
M204 WaveLAN
Requirements
For the M204 to be able to receive print jobs over a WaveLAN network, it
must have:
• at least version 5.7.1 firmware within it.
• a WaveLAN PCMCIA card (with an attached WaveModem) plugged
into one of its PCMCIA slots with the other slot empty.
• at least one other network station using a WaveLAN PCMCIA card
(with an attached WaveModem) with the same frequency (i.e. 915 MHz
or 2.4 GHz).
• the WaveLAN license key enabled within it.
Note
If you have purchased the version 5.7.x WaveLAN upgrade package
for your current M204 rather than purchasing a new M204 altogether,
you will need to enable the WaveLAN key within the unit before
using it. This key value will be given to you upon purchasing this
upgrade from Microplex and should be stored into the M204 using
these commands:
store key keyvalue psos novell appletalk wavelan
reset
To view the M204 key settings, please use “list key”.
• the correct gals (i.e. P20433 and P20453 labeled on the board inside the
casing) to be able to support the WaveLAN PCMCIA card.
Note
05/13/97
If any of these items are missing, the wireless printing will fail.
1
M204 v5.7.2 Release Notes (Con’t)
M204 WaveLAN
Configuration
The configuration steps for using the M204 with a WaveLAN network
are:
1
Configure the M204 WaveLAN PCMCIA card with the appropriate
network ID. This must be done using a PC, laptop, or dumb terminal
logged into the M204’s command shell through one of its serial ports.
The default COM1 and COM2 settings on the M204 are 9600 baud,
no parity, 8 data bits, 1 stop bit, and XON/XOFF flow control. If
using a PC or laptop, a crossed-over 9-pin to 9-pin cable must be
used. With most dumb terminals, a straight through 25-pin to 9-pin
serial cable is used. For further details on serial port login sessions,
please see the technical bulletin, “http://www.microplex.com/
microplex/support/bulletins/CFG-960607-01.html”, at Microplex’s
Web site. Within this document, you will find a section called “Serial
Port Configuration”.
Note
The command once logged in to the M204’s command shell is:
store ifc wvln nwid networkid
where networkid is the network ID to be assigned to the M204’s
WaveLAN card (in the range of 0100 - FFFF hexadecimal).
2
Once you are sure the WaveLAN card is configured properly, repower
the M204 to ensure it assigns the right network ID to the WaveLAN
card.
At this point, you should be able to recognize the M204 on your wireless
network. Therefore, you can now configure the M204 for whichever network protocol will be used. For example, if you will be using TCP/IP, you
will need to configure an IP address and subnet mask at the minimum on
the M204 so it can be recognized on the network. Then you will need to
configure a host to print to a printer attached to the M204. All of these
steps can be found in the current product manual or look to the
“Microplex Training Guide for All Products” found off the Technical
Support page at Microplex’s Web site - “http://www.microplex.com/
microplex/support”.
WaveLAN Warnings
When using WaveLAN, these points should be kept in mind:
• The M204 will not communicate over the wireless LAN unless its
WaveLAN PCMCIA card has been configured with a network ID.
• When using a WaveLAN PCMCIA card in one of the M204 slots, the
other slot must remain empty.
• The M204’s WaveLAN support does not include “roaming”. Therefore,
its WaveLAN card must always be pre-configured with the correct network ID.
• The M204’s WaveLAN support does not include encryption.
• The M204 will only communicate with WaveLAN nodes using the same
frequency (i.e. 915 MHz or 2.4 GHz).
05/13/97
2
M204 v5.7.2 Release Notes (Con’t)
• Lucent’s WaveLAN technology is not “line-of-sight” meaning you do
not have to have your network station pointing directly at the M204.
However, there is a maximum range of 800 feet between WaveLAN
nodes and there cannot be any concrete divisions in between.
Novell Configuration
Version 5.7.2 introduces a slight modification to the preferred server feature under Novell environments helping with file server connections in
larger installations. With version 5.7.2, if there’s more than 32 file servers
in total, the desired file server should be set as a preferred server using
these commands on the M204:
store pserver novell pserver add fileservername
reset
The M204 will only acknowledge 32 file servers and there’s no guarantee
that the desired file server will be one of these 32 servers. Therefore, the
preferred server setting will guarantee the right server is recognized. To
view which file servers the M204 does acknowledge at a given time,
please use this command on the device:
debug novell fserver
Note
If you have any version prior to 5.7.2, the preferred server feature should
not be used for any reason. If you have more than 32 file servers though or
would like improved file server connections, please upgrade to version
5.7.2. Microplex Technical Support can help you with this.
IPAssign Windows Configuration Tool
Prior to version 5.7.2 of the M204, assigning an IP address to the print
server is accomplished using ARP, RARP, or BOOTP. Most often a manual ARP command is the preferred choices but there can be problems with
some ARP implementations on Windows stations. Therefore, with version 5.7.2, Microplex has introduced a new simplified Windows uility,
IPAssign, which helps identify all Microplex products on your network
and temporarily assign IP addresses to them. IPAssign automatically recognizes BOOTP packets broadcasted on the network by a Microplex
product allowing you to then assign a temporary IP address to it for initial
communications over the network.
To use IPAssign to recognize an M204 on your network, you will need to:
05/13/97
1
Insert the Microplex diskette labeled “IPAssign” into the floppy drive
on your Windows station.
2
Load the File Manager or WinFile and look under the floppy drive for
an IPAssign self-extracting file.
3
Double click on the IPAssign file to launch the install program.
4
When prompted to install, click on YES to load the InstallShield
Wizard.
5
Answer the prompts throughout the wizard.
3
M204 v5.7.2 Release Notes (Con’t)
6
Once the install process is complete, you will be prompted to view the
“ReadMe” file. Select “Yes” to read this and when done, close the
file.
7
Find the new IPAssign program group and double click on the “IPAssign” icon to load the program.
8
At the “IPAssign” main dialogue box that appears, you should see an
entry for your M204 appear in the list box. If not, give IPAssign a
couple of minutes to find the device on the network or repower the
device to speed the process. Figure 1 shows an example screen.
Figure 1: IPAssign Main Screen
9
Once your M204’s Ethernet address appears in the list box, select it
and press ASSIGN.
10 At the “Assign IP” dialogue box that displays next, fill in the IP
address and subnet mask for this print server.
Note:
You can also assign a default router/gateway entry
within this dialogue box allowing your M204 to
communicate across subnets. This is optional
though.
11 Click SET when done to assign these TCP/IP settings to the print
server. IPAssign will then display two dialogue boxes informing you
of its progress.
Once you see the message about successfully assigning the settings, click
OK. These TCP/IP settings are now in the M204’s current memory to be
retained until the next power cycle.
You will now need to store these settings into the device’s EEPROM to
ensure the settings are not lost after a power cycle. To do this, you will
need to:
05/13/97
1
Begin a Telnet session with the print server using the IP address you
have just assigned to it.
2
Log in as “root” when prompted for a login name and at the password
prompt, just press ENTER since there is no password by default.
4
M204 v5.7.2 Release Notes (Con’t)
3
Once successfully logged in, enter these commands to store the IP
address and subnet mask into EEPROM:
store net ifnum addr IPaddress
store net 1 mask netmask
where ifnum is 1 for PCMCIA slot 1 and 2 for PCMCIA slot 2.
4
If you want to store a default router entry allowing for communications across subnets, you will need to enter this command specifying
the IP address of your subnet’s default router in the routerIPaddress
variable:
store net route add default routerIPaddress ifnum
5
Repower the M204 to make these settings take effect:
reset
At this point, your Telnet session will be closed and the M204 will reboot.
This ensures that the new TCP/IP settings are stored in EEPROM and
they are in fact being used. Now you will not lose these settings unless
they are changed using similar commands.
Unix Host Software
Microplex’s Unix host software, which comes with each Microplex product, has now been improved making it easier to use.
Overview
The Unix host software provided with Microplex products comes compressed and tarred using standard Unix utilities. The file will always be
called “npdist.tar.1.Z” so once copied onto your Unix system, you will
need to uncompress and untar it for use in a temporary directory.
Once undone, you will have a configuration script like “ezsetup” and a
directory called “npdist”. The directory contains extra files such as processing binaries, source code, and interface scripts which are not always
mandatory in a Microplex print setup.
Prior to the latest version 5.7 software release, Microplex products could
be configured for TCP/IP environments using either “npconfig” or
“ezsetup”, Microplex’s two configuration software programs written for
several flavours of Unix. “npconfig” was for more detailed configurations
and “ezsetup” was the program to run if you needed a simple, quick configuration of the print server or a print setup on your host.
With the version 5.7 release of the Unix host software, “ezsetup” is now
the only Unix installation program provided. Therefore, to configure a
print server with TCP/IP settings (i.e. IP address, subnet mask) and to
configure a print setup on your Unix host, you just need to run “ezsetup”
from your Unix command line once you’ve logged on as root or superuser. The syntax is:
./ezsetup
Note
If you have HP/UX, you must run “ezsetup” like this to ensure the proper
menus appear:
ksh ./ezsetup
05/13/97
5
M204 v5.7.2 Release Notes (Con’t)
You will be prompted about your type of Unix system and then a Main
Menu will appear providing these choices:
1
2
Configure New Unit
Configure Host Setup
If you’d like to configure the Microplex print server with an IP address
and subnet mask, select “1”. If you can already communicate with the
print server over TCP/IP, then you can select “2” to create a print setup on
this Unix host which can send print jobs to the print server. Simply follow
the prompts until “ezsetup” tells you it has completed its steps.
New “ezsetup” Advantages
The key advantages to this new “ezsetup” besides its ease of use are:
• It will work with all Microplex print server models including the
M200/M201, M202/M212, M204, M205/M206, and M208. You do not
need different versions of the software for each model.
• It will work with all firmware versions going back as early as version
4.0. You do not need to worry about firmware compatibility issues any
longer.
• If doing a print setup on a System V Unix host, a very simplistic
Microplex interface script, “rawsysv.if”, will now be used eliminating
the need for any extra host binaries or compilation. This also holds true
if you have a BSD-type Unix system but you want to use an interface
script within the printcap file rather than the standard LPD (or “remote
printer”) print method.
As for the rest of the Unix host software (i.e. the files contained within the
“npdist” directory), the only difference from earlier software versions is
the interface scripts provided. If interface scripts are needed for a Unix
print setup, the concentration is now on short, simplistic scripts which do
not require any additional host binaries or compilation. The scripts simply
capture the spooled data, send it to standard out, and then redirect this
data over the network to the print server. Any extra processing like carriage return insertion can then be done on the print server.
Note
All other binaries and source code are the same as before.
Microplex Printing System (MPS) for Windows
Prior to version 5.7.2 of the M204, the only Windows print methods
available were those provided with the operating system. Now with this
new firmware version, Microplex has introduced “MPS” as an alternative
direct socket print method for Windows NT and Windows 95 environments.
To configure a new MPS printer on a Windows station, you will need to:
05/13/97
1
Insert the Microplex diskette labeled “MPS” into the floppy drive.
2
Load up the File Manager or WinFile and look under the floppy drive
for an MPS ZIP file.
3
Double click on the MPS ZIP file to extract all files within it to a
directory on the Windows station.
6
M204 v5.7.2 Release Notes (Con’t)
4
Once extracted to a directory, find the “Setup” file and double click on
this to load the InstallShield Wizard.
5
Answer the prompts throughout the wizard and select “Yes” to restart
your computer at the end.
6
Once your computer is rebooted, open the Settings:Printer folder to
view your existing printers.
Note:
MPS will only work with an existing printer.
Therefore, if you don’t have an existing printer that
you can alter, create one now using any port settings you’d like. These will be changed in the following steps anyways.
7
Select the printer that you want to use with MPS and click on the right
mouse button to bring up a sub-menu.
8
Select “Properties” from this menu to display the current settings for
this printer.
9
Click on the “Details” tab to display the printer’s port settings.
10 Click on the ADD PORT button.
11 At the “Add Port” dialogue box that displays, click on the radio button labeled “Other”.
12 Click on “Microplex TCP/IP Printer Port” from within this “Other”
list.
13 At the next dialogue box that displays, fill in the host name or IP
address of the M205/M206 in the first field.
14 Fill in a valid TCP port number on the M205/M206 in the second
field. The choices are 4000 for COM1, 4200 for COM2, 4400 for
PRN1, and 4600 for PRN2 depending upon which port your printer is
attached to.
15 Click OK when done to return to the “Details” window. You should
now see something about “MPS Port” within the “Print to following
port:” field.
16 Click OK to close this printer’s properties window.
You now have a new network printer which relies on MPS to print
remotely to a printer off of the M204.
05/13/97
7
M204 v5.7.2 Release Notes (Con’t)
CE Mark
The M204 conforms with 89/336/EEC as amended (92/31/EEC and 93/
68/EEC) providing that certain requirements are met by the end user. The
requirements for CE Mark are:
Declaration of Conformity
1
Shielded cables must be used on all parallel and serial ports.
2
The included pink plastic caps must be placed securely over any
unused I/O ports.
Standards to which conformity is declared: ENC Directive 93/68/EEC
Manufacturer’s Name:
Microplex Systems Ltd.
Manufacturer’s Address:
8525 Commerce Court
Burnaby, B.C., Canada, V5A 4N3
Type of Equipment:
PCMCIA Print Server
Model #:
M204
Year of Manufacture:
1994
I hereby declare that the equipment specified above conforms to the
above Directive.
Place:
Date:
Name:
Position:
Vancouver, B.C.
November 20, 1996
Fred Fierling
President
COMMAND CHANGES
Changed Commands
The M204 print server has a command shell called “npsh” built in to its
firmware. This command shell can be accessed through telnet or remote
command sessions (i.e. rsh, rcmd, remsh) to the unit, through the “npsh”
Novell executable, or through one of the serial ports with a dumb terminal, PC, or laptop directly attached.
Within the parallel port command structure of this shell, this command is
used to alter the speed and flow control used on the ports:
Old
set portname [-]ackmode [-]bbmode [-]fastmode [-]slowmode [-]vslowmode
where:
05/13/97
portname
“prn1” or “prn2” for the parallel ports.
ackmode
Flow control. Use the ACK signal to trigger next
data transfer. Busy mode is used as the default flow
control method.
bbmode
Bit Bucket mode. Simulate an attached printer even
if one isn’t attached.
fastmode
Speed. Increase the data transfer rate.
8
M204 v5.7.2 Release Notes (Con’t)
slowmode
Speed. Slow the data transfer rate.
vslowmode
Speed. Slow the data transfer rate even further to
accomodate slower or older printer models.
With version 5.7 and higher, this command has been changed to:
New set portname mode slow|cen|pc|fast|bb
where:
portname
“prn1” or “prn2” for the parallel ports.
slow
Slow the data transfer rate.
cen
Centronics mode. Use with older impact printers
(i.e. dot matrix, line printers).
pc
Default mode. Will work with most printers.
fast
Increase the data transfer rate. Used with some
newer, faster printers like the HP 4 and 5 series.
bb
Bit Bucket mode. Simulate an attached printer even
if one isn’t attached.
Note
There is no longer a setting to adjust the flow control method of the parallel ports from busy mode to ACK mode. This is no longer necessary.
Note
Using the old command syntax for the parallel port will continue to work
with version 5.7 but this will eventually be phased out in future firmware
releases.
New Commands
The following commands have been added to the “npsh” command shell:
store ifc wvln nwid networkid
This command assigns a particular networkid (in the range of 0100 FFFF hexadecimal) to the M204’s connected WaveLAN card. Both the
network ID and the frequency must be the same between any device the
M204 tries to communicate with using the wireless network.
set sysinfo module [-]novell [-]appletalk [-]netbios
Prior to version 5.7.2, only the Novell and AppleTalk stack could be
enabled or disabled within the M204 allowing for easier memory allocation or network broadcast control. However, with version 5.7.2, the NetBIOS over TCP/IP protocol can now be controlled as well.
store tcpip tcp opts [-]disbufmgmt
Use this command to enable or disable receive buffer management on the
M204. The receive buffer controls how many simultaneous TCP connections can be allowed with the unit at one time. The only time you may
need to have receive buffer management turned off is if you notice short
pauses between the end of one print job and the start of the next job usually with LPR printing.
05/13/97
9
M204 v5.7.2 Release Notes (Con’t)
store pserver opts [jobtimeout seconds]
This command only applies if a logpath setting is used for printer feedback (e.g. logpath type equals “printer” for printer errors). Adjusting this
seconds value will tell the print server how long to wait for printer feedback at the end of a print job before it continues on to the next print job in
the queue. The default value is 0 meaning it will hold indefinitely. Most
printers should respond quite quickly so you won’t need to adjust this
value but if you have time-critical printing happening (e.g. one job every
7 seconds) with certain logging requirements, this may come into play.
Note
Anytime you execute a “store” command, you must reboot the print
server with a “reset” command or physically unplug and plug it back in.
Otherwise, the setting will not become a current or working setting in
memory.
NOTE: If you are experiencing any configuration problems with the M204, you might want to
look at the “Microplex Training Guide for All Products” found under the Technical
Support section, the “Support Shack”, at Microplex’s Web site (www.microplex.com).
05/13/97
10