1
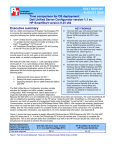
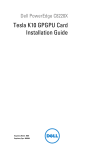
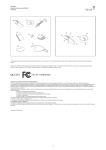
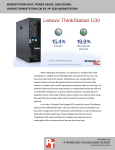
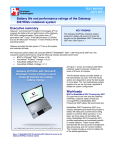
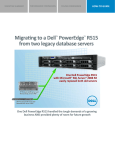
A QUICK AND EASY GUIDE TO SETTING UP THE DELL POWEREDGE C8000 A Principled Technologies setup guide commissioned by Dell Inc. TABLE OF CONTENTS Table of contents ..................................................................................... 2 Introduction ............................................................................................ 3 Dell 42U rack .......................................................................................3 Installing the rails ................................................................................4 Installing the C8000 chassis ................................................................5 Installing power cables .......................................................................6 Installing BMC cables ..........................................................................7 Connecting Ethernet cables to management ports ............................8 Installing network cables ................................................................. 10 Optional 40GbE PCI Express adapter card ....................................... 11 Connecting the C8000XD storage sled ............................................ 12 PowerEdge C8000 weight considerations ....................................... 14 About Principled Technologies ............................................................... 16 INTRODUCTION Highly dense computing solutions pack the processing power you need into a small space to help you save on both capital expenditure and operating expenses. Setting up large chassis designed to hold multiple dense servers, or sleds, can appear a daunting task. In this guide, we walk you through the simple process for setting up a full Dell PowerEdge C8000 chassis. We set up a full chassis in our own labs and also weighed various sled configurations to help you best determine what will work in your datacenter. With this simple guide, you can set up your own Dell PowerEdge C8000 compute system in no time. Dell 42U rack For high-density servers, Dell recommends Dell PowerEdge 4220 rack enclosures. There are three versions of the PowerEdge 4220 rack: standard, deep, and wide. For a highly dense computing solution such as the Dell PowerEdge C8000 chassis, we recommend a sturdy and roomy rack such as the PowerEdge 4220D (deep rack) or PowerEdge 4220W (wide rack). The PowerEdge 4220D rack is slightly deeper than the other racks (600mm wide x 1,200mm deep) and the PowerEdge 4220W rack is somewhat wider (750mm wide x 1,070mm deep). Be sure to check the depth and width of your available space for proper clearance prior to picking a server rack. For our installation, we used a Dell PowerEdge 4220W rack (see Figure 1). This rack has a static load capacity of 2,500 pounds and extra width for cabling. Make sure you properly configure any rack you use according to documentation prior to installing the C8000 chassis. For most 4220W installations using cable service loops, closing the front door may require you to reposition the mounting rails further back in the rack. We repositioned the Figure 1: Dell PowerEdge 4220W rack. mounting rails as such to accommodate SAS cabling for this installation. A quick and easy guide to setting up the Dell PowerEdge C8000 A Principled Technologies setup guide 3 Installing the rails 1. Install cage nuts in the appropriate position. 2. Push tabs and snap rails into place. 3. Add the stopping bracket. The smaller holes in the stopping bracket act as a washer. The bolt heads are smaller than the riser opening and slide if the stopping bracket is not installed. (Note: Refer to the Getting Started guide1 for additional installation details.) Figure 2: Rail and rack installation. 1 http://www.dell.com/support/Manuals/us/en/19/product/poweredge-c8000 A quick and easy guide to setting up the Dell PowerEdge C8000 A Principled Technologies setup guide 4 Installing the C8000 chassis Follow the steps below to install the C8000 chassis. Note: For best weight distribution, place the storage sleds toward the bottom of the server rack whenever possible, as they tend to weigh more than the compute sleds. 1. Remove power sleds, compute sleds, and storage sleds from the chassis prior to rack installation to lighten the load. 2. Use at least two people to slide the C8000 chassis onto the rails until the front ears touch the cage nuts. 3. Screw the front ears into the cage nuts to secure the chassis in place. 4. Re-insert the compute, storage, and power sleds. 5. We recommend installing all chassis and sleds before beginning cable installation. Figure 3: Chassis installation. A quick and easy guide to setting up the Dell PowerEdge C8000 A Principled Technologies setup guide 5 Installing power cables The steps below assume you have power distribution units (PDU) and rackmounted network switches installed in the rack according to the included documentation. This document does not include installation instructions for these items, as instructions can vary depending on the type you are installing. Note: Distribute C8000 power across two power circuits for redundancy. 1. Plug power cables from one side of C8000 chassis into one AC power source and the other side into a second AC power source. Be sure to run the power cables down the side of server rack to ensure the cables do not block fans and limit airflow. 2. Keep the power cables away from Ethernet cables. 3. Do not bend cables more than necessary during installation. 4. Do not place extra lengths of cable in front of cooling intake or exhaust ports. 5. Avoid mounting cables and cabling components in locations that block access to other equipment within the rack. 6. We recommend labeling power cables for quick identification in the future. 7. If the rack is not full, we recommend allowing space for future cabling. Figure 4: PDU installation. A quick and easy guide to setting up the Dell PowerEdge C8000 A Principled Technologies setup guide 6 Installing BMC cables You can access the Baseboard Management Controller (BMC) of a sled using two modes of operation: Non-Central Independent Mode, in which you access BMC through a dedicated NIC using the sled’s BMC management port Non-Central Consolidated Mode, in which you access BMC through a shared NIC using the PowerEdge C8000 server enclosure’s BMC management port and Ethernet port. For our setup, we chose the Non-Central Consolidated Mode as this reduces the number of Ethernet cables required for system management. To use Non-Central Consolidated Mode, a BMC management cable must be installed inside the sleds. To install the BMC management cable, you must open the sled and remove the hard drive carrier and tray. Figure 5 shows the BMC cable installed. Figure 5: BMC cable installation. A quick and easy guide to setting up the Dell PowerEdge C8000 A Principled Technologies setup guide 7 Connecting Ethernet cables to management ports For Non-Central Consolidated Mode, run Ethernet cables from your network switch to the management port on the front right of the Dell PowerEdge C8000 enclosure as the yellow cables in Figure 6 show. You can also run Ethernet cables to the rear BMC management port (see Figure 7). Before setting up the BMC, connect the sled to a local console and configure the BMC NIC in the BIOS F2 setup menu. In this configuration, you need not plug a network cable into the management port on the front of the compute sled (see Figure 8). In the alternative management configuration, NonCentral Independent Mode, you would plug the Ethernet cable into the front BMC port on each compute sled as highlighted in Figure 8. You would not plug any Ethernet cables into the BMC chassis ports using the Non-Central Independent Mode installation. Figure 6: Management port Ethernet cable installation. Figure 7: Rear BMC management port on chassis. A quick and easy guide to setting up the Dell PowerEdge C8000 Figure 8: Management port on compute sled. A Principled Technologies setup guide 8 We ran cables through the front pass-through holes (see Figure 6) to make the setup easier to see and understand in the pictures. While this is a valid configuration option, please note that running the cables this way has the potential to allow heat from the back of the server rack to come through those holes and create unfavorable temperatures. To avoid such issues, you can run cables on top of the mounting rails instead, using a cable lacing arm to keep cables neatly bundled (see Figure 9). Figure 9: Using a cable lacing arm to bundle cables. A quick and easy guide to setting up the Dell PowerEdge C8000 A Principled Technologies setup guide 9 Installing network cables Each compute sled has two embedded 1Gb NIC connectors on the front of the sled. Figure 10 shows a single bay C8220 sled, a dual bay C8220x GPU sled, and a dual bay C8220x compute sled. Depending on the required bandwidth, these ports should be connected to your network switch. We connected both NIC ports to our network switch to allow for maximum bandwidth and configuration options as shown in Figure 11. Use various lengths of Ethernet cable to ensure neat cabling. For example, use 14’ cables for the chassis in the bottom of the rack, use 7’ to 10’ cables for the middle and upper chassis, and use 5’ lengths of Ethernet cable for the chassis mounted closest to the switch. Group cables by function for better serviceability. Figure 11: Ethernet cable installation with 1Gb NIC connectors. Figure 10: C8220, C8220X GPU and C8220X compute sleds. A quick and easy guide to setting up the Dell PowerEdge C8000 A Principled Technologies setup guide 10 Optional 40GbE PCI Express adapter card One of the options available with the C8220 and C8220X sleds is a Mellanox dual-port InfiniBand® 40GbE PCI Express expansion card. Figure 12 shows two C8220X sleds with an InfiniBand 40GbE card installed in each and network cables attached. When using 40GbE network adapters, the two embedded 1Gb NIC connectors may be unnecessary and therefore not connected. Figure 12: Ethernet cable installation with 40GbE connectors. A quick and easy guide to setting up the Dell PowerEdge C8000 A Principled Technologies setup guide 11 Connecting the C8000XD storage sled The C8000XD storage sled is available with 3.5-inch or 2.5-inch SAS/SATA/SSD in 12or 24-disk configurations. Compute sleds connect to the C8000XD through four SAS connections on the front of the sled. The four SAS ports are labeled A1, A2, B1 and B2. (Figure 13 shows the C8000XD and highlights the four SAS ports.) You can configure these ports in the following four configurations. Refer to the C8000XD owner’s manual for more detailed information about the different configurations. 2 Single Port mode. In this mode, all drives in the C8000XD storage sled are available Figure 13: The C8000XD storage sled. to the connected compute sled. This option allows you to daisy-chain additional C8000XDs to increase the available storage to the compute sled. Dual Port mode. This mode delivers dual path functionality and redundant path capability. The connection to the storage would be through two different host bus adapters (HBAs). Expansion mode (non-zoning). This mode has two cables plugged from the compute sled to the C8000XD, which provides increased bandwidth to the storage. Hard drives in the storage sled are cascaded for extended storage capacity. Expansion mode (zoning). This mode allows configuration for compute sleds to have their own dedicated storage and access only the hard-drives in their assigned zone. In a four-zone configuration, for example, the SAS connections would be grouped so each connector has a dedicated zone (A1/Zone0, A2/Zone1, B1/Zone2, and B2/Zone3). The compute sled connected to A1 SAS connector would only access the drives in zone0. The compute sleds connected to the other SAS connectors would not be able to access zone0 but instead access their dedicated zone drives. 2 http://www.dell.com/support/Manuals/us/en/19/product/poweredge-c8000 A quick and easy guide to setting up the Dell PowerEdge C8000 A Principled Technologies setup guide 12 Refer to the C8000XD owner's manual for more zoning options used in different hard drive configurations.3 The C8220 and C8220X compute sleds have an internal SAS RAID controller to connect to internal drives. To connect the C8000XD storage sleds to the compute sleds, an external SAS controller must be installed in the available PCI Express slot. The external SAS controller is a dual-port card with four external connections. SAS cables must be connected between these ports and the C8000XD storage sled. Figure 14 shows the C8220X connected to two C8000XD storage sled in a Single Port mode configuration. In this configuration, one end of a SAS cable is plugged into the top port of the C8220X external controller and the other end is connected to port A1 on the C8000XD. This provides connection to the Figure 14: SAS cable installation. first C8000XD sled. To connect the second C8000XD, plug one end of the SAS cable to port B1 on the first storage sled and connect the other end to the second C8000XD in port A1. This provides communication to both storage sleds and gives maximum storage capacity for the C8220X compute sled. Because the C8000 chassis can be configured in multiple ways, there are several cabling possibilities. For example, in a configuration with a C8220X compute sled and C8000XD storage sled in the same chassis, the SAS cable would stretch across the chassis. For this situation and as a best practice in general, take the following two notes into consideration. NOTE: When cabling the compute sleds to the storage sleds, it is best practice to have them positioned on top of each other in the server rack so they are lined up vertically and cable between those units. Stretching cables across the chassis is messier and can restrict airflow. 3 http://www.dell.com/support/Manuals/us/en/19/product/poweredge-c8000 A quick and easy guide to setting up the Dell PowerEdge C8000 A Principled Technologies setup guide 13 NOTE: All cabling should not interfere with sled serviceability. To ensure that sled access is quick and easy, run cables out of the way whenever possible. Avoid running cables across main access points. Figure 15 shows the completed installation. Figure 15: Three views of the completed installation. PowerEdge C8000 weight considerations Racks have weight limits, so it is important to know how much your solution will weigh when you add your Dell PowerEdge C8000 and sleds. Figure 16 shows the weights of the C8000 chassis and components as measured in our labs, which can help you estimate the weight of your configuration. A quick and easy guide to setting up the Dell PowerEdge C8000 A Principled Technologies setup guide 14 Weight of C8000 configuration options Storage and compute configuration C8220 sled C8000XD sled with 12 x 3.5” SAS and SATA drives C8000XD sled with 12 x 2.5” SAS drives C8000XD sled with 24 x2.5" SSD drives C8220X sled with 2 x 2.5” SAS, 2 x 2.5” SATA, 4 x 3.5” SAS C8220X sled with 4 x 2.5” SATA, 8 x 2.5” SAS Other components C8000 chassis Power sled Switches Number of sled bays 1 2 2 2 2 2 Number of sled bays 8 1 N/A Weight 10 lbs. 38 lbs. 25 lbs. 26 lbs. 23 lbs. 21 lbs. Weight 45 lbs. 10 lbs. 51 lbs. Figure 16: Weights for various C8000 storage and compute sleds and other components. The Dell PowerEdge 4220W we used weighed 327 pounds.4 Server racks can vary, so consult the manufacture's specs for your rack weight prior to planning your solution for your datacenter. For example, as Figure 16 shows, a chassis full of storage sleds would weigh approximately 217 pounds (152 pounds for the C8000XD sleds, 20 pounds for the power sleds, and 45 pounds for the chassis). You can perform the same calculations to find the weight of other chassis and calculate the weight of a full rack. NOTE: Prior to configuring a rack build, consider facility weight limitations and the benefits of having a site survey. We recommend discussing the rack installation with your facility manager first. The weight of all components we set up (see Figure 15) was 1,639 lbs. This weight includes the rack, the eight C8000 chassis with sleds installed, topof-rack switches, and all cables. In addition to the items in Figure 16, you must take into consideration network and power cables. The combination of Ethernet, power, and SAS cables added 37 pounds to the configuration we set up. 4 Please note that our weight results differed slightly from the Dell Web site specifications, which list the rack at 335 pounds. A quick and easy guide to setting up the Dell PowerEdge C8000 A Principled Technologies setup guide 15 ABOUT PRINCIPLED TECHNOLOGIES Principled Technologies, Inc. 1007 Slater Road, Suite 300 Durham, NC, 27703 www.principledtechnologies.com We provide industry-leading technology assessment and fact-based marketing services. We bring to every assignment extensive experience with and expertise in all aspects of technology testing and analysis, from researching new technologies, to developing new methodologies, to testing with existing and new tools. When the assessment is complete, we know how to present the results to a broad range of target audiences. We provide our clients with the materials they need, from market-focused data to use in their own collateral to custom sales aids, such as test reports, performance assessments, and white papers. Every document reflects the results of our trusted independent analysis. We provide customized services that focus on our clients’ individual requirements. Whether the technology involves hardware, software, Web sites, or services, we offer the experience, expertise, and tools to help our clients assess how it will fare against its competition, its performance, its market readiness, and its quality and reliability. Our founders, Mark L. Van Name and Bill Catchings, have worked together in technology assessment for over 20 years. As journalists, they published over a thousand articles on a wide array of technology subjects. They created and led the Ziff-Davis Benchmark Operation, which developed such industry-standard benchmarks as Ziff Davis Media’s Winstone and WebBench. They founded and led eTesting Labs, and after the acquisition of that company by Lionbridge Technologies were the head and CTO of VeriTest. Principled Technologies is a registered trademark of Principled Technologies, Inc. All other product names are the trademarks of their respective owners. Disclaimer of Warranties; Limitation of Liability: PRINCIPLED TECHNOLOGIES, INC. HAS MADE REASONABLE EFFORTS TO ENSURE THE ACCURACY AND VALIDITY OF ITS TESTING, HOWEVER, PRINCIPLED TECHNOLOGIES, INC. SPECIFICALLY DISCLAIMS ANY WARRANTY, EXPRESSED OR IMPLIED, RELATING TO THE TEST RESULTS AND ANALYSIS, THEIR ACCURACY, COMPLETENESS OR QUALITY, INCLUDING ANY IMPLIED WARRANTY OF FITNESS FOR ANY PARTICULAR PURPOSE. ALL PERSONS OR ENTITIES RELYING ON THE RESULTS OF ANY TESTING DO SO AT THEIR OWN RISK, AND AGREE THAT PRINCIPLED TECHNOLOGIES, INC., ITS EMPLOYEES AND ITS SUBCONTRACTORS SHALL HAVE NO LIABILITY WHATSOEVER FROM ANY CLAIM OF LOSS OR DAMAGE ON ACCOUNT OF ANY ALLEGED ERROR OR DEFECT IN ANY TESTING PROCEDURE OR RESULT. IN NO EVENT SHALL PRINCIPLED TECHNOLOGIES, INC. BE LIABLE FOR INDIRECT, SPECIAL, INCIDENTAL, OR CONSEQUENTIAL DAMAGES IN CONNECTION WITH ITS TESTING, EVEN IF ADVISED OF THE POSSIBILITY OF SUCH DAMAGES. IN NO EVENT SHALL PRINCIPLED TECHNOLOGIES, INC.’S LIABILITY, INCLUDING FOR DIRECT DAMAGES, EXCEED THE AMOUNTS PAID IN CONNECTION WITH PRINCIPLED TECHNOLOGIES, INC.’S TESTING. CUSTOMER’S SOLE AND EXCLUSIVE REMEDIES ARE AS SET FORTH HEREIN. A quick and easy guide to setting up the Dell PowerEdge C8000 A Principled Technologies setup guide 16