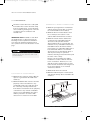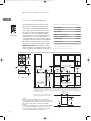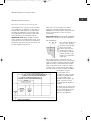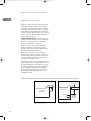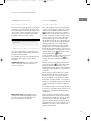
1
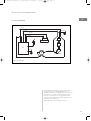
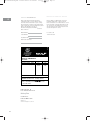
WOK installation_Mono 1.0:Intl Multi-F CT Install
31/3/10
1:26 PM
Page 1
MULTI-FUNCTION COOKTOP
INSTALLATION INSTRUCTIONS
Model number
ICBIM15G/S
This cooktop is approved for use with
Natural and Propane gases.
Leave instructions with the owner.
WOK installation_Mono 1.0:Intl Multi-F CT Install
31/3/10
1:26 PM
Page 2
C O N TA C T
I N F O R M AT I O N
Imported and
distributed by:
Multyflex
Website:
www.multyflex.com.au
M U LT I - F U N C T I O N C O O K T O P
Model No: ICBIM15G/S
As you follow these instructions, you will
notice WARNING and CAUTION symbols.
This blocked information is important for the
safe and efficient installation of Wolf equipment. There are two types of potential
hazards that may occur during installation.
signals a situation where minor injury or
product damage may occur if you do not
follow instructions.
states a hazard that may cause serious
injury or death if precautions are not
followed.
Another footnote we would like to identify is
IMPORTANT NOTE: This highlights information that is especially relevant to a problemfree installation.
WOLF ® is a registered trademark of Wolf Appliance, Inc.
WOK installation_Mono 1.0:Intl Multi-F CT Install
31/3/10
1:26 PM
Page 3
W O L F M U LT I - F U N C T I O N C O O K T O P
I N S TA L L AT I O N R E Q U I R E M E N T S
IMPORTANT NOTE:
Installer: Please read the entire Installation Instructions prior to installation.
Save these instructions for the local
inspector’s reference, then leave them
with the homeowner.
Homeowner: Please read and keep
these instructions for future reference
and be sure to read the entire Use &
Care Information prior to use.
IMPORTANT NOTE:
Statutory requirements:
This appliance shall be installed in accordance with the manufacturer’s installation
instructions, local gas fitting regulations,
municipal building codes, electrical wiring
regulations, and AS5601 the Australian
Standard for gas installation. Refer also to
AS5601 for gas pipe sizing tables.
If the information in this book is
not followed exactly, a fire or
explosion may result, causing
property damage, personal injury
or death.
IMPORTANT NOTE:
Installation to be carried out
only by an authorised person.
Do not modify this appliance.
A ventilation hood is recommended for use with the Wolf
gas multi-function cooktop.
R AT I N G P L AT E
I N F O R M AT I O N
Model Number
ICBIM15G/S
WHAT TO DO IF YOU
SMELL GAS:
Serial Number
Do not try to light any appliance.
Do not touch any electrical
switch.
Do not use any phone in your
building.
Immediately call your gas
supplier from a neighbor’s
phone. Follow the gas
supplier’s instructions.
If you cannot reach your gas
supplier, call the fire department.
Location of rating
plate under cooktop
Rating plate location
3
WOK installation_Mono 1.0:Intl Multi-F CT Install
31/3/10
1:26 PM
Page 4
W O L F M U LT I - F U N C T I O N C O O K T O P
S A F E T Y C O N S I D E R AT I O N S
B E F O R E Y O U S TA RT
If the information in this manual is not
followed exactly, a fire or explosion may
result causing property damage, personal
injury or death.
Statutory requirements
This appliance is not intended for use
by persons (including children) with
reduced physical, sensory or mental
capabilities, or lack of experience and
knowledge, unless they have been
given supervision or instruction
concerning use of the appliance by a
person responsible for their safety
Children should be supervised to
ensure they do not play with the appliance.
Do not spray aerosols in the vicinity of
this appliance while it is operation.
Where this appliance is installed in
marine craft or caravans, it shall not be
used as a space heater.
Never leave the appliance unattended
when cooking with fat or oil. If could
ignite if overheated.
In case of defect, switch electric power
off at the mains.
Never use an appliance that is not
working properly.
Do not allow the flame to extend
beyond the edge of the cooking utensil.
This instruction is based on safety
considerations.
Do not forget that the unit becomes hot
when in use. Common sense is important. Just because the flame is out,
does not mean parts cannot still be hot.
Keep the appliance area clear and free
from combustible materials, gasoline
and other flammable vapours and
liquids.
This cooktop is intended for indoor use.
4
This appliance shall be installed in
accordance with the manufacturer’s
installation instructions, local gas fitting
regulations, municipal building codes,
electrical wiring regulations, and
AS5601 the Australian Standard for gas
installations. Refer also to AS5601 for
gas piping sizes.
Proper installation is your responsibility. Have a authorised person install this
cooktop. You must also ensure that
electrical installation is adequate and in
compliance with all local codes and
ordinances.
Please check the product rating plate or
Use & Care Information for type of gas
needed.
Proper gas supply connection must be
available; refer to Gas Supply Requirements on page 8. Electrical ground is
required; see Electrical Requirements
on page 9.
Make sure you have everything necessary for correct installation. It is the
responsibility of the installer to comply
with the installation clearances specified on the product rating plate. The
rating plate can be found on the underside of the cooktop.
WOK installation_Mono 1.0:Intl Multi-F CT Install
31/3/10
1:26 PM
Page 5
I N S TA L L AT I O N I N S T R U C T I O N S
S I T E P R E PA R AT I O N
Check the location where the cooktop will
be installed. The location should be away
from strong draft areas, such as windows,
doors and strong heating vents or fans. Do
not obstruct flow of combustion and
ventilation air.
IMPORTANT NOTE: Installation of the Wolf
gas multi-function cooktop must meet the
following location requirements. All dimensions listed are minimum requirements for
safe operation. Refer to the illustration on this
page.
Failure to locate the cooktop module
without the proper clearances will result
in a fire hazard.
OVERHEAD CABINET DIMENSIONS
C) Minimum spacing between overhead side
cabinets must be greater than or equal to
the nominal width of the module(s).
D) Minimum 457 mm vertical distance from
the countertop to the bottom of side
cabinets within minimum side clearance.
E) Minimum vertical distance between the
countertop and combustible materials
above the cooktop module must be
762 mm. Where this is not practicable, the
underside of any combustible material less
than 600 mm above the burner shall be
protected by non-combustible mill board at
least 6 mm thick which is covered with
sheet metal not less than 0.4 mm thick, or
shall be protected by an equivalent
material, extending at least 225 mm beyond
the sides of the cooktop.
Range hoods and exhaust fans shall be
installed in accordance with the manufacturer’s instructions. However, in no case
shall the clearance between the top of the
burner and the underside of the range hood
be less than 750 mm, or an overhead
exhaust fan, 750 mm.
F) Minimum 64 mm from rear wall.
L O C AT I O N I N C O U N T E RT O P
A) Minimum flat countertop surface. Must be
equal to or greater than the width of the
module(s).
G) Maximum 330 mm depth of overhead and
side cabinets directly above and within side
clearance.
B) Minimum 200 mm wide clearance from the
periphery of the nearest burner to any
combustible surface up to 457 mm above
the countertop (noted by shaded area).
If the distance measured from the periphery
of the burner to any vertical combustible
surface, is less than 200 mm, the surface
shall be protected in accordance with
clause 5.12.1.1 and 5.12.1.2 of AS 5601.
C
G
D
E
F
B
A
B
Minimum installation clearances
5
WOK installation_Mono 1.0:Intl Multi-F CT Install
31/3/10
1:26 PM
Page 6
W O L F M U LT I - F U N C T I O N C O O K T O P
I N S TA L L AT I O N S P E C I F I C AT I O N S
The illustrations below provide the overall
dimensions, installation specifications and
countertop cut-out for Model ICBIM15G/S.
Model
ICBIM15G/S
MODEL ICBIM15G/S DIMENSIONS
If the cooktop is not installed above an oven,
the gas service may be supplied through the
floor. When an oven is installed below the
cooktop, unless you are using cabinets deeper
than 610 mm, it is recommended that the
electrical supply be placed in the base cabinet
to the right of the oven. Refer to the Installation
Specifications illustration below for specifics
on placement of the electrical and gas supply.
IMPORTANT NOTE: When multiple cooktops
and/or modules are installed side by side, refer
to the countertop cut-out dimensions on page 7.
Overall Width
381 mm
Overall Height
127 mm
Overall Depth
533 mm
Minimum Cabinet Depth
578 mm
Minimum Height Clearance*
127 mm
Cut-Out Width
356 mm
Cut-Out Depth
489 mm
*A minimum height clearance of 140 mm is
required between countertop and any combustible
surface directly below the cooktop.
Unit dimensions may vary to ± 3 mm.
533 mm
533
mm
OVERALL
OVERALL
DEPTH
DEPTH
381 MM
381 mm
OVERALL
OVERALL
WIDTH
WIDTH
838 mm RECOMMENDED
330 mm
max
64**
mm
127 MM
127
mm
CABINET WIDTH
457 mm
489 mm
COOKTOP CUT-OUT
DEPTH
64 mm
min
178 mm* min
762 mm
COUNTERTOP TO
COMBUSTIBLE
MATERIALS
ABOVE COOKTOP
Note
B
356 mm
CUT-OUT TO
COMBUSTIBLE COOKTOP CUT-OUT
WIDTH
MATERIALS
(BOTH SIDES)
Note
A
127 mm
E
914 mm
Overall Dimensions
STANDARD
FLOOR TO
COUNTERTOP
HEIGHT
G
381
mm
381 mm
LOCATION OF GAS
SUPPLY MAY ALSO EXTEND
127 mm ON FLOOR
FROM BACK WALL
LOCATION OF GAS SUPPLY
MAY ALSO EXTEND 127 mm ON
FLOOR FROM BACK WALL
127
mm
381 mm
NOTE: Application shown allows for installation of two 381 mm modules side-by-side with 838 mm recommended cabinet width. 457 mm
recommended cabinet width for installation of single 381 mm cooktop or module. *Minimum clearance from both side edges of cooktop cut-out
to combustible materials up to 457 mm above countertop. **Minimum clearance from rear edge of cooktop cut-out to combustible materials up
to 457 mm above countertop.
356 mm
COOKTOP CUT-OUT
WIDTH
Installation Specifications and
Countertop Cut-Out Dimensions
Note A:
Side clearances. If the distance measured from the
periphery of the nearest burner to any vertical surface is
less than 200 mm, the surface shall be protected in accordance with clauses 5.12.1.1. & 5.12.1.2 of AS5601.
Note B:
The rangehood fitted above the cooktop must be installed
according to the installation instructions for the rangehood. A minimum distance of 750 mm is required for a
range hood and 750 mm for an exhaust fan.
6
489 mm
64 mm
COOKTOP
CUT-OUT DEPTH
min
FRONT OF COUNTERTOP
WOK installation manual:Intl Multi-F CT Install
6/6/11
1:45 PM
Page 7
I N S TA L L AT I O N I N S T R U C T I O N S
I N S TA L L AT I O N O P T I O N S
M U LT I P L E C O O K T O P I N S TA L L AT I O N
If the multi-function cooktop is to be used with
any combination of additional cooktop units or
modules with a filler strip, the cut-out width is
calculated by adding the corresponding units'
cut-out dimensions plus 32 mm for each additional unit. Refer to the illustration below.
IMPORTANT NOTE: When multiple cooktops
and/or modules are installed side by side, each
unit must have its own separate recommended
electrical circuit. They must also have their own
seperate regulator and gas line.
When two or more modules are installed
together, an integrated module filler strip
(IFILLER/S) is recommended. Contact your Wolf
dealer for information on these accessory
components.
IMPORTANT NOTE: Review specific installation
instructions for product to product capabilities.
Gas connection:
The cooktop is adjusted to
operate on the gas type
specified on the gas type
label located on the
bottom of the unit. If in
doubt as to the type of
gas available contact the
network operator or gas
supplier for confirmation
of gas type.
The cooktop must be connected to the gas
supply with upstream connection of an isolation
valve in accordance with the respectively valid
regulations. We recommend that the isolation
valve be fitted prior to the cooktop to enable
isolation of the cooktop from the gas supply.
The valve must be easily accessible at all times.
This appliance may be
connected with a hose
assembly, class B or class D in
accordance to AS/NZS 1869.
If connected with a hose
assembly ensure that the gas
supply connection point is
accessible with the appliance
installed.
The position of the inlet connection is measured from bottom
RH rear of unit, 40 mm centre
line from rear and 55 mm
centre line from RH side.
7
WOK installation_Mono 1.0:Intl Multi-F CT Install
31/3/10
1:26 PM
Page 8
W O L F M U LT I - F U N C T I O N C O O K T O P
G A S S U P P LY R E Q U I R E M E N T S
The product rating plate, located on the
underside of the cooktop, has information on the type of gas that should be
used. If this information does not agree
with the type of gas available, contact
the network operator or gas supplier.
EXPLOSION HAZARD —
Securely tighten all gas connections.
Failure to do so can result in explosion,
fire or death.
If further information is required please
call:
I M P O RTA N T
NOTE
1300 808 859
This installation
must conform with
local codes and
ordinances.
G A S R AT I N G
HGC
(MJ/hr)
(gas)
Electrical
rating
(KW)
Injector
size
(mm)
Test point
pressures
(kPa)
ICBIM15/S
24.0
6.66
2.45
1.00
ICBIM15/S-LP
24.0
6.66
1.35
2.75
Model
8
WOK installation_Mono 1.0:Intl Multi-F CT Install
31/3/10
1:26 PM
Page 9
I N S TA L L AT I O N I N S T R U C T I O N S
ELECTRICAL REQUIREMENTS
ELECTRICAL SHOCK HAZARD —
Plug into a grounded earth pin on plug
electrical outlet.
Do not remove ground prong.
Do not use an adapter.
Failure to follow these instructions can
result in electric shock, fire or death.
IMPORTANT NOTE: If codes permit and a
separate ground wire is used, it is recommended that a qualified electrician determine
that the ground path is adequate.
Electronic ignition systems operate within
wide voltage limits, but proper ground and
polarity are necessary. In addition to checking
that the electrical outlet provides 240 V AC
power and is correctly grounded, the outlet
must be checked by a qualified electrician to
see if it is wired with correct polarity.
A wiring diagram covering the control circuit
for the Wolf multi-function cooktop model can
be found on page 13.
If an electrical outlet is not available, it is the
obligation of the customer to have a properly
grounded, 3-pin electrical outlet installed by a
qualified electrician.
IMPORTANT NOTE: Check with a qualified
electrician if you are not sure whether the
cooktop is properly grounded.
IMPORTANT NOTE: Do not ground to a gas
pipe.
A 240 V AC, 10 Amp electrical supply is
required. A time-delay fuse or circuit breaker is
recommended. It is recommended that a
separate circuit serving only this appliance be
provided.
9
WOK installation_Mono 1.0:Intl Multi-F CT Install
31/3/10
1:26 PM
Page 10
W O L F M U LT I - F U N C T I O N C O O K T O P
C O O K T O P I N S TA L L AT I O N
Insert the cooktop into the countertop cut-out
opening. Center the cooktop in the opening
and make sure that the front edge of cooktop
is parallel to the front edge of the countertop.
Check that all required clearances are met. Use
a pencil to outline the rear edge of the cooktop
on the countertop. Remove the cooktop from
the countertop opening.
IMPORTANT NOTE: When repositioning the
cooktop in the countertop cut-out opening, lift
the entire cooktop up from the opening to
prevent scratching the countertop.
Remove the foam strip from the hardware
package. Apply the foam strip around the
bottom of the burner box flush with the edge
as shown in the illustration below.
Reinsert the cooktop into the countertop
opening. Check that the cooktop is parallel to
the front edge of the countertop. Lift the entire
cooktop to make adjustments and align the
rear edge with the pencil line.
Attach the brackets to the burner box by inserting the clips into the rectangular punchouts on
the left and right side of the burner box. Insert
the 89 mm clamping screws into the brackets.
Use a screwdriver to tighten the clamping
screws against the underside of the countertop. Refer to the illustration below. Do not
overtighten screws.
Countertop
Burner Box
Cooktop
Burner Box
Foam
Strip
Bracket
Clip
Foam strip application
10
Bracket installation
89 mm
Clamping
Screw
WOK installation_Mono 1.0:Intl Multi-F CT Install
31/3/10
1:26 PM
Page 11
I N S TA L L AT I O N I N S T R U C T I O N S
C O O K T O P I N S TA L L AT I O N
S U R FA C E BURNERS
GAS LEAK TESTING
INITIAL LIGHTING
Use a brush and liquid detergent to test all gas
connections for leaks. Bubbles around connections will indicate a leak. If a leak appears, shut
off gas valve controls and adjust connections.
Then check connections again. Clean all the
detergent solution from the cooktop.
The cooktop burner uses an electronic igniter
in place of a standing pilot. When the cooktop
control knob is pushed in and turned to the
position, the system creates a spark to
light the burner. This sparking continues for 4
seconds or until the electronic ignition senses
a flame, which ever comes first. If the igniter
fails to ignite the gas in 4 seconds, the gas
safety shutoff valve will close, eliminating the
gas flow for 5 seconds. The valve will reopen
after the purge time of 5 seconds, and the
igniter will automatically attempt to re-ignite
the gas. This cycle of events is attempted 3
times. After the third attempt, in order for gas
to flow to the burner once again, the user must
return the knob to the
position and then
turn the knob to the
position.
Never test for a gas leak with a match or
other flame.
C O M P L E T I N G T H E I N S TA L L AT I O N
Once the cooktop has been checked for any
gas leaks, plug the power supply cord into the
grounded electrical outlet.
Place the burner head on the burner base and
position the burner grate over the burner
assembly.
IMPORTANT NOTE: Do not seal the cooktop
to the countertop. It must be removed if
service is necessary.
To check operation of the cooktop burner, push
in and turn the control knob to the
position. The flame should light within four
seconds.
If the burner does not light properly, turn the
control knob to the
position. Check that
the burner head is in the proper position.
Check that the power supply cord is plugged in
and that the circuit breaker or house fuse has
not blown.
Check operation again; If flame is not established within the ignition cycle time, release
the knob, open a door and wait 1 minute
before attempting a new ignition procedure.
If the flames are extinguished - for any reason
whatever - turn OFF the control knob and wait
at least 1 minute before retrying to ignite the
burner.
Ensure that the flames do not extinguish when
you reduce to low flame quickly. Check correct
operation of each burner individually and in
combination.
IMPORTANT NOTE: Initial lighting of the
cooktop burner may take slightly longer as
air in the system must be purged before
gas can be supplied to the burner.
Flames should be clear blue, with no yellow
tipping. If the burners show any abnormaility
check that burner heads are correctly located
and refer to the ‘trouble shooting’ guide on
page 13 of the Use & Care manual. If satisfactory performance can not be obtained, contact
Multyflex. For service contact number refer
page 12 of this booklet.
11
WOK installation manual:Intl Multi-F CT Install
6/6/11
1:49 PM
Page 12
W O L F M U LT I - F U N C T I O N C O O K TO P
C O O K TO P R E M O VA L
C O N TA C T
I N F O R M AT I O N
Imported and
distributed by:
Multyflex
Website:
www.multyflex.com.au
If it is necessary to remove the multifunction cooktop for service, shut off the
gas supply. Disconnect the gas and
electric supply. Remove the mounting
brackets on the right and left side of the
burner box and remove the cooktop.
Reinstall in the reverse order and check
the gas connection for leaks.
TROUBLE SHOOTING
IMPORTANT NOTE: If the multi-function
cooktop does not operate properly,
follow these troubleshooting steps:
Verify that power is being supplied to
the cooktop.
Check the gas supply and electrical
connections to ensure that the installation has been completed correctly.
Refer to the Troubleshooting Guide in
the Wolf Multi-Function Cooktop Use
& Care Information.
If the cooktop still does not work,
contact your Wolf dealer or regional
distributor. Do not attempt to repair
the cooktop yourself.
12
IF YOU NEED SERVICE
For service in your area, contact
either your Wolf dealer or call
1300 808 859.
When calling for service, you will
need the model and serial number of
your multi-function cooktop. Both
numbers are listed on the rating
plate, located on the underside of the
cooktop. A copy of the data plate is
reproduced below.
IMPORTANT NOTE:
Installation and service must be
performed by a qualified installer or
service agency.
Do not modify this appliance.
WOK installation_Mono 1.0:Intl Multi-F CT Install
31/3/10
1:26 PM
Page 13
I N S TA L L AT I O N I N S T R U C T I O N S
WIRING DIAGRAM
BLACK
GRN/YEL
WHITE
BLACK
WHITE
GAS VALVE
10
7
4
3
2
DSI
GRN/YEL
WHITE
POWER CORD
RED
BLACK
Model ICBIM15G/S
The information and images in this book are the
copyright property of Wolf Appliance, Inc., an
affiliate of Sub-Zero, Inc. Neither this book nor any
information or images contained herein may be
copied or used in whole or in part without the
express written permission of Wolf Appliance, Inc.,
an affiliate of Sub-Zero, Inc.
©Wolf Appliance, Inc. all rights reserved.
13
WOK installation_Mono 1.0:Intl Multi-F CT Install
31/3/10
1:26 PM
BEFORE CALLING FOR SERVICE
SERVICE I N F O R M AT I O N
When requesting information, literature,
replacement parts or service, always refer to
the model and serial number of your cooktop.
This information is found on the product rating
plate located rear of the removable lower panel.
Refer to the illustration on page 3.
Record the rating plate information below for
future reference.
Before calling your Wolf dealer, refer to the
troubleshooting guide on page 12. Check
the household fuse or circuit breaker to see if it
has been blown or tripped and that the electrical connection to the appliance has not been
disconnected. A power outage may also have
caused a disruption in service.
Model Number
For service call:
1300 808 859
Serial Number
Installation Date
MF025
Wolf Dealer and Phone
GSCS20229
SAI GLOBAL
AS4551
Made in USA
Model No: ICBIM15G/S
Serial No:
Gas type
Test point press. (kPa)
Injector sizes (mm)
Total Consumption (MJ/h)
NG
1.0
LPG
2.75
2.45
1.35
24.0
24.0
Electrical compliance: in accordance with
AS/NZS3100 240 V AC, 10 amps, 50 Hz
Imported & distributed by
Suite 1, 151 Barkley Avenue. Burnley VIC 3121
t: +61 3 9421 0232
IMPORTED &
D I S T R I B U T E D B Y:
MultyFlex
C O N TA C T
I N F O R M AT I O N
Website:
www.multyflex.com.au
14
Page 14
WOK installation_Mono 1.0:Intl Multi-F CT Install
31/3/10
1:26 PM
Page 15
15
WOK installation_Mono 1.0:Intl Multi-F CT Install
31/3/10
1:26 PM
Page 16
Imported & distributed by Multyflex
www.multyflex.com.au
MF034