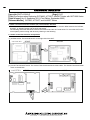
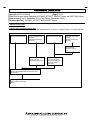
1
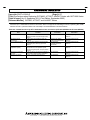
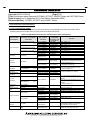
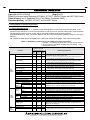
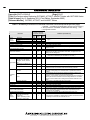
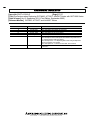
TECHNICAL BULLETIN
[Issue No.] GOT-A-0018-G
[Page] 1/27
[Title] Precautions when Replacing GOTA800, A77GOT, A64GOT Series with GOT1000 Series
[Date of Issue] Ver.G: September 2011 (First Edition: September 2005)
[Relevant Models] GOT800, A77GOT, and A64GOT Series
Thank you for your continued support of Mitsubishi Graphic Operation Terminal (GOT).
In TECHNICAL BULLETIN PLC-D-358 issued in July, 1999 and TECHNICAL BULLETIN PLC-D-406 issued in
July, 2001, we have already announced discontinuation of the GOT old series, which includes the GOT800,
A77GOT, and A64GOT series. For the GOT800, A77GOT, and A64GOT series, the repair acceptance period has
already ended. Therefore, we recommend that you replace the old series with the GOT1000 series with excellent
functions and performance.
Table of Contents
1. Requests for customers ··············································································································2
2. Selection of GOT ························································································································2
2.1 Precautions when replacing A851GOT with GOT1000 series·················································3
3. Communication units and options································································································5
3.1 List of replacement models····································································································5
3.2 Units that require new setting method ····················································································6
3.3 Communication modules and options without replaceable models ··········································· 7
3.4 Replacing the GOT800, A77GOT, or A64GOT series connected to
the MELSECNET(Ⅱ) or MELSECNET/B network system with the GOT1000 series·············· 7
3.4.1 Replacing the network in the entire system with the MELSECNET/H
network system···················································································································· 7
3.4.2 Changing the connection type between the programmable controller and
the GOT without change of the network in the entire system ············································· 7
3.5 Replacing the GOT800 or A77GOT series connected to
the MELSECNET/10 (programmable controller to programmable controller
optical loop/coaxial bus) network system with the GOT1000 series·········································· 9
4. Cables ············································································································································ 10
4.1 Bus connection cables·············································································································· 10
4.1.1 Utilization of cables in present use····················································································· 10
4.1.2 Replacing GOT when using multiple units of bus connection············································ 10
4.2 RS-232 cable···························································································································· 11
4.3 RS-422 cable···························································································································· 11
4.4 Network cable (MELSECNET/10 and CC-Link) ···································································11
4.5 Other cables ····························································································································· 11
5. Mounting intervals ························································································································· 12
5.1 GOT800 and A77GOT series ································································································· 12
5.2 A64GOT series························································································································ 12
6. Cable connection direction and PC (CF) card insertion direction··············································· 13
6.1 Cable connection direction and position············································································· 13
6.2 CF card insertion direction··································································································· 14
7. Monitor screen data ·················································································································· 16
7.1 Using existing monitor screen data ···················································································· 16
7.1.1 How to convert monitor screen data from GOT800 series to GOT1000 series ············ 17
7.1.2 How to convert monitor screen data from A77GOT series to GOT1000 series ··········· 20
7.1.3 How to convert monitor screen data from A64GOT series to GOT1000 series ··········· 21
7.1.4 Precautions for data conversion···················································································21
7.1.5 USB serial adapter available for communication between
the data transfer tool and the GOT800 series······························································21
7.2 Compatibility of monitor screen data ··················································································22
7.2.1 Data compatibility list ···································································································22
7.2.2 Monitor screen data compatibility between GOT800 series and GOT1000 series ······· 24
7.2.3 Monitor screen data compatibility between A77GOT or A64GOT series
and GOT1000 series···································································································· 25
7.3 Functions that require new settings ···················································································· 26
7.3.1 Printers ························································································································· 26
HEAD OFFICE : TOKYO BUILDING, 2-7-3 MARUNOUCHI, CHIYODA-KU, TOKYO 100-8310, JAPAN
NAGOYA WORKS : 1-14, YADA-MINAMI 5-CHOME, HIGASHI-KU, NAGOYA, JAPAN
TECHNICAL BULLETIN
[Issue No.] GOT-A-0018-G
[Page] 2/27
[Title] Precautions when Replacing GOTA800, A77GOT, A64GOT Series with GOT1000 Series
[Date of Issue] Ver.G: September 2011 (First Edition: September 2005)
[Relevant Models] GOT800, A77GOT, and A64GOT Series
1. Requests for customers
The GOT model selection list (Table 2-1) shows the recommended GOT1000 series models that have no or
less restrictions on the specifications when replacing each old series with the GOT1000 series. There may be
some other models that you can select depending on their system environment. Therefore, we recommend you
to select appropriate models by carefully considering the range of performance in current systems.
2. Selection of GOT
Select a GOT model.
When replacing each old series with the GOT1000 series, the GOTs have different panel cutting dimensions.
Therefore, use an attachment. For some GOT models, no compatible attachment is available. The following
table shows the recommended GOT1000 series models and the compatibility of the panel cutting dimensions.
Table 2-1 Recommended GOT1000 series models and compatibility of panel cutting dimensions
GOT800, A77GOT and A64GOT series in use
A870GOT-EWS
A870GOT-SWS
A870GOT-TWS
A8GT-70GOT-EW,
A8GT-70GOT-EB
With A8GT-PWEL
With A8GT-PW24
A870GOT
A8GT-70GOT-SW,
A8GT-70GOT-SB
With A8GT-PWST
With A8GT-PW24
A8GT-70GOT-TW,
A8GT-70GOT-TB
With A8GT-PWTF
With A8GT-PW24
A810GOT-CS
A810GOT
With A8GT-PWTF
A8GT-10GOT-C
With A8GT-PW24
A850GOT-LWD(-M3),
A850GOT-LBD(-M3)
A850GOT
A851GOT
A852GOT
A853GOT
With RS-422 connection
With communication
module
A850GOT-SWD(-M3),
With RS-422 connection
A850GOT-SBD(-M3)
With communication
module
A851GOT-LWD(-M3),A851GOT-LBD(-M3)
(*8)
A851GOT-SWD(-M3),A851GOT-SBD(-M3) (*8)
A852GOT-LWD(-M3),A852GOT-LBD(-M3)
A852GOT-SWD(-M3),A852GOT-SBD(-M3)
A853GOT-LWD(-M3), A853GOT-LBD(-M3)
A853GOT-SWD(-M3), A853GOT-SBD(-M3)
Recommended
GOT1000 series for
replacement
(*7)
GT1662-VNBA(*10)
GT1562-VNBA
GT1675-VNBA(*10)
GT1575-VNBA
GT1675M-VTBA
GT1575-VTBA
GT1662-VNBA(*10)
GT1562-VNBA
GT1662-VNBD(*10)
GT1562-VNBD
GT1675-VNBA(*10)
GT1575-VNBA
GT1675-VNBD(*10)
GT1575-VNBD
GT1675M-VTBA
GT1575-VTBA
GT1675M-VTBD
GT1575-VTBD
GT1675M-STBA(*1)
GT1575V-STBA(*1)
GT1675M-STBA(*1)
GT1575V-STBA(*1)
GT1675M-STBD(*1)
GT1575V-STBD(*1)
GT1550-QLBD(*2)
Panel cut
compatibility
○:Compatible
×:Not
compatible
×
×
×
×
×
×
×
×
×
×
×
×
×
×
×
×
×
×
×
×
×
×
×
×
×
Required attachments
GT15-60ATT-87
GT15-60ATT-87
GT15-70ATT-87
GT15-70ATT-87
GT15-70ATT-87
GT15-70ATT-87
GT15-60ATT-87
GT15-60ATT-87
GT15-60ATT-87
GT15-60ATT-87
GT15-70ATT-87
GT15-70ATT-87
GT15-70ATT-87
GT15-70ATT-87
GT15-70ATT-87
GT15-70ATT-87
GT15-70ATT-87
GT15-70ATT-87
None
None
None
None
None
None
GT15-50ATT-85
GT1550-QLBD(*9)
×
GT15-50ATT-85
GT1555-QSBD(*2)
×
GT15-50ATT-85
GT1555-QSBD(*9)
×
GT15-50ATT-85
GT1550-QLBD(*3)
GT1555-QSBD(*3)
GT1550-QLBD(*4)
GT1555-QSBD(*4)
GT1550-QLBD(*5)
GT1555-QSBD(*5)
×
×
×
×
×
×
GT15-50ATT-85
GT15-50ATT-85
GT15-50ATT-85
GT15-50ATT-85
GT15-50ATT-85
GT15-50ATT-85
HEAD OFFICE : TOKYO BUILDING, 2-7-3 MARUNOUCHI, CHIYODA-KU, TOKYO 100-8310, JAPAN
NAGOYA WORKS : 1-14, YADA-MINAMI 5-CHOME, HIGASHI-KU, NAGOYA, JAPAN
TECHNICAL BULLETIN
[Issue No.] GOT-A-0018-G
[Page] 3/27
[Title] Precautions when Replacing GOTA800, A77GOT, A64GOT Series with GOT1000 Series
[Date of Issue] Ver.G: September 2011 (First Edition: September 2005)
[Relevant Models] GOT800, A77GOT, and A64GOT Series
(from the previous page)
Recommended
GOT1000 series for
replacement
(*7)
GOT800, A77GOT and A64GOT series in use
A77GOT-CL, A77GOT-CL-S3, A77GOT-CL-S5
A77GOT
A77GOT-EL, A77GOT-EL-S3, A77GOT-EL-S5
A77GOT-L, A77GOT-L-S3, A77GOT-L-S5
A64GOT
A64GOT-L
A64GOT-LT21B
(*2)
(*2, *6)
GT1662-VNBA(*10)
GT1562-VNBA
GT1662-VNBA(*10)
GT1562-VNBA
GT1662-VNBA(*10)
GT1562-VNBA
GT1550-QLBD
GT1550-QLBD
Panel cut
compatibility
○:Compatible
×:Not
compatible
×
×
×
×
×
×
×
×
Required attachments
GT15-60ATT-77
GT15-60ATT-77
GT15-60ATT-87
GT15-60ATT-87
GT15-60ATT-77
GT15-60ATT-77
None
None
*1 The A810GOT is a GOT that is dedicated to output of the CRT display and others. The GOT1000 series has no GOT that
is dedicated to the output of the CRT display and others. When replacing with GOT1000 series, use the GOT1000 series
that supports the video/RGB function, and connect an RGB output unit to the GOT.
GOT1000 series that supports video/RGB function
GT1675M-VTBA
GT1675M-VTBD
GT1675M-STBA
GT1675M-STBD
GT1575V-STBA
GT1575V-STBD
RGB output unit for GOT1000 series
GT16M-ROUT
GT15V-75ROUT
*2 When replacing, use an RS-422 serial communication unit (GT15-RS4-9S) depending on the situation.
*3 When replacing, use an A bus connection unit (GT15-ABUS (2) or GT15-75ABUS (2)L).
*4 When replacing, use a CC-Link communication unit (GT15-J61BT13).
*5 When replacing, communicate with RS-232 port of GOT or use RS-232 serial communication unit (GT15-RS2-9P).
*6 The GOT1000 series does not support the MELSECNET/B network system. Refer to Section 3.4.
*7 The front face of all the GOT1000 series models is black. No models with the ivory front face are available.
*8 For a replacement model, the GT11 dedicated to the bus connection is also available. For details, refer to Section 2.1.
*9 For the A bus connection, use an A bus connection unit (GT15-ABUS(2) or GT15-75ABUS(2)L). For connecting any
communication unit for MELSECNET network systems, refer to Section 3.1 and select the communication unit.
*10 The drawing software GT Designer2 Version□ is not supported. Use GT Works3 Version1 (Ver1.15R or later).
2.1 Precautions when replacing A851GOT with GOT1000 series
When replacing the A851GOT with the GOT1000 series, the GOT1000 series dedicated to the bus connection
(GT11 dedicated to bus connection (GT1155-Q□BDA or GT1150-Q□BDA) is recommended.
Table 2-2 Recommended replacement models when replacing with GT11 dedicated to bus connection
(GT1150-QLBDA and GT1155-QSBDA)
GOTA800 series in use
A851GOT-LWD
A851GOT-LWD-M3
A851GOT-LBD
A851GOT-LBD-M3
A851GOT-SWD
A851GOT-SWD-M3
A851GOT-SBD
A851GOT-SBD-M3
Recommended GT11 dedicated to
bus connection with limited functions
shown in Table 2-3
GT1150-QLBDA
GT1150-QLBDA
GT1150-QLBDA
GT1150-QLBDA
GT1155-QSBDA
GT1155-QSBDA
GT1155-QSBDA
GT1155-QSBDA
Remarks
5.7”STN monochrome A bus connection
5.7”STN monochrome A bus connection
5.7”STN monochrome A bus connection
5.7”STN monochrome A bus connection
5.7”STN color A bus connection
5.7”STN color A bus connection
5.7”STN color A bus connection
5.7”STN color A bus connection
HEAD OFFICE : TOKYO BUILDING, 2-7-3 MARUNOUCHI, CHIYODA-KU, TOKYO 100-8310, JAPAN
NAGOYA WORKS : 1-14, YADA-MINAMI 5-CHOME, HIGASHI-KU, NAGOYA, JAPAN
TECHNICAL BULLETIN
[Issue No.] GOT-A-0018-G
[Page] 4/27
[Title] Precautions when Replacing GOTA800, A77GOT, A64GOT Series with GOT1000 Series
[Date of Issue] Ver.G: September 2011 (First Edition: September 2005)
[Relevant Models] GOT800, A77GOT, and A64GOT Series
Since the GT11 dedicated to the bus connection does not support the following functions, replacing the model
with the GT155□ (communication unit mounted) is recommended to use the functions.
Table 2-3 Limited functions by GT11 dedicated to bus connection (GT1150-QLBDA and GT1155-QSBDA)
Item
Station number switching
Access range for
monitoring
Print related functions
External I/O function
(Operation panel)
Kana-kanji conversion
function
Multiple connection
Function
The function to switch a network module
station number of monitor target of the
object
The access range that the GOT can
monitor
The functions related to report function,
comment print, hard copy print and
others
The function to connect external I/O
equipment such as operation panel,
numeric keypad panel, and push button
switch
The function to convert from hiragana to
kanji when inputting ASCII characters
When connecting multiple GOTs
GT11 dedicated to bus
connection
Not applicable
Only the host station
(0-FF) can be monitored.
Not applicable
(A printer cannot be
connected.)
Not applicable
Not applicable
Not applicable
HEAD OFFICE : TOKYO BUILDING, 2-7-3 MARUNOUCHI, CHIYODA-KU, TOKYO 100-8310, JAPAN
NAGOYA WORKS : 1-14, YADA-MINAMI 5-CHOME, HIGASHI-KU, NAGOYA, JAPAN
Alternative
Consider replacing with
GT155□.
Consider replacing with
GT155□.
Consider replacing with
GT155□.
Consider replacing with
GT155□.
Consider replacing with
GT155□.
Consider replacing with
GT155□.
TECHNICAL BULLETIN
[Issue No.] GOT-A-0018-G
[Page] 5/27
[Title] Precautions when Replacing GOTA800, A77GOT, A64GOT Series with GOT1000 Series
[Date of Issue] Ver.G: September 2011 (First Edition: September 2005)
[Relevant Models] GOT800, A77GOT, and A64GOT Series
3. Communication units and options
3.1 List of replacement models
The communication units and options for the old series are not applicable to the GOT1000 series. When
replacing with the GOT1000 series, use the units for the GOT1000 series.
Table 3-1 Replacement models for communication units and options
Communication
format/option
Unit model for GOTA800
and A77GOT
A7GT-BUSS (Small CON)
(*11)
A7GT-BUS (Large CON) (*11)
A bus connection
RS-232
connection
RS-422
connection
MELSECNET/10
connection
MELSECNET(II)
connection
MELSECNET/B
connection
A7GT-BUS2S (Small CON)
(*11)
A7GT-BUS2 (Large CON)
(*11)
A8GT-RS2
A8GT-RS4
A7GT-J71LP23
(*11)
GT15-75ABUSL
GT15-ABUS
GT15-75ABUSL
GT15-ABUS
GT15-75ABUS2L
GT15-ABUS2
GT15-75ABUS2L
GT15-ABUS2
GT15-RS2-9P
GOT built-in
interface (*14)
GT15-RS4-9S
Cable
compatibility
(For details, refer
to Chapter 4.)
Compatible
Compatible
Not compatible
Not compatible
Compatible
Compatible
Not compatible
Not compatible
Compatible
Compatible
Not compatible
GT15-RS2T4-9P
Incompatibility
GT16-C02R4-9S
Not compatible
GT15-J71LP23-25
Compatible
A7GT-J71BR13
(*11)
GT15-J71BR13
Compatible
A7GT-J71AP23
A7GT-J71AR23
(*11)
(*11)
A7GT-J71AT23B
(*11)
GT15-J71LP23-25
GT15-J71BR13
GT15-J71LP23-25
GT15-J71BR13
Compatible
Compatible
Not compatible
Not compatible
A8GT-J61BT13
(*11)
A8GT-J61BT15
(*11)
CC-Link
connection
External I/O
interface
Numeric keypad
panel
Unit model for
GOT1000
A8GT-70KBF
A8GT-50KBF
A8GT-TK
A7GT-TK
A8GT-70PRF
Printer connection
A8GT-50PRF
Remarks
Slim model (*13)
-
Slim model (*13)
-
Slim model (*13)
-
Slim model (*13)
-
-
-
9-pin connector type
9-pin connector type
* Applicable by connecting to the GOT
built-in interface (*14)
9-pin connector type
* Applicable to GT16 only
Use the MELSECNET/H communication
unit with the MELSECNET/10 mode.
* Refer to Section 3.4.
The network must be changed.
* Refer to Sections 3.3. and 3.4.
GT15-J61BT13
Compatible
The unit must be changed to the unit
dedicated to the CC-Link ver.2 network
system.
The unit must be changed to the unit
dedicated to the CC-Link ver.2 network
system.
* Refer to Section 3.3.
GT15-DIO (*12)
-
-
Not applicable
Not applicable
GT15-PRN
GT15-RS2-9P
GOT built-in
interface (*14)
GT15-PRN
GT15-RS2-9P
GOT built-in
interface (*14)
-
-
Not compatible
Not compatible
Refer to Section 3.3.
Refer to Section 3.3.
PictBridge compatible printer (*15)
Serial printer (*15)
Not compatible
Not compatible
Not compatible
PictBridge compatible printer (*15)
Serial printer (*15)
Not compatible
Memory card
interface
A7GT-MIF
GOT built-in CF
card interface
-
Memory card
Q1MEM-64/128/256/512/1M/
2MS
GT05-MEM-□MC
GT05-MEM-□GC
-
The CF card interface is built in the GOT
as standard equipment. The memory
card (SRAM) cannot be used.
For the GOT1000 series, the SRAM card
cannot be used. Use a CF card.
HEAD OFFICE : TOKYO BUILDING, 2-7-3 MARUNOUCHI, CHIYODA-KU, TOKYO 100-8310, JAPAN
NAGOYA WORKS : 1-14, YADA-MINAMI 5-CHOME, HIGASHI-KU, NAGOYA, JAPAN
TECHNICAL BULLETIN
[Issue No.] GOT-A-0018-G
[Page] 6/27
[Title] Precautions when Replacing GOTA800, A77GOT, A64GOT Series with GOT1000 Series
[Date of Issue] Ver.G: September 2011 (First Edition: September 2005)
[Relevant Models] GOT800, A77GOT, and A64GOT Series
*11 The communication units for the GOT800 series and A77GOT series have setting switches, including rotary switches.
Though the GOT1000 series communication unit does not have rotary switches and others, setting switches is required
with software. Therefore, set the switches with the drawing software or the utility. For details, refer to Section 3.2. for an
A bus connection unit, Section 3.4.2 (2) for a MELSECNET/10 communication module, and Section 3.4.2 (1) for
MELSECNET(Ⅱ) and MELSECNET/B communication modules.
*12 Specifications of external power supply voltage, external connection connector shape and others are changed. For
details, refer to the GT15 External I/O Unit (Positive Common Input/Sink Type Output) User's Manual (IB-0800382).
*13 When using the units for functions, including the external I/O function, sound output function, printer function, video/RGB
display function, and RGB output function, at the same time, use the following units. The slim model has limitation for
combination with other units.
GT15-ABUS (A bus connection 1ch), GT15-ABUS2 (A bus connection 2ch)
*14 To download monitor screen data and others from a personal computer to the GOT via the GOT built-in RS-232
interface, the cable must be replaced.
When the cable is not replaced, use the GT15-RS4-9S.
However, consider 1) as shown below.
1) The thickness of the GOT with the communication unit (E dimension shown in Chapter 5) increases by 13mm.
*15 Since the Centronics interface (A8GT-70PRF and A8GT-50PRF) is replaced with the USB interface (GT15-PRN) or the
RS-232 interface (GT15-RS2-9P or GOT built-in interface), change the printer model. For the printer models applicable
to the GOT1000 series (validated models), refer to TECHNICAL BULLETIN GOT-A-0010 “List of Valid Devices
Applicable for GOT1000 Series” on the MELFANSweb website.
3.2 Units that require new setting method
The communication units for the GOT800 series and A77GOT series listed below require settings with rotary
switches and others on the hardware. However, the communication units for the GOT1000 series do not have
rotary switches and others, and settings with the drawing software or the utility are required. For the GOT1000
series, refer to the following table.
Table 3-2 Units that require new setting method and new setting method after change
GOT800 series and A77GOT series communication module
Item
Model
Settings on hardware
(1) I/O slot setting switch
Bus connection
A7GT-BUS
(2) Extension number setting switch
interface module
A7GT-BUS2
A7GT-BUSS
A7GT-BUS2S
A8GT-J61BT13
CC-Link
(1) Mode setting switch:
A8GT-J61BT15
communication
(A8GT-J61BT13 only)Online/Offline
module
(2) Station number setting switch:
tens place, ones place
(3) Transmission baudrate setting switch
(4) Condition setting switch:
Input data status of data link faulty
station (A8GT-J61BT13 only), number
of occupied stations
GOT1000 communication unit
Model
Setting method
Set with the
GT15-75ABUS(2)L
drawing software
GT15-ABUS(2)
(GT Designer2 and
others) or utility of
the GOT.
GT15-J61BT13
HEAD OFFICE : TOKYO BUILDING, 2-7-3 MARUNOUCHI, CHIYODA-KU, TOKYO 100-8310, JAPAN
NAGOYA WORKS : 1-14, YADA-MINAMI 5-CHOME, HIGASHI-KU, NAGOYA, JAPAN
TECHNICAL BULLETIN
[Issue No.] GOT-A-0018-G
[Page] 7/27
[Title] Precautions when Replacing GOTA800, A77GOT, A64GOT Series with GOT1000 Series
[Date of Issue] Ver.G: September 2011 (First Edition: September 2005)
[Relevant Models] GOT800, A77GOT, and A64GOT Series
3.3 Communication modules and options without replaceable models
The communication modules and options for the GOT800 series and A77GOT series shown in the following list
have no alternative GOT1000 series models. If you have difficulty to replace the modules and options with the
GOT1000 series, keep enough spares.
Table 3-3 Communication modules and options without replaceable models and alternative plans
Category
Communication
module
Item
Data link unit for MELSECNET
(II) network system
Data link unit for MELSECNET/B
network system
CC-Link communication module
(remote device station)
Option
Model
A7GT-J71AP23
A7GT-J71AR23
A7GT-J71AT23B
A8GT-J61BT15
Numeric keypad panel
Alternative plan
Replacing with the MELSECNET/H network system
(GOT1000 series communication unit model:
GT15-J71BR13 or GT15-J71LP23-25) is
recommended. (Section 4.4)
Replacing with the CC-Link (intelligent device station)
communication unit (GOT1000 series communication
unit model: GT15-J61BT13) is recommended. (*16)
No alternative models (*17)
A8GT-TK
A7GT-TK
*16 - The number of used stations differs. (Remote device station: using two stations out of four stations, intelligent device
station: using one station out of four stations) Changing parameter in the CC-Link station setting (remote device station
-> intelligent device station) and others on the programmable controller are required.
- Maximum number of connected units is reduced from 32 to 26. When connecting more than 26 units, consider adding
a master station to support the system.
- Remote dedicated commands (initial setting command, continuous read command, random read command,
continuous write command, random write command, monitor register command, monitor request command, always
write register command, and always write register command) are not supported. Please consult Mitsubishi
representative for questions regarding to the remote dedicated command.
*17 Contact Mitsubishi Electric System & Service Co., Ltd about a cable (GT15-C03HTB) to use the A8GT-TK with the
GOT1000 series.
3.4 Replacing the GOT800, A77GOT, or A64GOT series connected to the MELSECNET(Ⅱ) or
MELSECNET/B network system with the GOT1000 series
When the GOT800, A77GOT, or A64GOT series is used in the MELSECNET(Ⅱ) or MELSECNET/B network
system, consider the replacement with any of the following method.
- Change the MELSECNET(Ⅱ) or MELSECNET/B network system in the entire system to the MELSECNET/H
network system, and replace the GOT800, A77GOT, or A64GOT series with the GOT1000 series.
- Without the change of the MELSECNET(Ⅱ) or MELSECNET/B network system in the entire system, change
the connection type between the programmable controller and the GOT, and replace the GOT800, A77GOT,
or A64GOT series with the GOT1000 series.
3.4.1 Replacing the network in the entire system with the MELSECNET/H network system
Use the following MELSECNET/H communication unit for the GOT1000 series.
Model
GT15-J71LP23-25
GT15-J71BR13
Specifications
Optical loop unit
Coaxial bus unit
For details of changing to MELSECNET/H system, refer to Transition from MELSEC-A/QnA (Large Type)
Series to Q Series Handbook (Network Modules: L(NA)-08048ENG).
3.4.2 Changing the connection type between the programmable controller and the GOT without change
of the network in the entire system
(1) When the existing programmable controller has an empty slot
Add a communication module (for other than the MELSECNET(Ⅱ), MELSECNET/B, and MELSECNET/10
network systems) to the programmable controller, and change the connection type between the
programmable controller and the GOT.
HEAD OFFICE : TOKYO BUILDING, 2-7-3 MARUNOUCHI, CHIYODA-KU, TOKYO 100-8310, JAPAN
NAGOYA WORKS : 1-14, YADA-MINAMI 5-CHOME, HIGASHI-KU, NAGOYA, JAPAN
TECHNICAL BULLETIN
[Issue No.] GOT-A-0018-G
[Page] 8/27
[Title] Precautions when Replacing GOTA800, A77GOT, A64GOT Series with GOT1000 Series
[Date of Issue] Ver.G: September 2011 (First Edition: September 2005)
[Relevant Models] GOT800, A77GOT, and A64GOT Series
Example of accessing the network via the programmable controller by changing the connection type of the
GOT
MELSECNET(Ⅱ)coaxial loop
or MELSECNET(Ⅱ)optical loop
or MELSECNET/B
Communication formats other than
MELSECNET(Ⅱ), /B, /10
Figure 3-1 Example of replacement configuration when adding a communication module to the
programmable controller with an empty slot and connecting the programmable controller to the
GOT
The following two restrictions are applied for the replacement.
a) Station number settings need to be changed depending on the station that the GOT is connected to.
- When connecting to the master station, change all station numbers of objects to the host station (0-FF).
- When connecting to local stations, station numbers do not need to be changed.
b) When using the cyclic device with host station write, the write area of the GOT is unable to use. Therefore,
changing the write device and corresponding ladder is required.
Table 3-4 Communication format between a programmable controller and a replacement GOT, a
representative communication unit model and a connected programmable controller
Replacement communication format
Representative GOT communication unit model
A bus connection
GT15-ABUS, GT15-75ABUSL
RS-232 connection
RS-232 port of GOT,GT15-RS2-9P
RS-422 connection
GT15-RS4-9S,GT15-RS2T4-9P
Connected programmable controller
AnS series
QnA(S) series
Q series
AnS series
QnA(S) series
Q series
AnS series
QnA(S) series
(2) When the existing programmable controller has no empty slot
Add a programmable controller to the network. Add a communication module (for other than the
MELSECNET(Ⅱ), MELSECNET/B, and MELSECNET/10 network systems) to the programmable controller,
and change the connection type between the programmable controller and the GOT.
HEAD OFFICE : TOKYO BUILDING, 2-7-3 MARUNOUCHI, CHIYODA-KU, TOKYO 100-8310, JAPAN
NAGOYA WORKS : 1-14, YADA-MINAMI 5-CHOME, HIGASHI-KU, NAGOYA, JAPAN
TECHNICAL BULLETIN
[Issue No.] GOT-A-0018-G
[Page] 9/27
[Title] Precautions when Replacing GOTA800, A77GOT, A64GOT Series with GOT1000 Series
[Date of Issue] Ver.G: September 2011 (First Edition: September 2005)
[Relevant Models] GOT800, A77GOT, and A64GOT Series
Example of accessing the network by adding a programmable controller to the network
MELSECNET(Ⅱ) coaxial loop
or MELSECNET(Ⅱ) optical loop
or MELSECNET/B
Add a
programmable
controller to the
network, and
connect the GOT.
Figure 3-2 Example of replacement configuration when adding a programmable controller to the network and
connecting the programmable controller to the GOT
3.5 Replacing the GOT800 or A77GOT series connected to the MELSECNET/10 (programmable controller to
programmable controller optical loop/coaxial bus) network system with the GOT1000 series
Use the MELSECNET/H communication unit listed in Section 3.4.1, set the MELSECNET/H communication
unit to the MELSECNET/10 mode, and connect the GOT to the MELSECNET/10 network system.
MELSECNET/10
MELSECNET/H
MELSECNET/10 mode
GOT1000
GOT-A900
+
+
MELSECNET/H communication
MELSECNET/10
unit (Connect with
communication unit
MELSECNET/10 mode)
Figure 3-3 Example of replacement configuration when changing networks
HEAD OFFICE : TOKYO BUILDING, 2-7-3 MARUNOUCHI, CHIYODA-KU, TOKYO 100-8310, JAPAN
NAGOYA WORKS : 1-14, YADA-MINAMI 5-CHOME, HIGASHI-KU, NAGOYA, JAPAN
TECHNICAL BULLETIN
[Issue No.] GOT-A-0018-G
[Page] 10/27
[Title] Precautions when Replacing GOTA800, A77GOT, A64GOT Series with GOT1000 Series
[Date of Issue] Ver.G: September 2011 (First Edition: September 2005)
[Relevant Models] GOT800, A77GOT, and A64GOT Series
4. Cables
4.1 Bus connection cables
4.1.1 Utilization of cables in present use
The following GOT800 series and A77GOT series bus connection cables can be used for the GOT1000 series
by adding dedicated ferrite cores (*) to the both ends of the cables.
Table 4-1 Available existing GOT800 series and A77GOT series cables
A bus connection cable
Large-size CPU extension cable
Small-size CPU extension cable
GOT-to-GOT connection cable
Small-size CPU long-distance
extension cable
GOT-to-GOT long-distance
connection cable
A0J2HCPU connection cable
Cable model
A8GT-C□NB
A370C□B-S1
A1SC□(N)B
Cable length
1.2 to 5m
1.2, 2.5m
0.5 to 5m
A8GT-C□EXSS(-1)
10.6 to 30.6m
A8GT-C□BS
10 to 30m
A9GT-J2C□B
1m
Ferrite core model (*)
GT15-AFC
Sales launch
Now on sale
* Purchase the ferrite cores from Mitsubishi Electric System & Service Co., Ltd. (The GT15-AFC includes two
ferrite cores for a cable.)
The following GOT800 series and A77GOT series cables are not available for the GOT1000 series. Replace
the cables with the bus connection cables for the GOT1000 series as shown below.
Table 4-2 Unavailable existing GOT800 series and A77GOT series cables
A bus connection cable
A bus
connection
cable
Large-size
CPU extension
cable
Cable model (combination)
Cable length
AC□B
AC□B+A7GT-CNB-BUS-1
0.6 to 5m
0.6 to 5m
+ 0.3m
0.6 to 5m
+10 to 30.6m
AC□B
+A7GT-CNB
+A8GT-C□EXSS-1/-C□EXSS
AC□B-R
Small-size
CPU extension
cable
A0J2HCPU
connection
cable
1.2 to 5m
AC□B-R
+A7GT-CNB-BUS-1
AC□B-R
+A7GT-CNB
+A8GT-C□EXSS-1/-C□EXSS
A7GT-C□EXS(-1)
A7GT-C□B
A370C□B
A370C□B
+A7GT-CNB-BUS-1
A1SC□NB
+A7GT-CNB-BUS-1
1.2 to 5m
+ 0.3m
1.2 to 5m
+10 to 30.6m
10 to 30m
10 to 30m
1.2 to 2.5m
1.2 to 2.5m
+ 0.3m
0.5 to 5m
+ 0.3m
A0J2C04B
0.4m
Alternative cable
model
GT15-C□NB
GT15-C□NB
GT15-AC□B
+A7GT-CNB
+GT15-C□EXSS-1
GT15-C□NB
GT15-C□NB
Remarks
The old series cable is a right
angle cable. The
corresponding cable is not
available for the GOT1000
series. Replace the cable with
the alternative cable.
Same as above
GT15-AC□B
+A7GT-CNB
+GT15-C□EXSS-1
GT15-C□EXSS-1
GT15-C□BS
GT15-A370C□B
GT15-A370C□B-S1
-
GT15-A1SC□B
-
GT15-J2C10B
The corresponding cable of the
0.4m cable is not available for
the GOT1000 series. Replace
the cable with the 1m cable.
4.1.2 Replacing GOT when using multiple units of bus connection
When multiple GOTs of GOT800 series are connected via the bus connection, one of the GOTs cannot be
replaced with the GOT1000 series. All the connected GOTs must be replaced with the GOT1000 series.
HEAD OFFICE : TOKYO BUILDING, 2-7-3 MARUNOUCHI, CHIYODA-KU, TOKYO 100-8310, JAPAN
NAGOYA WORKS : 1-14, YADA-MINAMI 5-CHOME, HIGASHI-KU, NAGOYA, JAPAN
TECHNICAL BULLETIN
[Issue No.] GOT-A-0018-G
[Page] 11/27
[Title] Precautions when Replacing GOTA800, A77GOT, A64GOT Series with GOT1000 Series
[Date of Issue] Ver.G: September 2011 (First Edition: September 2005)
[Relevant Models] GOT800, A77GOT, and A64GOT Series
4.2 RS-232 cable
The connectors for the GOT800 series serial communication module (RS-232) and for the GOT1000 series
serial communication port (RS-232) are the same type (9-pin D-sub (male), with inch screws). The pin locations
are also the same.
Use the Mitsubishi GOT1000 series cables (including user-created cables described in GOT1000 Series
Connection Manual) to connect to the GOT1000 series.
4.3 RS-422 cable
For the Mitsubishi GOT800 series cables in use (AC□R4 and A7GT-AC□R4), the connector for the GOT800
series cables differ from the connector for the GOT1000 series cables. Replace the cable with the GOT1000
series cable.
Use the Mitsubishi GOT1000 series cables (including user-created cables described in the GOT1000 Series
Connection Manual) to connect to the GOT1000 series.
4.4 Network cable (MELSECNET/10 and CC-Link)
The network cables for the old series are available for the GOT1000 series.
4.5 Other cables
Table 4-3 Treatment for other existing cables
Cable type
Printer cable
CRT connection cable
Treatment
The GOT800 series cables are not available for the GOT1000 series since the interfaces differ between the
GOT1000 series and the GOT800 series (GOT1000 series: USB or RS-232 interface, GOT800 series:
Centronics interface).
The cables for each old series (model: AC□VG) are available for the GOT1000 series.
HEAD OFFICE : TOKYO BUILDING, 2-7-3 MARUNOUCHI, CHIYODA-KU, TOKYO 100-8310, JAPAN
NAGOYA WORKS : 1-14, YADA-MINAMI 5-CHOME, HIGASHI-KU, NAGOYA, JAPAN
TECHNICAL BULLETIN
[Issue No.] GOT-A-0018-G
[Page] 12/27
[Title] Precautions when Replacing GOTA800, A77GOT, A64GOT Series with GOT1000 Series
[Date of Issue] Ver.G: September 2011 (First Edition: September 2005)
[Relevant Models] GOT800, A77GOT, and A64GOT Series
5. Mounting intervals
When replacing the GOT800, A77GOT, or A64GOT series with the GOT1000 series, some models and
connection types require larger mounting intervals than the GOT800, A77GOT, and A64GOT series. The
following describes the precautions.
For intervals required for each product, please refer to the product installation interval section in the GOT1000
catalog.
In addition, when installing a communication unit or option unit on the GOT to use the multi-channel function,
refer to GT15 User’s Manual for the E dimension.
5.1 GOT800 and A77GOT series
Among the mounting intervals (A to F dimensions in the above figure), the F dimension for the GOT1000 series
is larger than the F dimension for the A851GOT with the bus connection or the A852GOT with the CC-Link
connection. The following table shows the dimension.
When using the multi-channel function, consider the thickness of the communication unit to be mounted.
For details, refer to the chapter regarding the multi-channel function in the GOT1000 Series Connection
Manual.
Table 5-1 Depth dimension (F dimension) with bus connection or CC-Link connection (Unit: mm)
GOTA800 series in present use
Alternative model
Connection
F
Communication
F
GOT model
GOT model
type
dimension
unit model
dimension
A851GOT-LWD(-M3), A851GOT-LBD(-M3) A bus
GT1550-QLBD GT15-ABUS(2)
A851GOT
62
77
A851GOT-SWD(-M3),A851GOT-SBD(-M3) connection
GT1555-QSBD GT15-75ABUS(2)L
A852GOT-LWD(-M3),A852GOT-LBD(-M3) CC-Link
GT1550-QLBD
A852GOT
69
GT15-J61BT13
77
A852GOT-SWD(-M3),A852GOT-SBD(-M3) connection
GT1555-QSBD
5.2 A64GOT series
Table 5-2 shows the comparison of mounting dimensions.
For the A64GOT series, some dimensions are not defined. The E and F dimensions for the GOT1000 series
are larger than those for the A64GOT series. Check the dimensions when replacing the unit with the GOT1000
series.
Table 5-2 Comparison of mounting dimensions between A64GOT and GT1550-QLBD (Unit: mm)
Model
A64GOT-L/-LT21B
GT1550-QLBD
(With MELSECNET/H
communication unit)
A dimension
Not defined
B dimension
Not defined
C dimension
Not defined
D dimension
Not defined
E dimension
51.5
F dimension
73.5
65
80
50
50
100
77
HEAD OFFICE : TOKYO BUILDING, 2-7-3 MARUNOUCHI, CHIYODA-KU, TOKYO 100-8310, JAPAN
NAGOYA WORKS : 1-14, YADA-MINAMI 5-CHOME, HIGASHI-KU, NAGOYA, JAPAN
TECHNICAL BULLETIN
[Issue No.] GOT-A-0018-G
[Page] 13/27
[Title] Precautions when Replacing GOTA800, A77GOT, A64GOT Series with GOT1000 Series
[Date of Issue] Ver.G: September 2011 (First Edition: September 2005)
[Relevant Models] GOT800, A77GOT, and A64GOT Series
6. Cable connection direction and PC (CF) card insertion direction
The cable connection direction or position and the PC (CF) card insertion direction differ between the GOT800,
A77GOT, or A64GOT series and the GOT1000 series.
The following shows the difference between the old series and the GOT1000 series. To mount the GOT on the
control panel, perform wiring and others by referring to the following.
6.1 Cable connection direction and position
(1) GOT800 series: The terminal block is on the right side of the GOT.
<GOT rear face>
A870GOT
A85□GOT
(2) A77GOT and A64GOT series: The A77GOT has the terminal block at the bottom. The A64GOT has the terminal
block on the left side.
<GOT
rear face>
<GOT裏面>
A77GOT
A64GOT
HEAD OFFICE : TOKYO BUILDING, 2-7-3 MARUNOUCHI, CHIYODA-KU, TOKYO 100-8310, JAPAN
NAGOYA WORKS : 1-14, YADA-MINAMI 5-CHOME, HIGASHI-KU, NAGOYA, JAPAN
TECHNICAL BULLETIN
[Issue No.] GOT-A-0018-G
[Page] 14/27
[Title] Precautions when Replacing GOTA800, A77GOT, A64GOT Series with GOT1000 Series
[Date of Issue] Ver.G: September 2011 (First Edition: September 2005)
[Relevant Models] GOT800, A77GOT, and A64GOT Series
(3) GOT1000 series: The terminal block is at the bottom of the GOT.
6.2 CF card insertion direction
(1) GOT800 series: Insert a card from the left side of the GOT.
<GOT rear face>
(2) A77GOT series: Insert a card from the GOT rear face.
Memory card
A77GOT rear face
HEAD OFFICE : TOKYO BUILDING, 2-7-3 MARUNOUCHI, CHIYODA-KU, TOKYO 100-8310, JAPAN
NAGOYA WORKS : 1-14, YADA-MINAMI 5-CHOME, HIGASHI-KU, NAGOYA, JAPAN
TECHNICAL BULLETIN
[Issue No.] GOT-A-0018-G
[Page] 15/27
[Title] Precautions when Replacing GOTA800, A77GOT, A64GOT Series with GOT1000 Series
[Date of Issue] Ver.G: September 2011 (First Edition: September 2005)
[Relevant Models] GOT800, A77GOT, and A64GOT Series
(3) GOT1000 series (excluding GT155□ and GT115□): Insert a card from the GOT rear face.
GT15
GT16
CF Card
top face
When mounting the GOT, more than 100 mm
of mounting depth is required in order to
insert/remove the CF card.
(4) GT155□ and GT115□: Insert a card from the side of the GOT.
CF Card
top face
HEAD OFFICE : TOKYO BUILDING, 2-7-3 MARUNOUCHI, CHIYODA-KU, TOKYO 100-8310, JAPAN
NAGOYA WORKS : 1-14, YADA-MINAMI 5-CHOME, HIGASHI-KU, NAGOYA, JAPAN
TECHNICAL BULLETIN
[Issue No.] GOT-A-0018-G
[Page] 16/27
[Title] Precautions when Replacing GOTA800, A77GOT, A64GOT Series with GOT1000 Series
[Date of Issue] Ver.G: September 2011 (First Edition: September 2005)
[Relevant Models] GOT800, A77GOT, and A64GOT Series
7. Monitor screen data
7.1 Using exiting monitor screen data
Flow of using existing monitor screen data of GOT800 series, A77GOT or A64GOT series, or A77GOT-S5 data
GOT800 series
When you have the data
When you do not have
the data
(Upload the data from
the GOT.)
A77GOT or A64GOT series
A77GOT-S5
When you have the data
When you do not have
the data
(Upload the data from
the GOT.)
SW2□-AGOTP
Upload the project
data.
SW3NIW-A8GOTP or
data transfer tool
Upload the project data.
SW3NIW-A8GOTP
Convert the AGOTP
data into the GOT800
data when reading
other data.
GT Converter2 Version□
Convert the GOT800 data into the GOT1000
project data.
GT Designer2 Version2 or GT Works3 Version1
Edit the GOT1000 project
data.
HEAD OFFICE : TOKYO BUILDING, 2-7-3 MARUNOUCHI, CHIYODA-KU, TOKYO 100-8310, JAPAN
NAGOYA WORKS : 1-14, YADA-MINAMI 5-CHOME, HIGASHI-KU, NAGOYA, JAPAN
TECHNICAL BULLETIN
[Issue No.] GOT-A-0018-G
[Page] 17/27
[Title] Precautions when Replacing GOTA800, A77GOT, A64GOT Series with GOT1000 Series
[Date of Issue] Ver.G: September 2011 (First Edition: September 2005)
[Relevant Models] GOT800, A77GOT, and A64GOT Series
7.1.1 How to convert monitor screen data from GOT800 series to GOT1000 series
By converting the monitor screen data for the GOT800 series into the GOT1000 series data with the data
conversion software (GT Converter2 Version2 or GT Converter2 Version3), the monitor screen data for the
GOT800 series can be used for the GOT1000 series.
The data conversion software is included with the following drawing software for the GOT1000 series.
1)GT Converter2 Version2
- GT Works2 Version2(SW2D5C-GTWK2)
- GT Designer2 Version2(SW2D5C-GTD2)
2)GT Converter2 Version3
- GT Works3 Version1(SW1DNC-GTWK3)
(1) When you have the monitor screen data for the GOT800 series
Convert the GOT800 series data into the GOT1000 series data by using GT Converter2 Version□.
To edit the file after the conversion, open and edit the file with GT Designer2 Version□ or GT Works3
Version1.
< Operation of GT Converter2 Version□ >
1) Start GT Converter2 Version□.
2) Select the monitor screen data to be converted, and start conversion.
3) After the conversion is completed, name and save the file.
* The file format after conversion is “*.G1”instead of “*.GTE”.
* For the operation of GT Converter2 Version□, refer to the following manual.
1)GT Converter2 Version2
- GT Converter2 Version2 Operating Manual (SH-080533ENG)
2)GT Converter2 Version3
- GT Converter2 Version3 Operating Manual for GT Works3 (SH-080862ENG)
< Editing with GT Designer2 >
(a) GT Designer2 Version□
1) Start GT Designer2 Version□.
2) Select [Project] – [Open] from the menu.
3) Select [GOT1000 Binary Files(*.G1)] for [Files of type] in the [Open] dialog box.
4) Select the file to be edited, and then click the [Open] button.
5) Edit the file, and then save the file as a new file to create the monitor screen data (GTE file) for the
GOT1000 series.
* For details, refer to the GT Designer2 Version2 Screen Design Manual(SH-080530ENG).
HEAD OFFICE : TOKYO BUILDING, 2-7-3 MARUNOUCHI, CHIYODA-KU, TOKYO 100-8310, JAPAN
NAGOYA WORKS : 1-14, YADA-MINAMI 5-CHOME, HIGASHI-KU, NAGOYA, JAPAN
TECHNICAL BULLETIN
[Issue No.] GOT-A-0018-G
[Page] 18/27
[Title] Precautions when Replacing GOTA800, A77GOT, A64GOT Series with GOT1000 Series
[Date of Issue] Ver.G: September 2011 (First Edition: September 2005)
[Relevant Models] GOT800, A77GOT, and A64GOT Series
(b) GT Designer3 Version1
1) Start GT Designer3 Version1.
2) Select [Open] in the [Select Project] dialog box.
3) Click the [Open GT Designer2/G1 format file] button for another format in the [Open Project] dialog box.
4) Select [GOT1000 Binary Files(*G1)] for [Files of type] in the [Open] dialog box.
5) Select the file to be edited, and then click the [Open] button.
6) Edit the file, and then save the file as a new file to create the monitor screen data for the GOT1000
series.
* For details, refer to the GT Designer3 Version1 Screen Design Manual (Fundamentals)
(SH-080866ENG).
HEAD OFFICE : TOKYO BUILDING, 2-7-3 MARUNOUCHI, CHIYODA-KU, TOKYO 100-8310, JAPAN
NAGOYA WORKS : 1-14, YADA-MINAMI 5-CHOME, HIGASHI-KU, NAGOYA, JAPAN
TECHNICAL BULLETIN
[Issue No.] GOT-A-0018-G
[Page] 19/27
[Title] Precautions when Replacing GOTA800, A77GOT, A64GOT Series with GOT1000 Series
[Date of Issue] Ver.G: September 2011 (First Edition: September 2005)
[Relevant Models] GOT800, A77GOT, and A64GOT Series
(2) When you do not have the monitor screen data for the GOT800 series
After the data is uploaded from the GOT800 series, execute the conversion as shown in above (1).
The data can be uploaded from the GOT by using the GOT800 series drawing software SW3NIW-A8GOTP or
the data transfer tool.
* The GOT800 series drawing software SW3NIW-A8GOTP supports the operating systems of Windows3.1
and Windows95.
* The following shows the OSs that support the data transfer tool.
- Windows 2000 Professional
- Windows XP Professional/Home Edition
- Windows Vista Ultimate/Enterprise/Business/Home Premium/Home Basic
- Windows7 Ultimate/Enterprise/Professonal/Home Premium/Starter
* The SW3NIW-A8GOTP can be downloaded from the MLFANSWeb website
The data transfer tool is included with GT Works2 Version2 and GT Works3 Version1, or the tool can be
downloaded from the MELFANSWeb website.
< How to upload data with A8GOTP >
Refer to SW3NIW-A8GOTP Graphic Settings Software Package Operating Manual (Data
Transmission/Debugging/Document Creation Manual).
< How to upload data with data transfer tool >
1) Data transfer tool startup screen
Select [GOT800 Series], and then click the [GOT Read] button.
2) GOT read screen
Specify a location where data is read, and then click the [GOT Read] button to read the data.
3) After the upload, convert the data into the GOT1000 series data by using GT Converter2. → Refer to
Section 7.1.1 (1).
HEAD OFFICE : TOKYO BUILDING, 2-7-3 MARUNOUCHI, CHIYODA-KU, TOKYO 100-8310, JAPAN
NAGOYA WORKS : 1-14, YADA-MINAMI 5-CHOME, HIGASHI-KU, NAGOYA, JAPAN
TECHNICAL BULLETIN
[Issue No.] GOT-A-0018-G
[Page] 20/27
[Title] Precautions when Replacing GOTA800, A77GOT, A64GOT Series with GOT1000 Series
[Date of Issue] Ver.G: September 2011 (First Edition: September 2005)
[Relevant Models] GOT800, A77GOT, and A64GOT Series
7.1.2 How to convert monitor screen data from A77GOT series to GOT1000 series
The monitor screen data for the A77GOT series can be converted into GOT800 series data by using the
GOT800 series drawing software SW3NIW-A8GOTP. Then, the GOT800 series data can be converted into
GOT1000 series data by using the data conversion software (GT Converter2 Version□).
(1) When you have the monitor screen data for the A77GOT series
After the monitor screen data for the A77GOT series is converted into GOT800 series data by using the
GOT800 series drawing software SW3NIW-A8GOTP, convert the data into GOT1000 series data by using
GT Converter2 Version□.
1) Prepare the GOT screen data.
2) By using the W3NIW-A8GOTP, convert the data into GOT800 series data.
Select [Project] – [Import File] – [AGOTP Data] from the menu on the A8GOTP.
The data is read as the GOT800 series data.
3) Save the data by selecting [Project] –[Save As] from the menu.
4) Convert the data into GOT1000 series data by using GT Converter2 Version□.
→ Refer to Section 7.1.1 (1).
(2) When you do not have the monitor screen data for the A77GOT series
Upload the monitor screen data from the A77GOT, and then convert the data.
Note that uploading is available when the following conditions are satisfied.
- The GOT is the A77GOT-S5.
- The GOT type is set to [A77GOT-S5] in the data.
Uploading is not available with the models other than the A77GOT-S5. Use data stored in the personal
computer or floppy disk, or create screen data for the GOT1000 series.
To upload the monitor screen data from the A77GOT, the A77GOT drawing software
(SW2SRX-AGOTP/SW2IVD-AGOTP/SW2NX-AGOTP) is required.
1) Upload the monitor screen data from the A77GOT-S5, and save the data.
2) After the data is converted into GOT800 series data by using the SW3NIW-A8GOTP, convert the data
into GOT1000 series data by using GT Converter2 Version□. → Refer to Section 7.1.2 (1).
HEAD OFFICE : TOKYO BUILDING, 2-7-3 MARUNOUCHI, CHIYODA-KU, TOKYO 100-8310, JAPAN
NAGOYA WORKS : 1-14, YADA-MINAMI 5-CHOME, HIGASHI-KU, NAGOYA, JAPAN
TECHNICAL BULLETIN
[Issue No.] GOT-A-0018-G
[Page] 21/27
[Title] Precautions when Replacing GOTA800, A77GOT, A64GOT Series with GOT1000 Series
[Date of Issue] Ver.G: September 2011 (First Edition: September 2005)
[Relevant Models] GOT800, A77GOT, and A64GOT Series
7.1.3 How to convert monitor screen data from A64GOT series to GOT1000 series
The monitor screen data for the A64GOT can be converted into GOT1000 series data with the same
procedures as converting the A77GOT series data.
(1) When you have the monitor screen data for the A64GOT series
Convert the data with the same procedures as converting the A77GOT series data.
→Refer to Section 7.1.2 (1).
(2) When you do not have the monitor screen data for the A64GOT series
Uploading is not available with the A64GOT. Use data stored in the personal computer or floppy disk, or
create screen data for the GOT1000 series.
7.1.4 Precautions for data conversion
To use the A77GOT or A64GOT series data for the GOT1000 series, if the parts data is not stored in the
condition where the data is stored by using the SW□□□-AGOTP (if the parts file is stored in a different drive or
the directory of the parts file is changed), the parts data cannot be read.
When the parts file is stored in a different drive or the directory of the parts file is changed, perform the following
operations by using the SW□□□-AGOTP.
1) Read the existing old series data to be opened with the drawing software.
2) Read the parts file.
3) Save the file.
Specify the saved file as shown in the above 3) for conversion.
7.1.5 USB serial adapter available for communication between the data transfer tool and the GOT800
series
By using the data transfer tool, the screen data and others can be downloaded/uploaded from/to the GOT800
series.
(Compatible Product)
Manufacturer
Diatrend Corporation
PLANEX COMMUNICATIONS INC.
A87*GOT
A810GOT
AC30R2-9P
Model
DIFC-U2 (USB/RS-232C converter)
URS-04 (USB/serial adapter)
URS-04
Personal
computer
AC30R2-9SS
URS-04
AC30R2-9P
DIFC-U2
A85*GOT
Cable model
AC30R2-9SS
AC30R2-9P
Cable pin
9-pin (female)-9-pin (female), for AGOT
9-pin (female)-25-pin (male), for AGOT
The operation of the USB serial adapter is checked with the following personal computer.
- Apricot CX
* Windows Vista or Windows7 is not supported. For Windows Vista or Windows7, use the RS-232 cable.
HEAD OFFICE : TOKYO BUILDING, 2-7-3 MARUNOUCHI, CHIYODA-KU, TOKYO 100-8310, JAPAN
NAGOYA WORKS : 1-14, YADA-MINAMI 5-CHOME, HIGASHI-KU, NAGOYA, JAPAN
TECHNICAL BULLETIN
[Issue No.] GOT-A-0018-G
[Page] 22/27
[Title] Precautions when Replacing GOTA800, A77GOT, A64GOT Series with GOT1000 Series
[Date of Issue] Ver.G: September 2011 (First Edition: September 2005)
[Relevant Models] GOT800, A77GOT, and A64GOT Series
7.2 Compatibility of monitor screen data
7.2.1 Data compatibility list
To convert GOT800, A77GOT, or A64GOT series drawing data into GOT1000 series drawing data, some
functions have restrictions or cannot be converted. For the A77GOT or A64GOT series data, convert the data
into the GOT800 series monitor screen data by using the GOT800 series drawing software
(SW3NIW-A8GOTP9). Then, convert the data into the GOT1000 series drawing data by using GT Converter2
Version□.
For whether the data can be converted into the GOT1000 series drawing data, refer to the following table.
Table7-1 Availability of functions on GOT1000 series after conversion
: Available, ○: Available (The partial setting change may be required.),
<>: N/A (Conversion unavailable, available with new setting), ×: N/A,
-: Unsupported function
Whether the function is
available for GOT1000
series after conversion
Function
GOT
800
A77
GOT
A64
GOT
Numerical display
○*1
○
ASCII display
○*1
○
String display
-
Comment display
Data
display
function
○*1
-
-
Clock display
○*1
Alarm list display
○*1
-
-
-
-
-
-
<>
<>
○
○
-
○
○
-
-
○
○
Alarm history display
Level display
Lamp display
Panel meter
Parts display
Movement (Parts movement)
Locus (Parts movement)
Error warning display
Block
Numerical value
data
ASCII
display
Data list display
Trend
graph
Graph
display
function
Data
input
function
Scroll
<>
<>
-
×
-
Line graph
Bar
Normality
graph Accumulation
Band graph
Pie graph
-
×
-
<>
<>
-
Scatter graph
-
<>
<>
Spline graph
Numerical input
-
×
○*1
-
ASCII input
Batch
Overwrite
○*1
-
Remarks (Precautions)
Quarter characters are converted into quad characters. Therefore, set
the character display size to quarter size.
*1: When this object is overlapped with the other objects (example:
trend graph), set the layer for the object to [Front].
The function is converted into the ASCII display.
*1: When this object is overlapped with the other objects (example:
trend graph), set the layer for the object to [Front].
*1: When this object is overlapped with the other objects (example:
trend graph), set the layer for the object to [Front].
*1: When this object is overlapped with the other objects (example:
trend graph), set the layer for the object to [Front].
Part display setting alone to which the part number is not changed
cannot be used. (substantially impossible setting)
Configure the new setting for the alarm list display function.
The function is converted into multiple numerical displays and ASCII
displays.Quarter characters are converted into quad characters.
Therefore, set the character display size to quarter size.
Up to eight lines (data) are converted per graph.
For a graph with 9 to 16 lines (data), configure the new graph setting.
Configure the new setting for the trigger of the line graph function.
The GOT1000 series does not support this function. *
The GOT1000 series does not support this function.
Configure the new setting for the statistics graph.
Configure the new setting for the statistics graph.
The GOT800 series does not support this function. Therefore, when
replacing the A77GOT or A64GOT series data, configure the new
setting with GT Designer2.
The GOT1000 series does not support this function.
*1: When this object is overlapped with the other objects (example:
trend graph), set the layer for the object to [Front].
HEAD OFFICE : TOKYO BUILDING, 2-7-3 MARUNOUCHI, CHIYODA-KU, TOKYO 100-8310, JAPAN
NAGOYA WORKS : 1-14, YADA-MINAMI 5-CHOME, HIGASHI-KU, NAGOYA, JAPAN
TECHNICAL BULLETIN
[Issue No.] GOT-A-0018-G
[Page] 23/27
[Title] Precautions when Replacing GOTA800, A77GOT, A64GOT Series with GOT1000 Series
[Date of Issue] Ver.G: September 2011 (First Edition: September 2005)
[Relevant Models] GOT800, A77GOT, and A64GOT Series
Table7-1 Availability of functions on GOT1000 series after conversion(from the previous page)
: Available, ○: Available (The partial setting change may be required.),
<>: N/A (Conversion unavailable, available with new setting), ×: N/A,
-: Unsupported function
Whether the function is
available for GOT1000
series after conversion
Function
GOT
800
SET/RST
Touch
switch
Reversing
function
Switch
Report function
System information
Operation panel function
○*2
○*2
○*2
Announcement function
-
A77
GOT
*2: When operation is set more than once, it is necessary to set it
again.
<>
Status observation function
Time action function
-
Snapshot function, hard copy function
<>*3
-
-
<>*3
<>
-
-
-
<>
-
<>*4
-
Password
Figure data
-
Straight line, Continuous
straight line, Rectangle,
Polygon, Circle, Circular
arc
Rectangle of rubbing into,
Rubbing into
Oval
When this function is set with the A77GOT, configure the new setting.
*3: Configure the new setting.
This function is available with the new setting for the alarm history
display function.
The GOT800 series does not support this function. Therefore, when
replacing the A77GOT or A64GOT series data, configure the new
setting with GT Designer2.
*4: Displaying and printing the memory card data on the personal
computer are available. (Not available on the GOT.)
-
○
○
○
○
○
○
○
-
<>
<>
○
○
<>*5
<>*5
Graphic
Character
data
Remarks (Precautions)
A64
GOT
Text
Foreign character
Comment data
Parts data
Special key
Screen switching
○
Printer model specification
○
○
-
Backlight OFF time setting
Function key,
GOT
Arrow key (cursor key),
switch
Return key,
function
System protecting switch,
Emergency stop button
○
○
-
-
×
×
Pattern 2 of rubbing into is converted into pattern 1.
An ellipse of 23 dots or less is converted into a 32-dot ellipse.
Change the size with the GOT1000 series drawing software.
When the character data is overlapped with the other objects
(example: trend graph), the character data is positioned under the
objects.
The characters are converted into graphic characters because the
GOT1000 series supports the fast character display.
However, it is necessary to draw to the background in the rectangle of
rubbing into because the data of the reversing attribute is converted
into the normal rotation and to change the character attribute to the
black.
This function is available with the symbol parts.
Comment number 0 moves to another number and is used.
*5: Configure the new setting.
This function supports a PictBridge compatible printer and a serial
printer.(The printers manufactured by NEC Corporation (PC-PR
printers) are not available.)
This setting is available with the GOT1000 series main unit.
This function is available by creating a touch switch on the GOT screen
or creating a switch with the external I/O unit.
HEAD OFFICE : TOKYO BUILDING, 2-7-3 MARUNOUCHI, CHIYODA-KU, TOKYO 100-8310, JAPAN
NAGOYA WORKS : 1-14, YADA-MINAMI 5-CHOME, HIGASHI-KU, NAGOYA, JAPAN
TECHNICAL BULLETIN
[Issue No.] GOT-A-0018-G
[Page] 24/27
[Title] Precautions when Replacing GOTA800, A77GOT, A64GOT Series with GOT1000 Series
[Date of Issue] Ver.G: September 2011 (First Edition: September 2005)
[Relevant Models] GOT800, A77GOT, and A64GOT Series
7.2.2 Monitor screen data compatibility between GOT800 series and GOT1000 series
(1) Precautions for compatibility
When converting GOT800 series data into GOT1000 series data, the compatibility is basically upward.
However, some functions require changes of sequence programs or drawing data.
The following shows the functions that require changes of sequence programs or drawing data.
Table 7-2 Functions that require changes in sequence programs and drawing data
Item
Parts display
Description
When [Display Mode] is set to [XOR], the parts that group
superimposed figures are displayed as follows:
GOT800 series : The grouped figures are displayed at
once by using the XOR display.
GOT1000 series: Each in the grouped figures is
displayed individually in order of the
superimposed figures by using the
XOR display.
When [Display Mode] is set to [XOR] with the GOT800
series, if the same color is set for the line color and the
pattern color with the pattern type 8 (fill), the outside of
the part is displayed in one-dot smaller size with the
GOT1000 series.
When [Display Mode] is set to [XOR] with the GOT800
series (16-color model), if the converted data is displayed
with the GOT1000 series (16-color model), the
superimposed section of a figure and a part is displayed
with a dark color. (The display color setting is adjusted to
that of the GOT1000 series 65536-color models.)
<Example>
GOT
GOT800 series
(16 colors)
GOT1000 series
(16 colors)
GOT1000 series
(65536 colors)
Parts movement
Figure
color
Part
color
Blue
White
Blue
White
Blue
White
Superim
posed
section
color
Yellow
Dark
yellow
Yellow
When [Indirect] is set for [Parts indication] with the parts
movement function of the GOT800 series, if the device
value is a negative value or is outside the display range,
the parts are displayed as follows:
GOT800 series: The parts are not displayed.
GOT1000 series: The parts are displayed.
Procedures for replacing GOT800 series with GOT1000
series
Configure the auxiliary setting in the system environment
so that the grouped figures are displayed at once by using
the XOR display.
No change in the setting is required when the dark color is
used for the superimposed section.
When the dark color is not used for the superimposed
section, set the part to dark color.
(Either the part color or the superimposed section color is
always set to dark color.)
<GOT1000 series colors corresponding to the left
example>
Superim
posed
Figure
Part
GOT
section
color
color
color
GOT1000
series
(16 colors)
Blue
Dark
white
Yellow
When [Indirect] is not set with the parts movement function,
the display contents have no difference between the
GOT800 series and the GOT1000 series. Even if [Indirect]
is set, the display contents have no difference between the
GOT800 series and the GOT1000 series unless the device
value is a negative value or outside the display range.
Please make the part number "0" when the device value
becomes a negative numerical value, and it becomes
outside "Display range" and set outside "Display range".
(Parts are not displayed by making the number of "Display
parts" "0". )
HEAD OFFICE : TOKYO BUILDING, 2-7-3 MARUNOUCHI, CHIYODA-KU, TOKYO 100-8310, JAPAN
NAGOYA WORKS : 1-14, YADA-MINAMI 5-CHOME, HIGASHI-KU, NAGOYA, JAPAN
TECHNICAL BULLETIN
[Issue No.] GOT-A-0018-G
[Page] 25/27
[Title] Precautions when Replacing GOTA800, A77GOT, A64GOT Series with GOT1000 Series
[Date of Issue] Ver.G: September 2011 (First Edition: September 2005)
[Relevant Models] GOT800, A77GOT, and A64GOT Series
Table 7-2 Functions that require changes in sequence programs and drawing data (from the previous page)
Item
Touch switch
System information
[Before/after
change]
System information
[Automatic Screen
Saver Disable
Signal (b0), Forced
Screen Saver
Enable Signal (b1)]
Description
The priority level when the movement of the touch
switch is set more than once is different according to
GOT used.
GOT800 series: Word SET → Bit SET
GOT1000 series: Bit SET → Word SET
When a minus value is input by a numeric input of BIN
with 16 bit sign, it is different according to GOT that the
value and the value of the value after it changes use
before changing system information.
Example: Last quotation that inputs numerical
value:"-1"
Numeric input value:"-2"
<System information of GOT800 series>
Value before it changes "0X0000FFFF"
Value after it changes "0X0000FFFE"
<System information of GOT1000 series>
Value before it changes "0XFFFFFFFF"
Value after it changes "0XFFFFFFFE"
For the GOT1000 series, the operation of b1 (Forced
screen saver enable signal) takes precedence of the
operation of b0 (Automatic screen saver disable signal).
Therefore, the operation of the GOT varies depending
on the series when b0 and b1 are turned on.
<When b0 and b1 are turned on>
GOT800 series
The display and the backlight are turned off by the
screen saver.
GOT1000 series
The display and the backlight remain on.
Procedures for replacing GOT800 series with
GOT1000 series
Change the order of the touch switch operations.
When a negative value with the 16-bit singed BIN is not
input, the values have no difference between GOT800
series and GOT1000 series.
When the sequence program refers to Value before it
changes of the system information in 16-bit unit, the
values have no difference between GOT800 series and
GOT1000 series.
When the sequence program refers to Value before it
changes of the system information in 32-bit unit, make the
program refer to the lower 16 bits.
To turn on or off the backlight by using the forced screen
saver enable signal (b1) and the automatic screen saver
disable signal (b0), change the sequence program and
others.
7.2.3 Monitor screen data compatibility between A77GOT or A64GOT series and GOT1000 series
When converting A77GOT or A64GOT series data into GOT1000 series data, convert the data into GOT800
series data, and then convert the 800 series data into GOT1000 series data with GT Converter2 Version□.
Because A77GOT or A64GOT series data is converted into GOT800 series data once, the compatibility of the
A77GOT or A64GOT series data conforms to the GOT800 series compatibility.
HEAD OFFICE : TOKYO BUILDING, 2-7-3 MARUNOUCHI, CHIYODA-KU, TOKYO 100-8310, JAPAN
NAGOYA WORKS : 1-14, YADA-MINAMI 5-CHOME, HIGASHI-KU, NAGOYA, JAPAN
TECHNICAL BULLETIN
[Issue No.] GOT-A-0018-G
[Page] 26/27
[Title] Precautions when Replacing GOTA800, A77GOT, A64GOT Series with GOT1000 Series
[Date of Issue] Ver.G: September 2011 (First Edition: September 2005)
[Relevant Models] GOT800, A77GOT, and A64GOT Series
7.3 Functions that require new settings
Table 7-3 Functions that require new settings
Item
Function
User settings
To communicate with FA equipment, new settings for interface channel No.,
driver, communication baud rate are required.
For details of how to make the settings, refer to the following manuals.
Communication
- ”3.7 Communication Interface Setting (Communication Settings)” in the GT
Common settings
settings
Designer2 Version2 Screen Design Manual (SH-080530ENG)
- GOT1000 Series Connection Manual for GT Works3 (SH-080868ENG to
SH-080871ENG)
The drawing software GT Works3 Version2 (Ver2.25B or later)
PictBridge
or GT Works3 Version1 (Ver1.00A or later) is required. The
compatible
printer unit (GT15-PRN) is required separately. The extended
printer
function OS [Printer] or [Printer(PictBridge)] must be installed on
Printer
Printer function
the GOT.
The drawing software GT Works3 Version1 (Ver1.15R or later) is
Serial printer
required. The extended function OS [Printer(Serial)] must be
installed on the GOT.
To use the report function, the user settings for the printer described above is
Object
Report function
required, and the extended function OS [Report] must be installed on the GOT.
To use the sound output function, the sound output unit (GT15-SOUT) is required
Sound
Sound output function separately. The extended function OS [Sound Output] must be installed on the
GOT.
7.3.1 Printers
When a printer is used with the GOT800 series or A77GOT series, be aware of the following points.
(1) Type of printer
The GOT800 series and A77GOT series support parallel printers only. The GOT1000 series supports
PictBridge compatible printers and serial printers. Therefore, when you replace the GOT800 series or
A77GOT series with the GOT1000 series, the printer must be replaced. For printer models applicable to the
GOT1000 series (validated models), refer to TECHNICAL BULLETIN GOT-A-0010 “List of Valid Devices
Applicable for GOT1000 Series” on the MELFANSweb website.
(2) Required units
(a) For PictBridge compatible printers
The printer unit (GT15-PRN) is required separately.
(b) For serial printers
No option unit is required. A serial printer is connected to the RS-232 interface of the GOT.
(3) Report function
With a PictBridge compatible printer, the GOT1000 series supports the GOT800 series or A77GOT series
project data with the report style setting [Log/Page] only.
With a serial printer, the GOT1000 series supports the GOT800 series or A77GOT series project data with
the report style setting [Real/Cont].
HEAD OFFICE : TOKYO BUILDING, 2-7-3 MARUNOUCHI, CHIYODA-KU, TOKYO 100-8310, JAPAN
NAGOYA WORKS : 1-14, YADA-MINAMI 5-CHOME, HIGASHI-KU, NAGOYA, JAPAN
TECHNICAL BULLETIN
[Issue No.] GOT-A-0018-G
[Page] 27/27
[Title] Precautions when Replacing GOTA800, A77GOT, A64GOT Series with GOT1000 Series
[Date of Issue] Ver.G: September 2011 (First Edition: September 2005)
[Relevant Models] GOT800, A77GOT, and A64GOT Series
Version
A
B
C
D
E
F
Print date
February 2008
August 2008
November 2008
August 2009
February 2010
October 2010
G
September 2011
Revision
- First edition
- The descriptions are added and corrected.
- The descriptions are corrected.
- The descriptions of GT16 are added.
- The descriptions are corrected.
- The descriptions of “2. Selection of GOT” are corrected.
- The descriptions of the serial printer are added to the printer item of
“3. Communication units and options”.
- The descriptions of “4.1.2 Replacing GOT when using multiple units
of bus connection” are revised.
- The descriptions of “7. Monitor screen data” are corrected.
- The descriptions of “4.1.1 Utilization of cables in present use" are
corrected.
HEAD OFFICE : TOKYO BUILDING, 2-7-3 MARUNOUCHI, CHIYODA-KU, TOKYO 100-8310, JAPAN
NAGOYA WORKS : 1-14, YADA-MINAMI 5-CHOME, HIGASHI-KU, NAGOYA, JAPAN