1
Farbprofil: Generic CMYK printer profile - None
Komposit Standardbildschirm
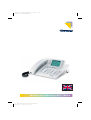
Operating instructions elmeg CS410 / CS410-U
1
G:\_elmeg\CS410\V1\uk\mn\uk-410-mn-10x1.vp
Mittwoch, 11. Juni 2003 15:05:39
Farbprofil: Generic CMYK printer profile - None
Komposit Standardbildschirm
2
G:\_elmeg\CS410\V1\uk\mn\uk-410-mn-10x1.vp
Mittwoch, 11. Juni 2003 15:05:39
Farbprofil: Generic CMYK printer profile - None
Komposit Standardbildschirm
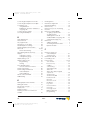
Table of contents
Description and Installation . . . . . . . . . . . . . . . . . . 1
Safety notes . . . . . . . . . . . . . . . . . . . . . . . . . . . . . . . . . . . . . . 2
Unpacking and placing the telephone . . . . . . . . . . . . . . . . . . . . . . . . . . 3
Connecting the telephone (ISDN and handset cords) . . . . . . . . . . . . . . . . . . 4
Connecting an configuring a headset (not included) . . . . . . . . . . . . . . . . . . . 5
Connecting the telephone to a PC . . . . . . . . . . . . . . . . . . . . . . . . . . . 6
Changing the label panel . . . . . . . . . . . . . . . . . . . . . . . . . . . . . . . . 7
Pictographs . . . . . . . . . . . . . . . . . . . . . . . . . . . . . . . . . . . . . . . 8
Setting the language of the display . . . . . . . . . . . . . . . . . . . . . . . . . . . 8
Telephone display and buttons . . . . . . . . . . . . . . . . . . . . . . . . . . . . . 9
Function and LEDs . . . . . . . . . . . . . . . . . . . . . . . . . . . . . . . . . . 12
Displays for programmed features . . . . . . . . . . . . . . . . . . . . . . . . . . . 13
Making Calls. . . . . . . . . . . . . . . . . . . . . . . . . . 14
Starting a call . . . . . . . . . . . . . . . . . . . . . . . . . . . . . . . . . . . . . 14
Accepting/rejecting a call . . . . . . . . . . . . . . . . . . . . . . . . . . . . . . . 16
Forwarding a call (call deflection). . . . . . . . . . . . . . . . . . . . . . . . . . . . 16
Calling line identification (anonymus call) restriction . . . . . . . . . . . . . . . . . . 17
Starting a call with a set number (MSN) . . . . . . . . . . . . . . . . . . . . . . . . 17
Redialing. . . . . . . . . . . . . . . . . . . . . . . . . . . . . . . . . . . . . . . . 17
Microphone activation/deactivation, open listening and hands-free calling . . . . . . . 20
Headset use . . . . . . . . . . . . . . . . . . . . . . . . . . . . . . . . . . . . . . 21
Message. . . . . . . . . . . . . . . . . . . . . . . . . . . . . . . . . . . . . . . . 21
Intercom . . . . . . . . . . . . . . . . . . . . . . . . . . . . . . . . . . . . . . . . 22
Automatic completion of call . . . . . . . . . . . . . . . . . . . . . . . . . . . . . . 23
Parking . . . . . . . . . . . . . . . . . . . . . . . . . . . . . . . . . . . . . . . . 24
Malicious call identification (MCID) . . . . . . . . . . . . . . . . . . . . . . . . . . . 25
Keypad and tone frequency dialing (dtmf dialing) . . . . . . . . . . . . . . . . . . . 26
Conducting calls with several parties . . . . . . . . . . . . 27
Call waiting . . . . . . . . . . . . . . . . . . . . . . . . . . . . . . . . . . . . . . 27
Table of contents
3
G:\_elmeg\CS410\V1\uk\mn\uk-410-mn-10x1.vp
Mittwoch, 11. Juni 2003 15:05:39
I
Farbprofil: Generic CMYK printer profile - None
Komposit Standardbildschirm
Enquiry Call . . . . . . . . . . . . . . . . . . . . . . . . . . . . . . . . . . . . . . 27
Call transfer (switching) . . . . . . . . . . . . . . . . . . . . . . . . . . . . . . . . 27
Broker’s call . . . . . . . . . . . . . . . . . . . . . . . . . . . . . . . . . . . . . . 28
Three-party conference . . . . . . . . . . . . . . . . . . . . . . . . . . . . . . . . 28
Telephone operation . . . . . . . . . . . . . . . . . . . . . 29
Telephone directory . . . . . . . . . . . . . . . . . . . . . . . . . . . . . . . . . . 29
VIP Memory . . . . . . . . . . . . . . . . . . . . . . . . . . . . . . . . . . . . . . 32
Caller and memo list
. . . . . . . . . . . . . . . . . . . . . . . . . . . . . . . . . 33
SMS and UUS1 text messages . . . . . . . . . . . . . . . . . . . . . . . . . . . . 37
Station guarding . . . . . . . . . . . . . . . . . . . . . . . . . . . . . . . . . . . . 42
Setting up cost monitoring . . . . . . . . . . . . . . . . . . 43
Viewing and deleting costs . . . . . . . . . . . . . . . . . . . . . . . . . . . . . . 43
Setting the tariff factor and the currency . . . . . . . . . . . . . . . . . . . . . . . . 44
Programming a charge limitation for a specific extension number . . . . . . . . . . . 45
Enabling or inhibiting an extension number (MSN) for outgoing calls . . . . . . . . . . 45
Displays during a call and charge information . . . . . . . . . . . . . . . . . . . . . 46
System telephony . . . . . . . . . . . . . . . . . . . . . . . 49
Function keys . . . . . . . . . . . . . . . . . . . . . . . . . . . . . . . . . . . . . 49
System menu for pabx systems with system telephony capability . . . . . . . . . . . 54
Configuration settings . . . . . . . . . . . . . . . . . . . . 55
Telephone numbers (MSN extension numbers) . . . . . . . . . . . . . . . . . . . . 55
Telephone PIN (password) . . . . . . . . . . . . . . . . . . . . . . . . . . . . . . . 57
Protecting access to the telephone menus by a PIN . . . . . . . . . . . . . . . . . . 58
Parking code (default setting) . . . . . . . . . . . . . . . . . . . . . . . . . . . . . 59
Programming the telephone name . . . . . . . . . . . . . . . . . . . . . . . . . . . 59
Number for the SMS center . . . . . . . . . . . . . . . . . . . . . . . . . . . . . . 59
Volume settings . . . . . . . . . . . . . . . . . . . . . . . . 61
Speaker volume setting . . . . . . . . . . . . . . . . . . . . . . . . . . . . . . . . 61
Setting the volume of the handset . . . . . . . . . . . . . . . . . . . . . . . . . . . 61
Acknowledgement signals . . . . . . . . . . . . . . . . . . . . . . . . . . . . . . . 62
II
Table of contents
4
G:\_elmeg\CS410\V1\uk\mn\uk-410-mn-10x1.vp
Mittwoch, 11. Juni 2003 15:05:40
Farbprofil: Generic CMYK printer profile - None
Komposit Standardbildschirm
Setting the volume of the »Station guarding« tone . . . . . . . . . . . . . . . . . . . 63
Call waiting tone . . . . . . . . . . . . . . . . . . . . . . . . . . . . . . . . . . . . 63
Setting the headset type . . . . . . . . . . . . . . . . . . . . . . . . . . . . . . . . 64
Volume setting for appointment reminders . . . . . . . . . . . . . . . . . . . . . . 64
Possible audio output features . . . . . . . . . . . . . . . . . . . . . . . . . . . . 65
Further settings . . . . . . . . . . . . . . . . . . . . . . . . 66
Call forwarding (call rerouting) . . . . . . . . . . . . . . . . . . . . . . . . . . . . . 66
Call waiting feature . . . . . . . . . . . . . . . . . . . . . . . . . . . . . . . . . . 67
Direct call . . . . . . . . . . . . . . . . . . . . . . . . . . . . . . . . . . . . . . . 68
Appointment reminders . . . . . . . . . . . . . . . . . . . . . . . . . . . . . . . . 70
Setting the display contrast . . . . . . . . . . . . . . . . . . . . . . . . . . . . . . 71
Auto-answer . . . . . . . . . . . . . . . . . . . . . . . . . . . . . . . . . . . . . . 71
Automatic headset use . . . . . . . . . . . . . . . . . . . . . . . . . . . . . . . . 71
Call filter . . . . . . . . . . . . . . . . . . . . . . . . . . . . . . . . . . . . . . . . 72
Setting the time . . . . . . . . . . . . . . . . . . . . . . . . . . . . . . . . . . . . 73
Extended configuration . . . . . . . . . . . . . . . . . . . . 74
Settings for an MSN extension number . . . . . . . . . . . . . . . . . . . . . . . . 74
Connected to a pabx . . . . . . . . . . . . . . . . . . . . . . . . . . . . . . . . . 75
Dial ranges. . . . . . . . . . . . . . . . . . . . . . . . . . . . . . . . . . . . . . . 75
Setting the User Interface . . . . . . . . . . . . . . . . . . . . . . . . . . . . . . . 76
Programming function keys . . . . . . . . . . . . . . . . . . . . . . . . . . . . . . 76
Service functions . . . . . . . . . . . . . . . . . . . . . . . 80
Reading the telephone’s firmware version . . . . . . . . . . . . . . . . . . . . . . . 80
Country-specific settings . . . . . . . . . . . . . . . . . . . . . . . . . . . . . . . 80
Downloading a new firmware . . . . . . . . . . . . . . . . . . . . . . . . . . . . . 81
Telephone BIOS . . . . . . . . . . . . . . . . . . . . . . . . . . . . . . . . . . . . 83
Reset - Resetting to default state . . . . . . . . . . . . . . . . . . . . . . . . . . . 84
Telephone and PC . . . . . . . . . . . . . . . . . . . . . . 85
CTI / TAPI using the telephone’s USB port . . . . . . . . . . . . . . . . . . . . . . 85
CAPI using the telephone’s USB port . . . . . . . . . . . . . . . . . . . . . . . . . 85
Audio applications using the telephone’s audio sockets. . . . . . . . . . . . . . . . 86
Table of contents
5
G:\_elmeg\CS410\V1\uk\mn\uk-410-mn-10x1.vp
Mittwoch, 11. Juni 2003 15:05:40
III
Farbprofil: Generic CMYK printer profile - None
Komposit Standardbildschirm
Contents of the WIN-Tools CD-ROM . . . . . . . . . . . . . . . . . . . . . . . . . 86
Installing the programs from CD-ROM . . . . . . . . . . . . . . . . . . . . . . . . . 87
Appendix . . . . . . . . . . . . . . . . . . . . . . . . . . . 89
Declaration of conformity and CE mark . . . . . . . . . . . . . . . . . . . . . . . . 89
Default telephone settings . . . . . . . . . . . . . . . . . . . . . . . . . . . . . . . 89
Telephone menus . . . . . . . . . . . . . . . . . . . . . . . . . . . . . . . . . . . 91
Technical specifications . . . . . . . . . . . . . . . . . . . 95
Index . . . . . . . . . . . . . . . . . . . . . . . . . . . . . . 97
Brief description of functions
Warranty Declaration
IV
Table of contents
6
G:\_elmeg\CS410\V1\uk\mn\uk-410-mn-10x1.vp
Mittwoch, 11. Juni 2003 15:05:40
Farbprofil: Generic CMYK printer profile - None
Komposit Standardbildschirm
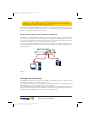
Description and Installation
You can connect the ISDN system telephone at the internal ISDN connection of an elmeg
pabx system (S0 or Up0). The ISDN telephone is connected to the ISDN network through an
ISDN jack (Western or RJ.45).
The ISDN telephone provides system features when connected to certain elmeg PABX systems. For example:
• Dialing from the pabx telephone directory
• Sending and receiving SMS messages
• Messaging and intercom calls with other system telephones connected to the pabx.
• Function keys for controlling special pabx features (switching call modes, team
log-in/off, line buttons, extension buttons).
The status of the programmed features can be displayed by means of LEDs assigned
to the specific function keys.
• Accessing the PABX system menu. This menu provides further pabx features.
The internal ISDN connection of the PABX systems automatically interfaces with the system
telephone. Please refer to the operating instructions of your PABX to determine whether these typical system features are provided with the various system telephones.
CS410
This system telephone is designed for connection to an internal S0-port (4 wires) of an elmeg
pabx system. If you wish to connect the telephone to an internal Up0-port, be sure to install
the internal Up0/S0-module into the telephone or use the external Up0/S0-converter.
CS410-U
This system telephone is designed for connection to an internal Up0-port (2 wires) of an elmeg pabx system. The internal Up0/S0-module or the external Up0/S0- converter are then
no longer required.
Setting up/ Configuring the system telephone
On the system telephone itself you can only carry out a limited configuration of the supported
features. You can only perform a complete configuration of the system telephone with the
Professional Configurator supplied with the WIN-Tools CD-ROM via the internal ISDN port of
an elmeg pabx system (starting from firmware version 5.40, CD version 5.43 and higher,
WIN-Tools Telephones from Version 3.30) or via the telephone’s USB-port.
System telephone extension modules
Your telephone is equipped with two slots for connecting optional modules and a dedicated
interface for an additional »T400« keyboard.
• Up0/S0-module (CS410 only)
You can install the Up0/S0 module in your telephone to connect it at a Up0 port of an
elmeg PABX system. The external Up0/S0- converter is then no longer required.
• Answering machine module
This module provides your telephone with a multi-function digital answering machine.
Description and Installation
7
G:\_elmeg\CS410\V1\uk\mn\uk-410-mn-10x1.vp
Mittwoch, 11. Juni 2003 15:05:41
1
Farbprofil: Generic CMYK printer profile - None
Komposit Standardbildschirm
For example: Separate programming for each MSN extension number, time control
feature for voice announcement related to specific MSN extension numbers, automatic message forwarding with newly recorded calls, recording of dictations, logging of
calls, remote polling protected by PIN
A special key and LED are provided for operation of the answering machine.
• Additional keypad »T400«
This additional keypad has 20 buttons with an inset LED, which can be used on two levels as function buttons. The LED is assigned to the first level. Another two LEDs are
provided for indicating additional information.
Up to three additional keypads can be connected (cascaded) to your telephone. A
plug-in power supply is required if you use more than one additional keypad. Use only
the approved power supply units available as accessory.
(Plug-in power supply unit T400 / Ident-Number: 220872.5
Plug-in power supply unit T400-UK / Ident-Nummer: 220873.3)
Safety notes
• Storage temperature: -25°C ... +70°C.
• Operating temperature: +5°C ... +40°C.
Only connect the telephone when the permissible ambient operating temperature has
been reached.
Please note that condensation on or in the telephone may occur when moving
from cold to warm surroundings. Only remove the telephone from the package
when the permissible ambient operating temperature has been reached.
•
•
•
•
•
•
•
•
•
•
2
You should not make calls or connect or disconnect any lines during thunderstorms.
Only attach the connecting cords at the connections provided.
Make sure phone cables are installed in a safe manner to prevent tripping.
Avoid the following:
Direct sunlight
Sources of heat (for example radiators)
Electronic devices (for example stereo components, office equipment or microwave
devices
Ingress of moisture or liquids
Aggressive fluids or vapors
Dusty environments
Do not use the phone in excessively humid rooms or hazardous locations.
Never open the telephone, or accessories, yourself.
Do not touch plug connectors with pointed, metal, or moist objects.
Place the phone or accessories on a non-skid surface.
When required, clean the telephone with a slightly moistened cloth.
Only use approved accessories.
Description and Installation
8
G:\_elmeg\CS410\V1\uk\mn\uk-410-mn-10x1.vp
Mittwoch, 11. Juni 2003 15:05:41
Farbprofil: Generic CMYK printer profile - None
Komposit Standardbildschirm
Elektrostatic charges
The telephone is supplied with enhanced ESD protection against the effects of electrostatic
discharge that exceeds the protection level cited in the approval specification. Elevated ESD
levels should nevertheless be avoided to the greatest possible extent. In some cases, electrostatic discharge levels can far exceed the approval limits or the resistance levels already
implemented in your telephones. Eliminate the causes or conditions that promote these elevated ESD levels, such as insufficient humidity or carpeting. The telephone manufacturer
does not assume any liability for damage caused under such circumstances.
Unpacking and placing the telephone
Unpacking
•
•
•
•
•
•
•
•
•
ISDN system telephone
Handset with handset connecting cord
2 feet
ISDN connecting cord (approx.6 m)
PC connecting cable (USB, approx. 3m)
PC-audio cable (3.5 mm stereo plug, approx. 2.5m)
Adapter cord for headsets with 4-pin connection cable (8-pin / 4-pin)
Cord holder (self-adhesive after removing the film)
Operating instructions and labels for function keys
Supplement with telephone safety instructions
• WIN-Tools CD-ROM with:
Professional Configurator, telephone, Download and Sound Manager,
TAPI-, USB-, CAPI- and NDISWAN-drivers, Adobe Acrobat Reader,
Operating instructions and Adobe Acrobat file for the printing of individual labels
Placing the telephone
Before placing the telephone, mount the rear feet at the positions (6) shown in figure 1.
Please note that the plastic feet of your ISDN system telephone may leave marks on sensitive
surfaces, such as furniture. The manufacturer of the ISDN system telephone is not liable for
any such damage. Therefore, use appropriate non-skidding pads under the phone.
Cleaning the telephone
The ISDN system telephone has been manufactured for normal, everyday use. When required, clean the ISDN system telephone with a slightly moistened cloth, or with an anti-static
cloth. Never use a solvent to clean the phone! Never use a dry cloth. Electrostatic charges
could damage the electronics in the system. It is essential that no liquids penetrate into the
inside of the ISDN system telephone, as this could destroy the phone.
Description and Installation
9
G:\_elmeg\CS410\V1\uk\mn\uk-410-mn-10x1.vp
Mittwoch, 11. Juni 2003 15:05:41
3
Farbprofil: Generic CMYK printer profile - None
Komposit Standardbildschirm
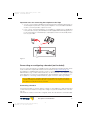
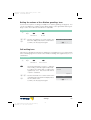
Connecting the telephone (ISDN and handset cords)
Please connect the ISDN cable and the handset cable. Otherwise you will not be able to operate the phone.
3
2
6
4
6
5
5
4
1
7
4
Figure 1
Connecting the handset connecting cord
Connect the handset cord (1) as shown in figure 1. Lay the handset cord in the cord groove
(4) and lock it below the two cord retainers (5).
Connecting the ISDN cord
Connection to the S0 (CS410)
Connect the ISDN cord (2) as shown in figure 1 (S0-connector). Ensure that the longer ISDN
connector is plugged into the ISDN socket and the shorter ISDN connector into the ISDN socket on the telephone. Then lay the ISDN cord in the cord groove (4) and lock it below the two
cord retainers (5).
Connection to the Up0 (CS410 with Up0/S0-module or CS410-U)
Connect the ISDN cable (2) as shown in figure 2 (Up0-socket). Ensure that the longer ISDN
connector is plugged into the ISDN outlet and the shorter ISDN connector into the ISDN socket on the telephone. Then lay the ISDN cord in the cord groove (4) and lock it below the two
cord retainers (5).
CS410 telephones equipped with a Up0/S0 module or CS410-U phones may not
be connected through the S0-socket (3) to the ISDN connection (e.g. internal
ISDN port of the PABX) .
4
Description and Installation
10
G:\_elmeg\CS410\V1\uk\mn\uk-410-mn-10x1.vp
Mittwoch, 11. Juni 2003 15:05:49
Farbprofil: Generic CMYK printer profile - None
Komposit Standardbildschirm
Important notes for connecting the telephone to the Up0
• You can connect a further ISDN device with an S0 port (for example an ISDN card or a
another telephone) at the S0 socket (3) of the telephone. For each additional ISDN device this connection provides a power of 1 watt.
• If you connect an internal ISDN bus (for example for a telephone in a neighboring
room) at the S0 socket (3), this ISDN bus must be equipped with terminating resistors .
For more information on installation procedures please refer to the Assembly instructions for your PABX.
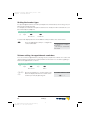
2
1
3
Figure 2
Connecting an configuring a headset (not included)
You can connect a headset to your telephone. Ask your dealer which headset models can be
used or retrieve the required information from the Internet at http://www.elmeg.com.
The telephone is equipped with an 8-pin socket for connecting a headset. Headsets with a
DSHG-interface (e.g. cordless DECT-headsets) can be connected to the telephone right
away. Special accessories are not required for this. Use the adapter cord included in the scope of supply for connecting standard headsets (4-pin connection cable, e.g. U10PS).
You can not connect / install the optional Answering Machine module and a headset with a DSHG port simultaneously to/in a system. You can only use one of these
two options at your phone at any one time.
Connecting a headset
Connect the headset as shown in figure 1on page 4 to the telephone’s dedicated headset
socket. Then lay the headset cord (3) in the cord groove (4) and lock it below the cord retainers (5).
If the headset cord does not fit in the cord guide, attach the self-adhesive cord holder supp-
Description and Installation
11
G:\_elmeg\CS410\V1\uk\mn\uk-410-mn-10x1.vp
Mittwoch, 11. Juni 2003 15:05:55
5
Farbprofil: Generic CMYK printer profile - None
Komposit Standardbildschirm
lied with the system to the bottom of your telephone (7). Then, route the headset cord under
the cord holder.
Headset socket assignments
8 - DSHG-transmitter
8
7 - V+ (3.3V)
7 6 - Microphone - (Ground)
6
5 5 - Handset (3.3V, switchable via resistor)
4 - Handset (Ground)
4
3 3 - Microphone +
2
2 - Ground (Ground)
1 1 - DSHG-receiver
Figure 3
Further settings when using a headset
You can use the handset or the headset for making calls. With headset operation, the following settings are required or possible:
• When configuring your telephone, program one of the function keys for headset operation (headset button, see page 51).
• You can use the headset connected to your system automatically for certain actions
on the phone (see page 71).
• If a special support feature is stored in your telephone for the headset your are using,
set your phone for that headset model.
For example, the LED in the microphone extension for »Firefly F142 N« from Plantronics can be activated by the telephone.
• If you would like to use the auto-answer feature with your headset, set the time after
which a call is answered (see page 71). When configuring your telephone, you should
program a function key to be used for activating or deactivating the auto-answer feature.
Connecting the telephone to a PC
Connecting the PC connection cord (USB)
Use the USB cord supplied with the system to connect the telephone to the PC, or
to the hub. If you use a different USB cord, ensure that the distance between the
telephone and the PC, or between the telephone and the hub, does not exceed
five meters, depending on the type of cord you are using.
Connect the USB cord (4) as shown in figure 4 (PC-socket). Plug the USB connector (type A)
into the corresponding socket of your PC and the USB connector (type B) into the USB socket on the back of the telephone (1). The telephone is automatically detected by the PC,
provided that both devices (telephone and PC) are switched on.
6
Description and Installation
12
G:\_elmeg\CS410\V1\uk\mn\uk-410-mn-10x1.vp
Mittwoch, 11. Juni 2003 15:06:01
Farbprofil: Generic CMYK printer profile - None
Komposit Standardbildschirm
Installation of a device driver is started automatically when initially connecting the
telephone to a PC. Insert the WIN-Tools CD-ROM supplied with the telephone
and follow the instructions displayed on the screen.
You will need a hub (USB distributor) if you plan to use several USB terminal devices at your
PC. Connect the hub to the USB port of the PC. You can then connect other USB terminal
devices, including the telephone to the hub.
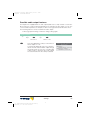
Connecting the audio sockets (Audio in / Audio out)
The telephone is equipped with an input (2) and an output (3) for audio signals. Both these
ports have a 3.5 mm stereo jack. When using the optional answering machine module, you
can connect the telephone via these ports to the PC sound card in order to upload announcements into the phone or save recorded messages on the PC.
You can also use specific telephone features with the Audio-Out output (see page 64). Connect the speakers (5) with a 3.5 mm stereo jack to the telephone’s Audio-Out (3) output, as
shown in figure 4.
2 3
1
4
5
Figure 4
Changing the label panel
The label panels for the function keys are included on a separate sheet enclosed in the operating instructions. Cut out the label you wish to use .
To change the label panel, press the flexible cover together between your index finger and
thumb and lift it out. The label panel can now be changed.
You can fill in the label for your telephone with your own information and then print it out using
the Professional Configurator. Also available on the WIN-Tools CD-ROM is an Adobe Acrobat file containing templates that you can also fill in and print out.
Description and Installation
13
G:\_elmeg\CS410\V1\uk\mn\uk-410-mn-10x1.vp
Mittwoch, 11. Juni 2003 15:06:08
7
Farbprofil: Generic CMYK printer profile - None
Komposit Standardbildschirm
Pictographs
The pictographs (symbols) described as follows have been used in these operating instructions to illustrate some procedures for setting and using the telephone.
b
a
l
g
d
q
t
Lift up the handset or start initializing selection.
Replace handset. The telephone is idle.
A call is signaled. The ringing tone melody sounds.
You are conducting a call.
A three-party conference call is initiated.
You hear the positive or negative acknowledgement signal.
Select the number, code, character or text.
09
*#
Press the appropriate button on the push-button set.
Setting the language of the display
You can select the language of your display.
Begin as follows:
a
<>
s
8
M
s
s
s
Configuration
Display
Language
Press the arrow buttons to view the available
languages.
Press the softkey adjacent to the desired
language. The display switches to the changed
language immediately.
Description and Installation
14
G:\_elmeg\CS410\V1\uk\mn\uk-410-mn-10x1.vp
Mittwoch, 11. Juni 2003 15:06:08
ˆ Which language? }
ˆItaliano
Español
ˆDeutsch
English
ˆFrançaise
Nederland
Farbprofil: Generic CMYK printer profile - None
Komposit Standardbildschirm
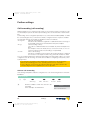
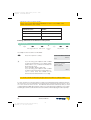
Telephone display and buttons
1
2
3
4
5
12
13
6
7
8
9
10
11
14
15
16
17
18
19
20
21
Figure 5
1
Speaker
2
Handset with connecting cord
3
Answering machine button on the telephone (optional module)
4
6 Softkeys
5
Seven-line backlit display
6
Menu key: This key opens the programming menu. If you are already located in a
menu and then press the key, either menu-specific functions are shown, or you
are moved back one programming step.
7
ESC key: Pressing the Esc button during programming returns the telephone to
its idle status.
8 / 10
Arrow button »To the left« / »To the right«: The arrows »{« and »}« in the right corner on the top line of the display indicate that you can call up further functions on
the lower lines using the arrow buttons.
9
OK key: Pressing this button confirms an entry or stores a setting in the telephone.
Description and Installation
15
G:\_elmeg\CS410\V1\uk\mn\uk-410-mn-10x1.vp
Mittwoch, 11. Juni 2003 15:06:16
9
Farbprofil: Generic CMYK printer profile - None
Komposit Standardbildschirm
11
C key: Press this button to move back one menu step in the menu. If you are currently in the input mode, this button can be used to delete individual characters.
12
Asterisk key/ hash key
13
Dial buttons
14
Open listening / hands-free button
15
Ending a call
16
Redial button
17
Enquiry button
18
Microphone
19
Five programmable function keys with LED: Each button has an inset two-color
LED (level 1 - red / level 2 - yellow). These LEDs can be used to indicate certain
functions.
20
Label panel for function keys
21
Call signaling (red) and answering machine (yellow) LED
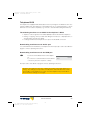
Telephone display
1
2
3
S¡
29.05.03 07:41
}
Info
-D-I-q-
S¡
Tel. drctry
S¡
VIP
S
S
Quiet ¨ S
5
1
2
3
4
6
5
4
Caller list ¨ S
6
Figure 6
Date
Time
21 characters per line
Arrow: Further menu items accessible by using the arrow
keys.
Answering machine button on
the telephone (optional module)
Arrow: Indication of the softkey
that can be used in the current
menu.
The telephone is equipped with a seven-line backlit display. Backlighting is automatically
switched on or off.
After you connect the system to the internal ISDN connection of your pabx system, the date
and time are shown on the top line of the display. The date and time are imported automatically from the pabx system. The text displayed for a function is always located next to the corresponding softkey. When you press the softkey, the next level is displayed. If not all information fit into the screen, this will be indicated by »«« or »««. To view further characters, press
the R key and then use the corresponding arrow key.
Various telephone display shots are illustrated in this operator’s manual to help explain the
different settings and use of the system. A wavy line at the top or bottom of an illustration indicates that not all of the 7 lines of that particular display are shown (only pertinent lines shown).
10
Description and Installation
16
G:\_elmeg\CS410\V1\uk\mn\uk-410-mn-10x1.vp
Mittwoch, 11. Juni 2003 15:06:22
Farbprofil: Generic CMYK printer profile - None
Komposit Standardbildschirm
Special feature for displaying lists in the display
Several entries are shown in the display as a list for certain settings or when using the phone.
These lists are required for telephone directory or VIP memory programmings for example.
<>
The active entry (the one you have selected) is
highlighted. Use the menu or the OK button to
display further features or select the highlighted entry.
ˆVIP digit to select{}
ˆ
ˆV0:···········0123456
ˆV1:TONY··········
ˆV2:
¬¬¬¬¬¬¬¬¬¬¬¬¬¬¬¬¬¬¬¬¬¬
Special feature for changing existing entries
You have various options available for changing existing entries (for example names or numbers).
Example 1:
You may want to change the telephone number of an entry, because that subscriber has moved to another place.
When you use the push-button set to enter the first digit of the new number the existing number is deleted completely. Enter the other digits of the new number.
Example 2:
You wish to change parts of a name in a telephone directory listing, because the name has
changed (e. g. in the case of marriage).
Use the arrow buttons to specify the storage position for that entry. You can overwrite an existing surname right away or delete it with the C-button and then enter the new name.
Use the buttons as follows when entering texts, letters digits or special
characters:
Key
1
2
3
4
5
6
7
8
9
Press
1
2
3
4
5
6
7
A
B
C
2
Ä
Å
Æ
D
E
F
3
€
G
H
I
4
J
K
L
5
M
N
O
6
Ö
Ø
P
Q
R
S
7
ß
T
U
V
8
Ü
W
X
Y
Z
9
1
Description and Installation
17
G:\_elmeg\CS410\V1\uk\mn\uk-410-mn-10x1.vp
Mittwoch, 11. Juni 2003 15:06:22
$
¥
11
Farbprofil: Generic CMYK printer profile - None
Komposit Standardbildschirm
Key
*
#
Press
1
2
3
4
5
6
7
*
#
0
Several special characters are assigned to the button »0«. For special
characters, press the 0 key.
For exampe.: »!«, »&«, »?«, »+«, »-«, »=«, »(«, »)«, »@«, »$«, ...
Input mode for entering letters
You have various possibilities for entering letters. The currently set input mode is displayed
on the top half of the display on the right-hand side (no display, »Abc« or »ABC«).
»Abc«
The next letter that you enter is shown as a capital, all others as small case
letters. Example: »Dean, James«.
no display
Every letter that you enter is shown in small case.
Example: »dean, james«.
»ABC«
Every letter that you enter is shown as capitals.
Example: »DEAN, JAMES«.
When you start entering texts, the input mode is always »Abc«. Press the R key to
change the input mode. To insert a character while in »Abc« mode, press the C
key.
Call signaling
Call signaling is effected using the ringing tone that has been set for the dialed number (MSN)
in each telephone.
If you are using the telephone at an internal ISDN connection of certain elmeg PABX systems,
you can program each MSN extension number with special ringing melodies for internal and
external calls.
Function and LEDs
You can program the five function keys on two levels with different functions via the PC configuration program for the telephone. Each key is equipped with an LED that is used to display
the active function. Each color is assigned to a particular level for the function key (level 1 - red
/ level 2 - yellow).
Press the key two times to reach the second level for the function keys. This must be done at
a short interval.
LED for call signaling and answering machine
flashes red:
Incoming calls
lit yellow:
Answering machine switched on
flashes yellow:
New messages recorded by the answering machine
12
Description and Installation
18
G:\_elmeg\CS410\V1\uk\mn\uk-410-mn-10x1.vp
Mittwoch, 11. Juni 2003 15:06:22
Farbprofil: Generic CMYK printer profile - None
Komposit Standardbildschirm
Acknowledegement signals
Entries or settings you make at your telephone are sometimes confirmed by acknowledgement signals.
Positive acknowledgement signal (1 long tone):
The positive acknowledgement signal indicates that your input has been accepted and stored by the telephone.
Negative acknowledgement signal. (3 short tones):
You will hear the negative acknowledgement signal when your input has not been accepted
by the telephone, or when invalid input has been made.
Displays for programmed features
s
<>
When the telephone is in the idle state, additional information about functions that have been
configured are shown on »Info« line of the
display. In this example: »-D-S-q-«.
Press the softkey next to »Info« if you wish to
get more information about the configured
functions.
ˆ29.05.03 07:21
}
ˆInfo
-D-S-qˆ
ˆTel. drctry
Quiet
ˆVIP
Caller list
If you have programmed several features,
press the arrow buttons to view the various
settings.
ªªªªªªªªªªªªªªªªªªªªªª
ˆInhibit/Menu:
Display
ˆGuard for modificatio
¬¬¬¬¬¬¬¬¬¬¬¬¬¬¬¬¬¬¬¬¬¬
Configured function
»D«
Active appointment reminder set.
»I«
Dial ranges or call filter active,
Access to telephone menus is protected.
»q«
Function »Station guarding« (only brief signal) active.
»Q«
Function »Station guarding« (complete) active.
(All call signals are switched off)
»U«
Call forwarding active.
»i«
Information about programmed function keys
For example: Message enabled / inhibited.
»×«
Answering machine, time control, call forwarding signaling or remote control are activated (optional module).
Description and Installation
19
G:\_elmeg\CS410\V1\uk\mn\uk-410-mn-10x1.vp
Mittwoch, 11. Juni 2003 15:06:23
13
Farbprofil: Generic CMYK printer profile - None
Komposit Standardbildschirm
Making Calls
Starting a call
Dial number - no correction possible
b
t
g
Dial number
Dial number - correction possible
a
t
b
g
Dial number
To change the number or to correct a wrong entry, select the wrong figure with the arrow
buttons and press C key to delete it. Now enter the correct number.
If you wish to conduct the call using the handset, just lift it up after dialing the number. Any
time during a call you can switch back and forth between hands-free calling, speaker function and use of the handset.
After you have dialed the number you can also press the speaker button to have the number
dialed and to use hands-free calling.
If a call can not be put through (e.g. number is inhibited via the dial ranges control, or the account for the number/MSN is empty), a corresponding message will appear in the display.
For example: »Inhibit. : ext. number«, when the dial range filter is active.
Other options for dialing without lifting the handset
The option of dialing without lifting the handset and of correcting or adding to a number also
exists during dialing:
• from the redialing memory (see page 17).
• from the caller/ memo list (see page 33).
• from the telephone directory (see page 29).
• from the VIP memory (see page 32).
• from the direct dialing memory (see page 15).
• via CTI (TAPI) features (see page 85).
If you are using one of these options, you can make further entries prior to initiating the call.
You can define which number (MSN), if any, is to be transmitted to the party being called.
Dialing from the pabx telephone directory
When you use this telephone with a system telephony supporting pabx system, you can dial
from the telephone directory of the pabx.
14
Making telephone calls
20
G:\_elmeg\CS410\V1\uk\mn\uk-410-mn-10x1.vp
Mittwoch, 11. Juni 2003 15:06:23
Kommunikationstechnik
Farbprofil: Generic CMYK printer profile - None
Komposit Standardbildschirm
a
R
s
O
t
Tel. drctry
<> O b g
Select
entry
Enter first letter
Dialing from the phone’s directory
You can store up to 250 names and numbers in the telephone directory. To select a name,
you can page through the directory using the arrow buttons, or enter the specific first letter(s)
of the name using the push-button set.
s
a
O
t
Tel. drctry
<>
O b g
Select
entry
Enter first letter
For information on how to program and configure the telephone directory, please refer to
page 29 of these operating instructions.
Dialing from the VIP memory
You can program VIP numbers for each of the ten buttons 1 … 0 including a name (20 characters max. ) and a telephone number (26 digits max.).
a
s
<>
VIP
Select VIP
destination
t
or
b
g
Select VIP
destination
For information on how to program VIP entries, please refer to page 32 of these operating instructions.
Direct dialing with function keys
Direct dialing is initiated using the direct dialing keys. Each of the five keys can be programmed with two functions or direct dialing numbers.
Z
a
b
g
Press the function key
Use the function keys to select the desired number.
If you wish to dial a number from the second level, press the corresponding key two times.
This must be executed at a short interval.
You can program the direct dialing / function keys via the PC configuration program or the
extended configuration of the telephone.
Kommunikationstechnik
Making telephone calls
21
G:\_elmeg\CS410\V1\uk\mn\uk-410-mn-10x1.vp
Mittwoch, 11. Juni 2003 15:06:24
15
Farbprofil: Generic CMYK printer profile - None
Komposit Standardbildschirm
Dialing from the caller/memo list
The phone has a combined caller and memo list. A maximum of 30 entries (calls, memos
SMS messages or UUS1- messages) are stored in this list. Entries in the caller or memo list
are indicated by the »Caller list« softkey.
a
s
b
Caller list
g
Select entry
For more information about the caller/memo list, please refer to page 33 of these operating
instructions.
Accepting/rejecting a call
In its initial state the telephone will accept all calls, regardless of the selected MSN. If two
calls are signaled simultaneously the first one is accepted when you lift the handset. The second call can still be signal by a call waiting signal.
The telephone display shows the caller’s number or the number the caller has dialed (MSN-1
… MSN-10, or the assigned name).
a
b
g
If you are unable, or do not wish to accept a call, you have the option of rejecting this call.
Press the »reject« softkey and the call will be no longer be signaled at your telephone.
If you are a member of a team, then this call will continue to be signaled at the phones of your
team. If the call was signaled only at your phone, the caller will hear the busy signal when the
call is rejected.
a
s
reject
Forwarding a call (call deflection)
If you are unable, or do not wish to accept a call, you have the option of forwarding this call.
Press the »transfer« softkey, if you wish to forward this call directly to another subscriber.
For each MSN you can set the number to which the call is forwarded as default number in the
configuration of the telephone. After pressing the softkey »x-fer« you can forward the call to
the default number or enter a new number.
a
16
s
t
transfer
Dial number
O
Making telephone calls
22
G:\_elmeg\CS410\V1\uk\mn\uk-410-mn-10x1.vp
Mittwoch, 11. Juni 2003 15:06:24
Kommunikationstechnik
Farbprofil: Generic CMYK printer profile - None
Komposit Standardbildschirm
Calling line identification (anonymus call) restriction
You can block the display of your telephone number at your caller’s telephone if desired. You
can set this function specifically for the next call, or permanently (see page 48).
Suppressing calling line identification for the next call
During an external or internal call, you can prevent the number from being transmitted (displayed) to the party you have called.
a
t
O
M
s
b
g
Concealed
Dial number
When a call is signaled, you can decide before accepting the call whether your number is to
be transmitted to the caller. If your phone is the final destination of call rerouting you can use
this procedure to prevent the caller from seeing the final destination phone number (i. e.
yours).
s
a
b
g
Concealed
Starting a call with a set number (MSN)
You can conduct an internal or external call such that a defined number (MSN) is transferred
from your telephone to the party you are calling. This number must have been entered previously in your telephone. When you call, either the number that is transmitted is shown in the
bottom line of the display (»MSN-1«... »MSN10«) or the name that you have assigned to this
number (MSN). You can initiate dialing using the set extension number (MSN) as explained in
the following, or you can use a programmed function key for this.
a
t
O
M
Dial number
s
s
MSN
MSN-1 … MSN-10
b
g
In the WIN-Tools Telephone Directory Manager you can assign a number (MSN) to
each name.
Redialing
The previously dialed telephone number is stored in the redial memory.
a
b
W
Kommunikationstechnik
g
Making telephone calls
23
G:\_elmeg\CS410\V1\uk\mn\uk-410-mn-10x1.vp
Mittwoch, 11. Juni 2003 15:06:25
17
Farbprofil: Generic CMYK printer profile - None
Komposit Standardbildschirm
Extended redialing
In the extended redialing the numbers of the last 20 calls, connections (conversations) and
text messages are stored. You can view these by pressing the redial button or the arrow buttons and subsequently have them redialed automatically.
a
W
W
O
b
g
Select entry
The last dialed number is displayed. At the end of the second line the status of this entry is indicated by the letters displayed there.
»v«
Connection
»A«
Call
»M«
Mail (extension numbers, to which SMS or UUS1 messages were sent)
»|«
Calls configured for automatic redialing.
no entry
You placed a call to somebody but did not reach him/her, or his/her line
was busy.
Deleting a telephone number from extended redialing or save as a memo
a
W
W
M
s
delete?
Select entry
or
s
memo?
Press the softkey below »delete?«, to delete the displayed entry immediately. Press the
softkey below »Memo?« to write the entry as a memo to the scratchpad. After being written to
the scratchpad the entry is deleted. The next telephone number is then displayed.
For an entry in the scratchpad, the softkey »Caller list« is shown on the display.
Importing numbers from extended redialing into the telephone directory
You can import a number that is present in the list for extended redialing into the telephone
directory of your phone (see page 29).
Begin as follows:
a
W
W
M
Select entry
s
Press the softkey »Tel. drctry«.
ˆ 5/0123456789
v
ˆ
ˆ
memo?
ˆTel. drctry
¬¬¬¬¬¬¬¬¬¬¬¬¬¬¬¬¬¬¬¬¬¬
t
O
Enter the name.
In this example: »Dean«.
Confirm your entry by pressing OK.
ˆInput telephone book
18
Making telephone calls
24
G:\_elmeg\CS410\V1\uk\mn\uk-410-mn-10x1.vp
Mittwoch, 11. Juni 2003 15:06:25
ˆName>Dean`
¬¬¬¬¬¬¬¬¬¬¬¬¬¬¬¬¬¬¬¬¬¬
Kommunikationstechnik
Farbprofil: Generic CMYK printer profile - None
Komposit Standardbildschirm
In the redialing function the name displays instead of the number.
ˆˆ 5/Dean
v
ˆ
ˆ
memo?
Tel. drctry
¬¬¬¬¬¬¬¬¬¬¬¬¬¬¬¬¬¬¬¬¬¬
Automatic redialing
If you placed a call to a subscriber whose number is busy or who does not answer, you can
then activate automatic redialing which will call that same subscriber again after about 10 seconds.
a
W
t
g
Dial number
Subscriber
busy
s
or
a
Autom.repeat
request
After around 10 seconds the hands-free calling function of your phone is activated and the
number is dialed automatically. This is repeated for up to around 2 minutes.
Up to 20 call attempts are made if the subscriber can still not be reached. After 20 unsuccessful attempts, automatic redialing will be cancelled. You will hear the negative acknowledgement signal in that case.
If automatic redialing is active, the »Autom.repeat request« softkey is shown
on the display. Press the right arrow button or the »Continue« softkey, to return
to the normal idle state display.
Suspending automatic redialing
You can suspend automatic redialing that you have started any time using the appropriate
procedure and place a normal call. To suspend automatic redialing, press the open listening/hands-free button during automatic redialing.
After the call automatic redialing starts again.
Deactivating automatic redialing
You can deactivate automatic redialing at any time. There are no further call attempts.
To deactivate automatic redialing during the dialing process press ESC.
If you like to deactivate automatic redialing in the idle state of the phone, proceed as follows:
s
s
Autom.repeat
request
Yes
a
Kommunikationstechnik
Making telephone calls
25
G:\_elmeg\CS410\V1\uk\mn\uk-410-mn-10x1.vp
Mittwoch, 11. Juni 2003 15:06:25
19
Farbprofil: Generic CMYK printer profile - None
Komposit Standardbildschirm
Microphone activation/deactivation, open listening and
hands-free calling
Activating/ muting the microphone
The mute function allows you to switch off the handset microphone during a normal call, or
the telephone microphone during hands free calling. The party you are calling will then no
longer be able to hear the conversation you conduct with persons in the room (room enquiry).
However, you will continue to be able to hear the party on the phone.
g
s
s
Room enquiry
Mute
g
speak
Call duration and cost logging are continued even if the microphone has been
de-activated.
Speaker function
The “Speaker” function can be activated when there are other persons in the room who wish
to also participate in the call. You continue to talk into the handset while this function is active.
You can set the volume during the call as described on page 61.
Please inform the party you are calling that open listening is activated. »|« indicates that open
listening is activated.
g
L
L
Begin open
listening
End open
listening
g
When you hang up the handset while open listening is active, both open listening and the call
itself are terminated.
Hands Free Calling
The handset remains in its cradle during hands free calling. The built-in microphone and the
speaker are activated. Any actions are carried out using the open listening / hands-free button only. You can switch back to normal »handset« calls at any time during hands free calling
by merely lifting up the handset. You can also switch from normal »handset« calling to hands
free calling when you hang up the handset after pressing the open listening / hands-free button. During hands-free calling acoustic signals such as the call waiting signal are not transmitted.
Please inform the party you are calling that hands-free calling is activated. »|« shows that
hands free calling is activated.
a
L
L
t
Begin hands free
Dial number
calling
20
End hands
free calling
Making telephone calls
26
G:\_elmeg\CS410\V1\uk\mn\uk-410-mn-10x1.vp
Mittwoch, 11. Juni 2003 15:06:26
Kommunikationstechnik
Farbprofil: Generic CMYK printer profile - None
Komposit Standardbildschirm
Headset use
You can connect a headset to your telephone. Connect and configure the headset as described on page 5.
You can use the handset or the headset for making calls.
Activating and deactivating the headset
For headset operation, one of the functions buttons must be configured as a headset key.
The LED assigned to this key indicates, whether the headset in switched on or off (LED on or
off).
z
a
activate headset
g
z
Call via headset
deactivate headset
t
Dial number
Activating and deactivating open listening while using the headset
g
L
g
L
Call via headset
Activate open listening
Call via headset and
open listening
g
z
Deactivate
Call via headdeactivate headset
set
open listening
Message
The message function allows you to establish a connection to a different telephone, without
this connection having to be actively accepted (picking up the handset, hands-free calling or
loudspeaker). This is a simplex (one-way) call in which only the party that initiated the message will be heard.
As soon as a telephone accepts the message, the connection is established. You will hear a
brief acoustic tone before the actual message.
For a message call, enter the internal number of the party you wish to call. You also
only need to enter the internal number with direct exchange line access. For example: »22« instead of »*22«.
When a message comes in for your telephone, the number or the name of the party sending
the message appears in the display. The message is preceded by a brief acoustic signal over
the speaker. The message can be terminated at any time by pressing ESC.
Messages are accepted automatically by the phones being called by activating the open listening function when:
• the phone is idle.
• messaging has been enabled for the pabx (control by means of the »Enabling messages« function key).
• »Station guarding« is not active.
Kommunikationstechnik
Making telephone calls
27
G:\_elmeg\CS410\V1\uk\mn\uk-410-mn-10x1.vp
Mittwoch, 11. Juni 2003 15:06:26
21
Farbprofil: Generic CMYK printer profile - None
Komposit Standardbildschirm
Messages can also be received even if the »Station guarding« function is active when the
»Enabling messages« function key has been programmed and is activated.
You can initiate a message using the procedure described in the following, or using a programmed function key. You can also initiate a message during an ongoing call (inquiry call)
using the corresponding function key.
You can only utilize this function if the messaging feature has been enabled in the
pabx for your MSN extension number.
Begin as follows:
a
M
s
>
Acoustic
t
g
L
s
Message
Enter the telephone number, for which the
message is to be given, or select an entry from
the telephone directory.
As soon as a telephone accepts the message,
the connection is established.
Press the open listening/hands-free button to
end a message.
ˆ| Message to
MSN-1
ˆTel. drctry
¬¬¬¬¬¬¬¬¬¬¬¬¬¬¬¬¬¬¬¬¬¬
ˆ| Message 22
ˆ00.24
MSN-1
Display
ˆmemo
¬¬¬¬¬¬¬¬¬¬¬¬¬¬¬¬¬¬¬¬¬¬
Intercom
The intercom function allows you to establish an internal connection to another system telephone without the called system telephone having to accept the call actively (lift up handset,
hands free calling/activate open listening). This is a call in which both parties can speak to
one another.
As soon as the system telephone has accepted the intercom call, the connection is established. You will hear a brief acoustic tone before the actual intercom call begins. If one of the
parties picks up the handset during an intercom call, the call becomes a standard type of call.
For an intercom call, enter the internal number of the party you wish to call. You
also only need to enter the internal number with direct exchange line access. For
example: »22« instead of »*22«.
When an intercom call comes in for your system telephone, the number or the name of the
calling party appears in the display. Intercom calls are preceded by a brief acoustic signal
over the speaker. The intercom call can be terminated at any time by pressing the ESC key.
Intercom calls are accepted automatically by activating the »Hands- free« feature when:
• the telephone is idle,
• the intercom feature has been enabled for the pabx (control by means of the »Enabling
intercom« function key).
• »Station guarding« is not active.
22
Making telephone calls
28
G:\_elmeg\CS410\V1\uk\mn\uk-410-mn-10x1.vp
Mittwoch, 11. Juni 2003 15:06:26
Kommunikationstechnik
Farbprofil: Generic CMYK printer profile - None
Komposit Standardbildschirm
Intercom calls can also be received even if the »Station guarding« function is active when the
»Enable intercom calls« function key has been programmed and is activated.
You can initiate intercom calls using the following procedure, or using a programmed function key.
You can only utilize this function if the intercom feature for system telephones has
been enabled in the pabx for your MSN extension number.
Begin as follows:
a
M
s
>
s
Acoustic
t
g
L
Intercom
Enter the telephone number, for which the intercom function is to be activated, or select an
entry from the telephone directory.
The connection is set up when the telephone
has accepted the intercom function.
To end the intercom function, press the open
listening/hands-free key.
ˆ| Speak to
MSN-1
ˆTel. drctry
¬¬¬¬¬¬¬¬¬¬¬¬¬¬¬¬¬¬¬¬¬¬
ˆ| Intercom 22
ˆ00.25
MSN-1
Display
ˆmemo
¬¬¬¬¬¬¬¬¬¬¬¬¬¬¬¬¬¬¬¬¬¬
Automatic completion of call
Using the function automatic completion of call to busy subscriber feature, you can reach a
party whose line is busy or who is not near his or her telephone. You are then notified that the
party for which completion of call has been configured can now be reached. You receive this
information from the exchange office for external call-backs and from the PABX system for
internal call-backs.
The telephone display then indicates »Autom. callback«. This display alternates every 2
seconds between the number or name of the desired party. As soon as you accept this information (by picking up the handset, for example), the selected party is called automatically.
Completion of call to busy subscriber (CCBS)
You hear the busy signal when calling the extension of the person you are trying to reach.
»Completion of call to busy subscriber« allows you to call the extension as soon as the other
subscriber hangs up his or her telephone.
Automatic completion of calls on no reply (CCNR)
When you call the desired number you always get a ringing signal, but the party is not near
the phone or does not answer. Using the function »Completion of call on no reply« you can
reach the party immediately when he/she ends a call, or lifts and then replaces his/her handset.
Kommunikationstechnik
Making telephone calls
29
G:\_elmeg\CS410\V1\uk\mn\uk-410-mn-10x1.vp
Mittwoch, 11. Juni 2003 15:06:27
23
Farbprofil: Generic CMYK printer profile - None
Komposit Standardbildschirm
Programming completion of call to busy subscriber
b
t
g
s
Dial number
Subscriber busy or
does not answer
Clbckbusy
a
The »Clbckbusy« softkey is only displayed, when automatic completion of calls are possible with the exchange office or with the pabx. The features »Completion of call to busy subscriber« or »Completion of call on no answer« must be applied for at your service provider for
external call-backs.
You can configure three call-backs at a time. If you are using an LCR procedure (e. g. the
LCR procedure of the phone), the »Completion of call to busy subscriber« function is carried
out automatically via your standard network service provider.
If automatic redialing is active, the »Clbckbusy« softkey is shown on the display.
Press the right arrow button or the »continue« softkey, to return to the normal
idle state display.
Viewing and clearing call-back calls
When the phone is in idle, any call-back calls that are initiated can be viewed in the display by
pressing the softkey »Clbckbusy«. Press this softkey to view the call-back calls. You can
then view the individual completion calls using the arrow keys. If you wish to delete a call
completion, select this call using the arrow key and then press the menu key, followed by the
»delete?« softkey.
All completions of call are automatically deleted after a predefined period. This time is set by
the service provider for external call-backs and by the PABX system for internal call-backs.
If the ISDN telephone is disconnected from the ISDN network, (for example by unplugging the ISDN connector of the phone or by switching off or resetting the
pabx), all requested call completions will be lost.
Parking
The parking function allows you to interrupt a call for up to three minutes. You can then unplug the plug-in connector for your ISDN system telephone from the ISDN outlet and plug it in
in a different room. You can continue with the previous call after »unparking« it. Or you can
»unpark« the call at a different phone and continue your call there.
Parking is only possible when only one connection is currently active with your ISDN telephone. After you unpark the call, the number for the parked subscriber will no longer be shown.
A »parking code« (0.... 99) is used to ensure that you are returned to the proper call when two
calls are parked. The default parking code is 55.
24
Making telephone calls
30
G:\_elmeg\CS410\V1\uk\mn\uk-410-mn-10x1.vp
Mittwoch, 11. Juni 2003 15:06:27
Kommunikationstechnik
Farbprofil: Generic CMYK printer profile - None
Komposit Standardbildschirm
If you park two calls on an ISDN bus this bus is then disabled for further calls. “Unparking” is possible only on the bus on which the call was also parked.
Parking is only possible when only one connection is currently active with your telephone.
Parking
g
Conversation
s
O
t
Disconnect and
then reconnect
a
park
Enter park
code
>
s
t
unpark
Enter
park code
Unparking
a
O
b
g
Conversation
Malicious call identification (MCID)
If you receive a prank or malicious call, you can arrange for the number of the caller to be saved at the exchange.
To enable this feature (Malicious call identification), it must first be applied for at your network
service provider.
Identification of the caller is effected in the exchange and the number stored there
with information on the number of the caller, the date and the time of the call.
You can use this feature in 2 situations.
Malicious call identification during ongoing call
g
You want to identify a caller.
>s
The telephone number can then be
established in the exchange.
a
mcid
Call with subscriber
After the caller has hung up the handset
g
You wish to determine the caller,
but he/she has already hung up
the handset.
Call with subscriber
s
The telephone number can then be
established in the exchange.
a
mcid
You can initiate tracing only in the course of an ongoing call when you are conducting hands-free calling using the telephone.
Kommunikationstechnik
Making telephone calls
31
G:\_elmeg\CS410\V1\uk\mn\uk-410-mn-10x1.vp
Mittwoch, 11. Juni 2003 15:06:28
25
Farbprofil: Generic CMYK printer profile - None
Komposit Standardbildschirm
Keypad and tone frequency dialing (dtmf dialing)
During an ongoing call you can take advantage of other features using keypad sequences or
DTMF dialing. In the telephone configuration program you can set whether keypad sequences or DTMF dialing is to be possible in the initial status of the telephone. The display indicates which other functions (keypad or dtmf) are possible.
»Keypad« softkey is displayed.
dtmf sequences can be entered right away and keypad sequences only after you press this softkey.
»dtmf« softkey is displayed.
keypad sequences can be entered right away and
dtmf equences only after you press this softkey.
Keypad and dtmf sequences can also be stored for function keys, which can then
be used during a call.
Keypad
Using the Keypad function you can manage service or features in the PABX system or in the
network of the service provider by entering character strings and digit sequences via the keypad. Ask your network service provider about this and consult the manual for your PABX to
determine whether »Keypad« is supported.
g
s
t
Keypad
Input of character strings
and digit sequences
Tone Frequency Dialing (DTMF dialing)
Using tone frequency dialing, you can transmit multifrequency signals (DTMF signals) during
an ongoing call in order, for example, to poll your answering machine or for using mail systems. If call waiting is active for an ongoing connection, tone frequency suffix dialing can not
be utilized.
g
26
s
t
dtmf
Input of character strings
and digit sequences
Making telephone calls
32
G:\_elmeg\CS410\V1\uk\mn\uk-410-mn-10x1.vp
Mittwoch, 11. Juni 2003 15:06:28
Kommunikationstechnik
Farbprofil: Generic CMYK printer profile - None
Komposit Standardbildschirm
Conducting calls with several parties
Call waiting
If, during an ongoing call, a second call comes in for you, the second call is signaled when
“Call waiting on” is set (see page 67).
s
waiting call
(250 subscribers 2)
g
g
accept
Call with subscriber 1
Call with subscriber 2;
Party 1 is put on hold
You can take a waiting caller, reject the call, or switch to a different subscriber. You
can not transfer any calls if you already have four calls on your phone.
Enquiry Call
You have the option of establishing up to three other connections during an ongoing call
using the enquiry call feature. You can also use the MSN assignment key, a line key or an extension key to initiate an enquiry connection.
R
g
Call with subscriber
t
g
Party 1 is put on
Dial number
hold
Call with subscriber 2
If you wish to set up further connections, proceed as described above.
An active connection can be terminated by pressing the key for ending a call. You can return
to the call that was previously put on hold. If there are no other calls on hold, a new connection can then be set up.
Call transfer (switching)
When a call is transferred, the active subscriber and the subscriber for the connection previously put on hold are always connected with one another.
You can initiate an enquiry call yourself (e. g. in order to announce the call) and can then
transfer the call.
g
R
Call with subscriber 1
Party 1 is put
on hold
t
g
s
Dial number
Call with subscriber 2
transfer
Kommunikationstechnik
Making telephone calls
33
G:\_elmeg\CS410\V1\uk\mn\uk-410-mn-10x1.vp
Mittwoch, 11. Juni 2003 15:06:28
27
Farbprofil: Generic CMYK printer profile - None
Komposit Standardbildschirm
Please note that this feature (ECT - Explicit Call Transfer) must be supported by
the PABX system when transferring two (2) external calls, or, when you use your
phone directly on the network termination unit, of your network service provider.
Broker’s call
If you have more than one connection active at your telephone (call waiting or enquiry call)
(max. of four connections), you can talk to these parties alternately (Broker’s call). For this,
there are up to four softkeys available, depending on the number of connections on hold
(»conn1«,... »conn4«). If the number or the name of the other party is known, the associated name or number is shown in the display instead of the text »Connection «.
g
>
s
>
g
Connection 1
Call with subscriber
...
Connection 4
s
g
Connection 1
Call with desired subscriber
...
Connection 4
Call with desired subscriber
If you have configured extension and line keys you can also carry out Broker’s calls between
different callers using these keys.
To terminate an active connection, press the disconnect key. You are then returned to the
call that was previously put on hold.
Three-party conference
If you have an active connection and a connection on hold at your system telephone, you can
initiate a conference call with these two parties. All three parties can speak to one another.
Conference calls are not possible with more than two (2) connections at your phone.
g
Call with subscriber 1
>
s
g
s
d
Connection 2
Call with subscriber 2
Conference
Conference with subscribers 1 and 2
To end the three-party conference, press the softkey »return_to_«. You are reconnected
with the subscriber of the last previous active connection. The other subscriber is put on
hold.
28
Making telephone calls
34
G:\_elmeg\CS410\V1\uk\mn\uk-410-mn-10x1.vp
Mittwoch, 11. Juni 2003 15:06:29
Kommunikationstechnik
Farbprofil: Generic CMYK printer profile - None
Komposit Standardbildschirm
Telephone operation
Telephone directory
You can store up to 250 names and numbers in the telephone directory. To select a name,
you can page through the directory using the arrow buttons, or enter the specific first letter(s)
of the name using the push-button set.
If the name of the caller is to be shown in the display instead of the caller’s number,
this number must be entered in the telephone directory with that name (includingprefix and, when used with a PABX, the line access digit).
Display of the caller name is only made when the transmitted number corresponds
to the number stored in the phone directory.
If the telephone is disconnected from the ISDN network and then reconnected, or if the data
for the telephone directory are transferred to the system telephone via the PC program, the
directory must be reorganized internally. This process takes place automatically and may require a few minutes. During this time, the telephone directory of your telephone is not available for use.
Settings for telephone book entries
Name and number
Each telephone book entry consists of a name (20 characters max.) and a number (26 digits
max.). The assignments for the keypad for entering letters, digits and special characters are
described on page 11.
Outgoing number (MSN assignment)
You can assign a number to each entry (»MSN-1« … »MSN-10«) that is to be transferred to
the party being called for outgoing calls. To set up a connection with this MSN prefix first dial
the number in the telephone directory in call preparation and then lift up the handset of your
phone. If you establish a connection using an MSN assignment key the number (MSN) for
this key is displayed at the party you are calling.
To define the number (»MSN-1«... vMSN-10«), that is to be displayed at the party being called, use the telephone directory program on the WIN-Tools CD. If you do not assign a number to an entry, or assign an incorrect number (one that is not in the phone directory), the first
number entered for the telephone is transferred (»MSN-1«).
Special dial (VIP tone) tone
You can program a special dial tone and for each entry and set the volume separately. A call
is signaled using the set special ringing tone when the caller also transmits the corresponding
number. This special ringing tone will then have priority over the ringing tone assigned to the
selected MSN.
Info text
You can store an info text for each entry. The information text is diplayed if:
Use
35
G:\_elmeg\CS410\V1\uk\mn\uk-410-mn-10x1.vp
Mittwoch, 11. Juni 2003 15:06:29
29
Farbprofil: Generic CMYK printer profile - None
Komposit Standardbildschirm
• you select an entry in the telephone directory with the OK key during call preparation.
• you press the softkey »Info« when a call is signalled.
• you press the softkey »Display« during a connection.
The info text length is restricted to 42 characters. The assignments for the keypad for entering letters, digits and special characters are described on page 11.
Adding an entry to the telephone book
Begin as follows:
a
M
s
s
s
Program nos.
Tel. drctry
New
t
O
Enter the name.
In this example: »Dean«.
Confirm your entry by pressing OK.
ˆInput telephone book
t
O
Insert a number.
In this example: »0123456«.
Confirm your entry by pressing OK.
ˆInput telephone book
ˆName>Dean_
¬¬¬¬¬¬¬¬¬¬¬¬¬¬¬¬¬¬¬¬¬¬
ˆNumber>0123456_
¬¬¬¬¬¬¬¬¬¬¬¬¬¬¬¬¬¬¬¬¬¬
Editing a telephone book entry
Begin as follows:
a M
<>
O
<>
O
s
s
s
Program
nos.
Tel.
drctry
List
t
O <> O
Enter first letter
Select entry
Change the existing name as described on
page 11.
In this example: »Dean, James«.
Confirm your entry by pressing OK.
Change the MSN extension number as described on page 11.
In this example: »01122334455«.
Confirm your entry by pressing OK.
30
Use
36
G:\_elmeg\CS410\V1\uk\mn\uk-410-mn-10x1.vp
Mittwoch, 11. Juni 2003 15:06:29
ˆ Change tbook data
ˆ
input
ˆName>Dean, James
¬¬¬¬¬¬¬¬¬¬¬¬¬¬¬¬¬¬¬¬¬¬
ˆ
ˆChange tbook data
input
ˆNumber>01122334455_
¬¬¬¬¬¬¬¬¬¬¬¬¬¬¬¬¬¬¬¬¬¬
Farbprofil: Generic CMYK printer profile - None
Komposit Standardbildschirm
Deleting a telephone book entry
Begin as follows:
a M
s
s
s
Program
nos.
Tel.
drctry
delete
t
O <> O
Enter first letter
Select entry
Programming a special dial (VIP tone) tone for a telephone book entry
Begin as follows:
a M
s
s
s
Program nos.
Tel. drctry
Sp.ton. call
<>
O
Press the arrow buttons to select the ringing
tone melody.
Confirm your entry by pressing ok.
<>
O
Use the arrow buttons to set the volume.
Confirm your entry by pressing OK.
<> O
Select entry
ˆ Dean, James
ˆMelody
{}
12
ˆ-----------©-------¬¬¬¬¬¬¬¬¬¬¬¬¬¬¬¬¬¬¬¬¬¬
ˆ Dean, James
{}
ˆ
- ©©©--- +
¬¬¬¬¬¬¬¬¬¬¬¬¬¬¬¬¬¬¬¬¬¬
Programming an info text for a telephone book entry
Begin as follows:
a M
t
O
s
s
s
Program
nos.
Tel.
drctry
Info
t
O <> O
Enter first letter
Select entry
Enter the data for the telephone book entry.
Confirm your entry by pressing OK.
ˆSen. eng. testcom
ˆBirthday: 15.05.1955_
¬¬¬¬¬¬¬¬¬¬¬¬¬¬¬¬¬¬¬¬¬¬
Use
37
G:\_elmeg\CS410\V1\uk\mn\uk-410-mn-10x1.vp
Mittwoch, 11. Juni 2003 15:06:29
ˆˆAdd. info. for tbook
ˆ
entry
31
Farbprofil: Generic CMYK printer profile - None
Komposit Standardbildschirm
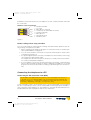
VIP Memory
You can program VIP numbers for each of the ten buttons 1 … 0 including a name (20 characters max. ) and a telephone number (26 digits max.).
Making an entry into the VIP memory
Begin as follows:
a
M
s
s
s
<>
Program nos.
VIP
New
Select VIP
destination
t
O
Enter the name of the VIP target. In this example: »Dean«.
Confirm your entry by pressing OK.
t
O
Insert a number.
In this example: »012345«.
Confirm your entry by pressing OK.
ˆ
O
Program VIP name
ˆV0>Dean_
¬¬¬¬¬¬¬¬¬¬¬¬¬¬¬¬¬¬¬¬¬¬
ˆProgram VIP number
ˆV0>012345_
¬¬¬¬¬¬¬¬¬¬¬¬¬¬¬¬¬¬¬¬¬¬
Editing a VIP entry
Begin as follows:
a
M
s
s
s
Program nos.
VIP
List
t
O
Change the existing name as described on
page 11.
In this example: »Dean, James«.
Confirm your entry by pressing OK.
t
O
Change the MSN extension number as described on page 11.
In this example: »01122334455«.
Confirm your entry by pressing OK.
32
Use
38
G:\_elmeg\CS410\V1\uk\mn\uk-410-mn-10x1.vp
Mittwoch, 11. Juni 2003 15:06:30
O
Select VIP
destination
ˆ
Program VIP name
ˆV0>Dean, James_
¬¬¬¬¬¬¬¬¬¬¬¬¬¬¬¬¬¬¬¬¬¬
ˆProgram VIP number
ˆV0>01122334455_
¬¬¬¬¬¬¬¬¬¬¬¬¬¬¬¬¬¬¬¬¬¬
Farbprofil: Generic CMYK printer profile - None
Komposit Standardbildschirm
Caller and memo list
The phone has a combined caller and memo list. A maximum of 30 entries (calls, memos
SMS messages or UUS1- messages) are stored in this list. Entries in the caller or memo list
are indicated by the softkey »Caller list«. You always have the most current entries in
the list. The most recent entry is displayed first.
When you press this softkey the number of new entries is shown on the display (for example:
»New calls: 4!«) and the number of new SMS or UUS1 messages (for example: »Messages: 2«).
Also shown in front of each entry is the number for that entry in the list and the total number of
all entries in the list.
For example: »3/10: 1122334455...... *«.
If the number in this entry is identical to a number in the telephone directory (phone directory
of the telephone or the pabx) the name is displayed instead of the number. You can also view
the time and the date of each entry as well as information (if applicable) about it. If you lift up
the handset of your phone while you are viewing an entry in the list, that caller is then called
automatically. Single entries can be selected for deletion.
Caller list
Calls that you do not accept, or that you specifically refuse, are stored in the caller list.
When a call is made with a subscriber from the caller list (you call or you are called), the entry
is automatically deleted and transferred into the redial memory.
Memo list
You can store a telephone number under a scratchpad memo. You can not input letters or
any other special characters. When a call is made with a subscriber from the scratchpad list
(you call or you are called), the entry is automatically deleted and transferred into the redial
memory.
You can enter a memo during a call or in the idle state. The following entries in the list are possible:
• Manual entry.
• Telephone number from short dialing memory.
• Telephone number from directory.
• Telephone number from direct dialing memory (Function keys).
• Number from the redialing memory.
SMS / UUS1 messages
When you receive a new message the number of messages you have received up to that
time is displayed when the telephone is in the idle state. The phone number, or the name of
the party who sent the message, and information about the type of message (SMS or UUS1)
are shown in the caller list. When you press the menu key you can read the received message
immediately, or save it in the list of SMS or UUS1 messages for reading at a later time.
After you view a new message that is located in the list of saved UUS1 or SMS messages,
that message is then deleted from the caller list.
Use
39
G:\_elmeg\CS410\V1\uk\mn\uk-410-mn-10x1.vp
Mittwoch, 11. Juni 2003 15:06:30
33
Farbprofil: Generic CMYK printer profile - None
Komposit Standardbildschirm
Viewing the caller list
a
The telephone is idle. The softkey »Caller
list« in the lower row of the display indicates
that an entry is present in the list. Press this
softkey.
s
The bottom lines show the entries available in
the caller list. The active entry (the one you
have selected with the arrow buttons) is highlighted.
ˆUUS:2
08:30
}
ˆ
ˆTel. drctry
ˆ
Quiet
ˆVIP
ˆ
Caller list
call
ˆ
ˆ
ˆ
ˆ
ˆ
today
{}
07:21
MSN-1
1/09:Miller office·*
2/09:TONY··········*
3/09:123456········n
4/09:Purchasing····*
In the upper rows of the display you see the type of entry (»call«, »memo«, »UUS«, »SMS«),
the date (for the first two days »today« or »yesterday«), the time and the number (MSN).
»*«
New call or new UUS1 or SMS text message
Call
»a«
Memo
»n«
Call ignored by call filter
»i«
When you view the caller list again, entries that you have already viewed but not
deleted are no longer marked by »*« on the display, but rather by »r«.
<>
You can view other entries using the arrow buttons.
ˆUUS
yesterday
{}
ˆ
15:24
ˆ 5/09:112233445566· n
ˆ 6/09:Sales·····
*
¬¬¬¬¬¬¬¬¬¬¬¬¬¬¬¬¬¬¬¬¬¬
Further information about a call / memo
<>
M
s
If you wish to view more information about the
entry, select the entry using the arrow key and
then press the menu button.
You now have the option of deleting the number, store it in the telephone book or have more
information displayed for the selected entry.
You may want to press the softkey »Info« for
example.
34
Use
40
G:\_elmeg\CS410\V1\uk\mn\uk-410-mn-10x1.vp
Mittwoch, 11. Juni 2003 15:06:31
Call-box Today
{}
07:21
MSN-1
ˆ1/09:Miller office·*
ˆ 2/09:TONY··········*
¬¬¬¬¬¬¬¬¬¬¬¬¬¬¬¬¬¬¬¬¬¬
ˆ
ˆ 1/Miller office
}
ˆCall
today
07:21
ˆMSN-1
Info
ˆTel. drctry
ˆdelete?
ˆ
continue
Farbprofil: Generic CMYK printer profile - None
Komposit Standardbildschirm
<>
C
The display now shows information about the
call. If not all information fit into the screen, use
the arrow keys to display more.
Press the C-button to leave the menu. You can
then use any one of the other options.
ˆ 1/Miller office
ˆ0123456789
ˆto MSN-1
ˆ(& MSN-2)
ˆcall today
07:21
ˆ( 2 x call)
»delete?«
»Info«
The entry is removed immediately.
Viewing further information about the call.
For example: The MSN extension number to which the message was sent
and the telephone number of the sender.
»Tel. drctry« Entering the number of the caller in the phone book of the phone.
»continue«
Viewing the next entry in the caller list.
Further informationen about a text message (SMS / UUS1)
<>
M
s
If you wish to view more information about the
entry, select the entry using the arrow key and
then press the menu button.
ˆ UUS yesterday
{}
ˆ
15:24
MSN-5
ˆ 5/09:112233445566 n
ˆ 6/09:Sales
*
¬¬¬¬¬¬¬¬¬¬¬¬¬¬¬¬¬¬¬¬¬¬
Press the right arrow button to have the »Tel.
drctry« softkey displayed.
ˆ 1/Sales
}
ˆUUS
yesterday 15:24
ˆMSN-5
Info
ˆread
ˆ
save
ˆdelete?
ˆ
continue
Press the softkey »read«.
The arrow (»†«) in the top row indicates an incoming text message.
<>
O
ˆ* UUS 01/03 †
MSN-1
ˆSales················
ˆThanks! Let's meet
ˆat 15.30
¬¬¬¬¬¬¬¬¬¬¬¬¬¬¬¬¬¬¬¬¬¬
If the message is not displayed completely press the arrow keys to view
the rest of the message.
Press ok if you have finished reading. Sie können dann eine der weiteren
Optionen nutzen.
»save«
Saving the message in the corresponding list of messages and deleting
the entry in the caller list.
»delete?«
The message is deleted immediately and added to a list of messages.
»Info«
Viewing further information about the message.
For example: The MSN extension number to which the message was sent
and the telephone number of the sender.
»Tel. drctry« Entering the number of the caller in the phone book of the phone.
»continue«
Viewing the next entry in the caller list.
Use
41
G:\_elmeg\CS410\V1\uk\mn\uk-410-mn-10x1.vp
Mittwoch, 11. Juni 2003 15:06:31
35
Farbprofil: Generic CMYK printer profile - None
Komposit Standardbildschirm
Deleting the caller / memo list
Deleting an entry
s
<>
Caller list
Select the entry you
wish to delete
a
M
s
delete?
Deleting all calls
You can delete all entries of the caller / memo list simultaneously. Text messages you have
received (SMS / UUS1) will not be deleted.
s
<>
Caller list
Select entry
a
M >
s
Delete all calls?
Entering the number of the caller in the phone book of the phone
Begin as follows:
s
<>
Caller list
Select entry
a
t
O
M >
s
Tel. drctry
Enter the name.
In this example: Dean.
Confirm your entry by pressing OK.
ˆInput telephone book
(Abc)
The memo or caller list then displays the name
instead of the number.
ˆ 5/Dean
ˆCall
today
08:12
ˆ
Info
¬¬¬¬¬¬¬¬¬¬¬¬¬¬¬¬¬¬¬¬¬¬
ˆName>Dean`
¬¬¬¬¬¬¬¬¬¬¬¬¬¬¬¬¬¬¬¬¬¬
Entering a memo
You can add a memo number from:
• the telephone’s phone directory (»Tel. drctry« softkey)
• the direct dialing memory / function keys (»direct« softkey)
• the VIP memory (»VIP« softkey)
• the redial list (»redial« softkey or redial button)
• or add a new number manually (»New« softkey)
The following example describes how to add a new number as a memo.
Begin as follows:
a
>
s
s
Memo
New
36
Use
42
G:\_elmeg\CS410\V1\uk\mn\uk-410-mn-10x1.vp
Mittwoch, 11. Juni 2003 15:06:32
Farbprofil: Generic CMYK printer profile - None
Komposit Standardbildschirm
t
O
Enter the number you wish to store as a memo.
In this example: »0123456«.
Confirm your entry by pressing OK.
ˆMemo number create
ˆ>0123456_
¬¬¬¬¬¬¬¬¬¬¬¬¬¬¬¬¬¬¬¬¬¬
SMS and UUS1 text messages
With this phone you can send and receive SMS or UUS1 messages (SMS - Short Message
Service, UUS1 - User to User Signalling). You can input a text message using the keypad on
the phone.
Sending and receiving of text messages is only possible when the sender has his/her number
transmitted to the receiving party, where it is also displayed. This is why text messages are
not transmitted, or not displayed on the telephone, when the phone number is not transmitted with the message.
An incoming text message is signaled by two brief acoustic tones in the phone. If the phone is
idle, the number of messages received is displayed, along with information about these messages in the caller list.
SMS Text Messages (subject to terms of network provider)
SMS allows you to send and receive text messages to/from other phones in a fixed-line network or to/from cell phones. A short message is restricted to 160 characters.
Sending/Receiving of SMS messages is only possible:
• When you use this telephone with a system telephony pabx system that supports the
SMS feature.
• When you have registered this feature at your network service provider, or the provider of the SMS center for your ISDN connection.
• When the phone number for the SMS center is stored in the telephone.
Consult the provider of the SMS center that has been configured to establish in which mobile
communication networks SMS messages can be sent and the costs for sending and receiving SMS messages. This telephone does not support the transmission of SMS messages
with special content (for example images, audio).
The telephone stores all SMS messages you have received or sent in two separate lists. Up
to 10 received an 10 sent SMS messages can be stored.
Please not that free storage space must be available to receive SMS messages. You cannot
receive more than 10 SMS messages.
SMS messages you have sent can be stored in a list. If this list is full, then the last SMS sent is
stored temporarily.
UUS1 text messages
You can send text messages from one telephone to another without having to call that particular subscriber. UUS1 text messages are limited to 31 characters.
UUS1 text messages can also be sent to internal and external telephones. You
can only use this feature with external telephones if »UUS1 (User to User Signaling)« has been applied for (and approved) for your ISDN connection.
Use
43
G:\_elmeg\CS410\V1\uk\mn\uk-410-mn-10x1.vp
Mittwoch, 11. Juni 2003 15:06:32
37
Farbprofil: Generic CMYK printer profile - None
Komposit Standardbildschirm
Note that all terminal devices that are used (telephones, pabx systems) must support the feature »UUS1 (User to User Signaling)«.
The telephone stores all UUS1 messages you have received or sent in two separate lists. Up
to 10 received an 10 sent UUS1 messages can be stored.
Please not that free storage space must be available to receive UUS1 text messages. You
cannot receive more than 10 UUS1 text messages.
UUS1 messages you have sent can be stored in a list. If this list is full, then the last UUS1
message sent is stored temporarily.
Creating and sending text messages
You can send a text message to a number stored in your telephone (telephone directory, VIP
memory or direct dialing memory), or input a new number for sending. To do this, press the
appropriate softkey »Tel. drcrty«, »direct«, »VIP«, »New« or »redial« in the menu
»Send mail«.To select a number assigned to a function key (»direct«) or to dial a number
from the redialing memory you can also press that corresponding key.
When sending text messages the first number (»MSN-1«) entered in the telephone
or the number specified by means of the user key are transmitted with the message.
Begin as follows:
a
>
s
s
s
Message
SMS or UUS
Send mail
Example: Creating a UUS1 text message
t
O
s
Insert the text.
In this example: »Meeting 9.30 to 11.00
George«.
Confirm your entry by pressing OK.
Press the corresponding softkey to select a
number stored in your telephone, or press
»New« to enter a new phone number. For example: »New«.
ˆ
Send mail
ˆUUS>Meeting 9.30 a.m.
ˆto 11.00 a.m. George_
¬¬¬¬¬¬¬¬¬¬¬¬¬¬¬¬¬¬¬¬¬¬
ˆ
Send mail/UUS
Repeat
ˆTel. drctry
New
ˆVIP
direct
t
O
Insert a number.
For example: »2200«.
Confirm your entry by pressing OK. The text
message is transferred to the defined recipient.
38
Use
44
G:\_elmeg\CS410\V1\uk\mn\uk-410-mn-10x1.vp
Mittwoch, 11. Juni 2003 15:06:32
ˆDefine targt. numb.
ˆ>2200_
¬¬¬¬¬¬¬¬¬¬¬¬¬¬¬¬¬¬¬¬¬¬
Farbprofil: Generic CMYK printer profile - None
Komposit Standardbildschirm
s
Finally, you can store the text message in the
appropriate list (»ok« softkey) or keep it in the
temporary memory (»No« softkey).
ˆ
Save message?
ˆNo
ok
¬¬¬¬¬¬¬¬¬¬¬¬¬¬¬¬¬¬¬¬¬¬
Important notes for entering numbers with SMS transmission
If the »Direct exchange line access« feature is switched off for your telephone, then you must
enter the line access digit before the target number. The line access digit must be stored in
the telephone.
When the telephone is connected to a pabx for which direct exchange line acces has been
programmed, the you can dial the target number directly.
Viewing newly received text messages
A new message can be displayed from the caller list (see page 33) or from the received text
messages list. Once you have read a message from the list of temporarily stored text messages, it is deleted from the caller list.
Viewing received or sent text messages
The following features are available when viewing temporarily stored text messages:
• Resending a text message.
You can edit a text message before actually resending it.
• Deleting a text message.
• Entering the number, to which the text message was sent or from which it was received into the telephones directory.
• Putting a text message into the list of permanently stored messages (UUS1 only).
Begin as follows:
a
>
s
s
s
Message
SMS or UUS
read,Inbox
or
read,Outbox
Example: Reading a received UUS1 message
The most recently added text message is displayed first. A new, unread text message is marked with an »*«. The following information can be displayed for a text message:
• Number of the text message in the list (in this example:»01/03«).
• Received (»†«) or sent (»‡«) text message (in this example: »†«).
• Number, for which the text message was sent (in this example:»MSN-1«).
• Number of the sender / receiver (in this example: »2200«).
Use
45
G:\_elmeg\CS410\V1\uk\mn\uk-410-mn-10x1.vp
Mittwoch, 11. Juni 2003 15:06:33
39
Farbprofil: Generic CMYK printer profile - None
Komposit Standardbildschirm
O
Press the arrow keys to view the entire text
messages.
Press OK to access the next menu with further
options.
In the upper row of the display you see the date
and the time, when you received the message.
To select an action, press the corresponding
softkey.
ˆ* UUS 01/03 †
MSN-1
ˆ2200·················
ˆI'LL PROBABLY BE 30
ˆMINUTES ˆLATE.
¬¬¬¬¬¬¬¬¬¬¬¬¬¬¬¬¬¬¬¬¬¬
ˆUUS 01/03 today
}
ˆ†
10:36
MSN-1
Save text
ˆsend
ˆdelete?
continue
»send«
Editing and then sending the text message.
To send the text message, please proceed as described for »Creating
and sending text messages« (see page 38).
»delete?«
Deleting a text message.
»Tel. drctry« If you wish the sender’s or receiver’s number stored in the telephone directory, press the right arrow button and then the »Tel. drctry« softkey. Enter the name for the phone book entry and confirm by pressing
OK.
»continue«
Viewing the next temporarily stored text message.
»Text
Moving the text message to the list of permanently stored message. To
do this, use the arrow key to select the storage location and confirm by
Save«
pressing OK.
(UUS1 only)
Permanently stored text messages (UUS1 only)
You can store up to five UUS1 text messages permanently in your telephone. You can then
edit, delete or send these text messages. You can only input these messages directly into
your telephone.
Begin as follows:
a
<>
>
s
s
s
Message
UUS
Select text
Press the arrow keys to select a text message.
ˆ
Select text
{}
ˆ1:
ˆ2:
ˆ3:
¬¬¬¬¬¬¬¬¬¬¬¬¬¬¬¬¬¬¬¬¬¬
O
M
Press the OK to enter or change that text message. Confirm your entries by pressing OK.
Press the menu key to send or delete a message.
ªªªªªªªªªªªªªªªªªªªªªª
ˆsend
ˆdelete?
¬¬¬¬¬¬¬¬¬¬¬¬¬¬¬¬¬¬¬¬¬¬
40
Use
46
G:\_elmeg\CS410\V1\uk\mn\uk-410-mn-10x1.vp
Mittwoch, 11. Juni 2003 15:06:33
Farbprofil: Generic CMYK printer profile - None
Komposit Standardbildschirm
»send«
Editing and then sending the text message.
To send the text message, please proceed as described for »Creating
and sending text messages« (see page 38).
Deleting a text message.
»delete?«
Automatic sending of text messages (only UUS1)
You can send a UUS1 text message automatically to a caller. For this, message 1 in the list of
permanently stored messages is used.
Begin as follows:
a
s
>
s
s
Message
UUS
>
s
Incoming
Press the softkey »Incoming«, to activate/deactivate automatic sending of messages.
»Incoming ˜«:automatic sending active.
»Incoming«:automatic sending not active.
ˆ
Message / UUS
{
ˆIncoming ˜
ˆInhib. receiv.
¬¬¬¬¬¬¬¬¬¬¬¬¬¬¬¬¬¬¬¬¬¬
Configuring the text message reception mode (UUS1 only)
You can program your telephone for external or internal UUS1 text message reception. Reception of external and internal text messages can be inhibited separately. You can program
the telephone directory in such a way that specific text messages can be received.
If you have disabled reception, external or internal text messages can only be received when
the sender’s phone number has been stored in the phone book with a special call signal.
Begin as follows:
a
s
>
s
s
Message
UUS
>
Press the »external« or »internal« softkey to enable or inhibit reception of UUS1 messages. For example:
»external ˜«: .Reception of external messages inhibited.
»internal«: Reception of internal messages
is possible.
Use
47
G:\_elmeg\CS410\V1\uk\mn\uk-410-mn-10x1.vp
Mittwoch, 11. Juni 2003 15:06:34
s
Inhib. recev.
ˆInhib. receiv. / UUS
external ˜
internal
¬¬¬¬¬¬¬¬¬¬¬¬¬¬¬¬¬¬¬¬¬¬
41
Farbprofil: Generic CMYK printer profile - None
Komposit Standardbildschirm
Error when sending or receiving an SMS
Error while sending an SMS
A corresponding error code is displayed in the event that for some unseen reason it is not
possible to transmit an SMS. Contact the SMS Service center of your network service provider / carrier to find out which error codes are displayed.
Error while receiving an SMS
There may be various reasons for it not being possible to receive an SMS, or for only having
voice output:
• The feature SMS has not been applied for (and approved) at your network service provider and/or the provider of the SMS Service Center.
• The SMS has been transferred by outside service providers which did not transmit this
message as an SMS.
• Permanent number suppression (inhibit) is activated for your ISDN connection.
• Ten SMS messages have already been stored in your telephone, preventing any further SMS messages from being received.
Station guarding
If you do not wish calls to be signaled with the programmed melody and volume, you can active the »Station guarding« feature. Depending on the specific setting, all calls will be displayed optically or along with a brief acoustic signal. To set the volume for the brief acoustic signal, proceed as described on page 62. In the idle state an »r« or »R« in the display shows that
the function »Station guarding« is activated.
»No«
The function »Station guarding« is deactivated.
»Ringing
Calls are signaled optically only (»Q« shown in the display).
signal off«
»ok«
Calls are signaled first by a brief acoustic signal and then only optically displayed (»q«).
a
s
s
Quiet
No/Ringing signal off/ok
42
Use
48
G:\_elmeg\CS410\V1\uk\mn\uk-410-mn-10x1.vp
Mittwoch, 11. Juni 2003 15:06:34
Farbprofil: Generic CMYK printer profile - None
Komposit Standardbildschirm
Setting up cost monitoring
You have the option of logging the accrued communication costs for your telephone. You
must apply for this feature to your network service provider.
Ask your service provider on the possibilities of charge data transmission. Please note that
transfer of all cost information from the exchange office to your telephone may not always be
possible for technical reasons. Any price reductions and special rates or convenience features utilized may result in differences between the data stored in the telephone and information listed in the phone bill.
Procedures for charge rate transmission
There are several standardized procedures for transmitting call charge rates. Usually the
same procedure is employed at one connection that is recognized and stored automatically
for future use by the telephone.
In the event that the type of charge information transmission is not stored in the phone,
»Wrong charge type« then appears in the display.
In this case you should delete all charge information stored in the telephone (see also: viewing/deleting total costs). Recognition and saving of the procedure that is used for transfer of
cost information is then re-activated.
You can set the tariff factor and the currency while configuring your telephone with
the PC.
Viewing and deleting costs
If you have implemented PIN protection for your phone’s configuration (see page 58), clearing of the charge rate accounts is also PIN protected. After pressing the softkey »delete?«
you then need to enter the PIN.
Viewing/deleting costs for the last call
Begin as follows:
a
>
s
ˆLast conn.:
Charge
ˆLast conn.
}
0.18 GBP
Total
ˆdelete?
¬¬¬¬¬¬¬¬¬¬¬¬¬¬¬¬¬¬¬¬¬¬
The charges for the last call are shown. To delete them, press the »Delete« softkey.
Use
49
G:\_elmeg\CS410\V1\uk\mn\uk-410-mn-10x1.vp
Mittwoch, 11. Juni 2003 15:06:34
43
Farbprofil: Generic CMYK printer profile - None
Komposit Standardbildschirm
Viewing and deleting total costs
Begin as follows:
>
a
s
s
Charge
Total
ˆTotal:
}
1.55 GBP
ˆLast conn.
Total
ˆdelete?
¬¬¬¬¬¬¬¬¬¬¬¬¬¬¬¬¬¬¬¬¬¬
You can view the sum of the charges accrued for all MSN extension numbers. To delete
them, press the »delete?« softkey.
If the sum of the costs is deleted, all MSN cost accounts are also deleted simultaneously and recognition and saving of the procedure that is used for transfer of
cost information is then re-activated.
Viewing/deleting costs for specific extension numbers (MSN)
Begin as follows:
>
a
s
>
s
Charge
MSN-2
ˆMSN-2:
}
0.31 GBP
MSN-3
ˆMSN-1
MSN-4
ˆMSN-2
¬¬¬¬¬¬¬¬¬¬¬¬¬¬¬¬¬¬¬¬¬¬
You can view the sum of the charges accrued for a particular MSN extension number. In this
example for »MSN-2«.
<>
s
To delete the total costs for the selected extension number (in this example MSN-2), press
the left arrow button and then the »delete?«
softkey.
ˆMSN-1:
{}
0.31 EUR
ˆLast conn.
Total
ˆdelete?
Setting the tariff factor and the currency
Begin as follows:
a
M
»Charge«
»Currency«
s
s
Configuration
Charge
s
Enter the new charge factor and confirm your entry by clicking »OK«. The
charge factor length is restricted to 4 characters. To enter a comma, use
the asterisk key.
Enter the new currency and confirm your entry by pressing OK. The currency name is restricted to 6 characters. The assignments for the keypad
44
Use
50
G:\_elmeg\CS410\V1\uk\mn\uk-410-mn-10x1.vp
Mittwoch, 11. Juni 2003 15:06:35
Farbprofil: Generic CMYK printer profile - None
Komposit Standardbildschirm
for entering letters, digits and special characters are described on page
11.
All charge data stored in the telephone are deleted. Recognition and saving of the procedure that is used for transfer of cost information (see
page 43) is then re-activated.
»delete?«
Programming a charge limitation for a specific extension
number
You can set up a charge account for each number (MSN) that has been entered in the telephone. An amount in the configured currency that is available for making calls will then be allocated to this account for the defined number (MSN). Once this amount has been exhausted, only free-of-charge calls can be directed for this MSN extension number. When you
have programmed specific dial ranges for this telephone, calls with costs can be directed to
the unrestricted numbers.
If this limit is reached during an ongoing call, the call can be completed.
When the amount for the account is increased, or when the accrued charges are cleared
calls with costs can again be made.
Attention: Not all service providers transfer charge rate information. If you make
calls using a service provider which does not transmit charge information, the
charge account is ineffectual.
Configuration of a charge account for a phone number (MSN) is described as follows using
MSN1 as the example.
Begin as follows:
a
t
O
M
s
s
s
Configuration
MSN
MSN-1 … MSN-10
Enter the amount that is available for this number for making calls.
Confirm your entry by pressing OK.
>
s
Charge
ˆDial inhib. by charge
ˆLimit/GBP>10`
¬¬¬¬¬¬¬¬¬¬¬¬¬¬¬¬¬¬¬¬¬¬
If you enter the amount available for making calls as »0«, the charge account is not activated.
Enabling or inhibiting an extension number (MSN) for outgoing calls
Each number stored in the phone (»MSN-1« … »MSN-10«) can be enabled or inhibited separately for outbound calls. If you have inhibited an MSN for outgoing calls, no outgoing calls
can be initiated through this number (e.g. MSN assignment via function key). Incoming calls
can continue to be received by this number.
If you attempt to set up a call using a number that has been inhibited for dialing, the following
Use
51
G:\_elmeg\CS410\V1\uk\mn\uk-410-mn-10x1.vp
Mittwoch, 11. Juni 2003 15:06:35
45
Farbprofil: Generic CMYK printer profile - None
Komposit Standardbildschirm
message is shown in the display »Inhibit.:MSN«.
Enabling or inhibiting of a number for outgoing calls is protected by an MSN-specific PIN.
You must enter this PIN in advance during configuration of the number (MSN). After that, you
can inhibit or enable dialing of external numbers (outgoing calls) for this MSN.
Begin as follows:
a
>
s
s
t
inhibit
MSN-1 … MSN-10
Specific PIN for the
MSN extension number
O
A check mark displayed next to the individual softkeys indicates the current status.
s
To inhibit dialing of external numbers for a specific MSN press the softkey »inhibit«. To
re-enable a number (MSN) for outbound calls,
press the softkey »enable«.
ˆ
MSN-1 ?
ˆinhibit
enable ˜
¬¬¬¬¬¬¬¬¬¬¬¬¬¬¬¬¬¬¬¬¬¬
Displays during a call and charge information
The following displays are possible during a call:
Call display for phone number
(»0123456«).
Call display for phone number
(»0123456«) and time (»07:41«).
Call display for phone number
(»0123456«) and duration (»32.43«) of the call. For example, the duration of a call can be displayed for all incoming
connections or when there are no charge data available.
Call display for phone number
(»0123456«) and charges (»0.36 GBP«).
Call display for date (»29.05.03«) and time (»07:41«).
ˆ0123456
ˆ
MSN-1
ˆ
Memo
ˆdisplay
¬¬¬¬¬¬¬¬¬¬¬¬¬¬¬¬¬¬¬¬¬¬
ˆ0123456
ˆ07:41
MSN-1
ˆMemo
ˆdisplay
¬¬¬¬¬¬¬¬¬¬¬¬¬¬¬¬¬¬¬¬¬¬
ˆ0123456
ˆ32.43
MSN-1
ˆ
Memo
ˆdisplay
¬¬¬¬¬¬¬¬¬¬¬¬¬¬¬¬¬¬¬¬¬¬
ˆ0123456
ˆ0.36 GBP
MSN-1
ˆ
Memo
ˆdisplay
¬¬¬¬¬¬¬¬¬¬¬¬¬¬¬¬¬¬¬¬¬¬
ˆ29.05.03
}
ˆ07:41
MSN-1
ˆ
Memo
ˆdisplay
¬¬¬¬¬¬¬¬¬¬¬¬¬¬¬¬¬¬¬¬¬¬
Correct charge display is shown only if you have applied at your network service
provider for transmission of charges during calls.
46
Use
52
G:\_elmeg\CS410\V1\uk\mn\uk-410-mn-10x1.vp
Mittwoch, 11. Juni 2003 15:06:36
Farbprofil: Generic CMYK printer profile - None
Komposit Standardbildschirm
Displaying information during a call
The displays during calls described as follows depend on your individual settings
and can therefore be different for each connection.
Correct charge display is shown only if you have applied at your network service
provider for transmission of charges during calls.
g
s
During a call, the upper rows of the display
show the number or the name of the other party (»TONY«) and the duration of the entire call
(»02.43«).
Press the »display« softkey.
ˆTONY
ˆ02.43
ˆ
ˆdisplay
ˆ
ˆMic.muted
ˆ
MSN-1
Memo
Keypad
Parking
You are then shown other information available
ˆTONY
ˆto MSN-1
on the current connection.
ˆ12.12.02 12:01
Date (»29.05.03«), time (»07:41«),
ˆ0987654321
ˆ0.36 GBP
02.55
associated number (»0987654321«),
Costs (»0.36 GBP«), duration of the call
(»02.55«)
Press the arrow key to display further information (if available).
If you are the destination of call rerouting, you will be shown the number that is
being rerouted (»U{123«), when it is transferred.
a
You see the normal display again during a connection.
ˆTONY 03.33
}
ˆ03:33
ˆ
Memo
ˆdisplay
¬¬¬¬¬¬¬¬¬¬¬¬¬¬¬¬¬¬¬¬¬¬
After finishing the call you see for about 5 seconds the following display.
ªªªªªªªªªªªªªªªªªªªªªª
ˆTONY
ˆCosts
0.36 GBP
¬¬¬¬¬¬¬¬¬¬¬¬¬¬¬¬¬¬¬¬¬¬
Selecting the type of data and charge information displayed during a call
Begin as follows:
a
M
s
s
s
Configuration
Display
Conversation
s
»Conversation« Programming the call data display mode
The following options are available:
»Date+Time«, »Tel. numb. only«, »Tnumb+Time« or
»Tnumb+Charge«.
»Duration«
Programming the call duration display mode
The following options for displaying the call duration are available:
»Always«:During a call, the display shows the duration but not the char-
Use
53
G:\_elmeg\CS410\V1\uk\mn\uk-410-mn-10x1.vp
Mittwoch, 11. Juni 2003 15:06:36
47
Farbprofil: Generic CMYK printer profile - None
Komposit Standardbildschirm
ges.
»Never«:The charges are displayed during a call. The duration of a call is
not displayed.
»for Charge«: Charge data, if available, are displayed. If no charge data
are available, the duration is displayed instead.
Display of information after completion of a call
Information about a call can be shown in the display when that call is completed. You can, for example, have the duration of the call or the charges
accrued for the call displayed.
»End«
Programming the calling line identification mode
(CLIP/CLIR/COLP/COLR)
Begin as follows:
a
M
»Incoming«
»Outgoing«
s
s
s
Configuration
Display
MSN ext.
s
Press the »Incoming« softkey to have the numbers displayed or not displayed at the called party. A checkmark displayed next to the softkey indicates that calling line identification is active.
Press the »Outgoing« softkey to have the numbers displayed or not displayed at the called party. A checkmark displayed next to the softkey indicates that calling line identification is active.
48
Use
54
G:\_elmeg\CS410\V1\uk\mn\uk-410-mn-10x1.vp
Mittwoch, 11. Juni 2003 15:06:37
Farbprofil: Generic CMYK printer profile - None
Komposit Standardbildschirm
System telephony
The system telephone is designed for being connected to the internal ISDN connection of
specific elmeg pabx systems.
When operated at these pabx systems, your telephone offers you a variety of typical features. For example:
• Dialing from the telephone directory of the PABX (see page 14).
• Message and Intercom (see page 21, 22 ).
• Special function keys (see page 49).
• Access to the system menu of the pabx (see page 54).
Please refer to the operating instructions of your PABX to determine whether these typical system features are provided with this particular telephone.
Function keys
The system telephone is equipped with five function keys, which you can program on two levels with different functions.
Each key is equipped with two-color LED that can be used to display the active function.
Each color is assigned to a particular level for the function key.
Function key examples
Direct dialing buttons (see page 15)
dtmf/ keypad sequences (see page 26)
Defining the (MSN) extension number for the next call (MSN assignment)
You can conduct an internal or external call such that a defined number (MSN) is transferred
from your telephone to the party you are calling. This number must have been entered previously in your telephone.
Line buttons
A B channel for an external ISDN connection is configured for a line key. When this key is
pressed, hands-free calling is activated automatically and the corresponding B channel of
the ISDN connection is accessed. You will hear the external dial tone.
If an external call is signaled at a different in-house telephone you can accept this call by pressing the line key.
Trunk bundle buttons
With modular pabx systems (elmeg ICT or higher) you can group several ISDN connections
to trunk bundles. By means of a trunk bundle button, you can assign these ISDN connections to a function key. When this key is pressed, hands-free calling is activated automatically
and the corresponding B channel of the ISDN trunk bundle is accessed. You will hear the external dial tone.
System telephony
55
G:\_elmeg\CS410\V1\uk\mn\uk-410-mn-10x1.vp
Mittwoch, 11. Juni 2003 15:06:37
49
Farbprofil: Generic CMYK printer profile - None
Komposit Standardbildschirm
Extension key
You can configure dialing to an internal extension using an extension key. When the corresponding key is pressed hands-free calling is activated and the listed subscriber called.
If a call for the listed subscriber is signaled you can accept the call by pressing the extension
key.
Team keys
A team key is a normal line key to which the internal number for a team is assigned. When the
corresponding key is pressed hands-free calling is activated and the listed team called.
If a call for the listed team is signaled you can accept the call by pressing the team key.
Team function log-on/ off
If you are entered as a subscriber in the call switching modes of one or more teams you can
configure a key so as to control the call signaling of your telephone. When you are logged in,
team calls will be signaled at your telephone. No team calls are signaled at your phone if you
are not logged in.
Day / night modes
You can configure a key so that you can switch between the call switching modes of the
PABX (Day/Night modes) when that key is pressed. The pabx uses call modes for signaling
team or door terminal calls, for example.
Message (see page 21)
Message on/off
You can also explicitly inhibit or enable receiving of messages using a corresponding function key.
Intercom (see page 22)
Activating intercom calling on/off
You can also explicitly inhibit or enable receiving of intercom calls using a corresponding
function key.
Boss/secretary feature
This function enables the interaction between the phones of the secretary and the boss.
Here, a special extension key with the number of the boss phone is assigned to the secretary
phone, and one with the number of the secretary phone assigned to the boss phone.
Call filter
The call filter allows you to explicitly reject or forward calls to your system telephone. A rejected call is given a busy signal and is stored in the caller list with a special flag. You can configure the call filter using PC Configuration for the system telephone and activate or de-activate
the filter using this function key.
Call rerouting (see page 66)
You can configure a button such that call rerouting is set up for a specific extension number
(MSN) of your phone. When this button is then pressed, call forwarding is either activated or
deactivated.
Direct call
Direct calling from the telephone (see page 69) can be configured via programmed function
keys. The direct call number must be stored in the telephone before direct calling via a functi-
50
System telephony
56
G:\_elmeg\CS410\V1\uk\mn\uk-410-mn-10x1.vp
Mittwoch, 11. Juni 2003 15:06:37
Farbprofil: Generic CMYK printer profile - None
Komposit Standardbildschirm
on key can be programmed. Deactivation of direct calls is carried out as described in the section »Direct call« (see page 69).
Headset on/off
If you have a headset connected to your telephone and ready configured, you can operate it
by means of a function key.
Press the headset key to initiate, accept or end a call.
Auto-answer
Your telephone can accept calls automatically, without you having to lift the handset or press
the speaker key. The time interval, after which a call is automatically answered, is programmed during telephone configuration with the PC. The auto-answer feature is activated and
deactivated by means of dedicated function key.
Extension key for an answering machine
This key is a special line key to which the internal number for the answering machine is assigned. A dtmf sequence can also be assigned to this key.
When you press this key the number of the answering machine is dialed and the stored
DTMF sequence then transmitted. You can use the DTMF sequence, for example, to activate the remote control function for the answering machine and listen to new messages. When
the answering machine is called the speaker is activated, but the microphone remains switched off. You can also accept a call signaled at the answering machine by pressing this key.
Voice mail key
If you are using a voice mail system at the PABX to which your phone is connected (for instance a Discofone voice mail system) you can also configure a button for controlling voice mail
functions. You can then set up a connection to your voice mailbox by pressing this button.
User key on/off (programming the system telephone’s MSN extension number)
Normally, the first number entered in the telephone (MSN-1) is used as the default number for
all settings and actions. You can set the default number for your telephone using the User
key. When you press this key the default number for the telephone is changed to the corresponding phone number (MSN). The changed default number is then used when you initiate
a call and when you send SMS or UUS messages.
Macro functions
You can configure the existing function keys of your telephone as self-programmed function
keys. These self-programmed functions are called macro functions (macros). Macros allow
you to save set routines and assign them to a specific function key. For example, you can
save frequently used codes for your PABX system or specifc routine actions as a macro and
call it up at a later time by pressing the corresponding function key.
System telephony
57
G:\_elmeg\CS410\V1\uk\mn\uk-410-mn-10x1.vp
Mittwoch, 11. Juni 2003 15:06:38
51
Farbprofil: Generic CMYK printer profile - None
Komposit Standardbildschirm
LED functions
Function key / LED
Line key
Extension key
Team key
lit
Trunk bundle button
Extension key for the
answering machine
flashes
Connection
flickers
Connection on hold
Incoming
call
no B-channel
available
AM holds active connection with caller
Connection with
AM/ Voice Box
Incoming
answering
machine call
New messages available
Voice Mail key
Function key / LED
lit
not lit
MSN assignment
connection established
by means of the key
Team function log-on/log-off
logged in
logged out
Day/ night mode
night active
day active
Message
own message
Message enable on/off
enabled
Intercom
own intercom
intercom enable on/off
enabled
inhibited
Call filter
active
off
Call rerouting
active
not active
Direct call
active
not active
Headset on/off
connection or
no connection
connection establishment
Auto-Answer
active
not active
User key
modified number
default number
inhibited
Each function key with an automatic LED function (e.g. line or extension buttons)
can only be programmed once for each system (telephone or extension keypad).
52
System telephony
58
G:\_elmeg\CS410\V1\uk\mn\uk-410-mn-10x1.vp
Mittwoch, 11. Juni 2003 15:06:38
Farbprofil: Generic CMYK printer profile - None
Komposit Standardbildschirm
Programming a function key
Programming of the function keys is effected during configuration of the system telephone
with the PC. You can program the five function keys on two levels with different functions.
Using the function key
Press the corresponding function key. The function assigned to this key is executed. An LED
associated with this particular function is switched on or off accordingly.
Press the key two times to reach the second level for the function keys. This must be executed at a short interval.
Important notes for LED functions
The status of the LEDs is not updated permanently in the system telephone. The status of the
LEDs is not changed when these functions are changed or switched using a code or PC configuration for the PABX system. If the telephone is disconnected from the ISDN network (for
example for Parking of a call) the LEDs will be off when the system telephone is plugged in
again.
The display for the assigned LED is changed and the corresponding feature activated/de-activated in the PABX system when you press a function key.
Example: You activate the message to your system telephone using the function key and someone else de-activates the announcement via the PABX system PC configuration. When
you press the function key you also de-activate the message and the assigned LED is switched accordingly.
System telephony
59
G:\_elmeg\CS410\V1\uk\mn\uk-410-mn-10x1.vp
Mittwoch, 11. Juni 2003 15:06:38
53
Farbprofil: Generic CMYK printer profile - None
Komposit Standardbildschirm
System menu for pabx systems with system telephony capability
The system telephone is designed for being connected to the internal ISDN connection of
specific elmeg pabx systems. These devices provide a special menu with further system-specific functions. This menu and the features that it contains are managed entirely
in the PABX.
Accessing the system menu for PABX systems
>
The telephone is idle. Press the right arrow key.
ˆ29.05.03 07:41
}
ˆTel. drctry
ˆ
Quiet
ˆVIP
ˆ
Caller list
s
Press the »PABX« softkey.
ˆ29.05.03 07:41
{
ˆinhibit
ˆ
Memo
ˆunpark
ˆ
Charge
ˆPABX
ˆ
Message
The description of the menu and the features which are available to you in this
menu are given in the operating instructions for your PABX system.
54
System telephony
60
G:\_elmeg\CS410\V1\uk\mn\uk-410-mn-10x1.vp
Mittwoch, 11. Juni 2003 15:06:39
Farbprofil: Generic CMYK printer profile - None
Komposit Standardbildschirm
Configuration settings
Telephone numbers (MSN extension numbers)
Up to 10 MSN (extension numbers) can be configured on your telephone. When you enter an
MSN or extension number in your ISDN system telephone you are essentially defining that
your ISDN system telephone is called using this MSN or extension number when a call is
made. If you enter more than one MSN extension number in your telephone, your phone will
ring each time one of these MSN extension numbers is called.
If you are using your telephone on the external ISDN port of a pabx, enter its internal extension number into the pabx. Please observe the instructions in the PABX manual.
When you call a subscriber, you can select a certain number (MSN) that is transmitted to the
subscriber (e. g. for separate charges). If you do not select any number, the number (MSN)
that has been entered first in the phone (MSN-1) is used.
How to configure an MSN (extension number) is described as follows for
»MSN-1«.
Begin as follows:
a
M
s
s
s
Configuration
MSN
MSN-1
ˆ
ˆ
Program MSN-1
}
transfer
ˆVolume
MSN Name
ˆSound
MSN ext.
Entering or viewing an MSN extension number (MSN)
You can only enter the MSN extension numbers with the Professional Configurator supplied
on the WIN-Tools CD-ROM. However, you can have the programmed number displayed at
the phone.
In the »Program MSN-1« menu, press the »MSN ext.« softkey.
O
The programmed number is displayed.
Press OK to leave this menu.
ˆ
Program MSN-1
}
ˆ--------------------ˆMSN-1:
222
¬¬¬¬¬¬¬¬¬¬¬¬¬¬¬¬¬¬¬¬¬¬
You can only make further settings (e.g. call signaling melody, volume, name) if the
number has already been previously configured.
Setting the melody and the volume
You can define and set a specific melody and its volume for each MSN or extension number
that you enter. If you are using the telephone at an internal ISDN connection of certain elmeg
PABX systems, you can program special ringing melodies and a different volume for internal
calls.
Settings
61
G:\_elmeg\CS410\V1\uk\mn\uk-410-mn-10x1.vp
Mittwoch, 11. Juni 2003 15:06:39
55
Farbprofil: Generic CMYK printer profile - None
Komposit Standardbildschirm
In the initial setting of the telephone, 10 different melodies are stored for call signaling. These
10 melodies can not be changed. You can import a further 10 melodies into your phone via a
PC. Using the Sound Manager supplied with the WIN-Tools CD-ROM, you can produce
your own tunes on the PC and then load these into the telephone. These melodies are then
stored in your phone as Melody 11 … 20. Ready-to-use melody profiles for downloading to
your phone are located in the WIN-Tools installation directory.
If you assign a call signaling melody to a number (MSN) that is not stored in your
phone, the first permanently stored melody in your phone is then used.
Setting the melody (tone)
In the menu »Program MSN-1« press the softkey »Sound« and then the softkey »internal« or »external«. In this example: »internal«.
<>
O
Use the arrow buttons to set the desired melody. The bar in the display indicates the current
status.
Confirm your entry by pressing ok.
ˆ
Select melody
ˆMSN-1,internal
{}
3
ˆ--©----------------¬¬¬¬¬¬¬¬¬¬¬¬¬¬¬¬¬¬¬¬¬¬
Setting the volume
In the menu »Program MSN-1« press the softkey »Volume« and then the softkey »internal« or »external«.
<>
O
Use the arrow buttons to set the volume. The
bar in the display indicates the current status.
Confirm your entry by pressing ok.
ˆSelect call signal {}
ˆMSN-1
- ©©©---- +
¬¬¬¬¬¬¬¬¬¬¬¬¬¬¬¬¬¬¬¬¬¬
In addition to steady volumes, you can also configure call signaling with an increasing volume. When this is done, the volume of the ringing tone is increased automatically as the call is
signaled. When the increasing volume function is configured the following symbol is shown in
the display »©©©©©©¾«.
Assigning a name to the MSN extension number
You can assign your own names (max. 8 characters) to the MSN extension numbers.
On each of the buttons on the push-button set there are three or four letters of the alphabet.
You can advance through the letters by pressing the appropriate button repeatedly (see
page 11). If there are two consecutive letters on the same button of the push-button set,
press the right arrow button after entering the first letter and then enter the next letter.
In the menu »Program MSN-1« press the softkey »MSN Name«.
t
O
Enter the name desired name.
In this example: »private«.
Confirm your entry by pressing OK.
56
Settings
62
G:\_elmeg\CS410\V1\uk\mn\uk-410-mn-10x1.vp
Mittwoch, 11. Juni 2003 15:06:39
ˆ Own MSN designation
ˆMSN-1>private_
¬¬¬¬¬¬¬¬¬¬¬¬¬¬¬¬¬¬¬¬¬¬
Farbprofil: Generic CMYK printer profile - None
Komposit Standardbildschirm
Programming a default call forwarding number
If you do not wish to accept a call, you can forward this call directly to a different phone number (see page 16).
If you frequently forward calls to the same number, you can use this number as a default setting in your phone. If you then wish to forward a call, the default number will be presented first
for you to use.
The default setting for such a number is made separately for each number (MSN) entered in
the telephone.
In the menu »Program MSN-1« press the softkey »transfer«.
t
O
Enter the desired telephone number. To delete
an existing number press the C button.
In this example: »0123456«.
Confirm your entry by pressing OK.
ˆCall forward. number
ˆMSN-1>0123456_
¬¬¬¬¬¬¬¬¬¬¬¬¬¬¬¬¬¬¬¬¬¬
Assigning a specific PIN for an extension number (MSN)
You can assign separate PINs to all of your telephone’s extension numbers (MSN). Using
this PIN, you can enable or inhibit an extension number (MSN) for outbound calls.
In the initial state, all MSN-specific PINs are set to »0000«.
In the »Program MSN-1« menu press the right arrow button and the »PIN« softkey.
t
O
t
O
Enter the specific PIN for »MSN-1« (default setting »0000«). If you have forgotten the
MSN-specific PIN, you can access this menu
via the individual PIN for the telephone.
Confirm your entry by pressing OK.
ˆ
Enter the 4-digit specific PIN for MSN-1.
In this example: »1234«.
Confirm your entry by pressing OK.
ˆ
Input PIN please
ˆ>****_
¬¬¬¬¬¬¬¬¬¬¬¬¬¬¬¬¬¬¬¬¬¬
Change PIN
ˆMSN-1>1234_
¬¬¬¬¬¬¬¬¬¬¬¬¬¬¬¬¬¬¬¬¬¬
Telephone PIN (password)
Some telephone settings and operations are protected by a PIN (password).
• Access to the telephone menus (see page 58)
• Deactivating a direct call (see page 69)
• Remote polling of the answering machine (optional module)
• Access to the »Service« menu (see page 80)
Settings
63
G:\_elmeg\CS410\V1\uk\mn\uk-410-mn-10x1.vp
Mittwoch, 11. Juni 2003 15:06:40
57
Farbprofil: Generic CMYK printer profile - None
Komposit Standardbildschirm
Begin as follows:
a
M
s
s
t
Configuration
inhibit
Enter PIN
(defaut settings 0000)
O
s
PIN
In this menu you are able to configure your individual PIN (0000... 9999). Please write down
the entered PIN. If you forget your PIN, you will not be able to access any of the PIN-protected settings. In this case please ask your specialized dealer or distributor.
t
O
Enter the new PIN.
In this example: »1234«.
Confirm your entry by pressing OK.
ˆ
Change PIN
ˆ>1234_
¬¬¬¬¬¬¬¬¬¬¬¬¬¬¬¬¬¬¬¬¬¬
Attention: The PIN is also reset to (0000) after executing the service reset for restoring the initial state (see page 83)
Protecting access to the telephone menus by a PIN
With the telephone PIN you can restrict access to the telephone menus (»Configuration«, »Setting« and »Program nos.«) and protect the stored charge data from unauthorized deletion. Before a menu can be called up (e.g. menu button and »Configuration«
key), the PIN must be entered when the protection feature is active.
You can set access restrictions separately for the »Configuration«, »Setting« and
»Program nos.« menus. The »inhibit« and »Service« menus are always protected by
the telephone PIN. Access restrictions for the »Configuration« menu will also apply for
deleting stored charge data.
Begin as follows:
a
s
M
s
s
t
Configuration
inhibit
Enter PIN
Press the »Configuration« softkey to activate or deactivate the PIN protection feature.
O
s
Menu
ªªªªªªªªªªªªªªªªªªªªªª
Configuration
ˆSetting
Program nos.
A check mark next to »Configuration ˜« indicates that the access restriction is active.
Press the »Configuration« softkey again to deactive the protection feature.
Accessing a menu via the PIN:
In these operating instructions, access to menus is always described without the use of a
PIN. If you set the PIN protection for a specific menu, you can access this menu as described
in the following example.
58
Settings
64
G:\_elmeg\CS410\V1\uk\mn\uk-410-mn-10x1.vp
Mittwoch, 11. Juni 2003 15:06:40
Farbprofil: Generic CMYK printer profile - None
Komposit Standardbildschirm
Begin as follows:
a
M
s
t
Configuration
Enter PIN
O
Configuration of the requested features is possible
Parking code (default setting)
A parking code of 55 is set in the initial state. You can change the default park code to a single- or double-digit code.
Begin as follows:
a
t
O
M
s
s
Configuration
Call-Parking
The initially set park code is displayed: »55«.
Enter the new parking code and confirm your
entry by pressing OK.
ˆStandard call-parking
ˆCall-Parking>55
¬¬¬¬¬¬¬¬¬¬¬¬¬¬¬¬¬¬¬¬¬¬
Programming the telephone name
You can assign a name (20 characters max.) to the telephone to provide it with unique identification within a PABX system. You will need the telephone name for example for configuring
the telephone through the interal ISDN connection of a connected elmeg pabx. The default
name entered is the telephone’s serial number.
Begin as follows:
a
t
O
M
s
s
t
Configuration
Service
Telephone PIN
Enter the name.
In this example: »Desk 25«.
Confirm your entry by pressing OK.
O
s
Name
ˆ
Device name
ˆName>Desk 25
¬¬¬¬¬¬¬¬¬¬¬¬¬¬¬¬¬¬¬¬¬¬
Number for the SMS center
With this system telephone you can send and receive SMS messages (text messages)
to/from other phones in a fixed-line network or to/from mobile phones. (see page 37).
Settings
65
G:\_elmeg\CS410\V1\uk\mn\uk-410-mn-10x1.vp
Mittwoch, 11. Juni 2003 15:06:41
59
Farbprofil: Generic CMYK printer profile - None
Komposit Standardbildschirm
However, sending and receiving SMS messages is only possible, when this phone
is connected to specific elmeg pabx systems. Please refer to the operating instructions for your PABX to determine whether SMS-features are provided with
this particular telephone.
To send or receive SMS messages with this telephone, the number for the SMS service provider must be stored in the telephone. The default number stored is »0193010« for the SMS
center of Deutsche Telekom. To change this number, proceed as described below.
Begin as follows:
a
t
O
M
s
s
t
Configuration
Service
Telephone PIN
Enter the number for the SMS service provider
without the line access digit.
For example: »0193010«.
Confirm your entry by pressing OK.
60
Settings
66
G:\_elmeg\CS410\V1\uk\mn\uk-410-mn-10x1.vp
Mittwoch, 11. Juni 2003 15:06:41
O
s
SMS
ˆ
SMS Center
ˆMSN ext.>0193010_
¬¬¬¬¬¬¬¬¬¬¬¬¬¬¬¬¬¬¬¬¬¬
Farbprofil: Generic CMYK printer profile - None
Komposit Standardbildschirm
Volume settings
Speaker volume setting
Permanent volume setting
Begin as follows:
a
M
<>
O
s
s
Acoustic
Speaker
Use the arrow buttons to set the volume. The
bar in the display indicates the current status.
Confirm your entry by pressing OK.
ˆ
ˆ
Loudspeaker
loudness
{}
ˆ
- ©©©---- +
¬¬¬¬¬¬¬¬¬¬¬¬¬¬¬¬¬¬¬¬¬¬
Temporary volume setting
bg
The telephone is idle or you wish to change the speaker volume during an ongoing call.
L
M
<>
E
Press the open listening button.
Press the menu button.
Use the arrow buttons to set the volume of the
speaker. The bar in the display indicates the
current status.
ˆ
ˆ
Loudspeaker
loudness
{}
ˆ
- ©©©---- +
¬¬¬¬¬¬¬¬¬¬¬¬¬¬¬¬¬¬¬¬¬¬
Press ESC in order to return to the normal display during an ongoing call. If you
confirm your entry by pressing OK instead of ESC, the existing value is overwritten by the newly set one.
Setting the volume of the handset
Permanent volume setting
Begin as follows:
a
M
s
s
Acoustic
handset
Settings
67
G:\_elmeg\CS410\V1\uk\mn\uk-410-mn-10x1.vp
Mittwoch, 11. Juni 2003 15:06:41
61
Farbprofil: Generic CMYK printer profile - None
Komposit Standardbildschirm
<>
O
Use the arrow buttons to set the volume. The
bar in the display indicates the current status.
Confirm your entry by pressing OK.
ˆ Handset loudness
{}
ˆ
- ©©-- +
¬¬¬¬¬¬¬¬¬¬¬¬¬¬¬¬¬¬¬¬¬¬
Temporary volume setting
bg
You lift the handset or you are conducting a call.
M
<>
E
Press the menu button.
Use the arrow buttons to set the volume of the
handset. The bar in the display indicates the
current status.
ˆ Handset loudness
{}
ˆ
- ©©-- +
¬¬¬¬¬¬¬¬¬¬¬¬¬¬¬¬¬¬¬¬¬¬
Press ESC in order to return to the normal display during an ongoing call. If you
confirm your entry by pressing OK instead of ESC, the existing value is overwritten by the newly set one.
Acknowledgement signals
With your ISDN system telephone you can select whether the acknowledgement signals are
always active, never active or only active when an incorrect entry is made. The default setting
has the acknowledgement signal always active.
Begin as follows:
a
M
s
s
Acoustic
Ack. tones
A check mark displayed next to the individual softkeys indicates the current status.
s
Press the softkey for the desired function:
»no«:Acknowledgement signals are always off.
»Ok«:Acknowledgement signal always active.
»Only error tn«:Acknowledgment signal
active for erroneous input.
62
Settings
68
G:\_elmeg\CS410\V1\uk\mn\uk-410-mn-10x1.vp
Mittwoch, 11. Juni 2003 15:06:41
ˆ Acknowledge signal
ˆ
active
?
ˆNo
ok ˜
ˆOnly error tn
Farbprofil: Generic CMYK printer profile - None
Komposit Standardbildschirm
Setting the volume of the »Station guarding« tone
You have various options of setting your telephone to »Station guarding« (see page 42). You
can set your telephone to signal incoming calls by a brief acoustic signal while »Station guarding« is active. The volume of that idle tone is adjustable.
Begin as follows:
a
M
<>
O
s
s
Acoustic
Quiet
Use the arrow buttons to set the volume. The
bar in the display indicates the current status.
Confirm your entry by pressing OK.
ˆ Idle tone volume
{}
ˆ
- ©©©--- +
¬¬¬¬¬¬¬¬¬¬¬¬¬¬¬¬¬¬¬¬¬¬
Call waiting tone
If the function call waiting (see page 67) is enabled on your telephone you can set the volume
of the call waiting signal. You can also select whether a waiting call is signaled only once, or
several times.
Begin as follows:
a
M
s
<>
O
s
s
Acoustic
Call wait.
The check mark next to »repeat ˜« indicates
that a waiting call wil be signaled repeatedly.
If you press the softkey again, a waiting call is
signaled only once. The check mark next to
»repeat« is deleted.
ˆ
Use the arrow buttons to set the volume of the
call waiting signal. The bar in the display indicates the current status.
Confirm your entry by pressing OK.
ˆ Call wait. tone
ˆ
vol.
Settings
69
G:\_elmeg\CS410\V1\uk\mn\uk-410-mn-10x1.vp
Mittwoch, 11. Juni 2003 15:06:42
Call wait. tone
ˆVolume
repeat ˜
{}
ˆ
- ©©©--- +
¬¬¬¬¬¬¬¬¬¬¬¬¬¬¬¬¬¬¬¬¬¬
63
Farbprofil: Generic CMYK printer profile - None
Komposit Standardbildschirm
Setting the headset type
If a special support feature is stored in your telephone for the headset your are using, set your
phone for that headset model.
For example, the LED in the microphone extension for »Firefly F142 N« from Plantronics can
be activated by the telephone.
Begin as follows:
a
M
s
s
Acoustic
Headset
A check mark displayed next to the individual softkeys indicates the current status.
s
Press the appropriate softkey to configure the
connected headset.
ˆ Headset / Acoustic?
ˆ PLANTRONICS FIREFLY
ˆStandard ˜
GN Netcom 2100/2200
ˆSILICOMP
¬¬¬¬¬¬¬¬¬¬¬¬¬¬¬¬¬¬¬¬¬¬
Volume setting for appointment reminders
You can set various appointments (see page 70) for your phone for which an acoustic and
optical signal is issued when the set date and time are reached. You can set the signaling volume for the appointment as follows.
Begin as follows:
a
M
s
>
Acoustic
<>
O
s
Date
Use the arrow buttons to set the volume. The
bar in the display indicates the current status.
Confirm your entry by pressing OK.
64
Settings
70
G:\_elmeg\CS410\V1\uk\mn\uk-410-mn-10x1.vp
Mittwoch, 11. Juni 2003 15:06:42
ˆAppt. call volume {}
ˆ
- ©©©--- +
¬¬¬¬¬¬¬¬¬¬¬¬¬¬¬¬¬¬¬¬¬¬
Farbprofil: Generic CMYK printer profile - None
Komposit Standardbildschirm
Possible audio output features
The telephone is equipped with an audio output (Audio-Out socket). Several acoustic telephone functions can be used in parallel with the local speaker via this output. You can also
connect external speakers, for example, to allow a message to be heard in the entire office.
The following features can be used with the audio output:
• Message, Open listening, Hands free calling, Calling signals
Begin as follows:
a
M
s
Acoustic
s
>
s
Audio Out
Press the appropriate softkey to switch the external output on or off.
A checkmark displayed next to the softkey indicates that this feature will be output through
the Audio-Out port. Press the corresponding
softkey again to deactivate the audio output.
The check mark next to the softkey is deleted.
Settings
71
G:\_elmeg\CS410\V1\uk\mn\uk-410-mn-10x1.vp
Mittwoch, 11. Juni 2003 15:06:42
ˆ Setting for using
ˆ
Audio Out
ˆMessage ˜
Hands-free calling
ˆSignaling tones
Speaker function ˜
65
Farbprofil: Generic CMYK printer profile - None
Komposit Standardbildschirm
Further settings
Call forwarding (call rerouting)
With this telephone you can be reached, even if you are not in the vicinity of your phone. This
is achieved by the system automatically forwarding calls to another internal or external number.
Call rerouting can be configured separately for any of the entered numbers (MSN). To utilize
the call rerouting function you must have already configured at least one phone number.
The following settings are possible for all MSN or extension numbers.
»delayed«
Delayed call forwarding:
All calls for this number are signaled for a defined time at the exchange or
in the PABX and are then forwarded when this period expires.
»busy«
Call forwarding on busy:
The calls for a defined number are forwarded only when the telephone is
busy.
(for example: There are already two (2) connections made, or one connection has been made and call waiting is not permitted)
»Fixed«
Direct call rerouting:
All calls for a number for which “fixed” call rerouting has been configured
are rerouted. Your telephone will not ring, when this number is called.
You can configure simultaneous delayed call rerouting and call rerouting on busy. If you have
configured a set call rerouting, cancel this function before configuring a new (other) call rerouting function.
If you operate your telephone with a pabx, please observe the call rerouting information (call forwarding) given in the operating instructions for your pabx.
If your is directly connected to the network termination unit, please observe the
corresponding information supplied by the service provider.
Activate call forwarding
The following example describes the configuration of a set call rerouting function for the number MSN1.
Begin as follows:
a
t
M
s
s
s
s
Setting
Call rerout.
Fixed
MSN-1
Enter the number to which the calls are to be
forwarded.
In this example: »0123456789«.
66
Settings
72
G:\_elmeg\CS410\V1\uk\mn\uk-410-mn-10x1.vp
Mittwoch, 11. Juni 2003 15:06:42
ˆ
ˆ
Call forwarding
direct
ˆMSN-1>0123456789_
¬¬¬¬¬¬¬¬¬¬¬¬¬¬¬¬¬¬¬¬¬¬
Farbprofil: Generic CMYK printer profile - None
Komposit Standardbildschirm
O
Confirm your entry by pressing OK.
Call rerouting has been registered. The three
dots at the right lower corner flash alternately.
ˆ
Call forwarding
direct
ˆMSN-1}0123456789 ...
¬¬¬¬¬¬¬¬¬¬¬¬¬¬¬¬¬¬¬¬¬¬
Viewing current call forwarding
When the telephone is idle, a »U« on the second line indicates that call forwarding has been
activated. Press the »Info« softkey if you wish to have more information displayed for the
programmed call rerouting.
Deactivating call rerouting
The following example describes how to deactivate a permanent call rerouting for MSN 1.
a
M
s
s
s
s
s
Setting
Call rerout.
Off
Fixed
MSN-1
Special features for the Swiss version
In its initial state, the telephone is configured for use at an internal ISDN connection with an elmeg PABX. If you wish to use your telephone at the network termination unit or at a third-party pabx, you will have to change the call rerouting protocol (»Keypad« or »ETSI«) as described below.
Use at a point-to-point connection (network termination unit)
a
M
s
s
Configu- Service
ration
t
O >
s
s
Call rerout. Keypad
Telephone
PIN
Use with an elmeg PABX
a
M
s
s
Configu- Service
ration
t
O >
Telephone
PIN
s
s
Call rerout.
ETSI
Call waiting feature
If, during an ongoing call, a second call comes in for you, the second call is signaled when
»Call waiting on« is set. A caller will hear the busy signal, when you have set your telephone to
»Call waiting off«.
A waiting call is indicated by a brief acoustic signal in the speaker and also displayed. You can
Settings
73
G:\_elmeg\CS410\V1\uk\mn\uk-410-mn-10x1.vp
Mittwoch, 11. Juni 2003 15:06:43
67
Farbprofil: Generic CMYK printer profile - None
Komposit Standardbildschirm
set the volume of the call waiting signal and select whether a waiting call is to be signaled only
one time, or several times (see page 63).
When »Station guarding« is set, the call is indicated as described on page 62. If you are using
the hands-free option for an active connection, waiting calls will only be signaled optically in
the display.
The following entries are possible for the call waiting feature:
»no«
With an ongoing connection or while a connection is being established,
no further calls will be signaled.
»ok«
Call waiting is only possible when there are one or two active calls and no
calls waiting at your telephone.
»OK,
Up to 4 simultaneous connections are possible on your telephone.
For example: two further calls can also be signaled by call waiting while
extended«
two other calls are already in progress.
Begin as follows:
a
s
M
s
s
Setting
Call wait.
Press the appropriate softkey below the desired call waiting type. A check mark displayed
next to the individual softkeys indicates the
current status.
ˆ Call waiting enable?
OK, extended
ˆNo ˜
ok
¬¬¬¬¬¬¬¬¬¬¬¬¬¬¬¬¬¬¬¬¬¬
Direct call
You can program a direct call for your telephone so that when you press any key (except for
ESC and the menu key) a set number will be dialed. If the direct call function is active only one
connection can be established to the set number. If you wish to establish a connection to a
different number you must first deactivate the direct call function.
An active direct call is protected by means of the telephone PIN (see page 57). The direct call
function can then only be deactivated after entering this PIN. As long as the PIN is set to
»0000« (default setting), you do not need to enter the PIN and can continue by pressing OK.
The following functions are possible with the direct call activated:
• Automatic dialing of the set number after lifting the handset of your phone, or pressing
any key (except for ESC and the menu key).
• Accepting calls, provided these are not suppressed by the call filter.
• Dates that have been set previously.
Further functions (e. g.: function keys, TAPI functions or headset operation) are
not possible when direct dialing is activated.
68
Settings
74
G:\_elmeg\CS410\V1\uk\mn\uk-410-mn-10x1.vp
Mittwoch, 11. Juni 2003 15:06:43
Farbprofil: Generic CMYK printer profile - None
Komposit Standardbildschirm
Programming a direct call number
Begin as follows:
a
t
O
M
s
s
s
Setting
Direct cal
MSN ext.
Insert a number.
In this example: »098765«.
Confirm your entry by pressing OK.
ˆ Dir. call-in number
ˆDirect cal>098765_
¬¬¬¬¬¬¬¬¬¬¬¬¬¬¬¬¬¬¬¬¬¬
If you are using your telephone with a PABX system, first enter the line access digit
of your PABX before entering the direct dialing number.
Activating direct call
a
M
s
s
s
Setting
Direct cal
ok
ˆ07:41
ˆ098765
Dir. call
¬¬¬¬¬¬¬¬¬¬¬¬¬¬¬¬¬¬¬¬¬¬
Direct dialing is now activated. The set direct call number is shown on the second line of the
display.
Deactivating a direct call
M
The phone is in the idle mode with the direct
call-in feature enabled.
Press the menu key.
ˆ07:41
098765
Dir. call
¬¬¬¬¬¬¬¬¬¬¬¬¬¬¬¬¬¬¬¬¬¬
t
O>
s
Enter the programmed PIN (in this example:
»0000«).
Confirm your entry by pressing OK.
ˆ
Press the softkey »ok« to deactivate direct dialing.
ˆ
Input PIN please
ˆ>*****_
¬¬¬¬¬¬¬¬¬¬¬¬¬¬¬¬¬¬¬¬¬¬
End direct call-in?
ˆNo
ok
¬¬¬¬¬¬¬¬¬¬¬¬¬¬¬¬¬¬¬¬¬¬
Settings
75
G:\_elmeg\CS410\V1\uk\mn\uk-410-mn-10x1.vp
Mittwoch, 11. Juni 2003 15:06:43
69
Farbprofil: Generic CMYK printer profile - None
Komposit Standardbildschirm
Appointment reminders
You have the option of setting three different dates with your telephone.
• The set appointment is signaled daily .
• The set appointment is signaled once.
• The set appointment is signaled weekly at the set time (date and time).
Once the date and time of the set appointment are reached, an acoustic (with fixed tune and
volume) and optical signal is issued. The volume of the signal used to indicate an appointment can be adjusted individually (see page 64). You can store a text for each appointment
(42 characters max.) which will be displayed when the appointment is reached.
If you press ESC, signaling of the appointment is interrupted and then continued later as a reminder. To terminate signaling of an appointment press OK. Signaling of the appointment
can also occur during a call, or when you have set the »Station guarding« feature.
When the telephone is idle, a »T« on the info line indicates that an appointment has been set
up.
Programming an appointment reminder
The following example describes how to program a weekly appointment 1.
Begin as follows:
a
M
s
s
<>
Setting
Date
Select appointment
O
t
O
Enter the time of the appointment.
In this example: »0930«.
Confirm your entry by pressing OK.
ˆ
t
O
Enter the date of the appointment.
In this example: »030603«.
Confirm your entry by pressing OK.
ˆ
t
Enter an information text for appointment 1 (42
characters max.).
In this example: »Telephone project
meeting«.
Confirm your entry by pressing OK.
ˆ
ˆ
O
s
Weekly
Set appointment 1
ˆTime>09:30
¬¬¬¬¬¬¬¬¬¬¬¬¬¬¬¬¬¬¬¬¬¬
Set appointment 1
ˆDate>03.06.03
¬¬¬¬¬¬¬¬¬¬¬¬¬¬¬¬¬¬¬¬¬¬
Explanation for
appointment 1
ˆTelephone project
ˆmeeting
¬¬¬¬¬¬¬¬¬¬¬¬¬¬¬¬¬¬¬¬¬¬
You can change the information text while an appointement is set by selecting the
corresponding appointement with the arrow keys and then pressing the menu
key.
70
Settings
76
G:\_elmeg\CS410\V1\uk\mn\uk-410-mn-10x1.vp
Mittwoch, 11. Juni 2003 15:06:44
Farbprofil: Generic CMYK printer profile - None
Komposit Standardbildschirm
Deactivating an appointment reminder
a
M
s
s
<>
Setting
Date
Select appointment
O
s
Off
Setting the display contrast
You can set individual contrast levels.
Begin as follows:
a
M
<>
O
s
s
Setting
Contrast
Use the arrow buttons to set the contrast.
Confirm your entry by pressing OK.
ˆ Display contrast
{}
ˆ
- ©©©©----- +
¬¬¬¬¬¬¬¬¬¬¬¬¬¬¬¬¬¬¬¬¬¬
Auto-answer
Your telephone can accept calls automatically, without you having to lift the handset or press
the speaker (headset) key. The auto-answer feature can be switched on or off with a function
key that has been programmed for this purpose.
Begin as follows:
a
M
s
s
Setting
AUTO accept
A check mark displayed next to the individual softkeys indicates the current status.
s
Press the appropriate softkey to set the time
after which a call is automatically answered.
ˆ
Time until call
accepted
?
5 seconds
ˆimmediately ˜
10 seconds
¬¬¬¬¬¬¬¬¬¬¬¬¬¬¬¬¬¬¬¬¬¬
ˆ
Automatic headset use
If you have a headset connected to your telephone, you can use it automatically for specific
features.
Settings
77
G:\_elmeg\CS410\V1\uk\mn\uk-410-mn-10x1.vp
Mittwoch, 11. Juni 2003 15:06:44
71
Farbprofil: Generic CMYK printer profile - None
Komposit Standardbildschirm
Automatic headset use active:
The call is taken via the headset when you press an extension or line key with automatic accepting of calls activated.
Automatic headset use not active:
The call is taken via the open listening / hands-free calling functions when you press an extension or line key with automatic accepting of calls activated.
Begin as follows:
a
M
s
Setting
>
s
Headset
A check mark displayed next to the individual softkeys indicates the current status.
s
Press the appropriate softkey to activate or deactivate automatic headset operation.
ˆ
Use headset?
ˆNo ˜
Ok
Call filter
The call filter allows specific calls to be put through or rejected on the basis of the recognized
phone number.
You can enter up to five filter numbers (26 digits max.) for the call filter. Filter numbers can be
local area codes or partial or complete numbers. When you enter »****« you can include
calls which do not transmit the number (caller ID) in the call filter. Using the call filter, calls
whose numbers, or beginning numbers concur with the filter numbers entered in the system,
can be rejected or accepted.
Rejected calls are saved in the caller list with a special flag. If the call was only signaled at your
telephone the caller will hear the busy signal when the call is rejected by the call filter. If you
are a member of a team the call will be signaled at a different telephone within the team.
Call filter operating modes
»no«
»reject«
»forward«
»complete«
All calls signaled.
Calls whose numbers, or beginning numbers concur with stored filter
numbers will be rejected. All other calls are signaled.
Calls whose numbers, or beginning numbers concur with stored filter
numbers will be signaled. All other calls are not signaled.
No calls are signaled.
Programming a filter number
You can configure a new filter number, or use a number already stored in the telephone (redialing, telephone directory, VIP or speed dialing memory).
72
Settings
78
G:\_elmeg\CS410\V1\uk\mn\uk-410-mn-10x1.vp
Mittwoch, 11. Juni 2003 15:06:44
Farbprofil: Generic CMYK printer profile - None
Komposit Standardbildschirm
The following example describes how to enter a new filter number.
Begin as follows:
a
M
s
>
Setting
t
O
s
s
<>
O s
Filter
New
Select filter
number
New
Enter the filter number. In this example:
»012345«.
Confirm your entry by pressing OK.
ˆFilter number create
ˆ>012345_
¬¬¬¬¬¬¬¬¬¬¬¬¬¬¬¬¬¬¬¬¬¬
Programming call filter operating modes
Begin as follows:
a
M
s
>
Setting
s
s
Filter
Incoming
A check mark displayed next to the individual softkeys indicates the current status.
s
Press the appropriate softkey to set the call filter to the desired mode of operation.
ˆ
ˆ
Filter incoming
calls
?
All calls
ˆNo ˜
forward
ˆreject
¬¬¬¬¬¬¬¬¬¬¬¬¬¬¬¬¬¬¬¬¬¬
Setting the time
Begin as follows:
a
M
s
Setting
>
s
Time
t
O
Enter the time and press OK to confirm.
t
O
Enter the date and press OK to confirm.
ˆ
Set time
ˆTime>07:41_
¬¬¬¬¬¬¬¬¬¬¬¬¬¬¬¬¬¬¬¬¬¬
Set time
ˆDate>29.05.03_
¬¬¬¬¬¬¬¬¬¬¬¬¬¬¬¬¬¬¬¬¬¬
Settings
79
G:\_elmeg\CS410\V1\uk\mn\uk-410-mn-10x1.vp
Mittwoch, 11. Juni 2003 15:06:45
ˆ
73
Farbprofil: Generic CMYK printer profile - None
Komposit Standardbildschirm
Extended configuration
For a full configuration the following options are available:
• PC-configuration of the telephone via the USB port
• PC-configuration of the telephone via the internal ISDN connection of an elmeg pabx
(firmware version 5.40 or later, CD version 5.43 or later, WIN-Tools Telephones from
Version 3.30).
• Extended configuration right at the telephone (may possibly have to be enabled by entering a specific code.)
Only limited configuration is possible when the telephone is recognized as a system telephone when connected to an elmeg PABX system. You have to enter a specific code number in
order to enter the telephone’s extended configuration mode.
Advanced configuration is activated automatically if the telephone is not recognized as a system telephone (for example when connected to the network termination unit, or at the internal ISDN port of a PABX system from a different manufacturer). In this case you do not have
to input the activation or deactivation codes for extended configuration.
Activating the extended configuration mode
Enter the code number »**46782551##« (Vanity-format »**INSTALL1##«).
Deactivating the extended configuration mode
Enter the code number »**46782550##« (Vanity-format »**INSTALL0##«).
If the ISDN telephone is disconnected from the ISDN network, (for example by unplugging
the ISDN connector of the phone or by switching off or resetting the pabx), the extended
configuration mode will be automatically switched off.
Settings for an MSN extension number
Begin as follows:
a
M
s
s
s
Configuration
MSN
MSN-1
ˆ
Program MSN-1
}
transfer
ˆVolume
MSN Name
ˆSound
MSN ext.
• Entering or modifying the MSN extension number ( »MSN ext.« softkey)
Numbers for the telephone (internal extension number when connected to the internal
ISDN connection of a pabx or external number when connected to the network termination unit);
74
Settings
80
G:\_elmeg\CS410\V1\uk\mn\uk-410-mn-10x1.vp
Mittwoch, 11. Juni 2003 15:06:45
Farbprofil: Generic CMYK printer profile - None
Komposit Standardbildschirm
Connected to a pabx
Begin as follows:
a
M
s
>
Configuration
s
ˆ
PABX
ˆType-ID
PABX
External line
ˆNumb. length
Ln.access
• PABX system type (»Type-ID« softkey)
Type 0: The PABX system does not transmit the line access digit on incoming calls.
The line access digit must be entered in the phone.
Type 1: The PABX system transmits a line access digit on incoming calls. No line access digit should be entered in the phone.
• Number length (»Numb. length« softkey)
The maximum length for internal numbers that are assigned to different internal extensions within your PABX system;
• Direct exchange line access (»Ln. access« softkey)
With direct exchange line access, you do not have to dial the line access digit for conducting outgoing calls.
• Line access digit (»External line« softkey)
Line access digit for the pabx;the line access digit is placed automatically in front of
the number of the caller for external calls.
Dial ranges
Begin as follows:
a M
s
s
t
Configuration inhibit
Enter
PIN
O
ˆ
ˆ
Config. inhibit
filter
ˆPIN
Outgoing
ˆMenu
List
• Entering restricted and unrestricted numbers (»List« softkey)
Select an entry and specify the desired area code, the telephone number or the partial
number.
• Programming dial range types (»Outgoing« softkey)
»No«: The dial filter is not active.
»unrestr. nos. Only«: You phone is inhibited for all outgoing calls, except for
those telephone numbers listed as unrestricted. For example, if the prefix »0211« is
enabled, all telephone numbers which begin with 0211 can be called.
»List«:The call control distinguishes between restricted and unrestricted numbers.
You can release restricted numbers again by listing them as unrestricted numbers. If
Settings
81
G:\_elmeg\CS410\V1\uk\mn\uk-410-mn-10x1.vp
Mittwoch, 11. Juni 2003 15:06:45
75
Farbprofil: Generic CMYK printer profile - None
Komposit Standardbildschirm
an entry in the enable list is longer than an entry in the inhibit list that entry can be dialed.
Setting the User Interface
Begin as follows:
a
M
s
>
s
Settings
ˆ
Use variant
Opearation
Keypad
ˆMute
¬¬¬¬¬¬¬¬¬¬¬¬¬¬¬¬¬¬¬¬¬¬
• Default setting during a call (»Keypad« or »dtmf« softkey)
Select whether in the initial settings »dtmf« or »keypad« is possible during an ongoing call;
• Hands-free operation (»Mute« softkey)
Set whether the microphone is activated with the handset in place (e.g. hands-free
calling), or whether it must be switched on by pressing the softkey »speak«.
Programming function keys
Begin as follows:
a
M
s
s
Program nos.
direct
ˆ
Program keys
ˆFunction
New
ˆmacro
List
• Direct dialing keys (»List« or »New« softkey)
Select a function key and then enter the desired number and the dtmf- or keypad sequence.
• Function keys (»Function« softkey)
Please select a function key first. Then select the feature type. Additional settings may
be required depending on the specific type of function you wish to program.
Function keys and further entries
Function
MSN assignment
Carrier/Provider
prefix
Display
»MSN-assignment«
»MSN-assignment«
76
Further entries
Telephone number index (MSN1 …
MSN-9) to be transmitted.
Telephone number index (MSN1 …
MSN-9) and code number of the desired
provider (for example 01033).
Settings
82
G:\_elmeg\CS410\V1\uk\mn\uk-410-mn-10x1.vp
Mittwoch, 11. Juni 2003 15:06:46
Farbprofil: Generic CMYK printer profile - None
Komposit Standardbildschirm
Function
Call filter
Display
»call filter«
Further entries
Call forwarding
»call forwarding«
Direct call
Headset
»Dir. call-in«
»Headset«
Auto-Answer
»Auto. Accept
on/off«
User key
»User on/off«
Index of numbers (MSN-1…MSN-9),
Call forwarding mode (1 - fixed, 2 - delayed, 3 - when busy) and
Call forwarding target.
Telephone number index (MSN1 …
MSN-9) for which calls are automatically
answered.
Telephone number index (MSN1 …
MSN-9) you wish to use for all further
programmings.
• Programming macro buttons (»macro« softkey)
Please select a function key first. First enter a name for that macro (max. 20 characters). Then enter the separate macro commands.
A macro’s command string is limited to 26 characters. Each command or key simulation consists of two characters. You can therefore only link a maximum of 13 commands together, or, for example, join 7 commands / key stroke simulations with a further 12 digits.
Commands and keys for macro programming
A macro consists of various commands, or key strokes, that are compiled into one command sequence and stored under a defined direct dialing key. When this function key is pressed, the individual commands contained in the macro are executed one after the other.
The following commands are available for macro programming
»B«
Initiating a call (same as lifting the handset)
»D«
Ending a call (same as replacing the handset)
»ELSE«
Alternative command, if a required condition (e.g. »IFLA« or »IFLB«) is not fulfilled.
»IFLA«
»IFLB«
Execute this macro only when the LED for the first level is off (»IFLA«) or flashes
(»IFLB«). If this condition is not fulfilled the procedure is discontinued, or resumed after the command »ELSE« (where available).
»K«
Keypad sequence; all of the following characters / digits are transmitted as a keypad sequence.
»LA«
Deactivate LED
»LB«
The LED flashes
»LE«
Activate LED
»LZ«
Activate LED for two seconds
Settings
83
G:\_elmeg\CS410\V1\uk\mn\uk-410-mn-10x1.vp
Mittwoch, 11. Juni 2003 15:06:47
77
Farbprofil: Generic CMYK printer profile - None
Komposit Standardbildschirm
»n«
Dummy number.
If a number is entered prior to execution of a macro (or for example, dialed from
the telephone) this number is used in place of the dummy number in the macro.
»P«
Pause (1 second) in the command sequence (between two characters/commands)
»RE«
Re-establish the phone’s idle state.
If there is an active connection at this phone, execution of this macro is canceled
at this point.
»SE«
Activating the speaker (normal volume)
»SA«
Activating the speaker (low volume)
»T«
DTMF sequence; all of the following characters / digits are transferred as DTMF
dialing.
»TS«
Testing a connection.If there is currently no connection active, or an outgoing
connection can not be set up (for example subscriber busy), execution of the macro is canceled at this point.
If you wish to incorporate a telephone key into a macro, press the corresponding key during
macro programming. Buttons used control the telephone during macro programming (e.g.
save, change position of entry, change entry or cancel) can be integrated into a macro by
using the commands described as follows.
The following commands are therefore available for these keys:
»c«
Actuation of the C- button.
»ESC«
Actuation of the ESC- button.
»f«
Actuation of the menu button.
»{«
Actuation of the left arrow button.
»OK«
Actuation of the OK button.
»}«
Actuation of the right arrow button.
»sh«
Press the key two times to reach the second level for the function keys.
Key assignments for macro programming are as follows:
Key
1
2
3
4
5
6
7
8
Press
1
1
2
3
4
5
6
7
8
2
B
D
IFLA
{
menu
}
T
3
c
ELSE
IFLB
K
N
P
TS
78
4
6
7
LB
LE
LZ
SA
SE
sh
esc
LA
ok
RE
Settings
84
G:\_elmeg\CS410\V1\uk\mn\uk-410-mn-10x1.vp
Mittwoch, 11. Juni 2003 15:06:47
5
Farbprofil: Generic CMYK printer profile - None
Komposit Standardbildschirm
Key
9
0
*
#
Press
1
9
0
*
#
2
3
4
5
6
7
Macro programming examples:
Function
Key programmed for a particular number
(for example: 012345 and activate LED for two seconds)
Setting an appointment
Reading new text messages (UUS1)
Inhibiting the phone for all outbound calls
»N«: Password for the telephone
(Key for level 1, activate LED)
Re-enabling the telephone for outbound calls
»N«: Password for the telephone
(key for level 2, deactivate LED)
Adding an entry to the telephone directory
Settings
85
G:\_elmeg\CS410\V1\uk\mn\uk-410-mn-10x1.vp
Mittwoch, 11. Juni 2003 15:06:47
Macro command string
RE,B,0,1,2,3,4,5,LZ
RE,f,s3,s5
RE,},s6,s6,s2
RE,f,s5,s1,N,ok,s5,s
4,LE,esc
RE,f,s5,s1,N,ok,s5,s
2,LA,esc
RE,f,s6,s2,s5
79
Farbprofil: Generic CMYK printer profile - None
Komposit Standardbildschirm
Service functions
Reading the telephone’s firmware version
You can have the version and the model of your phone displayed so that you can determine,
for example, which firmware version is available in your phone.
Begin as follows:
a
C
M
s
s
t
Configuration
Service
Telephone
PIN
The display shows information about your telephone.
For example:Firmware version, name, …
Press the C button to exit the menu.
O
s
Version
ˆ
ˆ
SoftwareIdentification
ˆType:CS410 Feldtest 8
ˆTime:04/10/03 13:41
ˆModul:V0.01
ˆ:V3.20 16 00 01 01
ˆName:Desk 25
Country-specific settings
Certain specific parameters need to be set if the telephone is to be used in a country other
than the country configured as default.
This includes setting the language, the currency and certain default specific parameters for a
country’s ISDN network.
Check as described as follows whether you need to set country-specific parameters for the
country in which the telephone is to be used.
Begin as follows:
a
M
s
s
t
Configuration
Service
Telephone
PIN
80
Service features
86
G:\_elmeg\CS410\V1\uk\mn\uk-410-mn-10x1.vp
Mittwoch, 11. Juni 2003 15:06:48
O
>
s
Country
Farbprofil: Generic CMYK printer profile - None
Komposit Standardbildschirm
s
Press the arrow keys to view the countries, for
which specific settings are available.
Press the softkey for the desired country. For
example: »English«.
All country-specific settings take effect immediately.
The telephone data will not be deleted.
ˆWhich Country? }
ˆItaliano
Español
ˆDeutsch ˜
English
ˆFrançaise
Nederland
ˆ29.05.03 07:41
}
ˆTel. drctry
Quiet
ˆVIP
Downloading a new firmware
• Do not press any keys (unless prompted to do so) or plug in or unplug any connectors
while data transfer is in progress. If the connecting line is interrupted during a download, restart the download program and proceed as described previously.
• Once the new firmware has been loaded completely the telephone performs a RESET
and is then available for use again.
• In some circumstances all of the data in your phone may be deleted after a firmware
download. If this is the case, a notice is given prior to starting the download. Prior to
downloading, save all of your telephone data (configuration, phone directory) to your
PC.
Downloading new firmware via the phone’s USB port
You can load the newest firmware versions into your telephone via the phone’s PC interface
and using the elmeg WIN-Tools CD ROM supplied with the system.
• Connect the phone to the PC.
• Load the new firmware into your PC (e. g. from the Internet).
• Start the elmeg WIN-Tools download program.
• In the field »Type of connection« select the »USB« port.
• Go to »File«, »Open« and select the directory where the new firmware is stored.
• In the field »Status« click »Start Download« to begin downloading the new firmware.
Downloading new firmware from the elmeg server
»ELMEG GmbH & Co.KG Kommunikationstechnik« provides a server PC which can be used
for loading new firmware into your telephone. In this case, the firmware is downloaded via the
ISDN connection. Download can take 12 minutes approximately, depending on the size of
the firmware file. Please note that there is a charge for loading firmware via an external ISDN
connection.
Service features
87
G:\_elmeg\CS410\V1\uk\mn\uk-410-mn-10x1.vp
Mittwoch, 11. Juni 2003 15:06:48
81
Farbprofil: Generic CMYK printer profile - None
Komposit Standardbildschirm
Important notice for export variants:
Please ask your specialized dealer/distributor for the access number of the
download server for your country!
Download server
Number
elmeg server
++49-(0)5171-901190
Initiating download of new firmware on the phone:
Begin as follows:
a
M
s
s
t
Configuration
Service
Telephone
PIN
O
s
s
Software
ok
The telephone then restarts from the BIOS.
s
Press the »Update« softkey.
ˆCx410-bios 1.03 by ps
Update
ˆInfo
¬¬¬¬¬¬¬¬¬¬¬¬¬¬¬¬¬¬¬¬¬¬
t
If you are using your telephone with a PABX
system, first enter the line access digit to obtain
external line access, and then the number for
the download server.
In this example: »005171901190«.
If you are using your telephone with a PABX
system for which automatic exchange line access is active, enter the number for the
download server without the line access digit.
ˆCx410-bios 1.02 by
ps
ˆFirmware Update
ˆPlease dial
ˆ005171901190
Abort
To cancel a download already in progress press the »Abort« softkey or ESC.
In some circumstances all of the data in your phone may be deleted after a firmware download. If this is the case, the following notice is given prior to starting the download:»All data
will be deleted Continue?«. The firmware download is started only after you have
confirmed this prompt by pressing the softkey »ok« If the data for the telephone are not deleted during the download, the download is started without first displaying the above prompt.
82
Service features
88
G:\_elmeg\CS410\V1\uk\mn\uk-410-mn-10x1.vp
Mittwoch, 11. Juni 2003 15:06:48
Farbprofil: Generic CMYK printer profile - None
Komposit Standardbildschirm
Telephone BIOS
This telephone is equipped with a BIOS (basic functions) in English. The BIOS functions also
remain available even if the firmware of the telephone does not operate properly, or if new
firmware was not loaded completely (e. g. if the PC crashed while loading the firmware).
The following functions are available in the telephone’s BIOS
• All phone calls are signaled. No number (MSN) has been entered in the telephone.
• Dialing of outgoing calls is possible after lifting the handset (no call preparation, no
open listening or hands-free calling).
• Loading new firmware via the phone’s PC port or via the ISDN connection.
Downloading new firmware via the PC port
To load new firmware in the BIOS of your telephone via the PC port, proceed as described on
page 81 of these operating instructions.
Downloading new firmware via the ISDN port
s
You are shown the BIOS menu for the telephone.
If you wish to load new firmware via the ISDN
connection, press the »Update« softkey.
ˆCx400-bios 1.03 by ps
Update
ˆInfo
¬¬¬¬¬¬¬¬¬¬¬¬¬¬¬¬¬¬¬¬¬¬
Now proceed as described on page 82 of these operating instructions.
Attention: The settings for the »Set« softkey are used for service and diagnosis at
elmeg. Any settings you may make or modify in this menu will affect the overall
functionality of your telephone. In some cases the telephone may not be able to
be used if these settings are changed.
Service features
89
G:\_elmeg\CS410\V1\uk\mn\uk-410-mn-10x1.vp
Mittwoch, 11. Juni 2003 15:06:49
83
Farbprofil: Generic CMYK printer profile - None
Komposit Standardbildschirm
Reset - Resetting to default state
You can reset the telephone to its initial state using the procedure described as follows. All of
the data that you have entered previously will be deleted.
If you have connected the elmeg T400 key extension module to your phone all of the data for
the module will also be deleted when this procedure is executed.
Please note: Settings for the answering machine and any texts that have been stored will
not be deleted. Please refer also to the instruction manual supplied with your answering machine.
Begin as follows:
a
s
M
s
s
t
Configuration
Service
Telephone
PIN
Press »ok« to reset the telephone to its initial
state. If you do not wish to have the data deleted press »No«.
When you press the »ok« softkey, the telephone is reset to the default state. All data are deleted.
O
s
s
Data
ok
ˆ Sure to delete all?
ˆ
ˆNo
ok
¬¬¬¬¬¬¬¬¬¬¬¬¬¬¬¬¬¬¬¬¬¬
ˆ29.05.03 07:41
ˆTel. drctry
Quiet
ˆVIP
84
Service features
90
G:\_elmeg\CS410\V1\uk\mn\uk-410-mn-10x1.vp
Mittwoch, 11. Juni 2003 15:06:49
Farbprofil: Generic CMYK printer profile - None
Komposit Standardbildschirm
Telephone and PC
CTI / TAPI using the telephone’s USB port
The abbreviations CTI and TAPI denote the standard interface for Windows telephony applications from Microsoft. Telephones and computers can work hand in hand via this interface.
CTI: Computer Telephony Integration
TAPI: Telephony Application Programming Interface
This allows you to dial directly from TAPI-compatible Windows programs, and the calls can
be used by the software. Consequently, setting up a connection via TAPI is considerably faster than with normal calling. TAPI, with its standard Microsoft interface, has the advantage
that it is already supported by a large number of programs and this number is growing all the
time.
The TAPI functions of the telephone are available immediately after being connected to the PC and does not require any additional activation procedures to be performed at the telephone.
CAPI using the telephone’s USB port
As a result, you do not need any additional ISDN card for your PC. The phone is equipped
with an integrated USB port for connection to the PC. Based on the programs and drivers
you have installed, you can use the telephone, for example to surf the Internet conduct data
exchange, send/receive fax messages, or implement an answering machine via the PC.
• Only one B channel is available for all applications, to ensure that the telephone can be
reached at all times. The applications being used can use this B channel one after the
other.
• Do not use the same MSN in these PC applications as are used in the telephone.
• If a CAPI application is active on your PC and using the available B channel this is indicated in the display of the telephone by »ONLINE«. Only one B channel is then available for telephony while this application is in use.
Fax and data applications (not included in scope of supply)
You can send or receive faxes from / to different applications by means of a fax program.
With a file transfer program you can transfer files from one PC to another or receive files. To
use this application with your telephone, the following drivers must be installed: USB and
CAPI drivers of the telephone.
Internet access
With this telephone you can surf the Internet. Use your provider’s (e.g. T-Online, AOL) software packages or the Windows Dial-up Networking. To surf the Internet by telephone, the
Telephone and PC
91
G:\_elmeg\CS410\V1\uk\mn\uk-410-mn-10x1.vp
Mittwoch, 11. Juni 2003 15:06:49
85
Farbprofil: Generic CMYK printer profile - None
Komposit Standardbildschirm
following drivers must be installed: USB and CAPI drivers of the telephone NDISWAN driver
(only necessary when using the Windows Dial-up Networking)
Audio applications using the telephone’s audio sockets
The telephone is equipped with an input (2) and an output (3) for audio signals. Both these
ports have a 3.5 mm stereo socket. When using the optional answering machine module,
you can connect the telephone via these ports to the PC sound card in order to upload announcements into the phone or save recorded messages on the PC.
You can also use specific telephone features with the Audio-Out output (see page 64).
Contents of the WIN-Tools CD-ROM
In these operating instructions we would like to give you a brief summary of the software included in the scope of supply for the system. The software programs themselves are not
described in these instructions. Should you have any questions or problems while you are
using the programs, you can also refer to the online help function of the various applications
for assistance. All of the programs used are provided with comprehensive online help.
Configuring the telephone (elmeg WIN-Tools)
• Professional Configurator:
Setting and configuration of the phone’s individual features are done in the configuration process. You can set up MSN extension numbers or program VIP keys and
function keys. You can also configure the phone’s displays, set the volume of various
signals, select dialing options (when the phone is connected to a PABX) or set the parameters for dial ranges and charge logging.
The Professional Configurator is also used for programming an optional answering
machine or the optional elmeg T400 keyboard extension.
• Telephone directory manager:
Use the phone directory manage to to create new entries for the phone directory (see
page 29) or assign a special dial tone (VIP dial tone) to individual numbers. With the import / export function you can also import data from other programs or export data for
further processing.
• Download manager
Use this program for loading new firmware for the telephone with your PC. A new firmware is loaded via the phone’s PC port.
• Sound manager
You can use the sound manager to create your own call signaling melodies at the PC
and then load these melodies into your telephone.
On completion of data exchange, the telephone undergoes an internal reorganization (of phone directory data for example). This process takes place automatically and may require a few minutes. During this time, certain telephone functions
will not be available for use (e. g. phone directory).
86
Telephone and PC
92
G:\_elmeg\CS410\V1\uk\mn\uk-410-mn-10x1.vp
Mittwoch, 11. Juni 2003 15:06:49
Farbprofil: Generic CMYK printer profile - None
Komposit Standardbildschirm
Application programs
• Adobe Acrobat Reader
Program for viewing and printing PDF documents.
Drivers
• CAPI driver (Common ISDN Application Programming Interface)
Links the telephone to programs that provide data communication functions.
For example: CAPI software (not included in the package)
• NDISWAN driver (NDIS - Network Device Interface Specification / WAN - Wide Area
Networking)
Integration of the telephone into the PC as a special ISDN network card.
For example: Connection to the Internet via Windows dial-up networking
• TAPI driver (Telephony Application Programmer’s Interface)
Interfacing to programs that provide computer-aided telephony.
For example: Windows dialing assistant, CTI software (not included in the package)
• USB driver (Universal Serial Bus)
Recognition and control of the phone after connecting to the USB port of the PC.
For example: Example of elmeg WIN-Tools programs
Important note for installation of the CAPI drivers:
Before installing the new drivers, be sure to remove any existing CAPI drivers in your system
(such as the drivers for an installed ISDN card), as Windows only supports one installed
CAPI.
Refer to the operating instructions for the device concerned, or for the operating system, for
details on removing drivers.
In some special circumstances it may be necessary to also physically remove the
ISDN card form your PC in addition to (virtually) removing the drivers.
Installing the programs from CD-ROM
At present, only Microsoft Windows operating systems are supported for connection of a PC to the telephone via the USB port.
PC requirements :
•
•
•
•
•
IBM or 100% compatible PC
Pentium or comparable processor, min. 133 MHz clock rate
min. 32 MB RAM
CD ROM drive
Free USB-port
Telephone and PC
93
G:\_elmeg\CS410\V1\uk\mn\uk-410-mn-10x1.vp
Mittwoch, 11. Juni 2003 15:06:50
87
Farbprofil: Generic CMYK printer profile - None
Komposit Standardbildschirm
• Windows 98SE / ME / 2000 / XP operating system
• Min. 80 MB free hard disk space for installation
Installation sequence
• Start your PC.
• Insert the CD ROM supplied with the system in the CD ROM drive of your PC.
• Wait a moment until the program starts automatically. If the autostart option is not activated in your PC, you can start the file »setup. exe« directly from the main directory of
the CD using Windows-Explorer (double click on the file), or using the option »Run« in
the Windows start menu.
• The welcome screen for the CD is displayed after you start the file.
• It is important that you install the programs and drivers in the order given:
CAPI driver
WIN-Tools programs
TAPI driver
CTI software (not included in the package)
CAPI software (not included in the package)
NDISWAN driver
• Connect the telephone to the PC’s USB port as described on page 6. The telephone
is automatically detected by the PC.
Installation of a device driver is started automatically the first time you connect the
telephone to the PC. The device driver is located in the root directory of the
CD-ROM. Follow the instructions displayed on the monitor.
• You can then use your phone together with the installed PC programs.
88
Telephone and PC
94
G:\_elmeg\CS410\V1\uk\mn\uk-410-mn-10x1.vp
Mittwoch, 11. Juni 2003 15:06:50
Farbprofil: Generic CMYK printer profile - None
Komposit Standardbildschirm
Appendix
Declaration of conformity and CE mark
This device meets the requirements of the following EC directive R&TTE 1999/5/EG:
1}»Directive 1999/5/EC of the European Parliament and of the Council
of 9 March 1999 on radio equipment and telecommunications terminal
equipment and the mutual recognition of their conformity«
You can also request this EC declaration of conformity at the following
Internet URL:
http://www.elmeg.com/products/conformity/
Default telephone settings
•
•
•
•
•
•
•
•
•
•
•
•
•
•
•
•
•
•
The serial number is entered as the telephone name.
Display language: English
Country-specific settings: English
No MSN extension numbers are stored.
Melody volume: Level 3, melody: Number 1;No call forwarding or deflection numbers,
no MSN extension name, MSN cost account deactivated, PIN for the MSN extension:0000, MSN enabled for dialing
No entries are stored in the caller / memo list and the redial list.
No entries are stored in telephone directory or the VIP memory.
No function keys programmed (direct dial-in, functions, macros).
10 permanently stored melodies. 10 storage places for additional melodies.
No UUS1 text messages are stored.
Reception of internal (pabx) and external text messages is possible.
No automatic relaying of text messages with a call.
No SMS text messages are stored. Number for the SMS center: 0193010 (SMS server of Deutsche Telekom AG)
Station guarding for the telephone is switched off.
Display contrast: Level 4
Speaker volume: Level 4
Handset volume: Level 2
Acknowledgement signals and error tones are active.
Appointment reminder volume: Level 3
Station guarding tone volume: Level 3
Call waiting tone volume: Level 3, call waiting tone repeat feature is active
Appendix
95
G:\_elmeg\CS410\V1\uk\mn\uk-410-mn-10x1.vp
Mittwoch, 11. Juni 2003 15:06:50
89
Farbprofil: Generic CMYK printer profile - None
Komposit Standardbildschirm
• No output of audio signals over the Audio-Out port.
• Numbers are identified with incoming and outgoing connections (CLIP / COLP).
• Telephone number and costs are displayed. The call duration is shown when no cost
•
•
•
•
•
•
•
•
•
•
•
•
•
•
•
•
•
data are available.
Display of information after completion of a call (e.g. duration)
Cost data: Tariff 0.062 and currency EUR
Call waiting is switched off.
Appointments are switched off. No appointment data stored.
Date:11.11.02 / Time: 11:11
Auto-Answer time: immediately
Headset use is not configured. Headset type: Standard
Dialing status during an ongoing call: DTMF-dialing
Microphone switched off after handsfree dialing.
Call filter switched off, no filter number stored.
Direct call switched off, no direct dial-in number stored.
PIN for the telephone: 0000
Dial ranges switched off, no restricted or unrestricted numbers stored.
Menu access is not PIN-protected.
PABX type: 0
Line access digit for the pabx: not stored.
Internal number length for the pabx: 4
Parking code: 55
90
Appendix
96
G:\_elmeg\CS410\V1\uk\mn\uk-410-mn-10x1.vp
Mittwoch, 11. Juni 2003 15:06:50
Farbprofil: Generic CMYK printer profile - None
Komposit Standardbildschirm
Telephone menus
»Configuration« menu
M
»Configuration«
Configuration
inhibit
}
MSN
Display
Charge
Call-Parking
Service
Standard call-parking
Program dial number }
Call-Parking>55
MSN-1
MSN-3
MSN-4
MSN-2
MSN-5
Display-Monitoring
Program dial number{
MSN-8
MSN ext.
MSN-6
Conversation
Language
MSN-9
MSN-7
MSN-10
Enter PIN
Example: MSN-6
Config. inhibit
filter
Program MSN-6
}
transfer
Volume
PIN
MSN Name
Sound
Menu
MSN ext.
Enter PIN
Service-Functions
Program MSN-6
}
{
Version
PIN
Name
Charge
Data
SMS
Software
Service-Funktionen {
Country
Charges
Charge
Currency
delete
Figure 7
Appendix
97
G:\_elmeg\CS410\V1\uk\mn\uk-410-mn-10x1.vp
Mittwoch, 11. Juni 2003 15:06:57
91
Farbprofil: Generic CMYK printer profile - None
Komposit Standardbildschirm
»Acoustic« menu
M
»Acoustic«
Volume, etc.
}
Headset
Ack. tones
Speaker
Quiet
Call wait.
handset
Call wait. tone
repeat ˜
Message
Date
Intercom
Audio Out
{}
Message ˜
Hands-free calling ˜
Signaling tones
Speaker function
Appt. call volume {}
- ©©©---- +
- ©©©--- +
Headset / Acoustic?
PLANTRONICS FIREFLY
Standard ˜
GN Netcom 2100/2200
SILICOMP
DECT Headset (DSHG)
Handset loudness
{
Setting for using
Audio Put
Volume
Loudspeaker
loudness
Volume, etc.
{}
- ©©-- +
Acknowledge signal
active
?
Nein
Ja ˜
Nur Fehlerton
Idle tone volume
- ©©©--- +
Figure 8
92
Appendix
98
G:\_elmeg\CS410\V1\uk\mn\uk-410-mn-10x1.vp
Mittwoch, 11. Juni 2003 15:07:03
{}
Farbprofil: Generic CMYK printer profile - None
Komposit Standardbildschirm
»Setting« menu
M
»Settings«
Setting
Direct cal
}
Setting
Headset
{
Contrast
Call rerout.
Date
Time
AUTO accept
Filter
Call wait.
Call waiting enable?
Call filter
OK, extended
No ˜
Incoming
ok
New
call forwarding
Use headset?
Off
No
Fixed
ok
delayed
busy
Display-Contrast
Call forwarding delay
{}
MSN-3
- ©©©©----- +
MSN-1
MSN-4
MSN-2
MSN-5
Activate direct call?
No
ok
MSN ext.
Time until call
accepted
?
5 seconds
immediatly ˜
10 seconds
Select appointment {}
1: 11:11 11.11.02
Off
2: 11:11 11.11.02
Off
3: 11:11 11.11.02
Off
Alarm for
appointment 1
?
Off
ONCE
Daily
Weekly
Figure 9
Appendix
99
G:\_elmeg\CS410\V1\uk\mn\uk-410-mn-10x1.vp
Mittwoch, 11. Juni 2003 15:07:09
93
Farbprofil: Generic CMYK printer profile - None
Komposit Standardbildschirm
»Program nos.« menu
M
»Program nos.«
Program dial number
Tel. drctry
VIP
telephone book
237 Entries avail.
Sp.ton. call
Info
New
delete
List
Program VIPs
New
List
Delete tbook data {}
···········Aaaaaaaaaa
Bbbbb················
·······Ccccccc,cccccc
Ddddd, Dddd··········
·················Eeee
Select VIP
{}
Reprogram VIP
{}
V0:
V1:
V2:
V3:
V4:
Select name please {}
Aaaaaaaaaa
0123456
Info - Info - Info Info - Info - Info
V0:
V1:
V2:
V3:
V4:
Input telephone book
Set specl. tone
{}
call
···········Aaaaaaaaaa
Bbbbb················
·······Ccccccc,cccccc
Ddddd, Dddd··········
·················Eeee
Name>Aaaaaaa_
Add. info. for tbook
entry
Info - Info - Info -_
94
Appendix
100
G:\_elmeg\CS410\V1\uk\mn\uk-410-mn-10x1.vp
Mittwoch, 11. Juni 2003 15:07:15
Farbprofil: Generic CMYK printer profile - None
Komposit Standardbildschirm
Technical specifications
Dimensions L x W x B:
Weight:
Temperature range
Operating:
Storage:
approx. 255 x 180 x 100 mm
approx. 0.8 Kg
+5° C … +40° C
-25° C … +70° C
ISDN connection (CS410)
Length of ISDN connection cord:
ISDN connection:
Channel structure:
ISDN power consumption:
approx. 6 meters
DSS1 protocol, point-to-multipoint access
B+B+D
=< 1 Watt
Up0 connection (CS410-U only)
Length of ISDN connection cord:
Up0 connection:
Channel structure:
Output:
ISDN power consumption:
approx. 6 meters
DSS1 protocol, point-to-point access
B+B+D
ISDN connection, DSS1 protocol, point-to-multipoint
access
=< 1 Watt
USB port
Length of USB connection cord:
Terminal device:
Speed class:
USB standard:
approx. 3 meters
Self powered terminal device
Full Speed
1.1
Audio connection
Length of Audio connection cord:
approx. 2,5 meters, 3.5 mm stereo plug
Appendix
101
G:\_elmeg\CS410\V1\uk\mn\uk-410-mn-10x1.vp
Mittwoch, 11. Juni 2003 15:07:15
95
Farbprofil: Generic CMYK printer profile - None
Komposit Standardbildschirm
96
Appendix
102
G:\_elmeg\CS410\V1\uk\mn\uk-410-mn-10x1.vp
Mittwoch, 11. Juni 2003 15:07:15
Farbprofil: Generic CMYK printer profile - None
Komposit Standardbildschirm
Index
A
Accepting a call . . . . . . . . . . . . 16
Acknowledgement signals . . . . . . . 13
setting . . . . . . . . . . . . . . . 62
Activating/deactivating the headset . . 51
Adding telephone book entries . . . . . 30
Additional keypad . . . . . . . . . . . . 2
Adobe Acrobat Reader. . . . . . . . . 87
Anonymus call . . . . . . . . . . . . . 17
Answering a call, automatic . . . . . . 71
Answering machine (AM) . . . . . . . . 1
PIN for remote polling. . . . . . . . 57
Answering machine module . . . . . . . 1
Answering machine-LED. . . . . . . . 12
Assigning the telephone name . . . . . 59
Assignment of the headset socket . . . . 6
Audio applications . . . . . . . . . . . 86
Audio in / Audio out. . . . . . . . . . 7,86
Auto-answer . . . . . . . . . . . . 51,71
Automatic completion of call . . . . . . 23
on no answer. . . . . . . . . . . . 23
Automatic redialing . . . . . . . . . . 19
deactivate . . . . . . . . . . . . . 19
suspend . . . . . . . . . . . . . . 19
Automatic use of the headset. . . . . . 71
B
Boss/ Sec. function . . . . . . . . . . 50
Broker's call . . . . . . . . . . . . . . 28
Buttons . . . . . . . . . . . . . . . . . 9
C
Call
parking . . . . . . . . . . . . . . 24
transfer/switching . . . . . . . . . 27
Call Accept
waiting call . . . . . . . . . . . . . 27
Call Deflection . . . . . . . . . . . . . 16
Call filter . . . . . . . . . . . . . . 50,72
programming . . . . . . . . . . . 73
programming filter numbers . . . . 72
Call LED . . . . . . . . . . . . . . . . 12
Call rerouting . . . . . . . . . . . . 50,66
Call signaling. . . . . . . . . . . . . . 12
Call transfer . . . . . . . . . . . . . . 27
Call waiting . . . . . . . . . . . . . . 27
Call waiting settings . . . . . . . . . . 67
Call waiting tone repetition . . . . . . . 63
Call-back, automatic . . . . . . . . . . 23
Caller and memo list . . . . . . . . . . 33
view . . . . . . . . . . . . . . . . 34
Caller/memo list
dialing a number . . . . . . . . . . 16
Cancelling calling line number
identification
for the next call . . . . . . . . . . . 17
CAPI driver. . . . . . . . . . . . . . . 87
CAPI using the USB port . . . . . . . . 85
CD-ROM contents . . . . . . . . . . . 86
Adobe Acrobat Reader . . . . . . . 87
drivers . . . . . . . . . . . . . . . 87
CE mark . . . . . . . . . . . . . . . . 89
Changing the label panel. . . . . . . . . 7
Charge information . . . . . . . . . . 46
programming . . . . . . . . . . . 47
Cleaning the telephone . . . . . . . . . 3
CLIP/CLIR/COLP/COLR . . . . . . . . 48
Completion of call
to busy subscriber . . . . . . . . . 23
Completion of call on no reply (CCNR) . 23
Completion of call to busy
subscriber (CCBS) . . . . . . . . . . . 24
Conference . . . . . . . . . . . . . . 28
Configuration, extended . . . . . . . . 74
Configuring the audio output . . . . . . 65
Connecting the audio sockets . . . . . . 7
Connecting the handset connecting cord 4
Connecting the ISDN cord . . . . . . . . 4
Connecting the PC connection cord
(USB) . . . . . . . . . . . . . . . . . . 6
Connecting the telephone . . . . . . . . 4
headset . . . . . . . . . . . . . . . 5
PC (USB / Audio) . . . . . . . . . . 6
Index
103
G:\_elmeg\CS410\V1\uk\mn\uk-410-mn-10x1.vp
Mittwoch, 11. Juni 2003 15:07:17
97
Farbprofil: Generic CMYK printer profile - None
Komposit Standardbildschirm
Connecting the telephone to the S0 . . . 4
Connecting the telephone to the Up0 . . 4
Controlling costs
charge limitation . . . . . . . . . . 45
inhibiting an extension number for
outgoing calls . . . . . . . . . . . 45
Country-specific settings. . . . . . . . 80
CTI using the USB port . . . . . . . . . 85
D
Daily appointment . . . . . . . . . . . 70
Data, technical . . . . . . . . . . . . . 95
Day / night modes . . . . . . . . . . . 50
Declaration of conformity. . . . . . . . 89
Default telephone settings . . . . . . . 89
Deleting telephone book entries . . . . 31
Direct call . . . . . . . . . . . . . . 50,68
PIN for deactivating. . . . . . . . . 57
Direct dialing with function keys. . . . . 15
Display . . . . . . . . . . . . . . . . 10
setting the contrast . . . . . . . . . 71
setting the language . . . . . . . . . 8
Display during a call . . . . . . . . . . 46
Displays during a call . . . . . . . . . . 46
programming . . . . . . . . . . . 47
viewing . . . . . . . . . . . . . . 47
Don't disturb feature
announcement tone volume . . . . 63
Download manager . . . . . . . . . . 86
Downloading new firmware . . . . . . 81
via the ISDN port . . . . . . . . . . 81
via the USB port . . . . . . . . . . 81
Drivers on the CD-ROM . . . . . . . . 87
DTMF dialing. . . . . . . . . . . . . . 26
E
Editing telephone book entries . . . . . 30
Editing VIP entries . . . . . . . . . . . 32
Electrostatic charges . . . . . . . . . . 3
Enquiry Call . . . . . . . . . . . . . . 27
Entering a memo . . . . . . . . . . . . 36
Entering a name for an extension
number . . . . . . . . . . . . . . . . 56
98
Entering letters . . . . . . . . . . . . . 11
Extended configuration . . . . . . . . 74
Extended redialing . . . . . . . . . . . 18
Extension key . . . . . . . . . . . . . 50
Extension key for an answering
machine . . . . . . . . . . . . . . . . 51
Extension number (MSN)
assigning a specific PIN. . . . . . . 57
assigning names . . . . . . . . . . 56
defining for the next call . . . . . . . 49
enable/inhibit for outgoing calls . . . 45
setting the melody (tone) . . . . . . 56
Extensions . . . . . . . . . . . . . . . 1
additional keypad . . . . . . . . . . 2
answering machine module . . . . . 1
Up0/S0-module . . . . . . . . . . . 1
F
Firmware download
va the ISDN port . . . . . . . . . . 81
via the PC port . . . . . . . . . . . 81
Firmware download . . . . . . . . . . 81
Forwarding a call . . . . . . . . . . . . 16
Function keys. . . . . . . . . . . . 12,49
auto-answer . . . . . . . . . . . . 51
boss/sec. key . . . . . . . . . . . 50
call filter . . . . . . . . . . . . . . 50
call rerouting . . . . . . . . . . . . 50
day/night modes . . . . . . . . . . 50
direct call. . . . . . . . . . . . . . 50
direct dial / dtmf-/ keypad
sequences . . . . . . . . . . . . . 49
extension key . . . . . . . . . . . 50
extension key AM . . . . . . . . . 51
headset on/off . . . . . . . . . . . 51
intercom . . . . . . . . . . . . . . 50
intercom on/off. . . . . . . . . . . 50
line button . . . . . . . . . . . . . 49
log-on/off . . . . . . . . . . . . . 50
macro functions . . . . . . . . . . 51
message . . . . . . . . . . . . . . 50
message on/off . . . . . . . . . . 50
MSN assignment. . . . . . . . . . 49
programming . . . . . . . . . . . 53
Index
104
G:\_elmeg\CS410\V1\uk\mn\uk-410-mn-10x1.vp
Mittwoch, 11. Juni 2003 15:07:18
Farbprofil: Generic CMYK printer profile - None
Komposit Standardbildschirm
team key . . . .
trunk bundle key
user on/off . . .
voice mail key .
.
.
.
.
.
.
.
.
.
.
.
.
.
.
.
.
.
.
.
.
.
.
.
.
.
.
.
.
.
.
.
.
.
.
.
.
.
.
.
.
50
49
51
51
H
Hands Free Calling . . . . . . . . . . . 20
Headset . . . . . . . . . . . . . . . 5,21
automatic use . . . . . . . . . . . 71
connecting . . . . . . . . . . . . . 5
settings . . . . . . . . . . . . . . . 6
socket assignments . . . . . . . . . 6
I
Infotext for telephone book entries . . . 29
Input mode for entering letters . . . . . 12
Inputting of macros . . . . . . . . . . 78
Installation sequence of the CD-ROM. . 88
Intercom . . . . . . . . . . . . . . 22,50
Intercom inhibiting filter. . . . . . . . . 50
K
Keypad . . . . . . . . . . . . . . . . 26
L
LED for calls and answering machine .
LEDs (LED) . . . . . . . . . . . . .
Line button. . . . . . . . . . . . . .
Loading new firmware . . . . . . . .
from the telephone BIOS . . . . .
via the ISDN port . . . . . . . . .
via the USB port . . . . . . . . .
Log-off (team) . . . . . . . . . . . .
Log-on (team) . . . . . . . . . . . .
after a call . . . . . . . . . . . . . 25
during an ongoing call . . . . . . . 25
MCID (Malicious call identification
(MCID) . . . . . . . . . . . . . . . . . 25
Memo list . . . . . . . . . . . . . . . 33
Message . . . . . . . . . . . . . . 21,50
Message inhibit . . . . . . . . . . . . 50
Microphone on/off . . . . . . . . . . . 20
Mounting the feet . . . . . . . . . . . . 3
MSN (extension number
setting the melody (tone) . . . . . . 56
MSN (extension number)
assigning a specific PIN. . . . . . . 57
assigning names . . . . . . . . . . 56
charge limitation . . . . . . . . . . 45
defining for the next call . . . . . . . 49
enable/inhibit for outgoing calls . . . 45
enter or view . . . . . . . . . . . . 55
setting the volume . . . . . . . . . 56
MSN (telephone number). . . . . . . . 55
MSN assignment
for telephone book entries . . . . . 29
MSN extension number
enter or view . . . . . . . . . . . . 55
setting the volume . . . . . . . . . 56
MSN-assignment . . . . . . . . . . . 17
Muting . . . . . . . . . . . . . . . . 20
N
.
.
.
.
.
.
.
.
.
12
12
49
81
83
81
81
50
50
NDISWAN driver . . . . . . . . .
Negative acknowledgement signal
Network termination unit . . . . .
Number (MSN)
charge limitation . . . . . . .
Number for the SMS center. . . .
. . . 87
. . . 13
. . . 28
. . . 45
. . . 59
O
One-time appointment . . . . . . . . . 70
Open listening . . . . . . . . . . . . . 20
M
Macro functions . . . . . . . . . . . . 51
Makro functions
entering commands and keys . . . 78
Malicious call identification (MCID) . . . 25
Index
105
G:\_elmeg\CS410\V1\uk\mn\uk-410-mn-10x1.vp
Mittwoch, 11. Juni 2003 15:07:18
99
Farbprofil: Generic CMYK printer profile - None
Komposit Standardbildschirm
P
PABX
function keys . . . . . . . . . . . . 49
system menu. . . . . . . . . . . . 54
Parking a call. . . . . . . . . . . . . . 24
PC requirements . . . . . . . . . . . . 87
Pictographs . . . . . . . . . . . . . . . 8
PIN for an extension number . . . . . . 57
PIN protection for telephone menus . . 58
Placing the telephone . . . . . . . . . . 3
Pocket money account. . . . . . . . . 45
Positive acknowledgement. . . . . . . 13
Professional Configurator . . . . . . . 86
Programming a charge limitation . . . . 45
Programming a direct call number . . . 69
Programming a filter number . . . . . . 72
Programming appointment reminders . 70
Programming calling line
identification transmission . . . . . . . 48
Programming number display . . . . . 48
Programming the parking code. . . . . 59
Programming the telephone PIN . . . . 57
Programming VIP entries . . . . . . . . 32
Programs of the CD-ROM . . . . . . . 86
Adobe Acrobat Reader . . . . . . . 87
drivers . . . . . . . . . . . . . . . 87
Protecting menu access by PIN . . . . 58
Protection against electrostatic charges . 3
R
Reading the telephone's firmware
version. . . . . . . . . . . . . . . . .
Redialing . . . . . . . . . . . . . . .
automatic . . . . . . . . . . . . .
extended . . . . . . . . . . . . .
Rejecting a call . . . . . . . . . . . . .
Reset . . . . . . . . . . . . . . . . .
Resetting the telephone to default state
data recovery . . . . . . . . . . .
80
17
19
18
16
84
84
S
Safety notes. . . . . . . . . . . . . . . 2
Sec. function. . . . . . . . . . . . . . 50
100
Setting appointment reminders
volume. . . . . . . . . . . . . . . 64
Setting the call waiting tone
call waiting tone volume . . . . . . 63
Setting the currency . . . . . . . . . . 44
Setting the display contrast. . . . . . . 71
Setting the handset volume. . . . . . . 61
Setting the language. . . . . . . . . . . 8
Setting the melody (tone) . . . . . . . . 56
Setting the parking code . . . . . . . . 59
Setting the ringing tone melody
at an elmeg PABX . . . . . . . . . 12
Setting the speaker volume. . . . . . . 61
Setting the tariff factor . . . . . . . . . 44
Setting the telephone name . . . . . . 59
Setting the tone (melody) . . . . . . . . 56
Setting the volume . . . . . . . . . . . 61
appointment reminder . . . . . . . 64
handset . . . . . . . . . . . . . . 61
melody. . . . . . . . . . . . . . . 56
speaker . . . . . . . . . . . . . . 61
Setting up cost monitoring . . . . . . . 43
Setting volume
station guarding . . . . . . . . . . 63
Settings, country-specific . . . . . . . 80
SMS
viewing . . . . . . . . . . . . . . 39
SMS center . . . . . . . . . . . . . . 59
SMS text message
error during transmission . . . . . . 42
error while receiving . . . . . . . . 42
SMS text messages . . . . . . . . . . 37
Sound manager . . . . . . . . . . 56,86
Special dial tone for the telephone
directory . . . . . . . . . . . . . . 29,31
Specific PIN for an extension number . . 57
Specifying the outgoing number . . . . 17
for telephone book entries . . . . . 29
Starting a call . . . . . . . . . . . . . 14
dialing from telephone directory. . . 15
dialing from the caller/memo list. . . 16
dialing from the VIP memory . . . . 15
direct dialing with function keys . . . 15
with a set number (MSN) . . . . . . 17
Index
106
G:\_elmeg\CS410\V1\uk\mn\uk-410-mn-10x1.vp
Mittwoch, 11. Juni 2003 15:07:19
Farbprofil: Generic CMYK printer profile - None
Komposit Standardbildschirm
without calling line identification
(CLIR) . . . . . . . . . . . . . .
Station guarding . . . . . . . . . . .
Suppressing calling line identification .
for the next call . . . . . . . . . .
Switching a call . . . . . . . . . . .
Switching call modes. . . . . . . . .
System menu of pabx systems . . . .
.
.
.
.
.
.
.
17
42
48
17
27
50
54
.
.
.
.
.
.
.
.
.
.
.
.
.
.
.
.
.
.
.
.
.
.
.
.
.
.
.
.
.
.
.
.
.
.
.
.
.
.
.
.
87
85
50
50
95
83
29
30
31
15
30
29
29
31
86
91
55
57
37
41
.
.
.
.
.
.
.
.
.
.
41
38
40
39
49
T
TAPI driver . . . . . . . . . . . . .
TAPI using the USB port . . . . . .
Team keys . . . . . . . . . . . . .
Team log-on/off . . . . . . . . . .
Technical specifications . . . . . .
Telephone BIOS . . . . . . . . . .
Telephone directory . . . . . . . .
adding an entry. . . . . . . . .
deleting an entry . . . . . . . .
dialing a number . . . . . . . .
editing an entry . . . . . . . . .
info text for an entry. . . . . . .
outgoing number for an entry . .
special dial tone (VIP tone) . . .
Telephone directory manager . . .
Telephone menus . . . . . . . . .
Telephone number (MSN) . . . . .
Telephone PIN . . . . . . . . . . .
Text messages. . . . . . . . . . .
automatic sending (only UUS1) .
configuring the reception mode
(UUS1 only) . . . . . . . . . .
creating and sending . . . . . .
save (UUS1 only) . . . . . . . .
viewing . . . . . . . . . . . .
Trunk bundle button . . . . . . . .
U
Unpacking and placing the telephone . . 3
Unpacking the telephone . . . . . . . . 3
Up0/S0-module . . . . . . . . . . . . 1
USB driver . . . . . . . . . . . . . . . 87
User key on/off . . . . . . . . . . . . . 51
UUS1 messages
save . . . . . . . . . . . . . . . . 40
viewing . . . . . . . . . . . . . . 39
UUS1 text messages. . . . . . . . . . 37
automatic sending . . . . . . . . . 41
configuring the reception mode. . . 41
creating and sending . . . . . . . . 38
V
Viewing and deleting costs . . . . . . . 43
last call . . . . . . . . . . . . . . . 43
specific extension numbers (MSN) . 44
total costs . . . . . . . . . . . . . 44
VIP dial tone for telephone book
entries . . . . . . . . . . . . . . . 29,31
VIP memory
dialing a number . . . . . . . . . . 15
editing an entry . . . . . . . . . . . 32
making an entry . . . . . . . . . . 32
VIP Memory . . . . . . . . . . . . . . 32
Voice mail key . . . . . . . . . . . . . 51
W
Weekly appointment . . . . . . . . . . 70
WIN-Tools CD-ROM . . . . . . . . . . 86
Index
107
G:\_elmeg\CS410\V1\uk\mn\uk-410-mn-10x1.vp
Mittwoch, 11. Juni 2003 15:07:19
101
Farbprofil: Generic CMYK printer profile - None
Komposit Standardbildschirm
102
Index
108
G:\_elmeg\CS410\V1\uk\mn\uk-410-mn-10x1.vp
Mittwoch, 11. Juni 2003 15:07:20
Farbprofil: Generic CMYK printer profile - None
Komposit Standardbildschirm
Brief description of functions
Enquiry Call
b
g
M
t
g
Dial number
Broker’s call
b
g
M
t
>
g
s
Connection1...
Connection4
Dial number
Conference
b
g
M
t
s
g
Conference
Dial number
Call transfer with prior notice
b
t
M
g
t
Dial number
s
g
transfer
Dial number
Park
b
g
s
t
O
park
Enter parking code
a
Unparking
a
>
s
t
unpark
Enter parking code
O
b
g
Call forwarding
a
l
s
t
transfer
Dial number
O
Extended redialing
a
W
W
Search number
O
or
Search number
109
G:\_elmeg\CS410\V1\uk\mn\uk-410-mn-10x1.vp
Mittwoch, 11. Juni 2003 15:07:20
b
g
Farbprofil: Generic CMYK printer profile - None
Komposit Standardbildschirm
Completion of call to busy subscriber
b
t
g
s
Dial number
Subscriber
busy
Clbckbusy
a
Selection of outgoing numbers (MSN)
a
O
t
F
Dial number
s
s
MSN
MSN1...
MSN10
b
g
t
O
Activate call forwarding
a
F
s
Setting
s
s
s
Call
delayed MSN1...
rerout. busy Fi- MSN10
xed
Dial number
Deactivating call forwarding
a
F
s
s
s
s
Setting
Call
rerout.
Off
MSN1...
MSN10
O
Station guarding
a
s
s
Quiet
No/ok/Ringing signal off
Dialing from caller list, telephone directory or short dialing memory
a
s
<>
Caller list /
tel. drctry / VIP
Select entry
110
G:\_elmeg\CS410\V1\uk\mn\uk-410-mn-10x1.vp
Mittwoch, 11. Juni 2003 15:07:20
b
g
Farbprofil: Generic CMYK printer profile - None
Komposit Standardbildschirm
Warranty Declaration
Insofar as claims filed for elimination of deficiencies (applicable laws) are being processed, these shall be
handled via the contractual partners. In addition, elmeg provides the following manufacturer’s warranty:
1. For this device, the company ELMEG GmbH & Co.KG Kommunikationstechnik grants a warranty period of 24 months, figured from the date of purchase from the dealer; this must be verified by the original
receipt, or other similar documents, in accordance with pertinent, existing guidelines.
2. Warranty claims shall be filed via a specialized elmeg dealer. A list of the elmeg specialized dealers is
available for users on the Internet at www.elmeg.de, or via the elmeg information hotline.
3. The voluntary elmeg warranty covers the rectification of any damage or deficiency that occurs during
the warranty period and which is demonstrably due to material or production faults.
4. Not included in this voluntary warranty are damage and deficiencies resulting from incorrect connection, from improper handling, from non-observance of the programming instructions or instructions for
use, or from force majeure. The voluntary elmeg warranty does not cover installation and programming
work performed by the specialized dealer. In particular, no claim can be made for installation or programming work to be performed free of charge by the specialized dealer. The voluntary elmeg warranty does
not cover deficiencies which have a negligible effect on the value or usability of the device. Further costs,
such as for installation, transport and travel expenses are expressly excluded from the elmeg warranty.
5. It is at the discretion of elmeg to replace the device with an identical one instead of performing repairs.
Further claims for damage are not permissible. Any data stored in the device will be lost after repair work
or replacement of the device.
6. The voluntary elmeg warranty is nullified if changes are made to the product, or when the product is
operated in a country for which it was not developed nor produced.
7. Fulfillment of the voluntary elmeg warranty presupposes that the device has been packed complete
and protected against breaking and impacts (if possible in the original packaging) and shipped with the
warranty certificate from the specialized dealer.
8. If testing reveals that there are no grounds for warranty claims, or that the product does not exhibit any
deficiencies, the costs for repair work and testing shall be borne by the user. The specialized dealer processing the claim arising from the voluntary elmeg warranty is authorized to charge these costs to the
user.
9. Services arising from the voluntary elmeg warranty effect neither an extension of the warranty period,
nor do they mark the beginning of a new term for the voluntary warranty.
10. Warranty claims according to applicable law filed by the end customer shall neither be excluded, nor
restricted by this independent manufacturer’s declaration.
© 2003 ELMEG GmbH & Co. KG Kommunikationstechnik - All rights reserved.
Any reprint of this documentation, even excerpts, is prohibited without the prior, express consent of the
publisher and exact designation of sources, regardless of the type and form of media used in the process (mechanical or electronic).
Function and logic descriptions for this documentation which refer to software products of other manufacturers are based on the software in use at the time of generation or print. Product and/or company
names used in this documentation may be registered trademarks.
111
G:\_elmeg\CS410\V1\uk\mn\uk-410-mn-10x1.vp
Mittwoch, 11. Juni 2003 15:07:21
Subject to modifications 5180 039213.8 / 06-2003 / 10x1
Farbprofil: Generic CMYK printer profile - None
Komposit Standardbildschirm
ELMEG GmbH & Co.KG
Kommunikationstechnik
Vöhrumer Str. 30
D-31228 Peine
http://www.elmeg.de
http://www.elmeg.com
Operating instructions elmeg CS410 / CS410-U
112
G:\_elmeg\CS410\V1\uk\mn\uk-410-mn-10x1.vp
Mittwoch, 11. Juni 2003 15:07:21