1
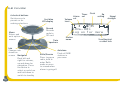
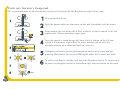
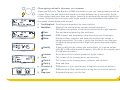
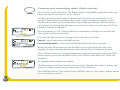
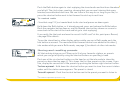
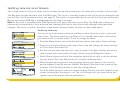
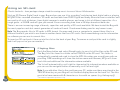
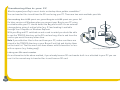
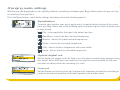
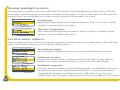
Bug Keeping
A practical guide for new owners
by PURE Digital
Safety instructions
Keep the radio away from heat sources.
Do not use the radio near water.
Avoid objects or liquids getting into the radio.
Do not remove screws from or open the radio casing.
Recording music
PURE Digital does not endorse piracy. The record features on the Bug are provided to allow you to listen to radio
at a time convenient to you and are not intended to enable proliferation of illegal copies of copyrighted music.
PURE Digital supports the music industry and the right of musicians to benefit from their copyrighted material.
Copyright
Copyright 2004 by Imagination Technologies Limited. All rights reserved. No part of this publication may be copied or distributed, transmitted, transcribed, stored in a retrieval system, or translated
into any human or computer language, in any form or by any means, electronic, mechanical, magnetic, manual or otherwise, or disclosed to third parties without the express written permission of
Imagination Technologies Limited.
Disclaimer
Imagination Technologies Limited makes no representation or warranties with respect to the content of this document and specifically disclaims any implied warranties of merchantability or fitness
for any particular purpose. Further, Imagination Technologies Limited reserves the right to revise this publication and to make changes in it from time to time without obligation of Imagination
Technologies Limited to notify any person or organization of such revisions or changes.
Trademarks
The Bug, The Bug logo, PURE, the PURE logo, PURE Digital, the PURE Digital logo, Imagination Technologies, and the Imagination Technologies logo are trademarks or registered trademarks of
Imagination Technologies Limited. All other product names are trademarks of their respective companies.
Credits
This manual was written by Bruce Murray. It is a product of PURE Digital, Imagination Technologies Ltd., Imagination House, Home Park Estate, Kings Langley, Hertfordshire WD4 8LZ, UK.
Kind thanks to The Cradle of Aviation Museum, Garden City, N.Y. for permission to use the image of Mr Marconi flying his kite.
Issue 2
2
April 2004
Contents
Bug Keeping............................................................................................................................ 1
Evolution ................................................................................................................................... 5
The Bug........................................................................................................................................................ 6
A Concise History of Radio.................................................................................................................... 6
DAB................................................................................................................................................................ 7
Meet The Bug ......................................................................................................................... 9
Full Frontal.................................................................................................................................................10
Rear end ....................................................................................................................................................11
Turn on, tune in, bug out.....................................................................................................................12
Bug Behaviour...................................................................................................................... 13
Listening to DAB .....................................................................................................................................14
Setting alarms and timers ....................................................................................................................21
Using an SD card ....................................................................................................................................24
Changing audio settings .......................................................................................................................27
Display backlight options ....................................................................................................................28
General setup options..........................................................................................................................28
Looking after your Bug .....................................................................................................29
Solving problems ....................................................................................................................................30
Warranty information ............................................................................................................................31
Providing for your Bug ........................................................................................................................31
Vital Statistics .........................................................................................................................33
Specifications ............................................................................................................................................34
3
4
Evolution
The story behind The Bug and DAB digital radio
by Wayne Hemingway
5
The Bug
The Bug is one seriously cool collaboration between
hEMINGWAYdESIGN - the founders of award winning label Red
or Dead and acclaimed designers of all things affordable from
wallpapers through to housing estates, and PURE Digital - the
pioneers of DAB Digital Radio behind the successful EVOKE-1.
EVOK
E-1...
boxy b
ut goo
d
The Bug may look cool on your coffee table but it also performs (as you would
ooooh, aaah
expect from men in white coats who have stroked their pointy beards over this ‘til their chins
The Bug...
were sore) and gives radio clarity and a choice of stations that will make you want to take your existing
FM/AM units down to your local Cats Protection League charity shop.
A Concise History of Radio
Michael Faraday discovered electromagnetic induction in 1831, then his mate Alexander G Bell
came up with the telephone a year later. In the vintage year 1877, Thomas A Edison recorded the
first sound... it was “Mary had a little lamb” and it was a lot more pleasing to the ears than the
entire output of Pop Idol and Fame Academy.
In 1900 a bloke called Reginald Fessenden used his trusty spark
generator to send the human voice a mile, in 1901 Marconi flew his
kite and topped that with the first transatlantic radio transmission.
Morse code followed then not much happened apart from Radio
Caroline sinking in 1980 and someone called The Hairy Cornflake
ff
o
ke
ever ta
dio’ll n
ra
is
on Radio 1 making a daft record about CB’ers.
th
rconi Mr Ma
But then came DAB - Digital Audio Broadcasting.
6
Carolin
e goes
down
DAB
To a fisherman a Dab is a flounder
lts
rts
for
ess
sel
si
mu
u
res
To you, the purchaser of this fine piece of design technology DAB is
Digital Audio Broadcasting. Listening to the radio whilst holding your rod and
eating fried potato will never be the same again.
po
ds
n
sa
ew
c, n
To a lover of northern British chip shops a Dab is a
large slice of potato dipped in batter and deep fried.
u
FM and AM are analogue radio signals and it doesn’t take much to interfere with the signal, just
little things like mountains, bad weather and high rise buildings can ruin that moment when England win
the world cup. However, if you are sat listening to your Bug in South Shields and someone suddenly builds a
skyscraper, a tornado comes in off the North Sea and a volcano creates a mountain the size of Everest near the village
of Cleadon then listening to DJ TranceMaster mixing a Fat One in a dancehall stylee will be just like you are there
strutting your stuff in the disco.
h...
Fis
Reception on your Bug remains crystal clear because DAB uses obstacles, i.e. the South Shields Erotic Gherkin Tower,
the Twister and the newly formed Geordie Alps as reflectors creating multipath reception conditions to optimise
receiver sensitivity. DAB automatically selects the strongest regional transmitter and gives you digital quality without
hiss, crackle and pop.
Furthermore DAB radios can carry text and soon pictures and even video on their displays. Imagine
lyrics being shown on the screen so you can sing along to all your favourite hits like Atmosphere by
Russ Abbot. All together now “Atmosphere, I love a party with...”
As well as music having digital quality, the spoken word comes over as clear as a bell. The huge
variety of radio stations available on your DAB set are identified by the station’s name. You don’t
have to remember any big numbers with a decimal point. The name of the station appears on the
I love
a pa
rty
knob twiddling but take it from us, scrolling is the new knob twiddling.
7
8
Meet The Bug
Introducing your Bug and getting started
9
Full Frontal
6 shortcut buttons
Quick access to
presets or for
making selections
Menu
Enters and
exits option
menus
Info
Changes info
shown on
screen Navigator
Rock left and
right for volume,
up and down for
navigation. Press
the centre to
select or switch on
and hold down to
switch to standby
10
Alarm
Volume set
level
Cool blue
LCD display
Clock
Eq
setting
Signal
strength
07:45
1Xtra - BBC
log on for more
Record
Records
radio to
SD card
Twin
speakers
ReVu/Snooze
Press to pause
radio, hold to
enter ReVu
mode or press
to snooze when
alarm is going off
Timer
set
Station
name
Autotune
Finds all DAB
stations in
your area
Scrolling text
or other info
Rear end
Flexible
neck
9V DC power
socket
SD card
slot
3.5mm
headphone
3.5mm
socket
USB port
analogue
out
Digital Telescopic
out
DAB
aerial
11
Turn on, tune in, bug out
OK, so you know what all the bits are but you are just itching to get The Bug fired up right? Here’s how...
Fully extend the aerial.
Push the power cable into the power socket and the adapter into the mains.
Select where you live, either UK or Rest of World, to start a search for all the
digital radio stations available in your area.
Once the search is complete you will hear the first station on the list now
stored in the memory of your Bug. To select another station, rock the
navigation button up or down and push to listen to it.
Change the volume by rocking the navigation button left or right and get
grooving. Welcome to the world of DAB digital radio. You’ll never look back.
To switch your Bug to standby, hold down the Navigator button. To switch back
on press the navigator button or the bottom right shortcut button on the head.
12
Bug Behaviour
Understanding your Bug and making it do what you want
13
Listening to DAB
Born to be DAB. Listening to DAB is what your Bug was made for. This bit tells you how your Bug works when listening
to DAB and what you can do with it.
Changing stations
Finding stations is much easier with DAB than with your old FM/AM set. When you first
switch on your Bug it quickly finds all the DAB stations available in your area and puts
them in a handy station list.
Rock then press to change stations
To change stations, flick through the station list on the bottom of the screen by rocking
the navigation button up or down, then press the centre of the navigator button when
you see the one you want.
Alternatively, you can fill the screen with the station list while you flick through the
stations, press Menu, select Live radio and change the station as above.
Flicking through station list
Autotuning makes life easy
Autotune finds all your stations
If you take your Bug travelling or move it around the house you can re-tune your Bug to
update the list of stations. Push the Autotune button and your Bug will find and store
all the stations for you including any new stations you can get in that area.
Pump up the volume
Turning up the volume
14
To turn the volume up or down, rock the navigation button right or left. The volume
icon on the screen shows the volume level.
Changing what’s shown on screen
Scrolling text
Multiplex
Clock
Presets
Show and Tell time. The Bug has 5 DAB info modes so you can change what you see on
screen. Press the Info button and repeat to choose between the 5 info modes. Some
of the modes have more than one option, shown by an arrow at the bottom right of the
screen. Push the shortcut button next to the arrow to choose between the options for
that mode (shown below with arrows).
1 Scrolling text Scrolling text broadcast by some stations.
2 Multiplex
Name of the multiplex the current station belongs to.
Multiplexes are groups of stations broadcast by a single operator.
Date
Day and date broadcast by the multiplex.
Channel
DAB channel and frequency of the station you are listening to.
Mode
Stereo or Mono indicator and data rate at which the station is
being transmitted. This rate is set by the stations to suit the type
of material being transmitted. High rates generally mean higher
quality.
Quality
Signal quality for the station you are tuned to. As a guide, values
from 85 to 100 indicate good reception, 70 to 84 so-so reception and
0 to 69 poor reception.
Content
Description of the content broadcast by the station.
3 Clock
Full screen clock showing hours and minutes.
Clock 2
Full screen clock showing hours, minutes and seconds.
Clock 3
Date and time.
4 Presets 1-5
DAB presets 1-5 for quick access using the six shortcut buttons.
6-10
DAB presets 6-10 for quick access using the six shortcut buttons.
5 Bug eyes
Animated bug eyes, just for fun.
Bug eyes
15
Pausing and rewinding radio (ReVu mode)
Hold it there, I want that track! The Bug includes a handy ReVu mode which lets you
pause and rewind live radio. It works like this:
The Bug constantly stores audio and text from the station you are tuned to in its
memory. The amount stored depends on how long you have been listening to that
station and the data rate of the broadcast. By putting your Bug into ReVu mode you
can access this stored audio and pause or rewind live radio over short periods (That’s
around 5 minutes at 128 kbps).
Once the memory is full, it keeps adding to the memory but starts to overwrite the
start of the stored audio and text.
ReVu mode - paused state
You can enter ReVu mode in two ways which you select as follows:
Paused - press and release the ReVu button.
Fast forward/rewind - press and hold the ReVu button for three seconds.
ReVu mode - forward/rewind state
When you enter ReVu mode you see the ReVu icon on the display and the clock
changes to show how many minutes/seconds behind the live broadcast you are.
Once in ReVu mode you can toggle between paused and playing by pushing the ReVu
button again or press the navigator button to exit ReVu mode and return to the live
broadcast.
To pause and replay live radio
Paused, 5 mins 2 secs behind real time
The phone goes in the final minutes of extra time!!! Aaargh, don’t panic - pause, and
when you hang up, carry on from where you left off. Goooaal.
Push the ReVu button. The display shows PAUSED and the clock shows how far behind
the live broadcast you are.
16
Push the ReVu button again to start replaying the stored audio and text from the where
you left off. The clock stops counting, showing that you are now listening that many
minutes/second behind real time. You can listen in this way for as long as you like, or
press the shortcut button next to fast forward to catch up to real time.
To rewind radio
I love that song!! I’ll just rewind back to the start and groove on down again.
Rewinding, 30 secs behind real time
Hold down the ReVu button, or if already paused, press and release the ReVu button.
Rock the navigator button down or use the Rewind shortcut key shown on screen to
move back to the start of the track and let go to start replaying.
If you really like the track and want to record it to SD card* at this point press Record,
see page 18 for details.
To see the stored text or other display options while you are in ReVu mode push the
Info button as normal. The rewind and fast forward controls are added to the other 5
info modes while you are in ReVu mode, see page 15 for details of other info modes.
Storing and recalling presets
All that rocking tiring you out? Store up to 10 of your favourite stations as presets
which you can get at quickly using the shortcut buttons on your Bug’s head.
Presets 1-5
Push one of the six shortcut buttons on the head or set the info mode to show the
presets as described on page 15. This shows the first five presets on the screen. If you
like, display the second set of five presets by pushing the bottom right shortcut button.
To store a preset - Hold down the shortcut button you want to store the current station
under until the station name appears. The preset is stored.
To recall a preset - Push the shortcut button next to the preset you want to listen to.
*Record function provided for personal use only
17
Recording radio to a memory card
That’s a keeper. Capture that special track and take it with you on a little bit of plastic.
You can record radio* to an SD (Secure Digital) card which you put into the SD card slot
in the rear of your Bug. The amount you can record depends on the size of your card
and the quality of the audio being broadcast. See Using an SD card, on page 24, for
more details of card types and how to play back recordings.
Recording to SD card
1.
Push your card in the slot on the rear with gold pins facing down and forwards.
2.
Press the Record button to start recording. You see a flashing record icon on the
screen.
3.
Press the Record button again to stop recording. You see a message giving the
name that the recording has been saved under.
Changing DAB options
I want it all, I want it now and I want it different tomorrow.
Customise the way your Bug works in DAB mode using these options. Push the Menu
button, select DAB options and choose from the following:
Station order
Change the order of stations on your station list using this option. The current order is
highlighted on screen. Choose from the following:
18
Alphanumeric
Displays all stations in alphanumeric order.
Favourite station
Displays your ten most listened to stations at the top of the
station list and the others below. Your favourite stations are
picked by your Bug which keeps track of how long you listen to
each station.
*Record function provided for personal use only
Active station
Displays active stations at the top of the station list and
inactive ones at the bottom, in alphanumeric order. Inactive
stations are those on your station list but not currently
available, marked with a ’?’.
Multiplex
Lists stations in groups according to their multiplex.
Multiplexes are groups of stations owned and broadcast by a
multiplex operator.
Remove inactive stations Removes inactive stations from the station list.
Add favs to presets
Available only when Favourite station order (above) has been
selected. Transfers your ten favourite stations to presets.
Manual tune
Find new stations or fine tune your reception using this option.
You see a list of channels and frequencies. Each multiplex has a different channel and
frequency (e.g. BBC is channel 12B and Digital One is 11D), contact the radio stations
for information on which multiplex they are broadcast on.
Channel/frequency selection
Below marker - no reception
1. Select the channel you want from the list.
Note You see a signal strength display. The marker indicates the minimum required
level for reception and the filled blocks indicate the current level.
2. Move your Bug or aerial and to try to raise the current level to the marker or beyond.
You will see the multiplex name next to the channel if a good signal is received and
the stations in that multiplex will be added to the station list. Press the navigation
button to see a list of the new stations added.
Note You can show the signal strength for a station you are listening to at any time by
pushing the navigation button.
Above marker - reception available
19
Auto-select station
Change the way you select stations using this option. This option is set to Off by default
meaning when you scroll to a new station you have to press the navigation button to
confirm the selection. If you set this option On, your Bug will automatically tune to the
station you stop at rather than waiting for confirmation.
DAB region
Change the frequencies scanned when you press the Autotune button using this
option.
United Kingdom - the default setting - scans all UK frequencies.
Rest of world - scans the full range of digital frequencies in Band III. This option is for
use outside the UK where other Band III stations may be available.
DRC setting
Make the quieter sounds in a broadcast easier to hear at low volume or in a noisy
environment using this option. The DRC (Dynamic Range Control) level of a broadcast
is set by the station and sent with the signal. At the time of writing only BBC Radio 3
regularly broadcasts a DRC level. Check with the broadcasters to find out if they use
DRC on their stations.
Select one of the following options:
DRC 0
DRC is switched off. Any DRC level broadcast will be ignored. This is the
default setting.
DRC ½ DRC level is set to ½ that sent with the broadcast.
DRC 1
20
Applies the DRC level as sent with the broadcast.
Setting alarms and timers
Set a sleep timer to lull you to sleep, alarms to wake you up and record timers for when you’re asleep. 24 hour radio.
The Bug gets the date and time from the DAB signal. The clock is normally shown on the top line of the display but you
can also set it to fill the whole screen, see page 15. The clock is set automatically for you the first time you switch your
Bug on and receive DAB and is updated regularly to keep it accurate.
Note As the clock is provided by the DAB signal you can’t adjust the time on your Bug. The DAB radio stations are
responsible for keeping this clock accurate and changing the time to take into account daylight saving and date
changes. The clock is used for the alarm, sleep timer and record timer functions as described below.
Setting alarms
You can set up to two alarms and pick a different radio station for each or choose to
hear a tone. The alarm switches your Bug on (if in standby) and tunes to the station
you have chosen or sounds a tone. To set or change an alarm:
1. Push the Menu button, select the Alarm/timer option and choose Alarm settings.
2. Select one of the two alarms and choose Set to see and change the alarm settings
or Off to switch that alarm off.
3. Set the time you want the alarm for, days you want it to apply, whether you want a
tone or radio alarm and station (if radio alarm) using the Navigation button.
4. Select Alarm volume and rock the navigation button left or right to set the volume
for your alarm. Push the Menu button to save the setting and exit.
5. Select Snooze period and rock the navigation button up or down to set a snooze
period between 5 and 30 minutes (default 8 minutes) after which the alarm will go
off again. Push the Menu button to save the setting and exit.
Alarm set icon
Push the Menu button to return to normal display. You will see a bell symbol on the
screen showing that the alarm is set. The list of alarms will also now show a bell
symbol next to the alarms that are switched on.
21
Cancelling alarms
Alarm snoozed
Alarm going off - options
When an alarm goes off you have four options - turn over and ignore it or one of the
following more sensible options:
Snooze
Push the Snooze button and you will snooze the alarm for the period set
(the default is 8 minutes). The radio or tone will go quiet and you see
‘Snoozed’ on the screen if the backlight is on. The alarm will repeat when
the snooze period has elapsed. You can repeat the snooze as many times as
you want up to 60 minutes after alarm time. The alarm will automatically
turn off after 60 minutes.
Cancel
Press the shortcut button indicated to cancel the alarm and return the radio
to its previous state.
Radio
Press the shortcut button to cancel the alarm and switch the radio on.
Using the sleep function
Want to drift off to the gentle murmour of late night talk shows? Set a sleep time after
which the Bug will automatically switch itself into standby mode.
1. Press the Menu button, select the Alarm/timer option and choose Sleep time.
2. Select one of the sleep times from 15 to 90 minutes or choose 0 to set no sleep time.
22
Setting a timed recording
Your Mother’s in town but obviously you don’t want to miss ‘Thrash metal hour’. Set a
timer and record* to SD card or your MiniDisc recorder and she need never know that
you really don’t like the TV themes in Brass CD she got you last Christmas.
You can set up to nine different timers. To set up a timed recording:
1. Press the Menu button, select the Alarm/timer option and choose Timed recording.
2. Select one of the nine timers and choose Set to see and change the timer settings
or Off to switch that timer off.
3. Set the start time, duration, day and station you want the timer for using the
navigation button to select (push) and change settings (up/down).
4. Choose to record to the SD card or output to an external recorder via the optical output.
5. Select whether you want the speakers to be on or off while recording.
Note The above instructions will not set the record time on an external recorder. Your
recorder may be able to detect when an S/PDIF signal is present (synchro-record)
or you will have to set your external recorder to start recording at the same time.
You should also press Menu, select Audio settings, Optical digital out and set this to
Off/Timer if using a synchro-record method so that your recorder can detect when the
recording is to start.
When you return to default mode you see a clock icon on the screen showing that one
or more timers are set. The timer list will also now show a clock next to those that are
switched on.
Timer set icon
*Record function provided for personal use only
23
Using an SD card
Plastic fantastic - have postage-stamp-sized fun saving music to one of these little beauties.
Stick an SD (Secure Digital) card in your Bug and you can use it for recording* and playing back digital radio or playing
MP3/MP2 files recorded elsewhere. SD cards are available from PURE Digital and many other electronics retailers and
are used in all sorts of devices, from digital cameras to mobile phones, and come in lots of different capacities. As a
rough guide - a 128 MB card will give you around 2 hours recording time from a 128 kbps broadcast data rate.
There is an ever increasing range of brands, capacities and quality of SD cards available. We have tested the Bug with
the most popular cards but cannot guarantee all cards will work. Check www.thebug.com for any known issues.
Note The Bug records files to SD cards in MP2 format. You may need to use a computer to convert these files to a
different format if you wish to use them in another device that uses SD cards. Check www.thebug.com for information
on software you can use to convert files.
To insert an SD card push it face up into the slot on the back of your Bug. To remove a card push the card in slightly
and it will pop out so you can remove it.
Playing files
Push the Menu button and select Stored tracks to see a list of the files on the SD card.
The Bug lists files found in a folder called TRACKS on the SD card. This folder is
automatically created and used to store the MP2 files when you record from radio on
your Bug. DAB recordings will show the station name and filename, MP3s will show
track title and additional file information where available.
Track list with DAB MP2 and MP3 files
24
The list will automatically scroll right to show extra file information where available or
you can use the navigator button to manually scroll left and right.
Note If you add other files to the card from your PC, make sure these are placed in the
TRACKS directory or your Bug will not find and display them on the track list. The files
must also have names with 8 characters or less with no spaces (e.g. thebug.mp3).
*Record function provided for personal use only
Rock the navigator button up and down to flick through the list of tracks available on
the SD card and push to select and start playing one.
Playing an MP3 from SD card
The display shows a card icon indicating that you are reading from the SD card, the
filename, time into track and the following controls:
Stop/Play
toggles between play and stop current track
Delete
deletes the file from the SD card
You can also rock the navigator up or down to see the track list and push to select
another file to play, press the ReVu button to pause and unpause playback or push the
Info button to toggle between the scrolling filename, date and the above controls.
When your file finishes your Bug will automatically play the next file on the track list
and continue in a loop like this from the first to the last track until you stop playback.
Managing your SD card
Manage your music habit. Keep track of your consumption. Delete files, format your
SD card and view the space available on your card using this option.
Push the Menu button, select SD card manager and choose from the following options:
Delete
This displays a list of all the files on the SD card that can be deleted. Use the
navigation button to flick through the list and push to select and delete a file.
Format This formats the SD card for use in the Bug - this process is useful if you want
to completely empty a card, use a new card or use a card previously used in
another device which may have a different format to that used in your Bug.
WARNING The format process deletes all files including any non-audio files
from the card.
Status
This displays the size of the card you have inserted, the space used and the
available space.
25
Transferring files to your PC
Want to expand your Bug’s music tastes or backup those golden soundbites?
You can transfer files to and from the SD card using your PC. There are two main methods possible:
Connecting the USB port on your Bug to a USB port on your PC
On later versions of Windows when you connect your Bug to your PC using
a suitable cable your PC should detect the Bug and install it as an external
storage device giving it a drive letter (e.g. E:) and making it available
through Your Computer or Windows Explorer.
With your Bug and PC switched on and a card inserted you should be able
to see the TRACKS directory on the SD card and copy files to and from the
card as you would from any other drive.
Note If you add other files to the card from your PC, make sure these are
placed in the TRACKS directory or your Bug will not find and display them
on the track list. The files must also have names with 8 characters or less
with no spaces (e.g. thebug.mp3).
Connecting your Bug to your PC
Using an SD card reader
As an alternative to the above method, if you already have an SD card reader built-in or attached to your PC you can
use it in the normal way to transfer files to and from an SD card.
26
Changing audio settings
Whether you like banging bass, ear-splitting treble or something in between your Bug’s Audio options let you set it up
to sound just how you like it.
Push the Menu button, select Audio settings and choose from the following options.
Equalisation
To match your mood or your music apply one of six equalisation settings to the sound
from your Bug. Select one of the following options by pressing the shortcut button next
to that setting:
(
) Flat - no eq applied to the signal, the default position
(
) BassBoost - boosts the bass and mid frequencies
(
) Monitor - boosts the treble and mid frequencies
(
) Studio - boosts the mid range frequencies
(
) Club - boosts the bass frequencies with some treble
(
) Arena - boosts the bass and treble frequencies
Optical digital out
Set the digital out socket on all the time or on only when a record timer operates using
this option. Set to Off/Timer if you want to use a synchro-record method so that your
recorder can detect when the recording is to start.
Line out
Set the Stereo out socket to Line out (speakers off, maximum volume) for recording or
output to an external amplifier or Normal (speakers on) at other times.
27
Display backlight options
Choose whether you want non-existent or Blackpool-illumination-style backlighting using these options. Push the
Menu button, select Display options and choose from the following options. If you set these options to Off, any button
press will switch on the backlight on for a few seconds to allow you to view what is on screen.
Brightness
Select the backlight brightness you want for when your Bug is switched on. Use the
navigator to choose between the options.
Standby brightness
Select the backlight brightness you want for when your Bug is in standby. Use the
navigator to choose between the options.
General setup options
Choose whether you see animations and view and upgrade your software version using these options. Push the Menu
button, select General setup and choose from the following options.
Animations setup
Select whether the Bug eyes animations on startup and shutdown are on or off.
Software version
Displays the current version of software installed in your Bug. You may need this
number if you contact customer support or you want to install new software.
Software upgrade
Check our website for details of when software upgrades are available for download.
Upgrades may be issued to provide enhanced functions or improve performance.
To upgrade the software in your Bug connect the USB socket to your PC using a
suitable cable, select this option and follow the instructions provided with the software.
28
Looking after your Bug
Solving problems and providing for your Bug
29
Solving problems
Your Bug should behave properly at all times, if it doesn’t do quite what you want check this list of common ailments
and cures. If you still have problems with your Bug, either visit the support section of our website at www.thebug.com
or contact us using the details on the back cover of this manual.
My Bug’s not making any noise
Make sure your Bug is plugged in and is switched on as explained on page 12.
Check that the volume level is not set too low, see page 14.
Check that the aerial is connected and you have done an Autotune to find digital radio stations as explained on page 14.
My Bug says ‘No stations available’
Check that your aerial is connected and extended.
Use the Autotune facility to search for stations, see page 14.
Try moving your Bug to find better reception.
My Bug is ‘burbling’
Although DAB is excellent at providing quality audio from very little signal, the quality can suffer if the signal strength
is too low. If that happens, a ‘burbling’ sound can sometimes be heard. Make sure your aerial is fully extended and try
moving your Bug to find better reception.
I can’t record to my SD card
Try formatting your SD card especially if it has not been used in your Bug before, see page 25.
Remove the card and check that the small lock switch on the card is not on.
Check that the card is not full using the SD card manager, see page 25.
30
Resetting your Bug
If you want to remove all presets, stored stations and favourite station settings and reset all options to the defaults use
this option.
1. Press and hold the Menu button for three seconds. You’ll see ‘Do you want to reset?’ on screen.
2. Press the ‘Yes’ shortcut button to confirm the reset or press ‘No’ or wait around ten seconds to cancel the reset.
Warranty information
Imagination Technologies Ltd. warrants to the end user that this product will be free from defects in materials and
workmanship in the course of normal use for a period of two years from the date of purchase. This guarantee covers
breakdowns due to manufacturing or design faults; it does not apply in cases such as accidental damage, however
caused, wear and tear, negligence, adjustment, modification or repair not authorised by us. Please return your
warranty card or register online to validate your warranty. Should you have a problem with your unit please contact
your supplier or contact PURE Digital Support at the address on the rear cover of this manual.
Providing for your Bug
PURE Digital will be providing accessories for the Bug - keep an eye on www.thebug.com.
31
32
Vital Statistics
Techie facts and figures to impress your friends
33
Specifications
Description
Stereo digital radio with full Band III reception capability, for reception of all UK DAB broadcasts.
Compliant with ETS 300 401 and capable of decoding all DAB transmission modes 1-4 up to and
including 384 kbps
Speakers
Two 3 inch X 1.5 inch oval, 4 ohm impedance
Frequency Range Band III (174 - 240 MHz), with fast autotune feature
34
Connectors
RF F-connector 75 ohm for DAB aerial connection (telescopic aerial supplied). 9V DC power adapter
socket. 3.5mm sockets for stereo analogue audio output and headphones. USB connector. SD card
slot. Optical out (S/PDIF) toslink connector.
Controls
Navigator includes volume and standby functions. Menu, Autotune, Record, Info and ReVu/Snooze.
Six context-sensitive shortcut buttons on head.
LCD Display
High visibility backlit fully graphical blue/white (122x32 pixel) LCD display.
Power supply
230V AC to 9V DC external power adapter supplied.
Approvals
CE marked. Compliant with the EMC and Low Voltage Directives (89/336/EEC and 73/23/EEC)
Dimensions
285mm (width) x 250mm (height) x 210mm (depth)
35
Please return your registration card to the following address or register online at
www.thebug.com to validate your warranty.
PURE Digital
Imagination Technologies Ltd.,
Imagination House,
Home Park Estate,
Kings Langley, Herts., WD4 8LZ, UK
[email protected]
[email protected]
www.pure-digital.com
www.thebug.com
12E37
01923 270188
01923 277488
01923 277477
fax
sales
support & service