1
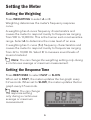
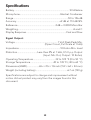
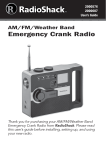
33-2055
User’s Guide
Digital Sound Level Meter
Thank you for purchasing your Digital Sound Level Meter
from RadioShack. Please read this user’s guide before
installing, setting up, and using your new meter.
2/3
Setup
Package contents
• Digital Sound Level Meter
• Carry Case
• User’s Guide
• Quick Start
Features
• For home/hobbyist use: fine tune your stereo, PA system,
or home theater
• Attaches to a tripod with ¼ inch connector
• Selectable weighting for noise level or musical sound
• Displays average or maximum sound level
• Integrated averaging from 1 to 199 seconds
1 Install battery
Your meter requires one 9V battery (not included) for power.
When BATT displays or the meter stops operating properly,
replace the battery.
1. Set RANGE to OFF.
2. Remove the battery compartment cover by pressing both
side in and lifting the cover.
3. Install one 9V battery (not included) as indicated by the
polarity symbols (+ and –).
b Battery Notes:
• After using the meter, set RANGE to OFF to save power.
• Dispose of batteries promptly and properly. Do not burn
or bury them.
• Use only fresh batteries of the required size and type.
2
Microphone
RANGE Switch
OUTPUT Jack
DH / RESET / MIN / MAX
WEIGHTING / RESPONSE
Tripod Adapter
3
• If you do not plan to use your meter for a long period,
remove the battery. Batteries can leak chemicals that may
damage electronic parts.
2 Mount and connect the meter (Optional)
1. Mount the meter on a (¼–inch) tripod to eliminate hand
noise and minimize the effects of sound reflected from
your body. This makes it easy to use the meter with
auxiliary recording or test equipment.
2. Use an audio patch cord (not included) to connect the
OUTPUT Jack to your stereo system or test equipment.
3 Set the sound range
Set RANGE to the desired sound range. If you cannot get
a reading, try other ranges until you get a reading, refer to
“Continuous Average Measurements” on Page 7.
4 Set the weighting
Press WEIGHTING to select A to determine the noise level
of an area, or C to measure sound levels of musical material.
Refer to “Setting the Weighting” on Page 5.
5 Set the response time
Press RESPONSE to set the response to FAST or SLOW.
Refer to “Setting the Response Time” on Page 5.
6 Read the measurement
Point the microphone at the sound source. The meter
displays the continuous average sound level. After the
measurement, set RANGE to OFF.
4
Setting the Meter
Setting the Weighting
Press WEIGHTING to select A or C.
Weighting determines the meter’s frequency response
curve.
A-weighting has A-curve frequency characteristics and
causes the meter to respond mainly to frequencies ranging
from 500 to 10,000 Hz. This is the human ear’s most sensitive
range. Select A to determine the noise level of an area.
C-weighting has C-curve (flat) frequency characteristics and
causes the meter to respond mainly to frequencies ranging
from 32 to 10,000 Hz. Select C to measure sound levels of
musical material.
n
Note: You can change the weighting setting only during
a continuous average or maximum measurement.
Setting the Response Time
Press RESPONSE to select FAST or SLOW.
When set to FAST, the meter updates the bar graph every
0.2 seconds. When set to SLOW, the meter updates the bar
graph every 0.5 seconds.
n
Note: You can change
the response setting
only during a continuous
average or maximum
measurement.
5
Understanding Indications
Level Indicator
The meter displays sound level using a number and a bar
graph. The number shows the sound level in dB within ±10
dB of the selected range and is updated once a second.
The bar graph’s center point represents the midpoint of the
selected range, for example, for Range 70, the center point
represents 70 dB. The bar graph updates every 0.2 seconds
or 0.5 seconds.
Overrange Indicator
When the sound level is higher than the highest number
in the selected range, the bar graph goes to + 10 dB and
both the bar graph and the number that represents the next
range flash.
For example, if the meter measures 91 dB in Range 80,
then the number 90 and the bar graph flash. If the meter
measures more than 126 dB in Range 120, the number 126
and the bar graph flash.
If you get the overrange indicator, try a higher range setting
until you get a reading in the upper half of the range (0 to
+10 dB).
Underrange Indicator
When the measured sound
level is lower than the
lowest sound level of the
selected range, LO appears
6
and the bar graph disappears. If this happens, try the next
lower range.
n Notes:
• The overrange or underrange indicator can also appear
when you recall a reading using the measurement
holding function and the measurement is under or over
the selected range.
• The meter can measure sound levels only from 50 to 126 dB.
Taking Measurements
Continuous Average Measurements
Follow these steps to measure the average sound level.
1. Set RANGE to the desired range setting. If the sound
level is very high, start at the highest range setting (120)
and reduce the setting until you get a reading.
There are seven ranges. Each covers 20 dB. The number
of a range represents the center of the range. When the
measured value is lower or higher than the set range,
an underrange or overrange indicator appears. See
“Underrange Indicator” and “Overrange Indicator” on Page 6.
Take measurements at several different points in the area
to get a good average.
n Notes:
• If you set RANGE to 120, the meter measures sound
levels from 110 to 126 dB.
• If you change the range setting during a
measurement, you clear all the current data and a
continuous average measurement resumes.
7
2. Set the weighting and response (see “Setting the
Weighting” and “Setting the Response Time” on Page 5).
3. Point the meter’s microphone at the sound source. The
meter displays the continuous average sound level
during a one-second sampling period and updates the
number on the display once a second.
4. After the measurement, set RANGE to OFF.
Taking Maximum Measurements
1. Follow Steps 1-3 in “Continuous Average Measurements”.
2. Press MAX; the word MAX appears.
The meter displays only the loudest measured sound
level during the one-second sampling period. The
bar graph shows the maximum level every 0.2 or 0.5
seconds.
The bar graph segment that corresponds to the peak
reading stays on the display for 2 seconds or until the
meter measures a higher maximum level.
3. Press MAX again to cancel the continuous maximum
measurement. A continuous average measurement
resumes.
Integrated Average Measurements
Follow these steps to monitor the sound level and average
the measurement over a period of 1 to 199 seconds. The
meter stores the average, maximum, and minimum sound
levels during the set time.
8
1. Press and hold DH
for about 2 seconds
during a continuous
average or maximum
measurement. The
digit 1 appears.
2. Press (or press and hold) MAX or MIN to set a period
from 1 to 199 seconds; position the meter for the
measurement.
3. Press RESET to start the monitoring.
The meter updates the current integrated average display
once a second. MIN and MAX flash until the set time is up.
When the set time is up, DH appears, and MIN and MAX go
on flashing. The meter displays the total integrated average
sound level.
4. Press MAX to display the maximum sound level for the
set time, press again to return to the total integrated
average sound level.
Press MIN to display the minimum sound level for the
set time, press again to return to the total integrated
average sound level.
5. Press RESET after you check the average, maximum, and
minimum sound levels. A continuous average or maximum
measurement resumes.
n Notes:
• If you change the RANGE setting during an integrated
average measurement, you clear any stored data and a
continuous average or maximum measurement resumes.
• You must repeat the procedure for taking an integrated
average measurement.
9
Taking Maximum and Minimum Measurements
during an Undetermined Time Period
1. Press RESET during a continuous average or maximum
measurement. At the end of the desired time period,
press DH. DH displays.
2. Press MAX and MIN respectively to check the average,
maximum (MAX stops flashing), and minimum (MIN
stops flashing) sound levels during the time period.
3. Press RESET to resume a continuous average or
maximum measurement.
Checking Stereo System Acoustics
To check the sound of a stereo system, use an audio sample
that produces pure tones, one at a time, at intervals that
span the entire audio spectrum. Use C-weighting with either
slow or fast response.
Make a graph or table to show the sound level each tone
produces. This gives you a clear idea of the frequency
response of the total audio system, including the room. To
smooth out the response, adjust the tone control, change
speaker placements, and use a frequency equalizer.
Holding Measurements
You can store the current measurements in memory and
freeze measurements on the display. The meter stores the
average, maximum, and minimum sound levels for the last
one second.
10
1. Press DH during a continuous average or maximum
measurement. DH displays and the last average or
maximum measurement is frozen.
2. For an average measurement, what is frozen is the last
average reading. Press MAX to check the last maximum
measurement. MAX displays. Press MAX again to return
to the average measurement.
For a maximum measurement, what is frozen is the last
maximum reading.
3. Press MIN to check the last minimum measurement. MIN
displays. Press MIN again to return to the average or
maximum measurement.
4. Press RESET to return to the continuous average or
maximum measurement.
n
Note: When you set RANGE to a different range during
measurement holding, you disable the holding function and
return to a continuous measurement.
Care and Service
• Keep your meter dry and clean. If it gets wet or dirty, wipe it
dry or clean immediately. Do not use harsh chemicals, cleaning
solvents, or strong detergents to clean the meter.
• Use and store the meter in normal temperature environments
only. Temperature extremes can shorten the life of electronic
devices and distort or melt plastic parts.
• Handle the meter gently and carefully. Dropping it can damage
the circuit boards and cause the meter to work improperly.
• Modifying or tampering the meter’s internal components
can cause malfunction and might invalidate its warranty. If
your meter is not performing as it should, take it to your local
RadioShack store for assistance.
11
Specifications
Battery................................................................................... 9V Alkaline
Microphone............................................................. Electret Condenser
Range...................................................................................50 to 126 dB
Accuracy................................................................ ±2 dB at 114 dB SPL
Reference......................................................... 0dB = 0.0002 Micro Bar
Weighting................................................................................... A and C
Display Response............................................................ Fast and Slow
Signal Output:
Voltage................................................................ 1 Volt Peak-Peak Min.
(Open Circuit, Full Scale at 1 kHz)
Impedance.............................................................. 10 Kohm Min. Load
Distortion...............................Less than 2% at 1 kHz, 0.5 V p-p Output
(Input: Mic Out, Output: 10 Kohm)
Operating Temperature.................................. 32 to 122 °F (0 to 50 °C)
Storage Temperature................................. -40 to 149 °F (-40 to 65 °C)
Dimensions (HWD).....................6¼ × 2½ × 1¾ inch (159 × 64 × 44 mm)
Weight (including battery)................................................6.7 oz (190 g)
Specifications are subject to change and improvement without
notice. Actual product may vary from the images found in this
document.
12
Limited Warranty
RadioShack warrants this product against defects in materials and
workmanship under normal use by the original purchaser for ninety (90)
days after the date of purchase from a RadioShack-owned store or an
authorized RadioShack franchisee or dealer. RADIOSHACK MAKES
NO OTHER EXPRESS WARRANTIES.
This warranty does not cover: (a) damage or failure caused by or
attributable to abuse, misuse, failure to follow instructions, improper
installation or maintenance, alteration, accident, Acts of God (such
as floods or lightning), or excess voltage or current; (b) improper or
incorrectly performed repairs by persons who are not a RadioShack
Authorized Service Facility; (c) consumables such as fuses or batteries;
(d) ordinary wear and tear or cosmetic damage; (e) transportation,
shipping or insurance costs; (f) costs of product removal, installation,
set-up service, adjustment or reinstallation; and (g) claims by persons
other than the original purchaser.
Should a problem occur that is covered by this warranty, take the
product and the RadioShack sales receipt as proof of purchase date
to any RadioShack store in the U.S. RadioShack will, at its option,
unless otherwise provided by law: (a) repair the product without
charge for parts and labor; (b) replace the product with the same or a
comparable product; or (c) refund the purchase price. All replaced parts
and products, and products on which a refund is made, become the
property of RadioShack. New or reconditioned parts and products may
be used in the performance of warranty service. Repaired or replaced
parts and products are warranted for the remainder of the original
warranty period. You will be charged for repair or replacement of the
product made after the expiration of the warranty period.
RADIOSHACK EXPRESSLY DISCLAIMS ALL WARRANTIES AND
CONDITIONS NOT STATED IN THIS LIMITED WARRANTY.
ANY IMPLIED WARRANTIES THAT MAY BE IMPOSED BY LAW,
INCLUDING THE IMPLIED WARRANTY OF MERCHANTABILITY
AND, IF APPLICABLE, THE IMPLIED WARRANTY OF FITNESS FOR A
PARTICULAR PURPOSE, SHALL EXPIRE ON THE EXPIRATION OF THE
STATED WARRANTY PERIOD.
EXCEPT AS DESCRIBED ABOVE, RADIOSHACK SHALL HAVE
NO LIABILITY OR RESPONSIBILITY TO THE PURCHASER OF THE
13
PRODUCT OR ANY OTHER PERSON OR ENTITY WITH RESPECT
TO ANY LIABILITY, LOSS OR DAMAGE CAUSED DIRECTLY OR
INDIRECTLY BY USE OR PERFORMANCE OF THE PRODUCT OR
ARISING OUT OF ANY BREACH OF THIS WARRANTY, INCLUDING,
BUT NOT LIMITED TO, ANY DAMAGES RESULTING FROM
INCONVENIENCE AND ANY LOSS OF TIME, DATA, PROPERTY,
REVENUE, OR PROFIT AND ANY INDIRECT, SPECIAL, INCIDENTAL,
OR CONSEQUENTIAL DAMAGES, EVEN IF RADIOSHACK HAS BEEN
ADVISED OF THE POSSIBILITY OF SUCH DAMAGES.
Some states do not allow limitations on how long an implied warranty
lasts or the exclusion or limitation of incidental or consequential
damages, so the above limitations or exclusions may not apply to
you. This warranty gives you specific legal rights, and you may also
have other rights which vary from state to state. You may contact
RadioShack at:
RadioShack Customer Relations
300 RadioShack Circle, Fort Worth, TX 76102 04/08
www.RadioShack.com
Protect the environment by recycling used electronics.
Go to E-CyclingCentral.com to find an electronic recycling center near you.
©2011. RadioShack Corporation.
All rights reserved. RadioShack and RadioShack.com
are trademarks used by RadioShack Corporation.
14
01A11
Printed in China
AO0330AAB1 33-2055