Download 8410D
Transcript
About Your Telephone
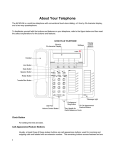
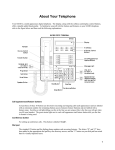
Your 8410D is a multi-appearance digital telephone. The display, along with the softkeys and display control
buttons, offers valuable added functionality.
To familiarize yourself with the buttons and features on your telephone, refer to the figure below and then
read the callout explanations for the buttons and features.
Call Appearance/Feature Buttons
At least three of these 10 buttons are call appearance buttons; used for incoming and outgoing calls
and labeled with an extension number. The remaining buttons access features and are labeled with
a feature name. Each has a red light telling you that this is the line you are using or this is the line
you will get when you lift your handset. The green status light next to each call appearance and
feature button tells you that the line or feature is being used.
Conference Button
For setting up conference calls. This button is labeled <Conf>.
Dial Pad
1
The standard 12-button pad for dialing phone numbers and accessing features. The letters "Q" and
"Z" have been added to the appropriate dial pad keys for directory access, and the "5" button on your
dial pad has raised bars for visually impaired users.
Display
A built-in 2-line by 24-character display.
Display Control Buttons
These four buttons are labeled <Menu>, <Exit>, <Prev>, and <Next>.
<Menu> is used to enter Softkey Mode and access the first feature option screen.
<Exit> is used for exiting the Display Mode and returning to Normal Mode.
<Prev> and <Next> can be used to help you go back and forth through the feature option
screens.
Drop Button
For disconnecting from a call or dropping the last party added to a conference call.
Handset
A handset is provided for placing and answering calls. This is sometimes called the "receiver". In
most cases, you must lift the handset (go off-hook) or activate the speaker or speakerphone before
you can use a feature.
Handset Jack
Located on the back of your telephone, this jack is used for connecting the handset to your
telephone.
Hold/Ring Button
A red button for putting a call on hold. By pressing <Shift> and then <Hold>, you can select a
personalized ring for your telephone from eight possible ringing patterns.
Line Jack
This jack is used for connecting a line cord to your telephone. Located on the back of your
telephone, this jack is labeled "LINE".
Message Light
A red light that goes on when a message has been left for you.
Mute Button
For turning off the microphone associated with the handset or the built-in speakerphone so the other
person on the call cannot hear you.
Shift Button
2
A blue button which can be used to access two additional features. When <Shift> is active, the red
light next to the button is on.
When used with <Hold>, you can select a personalized ring from among eight available patterns.
When used with <Speaker>, you can perform an acoustic test of the environment and adjust the
speakerphone to the surrounding acoustic environment for optimal performance (for the built-in
speakerphone option only).
Softkeys
The four buttons located below the display and labeled with arrows correspond to words on the
display screen. You can use the softkeys along with display control keys to access up to 12 features
on your telephone in addition to those features administered on the call appearance/feature buttons.
Check with your system manager for a list of the features that can be accessed with the softkeys.
Speaker/Reset Speaker Button
For accessing the built-in speakerphone. When you press <Shift> and then <Speaker> (your
telephone must be on-hook, and it must be set for the Speakerphone feature), you hear a set of
tones as the speakerphone performs an acoustic test of the environment. When the tones stop, your
speakerphone has finished adjusting itself for optimal performance and is ready for use.
Note:
Your telephone can be set for either the Speaker (listen-only) feature or the Speakerphone (listen
and speak) feature. Check with your system manager to see how your Speaker button is to be
used.
Speakerphone/Headset Adapter Jack
Located on the back of your telephone, this jack is used for connecting an external speakerphone
(such as an S101A or S201A Speakerphone) or a headset adapter (such as a 500A Headset
Adapter) to your telephone.
Test Button
When the telephone is initially powered up, the green light next to <Test> flashes if the link with the
switch is not (or not yet) operational. The light changes to steady green when the telephone is able
to communicate with the switch, and then goes off after a short period of time. After the telephone is
powered up, you can press <Test> to test the lights and display on your telephone.
Transfer Button
For transferring a call to another telephone.
Volume Control Button
For adjusting the volume of:
The speakerphone or speaker when a call is in progress using the two-way speakerphone or
one-way speaker
The handset while a call is in progress using the handset
The ringer while the speaker is off, and either the handset is inactive or the ringer is active
3
Notes:
1) When the speaker is active, the ringer volume is automatically reduced to a low setting. The
volume is restored when the speaker is turned off.
2) The Volume control button on your telephone does not control the volume level of adjunct
equipment.
4
Feature Finder
Abbreviated Dialing (AD)
Allows you to store selected phone numbers for quick and easy dialing. Each number can be a
complete or partial phone number, an extension number, or a feature or trunk code. Abbreviated
Dialing offers four possible types of lists: personal, group, system, and enhanced. You can have a
total of three out of the four lists. Numbers on a personal list are programmable by you; numbers on
group lists are programmable by the controller of the list; system lists are programmable only by the
system manager. Use this feature as a timesaver for dialing frequently called, lengthy, or emergency
numbers.
Note:
Check with your system manager concerning what types of lists you have and how
many of each list.
Call Forwarding All Calls
Temporarily forwards all your calls to another extension or to an outside number, depending on your
system. Use when you will be away from your telephone and you want your calls to be forwarded to
a phone number of your choice.
Automatic Callback
Sends you a special 3-burst ring indicating that a previously busy or unanswered extension is now
available. Use to avoid constant redialing when you wish to speak to someone who is frequently
busy on the phone, or is in and out of the office.
Note:
You can use this feature only for extensions, not for outside numbers.
Call Park
Puts a call on hold at your telephone, for retrieval at any extension. Use when you need to go
elsewhere to get information during a call, or whenever you wish to complete a call from a different
location. Also, if the call received is for someone else, use it to hold the call until the called party can
answer it from another telephone.
Call Pickup
Lets you answer a call at your telephone for another extension in your pickup group. Use when you
wish to handle a call for a group member who is absent or otherwise unable to answer.
Note:
You can use this feature only if you and the called party have been assigned to the
same pickup group by your system manager.
Conference
Allows you to conference up to six parties on a call (including yourself) so that you can conduct a 6way discussion. Use to set up timesaving conferences, or to spontaneously include an additional
party important to a conversation.
5
Hold
Puts a call on hold until you can return to it. While a call is on hold, you can place another call,
activate another feature, answer a waiting call, or leave your telephone to do another task. Use
when you have a call you don't want to drop, but have to interrupt briefly to do something else.
Inspect
Shows you call-related information for an incoming call when you are already active on a call. Use to
identify and screen new calls.
Last Number Dialed
Automatically redials the last extension or outside number you dialed. Use to save time in redialing a
busy or unanswered number.
Priority Calling
Allows you to call an extension with a distinctive 3-burst ring to indicate your call requires immediate
attention. Use when you have important or timely information for someone.
Reset Speakerphone
Initiates an acoustic test of the surrounding environment by using a series of tones. When the tones
stop, your speakerphone has finished adjusting itself for optimal performance. It is now ready for
use. Use whenever you move your telephone to a different location (even in the same room), when
the red light next to <Speaker> is fluttering, or when the display shows you a message that the
speakerphone needs to be reset. You can access this feature by pressing <Shift> and then
<Speaker> or pressing the softkey below the word "Begin" on the display.
Ringer Volume
Allows you to adjust the ringer volume on your telephone.
Select Ring
Allows you to choose a personalized ringing pattern for your telephone from among eight available
patterns. Use to help distinguish your incoming calls from those of other nearby telephones.
Send All Calls
Temporarily sends all your calls to the extension of a person designated by your system manager to
answer them when you cannot (perhaps a secretary or receptionist). Use when you will be away
from your desk for awhile, or when you do not wish to be interrupted by telephone calls.
Speakerphone
Allows you to place and answer calls or access other voice features without lifting the handset.
When you press <Shift> (when on-hook) and then <Speaker>, the built-in speakerphone performs a
test of the surrounding acoustic environment by using a sequence of tones. When the tones stop,
your speakerphone has finished adjusting itself for optimal performance. It is now ready for use.
(See "Reset Speakerphone".) Use the built-in speakerphone any time you prefer hands-free
communication, both speaking and listening, or for group conference situations.
6
Note:
Your telephone has either the Speaker (listen-only) or the Speakerphone (listen and
speak) feature. Check with your system manager to see how your telephone is
administered.
Time/Date
Shows you the date and time. Use as a handy calendar and clock.
Timer
Allows you to measure elapsed time. Use in order to keep track of time spent on a call or task.
Transfer
Transfers a call from your telephone to another extension or outside number. Use when your caller
needs to speak further with someone else.
Abbreviated Dialing
Note:
Before you can use this feature, AD buttons must first be assigned by your system manager.
(These AD locations can be assigned to actual buttons, or you may be able to access them with
the softkeys.)
If you hear the intercept tone while programming, start over from the beginning.
You may be able to use the following softkey features with Abbreviated Dialing (Press <Menu> and then the
softkey below the feature abbreviation):
Program (labeled "Prog") - You can program a phone number, extension, or feature access
code on an AD button.
Pause - A 1.5-second pause can be placed in an AD number, such as between an access
code and the phone number.
Mark - Numbers included after a Mark on an AD button are dialed in Touch-Tone signal form.
Wait - Numbers included after a Wait on an AD button are delayed 5 to 25 seconds until the
telephone receives dial tone from the switch.
Suppress (labeled "Spres") - Suppressed numbers are dialed but not shown on the display
(an "s" appears instead). Used for passwords or authorization codes.
To program or reprogram an AD button:
1.
On a separate sheet of paper, write down the outside numbers, extensions, and/or feature access
codes you want to program.
Note:
2.
7
Each AD button will hold one complete phone number or feature access code.
Pick up the handset.
[dial tone]
3.
Press <Menu> and then the softkey below Prog (if available on your display).
or, Press <Program>.
or, Dial the Program code *0.
[dial tone]
4.
Press the <AD xxxxx> button to be programmed.
5.
[dial tone]
Dial the phone number, extension, or feature access code you want to store (up to 24 digits).
Note:
You may be able to use the softkeys to add special functions such as Pause, Mark, or
Wait into the phone numbers programmed on the AD button.
If you are programming an outside number, be sure to include a trunk code, if applicable.
6.
Press #.
[confirmation tone]
The number is stored.
7.
If you want to program another button, repeat Steps 4 through 6.
8.
Hang up or press <Drop> to end programming.
To place an AD call:
1.
Press the selected <AD xxxxx> button.
[ringback tone]
The call is automatically dialed.
Note:
Before you can use this feature, AD buttons must first be assigned by your system manager.
Usually, an abbreviated dialing number is part of a personal list, group list, system list, or enhanced list. You
can have a total of three lists; the programmed number can be up to 24 digits and characters. You can also
program a number on an Automatic Dialing button that is not stored on an AD list. This programmed number
can be up to 16 digits and characters. Each digit counts as one character; special characters, such as pause
and suppress, count as two characters. The Automatic Dialing button can be used for one-touch dialing of
frequently called numbers.
To program a number into a personal list:
1.
On a separate sheet of paper, write down the outside numbers, extensions, and/or feature access
codes you want to store as items on your personal lists(s).
Notes:
1) Each phone number or feature code is stored as a separate list item.
2) You can store a maximum of 100 AD entries in a personal list.
8
2.
Pick up the handset.
[dial tone]
3.
Press <Menu> and then the softkey below Prog (if available on your display).
or, Press <Program>.
or, Dial the Program code *0.
[dial tone]
4.
Dial the Personal List number (1, 2, or 3).
5.
Dial the list item (1, 2, 3...).
[dial tone]
[dial tone]
6.
Dial the number you want to store (up to 24 digits).
Note:
You may be able to use the softkeys to add special features such as Pause, Mark, or
Wait into the phone numbers programmed on the AD button.
If you are programming an outside number, be sure to include a trunk code, if applicable.
7.
Press #.
[confirmation tone]
The number is stored.
8.
If you want to store additional items on the same list, repeat Steps 5 through 7. If you want to store
items on another list, press <Drop> and return to Step 1.
9.
Hang up or press <Drop> to end programming.
Note:
Keep a record of your personal list items; group, system, and enhanced lists can be
obtained from your system manager.
To place a call using an AD list:
1.
Press <Pers List>, <Grp List>, or <Sys List>.
[dial tone]
or, Dial the appropriate Abbreviated Dialing List code:
List 1 #7
List 2 #8
List 3 #9
Note:
2.
An <Enhcd List> may also be available; see your system manager.
Dial the desired list item (1, 2, 3...).
[ringback tone]
The call is automatically dialed.
9
Call Forwarding All Calls
You can access this feature with the softkeys only if the feature's abbreviation, CFrwd, appears on the
second line of one of the feature option screens.
To temporarily redirect all calls:
1.
Press <Menu> while on-hook or off-hook, then press the softkey below CFrwd (if available on your
display).
or, Press <Call Fwd> while on-hook or off-hook.
or, Dial the Call Forward code *2 while on-hook or off-hook.
2.
[dial tone]
If you have console permission and are not forwarding your own calls, dial the extension number
whose calls are to be forwarded.
[dial tone]
3.
Dial the extension or phone number where calls are to be sent.
[confirmation tone]
Note:
4.
Some telephones have restrictions on where calls can be forwarded (see your system
manager).
Hang up.
Note:
You may hear a ring-ping tone from your telephone as each call is forwarded.
To cancel Call Forwarding:
1.
Press <Menu> while on-hook, then press the softkey below CFrwd (if available on your display).
[dial tone]
or, Press <Call Fwd> while on-hook.
or, Dial the Call Forward Cancel code #2 while on-hook.
[confirmation tone]
Your calls will now ring at your own telephone.
Automatic Callback
You can access this feature with the softkeys only if the feature's abbreviation, AutCB, appears on the
second line of one of the feature option screens.
10
To automatically place another call to a busy or unanswered extension:
1.
Press <Menu> and then the softkey below AutCB (if available on your display) during the call
attempt.
or, Press <AutoCallBk> during the call attempt.
[confirmation tone]
Note:
2.
If you send your calls to coverage after activating Automatic Callback, your callback calls
will still ring at your extension and will not be redirected to coverage.
Hang up.
You hear a priority ring when both you and the called extension are idle. When you answer,
regular ringing is sent to the called party.
3.
Lift the handset when you hear a priority ring.
Note:
Automatic Callback is automatically canceled after 30 minutes.
To cancel Automatic Callback:
1.
Press <Menu> while on-hook, then press the softkey below AutCB again (if available on your
display).
or, Press <AutoCallBk> again while on-hook.
Call Park
You can access this feature with the softkeys only if the feature's abbreviation, CPark, appears on the
second line of one of the feature option screens.
To park a call for retrieval from any extension:
Note:
If Call Park is one of your softkey features, press <Menu> and then the softkey below CPark. Then
hang up. Or, if <Call Park> has been assigned to your telephone, press <Call Park> and hang up.
Otherwise, follow the instructions below:
1.
Press <Transfer>.
2.
Dial the Call Park code *6.
[dial tone]
[confirmation tone]
3.
Press <Transfer> again.
The call is parked.
4.
11
Hang up.
To retrieve a call parked at any extension:
1.
Pick up the handset or press <Speaker>.
2.
Dial the Answer Back code #6.
3.
Dial the extension where the call is parked.
[dial tone]
[dial tone]
[confirmation tone]
4.
If you are returning to a call parked at your telephone, dial your own extension.
Note:
If you receive an intercept tone, the parked call has been disconnected or retrieved by
someone else.
Call Pickup
You can access this feature with the softkeys only if the feature's abbreviation, CPkUp, appears on the
second line of one of the feature option screens.
To answer a call placed to your pickup group when your phone is idle:
1.
Press <Menu> and then the softkey below CPkUp (if available on your display).
or, Press <CallPickup>.
or, Dial the Call Pickup code *7.
You are connected to the ringing call.
Conference
To add another party to a call:
Note:
1.
Your conference call can include up to six parties, including yourself.
Press <Conf>.
[dial tone]
The present call is put on hold.
You are given a new call appearance button.
All other parties remain connected to each other.
2.
12
Dial the number of the new party and wait for an answer.
3.
You can discuss the call privately with the new party at this time. If the line is busy or there is no
answer, press the fluttering call appearance button to return to the call on hold.
4.
Press <Conf> again.
All parties are now connected.
5.
Announce the call.
6.
To establish additional conference connections, repeat Steps 1 through 5.
Add the call on hold to another call to which you are connected:
1.
Press <Conf>.
[dial tone]
The hold light continues to flutter.
The current call light flutters.
You are given a new call appearance button.
2.
Press the call appearance button of the call on hold.
3.
Press <Conf> again.
All parties are now connected.
4.
Announce the call.
To drop the last party added to a conference call:
1.
Press <Drop>.
The last party added to the conference call is dropped.
You remain connected to the other parties.
Note:
The parties other than the last one must disconnect to be released from the conference
call.
Hold
To put a call on hold:
Note:
1.
The light beside <Shift> must be off.
Press <Hold>.
The green light flutters.
13
The call is put on hold.
Note:
If you put a conference call on hold, the other parties remain connected.
To return to the call on hold:
1.
Press the call appearance button of the call on hold.
You are connected to the call on hold.
Note:
If you are active on a call and press the call appearance button of the call on hold, the
active call will be dropped.
To answer a new call while active on another:
1.
Press <Hold>.
The green light flutters.
The current call is put on hold.
2.
Press the call appearance button of the incoming call.
You are connected to the incoming call.
Inspect
You can access this feature with the softkeys only if the feature's abbreviation, Inspt, appears on the second
line of one of the feature option screens.
Note:
If you are currently on a call and a new call comes in, the display automatically shows you
information on the new call. You do not need to use the Inspect feature in this situation. However,
you can use the Inspect feature to see who is on a call that has been placed on hold.
To see who is on hold while on a call:
1.
Press <Menu> and then the softkey below Inspt (if available on your display).
or, Press <Inspect>.
2.
Press the call appearance button of the call on hold.
The information is shown on the display screen.
You remain connected to the present call.
3.
14
To return to the call on hold, press <Exit> then the call appearance button for the call on hold.
Last Number Dialed (Redial)
You can access this feature with the softkeys only if the feature's abbreviation, Last, appears on the second
line of one of the feature option screens.
To automatically redial the last number dialed:
1.
Press <Menu> while on-hook or off-hook, then press the softkey below Last (if available on your
display).
or, Press <LastDialed> while on-hook or off-hook.
or, Dial the Last Number Dialed code *9 while on-hook or off-hook.
Priority Calling
You can access this feature with the softkeys only if the feature's abbreviation, PCall, appears on the second
line of one of the feature option screens.
To place a priority call:
1.
Press <Menu> while on-hook or off-hook, then press the softkey below PCall (if available on your
display).
or, Press <Priority> while on-hook or off-hook.
or, Dial the Priority Calling code *1 while on-hook or off-hook.
[dial tone]
2.
Dial the extension.
[ringback tone]
Wait for the called party to answer.
Note:
If your call is not answered and you wish to redirect it to coverage, press <Go to Cvr>
while the call is ringing.
To change a regular call into a priority call:
1.
Press <Menu> and then the softkey below PCall (if available on your display).
or, Press <Priority>.
2.
Wait for the called party to answer.
Note:
15
If you still receive a call waiting ringback tone, wait a few minutes and try again.
Reset Speakerphone
You can adjust the speakerphone to the surrounding room acoustics to provide optimal performance. Use
the Reset Speakerphone feature in the following ways:
Whenever you move your telephone to another place (even in the same room)
Whenever the red light next to <Speaker> is fluttering
Note:
You may also use this feature when you are on a call in the unlikely event your speakerphone
makes a squealing noise during the call. Your speakerphone will adjust itself to normal for that call.
(No tones will be heard.)
Important Note:
If there has been an interruption in power (such as the system has just been
powered up again, or you have plugged in the telephone at another location), the light next to
<Speaker> flutters until you reset the built-in speakerphone.
You can initiate the Reset Speakerphone feature when your handset is on-hook, or during a call in which you
are using the built-in speakerphone. (If a call is in progress, you will not hear the tones, and the new
speakerphone adjustment is reset for only the duration of that call.)
Remember that you can use the Reset Speakerphone feature only if your telephone is set for the
Speakerphone feature (as opposed to the Speaker feature).
When you first power up the telephone, the following display appears.
PLEASE RESET SPKR. Begin Cancel
To reset the speakerphone:
1.
Press the softkey below Begin to reset the speakerphone.
Note:
If you do not want to reset the speakerphone at this time, press the softkey below
Cancel. The red light next to <Speaker> will continue to flutter.
If you press the softkey below Begin, the display shows the following timed screen:
OPTIMIZING PERFORMANCE OF The SPEAKERPHONE
You hear a set of rising tones as the speakerphone adjusts itself to the surrounding
acoustical environment. These tones are automatic. No user response is required.
To adjust the speakerphone to its surroundings:
1.
16
Press <Shift> while on-hook.
The red light next to <Shift> goes on steadily.
2.
Press <Speaker>.
The red light next to <Shift> goes off.
The red light next to <Speaker> blinks.
You hear a series of tones as the speakerphone performs an acoustic test of the
environment.
The display shows:
OPTIMIZING PERFORMANCE OF The SPEAKERPHONE
When the tones stop, your built-in speakerphone is ready for use.
Ringer Volume
To adjust the ringer volume (speaker is not active):
1.
To raise the volume, press the right half of the Volume control button. To lower the volume, press
the left half of the Volume control button.
The display shows:
RINGER L >>>>> H
On the display, one arrow indicates the lowest setting, and eight arrows indicate the highest
setting.
One full ring cycle sounds to demonstrate the new volume.
Note:
There are eight possible volume settings.
Select Ring
To select a personalized ringing pattern:
1.
Press <Shift>.
The red light goes on steadily.
2.
Press <Hold>.
The red light next to <Shift> winks.
The current ringing pattern plays and repeats every four seconds.
The ringing pattern you are hearing is displayed.
17
SELECT RING PATTERN: 1
3.
Continue to press (and then release) <Hold> (or press <Next> or <Prev>) to cycle through all eight
ringing patterns.
4.
When you hear the desired ringing pattern, press <Shift> again.
[confirmation tone]
Your new ringing pattern is set.
The number of the selected ringing pattern is displayed.
The red light next to <Shift> goes off.
Note:
If you receive a call, go off-hook, or lose power during selection, the process is
interrupted and you must start again.
Send All Calls
You can access this feature with the softkeys only if the feature's abbreviation, SAC, appears on the second
line of one of the feature option screens.
To send all calls (except priority calls) to coverage:
1.
Press <Menu> while on-hook, then press the softkey below SAC (if available on your display).
or, Press <Send Calls> while on-hook.
or, Dial the Send All Calls code *3 while on-hook.
[confirmation tone]
Note:
You may hear a ring-ping tone from your telephone as each call is forwarded.
To cancel Send All Calls:
1.
Press <Menu> while on-hook, then press the softkey below SAC again (if available on your
display).
or, Press <Send Calls> again while on-hook.
or, Dial the Send All Calls Cancel code #3 while on-hook.
[confirmation tone]
18
Speakerphone
Note:
Your telephone has either the Speaker (listen-only) or the Speakerphone (listen and speak)
feature. Check with your system manager to see how your telephone is administered.
To place or answer a call using the speakerphone:
Use the following procedure if your telephone is set for the Speakerphone (listen and speak) feature.
1.
Press <Speaker>.
The red light next to <Speaker> goes on steadily.
2.
Place or answer a call, or access the selected feature.
3.
Adjust the speakerphone volume if necessary.
To raise the volume, press the right half of the Volume control button. To lower the volume, press
the left half of the Volume control button.
The display shows:
SPEAKER L >>>>> H
On the display, one arrow indicates the lowest setting, and eight arrows indicate the highest
setting.
Note:
Note:
There are eight possible volume settings.
The Volume control does not affect an external speakerphone attached to your telephone.
To change from the speakerphone to the handset:
Use the following procedure if your telephone is set for the Speakerphone (listen and speak) feature.
1.
Pick up the handset and talk.
The red light goes off next to <Speaker>.
To change from the handset to the speakerphone:
Use the following procedure if your telephone is set for the Speakerphone (listen and speak) feature.
1.
Press <Speaker>.
The red light next to <Speaker> goes on.
2.
19
Hang up the handset.
To prevent the other party from hearing you:
Note:
If the Speakerphone feature is not active, the Mute feature turns off the microphone associated
with the handset (not the speakerphone). However, if the speakerphone is active and the handset
is not active, then the Mute feature turns off the microphone associated with the speakerphone (not
the handset).
Use the following procedure if your telephone is set for the Speakerphone (listen and speak) feature.
1.
Press <Mute>.
The red light next to <Mute> goes on.
The other person cannot hear you.
2.
Press <Mute> again to resume speaking to the other person.
The red light next to <Mute> goes off.
The other person can hear you again.
To end a call when using the speakerphone:
Use the following procedure if your telephone is set for the Speakerphone (listen and speak) feature.
1.
Press <Speaker> again to hang up.
The red light next to <Speaker> goes off.
Time/Date
You can access this feature with the softkeys only if the feature's abbreviation, TmDay, appears on the
second line of one of the feature option screens.
To view the date and time:
1.
Press <Menu> and then the softkey below TmDay (if available on your display).
or, Press <Date/Time>.
The display returns to Normal Mode after a few seconds.
20
Timer
You can access this feature with the softkeys only if the feature name, Timer, appears on the second line of
one of the feature option screens.
To view the elapsed time:
1.
Press <Menu> and then the softkey below Timer (if available on your display).
or, Press <Timer>.
The display shows the elapsed time.
2.
To stop the timer and clear the display, press <Menu> and then the softkey below Timer again (if
available on your display).
or, Press <Timer> again.
The elapsed time is displayed on the screen for about four seconds and then disappears.
Transfer
To send the present call to another number:
1.
Press <Transfer>.
[dial tone]
The present call is put on hold.
The green light flutters.
You are given a new call appearance button.
2.
Dial the number to which the call is to be transferred.
3.
[ringback tone]
Remain on the line and announce the call. If the line is busy of there is no answer, return to the
call on hold by pressing its call appearance button.
4.
Press <Transfer> again.
The call is sent to the dialed number.
5.
21
Hang up.
Tones and Their Meanings
Ringing tones are produced by an incoming call. Feedback tones are those which you hear through the
handset or the speaker.
Ringing Tones
1 ring - A call from another extension.
2 rings - A call from outside or from the attendant.
3 rings - A priority call from another extension, or from an Automatic Callback call you
placed.
ring-ping (half ring) - A call redirected from your telephone to another because Send All
Calls or Call Forwarding All Calls is active.
Feedback Tones
busy signal - A low-pitched tone repeated 60 times a minute; indicates the number dialed is
in use.
call waiting tone - One, two, or three beeps of high-pitched tone, not repeated; indicates an
incoming call is waiting to be answered. Number of beeps designates the source: one for an
internal call, two for an outside or attendant call, three for a priority call.
call waiting ringback tone - A ringback tone with a lower-pitched signal at the end; indicates
that the extension called is busy, but the called party has been given a call waiting tone.
confirmation tone - Three short bursts of tone; indicates a feature activation or cancellation
has been accepted. When you have finished selecting a ringing pattern for your telephone,
you hear two rising tones.
coverage tone - One short burst of tone; indicates your call will be sent to another extension
to be answered by a covering user.
dial tone - A continuous tone; indicates dialing can begin.
intercept/time-out tone - An alternating high and low tone; indicates a dialing error, a denial
of the service requested, or a failure to dial within a preset interval (usually 10 seconds) after
lifting the handset or dialing the previous digit.
local error tone - A steady low tone; indicates an incorrect button press.
recall dial tone - Three short bursts of tone followed by a steady dial tone; indicates the
feature request has been accepted and dialing can begin.
reorder tone - A fast busy tone repeated 120 times a minute; indicates all trunks are busy.
ringback tone - A low-pitched tone repeated 15 times a minute; indicates the telephone
dialed is being rung.
22
speakerphone reset tones - A rising set of tones; indicates that the speakerphone is
adjusting itself to the surrounding room acoustics.
23
Glossary
activate
To begin or turn on the operation of a feature.
attendant
The person who handles incoming and outgoing calls at the main telephone console.
AUDIX
Audio Information Exchange, an optional voice mail and message service that provides coverage for
calls to you by recording callers' messages and reporting Leave Word Calling messages.
call appearance button
A button used exclusively to place, receive, or hold calls. It has an assigned extension number and is
equipped with a red in-use light and a green status light.
console permission
The authorization (from your system manager) to initiate Call Forwarding All Calls for an extension other
than your own.
coverage
Automatic redirection of calls from an unanswered phone to another phone. Redirection could be to the
extension of a receptionist, secretary, coworker, AUDIX, or message center. A person who provides
coverage is a covering user.
DEFINITY Communications System Generic 1 and Generic 3
DEFINITY Communications System Generic 1 and Generic 3 and System 75 are communications
systems which transmit and receive voice and data signals for all communications equipment in a
network.
dial pad
The 12 pushbuttons that you use to dial a number and access features.
enhanced list
One of the four types of Abbreviated Dialing lists; programmable only by the system manager. Contains
phone numbers useful to all system members, and stores each of those numbers as a 1-, 2-, or 3-digit
list item.
extension
A dialing number of 1 to 5 digits assigned to each phone connected to a DEFINITY Communications
System Generic 1, Generic 3, or a System 75.
feature
A special function or service, such as Conference, Hold, Send All Calls, etc.
24
feature code
A dial code of 1, 2, or 3 digits, which you use to activate or cancel the operation of a feature.
group list
One of the four types of Abbreviated Dialing lists; programmable only by the system manager. Contains
phone numbers useful to members of a specific group, and stores each of those numbers as a 2-digit list
item.
handset
The handheld part of the telephone that you pick up, talk into, and listen from. This is sometimes called
the "receiver".
message retriever
A person authorized by the system manager to retrieve messages for other users.
off-hook
When the handset is removed from the cradle (for example, when you lift the handset to place or answer
a call).
on-hook
When the handset is left on the cradle (for example, when you use the speakerphone).
party
A person who places or answers a call.
personal list
One of the four types of Abbreviated Dialing lists; programmable by the system manager or by you, the
user. Contains phone numbers of your choice, and stores each of them as a single-digit list item.
personal list item
One of the 10 available slots on an Abbreviated Dialing personal list. The first nine personal list items
are given digits 1 to 9, with 0 for the tenth item.
pickup group
A group of telephone users who can answer calls for each other through the Call Pickup feature. Group
members are determined by the system manager and are usually located in the same work area or
perform similar job functions.
priority call
An important or urgent call that sends a special 3-burst ring.
program/reprogram
To use your dial pad to assign a phone number to a personal list item or an <AD xxxxx> button for
Abbreviated Dialing.
25
retrieve
To collect phone messages with the Message Retrieval or Voice Message Retrieval features. (Also, with
Call Park, to resume a call from an extension other than the one where the call was first parked.)
ringer
The device that produces the electronic ringing sound in your telephone.
stored number
A phone number which has been programmed and stored as a 1-, 2-, or 3-digit list item for use with
Abbreviated Dialing. It can be a complete or partial phone number, an extension number, or a trunk or
feature code. Once programmed, a number can be accessed by first dialing the list, then the list item
digit(s) under which it is stored; if the number is stored on an <AD xxxxx> button, the number can be
accessed by simply pressing that button.
switch
The device which makes connections for all voice and data calls for a network, and also contains
software for features. Also known as a system, switching system, or ECS (Enterprise Communications
Server). (Your switch is a Lucent Technologies DEFINITY Communications System Generic 1, Generic
3, or System 75.)
system list
One of the four types of Abbreviated Dialing lists; programmable only by the system manager. Contains
phone numbers helpful to all system users, and stores each of those numbers as a 2-digit list item.
system manager
The person responsible for specifying and managing the operation of features for all the voice and data
equipment in your network.
System 75
System 75, DEFINITY Communications System Generic 1, and Generic 3 are communications systems
which transmit and receive voice and data signals for all communications equipment in a network.
trunk
A telecommunications channel between your switch and the local or long distance calling network.
Trunks of the same kind connecting to the same end points are assigned to the same trunk group.
trunk code
A dial code of 1, 2, or 3 digits which you dial to access a trunk group to place an outside call.
26
Access Codes
27
Feature
Code
Abbreviated Dialing List #1
#7
Abbreviated Dialing List #2
#8
Abbreviated Dialing List #3
#9
Answer Back
#6
Call Forward
*2
Call Forward Cancel
#2
Call Park
*6
Call Pickup
*7
Last Number Dialed
*9
Priority Calling
*1
Program
*0
Send All Calls
*3
Send All Calls Cancel
#3


