1
unid~n@
UHF CB TRANSCEIVER
OWNER'S MANUAL
,
""
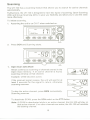
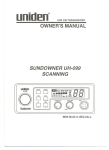
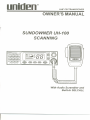
SUNDOWNER UH-100
SCANNING
ooldenSuaOOwlleruH-100
~;
&&~~~~~&
&~~~~~~~
&~tPtPtPtPtPtP
&~~~~~~~
&&~tPtP(j(P&
&&&&&&
VOL..-sa
U 8 @0
.'
.
IIEM
~
,-,-,, ,-,'
1PR,- IBBB.BBBuHz
SRF
SCN
l(";;BlE)) leYEll»)le~»)
le~)
CH
~
..
f1
'@ OFF
Lun.denj
With Audio Scrambler and
Built-In SELCALL
Table of Contents
Controls I Indicators I Connectors
Controls
Indicators
Connectors
Introduction .""..."""'.".'...".".".""""".""'.".
3
3
4
5
6
Included with your UH-100
Operation
Settingthe Squelch
"..."""."",
7
8
8
""."""".
Selecting a Channel
Channel Auto Step...
Transmitting
Using Repeater Channels
Scanning
Choosing a Priority Channel
Drop-Out Delay
Programming Scan Channels
Channel Seeking Operation
Voice Scrambler
9
9
10
10
13
15
15
16
17
18
LCD Backlight Level Control
Selective Calling
This is UH-100 Calling
Making a Call
Acknowledgment Tone
19
20
21
21
22
"
,
""""""""""""""""'"
10 SelcalllD Memory."."""""""""""""""""""""""""
23
Transmitting ID from Memory
24
ReceivingCall
"
Replying using SELCALL
"
Group Calling
Tone Squelch (Receiver Quieting)
Activating the Tone Squelch (Receiver Quieting)
Receiving Calls when in Quiet Mode
Tone Squelch Scanning
SELCALL Advance Programming
Radio ID Programming
Tone Period Programming
Lead-In Delay Programming
"""""""'"
Lead-In Tone Programming
,
Alarm Mode Programming
Group Call Mode Programming
Caller ID Decoding """"""""""""""""""""""""""""""""""""""""'"
1
,
25
26
28
29
30
30
31
32
34
35
36
37
39
41
42
Service
Care and Maintenance
43
44
Notice """""""""""""""""""""""""""
Preventive Maintenance
Troubleshooting
Memory Backup
UHF CB Channel Information
SIMPLEX Operating Mode
DUPLEX Operating Mode
Specifications
General
Measurement Conditions
44
44
44
44
45
45
46
47
47
48
"""""""""""""""""""""""
"""""""""""""'"
TransmitterSection
""""""""""""""""""'"
Receiver Section
SELCALL
Warranty
48
48
49
50
2
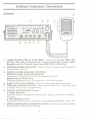
Controls I Indicators I Connectors
Controls
,
unlden~UH.100
tJtJ"",tJ
tJ""",
tJ""",
tJ""",
m
DUP'
CAL 1.1£1.1
Tso
GS
11
SRF...
~~~
88H888M~
-,,-,
,.., ,-,..
,
tJtJ"",ItJ
tJtJtJtJtJtJ
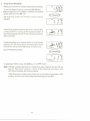
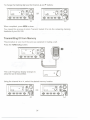
1. LIQUIDCRYSTALDISPLAY(LCD) PANEL- Indicators for TX,CAL, MEM,TSQ,
GS (OS), SCN, PRI, Channel Number, Frequency (SELCALL Code), Signal
Strength Level (S), Transmit Power Level (RF), DUP and Scrambler.
2. UP/DOWNCHANNELSELECTOR - These controls are used to select the desired
communication channel.
3. ON/OFF, VOLUME& SQUELCHCONTROLS
ON/OFF &Volume Control (Centre Knob)
Turns the UH-100 power ON or OFF and adjusts the volume.
Squelch Control (Outer Ring)
Eliminates background noise in the absence of an incoming signal.
4. PUSH-TO-TALK(PTT) SWITCH- Press to transmit and release to receive.
5. TONE CALLCONTROLBUTTON- Press to transmit SELCALLcodes, also used
to access TX SELCALLIDprogramming.
6. DUPLEX/ LCD BACKLlGHTControl
a. Duplex Operation
Press this button momentarily to choose semi-duplex operation for Channels 1
through 8.
b. LCD Backlight Control
Press and hold this button to change the LCD backlight level BRIGHT
- DIM- OFF.
7. OPENSCAN/GROUP SCAN CONTROL(OS/GS) - Switches operation between
OPENSCANand GROUPSCANMode.
3
8. SCANCONTROL(SCN)- Press to activate Normal OS/GS scanning or press and
hold to enable Seek Mode OS/GS Scanning.
9. MEMORY CONTROL (MEM) - Places channel numbers into the memory scan list
(OS or GS).
10. AUDIO SCRAMBLER I TONE SQUELCH CONTROL - Controls access to audio
scrambling feature and Tone Squelched operation (Quiet Mode).
Indicators
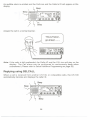
6
TS~
GS
Cl Cl Cl Cl Cl Cl
PRI
SRF...1
I SC
DDD.DDD,MHz
' I'
~
m
CA:JMEM
DUP f
I11~
~
~
~
I
11 1
~
11. Channel Indicator
- ,Indicates the channel number currently selected. On TX
SELCALL usage the Channel Indicator becomes a Memory location indicator.
12. Scan Indicator (SCN) - SCN icon appears when Normal Scan mode is activated.
When Seek Mode Scanning is selected the SCN icon blinks.
13. Priority Indicator (PRI) - Indicates that Priority channel is active when continuously
lit or Flashes when it is regularly being checked for activity while GS scanning.
14. Frequency I SELCALL ID Indicator - Shows the frequency of the current selected
channel. The Frequency Indicator changes to SELCALL ID display when using the
SELCALL feature.
15. RECEIVE SIGNAL I RF LEVEL Indicator (S I RF) - Indicates the relative signal
strength level when receiving (S) or the relative transmit power (RF) when
transmitting.
16. DUPLEX
selected.
Indicator
(DUP) - The DUP icon appears
when duplex operation
is
17. TRANSMIT Indicator (TX) - TX appears when the PTT button on the microphone
is pressed and the radio is transmitting. The RF icon also appears at this time.
18. CALL Indicator (CAL) - The CAL icon appears when the UH-100 radio is called
using SELCALL. It also appears when SELCALL codes are being transmitted.
19. SCRAMBLER
Indicator
(f)
- The f
icon appears
when the Voice scrambler
is
activated.
20. MEMORY Indicator (MEM) - MEM appears when the displayed channel is
programmed either in GS or OS Memory.
21. TONE SQUELCH Indicator (TSQ) - The TSQ icon will appear when the selected
channel is set to operate in Quiet Mode, or flashes when the radio is called using
SELCALL.
22. GROUP SCAN Indicator (GS) - The GS icon appears when Group Scan Mode is
activated. Open Scan is indicated by the absence of the GS icon.
4
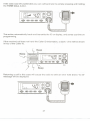
Connectors
FrontPanel
23. MICROPHONE SOCKET
The microphone plug is inserted into this socket.
Back Panel
0
0
~
6
24. EXTERNAL SPEAKER JACK - Used for remote receiver monitoring. When the
external speaker is connected, the internal speaker is automatically disconnected.
The connecting wire must use a 3.5mm miniature plug only.
25. ANTENNA CONNECTOR - Connect the Antenna here using a PL259 type
connector.
26. DC POWER CORD - DC power is connected to the transceiver through this jack. A
power cord is supplied with the transceiver.
5
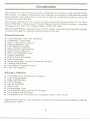
Introduction
The Uniden UH-1 00 UHF two way radio is designed to provide you with years of trouble
free service. Its rugged components and materials are capable of withstanding harsh
environments. The unit may be mounted in several convenient locations using the
universal mounting bracket.
You can be confident in your choice of radio equipment because the UH-100 offers
built-in SELCALL, Wide Liquid Crystal Display, Back-lit Control buttons, complete
coverage of the UHF CB Frequency Band, and much more.
We are certain that you will enjoy your UH-1 00. Please read this operating guide carefully
to ensure you gain the optimum performance of the unit.
General Features
.
.
.
.
.
.
.
.
.
.
.
.
.
.
.
Full Coverage of the UHF CB Band
5 Watt Max. Transmitter
Built - In SELCALL Feature
External Speaker Jack
Full Frequency Display
Wide Liquid Crystal Display
Back-lit Control Buttons
Multi LCD Backlight Level
Duplex Capability
Built-In Voice Scrambler
Open Scanning
Group Scanning / Priority Channel Monitoring
Channel Seek Mode
Push Button Channel Control
Front Fire Speaker
SELCALL Features
.
.
.
.
.
.
.
.
.
.
10 TX SELCALL ID Memory Locations
User Programmable
Caller Identification
Full ID Display
Last ID Re-SEND
Return Call
Acknowledge Tone
Tone Squelch Mode (Receiver Quieting)
Tone Squelched Scanning
Compatible with most SELCALL equipped radios in the market.
Specifications, features, and availability of optional Accessories are all subject to change
without prior notice.
6
Included with your UH-100
UH-100 Owner's Manual
Microphone Hanger, Screws
and Washers
@@
@@ ~~
~~
~
Mounting Bracket, Knobs,
Rubber Washer, Washer Stars
and Screws
=f
DC Power Cord with Fuse
Warranty Registration Sheet
7
Operation
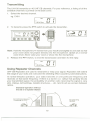
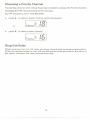
Setting the Squelch
1. To turn the unit ON, rotate VOLUME clockwise.
Adjust volume to a comfortable level.
Note: You must select a channel which is not in use before setting the SQUELCH
control on your radio.
2. Think of the Squelch control as a gate. If you turn SQUELCH fully clockwise it
raises the "Squelch Gate" so high that no signals get through.
~~i
~IY
Strong Signals
Medium Signals
~
Weak Signals
Noise
3. If you turn the SQUELCH fully counterclockwise it lowers the "Squelch Gate" so
that everything gets through - noise, weak signals, and strong signals.
..
..
..
..
..
..
..
..
..
Strong Signals
Medium Signals
~
Weak Signals
Noise
.
8
4. To set the "Squelch Gate" to the desired level, turn SQUELCH counterclockwise
until you hear noise. Then turn the SQUELCH clockwise just until the noise stops.
Now only strong signals get through.
..
..
Strong Signals
.
Medium Signals
~
Weak Signals
Noise
~I
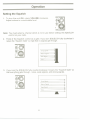
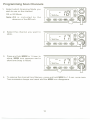
Selecting a Channel
1.
When you turn on the UH-1 00, the last channel used will appear on the LCD display.
egoCH01
I1I8IkB1~UH"oo
s
()()~~~~~()
()~~~~~~~
()~",~~~
()~~~~~~~
~
()()~~~,~()
2a. Press'"
Lt t
OO~<B>
[~
()()()()()()
,-, '
'f75.'fi'SlofHz
1~15Q)
1
~
~
~
to select a higher channel.
- or -
I8IkB1
~
UH-,00
()()~~~~~()
()~~~~~~~
()~~~,~" II
()~~~~~~~
()()~""()
()()()()()()
[
,-,-,
-
s
'f75.'fSOIofHz
LtL
(~ @ W ~
-
TSO
0MI8
2b. Press T to select a lower channel.
I8IkB1
~UH-'oo
()()~~~~~()
()~~~~~~~
()~~~,~"
s
I
I
I
'f71'fOOIofHz
()~~~~~~~
()()~~~~'()
[~)
() () () () () ()
l
TSO
~ ~ ~
Channel Auto Step
To quickly
change channels, press and hold ~ or ... . This changes channels at 10
channels per second.
Note: A short tone sounds when you press either ~ or... and the channel changes.
Another tone sounds when Channel Auto step begins.
9
Transmitting
The UH-100 transmits on 40 UHF CB channels. For your reference, a listing of all the
available channels is printed on the back cover.
1.
Select the desired channel.
ego CH01
UEU
s
I{
76.1{t?5MHz
,-, ,
LI I
2. To transmit, press the PTT switch to activate the transmitter.
..
.'116.'1('5....
m
MEAl
1
RF
I{ 76.1{t?5MHz
,-,
LI
,
I
<e>
TSQ (!D <aDS
Note: Hold the microphone 2-4 inches from your mouth and slightly to one side so that
your voice does not project directly into the microphone. Speak at a normal
voice level. Never raise your voice or shout into the microphone.
3.
Release the PTT Switch, to end the transmission
Mal
s
I{ 76.1{t?5MHz
,-,
LI
and listen for the reply.
,
I
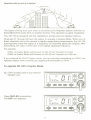
Using Repeater Channels
UHF CB Repeaters are used to retransmit or relay your signal. Repeaters will extend
the range of your radio and overcome the shielding effect caused by solid obstructions.
In normal Simplex operation, your radio transmits on one particular frequency and
receives on that same frequency. If there is a barrier (Le. valley) that partially blocks
your transmitted signal, the probability of another radio receiving the signal is very
slim. Valleys, tall buildings, metallic structures, ... etc. tend to act as a screen between
radios.
Standard Operation without
the aid of a repeater Station
""""'-..
Normal Simplex operat~
Transmitting on CH 01
\
No si~nal being
Received
'\
'
10
Operation with the aid of a repeater
The Signal coming from your radio is received by the Repeater Station and then retransmitted at the same time on another channel. This operation is called "Duplexing".
Your UH-100 is designed withthe capability to access and use repeater stations.
Channels 01 through 08 have the option to operate in Duplex Mode. When any of
these channels are set to operate in duplex mode during transmission, the UH-100
automatically sends the signal at a frequency 30 channels above the original. After
transmitting, the radio reverts back to its original operating frequency.
For example,
CH01 on DuplexMode willReceive on CH 01 but Transmit on CH31
CH02 on Duplex Mode willReceive on CH 02 but Transmit on CH32 etc....
If you transmit on CH01 Duplex mode, you are actually transmitting on CH31, the
repeater station down-converts your signal and retransmits on CH01.
To operate UH-100 in Duplex Mode,
ego CH01 is being used in your area for
repeater use.
MEM
s
I.{ 70.1.{i'5MHz
,-,
,
.-4
lelIEU»)«(!2!» [(~)
AlEAI
DUP
S
'I7Ei'li'5MHz
11
eCKF
~
«(-;:'»
Press DUPLEX momentarily.
The DUP icon appears.
~@
LI I
,-,
..
,
LI I
~@
eCKF
Whenever you press the PTT Switch the UH-100 frequency display changes to CH31
frequency.
iD
MEM
ex;.....
'I 77.
17 5 MHz
,-,
LI
~
~@
.
,
I
@~
~
~
~
([~)
(@D)
Press DUPLEX again to deactivate the Duplex Operation. UH-1 00 will return to Simplex
operation.
ItIEM
s
'I 76.'Ii'5MHz
,-, ,
LI I @
~@
12
OfF
Scanning
The UH-100 has a scanning feature that allows you to search for active channels
automatically.
Furthermore, the UH-100 is designed to have two types of scanning; Open Scanning
(OS) and Group Scanning (GS), to give you flexibility and allow you to use the radio
more effectively.
To initiate scanning.
1.
Assuming the unit is on CH 17 when switched on.
, -,, ~@
~
MEM
s
l{ 75.825MHz
OFF
~
--
~
,
((saIAMBl£» ((~EM)) ((~»)
«0&135»)
~
TSQ
2.
'T'"
Press SCN and Scanning starts.
MEM
saN,=g,-,
,"""
§J@
~
, I- ,
'""",
~
~
~
~Q
- 'T'"
-~~~
OFF
1. Open Scan (OS) Mode
Allows continuous scanning of channels stored in the
Open Scan memory. If an active channel is found,
scanning will stop on that channel.
" ,-,
l{71l{aaM~" - ,
MEM
S ...11 SCN-
Example. CH40 becomes active.
If the received signal ceases, the unit will wait for at
least 3 seconds for the signal to return, otherwise
scanning resumes.
" ,-,
l{71l{aaM~" ~- ,
S
MEM
saN-
~
To skip the active channel, press MEM momentarily.
Scanning resumes.
'=0,-,
MEM
saN
0,=' ,eD
-'
To deactivate SCAN, press the SCN switch or the PTT Button.
Note: If SCAN is deactivated while in an active channel, the UH-100 will stay on
that active channel. If no other channels are active, the UH-100 will reinstate
the starting channel.
13
2. Group Scan (GS) Mode
Allows you to monitor a Priority Channel while scanning.
MEMGS ,'<E71,-,
-=,-,
To use GS Mode Scanning, press the OS I GS key.
GS icon appears on the display. OS Mode is indicated
by the absence of the GS icon.
SCN
0'" ,=
~
GS Scanning checks the Priority channel activity
regularly.
If the Priority channel becomes active the radio will stay
on that channel for as long as the signal is present. If
the received signal ceases, Priority scanning continues
after 3 seconds.
If scanning stops on a channel which is not a Priority
Channel, UH-100 will continue monitoring the Priority
Channel for activity while listening to the active one.
, -,
MEM
GS
SCN
PRI
, ,
, -,
MEM
I as
S
SCN
, ,
I{ 75.825MHzPRI
1
MEM as
S
SCN
, ,,-,
"'
1{711{OOMHz" -
~
egoCH40 becomes active.
MEM
S
as
SCN
I{ 75.825MHzPRI
,
, -,
, ,
To deactivate SCAN, press the SCN key or the PTT Switch.
Note: If SCAN is deactivated while it is tuned at an active channel, the UH-100will
stay on that active channel. If none of the channels are active, the
UH-100 willreinstate the Prioritychannel.
If GS Scanning is initiated when there are no channels programmed in GS
memory,
an error tone will be heard and scanning
14
will not start.
Choosing a Priority Channel
The starting channel, when Group Scanning is initiated, is always the Priority Channel.
Changing the PRI channel setting while scanning,
ego PRI Channel is CH17 (476.825 MHz)
a. press"",
to select a higher channel (scanning pauses)
- or b. press"',
S
GS
BCN
"I
75.8SGMHz
PR,
,C,
to select a lower channel
GS
S
"I
Drop-Out
,,-,
SCN
75.8GGMHz
PRI
, ,-
,
,-'
Delay
While scanning, the UH-100 stops at a busy channel and receives a transmission.
When the received signal is over, the unit will wait for three seconds for the return of
the signal, otherwise, the radio resumes scanning.
15
Programming Scan Channels
1. Select which Scanning Mode you
wish to use on the channel.
GS
S
OS or GS Mode
&176.85OMHz
.
Note: OS is indicated
by the
absence of the GS icon.
,,-, ~@
, ,-,
-
re~
~
'~
~
([§:»
~
2. Select the channel you want to
store.
GS
S
I{
~
76.8i'5MHz
~
(~)
TSQ
3. Press and hold MEM for 1.5 sec. to
store. MEM icon appears and a
short tone beep is heard.
((]ID)
ME",
GS
S
&I
76.8i'5MHz
~
l@!D)
, -,, ~@
,
re
OFF
~
~"'6~.
4.
To remove the channel from Memory, press and hold MEM for 1.5 sec. once more.
Two successive beeps are heard and the MEM icon disappears.
16
Channel Seeking Operation
Unlike normal scanning, CHANNEL SEEK is used more often when checking for active
channels.
If a signal is detected, while seeking, the UH-100 will tune to that signal for 4 seconds
only and then resumes Seeking Operation.
Changing from SCAN to SEEK Mode operation.
-,,SCN-
1. Firstly, activate SCAN mode.
MEM
I{71300MHz_,
2. Press and hold SCN until a "beep" is heard. The SCN
icon starts to flash.
MEM'y
£
LI
-r'~I ,-,
Pi\CI Cl
3.
If an active channel is detected the UH-100 will stop on
that channel for 4 seconds. (eg. CH17)
"'EM. ,-,
s ...II)~
I{ 76Bt?5MHz
4. After 4 seconds, the UH-100 will start seeking again
for active channels.
'
I
I
MEM
'y~ "=1 ,-,
;sr:.CI Cl
5. If you find the channel interesting, simply press either
the PTT switch or the SCN key to stop the operation
before the 4 second timer elapses.
m
MEM
RF...11
I{ 76.850MHz
, ,-,
I I-'
-
When SCN is pressed again SEEK is still the mode of operation.
To change back to SCAN, while SEEKING. press and hold
SCN until a beep is heard. The SCN icon stops flashing.
MEM ,-, ,-,
SCN
Cl Cl
Note: SEEK checks the same channel stored in SCAN memory. Thus, you can Seek
either in OS or GS Mode.
17
Voice Scrambler
UH-100 has a built-in scrambler / de-scrambler
circuit.
The Voice Scrambler feature prevents users, without the necessary descrambler
equipment, "understanding" your conversation. This feature is NOT operable on CH01
through
CH08, CH31 through CH38, and CH11, and will only work between
units
with the voice scrambler feature compatible with the Uniden UH-100.
To activate the audio scrambler, select an available channel for audio scrambling.
egoCH10
Press SCRAMBLE, the'
icon appears.
,
MEN
s
1.{76.6SGUHz
,,-,
ILl
Transmit in a normal fashion.
fEI
MEN
RF!..II
I.{ 76.6SGUHz
, ,-,
ILl
To deactivate press SCRAMBLE again. The Lightning icon disappears.
MEN
s
I.{76.6SGUHz
, ,-,
ILl
Be "Polite" when using this feature. Use this feature when the communication
link is already established and only when needed.
Note: The Audio scrambler and the SELCALL functions cannot be operated
simultaneously.
18
LCD Backlight Level Control
The LCD backlight level can be changed to BRIGHT, DIM, or OFF.
To change the level simply press and hold the DUPLEX key for more than 1 .5 seconds.
IIEII
5
, ,-,
ILl
I..f 75.5SGMHz
re
To change further, press and hold DUPLEX again.
f
'
I
MEM
~ 75.5SGIIHz
,,-,
I LII
,
.18.
19
~@
OFF
Selective Calling
When you listen to UHF CB you will hear all the conversations going on, which can
become annoying at times. Ideally you need a system that alerts you when the signal
is from someone you wish to communicate with.
You want your radio to be SELECTIVE about the people you talk to!
That's what the Uniden UH-100 offers, with SELECTIVE CALLING, commonly known
as SELCALL. It lets you know that the people you want to talk to are calling.
To achieve this each radio must have a SELCALL ID.
This SELCALL ID acts as a "Phone Number" and your radio as a "Mobile Phone".
Everybody in your group must have a different "Phone Number" that only your group
members should know. If one of your members dials your "Phone Number", when
reached successfully, your "Mobile Phone" of course will "Ring", and your caller will
hear a "Ringing Tone".
This "Ring" is actually a CALL Alarm, and the "Ringing Tone" is an Acknowledgment
Tone. Any user tuned to your UHF CB channel will hear the conversation.
UH-100 Selcall Features
. UserProgrammable
UH-100 SELCALL ID
. 10 Transmit SELCALL ID Memory
.
.
.
.
.
.
.
.
Full ID Display
Caller Identification
Acknowledgment Tone
Auto Caller ID Load and Reply (Return Call)
Last ID Resend
Tone Squelched ChannelScanning
All SELCALL Parametersare User Programmable
ReceiverQuieting (Tone Squelched Mode)
Note: You only give your Selcall code to people who you want to be able to get in
touch with. Likewise you need to know their Selcall codes to be able to contact
them. Other users in your SELCALL family may not be using Uniden radios, the
Uniden UH-100 can be programmed to have full compatibility with other brands.
Please read the selcall advance programing section of this manual for guidance.
The Audio scrambler
simultaneously.
and the SELCALL functions
20
cannot be operated
This is UH-100 Calling.....
The UH-1 00 is shipped from the factory with a SELCALL ID setting of "00000". Refer to
the Advance Section on page 32 for details on how to change/customize your UH-100
SelcalllD.
Making a Call
To make a call, press and release the TONE CALL switch on the microphone.
II~+
@
t.,- f@
e
-
MEM
5
nnnnn
uuuuu
l
1
OFF
.--n
~
~ T60
~j)
((~)) ~
~.
~
The last used SelcalllD will be displayed.
(If you have never used the Selcall feature
00000 will appear.)
Press the MEM switch on the UH-100 and
the last digit of the SelcalllD will flash. This
indicates that you can now start to enter
the Transmit SelcalllD code.
nnnnn
uuuuu
nnnt?A'
uuuu.u
LdmJ
- I,-
-
- ,f-
The flashing digit is the one you can program.
To select the digit you wish to change use the ~ / SCRAMBLE or ~ / DUPLEX to move
the position.
~@
:rl
I D°tWR
.
~
I
OR
~OFF
~
~<aD~.
21
\4
OfJooa
- ,f-
To change the flashing digit use the Channel"" and"
OR
IDD~P
4
buttons.
r:;
ood;
--~
~~~~.
- L'-1 ~@
\I e
((~)~~~.~
When completed, press and hold the TONE CALL button to send.
fEI
CA!. MEM
1
RF
1i'3&fS
"-,
ILl
4
~
.
~I.@
e
.
~
If~))~l~)
This ID will be stored in the Last ID Transmitted
buffer. Every time the Tone call
button is pressed the last ID will be shown. To transmit the ID again, simply press and
hold the Tone Call button once more.
When the called radio is successfully reached an Acknowledgment
Acknowledgment
Tone will be received.
Tone
The UH-100 automatically acknowledges all the Selective Calls it receives, thereby
advising the caller that it has been contacted successfully.
Three Iow tone beeps characterise
the UH-100 Acknowledgment
22
Tone.
10 SelcalllD Memory
The UH-100 has a special 10 memory location, which stores the Selcall identification
(ID) codes of users in your group. This section tells you how to program the SelcalllD
memory .
Press and release the TONE CALL switch on the microphone.
f13CALIIaI
RF
.....
1t?1'fS
~
, ,-,
ILl
...
~~~~
TSO
- ,-
The last used SelcalllD will be displayed.
(If you have never used the Selcall feature
00000 will appear.)
Use the channel"
DDDDD
L
00000
and ~ buttons to select the Transmit Selcall Memory location number.
-
- '-/ II ~
OR
4
...
~@~~
~
T8Q
Press the MEM switch on the UH-100
and the last digit of the Selcall ID will
flash. This indicates that you can now
start to enter the Transmit Selcall ID
code.
~
auuo.Q.
nn~;f
.
LI.
DDDDD
~
<e
~
{9)
~~
j'-:;
P'MK:
- ,-,
LI
The flashing digit is the one you can program.
To select the digit you wish to change use the / SCRAMBLE or ~ / DUPLEX to move
<Ill
the position.
DDdhi
,-,
LI
OR
-.
...~~~
23
\.\.
PODDD
- ,-,
LI
To change the flashing digit use the Channel'" and ~ buttons.
,-,
- I1
-
,1./
000.I,
..
OR
I
~
(~)
I~
~
~
~
- LI,-, 11
~ ~{g)
000/;0
I
$> TI
~~~
I(~I
When completed, press MEM to store.
You repeat this process to store Transmit
locations of your UH-100.
Selcall
ID's into the remaining
Transmitting ID from Memory
The procedure is very much the same as explained in making a call.
Press the TONE CALL button.
MEM
s
1t?1'1S
-
,L
..
~I~
;J
~~~(~)
11IQ
The LCD Frequency display changes to
show the last ID transmitted.
Using the channel.
[]
or . , select the desired memory location.
OR
Ot?'I]5
..
-
ft?J"IS
0 lIlt?
..
(~)~~I~)
11IQ
~
'-~)~~~.
24
- ,-,
LI
.
memory
Once located, simply press and hold the TONECALLbutton to send.
..
ea<~~
- .a
,,,-,
RF...II
-" ,
m eN-
40,"136
~ OO~~
Press and hold
I
9>
The IDthat is sent becomes the Last ID Transmitted. Every time the TONE CALL
button is pressed this ID will be shown. To send the ID again, simply press and hold the
TONE CALL button.
Receiving a Call
When a Call is received from another UH-100 or Compatible
radio,
12345
Z
""NN
NIl""
"""'1
I"NIN
~=Il
~
=~
00000
"_1
NI"NI
I====W0 0000
ID: 23456
ID: 12345
the UH-100 will automatically
~
transmit an acknowledgment
Beep, Beep, Beep
z..
"""'1
~=I
~
0
~I~
,.,-/
IIINlN
1'1"11"11
""111'1
tone.
0000
~
\----
-~
,..""00000
=
--
An audible alarm is emitted and the Call icon and the Caller's ID will appear on the
display.
'F;
~~~~~~~~
tJ""",
Beep
f.ti.t~~.. * ,_,,-,
,LI ~ 0
Il
11
-mS6
tJ~~"~~,
J~~~r::
0
g
1 ?Q)
...
~ e'
Answer the call in a normal manner.
This is Falcon,
go ahead ........
Note:
If the radio is left unattended,
the Caller ID and the CAL icon will stay on the
display. The Call alarm can be con figured to continuously beep when
unanswered. (Please refer to Selcall Advance Programming on page 32)
Replying
using SELCALL
When a call is received from another UH-100, or compatible radio, the UH-100
automatically decodes and displays the caller ID.
Beep
~ ~;/
"- ""'",,-If
~.)f.1
I ,-,
~ :;~'Z,;~l
tJ""",
-iJ'IS6
,LI
;J""",
1+-f
tJ~,~""
Il
I
I
J~~~=e
26
~
~
~~-
If the radio was left unattended you can call back later by simply pressing and holding
the TONE CALL button.
'-' ,-,
fEl CIIL
RF.....
t?]'fS6
ILl
~
~~~~
TBQ
This action automatically
programming.
loads and transmits the ID on display, and saves you time on
If the received call does not have the Caller ID information, a dash (-) line will be shown
in lieu of the Caller ID.
~-l~ep
-
Beep--
~(;'~~~~~~
~ ~~~~~~~~
~~~~~~~~
11
,
,
11
~~~~~~~~
GAL
s_-H-
~"- ,-,
, LI
}~~~~~
GD
e
Returning a call in this case will cause the radio to emit an error tone and a "no id"
message will be displayed.
S
.l'Io,d.
+
'-' ,-,
ILl
oil
<ea>
TSO ~~(~)
27
Group Calling
Most Selcall users will have several members in their group. It is possible that everyone
in the group needs to be alerted at the same time, for example when an emergency
situation occurs. Calling them one by one can be inconvenient and time consuming. It
is possible to create a special code that will be recognized by every radio in the group
when transmitted. Your UH-100 incorporates this feature known as Group Calling.
The UH-100 has the capability of being owner programmed to Group Call within groups
of 2 to 10,11 to 100,101 to 1000 or 1001 to 10000 radios.
While you were setting SelcalllO numbers to be sent, you may have noticed the letter
"A" appeared on the LCO from time to time. This letter has a special application. When
added in your code to be transmitted, it tells the UH-100 that the call is a Group Call in
nature. Note that you have to follow a special format to make a Group Call.
To make a Group Call work all members of the group must have Selcall ID's in a
numerical sequence. e.g. group of 10 users may have the following SelcalllO's:
23450
23451
23452
23453
23454
23455
23456
23457
23458
23459
f13
To be able to Group Call all the other 9 radios in your group of
10 you would need to transmit the code 2345A.
GAL
SRF
1
~:JI{SR
'-' ,-,
IL'
ALL radios with 2345 as the first 4 numbers of their ID Code will be alerted.
Using the first four digits followed by "A" is suitable for calling groups of 2 to 10 radios
as shown above.
The first 3 digits followed by "AA" is for 11 to 100 radios. (eg 234AA)
The first 2 digits followed by "AAA" is for 101 to 1000 radios. (eg 23AAA)
The first digit followed by "A" is for 101 to 10000 radios. (eg 2AAAA)
You can still call any of the individual members of your group, without calling all the
others, by programming the individual's SelcalllO into a separate memory location.
e.g. You have your group call code (2345A) in memory location 5. You want to be able
to call unit 23453 outside the group so you store 23453 in memory location 3.
The UH-100 differentiates
beeps.
group calls and individual calls by emitting different alarm
For Group Calls the alarm beepwill
will be a high tone.
be a Iow tone and for individual tone calls the beep
Note: When
you transmit a Group Call you will not receive acknowledgment
from the other radios as you nonnally do with individual tone calls.
28
tones
Tone squelch (Receiver Quieting)
Receiver Quieting, or Tone Squelch (TSQ), is actually SELCALL in action. The UH100 receiver is muted and you cannot hear any signals until the mute is disengaged by
reception of your Selcall code.
Refer to page 8 for explanation
of how the squelch system works.
The Squelch discussed previously "screens" the received signal level, however in tone
squelch mode, the squelch monitors the signal for your ID.
1. The Tone Squelch Control acts as an electronic lock. Activating the Tone squelch
closes this lock.
Regardless of how strong the received signal is, if it does not have the required
"electronic key" the gate will remain closed.
NoKey
~@
Received Signal
2.
If the received signal contains
electronic lock will open.
the required
key (which is your Radio ID), this
The muting circuit is then deactivated on your radio and advises you that a call has
been received.
Electronic Key
~6!J
..
..
Received
..
..
..
Signal
.
..
....
Activating the Tone Squelch (Receiver Quieting)
1. Select the channel you want to put into quiet mode using the channel selector
switches.
"-/II ~
"EM
5
'176.6
ml,-
ILl
sa"""
~
((~)~~~~
TSQ
~
~
)
""'r'
-:;;
"'tI
"""'IC
2. Press the SCRAMBLElTSQ button for about 1.5 seconds. One beep is heard and
the TSQ indicator appears on the display. This channel is now programmed to
operate in Quiet Mode.
5
"EM TSO
'I 76.6S01AHz
~
I ,-,
f8
I LI
~
.
~
~
~~~~
When a quiet mode channel is selected the TSQ indicator appears on the display. The
microphone PTT is disabled on that channel until a signal with your SelcalllD is received.
All other channels can be used as normal.
3.
To deactivate any channel in quiet mode first select the relevant channel.
Press the SCRAMBLElTSQ button for about 1.5 seconds. Two beeps are heard
and the TSQ indicator disappears from the display.
Receiving Calls when in Quiet Mode
The UH-100 will respond in the same way in quiet mode as when it is called while in
normal mode.
When the call is left unanswered, however, the radio automatically resumes the quiet
condition. (The auto - quiet mode function can be switched ON or OFF, please refer to
the Selcall Advance Programming section on page 32)
30
Tone Squelch Scanning
You may wish to limit your scanning activities so the UH-100 will only scan the channels
you have pre-arranged to use with your SELCALL family. These are the channels you
have programmed as TSQ or quiet mode.
Tone Squelch Scanning applies this function.
To activate this feature firstly initiate SCAN.
MEM
BCN
"=1,-,
,-" ."".
,
--
~
~
e
CH
@
~
~~_.
Then press SCRAMBLEITSQ.
TSQ
BCN
~
eCH
,-, ,-,
~,-'
,- ,"""
@
~
~~~.
When a call is received the unit will pause scanning and an audible alarm is emitted.
If left unanswered the radio will resume Tone Squelch scanning. The UH-100 can be
programmed to deactivate scan automatically when a selective call is received. Please
refer to the Selcall Advance Programming Section.
To deactivate Tone Squelch Scanning,
simply press SCN key.
31
SELCALL Advance Programming
The Sundowner UH-1 00 radio is fully user programmable. It gives you the freedom to
select your own radio ID, configure the radio's response when a call is received, change
SELCALL parameters for compatibility with other UHF Radio brands, plus much more.
Please read the following procedure carefully to understand the full SELCALL capability
of this radio. This will enable you to utilize the SELCALL to maximum effect.
Since the following items are NOT frequently changed, and are characterized as highly
significant, a special accessing procedure has been developed to prevent accidental
changes or programming.
To access the SELCALL
Parameter Programming
mode.
First, switch OFF the radio.
Press and hold the OS/GS key and switch the radio ON simultaneously.
(
~
-~
.
(~
~
«...~
The radio will switch ON in the programming
Mode.
~@
150'- I
L Cl
~
Cc""""'» (~)
TSC
----
ccocc
(cID)
(@ID)~
.
a
'"T'"
32
~F
The illustration
below outlines the user programmable
Once inside the programming
parameter menu.
mode, use the .& or T to scroll on the menu.
Press MEM to select. Change the setting using the .& or T key. Press MEM again to
store and exit.
Programming Start
Radio ID
Programming
Tone Period
Programming
Caller ID
Decoding
Group Call Mode
Programming
Lead-In Delay
Programming
Alarm Mode
Programming
Lead-In Tone
Programming
Press and Hold the OS/GS Key again OR switch the radio OFF then ON to exit this
mode.
33
Radio ID Programming
To program your own Radio ID, perform the following procedure.
From the main menu, using the... or T key, go to the Radio ID Programming Menu.
(If you have never changed this parameter, the Radio ID 00000 will be displayed)
.
C-JI
1IQ
Press the MEM key to start programing. The last digit of the Radio ID will flash. This
indicates that you can now enter your new Radio ID.
The flashing digit is the one you can change. To select another digit, use the ~ or ~ to
move position.
IS
TSQ
,- -I
DDDQlK
4
CH
L LI
@
~
~~S>
To change the flashing digit value, use the... or T key.
When completed, press the MEM and the new Radio ID will be stored into the memory.
34
Tone Period Programming
Tone Period is the duration of one tone in a SElCALL ID sequence. The setting of this
parameter depends on the application. On long distance communications, where the
signal strength of the transmitted information is greatly reduced and affected by noise,
it is advisable to use a longer tone period. A long tone period gives the decoder more
time and information to check and evaluate the code.
Important Note: Ensure all radios in your group use the same tone period setting,
otherwise, you will not be able to selectively call one another.
To change the Tone Period setting.
From the main menu, using the... or T key, go to the Tone Period Programming
(If you have never changed the Tone Period, the default setting is 40 mSec)
TSO
..
DIID
(C ol
T8Q
,-, '
Menu.
~
,- Cl IIi~
+~Pn.c
~~~
Press the MEM key to start programming. The Tone Period on display will flash. This
indicates that you can now change the setting.
TSO
,-,
.-.'-,
.'".Mo"
..
e
I
CH
,- Cl ;;
.
~~~~
To change, use the... or T key.
You can select either, 40,70, 100
or 20 mSec.
"
When completed, press the MEM to store
the new Tone Period setting into the
memory
I
.
l ~q~q,
~~'~"
7SQ
':' -'
,
7SQ
,-, ,
,- ,-,
-
. .
'"0£'0'.'. -.,
L
35
1
'
7SQ
~.
.
~o7d"
. - ."
7SQ
, ~!M:
LI
,-,
,- LI-'I
..I
,-, ,
,- C,
Lead -In Delay Programming
Lead-in Delay is a SELCALL transmission parameter that "wakes-up" and helps the
receiver of the other radio to lock onto the incoming signal. Each time a SELCALL ID
is transmitted, the Lead-in Delay attaches itself to the beginning of the code sequence
and causes the transmitter to be on for a longer period prior to the code transmission.
This makes for a stronger communication link between the transmitter and the other
receiver.
The major advantage of having the Lead-in Delay longer is when selectively calling
another radio via a repeater station. A long Lead-in Delay helps to stabilize both the
communication link from your radio to the repeater station and from the repeater
station to the other radio.
To change the Lead - In Delay setting.
From the main menu, using the.. or ~ key, go to the Lead - in Delay Programming
Menu. (If you have never changed the Lead - In delay duration, the default setting is
500 mSec)
Press the MEM key to start programming. The Lead In Delay on display will flash. This
indicates that you can now change the setting.
~Md"
-.. ."
rsa, - I
L LI
~
~
~~e
36
sCH
a
To change, use the
or 4000 mSec.
or T key. You can select either 500,1000,2000,3000
When completed, press the MEM key. The new Lead - In Delay stops flashing and is
stored in the radio memory.
To return to normal operation, press and hold the OS/GS key for about 1.5 seconds,
or, press either the or T key to go to the next programmable parameter.
rl
rsa,
~i ~
.
~PIJ~
rsa
" Dolt
I';J- -...
Lead
'
TSO,
"'~iJ""
.~~oo...
L Cl
,
~. 4.1'
I>PlJq...
L Cl
, '
L Cl
I'
1-
lY.op~
rsa, -'
,- LI
...
TSO,-'
,- LI
-In Tone Programming
The Lead-In Tone when programmed, rides on the "Lead in Delay". When transmitting
a SelcalllD a continuous tone will be heard for the duration of the Lead In Delay.
The main function of the Lead - In Tone is to increase the probability of contact between
radios when Tone Squelch Scanning.
Unlike normal scanning, TSQ Scanning monitors the detected carrier for the presence
of Lead - In tone. Without it, TSQ scanning resumes.
If a Lead - In Tone is present the UH-100 will lock onto that signal and wait for the
SELCALL ID.
You can program the UH-100 to lock onto a particular Lead
enables the radio to immediately
your group.
- In Tone. This feature
recognize whether the signal present is intended for
i.e. If you are using Tone 1, your radio during TSQ scanning will lock only onto signal
with Tone 1 as its Lead - In tone.
Note: Should you wish your radio to lock onto any transmission
tone type present select "Tone - - ".
37
regardless of Lead-In
To change the lead-In Tone setting.
From the main menu, using the A or ... key, go to the lead-In Tone Programming
Menu. (If you have never changed the lead-In delay duration the default setting is
Tone 1)
ronE-I
-.
IC--»)
I~)I (@
TSQ
~~)
Press the MEMkey to start programming.
The lead In Tone on display willflash. This indicates that you can now change the
setting.
rsa, ,ront!~
CH
L I
~
a
e
~'
~~~..
To change, use the A or... key. You can select any Tones 1 to 9, A to For "- _".
When completed, press the MEMkey. The new lead-In Tone stops flashing and will
be stored in the radio memory.
To return to normal operation, press and hold the OS/GS key for about 1.5 seconds,
or press either the A or ... key to go to the next programmable parameter.
rsa, ,rlrD"E(:
:m
ronE .:l!:
..
L
L I
I,
rsa,
ronE
I
L
"'i!
..
:IT]
r onE :<'
.
L
..
rsa,
"o'q'
I
ronER
-
,-
I
rsa,
"q'
I
,-
I
ronE_3
..
.
L
,I
..
rsa,,ronE"'IJ
L I
38
------
Alarm Mode Programming
The UH-100 has two types of alarm set-up.
Set-up 1: Auto-Resume (Default setting)
When a Call is received in,
i)
Normal Mode
The alarm will sound only for 10 seconds
ii)
Tone Squelch Mode
The quieting circuit will open for 20 seconds. If left unanswered Tone Squelch
condition resumes. The alarm will sound for 10 seconds only.
iii) Normal Mode / Tone Squelch Scanning
The alarm will sound only for 10 seconds.
If left unanswered, scanning RESUMES after 20 seconds. The CAL icon will be
continuously lit on the display indicating that a call has been received. To look for
the called channel, cancel SCAN and use the A or 'Y key. The called channel will
display a CAL when found.
Set-up 2: Continuous Alarm
When a call is received
i) Normal Mode
in,
The radio emits a successive beeping alarm for 20 seconds then two successive
beeps every four seconds continuously unless answered.
ii)
Tone Squelch
Mode
The Tone Squelch condition is cancelled.
The radio emits a successive beeping alarm for 20 seconds then two successive
beeps every four seconds continuously unless answered.
iii) Normal Mode / Tone Squelch
Scanning
Scanning is cancelled.
The radio emits a successive beeping alarm for 20 seconds then two successive
beeps every four seconds continuously unless answered.
Note: Should you wish your radio to cancel scanning when a SELCALL is received,
select the continuous alarm mode.
39
To change the Alarm Mode setting.
From the main menu, using the. or ... key, go to the Alarm Mode Programming Menu.
(If you have never changed the Alarm setting, the default setting is Auto)
Press the MEM key to start programming. The Alarm setting on display will flash. This
indicates that you can now change the setting.
~
TSO
,-"
I-' L II -i~
Ruro
~
((-.Q)
TSQ
To change, use the.
~
~
@.) (r~1 ~
~
~
I
~
""'MIC
or... key.
When completed, press the MEM key. The new Alarm setting stops flashing and will be
stored in the radio memory.
To return to normal operation, press and hold the OS/GS key for about 1.5 seconds,
or press either the.
or ... key to go to the next programmable parameter.
.i.
'nu,':
..
TSQ
,-, ,
,-,t.
..;
I.oi-n.41
".
...
TSQ
,-, ,
,-,t.
40
Group Call Mode Programming
There are two ways the Group Call Code is transmiitted.
The Uniden UH-100 can be programmed
to accept either format.
Group 1 setting recognizes a group call transmitted with equal tone period.
Le. Calling 100 radios, with a tone period setting of 40 mSec.
Group 2 setting recognizes a group call transmitted with the first Group Call Tone period
extended by 3 times the original tone period setting (this is also the default setting).
~
A~
40mSec
---+I I+I
-.j 120mSec
I+-
To change the Group Call setting.
From the main menu, using the... or ~ key, go
to the Group Call Mode Programming Menu. (If
you have never changed the Group Call setting
before, its default is Group 2)
GroUP-
TSQ
,-, -'
LI C
~@~..P
TSQ
Press the MEM key to start programming. The
Alarm setting on display will flash. This indicates
that you can now change the setting.
-
TSQ
",-, -,'
GroUP- LI L
4
I~I_~~
To change, use the... or ~ key.
When completed, press the MEM key. The new
Group Call setting stops flashing and will be
stored in the radio memory.
GroUP-
To return to normal operation, press and hold
the OS/GS key for about 1.5 seconds,
or press either the... or ~ key to go to the next
programmable parameter.
GroUP.
41
llel~~@
~
I""MIC
Caller ID Decoding
The Sundowner UH-1 00 radio uses a total of 10 digits when making a Selective Call.
The first five digit is the ID of the radio to be called and the last five digit is its own ID.
Some radios in the market use only nine digit. If any member of your group is not using
Uniden radio, a quick check of its operating guide will advise you the signalling format
it is using.
To change the Caller ID setting.
From the main menu, using the... or ... key,
go to the Caller ID Decoding Menu. (If you
have never changed the Caller ID decoding
set-up, the default is digit 10)
TSQ
d 1[;If~
~
TSQ
Press the MEM key to start programming.The
digit Indicator on display will flash. This
indicates that you can now change the
setting.
(~)
c@
((~))
B
TSQ ,,-,
d 1[; If.
CH
ILl
@
~
~
(~J) .~(~).
To change, use the... or... key.
When completed, press the MEM key. The
new Caller ID setting stops flashing and will
be stored in the radio memory.
To return to normal operation, press and hold
the OS/GS key for about 1.5 seconds,
or press either the... or ... key to go to the
other programmable parameter.
42
TSQ~'
d IG If
d IG If-
-
,,-,,4
. , L'
Service
Should you find it desirable or necessary to service your UH-100, we suggest you
contact the Uniden Dealer where your purchase was made. Your dealer will be able to
assist you with complete service information.
If you require service that is within the terms of your warranty you should present a
copy of your receipt to your dealer to authenticate your claim.
If you find it inconvenient to obtain service assistance from a dealer, please pack your
radio in a suitable container that will provide adequate protection. Enclose a note
describing the problem and a copy of your receipt, and send the radio transportation
prepaid to:
Uniden Australia pty Limited
Customer Service Division
345 Princes Highway
Rockdale NSW 2216
Ph. (02) 9599-3100
Fax (02) 9599-3278
43
Care and Maintenance
Notice
If the UH-100 has been subjected to extreme high temperature (above 60°C) for a
prolonged period of time, blackening of the Liquid Crystal Display (LCD) may occur.
This is not a fault. Normal LCD operation resumes when the temperature stabilizes
back to standard operating conditions (0 to 55°C).
Preventive Maintenance
The following system checks should be made every six to twelve months:
1. Check the Standing Wave Ratio (SWR).
2. Inspect the tightness of all electrical connections.
3. Inspect the antenna coaxial cable for wear or breaks on the shielding.
4. Inspect the tightness of all screws and other mounting hardware.
Troubleshooting
Should the unit malfunction or perform poorly, follow the procedures indicated below:
1. If the transceiver is completely inoperative...
* Check the power cord and fuse.
2. If there is trouble with receiving...
* Check the VOLUME control setting.
* Be sure the SQUELCH is adjusted properly. Possibly the radio is over-squelched.
* Check that the radio is in an operational mode.
3. If there is trouble with transmitting...
* Check that the transmission line (coaxial cable) is securely connected to the
ANTENNA connector.
* Check that the antenna is fully extended for proper operation.
* Check that all transmission line (coaxial cable) connections are secure and free
of corrosion.
Memory Backup
A built-in capacitor protects the channels stored in the SUNDOWNER
for up to 2 weeks after the DC power cable is disconnected.
44
UH-100 memory
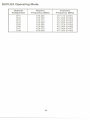
UHFCB Channel Information
This radio has been designed to provide a high level of performance in the Citizens
Band Radio Service, which is comprised of the following frequency assignments:
SIMPLEX Operating Mode
Channel
1
2
3
4
5
6
7
8
9
10
11
12
13
14
15
16
17
18
19
20
21
22
23
24
25
26
27
28
29
30
31
32
33
34
35
36
37
38
39
40
Channel Frequency in MHz
476.425
476.450
476.475
476.500
476.525
476.550
476.575
476.600
476.625
476.650
476.675
476.700
476.725
476.750
476.775
476.800
476.825
476.850
476.875
476.900
476.925
476.950
476.975
477.000
477.025
477.050
477.075
477.100
477.125
477.150
477.175
477.200
477.225
477.250
477.275
477.300
477.325
477.350
477.375
477.400
45
DUPLEX Operating Mode
Channel
Assignment
CH1
CH2
CH3
CH4
CH5
CH6
CH7
CH8
Receive
Frequency (MHz)
476.425
476.450
476.475
476.500
476.525
476.550
476.575
476.600
46
Transmit
Frequency (MHz)
477.175
477.200
477.225
477.250
477.275
477.300
477.325
477.350
(CH31)
(CH32)
(CH33)
(CH34)
(CH35)
(CH36)
(CH37)
(CH38)
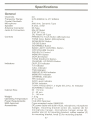
Specifications
General
Channels
Frequency Range
Crystal Oscillator
Microphone
Speaker
Antenna Connector
Jacks & Connectors
:40
: 476.425MHz to 477.40MHz
:4
: 600 ohm, Dynamic Type
: 8 ohm, 3.5W
: M-Type
: Mic 4P Metal
EXT SP 3.5<1>
Controls
Indicators
Cabinet Size
Weight
Operating Temperature
Power Requirements
SMA Approval
Accessories
DC Power 2P Type
: PRESS-TO-TALK Button (Microphone)
TON E CALL Button (Microphone)
SCAN/SEEK Button
OS/GS Button
SCRAMBLE Button
BACK LIGHT CONTROL Button
OFFNOLUME Control
SQUELCH Control
MEMORY Button
DUPLEX Button
TONE SQUELCH Button
CHANNEL UP/DOWN Button
: DUPLEX Indicator
TX Indicator
CALL indicator
TSQ Indicator
GROUP SCAN Indicator
MEMORY Indicator
CHANNEL Indicator
PRI Indicator
S/RF Level Indicator
SCAN Indicator
TX/RX FREQUENCY, 5 digits SELCALL ID Indicator
SCRAMBLE Indicator
:W: 172 mm
H : 52 mm
D : 145 mm
: 1.0 kg
: 0° to +55°C
: 13.8 VDC Nominal
: Type accepted under SMAS250
: DC power cable with built-in-fuse, microphone, microphone
hanger, mounting bracket screw (2), washer (2) for
microphone hanger, microphone hanger screw (2),
washer star (2) for mounting bracket, rubber washer (2)
for mounting bracket, knob (2) for mounting bracket
47
Measurement Conditions
: 13.8V (DC)
: 50 ohm
:25°C
1 kHz (RXlTX)
1000 /lV
::>owerSource
I\ntenna Impedance
Test Temperature
Modulation Frequency:
Mean Signal Input Level:
Reference Audio Output
Power
Reference Modulation
Deviation
Audio Output Load
: 500mW
: :i:3 kHz deviation
: 8 ohms
resistive
Transmitter Section
Frequency Tolerance at 25°C
(5 minutes after
turning on)
: :i:0.5 kHz
Carrier Power
: 5W (max)
Spurious Emission
:-40 dBm
Current Drain
: 1500mA
Modulation Frequency Response (1 kHz, 0 dB reference, at 1 kHz deviation)
Lower at 500 Hz
: -6 dB
Upper at 2.0 kHz
: +5 dB
Microphone Sensitivity
: 1.5mV
for 3 kHz Deviation
Maximum Deviation
: :i:4.5 kHz
at 1 kHz
at 6 kHz
: :i:1.5 kHz (max)
Receiver Section
Sensitivity at 12dB SINAD
Overall Audio Fidelity
(1 kHz, 0 dB reference)
Lower at 500 Hz
Upper at 2 kHz
Adjacent Channel
Selectivity (:t:25kHz)
Maximum Audio Output
Power
Audio Output Power at
10% THD
Hum & Noise Ratio at
Input 1mV
Squelch Sensitivity at
Threshold
Squelch Sensitivity at
Tight
Image Rejection Ratio
IF Rejection Ratio
Oscillator Dropout
Voltage
: 0.23 /lV or better
.
:+4 dB
:-6 dB
: 70 dB
:3W
:2W
:45 dB
: 0.1 /lV
: 1 /lV
:55 dB
: 100 dB
:9V
48
Current Drain at No
Signal
Current Drain at
Maximum Output
: 350mA
: 550mA
SELCALL
Standard
Encode/Decode Format
Transmit Tones
Receive Tones
Tone Periods
Lead-In Delay
Lead-In Tone
: CCIR International
: 5 Tones
:0-9,A-D,F
:0 - 9
: 20, 40, 70, 100mSec
: 500mSec, 1, 2, 3, 4Sec
:0-9,A-F
49
Warranty
Uniden Sundowner UH-100 UHF CB Radio
Australian One Year Warranty
Note: Please keep your sales docket as it provides evidence of warranty.
WARRANTOR:UNIDEN Australia Pty. Limited ACN 001 865498
ELEMENTS OF WARRANTY: UNIDEN warrants to the original retail owner for the
duration of this warranty, its Sundowner UH-100 UHF CB Transceiver Radio (hereinafter
referred to as the Product) to be free from defects in materials and craftsmanship with
only the limitations or exclusions set out below.
WARRANTY
DURATION:
This warranty to the original retail owner only, shall terminate
and be of no further effect ONE(1) Year after the date of original retail sale. This warranty
will be deemed invalid if the product is; (A) Damaged or not maintained as reasonable
and necessary, (B) Modified, altered or used as part of any conversion kits,
subassemblies, or any configurations not sold by Uniden, (C) Improperly installed, (D)
Repaired by someone other than an authorized Uniden Repair Agent for a defect or
malfunction covered by this warranty, (E) Used in conjunction with any equipment or
parts or as part of a system not manufactured by Uniden, (F) Installed, programmed or
serviced by anyone other than an authorized Uniden Repair Agent, or (G) Where the
Serial Number label of the product has been removed or damaged beyond recognition.
PARTS COVERED: This warranty covers for 1 year, the Sundowner UH-100 UHF CB
Transceiver Unit only. All accessories, mounting bracket, DC cable, fuse, and
microphone are covered for 90 days.
STATEMENT OF REMEDY: In the event that the product does not conform to this
warranty at any time while this warranty is in effect, the warrantor at its discretion, will
repair the defect or replace the product and return it to you without charge for parts and
service. THIS WARRANTY DOES NOT COVER OR PROVIDE FOR THE
REIMBURSEMENT OR PAYMENT OF INCIDENTAL OR CONSEQUENTIAL
DAMAGES.
WARRANTY CARD: If a warranty card has been included with this product, please fill
it in and return it to us within 14 days of purchase. Your name and serial number of the
product will then be registered in our database and this will help us process your claim
with greater speed and efficiency should you require warranty service.
PROCEDURE FOR OBTAINING PERFORMANCE OR WARRANTY: In the event that
the Product does not conform to this warranty, the Product should be shipped or
delivered, freight prepaid, with evidence of original purchase, (eg/ a copy of the sales
docket, to the warrantor at:
UNIDEN AUSTRALIA PTY, LIMITED
SERVICE DIVISION
345 Princes Highway, Rockdale, NSW 2216
Ph (02) 95993100 FAX (02) 95993278
Customers in other states should ship or deliver the Product
freight pre-paid to the nearest Uniden Authorized Repair Centre.
(Contact Uniden for the Warranty Agent nearest you.)
50
unidE!n@
Australia Pty. Ltd.
345 Princes Highway, Rockdale, N.S.W.2216
Phone:(02) 9599 3100
Fax:(02) 9599 3278
Uniden@is a registered trademark of Uniden Corporation.
Features, specifications, and availability of optional accessories are all
subject to change without notice.
UTZZ01864ZZ
@ Copyright
----
-
1996 Uniden Australia
Pty. Ltd.
---.....~:
j