1
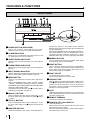
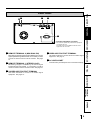
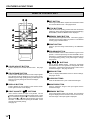
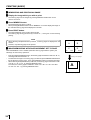
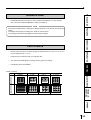
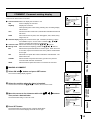
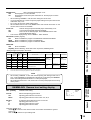
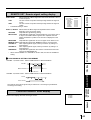
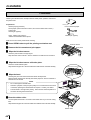
FEATURES & FUNCTIONS
FRONT PANEL
1 2345 6 78 9 A B
ALARM
SHEET
PAPER
S-VIDEO
G
C
D
E
F
1 POWER BUTTON (INDICATOR)
Press to turn on power. Press again to turn off power.
When the power is turned on, the indicator illuminates.
2 ALARM INDICATOR
When this unit is overheated, this indicator goes on and
off. When other error occurs, it lights up.
pressed, the picture on the monitor screen switches
between the picture of the input signal (source image) and
the memorized image.
When pressing MEMORY button while holding this button,
print paper will be fed and cut automatically, and the
mechanism will be initialized. Make sure to press
MONITOR button first, or a new image will be memorized.
3 SHEET ERROR INDICATOR
A MEMORY BUTTON
4 PAPER ERROR INDICATOR
B PRINT BUTTON
When an error concerning ink sheet occurs, this indicator
lights up.
When an error concerning print paper occurs, this indicator
lights up.
5 INPUT SIGNAL INDICATOR
While S-Video signal is selected for input signal, this lamp
lights up. When other signal is selected, it goes off.
6 MENU BUTTON
Press for color adjustment. The item will be switched in
order of;
SELECT COLOR/B&W→BRT → CONT → R-SUB → G-SUB
→ B-SUB → CENTER[+]→CANCEL[+]→SET[+] → SELECT
COLOR/B&W. (When selecting B&W, R-SUB, G-SUB, B-SUB
change to Y-SUB, M-SUB, C-SUB.)
To go back to the normal screen, press
PLUS(+) button
while SET[+] is selected. See page 32.
8
7 MINUS (-) BUTTON
8
Press to decrease the value of each setting item. To set
the value, select SET[+] in the MENU and press
PLUS
(+) button.
8 PLUS (+) BUTTON
6
Switches the display on the monitor. When this button is
8
Press to print the image memorized by the MEMORY
button. The image on the monitor screen switches to the
source image when printing starts. When image is not
memorized, printing is not available.
C PRINT OUTLET
The printed paper comes out here.
Do not put any objects in front of the outlet.
D OPEN BUTTON
G
Press to slide out the printing mechanism. Make sure to
unlock PRINTING UNIT LOCK SWITCH. When it is not
working, turn off the power once. Then try to press this
button again. Open the mechanism to load paper and ink
cassette or to clear a paper jam.
E TRAY
Holds the printed paper which was come out from the print
outlet. Lift the knob to pull out the tray. Make sure to pull it
out before using this unit.
F REMOTE TERMINAL
G PRINTING UNIT LOCK SWITCH
Connects the remote control supplied.
Press to increase the value of each setting item. To set
the value, select SET[+] in the
MENU and press this
button.
9 MONITOR BUTTON
Press to memorize the image to be printed. When signal
is not inputted, memory is not available.
Locks the printing unit.
Shift the switch to the left (LOCK side) to lock and to the
right (UNLOCK side) to unlock.
This unit is locked when shipping. When transporting this
unit, make sure to lock the unit.